email - [email protected] heavy-duty satellite dish tripodemail - [email protected] heavy-duty satellite...
TRANSCRIPT
Email - [email protected]
HEAVY-DUTY SATELLITE DISH TRIPODfeaturing the H&G eZEE-AIM© System
CARE AND USEAGE INSTRUCTIONS
The H&G Heavy-Duty Satellite Dish tripod is designed to provide a firm foundation for any TV satellite dish with a 1 5/8” or 2” diameter mast clamp. The tripod’s adjustable legs easily adapt to the most changeling set-up conditions. Each leg adjusts both in length and degree of spread, giving it almost unlimited adjustment. When used on a hard or slippery surface it is best to use our LEG RESTRAINT device, sold separately, to prevent the steel leg tips from slipping. DAMAGE TO THE TRIPOD OR DISH CAN OCCUR IF THE LEGS ARE NOT RESTRAINED. You may also use one of several alternate methods described in the following paragraph.
Obtain a remnant piece of carpeting, approximately 3’ X 3’ and set the tripod legs on the carpet or supply a piece of ½” exterior grade plywood approximately 3’ X 3’ or a circle 3’ in diameter. Screw a hook to the center. Place the tripod on the board, with the legs evenly spread, and mark where each leg point touches the plywood. Remove the tripod and drill a ½” hole at each spot to receive the leg tip. The board should be weighted down, with water jugs, rocks, or anything handy in the area to supply some ballast weight.
The tripod must be anchored down to prevent tipping over in wind gusts. If you are unable to use the ground screw stake due to a hard surface, we recommend using a 5-gallon pail, filled with water. A discarded paint pail, with cover, works very well and the cover prevents the water from evaporating and getting dirty. Use the handle on the pail to attach the bungee cord. This will supply approximately 45 pounds of ballast. (Note: The leg tips come with rubber guards that must be removed before use.) In high wind areas the legs can be extended with a wider stance for greater wind resistance. (See instructions on page 3 for high wind setup.)
The greatest effect from wind gusts happens when the wind blows directly towards the face of the dish. The concave structure of the dish actually collects the wind and magnifies the stress effect. It is very important to place one of the tripod's legs directly behind the face of the dish to counteract this force. (Using the H&G eZEE-AIM© alignment system, described below, automatically places the leg in the correct position.)
INITIAL SETUP
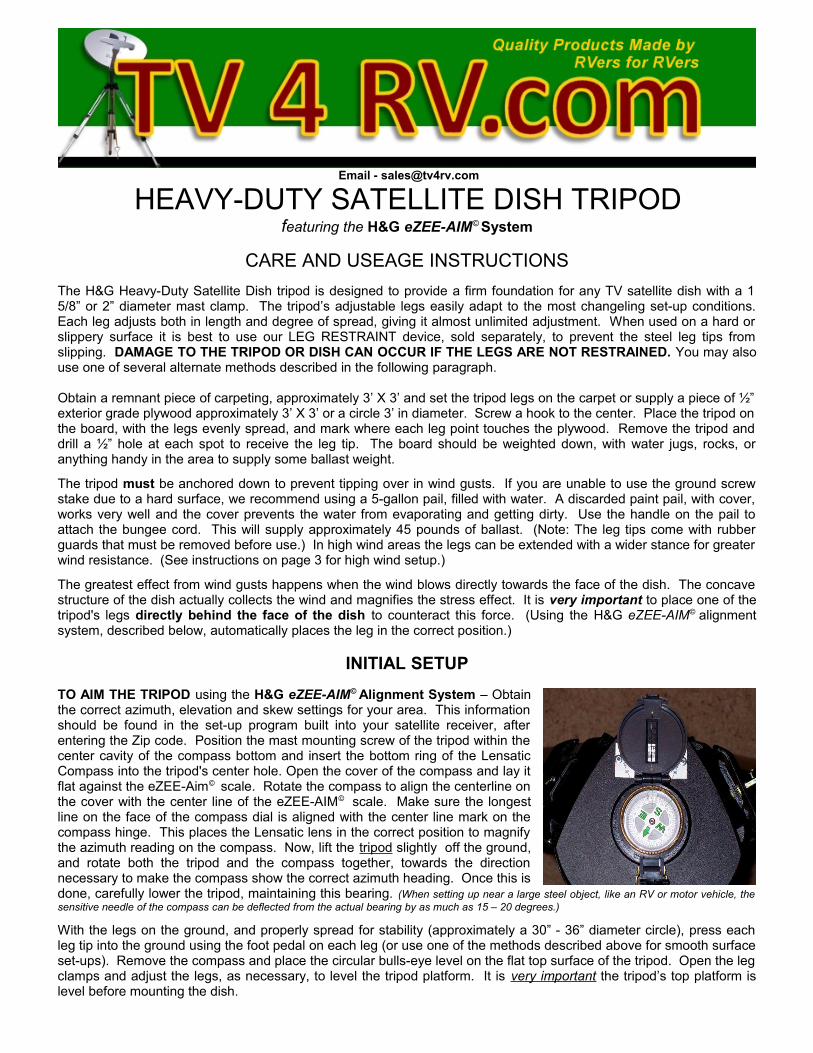
TO AIM THE TRIPOD using the H&G eZEE-AIM© Alignment System – Obtain the correct azimuth, elevation and skew settings for your area. This information should be found in the set-up program built into your satellite receiver, after entering the Zip code. Position the mast mounting screw of the tripod within the center cavity of the compass bottom and insert the bottom ring of the Lensatic Compass into the tripod's center hole. Open the cover of the compass and lay it flat against the eZEE-Aim© scale. Rotate the compass to align the centerline on the cover with the center line of the eZEE-AIM© scale. Make sure the longest line on the face of the compass dial is aligned with the center line mark on the compass hinge. This places the Lensatic lens in the correct position to magnify the azimuth reading on the compass. Now, lift the tripod slightly off the ground, and rotate both the tripod and the compass together, towards the direction necessary to make the compass show the correct azimuth heading. Once this is
done, carefully lower the tripod, maintaining this bearing. (When setting up near a large steel object, like an RV or motor vehicle, the sensitive needle of the compass can be deflected from the actual bearing by as much as 15 – 20 degrees.)
With the legs on the ground, and properly spread for stability (approximately a 30” - 36” diameter circle), press each leg tip into the ground using the foot pedal on each leg (or use one of the methods described above for smooth surface set-ups). Remove the compass and place the circular bulls-eye level on the flat top surface of the tripod. Open the leg clamps and adjust the legs, as necessary, to level the tripod platform. It is very important the tripod’s top platform is level before mounting the dish.
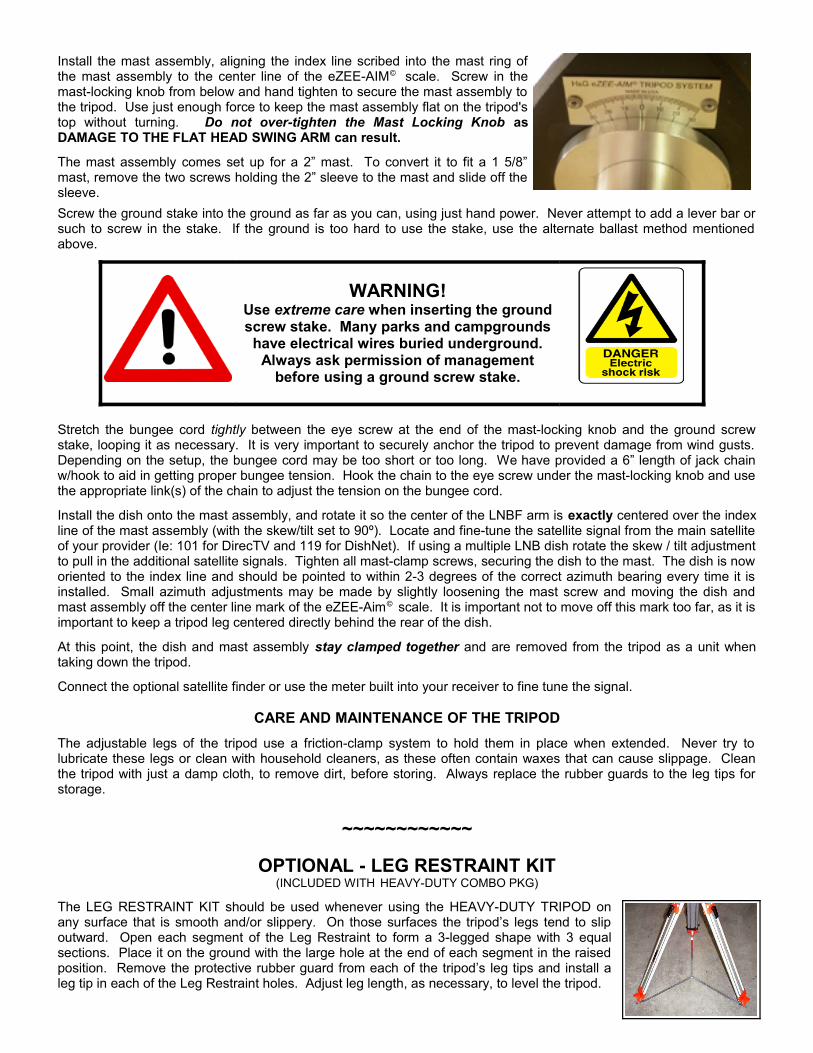
Install the mast assembly, aligning the index line scribed into the mast ring of the mast assembly to the center line of the eZEE-AIM© scale. Screw in the mast-locking knob from below and hand tighten to secure the mast assembly to the tripod. Use just enough force to keep the mast assembly flat on the tripod's top without turning. Do not over-tighten the Mast Locking Knob as DAMAGE TO THE FLAT HEAD SWING ARM can result.
The mast assembly comes set up for a 2” mast. To convert it to fit a 1 5/8” mast, remove the two screws holding the 2” sleeve to the mast and slide off the sleeve.
Screw the ground stake into the ground as far as you can, using just hand power. Never attempt to add a lever bar or such to screw in the stake. If the ground is too hard to use the stake, use the alternate ballast method mentioned above.
WARNING!Use extreme care when inserting the ground screw stake. Many parks and campgrounds
have electrical wires buried underground. Always ask permission of management
before using a ground screw stake.
Stretch the bungee cord tightly between the eye screw at the end of the mast-locking knob and the ground screw stake, looping it as necessary. It is very important to securely anchor the tripod to prevent damage from wind gusts. Depending on the setup, the bungee cord may be too short or too long. We have provided a 6” length of jack chain w/hook to aid in getting proper bungee tension. Hook the chain to the eye screw under the mast-locking knob and use the appropriate link(s) of the chain to adjust the tension on the bungee cord.
Install the dish onto the mast assembly, and rotate it so the center of the LNBF arm is exactly centered over the index line of the mast assembly (with the skew/tilt set to 90º). Locate and fine-tune the satellite signal from the main satellite of your provider (Ie: 101 for DirecTV and 119 for DishNet). If using a multiple LNB dish rotate the skew / tilt adjustment to pull in the additional satellite signals. Tighten all mast-clamp screws, securing the dish to the mast. The dish is now oriented to the index line and should be pointed to within 2-3 degrees of the correct azimuth bearing every time it is installed. Small azimuth adjustments may be made by slightly loosening the mast screw and moving the dish and mast assembly off the center line mark of the eZEE-Aim© scale. It is important not to move off this mark too far, as it is important to keep a tripod leg centered directly behind the rear of the dish.
At this point, the dish and mast assembly stay clamped together and are removed from the tripod as a unit when taking down the tripod.
Connect the optional satellite finder or use the meter built into your receiver to fine tune the signal.
CARE AND MAINTENANCE OF THE TRIPOD
The adjustable legs of the tripod use a friction-clamp system to hold them in place when extended. Never try to lubricate these legs or clean with household cleaners, as these often contain waxes that can cause slippage. Clean the tripod with just a damp cloth, to remove dirt, before storing. Always replace the rubber guards to the leg tips for storage.
~~~~~~~~~~~~
OPTIONAL - LEG RESTRAINT KIT(INCLUDED WITH HEAVY-DUTY COMBO PKG)
The LEG RESTRAINT KIT should be used whenever using the HEAVY-DUTY TRIPOD onany surface that is smooth and/or slippery. On those surfaces the tripod’s legs tend to slip outward. Open each segment of the Leg Restraint to form a 3-legged shape with 3 equal sections. Place it on the ground with the large hole at the end of each segment in the raised position. Remove the protective rubber guard from each of the tripod’s leg tips and install a leg tip in each of the Leg Restraint holes. Adjust leg length, as necessary, to level the tripod.
SETTING UP THE TRIPOD FOR A HIGH-WIND AREAThe setup instructions we provided above are intended for areas where the wind gusts will not exceed 45-50 mph. When setting up your tripod in an area that has wind gusts that will exceed that level we are providing some setup tips that will aid in securing your tripod further to prevent damage to both the tripod and satellite dish.
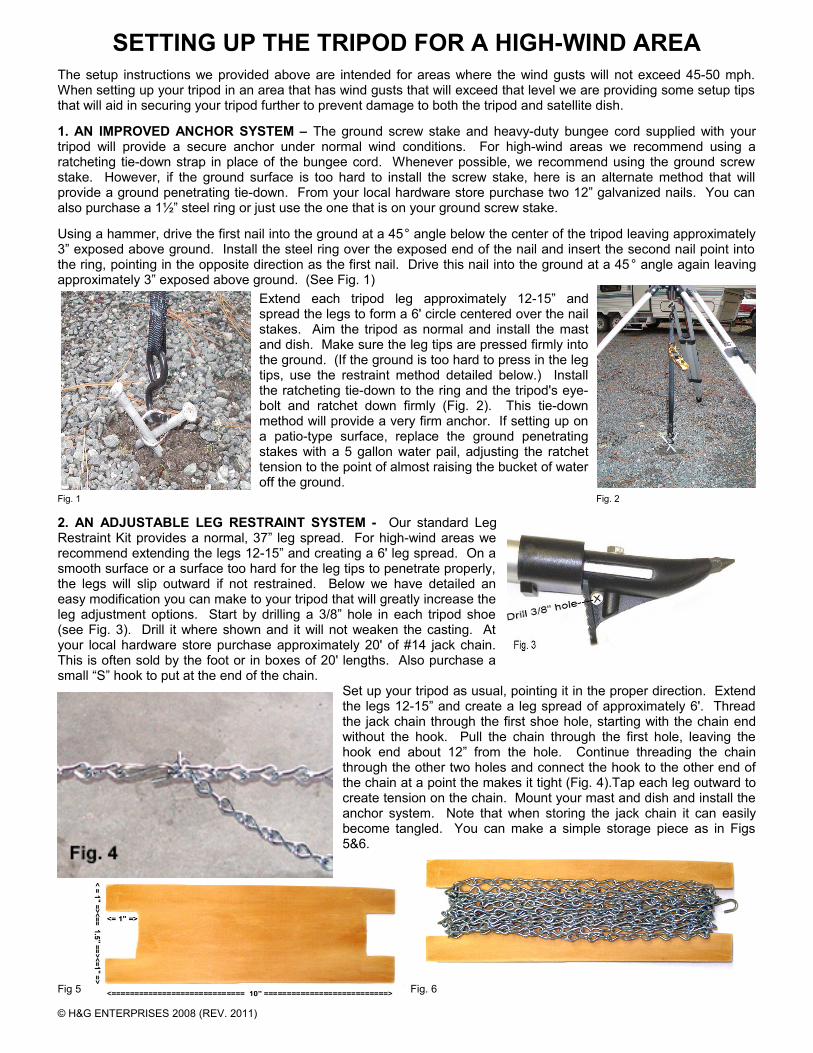
1. AN IMPROVED ANCHOR SYSTEM – The ground screw stake and heavy-duty bungee cord supplied with your tripod will provide a secure anchor under normal wind conditions. For high-wind areas we recommend using a ratcheting tie-down strap in place of the bungee cord. Whenever possible, we recommend using the ground screw stake. However, if the ground surface is too hard to install the screw stake, here is an alternate method that will provide a ground penetrating tie-down. From your local hardware store purchase two 12” galvanized nails. You can also purchase a 1½” steel ring or just use the one that is on your ground screw stake.
Using a hammer, drive the first nail into the ground at a 45° angle below the center of the tripod leaving approximately 3” exposed above ground. Install the steel ring over the exposed end of the nail and insert the second nail point into the ring, pointing in the opposite direction as the first nail. Drive this nail into the ground at a 45° angle again leaving approximately 3” exposed above ground. (See Fig. 1)
Extend each tripod leg approximately 12-15” and spread the legs to form a 6' circle centered over the nail stakes. Aim the tripod as normal and install the mast and dish. Make sure the leg tips are pressed firmly into the ground. (If the ground is too hard to press in the leg tips, use the restraint method detailed below.) Install the ratcheting tie-down to the ring and the tripod's eye-bolt and ratchet down firmly (Fig. 2). This tie-down method will provide a very firm anchor. If setting up on a patio-type surface, replace the ground penetrating stakes with a 5 gallon water pail, adjusting the ratchet tension to the point of almost raising the bucket of water off the ground.
Fig. 1 Fig. 2
2. AN ADJUSTABLE LEG RESTRAINT SYSTEM - Our standard Leg Restraint Kit provides a normal, 37” leg spread. For high-wind areas we recommend extending the legs 12-15” and creating a 6' leg spread. On a smooth surface or a surface too hard for the leg tips to penetrate properly, the legs will slip outward if not restrained. Below we have detailed an easy modification you can make to your tripod that will greatly increase the leg adjustment options. Start by drilling a 3/8” hole in each tripod shoe (see Fig. 3). Drill it where shown and it will not weaken the casting. At your local hardware store purchase approximately 20' of #14 jack chain. This is often sold by the foot or in boxes of 20' lengths. Also purchase a small “S” hook to put at the end of the chain.
Set up your tripod as usual, pointing it in the proper direction. Extend the legs 12-15” and create a leg spread of approximately 6'. Thread the jack chain through the first shoe hole, starting with the chain end without the hook. Pull the chain through the first hole, leaving the hook end about 12” from the hole. Continue threading the chain through the other two holes and connect the hook to the other end of the chain at a point the makes it tight (Fig. 4).Tap each leg outward to create tension on the chain. Mount your mast and dish and install the anchor system. Note that when storing the jack chain it can easily become tangled. You can make a simple storage piece as in Figs 5&6.
Fig 5 Fig. 6
© H&G ENTERPRISES 2008 (REV. 2011)
Email - [email protected]
DETAILED INSTRUCTIONS FOR INITAL MULTI-LNB DISH ORIENTATION TO THE HEAVY-DUTY MAST
For best results, it is critical to follow these step-by-step instructions and orient your multi-LNB dish to the Heavy-Duty Tripod Mast.1. Aim and level your tripod, following the tripod instructions. Try to set up in an area that is 20 to 30 feet away from any steel structures, such as an RV, tow vehicle, metal shed, etc. Such structures can move the compass heading as much as 15 to 20 degrees off North. Also keep your satellite dish away from the tripod during the aiming process.2. Install the tripod mast, aligning the index mark with the zero mark on the tripod scale and clamp it down.3. Mount the dish onto the mast, leaving the dish mast clamp loose. Set the elevation to the setting needed for your area. Set the skew / tilt adjustment to 90º, regardless of what your area requires. When doing this, it puts the LNB arm right at the bottom and lessens the chance of hitting other satellites in error. (This is ONLY required for this initial orientation.)4. Turn the dish on the mast until the LNB arm is directly over the zero line on the tripod scale. At this point you should be able to detect a signal from your main satellite. If not, move the dish slightly left, right, up or down as necessary to get a signal. Determine that you are on the correct satellite and keep fine-tuning the signal for maximum signal strength. Now clamp the dish to the mast, maintaining the position.5. Loosen the skew / tilt adjustment nuts and adjust the skew / tilt to the setting required for your area and fine-tune to pull in the additional satellite(s).The dish is now properly oriented to the mast. On future setups, simply aim and level the tripod, mount the dish/mast assembly, set the elevation and skew/tilt and you should be within 2-3 degrees of being on target. If slight azimuth adjustments are needed, simply loosen the mast locking knob and move the mast index mark off the zero mark as needed.
H&G ENTERPRISES 2013