elgg social networking - packt · number of open standards including ... host your own...
TRANSCRIPT

Elgg Social Networking
Mayank Sharma
Chapter No. 3 "Users, Profiles, and Connections"

For More Information: www.packtpub.com/elgg-social-networking/book
In this package, you will find: A Biography of the author of the book
A preview chapter from the book, Chapter NO.3 "Users, Profiles, and Connections"
A synopsis of the book’s content
Information on where to buy this book
About the Author Author name followed by his details. This information needs to be provided by the Development Editor.
Mayank Sharma is a contributing editor at SourceForge, Inc's Linux.com. He also writes a monthly column for Packt Publishing. Mayank has contributed several technical articles to the IBM developerWorks where he hosts a Linux Security blog. When not writing, he teaches courses on Open Source topics at the Indian Institute of Technology, Delhi, as guest lecturer.
Thanks to my mom Shashi and dad Rakesh for laying down tough standards, and younger brother Shashank who beat me at book-writing to become my mentor.
Gratitude to David Barnes for guiding me from start to finish, to Rashmi Phadnis for her edits, to Patricia Weir for managing and scheduling the book, and to the Elgg developers and community for such a wonderful project.

For More Information: www.packtpub.com/elgg-social-networking/book
Elgg Social Networking Elgg is an open-source social web application licensed under GPL version 2, and runs on the LAMP (Linux, Apache, MySQL, and PHP) or WAMP (Windows, Apache, MySQL, PHP) platform. It offers a networking platform, combining elements of blogging, e-portfolios, news feed aggregation, file sharing, and social networking. Elgg has its own plug-in architecture, and can use plug-ins to provide a calendar and a wiki. It supports a number of open standards including RSS, LDAP for authentication, FOAF, and XML-RPC for integration with most third-party blogging clients. It can be integrated with MediaWiki, Moodle, Drupal, and WebCT.
Elgg provides each user with a personal weblog, file repository (with podcasting capabilities), an online profile, and an RSS reader. Additionally, all of a user's content can be tagged with keywords—so they can connect with other users with similar interests and create their own personal learning network. However, where Elgg differs from a regular weblog or a commercial social network (such as MySpace) is the degree of control each user is given over who can access their content. Each profile item, blog post, or uploaded file can be assigned its own access restrictions—from fully public to readable only by a particular group or individual.
Using Elgg is the easiest way to create your own fully customized, hosted social network for your business, organization, or group of friends. Elgg communities can include blogs, discussion groups, media galleries, friends' lists, and much more. Because it's open source, and has many plug-ins, Elgg can be extended in unlimited ways. Elgg lets you host your own Facebook-style social network and retain complete control over how it works. This book shows you all you need to know to create safe, fun social networks.
While anybody can use Elgg to create their social network, it is especially useful in education as it has many features making it suitable for e-learning, including groups, communities, and blogs that can be used for online classes where students can communicate in a new way with each other and with students around the world—in a managed, protected environment, creating what its authors term a "personal learning landscape".

For More Information: www.packtpub.com/elgg-social-networking/book
What This Book Covers Chapter 1 covers the basics of social networking, runs over some popular social networks and goes through some of the features that are essential to online social networking. It introduces Elgg, and highlights some of the benefits of deploying one's own social network.
In Chapter 2 we use publicly accessible Elgg-installations like Ubuntero.org, the upcoming network of Ubuntu users, developers, and fans and the Elgg.org website itself as examples, to see the screens and options first-hand. After reading through the chapter, you should have a fairly good idea of what your very own Elgg-based social network will be able to do.
Chapter 3 deals with the users. We discuss several ways of inviting users to join the network, some of which can be used by ordinary users, while others are only for administrators. You'll learn to connect with other users on the network. We also run through Elgg's built-in mechanisms for attracting visitors to join the network. In between, we cover various account settings that a user can alter. After reading this chapter, you should have no trouble adding, managing or connecting to members in your Elgg network.
Chapter 4 covers one of the most exciting features—blogs. It will help you deal with abusive and off-topic content. You will learn to share video files, PDFs, images, and podcasts.
Chapter 5 Social networking is all about communities. This chapter will teach you to create communities, manage them, and manage the content in communities.
Chapter 6 You don't want your site to look like any other. It should have a unique style of its own. What better way to make this happen than using theming engines? This chapter will teach you all about themes. By the time you are through with this chapter, you will be able to create a unique theme for your site.
Chapter 7 covers some of the important Elgg plug-ins that’ll give you better control in administering your site.
Appendix A deals with installing Elgg in the popular LAMP web application environment of Linux, Apache, MySQL, and PHP. Since Apache, MySQL, and PHP can also run under a Windows operating system, you can also set up Elgg to serve your purpose in a "WAMP" environment, and this appendix covers this too.
Appendix B is a list of case studies that will help you relate to popular real-world networking sites that use Elgg.
For More Information: www.packtpub.com/elgg-social-networking/book
Users, Profiles, and Connections
Ever been to a night club on a Monday morning? There's you, there are the chairs, and the potential to host a party on the weekend. If you've been through Appendix A, your Elgg installation looks pretty much like an empty night club. There are lots of buttons, lots of potential, but no member except you.
But unlike a night club, you don't have to wait for the weekend to host your friends on Elgg. Invite them as soon as you're done setting up the software.
Elgg is designed to make it easier for you to invite people. If you've ever setup a blog or rolled your own website, how long did it take before you could invite your friends over? You had to put up all sorts of content to indulge them, and also fi ddle around decorating the portal so that it doesn't look dull.
That's where a social network is different from a regular website. The websites follow a two-way, one-to-many style of interaction, where the owner of the website, or blog, talks to all his visitors who respond with their comments, either on the website, or via e-mail.
On the other hand, social networking software follows a many-to-many style of interaction. Members interact with each other, and create their own content, which is then shared with all. This is then discussed and commented on by everyone.
The owner of the site is like the perfect host. They mingle, discuss with everyone, but don't stamp their authority, unless you're naughty. They're like every other member, except for the fact that they own the place. Sounds familiar?
So, you don't have to worry about content before inviting your friends. Your friends bring their own content. And thanks to Elgg's customization features, which I briefl y touched upon in Chapter 2, members can customize their respective areas on the network as they please. Groovy!
For More Information: www.packtpub.com/elgg-social-networking/book
Users, Profi les, and Connections
[ 32 ]
Connecting to Friends and UsersI hope you're convinced how important friends are to a social network. Initially, you'll have to manually invite your friends over to join. I say initially, because membership on a social network is viral. Once your friends are registered members of your network, they can also bring in their own friends.
This means that soon your friends would have invited their own friends as well. Chances are that you might not know these friends of your friends. So, Elgg not only allows you to invite friends from outside, but also connect with users already on the network.
Let's understand these situations in real-life terms. You invite your friends over to a party with you at your new Star Trek theme club. That's what you'll do with Elgg, initially. So your friends like the place and next time around they bring in more friends from work. These friends of friends from work, talk about your place with their friends and so on, until you're hosting a bunch of people in the club that you haven't ever met in your life. You overhear some people discussing Geordi La Forge, your favorite character from the show. You invite them over for drinks. That's connecting with users already on the network.
So let's head on over to Elgg and invite some friends!
Inviting Friends to Join There are two ways of inviting users to join your network. Either send them an email with a link to join the website, or let Elgg handle sending them emails.
If you send them emails, you can include a direct link to the registration page. This link is also on the front page of your network, which every visitor will see. It asks visitors to register an account if they like what's on the network. The procedure for registering using this mechanism has already been covered in Chapter 2.
Let Elgg Handle Registration This is the most popular method of inviting users to join the network. It's accessible not only to you, but also to your friends once they've registered with the network. To allow Elgg to send emails on your behalf, you'll have to be logged into Elgg. This is covered as part of installation in Appendix A.
Once you login, click on the Your Network button on the top navigation bar. This will take you to a page, which links to tools that'll help you connect with others. The last link in this bar (Invite a Friend) does exactly what it says.

For More Information: www.packtpub.com/elgg-social-networking/book
Chapter 3
[ 33 ]
When you click on this link, it'll explain to you some benefi ts of inviting friends over. The page has three fi elds:
Their name: Enter the name of the friend you're sending the invitation to.Their email address: Very important. This is the address to where the invitation is sent.An optional message: Elgg sends an email composed using a template. If you want to add a personal message to Elgg's email, you can do so here.
In the email, which Elgg sends on behalf of the network's administrator, that means you, it displays the optional message (if you've sent one), along with a link to the registration page. The invitation is valid for seven days, after which the registration link in the email isn't valid.
•
•
•
For More Information: www.packtpub.com/elgg-social-networking/book
Users, Profi les, and Connections
[ 34 ]
W hen your friends click on the registration form, it asks them to enter their:
Name: This is your friend's real name. When he arrives here by clicking the link in the email, this fi eld already has the same name as the one in the email. Of course, your friend can choose to change it if he pleases. Username: The name your friend wants to use to log in to the network. Elgg automatically suggests one based on your friend's real name.Password: The last two fi elds ask your friend to enter (and then re-enter to confi rm) a password. This is used along with the username to authenticate him on the system.
Once your friends enter all the details and click on join, Elgg creates an account for them, logs them in, and dispatches a message to them containing the log in details for reference.
Build a ProfileT he fi rst thing a new user has to do on the network is to create his profi le. If you haven't yet built up a profi le yourself, now is a good time.
Your profi le has several purposes, which we've already covered in Chapter 2. To recap, your profi le is your digital self. By fi lling in a form, Elgg helps you defi ne yourself in terms that'll help other members fi nd and connect to you.
This is again where socializing using Elgg outscores socializing in real life. You can fi nd people with similar tastes, likes, and dislikes, as soon as you enter the network.
So let's steam ahead and create a digital you.
The Various Profile OptionsO nce you are logged into your Elgg network, select the Your Profi le option from the top navigation-bar. In the page that opens, click the fi rst link, Edit this profi le.
This opens up a form, divided into fi ve tabs—Basic details, Location, Contact, Employment, and Education. Each tab helps you fi ll in details regarding that particular area. You don't necessarily have to fi ll in each and every detail. And you defi nitely don't have to fi ll them all in one go.
•
•
•

For More Information: www.packtpub.com/elgg-social-networking/book
Chapter 3
[ 35 ]
Each tab has a Save your profi le button at the end. When you press this button, Elgg updates your profi le instantaneously. You can fi ll in as much detail as you want, and keep coming back to edit your profi le and append new information.
Let's look at the various tabs:
Basic details: Although fi lling information in any tab is optional, I'd advise you to fi ll in all details in this tab. This will make it easy, for you to fi nd others, and for others to fi nd you. The tab basically asks you to introduce yourself, list your interests, your likes, your dislikes, your goals in life, and your main skills.Location: This tab requests information that'll help members reach you physically. Fill in your street address, town, state, postal code, and country.Contact: Do you want members to contact you outside your Elgg network? This tab requests both physical as well as electronic means which members can use to get in touch with you. Physical details include your work, home, and mobile telephone number. Electronic details include your email address, your personal and offi cial websites. Elgg can also list information to help users connect to you on instant messenger. It supports ICQ, MSN, AIM, Skype, and Jabber.Employment: List your occupation, the industry and company you work in, your job title and description. Elgg also lets you list your career goals and suggests you do so to "let colleagues and potential employers know what you'd like to get out of your career.".Education: Here you can specify your level of education, and which high school, university or college you attended, and the degree you hold.
A s you can clearly see, Elgg's profi ling options are very diverse and detailed. Rather than serve the sole purpose of describing you to the visitors, the profi le also helps you fi nd new friends as well, as we'll see later in this chapter.
•
•
•
•
•

For More Information: www.packtpub.com/elgg-social-networking/book
Users, Profi les, and Connections
[ 36 ]
What is FOAF?Wh ile fi lling the profi le, you must have noticed an Upload a FOAF fi le area down at the bottom of all tabs. FOAF or Friend of a Friend is a project (http://www.foaf-project.org/) to help create "machine-readable pages that describe people, the links between them and the things they create and do".
The FOAF fi le includes lots of details about you, and if you have already created a FOAF profi le, Elgg can use that to pick out information describing you from in there. You can modify the information once it's imported into Elgg, if you feel the need to do so.
The FOAF-a-Matic tool (http://www.ldodds.com/foaf/foaf-a-matic.en.html) is a simple Web-based program you can use to create a FOAF profi le.
A Face for Your ProfileOnc e you have created your digital self, why not give it a face as well. The default Elgg picture with a question mark doesn't look like you!
To upload your picture, head over to Your Profi le and select the Change site picture link. From this page, click Browse to fi nd and select the picture on your computer. Put in an optional description, and then choose to make it your default icon. When you click the Upload new icon button, Elgg will upload the picture.

For More Information: www.packtpub.com/elgg-social-networking/book
Chapter 3
[ 37 ]
Once the upload completes, Elgg will display the picture. Click the Save button to replace Elgg's default icon with this picture.
Elgg will automatically resize your picture to fi t into its small area. You should use a close-up of yourself, otherwise the picture will lose clarity when resizing. If y ou don't like the picture when it appears on the website, or you want to replace it with a new one, simply tick the Delete check-box associated with the picture you don't like. When you click Save, Elgg will revert to the default question-mark guy.

For More Information: www.packtpub.com/elgg-social-networking/book
Users, Profi les, and Connections
[ 38 ]
Access ControlYou might be wondering what to do if you'd really like to share your physical address or home telephone number with each and every member on the network. Elgg has three pre-defi ned groups that help you share all information on the network, or keep them private.
The three groups are Private, Public, and Logged-in users. These can be associated with everything on the Elgg network, including profi le items. By default, every profi le item is visible only to users that are logged into the system. But it's very simple to change the access setting of a particular item.
Each and every profi le item has a pull-down list with it. Use it to specify who gets to see a particular piece of information.
You can also make some information, like your personal or company website, public, which means it's accessible by everyone, including non-registered members browsing the website. This is like pasting your website address on a window facing the street. Everyone can look at it.
For sure, you wouldn't want to do that with your mobile phone number. In fact, you might not want to share that with anyone on the network. Elgg helps you mark such information as private and keep them safe from everyone.
But what about information that you don't want anyone to see, except certain friends?
Define Your Own Control ListsElgg' s default access controls are on the extreme sides. You can either share information with everyone on the network, or with no one.
To help create a middle ground, Elgg allows you to defi ne your own access control groups. A custom access group is nothing but a list of your friends. So for example if you want to share your employment details with your colleagues from work, and not with your friends of friends you've just met, you can create a custom group called colleagues and only allow them to access your employment details.
For More Information: www.packtpub.com/elgg-social-networking/book
Chapter 3
[ 39 ]
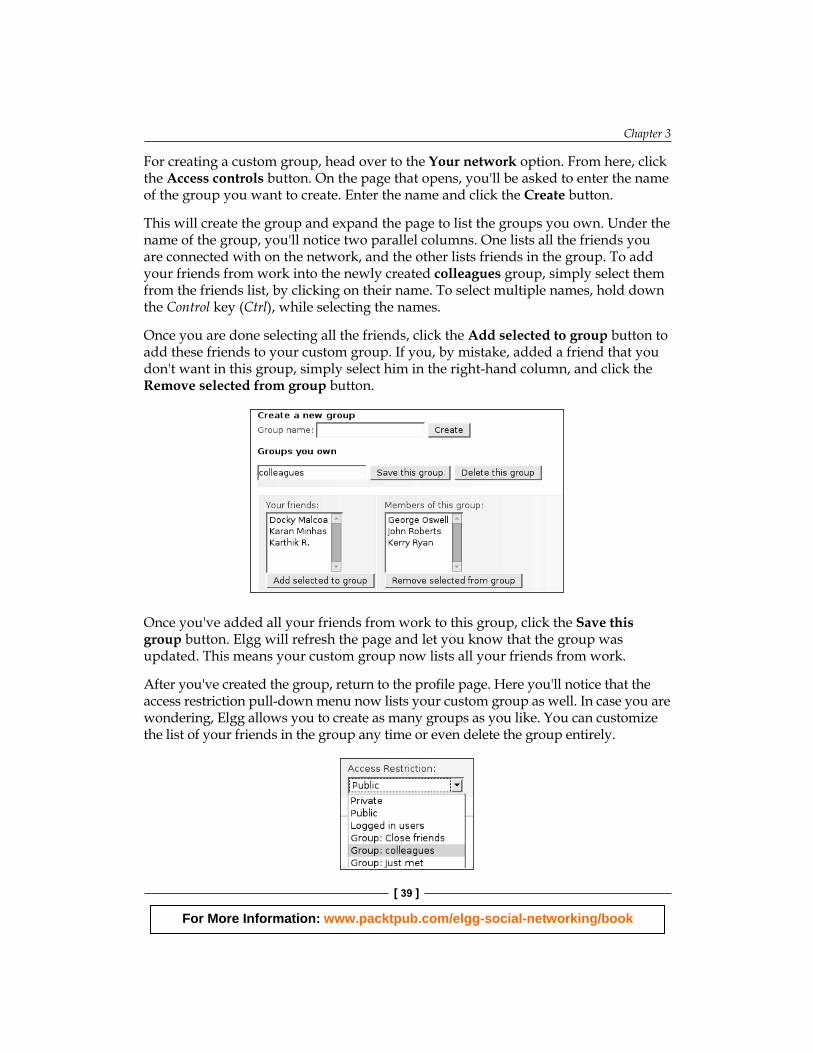
For creating a custom group, head over to the Your network option. From here, click the Access controls button. On the page that opens, you'll be asked to enter the name of the group you want to create. Enter the name and click the Create button.
This will create the group and expand the page to list the groups you own. Under the name of the group, you'll notice two parallel columns. One lists all the friends you are connected with on the network, and the other lists friends in the group. To add your friends from work into the newly created colleagues group, simply select them from the friends list, by clicking on their name. To select multiple names, hold down the Control key (Ctrl), while selecting the names.
Once you are done selecting all the friends, click the Add selected to group button to add these friends to your custom group. If you, by mistake, added a friend that you don't want in this group, simply select him in the right-hand column, and click the Remove selected from group button.
Once you've added all your friends from work to this group, click the Save this group button. Elgg will refresh the page and let you know that the group was updated. This means your custom group now lists all your friends from work.
After you've created the group, return to the profi le page. Here you'll notice that the access restriction pull-down menu now lists your custom group as well. In case you are wondering, Elgg allows you to create as many groups as you like. You can customize the list of your friends in the group any time or even delete the group entirely.

For More Information: www.packtpub.com/elgg-social-networking/book
Users, Profi les, and Connections
[ 40 ]
Making Friends with Internal MembersBy now, you should have gotten a hang of navigating around in Elgg. You've populated your profi le, and invited friends to join your network. As the word spreads about your network, members will start trickling in. Soon, you'll have a sizable number of people, all interested in the topic your network caters to.
It's not out of this world to imagine that you'll not know each and every one of them. Sure they are on your network, but the very nature of socializing on the Internet is to attract as many users as possible. Connections can happen, later.
So now that you have a dozen, or a hundred, or even a thousand members on your network, a majority of whom you don't know, how about making new friends?
Use Your Profile to Find ConnectionsWhen yo u log in, you are on the main welcome page. Here, you'll notice a link to view your profi le. When you click on the link, you'll be taken to a page that lists all elements of your profi le, along with the same two links to edit the profi le, and change your site picture. Nothing fancy here, eh?
Wrong! Look closely.
You'll notice that some or all of your items listed under interests, likes, dislikes, goals, and skills have mysteriously turned blue. No, they aren't dead. They've transformed themselves into hyperlinks. This means these items are now clickable.
For More Information: www.packtpub.com/elgg-social-networking/book
Chapter 3
[ 41 ]
Click on any one of them, and you are fl own to a page that lists members who have the same entry in their profi le.
For exam ple, if you list 'chocolate fudge' as one of the things you like, it'll be converted into a hyperlink as soon as someone else lists it too. Now when you click on the link, you land up on a page that lists everyone who has listed 'chocolate fudge' in their respective 'likes' category in their profi le.
Making ConnectionsOnce Elg g fi nds other members who share the same tastes as you, it's very easy to fi nd out more about them. Simply click on the person's icon or his name, and you'll be taken to his profi le page. Here, you can browse items on his profi le that he's made available for all logged in members to see.
Also, depending on what he's allowed you access to, you can, among other things, browse his blog, check out his friends, and his fi les.
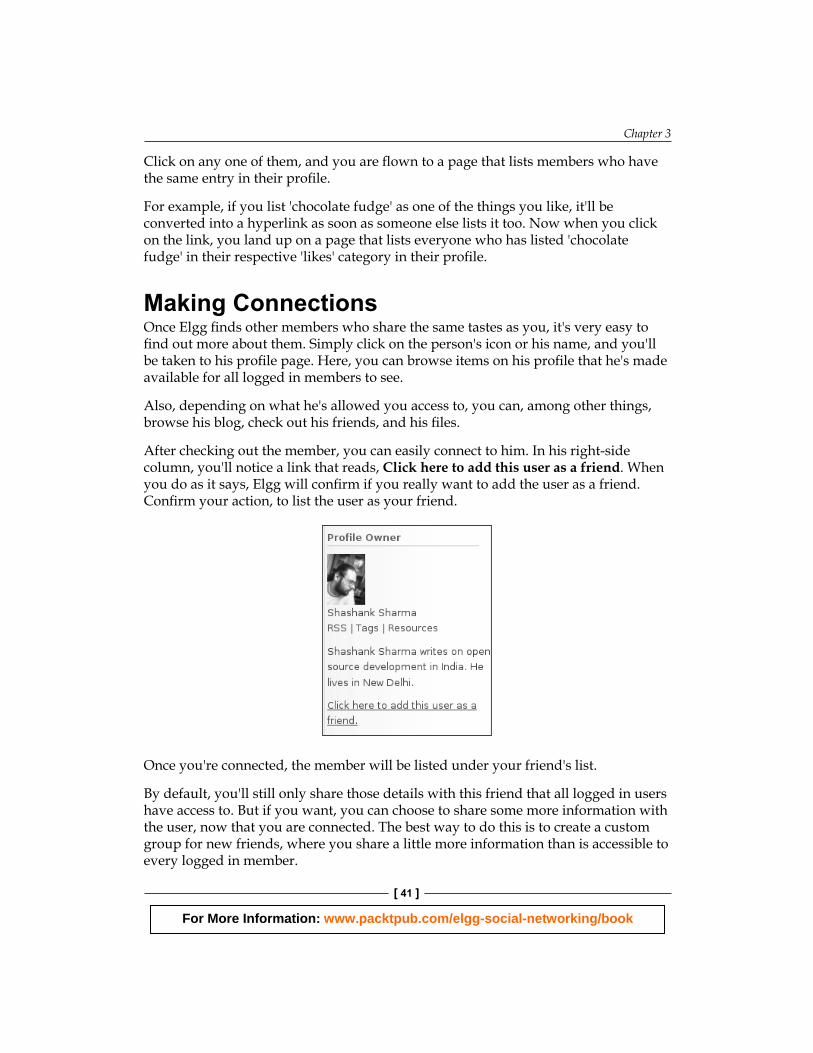
After checking out the member, you can easily connect to him. In his right-side column, you'll notice a link that reads, Click here to add this user as a friend. When you do as it says, Elgg will confi rm if you really want to add the user as a friend. Confi rm your action, to list the user as your friend.
Once you're connected, the member will be listed under your friend's list.
By default, you'll still only share those details with this friend that all logged in users have access to. But if you want, you can choose to share some more information with the user, now that you are connected. The best way to do this is to create a custom group for new friends, where you share a little more information than is accessible to every logged in member.

For More Information: www.packtpub.com/elgg-social-networking/book
Users, Profi les, and Connections
[ 42 ]
Being connected also facilitates easier communication and sharing between the users as we'll see in later chapters, when we create specialized communities and share resources.
Friendship ModerationThis act of connecting to other users also raises an issue. Suppose a person on your network, comes across your profi le, browses your blog, your profi le, and decides to connect to you as a friend. Wouldn't you want to reserve the right to "approve" his friendship? He has had a chance to browse through your profi le, and you should have the right to do that as well.
This is where Friendship moderation comes into play. We've gone over this option in Appendix A. The choice you made there, while setting up Elgg, were applicable to the entire system.
Let's suppose you left the default choice of "No moderation", to let anyone add anyone as their friend. You did that because most people would like that option. But you don't like the idea very much.
To change your friendship moderation setting, click on the Account settings option in the top navigation bar. From the page that opens, scroll down to the Friendship moderation option (third from the top). It has a pull-down menu that offers these three options:
No Moderation: anyone can list you as a friendModeration: friendships must be approved by youPrivate: nobody can list you as a friend
The options are self-explanatory. Select the option that best suits you. If you decide to moderate your friend's requests, whenever a member tries to add you as a friend, Elgg will inform them that the user they're trying to connect with "has elected to moderate friendship requests." Their requests will be added to your friendship moderation queue.
•
•
•
For More Information: www.packtpub.com/elgg-social-networking/book
Chapter 3
[ 43 ]
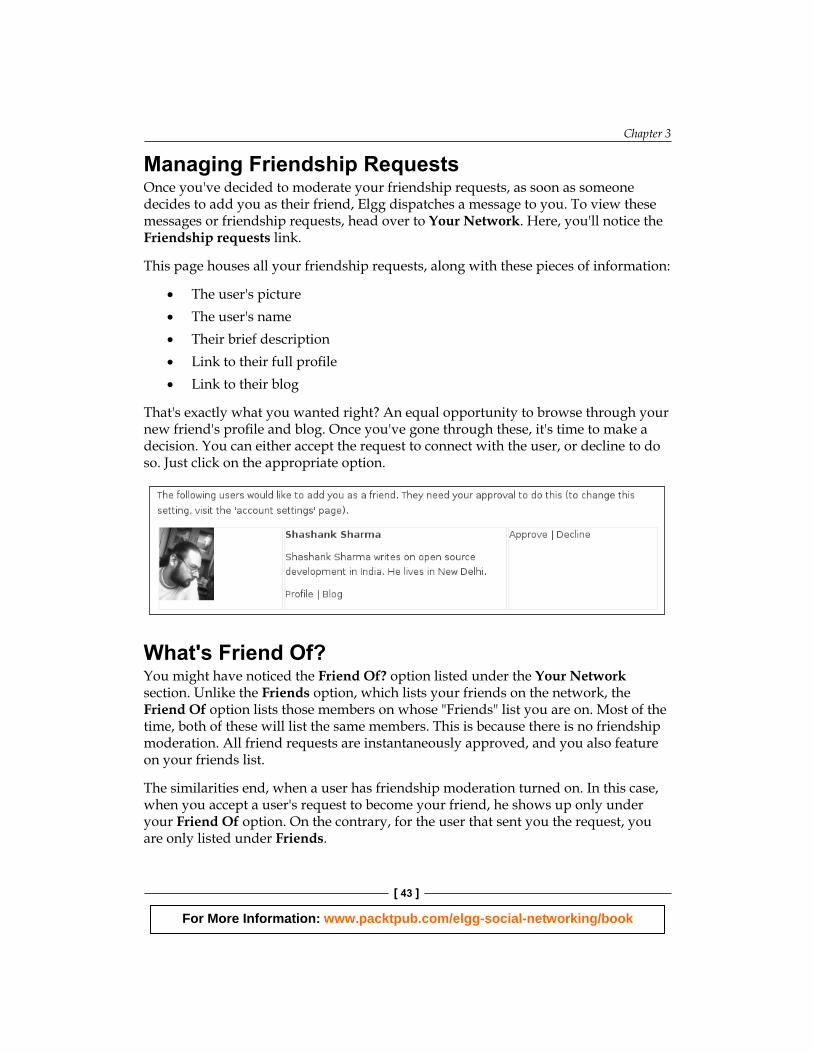
Managing Friendship RequestsOnce you've decided to moderate your friendship requests, as soon as someone decides to add you as their friend, Elgg dispatches a message to you. To view these messages or friendship requests, head over to Your Network. Here, you'll notice the Friendship requests link.
This page houses all your friendship requests, along with these pieces of information:
The user's pictureThe user's nameTheir brief descriptionLink to their full profi leLink to their blog
That's exactly what you wanted right? An equal opportunity to browse through your new friend's profi le and blog. Once you've gone through these, it's time to make a decision. You can either accept the request to connect with the user, or decline to do so. Just click on the appropriate option.
What's Friend Of?Y ou might have noticed the Friend Of? option listed under the Your Network section. Unlike the Friends option, which lists your friends on the network, the Friend Of option lists those members on whose "Friends" list you are on. Most of the time, both of these will list the same members. This is because there is no friendship moderation. All friend requests are instantaneously approved, and you also feature on your friends list.
The similarities end, when a user has friendship moderation turned on. In this case, when you accept a user's request to become your friend, he shows up only under your Friend Of option. On the contrary, for the user that sent you the request, you are only listed under Friends.
•
•
•
•
•

For More Information: www.packtpub.com/elgg-social-networking/book
Users, Profi les, and Connections
[ 44 ]
Other Account SettingsA part from controlling friendship moderation, the account settings page also lets you make several changes to your accounts. You can:
Change your full nameChange your email addressChange you passwordMake comments public: This controls who gets to comment on your resources. By default, it's restricted to logged in users only, but you can allow non-registered visitors to comment as well.Receive email notifi cations: Remember in Chapter 2, I briefl y mentioned Elgg's email feature? You can choose to be alerted of any new messages in your Elgg email. If you do so, Elgg will send a small message to your regular email ID, mentioned above, saying that you have a new message on Elgg.Language selection: Choose from more than a dozen languages. The default is English.Visual text editing: Elgg has a built-in WYSIWYG (What You See Is What You Get) text editor that helps you compose your blog posts better. By default, it's turned on, but if you want, you can choose to turn it off.
Attracting VisitorsS o far, we've only connected with friends who we invited ourselves or users that our friends invited. As your social network becomes popular, random visitors browsing the Internet might start showing up at our network's virtual doorstep.
Elgg has special mechanisms to entice visitors into registering. By giving visitors a sneak-peak of the content on the network, Elgg ensures that only interested people join. Previewing the content on the network also helps fi lter out people who might have come to the site expecting something else. This helps maintain the integrity of the network and ensure that the discussions are to the point.
Welcoming GuestsW hen visitors land up on your main page, they are greeted by Elgg's customized welcome message. It describes the network as per the settings covered in Appendix A. In addition to describing the network, Elgg also lists three links to help visitors make a decision regarding registration.
•
•
•
•
•
•
•

For More Information: www.packtpub.com/elgg-social-networking/book
Chapter 3
[ 45 ]
Please remember, Elgg only shares that information that is made accessible to the public. Private posts, posts made accessible to logged in members, or to custom groups, will not be listed on this page.
These details are on the page:
What people are saying: This is the fi rst link and gives visitors a sneak peak on the blog posts made by registered users. Visitors get an idea of what the members like to discuss, and what are they passionate about. Find others with similar interests and goals: This link takes visitors to a page where all keywords that describe interests, likes, dislikes, and so on, marked by more than one member are listed. This helps visitors get an idea of the categories of topics discussed in the network.Example users: There's no better way to fi nd out about the network, than to view profi les of its members. Elgg lists several members here that have some items on their profi le that members of the public can access. By clicking on the sample user's name, the visitor can, not only access their profi le, but also their blog, and posts. Of course, only those items that are publicly accessible.
•
•
•
For More Information: www.packtpub.com/elgg-social-networking/book
Users, Profi les, and Connections
[ 46 ]
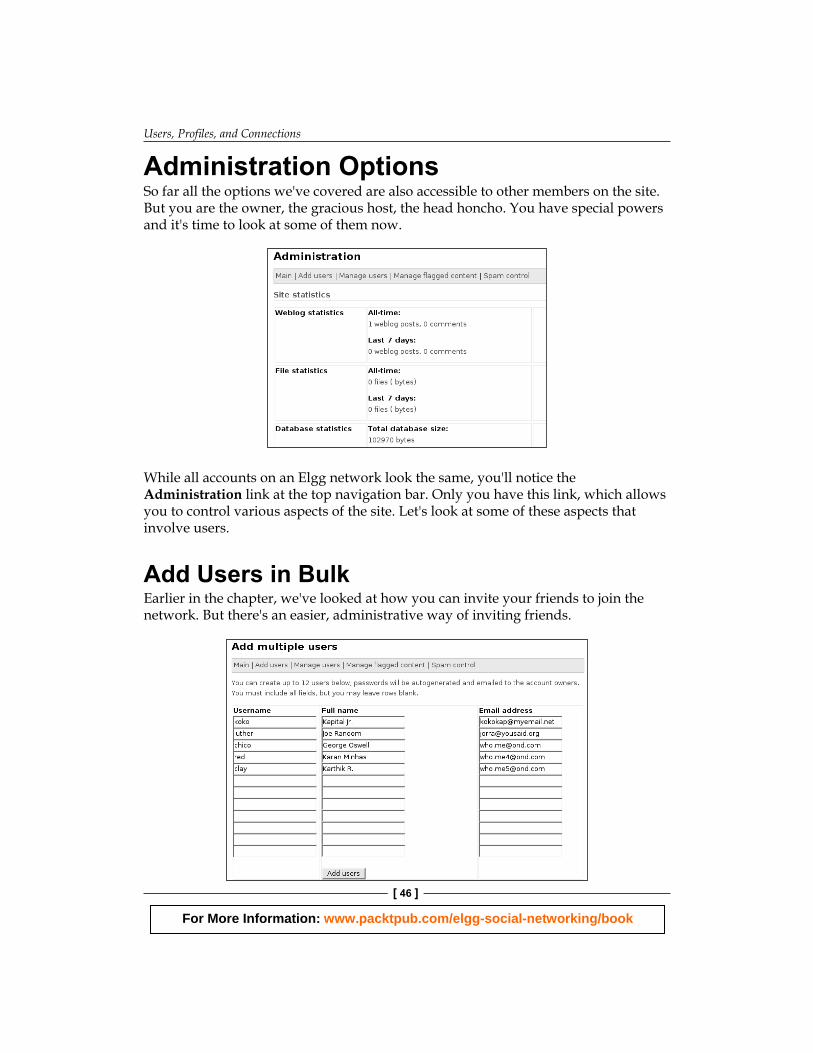
Administration OptionsSo far all the options we've covered are also accessible to other members on the site. But you are the owner, the gracious host, the head honcho. You have special powers and it's time to look at some of them now.
While all accounts on an Elgg network look the same, you'll notice the Administration link at the top navigation bar. Only you have this link, which allows you to control various aspects of the site. Let's look at some of these aspects that involve users.
Add Users in BulkEarl ier in the chapter, we've looked at how you can invite your friends to join the network. But there's an easier, administrative way of inviting friends.
For More Information: www.packtpub.com/elgg-social-networking/book
Chapter 3
[ 47 ]
From the administration screen, select the Add users option. This opens a page which allows you to register up to 12 users in one go. Acting on behalf of the users, enter these details:
UsernameFull nameEmail address
Once you're done fi lling up these details, click on the Add users button. Elgg will automatically generate a password for these users, and dispatch an email to them with the details. The email, sent on your behalf, informs the user that they've been added to your Elgg network. It also lists the username (which you specifi ed) and the password (which Elgg auto generated).
The user can then follow the link in the email to log in to the network. Once inside, a user can change his settings, including username and password, as mentioned in the account settings section above.
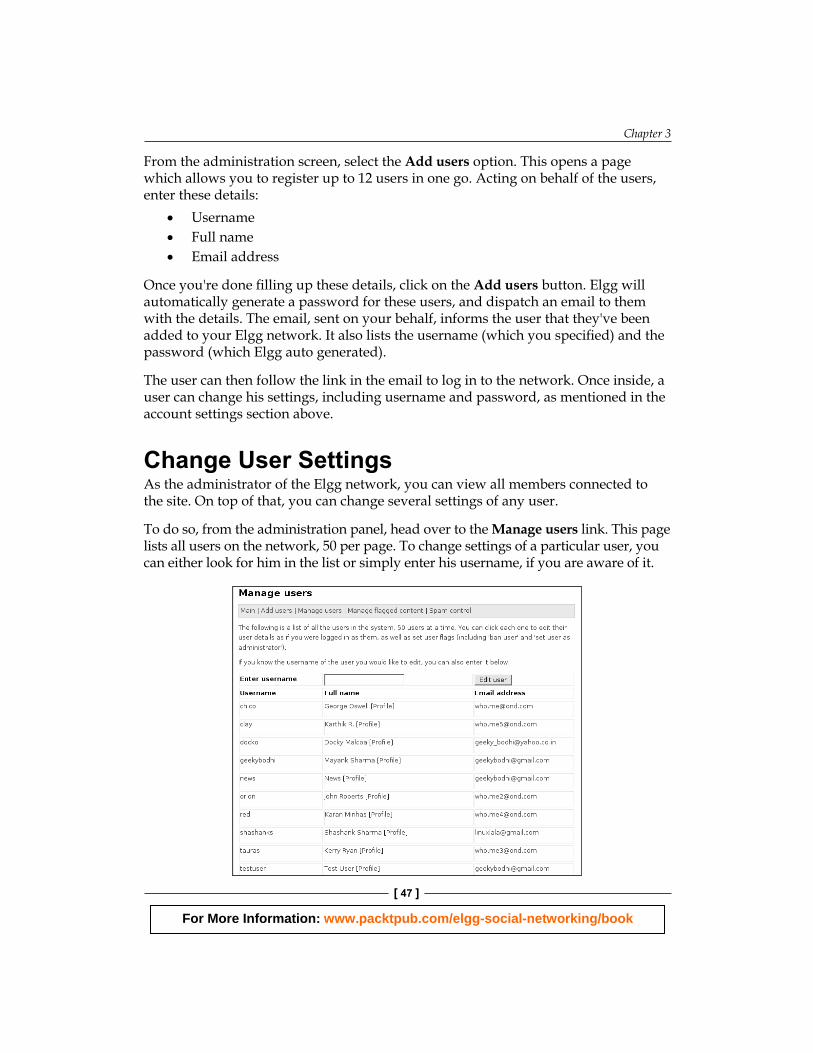
Change User SettingsAs th e administrator of the Elgg network, you can view all members connected to the site. On top of that, you can change several settings of any user.
To do so, from the administration panel, head over to the Manage users link. This page lists all users on the network, 50 per page. To change settings of a particular user, you can either look for him in the list or simply enter his username, if you are aware of it.
•••
For More Information: www.packtpub.com/elgg-social-networking/book
Users, Profi les, and Connections
[ 48 ]
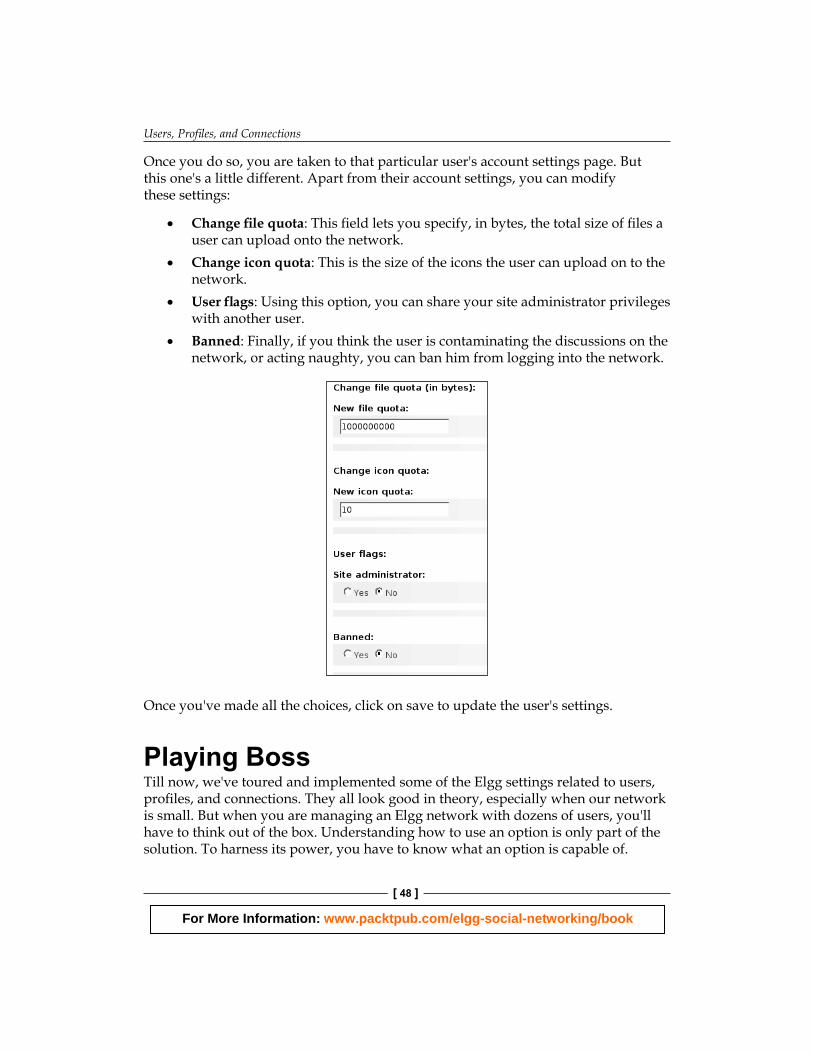
Once you do so, you are taken to that particular user's account settings page. But this one's a little different. Apart from their account settings, you can modify these settings:
Cha nge fi le quota: This fi eld lets you specify, in bytes, the total size of fi les a user can upload onto the network.Change icon quota: This is the size of the icons the user can upload on to the network.User fl ags: Using this option, you can share your site administrator privileges with another user.Banned: Finally, if you think the user is contaminating the discussions on the network, or acting naughty, you can ban him from logging into the network.
Once you've made all the choices, click on save to update the user's settings.
Playing BossTill now, we've toured and implemented some of the Elgg settings related to users, profi les, and connections. They all look good in theory, especially when our network is small. But when you are managing an Elgg network with dozens of users, you'll have to think out of the box. Understanding how to use an option is only part of the solution. To harness its power, you have to know what an option is capable of.
•
•
•
•
For More Information: www.packtpub.com/elgg-social-networking/book
Chapter 3
[ 49 ]
The settings below might sound pervasive to some users. Some will also be fl abbergasted because we discuss restricting users on our social network. It's important to understand that while creating content is the primary objective of a social network, we wouldn't want users to contaminate our system with off-topic or illegal discussions.
Blocking UsersAs you are running a social network, there will be a lot of people who'll misuse the moderation-free environment to abuse the system. If while installing, you had set up Elgg to allow anyone to register, there will be people who'll register with the sole purpose of distracting others.
In the chapter on content creation, we'll see how Elgg can help you keep the discussions on topic. Once you've spotted a user with a history of interfering in discussions and taking them off-topic or uploading blog posts and fi les that violate your policy, it's time to kick the miscreant from the network.
1. Log in to your Elgg account and click the Administration link.2. From the administration panel, click the Manage Users link. This will bring
up a list of users on the system.3. Select the user who's abusing the system or enter his username in the space
provided, and click on Edit user button. This will take you to a page from where you can edit that user's details.
4. Scroll down to the User fl ags: section. Under the Banned: option, toggle the Yes radio button to ban the user.
5. Click the Save button to save these settings.
Once a user is banned, he'll not be able to log in to the network. When the banned user returns to the network and tries to log in, he'll receive the You have been banned from the system! message.
Can I Formally Warn Users?Sometim es, it's not necessary that a user takes the discussion off-topic on purpose. Maybe he isn't really aware of the network's policy. As an admin, you should have the power to warn the user that he's taking the discussion off-topic, and he should mend his ways. Else, you'll have no option but to ban him.
Currently, Elgg lacks such a warning system. But you can still manually warn the user. Because as an admin, you have the user's email address, you can email him with links to the content that you have found to be inappropriate.
For More Information: www.packtpub.com/elgg-social-networking/book
Users, Profi les, and Connections
[ 50 ]
Removing the BanIf a us er promises to mend his ways and stick to the network's guidelines, you can restore his account. When you ban a user, Elgg doesn't remove the user from the system. Neither is any of his content automatically deleted.
To enable a banned account:
1. Log into your Elgg account and click the Administration link.2. From the administration panel, click the Manage Users link. This will bring
up a list of users on the system. 3. Select the user whose account you want to re-instate or enter his username
in the space provided, and click on Edit user button. This will take you to a page from where you can edit that user's details.
4. Scroll down to the User fl ags: section. Under the Banned: option, toggle the No radio button to ban the user.
5. Click the Save button to save these settings.
This should re-instate the user's status on the system, and they'll be able to log in with their original username and password.
Limiti ng Users on the SiteAs Elgg helps you create small specialized networks, unlike the bigger more generalized ones like MySpace, it makes sense to restrict the amount of resources a member can use. Because resources on a server are expensive, you wouldn't want members to upload all their music collection or tons of pictures.
Changing Space QuotaElgg le ts you vary the space allotted to each member. The best policy would be to keep it to an absolute minimum and let members request from you additional space if they want to upload something that's very useful and relevant to all members.
There isn't any built-in mechanism in Elgg to let members request you to increase their space. They'll have to rely on email to inform you.
The way this works is pretty simple:
1. Log into your Elgg account and click the Administration link.2. From the administration panel, click the Manage Users link. This will bring
up a list of users on the system.
For More Information: www.packtpub.com/elgg-social-networking/book
Chapter 3
[ 51 ]
3. Select the user whose resource you want to limit or enter his username in the space provided and click on the Edit user button. This will take you to a page from where you can edit that user's details.
4. Scroll down to the Change fi le quota section. Enter the new fi le quota in the space provided, replacing the number in the box.
5. Click the Save button, to save these settings.
Note that the space is mentioned in bytes. The default fi gure of 1000000000 bytes is almost 954 MB! Use Google's search bar to convert a fi gure in MB or KB into bytes. 5 MB is 5242880 bytes.
Sharin g Admin RightsAs your Elgg network grows, it might not be feasible for you to manage it all by yourself. In any case, even if a network has only a few users, sharing administration privileges with a trusted user would make your task a little easier. Carefully choose the member you wish to share the administration duties with:
1. Log into your Elgg account and click the Administration link.2. From the administration panel, click the Manage Users link. This will bring
up a list of users on the system.3. Select the user with whom you wish to share administrative powers or enter
his username in the space provided and click on Edit user button. This will take you to a page from where you can edit that user's details.
4. Scroll down to the User fl ags: section. Under the Site administrator: option, toggle the Yes radio button to escalate the user's power to that of a Elgg administrator.
5. Click the Save button to save these settings.
The Scope of an Elgg AdministratorAn Elgg administrator has full control of the network. He shares the same privileges as the person who has set up the network.
While this is a good option in certain situations, it's overkill in others. For example, let's consider you are running Elgg to connect students in your school. You will have no issues sharing the administration duties with a colleague.
For More Information: www.packtpub.com/elgg-social-networking/book
Users, Profi les, and Connections
[ 52 ]
But it's possible every class or subject has a forum of their own, or maybe run a multi-member blog. Since managing these dozens of forums and blogs would be diffi cult for you, it's only natural for you to appoint the class monitor to look over the respective blog or forum. But would you really want to share the full administrative powers with this student?
Unfortunately, Elgg currently doesn't let the main administrator defi ne the scope of the administrative powers for another user. There are only two types of users: normal users with no control over the Elgg network, or site administrators with complete control of the network.
But Elgg is still evolving. It's under heavy development and some of the features that it's not capable of currently, will probably be introduced in future versions of Elgg.
Some of the settings we've covered in this chapter are very powerful, and an improper setting can prevent users from entering the network. Please exercise caution while playing around with these settings, and if possible, fi rst try them out on a test user.
SummaryIn this chapter, we've covered the most important aspect of a social network—the users. We've discussed several ways of inviting users to join the network. Some are more direct methods, which can be replicated by other users as well, while others can only be used by us, the administrators.
Getting the user to the site is only one aspect of socializing. The other important aspect is creating his online portfolio or profi le. The profi le quantifi es the user in certain pre-determined criteria. In addition to describing him, we've seen how the profi le also helps the user fi nd people with similar tastes.
As the profi le lists several vital and sensitive pieces of information, privacy concerns have been addressed in this chapter. We've seen the various built-in options that Elgg provides, as well as the mechanism to create our own custom groups.
Then, we've covered how one can connect with other users on the network. Again, privacy concerns have been addressed, followed by a discussion about moderating friendship requests. We also ran through Elgg's built-in mechanisms for attracting visitors to join the network, and various account settings that a user can alter.
After reading this chapter, you should have no trouble adding, managing or connecting to members in your Elgg network.

For More Information: www.packtpub.com/elgg-social-networking/book
Where to buy this book You can buy Elgg Social Networking from the Packt Publishing website: http://www.packtpub.com/elgg-social-networking/book.
Free shipping to the US, UK, Europe and selected Asian countries. For more information, please read our shipping policy.
Alternatively, you can buy the book from Amazon, BN.com, Computer Manuals and most internet book retailers.
www.PacktPub.com