electronic vaccination data system - stellenbosch university
TRANSCRIPT

EVDS v0.1 Last Updated: 07 February 2021
& Prepared by
User Manual
:
Electronic Vaccination Data System

2
CONTENT
PREFACE ......................................................................................................................................................... 4
CHAPTER 1 Introduction ...................................................................................................................... 5
System Background .............................................................................................................................................. 5
High-level System Overview and Intended Purpose ................................................................................ 5
Organisational Unit Structure and User Profiles ....................................................................................... 5
General System Usage .......................................................................................................................................... 6
CHAPTER 2 Getting Started ................................................................................................................. 7
Lesson 1: Starting EVDS ................................................................................................................................ 7 EVDS Front Page ................................................................................................................................................ 7
Lesson 2: Obtaining a User Account ......................................................................................................... 8
Lesson 3: Log in to EVDS ............................................................................................................................... 8 Reset Your Password ......................................................................................................................................... 8 EVDS Home Page ............................................................................................................................................. 10 First Time Login ............................................................................................................................................... 11 Accessing Online Help ..................................................................................................................................... 11 Log out of EVDS ............................................................................................................................................... 12
Lesson 4: Manage Own Account .............................................................................................................. 12 Updating Personal Details ............................................................................................................................... 13 Changing Own Account User Password .......................................................................................................... 13 Update answers to security questions ............................................................................................................ 15
CHAPTER 3 Setting Up The System ................................................................................................ 16
Lesson 5: User Account Management .................................................................................................... 16 Add new account ............................................................................................................................................. 17 Possible duplicate account found ................................................................................................................... 19 Activate newly created accounts .................................................................................................................... 20
Lesson 6: System Configuration ............................................................................................................... 22 Registering an unregistered machine ............................................................................................................. 22 Changing the registered facility and vaccine site ............................................................................................ 23 No vaccine sites available at the facility .......................................................................................................... 23
CHAPTER 4 Operating the System ................................................................................................. 25
Lesson 7: Search for and Manage Existing Patients ......................................................................... 25
1. Search Patient ............................................................................................................................................... 25 Search by Number ........................................................................................................................................... 25 Appointments .................................................................................................................................................. 27
2. Patient Details .............................................................................................................................................. 28 Patient Summary ............................................................................................................................................. 28 Edit Patient Info............................................................................................................................................... 29 Verified Documents ......................................................................................................................................... 30 Vaccination History ......................................................................................................................................... 31 View Appointments ......................................................................................................................................... 31 eConsent ......................................................................................................................................................... 32

3
3. Register Vaccination .................................................................................................................................. 33
Appendix A: User Profiles and Associated Functionality ........................................................ 35
Appendix B: Troubleshooting ........................................................................................................... 36

4
PREFACE
This manual aims to provide the reader with step-by-step guidance on the use of the complete system functionality of the Electronic Vaccination Data System (EVDS). The organisation, section layout and interpretation of the information provided herein are explained before commencement of the instructional content. Providing the reader with an understanding as to how the content link to- and follow on each other will allow him/her the opportunity to extract optimal value from the manual and ensure maximum understanding of the content.
MANUAL ORGANISATION
The manual is divided into multiple Chapters with each chapter focusing on a specific set of system functionality. Chapters may be sub-divided into Lessons which concentrates on a sub-set of the functionality covered by the chapter. Certain chapters require the user to be familiar with system functionality that is covered in another chapter. While every effort has been made to ensure that chapters follow each other in a logical order, it is advisable that the user ensure that they’ve completed all the chapters and/or lessons that are listed as prerequisites before starting a new chapter.
Chapter Layout
Each chapter starts with an information block (Figure 1) indicating the Applicable User Profile(s) needed to access the System Functionality that is covered in the chapter. Any Prerequisite Chapters/Lessons is also listed here.
Prerequisite Lessons:
Applicable User Profile(s):
System Functionality Covered:
Figure 1: Information Block at the beginning of each Chapter
System functionality covered by the chapter is then explained using step-by-step instructions. Where needed, instructions and functionality are divided into smaller, more manageable lessons in order to keep it concise and understandable. When applicable, an information block, similar to that in Figure 1 will be provided for each lesson. Each chapter ends of with a Review Questions and Exercises section that provides the user with questions and/or training exercises to help them ascertain their level of understanding of the addressed system functionality.
Fonts and Colours Used
Various fonts and colours may be used to assist with the distinction between field names, links, buttons and page names.
Italic, “Vrinda” font type is used to indicate a Field Name that can be found on the page in question.
Italic and underlined “Vrinda” font type is used to indicate a clickable link or menu item that is present on the page in question.
The <name of a button> will be indicated with italic, bracketed “<Vrinda>” font type.
The Name of a Page will be indicated using bold, “Vrinda” font.
[References to other lessons or chapters] will be indicated with square brackets and highlighted grey.

5
CHAPTER 1 Introduction
This chapter is aimed at providing the user with the necessary background to- and information on the system that is required to achieve a basic understanding of the need for and intended purpose of the Electronic Vaccination Data System (EVDS).
Applicable User Profile(s): All
System Functionality Covered: System Background
System Overview and Intended Purpose
Organisation Unit Structure and User Profiles
General System Usage
System Background
The Electronic Vaccination Data System was developed in answer to the need for an Electronic Vaccination Data System to curb the spread of COVID 19.
High-level System Overview and Intended Purpose
The EVDS consists of a central data repository.
The EVDS requires internet connectivity to allow for secure communication and data exchanges with the central data repository.
The system assists vaccinators at vaccine sites to record patient vaccinations.
Basic system functionality include, but are not limited to:
Verify the identity of each patient that visits a vaccine site. o Visual verification of a patient’s identity will be performed whenever a valid
identification document is presented.
Update patient details
Capture patient consent
Record patient vaccination
Organisational Unit Structure and User Profiles
Access to system functionality is governed according to the Organisational Unit Structure together with the User Profile assigned to a user’s account.
User Profiles
The system has been configured with default user profiles. These profiles have been selected to group certain roles and system functionality together. The default user profiles together with their assigned roles and system functionality can be found in Appendix A:User Profiles and Associated Functionality.
Note that these are the available profiles at the time of release and that profiles may be added and/or adjusted as the system evolves.
Organisational Units

6
The system allows for the creation of user accounts at different organisational units (or levels). Organisation units are hierarchical which means that a user assigned to a specific unit will have access rights to all the units on a lower level.
National
Provincial
District
Sub-district (ward)
Facility
This means that users on a National level will have access rights (restricted by the assigned access profile) to data on National, Provincial, District, Sub-district and Facility levels. However, users on a Sub-district level will only have access to data for their specific sub-district and the associated facilities.
General System Usage
The system stores personal details of all patients that received vaccinations at identified facilities across South Africa. As it is of utmost importance that patients’ details be kept confidential at all times, it is strongly advisable that an EVDS user should:
Always log out of the EVDS whenever leaving his/her workstation.
Keep his/her EVDS password a secret and do not distribute it to other users.
Do not allow unauthorised users to work on the system.

7
CHAPTER 2 Getting Started
Applicable User Profile(s): All
System Functionality Covered: Starting the EVDS
Obtaining a user account
Log in to the EVDS
Manage own user account
Lesson 1: Starting EVDS
The EVDS is an online system that can be accessed from any computer, with a working internet connection, via the Chrome web browser
EVDS Front Page
Upon starting the EVDS (using the method described above) the EVDS Front Page will be displayed.
The name of the facility at which the work station is registered is displayed at the top, middle of the page.
The <Electronic Vaccination Data System Log In> button or Log In link provided can be used to log into the EVDS
8
Lesson 2: Obtaining a User Account
In order to use the system, each user should obtain their own user account. To obtain a user account you can either:
Request a user account from your provincial assigned Account Creator; or
Submit a request to EVDS service center
Lesson 3: Log in to EVDS
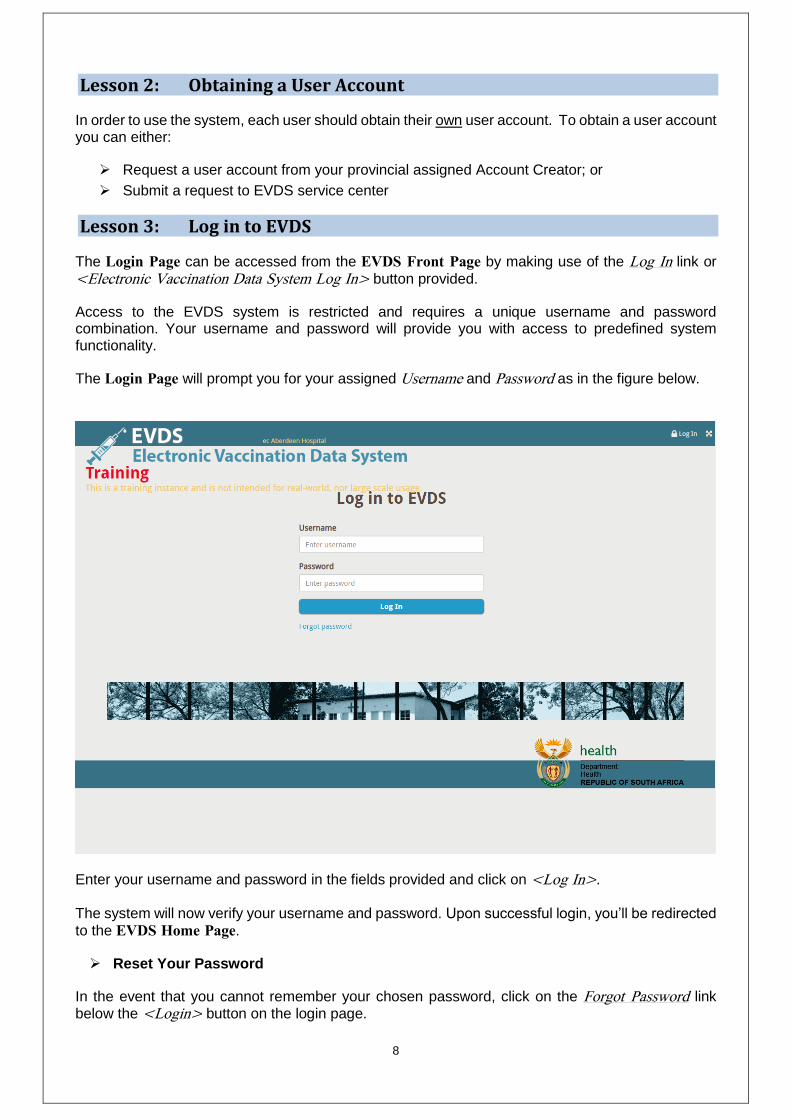
The Login Page can be accessed from the EVDS Front Page by making use of the Log In link or
<Electronic Vaccination Data System Log In> button provided.
Access to the EVDS system is restricted and requires a unique username and password combination. Your username and password will provide you with access to predefined system functionality.
The Login Page will prompt you for your assigned Username and Password as in the figure below.
Enter your username and password in the fields provided and click on <Log In>. The system will now verify your username and password. Upon successful login, you’ll be redirected
to the EVDS Home Page.
Reset Your Password
In the event that you cannot remember your chosen password, click on the Forgot Password link below the <Login> button on the login page.
9
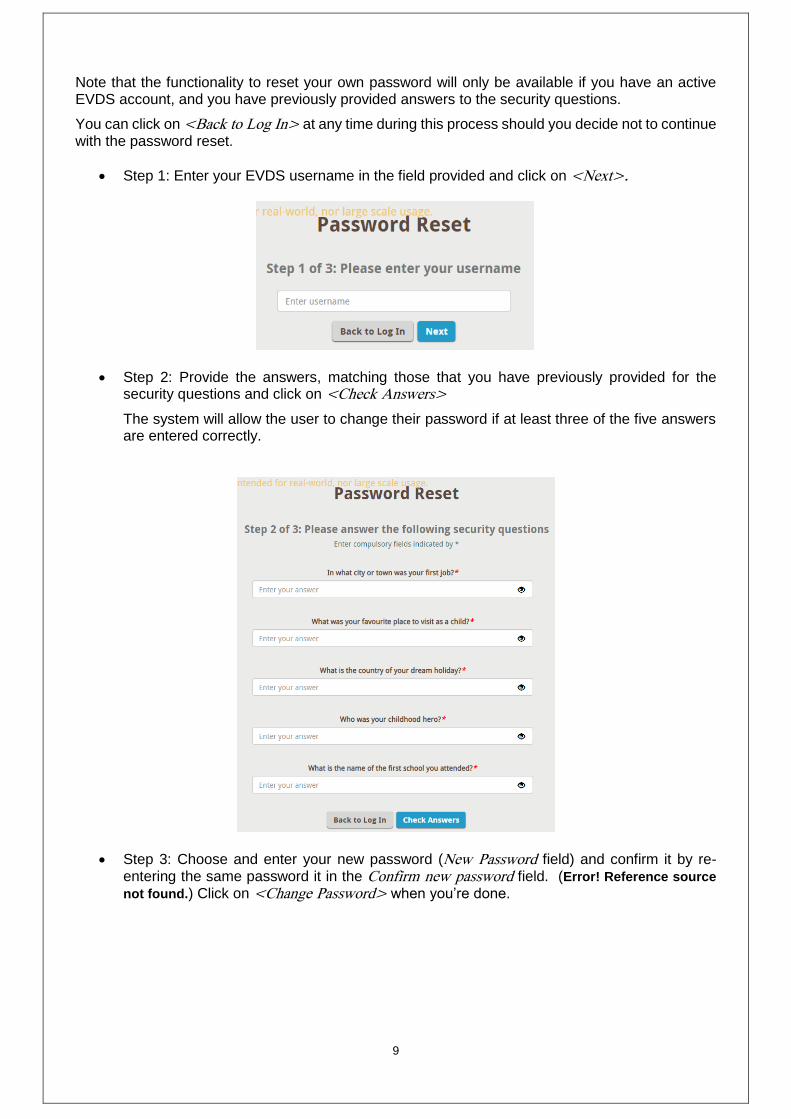
Note that the functionality to reset your own password will only be available if you have an active EVDS account, and you have previously provided answers to the security questions.
You can click on <Back to Log In> at any time during this process should you decide not to continue with the password reset.
Step 1: Enter your EVDS username in the field provided and click on <Next>.
Step 2: Provide the answers, matching those that you have previously provided for the security questions and click on <Check Answers>
The system will allow the user to change their password if at least three of the five answers are entered correctly.
Step 3: Choose and enter your new password (New Password field) and confirm it by re-entering the same password it in the Confirm new password field. (Error! Reference source
not found.) Click on <Change Password> when you’re done.

10
You can now enter your username and new password on the login page to access the system.
EVDS Home Page
The EVDS Home Page is the default screen after a successful logon to EVDS. The page will look
slightly different depending on the access rights (or user profiles) of the logged on user. The figure below shows the home page for a user with access profile “Patient Administrator” or “Vaccinator”.
The EVDS Home Page provides the user with menu items to access all their authorised
system functionality.
Applicable menu items can be found at the top right hand side of the page.

11
First Time Login
When you log into the system for the first time after 1) you have received your new account; or 2) your password has been reset, the system will display a red banner at the top right of the page requesting you to change your account password. A message will also be shown at the top centre of the system informing that you should update your password.
Provide your current password in the Old Password field (for a new account or after a password reset, this value will be the password provided to you by service desk).
When you click on <Update Password> to apply the password change, a green banner will be displayed at the top right of the screen to indicate success).
If you have not previously provided answers to the security questions, the system will require you to answer these questions. Provide all the answer and click on <Save>.
Accessing Online Help
The latest version of this User Manual can be accessed at any time by navigating to the Help menu

12
item which can be found under the logged in username displayed at the top right hand side (Error!
Reference source not found.) of the user’s Home Page.
Log out of EVDS
To end the current user session, log out of the system by navigating to the logged in username at the top right hand side of the page (Error! Reference source not found.)) and selecting Log out.
EVDS user accounts are unique and are assigned to an authorised individual. When a user logs in with a username and password, all other active user sessions using the same credentials will be terminated.
This means that if users attempt to share a user account, only one user at a time will be allowed to use the system.
The figure below shows the user being logged out and a message being displayed informing the user that EVDS is currently used on another tab (and or machine).
Lesson 4: Manage Own Account
There are certain settings that each user can customise for his/her own account. These settings can be accessed from the Edit Profile menu item which can be found under the logged in username
displayed at the top right hand side of the user’s Home Page.
The User Account page provides users with the functionality to update their personal details (email
or cellphone number), change their account password, or update answers to their security questions. Users can also view their own Account Status History.
In the event where the user is connected to a facility’s local server that has been offline for a long time, click on <Update Profile Details> to immediately bring down the most up to date user information from central server.
Note that this update will automatically happen with an account sync, clicking this button is only an additional means to ensure that information is updated immediately (in the event where an account sync has not completed yet).

13
Updating Personal Details
The Contact Info section of the User Account page allows the user to change their personal information (Error! Reference source not found.).
Modify any of the Contact Info information by editing the text in the fields provided.
Note that the Username, First Name, Surname, ID Number and Persal / Personnel number fields are greyed out as it is not possible to edit these.
Click on the <Update Personal Details> button to apply the changes to your account or select the <Cancel> button to discard any changes that was made to the personal information.
Changing Own Account User Password
The Change Password section of the User Account pages allows the user to change their own
password.
Type your current (old) password in the Old Password field.
In the New Password field, type the password that you would like your account password to be changed to. The password provided here should:

14
o Be a minimum of 6 characters;
o Not be the same as the old (or current) password as provided in the Old Password field.
o Not be the same as any of the 30 passwords used before.
o Contain at least one character each from the four available character types:
Lowercase letters
Uppercase letters
Numbers
Symbols
o Not contain the user’s first name or surname.
o Must be changed every 180 days.
In the Confirm New Password field, retype the password that you provided in the New Password field.
Click on the <Update Password> button at the bottom of the section to apply the password changes that was made or select <Cancel> to discard the changes.
When you click on <Update Password> to apply the password change, a green banner will be displayed across the screen. Dismiss the banner by clicking on the small cross provided on the right hand side.

15
Update answers to security questions
To provide answers to the security questions (or edit existing answers), click on <Add / Edit Answers> below the Change Password section.
Provide the answers to the security questions and click <Save> to apply the changes or <Cancel> to go back.

16
CHAPTER 3 Setting Up The System
This chapter focusses on the setup and configuration of the EVDS system as well as each individual work station used to access the system. Setup activities described here are mandatory to ensure a fully configured and operational system.
Lesson 5: User Account Management
Applicable User Profile(s): Account Creator
Account Approver
System Functionality Covered: User account creation
User account activation
Authorised system users will be responsible for creating user accounts as needed by system users.
To create an account, log into EVDS using an Account Creator profile and navigate to AdministrationUser Accounts from the Home Page.
Figure 2: Navigate to User Accounts
All existing user accounts that are associated with the logged in user’s organisational unit are displayed on the User Accounts page. From this page it is possible to search for accounts, view
existing accounts by status, edit user accounts or create new user accounts.

17
Add new account
Select the <Add> button above the list of existing accounts. Provide all the required information for
the user account on the Create a New User Account page.
Provide the user’s information under the Contact Info section.
Provide values for all the fields in the Contact Info section.
The Account Settings section allows you to choose a date on which the account should be automatically expired.
Select the Expire account on date option to activate the date field. An expiry date can now be selected by clicking on the date field and using the pop-up date calendar.
This date is optional and only needed for temporary accounts that are only valid for a certain, predefined period of time.
To make the account valid for an indefinite period of time, do not check the tick box to the left of the Expire account on date field.
The Assign User Profiles to User Account section allows you to assign the user profile(s) for
18
the account depending on which rights the user requires to perform his / her job.
Assign a user to one or more organisational units by selecting the applicable units listed under the Assign User to Organisation Units section.
The only available organisational units will be those that the currently logged in user has been assigned to.
The Search function can be used to search for a specific organisational unit if the currently logged in user has access to more than one organisational unit.
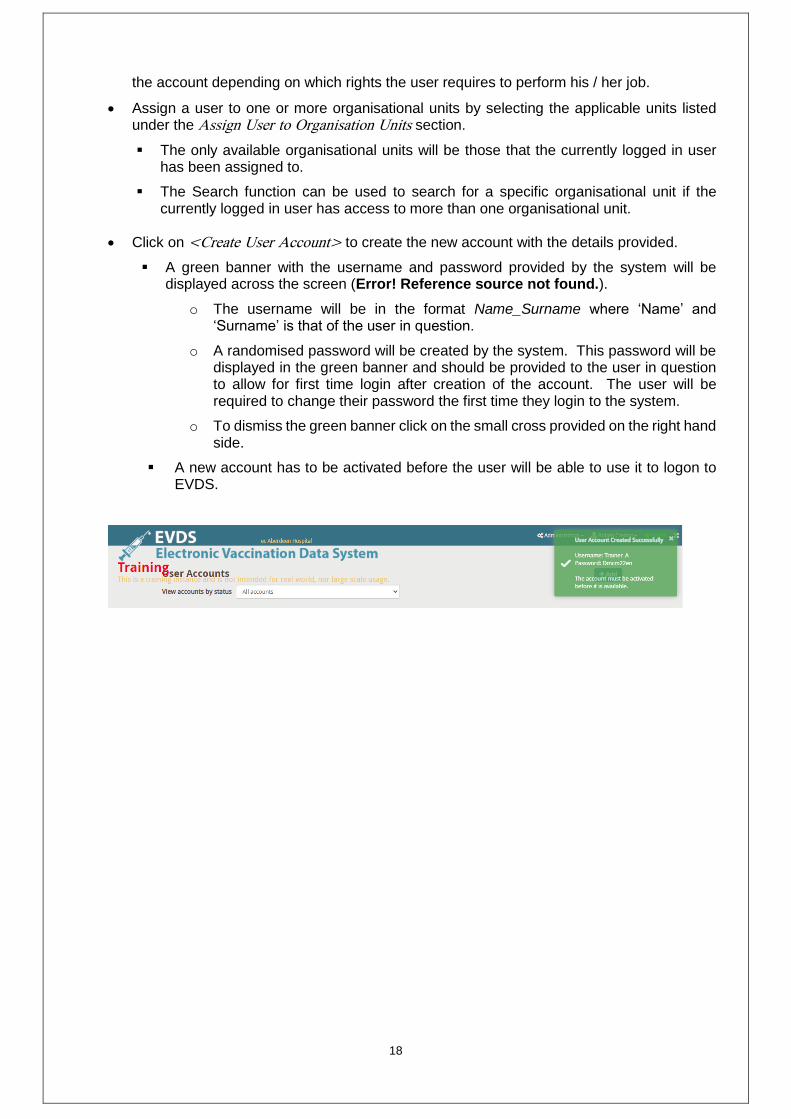
Click on <Create User Account> to create the new account with the details provided.
A green banner with the username and password provided by the system will be displayed across the screen (Error! Reference source not found.).
o The username will be in the format Name_Surname where ‘Name’ and ‘Surname’ is that of the user in question.
o A randomised password will be created by the system. This password will be displayed in the green banner and should be provided to the user in question to allow for first time login after creation of the account. The user will be required to change their password the first time they login to the system.
o To dismiss the green banner click on the small cross provided on the right hand side.
A new account has to be activated before the user will be able to use it to logon to EVDS.

19
Possible duplicate account found
The system will display a message, warning of a possible duplicate user account if the details entered under the Contact Info section are similar to an existing user account in the system.
Click on <View existing user account> and the system will list all the records found that is considered a possible duplicate.
Confirm the user’s details on the list displayed.
If none of the displayed records belong to the user, select the <Continue to Create Account> button at the bottom of the list of records to be able to create a new user account.
The system will not allow you to create an account with the same ID number as an existing user account.
If the user account Status is “Deactivated” click on <View> button to continue to confirm the user details and reactivate the user account. See Reactivate deleted user account below.
If the user account Status is “Active” click on <View> button to continue to confirm the user details and update the user account. See Edit existing account below
Should you wish to cancel the account creation, select the <Cancel> button.

20
Activate newly created accounts
A new account will need to be activated before the user can login to EVDS. Only a user with the Account Approver user profile can activate an account. You can use the View accounts by status drop down to find accounts that need to be activated or search for a specific account by using the search field.
Select <View> to the right of the account you wish to activate.
Confirm that all the user details are correct.
Scroll down to the Account Status History of the user in question.
Click on <Process pending account> to activate or decline the account.

21
Capture all the required data into the fields and click on <Activate account> to activate the account or <Decline activation> to decline or <Cancel> to cancel the account activation process.
If you click on <Activate account> button, a green banner with the username for the account activated will be displayed on the top right corner of the screen.
If you click on <Decline activation> button, a green banner with the username for the account being decline will be displayed on the top right corner of the screen.

22
Lesson 6: System Configuration
Applicable User Profile(s): Account Creator
Account Approver
Patient Administrator
Vaccinator
System Functionality Covered: First time registration of machine
Before using the system, it has to be registered to a specific facility and vaccine site. The system will not allow capturing of information until the facility and vaccine site have been selected.
Registering an unregistered machine
A message, “This machine is not registered with a facility”, will be displayed at the top of the EVDS Front Page indicating that the system is yet to be linked to a vaccine site. .
To register the machine to a facility and vaccine site, log in to the EVDS with your login credentials. Once logged in, the system will automatically prompt you to select the facility name.
Enter your facility name in the field provided and click on the <Search> button.
The system provide you with one or more possible matches. Select your facility from the search results and click on <Set Facility>.
The system will now prompt you to select the vaccine site that you are at.
Select your vaccine site from the available options provided and click on <Set Vaccine Site> to save your selection.

23
A notification is shown, confirming successful registration of the facility and vaccine site and the name of the selected vaccine site is now displayed at the top of the screen.
Changing the registered facility and vaccine site
It is important to always ensure that your system is registered to the correct facility and vaccine site. If you notice that an incorrect site is selected, you can correct this by navigating to the AdministrationFacility Settings.
You can now:
Just choose a different vaccine site at the same facility; OR
Click on <Choose a different facility> button to select a completely different facility
No vaccine sites available at the facility
If you select a facility that have no vaccine sites configured, the system will show a message that “No vaccine sites are available”. You will have to arrange to have these vaccine sites registered

24
and loaded before you can use the system at the specified facility. This request can be submitted via the EVDS service desk at http://hissupport.dhmis.org or via email to [email protected]
This means that this specific hospital will not be able to use EVDS until the service points have been configured.

25
CHAPTER 4 Operating the System
This chapter focusses on familiarising the EVDS user with the operational functionality of the system.
Lesson 7: Search for and Manage Existing Patients
Applicable User Profile(s): Patient Administrator
Vaccinator
System Functionality Covered: Searching the system for a patient
Updating an existing patient record
Capturing patient consent
Capturing a vaccination for a patient
To find a patient record, click on either the Search Patients menu item at the top or the <Search for Patient> button provided in the centre of the Home Page.
The Patient Search page divides the process into Search Patient, Patient Details, Select Action and
Complete Action steps. Completed steps will be highlighted to indicate the progress of the registration process.
1. Search Patient
The first step of this process will be to search for the patient on the system. Searches can be performed using a valid South African Identification number (ID), patient record number (HPRN) or passport number.
Search by Number
On the Search by Number tab, select one of the below options and enter any one of the accepted values indicated below:
ID Number – accepted values:
South African national identification number,
Refugee identification number
Note that the ID number can be entered by either:
a) Manually typing the ID number into the field provided; or

26
b) Selecting the input field (by clicking on it) and then using the provided barcode scanner to scan the barcode on the patient’s green RSA ID book or driver’s license.
Option b) above is only possible if:
1. The facility is equipped with the required barcode scanners; and 2. The patient presented a RSA green ID book, smart ID card, or a South African driver’s
license.
Patient Record Number (HPRN) – accepted values:
Valid Health Patient Record Numbers assigned by the Health Patient Registration System (HPRS) only.
All other numbers – accepted values:
South African passport number,
Foreign passport number
Section 22 (asylum seeker)permit number
Section 24 (legal refugee) permit number
Refugee identification number
Click on <Search>
The system will list all the patient records found that is considered a possible match to the search criteria.
Confirm the patient’s details in order to select the correct record.
Click on the record to continue.
Once the patient record is selected from the list, the system continues to step 2 (Patient Details) of
the process.

27
Note: If no matching records were found on the server, the system will display a No Search Results message at the bottom of the screen.
Appointments
If a patient has a scheduled appointment on the system, these will be displayed on the Appointments tab. Select the Appointments tab to view all existing appointments.
Select the date for which you would like to view appointments, then
Select the patient record from the list of appointments

28
Selecting the patient record from here will take you to the Patient Details page described in
step 2 below.
2. Patient Details
When a successful search has been executed (as described in step 1) and the patient record has been found on the system, the patient’s details are displayed. Clicking on <Back to Search> at any time will completely cancel the process and direct the user
back to step 1 (Search ) of the process in order to start a search.
Various different actions can be performed from here. Select a menu item on the left to access the different functionality. The menu items on the left will be disabled until you have confirmed the patient’s details.
Patient Summary
You have to confirm that you have are viewing the correct patient record before you can edit or provide additional patient information.
Select the checkbox to confirm that you have verified:
The patient information; and
The voucher number that was presented. All vouchers linked to a patient is displayed here. Vouchers can have different statuses:
o Issued – the voucher will be used when the vaccination is registered o Redeemed – the voucher has already been used for a previous vaccination
If no “issued” voucher is available the vaccination can continue without the voucher, and a
29
voucher will be issued after the fact.
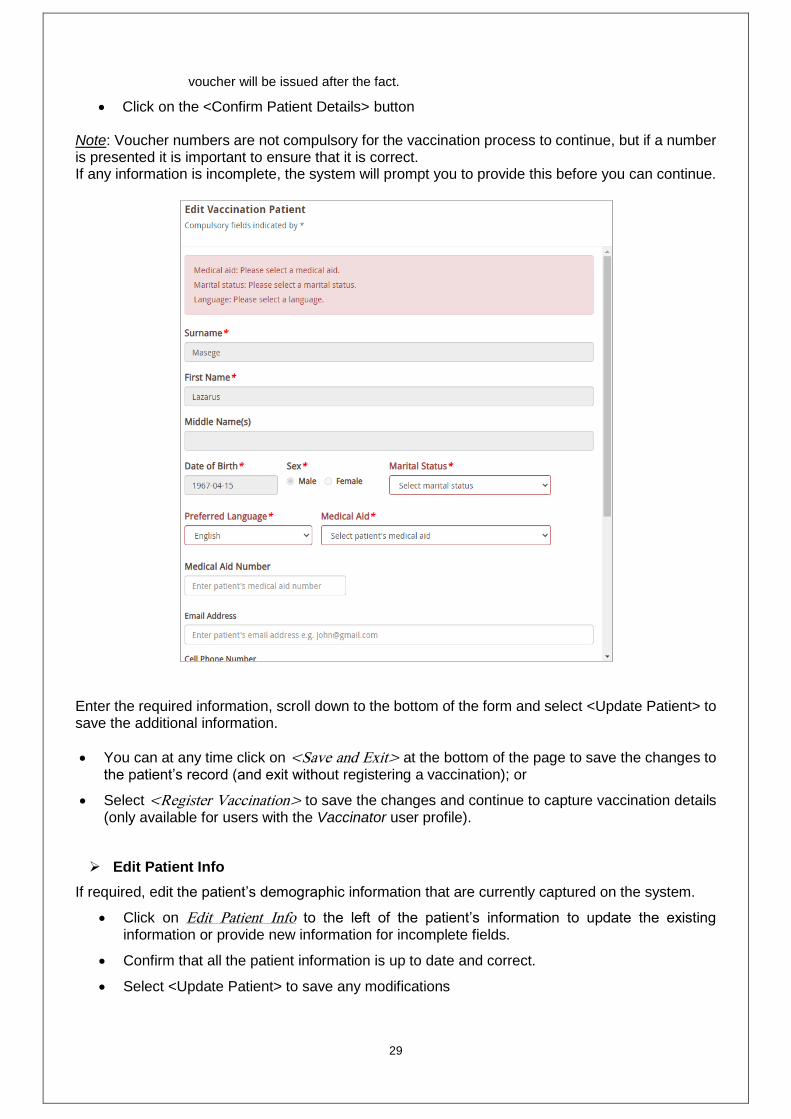
Click on the <Confirm Patient Details> button Note: Voucher numbers are not compulsory for the vaccination process to continue, but if a number is presented it is important to ensure that it is correct. If any information is incomplete, the system will prompt you to provide this before you can continue.
Enter the required information, scroll down to the bottom of the form and select <Update Patient> to save the additional information.
You can at any time click on <Save and Exit> at the bottom of the page to save the changes to the patient’s record (and exit without registering a vaccination); or
Select <Register Vaccination> to save the changes and continue to capture vaccination details (only available for users with the Vaccinator user profile).
Edit Patient Info
If required, edit the patient’s demographic information that are currently captured on the system.
Click on Edit Patient Info to the left of the patient’s information to update the existing information or provide new information for incomplete fields.
Confirm that all the patient information is up to date and correct.
Select <Update Patient> to save any modifications

30
Verified Documents
The Verified Documents tab displays all of the identification documents that are linked to the patient’s record.
Delete an existing document that is no longer valid by clicking on the <Delete> button next to verified document entry.
There should at any time be at least one valid identity document registered for a patient. It will thus not be possible to delete a document if it is the only registered one. A verified document with associated vaccinations will not be deleted, it will be greyed out and moved under the Proof of identity (inactive) field.
Add a new identity document (as presented by the patient) by clicking on <Add>.
Select the type of document from the list provided for Documentation presented.
Enter the Identification number printed on the document.
Provide the Document expiry date if applicable.
Note that certain validity checks are performed on some document identification numbers.
o South African ID numbers will only be accepted by the system if it:
o Is 13 numeric digits

31
o Passes the checksum validation used by the Department of Home Affairs to validate ID numbers.
o All South African passport numbers have to be 9 alpha-numeric digits.
Select <Save> to submit the new document’s details or <Cancel> to discard the changes made. The system returns to the list of captured documents.
Vaccination History
The Vacation History tab displays a list of previous vaccinations that was received by the patient. The date and time, vaccination dose (1st or 2nd), documentation presented, name of facility visited, and the facility type are provided.
In the last column you can view the vaccination details and/or view and add any adverse events that occurred for a vaccination.
View Appointments
The View Appointments tab displays the appointments associated with the patient.

32
eConsent
Patient consent may be captured by either Patient Administrator or a Vaccinator user, but it has to be captured before a Vaccinator user can capture a vaccination
On the first screen the vaccinator has to confirm that the vaccination was explained to the patient.
The next step is for the patient to provide consent. If the patient provides consent, the vaccinator selects “Yes” and continues to the next step where they have to ask the patient questions and capture the answers. If the patient does not provide consent the vaccinator selects “no” and the vaccination cannot continue.
Once consent (including compulsory questions) has been captured, the vaccinator can select <Register Vaccination> from the bottom of the page and continue with step 3 below.

33
3. Register Vaccination
To register a vaccination - search for the patient, confirm the patient details then click on <Register Vaccination>.
Figure 3: Register Vaccination
This will open the Vaccination Registration Step 3: Perform Action page.
Select the type of documentation that the patient presented as identification.
Note that by selecting a type of documentation you are also confirming that you’ve seen the physical identification document and performed a visual certification.
If the documentation presented is not listed in the list, click <Add New Document> to add the document presented.

34
Select a reason for vaccination, by indicating if this is the first vaccination or the second vaccination.
Select the trade name of the vaccine. ( There is currently only one option – Covishield)
Select the vaccine manufacturer. (There is currently only one option – The Serum Institute of India Ltd.)
Select the vaccine batch number. ( There is currently only one option – 4120Z004 )
Insert the vaccine serial number.
Insert the Vaccine expiry date.
Insert the Vaccine manufacturing date.
Insert the Date of vaccination.
Click on <Register Vaccinatio> to register the vaccination for this patient.
Confirm the details on the confirmation page.
Click <Finish> if all details are correct.
Select <Finish> to navigate to the Search by Number tab in order to start a new visit registration.

35
Appendix A: User Profiles and Associated Functionality Table 1: System Functionality associated with default User Roles
User Profile (Assigned roles) System functionality
Patient Administrator:
Register the facility and vaccine site
Search for and manage beneficiary information
Capture identification documents for patients
Capture consent
View appointments
View vaccination history
Vaccinator:
Register the facility and vaccine site
Search for and manage beneficiary information
Capture identification documents for patients
Capture consent
View appointments
View vaccination history
Register a vaccination
Capture adverse events
Account Approver:
Register the facility and vaccine site
Approve or decline newly created accounts
Account Creator:
Register the facility and vaccine site
Create new accounts for vaccinator or patient administrator users

36
Appendix B: Troubleshooting Report all system failures and/or difficulties to the EVDS service desk at:
012 395 9020; or 012 395 9712; or 012 395 9711; or 012 395 9713
www.hissupport.dhmis.org