electric bike owners manual
TRANSCRIPT

ELECTRIC BIKE OWNERS MANUAL
If you need us, we’re here! Contact our support team: 888-984-2762 or [email protected] www.freeforcepower.com

2
ELECTRIC BIKE OWNERS MANUAL Thank you for choosing the FREEFORCE Electric Bike. We want to make you aware of the dangers of riding an electric bicycle so you can have a safe and enjoyable riding experience for years to come. IMPORTANT: Read all of this manual before riding your e-bike or allowing anyone else to ride your e-bike. If you have any concerns or about your electric bike, please contact us at 888-984-2762 or [email protected].
WARNINGS AND CAUTION STATEMENTS PAGE 3-4
GENERAL SAFETY PAGE 5
WARNING: A SPECIAL NOTE TO PARENTS AND GUARDIANS PAGE 6
OPERATING PROCEDURES PAGE 7-9
FREEFORCE SPECIFICATIONS AND EBIKE DIAGRAM PAGE 9-11
EBIKE ASSEMBLY INSTRUCTIONS PAGE 12-16
EBIKE BATTERY INFORMATION PAGE 17-19
RIDING AND OPERATING YOUR EBIKE PAGE 19-23
EBIKE SERVICE AND MAINTENANCE GUIDELINES PAGE 24-26
EBIKE RIDING – GENERAL SAFETY PAGE 26-28
CHECKLIST: BEFORE YOU RIDE YOUR FREEFORCE EBIKE PAGE 29
Part I: Introduction To and Safe Use Of Your Non-Electric Components PAGE 29-36
Part II: Introduction to and Safe Use Of Your Electric Components PAGE 36-40
APPEARANCE AND CARE PAGE 41
WHEN YOU HAVE AN ACCIDENT, DROP YOUR EBIKE OR IT FALLS OVER PAGE 41-42
TROUBLESHOOTING PAGE 43
FAQS PAGE 43-45
THE LIFESPAN OF YOUR EBIKE AND ITS COMPONENTS PAGE 45
WARRANTY/LIMITED WARRANTY/REGISTER YOUR EBIKE PAGE 46-49

3
WARNINGS AND CAUTION STATEMENTS:
Failing to follow the directions below may result in risk of personal injuries, damage, or failure of the bicycle or system. All other losses or damages to themselves and others and to any property arising as a result of using the bicycle. Using different materials and components may affect the performance of the bicycle. If the life of a component has been exceeded, it may suddenly fail and may cause injuries to the rider. Any form of crack, scratches or change of coloring in highly stressed areas indicate the life of the component has been reached and should be replaced. Please read the manual before riding the bicycle. After you have carefully read the user manual, store it in a safe place to reference later. If you have an impairment or disability such as visual impairment, hearing impairment, physical
impairment, cognitive/language impairment, and/or a seizure disorder, consult your physician before
riding any bikes. For replacement parts, technical information, warranty assistance, and general questions please
contact us here: 888-984-2762 or [email protected]

4
PLEASE NOTE: PLEASE SEEK ASSISTANCE FROM A QUALIFIED TECHNICIAN FOR SERVICE, REPAIRS OR MAINTENANCE. DO NOT DISASSEMBLE, MODIFY OR REPLACE ELECTRICAL PARTS.
WARNING- NEVER ATTEMPT TO DISASSEMBLE OR ADJUST ANY OF THESE COMPONENTS: the motor, motor controller, battery, battery charger, throttle, or wiring harness of your electric bicycle. Doing so may cause extensive damage to these components, will void your warranty, and may cause a hazardous condition. If you cannot resolve a problem, contact FREEFORCE or your local bicycle repair store.
• In order to help minimize the chances of an accident and possible injury, it is critical that if you
have any repair or maintenance, which is not specially described in this manual, contact FREEFORCE or a bicycle store.
• Your individual maintenance requirements will be determined by everything from your riding style to geographic location. Consult your local bicycle store for help in determining your maintenance requirements.
• Many Bicycle service and repair tasks require special knowledge and tools. Do not begin any adjustments or service on your bicycle until you have learned how to properly complete them. Improper adjustment or service may result in damage to the bicycle or in an accident, which can cause serious injury or death.
PLEASE NOTE: Before performing ANY service, inspection or maintenance on your electric bicycle, you should first remove the battery. Failure to remove the battery could lead to the bicycle turning on unexpectedly, causing serious damage and injury.
• If you have to perform maintenance that requires the battery to be installed, you must be sure that if the bicycle wheel, chain or other drive train components begin moving unexpectedly they will not be in a position to cause injury or damage.

5
IMPORTANT SAFETY INSTRUCTIONS
WARNING: When using this product, basic precautions should always be followed, including the
following:
1. Read all the instructions before using the product.
2. To reduce the risk of injury, close supervision is necessary when the product is used near
children.
3. Do not put fingers or hands into the product.
4. Do not use this product if the flexible power cord or output cable is frayed, has broken
insulation, or any other signs of damage.
5. This equipment is not intended to be used at ambient temperatures less than 14°F or above
ambient temperatures of 140°F.
6. The battery is intended to be charged when the ambient temperature is between 32°F and
113°F. Never charge the battery when ambient temperatures are outside this range. LEGALITY:
• In the United States, electric bikes are defined as “a two or three wheeled vehicle with fully operable pedals and an electric motor of less than 750 watts (1hp) whose maximum speed on the paved level surface when powered solely by such a motor while ridden by an operator who weighs 170 pounds, is less than 20mph.
• Local and state regulations vary. It is your responsibility to ensure your bike is legal in your particular
area before riding it on public roads. If you’re unsure, ask your bicycle shop for more information
about local laws and regulations. GENERAL SAFETY:
• When operating your bike, it is critical to know how to properly care for your bike. Be sure to familiarize
yourself with all aspects of your bike functions and operations before riding it – especially on the open
road with other traffic.
• Since Electric Bikes are very different from regular bikes please be sure to read the section on “RIDING
ELECTRIC BIKES” as well as the rest of the manual.
• Never operate your bicycle when you are under the influence of alcohol or drugs, including
prescribed or over the counter medications.
• Always ride at a speed appropriate for the conditions. High speed means higher risk.
• It is your responsibility to familiarize yourself and comply with the applicable rules and regulations within
the country, state, county, province and/or city where you will be riding.
• Be careful to keep body parts and other objects away from the sharp chain rings, the moving chain, the
turning pedals and the crank, and the spinning wheels of your bicycle.

6
WARNING: A SPECIAL NOTE TO PARENTS & GUARDIANS IN THE UNITED STATES, ELECTRIC BIKES MAY USUALLY ONLY BE RIDDEN BY PERSONS 16 YEARS OLD AND
OLDER! PLEASE CONSULT YOUR STATE AND CITY LAWS IN ORDER TO UNDERSTAND THE LEGAL AGE FOR
RIDING AN ELECTRIC BIKE IN YOUR CITY/STATE.
As a parent or guardian, you are responsible for the safety of your adolescent when riding a bicycle. To
maximize the safe use of the bicycle by an adolescent, FREEFORCE strongly advises you to read this
Manual in its entirety, and practice the following precautionary guidelines:
• Understand and obey all applicable local motor vehicle, bicycle and traffic laws, and also adhere to
common sense rules of safe and responsible cycling
• Make sure the bicycle is properly fitted to the adolescent.
• Make sure the bicycle is in good repair and safe to operate at all times.
• Make sure that you and your adolescent have learned and understand how to safely operate an
electric bicycle and are familiar with the roads and/or other terrain upon which the bike will be
ridden.
• Make sure your adolescent always wears an approved bicycle helmet when riding.
Make sure your adolescent understands that a bicycle helmet is for cycling only, and must be
removed when not riding. A helmet must not be worn while playing in play areas, including
playground equipment, etc.
• Failure to follow the aforementioned warnings could result in serious injury or death. FREEFORCE assumes no liability for failure to comply with the stated guidelines.

7
RIDING YOUR FREEFORCE BIKE AND OPERATING PROCEDURES USE – COMMUTER and CRUISER:
FREEFORCE bikes, except the Mountain Bike model, are designed to be ridden on paved roads or graded
surfaces only. The bike is not designed to withstand off-road conditions or uneven terrain. FREEFORCE
assumes no liability for any accident, injuries, or property damage incurred as a result of rider’s use or
misuse of FREEFORCE bicycles, including, but not limited to, any damages resulting from or arising out of
off-road usage. An Electric Bike should not be used for anything else other than safely riding a bike. Putting undue, unintended, or unnecessary stress on the bike parts, frame, brakes handle bars, stem, or forks can cause these components and/or the bike to fail, causing serious injury or death. This bike should not be used for jumping over curbs, riding off road trails (except the Mountain Bike model), or any use other than for commuting and cruising in a relaxed, safe manner. Never exceed 20 miles per hour on this bike. SINGLE RIDER ONLY: FREEFORCE bikes are designed for one passenger only. DO NOT carry any additional passengers on the front or rear of the bike. The rear rack holding the battery is not designed to carry the weight of any additional passengers, except a baby carrier with maximum load of 40 pounds. Standing, kneeling, or sitting backwards or sideways (both legs on the same side of the bike) on the carrier seat while the bike is moving or stopped can easily result in broken limbs, loss of control of the bike, destroyed rims, a destroyed bike frame, or worse. WEIGHT CAPACITY: FREEFORCE Electric Bikes are designed with a maximum weight capacity of 275 pounds for all models. The
rear rack maximum weight capacity is 40 pounds. Exceeding the maximum weight capacity can result in
damage to the bike, which can lead to serious injury or death. RETROFITTING: Never retrofit our bikes with any bike components that are not approved in writing by FREEFORCE. This includes tires and tubes. FREEFORCE Bikes are fitted with approved ebike tires – never use any other tire unless approved by FREEFORCE in writing. Serious Injury and even death can result in unauthorized retrofitting and it will void your warranty. CARRYING CARGO: Carrying a load requires getting accustomed to. Practice manoeuvring and braking on a flat, hazard and traffic free street with and without a load before going out on your bike. Carrying a seated passenger or heavy load involves risks, foremost of which can be decreased braking power and increased stopping distance. The maximum weight capacity is 275lbs shared between the rider and cargo. VEHICLE RACKS:

8
Misuse of vehicle racks could result in a potential hazardous situation which, if not avoided, could result in serious injury or death. Be sure to read and follow the instructions provided by the rack manufacturer for more complete information. PEDAL ASSIST SENSOR (“PAS”):
WARNING: When you are in PAS mode – Do not pedal around corners – you will get a boost and your pedal will hit the ground and can cause injury or death!
• Do not use pedal assist on level and downhill grades if people are visible on the path you are riding
on. • Do not use pedal assist if small children or pets are within 100 feet.
HELMET USAGE:
• Always wear an approved helmet and ensure it fits according to the manufacturers’ instructions. Ensure your helmet meets the latest certification standards and is appropriate for the type of riding you do – and if there are any special requirements for riding an electric bike.
• Most serious bicycle injuries involve head injuries, which might have been avoided if the rider had
worn an appropriate helmet. FAILURE to wear a helmet when riding may result in serious injury or
death.
MECHANICAL SAFETY CHECK: • Check the condition of your Electric Bike before every ride. • Make sure no nuts, bolts or fixings are loose, and pay particular attention to the axle, nuts and
handlebar stem.
• Make sure the tires are correctly inflated with the recommended air pressure, which can be found on the rim of every tire.
• Check the brakes for proper operation. SMALL BICYCLE ACCESSORIES AND CHOKING HAZARD:
Some bicycle accessories may present a choking hazard and other hazard to small children. Keep any
bike parts accessories, tools away from small children.
TECHNICAL SUPPORT: It is important for your safety and riding performance to understand how things
work on your bike. We urge you to ask your local bicycle shop on how to fix the things described in this
section before you attempt them yourself, and that you have your bike shop check your work before you
ride the bike.
USE GOOD JUDGMENT:

9
Make sure no straps are in the way of spinning wheels where they could get caught. No bags, boxes or
any items should be placed in a position where they could get caught in the spokes Double check your
load for security and stability. Check to see that your wheels are securely fastened and that no
components or frame members are cracked or broken (in general, if at any time you notice a crack or bend
in your bike, stem, forks, or bars of your bicycle, stop riding immediately; take your bike to your local bike
shop and have them inspect it).
FREEFORCE PRODUCT SPECIFICATION
Frame 6061 aluminum Gearing 1x 8 speed Throttle Thumb throttle (left side) Pedal Assist 3 level pedal assist with Walk assist Maximum speed 20miles/h (32km/h) Charger Model KYLC084V42J Made by Wuxi Keyu Technology Company
Ltd. Input AC100-240V 1.8A 50-60Hz; Output 42.0V DC 2.0A
Charging time Approximately 5 hours
Battery Lithium ion battery 36V 10AH
Battery Capacity (Wattage Hours)
360WH
Motor type Rear-wheel drive Motor type Brushless DC Motor Nominal motor power 250W
Torque: Pound-inch (Newton meter)
398.2 lb.in (45Nm)
Operating temperature range during discharge
14°F to 140°F
Operating temperature range during charge
32°F to 113°F
Storage temperature (battery) 14°F to 131°F Humidity (storage) Up to 80% Nominal voltage 36V DC
Front Light power supply 2 x AA size 1.5V batteries
Rear Light power supply 1 x AA size 1.5V battery

10
FREEFORCE FASTERNER TORQUE SPECIFICATIONS
FASTERNER TORQUE SPECIFICATIONS
Component IN-LB NM
Headset, Handlebar, Seat Area
Seat fixing bolt (seat rail blinder) 159.3-194.7 18-22
Stem handle binder bolts 159.3-194.7 18-22
Stem Wedge (binder) bolts – quill type for threaded headset 159.3-194.7 18-22
Threaded headset locknut 309.75-354 35-40
Thread less Stem Clamp bolts 61.95-88.5 7-10
Crank set, Bottom Bracket, Pedal Area
Chainring bolt (aluminium) 53.1-88.5 6-10
Chainring Bolt (steel) 70.8-106.2 8-12
Crank Bolt 354-486.75 40-55
Pedal (into crank) 265.5-354 30-40
Derailleur, Shift Lever area
Front derailleur cable pitch 70.8-88.5 8-10
Front derailleur Clamp Mount 70.8-88.5 8-10
Rear Derailleur Cable Pinch Bolt 70.8-88.5 8-10
Rear Derailleur Mount Bolt 70.8-88.5 8-10
Shift Level (MTB thumb-type) 26.55-44.25 3-5
Rack Area
Bicycle Rack to Frame 70.8-88.5 8-10
Wheel Area
Wheel Axle Nuts to Frame/Fork 265.5-354 30-40
Brakes
Brake Cable Pinch Bolt 70.8-88.5 8-10
Brake Caliper to Frame/Fork 70.8-88.5 8-10
Brake Lever to Handlebar M6 70.8-88.5 M5 26.55-44.25
M6 8-10 M5 3-5
Disc Rotor to Hub 53.1-70.8 6-8

11
FREEFORCE Electric Bike DIAGRAM FOR ILLUSTRATION PURPOSES ONLY

12
ASSEMBLY INSTRUCTIONS Your bike requires only a few simple steps to get it ready for you to ride:
1. Remove the outside carton after cutting the nylon bands. Remove all of the inside cardboard
protection and bubble wrap. Carefully remove your bike from the carton.
2. Ensure the following pieces are included in the package:
a. FREEFORCE Electric Bike
b. Front Wheel
c. Fender (for Cruiser and Commuter models)
d. Pedals (Left and Right)
e. Charger
f. Keys for battery pack (usually attached with plastic tie either on the handlebar or on the
battery)
g. Assembly tools and manual
If there are any missing parts, please contact us 888-984-2762 or [email protected] for help
replacing missing pieces.
IMPORTANT: Before you begin to assemble your new e-bike, remove the battery and
charger from their boxes and begin charging. The battery will need to charge for 5 hours
to be fully charged. Your bike comes with a charging system. This charger can be
plugged into any AC100-240V outlet. When the battery is charging the LED light will be
RED. When the battery is fully charged the LED light will be GREEN.

13
Step Details Image Reference 1 Assemble the front fender by positioning
the front light (when supplied) at the front of the fork, with the fender top eye bracket at the back of the fork.
2 Tighten both screws of the fender stay The front lamp fixture and fender top eye bracket Assemble the front wheel by first separating the nut and spring as shown.
3 Fix the spring and nut on the e-bike. Leave enough room on both sides for the bike fork ends to slide on.

14
4 Place the wheel on the front fork. Then fasten the nuts. IMPORTANT: Make sure the brake disk is between the brake pads!
5 Check and align the stem with the front wheel and tighten the top stem bolt to 5nm to hold the stem in place
6 Using a 4mm Hex Wrench - Alan key, release the 4 screws to remove the handlebar cover. Put the handlebar in the support position.
15
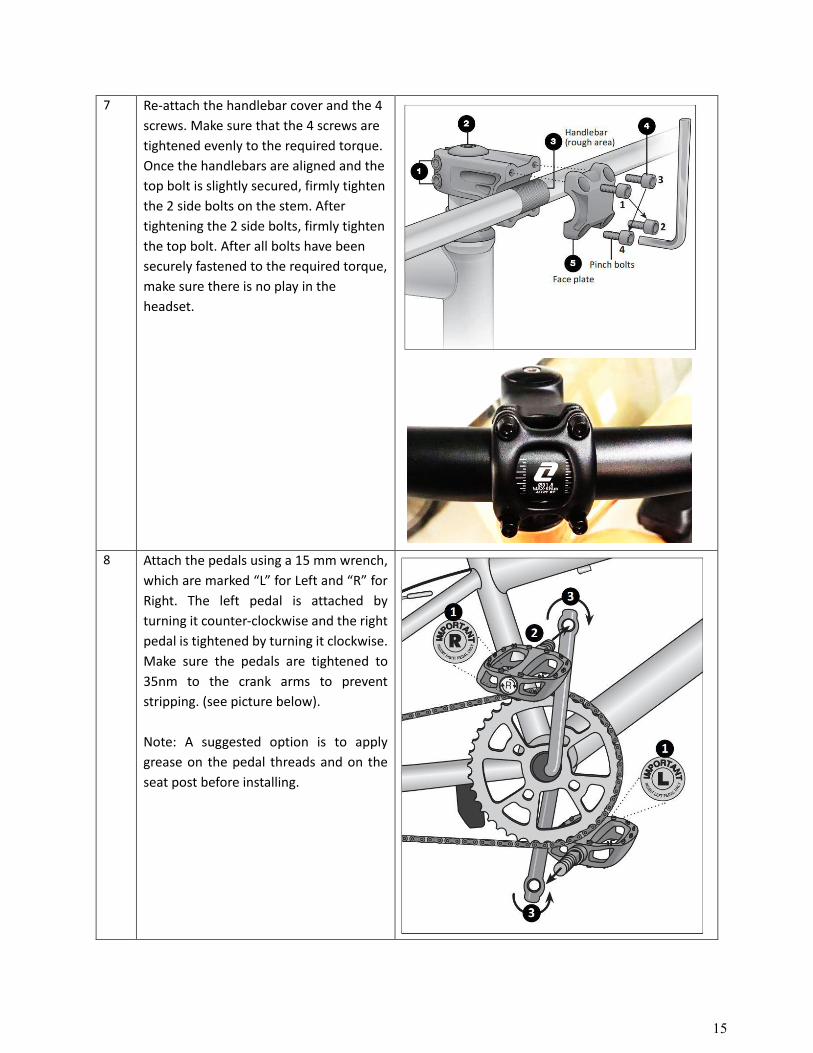
7 Re-attach the handlebar cover and the 4 screws. Make sure that the 4 screws are tightened evenly to the required torque. Once the handlebars are aligned and the top bolt is slightly secured, firmly tighten the 2 side bolts on the stem. After tightening the 2 side bolts, firmly tighten the top bolt. After all bolts have been securely fastened to the required torque, make sure there is no play in the headset.
8 Attach the pedals using a 15 mm wrench, which are marked “L” for Left and “R” for Right. The left pedal is attached by turning it counter-clockwise and the right pedal is tightened by turning it clockwise. Make sure the pedals are tightened to 35nm to the crank arms to prevent stripping. (see picture below). Note: A suggested option is to apply grease on the pedal threads and on the seat post before installing.
16
9 Insert the seat post into the frame by pulling open the quick release seat clamp and inserting the seat post into the seat tube. Close the clamp. Make sure the seat is tight enough so that you can’t twist it out of alignment. Move the clamp handle inward toward the seat post so it is held tight by the clamp. To adjust the height, pull the seat clamp handle away from the seat post and slide the seat up or down. Important! Be sure the minimum insertion marks do not go past the top of the seat clamp and are not visible
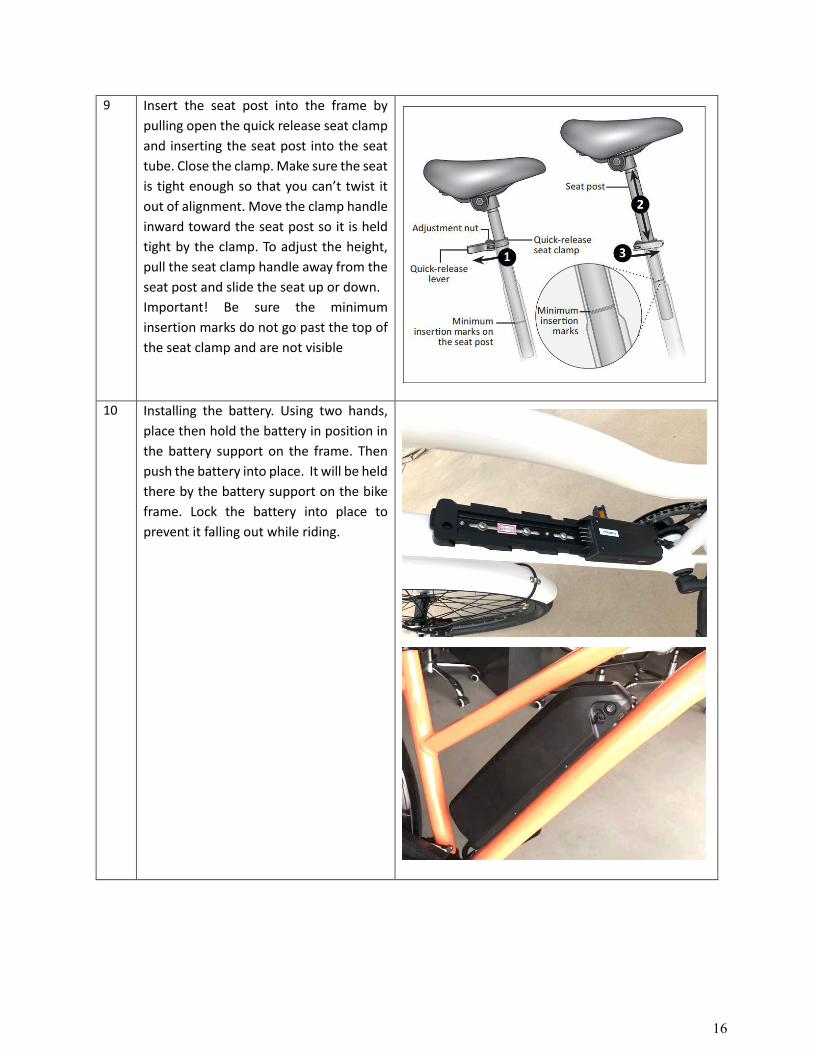
10 Installing the battery. Using two hands, place then hold the battery in position in the battery support on the frame. Then push the battery into place. It will be held there by the battery support on the bike frame. Lock the battery into place to prevent it falling out while riding.

17
BATTERY INFORMATION CHARGING YOUR BATTERY: Your bike comes with a charging system. This charger can be plugged into any AC100-240V outlet. When the battery is charging the LED light will be RED. When the battery is fully charged the LED light will be GREEN.
IMPORTANT: Battery must be switched ON before charging.
WARNING: Only use the battery charger model listed in this manual
INSTALLING THE BATTERY: Use two hands place then hold the battery in position in the battery support on the frame. Then push the battery into place. It will be held there by the battery support on the bike frame. Lock the battery when fully inserted in the battery holder.
Important: The battery must be locked when riding or it may fall out. The key does not have to be in to operate the bike.
Very Important! Your bike is supplied with two battery lock keys; please keep the spare key secure. We can only order you a replacement if you can provide the key number.
Please note your key number here-

18
REMOVING THE BATTERY: Unlock with the key. Pull the battery up out of the support bracket to remove it.
MASTER ON/OFF SWITCH: Make sure the switch located on the battery pack is ON to start the bike (O is off, I is on). • If you are riding frequently you can leave the switch ON. • When the bike will not be used for several days, turn it OFF. • Turn OFF the power when the e-bike is not in use or is recharging by turning off the battery.

19
BATTERY CHARGE INDICATION:
Press and hold the ON/ OFF button briefly, the LED will indicate the remaining power charge in the
battery.
Remaining total battery capacity
<20% One red light
>20% &<40% Two red lights
>40% &<60% Three red lights
>80% Four red lights
OPERATING YOUR BIKE Your Electric Bike is controlled through the thumb throttle mechanism located on the left side of your
handle bar. With the battery turned on, mount your bike and press the ON/OFF button on the control
panel until you see the indicator lights turn on.
Note: Before mounting the bike to ride, hold the brake lever. It cuts off the main power to the bike. It is
always safest to mount the bike before turning on the bike, as turning it on enables the throttle. If you
20
get on and off the bike with throttle ON, you may accidentally hit the throttle and send the bike
forward. You will have better control of the bike if you are straddling the bike and holding onto the
handle bars.
Caution: When you are finished riding, always turn OFF the electric bike so you do not accidentally touch the throttle getting off the bike.
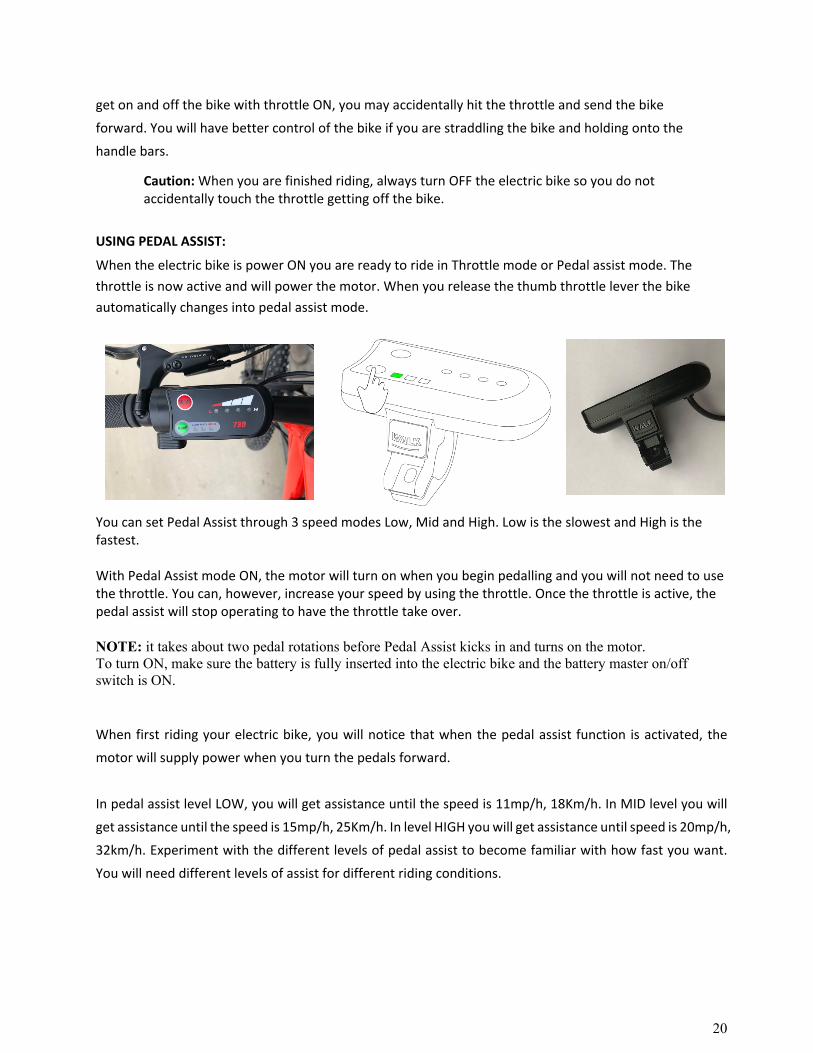
USING PEDAL ASSIST: When the electric bike is power ON you are ready to ride in Throttle mode or Pedal assist mode. The throttle is now active and will power the motor. When you release the thumb throttle lever the bike automatically changes into pedal assist mode.
You can set Pedal Assist through 3 speed modes Low, Mid and High. Low is the slowest and High is the fastest. With Pedal Assist mode ON, the motor will turn on when you begin pedalling and you will not need to use the throttle. You can, however, increase your speed by using the throttle. Once the throttle is active, the pedal assist will stop operating to have the throttle take over. NOTE: it takes about two pedal rotations before Pedal Assist kicks in and turns on the motor. To turn ON, make sure the battery is fully inserted into the electric bike and the battery master on/off switch is ON. When first riding your electric bike, you will notice that when the pedal assist function is activated, the motor will supply power when you turn the pedals forward.
In pedal assist level LOW, you will get assistance until the speed is 11mp/h, 18Km/h. In MID level you will
get assistance until the speed is 15mp/h, 25Km/h. In level HIGH you will get assistance until speed is 20mp/h,
32km/h. Experiment with the different levels of pedal assist to become familiar with how fast you want.
You will need different levels of assist for different riding conditions.

21
WALK ASSIST MODE:
When you push the WALK button located on the control panel, the motor will engage and help propel the
bike forward at a walking speed of around3mph (5km/h). When you release the button, the walk assist
stops.
Important: In the beginning, when you are getting used to the bike, it is always best to start out in LOW
mode and move up to the faster modes as you gain experience riding. If you start out in the faster modes
the motor is powerful and will go fast if you are not expecting it. In OFF mode the pedal assist and the
throttle are NOT active. Activating Head Lights (FBCM01NVY and FBCM01MTBLK Models Only) Use the switch to turn the front light on and off. Rear Reflector Lights (FBCM01NVY and FBCM01MTBLK and FBCM02WHT and FBCM02BLK models) Rear light; 1st use, Pull out the insulation tag. Press the switch to turn the rear reflector light on and off.
BATTERY RANGE TIPS:
• Know that riding your bike with full throttle in Pedal Assist will use up the battery more quickly than if you apply less throttle or ride in a lower pedal assist speed mode.
• If you are riding over 40 miles in one trip, use a lower pedal assist mode or pedal harder using throttle mode. This will assist the battery and extend your range by many miles.
• If you are on a long trip and the battery gets low and cuts off as you are riding, ease off on the throttle and it will come back on after a few seconds. If you ease off on the throttle or move down to 1 mode in pedal assist, you will get a few more miles of riding out of the battery.
FACTORS THAT AFFECT RANGE:
• State of your Battery Charge • Mode Setting: the bike will use less power in pedal assist mode due to the effort of the rider • Tire inflation pressure • Adjustment of the wheel bearings and brakes: tight bearings or a dragging brake will adversely
affect range • Rider Weight • Speed at which you travel, and local wind conditions. • Terrain (road surface and hills): traveling on a soft surface, such as dirt or gravel, or climbing a hill

22
uses energy faster
• Many starts and stops: full power from a standing start draws the most amperage from the battery
HOW TO MAXIMIZE YOUR RANGE:
• Fully charge your battery before each ride • Ride in pedal assist mode and pedal as much as you feel comfortable doing – the more you pedal
the further the battery will take you. • Check your tire pressure regularly and inflate the tires to the maximum pressure printed on the
tire sidewalls • Have your bicycle serviced periodically to ensure that the bearings run freely and the brakes do
not rub the rotors for the disc brakes when they are not applied. • Minimize the weight that you carry • Ride at slower speeds • Accelerate gently. Assist the system by pedaling as you accelerate to your cruising speed IMPORTANT- As your battery ages, it will gradually lose capacity. With proper care and maintenance, your lithium ion battery will retain up to 60% of its capacity for at least 700 discharge/recharge cycles. As capacity diminishes, you will notice a gradual drop off in max range capability. When range falls to an unacceptable level, contact us for information regarding purchasing a new battery.
THUMB THROTTLE CONTROL: The throttle control is operated on the left hand side. You control the throttle by pushing on the thumb attachment. The farther the throttle switch is from its resting position; the more power is delivered to the motor to accelerate the Electric Bike. When you want to slow down, you simply release the throttle and let it return to its resting position and simultaneously apply the brakes. BRAKES: Your Electric Bike is equipped with disc brakes for maximum reliability. Applying hand pressure to the brake
levers will cause the wheel brake to cause friction against the brake disc, slowing the wheel. The more hand
pressure applied to the brake lever, the faster the Electric Bike will come to a stop.
The brake lever has a power cut off switch, when you hold the lever, the power will turn off. The throttle
and pedal assist will not work.
The rear brake should always be applied before and while the front brake is applied. Applying only the front
brake to slow or stop at high speeds may result in the rider being ejected from the saddle and continuing
forward over the handlebars. It is best to apply even pressure to both brake levers when slowing or stopping.
23
Bicycles equipped with disc brakes will occasionally make a slight scraping noise when the wheels are turning without the brakes being applied. This is normal. Make sure that the brake lever does not contact the handlebar when full hand pressure is applied. If so, then the brakes must be adjusted by increasing the tension on the cable. With Hydraulic Brakes is it vital they are bled properly and by a certified bike mechanic – please service and
maintain your brakes every 500 miles or every 6 months or whenever necessary. Brakes are a critical part
of the bike and it is essential that both are working 100%.
WARNING- • Disc brake rotors become hot during use. Do not touch or contact with the disc rotors shortly
after use. • Wet weather will require a longer distance to stop. Brake earlier and avoid sudden stops
when riding in wet conditions. RIDING ON HILLS:
• If you encounter a hill that causes the speed of your bicycle to drop below 7mph (11km/h) on electric power only (throttle mode) with the throttle fully applied, you should pedal to assist the bicycle up the hill.
• Failure to pedal can overstress the motor and controller, possibly causing those components to overheat.
• Failure to pedal up steep hills to assist the bicycle also will overstress the battery reducing its
capacity and shortening its useful life. RIDING IN ADVERSE WEATHER CONDITIONS:
• Your electric bike is built with components that are sealed against dust and water and can safely operate in most weather conditions. To ensure the longest life of your components, however you should avoid riding in wet weather when possible.
• The FREEFORCE battery, however, cannot handle heavy rain conditions. You should refrain from using the bicycle in heavy or long-lasting rain (more than 3-4 minutes).
• Never charge or use the 12v outlet after riding in the rain. Park the bike in a dry, warm place and wait at least 24 hours before charging or using the 12V port.
• Since Electric Bikes are faster and heavier than normal bikes, when riding in wet weather, you should use extreme caution. You are more likely to fall from a wet road surface when traveling at high speed. Heavy electric bikes also take longer to slow down and the required stopping distance in wet weather is even greater. Be sure to leave ample room for stopping and brake gently and evenly to avoid falling.

24
ELECTRIC BIKE SERVICE AND MAINTENANCE GUIDELINES SERVICE: You bike needs to be checked and serviced by a qualified bike mechanic with every 100 miles of riding. This is a standard “best practice” for any new bike, as cables will stretch and components will "bed in". The service must include spoke tensioning for both front and rear wheels. TORQUE SPECIFICATIONS: Correct tightening torque of threaded fasteners is very important to your safety. Always tighten
fasteners to the correct torque. Bolts that are too tight can stretch and deform. Bolts that are too loose can move and fatigue. Either mistake can lead to a sudden failure of the bolt or the connection. Always use a correctly calibrated torque wrench to tighten critical fasteners on your bike. Carefully follow
the torque wrench manufacturers instruction on the correct way to set and use the torque wrench for
accurate results. In case of a conflict between the instructions in this manual and information provided by a local bike
shop, please contact us. Do not ride your bike until you are comfortable and verified the information.
25
MAINTENANCE
• Some service and maintenance can and should be performed by the owner and require no special tools or knowledge beyond what is presented in this manual.
• You should have your bicycle and its components checked periodically by a qualified bike mechanic for indicators of stress and/or potential failure, including cracks, deformation, corrosion, paint peeling, dents and any other indicators of potential problems, inappropriate use or abuse. These are important safety/maintenance checks and very important to help prevent accidents, bodily injury to the rider and shortened product life.
• The following are examples of the type of service you should perform yourself
o A qualified bicycle mechanic using the correct tools and procedures specified by the manufacturer should perform all other service, maintenance and repair in a properly equipped facility.
• Break in Period: Your bike will last longer and perform more efficiently if you break it in before
riding it hard. Control cables and wheel spokes may stretch when a new bike is first used and may require readjustment by your local bike shop. Your Mechanical Safety Check (below) will help you identify some things that need readjustment.
• Even if everything on your bike seems to be in working order, it is best to take your bike back to your local bike shop periodically for check-ups. We typically suggest you bring your bike in for a 30-day check-up.
• Another way to judge when it is time for the first check-up is to bring the bike in after three to five hours of usage. Of course, if at any time you suspect something is wrong with the bike, take it to your local bike shop for a check-up prior to riding it again.
MECHANICAL SAFETY CHECK:
Perform the following maintenance after every long or hard ride, and especially if the bike has been
exposed to water or grit; or at least every 100 miles:
o Clean the bike: Lightly lubricate the chains rollers with a good quality bicycle lubricant. Wipe off excess lubricant with a lint-free cloth. Lubrication is a function of climate. Talk to your local bike shop about the best lubricants and the recommended lubrication frequency for your area.
o Squeeze the front brake and rock the bike forward and back. Make sure everything feels solid. If you feel a clunk with any forward or backward movement of the bike, you probably have a loose headset. Have your bike checked by your local bike shop. If either brake lever fails, don’t ride the bike. Have your local bike shop check and repair or replace.
o Lift the front wheel off the ground and swing side to side. If you feel any binding or roughness in the steering, you may have a tight headset. Have it checked by your local bike shop.
o Rock one of the pedals toward and away from the centerline of the bike; then do the same with the other pedal. If anything feels loose, have your local bike shop check it.
o Examine the brake pads. If they are starting to look worn or not hitting the wheel rim squarely, have your local bike shop adjust or replace them.
o Check the control cables and cable housing. If you observe any kinks or fraying, have your local bike

26
shop replace them. o Squeeze each adjoining pair of spokes on either side of each wheel between your thumb and
index finger. They should feel the same. If any spokes feel loose, have your local bike shop check the wheel for tension and trueness.
o Check the tires for excess wear, cuts or tears. If you are unsure whether your tires are worn or damaged, ask your local bike shop, who can replace them if necessary.
o Check the wheel rims for excess wear, dings, dents and scratches. Consult your local bike shop if you see any rim damage.
o Check to make sure that all parts and accessories are still secured and tighten any which are not. o Check the frame, particularly in the area around all tube joints, the handlebars, the stem; and the
seat post for any deep scratches, cracks or discoloration. There are signs of stress-caused fatigue and indicate that a part is at the end of its useful life and needs to be replaced. See also “The lifespan of your bike and its components.”
o When the chain won’t shift smoothly and quietly from gear to gear, the derailleur is out of
adjustment, and you should see your local bike shop.
BIKE RIDING - GENERAL SAFETY Riding any bicycle, including electric bikes, carries certain risks and caution must always be exercised. The
following is a list of general bicycle safety rules and best practices that you should always comply with in
order to maximize the safety of your ride:
1. Obey the Rules of the Road and all traffic Laws.
2. Remember that you are sharing the road or path with others – motorists, pedestrians and other
cyclists. Respect their rights.
3. Ride defensively. Always assume that others do not see you.
4. Look ahead, and be ready to avoid the following:
5. Vehicles slowing or turning, entering the road or lane ahead of you, or coming behind you
6. Parked car doors opening
7. Pedestrians stepping onto the road or path
8. Children or pets playing near the road
9. Potholes, sewer grating, railroad tracks, expansion joints, road or sidewalk construction, debris
and other obstructions that could cause you to swerve into traffic, catch your wheel or cause you
to have an accident
10. Miscellaneous other hazards and distractions which can occur on a bicycle ride
11. Ride in the designated bike lane, on designated bike paths or as close to the edge of the road as
possible, in the direction or traffic flow or as directed by the local governing law.
12. Stop at the stop signs and traffic lights, slow down and look both ways at intersections.
Remember that a bicycle always loses in a collision with a motor vehicle, so be prepared to yield
even if you have the right of way.

27
13. Use approved hand signals for turning and stopping.
14. Wear proper attire, including bright clothing, protective glasses and sturdy shoes. Never wear a
loose fitting dress or long dress when riding – it can get caught in the moving parts of the bike and
cause serious injury or even death.
15. Never ride with headphones. They mask traffic sounds and emergency vehicles sirens, distract
you from concentrating on what is going on around you, and their wires can tangle in the moving
parts of the bicycle, causing you to lose control.
16. Never carry a passenger, unless it is a small child weighing less than 40 pounds whom you feel
comfortable carrying on a bike, can maintain head control and absorb the stresses felt on a bike
ride. Ensure the child is wearing an approved helmet, appropriate clothing for the ride and is
secured in a correctly mounted child carrier or a child carrier trailer. The child seat that attaches
to the EBC bikes is for side walk and board walk riding only and should never be used on the open
road where there is a chance or an accident with a car or other moving vehicles. Never exceed 15
miles per hour when you are carrying a child on the back seat, or 20 miles per hour when having a
child in an approved child trailer.4
17. Never carry anything that obstructs your vision or your complete control of the bicycle, or which
could become entangled in the moving parts of the bike.
18. Never hitch a ride by holding on to another vehicle or bike.
19. Do not weave through traffic or make any moves that may surprise people with whom you are
sharing the road.
20. Observe the right of way.
21. Avoid riding in bad weather, when visibility is obscured, at dawn, dusk or in the dark, or when
extremely tired. Each of these conditions increases the risk of accident.
22. Always bring some form of identification when riding.
23. Yield right of way to pedestrians and animals.
24. Signal with voice or bell when passing.
25. Walk your bike up or down access ramps or whenever you feel uneasy, unsure or unsafe.
26. Maintain a minimum of 10 feet behind the bike in front of you.
27. Be aware that your extra speed, and extra weight of the bike mean you must be more careful,
especially around other road and trail users.
28. Wet weather impairs traction, braking and visibility, both for the bicyclist and for other vehicles
sharing the road. The risk of an accident is dramatically increased in wet conditions.
29. Wet weather may lessen the grip of the rider’s feet on the pedals. If your feet slip off the pedals,
it could lead you to fall.
30. Night Riding – Riding your bike at night is much more dangerous than riding during the day.
Adolescents or inexperienced bike riders should never ride at dawn, at dusk or at night. Adults
who choose to accept the increased risk of riding at these times need to take extra care both

28
riding and choosing specialized equipment, which can help to reduce that risk. When riding at
night or in other hazardous conditions – RIDE SLOWLY – no more than 10 miles per hour.
31. Consult your local authorized bike shop about night riding and safety equipment.
32. Reflectors are not a substitute for required lights. Riding at dawn, at dusk or at night or at other
times of poor visibility without adequate bicycle lighting systems and without reflectors is
dangerous and may result in serious injury.
33. Check reflectors and their mounting brackets regularly to make sure that they are clean, straight,
unbroken and securely mounted. Have your local bike shop replace damaged reflectors and
straighten or tighten any that are bent or loose.
34. Do not remove the front or rear reflectors or reflector brackets from your bike. They are an
integral part of the bicycle safety system. Removing the reflectors reduces your visibility to others
using the roadway.
35. Make sure your bicycle has and always is equipped with correctly positioned and securely
mounted reflectors.
ADDITIONAL SAFETY MEASURES FOR RIDING ELECTRIC BIKES Because electric bikes are faster and heavier than normal bicycles, they require extra caution and care
while riding. Failure to heed the following safety instructions could lead to a crash, injury or death.
1. ALWAYS wear a helmet, closed toe shoes and eye protection when riding.
2. Electric bikes are considerably heavier than normal bicycles. For this reason parking, pushing,
lifting and carrying the bike is more difficult. Bear this in mind when loading your bike into a car
and unloading it, or when mounting it on a bicycle carrier system.
3. Never ride at a speed outside your comfort zone, or that you feel may be unsafe for the given
conditions.
4. When mounting your bike, make sure not to step on the pedals until you are sitting on the saddle
and gripping the handlebars firmly.
5. Keep your hands on the brake levers – or at least two fingers and remember that they will always
slow or stop the bike if pulled.
6. Get used to riding your electric bike without power or use of throttle or PAS (peddle assist) – only
once you are comfortable riding the bike as a regular bike then slowly introduce the PAS on
lowest level and work your way up. After you are 100% comfortable with PAS then start using the
throttle – very gently at first until you are comfortable with the settings, speed and acceleration.
7. When you’re ready to introduce power, use the lowest assist setting until you feel confident
controlling the electric assist.
8. Heavy electric bikes take longer to slow down; leave extra space for stopping safely.
9. Remember that all the information in this manual referring to bicycle safety also applies to your
electric bike.

29
CHECKLIST: BEFORE YOU RIDE YOUR FREEFORCE BIKE Important Information about Your Bike Components and Accessories
In order to ensure maximum safety, the following is a description of the exercises you should go
through prior to riding your FREEFORCE bike. This section will also describe the various components
of your bike, including their proper use and maintenance.
When you buckle on your helmet and go for your first ride, be sure to pick an area away from cars, other
cyclists, obstacles or other hazards in order to become familiar with the controls, features and
performance of your new Electric Bike.
PART I: Introduction to and Safe Use of Your Non-Electric Components
BRAKE CHECK:
• Ensure both brakes work prior to going on every single ride.
• Familiarize yourself with the braking actions of the bike. Test the brakes at slow speed, putting your
weight towards the rear and gently applying the brakes, rear brake first.
• Check the quick releases are closed. Check all control cables are seated and securely engaged.
• Sudden or excessive application of the front brake could pitch you over the handlebars.
• Applying brakes too hard can result in locking up the wheel, which could cause a loss of control and
injuries. Skidding is an example of what can happen when a wheel locks up
• Ensure you can fully engage the brakes without them having touch (bottom out) the handlebars. Do
not ride the bike unless the brakes are working well and adjusted by a professional bike mechanic.
DISC BRAKES:
• Riding with improperly adjusted brakes, worn brake pads, or wheels on which the rim ware marks
are visible, is dangerous and can result in serious injury or death
• Your FREEFORCE Bike is fitted with disc brakes. Disc brakes are extremely powerful. Take extra care
in becoming familiar with the brakes.
• Exercise care in touching the rotator or the calipers. Disc rotors have sharp edges, and both rotors
and calipers can get VERY hot.
• Your FREEFORCE bike is equipped with Disc brakes – to maintain the warranty and safety of the bike,
a qualified mechanic must repair, replace and maintain your brakes. Please ensure you take your
bike to your local bike shop at least every 300 miles or when you observe that your brakes are weak,
scraping or generally not working well.

30
• Be careful not to damage the rotor, calipers or brake pads when re-inserting the rotor into the caliper.
Never activate a disc brake’s control lever unless the rotor is correctly inserted in the caliper.
• See the brake instructions for operation and care of your brakes, and to determine when brake pads
must be replaced.
• Use only manufacturer’s approved genuine replacement parts to replace worn or damaged parts.
BRAKE CONTROLS AND FEATURES:
• For your safety you should know which brake lever controls the front and which controls the rear brake
on your bike. Typically, the right brake lever controls the rear brake and the left lever controls the front
brake. To confirm, squeeze one brake lever and look to see which brake (front or rear) engages. Next, do
the same with the other brake lever.
• Make sure your hands can reach and squeeze the brake levers comfortably. The lever reach is adjustable.
If you are unable to reach the brakes, you may need a different brake lever design.
• If at any time, for any reason, you need the stop the bike or stop the bike motor from turning – simply
squeeze the brake levers.
SHIFTING GEARS:
• Practice shifting gears in a safe place, away from vehicles or other hazardous environments, until you
feel comfortable with your ability to control your bicycle speed.
• Never move the shifter while peddling backwards. This could jam the chain and cause serious
damage.
TIRE AND WHEEL SAFETY:
• Ensure both front and back wheels are securely fastened – and if you do not know how or what this
is – do not guess – take the entire bike to an authorized certified bike mechanic. Incorrect
installation or replacement of wheels, tires, brakes; cables or any part of the bike can cause serious
injury or even death!
• Make sure tires are correctly inflated. Check by putting one hand of the saddle, one on the
intersection of the handlebars and stem, then bouncing your weight on the bike while looking at
the tire deflection. Compare what you see with how it looks when you know the tires are correctly
inflated; and adjust if necessary.
• Check to see if tires are in good shape – Spin each wheel slowly and look for cuts in the tread and
sidewall. REPLACE damaged tires before riding your bike.
WARNING- Bicycle Rims are subject to wear. Ask your mechanic to check the usability of your
RIMS and keep this in mind in making your decision to ride your bike – constantly check this
with your qualified mechanic.

31
• Ensure your wheels are TRUED before each ride. Spin each wheel and check for brake clearance and
side to side wobble. If a wheel wobbles side to side even slightly or rubs against or hits the brake
pads, take the bike to a qualified bike shop to have the wheel trued.
• Bicycle Wheels are designed to be removable for easier transportation and for repair of a tire
puncture. In most cases, the wheel axels are inserted into slots, called “drop outs” in the fork and
frame. FREEFORCE bikes have two ways of securing the wheels – front wheels are secured using the
hollow axil with a shaft (“skewer”) running through it which has an adjustable tension nut on one
end and an over center cam on the other. The back wheel uses a Hex nut and hex key bolts which
are threaded onto the hub axil.
• It is very important that you understand the type of wheel securing method on your bike, that you
know how to secure the wheels correctly, that you know how to apply the correct clamping force
that safely secures the wheel. Ask a bike mechanic to instruct you in correct wheel removal and
installation, and ask him to give you any available manufacturers instruction.
• Riding with an improperly secured wheel can allow the wheel to wobble or fall off the bike, which
can cause serious injury or death. Therefore, it is essential that you:
• Contact us or ask your local bike shop to help you make sure you know how to install and
remove your wheel safely.
• Understand and apply the correct technique for clamping your wheel in place.
• Each time, before you ride the bike, check that the wheel is securely clamped. The clamping
action of a correctly secured wheel must emboss the surfaces of the drop out.
TIRE INFLATION AND DEFLATION:
• Never inflate a tire beyond the maximum pressure marked on the tire’s sidewall. Exceeding the
recommended pressure may blow the tire off the rim which could cause damage to the bike and
serious or fatal injury to the rider and injury to bystanders.
• There is a safety risk in using gas station air hoses or other compressors. They are not made for
bicycles. They move a large volume of air into your tire very rapidly, which could cause the tube to
explode. You should use a bicycle pump which has a built-in pressure gauge.
• FREEFORCE inner tubes contain a chemical substance to reduce the chance of deflation when
contacted with a road hazard. Tires should not be deflated unless necessary. A white or green
substance will be discharged from the air valve when deflated. It is not harmful unless it is ingested.
To minimize tire wear and for maximum riding safety, comfort and handling, maintain
recommended tire air pressure, which can be found on the side wall of all tires. Use a reliable tire
air pressure gauge to check for proper inflation before every ride. At the same time, inspect tires
for excessive war and cracks. Replace tires if necessary.

32
INNER TUBE OF TIRE:
• We highly recommend that you carry a spare inner tube when you ride your bike. Although
FREEFORCE inner tubes are puncture resistant, they are not 100% puncture proof. The tubes provide
significant protection for up to 3mm holes, but you should always be prepared for unforeseen
punctures. Have an authorized mobile mechanics number handy and request their assistance in the
event of a tire puncture.
• Patching: Always carry a patch kit so that you can patch a tube in an emergency repair. Caution: If
you do not apply the patch correctly or apply several patches, the tube can fail, which could cause
you to lose control and fall. Replace a patched tube as soon as possible.
BIKE FIT:
Research and check to ensure your bicycle is the appropriate fir for you– if your bike is not
suitable for height weight and/or stature, do not ride it.
• Classic:
o “Stand-over Height” is the basic element of bike fit; it is the distance from the ground to
the top of the bicycle frame, or the level your pelvic area reaches when straddling the
bike.
• Your bike should have a minimum Stand-over Height clearance of two inches(5cm).
• To check for correct Stand-over Height, straddle the bike while wearing the shoes you plan
to wear while riding, and bounce vigorously on your heels. If your pelvic area touches the
frame, the bike is too big for you and is therefore unsafe to ride.
• Step Through:
• Stand-over Height does not apply. Instead, the limiting dimension is determined by saddle
height range. You must be able to adjust your saddle position as described in “Saddle
Position” below – without exceeding the limits set by the height of the top of the seat tube
and the “Minimum Insertion” or “Maximum Extension” mark on the Seat Post (if it is not
demarcated, to be safe you should allow for at least 4 inches of clearance below the seat
clamp.
• Ensure the saddle is adjusted to the correct height, installed correctly and all
bolts and attachments are firm and tight!
• Always ensure the seat post sleeve is inserted fully in the seat tube.
• If you notice any problems with the saddle or seat post, take the bike to the nearest qualified
bicycle mechanic to inspect and if necessary, fix or replace.
STEM, HANDLE BARS, ENDS AND GRIPS:
• Ensure that the stem and handlebars are properly fastened. Also look for any cracks or fatigue.
Alignment – make sure the saddle and handle stem are parallel to the bikes center line and clamped

33
tight enough so that you can’t twist them out of alignment. If you observe any issues with alignment,
you must have the bike inspected by a qualified bike mechanic prior to riding.
• Loose or damaged handlebar grips or extensions can cause you to lose control and fall. Unplugged
handlebars or extensions can cut you and cause serious injury. Make sure the handlebar grips are secure
and in good condition. If not, they should be replaced.
• Make sure the handlebar ends and extensions are plugged. If not, have your local bike shop plug them.
• Make sure the grips are tight enough that they do not twist.
• Your handlebar stem is a “quill” stem – to adjust, use the right size Alan key to adjust the height. Never
adjust above the recommended mark, or high enough to allow 4 inches of the stem to be left inside the
head tube.
• It is critical to tighten the Alan Key bolt according to torque table.
• Always check that the stem is tight and cannot move.
• A quill stems Minimum Insertion Mark must not be visible above the top of the headset. If the stem is
extended beyond the minimum insertion mark the stem my break or damage the fork’s steerer tube,
which could cause you to lose control and fall.
• On some bicycles, changing the stem or stem height can affect the tension of the front brake cable,
locking the front brake or creating excess cable slack which can make the front brake inoperable. IF the
front brake pads move in towards the wheel rim or out away from the wheel rim when the stem or stem
height is changed, the brakes must be correctly adjusted before you ride the bicycle.
WARNING- An Insufficiently Tightened Stem Clamp Bolt, handle clamp bolt or bar end extension
clamping bolt may compromise steering action, which could cause you to lose control and fall. To
determine whether the stem of your bike is tightened properly, place the front wheel of the
bicycle between your legs and attempt to twist the handlebars/stem assembly. If you are able to
twist the stem in relation to the front wheel or turn the handlebars in relation to the stem or turn
the bar end extension in relation to the handlebars, the bolts are insufficiently tightened. A bike
mechanic should set up your bike and ensure all bolts are tightened properly. Thereafter it is your
responsibly to check the clamp bolt each time you ride.
• Control Position Adjustments: The angle or the brake and shift control levers and their position on the
handlebars can be changed. Ask your local bike shop to make the adjustments for you. If you choose to
make your own control lever adjustment, be sure to re-tighten the clamp fasteners to the recommended
torque.
BRAKE REACH:
• This FREEFORCE bike has brake levers that have adjustments for tension and reach. If you have small
hands or find it difficult to reach the levers – ask your local bike shop to adjust the levers, change
34
the brake lever or do not ride the bike.
• The shorter the brake lever reach, the more critical it is to have correctly adjusted brakes, so that
full braking power can be applied within available brake lever travel. Brake lever travel that is
insufficient to apply full braking power can result in loss of control, which can result in serious injury
or death.
BOLTS AND NUTS:
• Check the condition of the bolts and nuts on your bike before EVERY RIDE – bolts and nuts will come
loose, so it is important to check the appropriate attachment of every nut and bolt.
• Correct tightening force on fasteners, nuts, bolts, and screws is extremely IMPORTANT – too little force,
and the fastener may not hold securely. Too much force, and the fastener can strip threads, stretch,
deform, weaken or break. Either way, incorrect tightening force can result in component failure
immediately or anytime in the future, which can cause you to lose control, fall or worse, lead to serious
injury or even death.
• To confirm that no component parts are loose, lift the front wheel off the ground by two or three inches,
then let it bounce on the ground. Ensure nothing sounds, feels or looks loose.
• Do a visual and tactical inspection of the whole bike. Any loose parts or accessories need to be secured
and checked by a qualified approved mechanic.
• To ensure that the many fasteners on your bicycle are correctly tightened, refer to the table showing
“Fastening Torque Specifications”.
• Correctly tightening a fastener requires a calibrated torque wrench. A professional bicycle mechanic
with a torque wrench should torque the fasteners on your bike.
• If you need to make an adjustment at home or in the field, we urge you to exercise care, and to have
the fasteners you worked on checked by a qualified mechanic before your next ride.
SADDLE:
• Saddle Position: Correct saddle adjustment is an important factor in getting the most performance and
comfort and safety from your bike.
• Ask your qualified bike mechanic to set the saddle for your optimal riding position and to show you
how to make this adjustment. If you choose to make your own saddle height adjustment, you should
go through the following steps:
Loosen the seat clamp.
Raise or lower the seat post in the seat tube (ensure the sleeve is all the way down and snug
inside the seat tube).
Make sure the saddle is straight fore and aft
Make sure the sleeve is all the way down and snug and level with top of set tube. Re-
tighten the seat post clamp to the recommended torque. Please refer to the torque table

35
or manufacturers’ instructions or get advice from you’re a qualified mechanic.
Once the saddle is at the correct height, make sure that the seat post does not project
from the frame beyond its “minimum insertion” or “Maximum extension mark” or no
more that 4 inches from the lowest point above end of seat tube.
• When making saddle angle adjustments with a single bolt saddle clamp, always check to make sure
that the serrations on the mating surfaces of the clamp are not worn. Worn serrations on the
clamp can allow the saddle to move, causing you to lose control and fall.
• Always tighten fasteners to the correct torque. Bolts that are too tight can stretch and deform. Bolts
that are too loose can move and fatigue. Either mistake can lead to a sudden failure of the bolt, causing
you to lose control and fall.
• NOTE: If your bike is equipped with a suspension seat post, the suspension mechanism may require
periodic service and maintenance. Ask a qualified mechanic for recommended service intervals for your
suspension seat post.
• Small changes in the saddle position can have a substantial effect on performance and comfort.
• To find your best saddle position, make only one adjustment at a time.
• After any saddle adjustment, be sure that the saddle adjustment mechanism is properly seated and
tightened before riding. A loose saddle clamp or set post can cause damage to the seat post or can
cause you to lose control and fall. A correctly tightened saddle adjusting mechanism will allow no saddle
movement in any direction. Periodically check to make sure that the saddle adjusting mechanism is
properly tightened.
CAUTION- Some claim that extended riding with a saddle which is incorrectly adjusted, or which
does not support your pelvic area correctly can cause short term or long-term injury to nerves and
blood vessels, or even impotence. If your saddle causes you pain, numbness or other discomfort,
listen to your body and stop riding until you see your local bike shop about the saddle adjustment
or a different saddle.
PEDALS:
• Ensure your pedals are tightened according to the torque chart – and ensure they have reflectors
on either side. Never allow your foot to hit the front wheel while it rests on the pedal.

36
• Make sure you wear correct shoes for the pedal you are using.
• Never use clip in shoes, slaps, or toe clips on electric bikes.
KICKSTAND:
• The "side-stand" style kickstand has a single leg that tips out to one side and allows the bike to lean against
it.
KEYS:
• The keys are used to lock the battery into place. Always make sure that the key position is in the "open"
setting when removing or inserting the battery.
• Move the key to the "lock" position to secure battery before operating bike. Riding the bike with the key
in the "open" position risks allowing the battery to slide out and damage the battery when dropped.
• Always remove the battery from bike when transporting on bike rack.
GENERAL:
• Check out the handling and responsiveness of the bike. If you have any questions or feel the bike is not
performing properly, consult a qualified bike mechanic.
PART II: Introduction to and Safe Use of Your Electric Components
WARNING: At no time should you make any modifications to your bikes’ electrical systems,
unless they are explicitly approved by the manufacturer in writing.
MOTOR:
FREEFORCE bikes are equipped with a high torque geared hub motor. The motor sits in the middle
of the rear wheel. The motor’s axil is held fixed in the rear drop out and its shell is spun by internal
electronics. The rotation of the hub is independent of any bicycle drive train components, including
the cranks, derailleur or cassette.
PEDAL ASSIST SENSOR (“PAS”):
FREEFORCE bikes are equipped with a Pedal Assist Sensor, which is installed on the bottom
bracket, and senses pedal crank rotation electronically.
THUMB THROTTLE:

37
FREEFORCE bikes are equipped with a thumb throttle, which is located on the left side of the
handlebar. Like on a motorcycle, a bike throttle is designed to let the user apply 0-100% of the
motor’s power at will. The throttle can act independently or in tandem with or without PAS.
BRAKE DISCONNECT SWITCH:
• FREEFORCE Bike brakes include an electronic disconnect switch which is activated when the lever is
depressed. Depressing this switch will disconnect the power to the motor.
• You should check the operation of your brake disconnect switch before every ride: While riding slowly in a
controlled environment (like your driveway), engage the motor then squeeze each brake separately. The
motor should lose power immediately and remain off as long as a brake lever is depressed.
CAUTION- The cable of your disconnect switch can be cut, come loose or malfunction – so always
perform a check before you ride. Be sure to depress both brakes in an emergency or when you
need the motor to disengage.
BATTERY:
Our FREEFORCE batteries are of the highest quality. They are equipped with Smart Chargers and
Smart BMS (battery management system) to ensure the battery will last as long as possible. You can
expect your battery to last at least 3 years, but closer to 5-8 years, depending on extent of use.
WARNING- Failure to properly use, charge, and store your battery as instructed will void the warranty
and could cause a hazardous situation. Before using your battery for the first time, read this section of the
manual in its entirety.
If you have any questions about your battery or its usage, please contact the FREEFORCE team at
888-984-2762 or [email protected] for additional instructions and guidance.
WHAT TO DO WHEN YOU FIRST GET YOUR NEW BATTERY: • Batteries are not shipped with a full charge. You should charge your battery for at least 4-5 hours
with the standard charger included. • The battery can be charged on or off the bike. • The rated output capacity of the battery is measured at 77F (25C). Any variations in this temperature
will alter the performance of the battery. Keep your battery away from high temperatures; heat will reduce overall battery life and run time.

38
SAFETY GUIDELINES FOR CHARGING: • Charge your bike indoors whenever possible. Charge your battery during the day in a room which has
a smoke or fire detector. Do not charge in your bedroom. • During the charging process, place the battery on a non-flammable surface or leave in the main
sleeve. • Charge in a well-ventilated area. Keep away from flames and sparks. • Avoid any contact with water or other fluids while charging. If the battery, charger or any
connections become wet, immediately unplug the charger and thoroughly dry all components. • Never leave the battery charging overnight. • Unplug the charger and disconnect from the outlet when the battery is full. AFTER CHARGING:
• Disconnect the power cord from the outlet or from the back of the charger. • Disconnect the charge cord from the battery pack.
BATTERY AND CHARGER CARE: • Your Bike Battery comes standard with an external charger that will charge a fully depleted battery in 5-
6 hours. The indicator light on the charger will be red when battery is charging and will turn green when fully charged.
• Avoid subjecting the battery to high temperatures, such as directly under the sun, for prolonged periods of time. Recharge the battery before it becomes completely discharged. Completely discharging will reduce the numbers of recharging cycles during the battery's life and limit the capacity.
• Never store the battery in the discharged state. After much use, your battery's charge-holding capacity will decrease. If you find that your battery does not hold a sufficient charge, please contact us to order a replacement.
• When the battery will not be used for an extended period of time, charge it fully and recharge it every 3 months. Store it in a cool, dry place.
• Your battery is engineered with precision for high capacity and a long, useful life. Do not use it to power other electrical devices. Improper use of the battery will damage the battery and shorten its useful life and may cause fire or an explosion. If you experience unusual sounds or odors coming from the charger or the battery, unplug charger immediately and contact customer service.
TROUBLESHOOTING YOUR BATTERY:
• Does Not Illuminate: Make sure your wall socket is working. Check the charge power cord. If the
charger still does not work, it may need to be repaired or replaced. Do not attempt to open the
charger case. Even if the charger is unplugged, you could still be injured by an electrical shock.
• Flashes Red: Make sure the charger is fully plugged into the battery. Unplug the charger from the
wall and from the battery. Wait about 10 seconds, then connect to the battery, followed by the wall
outlet. If the indicator LED still flashes red, there may be a problem with the battery or the charger.

39
• Flashes Amber: The battery voltage is low, and the charger is attempting to raise it back to normal
voltage with a low current charge. Leave the charger connected to the battery. IF the indicator still
flashes amber after a few hours, the battery may be damaged beyond easy repair.
• Flashes amber, then immediately to solid green: No issue, the battery in fully charged.
BATTERY MAINTENANCE AND SAFETY:
• Improper use of the battery charger can cause a fire resulting in severe injury or death and property damage. Please review the following instructions and guidelines carefully to ensure safe battery use and maintenance.
• When you are not going to use your battery for several weeks, fully charge the battery prior to turning it off. Be sure to turn on and charge your battery every 3 months to ensure it never completely loses its charge.
• The battery will get hot to the touch when charging, which is normal; however, if you smell or see any smoke – turn the battery and charger off and unplug anything attached to the battery. Contact us for a replacement.
• After a ride, fully recharge your battery as soon as it has cooled to room temperature. If battery is left in a discharged condition it will deteriorate much faster than a fully charged battery.
• Never block the fan vent on the battery pack or external charger. This can cause overheating and fire.
• Protect the battery from water and other moisture at all times. Never submerge your bike or battery in water, or even spray battery with water.
• Keep riding in the rain to a minimum – no more than 5 minutes per day. • Never use the external charger for more than 12 hours. • Only use the external charger supplied with this bike – never ever plug on another charger. Even
if it is physically possible to connect another type of battery, it is dangerous (fire hazard) and may damage other components of the bike.
• DO NOT use this battery with any other vehicle or appliance. Use of this battery with any other product will void the warranty and may create a hazardous condition that could cause a fire, resulting in severe injury, death and/or property damage.
• Never disassemble the battery or open the battery case. There is a significant risk of electric shock and damage to the battery. This will also void the warranty.
• Never short-circuit the discharge terminals of the battery. A short circuit will damage the battery and could cause a fire resulting in severe injury death, and/or property damage. When handling the battery, be aware of conductive materials that may short the battery terminals such as coins, nails etc.
• Never crush or puncture the battery. A punctured or crushed battery could catch fire causing a fire or explosion with could lead to serious injury, death and/or property damage.
• Keep battery away from excessive heat (104 degrees F or higher) or open flames. Avoid long-term exposure to direct rays from the sun.
• Protect the battery from materials that may contaminate the charge port or the output port,

40
such as dirt and sand; the ports may be difficult or impossible to clean out. • Never subject the battery to intense physical shock or severe vibrations.
BATTERY TRANSPORT:
• Lithium Ion batteries are subject to many regulations and are often considered dangerous or hazardous
materials by carriers. Be sure to check for relevant laws and ask the carrier for approval prior to shipping
a lithium-ion battery or transporting it by air. BATTERY DISPOSAL:
• Be friendly to the environment. Be sure to recycle your old batteries at a local battery-recycle centre. Do not throw them in the garbage. Visit www.call3recycle.org for more information.
FUSE:
• The fuse is located on the bottom of the battery, between the charging port and the On/Off switch
• The fuse is designed to protect the battery. If the fuse blows, there will be no power to any of the
electrical components powered by the battery. You can replace the fuse with a standard automotive
40amp fuse or contact customer service at [email protected].
GEARS:
• Your Electric Bike comes with a geared motor. First gear is for easier and uphill pedaling, and the last
gear is for maximum speed on level or downhill terrain.
• Change gears only while pedaling.
• The rear wheel contains eight chain sprockets. When the chain is around the largest sprocket, you
are in 1st gear, or the lowest gear. The high gear will have the derailleur positioned so that the chain
is directed around the smallest gear.
• Every position on the gear selector should cause a gear change
• Adjustments require fine tuning and should only be made by a qualified technician.
• Avoid changing gears very rapidly from first gear to the last gear, or vice versa. If you change multiple
gears too quickly, the chain may come off the front sprocket.
APPEARANCE AND CARE Periodically clean your FREEFORCE bike with a damp cloth. Don’t spray the bike with a water hose to avoid
electrical issues. Store your Electric Bike in a dry sheltered area away from the direct sunlight and wet or
damp environment. It is also recommended to apply chain lube (such as Tri-Flow or ProLink) to the
drivetrain of your bike when you clean it or wipe it down to keep it in good running condition.

41
IF YOU HAVE AN ACCIDENT, DROP YOUR BIKE OR IT FALLS OVER Should you have an accident, drop your bike or it falls over, your bike is unsafe to ride until you follow the
instructions included in this section. Failure to follow these instructions could lead to component or bike
operation failure. This could lead to serious injury or death.
1. Check the rechargeable battery. If the rechargeable battery is no longer properly in its holder or
shows any damage, do not use your bike any longer, at least not in assistance mode. Switch off
the motor and the battery separately, if necessary. Damage to the outer housing of the
rechargeable battery can result in the entry of water or moisture, which can lead to a sudden
failure of the electric assistance, a short circuit or electrical shocks. The battery could catch fire or
even explode!
2. Remove the battery before performing any additional service, inspection, or maintenance on your
electric bike. Failure to remove the battery could lead to the bicycle turning on unexpectedly,
causing serious damage or injury. If repairs to your bike require the battery to be installed,
position the bike so that if the wheel, chain or other drivetrain components begin moving
unexpectedly, they will not be in a position to cause injury or damage
3. Read, understand and comply with the drive system user manual. Do not disassemble or
attempt to service components unless you have been advised how to do so, explicitly in
writing, by the manufacturer.
4. Check whether the wheels are still firmly fixed in the dropouts and whether the rims are still
centered with respect to the frame or fork. Spin the wheels and observe the gaps between the
frame and tire and between the brake pads and the rim sides.
5. If the width of the gap has changed markedly and you have no way to true the wheel at your
location, you will need to release the rim brake pads without touching them. Please note that in
this case the brakes may not act as powerfully as you are used to.
6. Check the handlebars and stems to confirm that neither are bent or broken, and that they are
level and upright. Make sure the stem is firmly fixed on the fork by trying to turn the handlebars
relative to the front wheel. Briefly lean on the brake levers to make sure the handlebars are firmly
fixed in the stem.
7. Realign the components, if necessary and carefully tighten the bolts to ensure reliable clamping
of the components. The maximum torque values are printed directly on the components and/or
specified in the enclosed operating instructions. If neither are available, call a qualified bike
mechanic for assistance.
8. Check whether the chain still runs on the chain rings and sprockets. If your bike fell over onto the
chain side, check that the gears function properly. Ask someone to lift the bike by the saddle and
carefully shift through all the gears. Make sure the rear derailleur does not get too close to the
spokes as the chain climbs onto the larger sprockets If the rear derailleur or the
dropout/derailleur hanger is bent, the rear derailleur may collide with the spokes. This can result

42
in damage to the rear derailleur, the rear wheel and/or the frame. Check the function of the
front derailleur. A displaced front derailleur can throw off the chain, which will suddenly
interrupt the drive of the bike, potentially leading to an accident, injury or death.
9. Confirm the saddle is not out of alignment, using the top tube or the bottom bracket shell as a
reference. If necessary open the clamp, realign the saddle and re-tighten the clamp.
10. Let your bike bounce on the ground from a low height. If there is any rattling, see where it
comes from. Check the bearings, the bolts and the proper searing of the battery and the
connectors, as necessary.
11. Take a good look at the whole bike to detect any deformation, color changes, cracks. Ride back
very carefully or walk your bike to a professional mechanic and have the mechanic check the
bike and help resolve any issues.
12. If you have had an accident and are unsure whether your bike will function properly, leave
your bike rather than risk riding and endangering yourself and others.
13. If you do ride your bike, do not accelerate or brake hard until the bike has been checked by a bike
mechanic.
14. Deformed components, especially those made of aluminium, can break without previous
warning. If this occurs, they may not be repaired, i.e. straightening, as the imminent risk of
breakage will remain. This applies in particular to the fork, the handlebars, the stem, the cranks,
the seat posts and the pedals. When in doubt, you should replace these components.

43
TROUBLESHOOTING
If your bike is not working, check the Quick Disconnect Fittings to make sure they did not come loose or
unplugged.
There are 5 total Quick Disconnect Fittings to check: 1. Throttle –Yellow
2. Left Brake Lever – Red
3. Right Brake Lever – Red
4. Motor
5. LED Meter – Green
• Unwrap the black spiral wire covering until the Quick Disconnect Fitting is exposed. Unplug and
re-plug the Quick Disconnect Fitting(s).
• Make sure the battery is inserted fully into the bicycle. If it is not, the bicycle will receive no
power causing all of the electronics to not turn on.
• For any additional troubleshooting help, contact your local us or a qualified bike mechanic.
ELECTRIC BIKE FAQS
Q. How long does it take to fully charge the battery? A. Depends on the state of discharge, but around 5-6 hours if completely discharged. For the internal
charger 12-14 hours Q. How much does it cost to charge a FREEFORCE Bike? A. The average cost per full charge is about 10 cents per charge. If you charge the battery every single day
for a year, it would cost you about $35 per year. Q. Can I ride up hills and against strong headwinds on my FREEFORCE Bike? A. Yes. One of the main advantages of cycling on an electric bike is that it literally flattens hills and increases your average speed when tackling inclines and headwinds. If you provide a reasonable amount of effort, you should be able to tackle anything from a 1 in 10 (10%) gradient up to a 1 in 7 (14%) gradient. You will be amazed at the relative ease that your new bike can tackle some of the most arduous journeys. Q. Do I need a driver's license, insurance or registration? A. No, you don’t. According to Federal Law, electric bikes that are under 750 watts are classified as bicycles. For all intents and purposes, it's simply a bicycle that requires very little pedalling to travel 20 MPH (32 Km/H), saving you time and hassle. The law does require the use of a helmet and riders to be at least 16 years old. Check your local state laws for requirements.

44
Q. Do I need to pedal an electric bike? A. No, but it helps to prolong battery life. The motor on our bikes is both throttle and pedal assist controlled, allowing you to decide how much power your desire. Have you ever tried to cycle when speeding downhill on your normal bicycle? It's just like that, the motor is propelling you faster than you're cycling so there is pretty much no resistance, and it’s merely a formality! Q. What happens when I use the brakes under powered assistance? A. All our bikes are equipped with brake levers that have a built-in safety switch that automatically cuts off the motor power under normal braking conditions. This not only ensures a safe un-powered stopping feature, but also protects the motor under braking conditions so that it isn’t working against the brakes. Q. How far will my FREEFORCE Bike take me? A. This all depends on a few factors. Cycling with pedal assist along a straight road under normal conditions, the standard battery should last about 15-30 miles. Cycling up steep hills will obviously take more energy out of the battery and factors such as road surface, wind resistance, weight of the rider and tire pressure will affect your range. Longer range battery is also available. Q. What happens if I get a flat tire? A. The tires on our bikes are the same as conventional bicycles. Simply replace the tube with a tube of the
right size and inflate it. No special tires or parts will be needed. Q. How do I know when the battery is low? A. The bicycles have easily visible indicators located on the meters that show the amount of juice left. If it is getting low and you don’t think you will make it to your destination, you can switch off your motor and keep it just for the difficult bits. Q. Do I have to wait for the battery to empty before I charge it? A. No. The batteries we use are Lithium-ion batteries which do not suffer from memory effect. This means that there is no need to discharge a battery completely before you recharge it again. You can partially recharge the battery at any time without reducing its voltage or lifespan. We recommend recharging the battery after every use, regardless of how far you rode. Q. Can I put a child's trailer on my FREEFORCE Bike? A. Yes, you can certainly add a trailer to your bike. We suggest using one that hooks into the frame rather
than the axle.

45
Q. Can I put an FREEFORCE Bike on a vehicle bike rack? A. Yes, just make sure that the bike rack can hold the weight of the bike. We advise taking the battery off
to make it easier and lighter to lift and keep the battery safe.
THE LIFESPAN OF YOUR ELECTRIC BIKE AND ITS COMPONENTS
Nothing lasts forever, including your electric bike
• When the useful life of your bike or its components is over, continued use is hazardous. • Every bicycle and its components parts have a finite, limited useful life. The length of that life will
vary with the construction and materials used in the frame and components; the maintenance and care the frame and components receive over their life; and the type and amount of use to which the frame components are subjected.
• Non-authorized uses, including competitive events, trick riding, riding on severe or off-road terrain, riding in severe climates, riding with heavy loads, commercial activities and other types of non-standard use can dramatically shorten the life of the frame and components. Any one or a combination of these conditions may result in an unpredictable failure.
Perspective: • Today’s high performance bicycles require frequent and careful inspection and service. In this
section we explain some underlying material science basics and how they relate to your bicycle. We provide important, basic guidelines on how to maintain and inspect your bicycle. We cannot teach you everything you need to know to properly inspect and service your bicycle. That is why we repeatedly urge you to take your bicycle to your local bike shop for professional care and attention.
• You, the rider/owner, have control and knowledge of how often you use your bike, how hard you use it and where you use it. Because we cannot track your use, you must take responsibility for periodically bringing your bike to your local bike shop for inspection and service. A qualified bike mechanic will help you decide the frequency of inspection and service appropriate for as a result of your particular use your bike.

46
WARRANTY INFORMATION Your warranty is contained on the following pages. Please be sure to read the warranty in its entirety, and
return the Warranty Registration Form located on the last page of this Manual.
Like any mechanical device, a bicycle and its components are subject to wear and stress. Different
materials and mechanisms wear or fatigue from stress at different rates and have different life cycles. If a
component life cycle is exceeded, the component can suddenly and catastrophically fail, causing serious
injury or death to the rider. Scratched, cracks, fraying and discoloration are signs of stress-caused fatigue
and indicate that a part is at the end of its useful life and needs to be replaced. While the materials and
workmanship of your bicycle or of individual components may be covered by a warranty for a specific
period of time by the manufacturer, this is no guarantee that the product will last the term of the
warranty. Product life is often related to the kind of riding you do and to the treatment to which you
submit the bicycle and the standard of maintenance and care you have for your bike. The bicycle’s
warranty is not meant to suggest that the bicycle cannot be broken or will last forever. It only means that
the bicycle is covered subject to the terms of the warranty.
LIMITED WARRANTY One Year Limited Warranty Bicycle Components
FREEFORCE warranties that all new FREEFORCE bicycles and components therein are warranted to the
original retail purchaser ("Purchaser") against manufacturing defects in materials and/or workmanship for
a period of one (1) year from the date of original retail purchase.
Three Year Limited Warranty Battery
FREEFORCE warrants to the original purchaser that the battery is free of defects in material and
workmanship for 36 months. The defective product will be replaced or repaired if met under certain pre-
conditions. The first 12 months of the warranty is covered free of charge, the remaining 24 months is
covered under a pro-rated cost. The warranty period for a battery is calculated from the original battery
purchase date. The original receipt of purchase is required to establish proof of purchase and warranty date
and must be provided to FREEFORCE for all warranty claims.
The original sale receipt must be maintained for any further claims. All replacement batteries will be
warranted for the balance of the original warranty period.

47
The Purchaser is responsible for paying all of the following costs associated with the replacement: labor for
removal or installation; applicable taxes; and any shipping or transportation costs incurred in returning the
battery to FREEFORCE for evaluation.
LIMITATIONS ON GUARANTEE WARRANTY: THIS IS FREEFORCE COMPANY’S EXCLUSIVE WARRANTY, NO PARTY IS GRANTED EXPRESS OR IMPLIED
AUTHORITY TO CHANGE OR ANNUL THIS WARRANTY IN ANY MANNER, IMPLIED WARRANTIES INCLUDING
THAT OF MERCHANTABILITY AND FITNESS FOR A PARTICULAR PURPOSE ARE EXPRESSLY LIMITED IN
DURATION TO THE DURATION OF THIS WARRANTY, FREEFORCE DISCLAIMS ANY LIABILITY FOR SPECIAL,
INCIDENTAL OR CONSEQUENTIAL DAMAGES.
If you purchase your battery in a state/province that disallows limitations on implied warranty, or
exclusion or limitation of special, incidental or consequential damages, the limitation and exclusions
stated above may not apply to you. This warranty gives you special legal rights. You may also have other
rights which vary from state/province to state/province. This warranty is extended only to the original
retail purchaser.
TERMS OF LIMITED WARRANTY The warranty becomes effective on the date of the original retail purchase. The warranty is not meant to
suggest or imply that the Bikes cannot be broken or will last forever. It does mean that the Bicycle is covered
subject to the terms of the warranty. This warranty applies only to the original Purchaser of the FREEFORCE
Bicycle and is not transferrable to subsequent owners or any other party. This warranty is void if the Bicycle
is subjected to abuse, neglect, improper repair, improper maintenance, alteration, modification, an
accident or other abnormal, excessive or, improper use, at the sole discretion of FREEFORCE. During the
duration of this warranty, FREEFORCE, at their cost, will either repair the Bicycle of Bicycle component(s),
or at FREEFORCE’s sole discretion, will replace any defective Bicycle or component(s). with the same or
equivalent component(s). The foregoing warranties are in lieu of and exclude all other warranties not
expressly set forth herein, whether express or implied by operation of law or otherwise, including, but not
limited to any warranties of merchantability or fitness for a particular purpose. In no event shall FREEFORCE
be liable for incidental, consequential or punitive damages arising from use or unavailability of the Bicycle
or component(s) in any manner, including, without limitation, damages for personal injury, property
damage, or economic losses, whether based on contract, warranty, negligence, product liability, or any
other theory. FREEFORCE 's liability hereunder is expressly limited to the repair or replacement of Bikes or
component(s) or at FREEFORCE 's sole discretion, to the net amount paid to the original retail Purchaser. If
the original retail Purchaser elects to repair a defective Bicycle or component(s) himself or use the services
of someone other than FREEFORCE (or its designee) to repair the Bicycle or if Purchaser uses a replacement
part not authorized by FREEFORCE, FREEFORCE will not be liable for any damage, failure or loss caused by
48
the use of such unauthorized service or parts. Warranty terms, service availability, and service response
times may vary from state to state, country or region. Warranty service response time is subject to change
due to local parts availability. Your FREEFORCE authorized service provider can provide you with additional
details. FREEFORCE will not alter form or function of this bicycle to make it operate in a country for which
it was never intended to function for legal or regulatory reasons. FREEFORCE is not responsible for any
tariffs or duties that may be incurred in transferring the products. Transfer of the products may be covered
by export controls issues by the Unites States or other governments.
THIS WARRANTY IS VOID IN ITS ENTIRETY WITH ANY MODIFICATION OF THE FRAME, FORK, OR ANY
COMPONENTS. THIS WARRANTY IS LIMITED TO THE REPAIR OR REPLACEMENT OF A DEFECTIVE ITEM AND
IS THE SOLE REMEDY OF THE WARRANTY. THIS WARRANTY EXTENDS FROM THE DATE OF PURCHASE,
APPLIES ONLY TO THE ORIGINAL OWNER AND IS NOT TRANSFERRABLE.
THIS WARRANTY DOES NOT COVER:
• Normal wear and tear
• Damage or failure from abuse, neglect, misuse, or accident
• Improper assembly and/or follow-up maintenance
• Damage from stunt riding, jumping, acrobatics, or similar activities or any activity that is not
consistent with the intended use of the bicycle
• Damages resulting from failure to follow instructions for the Use and Warnings as provided in the
Owner’s Manual
• Damages resulting from improper care or use of the battery or charger
• Installation of components, parts, or accessories that are not originally intended for or compatible
with the FREEFORCE bicycle as sold
• Under performance of the battery after being fully charged and discharged more than 700 times
All warranties are void if the Bicycle is used for any purpose other than the reasonable intended use of the
Bicycle. Additionally, this warranty does not cover damage associated with commercial use.
CONSUMER RIGHTS:
This limited warranty gives the consumer specific legal rights. The consumer may also have other legal rights,
which vary from state to state or province to province. This warranty does not affect the statutory rights of
the consumer. Some states and countries do not allow the exclusion or limitation of incidental or
consequential damages or warranties, so some of the above limitations or exclusions may not apply to you.

49
PLEASE REGISTER YOUR ELECTRIC BIKE BY SUBMITTING THIS FORM TO: [email protected]
YOU MUST REGISTER YOUR ELECTRIC BIKE WITH FREEFORCE WITHIN 30 DAYS OF PURCHASE FOR
WARRANTY TO BE VALID
FREEFORCE WARRANTY INFORMATION:
Bicycle Serial Number6:_________________________
Battery Serial Number7: _________________________
Model: ______________________________________
Color: _______________________________________
Date of Purchase: ______________________________
Website Name: ________________________________
6 BICYCLE SERIAL NUMBER IS ENGRAVED UNDERNEATH THE CRANK OF YOUR FREEFORCE BICYCLE
7 BATTERY SERIAL NUMBER IS ON THE BOTTOM OF THE BATTERY OR NEXT TO THE KEY SLOT BELOW THE
BARCODE
V20210401