elastichost server admin i chatchai j 2013-01-28
TRANSCRIPT

Linux Server Admin
ElastichostServer Admin I
Chatchai J
2013-01-28

First login
● ใช้ vncviewer
$ vncviewer $ELASTICHOSTSIP● password: *******● login: root
– no password
● ใช้ secureshell
$ ssh toor@$ELASTICHOSTSIP● password: ********

initial setup
● set root password
# passwd root
● disabled 'toor' account
# passwd l toor
● create admin account# useradd m G sudo s /bin/bash c “Admin” cj
# passwd cj
# aptget install sudo
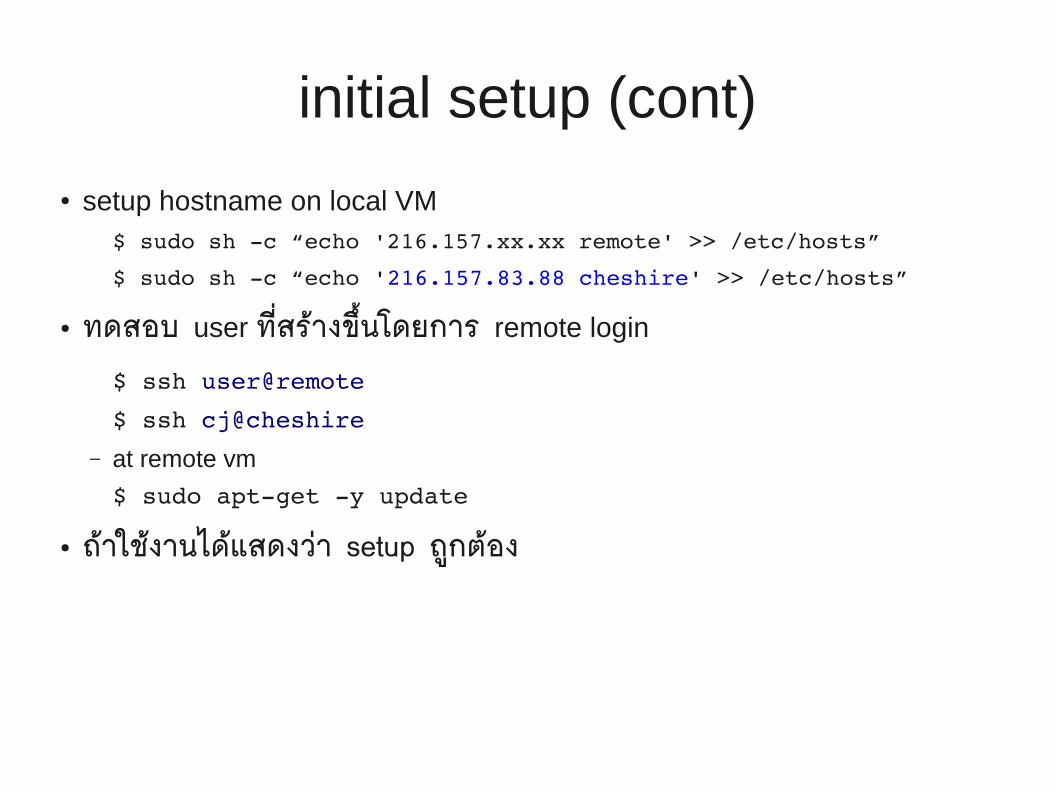
initial setup (cont)
● setup hostname on local VM$ sudo sh c “echo '216.157.xx.xx remote' >> /etc/hosts”
$ sudo sh c “echo '216.157.83.88 cheshire' >> /etc/hosts”
● ทดสอบ user ท่ีสร้างข้ึนโดยการ remote login
$ ssh user@remote
$ ssh cj@cheshire
– at remote vm
$ sudo aptget y update
● ถ้าใชง้านได้แสดงว่า setup ถูกต้อง

Setup secure shell key
● เพื่อใหก้ารสง่คำาสั่งไปยัง remote server ทำาไดส้ะดวกมากขึ้น และ ไม่จำาเป็นตอ้งใช้ GUI (vncviewer)
● local – Linux VM ใช้ local:~$● remote – Elastichost VM ใช้ remote:~$local:~$ remote:~$
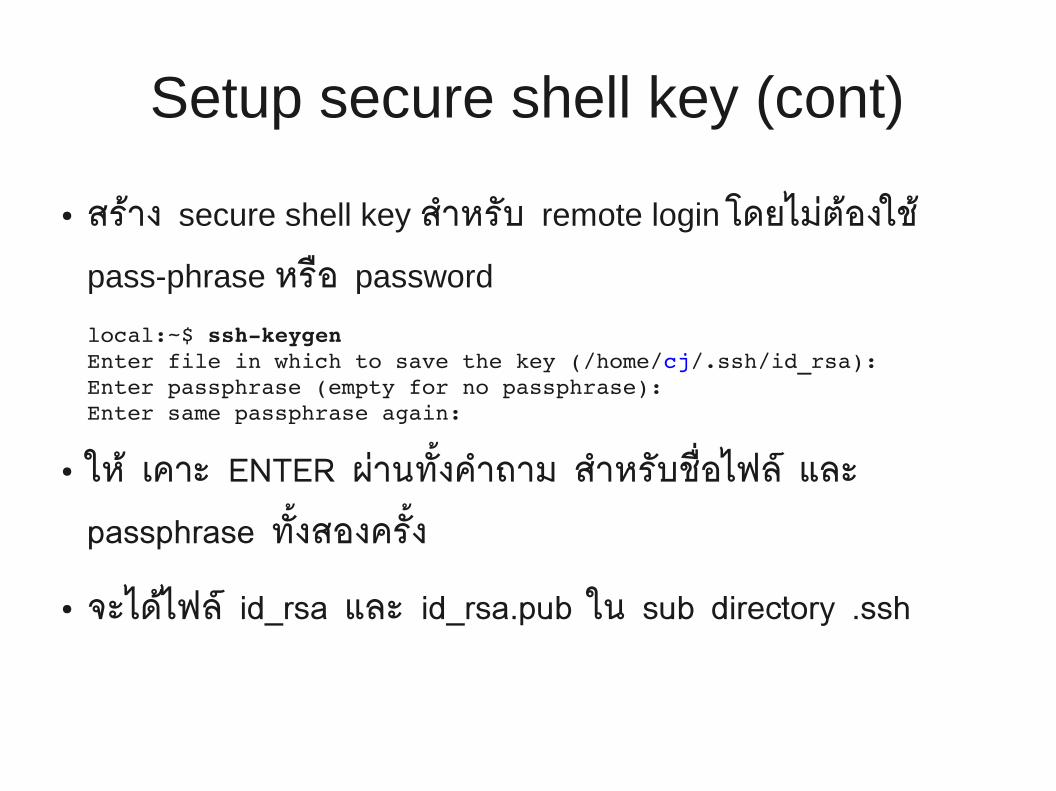
Setup secure shell key (cont)
● สร้าง secure shell key สำาหรับ remote login โดยไม่ต้องใช้ pass-phrase หรือ password
local:~$ sshkeygenEnter file in which to save the key (/home/cj/.ssh/id_rsa): Enter passphrase (empty for no passphrase): Enter same passphrase again:
● ให้ เคาะ ENTER ผ่านท้ังคำาถาม สำาหรับชื่อไฟล์ และ passphrase ท้ังสองครั้ง
● จะได้ไฟล์ id_rsa และ id_rsa.pub ใน sub directory .ssh

Setup secure shell key (cont)
● สง่ key ไปเก็บไว้ที ่remote host
local:~$ sshcopyid user@remote
user@remote's password:
● มี message เตือนให้ตรวจสอบไฟล์ ~/.ssh/authorized_keys บน remote host
● มันคือไฟล์เดียวกันกับ ~/.ssh/id_rsa.pub
● ลองเปรียบเทยีบโดยการใช้คำาสั่งlocal:~$ ssh user@remote cat .ssh/authorized_keyslocal:~$ cat .ssh/id_rsa.pub

Setup secure shell key (cont)
● ข้อสงัเกต: ตอนนี้เราสามารถ login ไปที่ remote
host และ execute คำาสั่งได้แลว้ โดยไม่ต้องป้อน password ใดๆ
● ใช้ความสามารถของ secure shell และใช ้private
key ~/.ssh/id_rsa
● ซึ่ง สะดวก แต ่อันตราย

Setup secure shell key (cont)
● สะดวก แต่ อันตราย● ใครก็ตาม ซึ่งมีไฟล์ id_rsa ของเรา สามารถใชสิ้ทธิของเรา ในการทำางานใดๆ บนเคร่ือง remote host ได้ โดยไม่จำาเป็นจะต้องรู้ password
● โดยเฉพาะถ้า กำาหนด sudo บางคำาส่ังแบบ NOPASSWD:
● วิธีการป้องกัน: เพิ่ม passphrase ใหก้ับ key ของเราlocal:~$ sshkeygen p

Setup secure shell key (cont)
● ปัญหา:
– ทุกคร้ังที่เรียกใช้คำาส่ังจะต้องป้อน passphrase
● WRONG – ถ้าใช้ gnome windows manager
● จริงเฉพาะใช้ text mode
– เหมือนกับตอนที่ไม่ได้ setup key
● เปลีย่นจาก password มาใช้ passphrase
● secure shell key ไมไ่ด้ช่วยอะไร?

Setup secure shell key (cont)
● ถ้าอยู่ใน GUI ให้ logout และ login ใหม่● Gnome จะมี gnome-keyring-daemon และ seahorse Encryption
Key Manager คอยจัดการ key ให้● Menu “System” ->”Preferences”->”Passwords and Encryption Keys”
● เลือก Tab “Personal Keys”
● สามารถ Export, Copy, Delete, Change Comment/Password ได้

keychain
● ถ้าใช้ terminal console และ remote login หรือ เครื่องท่ีใช้ในการจัดการ ไม่ได้ run gnome โดยตรง
● Notebook →Admin PC → Server● GUI (gnome) → text terminal → text terminal
● สามารถใช้ keychain สำาหรับทำางานแบบเดียวกันกับ Seahorse

keychain (cont)
● ติดตั้ง keychain
local:~$ sudo aptget install keychain sshaskpass
● เพ่ิมลงไปใน .bashrc
if [ x /usr/bin/keychain ]; then keychain id_rsa [ z "$HOSTNAME" ] && HOSTNAME=`uname n` [ f $HOME/.keychain/$HOSTNAMEsh ] && \ . $HOME/.keychain/$HOSTNAMEshfi

Setup secure shell key (cont)
● หลังจากใช้งาน keychain หรือ seahorse กจ็ะทำาให้สามารถ ป้อน passphrase เพียงครั้งเดียว ก็จะใช ้secure shell key ในครั้งต่อๆไปได้
● การใช้ secure shell key ยังมีความสามารถอื่นๆ อีกมาก เชน่ ระบวุ่าใช ้key นี้ run เฉพาะคำาสั่งนี้ โดยสง่มาจาก host นี้เท่านั้น

sync config using rsync
● เพ่ือความสะดวกในการแก้ไข / backup config
– sync config จาก remote → local
– ใช้ rsync
– จะต้องมี rsync ท้ังท่ี local และ remote
local:~$ sudo aptget install rsync
local:~$ ssh t remote sudo aptget install rsync

sync config (cont)
● First Synclocal:~$ sudo sulocal:~# cd; mkdir REMOTE; cd REMOTElocal:~/REMOTE# rsync avuP root@remote:/etc/ etc
lsa:~$ sudo sulsa:~# cd; mkdir cheshire; cd cheshirelsa:~/cheshire# rsync avuP root@cheshire:/etc/ etc

sync config (cont)
● แก้ไขข้อมูล● sync กลับ
local:~/REMOTE# rsync avuP etc root@remote:/
lsa:~/cheshire# rsync avuP etc root@cheshire:/
● จะมีเฉพาะไฟล์ที่ถูกแก้ไขเทา่นั้น ที่ถูกส่งกลับไป
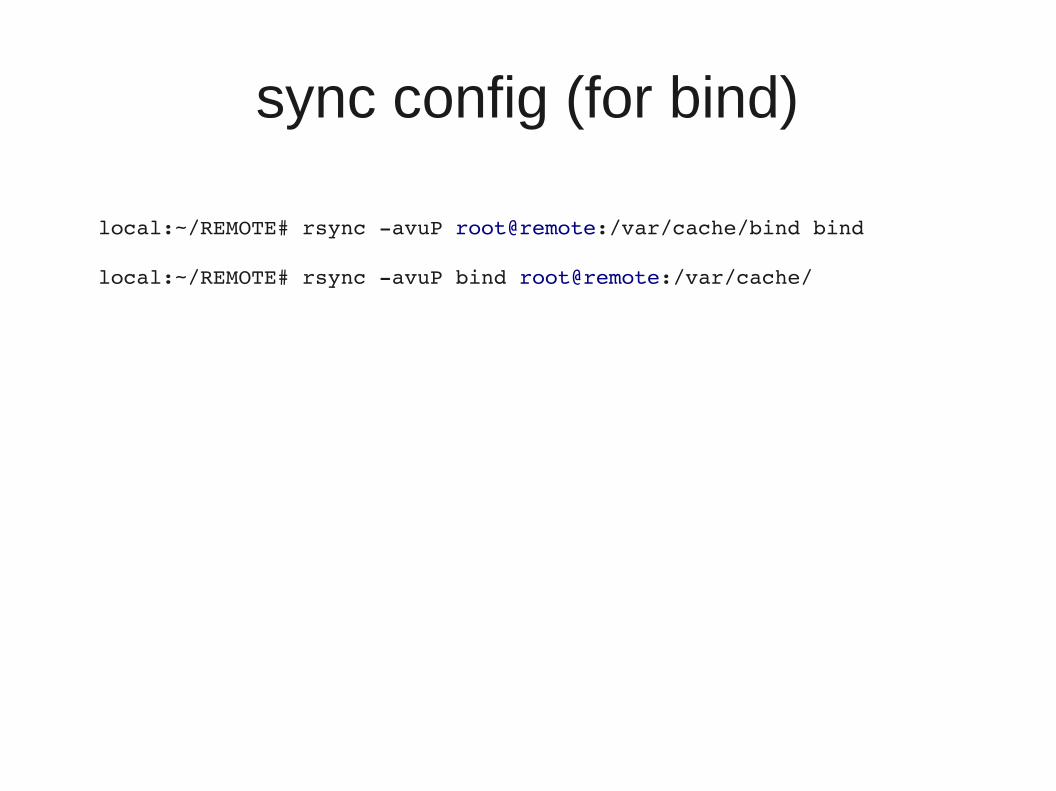
sync config (for bind)
local:~/REMOTE# rsync avuP root@remote:/var/cache/bind bind
local:~/REMOTE# rsync avuP bind root@remote:/var/cache/

sync config (deleted files)
● rsync --delete --delete-after
● อ่าน manual page ของ rsync สำาหรับ option
อื่นๆ● เป็นเครื่องมือท่ีมีประโยชน์มาก

sync config
● Note:
– ทุกคร้ัง ก่อนท่ีจะแก้ไข config ท่ี local copy
– ให้ sync config จาก remote server มาก่อนเสมอ– แกไ้ขแลว้ คอ่ย sync กลบัไป
● YOU HAVE BEEN WARNED
● การติดตั้ง/update package จะมีการแก้ไข config ที่ตัว server เพราะฉะนั้น ให้ถือว่า ข้อมูลที่ server มีความทันสมัยกว่า เสมอ
● ยกเว้นกรณีที่ ทำาผิดพลาดบน server (เช่น ลบไฟล์ผิด)

Elastic VM Setup
● /etc/hostname– cheshire.cheshirecat2012.net
– ใชช้ื่อเฉพาะ (cheshire) ไม่ควรใช้ชื่อ ฟังก์ชนั/หนา้ที่ (www, ns, smtp,
…)
– หนา้ที่สามารถย้ายไปอยู่ server ตวัอื่นได ้เมื่อเราม ีserver ใหใ้ช้มากขึ้น
● /etc/apt/sources.list– default point to ftp.uk.debian.org
– elastichosts อยู่ใน US => ftp.us.debian.org

VM Setup (cont)
● ติดตั้ง pacakge ท่ีต้องการใช้งานบน server
local:~$ ssh t remote sudo aptget install tmux
● เป็นต้น
