edq item setup training
TRANSCRIPT

EDQ Application User Manual
April 2014
because data matters
Page 2
• Enterprise Data Quality (EDQ) is the application that serves as the Item Master repository and book of record for item data.
• The EDQ Vendor Portal is where all Vendors will create and maintenance products that are agreed upon by the TRU Buyer.
• Through the use of work queues (stateflows), this application is used to initiate and enrich new and existing items which comprise the TRU catalog.
Intro to EDQ

Page 3
Vendor Extranet The link to the EDQ application is located on the homepage of the Vendor Extranet under the Application Links section on the middle left side of the screen.
1
Page 4
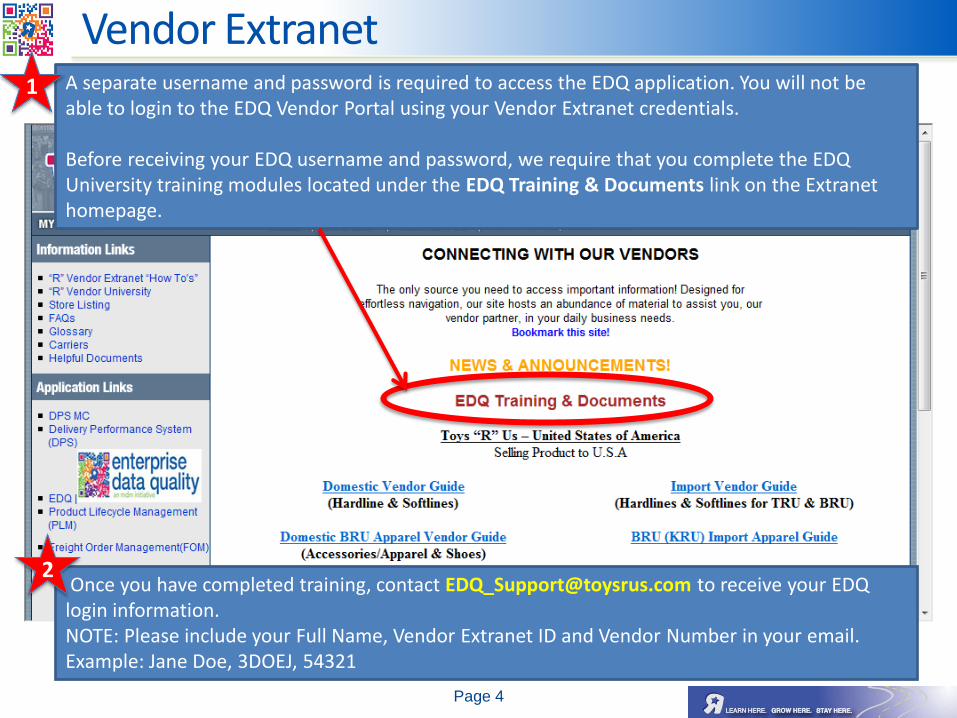
Vendor Extranet A separate username and password is required to access the EDQ application. You will not be able to login to the EDQ Vendor Portal using your Vendor Extranet credentials. Before receiving your EDQ username and password, we require that you complete the EDQ University training modules located under the EDQ Training & Documents link on the Extranet homepage.
Once you have completed training, contact [email protected] to receive your EDQ login information. NOTE: Please include your Full Name, Vendor Extranet ID and Vendor Number in your email. Example: Jane Doe, 3DOEJ, 54321
1
2
Page 5
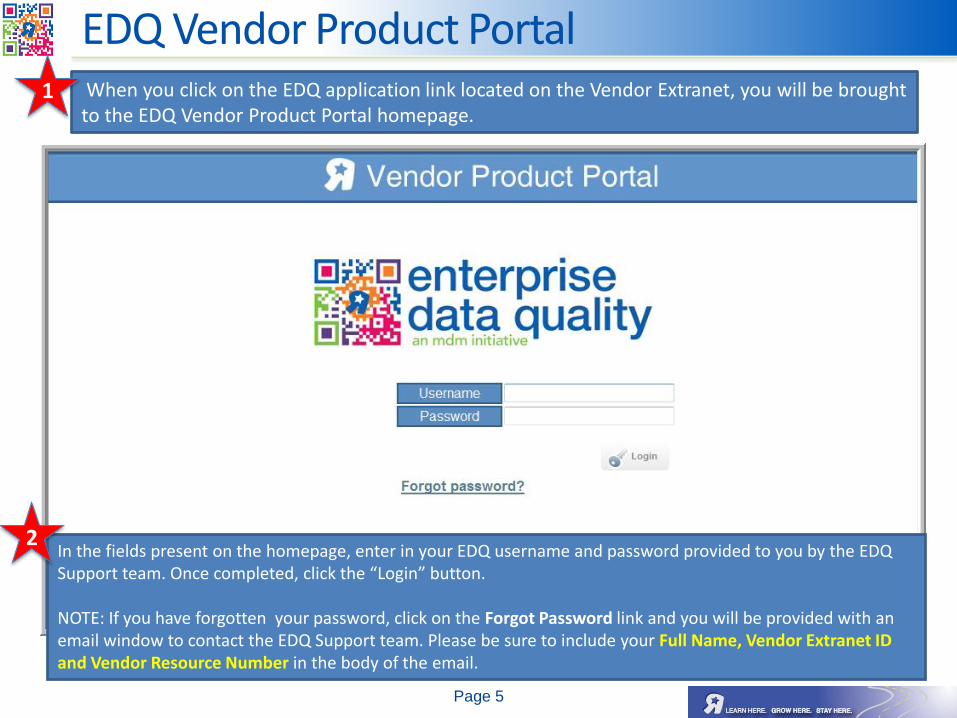
EDQ Vendor Product Portal When you click on the EDQ application link located on the Vendor Extranet, you will be brought to the EDQ Vendor Product Portal homepage.
In the fields present on the homepage, enter in your EDQ username and password provided to you by the EDQ Support team. Once completed, click the “Login” button. NOTE: If you have forgotten your password, click on the Forgot Password link and you will be provided with an email window to contact the EDQ Support team. Please be sure to include your Full Name, Vendor Extranet ID and Vendor Resource Number in the body of the email.
1
2
Page 6
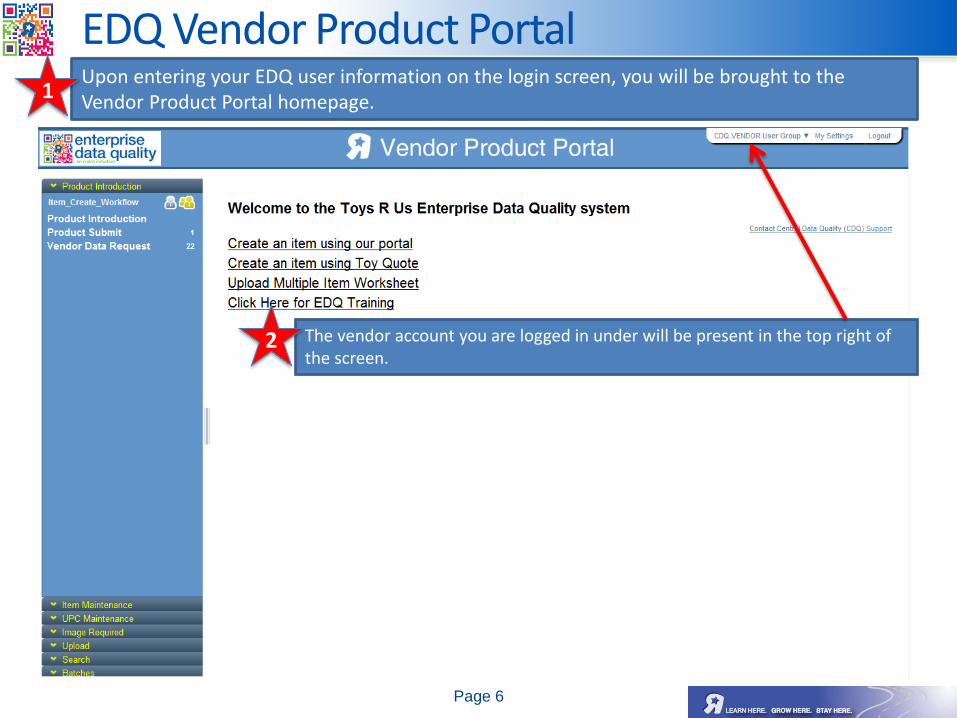
EDQ Vendor Product Portal Upon entering your EDQ user information on the login screen, you will be brought to the Vendor Product Portal homepage. 1
The vendor account you are logged in under will be present in the top right of the screen.
2
Page 7
EDQ Vendor Product Portal
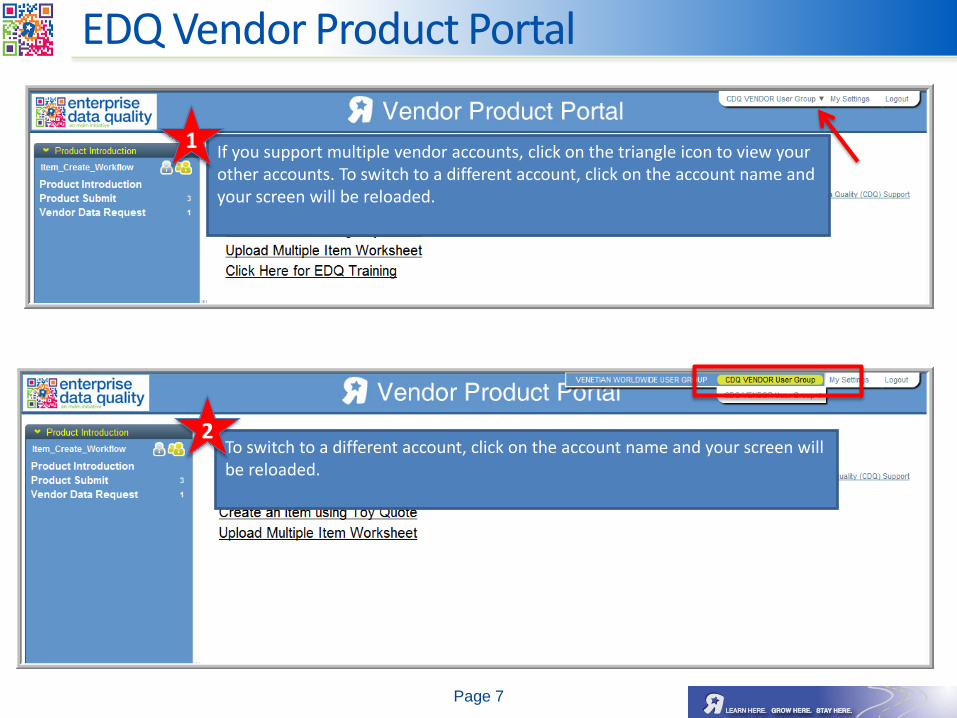
If you support multiple vendor accounts, click on the triangle icon to view your other accounts. To switch to a different account, click on the account name and your screen will be reloaded.
1
To switch to a different account, click on the account name and your screen will be reloaded.
2

Page 8
EDQ Vendor Product Portal All EDQ menus will be located in the left navigation bar. From here you will be able to access all the necessary screens needed for Item Creation and Item Maintenance. 1
All EDQ menus will be located in the left navigation bar: 1. Product Introduction: Menu used for new item creation and requests for
additional information. 2. Item Maintenance: Menu used to initiate an Item Maintenance Request and
review outstanding requests. 3. UPC Maintenance: Menu where all Pending UPC changes submitted through
the Item Maintenance process are held until reviewed by the TRU internal team.
4. Image Required: Menu where all UPCs Pending Image upload are held until Images have been uploaded and submitted to TRU for internal review.
5. Upload: Menu used to upload Multiple Item Worksheets and Quotesheets. 6. Search: Menu used to search all existing items within your vendor account. 7. Batches: Menu used to review upload and download statuses.
Page 9
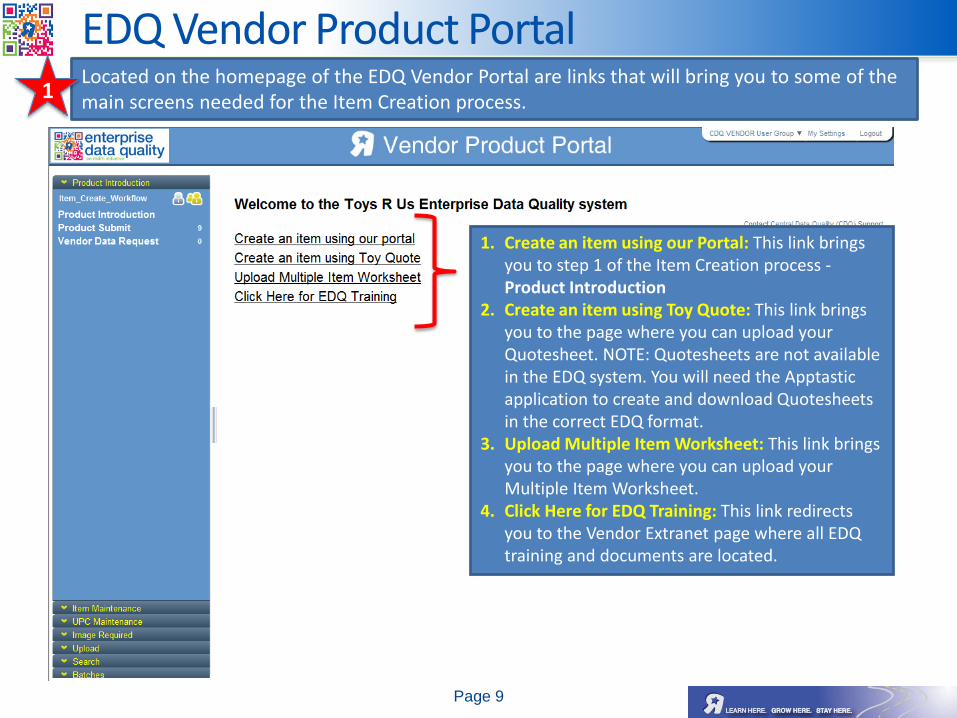
EDQ Vendor Product Portal Located on the homepage of the EDQ Vendor Portal are links that will bring you to some of the main screens needed for the Item Creation process. 1
1. Create an item using our Portal: This link brings you to step 1 of the Item Creation process - Product Introduction
2. Create an item using Toy Quote: This link brings you to the page where you can upload your Quotesheet. NOTE: Quotesheets are not available in the EDQ system. You will need the Apptastic application to create and download Quotesheets in the correct EDQ format.
3. Upload Multiple Item Worksheet: This link brings you to the page where you can upload your Multiple Item Worksheet.
4. Click Here for EDQ Training: This link redirects you to the Vendor Extranet page where all EDQ training and documents are located.

Page 10
Vendor Portal: Product Introduction There are 3 methods of item creation available in the EDQ Application: 1. Single Item Entry: Creating new items one at a time 2. Multiple Item Worksheet: Spreadsheet downloadable in the system used to create
multiple items at once 3. Quotesheet: Creating new items using the Apptastic Quotesheet
a. To create an item using the Single Item Entry method, begin by clicking on Product Introduction. b. You can also use the Create an item using our portal link on the main screen.
1
2
A
B

Page 11
EDQ Vendor Product Portal 1 The item creation process in EDQ contains two steps: Product Introduction and Product Submit.
Begin the Product Introduction process by completing all required fields on the Single Item Entry tab. NOTE: Required fields are italicized and marked with asterisks.
Once you have populated all required fields, click on the Create Product button at the bottom of the screen. Note: this button will not become clickable until all required fields have been populated. 2
Page 12
EDQ Vendor Product Portal
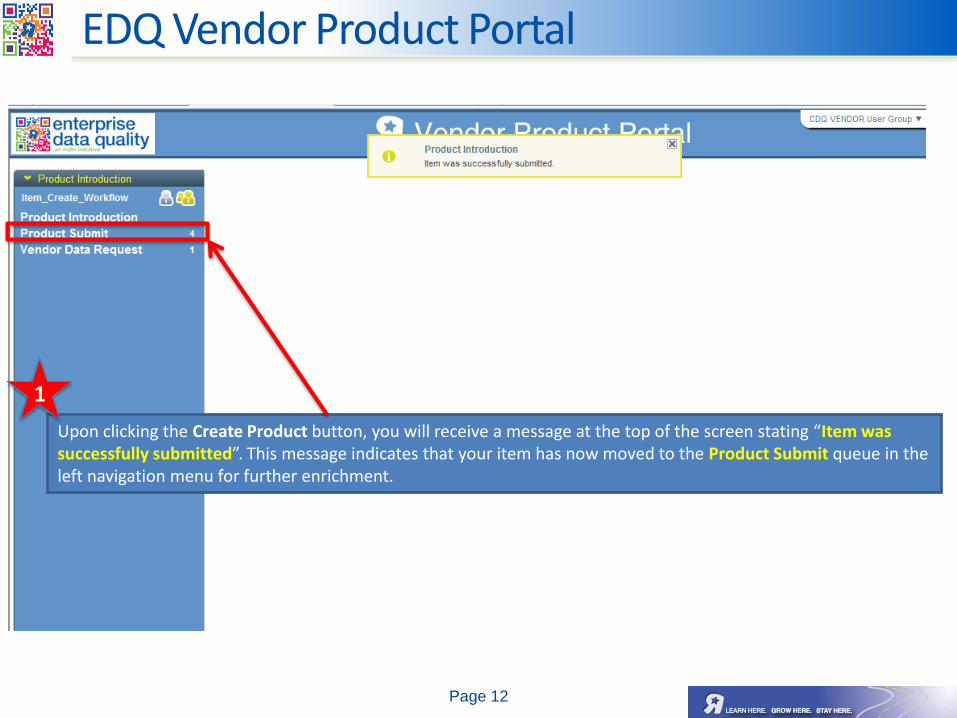
Upon clicking the Create Product button, you will receive a message at the top of the screen stating “Item was successfully submitted”. This message indicates that your item has now moved to the Product Submit queue in the left navigation menu for further enrichment.
1

Page 13
EDQ Vendor Product Portal To access you pending new items, click on Product Submit. 1
A list of your pending items will appear on the right side of the screen. Click on the EDQ ID number to open your item.
2
Page 14
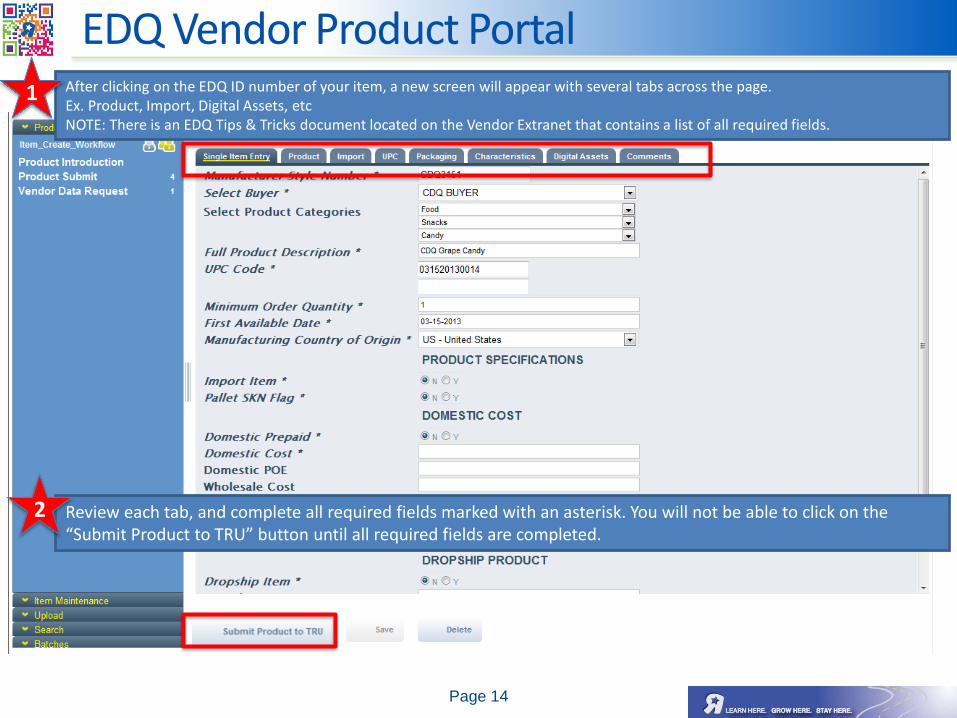
EDQ Vendor Product Portal After clicking on the EDQ ID number of your item, a new screen will appear with several tabs across the page. Ex. Product, Import, Digital Assets, etc NOTE: There is an EDQ Tips & Tricks document located on the Vendor Extranet that contains a list of all required fields.
1
Review each tab, and complete all required fields marked with an asterisk. You will not be able to click on the “Submit Product to TRU” button until all required fields are completed.
2
Page 15
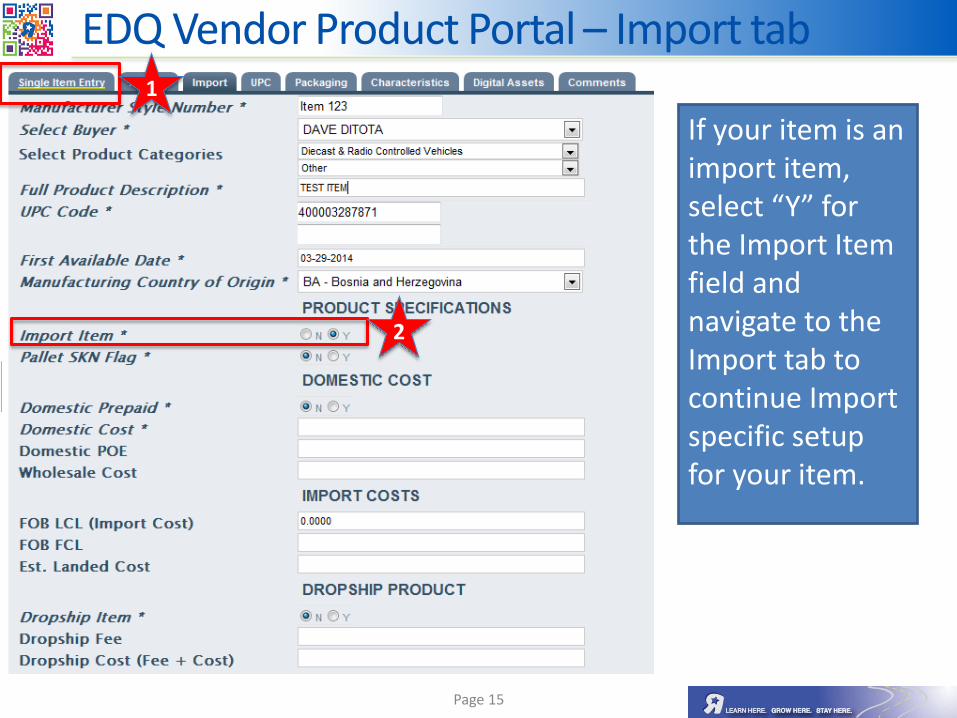
EDQ Vendor Product Portal – Import tab
If your item is an import item, select “Y” for the Import Item field and navigate to the Import tab to continue Import specific setup for your item.
1
2

Page 16
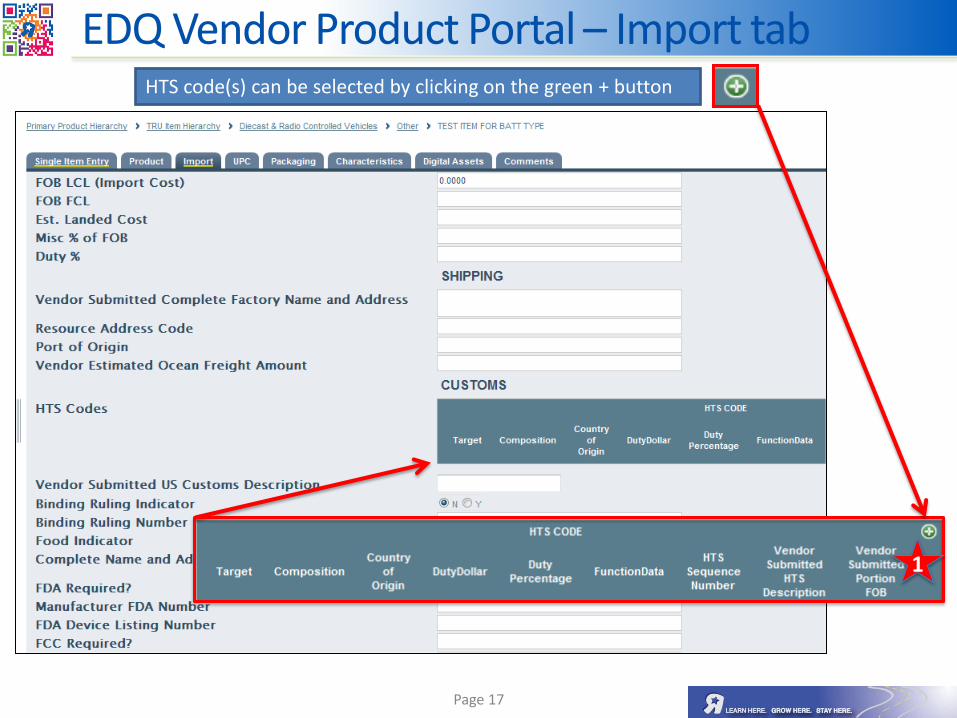
EDQ Vendor Product Portal – Import tab The Import tab requires the population of the Import Vendor Number, Vendor Submitted Complete Factory Name and Address, and HTS Code(s) fields prior to item submission.
2
3
1
Page 17
EDQ Vendor Product Portal – Import tab HTS code(s) can be selected by clicking on the green + button
1

Page 18
• Click on the arrow in front of each folder to drill down to the lowest level to find the most appropriate HTS code.
• If the HTS code that you use is not present, select the closest option and our import team will adjust accordingly.
• Note: Search tab allows you to type in the HTS code to bypass folders.
EDQ Vendor Product Portal – Import tab
Page 19
EDQ Vendor Product Portal – UPC tab
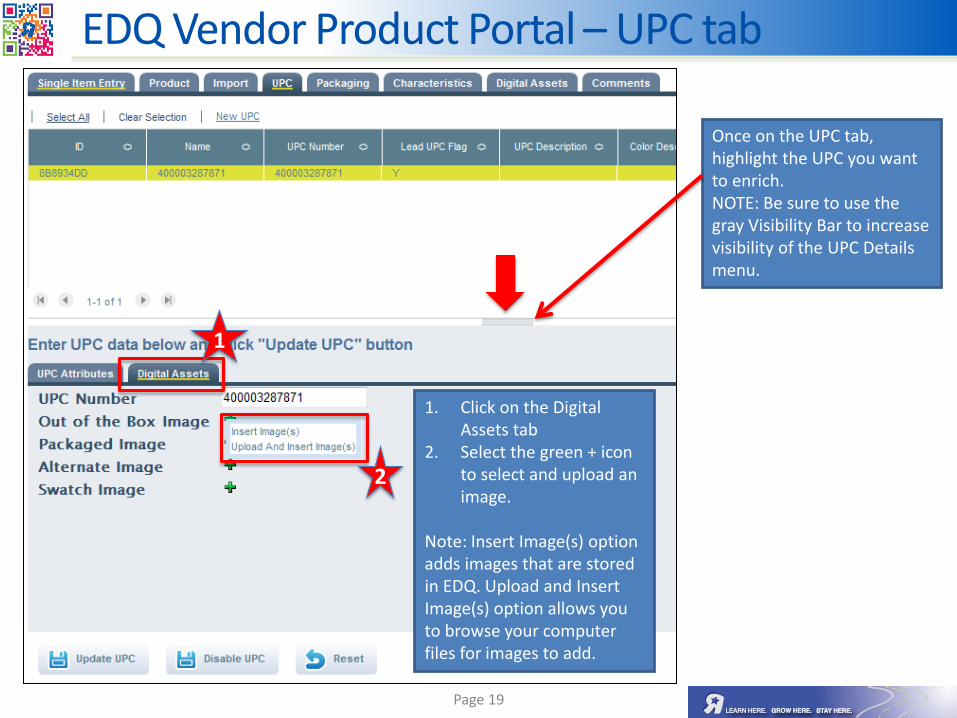
Once on the UPC tab, highlight the UPC you want to enrich. NOTE: Be sure to use the gray Visibility Bar to increase visibility of the UPC Details menu.
1. Click on the Digital Assets tab
2. Select the green + icon to select and upload an image.
Note: Insert Image(s) option adds images that are stored in EDQ. Upload and Insert Image(s) option allows you to browse your computer files for images to add.
1
2
Page 20
EDQ Vendor Product Portal – UPC tab
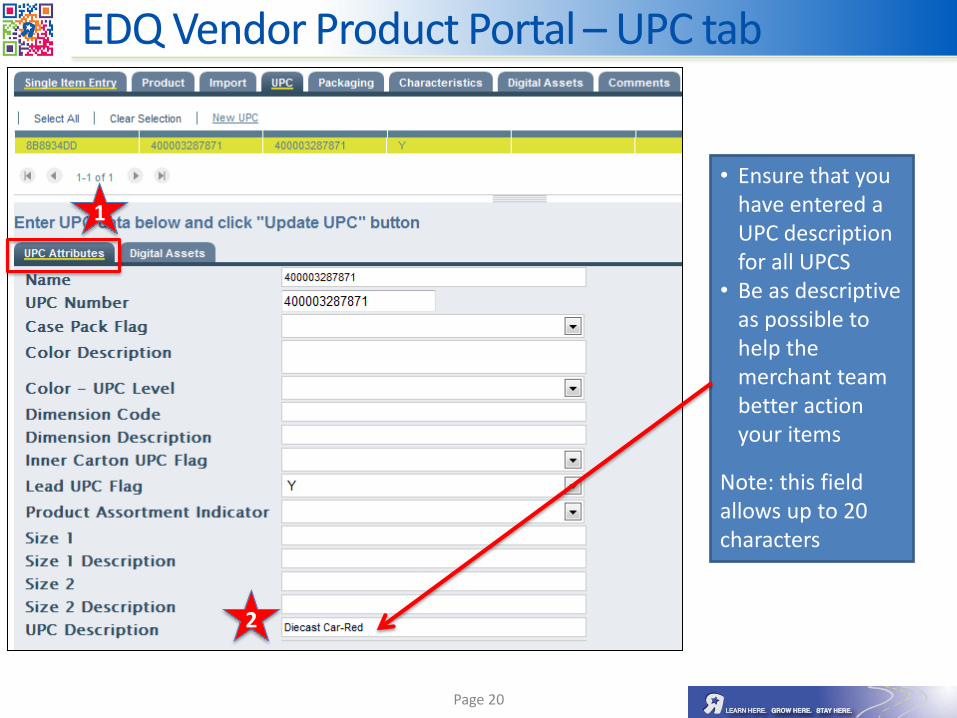
• Ensure that you have entered a UPC description for all UPCS
• Be as descriptive as possible to help the merchant team better action your items
Note: this field allows up to 20 characters
1
2
Page 21
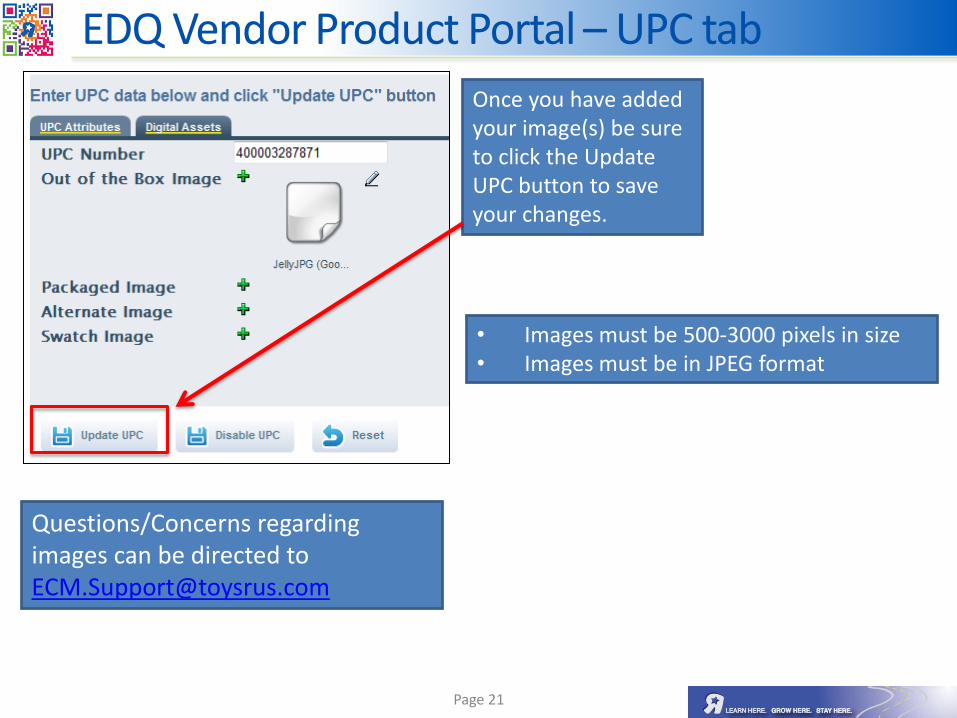
EDQ Vendor Product Portal – UPC tab
Once you have added your image(s) be sure to click the Update UPC button to save your changes.
• Images must be 500-3000 pixels in size • Images must be in JPEG format
Questions/Concerns regarding images can be directed to [email protected]
Page 22
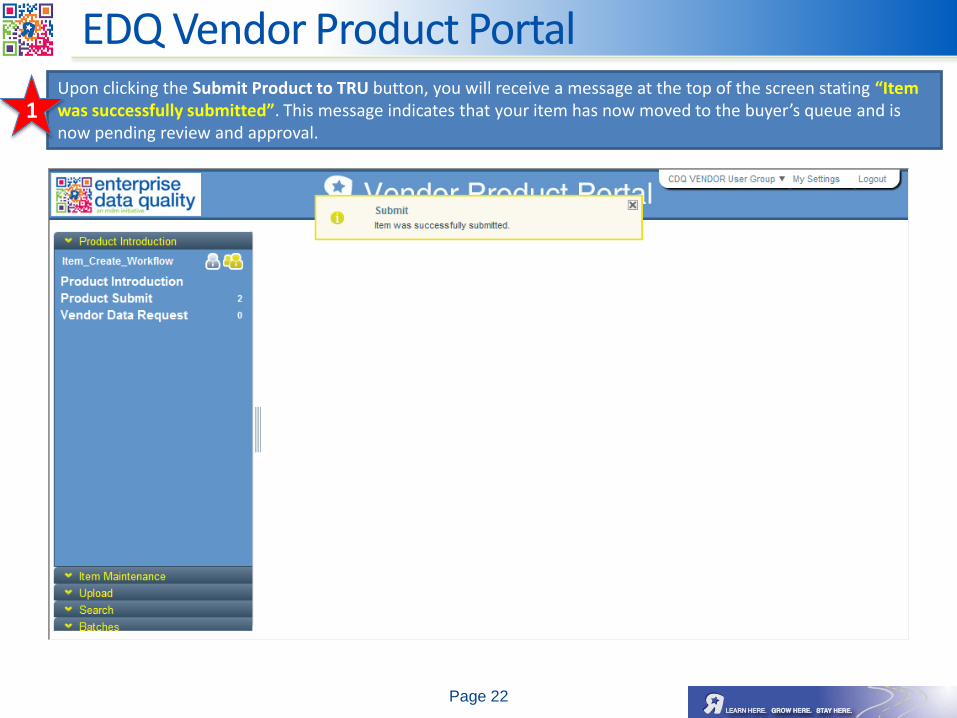
EDQ Vendor Product Portal Upon clicking the Submit Product to TRU button, you will receive a message at the top of the screen stating “Item was successfully submitted”. This message indicates that your item has now moved to the buyer’s queue and is now pending review and approval.
1
Item Creation via the Multiple Item Worksheet
because data matters
Page 24
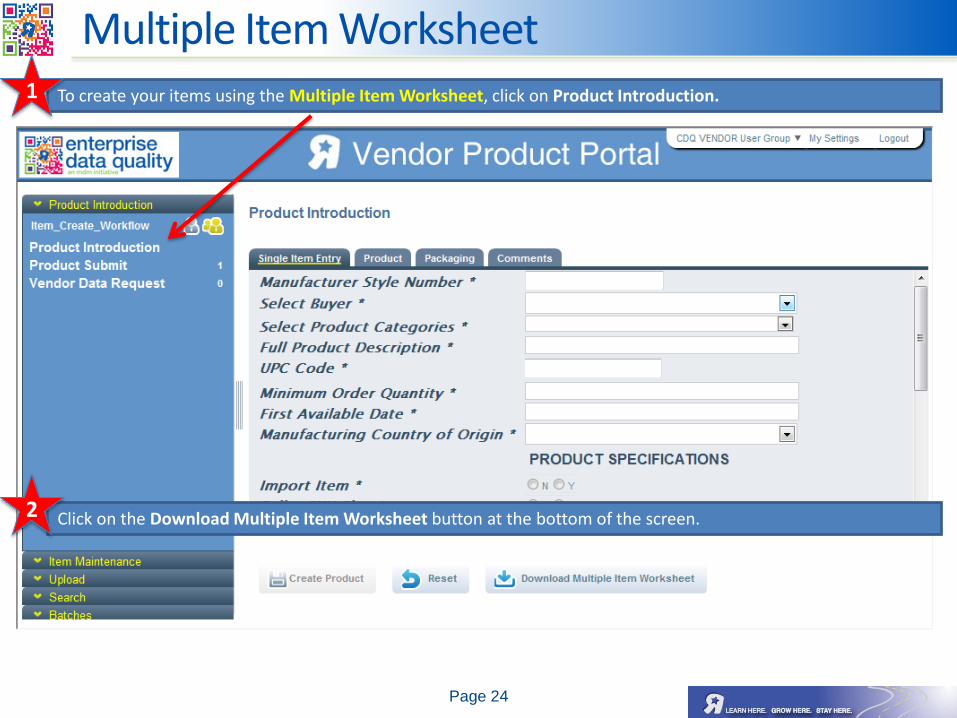
To create your items using the Multiple Item Worksheet, click on Product Introduction. 1
Click on the Download Multiple Item Worksheet button at the bottom of the screen. 2
Multiple Item Worksheet
Page 25
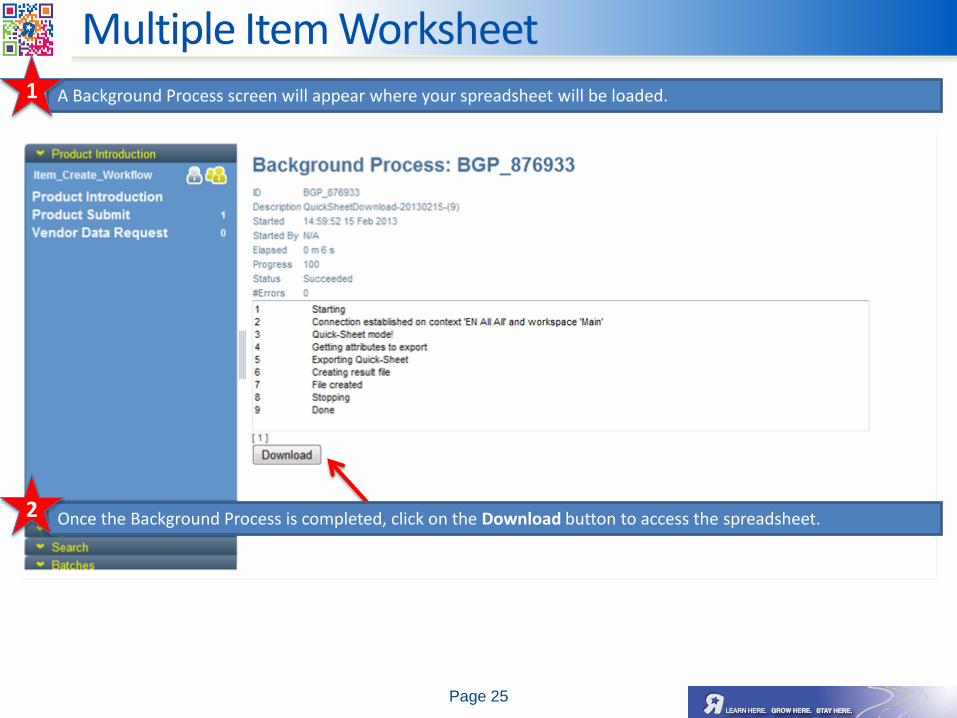
A Background Process screen will appear where your spreadsheet will be loaded. 1
Once the Background Process is completed, click on the Download button to access the spreadsheet. 2
Multiple Item Worksheet
Page 26
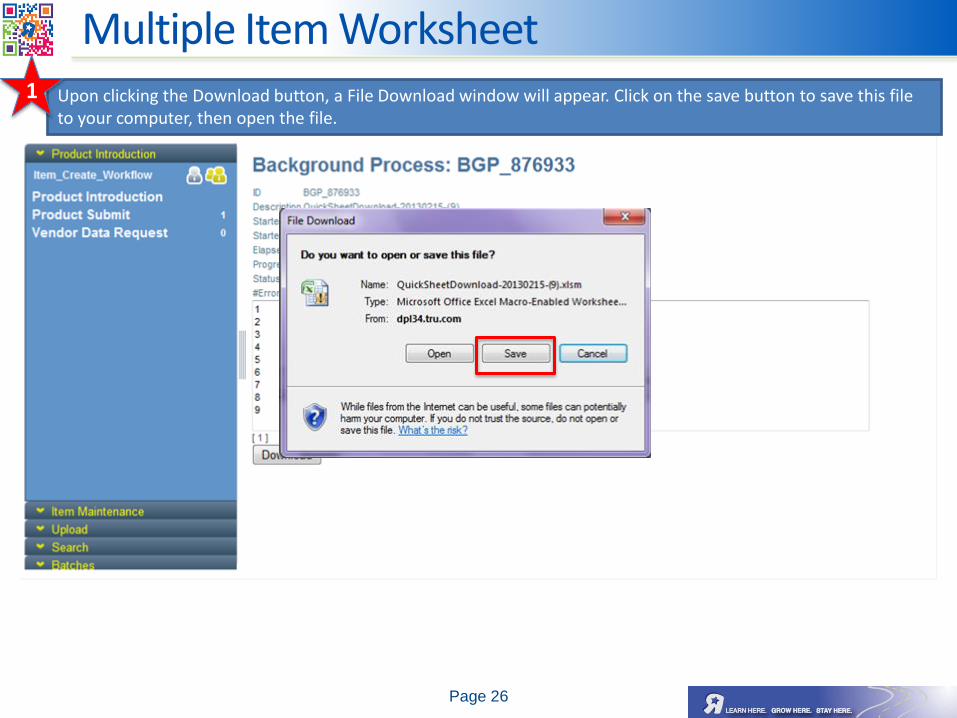
Upon clicking the Download button, a File Download window will appear. Click on the save button to save this file to your computer, then open the file.
1
Multiple Item Worksheet
Page 27
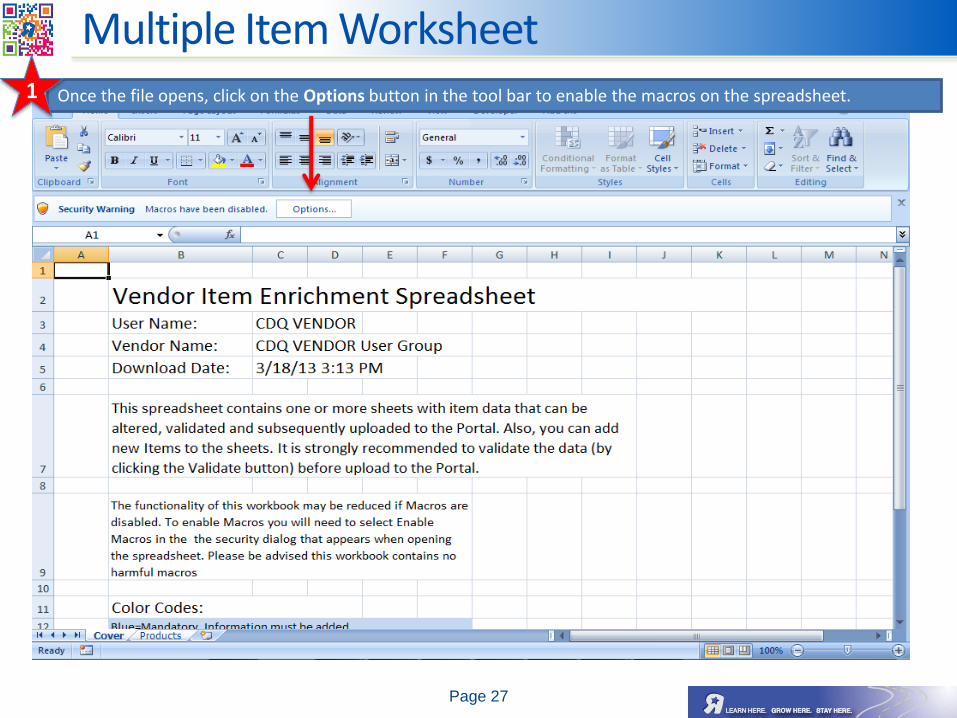
Multiple Item Worksheet Once the file opens, click on the Options button in the tool bar to enable the macros on the spreadsheet. 1
Page 28
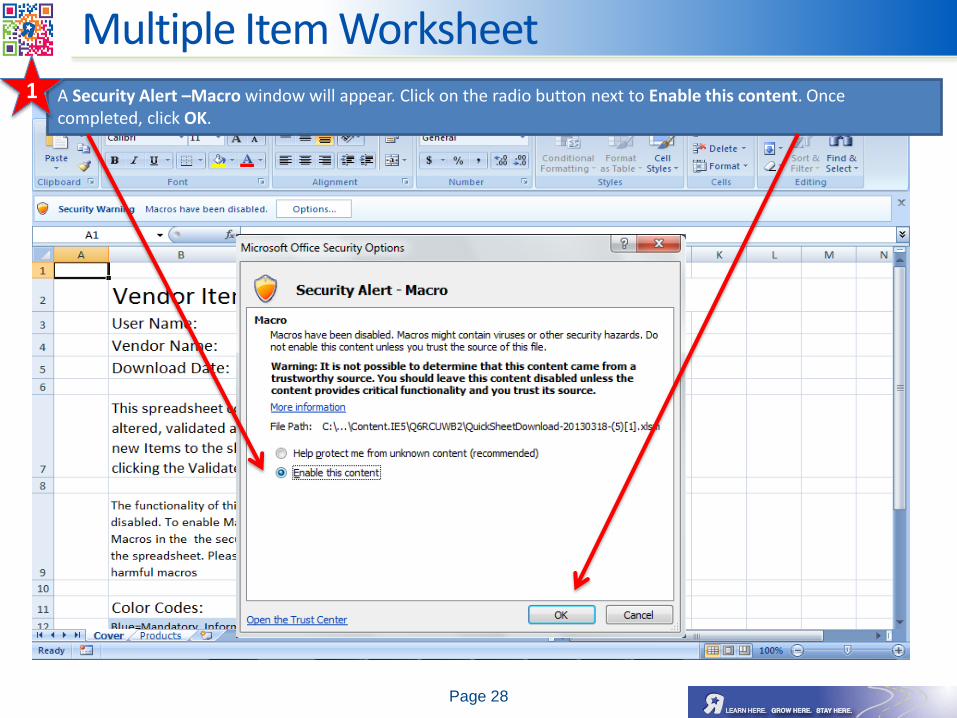
A Security Alert –Macro window will appear. Click on the radio button next to Enable this content. Once completed, click OK.
1
Multiple Item Worksheet
Page 29
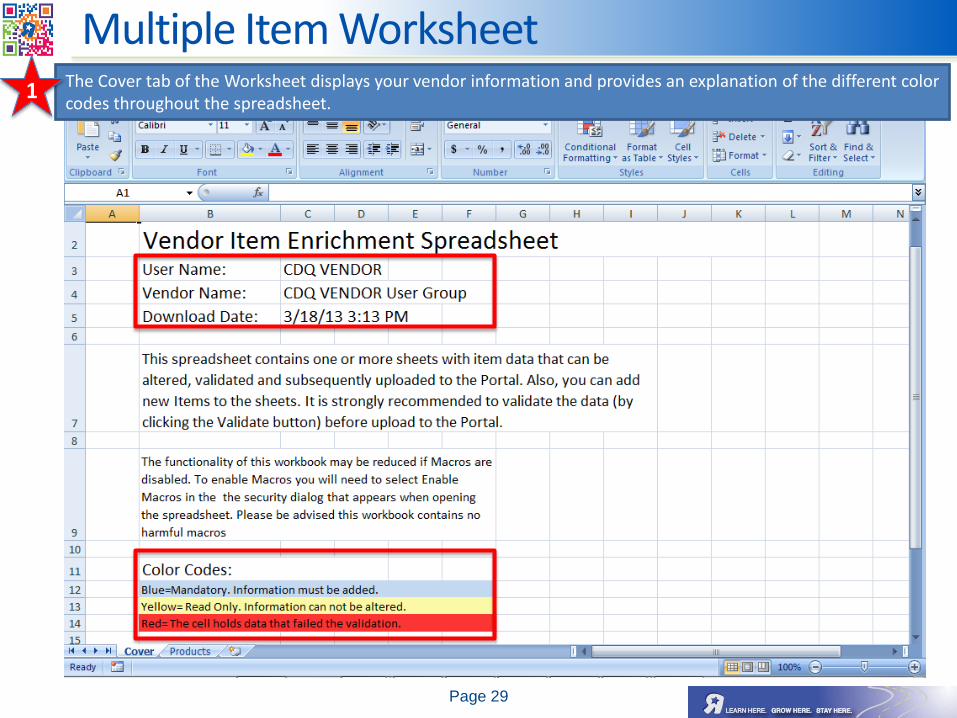
The Cover tab of the Worksheet displays your vendor information and provides an explanation of the different color codes throughout the spreadsheet.
1
Multiple Item Worksheet
Page 30
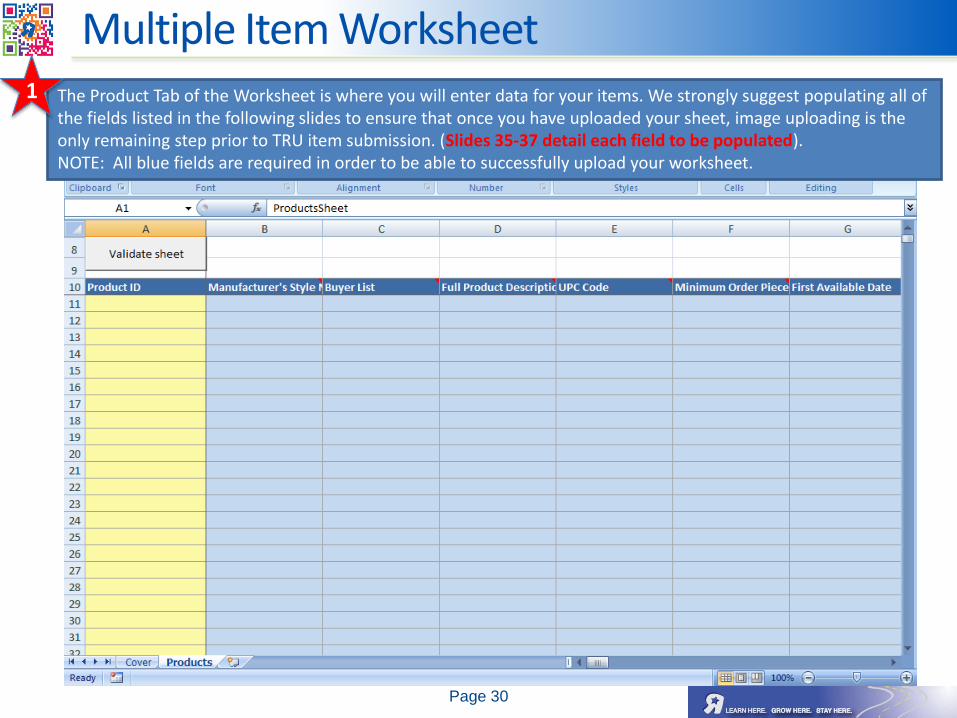
The Product Tab of the Worksheet is where you will enter data for your items. We strongly suggest populating all of the fields listed in the following slides to ensure that once you have uploaded your sheet, image uploading is the only remaining step prior to TRU item submission. (Slides 35-37 detail each field to be populated). NOTE: All blue fields are required in order to be able to successfully upload your worksheet.
1
Multiple Item Worksheet
Page 31
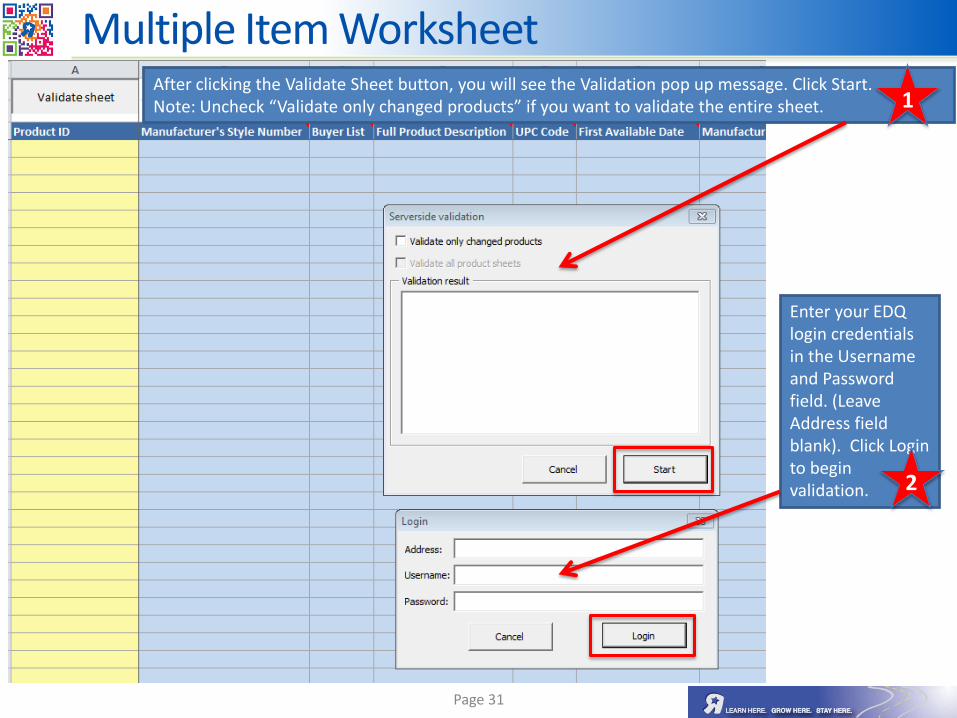
After clicking the Validate Sheet button, you will see the Validation pop up message. Click Start. Note: Uncheck “Validate only changed products” if you want to validate the entire sheet.
Enter your EDQ login credentials in the Username and Password field. (Leave Address field blank). Click Login to begin validation.
Multiple Item Worksheet
1
2
Page 32
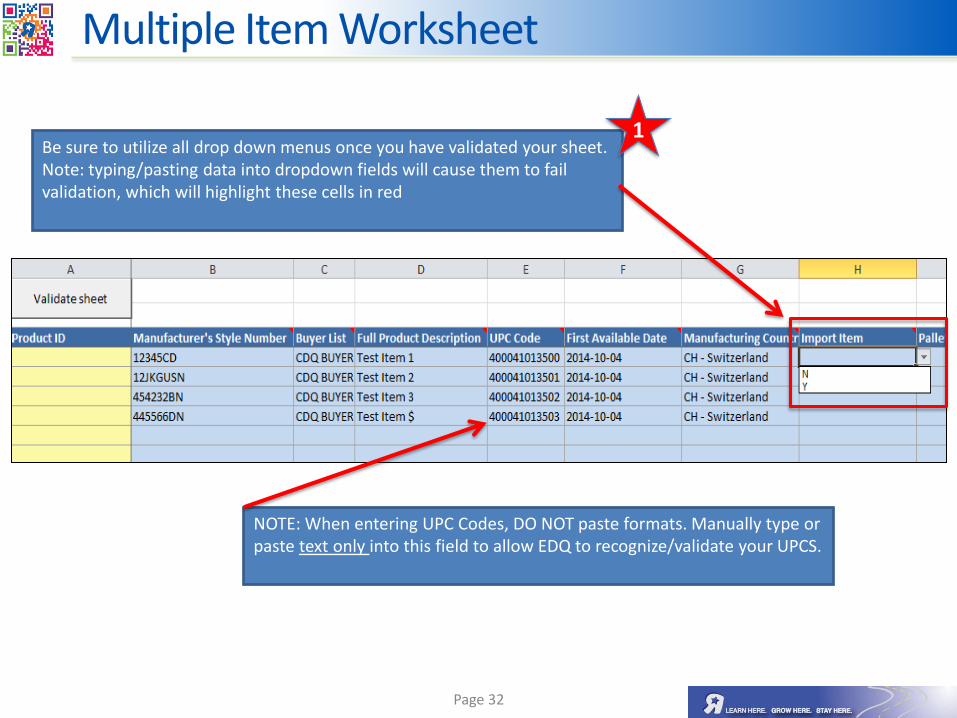
Be sure to utilize all drop down menus once you have validated your sheet. Note: typing/pasting data into dropdown fields will cause them to fail validation, which will highlight these cells in red
NOTE: When entering UPC Codes, DO NOT paste formats. Manually type or paste text only into this field to allow EDQ to recognize/validate your UPCS.
Multiple Item Worksheet
1
Page 33
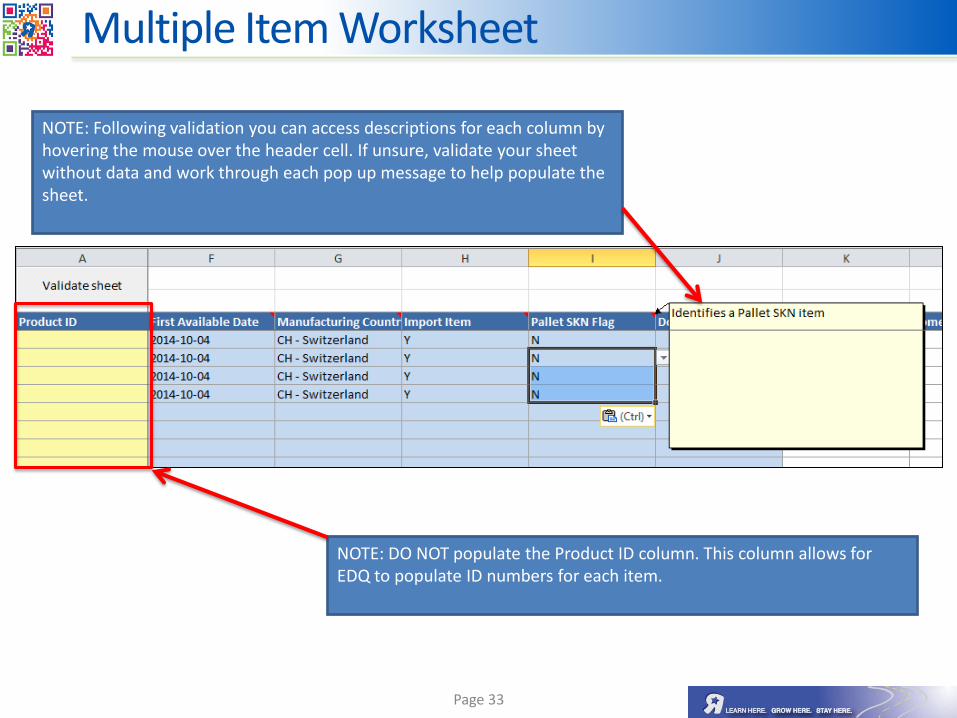
NOTE: Following validation you can access descriptions for each column by hovering the mouse over the header cell. If unsure, validate your sheet without data and work through each pop up message to help populate the sheet.
NOTE: DO NOT populate the Product ID column. This column allows for EDQ to populate ID numbers for each item.
Multiple Item Worksheet
Page 34
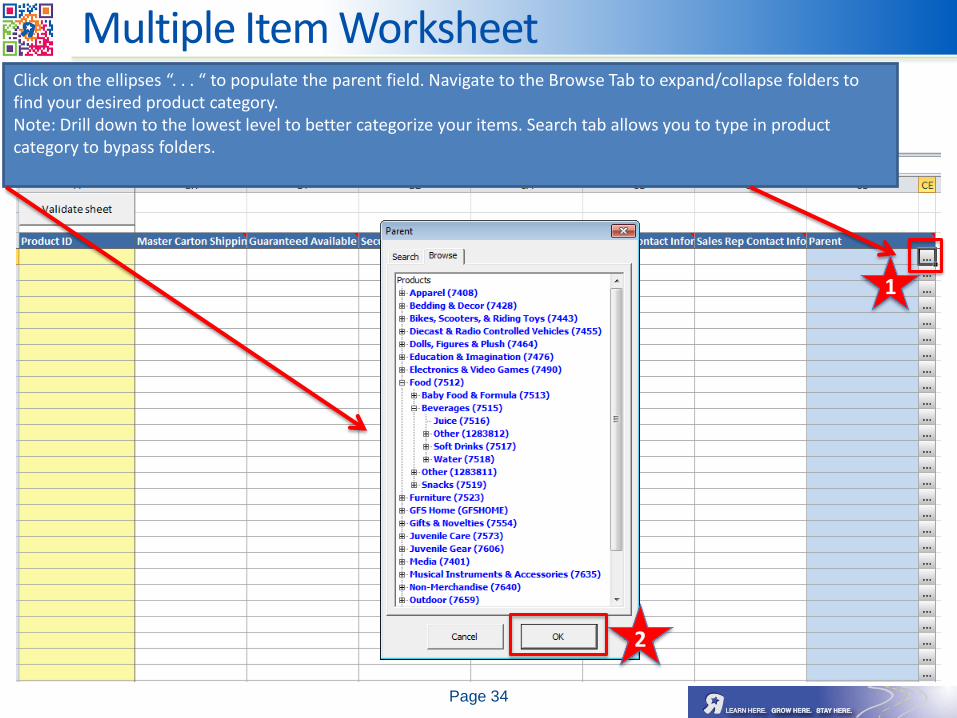
Click on the ellipses “. . . “ to populate the parent field. Navigate to the Browse Tab to expand/collapse folders to find your desired product category. Note: Drill down to the lowest level to better categorize your items. Search tab allows you to type in product category to bypass folders.
Multiple Item Worksheet
1
2
Page 35
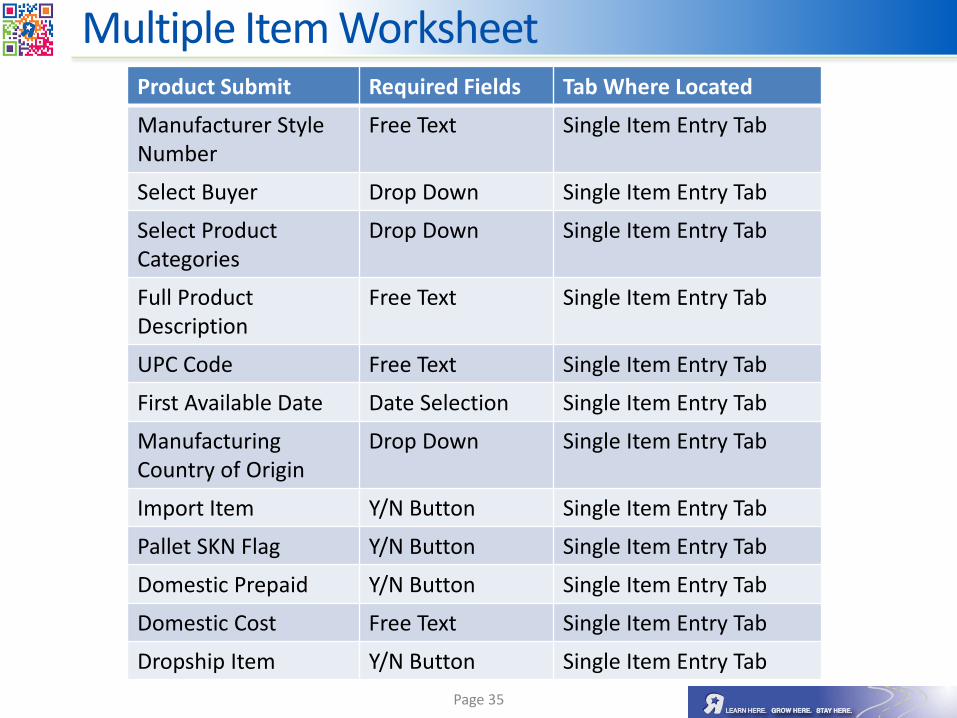
Multiple Item Worksheet Product Submit Required Fields Tab Where Located
Manufacturer Style Number
Free Text Single Item Entry Tab
Select Buyer Drop Down Single Item Entry Tab
Select Product Categories
Drop Down Single Item Entry Tab
Full Product Description
Free Text Single Item Entry Tab
UPC Code Free Text Single Item Entry Tab
First Available Date Date Selection Single Item Entry Tab
Manufacturing Country of Origin
Drop Down Single Item Entry Tab
Import Item Y/N Button Single Item Entry Tab
Pallet SKN Flag Y/N Button Single Item Entry Tab
Domestic Prepaid Y/N Button Single Item Entry Tab
Domestic Cost Free Text Single Item Entry Tab
Dropship Item Y/N Button Single Item Entry Tab
Page 36
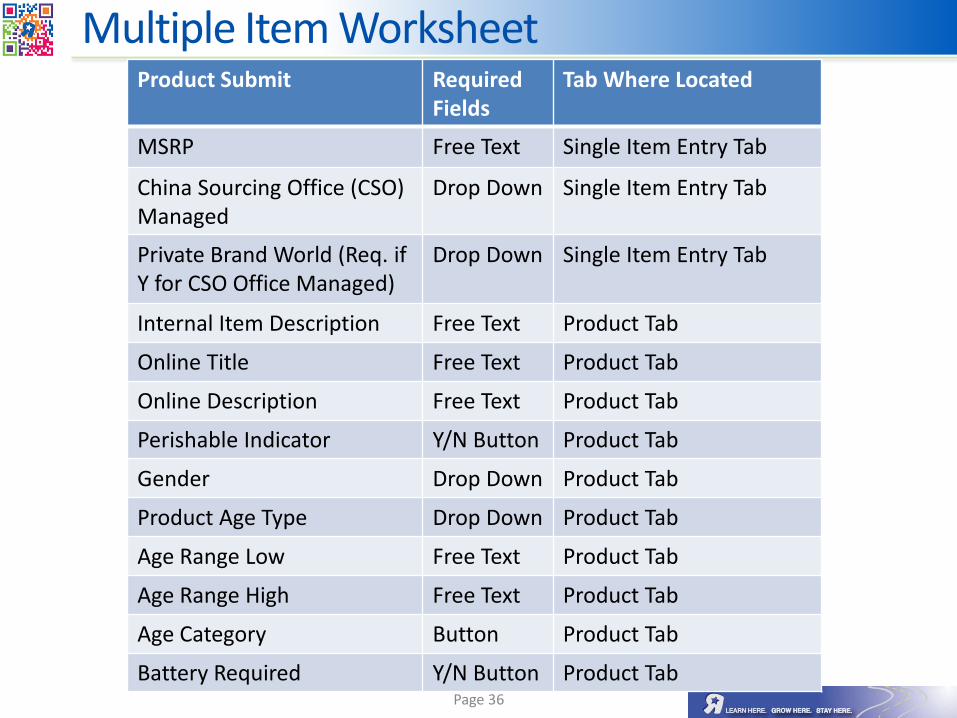
Multiple Item Worksheet Product Submit Required
Fields Tab Where Located
MSRP Free Text Single Item Entry Tab
China Sourcing Office (CSO) Managed
Drop Down Single Item Entry Tab
Private Brand World (Req. if Y for CSO Office Managed)
Drop Down Single Item Entry Tab
Internal Item Description Free Text Product Tab
Online Title Free Text Product Tab
Online Description Free Text Product Tab
Perishable Indicator Y/N Button Product Tab
Gender Drop Down Product Tab
Product Age Type Drop Down Product Tab
Age Range Low Free Text Product Tab
Age Range High Free Text Product Tab
Age Category Button Product Tab
Battery Required Y/N Button Product Tab
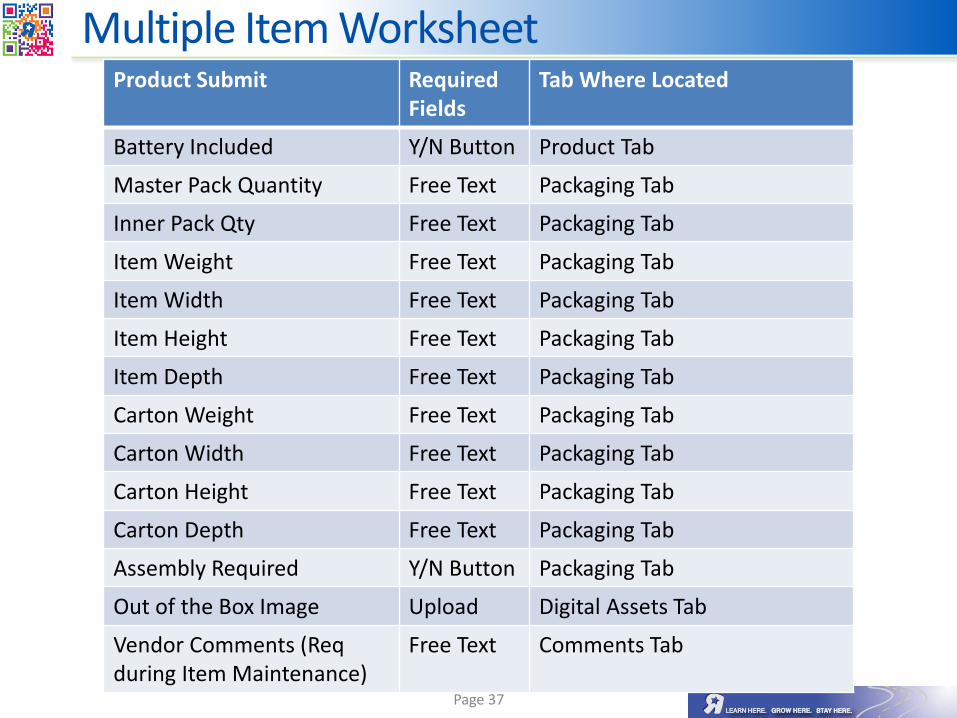
Page 37
Multiple Item Worksheet Product Submit Required
Fields Tab Where Located
Battery Included Y/N Button Product Tab
Master Pack Quantity Free Text Packaging Tab
Inner Pack Qty Free Text Packaging Tab
Item Weight Free Text Packaging Tab
Item Width Free Text Packaging Tab
Item Height Free Text Packaging Tab
Item Depth Free Text Packaging Tab
Carton Weight Free Text Packaging Tab
Carton Width Free Text Packaging Tab
Carton Height Free Text Packaging Tab
Carton Depth Free Text Packaging Tab
Assembly Required Y/N Button Packaging Tab
Out of the Box Image Upload Digital Assets Tab
Vendor Comments (Req during Item Maintenance)
Free Text Comments Tab

Vendor Data Request
(Resource Guide)
because data matters
Page 39
The EDQ Vendor Portal is used to create and maintain items in the TRU Item Master.
Once a new item is submitted out of the Product Submit queue, it is transitioned to the Buyer, Buyer’s Assistant, Import Logistics, and Enterprise Content Management (ECM) team for review and approval.
In the event that a newly created item is missing data or has data that does not meet TRU standards, the item will be returned to you and placed in your Vendor Data Request queue for enrichment and resubmission.
This document will guide you through the process of updating/re-submiting your items in the Vendor Data Request queue.
Introduction
Page 40
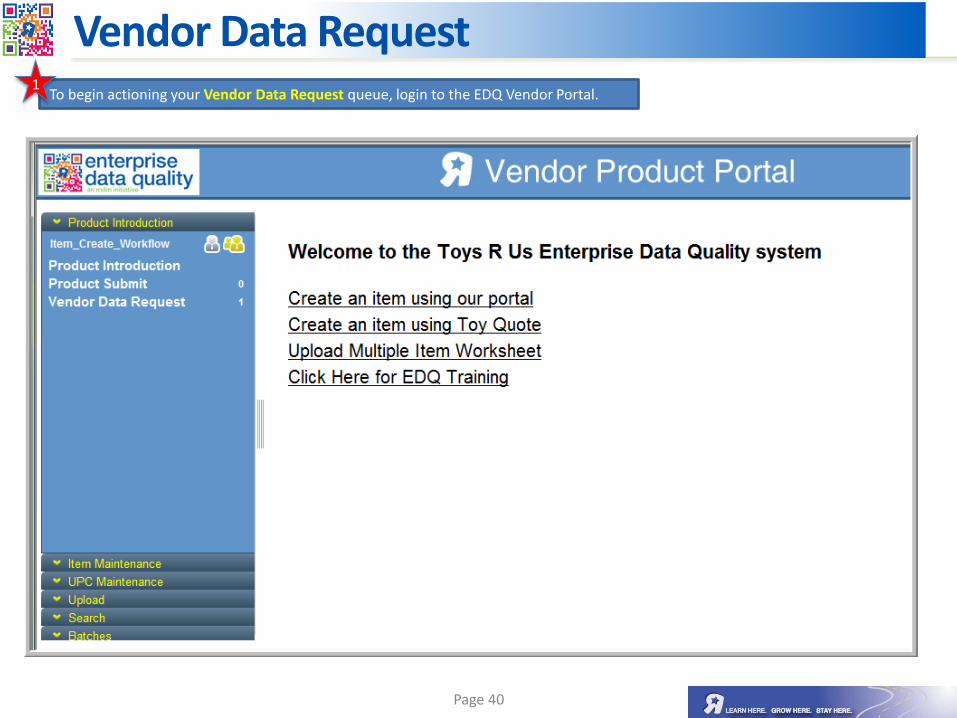
Vendor Data Request To begin actioning your Vendor Data Request queue, login to the EDQ Vendor Portal.
1
Page 41
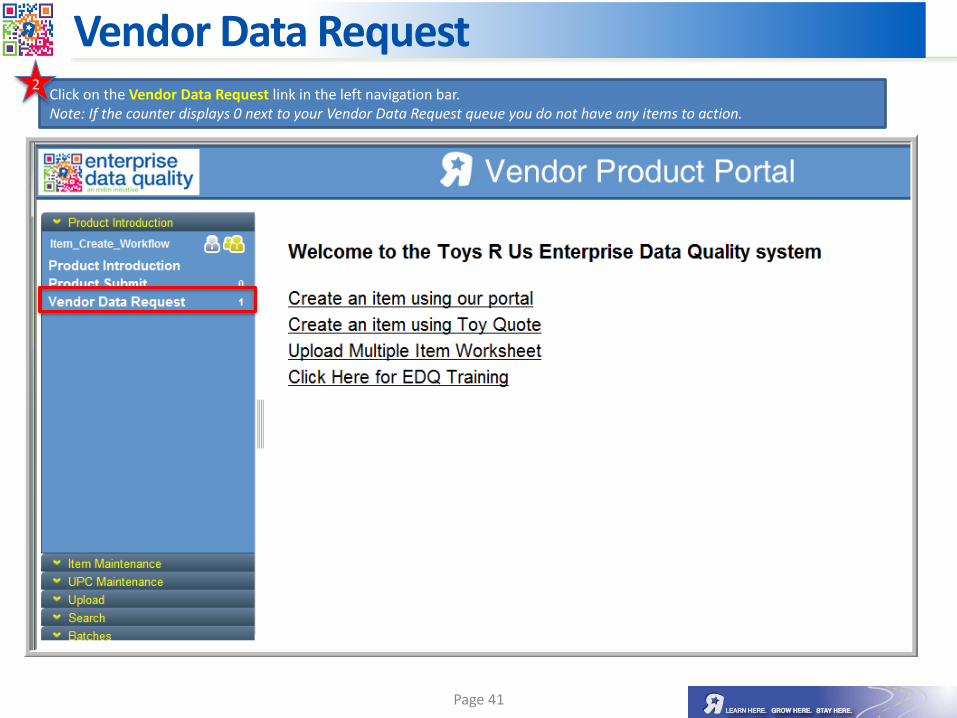
Vendor Data Request Click on the Vendor Data Request link in the left navigation bar. Note: If the counter displays 0 next to your Vendor Data Request queue you do not have any items to action.
2
Page 42
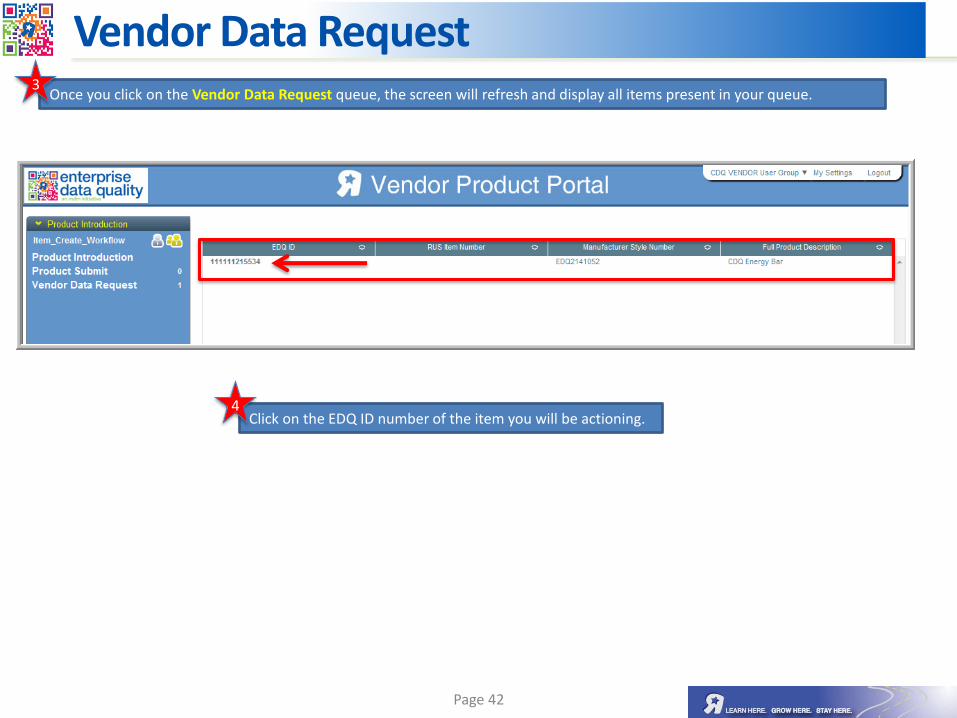
Vendor Data Request Once you click on the Vendor Data Request queue, the screen will refresh and display all items present in your queue.
3
Click on the EDQ ID number of the item you will be actioning. 4
Page 43
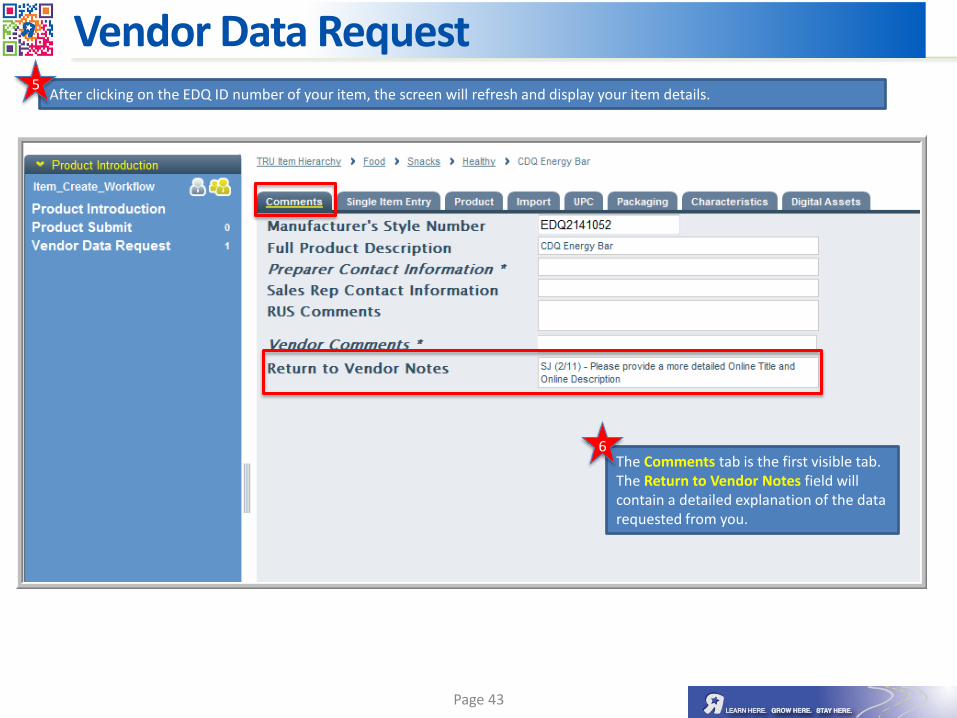
Vendor Data Request After clicking on the EDQ ID number of your item, the screen will refresh and display your item details.
5
The Comments tab is the first visible tab. The Return to Vendor Notes field will contain a detailed explanation of the data requested from you.
6
Page 44
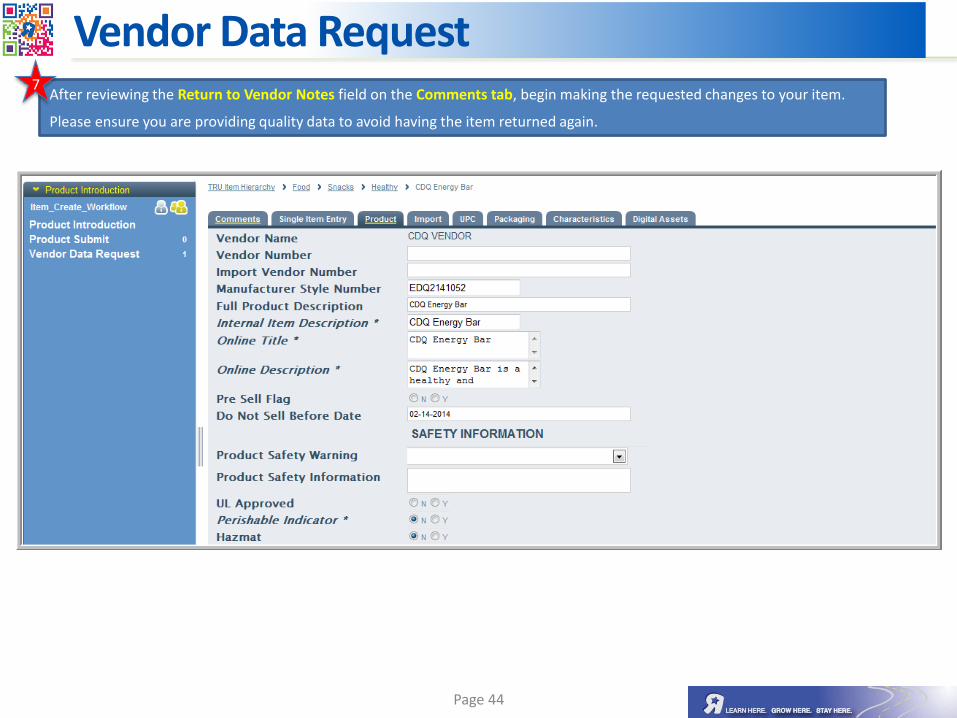
Vendor Data Request After reviewing the Return to Vendor Notes field on the Comments tab, begin making the requested changes to your item.
Please ensure you are providing quality data to avoid having the item returned again.
7
Page 45
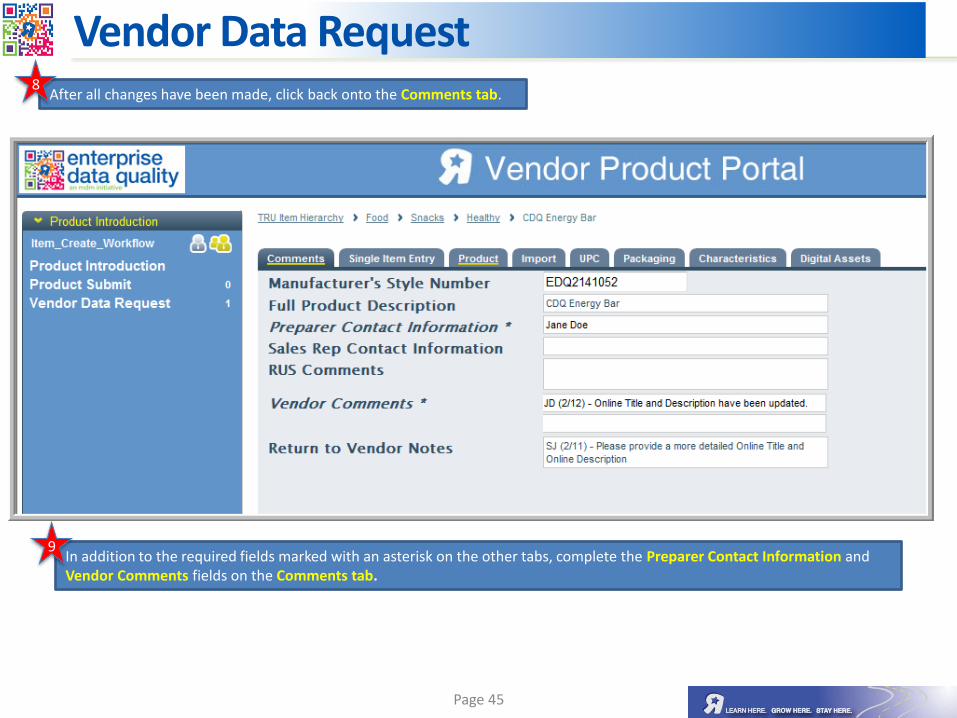
Vendor Data Request After all changes have been made, click back onto the Comments tab.
8
In addition to the required fields marked with an asterisk on the other tabs, complete the Preparer Contact Information and Vendor Comments fields on the Comments tab.
9
Page 46
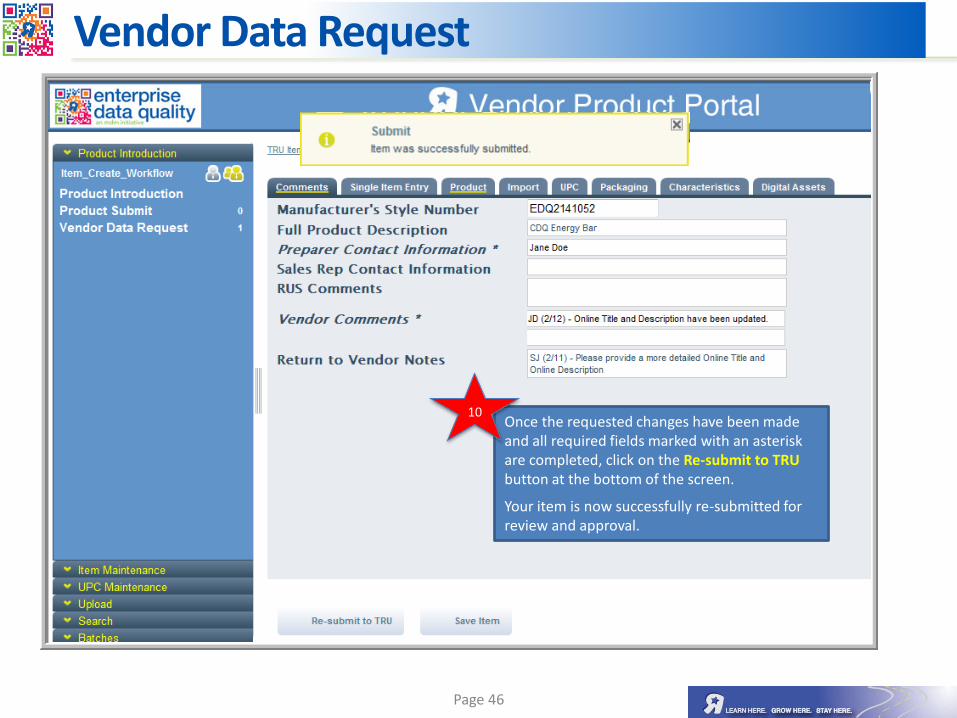
Vendor Data Request
Once the requested changes have been made and all required fields marked with an asterisk are completed, click on the Re-submit to TRU button at the bottom of the screen.
Your item is now successfully re-submitted for review and approval.
10
Page 47
Still have questions? Contact [email protected] (Please allow 48 hours for a response)
Multiple Item Worksheet