easy jewelry box - ana white for an optional adjustable drawer divider. easy jewelry box . 9 ¾” 6...
TRANSCRIPT
Easy Jewelry Box 1
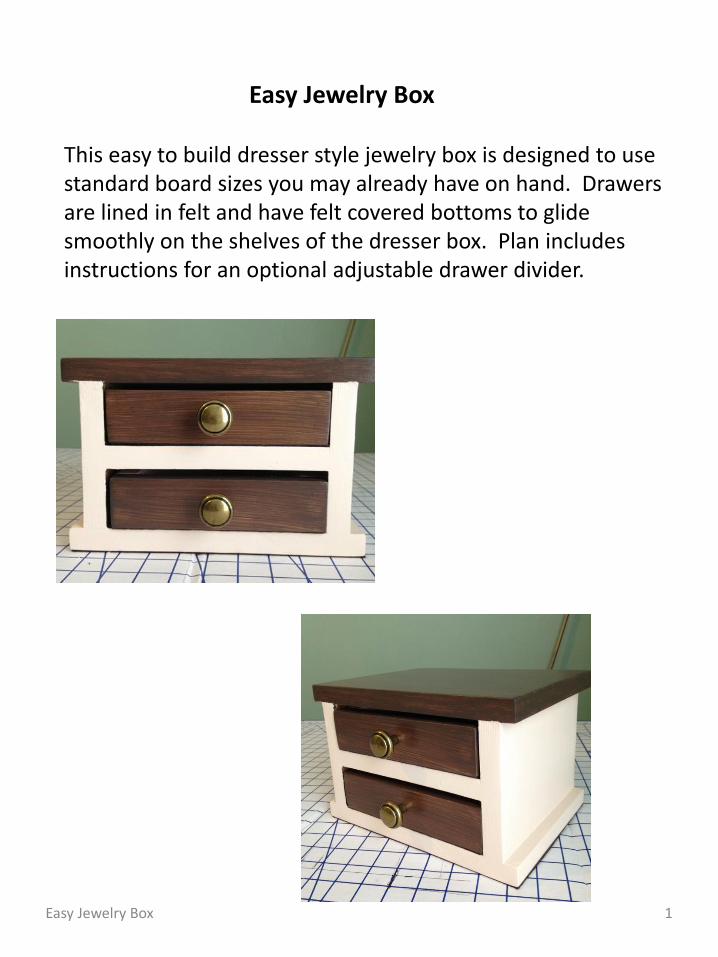
This easy to build dresser style jewelry box is designed to use standard board sizes you may already have on hand. Drawers are lined in felt and have felt covered bottoms to glide smoothly on the shelves of the dresser box. Plan includes instructions for an optional adjustable drawer divider.
Easy Jewelry Box
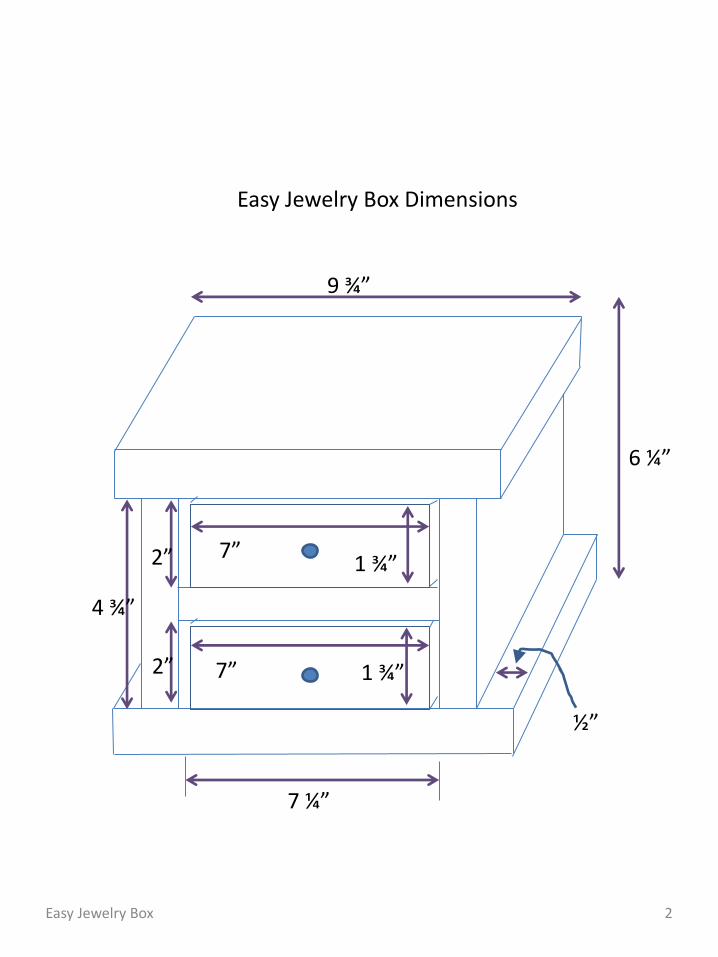
9 ¾”
6 ¼”
4 ¾”
7” 1 ¾”
1 ¾” 7”
7 ¼”
½”
2”
2”
2 Easy Jewelry Box
Easy Jewelry Box Dimensions
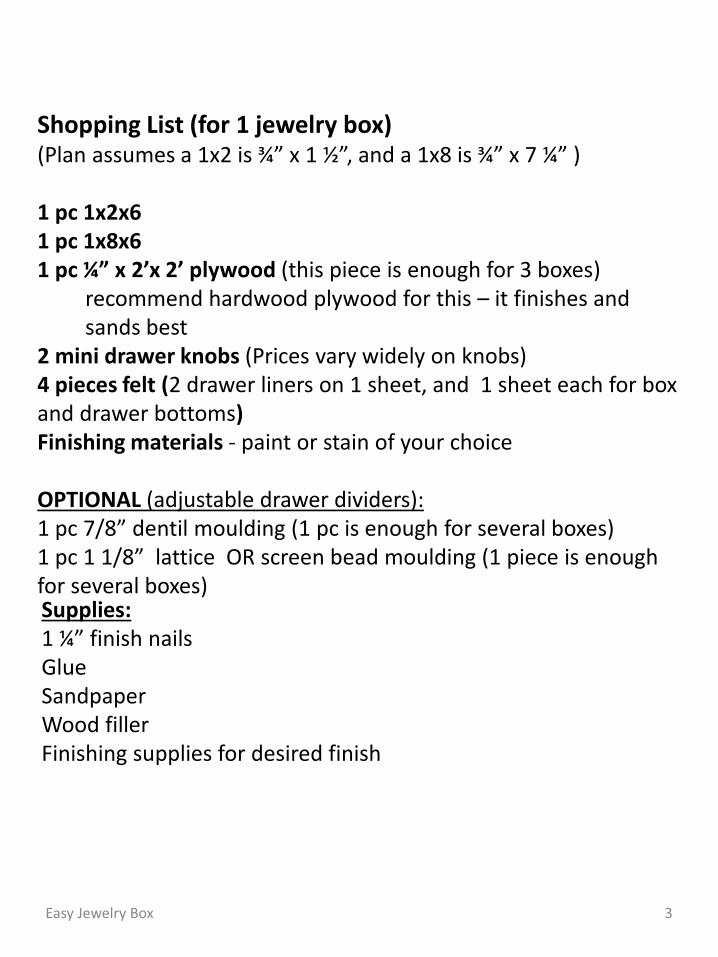
Shopping List (for 1 jewelry box) (Plan assumes a 1x2 is ¾” x 1 ½”, and a 1x8 is ¾” x 7 ¼” ) 1 pc 1x2x6 1 pc 1x8x6 1 pc ¼” x 2’x 2’ plywood (this piece is enough for 3 boxes)
recommend hardwood plywood for this – it finishes and sands best
2 mini drawer knobs (Prices vary widely on knobs) 4 pieces felt (2 drawer liners on 1 sheet, and 1 sheet each for box and drawer bottoms) Finishing materials - paint or stain of your choice OPTIONAL (adjustable drawer dividers): 1 pc 7/8” dentil moulding (1 pc is enough for several boxes) 1 pc 1 1/8” lattice OR screen bead moulding (1 piece is enough for several boxes)
3 Easy Jewelry Box
Supplies: 1 ¼” finish nails Glue Sandpaper Wood filler Finishing supplies for desired finish
Easy Jewelry Box 4
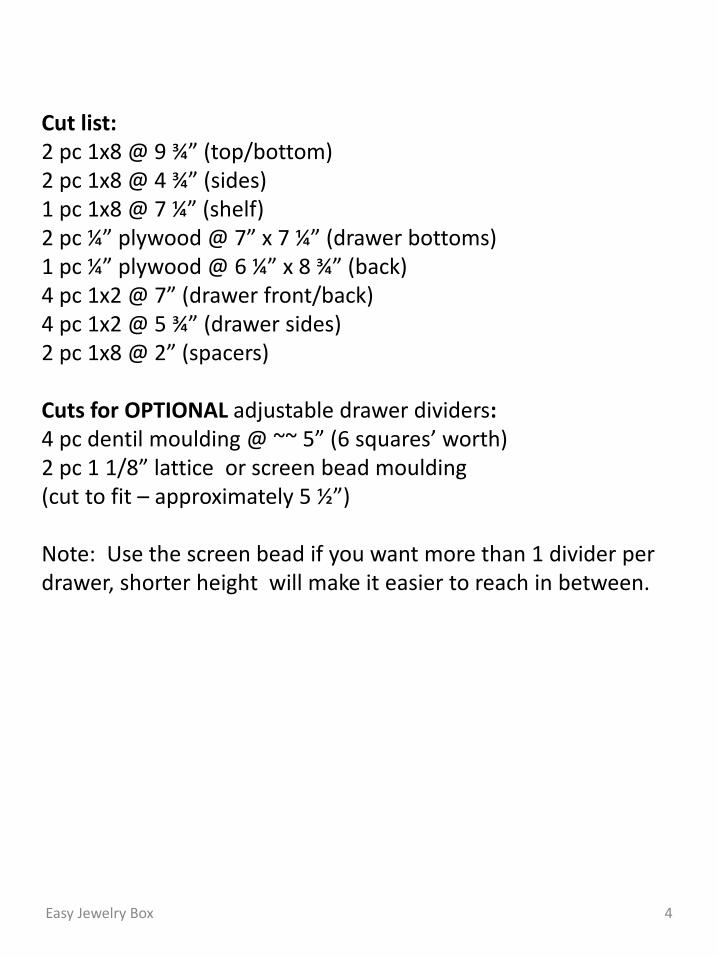
Cut list: 2 pc 1x8 @ 9 ¾” (top/bottom) 2 pc 1x8 @ 4 ¾” (sides) 1 pc 1x8 @ 7 ¼” (shelf) 2 pc ¼” plywood @ 7” x 7 ¼” (drawer bottoms) 1 pc ¼” plywood @ 6 ¼” x 8 ¾” (back) 4 pc 1x2 @ 7” (drawer front/back) 4 pc 1x2 @ 5 ¾” (drawer sides) 2 pc 1x8 @ 2” (spacers) Cuts for OPTIONAL adjustable drawer dividers: 4 pc dentil moulding @ ~~ 5” (6 squares’ worth) 2 pc 1 1/8” lattice or screen bead moulding (cut to fit – approximately 5 ½”) Note: Use the screen bead if you want more than 1 divider per drawer, shorter height will make it easier to reach in between.
Easy Jewelry Box 5
7” 7” 8 ¾”
7 ¼”
7 ¼”
7 ¼”
6 ¼”
6 ¼”
6 ¼”
Drawer bottom Box1
Drawer bottom Box1
Drawer bottom Box2
Drawer bottom Box3
Back Box1
Back Box2
Back Box3
Drawer bottom Box2
Drawer bottom Box3
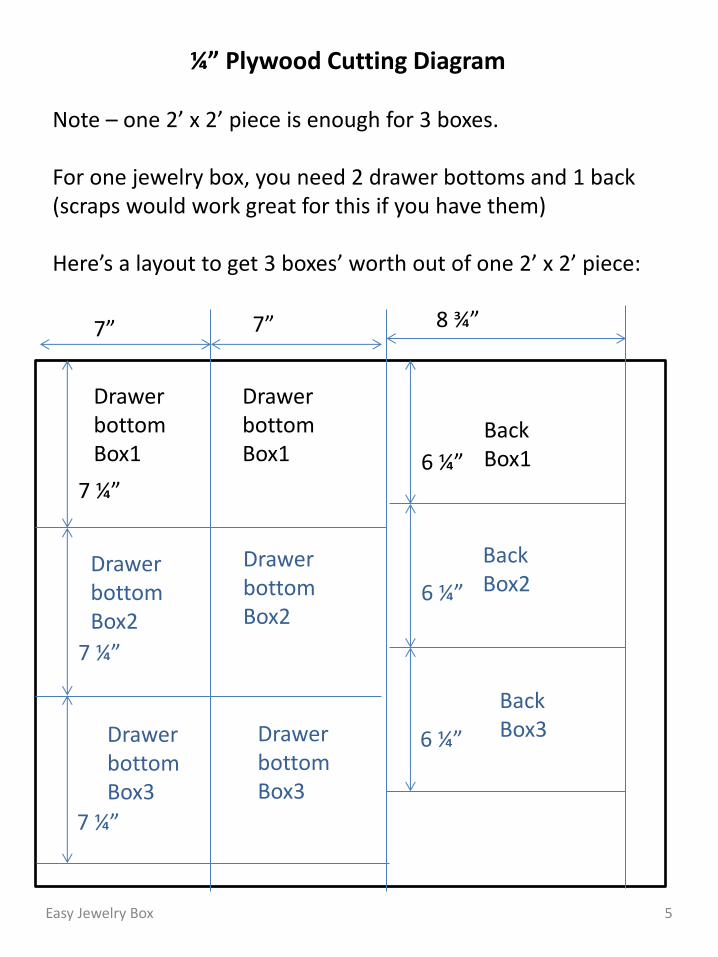
¼” Plywood Cutting Diagram
Note – one 2’ x 2’ piece is enough for 3 boxes. For one jewelry box, you need 2 drawer bottoms and 1 back (scraps would work great for this if you have them) Here’s a layout to get 3 boxes’ worth out of one 2’ x 2’ piece:
½” ½”
7 ¼”
4 ¾”
2”
7 ¼”
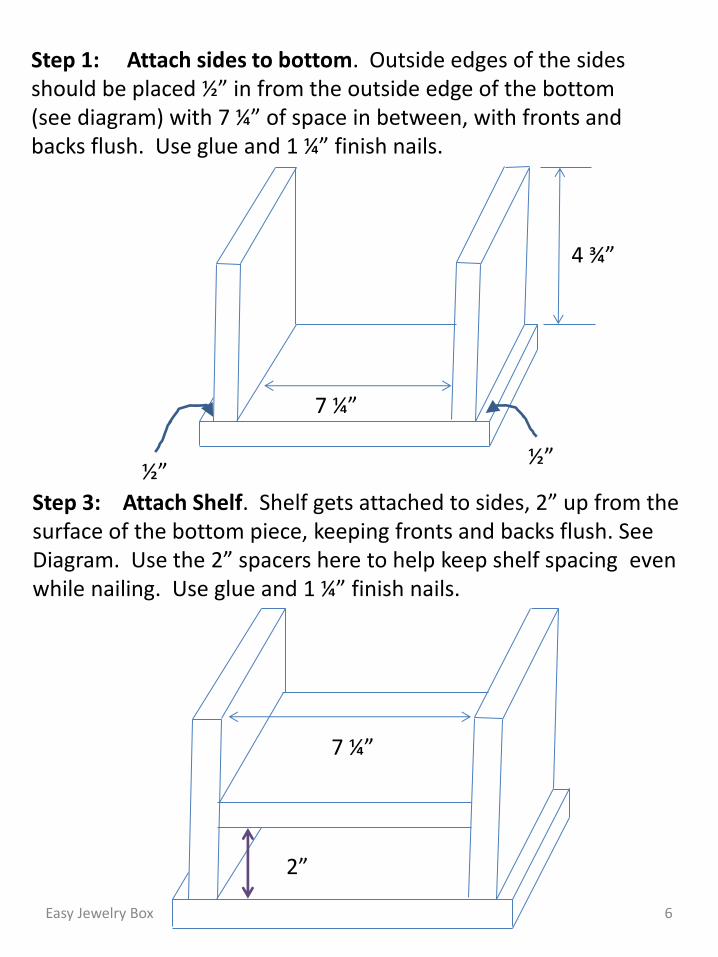
Step 1: Attach sides to bottom. Outside edges of the sides should be placed ½” in from the outside edge of the bottom (see diagram) with 7 ¼” of space in between, with fronts and backs flush. Use glue and 1 ¼” finish nails.
Step 3: Attach Shelf. Shelf gets attached to sides, 2” up from the surface of the bottom piece, keeping fronts and backs flush. See Diagram. Use the 2” spacers here to help keep shelf spacing even while nailing. Use glue and 1 ¼” finish nails.
6 Easy Jewelry Box
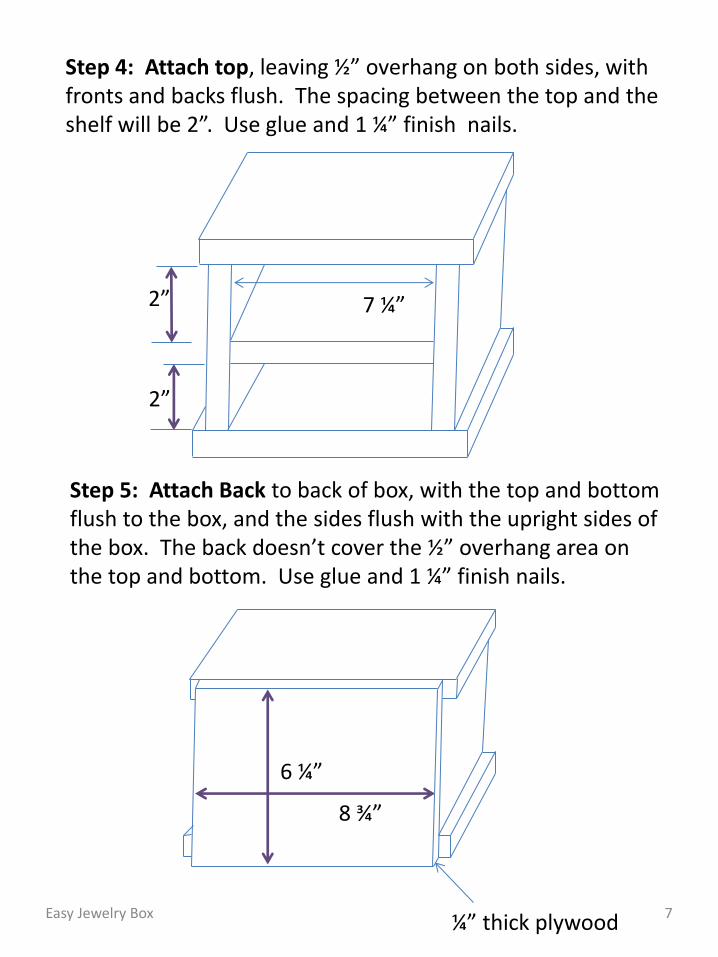
Step 4: Attach top, leaving ½” overhang on both sides, with fronts and backs flush. The spacing between the top and the shelf will be 2”. Use glue and 1 ¼” finish nails.
Step 5: Attach Back to back of box, with the top and bottom flush to the box, and the sides flush with the upright sides of the box. The back doesn’t cover the ½” overhang area on the top and bottom. Use glue and 1 ¼” finish nails.
7 Easy Jewelry Box
7 ¼” 2”
2”
6 ¼”
8 ¾”
¼” thick plywood
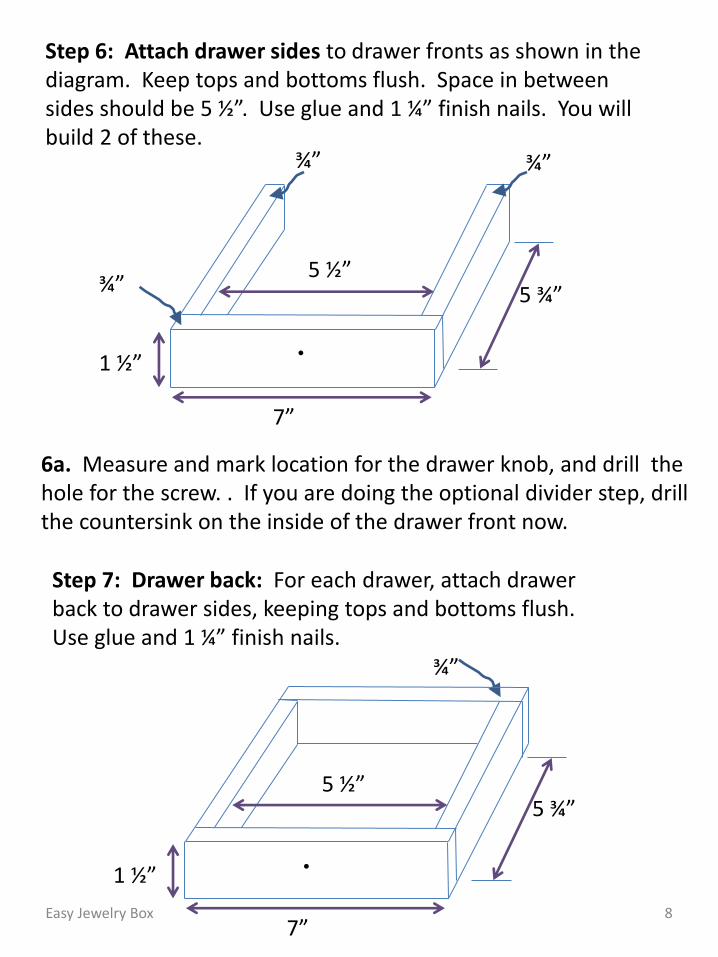
Step 6: Attach drawer sides to drawer fronts as shown in the diagram. Keep tops and bottoms flush. Space in between sides should be 5 ½”. Use glue and 1 ¼” finish nails. You will build 2 of these.
Step 7: Drawer back: For each drawer, attach drawer back to drawer sides, keeping tops and bottoms flush. Use glue and 1 ¼” finish nails.
8 Easy Jewelry Box
5 ½”
7”
1 ½”
¾” ¾”
¾” 5 ¾”
5 ½”
7”
1 ½”
¾”
5 ¾”
6a. Measure and mark location for the drawer knob, and drill the hole for the screw. . If you are doing the optional divider step, drill the countersink on the inside of the drawer front now.
7 ¼”
1 ¾”
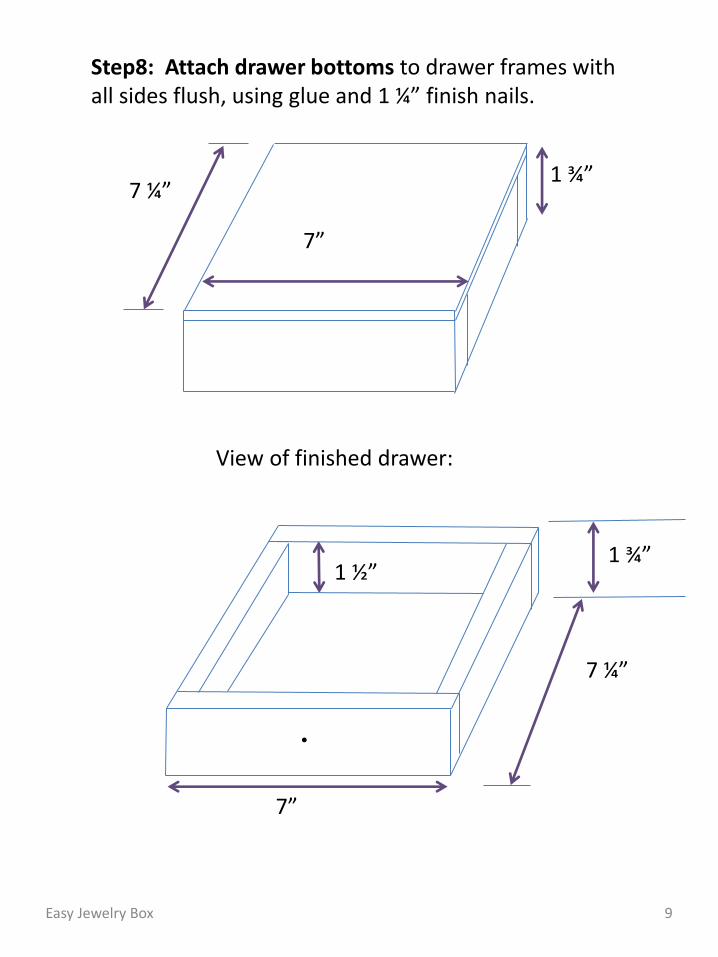
Step8: Attach drawer bottoms to drawer frames with all sides flush, using glue and 1 ¼” finish nails.
View of finished drawer:
9 Easy Jewelry Box
1 ¾”
7”
7 ¼”
7”
1 ½”
Step 9: Finish dresser box and drawers. Fill all holes with wood filler and let dry. Apply additional coats of wood filler as needed. When wood filler is completely dry, sand the project in the direction of the wood grain with 120 grit sandpaper. Vacuum sanded project to remove sanding residue. Remove all sanding residue on work surfaces as well. Wipe project clean with damp cloth. It is always recommended to apply a test coat on a hidden area or scrap piece to ensure color evenness and adhesion. Use primer or wood conditioner as needed. Paint or Stain to desired finish. Note : no need to paint or stain box and drawer bottoms, and inside drawer bottoms – these will be covered with felt. Idea: if you want to completely hide the plywood edge on the drawer fronts with a wood grain, you could apply some 2” edge banding to cover the whole drawer front. Follow package directions if you add edge banding. Allow the finish to dry thoroughly before applying the felt.
10 Easy Jewelry Box
Easy Jewelry Box 11
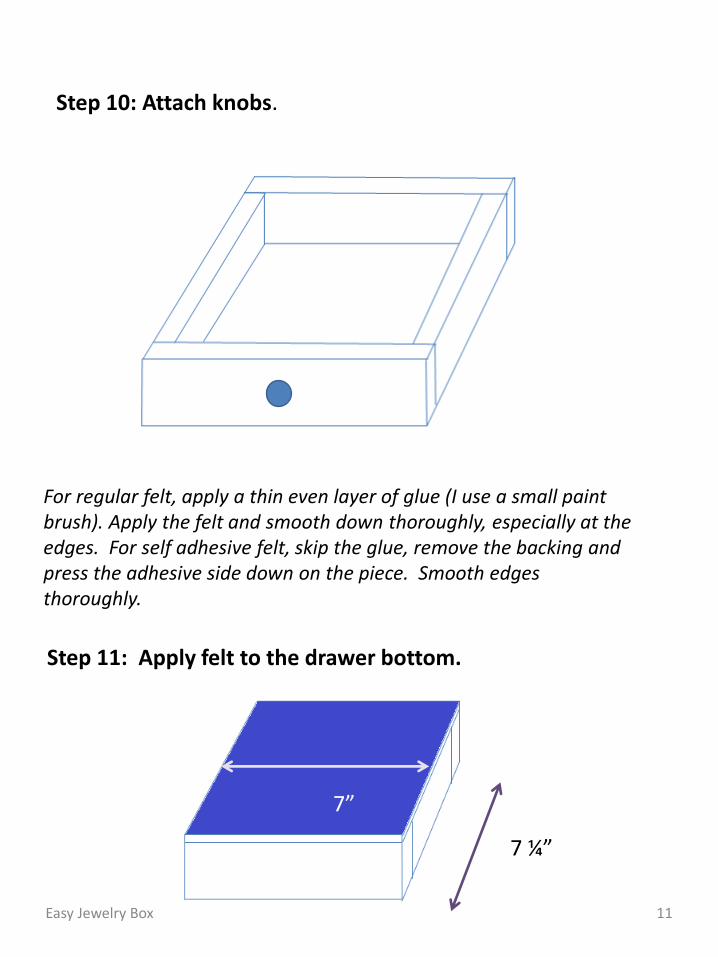
Step 10: Attach knobs.
For regular felt, apply a thin even layer of glue (I use a small paint brush). Apply the felt and smooth down thoroughly, especially at the edges. For self adhesive felt, skip the glue, remove the backing and press the adhesive side down on the piece. Smooth edges thoroughly.
7” 7”
7 ¼”
Step 11: Apply felt to the drawer bottom.
Easy Jewelry Box 12
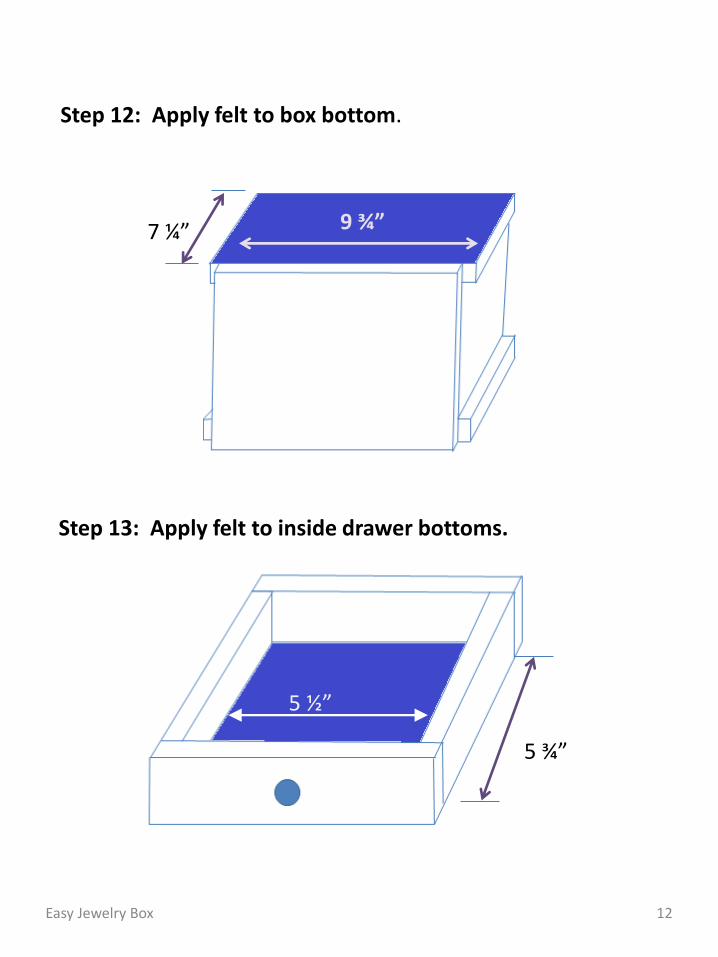
Step 12: Apply felt to box bottom.
Step 13: Apply felt to inside drawer bottoms.
5 ¾”
5 ½”
9 ¾” 7 ¼”
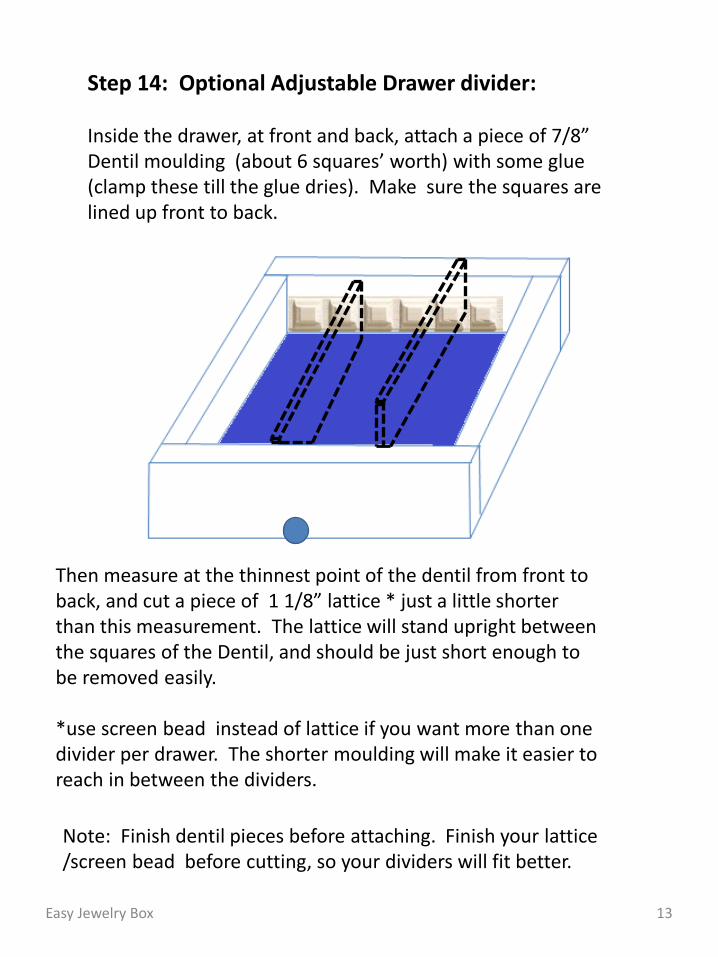
Step 14: Optional Adjustable Drawer divider: Inside the drawer, at front and back, attach a piece of 7/8” Dentil moulding (about 6 squares’ worth) with some glue (clamp these till the glue dries). Make sure the squares are lined up front to back.
Then measure at the thinnest point of the dentil from front to back, and cut a piece of 1 1/8” lattice * just a little shorter than this measurement. The lattice will stand upright between the squares of the Dentil, and should be just short enough to be removed easily. *use screen bead instead of lattice if you want more than one divider per drawer. The shorter moulding will make it easier to reach in between the dividers.
Note: Finish dentil pieces before attaching. Finish your lattice /screen bead before cutting, so your dividers will fit better.
13 Easy Jewelry Box
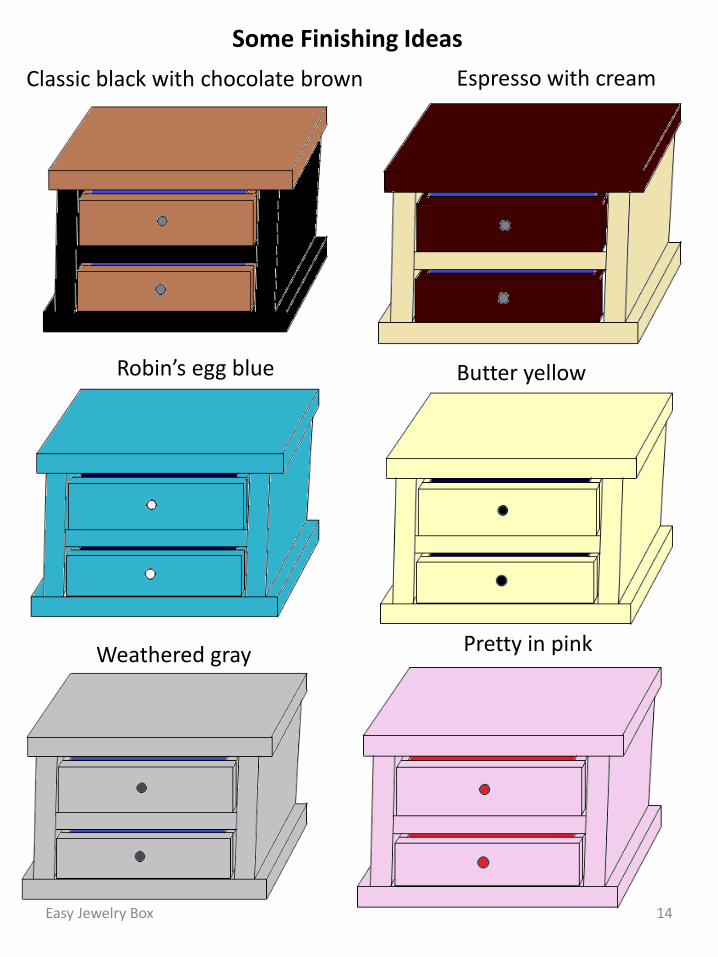
Some Finishing Ideas
Classic black with chocolate brown Espresso with cream
Robin’s egg blue Butter yellow
Weathered gray Pretty in pink
14 Easy Jewelry Box