earthquake engineering modules for k-12 education · earthquake engineering modules for k-12...
TRANSCRIPT

Earthquake Engineering Modules for K-12 Education
Developed at:
Washington University in Saint Louis
By: Waleed Barnawi, Shirley Dyke, Kevin Truman, Ellen Taylor, Leif Johnson
Edited by: Daniel Payne
March 26, 2007 This document documents a teaching module containing a series of lessons that are appropriate for educating K-12 students in fundamental engineering principles. The lessons have been developed over the course of several years, expanded upon and refined. In principle, any of the ‘modules’ could be used as a stand alone, one-time lesson to supplement one specific academic area such as forces and vectors or building fundamentals. Alternatively, the full module could be used as a continuous series of lessons over a 8-10 week period. Supplemental worksheets, learning activities and presentations are included herein to provide a great deal of the lesson’s substance and opportunities for active learning. Lessons 1-6 culminate in Lesson 7’s design project. Teams of students will design and construct a balsawood building. A scorecard is provided for students to encourage them to be creative and yet understand practical issues associated with construction and design. If a shake table is available, the project can also become a seismic design demonstration. Ideally this module, presented as a whole or individually, will satisfy some of the educational requirements and standards of the classroom in which it is offered. Acknowledgments Funding for the development of this module has been provided in part by the National Science Foundation GK12 Grants No. DGE-0138624, DGE-0538541 and CMS-0530737. Special thanks is also given to the teachers in the St. Louis area that have contributed to this module.

Table of Contents Lesson 1: Who are Engineers, and What Do They Do? Lesson 2: Basics of Buildings Lesson 3: Forces and Vectors Lesson 4: Forces become Loads Lesson 5: Strength of Materials Lesson 6: Shapes and Orientations Lesson 7: Design Project Explanation

K-12 Earthquake Engineering Education
1
LESSON 1: Who are Engineers, & What Do They Do? Suggested grade levels: All grades. Duration: 3 hours Goals for this lesson:
Form a connection with the students. Excite students and entice their interest. Students will:
• be able to explain what an engineer does to their parents and peers • be able to give examples of engineering in the world around them • be able to point out engineered objects • understand that working professionals often work in groups
Activities:
Newspaper Tower, see handout. Purpose: teambuilding and introducing engineering thinking.
Outline of Lesson:
I. Introductions II. Engineering
a. What do students already know about engineers? b. Offer stereotypes (possibilities below)
i. Nerdy ii. Awkward
iii. Male iv. Only care about math
c. Challenge stereotypes i. Many different kinds of people are engineers, all races, genders,
classes and countries. ii. Numbers, one of the most populous jobs.
iii. Most are just regular people who do all the same things the students do.
d. Note that engineers build different kinds of things related to everyday life. i. Cars
ii. Buildings

K-12 Earthquake Engineering Education
2
iii. Airplanes iv. Computers v. Cell phones
III. Learning Activity: Newspaper Tower a. Tell students how they’ll be graded. If they’re mature enough, show them the
rubric you’ll use. b. See Student Handout
IV. Closing a. If you will continue to use the lessons in this module, give each student a
paper folder in which to keep their materials. b. Point out that they’ve now done a little engineering themselves. c. Have the students each write 2-3 sentences about the activity including
i. Whether they liked it or not ii. And why.
d. Have the students finish the sentence “Engineers are important in society because they…”
e. If returning, be sure to tell them when and what to have with them next session.
K-12 Earthquake Engineering Education
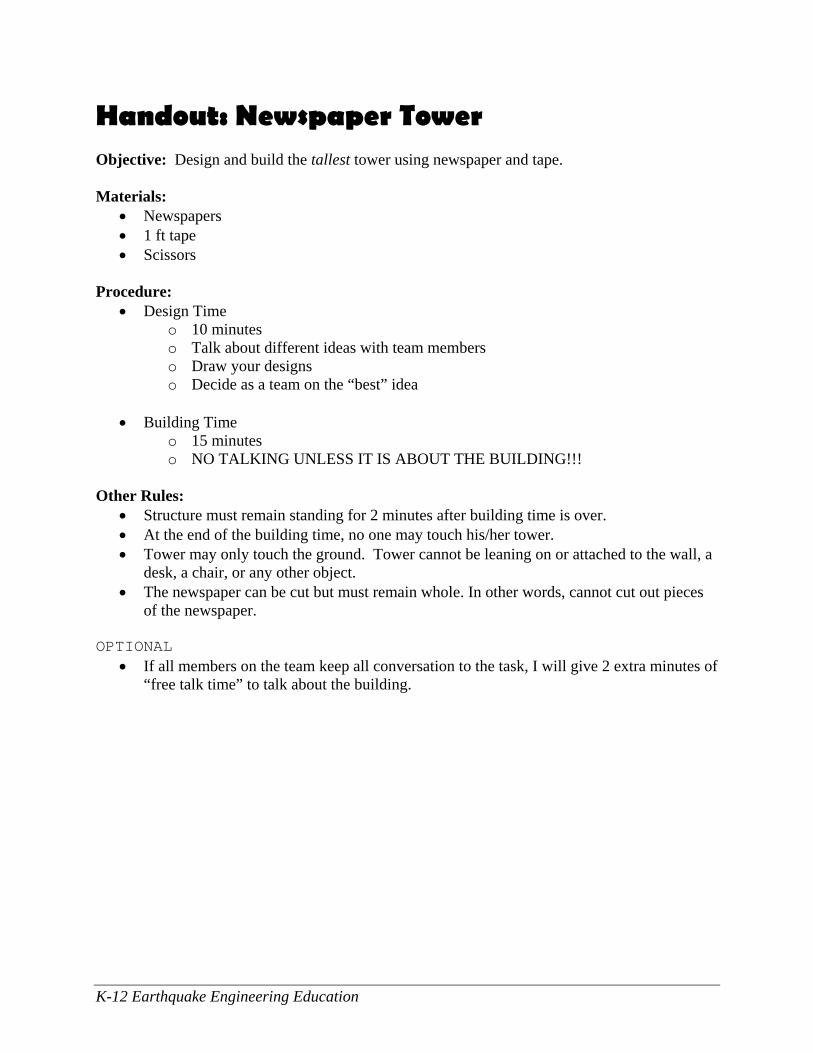
Handout: Newspaper Tower Objective: Design and build the tallest tower using newspaper and tape. Materials:
• Newspapers • 1 ft tape • Scissors
Procedure:
• Design Time o 10 minutes o Talk about different ideas with team members o Draw your designs o Decide as a team on the “best” idea
• Building Time o 15 minutes o NO TALKING UNLESS IT IS ABOUT THE BUILDING!!!
Other Rules:
• Structure must remain standing for 2 minutes after building time is over. • At the end of the building time, no one may touch his/her tower. • Tower may only touch the ground. Tower cannot be leaning on or attached to the wall, a
desk, a chair, or any other object. • The newspaper can be cut but must remain whole. In other words, cannot cut out pieces
of the newspaper. OPTIONAL
• If all members on the team keep all conversation to the task, I will give 2 extra minutes of “free talk time” to talk about the building.

K-12 Earthquake Engineering Education 3
Lesson 2: Basics of Buildings Suggested grade levels: Grades 3 and up Duration: 3 hours Goals for this lesson: Outline the basics of buildings including types, parts and construction Students will
• be able to name and point out several types of buildings • be able to name and point out basic building components • be able to explain to their peers and parents how a building
is constructed from the ground up out of those components • work in groups to accomplish a small project
Activities: K’nex Building Assembly, see student handout
Purpose: Similar to Newspaper Tower from Lesson 1, this activity is both an engineering learning experience and a team-building exercise.
Materials: K’nex
Handout, K’nex Building Handout, Terms Worksheet Handout, Basics of Buildings Worksheet Presentation, Building Basics (Please refer to Appendix) Outline of Lesson: I. Hand out “Terms” Worksheet
a. If you’ll continue to use the lessons in this module, this worksheet should be kept in student folders. It will be used in nearly every remaining lesson.
II. Building Basics Presentation a. Types b. Essential parts c. Constructing a building
NOTE: This is a good opportunity for the instructor to adapt the lessons in this module to their locality by finding pictures of well-known local buildings to include in the presentation. (For example the Arch in St. Louis)
III. Reiteration:

K-12 Earthquake Engineering Education 4
a. What are some types of buildings? i. Skyscrapers
ii. Religious Centers iii. Shopping malls
b. Buildings are composed of essential parts (beams, columns). What are these? i. Ask students to point out examples of these in their own classroom.
c. Starting from the bottom, how are buildings constructed? IV. Learning Activity: K’nex Building
a. Tell students how they’ll be graded. If they’re mature enough, show them the rubric you’ll use.
b. See Handout V. Closing
a. Review again, briefly, the material covered in the lesson. b. Give students Basics of Buildings handout.
i. Collect today or ii. Collect next session
c. Have the students each write 2-3 sentences about the activity including i. Whether they liked it or not
ii. And why. d. Have them write 2-3 more sentences about how the material from class helped them
in the K’nex Learning Activity. e. Point out to the students that they now have the basics for understanding buildings. f. If you’ll continue to use these lessons, tell students that they’re now ready to begin to
learn how to make the buildings stand up (Lesson 3).

K-12 Earthquake Engineering Education
Lesson 2 Name: ________________ Handout: Terms Worksheet Date: _________________ Term: Definition: Examples (2)
Beam
Girder
Column
Force
Static
Dynamic
Vector
Structurally sound
Load
Dead Load
Live Load
Horizontal Load
Bracing

K-12 Earthquake Engineering Education
Failure (building)
Tension
Compression
Moment (bending)
Torsion
Ductile
Brittle
Stress

K-12 Earthquake Engineering Education
Lesson 2: Name: ________________ Handout: Terms Worksheet (Teacher’s Copy) Date: _________________
Term: Definition: Examples(2): Beam Horizontal members of buildings that Steel I Beams support floors Wooden beam
Girder* Horizontal members of a building that Wooden girders in building
run perpendicular to beams that support presentation those beams
Column Vertical members of a building that support Underpass pier in column
beams, girders, and floors presentation
Steel column in building pres.
Force The influence on an object that produces a Sitting in chair
change in a physical quantity Pushing a book
Static Unchanging Walls Floor
Dynamic Changing or moving Book Planet Vector Direction North South
Structurally sound Used to describe structures that are N/A well engineered
Load Force that acts on an object N/A
Dead load An unmoving, ever present force on an Floor object Roof
Live load A force on an object that can be moved, but Desk
usually stays put for some time People
Horizontal loads A force that pushes on a structure in a Wind horizontal direction Earthquakes
Bracing* Reinforcement against lateral loads Drawing in the lateral bracing

K-12 Earthquake Engineering Education
Failure (building) Used to describe structures that break N/A down Tension A force on an object that is directed to Rubber band produce a strain or extension Tug of War Compression A force on an object that is directed to Garbage truck produce a shrinking or contraction Crushing a soda pop can Moment (bending) A force on an object that is directed to Bending a spoon produce a folding motion Bending a paper clip Torsion A force on an object that is directed to Cranking a jack in the box produce a twisting motion Turning a screw Ductile* After behaving elastically, the material behaves plastically for a while Brittle* After behaving elastically, the material fails suddenly and without warning Stress A force over an area N/A

K-12 Earthquake Engineering Education
Lesson 2 Name: ________________ Date: _________________
Handout: K’nexTM Building Objective: Design and create a small building that is stable and really nice to look at. Materials:
• 30 Cog-like pieces • 36 Members
Procedure:
• Design Time o 10 minutes o Talk about different ideas with team members. o Draw your designs. o Decide as a team on the “best” idea.
• Building Time
o 15 minutes Other Rules:
• Building must remain standing for 2 minutes after building time is over.
K-12 Earthquake Engineering Education
Lesson 2 Name: ________________ Date: _________________
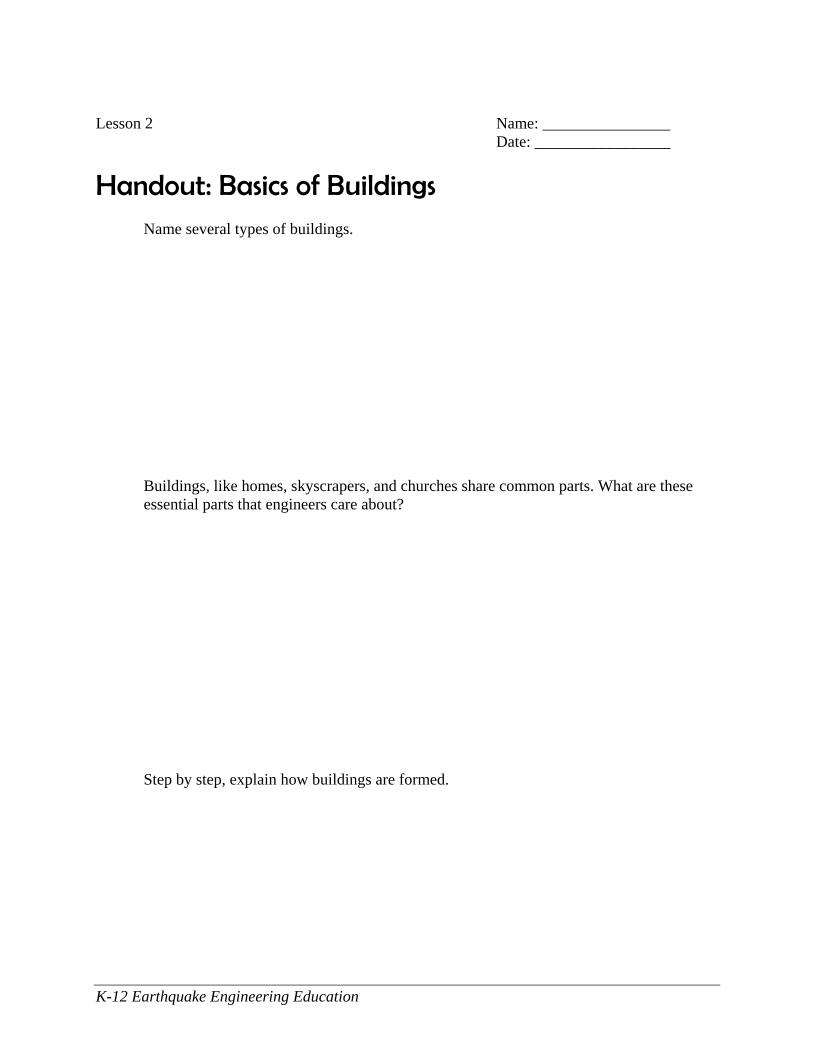
Handout: Basics of Buildings
Name several types of buildings. Buildings, like homes, skyscrapers, and churches share common parts. What are these essential parts that engineers care about? Step by step, explain how buildings are formed.

K-12 Earthquake Engineering Education 5
Lesson 3: Forces and Vectors Suggested grade levels: Grades 8 and up Duration: 3 hours Goals for this lesson: Students will
• learn and be able to explain o the concept of force o the difference between static and dynamic forces o the concept of vectors
• be able to demonstrate an intuitive understanding of how these concepts apply, particularly to buildings.
Activities: Learning Activity: Ring of Equilibrium, see below Materials: Handout, Terms Worksheet (See Lesson 2) Learning Activity: Ring of Equilibrium
Description: You make an unstable platform (the large disc in Figure 1) and place a ring with various weights hanging off it in the middle of the platform. As you move the ring around the platform, the platform will tilt and fall or remain horizontal depending on the loading. You can also add washers or marbles to the suspended weights (pictured as boxes) to unbalance the platform. This activity teaches the importance of balance and location of weights (vectors).
Figure 1: Example of Ring of Equilibrium Activity

K-12 Earthquake Engineering Education 6
Outline of Lesson:
I. Begin by reviewing material from Lesson 2: Basics of Buildings a. Types, parts and construction. b. Collect Basics of Buildings Worksheet if you assigned it. c. If you are using this as a stand-alone model, review Lesson 2 and point out to
your students the basic parts of the building around them. d. Tell students that now that they know the basic parts of a building, they’re
ready to learn the “science behind the construction”. II. Forces and Vectors:
a. Address misconceptions: ask students what is a force b. Have students get out their Terms Worksheet (pass out if necessary) c. Define Force
i. That which can impose a change in velocity on an object ii. Example: Car (mass) speeding up (acceleration), throwing a ball
iii. Note that this must be a material body; wind blowing is NOT a force, but wind blowing on a body IS.
d. Define Dynamic i. Changing with time, or moving
ii. Example: Pushing a book on a desk. If it were a boulder, we couldn’t actually move it.
e. Define Static i. Unchanging
ii. Example: Pushing one’s own hands together with equal force. iii. Elaborate how the forces are equal but opposite. iv. Example: Chair and legs. With advanced students, do a math problem
to demonstrate this concept. (Person in middle, each leg pushing up with ¼ of person’s weight).
v. Learning Activity: Ring of Equilibrium. 1. Use ring to demonstrate equilibrium and static forces. Ask
advanced students (secondary level) to explain mathematically or intuitively what is happening.
f. Define Vector i. Directional quantity
ii. Example: Pushing one’s hands together, again. III. Review
a. If time allows, review each of these terms. b. Ask students to explain them to you, practical examples to demonstrate
understanding can be stressed. IV. Closing
a. Discussion: What are some forces on buildings? i. People and objects inside buildings
ii. Self-weight of building iii. Environmental loads such as wind, snow, and earthquakes

K-12 Earthquake Engineering Education 7
iv. Impact, such as 9/11. NOTE: If the teacher desires, this could be a jumping-off point for a discussion of the role of engineers in society.
b. If you will continue with the lessons, tell students what to expect next time. Tell them
i. when you’ll be returning, ii. what you’ll be covering
1. How forces and vectors apply to buildings iii. what they should have ready for class.

K-12 Earthquake Engineering Education 8
LESSON 4: Forces Become Loads Suggested grade levels: Grades 8 and up Duration: 3 hours Goals for this lesson:
Engage students with dramatic presentation of local buildings and global disasters leading to structural failure.
Students will:
• Have an understanding that both the engineering soundness and aesthetic appeal of a building are important
• Be able to explain to their peers what loads are and identify some different types of loads
• Be able to explain to their peers the concept of structural failure and name some environmental causes of structural failure such as earthquakes and wind.
• Begin to think about how these concepts could be applied to their own end-of-term project.
Activities:
Discussion: Aesthetics The instructor can make learning familiar and local by making a slide show or picture presentation of 10-15 local buildings that the students will recognize. The students will narrow down the pool to the top 3-5 “nicest-looking” buildings.
Video: Earthquakes, hurricanes, tornados, etc. The instructor should find a few online videos (www.youtube.com) showing earthquakes, tornados, hurricanes, mudslides or any other natural phenomena often responsible for building failure. The instructor may want to choose a disaster which often strikes the students’ region. The video of the Tacoma Narrows Bridge collapse is often popular with students. Another interesting example is the collapse of the walkway in Kansas City. (http://en.wikipedia.org/wiki/Hyatt_Regency_walkway_collapse).
Learning Activity: Breaking the model Requires that a balsa wood structure be made before this lesson is presented. If the students will complete the design project presented in Lesson 7, this structure should be similar in size to those which the students will build.
K-12 Earthquake Engineering Education 9
Materials: Handout, Terms worksheet Presentation, Local aesthetics Video, environmental loadings and overloading Balsa wood structure of any size. Presentation, Engineering Loads (Please refer to Appendix) Outline of Lesson:
I. Review of Lesson 3: Forces and Vectors: a. Refresh students’ memories by going over terms on the Terms Worksheet
which were covered in Lesson 3. b. If you are using Lesson 4 as a stand-alone lesson, be sure that your students
are familiar with the topics presented in Lesson 3. II. Discussion: Aesthetics
a. Building isn’t all math and science, use this activity to expand students thinking about a design process.
b. How much a building is enjoyed depends on the engineering, but it also depends on how cool it is to look at or be in.
III. Forces become Loads a. Transition: But what good is a building that’s nice to look at but falls down? b. How do we keep that from happening? c. Reiterate/Review Beams and Columns d. Define Structurally Sound
i. Used to describe structures that are well engineered and will not easily fall down.
e. Define Load i. Force that acts on an object, an engineer’s word for force
ii. Engineering Loads Presentation IV. Failure
a. Learning Activity: Breaking the model i. By applying successively larger loads with something in the
classroom, break your model. (Books work well for this) b. Define Failure:
i. Used to describe what happens when a structure breaks down. ii. Example: The balsawood structure broken from the weights. Mention
earthquake forces could have also caused the building to fail. V. Closing
a. Briefly review terms learned today. b. Ask students what the most interesting part of the lesson was. c. Have students write 2-3 sentences about why they think the building failed
using what they’ve learned so far. d. What could have been changed about the structure to help it hold more
weight? 1-2 sentences.

K-12 Earthquake Engineering Education 10
LESSON 5: Strength of Materials Suggested grade levels: Grades 8 and up Duration: 3 hours Goals for this lesson:
Students will: • be able to explain the what is meant by “strength of materials” from an intuitive
perspective • more advanced students will also be able to explain the same with the concepts of
force, area and stress • be able to identify materials which have a higher or lower relative strengths
Activities: Learning Activity: Strength of Materials Worksheet Learning Activity: Materials Pros and Cons Worksheet Materials: Handout, Strength of Materials Worksheet Handout, Materials Pros and Cons Worksheet Note: A teacher copy is included for both of these worksheets. Outline of Lesson:
I. Review a. Begin by reviewing concepts from Lesson 4: Forces become Loads. b. If you are using this lesson as a stand-alone lesson, Lesson 4 may be helpful,
but is not a necessary to do before this one. II. Strength of Materials (intuitive)
a. Tell students that many of them have already learned this fundamental engineering principle when they were kids
i. The heavier the material, the more time and effort it takes to build with it
ii. But the heavier the material, the more protection it offers iii. Story of the Three Little Pigs

K-12 Earthquake Engineering Education 11
iv. Draw connection between the Big Bad Wolf in the story and hurricane winds in real life.
b. Ask students what building materials they’ve seen used in real life besides the ones in the story.
c. Learning Activity: Strength of Materials Worksheet d. Learning Activity: Materials Pros and Cons Worksheet
III. Strength of Materials (mathematical) a. The strength of a material is defined mathematically using the concept of
stress. b. Define Stress:
i. A force over an area ii. Engineers are concerned with the maximum stress a material can
handle. iii. Example: Would it hurt more to push on my hand with my finger or
with a needle with the same force? c. A small area gives a big stress
i. Mathematical examples ii. The more loads are spread out, the less stress there is, and the more a
given material will resist failure. (Building Hint) IV. Closing
a. Review concepts from today. i. Have students explain what strength of materials means using practical
every day examples. ii. Have students write 2-3 sentences about each of the following
1. Did the worksheets help explain anything about engineering? 2. Were there any parts they really liked? 3. Were there any they really hated?
iii. Have students finish this sentence: “ I don’t think it’s a good idea to stack all the TV’s on that one spot on the board because …”
b. If you will continue with the lessons, tell students what to expect next time. Tell them
i. when you’ll be returning, ii. what you’ll be covering
1. How forces and vectors apply to buildings iii. what they should have ready for class.

K-12 Earthquake Engineering Education
Lesson 5 Name: ________________ Date: _________________
Handout: Strength of Materials Draw a picture of each type of force:
Tension Compression
Moment Torsion
Tension “pull on force” Play-doh™ vs. rubber band What happens as you stretch it? Does it stretch far? How do we know what good/bad tension is? Which is better in tension? Compression “push on force” Play-doh™ vs. rubber band What happens as you push on it? Does it push down far? How do we know what good/bad compression is? Which is better in compression?

K-12 Earthquake Engineering Education
Moment “bending force” Play-dough vs. pencil What happens when you bend it? What is happening at the top and bottom of the play dough? How do we know what good/bad bending is? Which bends more? Torsion “twisting force” Hand vs. screwdriver What happens when you twist it? Which way is better to twist the screw? Why?

K-12 Earthquake Engineering Education
Lesson 5 Name: ________________ Date: _________________
Handout: Strength of Materials (Teacher’s Copy) Draw a picture of each type of force:
Tension Compression
Moment Torsion
Tension “pull on force” Play dough vs. rubber band Explain what tension is for terms and do box. Tension- A force on an object that is directed to produce a strain or extension What happens as you stretch it? Does it stretch far? How do we know what good/bad tension is? Which is better in tension?

K-12 Earthquake Engineering Education
Compression “push on force” Play dough vs. rubber band Explain what compression is and do box. Compression- A force on an object that is directed to produce a shrinking or contraction What happens as you push on it? Does it push down far? How do we know what good/bad compression is? Which is better in compression? Moment “bending force” Play dough vs. pencil Explain what bending moment is and do box. After second question, explain that bending is comprised of two parts: tension and compression. Moment- A force on an object that is directed to produce a folding motion What happens when you bend it? What is happening at the top and bottom of the play dough? How do we know what good/bad bending is? Which bends more? Torsion “twisting force” Hand vs. screwdriver Explain what torsion is and do box Torsion- A force on an object that is directed to produce a twisting motion Get two volunteers. Have one use their hand and the other use a screwdriver. What happens when you twist it? Which way is better to twist the screw? Why?

K-12 Earthquake Engineering Education
Lesson 5 Name: ________________ Date: _________________
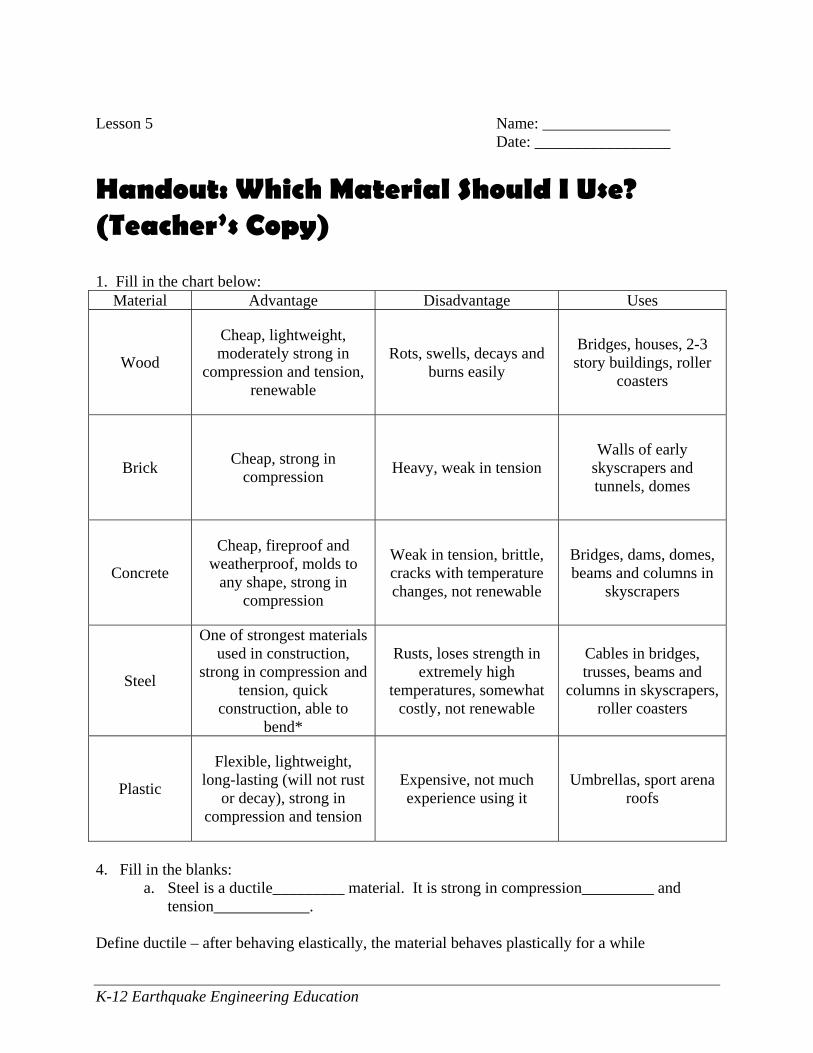
Which Material Should I Use? Important note: Building materials and forces are important factors for engineers to know because it helps them properly design buildings and machines.
1. Fill in the chart below:
Material Advantage Disadvantage Uses
Wood
Brick
Concrete
Steel
Plastic
2. Fill in the blanks:
a. Steel is a __________________ material. It is strong in ___________________ and ________________.

K-12 Earthquake Engineering Education
b. Concrete is a __________________ material. It is strong in ________________, but
weak in tension. (This is why steel reinforcing bars are put into concrete structures.)
c. Wood can be considered a re________________ material. 3. If you were asked to design a bumper on a highway, would you make it out of a ductile or
brittle material? Why?
K-12 Earthquake Engineering Education
Lesson 5 Name: ________________ Date: _________________
Handout: Which Material Should I Use? (Teacher’s Copy)
1. Fill in the chart below:
Material Advantage Disadvantage Uses
Wood
Cheap, lightweight, moderately strong in
compression and tension, renewable
Rots, swells, decays and burns easily
Bridges, houses, 2-3 story buildings, roller
coasters
Brick Cheap, strong in compression Heavy, weak in tension
Walls of early skyscrapers and tunnels, domes
Concrete
Cheap, fireproof and weatherproof, molds to
any shape, strong in compression
Weak in tension, brittle, cracks with temperature changes, not renewable
Bridges, dams, domes, beams and columns in
skyscrapers
Steel
One of strongest materials used in construction,
strong in compression and tension, quick
construction, able to bend*
Rusts, loses strength in extremely high
temperatures, somewhat costly, not renewable
Cables in bridges, trusses, beams and
columns in skyscrapers, roller coasters
Plastic
Flexible, lightweight, long-lasting (will not rust
or decay), strong in compression and tension
Expensive, not much experience using it
Umbrellas, sport arena roofs
4. Fill in the blanks:
a. Steel is a ductile_________ material. It is strong in compression_________ and tension____________.
Define ductile – after behaving elastically, the material behaves plastically for a while

K-12 Earthquake Engineering Education
b. Concrete is a brittle________ material. It is strong in compression____________,
but weak in tension. (This is why steel reinforcing bars are put into concrete structures.)
Define brittle – after behaving elastically, the material fails suddenly and without warning
c. Wood can be considered a renewable___________ material. 5. If you were asked to design a bumper on a highway, would you make it out of a ductile or
brittle material? Why?
K-12 Earthquake Engineering Education 12
LESSON 6: Shapes and Orientations Suggested grade levels: Grades 8 and up Duration: 3 hours Goals for this lesson: Students will:
• be able to demonstrate an intuitive understanding of the effects of the following on a members ability to carry loads:
o Shape o Orientation o Cross sectional area o Moment of Inertia
• recognize that the design of building structures is mathematical and rigorous. • be able to visually identify columns, beams and a few other selected structural
elements Note: This lesson is the most advanced and conceptually difficult of the first 6 lessons, and some alteration may be necessary before it will be accessible to pre-secondary students.
Activities: Learning Activity, Shapes and Orientations, see Worksheet Learning Activity, Bending a Yardstick and Dowel
Description: Have student volunteers bend a yardstick about its strong and weak axis to demonstrate the concept of moment of inertia and orientation of cross-section. Then have them bend a cylindrical wooden dowel.
Learning Activity, Moment of Inertia, see Worksheet Learning Activity, Shapes and Orientations of Equal Strength, see Worksheet Materials: Handout, Shapes and Orientations Worksheet Wooden or Metal Yardstick
Handout, Moment of Inertia Worksheet Handout, Shapes and Orientations of Equal Strength

K-12 Earthquake Engineering Education 13
Presentation, Building Basics (Please refer to Appendix) Presentation, Beams and Columns (Please refer to Appendix)
Pictures of a Truss Bridge 3 simple 12” long bridges (cardboard was used for original design) Outline of Lesson:
I. Review of previous lesson(s) a. Simply ask students to tell you what they studied. b. It may help to ask specific students, to make sure everyone has understood the
material so far. c. If you are using this as a stand-alone lesson, Lesson 5: Strength of Materials,
is not absolutely necessary to impart the lessons of this lesson. II. Shapes in buildings
a. Building Basics presentation i. What types of shapes do the students see in the buildings?
ii. Most common building shapes are triangles, rectangles and squares. Show pictures of bridge trusses here. (Project hint)
iii. Shapes and their arrangements are very important in how loads get distributed through a building
b. Learning Activity: Shapes and Orientations i. Explain the force distribution of the two shapes, pointing out the lack
of bracing in the square. ii. Point out how triangles are good shapes for stability and bracing
(Project hint) c. Ask students if they know of anyone in history who used triangles a lot.
i. Egyptians, Pyramids ii. Why did we stop building like them?
iii. Difficult angles, time-consuming, cost, space iv. Squares can be reinforced with triangles as needed.
1. Show them pictures of a truss bridge. III. Cross Sections
a. Like shapes and orientations, cross sections are important too. i. Explain Cross-section
ii. Learning Activity: Bending of Yardstick and Dowel 1. Which way was easier? 2. Ask students why they think that is.
b. Explain concept of moment of inertia i. Weak and strong axes
ii. Learning Activity: Moment of Inertia c. Note that the shapes from the Yardstick/Dowel demonstration are used every
day in construction IV. Beams, Columns and Equal Strength
a. Presentation: Beams and Columns b. Learning Activity: Shapes of Equal Strength
V. Closing

K-12 Earthquake Engineering Education 14
a. Congratulations to students, if they have completed Lessons 1-6, they have the fundamentals to begin the term-project described in Lesson 7.
b. Have the students write 2-3 sentences on how the activities helped them learn about shapes in buildings.
c. If you will continue with the lessons, tell students what to expect next time. Tell them
i. when you’ll be returning, ii. what you’ll be covering
1. How forces and vectors apply to buildings iii. what they should have ready for class.

K-12 Earthquake Engineering Education
Lesson 6 Name: ________________ Date: _________________
Handout: Shapes and Orientation
Objective: Discover which shape is more stable, a square or a triangle? You'll test the stability of a triangle and a square by standing them on a table and pressing on them. The one that changes shape less is more stable.
Materials: What You Will Need • 7 drinking straws • 14 paper clips
Procedure:
Make a Prediction Predict which shape will be more stable. Why do you think so? ______________________________________________________
Try It 1. With your partner, build a triangle and a square from the straws and paper clips. To connect two straws, slip the wide end of a paper clip into the end of one straw. Hook a second paper clip to the first. Now insert the wide end of the second clip into a second straw.
2. Compare the stability of the shapes. Stand each shape up and press down on the top corner. What happens? How much does each one bend and twist? How hard can you press down on each shape before it collapses?
Explain It Compare the results of your tests on the triangle and square. Which shape was more stable? ______________________________________________________

K-12 Earthquake Engineering Education
What do you think made it more stable? ______________________________________________________
How might this shape be used in large structures? ______________________________________________________ ______________________________________________________ Build On It Can you reinforce the less stable shape by adding no more than 2 straws and 4 paper clips?

K-12 Earthquake Engineering Education
Lesson 6 Name: ________________ Date: _________________
Handout: Moment of Inertia Exercise
In the world of construction, it is not feasible to check every beam and see if its right for the job, but it is still in engineer’s job to make sure the right beam is being used. We have gone over bending moment and therefore have an idea, in respect to bending about the ends, where to put an object to reduce bending. However, not all beams are the same, and choosing the wrong beam could result in lost lives and legal actions. This exercise is to introduce a new concept involved in choosing the right beam. This new concept is the area moment of inertia. Simply called the moment of inertia by civil engineers, the moment of inertia is a property of a shape that is used to resist bending and deflection. It is also analogous to the polar moment of inertia, which characterizes an object’s ability to resist torsion (Wikipedia). Knowing this property is essential in choosing the right beam for the job. In a simplified case, if the weight is being placed on the same part of several beams that have the same length, the one with the highest moment of inertia will resist bending and torsion the most. For this exercise, use a ruler and calculator to find the moments of inertia (don’t forget your units) and rank the beam spans.
Moment of inertia formula (for rectangular cross section)
12
3hbI x⋅
=
b= width (x-dimension) h= height (y-dimension) Bridge Type Moment of inertia (in4) Rank Bridge 1 xI =___________ ____ Bridge 2 xI =___________ ____ Bridge 3 xI =___________ ____

K-12 Earthquake Engineering Education
Lesson 6 Name: ________________ Date: _________________
Handout: Shape and Orientation Equal Strength 1. You are a structural engineer designing a skyscraper. Put in dimensions. You can either use
steel I-shapes or solid cylinders for the columns. List the ONE MAIN advantage and disadvantage of each.
Choice Picture Advantage Disadvantage
I-shape
Solid Cylinder
2. When you made the triangle and square with the straws, which shape was stronger? How did
you make the weaker shape stronger?

K-12 Earthquake Engineering Education 15
LESSON 7: Earthquake Design Project Suggest grade levels: Grades 8 and up Duration: 3 hours Goals for this lesson: This is the final lesson of the Earthquake Engineering Module. Its major component, the Seismic Design Competition, is the culminating activity of everything the students have learned. Teams of 4-5 students will design a high-rise and construct it using balsa wood. The rules presented in “Design Project Rules” call for a 18” tall, 6” x 6” base structure, but the dimensions are adjustable. Students will demonstrate:
• understanding of basic scientific principles • knowledge of building fundamentals including
o structural elements o building formation o member design
• the ability to work together in teams Activities: Learning Activity, What If Worksheet and/or discussion Term Project, Design Exhibition Materials: Handout, Terms Worksheet Handout, What If… Worksheet Handout, Design Exhibition (term project) Balsa wood: Several bundles of ¼” x 1/8” pieces Base plates: 6”x 6” x ½” wood squares
Wood Glue, Rubber bands, Clamps, Pins Hot glue gun (for gluing to base plate only)

K-12 Earthquake Engineering Education 16
Outline of Lesson:
I. Review/Terms a. If you’ve been using all of the lessons, now is the time to make sure that each
student has a fundamental grasp of the concepts. i. Review each term on the Terms Worksheet
ii. Brush up on terms that students are weak on. b. If you have not been using the previous lessons, you may want to go over the
Terms Worksheet to ensure that the students have a sufficient understanding to complete the project.
i. This, however, is not necessary ii. Other educational materials can be substituted at this time with little-
to-no difficulty II. Engineering Practice
a. Learning Activity, What If… Worksheet i. Taylor the amount of help you give to the level of students
ii. You may want to use this worksheet as a way to gauge how prepared the students are for the project.
b. Introduce Design Exhibition i. Go over
1. Rules 2. Expected outcomes 3. Grading
ii. Split students into teams of 4-5 students each

K-12 Earthquake Engineering Education
Lesson 7 Name: ________________ Date: _________________
Handout: What If…. Scenario: You are a structural engineer responsible for the design of a tall building for a large electronics company (i.e. Microsoft, Apple). This building will store electronic equipment on all floors which you designed to be evenly distributed. After going through several design issues with your fellow engineers you think that erecting a concrete building with reinforced beams and columns is the best way to go. You also suggest that the building be shaped like a rectangle. In a meeting where you present your proposal, some of your fellow engineers look doubtful. They approach you after the meeting with several questions and suggestions. Upon hearing the suggestions, you shake your head furiously. You KNOW your design is the best for this project. Refute their questions with what you know about buildings, forces and loading, materials, shapes, and stresses. Use engineering terms and explain your answers using engineering terms to prove to them you are right. Engineer 1: “What if we try to put all of the equipment on the lower floors? This will clear up the top floors for free space” Engineer 2: “What if we stacked all of the equipment in one small area on the floor? We can make sure it doesn’t fall. This will give us more room on each floor” Engineer 3: “Concrete is expensive. What if we used timber and made the building out of wood?” Engineer 4: “What if we just used concrete and didn’t use the steel inside? This could save us money?

K-12 Earthquake Engineering Education
Engineer 1: “What if we used a triangular shape for the building? You know like the pyramids of Egypt. They’re still around.” Engineer 2: “What if we only used thin rectangular columns to save on money?” (Hint: You know that a strong wind blows on the flat side of the proposed columns)
K-12 Earthquake Engineering Education
Seismic Design Exhibition
Exhibition Rules
Materials needed: Balsa wood: Several bundles of ¼” x 1/8” pieces Wood Glue Base plates: 6”x 6” x ½” wood squares Optional:
Rubber bands Clamps Pins Hot glue gun (for gluing to base plate only) 1.0 Introduction The objectives of the seismic design exhibition is to provide K-12 school students with an opportunity to gain practical civil engineering experience by doing a hands on project designing and constructing a frame structure to withstand earthquake simulations. The exhibition will be held on ______________ in ___________ room. 2.0 Design Objective Your structural design team has been contracted by the city of San Francisco to design a high rise building (skyscraper). As you are a new company, the city council would like for you to first design and construct a scaled model to showcase your capabilities. This model will be subjected to normal building loads and earthquake loads to prove to the council it can withstand the worst possible conditions. Model dimension specifics: Note: These can be modified. Maximum number of floors: 3 levels Maximum building plan dimensions 6 inch square Floor height 6 inches Maximum height 18 inches Floors need not be actually constructed

K-12 Earthquake Engineering Education
3.0 Rules
3.1 Design 3.1.1 All teams are required to come up with a company name 3.1.2 Any number of designs can be used or thought through, but teams are only
required to submit 1 set of drawings for their design 3.1.3 All contributing members must have their signatures and company name
on all design sheets in order for them to count 3.1.4 All teams must provide a top view drawing for each floor unless all floors
are identical. If this is the case, the team must indicate on the drawing that this is for appropriate floors
3.1.5 All teams must provide at least 1 side view drawing of their building 3.1.6 All teams must provide dimensions on their drawings
3.2 Construction 3.2.1 All teams are required to use only balsa wood and wood glue as materials 3.2.2 No column is allowed to be longer than 6 inches, due to transportation
restrictions 3.2.3 No beam is allowed to be longer than 3 inches, due to transportation
restrictions 3.2.4 Allowable horizontal (lateral) force resisting systems include: diagonal
bracing, cross bracing, moment connections, and shear walls 3.2.5 Diagonal bracing can be in the vertical or horizontal plane. Bracing cannot
be in 3-D as this would obstruct a room. 3.2.6 Shear walls can be any height. Shear walls can be attached to the ends of
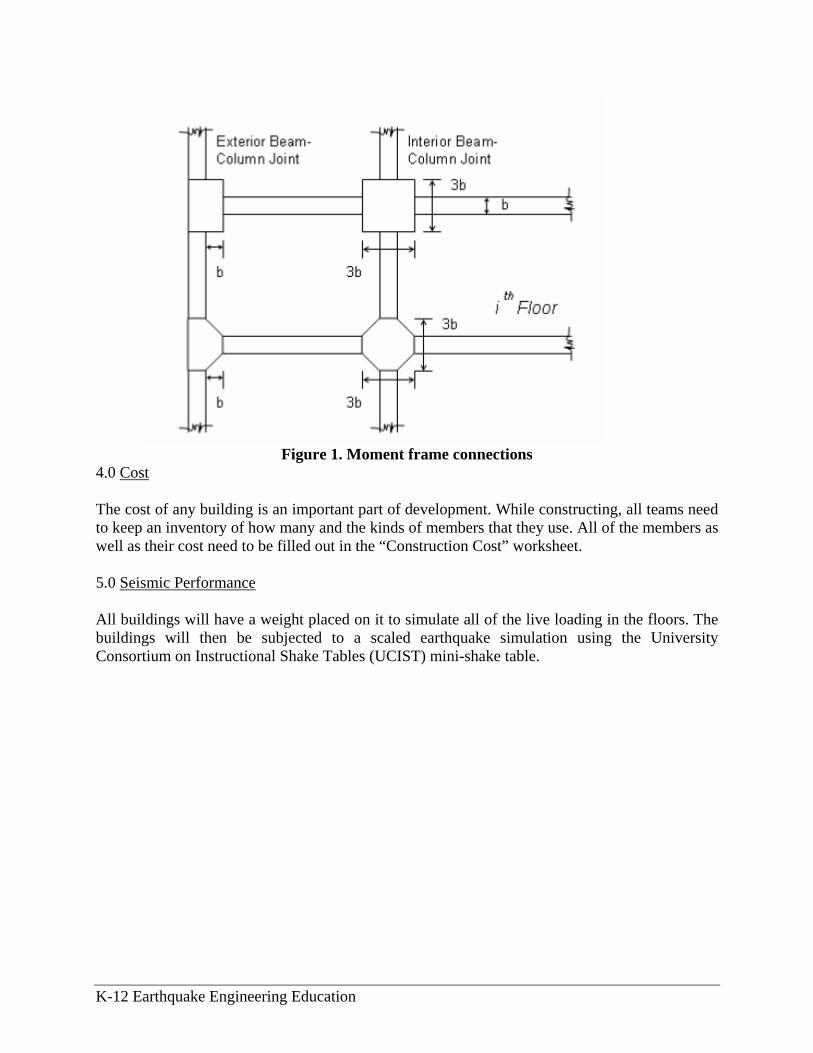
columns 3.2.7 The height and length of moment frame connections shall not exceed 3
times the maximum cross-section dimension of the members as shown in Figure 1.
3.2.8 All base plates will be provided for teams 3.2.9 The ground floor connections of the columns to the base plate will be
connected with hot glue 3.2.10 The top of the structure needs to have a flat portion in order to place
weights
3.3 Presentation 3.3.1 All teams will be required to give a 5 min oral presentation to a panel of
“council members”. The “council” will have 5 min to ask questions following the presentation
3.3.2 All presentations will be strongly encouraged to use Microsoft PowerPoint 3.3.3 All presentations must explain the design and construction process, give
the cost, and why the building is pleasing to look at
NOTE: The Presentation portion can be toned up or down to reduce the time necessary to complete the project.
K-12 Earthquake Engineering Education
Figure 1. Moment frame connections
4.0 Cost The cost of any building is an important part of development. While constructing, all teams need to keep an inventory of how many and the kinds of members that they use. All of the members as well as their cost need to be filled out in the “Construction Cost” worksheet. 5.0 Seismic Performance All buildings will have a weight placed on it to simulate all of the live loading in the floors. The buildings will then be subjected to a scaled earthquake simulation using the University Consortium on Instructional Shake Tables (UCIST) mini-shake table.

K-12 Earthquake Engineering Education
K-12 Earthquake Engineering Education
Appendix
Building Basics Presentation:

K-12 Earthquake Engineering Education
Building Basics Presentation:

K-12 Earthquake Engineering Education
Building Basics Presentation:

K-12 Earthquake Engineering Education
Building Basics Presentation:

K-12 Earthquake Engineering Education
Forces and Engineering Loads Presentation:

K-12 Earthquake Engineering Education
Forces and Engineering Loads Presentation:

K-12 Earthquake Engineering Education
Forces and Engineering Loads Presentation:

K-12 Earthquake Engineering Education
Beams and Columns Presentation:

K-12 Earthquake Engineering Education
Beams and Columns Presentation:
Other Relevant Resources
K.Z. Truman, A. Hurd, E. Taylor, and S.J. Dyke. “Structural Engineering in the Middle School Classroom: Building a Foundation in Math and Science,” Proceedings of the International Conference on Engineering Education, Puerto Rico, July 23–28, 2006.
S.J. Dyke, P. Vaziri and C. Roblee, “Execution of the Vision for NEES Education, Outreach and Training,” Proceedings of the International Conference on Engineering Education, Puerto Rico, July 23–28, 2006.
S.J. Dyke, S.M. Johnson, R.T. Ranf, J.M. Caicedo, and M. Soto-Fournier “Advancing Earthquake Engineering Education through a Cooperative Effort Based on Instructional Shake Tables,” Proceedings of the Seventh U.S. National Conference on Earthquake Engineering, Boston, Massachusetts, July 21–25, 2002.
S.J. Dyke and J.M. Caicedo, “The University Consortium of Instructional Shake Tables,“ Proceedings of the 2002 International Conference on Advances and New Challenges in Earthquake Engineering Research, Harbin and Hong Kong, August 15–20, 2002.
S.J. Dyke, B. Nepote, J.M. Caicedo, Scott Johnson and Euridice Oware, “Earthquake Engineering Education: A Modern Approach,” Proceedings of the American Society of Engineering Education, St. Louis, Missouri, June 18–21, 2000.