e-business intelligence front-end tool access to - ibm redbooks
TRANSCRIPT

ibm.com/redbooks
e-Business IntelligenceFront-End Tool Accessto OS/390 Data Warehouse
Viviane Anavi-ChaputKjell HanssonCharles Lewis
Cheryl Raitakari
QMF for Windows, DB2 OLAP Server Analyzer, and Brio connections to OS/390 DW
DB2 Connect database connection configurations
Selecting front-end user tools to interoperate with OS/390 DW
Front cover


e-Business IntelligenceFront-End Tool Accessto OS/390 Data Warehouse
May 2001
SG24-5688-00
International Technical Support Organization

© Copyright International Business Machines Corporation 2001. All rights reserved.Note to U.S Government Users – Documentation related to restricted rights – Use, duplication or disclosure is subject torestrictions set forth in GSA ADP Schedule Contract with IBM Corp.
First Edition (May 2001)
This edition applies to DB2 for OS/390 V7 for use with the OS/390 V2R8 Operating System
Comments may be addressed to:IBM Corporation, International Technical Support OrganizationDept. HYJ Mail Station P0992455 South RoadPoughkeepsie, NY 12601-5400
When you send information to IBM, you grant IBM a non-exclusive right to use or distribute the information in any way it believes appropriate without incurring any obligation to you.
Before using this information and the product it supports, be sure to read the general information in Appendix D, “Special notices” on page 161.
Take Note!

Contents
Preface . . . . . . . . . . . . . . . . . . . . . . . . . . . . . . . . . . . . . . . . . . . . . . . . . . . viiThe team that wrote this redbook. . . . . . . . . . . . . . . . . . . . . . . . . . . . . . . . . . . viiComments welcome. . . . . . . . . . . . . . . . . . . . . . . . . . . . . . . . . . . . . . . . . . . . . . ix
Chapter 1. e-BI front-end tool connectivity overview . . . . . . . . . . . . . . . 11.1 Who uses e-BI front-end tools? . . . . . . . . . . . . . . . . . . . . . . . . . . . . . . 1
1.1.1 Information providers . . . . . . . . . . . . . . . . . . . . . . . . . . . . . . . . . . 11.1.2 Information consumers . . . . . . . . . . . . . . . . . . . . . . . . . . . . . . . . . 2
1.2 IBM BI infrastructure components. . . . . . . . . . . . . . . . . . . . . . . . . . . . . 21.2.1 Access enablers . . . . . . . . . . . . . . . . . . . . . . . . . . . . . . . . . . . . . . 31.2.2 Decision support tools . . . . . . . . . . . . . . . . . . . . . . . . . . . . . . . . . 61.2.3 BI application solutions. . . . . . . . . . . . . . . . . . . . . . . . . . . . . . . . . 8
1.3 N-tier tool architectures . . . . . . . . . . . . . . . . . . . . . . . . . . . . . . . . . . . . 81.3.1 Logical n-tier. . . . . . . . . . . . . . . . . . . . . . . . . . . . . . . . . . . . . . . . . 81.3.2 Physical n-tier. . . . . . . . . . . . . . . . . . . . . . . . . . . . . . . . . . . . . . . . 9
1.4 Connection alternatives to the DB2 for OS/390 data warehouse. . . . . 111.4.1 Two-tier connections . . . . . . . . . . . . . . . . . . . . . . . . . . . . . . . . . 121.4.2 Three-tier connections . . . . . . . . . . . . . . . . . . . . . . . . . . . . . . . . 13
Chapter 2. Methodology for e-BI front-end tool implementation . . . . . 152.1 Checking the system environments . . . . . . . . . . . . . . . . . . . . . . . . . . 15
2.1.1 ITSO test environments . . . . . . . . . . . . . . . . . . . . . . . . . . . . . . . 162.2 Customizing the OS/390 environment . . . . . . . . . . . . . . . . . . . . . . . . 17
2.2.1 Network setups. . . . . . . . . . . . . . . . . . . . . . . . . . . . . . . . . . . . . . 172.2.2 DB2 setups. . . . . . . . . . . . . . . . . . . . . . . . . . . . . . . . . . . . . . . . . 182.2.3 DB2 OLAP Server for OS/390 setups . . . . . . . . . . . . . . . . . . . . . 192.2.4 RRS and WLM setups . . . . . . . . . . . . . . . . . . . . . . . . . . . . . . . . 192.2.5 User account definitions and authorizations . . . . . . . . . . . . . . . . 19
Chapter 3. Configuring database connections . . . . . . . . . . . . . . . . . . . 213.1 DB2 DDF setup . . . . . . . . . . . . . . . . . . . . . . . . . . . . . . . . . . . . . . . . . 213.2 DB2 Connect setup . . . . . . . . . . . . . . . . . . . . . . . . . . . . . . . . . . . . . . 24
3.2.1 Installing DB2 Connect EE . . . . . . . . . . . . . . . . . . . . . . . . . . . . . 253.2.2 Configuring DB2 Connect EE . . . . . . . . . . . . . . . . . . . . . . . . . . . 293.2.3 Configuring the NT server for client access . . . . . . . . . . . . . . . . 36
3.3 Client PC setup . . . . . . . . . . . . . . . . . . . . . . . . . . . . . . . . . . . . . . . . . 373.3.1 Adding a user to Windows NT . . . . . . . . . . . . . . . . . . . . . . . . . . 383.3.2 Installing the DB2 Run-Time client . . . . . . . . . . . . . . . . . . . . . . . 393.3.3 Configuring the Client PC . . . . . . . . . . . . . . . . . . . . . . . . . . . . . . 39
3.4 Testing the client/server connection . . . . . . . . . . . . . . . . . . . . . . . . . . 40
© Copyright IBM Corp. 2001 iii

Chapter 4. QMF for Windows . . . . . . . . . . . . . . . . . . . . . . . . . . . . . . . . . 414.1 QMF family. . . . . . . . . . . . . . . . . . . . . . . . . . . . . . . . . . . . . . . . . . . . . 41
4.1.1 QMF for OS/390 . . . . . . . . . . . . . . . . . . . . . . . . . . . . . . . . . . . . . 414.1.2 QMF for Windows . . . . . . . . . . . . . . . . . . . . . . . . . . . . . . . . . . . . 424.1.3 DB2 Warehouse Manager . . . . . . . . . . . . . . . . . . . . . . . . . . . . . 444.1.4 QMF High Performance Option. . . . . . . . . . . . . . . . . . . . . . . . . . 45
4.2 Configuring QMF for Windows . . . . . . . . . . . . . . . . . . . . . . . . . . . . . . 454.2.1 Configuring database connections . . . . . . . . . . . . . . . . . . . . . . . 464.2.2 Creating QMF for Windows database objects . . . . . . . . . . . . . . . 544.2.3 Binding QMF for Windows packages . . . . . . . . . . . . . . . . . . . . . 604.2.4 Granting permissions . . . . . . . . . . . . . . . . . . . . . . . . . . . . . . . . . 624.2.5 Creating sample tables . . . . . . . . . . . . . . . . . . . . . . . . . . . . . . . . 63
4.3 QMF SQL Query for the Web . . . . . . . . . . . . . . . . . . . . . . . . . . . . . . . 644.3.1 Installing the QMF SQL Query for the Web Java servlet . . . . . . . 664.3.2 Customizing the QMF SQL Query for the Web servlet . . . . . . . . 684.3.3 Connecting QMF SQL Query for the Web-to-DB2 servers . . . . . 714.3.4 Testing QMF SQL Query for the Web . . . . . . . . . . . . . . . . . . . . . 73
4.4 QMF Report Center . . . . . . . . . . . . . . . . . . . . . . . . . . . . . . . . . . . . . . 754.5 QMF for Windows usage scenarios . . . . . . . . . . . . . . . . . . . . . . . . . . 78
4.5.1 Scenarios for information providers . . . . . . . . . . . . . . . . . . . . . . 794.5.2 Scenarios for information consumers . . . . . . . . . . . . . . . . . . . . . 804.5.3 Choosing the best configuration . . . . . . . . . . . . . . . . . . . . . . . . . 82
Chapter 5. Brio Enterprise . . . . . . . . . . . . . . . . . . . . . . . . . . . . . . . . . . . 855.1 Brio Enterprise tools . . . . . . . . . . . . . . . . . . . . . . . . . . . . . . . . . . . . . . 85
5.1.1 Web client components . . . . . . . . . . . . . . . . . . . . . . . . . . . . . . . 855.1.2 Non-Web client component. . . . . . . . . . . . . . . . . . . . . . . . . . . . . 855.1.3 Server components . . . . . . . . . . . . . . . . . . . . . . . . . . . . . . . . . . 865.1.4 Brio Enterprise Server Administrator. . . . . . . . . . . . . . . . . . . . . . 87
5.2 Brio documents and repository . . . . . . . . . . . . . . . . . . . . . . . . . . . . . . 875.2.1 Brio documents . . . . . . . . . . . . . . . . . . . . . . . . . . . . . . . . . . . . . 875.2.2 Brio repository . . . . . . . . . . . . . . . . . . . . . . . . . . . . . . . . . . . . . . 88
5.3 Open Catalog Extension file . . . . . . . . . . . . . . . . . . . . . . . . . . . . . . . . 885.4 Non-Web client connection to DB2 data warehouse . . . . . . . . . . . . . . 89
5.4.1 BrioQuery configuration for DB2 data warehouse connection . . . 895.4.2 Test the DB2 data warehouse connection. . . . . . . . . . . . . . . . . . 91
5.5 Non-Web client connection to DB2 OLAP Server . . . . . . . . . . . . . . . . 965.5.1 BrioQuery DB2 OLAP server connection configuration . . . . . . . . 965.5.2 Test the connection to DB2 OLAP Server . . . . . . . . . . . . . . . . . . 98
5.6 Web client connection to DB2 data warehouse . . . . . . . . . . . . . . . . . 1015.6.1 IBM HTTP Server (Apache) configuration for NT . . . . . . . . . . . 1025.6.2 OnDemand Server configuration. . . . . . . . . . . . . . . . . . . . . . . . 1045.6.3 Testing the OnDemand Server setup . . . . . . . . . . . . . . . . . . . . 110
iv e-Business Intelligence Front-End Tool Access to OS/390 Data Warehouse

5.7 Web client connection to DB2 OLAP Server . . . . . . . . . . . . . . . . . . . 1125.7.1 Implement the Web client connection . . . . . . . . . . . . . . . . . . . . 1135.7.2 Test the Web client connection . . . . . . . . . . . . . . . . . . . . . . . . . 113
5.8 Security . . . . . . . . . . . . . . . . . . . . . . . . . . . . . . . . . . . . . . . . . . . . . . 1145.8.1 Access to Brio documents . . . . . . . . . . . . . . . . . . . . . . . . . . . . 1145.8.2 User authentication . . . . . . . . . . . . . . . . . . . . . . . . . . . . . . . . . 1145.8.3 Authorization to execute queries. . . . . . . . . . . . . . . . . . . . . . . . 1155.8.4 Non-Web client security . . . . . . . . . . . . . . . . . . . . . . . . . . . . . . 115
5.9 Zero administration for Web clients . . . . . . . . . . . . . . . . . . . . . . . . . 1155.10 Integration with other tools . . . . . . . . . . . . . . . . . . . . . . . . . . . . . . . 1165.11 Metadata exchange . . . . . . . . . . . . . . . . . . . . . . . . . . . . . . . . . . . . 1165.12 Brio usage scenarios . . . . . . . . . . . . . . . . . . . . . . . . . . . . . . . . . . . 117
5.12.1 Scenarios for information providers . . . . . . . . . . . . . . . . . . . . 1175.12.2 Scenarios for Web-based information consumers . . . . . . . . . . 118
Chapter 6. IBM DB2 OLAP Server Analyzer . . . . . . . . . . . . . . . . . . . . 1216.1 Product components . . . . . . . . . . . . . . . . . . . . . . . . . . . . . . . . . . . . 1216.2 Connection architectures . . . . . . . . . . . . . . . . . . . . . . . . . . . . . . . . . 1226.3 Security . . . . . . . . . . . . . . . . . . . . . . . . . . . . . . . . . . . . . . . . . . . . . . 123
6.3.1 User security . . . . . . . . . . . . . . . . . . . . . . . . . . . . . . . . . . . . . . 1236.3.2 RACF and DB2 for OS/390 security . . . . . . . . . . . . . . . . . . . . . 1256.3.3 Web security . . . . . . . . . . . . . . . . . . . . . . . . . . . . . . . . . . . . . . 125
6.4 Virtual cubes . . . . . . . . . . . . . . . . . . . . . . . . . . . . . . . . . . . . . . . . . . 1266.5 Installing IBM DB2 OLAP Server Analyzer . . . . . . . . . . . . . . . . . . . . 126
6.5.1 Installing the Analyzer NT Server machine . . . . . . . . . . . . . . . . 1266.5.2 Creating the database connection . . . . . . . . . . . . . . . . . . . . . . 1296.5.3 Modifying the database name . . . . . . . . . . . . . . . . . . . . . . . . . . 1306.5.4 Creating a new user and profile . . . . . . . . . . . . . . . . . . . . . . . . 1316.5.5 Importing the sample views (optional). . . . . . . . . . . . . . . . . . . . 1346.5.6 Installing the Analyzer Windows client . . . . . . . . . . . . . . . . . . . 1376.5.7 Testing the Analyzer Windows client . . . . . . . . . . . . . . . . . . . . 139
6.6 Configuring the Web environment . . . . . . . . . . . . . . . . . . . . . . . . . . 1396.6.1 Configuring the IBM HTTP Web server . . . . . . . . . . . . . . . . . . . 1396.6.2 Configuring the Microsoft IIS Web server . . . . . . . . . . . . . . . . . 140
6.7 Starting the Analyzer Web clients . . . . . . . . . . . . . . . . . . . . . . . . . . . 1436.7.1 HTML-based Web client . . . . . . . . . . . . . . . . . . . . . . . . . . . . . . 1446.7.2 Java-based Web client . . . . . . . . . . . . . . . . . . . . . . . . . . . . . . . 145
6.8 Analyzer Excel add-in. . . . . . . . . . . . . . . . . . . . . . . . . . . . . . . . . . . . 1456.8.1 Installing the Excel add-In . . . . . . . . . . . . . . . . . . . . . . . . . . . . 1466.8.2 Configuring the Excel add-in. . . . . . . . . . . . . . . . . . . . . . . . . . . 146
6.9 Analyzer usage scenarios . . . . . . . . . . . . . . . . . . . . . . . . . . . . . . . . 147
v

Appendix A. BI tools interoperating with OS/390 DW . . . . . . . . . . . . . 149A.1 Query and reporting tools . . . . . . . . . . . . . . . . . . . . . . . . . . . . . . . . . . . . 149A.2 OLAP tools . . . . . . . . . . . . . . . . . . . . . . . . . . . . . . . . . . . . . . . . . . . . . . . 150A.3 Data mining tools . . . . . . . . . . . . . . . . . . . . . . . . . . . . . . . . . . . . . . . . . . 150A.4 BI application solutions . . . . . . . . . . . . . . . . . . . . . . . . . . . . . . . . . . . . . . 151
Appendix B. Setting up DB2 DDF . . . . . . . . . . . . . . . . . . . . . . . . . . . . . . 153
Appendix C. QMF for Windows database connection configuration . 157
Appendix D. Special notices . . . . . . . . . . . . . . . . . . . . . . . . . . . . . . . . . . 161
Appendix E. Related publications . . . . . . . . . . . . . . . . . . . . . . . . . . . . . . 165E.1 IBM Redbooks . . . . . . . . . . . . . . . . . . . . . . . . . . . . . . . . . . . . . . . . . . . . 165E.2 IBM Redbooks collections. . . . . . . . . . . . . . . . . . . . . . . . . . . . . . . . . . . . 165E.3 Other resources . . . . . . . . . . . . . . . . . . . . . . . . . . . . . . . . . . . . . . . . . . . 166E.4 Referenced Web sites. . . . . . . . . . . . . . . . . . . . . . . . . . . . . . . . . . . . . . . 166
How to get IBM Redbooks . . . . . . . . . . . . . . . . . . . . . . . . . . . . . . . . . . 169IBM Redbooks fax order form . . . . . . . . . . . . . . . . . . . . . . . . . . . . . . . . . . . . 170
Index . . . . . . . . . . . . . . . . . . . . . . . . . . . . . . . . . . . . . . . . . . . . . . . . . . . 171
IBM Redbooks review . . . . . . . . . . . . . . . . . . . . . . . . . . . . . . . . . . . . . . 173
vi e-Business Intelligence Front-End Tool Access to OS/390 Data Warehouse

Preface
Based on the IBM e-Business Intelligence (BI) architectural framework, this IBM Redbook explains the building blocks required to connect front-end e-BI user tools to the OS/390 data warehouse or data mart. It also shows the Web integration in the architecture and the accessibility of the data warehouse from browser-based clients in an e-business environment. The book provides:
• An overview of the e-BI user connectivity and architectural framework on OS/390, as well as guidance on choosing the appropriate e-BI front-end user tool or e-BI user application based on end-user profiles.
• Connectivity methodologies, contrasting Web-based middleware with traditional client/server middleware in 2-tier or N-tier solutions connecting users to the OS/390 data warehouse or data mart.
• The steps needed to implement front-end e-BI user tools accessing the OS/390 data warehouse and OLAP data mart. We highlight the stumbling blocks and show the implementation steps for:
– QMF for Windows – Brio – DB2 OLAP Server Analyzer
The team that wrote this redbook
This redbook was produced by a team of specialists from around the world working at the International Technical Support Organization Poughkeepsie Center.
Viviane Anavi-Chaput is a Senior IT Specialist for Business Intelligence and DB2 at the IBM International Technical Support Organization, Poughkeepsie Center. She writes extensively, teaches worldwide, and presents at international conferences on all areas of Business Intelligence and DB2 for OS/390. Before joining the ITSO in 1999, Viviane was a Senior Data Management Consultant at IBM Europe, France. She was also an ITSO Specialist for DB2 at the San Jose Center from 1990 to 1994.
Kjell Hansson is an IT Specialist in IBM Sweden. He has more than 10 years of experience in Database Management, Application Development, Design and Performance Tuning with DB2 for OS/390.
© Copyright IBM Corp. 2001 vii

He has extensive experience from Data Warehouse implementations. Kjell holds a degree in Systems Analysis from Umeå University, Sweden.
Charles Lewis is a Certified Consulting I/T Specialist with IBM’s Advanced Technical Support at the Dallas Systems Center. He has worked with IBM for 22 years and has been involved with DB2 since the first release.His areas of expertise include DB2 Application Design and Performance Tuning. His current focus is on implementation of DB2 e-Business and Business Intelligence applications.
Cheryl Raitakari is an I/T Specialist with Integrated Technology Services in IBM Canada. She provides customer Q/A and defect support for IBM relational database products and tools. She has over 10 years of experience with Database Management and DRDA. Cheryl holds an Honours Bachelor of Math degree from the University of Waterloo, Canada.
Thanks to the following people for their contributions to this project:
Mike BiereIBM S/390 WW BI Sales, US
Steve BowerIBM Global Business Intelligence Services, UK
Barbara BurkardBrio Technology, Inc., US
Christopher DziekanHyperion Solutions, US
Tim GranshawBrio Technology, Inc., US
Cary GrossBrio Technology, Inc., US
Vicki HicksDB2 Advocate, IBM DB2 Development, Silicon Valley Laboratory, US
Tom IglehartRocket Software, Inc., US
viii e-Business Intelligence Front-End Tool Access to OS/390 Data Warehouse

Ann JacksonIBM S/390 - WW BI Segment -Technical Support, US
Ashraf KamelIBM S/390 BI Pre-Sales Technical Support, US
Gerard LaumayIBM S/390 BI Architect, Products and Solutions Support Center, Montpellier, France
Merrilee OsterhoudtIBM S/390 BI Technical Support Leader, US
Andrea ReidIBM Decision Support Brand Manager, Silicon Valley Laboratory, US
Shri ShrimaliS/390 BI Pre-Sales Technical Support, US
Bryan SmithIBM DB2 Development, Silicon Valley Laboratory, US
William J. SterlingIBM WW OLAP Technical Support, US
Thanks also to Terry Barthel and Alfred Schwab for their editorial assistance, and Ella Buslovich for her graphics assistance.
Comments welcome
Your comments are important to us!
We want our Redbooks to be as helpful as possible. Please send us your comments about this or other Redbooks in one of the following ways:
• Fax the evaluation form found in “IBM Redbooks review” on page 173 to the fax number shown on the form.
• Use the online evaluation form found at ibm.com/redbooks
• Send your comments in an Internet note to [email protected]
ix

x e-Business Intelligence Front-End Tool Access to OS/390 Data Warehouse

Chapter 1. e-BI front-end tool connectivity overview
The DB2 data warehouse on OS/390OS/390 supports diverse user connections from any user platform, and interoperates with all categories of BI tools and application solutions in an e-business environment.
This chapter introduces the IBM BI architecture for connecting a large variety of users to the DB2 data warehouse on OS/390. We also discuss BI user profiles and their specific requirements which influence the connectivity choices we make to have them interoperate with the data warehouse or the data mart on OS/390.
1.1 Who uses e-BI front-end tools?
When planning connectivity to the data warehouse, it is important to understand the BI user profiles. Users’ business requirements and technical skills determine the type of BI tool they choose and the type of technology they need to connect to the data warehouse.
BI users are the enterprise staff people who are in charge of addressing business requirements such as:
• Enhancing communication with employees, vendors, suppliers, customers • Improving the profitability of existing products and services • Creating new product and service offerings • Better managing risk • Reducing operating expenses
BI users possess widely varying technical expertise, ranging from skilled I/T professionals to computer novices.
To enable a general discussion on BI users, we adopted a classification made by “The IBM Business Software Solution”, authored by Database Associates International, Inc., which defines two categories of BI users:
• Information providers • Information consumers
1.1.1 Information providersInformation providers typically have an intimate knowledge of the existing data and an extensive knowledge of the application computing technology, which enables them to transform raw data into information required to make business decisions.
© Copyright IBM Corp. 2001 1

Examples of information providers include:
• Business analysts • Market managers • Highly skilled “knowledge workers”
1.1.2 Information consumers Information consumers rely on information providers to provide access to the information they need. Predefined queries and canned reports or packaged applications are often used to minimize the data knowledge and technical expertise required to transform raw data into information.
Examples of information consumers include:
• Business executives and managers • External users such as customers, vendors and suppliers • Administrative or clerical workers
DB2 for OS/390 relies on the IBM BI architecture to provide connectivity to this large variety of users.
1.2 IBM BI infrastructure components
The IBM BI infrastructure provides a component framework and specifications which facilitate selecting the right BI tools by user audience and the corresponding connectivity components to implement those tools and their interoperation with the DB2 data warehouse on OS/390.
Adopting the specifications of the framework increases the likelihood of meeting the needs of the individual user’s preference for style of interface, meeting performance goals, and supporting the enterprise’s standards for security of information assets.
Figure 1 on page 3 shows the IBM BI infrastructure components necessary to implement a business intelligence application and integrate it with e-business. This redbook focuses on Decision Support Tools connectivity middleware and interoperation with OS/390 based data warehouse or data marts.
2 e-Business Intelligence Front-End Tool Access to OS/390 Data Warehouse

Figure 1. IBM BI infrastructure components
The IBM BI framework is based on the use of technologies which scale to support a large number of users, both intranet and Internet, connecting to the OS/390 data warehouse. Robust connectivity options are included for SNA and TCP/IP network protocols, as well as web connection interfaces.
1.2.1 Access enablersAccess enablers are the application interfaces and the connectivity middleware which enable users to access a BI tool or application connecting to the DB2 data warehouse on OS/390.
1.2.1.1 Application interfacesApplication interfaces are the means by which users interact with BI applications. They determine what users see on their display screens. A properly designed application interface accommodates the skill level and technology available to its primary user audience. Most common application interfaces are:
• GUIs • Web browsers • PDA interfaces • 3270 interfaces
Operational and External Data
Warehouse Construction and Population- DW architectures, DB design, ETL tools
Industry Solutions and B.I. Applications
Decision Support ToolsQuery & Reporting OLAP Data Mining
Access EnablersApplication Interfaces Connectivity Middleware
Metadata
Managem
entA
dmin
istr
atio
n
Data Mart
Data Management
OperationalData Stores
DatalWarehouse
Chapter 1. e-BI front-end tool connectivity overview 3

Application interfaces are implemented in various devices which can all interoperate with the OS/390 data warehouse. Such devices are:
• Kiosks • Handheld or PDA devices • Laptops • Desktop PCs • 3270 terminals
Figure 2 shows the broad range of user expertise, device types, and application interface possibilities.
Figure 2. User application interfaces
Selecting a device and an application interface depends on users’ preferences, skills and experience.
For example, an I/S professional may be very comfortable with a 3270 terminal and use of a keyboard to enter commands or to select business functions from a menu. However, the typical non-I/S business professional may feel more comfortable using a GUI-based application with a pointing device to point-and-click on business functions displayed as graphical icons.
Mobile usersPDA interfaces
Desktop clientsGUI
Employees3270 interface
3270
Stock holdersWeb browser
GUI
Browser
SuppliersWeb browser
CustomersWeb browser
S/390
DB2
PDA Server
BI - OLAP
WEB APPLICATION SERVER
OLAP
Business analystsGUI - OLAP
Browser
4 e-Business Intelligence Front-End Tool Access to OS/390 Data Warehouse

BI applications deployed in a public location, such as a rental car counter, to look up addresses or obtain directions, may run in a kiosk with a GUI and a touchscreen to replace the keyboard. Customers using eBI applications to inquire on the status of an order or track a customer service request may use a Web browser to initiate an inquiry against a OS/390 data warehouse.
A medical provider in a patient care setting may use a handheld device to access patient records or a data warehouse of clinical information. A rapidly growing community of mobile users, such as sales reps, also rely on handheld computing devices and personal digital assistants for access to corporate data marts and data warehouses.
Application interfaces usually come with the BI tool.
GUIsBI front-end tools, such as Query Management Facility (QMF) for Windows, Business Objects, Brio, Cognos and many more, all provide graphical user intefaces (GUIs) for user access to warehouse data.
Web browsersAny industry-standard Web browser, such as Netscape’s Navigator or Microsoft’s Internet Explorer, may be used as an application interface by Web users.
PDA interfacesDB2 Everywhere runs in handheld devices either on Palm OS or Windows CE operating systems. It supports access to the warehouse, which can be on a OS/390. IBM Mobile Connect communications software, executing on the Windows NT server, provides the support needed to synchronize data exchange between the handheld device and the warehouses implemented on the OS/390.
3270 interfacesQMF for OS/390 and Application System are examples of products which provide 3270 terminal application interfaces.
1.2.1.2 Connectivity middlewareIBM BI architecture connectivity middleware fully supports BI tool interoperability with the OS/390 data warehouse such that the user application interface or front-end tools choice is not limited.
The IBM BI architecture supports the following connectivity middleware for connecting to the DB2 data warehouse on OS/390:
Chapter 1. e-BI front-end tool connectivity overview 5

Database connectors for Web browsersWeb-based database connectors are:
• IBM Net.Data, which provides the native SQL APIs for Web BI applications • The Java APIs, such as JDBC and SQLJ
Database connectors for PCsNon-Web-based database connectors are:
• SQL APIs • ODBC and CLI APIs • JDBC and SQLJ APIs
Client/Server DRDA connectorThe DRDA-enabled client/server connector for DB2 is:
• IBM DB2 Connect
1.2.2 Decision support toolsBI applications can be developed in-house (using Java programming, for example), or they can be acquired as off-the-shelf packages called tools. There are three categories of decision support tools to satisfy users’ different levels of expertise and access requirements to business information:
• Query and reporting tools • OLAP tools • Data mining tools
1.2.2.1 Query and reporting toolsQuery and reporting tools allow you to build and run ad hoc queries and generate reports with an easy-to-use graphical user interface.
Information providers typically use a query and reporting tool to build their data request and format reports in an ad hoc manner. Such predefined reports can be stored in a repository to be used by information consumers.
Information consumers typically use a query and reporting tool for querying canned reports in a data warehouse on a scheduled or as-needed basis. An example of this is a financial analyst who must examine a monthly profit and loss statement or produce a trial balance each month.
For information consumers accessing the data warehouse using a Web browser, the tool allows publishing the report in HTML format on a Web server. As a matter of fact, external information consumers such as customers, vendors, and suppliers often prefer using a Web browser that
6 e-Business Intelligence Front-End Tool Access to OS/390 Data Warehouse
does not require any specialized application or data connectors to be installed on the (thin) client machine.
The IBM query and reporting tools on OS/390 are the QMF Family tools:
• QMF for OS/390 • QMF High Performance Option (HPO) • QMF for Windows
Chapter 4, “QMF for Windows” on page 41, gives detailed explanations on the QMF Family and QMF for Windows. A complete list, including third-party vendors, of query and reporting tools interoperating with the OS/390 data warehouse is also provided in Appendix A, “BI tools interoperating with OS/390 DW” on page 149.
1.2.2.2 OLAP toolsOLAP tools enable users to ask intuitive questions such as “what is the profitability for the third quarter across the southeast region for my focus products?”. To address such questions requires comprehensive financial, mathematical, and statistical functions and calculations provided by more specialized tools such as online analytical processing (OLAP) tools. With OLAP tools, users can check for year-to-date sales and then drill down to a particular product or sales region for additional detail.
The IBM OLAP tool on OS/390 is:
DB2 OLAP Server for OS/390
DB2 OLAP Server offers intuitive navigation, a highly interactive graphical user interface, and multidimensional calculation capabilities for presentation and reporting needs.
Hyperion Analyzer is the leading client front-end tool for DB2 OLAP Server.
A complete list, including third-party vendors, of OLAP tools interoperating with the OS/390 data warehouse is also provided in Appendix A, “BI tools interoperating with OS/390 DW” on page 149.
1.2.2.3 Data mining toolsUsers requiring technology to assist with information discovery require yet another category of BI front-end tools: data mining tools. Data mining tools provide robust search, analysis, classification, and clustering capabilities to deliver comprehensive BI applications.
Chapter 1. e-BI front-end tool connectivity overview 7

These tools are used to discover associations or patterns, segment or cluster information based on similarity of attributes, discover similar time sequences, or create predictive classification models.
The IBM data mining tools on OS/390 are:
• IBM Intelligent Miner for Data for OS/390 • IBM Intelligent Miner for Text for OS/390
A complete list, including third-party vendors, of data mining tools interoperating with the OS/390 data warehouse is also provided in Appendix A, “BI tools interoperating with OS/390 DW” on page 149.
1.2.3 BI application solutionsBI application solutions are packaged tools and services which address an industry-specific business area.
The IBM BI application solution is:
Intelligent Miner for Relationship Marketing (IMRM)
IMRM is a customer relationship management (CRM) solution, based on Intelligent Miner for Data, which helps users understand key business issues such as customer segmentation, and customer potential buying and loyalty behavior.
A complete list, including third-party vendors, of application solutions interoperating with the OS/390 data warehouse is also provided in Appendix A, “BI tools interoperating with OS/390 DW” on page 149.
1.3 N-tier tool architectures
We need to distinguish between the logical n-tier application architectures and the n-tier physical implementations.
1.3.1 Logical n-tier The logical architecture of a BI tool or application refers to the software layers that were used to build that application.
Those application layers are:
• The presentation layer, which refers to the user interface running on a client PC
8 e-Business Intelligence Front-End Tool Access to OS/390 Data Warehouse

• The application logic layer, which refers to the core application running on the application server
• The database management layer, which refers to the database access services running on the database server
1.3.1.1 Logical two-tierA logical two-tier application is architected with two different logical layers. The application logic is bundled either with the presentation layer or with the data management layer, as shown in Figure 3.
Figure 3. Logical two-tier application architecture
1.3.1.2 Logical three-tierA logical three-tier application is architected with three different logical layers (presentation, application logic, data management), regardless of the hardware platforms where those layers are physically implemented. Figure 4 shows a three-tier logical application architecture.
Figure 4. Logical three-tier application architecture
Most BI tools have three-tier logical application architectures.
1.3.2 Physical n-tier A physical n-tier implementation refers to the hardware instances upon which an application resides.
PresentationApplication Logic
Data Management
PresentationApplication Logic
Data Management
Data ManagementData Management
Data Management
PresentationData
ManagementApplication Logic
Chapter 1. e-BI front-end tool connectivity overview 9
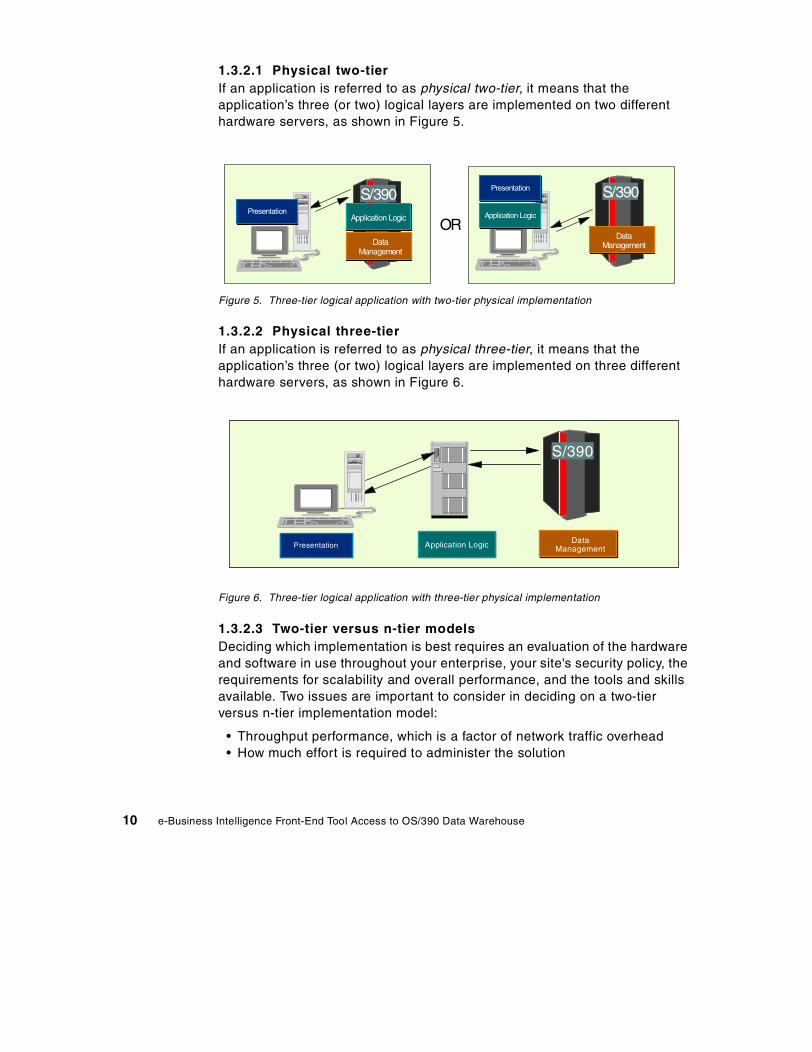
1.3.2.1 Physical two-tierIf an application is referred to as physical two-tier, it means that the application’s three (or two) logical layers are implemented on two different hardware servers, as shown in Figure 5.
Figure 5. Three-tier logical application with two-tier physical implementation
1.3.2.2 Physical three-tierIf an application is referred to as physical three-tier, it means that the application’s three (or two) logical layers are implemented on three different hardware servers, as shown in Figure 6.
Figure 6. Three-tier logical application with three-tier physical implementation
1.3.2.3 Two-tier versus n-tier modelsDeciding which implementation is best requires an evaluation of the hardware and software in use throughout your enterprise, your site's security policy, the requirements for scalability and overall performance, and the tools and skills available. Two issues are important to consider in deciding on a two-tier versus n-tier implementation model:
• Throughput performance, which is a factor of network traffic overhead • How much effort is required to administer the solution
ORPresentation
Presentation
Application Logic
S/390Application Logic
DataManagement
S/390
DataManagement
DataApplication Logic
Application Logic DataManagementPresentation
S/390
10 e-Business Intelligence Front-End Tool Access to OS/390 Data Warehouse
When there is a requirement to minimize query response time, consider a two-tier deployment model. Two-tier model requires less network overhead than n-tier model to send and receive information from the OS/390. Usage of DB2 stored procedures can also help eliminate network traffic delay which is caused by transferring large amounts of data across the network.
The two-tier approach may also simplify systems management and administration. With fewer tiers, the tasks of implementing security and configuring the network infrastructure are less complex. On the other hand, there is a higher footprint at each client instance, which may slightly increase the licence fees.
N-tier models allow you to divide a BI application into multiple parts, and optimizing each of those parts is one way to improve performance. Having multiple parts gives you flexibility when adding usability to the user interface, adding capacity, or eliminating bottlenecks.
1.4 Connection alternatives to the DB2 for OS/390 data warehouse
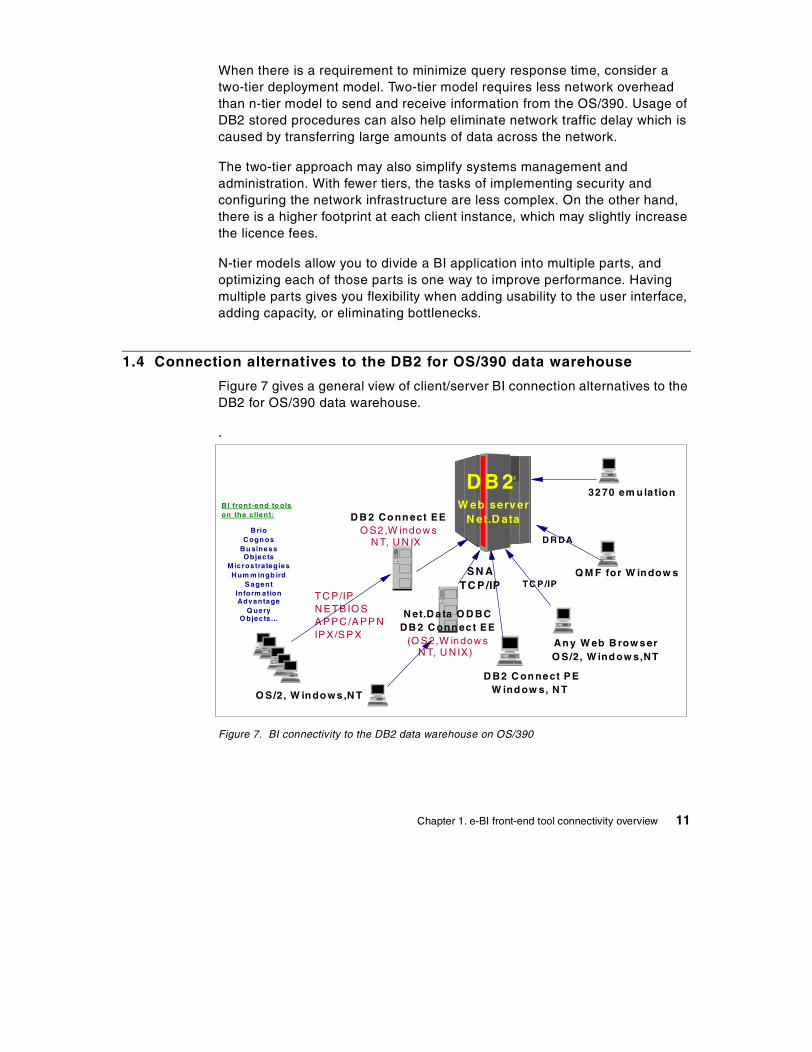
Figure 7 gives a general view of client/server BI connection alternatives to the DB2 for OS/390 data warehouse.
.
Figure 7. BI connectivity to the DB2 data warehouse on OS/390
B I front-end to olson the c lient:
B rioC ogn os
B u sinessObjects
M icrostra tegiesH um m ingb ird
S agentInform ationAdvantage
Q ueryO bjects ...
T C P/IPN E TB IO SA P PC /A PP NIP X/S P X
D B 2 Co nn ect EEO S2,W indow s
N T, U N IX
D B2 C on nect P EW ind ow s, N T
TC P /IP
An y W eb B row serO S/2, W ind ow s,NT
O S/2, W in do ws ,N T
Q M F for W in dow s
D R DA
3270 em u la tionW eb server
N et.D ata
SN ATC P/IP
D B 2
N et.D a ta O D BCDB 2 C onn ec t EE
(O S 2,W indow s N T, U NIX)
Chapter 1. e-BI front-end tool connectivity overview 11
PCs running BI user tools access the OS/390 data warehouse in two- or three-tier connections.
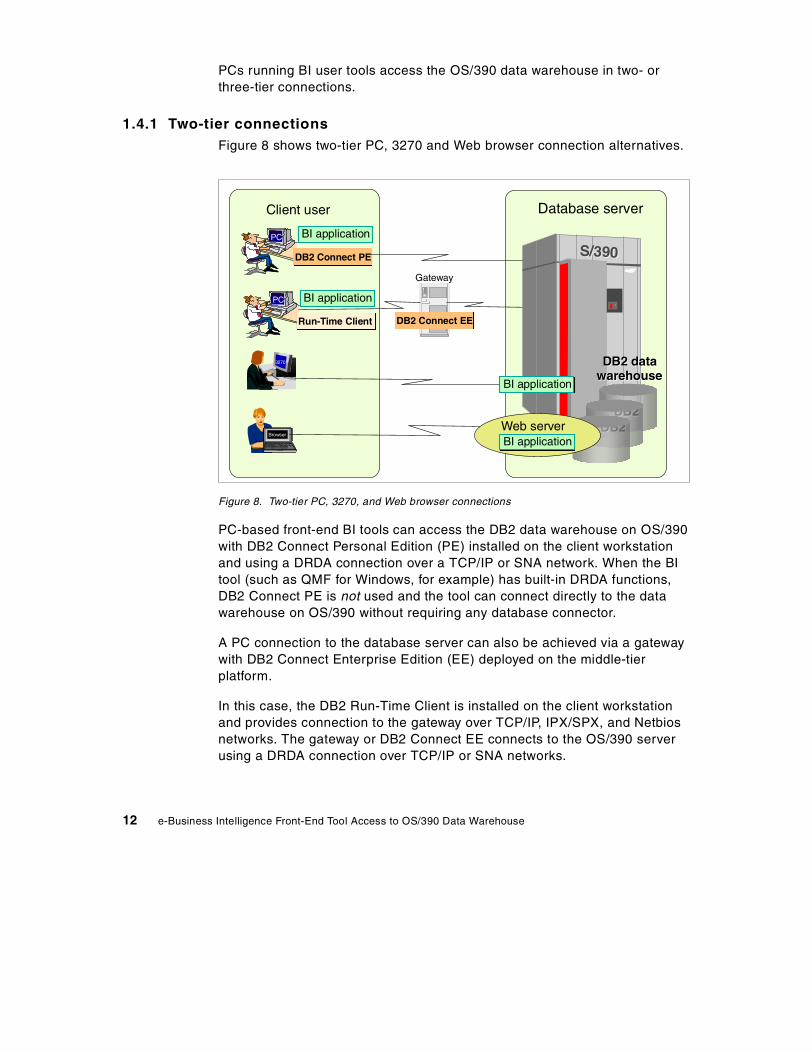
1.4.1 Two-tier connections Figure 8 shows two-tier PC, 3270 and Web browser connection alternatives.
Figure 8. Two-tier PC, 3270, and Web browser connections
PC-based front-end BI tools can access the DB2 data warehouse on OS/390 with DB2 Connect Personal Edition (PE) installed on the client workstation and using a DRDA connection over a TCP/IP or SNA network. When the BI tool (such as QMF for Windows, for example) has built-in DRDA functions, DB2 Connect PE is not used and the tool can connect directly to the data warehouse on OS/390 without requiring any database connector.
A PC connection to the database server can also be achieved via a gateway with DB2 Connect Enterprise Edition (EE) deployed on the middle-tier platform.
In this case, the DB2 Run-Time Client is installed on the client workstation and provides connection to the gateway over TCP/IP, IPX/SPX, and Netbios networks. The gateway or DB2 Connect EE connects to the OS/390 server using a DRDA connection over TCP/IP or SNA networks.
Client user Database server
PC
PC
Gateway
S/390S/390
DB2DB2DB2DB2
DB2 dataDB2 datawarehousewarehouse
BI application
DB2 Connect PE
DB2 Connect EE
3270
BI application
BrowserWeb serverBI application
BI application
Run-Time Client
12 e-Business Intelligence Front-End Tool Access to OS/390 Data Warehouse

DB2 Run-Time Client comes with DB2 Connect at no additional cost. This connection method requires less installation and maintenance on the client workstations.
3270 terminals connect directly to the BI application which runs on OS/390; the connection can be local or remote.
Web browsers require a Web server to provide connectivity to the BI application and to the data warehouse on OS/390. In a two-tier connection, the Web server is implemented on the OS/390.
In this case, the BI application running on the OS/390 connects locally to the DB2 data warehouse using Java APIs such as JDBC or SQLJ; or the application uses Net.Data, which provides the native SQL API for accessing DB2; or the application provides its specific proprietary connection interface. The browser connects to the OS/390 server using TCP/IP.
1.4.2 Three-tier connectionsFigure 9 shows three-tier PC and Web browser connections.
Figure 9. Three-tier PC and Web browser connections
Client user
PC
Browser
Run-Time Client
Application server
Web server
BI application
DB2 Connect EE
Appl client
Database server
S/390S/390
DB2DB2DB2DB2
DB2 dataDB2 datawarehousewarehouse
Appl server
Chapter 1. e-BI front-end tool connectivity overview 13

In a three-tier connection, PC users connect to the middle tier, where the BI application resides, using the DB2 Run-Time Client over TCP/IP, IPX/SPX, or Netbios networks.
Web browsers connect to a Web server on the middle tier over TCP/IP networks. Often BI tools require the application to run on the same platform as the Web server.
The BI application on the middle tier connects remotely to the DB2 data warehouse on the OS/390 third tier through DB2 Connect EE using a DRDA connection over TCP/IP or SNA networks.
Connection can also be achieved between the Application Client (on the middle tier) and the Application Server (on the third tier) using an application-specific interface.
The following chapters of this redbook focus on the methodology of implementing e-BI user tools and how to make them interoperate with the data warehouse/mart on OS/390. We discuss connectivity issues using tool examples based on QMF for Windows, Brio, and DB2 OLAP Server Analyzer.
14 e-Business Intelligence Front-End Tool Access to OS/390 Data Warehouse

Chapter 2. Methodology for e-BI front-end tool implementation
The methodology we recommend for e-BI user tool implementation is as follows:
• Check the system environments and making sure to have the necessary hardware and software with the most current maintenance levels.
• Customize the OS/390 environment focusing on:
- DB2 settings - OLAP application server settings - RRS and WLM settings - User account definitions and authorizations in RACF, DB2, and OLAP
• Configure network connections to the DB2 data warehouse on OS/390.
• Configure database connections to the DB2 data warehouse on OS/390.
• Configure Web connections to the DB2 data warehouse on the OS/390.
• Implement e-BI user tools.
The following sections give a detailed explanation of what we did to implement, in the ITSO test environment, some selected decision support tools, such as QMF for Windows, Brio, and DB2 OLAP Server Analyzer. Those front-end BI tools connect to the DB2 data warehouse and, when applicable, to the OLAP Server on OS/390.
2.1 Checking the system environments
Make sure that your system environment has the necessary hardware and software to support your tool installation. Also make sure that your system is at the latest maintenance level.
• Windows and NT environments
Verify the server and domains. Make sure you have the most current level of the BI tool you are implementing, as well as the prerequisite connectivity middleware. Check the FixPack requirements. DB2 Connect-related FixPacks can be found at the following URL:
ftp://ftp.software.ibm.com/ps/products/db2/fixes/
• OS/390 environment
Verify with the OS/390 database administrator that the DB2 system underlying the data warehouse is at the most current level of maintenance including the refresh (when applicable) which adds new functions to DB2.
© Copyright IBM Corp. 2001 15

Updated information on maintenance levels and PTFs for DB2 is available from the web at the following URL:
http://www.software.ibm.com/data/db2/db2tech/
Make sure that the DB2 subsystem and the OLAP Server applications are up and running when you test your connections to the data warehouse on OS/390.
2.1.1 ITSO test environmentsIn this section, we describe the system configurations we used at the ITSO. Our middle tier was a PC with Windows NT. The DB2 database server was an OS/390 system with DB2V6.1, as shown in Figure 10.
Figure 10. ITSO system configurations used in the BI tool implementation process
Window clientsWe used the following systems for the client workstations:
• Windows NT 4.0
• DB2 Run-Time Client or DB2 Connect PE
• TCP/IP Port 5000 was used for communications to DB2 Connect EE
• Client components of QMF for Windows, Brio, and DB2 OLAP Server Analyzer software
NT server We used a system consisting of the following as the BI application server in a three-tier configuration:
NT server S/390 server
S/390S/390
Windows client
DB2DB2DB2DB2
DB2 dataDB2 dataw arehousewarehouseTCP/IPTCP/IP
DB2 Run-TimeDB2 Run-Time DB2 Connect EEDB2 Connect EE
DB
2D
DF
DB
2D
DF
DB2 Connect PEDB2 Connect PE
16 e-Business Intelligence Front-End Tool Access to OS/390 Data Warehouse
• Windows NT 4.0 system
• DB2 Connect 6.1 Enterprise Edition
• IBM HTTP Web server
• Microsoft IIS Web server
• Middle-tier components of QMF for Windows, Brio, and DB2 OLAP Server Analyzer software
Database server system We used a system consisting of the following for the database server:
• OS/390 V2R8 with TCP/IP (OS/390 eNetwork Communication Server TCP/IP V2R8)
• DB2 UDB for OS/390 V6.1 at PUT level 0003
• DB2 OLAP Server Version 1.1
2.2 Customizing the OS/390 environment
You should customize your OS/390 environment to support BI tool and application executions against the DB2 data warehouse. Customizing the OS/390 environment includes:
• Network setups • DB2 setups • OLAP Server setups • RRS and WLM setups • Security definitions in RACF and DB2 for user authentication and
authorizations
2.2.1 Network setupsYou must rely on your in-house networking staff and network software vendors’ technical support services to implement and support your network configurations.
2.2.1.1 TCP/IP network connectionsTo access a DB2 server using TCP/IP, a BI tool must be able to establish a TCP/IP connection from the local host (the system on which the BI tool is running) to the remote host (the system on which DB2 for OS/390 is running) and remote port (the port on which DB2 for OS/390 is listening).
The process of implementing TCP/IP connectivity between Microsoft Windows and DB2 is generally a much easier task than the corresponding
Chapter 2. Methodology for e-BI front-end tool implementation 17

SNA connectivity. You must rely on your in-house TCP/IP networking staff and your TCP/IP software vendor’s technical support services to implement and support your network configuration.
2.2.1.2 SNA (LU 6.2, APPC, and CPI-C) network connectionsLU 6.2 is an SNA communications architecture. Advanced Program-to-Program Communication (APPC) is a language based on the LU 6.2 architecture. A developer of SNA transaction programs has to choose from many different implementations of APPC. This could potentially lead to product incompatibility. Even though each implementation of APPC adheres to the LU 6.2 architecture, two implementations of APPC might not be exactly the same. Therefore, programs that rely on one vendor’s APPC implementation might not work with another vendor’s implementation.
This problem is solved by a standard, common programming interface, CPI-C, which implements the APPC verb set. Therefore, applications that require the use of the APPC verb set can instead be written using CPI-C in order to achieve SNA vendor independence. QMF for windows is an application that is written using CPI-C.
In an SNA network, a BI tool’s basic requirement is that it must be able to establish an LU 6.2 session with DB2, using the CPI-C interface. This connectivity usually is not provided with the BI tool; you must have a third-party tool that implements it. Whatever product you use to provide SNA connectivity must be installed and configured before installing or using the BI tool.
The process of implementing LU 6.2 connectivity between Microsoft Windows and DB2 can be a complex task, depending on your SNA environment. The Windows-based SNA products that can be used, and the different ways to use them, are far too numerous and complex to be described in detail in this redbook. You must rely on your in-house SNA networking staff and your SNA software vendor’s technical support services to implement and support your network configuration.
2.2.2 DB2 setupsThe BI user tools you are implementing execute against the DB2 data warehouse on OS/390. It is the responsibility of the database administrator to install the DB2 data warehouse environment and customize the DB2 settings as required by the specific BI tool you are using.
18 e-Business Intelligence Front-End Tool Access to OS/390 Data Warehouse
BI tools and applications use dynamic SQL, and dynamic statement caching function should be activated in DSNZPARM through:
• CACHDYN=YES • MAXKEEPD=5000
Caching of dynamic SQL is done in the EDM pool, which should be sized accordingly. You have the option of moving the portion of the EDM pool that contains cached dynamic statements in a data space to alleviate space requirements in the DBM1 address space. When using data spaces, make sure they are completely backed by processor storage to avoid any paging activity that may lower dynamic query performance.
Idle thread time-out should also be used when customizing DDF.
Make sure DB2 and DDF are up and running when you are connecting to the data warehouse.
2.2.3 DB2 OLAP Server for OS/390 setupsNote that OLAP front-end tools connect to the DB2 OLAP application server on the OS/390. It is the responsibility of the database administrator to set up and customize the OLAP environment on OS/390. A detailed explanation of this can be found in the IBM Redbook Getting Started with DB2 OLAP Server for OS/390, SG24-5665.
Make sure the OLAP application is started when you are connecting to the OLAP Server.
2.2.4 RRS and WLM setups Stored procedures and DB2 OLAP Server applications executing on OS/390 require RRS and WLM, which must be set up and running at the time of connection to the data warehouse on OS/390.
2.2.5 User account definitions and authorizationsYou need to distinguish between two types of user IDs:
• User IDs for end users to access the BI tool
These IDs are authenticated and authorized by the BI tool security functions.
• User IDs for the BI tool to connect and access the DB2 data warehouse and/or the OLAP Server on the OS/390.
Chapter 2. Methodology for e-BI front-end tool implementation 19

These IDs must be valid RACF user IDs. They are authenticated and authorized at RACF, DB2, and OLAP levels.
20 e-Business Intelligence Front-End Tool Access to OS/390 Data Warehouse

Chapter 3. Configuring database connections
Enabling two- or three-tier connections to the DB2 data warehouse onOS/390 requires a set of tasks that is most often independent from the BI tool installation. You should customize your database connections to the DB2 data warehouse on OS/390 before starting to install any BI tool. This implies customizing DB2 Connect.
DB2 Connect uses DRDA, an architecture that defines database communication protocols, to connect to DRDA-compliant database servers via TCP/IP or SNA protocols. It is available in two flavors: Personal Edition, which allows a single user to connect to the host; and Enterprise Edition, which is a gateway server that allows multiple users to connect to the host.
If you are considering implementing DB2 Connect for the first time, there are many things to consider. The IBM DB2 Connect User’s Guide, Chapter 1, “DB2 Connect Performance” is a good place to start. There is also extensive information about DB2 Connect performance tuning on the World Wide Web at the following URL:
http://www.software.ibm.com/data/db2/performance
We recommend you use the default settings initially, and monitor product usage and performance over time. As usage of DB2 Connect increases, it may be necessary to modify some of the DB2 for OS/390 parameter (ZPARM) settings.
In this chapter, we discuss the connection tasks including DB2 DDF setup, DB2 Connect setup, and Client PC setup.
At the end of the setup tasks, you should be able to successfully test your connections and access the DB2 database on OS/390.
3.1 DB2 DDF setup
In our case, we had an OS/390 V2R8 system with a DB2 V6 database server using the location name DBH2. This DBH2 instance was our target data warehouse database on OS/390.
An easy way to determine the correct location name value for a DB2 for OS/390 server is to run the following query at the server using DB2I or QMF host:
SELECT DISTINCT CURRENT SERVER FROM SYSIBM.SYSTABLES
The resulting value is the RDB name for the server.
© Copyright IBM Corp. 2001 21

We had a standard installation of DB2 for OS/390 V6 with the recommended maintenance applied and DDF facility enabled. Refer to Appendix B, “Setting up DB2 DDF” on page 153, to see the parameters we used.
On our system, DDF listened on TCP/IP port 33368.
The DB2 location name and DDF TCPPort can also be found by searching the DB2xMSTR address space for the DB2 system being connected to. You may need to enlist the help of your OS/390 systems support staff to obtain this information.
If you have access to the OS/390 System Display and Search Facility (SDSF), you can obtain this information from the messages generated by the DB2 DB2xMSTR started task. SDSF is executed from an ISPF panel on the remote OS/390 host, as shown in Figure 11 on page 22.
Figure 11. Starting SDSF on ISPF panel
22 e-Business Intelligence Front-End Tool Access to OS/390 Data Warehouse
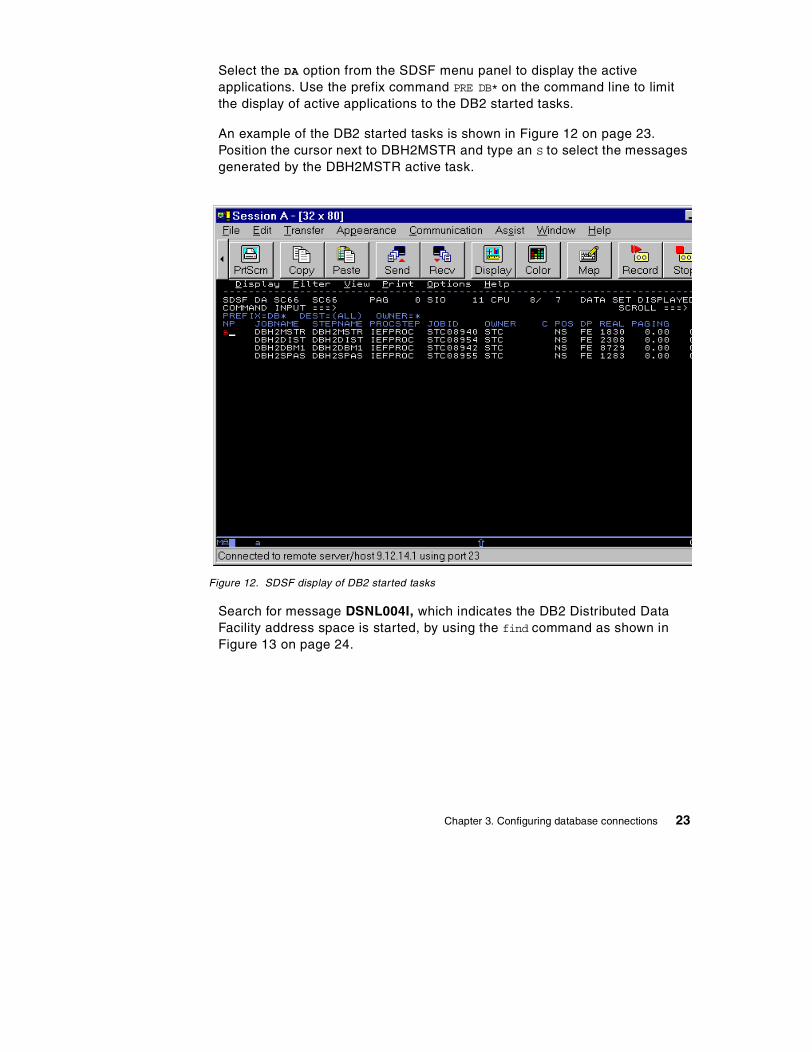
Select the DA option from the SDSF menu panel to display the active applications. Use the prefix command PRE DB* on the command line to limit the display of active applications to the DB2 started tasks.
An example of the DB2 started tasks is shown in Figure 12 on page 23. Position the cursor next to DBH2MSTR and type an S to select the messages generated by the DBH2MSTR active task.
Figure 12. SDSF display of DB2 started tasks
Search for message DSNL004I, which indicates the DB2 Distributed Data Facility address space is started, by using the find command as shown in Figure 13 on page 24.
Chapter 3. Configuring database connections 23

Figure 13. DBH2MSTR started task output messages
An example of the DSNL004I message is as follows:
DSNL004I =DBH2 DDF START COMPLETELOCATION DBH2LU USIBMSC.SCPDBH2GENERICLU -NONEDOMAIN wtsc66oe.itso.ibm.comTCPPORT 33368RESPORT 33369
If DB2x is not configured to support TCP/IP, see the DB2 Installation Guide provided with your DB2 license for instructions on how to configure TCP/IP for your DB2 subsystem.
3.2 DB2 Connect setup
We installed DB2 Connect V6.1 EE on an NT system connected to our DBH2 DB2 subsystem on OS/390.
Note: Remember that DDF must be up and running in order for DB2 Connect to be able to establish a connection to DB2 on OS/390. If you have trouble connecting, verify that sure DDF is running.
24 e-Business Intelligence Front-End Tool Access to OS/390 Data Warehouse
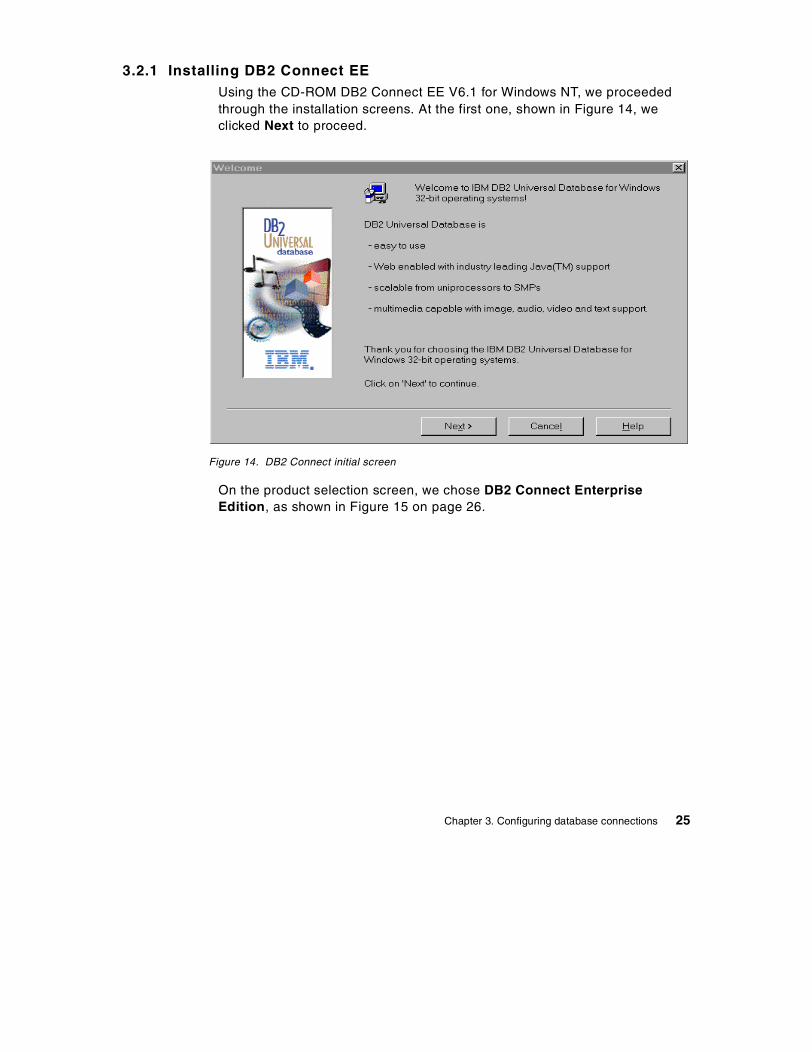
3.2.1 Installing DB2 Connect EEUsing the CD-ROM DB2 Connect EE V6.1 for Windows NT, we proceeded through the installation screens. At the first one, shown in Figure 14, we clicked Next to proceed.
Figure 14. DB2 Connect initial screen
On the product selection screen, we chose DB2 Connect Enterprise Edition, as shown in Figure 15 on page 26.
Chapter 3. Configuring database connections 25
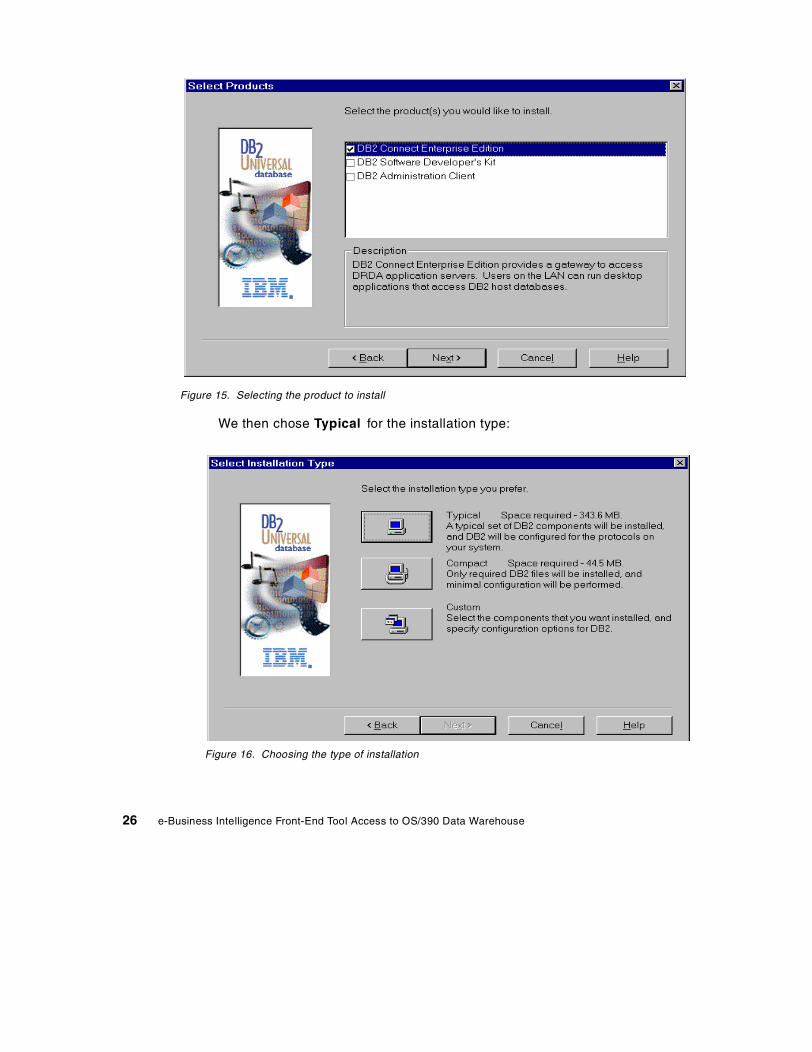
Figure 15. Selecting the product to install
We then chose Typical for the installation type:
Figure 16. Choosing the type of installation
26 e-Business Intelligence Front-End Tool Access to OS/390 Data Warehouse

We chose to install this product in the directory D:\SQLLIB (see Figure 17).
Figure 17. Choosing the destination location
We had to enter the user name and password for the administrative service, as shown in Figure 18 on page 27. This user ID and password combination is a Windows NT logon ID that has admin authority. We chose the default, db2admin, which we created, and gave it admin authority on NT.
Figure 18. Entering user ID and password
Chapter 3. Configuring database connections 27
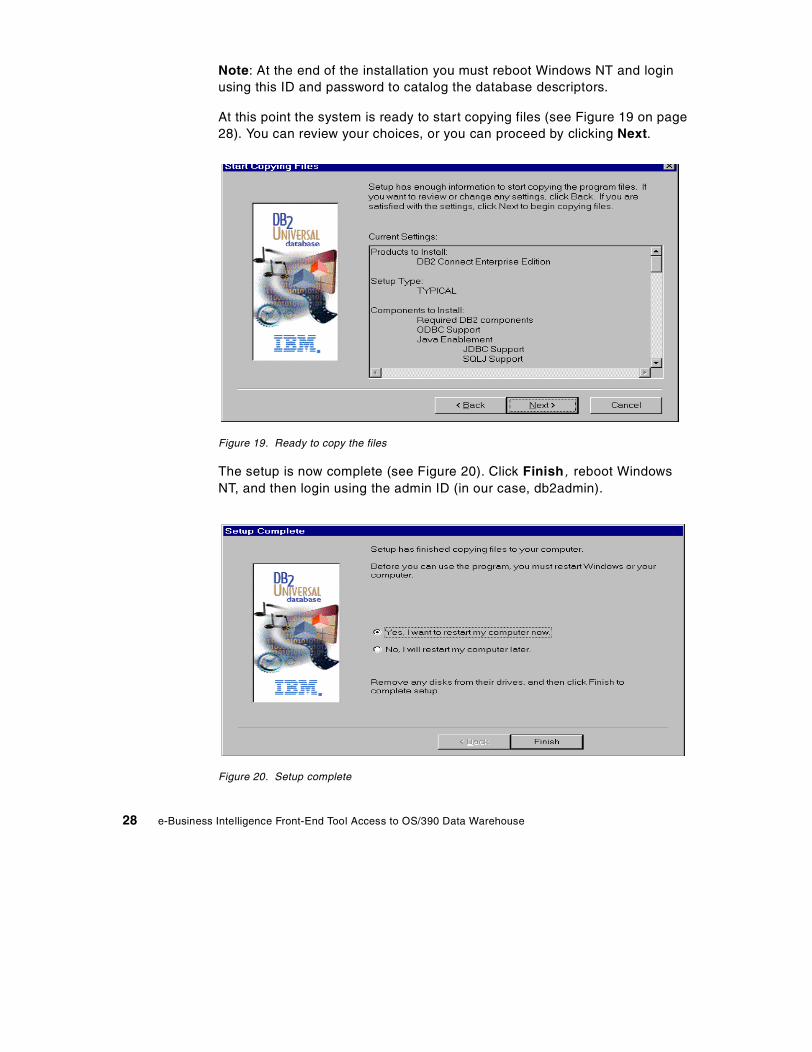
Note: At the end of the installation you must reboot Windows NT and login using this ID and password to catalog the database descriptors.
At this point the system is ready to start copying files (see Figure 19 on page 28). You can review your choices, or you can proceed by clicking Next.
Figure 19. Ready to copy the files
The setup is now complete (see Figure 20). Click Finish, reboot Windows NT, and then login using the admin ID (in our case, db2admin).
Figure 20. Setup complete
28 e-Business Intelligence Front-End Tool Access to OS/390 Data Warehouse

3.2.2 Configuring DB2 Connect EETo avoid confusion, you should determine all the information you will need before you start this process. Using inconsistent information will prevent you from establishing connectivity, and it will be difficult to determine what is incorrect.
Table 1 lists the parameters we used for our installation.
Table 1. Parameters for DB2 Connect setup
After the system has rebooted, go to Start -> Programs -> DB2 for Windows NT -> Client Configuration Assistant to create and catalog database descriptors.
On the welcome screen shown in Figure 21 on page 30, choose Add Database.
Parameter Source Value used
Protocol Database Services TCP/IP
Target Operating System OS/390
Hostname SYS1.TCPPARMS (PROFILE)
WTSC66OE or 9.12.2.27
Port Number Port number for DRDA in SYS1.TCPPARMS (PROFILE)
33368
Location Name Target Database DBH2
Database Alias For DB2 Connect DBNTH2
TSO User ID Valid user ID with RACF and DB2 dbadm
BIRES1
TSO password RACF password pswxxx
Chapter 3. Configuring database connections 29

Figure 21. Client Configuration Assistant welcome screen
For the Source, choose Manually configure a connection to a DB2 database and click Next (see Figure 22).
Figure 22. Source option
30 e-Business Intelligence Front-End Tool Access to OS/390 Data Warehouse

For the protocol choose TCP/IP, and choose OS/390 as the target operating system (Figure 23).
Figure 23. Protocol option
For the TCP/IP configuration, enter the OS/390 fully qualified hostname or the IP address of the OS/390 host. Enter the port that is reserved for the DDF in the DB2 instance. In our case, the host name was wtsc66oe.itso.ibm.com and the port was 33368 (see Figure 24 on page 31).
Figure 24. TCP/IP parameters
Chapter 3. Configuring database connections 31

For the database configuration, enter the Location name (in our case DBH2, which is the DB2 OS/390 instance name). Enter the database alias name that will be used to point to the DB2 instance on OS/390. We chose DBNTH2 (see Figure 25).
Figure 25. Database alias name
Register this database as an ODBC source (see Figure 26). This will allow access to the host database by DB2 Run-Time clients.
32 e-Business Intelligence Front-End Tool Access to OS/390 Data Warehouse
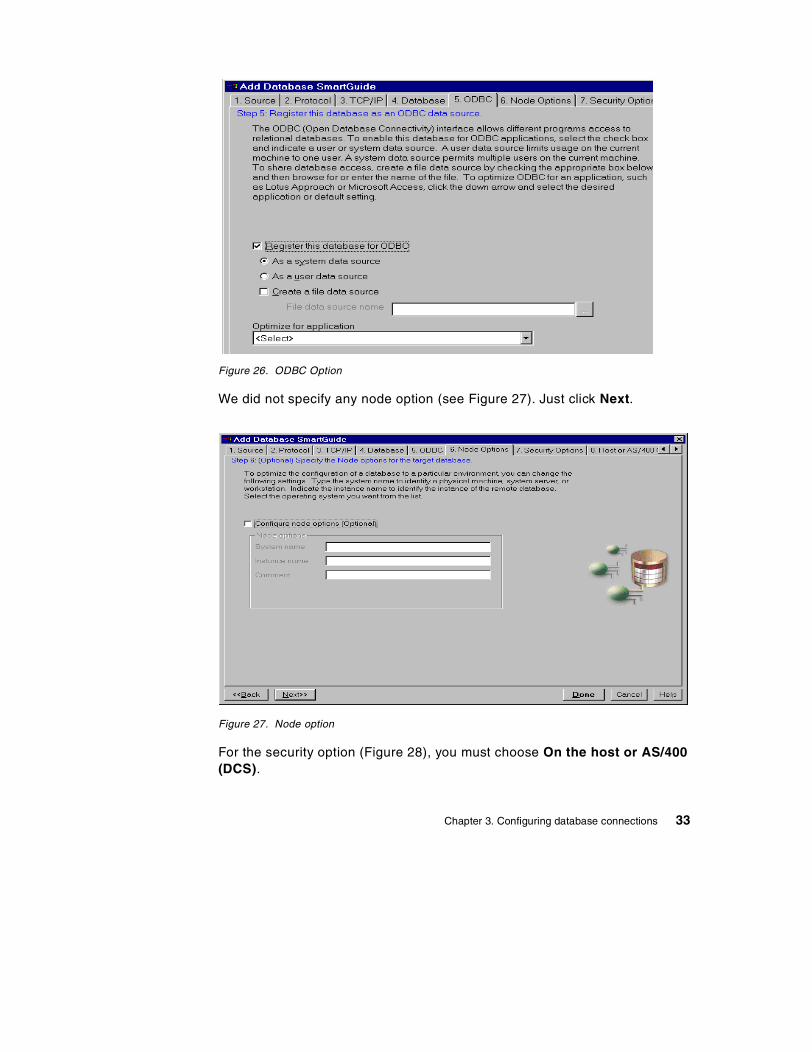
Figure 26. ODBC Option
We did not specify any node option (see Figure 27). Just click Next.
Figure 27. Node option
For the security option (Figure 28), you must choose On the host or AS/400 (DCS).
Chapter 3. Configuring database connections 33

Figure 28. Security option
We did not choose any host options in Figure 29.
Figure 29. Host option
34 e-Business Intelligence Front-End Tool Access to OS/390 Data Warehouse

Figure 30 shows that we had successfully configured the connection. We were ready to test the connection by clicking Test Connection.
Figure 30. Completion of configuration for DBNTH2
To test the connection, enter a valid TSO RACF user ID and password, as in Figure 31. The user ID should also be DB2 authorized.
Figure 31. Testing the connection
If the connection is successful, you should get the message shown in Figure 32 on page 36. If you do not receive this message, verify that you can ping the host and that the DDF is running.
Chapter 3. Configuring database connections 35
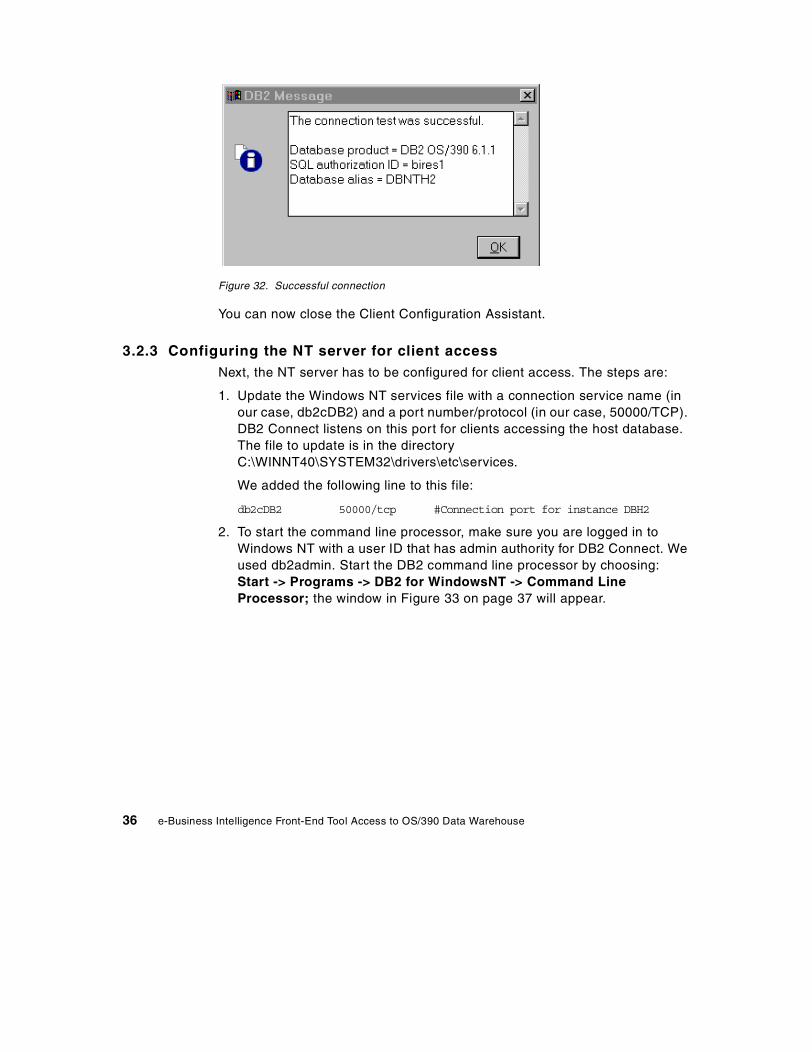
Figure 32. Successful connection
You can now close the Client Configuration Assistant.
3.2.3 Configuring the NT server for client accessNext, the NT server has to be configured for client access. The steps are:
1. Update the Windows NT services file with a connection service name (in our case, db2cDB2) and a port number/protocol (in our case, 50000/TCP). DB2 Connect listens on this port for clients accessing the host database. The file to update is in the directory C:\WINNT40\SYSTEM32\drivers\etc\services.
We added the following line to this file:
db2cDB2 50000/tcp #Connection port for instance DBH2
2. To start the command line processor, make sure you are logged in to Windows NT with a user ID that has admin authority for DB2 Connect. We used db2admin. Start the DB2 command line processor by choosing:Start -> Programs -> DB2 for WindowsNT -> Command Line Processor; the window in Figure 33 on page 37 will appear.
36 e-Business Intelligence Front-End Tool Access to OS/390 Data Warehouse

Figure 33. Starting the command line processor
3. Update the database configuration file with the connection service name parameters by entering the following commands:update database manager configuration using svcename db2cDB2
db2stop
db2start
Note: The db2stop command will halt your DB2 Connect environment.
4. Exit the command line processor by typing Quit at the DB2 prompt, then type Exit at the next prompt.
The DB2 Connect server is now ready for client access.
3.3 Client PC setup
In a three-tier connection, you need to set up your client PC by installing and configuring the DB2 Run-Time client code.
Chapter 3. Configuring database connections 37

3.3.1 Adding a user to Windows NT If you have a Windows NT operating system on your client PC, you must first add a user to your Windows NT. If you have Windows 95 or later, you may skip this step and proceed directly with the installation of the DB2 Run-Time client. We did the following:
Go to user management:Start -> Programs -> Administrative Tool -> User ManagerClick User in the tool bar;Click New User in the pull-down menu.
Fill in the following information:
Username:FullnameDescriptionPasswordConfirm password
Choose one of the following password options:
User Must Change Password at Next LogonUser Cannot Change PasswordPassword Never ExpiresAccount Disabled
Click groups.
Select Administrators, then click Add.
Click OK on the group memberships window.
Click OK on the New User window.
Click Policy in the tool bar of the User Manager window.
Click User Rights in the pull-down menu.
Click the box for Show Advanced User Rights at the bottom of the User Rights Policy window.
Click the pull-down menu for Rights.
Click Act as part of the operating system.
Click Add on the User Rights Policy.
38 e-Business Intelligence Front-End Tool Access to OS/390 Data Warehouse

Click OK on the User Rights Policy window.
Now you can install the DB2 Run-Time client.
3.3.2 Installing the DB2 Run-Time client The DB2 Run-Time client code needs to be installed on the client PC. It allows a CLI connection to the workstation DB2 database (including DB2 Connect and DataJoiner). The client PC operating system we chose was Windows 95. If you have a Windows NT operating system on your PC, you must first add a user to your Windows NT as described in the previous section.
The CD-ROM we used was DB2, Version 6.1 Run-Time Clients for Windows. When you insert the CD-ROM, you will go through the following series of screens to configure the DB2 Run-Time client.
After the welcome screen, you are asked to select the product to install as shown in Figure 34.
Figure 34. Product selection
The only choice is DB2 Run-Time Client, so choose it and click Next.
For the installation type screen, choose Typical. For the destination screen, we chose D:\sqllib. On the next screen, we did not choose Netbios.
After the files were copied, we received the following message:
Setup is complete, click on Finish and reboot the machine.
3.3.3 Configuring the Client PCThe steps to configure the Client PC are:
Chapter 3. Configuring database connections 39

1. Update the services file with a connection service name and port number. The port number must be the same that was used on the NT server. The service name is arbitrary. We added the following entry to the file:
C:\Winnt\system32\drivers\etc\services
db2cDB2 50000/tcp #Connection to DB Alias DBNTH2 on NT Server
2. To catalog a TCP/IP node, we started the command line processor and issued the following command:
catalog tcpip node db2node remote 9.12.2.105 server 50000
Note: The node name is arbitrary. The remote is the IP address of the NT server and the server has the port number used by both the client PC and the NT server machine.
3. To catalog the database on the client PC we used the following command:
catalog database dbnth2 as db2os390 at node db2node
Note: The database name is the DB alias used on the server for DBH2. The alias db2os390 is the DB alias used on the client.
3.4 Testing the client/server connection
To test the client/server connection, issue the db2start command, and then enter the following command:
connect to db2os390 user bires1 using pswxxx
User BIRES1 is an OS/390 TSO RACF user ID and a DB2 authorized user.
A successful connection between the client and the server should result in the following message:
Database Connection Information
Database Server = DB2 OS/390 6.1SQL Authorization ID = bires1Local Database Alias = db2os390
40 e-Business Intelligence Front-End Tool Access to OS/390 Data Warehouse

Chapter 4. QMF for Windows
QMF for Windows is part of the Query Management Facility (QMF) Family products. This chapter positions QMF for Windows in the QMF Family and explains how to perform the administration tasks of configuring the database connections and creating the QMF for Windows database objects.
4.1 QMF family
The QMF Family is a tightly integrated, powerful, reliable query and reporting toolset for any DB2 relational database management system. It offers a comprehensive data access, governing, and administration solution including:
• Accessing large amounts of data from a variety of data sources • Sharing central repositories of queries and enterprise reports • Implementing tightly controlled distributed solutions • Java SQL Query from a browser and report publishing to the Web for
viewing with a browser
The QMF Family provides access to data all over the enterprise from the following host and workstation servers:
• DB2 for OS/390 • DB2 for VSE & VM • DB2 for AS/400 • DB2 workstation servers running on OS/2, Windows, NT, AIX, and other
UNIX operating systems
QMF coupled with IBM DB2 DataJoiner allows access to non-relational and other vendor data sources as well.
QMF Family enables multiple types of users (novices, analysts, experts, application developers, and DBAs) to access enterprise-wide data, and produce reporting (including in HTML) charts or customized applications (via QMF's APIs), as well as rapid prototyping. QMF allows for batch processing, execution of QMF procedures (including REXX conditional logic), and sharing central repositories of queries and reports across the enterprise.
4.1.1 QMF for OS/390QMF for OS/390 (also called QMF host) executes in the TSO/ISPF and CICS/ESA environments on OS/390, in the CMS environment in VM, and in the CICS/ESA environment in VSE. QMF for OS/390 allows integration with
© Copyright IBM Corp. 2001 41

many host applications via its APIs, as well as integration with other host products such as ISPF for creating custom applications. Batch processing capabilities, easily distributed application enabling, and scalability are just a few of QMF for OS/390's many benefits.
QMF is also available as part of the DB2 Warehouse Manager for OS/390 solution, described below.
QMF for OS/390 V7 key enhancements include:
• Support for DB2 for VSE DRDA remote unit of work (RUOW) Application Requestor (in CICS)
• DB2 for AS/400 V4R4, or later, server support
• Full ROWID data type support
• Limited Large Object (LOB) data type support
• Additional Date (DD) and Time (TT) edit codes
• Object type defaults added to additional command syntax: CONVERT, EDIT, EXPORT, PRINT, RESET, RUN and SAVE
• Improved HELP, including larger HELP panel size and direct navigation to the QMF HOME panel.
4.1.2 QMF for WindowsQMF for Windows complements host QMF and is built for DB2, offering query, updating and reporting from the Windows environment. QMF for Windows provides access to existing QMF host objects (queries, forms, procedures) without any migration and very little, if any, retraining necessary. Execution of QMF commands, including procedures with IBM Object REXX (required on the workstation) and extensive governing of user actions and control over DB2 resource consumption via its administrative component, make QMF for Windows the query and reporting tool of choice for thousands of customers worldwide.
QMF for Windows is available as a feature of DB2 for OS/390 V5, V6 and V7. It is also available as a feature of BD2 for VSE and VM V6 and V7. An OS/390 license allows distributed access to any DB2 whether on OS/390, AS/400, or workstation platforms.
QMF for Windows for DB2 Workstation Databases is available as a standalone, one-time-charge product, and is licensed to access DB2 workstation databases only. QMF for Windows for AS/400 is available as a
42 e-Business Intelligence Front-End Tool Access to OS/390 Data Warehouse

standalone, one-time-charge product and is licensed to access DB2 for AS/400 databases only.
QMF for Windows is also included in the DB2 Warehouse Manager for Workstation, OS/390 and AS/400.
4.1.2.1 QMF for Windows V7QMF for Windows V7 key enhancements include:
• Java-based SQL query allows users to submit queries to DB2 via a browser, as well as the ability to view users’ queries and tables from a browser.
• Ease of use with a point-and-click/drag-and-drop interface to QMF form creation. Aggregation, grouping, and formatting can be performed in the query results. Enhanced sorting allows the results of a query to be sorted on more than one noncontinuous column.
• An enhanced object list window adds Windows tree control for more intuitive navigation and location of QMF objects.
• Procedures with REXX.
4.1.2.2 QMF for Windows connectivityFigure 35 shows QMF for Windows connections to a DB2 for OS/390 data warehouse.
Figure 35. QMF for Windows connections to a DB2 for OS/390 data warehouse
DRDA(TCP/IP or SNA)
DB2 for OS/390DRDA AS
QMF for WindowsCLI
QMF for WindowsDRDA AR
TCP/IPIPX/SPX
NETBIOS
DRDA
(TCP/IP
or SNA)
DB2 Connect orData JoinerDRDA AR
Chapter 4. QMF for Windows 43
There are two ways in which QMF for Windows can connect to a DB2 database server on OS/390:
• Distributed Relational Database Architecture (DRDA) over TCP/IP or SNA
One layer of DRDA describes the communication protocol that must be used by the participants in the architecture. Specifically, it defines that requesters and servers must communicate via the TCP/IP or the SNA LU 6.2 protocol.
QMF for Windows is a DRDA Application Requester (AR) and DB2 is the DRDA Application Server (AS). QMF for Windows requires no middleware, such as ODBC or DB2 Connect, to access DB2. The AR is built into QMF for Windows.
• Call Level Interface (CLI) to connect to a workstation DB2 database (including DB2 Connect and DataJoiner)
CLI is an application programming interface (API) for relational database access that is included as part of the DB2 Run-time client for Windows, OS/2, or UNIX platforms. Using CLI, client applications (like QMF for Windows) can connect to DB2 servers on workstations and execute SQL statements. With the addition of a connectivity gateway (DB2 Connect or DB2 DataJoiner), CLI applications can connect to DB2 mainframe servers (OS/390, VM and VSE).
4.1.3 DB2 Warehouse ManagerDB2 Warehouse Manager provides flexible, easy-to-use tools to create, manage and access your data warehouse and to govern and track its usage. In addition, it allows access to multiple data sources including: DB2, Oracle, Sybase, Informix, Microsoft flat files, ODBC and OLE.
Data warehousing is the foundation of business intelligence and customer relationship management. To leverage your data effectively, DB2 Warehouse Manager includes:
• Data Warehouse Center - creates, schedules and manages data warehouses.
• Agent - manages the flow of data between the data sources and the target warehouses.
• Information Catalog Manager - helps end users find, understand, and access available information.
• DB2 UDB Enterprise Edition V7.1 (limited-use license).
• Depending on the platform, DB2 Warehouse Manager includes the following:
44 e-Business Intelligence Front-End Tool Access to OS/390 Data Warehouse

– QMF, QMF HPO, and QMF for Windows on OS/390 – QMF for Windows on AS/400 and workstations
4.1.4 QMF High Performance OptionQMF High Performance Option (HPO) is included with DB2 Warehouse Manager for OS/390. It contains two major components:
• QMF HPO/Manager consists of a group of functions that improves governing capabilities, including a preemptive governor to analyze QMF host queries. The governing capabilities of QMF HPO/Manager allow an organization to establish controls to protect production applications and satisfy the business need for “on demand” information. Examples include time of day, day of week, and controlling resource consumption based on use of QMF commands and SQL statements.
The monitoring capabilities of QMF HPO/Manager display critical information of native batch and online QMF sessions and help to identify the source of problems, including cancelling queries before they impact the system.
In addition, QMF HPO/Manager provides powerful object tracking and management capabilities including a broad range of statistics on usage and administration of QMF objects. It is a perfect tool for analyzing your QMF query environment to determine which queries and procedures are best moved to the data warehouse, for example.
• QMF HPO/Compiler provides the ability to automatically convert queries and reports into efficient programs in OS/VS COBOL or VS COBOL II. This ability reduces:
– CPU consumption – DB2 catalog contention – DB2 Optimizer overhead – Security concerns as converted programs use static SQL instead of
dynamic SQL
4.2 Configuring QMF for Windows
Before configuring QMF for Windows, you must verify the following:
• The OS/390 environment is customized and the required network infrastructure is properly set up as described in 2.2, “Customizing the OS/390 environment” on page 17.
• The database connections are configured as described in Chapter 3, “Configuring database connections” on page 21.
Chapter 4. QMF for Windows 45

Those setups are outside the control of QMF for Windows and must be done before you start to configure this tool.
4.2.1 Configuring database connectionsTo describe a database connection, QMF for Windows Administrator creates a server definition file (SDF). The SDF contains all of the technical information needed by QMF for Windows to access the DB2 for OS/390 server (or any other DB2 server). There are two ways, as shown in Figure 36, to use an SDF:
• Provide each user with their own SDF.
• Provide a single SDF that is shared by multiple users over a file-sharing network. This approach has the advantage that it centralizes administration of the SDF: You only need to create and maintain a single file, and users need only point to that file when they run QMF for Windows.
Figure 36. Server definition file
Appendix C, “QMF for Windows database connection configuration” on page 157, shows the dbh2.ini SDF file we generated in our test environment.
You use the QMF for Windows Administrator function to configure QMF for Windows database connections.
Clients with QMF, no local SDF
File Server withcentral SDF
DatabaseServer 1
DatabaseServer 2
Client with QMFand local SDF
Type text
Type text
46 e-Business Intelligence Front-End Tool Access to OS/390 Data Warehouse

Go to Start->Programs->QMF for Windows- 7.1>QMF for Windows Administrator to open the QMF for Windows Administrator screen, as shown in Figure 37.
Figure 37. QMF for Windows Administrator screen
• From the File menu, click New..., Save As..., or Open... to open a new or existing SDF file (in our example, we open the dbh2.ini SDF file). Then click New to create a new database connection definition. The Server Parameters dialog box opens (see Figure 38).
Figure 38. Server Parameters screen
Chapter 4. QMF for Windows 47

• The Server Parameters dialog box allows you to specify:
– A server name
You must define each database server that you or your users access with QMF for Windows. When you do so, you give each database server a server name.
There are no restrictions on what this name can be; it is intended to be a descriptive, user-friendly label for the server, used only by the users in QMF for Windows and by the DBA in QMF for Windows Administrator. This name is all that the user of QMF for Windows needs to know in order to access that server; all of the technical details about how to access the server are hidden behind the server name in the SDF.
– An RDB name
You define the RDB name, also known as the location name in DB2 for OS/390 technology, or simply the database name in DB2 Universal Database (UDB) technology.
An easy way to determine the correct value for a DB2 for OS/390 server is to run the following query at the server using a DB2I or QMF host:
SELECT DISTINCT CURRENT SERVER FROM SYSIBM.SYSTABLES
The resulting value is the RDB name for the server.
– The network connection
There are three different ways for QMF for Windows to connect to a database: DRDA via TCP/IP, DRDA via CPI-C, or CLI. After selecting the radio button for the required connection, you need to enter the following values, depending on the selection you made:
• Connect using TCP/IP
Not all the DB2 host servers support TCP/IP connections. Native TCP/IP support is available for DB2 for OS/390 Version 5 and later releases.
If you don’t know if your DB2 OS/390 subsystem is configured to use TCP/IP, see the Sync Port and host name in DB2xMSTR.
Figure 38 on page 47 shows a Server Parameters screen for the connection definition of a DB2 UDB for OS/390 Version 6 database using DRDA via TCP/IP as the network connection with the following parameters:
– Host Name
If you enter a TCP domain name for the IP host name, QMF for Windows Administrator resolves that name to an address using the
48 e-Business Intelligence Front-End Tool Access to OS/390 Data Warehouse

GetHostByName socket call. Alternatively, you can directly specify the host address in dotted decimal notation (for example, “1.2.3.4”).
– Port number:
This is the TCP/IP port the database server is configured for, with its listener port in the services file.
• Connect using CPI-C
Before configuring this connection, you must specify the SNA software that you are using to implement CPI-C in your Windows environment. This software has to be configured, and the CPI-C symbolic destination name for the database server has to be defined before the QMF for Windows installation. The CPI-C symbolic destination name is defined in your SNA software.
For a detailed description of the setup required to configure an SNA session for QMF for Windows, see “Configuring your SNA (LU 6.2, APPC, and CPI-C)” in the IBM Redbook A DB2 Enterprise Query Environment - Build It with QMF for Windows!, SG24-5746.
From the main window in QMF for Windows Administrator, select Options... from the Edit menu. In the Options dialog box in the CPI-C Options group, specify the name of the DLL that your SNA software provides for CPI-C applications, as shown in Figure 39.
The name of the provider DLL typically is wcpic32.dll.
Figure 39. Provider DLL in the Options screen
Chapter 4. QMF for Windows 49

Using DRDA via CPI-C requires only a single entry in the Server Parameters screen: the symbolic destination name, as shown in Figure 40.
Figure 40. CPI-C connection definition
• Connect using DB2 UDB for Windows CLI
In order for QMF for Windows to connect to DB2 via CLI, you should first configure the database connections as described in Chapter 3, “Configuring database connections” on page 21. You should configure DB2 Connect using the Client Configuration Assistant as described in “Configuring DB2 Connect EE” on page 29.
The network configuration is performed as part of the DB2 UDB client configuration, rather than as a part of QMF for Windows configuration.
Once the database connections are defined, at the QMF for Windows Administrator level you need only to specify the alias defined for a particular database.
The primary advantage of using CLI is simplified configuration: If a database is already defined in the DB2 UDB client, its alias is the only information needed in QMF for Windows.
The disadvantages of using CLI are:
50 e-Business Intelligence Front-End Tool Access to OS/390 Data Warehouse

– QMF for Windows performance using CLI and DB2 Connect is generally slower than using DRDA connection to connect to OS/390 servers directly.
– QMF for Windows only supports connections to workstation databases with CLI. A DRDA connection via DB2 Connect or DB2 DataJoiner is required to access any host DB2 database
– There are restrictions on using QMF for Windows via CLI to bind static SQL.
Figure 41 shows a connection to a DB2 for OS/390 database using DB2 Connect Enterprise Edition via CLI.
Figure 41. CLI connection using DB2 Connect to DB2 UDB for OS/390 server
To access a DB2 UDB server using CLI, QMF for Windows must be able to establish a CLI connection from the local workstation (the system on which QMF for Windows is running) to the remote host (the system on which DB2 is running) via the DB2 Run-Time client.
QMF for Windows requires the DB2 UDB client Version 5.2 or later to access the database via CLI, and supports CLI connections to the
Chapter 4. QMF for Windows 51
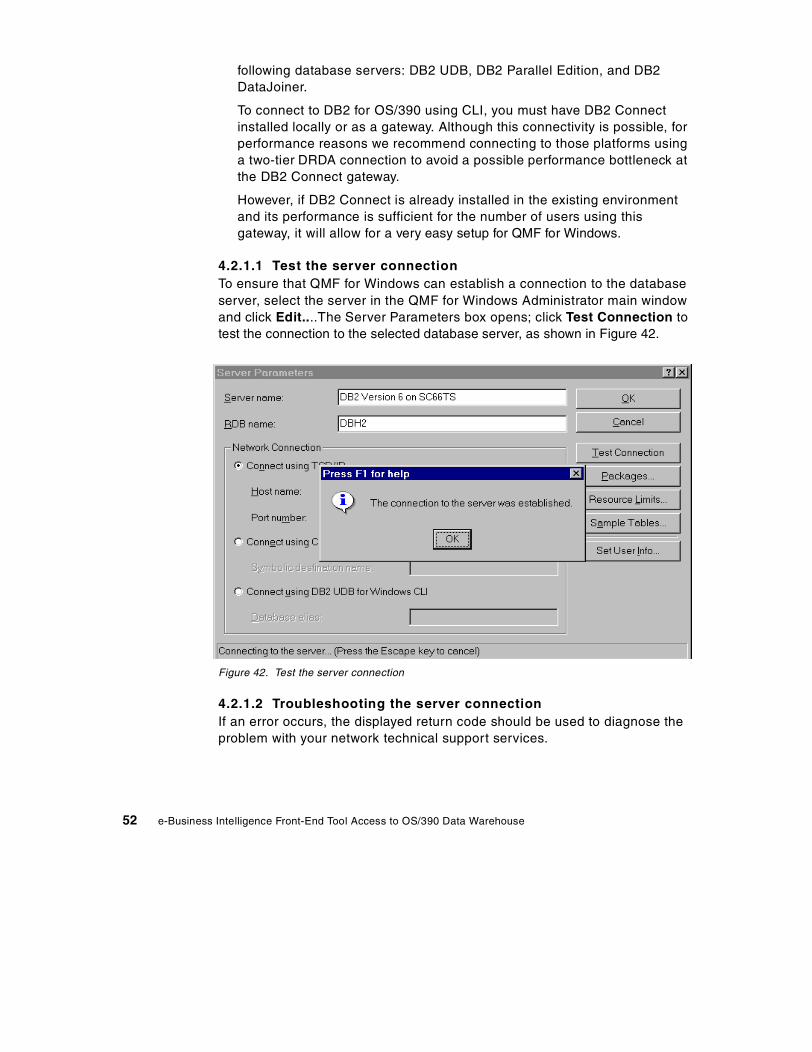
following database servers: DB2 UDB, DB2 Parallel Edition, and DB2 DataJoiner.
To connect to DB2 for OS/390 using CLI, you must have DB2 Connect installed locally or as a gateway. Although this connectivity is possible, for performance reasons we recommend connecting to those platforms using a two-tier DRDA connection to avoid a possible performance bottleneck at the DB2 Connect gateway.
However, if DB2 Connect is already installed in the existing environment and its performance is sufficient for the number of users using this gateway, it will allow for a very easy setup for QMF for Windows.
4.2.1.1 Test the server connectionTo ensure that QMF for Windows can establish a connection to the database server, select the server in the QMF for Windows Administrator main window and click Edit....The Server Parameters box opens; click Test Connection to test the connection to the selected database server, as shown in Figure 42.
Figure 42. Test the server connection
4.2.1.2 Troubleshooting the server connectionIf an error occurs, the displayed return code should be used to diagnose the problem with your network technical support services.
52 e-Business Intelligence Front-End Tool Access to OS/390 Data Warehouse

If you need to further investigate the problem, you can turn on tracing in QMF for Windows Administrator as follows:
• In the main window, select Options... from the Edit menu.
• In the Options dialog box, click Traces...
• In the Traces dialog box, review the listed trace file names; the defaults are probably acceptable.
• If the problem occurs when connecting using TCP/IP or CPI-C, in the appropriate combo box, select Calls with parameters and buffers to record all the communication information.
Note: Be aware that the user ID, password, and other sensitive data is written in clear text in the trace files.
• Click OK in the Trace dialog box and then in the Options dialog box.
• Test the connection that caused the error again.
A detailed trace of the calls that QMF for Windows Administrator made to the SNA or TCP/IP software is written to the specified trace files; see Figure 43.
Figure 43. Tracing the server connection
Chapter 4. QMF for Windows 53

If connecting to DB2 via an SNA network The SNA link and the LU 6.2 session between the QMF for Windows LU and the DB2 LU must be active in order to establish the connection.
There are very few errors that can occur in QMF for Windows Administrator when trying to establish a connection to the server. A problem at this point almost certainly indicates a problem with the network configuration, rather than with the QMF for Windows Administrator. The few errors that can occur are:
• Failure to activate the SNA software or to start the SNA node
• Failure to activate the SNA link
• Failure to properly configure an LU 6.2 session between the QMF for Windows LU and the DB2 LU
4.2.2 Creating QMF for Windows database objectsYou must create the QMF for Windows objects for each database server you intend to use with QMF for Windows. Some of these objects might already exist at a DB2 server from a previous QMF installation (such as QMF host on the OS/390).
The Administrator module can automatically determine which objects need to be created, and it will allow you to automatically create them. Before proceeding, verify if you have the necessary DB2 privileges to create objects at the target server.
To create the QMF installation objects, use the following steps:
Turn tracing off when the problem is resolved. Tracing can have a significant adverse impact on the performance of QMF for Windows.
Note
The QMF objects are required to use the new QMF Web Query Feature of QMF for Windows Version 7.1 to access data at a DB2 Server.
These QMF objects can be installed as part of the installation of QMF for Windows or may already exist at the DB2 server from a previous QMF installation (such as QMF host).
Note
54 e-Business Intelligence Front-End Tool Access to OS/390 Data Warehouse

• In the QMF for Windows Administrator main window, select the server and click Edit...
• On the Server Parameters dialog box, click Manage.
• Select the Packages option from the resulting pop-up box.
Enter all of the required values on the resulting Package Properties input panel (see Figure 44).
Figure 44. Create QMF for Windows objects
– Collection ID
This is the user-defined name that will group the packages that are created for use by QMF for Windows and QMF for Windows Administrator. The collection name is limited to eight characters.
In this collection, the following five packages will be bound: RAARDBI1, RAARDBI2, RAARDBIA, RAASHUT2, RAASHUT3.
Chapter 4. QMF for Windows 55
– Owner ID
To bind those packages, your userid must have authority at the database server to run the SQL that they contain. If your primary authorization ID has the required privileges, you can leave this field blank. If you have a secondary authorization ID that you usually use for administrative tasks, enter it in this field.
– Advanced button
Click the Advanced button on the Package Properties panel and indicate whether existing packages and authorizations are to be retained. In most cases, you should make sure these two boxes are checked.
When installing a new version or service release of QMF for Windows, this will replace all of the existing packages, thus all the clients with a full QMF for Windows installation need to upgrade to the new version as well. All QMF for Windows installations with older versions will no longer be able to connect to the server.
• Click OK to return to the Package Properties panel for additional selections.
– Decimal delimiter
Select the decimal delimiter that your users enter when writing SQL.
– String delimiter
Select the string delimiter that your users enter when writing SQL.
When you define multiple server entries within the SDF, accessing the same database but using different network connection options, be sure to use different Collection Names for each network option. If you fail to do so, only those users accessing the server using the last bound packages will be able to access the server.
Note
When defining a connection to DB2 for OS/390, use uppercase for the Owner ID. QMF for Windows does not translate lowercase to uppercase.
Note
56 e-Business Intelligence Front-End Tool Access to OS/390 Data Warehouse

• When you click Next >, QMF for Windows Administrator opens a connection to the database server to bind the installation package RAARDBI1. Your authorization ID must have the BINDADD privilege at the database server in order to bind package RAARDBI1.
• After the installation package is bound, QMF for Windows Administrator asks you whether you want to automatically check which objects need to be created (and which ones already exist). The recommended choice is to check which options already exist. After making a selection, click Next >.
In order to check for the existence of the required objects, the SELECT authority is required on the following tables on the DB2 for OS/390 server platform:
SYSIBM.SYSDATABASESYSIBM.SYSTABLESPACESYSIBM.SYSTABLES
If all of the objects already exist, a message to this effect will be displayed and you do not need to do anything further. Click OK to remove the message pop-up.
• You will now have the option to bind the QMF database packages. If you decide to bind the packages, you will be given the option to replace existing packages and authorizations. Once you make your decision regarding the bind of the QMF database packages, click Next >.
A return SQL code of -551 or -552 indicates that the authorization ID on the bind (either your primary user ID or the specified owner ID) does not have all the privileges required to create database objects at the selected database server.
Encoding schema differencesIf you have different encoding schemas, QMF for Windows produces an SQL code = -873 SQL state = 53090 error. If you are using Host QMF, before running the Create Objects step within the QMF for Windows Administrator, check your database encoding schema. The DB2 system tables must have the same encoding schema as the QMF control tables.
The encoding schema is either EBCDIC or ASCII. It must be the same in both applications to run the Create Objects step from within the QMF for Windows Administrator. The change of the DB2 encoding schema (installation parameter DEF ENCODING SCHEME in panel DSNTIPF) is not recommended.
Chapter 4. QMF for Windows 57

Special care should be used for DB2 OS/390 servers defined as CCSID ASCII, since you have to modify the DDL provided by the QMF for Windows Administrator’s automatic detection.
QMF for Windows does not check for the CCSID, and you could run into a -873 error when the product tries to create a QMF view from one table defined as ASCII and one as EBCDIC. We suggest you modify the DDL as follows:
CREATE DATABASE .......CCSID EBCDIC
Existing QMF installationsIf you already have QMF on an OS/390 platform (OS/390, VM, or VSE) or any prior versions of QMF for Windows installed, QMF for Windows creates some of its own tables and views in the already present databases. The naming convention adopted by QMF for Windows uses RDBI as the creator of the majority of the QMF objects.
Version 6.1 or later of QMF for Windows stores user profile, resource limits, and authorization ID information in different tables, and uses different views than previous versions and host QMF.
The new tables and views used to access these tables are created when you click Create Objects on the Packages dialog in QMF for Windows Administrator. If you look at the SQL that is generated to create these tables and views, you'll notice that:
• If any of the previous host QMF tables are detected to exist, INSERT statements will be created to copy all of the data stored in the old tables to the new tables, as follows:
INSERT INTO RDBI.PROFILE_TABLESELECT * FROM Q.PROFILES;INSERT INTO RDBI.RESOURCE_TABLESELECT * FROM Q.RESOURCE_VIEW;
• In the CREATE VIEW statements for each of RDBI.PROFILE_VIEW and RDBI.RESOURCE_VIEW views, there are two versions of the FROM clause, one referring to a table owned by RDBI, and one referring to a table owned by Q (which is commented out by default).
To continue sharing information between host QMF and QMF for Windows, comment out the line referring to RDBI, and uncomment the line referring to Q.
If you make no changes, the information in the tables owned by Q will be unaffected, but also will not be used by QMF for Windows.
58 e-Business Intelligence Front-End Tool Access to OS/390 Data Warehouse

So, if you want to use your existing QMF objects, only the above-mentioned modification during installation has to be done. Once this is set up correctly, you do not need to make any changes to the existing objects to make them available through QMF for Windows.
User profilesBy default, QMF for Windows V6.1 or later stores and accesses user profile information in the table named RDBI.PROFILE_TABLE.
Always access this table through the view named RDBI.PROFILE_VIEW. If you want to continue using your existing Q.PROFILES table (host QMF), then modify the DDL used to create RDBI.PROFILE_VIEW and point it to Q.PROFILES as follows:
CREATE VIEW RDBI.PROFILE_VIEW(CREATOR,"CASE",DECOPT,CONFIRM,WIDTH,LENGTH,LANGUAGE,SPACE,TRACE,PRINTER,TRANSLATION,PFKEYS,SYNONYMS,RESOURCE_GROUP,MODEL,ENVIRONMENT) AS SELECT CREATOR, "CASE", DECOPT, CONFIRM,WIDTH, LENGTH, LANGUAGE, SPACE,TRACE, PRINTER, TRANSLATION,PFKEYS, SYNONYMS, RESOURCE_GROUP,MODEL, ENVIRONMENTFROM Q.PROFILES;-- FROM RDBI.PROFILE_TABLE;
Resource groupsBy default, QMF for Windows Version 6.1 and later stores and accesses resource group (governing) information in the table named RDBI.RESOURCE_TABLE. QMF for Windows always accesses this table through the view named RDBI.RESOURCE_VIEW.
If you want to continue using your existing Q.RESOURCE_TABLE table (host QMF), modify the DDL used to create RDBI.RESOURCE_VIEW and point it to Q.RESOURCE_VIEW (the view already created on Q.RESOURCE_TABLE) as follows:
CREATE VIEW RDBI.RESOURCE_VIEW(RESOURCE_GROUP,
Chapter 4. QMF for Windows 59

RESOURCE_OPTION,INTVAL,FLOATVAL,CHARVAL) AS SELECT RESOURCE_GROUP, RESOURCE_OPTION,INTVAL, FLOATVAL, CHARVALFROM Q.RESOURCE_VIEW;-- FROM RDBI.RESOURCE_TABLE;
Primary/secondary IDsBy default, QMF for Windows Version 6.1 or later stores and accesses primary/secondary authid relationship information in the table named RDBI.AUTHID_TABLE. QMF for Windows always accesses this table through the view named RDBI.AUTHID_VIEW.
If you want to continue using your existing table Q.RAA_AUTHID_TABLE (the older version of the QMF for Windows product), modify the DDL used to create RDBI.AUTHID_VIEW and point it to Q.RAA_AUTHID_TABLE as follows:
CREATE VIEW RDBI.AUTHID_VIEW(PRIMARY_ID,SECONDARY_ID)ASSELECT PRIMARY_ID, SECONDARY_IDFROM Q.RAA_AUTHID_TABLE;-- FROM RDBI.AUTHID_TABLE;
4.2.3 Binding QMF for Windows packagesTo run distributed SQL at any database server, you must bind the QMF for Windows packages at that database server. The QMF for Windows packages refer to the set of objects that the product uses. These packages might already exist at the server; in this case, they will be replaced.
You use QMF for Windows Administrator to choose the collection name and bind options (owner id, etc.....) for the packages that it requires and to automatically bind the packages at the server. In this collection, the following five packages will be bound: RAARDBI1, RAARDBI2, RAARDBIA, RAASHUT2, RAASHUT3.
• RAARDBI1
This is used only in the server configuration phase to create the database objects required by QMF for Windows in each connected database server.
• RAARDBIA
60 e-Business Intelligence Front-End Tool Access to OS/390 Data Warehouse

This is used only by the Administrator module and contains the SQL required for administrative functions.
• RAARDBI2, RAASHUT2, and RAASHUT3
These are used by the QMF for Windows module.
• To create the packages at the target server, do the following:
– In the QMF for Windows Administrator main window, select the server and click Edit.
– On the Server Parameters dialog box, click Packages.
– Enter all of the required values in the resulting Packages dialog box.
– On the Packages dialog box, you bind the user and administrator packages by clicking Bind. The status line will indicate the progress of the bind operation. If any errors occur, you must correct them and repeat the bind. The most common errors include:
• SQL code of -204 that indicates that a required table does not exist. To create it, click Create Objects.
• SQL codes of -551 or -552 indicate that the authorization ID on the bind (either your primary user ID or the specified owner ID) does not have all of the following privileges required to bind the packages, as shown in Table 2.
Table 2. Required privileges
Table/View Name Privileges
RDBI.RESERVED SELECT
RDBI.PROFILE_VIEW SELECT, INSERT, UPDATE
RDBI.TABLE_VIEW SELECT
RDBI.USER_AUTHID_VIEW SELECT
RDBI.USER_ADMIN_VIEW SELECT
RDBI.RESOURCE_VIEW SELECT, INSERT, UPDATE, DELETE
Q.RAA_SUBTYPE SELECT, INSERT, UPDATE, DELETE
Q.RAA_OBJECT_VIEW SELECT
Q.OBJECT_DATA SELECT, INSERT, DELETE
Q.OBJ_ACTIVITY_SUMM SELECT, INSERT, UPDATE, DELETE
Q.OBJECT_DIRECTORY SELECT, INSERT, UPDATE, DELETE
Chapter 4. QMF for Windows 61

4.2.4 Granting permissionsFinally, after you bind the QMF for Windows packages, you must grant permissions to your users to execute the user packages and work with the product. This grant is automatically done by the Administrator module; you only have to specify the users’ IDs and the product will construct and execute the grant SQL at the server:
If this is the initial configuration of the QMF for Windows connection to the DB2 server, you are automatically navigated to the Permissions dialog box shown in Figure 45 on page 62.
Figure 45. Granting permissions
To invoke this function after initial installation, select Manage from the Server Parameters dialog box and choose Packages from the resulting pop-up.
Q.OBJECT_REMARKS SELECT, INSERT, UPDATE, DELETE
Q.OBJ_ACTIVITY_DTL SELECT, INSERT, UPDATE, DELETE
Table/View Name Privileges
62 e-Business Intelligence Front-End Tool Access to OS/390 Data Warehouse

Click Next > on the Package Properties dialog box. On the Check Objects dialog box, assume that all objects exist and click Next >.
On the Bind Packages dialog box, choose to not bind the packages again and click Next >.
In the Permissions dialog box:
• Enter the user IDs to which you want to grant the authority.
• Click Next > to make this change at the selected database server.
4.2.5 Creating sample tablesQMF for Windows provides nine sample tables that you can use while learning the product, before you begin working with your own tables. They contain information about an imaginary electrical parts company; see Table 3.
Table 3. Sample QMF tables
To create the sample tables, use the following procedure:
• Select the server at which you want to create the samples tables and click Edit. The Server Parameter dialog box opens.
• Click Manage and select Sample Tables from the pop-up. A dialog box opens, warning you that the sample tables will overwrite any previous versions of the sample tables that exist on the server. Figure 46 on page 64 shows the screen that appears when the sample tables are going to be created.
Sample table name Contains information about
Q.APPLICANT The prospective employees of the company
Q.INTERVIEW The interview schedule for prospective employees
Q.ORG Organization of the company by department (within division)
Q.PARTS Materials supplied to the company
Q.PRODUCTS Products produced by the company
Q.PROJECT Company projects
Q.STAFF The employees of the company
Q.SALES Sales information for the company
Q.SUPPLIER Other companies who supply materials to the company
Chapter 4. QMF for Windows 63
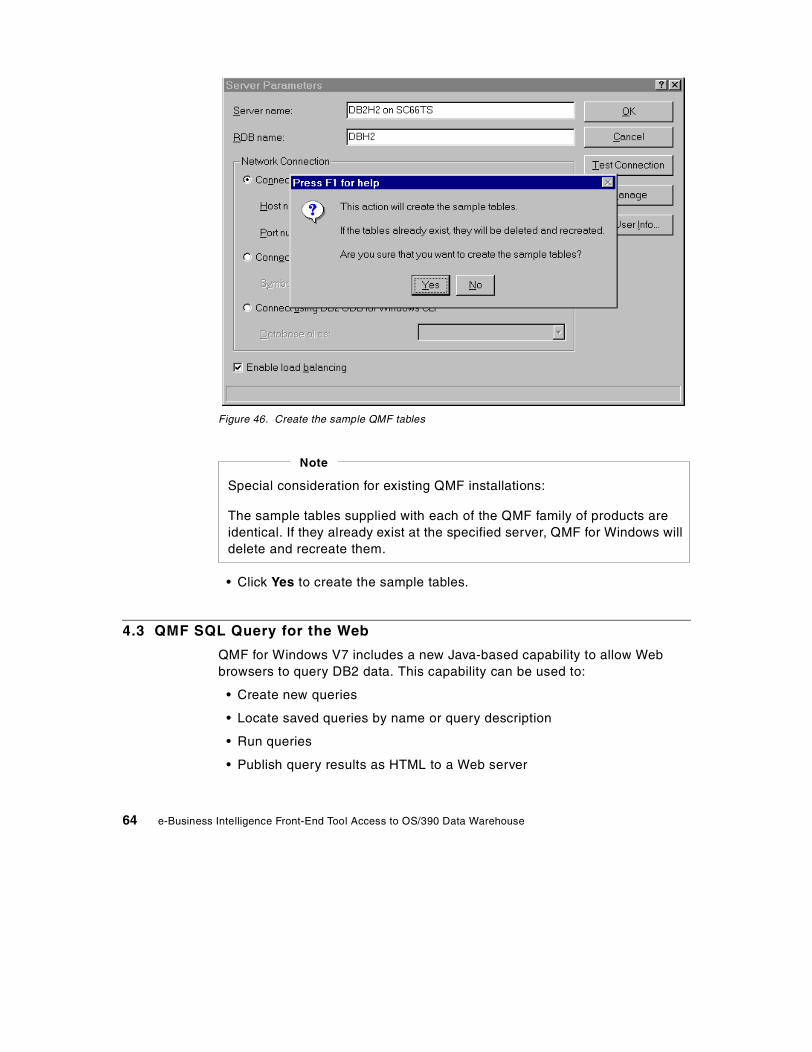
Figure 46. Create the sample QMF tables
• Click Yes to create the sample tables.
4.3 QMF SQL Query for the Web
QMF for Windows V7 includes a new Java-based capability to allow Web browsers to query DB2 data. This capability can be used to:
• Create new queries
• Locate saved queries by name or query description
• Run queries
• Publish query results as HTML to a Web server
Special consideration for existing QMF installations:
The sample tables supplied with each of the QMF family of products are identical. If they already exist at the specified server, QMF for Windows will delete and recreate them.
Note
64 e-Business Intelligence Front-End Tool Access to OS/390 Data Warehouse

• View query results in a Web browser
• Download query results to a spreadsheet
Figure 47 shows the QMF SQL Query for the Web.
Figure 47. QMF SQL Query for the Web
QMF SQL Query for the Web requires a Web application server product that supports the Java servlet standard. Supported Web application servers include:
• WebSphere Application Server for AIX, Sun Solaris, and Windows NT, Version 2.0 or later
• Sun Java Web Server Version 1.1.3 or later
Web application server products not included in this list, that support the Java servlet standard, should also work with QMF SQL Query for the Web.
Chapter 4. QMF for Windows 65

In addition, a JDBC driver is required to provide connectivity to any of the database products supported by QMF for windows. The JDBC driver support needed for DB2 servers are included with DB2 UDB database servers, DB2 Connect and DB2 DataJoiner middleware solutions.
In this section, the set-up and configuration of a HTTP server, a Web application server and the JDBC drivers on a Windows NT server platform is discussed.
4.3.1 Installing the QMF SQL Query for the Web Java servletThe configuration used to implement QMF SQL Query for the Web is shown in Figure 48.
Figure 48. QMF SQL Query for the Web configuration
Netscape Navigator 4.08 is used on the TESTIIS workstation to invoke QMF SQL Query for the Web servlet. QMF for Windows Version 7 (including SQL Query for the Web), IBM HTTP Server Version 1.1.6, IBM WebSphere Application Server Version 3.02, and DB2 UDB Enterprise Edition Version 6.1 for Windows NT (including DB2 Connect as DRDA gateway to DB2 UDB for OS/390 Version 6) are installed on the TOT107 server.
QMF SQL Query for the Web is configured for access to the local DB2 for NT server and for access via DB2 Connect to DB2 for OS/390 database server.
The basic installation of QMF SQL Query for the Web servlet requires simply copying the qmfweb.jar file to the IBM WebSphere Application Server servlet
Internet
HTTP
NT Server 4.0Websphere HTTP/WASDB2 UDB EEDB2 Connect EEJDBC/SQLJ DriversQMF for Windows 7.1QMF SQL Query for the WEB servlet
S/390 host (SC62)
DB2DB2
DB2 UDB V6 for OS/390
DB2DB2
DB2DB2
JDBC
DRDA
NT 4.0Netscape
WebBrowser
PC Workstation(TESTIIS)
N
PC Workstation(TOT107)
QMFQMFControlControltablestables
66 e-Business Intelligence Front-End Tool Access to OS/390 Data Warehouse

directory. During the QMF for Windows V7 installation, the qmfweb.jar file is placed in the <drive>:\Program Files\IBM\QMF for Windows\ directory.
The qmfweb.jar file must be copied into the IBM WebSphere Application Server’s servlet directory. The servlet directory for the WebSphere application server is <drive>:\Websphere\AppServer\servlets\.
To move the .jar file to the servlet directory, type the following at a Windows NT Command Prompt:
COPY <drive>:\Program Files\IBM\QMF for Windows\qmfweb.jar<drive>:\Websphere\AppServer\servlets\
Next, the WebSphere Administrator’s Console is used to define the QMF SQL Query servlet in the default_app Web server. To start the WebSphere Administrative Console on Windows NT, you must verify that the IBM WebSphere Administrative Server on Windows NT is running.
From the Windows NT Start menu, select Settings -> Control Panel -> Services. If the Administrative Service must be started, from the Services panel select IBM WS AdminServer. Press Start.
To start the WebSphere Administrative Console on Windows NT, from the Start menu, select Programs -> IBM WebSphere -> Application Server V3.0 -> Administrator’s Console. This starts the console, as shown in Figure 49.
Chapter 4. QMF for Windows 67

Figure 49. IBM Websphere Administrator’s Console
4.3.2 Customizing the QMF SQL Query for the Web servletThe following steps are necessary to customize the QMF SQL Query for the Web servlet using the WebSphere administrative console:
• Click the Topology tab.
• Expand the WebSphere Administrative Domain tree view.
• Expand your host name tree view. The Web Server host name created during the installation of IBM WebSphere for our configuration is tot107.
• Select and click Default Server, servletEngine, and default_app on this server.
• Right-click default_app, select Create, and click Servlet.
• Enter the responses below for the parameters specified in the Create Servlet dialog box shown in Figure 50 on page 69:
– Servlet Name: com.ibm.db2.web.query.WebQuery
– Description: IBM DB2 Web Query
– Servlet Class Name: com.ibm.db2.web.query.Webquery
68 e-Business Intelligence Front-End Tool Access to OS/390 Data Warehouse
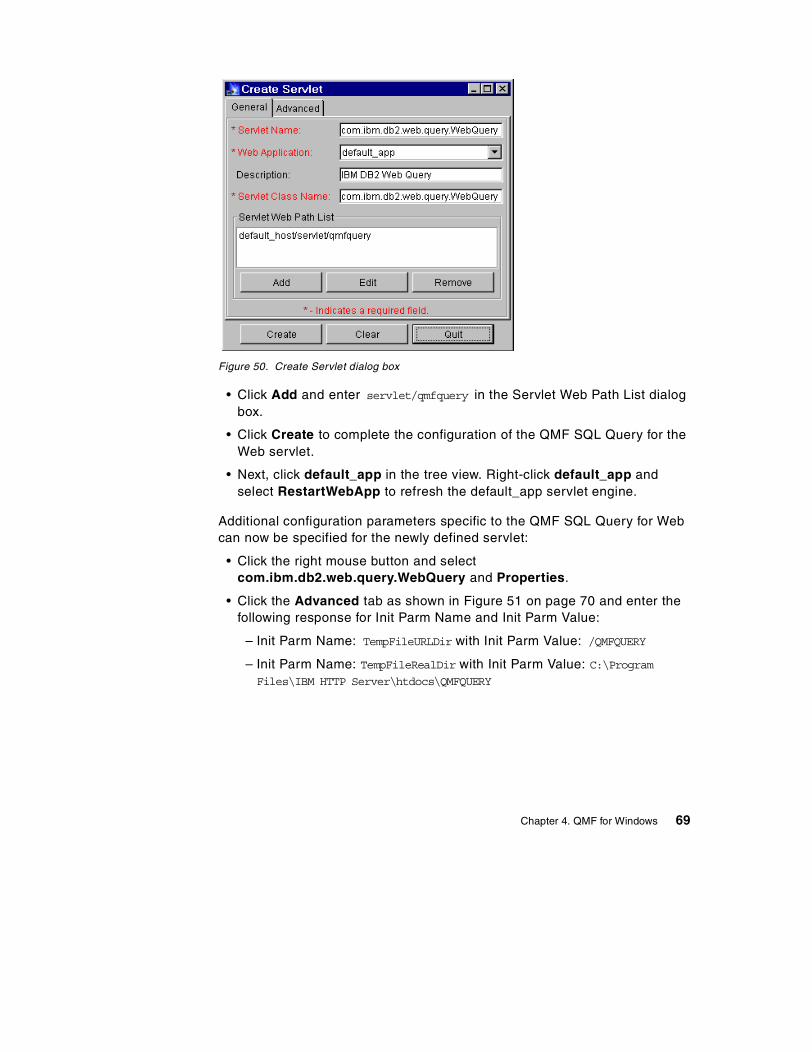
Figure 50. Create Servlet dialog box
• Click Add and enter servlet/qmfquery in the Servlet Web Path List dialog box.
• Click Create to complete the configuration of the QMF SQL Query for the Web servlet.
• Next, click default_app in the tree view. Right-click default_app and select RestartWebApp to refresh the default_app servlet engine.
Additional configuration parameters specific to the QMF SQL Query for Web can now be specified for the newly defined servlet:
• Click the right mouse button and select com.ibm.db2.web.query.WebQuery and Properties.
• Click the Advanced tab as shown in Figure 51 on page 70 and enter the following response for Init Parm Name and Init Parm Value:
– Init Parm Name: TempFileURLDir with Init Parm Value: /QMFQUERY
– Init Parm Name: TempFileRealDir with Init Parm Value: C:\ProgramFiles\IBM HTTP Server\htdocs\QMFQUERY
Chapter 4. QMF for Windows 69

Figure 51. Edit Servlet Parameters
TempFileRealDir is the directory used to store temporary files generated by QMF SQL Query for the Web. This should refer to a directory where temporary files can be created on the platform where the Web application server is running. If the directory specified does not already exist, you will have to create the directory in the Windows NT file system.
TempFileURLDir is the prefix of URLs that refer to the (real) directory specified by the TempFileRealDir parameter. It is used in generated URLs.
Note
70 e-Business Intelligence Front-End Tool Access to OS/390 Data Warehouse

4.3.3 Connecting QMF SQL Query for the Web-to-DB2 serversTo access a DB2 server from a Java-based servlet such as QMF SQL Query for the Web, a JDBC driver and data source must be defined using the WebSphere administrative console. The JDBC driver must be installed on the Web server host where the QMF SQL Query for the Web servlet is defined (in this example, the host name is TOT107).
• To add a JDBC driver, follow these steps:
• Click the Topology tab of the WebSphere administrator’s console and select WebSphere Admin Domain.
• Right-mouse click and then select Create and JDBCDriver.
In the “Create a JDBC Driver” dialog, enter the following values as shown in Figure 52 on page 71:
– Name: SampleJDBC
– Implementation Class: com.ibm.db2.jdbc.app.DB2Driver
– URL Prefix: jdbc:db2 (this is the default; it assumes DB2 is the database)
– JTA Enabled: false (this is the default; it assumes DB2 is the database)
Figure 52. JDBC properties
• Click Create and, after a message displays stating the creation was successful, click OK.
Chapter 4. QMF for Windows 71

After creating the JDBC driver, the next step is to create a data source. As shown in Figure 53 on page 72, to add a data source do the following:
• Click the Topology tab of the WebSphere administrator’s console and select WebSphere Admin Domain.
• Right-mouse click and then select Create and DataSource.
In the “Create a DataSource” dialog, enter the following information:
– DataSource: SampleDBSource (for example)
– Database Name: SampleDB (for example)
– Driver: SampleJDBC (the JDBC driver just created)
Figure 53. Create a data source
• Click Create and, after a message displays stating the creation was successful, click OK.
The next step is to install the JDBC driver on the Web server host. Follow these steps to install the JDBC driver.
• On the Topology tab, click the right mouse button on the Sample JDBC object. From the pop-up menu, select Install.
JDBC drivers must be specified for all DB2 server connections defined for access by QMF SQL Query for the Web. For example, JDBC drivers must be created to access to DB2 for OS/390 via the DBNTH2 CLI connection shown in Figure 41 on page 51.
Note
72 e-Business Intelligence Front-End Tool Access to OS/390 Data Warehouse

• In the “Install Driver” dialog, select the node (TOT107, in this example) onto which you will configure this JDBC driver.
• After you select the node, the Jar file option becomes selectable. Click Browse to locate the file system directory where the DB2 JDBC driver is installed. If you already know the file directory, enter as follows:
– C:\SQLLIB\java\db2java.zip
• Click Install and, if the installation is successful, click OK.
You are now ready to test QMF SQL Query for the Web.
4.3.4 Testing QMF SQL Query for the WebEnsure the default Web server and the QMF SQL Query for the Web servlet is started in your WebSphere Web server. This can be verified (and started, if necessary) from the WebSphere administrator’s console.
Start your Web browser and specify the URL for the QMF SQL Query for the Web servlet. To run the QMF SQL Query for the Web servlet, Netscape Navigator 4.08 is the Web browser. The format of the URL to start QMF SQL Query for the Web is:
http://<your_host>/servlet/qmfquery
where <your_host> is the URL for your Web server.
If QMF SQL Query for the Web is successfully configured, you should see the Web page shown in Figure 54 on page 74 at your Web browser.
Chapter 4. QMF for Windows 73

Figure 54. QMF SQL Query for the Web
Query results are available for viewing at the Web browser. See Figure 55 on page 75 for an example of query results returned to the Web browser.
74 e-Business Intelligence Front-End Tool Access to OS/390 Data Warehouse

Figure 55. Query results displayed via Web browser
4.4 QMF Report Center
QMF for Windows V7 includes a new capability called “Report Center,” which comes as an install option of QMF for Windows. This capability, shown in Figure 57 on page 77, can be used to:
• Organize, locate, launch and even “program” objects of personal interest
• “Aim” queries or tables at applications (such as spreadsheets), or publish them to Web servers
Chapter 4. QMF for Windows 75
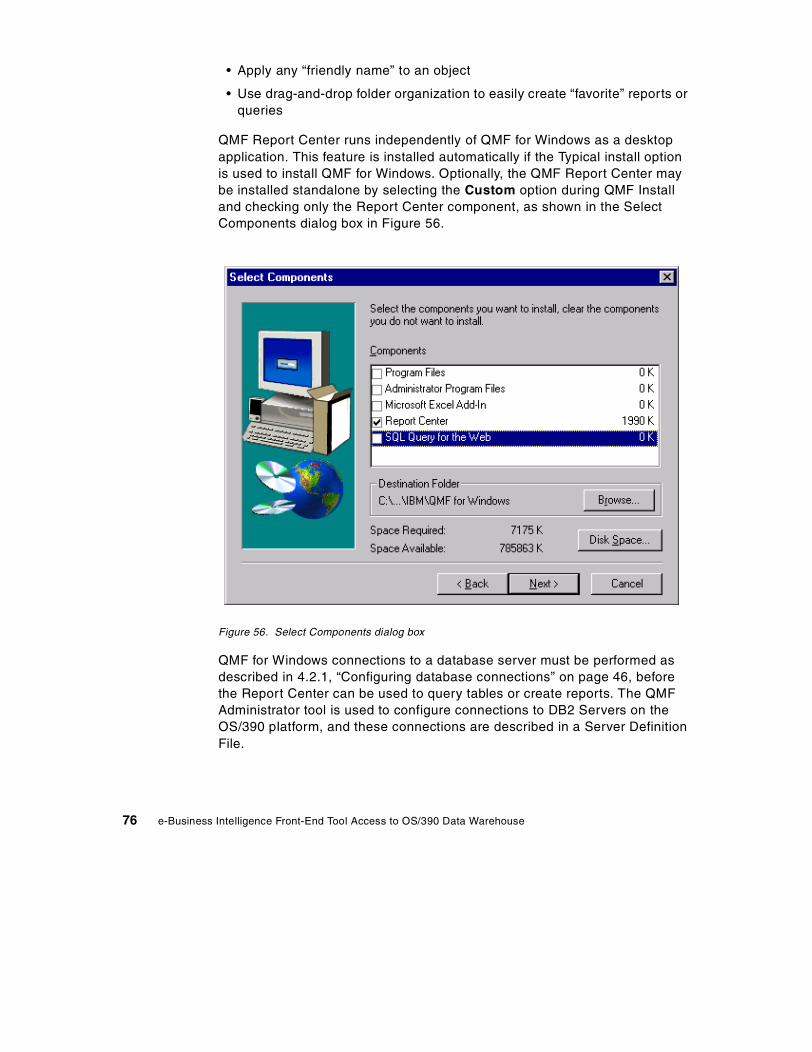
• Apply any “friendly name” to an object
• Use drag-and-drop folder organization to easily create “favorite” reports or queries
QMF Report Center runs independently of QMF for Windows as a desktop application. This feature is installed automatically if the Typical install option is used to install QMF for Windows. Optionally, the QMF Report Center may be installed standalone by selecting the Custom option during QMF Install and checking only the Report Center component, as shown in the Select Components dialog box in Figure 56.
Figure 56. Select Components dialog box
QMF for Windows connections to a database server must be performed as described in 4.2.1, “Configuring database connections” on page 46, before the Report Center can be used to query tables or create reports. The QMF Administrator tool is used to configure connections to DB2 Servers on the OS/390 platform, and these connections are described in a Server Definition File.
76 e-Business Intelligence Front-End Tool Access to OS/390 Data Warehouse

Once database server connections are in place, start the QMF Report Center on Windows NT. From the Start menu, select Programs, QMF for Windows 7.1, and then Report Center. This starts the QMF Report Center desktop application as shown in Figure 57. QMF Report Center displays all reports and tables available to the user in a tree format for each DB2 Server connection.
Figure 57. QMF Report Center
To run a saved report or to query a table, position the pointer at the query or report of interest and double-click to run a query and format an output report with the query results. An example of a report produced using QMF Report
Chapter 4. QMF for Windows 77

Center (displayed using the Windows NT Notepad to view a text output file) is shown in Figure 58.
Figure 58. Output from query of Q.STAFF DB2 table
4.5 QMF for Windows usage scenarios
QMF offers a total solution that includes accessing large amounts of data and sharing central repositories of queries and enterprise reports. It also allows you to implement tightly-controlled, distributed, or client/server solutions. In addition, you can use QMF to publish reports to the World Wide Web that you can view with your favorite Web browser.
In this section, we discuss the configurations available at the ITSO for use of QMF for Windows with DB2 for OS/390 data warehouses. QMF for Windows independently, or along with the QMF host feature of DB2 UDB for OS/390, provides both 2-tier and 3-tier business intelligence solutions for BI information provider and information consumer users.
78 e-Business Intelligence Front-End Tool Access to OS/390 Data Warehouse

4.5.1 Scenarios for information providersBoth 2-tier and 3-tier configurations were configured during this project to illustrate the use of QMF for BI information provider users. Two workstations, TESTIIS and TOT107, were configured with the prerequisite client, database connectivity, and Web serving components required to use QMF for Windows to access the OS/390-based data warehouse. Network, database, and Web connections to a OS/390 host, SC62, are defined and described in this section in order to address the requirements of a BI information provider user.
Figure 59 shows a 2-tier information provider scenario. QMF for Windows Version 7 is installed on the Windows NT Server (TOT107) and configured using the integrated DRDA Application Requestor to connect to the DB2 UDB for OS/390 V6 database server.
This configuration allows information providers with a highly graphical GUI-based tool to create queries, format reports and save the queries and report formats for subsequent use by other users. Saved queries and reports may be stored centrally on the OS/390 host for subsequent use by other, less-skilled BI information consumers.
Figure 59. 2-tier information provider scenario
In general, a 2-tier configuration provides the best opportunity for high performance. The software path length is shorter and the number of network nodes required to transfer requests from the client requestor to the remote data warehouse deployed on the OS/390 is fewer.
However, QMF for Windows also offers the option of being used in 3-tier configurations as shown in Figure 60 on page 80.
NT 4.0QMF for Windows V7
TCP/IP
DRDADB2DB2
DB2 EEDB2 EE DB2 UDB for OS/390 V6
DB2DB2
DB2DB2
Data
Warehouse
PC Workstation(TOT107)
S/390 host (SC62)
Chapter 4. QMF for Windows 79

Figure 60. 3-tier information provider scenario
This 3-tier configuration demonstrates an option to minimize the number of DRDA connections required to the DB2 UDB for OS/390 database server.
In this scenario, one workstation, TESTIIS, is configured as a QMF client platform for use in developing queries and report formats. A second workstation, TOT107, is configured with DB2 Connect Enterprise Edition and DB2 UDB for Windows NT to provide a database for QMF control tables, and connectivity to the OS/390 host where DB2 UDB for OS/390 V6 is installed.
QMF queries and saved reports are created by an information provider user and saved on the middle-tier for later use. Another advantage of using this configuration is that no database or connectivity software beyond what is included in QMF is required. Also, multiple BI users may make use of the common QMF objects (queries, reports, and procs) stored on the middle-tier server as well as exploit the single DRDA connection between the middle-tier and the remote OS/390 host.
4.5.2 Scenarios for information consumersWe configured both 2- and 3-tier information consumer scenarios to access DB2 UDB for OS/390 V6 tables using QMF for Windows. These scenarios minimize the skills required by an information consumer to make use of a data warehouse implementation.
NT Workstation 4.0QMF for Windows 7.1
TCP/IP
CLI
NT Server 4.0DB2 UDB EE V6DB2 Connect EEQMF control tables
TCP/IP
DRDA
S/390 host (SC62)
DB2DB2
DB2 UDB V6 for OS/390
DB2DB2
DB2DB2
QMFQMFClientClient
PC Workstation(TESTIIS)
PC Workstation(TOT107)
QMFQMFControlControltablestables
80 e-Business Intelligence Front-End Tool Access to OS/390 Data Warehouse

Figure 61 shows an example of a 2-tier information consumer scenario.
Figure 61. 2-tier information consumer scenario
The QMF Report Center on the client workstation delivers a QMF for Windows BI application to the information consumer. The information consumers are presented a list of query objects or report objects which they invoke from their respective desktop. The resulting output can be targeted for integration with familiar spreadsheet, word processing, or text editing applications. Use of QMF for Windows to navigate the DB2 data warehouse on OS/390 can be made transparent to the information consumers.
From a connectivity perspective, QMF for Windows V7 Administrator is used to define a server connection directly from the client, using DRDA, to the remote DB2 for OS/390 server.
Figure 62 on page 82 shows a 3-tier information consumer scenario using a Web browser and a connection gateway to access the data warehouse on OS/390.
NT 4.0QMF for Windows V7QMF Report CenterDesktop applicationssuch as Excel and Notepad
TCP/IP
DRDA
S/390 host (SC62)
DB2DB2
QMFQMFcontrolcontroltablestables
PC Workstation(TOT107)
DB2 UDB for OS/390 V6
DB2DB2
DB2DB2
Data
Warehouse
Chapter 4. QMF for Windows 81

Figure 62. 3-tier information consumer scenario
In this 3-tier information consumer scenario, a very thin client is deployed using a Web browser: Netscape Navigator in our example. The middle-tier configuration includes a Web server and QMF for Windows SQL Query for the Web Java servlet that creates and executes queries and displays query output as HTML pages.
Connectivity to a remote DB2 server, such as DB2 UDB for OS/390 V6 host, is enabled via the JDBC driver and a DRDA connection. DB2 Connect provides connectivity to the remote DB2 server database.
QMF control tables required to save QMF objects and QMF user profiles may be stored either locally on the middle tier where DB2 UDB EE is also installed, or on the remote DB2 server on the OS/390.
4.5.3 Choosing the best configurationSome of the key factors to look at in selecting the best configuration for use of QMF for Windows include:
• The end user’s technical experience and expertise • The hardware resources available to support the configuration • The support required to install, administer, and maintain your configuration • Performance and response time requirements
Internet
HTTP
NT Server 4.0Websphere HTTP/WASDB2 UDB EEDB2 Connect EEJDBC/SQLJ DriversQMF for Windows 7.1QMF SQL Query for the WEB servlet
S/390 host (SC62)
DB2DB2
DB2 UDB V6 for OS/390
DB2DB2
DB2DB2
JDBC
DRDA
NT 4.0Netscape
WebBrowser
PC Workstation(TESTIIS)
N
PC Workstation(TOT107)
QMFQMFControlControltablestables
82 e-Business Intelligence Front-End Tool Access to OS/390 Data Warehouse
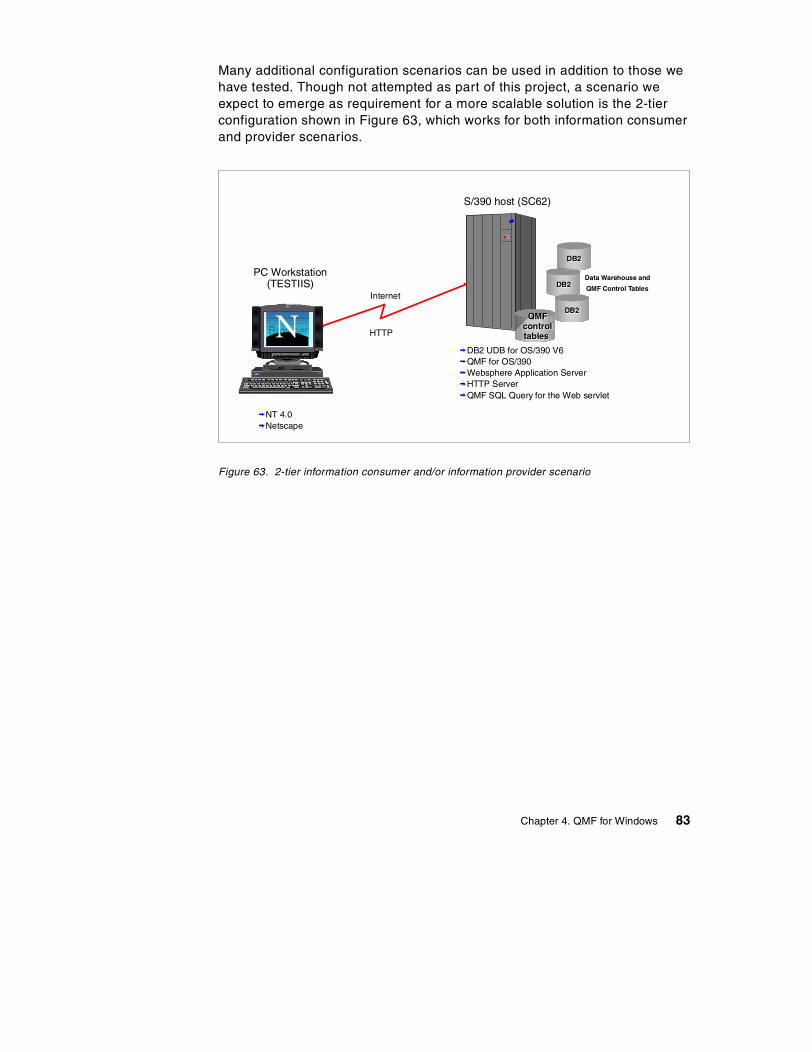
Many additional configuration scenarios can be used in addition to those we have tested. Though not attempted as part of this project, a scenario we expect to emerge as requirement for a more scalable solution is the 2-tier configuration shown in Figure 63, which works for both information consumer and provider scenarios.
Figure 63. 2-tier information consumer and/or information provider scenario
Browser
NT 4.0Netscape
Internet
HTTPN
DB2DB2
DB2 UDB for OS/390 V6QMF for OS/390Websphere Application ServerHTTP ServerQMF SQL Query for the Web servlet
DB2DB2
DB2DB2
Data Warehouse and
QMF Control Tables
PC Workstation(TESTIIS)
S/390 host (SC62)
QMFQMFcontrolcontroltablestables
Chapter 4. QMF for Windows 83

84 e-Business Intelligence Front-End Tool Access to OS/390 Data Warehouse

Chapter 5. Brio Enterprise
This chapter describes the Brio Enterprise tool connectivity to DB2 for OS/390 and DB2 OLAP Server for OS/390. Using a number of scenarios, we show how Brio can fulfill the requirements of information providers and information consumers.
5.1 Brio Enterprise tools
Brio Enterprise is a client/server tool suite providing functionality for query, analysis and reporting in an integrated suite of products. The product suite enables access to both relational data, such as DB2 for OS/390, and to OLAP data such as DB2 OLAP Server for OS/390. End users can choose to access the data either from a Web user interface or from a PC GUI. The server components of the tool suite and the common repository make it possible to share and access queries and reports (documents) across organizations in a controlled way.
5.1.1 Web client componentsBrio’s Web-based client components are:
• Brio.Insight • Brio.Quickview
5.1.1.1 Brio.InsightBrio.Insight is a Web client application that allows users to view, build and execute Brio documents. Brio.Insight is intended for information consumers. It uses Brio OnDemand Server (refer to 5.1.3.1, “Brio OnDemand Server” on page 86 for more details) on the middle tier to access the documents and the data warehouse.
5.1.1.2 Brio.QuickviewBrio.Quickview is a read-only Web client application. It allows users to view, refresh and save locally Brio documents. It uses Brio OnDemand Server on the middle tier to access the documents.
5.1.2 Non-Web client componentBrioQuery is Brio’s non-Web client component. Clients can connect directly to the DB2 for OS/390 or to the DB2 OLAP Server on OS/390 using a two-tier connection, or they can connect in three-tier through a server gateway.
© Copyright IBM Corp. 2001 85

5.1.2.1 BrioQueryBrioQuery enables query, reporting and analysis of data. The reporting and analysis features are extended with pivoting and charting functionalities. For OLAP data, Brio is also extended with an OLAP query functionality. BrioQuery also enables building and deploying data analysis applications.
BrioQuery comes in the following three editions:
BrioQuery Designer BrioQuery Designer is intended for information providers. Using BrioQuery Designer, information providers can create and distribute data models and Brio documents to be used throughout the organization. The designer can fully administer the Brio repository, and create new repositories. For a further discussion of the Brio Repository, see 5.2.2, “Brio repository” on page 88.
BrioQuery Explorer BrioQuery Explorer is intended for information consumers with good technical skills and a solid understanding of the database structure they are working with. The difference between the Designer edition and the Explorer is that the Designer edition can create, manage and deploy documents to the repository. Explorer users can access and execute these documents.
BrioQuery NavigatorBrioQuery Navigator is intended for information consumers. It allows them to access reports or data models defined by information providers. Information consumers using Brio Navigator do not need to have a detailed understanding of the database structure they are working with.
5.1.3 Server componentsBrio server components are Brio OnDemand Server and Brio Broadcast Server.
5.1.3.1 Brio OnDemand ServerBrio OnDemand Server (ODS) is a Web server application that uses pull technology to allow users to build, list, display and execute Brio documents through the Web. These Brio documents are stored in the Brio repository. Access to the documents is also controlled through the repository. For a discussion about Brio ODS connectivity, refer to 5.6, “Web client connection to DB2 data warehouse” on page 101.
5.1.3.2 Brio Broadcast ServerBrio Broadcast Server is a PC server application that implements batch processing and distribution of reports. It contains a scheduling facility that
86 e-Business Intelligence Front-End Tool Access to OS/390 Data Warehouse

makes it possible to create calendar or event-based reports. The broadcast server can distribute the reports in different ways. It can, for example, send reports by e-mail to a group of users, send the reports by FTP to a remote system, transform the reports into HTML, and publish them on an intranet, or direct the reports to a printer. The scheduling and distribution of the information is stored, managed and controlled from the repository.
5.1.4 Brio Enterprise Server Administrator Brio Enterprise Server Administrator (BES) is the administration, installation and configuration tool for Brio Broadcast Server and Brio OnDemand Server. BES can be used to:
• Configure server settings for Brio ODS and Brio Broadcast Server • Manage users, user groups and group privileges for accessing server
components • Register Brio ODS documents • Define printers, FTP locations and target directories for Brio Broadcast
server • Define and manage Broadcast Server jobs
5.2 Brio documents and repository
All query and analysis objects created and used within Brio are stored as Brio documents in the Brio repository. These objects can be used within the Brio Enterprise tool suite.
5.2.1 Brio documentsA Brio document can consist of the following sections:
• Query section - defines the request against the database. The user can select from a number of available tables and columns (data model). The user also adds join criteria, selection criteria, sorts etc. Based on the type of database, relational or OLAP, the user is presented with the relational or the OLAP query section.
• Result section - shows the result from an executed query. The result can be manipulated in the result section. The data can, for example, be summed and formatted.
• Table section - lets the user display the data in tabular format. The input to this section is data from the result section.
• Pivoting section - lets the user manipulate and data the data by using pivoting functionality.
• Chart section - lets the user create graphs and charts such as pie charts, line charts and 3-D charts.
Chapter 5. Brio Enterprise 87

• Report section, lets the user create presentation reports. This can include customer-specific graphics like company logotypes.
• EIS section - enables building customized applications using Java scripts.
5.2.2 Brio repositoryAll documents created within the Brio Enterprise tools (such as queries, reports and data models) are stored in the Brio repository which resides in relational tables stored, for example, in DB2 for OS/390. Storing the repository in OS/390 makes it possible to reuse its documents throughout the organization. For example, it is possible to use the same Brio repository stored on DB2 for OS/390 for both Web and client/server users. Figure 64 shows how different types of end users interact with the repository.
Figure 64. User interactions with the repository
Information providers deploy documents to the repository by using Brio Query Designer or Brio Enterprise Server Administrator.
5.3 Open Catalog Extension file
To describe its database connections, Brio uses an Open Catalog Extension (OCE) file.
Brio Query DesignerDB2 Connect PEDB2 OLAP Client API
TCP/IPHTTP/HTTPS
NT server
Brio OnDemand ServerWeb ServerBrio Enterprise Admin ServerDB2 Connect PE
Browser
Information Provider
Brio Insight orBrio Quickview
TCP/IP
Brio Query Explorer orBrio Query NavigatorDB2 Connect PEDB2 OLAP Client API
Information Consumer
TCP/IP
Information Consumer
S/390 server
S/390S/390
Brio RepositoryOlap Data
DB2DB2OLAPOLAP
ServerServer
DB2 datawarehouse
88 e-Business Intelligence Front-End Tool Access to OS/390 Data Warehouse

There is one OCE file for each database connection. (Note that the term “database” used in Brio terminology corresponds to the DB2 subsystem on OS/390.) The OCE file contains the necessary settings to describe the connection to a specific database. The settings include information about the connection middleware, the database, the userid and password used for the database connection and the network address of the database.
An OCE is created using the Database Connection Wizard. The Wizard can be invoked from any of the BrioQuery products, Brio ODS or Brio BroadCast Server. It is invoked by the menu choice Tools->Connection->Create.
5.4 Non-Web client connection to DB2 data warehouse
BrioQuery uses ODBC and DB2 Connect to connect to the DB2 data warehouse. Figure 65 shows a 2-tier connection example. The DB2 on OS/390 subsystem must be registered as an ODBC data source in the ODBC registry, and a connection from DB2 Connect to the OS/390 must exist before creating the OCE file.
Figure 65. BrioQuery to DB2 data warehouse 2-tier connection
5.4.1 BrioQuery configuration for DB2 data warehouse connection1. Start BrioQuery designer. From the Start menu, Select Programs ->
BrioQuery Designer -> BrioQuery Designer. Select Cancel on the Welcome to BrioQuery window.
2. Select Tools -> Connections -> Create. This will start the Database Connection Wizard (Figure 66 on page 90).
DRDA via TCP/IP or SNA
Brio QueryDB2 Connect PE
S/390 server
S/390S/390
Brio Repository
DB2 datawarehouse
Chapter 5. Brio Enterprise 89

Figure 66. BrioQuery Designer Main Menu
3. Select ODBC for the Connection Software and DB2 for Type of Database. Select Next (Figure 67).
Figure 67. Database Connection Wizard
4. Enter a valid userid and password. For Host, select your DB2 for OS/390 database (DBNTH2, in our case). Select Next (Figure 68 on page 91).
90 e-Business Intelligence Front-End Tool Access to OS/390 Data Warehouse

Figure 68. Connect to the data source
5. Select Finish on the next window, and answer Yes when prompted to save the Open Catalog Extension (OCE).
5.4.2 Test the DB2 data warehouse connection1. From the BrioQuery main window select File -> New.
2. From Recent Database connection files, select the name of the OCE you just saved (dbcdb2, in our case). Click on OK (Figure 69).
Figure 69. Select Database Connection File
Chapter 5. Brio Enterprise 91

3. Enter a valid userid and password for the database when prompted, then click OK. The BrioQuery screen is displayed (this may take a few minutes).
4. On the left side, click Tables to get a list. Select one you are familiar with. We selected the Staff table. BrioQuery will show the table and its columns (Figure 70).
Figure 70. Select the Staff Table for a Query
92 e-Business Intelligence Front-End Tool Access to OS/390 Data Warehouse

5. Drag the columns you would like in your report to the request line above the table as indicated on the window. We select ID, Name, and Salary (Figure 71).
Figure 71. Select columns for report
Chapter 5. Brio Enterprise 93

6. Click Process from the toolbar to run the report (Figure 72).
Figure 72. Simple BrioQuery Report
7. At this point the query can be saved for use later, testing Web clients, for instance. Select File -> Save To Repository -> Select. Pick the connection used for the repository (Odbcdb2.oce, in our case). Click OK.
8. Enter a valid userid and password when prompted. Click OK.
94 e-Business Intelligence Front-End Tool Access to OS/390 Data Warehouse

9. Enter a query name and a description on the Model tab (Figure 73).
Figure 73. Save to repository model tab
10.Select the Groups tab. Enter the owner name for the repository, BIRES1, and select which groups of users will be able to see/run the query. Then click OK to save the query (Figure 74).
Figure 74. Save to Repository Groups tab
Chapter 5. Brio Enterprise 95

5.5 Non-Web client connection to DB2 OLAP Server
To connect to DB2 OLAP Server for OS/390 from Brio, the DB2 OLAP client API’s must be installed on the client workstation. The APIs are available on the Brio installation CD and can be installed from there. As shown in Figure 75, no other middleware, except for TCP-IP communication, is required for the two-tier connection.
Figure 75. BRIOQuery to DB2 OLAP Server 2-tier connection
5.5.1 BrioQuery DB2 OLAP server connection configuration1. To start BrioQuery Designer, from the Start menu, select Programs ->
BrioQuery Designer -> BrioQuery Designer. Select Cancel on the Welcome to BrioQuery window.
2. Select Tools -> Connections -> Create. This will start the Database Connection Wizard.
3. Select DB2 OLAP for the Connection Software and DB2 OLAP for Type of Database. Select Next (Figure 76)
.
Figure 76. Database Connection Wizard
DB2 OLAP APIs via TCP/IPS/390S/390
Brio QueryDB2 Connect PEDB2 OLAP Client API
Brio Repository
OBDC via TCP/IPfor repositoryconnection
DB2 datawarehouse
DB2DB2OLAPOLAP
ServerServer
96 e-Business Intelligence Front-End Tool Access to OS/390 Data Warehouse

4. Enter a userid and password for the DB2 OLAP Server. For Host, enter the IP address for the system running DB2 OLAP Server. Note that for OS/390 it should be the IP address for UNIX System Services (USS). Select Next (Figure 77).
Figure 77. Connect to the data source
5. Enter the DB2 OLAP application/database name you want to work with (in our case, Sample/Basic). Select Next (Figure 78).
Figure 78. Application/Database
Chapter 5. Brio Enterprise 97

6. Select Measures from the list, for the measures dimension of the cube (Figure 79).
Figure 79. Measures Dimension
7. Select Finish on the next window, and answer Yes when prompted to save the OCE.
5.5.2 Test the connection to DB2 OLAP Server1. From the BrioQuery main window, select File -> New.
2. From Recent Database connection files, select the name of the Open Catalog Extension, OCE, you just saved (Olapdb2, in our case). Click OK (Figure 80).
Figure 80. Create a new OLAP document
98 e-Business Intelligence Front-End Tool Access to OS/390 Data Warehouse

3. Enter a valid DB2 OLAP Server userid and password when prompted. The OLAPQuery window will be displayed (Figure 81).
Figure 81. OLAPQuery window
4. Click the plus sign (+) beside Measures to expand it. Then expand Profit, and Margins. Drag Sales over to the Measures box, bottom right (Figure 82).
5. Click the + beside Years to expand it, and drag Quarter (All) to the Top Labels box, just above the Measures box (Figure 82 on page 100).
6. Click Process on the toolbar. This will access the data and create the report (Figure 82 on page 100).
Chapter 5. Brio Enterprise 99

Figure 82. Simple OLAPQuery test
7. Save the query for later testing. See 5.4.2, “Test the DB2 data warehouse connection” on page 91, Step 7, for instructions on saving queries to the repository.
100 e-Business Intelligence Front-End Tool Access to OS/390 Data Warehouse

5.6 Web client connection to DB2 data warehouse
To use any of the Web client products included in the Brio enterprise suite, appropriate communication and products must be defined and installed.
Web clients need to install Brio.Insight or Brio. Quickview on the client workstation. These products are implemented as Web Browser plug-ins. They are available both for Netscape Navigator and Microsoft Explorer browsers. As we discuss in 5.9, “Zero administration for Web clients” on page 115, client Web installations can be highly automated by using the zero administration concept.
You must also install Brio OnDemand Server (ODS) on the middle-tier Web application server. A Web server must also be installed on this or another server. The Web server handles the requests from the Web clients using standard protocols, and redirects the requests to BRIO ODS.
Brio ODS is supported on Windows NT and on UNIX (HP, Sun, AIX).
Figure 83 shows a three-tier Web connection to a DB2 for OS/390 data warehouse (DW) using Brio.Quickview or Brio.Insight browser plug-ins.
Figure 83. Brio.Insight or Brio.Quickview to DB2 DW 3-tier Web connection
Communication between the Web browser and the Web server uses standard HTTP or HTTPS protocol. The Web server handles all communications to Brio ODS. The API used between the Web server and Brio ODS depends on the installed Web server.
Information Consumer
DRDA via TCP/IPor SNA
HTTP/HTTPSvia TCP/IP
NT server
S/390 server
S/390S/390
Brio OnDemand ServerWeb ServerBrio Enterprise Admin ServerDB2 Connect PE
Browser
Brio Insight orBrio Quickview
Brio Repository
DB2DB2OLAPOLAP
ServerServer
DB2 datawarehouse
Chapter 5. Brio Enterprise 101

Brio currently supports the following Web servers and APIs:
• IBM HTTP Apache Server with CGI API (or any other Apache-based Web server)
• Netscape Enterprise Server with NSAPI or CGI • Microsoft Internet Information Server with ISAPI or CGI
The Brio ODS installation program is able to automatically detect and configure Netscape Enterprise Server and Microsoft Internet Information Server running on NT. On UNIX platforms, Brio ODS detects and configures Netscape Web servers and Apache Web Servers. There is currently no support for detecting and configuring Apache Web Servers running on NT.
We tested both the Microsoft Internet Information server and the IBM HTTP Apache Server under NT. When using the IBM HTTP server on NT, we had to do some manual configuration.
5.6.1 IBM HTTP Server (Apache) configuration for NT The version of Brio Enterprise we used (6.2) did not include configuration support for the IBM HTTP Server running on NT. This section describes the necessary steps for this configuration.
5.6.1.1 Modify filesTo configure the OnDemand Server to work with the Apache Web server on NT, you must set up the following items:
1. Directory aliases
A directory alias maps a physical directory on your Web server to a virtual directory. The directory alias information resides in the srm.conf or httpd.conf file which is located in the <Apache Install Dir>\conf directory. Scrolls through this file until you reach the alias section and add the following items:
Alias /odshtml "<ODSINSTALLDIR>/server/html/"Alias /odsimage "<ODSINSTALLDIR>/server/images/"Alias /components <ODSINSTALLDIR>/server/webclients/"Alias /execomp "<ODSINSTALLDIR>/server/webclients/exes/"
<ODSINSTALLDIR> is the directory where the OnDemand Server is installed.
For example:
Alias /odshtml "C:/Program Files/brio/brio enterprise server/server/html/"Alias /odsimage "C:/Program Files/brio/brio enterpriseserver/server/images/"
102 e-Business Intelligence Front-End Tool Access to OS/390 Data Warehouse

Alias /components "C:/Program Files/brio/brio enterpriseserver/server/webclients/"Alias /execomp "C:/Program Files/brio/brio enterpriseserver/server/webclients/exes/"
2. Script alias
A script alias maps a physical directory on your Web server to a virtual directory and tells the Web server to execute any scripts. The script alias information resides in the srm.conf or the httpd.conf file which is located in the <Apache Install Dir>\conf directory. Scroll through this file until you reach the script alias section and add the following item:
ScriptAlias /ods-cgi "<ODSINSTALLDIR>/server/CGI/"
3. Mimetypes
Mimetypes tell the Web server what header to return to the browser when a file is requested. Mimetypes are mapped using the file extension. The mimetype information resides in the mime.types file, which is located in the <Apache Install Dir>\conf directory. Add the following entries in this file:
application/x-brioquerybqyapplication/x-brioquerydatabqdapplication/java-archivejarapplication/x-javascriptjs
5.6.1.2 Change startup HTMLIt may also be necessary to change the startup html file. The file brio.html is located in:
<ODSINSTALLDIR>/server/html
Edit this file using an ASCII text editor (Notepad, for example). In the beginning of the file, the variable BrioStartURL is set for Apache servers. It should be:
BrioStartURL = "../ods-cgi/odscgi.exe" // cgi on windows
If there is a double forward slash (//) in the beginning of this row remove it and put // in the beginning of all other BrioStartURL rows.
5.6.1.3 ODS.INI FileThe ODS.INI file (in the ODS installation directory) contains general settings for Brio ODS. These settings are normally set during the installation. We found it valuable to verify that the settings we entered in Brio ODS corresponded to the actual settings in this file.
Chapter 5. Brio Enterprise 103

5.6.1.4 Hostname resolutionWhen CGI is used, the client must be able to resolve the hostname from the IP address (it must be registered on a name server that is available to the client). This applies even though the user is entering the IP address rather than the hostname on the Brio start-up URL.
In this situation the login to the ODS repository works, but when the user tries to process a query, it will try to connect to the host name (rather than to the IP address), which cannot be resolved because the IP address has been translated to the host name when the user first connected to the ODS repository.
5.6.2 OnDemand Server configuration1. Start Brio Enterprise Server Administrator. From Start, select Programs ->
Brio Enterprise Server -> Server Administrator.
2. Click OnDemand Server when prompted for which service to set up (Figure 84).
Figure 84. OnDemand Server main window
3. Right-click Servers. Select New.
4. Choose Create to create a new connection (OCE), or Select, to select an existing OCE from the list. The connection must have ODBC as the connection software, and DB2 as the type of database. This is because the connection created/selected in this step will be used to connect to the Brio repository stored in DB2 on the OS390. To create a new connection, follow the steps in 5.4, “Non-Web client connection to DB2 data warehouse” on page 89.
5. If using an existing OCE, you will be prompted to logon. Enter a valid userid and password for the host.
6. Select the Repository owner from the list. If at least one repository does not exist, you will be prompted to create it before continuing. (We used the repository owned by BIRES1.) Click OK (Figure 85 on page 105).
104 e-Business Intelligence Front-End Tool Access to OS/390 Data Warehouse
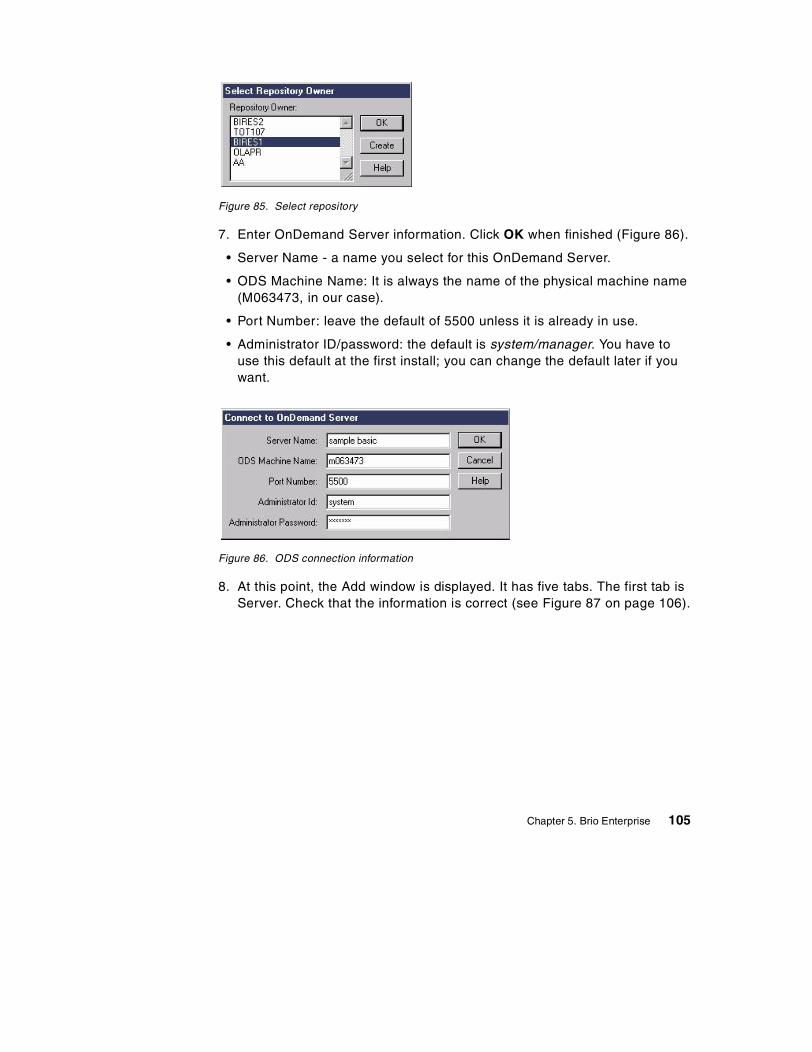
Figure 85. Select repository
7. Enter OnDemand Server information. Click OK when finished (Figure 86).
• Server Name - a name you select for this OnDemand Server.
• ODS Machine Name: It is always the name of the physical machine name (M063473, in our case).
• Port Number: leave the default of 5500 unless it is already in use.
• Administrator ID/password: the default is system/manager. You have to use this default at the first install; you can change the default later if you want.
Figure 86. ODS connection information
8. At this point, the Add window is displayed. It has five tabs. The first tab is Server. Check that the information is correct (see Figure 87 on page 106).
Chapter 5. Brio Enterprise 105

Figure 87. Add Server tab
9. Verify that the information on the Settings tab is correct (Figure 88).
Figure 88. Add Settings tab
10.Ensure OnDemand Server Repository is selected on the Authentication tab (Figure 89).
Figure 89. Add Authentication tab
106 e-Business Intelligence Front-End Tool Access to OS/390 Data Warehouse

11.Ensure that the directories listed on the Directories tab are correct (Figure 90).
Figure 90. Add Directories tab
12.Ensure that the server repository information is correct on the Server Repository tab. If this is the first server being defined for ODS, most of this tab will be blank. The OCE in the server repository tab should be the same as the OCE defined on the server tab. In our case, the OCE is Odbcdb2.oce we previously created. Enter an ID that has authority to update the repository tables, and its password. Check that the OCE and repository owner name is the same as the owner name on the Server tab (Figure 91).
Figure 91. Add Server Repository tab
13.Click OK to create the server. Any users, groups, or documents found in the repository will be added to the server automatically (see Figure 92 on page 108).
Chapter 5. Brio Enterprise 107

Figure 92. ODS main window with new server
14. Add any users that are required. Right-click Users, then select New. Enter userid and password. Ensure that the Allow access to ONDemand Server checkbox is checked.
15.Create a group for your users if you do not have one. Right-click Groups, then select New. Ensure that the Allow access to OnDemand Server checkbox is checked. Select Query and Analyze for default privilege. Check Allow registering documents and Prompt for database logon. Move users to the Users in Group box.
Note: You may want to reconsider the default privileges later, but the suggested setting is ok for testing.
16.Add your test documents. Right-click Documents -> Add Document -> Repository Model. Select the query from the list of documents previously saved in the repository. The Add window will be displayed (Figure 65 on page 89).
See 5.4, “Non-Web client connection to DB2 data warehouse” on page 89, and 5.5, “Non-Web client connection to DB2 OLAP Server” on page 96 for sample queries that you can load from the repository into a document.
17.Give the document a name and a description, and assign it to one or more groups to give users access. Select OK (Figure 93 on page 109).
108 e-Business Intelligence Front-End Tool Access to OS/390 Data Warehouse

Figure 93. Add Document tab
18.Select the new document and the appropriate connection (Olapdb2.oce, in this case) since it is an OLAP query (Figure 94).
Figure 94. Add Connection tab
Chapter 5. Brio Enterprise 109

5.6.3 Testing the OnDemand Server setupTo check whether the configuration is correct:
1. On the NT server, ensure the Web server and ODS are started.
2. On the Web client, start the browser. Enter this URL (see Figure 95):
//<hostname>/odshtml/brio.html
In our case:
//M063473/odshtml/brio.html
Figure 95. Web client start page
110 e-Business Intelligence Front-End Tool Access to OS/390 Data Warehouse

3. Click New logon. When prompted, enter your ODS server userid and password.
Note: If you are using Netscape and the userid is not displayed when you enter it, the default fonts need to be used. From the Netscape toolbar, select Edit -> Preferences -> Appearance -> Fonts. Click Use my default fonts. Select OK. Stop and restart the browser (Figure 96).
Figure 96. Netscape fonts
4. Select the report you would like to run from the list. This list shows only those reports added as a document in ODS (Figure 97).
Figure 97. Report Catalog
Chapter 5. Brio Enterprise 111

5. The results are displayed in Figure 98.
Figure 98. Report display on browser
5.7 Web client connection to DB2 OLAP Server
Figure 99 shows a three-tier connection between the Web client Brio.Insight or Brio.Quickview and DB2 OLAP Server for OS/390. Connecting to the DB2 OLAP Server requires the Essbase APIs on the middle tier next to Brio ODS. Essbase APIs connect directly to DB2 OLAP Server on OS/390 over TCP/IP.
112 e-Business Intelligence Front-End Tool Access to OS/390 Data Warehouse

Figure 99. Brio.Insight or Brio.Quickview to DB2 OLAP Server 3-tier connection
5.7.1 Implement the Web client connectionTo set up a connection to DB2 OLAP Server, all the steps required to set up connections to DB2 and the repository must be completed first; see 5.6.2, “OnDemand Server configuration” on page 104.
Once this configuration is complete and tested, the only additional steps required to connect to the DB2 OLAP Server are to create the OCE, and a query that uses it.
1. To create the OCE, select Tools ->Connection->Create from the toolbar, and follow the instructions given in 5.5.1, “BrioQuery DB2 OLAP server connection configuration” on page 96. Ensure that the connection software is DB2 OLAP and the database is DB2 OLAP.
2. To create an OLAP query, follow the instructions given in 5.5.2, “Test the connection to DB2 OLAP Server” on page 98.
3. Once the report is saved, go into ODS and add it as a document. See 5.6.2, “OnDemand Server configuration” on page 104, step 16, for instructions on how to add a document.
5.7.2 Test the Web client connection1. Follow the steps in 5.6.3, “Testing the OnDemand Server setup” on page
110 to start the browser and get logged on.
2. Select the OLAP query from the document list. The OLAP report will be displayed in the browser window.
DB2 OLAP APIsvia TCP/IP
HTTP/HTTPS
NT server
Brio OnDemand ServerWeb ServerBrio Enterprise Admin ServerDB2 Connect PE
Browser
Brio Insight orBrio Quickview
Brio Repository
InformationConsumer
S/390 server
S/390S/390
DRDA viaTCP/IP orSNA to Briorepository
DB2 datawarehouse
DB2DB2OLAPOLAP
ServerServer
OLAP dataBrio Repository
Chapter 5. Brio Enterprise 113
5.8 Security
Brio implements security on multiple levels.
5.8.1 Access to Brio documentsThe first level of access is protection of the objects in the repository. Access privileges to a Brio document are always given to a user group. Access privileges include:
• View • View and process • Analyze • Analyze and process • Query and process
The list of users, user groups, connections between users and groups, and privileges for each group are stored in the ODS repository. The management of these definitions is performed by the administrator from the Brio Enterprise Server Administrator component.
5.8.2 User authenticationBrio supports three different methods of authenticating Web users to the ODS repository. Each of these methods have different security and management implications, as explained in the following sections.
5.8.2.1 Authenticate user with database loginWhen the ODS repository resides on DB2 for OS/390, the userid and password entered on the HTML login form are passed to RACF and DB2, which verify that the user has a valid userid, password combination.
With the Authenticate user with database login method, it is not necessary to add a password to the userid definition in the ODS repository.
Users who want to access only public Brio documents do not need to be added to the Brio user list. When appropriate, giving public access for executing documents stored in Brio and using “Authenticate user with database login” keeps the user administration within Brio to a minimum. In this case the actual access control is deferred to OS/390. The access privileges to DB2 tables is verified when the user tries to process the query, rather than when opening the Brio document.
114 e-Business Intelligence Front-End Tool Access to OS/390 Data Warehouse

5.8.2.2 Authenticate user with ODS repositoryIf this option is selected, the userid and password entered on the HTML login form are matched against the userid and password stored in the Brio ODS repository. If they match, the user is authenticated within ODS and is presented with the list of documents granted to the groups the user is connected to.
5.8.2.3 Authentication by the customer methodThe third option is to use a customer-specific Java Bean invoked by Brio ODS to perform the authentication. The userid and password are passed to the Java Bean. This option enables customer-specific coding for authentication. It can be used to achieve a single logon (avoiding logon to both Brio ODS and the database server).
5.8.3 Authorization to execute queriesFor a user to be able to execute a Brio query against DB2 for OS/390 or DB2 OLAP server via ODS, two things must be fulfilled:
• Within the ODS repository, the user must be connected to a group that has been granted execute authority to the query, or the execute access for the query is granted to public.
• When the user executes the query, he/she is prompted to enter a valid RACF userid, password combination. This userid must be granted appropriate access to the objects used within the query.
5.8.4 Non-Web client securityAn information consumer (using BrioQuery Explorer or Navigator) can choose to either store and retrieve Brio objects from a file system (either on a local PC disk or on a LAN PC disk), or to retrieve Brio objects from a repository. To retrieve objects from the repository, the user needs select authorization to the repository tables. The non-Web client also needs appropriate access to the underlying objects when trying to execute a query.
5.9 Zero administration for Web clients
To allow automated version control and installation of new versions of Brio Web client software, Brio uses a concept called zero-administration clients. A copy of the latest version of the client software resides on the ODS. When a client connects to ODS, the version of this copy is compared to the version of the client’s software. If the client version is downlevel, the client is prompted to download and install the new version. This concept can also be used for initial installation of client software.
Chapter 5. Brio Enterprise 115

5.10 Integration with other tools
It is possible to export results from Brio queries, reports and pivot tables to Microsoft Excel and Lotus 123 spreadsheets (xls and wks format). Brio also supports export to comma-separated text format (CSV). The CSV format can be used to import report data from Brio to desktop database products such as Microsoft Access and Lotus Approach. Brio also supports export of data to HTML format.
Brio comes with a number of OLE Automation classes. Using these classes, it is possible to invoke Brio from either user-written applications or other software tools. The OLE automation classes use standard Windows APIs that are supported by a large number of application development tools.
5.11 Metadata exchange
Brio is able to display metadata for tables, table columns, joins, lookups and remarks (for tables and columns). The metadata in Brio is retrieved using SQL statements. These SQL statements can be customized. The customization can either be done by manually specifying the SQL statements, or by presetting the metadata access to one of a number of predefined metadata tools, for example DB2 Warehouse Manager.
By default, when connecting to DB2 for OS/390, the metadata access is directed to DB2’s system catalogue. In this case, the available table list is created by accessing SYSIBM.SYSTABLES. By customizing this SQL statement, the number of tables listed can be limited.
The SQL statements that retrieve metadata can either be executed against the same database connection that is used to retrieve the main data, or against another database connection. The metadata connection is specified at the same time as the main database connection. This is achieved by checking the meta connection check box when creating the main database connection OCE.
If the metadata and the main data do not reside in the same database, the main database connection contains a link to a secondary database connection where the metadata resides. Every time the user wants to retrieve metadata (for example, when listing available tables, listing columns for a table, or displaying remarks for table columns), SQL statements are issued against the secondary database connection. When the user wants to retrieve actual data, this is achieved by accessing the primary database.
116 e-Business Intelligence Front-End Tool Access to OS/390 Data Warehouse

Figure 100 shows a scenario where the main database connection is accessing DB2 for OS/390 and the metadata database connection is accessing DB2 Warehouse Manager residing on Windows NT. The table list, the columns, the table remarks and the column description displayed in Brio for this scenario are retrieved from DB2 Warehouse Manager, rather than from DB2’s system catalogue on DB2 for OS/390.
Figure 100. Brio metadata connection schema
5.12 Brio usage scenarios
This section provides information about the configurations we used to test Brio. We tried to emulate real-world scenarios with different types of users and user roles.
5.12.1 Scenarios for information providersFigure 101 on page 118 shows a setup intended for advanced users (information providers) that develop and deploy queries throughout the organization. By using a 2-tier connection to both DB2 and DB2 OLAP Server, the information providers have an efficient environment for query and report development. The absence of a middle tier gives better query performance for queries returning large result sets.
The connection to Brio ODS and Brio Broadcast Server gives this user full administrative control. This user can add users, add user groups, authorize
Brio Query DesignerDB2 Connect PEDB2 runtime client
DB2 WarehouseManager NT server(Metadata)
DRDA via TCP/IP
S/390 server
S/390S/390
Brio RepositoryOlap Data
UDB Enterprise Edition
DB2 datawarehouse
Chapter 5. Brio Enterprise 117

groups to access Brio documents, add and register documents, schedule queries and reports in Brio Broadcast Server, monitor Brio ODS and Brio Broadcast Server, etc. If necessary, for example, to customize layout of HTML reports produced by Brio, this user can also administer the Web server.
Figure 101. Information provider scenario
5.12.2 Scenarios for Web-based information consumersAs shown in Figure 102 on page 119, we used Netscape Navigator and Brio.Insight for the client setup for the information consumer.
Brio Query DesignerDB2 Connect PEDB2 OLAP Client API
TCP/IP
NT server
Brio OnDemand ServerWeb ServerBrio Enterprise Admin ServerDB2 Connect PEDB2 OLAP Client APIsInformation
Provider
DRDA via TCP/IPor SNA
S/390 server
S/390S/390
Brio RepositoryOlap Data
DB2 OLAP APIsvia TCP/IP
DB2 datawarehouse
DB2DB2OLAPOLAP
ServerServer
118 e-Business Intelligence Front-End Tool Access to OS/390 Data Warehouse

Figure 102. Web-based information consumer scenario
Information Consumer
DRDA via TCP/IPor SNA
HTTP/HTTPSvia TCP/IP
NT server
S/390 server
S/390S/390
Brio OnDemand ServerWeb ServerBrio Enterprise Admin ServerDB2 Connect PE
Browser
Brio Insight orBrio Quickview
Brio Repository
DB2 datawarehouse
Chapter 5. Brio Enterprise 119

120 e-Business Intelligence Front-End Tool Access to OS/390 Data Warehouse
Chapter 6. IBM DB2 OLAP Server Analyzer
DB2 OLAP Server Analyzer V7.1 is the OLAP analysis, presentation, and reporting front-end BI tool which connects to the DB2 OLAP Server for OS/390, while capable of drilling through to relational DB2 data. It is ideal for business intelligence applications such as sales analysis, product profitability, and key performance measurements. With highly interactive graphical display and intuitive navigation capabilities, it enables the widest range of users to quickly analyze critical business information. It gives users point-and-click access to advanced DB2 OLAP Server features.
DB2 OLAP Server Analyzer is an add-on product to DB2 OLAP Server for OS/390 V7.1. It is based on Hyperion Analyzer V5, also known as Wired for OLAP.
6.1 Product components
The DB2 OLAP Server Analyzer has the following product components:
• Windows client
The Analyzer Windows client is a Windows- or NT-based fat client that can be used by itself for accessing DB2 OLAP Server, or for administering the Web environment. At least one such Windows client is required to administer the Analyzer Analysis Server.
• Analysis Server
The Analysis Server is required to provide all access from the web, including custom applications using the Analyzer API toolkit. The server requires at least one Windows client for administration. Analysis Server communicates view definitions and system information between the repository, Web clients, and the Excel Add-in. Analysis Server runs on NT or Windows 2000 operating systems.
• HTML Web client
The HTML Web client is an HTML thin client used via a Web browser. The HTML Web client connects to the repository and DB2 OLAP Server through the Analysis Server. Supported browsers are Microsoft Internet Explorer and Netscape Navigator.
• Java Web Client
The Java Web Client requires a Java-capable Web browser, such as Microsoft Internet Explorer or Netscape Navigator. The Java Web client leverages a Java Run-time Environment (JRE) within a Web browser to
© Copyright IBM Corp. 2001 121

offer more interactive functionality than the HTML thin client. The Java Web client connects to the repository and DB2 OLAP Server through the Analysis Server.
• API toolkit
Developers can use the API toolkit to invoke Analyzer functions in custom Web-based business analysis applications using open, mainstream development tools such as JavaScript.
• Design tools
The design tools provide a graphical interface for creating composite views called Forms, and graphic views called Pinboards.
• Administration tools
The Administration tools provide a graphical interface for managing user profiles, user groups, and database connections through the Windows operating system. They also provide access to utilities such as the Analysis Server configuration utility.
• Repository
The repository centrally stores Analyzer user settings, system data, views and reports in relational database tables. The default repository is based on Paradox; however, in production environments, a scalable enterprise repository such as DB2 UDB, SQL Server, or Oracle database should be used. The repository can reside on the “fat” Windows client workstation, or on the middle-tier server, or centrally on the OS/390 server, where all users will be able to see and share its contents.
• Add-in for Excel
The Excel add-in provides Microsoft Excel users the ability to centrally store, retrieve, and distribute worksheets to the Analyzer repository using a menu item added to the Administration tool.
6.2 Connection architectures
DB2 OLAP Server Analyzer can be configured in two- or three-tier connections to the OLAP Server for OS/390, as shown on Figure 103 on page 123.
122 e-Business Intelligence Front-End Tool Access to OS/390 Data Warehouse

Figure 103. Analyzer 2- and 3-tier connections to DB2 OLAP Server for OS/390
DB2 OLAP Server Analyzer requires the Essbase APIs to connect to the DB2 OLAP Server application running on the OS/390. The Virtual Cubes facility provides the ability to drill-through to relational data. Connection to relational data, in this case, is achieved through DB2 Connect.
On a three-tier implementation, DB2 Run-Time client is required on the client workstation to connect the client to the middle-tier database where DB2 Connect EE is running.
6.3 Security
There are several security issues to consider.
6.3.1 User securityIn order to log into Analyzer, a valid user ID and password must be defined and authenticated. User information is stored within the Analyzer Repository. A default user name and password of system 12345 has been set up during initial installation. Subsequent users can be created or imported from the Manage option of the Analyzer Administration Tools program.
Administrators may choose to use the Analyzer security, Windows NT Domain authentication, or DB2 OLAP Server security to validate users and logons. It is not possible to use Windows NT Domain Authentication and DB2 OLAP Server security at the same time.
NT server OS/390 server
TCP/IPTCP/IP
TCP/IP
DB2DB2OLAPOLAP
ServerServer
Analyzer client
DB2 Run-Time client Essbase APIDB2 UDB EEDB2 Connect EE
Essbase APIDB2 UDB PEDB2 Connect PE
Repo-sitory
Repo-sitory
DB2 datawarehouse
Chapter 6. IBM DB2 OLAP Server Analyzer 123

Windows NT Domain authentication verifies that a user attempting to run Analyzer has been authenticated to a Windows NT domain. Analyzer runs for authenticated users, with defined Analyzer user profiles, without prompting them to login. (Analyzer user account must exist.)
Select the Automatically Generate New User Accounts check box to generate new Analyzer user profiles when Microsoft Windows NT domain-authenticated users log into Analyzer for the first time. Keep in mind that user profiles and user properties are inherited from the “default user” user profile.
When DB2 OLAP Server security is enabled, Analyzer uses the specified DB2 OLAP Server to validate user ID, password and user type for login.
Administrators can also import user names into the Analyzer security system. Import formats include text, DB2 OLAP Server, or the NT Network.
Note: Database record security itself (read and write levels) is always endorsed and adhered to through DB2 OLAP Server security settings.
6.3.1.1 User groupsUser groups can be created and managed to provide an additional level of View (report) security. Users can exist in multiple groups simultaneously. When a View Group is created, the author may elect to publish the group to everyone, to individual user groups, or elect to keep it private.
6.3.1.2 User profilesEach individual user has a user profile within Analyzer. The Administration Tools allow the administrator to centrally manage default settings for each user. Additionally, individual users settings can be personalized directly from the Analyzer Windows Client. Additional look and feel and startup personalization, database access and single-sign on security settings are defined within a user profile.
Analyzer supports the ability to access information from more then one DB2 OLAP Server, regardless of platform. Virtual cubes can be defined by the administrator in order to provide a seamless drill-through to relational details not stored within the DB2 OLAP Server cube.
Since user IDs and passwords may vary between different DB2 OLAP Servers and relational virtual cubes, Analyzer provides a feature within the user profiles whereby individual connection login user names and passwords can be preset, resulting in a single signon look and feel for the end users as they start the Analyzer product.
124 e-Business Intelligence Front-End Tool Access to OS/390 Data Warehouse

6.3.2 RACF and DB2 for OS/390 securityGeneral users of IBM DB2 OLAP Server Analyzer do not require DB2 authorization, they just need a RACF user ID/password. The DB2 OLAP Server for OS/390 supervisor ID needs to be authorized to RACF, DB2 and to DB2 OLAP Server. The DB2 OLAP Server authorizes the user’s or user group’s privileges within OLAP Server integrated security.
However, power users wanting to use virtual cubes to access the relational data are treated like a regular distributed database user (DB2 Connect is required to access the host data), as well as DB2 authority is required. We recommend setting up a RACF group for these users and granting DB2 authority to the group for the access required: Select authority on the tables required for the virtual cubes, for example.
6.3.3 Web securityFirewalls protect internal networks from external network hazards. Because firewalls restrict internal/external network traffic, Analyzer client-server communication changes when a firewall is introduced.
For a client machine with an Internet browser to instantiate the Java web client, it must send a request to the Web server (using Port 80 Internet connections). The Web server virtual directory alias retrieves the Java classes and HTML source code from the \Hyperion Analyzer\Web Clients\ directory. After the Web client is instantiated, the client machine can communicate directly to the Analysis Server, using port 5000 connections. The Analysis Server brokers all subsequent TCP/IP requests to the repository and the OLAP database.
A client machine outside the firewall must request Analyzer Java classes and HTML pages from the Web server in order to instantiate a Web client. Analyzer Java applets on the Web server establish an HTTP connection and route subsequent client requests to an Enhanced Web Services facility. This facility, visible on both sides of the firewall, brokers requests to the Analysis Server using port 5000. The Enhanced Web Services facility then returns the data to the Web server, where it is sent back out the firewall to the client machine.
After the Java Web Client is instantiated, the client machine must continue communicating with the Analysis Server via the Enhanced Web Services facility (and cannot communicate directly to the Analysis Server inside the firewall).
Chapter 6. IBM DB2 OLAP Server Analyzer 125

For further details regarding the Enhanced Web Services (CGI, NSAPI or ISAPI editions), refer to Analyzer enterprise guide documentation.
6.4 Virtual cubes
Virtual cubes provide a way for users to bring data from relational data sources (ODBC and DB2 Connect are used for connectivity) into Analyzer and manipulate the data much like the OLAP data. DB2 OLAP Server views can be linked to Analyzer views which obtain data from a virtual cube for:
• Drill through to another level of detail • Drill through for additional information
The Analyzer virtual cube utility enables administrators to present users with multidimensional representations of data stored in relational databases by:
• Defining an SQL query to define a dataset as a cube • Defining metadata using Analyzer virtual cube definition which describes
the dataset in terms of OLAP dimensions and measures.
6.5 Installing IBM DB2 OLAP Server Analyzer
There are numerous installation configurations possible; we will discuss the two main ones:
• We describe an NT server which will host the Analyzer Analysis Server, the repository, the administration tools, and a Web server. The Analyzer windows client will also be installed here.
• We also describe a standalone Analyzer windows client.
Note: In this scenario, the repository is on the NT server. This means that the repository will be shared with Web clients. This will require the IBM DB2 UDB Enterprise Edition.
6.5.1 Installing the Analyzer NT Server machine1. Start Setup.exe from the DB2 OLAP Server Analyzer CD.
2. Select the components you wish to install. If you are planning to use a Web client, ensure the Analyzer Analysis Server is selected (see Figure 104 on page 127).
126 e-Business Intelligence Front-End Tool Access to OS/390 Data Warehouse

Figure 104. Components to install
3. Click Next, and you will see the screen shown in Figure 105.
Figure 105. Installation Type - Complete or Custom
4. Select All Options, and click Next (Figure 105).
Chapter 6. IBM DB2 OLAP Server Analyzer 127

Figure 106. Repository Type
5. Select Enterprise Repository and Create New. Click Next (Figure 106).
6. Click No when asked if Microsoft OLAP services should be installed.
Figure 107. Information required to create a new Enterprise Repository
128 e-Business Intelligence Front-End Tool Access to OS/390 Data Warehouse

7. Select IBM DB2 for the relational database platform, and enter the name of the database in the DB2 DSN field. Note that the database must already exist (Figure 107 on page 128.)
8. Enter a user ID and password for an ID with enough authority on the database to create the required objects for the repository. Click Next.
The product is now installed, and the repository objects created in the selected database.
After installing Analyzer, some setup is required in order to create users and connect to the Sample Views included in Analyzer. It is assumed that DB2 OLAP Server 1.1 or higher has been installed on the OS/390, and the Sample Basic database included with the DB2 OLAP server has been created.
6.5.2 Creating the database connection1. Start the Analyzer Administrator Tools program. From the Start menu,
select Programs -> Hyperion Solutions -> Hyperion Analyzer -> Hyperion Analyzer Administration Tools. When prompted for user ID/password, use system and 12345.
2. Select Manage from the tool bar (Figure 108).
Figure 108. Analyzer Administration Tools toolbar
3. Right-click the Database folder and select the New menu item to define new connections. When prompted, enter your DB2 OLAP Server user ID and password. The right side of the window will be populated with the list of available applications/databases (Figure 109 on page 130).
Chapter 6. IBM DB2 OLAP Server Analyzer 129
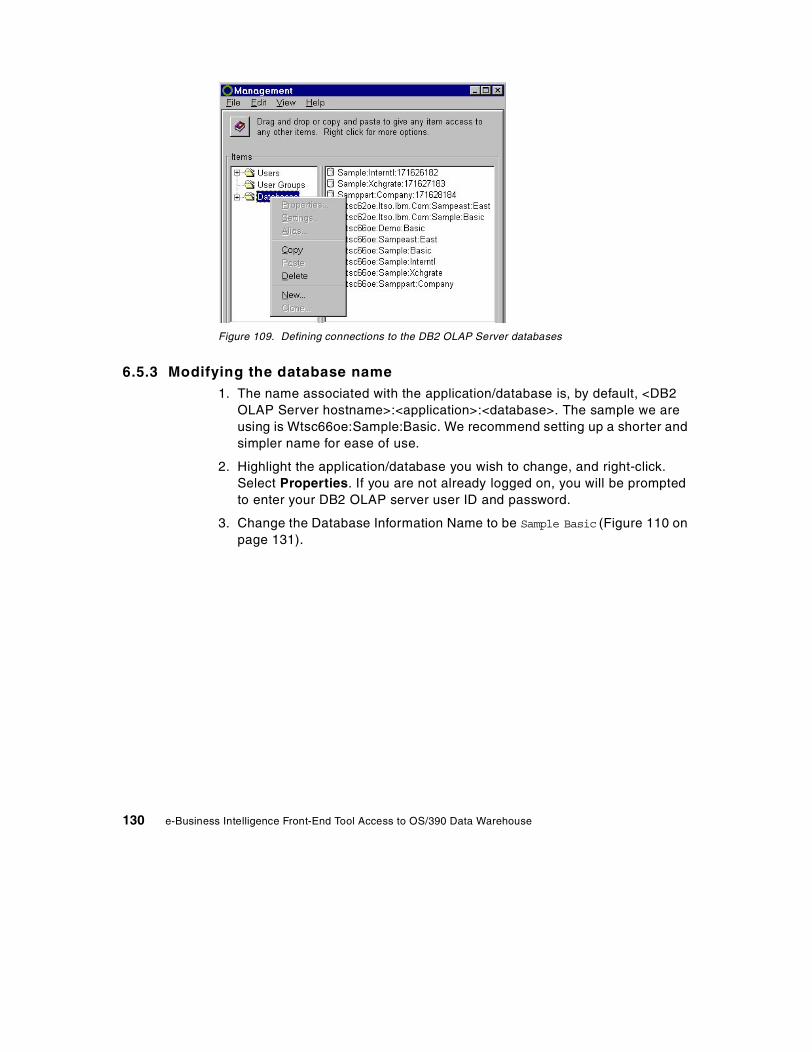
Figure 109. Defining connections to the DB2 OLAP Server databases
6.5.3 Modifying the database name1. The name associated with the application/database is, by default, <DB2
OLAP Server hostname>:<application>:<database>. The sample we are using is Wtsc66oe:Sample:Basic. We recommend setting up a shorter and simpler name for ease of use.
2. Highlight the application/database you wish to change, and right-click. Select Properties. If you are not already logged on, you will be prompted to enter your DB2 OLAP server user ID and password.
3. Change the Database Information Name to be Sample Basic (Figure 110 on page 131).
130 e-Business Intelligence Front-End Tool Access to OS/390 Data Warehouse

Figure 110. Modify the Database Name
4. Select OK.
6.5.4 Creating a new user and profile 1. From the Management window, right-click the Users folder. Select New.
Figure 111. Edit User Window
2. Enter a valid user ID, name, and password. Confirm the password by retyping it in the Confirm Password box (Figure 111).
Chapter 6. IBM DB2 OLAP Server Analyzer 131

3. Set the user type to System Manager if the ID is to be an administrator ID. An administrator can create Forms, modify views created by other administrators, and start the administrator program and utilities.
4. The bottom half of the window contains a list of available data sources and a list of connections that have been previously established. In our case there are none.
Since the user profile setting of Use Authorized Database was not selected, it is not necessary to populate the Databases for this user list. However, doing so will allow a user ID and password to be associated with the application/database. This will save the user from having to logon each time the application/database is accessed (also see Figure 111).
5. Highlight Sample Basic in the All Databases list, and click Add (also see Figure 111). The Database Connection window will be displayed (Figure 112 on page 132).
Figure 112. Link a user ID/password with a database connection
6. If your DB2 OLAP Server user ID and password are identical to your Analyzer user ID and password, select Use User’s ID and Password; otherwise select Enter User ID and Password. If you select the latter, enter the DB2 OLAP server user ID, password, and confirm the password.
7. Select OK on the Database Connection window (Figure 112), and the Database Properties window.
8. At this point you may want to change the user’s profile options. We recommend changing the startup options to make the sample demos flow easily. From the Management window, highlight the user you wish to
132 e-Business Intelligence Front-End Tool Access to OS/390 Data Warehouse

modify, and right-click it. Select Settings. Select the Startup tab, followed by the Startup Options item (Figure 113 on page 133).
Figure 113. User Settings window
9. Set the Startup Options to be Startup in Home Page and select Default Connection (see Figure 114).
Figure 114. Startup Options
10.Select Sample Basic from the database list, then click OK (Figure 115).
Chapter 6. IBM DB2 OLAP Server Analyzer 133

Figure 115. Select Database window
6.5.5 Importing the sample views (optional) 1. From the Start menu, select Programs -> Hyperion Solutions ->
Hyperion Analyzer -> Hyperion Analyzer Windows Client. When prompted for user ID/password, use system and 12345.
Note: it is possible to get an error stating that no views exist on the home page. This will occur if the startup profile of the ID is Home Page, and if this is the first time into the product.
Figure 116. Analyzer Window
2. Choose File to invoke the View Manager (Figure 116).
134 e-Business Intelligence Front-End Tool Access to OS/390 Data Warehouse

Figure 117. View Manager
3. Click Import (Figure 117).
Chapter 6. IBM DB2 OLAP Server Analyzer 135
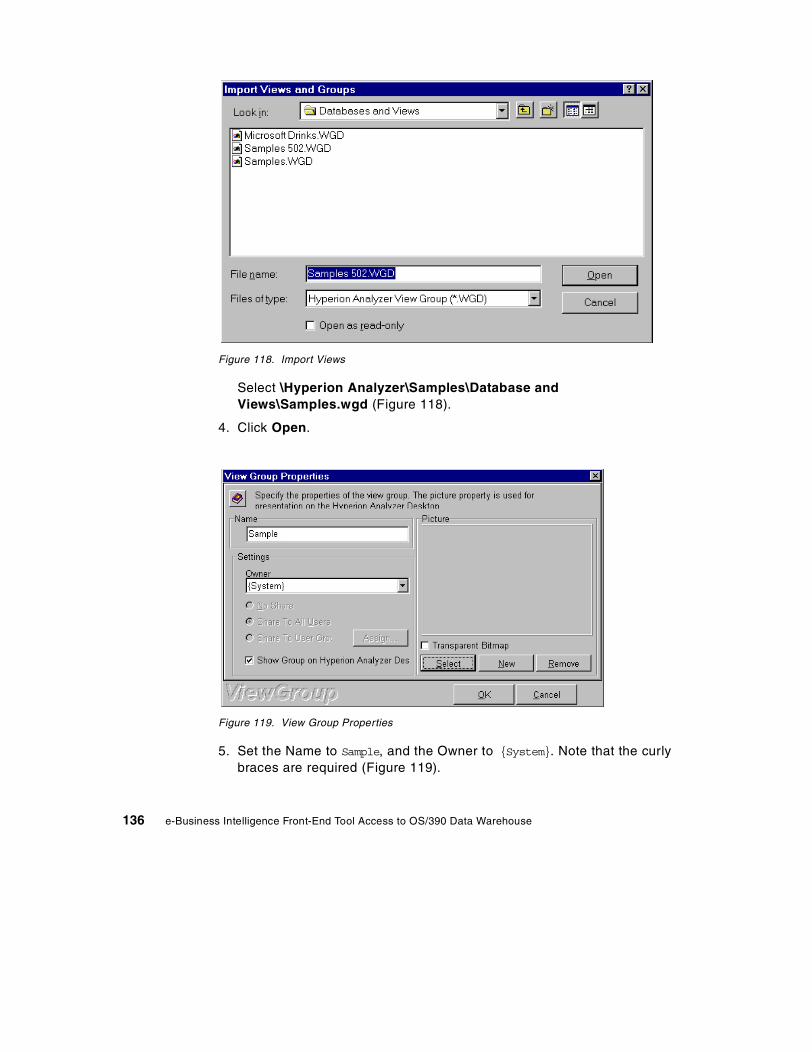
Figure 118. Import Views
Select \Hyperion Analyzer\Samples\Database and Views\Samples.wgd (Figure 118).
4. Click Open.
Figure 119. View Group Properties
5. Set the Name to Sample, and the Owner to {System}. Note that the curly braces are required (Figure 119).
136 e-Business Intelligence Front-End Tool Access to OS/390 Data Warehouse

You can select a picture for the icon that will be displayed on the Analyzer main menu (see Figure 120 on page 137); however, this is not required. (Samples are included in ..\Hyperion Analyzer\Samples\Images\Group Pictures.)
6. Click OK.
7. When prompted, select Sample Basic as the database. Click OK on this window, as well as OK on the View Manager window. The Analyzer Main Menu - TBC Online Analysis Group will be displayed.
Figure 120. Analyzer Samples Main Menu
Try all the tabs at the bottom of the window to ensure they all open and are populated with the DB2 OLAP live data correctly. At this point you are welcome to “tour” the sample views to familiarize yourself with them.
6.5.6 Installing the Analyzer Windows clientThis is basically the same as installing the entire Analyzer product, except that instead of creating a new repository, an existing one will be used. In our case, we used the repository we created on the NT server.
Chapter 6. IBM DB2 OLAP Server Analyzer 137

Note: In order to connect to the enterprise repository on the NT server, DB2 Run-Time client is required on the windows client. Also, it is a good idea to verify that the connection between the DB2 Run-Time client and the DB2 UDB EE server is set up and functioning before continuing with the installation of the Analyzer Windows client.
1. Select Enterprise Repository and Connect to Existing. Click Next (Figure 121).
Figure 121. Repository Type - Existing
Figure 122. Existing Repository information
138 e-Business Intelligence Front-End Tool Access to OS/390 Data Warehouse

2. Select IBM DB2 for the relational database platform, and enter the name of the database in the DB2 DSN field. Note that the database must already exist (Figure 122 on page 138).
3. Enter a user ID and password for an ID with enough authority to select/insert/update the repository objects. Select Next (again see Figure 122 on page 138).
The Windows client is now installed.
6.5.7 Testing the Analyzer Windows client Since we have already set up the sample views in the repository, all that is required to test the Windows Client install is to start up the client and check that the views display properly and the data is retrieved.
6.6 Configuring the Web environment
It is currently supported to run Analyzer Web clients using one of the following Web servers: Netscape Enterprise Server, Microsoft Internet Information Services, or IBM HTTP Server (Java client only)
Supported Web servers
• Microsoft Internet Information Services 4.0, or later • Netscape Enterprise Server 3.5, or later • IBM HTTP server (Java client only)
6.6.1 Configuring the IBM HTTP Web serverAfter installing the HTTP Server, some setup is required to run the Analyzer samples. This requires manually editing the configuration file, httpd.conf, to add a directory alias. The configuration file can be found in the .../IBM HTTP Server/conf/ directory.
1. Stop the HTTP Server if it is running. From the Start menu, select Programs -> IBM HTTP Server -> Stop HTTP Server.
2. Back up the existing httpd.conf file
3. Find the Aliases section in the httpd.conf file, and add the following line:
Alias /analyzer “.../Hyperion Analyzer/Web Clients” (Figure 123 on page 140).
Chapter 6. IBM DB2 OLAP Server Analyzer 139

Figure 123. Alias section of httpd.conf file
Save the changes.
4. Start the HTTP Server.
6.6.2 Configuring the Microsoft IIS Web serverAfter installing the IIS Web server, you need to define a virtual directory for Analyzer. This will enable the Web client to find the Analysis Server when it connects to the IIS Web server.
Steps to define a virtual directory:
1. Start the Internet Services Manager. From the Start menu, select Programs, Microsoft Internet Server, and then Internet Service Manager (see Figure 124).
Figure 124. Microsoft Internet Service Manager
2. Double-click on the name of your Web server (testiis, in our case), service type WWW (see Figure 125 on page 141).
# A liase s: A dd he re as m any a liases as you need (w ith no lim it) . T he fo rm a t is# A lias fakenam e rea lnam e
# N ote tha t if you inc lude a tra iling / on fakenam e then the serve r w ill# requ ire it to be p resen t in the U R L. S o "/icons " isn 't a liased in th is# e xam p le .
A lias /icons / "C :/P rog ram F iles /IB M H T T P S erve r/icons /"
########################ana lyze r##################A lias /a na lyzer "D :/P rog ram F iles /H ype rion A nalyze r/W eb C lien ts"
140 e-Business Intelligence Front-End Tool Access to OS/390 Data Warehouse

Figure 125. Service Properties for testiis Web Server - Service tab
3. Select the Service tab, and ensure the Anonymous Logon Username is a valid Windows NT user (Figure 125).
4. Select the Directories tab.
Chapter 6. IBM DB2 OLAP Server Analyzer 141

Figure 126. Service Properties for testiis Web Server - Service tab
5. Click Add (Figure 126).
6. Enter the location of the \Hyperion Analyzer\Web Clients directory (created during installation of the Analyzer Analysis Server) in the directory field, or use the Browse button to select it (Figure 127 on page 143).
7. Click Virtual Directory and enter an alias name for the virtual directory. Select something simple, as this will be what is entered as part of the URL from the Web client. We selected “analyzer” (Figure 127 on page 143).
8. Ensure that both Read and Execute are selected in the Access section of the window (again see Figure 127 on page 143).
142 e-Business Intelligence Front-End Tool Access to OS/390 Data Warehouse
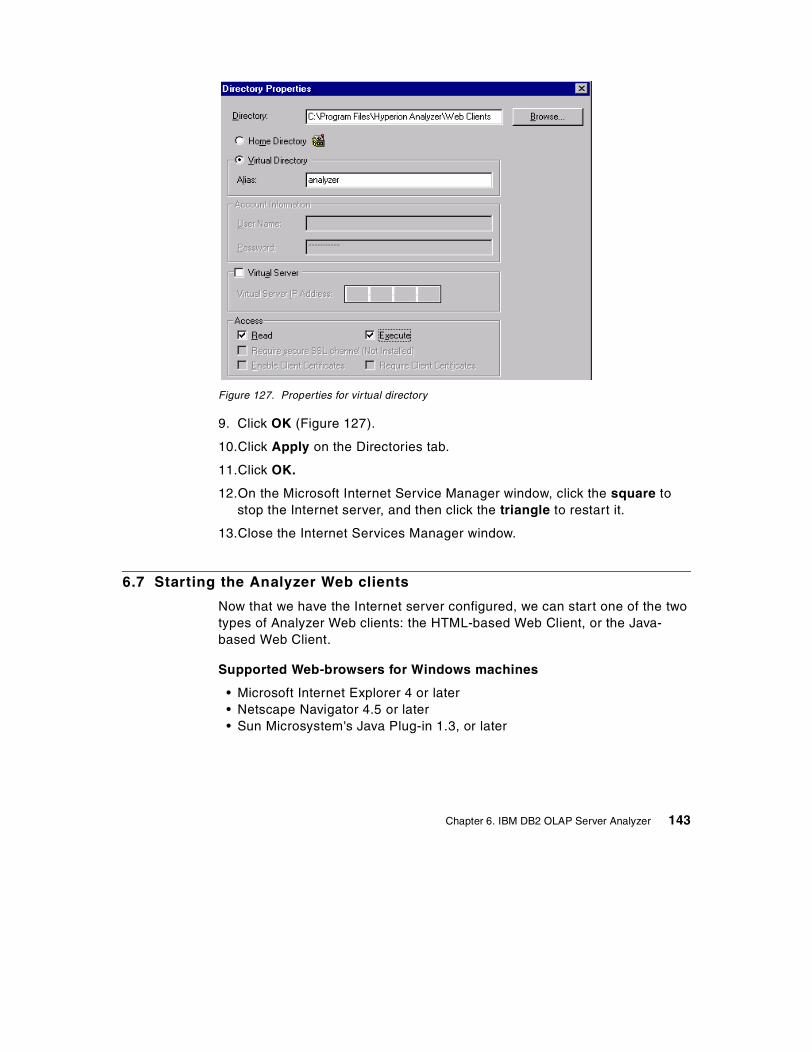
Figure 127. Properties for vir tual directory
9. Click OK (Figure 127).
10.Click Apply on the Directories tab.
11.Click OK.
12.On the Microsoft Internet Service Manager window, click the square to stop the Internet server, and then click the triangle to restart it.
13.Close the Internet Services Manager window.
6.7 Starting the Analyzer Web clients
Now that we have the Internet server configured, we can start one of the two types of Analyzer Web clients: the HTML-based Web Client, or the Java-based Web Client.
Supported Web-browsers for Windows machines
• Microsoft Internet Explorer 4 or later • Netscape Navigator 4.5 or later • Sun Microsystem's Java Plug-in 1.3, or later
Chapter 6. IBM DB2 OLAP Server Analyzer 143

Follow these steps:
1. Ensure that the Analysis server is started.
2. Start a browser and enter the following URL:
http://<internet server name>/<virtual directory alias>/index.html
3. In our case, we used the following URL, which displayed the Analyzer Web Client welcome page shown in Figure 128:
http://testiis/analyzer/index.html
Figure 128. Welcome page
6.7.1 HTML-based Web clientNote the following in regard to this section: Analyzer HTML Web clients require read and write privileges to the /Hyperion Analyzer/Web Clients/Temp subdirectory if using Windows 2000, as charts will not display.
To start the HTML-based Web client, select Launch now at the bottom of the paragraph describing this Web client on the welcome page (see Figure 128). Enter a valid Analyzer user ID and password when prompted. The Analyzer desktop will be displayed (Figure 129).
144 e-Business Intelligence Front-End Tool Access to OS/390 Data Warehouse

Figure 129. Analyzer Desktop
Select the Samples icon to run the sample views.
6.7.2 Java-based Web clientTo start the Java-based Web client, select the Launch now link located at the bottom of the paragraph describing the Java-based Web client on the welcome page (see Figure 128 on page 144). The first time this client is run, the Analyzer jar file will be installed, and you will be asked to stop and restart the browser. After this, the Analyzer will start up, prompt for a valid Analyzer user ID and password, and display the Analyzer desktop (see Figure 129).
6.8 Analyzer Excel add-in
The Analyzer Excel add-in is a menu option that is added to the Excel toolbar. It allows Excel worksheets to be saved to the repository, and therefore shared; refer to Figure 130 on page 145.
Figure 130. Excel main view
Chapter 6. IBM DB2 OLAP Server Analyzer 145
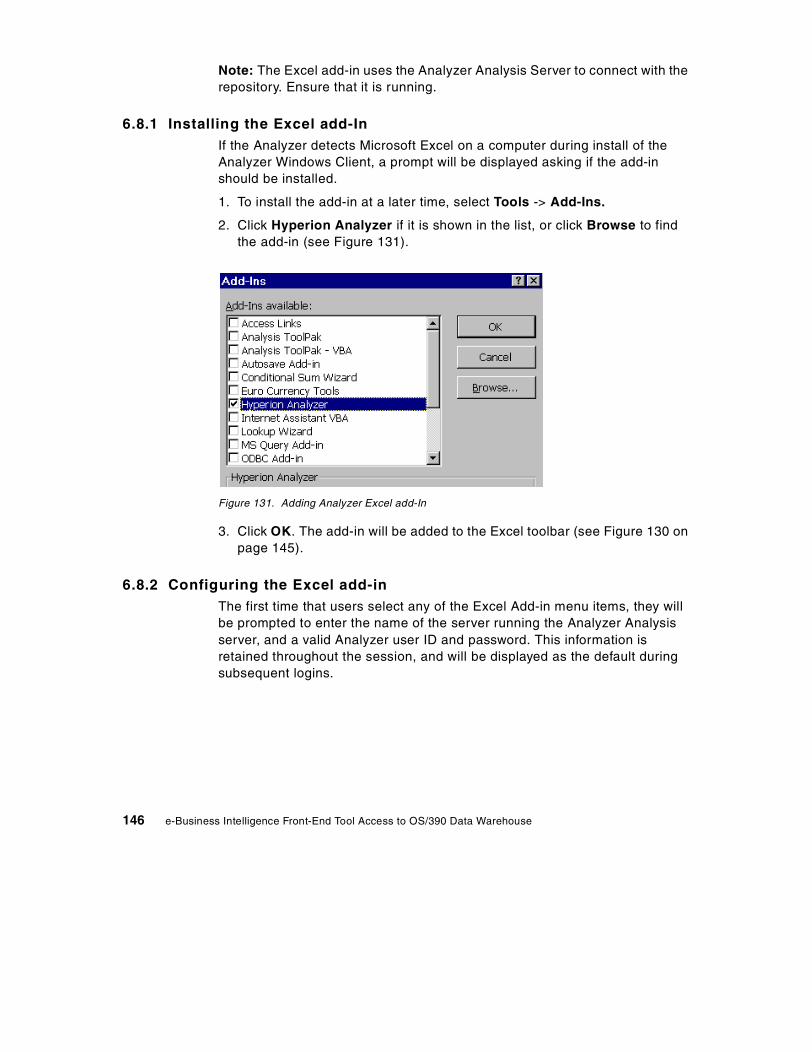
Note: The Excel add-in uses the Analyzer Analysis Server to connect with the repository. Ensure that it is running.
6.8.1 Installing the Excel add-InIf the Analyzer detects Microsoft Excel on a computer during install of the Analyzer Windows Client, a prompt will be displayed asking if the add-in should be installed.
1. To install the add-in at a later time, select Tools -> Add-Ins.
2. Click Hyperion Analyzer if it is shown in the list, or click Browse to find the add-in (see Figure 131).
Figure 131. Adding Analyzer Excel add-In
3. Click OK. The add-in will be added to the Excel toolbar (see Figure 130 on page 145).
6.8.2 Configuring the Excel add-inThe first time that users select any of the Excel Add-in menu items, they will be prompted to enter the name of the server running the Analyzer Analysis server, and a valid Analyzer user ID and password. This information is retained throughout the session, and will be displayed as the default during subsequent logins.
146 e-Business Intelligence Front-End Tool Access to OS/390 Data Warehouse

6.9 Analyzer usage scenarios
There are many ways in which IBM DB2 OLAP Server Analyzer can be configured. A company will generally have many Analyzer Web client users, and a few Analyzer Windows client power users (Figure 132).
Figure 132. Three-tier DB2 Olap Server Analyzer configuration
In this configuration, the repository is stored on the NT server, and shared by both the Analyzer Web client and the Analyzer Windows clients. This requires DB2 UDB Enterprise Edition. DB2 UDB Enterprise Edition includes DB2 Connect Enterprise Edition, which will allow both the Web client and Windows client users to access the live data on the DB2 OLAP Server for OS/390. The Analyzer Windows client can access this data directly, but requires DB2 Connect for virtual cubes.
It is also possible to have a two-tier configuration (see Figure 133 on page 148). In this setup, the Analyzer repository is located on the Windows client along with the rest of the Analyzer software. This requires DB2 UDB Personal Edition. DB2 Connect Personal Edition is required for virtual cubes.
Analyzer Windows ClientAnalyzer Administration toolsDB2 Run-Time client
TCP/IPTCP/IP
Thin client
DB2 UDB EE RepositoryWeb ServerAnalyzer Analysis ServerAnalyzer Windows ClientAnalyzer Administration tools
Browser
Fat client
DB2 OLAPDB2 OLAPServerServer
Java Web clientHTML Web client
Repo-sitory
DB2 datawarehouse
S/390
Chapter 6. IBM DB2 OLAP Server Analyzer 147

Figure 133. Two-tier DB2 OLAP Server Analyzer configuration
TCP/IP
S/390S/390Fat client
DB2 OLAPDB2 OLAPServerServerAnalyzer Windows Client
Analyzer Administration toolsDB2 UDB RepositoryDB2 UDB PEDB2 Connect PE DB2 data
warehouse
Repo-sitory
148 e-Business Intelligence Front-End Tool Access to OS/390 Data Warehouse

Appendix A. BI tools interoperating with OS/390 DW
In this appendix we provide an extensive list of BI tools that interoperate with an OS/390 data warehouse.
A.1 Query and reporting tools
• AlphaBlox
• Andyne GQL
• Aonix Front & Center
• Application System - ASTRAC
• Brio Enterprise
• Business Objects
• Cognos Impromptu
• Dimensional Insight
• DSS Agent - Microstrategy
• EveryWare Dev Tango
• Focus - Information Builders
• Forest & Trees
• Hummingbird
• Information Advantage
• Infospace SpaceSQL
• InSight - Arcplan inc.
• Lotus Approach
• MathSoft
• MetaViewer
• Microsoft desktop products
• NexTek EI Manager
• Nomad
• Pilot
• QMF for OS/390, VM, VSE
• QMF for Windows
© Copyright IBM Corp. 2001 149

• Sagent - Info Studio
• SAS (AF) Reporting
• Scribe
• Seagate Crystal info
• Showcase Analyzer
• SpeedWare reporter
• SPSS
A.2 OLAP tools
• Admiral Solutions - Mind
• Andyne PaBLo
• Brio Enterprize
• Business Objects
• Cognos Powerplay
• DB2 OLAP Server for OS/390
• Hummingbird BI/Analyze
• Hyperion Essbase
• Information Advantage
• NCR Teradata
• NGQ-IQ
• Olympic amis
• Pilot
• Primo EIS Executive Information System
• Sagent - Analysis Studio
• Sillvon Data Tracker
• SAS MDDB Server
• Velocity
A.3 Data mining tools
• Business Objects Miner
• Cognos Scenario
150 e-Business Intelligence Front-End Tool Access to OS/390 Data Warehouse

• IBM Intelligent Miner for Text
• IBM Intelligent Miner for Data
• Pilot
• PolyAnalyst Data Mining
• SAS Enterprise Miner
• Search cafe
• Viador Suite
A.4 BI application solutions
• Business Analysis Suite for SAP
• IBM Decision Edge (BF&S, Teleco, Utilities)
• IBM Intelligent Miner - CRI
• Platinum Risk Advisor
• Recognition Systems
• SAP Business Warehouse
• Show Business Cuber
• VALEX
• Viador Portal Suite
Appendix A. BI tools interoperating with OS/390 DW 151

152 e-Business Intelligence Front-End Tool Access to OS/390 Data Warehouse

Appendix B. Setting up DB2 DDF
The following four steps customize DB2 DDF.
1. BSDS changes.
Most DDF parameters are stored in the DSNZPARM module. We used the DSNTIJUZ member in DSN610.NEW.SDSNSAMP to update the DSNZPARM module. One of the steps in the DSNTIJUZ JCL is to update the BSDS information, using the change log inventory utility. To execute the change log inventory you must stop the DB2 subsystem.
Following is the DSNTIJUZ job step to update the BSDS:
//DSNTLOG EXEC PGM=DSNJU003,COND=(4,LT)//STEPLIB DD DISP=SHR,DSN=DSN610.SDSNLOAD//SYSUT1 DD DISP=OLD,DSN=DSN610.BSDS01//SYSUT2 DD DISP=OLD,DSN=DSN610.BSDS02//SYSPRINT DD SYSOUT=*//SYSUDUMP DD SYSOUT=*//SYSIN DD *DDF LOCATION=DBH2,LUNAME=SCPDBA1,
NOPASSWD,RESPORT=33368,PORT=33369//*
2. Define DB2 DDF to VTAM - SYS1.LOCAL.VTAMLST.
To enable SNA LU6.2 support, you must also define an APPL in VTAM. Do this is in SYS1.LOCAL.VTAMLST. The LUNAME keyword must be defined in BSDS and the LU must be active, prior to starting DDF communications.
The following shows the APPL definitions in SYS1.LOCAL.VTAMLST:
** **** DB2 V6 LU DEFINITION FOR DRDA **** **
VBUILD TYPE=APPL*SCPDBA1 APPL ACBNAME=SCPDBA1, X
APPC=YES, XATNLOSS=ALL, XAUTH=(ACQ), XAUTOSES=10, XDMINWNL=25, XDMINWNR=25, XDSESLIM=50, XEAS=509, XENCR=NONE, X
© Copyright IBM Corp. 2001 153
MODETAB=ISTINCLM, XPARSESS=YES, XSECACPT=ALREADYV, XSONSCIP=NO, XSYNCLVL=SYNCPT, XVERIFY=NONE, XVPACING=2, XVTAMFRR=NO
3. Define DB2 DDF to RACF.
DDF uses UNIX System Services to perform TCP/IP services. Some of the UNIX System Services functions that DDF executes require an authorized user with certain privileges. To execute the authorized functions, the user ID associated with the DDF started task must be defined for UNIX System Services as a superuser. To define a user ID as a superuser, you must set the User Identifier (UID) parameter of the RACF user profile to zero.
To set the UID parameter for your DDF user, you can issue one of the following RACF commands:
ADDUSER userid OMVS(UID(0))ALTUSER userid OMVS(UID(0))
The ADDUSER RACF command adds a new user profile and should be used when creating a new user for DDF. The ALTUSER RACF command changes the RACF profile for the existing DDF user. To check whether your DDF user ID is already correctly defined to RACF, issue the following RACF command:
LISTUSER userid OMVS
If you specify both a user ID and a group in the RACF Started Procedure Table, ICHRIN03, for the DDF address space, the group must also have a valid UNIX System Services group ID (GID) setting. To define RACF groups to be UNIX System Services groups, use the RACF panels or the following command:
ADDGROUP groupid OMVS(GID(n))
where groupid is the name of the RACF group associated with the DDF address space, and can be any valid unique identifier.
4. Define DB2 DDF to TCP/IP.
Part of the DDF customization process is to select port numbers when updating the BSDS. The DDF statement of the change log inventory has been enhanced with PORT and RESPORT values. If PORT and RESPORT are defined, DDF accepts TCP/IP connections from any client
154 e-Business Intelligence Front-End Tool Access to OS/390 Data Warehouse

that provides valid security information. DB2 also allows outbound connections to other DRDA servers using TCP/IP.
To define the port numbers in TCP/IP you must update the TCP/IP PROFILE data set. In our case, we used SYS1.TCPPARMS member PROFILE. You must register the TCP/IP port numbers you have specified during DB2 installation or when using the change log inventory utility.
We defined two port numbers required by our DB2 subsystem, DB2D. In the PORT statement you must use TCP as the protocol, and the name of the UNIX System Services started procedure (in our case, OMVS). Because DB2 uses UNIX System Services services to connect to TCP/IP, the DB2 ports are reserved for the UNIX System Services address space, and not for the DDF address space, xxxxDIST. The PORT definitions are shown here:
SYS1.TCPPARMS(PROFILE)PORT23 TCP INTCLIEN ;33322 TCP OMVS ; DRDA SQL PORT for DB2D33323 TCP OMVS ; DRDA SQL resync port for DB2D
For more detailed information on customizing DDF, refer to WOW! DRDA Supports TCP/IP: DB2 Server for OS/390 and DB2, SG24-2212.
Appendix B. Setting up DB2 DDF 155

156 e-Business Intelligence Front-End Tool Access to OS/390 Data Warehouse

Appendix C. QMF for Windows database connection configuration
This appendix shows the dbh2.ini SDF file generated using the QMF administrator tool.
[DB2H2 on SC66TS]Timestamp=20000726160709RDBName=DBH2HostName=wtsc66oe.itso.ibm.comPort=33368SymDestName=*TCP/IP*DriverName=QueryBlockSize=32500DecimalDelimiter=PeriodStringDelimiter=ApostropheIsolationLevel=CursorStabilitySendOUTOVRAlways=0BindReplace=1BindKeep=1BindOwner=EnterpriseType=DatabaseType=DB2DisableLoadBalancing=0xSingleCCSID=37xMixedCCSID=0xDoubleCCSID=0xQMFCCSID=37QMFWin-CollectionID-0000000000000037=NULLIDDefaultSchedule1=Y00000078000003840009601710000012C0000000000000000000A0000000007FDFFFE00002710XXDefaultSchedule2=@0000000000000000DefaultSchedule3=2DefaultSchedule4=1DefaultSchedule5=A0000000000000000RDBI-CollectionID-0000000000000023=NULLID[Server Parameters]Server1=DB2H2 on SC66TSServer2=DBH2 on SC66TS via CLIServer3=DBH2 on SC66TS via CLI and DRDA[DBH2 on SC66TS via CLI]Timestamp=20000908202152RDBName=DBNTH2HostName=*CLI*
© Copyright IBM Corp. 2001 157

Port=446SymDestName=*TCP/IP*DriverName=IBM DB2 ODBC DRIVERQueryBlockSize=32500DecimalDelimiter=PeriodStringDelimiter=ApostropheIsolationLevel=CursorStabilitySendOUTOVRAlways=0BindReplace=1BindKeep=1BindOwner=EnterpriseType=DatabaseType=DB2DisableLoadBalancing=0xSingleCCSID=37xMixedCCSID=0xDoubleCCSID=0xQMFCCSID=37QMFWin-CollectionID-0000000000000037=NULLIDDefaultSchedule1=Y00000078000003840009601710000012C0000000000000000000A0000000007FDFFFE00002710XXDefaultSchedule2=@0000000000000000DefaultSchedule3=2DefaultSchedule4=1DefaultSchedule5=A0000000000000000[DBH2 on SC66TS via CLI and DRDA]Timestamp=20000908202500RDBName=DBNTH2HostName=*CLI*Port=446SymDestName=*TCP/IP*DriverName=IBM DB2 ODBC DRIVERQueryBlockSize=32500DecimalDelimiter=PeriodStringDelimiter=ApostropheIsolationLevel=CursorStabilitySendOUTOVRAlways=0BindReplace=1BindKeep=1BindOwner=EnterpriseType=DatabaseType=DB2DisableLoadBalancing=0DefaultSchedule1=Y00000078000003840009601710000012C0000000000000000000A0000000007FDFFFE00002710XX
158 e-Business Intelligence Front-End Tool Access to OS/390 Data Warehouse

DefaultSchedule2=@0000000000000000DefaultSchedule3=2DefaultSchedule4=1DefaultSchedule5=A0000000000000000xSingleCCSID=37xMixedCCSID=0xDoubleCCSID=0xQMFCCSID=37
Appendix C. QMF for Windows database connection configuration 159

160 e-Business Intelligence Front-End Tool Access to OS/390 Data Warehouse
Appendix D. Special notices
This publication is intended to help technical professionals who want to implement Business Intelligence tools which interoperate with a DB2 data warehouse or data mart on S/390. The information in this publication is not intended as the specification of any programming interfaces that are provided by the product tools referenced in this publication. See the PUBLICATIONS section of the IBM Programming Announcement for the product tools for more information about what publications are considered to be product documentation.
References in this publication to IBM products, programs or services do not imply that IBM intends to make these available in all countries in which IBM operates. Any reference to an IBM product, program, or service is not intended to state or imply that only IBM's product, program, or service may be used. Any functionally equivalent program that does not infringe any of IBM's intellectual property rights may be used instead of the IBM product, program or service.
Information in this book was developed in conjunction with use of the equipment specified, and is limited in application to those specific hardware and software products and levels.
IBM may have patents or pending patent applications covering subject matter in this document. The furnishing of this document does not give you any license to these patents. You can send license inquiries, in writing, to the IBM Director of Licensing, IBM Corporation, North Castle Drive, Armonk, NY 10504-1785.
Licensees of this program who wish to have information about it for the purpose of enabling: (i) the exchange of information between independently created programs and other programs (including this one) and (ii) the mutual use of the information which has been exchanged, should contact IBM Corporation, Dept. 600A, Mail Drop 1329, Somers, NY 10589 USA.
Such information may be available, subject to appropriate terms and conditions, including in some cases, payment of a fee.
The information contained in this document has not been submitted to any formal IBM test and is distributed AS IS. The use of this information or the implementation of any of these techniques is a customer responsibility and depends on the customer's ability to evaluate and integrate them into the customer's operational environment. While each item may have been reviewed by IBM for accuracy in a specific situation, there is no guarantee
© Copyright IBM Corp. 2001 161
that the same or similar results will be obtained elsewhere. Customers attempting to adapt these techniques to their own environments do so at their own risk.
Any pointers in this publication to external Web sites are provided for convenience only and do not in any manner serve as an endorsement of these Web sites.
The following terms are trademarks of the International Business Machines Corporation in the United States and/or other countries:
The following terms are trademarks of other companies:
Tivoli, Manage. Anything. Anywhere.,The Power To Manage., Anything. Anywhere.,TME, NetView, Cross-Site, Tivoli Ready, Tivoli Certified, Planet Tivoli, and Tivoli Enterprise are trademarks or registered trademarks of Tivoli Systems Inc., an IBM company, in the United States, other countries, or both. In Denmark, Tivoli is a trademark licensed from Kjøbenhavns Sommer - Tivoli A/S.
C-bus is a trademark of Corollary, Inc. in the United States and/or other countries.
Java and all Java-based trademarks and logos are trademarks or registered trademarks of Sun Microsystems, Inc. in the United States and/or other countries.
Microsoft, Windows, Windows NT, and the Windows logo are trademarks of Microsoft Corporation in the United States and/or other countries.
PC Direct is a trademark of Ziff Communications Company in the United States and/or other countries and is used by IBM Corporation under license.
ActionMedia, LANDesk, MMX, Pentium and ProShare are trademarks of Intel Corporation in the United States and/or other countries.
UNIX is a registered trademark in the United States and other countries
e (logo)® IBM ®SPSystem/390VTAMWebSphereWizard
RedbooksRedbooks Logo 3090400LotusApproach
162 e-Business Intelligence Front-End Tool Access to OS/390 Data Warehouse

licensed exclusively through The Open Group.
SET, SET Secure Electronic Transaction, and the SET Logo are trademarks owned by SET Secure Electronic Transaction LLC.
Other company, product, and service names may be trademarks or service marks of others.
Appendix D. Special notices 163

164 e-Business Intelligence Front-End Tool Access to OS/390 Data Warehouse

Appendix E. Related publications
The publications listed in this section are considered particularly suitable for a more detailed discussion of the topics covered in this redbook.
E.1 IBM Redbooks
For information on ordering these publications see “How to get IBM Redbooks” on page 169.
• A DB2 Enterprise Query Environment - Build It with QMF for Windows!, SG24-5746
• Getting Started with Data Warehouse and Business Intelligence, SG24-5415
• WOW! DRDA Supports TCP/IP: DB2 Server for OS/390 and DB2 Universal Database, SG24-2212
• Getting Started with DB2 OLAP Server on OS/390, SG24-5665-00
• Capacity Planning for Business Intelligence Applications: Approaches and Methodologies, SG24-5689
• Getting Started with Data Warehouse and Business Intelligence, SG24-5415
E.2 IBM Redbooks collections
Redbooks are also available on the following CD-ROMs. Click the CD-ROMs button at ibm.com/redbooks for information about all the CD-ROMs offered, updates and formats.
CD-ROM Title Collection Kit Number
IBM System/390 Redbooks Collection SK2T-2177IBM Networking Redbooks Collection SK2T-6022IBM Transaction Processing and Data Management Redbooks Collection SK2T-8038IBM Lotus Redbooks Collection SK2T-8039Tivoli Redbooks Collection SK2T-8044IBM AS/400 Redbooks Collection SK2T-2849IBM Netfinity Hardware and Software Redbooks Collection SK2T-8046IBM RS/6000 Redbooks Collection SK2T-8043IBM Application Development Redbooks Collection SK2T-8037IBM Enterprise Storage and Systems Management Solutions SK3T-3694
© Copyright IBM Corp. 2001 165

E.3 Other resources
These publications are also relevant as further information sources:
• DB2 UDB for OS/390 and z/OS
- Administration Guide, SC26-9931 - Command Reference, SC26-9934 - Installation Guide, GC26-9936 - ODBC Guide and Reference, SC26-9941 - SQL Reference, SC26-9944 - Utility Guide and Reference, SC26-9945 - What's New?, GC26-9946
• Query Management Facility (QMF)
- Developing QMF Applications, SC27-0718 - Getting Started with QMF for Windows, SC27-0723 - Installing and Managing QMF on OS/390, GC27-0719 - Installing and Managing QMF for Windows, GC27-0722 - Introducing QMF, GC27-0714 - QMF High Performance Option User's Guide for OS/390, SC27-0724 - QMF Messages and Codes, GC27-0717 - QMF Reference, SC27-0715 - Using QMF, SC27-0716
• DB2 OLAP Server
- DB2 OLAP Server Start Here, GC26-9236 - DB2 OLAP Server Installation Notes, GC26-9237 - Using DB2 OLAP Server, SC26-9235 - DB2 OLAP Server Administrator’s Guide Volume 1, SC26-9238 - DB2 OLAP Server Administrator’s Guide Volume 2, SC26-9286 - DB2 OLAP Server Quick Technical Reference, SC26-9239 - SQL Drill-Through Guide, SC26-9244
E.4 Referenced Web sites
These Web sites are also relevant as further information sources:
• S/390 Business Intelligence Web page:
http://www.ibm.com/solutions/businessintelligence/s390
• IBM Software Division, DB2 Information page:
http://w3.software.ibm.com/sales/data/db2info
166 e-Business Intelligence Front-End Tool Access to OS/390 Data Warehouse
• IBM Global Business Intelligence page:
http://www-3.ibm.com/solutions/businessintelligence/
• DB2 for OS/390:
http://www.software.ibm.com/data/db2/os390/
• DB2 Connect:
http://www.software.ibm.com/data/db2/db2connect/
• DataJoiner:
http://www.software.ibm.com/data/datajoiner/
• Net.Data:
http://www.software.ibm.com/data/net.data//
• Hyperion home page:
http://www.hyperion.com
• OLAP Council home page:
http://www.olapcouncil.org
Appendix E. Related publications 167

168 e-Business Intelligence Front-End Tool Access to OS/390 Data Warehouse

How to get IBM Redbooks
This section explains how both customers and IBM employees can find out about IBM Redbooks, redpieces, and CD-ROMs. A form for ordering books and CD-ROMs by fax or e-mail is also provided.
• Redbooks Web Site ibm.com/redbooks
Search for, view, download, or order hardcopy/CD-ROM Redbooks from the Redbooks Web site. Also read redpieces and download additional materials (code samples or diskette/CD-ROM images) from this Redbooks site.
Redpieces are Redbooks in progress; not all Redbooks become redpieces and sometimes just a few chapters will be published this way. The intent is to get the information out much quicker than the formal publishing process allows.
• E-mail Orders
Send orders by e-mail including information from the IBM Redbooks fax order form to:
• Telephone Orders
• Fax Orders
This information was current at the time of publication, but is continually subject to change. The latest information may be found at the Redbooks Web site.
In United States or CanadaOutside North America
e-mail [email protected] information is in the “How to Order” section at this site:http://www.elink.ibmlink.ibm.com/pbl/pbl
United States (toll free)Canada (toll free)Outside North America
1-800-879-27551-800-IBM-4YOUCountry coordinator phone number is in the “How to Order” section at this site:http://www.elink.ibmlink.ibm.com/pbl/pbl
United States (toll free)CanadaOutside North America
1-800-445-92691-403-267-4455Fax phone number is in the “How to Order” section at this site:http://www.elink.ibmlink.ibm.com/pbl/pbl
IBM employees may register for information on workshops, residencies, and Redbooks by accessing the IBM Intranet Web site at http://w3.itso.ibm.com/ and clicking the ITSO Mailing List button. Look in the Materials repository for workshops, presentations, papers, and Web pages developed and written by the ITSO technical professionals; click the Additional Materials button. Employees may access MyNews at http://w3.ibm.com/ for redbook, residency, and workshop announcements.
IBM Intranet for Employees
© Copyright IBM Corp. 2001 169

IBM Redbooks fax order form
Please send me the following:
We accept American Express, Diners, Eurocard, Master Card, and Visa. Payment by credit card notavailable in all countries. Signature mandatory for credit card payment.
Title Order Number Quantity
First name Last name
Company
Address
City Postal code
Telephone number Telefax number VAT number
Invoice to customer number
Country
Credit card number
Credit card expiration date SignatureCard issued to
170 e-Business Intelligence Front-End Tool Access to OS/390 Data Warehouse

Index
Aaccess enablers 3application interfaces 3application solutions 151
BBI
architectures 8connectivity 1, 11infrastructure 2tools 149users 1
information consumers 2information providers 1
Brio Enterprise 85Brio Broadcast Server 86Brio Enterprise Server Administrator 87Brio OnDemand Server 86Brio.Insight 85Brio.Quickview 85BrioQuery 86
BrioQuery Designer 86BrioQuery Explorer 86BrioQuery Navigator 86
connection to DB2 data warehousenon-Web 89Web 101
connection to DB2 OLAP Servernon-Web 96Web 112
documents 87Open Catalog Extension 88repository 88security 114usage scenarios 117
Cconnections 21
client PC 37DB2 Connect 21, 24DB2 DDF 21
Ddatabase connections 21
© Copyright IBM Corp. 2001
DB2 Connect 21, 24DB2 OLAP Server Analyzer 121
connection architectures 122Excel add-in 145installation 126security 123usage scenarios 147virtual cubes 126Web clients 143Web configurations 139
DB2 OLAP Server for OS/390 setups 19DB2 setups 18DB2 Warehouse Manager 44DDF 21, 153decision support tools 6, 149
data mining 150OLAP 150query and reporting 149
Nnetwork setups 17
QQMF family 41
QMF for OS/390 41QMF for Windows 42QMF High Performance Option 45
QMF for Windows 41database connections 46, 157database objects 54packages 60permissions 62Report Center 75sample tables 63SQL Query for the Web 64usage scenarios 78
QMF Report Center 75QMF SQL Query for the Web 65
RRRS setups 19
WWLM setups 19
171

172 e-Business Intelligence Front-End Tool Access to OS/390 Data Warehouse

© Copyright IBM Corp. 2001 173
IBM Redbooks review
Your feedback is valued by the Redbook authors. In particular we are interested in situations where a Redbook "made the difference" in a task or problem you encountered. Using one of the following methods, please review the Redbook, addressing value, subject matter, structure, depth and quality as appropriate.
• Use the online Contact us review redbook form found at ibm.com/redbooks • Fax this form to: USA International Access Code + 1 845 432 8264 • Send your comments in an Internet note to [email protected]
Document NumberRedbook Title
SG24-5688-00e-Business Intelligence Front-End Tool Access to OS/390 Data Warehouse
Review
What other subjects would you like to see IBM Redbooks address?
Please rate your overall satisfaction:
O Very Good O Good O Average O Poor
Please identify yourself as belonging to one of the following groups:
O Customer O Business Partner O Solution DeveloperO IBM, Lotus or Tivoli EmployeeO None of the above
Your email address:The data you provide here may be used to provide you with information from IBM or our business partners about our products, services or activities.
O Please do not use the information collected here for future marketing or promotional contacts or other communications beyond the scope of this transaction.
Questions about IBM’s privacy policy?
The following link explains how we protect your personal information.ibm.com/privacy/yourprivacy/


(0.2”spine)0.17”<->0.473”
90<->249 pages
e-Business Intelligence Front-End Tool Access to OS/390 Data Warehouse


®
SG24-5688-00 ISBN 0738418986
INTERNATIONAL TECHNICALSUPPORTORGANIZATION
BUILDING TECHNICALINFORMATION BASED ONPRACTICAL EXPERIENCE
IBM Redbooks are developed by the IBM International Technical Support Organization. Experts from IBM, Customers and Partners from around the world create timely technical information based on realistic scenarios. Specific recommendations are provided to help you implement IT solutions more effectively in your environment.
For more information:ibm.com/redbooks
e-Business IntelligenceFront-End Tool Accessto OS/390 Data Warehouse
QMF for Windows, DB2 OLAP Server Analyzer, and Brio connections to OS/390 DW
DB2 Connect database connection configurations
Selecting front-end user tools to interoperate with OS/390 DW
Based on the IBM e-BI architectural framework, this IBM Redbook explains the building blocks required to connect front-end e-BI user tools to the OS/390 data warehouse or data mart. It also shows the Web integration in the architecture and the accessibility of the data warehouse from browser-based clients in an e-business environment. The book provides:
- An overview of e-BI user connectivity and architectural framework on OS/390, as well as guidance on choosing the appropriate e-BI front-end user tool or e-BI user application based on end-user profiles.
- Connectivity methodologies, contrasting Web-based middleware with traditional client/server middleware in 2-tier or N-tier solutions connecting users to the OS/390 data warehouse or data mart.
- The steps needed to implement front-end e-BI user tools accessing the OS/390 data warehouse and OLAP data mart. We highlight the stumbling blocks and show the implementation steps for:
- QMF for Windows- Brio- DB2 OLAP Server Analyzer