e-billing user guide - rco.wa.gov · pdf filethis user guide does not outline any specific...
TRANSCRIPT

E-Billing User Guide
Steps to Creating and Tracking E-Billings
March 2015

Table of Contents
Section 1: Overview ............................................................................................................................. 1
About this Guide .......................................................................................................................................... 1
Getting Started ............................................................................................................................................. 3
Section 2: Preparing a Bill .................................................................................................................. 6
Task 1: Review Project Billing History .................................................................................................. 6
Task 2: Start a Bill ......................................................................................................................................... 9
Task 3: Enter Costs .................................................................................................................................... 12
Task 4: Review Your Bill ........................................................................................................................... 15
Task 5: Attach Documents ...................................................................................................................... 17
Task 6: Certify and Submit Your Bill .................................................................................................... 19
Task 7: Using the Dashboards............................................................................................................... 25
Section 3: Preparing Your Acquisition Bill ..................................................................................... 30
Task 1: Setup Your Acquisition Bill ...................................................................................................... 30
Task 2: Enter Costs .................................................................................................................................... 32
Task 3: Attach Documents ...................................................................................................................... 33
Task 4: Fill Out Property Pages ............................................................................................................. 36
Section 4: Finding and Fixing Errors, Equipment, and Importing .............................................. 40
Task 1: Find and Fix Errors ...................................................................................................................... 40
Task 2: Enter Equipment Purchases .................................................................................................... 41
Task 3: Import Cost Information .......................................................................................................... 44
Section 5: Personal Service Contracts ............................................................................................. 49
Billing for Personal Service Contracts ................................................................................................ 49
Section 6: Tips and Tricks and the RCO Web Site ......................................................................... 50
Tips and Tricks ............................................................................................................................................ 50
The RCO Web Site ..................................................................................................................................... 51

Section 1: Overview
Page 1
RCO’s E-billing User Guide March 2015
Section 1:
Overview
About this Guide
This guide will lead you through the steps of creating a bill using PRISM Online for projects
funded by the Recreation and Conservation Office (RCO).
For more information about electronic billings (e-billing) and reimbursement information, visit
RCO’s Reimbursement Web page.
Questions?
Recreation and Conservation Office
Natural Resources Building
1111 Washington Street Southeast
Olympia, WA 98501
Web site
Mailing Address
P.O. Box 40917
Olympia, WA 98504-0917
Telephone: (360) 902-3000
FAX: (360) 902-3026
TTY: (360) 902-1996
E-mail: [email protected]
Our Goal
RCO’s goal is to process payments for all properly completed bills within 30 days of receipt.
Section 1: Overview
Page 2
RCO’s E-billing User Guide March 2015
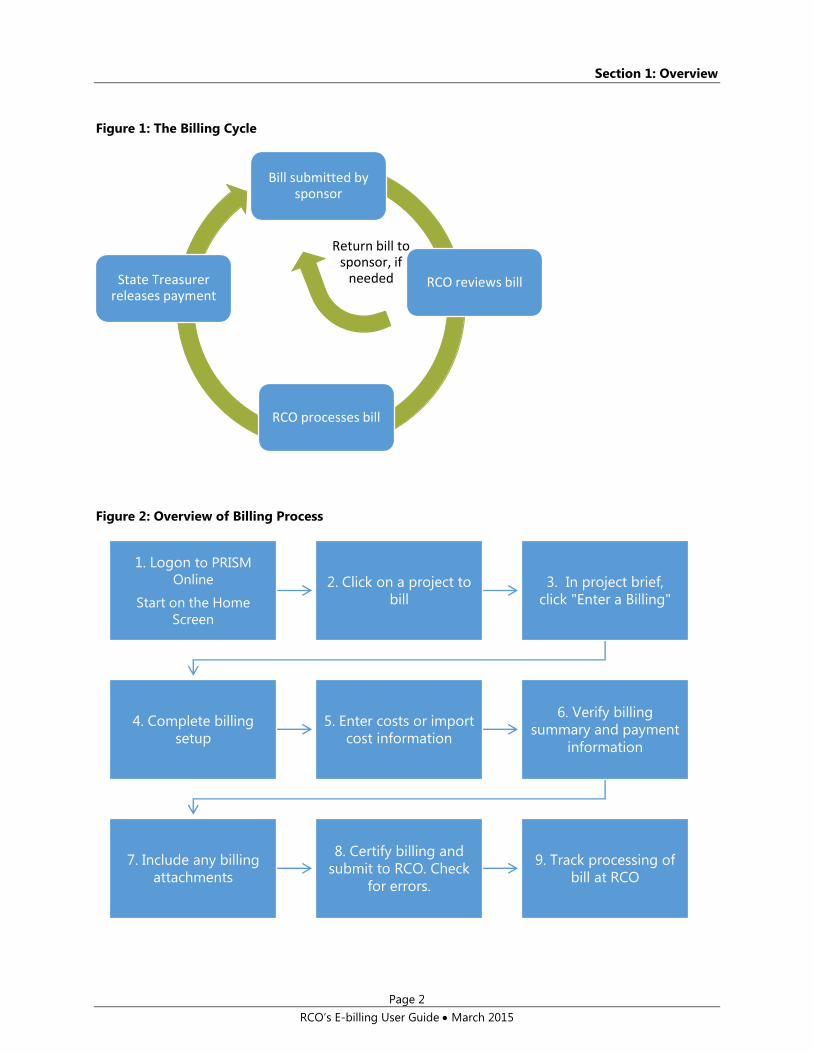
Figure 1: The Billing Cycle
Figure 2: Overview of Billing Process
1. Logon to PRISM
Online
Start on the Home
Screen
2. Click on a project to
bill
3. In project brief,
click "Enter a Billing"
4. Complete billing
setup
5. Enter costs or import
cost information
6. Verify billing
summary and payment
information
7. Include any billing
attachments
8. Certify billing and
submit to RCO. Check
for errors.
9. Track processing of
bill at RCO
Bill submitted by sponsor
RCO reviews bill
Return bill to sponsor, if
needed
RCO processes bill
State Treasurer releases payment

Section 1: Overview
Page 3
RCO’s E-billing User Guide March 2015
Getting Started
PRISM Online
To enter your bills electronically, first get to the Internet (we recommend using Internet Explorer)
and type the login address https://secure.rco.wa.gov/Prism/Sponsor/Account/LogOn to get to
PRISM Online. Then enter your login ID and password. If you don’t have one, you can make a
request on RCO’s PRISM resources Web page.
Once logged in, the first screen displayed will be the home page.
Home Page Overview
A. Header – The dark blue bar at the top of the screen shows who is logged on to PRISM
online. There are several different navigation choices in white text. This is present for all
screens.
B. Select Organizations, Show Data For –Shows the organizations connected to you. Select
which organization’s data you would like to display. Also, you may view data for just the
person logged in or for the entire organization.
B C
D E F
A

Section 1: Overview
Page 4
RCO’s E-billing User Guide March 2015
C. Map Navigation – Displays a map of the projects related to the data selection. You may click
on the map to select specific projects.
D. My Options – Provides navigation choices. Select choices or enter specific information.
E. My Projects – Provides navigation choices. Select a piece of the pie chart or a link to see
projects related to your choice.
F. My Recent Activity – Displays recent projects. Pick one to view information.
Required Roles for Entering a Bill
To enter a bill in PRISM Online, you must:
Have an active account in RCO PRISM, with a user ID and login
Be associated with the sponsor of the project
Have one of three roles for the project
Billing
Project contact
Alternate project contact
Reimbursement Rules
This user guide does not outline any specific rules about reimbursements. It is only a guide to
using the PRISM Online e-billing feature.
For information on reimbursements (costs, documentation, billing RCO, calculation factors,
Salmon Recovery Funding Board cash advances, and other requirements), please see Manual 8,
Reimbursements.
Section 1: Overview
Page 5
RCO’s E-billing User Guide March 2015
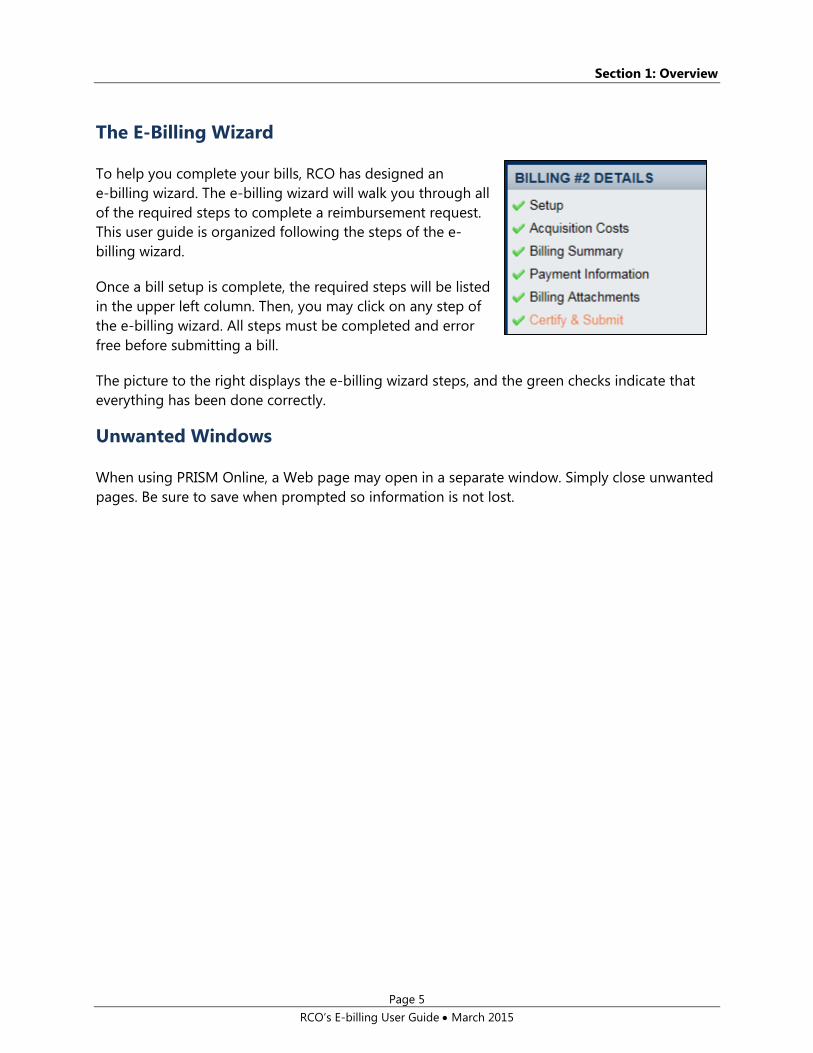
The E-Billing Wizard
To help you complete your bills, RCO has designed an
e-billing wizard. The e-billing wizard will walk you through all
of the required steps to complete a reimbursement request.
This user guide is organized following the steps of the e-
billing wizard.
Once a bill setup is complete, the required steps will be listed
in the upper left column. Then, you may click on any step of
the e-billing wizard. All steps must be completed and error
free before submitting a bill.
The picture to the right displays the e-billing wizard steps, and the green checks indicate that
everything has been done correctly.
Unwanted Windows
When using PRISM Online, a Web page may open in a separate window. Simply close unwanted
pages. Be sure to save when prompted so information is not lost.
Section 2: Preparing a Bill
Page 6
RCO’s E-billing User Guide March 2015
Section 2:
Preparing a Bill
Task 1: Review Project Billing History
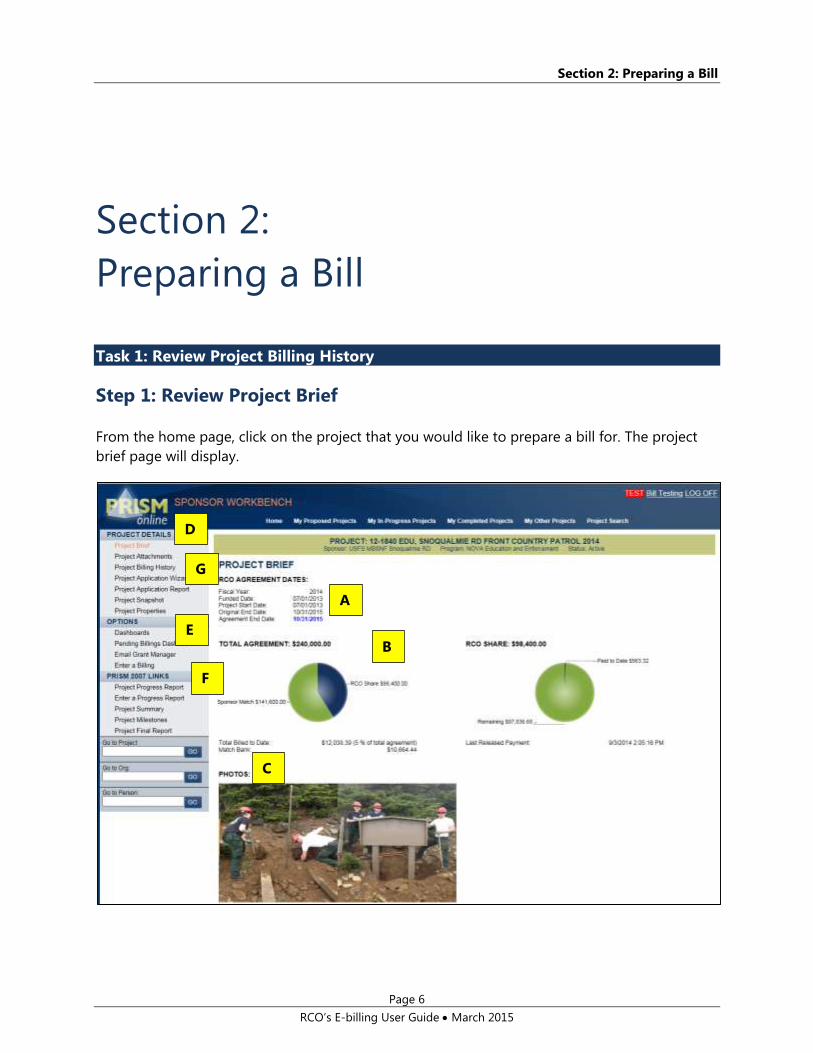
Step 1: Review Project Brief
From the home page, click on the project that you would like to prepare a bill for. The project
brief page will display.
D
C
B
A
E
F
G
Section 2: Preparing a Bill
Page 7
RCO’s E-billing User Guide March 2015
A. RCO Agreement Dates – Displays key dates for each RCO agreement. The data comes from
PRISM and reflects any completed amendments.
B. Total Agreement – Illustrates the total agreement amount, splitting the match and RCO
share. RCO Share – illustrates what has been billed of the RCO share. Other data also is
displayed such as match bank, if applicable.
C. Photos – Displays any photographs attached to the project.
D. Project Details – Allows you to view attachments, billing history, application, snapshot, and
properties.
E. Options – Displays various dashboards, pending bill information, a link to e-mail the grants
manager, and a place to enter a bill.
F. PRISM 2007 Links – Outlines options available in PRISM 2007. This includes project progress
reports, project summary, project milestones and project final report.
G. Review History – Before you create a bill, you first should review the project billing history.
Under Project Details, select “Project Billing History.” You can select “Enter a Billing” on this
page if you would like to skip the step of reviewing the project’s history of bills.

Section 2: Preparing a Bill
Page 8
RCO’s E-billing User Guide March 2015
Step 2: Review Project Billing History
A. Check boxes to select what billing information to display.
Released billings
In process and approved billings
Draft and returned billings
PRISM defaults to all three selected. When a change is made, it will remain until altered
again.
B. Balances – References key balances related to the project. Key balances include the RCO
Grant Amount, Paid to Date, Amount Remaining, Match Bank, Match Owed, and Planned
Retainage.
C. Billing History – All bills displayed here. Select the bill number (left side) to open the bill.
D. Billings to Date – Certain elements of bills can be selected.
E. Export – Select this button to export all summarized billing history information.
E
F
D
C
B
A

Section 2: Preparing a Bill
Page 9
RCO’s E-billing User Guide March 2015
F. Enter New Billing – Click here to start a new bill.
Task 2: Start a Bill
After reviewing the billing history and selecting “Enter New Billing,” a new bill will be started
using the e-billing Wizard.
If there are draft bills, PRISM will ask you to confirm that you want to start a new bill. There can
be as many draft bills as you like. Please note that upon completion of a project, you need to
remove all draft bills.
The “Billing Setup” screen is where details about the bill are entered.
Section 2: Preparing a Bill
Page 10
RCO’s E-billing User Guide March 2015
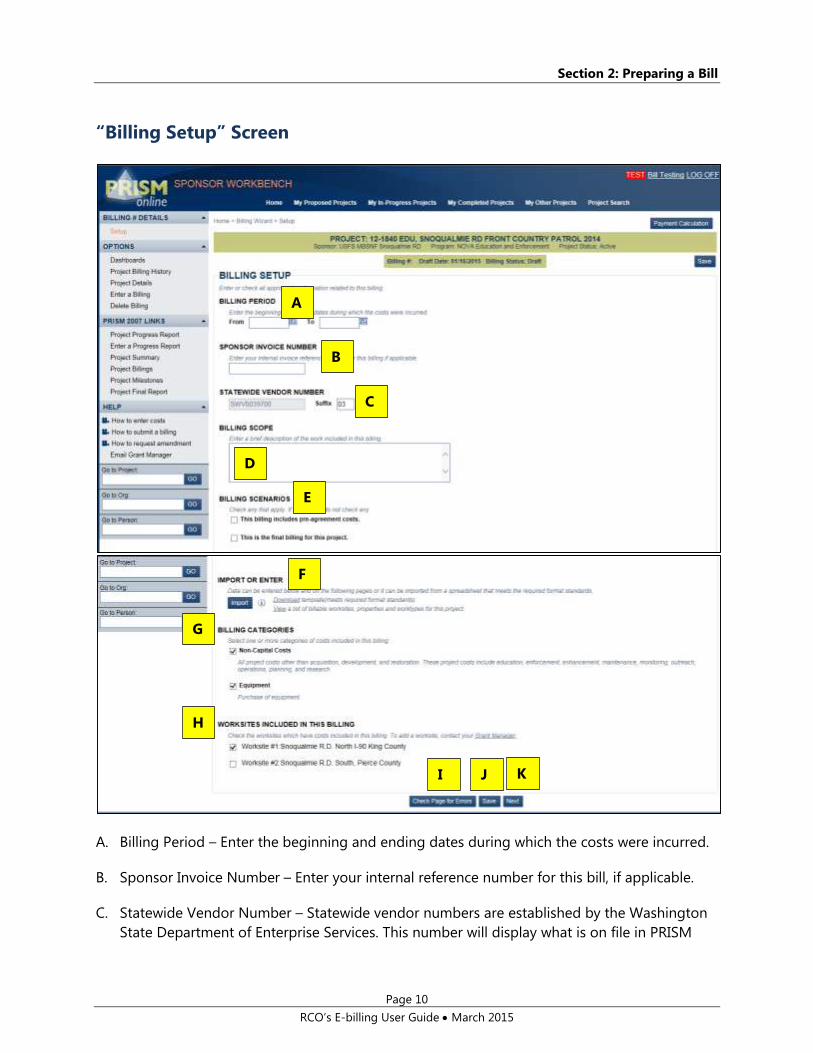
“Billing Setup” Screen
A. Billing Period – Enter the beginning and ending dates during which the costs were incurred.
B. Sponsor Invoice Number – Enter your internal reference number for this bill, if applicable.
C. Statewide Vendor Number – Statewide vendor numbers are established by the Washington
State Department of Enterprise Services. This number will display what is on file in PRISM
E
D
C
B
A
G
F
H
I J K

Section 2: Preparing a Bill
Page 11
RCO’s E-billing User Guide March 2015
and cannot be modified. Based on your need, the Department of Enterprise Services may
establish several suffixes to identify different payment locations or different payment
information. You can modify the suffix for this bill.
D. Billing Scope – Enter a brief description of the work included in this bill.
E. Billing Scenarios – PRISM will display any potential billing scenarios applicable for your
project. Check any that apply. Some of the scenarios may require additional information.
F. Import or Enter – You have a choice of whether to import your billing data from a
spreadsheet template or enter your data on each screen by using the e-billing wizard. The
import process will be covered later in Section 3.
G. Billing Categories – Select one or more categories of costs included in this bill. These
categories are the major categories based on the project type and program. Costs will be
entered in these categories. Check the applicable categories.
Non-capital projects
Non-capital
Equipment
Development or restoration projects
Development or restoration
AA & E (Administrative, Architecture, and Engineering)
Acquisition projects
Property
Incidentals
Administrative costs
H. Worksites included in this Billing – Once a billing category is selected, the worksites included
in the agreement will be displayed. Select the worksites that will be included in this bill.
I. Check Page for Errors – This button may be used on each page. Before a bill can be
submitted, each page must be clear of all errors.
J. “Save” Button – Save all work.
K. Next – This button advances the user to the next page of the e-billing wizard.

Section 2: Preparing a Bill
Page 12
RCO’s E-billing User Guide March 2015
Task 3: Enter Costs
After completing setup and selecting the “Next” button, the costs pages will display. The costs
pages display based on the billing categories and worksites selected on the billing set-up.
In this example, there is one cost page for education costs and one cost page for equipment
costs. This example shows the cost page for education costs. There is one worksite displayed on
both pages. This reflects the choices in the billing set-up.
If the bill requires modification, just hit the “Back” button and modify. Save the changes and
select the “Next” button to enter costs.
Step 1: Enter Costs
Below is an example of costs for an education (non-capital) project. Costs pages have different
titles based on the billing categories chosen.
A. Payment Calculation – Select this button during the billing process to see what the payment
from RCO will be at that point in time.
B
A
C
D
Section 2: Preparing a Bill
Page 13
RCO’s E-billing User Guide March 2015
B. Costs Section – Enter costs here. The page name will reflect whatever billing categories are
selected in the bill setup. Enter costs for each property by billing categories. Each transaction
will have two rows. To add additional rows, click the “Add Costs” button.
First Row
Paid To/Donated By Description – Enter the name.
Expenditure Amount – Enter the amount you have paid to date.
Non-Reimbursable Amount – Enter the amount of the donation, or the amount not
to be reimbursed, that will be counted as match.
Non-Reimbursable Type – There are several donated, non-reimbursable types.
Choose the appropriate type. Detailed records are required to be maintained.
Summary information is required to be reported.
Donated Animal Stock Use – Details will be required.
Donated Equipment Use – Details will be required.
Donated General Labor – Details will be required.
Donated Materials – Details will be required.
Donated Mileage – Details will be required.
Donated Services – Details will be required.
Donated Skilled Labor – Details will be required.
Donated Supplies – Details will be required.
Expenditure
Other Grant – Grant information will be required.
Total Amount – Calculates automatically.
Transaction Date From – This is the date of the transaction and must be entered.
SN – Sponsor Note – Use this field if you wish to add notes about specific
transactions.
Section 2: Preparing a Bill
Page 14
RCO’s E-billing User Guide March 2015
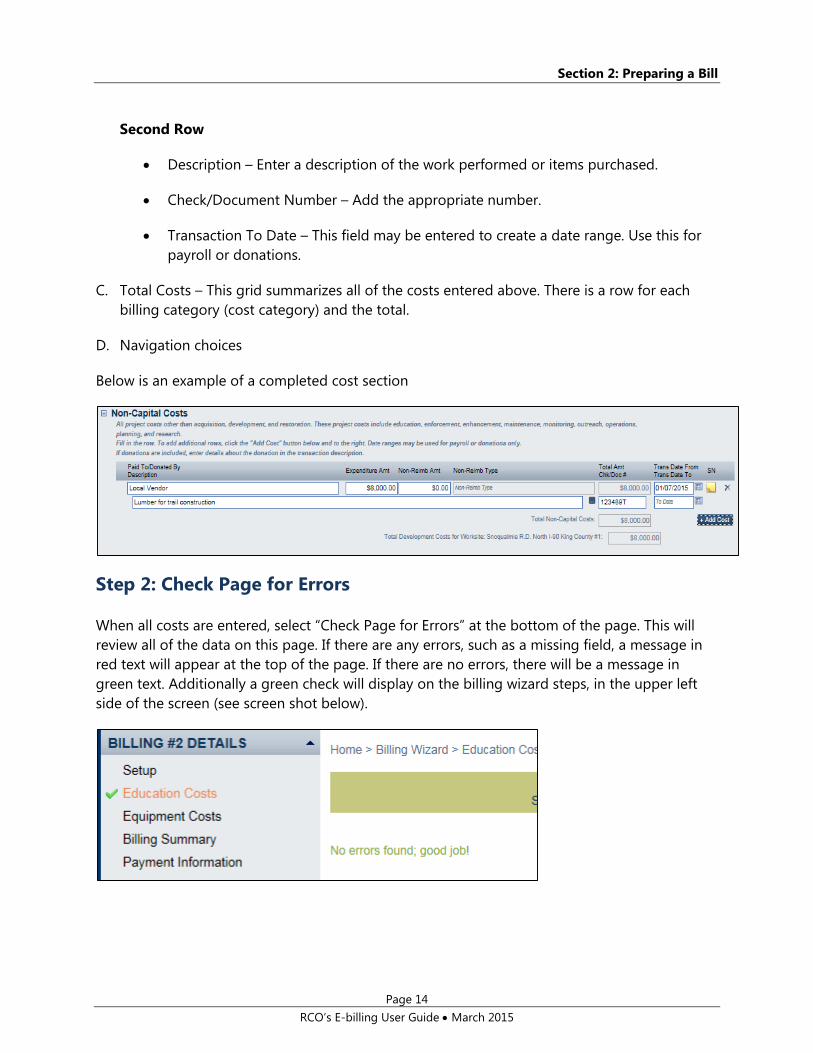
Second Row
Description – Enter a description of the work performed or items purchased.
Check/Document Number – Add the appropriate number.
Transaction To Date – This field may be entered to create a date range. Use this for
payroll or donations.
C. Total Costs – This grid summarizes all of the costs entered above. There is a row for each
billing category (cost category) and the total.
D. Navigation choices
Below is an example of a completed cost section
Step 2: Check Page for Errors
When all costs are entered, select “Check Page for Errors” at the bottom of the page. This will
review all of the data on this page. If there are any errors, such as a missing field, a message in
red text will appear at the top of the page. If there are no errors, there will be a message in
green text. Additionally a green check will display on the billing wizard steps, in the upper left
side of the screen (see screen shot below).

Section 2: Preparing a Bill
Page 15
RCO’s E-billing User Guide March 2015
Task 4: Review Your Bill
After entering all costs for the bill, the next step is to review the billing summary. The billing
summary recaps all of the data entered.
Step 1: Review Your Bill
A. In the table, the first two left columns summarize the agreement totals. If costs are broken
into categories, the amounts will be reflected here. If costs are not in categories, the sub-
totals will be zero. Below the horizontal line, the RCO grant share and sponsor share are
displayed.
B. This Billing – Represents the current bill. All of the costs will be summarized. Keep in mind is
that RCO will pay the percent share of total eligible costs billed, but RCO can only reimburse
for actual expenditures.
C. Billed to Date – Shows all project bills, including the current bill.
D. Total for this Billing – This table shows the totals for this bill only, by worksite. When there is
one worksite, this table is the same as Section B in the table above. When there is more than
one worksite, this table will display that information.
E. Save as PDF – Select this button to save the information on this screen to a PDF file. Please
note: When the bill is complete, you can save the entire bill as a PDF. This will be shown in
Task 6.
E
D
C B A

Section 2: Preparing a Bill
Page 16
RCO’s E-billing User Guide March 2015
Step 2: Review Payment Information
A. Payment Calculation – This area displays the calculation that RCO will use to determine the
reimbursement. PRISM calculates each reimbursement by using the entire history of bills,
including contract modifications. Our goal is to display the factors impacting each payment
so that the basis of the calculations is clear.
Total Billed to Date
Total Approved to Date
RCO Percent
RCO Share Approved (a)
Approved Expenditures (b)
Lesser of (a) or (b)
Less Payments to Date
Return of Funds Amount
Adjustments to this Payment
B A

Section 2: Preparing a Bill
Page 17
RCO’s E-billing User Guide March 2015
Retainage Held
This Payment Amount – Final calculated payment amount for this billing
B. Balances – This section shows key balance information.
First section:
The amount of this payment.
RCO Grant Balance – including the proposed payment.
Advance Balance – if applicable, for Salmon Recovery Funding Board projects
only.
Match shows Match Bank and Match Owed.
Retainage shows:
Planned Retainage Amount (percent) – RCO generally holds a portion of the
grant funds, usually the final 10 percent, until the project has been completed
and all required documentation is approved. This is the percent that RCO
plans to retain on this project.
Planned Trigger Amount – This number is the number at which the retainage
takes effect. Any expenditures past this amount will be retained by RCO until
the project is complete, and all required documentation is received.
Agreement shows the details for the RCO share and sponsor match for the
agreement
Task 5: Attach Documents
This screen is where any documents related to the bill are attached. PRISM will check for any
required attachments once the “Check Page for Errors” button is selected. Any documents
attached here also are shown in the main attachment display screen for the project in PRISM
2007.
You may want to attach bills created from your accounts receivable systems.
There are additional examples of required attachments, mainly in acquisition projects. Review
Fact Sheet 11: Required Attachments for more information.
Section 2: Preparing a Bill
Page 18
RCO’s E-billing User Guide March 2015
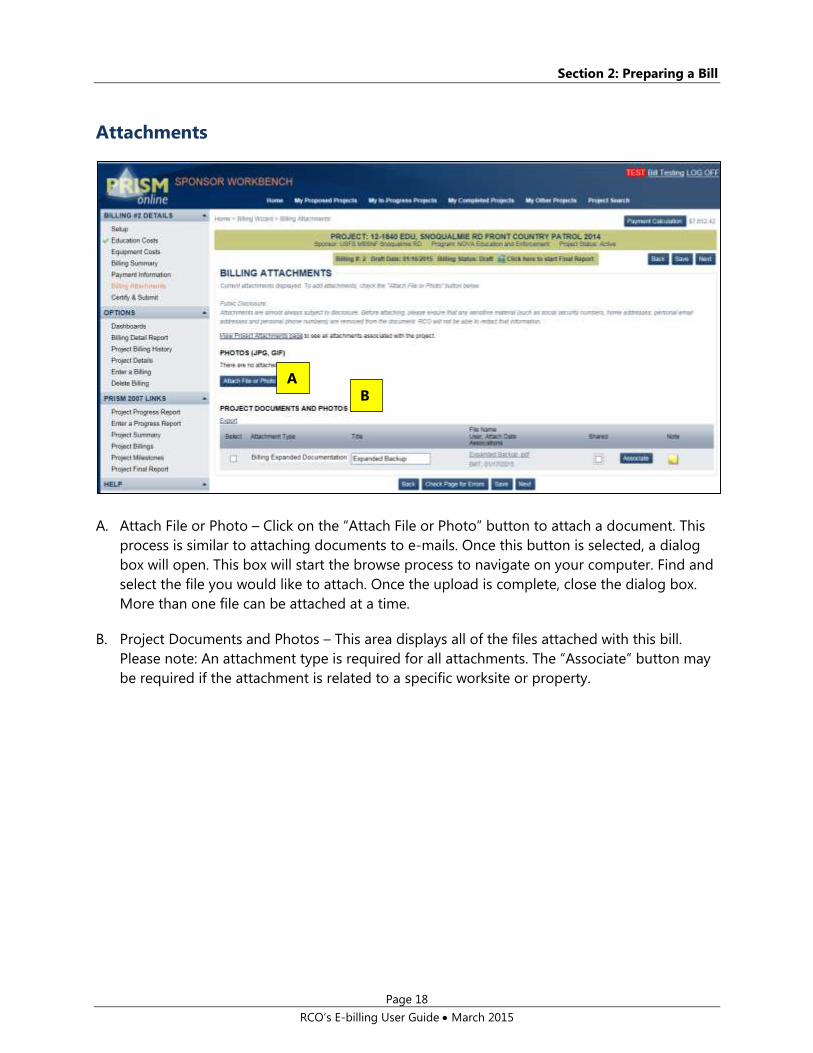
Attachments
A. Attach File or Photo – Click on the “Attach File or Photo” button to attach a document. This
process is similar to attaching documents to e-mails. Once this button is selected, a dialog
box will open. This box will start the browse process to navigate on your computer. Find and
select the file you would like to attach. Once the upload is complete, close the dialog box.
More than one file can be attached at a time.
B. Project Documents and Photos – This area displays all of the files attached with this bill.
Please note: An attachment type is required for all attachments. The “Associate” button may
be required if the attachment is related to a specific worksite or property.
B
A
Section 2: Preparing a Bill
Page 19
RCO’s E-billing User Guide March 2015
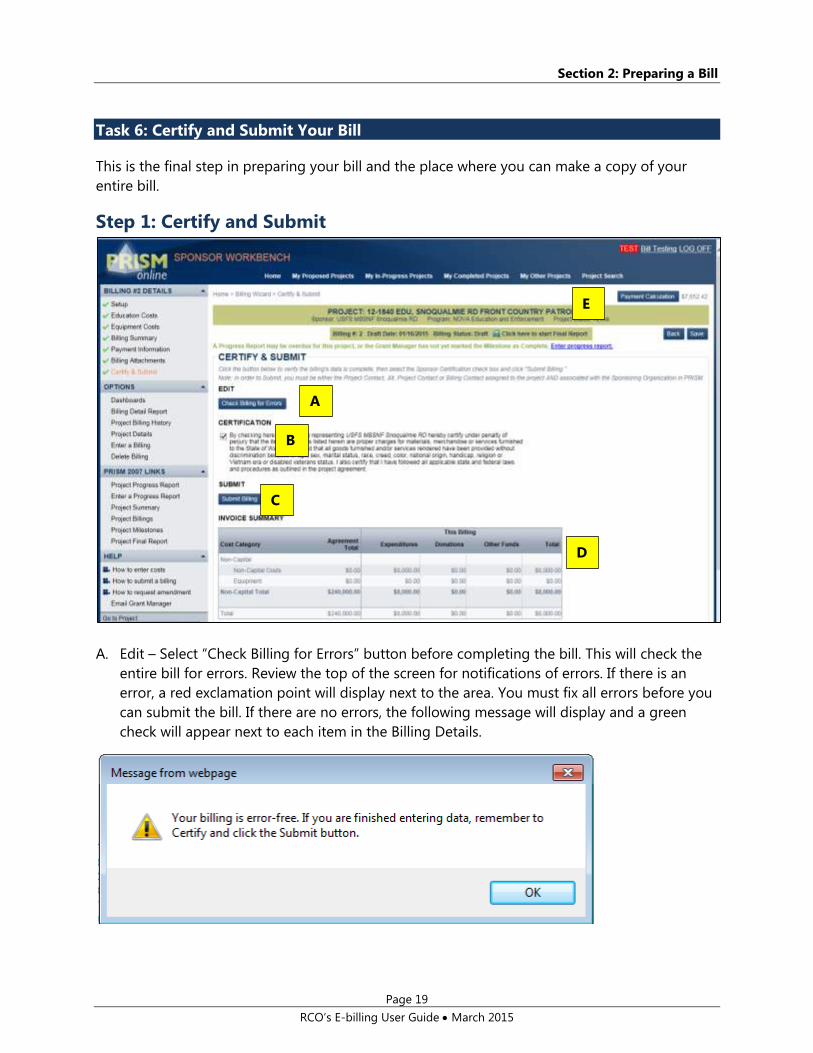
Task 6: Certify and Submit Your Bill
This is the final step in preparing your bill and the place where you can make a copy of your
entire bill.
Step 1: Certify and Submit
A. Edit – Select “Check Billing for Errors” button before completing the bill. This will check the
entire bill for errors. Review the top of the screen for notifications of errors. If there is an
error, a red exclamation point will display next to the area. You must fix all errors before you
can submit the bill. If there are no errors, the following message will display and a green
check will appear next to each item in the Billing Details.
A
E
B
C
D

Section 2: Preparing a Bill
Page 20
RCO’s E-billing User Guide March 2015
B. Certification – When the bill is error free, read the
certification and, if you agree, click the certification
box. Your name and organization is included in the
certification.
C. Submit – Once the certification is complete, select
“Submit.” There will be a verification question to
make sure you want to submit the billing. Click OK.
The billing will be submitted. You will be given an
opportunity to add any clarifying notes to the billing
if desired.
D. Invoice Summary – This
table summarizes the bill.
E. Payment Calculation – Click
on this button during the
billing process to see what
the payment from RCO will
be at that point in time.
Section 2: Preparing a Bill
Page 21
RCO’s E-billing User Guide March 2015
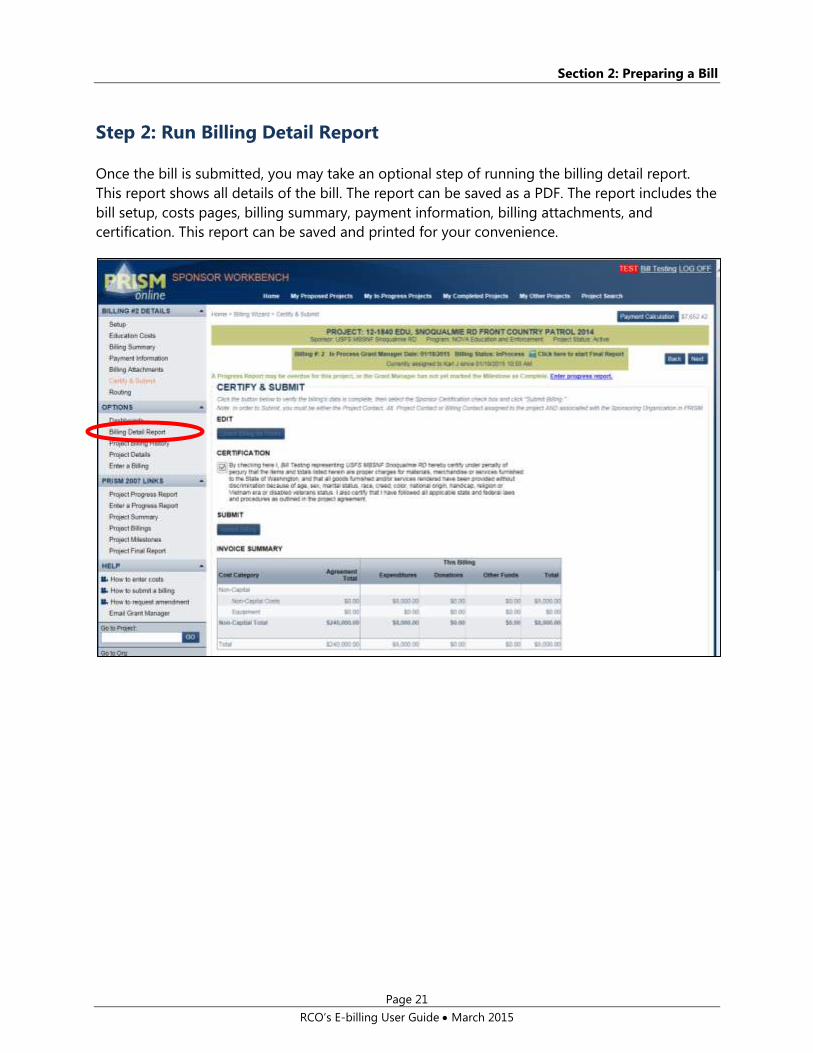
Step 2: Run Billing Detail Report
Once the bill is submitted, you may take an optional step of running the billing detail report.
This report shows all details of the bill. The report can be saved as a PDF. The report includes the
bill setup, costs pages, billing summary, payment information, billing attachments, and
certification. This report can be saved and printed for your convenience.
Section 2: Preparing a Bill
Page 22
RCO’s E-billing User Guide March 2015
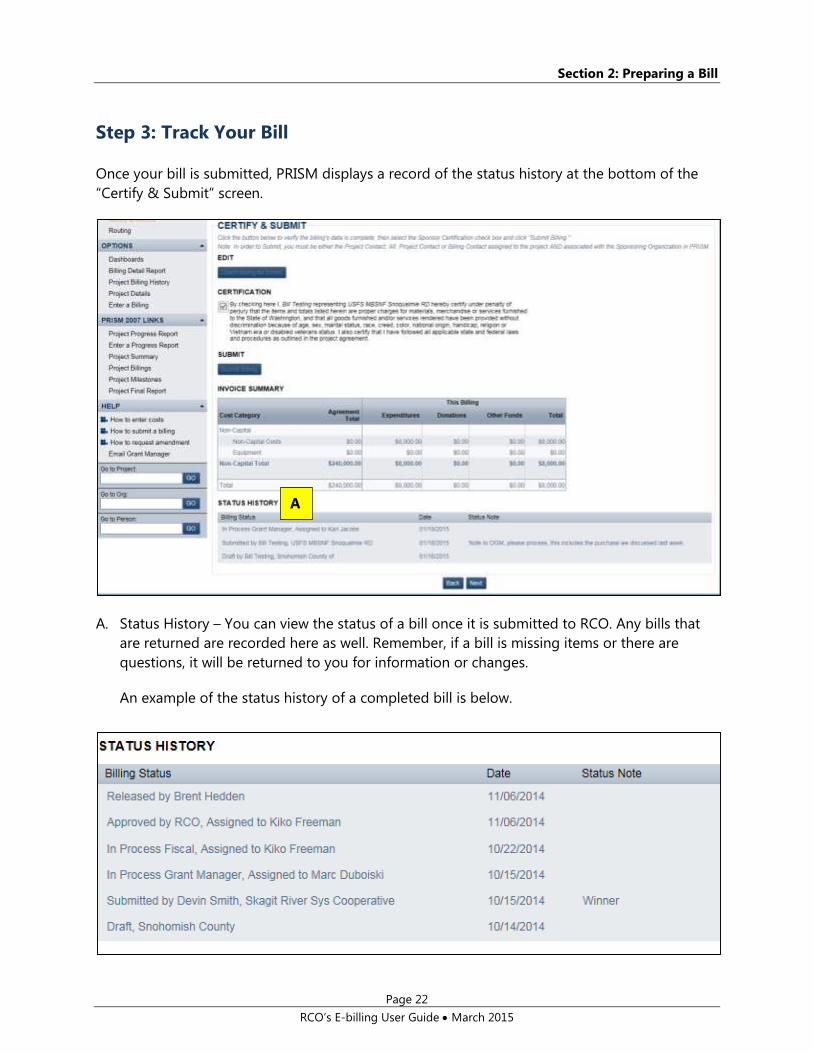
Step 3: Track Your Bill
Once your bill is submitted, PRISM displays a record of the status history at the bottom of the
“Certify & Submit” screen.
A. Status History – You can view the status of a bill once it is submitted to RCO. Any bills that
are returned are recorded here as well. Remember, if a bill is missing items or there are
questions, it will be returned to you for information or changes.
An example of the status history of a completed bill is below.
A
Section 2: Preparing a Bill
Page 23
RCO’s E-billing User Guide March 2015
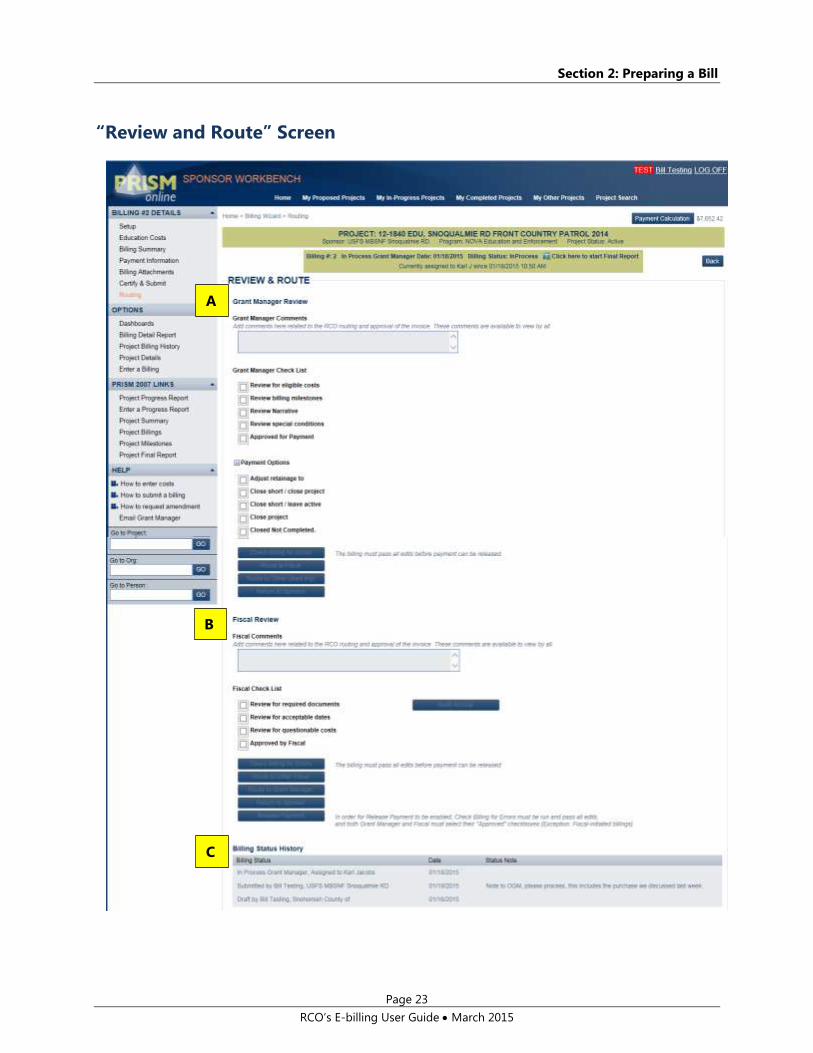
“Review and Route” Screen
B
A
C

Section 2: Preparing a Bill
Page 24
RCO’s E-billing User Guide March 2015
A. Grant Manager Review – The RCO grants manager reviews the submitted bill and may add
comments. The grants manager completes the bill checklist and payment options. For final
bills, there are several more items to review.
RCO grants manager checklist includes:
Review for eligible costs
Review for billing milestones
Review narrative
Review special conditions
Approval for payment – this is only the first half of the approval. Final approval must
have both fiscal and grant manager approval to release the payment.
RCO grants manager payment options include:
Adjust retainage to – Indicate a percentage for retainage amount
Close short/close project – Remove any remaining balance and move project to
closed status
Close short/leave active – Remove any remaining balance and leave project active
Close project – Move project to closed status
Closed Not Completed – Move project to closed not completed status, which
indicates that some money has been spent, but the goals of the project were not
accomplished.
The RCO grants manager has several other options for handling the bill at the bottom of the
grants manager review section. The choices are not shown clearly on the screen print above,
but the options are listed here:
Check Billing for Errors – This is a final check to ensure that all edits have passed. The
final check is needed to make sure that nothing has changed since the bill was
submitted initially. Changes may include contract amendments or other billings
released.
Route to Fiscal
Route to Other Grant Manager
Return to Sponsor

Section 2: Preparing a Bill
Page 25
RCO’s E-billing User Guide March 2015
B. Fiscal Review – RCO fiscal staff review the bill and may add comments. Fiscal staff can
complete the accounting process of building an accrual, if needed. Fiscal staff must
complete the fiscal checklist, which includes:
Review for required documents
Review for acceptable dates
Review for questionable costs
Approved by Fiscal – this is only one half of the approval. Final approval must have
fiscal and grants manager approval to release the payment
Fiscal staff have several other options for handling the bill, below the fiscal checklist.
Check Billing for Errors – This is a final check to ensure that all edits have passed. The
final check is needed to make sure that nothing has changed since the bill was
submitted initially. Changes may include contract amendments, or other billings
released.
Route to Other Fiscal staff
Route to Grant Manager
Return to Sponsor
Release Payment – Releasing payment can only be completed when final "Check
Billing for Errors” has completed, and both fiscal and the grants manager have
checked the approved check box.
NOTE: Fiscal occasionally may enter an adjusting bill. This is referred to as a fiscal initiated
billing. These billings must result in a negative or zero payment.
C. Billing Status History is duplicated on this screen.
Task 7: Using the Dashboards
In addition to using the Billing Status History, there are several dashboards available to track
billings.
To view a dashboard, click on “Dashboards” under “My Options” from the home page or from
any billing screen in the “Options” section.

Section 2: Preparing a Bill
Page 26
RCO’s E-billing User Guide March 2015
From the billing page:
Section 2: Preparing a Bill
Page 27
RCO’s E-billing User Guide March 2015
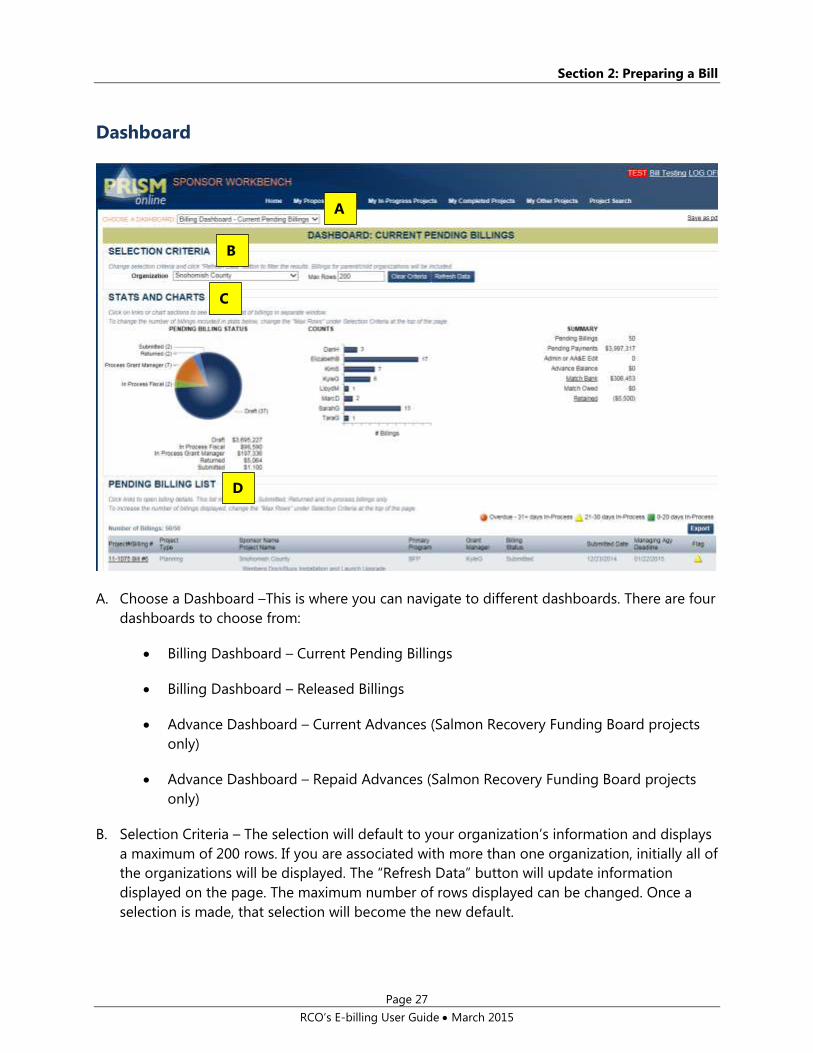
Dashboard
A. Choose a Dashboard –This is where you can navigate to different dashboards. There are four
dashboards to choose from:
Billing Dashboard – Current Pending Billings
Billing Dashboard – Released Billings
Advance Dashboard – Current Advances (Salmon Recovery Funding Board projects
only)
Advance Dashboard – Repaid Advances (Salmon Recovery Funding Board projects
only)
B. Selection Criteria – The selection will default to your organization’s information and displays
a maximum of 200 rows. If you are associated with more than one organization, initially all of
the organizations will be displayed. The “Refresh Data” button will update information
displayed on the page. The maximum number of rows displayed can be changed. Once a
selection is made, that selection will become the new default.
D
C
B
A

Section 2: Preparing a Bill
Page 28
RCO’s E-billing User Guide March 2015
C. Stats and Charts – This area will display a summary of information in a variety of charts,
depending on which dashboard is chosen. You may click on a piece of the pie chart or bar
graph and additional information will display on a new web page.
D. Pending Billing Lists – The data shown in the example is not actual data.
The dashboard shown above is for “Current Pending Billings.” This dashboard shows a list of all
pending bills for an organization. It includes a graph that shows bills by status, another graph by
grant manager, and a table showing the pending bills list. This list includes indicators showing
how long a bill has been pending payment. Our goal is to pay all bills within 30 days. There are
flags to indicate how old bills are on the pending bill list. A red circle is used for bills that are
overdue (31 days and older). A yellow triangle is used for bills that are 21-30 days old. A green
square is used for bills up to 20 days old. The icon for each billing is in the last column.
The next dashboard on the drop-down list is for “Released Billings.” This dashboard shows all
bills that have been paid to the organization. It also will display bills paid using “PRISM 2007,”
the old paper-based process. Please note, old bills do not have the same level of details that the
new bills will have.
The third dashboard on the drop-down list is the “Current Advances List.” This is for Salmon
Recovery Funding Board projects only. There are flags to indicate the stage of the advances. For
sponsors, a red circle is used for advances that are overdue. A yellow triangle is used for
advances that are due in 30 days or less. A green square is for advances with more than 30 days
remaining to the due date. RCO staff have 15 days to account for advances once a bill is
submitted by the sponsor. The internal flag for RCO staff of a red circle is used when advances
are overdue. A yellow triangle is used for advances that are due in 5 days or less. A green square
is used for advances with more than 5 days remaining to the due date. The icon for each billing
is in the last column.

Section 2: Preparing a Bill
Page 29
RCO’s E-billing User Guide March 2015
The final dashboard is the “Repaid Advances List.” This is for Salmon Recovery Funding Board
projects only.
All of the lists can be sorted by clicking on any of the headers. To open a bill, click on the
Project#/Billing# column on the left.
Export – Use this button to export a list to an Excel spreadsheet. For old billings processed in
PRISM 2007, this data does not necessarily reflect accurate processing time.
Section 3: Preparing Your Acquisition Bill
Page 30
RCO’s E-billing User Guide March 2015
Section 3:
Preparing Your Acquisition Bill
Task 1: Setup Your Acquisition Bill
Acquisition bills are different than other types of bills for several reasons. Acquisition bills:
Require more backup documents about property and incidental costs.
In addition to the billing categories, you must choose a work type for each cost on each
bill. For example, if you choose a billing category of incidental costs, you also must
choose a work type, such as appraisal, demolition, cultural resources, signs, or many
others.
Require details, such as the actual acquisition date, property location, values, and more
on the property page.
Acquisition projects use properties. Non-acquisition projects use worksites.
Setup Your Acquisition Project Bill
This section will focus on items that are unique for acquisition projects. If you would like a
complete overview of the “Bill Setup” screen, see Section 1.
Section 3: Preparing Your Acquisition Bill
Page 31
RCO’s E-billing User Guide March 2015
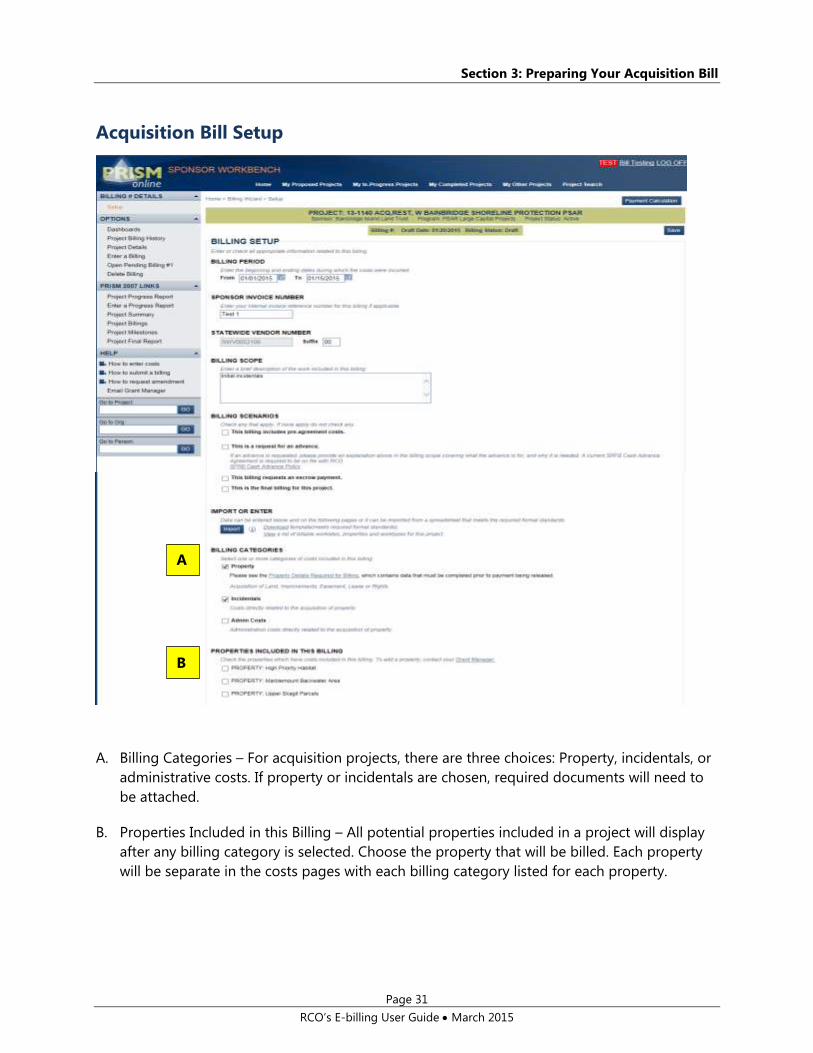
Acquisition Bill Setup
A. Billing Categories – For acquisition projects, there are three choices: Property, incidentals, or
administrative costs. If property or incidentals are chosen, required documents will need to
be attached.
B. Properties Included in this Billing – All potential properties included in a project will display
after any billing category is selected. Choose the property that will be billed. Each property
will be separate in the costs pages with each billing category listed for each property.
A
B

Section 3: Preparing Your Acquisition Bill
Page 32
RCO’s E-billing User Guide March 2015
Task 2: Enter Costs
Enter Your Costs
B
A

Section 3: Preparing Your Acquisition Bill
Page 33
RCO’s E-billing User Guide March 2015
A. Enter costs by property and work type. Unlike the previous non-capital example, work types
must be entered with each transaction on acquisition projects.
B. If more than one property is selected, the properties will be listed one after another, with all
potential billing categories listed.
Task 3: Attach Documents
As was mentioned earlier, there are required acquisition billing documents that need to be
attached in PRISM. See the detailed Fact Sheet 11: Required Attachments for a complete list of
required attachments.
When you first enter the “Billing Attachments” screen there will be no attachments. Please note,
to determine if required attachments are present, the system will review all attachments for the
project to date. If the attachment is already present, it will not be required to be attached again.
If attachments are required, there will be a message at the top of the screen in red text.
Additionally, the attachments must be related to the correct property.
Example of errors for acquisition “Billing Attachments” screen. The red text highlights the errors.
Section 3: Preparing Your Acquisition Bill
Page 34
RCO’s E-billing User Guide March 2015
The errors listed here are a sample:
Because the bill included the incidental cost of appraisal, the following documents must
be attached:
Appraisal document
Appraisal Review document
Because the bill included property, the following documents must be attached:
Environmental Site Assessment Report
Or RCO Property Assessment Checklist
Hazardous Substance Certification Form
Preliminary Title Report
Deed
Deed of Right
Title Insurance
Each attachment needs the correct attachment type. The attachment type must be titled
correctly and match with the required document.
Each attachment also needs to be associated with the correct property. Click on the first button
to choose specific worksites and properties. Click on the second button to select the correct
property for each required attachment.
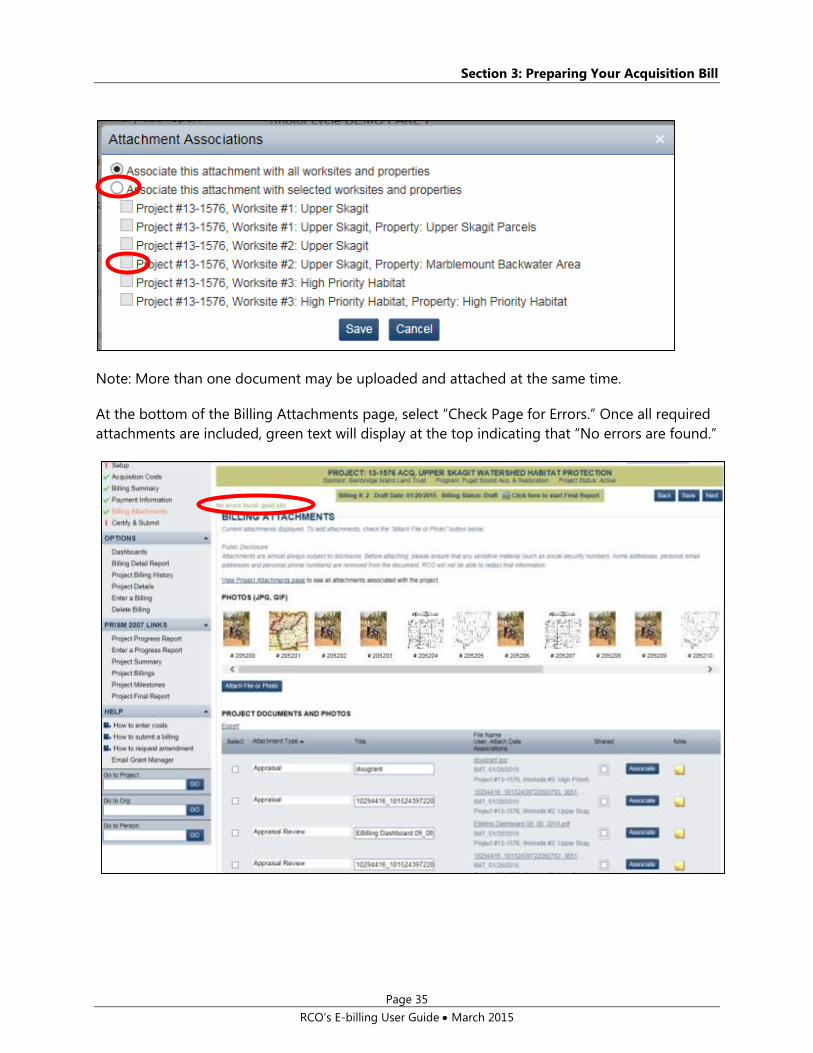
In this case, we assume the attachment is for the “Marblemount Backwater Area,” so you would
click the second button and then click the property detail. See the red circles below.
Section 3: Preparing Your Acquisition Bill
Page 35
RCO’s E-billing User Guide March 2015
Note: More than one document may be uploaded and attached at the same time.
At the bottom of the Billing Attachments page, select “Check Page for Errors.” Once all required
attachments are included, green text will display at the top indicating that “No errors are found.”

Section 3: Preparing Your Acquisition Bill
Page 36
RCO’s E-billing User Guide March 2015
Task 4: Fill Out Property Pages
Required information on the property cost page can be input ahead of the bill. All required
information could be added on the property page. Alternately, you can start the bill, enter costs,
include required attachments, then go to the property page and enter required information.
The red text error at the top of the “Billing Setup” screen indicates that you need to view the
property pages and add missing data.
See the error message that you need to enter information on the property page. Then go to the
property page and click on the link in the error text.
Step 1: View Property Pages
To view property pages, there are several options:
Open the project details page
Click the project properties link, under Options on the left side
Or you could click on the link that is present when property costs are selected
Finally, you could click on the link in the error message

Section 3: Preparing Your Acquisition Bill
Page 37
RCO’s E-billing User Guide March 2015
Once you are on the “Project Properties” screen, click on the correct property.
Step 2: Fill in Property Details
Once you click the property, the property details will display. If information is required, it will
display at the top of the screen in red text. Below is a screen shot of property details page with
errors at the top.
Section 3: Preparing Your Acquisition Bill
Page 38
RCO’s E-billing User Guide March 2015
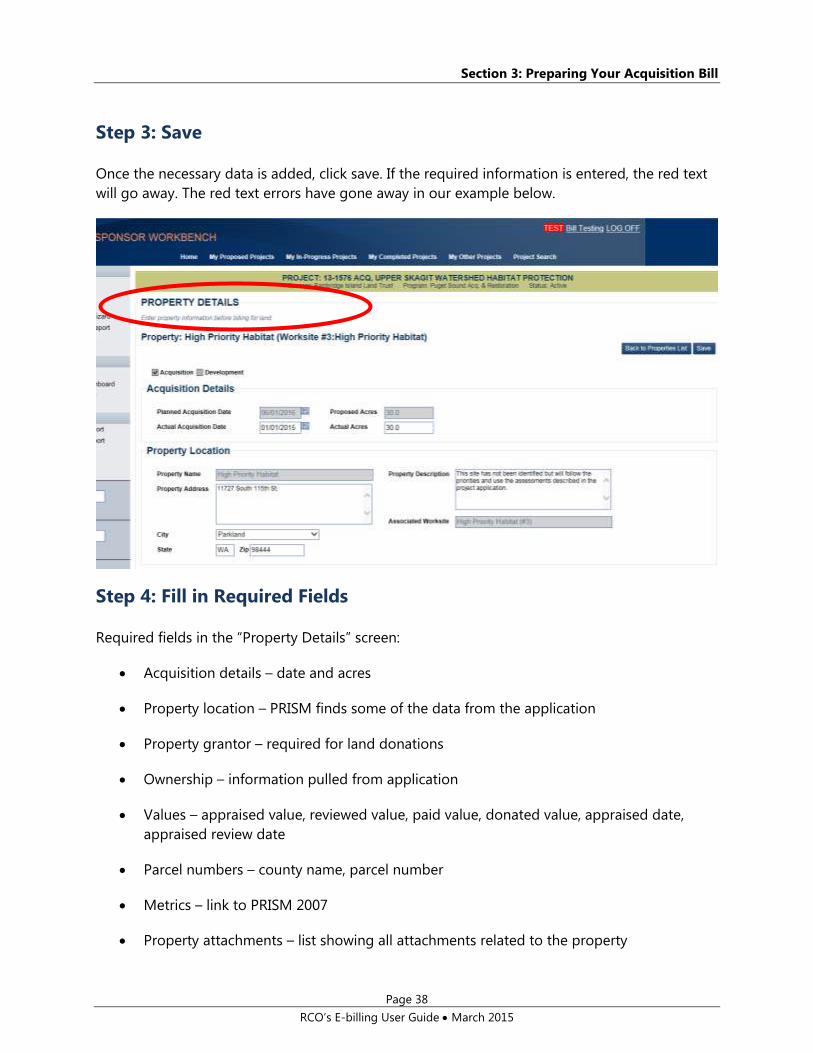
Step 3: Save
Once the necessary data is added, click save. If the required information is entered, the red text
will go away. The red text errors have gone away in our example below.
Step 4: Fill in Required Fields
Required fields in the “Property Details” screen:
Acquisition details – date and acres
Property location – PRISM finds some of the data from the application
Property grantor – required for land donations
Ownership – information pulled from application
Values – appraised value, reviewed value, paid value, donated value, appraised date,
appraised review date
Parcel numbers – county name, parcel number
Metrics – link to PRISM 2007
Property attachments – list showing all attachments related to the property
Section 3: Preparing Your Acquisition Bill
Page 39
RCO’s E-billing User Guide March 2015
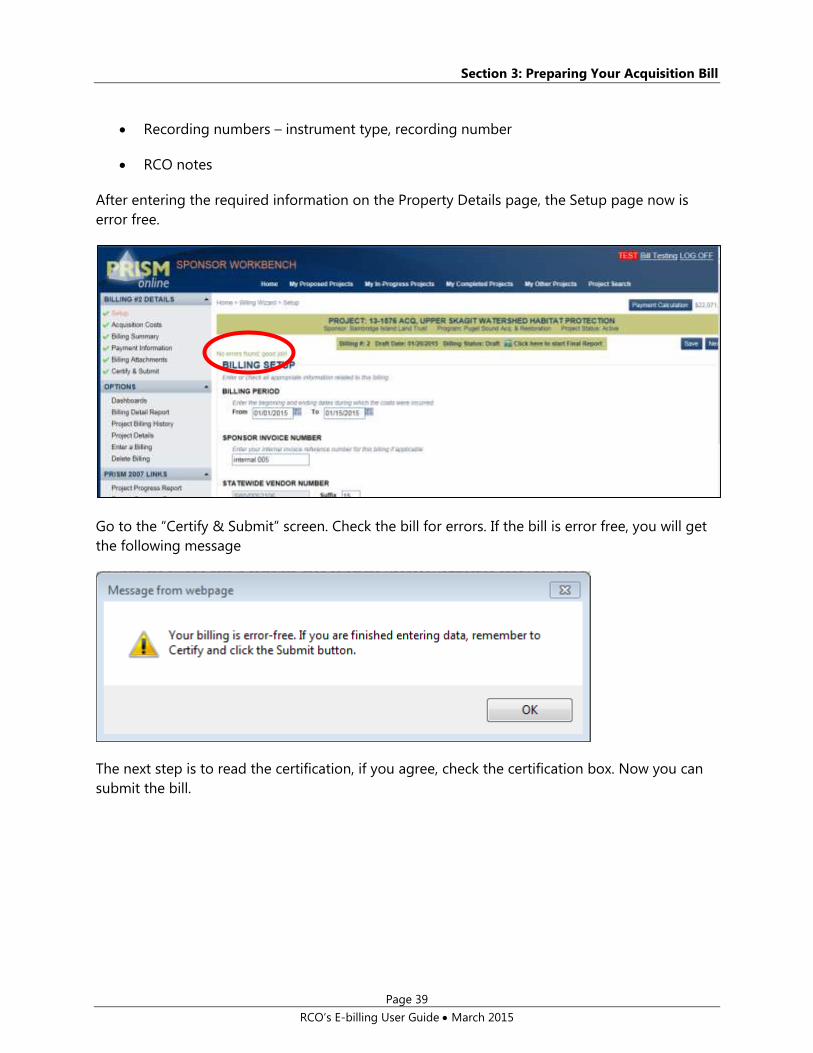
Recording numbers – instrument type, recording number
RCO notes
After entering the required information on the Property Details page, the Setup page now is
error free.
Go to the “Certify & Submit” screen. Check the bill for errors. If the bill is error free, you will get
the following message
The next step is to read the certification, if you agree, check the certification box. Now you can
submit the bill.

Section 4: Finding and Fixing Errors, Equipment and Importing
Page 40
RCO’s E-billing User Guide March 2015
Section 4:
Finding and Fixing Errors,
Equipment, and Importing
Task 1: Find and Fix Errors
The e-billing system uses many edits (double checks) to verify that all required information has
been entered or attached while using the e-billing wizard. The error check can be done at any
time, but the entire bill must be error free before it can be submitted.
For example, several fields are required for cost information. The system will allow you to enter a
cost without a description. When you click the “Check Page for Errors” button, the system will
point out that an item is missing. In this case the required description.
In order to check for errors on a single page, use the “Check Page for Errors” button at the
bottom of the “Billing Setup” screen.
Errors are shown in red text at the top of the page and there will be a red exclamation point next
to the steps of the e-billing wizard where there is an error. When a page is error free, there will
be a green check mark on the upper left side panel on the steps of the e-billing wizard.
If you like, you can wait and check the entire bill at once, by going to the “Certify & Submit”
screen, then select “Check Billing for Errors.” This will check the entire bill at once. After that has
been done, then the bill can be certified and submitted.
To check the entire billing for errors, use the “Check Billing for Errors” button at the bottom of
the “Certify & Submit” screen.

Section 4: Finding and Fixing Errors, Equipment and Importing
Page 41
RCO’s E-billing User Guide March 2015
Below is a screen shot showing an example of errors at the top of “Billing Setup” screen. Note
the error at the top of the page and the red exclamation point in the upper left side panel.
Below is an example of corrected errors “Billing Setup” screen. Note the green check mark next
to set up in the upper left panel.
A listing of possible errors can be found on the Fact Sheet 7.
Task 2: Enter Equipment Purchases
If your agreement allows for the purchase of equipment, please follow these steps. If you are not
sure if your agreement allows for equipment, please check with your RCO outdoor grants
manager. RCO considers equipment to be more than $1,000. Any equipment purchases are
entered on these screens.
Section 4: Finding and Fixing Errors, Equipment and Importing
Page 42
RCO’s E-billing User Guide March 2015
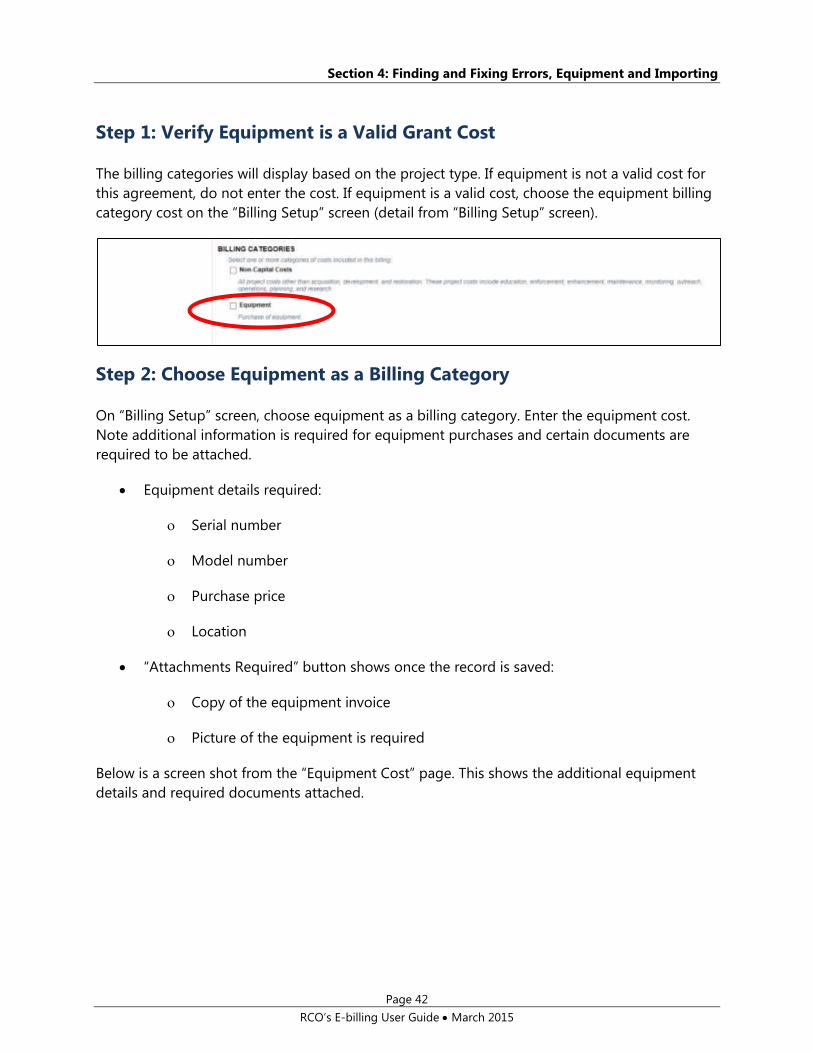
Step 1: Verify Equipment is a Valid Grant Cost
The billing categories will display based on the project type. If equipment is not a valid cost for
this agreement, do not enter the cost. If equipment is a valid cost, choose the equipment billing
category cost on the “Billing Setup” screen (detail from “Billing Setup” screen).
Step 2: Choose Equipment as a Billing Category
On “Billing Setup” screen, choose equipment as a billing category. Enter the equipment cost.
Note additional information is required for equipment purchases and certain documents are
required to be attached.
Equipment details required:
Serial number
Model number
Purchase price
Location
“Attachments Required” button shows once the record is saved:
Copy of the equipment invoice
Picture of the equipment is required
Below is a screen shot from the “Equipment Cost” page. This shows the additional equipment
details and required documents attached.
Section 4: Finding and Fixing Errors, Equipment and Importing
Page 43
RCO’s E-billing User Guide March 2015
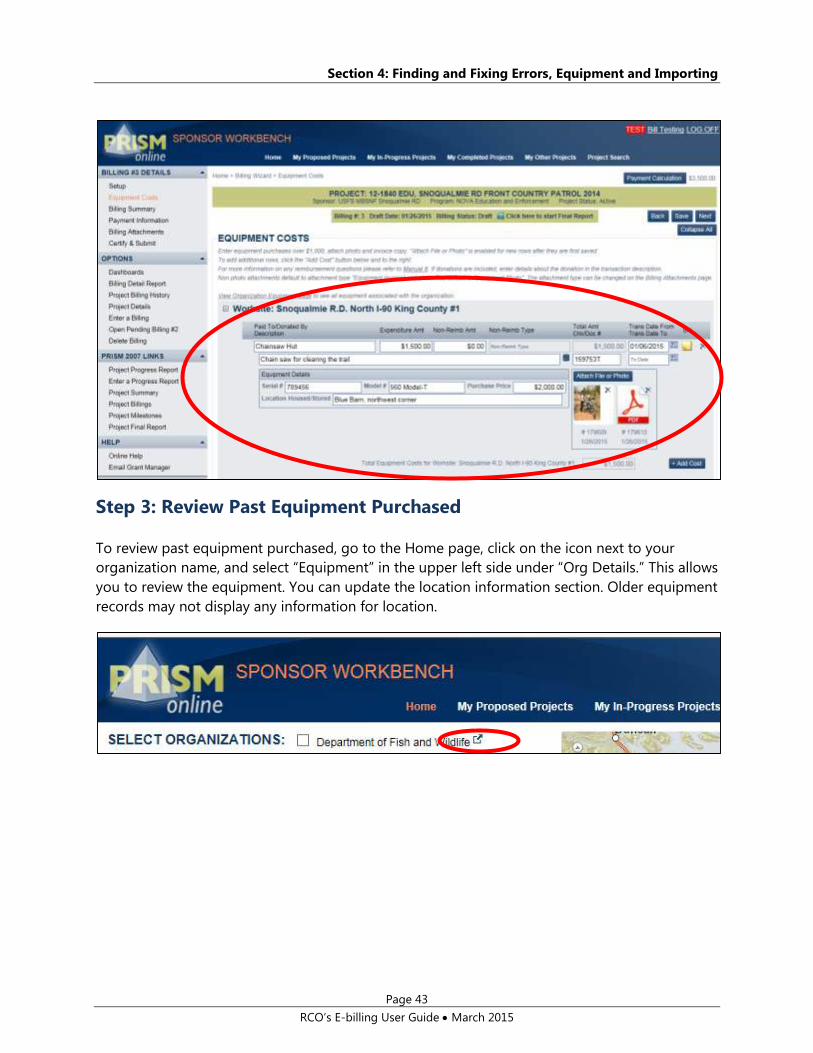
Step 3: Review Past Equipment Purchased
To review past equipment purchased, go to the Home page, click on the icon next to your
organization name, and select “Equipment” in the upper left side under “Org Details.” This allows
you to review the equipment. You can update the location information section. Older equipment
records may not display any information for location.

Section 4: Finding and Fixing Errors, Equipment and Importing
Page 44
RCO’s E-billing User Guide March 2015
Task 3: Import Cost Information
E-billing allows you to import cost information. This requires using Excel with RCO formatted
templates and adding unique billing information from your organization’s accounting system.
This template is available on the “Billing Setup” screen, near the import option.
Begin on the “Billing Setup” screen, select “Download” to get the Excel template. Based on the
project type, the template will be tailored to fit your project. Save the Excel file on your network
or computer.
Select “View” to show a list of valid worksites, properties, and work types for the project.
The first tab of the template contains detailed instructions for using the import process. There
will be other tabs for each cost category for the specific project. See Section 1, Task 3 for a full
listing of project types and cost categories. The last tab of the template is for look up data in
regards to the chosen project. The look up data shows the valid work types, valid non-
reimbursable types, valid units, and valid labor rate justifications.

Section 4: Finding and Fixing Errors, Equipment and Importing
Page 45
RCO’s E-billing User Guide March 2015
On the costs pages (screen print below), add cost information starting on Row 3. The first two
rows give titles (Row 1) and further details about what should be included in the column
(Row 2). Do not alter these two rows. Data is input in Row 3 and below.
This template requires that the worksite or property (Column A) is referenced exactly like the
worksite or property in PRISM for the project. Additionally, if match is reported, the match
category must match exactly. Any units that are to be entered must match exactly, or the upload
will not complete for that row. PRISM will upload what it can, but if the spreadsheet contains
data that does not match the required format, that data will be blank in the costs pages.
Section 4: Finding and Fixing Errors, Equipment and Importing
Page 46
RCO’s E-billing User Guide March 2015
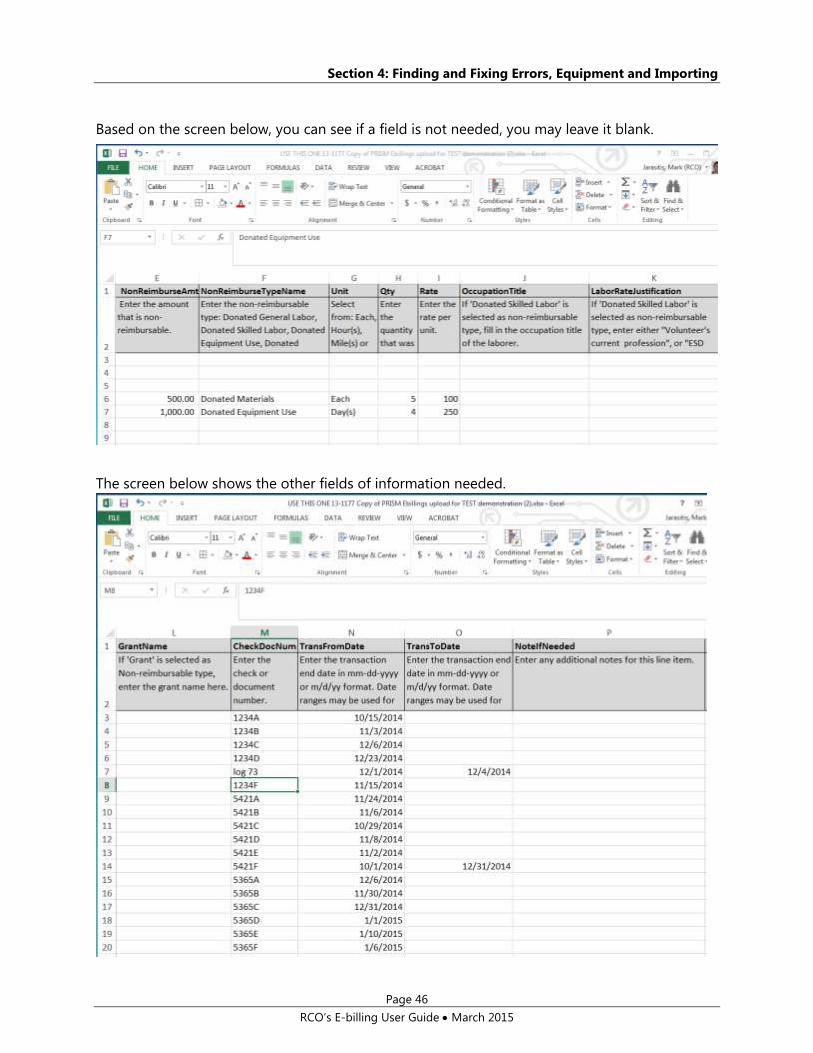
Based on the screen below, you can see if a field is not needed, you may leave it blank.
The screen below shows the other fields of information needed.
Section 4: Finding and Fixing Errors, Equipment and Importing
Page 47
RCO’s E-billing User Guide March 2015
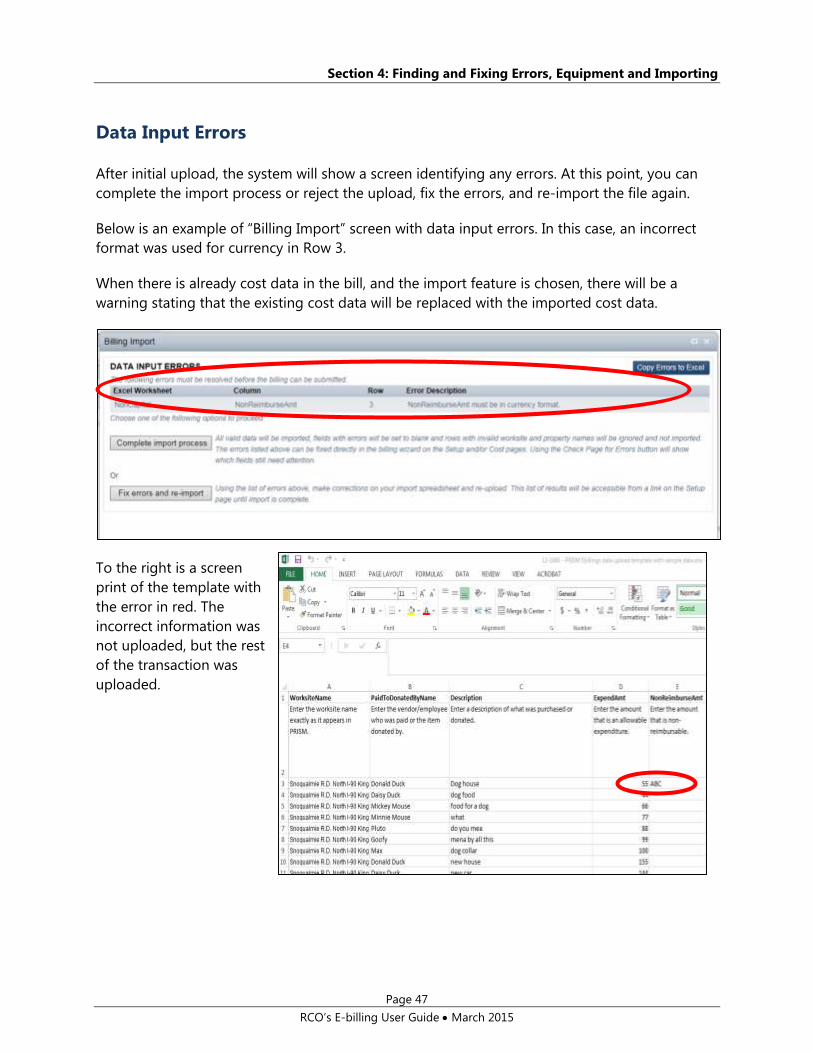
Data Input Errors
After initial upload, the system will show a screen identifying any errors. At this point, you can
complete the import process or reject the upload, fix the errors, and re-import the file again.
Below is an example of “Billing Import” screen with data input errors. In this case, an incorrect
format was used for currency in Row 3.
When there is already cost data in the bill, and the import feature is chosen, there will be a
warning stating that the existing cost data will be replaced with the imported cost data.
To the right is a screen
print of the template with
the error in red. The
incorrect information was
not uploaded, but the rest
of the transaction was
uploaded.

Section 4: Finding and Fixing Errors, Equipment and Importing
Page 48
RCO’s E-billing User Guide March 2015
Here is a screen print of the uploaded cost data.
Once a template is used, it can be used again for any future bills. Be sure to remove old data so
that costs are not billed twice.
New columns may be added to the spreadsheet, but the import process will ignore them.

Section 5: Personal Service Contracts
Page 49
RCO’s E-billing User Guide March 2015
Section 5:
Personal Service Contracts
Billing for Personal Service Contracts
Bills for all RCO personal service contracts must be completed through e-billing on PRISM
Online. The processes will vary depending on the levels of detail required by your RCO
agreement. There are two choices available for billing personal service contracts:
The contractor follows the same billing process as RCO grants projects. This means for
each bill, you enter information for each transaction individually with a row for each cost.
Or
Use the current process for creating your regular invoice in your accounting system. You
then create a bill in PRISM. On the “Billing Setup” screen, enter the dates covered by your
invoice as the billing period. On the Costs page, enter one cost for the invoice and select
in In the Paid To/Donated By field, use “See attached.” Enter the amount of expenditure.
In the Description field, use “See attached.” For the check number, use “See attached”
and the transaction dates can cover the period covered by your invoice. The final step is
to attach a PDF of your invoice to the “Billing Attachments” screen, use billing
attachment as the attachment type.
In all cases, bills must include the required amount of detailed documentation. This detail
usually includes the contractor’s employee, rate of pay, hours worked, any details on other
purchases. For contracts developed with set amounts for set tasks, include details identifying the
completion of the tasks and the negotiated amount.

Section 6: Tips and Tricks and the RCO Web Site
Page 50
RCO’s E-billing User Guide March 2015
Section 6:
Tips and Tricks and the RCO Web
Site
Tips and Tricks
This section contains some tips and tricks we have found helpful in using this program. If you
have a helpful tip, please let us know. We may include your tip in a future edition of this user
guide. E-mail us at [email protected].
Get familiar with the process – At first, the process of using the e-billing wizard may seem very
different. We trust that after completing several bills, the steps and the program will become
more familiar and easier to use. Be patient, you can do it. If you have problems, or questions,
please let us know.
“Back” buttons work in browser – When working through the e-billing wizard, the “Back”
buttons will work in the browser. If you need to see the previous screen, hit the “Back” button.
Start a new session – If you have a question, or would like to look up something, but don’t
want to lose your place, that is no problem. Just right click the item you are interested in. By
right clicking, a dialog box will display. You can choose to open the link in a new tab or new
window. Once you are done, just close the window.
When doing a billing, right click to open property details/brief, then you will have access to
property pages, too. Once the property details/brief page is open, look in the upper left of the
screen. Click on the property pages to add details about acquisition projects.
Enter property information as soon as you have the information – Acquisition information
can be entered at any time on the property page. You also can attach required documents, such
as the deed or appraisal, even if you aren’t doing a bill right away. When you are ready to bill,
that information already will be in PRISM.

Section 6: Tips and Tricks and the RCO Web Site
Page 51
RCO’s E-billing User Guide March 2015
Always go to Billing History first – When starting a new bill, go to “Billing History” first. This
will allow you to verify there is not a draft bill in the system and to verify the progress of
previous bills. Please note, there can be more than one draft bill if this is helpful to you.
Delete old, unused draft bills – While you can have more than one draft bill, all un-submitted
drafts must be deleted before a project can be closed. Delete any draft bills that are not going
to be used. To delete a draft bill, open the pending bill and click on “Delete Billing” in the
“Options” area on the left side in the middle of the panel.
Expanded backup documentation – RCO monitors our grant sponsors carefully. This
monitoring is done with a review of each bill submitted. We check for allowable costs and
questionable costs, and we make sure that costs are within the appropriate dates. Additionally,
RCO requests expanded backup documentation from each sponsor. Our goal is to request this
once a year.
When expanded backup documentation is requested, we will send an e-mail and let you know
what we need to see. When bills are prepared, the system will identify whether expanded
backup documentation is required. Based on this request, you will need to include all
timesheets, pay rates, invoice copies, volunteer logs, and any other backup that shows the
source documents for the request. These documents need to be scanned and attached in
PRISM, usually using PDF format.
The RCO Web Site
You may go to our Web site to view training videos and fact sheets.
Fact Sheets
1 Advances – Salmon Recovery Funding Board
2 Billing Categories, Work types Overview, Properties, Worksites
3 Billing Personal Service Contracts
4 Secured Access Rules
5 Date Edits
6 E-Billing Overview
7 Edits and Errors
8 Escrow Payments
9 Importing
10 Navigation, Getting Around
11 Required Attachments