e a r t h earth r e s o u r c e sresources a case study : oil...
TRANSCRIPT

E A R T H
EARTH
R E S O U R C E S
RESOURCESA Case Study
A Case Study: Oil
: Oil
A 6th-12th grade curriculum to promote scientific literacy
A 6th-12th grade curriculum to promote scientific literacy
S
S
A
A
M
M
P
P
L
L
E
E
R
R
State of California
Gray DavisGovernor
Winston H. HickoxSecretary
California Environmental Protection Agency
Integrated Waste Management Board
Linda Moulton-PattersonBoard Chair
Dan Eaton Board Member
Steven R. JonesBoard Member
José MedinaBoard Member
Michael PaparianBoard Member
David A. RobertiBoard Member

Copyright © 1998, 2001 by the Integrated Waste Management Board. Allrights reserved. This publication, or parts thereof, may not be reproducedwithout written permission.
Transparencies and student handouts may be duplicated for classroom use.
The statements and conclusions of this curriculum are those of the contrac-tor and not necessarily those of the Integrated Waste Management Board, itsemployees, or the State of California. The State makes no warranty, ex-pressed or implied, and assumes no liability for the information contained inthe succeeding text. Any mention of commercial products or processes shallnot be construed as an endorsement of such products or processes.
Publication #: 322-00-003Revised February 2001.
Here is our contact information:
California Integrated Waste Management BoardOffice of Integrated Environmental Education, MS 14A1001 I StreetP.O. Box 4025Sacramento, CA 95812-4025(916) 341-6769www.ciwmb.ca.gov/Schools/1-800-CA-WASTE (CA only)
Printed on Recycled Paper

Dear Educator:
Increasingly, schools are facing the challenges of implementing new standards forscience education and integrating environmental education into the classroom.Earth Resources — A Case Study: Oil is a curriculum that can help educators to meetthis challenge. It was developed through a collaboration between the California Scope,Sequence and Coordination Project, the Integrated Waste Management Board, and theCalifornia Department of Education.
I am confident that you will find that the Earth Resources curriculum makes sciencemore relevant and interesting for your students. Because Earth Resources was writtento align with the California Guide to Environmental Literacy, National Science EducationStandards, Benchmarks for Science Literacy, and California Science Framework, it isdevelopmentally and conceptually appropriate for 9th and 10th grade students. Thiscurriculum would make an excellent addition to programs in integrated/coordinatedscience, environmental science, and traditional science.
With its hands-on, inquiry-based approach, Earth Resources facilitates learning byallowing students to actively construct their own knowledge of environmental scienceconcepts and issues through research, discussion, exploration, and application. Eachlesson fosters conceptual change by enabling students to revisit, analyze, and adjusttheir preconceptions.
While Earth Resources engages students in learning about the importance of naturalresource conservation, its greatest strength lies in providing in-depth knowledgeabout oil formation, exploration, acquisition, processing, and everyday use, as wellas enlightening students about the proper disposal and recycling of used oil. Ofsignificance to local communities and recycling programs, this curriculum alsoprovides students with the cognitive skills to develop strategies for responsibleaction and community outreach.
Sincerely,
Bill Andrews, Education Programs Consultant
Office of Environmental Education
Standards, Curriculum, and Assessment Division
(916) 657-5374
A Letter of Endorsement…
February 2001
Dear Educator:
The Integrated Waste Management Board (CIWMB) is pleased to provide you with an excerpt from our curriculum, EarthResources—A Case Study: Oil. Earth Resources (ER) is a 6th through 12th grade curriculum which features over 18engaging lessons enabling students to learn about the lifecycle of a natural resouce (using oil as a case study)—how it isformed, discovered, extracted, processed, used, collected, and recycled. Through hands-on laboratory investigations,students identify environment. They will explore the science concepts behind the decisions they will need to make andsome of the consequences of these decisions.
This document, which we have coined the “ER Sampler,” includes the following excerpts from the complete curriculum: theintroduction, the “Section At A Glance” for all four sections; one lesson; and the table of contents for the appendices. Theintroduction gives you a comprehensive explanation of the how, why, when, who, and what that went into developing thiscurriculum, plus the curriculum’s features and how to use it. The Section At a Glance pages contain a complete synopsis ofeach section, including lesson summaries and a matrix on lesson concepts, scientific thinking processes, and desiredoutcomes, plus so much more!
Lesson 4 from Section One is a lesson on “Getting Crude Oil: Oil Extraction.” While most of the Earth Resources curriculumis spiraling and builds upon previous learned concepts, this particular lesson is pretty autonomous with very little referenceto prior lessons the students have completed. It has a hands-on experiment, which requires the students to build anextraction pump. We think you and your students will find it informative, interesting, and engaging. The last part of the ERSampler is a one-page overview of the appendix. (Appendix A is included with Lesson 4 in this ER Sampler.) When youreview the appendix overview, you will discover there is a wealth of information in the 11 appendices included in the full ERcurriculum.
We hope this excerpt will whet your appetite and compel you to sign up for an ER workshop so that you can receive acomplimentary copy of the full ER curriculum. To find our about a workshop in your area or to help organize one, pleasecontact the CIWMB regional representative for your area. See the regional map on the next page.
Thank you for your interest in teaching our youth about environmental stewardship through this unique vehicle on the studyof oil.
Respectfully yours,
Linda Moulton-Patterson, Chair
California Integrated Waste Management Board

Office of Integrated Environmental Education

Earth Resources Project DirectorsPhil LafontaineBrenda Hamilton
Earth Resources Past Project DirectorGary Sokolis
SS&C Project DirectorHelen Kota
IWMB Curriculum AdvisorsNatalie LeeCara Morgan
Administrative AssistantSarah Davis
Lead TeamDebra Bereki, Fillmore High School
Pris Brutlag, Parsons Junior High School
Anne Buchwald, Granite Hills High School
Sean Genovese, Millikan High School
Margaret Johnson, Edison High School
Jon Lefler, Enterprise High School
Berenice Sealy, Rancho Cucamonga HighSchool
Editing TeamMelissa AronsonPris BrutlagBrenda HamiltonPhil LafontaineNatalie LeeCara Morgan
Advisory BoardMelissa Aronson, California State
University StanislausBill Andrews, California Department
of EducationAlan Borner, Environmental Hazards
Management InstituteAngie Cianelli Rowe, Evergreen Oil, Inc.Reed Engdahl, American Petroleum
InstituteAudrey Goins-Brichi, Chevron CorporationBrad Jones, American Petroleum InstituteSteve Kerdoon, DeMenno/KerdoonChris Mahoney, DeMenno/KerdoonRoopal Mayor, Mayor InternationalD. Brett Morton, Pennzoil Products Company
Kate Muir, UCLA Ocean Discovery CenterNancy Sauer, Pennzoil Products CompanyMichael Shea, California State University,
Sacramento (CSUS)Tom Smithson, CSUSNatasha Stillman, San Francisco
Recycling ProgramArt Sussman, WestEdJeff Wilson, Western States Petroleum
Association
Lesson WritersDebra Bereki, Fillmore High School
Anne Bogardt, Borrego Springs HighSchool
David Braunstein, Jordan High School
Pris Brutlag, Parsons Junior High School
Anne Buchwald, Granite Hills High School
Tony Dauer, South Gate Senior High School
Susann Evans, Springstowne Junior HighSchool
Teresa Foote, Roosevelt Junior HighSchool
Sean Genovese, Millikan High School
Margaret Johnson, Edison High School
Denise Jones, Bullard High School
Dennis Kurtz, Nordhoff High School
Jon Lefler, Enterprise High School
Courtney Perry, Western States PetroleumAssociation
Jean Roberts, Bullard High School
Berenice Sealy, Rancho Cucamonga HighSchool
Lynn Skutches, Calaveras High School
Gary Sokolis, Amador High School
Sande Sutter, Hogan High School
Joy Tanigawa, El Rancho High School
Ronald Ulrich, Washington High School
AssessmentTrish Digenan, Riverside Polytechnic
High SchoolPhil Lafontaine, Oak Ridge High SchoolDorothy Reardon, Del Campo High SchoolTerry Shanahan, Millikan High SchoolSusan Thee, Thousand Oaks High School
Curriculum Development Team
Field Test TeachersRay Barber, Pleasant Valley High SchoolHeather Bassett, El Rancho High SchoolNeal Bridgnell, Millikan High SchoolRich Canfield, Village High Continuation
SchoolMary Cortez, Edison High School, StocktonGreg Evans, Tokay High SchoolMyrna Fleming, North Hollywood Senior
High SchoolRicardo Flores, North Hollywood Senior
High SchoolEma Gluckmann, Sacramento High SchoolLinda Hewitt, Cordova Senior High SchoolBrian Jacobs, Sacramento High SchoolBetty James, Riverside Polytechnic High
SchoolCarol Lee, Redwood High School, LarkspurTed Lowden, Amador Valley High SchoolGreta Lynch-Douglas, Millikan High
SchoolLyn Moreno, San Marin High SchoolTeresa Northcutt, Tokay High SchoolRon Palmer, San Marin High SchoolBill Pence, Cordova High SchoolNancy Reclusado, Sacramento High
SchoolDan Riordan, Bear Creek High SchoolEllen Selover, Bear Creek High SchoolRonald Smith, Morse Senior High SchoolBob Spencer, North High School,
BakersfieldBarbara Sugaya-Jones, Fall River Junior/
Senior High SchoolRen Wakefield, Pleasant Valley High
SchoolNancy Wentz, Amador Valley High SchoolJoAnne Winterstein, Andrew P. Hill High
SchoolMike Young, Riverside Polytechnic High
SchoolBob Zeimet, West High School, BakersfieldCarol Zucca, Edison High School
Integrated Waste Management BoardBob BoughtonNatalie LeeCara Morgan
Kit DevelopmentGloriane Hirata, Resource Area for TeachersMargaret Johnson, Edison High SchoolLarry Lack, Marin Catholic High School
Graphic Design and LayoutLori Wisheropp, CSUS Foundation
Special AcknowledgmentsFor their administrative assistance:Kathryn Bolter and Meghan Fergus
All students involved in field testing thecurriculum
For providing squeezebox constructionplan: Woody Williams, Millikan High School
For developing the concept mapsfor each section: Dorothy Reardon,Del Campo High School
For their work on illustrations:Barbara Olsen, Oak Ridge High School;Dianne Rose, CSUS Foundation; andLori Wisheropp, CSUS Foundation
For research assistance: Ed Lastelic,American Petroleum Institute
For their assistance in reviewing portionsof the curriculum: Mike Brugh, CalServe/California Department of Education; JaneBurns, Evergreen Environmental Services,Inc.; Tim Horner, Ph.D., CSUS; Sharon Lien,Blue Planet Foundation; Frank Potter, Ph.D.,University of California, Irvine; Dan Tuttle,California Department of Conservation, BillWeightman, Steel Recycling Institute
For providing resource kit materials:American Petroleum Institute; City ofSan Jose Environmental ServicesDepartment; Community EnvironmentalCouncil; Enterprise for Education;Environmental Hazards ManagementInstitute; Lindsay Museum; National EnergyFoundation
For granting permission to duplicateinstructional videotapes: Alameda CountyWaste Management Authority; AmericanOceans Campaign; American PetroleumInstitute; Community EnvironmentalCouncil; Earth Communications Office;Environmental Hazards ManagementInstitute; Evergreen EnvironmentalServices, Inc.
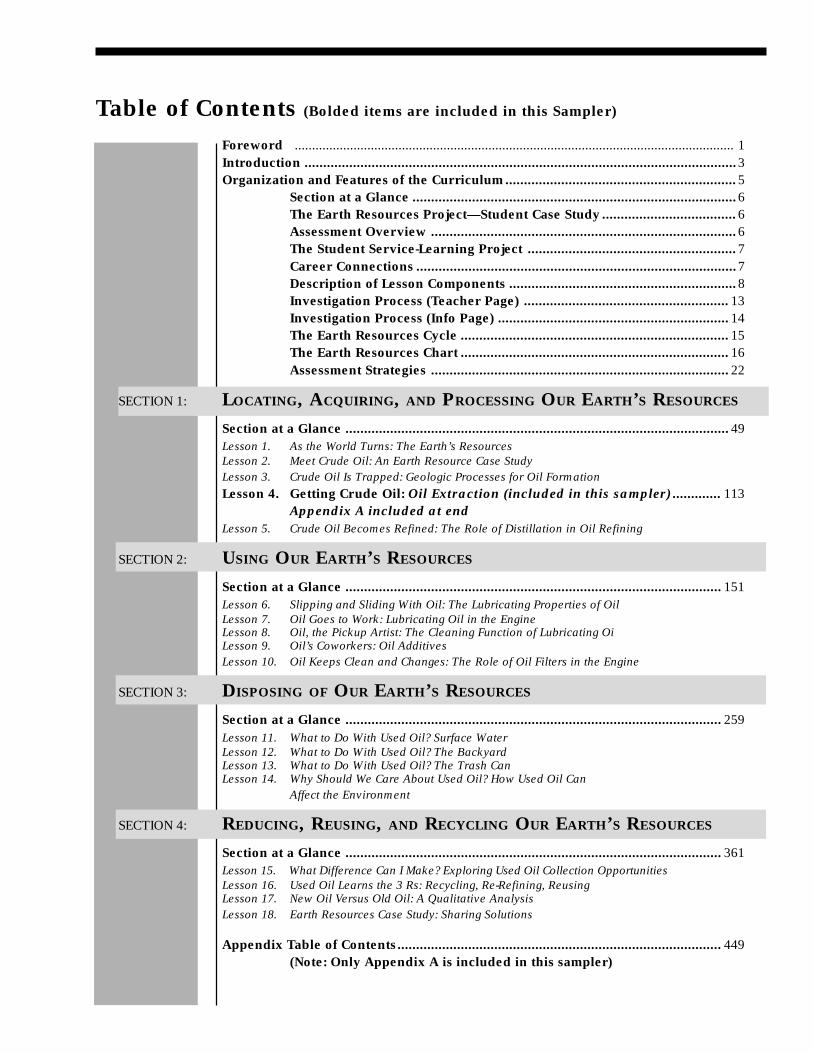
Table of Contents (Bolded items are included in this Sampler)
Foreword ............................................................................................................................... 1Introduction ....................................................................................................................3Organization and Features of the Curriculum.............................................................. 5
Section at a Glance .......................................................................................6The Earth Resources Project—Student Case Study .................................... 6Assessment Overview ..................................................................................6The Student Service-Learning Project ........................................................ 7Career Connections ......................................................................................7Description of Lesson Components .............................................................8Investigation Process (Teacher Page) ....................................................... 13Investigation Process (Info Page) .............................................................. 14The Earth Resources Cycle ........................................................................ 15The Earth Resources Chart ........................................................................ 16Assessment Strategies ................................................................................ 22
SECTION 1: LOCATING, ACQUIRING, AND PROCESSING OUR EARTH’S RESOURCES
Section at a Glance ....................................................................................................... 49Lesson 1. As the World Turns: The Earth’s ResourcesLesson 2. Meet Crude Oil: An Earth Resource Case StudyLesson 3. Crude Oil Is Trapped: Geologic Processes for Oil FormationLesson 4. Getting Crude Oil: Oil Extraction (included in this sampler) ............. 113
Appendix A included at endLesson 5. Crude Oil Becomes Refined: The Role of Distillation in Oil Refining
SECTION 2: USING OUR EARTH’S RESOURCES
Section at a Glance ..................................................................................................... 151Lesson 6. Slipping and Sliding With Oil: The Lubricating Properties of OilLesson 7. Oil Goes to Work: Lubricating Oil in the EngineLesson 8. Oil, the Pickup Artist: The Cleaning Function of Lubricating OiLesson 9. Oil’s Coworkers: Oil AdditivesLesson 10. Oil Keeps Clean and Changes: The Role of Oil Filters in the Engine
SECTION 3: DISPOSING OF OUR EARTH’S RESOURCES
Section at a Glance ..................................................................................................... 259Lesson 11. What to Do With Used Oil? Surface WaterLesson 12. What to Do With Used Oil? The BackyardLesson 13. What to Do With Used Oil? The Trash CanLesson 14. Why Should We Care About Used Oil? How Used Oil Can
Affect the Environment
SECTION 4: REDUCING, REUSING, AND RECYCLING OUR EARTH’S RESOURCES
Section at a Glance ..................................................................................................... 361Lesson 15. What Difference Can I Make? Exploring Used Oil Collection OpportunitiesLesson 16. Used Oil Learns the 3 Rs: Recycling, Re-Refining, ReusingLesson 17. New Oil Versus Old Oil: A Qualitative AnalysisLesson 18. Earth Resources Case Study: Sharing Solutions
Appendix Table of Contents....................................................................................... 449(Note: Only Appendix A is included in this sampler)

Earth Resources — A Case Study: Oil Page 1
Each year, Californians generate approxi-mately 45 million tons of solid wastes. Asour population grows and the number oflandfills becomes scarce, the need tomanage the ever-growing quantities ofwaste materials becomes more important.The Integrated Waste Management Board(IWMB), as part of the California Environ-mental Protection Agency, is responsiblefor implementing a comprehensive set oflaws designed to address California’ssolid waste disposal needs and lessen thedemand upon our natural resources. TheIWMB has a public information andeducational mandate as part of its overallmission, which includes school programs.In all its outreach activities, the IWMBpromotes an integrated waste manage-ment hierarchy emphasizing the four Rs:reduce, reuse, recycle, and buy recycled.
Teachers can educate California’s youthabout the importance of these actions,teaching them waste management skillsthat will last throughout their lives. Stateand local agencies can support theeducation community by providingresources, materials, and motivation topromote waste management concepts.Teachers should look to state and localgovernment programs for informationand materials to support their efforts.
In California, as part of its overall solidwaste management efforts each city andcounty must develop programs to safelymanage household hazardous wastes(HHW) generated within its jurisdiction.Many jurisdictions maintain local HHWcollection networks and support schoolprograms or give classroom presenta-tions as part of their public educationefforts. The IWMB operates a programspecifically focused on used motor oilrecycling. This program offers grants tolocal jurisdictions to provide used oilcollection and conduct public outreach.The IWMB is also charged with thedevelopment of an information andeducation program for used oil recyclingas well as the promotion of recycling andsource reduction of solid wastes.
Foreword
Meeting California’s Environmental Education Challenge
In developing both the used motor oilrecycling program and the schools pro-gram, the IWMB discovered the compellingneed for curricula that focused on theresponsible use of resources. Local programmanagers and science teachers soughtup-to-date materials that meet the mostrecent teaching standards and provideenvironmental, resource conservation, andrecycling messages. Such a curriculum, itwas hoped, would be built on a coordi-nated science approach that interlinks life,physical, and Earth sciences while weavingconcepts around a central theme that isrelated directly to students’ lives.
A tool to meet this challenge has nowbeen developed. Earth Resources — ACase Study: Oil is a natural resource-basedcurriculum that presents oil as a casestudy and contains hands-on, inquiry-based lessons. Through the curriculum,students explore the formation, extrac-tion, and processing of crude oil; the useof motor oil and the environmentalimpact of its improper disposal; and thebenefits of recycling used oil. By usingthis curriculum and partnering with localgovernments, teachers can also helpdevelop strong connections between theirstudents and communities.
This curriculum was developed in part-nership with the California Departmentof Education and the California Scope,Sequence and Coordination (SS&C)Project, with support from the IWMB. Todevelop the curriculum, SS&C broughttogether teams of teachers from acrossthe state who are experienced in design-ing lessons, embedding assessment, andfield-testing materials. An advisory groupconsisting of educators, scientists, andrepresentatives from environmentalorganizations and oil and oil recyclingindustries provided guidance on content.
These partners and contributing expertsare confident that Earth Resources willequip students with the knowledge andskills to make a difference toward protect-ing the environment.

Page 2 Earth Resources — A Case Study: Oil
Earth Resources — A Case Study: Oil Page 3
Introduction
Earth Resources — A Case Study: Oil is acurriculum designed to promote scientificliteracy and to enable students to makeresponsible decisions. When they arebased on scientific knowledge, respon-sible decisions help to promote the wiseconsumption of resources. As humanconsumption of Earth materials increases,it is imperative that students explore theenvironmental issues associated with theprocessing, use, disposal, and reuse ofresources. The concepts explored in thiscurriculum focus on the issues associatedwith motor oil, but can be applied to anyEarth material used by humans.
The Earth Resources curriculum wasdeveloped in a collaboration between theIntegrated Waste Management Board, theCalifornia Department of Education, andthe California Scope, Sequence and Coordi-nation project. All three groups favoredtargeting high school students due to theirinterest in automobiles, their high propor-tion of “do-it-yourself” oil changing, andtheir growing role as consumers. Theproject partners agreed that responsiblebehaviors should be established early,rather than changing entrenched behav-iors later through future education.
The curriculum unit is designed for 9th and10th grade science students. Aligned withthe National Science Education Standardsand the California Science Framework, thecurriculum enables students to focus on theuse and conservation of a natural resourcethrough the case study of motor oil. Itscontent is divided into four sections. Thefirst section focuses on the formation,exploration, and processing of the resource;the second section explores the use of theresource by consumers; the third sectiondiscusses the routes of disposal into theenvironment and the related impacts; andthe fourth discusses opportunities forindividual actions. As students explore theissues surrounding the use of motor oil,they are encouraged to apply the conceptsto other resources and consumer productssuch as aluminum, paper, and glass.
The Earth Resources curriculum facilitatesstudent learning by utilizing a variety ofinstructional strategies. The lessons werecrafted and field-tested by scienceteachers throughout California to activelyengage all students. As the curriculumunfolds, students employ scientificthinking processes to build their concep-tual understanding. The curriculumprovides facilitated learning prompts andassessment strategies to accommodate avariety of student learning styles.
The following facilitated instructionalstrategies are used in the lessons:
• “Hands-on, minds-on” investigationsand activities
• Inquiry-based instruction wherestudents are encouraged to exploretheir previous knowledge and precon-ceptions, discover new information,scientifically investigate and apply thenew information, and compare theirfindings to their previous knowledge
• An integrated science approach thatnot only enables students to studyEarth, life, and physical sciences, butalso allows them to understand theconnections between the sciences
• Collaborative study where studentsare required to work with otherstudents, listen to and value thediverse ideas of other students, and tosolve problems after considering allconcerns
• A wide range of assessment strategiesto enable all learners to demonstratetheir conceptual as well as factualunderstanding of the content
Through these instructional strategies,teachers can guide their students towardthe achievement of each lesson’s desiredoutcomes, which are based on thescience and issues surrounding the use ofEarth resources. In so doing, teachers canhelp their students to become respon-sible decision makers and informedmembers of a global society.

Page 4 Earth Resources — A Case Study: Oil
Earth Resources — A Case Study: Oil Page 5
Organization and Features of the Curriculum
Earth Resources — A Case Study: Oil is divided into four sections, as follows:
• Section 1: Locating, Acquiring, and Processing Our Earth’s Resources
• Section 2: Using Our Earth’s Resources
• Section 3: Disposing of Our Earth’s Resources
• Section 4: Reducing, Reusing, and Recycling Our Earth’s Resources
Each section supports the unifying concept of the curriculum. All of the unifying, section,and lesson concepts are based on the National Science Education Standards, Benchmarks forScience Literacy, California Science Framework, and California Guide to Environmental Literacy.
The following chart provides an overall perspective of the concepts addressed by thiscurriculum.
Section Concepts
Human: Natural resources are usedby human populations in order tomaintain and improve their existence.
Scientific: The Earth’s natural re-sources are formed over time. Theseresources have observable physicaland chemical properties.
SECTION 1:
Locating, Acquiring, andProcessing Our Earth’s Resources
Section Concepts
Human: Materials from humansocieties affect both physical andchemical cycles of the Earth.Scientific: Because ecosystems areinterdependent, a change in onesystem may have far-reaching effectson the others.
SECTION 3:
Disposing of OurEarth’s Resources
Section Concepts
Human: Human use of the Earth’snatural resources is based uponchemical and physical properties.
Scientific: All matter has observablechemical and physical propertieswhich govern its interactions.
SECTION 2:
Using Our Earth’s Resources
Section Concepts
Human: Human activities should aimat maintaining a sustainable systemthrough careful management of theEarth’s resources.Scientific: All matter has observablechemical and physical propertieswhich govern its interactions.
SECTION 4:
Reducing, Reusing, andRecycling Our Earth’s Resources
UNIFYING CONCEPTThe Earth is a complex system that changes overtime, yet exists in a dynamic balance that isaffected by human populations. The balance isgoverned by the interaction of matter and energy.
Adapted from essential documents: California State Framework, National Standards, California Guide to Environmental Literacy

Page 6 Earth Resources — A Case Study: Oil
SECTION AT A GLANCEThis component of the curriculumprovides an overview of each sectionand its lessons. It is provided to facilitateteacher planning and advance collectionof the materials needed to implementthe curriculum.
Each “Section at a Glance” includes:
• The unit’s unifying concept and sectionconcepts.
• An overview statement describing thefocus of the section.
• Overview statements describing theactivities of each lesson.
• A chart listing each lesson, the corre-sponding lesson concepts, scientificthinking processes used in eachlesson, and the desired student out-comes for each lesson.
• Materials lists and teacher preparationsteps for each lesson in the section.
• A storyline designed to activelyinvolve the student in a scenario skit,to be performed by the students inclass before the section begins.
• A list of suggested assessment strate-gies and sample questions and/orprompts that may be used to enablestudents to demonstrate their concep-tual understanding of the section and/or lessons.
• A lesson outline, suggestions, and toolsfor the ongoing Earth ResourcesProject — Student Case Study.
THE EARTH RESOURCES PROJECT
— STUDENT CASE STUDYThe National Science Education Standardsemphasize that students should experi-ence science as inquiry which engagesthem in the active construction of ideasand explanations. Students should beguided to generate questions that make itpossible to analyze data, develop a richerknowledge base using science concepts,make connections between evidence andexplanations, and recognize alternate
explanations. The Earth Resourcescurriculum supports these conceptsthrough the use of an Earth ResourcesProject — Student Case Study.
This project encourages students toselect an Earth material, other than oil,on which to conduct research for theirown case study. Using their newly gainedknowledge and concepts learned in theoil case study, students apply the pat-terns of extraction, use, and disposal totheir chosen material. Complete detailsabout the project and lesson outlines forstudent research days are located at theend of each “Section at a Glance.”
ASSESSMENT OVERVIEWThe assessment component of EarthResources is designed to provide sugges-tions for evaluating the students’ knowl-edge and growth throughout the curricu-lum. A variety of suggested assessmentmethods are outlined within each “Sec-tion at a Glance.” The strategies vary inthe complexity of evaluative processesused. Some of the strategies are designedto assess student progress, understand-ing, and application of lesson concepts,while others are appropriate to assesssection or unit concepts.
The goals of the assessment strategiesare to evaluate the following:
• Conceptual understanding by indi-vidual students
• Students’ individual and team skills(i.e., evidence of active participation inquestioning, sharing, and discussing;and skills in investigating, data-collecting, and collaborating)
• Habits of the mind (i.e., students’ability to show diverse thinking, becurious, demonstrate critical thinking,respect different points of view, anddemonstrate the capacity to changetheir minds when appropriate)
For more information about the assess-ments developed for this curriculum, see“Assessment Strategies” (page 22).
Earth Resources — A Case Study: Oil Page 7
THE STUDENT SERVICE–LEARNING PROJECTWhat is the purpose of an educationalendeavor, if nothing is done with itafterwards?
An important goal of this curriculum isto encourage student participation inpublic outreach programs that supportused oil and filter recycling programs inevery community. When students use thescience learned in this curriculum tosubstantiate community action, they willserve as convincing advocates. The bestway to do this is to actively involvestudents in the community through aservice–learning project.
After students have completed the EarthResources curriculum, they will be askedto design and implement a service–learning project. The details for theproject are located at the end of Section4. In addition, more information and someassessment strategies for service learningprojects are discussed on page 30.
CAREER CONNECTIONSIn developing the Earth Resources cur-riculum, one of the goals is for studentsto experience some of the excitementand challenges felt by those in environ-mental science and petroleum industry-related careers. Because Earth Resourcesuses pedagogical methods that makescience content and issues relevant tostudents’ own lives, it is designed toheighten students’ enjoyment of science,enable them to experience success inscience, and encourage them to considerscience-related careers.
In an effort to connect integrated sciencecontent with careers, the appendix of thecurriculum provides activity ideas forstudents to investigate a variety ofcareers related to the lessons. In addi-tion, the curriculum’s appendix features alist of contact information for organiza-tions, publications, and web sites thatcan provide resources about relatedcareers, workplace procedures, and thescience and mathematics behind them.

Page 8 Earth Resources — A Case Study: Oil
Description of Lesson Components
Lesson #
Section Concepts
Human: Each human concept isbased on the National Standards forScience Education and the CaliforniaScience Framework; it addresseshuman impact on the ecosystem.
Scientific: Each scientific concept isbased on the National Standards forScience Education and the CaliforniaScience Framework; it addresses thescientific content of each section.
SECTION #:
Section Title
LESSON CONCEPTThe lesson concept is the specific concepttaught by the lesson. The concept mightbe either more science-related, morehuman-related, or a combination of both.
LESSON OVERVIEWThe lesson overview briefly explains thelesson and the student action involved inthe lesson.
DESIRED OUTCOMESThe desired outcomes indicate the expected student learning after students haveperformed the activity. The outcomes are developed in two statements: the first is ageneral statement pertaining to resources, and the second statement is specific to oil.The desired outcomes are related to the California Science Framework.
Students will use the following scientific thinking processes:
This process-oriented section lists the scientific thinking processes used by thestudents during the lesson.
In each lesson of Earth Resources —A Case Study: Oil, the following compo-nents appear in the order indicated.
STEPS FOR TEACHING
Student SuggestedTeacher Action Action Time
This lesson component maps out the steps andactions of the teacher necessary to facilitate thedesired student outcomes.
This componentoutlines the activitiesof the studentstoward gaining anunderstanding of thelesson concepts.
This component liststhe estimated timesfor each part of thelesson. Professionaljudgment of studentcapabilities shouldbe used in determin-ing the actual timesneeded.

Earth Resources — A Case Study: Oil Page 9
BACKGROUND FOR TEACHERSThis lesson component provides teach-ers with some relevant informationneeded to facilitate the lesson. It isassumed that the teacher has a generalknowledge of the scientific conceptsbeing used in the activity. However, newinformation is provided to help infusescientific concepts into the specificcontent of the lesson.
References used to construct the lessonor background information and recom-mendations for further investigation arecited as needed.
KEY WORDS
This lesson component lists the terms and definitionswhich are essential to the lesson. As they are discussingthe concepts, students may not use the correct term, butmay instead use “transitional language” to facilitate theirunderstanding. Teacher are advised to attach scientificvocabulary to this “transitional language.”
WHAT YOU WILL NEED
This component provides a list of materials and equip-ment needed to perform the activity. This section isdesigned in two parts: the first lists the materials andequipment needed for the entire class; the second does sofor each group of students.
GETTING READYThis component lists the teacher’s stepsfor advance preparation that are neces-sary to facilitate the lesson.
TEACHER NOTESThis component may be provided tooffer additional tips to facilitate thelesson.

Page 10 Earth Resources — A Case Study: Oil
EXTENSIONThis lesson componentprovides additional activities,if time permits, for furtherinvestigation. These activitiesenable the student to gain adeeper understanding ofthe concepts.
ACTION NARRATIVE
The action narrative is a possible script of questions that can be used by the teacherto facilitate student learning. Teacher script is indicated in bold print. Some typicalstudent responses are provided in non-bold print.
Prethink__ minutes
This lesson component sets the stage for the lesson. A connection to past lessonsis provided as well as an opportunity for students to identify previous knowledgeabout the lesson, an essential aspect of inquiry-based learning. An important partof the Prethink is for students to record their preconceptions so that they can bere-examined at a later point in the lesson. An estimate of the time needed for theactivity is provided.
Problem for Student InvestigationThis component sets the stage for the student investigation. The Problem forStudent Investigation is then used to engage the students in the activity by direct-ing them to construct a prediction/hypothesis for the activity.
Student Action__ minutes
This component introduces the student investigation, with notes on safety asneeded. The student investigation is the actual hands-on activity performed by thestudent to facilitate understanding of the concepts. An estimate of the time neededto complete the investigation is provided. (A detailed overview of the student andteacher investigation pages is provided at the conclusion of this sample lesson.)
Action Processing__ minutes
This component provides teachers with a possible script of questions to enablestudents to further explore and apply the information and conclusion gained in theinvestigation. These questions enable the teacher to identify and possibly dispelmisconceptions related to the investigations. An important part of this sectioninvolves students in revisiting their preconceptions that were recorded in thePrethink section. A time estimate is provided for the activity.
Home StudyThis component introduces the Home Study assignment.
CHECKING FOR UNDERSTANDING
Student ReflectionsThis lesson component provides some suggestions for assessingstudent understanding of the concepts explored in the lesson.Student reflections are provided to enable students to self assessand reflect on their learning.
Teacher ReflectionsTeacher reflection questions are provided to assess the overalllearning of the students in the lesson.

Earth Resources — A Case Study: Oil Page 11
Overheads
These pages are black-line masterswhich teachers are advised to photocopyonto transparencies before the lessonbegins.
Info Page
The Info Page is a black-line masterand typically provides reference-typeinformation for students.
Student Investigation
These pages are black-line masters thatcontain student instructions for conduct-ing the investigation (see “InvestigationProcess,” page 14).
Activity Page
The Activity Page is a black-line master;it engages the student in a classroomactivity that does not constitute alaboratory-type investigation.
Home Study
The Home Study is a black-line master;it provides an additional opportunity forstudents to apply the lesson conceptswhile outside of class.

Page 12 Earth Resources — A Case Study: Oil
Teacher Pages
These pages provide the teacherwith sample student responses toinvestigations and/or activities, orthey contain instructional tools forthe teacher.
TEACHER PAGE
TEACHER PAGE
TEACHER PAGE

Earth Resources — A Case Study: Oil Page 13
Investigation Process
PREPARATION
Read
An important step before students perform any investigation is to read the entire investigation sheet. Readingwill help students to understand the focus of the investigation and to become familiar with the task(s).
Background
After you have discussed and prepared the students for the investigation, students will be asked to discuss thekey concepts related to the investigation. In this background section, students should include the scientificprinciple that the lab is based upon. They should also include a brief statement on the possible discoveries,observed and unobserved, that they might make to better understand the world around them. The length of thebackground is determined by the depth you require of your students.
Problem for Student Investigation
All investigations start with a problem statement. The curriculum provides the question that the investigation willexplore. A general question and an oil-specific question are usually provided.
Prediction/Hypothesis
Before starting the investigation, students will be asked to make an educated guess about the outcome(s) of theinvestigation. The prediction/hypothesis statement is written to answer the problem statement. Students areinstructed to write their prediction/ hypothesis as a single “If... then....” statement. For example: “If a plant issubjected to an environment with no sunlight, then the plant will die.”
INVESTIGATION
Materials
After the students have read the procedure, they are asked to construct a materials list. The intent is to furtherengage the students in the procedure. Students are reminded to be specific about the types and amounts ofmaterials and supplies needed for the investigation.
Procedure
The curriculum includes some investigations that provide the procedure and others that ask students to designtheir own procedure. When students are asked to design the procedural steps, they should be instructed to bespecific enough that another scientist could repeat the lab over in another setting. The usual format is in a listfashion, but students could draw diagrams to help illustrate the steps.
Data
Students are asked to record the data that they measure or observe. Data includes information such as time,weights, lengths, color changes, etc. Students record the data in anecdotes, tables, lists, charts, etc. Somecharts are provided to facilitate record-keeping, and some are left out so that the students can gain experience indesigning their own. Remind students to include the units for all data recorded.
Results
Students are asked to summarize their data and note any patterns that emerge. They should not explain thereasons for the data and/or patterns.
Analysis
The expected investigation results may not occur for a variety of reasons. In their analysis, students shouldexplain the results of the investigation. This critical review of the data is usually written as an essay, using thedata to support and explain possible deviations. The Student Investigation pages provide students with a seriesof questions to help evaluate the results.
Conclusion
The conclusion is designed in two parts. The first is for students to reflect on their prediction, and the second isfor students to apply the newly gained information to the curriculum and/or to the outside world. The StudentInvestigation pages provide focus questions to guide students toward their final conclusion.
TEACHER PAGE

Page 14 Earth Resources — A Case Study: Oil
Investigation Process
PREPARATION
Read
An important step before you perform any investigation is to read the entire investigation sheet. Reading willhelp you to understand the focus of the investigation and to become familiar with the task(s).
Background
You should explain, in essay format, the key concept that this experiment will demonstrate or illustrate. Youshould include the scientific principle that the lab is based upon. In addition, you should include a brief statementabout the possible discoveries, observed and unobserved, that you might make to better understand the worldaround you.
Problem for Student Investigation
All investigations start with a problem statement. This is the question that the investigation will test and answer.This question is based on an anomaly or discrepant event in the world. You usually state the question in onesentence. For example: “Does a plant need....?”; “What is the cause of....?”; “What will happen if...?”.
Prediction/Hypothesis
Before starting the investigation, you will be asked to make an educated guess on the outcome(s) of the investi-gation. The prediction/hypothesis answers the problem statement. A prediction/hypothesis is written in a single“If... then...” statement. For example: “If a plant is subjected to an environment with no sunlight, then the plantwill die.”
INVESTIGATION
Materials
Make a list of all materials to be used during the experiment. Be certain to include the size and type of eachobject. For example, instead of listing “container,” list “100-ml beaker.” Also, list the supplies and the amountsneeded, such as “20 g of NaCl.” Remember, the more specific you can be, the better.
Procedure
The procedure lists the steps taken during the investigation. If you are asked to design the procedural steps,then the steps should be clear enough that another scientist could repeat the lab over in another setting. Theusual format is in a list fashion, but you can draw diagrams to help illustrate the steps.
Data
Record the data that you measured or observed during this lab. Data usually includes time, weights, lengths,color changes, etc. Data is recorded in anecdotes, tables, lists, and charts. Be sure to include the units for alldata recorded.
Results
Discuss the data you observed and recorded. Note any patterns that emerge. Do not explain the reasons for thedata and/or patterns—your explanation of the data will take place later, in the analysis.
Analysis
It is very rare to achieve the expected results on a lab, so your task, as a scientist, is to explain why your resultsmight have deviated. Your critical review of the data is usually written as an essay. Use your data to support andexplain possible deviations. The Student Investigation pages provide you with a series of questions to help youevaluate the results. In the final analysis, you might want to consider two questions to help focus your essay:(1) Do you have enough data? (2) What data is supporting your analysis?
Conclusion
Was your hypothesis proven to be correct or not? Why? What have you learned about the world around you thatyou did not previously know? What might be the larger applications of this investigation to the greater world?Where can you see this principle or concept applied outside the science laboratory? The Student Investigationpages provide focus questions to guide you toward your final conclusion.

Earth Resources — A Case Study: Oil Page 15
The Earth Resources Cycle
The Earth Resources Cycle is a graphicorganizer designed to enable the teacherand students to visualize the stages in theresource cycle. The stages encompass theprocesses of formation, exploration,acquisition, processing, use, disposal,collection, re-processing, and reuse of anEarth material. The cycle has a variety ofinstructional uses that can enhance thecurriculum, as follows:
• Use the cycle as an overhead transpar-ency to provide the students with avisual depiction of the lessons and thesections as the curriculum unfolds.
• Display the cycle at the end of eachsection to review and assess studentunderstanding of the processes dis-cussed in the section.
• Have students develop the cycle into aposter to enable them to review thecurriculum on their own as the lessonsprogress.
• Display the cycle to the students at theend of the unit and ask students tocreate a statement and/or picture todescribe the action or process con-tained in each arrow of the cycle.
• Display the cycle without the wordsand ask students to fill it in, using theirown words and/or pictures to explainthe processes represented by eacharrow.
A black-line master of the Earth ResourcesCycle may be found on page 78.
Description of theEarth resource(renewable ornonrenewable),its origins, andits location.
Method and impactof exploration forthe resource.
Method and impactof acquisition (positiveand negative).
Method and impactof refinement/processing forhuman use(positive/negative).
Impact ofthe variousmethods ofdisposing ofthe usedresource(positive andnegative).
The processes usedfor collection ofthe resource.
Resource continuesthrough the cycleto be re-processedand re-used.
Description of howhumans use theresource, impact ofthe use, and how theresource changesduring use.

Page 16 Earth Resources — A Case Study: Oil
The Earth Resources Chart
The Earth Resources Chart is a tooldesigned to enable students to compiletheir knowledge about a natural resource.The lessons provide students withopportunities to add to their charts asthey gather new information.
The primary purpose of the Earth Re-sources Chart is to provide a record ofstudent knowledge as students progressthrough the lessons. At strategic points inthe curriculum, students are asked torecord their collective knowledge aboutoil on the chart. As they gain moreinformation and/or their preconceptionschange, they are able to continue revisingand adding to the chart.
The secondary purpose of the chart is toserve as a graphic organizer for the EarthResources Project — Student Case Study,in which students will research anotherEarth resource (see page 63). As theyconduct their Earth Resources Project,they will complete their own chart for theselected resource in addition to the class
chart for oil. Students can use theinformation on the class chart as areference while developing theirprojects.
The following pages contain a masterEarth Resources Chart for the entirecurriculum, containing only the headersfor the chart. To maintain a record ofstudent responses as they progressthrough the curriculum, you may wish tocreate overhead transparencies of thismaster or develop a large classroomposter of the chart.
In addition, on the following pages, amaster chart for each section of thecurriculum (again, with headers only) isprovided for classroom use. Completedportions of the chart with sample studentresponses are located in Lessons 2, 4, 5,8, 9, 11, 17, and 18. You might considereither having students create their owncharts or, alternatively, providing themcopies of the chart for their portfolios,learning journals, or notebooks.
Earth Resources — A Case Study: Oil Page 17
Ea
rth
Reso
urces C
ha
rt

Page 18 Earth Resources — A Case Study: Oil
Ea
rth
Reso
urces C
ha
rt

Earth Resources — A Case Study: Oil Page 19
Ea
rth
Reso
urces C
ha
rt

Page 20 Earth Resources — A Case Study: Oil
Ea
rth
Reso
urces C
ha
rt

Earth Resources — A Case Study: Oil Page 21
Ea
rth
Reso
urces C
ha
rt
Page 22 Earth Resources — A Case Study: Oil
Assessment Strategies
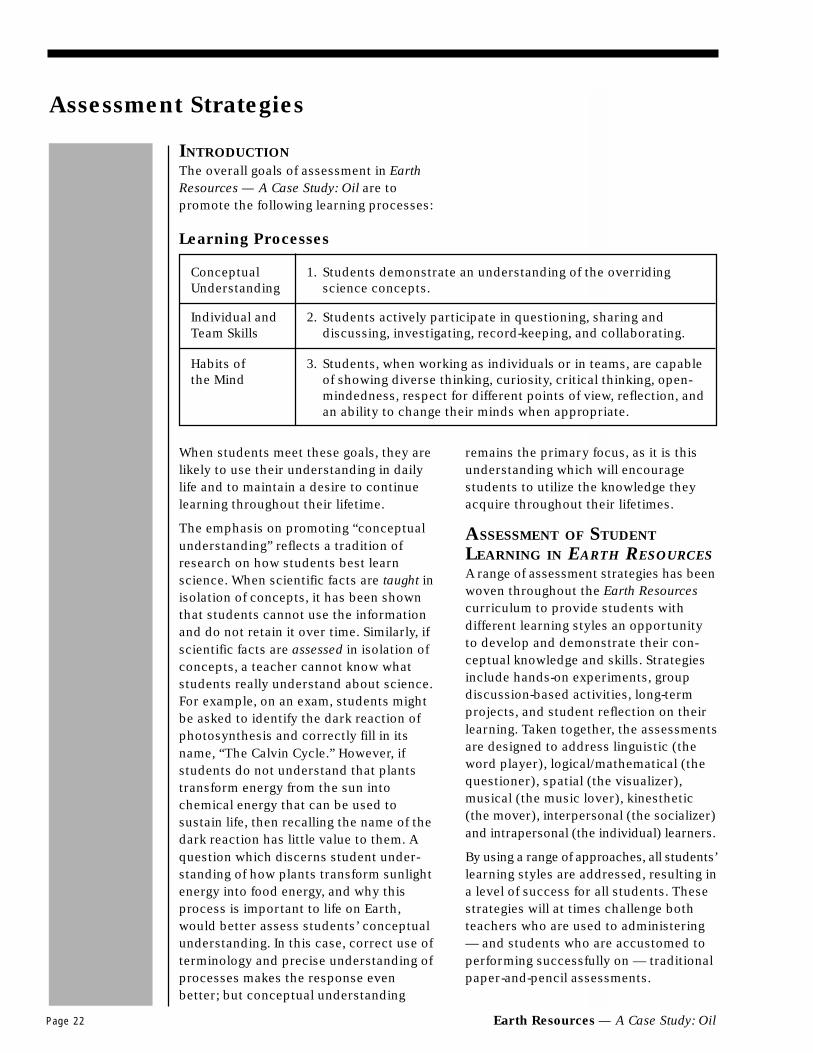
INTRODUCTIONThe overall goals of assessment in EarthResources — A Case Study: Oil are topromote the following learning processes:
Learning Processes
Conceptual 1. Students demonstrate an understanding of the overridingUnderstanding science concepts.
Individual and 2. Students actively participate in questioning, sharing andTeam Skills discussing, investigating, record-keeping, and collaborating.
Habits of 3. Students, when working as individuals or in teams, are capablethe Mind of showing diverse thinking, curiosity, critical thinking, open-
mindedness, respect for different points of view, reflection, andan ability to change their minds when appropriate.
When students meet these goals, they arelikely to use their understanding in dailylife and to maintain a desire to continuelearning throughout their lifetime.
The emphasis on promoting “conceptualunderstanding” reflects a tradition ofresearch on how students best learnscience. When scientific facts are taught inisolation of concepts, it has been shownthat students cannot use the informationand do not retain it over time. Similarly, ifscientific facts are assessed in isolation ofconcepts, a teacher cannot know whatstudents really understand about science.For example, on an exam, students mightbe asked to identify the dark reaction ofphotosynthesis and correctly fill in itsname, “The Calvin Cycle.” However, ifstudents do not understand that plantstransform energy from the sun intochemical energy that can be used tosustain life, then recalling the name of thedark reaction has little value to them. Aquestion which discerns student under-standing of how plants transform sunlightenergy into food energy, and why thisprocess is important to life on Earth,would better assess students’ conceptualunderstanding. In this case, correct use ofterminology and precise understanding ofprocesses makes the response evenbetter; but conceptual understanding
remains the primary focus, as it is thisunderstanding which will encouragestudents to utilize the knowledge theyacquire throughout their lifetimes.
ASSESSMENT OF STUDENT
LEARNING IN EARTH RESOURCESA range of assessment strategies has beenwoven throughout the Earth Resourcescurriculum to provide students withdifferent learning styles an opportunityto develop and demonstrate their con-ceptual knowledge and skills. Strategiesinclude hands-on experiments, groupdiscussion-based activities, long-termprojects, and student reflection on theirlearning. Taken together, the assessmentsare designed to address linguistic (theword player), logical/mathematical (thequestioner), spatial (the visualizer),musical (the music lover), kinesthetic(the mover), interpersonal (the socializer)and intrapersonal (the individual) learners.
By using a range of approaches, all students’learning styles are addressed, resulting ina level of success for all students. Thesestrategies will at times challenge bothteachers who are used to administering— and students who are accustomed toperforming successfully on — traditionalpaper-and-pencil assessments.

Earth Resources — A Case Study: Oil Page 23
The assessment strategies can be usedthroughout Earth Resources — A CaseStudy: Oil as learning tools to help stu-dents toward greater and longer lastingunderstanding, to help you evaluate theirlearning, and to provide a context forstudents to put their knowledge to use.All of the assessments are closely linkedto specific lessons and are physicallylocated within the lessons, within each“Section at a Glance,” and/or at the end ofthe entire curriculum.
Assessment Strategies
Within a lesson:• PETRO-Mail• Learning Journals
At the end of a lesson or section:• “Live-at-Five” Interviews• Concept Maps• Creative Expression Projects• Group Evaluations• Self- and Peer Evaluations
For the entire curriculum:• Service–Learning Projects• Portfolios
Taken together, these assessments buildon one another. For example, learningjournals and student investigations canbe used as steps toward the developmentof the service–learning project; in turn,the learning journals, student investiga-tions, and completed service–learningproject can be included in a portfolio.The assessments work together to takestudents through a conceptual discoveryprocess in which they do the following:
• Discover (find out)
• Analyze (take apart the known)
• Synthesize (put together the known)
• Apply (make use of the known)
• Evaluate (reflect on the learning thathas taken place)
For each of the assessment strategiesdescribed in the following pages, youwill find an overview of the strategy, anassessment action plan, and ideas forevaluation. Portfolios, the final strategy
described in this chapter and the sug-gested overall form of assessment forEarth Resources — A Case Study: Oil, canrepresent an organized collection of arange of assessment activities that havebeen assigned to students over thecourse of the curriculum.
TOOLS FOR ASSESSMENT
IN EARTH RESOURCESAlthough a number of “strategy-specific”tools are provided in this chapter aftercertain assessment strategies, threeadditional tools with broader applicabil-ity have been included at the end of thischapter to help you evaluate your stu-dents and keep a record of their achieve-ment. These tools include: (1) “Levels ofAchievement,” a five-level rubric that canbe used to evaluate students’ level ofachievement and progress on a givenassignment (page 44); (2) “EvaluatingStudent Performance: Student-TeacherAgreement,” a tool that can be used toinvolve students in developing their ownfive-level rubric (page 45); and (3) “Habitsof the Mind,” a chart showing how assess-ment strategies match different learningstyles (page 46).
In addition, the “Teacher Evaluation Form:Self- and Peer Evaluation” (page 37)provides you with a place to keep arecord of student achievement through-out the whole Earth Resources curriculum.You can enter the date an activity isassigned, the date it is due, performancelevels determined through student self-evaluation, peer evaluation, and/orteacher evaluation, and points assigned.All lessons in the curriculum are listed,even though they may not all be assigned.Individual and team skills and “habits ofthe mind” are also listed for your evalua-tion. Open rows at the bottom of the pagecan be used to write in assessments andspecial projects that you might assignover the course of the curriculum.
Although all of these tools can be adaptedin a variety of ways, they can easily beused “as is” to support the use of many ofthe assessment strategies described onthe following pages.

Page 24 Earth Resources — A Case Study: Oil
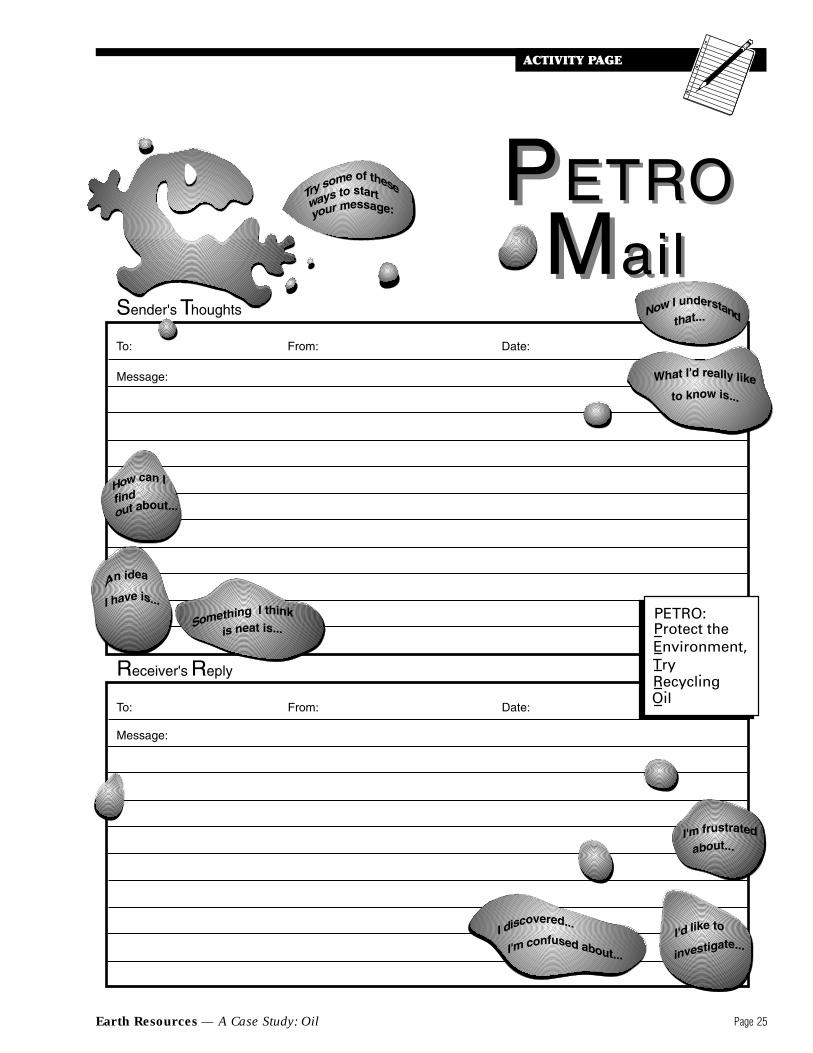
ASSESSMENT ACTION
1. Duplicate and distribute a PETRO-Mail form to each student (a photocopiablemaster form follows on the next page).
2. Instruct students to write a question or statement that will require otherstudent(s) to demonstrate their understanding of a concept or skill. Studentsshould ask questions that will generate more than single-word responses, usingtrigger words such as “explain” and “describe” or words leading toward analy-sis such as “how” and “why.” As students practice writing mail, they willimprove their questioning techniques.
3. After students have written their mail, you should review what students havewritten so that you have a sense of the appropriateness of their questions andquestioning technique. This gives you the opportunity to check on the generallevel of understanding among your students. As the “postmaster,” you couldeven invent a “PETRO Postmark.”
4. After you review the mail, forward it to a student receiver for a response.
5. The receiver then composes a response, delivers the response to you forreview, then you send it back to the original questioner.
6. If the response is incorrect or incomplete, the student who wrote the originalquestion can explain or provide a better answer to the student who wrote theresponse, or send another PETRO-Mail message.
EVALUATION
PETRO-Mail gives both you and your students an informal strategy for uncoveringmisunderstandings. You can ask students to save the mail in a portfolio, or you canuse it as a checkpoint along the way that receives no formal grading.
PETRO-MAILPETRO-Mail is a process in which stu-dents, as individuals or in groups, writenotes to their peers to show their devel-oping understanding of concepts. Thisstrategy involves students in the thought-ful development of questions or factualstatements that are, in turn, addressed totheir classmates who are then asked torespond. (PETRO stands for: “Protect theEnvironment, Try Recycling Oil.”)
Earth Resources — A Case Study: Oil Page 25

Page 26 Earth Resources — A Case Study: Oil
ASSESSMENT ACTION
Using the questions included in each lesson, or using other questions that youhave generated, ask students to write continuously for five to ten minutes orlonger. Remind students to avoid editing their own writing, but to instead keep thepen moving, even if they repeat themselves or find that they are writing little that isvaluable. You can use the image of “the diamond in the dust heap” to help studentsto visualize that a learning journal can contain much writing that will never beused, yet reveal occasional moments of real clarity and inspiration.
EVALUATION
Learning journals should not be graded for content, though it is useful to givestudents incentives for writing in their learning journals, such as a stamp on thejournal page, points for effort, or points for meeting the required number of learn-ing journal pages. One evaluation strategy is to ask students to choose one page orparagraph from their learning journal that explains a new project or idea, and toask for peer or group response on how to develop the project or idea even further.Students can also include their learning journal entries in portfolios.
LEARNING JOURNALSA learning journal allows students to keepa personal record of their thoughts andlearning progress. It gives them a placewhere they are not yet concerned aboutfinal products or grades, where they canfreely explore ideas, and where theirthoughts still can be unstructured. Thewriting process itself helps students toconnect new learning to personal experi-ences, to previous learning, to currentevents, or to their concerns and inter-ests. It can be viewed as a sourcebook ora place in which ideas for projects orinquiries can develop and take shape.
Journal-writing can be used before alesson begins to allow students to thinkand generate their prior thoughts aboutthe lesson’s content. Journal-writing canalso be used during the lesson to reflectupon what they have just learned. At theend of the lesson, journals can be used asa self-reflection tool on what studentshave learned or what they still havequestions about. The use and effective-ness of journal-writing depends on theprompt. Suggestions for journal-writingprompts are provided at the end of eachlesson, in the Checking for Understandingportion of the lesson.
Example of a Learning Journal Entry
“It seems that I haven’t been thinking about how we find oil or how it getsout of the ground. The way it was makes it confusing. I heard that dinosaursmade it but maybe they didn’t. Maybe you could explain more to me afterschool today? I should ask her if she knows more about it. The squeeze boxwas fun to work with, but it got very messy and got my new pants dirty. Ineed to be more careful in class.”

Earth Resources — A Case Study: Oil Page 27
ASSESSMENT ACTION
Use the questions at the end of each lesson or others that you have developed.Assign one question to each team of students or each individual, then providestudents with an opportunity to talk with each other about how they will respondbefore conducting the “Live-at-Five” interviews.
EVALUATION
While students are discussing their answers, you can monitor their progress bylistening in on their conversations and by noting their participation and involve-ment. This assessment provides you with another opportunity to evaluate indi-vidual and team skills and habits of mind while checking for conceptual under-standing. As the interviewer moves from team to team, you can evaluate thegroup’s response using the “Levels of Achievement” rubric included at the end ofthis section (page 44).
“LIVE-AT-FIVE” INTERVIEWSThe “Live-at-Five” interview — modeledafter the “man-on-the-street” interviewsfirst seen in Sid Caesar’s Comedy Hourmany years ago, and currently seen inprime-time news programs—is a simple,entertaining, and informal assessmentused to recognize misconceptions and toassess learning. Students receive chal-lenging questions to answer as a team or
as individuals. Collaborating as scien-tists, they express their thoughts, refinetheir ideas, and convince others of thevalidity of their ideas. The goal is forstudents to explain to the interviewertheir answer to a challenging questionthat has been posed. You can designateone or more students to be an inter-viewer, or serve as the intervieweryourself.

Page 28 Earth Resources — A Case Study: Oil
ASSESSMENT ACTION
Construction of a concept map can be an individual, small-group, or large-groupactivity. One technique is to have students place the key words on self-stickingnotes, then move the key words around experimentally until an optimum arrange-ment is achieved. As students work through this process, ask them to add linkingwords (usually verbs) that will explain the action connecting the key words. Finally,ask students to draw arrows which indicate how to read the map and the directionin which the information flows. By reading from one key word to the next, alongwith the linking word, students should make a sentence that states an appropriateconcept or relationship between the key words.
EVALUATION
The assessment of concept maps does not need to be time-consuming. Both peerand group evaluation can be used to assess concept maps. Concept maps can alsobe included in a portfolio and can even represent the conceptual content of theentire portfolio, if used as a culminating assessment. In class, you may also spot-check certain key words to see that they are appropriately linked and take neces-sary action if misunderstandings remain.
CONCEPT MAPSConcept maps allow students to demon-strate their understanding of how ideasrelate to each other in a pictorial manner,a technique especially helpful to spatiallearners. Concept maps require studentsto show their understanding of terms andideas along with the interrelationshipsamong those terms and ideas. Afterquickly looking at students’ concept maps,teachers are able to pinpoint misunder-standings and clear them up beforemoving on.
Concept maps can be used at varioustimes throughout the curriculum, asfollows:
• At the end of a single lesson oractivity to help summarize the day’slearning
• At the end of several lessons or activi-ties to tie together the learning (at thislevel the concept map should becomevery web-like, showing numerousinterconnections)
• At the end of the entire curriculum as aculminating assessment
• As an ongoing assignment to be up-dated after each activity, resulting inone complete map at the end of thecurriculum
The three components of a concept mapare the key words (usually circled), thearrows that connect the key words, andthe linking words written on the arrows.
A sample concept map follows. Sampleconcept maps for each section are locatedin each “Section at a Glance.”

Earth Resources — A Case Study: Oil Page 29
Sample Concept Map

Page 30 Earth Resources — A Case Study: Oil
SERVICE–LEARNING PROJECTSService–learning projects providestudents with meaningful learningopportunities through communityservice projects which meet clearcommunity needs. As a facilitator, yourrole is to guide your students throughthe process of choosing a project,designing and planning a project, andmaking the necessary communitycontacts, while showing them how tocooperatively work in partnership withyou, each other, and community organi-zations. By involving your students inthis learning process, they will gain real-world knowledge, make valuable commu-nity partnerships, and see the connec-tion between classroom instruction andits real-life application. Projects such asthese have the power to help studentsdiscover their strengths and interestsand to develop leadership skills and
ASSESSMENT ACTION
To be successful, service–learning projects need to be well organized. Althoughstudents should plan the project and be involved in all stages of its development,you will have to guide students and help them find experts in the community withwhom they can work in partnership.
To begin, you might ask students to write in their learning journals or discuss insmall teams the following questions:
What actions should we take based on our new knowledge?
Who should know about this?
How should we go about educating others?
What would be the best way of getting our message out?
Does the project meet a community need?
What impact might this project have?
What community organization or expert from the community can we work inpartnership with?
Does this project have the capability of becoming an ongoing, long-term project?
Once they have done the preliminary thinking and you have offered your adviceand feedback, students should go about creating an action plan, designatingresponsibilities, deciding on contacts to be made, gathering information, andproducing a sketch of their product. You will need to prepare your students formaking public contacts and coach them in the proper way to greet communitymembers, show telephone manners, and be diplomatic.
(continued on next page)
cooperative working skills. In turn,students can gain confidence in theirability to bring about positive changethrough a lifelong engagement withcommunity service.
In Earth Resources, service–learningprojects are assigned at the end of the unit.Students’ newly gained knowledge can beapplied to the task of bringing about aproactive change in public awareness.Projects should not only inform thecommunity of the ecological problemsthat leakage and improper disposal ofused oil can cause, but should also aim toteach the public how to properly disposeof oil and how to facilitate the recyclingprocess by using re-refined oil.
See “Student Service–Learning Project”(page 437) for a lesson that focuses onthis type of learning opportunity, withexamples of service–learning projects.
Earth Resources — A Case Study: Oil Page 31
Throughout the project, you should evaluate the quality, direction, and scope ofstudents’ work, making sure that students stay focused and do not take on toolarge of a task. Periodically, make sure that students are:
• Using scientific research procedures.
• Adhering to their action plans.
• Remaining focused on their project and on their goal to educate othersabout the importance of recycling used oil.
• Sharing responsibilities, working together cooperatively, and effectivelymaking community partnerships.
The “Student Service–Learning Project” lesson which follows Lesson 18 providestools to help students organize their projects (page 437).
EVALUATION
Students can self-evaluate the success of their projects, using the self-reflectionform included in the “Student Service–Learning Project” lesson. You might also wantto evaluate group dynamics and provide feedback to students on the success oftheir collaborations. To evaluate the final product, you can use the “Levels ofAchievement” rubric provided at the end of this chapter (page 44), or ask studentsto develop their own rubric using the same form as an example. Peers could alsouse the rubric to evaluate their classmates’ products.
Page 32 Earth Resources — A Case Study: Oil
CREATIVE EXPRESSION PROJECTSCreative expression projects givestudents an opportunity to develop andshow their understanding in a non-traditional way. By making a creativeproject in a format and style of theirown choosing, students can integratescientific knowledge with their artistry
ASSESSMENT ACTION
Creative expression can be completed by the students in a short or long period oftime. A short-term creative expression project would be limited to an activity whichcould be completed in an evening or class period. In addition, a short-term projectshould be devised to show a process or single concept and is usually completed byindividual students. The directions and mode of expression must be clearly de-fined. The long-term project would be more involved and completed over anextended period of time. The project could be done by a group to enable studentsto demonstrate their overall understanding of the section or entire curriculum. Tobegin a long-term project, you will want to help students to discover their preferredcreative mode. Examples of questions you might ask students include:
• What are some of your favorite hobbies?
• What are ways in which you like to express yourself?
• What are some of the different ways that people express their thoughts?
By generating a list of possible creative modes, you can help students to see theiroptions. In addition, you will want to decide whether students will work indepen-dently or in groups.
Inform students that they can choose their method of presentation, but they allmust demonstrate a clear understanding of the major processes or scientificconcepts involved. Remind them that this is a creative project and that any cre-ative mode of expression is encouraged, such as humor, mystery, and cartooning.
Questions will arise about materials the school can provide, about the size orduration of the projects, about storage, and about the amount of money studentscan spend. You will have to make decisions based on your particular setting, time,and resource constraints. You might also address the possibility of studentsreceiving outside help from parents or from others by sending home a letterdescribing the project to parents and explaining your expectations. Always encour-age parents to oversee the operation of power tools or technology used to con-struct the projects.
You can ask students to write a learning journal entry about their ideas, to drawpreliminary sketches for their project, or to discuss in small groups their ideas. Apossible timeline is as follows:
Week One — Students turn in a paper identifying the project, the materialsneeded, and the steps they must take to accomplish the project.Students also begin researching information they will need to use.
(continued on next page)
and their preferred method of communi-cation. Examples of projects include butshould not be limited to: creating andperforming a song; writing and perform-ing a play or skit; drawing a picture,poster or cartoon; creating a working orstatic three-dimensional model; andproducing a video.

Earth Resources — A Case Study: Oil Page 33
Week Two — Students turn in a rough sketch or a rough draft of the project forpeer and/or teacher review.
Week Three — Students present projects to the class.
EVALUATION
It can help students to talk about how the project will be evaluated and whatcriteria will be used to determine its success before they actually begin working.You might consider using the “Levels of Achievement” rubric to evaluate projects(page 44). Alternatively, you can ask students to develop their own rubric using“Evaluating Student Performance: Student-Teacher Agreement” as a suggested format(page 45).
Begin the rubric-making process by asking students to describe the qualities of anexcellent project. Once you have a list of criteria, you can ask students to make aparallel list for a very low performance. The final step is to fill in the middle levelsof the rubric. By asking students to make their own rubric, you can help them tounderstand the criteria for evaluation and to know that evaluation is not an arbi-trary or personal judgment about their creativity.
You can also use the rubric to conduct peer, group, and/or teacher evaluation. Inaddition, the rubric for creative expression projects lends itself to self-evaluationby students. For example, the self-evaluation form on the following page can beused in conjunction with a rubric to evaluate creative expression projects.

Page 34 Earth Resources — A Case Study: Oil
Self Evaluation:
Creative Expression Projects
Name: _________________________ Date: ____________
Project:____________________________________________
1. What parts of your project were especially well done? Why do you think so?
2. What parts of your project do you think could be even better? Why?
3. If you worked in a group, what did you contribute to this project?
4. Using the rubric, what level of performance would you assign to this project? Why? Level of Performance
Earth Resources — A Case Study: Oil Page 35
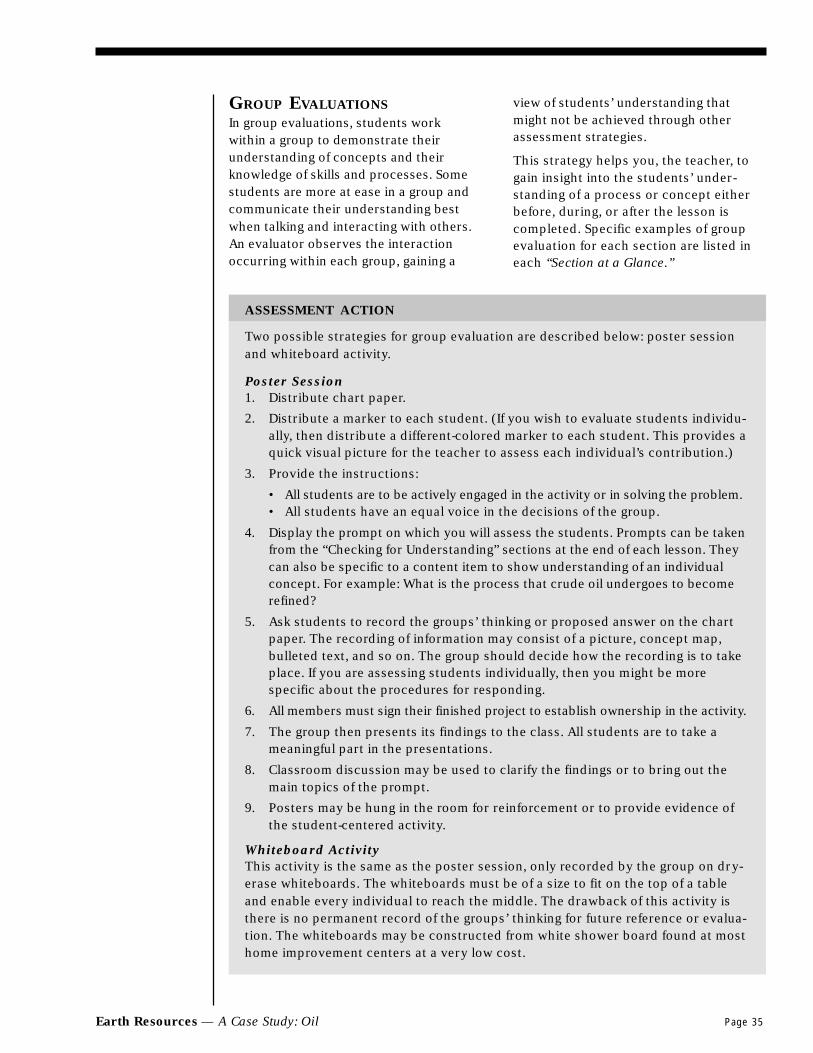
GROUP EVALUATIONSIn group evaluations, students workwithin a group to demonstrate theirunderstanding of concepts and theirknowledge of skills and processes. Somestudents are more at ease in a group andcommunicate their understanding bestwhen talking and interacting with others.An evaluator observes the interactionoccurring within each group, gaining a
ASSESSMENT ACTION
Two possible strategies for group evaluation are described below: poster sessionand whiteboard activity.
Poster Session1. Distribute chart paper.
2. Distribute a marker to each student. (If you wish to evaluate students individu-ally, then distribute a different-colored marker to each student. This provides aquick visual picture for the teacher to assess each individual’s contribution.)
3. Provide the instructions:
• All students are to be actively engaged in the activity or in solving the problem.• All students have an equal voice in the decisions of the group.
4. Display the prompt on which you will assess the students. Prompts can be takenfrom the “Checking for Understanding” sections at the end of each lesson. Theycan also be specific to a content item to show understanding of an individualconcept. For example: What is the process that crude oil undergoes to becomerefined?
5. Ask students to record the groups’ thinking or proposed answer on the chartpaper. The recording of information may consist of a picture, concept map,bulleted text, and so on. The group should decide how the recording is to takeplace. If you are assessing students individually, then you might be morespecific about the procedures for responding.
6. All members must sign their finished project to establish ownership in the activity.
7. The group then presents its findings to the class. All students are to take ameaningful part in the presentations.
8. Classroom discussion may be used to clarify the findings or to bring out themain topics of the prompt.
9. Posters may be hung in the room for reinforcement or to provide evidence ofthe student-centered activity.
Whiteboard ActivityThis activity is the same as the poster session, only recorded by the group on dry-erase whiteboards. The whiteboards must be of a size to fit on the top of a tableand enable every individual to reach the middle. The drawback of this activity isthere is no permanent record of the groups’ thinking for future reference or evalua-tion. The whiteboards may be constructed from white shower board found at mosthome improvement centers at a very low cost.
view of students’ understanding thatmight not be achieved through otherassessment strategies.
This strategy helps you, the teacher, togain insight into the students’ under-standing of a process or concept eitherbefore, during, or after the lesson iscompleted. Specific examples of groupevaluation for each section are listed ineach “Section at a Glance.”

Page 36 Earth Resources — A Case Study: Oil
SELF- AND PEER EVALUATIONSSelf- and peer evaluations can bevaluable learning tools for studentsbecause they give students theopportunity to apply criteria to theirown and to others’ work. Throughthis decision-making process, stu-dents can gain a clearer understand-ing of what constitutes quality work.It is common to find students whojudge their own work more harshlythan the teacher, just as it is commonto find students who clearly under-stand the strengths and weaknesses oftheir peers’ work. Through theseevaluation processes, students areasked to see their own work moreclearly and to take responsibility forimproving their work.
ASSESSMENT ACTION
After completing a project, ask students to answer questions about their own workusing a self-evaluation form such as those included in the “Student Service–LearningProject” lesson (page 447) and after the creative expression project description inthis chapter (page 34). Students can also use self-evaluation questions to describetheir rationale for including work in a portfolio and to reflect on their learning.
EVALUATION
If you are using a rubric, the “Teacher Evaluation Form — Self- and Peer Evaluation”on the following page has columns to note the rubric descriptors, or scores, thatstudents have assigned to their own work and to the work of their peers. As youmake your final evaluation, you can take into account either self- or peer evalua-tion, or both.
The “Teacher Evaluation Form — Self- and Peer Evaluation” can also enablestudents to chart their progress as they complete the various activities andassignments in the unit. This form can be used in a variety of ways. The topsection, listing the lessons, could serve as a cumulative evaluation. Alternatively,as the lessons progress, you may want to pick a period of time or activity thatdemonstrates a particular skill or thinking process to evaluate. This skill may byre-evaluated at certain points during the curriculum or evaluated over the courseof the entire curriculum. As a final self-evaluation, students may use this form toevaluate their progress toward improving various skills they have used in thelessons, then determine their areas of success and areas for continued improvement.
Self-evaluation can be especially useful onlonger-term projects or creative projects.When students have invested a lot ofthemselves in a piece of work, self-evalua-tions can provide a valuable dialoguebetween the student and teacher, ratherthan a simple judgment by a letter grade.
Peer evaluations can be especially usefulwhile projects are being made. Peers canoften give each other good advice. Peerevaluations, when based on a rubric withclearly defined criteria, can also be usefulon final projects.
Peer evaluations can also be used in avariety of ways in the day-to-day class-room. For example, they can be used aftera group presentation, group investigationlab activity, short-term creative project, orgroup problem-solving activity.

Earth Resources — A Case Study: Oil Page 37
Teacher Evaluation Form:
Self- and Peer Evaluation
DateAssigned Date Due Self Peer Teacher Points
1. As the World Turns:The Earth’s Natural Resources
2. Meet Crude Oil:An Earth Resource Case Study
3. Crude Oil Is Trapped:Geologic Processes for Oil Formation
4. Getting Crude Oil:Oil Extraction
5. Crude Oil Becomes Refined:The Role of Distillation in Oil Refining
6. Slipping and Sliding With Oil:The Lubricating Properties of Oil
7. Oil Goes to Work:Lubricating Oil in the Engine
8. Oil, the Pickup Artist:The Cleaning Function of Lubricating Oil
9. Oil’s Coworkers:Oil Additives
10. Oil Keeps Clean and Changes:The Role of Oil Filters in the Engine
11. What to Do With Used Oil?Surface Water
12. What to Do With Used Oil?The Backyard
13. What To Do With Used Oil?The Trash Can
14. Why Should We Care About Used Oil?How Used Oil Can Affect the Environment
15. What Difference Can I Make?Exploring Used Oil Collection Opportunities
16. Used Oil Learns the 3 Rs:Recycling, Re-Refining, Reusing
17. New Oil Versus Old Oil:A Qualitative Analysis
18. Earth Resources Case Study:Sharing Solutions
continued on next page
Student Service–Learning Project
Subtotals
Name: _________________________ Date: ____________
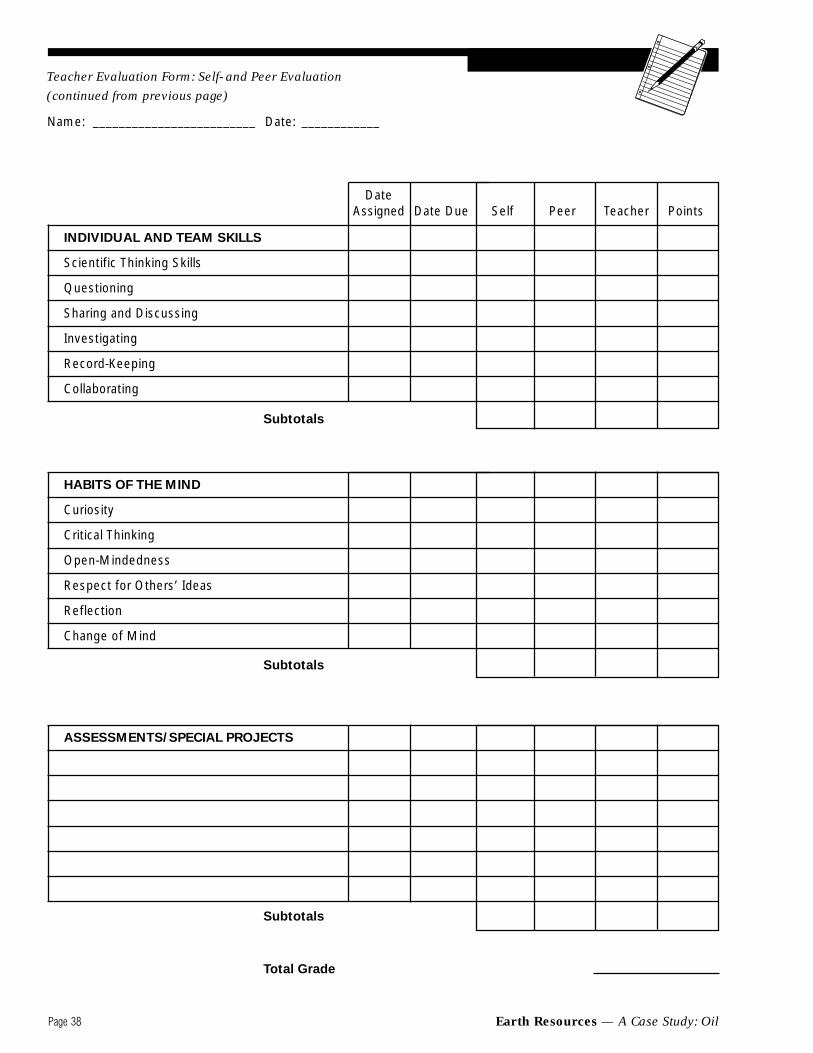
Page 38 Earth Resources — A Case Study: Oil
Teacher Evaluation Form: Self- and Peer Evaluation
(continued from previous page)
DateAssigned Date Due Self Peer Teacher Points
INDIVIDUAL AND TEAM SKILLS
Scientific Thinking Skills
Questioning
Sharing and Discussing
Investigating
Record-Keeping
Collaborating
Subtotals
HABITS OF THE MIND
Curiosity
Critical Thinking
Open-Mindedness
Respect for Others’ Ideas
Reflection
Change of Mind
Subtotals
ASSESSMENTS/SPECIAL PROJECTS
Subtotals
Total Grade
Name: _________________________ Date: ____________
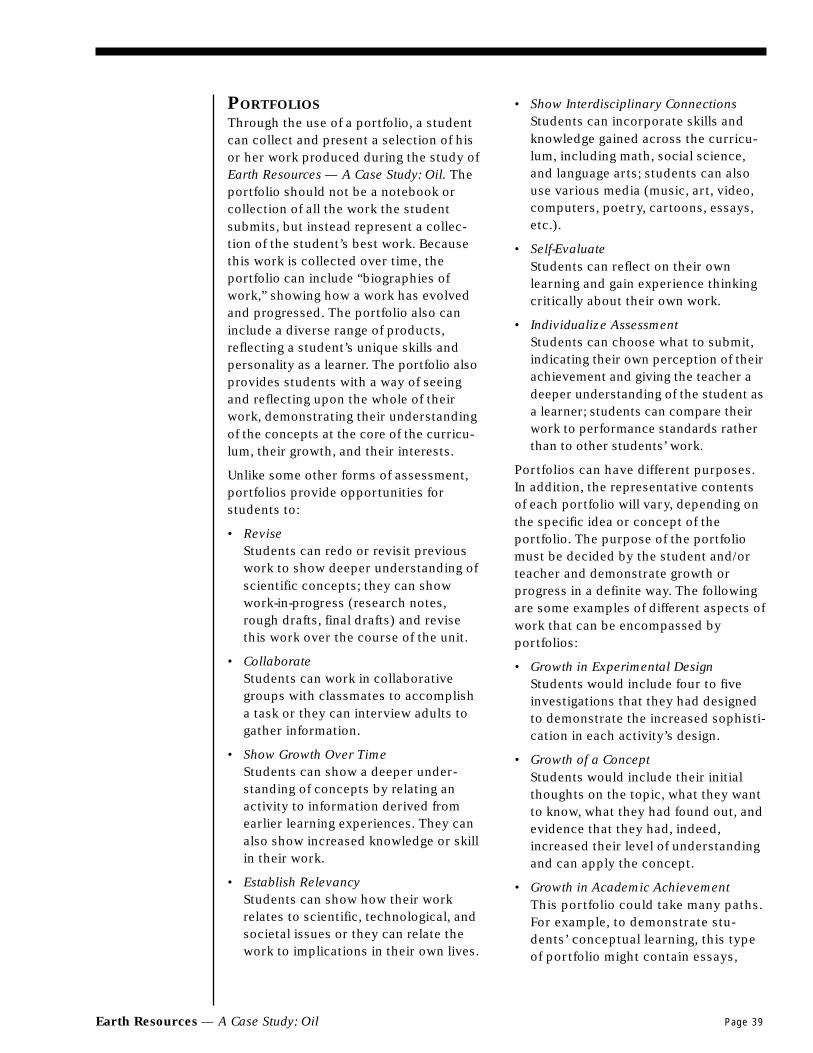
Earth Resources — A Case Study: Oil Page 39
PORTFOLIOSThrough the use of a portfolio, a studentcan collect and present a selection of hisor her work produced during the study ofEarth Resources — A Case Study: Oil. Theportfolio should not be a notebook orcollection of all the work the studentsubmits, but instead represent a collec-tion of the student’s best work. Becausethis work is collected over time, theportfolio can include “biographies ofwork,” showing how a work has evolvedand progressed. The portfolio also caninclude a diverse range of products,reflecting a student’s unique skills andpersonality as a learner. The portfolio alsoprovides students with a way of seeingand reflecting upon the whole of theirwork, demonstrating their understandingof the concepts at the core of the curricu-lum, their growth, and their interests.
Unlike some other forms of assessment,portfolios provide opportunities forstudents to:
• ReviseStudents can redo or revisit previouswork to show deeper understanding ofscientific concepts; they can showwork-in-progress (research notes,rough drafts, final drafts) and revisethis work over the course of the unit.
• CollaborateStudents can work in collaborativegroups with classmates to accomplisha task or they can interview adults togather information.
• Show Growth Over TimeStudents can show a deeper under-standing of concepts by relating anactivity to information derived fromearlier learning experiences. They canalso show increased knowledge or skillin their work.
• Establish RelevancyStudents can show how their workrelates to scientific, technological, andsocietal issues or they can relate thework to implications in their own lives.
• Show Interdisciplinary ConnectionsStudents can incorporate skills andknowledge gained across the curricu-lum, including math, social science,and language arts; students can alsouse various media (music, art, video,computers, poetry, cartoons, essays,etc.).
• Self-EvaluateStudents can reflect on their ownlearning and gain experience thinkingcritically about their own work.
• Individualize AssessmentStudents can choose what to submit,indicating their own perception of theirachievement and giving the teacher adeeper understanding of the student asa learner; students can compare theirwork to performance standards ratherthan to other students’ work.
Portfolios can have different purposes.In addition, the representative contentsof each portfolio will vary, depending onthe specific idea or concept of theportfolio. The purpose of the portfoliomust be decided by the student and/orteacher and demonstrate growth orprogress in a definite way. The followingare some examples of different aspects ofwork that can be encompassed byportfolios:
• Growth in Experimental DesignStudents would include four to fiveinvestigations that they had designedto demonstrate the increased sophisti-cation in each activity’s design.
• Growth of a ConceptStudents would include their initialthoughts on the topic, what they wantto know, what they had found out, andevidence that they had, indeed,increased their level of understandingand can apply the concept.
• Growth in Academic AchievementThis portfolio could take many paths.For example, to demonstrate stu-dents’ conceptual learning, this typeof portfolio might contain essays,

Page 40 Earth Resources — A Case Study: Oil
ASSESSMENT ACTION
In their portfolios, students can include learning journal entries, drafts, research orinterviews of experts, completed projects, extended investigations, performancetasks, or any other product created throughout the course of study. However, ithelps to identify categories in which students should select samples of work. Forexample, you could ask students to include one entire project, including notes,research, drafts, and final draft; selected learning journal entries; the final draft of asecond project; and evidence of their work during two lessons. From those catego-ries, students can make choices about what to include in their portfolio.
Once students have selected their work, they should answer the self-evaluationquestions on “Portfolio Self–Reflection” (page 41). Encourage students to write asmuch as they can and to try to give in-depth responses. You can ask students tocreate a cover for their portfolio. You can also ask them to write a letter introduc-ing their portfolio to a prospective employer, explaining how their work illustratestheir competence and understanding; or a letter to a peer, explaining how the workillustrates their talents and interests.
If you are using the entire Earth Resources curriculum, you might want to begin theprocess by asking students to reflect on the following questions:
How were the Earth’s natural resources formed?
How does the disposal of used natural resources affect the environment?
What can be done now to conserve natural resources for future generations?
Revisit these same questions at periodic intervals throughout the course of studyso that students can show growth in their understanding of the concepts andprocesses that they are learning. At the end of the curriculum, you might considerasking students to write a concluding essay on a topic to summarize their learning.
If you are using only part of the curriculum, you can ask students to explain whatthey know about the topics being studied both before and after the course of study,and include these statements in the portfolio as evidence of growth.
EVALUATION
Scoring the portfolio holistically requires some practice, but it can be facilitatedthrough use of the “Portfolio Scoring Guide,” a four-level rubric that describes levelsof achievement for specific student skills and conceptual understandings (page 43).The individual portfolio entries are graded during the course of study. The overallportfolio score is based on the quality and thoughtfulness of the composition (i.e.,the student’s selection of work samples) and on the student’s self-reflections onthose samples.
on-demand tests and assessments,peer or self-evaluations, or any othertype of evidence that would showattainment of the concepts. Sometype of beginning, middle, and endingbenchmark must be cited to clearlydemonstrate growth in the chosenarea. This portfolio is more cumula-tive in nature than portfolios that arecompiled for other purposes.
• Exploration of a ProblemStudents would demonstrate theirunderstanding of the problem, theirresearch and newly gained knowledgeabout the problem, and the possiblesolution to the problem. This type ofportfolio could be used to documentthe Earth Resources Project — StudentCase Study or the service learningproject.

Earth Resources — A Case Study: Oil Page 41
Portfolio Self-Reflection
I have chosen to place this entry in my portfolio because it shows…
I am proud of this work because…
If I were given the chance, I would improve my work by…
This entry is related to these scientific concepts:
This entry relates to the real world because it…
If this was a group project, my contribution would have been…
What I like best about this activity is…
This activity tells you that I…
Name: _________________________ Date: ____________

Page 42 Earth Resources — A Case Study: Oil
Portfolio Self-Reflection
I have chosen to place this entry in my portfolio because it shows…
Answers will vary. The student response should be a statement that describes the quality of the work, makingreferences to the scoring guide as applicable.
I am proud of this work because…
Answers will vary.
If I were given the chance, I would improve my work by…
Answers will vary. However, the response should give specific examples of areas of improvement.
This entry is related to these scientific concepts:
Answers will vary, but all should reference the relevant scientific concepts.
This entry relates to the real world because it…
Student responses should cite specific examples of connections to the student’s life, to society, or to technology.
If this was a group project, my contribution would have been…
Student responses should show that they helped make decisions in planning and organizing the project, sharedinformation and ideas, helped others to learn and become involved, helped to complete the work well, andtook responsibility for their own learning and for the learning of others.
What I like best about this activity is…
Answers will vary.
This activity tells you that I…
Answers will vary.
TEACHER PAGE
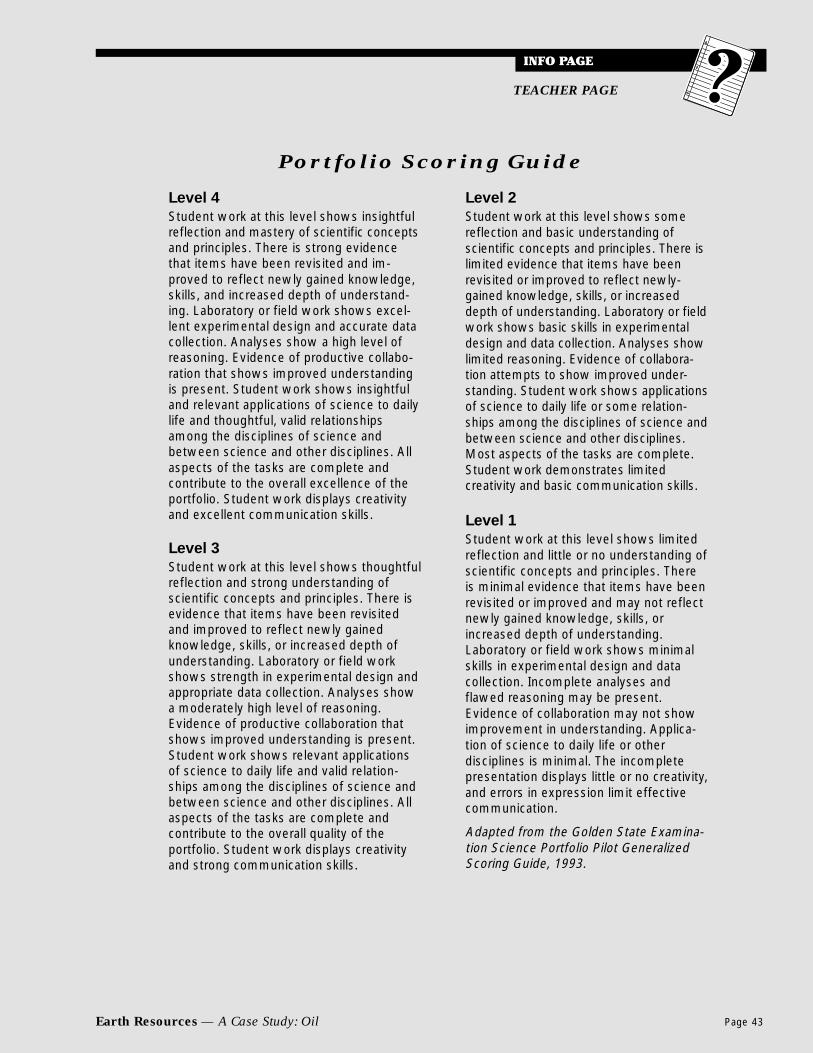
Earth Resources — A Case Study: Oil Page 43
Level 4
Student work at this level shows insightfulreflection and mastery of scientific conceptsand principles. There is strong evidencethat items have been revisited and im-proved to reflect newly gained knowledge,skills, and increased depth of understand-ing. Laboratory or field work shows excel-lent experimental design and accurate datacollection. Analyses show a high level ofreasoning. Evidence of productive collabo-ration that shows improved understandingis present. Student work shows insightfuland relevant applications of science to dailylife and thoughtful, valid relationshipsamong the disciplines of science andbetween science and other disciplines. Allaspects of the tasks are complete andcontribute to the overall excellence of theportfolio. Student work displays creativityand excellent communication skills.
Level 3
Student work at this level shows thoughtfulreflection and strong understanding ofscientific concepts and principles. There isevidence that items have been revisitedand improved to reflect newly gainedknowledge, skills, or increased depth ofunderstanding. Laboratory or field workshows strength in experimental design andappropriate data collection. Analyses showa moderately high level of reasoning.Evidence of productive collaboration thatshows improved understanding is present.Student work shows relevant applicationsof science to daily life and valid relation-ships among the disciplines of science andbetween science and other disciplines. Allaspects of the tasks are complete andcontribute to the overall quality of theportfolio. Student work displays creativityand strong communication skills.
Level 2
Student work at this level shows somereflection and basic understanding ofscientific concepts and principles. There islimited evidence that items have beenrevisited or improved to reflect newly-gained knowledge, skills, or increaseddepth of understanding. Laboratory or fieldwork shows basic skills in experimentaldesign and data collection. Analyses showlimited reasoning. Evidence of collabora-tion attempts to show improved under-standing. Student work shows applicationsof science to daily life or some relation-ships among the disciplines of science andbetween science and other disciplines.Most aspects of the tasks are complete.Student work demonstrates limitedcreativity and basic communication skills.
Level 1
Student work at this level shows limitedreflection and little or no understanding ofscientific concepts and principles. Thereis minimal evidence that items have beenrevisited or improved and may not reflectnewly gained knowledge, skills, orincreased depth of understanding.Laboratory or field work shows minimalskills in experimental design and datacollection. Incomplete analyses andflawed reasoning may be present.Evidence of collaboration may not showimprovement in understanding. Applica-tion of science to daily life or otherdisciplines is minimal. The incompletepresentation displays little or no creativity,and errors in expression limit effectivecommunication.
Adapted from the Golden State Examina-tion Science Portfolio Pilot GeneralizedScoring Guide, 1993.
Portfolio Scoring Guide
TEACHER PAGE
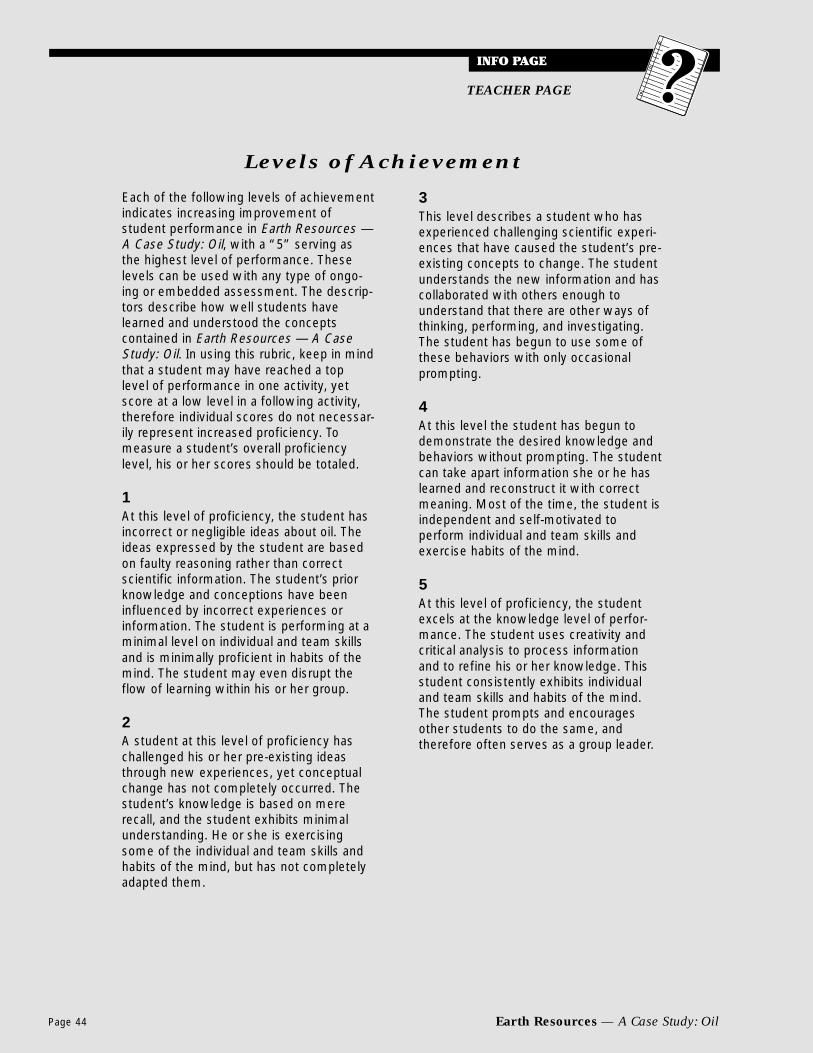
Page 44 Earth Resources — A Case Study: Oil
Each of the following levels of achievementindicates increasing improvement ofstudent performance in Earth Resources —A Case Study: Oil, with a “5” serving asthe highest level of performance. Theselevels can be used with any type of ongo-ing or embedded assessment. The descrip-tors describe how well students havelearned and understood the conceptscontained in Earth Resources — A CaseStudy: Oil. In using this rubric, keep in mindthat a student may have reached a toplevel of performance in one activity, yetscore at a low level in a following activity,therefore individual scores do not necessar-ily represent increased proficiency. Tomeasure a student’s overall proficiencylevel, his or her scores should be totaled.
1
At this level of proficiency, the student hasincorrect or negligible ideas about oil. Theideas expressed by the student are basedon faulty reasoning rather than correctscientific information. The student’s priorknowledge and conceptions have beeninfluenced by incorrect experiences orinformation. The student is performing at aminimal level on individual and team skillsand is minimally proficient in habits of themind. The student may even disrupt theflow of learning within his or her group.
2
A student at this level of proficiency haschallenged his or her pre-existing ideasthrough new experiences, yet conceptualchange has not completely occurred. Thestudent’s knowledge is based on mererecall, and the student exhibits minimalunderstanding. He or she is exercisingsome of the individual and team skills andhabits of the mind, but has not completelyadapted them.
3
This level describes a student who hasexperienced challenging scientific experi-ences that have caused the student’s pre-existing concepts to change. The studentunderstands the new information and hascollaborated with others enough tounderstand that there are other ways ofthinking, performing, and investigating.The student has begun to use some ofthese behaviors with only occasionalprompting.
4
At this level the student has begun todemonstrate the desired knowledge andbehaviors without prompting. The studentcan take apart information she or he haslearned and reconstruct it with correctmeaning. Most of the time, the student isindependent and self-motivated toperform individual and team skills andexercise habits of the mind.
5
At this level of proficiency, the studentexcels at the knowledge level of perfor-mance. The student uses creativity andcritical analysis to process informationand to refine his or her knowledge. Thisstudent consistently exhibits individualand team skills and habits of the mind.The student prompts and encouragesother students to do the same, andtherefore often serves as a group leader.
Levels of Achievement
TEACHER PAGE

Earth Resources — A Case Study: Oil Page 45
Score Content Criteria
5
4
3
2
1
Evaluating Student Performance:
Student-Teacher Agreement
Performance Standards

Page 46 Earth Resources — A Case Study: Oil
Habits of the Mind
TEACHER PAGE

Section 1: Locating, Acquiring, and Processing Our Earth’s Resources Section at a Glance / Page 49
Section at a Glance: Section 1
Section Concepts
Human: Natural resources are usedby human populations in order tomaintain and improve their existence.
Scientific: The Earth’s natural re-sources are formed over time. Theseresources have observable physicaland chemical properties.
SECTION 1:
Locating, Acquiring, andProcessing Our Earth’s Resources
LESSON OVERVIEWS
Lesson 1As the World Turns: The Earth’s ResourcesStudents explore their prior knowledge about how humans use Earth resources tomaintain and improve their existence. Students identify Earth resources used to manu-facture items and identify whether they are renewable or nonrenewable. Studentsexplore the positive and negative impacts of processing resources into useful materials.
Lesson 2Meet Crude Oil: An Earth Resource Case StudyStudents explore crude oil, its origins, and the stages of its formation. Students analyzethe rate of petroleum consumption and the need to manage resources.
Lesson 3Crude Oil Is Trapped: Geologic Processes for Oil FormationUsing a squeeze box, students investigate how geological processes have contributed tothe accumulation of crude oil under certain types of geological conditions.
Lesson 4Getting Crude Oil: Oil ExtractionStudents discuss issues surrounding the acquisition of natural resources. Studentsexplore the difficulties of crude oil extraction. Students simulate crude oil extraction.
Lesson 5Crude Oil Becomes Refined: The Role of Distillation in Oil RefiningStudents investigate the separation of liquid mixtures by distillation and relate thisprocess to the refining of crude oil.
Earth Resources Project — Student Case StudyStudents select an Earth resource, other than oil, on which to conduct research for theirown case study. After each section, students spend a class session researching, tracing,synthesizing, and analyzing how the resource fits into the Earth Resources Chart.
UNIFYING CONCEPTThe Earth is a complex system thatchanges over time, yet exists in adynamic balance that is affected byhuman populations. The balance isgoverned by the interaction of matterand energy.
SECTION 1 OVERVIEWThe first section focuses on the forma-tion, exploration, acquisition, and pro-cessing of crude oil.
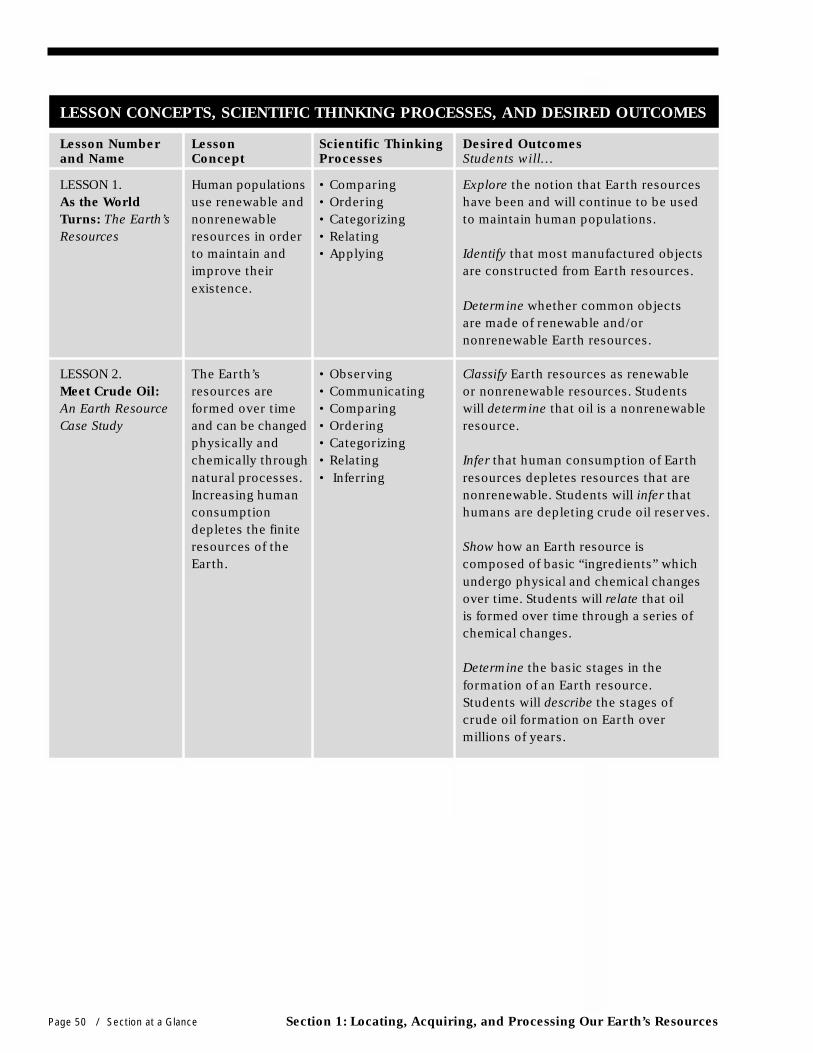
Page 50 / Section at a Glance Section 1: Locating, Acquiring, and Processing Our Earth’s Resources
LESSON CONCEPTS, SCIENTIFIC THINKING PROCESSES, AND DESIRED OUTCOMES
Lesson Number Lesson Scientific Thinking Desired Outcomesand Name Concept Processes Students will…
LESSON 1. Human populations • Comparing Explore the notion that Earth resourcesAs the World use renewable and • Ordering have been and will continue to be usedTurns: The Earth’s nonrenewable • Categorizing to maintain human populations.Resources resources in order • Relating
to maintain and • Applying Identify that most manufactured objectsimprove their are constructed from Earth resources.existence.
Determine whether common objectsare made of renewable and/ornonrenewable Earth resources.
LESSON 2. The Earth’s • Observing Classify Earth resources as renewableMeet Crude Oil: resources are • Communicating or nonrenewable resources. StudentsAn Earth Resource formed over time • Comparing will determine that oil is a nonrenewableCase Study and can be changed • Ordering resource.
physically and • Categorizingchemically through • Relating Infer that human consumption of Earthnatural processes. • Inferring resources depletes resources that areIncreasing human nonrenewable. Students will infer thatconsumption humans are depleting crude oil reserves.depletes the finiteresources of the Show how an Earth resource isEarth. composed of basic “ingredients” which
undergo physical and chemical changesover time. Students will relate that oilis formed over time through a series ofchemical changes.
Determine the basic stages in theformation of an Earth resource.Students will describe the stages ofcrude oil formation on Earth overmillions of years.

Section 1: Locating, Acquiring, and Processing Our Earth’s Resources Section at a Glance / Page 51
LESSON CONCEPTS, SCIENTIFIC THINKING PROCESSES, AND DESIRED OUTCOMES
Lesson Number Lesson Scientific Thinking Desired Outcomesand Name Concept Processes Students will…
LESSON 3. Tectonic forces • Observing Describe how Earth resources are formedCrude Oil Is cause the Earth’s • Communicating and deposited. Students will describe theTrapped: structure to be • Comparing relationship between the deposition ofGeologic dynamic, creating • Ordering sedimentary layers and the formation ofProcesses for new geologic • Categorizing crude oil.Oil Formation formations. • Relating
• Inferring Give examples of the formation of Earth
• Applying resources through geologic processes.Students will explain how geologicalprocesses have contributed to the accum-ulation of large volumes of crude oil.
Infer the location of Earth resources.Students will infer the location of crude oil.
LESSON 4. Physical and chem- • Observing Demonstrate how Earth resources areGetting Crude ical properties • Communicating acquired. Students will conduct andOil: Oil Extraction facilitate human • Comparing manipulate a model for extracting oil.
extraction of • Relatingnatural resources. • Inferring Identify economic and environmental
• Applying issues related to the acquisition of Earthresources. Students will describe theeconomic and environmental issuesrelated to oil extraction.
LESSON 5. Humans use • Observing Describe distillation as the separation of aCrude Oil Becomes materials based • Communicating mixture of two or more componentsRefined: The Role upon their • Comparing through the process of vaporizationof Distillation in physical and • Ordering followed by condensation. Students willOil Refining chemical • Categorizing discuss the use of distillation in separating
properties. • Applying the components of crude oil.
Describe the relationship of boiling pointsto separation. Students will describe howa difference in boiling points is used toseparate the components of crude oil.
Earth Resources All of the Earth’s • ObservingProject — Student materials, used • CommunicatingCase Study by humans as • Comparing(Research Day) resources, pass • Ordering
through a series • Categorizingof identifiable • Relatingstages. • Inferring
• Applying
Identify questions and concepts about anEarth resource.
Design and conduct research on an Earthresource.
Formulate, revise, and synthesize thenewly gained information.
Recognize and analyze alternate explana-tions and models about an Earth resource.
Begin creating a presentation about anEarth resource.

Page 52 / Section at a Glance Section 1: Locating, Acquiring, and Processing Our Earth’s Resources
Lesson 1As the World Turns: The Earth’s Resources
Lesson 2Meet Crude Oil: An Earth Resource Case Study
Getting Ready
Collect diatoms and other plankton (i.e., algae) from a stream or the ocean,or if unavailable, mix water with diatomaceous earth.
Collect a sample of partially decomposed organic matter (at least 1 liter) fromthe bottom sediment of a nearby pond or compost pile (the material should
Getting Ready For Section 1
WHAT YOU WILL NEED
For the class:• Selection of samples, such as:
– aluminum (e.g., aluminum cans)
– glass (e.g., bottles and jars)
– paper (e.g., pieces of paper, box)
– plastic (e.g., bag, bottle)
– steel can
• References related to Earth resources (CD-ROM, encyclopedias, etc.)
For each group of students:• Chart paper
• Markers or felt-tipped pens
WHAT YOU WILL NEED
For the class:• Sample of mineral oil in a clear container• Sample of motor oil in a sealed, clear container• Videotape, Fuel-Less• Pictures and/or diagrams of marine plankton• Microscopes• Prepared slides of the actual or skeletal remains of marine plankton
(diatoms or algae)• Prepared slides of partially decomposed organic matter (optional)
For each group of students:• Markers• Sealed container/baggie of partially decomposed organic matter, from a
pond or compost pile• Hand-held lenses• Envelope of “Formation of Crude Oil” strips (mixed up)
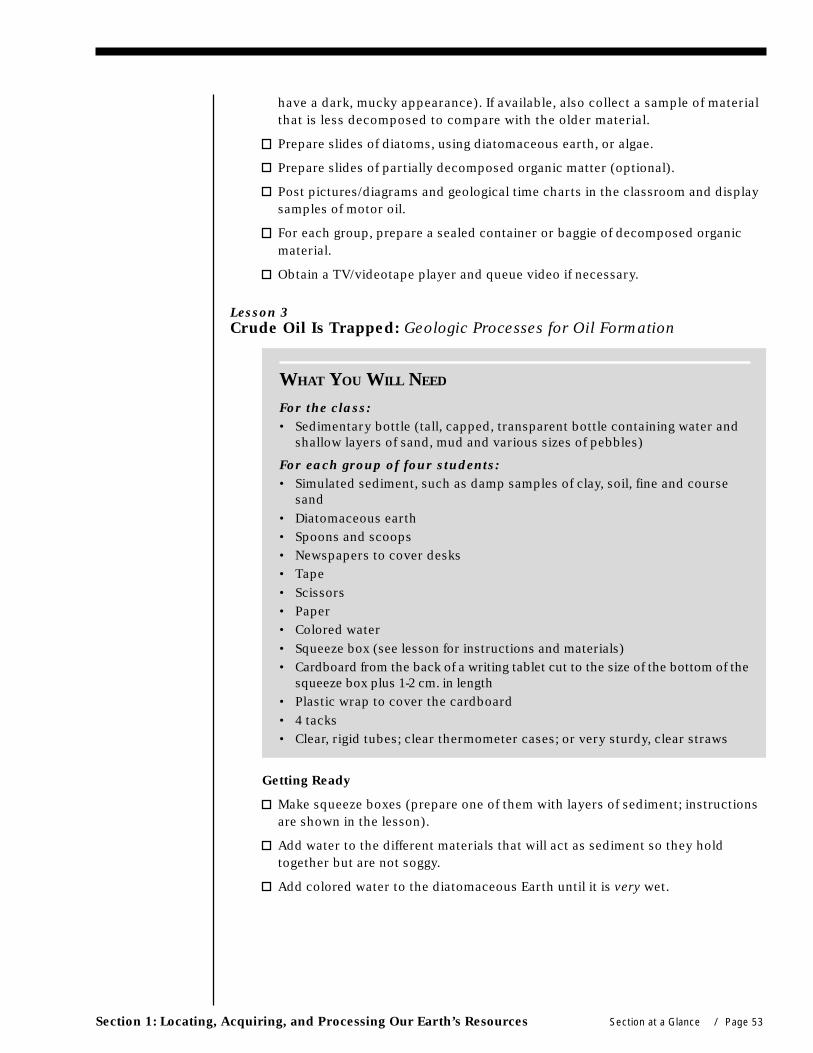
Section 1: Locating, Acquiring, and Processing Our Earth’s Resources Section at a Glance / Page 53
have a dark, mucky appearance). If available, also collect a sample of materialthat is less decomposed to compare with the older material.
Prepare slides of diatoms, using diatomaceous earth, or algae.
Prepare slides of partially decomposed organic matter (optional).
Post pictures/diagrams and geological time charts in the classroom and displaysamples of motor oil.
For each group, prepare a sealed container or baggie of decomposed organicmaterial.
Obtain a TV/videotape player and queue video if necessary.
Lesson 3Crude Oil Is Trapped: Geologic Processes for Oil Formation
Getting Ready
Make squeeze boxes (prepare one of them with layers of sediment; instructionsare shown in the lesson).
Add water to the different materials that will act as sediment so they holdtogether but are not soggy.
Add colored water to the diatomaceous Earth until it is very wet.
WHAT YOU WILL NEED
For the class:• Sedimentary bottle (tall, capped, transparent bottle containing water and
shallow layers of sand, mud and various sizes of pebbles)
For each group of four students:• Simulated sediment, such as damp samples of clay, soil, fine and course
sand• Diatomaceous earth• Spoons and scoops• Newspapers to cover desks• Tape• Scissors• Paper• Colored water• Squeeze box (see lesson for instructions and materials)• Cardboard from the back of a writing tablet cut to the size of the bottom of the
squeeze box plus 1-2 cm. in length• Plastic wrap to cover the cardboard• 4 tacks• Clear, rigid tubes; clear thermometer cases; or very sturdy, clear straws
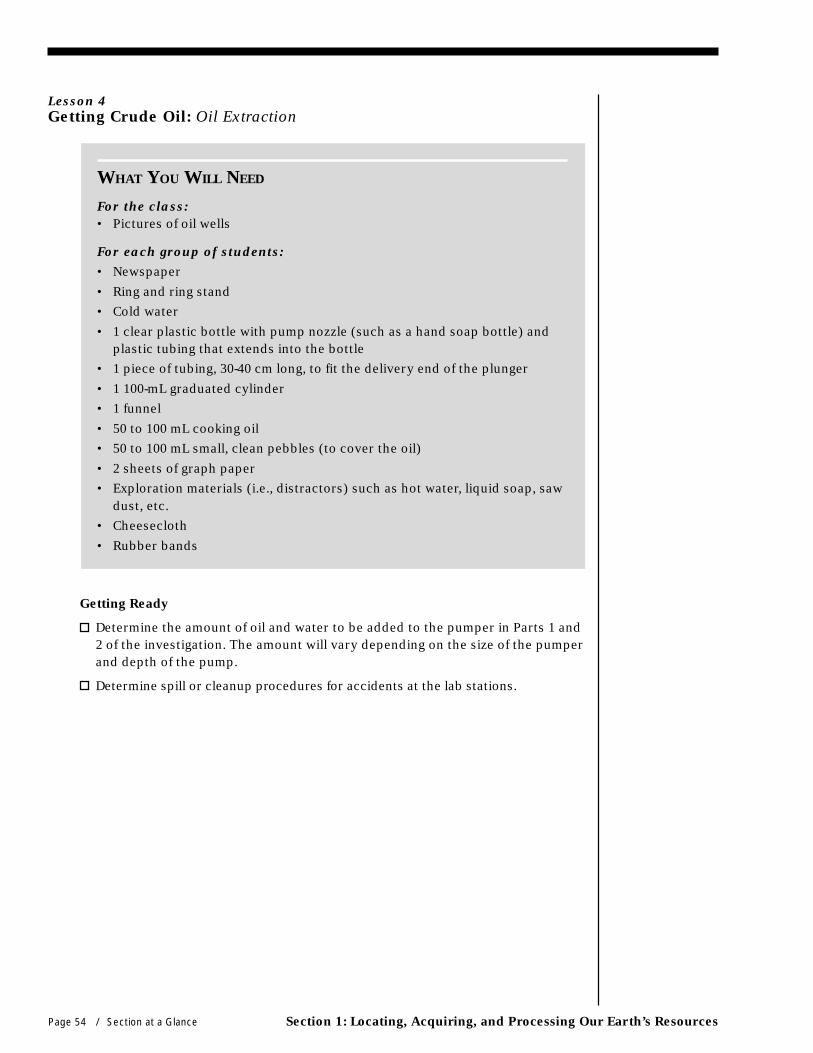
Page 54 / Section at a Glance Section 1: Locating, Acquiring, and Processing Our Earth’s Resources
Lesson 4Getting Crude Oil: Oil Extraction
Getting Ready
Determine the amount of oil and water to be added to the pumper in Parts 1 and2 of the investigation. The amount will vary depending on the size of the pumperand depth of the pump.
Determine spill or cleanup procedures for accidents at the lab stations.
WHAT YOU WILL NEED
For the class:• Pictures of oil wells
For each group of students:
• Newspaper
• Ring and ring stand
• Cold water
• 1 clear plastic bottle with pump nozzle (such as a hand soap bottle) andplastic tubing that extends into the bottle
• 1 piece of tubing, 30-40 cm long, to fit the delivery end of the plunger
• 1 100-mL graduated cylinder
• 1 funnel
• 50 to 100 mL cooking oil
• 50 to 100 mL small, clean pebbles (to cover the oil)
• 2 sheets of graph paper
• Exploration materials (i.e., distractors) such as hot water, liquid soap, sawdust, etc.
• Cheesecloth
• Rubber bands

Section 1: Locating, Acquiring, and Processing Our Earth’s Resources Section at a Glance / Page 55
WHAT YOU WILL NEED
For the class:• 1 liter jar of muddy water• 1 liter jar of gravel/sand mixture• 1 liter jar of water• Sugar• Funnel and filter paper• 1 wire screen with mesh size between that of the sand and the gravel• 1 pan• Lab setup for the boiling and condensation of water to demonstrate to
students• Small quantity of rubbing alcohol• Beaker or small glass container• Small quantify of water• Samples of petrochemical products (i.e., CD cases, cosmetics, credit cards,
paint thinner, kerosene, paraffin wax)
For each student:• 2 sheets of graph paper
For each group of two students:• 50 mL of a 1:1 mixture of rubbing alcohol and water• Ice• 2 pairs of safety goggles• 1 250-mL Erlenmeyer flask• 1 thermometer, 0 - 110˚ C range• 2 50-mL graduated cylinders• 1 two-holed stopper to fit the flask• 1 400-mL beaker for ice• 1 ring stand and ring• 1 piece of rubber hose, 60-80 cm long• 1 wire gauze• Boiling chips• 1 hot plate (or gas burner)• 1 utility clamp• 1 glass tube, bent
Lesson 5Crude Oil Becomes Refined: The Role of Distillation in Oil Refining
Getting Ready
Assemble one distillation setup to serve as a model.
In the interest of safety and time, you may wish to construct the stopper-ther-mometer-tubing-tube setups for each group beforehand.
Prepare the mixture of rubbing alcohol and water mixture in a 1:1 ratio.Make 50 mL per lab station.

Page 56 / Section at a Glance Section 1: Locating, Acquiring, and Processing Our Earth’s Resources
WHAT YOU WILL NEED
For the class:• Research materials, such as:
- 4 to 5 different sets of encyclopedias, both print and electronic
- Selection of pamphlets and books about the chosen materials and resources
- List of local resource agencies
- Internet access with specific bookmark addresses (if possible)
Earth Resources Project — Student Case Study(Research Day)
Getting Ready
Arrange for the class to conduct research in the school library/media center forone or more class session(s).
If necessary, ask the librarian/media specialist to set aside some referencematerials for a reserve section.

Section 1: Locating, Acquiring, and Processing Our Earth’s Resources Section at a Glance / Page 57
Storyline
An interesting way to start the study of Earth resources is to actively involve studentsfrom the beginning. One suggestion is to start with a short “play” that sets the scene.The Section 1 storyline will involve six students in role-playing the characters andperforming this skit in front of the class.
ANALYSIS OF A RESOURCE: PART 1An Oily BeginningCharacters: Mom, Dad, their teenage children — Andrea (17), Elias (15), Cecylia (13) —and the narrator
Narrator: As the family drives along Highway 1 through the redwood forest in North-ern California, a discussion on modes of transportation arises. Cecylia, theimaginative teenager, comes up with an innovative method of transporta-tion.
Cecylia: Wouldn’t it be great if we just had to “think” ourselves from one place toanother? We wouldn’t need cars, so there wouldn’t be any junk cars lyingaround. Dad wouldn’t have to worry about whether he was going to get aflat tire on our vacation. We wouldn’t have tow trucks or pollution fromvehicles.
Elias (always the practical one): But Cecylia, think about all the jobs that would be lost!
Cecylia: Would you stop progress because of the loss of jobs? Think about it, Elias, ifsome jobs were lost, others would be created.
Andrea: Yeah, Elias, don’t be an airhead. Let’s think about what jobs could be cre-ated from Cecylia’s new transportation method.
Narrator: The car begins to slow.
Andrea: OK, Dad. Did you forget to fill the gas tank? Are we out of gas? Do you realizethere aren’t any tow trucks or gas stations for miles? Cecylia’s idea aboutmental transportation isn’t sounding too bad right now!
Mom: Andrea, we’re not out of gas. Look at the traffic ahead. All the cars arestopped on both sides of the road. I wonder what is going on.
Dad: There’s a policeman. I think I’ll go ask what the problem is.
Narrator: Dad gets out of the car to talk to the policeman. When he returns, he isfrowning, and he has some bad news.
Dad: There’s been an accident up ahead. A tanker truck collided with a loggingtruck. The tanker is leaking some gooey stuff into the river. The diesel tankon the logging truck has been punctured and the logs have rolled off thetruck. They are covered with the goo. Not only is there a tremendous dangerof fire but the river is being badly polluted. They want us to turn around andgo back. We will not be able to get through on this road for several days.

Page 58 / Section at a Glance Section 1: Locating, Acquiring, and Processing Our Earth’s Resources
Mom: Wasn’t there a town a few miles back?
Andrea: Mom, that town is down river from this accident. Won’t the residents getthe polluted water?
Elias: That’s right. Has someone warned them?
Cecylia: Say, Dad, you’re an engineer. Why don’t you offer to help? You could comeup with a way to stop the polluted water from reaching the town!
Dad: No!!! Your safety is most important to me right now. Besides, it would takemore then one person to do that.
Narrator: Dad turns the car around and they drive back in the direction from whichthey had come. After a brief time, Cecylia, who has been thinking aboutthis accident, starts asking questions.
Cecylia: Dad, didn’t the policeman say that diesel was spilled?
Dad: Yes, Cecylia, he did. You know that diesel fuel and gasoline come fromcrude oil.
Cecylia: I knew that. We learned it in science last year. The crude oil is what weextract from the ground or the ocean floor. After the crude oil is extractedfrom the ground, it is distilled to produce lots of things. One of thosethings is gasoline, another is diesel fuel.
Dad: You are correct to a point, Cecylia. But it must be transported before itcan be refined — which is the correct term for the distillation of crude oil.Then the products must be transported to places where they can be sold.
Elias: We use a lot of gasoline to transport hazardous chemicals and stuff. It canbe a fire danger, or a pollutant if it gets into the water. By the way, Dad,who will clean up the water and how will they do that?
Dad: To answer your question, Elias, there are specially trained people who canclean up all kinds of spills. Many precautions are taken when transportinghazardous materials to prevent spills from occurring in the first place.But in spite of all the safety precautions, accidents still happen.
Cecylia: Well, Elias, what do you think of my idea now for just “thinking” ourselvesto another place, instead of having to drive there? At least my creativesuggestion would eliminate the hazard of transporting hazardousmaterials!
Elias: Yeah, I see your point. But we also need to think about how we use naturalresources everyday and how it affects the environment. Why don’t we takea closer look at these resources and how they are turned into products weuse?
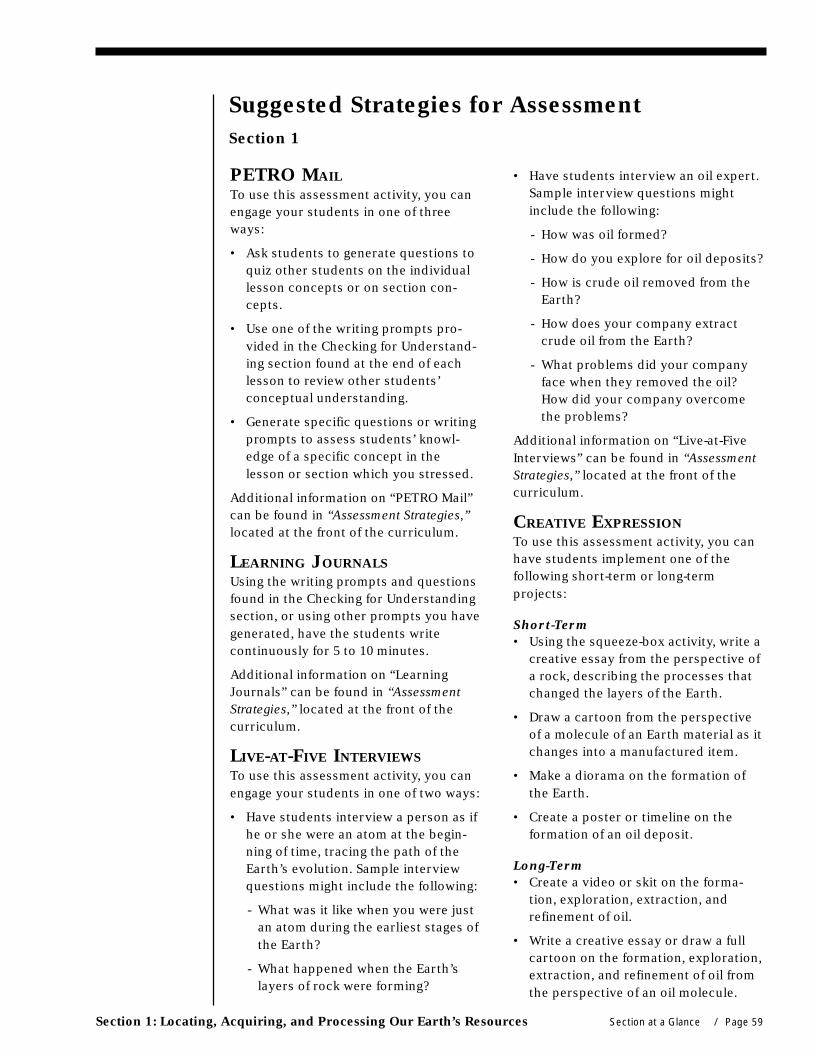
Section 1: Locating, Acquiring, and Processing Our Earth’s Resources Section at a Glance / Page 59
PETRO MAILTo use this assessment activity, you canengage your students in one of threeways:
• Ask students to generate questions toquiz other students on the individuallesson concepts or on section con-cepts.
• Use one of the writing prompts pro-vided in the Checking for Understand-ing section found at the end of eachlesson to review other students’conceptual understanding.
• Generate specific questions or writingprompts to assess students’ knowl-edge of a specific concept in thelesson or section which you stressed.
Additional information on “PETRO Mail”can be found in “Assessment Strategies,”located at the front of the curriculum.
LEARNING JOURNALSUsing the writing prompts and questionsfound in the Checking for Understandingsection, or using other prompts you havegenerated, have the students writecontinuously for 5 to 10 minutes.
Additional information on “LearningJournals” can be found in “AssessmentStrategies,” located at the front of thecurriculum.
LIVE-AT-FIVE INTERVIEWSTo use this assessment activity, you canengage your students in one of two ways:
• Have students interview a person as ifhe or she were an atom at the begin-ning of time, tracing the path of theEarth’s evolution. Sample interviewquestions might include the following:
- What was it like when you were justan atom during the earliest stages ofthe Earth?
- What happened when the Earth’slayers of rock were forming?
Suggested Strategies for AssessmentSection 1
• Have students interview an oil expert.Sample interview questions mightinclude the following:
- How was oil formed?
- How do you explore for oil deposits?
- How is crude oil removed from theEarth?
- How does your company extractcrude oil from the Earth?
- What problems did your companyface when they removed the oil?How did your company overcomethe problems?
Additional information on “Live-at-FiveInterviews” can be found in “AssessmentStrategies,” located at the front of thecurriculum.
CREATIVE EXPRESSIONTo use this assessment activity, you canhave students implement one of thefollowing short-term or long-termprojects:
Short-Term• Using the squeeze-box activity, write a
creative essay from the perspective ofa rock, describing the processes thatchanged the layers of the Earth.
• Draw a cartoon from the perspectiveof a molecule of an Earth material as itchanges into a manufactured item.
• Make a diorama on the formation ofthe Earth.
• Create a poster or timeline on theformation of an oil deposit.
Long-Term• Create a video or skit on the forma-
tion, exploration, extraction, andrefinement of oil.
• Write a creative essay or draw a fullcartoon on the formation, exploration,extraction, and refinement of oil fromthe perspective of an oil molecule.

Page 60 / Section at a Glance Section 1: Locating, Acquiring, and Processing Our Earth’s Resources
Additional information on “CreativeExpression” can be found in “AssessmentStrategies,” located at the front of thecurriculum.
GROUP EVALUATION POSTER
SESSION OR WHITE BOARDThis activity can help you gauge students’preconceptions before each lesson beginsor during the Prethink portion of eachlesson. Save the poster for review at theend of the lesson. If you do this activity onwhite boards, have the students recordthe ideas in their learning journals. Youshould refrain from adding information orcorrecting the students’ statements. Whilestudents review their prior thinking duringthe Action Processing section of eachlesson, you may want to ask questions toenable the students to dispel the miscon-ceptions shown on the posters.
Sample prompts include:
• Discuss the formation of oil deposits.
• How do oil companies extract crudeoil?
• Explain the process of refining crudeoil and the products that are obtained.
Additional information on “Group Evalua-tion Poster Session or White Board” canbe found in “Assessment Strategies,”located at the front of the curriculum.
PORTFOLIOSBefore the student can begin collectingentries for the portfolio, students and/orteacher must decide the purpose of theportfolio. After the purpose and numberof entries are decided, students shouldtake the following steps:
• Make their first selections.
• Generate some initial thoughts fortheir topics.
• Self-reflect as to why they chose theentry.
• Determine what they know about thechosen subject.
• Decide what they want to know aboutthe chosen subject.
If you are using this curriculum as theorganizer for the portfolios, you mightbegin the process by asking students toreflect on these questions:
• How does the Earth form and recycleits natural resources?
• What effects can the disposal of usednatural resources have on the environ-ment or on the Earth’s systems?
• What can be done now so that we willhave natural resources available for usein the future?
• How does the human use of a naturalresource affect the Earth and itssystems?
• What is meant by renewable andnonrenewable resources of the Earth?
Additional information on “Portfolios”can be found in “Assessment Strategies,”located at the front of the curriculum.
CONCEPT MAPSTo use this assessment activity, try oneof the following ideas:
• Have students generate a list of high-frequency or key terms used in theday’s activities or lessons, and thenhave them use this list to construct aconcept map.
• Generate a list of key terms which youhave determined to assess the students’conceptual understanding of the lesson,and then have students generate a conceptmap that includes these key terms.
• Use the following concept map to assessyour students’ conceptual understand-ing of the section. Provide your studentswith copies of “Activity Page — EarthResources Concept Map for Section 1.”Have your students fill in the blankconcept map, using the list of key termsused. You may wish to fill in a few of thekey terms to get students started. Usethe corresponding Teacher Page toassess students’ understanding.
Additional information on “Concept Maps”can be found in “Assessment Strategies,”located at the front of the curriculum.
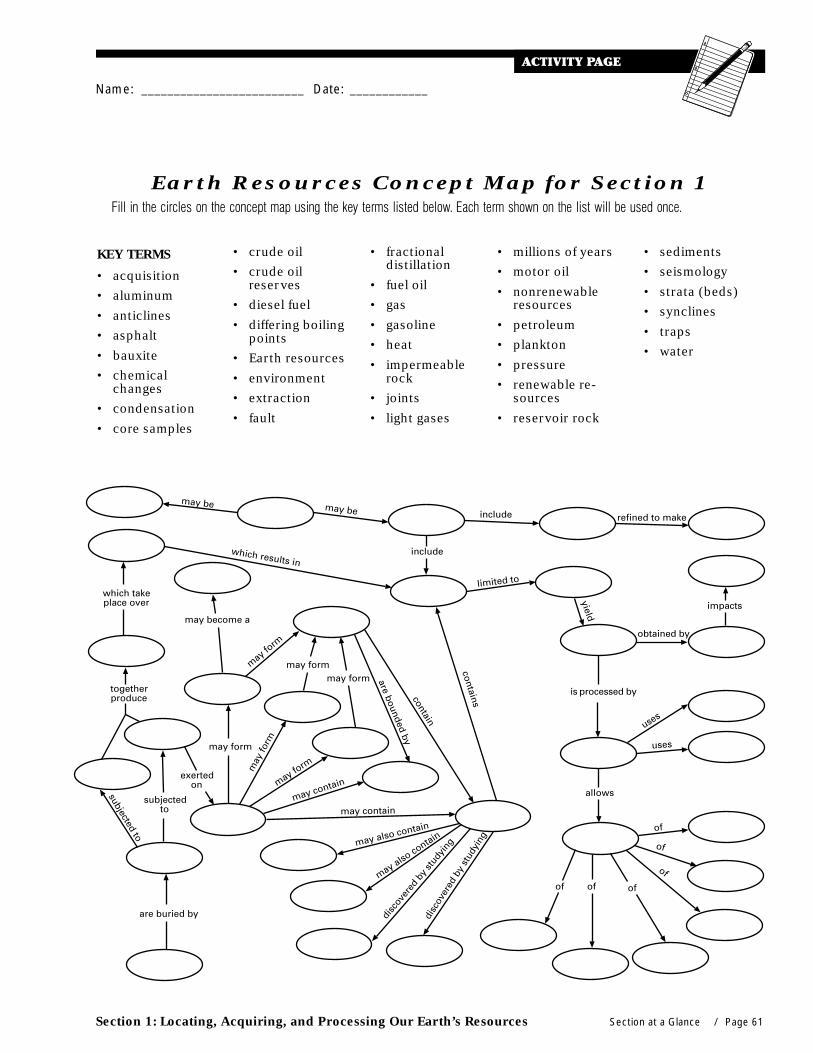
Section 1: Locating, Acquiring, and Processing Our Earth’s Resources Section at a Glance / Page 61
Earth Resources Concept Map for Section 1Fill in the circles on the concept map using the key terms listed below. Each term shown on the list will be used once.
KEY TERMS
• acquisition
• aluminum
• anticlines
• asphalt
• bauxite
• chemicalchanges
• condensation
• core samples
• millions of years
• motor oil
• nonrenewableresources
• petroleum
• plankton
• pressure
• renewable re-sources
• reservoir rock
• crude oil
• crude oilreserves
• diesel fuel
• differing boilingpoints
• Earth resources
• environment
• extraction
• fault
• fractionaldistillation
• fuel oil
• gas
• gasoline
• heat
• impermeablerock
• joints
• light gases
• sediments
• seismology
• strata (beds)
• synclines
• traps
• water
Name: _________________________ Date: ____________
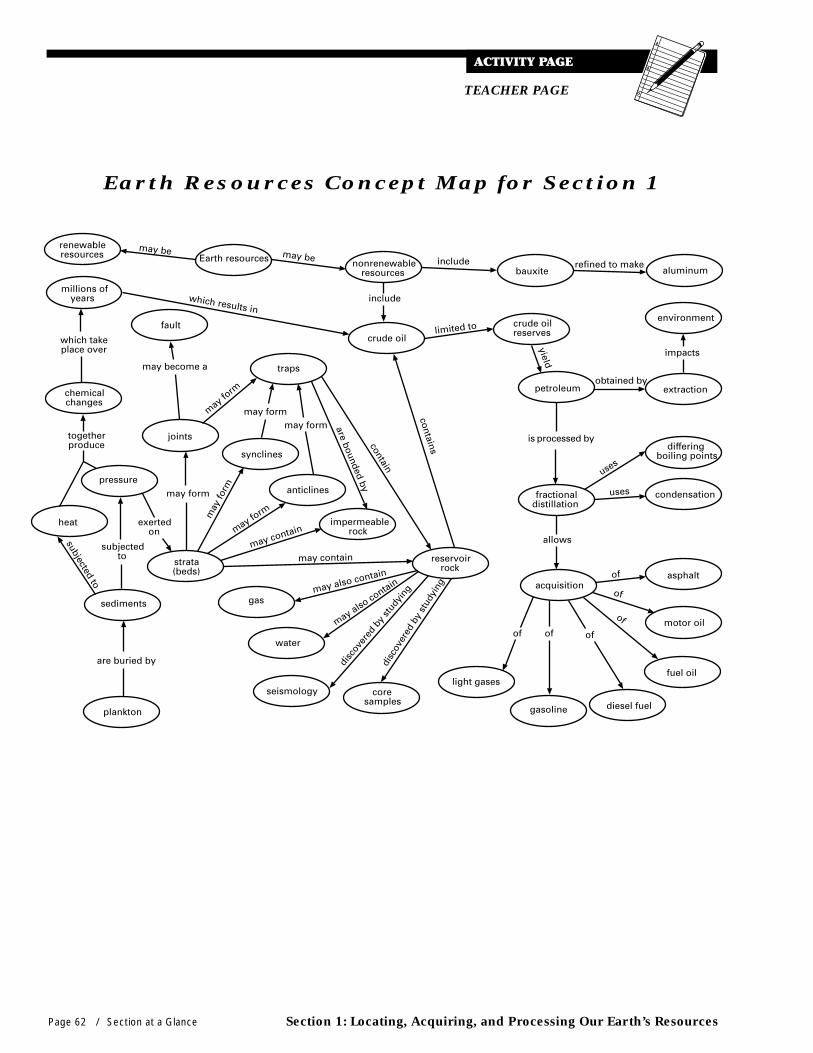
Page 62 / Section at a Glance Section 1: Locating, Acquiring, and Processing Our Earth’s Resources
TEACHER PAGE
Earth Resources Concept Map for Section 1

Section 1: Locating, Acquiring, and Processing Our Earth’s Resources Section at a Glance / Page 63
SECTION 1:
Earth Resources Project — Student Case Study
Section Concepts
Human: Natural resources are usedby human populations in order tomaintain and improve their existence.
Scientific: The Earth’s natural re-sources are formed over time. Theseresources have observable physicaland chemical properties.
SECTION 1:
Locating, Acquiring, andProcessing Our Earth’s Resources
UNIFYING CONCEPTThe Earth is a complex system thatchanges over time, yet exists in a dynamicbalance that is affected by human popula-tions. The balance is governed by theinteractions of matter and energy.
LESSON CONCEPTAll of the Earth’s materials, used by humansas resources, pass through a series ofidentifiable stages.
LESSON OVERVIEWStudents select an Earth resource, otherthan oil, on which to conduct research for their own case study. After each section,students spend a class session researching, tracing, synthesizing, and analyzing how theresource fits into the Earth Resources Chart.
After Section 1, students research the following:• Description of the Earth resource (renewable or nonrenewable)• Description of the source and location of the raw Earth material• Method and impact of exploration for the material• Method and impact of acquisition of the material
• Method and impact of refinement/processing of the material as a human resource
DESIRED OUTCOMESStudents will:
Identify questions and concepts about an Earth resource.
Design and conduct research on an Earth resource.
Formulate, revise, and synthesize the newly gained information.
Recognize and analyze alternate explanations and models about an Earth resource.
Begin creating a presentation about an Earth resource.
Students will use the following scientific thinking processes:
Observing, communicating, comparing, ordering, categorizing, relating, inferring, and applying.
STEPS FOR TEACHING
Teacher Action Student Action Suggested Time
Ask students to review the stages of the Earth Resources Examining 5 min.Chart. Prior Ideas
Direct students to brainstorm what they know and Inferring, Applying, 5 min.want to know about their chosen resource. and Relating Information
Guide students in the appropriate research methods Relating 5 min.and emphasis for their chosen resource. Information
Provide time and resources for students to conduct research. Applying Knowledge 50 min.
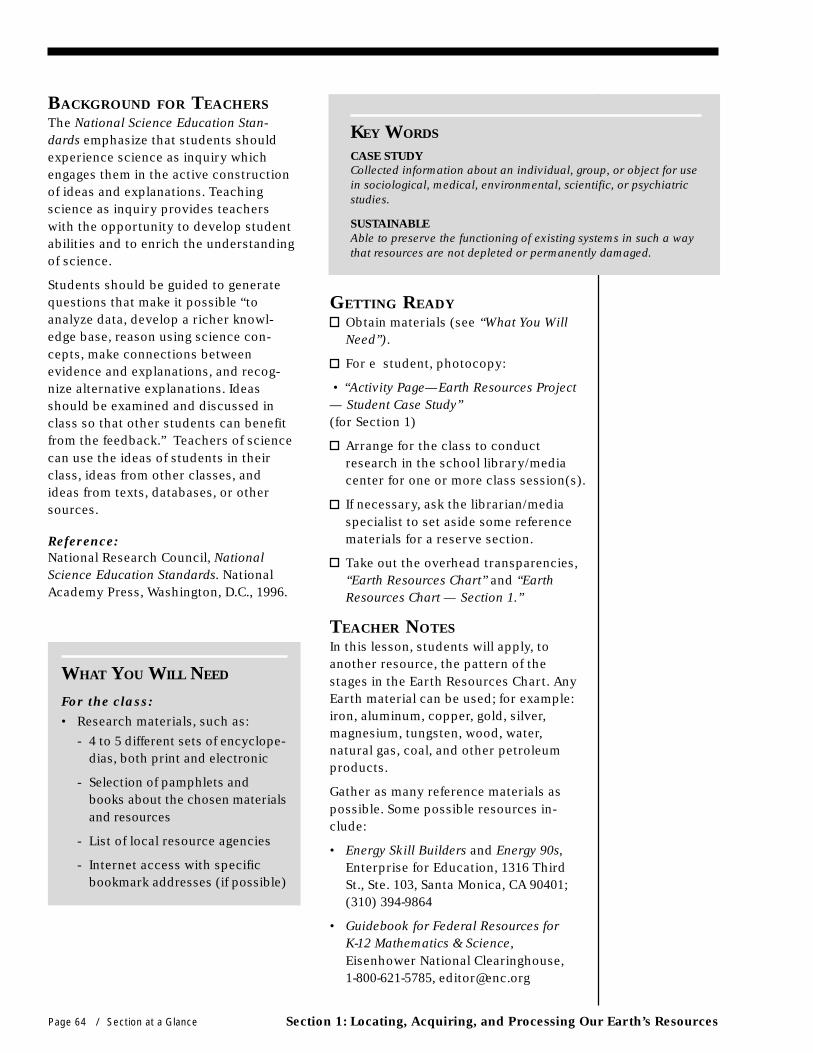
Page 64 / Section at a Glance Section 1: Locating, Acquiring, and Processing Our Earth’s Resources
BACKGROUND FOR TEACHERSThe National Science Education Stan-dards emphasize that students shouldexperience science as inquiry whichengages them in the active constructionof ideas and explanations. Teachingscience as inquiry provides teacherswith the opportunity to develop studentabilities and to enrich the understandingof science.
Students should be guided to generatequestions that make it possible “toanalyze data, develop a richer knowl-edge base, reason using science con-cepts, make connections betweenevidence and explanations, and recog-nize alternative explanations. Ideasshould be examined and discussed inclass so that other students can benefitfrom the feedback.” Teachers of sciencecan use the ideas of students in theirclass, ideas from other classes, andideas from texts, databases, or othersources.
Reference:National Research Council, NationalScience Education Standards. NationalAcademy Press, Washington, D.C., 1996.
WHAT YOU WILL NEED
For the class:
• Research materials, such as:
- 4 to 5 different sets of encyclope-dias, both print and electronic
- Selection of pamphlets andbooks about the chosen materialsand resources
- List of local resource agencies
- Internet access with specificbookmark addresses (if possible)
GETTING READYObtain materials (see “What You WillNeed”).
For e student, photocopy:
• “Activity Page—Earth Resources Project— Student Case Study”(for Section 1)
Arrange for the class to conductresearch in the school library/mediacenter for one or more class session(s).
If necessary, ask the librarian/mediaspecialist to set aside some referencematerials for a reserve section.
Take out the overhead transparencies,“Earth Resources Chart” and “EarthResources Chart — Section 1.”
TEACHER NOTESIn this lesson, students will apply, toanother resource, the pattern of thestages in the Earth Resources Chart. AnyEarth material can be used; for example:iron, aluminum, copper, gold, silver,magnesium, tungsten, wood, water,natural gas, coal, and other petroleumproducts.
Gather as many reference materials aspossible. Some possible resources in-clude:
• Energy Skill Builders and Energy 90s,Enterprise for Education, 1316 ThirdSt., Ste. 103, Santa Monica, CA 90401;(310) 394-9864
• Guidebook for Federal Resources forK-12 Mathematics & Science,Eisenhower National Clearinghouse,1-800-621-5785, [email protected]
KEY WORDS
CASE STUDYCollected information about an individual, group, or object for usein sociological, medical, environmental, scientific, or psychiatricstudies.
SUSTAINABLEAble to preserve the functioning of existing systems in such a waythat resources are not depleted or permanently damaged.

Section 1: Locating, Acquiring, and Processing Our Earth’s Resources Section at a Glance / Page 65
• Ground Water Education for SecondaryStudents, Water Education Foundation,717 K St., Ste. 517, Sacramento, CA95814; (916) 444-6240, <www.water-ed.org>
At the conclusion of each section of thecurriculum, provide at least one classsession for students to research in class.However, students should also workindependently, revisiting their case studyas the unit proceeds.
At the end of the entire unit, students willuse their research to develop a presenta-tion on their case study. Lesson 18 willprovide students an opportunity topresent their finished projects.
Before assigning the project to students,it is a good idea to decide what types ofend product are acceptable (i.e., essay,poster, oral speech with essay, video). Itis also recommended that you set a limiton the number of students that areallowed to complete each type of endproduct, or else all students mightproduce the same type of product. Inassessing the project, consider not onlythe quality of presentation, but whethereach stage of the Earth Resources Chartwas given adequate treatment.
If time permits, you may require studentsto make an oral presentation. Thisprovides an added dimension to theproject: Students become “teachers,” andthe student listeners can learn morecontent and increase their presentationskills by watching their peers.
The guidelines for oral presentations areas follows:
• Length should be no longer than 5minutes.
• Visual props should be included, suchas charts, pictures, tables, overheads,or posters.
• Creative expression should be encour-aged, such as a dramatization, skit,song, comedy routine, or video.
• The criteria for assessment shouldinclude how well the audience under-stands the stages. (The easiest way togauge audience understanding is forthe listening student audience to draw,sketch, and label the stages of theparticular resource being presented.)
Students often have difficulty planningahead and pacing their work. Therefore,it is a good idea to set up “checkpoint”dates by which students must completevarious stages of research.

Page 66 / Section at a Glance Section 1: Locating, Acquiring, and Processing Our Earth’s Resources
ACTION NARRATIVE
Prethink15 minutes
Let’s review the Earth Resources Chart to determine what we have learned aboutoil thus far.Display one or both of the overhead transparencies, “Earth Resources Chart” and/or“Earth Resources Chart — Section 1.”
Ask a student to review and explain each column of the chart, or do it yourself.
Consider the Earth resource you chose for your case study in Lesson 1. Brain-storm what you know and what you want to know about your Earth resource.Ask a few students to share their brainstorms.
Distribute “Activity Page — Earth Resources Project – Student Case Study (Section 1).”
Today, each of you will begin to research the answers to your questions about theEarth resource you have chosen.Discuss all elements of the Activity Page with the students. The Activity Page isdesigned to enable students to access their prior knowledge about the section aswell as to focus what they want to know about their chosen resources. The sheetalso includes additional questions for the students to research.
In your discussion, emphasize to students that their research should includetechnical and scientific information, such as chemical formulas, equations, scientificstudies, cost analyses, and energy use. The content of their research should addressall of the stages shown in the Earth Resources Chart and should include illustra-tions, charts, graphs, diagrams, and other visuals, depending on the scope ofpreparation that you, as the teacher, would like to emphasize. The length of theresearch will vary depending on the resource.
Be sure to remind students that at the end of the entire unit they will use theirresearch to develop a product that will be used as a vehicle to present their study.Explain the types of end product that are acceptable to you. Tell students that theirprojects will be evaluated for quality of presentation and for adequate treatment ofeach of the stages in the Earth Resources Chart. If you decide to have students givean oral presentation, review the guidelines for oral presentations.
Student Action45 minutes
Provide the resources and time necessary for students to begin researching infor-mation. Assist, guide, and facilitate as necessary.
Action Processing5 minutes
Who will share one interesting or surprising fact or idea you learned today?Allow a few students to share after each day of research.
At this point, you should have a good start on your research. Continue workingoutside of class and at home to complete your research on this section. Be sure tosee me if you need any help.Remind students that they should be compiling information for their case study inpreparation for their culminating report and presentation.

Section 1: Locating, Acquiring, and Processing Our Earth’s Resources Section at a Glance / Page 67
Home StudyStudents should continue their ongoing research during the next section. Periodi-cally remind students of this and ask them to share a bit of what they have learned.
CHECKING FOR UNDERSTANDING
Student Reflections• I discovered that…
• I was interested/surprised to learn that…
Teacher Reflections• Can students find the necessary information for each stage of the
Earth Resources Chart?
• Do the students realize that each Earth resource follows the patternof the Earth Resources Chart?
EXTENSIONUse this research opportunity to collaborate and integratewith the students’ English class. The use of research toolssuch as source cards and note cards, outlines, and roughdrafts is taught in English courses; their use can enhancethis scientific case study.

Page 68 / Section at a Glance Section 1: Locating, Acquiring, and Processing Our Earth’s Resources
Earth Resources Project – Student Case Study (Section 1)
What do you know about the Earth resource that you chose?How is it found and processed?
Select an Earth material (rock, mineral, or plant) that humans use as a resource. Conduct research to develop your own case study onthis Earth resource. Use the categories from the Section 1 portion of the Earth Resources Chart to focus your research. Consider theimpact of exploration, processing, and use on the Earth’s environment; the scientific technologies needed; and the supply of, anddemand for, the resource.
PREPARATIONPREPARATIONPREPARATIONPREPARATIONPREPARATION
What do you want to know about the Earth resource that youchose? How is it found and processed?
Additional Research Questions
Purpose• Why is the resource used by humans?
• For what purpose(s) is the resource used?
Description
• What physical and chemical properties make the resource desirable for use?
Exploration• What is the source and location of the raw Earth material?
• How do humans obtain the raw material from the earth?
• What is the impact of exploration, both positive and negative?
Processing• Once the raw material is obtained, how is it processed for use?
• What are the impacts of processing the resource, both positive and negative?
Name: _________________________ Date: ____________

Section 1: Locating, Acquiring, and Processing Our Earth’s Resources Section at a Glance / Page 69
GUIDELINES FOR RESEARCH1. First, read general information about the resource.
2. Either using separate note cards or separate pieces of paper for each research question, answer each question with notes or witha paraphrase from your research.
3. Always use your own words. Take notes on key ideas, not entire sentences.
4. Consult a minimum of three resources to obtain complete information about the resource.
5. Always credit each source of information (book, pamphlet, magazine, encyclopedia, expert interview, speech, etc.) with the author,title or name of source, and date.
6. Gather interesting data, graphics, diagrams, and other visuals to enhance your research.
GUIDELINES FOR PRESENTATION
Format Possibilities• Written report• Poster• Brochure• Booklet• Video• Oral presentation• Display
• Other ideas
WHAT HAVE YOU LEARNED?After completing the case study, you will use your research to develop a presentation that will be evaluated using the followingstandards:
Content• Addresses all stages in the Earth Resource Chart.• Answers all research questions.• Includes technical and scientific information, such as chemical formulas, equations, scientific studies, cost analyses, and energy
use when applicable.
Quality of Work• Includes illustrations, charts, graphs, diagrams, and other visuals.• Uses standard language, including spelling, punctuation, and capitalization.• Is printed in ink or typed.• Is organized in such a way that it shows clear understanding and careful thought.• Is inviting, neat, and eye-appealing.
• Is creative and unique.
Oral Presentation• Is no longer than 5 minutes.• Is clearly spoken, using visuals, props, or models.• Demonstrates enthusiasm and uses eye contact.
• Is spoken, not read.
Earth Resources Project – Student Case Study (Continued)
Be sure to check with your teacher for anyparticular requirements you may have forthis class.

Page 70 / Section at a Glance Section 1: Locating, Acquiring, and Processing Our Earth’s Resources
Notes
sample lesson


Getting Crude Oil: Oil Extraction Section 1, Lesson 4 / Page 113
Getting Crude Oil: Oil Extraction
Lesson 4
Section ConceptsHuman: Natural resources are usedby human populations in order tomaintain and improve their existence.
Scientific: The Earth’s natural re-sources are formed over time. Theseresources have observable physicaland chemical properties.
SECTION 1:
Locating, Acquiring, andProcessing Our Earth’s Resources
LESSON CONCEPTPhysical and chemical properties facilitatehuman extraction of natural resources.
LESSON OVERVIEWStudents discuss issues surroundingthe acquisition of natural resources.Students explore the difficulties ofcrude oil extraction. Students simulatecrude oil extraction.
DESIRED OUTCOMESStudents will:
Demonstrate how Earth resources are acquired. Students will build and manipulatea model for extracting oil.
Identify economic and environmental issues related to the acquisition of Earthresources. Students will describe the economic and environmental issues relatedto oil extraction.
Students will use the following scientific thinking processes:
Observing, communicating, comparing, relating, inferring, and applying.
STEPS FOR TEACHING
Student SuggestedTeacher Action Action Time
Ask students to identify how Earth resources, Examining 10 min.such as oil, are acquired. Prior Ideas
Direct students to construct and use an apparatus Observing,to separate oil from an oil-pebble mixture. Recording, and
ProcessingInformation 55 min.
Direct students in designing their own process for Posing aextracting oil. Challenge
Guide students in comparing the effectiveness of Processing 10 min.extraction processes. Information
Instruct students to reflect on oil extraction methods. Reflection 10 min.
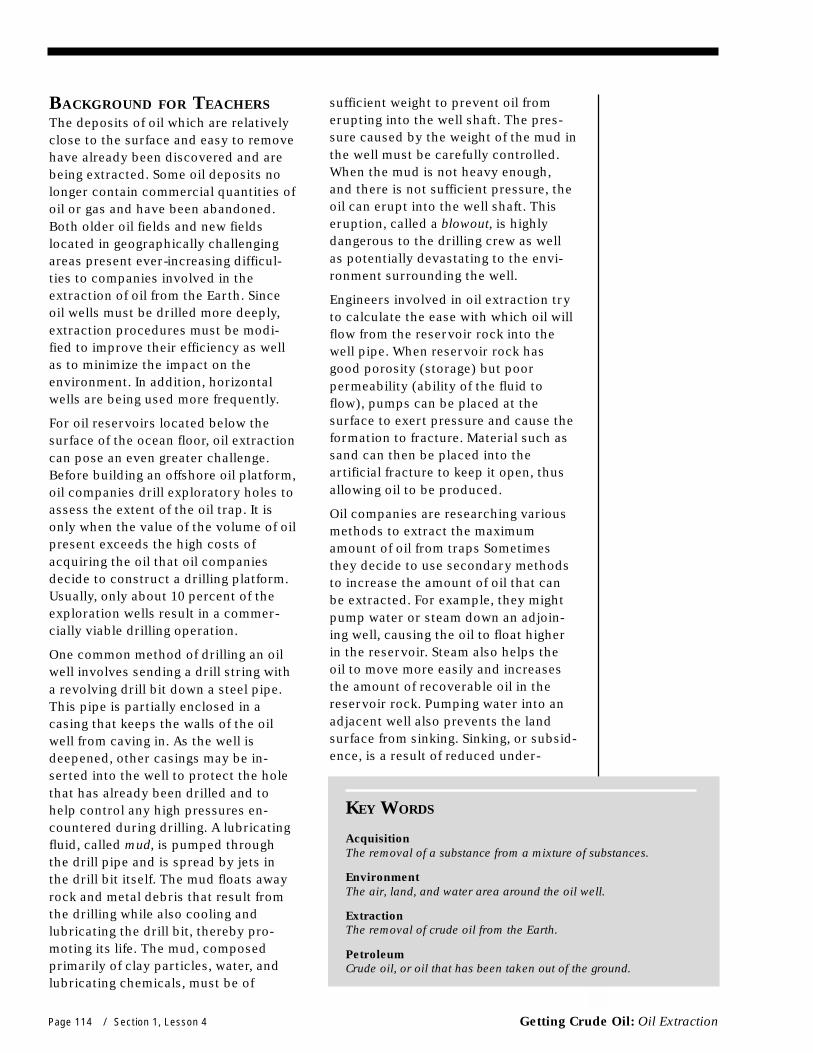
Page 114 / Section 1, Lesson 4 Getting Crude Oil: Oil Extraction
BACKGROUND FOR TEACHERSThe deposits of oil which are relativelyclose to the surface and easy to removehave already been discovered and arebeing extracted. Some oil deposits nolonger contain commercial quantities ofoil or gas and have been abandoned.Both older oil fields and new fieldslocated in geographically challengingareas present ever-increasing difficul-ties to companies involved in theextraction of oil from the Earth. Sinceoil wells must be drilled more deeply,extraction procedures must be modi-fied to improve their efficiency as wellas to minimize the impact on theenvironment. In addition, horizontalwells are being used more frequently.
For oil reservoirs located below thesurface of the ocean floor, oil extractioncan pose an even greater challenge.Before building an offshore oil platform,oil companies drill exploratory holes toassess the extent of the oil trap. It isonly when the value of the volume of oilpresent exceeds the high costs ofacquiring the oil that oil companiesdecide to construct a drilling platform.Usually, only about 10 percent of theexploration wells result in a commer-cially viable drilling operation.
One common method of drilling an oilwell involves sending a drill string witha revolving drill bit down a steel pipe.This pipe is partially enclosed in acasing that keeps the walls of the oilwell from caving in. As the well isdeepened, other casings may be in-serted into the well to protect the holethat has already been drilled and tohelp control any high pressures en-countered during drilling. A lubricatingfluid, called mud, is pumped throughthe drill pipe and is spread by jets inthe drill bit itself. The mud floats awayrock and metal debris that result fromthe drilling while also cooling andlubricating the drill bit, thereby pro-moting its life. The mud, composedprimarily of clay particles, water, andlubricating chemicals, must be of
KEY WORDS
AcquisitionThe removal of a substance from a mixture of substances.
EnvironmentThe air, land, and water area around the oil well.
ExtractionThe removal of crude oil from the Earth.
PetroleumCrude oil, or oil that has been taken out of the ground.
sufficient weight to prevent oil fromerupting into the well shaft. The pres-sure caused by the weight of the mud inthe well must be carefully controlled.When the mud is not heavy enough,and there is not sufficient pressure, theoil can erupt into the well shaft. Thiseruption, called a blowout, is highlydangerous to the drilling crew as wellas potentially devastating to the envi-ronment surrounding the well.
Engineers involved in oil extraction tryto calculate the ease with which oil willflow from the reservoir rock into thewell pipe. When reservoir rock hasgood porosity (storage) but poorpermeability (ability of the fluid toflow), pumps can be placed at thesurface to exert pressure and cause theformation to fracture. Material such assand can then be placed into theartificial fracture to keep it open, thusallowing oil to be produced.
Oil companies are researching variousmethods to extract the maximumamount of oil from traps Sometimesthey decide to use secondary methodsto increase the amount of oil that canbe extracted. For example, they mightpump water or steam down an adjoin-ing well, causing the oil to float higherin the reservoir. Steam also helps theoil to move more easily and increasesthe amount of recoverable oil in thereservoir rock. Pumping water into anadjacent well also prevents the landsurface from sinking. Sinking, or subsid-ence, is a result of reduced under-

Getting Crude Oil: Oil Extraction Section 1, Lesson 4 / Page 115
ground volume, caused by removing theoil. Another method of oil extractioninvolves the injection of a gas into anadjoining well to re-pressurize the welland force the oil to the pump. A methodthat has been tried but abandonedinvolved the injection of a biodegrad-able acid into an adjoining well, whichbreaks down the reservoir rock andallows the oil to flow more readily intothe well.
Even using these secondary methods ofextraction, only 30 percent of the crudeoil can actually be removed due to thetendency of oil to cling to the surround-ing rock.
Reference:
Petroleum Exploration: A Continuing Need.American Petroleum Institute, Washing-ton, D.C.
GETTING READYObtain materials(see “What You Will Need”).
For each student, photocopy:
• “Student Investigation —Simulating Oil Extraction”
Photocopy each of the following ontoa transparency:
• “Overhead — Oil Derrick”
• “Overhead — Oil Well”
Assign students to groups of two.
Determine the amount of oil andwater to be added to the pumper inParts 1 and 2 of the investigation. Theamount will vary depending on thesize of the pumper and depth of thepump.
Determine spill or cleanup proceduresfor accidents at the lab stations.
Take out the overhead transparencies,“Earth Resources Chart” and “EarthResources Chart — Section 1”
TEACHER NOTESDepending on the ability level of theclass, be prepared to demonstrate howto put the equipment together and howto use it.
The placement of several waste oilcontainers around the room will reducethe amount of potential spillage andprovide more time for actual lab work.
Encourage students to adopt a rhythmicpumping procedure.
If possible, have several spare plungersavailable.
Glass graduated cylinders are easier toclean than plastic.
If small grains of sand/gravel are used, thepumper may clog. A piece of cheeseclothheld in place over the end of the pumperwith a rubber band will help preventclogging. Rubber bands from orthodonticbraces work well for this purpose.
As you set up, be sure that the plastictubing does not touch the bottom of theplastic bottle.
WHAT YOU WILL NEED
For the class:• Pictures of oil wells
For each group of students:• Newspaper
• Ring and ring stand
• Cold water
• 1 clear plastic bottle with pump nozzle (such as a handsoap bottle) and plastic tubing that extends into thebottle
• 1 piece of tubing, 30-40 cm long, to fit the delivery endof the plunger
• 1 100-mL graduated cylinder
• 1 funnel
• 50 to 100 mL cooking oil
• 50 to 100 mL small, clean pebbles (to cover the oil)
• 2 sheets of graph paper
• Exploration materials (i.e., distractors) such as hotwater, liquid soap, saw dust, etc. (see “Teacher Notes”)
• Cheesecloth (see “Teacher Notes”)
• Rubber bands (see “Teacher Notes”)
Page 116 / Section 1, Lesson 4 Getting Crude Oil: Oil Extraction
ACTION NARRATIVE
Prethink10 minutes
Based on what you learned in the last Student Investigation, what are thecharacteristics of places that would be the best locations to drill for oil?Students might suggest looking for folds, faults, or other places where oil can betrapped in the Earth.
Let’s consider how we obtain some of our Earth resources.Ask students to discuss how different resources are obtained. Examples mightinclude trees that are harvested for lumber, crude oil that is extracted from theEarth, and bauxite ore (used to make aluminum) that is mined from the Earth.
What types of issues are involved in acquiring Earth resources?Focus on the actual methods and the issues: geography (difficulty in locating theresource); scarcity of the resource; the energy use required; damage to the environ-ment; cost; and any scientific principles (i.e., density) involved in acquiring re-sources from their natural locations.
How would you predict that we could get crude oil out of the Earth?Students might suggest sucking or pumping it out of the Earth.
Record student responses for later review in Action Processing.
Problem for Student InvestigationLet’s investigate how to extract crude oil from the Earth and what possibleproblems the oil companies face in extracting all of the crude oil.
Distribute “Student Investigation — Simulating Oil Extraction.”
Part 2 of the investigation simulates thewater injection of adjacent wells. Thelength of the plastic tubing inside theplastic bottle is critical for this part ofthis investigation. As students pour waterinto the plastic bottle, it is important tomake sure that the water level staysbelow the bottom of the plastic tubing.
For the student-designed investigation(Part 3), you will need to gather variousmaterials that could be used by thestudents. You will want to provide notonly the materials that you think thestudents will need, but also distractorswhich will help students to “think outsideof the box.” Distractors might include ahot plate, an air pump, liquid dish soap,other types of oil, saw dust, and dirt.
You might have the students design theinvestigation on one day and perform it
on the next. If time permits, you couldhave the student perform more then oneinvestigation. The more the studentsexplore, the better they will understandthe research processes of oil companies.
As you will note, there is no specificHome Study page. The analysis questionsor the student-designed activity might beused as a Home Study. What you assigndepends on how you approach the lab.
Supplemental classroom resourcesrecommended for this lesson:
All About Petroleum. American PetroleumInstitute, Washington, D.C.
Running on Oil. National Science TeachersAssociation, Washington, D.C., 1995.

Getting Crude Oil: Oil Extraction Section 1, Lesson 4 / Page 117
Student Action55 minutes
See “Student Investigation — Simulating Oil Extraction.”
Action Processing20 minutes
What methods worked the best for extracting oil? Why?Student answers will vary.
What effect did the water have on the oil?Be sure to explain the concept of density.
How does an oil well work?Display “Overhead — Oil Derrick,” “Overhead — Oil Well,” and any available picturesof oil wells.
Discuss how the well works. Be sure to discuss how and why companies might injectwater into an adjacent well.
What types of issues might an oil company face if they choose to inject substancesinto the wells to increase production?An oil company must consider the extra costs and the uncertainty over whether thetechnique will retrieve more oil.
What will be the impact on the groundwater and the ecosystem?Students might say that a leak will contaminate the groundwater.
If you were to inherit land that has oil wells on it, which method(s) of extractionwould you select, and why?The method(s) they choose may vary. Be sure students understand the reasons forchoosing a particular method.
Now let’s review your previous thoughts about how oil is processed into a formwe can use. Were they accurate? Should your original response be edited orchanged? If so, how would you modify it and why?Allow students an opportunity to share their ideas and record their responses.
Now, let’s refer to our Earth Resources Chart.
Display the overhead transparency, “Earth Resources Chart — Section 1”.
Encourage students to refer to their Earth Resources Chart.
Now, let’s add to our Earth Resources Chart for oil.
Accept student suggestions. The following sample chart shows possible responses.
Sample Portion of Earth Resources Chart: Oil
Method of Impacts of Method of Impacts ofExploration Exploration Acquisition Acquisition
+ – + –
Seismographic Separates Creating Pumping Create Canoil seismic jobs change
disturbance naturalin locating habitatsoil
Transporting Creates Possiblejobs leaks or
spills

Page 118 / Section 1, Lesson 4 Getting Crude Oil: Oil Extraction
CHECKING FOR UNDERSTANDING
Student Reflections• How have my ideas about the extraction of crude oil changed?
• Extraction is…
• The most efficient method of obtaining an Earth resource may not be the bestway because…
• Extracting oil has an effect on…
Teacher Reflections• How have students’ perceptions about the extraction of crude oil changed?
• Do students understand that oil is trapped between particles of the substrateand must be extracted from that location?
• Do students understand the extraction processes for oil?
• Do students understand the issues encountered during the acquisition ofEarth resources?
EXTENSIONSHave students contact an oil company or use the Internetto investigate the newer methods of extracting oil.
Have students investigate the different careers involvedin an offshore drilling operation, such as the planner/economist, environmental/civil engineer, drilling engineer,logging/reservoir engineer, and extraction mud engineer.(See Appendix A.)

Getting Crude Oil: Oil Extraction Section 1, Lesson 4 / Page 119
Oil Derrick
Figure courtesy ofAmerican Petro-leum Institute

Page 120 / Section 1, Lesson 4 Getting Crude Oil: Oil Extraction
Oil Well
Figure courtesyof the NationalEnergy Foundation
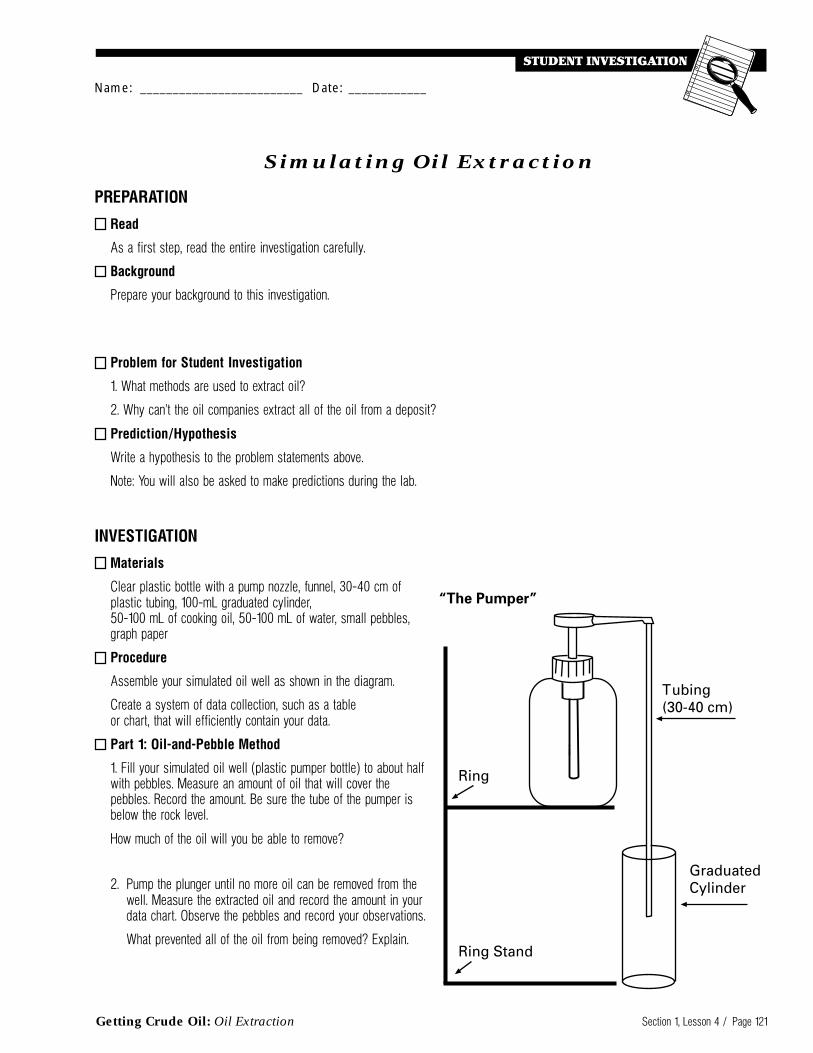
Getting Crude Oil: Oil Extraction Section 1, Lesson 4 / Page 121
Simulating Oil Extraction
PREPARATION
Read
As a first step, read the entire investigation carefully.
Background
Prepare your background to this investigation.
Problem for Student Investigation
1. What methods are used to extract oil?
2. Why can’t the oil companies extract all of the oil from a deposit?
Prediction/Hypothesis
Write a hypothesis to the problem statements above.
Note: You will also be asked to make predictions during the lab.
INVESTIGATION
Materials
Clear plastic bottle with a pump nozzle, funnel, 30-40 cm ofplastic tubing, 100-mL graduated cylinder,50-100 mL of cooking oil, 50-100 mL of water, small pebbles,graph paper
Procedure
Assemble your simulated oil well as shown in the diagram.
Create a system of data collection, such as a tableor chart, that will efficiently contain your data.
Part 1: Oil-and-Pebble Method
1. Fill your simulated oil well (plastic pumper bottle) to about halfwith pebbles. Measure an amount of oil that will cover thepebbles. Record the amount. Be sure the tube of the pumper isbelow the rock level.
How much of the oil will you be able to remove?
2. Pump the plunger until no more oil can be removed from thewell. Measure the extracted oil and record the amount in yourdata chart. Observe the pebbles and record your observations.
What prevented all of the oil from being removed? Explain.
Name: _________________________ Date: ____________

Page 122 / Section 1, Lesson 4 Getting Crude Oil: Oil Extraction
EXTRACTION TABLE
Condition of Volume Volume Total Volume of % of OilInvestigation Before Pumped Oil Extracted Pumped
Pumping
Oil and Pebbles
Cold Water
Student Design
Other Student Design
Part 2: Cold-Water Method
Oil companies need to remove as much of the deposits of oil as possible. How might a company succeed in this task? Oil companieshave tried many methods, but have determined that if they use the effects of density differences, they will have more success. To usethis method, they inject water into the adjacent well to aid in the recovery process.
How will density differences affect the removal of the remaining oil?
1. Place 50 mL of water into the simulated oil well (plastic pumper bottle). Let the mixture settle for about3 minutes. Observe the mixture. Record your observations.
2. Again pump the pumper until you have removed as much of the oil as possible. Measure the extracted oil and record this measurementin the data chart. Observe the pebbles and record your observations.
What prevented all of the oil from being removed? Explain.
Part 3: Student Exploration
Oil companies have conducted research for many years to determine other methods to recover the remaining oil left in the ground.Imagine that you have been hired by an oil company to research different methods to accomplish this task. Given the materials yourteacher has gathered, determine another method that the oil company might use to extract more oil.
You will need to follow the method outlined in the beginning of this activity to design your investigation. Determine your materials listand procedure for the investigation. Do not forget to develop your problem statement and hypothesis.
Remember, data collection is very important to the investigative process. Your procedure must be detailed enough so that any scientistcould follow your steps and replicate your experiment.
Note: You must return to the well the amount of oil removed in the cold-water extraction to determine the effectiveness of the variousmethods.
Data
Add the volume of oil removed using the oil-and-pebble method (Part 1) to the volume of oil removed with the cold-water method (Part2). The total is the volume of oil that would have been extracted by the cold-water method alone. Record this amount into your table asthe “Total Volume of Oil Extracted” by the cold-water method.
Stimulating Oil Extraction (Continued)
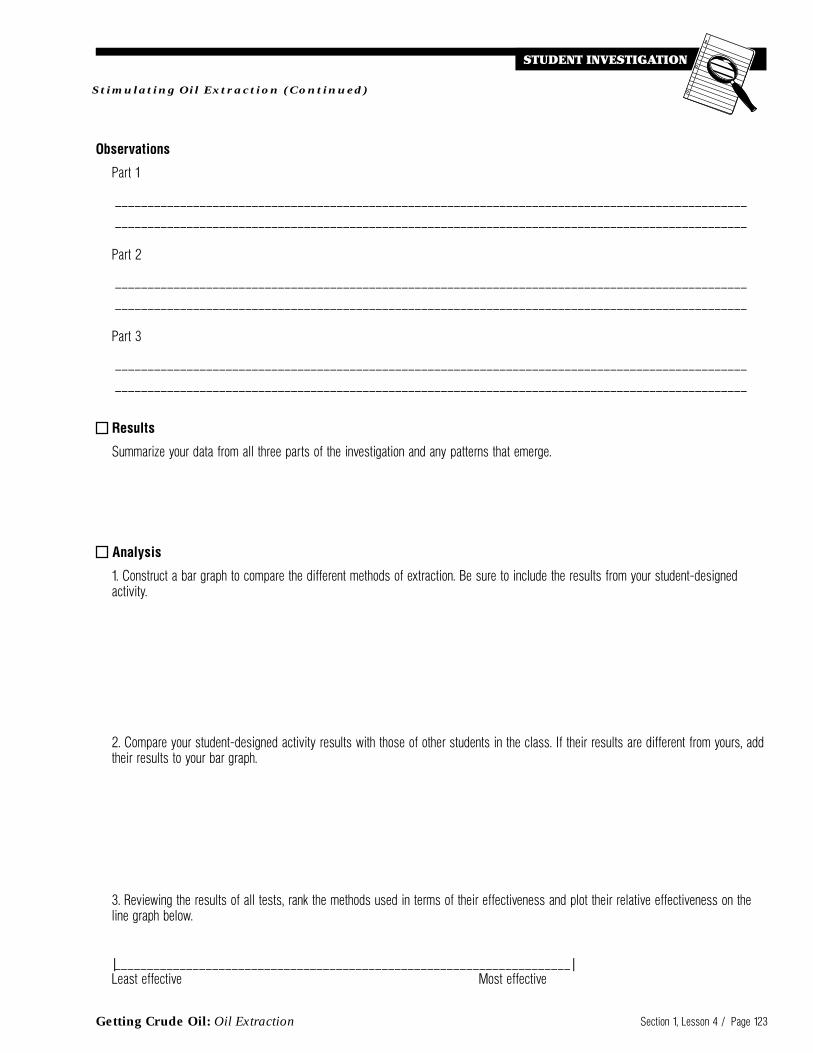
Getting Crude Oil: Oil Extraction Section 1, Lesson 4 / Page 123
Stimulating Oil Extraction (Continued)
Observations
Part 1
_________________________________________________________________________________________________
_________________________________________________________________________________________________
Part 2
_________________________________________________________________________________________________
_________________________________________________________________________________________________
Part 3
_________________________________________________________________________________________________
_________________________________________________________________________________________________
Results
Summarize your data from all three parts of the investigation and any patterns that emerge.
Analysis
1. Construct a bar graph to compare the different methods of extraction. Be sure to include the results from your student-designedactivity.
2. Compare your student-designed activity results with those of other students in the class. If their results are different from yours, addtheir results to your bar graph.
3. Reviewing the results of all tests, rank the methods used in terms of their effectiveness and plot their relative effectiveness on theline graph below.
|______________________________________________________________________|Least effective Most effective
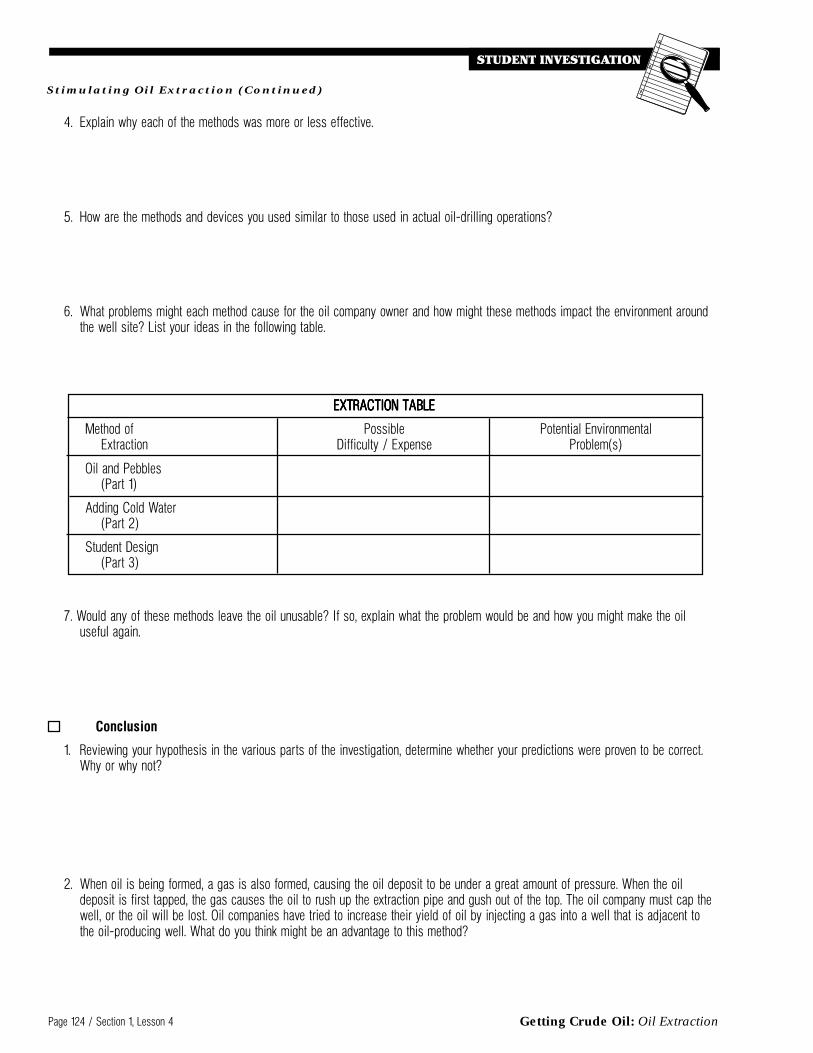
Page 124 / Section 1, Lesson 4 Getting Crude Oil: Oil Extraction
4. Explain why each of the methods was more or less effective.
5. How are the methods and devices you used similar to those used in actual oil-drilling operations?
6. What problems might each method cause for the oil company owner and how might these methods impact the environment aroundthe well site? List your ideas in the following table.
7. Would any of these methods leave the oil unusable? If so, explain what the problem would be and how you might make the oiluseful again.
Conclusion
1. Reviewing your hypothesis in the various parts of the investigation, determine whether your predictions were proven to be correct.Why or why not?
2. When oil is being formed, a gas is also formed, causing the oil deposit to be under a great amount of pressure. When the oildeposit is first tapped, the gas causes the oil to rush up the extraction pipe and gush out of the top. The oil company must cap thewell, or the oil will be lost. Oil companies have tried to increase their yield of oil by injecting a gas into a well that is adjacent tothe oil-producing well. What do you think might be an advantage to this method?
Stimulating Oil Extraction (Continued)
EXTRACTION TABLEEXTRACTION TABLEEXTRACTION TABLEEXTRACTION TABLEEXTRACTION TABLE
Method of Possible Potential EnvironmentalExtraction Difficulty / Expense Problem(s)
Oil and Pebbles(Part 1)
Adding Cold Water(Part 2)
Student Design(Part 3)
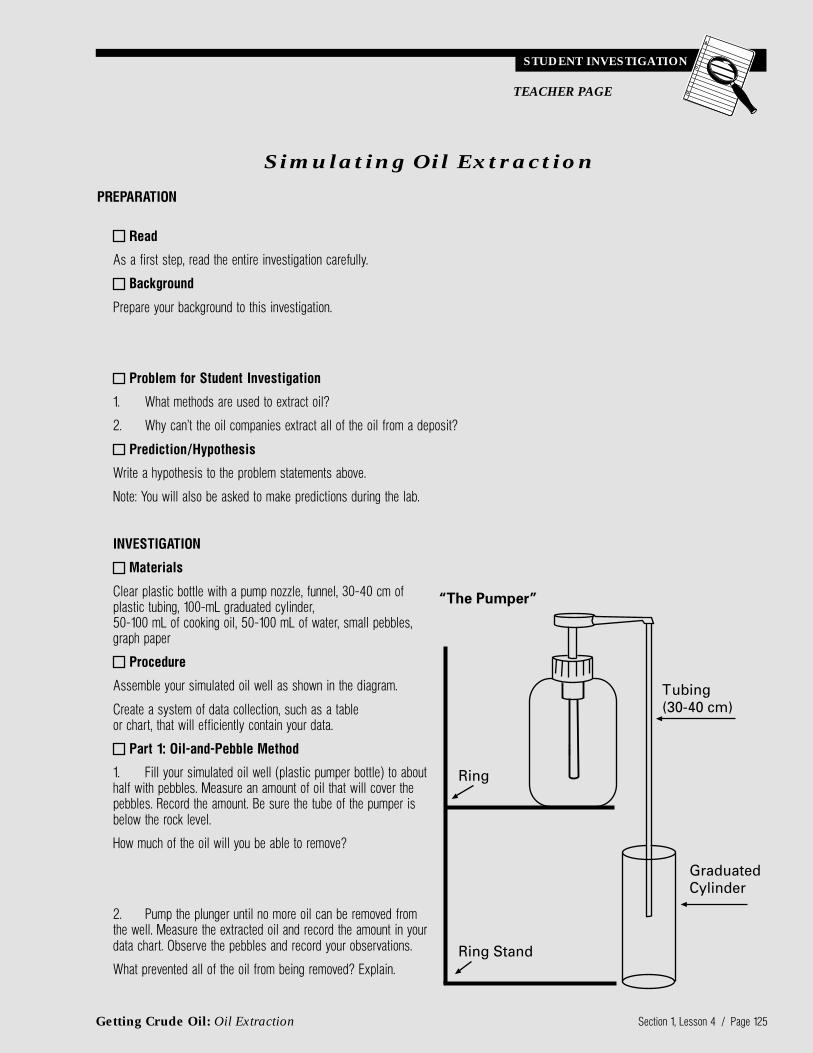
Getting Crude Oil: Oil Extraction Section 1, Lesson 4 / Page 125
STUDENT INVESTIGATION
Simulating Oil Extraction
PREPARATION
Read
As a first step, read the entire investigation carefully.
Background
Prepare your background to this investigation.
Problem for Student Investigation
1. What methods are used to extract oil?
2. Why can’t the oil companies extract all of the oil from a deposit?
Prediction/Hypothesis
Write a hypothesis to the problem statements above.
Note: You will also be asked to make predictions during the lab.
INVESTIGATION
Materials
Clear plastic bottle with a pump nozzle, funnel, 30-40 cm ofplastic tubing, 100-mL graduated cylinder,50-100 mL of cooking oil, 50-100 mL of water, small pebbles,graph paper
Procedure
Assemble your simulated oil well as shown in the diagram.
Create a system of data collection, such as a tableor chart, that will efficiently contain your data.
Part 1: Oil-and-Pebble Method
1. Fill your simulated oil well (plastic pumper bottle) to abouthalf with pebbles. Measure an amount of oil that will cover thepebbles. Record the amount. Be sure the tube of the pumper isbelow the rock level.
How much of the oil will you be able to remove?
2. Pump the plunger until no more oil can be removed fromthe well. Measure the extracted oil and record the amount in yourdata chart. Observe the pebbles and record your observations.
What prevented all of the oil from being removed? Explain.
TEACHER PAGE
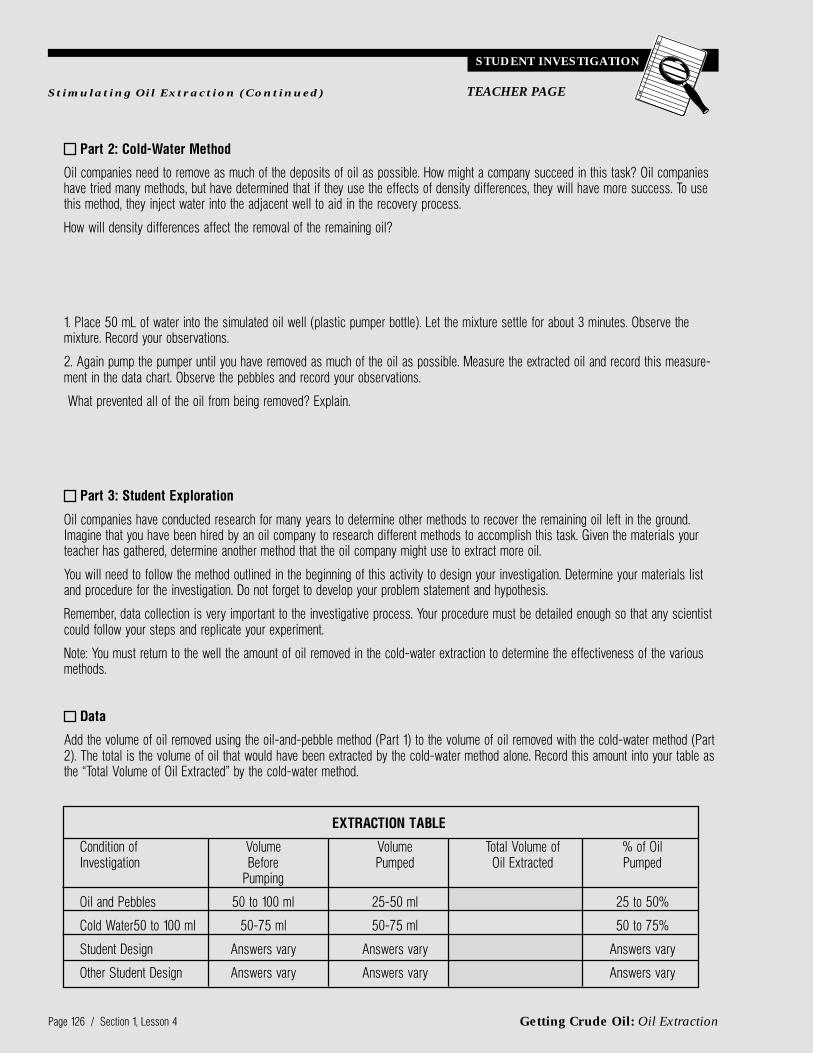
Page 126 / Section 1, Lesson 4 Getting Crude Oil: Oil Extraction
Part 2: Cold-Water Method
Oil companies need to remove as much of the deposits of oil as possible. How might a company succeed in this task? Oil companieshave tried many methods, but have determined that if they use the effects of density differences, they will have more success. To usethis method, they inject water into the adjacent well to aid in the recovery process.
How will density differences affect the removal of the remaining oil?
1. Place 50 mL of water into the simulated oil well (plastic pumper bottle). Let the mixture settle for about 3 minutes. Observe themixture. Record your observations.
2. Again pump the pumper until you have removed as much of the oil as possible. Measure the extracted oil and record this measure-ment in the data chart. Observe the pebbles and record your observations.
What prevented all of the oil from being removed? Explain.
Part 3: Student Exploration
Oil companies have conducted research for many years to determine other methods to recover the remaining oil left in the ground.Imagine that you have been hired by an oil company to research different methods to accomplish this task. Given the materials yourteacher has gathered, determine another method that the oil company might use to extract more oil.
You will need to follow the method outlined in the beginning of this activity to design your investigation. Determine your materials listand procedure for the investigation. Do not forget to develop your problem statement and hypothesis.
Remember, data collection is very important to the investigative process. Your procedure must be detailed enough so that any scientistcould follow your steps and replicate your experiment.
Note: You must return to the well the amount of oil removed in the cold-water extraction to determine the effectiveness of the variousmethods.
Data
Add the volume of oil removed using the oil-and-pebble method (Part 1) to the volume of oil removed with the cold-water method (Part2). The total is the volume of oil that would have been extracted by the cold-water method alone. Record this amount into your table asthe “Total Volume of Oil Extracted” by the cold-water method.
STUDENT INVESTIGATION
Stimulating Oil Extraction (Continued)
EXTRACTION TABLE
Condition of Volume Volume Total Volume of % of OilInvestigation Before Pumped Oil Extracted Pumped
Pumping
Oil and Pebbles 50 to 100 ml 25-50 ml 25 to 50%
Cold Water50 to 100 ml 50-75 ml 50-75 ml 50 to 75%
Student Design Answers vary Answers vary Answers vary
Other Student Design Answers vary Answers vary Answers vary
TEACHER PAGE
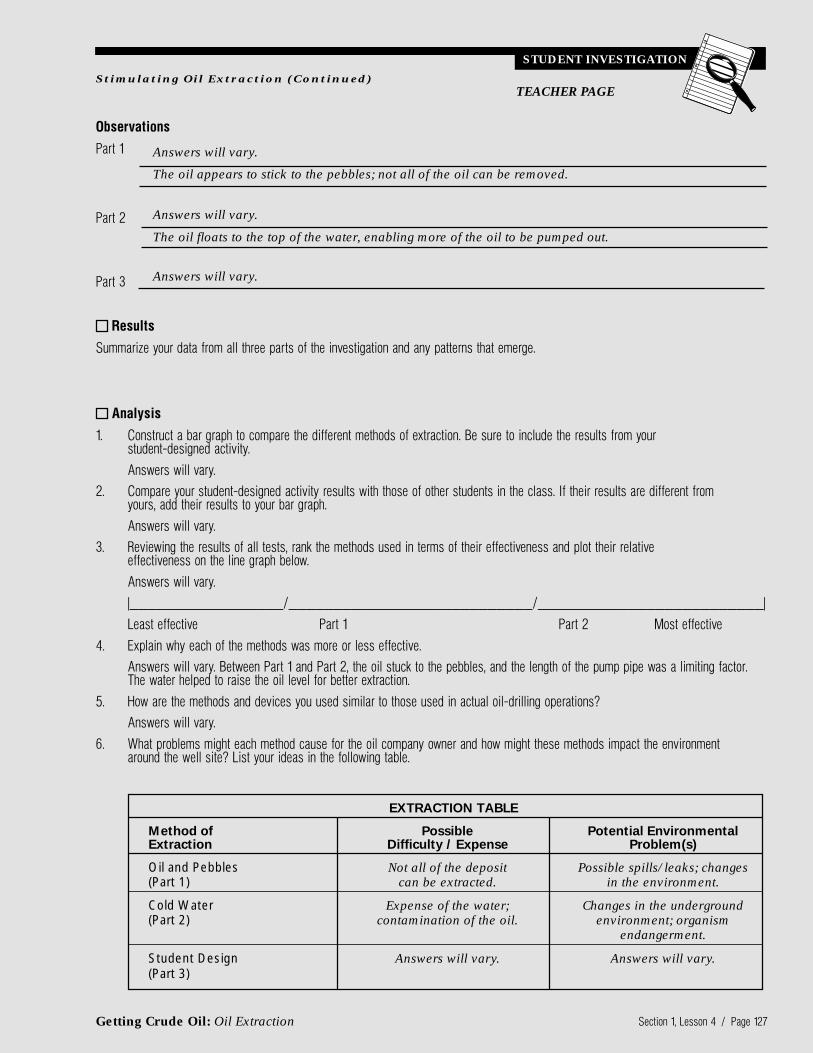
Getting Crude Oil: Oil Extraction Section 1, Lesson 4 / Page 127
Stimulating Oil Extraction (Continued)
EXTRACTION TABLE
Method of Possible Potential EnvironmentalExtraction Difficulty / Expense Problem(s)
Oil and Pebbles Not all of the deposit Possible spills/leaks; changes(Part 1) can be extracted. in the environment.
Cold Water Expense of the water; Changes in the underground(Part 2) contamination of the oil. environment; organism
endangerment.
Student Design Answers will vary. Answers will vary.(Part 3)
ObservationsPart 1
Part 2
Part 3
ResultsSummarize your data from all three parts of the investigation and any patterns that emerge.
Analysis1. Construct a bar graph to compare the different methods of extraction. Be sure to include the results from your
student-designed activity.Answers will vary.
2. Compare your student-designed activity results with those of other students in the class. If their results are different fromyours, add their results to your bar graph.Answers will vary.
3. Reviewing the results of all tests, rank the methods used in terms of their effectiveness and plot their relativeeffectiveness on the line graph below.Answers will vary.|_________________/___________________________/_________________________|Least effective Part 1 Part 2 Most effective
4. Explain why each of the methods was more or less effective.Answers will vary. Between Part 1 and Part 2, the oil stuck to the pebbles, and the length of the pump pipe was a limiting factor.The water helped to raise the oil level for better extraction.
5. How are the methods and devices you used similar to those used in actual oil-drilling operations?Answers will vary.
6. What problems might each method cause for the oil company owner and how might these methods impact the environmentaround the well site? List your ideas in the following table.
TEACHER PAGE
Answers will vary.
The oil appears to stick to the pebbles; not all of the oil can be removed.
Answers will vary.
The oil floats to the top of the water, enabling more of the oil to be pumped out.
Answers will vary.
STUDENT INVESTIGATION

Page 128 / Section 1, Lesson 4 Getting Crude Oil: Oil Extraction
TEACHER PAGE
7. Would any of these methods leave the oil unusable? If so, explain what the problem would be and how you might make the oiluseful again.
Answers will vary.
Conclusion
1. Reviewing your hypothesis in the various parts of the investigation, determine whether your predictions were proven to be correct.Why or why not?
Answers will vary.
2. When oil is being formed, a gas is also formed, causing the oil deposit to be under a great amount of pressure. When the oildeposit is first tapped, the gas causes the oil to rush up the extraction pipe and gush out of the top. The oil company must cap thewell, or the oil will be lost. Oil companies have tried to increase their yield of oil by injecting a gas into a well that is adjacent to theoil-producing well. What do you think might be an advantage to this method?
Answers will vary.
STUDENT INVESTIGATION
Stimulating Oil Extraction (Continued)
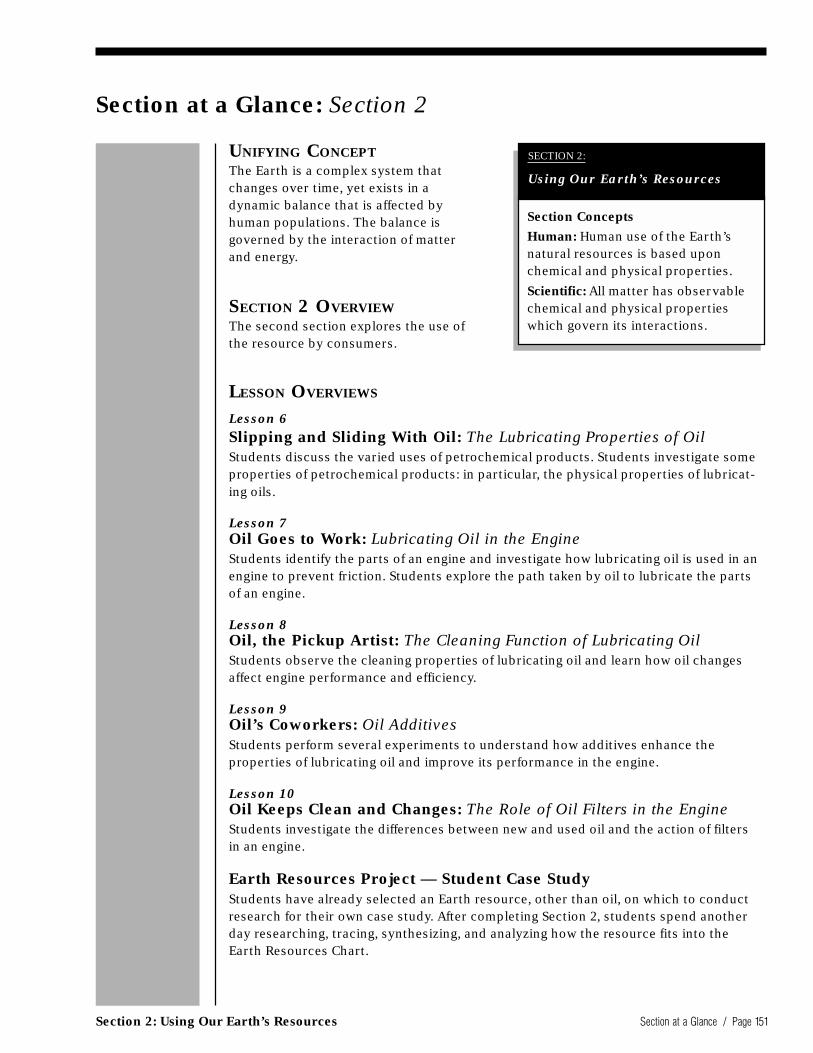
Section 2: Using Our Earth’s Resources Section at a Glance / Page 151
Section at a Glance: Section 2
LESSON OVERVIEWS
Lesson 6Slipping and Sliding With Oil: The Lubricating Properties of OilStudents discuss the varied uses of petrochemical products. Students investigate someproperties of petrochemical products: in particular, the physical properties of lubricat-ing oils.
Lesson 7Oil Goes to Work: Lubricating Oil in the EngineStudents identify the parts of an engine and investigate how lubricating oil is used in anengine to prevent friction. Students explore the path taken by oil to lubricate the partsof an engine.
Lesson 8Oil, the Pickup Artist: The Cleaning Function of Lubricating OilStudents observe the cleaning properties of lubricating oil and learn how oil changesaffect engine performance and efficiency.
Lesson 9Oil’s Coworkers: Oil AdditivesStudents perform several experiments to understand how additives enhance theproperties of lubricating oil and improve its performance in the engine.
Lesson 10Oil Keeps Clean and Changes: The Role of Oil Filters in the EngineStudents investigate the differences between new and used oil and the action of filtersin an engine.
Earth Resources Project — Student Case StudyStudents have already selected an Earth resource, other than oil, on which to conductresearch for their own case study. After completing Section 2, students spend anotherday researching, tracing, synthesizing, and analyzing how the resource fits into theEarth Resources Chart.
UNIFYING CONCEPTThe Earth is a complex system thatchanges over time, yet exists in adynamic balance that is affected byhuman populations. The balance isgoverned by the interaction of matterand energy.
SECTION 2 OVERVIEWThe second section explores the use ofthe resource by consumers.
Section Concepts
Human: Human use of the Earth’snatural resources is based uponchemical and physical properties.
Scientific: All matter has observablechemical and physical propertieswhich govern its interactions.
SECTION 2:
Using Our Earth’s Resources

Page 152 / Section at a Glance Section 2: Using Our Earth’s Resources
LESSON CONCEPTS, SCIENTIFIC THINKING PROCESSES, AND DESIRED OUTCOMES
Lesson Number Lesson Scientific Thinking Desired Outcomesand Name Concept Processes Students will…
LESSON 6. The physical and • Observing Observe, determine, and record that allSlipping and chemical properties • Ordering matter has properties. Students willSliding With Oil: of matter determine • Categorizing identify the general physical propertiesThe Lubricating how it interacts • Relating of lubricating oil.Properties of Oil with other matter. • Inferring
• Applying
LESSON 7. Physical proper- • Observing Demonstrate that an Earth resource is usedOil Goes to Work: ties of matter • Communicating in a specific manner. Students will traceLubricating Oil determine its • Relating the path that oil follows through an engine.in the Engine ability to interact • Inferring
effectively with • Applyingother pieces ofmatter
LESSON 8. Substances in • Communicating Discuss that when a chemical change occurs,Oil, the Pickup a mixture interact • Observing new substances are produced with a releaseArtist: The based upon their • Comparing of some form of energy. Students will describeCleaning Function chemical and • Inferring the products and energy release of theof Lubricating Oil physical properties. • Applying chemical reaction when gasoline is burned.
Explore the interaction of matter. Studentswill describe the interactions of water andoil with carbon and metal particles whenforming mixtures.
Identify that objects behave in manydifferent ways depending, in part, on theirsurroundings. Students will explain howmetallic and carbon contaminantssuspended in lubricating oil interfere withthe proper functioning of an engine.
Explain that only one variable at a time canbe changed during a fair comparison testof the effectiveness of a substance. Studentswill design an experiment, using only onevariable at a time, to test the cleaningfunction of oil.
Discuss physical properties of substancesthat make them useful to humans. Studentswill observe the physical properties oflubricating oil and discuss their effectson a car’s engine.
Discuss how the physical and chemicalproperties of a resource material determineits value for humans. Students will discusshow the properties of oil make it a goodsubstance for keeping an enginerunning smoothly.
Understand that complicated machinescontain several parts connected invarious ways. Students will describe inbasic terms how oil lubricates a V-8 engine.

Section 2: Using Our Earth’s Resources Section at a Glance / Page 153
LESSON CONCEPTS, SCIENTIFIC THINKING PROCESSES, AND DESIRED OUTCOMES
Lesson Number Lesson Scientific Thinking Desired Outcomesand Name Concept Processes Students will…
LESSON 9. The physical and • Observing Describe how environmental factors canOil’s Coworkers: chemical properties • Communicating physically and chemically change sub-Oil Additives of the individual • Comparing stances. Students will discuss the physical
substances of a • Relating and chemical changes that oil undergoesmixture determine • Inferring during use.how the mixture • Applyingwill interact with Discuss how properties of a substanceother substances. can be altered by mixing it with a small
amount of other substances. Studentswill describe the benefits of additives inlubricating oil.
LESSON 10. Mixtures can • Observing Explain that when matter interactsOil Keeps Clean be separated • Communicating with other matter under ordinaryand Changes: by use of • Comparing circumstances, it changes in variousThe Role of physical • Ordering ways. Students will compare new andOil Filters in properties. • Cataloging used oil samples.the Engine • Relating
• Applying Discuss how mixtures can be separatedby filtering for particle size. Studentswill experiment with the use of differentmaterials to filter oil.
Earth Resources All of the Earth’s • Observing Identify questions and concepts aboutProject — Student materials, used • Communicating an Earth resource.Case Study by humans as • Comparing(Research Day) resources, pass • Ordering Design and conduct research on an
through a series • Categorizing Earth resource.of identifiable • Relatingstages. • Inferring Formulate, revise, and synthesize the
• Applying newly gained information.
Recognize and analyze alternateexplanations and models about anEarth resource.
Continue creating a presentation aboutan Earth resource.

Page 154 / Section at a Glance Section 2: Using Our Earth’s Resources
Lesson 6Slipping and Sliding With Oil: The Lubricating Properties of Oil
Lesson 7Oil Goes to Work: Lubricating Oil in the Engine
Getting Ready
Photocopy “Activity Page — The Lubricating System” onto a transparency (cut intostrips to make labels for each engine part that is lubricated with oil).
Photocopy “Activity Page — Oil Drops” (cut apart the “Recycle Used Oil” symbols anduse to illustrate the flow of oil through the engine).
Getting Ready For Section 2
WHAT YOU WILL NEED
For the class:• 5 to 6 samples of rusted metal
For each group of students:• 1 Newton spring scale
• 3 syringes labeled “Control (C),” “Water (W),” and “Oil (O)”
• Small container of tap water labeled “Water”
• Small container of vegetable oil labeled “Oil”
For each student, to conduct “Home Study — A Trusty Tale” (optional):• Steel wool or fine sand paper
• 6 nongalvanized iron nails
• 3 plastic lids or petri dishes
• Sample of clean vegetable oil
WHAT YOU WILL NEED
For the class:• Bottle of hand lotion
• Piece of heat-warped metal
• Bimetallic strip
• Bunsen burner
• Transparent engine model that can be cranked so that the parts move(optional)
• Transparent tape (optional)
• Erasable marker (optional)

Section 2: Using Our Earth’s Resources Section at a Glance / Page 155
Lesson 8Oil, the Pickup Artist: The Cleaning Function of Lubricating Oil
Getting Ready
Grind charcoal briquettes into a fine powder.
Lesson 9Oil’s Coworkers: Oil Additives
WHAT YOU WILL NEED
For the class:• Balance scales (if possible, one for each group)• Candle• Matches• Glass plate or slide
For each group of students:• 2 small, narrow bottles or large test tubes with lids or stoppers• 25-50 mL water• 25-50 mL vegetable oil• 1 graduated cylinder• 0.5 g ground charcoal• 0.5 g iron filings• Soap, water, and paper towels for cleanup
WHAT YOU WILL NEED
For the class:• 3 or 4 different samples of one-quart motor oil containers from different
manufacturers• 1 c vegetable oil• 3 viscosity tubes (see “Getting Ready”)• 1 150-mL beaker• Ice• Water• Hot plate• 20 mL 0.1 M hydrochloric acid• 10 shiny magnesium strips, each 10 cm in length• Steel wool• Blender• Vegetable shortening• 2 stop watches or a clock with a second hand• Pieces of grime-coated metal (see “Getting Ready”)• Pieces of “clean” metal for comparison• Chart paper and markers or overhead transparency and pens
(continued)

Page 156 / Section at a Glance Section 2: Using Our Earth’s Resources
Getting Ready
Collect three or four different one-quart motor oil containers from differentmanufacturers, including SAE weights of 30, 10/40, and 5/30.
For the viscosity demonstration, prepare a warm water bath and an ice bath.
Prepare viscosity tubes using three screw-cap test tubes (or three 18 x 100 testtubes with stoppers) and 3 BBs. Fill each test tube almost completely withvegetable oil. Place one BB in each test tube and then cap or stopper the testtubes. It is desirable to have no air bubble in the closed tube.
Display simulated pieces of “clean” and “dirty” engine parts on a table beforeclass begins. To simulate dirty engine parts, mix vegetable shortening with dirtand dust, and then coat a piece of metal with the “grime.” If you prefer a realsample, ask a bicycle shop to donate the rear gear cluster from an old bike.(This is road grime at its best.)
Mix a saturated solution of 4.2 g baking soda and 500 mL of water to makeSubstance B.
Prepare 20 mL of a 0.1 M hydrochloric acid solution.
Shine each of the 10 magnesium strips by rubbing them with steel wool.
For each group of students:
TEST 1• Water• Graduated cylinder• 3 test tubes and labels• 3 stoppers that fit the test tubes• Detergent in dropper bottle• 5 mL Substance A (a defoamer used for carpet cleaning)• 5 mL Substance B (saturated solution of baking soda) (see “Getting Ready”)• Test tube rack
TEST 2• Water• Quality detergent in a dropper bottle or soapless hand cleaner• 2 small jars with lids, such as baby food jars• 2 labels for the jars• Dirty oil or grease sample (see “Getting Ready”)
TEST 3• Water• 20 mL vinegar• Graduated cylinder• Balance• 4 150-mL beakers• 10 mL Substance B (saturated solution of baking soda) (see “Getting
Ready”)• Waste container• 3 pieces of zinc
(continued from previous page)

Section 2: Using Our Earth’s Resources Section at a Glance / Page 157
Lesson 10Oil Keeps Clean and Changes: The Role of Oil Filters in the Engine
Getting ReadyFor each group of students, prepare simulated used oil using the followingsubstances:• 100 mL vegetable oil• 1 g sand or dirt• 1.25 g charcoal• 1 g metal pieces (if available)
Cut an oil filter in half, lengthwise.
Earth Resources Project — Student Case Study (Research Day)
Getting Ready
Arrange for the class to conduct research in the school library/media center forone or more class session(s).
If necessary, ask the librarian/media specialist to set aside some referencematerials for a reserve section.
WHAT YOU WILL NEED
For the class:
• Samples of new and simulated used oil (see “Getting Ready”)
• Oil filter cut in half lengthwise
• One or more transparent fuel filter(s)
• Variety of car owner manuals
For each group of students:
• Coffee filter paper
• Paper towels, toilet paper, facial tissue
• Cheesecloth
• Pieces of cotton or polyester fabric
• Any other filtering material that is readily available
• Clear plastic beverage water bottles (one small, and one medium or largeso that the smaller one will fit inside the other)
• Nail
• 100 mL simulated used oil (see “Getting Ready”)
• Graduated cylinder
WHAT YOU WILL NEED
For the class:• Research materials, such as:
- 4 to 5 different sets of encyclopedias, both print and electronic- Selection of pamphlets and books about the chosen materials and resources- List of local resource agencies- Internet access with specific bookmark addresses (if possible)

Page 158 / Section at a Glance Section 2: Using Our Earth’s Resources
Storyline
One way to attract students’ attention to the properties of lubricating oil and to get theminvolved in the curriculum is to use the following storyline. Choose four students toperform the short “play” in front of the class. Provide time for them to learn their rolesprior to the performance.
ANALYSIS OF A RESOURCE: PART 2As the Oil Moves ThroughCharacters: Mom, Elias, Cecylia, and the narrator
Narrator: Mom is changing the oil on the car.
Elias: Mom, how long is that going to take for you to change the oil? You’ve beenworking on it for a long time, it seems.
Mom: It doesn’t take long, but our trip through the redwoods put a lot of miles onour car. The car’s users manual says the oil needs to be changed every fewthousand miles, and I’m changing the oil filter, too. It needs to be changedeach time we change the oil, so a clean filter can keep the new oil clean for alonger time. You know, that reminds me: the accident that we came acrosson our trip involved a diesel fuel spill. The oil in our car comes from thesame crude oil refining process that produces diesel fuel.
Elias: But Mom, you and Dad said that gasoline comes from the refining of crude oil!
Mom: That’s right. Diesel fuel, gasoline, and motor oil also come from the samerefining process. There are also many other products. It seems that crudeoil is essential to our way of life.
Narrator: Cecylia joins Mom and Elias.
Cecylia: Mom, you promised that you would show me how to change theoil some day. How about making today the day you show me? I’ll be drivingsoon, and I’ll need to know about cars.
Mom: That sounds like a great idea, Cecylia. Come help me change the oil and filterin our car.
Cecylia: It’s very hard to see why it is important to put oil in the engine, Mom.Where does it actually go?
Mom: Cecylia, it is hard to see where the oil goes because most of theengine parts that require oil are covered. (Mom turns excitedly to Cecylia.)Cecylia, let’s go to the model store and buy a model engine! Then I canreally show you where all the oil goes throughout the engine and why it’snecessary. Without oil, the engine simply won’t run. The friction is toogreat.
Cecylia: Great idea, Mom!
Narrator: Later that day, Cecylia is busy with her model engine.
Cecylia: Mom, I see why you need oil on the crankshaft and the pistons. They simplydon’t turn or move up and down without something to make it slippery. ButMom, if the oil goes through the engine and filter, it still gets dirty. Where orhow does the dirt and grime get into the oil?
Mom: Yes, the oil gets very dirty, and then it can’t work as well as clean oil. So,we change the oil and the oil filter periodically because we don’t want dirtyoil moving through the engine. Why don’t we look at what the oil does inthe engine and how it gets dirty?
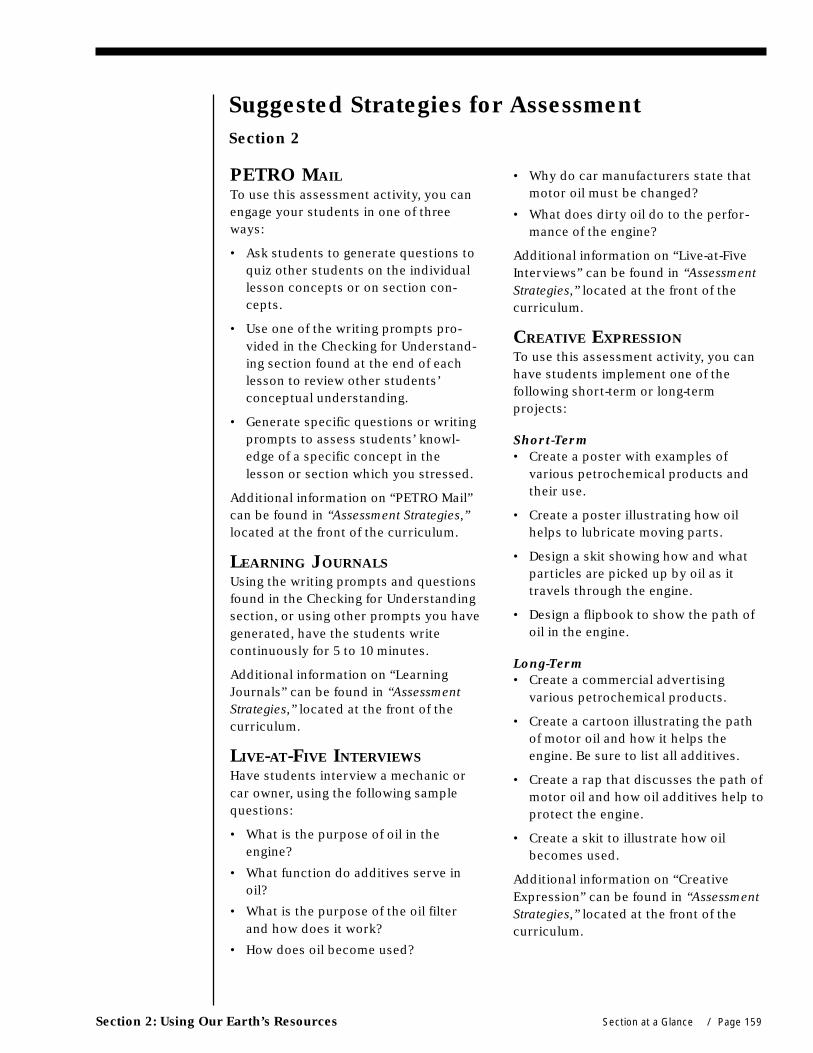
Section 2: Using Our Earth’s Resources Section at a Glance / Page 159
PETRO MAILTo use this assessment activity, you canengage your students in one of threeways:
• Ask students to generate questions toquiz other students on the individuallesson concepts or on section con-cepts.
• Use one of the writing prompts pro-vided in the Checking for Understand-ing section found at the end of eachlesson to review other students’conceptual understanding.
• Generate specific questions or writingprompts to assess students’ knowl-edge of a specific concept in thelesson or section which you stressed.
Additional information on “PETRO Mail”can be found in “Assessment Strategies,”located at the front of the curriculum.
LEARNING JOURNALSUsing the writing prompts and questionsfound in the Checking for Understandingsection, or using other prompts you havegenerated, have the students writecontinuously for 5 to 10 minutes.
Additional information on “LearningJournals” can be found in “AssessmentStrategies,” located at the front of thecurriculum.
LIVE-AT-FIVE INTERVIEWSHave students interview a mechanic orcar owner, using the following samplequestions:
• What is the purpose of oil in theengine?
• What function do additives serve inoil?
• What is the purpose of the oil filterand how does it work?
• How does oil become used?
Suggested Strategies for AssessmentSection 2
• Why do car manufacturers state thatmotor oil must be changed?
• What does dirty oil do to the perfor-mance of the engine?
Additional information on “Live-at-FiveInterviews” can be found in “AssessmentStrategies,” located at the front of thecurriculum.
CREATIVE EXPRESSIONTo use this assessment activity, you canhave students implement one of thefollowing short-term or long-termprojects:
Short-Term• Create a poster with examples of
various petrochemical products andtheir use.
• Create a poster illustrating how oilhelps to lubricate moving parts.
• Design a skit showing how and whatparticles are picked up by oil as ittravels through the engine.
• Design a flipbook to show the path ofoil in the engine.
Long-Term• Create a commercial advertising
various petrochemical products.
• Create a cartoon illustrating the pathof motor oil and how it helps theengine. Be sure to list all additives.
• Create a rap that discusses the path ofmotor oil and how oil additives help toprotect the engine.
• Create a skit to illustrate how oilbecomes used.
Additional information on “CreativeExpression” can be found in “AssessmentStrategies,” located at the front of thecurriculum.

Page 160 / Section at a Glance Section 2: Using Our Earth’s Resources
GROUP EVALUATION POSTER
SESSION OR WHITE BOARDThis activity can help you gauge students’preconceptions before each lessonbegins, or during the Prethink portion ofeach lesson. Save the poster for review atthe end of the lesson. If you do thisactivity on white boards, have the stu-dents record the ideas in their learningjournals. You should refrain from addinginformation or correcting the students’statements. While students review theirprior thinking during the Action Process-ing section of each lesson, you may wantto ask questions to enable the students todispel the misconceptions shown on theposters.
Sample prompts include:
• Explain the function of oil in theengine.
• Explain the function and types of oiladditives.
• What physical properties of oil changeas oil becomes used?
• How does the oil filter work in remov-ing particles from the oil as it movesthrough the engine?
Additional information on “Group Evalua-tion Poster Session or White Board” canbe found in “Assessment Strategies,”located at the front of the curriculum.
PORTFOLIOSIf you are using this assessment activity,students should take the following stepsat this time:
• Make their second selections.
• Self-reflect as to why they chose theentry.
• Revise their thoughts about theirtopics.
• Describe what they have learned aboutthe chosen subject.
• Decide what they still want to know.
Additional information on “Portfolios”can be found in “Assessment Strategies,”located at the front of the curriculum.
CONCEPT MAPSTo use this assessment activity, try one ofthe following ideas:
• Have students generate a list of high-frequency or key terms used in theday’s activities or lessons, and thenhave them use this list to construct aconcept map.
• Generate a list of key terms which youhave determined to assess the stu-dents’ conceptual understanding of thelesson, and then have students gener-ate a concept map that includes thesekey terms.
• Use the following concept map toassess your students’ conceptualunderstanding of the section. Provideyour students with copies of “ActivityPage — Earth Resources Concept Mapfor Section 2.” Have your students fill inthe blank concept map, using the listof key terms used. You may wish to fillin a few of the key terms to get stu-dents started. Use the correspondingTeacher Page to assess students’understanding.
Additional information on “Concept Maps”can be found in “Assessment Strategies,”located at the front of the curriculum.

Section 2: Using Our Earth’s Resources Section at a Glance / Page 161
Earth Resources Concept Map for Section 2Fill in the circles on the concept map using the key terms listed below. Each term shown on the list will be used once.
KEY TERMS
• additives
• anti-corrosives
• combustionproducts
• corrosion (rusting)
• cylinders
• detergents
• foam inhibitors
• friction
• lubricating oil
• metals
• oil filter
• oil pump
• particles
• pistons
• shaft bearings
• viscosity
Name: _________________________ Date: ____________

Page 162 / Section at a Glance Section 2: Using Our Earth’s Resources
TEACHER PAGE
Earth Resources Concept Map for Section 2

Section 2: Using Our Earth’s Resources Section at a Glance / Page 163
SECTION 2:
Earth Resources Project — Student Case StudyUNIFYING CONCEPTThe Earth is a complex system that changesover time, yet exists in a dynamic balancethat is affected by human populations. Thebalance is governed by the interactions ofmatter and energy.
LESSON CONCEPTAll of the Earth’s materials, used by humansas resources, pass through a series ofidentifiable stages.
LESSON OVERVIEWStudents have already selected an Earthresource, other than oil, on which to conduct research for their own case study. Aftercompleting Section 2, students spend another day researching, tracing, synthesizing, andanalyzing how the resource fits into the Earth Resources Chart.
After Section 2, students research the following:
• The properties of the resource that meet human needs
• Specific uses of the resource
• Ways in which the resource changes during use
• Impact of its use on the environment
DESIRED OUTCOMESStudents will:
Identify questions and concepts about an Earth resource.Design and conduct research on an Earth resource.Formulate, revise, and synthesize the newly gained information.Recognize and analyze alternate explanations and models about an Earth resource.Continue creating a presentation about an Earth resource.
Students will use the following scientific thinking processes:Observing, communicating, comparing, ordering, categorizing, relating, inferring, and applying.
STEPS FOR TEACHING
Teacher Action Student Action Suggested Time
Ask students to review the stages of the Earth Resources Examining 5 min.Chart. Prior Ideas
Direct students to brainstorm what they know and Inferring, Applying, 5 min.want to know about their chosen resource. and Relating Information
Guide students in the appropriate research methods Relating 5 min.and emphasis for their chosen resource. Information
Provide time and resources for students to conduct research. Applying Knowledge 50 min.
Section Concepts
Human: Human use of the Earth’snatural resources is based uponchemical and physical properties.
Scientific: All matter has observablechemical and physical propertieswhich govern its interactions.
SECTION 2:
Using Our Earth’s Resources

Page 164 / Section at a Glance Section 2: Using Our Earth’s Resources
BACKGROUND FOR TEACHERSThe National Science Education Standardsemphasize that students should experi-ence science as inquiry which engagesthem in the active construction of ideasand explanations. Teaching science asinquiry provides teachers with theopportunity to develop student abilitiesand to enrich the understanding ofscience.
Students should be guided to generatequestions that make it possible “toanalyze data, develop a richer knowledgebase, reason using science concepts,make connections between evidence andexplanations, and recognize alternativeexplanations. Ideas should be examinedand discussed in class so that otherstudents can benefit from the feedback.”Teachers of science can use the ideas ofstudents in their class, ideas from otherclasses, and ideas from texts, databases,or other sources.
Reference:National Research Council, NationalScience Education Standards. NationalAcademy Press, Washington, D.C., 1996.
GETTING READYObtain materials(see “What You Will Need”).
For each student, photocopy:
• “Activity Page — Earth ResourcesProject – Student Case Study”(for Section 2)
Arrange for the class to conductresearch in the school library/mediacenter for one or more classsession(s).
If necessary, ask the librarian/mediaspecialist to set aside some referencematerials for a reserve section.
Take out the overhead transparencies,“Earth Resources Chart” and “EarthResources Chart — Section 2.”
TEACHER NOTESIn this lesson, students continue applyingthe pattern of the stages of resource useto another resource.
WHAT YOU WILL NEED
For the class:• Research materials, such as:
- 4 to 5 different sets of encyclope-dias, both print and electronic
- Selection of pamphlets andbooks about the chosen materialsand resources
- List of local resource agencies
- Internet access with specificbookmark addresses (if possible)
Gather as many reference materials aspossible. Some possible resources include:
• Energy Skill Builders and Energy 90s,Enterprise for Education, 1316 ThirdSt., Ste. 103, Santa Monica, CA 90401;(310) 394-9864
• Guidebook for Federal Resources forK-12 Mathematics & Science,Eisenhower National Clearinghouse,1-800-621-5785, [email protected]
• Ground Water Education for SecondaryStudents, Water Education Foundation,717 K St., Ste. 517, Sacramento, CA95814; (916) 444-6240, <www.water-ed.org>
At the conclusion of each section of thecurriculum, provide at least one classsession for students to research in class.However, students should also workindependently, revisiting their case studyas the unit proceeds.
Students often have difficulty planningahead and pacing their work. Therefore,it is a good idea to set up “checkpoint”dates by which students must completevarious stages of research.
KEY WORDS
CASE STUDYCollected information about an individual, group, or object for usein sociological, medical, environmental, scientific, or psychiatricstudies.
SUSTAINABLEAble to preserve the functioning of existing systems in such a waythat resources are not depleted or permanently damaged.
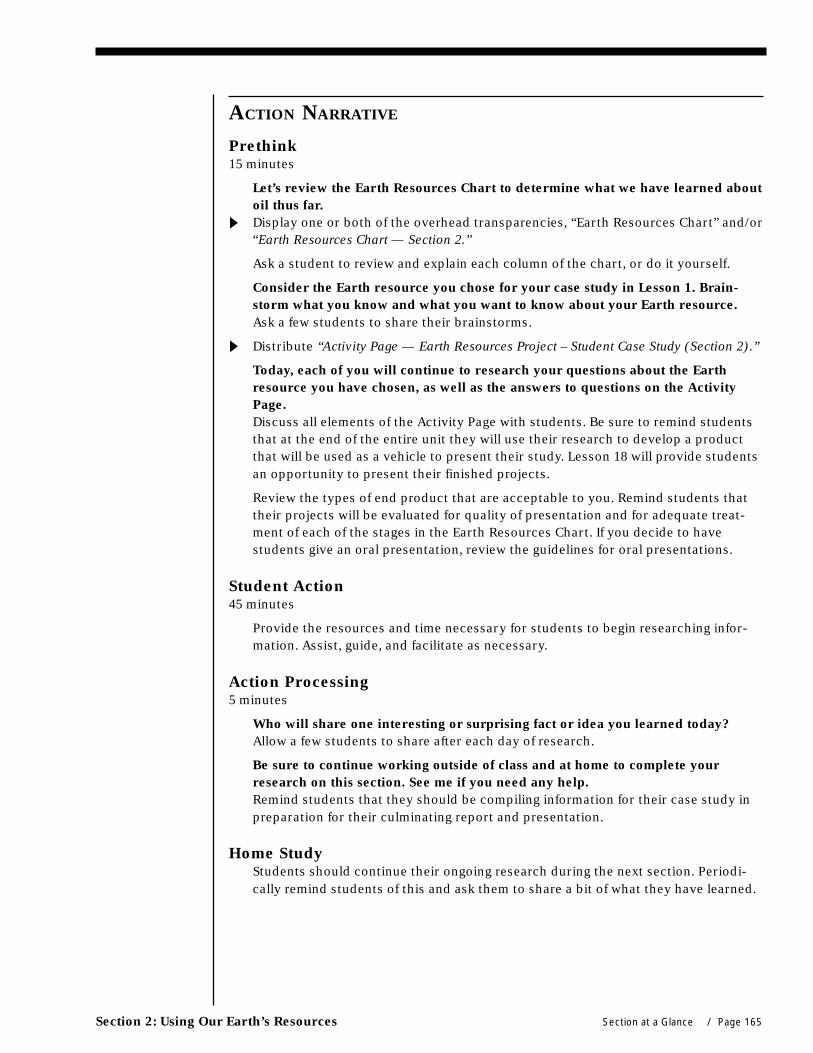
Section 2: Using Our Earth’s Resources Section at a Glance / Page 165
ACTION NARRATIVE
Prethink15 minutes
Let’s review the Earth Resources Chart to determine what we have learned aboutoil thus far.Display one or both of the overhead transparencies, “Earth Resources Chart” and/or“Earth Resources Chart — Section 2.”
Ask a student to review and explain each column of the chart, or do it yourself.
Consider the Earth resource you chose for your case study in Lesson 1. Brain-storm what you know and what you want to know about your Earth resource.Ask a few students to share their brainstorms.
Distribute “Activity Page — Earth Resources Project – Student Case Study (Section 2).”
Today, each of you will continue to research your questions about the Earthresource you have chosen, as well as the answers to questions on the ActivityPage.Discuss all elements of the Activity Page with students. Be sure to remind studentsthat at the end of the entire unit they will use their research to develop a productthat will be used as a vehicle to present their study. Lesson 18 will provide studentsan opportunity to present their finished projects.
Review the types of end product that are acceptable to you. Remind students thattheir projects will be evaluated for quality of presentation and for adequate treat-ment of each of the stages in the Earth Resources Chart. If you decide to havestudents give an oral presentation, review the guidelines for oral presentations.
Student Action45 minutes
Provide the resources and time necessary for students to begin researching infor-mation. Assist, guide, and facilitate as necessary.
Action Processing5 minutes
Who will share one interesting or surprising fact or idea you learned today?Allow a few students to share after each day of research.
Be sure to continue working outside of class and at home to complete yourresearch on this section. See me if you need any help.Remind students that they should be compiling information for their case study inpreparation for their culminating report and presentation.
Home StudyStudents should continue their ongoing research during the next section. Periodi-cally remind students of this and ask them to share a bit of what they have learned.

Page 166 / Section at a Glance Section 2: Using Our Earth’s Resources
CHECKING FOR UNDERSTANDING
Student Reflections• I discovered that…
• I was interested/surprised to learn that…
Teacher Reflections• Can students find the necessary information for each stage of the
Earth Resources Chart?
• Do the students realize that each Earth resource follows the patternof the Earth Resources Chart?
EXTENSIONUse this research opportunity to collaborate and integratewith the students’ English class. The use of research toolssuch as source cards and note cards, outlines, and roughdrafts is taught in English courses; their use can enhancethis scientific case study.
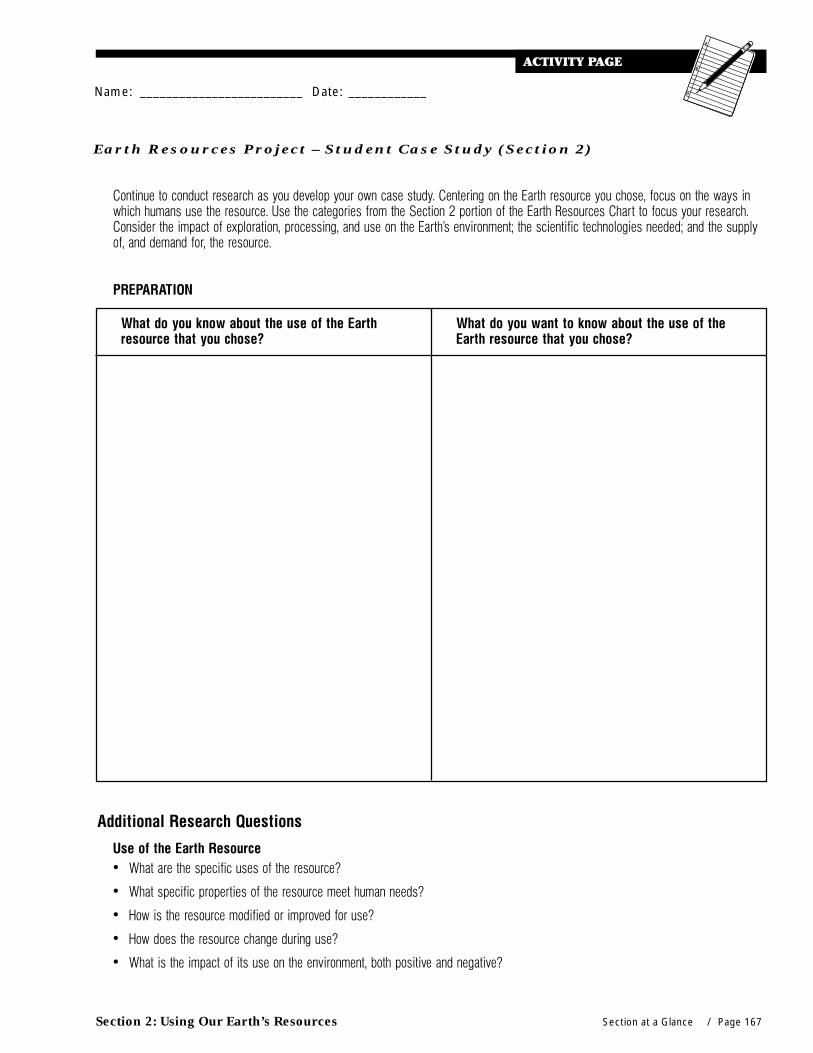
Section 2: Using Our Earth’s Resources Section at a Glance / Page 167
Earth Resources Project – Student Case Study (Section 2)
What do you know about the use of the Earthresource that you chose?
Continue to conduct research as you develop your own case study. Centering on the Earth resource you chose, focus on the ways inwhich humans use the resource. Use the categories from the Section 2 portion of the Earth Resources Chart to focus your research.Consider the impact of exploration, processing, and use on the Earth’s environment; the scientific technologies needed; and the supplyof, and demand for, the resource.
PREPARATION
What do you want to know about the use of theEarth resource that you chose?
Additional Research Questions
Use of the Earth Resource• What are the specific uses of the resource?
• What specific properties of the resource meet human needs?
• How is the resource modified or improved for use?
• How does the resource change during use?
• What is the impact of its use on the environment, both positive and negative?
Name: _________________________ Date: ____________

Page 168 / Section at a Glance Section 2: Using Our Earth’s Resources
Notes

Section 3: Disposing of Our Earth’s Resources Section at a Glance / Page 259
Section at a Glance: Section 3
LESSON OVERVIEWS
Lesson 11What to Do With Used Oil? Surface WaterStudents investigate the advantages and disadvantages of a common, but hazardousand illegal, method of used motor oil disposal. Students determine that disposing ofused oil in waterways contaminates the water and can impact plants and wildlife.
Lesson 12What to Do With Used Oil? The BackyardStudents investigate the advantages and disadvantages of a common, yet hazardousand illegal, method of used motor oil disposal. Students analyze the environmentalimpact of dumping oil in the backyard. Students determine that a contaminant dumpedinto a model of a backyard leaches into the groundwater system.
Lesson 13What to Do With Used Oil? The Trash CanStudents investigate the advantages and disadvantages of a common, yet hazardousand illegal, method of used motor oil disposal. Students analyze the environmentalimpact of discarding used motor oil in a landfill. Students determine how used motoroil travels through a model of a landfill.
Lesson 14Why Should We Care About Used Oil? How Used Oil Can Affectthe EnvironmentStudents investigate the following concepts: food pyramids, trophic levels, andbiological magnification. Students analyze the effects of a small amount of toxin ona food pyramid.
Earth Resources Project — Student Case StudyStudents have already selected an Earth resource, other than oil, on which to conductresearch for their own case study. After completing Section 3, students spend anotherday researching, tracing, synthesizing, and analyzing how the resource fits into theEarth Resources Chart.
UNIFYING CONCEPTThe Earth is a complex system thatchanges over time, yet exists in adynamic balance that is affected byhuman populations. The balance isgoverned by the interaction of matterand energy.
SECTION 3 OVERVIEWThe third section discusses the routes ofused oil disposal into the environmentand the related impacts.
Section Concepts
Human: Materials from humansocieties affect both physical andchemical cycles of the Earth.
Scientific: Because ecosystems areinterdependent, a change in onesystem may have far-reaching effectson the others.
SECTION 3:
Disposing of Our Earth’sResources

Page 260 / Section at a Glance Section 3: Disposing of Our Earth’s Resources
LESSON CONCEPTS, SCIENTIFIC THINKING PROCESSES, AND DESIRED OUTCOMES
Lesson Number Lesson Scientific Thinking Desired Outcomesand Name Concept Processes Students will…
LESSON 11. A change in one • ObservingWhat to Do part of the ecosys- • CommunicatingWith Used Oil? tem has conse- • ComparingSurface Water quences for other • Relating
parts of the • Inferringecosystem. • Applying
LESSON 12. A change in one • ObservingWhat to Do part of the eco- • CommunicatingWith Used Oil? system has con- • RelatingThe Backyard sequences for • Inferring
other parts of • Applyingthe ecosystem.
LESSON 13. A change in one • ObservingWhat to Do part of the eco- • CommunicatingWith Used Oil? system has con- • RelatingThe Trash Can sequences for • Inferring
other parts of • Applyingthe ecosystem.
Explain the impact on the environmentwhen a used natural resource is dis-carded in waterways. Students willanalyze the impact on the environmentwhen used oil and its contaminantsubstances are discarded in waterways.
Generalize that although substances areuseful, they may be hazardous if notproperly controlled. Students willexplain why diluting oil to parts permillion is not an effective method fordisposing of used oil in waterways.
Explain the impact on the environmentwhen a used natural resource is discardedon the ground and eventually reaches thegroundwater. Students will analyze theenvironmental impact of used oil and itscontaminant substances when they arediscarded on the ground and eventuallyreach the groundwater system.
Generalize that substances may be hazard-ous if not properly controlled. Studentswill explain why dumping oil in thebackyard is not a safe nor environmen-tally sound method of used oil disposal.
Predict how a single component of asystem might interact with othercomponents in various ways. Studentswill explain how used oil, with itscontaminant substances, might leachinto groundwater through a landfill.
Explain the environmental impactcaused by the disposal of a used naturalresource into a landfill. Students willanalyze the environmental impacts thatcan occur when used oil and its contami-nants are discarded in a landfill.
Generalize that natural systems havethe capacity to reuse water, but thecapacity is limited. Students will evalu-ate the basis for California Health andSafety Code 25250.5 and the legalmethods of disposal for used oil and itscontaminants.
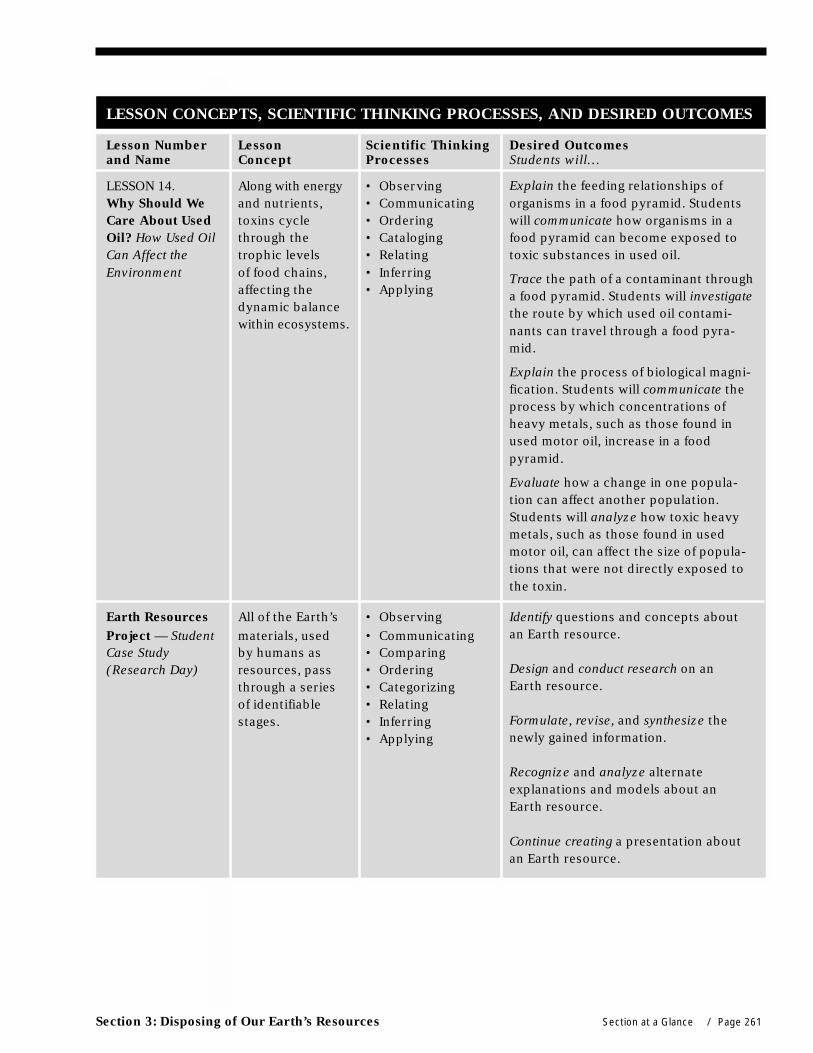
Section 3: Disposing of Our Earth’s Resources Section at a Glance / Page 261
LESSON CONCEPTS, SCIENTIFIC THINKING PROCESSES, AND DESIRED OUTCOMES
Lesson Number Lesson Scientific Thinking Desired Outcomesand Name Concept Processes Students will…
LESSON 14. Along with energy • ObservingWhy Should We and nutrients, • CommunicatingCare About Used toxins cycle • OrderingOil? How Used Oil through the • CatalogingCan Affect the trophic levels • RelatingEnvironment of food chains, • Inferring
affecting the • Applyingdynamic balancewithin ecosystems.
Earth Resources All of the Earth’s • Observing Identify questions and concepts aboutProject — Student materials, used • Communicating an Earth resource.Case Study by humans as • Comparing(Research Day) resources, pass • Ordering Design and conduct research on an
through a series • Categorizing Earth resource.of identifiable • Relatingstages. • Inferring Formulate, revise, and synthesize the
• Applying newly gained information.
Recognize and analyze alternateexplanations and models about anEarth resource.
Continue creating a presentation aboutan Earth resource.
Explain the feeding relationships oforganisms in a food pyramid. Studentswill communicate how organisms in afood pyramid can become exposed totoxic substances in used oil.
Trace the path of a contaminant througha food pyramid. Students will investigatethe route by which used oil contami-nants can travel through a food pyra-mid.
Explain the process of biological magni-fication. Students will communicate theprocess by which concentrations ofheavy metals, such as those found inused motor oil, increase in a foodpyramid.
Evaluate how a change in one popula-tion can affect another population.Students will analyze how toxic heavymetals, such as those found in usedmotor oil, can affect the size of popula-tions that were not directly exposed tothe toxin.
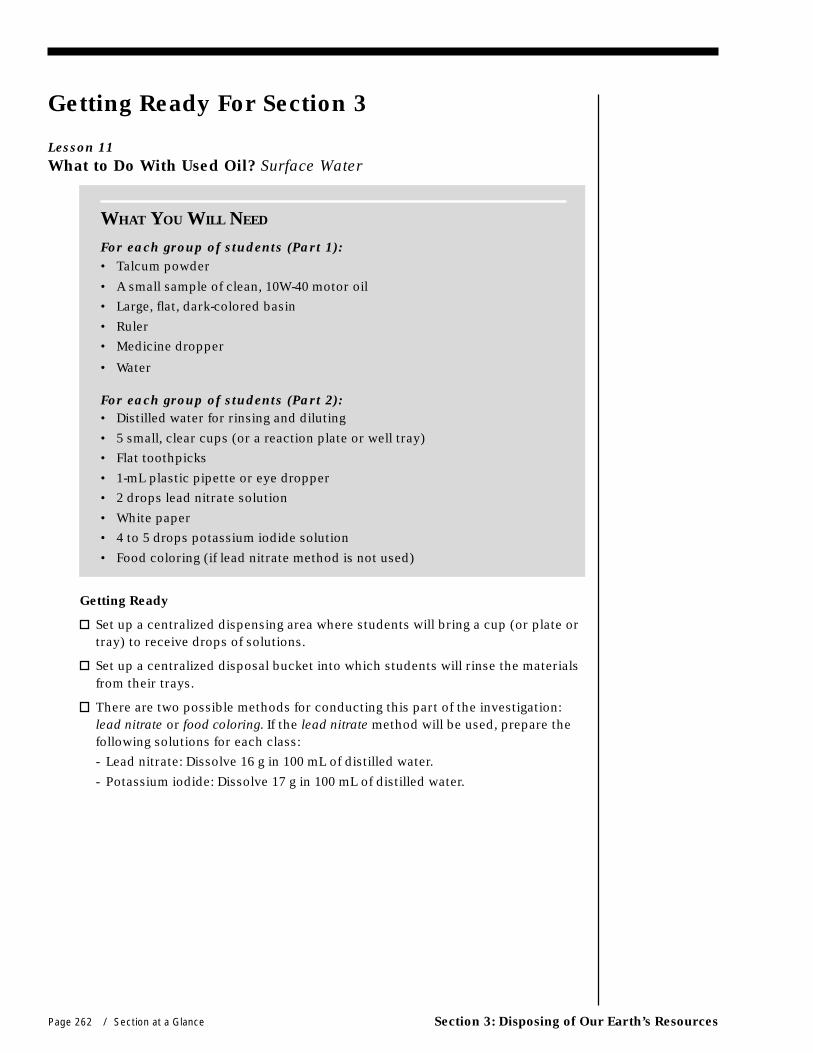
Page 262 / Section at a Glance Section 3: Disposing of Our Earth’s Resources
Lesson 11What to Do With Used Oil? Surface Water
Getting Ready
Set up a centralized dispensing area where students will bring a cup (or plate ortray) to receive drops of solutions.
Set up a centralized disposal bucket into which students will rinse the materialsfrom their trays.
There are two possible methods for conducting this part of the investigation:lead nitrate or food coloring. If the lead nitrate method will be used, prepare thefollowing solutions for each class:
- Lead nitrate: Dissolve 16 g in 100 mL of distilled water.
- Potassium iodide: Dissolve 17 g in 100 mL of distilled water.
Getting Ready For Section 3
WHAT YOU WILL NEED
For each group of students (Part 1):• Talcum powder
• A small sample of clean, 10W-40 motor oil
• Large, flat, dark-colored basin
• Ruler
• Medicine dropper
• Water
For each group of students (Part 2):• Distilled water for rinsing and diluting
• 5 small, clear cups (or a reaction plate or well tray)
• Flat toothpicks
• 1-mL plastic pipette or eye dropper
• 2 drops lead nitrate solution
• White paper
• 4 to 5 drops potassium iodide solution
• Food coloring (if lead nitrate method is not used)
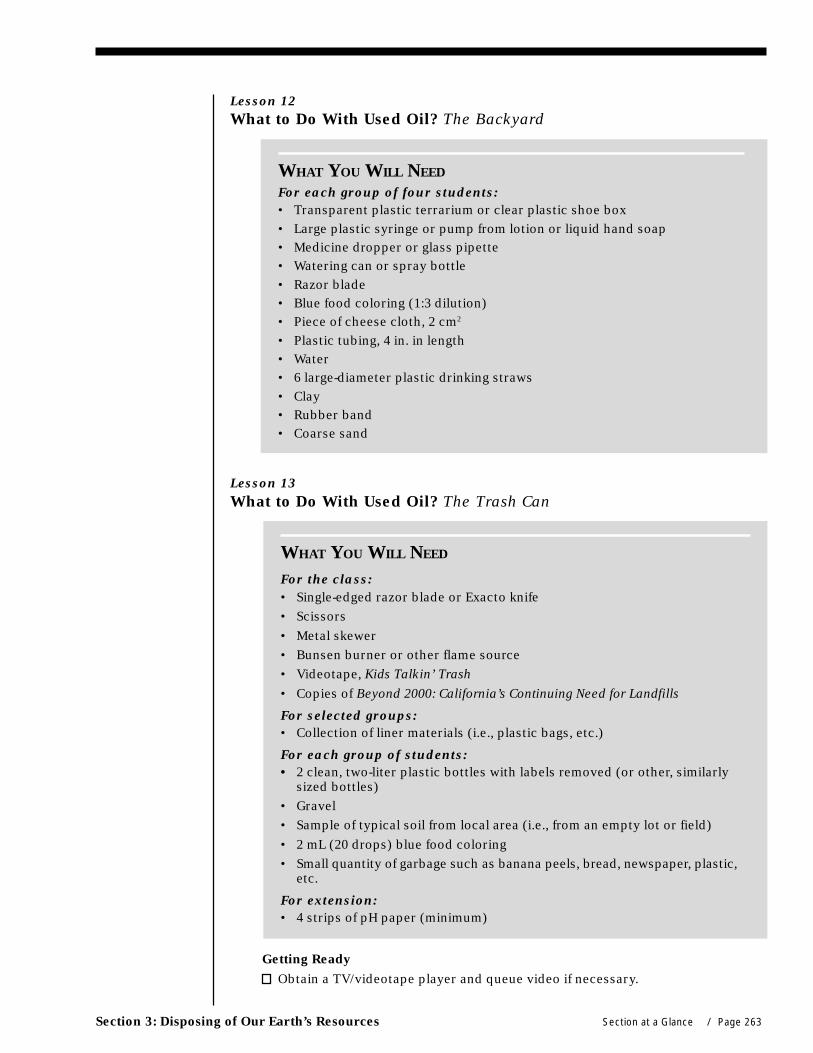
Section 3: Disposing of Our Earth’s Resources Section at a Glance / Page 263
Lesson 12What to Do With Used Oil? The Backyard
Lesson 13What to Do With Used Oil? The Trash Can
Getting Ready
Obtain a TV/videotape player and queue video if necessary.
WHAT YOU WILL NEED
For each group of four students:• Transparent plastic terrarium or clear plastic shoe box• Large plastic syringe or pump from lotion or liquid hand soap• Medicine dropper or glass pipette• Watering can or spray bottle• Razor blade• Blue food coloring (1:3 dilution)• Piece of cheese cloth, 2 cm2
• Plastic tubing, 4 in. in length• Water• 6 large-diameter plastic drinking straws• Clay• Rubber band• Coarse sand
WHAT YOU WILL NEED
For the class:• Single-edged razor blade or Exacto knife• Scissors• Metal skewer• Bunsen burner or other flame source• Videotape, Kids Talkin’ Trash• Copies of Beyond 2000: California’s Continuing Need for Landfills
For selected groups:• Collection of liner materials (i.e., plastic bags, etc.)
For each group of students:• 2 clean, two-liter plastic bottles with labels removed (or other, similarly
sized bottles)• Gravel• Sample of typical soil from local area (i.e., from an empty lot or field)• 2 mL (20 drops) blue food coloring• Small quantity of garbage such as banana peels, bread, newspaper, plastic,
etc.
For extension:• 4 strips of pH paper (minimum)
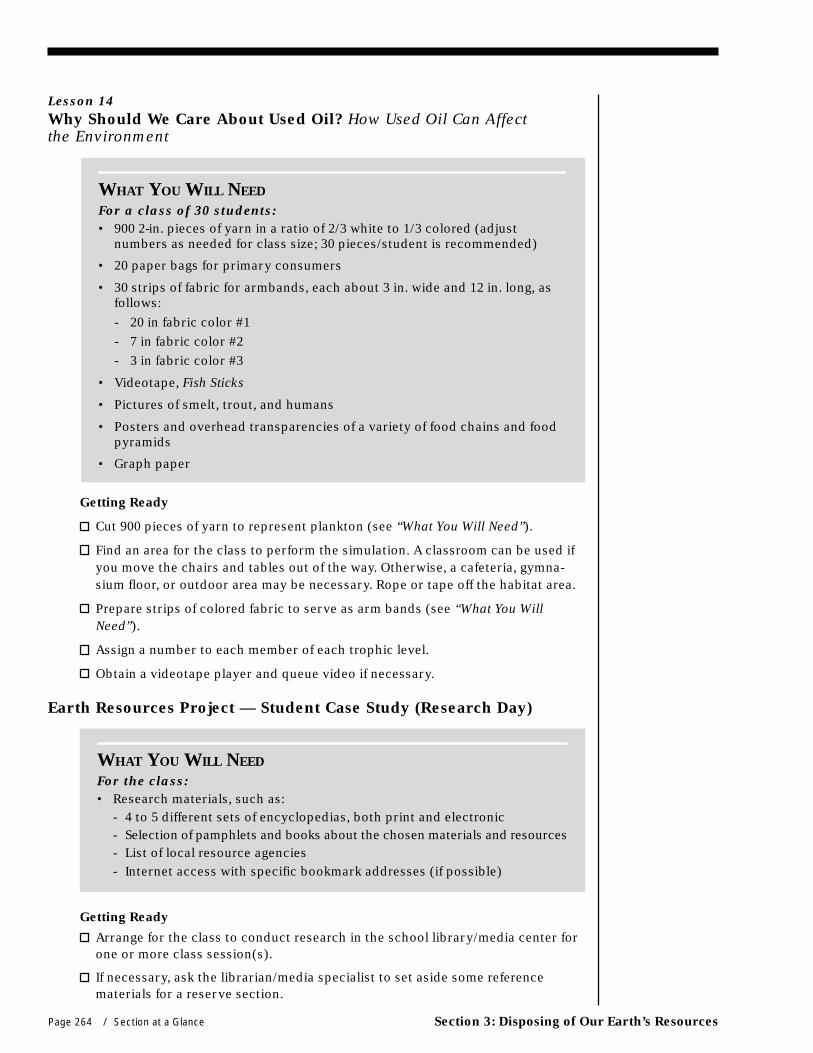
Page 264 / Section at a Glance Section 3: Disposing of Our Earth’s Resources
Lesson 14Why Should We Care About Used Oil? How Used Oil Can Affectthe Environment
Getting Ready
Cut 900 pieces of yarn to represent plankton (see “What You Will Need”).
Find an area for the class to perform the simulation. A classroom can be used ifyou move the chairs and tables out of the way. Otherwise, a cafeteria, gymna-sium floor, or outdoor area may be necessary. Rope or tape off the habitat area.
Prepare strips of colored fabric to serve as arm bands (see “What You WillNeed”).
Assign a number to each member of each trophic level.
Obtain a videotape player and queue video if necessary.
Earth Resources Project — Student Case Study (Research Day)
Getting Ready
Arrange for the class to conduct research in the school library/media center forone or more class session(s).
If necessary, ask the librarian/media specialist to set aside some referencematerials for a reserve section.
WHAT YOU WILL NEED
For a class of 30 students:• 900 2-in. pieces of yarn in a ratio of 2/3 white to 1/3 colored (adjust
numbers as needed for class size; 30 pieces/student is recommended)
• 20 paper bags for primary consumers
• 30 strips of fabric for armbands, each about 3 in. wide and 12 in. long, asfollows:- 20 in fabric color #1- 7 in fabric color #2- 3 in fabric color #3
• Videotape, Fish Sticks
• Pictures of smelt, trout, and humans
• Posters and overhead transparencies of a variety of food chains and foodpyramids
• Graph paper
WHAT YOU WILL NEED
For the class:• Research materials, such as:
- 4 to 5 different sets of encyclopedias, both print and electronic- Selection of pamphlets and books about the chosen materials and resources- List of local resource agencies- Internet access with specific bookmark addresses (if possible)

Section 3: Disposing of Our Earth’s Resources Section at a Glance / Page 265
Storyline
One way to attract students’ attention to methods of used oil disposal and their impacton the environment and get them involved in the curriculum is to use the followingstoryline. Choose three or four students to perform the following skit in front of theclass. Provide time for them to learn their roles prior to the performance.
ANALYSIS OF A RESOURCE: PART 3An Oily MessNote: This part of the skit is most effective when performed as an introduction to Lesson 11.
Characters: Narrator, neighbor, Cecylia
Narrator: Cecylia has finished helping her mother change the oil in their car. She seesthe next-door neighbor.
Neighbor: Hey, I see you were helping your mother change the oil in your car. That’sdifferent for a girl!
Cecylia: I enjoy working on the car. My dad doesn’t know much about it. Someoneneeds to know what to do in case the car breaks down on a vacation.Besides, it makes me feel useful. But now I have to decide what to do withthis used motor oil.
Neighbor: I don’t worry about that used stuff. When I change my oil I get rid of theused oil any way I can.
Cecylia: Any way you can?!? What do you mean by that?
Neighbor: That’s just what I mean, any way I can! If I have an empty bottle or container,I pour the used oil into it and throw it in the trash. If I don’t have a container,I just pour it out where nobody can see it. If I have some tall weeds, I use itas a weed killer so I don’t have to cut them down. Sometimes I have someold brake fluid or antifreeze in a container, and I just pour the used oil intothat.
Cecylia (excited): What?!? Don’t you realize what could happen if you just pour used oilon the ground? How do you know that the used oil won’t end up hurting theenvironment? Let’s investigate to see what could happen.
Neighbor: Well, I never thought about whether it’s bad for the environment when Ithrow away my oil.
Cecylia: Tell you what: I’m going to do a little investigation. Do you want to join me?
Neighbor: Nah. Just tell me what happens.
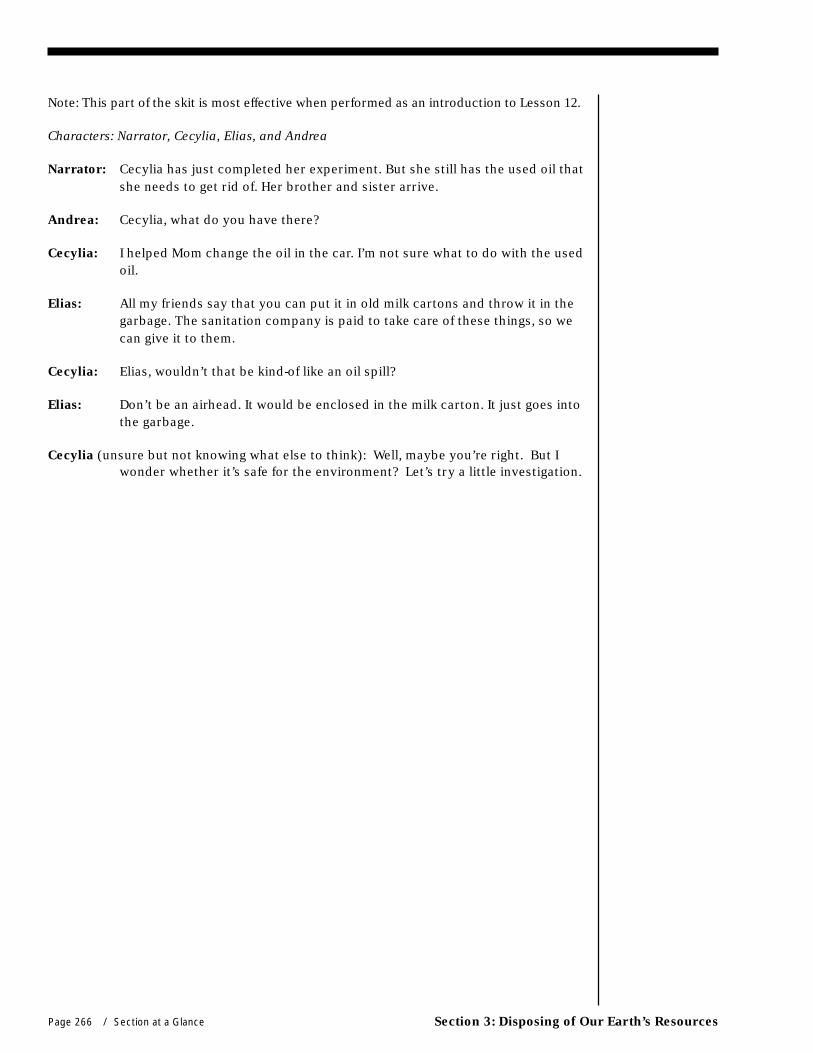
Page 266 / Section at a Glance Section 3: Disposing of Our Earth’s Resources
Note: This part of the skit is most effective when performed as an introduction to Lesson 12.
Characters: Narrator, Cecylia, Elias, and Andrea
Narrator: Cecylia has just completed her experiment. But she still has the used oil thatshe needs to get rid of. Her brother and sister arrive.
Andrea: Cecylia, what do you have there?
Cecylia: I helped Mom change the oil in the car. I’m not sure what to do with the usedoil.
Elias: All my friends say that you can put it in old milk cartons and throw it in thegarbage. The sanitation company is paid to take care of these things, so wecan give it to them.
Cecylia: Elias, wouldn’t that be kind-of like an oil spill?
Elias: Don’t be an airhead. It would be enclosed in the milk carton. It just goes intothe garbage.
Cecylia (unsure but not knowing what else to think): Well, maybe you’re right. But Iwonder whether it’s safe for the environment? Let’s try a little investigation.
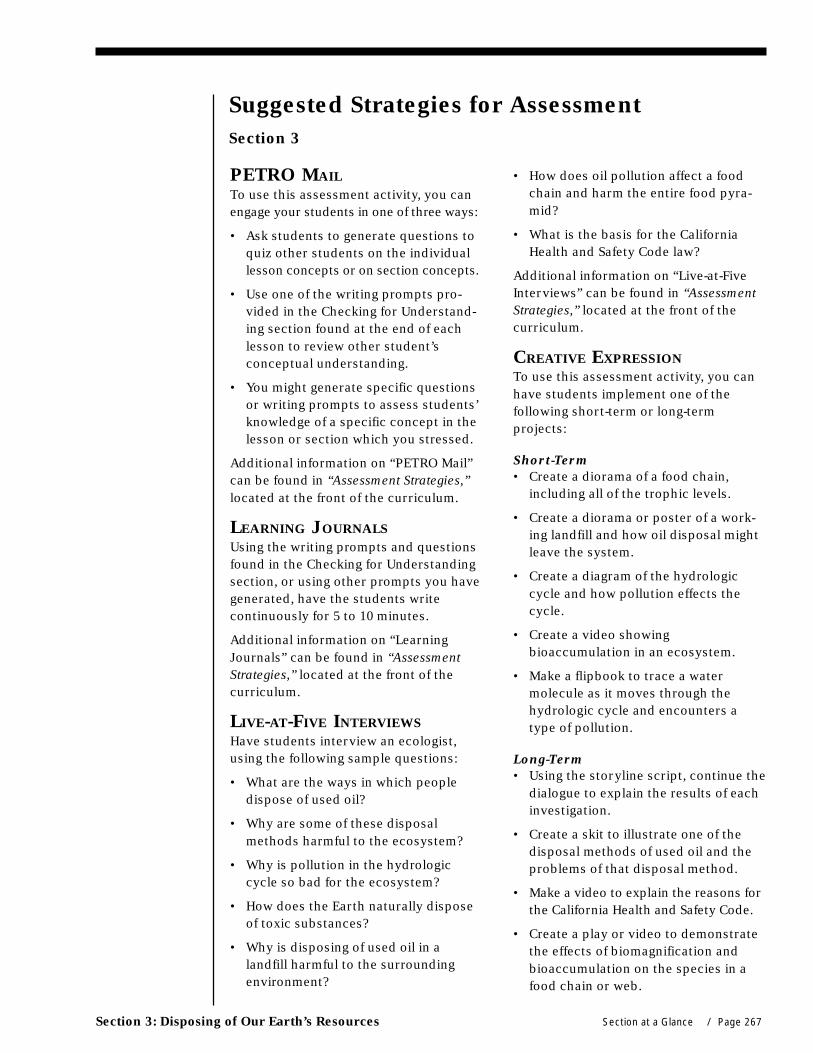
Section 3: Disposing of Our Earth’s Resources Section at a Glance / Page 267
PETRO MAILTo use this assessment activity, you canengage your students in one of three ways:
• Ask students to generate questions toquiz other students on the individuallesson concepts or on section concepts.
• Use one of the writing prompts pro-vided in the Checking for Understand-ing section found at the end of eachlesson to review other student’sconceptual understanding.
• You might generate specific questionsor writing prompts to assess students’knowledge of a specific concept in thelesson or section which you stressed.
Additional information on “PETRO Mail”can be found in “Assessment Strategies,”located at the front of the curriculum.
LEARNING JOURNALSUsing the writing prompts and questionsfound in the Checking for Understandingsection, or using other prompts you havegenerated, have the students writecontinuously for 5 to 10 minutes.
Additional information on “LearningJournals” can be found in “AssessmentStrategies,” located at the front of thecurriculum.
LIVE-AT-FIVE INTERVIEWSHave students interview an ecologist,using the following sample questions:
• What are the ways in which peopledispose of used oil?
• Why are some of these disposalmethods harmful to the ecosystem?
• Why is pollution in the hydrologiccycle so bad for the ecosystem?
• How does the Earth naturally disposeof toxic substances?
• Why is disposing of used oil in alandfill harmful to the surroundingenvironment?
Suggested Strategies for AssessmentSection 3
• How does oil pollution affect a foodchain and harm the entire food pyra-mid?
• What is the basis for the CaliforniaHealth and Safety Code law?
Additional information on “Live-at-FiveInterviews” can be found in “AssessmentStrategies,” located at the front of thecurriculum.
CREATIVE EXPRESSIONTo use this assessment activity, you canhave students implement one of thefollowing short-term or long-termprojects:
Short-Term• Create a diorama of a food chain,
including all of the trophic levels.
• Create a diorama or poster of a work-ing landfill and how oil disposal mightleave the system.
• Create a diagram of the hydrologiccycle and how pollution effects thecycle.
• Create a video showingbioaccumulation in an ecosystem.
• Make a flipbook to trace a watermolecule as it moves through thehydrologic cycle and encounters atype of pollution.
Long-Term• Using the storyline script, continue the
dialogue to explain the results of eachinvestigation.
• Create a skit to illustrate one of thedisposal methods of used oil and theproblems of that disposal method.
• Make a video to explain the reasons forthe California Health and Safety Code.
• Create a play or video to demonstratethe effects of biomagnification andbioaccumulation on the species in afood chain or web.

Page 268 / Section at a Glance Section 3: Disposing of Our Earth’s Resources
Additional information on “CreativeExpression” can be found in “Assess-ment Strategies,” located at the front ofthe curriculum.
GROUP EVALUATION POSTER
SESSION OR WHITE BOARDThis activity can help you gauge stu-dents’ preconceptions before eachlesson begins, or during the Prethinkportion of each lesson. Save the posterfor review at the end of the lesson. Ifyou do this activity on white boards,have the students record the ideas intheir learning journals. You shouldrefrain from adding information orcorrecting the students’ statements.While students review their priorthinking during the Action Processingsection of each lesson, you may want toask questions to enable the students todispel the misconceptions shown onthe posters.
Sample prompts include:
• Explain how the modern landfillworks and how disposal of used oil inthe landfill may harm the surround-ing environment.
• Explain how motor oil can enter intothe hydrologic cycle and how thiswill affect organisms in the ecosys-tem.
• Explain why the California Healthand Safety Code was written, usingexamples to illustrate your ideas.
• Explain the concept ofbiomagnification andbioaccumulation and how they affectorganisms involved in a food chainor web.
Additional information on “GroupEvaluation Poster Session or WhiteBoard” can be found in “AssessmentStrategies,” located at the front of thecurriculum.
PORTFOLIOSIf you are using this assessment activity,students should take the following stepsat this time:
• Make their third selections.
• Self-reflect as to why they chose theentry.
• Determine what they have learnedabout the chosen subject .
• Decide what they want to know.
• Present any questions they may stillhave, or generate any new questions.
Additional information on “Portfolios”can be found in “Assessment Strategies,”located at the front of the curriculum.
CONCEPT MAPSTo use this assessment activity, try one ofthe following ideas:
• Have students generate a list of high-frequency or key terms used in theday’s activities or lessons, and thenhave them use this list to construct aconcept map.
• Generate a list of key terms which youhave determined to assess the stu-dents’ conceptual understanding of thelesson, and then have students gener-ate a concept map that includes thesekey terms.
• Use the following concept map toassess your students’ conceptualunderstanding of the section. Provideyour students with copies of “ActivityPage — Earth Resources Concept Mapfor Section 3.” Have your students fill inthe blank concept map, using the listof key terms used. You may wish to fillin a few of the key terms to get stu-dents started. Use the correspondingTeacher Page to assess students’understanding.
Additional information on “Concept Maps”can be found in “Assessment Strategies,”located at the front of the curriculum.

Section 3: Disposing of Our Earth’s Resources Section at a Glance / Page 269
Earth Resources Concept Map for Section 3Fill in the circles on the concept map using the key terms listed below. Each term shown on the list will be used once.
KEY TERMS
• aquifer
• bioaccumulationandbioconcentration
• biologicalmagnification
• California law
• contaminants
• food pyramid
• groundwater
• lakes and rivers
• landfill
• leachate
• municipal watersupplies
• non-point sourcepollution
• oil slicks
• point sourcepollution
• precipitation
• primaryconsumers
• producers
• runoff
• secondaryconsumers
• soil
• surface water
• tertiary consumers
• used oil
• water
Name: _________________________ Date: ____________

Page 270 / Section at a Glance Section 3: Disposing of Our Earth’s Resources
TEACHER PAGE
Earth Resources Concept Map for Section 3

Section 3: Disposing of Our Earth’s Resources Section at a Glance / Page 271
SECTION 3:
Earth Resources Project — Student Case StudyUNIFYING CONCEPTThe Earth is a complex system that changesover time, yet exists in a dynamic balancethat is affected by human populations. Thebalance is governed by the interactions ofmatter and energy.
LESSON CONCEPTAll of the Earth’s materials, used by humansas resources, pass through a series ofidentifiable stages.
LESSON OVERVIEWStudents have already selected an Earthresource, other than oil, on which toconduct research for their own case study. After completing Section 3, students spendanother day researching, tracing, synthesizing, and analyzing how the resource fits intothe Earth Resources Chart.
After Section 3, students research the following:
• Options for disposal of the resource after it is used
• Advantages and disadvantages of disposal options with regards to the environment,human quality of life, and economics
DESIRED OUTCOMESStudents will:
Identify questions and concepts about an Earth resource.
Design and conduct research on an Earth resource.
Formulate, revise, and synthesize the newly gained information.
Recognize and analyze alternate explanations and models about an Earth resource.
Continue creating a presentation about an Earth resource.
Students will use the following scientific thinking processes:Observing, communicating, comparing, ordering, categorizing, relating, inferring, and applying.
STEPS FOR TEACHING
Teacher Action Student Action Suggested Time
Ask students to review the stages of the Earth Resources Examining 5 min.Chart. Prior Ideas
Direct students to brainstorm what they know and Inferring, Applying, 5 min.want to know about their chosen resource. and Relating Information
Guide students in the appropriate research methods Relating 5 min.and emphasis for their chosen resource. Information
Provide time and resources for students to conduct research. Applying Knowledge 50 min.
Section Concepts
Human: Materials from humansocieties affect both physical andchemical cycles of the Earth.
Scientific: Because ecosystems areinterdependent, a change in onesystem may have far-reaching effectson the others.
SECTION 3:
Disposing of Our Earth’sResources

Page 272 / Section at a Glance Section 3: Disposing of Our Earth’s Resources
BACKGROUND FOR TEACHERSThe National Science Education Standardsemphasize that students should experi-ence science as inquiry which engagesthem in the active construction of ideasand explanations. Teaching science asinquiry provides teachers with theopportunity to develop student abilitiesand to enrich the understanding ofscience.
Students should be guided to generatequestions that make it possible “toanalyze data, develop a richer knowledgebase, reason using science concepts,make connections between evidence andexplanations, and recognize alternativeexplanations. Ideas should be examinedand discussed in class so that otherstudents can benefit from the feedback.”Teachers of science can use the ideas ofstudents in their class, ideas from otherclasses, and ideas from texts, databases,or other sources.
Reference:National Research Council, NationalScience Education Standards. NationalAcademy Press, Washington, D.C., 1996.
GETTING READYObtain materials(see “What You Will Need”).
For each student, photocopy:
• “Activity Page — Earth ResourcesProject — Student Case Study”(for Section 3)
Arrange for the class to conductresearch in the school library/mediacenter for one or more class session(s).
If necessary, ask the librarian/mediaspecialist to set aside some referencematerials for a reserve section.
Take out the overhead transparencies,“Earth Resources Chart” and “EarthResources Chart — Section 3.”
TEACHER NOTESIn this lesson, students continue applyingthe pattern of the stages of resource useto another resource.
WHAT YOU WILL NEED
For the class:• Research materials, such as:
- 4 to 5 different sets of encyclope-dias, both print and electronic
- Selection of pamphlets andbooks about the chosen materialsand resources
- List of local resource agencies
- Internet access with specificbookmark addresses (if possible)
Gather as many reference materials aspossible. Some possible resources include:
• Energy Skill Builders and Energy 90s,Enterprise for Education, 1316 ThirdSt., Ste. 103, Santa Monica, CA 90401;(310) 394-9864
• Guidebook for Federal Resources forK-12 Mathematics & Science,Eisenhower National Clearinghouse,1-800-621-5785, [email protected]
• Ground Water Education for SecondaryStudents, Water Education Foundation,717 K St., Ste. 517, Sacramento, CA95814; (916) 444-6240, <www.water-ed.org>
At the conclusion of each section of thecurriculum, provide at least one classsession for students to research in class.However, students should also workindependently, revisiting their case studyas the unit proceeds.
Students often have difficulty planningahead and pacing their work. Therefore,it is a good idea to set up “checkpoint”dates by which students must completevarious stages of research.
KEY WORDS
CASE STUDYCollected information about an individual, group, or object for usein sociological, medical, environmental, scientific, or psychiatricstudies.
SUSTAINABLEAble to preserve the functioning of existing systems in such a waythat resources are not depleted or permanently damaged.

Section 3: Disposing of Our Earth’s Resources Section at a Glance / Page 273
ACTION NARRATIVE
Prethink15 minutes
Let’s review the Earth Resources Chart to determine what we have learned aboutoil thus far.Display one or both of the overhead transparencies, “Earth Resources Chart” and/or “Earth Resources Chart — Section 3.”
Ask a student to review and explain each column of the chart, or do it yourself.
Consider the Earth resource you chose for your case study in Lesson 1. Brain-storm what you know and what you want to know about your Earth resource.Ask a few students to share their brainstorms.
Distribute “Activity Page — Earth Resources Project – Student Case Study (Section 3).”
Today, each of you will continue to research your questions about the Earthresource you have chosen, as well as the answers to questions on the ActivityPage.Discuss all elements of the Activity Page with students. Be sure to remind studentsthat at the end of the entire unit they will use their research to develop a productthat will be used as a vehicle to present their study. Review the types of end prod-uct that are acceptable to you. Remind students that their projects will be evaluatedfor quality of presentation and for adequate treatment of each of the stages in theEarth Resources Chart. If you decide to have students give an oral presentation,review the guidelines for oral presentations.
Student Action45 minutes
Provide the resources and time necessary for students to begin researching infor-mation. Assist, guide, and facilitate as necessary.
Action Processing5 minutes
Who will share one interesting or surprising fact or idea you learned today?Allow a few students to share after each day of research.
Be sure to continue working outside of class and at home to complete yourresearch on this section. See me if you need any help.Remind students that they should be compiling information for their case study inpreparation for their culminating report and presentation, which will take place inLesson 18. Be sure to remind the students of the due date as well as the type ofproduct you will be expecting.
Home StudyStudents should continue their ongoing research during the next section. Periodi-cally remind students of this and ask them to share a bit of what they have learned.

Page 274 / Section at a Glance Section 3: Disposing of Our Earth’s Resources
CHECKING FOR UNDERSTANDING
Student Reflections• I discovered that…
• I was interested/surprised to learn that…
Teacher ReflectionsCan students find the necessary information for each stage of the EarthResources Chart?
• Do the students realize that each Earth resource follows the pattern of theEarth Resources Chart?
EXTENSIONUse this research opportunity to collaborate and integratewith the students’ English class. The use of research toolssuch as source cards and note cards, outlines, and roughdrafts is taught in English courses; their use can enhancethis scientific case study.

Section 3: Disposing of Our Earth’s Resources Section at a Glance / Page 275
Earth Resources Project – Student Case Study (Section 3)
What do you know about the disposal methods forthe Earth resource that you chose?
Continue to conduct research as you develop your own case study. Centering on the Earth resource you chose, focus on the types ofdisposal methods for the resource after it has been processed and used. Use the categories from the Section 3 portion of the EarthResources Chart to focus your research. Consider the impacts of exploration, processing, and use on the Earth’s environment; thescientific technologies needed; and the supply of, and demand for, the resource.
PREPARATION
What do you want to know about the disposalmethods for the Earth resource that you chose?
Additional Research Questions
Disposal of the Earth Resource• After use, what are the different methods of disposal of the resource?
• What are the advantages and disadvantages of the disposal methods for the environment and human quality of life?
• What are the possible economic impacts of the various methods of disposal of your resource?
Name: ________________________ Date: ________

Page 276 / Section at a Glance Section 3: Disposing of Our Earth’s Resources
Notes
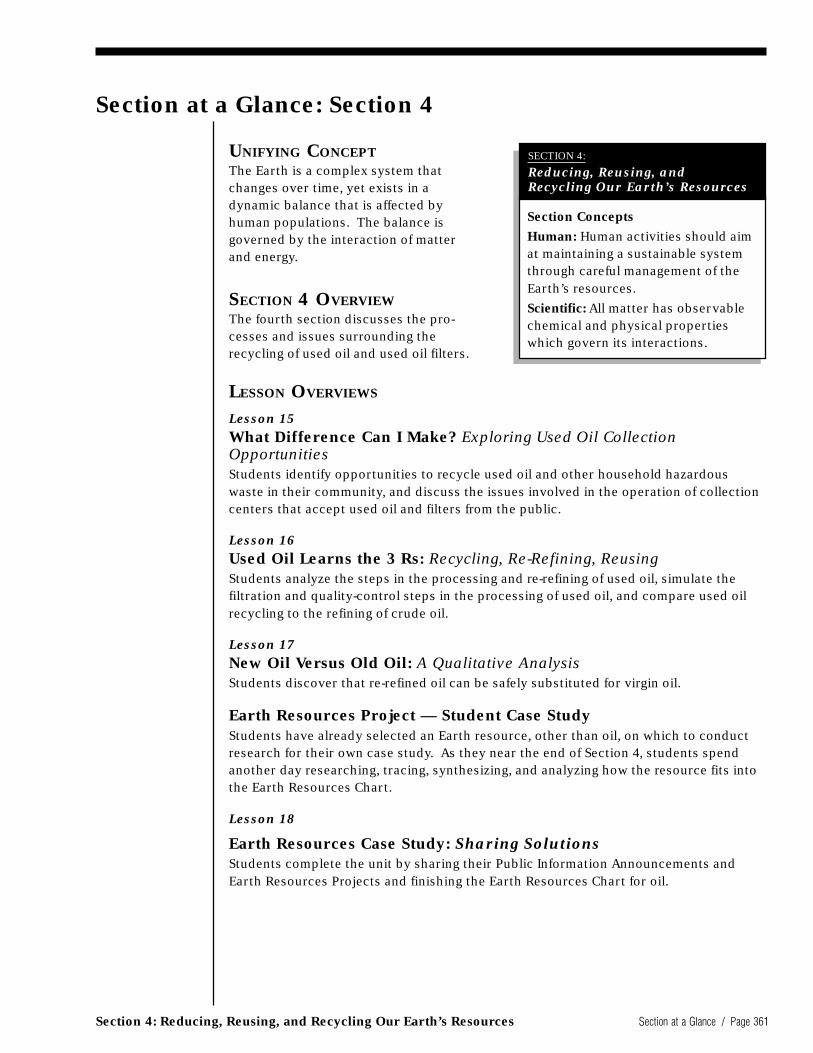
Section 4: Reducing, Reusing, and Recycling Our Earth’s Resources Section at a Glance / Page 361
Section at a Glance: Section 4
LESSON OVERVIEWS
Lesson 15What Difference Can I Make? Exploring Used Oil CollectionOpportunitiesStudents identify opportunities to recycle used oil and other household hazardouswaste in their community, and discuss the issues involved in the operation of collectioncenters that accept used oil and filters from the public.
Lesson 16Used Oil Learns the 3 Rs: Recycling, Re-Refining, ReusingStudents analyze the steps in the processing and re-refining of used oil, simulate thefiltration and quality-control steps in the processing of used oil, and compare used oilrecycling to the refining of crude oil.
Lesson 17New Oil Versus Old Oil: A Qualitative AnalysisStudents discover that re-refined oil can be safely substituted for virgin oil.
Earth Resources Project — Student Case StudyStudents have already selected an Earth resource, other than oil, on which to conductresearch for their own case study. As they near the end of Section 4, students spendanother day researching, tracing, synthesizing, and analyzing how the resource fits intothe Earth Resources Chart.
Lesson 18
Earth Resources Case Study: Sharing SolutionsStudents complete the unit by sharing their Public Information Announcements andEarth Resources Projects and finishing the Earth Resources Chart for oil.
UNIFYING CONCEPTThe Earth is a complex system thatchanges over time, yet exists in adynamic balance that is affected byhuman populations. The balance isgoverned by the interaction of matterand energy.
SECTION 4 OVERVIEWThe fourth section discusses the pro-cesses and issues surrounding therecycling of used oil and used oil filters.
Section Concepts
Human: Human activities should aimat maintaining a sustainable systemthrough careful management of theEarth’s resources.
Scientific: All matter has observablechemical and physical propertieswhich govern its interactions.
SECTION 4:
Reducing, Reusing, andRecycling Our Earth’s Resources
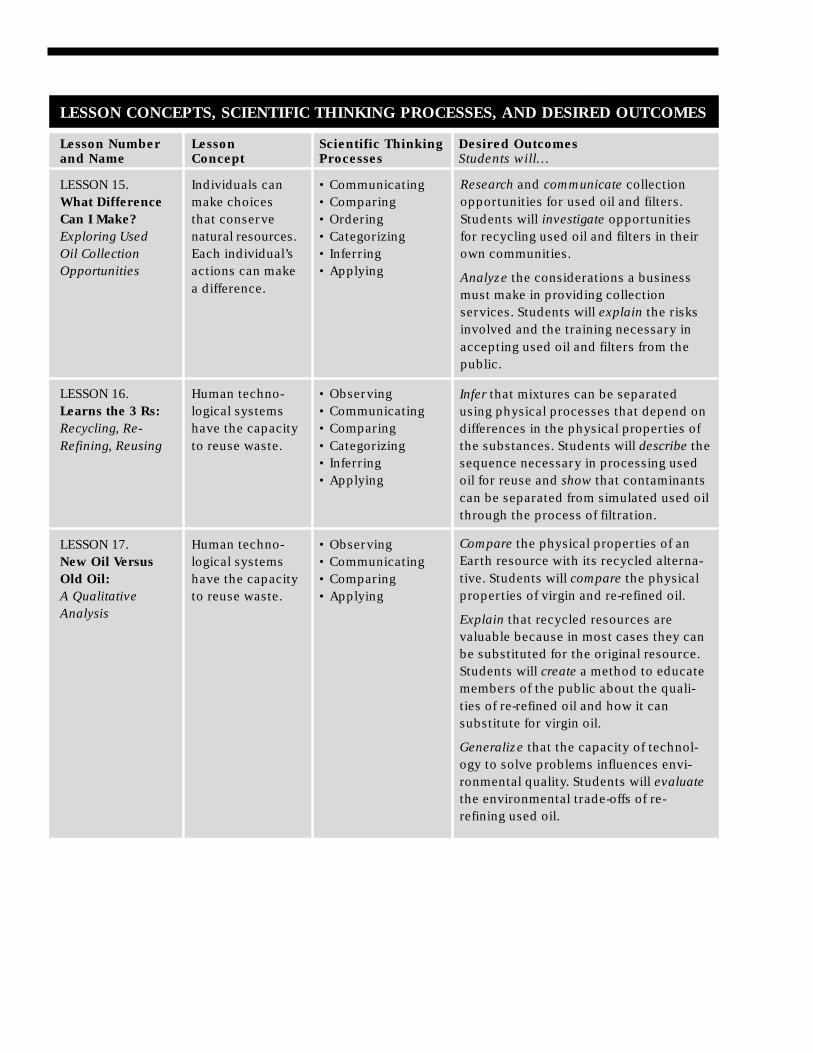
LESSON CONCEPTS, SCIENTIFIC THINKING PROCESSES, AND DESIRED OUTCOMES
Lesson Number Lesson Scientific Thinking Desired Outcomesand Name Concept Processes Students will…
LESSON 15. Individuals can • CommunicatingWhat Difference make choices • ComparingCan I Make? that conserve • OrderingExploring Used natural resources. • CategorizingOil Collection Each individual’s • InferringOpportunities actions can make • Applying
a difference.
LESSON 16. Human techno- • ObservingLearns the 3 Rs: logical systems • CommunicatingRecycling, Re- have the capacity • ComparingRefining, Reusing to reuse waste. • Categorizing
• Inferring• Applying
LESSON 17. Human techno- • ObservingNew Oil Versus logical systems • CommunicatingOld Oil: have the capacity • ComparingA Qualitative to reuse waste. • ApplyingAnalysis
Research and communicate collectionopportunities for used oil and filters.Students will investigate opportunitiesfor recycling used oil and filters in theirown communities.
Analyze the considerations a businessmust make in providing collectionservices. Students will explain the risksinvolved and the training necessary inaccepting used oil and filters from thepublic.
Infer that mixtures can be separatedusing physical processes that depend ondifferences in the physical properties ofthe substances. Students will describe thesequence necessary in processing usedoil for reuse and show that contaminantscan be separated from simulated used oilthrough the process of filtration.
Compare the physical properties of anEarth resource with its recycled alterna-tive. Students will compare the physicalproperties of virgin and re-refined oil.
Explain that recycled resources arevaluable because in most cases they canbe substituted for the original resource.Students will create a method to educatemembers of the public about the quali-ties of re-refined oil and how it cansubstitute for virgin oil.
Generalize that the capacity of technol-ogy to solve problems influences envi-ronmental quality. Students will evaluatethe environmental trade-offs of re-refining used oil.

Section 4: Reducing, Reusing, and Recycling Our Earth’s Resources Section at a Glance / Page 363
LESSON CONCEPTS, SCIENTIFIC THINKING PROCESSES, AND DESIRED OUTCOMES
Lesson Number Lesson Scientific Thinking Desired Outcomesand Name Concept Processes Students will…
Earth Resources All of the Earth’s • Observing Identify questions and concepts aboutProject — Student materials, used • Communicating an Earth resource.Case Study by humans as • Comparing(Research Day) resources, pass • Ordering Design and conduct research on an
through a series • Categorizing Earth resource.of identifiable • Relatingstages. • Inferring Formulate, revise, and synthesize the
• Applying newly gained information.
Recognize and analyze alternateexplanations and models about anEarth resource.
Create a presentation about an Earthresource.
LESSON 18. Natural systems • CommunicatingEarth Resources have the capacity • ComparingCase Study: to reuse waste. • RelatingSharing Solutions • Applying
Explain that the use and improperdisposal of an Earth resource influencesenvironmental quality and can bedetrimental to humans. Students willcommunicate problems and solutionsassociated with using and properlyhandling used oil and filters.

Lesson 15What Difference Can I Make? Exploring Used Oil CollectionOpportunities
Getting Ready
Post the community map.
Make used oil recycling center symbols to pin onto the map by photocopying“Activity Page — Used Oil Recycling Center Symbols” and cutting the symbolsapart.
Post the six sheets of poster paper around the room and, on each one, writethe title of one of the six types of collection programs researched by studentsin Lesson 11’s Home Study.
Getting Ready For Section 4
WHAT YOU WILL NEED
For the class:• Interview responses from Lesson 11’s “Home Study — How Easy Is It To
Recycle Oil?”
• Six or more large sheets of poster paper or chart paper
• A large map of your community
• Used oil recycling center symbols (see “Getting Ready”)
• Push pins or tacks

Section 4: Reducing, Reusing, and Recycling Our Earth’s Resources Section at a Glance / Page 365
Lesson 16Used Oil Learns the 3 Rs: Recycling, Re-Refining, Reusing
Getting Ready
Set up a water distillation apparatus, which you will demonstrate at the close ofthe activity (optional).
Set up a conductivity apparatus to be used to test the student purified watersamples (optional).
WHAT YOU WILL NEED
For the class:• 2 L contaminated water (to simulate used oil), consisting of:
– 2 L tap water– 1/2 tablespoon table salt (NaCl)– 1/2 cup used coffee grounds
• 1 distillation apparatus (optional)
• 1 conductivity meter (optional)
• Rubber tubing (optional)
• Videotape, Evergreen: Redefining Tomorrow by Re-Refining Today
For each group of students:• 1 100-mL graduated cylinder
• Ring stand and ring clamp
• 2 150-mL beakers
• Funnel, medium to large-sized
• Clay triangle
• Paper cup
• Paper clip
• 1 filter paper (Whatman #1, 11-cm diameter)
• 1 125-mL Erlenmeyer flask
• 15 g decolorizing charcoal
• 150-200 g clean sand, pre-moistened
• 150-200 g clean gravel, pre-moistened
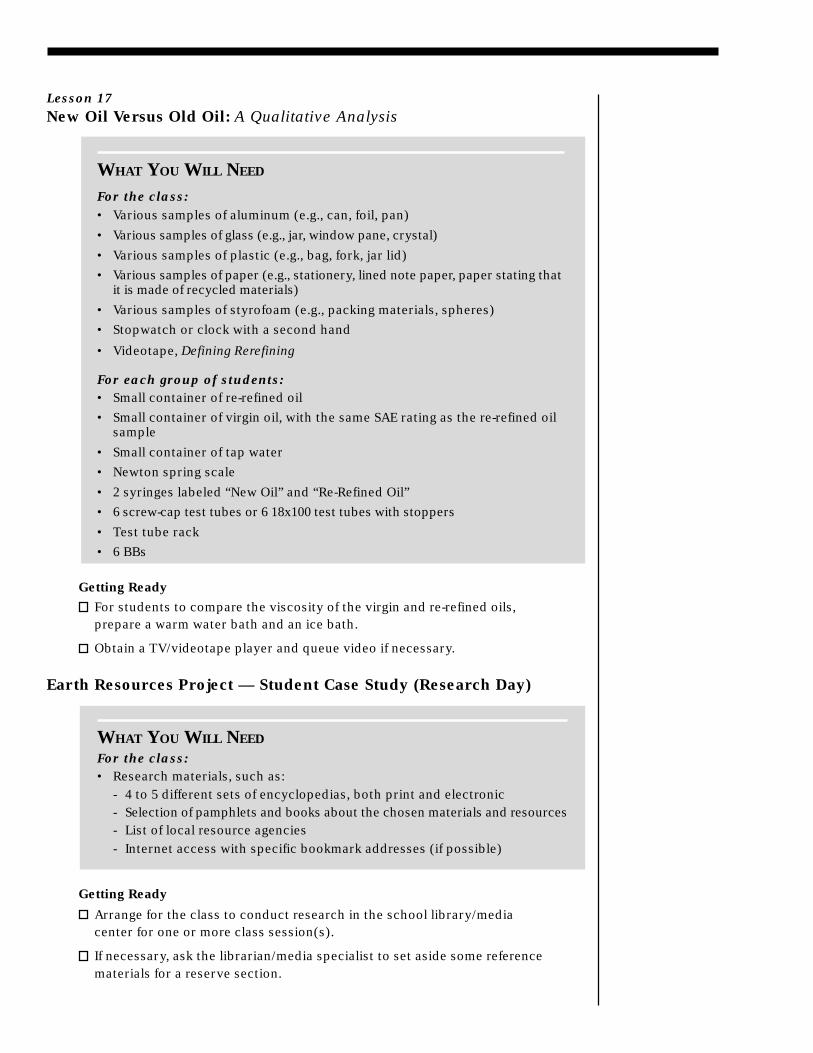
WHAT YOU WILL NEED
For the class:• Various samples of aluminum (e.g., can, foil, pan)
• Various samples of glass (e.g., jar, window pane, crystal)
• Various samples of plastic (e.g., bag, fork, jar lid)
• Various samples of paper (e.g., stationery, lined note paper, paper stating thatit is made of recycled materials)
• Various samples of styrofoam (e.g., packing materials, spheres)
• Stopwatch or clock with a second hand
• Videotape, Defining Rerefining
For each group of students:• Small container of re-refined oil
• Small container of virgin oil, with the same SAE rating as the re-refined oilsample
• Small container of tap water
• Newton spring scale
• 2 syringes labeled “New Oil” and “Re-Refined Oil”
• 6 screw-cap test tubes or 6 18x100 test tubes with stoppers
• Test tube rack
• 6 BBs
WHAT YOU WILL NEED
For the class:• Research materials, such as:
- 4 to 5 different sets of encyclopedias, both print and electronic- Selection of pamphlets and books about the chosen materials and resources- List of local resource agencies- Internet access with specific bookmark addresses (if possible)
Lesson 17New Oil Versus Old Oil: A Qualitative Analysis
Getting Ready
For students to compare the viscosity of the virgin and re-refined oils,prepare a warm water bath and an ice bath.
Obtain a TV/videotape player and queue video if necessary.
Earth Resources Project — Student Case Study (Research Day)
Getting Ready
Arrange for the class to conduct research in the school library/mediacenter for one or more class session(s).
If necessary, ask the librarian/media specialist to set aside some referencematerials for a reserve section.

Section 4: Reducing, Reusing, and Recycling Our Earth’s Resources Section at a Glance / Page 367
WHAT YOU WILL NEED
For each class:• Students’ Public Information Announcements• Earth Resources Projects — Student Case Studies• Videotape, Fuel-Less (optional)
Lesson 18Earth Resources Case Study: Sharing Solutions
Getting Ready
Obtain TV/videotape player and queue video if necessary.

Storyline
One way to attract students’ attention to the issues surrounding the recycling of usedoil and oil filters and get them involved in the curriculum is to use the followingstoryline. Choose three students to perform the following skit in front of the class.Provide time for them to learn their roles prior to the performance.
ANALYSIS OF A RESOURCE: PART 4The Final CleanupCharacters: Narrator, Cecylia, Mom
Narrator: Cecylia has completed her experiments and discovered that many peoplehave the wrong ideas about used oil.
Cecylia: Mom, I have learned a lot from my simple experiments with the used oilfrom our motor. But it is scary that there are so many people who do notknow the truth about the dangers of used motor oil if it is not taken to therecycling place and is put in the wrong place, instead. It can really causeproblems for the environment.
Mom: You’re right, Cecylia. Used motor oil can be handled in a very responsiblemanner. You know, we can call our local waste management agency to findout the best method of handling this used oil.
Cecylia: People also need to know that used oil should be recycled. I wonder howmany people are aware of this?
Mom: I don’t know, Cecylia. Maybe you could do some research around town andfind out.
Cecylia: OK, Mom. But in the meantime I want to tell everyone in our neighborhoodabout used oil recycling. Do you think I could call the newspaper and theywould interview me?
Mom (laughing): It is certainly worth a try! In the meantime, let’s think of other ways inwhich we can educate the entire community about how important and easyit is to recycle used oil.
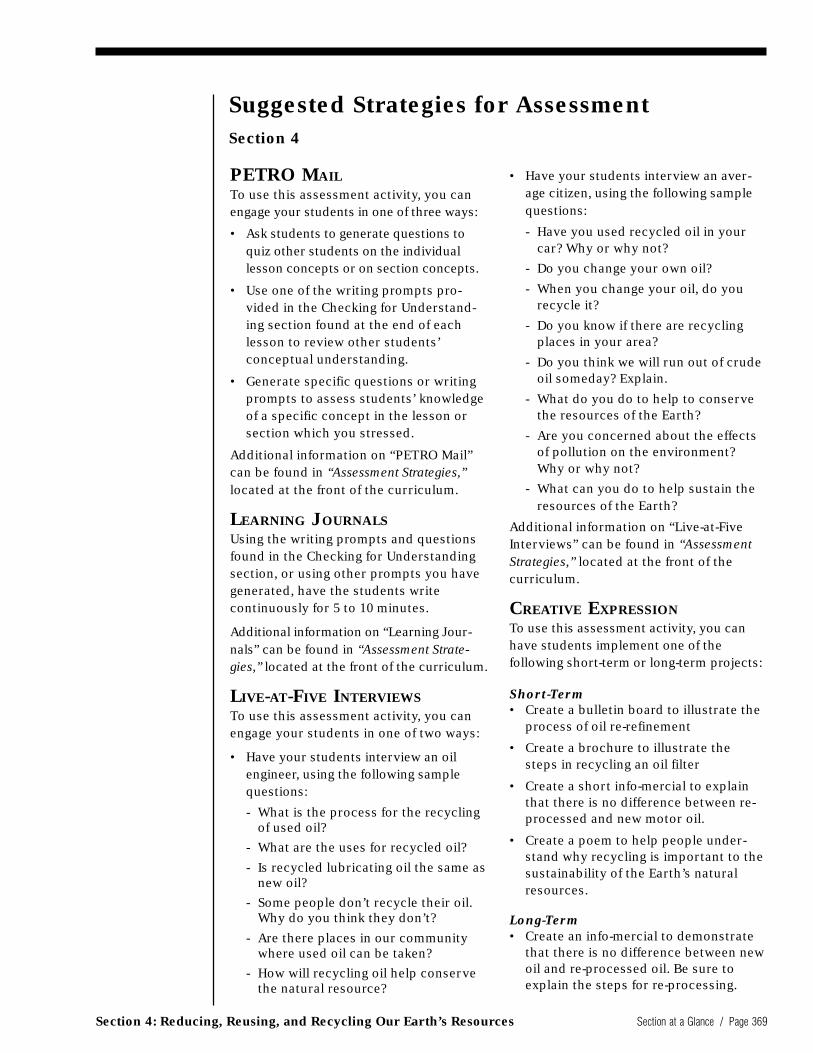
Section 4: Reducing, Reusing, and Recycling Our Earth’s Resources Section at a Glance / Page 369
PETRO MAILTo use this assessment activity, you canengage your students in one of three ways:
• Ask students to generate questions toquiz other students on the individuallesson concepts or on section concepts.
• Use one of the writing prompts pro-vided in the Checking for Understand-ing section found at the end of eachlesson to review other students’conceptual understanding.
• Generate specific questions or writingprompts to assess students’ knowledgeof a specific concept in the lesson orsection which you stressed.
Additional information on “PETRO Mail”can be found in “Assessment Strategies,”located at the front of the curriculum.
LEARNING JOURNALSUsing the writing prompts and questionsfound in the Checking for Understandingsection, or using other prompts you havegenerated, have the students writecontinuously for 5 to 10 minutes.
Additional information on “Learning Jour-nals” can be found in “Assessment Strate-gies,” located at the front of the curriculum.
LIVE-AT-FIVE INTERVIEWSTo use this assessment activity, you canengage your students in one of two ways:
• Have your students interview an oilengineer, using the following samplequestions:
- What is the process for the recyclingof used oil?
- What are the uses for recycled oil?
- Is recycled lubricating oil the same asnew oil?
- Some people don’t recycle their oil.Why do you think they don’t?
- Are there places in our communitywhere used oil can be taken?
- How will recycling oil help conservethe natural resource?
Suggested Strategies for AssessmentSection 4
• Have your students interview an aver-age citizen, using the following samplequestions:
- Have you used recycled oil in yourcar? Why or why not?
- Do you change your own oil?
- When you change your oil, do yourecycle it?
- Do you know if there are recyclingplaces in your area?
- Do you think we will run out of crudeoil someday? Explain.
- What do you do to help to conservethe resources of the Earth?
- Are you concerned about the effectsof pollution on the environment?Why or why not?
- What can you do to help sustain theresources of the Earth?
Additional information on “Live-at-FiveInterviews” can be found in “AssessmentStrategies,” located at the front of thecurriculum.
CREATIVE EXPRESSIONTo use this assessment activity, you canhave students implement one of thefollowing short-term or long-term projects:
Short-Term• Create a bulletin board to illustrate the
process of oil re-refinement
• Create a brochure to illustrate thesteps in recycling an oil filter
• Create a short info-mercial to explainthat there is no difference between re-processed and new motor oil.
• Create a poem to help people under-stand why recycling is important to thesustainability of the Earth’s naturalresources.
Long-Term• Create an info-mercial to demonstrate
that there is no difference between newoil and re-processed oil. Be sure toexplain the steps for re-processing.

• Using the beginning skit, continue thestoryline to help people understandthe reason for recycling.
• Create a video to explain why recyclingoil is important today and in the future.
• Create a skit or video explaining thatthe power of one person’s actions canmake a difference in helping to sustainthe resources of the Earth.
Additional information on “Creative Expres-sion” can be found in “Assessment Strate-gies,” located at the front of the curriculum.
GROUP EVALUATION POSTER
SESSION OR WHITE BOARDThis activity can help you gauge students’preconceptions before each lesson begins,or during the Prethink portion of eachlesson. Save the poster for review at theend of the lesson. If you do this activity onwhite boards, have the students recordthe ideas in their learning journals. Youshould refrain from adding information orcorrecting the students’ statements. Whilestudents review their prior thinking duringthe Action Processing section of eachlesson, you may want to ask questions toenable the students to dispel the miscon-ceptions shown on the posters.
Sample prompts include:
• Explain the re-processing of used oil.
• Compare and contrast new and usedmotor oil.
• Explain how recycling oil aids inconserving and the sustaining theEarth’s resources.
• With your table group, compare andcontrast various aspects of the re-sources that you have researched; forexample, the quantity of resource thatis disposed of, the uses of the re-source, the quantity of the resourcethat is (and has been) recycled, andthe ways of recycling and re-processingthe resource.
• Compare and contrast the methods ofre-processing used oil with the meth-ods of processing the resource thatyou have researched.
• Explain the notion that one person canmake a difference.
Additional information on “Group Evalua-tion Poster Session or White Board” canbe found in “Assessment Strategies,”located at the front of the curriculum.
PORTFOLIOSIf you are using this assessment activity,students should take the following stepsat this time:
• Make their final selections.
• Self-reflect as to why they chose theentry.
• Determine what they learned about thechosen subject.
• Present their final conclusions.
Additional information on “Portfolios”can be found in “Assessment Strategies,”located at the front of the curriculum.
CONCEPT MAPSTo use this assessment activity, try one ofthe following ideas:
• Have students generate a list of high-frequency or key terms used in theday’s activities or lessons, and thenhave them use this list to construct aconcept map.
• Generate a list of key terms which youhave determined to assess the stu-dents’ conceptual understanding of thelesson, and then have students gener-ate a concept map that includes thesekey terms.
• Use the following concept map toassess your students’ conceptualunderstanding of the section. Provideyour students with copies of “ActivityPage — Earth Resources Concept Mapfor Section 4.” Have your students fill inthe blank concept map, using the listof key terms used. You may wish to fillin a few of the key terms to get stu-dents started. Use the correspondingTeacher Page to assess students’understanding.
Additional information on “Concept Maps”can be found in “Assessment Strategies,”located at the front of the curriculum.

Section 4: Reducing, Reusing, and Recycling Our Earth’s Resources Section at a Glance / Page 371
Earth Resources Concept Map for Section 4
Fill in the circles on the concept map using the key terms listed below. Each term shown on the list will be used once.
KEY TERMS• acetone• alcohol• API certification• asphalt materials• certified collection
center• collection• county/city
programs• delivery• diesel fuel• distillation• filtration• household
hazardous wastes• hydrotreatment• industry
• lubricating properties• marine fuel• non-certified
collection center• post-consumer
materials• power plants• pre-consumer
materials• re-processed oil
• re-processing• re-refined oil• re-refining• recycling
programs• used oil and used
oil filters• used oil recycling
facility• viscosity
• volatile light-endproducts
• water• water treatment plant
Name: _________________________ Date: ____________

Page 372 / Section at a Glance Section 4: Reducing, Reusing, and Recycling Our Earth’s Resources
TEACHER PAGE
Earth Resources Concept Map for Section 4

Section 4: Reducing, Reusing, and Recycling Our Earth’s Resources Section at a Glance / Page 373
SECTION 4:
Earth Resources Project — Student Case StudyUNIFYING CONCEPTThe Earth is a complex system thatchanges over time, yet exists in a dynamicbalance that is affected by human popula-tions. The balance is governed by theinteractions of matter and energy.
LESSON CONCEPTAll of the Earth’s materials, used byhumans as resources, pass through aseries of identifiable stages.
LESSON OVERVIEWStudents have already selected an Earth resource, other than oil, on which to conductresearch for their own case study. As they near the end of Section 4, students spendanother day researching, tracing, synthesizing, and analyzing how the resource fits intothe Earth Resources Chart.
During Section 4, students research the following:
• Possible future uses of the resource
• Method(s) of reducing, reusing, and/or recycling the resource
• Impact of the methods of reducing, reusing, and/or recycling the resource
• Actions they and others can take to make a difference in sustaining the resource
DESIRED OUTCOMESStudents will:
Identify questions and concepts about an Earth resource.
Design and conduct research on an Earth resource.
Formulate, revise, and synthesize the newly gained information.
Recognize and analyze alternate explanations and models about an Earth resource.
Create a presentation about an Earth resource.
Students will use the following scientific thinking processes:Observing, communicating, comparing, ordering, categorizing, relating, inferring, and applying.
STEPS FOR TEACHING
Teacher Action Student Action Suggested Time
Ask students to review the stages of the Earth Resources Examining 5 min.Chart. Prior Ideas
Direct students to brainstorm what they know and Inferring, Applying, 5 min.want to know about their chosen resource. and Relating Information
Guide students in the appropriate research methods Relating 5 min.and emphasis for their chosen resource. Information
Provide time and resources for students to finish conducting Applying 50 min.research and to finalize their presentations. Knowledge
Section Concepts
Human: Human activities should aimat maintaining a sustainable systemthrough careful management of theEarth’s resources.
Scientific: All matter has observablechemical and physical propertieswhich govern its interactions.
SECTION 4:
Reducing, Reusing, andRecycling Our Earth’s Resources
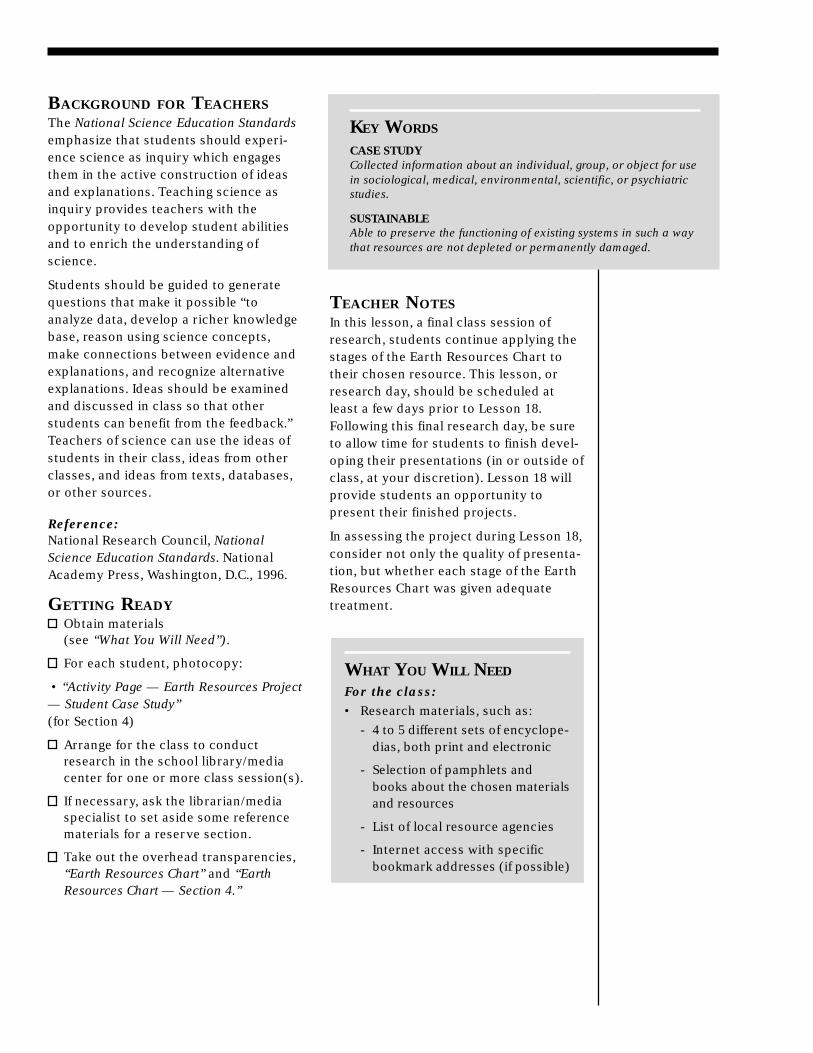
BACKGROUND FOR TEACHERSThe National Science Education Standardsemphasize that students should experi-ence science as inquiry which engagesthem in the active construction of ideasand explanations. Teaching science asinquiry provides teachers with theopportunity to develop student abilitiesand to enrich the understanding ofscience.
Students should be guided to generatequestions that make it possible “toanalyze data, develop a richer knowledgebase, reason using science concepts,make connections between evidence andexplanations, and recognize alternativeexplanations. Ideas should be examinedand discussed in class so that otherstudents can benefit from the feedback.”Teachers of science can use the ideas ofstudents in their class, ideas from otherclasses, and ideas from texts, databases,or other sources.
Reference:National Research Council, NationalScience Education Standards. NationalAcademy Press, Washington, D.C., 1996.
GETTING READYObtain materials(see “What You Will Need”).
For each student, photocopy:
• “Activity Page — Earth Resources Project— Student Case Study”(for Section 4)
Arrange for the class to conductresearch in the school library/mediacenter for one or more class session(s).
If necessary, ask the librarian/mediaspecialist to set aside some referencematerials for a reserve section.
Take out the overhead transparencies,“Earth Resources Chart” and “EarthResources Chart — Section 4.”
WHAT YOU WILL NEED
For the class:• Research materials, such as:
- 4 to 5 different sets of encyclope-dias, both print and electronic
- Selection of pamphlets andbooks about the chosen materialsand resources
- List of local resource agencies
- Internet access with specificbookmark addresses (if possible)
TEACHER NOTESIn this lesson, a final class session ofresearch, students continue applying thestages of the Earth Resources Chart totheir chosen resource. This lesson, orresearch day, should be scheduled atleast a few days prior to Lesson 18.Following this final research day, be sureto allow time for students to finish devel-oping their presentations (in or outside ofclass, at your discretion). Lesson 18 willprovide students an opportunity topresent their finished projects.
In assessing the project during Lesson 18,consider not only the quality of presenta-tion, but whether each stage of the EarthResources Chart was given adequatetreatment.
KEY WORDS
CASE STUDYCollected information about an individual, group, or object for usein sociological, medical, environmental, scientific, or psychiatricstudies.
SUSTAINABLEAble to preserve the functioning of existing systems in such a waythat resources are not depleted or permanently damaged.

Section 4: Reducing, Reusing, and Recycling Our Earth’s Resources Section at a Glance / Page 375
ACTION NARRATIVE
Prethink15 minutes
Let’s review the Earth Resources Chart to determine what we have learned aboutoil thus far.Display one or both of the overhead transparencies, “Earth Resources Chart” and/or“Earth Resources Chart — Section 4.”
Ask a student to review and explain each column of the chart, or do it yourself.
Consider the Earth resource you chose for your case study in Lesson 1. Brain-storm what you know and what you want to know about your Earth resource.Ask a few students to share their brainstorms.
Distribute “Activity Page — Earth Resources Project – Student Case Study (Section 4).”
Today, each of you will continue to research your questions about the Earthresource you have chosen, as well as the answers to questions on the Activity Page.Discuss all elements of the Activity Page with students. Remind students that theirprojects will be evaluated for quality of presentation and for adequate treatment ofeach of the stages in the Earth Resources Chart. If you decide to have students givean oral presentation, review the guidelines for oral presentations.
Student Action45 minutes
Provide the resources and time necessary for students to begin researching infor-mation. Assist, guide, and facilitate as necessary.
Action Processing5 minutes
Who will share one interesting or surprising fact or idea you learned today?Allow a few students to share after each day of research.
Home StudyBe sure to continue working outside of class and at home to complete yourresearch on this section. See me if you need any help.Remind students that their presentations must be ready to present by the beginningof Lesson 18.
CHECKING FOR UNDERSTANDING
Student Reflections• I discovered that…
• I was interested/surprised to learn that…
Teacher Reflections• Can students find the necessary
information for each stage of theEarth Resources Chart?
• Do the students realize that eachEarth resource follows the patternof the Earth Resources Chart?
EXTENSIONUse this research opportunity tocollaborate and integrate with thestudents’ English class. The use ofresearch tools such as sourcecards and note cards, outlines, andrough drafts is taught in Englishcourses; their use can enhancethis scientific case study.
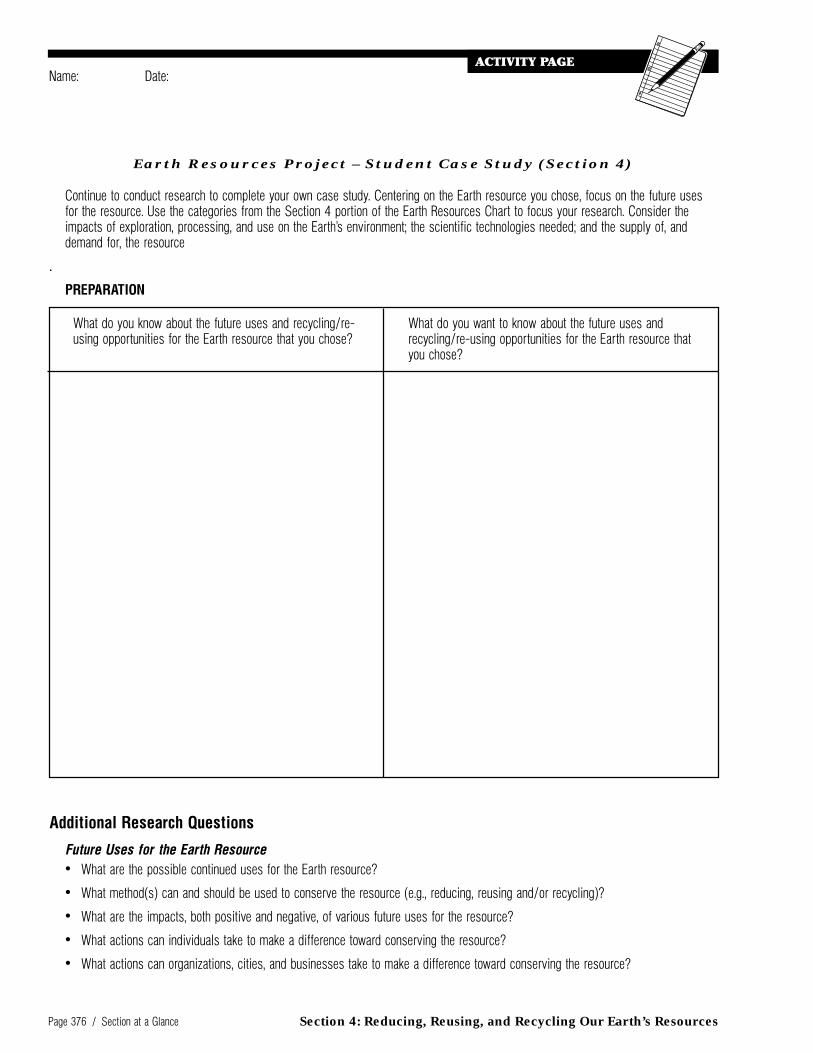
Page 376 / Section at a Glance Section 4: Reducing, Reusing, and Recycling Our Earth’s Resources
Earth Resources Project – Student Case Study (Section 4)
What do you know about the future uses and recycling/re-using opportunities for the Earth resource that you chose?
Continue to conduct research to complete your own case study. Centering on the Earth resource you chose, focus on the future usesfor the resource. Use the categories from the Section 4 portion of the Earth Resources Chart to focus your research. Consider theimpacts of exploration, processing, and use on the Earth’s environment; the scientific technologies needed; and the supply of, anddemand for, the resource
.
PREPARATION
What do you want to know about the future uses andrecycling/re-using opportunities for the Earth resource thatyou chose?
Additional Research Questions
Future Uses for the Earth Resource• What are the possible continued uses for the Earth resource?
• What method(s) can and should be used to conserve the resource (e.g., reducing, reusing and/or recycling)?
• What are the impacts, both positive and negative, of various future uses for the resource?
• What actions can individuals take to make a difference toward conserving the resource?
• What actions can organizations, cities, and businesses take to make a difference toward conserving the resource?
Name: Date:

Appendices
Appendices
Appendix A:Exploring Career Avenues (included in this sampler) ............................................451
Appendix B:Supplemental Articles for Student Reading ..............................................................467
Appendix C:California Museums Featuring Automotive or Petroleum-Related Exhibits .........497
Appendix D:List of Overheads Used in Earth Resources .............................................................499
Appendix E:Recommended Supplemental Classroom Resources ..............................................501
Appendix F:About the Videos ..........................................................................................................503
Appendix G:Where to Get More Information .................................................................................505
Appendix H:Relevant Web Sites .......................................................................................................509
Appendix I:List of Used Oil Grant Recipients ...............................................................................513
Appendix J:Glossary ........................................................................................................................527
Appendix K:Bibliography .................................................................................................................533
Page 449

Appendices
Appendix A
Exploring Career Avenues
When elementary-school children areasked to consider what they would liketo be when they grow up, they oftenrespond swiftly with naive conviction,and their answers are almost alwayslimited to the careers which have cap-tured their imagination through storiesand in the limited realms of their youngday-to-day lives.
High school students are, of course,more aware of the infinite variety ofcareers that the world has to offer andthe type of work that these careers entail.Yet, they often feel intimidated by thethought of preparing for a career pathand searching for a job related to theircareer aspirations.
The following set of activities and tools isdesigned to enable students to exploredifferent career avenues related to EarthResources — in particular, careers in theenvironmental sector and petroleum andautomotive industries. The activities andtools are also intended to help studentsanalyze their skills and aspirations, aswell as corresponding educationalrequirements, as they relate to prospec-tive career choices.
By engaging in these activities, studentswill:
• Investigate a career in the environ-mental sector, petroleum industry,and/or automotive industry, using“Info Page — Career Possibilities” and“Info Page — Places to Start: Web Sitesfor Career Exploration.” (Note thatthese lists of careers, organizations,and web sites are provided as sugges-tions; they are not intended to becomprehensive.)
• Describe the work responsibilities oftheir career choice and the possibilityof advancement in this career; re-search the educational requirementsfor the career and locate institutionsof higher education which offer thebest education in the corresponding
field of study; and research theecological impact of their careerchoice, through ”Activity Page —Researching a Career.”
• Complete a self-assessment to analyzetheir skills as they relate to some ofthe career requirements, using “Activ-ity Page — Personal Survey: A CareerPath Exercise.”
• Write a letter requesting a careermentor and/or an informationalinterview using “Info Page — SampleInquiry Letter” as a model.
• Intern or “job shadow,” for at least oneweek, with a mentor in the careerwhich they have chosen; keep ajournal of their daily experiences; and,if possible, take some on-the-jobphotographs using “Info Page — JobShadowing Strategies.” (These journalsand photographs can and should laterbe included in their student portfo-lios.)
Teacher NotesThe job-shadowing activity may requiresome advance preparation. To helpstudents make connections with a careermentor, compile a sample list of localgovernment agencies and nearby indus-tries that do work in the environmentalsector, petroleum industry, or automo-tive industry, and compile lists of relatededucational and training programs atlocal universities, colleges, and technicaltraining schools. If you invited guestspeakers to your class during anyportion of this curriculum — such asgeologists, engineers, waste managementrepresentatives, urban or environmentalplanners, oil company representatives,used oil recyclers, water treatment plantoperators, or hazardous waste haulers —you may want to ask them whether theywould be interested in serving as careermentors and/or if they have additionalcontacts.

Appendices
It is a good idea to review your students’proposed dialogue and review the rulesof good phone etiquette before theybegin making phone calls in search of acareer mentor. You might also want toreview students’ letters requesting acareer mentor and/or informationalinterview, before they are mailed.
An excellent source of information onjob shadowing, career exploration, andschool-community partnership strate-gies is the comprehensive Internet site ofthe National School-to-Work Office at<http://www.stw.ed.gov/>. This siteoffers a wealth of resources on theschool-to-career movement.
In addition, the School-to-Career Office ofthe California Department of Education(CDE) offers a publication that containsresources to help educators design andimplement rigorous, high-quality work-based learning experiences for studentsof all ages. This publication, titled Work-Based Learning Guide, can be ordered for$12.50 (plus tax, shipping, and handling)from the CDE Publications Division, SalesOffice, P.O. Box 271, Sacramento, CA95812-0271; (916) 445-1260.

Appendices
Researching a Career
Use “Info Page — Career Possibilities” and “Info Page — Places to Start: Web Sites for Career Exploration” as well as additionalreferences in your library and on the Internet to help you research answers to the following questions.
1. What career are you researching?
2. Describe the work and responsibilities of this career.
3. What are the most interesting aspects of this career, in your opinion?
4. What are the possibilities for advancement and the average yearly wage in this career?
Name: _________________________ Date: ____________

Appendices
5. Summarize the educational requirements for this career.
6. Which technical schools, colleges, and/or universities offer the best education for this career?
7. Describe the impact this career has on the environment, and whether this impact is positive or negative.
8. List three things about this career that you would like to know more about.
Researching a Career (Continued)
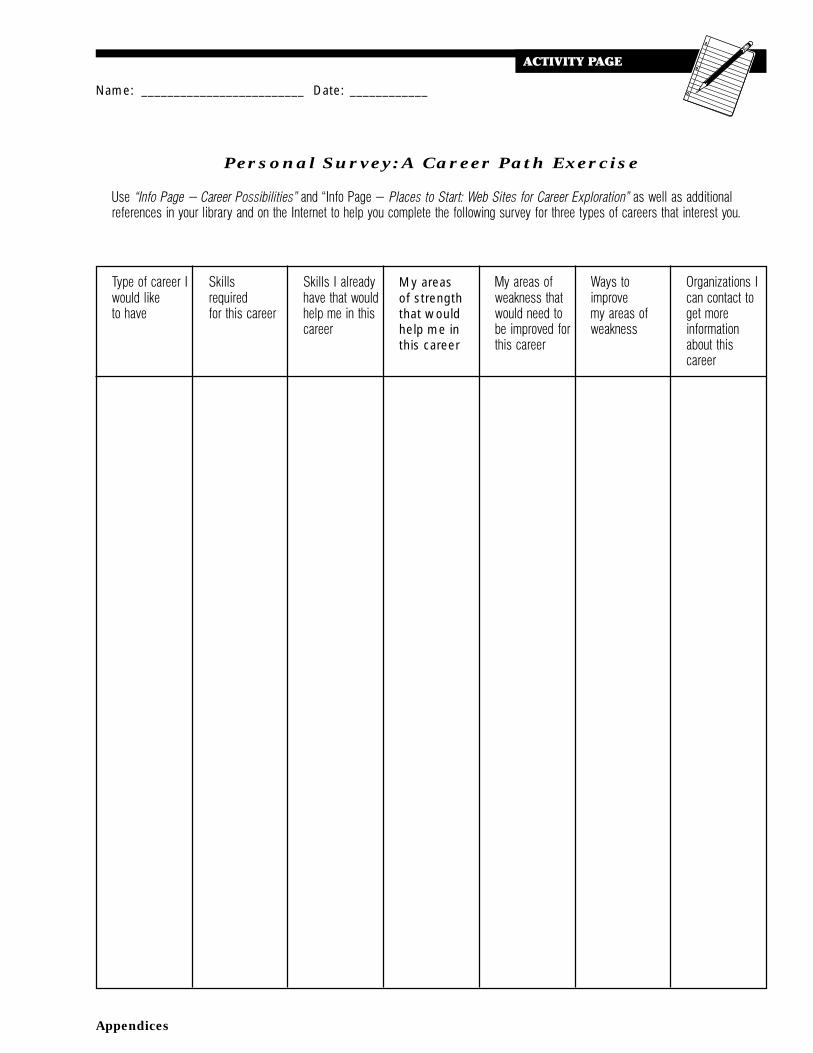
Appendices
Use “Info Page — Career Possibilities” and “Info Page — Places to Start: Web Sites for Career Exploration” as well as additionalreferences in your library and on the Internet to help you complete the following survey for three types of careers that interest you.
Personal Survey: A Career Path Exercise
Type of career Iwould liketo have
Skillsrequiredfor this career
Skills I alreadyhave that wouldhelp me in thiscareer
My areasof strengththat wouldhelp me inthis career
My areas ofweakness thatwould need tobe improved forthis career
Ways toimprovemy areas ofweakness
Organizations Ican contact toget moreinformationabout thiscareer
Name: _________________________ Date: ____________
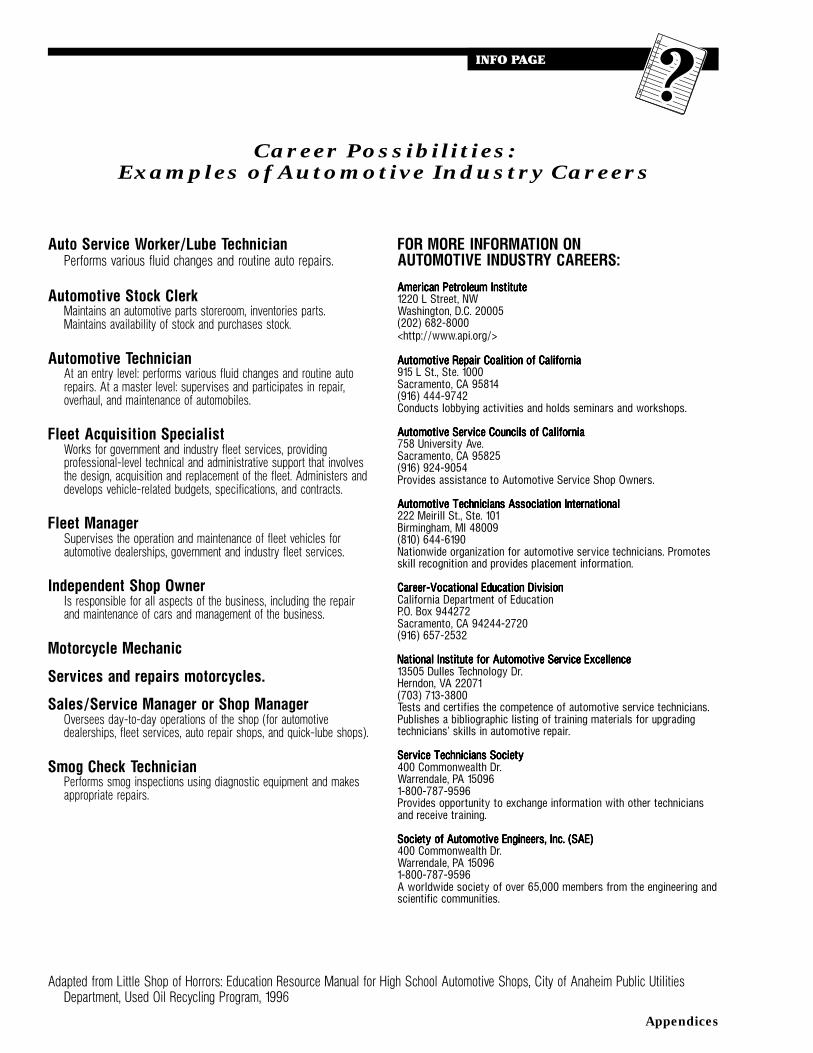
Appendices
Auto Service Worker/Lube TechnicianPerforms various fluid changes and routine auto repairs.
Automotive Stock ClerkMaintains an automotive parts storeroom, inventories parts.Maintains availability of stock and purchases stock.
Automotive TechnicianAt an entry level: performs various fluid changes and routine autorepairs. At a master level: supervises and participates in repair,overhaul, and maintenance of automobiles.
Fleet Acquisition SpecialistWorks for government and industry fleet services, providingprofessional-level technical and administrative support that involvesthe design, acquisition and replacement of the fleet. Administers anddevelops vehicle-related budgets, specifications, and contracts.
Fleet ManagerSupervises the operation and maintenance of fleet vehicles forautomotive dealerships, government and industry fleet services.
Independent Shop OwnerIs responsible for all aspects of the business, including the repairand maintenance of cars and management of the business.
Motorcycle Mechanic
Services and repairs motorcycles.
Sales/Service Manager or Shop ManagerOversees day-to-day operations of the shop (for automotivedealerships, fleet services, auto repair shops, and quick-lube shops).
Smog Check TechnicianPerforms smog inspections using diagnostic equipment and makesappropriate repairs.
Career Possibilities:Examples of Automotive Industry Careers
FOR MORE INFORMATION ONAUTOMOTIVE INDUSTRY CAREERS:
American Petroleum InstituteAmerican Petroleum InstituteAmerican Petroleum InstituteAmerican Petroleum InstituteAmerican Petroleum Institute1220 L Street, NWWashington, D.C. 20005(202) 682-8000<http://www.api.org/>
Automotive Repair Coalition of CaliforniaAutomotive Repair Coalition of CaliforniaAutomotive Repair Coalition of CaliforniaAutomotive Repair Coalition of CaliforniaAutomotive Repair Coalition of California915 L St., Ste. 1000Sacramento, CA 95814(916) 444-9742Conducts lobbying activities and holds seminars and workshops.
Automotive Service Councils of CaliforniaAutomotive Service Councils of CaliforniaAutomotive Service Councils of CaliforniaAutomotive Service Councils of CaliforniaAutomotive Service Councils of California758 University Ave.Sacramento, CA 95825(916) 924-9054Provides assistance to Automotive Service Shop Owners.
Automotive Technicians Association InternationalAutomotive Technicians Association InternationalAutomotive Technicians Association InternationalAutomotive Technicians Association InternationalAutomotive Technicians Association International222 Meirill St., Ste. 101Birmingham, MI 48009(810) 644-6190Nationwide organization for automotive service technicians. Promotesskill recognition and provides placement information.
Career-Vocational Education DivisionCareer-Vocational Education DivisionCareer-Vocational Education DivisionCareer-Vocational Education DivisionCareer-Vocational Education DivisionCalifornia Department of EducationP.O. Box 944272Sacramento, CA 94244-2720(916) 657-2532
National Institute for Automotive Service ExcellenceNational Institute for Automotive Service ExcellenceNational Institute for Automotive Service ExcellenceNational Institute for Automotive Service ExcellenceNational Institute for Automotive Service Excellence13505 Dulles Technology Dr.Herndon, VA 22071(703) 713-3800Tests and certifies the competence of automotive service technicians.Publishes a bibliographic listing of training materials for upgradingtechnicians’ skills in automotive repair.
Service Technicians SocietyService Technicians SocietyService Technicians SocietyService Technicians SocietyService Technicians Society400 Commonwealth Dr.Warrendale, PA 150961-800-787-9596Provides opportunity to exchange information with other techniciansand receive training.
Society of Automotive Engineers, Inc. (SAE)Society of Automotive Engineers, Inc. (SAE)Society of Automotive Engineers, Inc. (SAE)Society of Automotive Engineers, Inc. (SAE)Society of Automotive Engineers, Inc. (SAE)400 Commonwealth Dr.Warrendale, PA 150961-800-787-9596A worldwide society of over 65,000 members from the engineering andscientific communities.
Adapted from Little Shop of Horrors: Education Resource Manual for High School Automotive Shops, City of Anaheim Public UtilitiesDepartment, Used Oil Recycling Program, 1996
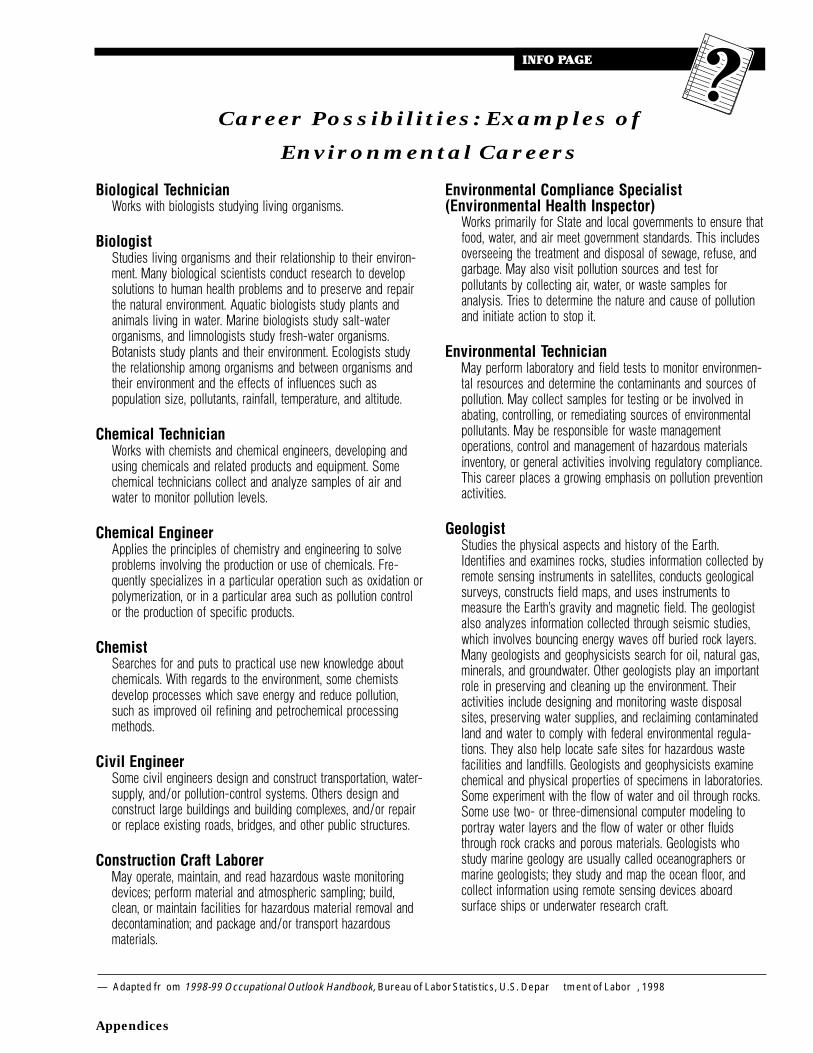
Appendices
Biological TechnicianWorks with biologists studying living organisms.
BiologistStudies living organisms and their relationship to their environ-ment. Many biological scientists conduct research to developsolutions to human health problems and to preserve and repairthe natural environment. Aquatic biologists study plants andanimals living in water. Marine biologists study salt-waterorganisms, and limnologists study fresh-water organisms.Botanists study plants and their environment. Ecologists studythe relationship among organisms and between organisms andtheir environment and the effects of influences such aspopulation size, pollutants, rainfall, temperature, and altitude.
Chemical TechnicianWorks with chemists and chemical engineers, developing andusing chemicals and related products and equipment. Somechemical technicians collect and analyze samples of air andwater to monitor pollution levels.
Chemical EngineerApplies the principles of chemistry and engineering to solveproblems involving the production or use of chemicals. Fre-quently specializes in a particular operation such as oxidation orpolymerization, or in a particular area such as pollution controlor the production of specific products.
ChemistSearches for and puts to practical use new knowledge aboutchemicals. With regards to the environment, some chemistsdevelop processes which save energy and reduce pollution,such as improved oil refining and petrochemical processingmethods.
Civil EngineerSome civil engineers design and construct transportation, water-supply, and/or pollution-control systems. Others design andconstruct large buildings and building complexes, and/or repairor replace existing roads, bridges, and other public structures.
Construction Craft LaborerMay operate, maintain, and read hazardous waste monitoringdevices; perform material and atmospheric sampling; build,clean, or maintain facilities for hazardous material removal anddecontamination; and package and/or transport hazardousmaterials.
Environmental Compliance Specialist(Environmental Health Inspector)
Works primarily for State and local governments to ensure thatfood, water, and air meet government standards. This includesoverseeing the treatment and disposal of sewage, refuse, andgarbage. May also visit pollution sources and test forpollutants by collecting air, water, or waste samples foranalysis. Tries to determine the nature and cause of pollutionand initiate action to stop it.
Environmental TechnicianMay perform laboratory and field tests to monitor environmen-tal resources and determine the contaminants and sources ofpollution. May collect samples for testing or be involved inabating, controlling, or remediating sources of environmentalpollutants. May be responsible for waste managementoperations, control and management of hazardous materialsinventory, or general activities involving regulatory compliance.This career places a growing emphasis on pollution preventionactivities.
GeologistStudies the physical aspects and history of the Earth.Identifies and examines rocks, studies information collected byremote sensing instruments in satellites, conducts geologicalsurveys, constructs field maps, and uses instruments tomeasure the Earth’s gravity and magnetic field. The geologistalso analyzes information collected through seismic studies,which involves bouncing energy waves off buried rock layers.Many geologists and geophysicists search for oil, natural gas,minerals, and groundwater. Other geologists play an importantrole in preserving and cleaning up the environment. Theiractivities include designing and monitoring waste disposalsites, preserving water supplies, and reclaiming contaminatedland and water to comply with federal environmental regula-tions. They also help locate safe sites for hazardous wastefacilities and landfills. Geologists and geophysicists examinechemical and physical properties of specimens in laboratories.Some experiment with the flow of water and oil through rocks.Some use two- or three-dimensional computer modeling toportray water layers and the flow of water or other fluidsthrough rock cracks and porous materials. Geologists whostudy marine geology are usually called oceanographers ormarine geologists; they study and map the ocean floor, andcollect information using remote sensing devices aboardsurface ships or underwater research craft.
— Adapted fr om 1998-99 Occupational Outlook Handbook, Bureau of Labor Statistics, U.S. Depar tment of Labor , 1998
Career Possibilities: Examples of
Environmental Careers

Appendices
Career Possibilities: Examples of Environmental Careers (Continued)
HydrologistStudies the distribution, circulation, and physical properties ofunderground and surface waters. Studies the form andintensity of precipitation, its rate of infiltration into the soil,movement through the Earth, and its return to the ocean andatmosphere. The hydrologist’s work is closely related togeology and geophysics, and it is particularly important inenvironmental preservation and remediation.
Motor Vehicle InspectorVerifies the compliance of automobiles and trucks with Staterequirements for safe operation and emissions. Inspects truckcargoes to assure compliance with legal limitations on grossweight and hazardous cargoes.
Urban PlannerDevelops long- and short-term land use plans to provide forgrowth and revitalization of urban, suburban, and ruralcommunities, while helping local officials make decisionsconcerning social, economic, and environmental problems.Addresses issues such the effect of growth and change on acommunity and on the environment. Some urban planners areinvolved in environmental issues ranging from pollution controlto wetland preservation, forest conservation, or the location ofnew landfills. Often referred to as community, county, or cityplanners because most are employed by local governments.
Wastewater Treatment Plant OperatorRemoves harmful pollutants from domestic and industrialwastewater so that it is safe to return to the environment.Controls the processes and equipment to remove solidmaterials, chemical compounds, and micro-organisms fromwastewater or to render them harmless. Controls pumps,valves, and other processing equipment to move the wastewa-ter through the various treatment processes, and disposes ofthe waste materials removed from the water.
Water Treatment Plant OperatorTreats water so that it is safe to drink. Controls the processesand equipment to remove solid materials, chemical compounds,and micro-organisms from water or to render them harmless.Controls pumps, valves, and other processing equipment tomove the water through the various treatment processes, anddisposes of the waste materials removed from the water.
FOR MORE INFORMATION ONENVIRONMENTAL CAREERS:
American Chemical SocietyAmerican Chemical SocietyAmerican Chemical SocietyAmerican Chemical SocietyAmerican Chemical SocietyDepartment of Career Services1155 16th St., NWWashington, D.C. 20036Provides information on careers in chemistry and chemical engineering.
American Geological InstituteAmerican Geological InstituteAmerican Geological InstituteAmerican Geological InstituteAmerican Geological Institute4220 King St.Alexandria, VA 22302-1502<http://www.agiweb.org>Provides information on training and career opportunities for geologists.
American Geophysical UnionAmerican Geophysical UnionAmerican Geophysical UnionAmerican Geophysical UnionAmerican Geophysical Union2000 Florida Ave., NWWashington, D.C. 20009Provides information on training and career opportunities for geophysicists.
American Institute of Biological SciencesAmerican Institute of Biological SciencesAmerican Institute of Biological SciencesAmerican Institute of Biological SciencesAmerican Institute of Biological Sciences1444 I St., NWWashington, D.C. 20005<http://www.aibs.org>Provides information on careers in the biological sciences.
American Institute of Chemical EngineersAmerican Institute of Chemical EngineersAmerican Institute of Chemical EngineersAmerican Institute of Chemical EngineersAmerican Institute of Chemical Engineers345 East 47th St.New York, NY 10017-2395
American Planning AssociationAmerican Planning AssociationAmerican Planning AssociationAmerican Planning AssociationAmerican Planning AssociationEducation Division122 South Michigan Ave., Ste. 1600Chicago, IL 60630-6107Provides information on careers in urban and regional planning.
American Society of Civil EngineersAmerican Society of Civil EngineersAmerican Society of Civil EngineersAmerican Society of Civil EngineersAmerican Society of Civil Engineers1801 Alexander Bell Dr.Reston, VA 20191-4400
American Water Works AssociationAmerican Water Works AssociationAmerican Water Works AssociationAmerican Water Works AssociationAmerican Water Works Association6666 West Quincy Ave.Denver, CO 80235Provides information on careers in water treatment.
Association of Hazardous Materials ProfessionalsAssociation of Hazardous Materials ProfessionalsAssociation of Hazardous Materials ProfessionalsAssociation of Hazardous Materials ProfessionalsAssociation of Hazardous Materials Professionals3919 Westerly Place, Ste. 200Newport Beach, CA 926601-800-582-9747Provides a networking forum for those involved in the management andsafety of hazardous materials.
California Air Resources BoardCalifornia Air Resources BoardCalifornia Air Resources BoardCalifornia Air Resources BoardCalifornia Air Resources Board2020 L St.P.O. Box 2815Sacramento, CA 95814(916) 445-5630 (Personnel Office)
California Conservation CorpsCalifornia Conservation CorpsCalifornia Conservation CorpsCalifornia Conservation CorpsCalifornia Conservation Corps1530 Capitol Ave.Sacramento, CA 958141-800-952-5627Offers employment and education to young women and men, ages 18 to 23.
California Department of ConservationCalifornia Department of ConservationCalifornia Department of ConservationCalifornia Department of ConservationCalifornia Department of Conservation801 K St.Sacramento, CA 95814(916) 322-7685 (Personnel Office)<http://www.consrv.ca.gov>

Appendices
California Department of Fish and Game1416 Ninth St., 12th Fl.Sacramento, CA 95814(916) 653-8120 (Personnel Office)
California Department of Toxic Substances ControlOffice of Pollution Prevention & Technology DevelopmentP.O. Box 806Sacramento, CA 95812-0806(916) 323-2679 (Personnel Office) or (916) 322-3670<http://www.cwo.com-opptd\>
California Department of Water Resources1416 Ninth St.Sacramento, CA 95814(916) 653-6192 (Public Information)
California Environmental Protection Agency555 Capitol Mall, Ste. 235Sacramento, CA 958141-800-808-8058 (Help Line)
Career-Vocational Education DivisionCalifornia Department of EducationP.O. Box 944272Sacramento, CA 94244-2720(916) 657-2532
Commencement 2000USDA Forest Service Pacific Southwest Region630 Sansome St.San Francisco, CA 94111(415) 705-2604A program that focuses on environmental career awareness and pre-career training.
Environmental Careers Organization286 Congress St.Boston, MA 02210-1009
Geological Society of AmericaP.O. Box 9140Boulder, CO 80301-9140<http://www.geosociety.org>Provides information on training and career opportunities for geolo-gists.
Hazardous Waste Association of California1010 F St., Ste. 300Sacramento, CA 95814(916) 447-7571Represents hazardous waste haulers, generators, and disposalfacilities, and monitors legislation.
Integrated Waste Management Board8800 Cal Center DriveSacramento, CA 95826(916) 255-2557 (Personnel Office)
Junior Engineering Technical SocietyJETS-Guidance1420 King St., Ste. 405Alexandria, VA 22314-2794<http://www.asee.org/jets>General information on a variety of engineering disciplines can beobtained by sending a self-addressed business-size envelope affixedwith 6 first-class stamps.
Laborers’ International Union of North America905 16th St., NWWashington, DC 20006Provides general information about the work of construction craftlaborers.
Marine Technology Society1828 L St., NW, Ste. 906Washington, D.C. 20036Provides a list of education and training programs in oceanographyand related fields.
State Water Resources Control Board901 P St.P.O. Box 100Sacramento, CA 95812-0100(916) 657-1738 (Personnel Office)
Student Conservation AssociationNorthern California:655 13th St., Ste. 301Oakland, CA 94612(510) 832-0804Southern California:2600 Hoover St.Los Angeles, CA 90007(213) 747-6798Offers volunteer conservation programs in parks, forests, and refugesin the United States, Canada, and Mexico.
Water Environment Federation601 Wythe St.Alexandria, VA 22314Provides information on careers in water treatment.
Career Possibilities: Examples of Environmental Careers(Continued)

Appendices
Chemical EngineerHelps improve the technology and methods used for drilling,completing, and simulating wells. May develop new productformulations or processing techniques, or may work on a teamto test and develop promising new catalysts, or may usecomputer-controlled pilot plants to evaluate the scale-up oflaboratory-sized reactions. May serve as a sales representative,helping to solve customers’ technical problems.
ChemistSearches for and puts to practical use new knowledge aboutchemicals. With regards to the environment, some chemistsdevelop processes which save energy and reduce pollution,such as improved oil refining and petrochemical processingmethods.
Civil EngineerCivil engineers who work in the petroleum industry developequipment and methods to support oil drilling, production, andmanufacturing. They may improve design and analysis methodsused on offshore structures and in offshore operations.
Drilling EngineerWorks on the technical and operational aspects of producing oilfrom new and existing wells.
Electrical EngineerConducts research on new designs for electric motors, motorstarters, switch gear, power cables, program controllers, andadvanced control systems.
Facilities EngineerTakes charge of planning construction projects such asrenovating a service station, extending a pipeline, or building anew plant from the ground up.
GeologistStudies the physical aspects and history of the Earth. Identifiesand examines rocks, studies information collected by remotesensing instruments in satellites, conducts geological surveys,constructs field maps, and uses instruments to measure theEarth’s gravity and magnetic field. The geologist also analyzesinformation collected through seismic studies, which involvesbouncing energy waves off buried rock layers. Many geologistsand geophysicists search for oil and natural gas. Petroleumgeologists explore for oil and gas deposits by studying andmapping the subsurface of the ocean or land. They use
Career Possibilities: Examples of PetroleumIndustry Careers
sophisticated geophysical instrumentation, well log data, andcomputers to collect information. They may experiment withthe flow of water and oil through rocks. Some use two- orthree-dimensional computer modeling to portray water layersand the flow of water or other fluids through rock cracks andporous materials.
Health and Safety EngineerFocuses on day-to-day and long-term health and safety needs.
Mechanical EngineerHelps improve the technology and methods used for drilling,completing, and simulating wells. May work on productenhancements for fuels and lubricants. May improve designand analysis methods used on offshore structures and inoffshore operations.
Petroleum Engineer (includes Drilling Engineer,Reservoir Engineer, and Production Engineer)
Working with a team, helps to determine where and how an oilcompany should extract oil and gas. Helps improve thetechnology and methods used for drilling, completing, andsimulating wells.
Petroleum TechnicianMeasures and records physical and geologic conditions in oilor gas wells using instruments lowered into wells or byanalysis of the mud from wells. Collects and examinesgeological data or tests geological samples to determinepetroleum and mineral content. Some petroleum technicians,called scouts, collect information about oil and gas welldrilling operations, geological and geophysical prospecting,and land or lease contracts.
Planner/EconomistWorks in a team to decide which tract of oil-producing land topurchase and drill on. Computes the financial success ofmajor drilling operations.
Process EngineerMay monitor product yields, catalyst life and processefficiencies, and make recommendations that could increaseplant efficiency or yield. May take part in defining needs forinspection, cleaning, and repair of equipment during plantshutdowns. May contribute ideas for redesigned processes toimprove product quality, to reduce operating costs, or to
Adapted from Chevron Professional Opportunities and 1998-99 Occupational Outlook Handbook, Bureau of Labor Statistics, U.S.Department of Labor, 1998

Appendices
Career Possibilities: Examples of Petroleum Industry Careers(Continued)
improve safety or the environment. May evaluate the potentialeconomic or environmental advantages of a new researchbreakthrough, design a distillation column or reactor, orobserve how a refinery or chemical plant performs in actualoperation.
Production EngineerMonitors the performance of producing fields and recommendsand executes programs to improve production and profitability.
Reservoir EngineerWorks with geologists to conduct tests and develop reservoirperformance simulations to prepare plans for developing oiland gas fields. Estimates the amount of oil and gas in areservoir and evaluates the economics of extracting it withprimary, secondary, or enhanced oil recovery techniques. Usesadvanced computer simulation technology to understand thereservoir and performs economic analyses on a variety ofprojects such as water flooding, carbon dioxide flooding,steam drives, and offshore development.
For More Information on Petroleum IndustryCareers:
American Association of Petroleum GeologistsCommunications Dept.P.O. Box 979Tulsa, OK 74101
American Chemical SocietyDepartment of Career Services1155 16th St., NWWashington, D.C. 20036Provides information on careers in chemistry and chemical engineering.
American Institute of Chemical Engineers345 East 47th St.New York, NY 10017-2395
American Petroleum Institute1220 L Street, NWWashington, D.C. 20005(202) 682-8000<http://www.api.org/>
American Society of Civil Engineers1801 Alexander Bell Dr.Reston, VA 20191-4400
American Society of Mechanical Engineers345 E. 47th St.New York, NY 10017
California Department of Conservation, Division of Oil and Gas801 K St.Sacramento, CA 95814(916) 322-7685 (Personnel Office)<http://www.consrv.ca.gov>
Chevron, U.S.A.<http://www.chevron.com/about/hr/index.html>
Independent Lubricant Manufacturers Association651 S. Washington StreetAlexandria, VA 22314(703) 684-5574<http://www.ilma.org>
Institute of Electrical and Electronics Engineers1828 L St., NW, Ste. 1202Washington, D.C. 20036
Institute of Industrial Engineers, Inc.25 Technology Park/AtlantaNorcross, GA 30092<http://www.iienet.org>
International Association of Drilling Contractors<http://www.iadc.org>
National Oil Recyclers Association12429 Cedar RoadSuite 26Cleveland, OH 44106-3172(216) 791-7316<http://www.noroil.com>
Society of Petroleum EngineersP.O. Box 833836Richardson, TX 75083-38361-800-456-6863<http://www.spe.org>
Appendices
Career and Educational Guidance Library: Career Explora-tion LinksA web site of the University of California, Berkeley<http://www.uhs.berkeley.edu/CareerLibrary/links/careerme.htm>
Career Planning Center for Beginning Scientists andEngineersA collaborative web site of the National Academy of Sciences,National Academy of Engineering, Institute of Medicine, and NationalResearch Council<http://www2.nas.edu/cpc/index.html>
Catapult Career ChoicesA web site of the National Association of Colleges and Employers<http://www.jobweb.org/catapult/choice.htm>
Comprehensive Career Summaries from the1998-99 Occupational Outlook HandbookA web site of the U.S. Department of Labor, Bureau of LaborStatistics<http://stats.bls.gov/ocohome.htm>
Environmental Careers OrganizationA web site of the Environmental Careers Organization<http://www.eco.org/>
EnviroworldA web site of Environment 21 Magazine<http://www.enviroworld.com>
Exploring Occupations: Getting You Started on YourCareer PathA web site of the University of Manitoba<http://www.umanitoba.ca/counselling/careers.html>
Career and Job Info for StudentsA web site of Federal Resources for Educational Excellence<http://www.ed.gov/free/>
Job Opportunities with ChevronA web site Chevron Corporation<http://www.chevron.com/about/hr/index.html>
nternet Connections: Job Searching ResourcesA web site of The Wallace Library, Rochester Institute of Technology<http://wally.rit.edu/internet/jobs.html>
Job Opportunities with ShellA web site of Shell Services Company<http://www.shellus.com/jobs/joboppor.html>
Places to Start: Web Sites for Career Exploration
Job Search FAQ’sA web site of the Career Relocation Corporation of America<http://americasemployers.com/Faq/>
Job Searching and Career Exploration by Major Field ofStudyA web site of the Montana State University-Bozeman<http://www.montana.edu/wwwcp/academic.html>
Job TrakA web site of the Jobtrak Corporation<http://www.jobtrak.com>
JobwebA web site of the National Association of Colleges and Employers<http://www.jobweb.com>
JETS: Engineering CareersA web site of the Junior Engineering Technical Society
<http://www.asee.org/jets>
Kaplan CareersA web site of Kaplan Educational Centers<http://www1.kaplan.com/view/zine/0,1282,8,00.html>
Nation Job Online Jobs DatabaseA web site of the Nation Job Network<http://www.nationjob.com>
Preparing for the Job SearchA web site of Oberlin College<http://cs.oberlin.edu/students/csmc/jobs/>
Princeton Review Online CareerA web site of the Princeton Review<http://www.review.com/career/>
Science’s Next Wave: Resources for the Next Generation ofScientistsA web site of the American Association for the Advancement ofScience<http://www.nextwave.org/>
Student Center “About Work”A web site of TMP Worldwide<http://www.aboutwork.com/indexsc.html>

Appendices
To job shadow is to follow an employer or employee at an agency orbusiness to learn about a particular job or industry. Through jobshadowing, you can observe a workplace, interview employees abouttheir day-to-day responsibilities and their educational background,and record your observations of typical tasks and skills needed toperform those tasks.
Your job-shadowing experience should last at least one week. Duringthis time, keep a journal in which you note your observations aboutthe job. If possible, take photographs to illustrate various responsi-bilities of the job you are shadowing.
After selecting the type of job that you would like to shadow, yourfirst step in preparing for a job shadowing experience is to answerthe following questions:
• What do you want to learn from this experience?
• Why would you want to learn this?
• What do you feel is the purpose of this experience?
After you have answered these questions, the next step is to find acareer mentor, an experienced employee or employer who willprovide guidance as you learn about the job that you would like toshadow.
Possible Contacts:To find your career mentor, talk to local universities, colleges, andtechnical training schools. In addition, contact U.S., State, and localgovernment agencies (such as the Department of Forestry, FireDepartment, Department of Agriculture, Department of Fish andGame, Department of Water Reclamation, Cal Trans, public utilitiessuch as water treatment and waste management, and so on) whichmay have careers similar to those you are interested in. Suchagencies often have internship programs. In addition, don’t forget tocontact private industries; they often welcome those interested intheir profession as apprentices, job shadowers, or interns. If theseagencies or industries can’t provide you with a career mentor, askthem for other possible contacts.
If you have to make several phone calls, don’t get discouraged —your politeness, patience, persistence will eventually lead you to theright person who can help.
What to Say:After completing “Activity Page — Researching a Career,” “ActivityPage — Personal Survey: A Career Path Exercise,” and the questionslisted above, practice what you will say over the telephone. Be sureto get your teacher’s approval on your proposed dialogue before youbegin making phone calls.
Job Shadowing Strategies
Example:Hello, my name is (name) from (school name). I am interested inbecoming a (career choice). May I speak to whomever is thedirector of (name of related department) about the possibility ofworking with a mentor and learning more about (chosen career)?
When speaking to the director of an organization, make sure youintroduce yourself once again and explain to him/her what you wishto learn. Be polite but persistent. Ask him/her to suggest a careermentor whom you could “job shadow” for at least one week. Mentionthat you became interested in this particular line of work whilestudying the importance of recycling used oil in your science class.
If you do not have success with this particular manager, don’t giveup! Ask this person to suggest other departments or companies tocontact.
Writing an Inquiry Letter:In today’s workplace, communication skills are highly valued. Yourcorrespondence with potential employers gives you the opportunityto illustrate your competence in writing clearly, concisely, andeffectively.
After you obtain the name and address of one or more directors ormanagers of organizations where you would like to have a careermentor, write a letter to each person to inquire about the possibilityof job shadowing. Use “Info Page — Sample Inquiry Letter” as anexample. Even if you have already talked to possible contacts overthe telephone, a letter can serve as a follow-up to confirm yourinterest in this opportunity.
Whether you are writing your letter to request a job shadowingexperience, or to request an informational interview, be sure that youinclude the following:
• In the first paragraph, introduce yourself briefly and state thereason of the letter.
• In the second paragraph, tell why you are interested in theposition or in working with a career mentor.
• In the final paragraph, propose some action on your part andanticipate a positive response. Indicate that you will make a phonecall and that you would like to set up an interview. Remember toinclude your phone number. The number may be listed in this finalparagraph or placed under your typewritten name.
Job-Shadow Interview:
After you find a career mentor, schedule a date to go in for anintroductory interview. Be sure to dress for success; first impres-sions are important.

Appendices
During this introduction, be sure to ask the following questions:• What will I be doing?
• What dress or appearance are considered appropriate?
• What days and times will I be shadowing?
• Whom will I be working with and whom will I beable to meet?
• Do I need to bring a lunch, or money for lunch?
• What safety precautions do I need to follow?
• Are there any other procedures, policies, or information that Ineed to be aware of before starting my job-shadowing experience?
Keep a Job-Shadowing Journal:
To help you get the most out of your job-shadowing experience,keep a job-shadowing journal.
• Make an entry in your log every day, recording what you did,what you learned, what you found interesting, and what youfound difficult.
• Make sure to have your mentor sign your journal each day.
• At the end of your job-shadowing experience, ask your mentor tobriefly remark on your learning experience on the page followingyour last entry in your journal.
• Be sure to take some photographs of yourself and your mentoron the job. These photos should be added to your portfolio.
Job Shadowing Strategies (Continued)

Appendices
Sample Inquiry Letter
234 Central AvenueSacramento, CA 95814January 1, 1998
Ms. Jane Martinez
Employment Manager
Sacramento Municipal Water Treatment Plant
1818 Gilbreth, Suite 142
Sacramento, CA 95814
Dear Ms. Martinez:
As a student at Washington High School who is studying the effects of used oil disposal on water supplies, I am interested inexploring a career as a water treatment plant operator. Accordingly, I am requesting an opportunity to work with, or “job shadow,” anemployee of your organization who would be willing to be a career mentor on a part-time, after-school basis during a one-week periodor longer.
Participating in a job shadowing experience will help me to learn firsthand about the job responsibilities and requirements of a watertreatment plant operator. Such an experience will help me decide whether this is the type of work I would like to do someday. It willalso help me to understand the steps I need to take to begin preparing for this career.
I would very much like to speak with you further about the possibility of participating in a job shadowing opportunity at your agency. Iwill contact you within the next week, hoping to arrange an introductory interview. If you have any questions, I can be reached bytelephone at (916) 123-4567. Thank you very much for your time and assistance.
Sincerely,
James Mason, Jr.

Notes: