dynamic powerpoint methods - s3.amazonaws.compowerpoint.pdfautoshape. a handy trick is to create an...
TRANSCRIPT

Dynamic PowerPoint Using PowerPoint’s Interactivity Features to Create Games, Quizzes, Menus, Tutorials and More.
Methods JUMPING Interactivity, in a nutshell, means that when someone does something (such as mouse click on an object) something specific happens. This can be thought of as the IF touched, THEN jump method. PowerPoint has progressively introduced a number of options that allow increasing flexibility using this simple concept.
Hyperlinks (PowerPoint 97 and higher)
Hyperlinks allow for IF mouse-click, THEN jump to An Existing File or Web Page, or A place in the current presentation, or Create a new document, or An Email Address. They also allow IF mouse-over, THEN display user-specified text.
Hyperlinks in this context are typically displayed as underlined text. Once clicked on, the color of the hyperlink changes. You can use this feature to create a hyperlink on a slide that will seem to disappear when it’s been clicked on, or create a hyperlink that doesn’t show up until it’s been clicked on. You may have seen this technique used in a Jeopardy or Family Feud style game.
To create a hyperlink, use your mouse to highlight the text that will be the hyperlink and click on Insert, Hyperlink. Decide what you want to jump to, if this is a game you typically jump to a slide in the presentation. When you link to An existing file or web page, or an email address, PowerPoint will automatically add pop-up mouse-over text to your hyperlink. If desired, you can change this (pop-up) text by clicking on the Screen Tips button. Sonia Coleman has posted a nice little tip about using Screen Tips. When you’ve finished, click ok.

To have your hyperlinks appear or disappear when they’re clicked on, you need to edit the color schemes of the slides. Click on Format, Slide Design, Color Schemes. Click on Edit Color Schemes. Choose the Custom Tab. Change the Accent and Hyperlink color or Accent and Followed Hyperlink color to match the background color of the hyperlink text. Change Hyperlink color if you want it to be hidden and then appear, change Followed hyperlink color if you want it to show and then disappear. PowerPoint MVP Echo Swinford has an excellent tutorial on Color Schemes.

Hyperlinks can also be applied to AutoShapes, Clip Art, etc. Hyperlinks applied to AutoShapes will not change the color or underline the text (if any) within the AutoShape. A handy trick is to create an "invisible box" on your slide and apply a hyperlink to it. After you've applied your hyperlink settings, set the fill color and line color to none on your AutoShape.

Hyperlinks applied to Placeholders (such as Title and Text placeholders) will apply the hyperlink to all the text within the Placeholder, so you may want to highlight the specific text within the placeholder for the hyperlink.


PowerPoint MVP Steve Rindsberg has a nice explanation here about controlling the formatting of hyperlinked text.
Action Settings (PowerPoint 2000 or higher)
Action Settings were introduced in PowerPoint 2000. In addition to the same IF, THEN features as Hyperlinks, they also allow you to Run a Program, or Run a Macro, or initiate an Object Action (such as play a movie) AND/OR Play a Sound AND/OR highlight the object. These features are available for both mouse-click and mouse-over. So you can set any object in PowerPoint, such as an AutoShape, Clip Art or Text to initiate an action by being clicked on or having the mouse move over it. For example, you could set a button to run a macro on mouse-click and also have that same button play a chime and highlight on mouse-over. A good way to learn action settings is to start with Action Button AutoShapes. Click on AutoShapes, Action Buttons. Choose an Action Button and draw it on your slide. PowerPoint will automatically apply the Action

Settings for you. With Action Buttons you can place more control on navigating through your presentation.

Just as with hyperlinks, any object that links to an existing file or web page, or an email address will automatically have mouse-over text applied. But, you cannot change Screen Tips for any objects with Action Settings for highlight on mouse-click or mouse-over or to play a sound. All Action Button AutoShapes have highlighting applied and you can't remove it, but you can use other AutoShapes to create your own custom Action Buttons. If you want to change the text of your Screen Tips, don't check the sound or highlight boxes in Action Settings until after you’ve added your screen tips and don’t use the Action Button AutoShapes.
All Action Button AutoShapes have highlighting applied and you can't remove it, but you can use other AutoShapes to create your own custom Action Buttons. If you want to change the text of your Screen Tips, don't check the highlight boxes in Action Settings or use the Action Button AutoShapes.

A quick and easy way to create a quiz in PowerPoint is to list a question with multiple answers. You can then apply an action setting to each answer that plays a “wrong answer” sound or a “right answer” sound on mouse-click. If you apply your Action Settings to text only, you can use the color schemes to make links that either appear or disappear.
By using these Play Sound Action Settings applied to Text and color schemes that have your hyperlink match your background and followed hyperlink contrast with the background, you can create Family Feud style answers that don’t appear until you click on them.

Mouse-overs provide an additional element of flexibility with the same options as Mouse-click. I have a tutorial on creating mouse-over effects with action settings and several downloadable examples. PowerPoint MVP Chirag Dalal has a nice demo about creating mouse-over effects.
Triggers (PowerPoint Xp or higher)
Animation Triggers were introduced in PowerPoint Xp (2002). Animation triggers allow for IF mouse-click on a designated object, THEN play this animation of this (these) objects. This feature is handy for making items appear and/or disappear. This feature can be used to create a Memory style game by creating Show & Hide buttons for the squares of the game board.

The example above shows the Number 6 rectangle is set to appear (Stretch) when the Show 6 button is clicked and exit (collapse) when the Hide 6 button is clicked.
You can also use triggers to create drop down menus, start animations that explain complex concepts, or show letters for simple hangman type letter games.
View PowerPoint MVP Geetesh Bajaj's tutorial on Trigger Animations and/or PowerPoint MVP Kathy Jacobs’ Trigger Happy Animations tutorial for step by step directions on creating animation triggers. PowerPoint MVP Shyam Pillai has posted this "proof of concept" presentation (zip file) for drop down menus using animation triggers.

BRANCHING When your presentation can be broken down into sections or topics, you may want to jump to each section. This concept is known as BRANCHING because each section can be run independently of each other.
Menus
With Action Settings and Action Buttons, you can create a menu driven slide show that can be viewed non-sequentially. This is especially helpful when creating computer based training modules. There are two methods you can use to create interactive (or branching) menus in PowerPoint. PowerPoint MVP Taj Simmons’ has an excellent tutorial on Interactive Menus that explains both methods.
Custom Shows
Create Custom Shows within a slide show when you want all your menu items to be contained within one file. To create a custom show, click on Slide Show, Custom Shows, New, Select the Slides you want to be in the custom show and give it a unique name. You can now link to the Custom Show from your menu slide. If you check the Show & Return box, you will return to the original menu after the custom show is complete. In PowerPoint 2002/2003, you can use an Action Button to "end show" and if you have checked the Show & Return box, it will close only the custom show. If you did not check the Show & Return box, it will close the entire presentation. In PowerPoint 2000, it will close the entire presentation whether you check the Show & Return box or not.

External Presentations
You can also link to external presentations from a menu slide and even start at a specific slide in an external presentation. This is useful if you have multiple presentations created by different persons.

Navigation
PowerPoint is designed to automatically advance to the next slide, but this may cause viewers to accidentally jump to the wrong slide when you're using a slide with hyperlinks (such as a menu slide). You can prevent this, but you must provide the navigation for the slide. This means you need to add navigation buttons to the slide, such as NEXT, BACK, HOME, etc. From your menu slide, click on Slide Show, Slide Transition and uncheck the Advance on mouse click box. To remove the advance on mouse click for all slides in your presentation, click on Slide Show, Set Up Show and select Browsed at Kiosk.

NESTING NESTING means a cluster of similar items or a set of objects of that can be stacked together (each fitting within the one immediately before).
Nested Menus and Shows
Within PowerPoint you can create Nested Menus (a menu that goes to another menu) and even Nested Custom Shows. This presentation on Fun Menu Animations is an example of both nested menus and nested custom shows. When you are going to create a presentation that has multiple branching (or nesting), it's a good idea to map out the structure of the presentation before you begin.

A Show in a Show
Long before reporters made embed a household word, PowerPoint provided the ability to embed objects within a presentation. A nice metaphor for embedding in PowerPoint are the Russian Nesting Dolls. Literally, the object is contained within the presentation (with certain limitations).
Embedding is most effectively used with other Office Applications. It is an excellent method to provide demonstrations for when you need to edit something while running a presentation, or provide the ability to practice an activity from within a running presentation. It also means you can have a single file that contains all your presentations.
To embed an object in PowerPoint, click on Insert, Object, Create from file, browse to select the file, click ok.
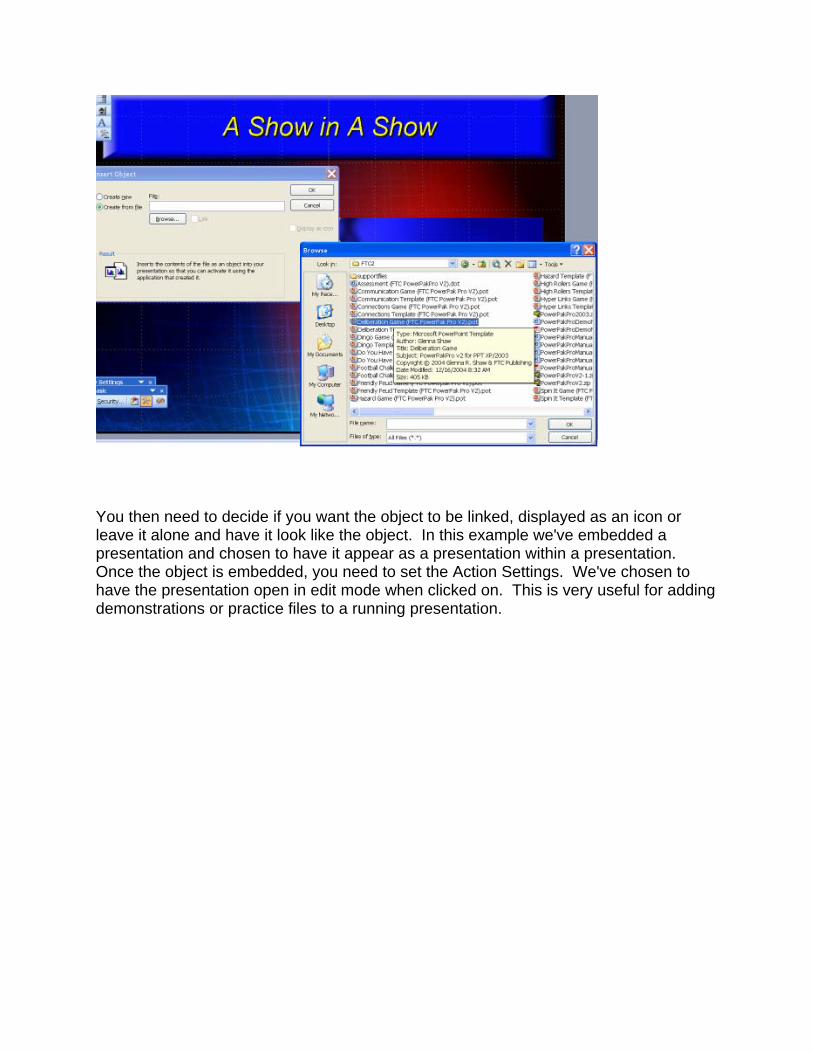
You then need to decide if you want the object to be linked, displayed as an icon or leave it alone and have it look like the object. In this example we've embedded a presentation and chosen to have it appear as a presentation within a presentation. Once the object is embedded, you need to set the Action Settings. We've chosen to have the presentation open in edit mode when clicked on. This is very useful for adding demonstrations or practice files to a running presentation.

Not all files can be successfully embedded in PowerPoint. If PowerPoint cannot embed the file, it will automatically link to it and add an icon to your presentation. When you click on the icon, depending on how you've set your Action Settings, PowerPoint will open the file with the program associated with the file extension. The file will not be truly embedded in your presentation. In these instances, it's typically better to create your own object and link to the file. Embedding will limit what you can do with the object. You'll need to experiment with your own files to determine what's the best method for you.
The PowerPoint 2003 Viewer does NOT support these embedded objects. The PowerPoint 97 viewer does, but does not support many of the new features of PowerPoint. Embedded objects are best used for folks that have the full PowerPoint application.
LOOPING Another method that can be used in PowerPoint is the DO some action WHILE NOT some action, also known as LOOPING. In PowerPoint, you can loop a slide show or group of slides until the ESC key is pressed. This technique and some action settings or hyperlinks can be used to create the illusion of tumbling dice or a game spinner similar to “Wheel of Fortune”.

External Presentations
Set slide transitions to advance automatically and then click on Slide Show, Set Up Show, and check the Loop continuously until ESC box. Create a link to go to this looping presentation and it will run until you press the ESC key and then return to the original slide from where it was launched. PowerPoint MVP Taj Simmons has a nice tutorial on looping external presentations.
Custom Shows
You can also loop a Custom Show within PowerPoint. Set the Slide Transitions on the Custom Show slides to advance automatically (make sure none of the other slides in your presentation have advance automatically set in slide transitions) and click on Slide Show, Set Up Show, and check the Loop continuously until ESC box. Make sure the radio button for Advance Slides Using timings, if present is selected. When you click on

a link to run the Custom show, it will loop until you hit the ESC key. You'll also need to hit the ESC key to exit from the main presentation. This fireworks template demonstrates a looping custom show.
PROGRAMMING
Visual Basic

PowerPoint provides the option of programming in Visual Basic Programming Language (VB). To enter the Visual Basic Editor, click on View, Toolbars, and make sure the Visual Basic toolbar is selected (so it shows). On the Visual Basic Toolbar, click on the icon for the Visual Basic Editor.
Resources
In addition to the VB Help, these sites provide excellent information for programming in PowerPoint:
PowerPoint MVP Shyam Pillai's VB SectionPowerPoint MVP Chirag Dalal's VB SectionPowerPoint MVP Steve Rindsberg's Programming in PowerPoint sectionProfessor David M. Marcovitz's Powerful PowerPoint for Educators
Distribution

If you are creating interactive presentations, it's a logical assumption that you're going to want to distribute (or share the presentation). PowerPoint provides several methods for this, such as on CD, as a web page or simply sending the file(s). Each method has its pros and cons. If you're creating interactive presentations, its typically best to stick with distribution on a CD or as a PowerPoint Show (PPS) file because PowerPoint HTML doesn't support all the interactivity features of PowerPoint. When sharing presentations, your biggest pitfall will probably be links breaking. See PowerPoint MVP Steve Rindsberg's site for more information and help with broken links.
PowerPak and PowerPakPro for PowerPoint My game templates utilize a large variety of these concepts. You can download demos to see how it’s done. Copyright© 2005 Glenna Shaw. All Rights Reserved.