dxh 520 performance verification workbook · instrument installation once your dxh 520 hematology...
TRANSCRIPT

DxH 520 Performance Verification Workbook Page 1 of 94 Ver 2.1 June 2019 Beckman Coulter Technical Product Training
DxH 520 PERFORMANCE VERIFICATION WORKBOOK

DxH 520 Performance Verification Workbook Page 2 of 94 Ver 2.2 July 2019 Beckman Coulter Technical Product Training
WARNING AND PRECAUTIONS NOTICE
INTENTION FOR USE
TRADEMARKS
REVISION STATUS
DxH 520 Performance Verification Workbook Page 3 of 94 Ver 2.2 July 2019 Beckman Coulter Technical Product Training
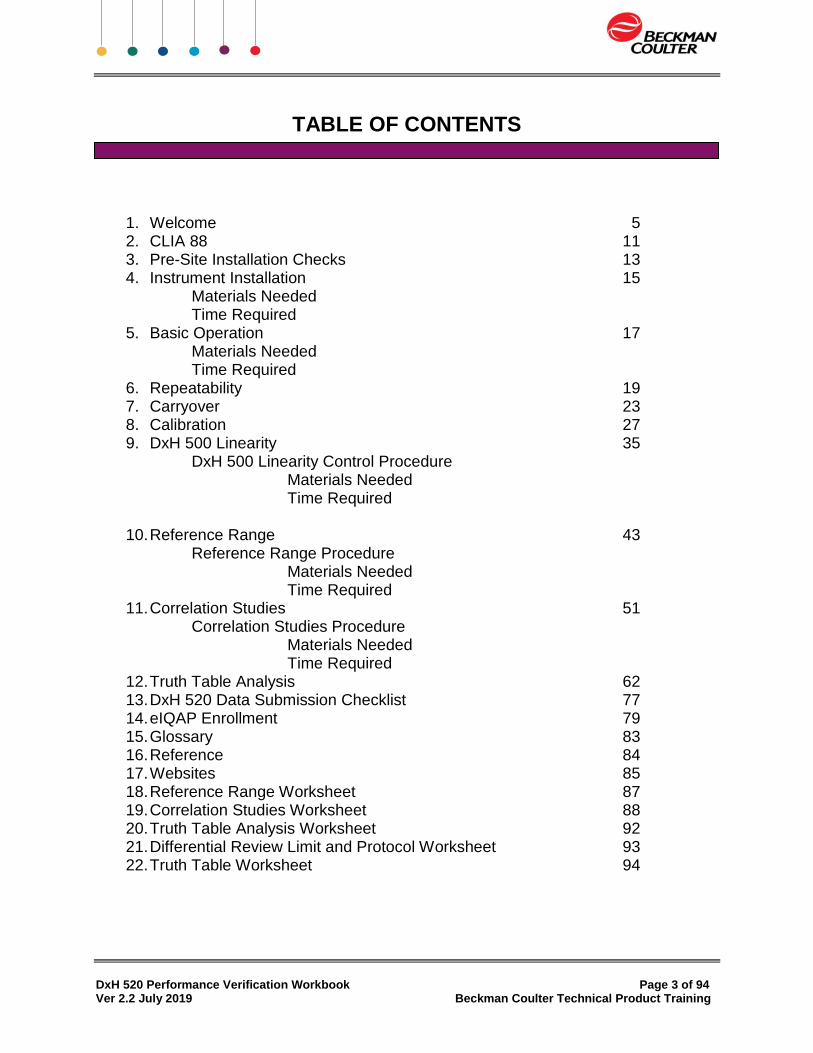
TABLE OF CONTENTS
1. Welcome 5 2. CLIA 88 11 3. Pre-Site Installation Checks 13 4. Instrument Installation 15 Materials Needed Time Required 5. Basic Operation 17 Materials Needed Time Required 6. Repeatability 19 7. Carryover 23 8. Calibration 27 9. DxH 500 Linearity 35 DxH 500 Linearity Control Procedure Materials Needed Time Required 10. Reference Range 43
Reference Range Procedure Materials Needed Time Required 11. Correlation Studies 51 Correlation Studies Procedure Materials Needed Time Required 12. Truth Table Analysis 62 13. DxH 520 Data Submission Checklist 77 14. eIQAP Enrollment 79 15. Glossary 83 16. Reference 84 17. Websites 85 18. Reference Range Worksheet 87 19. Correlation Studies Worksheet 88 20. Truth Table Analysis Worksheet 92 21. Differential Review Limit and Protocol Worksheet 93 22. Truth Table Worksheet 94

DxH 520 Performance Verification Workbook Page 4 of 94 Ver 2.2 July 2019 Beckman Coulter Technical Product Training
DxH 520 Performance Verification Workbook Page 5 of 94 Ver 2.2 July 2019 Beckman Coulter Technical Product Training
WELCOME
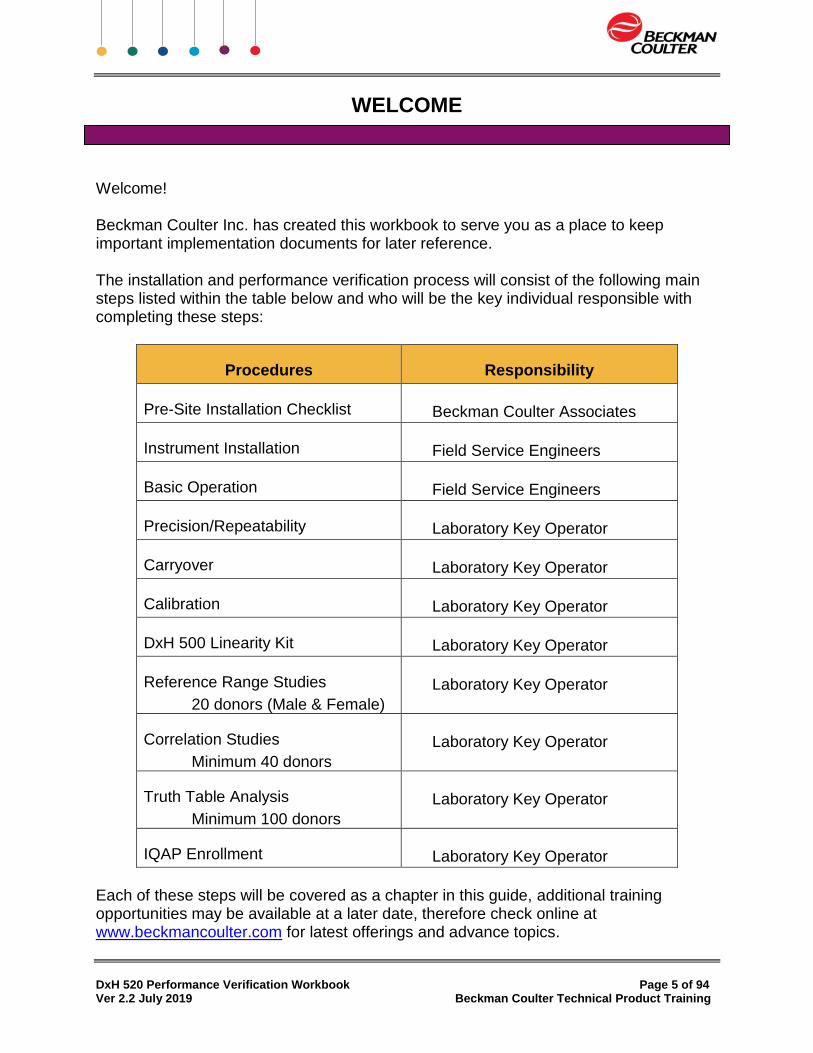
Welcome! Beckman Coulter Inc. has created this workbook to serve you as a place to keep important implementation documents for later reference. The installation and performance verification process will consist of the following main steps listed within the table below and who will be the key individual responsible with completing these steps:
Procedures Responsibility
Pre-Site Installation Checklist Beckman Coulter Associates
Instrument Installation Field Service Engineers
Basic Operation Field Service Engineers
Precision/Repeatability Laboratory Key Operator
Carryover Laboratory Key Operator
Calibration Laboratory Key Operator
DxH 500 Linearity Kit Laboratory Key Operator
Reference Range Studies
20 donors (Male & Female)
Laboratory Key Operator
Correlation Studies
Minimum 40 donors
Laboratory Key Operator
Truth Table Analysis
Minimum 100 donors
Laboratory Key Operator
IQAP Enrollment Laboratory Key Operator
Each of these steps will be covered as a chapter in this guide, additional training opportunities may be available at a later date, therefore check online at www.beckmancoulter.com for latest offerings and advance topics.
DxH 520 Performance Verification Workbook Page 6 of 94 Ver 2.2 July 2019 Beckman Coulter Technical Product Training
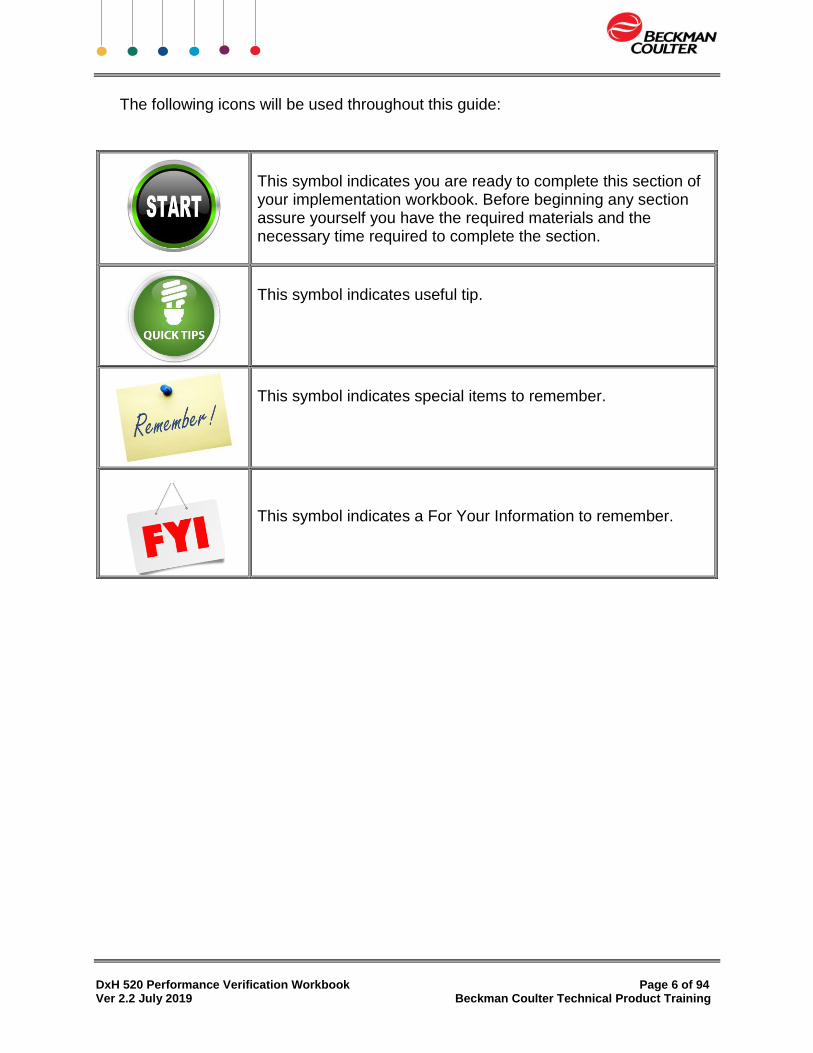
The following icons will be used throughout this guide:
This symbol indicates you are ready to complete this section of your implementation workbook. Before beginning any section assure yourself you have the required materials and the necessary time required to complete the section.
This symbol indicates useful tip.
This symbol indicates special items to remember.
This symbol indicates a For Your Information to remember.

DxH 520 Performance Verification Workbook Page 7 of 94 Ver 2.2 July 2019 Beckman Coulter Technical Product Training
HEMATOLOGY CUSTOMER SUPPORT CONTACTS
SALES AND SERVICE OFFICES
FOR SERVICE OR TECHNICAL INFORMATION CUSTOMER TECHNICAL SUPPORT CENTER / SERVICE United States………………………………………800 526-7694 ORDER ASSISTANCE
United States……………………………………...800 526-3821 BECKMAN COULTER Web Site……………………………………..www.BeckmanCoulter.com DxH 500 Series Data Submission United States……………………[email protected] Sales Office: 250 South Kraemer Boulevard Brea,CA. 92821 800 526-3821 Instrument Model __________________________________ Serial Number __________________________________ SID#/Instance#: __________________________________ IQAP Participant # __________________________________ Your Account#: _________________________________ Customer Service Representative: _________________________________ (Order/Contract Assistance) Applications Specialist: __________________________________ Field Service Engineer: __________________________________ Instrument Sales Representative: __________________________________

DxH 520 Performance Verification Workbook Page 8 of 94 Ver 2.2 July 2019 Beckman Coulter Technical Product Training

DxH 520 Performance Verification Workbook Page 9 of 94 Ver 2.2 July 2019 Beckman Coulter Technical Product Training
BEFORE YOU BEGIN
The DxH 520 Workbook is designed to assist you in making a smooth transition integrating your new Hematology System into your laboratory. Please take the time to review this book thoroughly. Within this Workbook you will find guidelines for evaluating your new analyzer. You will find procedures and worksheets to assist you with each stage of the verification process. Please note that the procedures provided outline the general steps for characterizing the performance of your new system. Your current laboratory policies or your local regulatory agency may dictate more specific procedures for your laboratory to follow. We suggest that you use this DxH 520 Workbook to store all of your installation records and subsequent characterization data for your system. We hope you will find the information contained in this manual a useful tool for making a smooth transition to your new hematology system.

DxH 520 Performance Verification Workbook Page 10 of 94 Ver 2.2 July 2019 Beckman Coulter Technical Product Training

DxH 520 Performance Verification Workbook Page 11 of 94 Ver 2.2 July 2019 Beckman Coulter Technical Product Training
ABOUT CLIA ‘88
Much has been said and written about the impact of the Clinical Laboratory Improvement Amendments of 1988 (CLIA’88) on the laboratory and method evaluation.1 It is often confusing to determine what is needed for accreditation and certification for the different types of testing categories. The Centers for Medicare & Medicaid Services (CMS) regulates all laboratory testing (except research) performed on humans in the U.S. through the Clinical Laboratory Improvement Amendments (CLIA). The following procedures will assist you in the evaluation of a new instrument or clinical test. Not all of these procedures are required by CLIA; however, some of them may be required by the College of American Pathologists (CAP), the Joint Commission of Accreditation of Healthcare Organizations (known as JCAHO), and/or individual agencies. It is important to know local requirements as well as those of any other accrediting agencies that will impact your laboratory. The data generated from some of these procedures will help to establish the baseline characterization of your system. Your laboratory must compile its own policies and procedures manual for method evaluation in compliance with the appropriate accrediting agencies. You are empowered to make your own decisions as to what procedures are appropriate, and which performance limits or specifications are acceptable.

DxH 520 Performance Verification Workbook Page 12 of 94 Ver 2.2 July 2019 Beckman Coulter Technical Product Training
DxH 520 Performance Verification Workbook Page 13 of 94 Ver 2.2 July 2019 Beckman Coulter Technical Product Training
PRE-SITE INSTALLATION CHECKS
We recommend that the individual responsible for the implementation of the instrument in your lab participate in the pre-installation checks with the Beckman Coulter Field Service Engineer. This may be the key operator, laboratory consultant, supervisor, or the physician. In this section you will verify the minimum instrument requirements regarding space and accessibility requirements and electrical requirements as well as operational ambient temperature, humidity and altitude requirements. To help guide the Beckman Coulter Field Service Engineer and you through the DxH 520 pre-installation checks, we provide a checklist. The checklist will assist with completing the pre-installation checks prior to the installation of the DxH 520 instrument by a certified Beckman Coulter trained Field Service Engineer. This section is intended to be a storage area for the DxH 520 Pre-Installation Checklist.
Responsibility:
Beckman Coulter Associates
Materials Needed:
Pre-Site Installation Checklist.
Time Required: Approximately ½ hour

DxH 520 Performance Verification Workbook Page 14 of 94 Ver 2.2 July 2019 Beckman Coulter Technical Product Training
DxH 520 Performance Verification Workbook Page 15 of 94 Ver 2.2 July 2019 Beckman Coulter Technical Product Training
INSTRUMENT INSTALLATION
Once your DxH 520 Hematology System arrives at your institution with the DxH 500 Series reagents, calibrators, controls, and linearity kit, you will need to carefully inspect the instrument carton and determine if all reagents are received within the proper temperature. If you see signs of mishandling, damage, or incorrect temperature, contact our customer service representative by calling 800-223-0130. Installation of the DxH 520 instrument will be performed by a certified Beckman Coulter trained Field Service Engineer. The system will be positioned on a table in a secure location away from any vibration, electromagnetic interference, or combustible materials. The instrument will require at least 4 feet of counter space and be within 6 feet of an electrical outlet.
Responsibility:
Beckman Coulter Field Service Associate
Materials Needed:
DxH 520 Hematology Instrument
DxH 500 Series Controls, Calibrators and the DxH 500 Linearity Kit
DxH 500 Series Diluent, Lyse and Cleaner reagents
Time Required: Approximately 3 hours
Important Note: The DxH 500 Series Controls, and Calibrators and DxH 500 Linearity Kit
should be stored upright at 2 – 8oC when not in use. Protect tubes from overheating and freezing.
Now:
Complete DxH 520 Instrument installation

DxH 520 Performance Verification Workbook Page 16 of 94 Ver 2.2 July 2019 Beckman Coulter Technical Product Training
DxH 520 Performance Verification Workbook Page 17 of 94 Ver 2.2 July 2019 Beckman Coulter Technical Product Training
BASIC OPERATION
To complete the required procedures for instrument implementation, you will need to know how to process patient samples through your new instrument. Several tools are available to guide you. The reference for instrument operation and performance is found in the Instructions for Use. Future updates of this document can be found on the Beckman Coulter website at www.beckmancoulter.com. To simplify your basic training, a Beckman Coulter trained associate will facilitate your DxH 520 basic operation training. Topics that will be covered during your instrument training are: Software and Hardware system overview, System Operations which includes Startup, Daily Checks, Instrument Setup, Shutdown and Quality Control Setup. Additional training topics will include processing quality controls, patient samples analysis, and maintenance. Extra training opportunities can be found on the Beckman Coulter Learning Lab at www.beckmancoulter.com.
Responsibility:
Laboratory Key Operator and Beckman Coulter Field Service Associate
Materials Needed:
DxH 520 In-Laboratory Training Guide Provided in the Beckman Coulter website is the DxH 520 In-Laboratory Training guide. This training guide provides easy-to-follow one-page overview of daily procedures.
DxH 520 Instructions for Use Also provided in the Beckman Coulter website is the DxH 520 Instructions for Use. This will contain a more detailed description of the DxH 520 Instruments along with a training checklist and for Use training procedures and installation steps beyond the Quick Start Installation Guide above.
DxH 520 Training Checklist and Implementation Checklist
Time Required:
Variable

DxH 520 Performance Verification Workbook Page 18 of 94 Ver 2.2 July 2019 Beckman Coulter Technical Product Training
Now:
Complete your Basic Operation Training Important Note: To access the additional training module:
Go to www.beckmancoulter.com Under Resources
o Select Training Courses Register New Account or Login to your existing account
o New Account: Fill out the form with your address and account information.
o Existing Account: Click on Login Enter your Username or Email and password Click on the training eLearning modules.
For data submission and non-urgent inquires on the DxH 520 implementation workbook or instrument operation, contact Customer Technical Support by emailing [email protected]
DxH 520 Performance Verification Workbook Page 19 of 94 Ver 2.2 July 2019 Beckman Coulter Technical Product Training
Precision/Repeatability
Repeatability is the closeness of agreement between the results of successive measurements on the same substance carried out under the same conditions of measurement. Also known as reproducibility, precision, within run precision, within-assay, within-run, intra-assay, and intra-run precision. A Repeatability procedure is required by your regulatory agency or your own laboratory protocol.This procedure may be used at any time to verify the precision of the instrument. This section is intended to be a storage area for the DxH 520 instrument Repeatability printout.
Responsibility:
Laboratory Key Operator
Materials Needed:
1 fresh EDTA tube of blood, enough for a minimum of ten cycles 3 Additional tubes
Time Required: Approximately 1 hour
Important Note: Capped samples cannot be pierced more than four times. When an uncapped whole-blood is processed, separating the blood into three tubes is not necessary.
Now:
Running Repeatability procedure

DxH 520 Performance Verification Workbook Page 20 of 94 Ver 2.2 July 2019 Beckman Coulter Technical Product Training
Precision/Repeatability
Risk of loss of data. When performing a Repeatability, do not leave the screen until you have finished analyzing the required number of replicates.
Running Repeatability on DxH 520 Analyzer
STEP ACTION
1
Separate the whole-blood sample into three tubes. NOTE: Capped samples cannot be pierced more than four times. When an uncapped whole-blood is processed, separating the blood into three tubes is not necessary.
2 Select the QC/QA icon from the main menu.
3 On the Quality Control (Data View) screen, select the QA icon .
4 A dialog box will appear, select the Repeatability icon .
5
If existing data is present, a warning box will appear with the following message: Repeatability table contains data. To run, repeatability data must be deleted. Print repeatability data before deleting or delete data without printing.
Make your selection and select the OK icon to continue. 6 Mix the sample.
7
Fully insert the whole blood sample into the tube holder and select
the Run icon . The sample trap door will automatically close to initiate the analysis.
8 The status LED flashes red when aspiration is in progress and turns solid red throughout processing.
9 Remove the specimen tube when the sample trap door opens and the status LED is green.
10 Continue to mix the specimen tube.
11 Wait for the instrument to process the specimen and to display the results in the Repeatability screen. The instrument automatically saves the results into the database.
DxH 520 Performance Verification Workbook Page 21 of 94 Ver 2.2 July 2019 Beckman Coulter Technical Product Training
Precision/Repeatability
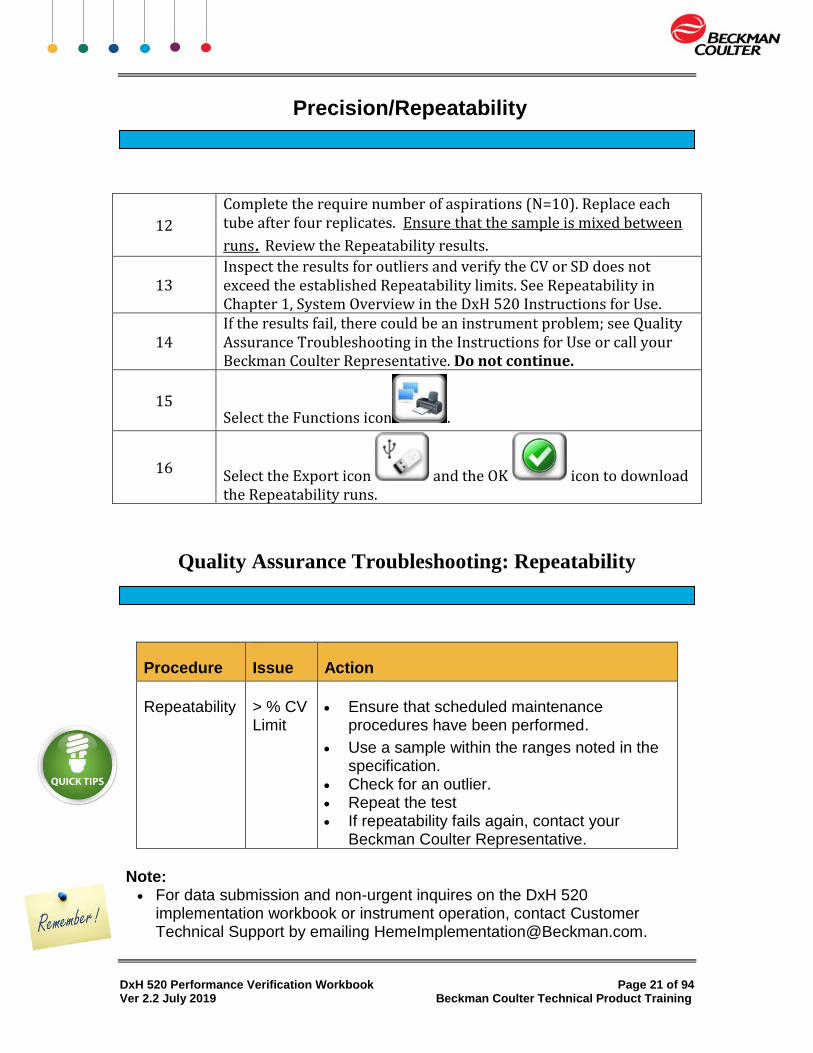
12
Complete the require number of aspirations (N=10). Replace each tube after four replicates. Ensure that the sample is mixed between
runs. Review the Repeatability results.
13 Inspect the results for outliers and verify the CV or SD does not exceed the established Repeatability limits. See Repeatability in Chapter 1, System Overview in the DxH 520 Instructions for Use.
14 If the results fail, there could be an instrument problem; see Quality Assurance Troubleshooting in the Instructions for Use or call your Beckman Coulter Representative. Do not continue.
15 Select the Functions icon .
16 Select the Export icon and the OK icon to download the Repeatability runs.
Quality Assurance Troubleshooting: Repeatability
Procedure Issue Action
Repeatability > % CV Limit
Ensure that scheduled maintenance procedures have been performed.
Use a sample within the ranges noted in the specification.
Check for an outlier. Repeat the test If repeatability fails again, contact your
Beckman Coulter Representative.
Note: For data submission and non-urgent inquires on the DxH 520
implementation workbook or instrument operation, contact Customer Technical Support by emailing [email protected].

DxH 520 Performance Verification Workbook Page 22 of 94 Ver 2.2 July 2019 Beckman Coulter Technical Product Training
.

DxH 520 Performance Verification Workbook Page 23 of 94 Ver 2.2 July 2019 Beckman Coulter Technical Product Training
Carryover
Carryover is the amount, in percent, of sample remaining in the system and picked up by the next sample cycled. Low-to-high carryover is the amount of sample with low cell concentrations carried over to samples with high cell concentrations, such as diluent to blood. High-to-low carryover is the amount of samples with high cell concentrations carried over to samples with low cell concentrations, such as blood to diluent.
A Carryover procedure is required by your regulatory agency or your own laboratory protocol. This procedure may be used at any time to verify the performance of CBC parameters. Most Beckman Coulter hematology instruments have a high to low carryover test procedure that automates running samples and does the statistical calculations. This section is intended to be a storage area for the DxH 520 instrument Carryover printout.
Responsibility:
Laboratory Key Operator
Materials Needed:
1 fresh EDTA tube of blood 3 Additional tubes labeled Diluent 1, Diluent 2, Diluent 3
Time Required: Approximately ½ hour
Risk of loss of data. When performing Carryover, do not leave the screen until you have finished the entire procedure.
Now:
Complete Carryover procedure

DxH 520 Performance Verification Workbook Page 24 of 94 Ver 2.2 July 2019 Beckman Coulter Technical Product Training

DxH 520 Performance Verification Workbook Page 25 of 94 Ver 2.2 July 2019 Beckman Coulter Technical Product Training
Carryover Running Carryover on DxH 520 Analyzer
STEP ACTION
NOTE:
Materials Required:
One tube of whole blood Three tubes labeled Diluent 1, Diluent 2 and Diluent 3 (for use in step 2)
1 Dispense diluent by selecting the Diagnostics Icon
from the main menu.
2
Select DILUENT DISPENSE. Have a tube ready for the diluent to be dispensed and
select the OK icon to automatically dispense the diluent into each of the three labeled tubes.
3 Select the QC/QA icon from the main menu.
4 From the Quality Control (Data view) screen, select the
Quality Assurance icon .
5 From the QA dialog box, select the Carryover
icon .
6 From the Carryover screen, select the Start icon .
7 Select the OK icon to delete existing information, if present.
8
Fully insert the specimen tube into the tube holder and
select the Run icon . The sample trap door will automatically close to initiate the analysis. Ensure to mix the sample gently between each cycle and repeat this process two more times.
DxH 520 Performance Verification Workbook Page 26 of 94 Ver 2.2 July 2019 Beckman Coulter Technical Product Training
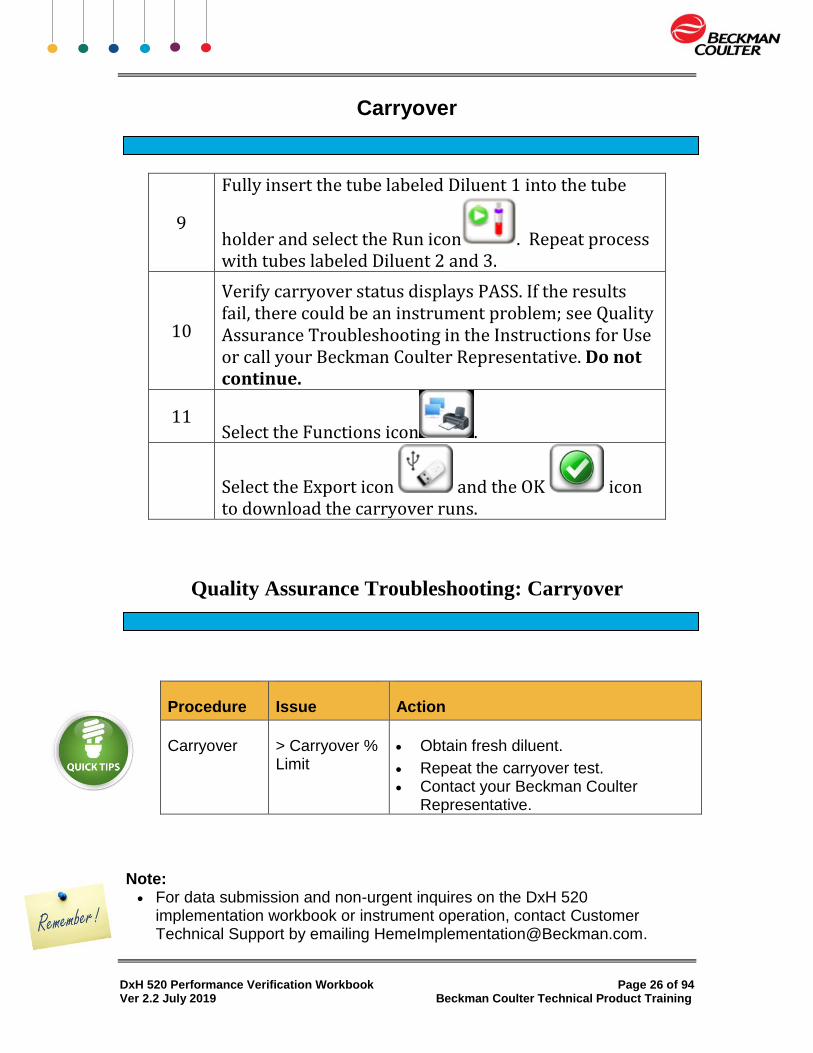
Carryover
9
Fully insert the tube labeled Diluent 1 into the tube
holder and select the Run icon . Repeat process with tubes labeled Diluent 2 and 3.
10
Verify carryover status displays PASS. If the results fail, there could be an instrument problem; see Quality Assurance Troubleshooting in the Instructions for Use or call your Beckman Coulter Representative. Do not continue.
11 Select the Functions icon .
Select the Export icon and the OK icon to download the carryover runs.
Quality Assurance Troubleshooting: Carryover
Procedure Issue Action
Carryover > Carryover % Limit
Obtain fresh diluent.
Repeat the carryover test. Contact your Beckman Coulter
Representative.
Note: For data submission and non-urgent inquires on the DxH 520
implementation workbook or instrument operation, contact Customer Technical Support by emailing [email protected].

DxH 520 Performance Verification Workbook Page 27 of 94 Ver 2.2 July 2019 Beckman Coulter Technical Product Training
Calibration
Calibration procedure is used to set an instrument at a specific value or values using a reference method.
When the calibration procedure is performed under the following conditions, it will assure the following:
DxH 520 instrument data output accurately reflects sample input. Demonstrate that the performance of the instrument is consistent with the
manufacturer’s claims. Assure when to verify vs. when to calibrate your instrument. To bring an established method, device or analytical system online. Demonstrate acceptable performance as follow-up corrective actions
taken after a failed proficiency-testing event. The DxH 500 Series Calibrator is designed for the determination of calibration factors for the DxH 500 Series Systems in conjunction with specific DxH 500 Series reagents.
Responsibility:
Laboratory Key Operator
Materials Needed:
DxH 500 Series Calibrator Time Required: Approximately 1 hour
Important Note: The DxH 500 Series Calibrator should be stored upright at 2 – 8oC when not in use. Protect tubes from overheating and freezing. Unopened tubes are stable until the expiration date. Opened tubes are stable for 5 days, provided they are handled properly.
Now:
Prepare for calibration

DxH 520 Performance Verification Workbook Page 28 of 94 Ver 2.2 July 2019 Beckman Coulter Technical Product Training
DxH 520 Performance Verification Workbook Page 29 of 94 Ver 2.2 July 2019 Beckman Coulter Technical Product Training
Calibration
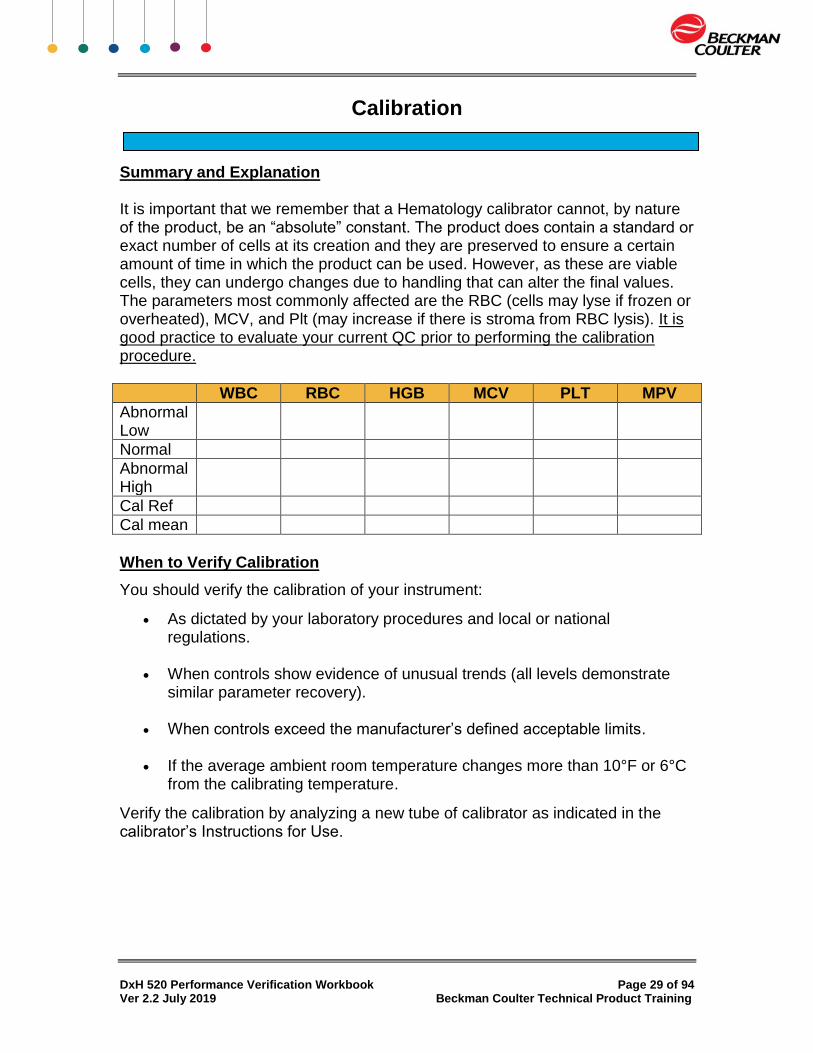
Summary and Explanation It is important that we remember that a Hematology calibrator cannot, by nature of the product, be an “absolute” constant. The product does contain a standard or exact number of cells at its creation and they are preserved to ensure a certain amount of time in which the product can be used. However, as these are viable cells, they can undergo changes due to handling that can alter the final values. The parameters most commonly affected are the RBC (cells may lyse if frozen or overheated), MCV, and Plt (may increase if there is stroma from RBC lysis). It is good practice to evaluate your current QC prior to performing the calibration procedure.
WBC RBC HGB MCV PLT MPV
Abnormal Low
Normal
Abnormal High
Cal Ref
Cal mean
When to Verify Calibration
You should verify the calibration of your instrument:
As dictated by your laboratory procedures and local or national regulations.
When controls show evidence of unusual trends (all levels demonstrate
similar parameter recovery). When controls exceed the manufacturer’s defined acceptable limits. If the average ambient room temperature changes more than 10°F or 6°C
from the calibrating temperature.
Verify the calibration by analyzing a new tube of calibrator as indicated in the calibrator’s Instructions for Use.
DxH 520 Performance Verification Workbook Page 30 of 94 Ver 2.2 July 2019 Beckman Coulter Technical Product Training
Calibration
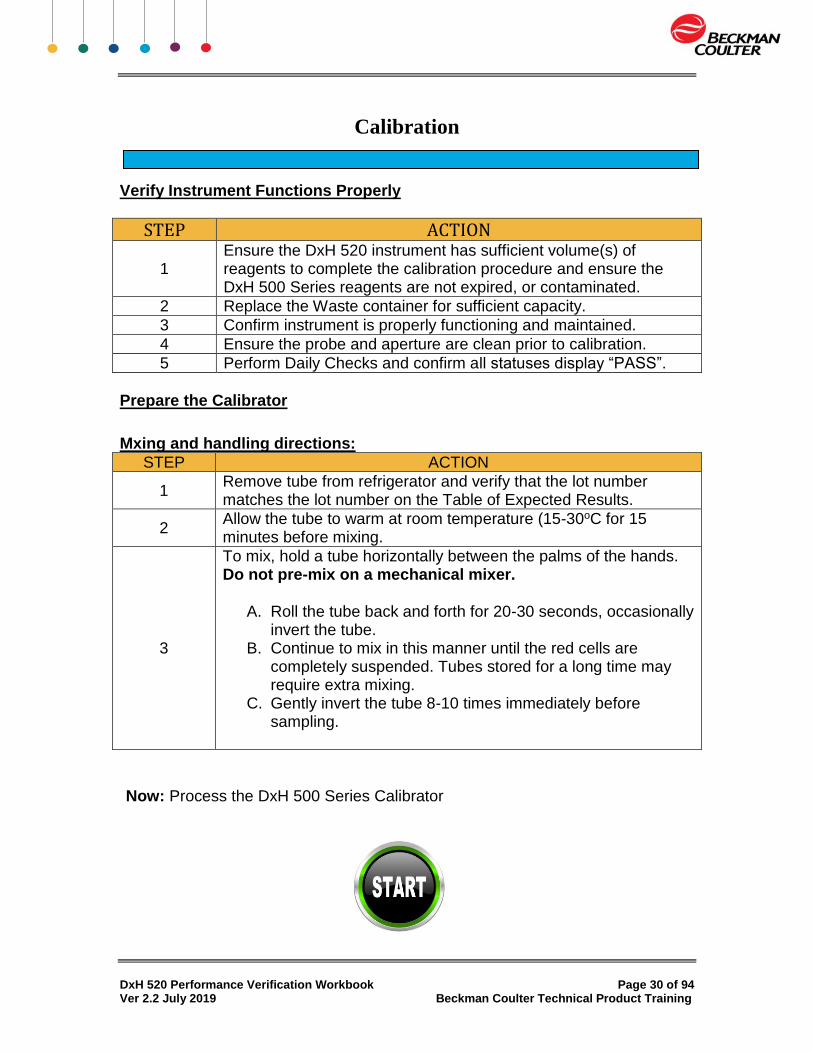
Verify Instrument Functions Properly
STEP ACTION
1 Ensure the DxH 520 instrument has sufficient volume(s) of reagents to complete the calibration procedure and ensure the DxH 500 Series reagents are not expired, or contaminated.
2 Replace the Waste container for sufficient capacity.
3 Confirm instrument is properly functioning and maintained.
4 Ensure the probe and aperture are clean prior to calibration.
5 Perform Daily Checks and confirm all statuses display “PASS”.
Prepare the Calibrator
Mxing and handling directions:
STEP ACTION
1 Remove tube from refrigerator and verify that the lot number matches the lot number on the Table of Expected Results.
2 Allow the tube to warm at room temperature (15-30oC for 15 minutes before mixing.
3
To mix, hold a tube horizontally between the palms of the hands. Do not pre-mix on a mechanical mixer.
A. Roll the tube back and forth for 20-30 seconds, occasionally invert the tube.
B. Continue to mix in this manner until the red cells are completely suspended. Tubes stored for a long time may require extra mixing.
C. Gently invert the tube 8-10 times immediately before sampling.
Now: Process the DxH 500 Series Calibrator

DxH 520 Performance Verification Workbook Page 31 of 94 Ver 2.2 July 2019 Beckman Coulter Technical Product Training
Calibration
The Table of Expected Results provided with the DxH 500 Series Calibration kit contains the expected values for the calibrator. You will use these values during the preparation of the software for running the calibrator. Set Up the Calibration
STEP ACTION
1 Select the QC/QA icon from the main menu.
2
On the Quality Control (Data View) screen, select the QA
icon .
3 A dialog box will appear, select the Calibration icon .
4
If existing data is present, a dialog box will appear with the following message: Print calibration before deleting or delete data without printing.
Make your selection and select the OK icon to continue.
5
Select the Setup Calibration with Barcode icon and scan the barcode on the Table of Expected Results, or if not equipped with a barcode scanner, select the Setup
Calibration Manually icon and enter the information using the on-screen keyboard.
6 Select the OK icon to continue. The sample trap door automatically opens.

DxH 520 Performance Verification Workbook Page 32 of 94 Ver 2.2 July 2019 Beckman Coulter Technical Product Training
Calibration
Run DxH 500 Series Calibrator
Risk of loss of data. When calibrating, do not leave the screen until you have finished analyzing the required number of replicates.
STEP ACTION
1 Prepare the DxH 500 Series Calibrator according to the Instructions for Use. It is very important to follow the mixing directions carefully.
2
Fully insert the calibrator into the tube holder and select
the Run icon . The sample trap door will automatically close to initiate the analysis.
3 The status LED flashes red when aspiration is in progress and turns solid red throughout processing.
4
Wait for the instrument to process the calibrator and to display the results in the Calibration screen. The instrument automatically saves the results into the database.
5 Remove the calibrator when the sample trap door opens and the status LED is green.
6 Ensure that the calibrator is mixed between runs.
7 When the result is displayed, select the checkbox in the EXCL. column to exclude the first (PRIME) run. Complete the required number of aspirations (N=10).
8 Review the calibration results. When to Calibrate
Calibrate if:
Calibration verification fails. Any component involved in dilution or primary measurement was
replaced. This includes the aspiration line or probe, and the apertures.
You are advised to do so by your Beckman Coulter Representative.

DxH 520 Performance Verification Workbook Page 33 of 94 Ver 2.2 July 2019 Beckman Coulter Technical Product Training
Calibration
Adjust instrument calibration and verify results:
STEP ACTION
1
To accept the calibration, touch the Accept Calibration icon
.
2 Select the Functions icon .
3 Select the Export icon and the OK icon to download the calibration runs.
4 Verify calibration using DxH 500 Series Calibrator as indicated in the calibrator’s Instructions for Use.
Quality Assurance Troubleshooting: Calibration
Procedure Issue Action
Calibration %CV
Factor % Diff
Delta Diff
Contact your Beckman Coulter
Representative.
Note: For data submission and non-urgent inquires on the DxH 520
implementation workbook or instrument operation, contact Customer Technical Support by emailing [email protected].

DxH 520 Performance Verification Workbook Page 34 of 94 Ver 2.2 July 2019 Beckman Coulter Technical Product Training
DxH 520 Performance Verification Workbook Page 35 of 94 Ver 2.2 July 2019 Beckman Coulter Technical Product Training
ABOUT DxH 500 Linearity Kit
Verification of the instrument linearity is required by your regulatory agency or your own laboratory protocol. This procedure verifies instrument specific intended use. Furthermore, CAP requirements13 and CLIA regulations14 both mandate that laboratories establish reportable range for each test method. Additionally, CLIA requires that laboratories verify performance specification for accuracy, precision, measuring range and reference ranges upon instrument installation and prior to patient testing2.
Please note that your laboratory may be subject to local, state, and federal regulatory laws. Different agencies may dictate more specific procedures for your laboratory to follow, therefore please contact your local regulatory agency for information on the specific requirements.
The instrument performance will need to be verified whenever new equipment is introduced to the laboratory, or when existing equipment is replaced. This documentation should be maintained with the instrument. This section is intended to be a storage area for all instrument characterization studies printouts and for the final DxH 500 Linearity report.
Responsibility:
Laboratory Key Operator
Materials Needed:
DxH 500 Linearity Kit Vortex DxH 500 Series Calibrator DxH 500 Series Control DxH 520 Instructions for Use
Time Required:
Approximately 3 hours Now:
Process DxH 500 Linearity (as follows)
DxH 520 Performance Verification Workbook Page 36 of 94 Ver 2.2 July 2019 Beckman Coulter Technical Product Training
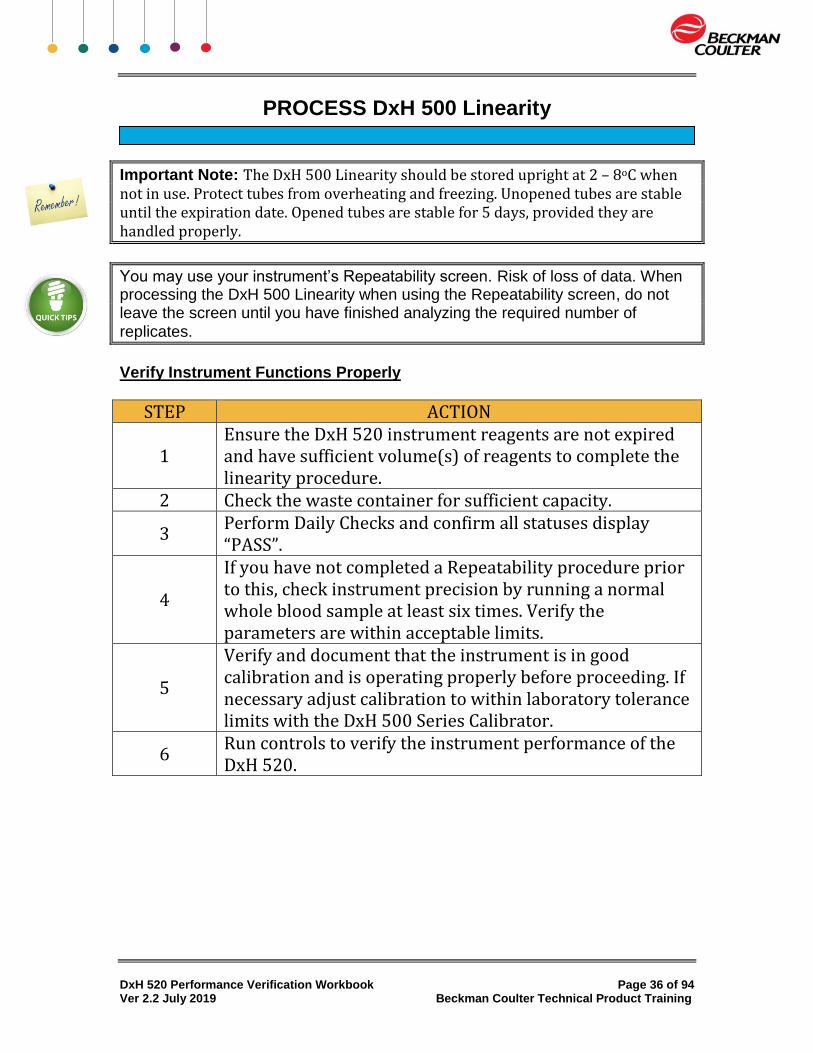
PROCESS DxH 500 Linearity
Important Note: The DxH 500 Linearity should be stored upright at 2 – 8oC when not in use. Protect tubes from overheating and freezing. Unopened tubes are stable until the expiration date. Opened tubes are stable for 5 days, provided they are handled properly.
You may use your instrument’s Repeatability screen. Risk of loss of data. When processing the DxH 500 Linearity when using the Repeatability screen, do not leave the screen until you have finished analyzing the required number of
replicates.
Verify Instrument Functions Properly
STEP ACTION
1 Ensure the DxH 520 instrument reagents are not expired and have sufficient volume(s) of reagents to complete the linearity procedure.
2 Check the waste container for sufficient capacity.
3 Perform Daily Checks and confirm all statuses display “PASS”.
4
If you have not completed a Repeatability procedure prior to this, check instrument precision by running a normal whole blood sample at least six times. Verify the parameters are within acceptable limits.
5
Verify and document that the instrument is in good calibration and is operating properly before proceeding. If necessary adjust calibration to within laboratory tolerance limits with the DxH 500 Series Calibrator.
6 Run controls to verify the instrument performance of the DxH 520.

DxH 520 Performance Verification Workbook Page 37 of 94 Ver 2.2 July 2019 Beckman Coulter Technical Product Training
DxH 500 RBC Linearity
The performance of this product is assured only if it is properly stored and used as described in the DxH 500 Linearity Instructions for Use. Incomplete mixing or improper handling of a tube prior to use invalidates both the sample withdrawn and any remaining material in the tube.
Mixing and handling directions: DxH 500 RBC Linearity
STEP ACTION
1 Remove tubes from refrigerator and allow to warm at room temperature (15-30oC) for 15 minutes before mixing.
2
To mix, hold a tube horizontally between the palms of the hands. Do not pre-mix on a mechanical mixer.
A. Roll the tube back and forth for 20-30 seconds, occasionally invert the tube.
B. Continue to mix in this manner until the red cells are completely suspended. Tubes stored for a long time may require extra mixing.
C. Gently invert the tube 8-10 times immediately before sampling.
Process the DxH 500 RBC Linearity
STEP ACTION
1 Select the QC/QA icon from the main menu.
2 On the Quality Control (Data View) screen, select the QA icon .
3 A dialog box will appear, select the Repeatability icon .
4
If existing data is present, a warning box will appear with the following message: Repeatability table contains data. To run, repeatability data must be deleted. Print repeatability data before deleting or delete data without printing.
Make your selection and select the OK icon to continue.

DxH 520 Performance Verification Workbook Page 38 of 94 Ver 2.2 July 2019 Beckman Coulter Technical Product Training
5
Gently invert the tube 8-10 times immediately before sampling.
6 To prime the instrument, run first level once and discard the result.
7 Test all levels from the DxH 500 RBC Linearity set in order from low to high.
8
Run each level four times per level starting with level 1 and continuing to each consecutive level up to level 6. Remember to mix the DxH 500 RBC Linearity vials between each cycle according to the Instructions for Use.
9 Inspect the results for outliers.
10 Insert a USB flash drive into the front USB port.
11 Select the Function icon .
12 Select the Export icon .
13
A warning box displays the following message: You are about to Export Repeatability Data. Insert USB. Continue?
Select OK icon to accept your choice or the Exit icon
to cancel the export.
14 After running the highest level, perform Daily Checks and confirm all statuses display “PASS”.

DxH 520 Performance Verification Workbook Page 39 of 94 Ver 2.2 July 2019 Beckman Coulter Technical Product Training
DxH 500 WBC Linearity
The performance of this product is assured only if it is properly stored and used as described in the DxH 500 Linearity Instructions for Use. Incomplete mixing or improper handling of a tube prior to use invalidates both the sample withdrawn and any remaining material in the tube.
Mixing and handling directions: DxH 500 WBC Linearity
STEP ACTION
1 Remove tubes from refrigerator and allow to warm at room temperature (15-30oC) for 15 minutes before mixing.
2
Mix using vortex mixer.
A. Mix vigorously by vortexing the sample on a vortexer for 2
minutes making sure a vortex is created in the tube.
B. Let sample sit undisturbed for 10 minutes to allow micro bubbles to dissipate before sampling.
C. Invert the tube 8-10 times immediately before each sampling.
Process the DxH 500 WBC Linearity
STEP ACTION
1 Select the QC/QA icon from the main menu.
2 On the Quality Control (Data View) screen, select the QA icon .
3 A dialog box will appear, select the Repeatability icon .
4
If existing data is present, a warning box will appear with the following message: Repeatability table contains data. To run, repeatability data must be deleted. Print repeatability data before deleting or delete data without printing.
Make your selection and select the OK icon to continue.

DxH 520 Performance Verification Workbook Page 40 of 94 Ver 2.2 July 2019 Beckman Coulter Technical Product Training
5
Invert the tube 8-10 times immediately before ach sampling.
6 To prime the instrument, run first level once and discard the result.
7 Test all levels from the DxH 500 WBC Linearity set in order from low to high.
8
Run each level four times per level starting with level 1 and continuing to each consecutive level up to level 6. Remember to mix the DxH 500 WBC Linearity vials between each cycle according to the Instructions for Use.
9 Inspect the results for outliers.
10 Insert a USB flash drive into the front USB port.
11 Select the Function icon .
12 Select the Export icon .
13
A warning box displays the following message: You are about to Export Repeatability Data. Insert USB. Continue?
Select OK icon to accept your choice or the Exit icon
to cancel the export.
14 After running the highest level, perform Daily Checks and until all statuses display “PASS”.

DxH 520 Performance Verification Workbook Page 41 of 94 Ver 2.2 July 2019 Beckman Coulter Technical Product Training
DxH 500 PLT Linearity
The performance of this product is assured only if it is properly stored and used as described in the DxH 500 Linearity Instructions for Use. Incomplete mixing or improper handling of a tube prior to use invalidates both the sample withdrawn and any remaining material in the tube.
Mixing and handling directions: DxH 500 PLT Linearity
STEP ACTION
1 Remove tubes from refrigerator and allow to warm at room temperature (15-30oC) for 15 minutes before mixing.
2
Mix using vortex mixer.
A. Mix vigorously by vortexing the sample on a vortexer for 2
minutes making sure a vortex is created in the tube.
B. Let sample sit undisturbed for 10 minutes to allow micro bubbles to dissipate before sampling.
C. Invert the tube 8-10 times immediately before each sampling.
Process the DxH 500 PLT Linearity
STEP ACTION
1 Select the QC/QA icon from the main menu.
2 On the Quality Control (Data View) screen, select the QA icon .
3 A dialog box will appear, select the Repeatability icon .
4
If existing data is present, a warning box will appear with the following message: Repeatability table contains data. To run, repeatability data must be deleted. Print repeatability data before deleting or delete data without printing.
Make your selection and select the OK icon to continue.

DxH 520 Performance Verification Workbook Page 42 of 94 Ver 2.2 July 2019 Beckman Coulter Technical Product Training
5
Invert the tube 8-10 times immediately before each sampling.
6 To prime the instrument, run first level once and discard the result.
7 Test all levels from the DxH 500 PLT Linearity set in order from low to high.
8
Run each level four times per level starting with level 1 and continuing to each consecutive level up to level 6. Remember to mix the DxH 500 PLT Linearity vials between each cycle according to the Instructions for Use.
9 Inspect the results for outliers.
10 Insert a USB flash drive into the front USB port.
11 Select the Function icon .
12 Select the Export icon .
13
A warning box displays the following message: You are about to Export Repeatability Data. Insert USB. Continue?
Select OK icon to accept your choice or the Exit icon
to cancel the export. 14 Remove the USB flash drive from the Front USB port.
15 After running the highest level, perform Daily Checks and until all statuses display “PASS”.
16
Submit your DxH 500 Linearity results to the Beckman Coulter
application support team at [email protected]. A. DxH 520 Daily Checks and Background Results. B. DxH 500 Linearity Assay Values and Expected Ranges. C. DxH 520 Exported Results.
After you submit your data, a Beckman Coulter Application Specialist will prepare tabular summaries and graphic presentations of your data.

DxH 520 Performance Verification Workbook Page 43 of 94 Ver 2.2 July 2019 Beckman Coulter Technical Product Training
ABOUT REFERENCE RANGE
The CLIA Quality System Regulations became effective on April 24, 2003. Now the laboratory is required to check (verify) the manufacturer’s performance specifications provided in the package insert – for accuracy, precision, reportable range (Measuring Range), and reference range. The DxH 520 series analyzers will contain default reference ranges for Adult male and female. DxH 520 hematology systems will also contain additional age range flagging sets. These age range flagging sets are: Neonate, Infant, Child, and Adolescent. In order to establish a reference interval/ range, the Clinical and Laboratory Standards Institute (CLSI) recommends labs collect a sufficient number of qualified reference donors to produce a minimum of 120 samples. This can be a difficult task. Therefore, CLSI strongly encourages laboratories to verify reference values established by the manufacturer or established by another laboratory. To verify a reference interval / range:
1. If a lab has previously established a reference interval (using 120 samples) for its population, it may verify that reference interval by transference.
a. You may use transference if the original study was conducted:
Using the same analytical system / reagent, and
With similar subject population as your lab. b. Perform a method comparison between your new method and
the method used in the original study. You may use samples that exceed the reference interval. Evaluate the relationship between the two methods. If the new method provides values that are acceptably comparable, then the reference interval/range can be transferred
2. Or, a lab may verify a reference interval/range established elsewhere or
by the manufacturer by collecting a minimum of 20 samples from qualified, healthy reference donors. Your 20 donors must fairly represent your population and the population in the original study.

DxH 520 Performance Verification Workbook Page 44 of 94 Ver 2.2 July 2019 Beckman Coulter Technical Product Training
PERFORM VERIFICATION OF REFERENCE RANGE
The laboratory director and/or the Medical Laboratory consultant will need to validate the normal range studies.
This section is intended to be a storage area for all instrument installation printouts, regarding Normal Range verification.
Responsibility:
Laboratory Key Operator
Materials Needed:
20 Donor (Female, Male) Whole-blood samples. Barcode Labels [Provided]
Time Required:
Variable
NOTE: For data submission and non-urgent inquires on the DxH 520 implementation workbook or instrument operation, contact Customer Technical Support by emailing [email protected].
References 1. Clinical and Laboratory Standards Institute. Defining, Establishing and Verifying Reference
Intervals in the Clinical Laboratory; Approved Guideline. CLSI document C28-A3C, 2010
2. Clinical and Laboratory Standards Institute. Method Comparison and Bias Estimation Using
Patient Samples; Approved Guideline. EP09-A3, 2013.
DxH 520 Performance Verification Workbook Page 45 of 94 Ver 2.2 July 2019 Beckman Coulter Technical Product Training
PERFORM VERIFICATION OF REFERENCE RANGE
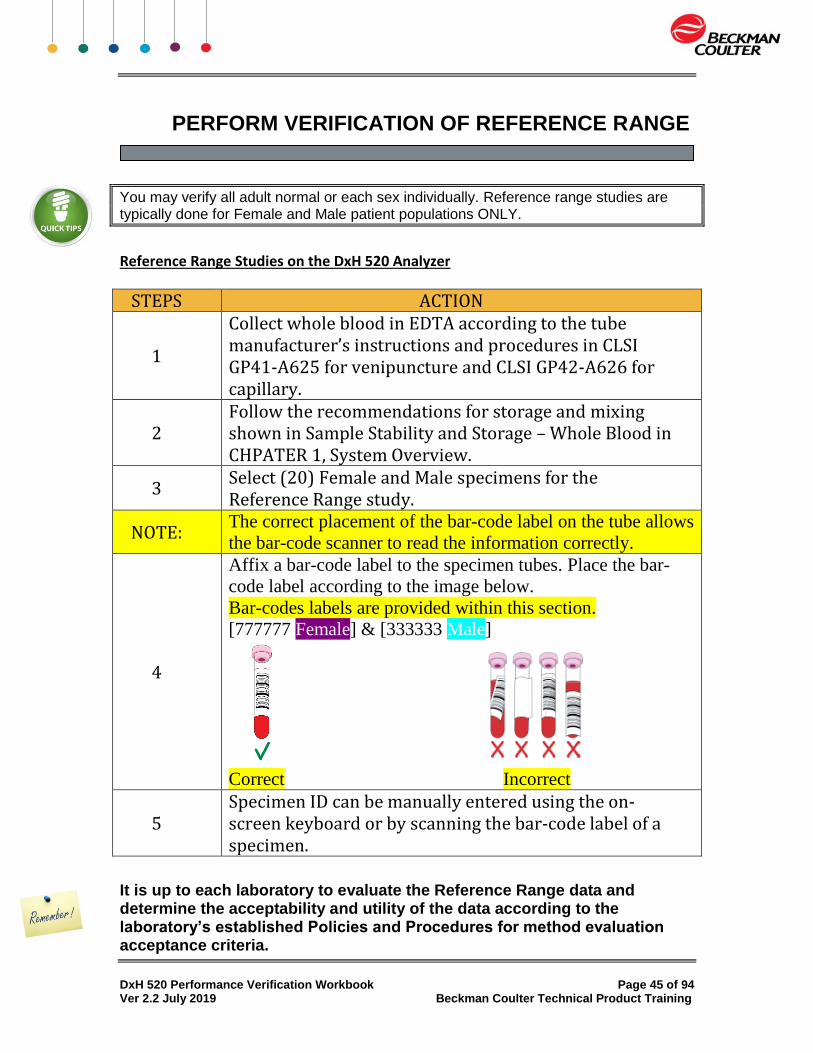
You may verify all adult normal or each sex individually. Reference range studies are typically done for Female and Male patient populations ONLY.
Reference Range Studies on the DxH 520 Analyzer
STEPS ACTION
1
Collect whole blood in EDTA according to the tube manufacturer’s instructions and procedures in CLSI GP41-A625 for venipuncture and CLSI GP42-A626 for capillary.
2 Follow the recommendations for storage and mixing shown in Sample Stability and Storage – Whole Blood in CHPATER 1, System Overview.
3 Select (20) Female and Male specimens for the Reference Range study.
NOTE: The correct placement of the bar-code label on the tube allows
the bar-code scanner to read the information correctly.
4
Affix a bar-code label to the specimen tubes. Place the bar-
code label according to the image below.
Bar-codes labels are provided within this section.
[777777 Female] & [333333 Male]
Correct Incorrect
5 Specimen ID can be manually entered using the on-screen keyboard or by scanning the bar-code label of a specimen.
It is up to each laboratory to evaluate the Reference Range data and determine the acceptability and utility of the data according to the laboratory’s established Policies and Procedures for method evaluation acceptance criteria.

DxH 520 Performance Verification Workbook Page 46 of 94 Ver 2.2 July 2019 Beckman Coulter Technical Product Training
PERFORM VERIFICATION OF REFERENCE RANGE FEMALE BARCODE LABELS
FEMALE
FEMALE
FEMALE
FEMALE
FEMALE
FEMALE
FEMALE
FEMALE
FEMALE
FEMALE
FEMALE
FEMALE
FEMALE
FEMALE
FEMALE
FEMALE
FEMALE
FEMALE
FEMALE
FEMALE
FEMALE

DxH 520 Performance Verification Workbook Page 47 of 94 Ver 2.2 July 2019 Beckman Coulter Technical Product Training
PERFORM VERIFICATION OF REFERENCE RANGE MALE BARCODE LABELS
MALE
MALE
MALE
MALE
MALE
MALE
MALE
MALE
MALE
MALE
MALE
MALE
MALE
MALE
MALE
MALE
MALE
MALE
MALE
MALE
MALE
MALE
MALE
MALE

DxH 520 Performance Verification Workbook Page 48 of 94 Ver 2.2 July 2019 Beckman Coulter Technical Product Training
DxH 520 Performance Verification Workbook Page 49 of 94 Ver 2.2 July 2019 Beckman Coulter Technical Product Training
PERFORM VERIFICATION OF REFERENCE RANGE
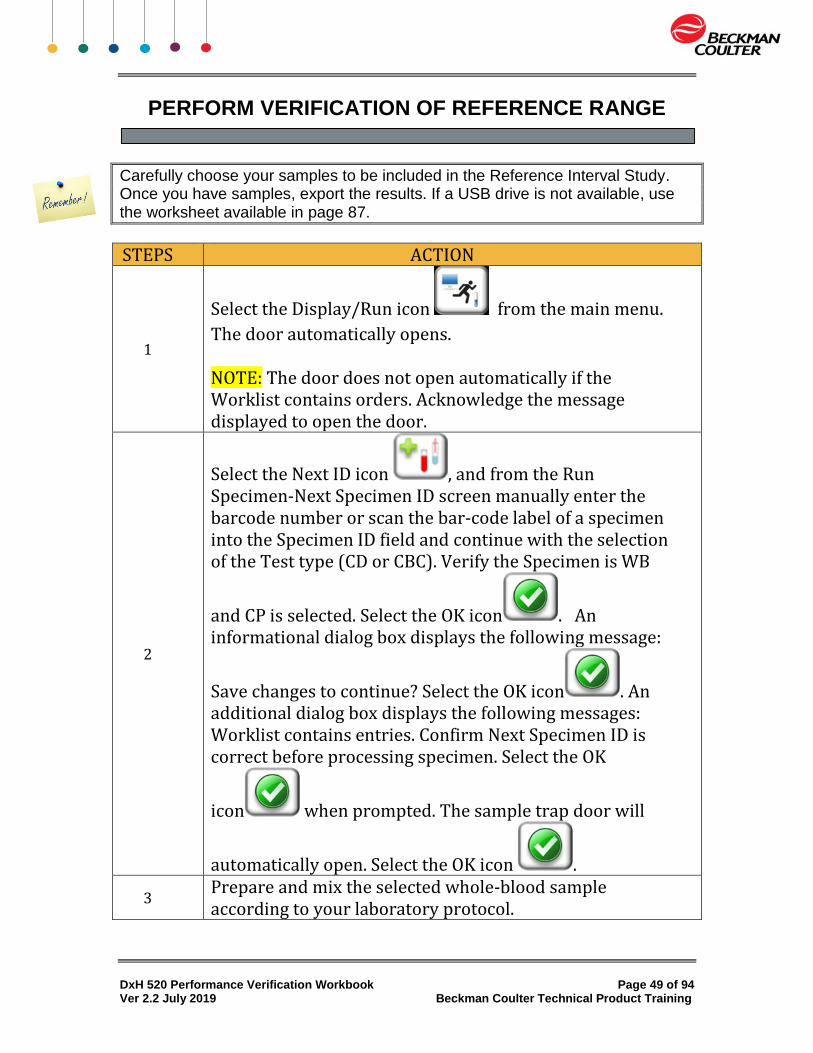
Carefully choose your samples to be included in the Reference Interval Study. Once you have samples, export the results. If a USB drive is not available, use the worksheet available in page 87.
STEPS ACTION
1
Select the Display/Run icon from the main menu.
The door automatically opens.
NOTE: The door does not open automatically if the Worklist contains orders. Acknowledge the message displayed to open the door.
2
Select the Next ID icon , and from the Run Specimen-Next Specimen ID screen manually enter the barcode number or scan the bar-code label of a specimen into the Specimen ID field and continue with the selection of the Test type (CD or CBC). Verify the Specimen is WB
and CP is selected. Select the OK icon . An informational dialog box displays the following message:
Save changes to continue? Select the OK icon . An additional dialog box displays the following messages: Worklist contains entries. Confirm Next Specimen ID is correct before processing specimen. Select the OK
icon when prompted. The sample trap door will
automatically open. Select the OK icon .
3 Prepare and mix the selected whole-blood sample according to your laboratory protocol.
DxH 520 Performance Verification Workbook Page 50 of 94 Ver 2.2 July 2019 Beckman Coulter Technical Product Training
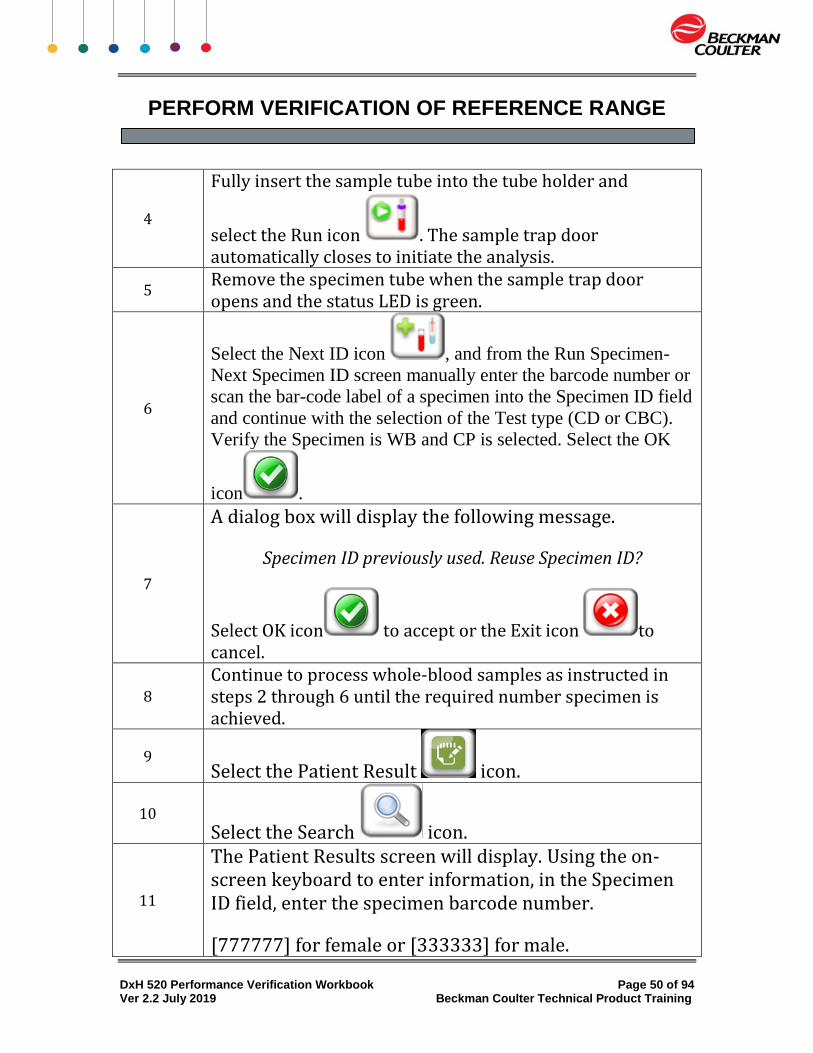
PERFORM VERIFICATION OF REFERENCE RANGE
4
Fully insert the sample tube into the tube holder and
select the Run icon . The sample trap door automatically closes to initiate the analysis.
5 Remove the specimen tube when the sample trap door opens and the status LED is green.
6
Select the Next ID icon , and from the Run Specimen-
Next Specimen ID screen manually enter the barcode number or
scan the bar-code label of a specimen into the Specimen ID field
and continue with the selection of the Test type (CD or CBC).
Verify the Specimen is WB and CP is selected. Select the OK
icon .
7
A dialog box will display the following message.
Specimen ID previously used. Reuse Specimen ID?
Select OK icon to accept or the Exit icon to cancel.
8
Continue to process whole-blood samples as instructed in steps 2 through 6 until the required number specimen is achieved.
9 Select the Patient Result icon.
10 Select the Search icon.
11
The Patient Results screen will display. Using the on-screen keyboard to enter information, in the Specimen ID field, enter the specimen barcode number.
[777777] for female or [333333] for male.
DxH 520 Performance Verification Workbook Page 51 of 94 Ver 2.2 July 2019 Beckman Coulter Technical Product Training
PERFORM VERIFICATION OF REFERENCE RANGE
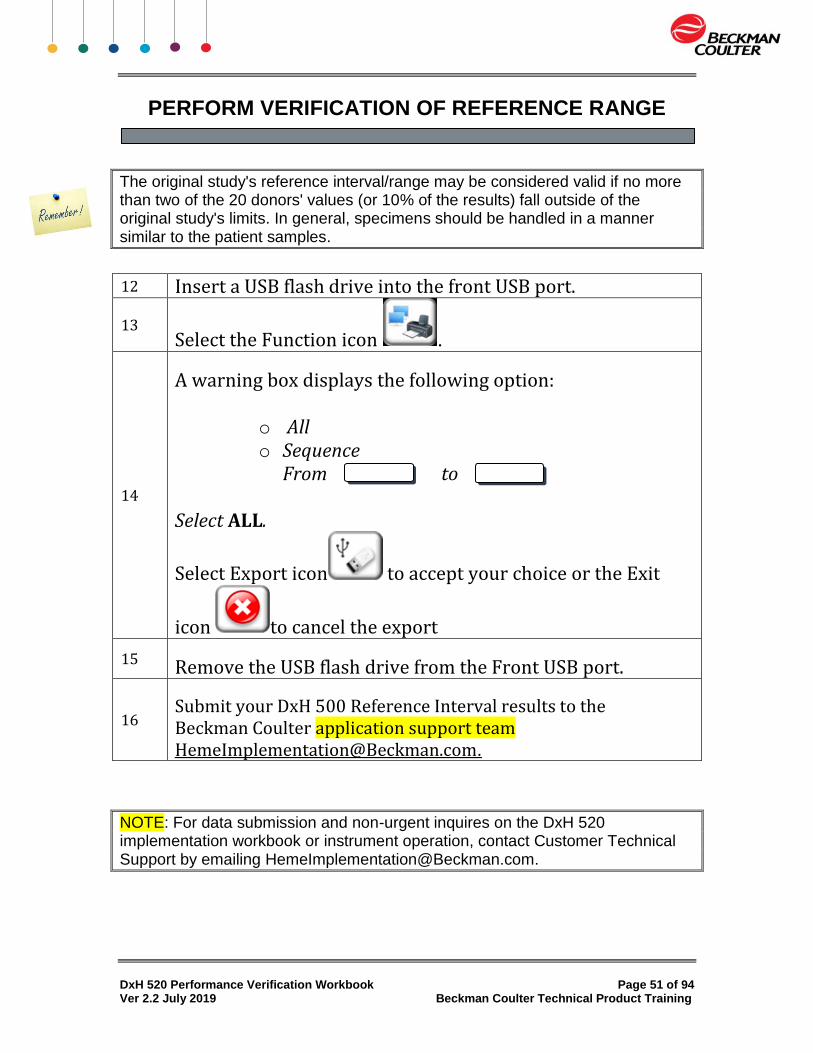
The original study's reference interval/range may be considered valid if no more than two of the 20 donors' values (or 10% of the results) fall outside of the original study's limits. In general, specimens should be handled in a manner similar to the patient samples.
12 Insert a USB flash drive into the front USB port.
13 Select the Function icon .
14
A warning box displays the following option:
o All o Sequence
From to
Select ALL.
Select Export icon to accept your choice or the Exit
icon to cancel the export
15 Remove the USB flash drive from the Front USB port.
16 Submit your DxH 500 Reference Interval results to the Beckman Coulter application support team [email protected].
NOTE: For data submission and non-urgent inquires on the DxH 520 implementation workbook or instrument operation, contact Customer Technical Support by emailing [email protected].

DxH 520 Performance Verification Workbook Page 52 of 94 Ver 2.2 July 2019 Beckman Coulter Technical Product Training

DxH 520 Performance Verification Workbook Page 53 of 94 Ver 2.2 July 2019 Beckman Coulter Technical Product Training
ABOUT CORRELATION STUDIES
This section will discuss Correlation Studies (method comparison). Please note that your laboratory must be in compliance with all local, state and federal regulatory laws. Different agencies may dictate more specific procedures for your laboratory to follow, so contact your local regulatory agency to verify if Method Comparison is necessary for your laboratory.
Method Comparison is a regulatory requirement to show agreement between two methods. Most often, a new instrument will be compared to the lab's current method. The comparison must be completed before the new method is placed into use. Patient specimens for analysis are usually acquired from the lab's routine population. Some specimens should be specially chosen to test the complete measuring range.
Before beginning the process of method comparison, verify the performance and calibration of both the current (reference) instrument and the test instrument. Both instruments should meet the manufacturer’s specifications with regard to maintenance, background checks, reproducibility/repeatibility, carryover, calibration, and quality control. Refer to the DxH 520 Instructions for Use for specifications.
This section is intended to be a storage area for all DxH 520 instrument printouts regarding Method Comparison.
DxH 520 Performance Verification Workbook Page 54 of 94 Ver 2.2 July 2019 Beckman Coulter Technical Product Training
PERFORM CORRELATION STUDIES
CBC AND DIFF PARAMETERS COMPARISION
Specimen Collection Guidelines
The specimens collected for method comparison should reflect the typical patient population of the laboratory and be indicative of the clinically meaningful range for making medical decisions. This includes normal and abnormal inpatients, outpatients, and pediatric and specialty clinics existing in the laboratory population.
The quality of specimens is an important factor when collecting data. Poorly collected specimens contribute to poor data and lead to false conclusions. In the pages that follow, we provide you with information regarding: guidelines for properly collected specimens, general information and data analysis.
Properly collected and maintained specimens are:
Collected in tubes containing a salt of EDTA and filled to the appropriate volume according to the tube manufacturer’s specifications to ensure the proper proportion of blood to anticoagulant.
Collected according to the tube manufacturer’s instructions. Sufficient quantity of samples to be run on both the current instrument and
the test instrument. Processed on both instruments within one or two hours of each other and
within the same time frame as the laboratory routinely analyzes specimens.
Thoroughly mixed before processing to establish cellular equilibration.

DxH 520 Performance Verification Workbook Page 55 of 94 Ver 2.2 July 2019 Beckman Coulter Technical Product Training
PERFORM CORRELATION STUDIES
Data Analysis If a laboratory intends to compare a current automated differential to the new automated differential, then linear regression may be used. Keep the following in mind if you choose to do this:
CONSIDERATIONS
Compare similar technology (e.g. 5-part diff to 5-part diff or 3-part diff to 3part diff).
Use the same samples on each instrument.
Run the samples within 2 hours on both analyzers.
Many white cell count parameters including basophils and eosinophils often have correlation coefficients in the range of 0.2 to 0.5. Slopes and intercepts for such parameters are not statistically optimal for evaluation. The only important statistic resulting from this analysis is the bias at the upper and lower limits of the normal range." (EP Evaluator Report Interpretation Guide 8.0.0.165, David G. Rhoads Associates, Inc.).
Linear regression may not be an adequate statistical tool for analysis of the differential parameters due to the variability of the manual differential. Commonly used methods for determining clinically acceptable method comparison between automated differential and manual differentials are:
Mean Difference Binomial Envelope Distribution
NOTE: For data submission and non-urgent inquires on the DxH 520 implementation workbook or instrument operation, contact Customer Technical Support by emailing [email protected]

DxH 520 Performance Verification Workbook Page 56 of 94 Ver 2.2 July 2019 Beckman Coulter Technical Product Training
DxH 520 Performance Verification Workbook Page 57 of 94 Ver 2.2 July 2019 Beckman Coulter Technical Product Training
PERFORM CORRELATION STUDIES
The laboratory director and/or the medical laboratory consultant will need to validate the correlation studies.
Responsibility:
Laboratory Key Operator
Materials Needed:
Minimum of 40 Donor whole blood samples collected in K2 or K3 EDTA tubes.
Samples Needed:
The number of specimens required for method comparison depends on the needs of the laboratory. CLSI EP09-A3 recommends that at least 40 samples be analyzed. Samples chosen should span the upper and lower end of the measuring range and incorporate unexpected interfering substances using the available patient population.
Time Required:
Variable
NOTE: For data submission and non-urgent inquires on the DxH 520 implementation workbook or instrument operation, contact Customer Technical Support by emailing [email protected]
DxH 520 Performance Verification Workbook Page 58 of 94 Ver 2.2 July 2019 Beckman Coulter Technical Product Training
PERFORM CORRELATION STUDIES
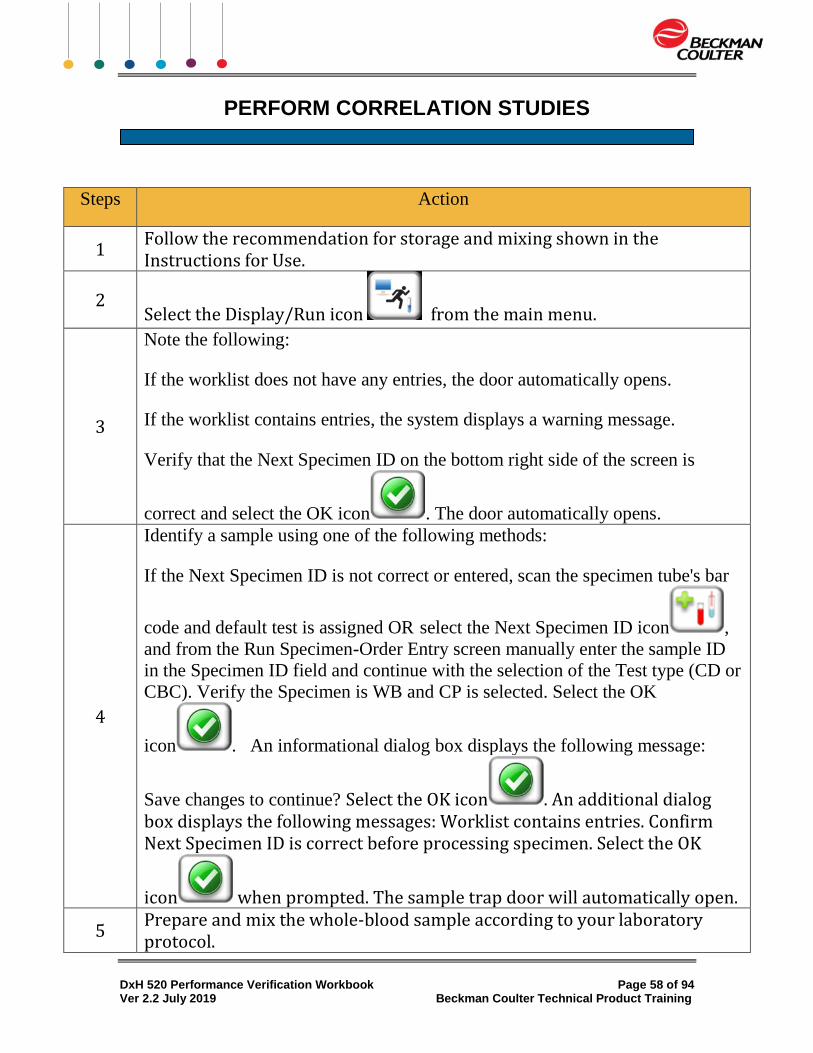
Steps Action
1 Follow the recommendation for storage and mixing shown in the Instructions for Use.
2 Select the Display/Run icon from the main menu.
3
Note the following:
If the worklist does not have any entries, the door automatically opens.
If the worklist contains entries, the system displays a warning message.
Verify that the Next Specimen ID on the bottom right side of the screen is
correct and select the OK icon . The door automatically opens.
4
Identify a sample using one of the following methods:
If the Next Specimen ID is not correct or entered, scan the specimen tube's bar
code and default test is assigned OR select the Next Specimen ID icon ,
and from the Run Specimen-Order Entry screen manually enter the sample ID
in the Specimen ID field and continue with the selection of the Test type (CD or
CBC). Verify the Specimen is WB and CP is selected. Select the OK
icon . An informational dialog box displays the following message:
Save changes to continue? Select the OK icon . An additional dialog box displays the following messages: Worklist contains entries. Confirm Next Specimen ID is correct before processing specimen. Select the OK
icon when prompted. The sample trap door will automatically open.
5 Prepare and mix the whole-blood sample according to your laboratory protocol.
DxH 520 Performance Verification Workbook Page 59 of 94 Ver 2.2 July 2019 Beckman Coulter Technical Product Training
PERFORM CORRELATION STUDIES
6
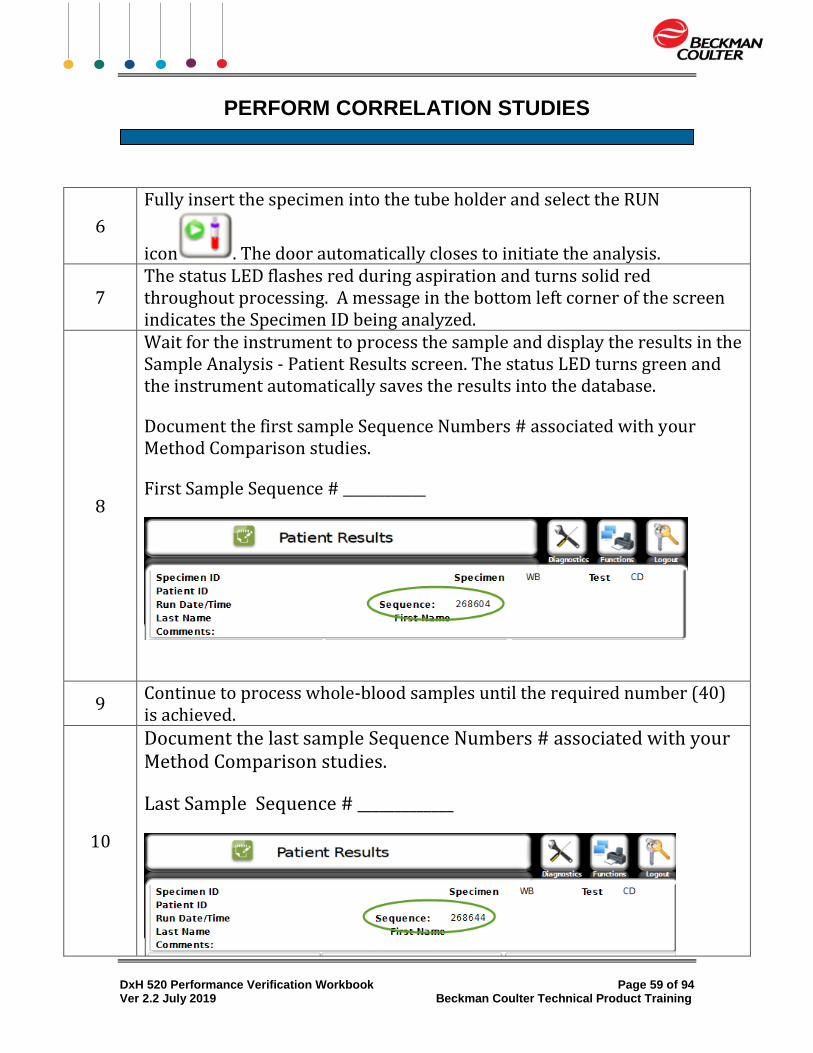
Fully insert the specimen into the tube holder and select the RUN
icon . The door automatically closes to initiate the analysis.
7 The status LED flashes red during aspiration and turns solid red throughout processing. A message in the bottom left corner of the screen indicates the Specimen ID being analyzed.
8
Wait for the instrument to process the sample and display the results in the Sample Analysis - Patient Results screen. The status LED turns green and the instrument automatically saves the results into the database.
Document the first sample Sequence Numbers # associated with your Method Comparison studies.
First Sample Sequence # ____________
9 Continue to process whole-blood samples until the required number (40) is achieved.
10
Document the last sample Sequence Numbers # associated with your Method Comparison studies.
Last Sample Sequence # _____________
DxH 520 Performance Verification Workbook Page 60 of 94 Ver 2.2 July 2019 Beckman Coulter Technical Product Training
PERFORM CORRELATION STUDIES
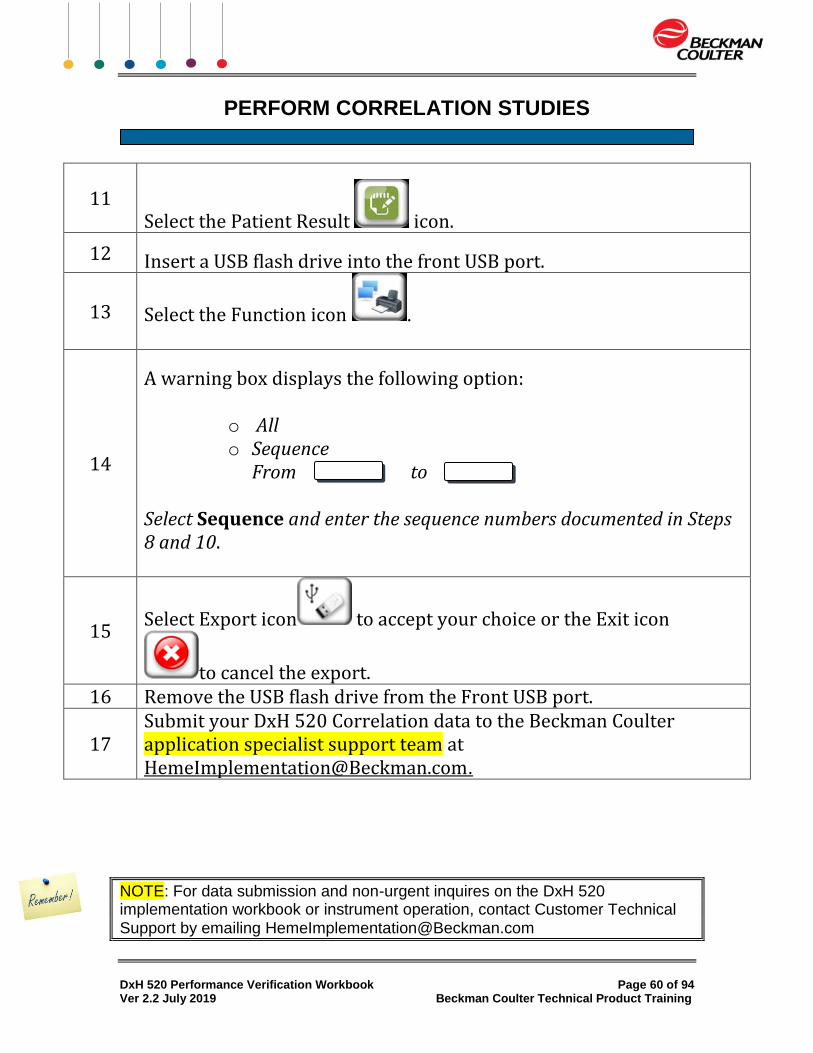
11 Select the Patient Result icon.
12 Insert a USB flash drive into the front USB port.
13 Select the Function icon .
14
A warning box displays the following option:
o All o Sequence
From to
Select Sequence and enter the sequence numbers documented in Steps 8 and 10.
15 Select Export icon to accept your choice or the Exit icon
to cancel the export. 16 Remove the USB flash drive from the Front USB port.
17 Submit your DxH 520 Correlation data to the Beckman Coulter application specialist support team at [email protected].
NOTE: For data submission and non-urgent inquires on the DxH 520 implementation workbook or instrument operation, contact Customer Technical Support by emailing [email protected]
DxH 520 Performance Verification Workbook Page 61 of 94 Ver 2.2 July 2019 Beckman Coulter Technical Product Training
PERFORM CORRELATION STUDIES
The following section will provide the Laboratory Director and/or the Medical Laboratory consultant with information regarding data analysis for Method Comparison.
Data Analysis:
Upon completion of specimen collection and processing, compare results from the current instrument and the DxH 520 Hematology instruments and review for acceptable comparison. Methods of data analysis include:
1. Calculation of mean difference statistics.
2. Determination of method comparison and linear regression.
3. Graphing.
J. Westgard and M. Hunt state “Statistical tests do not provide the criteria for acceptability. Acceptability depends on whether the errors limit the clinical usefulness of the method. Statistical tests can provide specific estimates of errors upon which judgements can be made, but they are not a substitute for judgments.”2
IMPORTANT
The responsibility to determine acceptable performance of data lies with the evaluating laboratory.
Each laboratory is ultimately responsible for interpretation of comparison data and developing its own evaluation criteria for acceptability of results.
NOTE: For data submission and non-urgent inquires on the DxH 520 implementation workbook or instrument operation, contact Customer Technical Support by emailing [email protected]

DxH 520 Performance Verification Workbook Page 62 of 94 Ver 2.2 July 2019 Beckman Coulter Technical Product Training
DxH 520 Performance Verification Workbook Page 63 of 94 Ver 2.2 July 2019 Beckman Coulter Technical Product Training
TRUTH TABLE ANALYSIS
Please note that your laboratory may be subject to local, state, and federal regulatory laws. Different agencies may dictate more specific procedures for your laboratory to follow, therefore please contact your local regulatory agency for information on the specific requirements.
One of the most important tasks to accomplish during the implementation of any
automated differential analyzer is to establish/verify an effective flagging protocol. The purpose of the flagging protocol is to identify those samples which
require a slide review so that significant morphology detail can be added to the automated report. The extent to which an analyzer can effectively screen "normal" vs "abnormal" is defined as the instrument's clinical sensitivity. The
Truth Table is an effective tool for evaluation of the instrument's clinical sensitivity.
The first step in establishing an effective flagging protocol is to clearly define those findings that are considered clinically significant. A significant finding
would be considered some detail that could add value to the report and ultimately affect/improve patient care.
The next step is to identify ways to flag for these findings. Some flags and codes are already built into the analyzer and are generated when the analyzer detects an unusual or unexpected distribution of particles. Additional flags can be set up by the operator to reflect the laboratory's review requirements and to support the
screening process.
Specimens determined to be abnormal by the automated system should be evaluated according to the laboratory’s protocols. Specimens determined to be
normal by the automated system could be released without further review (autovalidation). The evaluation of the instrument's clinical sensitivity is critical
because over-flagging may lead to unnecessary differential review, while under-flagging may miss abnormal samples.
The manual differential is used as a reference method to assess whether the
instrument's flagging is appropriate. The lab determines the flagging limits which separate normal results from abnormal results, classifying each sample as a
True Negative, True Positive, False Negative or False Positive. Reviewing and possibly adjusting the operator definable flags may further improve the efficiency
of the automated differential system.

DxH 520 Performance Verification Workbook Page 64 of 94 Ver 2.2 July 2019 Beckman Coulter Technical Product Training
TRUTH TABLE ANALYSIS
Please note that your laboratory may be subject to local, state, and federal regulatory laws. Different agencies may dictate more specific procedures for your laboratory to follow, therefore please contact your local regulatory agency for information on the specific requirements.
Automated vs Manual Differential Data Collection
Responsibility:
Laboratory Key Operator
Materials Needed:
When comparing the automated differential to the manual differential, ensure that the inherent variations of slide preparation are minimized by:
CONSIDERATIONS
Making quality smears
Staining with quality stain
Using optically clean microscopes
Having qualified technologist review the smear(s)
Samples Needed:
Minimum of 100 Donor whole blood samples collected in K2 or K3 EDTA tubes.
Specimens are identified by lab number on both printouts and microscopic
slides for future reference. CLSI H20-A23 recommends that two technologists each perform a 200 cell manual differential on two different slides (total of 400 cells analyzed by each technologist). More cells counted results in a more precise and accurate reference against which to judge the accuracy of the automated method. Automated differential systems analyze thousands of cells. The Rumke Binomial Distribution Table4 , published by C.L. Rumke in 1978, illustrates that the statistical uncertainty of reference values is a direct function of the number of cells counted. The imprecision of the manual differential is especially pronounced with low numbers (e.g., monocyte, eosinophil and basophil percent).
Time Required:
Variable
DxH 520 Performance Verification Workbook Page 65 of 94 Ver 2.2 July 2019 Beckman Coulter Technical Product Training
TRUTH TABLE ANALYSIS
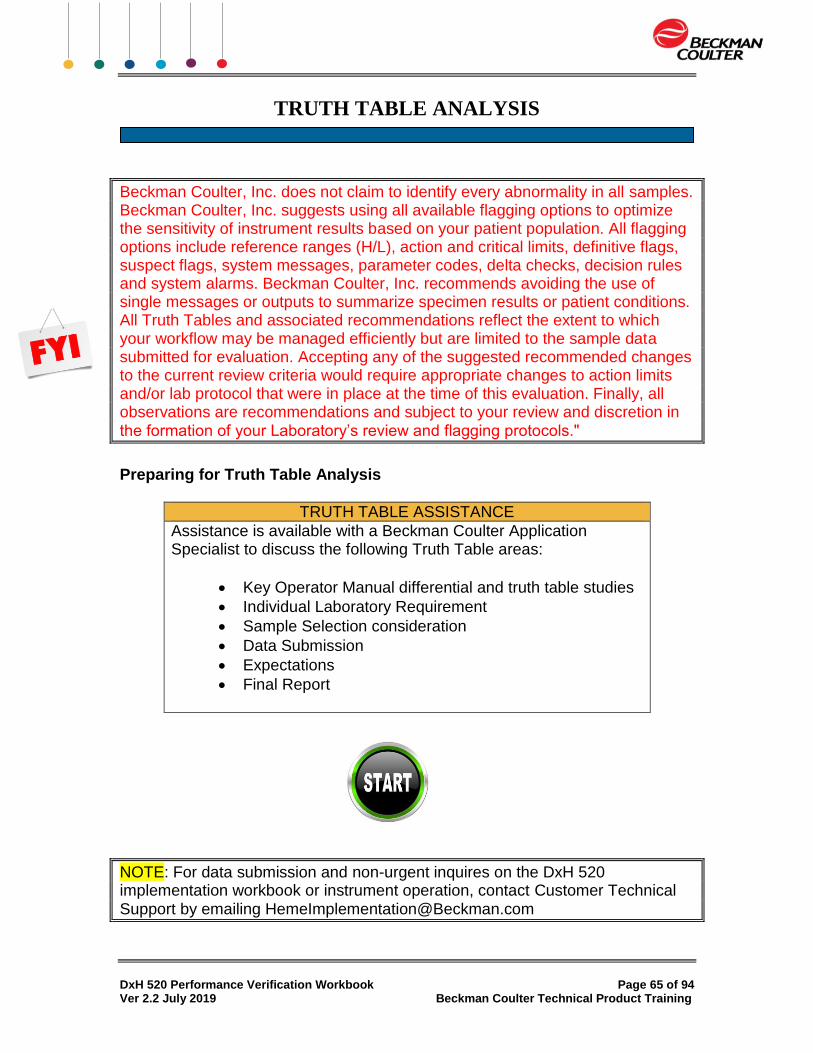
Beckman Coulter, Inc. does not claim to identify every abnormality in all samples. Beckman Coulter, Inc. suggests using all available flagging options to optimize the sensitivity of instrument results based on your patient population. All flagging options include reference ranges (H/L), action and critical limits, definitive flags, suspect flags, system messages, parameter codes, delta checks, decision rules and system alarms. Beckman Coulter, Inc. recommends avoiding the use of single messages or outputs to summarize specimen results or patient conditions. All Truth Tables and associated recommendations reflect the extent to which your workflow may be managed efficiently but are limited to the sample data submitted for evaluation. Accepting any of the suggested recommended changes to the current review criteria would require appropriate changes to action limits and/or lab protocol that were in place at the time of this evaluation. Finally, all observations are recommendations and subject to your review and discretion in the formation of your Laboratory’s review and flagging protocols."
Preparing for Truth Table Analysis
TRUTH TABLE ASSISTANCE
Assistance is available with a Beckman Coulter Application Specialist to discuss the following Truth Table areas:
Key Operator Manual differential and truth table studies
Individual Laboratory Requirement
Sample Selection consideration
Data Submission
Expectations
Final Report
NOTE: For data submission and non-urgent inquires on the DxH 520 implementation workbook or instrument operation, contact Customer Technical Support by emailing [email protected]
DxH 520 Performance Verification Workbook Page 66 of 94 Ver 2.2 July 2019 Beckman Coulter Technical Product Training
TRUTH TABLE ANALYSIS
DIFF PARAMETERS COMPARISION
Truth Table Differential
DATA COLLECTION
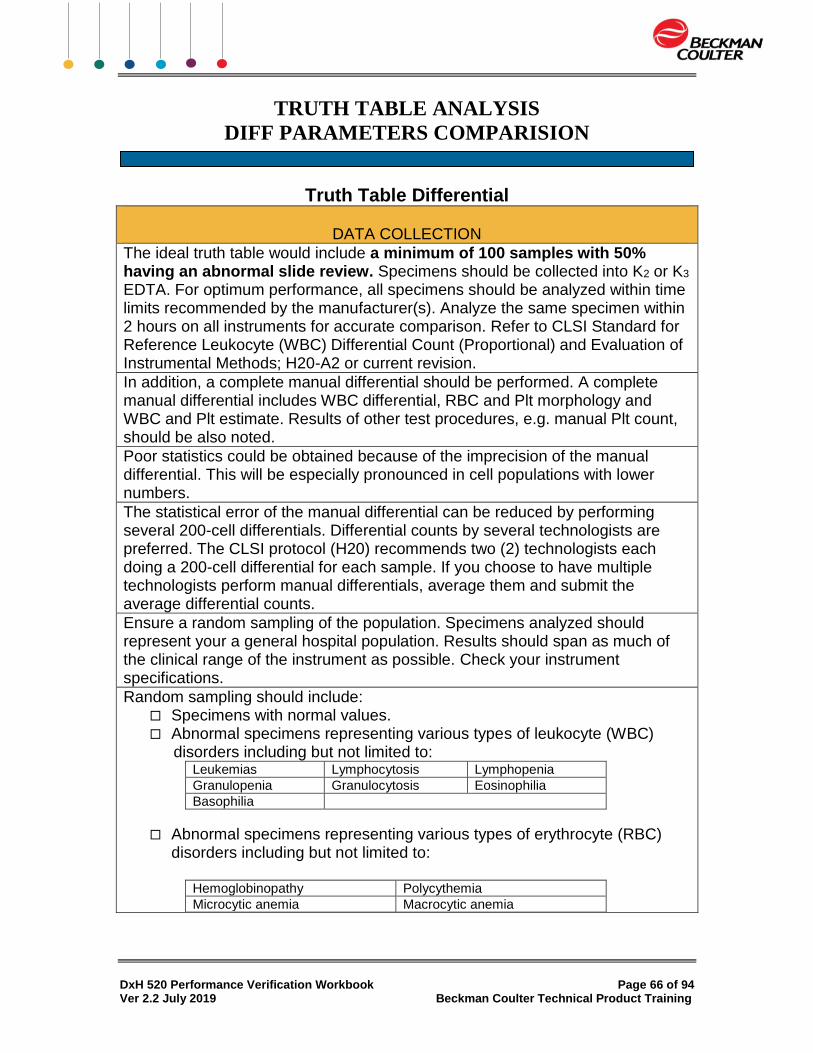
The ideal truth table would include a minimum of 100 samples with 50% having an abnormal slide review. Specimens should be collected into K2 or K3 EDTA. For optimum performance, all specimens should be analyzed within time limits recommended by the manufacturer(s). Analyze the same specimen within 2 hours on all instruments for accurate comparison. Refer to CLSI Standard for Reference Leukocyte (WBC) Differential Count (Proportional) and Evaluation of Instrumental Methods; H20-A2 or current revision.
In addition, a complete manual differential should be performed. A complete manual differential includes WBC differential, RBC and Plt morphology and WBC and Plt estimate. Results of other test procedures, e.g. manual Plt count, should be also noted.
Poor statistics could be obtained because of the imprecision of the manual differential. This will be especially pronounced in cell populations with lower numbers.
The statistical error of the manual differential can be reduced by performing several 200-cell differentials. Differential counts by several technologists are preferred. The CLSI protocol (H20) recommends two (2) technologists each doing a 200-cell differential for each sample. If you choose to have multiple technologists perform manual differentials, average them and submit the average differential counts.
Ensure a random sampling of the population. Specimens analyzed should represent your a general hospital population. Results should span as much of the clinical range of the instrument as possible. Check your instrument specifications.
Random sampling should include: Specimens with normal values. Abnormal specimens representing various types of leukocyte (WBC)
disorders including but not limited to: Leukemias Lymphocytosis Lymphopenia
Granulopenia Granulocytosis Eosinophilia
Basophilia
Abnormal specimens representing various types of erythrocyte (RBC) disorders including but not limited to:
Hemoglobinopathy Polycythemia
Microcytic anemia Macrocytic anemia

DxH 520 Performance Verification Workbook Page 67 of 94 Ver 2.2 July 2019 Beckman Coulter Technical Product Training
TRUTH TABLE ANALYSIS
DIFF PARAMETERS COMPARISION
Truth Table Differential
CONSIDERATIONS
Abnormal specimens representing various types of platelets (PLT) disorders including but not limited to:
Thrombocytosis Thrombocytopenia
Morphological platelet disorders
If total vote outs (dashes), incomplete computation (dots) or results with system-generated messages are observed for any specimen, repeat the analysis of that specimen on the evaluation instrument. Submit both the original and repeated values.
Results for all specimens analyzed on all instruments should be obtained and labeled appropriately. For each specimen, collect the following data:
ASSEMBLE
The Evaluation “Test” instrument result(s). If possible, printed results
The Reference “Current” instrument result(s). If possible, printed results
Any confirmatory results
Export specimen results to a flash drive. If possible, printed results
For data submission and non-urgent inquires on the DxH 520 implementation workbook or instrument operation, contact Customer Technical Support by emailing [email protected]

DxH 520 Performance Verification Workbook Page 68 of 94 Ver 2.2 July 2019 Beckman Coulter Technical Product Training
TRUTH TABLE ANALYSIS
Truth Table Differential
Define Review Limits and Review Protocol To establish review limits and a review protocol for your laboratory’s patient population and specific needs:
Steps Action
1 Define and record a Test instrument review protocol on the Differential Review Limit and Protocol worksheet.
2 Record the instrument-generated flags that require further action.
3 Define the high and low limits your laboratory uses to take slide review action
on an automated differential result.
4
Be specific, define less than and greater than with “or equal to” if applicable; e.g. if > 10% is your limit for Eosinophil, then 10% is normal or negative and 11 % is abnormal or positive. Depending upon your protocol results falling outside these abnormal limits require either a smear scan or a full manual differential.
5 Complete the Differential review limit and protocol worksheet.
6 Upon your protocol, results failing outside these abnormal limits require either a smear scan or a full manual differential.

DxH 520 Performance Verification Workbook Page 69 of 94 Ver 2.2 July 2019 Beckman Coulter Technical Product Training
DIFFERENTIAL REVIEW LIMIT AND PROTOCOL WORKSHEET
1. Define Test Instrument Review Protocol (Abnormal Limits)
a. All Instrument generated flags will be used. List exceptions below.
______________________________________________________________________
b. Operator Defined Flags
Instrument Review Limits
Low High
WBC
RBC
HGB
HCT
MCV
MCH
MCHC
RDW
RDW-SD
PLT
MPV
LY%
MO%
NE%
EO%
BA%
LY #
MO #
NE #
EO #
BA #
2. Define Reference Manual Differential Abnormal Limits
LIMITATION STATEMENT:
All numerical results reported for Basophil count and percent values must be reflexed for manual microscopy or followed up for additional testing based on the laboratory’s SOP. Segmented Neutrophils
Metamyelocytes
Band Neutrophils Myelocytes
Lymphocytes Promyelocytes
Variant Lymphocytes Blasts
Monocytes NRBCs
Eosinophils RBC Morphology
Basophils PLT Morphology
Other (Specify) WBC Morphology

DxH 520 Performance Verification Workbook Page 70 of 94 Ver 2.2 July 2019 Beckman Coulter Technical Product Training
TRUTH TABLE ANALYSIS
How to Establish a Truth Table
The automated differential’s sensitivity, specificity and efficiency in distinguishing normal and abnormal specimens are determined using Truth Table analysis. The manual differential is used as a reference to assess whether the instrument has correctly classified the specimen as normal (released without further view-auto-validation) or abnormal (requiring review). To Perform a Truth Table Analysis:
Step Action
1
For each specimen analyzed on the DxH 520 Instrument: a. Classify the instrument results as Normal (“negative”) if no flags or
messages are present. b. Classify the instrument results as Abnormal (“positive”) if flags or
messages are present.
2
Perform a manual differential on all samples evaluated in Step 1. a. Classify as Abnormal (“positive”) any morphological or
distributional abnormality observed. b. Classify as Normal (“negative”) any manual differential count in
which all cell types are normal and within your established limits.
3
Categorize each specimen as one of the following four categories and record the results on the differential Truth Table Worksheet:
True Negative (TN): Normal (negative) by both test (new instrument) and reference (manual diff) methods.
True Positive (TP): Abnormal (positive) by both test (new instrument) and reference (manual diff) methods.
False Negative (FN): Normal (negative) by test method (new instrument) and abnormal (positive) by reference (manual diff) method.
False Positive (FP): Abnormal (positive) by test method (new instrument) and normal (negative) by reference method (manual diff).

DxH 520 Performance Verification Workbook Page 71 of 94 Ver 2.2 July 2019 Beckman Coulter Technical Product Training
Step Action
4 Calculate and record on the Differential Truth Table Worksheet the following:
a. True Negative: the percentage of specimens considered normal (negative) by
both the test method (new instrument) and the reference method (manual diff). % TN = (# True Negatives / total number of specimens) x 100
b. True Positive: the percentage of specimens considered abnormal (positive) by both the test method (new instrument) and the reference method (manual diff). % TP = (# True Positives / total number of specimens) x 100
c. False Negative: the percentage of specimens considered normal by the test
method (new instrument) and abnormal by the reference method (manual diff). Galen/Gambino
% FN = (# False Negatives / total number of specimens) x 100
CLSI
% FN = (# True Negative / (True Negative+False Positives) x 100
d. False Positive: the percentage of specimens considered abnormal by the test method (new instrument) and normal by the reference method (manual diff). Galen/Gambino
% FP = (# False Positives / total number of specimens) x 100
CLSI
% FP = (False Positive/(False Positive+TN)) X 100
e. Specificity: the percentage of manual differential normals that were also normal on the instrument.
Specificity = # True Negatives # (True Negative + False Positives) x 100
f. Sensitivity: the percentage of manual differential abnormals that were also abnormal on the instrument.
Sensitivity = # True Positives # (True Positives + False Negatives) x 100
g. Predictive Value of a Negative Test (PVN): the percentage of specimens that were normal on both the instrument and the manual differential.
PVN = # True Negatives # (True Negatives + False Negatives) x 100

DxH 520 Performance Verification Workbook Page 72 of 94 Ver 2.2 July 2019 Beckman Coulter Technical Product Training
h. Predictive Value of a Positive Test (PVP): the percentage of specimens that
were abnormal on both the instrument and the manual differential.
PVP = # True Positives # (True Positives + False Positives) x 100
i. Agreement: the percentage of specimens correctly categorized by the automated differential.
# (True Positives + True Negatives) total number of specimens x 100
IMPORTANT
The Truth Table format can be used for a variety of purpose. It is important to understand that the statistics reflect the patient mix that is used during the study. The focus of an Implementation Truth Table is to optimize Sensitivity. Focus on the False Negative Samples. Evaluate if there is a particular flag that could be added or modified so that these same samples would be flagged. Determine what is an acceptable balance between False Negative (missed significant findings) and False Positive sample (increased review rate). The responsibility to determine aceptable performance of above data lies with the evaluating laboratory.
IMPORTANT

DxH 520 Performance Verification Workbook Page 73 of 94 Ver 2.2 July 2019 Beckman Coulter Technical Product Training
DIFFERENTIAL TRUTH TABLE WORKSHEET
1. Classify differentials into one of four categories and total each column.
REFERENCE (Manual Differential)
Normal (Negative)
Abnormal (Positive)
Total
Normal (Negative)
(TN) (FP)
TEST (new instrument) Abnormal
(Positive) (FN) (TP)
Total
2. Calculate the following parameters.
PARAMETER CALCULATION RESULT (%)
% TN Number of TN/Total
% TP Number of TP/Total
% FN Number of FN/Total
% FP Number of FP/Total
Specificity [# TN/ # (TN + FP)] x 100
Sensitivity [# TP/ # (TP + FN)] x 100
Predictive Value of a Negative Test [# TN/ # (TN + FN)] x 100
Predictive Value of Positive Test [# TP/ # (TP + FP)] x 100
Agreement [(# TP + # TN)/Total] x 100
2. Reviewed by _______________________________ Date ___________

DxH 520 Performance Verification Workbook Page 74 of 94 Ver 2.2 July 2019 Beckman Coulter Technical Product Training
TRUTH TABLE ANALYSIS WORKSHEET
Sample ID
Tech ID Tech ID Tech ID Tech ID
Segs Segs Segs Segs
Bands Bands Bands Bands
Meta Meta Meta Meta
Myelo Myelo Myelo Myelo
Pro Pro Pro Pro
Blast Blast Blast Blast
Lymph Lymph Lymph Lymph
Atyp Ly Atyp Ly Atyp Ly Atyp Ly
Mono Mono Mono Mono
Eos Eos Eos Eos
Baso Baso Baso Baso
NRBC NRBC NRBC NRBC
Other Other Other Other
Total Total Total Total
Significant RBC morph Significant RBC morph Significant RBC morph Significant RBC morph
Significant PLT observations Significant PLT observations Significant PLT observations Significant PLT observations

DxH 520 Performance Verification Workbook Page 75 of 94 Ver 2.2 July 2019 Beckman Coulter Technical Product Training
TRUTH TABLE ANALYSIS WORKSHEET
Sample ID
Tech ID Tech ID Tech ID Tech ID
Segs Segs Segs Segs
Bands Bands Bands Bands
Meta Meta Meta Meta
Myelo Myelo Myelo Myelo
Pro Pro Pro Pro
Blast Blast Blast Blast
Lymph Lymph Lymph Lymph
Atyp Ly Atyp Ly Atyp Ly Atyp Ly
Mono Mono Mono Mono
Eos Eos Eos Eos
Baso Baso Baso Baso
NRBC NRBC NRBC NRBC
Other Other Other Other
Total Total Total Total
Significant RBC morph Significant RBC morph Significant RBC morph Significant RBC morph
Significant PLT observations Significant PLT observations Significant PLT observations Significant PLT observations

DxH 520 Performance Verification Workbook Page 76 of 94 Ver 2.2 July 2019 Beckman Coulter Technical Product Training

DxH 520 Performance Verification Workbook Page 77 of 94 Ver 2.2 July 2019 Beckman Coulter Technical Product Training
DxH 520 DATA SUBMISSION CHECKLIST This checklist must be filled and attached to email along with 7 files listed below. Submit your checklist to the Beckman Coulter application specialist support team at [email protected].
Customer information: Name of Hospital/Institution:
Primary Contact Name:
Telephone Number:
Email address
DxH 520 Serial Number/Instance number
(s):
Reference Instrument Information
(Serial Number, Manufacturer, model)
Files to be attached Procedure Date
Completed
Technician Date
Submitted
RBC/HGB Linearity export file (all levels).
CSV
PLT Linearity export file (all levels).CSV
WBC Linearity export file (all levels).CVS
DxH 520 (test) correlation data exports file.
CVS
Reference instrument correlation data
export file .CSV
Data Entry Worksheet for DxH 520
validation (if cannot be exported from
Analyzer)
Package insert for R & D Linearity to
include ranges & Lot #
Please ensure sample IDs in reference and test methods match.
Please perform Linearity studies in REPEATABILITY mode.
Follow instructions in DXH520 implementation workbook how to export
data to USB drive.
Please ensure any PHI is removed per laboratory protocol from submitted
patient records
Date_________________

DxH 520 Performance Verification Workbook Page 78 of 94 Ver 2.2 July 2019 Beckman Coulter Technical Product Training

DxH 520 Performance Verification Workbook Page 79 of 94 Ver 2.2 July 2019 Beckman Coulter Technical Product Training
IQAP ENROLLMENT
The Beckman Coulter Hematology Interlaboratory Quality Assurance Program (IQAP) is a peer comparison program offered to users of Beckman Coulter instrumentation worldwide. IQAP complements and enhances your laboratory’s in-house quality control. Customers with instrumentation configured with Beckman Coulter reagents, and using Beckman Coulter calibrators and controls are eligible for this free program. IQAP is an added-value service provided at no additional cost to Beckman Coulter customers and allows laboratories to compare results to those of other laboratories running the same lot number of controls. In addition, the online eIQAP portal you can easily submit, view and compare QC reports with hematology peer groups worldwide. Participation is voluntary!
Responsibility:
Laboratory Key Operator
Materials Needed:
Computer with Internet Access
Time Required:
Variable
NOTE: For data submission and non-urgent inquires on the DxH 520 implementation workbook or instrument operation, contact Customer Technical Support by emailing [email protected]

DxH 520 Performance Verification Workbook Page 80 of 94 Ver 2.2 July 2019 Beckman Coulter Technical Product Training
IQAP ENROLLMENT
STEPS ACTION
1
Access the Beckman Coulter eIQAP web site at:
2
Select Need an Account? Click here to Register.
3
Complete the information on the Account Registration screen.

DxH 520 Performance Verification Workbook Page 81 of 94 Ver 2.2 July 2019 Beckman Coulter Technical Product Training
4
Select the Terms and Conditions, and select to complete the registration process.
5 Wait for the system response thanking you for registering. You will receive an email thanking you for registering.
NOTE
The eIQAP enrollment phase can only be performed after having completed the Registration process and received the Congratulations message. Beckman Coulter recommends completing the Enrollment phase immediately after registering for eIQAP.
6 If you logged out of the system, log back in. If you are still logged in, select Continue with Hematology/Cytometry enrollment.
7
Select the Instrument Type from the dropdown list, complete the required field for Serial Number and select Next.
8 Verify and complete the information required on the screen and select Next.
9
Wait for the system response to indicate that the enrollment in eIQAP was successful. If done, select Sign Out or select Back to Dashboard to add additional instruments.
NOTE: For data submission and non-urgent inquires on the DxH 520 implementation workbook or instrument operation, contact Customer Technical Support by emailing [email protected]

DxH 520 Performance Verification Workbook Page 82 of 94 Ver 2.2 July 2019 Beckman Coulter Technical Product Training

DxH 520 Performance Verification Workbook Page 83 of 94 Ver 2.2 July 2019 Beckman Coulter Technical Product Training
APPENDIX - GLOSSARY
Accuracy of a test is the closeness of the test result to the true value.
Carryover The amount in percent of sample remaining in the system and picked up by the next sample cycled. Low-to-high carryover is the amount of sample with low cell concentrations carried over to sample with high cell concentration, such as diluent to blood. High-to-low carryover is the amount of samples with high cell concentrations carried over to samples with low cell concentrations such as blood to diluent.
Coefficient of Variation (CV%) is the standard deviation expressed in terms of the percentage of the mean.
Linear regression is a statistical technique to find the line that best predicts Y from X.
Mean is the center of distribution. It is used to describe or summarize a collection of data by defining an average.
Mean Difference is the unknown minus the known.
Measuring range (linearity) is a set of values of measurands for which the error of a measuring instrument is intended to lie within specified limits.
Outlier is a result outside of the established range.
Precision is the closeness of results of repeated analysis performed on the same material. Precision is often expressed quantitatively as standard deviations, or coefficients of variation. (also known as repeatability or reproducibility)
Patient Population is the group of individual values about which a generalization is derived.
Reference interval is the interval between and including the lower reference limit to the upper reference limit of the reference population (e.g., 95% of persons presumed to be healthy or normal.
Repeatability/Reproducibility is the closeness of results of repeated analysis performed on the same material. Precision is often expressed quantitatively as standard deviations, or coefficients of variation. (also known as precision or reproducibility)
Standard Deviation (SD) is a measure of the dispersion or variation in the results about the mean.
True Negative is the percentage of specimens considered normal (negative) by both the test method (new instrument) and the reference method (manual diff).
True Positive is the percentage of specimens considered abnormal (positive) by both the test method (new instrument) and the reference method (manual diff).
Truth Table is a technique for evaluation of method sensitivity, specificity and efficiency.

DxH 520 Performance Verification Workbook Page 84 of 94 Ver 2.2 July 2019 Beckman Coulter Technical Product Training
REFERENCES
1. CLSI EP09-A3 Measurement Procedure and Bias Estimation Using Patient samples; Approved Guideline-Third Edition. August 2013
2. Westgard J and Hunt M. Use and Interpretation of Common Statistical Tests in Method-comparison Studies. Clinical Chemistry, 1973; 19(1): 49-57.
3. CLSI H20-A23 Reference Leukocyte (WBC) Differential Count (Proportional) and Evaluation of Instrument Methods-Second Edition, 2007.
4. Duncan KL and Gottfried EL. Utility Of The Three-Part Differential Count. American Journal of Clinical Pathology, 1987; 88:308-313.
5. Dutcher TF (author) and Savage RA (ed) Questions and Answers. CAP Today, 1992; 4:65-66.
6. Ardron MJ, Westgard JC and Dutcher TF. Band Neutrophil Counts Are Necessary For The Diagnosis Of Infection In Patients With Normal Total Leukocyte Counts. American Journal of Clinical Pathology, 1994; 11:646-649.
7. Gossens W, VanHove L and Verwilghen RL. Monocyte Counting: Discrepancies In Results Obtained With Different Automated Instruments. Journal of Clinical Pathology, 1991; 44:224-227.
8. Bourke GJ and NcGilvray J. Interpretation and Uses of Medical Statistics. Blackwell Scientific Publications, Osney Mead, Oxford, UK, 1975.
9. CLSI C28-A2, How to Define and Determine Reference Intervals in the Clinical Laboratory; Approved Guideline-Second Edition, June 2000.
10. CLSI C24-A2 Statistical Quality Control for Quantitative Measurement : Principles and Definitions; Approved Guideline-Second Edition, 1999.
11. Westgard, JO. "But is it really out?" Doing the wrong QC wrong. Essay 115. September 2007.
12. College of American Pathologists, 2004, Commission on laboratory Accreditation Inspection Checklist HEM.30250
13. Clincial laboratory Improvement Amendments as set forth in 42 CFR 493.1253 Standard.

DxH 520 Performance Verification Workbook Page 85 of 94 Ver 2.2 July 2019 Beckman Coulter Technical Product Training
WEBSITES FOR LABORATORY REFERENCE
Beckman Coulter Inc. www.beckmancoulter.com www.beckmancoulter.com/qap Clinical Laboratory Standards Institute (CLSI) www.clsi.org Collage of American Pathologist (CAP) www.cap.org Joint Commission (JCAHO) www.jointcommission.org Centers for Medicare and Medicaid Services (CMS) www.cms.hhs.gov Clinical Laboratory Improvements Amendments www.cms.hhs.gov/clia Proficiency Testing Providers www.cms.hhs.gov/CLIA/14_Proficiency_Testing_Providers.asp Media Lab, Inc. (Online Compliance and Continuing Education for Clinical Laboratories www.medialabinc.net Westgard QC (Tools, Technologies and Training for Healthcare Laboratories) www.westgard.com

DxH 520 Performance Verification Workbook Page 86 of 94 Ver 2.2 July 2019 Beckman Coulter Technical Product Training

DxH 520 Performance Verification Workbook Page 87 of 94 Ver 2.2 July 2019 Beckman Coulter Technical Product Training
PERFORM REFERENCE INTERVAL/RANGE WORKSHEET
WBC RBC HGB HCT MCV MCH MCHC RDW RDW-SD
PLT MPV LY% MO% NE% EO% BA%
Patient 1 Patient 2 Patient 3 Patient 4 Patient 5 Patient 6 Patient 7 Patient 8 Patient 9 Patient 10 Patient 11 Patient 12 Patient 13 Patient 14 Patient 15 Patient 16 Patient 17 Patient 18 Patient 19 Patient 20
Proposed Reference Intervals Patient Low Patient High

DxH 520 Performance Verification Workbook Page 88 of 94 Ver 2.2 July 2019 Beckman Coulter Technical Product Training
PERFORM CORRELATION STUDIES WORKSHEET
Current (reference) Instrument
WBC RBC HGB HCT MCV MCH MCHC RDW RDW-
SD PLT MPV LY% MO% NE% EO% BA%
Patient 1 Patient 2 Patient 3 Patient 4 Patient 5 Patient 6 Patient 7 Patient 8 Patient 9 Patient 10 Patient 11 Patient 12 Patient 13 Patient 14 Patient 15 Patient 16 Patient 17 Patient 18 Patient 19 Patient 20

DxH 520 Performance Verification Workbook Page 89 of 94 Ver 2.2 July 2019 Beckman Coulter Technical Product Training
PERFORM CORRELATION STUDIES WORKSHEET
Current (reference) Instrument
WBC RBC HGB HCT MCV MCH MCHC RDW RDW-SD
PLT MPV LY% MO% NE% EO% BA%
Patient 21 Patient 22 Patient 23 Patient 24 Patient 25 Patient 26 Patient 27 Patient 28 Patient 29 Patient 30 Patient 31 Patient 32 Patient 33 Patient 34 Patient 35 Patient 36 Patient 37 Patient 38 Patient 39 Patient 40

DxH 520 Performance Verification Workbook Page 90 of 94 Ver 2.2 July 2019 Beckman Coulter Technical Product Training
PERFORM CORRELATION STUDIES WORKSHEET
DxH 520 (Test) Instrument
WBC RBC HGB HCT MCV MCH MCHC RDW RDW-
SD PLT MPV LY% MO% NE% EO% BA%
Patient 1 Patient 2 Patient 3 Patient 4 Patient 5 Patient 6 Patient 7 Patient 8 Patient 9 Patient 10 Patient 11 Patient 12 Patient 13 Patient 14 Patient 15 Patient 16 Patient 17 Patient 18 Patient 19 Patient 20

DxH 520 Performance Verification Workbook Page 91 of 94 Ver 2.2 July 2019 Beckman Coulter Technical Product Training
PERFORM CORRELATION STUDIES WORKSHEET
DxH 520 (Test) Instrument
WBC RBC HGB HCT MCV MCH MCHC RDW RDW-SD
PLT MPV LY% MO% NE% EO% BA%
Patient 21 Patient 22 Patient 23 Patient 24 Patient 25 Patient 26 Patient 27 Patient 28 Patient 29 Patient 30 Patient 31 Patient 32 Patient 33 Patient 34 Patient 35 Patient 36 Patient 37 Patient 38 Patient 39 Patient 40
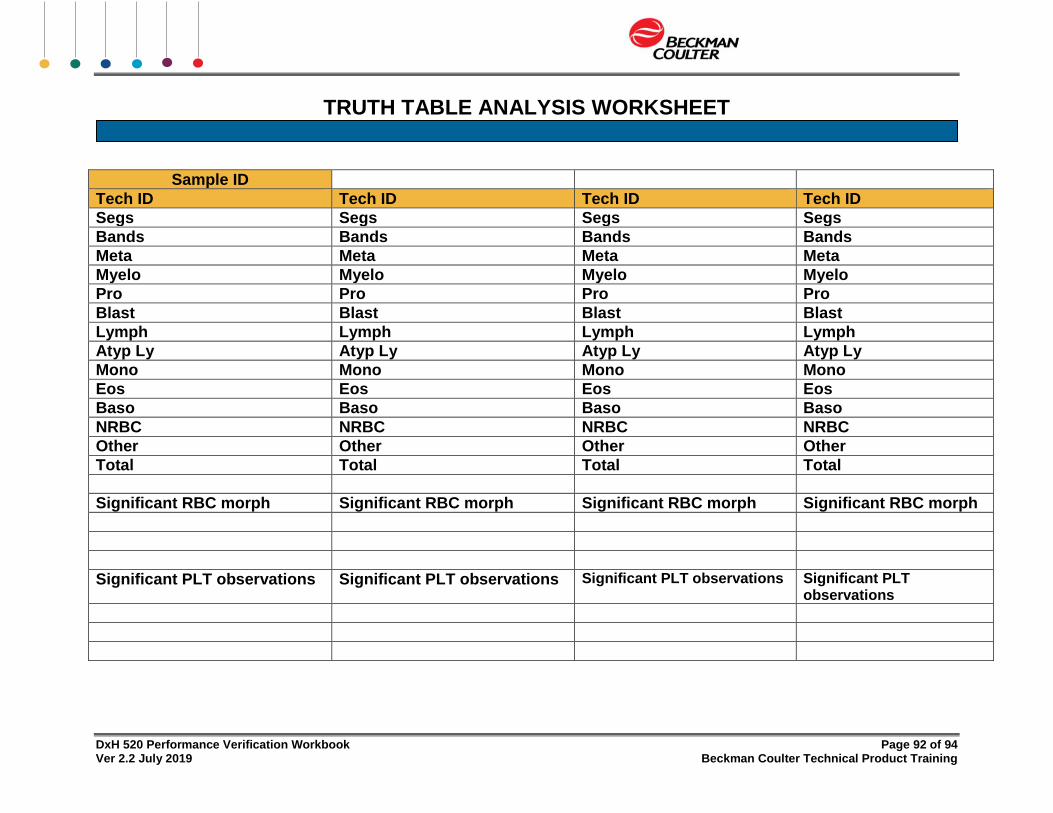
DxH 520 Performance Verification Workbook Page 92 of 94 Ver 2.2 July 2019 Beckman Coulter Technical Product Training
TRUTH TABLE ANALYSIS WORKSHEET
Sample ID
Tech ID Tech ID Tech ID Tech ID
Segs Segs Segs Segs
Bands Bands Bands Bands
Meta Meta Meta Meta
Myelo Myelo Myelo Myelo
Pro Pro Pro Pro
Blast Blast Blast Blast
Lymph Lymph Lymph Lymph
Atyp Ly Atyp Ly Atyp Ly Atyp Ly
Mono Mono Mono Mono
Eos Eos Eos Eos
Baso Baso Baso Baso
NRBC NRBC NRBC NRBC
Other Other Other Other
Total Total Total Total
Significant RBC morph Significant RBC morph Significant RBC morph Significant RBC morph
Significant PLT observations Significant PLT observations Significant PLT observations Significant PLT observations
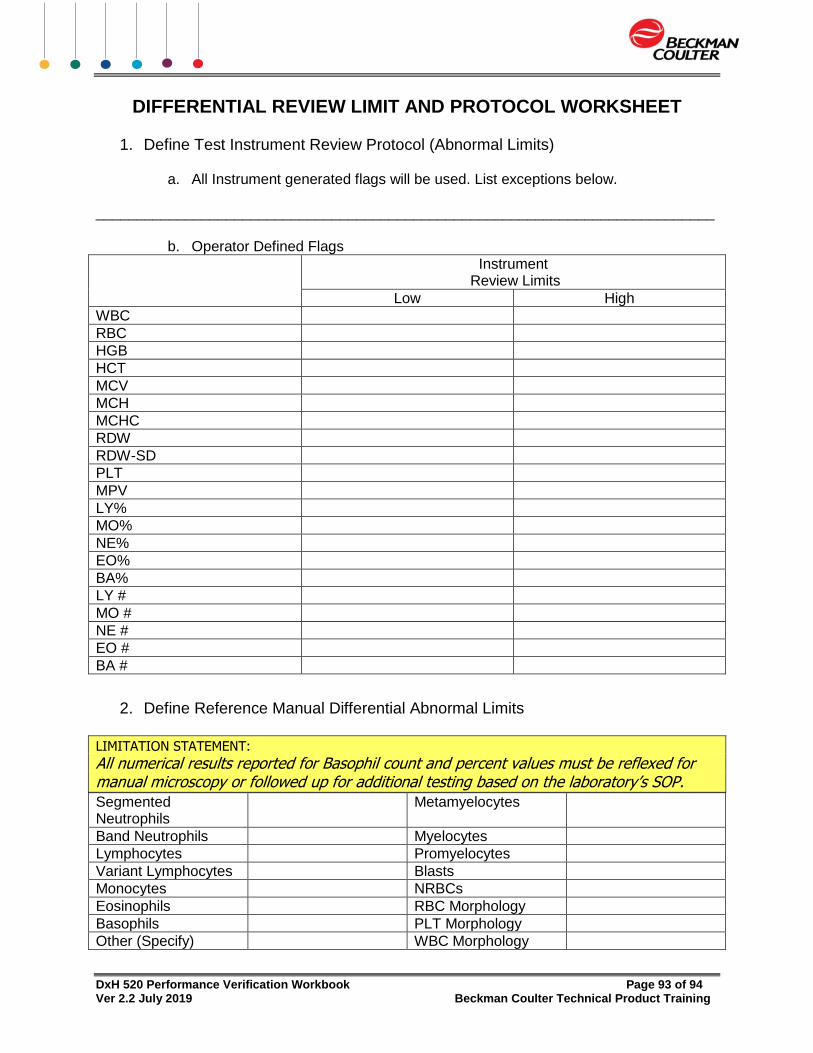
DxH 520 Performance Verification Workbook Page 93 of 94 Ver 2.2 July 2019 Beckman Coulter Technical Product Training
DIFFERENTIAL REVIEW LIMIT AND PROTOCOL WORKSHEET
1. Define Test Instrument Review Protocol (Abnormal Limits)
a. All Instrument generated flags will be used. List exceptions below.
____________________________________________________________________________
b. Operator Defined Flags Instrument
Review Limits
Low High
WBC
RBC
HGB
HCT
MCV
MCH
MCHC
RDW
RDW-SD
PLT
MPV
LY%
MO%
NE%
EO%
BA%
LY #
MO #
NE #
EO #
BA #
2. Define Reference Manual Differential Abnormal Limits
LIMITATION STATEMENT:
All numerical results reported for Basophil count and percent values must be reflexed for manual microscopy or followed up for additional testing based on the laboratory’s SOP. Segmented Neutrophils
Metamyelocytes
Band Neutrophils Myelocytes
Lymphocytes Promyelocytes
Variant Lymphocytes Blasts
Monocytes NRBCs
Eosinophils RBC Morphology
Basophils PLT Morphology
Other (Specify) WBC Morphology

DxH 520 Performance Verification Workbook Page 94 of 94 Ver 2.2 July 2019 Beckman Coulter Technical Product Training
DIFFERENTIAL TRUTH TABLE WORKSHEET
3. Classify differentials into one of four categories and total each column.
REFERENCE (Manual Differential)
Normal (Negative)
Abnormal (Positive)
Total
Normal (Negative)
(TN) (FP)
TEST (new instrument) Abnormal
(Positive) (FN) (TP)
Total
2. Calculate the following parameters.
PARAMETER CALCULATION RESULT (%)
% TN Number of TN/Total
% TP Number of TP/Total
% FN Number of FN/Total
% FP Number of FP/Total
Specificity [# TN/ # (TN + FP)] x 100
Sensitivity [# TP/ # (TP + FN)] x 100
Predictive Value of a Negative Test [# TN/ # (TN + FN)] x 100
Predictive Value of Positive Test [# TP/ # (TP + FP)] x 100
Agreement [(# TP + # TN)/Total] x 100
3. Reviewed by ___________________________________ Date ____________