dspace for administrators (repository managers) a as an e on of...
TRANSCRIPT
Page 1
DSpace for Administrators (Repository Managers)
1. Access a pre‐installed DSpace instance
1. In you Internet Browser, go to http://neo.bib.sun.ac.za/jspui/. This instance was installed
on the test server of the Stellenbosch University.
2. Register as an E‐person on a pre‐installed instance of DSpace
1. Click on Sign on to: >> My DSpace.
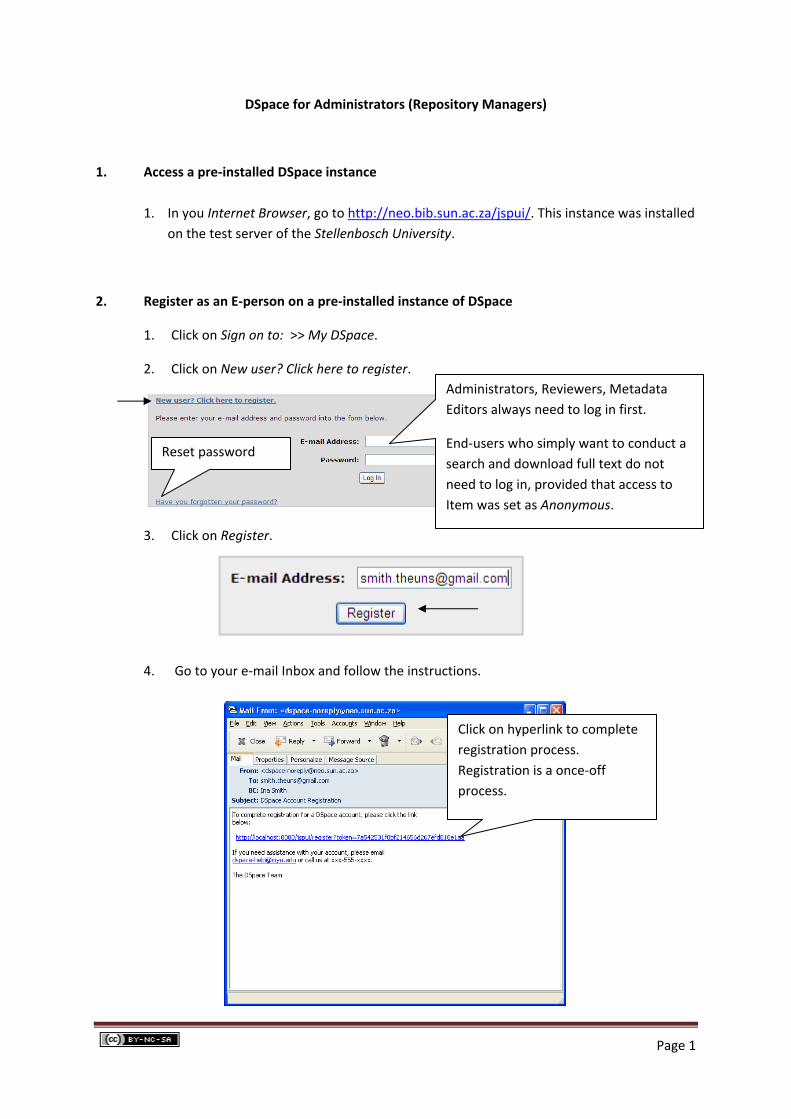
2. Click on New user? Click here to register.
3. Click on Register.
4. Go to your e‐mail Inbox and follow the instructions.
Reset password
Administrators, Reviewers, Metadata
Editors always need to log in first.
End‐users who simply want to conduct a
search and download full text do not
need to log in, provided that access to
Item was set as Anonymous.
Click on hyperlink to complete
registration process.
Registration is a once‐off
process.

Page 2
5. You will be prompted to enter a DSpace password, and to re‐type the password to
confirm.
6.
Logged in. Always remember to log
out when done.
Task Pool area ‐
currently empty
Example of Task Pool with one
task waiting to be completed.

Page 3
3. Registering an E‐person as an Administrator
1. Each of you has Administrator rights on the test server. Ideally maximum 3 persons
are recommended to have administrative rights: the DSpace IT Manager, DSpace IR
Manager, 1 Back‐up person. These persons have full authorization on all levels.
2. While logged in, click on Administer in the navigation column to the left of your
DSpace screen.
3. Click on Groups. An Administrator account was set up during the DSpace installation.
4. Click on Edit next to the Administrator Group.
5. Example of DSpace Administrators registered:
Create a group with only certain members,
and certain rights assigned to these
members.
Anonymous = Everyone on the Internet can
access/ view/ download item.
Select more people as
Administrators. They
need to be visible as E‐
people.
Remove any of the
Administrators at any stage
Remember to always Update Group
for changes to take effect

Page 4
Select E‐people: A list of all people who have successfully registered with DSpace or who
were manually registered by the DSpace Administrator will be displayed. Add names from
this list, Close and Update Group:
4. Manually create E‐people
1. Click on E‐people in the administration interface.
2. Click on Add E‐person.
3. Complete the form, and Save.
4. To delete an E‐person, while within the E‐people interface, click on Select E‐person.
Select the persons’ name, and choose to Edit (add changes) or Delete.
5. You will be prompted to confirm the deletion. Click Delete.
6. When you want to Edit an E‐person, DSpace will display a list of all Groups to which that
person belongs:
Search for a specific person – the list
can become very long as your
repository grows! Arrange e‐people according
to ID, E‐mail, Language. By
default arranged according
to Last Name.

Page 5
5. Automatically generated Groups within DSpace
Everytime a new Collection is created, DSpace automatically generates certain Groups for
that Collection, depending on the workflow for that Group. Names of Groups can be
changed, but avoid as far as possible, unless it is a new group manually created by you and
not automatically generated by DSpace.
Example of automatically generated Groups for one specific Collection (Research Articles
(Arts and Social Sciences)) in DSpace:
The above was automatically generated and is visible under Administer >> Groups because
of the way the Collection was initially created:
To explain:
COLLECTION_28_ADMIN This Collection will have delegated collection administrators
COLLECTION_28_SUBMIT Some users will be able to submit to this collection
COLLECTION_28_WORKFLOW_STEP_1 The submission workflow will include an accept/reject step
COLLECTION_28_WORKFLOW_STEP_2 The submission workflow will include an accept/reject/edit metadata step
COLLECTION_28_WORKFLOW_STEP_3 The submission workflow will include an edit metadata step
Members of this Group can be
edited at any stage
Refers to the Anonymous Group
Any step in the workflow can be
deleted from here
First screen
to complete
when
creating a new
Collection

Page 6
6. Manually created Groups in DSpace
1. While in the administrative interface, click on Groups.
2. Click on Create New Group.
3. Select individual E‐persons or existing Groups to form part of this new Group.
4. Give the Group a descriptive name, or stick to the DSpace Group naming convention,
e.g. COLLECTION_28_EMBARGOES.
5. Click on Update Group.
Note: We will work with Groups and E‐persons again later, once we start setting up
Collections and assigning rights.
Descriptive name for Group

Page 7
7. Editing the News on your repository home page
Use the repository home page to communicate news, events, achievements, training and
many more – i.e. as a marketing and communication tool, but also to communicate
important information. DSpace allows html to be used in these fields. Also add images to
make it more attractive if needed.
1. While logged on as Administrator, go to Administer >> Edit News.
2. Click on Top News or Sidebar News to edit it in html.
3. Save your changes afterwards and view at Home.
8. Edit the default DSpace license
Every time an E‐person submits an item to DSpace, he/she needs to grant a license, stating
that copyright has been cleared or that they are the owners of the copyright, that they give
permission to your institution to distribute the item on DSpace, etc. This license can be
customized – work with the legal officer on campus to make sure that all is covered. This
license is to protect the Submitter, but also the institution.
1. While logged in as Administrator, go to Administer >> Edit Default License.
2. Replace the text in the text box with the new text as agreed upon with your legal officer,
and Save.
Top News Sidebar News

Page 8
9. Metadata Registry (Dublin Core)
Metadata (meta data, or sometimes meta information) is "data about other data", of any sort in any media. For example, metadata would document data about data elements or attributes, (name, size, data type, etc) and data about records or data structures (length, fields, columns, etc) and data about data (where it is located, how it is associated, ownership, etc.). Metadata may include descriptive information about the context, quality and condition, or characteristics of the data.
The Dublin Core metadata element set is a standard for cross‐domain information resource description. It defines conventions for describing things online in ways that make them easy to find. Dublin Core is widely used to describe digital materials such as video, sound, image, text, and composite media like web pages. Implementations of Dublin Core typically make use of XML and are Resource Description Framework based. Dublin Core is defined by ISO in ISO Standard 15836, and NISO Standard Z39.85‐2007.
The Dublin Core Metadata Registry is designed to promote the discovery and reuse of properties, classes, and other types of metadata terms. It provides an up‐to‐date source of authoritative information about DCMI metadata terms and related vocabularies. The registry aids in the discovery of terms and their definitions and shows relationships between terms. The reuse of existing metadata terms is essential to standardization, and promotes greater interoperability between metadata element sets. The discovery of existing terms is an essential, and prerequisite, step in this process. This application promotes the wider adoption, standardization and interoperability of metadata by facilitating its discovery, and reuse, across diverse disciplines and communities of practice.
The fifteen element "Dublin Core" described in this standard is part of a larger set of metadata vocabularies and technical specifications maintained by the Dublin Core Metadata Initiative (DCMI). The full set of vocabularies, DCMI Metadata Terms [DCMI‐TERMS], also includes sets of resource classes (including the DCMI Type Vocabulary [DCMI‐TYPE]), vocabulary encoding schemes, and syntax encoding schemes. The terms in DCMI vocabularies are intended to be used in combination with terms from other, compatible vocabularies in the context of application profiles and on the basis of the DCMI Abstract Model [DCAM].
Acknowledgement:
Dublin Core Metadata Schema: http://dublincore.org/
Dublin Core Metadata Registry: http://dcmi.kc.tsukuba.ac.jp/dcregistry/
Using Dublin Core – the official usage guide: http://dublincore.org/documents/usageguide/
Expressing Qualified Dublin Core in RDF / XML: http://dublincore.org/documents/dcq‐rdf‐xml/
Dublin Core on Wikipedia: http://en.wikipedia.org/wiki/Dublin_Core
PLEASE REFER TO ADDENDUM A AT BACK OF MANUAL

Page 9
1. While logged in as Administrator, go to Administer >> Metadata Registry. 2. You have the option to create a new schema by entering a namespace/name or
edit an existing one by clicking the update button.
3. Click on the link to the Dublin Core Metadata Registry for this instance of
DSpace.
4. Do not change any content within the Element and Qualifier fields. You can
however add a Scope Note to describe each field and how it is suppose to be
used.
5. Add Metadata Field: To create a new field you must provide a unique element
and qualifier pair. The qualifier may be left blank if desired and the element and
qualifier cannot contain spaces, underscores or periods. Click Add New.
6. Move Field: If you have more than one schema a form would appear here
allowing you to move fields between schemas.
Column containing
names of Elements
Column containing
names of Qualifiers
Scope Notes can be added

Page 10
10. Bitstream Format Registry
A bitstream or bit stream is a time series of bits. A bytestream is a series of bytes, typically of 8 bits each, and can be regarded as a special case of a bitstream. When a bitstream is captured and stored in a computer storage medium, a computer file is created.
This list of bitstreams provides information about known bitstreams and their support level. You can edit or add new bitstream formats with this tool. Please take note of the following:
You can only edit one bitstream format at a time. Make the edits to one row, and click the relevant 'update' button. Only edits you've made to that row will be saved.
Extensions are file extensions that are used to automatically identify the format of uploaded files. You can enter several comma‐separate extensions for each format.
The Name of each format must be unique, though the MIME type need not be. For example, you might have separate format registry entries for different versions of Microsoft Word, even though the MIME type will be the same for each of them.
Internal formats are hidden from the user, and are used for administrative purposes. For example, the licenses that submitters grant are stored as License format bitstreams, and these aren't shown to end users.
If you delete a bitstream format, any bitstreams in the system of that format will be reverted to the Unknown format.
Important: Do not delete the Unknown or License formats.
Also note that the config/registries/bitstream‐formats.xml is only used during the build process to populate the format registry in the database, which is the 'live' version. Changes you make with this UI will only be reflected in the database registry, and not the XML file (and vice versa.)
Source: http://dspace‐dev.dsi.uminho.pt:8080/common/dspace‐docs‐1.1.1‐1/admin‐ui.html
1. While logged in as Administrator, go to Administer >> Bitstream Format Registry.
2. Scroll down to the bottom to Add New.
Page 11
11. Statistics
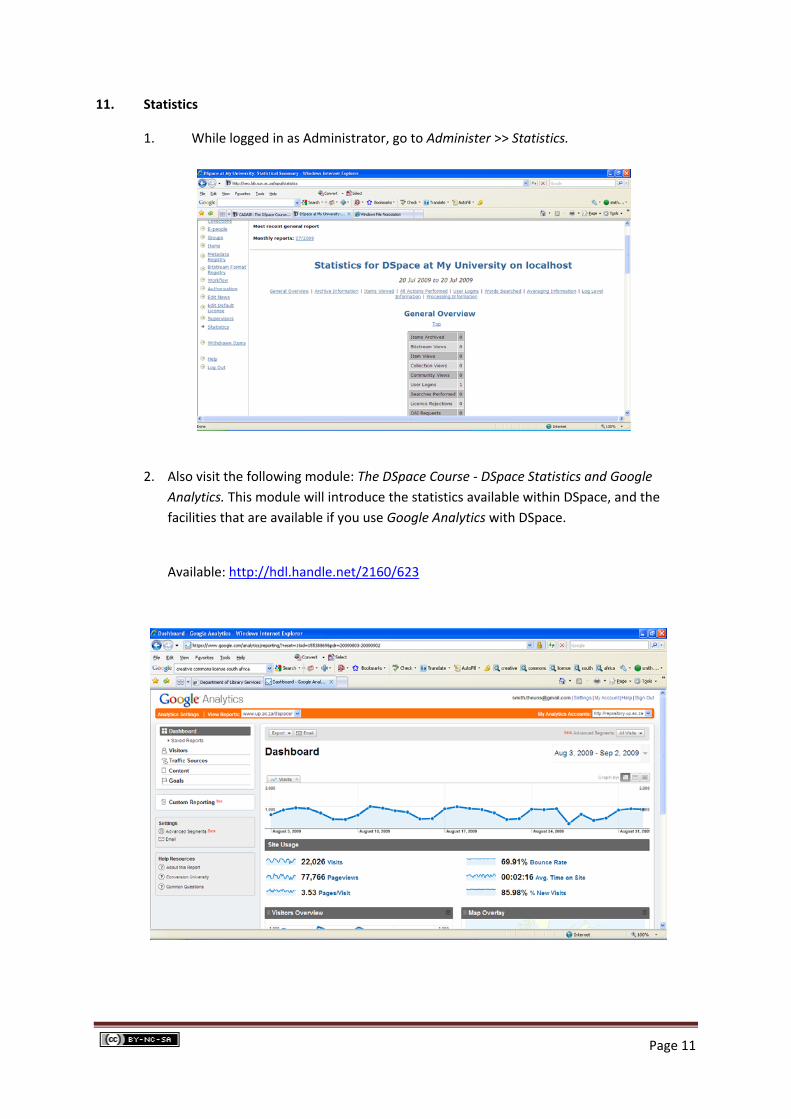
1. While logged in as Administrator, go to Administer >> Statistics.
2. Also visit the following module: The DSpace Course ‐ DSpace Statistics and Google
Analytics. This module will introduce the statistics available within DSpace, and the
facilities that are available if you use Google Analytics with DSpace.
Available: http://hdl.handle.net/2160/623

Page 12
12. Structuring DSpace according to Communities & Collections
Why? To keep your repository well organized, and keep Items that belong together
according to media type, disciplines, faculties, departments or anything else ‐
together.
Needs will differ from Community to Community or Collection to Collection– make
provision for it. Be flexible, but not too much!
Some Metadata Editors (Cataloguers) might prefer to work in their subject of
expertise only. They can then be registered within the workflow for the specific
Collections relevant to them.
By having their own Community within the bigger repository, research output by
faculties and departments can be grouped together, and reflect all research output
with one glance. Links can be created to individual Communities/ Collections.
Always think and make provision for how the repository/ Community/ Collection
might develop and grow/ change over time.
It is ok to change the name of a Community/ Collection at some stage, and if needed.
Remember to record the changes in the Provenance area for that Community/
Collection for future reference. You can also cross‐reference to the new Collection if
the previous one was closed. Use the area on the home page of that Collection to
update end‐users (Collection >> Edit). Don’t delete the Community/ Collection – it
will only confuse end‐users. Clearly refer the end‐users to the new Collection.
Items can only be submitted on the following conditions:
‐ The submitter needs to be registered as a Submitter for that specific Collection.
‐ Items cannot be submitted if there is no Collection to submit it to.
‐ Contact details should be clearly visible from where submitters can request to
become Submitters.
‐ Copyright should have been cleared, and the Item needs to be in the correct digital
format.
An unlimited number of Top‐Level Communities, Sub‐Communities and Collections
can be created, but try let it not become too complicated – keep the structure
simple.
Try to align your Community/ Collection structure with that of your institution, e.g.:
Faculty of ……………… (Top‐level Community)
Dept. of ……………………… (Sub‐Community)(optional)
Research Articles (Dept. of …….) (Collection)
Theses (Dept. of …….)
Dissertations (Dept. of …… )
Mini‐dissertations (Dept. of ……. )
Dept. of ……………………… (Sub‐Community)(optional)
Research Articles (Dept. of …….)
Theses (Dept. of …….)
Dissertations (Dept. of …… )
Mini‐dissertations (Dept. of ……. )
Page 13
Faculty of ……………… (Top‐level Community)
Dept. of ……………………… (Sub‐Community)(optional)
Research Articles (Dept. of …….)
Theses (Dept. of …….)
Dissertations (Dept. of …… )
Mini‐dissertations (Dept. of ……. )
Dept. of ……………………… (Sub‐Community)(optional)
Research Articles (Dept. of …….)
Theses (Dept. of …….)
Dissertations (Dept. of …… )
Mini‐dissertations (Dept. of ……. )
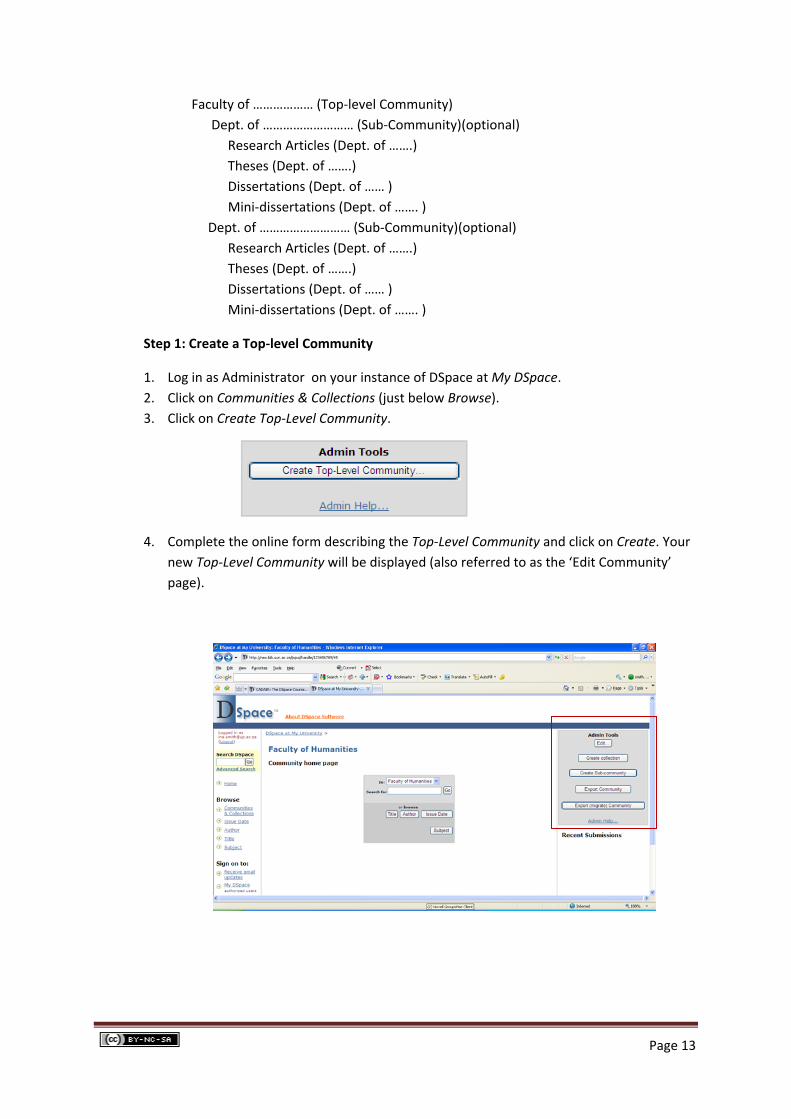
Step 1: Create a Top‐level Community
1. Log in as Administrator on your instance of DSpace at My DSpace.
2. Click on Communities & Collections (just below Browse).
3. Click on Create Top‐Level Community.
4. Complete the online form describing the Top‐Level Community and click on Create. Your
new Top‐Level Community will be displayed (also referred to as the ‘Edit Community’
page).

Page 14
Step 2: Create a Sub‐Community (optional)
1. To create a Sub‐Community, go to the Community home page of the Community that is
to be the parent of the new Sub‐Community.
2. Then, click on the Create Sub‐community in the Admin Tools box at the top right‐hand
corner of the page. This will create the new Sub‐Community and take you to the home
page for that Sub‐Community, also referred to as the ‘Edit Community’ page for that
Sub‐Community.
Editing a Top‐level Community or a Sub‐Community
Fill out the forms as needed. Name is required. All other fields are optional.
Short Description: Appears on the Community List page below the Community
name, and should be one or two sentences of plain text describing the Community.
Introductory Text, Side Bar Text, Copyright Text: Fields are displayed on the
Community’s home page.
Introductory Text and Side Bar Text are both HTML fields, which means you should
place text in <p> </p>.
Upload Logo: Relatively small logo sizes look best due to the design of the Collection
home page.
Click Create or Update when done with changes.
Step 3: Create a Collection
1. To create a Collection, go to the Community home page of the Community that is to be
the parent of the new Collection.
2. Then, click on the Create Collection in the Admin Tools box at the top right‐hand corner
of the page.
3. Follow the wizard, and click on Next to move forward each time.
Page 15
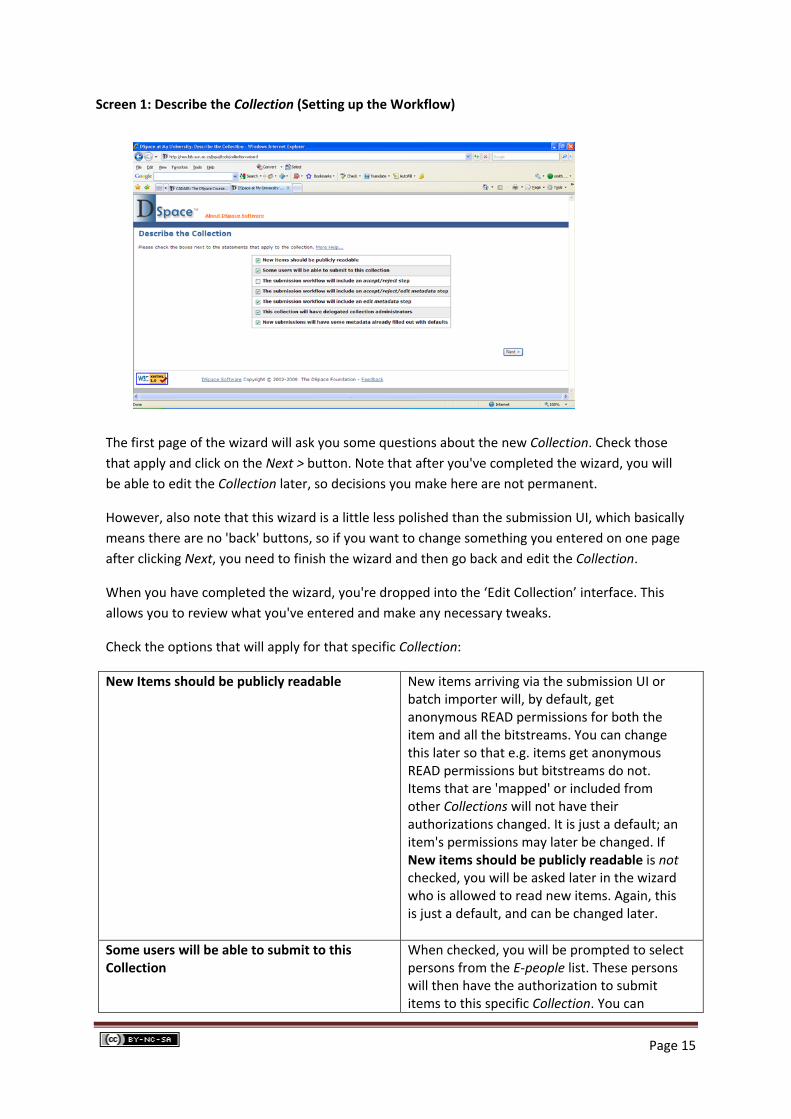
Screen 1: Describe the Collection (Setting up the Workflow)
The first page of the wizard will ask you some questions about the new Collection. Check those
that apply and click on the Next > button. Note that after you've completed the wizard, you will
be able to edit the Collection later, so decisions you make here are not permanent.
However, also note that this wizard is a little less polished than the submission UI, which basically
means there are no 'back' buttons, so if you want to change something you entered on one page
after clicking Next, you need to finish the wizard and then go back and edit the Collection.
When you have completed the wizard, you're dropped into the ‘Edit Collection’ interface. This
allows you to review what you've entered and make any necessary tweaks.
Check the options that will apply for that specific Collection:
New Items should be publicly readable New items arriving via the submission UI or batch importer will, by default, get anonymous READ permissions for both the item and all the bitstreams. You can change this later so that e.g. items get anonymous READ permissions but bitstreams do not. Items that are 'mapped' or included from other Collections will not have their authorizations changed. It is just a default; an item's permissions may later be changed. If New items should be publicly readable is not checked, you will be asked later in the wizard who is allowed to read new items. Again, this is just a default, and can be changed later.
Some users will be able to submit to this Collection
When checked, you will be prompted to select persons from the E‐people list. These persons will then have the authorization to submit items to this specific Collection. You can

Page 16
manually add these persons at Administer >> E‐people >> Add E‐person, or the person can register at My DSpace.
The submission workflow will include an accept/ reject/ edit metadata step (Workflow Step 2)
Reviewer will be able to check newly submitted items:
- Do baseline metadata editing e.g. fix spelling errors
- Check for duplicates
- Check whether item has been submitted to the correct Collection – if not, Reject
- Check whether full text has been submitted in the required file format e.g. pdf
- Check quality of full text file
- Check whether copyright has been cleared, if required
The submission workflow will include an edit metadata step (Workflow Step 3)
Metadata Editor is notified of a new submission. Commit item to archive, and then do metadata editing in the DC Registry of an individual item. Add value to items, e.g. more keywords, LCSH’s, abstracts, check whether metadata adheres to the necessary standards and correct where needed. Always register the Metadata Editor also as a Collection Administrator.
This collection will have delegated collection administrators
This person manages the Collection, manage Submitters, can edit the Item Template, edit the Collection home page, edit the DC Registry of an Item anytime etc.
New submissions will have some metadata already filled out with defaults
Create an Item Template for that specific Collection. On this screen you can specify some Dublin Core values that new submissions will have pre‐filled out e.g. if the Publisher for all items submitted to that specific Collection is going to be the same for all Items. Some of the values you can set here do not appear in the submission UI, so end‐users may not have the chance to edit them. Also note that these Dublin Core values will be added to items imported via the batch importer.
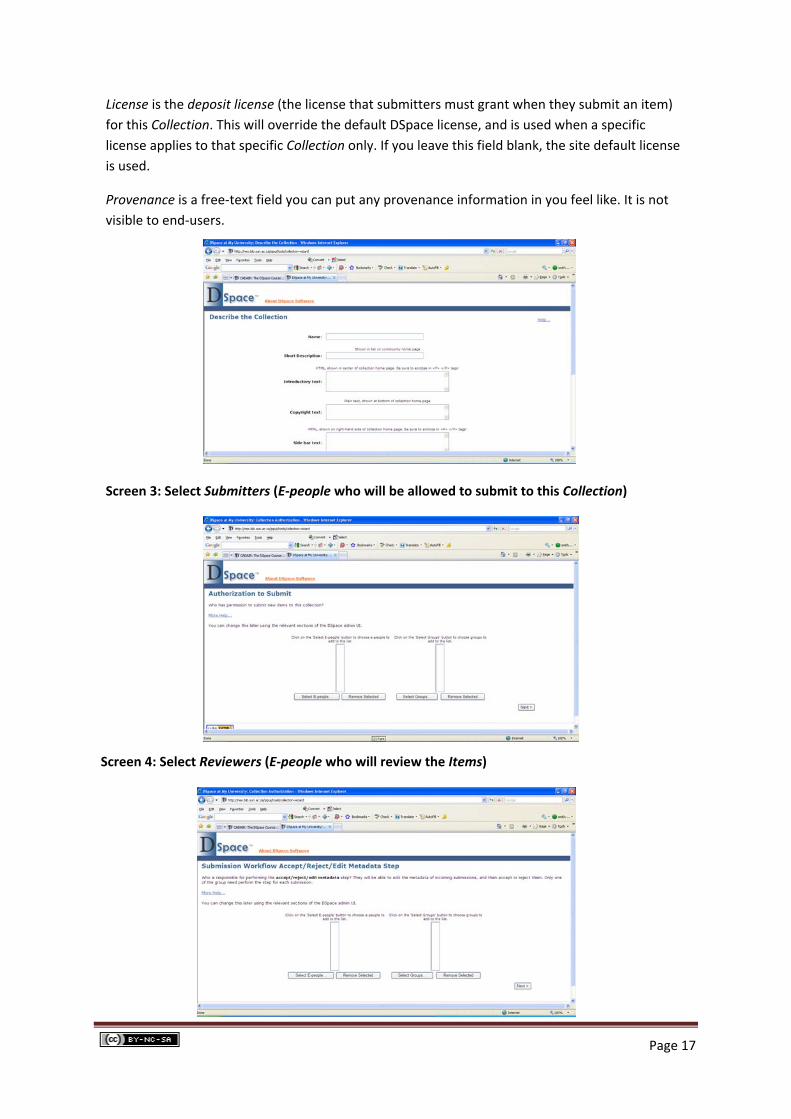
Screen 2: Describe the Collection (Information)
The next page allows you to fill in some basic information about the Collection. The Name field is
mandatory, the others are not.
Copyright Text is simply text that will appear at the bottom of the Collection's home page, and
that applies to that Collection only.
Page 17
License is the deposit license (the license that submitters must grant when they submit an item)
for this Collection. This will override the default DSpace license, and is used when a specific
license applies to that specific Collection only. If you leave this field blank, the site default license
is used.
Provenance is a free‐text field you can put any provenance information in you feel like. It is not
visible to end‐users.
Screen 3: Select Submitters (E‐people who will be allowed to submit to this Collection)
Screen 4: Select Reviewers (E‐people who will review the Items)

Page 18
Screen 5: Select Metadata Editors
Screen 6: Assign Collection Administrators (incl. Metadata Editors)
Screen 7: Set up the Item Template (with pre‐filled out metadata)
On the above screen you can specify some Dublin Core values that new submissions will
have pre‐filled out. Some of the values you can set here do not appear in the submission
Page 19
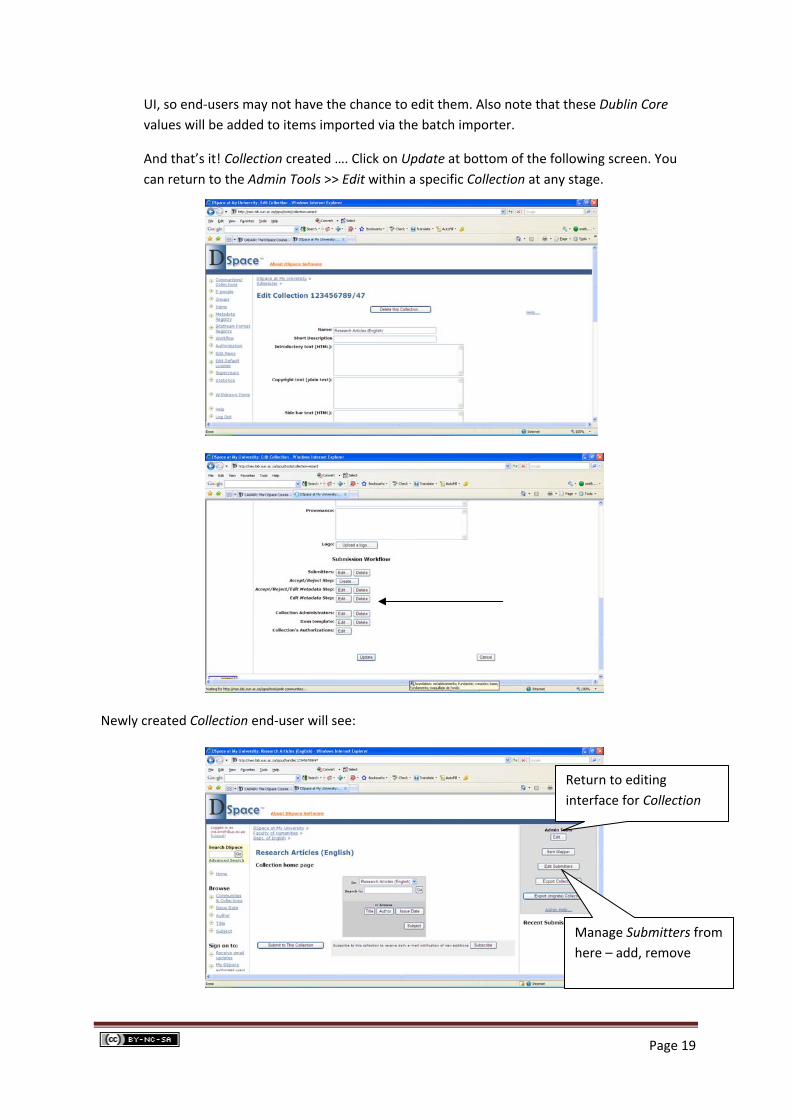
UI, so end‐users may not have the chance to edit them. Also note that these Dublin Core
values will be added to items imported via the batch importer.
And that’s it! Collection created …. Click on Update at bottom of the following screen. You
can return to the Admin Tools >> Edit within a specific Collection at any stage.
Newly created Collection end‐user will see:
Return to editing
interface for Collection
Manage Submitters from
here – add, remove

Page 20
If you click on Groups in the Administrative interface, you will see that the Collection now has the
following Groups:
13. Prepare an item for submission to a specific Collection
1. Copyright
‐ If you are the copyright owner, no consent is needed
‐ Items donated to the institution: archive letter of consent by original
copyright owner or donor. Permission should be granted to digitize material
and distribute in e‐format via the repository.
‐ Research articles where copyright was transferred to publisher: check
publisher policy on self‐archiving within a repository on SHERPA RoMEO
http://www.sherpa.ac.uk/romeo.php. If no policy, check out publisher’s web
site or contact publisher directly and get consent in written format.
‐ Material created by members of an institution e.g. theses & dissertations:
copyright belongs to institution.
2. Scan/ digitize item
According to international standards e.g. World Digital Library standards for images.
Text documents: 300 – 600 dpi. Tiff image stored on archival server. Derivited jpeg or
pdf file submitted to DSpace. OCR text before migrating to pdf – that way the full text
will also be searchable. Manipulate digital items with e.g. Adobe Photoshop, GIMP.
Visit http://www.dspace.org for more info on various file formats accepted by DSpace or
view at Administer >> Bitstream Format Registry.
Convert documents to pdf using: Adobe Distiller, Abbyy PDF Transformer, CutePDF
Convert documents from pdf back to original format: Abbyy PDF Transformer
3. File naming conventions – guidelines
Also see Library of Congress naming conventions for digital resources
1. Keep file names as short and descriptive possible.
2. Avoid capital letters.
3. Avoid special characters e.g. # * ~
4. Use _ (underscore) to create spaces between characters – do not use your spacebar.

Page 21
5. Use logical file names.
6. Only use alphabetical letters or numbers.
7. Where numerical sequence is important, use numbers e.g. 01title_page.pdf,
02content.pdf etc. Submit the last number in the sequence first and work
backwards.
4. Familiarize yourself with the content of the item you want to submit
E.g. title, author/s, keywords, rights, publisher etc. Keep file open while submitting so
that you can copy & paste metadata from the original item.
14. Submit an Item to a specific Collection
1. Apply for submission rights to a specific Collection with the Collection
Administrator or Repository Manager.
2. Once rights were assigned, log in at My DSpace.
3. Click on Start a New Submission.
4. Select the Collection you wish to submit an Item to from the list below, then
click Next.
5. Describe the Item. Check the boxes next to the statements that apply to this submission.
Click Next.
Page 22
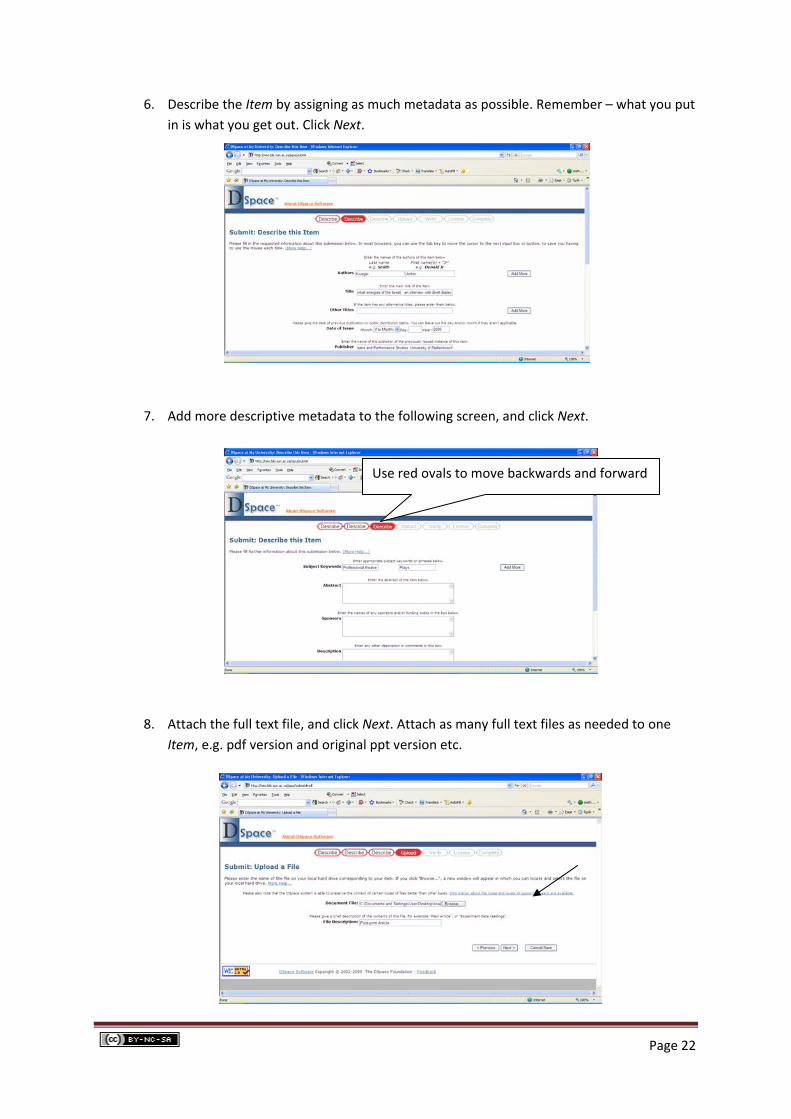
6. Describe the Item by assigning as much metadata as possible. Remember – what you put
in is what you get out. Click Next.
7. Add more descriptive metadata to the following screen, and click Next.
8. Attach the full text file, and click Next. Attach as many full text files as needed to one
Item, e.g. pdf version and original ppt version etc.
Use red ovals to move backwards and forward

Page 23
9. Verify that the file that was uploaded is the correct file. Click Next.
10. Last opportunity to verify metadata and file. Click Next.
11. In order for DSpace to reproduce, translate and distribute the submission worldwide,
your agreement to the terms is necessary (default DSpace License). Click I Grant the
License.
12. Your submission is now completed, and the Item will remain in your Task Pool until
reviewed by the Reviewer and edited by the Metadata Editor.
13. The Reviewer will receive an e‐mail notification that a new item was submitted, that
needs to edited/ approved/ rejected.
14. Once approved, the Metadata Editor will receive an e‐mail notification that a new item
was approved, and the Editor then commits it to the archive. Once committed to the
Add more files

Page 24
archive, the item will be assigned a persistent URL, and it will be available for the whole
world to see.
15. Once the Item has gone through the workflow, it will display as follows:
IMPORTANT: Use Unicode/ UTF8 to enter special characters. See
http://www.fileformat.info/info/unicode/char/search.htm
Special characters in DSpace are best viewed with Firefox.
15. Workflow
Use this tool to clear out workflows that have been abandoned and will never be
completed, or for some other reason e.g. duplicate, Submitter realised it was the wrong
version submitted etc.
1. Go to Administer >> Workflow.
2. Find the specific item, and click Abort. You will be asked to confirm the action.
3. The item will be returned to the Task Pool of the Submitter.
Edit DC Registry of individual item, add
metadata fields, remove metadata fields etc.

Page 25
16. Search a specific Item
You can conduct as Basic or Advanced Search within DSpace, or search from the
Administrative interface.
1. Go to Administer >> Items.
2. Enter the Handle or internal item ID of the item you want to edit or delete.
2263 = Handle for University of Pretoria (CNRI Handle System)
Both of the above will take you to the DC Registry of the item:
Scroll down to the bottom of the DC registry to add more metadata fields. You can
repeat each Element and each Qualifier as many times as you wish. Some of the
metadata is system generated. See ADDENDUM A.

Page 26
17. Mapping
It could be that sometimes you want one item to display in two different Collections
simultaneously, without having to re‐submit it. It could be that an article was written by two
researchers from two different departments, and they want the article to be reflected in
both departments’ Collections. Submit the item once only, to the Collection for the first
author. Then ‘map’ it to the second Collection.
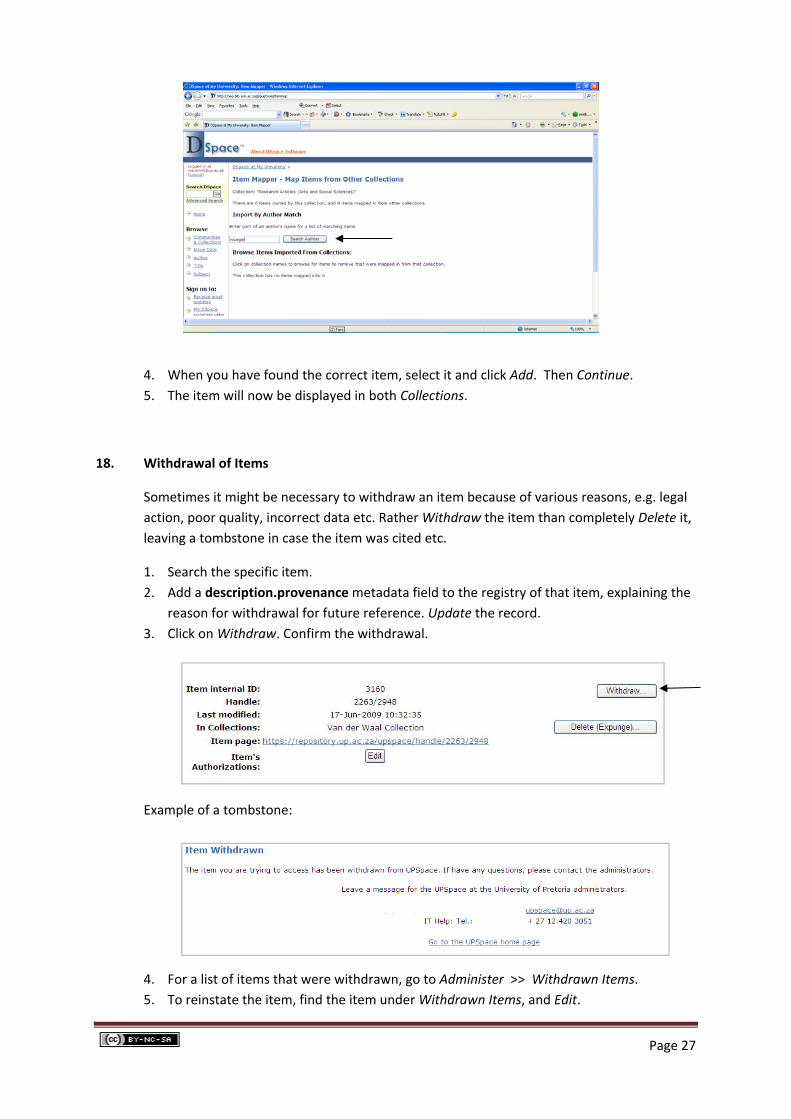
1. Go to the Collection to which you want to map the item.
2. Under Admin Tools, click on Item Mapper.
3. Search according to the surname of the author of the item, and click Search Authors.
Full text pdf file that was
submitted
Some system generated provenance
metadata
Page 27
4. When you have found the correct item, select it and click Add. Then Continue.
5. The item will now be displayed in both Collections.
18. Withdrawal of Items
Sometimes it might be necessary to withdraw an item because of various reasons, e.g. legal
action, poor quality, incorrect data etc. Rather Withdraw the item than completely Delete it,
leaving a tombstone in case the item was cited etc.
1. Search the specific item.
2. Add a description.provenance metadata field to the registry of that item, explaining the
reason for withdrawal for future reference. Update the record.
3. Click on Withdraw. Confirm the withdrawal.
Example of a tombstone:
4. For a list of items that were withdrawn, go to Administer >> Withdrawn Items.
5. To reinstate the item, find the item under Withdrawn Items, and Edit.
Page 28
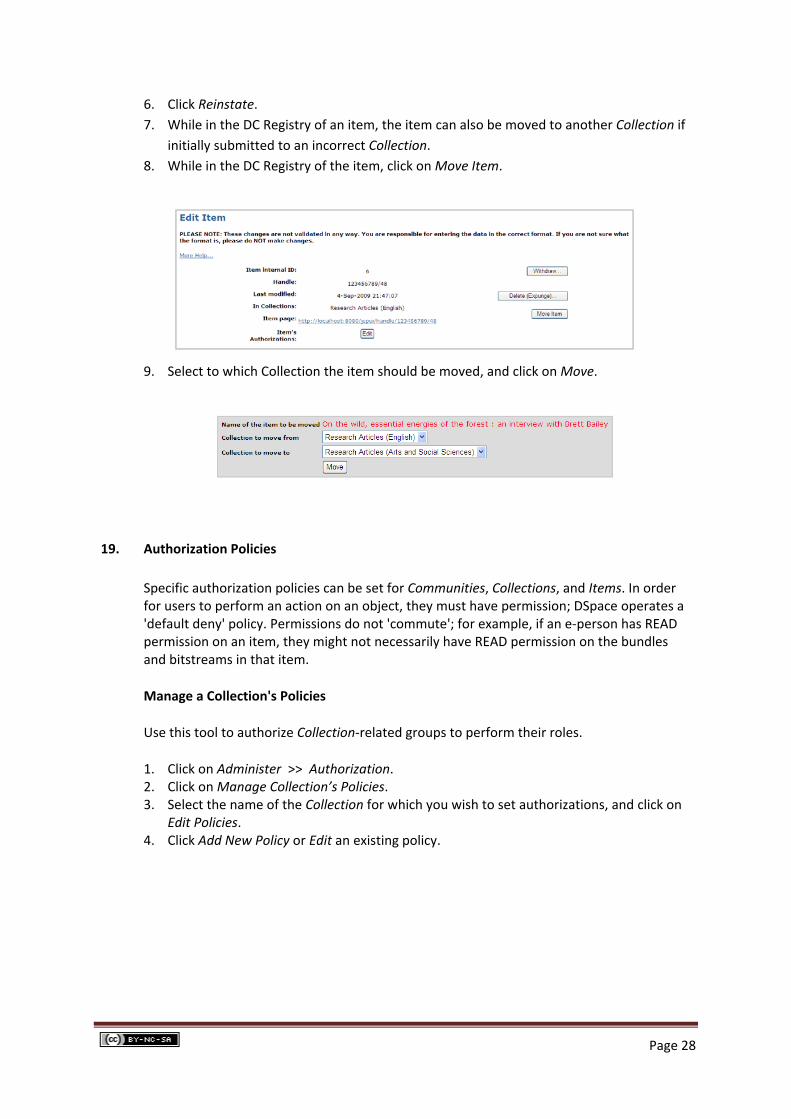
6. Click Reinstate.
7. While in the DC Registry of an item, the item can also be moved to another Collection if
initially submitted to an incorrect Collection.
8. While in the DC Registry of the item, click on Move Item.
9. Select to which Collection the item should be moved, and click on Move.
19. Authorization Policies
Specific authorization policies can be set for Communities, Collections, and Items. In order for users to perform an action on an object, they must have permission; DSpace operates a 'default deny' policy. Permissions do not 'commute'; for example, if an e‐person has READ permission on an item, they might not necessarily have READ permission on the bundles and bitstreams in that item.
Manage a Collection's Policies
Use this tool to authorize Collection‐related groups to perform their roles.
1. Click on Administer >> Authorization. 2. Click on Manage Collection’s Policies. 3. Select the name of the Collection for which you wish to set authorizations, and click on
Edit Policies. 4. Click Add New Policy or Edit an existing policy.

Page 29
Policies for Research Articles (English) Collection:
5. Select the Group for which you wish to set authorizations (Group must have been created in advance), and then select an action for that Group from the drop‐down menu.
6. Click Save. Now only the Administrator Group can open all full text files in this specific Collection. Repeat until all policies are in place.
Click Edit to restrict access to all full text
files (bitstreams) in Collection

Page 30
Note:
Newly‐submitted items accepted into a collection inherit the DEFAULT_ITEM_READ and DEFAULT_BITSTREAM_READ authorization policies associated with the collection, which become the READ policies for the item and its bitstreams. However, if you change a collection's default policies after items have been accepted, policies for existing items will not be changed automatically. You would have to change the permissions on those items using the Advanced Policy Admin Tool to make them accessible.
All collections must have an ADD policy for a submitter group, or else no one will be able to submit items to the collection.
Manage a Community's Policies
This tool allows you to edit a community's policies in much the same way as a collection's are edited, described above.
Presently, since administration is done centrally, this tool doesn't have a lot of use‐‐usually you will just add READ permission for the Anonymous group just after you create a community, and leave it at that. This permission is applied to the community's logo if there is one, which allows people to see the logo when they go to the community home page.
A community's policies are set to a default Anonymous READ.
Manage an Item's Policies
This tool allows you to edit the policies for individual items. When you wish an item's policies to be different from those of the rest of those in a collection, you can use the item policy editor to customize the policies. It is a good practice long term management of a collection however, for all of the items in a collection to share the same authorizations.
Advanced Policy Admin Tool
Use this tool to set and clear policies for items or bitstreams across a whole collection. Be careful about using the Clear Policies button.
Select the collection from the top list and the group you want to give or remove permission for from the bottom list. Then select the type of object (item or bistream) that you want to edit permissions for. Then select the action from the drop‐down.
For example, say you wanted to give everyone in a group 'privileged_users' Read access to all of the bitstreams in a restricted collection. You'd select 'privileged users' from the top list, 'bitstream' from the 'content type' drop‐down, 'privileged_users' from the 'group' list, 'Read' from the 'action' drop‐down, and click 'Add policy'.