dslr cinema crafting the film look with lg sensor vid cams k lancaster (focal, 2011) bbs
DESCRIPTION
ÂTRANSCRIPT


DSLR CinemaCrafting the Film Look with Video
Kurt Lancaster
Focal Press

Front-matter
Advance Praise for DSLR Cinema
“A huge thank you to Kurt Lancaster for giving a voice toHDSLR … in this new trail-blazing book. I welcome him on theset any time….”
—Shane Hurlbut, ASC
“This book should be in every camera bag. A rich,comprehensive, and poetic examination of how filmmakers andcinematographers are creating stunning moving imagery withHDLSRs.”
—Rodney Charters, ASC
“IF YOU BUY ONE BOOK ON DSLR SHOOTING, MAKE ITTHIS ONE! …It tells me exactly what I want to know—how to getthe LOOK that I need. Hats off to the author for tackling thissubject. It makes the book INVALUABLE for the DSLRfilmmaker.”
—Julian Grant, Producer/Director
“Kurt has written a masterpiece in HDSLR books—somethingthat everyone starting to make a movie should read. It is likeFilm School 101 and planet5D all wrapped together in a book.The thing that sets Kurt's book apart from the other HDSLRtraining DVDs and books is the expanded look at several

different short films. Breaking them down piece by piece (notonly the images but the story as well) helps the studentunderstand what went into the films and what to learn from eachone.
“Sure, there's good coverage of the very basics ofmoviemaking (lighting, equipment, rigs, movie terms,etc.) for those who are new or moving from stills. And yetthere's also much more detail in the basics than most ofthe other materials I've seen. Detail you can sink yourteeth into and learn from.
“At planet5D, we ask moviemakers to give us detailsabout a particular shoot—but with Kurt's book, you getan entire chapter on the breakdown of Shane Hurlbut'sThe Last 3 Minutes—much more detail than we couldprovide in 10 posts online.
“With interviews of major industry players, detailsabout making movies, both the hardware and the storyside, you will find plenty to not only learn from but to enjoyin this wonderful book.”
—Mitch Aunger ( www.Planet5D.com )
“It tells me exactly what I want to know—how to get the LOOKthat I need. Hats off to the author for tackling this subject. Itmakes the book INVALUABLE for the DSLR filmmaker.”
—Julian Grant, Producer/Director
“Fantastic Approach! By emphasizing excellentCinematography as a critical aspect of filmmaking (especiallyCinematography in support of Storytelling), he is immeasurablyhelping myriads of budding filmmakers avoid making crappy-looking films.… Correspondingly, by emphasizing a ‘hands-on’

approach, and providing excellent walk-throughs of specifictechniques to significantly, measurably improve the reader'scinematography, he lifts this book high above the pack!”
—Dave Anselmi, Director, Producer, andInstructor, PracticalMysticProductions.com
DSLR CinemaCrafting the Film Look with Video
Kurt Lancaster
Amsterdam • Boston • Heidelberg • London • New York •Oxford • Paris • San Diego • San Francisco • Singapore • Sydney •
Tokyo
Focal Press is an imprint of Elsevier

Copyright
Focal Press is an imprint of Elsevier
30 Corporate Drive, Suite 400, Burlington, MA 01803, USA
The Boulevard, Langford Lane, Kidlington, Oxford, OX5 1GB, UK
© 2011 Elsevier Inc. All rights reserved.
No part of this publication may be reproduced or transmitted in anyform or by any means,electronic or mechanical, includingphotocopying, recording, or any information storage and retrievalsystem, without permission in writing from the publisher. Details onhow to seek permission, further information about the Publisher'spermissions policies and our arrangements with organizations such asthe Copyright Clearance Center and the Copyright Licensing Agency,can be found at our website: www.elsevier.com/permissions.
This book and the individual contributions contained in it areprotected under copyright by the Publisher (other than as may benoted herein).
NoticesKnowledge and best practice in this field are constantly changing. As newresearch and experience broaden our understanding, changes in researchmethods, professional practices, or medical treatment may become necessary.
Practitioners and researchers must always rely on their own experience andknowledge in evaluating and using any information, methods, compounds, orexperiments described herein. In using such information or methods they shouldbe mindful of their own safety and the safety of others, including parties forwhom they have a professional responsibility.
To the fullest extent of the law, neither the Publisher nor the authors,contributors, or editors, assume any liability for any injury and/or damage topersons or property as a matter of products liability, negligence or otherwise, orfrom any use or operation of any methods, products, instructions, or ideascontained in the material herein.

Library of Congress Cataloging-in-Publication DataLancaster, Kurt, 1967–Crafting the film look with video/Kurt
Lancaster.
p. cm.
ISBN 978-0-240-81551-0
1. High definition video recording. 2. Single-lens reflex cameras. 3.Composition (Photography) 4. Cinematography. I. Title.
TR862.L36 2011
778.5'3—dc22
2010035587
British Library Cataloguing-in-Publication DataA catalogue record for this book is available from the British Library.
For information on all Focal Press publications visit our website atwww.elsevierdirect.com
10 11 12 13 14 5 4 3 2 1
Printed in Canada

Dedication
This book is dedicated to Alex Oliszewski and Stacey Sotosky, thebest of friends who are always there during the thick and thin.

Table of ContentsAcknowledgmentsForewordAbout the WebsiteIntroduction: The HDSLR Cinema RevolutionPart 1 DSLR Shooter's Toolkit: A Cinematographer's Guide toCrafting Astounding Images and Telling Better StoriesIntroductionChapter 1: Composition, Blocking, and Camera MovementChapter 2: Lighting Your DSLR ShootChapter 3: Exposing Your Shots with DSLRs: Metering with the ZoneSystem and Using the Right LensChapter 4: Using DSLR Picture Styles: Pitfalls of Presets andCreating Custom StylesChapter 5: Recording Quality Audio with DSLRs: Yes, It's Possible!Chapter 6: DSLR Postproduction Workflow and Techniques:Transcoding Footage, Syncing Audio, and Color GradingChapter 7: Telling Better Stories with Your DSLRPart 2 Master DSLR Shooters at Work: Case StudiesIntroductionChapter 8: Crafting the Film Look with Postproduction Work: Casulo(2009), directed by Bernardo Uzeda, Brazil, 17min.Chapter 9: Crafting the Film Look by Building a Rapport withCharacters: 16 Teeth: Cumbria's Last Traditional Rakemakers (2009),directed by Rii Schroer, England, 2:29min.Chapter 10: Crafting the Film Look with Cinema Lenses: A Day at theRaces (2010), directed by Philip Bloom, United States, 6:00min.Chapter 11: Crafting the Film Look with Location and CGI Art: TheChrysalis (2010), directed by Jeremy Ian Thomas, United States,6:54min.Chapter 12: Crafting the Film Look with Light, Composition, andBlocking: The Last 3 Minutes (2010), directed by Po Chan, director ofphotography Shane Hurlbut, ASC, United States, 5:18min.

Part 3 Getting the GearIntroductionChapter 13: DSLR Cinema Gear by BudgetChapter 14: Conclusion: From Film to HDSLR CinemaAfterwordImage ResolutionISO Tests for the Canon 5D Mark II and 7DExposure and Dynamic RangeLuminance and Chrominance CompressionStory Treatment to The Last 3 Minutes by Po ChanTwelve Steps for HDSLR ShootingIndex

Acknowledgments
I would like to thank Elinor Actipis at Focal Press for being intriguedenough with my email pitch for a book on DSLR cinema to ask me fora formal proposal to get the ball rolling.
Many thanks to Michele Cronin at Focal Press for shepherding thebook from its genesis through—if not a revelation (that's for readers todecide)—but a completion.
Thanks to all of the manufacturers, artists, and photographers—toomany to name individually—for permission to use their images in thisbook. Without the pics, it would have just been words, which would justnot have been as exciting.
Furthermore, much appreciation for the critical eye and keen adviceof Julian Grant and Dave Anselmi—my deep appreciation for theircomments. This book is better than it would have been without them.
Many thanks to the reviewers who gave comments at the beginningof the process: Dave A. Anselmi, Director/Producer/Instructor(PracticalMysticProductions.com), Michael Brennan, Director ofPhotography; Julian Grant, Producer/Director, Assistant Professor atColumbia College-Chicago; Andrew Jones, Cinematographer;Eugenia Loli, Tech reviewer, software developer, video -grapher(http://vimeo.com/eugenia/videos); Bruce Sheridan, Chair, Film andVideo Department, Columbia College Chicago; Phil South, Tutor,Bristol Old Vic Theatre School.
Hats off to Diana Copsey, Nathaniel Westenhaver, and JessicaWolfson for the transcriptions of many interviews.
Thanks also to Peter Tvarkunas, Director of Education at Canon,who was open to the project and offered much support.
I especially want to thank the international cast of filmmakers,cinematographers, journalists, and DSLR shooters who were
generous with their time for interviews: First off, Philip Bloom, whoseDSLR films and blog inspired me to delve into DSLR cinematography—he is a true British gentleman; American Jared Abrams atCinema5D.com; planetMitch at planet5D.com—I look forward to hisDSLR news updates every day; Rii Schroer, a German photojournalistworking in England; Brazilian director Bernardo Uzeda andcinematographer Guga Millet; British ex-pat Neal Smith at HdiRAWworks; American filmmaker and colorist Jeremy Ian Thomas (HdiRAWworks); Kris Cabrera for insights into special effects with theCanon 7D; American writer and director Jamin Winans; and muchappreciation for Hong Kong director Po Chan and ASC memberShane Hurlbut for letting me on the set of The Last 3 Minutes, so Icould see the Canon 5D Mark II in action, as well as the Elite Teammembers who offered tips and allowed me to get underfoot as theyshot, and of course Lydia Hurlbut, who not only offered invaluableassistance with the manuscript, but made sure I was in the rightlocation for shoots over the greater LA area.
I also wish to thank my colleagues at the School of Communicationat Northern Arizona University who provided moral support during thewriting of this manuscript as I held down a full teaching load. NormanMedoff offered advice and encouragement. Paul Helford and JannaJones were always there with a smile. Mary Tolan was a friend whojumped at the chance to shoot a project with a DSLR and asked theright questions. Mark Neumann always provided moral support andwas always open to faculty willing to push the envelope in theclassroom. Peter Schwepker lent me his 5D over spring break before Idecided to get mine—many thanks. I also want to thank my dean,Michael Stevenson, who offered encouragement when I took on theproject; it was a boost of support during a hectic semester.
In addition, I thank my students who inspire me to do even betterwork—both in teaching and shooting—some of whom were willing toexperiment with DSLR cinematography when I encouraged them touse DSLRs for their projects before there were any rule books:Shannon Sassone, Shannon Thorp, Danielle Cullum, Taylor Mahoney,and Margo McClellan.

I also want to thank my friend Beau L'Amour, who not only gave me aplace to stay in LA, but offered detailed advice on audio and lenses,and got me contacts at Bandito Brothers.
Finally, special thanks to Stephanie and Morgan Petrie—who havebeen my family in Flagstaff. And of course to my mother, Judy Bennett,and her husband, Clay, who opened their cottage on Sebec Lake inMaine—providing a place to relax after the book was completed.

Foreword
Shane Hurlbut, ASC
When Kurt came to me with the idea of writing this book on HDSLRfilm-making, I was honored to be a part of it. I have been neck deep inthis technology since January 26, 2009. It has been a roller-coasterride trying to figure out this new disruptive technology from a motionpicture cinematographer's perspective. Forging ahead with normaloperating procedure did not translate. I had to think out of the box andteach myself about menus, picture styles, and create a new checks-and-balances ritual for shooting. There is not much that this camerasystem cannot do because it can be small and compact or as big asyou choose to make it. The platform is so liberating that I feel like afive-year-old again—full of possibility and endless creativity.
I constantly refer the Canon 5D Mark II as a game changer becausethe paradigm has shifted. This is the future, and as technology getsbetter so will the camera's data rates, processing power, and ability todo more uncompressed media capture. I have shot with film for myentire career that includes 15 movies, hundreds of commercials, manymusic videos, and 20 short films because the HD landscape neverattracted me. It looked plastic and too sharp, with a depth of field thatfelt false. If the story and characters are engaging and the filmtransports you, the capture medium doesn't matter.
Even though ENG manufacturers kept updating HD cameras, Ichose to shoot with film. So now why the sudden shift in thinking aboutHD? The Canon 5D is not HD. It is what I call digital film because thequality is unlike any other HD camera available to date. The imagelooks unique. It is its own genre—one that I believe looks and feels theclosest to film. I believe HD video capture has finally come from theright place, the still photography platform. Canon has been working onthis sensor for years. It was trying to make a sensor that felt like filmand could replace film in the still photography landscape. Motion

picture capture came from a brilliant individual, Louis Lumière, wholooked through his pin-hole camera and asked, “I wonder what it wouldlook like if this image moved?” As a result, motion pictures were born.The Canon engineers did the exact same thing. They asked, “I wonderwhat would happen if we put this little HD media capture on our stillcamera to help photojournalists in the field grab sound and videobites?” Poof! The HDSLR video revolution had its smoke; then VincentLaforet added the fire with Reverie and the world saw this camera assomething different.
When I set out on my creative journey with the camera, it involved asteep learning curve. The Elite Team and I made tons of mistakes inthe beginning. We tried so hard to understand and breathe cinematiclife into this camera. Midway through the journey, everything justworked. I continued to hone my abilities with the 5D camera system,tried to ingest as much knowledge as I could and share it with the filmcommunity. That is how Hurlbut Visuals was born (seehttp://www.hurlbutvisuals.com/).
My wife, Lydia Hurlbut, whom I have known since I was three yearsold, used to come over with her Dad to give communion to mygrandmother, who was living with us on our family farm. We soonbecame friends and started dating in 1979. We married in the fall of1988, and I have been blessed with the most amazing soulmate inhistory. Now Lydia is cofounder of our website, which was herbrainchild. She wanted to showcase my fearless, pioneering, trail-blazing spirit with this new technology. My wife also convinced me that Ihad to change the way I think because the old rules of holding thingsclose to your chest and keeping secrets of what you have learned don'tapply anymore. So, I started giving away everything as I wasexperiencing it shooting a full-length feature, Act of Valor (forthcoming)and a variety of commercials. None of this was in a manual; you had tofail many times before a success, and that is what the Elite Team and Idid every day. Our shooting experiences became the HurlBlog (seehttp://www.hurlbutvisuals.com/blog/).
Once we added HurlBlog, our website took off in a variety ofunexpected ways. I answer every comment personally and give

practical on-the-job learning. The unexpected piece was the amazingdialog that occurs with everyone's input. I learn so much from thebloggers and feel excited about our forum. Lydia's vision of anintimate, personal, and heartfelt experience that was not just about anindividual but about the synergy and team effort involved in creatingbeautiful images came alive in the blog.
The mission of Hurlbut Visuals is to educate and inspire onefilmmaker at a time. Cutting-edge visuals are a critical part of our site.In order to deliver those visuals to the online community, we consultedwith Web developer Ryan Fritz, who owns RYNO Technologies inAlbuquerque, New Mexico. We had to have the right creative mindsetto embrace this new technology with a flow in the online world that waselegant yet simple, informative but not confusing. Ryan and his EliteTeam were the perfect fit. He and Lydia have collaborated to take agreat idea and turn it into a powerhouse site in less than sevenmonths. On a daily basis, I get comments from students saying thatthey learned more from my blog entries than from three years of studyat NYU. That is not only very humbling but a huge responsibility andone that I take seriously.
The Last 3 Minutes is the next chapter where we figured it all outwithout any more mistakes, just imagery that held up on a 60-footscreen. The piece is moving because you identify with the characterson a journey through time, in reverse. The imagery and story wouldnever have been possible without the writing and direction of one ofthe most talented directors I have ever worked with, Po Chan. She haspassion and a clear understanding of how to get the best performancefrom an actor by writing a backstory to make the characters comealive. Po embraces a visual style that is not ordinary but unique inevery way. She is visionary, and I thank her for writing and directing ashort that will continue to change the way people think about thistechnology. BRAVO!!
Finally, I would like to discuss the concept of recycling. It is such aneasy idea, one that many people discuss every day, but when it comesto changing behavior, few people follow through. We consume morethan any other country in the world. When will we stop? When will we

say enough? Every little step that one single person takes adds up to abig change.
There is so much waste in the film business that it boggles my mind.Sets are built, torn down, thrown into a dumpster, never to be seenagain. Think of all the wood, glue, nails, labor, design, and creativitythrown into the trash. This new technology recycles. It is small andrequires less space, fewer crew members, less light, less power, lessfuel, and less food. One thing it does not lack is creativity because itleaves a big vision while using a small footprint. Filmmakers whowould never have a voice now have one. Isn't that what we want toteach our children? To make a difference in the world by leaving asmall footprint while keeping a strong vision.
I ask all cinematographers, videographers, still photographers,directors, producers, agency creatives, production companies,studios, actors, technicians, and so forth to embrace, push, sell,believe in, experiment, inspire, convince, persuade, and not to dobusiness as usual by thinking out of the box to save the planet. It startswith one and grows exponentially. This technology is not only eco-friendly but financially friendly by saving lots of money while shooting. Iwill lead the march and unite as many co-collaborators to drink theHDSLR Kool-Aid.
Lastly, a huge thank you to Kurt Lancaster for giving a voice toHDSLR, specifically the Canon cameras, in this new trail-blazing book.I welcome him on the set any time after his assistance on The Last 3Minutes. He jumped into action when our sound person was stuck intraffic and did excellent sound recording. Kurt was like a superherosound guy in the night to save our project. Kudos, my man!
26 June 2010

About the Website
The website includes a number of additional resources, including videos of the filmsthat are featured as case studies in the book.
Please be sure to visit!http://booksite.focalpress.com/dslrcinema/For initial access, the website requires the use of the following access code:hdslrOnce registered, you will be prompted to create your own password for sub
sequent access to the site. Please mark this for your records.Visit the author's DSLR Cinema blog:http://www.kurtlancaster.com/dslr-cinema/

Introduction: The HDSLR Cinema Revolution
“You can go for greatness or be concerned about makingmistakes. If you're concerned about mistakes you will holdyourself back.”
—Bob Primes, ASC (HDSLR workshop at HdiRAWworks, Los Angeles, 1 May 2010)
The Beginning of the HDSLR Revolution:Photographer Vincent Laforet Redefines theGameHigh-definition single lens reflex cameras (HDSLRs)—those that shootstills and high-definition video—are designed for photographers.They're primarily stills cameras. But thousands of DSLR shooters areusing them as cinema cameras. This book shows DSLR shooters howto get the cinematic look using the video mode of DSLR cameras.1
For years, many students and low-budget indie filmmakers had toshoot on video because film cameras and film stock were tooexpensive (I remember paying $50 to purchase and develop twominutes of black & white 16 mm film in the mid-1990s at NYU). Videocameras—especially with the release of Panasonic's DVX100 thatshot in 24P and allowed for gamma curve changes in camera pricedat $3,700 in 2002—was perceived as a game changer. A lot of indiesgravitated toward this camera for their cinema projects. Thenaffordable HD cameras hit the market with full HD 1920×1080resolution by the middle of the decade, and it appeared the genie waslet out of the bottle. Today, consumers can purchase mini point-and-shoot HD cameras that James Bond could use on his spy missions.
Yet, all of these cameras—whether HD or not, whether shooting in24P or 30P, whether recorded on P2 cards at 100 Mbps—look like

video, feel like video—that uncinematic, flat, overly sharp look thatmake cinema-makers and photographers cringe.2 Why? Becausevideo cameras are so crammed with features (needed for ENG workand for ease of use for low-end consumer cameras) that it becomeseverything for everyone. Video cameras can shoot family reunions,reporters can shoot news, sporting events can be caught in full HDglory—but none of those video cameras capture the look and feel ofcinema (without special 35 mm lens adapters). Video cameras are fullof compromises, such as high zoom ratios with fixed lenses that do notcome close to the quality of the glass found in Zeiss or Canon L seriesprime lenses, for example.
Vincent Laforet, whose photographs have appeared in NationalGeographic, Sports Illustrated, Time, Life, and Newsweek, amongothers, remembers purchasing a Panasonic DVX100 (the miniDV24P camera), but he quickly became “totally disinterested” in it, he tellsme in an interview. “I was not impressed with lens, depth of field, andthe look and feel of it” and he returned it in a week. Jeremy IanThomas, a colorist and editor at Hdi RAWworks in Hollywood,discusses how he felt as a former student at the Los Angeles FilmSchool, where he was constantly confronted with the limitations ofvideo: “I'd be shooting on these crappy DV cameras. You're looking atthe image and even with HD cameras it doesn't look like a movie tome, and I immediately found out that that had to do with color. And ithad to do with creating looks. And creating a vibe for the movie bydoing certain things to the image” (interview with author).
Whether or not someone prefers to shoot HD video on a standardvideo camera or on a DSLR, what can't be argued is howphotographer Vincent Laforet redefined the argument overnight.Although Nikon released the first DSLR that shot HD video (the D90with 1280×720p resolution), it was Canon's 5D Mark II that capturedthe hearts of filmmakers. It not only utilized full HD 1920×1080P video,but did so with a full frame sensor (36×24 mm)—essentially equivalentin size to a 65 mm VistaVision cinema camera. The Canon 5D Mark IIwas announced on 17 September 2008.
Laforet, one of Canon's “Explorers of Light” educators and a former

Pulitzer Prize-winning photographer for The New York Times (2000–2006), had an appointment with David Sparer, Canon's seniormanager of Pro-Products Technical Marketing. It was a Friday. Theteam just unpacked the prototype Canon 5D Mark II. Laforet took apeek, but they wouldn't let him touch the camera until he signed anondisclosure agreement. Indeed, when he found out it was the world'sfirst DSLR camera to shoot full-size HD video, he begged Sparer to lethim borrow one for the weekend. But the cameras were to be shippedout to other photographers for testing on Monday, so the answer wasno. Laforet made a pitch.
“This camera is basically going to sit for two days doing nothing,”Laforet remembers saying. “Just let me borrow it for a few hours and I'llgive it right back, so I can try shooting a sample movie.” Theyeventually agreed, and told Laforet that Canon would not sponsor themovie. “You are just borrowing the camera entirely independently fromCanon, and doing your own little thing. If the movie turns out good, we'lluse it—if not, we won't,” Laforet remembers them saying.3
He came up with a scenario and shot Reverie over a weekend (seeFigure I.1).
Figure I.1 Still from Vincent Laforet's Reverie, the runaway Internet hit that changed Laforet's lifeovernight.

(©2009 Vincent Laforet. Used with permission.)
When Laforet first saw the results of the 5D Mark II on-screen, heknew this was different from any type of video he had previouslyexamined. “I was literally stunned a number of times,” he mused. “Icould not believe my eyes. It's one of the best still cameras out in theworld. But between the size of the sensor and the lens choice and theway it captures light it's absolutely stunning.”
“I was literally stunned a number of times,” Laforet mused. “I could not believemy eyes. It's one of the best still cameras out in the world.
After Laforet put Reverie online (Canon liked it), it received over amillion views in a week, and Laforet's life changed overnight. The dayafter the upload, he received three different film project offers within aday.
Ultimately, the difference between ENG video cameras and DSLRvideo cameras seems to revolve around the fact that DSLRs did notcome out of the ENG video camera world: they came from the stillscamera world, from where cinema originally evolved—an importantdistinction for Shane Hurlbut, ASC.
Shane Hurlbut, ASC, Embraces the Canon 5DMark IIHurlbut, who most recently DP'ed Terminator Salvation (2009), wasoriginally trained on ENG cameras—a number of years ago as astudent in mass communication at Emerson College in Boston. Oneeventful summer made him change his “religion.” Over a summerbreak, one of his friends returned from USC film school and asked himto help shoot a movie in their hometown in upstate New York. Hereminisces, “So I thought, ‘All right I'll help Gabe out and learn.’ It wasall nights, so I started working on that project and fell in love with film. Ijust started looking at it and it was so different than TV and I thought

‘my God this is it.’ So I went back that next semester and I changedeverything I had from TV and mass communication to film and then Idid a four-year film degree in one year.”4
Video just does not look like film. HD (at least at the prosumer level)may have been a game changer for news, sports, and eventvideographers—but not for many filmmakers.
The American Society of Cinematographers—that elite group whowill give membership only by invitation—sponsored an event to showoff the Canon 5D Mark II at Sammy's Camera in Los Angeles inFebruary 2009. Hurlbut, among other ASC members, attended. “I wentto Sammy's, and everyone was playing with it,” but many weren'tconvinced at first, because of the stills camera form factor, and weren'tsure on how to best harness its potential as a cinematic tool.
But Hurlbut saw the potential right away. “They had Vincent Laforet'sfilm, Reverie, playing up there on a monitor. And I looked at that spot,and I thought, ‘Whoa, that came from this camera?’ And then I put the5D in my hand and a light bulb went off. I knew that this was going tochange everything. I was all in” (speech at Hdi RAWworks, 1 May2010). He bought the Canon 5D Mark II that evening. “I realized thatthis is a game changer. I thought it was revolutionary. Then my mindjust started thinking completely out of the box, ‘What if we could do this,this, this, this, and this,’ and it began to inspire me even more as afilmmaker.” He worked his way through the various menu functions andtaught himself how to use the camera. When McG, the director ofTerminator Salvation, called Hurlbut and asked him to direct andshoot a series of webisodes to promote the movie—all based arounda first-person perspective of a helmet cam—Hurlbut was all over it. Itwould allow him to take advantage of the Canon 5D Mark II. “Thecameraman was the actor,” Hurlbut says. “It was so exciting.” BanditoBrothers Productions produced the webisodes for Warner Brothers.Bandito Brothers directors were very impressed with the look of theTerminator webisodes, so they asked Hurlbut to DP their featureabout the elite Navy SEALs where Hurlbut got to experiment more withthe 5D—75% percent of the feature was shot with the Canons.(Speech at HdiRAWworks, 1 May 2010.)

Hurlbut saw the potential right away. “They had Vincent Laforet's film, Reverie,playing up there on a monitor. And I looked at that spot, and I thought, ‘Whoa,that came from this camera?’ And then I put the 5D in my hand and a light bulbwent off. I knew that this was going to change everything. I was all in.”
“Where did the idea of motion pictures come from?” Hurlbut asks. “Itcame from a brilliant individual, Louis Lumière. When he lookedthrough his pin-hole camera, he asked himself the question, ‘Iwondered what it would look like if this image moved?’ SHABANG!!Motion pictures were born. Why were the keys to the castle given tothe ENG manufacturers to design our HD platform? Their specialty iscapturing the news and sports. When I look at their images they don'tlook cinematic. I feel that the HD platform has now come from the rightsource, still photography.” For example, Hurlbut explains, “I like toshoot a shallow depth of field, so the audience is drawn to what's infocus.”
Why were the keys to the castle given to the ENGmanufacturers to design our HD platform? Their specialty iscapturing the news and sports. When I look at their images theydon't look cinematic. I feel that the HD platform has now comefrom the right source, still photography.
Up to this point, the HD video camera chip technology just doesn'tquite do it for Hurlbut because the video looks overly sharp and hasway too much depth of field. “New make-up is being designed,diffusion is being added, new LUTs (lookup tables) are beingengineered all to try and make HD look good,” Hurlbut says. “TheCanon does all of this automatically without all the re-invention. Youneed to think much more out of the box, stop looking at all the numbersand drink the DSLR Kool-Aid, along with its limited color space anddigital compression. This is what makes it look cinematic and organic,I call it digital film.”

Because of this, Hurlbut embraces the DSLR over the high-end HDvideo cameras. “If I am shooting anything else, then I am shooting film,”Hurlbut states. He often gets some strange looks when pulling out his5D, especially when he hands it to the Technocrane technicians.“When I grab my 5D Moviemaker package, people who never workedwith the still photography platform before view it like [a] UFO has justlanded,” he laughs.
But despite its alien look in the film world, Hurlbut tries to keepshooting simple. “What I like to do is try to keep it as close to theprocess of exposing film as possible.” In the short produced for Canon,The Last 3 Minutes (see Figures I.2 and I.3), he notes how he used“my lighting monitor which becomes my viewfinder. It is intimate andmy portal to view the light and composition.” Not a big black tent withtons of wires running out of it, with waveform monitors, computers, andlarge HD monitors inside, nor did he utilize a digital image technician(DIT) seen on the set of Battlestar Galactica, for example. Byembracing the simplicity of the Canon technology, he was able to keepthe production simple, small, and intimate with the director and theactors, not a big circus. The camera becomes the DIT as well as thevideo playback technician. “Small footprint, big vision,” he smiles.

Figure I.2 Shane Hurlbut, ASC, looks at his field monitor as he adjusts the focus ring on the Canon5D Mark II for The Last 3 Minutes. “I light to the monitor,” Hurlbut says. Note the red tape on themonitor setting the 1:85 aspect ratio; the 5D Mark II does not output HD when shooting in live mode,but standard definition.(Photo by Kurt Lancaster)
Figure I.3 The shot from The Last 3 Minutes that Shane Hurlbut set up as seen in Figure I.2.(©2010 Hurlbut Visuals. Used with permission.)

As Shane Hurlbut says, the camera “is exciting to me. And I think outof all this it's going to start a massive revolution.”
Neil Smith, one of the pioneers of all-digital postproduction for theRED camera was not so easily convinced as Hurlbut and Laforetabout the potential DSLR cinema revolution.
Neil Smith's Take on the DSLR CinemaRevolutionNeil Smith, a white-haired Englishman who retired from Microsoft,financed a grad school degree in neuroscience and became adocumentary filmmaker. A few years ago, he started and today stillruns an all-digital postproduction house, Hdi RAWworks(hdirawworks.com), specifically for digital file-based workflows down inThe Lot in Hollywood.
He attended the Collisions conference about the merging offilmmaking and DSLR cameras near the end of August 2009 at theLos Angeles Film School. Not only did Smith observe Shane Hurlbut,ASC, and Vincent Laforet speak, but Smith's Hdi RAWworks companyput together their material that was to be projected at the conference.He looked at the work on a 60-foot screen and remembered thinking,“This is serious; this is cinematic-quality images.”5
Rodney Charters, ASC, also convinced Smith to consider thepotential of DSLRs as a cinema camera. As the DP on the TV series24, Charters purchased a Canon 5D Mark II and used it primarily foreffects plate shots in the series. Neil Smith met him when he wasshooting a CBS pilot, Washington Field, on a RED camera. He usedSmith's posthouse for the postproduction work. Charters needed toget shots of the White House, Smith explains. “You try to film out in thestreets of Washington, DC, anywhere near the White House with aRED camera and see what happens when an SUV with dark windowspulls up and six beefy chaps get out and beat the crap out of you,”Smith laughs. Charters, Smith continues, took the stealth approach.“He and his AC got his 5D Mark II, went outside, and took some

background shots of the White House. He pretended to be a museumtourist. He got a shot where a cop car goes right in front of him, andnobody is stopping him,” Smith adds.
Smith wondered how the HD video capabilities of the Canon 5DMark II would compare to the 4K resolution of a RED camera. Would itbe cinematic or look as though it painfully stood out with a videoaesthetic? Back in a screening room down at The Lot in Hollywood,they projected Charter's White House footage on a $100,000 2K DLPprojector. “We put it on the 20-foot screen downstairs,” Smith remarks,“and I looked at it and I said, ‘Ooh, that doesn't look as bad as Iexpected to look.’”
“We are a RED house,” Smith continues, “we know image quality;we graded the first 4K images off of the first RED. We understand allabout color space and resolution.” So even to consider using a hybridDSLR that line-skips its images because the CMOS sensor processoris too slow to handle it was more than a leap of faith. It was, for thedigital purist, like asking the ugly duckling to dance after turning downthe prom queen (see Appendix 1, “Image Resolution”). But in the righthands, the ugly duckling can shine. Smith asked Charters to do theultimate test. Shoot a series of demo shots at The Lot with the REDOne, Canon 5D Mark II, and the Canon 7D and intermix the footageand see whether anyone could tell the difference.
They presented the work at the HD Expo in New York in the fall of2009 in front of 200 filmmakers, Smith explains. “We askedeverybody, ‘If you can guess absolutely correctly which is RED, 5D,and 7D, we will buy you the best meal you ever had,’” Smithchallenged. “We have not had to buy a meal.” Despite the numbersand resolution charts, the 5D and 7D hold up against the RED—atleast in the 2K world. However, 4K resolution is an entirely differentstory. For now, though, Smith is pushing the HDSLR cinema revolution,and he feels that Canon will beat out the other dedicated videocameras due to Moore's Law—faster, better, cheaper—the HDSLRcameras can only get better, plus Canon has the sales distribution andmass market on its side.

We asked everybody, “If you can guess absolutely correctlywhich is RED, 5D, and 7D we will buy you the best meal youever had,” Smith challenged. “We have not had to buy a meal.”Despite the numbers and resolution charts, the 5D and 7D holdup against the RED—at least in the 2K world.
In the end, Smith feels that the DSLR model for shooting movies “isa new form of filmmaking. This is cinéma vérité reborn.” He adds:“There is something about the form factor about these cameras whichallows you to work with actors in a totally different way.”
Greg Yaitanes, a director of the TV series House MD, agrees withSmith. When they used the Canon 5D Mark II to shoot the last episodeo f House in spring 2010, he said in an interview with Philip Bloom,“This was beyond a cinematic look. It gave a new level of being able topull the actors out of the background and pull them … right to your face,and give an intimacy that I haven't seen in digital or film.”6
In addition to its size, Smith says the Canon sensor has a certaincinematic look to it. “To me, these HD digital SLRs have a 35 mm filmaesthetic—there is something about the sensor and the color science,”Smith muses. “You know, Canon had been making good 35 mm [still]film cameras for years; they've been making good 35 mm digitalcameras for years. There is something in the sensor design,something in the spirit of the machine, the soul of the machine that isvery organic. There is something that Canon engineers do with thesesensors and their color science that produces a very film-likeaesthetic.”
Smith feels that due to “the form factor, the price, the image quality,and the new techniques of filmmaking” that it will “revolutionize anythingwith a micro budget. Anything under a million dollars where they usedto consider a large HD camera they will now consider two or threeHDSLRs.” Due to Moore's law, Smith explains, “faster, better,cheaper” HDSLRs will just get better; he predicts that it will beginshooting RAW HD video in another year or two. Because Canon hasthe R&D and the marketing, he feels it will remain king of the HDSLR

cinema world.7
Lucasfilm takes on DSLRs–with the help ofPhilip BloomLucasfilm apparently agrees with Smith. Independent filmmaker PhilipBloom, who, like Smith, dismissed the value of the Canon 5D Mark II,bought one and tossed it aside because he couldn't control some ofthe features manually. As a professional DP, he wanted that control.But late in the spring of 2009, he saw the potential. He started shootingsome projects with it. He wrote about his experiences and put samplesof his work on his blog (philipbloom.net). People noticed. Withinseveral months, he became one of the key HDSLR experts, beinginvited to give workshops and asked by Canon and Panasonic to testout cameras for them. Rick McCallum, the producer of Star Wars(episodes I–III) noticed as well and invited him out to Skywalker Ranchin Marin County, California, in October 2009. Mike Blanchard, thehead of postproduction at Lucasfilm, called him up. They wanted toknow how far the cameras could be pushed cinematically—can aDSLR be used as a cinema camera?
Bloom arrived with his equipment and shot around the countryside ofSkywalker Ranch (see Figure I.4). He converted the files to AppleProRes overnight and cut together a rough edit by morning. The bigguys wanted to see it projected on a 40-foot screen. That was the truetest. Bloom knew the work looked good on his computer screen. Andhis stuff looked good on the Web—but on a cinema screen? That wasthe true test.

Figure I.4 Still from Bloom's Skywalker Ranch, a test video he shot for Lucasfilm to see how itwould look blown up on a 40-foot screen. “My heart was racing,” Bloom says. “I watched as the editplayed and they loved it.”(©2009 Philip Bloom. Used with permission.)
For George Lucas and his team, Bloom says, “If it looks great on thebig screen then that is the most important thing. Not codecs,limitations, bit rates, et cetera. All those are very important, but themost important thing by far for them is how it actually looks and itpassed with flying colors. That is what they really care about.”8
Bloom blogged about his experience at Skywalker Ranch:
I was nervous. Never having seen my work on a big screen asgood as this, but also George Lucas came in to watch and alsothe legendary sound designer Ben Burtt. My heart was racing. Iwatched as the edit played and they loved it. My favoritemoment was when the star timelapse came on and Ben Burttsaid ‘Hey, now, hang on!!’ This was a very quick ungraded draftedit knocked together from a crappy grey day as a test, notsupposed to be shown as an example of my work! ThenQuentin Tarantino came in as he was due to talk at a screeningof Inglourious Basterds and George said to Quentin, come see

this. Quentin waxed lyrical, calling it Epic and WilliamWyleresque and was shocked it was shot on a DSLR. He hadno idea you could shoot HD video on them or they were sogood.
Bloom passed the test and Lucasfilm used Canon 5Ds on selectedscenes in the upcoming feature Red Tails, a story about an AfricanAmerican fighter squadron in World War II.
Mike Blanchard, Lucasfilm's head of postproduction, wasn't sure ifthe footage would hold up on-screen. “Certainly when we just look atthe footage and put it on a big screen it holds up way better than it hasa right to,” he says. A lot of people get caught up in the numbers game,comparing one type of camera to another, he continues, such as theargument that “film is 4K, blah, blah, blah. You know, it's really not,because nobody ever sees a projected negative.9 So by the time youdo a release print and [put it] through its paces, it's no way near [what]a lot of people claim that it really is. So the great part about working atLucasfilm, for people like Rick [McCallum] and George [Lucas]—working for them—is that you just show them things and that's where itends. We don't do little charts about how it doesn't have that or itdoesn't do that. We make it work. And that's just a beautiful way to dowork, because it opens up everything.” (Interview with Jared Abrams,15 April 2010; http://www.cinema5d.com/news/?p=3216).
Hollywood Embraces DSLRWhen the finale of House MD (2010) was shot, director Greg Yaitanesand his team went with the Canon 5D Mark II. They previously shot onfilm. He noted that there is a stark difference between those who areshooting stories and those who are shooting test charts: “…[S]omebody could sit there and say to me, ‘Well, you know, I looked atthe specs and this doesn't line up and this and that.’” But Yaitanes saidthe proof comes from working “out there in the field.” We “told a storyand people have had an emotional reaction to that story, and, frankly,again, that trumps everything”—and they're continuing to use the 5D inthe 2010-11 season.10

The Canon 5D Mark II and the Motion Picture IndustryBy Jared Abrams
http://cinema5d.com/The Canon 5D Mark II has truly revolutionized the motion picture industry.
Ironically, the camera's video capability was all done by mistake. A videoengineer was visiting the stills camera division of Canon when he was shown thenew Canon 5D Mark II. He simply said, “If you like, I can add video to thatcamera.”
Here in Hollywood alone many major productions have adopted the Canon 5DMK II or Canon 7D as their A, B, or C cameras. It all started with the movie IronMan 2. The 2nd Unit DOP was using the camera for stunt work. At $2,500 it wasbetter than risking a camera operator's life and cheaper to have it destroyedduring a stunt than any other camera available at the time. There were majorflaws with the camera when it first came out. There was no manual aperturecontrol, and it shot only true 30P. Canon sent two engineers to the set, andwithin two weeks, they were able to add manual aperture control to the camera.The frame rate was the same but now the camera was a better tool for videowork.
DOP Shane Hurlbut was also using the 5D Mark II as an additional camera fora Navy Seals movie (Act of Valor) he was shooting with multiple cameras andformats, ending up shooting most of the movie with 5Ds and 7Ds.
Philip Bloom was contacted by Rick McCallum of Lucasfilm to consult onusing the Canon 5D Mark II for plate shots and eventually became an additionalcamera operator on George Lucas's new film Red Tails. DOP Rodney Chartersof the hit show 24 was using the Canon 5D Mark II for plate shots and carmounts around Los Angeles.
The camera started popping up everywhere. By the spring of 2010, HDSLRfever had hit Hollywood. Ken Glassing, the Second Unit DOP for NCIS, hadbeen using the Canon 7D for all kinds of work, such as motorcycle shots andPOV shots from the trunk of a car. DOP Crescenzo Notarile had been using the5D Mark II for B camera work on the Ghost Whisperer. Californication had onespinning on 2nd Unit, replacing a 16 mm Bolex. AMC's Mad Men began using aPL Mount Canon 7D for their new episodes. It now seemed as though everyonewas using this new tool in his or her kit.
Then Gale Tattersall, the DOP of the show House MD, and Director GregYaitanes decided that the camera was a perfect fit for the small sets on anupcoming episode. This was the real test for the camera. Would it hold up under

broadcast conditions for one of the most popular shows in the country? Itpassed with flying colors. The final episode was a hit, and everyone in theHDSLR community rejoiced.
Now it is no longer news if a show is shooting with HDSLRs. The Canon 5DMark II, with its full-frame still sensor, has a certain aesthetic that cannot beachieved with any other camera. The use of depth of field to help tell the storyhad been missing from the video toolkit for some time. There was a short time ofDOF lens adapters, but that was only a temporary solution. Now with theshallow DOF of the Canon HDSLRs, we have that tool, and it comes at abargain price. Anyone with a good story and a good eye can produce high-quality imagery with these cameras.
What This Book is AboutThis book is designed for people who want to open up the possibilitiesof using DSLRs as a cinema camera—whether you're shooting awedding, a student thesis film, a documentary, video journalism, anindependent film for a festival, or a feature. It's designed to help theDSLR shooter create cinema-quality HD video with the fewestpossible people and equipment—to maintain a small footprint of theone-person shooter, if needed, but with the ability to maintain a bigvision, as Shane Hurlbut noted earlier.
Ultimately, HDSLR shooters can learn how to make their work lookbetter by reading this book, but hooking that cinematic look to a goodstory is more than key. It's essential. It's what will impact an audience.
Philip Bloom, one of the gurus of DSLR cinema, best sums up thepurpose of this book, as he explained to me the DSLR vision overbreakfast at Venice Beach's Sidewalk Café:
Suddenly we are giving people an affordable tool to make high-quality imagery, and it's releasing potential in people they neverrealized they had. There are people out there who never thoughtthat they would be able to shoot high-quality images like this,that they would have the opportunity to do it. And they will go outand do it and they may not do it as a full-time job—and most of

them [won't]—but it's the passion brought out in people that isjust incredible.
This book is about taking that passion, that desire to shoot HDvideo with a DSLR camera, as if you were shooting film—and not as ifyou're shooting on an ENG or prosumer video camera. This cameradoesn't function like one of those. Instead, you must think like acinematographer, rather than a videographer.
The simplicity of pointing and shooting a DSLR camera as if youwere shooting a video camera with everything automatically set is notthe way to go.11 Just as a cinema camera requires a solidunderstanding of lenses, focus, composition, depth of field, exposure,lighting, ISO (film exposure speed), color balance, and separaterecording of audio, the DSLR shooter needs to approach projects in asimilar way.
What's Covered in the BookThis book assumes you already know how to shoot and edit. At thesame time, the importance of basic cinematography will not beassumed, and even if you already have this knowledge, the review maybe beneficial because the examples draw from a DSLR perspective.In either case, the first part of the book covers what I call thecinematographer's toolkit, the tools needed by DSLR shooters toattain a cinematic look, the “film look”—or at least an HDSLR cinemaaesthetic that sets your work apart from normal video.
Chapters 1 through 5 include either a checklist or a set of steps, soyou can plan each element as you begin to master it, or use eachchecklist as a helpful reminder. All the chapters include workingexamples from some of the best DSLR shooters in the field to illustratethe technical and artistic expression of cinematography. It's not anexhaustive overview of DSLR shooters, however. Only a few wereselected for this book—based on availability and the author'ssensibilities. There are many, many others that just could not beincluded. Chapter 6 covers postproduction workflow, while Chapter 7

provides an overview and exercises on storytelling so you can quicklythink about the number one reason to get a DSLR in the first place: totell good stories.
The goal isn't to master the entire art and craft of cinematography inthese chapters, but to expose you to some of the basic principles soyou can begin shooting DSLR projects cinematically. Ultimately, thefilm look is actually different from the cinematic look of HDSLRs, whichI refer to as the HDSLR cinema aesthetic; however, I do refer to thefilm look throughout the book as a shorthand, a simple way to explorethat cinematic look that's far different from conventional video.
Part I, “DSLR Shooter's Toolkit: A Cinematographer's Guide toCrafting Astounding Images and Telling Better Stories,” includes thefollowing chapters:
1. “Composition, Blocking, and Camera Movement.” This chapterprovides the basics, the first tools needed to begin to masterwhat it means to make cinema. It examines the golden mean incomposition, the importance of working with actors to tell a storyvisually through body language, as well as why cameramovement is one of the most powerful elements incinematography.
2. “Lighting Your DSLR Shoot.” Without an understanding of lightand shadow, the DSLR shooter will never break out of the flatvideo aesthetic. Lighting sets the mood of every scene, and justbecause DSLR cameras are good in low light doesn't mean youshould ignore the most important tool in cinematography.
3. “Exposing Your Shots with DSLRs: Metering with the ZoneSystem and Using the Right Lens.” This chapter describestechnical geek stuff, but cinematographers wouldn't considerthemselves cinematographers without an understanding of howto utilize these tools to shape the look and feel of their digitalfilms. A mastery of the tonal scale will teach you how much lightto use on your subject and in the background. Exposure will helpyou determine not only how much light hits the sensor, but howmuch depth of field you'll have, while the ability to use a variety of

lenses already sets the DSLR shooter's work apart from mostvideo shooters.
4. “Using DSLR Picture Styles: Pitfalls of Presets and CreatingCustom Styles.” Shane Hurlbut, ASC, says that with DSLRcameras, you have to get the picture close in-camera becausethere's not much latitude for color grading in post. Picture style isone of the most powerful tools DSLR shooters can use to gettheir look before shooting. The chapter also covers the use of flatand superflat settings, in addition to exploring how to changecolor temperature in-camera.
5. “Recording Quality Audio with DSLRs: Yes, It's Possible!” Notenough can be said about the importance of getting clean audio.It's more important than capturing a good picture. Poorlyrecorded sound will prevent an audience from seeing your film.This chapter goes over some of the technical aspects ofmicrophones and includes recommendations for equipment. Italso includes the best way to get the cleanest sound for DSLRshooters: the external audio recorder.
6. “DSLR Postproduction Workflow and Techniques: TranscodingFootage, Syncing Audio, and Color Grading.” This chapterdetails the steps required to convert DSLR footage into a formfriendly for editing and color grading using Squared 5's MPEGStreamclip, Cineform's NeoScene, and Apple's Final Cut Pro'sLog and Transfer setup. In addition, it includes steps for usingPluralEyes, the software that will sync external audio recordingwith in-camera sound. Furthermore, the chapter includes a basicoverview of Magic Bullet, an easy-to-use and powerful color-grading software tool.
7. “Telling Better Stories with Your DSLR.” This chapter is for thosewho want to make good on their traditional storytelling skills. It'sone thing to buy a DSLR camera and start shooting, but to enterthe world of professional cinema, a mastery of storytelling isessential. The chapter provides the basics of the three-actstructure, covers the importance of visual storytelling through theactions characters take, and provides tips on writing good

dialog. It uses Vincent Laforet's Reverie and Jamin Winans'Uncle Jack as case studies. In addition, it includes exercises onhow to get good story ideas.
Part II, “Master DSLR Shooters at Work: Case Studies,” presentsfive international case studies of master DSLR shooters at work. Itincludes examples of short fiction and short documentary projects.
1. “Crafting the Film Look with Postproduction Work: Casulo(2009), directed by Bernardo Uzeda, Brazil, 17 min.” A team ofBrazilian filmmakers put together one of the most visuallyattractive DSLR projects to date. The film, Casulo, was shot on aCanon 5D Mark II and earned the top Brazilian cinematographyaward in 2010. The director of the film, Bernardo Uzeda, told methat after a screening (the work was transferred to 35 mm film),some experienced postproduction people felt the print contained“such sharpness and rich colors that it looked as if it was shot in65 mm. I think this kind of a result for a camera that costs evenless than the lenses and accessories we were using is quite arevolution.” For those with an eye for film, the Canon 5D Mark IIstood out due to its VistaVision-size sensor. The before andafter shots of postproduction noise removal and color gradingincluded in this chapter reveal the importance of taking the timeto do it right in post.
2. “Crafting the Film Look by Building a Rapport with Characters:16 Teeth: Cumbria's Last Traditional Rakemakers (2009),directed by Rii Schroer, England, 2:29 min.” This short but sweetpiece of documentary journalism by German photographer RiiSchroer shows not only how a one-woman team can get superbresults when using a Canon 5D Mark II, but the care taken tobuild a rapport with her subjects actually helped achieve acinematic feel, which was also shaped by avoiding the standardTV news style of shooting and narrating with a reporter's voice.
3. “Crafting the Film Look with Cinema Lenses: A Day at theRaces (2010), directed by Philip Bloom, United States, 6:00

min.” Neil Smith, mentioned earlier in this introduction, wantedPhilip Bloom to shoot a project on a Canon 7D fitted with aspecial PL mounting plate that can take cinema lenses. Lensesare important to the DSLR shooter, but this project shows whatkind of look can be attained by using $20K Cooke lenses. Itreveals Philip Bloom's signature style with close-ups of faces inand around horse stables and a racetrack.
4. “Crafting the Film Look with Location and CGI: The Chrysalis(2010), directed by Jeremy Ian Thomas, United States, 6:54min.” The importance of getting the right location is highlighted inthis case study, as Jeremy Ian Thomas shows off the capabilitiesof the Canon 7D in the salt flats of Death Valley, California; italso showcases how digital 3D graphics become incorporatedinto DSLR footage. In addition, it includes details from thepreproduction meeting I observed before the team went out toshoot.
5. “Crafting the Film Look with Light, Composition, and Blocking:The Last 3 Minutes (2010), directed by Po Chan, director ofphotography Shane Hurlbut, ASC, United States, 5:18 min.” Iwas on set during the shooting of this ambitious film shot over aperiod of five days with 18 different locations. This heart-rendingstory that flies by quickly shows off the power of cinematicstorytelling with the Canon 5D Mark II. The chapter includesinterviews with the writer-director, Po Chan, as well as withShane Hurlbut, ASC, the cinematographer on the project.
Part III, “Getting the Gear,” comprises the last two chapters of thebook and breaks down what kind of equipment you can get on avariety of budgets.
1. “DSLR Cinema Gear by Budget” provides a list of some of theequipment being used by HDSLR shooters. In many cases, thischapter showcases how the equipment was used. At the sametime, it provides a brief overview of what the equipment does.Essentially, the chapter includes three different sets ofequipment that can be purchased by budget size, but it does not

include big-ticket items seen in a full production package inHollywood. Rather, these are the different kinds of equipmentdesigned for the solo or small team DSLR shooters who needportability, who are on a small budget, and who are not going tobuy or rent a set of tracks, for example. The equipment includessome of the DSLR cameras (not an exhaustive list), audioequipment (such as microphones and external recorders),portable lights, tripods, steadicams, shoulder mounts, handheldgear, backpacks, lenses, and so forth. Most of the equipment Imentioned are being used by DSLR shooters, and there is farmore equipment being manufactured and sold than could ever bycovered in a single chapter of a book.
2. “Conclusion: From Film to HDSLR Cinema.” The final chapterdetails where we are and where we are going with HDSLRcinema.
This is one of the most exciting times to be a filmmaker. Potentialfilmmakers and students got excited with miniDV and the laterprosumer HD, but these didn't really break through to the cinemaworld, other than with a few exceptions. When it comes to the HDSLRcinema revolution, there's been nothing like it in the history of cinema.The closest we got was the breakthrough by Richard Leacock andRobert Drew, who developed a portable 16 mm sync-sound filmcamera that changed how documentaries were made (see, forexample, Primary, 1960).
What kinds of projects and what styles of filmmaking will developfrom HDSLR cinema? You, as a DSLR shooter, will pave the way for anew kind of cinema, a cinema that could never have been previouslyattained on such a small equipment budget.
Show us what you can do.
1 The book uses HD-DSLR, HDSLR, hybrid DSLR, and DSLR interchangeably, butmostly DSLR for the sake of simplicity. Furthermore, most of the examples coveredin this book were coincidently shot with Canon 5D Mark II (predominantly) and theCanon 7D, as well as Canon's Rebel T2i. There's one example of a Panasonic GH1

utilizing a Steadicam Merlin. Nikon deserves mention, but no one I came acrosswas using them. There are many manufacturers making DSLR cameras that shootgood HD video, but it seems that most of the independent filmmakers andjournalists shooting with DSLRs are mainly opting for the Canon.2 In the right hands, electronic news gathering (ENG) cameras and lower-end HDcameras can look cinematic, but for the low price point, I'm not aware of any HDvideo camera that can look nearly as cinematic as a Canon 5D Mark II camera.3 Wallach, H. Interview: Vincent Laforet. <http://www.usa.canon.com/dlc/controller?act=GetArticleAct&articleID=1286&fromTips=1>.4 All interviews with Hurlbut were conducted by the author (in March 2010), unlessotherwise noted.5 All interviews with Smith in this chapter were conducted by the author in March2010.6 Bloom, P. (2010, April 19). Exclusive: In depth interview with Greg Yaitaines.PhilipBloom.net. <http://philipbloom.net/2010/04/19/in-depth-interview-with-executive-producer-and-director-of-house-season-finale-shot-on-canon-5dmkii/>.7 By the time this book is published, Sony and Panasonic will be releasing HDvideo cameras with bigger chips and interchangeable lenses.8 Bloom, P. (2009, Dec. 12) The tale of Lucasfilm, Skywalker Ranch, Star Wars andCanon DSLRs on a 40 foot screen! PhilipBloom.net.<http://philipbloom.net/2009/12/12/skywalker/>.9 The raw negative can go up to 6,000 lines of resolution, whereas a projection print(analog) is typically around 2,000 lines (but digital intermediate scanned films cango higher).10 Bloom, P. (2010, April 19). Exclusive: In depth interview with Greg Yaitaines.PhilipBloom.net. <http://philipbloom.net/2010/04/19/in-depth-interview-with-executive-producer-and-director-of-house-season-finale-shot-on-canon-5dmkii/>.11 I'm exaggerating here. Many video users shoot everything manually, but thedifference with a DSLR is that it reflects the purity of shooting on film—set lens withdepth of field, set your lighting, meter it, set the f-stop, focus, and shoot.

Part 1DSLR Shooter's Toolkit: A
Cinematographer's Guide toCrafting Astounding Imagesand Telling Better Stories


Part 1. DSLR Shooter's Toolkit: A Cinematographer's Guide toCrafting Astounding Images and Telling Better Stories
“We bring a light into the darkness. We find the magic andstructure the movie.”
—Gordon Willis, ASC (Cinematographer of TheGodfather) 1
The importance of cinematography and its relationship to storytelling—whether you're shooting shorts, feature fiction, documentaries, news,weddings, or music videos—cannot be underestimated. To be a goodDSLR shooter, you need to think like a cinematographer (whether ornot you're doubling as the director). And cinematographers arefundamentally storytellers—the ones who translate a writer's words intoimages that draw viewers into the world. Without a compelling story,you simply have disassociated images. Beautiful images without astory may look good, but to get an audience to watch your digital film,the story is key, even if that story is a visual poem (such as PhilipBloom's “People” series or his compelling short doc, A Day at theRaces, featured in Chapter 10 or a short fiction with no dialog, such asVincent Laforet's Reverie). Indeed, not-so-perfect images tied to acompelling story will hold an audience more than strong images linkedto a poorly conceived concept or story. If you need to cover the basics,including tips on writing good dialog, take a look at Chapter 7, “TellingBetter Stories with Your DSLR.”
Cinematic style is essentially the way to express yourself throughfilmic language. Just as authors use words to describe a scene, acharacter, and action or a painter uses pigments and dyes to giveform, shape, and color to a canvas, a director and cinematographerwill use camera movement and lighting to express themselves. Indeed,the words cinematography and photography are interrelated—meaning to write with movement and light (graph: write; cinema:movement; photo: light). Shooting with a DSLR—a digital tool thatapproaches the mythic film look more nearly than any other video

camera preceding it—you need to think about shooting your projectsby means of camera movement (and stillness), as well as by light (andshadow). These are your fundamental expressive tools in telling yourstory.
If you ask cinematographers how to attain the cinema look, likelythey'll respond against your expectations. You're really not attemptingto create a mythical “film look,” but rather trying to create the look andfeel of the story you're trying to tell, cinematically. The first part of thisbook examines how to create the best possible image for your story. Itincludes several setups as described by working cinematographerswho have created a look that matches their story's intent.
The desire to attain a cinematic look with video was born out of the stark and flatpixilation of the video image, as opposed to the sharp but creamy soft look offilm. One of the main reasons filmmakers have avoided using video cameras toshoot their movies (despite the potential huge savings) revolves around theinherent quality of the video look—an aspect of resolution and sensor propertywhen it exposes light digitally. Furthermore, the video look also stems from anestablished way we perceive video in broadcast television—such as verycontrasty images, facial tones not as natural as in film, very little details thatcan be seen in the shadows—so everything is often lit evenly, brightly, andresults in the “video look.”
This book shows you how to move away from the video look and willhelp you attain a cinematic look with DSLRs. But the ability to attainthis look is highly subjective and what some people may tolerate asacceptable, others may cringe; however, very few can deny that agood story, well executed, trumps any kind of look. As a DSLRshooter, your goal should be to help reinforce the look and feel of astory through better cinematography. Not only are the stories youchoose to tell up to you, but how they look and feel to an audiencederive from the choices you make when shooting; the shot will feeldifferent if your protagonist wears red versus green, for example. AsJon Fauer, ASC, says, the style—the look you're trying to attain—iswhat will grab an audience's attention. In a commercial, he notes, “Youare trying to sell a product or idea, but you are also trying to grab

people's attention, with the cinematography, the lighting, composition,and camera movement.”2
Allen Daviau, ASC, cinematographer for such films as Peter Weir'sFearless, Stephen Spielberg's Empire of the Sun, ET: The Extra-Terrestrial, and The Color Purple, among others, discusses one wayhe works with a director to get the “look” of the story: “looking at films,stills, paintings, and tear sheets out of publications.” He continues bydiscussing how Raoul Coutard, cameraman for Jean-Luc Godard,used a similar approach:
For a scene that shows a gentleman walking through a door,the left side of Godard's frame might have been inspired by agenre noir film from the '20s and the right side of the framemight have come from a poster he saw that morning on theMetro.2
Just as there is no formula for writing a script or directing, there is noformula for cinematographers to create the look of a film—it's drawnon art, storytelling, a passage from a poem, a photograph, a poster, avisit to a museum, and much more. The inspiration and art come first.The technology—like the painter's brush—is used in service to the art.
The cinematographer for such television shows as Malcolm in theMiddle and Dawson's Creek, Levie Isaacks, ASC, says that acinematographer creates “the look of the film” by how “[y]ou select yourfilm stocks. You select the kind of camera movement that you want todo. You select your lighting style: contrasty or not contrasty and thecolors. Out of all those elements, you create the look of the film.”2
Andrew Laszlo, ASC, cinematographer for Shogun, explores thelook of the film as a way to choose a style. This style, or look, shouldbe drawn from “the subject matter,” the story of the film, he says. Afterreading the script, Laszlo notes how “images begin to form in yourimagination and in your vision.” He wants to “impact the audience” withthese images, so he “enhances” this reality:

I have to bring something to that reality that will affect theaudience as they look at the picture. Is it a happy day? Is it asad day? What can I do to create an impression, an emphasis?Techniques and tools come into play—lenses, film stocks,filters, focal lengths, all kinds of gimmicks that an individualartist may come up with and say, “This is what I feel; this is whatI'll do to enhance the image so it will serve the story best, asdepicted by the script.”2
Like Isaacks, Laszlo realizes that the tools of the cinematographerare vast: film stock, lighting style, camera movement, lenses and focallengths, filters—not to mention the time of day, the use of scrims, flags,and reflectors, lighting ratios, tone and color, and so on. Filmmaking—even more so than theater—is one of the most difficult art forms tomaster. A painter paints, a novelist or poet writes, a sculptor sculpts—all arts that are conducted in one medium (most of the time). In film,many different art forms and technology comprise thecinematographer's palette.
As a DSLR shooter, you need to consider shooting like acinematographer, not a videographer. So the first few chapters of thisbook cover the main elements you need to consider to make DSLRvideo look more cinematic, and it gives you these techniques on a lowbudget. You don't need the full equipment package of a Hollywoodproduction team (although that can help), but you can achieve thisshooting solo, if needed. So the information in this book is useful notonly for independent filmmakers, shooting both docs and fiction, butalso for event and wedding shooters, video journalists, as well asstudents.
The first three chapters provide the foundation, the basic toolsneeded for DSLR shooters to craft a cinematic look with video DSLRs—from composition to exposure. The fourth chapter describes howyou can shape a cinematic look by manipulating the picture styles ofDSLR cameras. Chapter 5 covers audio recording—one of the mostimportant aspects in making a good film, while Chapter 6 presents thepostproduction workflow. As I define these tools of the

cinematographer, I include examples of how DSLR shooters approachthem in their projects. The goal isn't to master the entire art and craft ofcinematography in these chapters, but to expose you to some of thebasic principles so you can begin shooting DSLR projectscinematically, to help express the film look.
The final chapter of this part Chapter 7, “Telling Better Stories withYour DSLR,” is one of the most important, for if you do not know how tocraft a good story, then your images will contain little meaning and willunlikely attract an audience. There are many books on telling stories,but this compact chapter provides you with core information so youcan start telling better stories right away.
1 Fauer, J. (2008). Cinematographer Style: The Complete Interviews, Vol. 1, (p.395).American Society of Cinematographers.2 Fauer, J. (2008). Cinematographer Style: The Complete Interviews, Vol. 1, (p.395).American Society of Cinematographers.


Chapter 1
Composition, Blocking, and Camera Movement
Composition, blocking, and camera movement are the building blocksof your story. They're intertwined like DNA. You cannot have onewithout the others, so this first chapter begins with defining these threeelements and showing examples of how DSLR shooters composetheir image along the golden mean, how they tell a story through theblocking of performers, and how they utilize camera movementpoetically.
CompositionYour three-dimensional subjects and the scene they're in arecomposed through your lens. This composition relies on many factors,including lenses and shot sizes, as well as camera angles. But oneunderlying principle can't be understated: the golden mean appearingin nature, a ratio studied by mathematician and philosopherPythagoras (whom you might recall from that high school geometryclass). Many cameras are equipped with rule-of-thirds grid lines, whichprovides a decent way to compose your images—keeping eye lineson the top third of the image and your subject in either the right or leftthird, for example. But photographer Jake Garn argues that the Rule ofThirds isn't as naturally dynamic as the use of the golden mean, whichwe can see in one of his photos in Figure 1.1—the girl in theforeground composed along the golden mean.
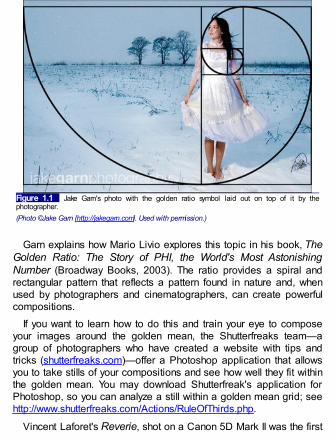
Figure 1.1 Jake Garn's photo with the golden ratio symbol laid out on top of it by thephotographer.(Photo ©Jake Garn [http://jakegarn.com]. Used with permission.)
Garn explains how Mario Livio explores this topic in his book, TheGolden Ratio: The Story of PHI, the World's Most AstonishingNumber (Broadway Books, 2003). The ratio provides a spiral andrectangular pattern that reflects a pattern found in nature and, whenused by photographers and cinematographers, can create powerfulcompositions.
If you want to learn how to do this and train your eye to composeyour images around the golden mean, the Shutterfreaks team—agroup of photographers who have created a website with tips andtricks (shutterfreaks.com)—offer a Photoshop application that allowsyou to take stills of your compositions and see how well they fit withinthe golden mean. You may download Shutterfreak's application forPhotoshop, so you can analyze a still within a golden mean grid; seehttp://www.shutterfreaks.com/Actions/RuleOfThirds.php.
Vincent Laforet's Reverie, shot on a Canon 5D Mark II was the first

sensational DSLR web hit that highlighted the low-light capabilities ofthe camera. It features a man longing for a girl, failing to find her duringa late-night rendezvous. Let's look at a few random stills and applyShutterfreak's golden mean app in Photoshop, just to see how it holdsup compositionally along the golden mean (see Figures 1.2–1.4).
Figure 1.2 In the opening shot of Laforet's film, we can see how the man and woman kissingbecome the compositional center point, the naturally occurring spot on the “canvas,” placing theBrooklyn Bridge in the background into balance. If Laforet had composed the characters dead center,the choice may not have been as compositionally powerful as the one he chose. Whether or notLaforet was conscious of it, the golden mean used as a tool helps provide compositional resonance tothe scene.(Still from Reverie. ©2008 Vincent Laforet. Used with permission.)

Figure 1.3 In this tight close-up, we can see again how Laforet's compositional choice resonateswith power around the golden mean.(Still from Reverie. ©2008 Vincent Laforet. Used with permission.)
Figure 1.4 The woman waits for the man, but he'll be too late. Whether or not he was conscious ofit, Laforet composed her along the golden mean, providing strong composition to the scene as thecamera tilts up. Note the back light placement causing a rim light glow, as well as her shadow to fallacross the ground right across the golden mean line, presenting a strong compositional vertical forthe shot. (Three-point lighting setup is covered in the next chapter.)(Still from Reverie. ©2008 Vincent Laforet. Used with permission.)
Another aspect of composition includes creating the illusion of threedimensions by providing depth to a scene. The woman in Figure 1.4appears to stand out from the background due to the fact that lights areon in the background—this gives the scene depth. Also, you maystage background and foreground characters and move them along

different planes of action to signify the sense of depth as well.
Practicing with depth, light, and placement of your subjects is thebest way to train yourself for good composition. Ultimately, there areno rules, only what looks and feels right for the story. But anunderstanding of where and why these rules work—and a mastery ofthem in your DSLR shooting—is important if you want to createpowerful shots. Don't break the rules until you know how to use each ofthem well.
Checklist for Composition
1. Who owns the story and/or who owns the scene? Your compositionalchoice may revolve around your central character or characters. Knowwho they are so your composition can reflect the central power, point ofview, and/or ownership of the scene.
2. What is in the frame? What you see is what you get. If you don't wantsomething in the frame, get it out of the way or move your subject(s) untileverything you see is meant to be there.
3. Place your main characters along the golden mean for strongcomposition. Follow the general principles of framing a character screenleft if they're looking right and screen right if they're looking left. Keepeyelines around one-third from the top as a general rule. Break theserules when your story demands it.
Golden Mean ApplicationTo use the Golden Mean application from the Shutterfreaks team in Photoshop,first download the app fromhttp://www.shutterfreaks.com/Actions/RuleOfThirds.php.
How to Install the Actions
1. Open Photoshop.2. If you haven't already done so, extract all the files from the ZIP file into a
folder on your hard disk.3. Click and drag the .atn file from that folder to your Photoshop window. If

you look in the Actions window in Photoshop, you will see the action setappear there.
Using the ActionsOpen the action set by clicking the little arrow just to the left of the nameRuleOfThirds. You may need to scroll down in the Actions window to see theactions.
Open a photo you want to analyze.Highlight one of the actions by clicking it, and then run the action by clicking
the Play Selection arrow at the bottom of the Actions window.The actions will make changes to a duplicate of your file so that you can
protect your original.
Notes
1. If the Action window isn't visible, you can show it by going to thePhotoshop menu and selecting Window/Actions.
2. If you'd like an action that will help you crop your images to conform tothe Rule of Thirds and the golden mean, check out our Rule of Thirds ProAction (http://www.shutterfreaks.com/Actions/RuleOfThirdsPro.html).
3. If you are new to using Photoshop actions,http://www.shutterfreaks.com/Tips/GettingStartedPS.html offers anintroduction to the basics.
4. If you see an error similar to “The Command Make is not currentlyavailable,” you may be running the action on a 16-bit image in an olderversion of Photoshop that doesn't support layers in 16 bits. To correct theproblem, convert your image to 8 bits before running the action.
BlockingBlocking is where, when, and how subjects are placed and move in thecomposition, whether working with actors or characters in adocumentary. How they are placed, when they move, where they movefrom, and where they go are dependent on the story. There should benothing random because these movements (the blocking of theperformers) need to be motivated; otherwise, random movements not

grounded in the story will appear weak on-screen. The job of thedirector is to shape or choreograph the blocking (see Figure 1.5),while the cinematographer needs to capture these movements with thecamera.
Figure 1.5 Po Chan directs the blocking of William (performed by Harwood Gordon) in theopening sequence from her short, The Last 3 Minutes.(Photo ©2010 by Kurt Lancaster.)
Po Chan's approach to blocking in The Last 3 Minutes (featured inChapter 12) is as precise as her direction on all aspects of the short:“All elements in this short film, from casting and the music to thewardrobe; from makeup (the choice of lipstick color) to the hairstyleand hair color; from the patterns and textures of the set dressingpieces to the looks of the crystal itself, are all carefully chosen so thatthey all work in harmony to tell the story,” she explains to me in aninterview on set.
In the scene, Po takes time to set up the physical actions for actorHarwood Gordon, as his character William Turner has a heart attackand collapses to the floor. Po knows what she's looking for. Sheunderstands very well (and is glad) that Gordon has had no suchexperience before. She goes into extreme detail and wants Gordon toconvey the pain in this moment. She explains to him the different layersof emotions that should be inside him in this scene. By doing so, shekeeps the actor fresh in his imagination, and the physical actionconveys that naturalness she's looking for. Some actors may be handsoff with the director, but Po says she looks for actors she cancommunicate with, heart to heart, look into their eyes, and know theirfeelings: “I trust them and I want them to know that they can trust me.”
Every gesture Gordon does, every expression he makes, is carefullyobserved by Po. In this scene, there is no dialog, so the physicalactions are the main vehicle to convey the story. “I trust my instinctwithin—it's always correct,” she says. She puts herself emotionally intothe scene as she directs: “If my actor cries, I cry. I apply myself to them.
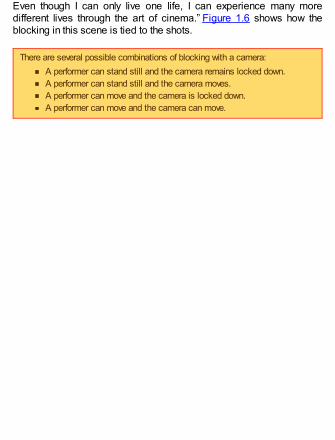
Even though I can only live one life, I can experience many moredifferent lives through the art of cinema.” Figure 1.6 shows how theblocking in this scene is tied to the shots.
There are several possible combinations of blocking with a camera:A performer can stand still and the camera remains locked down.A performer can stand still and the camera moves.A performer can move and the camera is locked down.A performer can move and the camera can move.

Figure 1.6 A series of shots from the opening sequence of The Last 3 Minutes (Dir. Po Chan)reveal how her blocking visually reveals the story. The movements and position of Harwood Gordon's

character, William, on-screen provides the information for an audience to understand what is goingon; Shane Hurlbut's shots support the blocking by conveying these emotions through shot sizes,composition, and lighting.(Stills from The Last 3 Minutes ©2010 Hurlbut Visuals. Used with permission.)
Each one of these changes the dynamics of the scene. There is no“right” choice since it depends on an understanding of the story andwhat you want to convey to the audience. Each scene has an emotionshift, a change that alters the emotion of the scene, and anunderstanding of when this change occurs will help you make thebetter choice.
For example, in this particular scene (refer to Figure 1.6), thecamera remains fairly static (with slight handheld motion, but no dollyor crane shots), and the character moves. In the second image, wesee a low camera angle looking up before it cuts to the third image,when Gordon drops into a tight close-up frame of the camera. Thesetwo shots contain the shift in the scene—conveying to the audience thesuddenness of his heart attack in the first, while the close-upexpresses his surprise and pain. This is the first time the tight close-upis used in this scene. It's the crux, the point where the scene shifts intoa new direction. In the beginning of the scene, William is mopping thefloor, alone with his thoughts. But in the close-up, we see his pain andstruggle, and the scene shifts as he struggles for a meaningfulheirloom in his pocket and his life flashes before his eyes. Thefilmmakers could have added camera movement at this point toemphasize this point, but it may have come across as melodramatic oroverly manipulative, whereas the low angle followed by the tight close-up does the job in this particular instance.
In summary, blocking is the visual depiction of the story by actors'bodies—their body language, gestures, and movement through space—and this blocking must be tied to the shot, whether the camera islocked down or moves. In the opening sequence to The Last 3Minutes, we can see how the story is fully told by not only how thecharacter of William is composed in space, but how he moves andhow the camera captures his movements. Whatever decision youmake as a cinematographer when shooting with DSLRs, be aware

that blocking and camera movement are intrinsically tied together (seethe next section on camera movement).
Blocking is the visual depiction of the story by actors' bodies.
Checklist for Blocking
1. Who owns the scene—the point of view character? This is the characterwho, perhaps, has most to lose in the scene or the character impactedby the events in the scene. When you know who owns the scene, then,as the director, you can determine what the emotional state of thischaracter is at the beginning of the scene and at the end of the scene:where does this change occur? You need to know this to be able toeffectively block the scene (and determine how you'll emphasize thismoment—through shot size/angle changes and/or camera and/or actormovement).
2. Set up your camera so that you capture not only the action of thischaracter, but more importantly, the reaction of the character to theevents occurring in the scene—especially where the scene changeoccurs. The character's actions and reactions will motivate where andwhat you capture on camera—and will help immensely in editing. Thechoices for blocking and the use of the camera include these fourcombinations:
A performer can stand still and the camera remains locked down.A performer can stand still and the camera moves.A performer can move and the camera is locked down.A performer can move and the camera can move.
3. The choice you make should be dependent on the needs of the story;this takes analysis (see Chapter 7 on stories for more details).
4. Make a list (mental or physical) of the shots you need to tell the story—and for editing, especially as it relates to the scene's emotional shift.Think about the actions of the characters and what they're doing fromshot to shot. What shots do you need to tell the full story when you edit?Where do the performers' eyelines take us? This is one good clue tochoosing shots to edit, and a good shooter needs to capture theseeyelines. What will the shots look like as you edit? Do you have enoughshots? Can you condense several shots into one shot with cameramovement? Documentary filmmakers the Renaud brothers mention how

important it is for shooters to be editors: “We started out as editors as Ibelieve all young filmmakers should do. If you can become a good editorfirst, it is easy to become a good shooter.”1
Camera Movement and StabilizationIf blocking expresses the movement in the composition of a scene, thecamera movement moves the composition and will result in strongvisual dynamics. Just as a character needs to be motivated beforemoving on-screen, the camera needs to be motivated in its movement.The camera's movement needs to be tied to character motivations andmovements because the camera captures emotions and actionsthrough its lens.
To quickly attain an amateur look in your DSLR projects, justhandhold the camera and move around a lot. Controlling the movementof a camera takes discipline and proper tools. And DSLR camerasare less stable than typical video cameras; they're shaped forphotography, not for handheld video movement. When you areengaging in handheld movement, the cameras are awkward anddifficult to keep stable for longer sustained shots. One of the problemswith handheld work is that it's hard; it's easy to make the movementsunprofessionally shaky! Move in slow motion and make the camerafeel heavy. It's easy to whip a light camera around and make it jiggletoo much as the body of the DSLR shooter fails to remain still. Youmust Zen your body and focus your attention on the shot. In many of theshots of The Last 3 Minutes, Shane Hurlbut, ASC, handheld thecamera, but his body was rock steady and the movements of thecamera were slight and were never jerky.
Several companies have designed a variety of handheld andshoulder-mounted stabilization devices for helping with handheldshots. But they can still provide poor results if you're moving aroundand bouncing too much. Holding still, moving in slow motion, andmoving as if you're carrying weights will help your handheld work.Proper stabilization, whether using a tripod or Zacuto's “Target

Shooter,” for example, when properly practiced, will help provide aprofessional cinema look.
When handholding shots, you may tilt up and down along the verticalaxis (yaw) or move side to side, left to right (pitch). A roll occurs whenyou move front to back like a ship riding waves at sea (rarely used).
It's easy to whip light cameras around and make it jiggle too much as the bodyof the DSLR shooter fails to remain still. You must Zen your body and focusyour attention on the shot.
One of the safest ways to get a clean shot is to use a tripod … whenthe story warrants it. It's one of the best ways to get stable andacceptable shots for DSLR projects, but the shots may appear toostatic, so some slight motion may be needed. Again, let your storydetermine the best way to convey the emotion you want in a scene.You may pan or tilt on a tripod (whether on a tripod or handheld), butbe sure to move in slow motion to minimize shakiness and the “Jell-Oeffect” of the camera's CMOS sensor—when vertical lines shiftdiagonally while panning when you move the camera fast because thesensor speed is too slow to keep up with the movement. Also,remember that the longer the lens, the faster the apparent motion andthe more unstable the shot will be when handholding. It may be best touse a tripod when using a long lens.
Panning a DSLR and the Jell-O EffectA lot of video tests revealing how a fast pan can cause verticals to shift havebeen posted online. Critics point to these shifts as a weakness to the camera.At the same time, however, this issue doesn't seem to impact manyprofessional filmmakers. Shane Hurlbut, ASC, says he's rarely encountered theproblem. Vincent Laforet (dir. Reverie) recently said this about it:
While the “Jell-O effect” exists with any CMOS sensor given their design,I didn't find it to be a factor in this project—or, for that matter—on any ofmy other productions. It's important to keep in mind that any camera outthere, film or digital, has limitations on how fast you can pan it—

especially when projected onto a large screen. In general, a DP willalways plan for this on any camera moves they are directing the speed ofthe camera's move. It's important to remember that a pan may look justfine on a 17H monitor—but the same pan may be a bit painful for theaudience's eyes on 50 foot silver screen. Unless you are doing dynamicand fast moving action sequences, where you are purposefully movingthe camera at extremely high rates (whip pans, running sequences, etc.),I would say it's unlikely you will encounter issues with the “Jell-O effect.”2
In the end, it's the DP's responsibility to know the strengths and weaknessesof his tools and to know how to shoot around those limitations.
Camera movement includes
Pan: left to right on the tripod axis (see Figure 1.7a)
Figure 1.7a Panning.
Tilt: up and down on the tripod axis (see Figure 1.7b)
Figure 1.7b Tilting.
Push-in through space (see Figure 1.7c)

Figure 1.7c Push-in.
Pull-out through space (see Figure 1.7d)
Figure 1.7d Pull-out.
Tracking (or dolly): lateral movement through space (see Figure1.7e)
Figure 1.7e Tracking.
Crane: up and down movement through spaceDespite the suggestion of using a tripod, one of the most powerful
tools to create the film look revolves around camera movement—thatpoetic push-in or tracking shot that moves the viewer smoothly throughthe space of the cinematic world. But getting a dolly that works reallywell will blow the budget (let's face it, cheaper tripod dollies—tripodswith wheels attached to them—just don't cut it). And the skateboarddolly or wheelchair trick goes only so far (and requires a smoothsurface). Laying down tracks just isn't doable for most DSLR shooters,either.
However, there's an affordable way to get that high-end filmic look:the Kessler Crane Pocket Dolly Traveler, a fairly inexpensive devicethat can produce high-end results. In Philip Bloom's short, Salton SeaBeach (http://vimeo.com/10314280), he masterfully attains tracking

shots by using this dolly (see Figures 1.8 and 1.9).
Figure 1.8 Two stills from Salton Sea Beach, showing how subtly Philip Bloom slowly pushes inon a shot using the Kessler Crane Pocket Dolly Traveler, which allows for Hollywood-type dolly/trackcamera movements both laterally and in and out. (Note the change in the sides of the shot—the 2 ×4 in the bottom screen left is no longer visible above.) The slow push-in offers poetic power around itssmooth rhythmic beat. Push-in shot from 1:31. Film shot on a Canon Rebel T2i with a variety oflenses. Color grading with Magic Bullet software.(©2010 by Philip Bloom. Used with permission.)

Figure 1.9 Philip Bloom sets up a tracking shot in his short, Salton Sea Beach, using the KesslerCrane Pocket Dolly Traveler on his tripod. By moving the camera on this micro dolly, the DSLRshooter can achieve high-end Hollywood-style cinema motion.(©2010 Philip Bloom. Used with permission.)
High-end dollies can be bulky and expensive. For low-budget DSLRshooters—especially those one man- and one woman-band shooters—the 25-inch pocket dolly (see Figure 1.10) becomes a portablesolution that can be thrown in a tripod bag.

Figure 1.10 The 25-inch Kessler Crane Pocket Dolly Traveler (version 1) used by Philip Bloom inSalton Sea Beach. The image in the foreground shows the product with the crank and belt. Bloomrecommends the one with the crank because he feels it's “definitely smoother … and is quiet. I don'tactually use the crank on the Pocket Dolly,” he notes. “I find I get better results using it by hand, butthe addition of the crank and belt system makes it smoother than the non crank one and I was able toget first takes almost every time” (Bloom, P. (2010, May 5). Kessler Crane's Motorized dolly tripodsystem now shipping. PhilipBloom.net . <http://philipbloom.net/2010/05/25/kessler/>.)(©2010 Kessler Crane. Used with permission.)
If the Pocket Dolly Traveler adds a rhythmic beat like a line of poetry,Ken Yiu's use of Tiffen's Steadicam Merlin presents a song. Heachieved amazingly smooth handheld shots in Wedding Highlightswith a Panasonic Lumix GH1 with kit lens (see Figure 1.11).
Figure 1.11 Ken Yiu achieved amazingly smooth motion in his Wedding Highlights using thePanasonic Lumix GH1 and the kit lens (14–140 mm, f/4-5.8) with Tiffen's Merlin Steadicam. Colorgrading with Final Cut Pro (see Yui, K. Lumix GH1-Wedding Highlights. Vimeo.com.<http://vimeo.com/6272661>.)(©2009 Ken Yiu.)
Tiffen's Steadicam Merlin balances the camera on a handheldsupport device, providing the ability to shape smooth handheld shots. Itrequires perfect balance based on the camera's and accessory's

weight—so windy days are not good when using this tool outdoors.The “Merlin Cookbook” is a website that assists Merlin users toachieve balance with their particular camera. Instructions can be foundthere as a PDF file:http://www.merlincookbook.com/MerlinBetaBalInstr1-27.pdf. The sitealso includes a metric and English measurement scale to create the“Magic Formula” for balance; seehttp://www.merlincookbook.com/formula.php.
Ken Yui's setup for his wedding shoot includes these settings (theyonly make sense for Merlin users who've read the manual; see Figure1.12):
GH1 + stock lens (+ low profile quick release)Front: |)Bottom: ||)Arc: −1Stage: −2Gimbal position: 32 mmZ: −5
Weblinks“Merlin Cookbook”
http://www.merlincookbook.com/MerlinBetaBalInstr1-27.pdf“Magic Formula”http://www.merlincookbook.com/formula.php

Figure 1.12 Tiffen's Steadicam Merlin used by Ken Yiu on his poetically smooth project,Wedding Highlights.(©Tiffen Corporation.)
Vladimir Chaloupka of Santa Fe, New Mexico, presents a videotutorial using a Canon 5D Mark II on the Tiffen page athttp://www.tiffen.com/merlin_canon5d_qtmovie.html.3
However smooth the Merlin may be, it does take considerablepractice, including support, to make it really shine. For longer-durationshots, you may need some sort of wrist and/or waist support. RedrockMicro may also offer a more affordable way to go, but if you're really ona low budget and want the steadicam look, the do-it-yourselfsteadicam may prove useful (http://steadycam.org/). It costs about $14in parts, but after having built and used one, you do get what you payfor: bulky and too heavy.
WeblinkMerlin video tutorial using a Canon 5D Mark II
http://www.tiffen.com/merlin_canon5d_qtmovie.html

The Franken-CameraBy Travis Fox, 5 June 2010 Travis
Recently, a couple people have asked me about my (and these are not mywords) ghetto fabulous or franken-camera Canon 7D video system (see Figure1.13). In some ways, the DSLR system for me simply represents a bettercamera, not a fundamental shift in video storytelling. Over the years, I'vechanged cameras when technology changed and quality got better but my stylehas more-or-less remained constant.
Figure 1.13 Travis Fox of Travis Fox Films (travisfox.com)—and formerly a video journalist forThe Washington Post—didn't like the feel of DSLR cinema rigs, which to him felt as though hewas carrying a shoulder-mounted video camera. He missed the feel of his Sony Z1U “cradling itlike a baby or a football as is my practice,” he says.(Photo by Mark Mann ©2010 Travis Fox Films. Used with permission.)
The biggest reason I had for not adopting the DSLR sooner was ergonomics. Icould deal with the lack of timecode, the audio fixes, and the overheating, but Isimply couldn't handhold the thing steady and interact with my characters at thesame time. I wanted a DSLR built like the Sony Z1U, which I used lovingly foryears. I checked out all the standard “rigs,” the Zacuto and the Redrock Micro,but they seemed to push me towards holding the camera like a Betacam[shoulder-mounted camera], not cradling it like a baby or a football as is mypractice.

In the end, I ended up saving money and getting a fit I could deal with. An $8bracket (it's literally the cheapest flash bracket that B&H stocks) holds the Ikanmonitor out in front to the left of the lens just like the Z1U. I splurged on theother bracket (it was a hundred bucks), which holds the audio gear andbalances the camera out by moving weight to the back of the camera. …
With the ergonomics worked out, one of the first assignments I had was aseries of stories with NPR's Adam Davidson in Haiti for PBS/FRONTLINE. Assoon as I headed out in the hot Haitian sun I was soon confronted with a seriesof new issues to work out. The biggest surprise was the overheating. I hadworked with 5D in the Chihuahuan desert in July, so I thought I was prepared,but in Haiti the 7D would shut down sometimes only after 30 minutes ofshooting in the heat of the day. I quickly changed the way I work in order tominimize this DSLR flaw. (Fox, T. (2010, June 5). The Franken-Camera. TravisFox Films. <http://blog.travisfox.com/>.)
Philip Bloom, in Cherry Blossom Girl, utilized a variety of lenses, aswell as Zacuto's Striker around the streets of Chicago (see Figure1.14).
Figure 1.14 Still from Philip Bloom's Cherry Blossom Girl (see http://vimeo.com/5223767) wasshot handheld with Zacuto's Tactical Shooter. Shot on the Canon 5D Mark II. The Tactical Shooterhas since been replaced by a newer model, the Target Shooter.(©2009 Philip Bloom. Used with permission.)
Unlike the Merlin, where we see how Ken Yiu engaged smoothhandheld movement while walking, Bloom stands still, allowing for aslight bobbing movement of the camera as the tactical Shooter is

braced against his body (see Figures 1.15 and 1.16). He's in fullcontrol of his 5D Mark II camera.
Checklist for Camera Movement and Stabilization
1. What does your story demand? Your story—the emotional intentionyou're trying to express in your shot—should indicate whether the shotshould be locked down on a tripod or contain smooth movement (such aswith the Pocket Dolly) or a little bit more rough (perhaps the ZacutoTarget Shooter). Also, take note at what point in a scene the camerashould move or stay still. This should convey the emotional shift in thestory.
2. What angle of lens are you using? Long lenses = tripod in most cases.Normal and wide lenses = handheld and handheld stabilizers.
3. What kind of shot do you need? If you want the handheld look, providinga sense of immediacy or presence to the scene, then utilize a handheldstabilizer—such as the Steadicam Merlin—with a wide to normal lens. Ifyou need a stable shot, no matter the lens size, then lock down thecamera on a tripod.
4. Are you short on time? Do you need to “run and gun”? For videojournalists and documentary filmmakers on the move, the handheldstabilizer, such as Zacuto's Target Shooter or Striker, or Redrock Micro'snano—RunningMan will be best for quick setups and to get in and out ofa scene quickly.
Figure 1.15 Bloom stabilizes his Canon 5D Mark II with Zacuto's Tactical Shooter (replaced by theTarget Shooter model), giving him the ability to engage fairly stable handheld shots. Attached toBloom's 5D is the Zakuto Z-Finder eyepiece for the camera's LCD screen and a Rode Video Mic.(Bloom, P. (2009, June 18). Cherry Blossom Girl. PhilipBloom.net .

<http://philipbloom.co.uk/2009/06/18/new-web-series-and-new-short-film-on-canon-5d-mkii-the-art-fair/>.)(©2009 and courtesy of Philip Bloom.)
Figure 1.16 Zacuto's Target Shooter (the later model of the Tactical Shooter used by PhilipBloom in Cherry Blossom Girl). Attach a Z-Finder, and you'll have an essential eyepiece for outdoorshooting. It not only adds another point of contact to the body when shooting (for better handheldstabilization), but allows for better viewing of the LCD screen because it includes either a 2.5× or 3×magnification.(© 2010 Zacuto; http://store.zacuto.com/Target-Shooter.html.)
1 Lancaster, K. (2010). Shooting in Haiti: an interview with the Renaud brothers.Documentary Tech. <http://documentarytech.com/?p=3489>.2 Laforet, V. (2010, June 1). VW Spec Ad posted with behind scenes video. VincentLaforet Blog <http://blog.vincentlaforet.com/2010/06/01/vw-spec-ad-and-canon-digital-learning-center/>, accessed 02.06.20103 Chaloupka, V. On Steadicam Merlin and Canon 5D Mark II still camera.Tiffen.com . <http://www.tiffen.com/merlin_canon5d_qtmovie.html>


Chapter 2
Lighting Your DSLR Shoot
If the composition, blocking, and camera movement shapes the visuallook of your film, lighting determines what the look feels like. No matteryour lens choice, proper exposure, and ISO setting, a lack ofunderstanding how to utilize light will destroy your cinematic look. Acinema-like camera will not provide a cinema look alone. Lighting isyour most powerful ally in helping you sculpt a film look. VilmosZsigmond, ASC (The Deer Hunter), says that the “type of lighting weuse actually creates the mood for the scene.”1
This mood is what you, as the DSLR shooter, must try to shape andcapture with your camera. It helps provide visual depth to your picture.If you shot an off-white subject against a white wall, there's not muchcontrast—not much light and shadow—and the picture appears flat. Ifyou shoot somebody white against a dark background, the personstands out, and if you add background lighting to the scene, the depthincreases. DSLR cameras maintain a strong advantage over HDvideo cameras because they have the capability with larger chips andISO settings to shoot in natural and practical low-light situations, sofewer lights are needed on set.
The quality of light refers to what it looks like and what it feels like.What it looks like is what you see on the surface. The feel, on the otherhand, conveys the emotion shaped by lighting. You can craft the lookand feel of a film by paying attention to:
1. Light quality2. Light direction3. Light and shadow placement4. Color temperature
Craft the look and feel of a film by paying attention to:
1. Light quality2. Light direction3. Light and shadow placement4. Color temperature
Light Quality 1: Should It Be Hard or Soft?

Hard light is direct, producing harsh shadows, and results in a highlevel of contrast. This can come from a sunny day or an unshaded lightpointed directly at a subject. Hard lights are especially effective asbacklight and rimlight sources, such as the example in Figure 2.1.
Figure 2.1 Vincent Laforet chooses to use a hard light source, not only casting a shadow, butbringing out the texture of the flowers due to the placement or light source direction from the side.Lights from headlights of a car with a white reflector were used for this shot. Lens: 50mm, f/1.2 shot atf/4.(Still from Reverie. ©2008 Vincent Laforet. Used with permission.)
Soft light is indirect, created by reflecting or diffusing the light—anovercast day or a scrim or sheet dropped between the light source andthe subject, or simply bouncing light off a white art board, or evenreflecting light off a wall or ceiling. This type of light provides lowcontrast to the image (see Figure 2.2).
Figure 2.2 The waiting woman in Laforet's Reverie is cast in a combination of hard and soft light.A rear three-quarter key highlights her hair and cheekbone in hard-quality light, while her face and

chest are filled in with soft red light—actually lit from the taillight of a car to get the desired effect.(See Figure 2.17 for a lighting diagram of this shot.)(Still from Reverie. ©2008 Vincent Laforet. Used with permission.)
One of the counterintuitive properties of light is the fact that as thelighting instrument is brought closer to the subject, the softer thelighting gets, while farther away, the harder it is because it becomesmore of a point source, causing the hard light quality to stand out. Adiffused light source from farther away may convey a harder lightquality than a low-watt Fresnel lamp up close.
Light Quality 2: DirectionThe direction of the light will determine the placement of shadows and,consequently, the physical texture of objects and people. There arefewer shadows when the lighting is on-axis of the camera (the front).Shadows increase as the light shifts off-axis of the camera and to therear of your subject. Light from the side will increase the texture of thescene. When lighting is “motivated,” it refers to a light from a particularsource, such as a fireplace, window, lamp, or the sun. In the mediumclose-up of the woman in the still from Laforet's Reverie (see Figure2.2), the hard light source is from the three-quarter right rear position,elevated above the actress's head, the light motivated by a streetlamp.Background streetlamps provide ambient lighting, while fill lights fromthe front—lights either bounced or scrimmed—provide a soft look andfeel on the woman. Although the red light isn't necessarily motivated, itconveys an emotion Laforet wanted in the scene. The saturation ofcolor is more prominent when the source is from the front, while colorsbecome desaturated when the lights are placed in the rear.
Light Placement Terminology
Key: The main light source of the scene (a window, a table lamp,overhead lighting, a fireplace, and so forth). Know where your motivatedlight source is and add lights, if needed, to reinforce it accordingly. Canbe hard or soft quality.Fill: Lights used to fill in shadows caused by the key light. Usually a softquality.Back and Rim: Lights placed behind characters to separate them fromthe background. A rim light specifically is placed high with the light fallingon a character's head, her hair lit in such a way as to differentiate herfrom the background.Background: Lighting occurring in the background of the set, designedto separate it from the foreground, giving the scene visual depth. Thesecould be street lights, lights in a store, a hallway light inside, and soforth.

Following are a series of stills from a variety of DSLR shooters'work, each one illustrating a different light source direction.
Light Source Direction: SideA side key light on the front of the face brings out the main features ofthe character, the emotions expressed by the face (see Figure 2.3).
Figure 2.3 In Philip Bloom's San Francisco's People, he utilizes practicals from street lamps tolight his subject. (See Bloom, P. (2009). San Francisco's People: Canon 5DmkII.<http://philipbloom.co.uk/dslr-films/san-franciscos-people-canon-5dmkii/>.) Shot handheld with aCanon 5D Mark II; 50mm f/1.2 lens with Zacuto Z-Finder (eyepiece adapter).(©2009 Philip Bloom. Used with permission.)
Light Source Direction: Side
Figure 2.4 In this still from Rii Schroer's 16 Teeth: Cumbria's Last Traditional Rakemakers(featured in Chapter 9) we see how Schroer utilizes side lighting to highlight the features of hersubject. Side lighting brings out texture because it reinforces shadows, as we can see with the man'swrinkles (on-axis light will lesson shadows). Fill light reflects back onto the man's screen-right face tohelp ease out the shadows (light from a window). Backlighting provides a sense of depth to the frame.(See Schroer, R. (2009). 16 Teeth: Cumbria's Last Traditional Rakemakers. Vimeo.com.

<http://vimeo.com/4231211>.) Shot on Canon 5D Mark II; Canon 24-70mm/2.8 lens.(©2009 Rii Schroer. Used with permission.)
Light Source Direction: Back
Figure 2.5 Another still from Rii Schroer's 16 Teeth reveals how one key source light from the 180-degree rear offers a silhouette effect (the camera is exposed for the outside). Some of the light spillsinto the room, providing detail on the workshop table, but with no additional lighting we do not seedetails of the subject. Shot on Canon 5D Mark II; Canon 24-70mm, f/2.8.(©2009 Rii Schroer. Used with permission.)
Light Source Direction: ¾ Rear
Figure 2.6 Ken Yiu utilizes a ¾ rear to shape a backlighting look that creates a contrast by puttingthe woman's screen-left face in shadow, but enough on the screen-right side to give us a dramaticexpression. (Yui, K. (2009). Y. Lumix GH1-Wedding Highlights. Vimeo.com .<http://vimeo.com/6272661>; normal shooting mode, kit lens: 14-140mm, f/4-5.8).(Still from Wedding Highlights. ©2009 Ken Liu. Used with permission.)
Light Source Direction: Front
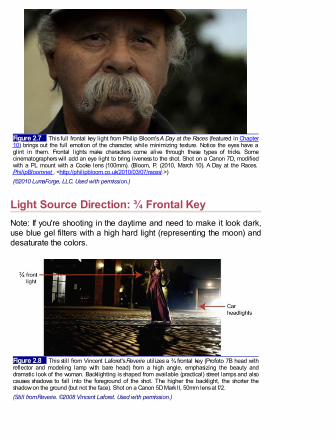
Figure 2.7 This full frontal key light from Philip Bloom's A Day at the Races (featured in Chapter10) brings out the full emotion of the character, while minimizing texture. Notice the eyes have aglint in them. Frontal lights make characters come alive through these types of tricks. Somecinematographers will add an eye light to bring liveness to the shot. Shot on a Canon 7D, modifiedwith a PL mount with a Cooke lens (100mm). (Bloom, P. (2010, March 10). A Day at the Races.PhilipBloom.net . <http://philipbloom.co.uk/2010/03/07/races/.>)(©2010 LumaForge, LLC. Used with permission.)
Light Source Direction: ¾ Frontal KeyNote: If you're shooting in the daytime and need to make it look dark,use blue gel filters with a high hard light (representing the moon) anddesaturate the colors.
Figure 2.8 This still from Vincent Laforet's Reverie utilizes a ¾ frontal key (Profoto 7B head withreflector and modeling lamp with bare head) from a high angle, emphasizing the beauty anddramatic look of the woman. Backlighting is shaped from available (practical) street lamps and alsocauses shadows to fall into the foreground of the shot. The higher the backlight, the shorter theshadow on the ground (but not the face). Shot on a Canon 5D Mark II, 50mm lens at f/2.(Still from Reverie. ©2008 Vincent Laforet. Used with permission.)

Figure 2.9 The setup for the shot featured in Figure 2.8. Vincent Laforet, screen right, sits behindthe camera, while we can see the breaklights on the vehicle casting red light onto the model.(Photo courtesy of Vincent Laforet.)
Light Quality 3: Light and ShadowShadows bring out drama and are essential when creating a nightscene (see Figure 2.10). Related to light direction is the placement ofshadows. The direction and height of the light determine how shadowsfall in the cinematographer's composition. Lights from the front willminimize shadows, whereas lights from the rear will increase theamount of shadows seen on camera. The higher the light source, theshorter the shadow. If you want long shadows, shoot at sunrise orsunset, or place your lights low, instead of high, in the background.Side lighting will increase texture.
Figure 2.10 In the opening sequence to Laforet's Reverie, we can see how he crafted a night lookfor this scene. Soft light (with a blue gel to color the scene) from above left lights the actor's face,while one from the front hits his feet. The light is tightly controlled, minimizing spill, so as to enhancethe shadows in the space. The lack of a backlight also helps accent the darkness and provides thenight-time feel.(Still from Reverie. ©2008 Vincent Laforet. Used with permission.)
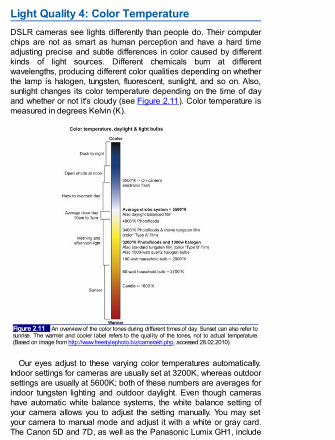
Light Quality 4: Color TemperatureDSLR cameras see lights differently than people do. Their computerchips are not as smart as human perception and have a hard timeadjusting precise and subtle differences in color caused by differentkinds of light sources. Different chemicals burn at differentwavelengths, producing different color qualities depending on whetherthe lamp is halogen, tungsten, fluorescent, sunlight, and so on. Also,sunlight changes its color temperature depending on the time of dayand whether or not it's cloudy (see Figure 2.11). Color temperature ismeasured in degrees Kelvin (K).
Figure 2.11 An overview of the color tones during different times of day. Sunset can also refer tosunrise. The warmer and cooler label refers to the quality of the tones, not to actual temperature.(Based on image from http://www.freestylephoto.biz/camerakh.php, accessed 28.02.2010).
Our eyes adjust to these varying color temperatures automatically.Indoor settings for cameras are usually set at 3200K, whereas outdoorsettings are usually at 5600K; both of these numbers are averages forindoor tungsten lighting and outdoor daylight. Even though camerashave automatic white balance systems, the white balance setting ofyour camera allows you to adjust the setting manually. You may setyour camera to manual mode and adjust it with a white or gray card.The Canon 5D and 7D, as well as the Panasonic Lumix GH1, include

preset color temperatures you can select with the dial (Philip Bloomrefers to this as “dialing in the color temperature”). Balancing correctlyis important so that you can control your image. Sometimes you maywant to experiment with color temperature as a way to change the lookof the scene, but you should always control this important element oflighting (see Figure 2.12).
Cinematographer's TipColor Temperature
Shane Hurlbut, ASC
You have to get the in-camera look as close as possible to the final vision forthe project. It's an 8-bit color space, 4-2-0. It is compressed and that colorspace can be limiting. I find it is the compression that makes it look the closestto film, so embrace it. As a cinematographer, you really need to micromanagethe color temperature. If you want a day exterior to feel consistent throughout aday from morning till sunset, you need to start with your color temperature sothat it is consistent with that of the sun. In the morning it could be around 3400degrees. To keep the light looking white and not orange, you will need to setyour color temp at 3400 Kelvin. By midday it should be around 5200 to 5500Kelvin. You repeat the same approach at sunset. We had a sequence in Act ofValor on a dry lake bed that posed for a landing strip in the Horn of Africa. Westarted before the sun came up and were there until it went behind the SierraNevadas at around 7:45pm. I used this micromanaging approach and the imageis so consistent. In the final color correction we hardly had to do anymanipulation other than dialing in contrast. (Hurlbut, S. (2009, Nov. 9). CollisionC o n f e r e n c e . Video.<http://shanehurlbut.smugmug.com/Professional/CollisionConference/10137672_ia4ZS#697099091_Bqx5z-A-LB>, accessed 28.05.2010).

Figure 2.12 Three shots of the same model using three different color temperatures. The middleone is “correct.” The first one is too blue, and the third is too warm for the standard look. However, thecolor temperature is a guide; you may decide the warm image is the color temperature you're lookingfor to capture the feeling of your story.(Photos by Kurt Lancaster.)
In addition, many of these cameras allow you to create presets forthe picture look. Several DSLR shooters have mimicked the look of avariety of film stocks to create different looks as well. (See Chapter 4for details on adjusting color temperature, as well as steps for shapingyour picture style.) In addition, postproduction color grading allows youto further shape the look of your project (Philip Bloom, for example,uses Magic Bullet software to utilize color grading plug-ins to achievehis looks).
There is no one way to determine color balance. Do you balance fortungsten if you're indoors near a window, do you just go with the

tungsten if you're indoors near a window, do you just go with thecamera's preset (daylight, indoor, outdoor shade, and so forth), or doyou dial it in? You need to look at the image and think about how itrelates to the story to best determine what you need. Shane Hurlbut,ASC, dials in his color temperature by eyeballing the monitor or thecamera's LCD screen and getting the look as close as he can get itbefore turning it over to postproduction. Others suggest using thepresets for consistency depending on the lighting type you're in, andsetting manual white balance only when in a mixed lighting setup(halogens, fluorescents, incandescents in one room, for example). TheCanon 7D tends to go a little red when shooting indoors with theincandescent setting.
White Balance TipDo not manually white balance during a sunrise or sunset because you wouldbe adjusting the nice golden flow into white, and you don't want to lose thegolden glow! During the sunset scene in The Last 3 Minutes, Shane Hurlbut,ASC, dialed in his color temperature at 4700 degrees K (see Figure 2.13).
Figure 2.13 Shane Hurlbut, ASC, dialed in the color temperature to 4700 degrees Kelvin forthe beach scene from The Last 3 Minutes (featured in, Ch. 12 ).(©2010 Hurlbut Visuals and The Bandito Brothers. Used with permission.)
Sample Lighting SetupsThe following stills and diagrams with brief explanations show basicsetups for shooting outdoor day, outdoor night, indoor day, and indoornight as tied to the idea of composition and light quality.
Outdoor Day (Soft and Hard)—Philip Bloom'sCherry Blossom Girl

When shooting outdoor locations, time of day and weather are the twomost important factors to consider; they determine your light sourceand shadows. Big-budget films may use generators with daylightlamps, but when shooting a documentary or an outdoor wedding, forexample, you need to be aware of the sun's location because it will bethe primary light source (see Figures 2.14 and 2.15). Mornings andafternoons tend to provide better shooting because the colortemperature will provide warmer skin tones; it will also provide longshadows, so you can shape the look around this light and shadowplacement. However, when shooting during the “golden hour,” you'llhave less time to shoot and a bit more challenge in post to match thecolor temps from shot to shot (and sometimes within the shot) becausethe lighting is changing quickly (and thus the color temperature). Inaddition, to soften the quality of the light, you may want to use a scrimto remove the harshness of the light on a subject's face, or you maywant to bounce light off a reflector to provide fill light.

Figures 2.14 and 2.15 In these two stills from Philip Bloom's Cherry Blossom Girl, we see howhe utilized the position of the sun to light the same subject in two different ways. In the first, we seethe woman lit from the side with soft-quality lighting, reflected sunlight causing fill light on her rightside. In the second shot, Bloom places the woman so she's lit by a high key sun from ¾ back, actingas a hard rim light, which causes a glow around her hair and shoulders. The sunlight reflects backonto her face, acting as a soft fill.(Stills from Cherry Blossom Girl. ©2009 Philip Bloom. Used with permission.)
Indoor Day—Philip Bloom's Cherry Blossom Girl
Figure 2.16 In this shot, Bloom utilizes an open doorway to provide a key light on his two subjectsinside. The rear side lighting lights the screen-left side of the couple, while a bit of reflected light onscreen right helps add a bit of fill to the scene. Notice the color temperature of warm hues, comparedto the cooler tones of the woman in Figures 2.14 and 2.15.(Still from Cherry Blossom Girl. ©2009 Philip Bloom. Used with permission.)

Outdoor Night—Vincent Laforet's Reverie
Figure 2.17 In this setup from Laforet's Reverie, we see a medium close-up of a woman. A ¾ rearkey (a kicker provided by car headlights) is used to highlight her hair. The street lights in thebackground, soft and out of focus, provide some backlighting as well as ambience to the scene. Thefront left key light with red, projected by car breaklights, is placed ¾ left, along with a Profoto 7Blamp with bare head and reflector; 200mm lens at f/2 wide open. The red light is unmotivated; wedon't see the source of the light in the wider shot.(Still from Reverie. ©2008 Vincent Laforet. Used with permission.)
Indoor Day—Rii Schroer's 16 Teeth: Cumbria'sLast Traditional RakemakersIn shaping the interior during the day, many cinematographers will usewindows for short shoots (see Figure 2.18). They may add in a daylightlamp from the direction of the window on longer shoots, so as not tolose light direction when the direction of the light changes over thecourse of a day.

Figure 2.18 Rii Schroer utilizes sunlight from a window as her key light in 16 Teeth: Cumbria'sLast Traditional Rakemakers. The light bounces off the back wall and ceiling, acting as fill light onthe characters. A fireplace also adds backlighting screen left. For additional details, see Chapter 10.(Still from 16 Teeth. ©2009 Rii Schroer. Used with permission.)
Indoor Night—Vincent Laforet's Reverie
Figure 2.19 Beauty dish light from above with grid. TV light in front with blue screen. Rim lightwith bare bulb from behind couch. Lens: 1.2, 85mm at f/2.

(Still from Reverie. ©2008 Vincent Laforet. Used with permission.)
Checklist for Lighting
1. The quality of the light: hard or soft; direct lighting or bounced (orscrimmed) lighting for each light you're going to use.
2. The kinds of light you're using: key, fill, back, background. (Yes, thereare many different types of lights—from sunlight with a reflector tohardware store halogen work lights, but you need to determine howthey're going to be utilized.) Many scenes will have all four of them, butthere's no rule. Sunlight with a reflector may be all that's required. WithDSLR cameras, Philip Bloom says that he tries to use as much naturaland practical light as possible before bringing in other lights. Whennecessary, he uses LED and Kino Flo Divas, and he stresses theimportance of some LED light in front to light the eyes of the performers.But he's an experienced shooter. If you're more of a beginner, practicewith three-point lighting until you can really “see” the light around you andhow you can use it to your advantage and use such material as bouncinglight off a white t-shirt, for example.
3. Light placement of each light. A frontal ¾ key will make the scene lookdifferent than a rear ¾ key with a frontal fill light. Lighting placement willdetermine shadow placement, all of which will convey a different mood.
4. Lighting zones or contrast rangeA. Will everything be lit evenly?B. Will there be some contrast between bright and darker areas?C. Will there be great contrast between the light and shadows?D. Will you need to scrim the lights to dim them, use a dimmer,
move lights closer or farther away from the subject?E. Do you have shutters on the lights to control where the light falls?F. Do have blackout scrims (flags) to control where the light and
shadows are placed?5. If you're shooting outdoors, what time of day will provide the best mood
for the scene? Because sunlight is your key light source, it will determineto a large extent the mood of your scene. A high-contrast scene withharsh light might be best during late morning through early afternoon,while early morning or early evening will provide the golden hour look withlong shadows and rich sunlight tones. Use of reflectors and scrims willhelp you control outdoor lighting. Night shots may require additionallighting setups if there aren't enough practical lights (from storefronts andstreetlamps, for example).
6. Control your color temperature. Indoor lighting is different than outdoorlighting. A fluorescent light will look different than an incandescent bulb.Know your primary light source and adjust your white balanceaccordingly.
1 Fauer, J. (2008). Cinematographer Style: The Complete Interviews, Vol. 1. (p.332).American Society of Cinematographers


Chapter 3
Exposing Your Shots with DSLRs
Metering with the Zone System and Using the Right Lens
One of the tools to shape the ratio of light and shadow revolves aroundthe zone scale—an arbitrary scale indicating the tonal values from darkto light in an 11-step black–gray–white gradation, numbered 0–10(0=black; 10=white; see Figure 3.1). Zones 0–3 represent black anddeep shadow values (details and texture in an image can begin to beseen in zone 2, while 3 shows dark details and some texture, and 4reveals landscape shadows and dark foliage). In addition, zones 4–6represent face tones (from dark-skinned to Caucasian facial tones).The mid-gray of 5 represents brown skin tones and sky; this is also thevalue of an 18% gray card used for white balance. Zones 7–9 hitlighter grays and highlights (an 8 would reveal texture in snow, whereas9 would represent blown-out highlights, and 10, pure white). Each zonenumber indicates a doubling in brightness from the previous zone; thegray in 6 is twice as bright as the gray in 5; the gray in 7 is four timesbrighter than 5 (each step is a multiple of two). The black in 1 is half asbright as in 2.
Figure 3.1 Zone scale from 0–10, referring to a quantification of a black-to-white gradation. Onezone is twice as bright as the next when moving toward the white, while it's half as bright whenmoving toward the black. This matches the value of f-stop settings.(Based on Zone System. Wikipedia.com. <http://en.wikipedia.org/wiki/Zone_system,> accessed28.02.10)
Shane Hurlbut, ASC, explains, “Film has about 13.5 stops oflatitude. Eight of these fall in the over-exposure (highlights) while 5.5falls in the underexposed areas (the shadows).” The Canon 5D Mark II“goes in the other range,” Hurlbut explains. “It's got 7 in the under and4–5 in the over.” He adds: “So you're not able to handle highlights aswell” as film with the 5D.
Simply put, the zone scale is a tool DSLR shooters can use to traintheir eye in controlling how much light should be in a scene—toproperly shape the exposure range of the DSLR camera. Don't use it
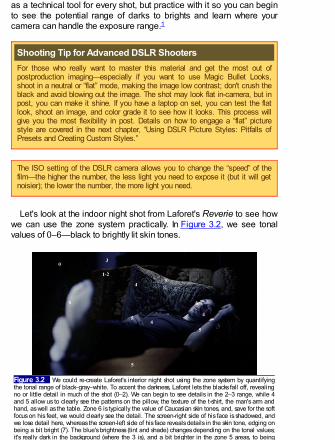
as a technical tool for every shot, but practice with it so you can beginto see the potential range of darks to brights and learn where yourcamera can handle the exposure range.1
Shooting Tip for Advanced DSLR ShootersFor those who really want to master this material and get the most out ofpostproduction imaging—especially if you want to use Magic Bullet Looks,shoot in a neutral or “flat” mode, making the image low contrast; don't crush theblack and avoid blowing out the image. The shot may look flat in-camera, but inpost, you can make it shine. If you have a laptop on set, you can test the flatlook, shoot an image, and color grade it to see how it looks. This process willgive you the most flexibility in post. Details on how to engage a “flat” picturestyle are covered in the next chapter, “Using DSLR Picture Styles: Pitfalls ofPresets and Creating Custom Styles.”
The ISO setting of the DSLR camera allows you to change the “speed” of thefilm—the higher the number, the less light you need to expose it (but it will getnoisier); the lower the number, the more light you need.
Let's look at the indoor night shot from Laforet's Reverie to see howwe can use the zone system practically. In Figure 3.2, we see tonalvalues of 0–6—black to brightly lit skin tones.
Figure 3.2 We could re-create Laforet's interior night shot using the zone system by quantifyingthe tonal range of black–gray–white. To accent the darkness, Laforet lets the blacks fall off, revealingno or little detail in much of the shot (0–2). We can begin to see details in the 2–3 range, while 4and 5 allow us to clearly see the patterns on the pillow, the texture of the t-shirt, the man's arm andhand, as well as the table. Zone 6 is typically the value of Caucasian skin tones, and, save for the softfocus on his feet, we would clearly see the detail. The screen-right side of his face is shadowed, andwe lose detail here, whereas the screen-left side of his face reveals details in the skin tone, edging onbeing a bit bright (7). The blue's brightness (tint and shade) changes depending on the tonal values;it's really dark in the background (where the 3 is), and a bit brighter in the zone 5 areas, to being

it's really dark in the background (where the 3 is), and a bit brighter in the zone 5 areas, to beingreally light in zone 6.(Still from Reverie. ©2009 Vincent Laforet. Used with permission.)
By keeping the dynamic range within six stops and exposing thebrightest part of the face at 6, Laforet is able to shape the rest of thescene around the blacks, letting the exposure of the man's body falldown to 0; blacks dominate the scene (stressing the nighttime feel ofthe shot). He allows the Caucasian skin tone to shine the brightest withthe face and feet, with part of the arm and hand to hit zone 5, withshadows falling off into the blacks.
Tip: Zone Scale in PracticeA typical Caucasian face has a reflectivity of 36%; a brown face, about 16%; ablack face, 10%. Green leaves have a 14% reflectance, while black velvet is at2%. Light grays reflect 70% of light, while off-whites reflect 80% (see Viera, D.,& Viera, M. (2005). Lighting for Film and Digital Cinematography, (p.54).Wadsworth).
If you want to expose for zone 5 (the “correct” exposure for an 18% mid-rangegray card), set your lights and/or place your subject, angle the 18% gray cardso that it reflects the same light as your subject, and take your reading. The18% gray card refers to the reflection and absorption of light (18% of the light isreflected, while 82% is absorbed). If you get an exposure reading of f/5.6 on yourlight meter for your particular ISO setting, then that's your f-stop setting, and therest of the tonal range will fall off or increase depending on the amount of light inother areas of the shot. If you're trying to control the amount of detail in theshadows and/or highlights, you can adjust your lights accordingly.
Most independent filmmakers and video journalists will usually just eyeball theexposure so that the image on the LCD screen looks right. But if you're reallytrying to control the image and know that you want the audience to see detailsin the background, you could plan for it to be two stops dimmer than your mainsubject in the foreground (which you've exposed at f/5.6 on zone 6), for example.You would light the background for zone 4, and you would know you're in zone 4when you get a metered reading of f/2.8 at the same speed (ISO setting). At thesame time, if you want your audience to see details in the highlights, you couldkeep the exposure of your highlights in zone 7 (one stop above your mainsubject of 6, setting your lights and scrims so your meter would not go abovef/8).
Tip: Lighting and the Zone ScaleA fast way to set your lights so as to brighten or dim your subject is toremember the inverse square law as a main property of light. Doubling thedistance of the light from your subject (by either moving the light or your subject)drops off the brightness four times. If you halve the distance, the brightness

increases by four. So if your subject is being lit inside by a window, and she'stoo bright for your exposure range, you can move the subject farther away (orplace a gel filter on the window). If you're using lights, then you can simply movethe lights farther away or closer to the subject to change the intensity (or youcould use a dimmer on the light—although this will tend to change the colortemperature of the light, thus impacting your white balance). In either case,moving the light or moving the subject toward or away from the light source willchange your zone scale.
Most small image sensors in video cameras have about a 4½ to 5 stop range(meaning you can expose along nearly five zones; film contains at least 8stops), but larger sensor cameras, such as the Canon 5D Mark II, have achievedaround 9 stops, according to Philip Bloom. So choosing which zone to exposeprovides an idea of where your highlights and shadows will fall out of theexposure range. Choosing to properly expose at zone 5, for example, will tellyou that you can capture a fair amount of detail when exposing in zones 4–8 or3–7.
Tip: The HistogramIf you don't have a light meter, you could use the histogram graph found on mostcameras to “read” the range of tonal values in the shot, and adjust the camera'sexposure or ISO setting accordingly (see Figure 3.3). The histogram representsthe amount of your scene that's bright or dark (the tonal values). If the metershows a high amount on the left side of the screen, the image is overall dark,showing the image to be “crushed” (a lot of detail lost in the blacks); a highamount on the right side of the meter reveals the image to be mostly bright andcould be blown out. The gray values fall in the middle, so the 18% gray cardreference representing the midrange point will be equivalent to a histogramreading in the middle of the graph. When applied to the zone scale, the readingson the left 40% of the graph would represent 0–3 (the dark grays and blacks), 4–6 (the middle gray tones) would fall into the middle of the graph (20–30 percent);while brighter gray tones, highlights, and white would fall along the right 30–40%of the graph.

Figure 3.3 The Canon Rebel's histogram, which indicates the spread of darks to brights—theshadows to highlights from left to right. Essentially, it allows you to quickly monitor whether theblacks have been crushed or the highlights blown out.(Photo courtesy of Canon.)
Photographer Michael Reichmann tells his students that when he shoots, “I'mbarely even aware of the image on the LCD; it's the histogram that commandsmy attention.” Perhaps this is an exaggeration because getting a goodcomposition is key, but once the composition has been chosen, having properexposure is just as important, and the histogram is one of the tools to showwhat your image looks like across the tonal range. Reichmann believes thatthere is no “bad” histogram because it's simply giving you what the reading is.Histograms are valuable for showing you how much of an image is blown out orcrushed. But you can adjust your light and shade accordingly if you're trying toplace your subject in the middle of the histogram exposure zone. (SeeReichmann, M. Understanding Histograms. luminous-landscape.com .<http://www.luminous-landscape.com/tutorials/understanding-series/understanding-histograms.shtml>).
Furthermore, if you're using a low-contrast picture style for postproductionwork, the histogram becomes a useful tool for you to engage in order to watchwhether or not you're crushing blacks or blowing highlights.
ExposureExposure represents the amount of light allowed to fall on a camera'ssensor.2 Manual prime lenses, such as the Zeiss and Leica, have f-stops placed on the barrel of the lens, and you adjust the stop manuallyrather than through the in-camera setting (see Figure 3.4). An iris—likethe pupil of your eye—controls this. When it is opened all the way,more light falls in. When it is nearly closed, less light enters (see Figure3.5).

Figure 3.4 This Zeiss Contax 55 mm/1.4 prime lens places the f-stop settings on the lens itself.This lens has an f-stop range from f/1.4 to f/16.(Photo by Kurt Lancaster.)

Figure 3.5a–h The f-stops represent the opening and closing of the iris of a camera. The lowerthe f-stop, the more open it is, letting more light in. The higher the number, less amount of lightenters. Each f-stop number represents a halving (closing) or doubling (opening) of light. An f/2.8prevents half the light of f/2, whereas f/11 allows twice the light of an f/16. Zeiss Contax 50 mm/1.4.(Notice the shallow depth of field; the iris is sharp, but the front of the lens is out of focus.)(Photos by Kurt Lancaster.)
For DSLR cameras, the range of the aperture opening is measuredwith f-stops:3 1, 1.4, 2, 2.8, 4, 5.6, 8, 11, 16, 22, 32 (most videocameras don't have the 22 or 32, but many DSLR cameras do). F/1 (or

the lowest number available on the lens) represents the iris opened allthe way, whereas 32 (or the highest available on the lens) is nearlyclosed. Each number in the sequence represents a doubling of lightwhen opening up (f/11 lets in twice as much lights as f/16), while astopping down of the exposure halves the amount of light (f/16receives half as much light as f/11; see Figure 3.6).
Figure 3.6 The same shot with three different f-stop settings. The top image is at f/8, the middle isf/11, and the bottom is f/16, each one letting in half the light as the one previous. F/8 is the properexposure where you can still see some details in the shadows without the subject's face being blownout. Zeiss 25 mm, f/2.8.(Photos by Kurt Lancaster.)

Furthermore, different f-stop settings will also influence the depth offield of your lens. The lower the f-stop, the more shallow the depth offield becomes. Higher f-stops increase the depth of field.
Cinematographer Tip
Film Look with Exposure, Shutter Speed, and FiltersShane Hurlbut, ASC, says, “Making HD look like film has a cocktail and one ofthe essential ingredients to this flavorful recipe is Neutral Density. You have tokeep your exposure on a [Canon 5D Mark II] around a 5.6 to get that beautifulshallow depth of field. The 7D should be around a 2.8, and the 1D around a 4.0.This gives the focus puller a chance and still retains a beautiful fall off of focus.”
“The 7D has close to a 35 mm sensor so you would shoot around a 2.0/2.8split to give a decent focus range but keep the background out of focus enoughto battle aliasing and moiré issues. [Shoot shutter speed of] 1/50 or 1/40 all thetime. I do not like to go above it. When you go at a 1/60 or higher it starts tolook like video, it's too sharp for me. I use the motion blur at a 1/50 and 1/40 tohelp with the crispness of HD and make it look more like film.”
In addition, Hurlbut, who shot Terminator Salvation, recommends usingneutral density filters (to change the exposure value without altering the f-stopsetting). “Tiffen's Water White NDs and Water White IR NDs looked thecleanest of all the available filters. This filter was specifically designed for the HDworld. It is very pure glass to give you the best image for your post colorcorrection. The filters that were originally made for film had brown and green inthe glass that was no problem to dial out in film because of the uncompressed4:4:4 color space. But now with HD 8-bit compressed color space, you do nothave that range of manipulation in color correction. By using neutral density athigher levels to achieve a shallow depth of field, you must deal with the problemof infrared (IR) pollution. The Water White IR NDs counteract this issue and givean image that does not have so much pink/magenta. As a cinematographer, Iwant to limit this contamination because it ends up showing in the blacks aswell as skies in day exteriors.” (Shane Hurlbut, personal notes. See Hurlbut, S.(2010, Feb. 10). Filtration: Beware of the Reaper of Cheap Glass. Hurlblog.<http://hurlbutvisuals.com/blog/2010/02/10/filtration-beware-of-the-reaper-of-cheap-glass/.>)
Philip Bloom says, “Don't use the LCD screen to expose.” Use the camera'smetering system instead.
Most people eyeball the exposure by using the LCD or an externalmonitor, but this approach will not provide an accurate reading. PhilipBloom recommends against it. “Don't use the LCD screen to expose,”he says. By using the camera's metering system, Bloom feels you can

get a more accurate read—important for professional use. You canmeter your exposure with DSLR cameras. A button on top of theCanon 5D Mark II, for example, allows you to adjust the white balanceand the type of meter you want to engage: evaluative, partial, spot, andcenter-weighted.
I use the spot meter to determine the precise value of exposure forthe center of the screen, moving the camera if I want to get a readingon another part of the scene. A small exposure index provides a meterwith a center scale indicating proper exposure with a latitude of twostops in either direction—another tool to use in your zone scale if youdon't have a spot meter (see Figure 3.7). In addition, if you'reautofocusing, set the “crosshair” to center as well; then you can exposeand focus the center point at the same time.
Figure 3.7 Canon's exposure meter allows you to spot meter your subject and adjust it accordinglyso you can get proper exposure by finding the center “standard exposure index.” The scale is set at1/3 increments and can go up to plus two or minus two stops, which is useful if you're spotting a rangeof useful exposure, such as moving the camera to spot meter between the subject and background orforeground and subject. When you press the shutter halfway, a bar below the exposure index willappear, indicating where your actual exposure is—it will flash when it falls below �2 or above �2. Byadjusting the f-stops and/or ISO, you can find the center point. You can also force over- orunderexposure by turning the quick control dial while pressing down the shutter halfway.(Image courtesy of Canon.)
TipIf you need the exposure wide open for best shallow depth of field work, thenyou may want to change the ISO and/or add neutral density filters so you canlock your iris.
Get the Canon 5D or 7D? It's the Chip Size That Offers a

Smoother Tonal Range for Shane Hurlbut, ASC“The 5D is the king of the hill,” Hurlbut says. “And the 7D and the 1D areclimbing that hill and they don't even have a rope. The 7D is not bad, but it's a24 mm sensor. And you're not able to get that depth of field you get with the 5D—to have the ability to go really shallow. In a shot from The Last 3 Minutes withthat carpet line, I've never seen anything like it. 35 mm never gave me that linebefore—it was extreme. And the camera was at f/5.6 with the ISO at 320, andshot with a Canon L 100mm Macro lens. So when you need the added f-stop,you can go there; you can go shallow” (see Figure 3.8).
Figure 3.8 A shot from The Last 3 Minutes reveals the potential narrow depth of field with theCanon 5D Mark II. Canon 100mm L, aperture set at f/5.6, and ISO 320.(©2010 Hurlbut Visuals. Used with permission.)
Hurlbut feels that the 5D provides a “broader range of visual creativity” than the7D. The 7D “has […] more depth of field for [a] filmmaker that doesn't have afocus puller,” Hurlbut explains. What makes the difference, Hurlbut argues, isthe pixel size. “The Vista Vision-size sensor on the 5D is 2.3 times the size ofthe 7D sensor. So the image, the pixel sizes—they are larger. The bigger thepixel, the easier it is for light to enter and give a more graduated fall off into theshadow areas, so it looks more filmic.”
What does he mean by this? The larger pixel sizes, Hurlbut explains, relate to“how the contrast range falls from light hitting somebody on the face and thenthe shadow area that goes underneath their chin, for example. But the 7D isgoing to see that more like a black diamond run on a ski slope.” The 5D willgraduate into the shadow area and make more of a filmic fall off because of thepixel size and its light-gathering ability, which would feel more like a bunnyslope. The 7D has the advantage of slow motion, a film gate that's closer toregular 35 mm film, and a depth of field that isn't as hard to fight with as the 5DMark II. (Notes from personal interview, March 2010.)
Using the Camera's Spot Meter (Canon 5D MarkII)
1. Press the WB button after turning the camera all the way up (to

the symbol).2. Adjust the main dial to select which meter you want to use (the
spot meter is indicated by a dot). If you're using a different modelthan Canon's 5D Mark II, follow the manual to set the spot meter;all DSLRs have this feature.
3. Point the camera at your subject (using the center of the screenfor spot metering) and press the shutter button halfway down. Abar will appear below the exposure meter, indicating where youare exposed—whether under or over. If you're off the scale oneither end, it will flash until you adjust the aperture.
4. Adjust the aperture until the bar is beneath the center line of themeter—unless you're purposely over- or underexposing, in whichcase adjust the lights, f-stop, and/or ISO until you're at yourdesired setting.
5. You can use this tool to see how far you're over or under withbackground and foreground lighting. For example, if you're offthe meter range, then you know you're pushing the latitude of thecamera's exposure. You can adjust the lighting accordingly, ifpossible.
Cinematographer TipJim Mathers, president (and co-founder) of the Digital Cinema Society,discusses how he approaches exposure:
With exposure tests, what I'm basically looking for is the sweet spotsomewhere between two competing extremes of underexposure on oneside, where the image would start to become unacceptably noisy; and onthe other, the point where I would start to clip, or lose detail in thehighlights. It would seem logical to flatly expose a chip chart, then simplycount out the number of steps between the two limits to find the medianvalue. However, I find that this is not always the exact center betweenthese poles; it can be more of a creative choice, and it can varydepending on the subject. And while it would be nice to assign acorresponding ASA/ISO number to a given sensor, this also depends onthe shooting situation. For example, in a high contrast daylight exterior, Imight tend to rate the sensor a little higher, looking to protect thehighlights, which would lead me to allow less exposure to reach thesensor. However, in a low key setup I might be looking to captureshadow detail, treating the sensor as if it is less sensitive, allowing morelight to pass through to help insure my shadow areas stay free of toomuch noise. Now, I'm way too pragmatic to have a different meter settingfor every scene, but I have found two or three different ratings varying withthe broad category of the shot to be appropriate, just as I might shoot a

movie on two or three different stocks. (Digital Cinema SocietyNewsletter. 26 March 2010: #6.2)
Cinematographer TipShane Hurlbut, ASC, discusses the importance of ISO settings on the 5D MarkII and how it relates to compression of the color bit depth:
In the beginning, I was scared to go above 500 ISO but 500 ISO isactually noisier than 1600 ISO. You have to give this sensor light. If youdon't give the sensor enough light, then your 8 BIT compressed colorspace will go down to 6 BIT then 4 BIT then 2 BIT color space at whichpoint you have no control in post. It is better to feed it a little more lightand then adjust your color and contrast in post. (Jan. 5, 2010 newsletter:http://hurlbutvisuals.com/newsletter_archive.php)
Hurlbut Visuals conducted a series of ISO tests and determined that the bestsettings for reduced noise levels for Canon's 5D Mark II and 7D are ISO 160,320, 640, 800, and 1250. (See Appendix 2.)
Cinematographer Tip
Lens and Sensor Size on the Canon 5D Mark IIShane Hurlbut, ASC, says, “The 5D's sensor is the size of the 70 mm VistaVision. Focus is nearly impossible at a 1.4 or a 2.0 unless you are shootinglock-off shots with little or no motion. Shooting the 5D at a 5.6 is equivalent to a1.4/2.0 split on 35 mm film. Nobody shoots movies at a 1.4/2.0 split becausethe focus puller does not have a chance to get anything in focus. If you shootaction or move the camera around with a bit of handheld, you will not have aprayer.” (Notes from personal interview, March 2010.)
Using Neutral Density FiltersFilters can change the quality of a lens, diffusing an image to make itslightly soft. The most important ones are designed not only to protectyour lenses from scratches, but filter the amount of light hitting the lens;they are called neutral density (ND) filters. This type of filter allows youto keep the aperture open under bright light conditions; the filteressentially stops down the f-stop aperture setting—without closing theiris—the amount depending on the type of filter used. Filters can bescrewed onto the lens or dropped in front of the lens when using amatte box, or they can be conveyed electronically if the camera has a

built-in neutral density function; none of the current HDSLRs haveelectronic ND filters.
Filters are assigned different numbers depending on their density,their ability to block out light. ND2 will be labeled 0.3, providing for aone f-stop equivalent reduction (see Table 3.1). Companies also makevariable ND filters so you can adjust the filter without having to switchthem out.
Table 3.1 Filter Name, Density, and f-Stop Reduction
ND Filter Type Density f-Stop ReductionND2 0.3 1ND4 0.6 2ND8 0.9 3ND16 1.2 4ND32 1.5 5ND64 1.8 6
In addition, when you're choosing an ND filter, consider getting onethat includes infrared filtration. The IR is especially useful for DSLRcameras because they're sensitive to infrared, causing oversaturationof red, as well as focusing interference issues.
Questions to Consider When Using Filters
1. What is your exposure latitude? Are you shooting in bright sunlight, forexample? Set your ISO level where you want it and then set theexposure. If you're blowing out the highlights, then it's too bright. Addinga neutral density filter will change your exposure latitude and allow you toget the shot you need.
2. How much light do you want to come through? The density determinesthe strength of the filter. The higher the number, the less light will comethrough. Be aware of the changing exposure latitude with ND filters. A 0.9filter, for example, provides 3 stops of exposure across your entire range.So if you're using an ND filter only to prevent a blowout of the highlight,be aware that your shadows will deepen, and you may lose detail,although before the ND placement, it was fine. You'll need to brighten theshadow if you don't want to lose the detail.
Cinematographer Tip

Philip Bloom recommends using variable neutral density filters. He prefers theSingh-Ray 77 mm screw-on because it dials in 2 to 8 stops of neutral density byrotating the filter. (Personal notes from Hdi RAWworks workshop, March 2010.)
In addition, if you're shooting flat/superflat, use filters only to change the lightquality, such as ND filters, ND graduated filters, and polarizers. Other filters,such as soft and frost, and so on can be applied in postproduction using MagicBullet, for example.
Considering Shutter SpeedTypically, you would follow the 180-degree shutter speed rule. Theshutter in a film camera would normally be half a circle (180 degrees),so if the film speed is of a second (fps), you would double that toget the shutter speed ( ). NTSC video shoots at 30 fps, while PAL(European standard) is 25 fps, so with NTSC you would typically shoota t of a second shutter speed. Shane Hurlbut, ASC, however,considers this “a recipe for delivering images that look like video, notfilm”:
I use a 40th or a 50th of a shutter. You never go above that.Anytime you go above, it starts looking like video. By just going
up to of a second it instantly takes a beautiful 5D that givesfilmic images and turns it into a video camera. The more yousharpen the image, the more it looks plastic. I use the motionblur to soften the crispness of HD. Shooting at a 50th is likeshooting with a 200 degree shutter. I shot the whole Rat Packon a 200 degree shutter—I loved that look.4
So setting the proper shutter speed is important in helping to attainthe film look with DSLR cameras.
Considering Frame RatesBefore addressing in-camera settings, I want to address frame rate.Currently, film has a 24 frames per second rate, and provides one ofthe benchmarks for getting the film look (video shooting at 24P), whichengages a judder effect when shooting (and that's part of the film look).
However, such filmmakers as James Cameron offer a differentopinion. He feels that unless you're transferring your project to film orhave it projected on a 24 frames per second (fps) player, then you

have it projected on a 24 frames per second (fps) player, then youdon't need to shoot 24P. In an interview with David Cohen of Variety,Cameron actually argues for a faster frame rate in order to increasethe smoother quality of the image:
I've run tests on 48 frame per second stereo and it is stunning.The cameras can do it, the projectors can (with a smallmodification) do it. So why aren't we doing it, as an industry?
Because people have been asking the wrong question foryears. They have been so focused on resolution, and countingpixels and lines, that they have forgotten about frame rate.Perceived resolution = pixels � replacement rate. A 2K imageat 48 frames per second looks as sharp as a 4K image at 24frames per second … with one fundamental difference: the4K/24 image will judder miserably during a panning shot, andthe 2K/48 won't. Higher pixel counts only preserve motionartifacts like strobing with greater fidelity. They don't solve themat all.5 )
Cameron argues for 48 frames per second because the qualitydoesn't vastly increase at a higher number and it's compatible with filmprojection (doubling the standard 24 frame rate).
For DSLR shooting, 24P will best represent the film look becausethat's the aesthetic of film and best engages the film look whenshooting with video. But getting the film look isn't just about shooting24P. You need to sculpt light and shadow and work within a specifieddynamic range, engage smooth and stable camera work, chooselenses and filters, and get proper exposure at the proper shutter speedwhen telling your story as powerfully as possible.
Checklist for Exposure
1. Set your camera to manual video mode.2. Determine your exposure latitude. Knowing your latitude range from
shadows to highlight will help determine how much light you need foryour subject, foreground, and background. If you know the dynamic rangeof the camera, you can determine how much light and light blockage youneed to control the amount of light throughout your entire exposurerange. A light meter is helpful for this process, but you can also use thehistogram to see the dynamic range from dark to bright. And you can use

the exposure meter in the camera. As you practice with image, light, andshadow, you'll be able to eyeball the exposure range for your particularcamera.
3. How rich do you want the image? The ISO level—the “speed” of theexposure—determines the richness of the image. The higher the number,the more light sensitive it will be but will result in more video noise; thelower the number, the richer the image will look but will require morelighting. Outdoor daylight will allow for ISO 100, whereas outdoor nightshots will require a high ISO setting. Some cameras have been tested fortheir “sweet” spot. Philip Bloom and Jeremy Ian Thomas of HdiRAWworks tested the Canon 5D and feel that ISO 320 will produce thecleanest image (of course, your story may dictate more grain noise, soeverything goes back to the story mood you're setting). They also feel,after doing the test, that the Canon has the following native ISOs in the5D Mark II and 7D:6 160, 320, 640, and 1250. They feel all the othersettings are digitally manipulated. Bloom says he'll use 640 when it'sdarker and 160 under a blazing sun. He was able to expose a scene withcandlelight with ISO 800. The ISO test provided by Hurlbut Visuals (seeAppendix 2) indicate the best ISOs are at 160, 320, 640, 800, and 1250.
4. How much light do you want? Set your aperture's f-stop (the lower thenumber, the more open the iris, letting in more light; higher numbersclose up the iris, cutting off the amount of light falling on the sensor).Neutral density filters are used to cut out light without changing your f-stop. (See the earlier section on filters.)
5. How much depth of field do you want? When the aperture is more open,you'll have less focal depth of field; when the aperture is more closed, thedepth of field will increase. If you need shallow depth of field and you'retoo overexposed when the aperture is wide open, decrease your ISOsetting and/or use neutral density filters.
6. Set your shutter speed. It should remain at 1/40 or 1/50 of a second tomaintain a nonvideo look and get you closer to the film look.
LensesThe human eye can see about 240 degrees with peripheral vision.Lenses do not reveal what the natural unaided eye can see. Rather,the cinematographer uses lenses as a way to shape the emotionalequivalency of what the human eye perceives and feels. If you standwithin typical talking distance from someone, this is what may translateon film as a medium shot. If the person is in a wide or long shot, thismay be equivalent to someone standing on the other side of a room—shouting distance. A close-up would be equivalent to an intimateconversation, a kiss, or a fight—where you are inches from asomeone.

Different lenses render how we perceive the subject and settingdescriptively and emotionally. Practically, different lenses allow us tochange the angle of what can be seen; they're measured by the focallength (a wide angle lens on a 35 mm camera would have a 20 mmfocal length, and a long lens might contain a 100 mm focal length; a“normal” lens would be 35 mm or 50 mm focal length; see Figure 3.9).The focal length on a DSLR camera is simply the distance of the lensto the imaging sensor when the focus is set to infinity.
Figure 3.9 A set of three Zeiss Contax prime lenses: 100 mm, 50 mm, 25 mm.(Photo by Kurt Lancaster)
A short focal length lens (a wider convex lens) bends the lightsharply, bringing the image in focus only a short distance from the lens,but the image is smaller and therefore can capture more of the scene(and place much of the foreground and background in sharp focus). Along focal length lens is less convex, bending the light at a smallerangle, placing the focal distance farther away, making the image larger(with less of the foreground and background of the scene in focus).
As a comparison, the angle of view can be broken down to a 25 mmlens having a field of view of 80 degrees, 50 mm with 46 degrees, 100mm with 24 degrees, and 180 mm with 13 degrees.6 In effect, thesharper the angle, the closer the view you can capture with the lens, ifthe camera is placed at the same distance (see Figures 3.10–3.14).

Figure 3.10 Angle of view illustration for Figures 3.11–3.14.
Figure 3.11 Zeiss 25 mm. About six feet from the subject.(Photo by Kurt Lancaster)
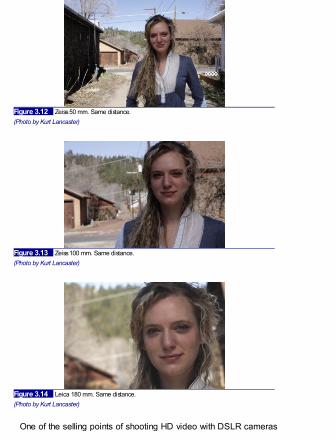
Figure 3.12 Zeiss 50 mm. Same distance.(Photo by Kurt Lancaster)
Figure 3.13 Zeiss 100 mm. Same distance.(Photo by Kurt Lancaster)
Figure 3.14 Leica 180 mm. Same distance.(Photo by Kurt Lancaster)
One of the selling points of shooting HD video with DSLR cameras

is the ability of the cinematographer to use a variety of lenses to shapethe look of the project. While most prosumer HD video cameras allowfor good HD clarity, digital filmmakers were limited by the fixed zoomlenses and small sensors. Larger sensors and removable lenses of thehybrid DSLR cameras open up important creative elements not readilyavailable on standard HD video cameras (without complex andexpensive 35 mm lens adaptors). The ability to play with depth of fieldopens up the possibilities of utilizing more of the cinematographer'sfilm tools to craft better and stronger visual stories.
In Laforet's Reverie, for example, the opening shot (see Figure3.15) and a shot later in the film (see Figure 3.16) are from the samesetup using the same lighting conditions and position. However, theangle of the lens is different. Laforet uses a tilt-shift lens (45 mm shotat f/2.8) in Figure 3.15, which allows for selective focus. The first onelooks as though it utilizes the shallow depth of field of a longer lens butwas used with the tilt-shift lens (see Figure 3.17) , allowing Laforet tochange the depth of field in the shot, placing the background out offocus, while his main subjects (the man and woman kissing) are infocus. If you look closely, you can see that in this moment of the shot(which changes focus over time), the arms of the man and woman aresharply focused while the heads are in soft focus. The second shot(Figure 3.16) reveals the woman waiting, and the Brooklyn bridge andskyline are in sharp focus.
NoteOpening up the aperture decreases depth of field but will, of course, increasethe amount of light exposed. If you want a shallow depth of field and you havetoo much exposure, then use neutral density filters.

Figure 3.15 Laforet uses a tilt-shift lens (45 mm, f/2.8) to attain selective focus. Light from aboveon Profoto 7B with a head and beauty dish and grid. Modeling lamp from 7B head only. A small LEDflashlight was used from the ground for backlight—a rim light glow edging along the woman's back.(Still from Reverie. ©2009 Vincent Laforet. Used with permission.)
Figure 3.16 Laforet uses the same tilt-shift lens as in Figure 3.15, but alters the selective focus tobring the entire shot in focus, similar to the effect with a wide angle lens. Same lighting as in theprevious shot.(Still from Reverie. ©2009 Vincent Laforet. Used with permission.)

Figure 3.17 Canon's 45 mm tilt-shift lens used by Laforet to change physical alignment of thelens and thus a shifting focal plane. A low-cost alternative to the tilt-shift lens is the Lensbaby,profiled in the equipment chapter.(Image courtesy of Canon.)
In addition to the focal length and depth of field of lenses, anotherimportant factor is the speed of the lens. A “fast” lens has a widermaximum open aperture (iris opening). Less light is needed to exposethe film—better for low light and night setups. A “slow” lens means thatit contains a narrower maximum aperture opening; more light isneeded for proper exposure. A fast lens could be f/1.4 or f/2, forexample, whereas a slow lens would be f/5.6. The difference in the twois significant: an f/1.4 lens lets in 16 times more light than an f/5.6 lens!The terms fast and slow refer to the shutter speed. Typically, a slowlens would need to keep the shutter open longer to let in the sameamount of light, whereas the fast lens allows for less time to let in light,thus a faster shutter speed.
The Director's Lens App for iPhoneTo help you make the right lens choice, you could use Artemis, the director'sdigital viewfinder iPhone app, which allows you to set the format and angle of thelens, the iPhone acting as a viewfinder, including settings for the Canon 5D and7D (see Figure 3.18).

Figure 3.18 Screen shot from the Artemis iPhone director's digital viewfinder app. It provideslens size, angle, and a visual outline representing the field of view on-screen. Developed byChemical Wedding (http://www.chemicalwedding.tv/artemis.html).(Image used with permission.)
The formats, with more in development, include:16 mm Standard, Super, and 1.3 Anamorphic35 mm Standard, Super, and Anamorphic65 mm35 mm Digital (ARRI D-21, RED One, Sony F35, Panavision Genesis)
” Digital (Sony F23, Thompson Viper, Panasonic Varicam)½” Digital (including Sony EX3 & EX1)
” Digital (including Panasonic HVX200)5D Mark II and 7D
The type of lens determines not only what you will see, but how muchlight will be exposed. With most prosumer HD video cameras,filmmakers are stuck with the fixed zoom lens. Expensive adaptorsallowed for the addition of a 35 mm lens, but with DSLRs, changinglenses is now a standard option. A zoom lens may be good forshooting documentaries, but many of these lenses adjust the exposurespeed. Zooming all the way in requires more light to expose, whereaszooming out to the widest angle requires less light. Many lenses havefixed angles, so when you place a 50 mm lens on your camera, theonly way to change the size of the composition would be to move the

camera closer or farther away from the subject. Different lensesdetermine the depth of field of what's in focus. They also determine thequality of the image, whether the lenses capture a wide image (withwide angle lenses) or whether they compress the image, creating tightshots with long lenses and shallow depth of field.
The type of lens determines not only what you will see, but how much light willbe exposed.
Checklist for Lenses
1. Zoom or primes? Cheaper zoom lenses change the aperture speedrating. For example, an f/4–5.6 means that the lens pulled wide willprovide the greatest exposure of f/4; zoomed all the way in will providethe widest exposure of f/5.6. Effectively, this means that you need toexpose everything for f/5.6 or higher because you should not change thef-stop when shooting a scene (or the shots will look different). If you havethe budget, more expensive zoom lenses will maintain their aperturerating all the way through the zoom—such as Canon't L series lenses.
2. Prime lenses have a fixed focal length and aperture rating. These are thebest lenses but can be limiting in documentary work because you maywant to change lens angles quickly without having to change lenses.
3. What is the manufacturer's brand? Different lenses require differentmounts to fit different brands and different lens sizes. PL mounts areused for cinema lenses. The Panasonic GH1 uses a micro 4/3 mount,whereas the Canon 5D uses a full-frame 35 mm EF mount, and so forth.It's recommended that you do not buy a camera with the kit lens, butinvest in high-quality zooms and a couple of primes. What to look for:does the focus ring stop or is it mushy—free spinning past the pointwhere it should stop? If you're using DSLRs in cinema projects with focuspullers or shooters needing precision, getting a lens type that stops isessential, especially when using different manufacturers' focus assists.Zeiss primes, for example, are designed for manual focusing with a lowerturn ratio (a half turn usually covers the full focal range). Also, imagestabilization is important because a slight shake or vibration can causeruined shaky shots, especially on longer lenses. A list of recommendedlenses can be found in the chapter on gear. Furthermore, when swappingout lenses, be aware of dust. You should get into a car or go inside if thewind is blowing or cover your camera with a jacket.
4. How much of the scene do you want the audience to see? Wide anglelenses present a wider field of view, whereas long lenses narrow what canbe seen.
5. How much of the scene do you want in focus? Wide angle lenses putmore of the scene in focus, whereas longer lenses decrease depth offield and narrow what's in focus. Both of these questions are answered by

the length of the lens and the placement of the camera. If you want theaudience to see more of the scene, then use a wide angle lens. If youwant them to see less, use a long lens. If you want more of the scene infocus, then use a wide to normal length lens; if you want a shallow depthof field, then use a long lens.
6. Decide the speed of the lens. A fast lens (such as f/1.4) will allow you toshoot in low and natural light, better than a slow lens (such as f/4).Faster lenses will also allow you to lower the ISO setting, giving youmore room to choose a richer look, as well as providing a shallower depthof field.
Now that we've covered some of the basics of cinematography, thenext chapter will examine how you can shape the picture style of yourDSLR, so you can get the look you want in-camera before you beginshooting.
1 The dynamic range refers to the luminance range of the setup—the ratio ofbrightest to darkest areas of the shot. In general, video has about a 4½ zone scalerange (different formats will go higher or lower, whether you're using miniDV—less,or DigiBeta—more), whereas DSLR cameras with large sensors can double that.Generally, video can express a contrast latitude ratio of 25:1, whereas film has256:1 ratio (each zone is a doubling of brightness, so four zones is 16, 8 zones is256). Knowing this, you can make choices as to proper exposure for a person'sface; for example, lighting the set accordingly so that your ratio stays within four tofive zones and letting the rest fall off. And if you want the audience to see detailsthroughout the shot, you can set up your lights so that everything stays within fourzones, for example. The contrast ratio for video cameras reflects their small chip
sizes to inch. Such DSLR cameras as the Canon 5D and 7D have muchlarger chips, the 5D containing the largest, allowing over eight zones of exposureaccording to Shane Hurlbut, ASC. Jeremy Ian Thomas, a colorist at Hdi RAWworksin Hollywood, says he can get two stops of latitude in the shadows with the Canon7D if it is shot “superflat,” a picture style mode that provides low contrast.Each of the camera's exposure settings (the f-stop or T-stop), matches the changein the zone scale; a stop down will halve the value of the exposure, whereas openingone stop will double the brightness. So the DSLR filmmaker can take advantage ofthe zone system by either setting up lights and adjusting exposure or using naturallighting and adjusting exposure. The f-stop doesn't measure tonal values; it's simplya representation of how much light is reflected on the surface of what's being shot—the light coming through the lens. Looking at an image doesn't reveal the f-stopsetting, but when you use the zone system, you can get a fairly accurate read ofthe tonal values to the point that you could re-create the look of the shot.The typical place to start with exposure is to measure your primary subject in thesetup with an 18% gray card. Set your ISO and take the measurement. This will setyour proper exposure (you'll get the correct f-stop setting), placing it in the middle(zone 5). If you control the lights, you could also go the other way. Open theaperture all the way and then adjust the lights until you have the 18% gray card at

the proper exposure.2 For a technical rundown of video versus film exposure, as well as dynamic range,see Appendix 3.3 T-stops are also used in this terminology; f-stops are determined mathematically(focal length divided by the diameter of the aperture), whereas T-stops are similarbut take in effect the light absorption quality of lenses. For practical purposes,they're nearly the same. The author uses f-stops throughout this book.4 Red centre #056. fxguide.com . <http://media.fxguide.com/redcentre/redcentre-056.mp3>, accessed 24.03.20105 Cohen, D. S. (2008, April 10). James Cameron supercharges 3-D. Variety.<http://www.variety.com/article/VR1117983864.html?categoryid=1009&cs=1>.6 The Canon Rebel T2i (550) uses all of its ISOs natively.6 The field of view ultimately depends on the lens size and the size of the sensorchip of the camera. A 35mm on a 7D has a 1.6 × difference in the field of view than a35mm on a 5D, for example. The 35mm on the 7D will be similar to a 56mm on the5D. See Collins, M. (2010). 5Dmk2/7D lens comparison test. Vimeo.com.<http://vimeo.com/14832168>.

Chapter 4
Using DSLR Picture Styles
Pitfalls of Presets and Creating Custom Styles
There's no fixed formula for creating a cinematic look, but there arewidely agreed-on parameters that should be considered. As you sawin the previous chapters, there are tools cinematographers use tocreate the mood they want the audience to feel in a particular scene ofa story. In DSLR cinema projects, the first consideration revolvesaround how to offset the video look. If DSLR shooters are not shootingwith film but using high-definition video, then they need to know thedifferences between the two. Indeed, many young cinematographersmay have never shot on film and, consequently, may not know whyvideo looks different than film. There are reasons why manycinematographers and directors of photography have avoided the useof video in the past, despite video being available for decades, andmuch cheaper than the film. If film is considered soft, creamy, as wellas smooth and sharp (mainly created by a good-quality lens), andsometimes grainy, then video usually feels harsh, sharp, noisy, andsometimes juddery (when it's captured wrong).1 The video look mainlyrevolves around overly sharp resolution (as well as how the signal isprocessed for television).2
There's no fixed formula for creating a cinematic look, but there are widelyagreed-on parameters that should be considered.
The attempt to control your image in-camera is one of the importanttools in removing the video look and beginning to achieve a cinematiclook. In this chapter, you learn how to engage a cinematic style withDSLRs by utilizing picture-style and color balance tools.

Shoot the Image FlatWhat precise picture style to recommend—as well as what presets touse (such as monochrome, faithful, neutral, landscape, portrait, andstandard, found in Canon DSLRs) or whether or not to create your ownpicture style—is highly subjective. Yet, few cinematographers woulddisagree that shooting in anything but a modified neutral setting maytake away the cinematic look you're trying to attain.
Some cinematographers will even take the image to the extremeand shoot in “flat” or “SuperFlat”modes—especially if they're engagingin a high amount of postproduction color grading. Jeremy Ian Thomas,a colorist and editor at Hdi RAWworks in Hollywood, discusses thepossibilities in shooting in a flat mode:
I can actually show you some of the SuperFlat and how muchinformation I'm pulling out of it. It's incredible. There's at leasttwo stops in the shadows, at least. And the thing about thesecameras I discovered when talking to Rodney Charters, ASC,is to expose for your highlights, because if you lose thehighlights in this camera, they're gone forever. They go into theabyss of pixels and they never come back. Now, the low end Ican get back. Especially if you're shooting in a flat, neutralprofile. If you expose and get a beautiful sky and you want thisguy's legs or his torso, I can get that back out of the shadows,but I can't get it out of the highlights. (Interview with author, 9March 2010.)
Some people warn against shooting SuperFlat because it destroysthe skin tones in post, but others argue just the opposite.3
Thomas feels you can get a good look with Canon DSLRs withoutplaying with picture styles: “Skin tones, overall color saturation, andcolor separation with these cameras [are] pretty incredible right outtathe box. It's really amazing.” But he also feels that as a colorist “thesecameras” are great when using “the flat profiles.”

So despite the concerns of some DSLR shooters when usingSuperFlat, Thomas feels that it provides the most latitude in getting theimage to look good if you're going to do a lot of manipulation in post.“It'll look like milk and honey in post,” he says, and by shooting it flat,“saturated colors blossom” when properly graded in post. He alsoprefers that the camera be set in the Adobe RGB color space,because “there's a lot of info there” for postproduction work. If you'renot going to shoot SuperFlat (a parameter only recommended if you'renot going to do a large amount of color grading), then Philip Bloomrecommends shooting it flat—which means dialing everything back(setting sharpness to 0, contrast to 0, color tone to 0, and saturation to−2).
By shooting the image flat, “saturated colors blossom” when properly graded inpost.
In addition, if flat and SuperFlat are too confusing, simply chooseNeutral picture style and use the histogram and shoot flat with that—making sure there's data in all the ranges of the tonal scale. The REDOne camera shoots flat because that camera is designed to gothrough a heavy post-process.
If flat and SuperFlat are too confusing, simply choose Neutral picture style anduse the histogram and shoot flat with that—making sure there's data in all theranges of the tonal scale.
Due to the subjective nature of color grading and getting the look ofyour shoot, your first step always should be to test before shooting areal project. Test it all the way through the postproduction phase tomake sure you're getting what you want. Jeremy Abrams, the NewsDirector for Cinema5D, agrees that testing is crucial. Just ascinematographers shooting on film “test lenses for color temperature[and] test the film stock for latitude,” you need to do a similar thing withDSLRs. “You can't just run out and shoot. Preview before you shoot—shoot an image or a series of images and go back and look at [it] on

the big monitor to see if you like what you see” (interview with author,March 2010).
Your first step always should be to test before shooting a real project.
And if you're going to be transferring to film, it is even moreimportant to test. What does the film processing company recommendfor the settings of the camera you're using? Can you shoot test shots inall your locations with similar lighting setups and have the filmprocessed and projected? This kind of testing may be crucial for aprofessional film shoot, especially on a large-budget project.
Cinematographer TipShane Hurlbut, ASC, recommends setting the contrast and color tone at neutralzero but knocking the sharpness to 0, saturation down one notch to −1 (andkeeping the contrast and color tone at 0) when shooting with the Canon 5DMark II (see Figure 4.1;http://hurlbutvisuals.com/blog/category/cinematography/).
Figure 4.1 Shane Hurlbut, ASC, recommends setting Canon 5D Mark II's sharpness to zeroand saturation at a −1 (with contrast and color tone at 0). Keep the contrast and color tone atneutral zero.(Image courtesy of Hurlbut Visuals.)
Cinematographer TipPhilip Bloom recommends the following settings for the Canon 5D Mark II and

7D (as well as the Canon Rebel T2i and 60D):Sharpness: 0 (all the way to the left)Contrast: 0 (middle)Saturation: −2Color tone: 0 (middle)
Figures 4.2 through 4.9 show examples of Canon's picture styles.Figures 4.2 through 4.5 show the pictures you should never use whentrying to shape the cinematic look with Canon DSLRs: standard,portrait, landscape, and faithful. Rather, starting with the neutral setting(as in Figure 4.6) and adjusting the sharpness, contrast, saturation,and color tone, you can begin to shape a more cinematic image (seeFigure 4.7). Be aware that when you're looking at the small screen ofthe camera, the image will look better than when it's on a large screen.
Figure 4.2 Standard. Zeiss 100 mm, f/3.5.(Photo by Kurt Lancaster.)
Figure 4.3 Portrait. Zeiss 100 mm, f/3.5.(Photo by Kurt Lancaster.)

Figure 4.4 Landscape. Zeiss 100 mm, f/3.5.(Photo by Kurt Lancaster.)
Figure 4.5 Faithful. Zeiss 100 mm, f/3.5.(Photo by Kurt Lancaster.)
Figure 4.6 Neutral. Zeiss 100 mm, f/3.5.(Photo by Kurt Lancaster.)
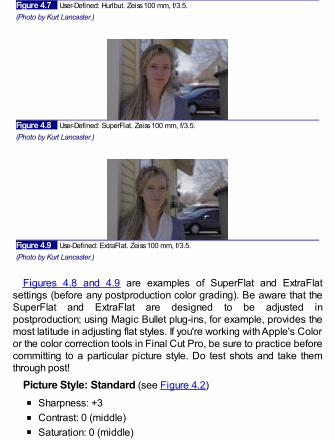
Figure 4.7 User-Defined: Hurlbut. Zeiss 100 mm, f/3.5.(Photo by Kurt Lancaster.)
Figure 4.8 User-Defined: SuperFlat. Zeiss 100 mm, f/3.5.(Photo by Kurt Lancaster.)
Figure 4.9 Use-Defined: ExtraFlat. Zeiss 100 mm, f/3.5.(Photo by Kurt Lancaster.)
Figures 4.8 and 4.9 are examples of SuperFlat and ExtraFlatsettings (before any postproduction color grading). Be aware that theSuperFlat and ExtraFlat are designed to be adjusted inpostproduction; using Magic Bullet plug-ins, for example, provides themost latitude in adjusting flat styles. If you're working with Apple's Coloror the color correction tools in Final Cut Pro, be sure to practice beforecommitting to a particular picture style. Do test shots and take themthrough post!
Picture Style: Standard (see Figure 4.2)
Sharpness: +3Contrast: 0 (middle)Saturation: 0 (middle)
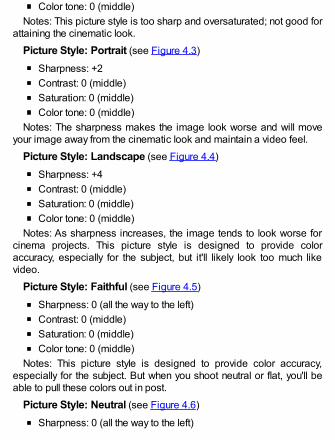
Color tone: 0 (middle)Notes: This picture style is too sharp and oversaturated; not good for
attaining the cinematic look.
Picture Style: Portrait (see Figure 4.3)
Sharpness: +2Contrast: 0 (middle)Saturation: 0 (middle)Color tone: 0 (middle)
Notes: The sharpness makes the image look worse and will moveyour image away from the cinematic look and maintain a video feel.
Picture Style: Landscape (see Figure 4.4)
Sharpness: +4Contrast: 0 (middle)Saturation: 0 (middle)Color tone: 0 (middle)
Notes: As sharpness increases, the image tends to look worse forcinema projects. This picture style is designed to provide coloraccuracy, especially for the subject, but it'll likely look too much likevideo.
Picture Style: Faithful (see Figure 4.5)
Sharpness: 0 (all the way to the left)Contrast: 0 (middle)Saturation: 0 (middle)Color tone: 0 (middle)
Notes: This picture style is designed to provide color accuracy,especially for the subject. But when you shoot neutral or flat, you'll beable to pull these colors out in post.
Picture Style: Neutral (see Figure 4.6)
Sharpness: 0 (all the way to the left)

Contrast: 0 (middle)Saturation: 0 (middle)Color tone: 0 (middle)
Notes: This picture style is designed for the most leeway inpostproduction color grading. It provides you with room to play in postwithout burning in the video look as most of the other picture stylestend to do. You should begin with this setting and then adjust and testthe settings you need for your look.
Picture Style: Hurlbut (User-Defined) (see Figure 4.7)
Sharpness: 0 (all the way to the left)Contrast: 0 (middle)Saturation: −1 (middle)Color tone: 0 (middle)
Notes: This is probably one of the best picture styles you can playwith. Use it as a basis and experiment. This is the setting ShaneHurlbut, ASC, recommends on his blog. In The Last 3 Minutes, hebumped the Contrast to −4 and Saturation to −2—the basic settingsfor shooting your image flat, which reinforces the point that you need totest and adjust until you have the look you want.
Picture Style: SuperFlat (User-Defined) (see Figure 4.8)
Sharpness: 0Contrast: −4 (all the way to the left)Saturation: −2 (two clicks to the left)Color tone: 0 (middle)
Notes: This is the setting Jeremy Ian Thomas recommends for thoseexperienced in postproduction color grading, but others argue you maylose natural skin tones, so be sure to test before committing to aparticular picture style.
Picture Style: ExtraFlat (see Figure 4.9)
Sharpness: 2 (two clicks from the left)Contrast: −4 (all the way to the left)

Saturation: −4 (all the way to the left)Color tone: +2 (two clicks from the right)
Notes: As you can see, the image is washed out, but some coloristssay that using these kinds of settings is the best way to do seriouscolor grading. If you compare both the SuperFlat and ExtraFlat imagesto the one in Neutral, you can see the black in the car and the pupils ofthe model's eyes crushed, but the flat settings lower the contrast(blacks not crushed) and provide two stops of latitude out of theshadows.
ExtraFlat was designed by Eugenia Loli when she wasn't fully satisfied with theSuperFlat setting, claiming that it was too saturated. She took the Neutralsetting as her base, and “it's a tiny bit less contrasty, but a lot less saturated,and it doesn't have the ‘red face’ attribute of the video look” (Loli, E. (2010,January 25). Flatting the flat look<http://eugenia.gnomefiles.org/2010/01/25/flatting-the-flat-look/>, accessed19.05.2010).
The ExtraFlat file can be downloaded fromhttp://eugenia.gnomefiles.org/images2/ExtraFlat.zip. Steps to installdownloaded custom picture styles are covered later in this chapter; see steps1–5 and 11–15 of “Picture Styles—Step by Step.”
As can be seen in all the picture style photos of the model, LillieLaraque, the Canon 5D Mark II biases the reds. ExtraFlat is leastimpacted by this bias. This issue can be corrected in postproductionor altered in the camera's color correction setup feature, which iscovered later in the chapter.
Embracing 8-Bit Color CompressionShane Hurlbut, ASC
With the 5D Mark II, I embrace the compression and that adds to my cocktail ofmaking it look like film.4 So with 8-bit compressed color, treat it like reversal filmstock5 —you have to get it close [to make it work right]. You cannot take animage that you forgot to adjust your color temp, and it comes in blue and wantto turn it white. Well, you can get it there, but it's going to feel unnatural. Treat

the image like you are putting the latent image that will have no color correctionpossibilities onto that CF card. And that has been my recipe.… I take thecamera and turn it into a digital imaging technician. The camera becomes theDIT. So in my picture styles, I have a picture style that I match to my lighting.That's the look of the movie. So if we put the picture style up and if it's dayexteriors, we roll with that picture style and we see where it is and then I slideover to what we call SEAL raw [shooting in a flatter mode]. And SEAL raw wasa picture style that I basically went into the computer and bent the [color andcontrast] curves so that I could suppress the highlights a little bit so they didn'tblow so much, and give me a little more latitude in the blacks. So we dial in ourexposure and match lighting with the picture style that will be the latent imageof the movie, then … right before we rolled, we slid it down and punched theselect button and rolled on SEAL raw. It would give me a little more colorcorrection ability in the under- and the over-exposed areas. Since the film, Act ofValor, I have altered this approach as I navigate without an owner's manual. Iuse an HP 2480 Dreamcolor ZX Lighting monitor with a rec. 709 function LUT[Lookup Table]. Now, I keep a flat picture style on the camera and don't have toswitch back and forth. (Red centre #056. fxguide.com .<http://media.fxguide.com/redcentre/redcentre-056.mp3.>, accessed24.03.2010)
In addition to using a flat shooting mode, some users of the camerashave tested different picture styles (that can be set in the camera),some of which mimic different film stocks. Cinema5D.com, a blog-user group post for Canon hybrid DSLRs, lists a dozen differentpicture styles for different types of film stocks—from Fuji FP-100C toKodachrome 25. You can find 7D files located athttp://cinema5d.com/viewtopic.php?f=64&t=7104.
Adjusting the RED Camera (Scarlet, Epic) with Mysterium-XSensorJim Mathers, a cinematographer and president of the Digital Cinema Society,discusses what he does when adjusting the settings on his RED camera withthe Mysterium-X sensor. RED is a camera designed to be shot in a flat modewith the assumption that all the shots will be color-graded in post (and thereforeneeds to be color-graded in post before you can tell what it looks like):
The in-camera metering has been steadily improving with each firmware

update, but with the new sensor and the latest firmware build, whichsupports “FLUT™”, (Floating-Point Lookup Table,) and REDcolor, thenew Color Science for Mysterium-X, it is very well dialed in. There arereally more exposure guides than anyone should ever need includingFalse Color, Stop Lights, Zebras, Histogram, Goal Posts, Barber Pole,RAW Check, and … I honestly don't use these in-camera tools toomuch, or even know what they all do.
What I like to do instead is to record a shot, then quickly load itinto REDCINE-X™. This is a free application, downloadable tothose registered at RED.com. It provides very sophisticated coloranalysis software allowing you to view the image in a variety ofcolor spaces and several Gamma Spaces, even custom. As withRED Alert, you can adjust color, contrast, saturation, and adjustthe gamma curve with a number of different interfaces, readjustingthe settings you had loaded in as Metadata when you shot. Youcan even White Balance in post by dragging the cursor towhatever you might want to reference as white in your picture onthe viewer. To top it off, you can download these settings backinto the camera for better on-set calibration, which should be agreat help in matching multiple cameras.
There's a lot to play with in the new REDCINE-X™, and I foundjust going through it to be a very educational exercise in colormanagement. Not that I would think myself competent to grade amovie, but it gives me a glimpse into the kinds of tools available tothe trained Colorist, and I think it will help me communicate thenext time I'm supervising a color timing session. In this case, it isall about giving me the confidence to make quick decisions on theset as the sun is going down, in and out of clouds, or for whateverreason I am, as usual, rushed. (Digital Cinema Society Newsletter,26 March 2010 #6.2)
Author's note: For those not using a RED and needing a sophisticatedproduction tool to communicate with postproduction, take a look at Gamma andDensity's DcP software at http://3cp.gammadensity.com/index-2-prod-3cP.html.You can download a demo version and test it to see if it meets your needs.
Production Color CorrectionShane Hurlbut, ASC, quickly embraced the Canon 5D Mark II as acinema camera—but with limitations. He discovered that the 8-bit

color space did not give him the postproduction latitude he wasaccustomed to in film:
Our solution was to go back to the un-compressed Cineform orAdobe CS5 4:4:4 files and start anew.6 This worked very welland it seemed to give us much more range. I also realized toolate that this camera needs light. If you don't feed it enough lightthe 8-bit compressed color space quickly goes to 4- and then to2- bit color space.7 You can always create contrast bystretching the image by pushing the whites and pulling yourblacks down. Underexposure is a powerful tool with thiscamera, but the whole image cannot be underexposed. It willresult in noise, fall apart quickly in color correction and just lookmuddy. (Hurlbut, S. (2010, March 30). Color Correction: PutYour Best Foot Forward. Hurlblog<http://hurlbutvisuals.com/blog/2010/03/30/color-correction-put-your-best-foot-forward/>.)
Essentially, Hurlbut realized that the H.264 codec Canon usesdoesn't have much wiggle room in post with color correction. Althoughit can be edited natively with some software (including Final Cut Pro), itis not the way to go because it's being used as an origination codec,not a postproduction one. DSLR footage must be up-rezzed to a 4:4:4or 4:2:2 color space. One of the ways to work around the codec in-camera, Hurlbut suggests, is to try to attain the look with Canon'sPicture Style Editor, modifying a RAW still image and then save it as alook you can upload into the camera (see Figure 4.10).

Figure 4.10 The picture style for The Last 3 Minutes was shot in modified neutral with a −4 onContrast and −2 on Saturation.(Still from The Last 3 Minutes ©2010 Hurlbut Visuals. Used with permission.)
In addition to engaging such user-defined picture styles asSuperFlat and ExtraFlat by adjusting sharpness, contrast, saturation,and color tone, one of the key features of the Canon DSLR revolvesaround the custom picture style, which allows you to take a RAW photoand set that as your user-defined picture style!
Picture Style—Step by Step
1. Take a RAW picture.8
2. Plug the camera into the computer and turn it on.3. Open up EOS Utility (install from the provided EOS Digital
Solution Disk that comes with the camera); it looks like theimage in Figure 4.11.

Figure 4.11 Canon's software for computer control of the camera.
4. Click on the Accessories button (there are two: Control Cameraand Accessories), which takes you to the window shown inFigure 4.12.
Figure 4.12 Window to the Picture Style Editor.
5. Open the Picture Style Editor. If you're installing a picture styleyou've downloaded, such as ExtraFlat, go to step 11.
6. Open the folder containing the RAW image you want to

reference and drag and drop it to the window shown in Figure4.13.
Figure 4.13 The empty screen where you can drag an image for picture stylemanipulation.
7. Click on the second button from the bottom left (the image withtwo little windows), and you get two images: one is the original,and the second is the one you'll manipulate (see Figure 4.14).

Figure 4.14 A two-up image for picture style manipulation. On the left is the untouchedRAW image, while the right image shows the changes you can make in the far-right window.
8. The diagonal line in the lower-right grid represents a gammacurve. Adjusting this allows you to shape the look of your picturestyle. Click on the line and drag the mouse to adjust the image.
9. Dragging a point on the lower part of the line to the left willexpand the space in the blacks, providing a bit more dynamicrange (see Figure 4.15). Dragging it to the right will crush theblacks. Shane Hurlbut, ASC, recommends just a slight curve tothe left to open up the blacks a bit. As you adjust the setting, theinput/output will receive a number value. High values—the brights—should be lessened; you can do so by creating a node nearthe top of the line and then dragging it slightly to the right. Themiddle of the line allows you to adjust the midrange values. Themore you bend the curves, the more extreme the image, so slightadjustments are recommended. Essentially, you're stretching theblacks and whites and making them flat, which is the opposite ofthe goal in post—where you want to deepen the blacks andslowly roll off the whites. Experimentation is the best school,when it comes to shaping picture profiles! Test, Test, Test!

Figure 4.15 Click on the gamma curve line to make changes to the image in the picturestyle window.
10. After you've made the adjustment to your tastes, getting the lookas close as possible to the final look you desire, save the file. Ifyou're doing a professional-style shoot, you'll want two files: onereflecting the final look you want as a lookup table, and the otheryou'll want to create as a flat look, which is the best way toengage color grading in post. If you're not planning to do muchpost work, such as when you're shooting a journalism pieceneeding a fast turnaround, get the look you want as close aspossible. This is the new picture style that you'll upload to thecamera.
11. Go to EOS Utilities and click on the Camera settings/Remoteshooting menu (see Figure 4.16). The camera must be pluggedinto the computer and turned on for these menu items to appear.

Figure 4.16 Main menu.
12. You should see a window with a control panel to your camera,which includes battery life, f-stop settings, color temperature,shutter speed, and what picture style you're currently on, amongother features (see Figure 4.17). Look at the Picture Stylesection and click on User Def. 1 (there are three, and you canchoose any one of them).

Figure 4.17 The control panel to the 5D Mark II camera. It not only provides the currentsettings of the camera, but allows you to import the picture style.
13. You can click on the picture style and adjust the detail settings,white balance shift, and so forth (see Figure 4.18). Click onRegister User Defined style.9

Figure 4.18 The data for the picture style as shown in the control panel window.
14. This will take you to a window where you can select from a drop-down menu or open a folder. In this case, open the folder andselect the picture file you created from the adjusted RAW imagein Picture Style Editor (see Figure 4.19). Note: This is the stepyou use if you're downloading an existing picture style, such asExtraFlat.

Figure 4.19 Three user-defined styles can be manipulated. Click the folder button toupload your particular picture style for each.
15. After you've selected your picture style file, your window will showthe file. It includes the adjustments made in the picture detailshown in Figure 4.20.
Figure 4.20 After you upload the picture style, the window will provide an overview of thesettings in-camera.
The picture style has been set and saved into your camera. Anytimeyou choose this user defined style, you'll be shooting in the mode youshaped through the Picture Style Editor. Just as a cinematographerwill test film stock before shooting, you should test it and experimentwith others before shooting. Use a flat mode when shooting whenyou're planning to do any color grading in post, and use the lookuptable as your film look reference point. The best test is to put it throughthe decompression and editing workflow and export it onto a largescreen and view it. You should be making these picture style edits onlywith a calibrated monitor in order to ensure accuracy, which isimperative if you're transferring the footage to film. And taking theadvice of the film-out company you're using is a must when you'replanning to screen the end result on film.

Color BalanceHaving used 15 different 5D Mark IIs on the shoot of the Navy SEALSmovie, Act of Valor, Hurlbut says he has noticed different biases in thesensors; some have a slight cast of yellow or magenta. BernardoUzeda, the director and postproduction person on the Brazilian shortCasulo (featured in Chapter 8) notes how the 5D Mark II used on theshoot was “very sensitive to the color red” and he removed “red fromalmost 100% of the shots” in postproduction.
I teach students to shoot a white or gray card image in the lightingconditions they're shooting under (making sure to dial in the propercolor temperature) and be sure the image is truly white (or gray). Ifthere's a slight color cast, then the color balance of the camera may beadjusted manually by clicking on the Menu button on the camera andgoing into the white balance shift/white balance bracketing (WBSHIFT/BKT) menu located under tab 2 (Shooting 2 submenu of themain menu; see Figure 4.21).
Figure 4.21 The list of submenu items under tab 2 of the main menu in the Canon 5D Mark II.(Image courtesy of Canon.)
After you select the WB SHIFT/BKT submenu, you will be taken tothe color correction window (see Figure 4.22).

Figure 4.22 The white balance shift window. B=blue, G=green, A=amber, M=magenta. Move thecamera's toggle switch to adjust the parameters.(Image courtesy of Canon.)
By making adjustments with the toggle, you can remove the colorcast. If it's reddish, move the point toward the green, for example. Usethe opposite color for the one you want to alter. You can also use thistool to add color to a scene if you are trying to attain that look. Again,test it first in the field.
The most important point revolves around the fact that an 8-bit colordepth is “thin,” to use the words of Hdi RAWworks colorist Jeremy IanThomas, especially in a Canon 5D Mark II. And as Hurlbut explains, thecompressed H.264 codec does not help because there's very littleroom to stretch the look of the image in post. Therefore, attain yourlook as close as possible to the final product. An additional note,Thomas explains that, as a colorist, he prefers the Canon 7D becausethe pixels are more dense—not stretched as thin as the 5D—and itgives him a little bit more play in post. Shooting a color-true chart mightalso be useful when wanting to get your color temperature right (lookup “DSC color chart” on the Web), but they can be pricey, around$200.
To sum up, Jared Abrams, News Director for Cinema 5D,discusses the importance of planning the look of the film before youshoot:
You are building a race car, you are priming it and these guysget to paint it and boy wouldn't it be a bummer if they painted itday glow orange on you? Neil Smith at Hdi RAWworks is really

passionate about—and I agree with him totally—talking to yourcolorist; talk to your post people first before you ever shoot thecamera. Talk to someone about the post processing and thecolor so when you shoot you can favor what they need to makethe best product.
This chapter gave you an overview of what picture styles look likeand how to engage picture styles to shape the look of your film beforeshooting it; it also covered the ability to shape the color correction ofCanon DSLRs in-camera. The next chapter covers one of the mostimportant tools in attaining a film look—recording quality audio—because no matter how good your look is, if the audio is bad, theaudience will not be able to see how good it looks. Therefore, a cleanaudio design is essential in achieving the potential cinematic quality ofDSLRs. Without it, you have less than half a film. Audio is not anafterthought, because a good audio design can make your film shinemore than any other tool.
1 If video is captured wrong (such as with Panasonic's DVX100 A/B coming in at1/60), motion-blur will need to be added to attain the 1/48 look.2 Television broadcast utilizes interlaced scan lines, such as 60i in a camera. If notcorrected in post, websites will show these horizontal lines as video artifacts, whichruins the image.3 See Why Shoot Flat? My Definitive Answer: http://www.elskid.com/blog/?p=981&cpage=1;Flatten your 5D: http://prolost.com/blog/2009/8/3/flatten-your-5d.html;They Shoot Horses JPEGs Don't They?:http://photocinenews.com/2010/04/26/they-shoot-horses-jpegs-dont-they/;Shoot flator not?: http://www.canon5dtips.com/2010/04/shoot-flat-or-not/;Changes inLatitudes, Changes in Attitudes: http://www.notafraid.com/2010/03/changes-in-latitudes-changes-in-attitudes/;4 Hurlbut knows that film is closer to a 20-bit compression. However, he feels if heembraces the limitations of the 8-bit color space of the Canon DSLRs—instead offorcing it to do what it can't—he can work around those limitations and attain a filmlook that works for him.5 In other words, worry about blowing out the highlights, so be sure to expose forthe highlights.6 Chapter 6 on postproduction, covers the Cineform codec for decompressing themovie files.

7 This occurs when a poor lighting and/or wrong ISO setting is used.8 One DSLR shooter notes how he takes a different picture for each ISO and colortemperature setting; he created three picture profiles taking into considerationdifferent color temps: Tungsten (indoor), daylight shade, and normal daylight. (Tico(2010). <http://hurlbutvisuals.com/blog/2010/03/30/color-correction-put-your-best-foot-forward/>.)9 Notice the Live View shoot … button. Clicking on it will allow to see yourcamera's image through your laptop. If you're in the field and want to use your laptopas a field monitor, this feature allows you to do so.


Chapter 5
Recording Quality Audio with DSLRs
Yes, It's Possible!
Record Sound Like A FilmmakerLancaster law of sound: No one can watch a film if the audio soundsbad. No matter how good the image, poor sound quality will block yourviewers from ever appreciating the image. Do not ever skimp onsound. It is the most important element in scenes with dialog. In fact,you can present a fairly poor image and if the audio is spot on, peoplewill enjoy the movie—more so than good images accompanied by badsound. Bad sound is a dead giveaway that the film was made by anamateur.
With DSLR cameras, it's pretty easy to get bad sound. But withsome basic knowledge and the proper tools, the DSLR shooter canrecord great audio. Dialog should never be recorded with the built-incamera mics. Ever.1 Jeremy Abrams, the news director at Cinema5D,says he likes the fact that DSLRs make you go “back to basics” offilmmaking:
The way they started motion picture was one frame at a time.And eventually they just strung 'em together until it looked likesomething they were used to and liked, and off we went. TheDSLR cameras are doing just the same thing. It's a great sync-sound camera. If you treat it like that, then you'll get the most outof it. If you run separate sound, you will get better sound. Andthe fact that they didn't jam all this audio into it just makes it amore potent camera. That's one of the bad things aboutstandard little video cameras is that they're trying to jam all this

audio technology into it. (Interview with author, March 2010.)
Because DSLR manufacturers decided to deliver a strong pictureover strong audio—and there's a compromise on space—DSLRshooters must shoot like filmmakers when recording sound. Ideally,recording sound separately, or at the very least, disabling theautomatic gain control (AGC) in the camera, getting the propermicrophones, and connecting the mic to a professional audio adapter(containing a preamp with limiters) are essential in getting the bestpossible sound.
DSLR shooters must shoot like filmmakers when recording sound.
The following are some basics you, as the DSLR filmmaker, shouldconsider when shooting:
1. What is the sound quality of the space you're recording, whetherindoor or outdoors?
2. What type of microphone will you use, such as a shotgun mic ora lavaliere? Or are you stuck with just an onboard mic? Thechoice will determine your pickup pattern (what area of sound themic will favor when recording).
3. Will you use a condenser or dynamic mic? Will it be poweredthrough its own battery or from the camera's power, providing“phantom” power?
4. Will you have high impedance or low impedance—minijackinput or XLR input?
5. Can you disable automatic gain control of your sound andmanually control the sound?
6. What is the compression of your audio recording?7. Where will you place the microphone? Will it be a camera-
mounted mic, or will you use a boom pole or pistol grip?8. Will you use an external audio recorder or just record it to the

camera (or both)?
The answers to these questions will determine your audio quality.This chapter covers these topics so you can be more informed in yourchoices as you shoot and know the impact of compromises. Youshould test through postproduction and into a final export of yourproject to understand what your final field audio recording will soundlike.
Sound QualityJust as the cinematographer must be aware of the quality and sourceof light in a scene, DSLR shooters need to be aware of the ambientroom quality. Is it hard or soft? Hard walls and hard floors will reverbyour audio, providing micro-echoes of sound in the space. Test thesound quality by yelling in the space. If you hear an echo, reverb will beabundant and the audio may sound a bit tinny. A room with carpeting,furniture, and so forth will absorb the sound and break up the audiowavelengths, so the reverb will be minimized. Outdoors (other than analley) will likely provide a soft sound quality. A windy day will causeaudio impacts, pretty much ruining the recording. Using a windscreenwill minimize this damage—not the foam windscreen that usuallycomes with the mic, but a large, thick, furry screen covering a soundblimp for wind production (look ahead to Figure 5.8).
In addition, the DSLR shooter must decide if the subjects shouldsound close or far away. In most cases, their voices should sound asthough they're close, so the microphone must be brought in close (lessthan three feet or closer). If distance needs to be conveyed, then pullthe microphone back so it sounds as though someone is talkingacross the room, for example.
In addition, many DSLR cameras utilize automatic gain control,which means the camera will adjust the levels of the audio coming intothe recording, depending on how much sound is hitting the mic. A lot ofsound will lower the input, whereas soft sounds will force the camera toincrease the levels, typically causing unwanted hiss. In either case, the

AGC will result in bad sound by recording uneven audio levels andadding extra noise when the levels are low and the AGC increases tocompensate. In most cases, you want to turn off the AGC, which isreally not an option for most DSLR cameras. The Canon 5D Mark IIand Canon 60D allow for manual control of the audio. BeachTek andjuicedLink are two companies that provide devices to disable the AGCof cameras and allow you to input XLR microphones (more about themlater in the chapter). These devices trick the camera so that it thinks allthe audio is even, allowing manual control of the audio.
In addition, audio is recorded at different qualities. A 44.1 k, 16-bitrecording is lower quality than a 48 k, 24-bit recording. The firstnumber refers to the sampling rate—the amount of times per secondthe audio is sampled (44,100/second), and the second number refersto the amount of information recorded per sample (16 or 24). MostDSLR cameras have a set recording compression scheme, and theywill be of the two types. Both will provide good sound quality. If you'reusing an external recorder, you have the option of setting differentcompression schemes. Just make sure you set the same compressionas the camera so you can sync them up in post. Do not usecompressed .mp3 recording—no matter how high the bit rate. Keepyour audio data as raw as possible!
Also, when recording audio, such as dialog, be sure to record roomtone in every space you record. Have everyone on set be quiet andrecord blank audio for at least a minute. This will capture the ambientsound you will need in editing in order to fill in gaps between takes orto even out the sound quality from different takes.
Checklist for Sound Quality
1. Are you indoors or outdoors?2. What is the surface quality of the environment? Will the sound reverb, or
is it absorbed in the environment?3. Do you want your subject to sound close?4. Do you want your subject to sound far away?5. Can you turn off the automatic gain control? If not, then use an audio

adapter that turns it off or use an external digital audio recorder.6. What is your compression value? (You don't need this unless you're
using a recording external device, in which case you want it to match thecamera's audio compression.)
The following sections provide an overview of some of theequipment you may think about using on your shoots. They include ajustification of what works well and why. Some of this information maybe a review for experienced filmmakers, so feel free to skip over it. Ifyou're relatively new to DSLR filmmaking, the information may beuseful, especially if you're trying to get better sound for your projects.The final section of the chapter will walk you through two audioworkflow setups covering the recording of an external onboard mic andan external digital recorder with the intention of syncing your audiousing PluralEyes software in Final Cut (covered in Chapter 6 onpostproduction workflow).
Microphone TypesMicrophone types sound differently; they will convey different audioqualities depending on the space you're in. The major mic typesinclude lavalieres (lavs), omnidirectionals (omnis), cardioids, andshotguns. They will never sound the same.
Lavs are needed for wide shots with dialog (we'll see the boompole with a shotgun mic in a wide shot).Cardioids are for use indoors.Shotguns are for outdoor medium and close-up shots.
Cardioids provide the best sound recording but pick up too muchnoise outside. Because shotgun mics have the rear lobe pickuppattern, they'll pick up reflections of sound off the ceiling and wall,resulting in interference. Lavs, although useful for picking up dialog in awide shot, don't sound as good and need to be postprocessed tobring back the warmth of a person's voice. For run-and-gun journalistsand documentary filmmakers, the shotgun is the best choice if you can

choose only one mic.
Many of these mics include space for a 1.5 volt AA battery, but youwill want to use phantom power if available because it will increase thequality during recording, although it will reduce the battery life of yourrecorder. The voltage allows the signal to be picked up when soundwaves hit the front plate, changing the value of the air quality against acapacitor and turning it into an electric signal. On the other hand,dynamic microphones, the ones you see reporters use on televisionnews, are more rugged and do not require any external power. But thesound quality is not as good as condenser microphones.
Shotgun microphones are unidirectional, oftentimes with a cardioidor supercardioid pickup pattern. A cardioid pattern allows you torecord sounds from the direction the microphone is pointed (seeFigure 5.1), whereas a supercardioid—found in shotgun mics—doesthe same thing but also picks up some sound from the rear (seeFigure 5.2).
Figure 5.1 Cardioid pickup pattern.(The Microphone, your voice's Gateway to the World. Voiceover4us.com.
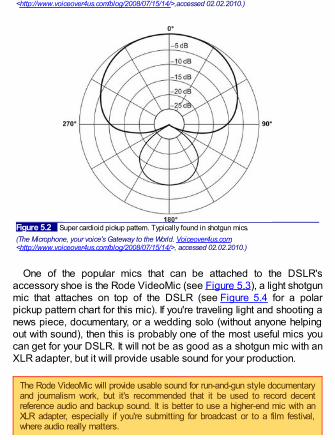
<http://www.voiceover4us.com/blog/2008/07/15/14/>,accessed 02.02.2010.)
Figure 5.2 Super cardioid pickup pattern. Typically found in shotgun mics.(The Microphone, your voice's Gateway to the World. Voiceover4us.com.<http://www.voiceover4us.com/blog/2008/07/15/14/>, accessed 02.02.2010.)
One of the popular mics that can be attached to the DSLR'saccessory shoe is the Rode VideoMic (see Figure 5.3), a light shotgunmic that attaches on top of the DSLR (see Figure 5.4 for a polarpickup pattern chart for this mic). If you're traveling light and shooting anews piece, documentary, or a wedding solo (without anyone helpingout with sound), then this is probably one of the most useful mics youcan get for your DSLR. It will not be as good as a shotgun mic with anXLR adapter, but it will provide usable sound for your production.
The Rode VideoMic will provide usable sound for run-and-gun style documentaryand journalism work, but it's recommended that it be used to record decentreference audio and backup sound. It is better to use a higher-end mic with anXLR adapter, especially if you're submitting for broadcast or to a film festival,where audio really matters.

If you're shooting solo and going for speed, attaching an on-camera mic, suchas the Rode VideoMic, is a great choice. When you're talking to someone, besure that person is close, no more than three feet away, if you want to captureas clean a sound as possible. This may work great for news and documentary.However, when shooting short fiction pieces and commercials, you will wantwider shots and still pick up clean audio. But because the performers are morethan a few feet away (even five feet is probably too far), you'll need to run longercable. Be aware that microphones with minijack plugs (the standard tip-ring-sleeve, or TRS, connectors) are high impedance using unbalanced cables andthe signal will weaken over distance, and these mics are prone to picking upnoise. You need a balanced cable (XLR).
Figure 5.3 Rode VideoMic with foam cover. This mic includes a built-in shock mount to reducenoise from movement. The foam windscreen is not useful against wind; you'll need a goodwindscreen (see Figure 5.8). The frequency response of this mic ranges from 40 Hz to 20 kHz. Thismic uses a minijack connector; it's a high impedance mic but can connect directly to the DSLR'smicrophone jack without any kind of adapter. This minijack mic could be plugged directly into anexternal audio recorder, such as the Marantz PMD620 (~$400). You may want to tape the minijackplug so that there's less of a chance of having the cord accidentally being pulled during a recording.(Image courtesy of Rode.)

Figure 5.4 Rode VideoMic's polar pickup pattern measured in frequency response. The Hertzrefers to the wavelength. The lower number is low-frequency sounds such as rumbles and base. Thehigher frequency expresses higher tones. A human voice can range from 80 Hz to 1100 Hz.(Image courtesy of Rode.)
The Rode NTG2 shotgun mic is a decent dialog microphone, mostuseful for outdoor shots or indoors if sound reflection is minimal (seeFigure 5.5), and if you're shooting solo, attach this mic to a DSLR rigalong with an XLR adapter that provides phantom power, and you'll getreally good sound. If you have a sound person, this type of mic is agreat choice when attaching it to an external recorder (such as aTascam DR-100 or Zoom H4n).

Figure 5.5 The Rode NTG-2 shotgun microphone and its polar pickup pattern. A good budgetdialog mic. The frequency response of this mic ranges from 20 Hz to 20 kHz. This mic uses an XLRconnector, which means you'll need to use an audio adapter from BeachTek or juicedLink.(http://usa.rodemic.com/microphone.php?product=NTG-2, accessed 02.02.2010.)
Whatever shotgun mic you end up using, knowing its strengths andweaknesses is important. Note, for example, the frequency responseof the Rode VideoMic compared to the Rode NTG-2. The NTG-2 cango as low as 20 Hz, whereas the VideoMic is limited to 40 Hz. Fewerlow frequencies will be picked up by the VideoMic. However, often aboom pole sound operator will engage the low-cut filter to minimizeboom pole handling, removing the lower frequencies from the shotgunmic.
Shotgun mics provide the best sound in your recording work, butusing a shotgun inside a room with a lot of reverb will cause extraaudio muddiness. Also, the onboard VideoMic attaches to a high-impedance 3.5 mm connector. If attached to an extension cable, it maypick up noise (such as from a nearby radio station, for example), andthe audio quality will drop off.

If, instead, you use a mic with an XLR connector (with balancedcable, which will resist the noise that high-impedance lines will pickup), you will have the advantage of running long cable, and it'll pick upvery little to no noise, and the audio quality will stay high. But you willneed to hook it up to an XLR adapter or use an external audiorecorder with XLR inputs, because DSLR cameras currently availabledo not contain an XLR input (see the “XLR Adapters” section later).
It must be noted that the interference tube in shotgun mics don't workwell indoors—unless there's a lot of sound absorption material, suchas furniture. Sound reflecting off the wall skews the frequency anddraws attention to the echo sounds. If all you have is a shotgun mic,typical of run-and-gun style doc shooters, video journalists, and indies,be aware of the space you're in and adjust the direction of the mic, asneeded. Holding the mic from below, for example, may minimizesounds bouncing off the walls.
When pointing a shotgun mic at someone, remember that it will pickup sound behind the person, so if he is standing on a sidewalk andyou're facing the street with the camera-mic setup, you'll get loud trafficnoise. If you have the person turn around so you're facing a storefront,you'll get much cleaner sound. When shooting a documentary in HoodRiver, Oregon, I interviewed many people on the street asking themabout their Sasquatch sightings. The shotgun mic was held close tothem, and traffic noise was minimal, despite the number of cars andtrucks rumbling by. In addition, holding the mic up in the air (with aboom pole or pistol grip) and pointing down toward your performer'svoice will also minimize external sounds because extra noise isminimal when pointing toward the ground.
Most lavaliere mics are omnidirectional, picking up sound from alldirections. If you want someone to sound close up and personal, thelav mic, when wired properly, provides a good, clean sound. Lavsrequire a transmitter box that typically hooks to the subject's belt, and awire attached to the mic is strung up beneath the subject's shirt andhooks onto the shirt collar (see Figure 5.6). An XLR wire connects thetransmitter box to the camera's XLR adapter. There are also wirelessmodels, which allow the transmitter to send the audio remotely to a

receiver that connects to the XLR adapter.
Figure 5.6 Sennheiser's wireless lav G3 microphone system. It's expensive at $600, but thewireless will give you flexibility on shoots.
Built-in mics, no matter the camera, are nearly useless and usuallyprovide poor sound quality. They're useful only for reference audio ifyou're recording sound externally on a digital recording device. If youmust use the onboard mic, make sure it's not windy and make sureyour subject is standing no more than three feet away.
For DSLR cameras, phantom power is provided only with onboardexternal XLR adapters or external digital recorders.
Getting the Right Mic and Using a Boom OperatorFilmmaker David Anselmi says that “even a crappy mic sounds better on aboom! A mic with a boom pole and a good boom operator can give you greatsound—much, much better than a $1,000 Sennheiser 416 mounted on thecamera!”
In addition, Anselmi recommends going for microphones in the $600–$1,000range. “You may want to do an A/B comparison of a lower-end mic with a high-end mic with excellent audio monitors, so you can hear the difference—you'llnever be satisfied with a $250 mic again. Also, for outdoors—especially in heavywind—a blimp is essential.” Words of wisdom as you shop for the rightmicrophone. Testing is always the best rule of thumb. If you're in New York City,B&H Photo has an audio room where you can test microphones (otherprofessional video/audio gear stores will also allow you to test mics).

WindscreensWindscreens are absolutely essential when shooting outdoors, even ifthere's only a light breeze. Wind impacts a microphone's diaphragmhard and can easily damage your audio. The foam covers that comewith microphones are really designed to soften the speech of theperformer; they're not windscreens and will not hold up to outdoor useeven on a light windy day. Rather, using a windmuff or windscreen isthe way to go (see Figure 5.7). They slip over the microphone, andtheir thick, furry cover breaks up the impact of the wind. Some modelscover the microphone snuggly; others, such as Rycote's Miniscreen,leave a gap between the mic and windscreen, which, from my tests,seems to work better in stronger wind (see Figure 5.8). (See Chapter13 on gear for an overview of several different models.)
Figure 5.7 The Rycote Softie offers some protection against wind but is not good for moderatelevels of wind.

Figure 5.8 Rycote's Miniscreen is a great budget option (~$80) for taking out moderate wind noiseon a shotgun microphone.
XLR AdaptersIf you want to get good sound out of a DSLR, utilizing a preamp withXLR connectors is the best option if you're not using an externalrecorder. You'll get a rich and clean signal. This option also allows youto use professional XLR mics.
Furthermore, using an XLR cable is a must for recording over adistance of a few feet, and because DSLR cameras do not containXLR inputs, you'll need to use an XLR adapter. JuicedLink andBeachTek are two popular companies that build XLR adapters, but thetwo products I'll describe here also allow for audio monitoring (withheadphone inputs), provide phantom power to power your mics, andsubvert the automatic gain control of the audio in-camera. As notedbefore, most, if not all, DSLR cameras use AGC; the only exceptionsas of this writing are the Canon 60D and 5D Mark II (which updated itsfirmware in March 2010 to allow for manual control of audio).
Be sure the adapter has the proper transformer and circuits; otherwise, the noise resistance natural to the XLR cable will be lost. Inaddition, the XLR adaptor box contains a mini-jack that plugs into theDSLR's mic input; this input can easily break. Some people hot gluethe right angle connector into the minijack and cable-tie the slack to thecamera, connecting and disconnecting the cable from the adapter box.

BeachTek DXA-SLR XLR AdapterBeachTek's DXA-SLR model includes a microphone preamp (15 dB)to help provide a clean signal for your microphone (see Figure 5.9). It'sdesigned so you can access the battery of the Canon 5D Mark II. Italso has 48 volts of phantom power capabilities, which is an addedbonus for powering your mics. It doesn't have LED meters formonitoring audio input levels, but it uses a single LED to indicate redwhen audio clips.
Figure 5.9 BeachTek's DXA-SLR model.
JuicedLink's Preamp DT454JuicedLink's preamp DT454 provides clean audio with the circuitry ofits preamp—a product designed for video cameras needing XLRadapters (see Figure 5.10). It overrides the automatic gain control ofDSLR cameras with an AGC disabler (not needed for the Canon 5Dand 60D). It allows you to use up to two XLR mics, as well as twominijack unbalanced mics (useful for those who own Rode's VideoMicbut want a clean connection and clean sound). It also includes LEDlevel meters, a headphone jack (a must-have!), as well as 48 V and 12V of phantom power.

Figure 5.10 JuicedLink's preamp DT454.
Pistol Grip and Boom PolePistol grips and boom poles are basic tools if you're working with acrew. If you're running and gunning, then stick with your onboardexternal microphone, but if you have at least one other person helpingout on the shoot, use a boom pole to bring your mic in close to yoursubject. A pistol grip provides a similar tool for medium and close-upshots (see Figure 5.11). I've sat in a chair during an interview andhandheld the mic with a pistol grip, just out of frame, and receivedexcellent quality sound because I can place the mic a foot or two closerto the subject than just placing it on-camera. In this kind of setup, I putthe camera on a tripod, use an XLR adapter, and sit beside thecamera so I can monitor the image during the interview. When using aboom pole, be sure to strap the cord to the pole, so the wire doesn't hitthe pole, creating additional noise.

Figure 5.11 A Rycote pistol grip. Great for getting a mic in close when you have tighter shots. Thedevice is designed to minimize noise when holding a shotgun microphone.
External RecordersIf you want to get the best sound possible with DSLR cameras, theZoom H4n (see Figure 5.12) and Tascam DR-100 (see Figure 5.13)are two possible choices for you to record sound separately, whilegetting a professionally clean recording with XLR mics. They recorddigitally onto an SDHC card.
Figure 5.12 Zoom H4n audio recorder.

Figure 5.13 Tascam DR-100 audio recorder.
Essentially, these recorders allow you to hook up a professionalmicrophone to their XLR inputs, so you'll get the cleanest audio. Thereare also a variety of settings that can be chosen, but be sure to pick anon-MP3 compressed format. Use 44.1 kHz, 16-bit or 48 kHz, 24-bit(or the one that matches the audio compression of the camera. If it's adifferent rate, you may get material out of sync). You will still recordaudio on the DSLR camera's microphone and use it as a reference,and replace it with the clean audio after you've synced it up using a lipsync software, such as PluralEyes from Singular Software (PC version—Sony Vegas Pro; Mac version—Final Cut Pro) or DualEyes, astandalone application for PC or Mac. Record a slapping of hands oruse a slate at the beginning of the take, and make sure everything'srecording; it's sometimes too easy to forget to turn on the externalrecorder!
Use the Rode VideoMic connected to the DSLR's hotshoe as yourreference and backup sound; then bring in the XLR mic as close aspossible. You could consider putting the device on a small tripod. Ifyou're using only a minijack microphone, you may want to considergetting the Marantz PMD620 audio recorder. It doesn't have XLRinputs, but it'll give you a clean recording—much better than the on-camera mic.
If you do not want to deal with an external recorder and you want thebest possible sound out of a DSLR, you may want to consider a moreexpensive option (~$665): Sound Devices MixPre (see Figure 5.14).

It's a portable field mixer and mic preamp that contains unclippablelimiters, so, if set properly, it will not blow out any sound. It's made ofmetal, so the rugged device will hold up to some impact abuse. Usethe tape out as the output that you will plug into the camera'smicrophone input. The chief advantage is the ability to use XLRmicrophones, but you can also monitor audio, adjust the levels, andview an LED level meter. If you want pristine sound, hook it up to theTascam DR-100 or Zoom H4n when recording sound externally to thecamera.
Figure 5.14 Sound Devices MixPre is a powerful preamp for adding quality audio to yourrecordings. Clean and quiet preamps with unclippable limiters make this one of the most powerfultools in your audio arsenal.
If you're hooking the MixPre directly to the DSLR, be sure to get aspecial cable made by Pinknoise (http://www.pinknoise-systems.co.uk/pinknoise-25-p-459.html). It provides a −25dBattenuation pad, so the line level coming out of the MixPre isn't too hotfor the DSLR. For buyers in the United States, you can purchase thecable on eBay.
Without such limiters, you'll want to record your audio at −12dBu or−20dBu to minimize the risk of clipping audio if a subject or performergets too loud. However, the audio levels will be low and will have to beboosted in post (usually the normalization gain). When you're boosting,the audio will usually result in increased noise, so you will need to usea noise reduction plug-in for the software.
HeadphonesYou need to monitor the audio when shooting. The problem with most,

if not all, DSLRs is their lack of a headphone jack—thus, theimportance of getting an XLR adapter with a headphone input or usingan external digital audio recorder. Monitoring sound will allow you toknow when something's not working right. Unfortunately, without aheadphone jack on the DSLR and monitoring only through the XLRadapter, you don't know if something is going bad with the sound in-camera. This is another reason why using external recorders forDSLRs is important.
With that said, there are headphones designed to sound pretty, andthen there are headphones designed to sound accurate: monitorheadphones. You want the headphones that sound accurate. One ofthe best websites detailing unbiased ratings and sales of headphonesis http://headphone.com. For studio use—mics that will sound accurate—this site recommends four models for ~$100 and under (two ofwhich are at ~$60): Beyerdynamic DT2325 (~$60) and Shure SRH240(~$60; see Figure 5.15); and Sennheiser HD 280Pro and ShureSRH440 (at ~$100). Go to their site and scroll down to “Headphonesfor Studio Use”: http://www.headphone.com/selection-guide/dj-and-studio.php. Sony also makes a monitoring headphone that is good forfield production: the MDR-7506 (~$90).
Figure 5.15 The Shure SRH240 (~$60). A good budget headphone that offers clean, evenmonitoring of audio.

Getting the right headphones—within the parameter of making surethey're designed for monitoring sound (studio and/or field production)—is essential. But once you have the choice paired down toheadphones that are designed for accurate monitoring, the ones youpurchase should be those that are comfortable for you to wear.
Checklist for External Onboard Minijack Mic
1. Choose your microphone (such as the Rode VideoMic), attach it to theaccessory shoe plate, and plug the mic directly to the microphone jackof the camera.
2. Turn on the mic (be sure you put a fresh battery into the microphone).3. If possible, turn off the AGC and set the audio input levels of the camera
at −12dBu to minimize clipped audio.4. Keep your subject no more than a few feet away or so; this will provide
the strongest audio signal.5. Input your files normally. The audio is recorded simultaneously with the
video.
Checklist for External XLR Mic with XLR Adapter
1. Choose your microphone (such as an XLR shotgun mic).2. Attach the XLR adapter and connect the XLR's minijack plug into the
camera's minijack microphone input. (Make sure you put fresh batteriesinto the adapter.)
3. Plug the mic's XLR cable into input 1 of the XLR adapter.4. If the camera has automatic gain control (most DSLR cameras do, but
read the manual to find out), turn on the XLR adapter's AGC disabler.5. Use either a boom pole or pistol grip, or mount it to the camera with a
shockmount with an accessory shoe adapter. Plug the mic to themicrophone input of the XLR adapter.
6. Turn on the phantom power (it'll be either 48 V or 12 V). If you have a 12V option, you may want to use this to save battery life, but be sure themic you choose can utilize 12 V of phantom power.
7. Plug in your headphones.

8. Set the max levels of your audio to −12dBu to help prevent clipping if aperformer or subject gets too loud. This will give you 12 decibels ofheadroom.
9. Keep your microphone no more than three feet away from the performer.10. The audio is recorded simultaneously with the video, so no additional
steps are needed when you export your files from the camera to thecomputer.
Checklist for External Recorders (Tascam DR-100)
1. Do two recordings: one on-camera for reference and backup and theother externally. Choose your microphone type and follow the previouschecklist for minijack on-camera recording. Don't worry about an externalXLR adapter because that just complicates the workflow. You could justuse the camera's mic, but if you hook up a Rode VideoMic, for example,you'll get usable sound, so if something did go wrong in the externalrecording, you'll have a backup.
2. Most audio recorders contain a tripod screw hole, so you can mount therecorder onto its own tripod, if desired, or mount it to a DSLR rig.
3. Put fresh batteries into the recorder.4. Choose your microphone for the digital audio recorder (XLR shotgun, XLR
lav, or both—using the two different inputs) and hook it up to a boompole, pistol grip, or tripod. Make sure it's no less than three feet away.
5. Attach the XLR cable to the mic and the input of the audio recorder (ifyou're using two mics, plug both into the recorder).
6. Set your audio recorder's audio compression scheme; be sure it matchesthe camera's recording capabilities (it'll most likely be 44.1 kHz, 16-bit or48 kHz, 24-bit). Some recorders can do 96-bit, which will give you aneven better recording to work with in post. Just be sure the kilohertz (44.1or 48) matches the camera setting.
7. Unless you're using a field mixer with limiters (such as the MixPre), setthe max levels of your audio to −12dBu to help prevent clipping if aperformer or subject gets too loud. This will give you 12 decibels ofheadroom.
8. Turn on the phantom power (it'll be either 48 V or 12 V). If you have a 12V option, you may want to use this to save battery life, but be sure yourmic can utilize 12 V of power. Otherwise, just stick with 48 V.
9. Plug in your headphones. There's a separate volume control for the

headphones, but what you're hearing isn't exactly what you're actuallyrecording!
10. Press Record on the digital audio recorder. The first time you press theRecord button, it'll flash red and provide an audio level signal so you cantest your levels before actually recording.
11. Set your levels by doing an audio test. There are two input level dials, soyou can adjust each microphone separately if you're using two mics.
12. Press the Record button a second time to start recording. Double-checkthe timelapse clock to see if it's ticking; this will assure you that you'rerecording the audio!
13. Start recording on the camera.14. Clap your hands or use a slate.15. Begin the scene.16. When the scene is completed, press the Stop button. (If you press the
Pause button, you will keep one file recording; if you press the Stop, theneach time you record, a new file will be created–which is useful whenrecording multiple takes of video.)
17. Take note of the file number on the audio recorder, so you can match itto the right take on the camera.
18. Export the camera's video-audio footage into your computer. This willneed to be processed (see the Chapter 6 on postproduction workflow).When you process it, keep the audio in its native format (44.1 kHz or 48kHz). This audio will be your synced reference audio.
19. Export the audio from the audio recorder. You'll use this audio to replacethe camera audio after you've synced it using PluralEyes (see the nextchapter), or if you do it manually.
This chapter should have provided you with the tools to get thequality sound you need for your DSLR projects. The next chaptercovers the final toolkit for the DSLR shooter: postproduction workflowfor audio and video.
1 Use it only as reference audio.


Chapter 6
DSLR Postproduction Workflow andTechniques
Transcoding Footage, Syncing Audio, and Color Grading
Most HDSLR cameras shoot in some form of the H.264 codec, whichis essentially a finishing or output mode designed for the Web and Blu-ray DVDs. It is not designed to be edited. Why is this codec usedthen? Because it's what allows HD to be a viable form—putting a lot ofdata onto a memory card. When these cameras begin to shoot RAW,there will be a lot more data space needed. For now, this is thetechnology DSLR shooters are stuck with.
However, with that said, you can drag and drop Canon's DSLRsnative .mov files into Final Cut 7, Sony Vegas Pro, or Premiere Proand edit straight without any transcoding. Despite that ability, though,it's highly recommended—and postproduction professionals agree—to transcode and decompress the files, especially if you're doing anykind of color grading. Very few—if any—professionals would everconsider editing with the native files. A video journalist with a fastturnaround may try to make it work, and if you're a student with a shortproject without any worries about doing any post finishing work, youcould edit with the native files and see how that approach works out.The best school is to try it both ways and see what works best for you.
In either case, a transcoded file will provide much more “headroom”in post and allow for a smoother workflow when you're editing. Thetranscoding process, whether you're using Squared 5's MPEGStreamclip, Cineform's codec, or Final Cut's ProRes, will provide a4:4:4 or 4:2:2 color space (see Appendix 4 on chrominance andluminance compression).
This chapter includes a step-by-step guide in converting your DSLRfootage using Squared 5's MPEG Streamclip (freeware for both Macand PC), Cineform's Neoscene (which can be used for Apple and PCcomputers), and Final Cut Pro's Log and Transfer process. In addition,it also provides the workflow necessary to convert external audiorecording (such as with the Tascam DR-100) using PluralEyes syncingsoftware. Lastly, it covers some of the basics of color grading withMagic Bullet Looks, a powerful tool for filmmakers to put the finaltouches on their project in crafting a film look.
Deinterlace Your VideoMost DSLRs, such as the Canons, shoot in 1080P, progressive scanned. A fewmay shoot in 1080i (interlaced mode, such as Panasonic's GH1). Deinterlacinga DSLR movie if shot in 1080i is one of the key tools a cinematographer mustutilize to avoid the video look. It is far, far better to get a camera that shootsprogressive scan. If you need to deinterlace, use Magic Bullet Frames.
Getting Files into the Computer

One of the benefits of DSLRs is their tapeless recording. Camerassuch as the Canon 5D Mark II and 7D record on Compact Flash,whereas the Rebel T2i, 60D, and Panasonic's GH1 record on thesmaller-sized SDHC cards (which are about half the price). It's notpractical to buy dozens of memory cards and keep them as permanentarchive media (unless you have the money!).
There are two approaches you can use:
1. Drag and drop files onto the computer (and I recommend at leasttwo other hard drives: one as a backup; the other as anarchive).1 Use this approach only when you are using NeoSceneor Streamclip or another software where you can drag and dropfiles or select files individually for decompression transcoding.
2. If you're editing on Final Cut Pro, you must keep the originalfolder structure of the camera's memory card intact, putting acopy of it on your hard drive.
Squared 5 MPEG Streamclip WorkflowTo use Squared 5's MPEG Streamclip freeware, follow these steps:
1. Download and install MPEG Streamclip fromhttp://www.squared5.com/.
2. If you're converting one file at a time, go to File→Open andsearch for the files you want to decompress. However, if you'redoing more than one file, then batch process the files. Go to List—Batch List (see Figure 6.1a), then click the button, Add Files(see Figure 6.1b).

3. Your file appears in the main window. You may set in and outpoints (I and O) if you need to convert only a section of the clip.Choose File→Export and select Export to QuickTime… (seeFigure 6.2) or another format if desired.
Figure 6.2 Select the export type you need (typically QuickTime for Mac users); in thiscase, I chose Export to QuickTime….
4. The Exporter window (for Mac) defaults to Apple Motion JPEG Aand places the quality of your clip at 50% and with interlacing(see Figure 6.3). You will need to change these parameters.Slide the quality to 100%. Deselect Interlaced Scaling (if yourfootage was shot progressive, which the Canon HDSLRs do).The Frame size should default to the original footage size (in thiscase, 1920×1020)

Figure 6.3 You will need to change the default settings to make your footage look asgood as possible: Deselect Interlaced Scaling (for progressive cameras, such as the Canon),slide Quality to 100%, and change Apple Motion JPEG compression.
5. For Mac users, select Apple ProRes 422 (LT) for a fast render(see Figure 6.4). Higher-quality renders should be used for workexporting to film (ProRes 4444). Philip Bloom uses 422 (LT) forweb-produced work, and it works just fine. Use 4444 if you'regoing to film-out or full-screen project—but it will increase yourfile size a lot, so be sure to have enough hard drive space. PCusers should test what best works for them. A test I did of an AVIfile failed to import the video track in Vegas Pro (only audiocame in).
Figure 6.4 You can choose from a variety of codecs when exporting with MPEGStreamclip. Apple ProRes is the standard for Final Cut Pro users.
6. After completing the Compression format selection [AppleProRes 422 (LT)], placing the Quality to 100%, and removingInterlaced Scaling (see Figure 6.5), click on the Make Moviebutton.

Figure 6.5 The screen as it appears when ready to convert the file.
7. After you click Make Movie, the file is encoded into a file sizeabout twice the original [when using Apple ProRes 422 (LT); seeFigure 6.6]. The LT version has a much faster rate than files usedby Apple's transcoding process in Final Cut Pro and is fasterthan CineForm's Neo Scene. Because of its faster speed, Irecommend that video journalists use MPEG Streamclip whenworking on tight deadlines.
Figure 6.6 The file transcodes, nearly doubling the file size after the render is completed.
Cineform Neo Scene WorkflowThe Cineform Neo Scene Workflow software is available for about$130 and will convert your files into a form that can be edited in justabout any software you choose to use. The software can be installedon a PC or Mac. When transcoding, follow these steps:
1. Open Cineform Neo Scene and select a destination folder forconverted videos (see Figure 6.7).

Figure 6.7 As soon as you open Cineform's Neo Scene on a PC, it will ask for adestination folder. Select it and then choose the Convert tab.
2. Import your files and click on the Convert tab. You may use theCapture window which appears when you plug in a camera, butthis is not recommended. Rather, copy your folder and/or filesover to the computer and copy them again onto at least oneother external drive as a backup (having two backups is evenbetter).
3. Click on Select Files or Select Folder and browse to the foldercontaining the files and select them (see Figure 6.8). Click onOpen to bring them into the SourceClips window (see Figure6.9).
Figure 6.8 Select files or folders and import the files needing conversion.

Figure 6.9 Files are imported into the SourceClips window.
4. Click on the Prefs button for preferences. Choose the following(see Figure 6.10):
Automatically convert to CineForm Intermediate.Split file on scene changes.CineForm Encoder Options: High.Output Frame Format: Maintain the source frame format(you could also choose Convert to 24P if you didn't shoot24P natively). Select Deinterlace if your footage was shot1080i (it's highly recommended that you use Magic BulletFrames for deinterlacing, however).Target Directory: Choose the folder where you want yourconverted files to be placed.
Figure 6.10 Select the capture and encoder options, output frame format, and thedestination folder of the converted clips.

5. Click OK.6. Click the Start button. As the files are converted, they'll appear in
the Converted Clips window (see Figure 6.11). If you click theLog button, you can see the conversion status of each file (seeFigure 6.12). In addition, the files are checked off in theSourceClips window as they are completed.
Figure 6.11 After you click the Start button, the files are automatically converted andappear in the Converted Clips window.
Figure 6.12 As the files are converted, the Log window (which opens when you click theLog button) shows the progress of each file being converted.
The converted files will appear in the destination folder you chose,and you can now import them into your computer's editing software.
Canon EOS Plug-in for Apple Final Cut ProWorkflowIn spring 2010, Canon created a plug-in for Final Cut Pro (versions6.03 to 7.0), allowing user selection of Canon E1 EOS Movie in its Log

and Transfer menu. Essentially, the software allows for an automaticpreference transcoding of a 422 chrominance and luminance colorspace (or 444 with Final Cut 7; see Appendix 4 for additionalinformation on chrominance and luminance).
Steps for Getting and Installing the Canon EOSPlug-in for Final Cut ProTo get and install the Canon EOS Plug-in for Final Cut Pro, followthese steps:
1. Confirm you have or update to Final Cut Pro v6.0.6, v7.0.1, orlater.
2. Go tohttp://www.usa.canon.com/cusa/consumer/products/cameras/slr_cameras/eos_5d_mark_ii.
3. Drivers & Software.4. Choose Operating System = Mac OS X.5. Click on “ce1100x.dmg.zip” EOS MOVIE Plugin-E1 for Final Cut
Pro.6. Select Mac OS X from the Drivers/Software Selection drop-
down menu (see Figure 6.13).
Figure 6.13 Select the Mac OS X operating system; then download the EOS Movie plug-in.
7. Select CE1100X.dmg.zip beneath EOS MOVIE Plugin-E1 forFinal Cut Pro. After it downloads and unzips, you will see thedisk image, CE1100X.dmg.
8. Double-click CE1100X.dmg to mount the disk image.9. A folder named CE1100X will open. Double-click on the installer.
10. Follow the prompts to install the plug-in.
If you're using a Canon Rebel T2i (550), for some reason Canon did

not include the plug-in for it. However, you can add it manually. Afterinstalling the plug-in, follow these steps:
1. Double-click the Macintosh hard drive.2. Go to Library folder→Application
Support→ProApps→MIO→RAD→Plugins→CanonE1.RADPlug→Contents→Resources→cameras.plist.3. Open cameras.plist and add the following code in the text editor
exactly as emphasized in bold on lines 20-23, below:
<?xml version=“1.0” encoding=“UTF-8”?><!DOCTYPE plist PUBLIC “-//Apple//DTD PLIST 1.0//EN” “
http://www.apple.com/DTDs/PropertyList-1.0.dtd ”><plist version=“1.0”><dict><key>1D</key><array><string>Canon EOS-1D Mark IV</string></array><key>5D</key><array><string>Canon EOS 5D Mark II</string></array><key>7D</key><array><string>Canon EOS 7D</string></array><key>T2i</key><array><string>Canon EOS REBEL T2i</string></array></dict></plist>
1. Save the document. The Rebel T2i should now be recognized inFinal Cut Pro.
Final Cut Pro Log and Transfer WorkflowTo run Final Cut Pro Log and Transfer, do the following:
1. Connect the CF card to the computer and back up the files. Besure to keep the folder structure intact, so copy the DCIM folderto the computer and back-up drive. The Final Cut Canon plug-inalso allows you to back up the disk image (see Figure 6.14).Select the second menu listing and right-click on the CF name.

Figure 6.14 Final Cut Pro's Canon plug-in allows you to back up the memory card as adisk image.
2. Open Final Cut Pro and go to File→Log and Transfer. The filesshould automatically open and show up in a list.
3. If the files do not show up, click on the folder image and scroll tothe folder you want to import (see Figure 6.15). Final Cut willrecognize the files and import them.
Figure 6.15 Click on the folder button to import your files in Final Cut.
4. Click on the Action button (the image of a gear, next to the menulist button to the right of the Finder window; see Figure 6.16).This will take you to the Import Preferences window.
Figure 6.16 Click on the Action button to take you to the Canon EOS plug-in.
5. Scroll down to Canon E1 EOS Movie (see Figure 6.17). Itdefaults to Apple ProRes 422 (HQ), but if you right-click on it, you

are provided with two other options. Click OK.
Figure 6.17 Import Preferences window revealing the Canon transcode plug-in with threetranscoding options.
6. Back in the Log and Transfer window (see Figure 6.18), you canlook at each clip by clicking on the thumbnail and reviewing it inthe preview window. You can also choose (or mark) In and Outpoints (optional). You can also add comments in the LoggingArea, so your clips can come in with the information you mayneed when editing.
Figure 6.18 Final Cut Pro's Log and Transfer window. Double-click a file on the left, andit appears in the preview window, where you can mark In and Out points and write upcomments and put a new name on each file.
7. You can then select Add Selection to Queue or drag and dropyour clips to the Transfer Queue (the bottom-left window). Here,the clips will begin transcoding automatically (see Figure 6.19).After transcoding, the clips will appear in the browser window inFinal Cut.

Figure 6.19 Once you choose Add Selection to Queue or drag and drop a file in thetranscoding window on the bottom left, the files will begin converting automatically.
8. Close Log and Transfer and edit as normal. Your converted clipswill appear in Final Cut's browser window (see Figure 6.20).
Figure 6.20 The converted files will appear in Final Cut's browser window, where you canedit them as you would any other clip.
If you used an external audio recorder, the next section covers howto sync up your audio files with the reference audio recorded oncamera.
Syncing Audio—PluralEyes WorkflowUp until the release of Singular Software's PluralEyes, it was difficult tosync audio and video dialog. However, as of this writing (April 2010),the software can be used only in Final Cut Pro or Sony Vegas Pro. Butin the fall of 2010, the company released DualEyes, which is a

standalone application for syncing audio with DSLRs with the PC andMac. To sync your audio, follow these steps:
1. Open Final Cut Pro.2. Import your converted video files if you used MPEG Streamclip
or Cineform's Neo Scene (it should be there already if you usedFinal Cut's Log and Transfer). Be sure to import the audio filesrecorded onto the external recorder (again, be sure to make abackup and place it into your Final Cut project folder; do notimport directly from the recorder!).2
3. Go to File→New→Sequence to create a sequence in Final Cutand name it “pluraleyes” (see Figure 6.21).
Figure 6.21 Before using PluralEyes, be sure to create a new Sequence and name it“pluraleyes.”
4. Click on the new pluraleyes sequence tab and drag in your video(which includes the audio you recorded on-camera) to thetimeline; place it anywhere on one track (see Figure 6.22). Thendrag in the audio files you recorded on the external audiorecorder below the on-camera audio; again, place them on onetrack.
Figure 6.22 Place the video files anywhere on one track. Drag the separately recordedaudio onto a track below it.
5. If you recorded only one channel of audio (used one XLRmicrophone in either the left or right input of the recorder), delinkthe stereo pair (if paired, you can tell when the two little trianglesare facing each other). Select Modify→Stereo Pair (see Figure6.23). Delete the empty track. Select the track with audio.Simultaneously press Option-Shift, left click mouse, and dragdown the audio track to make a copy. Select both tracks. Thenselect Modify→Stereo Pair to relink. Both tracks are now pairedstereo audio.

Figure 6.23 Select Stereo Pair from the Modify menu to delink and relink pairs of audio.
6. Open PluralEyes (external to Final Cut) and click the Sync button(see Figure 6.24).
Figure 6.24 Open PluralEyes and click the Sync button.
7. You can select options by clicking the Change button, allowingyou to choose a single output sequence and a replace audiooption, for example (see Figure 6.25). Then click OK.

Figure 6.25 Clicking the Change button will give you options to select so that you canfine-tune the syncing process.
8. Click the Sync button. The files are automatically processed,syncing up the different audio files (see Figure 6.26).
Figure 6.26 Files being processed in Final Cut through PluralEyes.
9. After files are processed, multiple sequences will be opened,one for each synced file (unless you chose Single outputsequence in step 7). Click on the tab of one of the synced audiofiles on the Final Cut timeline, and you can see the external audiolined up with the video-camera audio (see Figure 6.27). Simplyuse the blade tool to remove the extra audio you don't need.Delete the on-camera audio and move the new audio into itsplace. Link the audio and video by selecting the audio and videoand then selecting Modify→Link.
10. Sometimes PluralEyes will fail to sync specific audio. These fileswill appear in the pluraleyes unsynced sequence. Go to thissequence and run the program again. If it still fails to sync up,there may not be much more you can do other than manuallysyncing the unsynced files (see Figure 6.27).

Figure 6.27 Here, we can see the one video file with its audio lined up with the externalrecorder's file below it. If you didn't use the Replace audio option with the Change button(see step 7), then use the blade tool and slice away any extra audio you don't need. Deletethe on-camera audio and replace it with the new. Copy the video and the new audio andpaste them together on the timeline of your main project sequence.
11. Create your main project sequence in Final Cut's browserwindow. Go to each PluralEyes synced tab (if you didn't selectSingle output sequence in step 7) and copy each video with thenew audio and paste it on the timeline in your main projectsequence. (Otherwise, bring in the files from the single syncedsequence tab.) Note: There's also a Replaced audio tab foraudio if you chose the Replace audio option in step 7. In eithercase, your original sequence is untouched, and you will want toreplace the files with the new synced audio.
12. Edit the files as normal.
Once you go through this process a couple of times, it becomesrather simple and you'll realize that the quality of the audio is so muchbetter than on-camera audio that it's worth the extra steps to deliver thebest possible product.
A recommended alternative to using PluralEyes when using a dual-audiorecording system setup is one developed by David Anselmi of Practical MysticProductions (http://www.practicalmysticproductions.com/):
1. Separate the audio tracks of the two separate recordings.2. Pan hard left on the first track and hard right on the other track.3. Adjust relative volume so both tracks match.4. Listen on headphones.5. Nudge one of the audio tracks back and forth, until the flanging—the
audio delay between the two—stops. You've just synced the audio!
Color Grading WorkflowAfter you've synced up your audio and edited the piece, your final stepin the postproduction workflow is to color-grade your images. This canbe done in any professional editing software, such as Sony Vegas orFinal Cut Pro, and Apple's Color is a professional color gradingsoftware with powerful tools. However, this book will not cover how touse them because doing so would go beyond the space requirementsand scope of this book. Books have been published on how to use

such software. But there is one tool that may be useful for DSLRshooters that I will cover, but not exhaustively. The next sectionprovides the steps for doing basic color grading with automaticpresets (that you can modify) in Magic Bullet Looks put out by RedGiant Software. This software is used by Philip Bloom in most of hisworks.
Filmmaker Khalid Mohtaseb used Magic Bullet Looks to grade his short, titledHaiti Earthquake Aftermath Montage (http://vimeo.com/9608637), shot on aCanon 5D Mark II. The two examples in Figures 6.28a and 6.28b show thepower of this software in helping to create the film look. Mohtaseb actually usesPhotoshop for his first step, “retouching a screenshot from the clip.” He usesthat retouched still as a reference point. He then utilizes Final Cut Pro's three-way color corrector “to shift the mids and shadows to a warmer color tone.”Lastly, he fires up Magic Bullet Looks “to fine-tune the exposure and colors. Irarely ever use the Looks presets as they are overused and [I] can get moreprecise results by building my own” (Mohtaseb, K. (2010, March 25). Into theHaiti Earthquake Zone—Khalid Mohtaseb Covers the Aftermath on 5DMKII.DSLR News Shooter. <http://www.dslrnewsshooter.com/2010/03/25/into-the-haiti-earthquake-zone-khalid-mohtaseb-covers-the-aftermath-on-5dmkii/>,accessed 19.04.2010). He shot in Standard picture style, with some of theshots' contrast pulled all the way down.
Figures 6.28a and 6.28b Cinematographer Khalid Mohtaseb utilizes Magic Bullet Looks tocolor-grade his film projects. The before image (a) is on the left, while the postgrading process(b) is on the right.(© 2010 Khalid Mohtaseb. Used with permission.)
Noise Reduction SoftwareA lot of video picks up noise—especially at high ISO settings. Noise reductionsoftware is a useful tool that can help offset such noise. One such applicationcan be found at http://www.neatvideo.com/. The plug-in is available for AfterEffects, Premiere, Final Cut, VirtualDub, Sony Vegas, and Pinnacle Studio. Alimited functionality demo is available free. The Pro version, which allows for HD1920×1080 noise removal, costs just under $100. To see an example of theresult of this software, read the case study for Casulo, a Brazilian shorttransferred to 35 mm film, in Chapter 8. For the same price, Red Giant Softwaresells Magic Bullet Denoiser at http://www.redgiantsoftware.com/store/all/magic-bullet-denoiser/.

WeblinkVideo tutorials of Magic Bullet can be found here:http://www.redgiantsoftware.com/videos/tutorials/#magic-bullet-looks
Magic Bullet Looks for Final Cut Pro WorkflowFollow these steps for doing basic color grading with Magic BulletLooks:
1. Once the software is installed, open your Final Cut project andselect the clip to which you want to apply Magic Bullet Looks.
2. Go to Effects→Video Filters→Magic Bullet→ Looks (see Figure6.29).
Figure 6.29 The Magic Bullet Looks plug-in for Final Cut Pro.
3. Once the effect is applied, go to the clip's Filters tab in theViewer window of Final Cut (see Figure 6.30), and click thetriangle to expand the window.

Figure 6.30 Filters tab of the Viewer window in Final Cut Pro. Click on the Looks triangleto expand the window and then click on Edit.
4. Click on the Edit box in the Look row. (If you're using a trialversion of Magic Bullet Looks, a Register button will appearabove the Edit box; it's a shortcut that will take you to Red Giant'sregistration/purchasing page.)
5. You will be taken to the LooksBuilder, or editor, of Magic BulletLooks (see Figure 6.31). Your clip will appear as a large imagein the center of the screen. Along the left and right edge are twovertical words: Looks (left) and Tools (right). These are the toolsand plug-ins where the magic happens.
Figure 6.31 The Magic Bullet Looks editor, called the LooksBuilder.
6. Click on the Looks tab in the far-left vertical. Here, you'll seedozens of prebuilt effects plug-ins—everything from film stockemulation to crime show TV drama (see Figure 6.32). Thesoftware engineers have gone through the tools of Magic BulletLooks and emulated a variety of looks found on television showsand in movies and music videos, among others. You can click onany one of the looks, and you'll see an immediate preview in thecenter image of the main page. Take the time to experiment to

get the one that's closest to the emotional look you want toconvey—the one that most closely fits your story.
Figure 6.32 Some of the Magic Bullet Looks preset effect plug-ins.
7. Once you've selected the effect plug-in you desire, notice theseries of image tools along the bottom of the main screen (seeFigure 6.33). The icons below reflect the “Coolish” effect in theMusic Videos menu. (Although the project is not a music video,the look works for the piece.) Despite the names of plug-ins,you're using them to get the look you want.

Figure 6.33 Once the effect plug-in is chosen, you can see a series of tools that wereused to create that look. You can manipulate them further to fine-tune the look you want.
8. Click on any one of the tools along the bottom row, and you'll seethe parameters of the particular tool in the far-right column (seethe bottom right of Figure 6.33). See Figure 6.34 for a close-upof the Curves tool. Different effects plug-ins will reveal differenttools.
Figure 6.34 The Curves tool as used in creating the “Coolish” effect plug-in. The look canbe manipulated further by adjusting the full RGB curve or individual RGB curves. You will begiven instant feedback as you adjust them.
9. Examine the variety of tools and adjust the parameters asneeded.
10. If you want to add additional tools to manipulate or simply not useany of the Looks preset plug-ins, click on the Tools tab along thefar-right window, where you'll see dozens of tools to shape thelook you want from scratch. There are menus for manipulating

the look of the Subject, Matte, Lens, Camera, and Post (seeFigure 6.35).
The variety of tools allow you to manipulate the look of the scene—such asadding a filter that would normally be applied in-camera when shooting, but canbe done in post with Magic Bullet. You can change the exposure or spot-metera section and change the exposure of it. These powerful tools can help changethe entire look of your film, but the goal is to adjust it so that it feels right for thestory, not to have it stand out and look as though it was color-graded. (SeeFigures 6.35 and 6.36 for examples.)
Figure 6.35 Some of the tools used for subject manipulation—everything from changing theexposure of the image to adding a fill light.
Figure 6.36 The Lens tools allow you to adjust exposure, such as Vignette. The SpotExposure is a good tool for adjusting foreground and background exposures.
1. When you have the look you want, you can save the look bygoing to File→Save Look As and then clicking OK in the bottom-right window (see Figure 6.37).

Figure 6.37 Back in the main screen, click on the OK button, bottom right, when you'reready to apply the effect.
2. Once you click OK, you'll be brought back to Final Cut, where youcan see the effects filters in place (see Figure 6.38). Repeatthese steps for each shot that you want to manipulate.
Figure 6.38 The Magic Bullet Looks Filters windows now shows some of the symbols forthe tools used for the particular effects plug-in used. Click on the Edit button to go back andmake further changes to your look.
Using Magic Bullet Looks is a great way to experiment and explorewith the film look. In Part II of the book, there are examples of beforeand after shots of several films, showing how the color gradingprocess worked for those projects. But to just show some of thepotential power of this software, the examples shown here in Figures6.39 through 6.42 reveal how you can change an image through MagicBullet Looks' color correction tool, adjust the settings of the f-stopalong a graduated filter, and see what happens when you apply theSwing-Tilt (similar to the Tilt-Shift lens effect) to a shot in post.

Figure 6.39 The raw data from Final Cut before being adjusted in Magic Bullet Looks.(Still from Jase Johnson's Revival by Dennis Givens. Shot by Kurt Lancaster.)
Figure 6.40 The Magic Bullet Looks 3-Way Color Corrector allows you to adjust the colors ofshadow areas, midtones, and highlights by using a slider along red, green, and blue. Comparing thisimage with the original, the reds have been lowered, making the image more cool.(Still from Jase Johnson's Revival by Dennis Givens. Shot by Kurt Lancaster.)
Figure 6.41 The Magic Bullet Looks Grad Exposure filter applied to the color-corrected shot with2 stops of exposure drop-off on screen right, graduated to the left end of the dashed line hoveringnear the middle of the screen.(Still from Jase Johnson's Revival by Dennis Givens. Shot by Kurt Lancaster.)

Figure 6.42 The Magic Bullet Looks Swing-Tilt effect applied to the shot (before color correction).Notice the foreground blur along the edge of the guitar, while the performer's face stays in focus. Thehorizontal solid line marks the depth of field, whereas the dashed vertical indicates the center pointand angle of the tilt shift.(Still from Jase Johnson's Revival by Dennis Givens. Shot by Kurt Lancaster.)
In addition, Magic Bullet works well with neutral “flat” settings. Theframe grabs in Figures 6.43 and 6.44 were shot with ExtraFlat on aCanon 5D Mark II and graded used Magic Bullet Looks.
Figure 6.43 Frame grab of a shot utilizing ExtraFlat picture style. Note the washed-out milky look;the colors do not pop, but when put into Magic Bullet Looks, the richness of the colors comes out (seeFigure 6.44).
Figure 6.44 With Filmlike Color Curves, the flatness in Figure 6.43 is removed, and the imagepops with color and contrast.
Here's some final advice on color grading. No matter what effect you

use—from something as simple as applying a little bit of tonebrightening to a shot to shaping a complex graduated exposure—asyou go through your scenes, shot by shot, be sure to remain consistentin matching shots in a sequence, as well as when making thetransitions between sequences. You don't want images to stand outbecause you improperly graded a shot or failed to match it with theprevious shot. You may want to save presets in Magic Bullet, such as“Scene 1,” so you have the look down for that scene and can apply it tothe other shots in that scene. If the tones need to change from shot toshot, be sure you color-grade by matching the skin tones of yourperformers from shot to shot. If the facial tones don't match, then theaudience will notice it. Use the eyedropper tool and save the profileand apply it to the other shots in the scene.
This chapter covered the basics of working with a postproductionworkflow to decompress your DSLR footage into a form that can beeasily edited, and with increased chrominance and luminance colorspace, it makes it better for color grading. The chapter showed thesteps for converting these files with Squared 5's MPEG Streamclip,Cineform's Neo Scene, and Apple's Final Cut Pro Log and Transferprocess. In addition, it provided the steps to sync up externallyrecorded audio using PluralEyes. It then shifted into the process toconvert the look of your project using Magic Bullet Looks—a powerfulpostproduction tool to finalize the look of your DSLR footage so youcan fully apply the final touches in achieving a cinematic look.
1 Don't use a hard drive as a long-term archive solution. Use it as a backupthroughout production and postproduction. If you know you no longer need thefootage, then you're good. However, if you're working for a client or you work at aproduction company, keeping an archive is essential—and making hard drivebackups is not recommended as the best solution for long-term archival purposes.Rather, going with an Enterprise Tape solution (LTO-4 800GB tapes) with an archivaldrive will cost about $7,000, which is a much wiser choice, and if you have a clientneeding archive material, that price is a lot cheaper than having to go back in thefield and get new footage.2 If you import files from the recorder, as soon as you disconnect it, your files will bemissing. And if you formatted the memory card after disconnecting the recorder andyou failed to make a backup, the files are gone. For good.


Chapter 7
Telling Better Stories with Your DSLR
How to Create Interesting CharactersThe key to finding your story is determining what your main characterwants and what he or she does to get it. In a wedding video, a brideand groom want to get married; therefore, all of your choices, from thelook of the film to what shots you choose to shoot must revolve aroundthis dramatic need.
Jamin Winans' great internet short Uncle Jack is one of thestrongest short films shot on a DSLR—due to the fact that it tells apowerful story. Jack wants to escape his pursuers while at the sametime he wants to keep his niece happy by telling her a fairytale.
In summary, Uncle Jack takes the fairytale motif and updates it intoa contemporary setting in which a man is fleeing a crime scenechased by thugs who want him dead. An unconscious clown sits in thepassenger seat of the car, while a giggling woman screams with gleein the back seat of the convertible. Bullets fly and Jack's cell phonerings. Without listening to who's on the other end, Jack assumes it'sone of his cohorts, and he warns him that the plan has beencompromised and to, “Get out of there.” The film cuts to a young girl onher bed, who quizzically says, “Uncle Jack?” He tries to ditch her, butshe insists that he tell her a story because her parents are fighting andhe once told her that she could call him any time when that happens.Not wanting to break his word, he tells her a fairytale, using his presentpredicament as the metaphor for the story. By the end of the film, UncleJack and his buddy in the clown suit are cornered in a costume shop,and the niece realizes what's going on and tells her uncle what to do tobeat the enemy. After their defeat, Uncle Jack's niece tells him to stopgambling.

The story works well because the main character isn't just a shadycharacter trying to avoid a gambling debt; he's a shady character wholoves his niece and doesn't want to disappoint her. Good storiesevolve from avoiding the stereotype that tends to drive the profit-motivated bottom line. The famed cinematographer Haskell Wexler,ASC, puts it this way:
For me, artistic goes beyond the visual image or photograph;it's the totality of the philosophy, the ideas, the personality andthe soul of people. Too often, the search for what seems to becommercial—the things that grab people's attention—opensthe door for celebrating antipersonal behavior, celebratingwarfare, celebrating ways which do not elevate and servemankind.1
Uncle Jack could have devolved into blockbuster violence, butWinan's takes the story to a deeper level by making Jack a conflictedcharacter who represents something more than a stereotype. Wexler'sadvice extends to documentaries and news: what kinds of stories areyou going to tell? The answer stems from the roots of why humanbeings tell stories in the first place.
How to Tap into Mainstream Audience'sEmotional CoreThere are probably as many reasons to be entertained by a story asthere are people. The films of George Lucas and Stephen Spielbergtend to resonate with a wide audience because these filmmakersunderstand how to shape the images and stories that carry emotionaland intellectual meaning for the viewer. Storytellers with broad appealseem to naturally craft compelling stories that meet the needs ordemands of a wide audience.
When storytellers strive to create and capture images that areunique to their own personal perspective, when they're tapping into thesubconscious intuition, they can inspire viewers and perhaps teach

them something about how to live their lives more fully.
In Uncle Jack, Winans taps into larger themes and not only providesus with an entertaining but tragically flawed character, but also uses theniece as the impetus to help change this character into somethingbetter than he is. “I liked the idea that the niece was just someonelistening to the fairy tale,” Winans explains in an interview, “but by theend you realize she's truly part of it and ultimately the knower of all.She's part of his world initially, but by the end, he's part of her world.”2
Being conscious when such change of character occurs is essentialwhen crafting compelling stories—it's the hinge where your directingand cinematography revolves, since when you know when a characterchanges, you can craft images that highlight that change.
Whether we want to write our own scripts or shoot another's script,we should choose projects that resonate in some way with our need totell this particular story. The art of shooting it well—shaping the lookand feel of it—will be more honest and clear when we do a project thatmeans something to us. This doesn't mean that when you choose toshoot a wedding or a commercial, for example, every moment of thework is imbued with deep psychological meaning. But a job can bemore than a job when we endow it with our passionate view of how weperceive the world. Do we linger on a glance from the bride in a tightclose-up when she looks at the groom because we see in this momenta universal moment of truth … and we weld this image to the culturalbelief that love can last forever? Maybe.
One of the reason's Vincent Laforet's Reverie is powerful isn't that it was shot ona Canon 5D Mark II. It's that he opened with that romantic kiss between acouple and the guy blows it—he tries to pursue his love but loses it. The storycontains power. It resonates with a universal theme of lost love, and most of ushave experienced that loss in our own way. And in the hands of a good director-cinematographer (the DSLR shooter), the story can be translated into powerfulimages that resonate with an audience.
For Winans, the premise for Uncle Jack told through a fairytale lenswas about shaping a point of view: “I strongly believe the world we see

is a choice of perspective. Some of us see the laws of physics andsome of us see magic. The fairy tale theme in a modern context wasjust choosing to see the typical action (cars and guns) sequence asmagical instead.” The perspective was shaped by the dramatic needfor Jack to tell a story to his niece—not only to keep his promise, buteventually this act provides him self-realization about his own foiblesand need for humility and change.
Uncle Jack and his niece—their conflicting dramatic needs thatcoalesce around a mutual desire to help each other out—express thecore of Winan's short. How the characters react to the situation they'rein defines who these characters are, and by having Jack become thisfather figure to his niece in her time of need provides her anopportunity to help save his life over the phone. And the dramaticneeds of the characters are what an audience identifies with.
The story sets the tone and becomes the soul of the shoot. Thecamera is secondary. Philip Bloom, at a DSLR Hdi RAWworksMasterclass held in Los Angeles on March 6, 2010, discussed that itdidn't really matter what lenses or camera you use if the content is“engaging”; it's the story that matters.
Always start with characters—from them stems the conflict, thus thedrama, and the audience will more easily get caught up in the story.
Always start with characters—from them stems the conflict, thus the drama,and the audience will more easily get caught up in the story.
Documentary filmmakers Brent and Craig Renaud have made such films asWarrior Champions, Little Rock Central High: 50 Years Later, Taking the Hill,Off to War, and Dope Sick Love. When asked about shooting short docprojects for the The New York Times after the earthquake in Haiti, theydiscussed the importance of finding stories that others avoid:
We love to tell stories that won't get told otherwise or at least not in thesame way. In one story we produced for the The New York Timesrecently we focused on the young Haitian American Navy Corpsmenaboard the USNS Comfort hospital ship who have been called upon to be

translators for victims of the earthquake in Haiti. With no training at all,these young men and women stepped up and became a lifeline forvulnerable Haitian patients coming aboard the ship, a foreign countryreally, unfamiliar and scary. The Corpsmen comfort the patients andattend to their needs, letting them know that the United States is here tohelp. Sometimes they tell the patients that their legs will be amputated,or even that they will soon die. Through the experience of thesetranslators the viewer is given a totally different and interesting look atthis crisis. These Corpsmen are national heroes, and had we not profiledthem, very few people would have known it. Showing things like this tothe world is something that makes us proud. (Lancaster, 2010,Documentary Tech. http://documentarytech.com/?p=3489)
One of their major themes revolves around the underdog doing something thatdeepens the human experience. The Renaud brothers capture these momentsin their projects because something within compels them to bring back storiesthat mean something. And at the heart of it is the story—not what camera theyshoot on; not the technology—but what story they are going to tell and whatcharacters would compellingly help convey that story.
In our long form documentary work everything is about character. We aremore likely to start a project with a character we like rather than an issueor a story. The short form news stories that we produce for the Times area little different, but not a lot. With these stories often we are startingfrom a larger concept, like the Drug War in Juarez, or the earthquake inHaiti, but whereas most news stories are dominated by a correspondenteither on camera or in voice-over, we are still looking for characters todrive the story. We do use some voice-over in these news piecesbecause it helps focus and keep the stories short. However we use aslittle as possible. We believe the look on a child's face, or a gesture froma politician, uncommented on can sometimes speak worlds more than anall knowing voice-over. (Lancaster 2010, Documentary Tech.http://documentarytech.com/?p=3489)
The character is key because around that person is a dramatic need thattends to be universal by which the audience can identify and become engagedwith the content—and they will more quickly fall in love with your images!
Where Do Good Ideas Come From?I tell my writing and production students that there is only one of them in

the universe, and their job is to discover their unique voice and sharethat with others. Good stories come from storytellers who are honestwith themselves and tell a story that's unique to their voice andpassions. If you are going to shoot a scene in which a couple kiss, thenyou had better film it in such a way that comes from how you see theworld—whether that's drawn from a fantasy dream vision, a nightmare,or from real life. In either case, it's rooted in how you feel and see theworld. That's essentially what good filmmakers do and helps guidethem in shaping images that haven't been seen before. We haven'tseen shots quite like those in Laforet's Reverie. Although we've seenplenty of chase scenes in film, we haven't quite seen the one Winansgives us in Uncle Jack (see Figure 7.1). These scenes stem from thevision of how these filmmakers perceive the world. It's their uniquevoices that help provide power to those images. Then their choice ofcameras and how they shape the look and feel of their scenes arecoming from the right place—the story.
Figure 7.1 The clever and powerful story of Uncle Jack revolves around fairytale themes in a fewshort minutes. In this shot, a Pentax K-7 DSLR is taped to the steering wheel with a wide angle lensto shoot everyone in the car. The car is set in a studio against a greenscreen.(© 2010 Jamin Winans. Used with permission.)
It's their unique voices that help provide power to those images. Then theirchoice of cameras and how they shape the look and feel of their scenes arecoming from the right place—the story.
However, if the shots are too unique—not tapping into the dramaticaction of a character with wants and needs—you may end up puttingtogether a pretty film, but you may lose your audience. Without a solidstory, you won't likely capture a large audience.
In a personal example, when I directed a short written by a formerstudent of mine—The Kitchen, set in a 1950s farmhouse—the stiflingheat of August would bring in evening thundershowers. In probablyevery movie I've seen, the sound of thunder always occurssimultaneously with the flash of lightning. But that's not how I observedthe world growing up during summer thunderstorms in Maine. Theremight be distant flashes of “heat” lightning with no thunder, and as it gotcloser, the lightning flash would always occur first, until it was rightoverhead. After seeing a flash, we would count the silence until thethunder to determine the approximate distance of the storm (fiveseconds would be about a mile). So when I crafted the sound designfor this short around my experiences as a child in Maine, there wouldbe flashes followed by moments of silence, the moments shortening asthe storm intensified—and I paralleled this with the increasingemotional tensions of the film.
Winan's Uncle Jack “started with the idea of a character forced tostay on his phone through ridiculous circumstances and yet try to makeit seem like everything was fine,” the writer-director explains. “Fromthere I asked the question, ‘Who's the last person he should want to beon the phone with?’ I liked the contrast of a clearly shady guy talkingvery genuinely and sweetly to a little kid. That quickly led to himtranslating his current situation into a bedtime story.”
Developing Story Ideas by Michael Rabiger (Focal Press, 2006) isan essential read if you really want to tap into your original voice forfinding and analyzing stories; it's useful for writers and nonwriters. In it,he presents dozens of writing exercises that will help you discover a

unique voice in telling stories. “Discovering the source of your stories,”he writes, “those you are best qualified to tell, means looking forcauses and effects in your own life and grasping the nature of what youfeel most deeply. … it regularly produces insights that make peoplemore accessible and interesting—both the real people around you andthe fictional ones you nurture into existence” (15). The book includesexercises on discovering your voice and influences in life, conductingdramatic analysis, and assessing the feasibility and quality of stories. Italso includes a series of writing projects covering tales from yourchildhood and family stories, retelling a myth in a modern-day setting,telling a story based on dream images, adapting a short story,adapting a news story and a documentary topic, writing a 30-minutefiction piece, and writing a feature film.
Having taught beginning scriptwriting for seven years, I determinedthe number of good scripts in my class hovered around 20–25 percent.After my students began using Rabiger's book, I saw the number ofgood scripts increase to 75–80 percent. The exercises work, so, as aprofessional educator, I wholeheartedly recommend the book.
Essentially, Rabiger guides you through a series of short writingexercises that tap into the your memories—whether it's a childhoodmemory, a story told in the family (such as about the time when mycrazy uncle…). He has you write in the present tense in outline scripttreatment form. In addition, he provides tools on how to analyze ascript for its story structure, as well as how to assess a story for itsstrengths and weaknesses.
I end this section with a couple of writing exercises that should helpyou find your voice and begin writing stories (or choosing stories thatresonate with you). The first is drawn from Rabiger's Developing StoryIdeas, and the second presents a way that I developed to write dialog.I include examples to help jump-start the exercises.
Exercise
Discovering Stories You Should Tell and Finding Story Ideas

Modified from Rabiger's Developing Story Ideas (Focal Press, 2006: 25–26).3
“Survey of Yourself and Your Authorial Goals”
1. Describe the “marks left on you by one or two really formativeexperiences”—ones that were life-changing or forced you to appreciatelife in a different way. It can be happy and/or sad experiences—but itshould be something that moved you to experience deep emotions. Keepthese notes private. They do not need to be shared.
2. “Develop two or three themes connected with the marks that this maincharacter carries. Examples: isolation; betrayal; the high cost ofpretense.”
3. “Think of three or four types of characters toward whom you feel particularempathy.”
4. “Develop four provisional story topics. Make all four exploit a single themefrom your answer to #1,” and make each topic contain a main character,explore concerns you care about, and be as different from each other aspossible.
5. If you want to work on a fiction piece, write a short three- to five-paragraph story in the present tense and showing only what an audiencecan see and hear (you can't see thoughts, so keep the story within themain character's point of view and what the audience can see on theimaginary movie screen of your mind). Craft the story around one of thesestory topics. Be sure to give your main character an agenda: she has aneed, desire, or want that she must attempt to fulfill. Make her do it andput an obstacle or two in her way.
Example from one of my former students:
1. Psychological marks (private notes, not published).2. Develop two or three themes
a. Shameb. Self-destructionc. Misdirected anger
3. Three or four types of characters:a. Professional career people who obtained “everything” on
their own and subsequently destroyed it all on their own.b. Someone who lost his/her identity due to self-indulgence

(Gollum/Sméagol from Lord of the Rings).c. Children who are emotionally abandoned and therefore
never feel validated in their own emotions.4. Four provisional story topics based on the theme of self-
destruction:a. A motivated career woman who is secretly plagued by self-
loathing and doubt but strives to be recognized andrespected.
b. A daughter pretending that she's successful, happy &healthy in order to protect her mother from the truth abouther addiction to drugs.
c. A young thrill-seeker who hangs out with the Moab crowdto ride off cliffs with his bicycle and participates in variousdaredevil stunts—who is beginning to realize that he reallydoesn't care if he gets hurt or even dies.
d. An animal rights activist & stray/abused animal rescuerwho ends up getting overwhelmed and is finally arrestedfor animal abuse & neglect.
From this, we can see how this student evolved this theme into thisstory outline.
Scene 1: A 9-year-old girl named Millie wakes up and pads intothe tiny kitchen of a dilapidated, wooden shack, clutching aragged teddy bear. It is 1927 in rural Oklahoma. Millie sees hermother in the kitchen, staring wildly at the dirty pots and pansstrewn all over the sink and table. Millie asks her mother what iswrong. Her mother tells her that ghosts came in during the nightand messed up the pots and pans after she'd cleaned them,making breakfast for themselves and leaving before anyone inthe house woke up. Millie tries to reason with her mother, but hermother emphatically tells her that she heard the ghosts clankingthe pans and making a [ruckus] all night long. Millie presses theteddy bear close to her chest with both arms, turns around andgoes back to her room.

Scene 2: Millie comes home from school during a cold winterday and sees that her little 4-year-old brother, Jake, is curled upin the corner, writhing in pain. She runs into the kitchen to tell hermother that something is wrong with Jake. Her mother continuesto hum to herself and plod around the kitchen, making some kindof imaginary dinner for imaginary guests. Millie tugs on hermother's skirt, insisting that she come now and look at Jake.Millie's mother shoos her away and tells her it's not polite tointerrupt adults when they're having a conversation—even thoughMillie's mother is the only adult at home right now. Millie runsback into the living room to check on Jake. He is pale andholding his belly. He emits a loud moan and her mother's voicecan be heard from the kitchen, telling the children to pipe downand be quiet. Millie runs back into the kitchen once more,begging her mother to please come look at Jake, telling her thathe's really, really sick. Her mother stares out the window whileshe holds an imaginary bowl of imaginary food in one arm andstirs with an imaginary spoon in the opposite hand. Millie runsback into the living room and props open the front door. Sheclumsily gathers Jake up in her tiny arms. He is almost as big asshe is, so she has to pull him up several different ways beforeshe finally gets a good hold of the boy. Millie carefully steps outof the house and down the rickety wooden steps, and sets offacross the fields.Scene 3: Millie toddles across the field with her brother in herarms. She knows the general direction of town and heads for it.She continues walking with Jake, having to set him down everynow and then to catch her breath, then gather him up again tokeep walking. The hospital is miles away. Millie carries Jake thisway all by herself for the entire journey.Scene 4: Millie finally arrives at the hospital. Nurses notice heras she stumbles up the walkway, exhausted. The nurses run outto grab Jake and help her up. They ask her what is wrong, andshe can barely breathe, much less talk. One of the nurses, afterone look at Jake, picks the boy up and hurries into the building.

Millie is helped inside by the nurses and given a drink of water.Millie sits on the cold, hard wooden bench and waits, her watercup emptied, her dress and face filthy with dirt and dead weedsfrom the fields she had to cross. She lies down and curls up onthe bench.Scene 5: Millie wakes up. A doctor is touching her shoulder,trying to ask her questions about where her parents are and howshe got there. Millie rubs her eyes and gazes up at the doctor,asking for Jake. The doctor informs her that Jake had a seriouscase of appendicitis, and that if she had not taken him to thehospital when she had, his appendix would have burst and hevery likely would have died. The doctor tells Millie that Jake mustspend some time in the hospital bed and that she should gohome. Millie obediently walks out of the hospital and headsacross the miles of fields that lead to home.
We can see the development of an original voice in this story, onethat comes from this student's unique perspective on life. We can alsosee the development of the three act structure—the emotional arcmapping the change in character: the setup (the daughter notices thatthere is something wrong with her mother), complications (thedaughter tries to get her mother to help the sick brother), climax/crisis(she takes her brother by herself to the hospital), and resolution (thebrother survives).
Exercise
Writing Good DialogGive two characters conflicting agendas and place them into a scene thatoccurs in one location in one moment of time. As they speak, do not alloweither of them to reveal their agenda through dialog—until the end of the scene(if at all), unless you want your story to sound like a soap opera! This willheighten the subtext—the underlying emotions and motivations of thecharacters—and will usually lead to good dialog. If you reveal the agenda toosoon, the energy will likely dissipate quickly.
Example of dialog with hidden agendas (1) by Margo McClellen:

Daytime, outside a posh restaurant on Sunset Boulevard. PAULY isstanding in front of the doorway and lights a cigarette. He dons atacky blue jumpsuit and gold jewelry. A strange looking man, anALIEN, wearing a tailored suit that could be Armani (if it weren’tfor the fish-scale-like print) stoically walks up to Pauly.ALIENGood afternoon. Please take me to your--PAULYHey, is that a vintage Jag?ALIEN... good afternoon. I would like for you to--PAULYHey man, what kind of mileage you get in that baby?ALIENMile--PAULYYeah I bet she guzzles, eh? But who gives a crap, right? That
car is HOT.ALIENGood ... afternoon ... I would like--PAULYYou don’t speak English too good, do ya?Pauly glances up and down the street.PAULYHey, my girlfriend’s comin’ out in a sec. She’s gotta SEE this
thing!(toward restaurant entrance)Hey, SHEILA! Get yer ass out here, RIGHT NOW...you gotta SEE
this!(to ALIEN)Hey uh, do you have the time?ALIENTime? I--PAULYHEEEY SHEEEILA!!!SHEILA sprints out of the restaurant, glancing over her
shoulder. She notices Alien and smiles sweetly, then looks at

Pauly urgently.PAULYHere, baby, c’mon—you gotta SEE this CAR!Pauly grabs her arm and starts to pull her toward Alien’s “car”.PAULY(walking around the car)Check this OUT, man!(to ALIEN)Hey, you wouldn’t mind if we took it for a little spin would
you? I’ll give you FIVE HUNDRED BUCKS right now if you just let metake it around the block. All you gotta do is just WAIT HERE ’tilwe get back ...ALIENWait ... here? You must take me to your--PAULYYeah yeah yeah I’ll take you wherever you wanna go, foreign boy.
After we get back.He and Sheila exchange a knowing glance as they get into the
“car.” The vehicle begins to sputter, then starts violentlyflashing bright yellow and orange.PAULY(from inside the car)WHAT the--The “car” winks out of existence. Alien just stands there,
staring at the empty parking space.ALIENWell ... crap.We can clearly see the two different agendas: The alien wants directions to
the “leader,” while Pauly wants to “borrow” the alien’s ride and impress hisgirlfriend. Although it’s clear what both characters want, by having Pauly be thelead—taking charge, doing what he wants, he is able to overcome the obstacleof the alien character. The alien, on the other hand, is clear on what it wants,but its agenda is so at odds with Pauly’s that it never gets a chance—whichadds to the comedic flavor of the scene. Good dialog is driven by hiddenagendas.
Example of dialog with hidden agenda by Ed Crosby.Will and Joe, two high school students, hang out in the back of
their school. They’re smoking cigarettes. Jennifer skips up to

them.JENHey Will.WILL’Sup.JoeHey Jen.Jen doesn’t take her eyes off Will.JENOh hey ... umm Will, how are you?WILLFine.JENOh cool.JOEWhat’s goin on with you, Jen?JENNothin much.WILLMan, I can’t wait to get my leather jacket.JENOh yeah that’s a beautiful jacket. It’s gonna look really good
on you.WILLYeah, I know, I’ve been saving for like a month but it’s gonna
be worth it. Man I’m going to look so cool.JENYeah.JoeHey Jen did you get that note I left in your locker?JENHuh? Uhh no ... I don’t know.JOEYeah well basically I’m going to The Rat this weekend to see The
Unseen so I can pick you up a t-shirt or a pin or whatever ’causeI remember you said how you liked them when we were talking about

bands at the pep rally.JENWhat? Oh yeah that would be cool.WILLThat punk rock shit, fuckin sucks. They can’t even play. Sounds
like shit.JOEIt’s not about musicianship, Will, It’s about raw aggression.WILLYeah cause that’s what gets girls in the mood, “raw aggression.”JENUmmm, I kind of like it.WILLWhatever.JOEYeah so if you want a t-shirt They’re only like 5 bucks but I
can totally spot you the cash. You can pay me after or maybe youcould buy me a beer sometime.JENHmmm hmmm. Hey Will, uhhhh ... Can you give me a ride?WILLYou wanna ride in The Machine?JENYeah, I love The Machine.WILLSure, babe. What you gonna do for me?JENHeh heh.Jen looks at Joe who is looking at the ground.WILLGod I love that car. It’s like an extension of my personality.
It’s like you can look at my car and go, “Yeah, that guy is prettycool.”JEN(turned off)Uhhh yeah.

JOEThat’s how I feel about my 10 speed. One look at that thing and
the ladies go wild.Jen laughs.WILLWhat, are you serious? No chick is into a guy who rides a bike.JENYeah, I mean how old are you?JOE16.JENAnd you ride a bike?JOEYeah, that’s right I ride a bike!JENOkay, Jesus!They all stand around shifting uncomfortably. The schoolbell
rings.WILLWell, schools out. Gimme another smoke, Joe. Come on, The
Machine awaits.JOE(Looking at the ground)I’m gonna walk.WILLWhat dude, you live like four miles from here.JOEYeah I know.WILLYou’re going to walk four miles in those ratty tennis shoes.
They’re going to fall off by the time you get home.JOEI don’t care.WILLOkay, come on, Jen.JEN

Hey, you know, I just remembered I have detention today.WILLOkay.JENOkay see you guys later.Jen runs off without looking at either of them.WILLShe is so weird. Alright, man, have a good walk.JOEThanks.Will walks off. Joe, suddenly hauls off and kicks a garbage can,
then he just stands there. He turns to walk away.JENJoe!JOEJen?Jen walks out from behind the school.JOEWill left already.JENOh.She looks around and fidgets.JOEWhat happened to detention?JENUhhh... cancelled ... yeah they cancelled it.They both stand there looking uncomfortable.JOEWell I was gonna go ...JENYES!JOEYes?JEN

I mean what were you going to say?JOEI was gonna go home and listen to records.JENOh that sounds cool.JOEI mean you could come too if you wanted.JENUhhh sure.They walk off together smiling.The subtext is clear, and we never have to worry about feeling as though the
author is spoon-feeding how we should feel about the characters or let them tellus what their agendas are. Rather, the writer lets the emotional dynamics of thecharacters take over as they try not to say what's exactly on their minds, andwe're led into a story that is entertaining because it forces the audience toguess what's going on, and this guessing is what keeps them interested.
Story StructureAfter you have a sense of character down and what the story may beabout—and have a sense of how to write decent dialog—you need tothink about story structure. This story structure is mainly shaped, orcaused, by the main character, whether the character is initiating theaction or reacting to it. In Uncle Jack, Jack wants to flee his pursuers,while trying to keep his niece happy over the phone. The structure ofthe story comes out of his need to escape while simultaneously usingthe changing scenes of his escapade to embellish the fairytale he'stelling his niece.
Every action has a reaction. What occurs in one scene causes whatwill follow. A character does this by performing actions. He engages inactions because he wants something. Uncle Jack's niece wants him totell her a story so she doesn't have to think about her parents' fighting.Uncle Jack reacts to this by telling her a story, while he simultaneouslywants to escape his attackers. Neither character is static. For onething, if a character is static, then there's nothing to propel the story

forward; there is no dramatic need for an audience to gain emotionalattachment and they'll look for other stories that hook them. Andsecond, these actions, the dramatic needs of the characters, must bearranged in a such a way as to build emotions in the characters and,by extension, the audience.
Dramatic need drives the plot—the arrangement of actions. A bridewanting to get married would be the dramatic need in a weddingvideo, for example. So, when we're the DSLR shooters, what actionsdo we need to capture that reveal this dramatic need? In fiction, thedramatic needs of the character start with the writer but continuethrough production and into the postproduction phase of editing. Butthe principle applies to nonwriters, as well. The filmmaker, whethershooting a documentary on the fly or setting up a commercial, rockvideo, or wedding shoot, must understand the dramatic needs of thecharacters and subjects to be able to deliver useful shots for the editor(even if the filmmaker is the editor!); these shots need to move thestory forward.
Typical story structures follow this pattern: hook, introduction orsetup of the dramatic need of the character (some may refer to this asthe exposition, the minimal necessary information needed by anaudience to get the story), conflict or complications to the dramaticneed that rises to a climax, and finally a resolution (the dramatic needis resolved).
A hook is an incident that grabs the audience's attention right away.We're given some kind of background or context or introduction to thecharacter or situation. There's some obstacle the character mustovercome to get what she wants; this conflict builds to a crisis point orclimax where the character either gets what she wants or doesn't.Finally, the resolution reveals what the character learned from herexperience.
This should not be a formulaic process, but rather one that's organic,rising out of the character's needs and wants as expressed by thewriter (or filmmaker analyzing the story structure of whatever pieceshe's planning to shoot). The emotional changes a character goes

through pivot around the setup, complications, and climax. Theseemotional changes in character (the character arc) typically revolvearound three acts.
Act 1 presents the setup, the introduction of the characters, theirbackground, and setting. It may introduce the conflict—thecentral need or want of the character coming into conflict withsomething, someone, or even herself.Act 2 presents a turn of events for the central character in herquest to get what she wants; obstacles or complications get inher way, eventually escalating to Act 3.Act 3 comes at the apex of the story, the climatic pointrepresenting the strongest emotional moment for the characterwhere she must face the final confrontation, the final crisis (thewedding vows and kiss at the wedding). She either gets whatshe wants or she doesn't, thus resolving the story.
In the Alien-Pauly story described in the dialog writing exercise, wecan even see the emotional arc of the characters in a mini three-actstructure; indeed, individual scenes will contain elements of the three-act structure (but usually not the resolution because the story continuesinto another scene):
Setup of Act 1: The alien wants directions, while Pauly checksout the Alien's ride, thinking that it's a souped-up car.Act 2: This act adds the complication of Pauly deciding not tojust look at the “car,” but to call his girlfriend out and take the carfor a spin, perhaps even to steal it—rising to the climax/crisis inthe next act.Act 3: Pauly taking the “car,” leaving the Alien standing on thesidewalk as the resolution.
In Uncle Jack, the emotional arc of the characters look like this:
Setup of Act 1: Uncle Jack tries to escape thugs shooting at him.His niece calls him. He tries to get rid of her, but can't, taking usto…Act 2: This act adds the complication of Uncle Jack trying to tell a

fairytale to his niece while he flees the car, enters a train, saveshis buddy clown from falling from a building, and heads down atunnel.Act 3: And they hide in a costume shop, where they are corneredby two gunman, while the niece explains to Uncle Jack how toescape the situation, thus resolving the story.
Why is this important for us as DSLR shooters? As the personresponsible for setting the look of the shots and capturing them oncamera, you, as the director (whether shooting it yourself or workingwith a cinematographer), must understand the story and know whatimages go where so the editor has everything needed to deliver astrong story. Gordon Willis, ASC, describes how the cinematographer“is responsible for the image. He is responsible for putting that magicup on the wall. He's the visual psychiatrist, moving the audience fromhere to there”4
If the cinematographer doesn't understand the story—the underlyingdramatic needs of the character expressed over time—then how willshe know what to shoot and how to shoot? This is rooted in the story.When a clearly written script maps the change of a character as heattempts to get what he wants (or even just a brief outline of theemotional change of the bride and groom in a wedding video), then it'smuch easier to revolve the story around a central character trying to getwhat he wants. If the story is vague, with a weak central character, thestory doesn't move forward and the cinematography doesn't have abasis on which to shoot. Plus, you end up with random shots that mightlook pretty but don't move a story forward, moment by moment, shot byshot, and will likely bore an audience.
Get a script, write a script, adapt a story, or analyze and structure arock video or wedding shoot around a story. If you can't think of a story,then modernize a fairytale and shoot it with friends. What would a shortfilm look like if you rewrite and set the “Little Red Riding Hood” folktalein New York City or Los Angeles or a small town in middle America?Tell a story with your images.
Until you're telling a story, you're not doing cinema but simply playing

around with a camera.
Winans, the writer and director of the Internet short Uncle Jack (as well as thewriter-director of 2009's fantastic independent film, Ink) believes that “story iseverything” when it comes to narrative filmmaking. As a beginning filmmaker, heused to gravitate toward “cool shots, cool editing” without thinking too muchabout the story. “But after enough miserably failed films with really cool shots,”Winans explains, “it became apparent that if I didn't have the script, and morespecifically the story, then I was sunk no matter what I did with the camera.” Soas he honed his filmmaking skills, he focused on the story: “As the years havegone by, my focus has been less and less on the technical process and moreand more about the script.” He faced a hard lesson and realized that “filmmakingis way too difficult, expensive, and time consuming to waste on a bad script,” headds.
Let's look at an example to see how this structure can be seen inVincent Laforet's Internet hit Reverie (see http://vimeo.com/7151244),shot on a Canon 5D Mark II. This short piece (97 seconds, excludingcredits), tells the simple story of a man forgetting to meet his girl at aspecific place. He wakes up and realizes he's late, then flies out thedoor, grabs flowers, and races his way to her location in his car, butmisses her. Finally, the search escalates as he rides a helicopter inorder to find her, but he fails. The movie ends as it began, a mansleeping on a couch dreaming about his girl. He wakes up and rushesout to try and meet her in time, but his love is gone—or perhaps it wasjust a dream.
Let's map Laforet's short as a mini three-act piece on the graph, asshown in Figure 7.2.
Act 1: Hook, setup of dramatic need: The man wants the woman.We see a man and woman kissing. Man on sofa, sleeping, asTV flickers light onto him. He gets flashes of images of a womandressed in red, waiting for him. The conflict is set up: he shouldbe there, but he fell asleep watching TV.Act 2: Rising action, further complications to his dramatic need.Man washes his face, rushes up stairs, grabs flowers, and racesthrough the city, looking around as he drives. The woman stands

and waits. There is a series of shots of the man driving,overcoming further obstacles; he's using the GPS—perhaps he'slost. He arrives, whipping off his sunglasses, but she's not there.Act 3: Climax/crisis/final confrontation and resolution. The girl'sgone. The man's arrived too late, and the flowers drop out of hishand. He sweats bullets. He drives around the city, looking forher. The sequence ends with a climatic shot of him in ahelicopter as he continues to look for her. Panoramic shots of thecity. The story is resolved as he realizes he's not going to findher. The short ends with him on his couch, waking up and rushingout the door—presumably the beginning of the film, or perhapshe's just dreaming about the encounter and failure to meet thegirl. In either case, the story is resolved. He doesn't get the girl.
Figure 7.2 The three-act structure of Vincent Laforet's Reverie.
Storytelling Shooting ExerciseBy Dave Anselmi
A good way to practice scriptwriting and see how what you write getstranslated on film is to take a small scene from one of your favorite films and re-
create it, shot by shot. Shoot a scene from one of your favorite films (make sureit's a good film that you can actually shoot—an action film with a lot of specialeffects may be too hard, but a good scene of drama can do the trick). Byrepeating the scene, by re-creating it shot-by-shot, you'll get a good sense ofhow good storytelling works on film. With this knowledge, you'll start tounderstand how to write better scripts.
Once the story is in place, a script written, then the cinematographer—in consultation with the director—determines the look and feel of thefilm, before shooting begins. In smaller projects, you may be thecinematographer and the director. In either case, the story should beyour guide in determining how the film should look—whether you'reshooting people to provide a snapshot of a city, wedding, commercial,music video, short, documentary, piece of video journalism, or feature.
1 Fauer, J. (2008). Cinematographer Style: The Complete Interview, Vol. 1, (p.297).American Society of Cinematographers.2 All quotations by Winans in this chapter were conducted by the author in June2010.3 This exercise was published in Developing Story Ideas, Second Edition, by MichalRabiger, Chapter 3, “Artistic Identity,” Copyright © 2006 Elsevier, Inc. Printed withpermission.4 Fauer, J. (2008). Cinematographer Style: The Complete Interviews, Vol. 1, (p.315).American Society of Cinematographers.

Part 2Master DSLR Shooters at
Work: Case Studies


Part 2. Master DSLR Shooters at Work: Case Studies
This next part of the book examines five strong story projects createdby those with a flare for experimentation, a desire to push thecapabilities of their DSLRs. Most of them used the Canon 5D Mark II,whereas two projects utilized the Canon 7D. Hundreds of others couldhave been chosen for the book, but these are the projects and peoplethat fascinated me and represented some of the best cinematicdocumentary and short fiction projects in the DSLR world from aninternational perspective. Each chapter in this part explores a differentaspect of filmmaking to reveal the capabilities of the cameras. Itexamines the approaches filmmakers took in attaining a cinematiclook utilizing a variety of techniques1 —from taking advantage oflocations to engaging documentary cinema techniques to working withthe blocking of actors.
I n Chapter 8, Brazilian director Bernardo Uzeda, along withcinematographer Guga Millet and producer Isadora Sachett,envisioned a film look in their short Casulo that earned them aBrazilian Society of Cinematographers award. Their look relied on astrong primary color palette, the use of visual texture, and apostproduction process that not only included serious amounts of colorgrading, but also involved removing video noise from each shot. Theprocess resulted in images of such pristine richness that one would behard pressed to say it wasn't shot on film—and, indeed, it wastransferred to 35 mm film to screen at film festivals in Brazil (someviewers thought it was shot on 65mm!).
I n Chapter 9 photojournalist Rii Schroer found the 5D Mark II awelcome fit to her intimate photography style, which includes building arapport with her subjects, resulting in her characters shining throughwith not only cinematic flare, but with personalities that shimmer withdepth. Furthermore, Schroer practiced a documentary style in her workthat forthrightly challenges the need to engage in a TV news style, astyle that looks and feels like video, rather than cinema. Schroer is ajournalist who listens to her subjects, gives them a voice with respect,and at the same time weaves a story with strong images. Rather than

let images simply illustrate a narration—as we typically find in TV news—Schroer practices visual journalism to be able to tell the story visuallyand cinematically.
Chapter 10 explores Philip Bloom's A Day at the Races. Bloom is aself-made guru of DSLR cinema and has become one of the strongestpromoters of the HDSLR movement. In this short, he practiced histechnique with a modified Canon 7D fitted out with high-end Cookecinema lenses. He not only engaged his trademark style by coveringhis subjects with close-ups of faces, providing textural detail in the film,but captured the atmosphere of a horse stable and racetrack by doingso. His unique style stands out and he represents one of the mostprolific powerful DSLR shooters working today.
I n Chapter 11, Jeremy Ian Thomas, a colorist by day at HdiRAWworks, and a director by night, put together the otherworldlyfeeling of The Chrysalis—taking advantage of California's DeathValley to evoke a purgatory for a young man who walks in between theliminal space of life and death. Thomas's wizardly skills in Apple'sColor allows him to eke out a cinematic style from flat and superflatsettings of Canon's 5D Mark II and 7D. In this project, he engaged theCine Marvel picture style and integrated those images with CGIspecial effects.
In Chapter 12, Shane Hurlbut, ASC, teamed up with writer-directorPo Chan to present probably the most engaging cinematic and heart-breaking short fiction shot on a Canon 5D Mark II to date with The Last3 Minutes. It's certainly one of the most ambitious short DSLR filmsmade—utilizing 18 different locations as we see an older man's lifeflash before his eyes (and all shot in five days). The impeccable detailin setting up each shot, getting the light perfect, choosing the properlenses, and working with actors to shape the performance just sohelped achieved a compelling cinematic look desired by so manyaspiring filmmakers shooting digitally.
Note: All quotations of filmmakers in this section of the book arefrom interviews with the author, unless otherwise noted.

1 I'm using film “look” in the titles to stay consistent with the book title—which is auseful marketing tool—but, of course, there is a difference, and a film look is notjust one formula and refers to a variety of cinematic elements.


Chapter 8
Crafting the Film Look with PostproductionWork
Casulo (2009), directed by Bernardo Uzeda, Brazil, 17 min.
Technical data: Shot on a Canon 5D Mark II with Sigma 24–70 mmf/2.8 lens. Audio recorded with a Sennheiser MKH-416 microphone onan M-Audio Microtrack 2 digital audio recorder. Files converted toMPEG. Postproduction software: Final Cut Pro, Twister plug-in in AfterEffects (for 24P pulldown), Color Finesse 2.0 and the Tiffen DFX 2.0filters, graduated NDs, vignettes, selective saturation, and so forth.Neat Video plug-in for noise reduction (Pro version). Images croppedand conformed to 1.85 aspect ratio for 35 mm film transfer, providing a1920 × 1037 resolution, direct-to-positive or direct-to-print transfer atTechnicolor USA using Cinevator (manufactured by a company fromNorway called Cinevation).
The trailer to Casulo is located at http://www.vimeo.com/5133770.

Figure 8.1 Still from Bernardo Uzeda's Casulo(©2009. Used with permission.)
Out of all the shorts shot on a HDSLR that I've seen online, Casulo isone of the strongest examples of video expressing the film look.Indeed, in 2010, the film earned the top cinematography award fromthe Brazilian equivalent of the American Society of Cinematographers:Associação Brasileira de Cinematografia. Casulo, reverberating withsurreal echoes of David Lynch, tells the story about the complexities ofobsession and death as a daughter spies on her mother whobecomes obsessed by a male neighbor and a girl he is with. Althoughthe narrative involves intricate levels of visual information and very littledialog, what stands out in the film is how the director andcinematographer captured those images and put them through aheavy postproduction process to shape a strong cinematic quality tothe work (which was transferred to 35 mm film). The film was writtenand directed by Bernardo Uzeda, with cinematography by Guga Millet,and produced by Isadora Sachett. The project was shot on a Canon5D Mark II in April 2009.
Story Idea

Uzeda's background is in film music and sound design, and at onepoint he made a documentary for film school. The doc earned severalawards, which helped him raise money and gain the “confidence,” heexplains, to put together his first fiction. I thought of something thatcould be impressive visually and that could be done without a bigbudget or a big crew.”1
Uzeda and producer Isadora Sachett shared a “certain distaste forthe current types of features and shorts that were being made” inBrazil, he says. These stories not only shared similar journalistic styleand themes, but also the “aesthetics, especially social/raw images”and most of which relied on dialog. Uzeda, a fan of visual cinema—incontrast to the dialog-heavy films produced in Brazil—wrote a murderobsession story with very little dialog. “Surrealistic images,” Uzedasays, would drive the story, suspending it from realism. However, headmits that the film “can be confusing in a first viewing, but I like tothink of it more as a dreamlike experience (this kind ofexperimentation is part of the fun when you are financing the wholeproject with your money),” he adds.
So he wrote his screenplay to shoot on a tight budget: “small crew,accessible locations, few actors, and so forth. Eighty percent of thefilm was shot in the facilities of my building (apartments, garage,swimming pool, emergency stairs, rooftops, balconies). So we onlyhad to scout and pay for a couple of extra locations (which madeprincipal photography considerably faster and cheaper),” Uzedaexplains.
However, before he wrote the script, Uzeda looked at a variety oflocations where he lived—ones that expressed “potential value forcreating the atmosphere that I wanted. A recurring element in theshooting script is the POV shot,” Uzeda says. “It was very important forthe story to let the characters see and feel the atmosphere aroundthem, and sometimes, they observe the other without being observed(something that was only possible after heavy location scouting,searching for places and corners that allowed this type of blockingeffect)” (see Figures 8.2 and 8.3).

Figure 8.2 Still from Casulo, revealing how the production team utilized existing locations to helptell the story: a character peeks out a window, as she spies on a neighbor.(Still from Casulo ©2009. Used with permission.)
Figure 8.3 Looking unobserved conveys one of the principal themes of Casulo, which Uzeda setsup in this shot of a woman looking through a neighbor's window from her own apartment.(Still from Casulo ©2009. Used with permission.)
Shooting with Texture and Color

Because Uzeda focused on a story that would be told with images, hewanted to make sure the “details of its environments, [especially] thetextures and the colors, was a key factor,” he explains. His influenceswere photographers Sally Mann and Gregory Crewdson. “Both of themuse extremely high resolution and contrast large format cameras,” henotes. He also explains how his DP, Guga Millet, is “highly fond of JohnAlton, Conrad Hall, and Greg Tolland.”
Money came from his own personal funds, as well as from producerIsadora Sachett. She also brought in DP Guga Millet and a number ofother volunteer crew members. They “agreed to work for free justbecause they saw some potential in the project,” Uzeda adds.
However, it wasn't a fast route to get the film made. They spent ayear in preproduction and story development, which kept changing witha shrinking budget. But when they started shooting, their work wascompleted in five days. Postproduction took four months.
They were planning to shoot on Panasonic's HVX200, the tapelessP2 camera, jury-rigged with a 35 mm lens adapter. Guga Millet, theDP, owns the camera, so they could have used it free—a welcomehurdle to overcome with a low budget. But Millet told Uzeda that therewas a better camera out there—the Canon 5D Mark II—that couldshoot in 1080P and had the ability to change lenses, in addition toattaining “better definition, contrast, and color response in general,”Uzeda continues, due to its full-frame sensor. Uzeda quickly gotexcited about the possibility. However, just as fast, he got “highlysuspicious” when Millet said that it was a stills camera with a “filmmode.” Uzeda wondered if “this type of equipment could be up to thetask of shooting the film which I had in mind.” Neither of them had everused such a camera, and there wasn't one to be found in Rio DeJaneiro at the time.
Millet flew to Sao Paulo to check one out at a “photography tech-fair,” Uzeda confers. “He then sent me some .mov files straight fromthe camera, and I was immediately impressed. That sharpness anddepth of focus [were] exactly what I wanted for this project. We had tospend a large part of the budget buying accessories for the camera,

but it was definitely worth it,” Uzeda says. “The portability of thecamera itself and especially the larger sensor made possible for us tosave significant money in lighting gear and [and allowed us to get]other accessories like waterproof cases.”
Once they had the evolving budget nailed down, the script finalized,and a camera chosen, they moved on to casting the actors. ForUzeda, “the most important factor [was] their faces,” he says. “Theyhad to portray immediate expressiveness without saying too much oreven moving too much. They had to say a lot with only their eyes andsubtle body language. I think the shot of the actor on the Laundromatroom, with his lost gaze, is really representative of what the film isabout” (see Figure 8.4).
Figure 8.4 The lost gaze of actor Charles Fricks in Casulo. The emotion expressed in this shot,says director Uzeda, represents what the film is about. Note the shallow depth of field in the shot andhow the color grading allows the character to pop out on-screen. Also note that the character has awarm look to him, but the background remains cool, providing the sense of contrast and depth.(Still from Casulo ©2009. Used with permission.)
Another image Uzeda had for the script was a red-head girl, whowould be easily “differentiated from the others ([especially] on distantshots), not to mention the interesting underwater effect of her red hairon the shot when she dies in the pool,” Uzeda notes. “I wanted the

audience to be confused for a moment, as if her hair were bloodfloating on the surface, but in fact, it is just the red color of the hair witha strong backlight” (see Figures 8.5 and 8.6).
Figure 8.5 Actress Thaís Inácio becomes the red-headed girl that director Uzeda wanted in orderto have her stand out in images.(Still from Casulo ©2009. Used with permission.)
Figure 8.6 The red hair of Thaís Inácio spills over into a pool of water, backlit so as to look likeblood—even if only for a moment.

(Still from Casulo ©2009. Used with permission.)
Production NotesThe production process went smoothly due to a tightly plannedshooting script. Uzeda says he “spent months timing the movie insidemy head with a chronometer. There was no time or budget for errors,so 80% of all the decisions were made during the elaboration of theshooting-script” in order to allow principal photography to “run smoothlyand fast.” But he allowed “room for new ideas and spontaneity on theset,” he explains. “Guga usually came up with incredible shots andsetups that I couldn't visualize until 10 minutes before rolling thecamera. I spent one year talking to him about references from othermovies, still photographers, painters, so our minds were pretty muchon sync regarding the framing of the shots, blocking, and use of lights.There was little to no rehearsal with the actors (with the exception ofthe dialog between the mother and daughter, since it involved theperformance of a child).”
Guga would typically begin his day talking to the assistant director todetermine the order of the setups for the day's shoot, creating a map“of the locations and sets,” Uzeda says, “marking where the camerawould be and this helped me, Guga, and the art director to preview thesetups and think some time ahead.”
Because of the 5D Mark II's potential shallow depth of field, Uzedaused a focus puller. “Focus is a serious thing and it is not fixable inpost,” Uzeda warns. “Keep in mind that monitoring your video with aDSLR (at least in my experience with Canon) is not an easy thing. Wetried using a Marshall monitor, but it didn't respond well to the realresolution of the camera (since we only had the option of using theRCA connector).2 So, that left them with the small display of thecamera itself to pull the very subtle focus of an image intended to beprojected into the big silver screen—this is not an easy thing to do.”
Another challenge was the limited first firmware build for the 5DMark II. They were stuck with 30P and an automatic ISO (they shot

before the firmware release that fixed this problem). “I was very afraidof losing the film look due to the frame rate,” Uzeda says, “but I noticedthat the progressive factor was much more important than the fps[frames per second] factor to attaining the feel I wanted for this project.In fact, I didn't care so much about emulating 35 mm film, but I alsodidn't want the ‘video feel’ due to small color/image resolution,interlaced frames, and so forth.”
Lighting the ScenesThe crew also spent a lot of time getting the lighting right—one of thekey aspects of getting a cinematic look. “Sometimes the lightingsetups took hours,” Uzeda remembers, “due to our small crew andambitiousness with the visual aspects of the film. So Guga usuallymade one basic light scheme that could serve all the camera setups(this took some time), but after that we only needed minimaladjustments from one setup to another.”
Part of the lighting design revolved around using practical lights.“Even though most of the film displays stylized and unnatural colorsand lights,” Uzeda says, “the shots ranged from working with verysimple practical lighting, like the blue lamp as a fill light for the girl'sface (see Figure 8.7), to completely artificial and extreme setups, likethe last underwater night-shot; there we used a strong photofloodoutside the water, to create the rays of light through the hair of thedead girl inside the swimming pool” (see Figure 8.6).

Figure 8.7 Cinematographer Guga Millet sculpted light and shadow to provide us with this moodyscene. He used the blue lamp, screen right, as a practical in lighting the girl's face. The arrow leftpoints to the bounced light of a practical 3.2 K (tungsten color temperature) lamp on the floorpointed at the wall. Notice that a bit of this floor light hits the edge of the girl's shoulder and hair.This backlight separates her from the background, providing a sense of depth in the shot. The secondarrow points to a blue lava lamp that reflects onto her face, shoulders, and wall. This is a soft keylight. Images from the film were inspired by photographer Gregory Crewdson.(Still from Casulo ©2009. Used with permission.)
As Uzedo notes, he wasn't trying to emulate 35 mm film. Indeed,there is no formula for creating the film look. Different directors andcinematographers express different visions of how to set up anoutdoor day or night shot, for example, based on the mood they'retrying to set for the story. Following are a few case study lightingsetups showing how director Uzeda and cinemato-grapher Milletcrafted a cinematic look during the production of Casulo with theCanon 5D Mark II.
Attaining the Film Look Indoors—NightWe can see how cinematographer Guga Millet sculpted light andshadow to provide us with the moody scene in Figure 8.7. Figure 8.8shows the lighting setup.

Figure 8.8 Floor plan of lighting setup for Figure 8.7.
Light and ShadowDP Guga Millet describes how the director envisioned the shot inFigure 8.7: “The blue face shot was something that Bernardo wantedfrom the beginning. We did lots of tests with this blue lava lamp. I wishit was a little stronger though (although we fixed that in post), but wecan really see that the light source is really that lamp.” Millet explainshow he lit the scene “like I was working with ISO 320 film with shutter at1/60. The idea was to use only that lamp to light the actress. I alsoplaced a 3.2°K in the background in order to create a backlight.” Hefelt that blue light “would be too much and the lamp didn't have powerenough to enhance her face. But I think it didn't work exactly the way Iintended. The light was too low on the ground, and we couldn't raise it.”
Exposure and ISO Setting

ISO 320, f/2.8, shutter 1/60.
“Actually,” Millet explains, “I could not change ISO or shutter settings.The camera was in auto ISO mode in those days [when shooting in livemode]. I only had control over the f-stops”—because of the Sigma lenswith a manual f-stop ring on it. They shot in April 2009 before theCanon 5D Mark II firmware that allowed manual control of aperture andISO. The frame rate was stuck at 30 fps. According to Philip Bloom,the Canon 5D Mark II's sweet spot is at ISO 320, so they hit the bestISO setting for the camera.
LensSigma 24–70 mm, f/2.8
Guga explains the lens choice: “When we shot the film, the camerawas still in its first firmware, fully automatic 30 fps. So I used lenses forNikon mount,” allowing for manual control of the aperture on the lens.
FiltersNo filters were used in the shot.
Camera StabilizationThe film was shot “on a kind of cinesaddle (which I like to callcinepillow). The camera sits on the bag and shapes itself around thecamera through high-tech foam. It helps stabilizes the camera,” Milletsays.
Attaining the Film Look Outdoors—DayUzeda notes how the scene in Figure 8.9 “was done completely atnatural daylight (around midday or 1 p.m.).”

Figure 8.9 The arrow represents the direction of the sun.(Still from Casulo ©2009. Used with permission.)
Attaining the Film Look Outdoors—DuskThe silhouette in Figure 8.10 highlights the character's loneliness andisolation.
Figure 8.10 The silhouette highlights the character's loneliness and isolation. The setting sun is

used as backlighting.(Still from Casulo ©2009. Used with permission.)
Story IntentionThe DP, Guga Millet, says how they “wanted to place her character in aworld of her own. I think we achieved that with her silhouette againstthe blurred city.” The time of day enhances her loneliness; the imagewould say something much different if it had been shot in theafternoon.”
Light and ShadowGuga explains the setup: “The woman silhouette shot was done onlywith natural light something like 10 minutes after sunset, at the magichour. We raised the contrast in post to enhance the silhouette idea (inthe flat image we could see more of the actress's face).” The silhouettealso helps set the character apart and heightens her loneliness.
Exposure and ISO SettingISO 320, f/2.8, shutter 1/60.
LensSigma 24–70 mm, f/2.8.
“The idea was to defocus the background as usual,” Guga says,“with the intent of having a more dreamlike quality to the scenes.”
FiltersNo filters were used.
Camera Stabilization

Tripod.
AudioAnother aspect of production was how Uzeda didn't use locationsound recording. “We shot the entire film without a sound recordist orlocation sound (with the exceptions of two small dialog scenes thatwere recorded on the set),” Uzeda explains. “This was another factorthat helped to speed up the whole shooting process and keep usinside of the budget. Nevertheless, the postproduction months wereloaded with intense work, but since this is something that is extremelycheaper than feeding and transporting 20 people with cameraequipment from one place to another, I thought it was worth the time.”
They used a Sennheiser MKH-416 hyper-cardioid microphone withM-Audio Microtrack 2 digital audio recorder, for the two dialog scenes.
Getting the Look in PostproductionAfter completing principal photography, Uzeda moved intopostproduction—where his specialty lies. “The 5D Mark II is also verysensitive to the color red; I saw myself removing red from almost 100%of the shots.” The examples shown in Figures 8.11 through 8.13 revealthe redness in the originating shot.
Watch Out for RedShane Hurlbut, ASC, who shot a Navy SEALS movie, Act of Valor, on 15different Canon 5D Mark II's, noticed different color balance settings in severalcameras. Guga Millet shot Casulo on a 5D Mark II that ran red. Uzeda admitsthat although Casulo was “a great achievement in cinematography, I can't denythat 100% of the film was extremely color-graded in post, and we also did someRGB noise reduction, which saved some otherwise unusable shots.” For colorgrading, he utilized Color Finesse 2.0 and the Tiffen DFX 2.0 filters. Noisereduction was accomplished by using “the incredibly cheap and effectiveNeatVideo plug-in by ABSoft.”
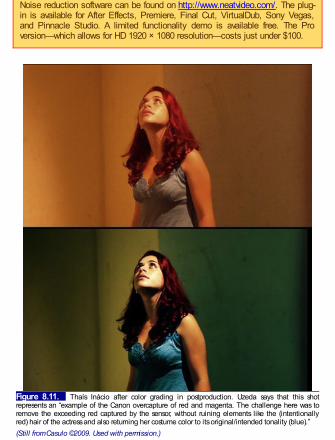
Noise reduction software can be found on http://www.neatvideo.com/. The plug-in is available for After Effects, Premiere, Final Cut, VirtualDub, Sony Vegas,and Pinnacle Studio. A limited functionality demo is available free. The Proversion—which allows for HD 1920 × 1080 resolution—costs just under $100.
Figure 8.11. Thaís Inácio after color grading in postproduction. Uzeda says that this shotrepresents an “example of the Canon overcapture of red and magenta. The challenge here was toremove the exceeding red captured by the sensor, without ruining elements like the (intentionallyred) hair of the actress and also returning her costume color to its original/intended tonality (blue).”(Still from Casulo ©2009. Used with permission.)

Figure 8.12 Another example of how color grading in post helped achieve the film look inUzeda's Casulo.(Still from Casulo ©2009. Used with permission.)

Figure 8.13 In this scene set in the kitchen, director Uzeda explains how the DP “placed a coldlight with a CTO (orange) gel, the resulting video in the camera (along with some color balanceimprecisions on the 5D Mark II settings), was a completely green kitchen, so we had to fix that in post(note that the white/beige wall on the background turned purple because of this subtraction of green,which by the way, I think looks interesting),” Uzeda says.(Still from Casulo ©2009. Used with permission.)
Because Uzeda wanted to transfer the digital film to a 35 mm filmprint, he had no option but to conform the 30P to 24P. “The pulldownprocess was done using two different methods,” he notes, “which

depended on the nature of the shot. Sometimes I conformed from 30Pto 24P, which doesn't involve any sort of pulldown. Each frame ismaintained. Only the speed is altered (20% slower), so we are actuallyreading 30 frames 24 times per second, which yielded a great effect insome shots (a smooth and dreamlike feeling), but this method isunusable for dialog scenes where the speed of the movements of theactors could be distorted. The other method used a plug-in calledTwixtor in After Effects.”
Postproduction WorkflowAfter he transferred the files to the computer, Uzeda took the nativeH.264 .mov files from the 5D Mark II and decompressed them intoMPEG files for editing purposes (although Apple Pro Res will work, aswell). When he completed the final cut, he says he “reconformed thewhole project to the original H.264 .movs from the camera and thenwent to After Effects. There, I processed the shots with (in this order):pulldown from 30→23.976 fps; digital noise reduction with NeatVideo;general color grading; miscellaneous filters (usually graduated NDs,vignettes, selective saturation, and so forth).”
As noted before, Uzeda wanted to project on a 35 mm film print toattain the best possible viewing experience for an audience. “There'sstill no widely available digital projection that can match the color andpixel resolution of film,” Uzeda argues. He also wanted to do a DolbyDigital 5.1 surround sound mix. “Casulo is a very sensorial and visualfilm,” Uzeda exclaims. “Its sounds and images are everything in theexperience. I could not afford making a digital exhibition copy and letthe film end up screening in some festivals that only [have] two options:35 mm or ‘DV family tapes.’”
Color GradingWhen color grading and noise reduction was completed, Uzeda exported thefinal output to uncompressed .mov files at 1920 × 1080p/23.976 fps. Butbecause the 16 × 9 widescreen format is at a 1.78 aspect ratio, he cropped hisimages slightly to be able to conform to an aspect ratio of 1.85 for 35 mm film

transfer, providing a 1920 × 1037 resolution. He transferred the film atTechnicolor USA “through a new technology called DTP (direct-to-positive ordirect-to-print) using a machine called Cinevator (manufactured by a companyfrom Norway called Cinevation).” Uzeda adds, “Through this method, there areno negatives involved. The digital files and your 5.1 mix in your MO-Disk aretransferred directly to your final positive. You have less control since there is nocolor adjusting using the inter-negatives; nonetheless, it is a more affordableprocess for lower-budget productions, and I was very impressed and satisfiedwith the results.”
ScreeningThe film was screened in fall 2009 at the Rio de Janeiro InternationalShort Film Festival, in what Uzeda calls “a really nice theater, and thatwas the first time I could feel the power of the movie in a really largescreen with a crowded audience which was very receptive to theexperience. I hope to screen the film in other international festivals, ofcourse, but nowadays with the overdose of short-films submissions, it'sgetting harder and harder to find a proper space for a 17-minute silentshort thriller. My goal in creating the film was to have a first experiencedirecting actors and working with a good DP, and it sure wasunforgettable.”
Uzeda plans to shoot his next project on a DSLR, again. “Things aregetting better and cheaper. I think the cost-benefit result is amazing forlower-budget projects (although each day, more and more medium-/high-budget projects have DSLR cameras readily available for somemiscellaneous shots),” Uzeda says. But Uzeda explains that a cameradoesn't make a film. “The main thing will always be: it is not the camerathat makes a good film, and not even great cinematography. We've allseen films shot with very little money and gear that impressed us,whereas every week there are lousy multimillion dollar features madewith the best gear (and the best DPs) that are completely forgettable.Nonetheless, I suggest getting a very open-minded and experiencedDP for shooting with a stills camera. Make tests and experiment in thelocations where principal photography will occur if possible. Neverthink you are saving money having friends or nonexperienced people

to handle important set functions like a director's assistant, gaffers, setproduction crew, and so forth.”
“We've all seen films shot with very little money and gear that impressed us,whereas every week there are lousy multimillion dollar features made with thebest gear (and the best DPs) that are completely forgettable. Nonetheless, Isuggest getting a very open-minded and experienced DP for shooting with astills camera. Make tests and experiments in the locations where principalphotography will occur if possible. Never think you are saving money havingfriends or nonexperienced people to handle important set functions like adirector's assistant, gaffers, set production crew, and so forth.”
Uzeda faced these big drawbacks when using the Canon 5D Mark IIbefore the firmware update:
Problems occur with HD video monitoring, and no matte orreticules are available for monitoring on different aspect ratios orany kind of more-advanced image monitoring.Some strange artifacts can appear on fast-moving subjects,such as subtle ghosty motion blurs and things that you wouldn'tsee in the same image if shot on 35 mm.Subtle use of focus is very hard to do and demands anexperienced and patient focus puller; otherwise, you can end upwith a completely ruined film.Color sensibility of the sensor is still not uniform. Moiré-patternsshow up.No matter how beautiful the image is, it is still being digitallycompressed frame by frame.DSLRs generate more noise than most people think.Slow-motion implementation is poor or nonexistent.Audio implementation (at that time) is poor.
In any case, Uzeda feels that the “main [benefit] of shooting with aDSLR is, of course, the price vs. quality of image (full HD resolution,big sensor, possibility of changing lens, rich color, and contrast).” Andif it's transferred to a 35 mm film properly, “you can get more than
impressive results on the big silver screen.”
After seeing Uzeda's film on 35 mm, some experiencedpostproduction people told him that they felt it contained “suchsharpness and rich colors that it looked as if it was shot in 65 mm. Ithink this kind of a result for a camera that costs even less than thelenses and accessories we were using is quite a revolution,” Uzedasays.
1 All quotations in this chapter are from interviews conducted by the author.2 The Canon 5D Mark II has an HDMI out for high-definition playback, butmysteriously only outputs in standard definition in live mode when shooting. The 7Ddoes not have this problem.


Chapter 9
Crafting the Film Look by Building a Rapportwith Characters
16 Teeth: Cumbria's Last Traditional Rakemakers (2009),directed by Rii Schroer, England, 2:29 min.
Technical data: Shot on a Canon 5D Mark II (standard picture style)with Canon 24–70 mm/2.8, Canon 50 mm macro. Merlin Steadicamwork with Nikon 28 mm and Canon adapter. Background audiorecorded on the 5D Mark II, with additional audio recorded on aMarantz PMD660. The work was edited in Final Cut Pro withconversion to Apple Pro Res.
16 Teeth is located at http://vimeo.com/4231211.
Figure 9.1 John Rudd, one of Cumbria's last traditional rakemakers. Rii Schroer profiles John andhis son, Graeme, in a short-shot doc on a Canon 5D Mark II.

(© 2009 Rii Schroer. Used with permission.)
Filmmaker BackgroundBorn and raised in Germany, Rii Schroer followed the more practicalroute at university: economics and business administration. Aftergetting her degree, she got a business job in Hamburg and movedthere. As she worked for about six months, she became drawn toHamburg's “vibrant photographic scene,” where there were “lots oflectures and exhibitions,” she says in an interview. She saw apresentation by Kent Kobersteen when he was the picture editor atNational Geographic, and it changed her life. The lecture included adiscussion about how the magazine's photographers work on stories.“It somehow clicked,” Schroer remembers distinctly. “I decided thatevening to become a photographer and went to a secondhandphotographic fair a couple of days later to buy my first camera (a NikonF90x).”
Schroer spent a year studying photojournalism and then moved toLondon “to work over the summer holidays.” She says, “[I] was drawninto the amazing photo scene there, and started contacting the localpapers to get some work experience and earn my first, although verymoderate, money with photography.” Schroer enjoys the “fast pace ofnews reporting, but also the technical aspects of photography. To workfor the national papers doing news, but also work on feature stories,seemed to be a logical next step at that time.”
Although she studied photography and found her passion there,Schroer said she was “interested in film from an early age, againbeing exposed to a brilliant cinema in my hometown, which showed allthe classics and interesting European and Overseas releases.” Sheplayed around with “little camcorders,” but photography andcinematography didn't converge—as with many of the filmmakers inthis book—until the release of the Canon 5D Mark II. “I often thoughtsome stories I photographed for the papers would be better told withvideo or as multimedia pieces, so the new technical developmentscame as a blessing” and provided an “interesting way to tell stories,”

she explains.
At that point, “I took filmmaking seriously,” Schroer says. Althoughshe admits that there are “different thought processes and skillsneeded in doing photography or video,” she finds that “there are moresimilarities than differences. At the end of the day, you are trying to tella story, work with visuals, and have the joy of engaging with peoplefrom all walks of life, no matter the medium.” So whether she shootsvideo or photography, the story (and outlet for it) will determine the bestway to do it, whether shooting photo, video, or both in combination.
Making the Phone CallSchroer first saw the story about the rakemakers, John and Graeme, ina local newspaper. She called them to see what they were like andtalked “about their work and lives in the remote village of Dufton inCumbria, England.” She discovered that “they were great, down-to-earth characters and the old, dark workshop and working practices hedescribed sounded perfect for shooting this piece with a DSLRcamera to make use of its low-light capabilities.”
Once she had the feeling for her characters, Schroer decided thatthe “initial idea was to get a fresh take on an old tradition and to findthose little quirky moments that put a smile on your face.” With that, shehad the beginnings of a story concept. Rather than writing a script, sheand her assistant “formulated our interview questions.” After speakingto John on the phone, she was almost ready to shoot.
On LocationBefore pulling out her camera, Schroer remembered the first lesson inphotojournalism: “It is often crucial to be able to build a rapport with thepeople you meet in a very short amount of time,” she says. This rapportcomes easily for Schroer. It's in her nature. “I love to be with peoplefrom all walks of life and enjoy having the opportunity to peek into otherpeople's lives. Wherever you are, a smile can open lots of doors,” sheadds.

And sometimes it does come easy. “John and Graeme gave us agreat welcome and made it easy for us,” Schroer explains. “I guess itwas a nice change for them, to have us around for a day. And yes, wetook our time in the beginning, had some tea and laughter beforepulling out the camera. Our preparation was simple. Kind of a ‘shut upand shoot’ approach.”
Schroer worked with Tansy Sibley, her assistant, who wrote anuntitled article that would accompany the video on vimeo.com (seehttp://vimeo.com/4231211). They defined the questions for theinterview. They also made sure the “equipment was in full workingorder, batteries charged, and so forth,” which gave them the freedomto then “go with the flow.”
The Difference between TV News andDocumentary JournalismAfter getting to know their subjects and getting them relaxed for filming,“We decided that we should start with the sit-down interview first,”Schroer says, “as it gave us a framework for the story and a guide tofocus on certain visuals over the day” (see Figure 9.2). As they talkedduring the interview, Schroer says she “made mental notes of thingsthat I found interesting for close-up shots, although a lot of them did notmake it into the final edit, due to the time-constraints of the piece.”After the interview, she took a series of stills, portrait pictures. Thenthey just “let them go on with their jobs, following them around. The 5DMark II allowed us to keep it small and intimate during the shoot.”

Figure 9.2 After getting her subjects at ease, Schroer conducts an interview, providing her withstories and ideas from her subjects before she starts shooting action footage to visualize her piece.(©2009 Rii Schroer. Used with permission.)
Schroer shaped part of her cinematic style by avoiding a TV/videonews style and instead utilizing documentary film techniques. Videonews often
Involves a reporter's presence with a dominating voice narrationand/or standup performance in front of a camera.Uses static shots with some pans.Uses shots designed to illustrate the story instead of showing thestory.Filters the presence of the subject through the reporter's voice.Lacks the voice of a strong central character, and story depth isoften shallow .
By taking the time to build a rapport with John and Graeme, Schroerengaged a more cinematic “look” by utilizing these documentary filmtechniques:
Backing off and allowing the subject to use their own voices (the“shut up and shoot” approach). This instantly provides adocumentary film feel to the project because it no longer feels

like a TV news piece.Engaging camera movement through the Merlin Steadicam,along with locked-down shots. Cinema moves.Using shots to tell the story visually. Cinema is a visual medium,and the story should unfold visually, rather than being toldprimarily through narration.Allowing the subjects' presence, their look, their feeling, theircharacters to come through as the most important elements (notthe journalist nor the journalist's words or narration). Thisapproach usually works well if the filmmaker builds a rapport withtheir subject.Allowing the characters and their voices to tell their story. Thisway, the journalist is placed in the background, off-screen, whichprovides room for developing a story that's much deeper thanmost TV news stories.
By following John and Graeme around as they worked, Schroer got“a lot of material,” she explains, but “it was pretty clear whilst shootingwhich bits had the potential to go into the tight, short edit—for example,John talking about his worn shoe (see Figure 9.3), atmospheric shots,such as the silhouette whilst John is working in front of the window (seeFigure 9.4), and so forth.” These visuals—which include aphotographer–cinematographer's keen sense of how light and shadowcan be used to visualize and shape the mood of a story—add to thecinematic feel of the piece and show us what the characters do andfeel. Rather than having a reporter tell us what her characters think andfeel, we see and hear them.

Figure 9.3 John Rudd points out his worn shoe in Rii Schroer's 16 Teeth. A 28 mm lens was usedfor camera intimacy, Schroer says.(©2009 Rii Schroer. Used with permission.)
Figure 9.4 John Rudd passes in front of a window in one of Rii Schroer's powerful images in 16Teeth. Her images, shaped with an awareness of lighting, are used to show us the story.(©2009 Rii Schroer. Used with permission.)
A Photographer Transitions to HD Video

Schroer notes how easy it was for her to adapt to the HDSLR world.“[When I am] working as a press photographer, the camera feels likesecond nature to me and I have a wide range of lenses available,” shesays. However, Schroer hadn't mastered all the intricacies of thecamera until later, such as the picture style. “As this was one of the firstvideo stories being shot on it,” she notes, “I used a standard picturestyle. I now use a ‘user defined’ picture style (sharpness and contrastall the way down, and saturation down by two notches) and do gradingin post production.” She's learned to shoot it “flat” in order to allowmore room when color grading in post.
In addition, the small size of the camera worked to her advantage,as Schroer believes the “5D Mark II rather than a regular video camerawas less intimidating for John and Graeme.” She also feels that theshape and size of the camera helped, as well, in making her subjectscomfortable. “The camera looked more like a stills camera than avideo one,” she explains. With the camera being less intimidating, shewas able to build the intimacy with her documentary subjects, helpingto provide that cinematic feel—especially with the use of close-ups.
“The camera looked more like a stills camera than a video one,” Schroerexplains. With the camera being less intimidating, she was able to build theintimacy with her documentary subjects, helping to provide that cinematic feel—especially with the use of close-ups.
However, the hardest part for Schroer was “the lack of decentfocusing controls [which made] accurate focusing challenging attimes.” Audio was also an issue, so they “decided to record the audioseparately on a Marantz PMD660, and synced it with the piece inpostproduction.” Most of the shots were locked down on a tripod, whilemoving handheld shots were done with the Merlin Steadicam “toachieve a more vibrant, intimate feel,” Schroer says.
They also decided not to bring any lights, using “available light only(in contrast to the still pictures taken of them, which were separatelylit),” Schroer explains. This also allowed them to “easily go with the flow

and also test the camera's low-light capabilities,” she adds.
For Schroer, composition “happens intuitively and is certainly basedon my experience as a stills photographer. I make sure to film a goodvariety of wide, medium and close-up shots, and decide on the spotwhich lenses to use, depending on what is happening. For example,the opening shot of the rake was filmed on the 50 mm macro lens tomake use of the shallow depth of field possibilities (see Figure 9.5).John's shoe scene was filmed on a wide 28 mm lens, being close tohim (see Figure 9.3). It was important to us to achieve intimatesequences of them, so the wide angle seemed to be a good choice.”Thinking about which lens to use to best tell the story places Schroerinto the cinematographer's frame of mind, as opposed to that of thevideographer, who shoots mainly to illustrate a story instead ofshooting to tell the story visually.
Figure 9.5 The opening title shot to 16 Teeth. Schroer says she used the 50 mm macro lens to“make use of the shallow depth of field possibilities,” a key function of cinematography. Take note ofthe narrow focal plane along the edge of the rake.(©2009 Rii Schroer. Used with permission.)
Schroer also had to face dark conditions with automatic exposure—meaning that “most of the shots were automatically shot on the widest

open apertures. Now I mostly shoot around f/5.6. It seems to be a goodsetting for not being too shallow, especially when moving, but givesenough depth of field to not have it look like video. For that reason Iused a Nikon 28 mm lens with Canon adapter for the steadicam workto be able to select aperture settings at around f/5.6 and to be able tomove without losing focus,” she says.1 The Nikon—with its f-stopsettings on the lens—was one of the options for which 5D Mark IIowners had to adjust aperture manually before Canon's firmwareupdate later in 2009.
Zoom lenses are an essential part of Schroer's toolkit, especially “ifyou don't want to carry too many lenses around and need to be ratherflexible. I have found the Canon 24-70 mm a reliable workhorse formost situations, with the 50 mm macro lens for close-ups in the bag.”But for her beauty shots, she likes to utilize primes: 24 mm f/1.4, 85mm f/1.2, and a 100 mm macro. Using multiple lenses for a shoot alsosets her into the film world and helps differentiate her work from typicalvideo news pieces.
Approach to EditingAfter getting her footage into the computer, Schroer transcoded theminto Apple Pro Res. As she edits, Schroer looks “for those littlemoments I find surprising, fun, and visually entertaining. I have greatrespect for the craft of editing. As a one-man/woman operation though,you go with the flow and a lot of it comes down to intuition andrecapturing the fresh thoughts you had” after you left the scene, sheexplains.
“What did you find surprising or did not know at all, what made youlaugh? It is simple questions you try to answer and then put together, tomake a piece that feels authentic to your experience,” she notes abouther process when editing.
“… As a one-man/woman operation, you go with the flow and a lot of it comesdown to intuition and recapturing the fresh thoughts you had” after you left thescene, she explains. “What did you find surprising or did not know at all, what

made you laugh? It is simple questions you try to answer and then put together,to make a piece that feels authentic to your experience,” she notes about herprocess when editing.
At first Schroer considered showing the story of rake making, but inthe end focused on the characters. “We did film all the steps of how therakes are made, but in terms of the story, we were more interested inshowing Graeme and John's characters and their love of what they do,than, for example, creating an informational piece about a dyingtradition.”
In the end, the editing choices revolved around her goal “to capturethe kudos of Graeme and John, their warm, down-to-earth characters,and their joy and pride in the work they do.”
DSLR Advantages Outweigh DisadvantagesRii Schroer loves the adventure and flexibility in shooting with a DSLRcamera that can both shoot stills and high-quality video. “For my line ofwork,” she explains, it “opens up amazing possibilities in offering fullmultimedia packages to clients, shooting stills and full-frame HD videowith one device, achieving cinematic quality in a small or one-man/woman team. The system is very adjustable. It can be used smallfor a ‘fly on the wall approach’ with not more than a tripod or small rig,or used more elaborately on rigs with focus pulling, glidetracks, jib-arms, whatever one can think of.”
“For my line of work,” she explains, it “opens up amazing possibilities in offeringfull multimedia packages to clients, shooting stills and full-frame HD video withone device, achieving cinematic quality in a small or one-man/woman team. Thesystem is very adjustable. It can be used small for a ‘fly on the wall approach’with not more than a tripod or small rig, or used more elaborately on rigs withfocus pulling, glidetracks, jib-arms, whatever one can think of.”
Like other 5D Mark II shooters, Schroer found getting accuratefocus, “especially in low-light conditions challenging,” as well as the

audio issues. But because “there are ways of getting around thesechallenges to create the story you want to tell,” Schroer feels the qualityof the image outweighs the disadvantages.
By taking advantage of images—by telling the story through the lensof the DSLR camera rather than a reporter's voice, allowing hersubjects to take center stage, and engaging a cinematographer's eyefor lighting to help set the mood—Schroer provides a short digital filmthat's far more cinematic than reports found on TV news. And that's agoal more video journalists should try to attain in their work.
1 For journalists, if you can shoot at f/5.6, you can use cheaper glass. The mostexpensive glasses are fast, but if you don't need to go down to f/1.4, for example,you can use less expensive lenses.


Chapter 10
Crafting the Film Look with Cinema Lenses
A Day at the Races (2010), directed by Philip Bloom, UnitedStates, 6:00 min.
Technical data: Shot on a Canon 7D with PL Mount in a neutral picturestyle with Cooke S4 25 mm and 100 mm lenses and a Tokina 11–16mm lens. Audio was recorded on a Zoom H4n with a Rode shotgunmic on a boom. The 7D was also modified with a 6 × 6 Mattebox and0.9, 0.6, and 0.2 ND filters. Edited with Final Cut Pro. Color gradingwith Apple Color.
A Day at the Races is located at http://vimeo.com/9978341.
Meeting Philip BloomBloom, hailing from England, arrives late at Venice Beach's famedSidewalk Café, where you can find a Louis L'Amour hamburger on themenu, as well as homeless teens with their dogs intermingling withcircus act characters roaming along the boardwalk. But he's alwaysjolly and can win you over in moments with his charm. Bloom came outof the ranks of Sky Television in England. He begged to be a cameraoperator and actually found his break when a sound crewmember left.He filled the opening and Bloom says he “learned to shoot from someof the best cameramen I've ever worked with.” He also learned to workefficiently and quickly by shooting news. “I would have to say that someof the greatest training for people to learn to shoot fast and shootefficiently is to work news. Because you really have to get stuff donefast,” he notes. “I will walk into a room and it is almost like aTerminator-style scan,” he quips. “I'll look around the room and withinabout 30 seconds I will put any additional lighting where the subject is

going to be and where the camera is going to be.” He stayed with SkyTelevision for 17 years, traveling the world producing documentariesfor his last three years at Sky. “It was great fun,” he smiles.
Some of the greatest training for people to learn to shoot fast and shootefficiently is to work news.
After leaving Sky, he went independent. And found DSLRs. But hefirst balked at their potential. He tossed the Canon 5D Mark II aside.After seeing some footage over the summer of 2009, he began tochange his mind. “Initially I thought the weaknesses outweighed thestrengths, but by progressively using them, and with new camerascoming out and more importantly with new firmware coming out, it feelslike it is going the other way and the strengths are outweighing theweaknesses,” Bloom explains.
Bloom shot some projects with it, including a commercial forGreenpeace (see “Greenpeace: Voices of Change” athttp://vimeo.com/6695584; see Figure 10.2). He quickly became oneof the foremost gurus of DSLR cinema, even hired by Lucasfilm toshow the Lucas team the cinematic potential of the cameras and thenlater brought on the set of Red Tails to shoot some plates and pickupshots with Canon DSLRs (see Figure 10.3).
See the following:Philip Bloom's Greenpeace commercial, “Voices of Change” directed by Lucy
Campbell-Jackson: http://vimeo.com/6695584;Philip Bloom's timelapse video, “Lucasfilm's Red Tails on set Timelapse”:
http://vimeo.com/12148053;Philip Bloom behind the scenes of Red Tails, “Behind the Scenes on
Lucasfilm's Red Tails with the Canon DSLRs”: http://vimeo.com/11695817;Philip Bloom's video, “Skywalker Ranch”: http://vimeo .com/8100091.

Figure 10.1 Still from A Day at the Races directed by Philip Bloom, showing off his trademarkclose-up of people's faces.(©2010 LumaForge, LLC. Used with permission.)
Figure 10.2 Still featuring Ishan Tankha from a 90-second spot, “Voices of Change” directed byLucy Campbell-Jackson and shot by Philip Bloom on a Canon 5D Mark II. Note Bloom's obliquecomposition capturing the depth in the shot.(©2009 Greenpeace.)

Figure 10.3 George Caleb Bingham's Mississippi Boatman (1850). Photo of painting by KurtLancaster. National Gallery.
“When you see them on the big screen, you can understand whyLucasfilm is so amazed by these cameras,” Bloom explains, “and thewhole industry is so interested in buying them because filmmaking isan expensive business and a big part of that is cameras and big partsof that [are] the amount of crew that is needed.”
Bloom admits he's not an expert in the design of Canon lenses orthe technical aspects of how everything works inside the camera, buthe does say, “I'm just very passionate about using them and I use themprolifically and that is why people come to me. They come to mebecause of my experience.”
He's distinctly known for a style that captures intimate portraits ofpeople's faces, a style that strikingly echoes with the composition ofBingham's Mississippi Boatman (see Figures 10.1 and 10.3). And forA Day at the Races, the Cooke lenses add compositional strength toBloom's project.
But what is more interesting is how some of Philip Bloom's imagesfrom A Day at the Races (including many shots from his peopleseries), captures a similar style and composition of Bingham (see Fig.10.4).

Figure 10.4 Philip Bloom captures emotion with a close-up in A Day at the Races.(©2010 LumaForge, LLC. Used with permission.)
Although I don't believe Bloom has studied Bingham's art, manycinematographers do, and what Bloom instinctively conveys is a keenconcept of composition that echoes what a master painter does withcomposition—all of which provides cinematic strength to his HDvideos. Bloom's shots not only convey the compositional sensibilitiesof an artist (such as Bingham's work from 160 years earlier), but theyalso engage what good artists alwasy do—capture the essence ofhumanity in moments of unvamished truth, the rawness of the humancondition filtered through the artist's eyes with aesthetic prowess.
Shooting with Cinema LensesIn early 2010, Neil Smith, founder of the digital post house HdiRAWworks asked Philip Bloom to come to Los Angeles and shoot ADay at the Races as a proof-of-concept piece—that the Canon 7Dcan be utilized as a cinema camera by fitting it out with Cooke lenses(S4i; see Figure 10.5). These lenses are meant to be rented, unlessyou have an extra $20,000 lying around. “As a serious professional

post house, the first time I came across HDSLR cameras I totally poohpoohed them,” Smith laughs. “I thought we would never use them. Theywould never be used in” cinema projects.
Figure 10.5 A Canon 7D fitted with a PL mount, sports a $20,000 Cooke lens.(©2010 LumaForge, LLC. Used with permission.)
Neil Smith hired Philip Bloom not only to shoot a short with a 7Dfitted out with Cooke cinema lenses, but to present a master classworkshop at The Lot in March 2010. It was a way to prove how thesecameras can be utilized by a small crew and still attain a cinema lookfor film projects. It's a way of “making things simpler and morestreamlined. And that's certainly [… what] these cameras are verygood at doing,” Bloom says.
Bloom explains how he initially conceived the story with Neil Smith.“He wanted the majesty of the horses through the morning mist runningon the race track,” Bloom remembers. But “the longest lens I got was100 mm” and there was no mist. “Filming horse racing with onecamera and the longest lens [at] 100 mm, you aren't going to getmuch,” Bloom remarks. “I was expecting longer lenses, and I didn't getthem, so as soon as I saw the lenses I had, I completely changed theplan. I said, OK, we are going to do the detail behind the racing. Weare going to capture the life around the racing instead of the racingitself.”
This became the story—an immersion into the environmentsurrounding the horse races, such as the stables, rather than the race,itself.
Retrofitting the Canon 7DHot Rod Cameras (hotrodcameras.com; Illya Friedman, President)designed a PL mount for the 7D, allowing professional cinema makersto mount cinema-type lenses, such as the Cooke modeled in A Day atthe Races. It's not cheap for low-budget DSLR shooters, but for$3,250, the company will take your 7D and modify it so that it can takethe PL mount. For Races, Bloom utilized two Cooke S4 lenses, 25mm and 100 mm, as well as a modified Tokina 11–16 mm. Bloomloved the way the images with the Cookes turned out. “What agorgeous image these lenses give you,” he explains on his blog. “Yesit was a lot more fiddly and time consuming using these lenses with amattebox for NDs than my normal ‘run and gun’ setup but it was worthit. The images … speak for themselves!”1
On LocationBloom shot in and around horse stables at Hollywood Park for two anda half hours; then he and his team shot for a couple of hours at SantaAnita racetrack. It was a 5 a.m. shoot. Smith explains, Bloom “shot onlyin available light. He captured some beautiful images of the racehorses being put through their morning training before sunrise and thenin the afternoon at an actual race at the Santa Anita track.”
The only shots where they used the mic were with the interviews andthe man playing the trumpet. All the ambient noise was recorded in-camera, including the shoveling of the hay (see Figure 10.6). If the levelis low enough, editor Jeremy Ian Thomas says, “it's good enough” touse in the project. However, if the levels are too high, “then you hearthat kind of tin can feel,” Thomas adds. (Which is why recording on aseparate audio recorder is preferable.)

Figure 10.6 You can hear the scooping of the hay beneath the music track in A Day at the Races.The audio for this shot was recorded on-camera.(©2010 LumaForge, LLC. Used with permission.)
Despite the fact they didn't get long lenses for the initial plan ofshooting a race, Bloom felt it worked in his favor by covering thebackdrop of the races so that they could focus on the people setting upthe event, the ones working in the stables. “That is the kind of thing I doanyway,” Bloom explains. “We had the horses in there as backgroundand that worked so much better. I was really happier with it.”
Jeremy Ian Thomas, the editor of the piece, was on location withBloom, who explained to Thomas that the story “wasn't going to beabout the majesty of the horses, but the life swirling around the horses,and that there's this whole other world” where “the horses are actuallyinnocent bystanders in a much more human” story, Thomas says. “It'snot really about the horses. They're beautiful and humble and quiet, butaround them is a whole industry of gambling, and Philip and I were verycognitive of that early on in the storytelling. He and I were looking ateach other like, ‘We need to stay here in the stables.’“
But Neil Smith originally “wanted to go shoot the horses running,”Thomas explains, “but Philip said, ‘Let's stay here’ [in the stables] and Iagreed with him. ‘Let's stay here and let's capture the light here, and

then we'll move on to the horses.’“
Thomas continues, “Anybody who [watches] it will see that thehorses are quite out of focus in a lot of it (see Figure 10.7). They'rebehind the people, and it's more about the life around it, and I thoughtthat was brilliant.” Thomas pauses. “Horses are great and I thinkhorses are amazing, but there's been a lot of movies anddocumentaries about horses, but there hasn't been any, that I've seen,about the life around the race horses. And I thought that was prettycool.”
Figure 10.7 A woman poses in front of a horse revealing the shallow depth of field in naturallighting of the Canon 7D in A Day at the Races.(©2010 LumaForge, LLC. Used with permission.)
Philip Bloom remembers arriving at “the ungodly hour of 4:30 a.m.”They started with Mike Mitchell, a trainer at the Hollywood stables.Bloom remarks on his blog how he has a “family in the racing businessin England, and the people working in the stables are generally youngblonde students (huge sweeping generalizing there!),” but at theHollywood stables, “they seemed to be Latin American guys withMASSIVE filmic moustaches. Much more fun for me to film, as peopleknow I tend to film interesting looking people than the obvious pretty

ones!”2 And one of Bloom's trademark styles is to gravitate toward theclose-ups of these faces (see Figure 10.1).
For most of his previous projects—and all of his personal ones—Bloom typically edits. But due to the time constraints on this project, hepassed off the task to Jeremy Ian Thomas of Hdi RAWworks. “It is sonice to see someone else take your work,” Bloom says, “and Jeremywas so tuned in to what I wanted. It worked brilliantly.”
After dumping the footage into the computer, Thomas crosses hisfingers and says he “hopes this footage is good”—and he speaks frombeing one of the people on location that day. “I hope we didn't messup,” he laughs. He's seen Philip Bloom's work and knows what he'slooking for. “I like Philip's editing style,” Thomas says, “but it is differentthan mine, and I thought, ‘Okay, I don't want to go too far left field andhave to re-edit it because he doesn't like it.’ So I kept in mind whatPhilip might want to see.” But when it came to pacing the film, Thomastook “a lot of liberties.”
Thomas did not want to mimic Bloom's work found in much of hispersonal short DSLR projects. “His stuff tends to be dissolves—longdissolves, beauty photography of trees and deserts and stuff, and Iwanted this to feel more narrative—like it was building and buildingand building,” Thomas remarks. “I wanted it to feel a little morehypnotic,” while at the same time sticking “pretty close to what [Bloom]was used to seeing.”
Bloom explains how he is drawn to “real people's stories. That's myfavorite. I like real people, just telling about their life. Becauseeverybody's got fascinating stories to tell.” Although not in-depthcharacter studies, the stories Bloom creates tend to revolve aroundpeople's faces and the environment they're in.
One of the images that stood out to Thomas included a shot “whereyou see something spinning, and you don't quite know what it is yet,and then the horse comes in frame. I knew that was going [to] be eitherthe opening shot, or one of the opening shots, because I thought it wasnice. I liked the abstract feel of that. And then the horse shows up andyou go, Oh, okay, it's—and then we go wide, and you see the whole

stable” (see Figures 10.8 to 10.10).
Figure 10.8 Jeremy Ian Thomas originally conceived this abstract object motion as the openingshot of the film. It appears about 30 seconds into A Day at the Races.(©2010 LumaForge, LLC. Used with permission.)
Figure 10.9 As the shot proceeds, it goes a bit wide and we see a horse.(Still from A Day at the Races. ©2010 LumaForge, LLC. Used with permission.)

Figure 10.10 A full wide shot reveals the horse tied to an exercise carousel.(Still from A Day at the Races. ©2010 LumaForge, LLC. Used with permission.)
Thomas explains how he edited in “my mind where I thought shotswould go” as he “was watching that [scene] when [Bloom] shot it” (seeFigure 10.11). Thomas says that's what he does when he directs aproject. “I edit in my mind. When we shoot, I already am piecing ittogether.”
Figure 10.11 Philip Bloom eyes a shot in A Day at the Races on a Marshall monitor attached tothe Canon 7D.

(©2010 LumaForge, LLC. Used with permission.)
Thomas feels that color grading is a process that should begin withthe cinematographer. “If you're working with a good DP like Philip,” hesays, “you're lucky, because you're starting out with a really good colorpalette to begin with.” Whether DPs realize it or not, Thomas believesthey are “being drawn to the color of an image a lot of times, evenmore than a composition.” In the case of A Day at the Races, whatBloom shot contained “heavy, heavy color tones already,” Thomasobserves. “Every image he grabbed had something in it already that Iliked” as a colorist. “So I would either enhance what was already there,or I would dial it back if there was too much of it. Some of the stuffinside the stalls was too yellow, so I would have to dial the yellow backand bring some more earth tones beneath the yellow” (see Figure10.12).
Figure 10.12 A shot from inside a stable, which for Jeremy Ian Thomas was too yellow, so he, asthe colorist, “would have to dial the yellow back and bring some more earth tones beneath theyellow,” he explains.(Still from A Day at the Races. ©2010 LumaForge, LLC. Used with permission.)
But this process isn't always easy, especially with some other DPswho are not looking at colors. “When you're not working with someone

like Philip, and there's not a lot of color, you have to really make the DPlook good, [as if] he saw that color already,” Thomas explains. “But all Ireally did with A Day at the Races was keep the skin tones intact bydoing a desaturation of the skin tones, and then I would saturateeverything around the subject, because the colors were already sobeautiful. There were these really nice greens, mid-level greens, andthere were these really beautiful pink hues across the mid-tones at thestables. And there was a nice yellow, and some pink.” When he saw aperson in a shot, Thomas said he “would make sure their skin toneswere right. But everything around them was popping, and colorful” (seeFigure 10.13). Overall, he felt that it was “a really good gradingexperience.”
Figure 10.13 The colors would “pop,” as Jeremy Ian Thomas explains in observing A Day at theRaces. He would make sure the skin tones were correct and then bring out the colors by saturatingthem a bit.(©2010 LumaForge, LLC. Used with permission.)
In the end, Bloom was happy with the project. He gave some notesto Thomas after seeing the rough cut, and additional changes weremade. Bloom wouldn't have chosen the particular piece of music forthe piece and would have taken a different approach for the final edit,he explains, but he admits that “it's always great to see how someone

else interprets your work.”
Bloom also enjoyed using the Cooke lenses on the 7D, but at thesame, “I honestly feel for the type of shooting that I do, like this piece,that using Canon or Zeiss lenses would have been just as great.”
Neil Smith was pleased with the work that Bloom and Thomas did:“When we screen the movie in our theater,” Smith boasts, “people aretruly amazed at what Philip was able to capture with the low-lightcapability of the 7D and with a documentary style of shooting.” In short,Smith explains, “the real purpose behind the film was to show howHDSLR cameras can be used to help creative filmmakers tell theirstories, easily and cheaply without sacrificing production value.”3
1 http://philipbloom.co.uk/2010/03/04/shooting-7d-pl-with-cooke-lenses-for-saturdays-la-masterclass/, accessed 26.04.2010.2 http://philipbloom.co.uk/2010/03/04/shooting-7d-pl-with-cooke-lenses-for-saturdays-la-masterclass/, accessed 26.04.2010.3 Cheap in relationship to the cost of a cinema film camera, as well as film stock.The lenses, however, are not cheap, but this film shows that a modified Canon 7Dcan utilize a high-end lens package that can be rented without having to use a full-size cinema camera.


Chapter 11
Crafting the Film Look with Location and CGIArt
The Chrysalis (2010), directed by Jeremy Ian Thomas, UnitedStates, 6:54 min.
The Chrysalis can be found at http://vimeo.com/11367602.
Figure 11.1 The color palette of The Chrysalis was browns, blues, and whites. Actor Mike Wadewalks across salt flats in the midground of California's Death Valley.(©2010 Hdi RAWworks. Used with permission.)
Jeremy Ian Thomas, a professional colorist at Hdi RAWworks, sitsin a cramped space around the corner from the Douglas Fairbanksbuilding in The Lot in Hollywood, a site that resonates with film history—Mary Pickford, Charlie Chaplin, D.W. Griffith, among other names—a site where black-and-white silent films expressed the cutting-edge

90 years ago. Thomas sits on a swivel chair in front of an L-shapeddesk in the middle of the room as he conceives the cutting edge withDSLRs in 2010. Behind him are two couches. Shelves are full ofproduction knick-knacks. There's barely room to pull up a chairbecause one has to walk over gear bags and LitePanels in order tochill. On the wall hangs a 10-bit plasma screen, the output to a fullydecked-out Mac Pro containing more filmic energy than CharlieChaplin. Here, Thomas makes HDSLRs and other digital films lookreally good.
Philip Bloom calls Thomas a wizard at color grading—but he doesn'tlook like Gandalf. A tall, large man with boyish looks, Thomasexpresses an infectious passion for filmmaking at all levels—fromsound design, color grading, producing, and directing. Thomasattended the LA Film School and fell into color grading as a way toearn a living. But he loves getting a talented team together and puttingprojects together; he faces a team of people for a short he outlinedwith Robert Lehman, The Chrysalis, to be shot over the weekend inCalifornia's Death Valley.
The Chrysalis was conceived as a short fiction project to prove thecinematic capabilities of the Canon 7D. Neil Smith, the owner of HdiRAWworks and the producer of this film (as well as producer on A Dayat the Races profiled in Chapter 10) says that both projects“demonstrated that HDSLRs when combined with professional gradecinema lenses—from the high-end Cookes to the less-expensiveZeiss ZE primes—are capable of a wide range of visual storytelling.”Smith calls the project a shooting exercise, to push the capabilities ofthe Canon 7D. “We sent the film-crew out into Death Valley with asingle African American actor and a standard 7D fitted with Zeiss ZEprimes,” Smith says. “The crew filmed in the glaring sun of the desertfor three days and then combined the footage with a very clever visualeffect shot of a large spinning glass orb to produce an illusion of somemagical transformation taking place out in the wilderness.”
The project essentially would answer these two questions: Could theCanon 7D hold up to the contrast of desert daylight and can it deliver a

scene with CGI art?
With the producer's go-ahead, they had to find a DP to shoot theproject. Jeremy Ian Thomas met Dave Christenson when he came toHdi RAWworks to talk to Neil Smith and Thomas about using theCanon 7D for a documentary he was shooting in Nepal. After Thomassaw Christenson's footage, he asked him to DP this super-low-budgetweekend project. It would include special effects CGI created by KrisCabrera. But the microbudget of $1,000 meant nobody got paid, sothe love for cinema and the love for shooting with DSLRs drove thecrew to jump on board the project. Thomas explains that “they are allgetting paid in hugs and some fruit snacks and we've got fruit snacks,”the crew around him laughs. I observe the preproduction meeting forthe film.
Sponsors donated equipment, such as a Red Rock Micro shouldermount, Lite Panels for lights (which they did not end up using), andZeiss lenses (see Figure 11.2). Despite the sponsors, Thomasemphasizes that “it's more important for us to come back with a reallygreat little short than for us to utilize all the gear that was given to usand come back with a [weak] short. Let's try to use everything wepossibly can, but never ever let it hinder what we're doing.”

Figure 11.2 DP Dave Christenson looks through a Zakuto viewfinder with a kitted-out Canon 7D.Director Jeremy Ian Thomas looks on (screen right).(Photo by Hunter Kerhart. ©2010 Hdi RAWworks. Used with permission.)
The Preproduction Vision of Jeremy Ian ThomasThe Chrysalis tells the story of a man going through a “spiritualexperience,” Thomas explains to the actor and his crew. It's “going tofeel like a survival flick for the first three minutes” or so. We'll see a“guy wearing Army” fatigues with a “backpack on and little campingstuff hanging off” (see Figure 11.3). He's “going to be eating out of acan of beans, very kind of Mad Maxist, wide desert survival feel.”

Figure 11.3 Equipment hangs off actor Mike Wade as he pauses on the salt flats in The Chrysalis.We'll see a “guy wearing Army” fatigues with a “backpack on and little camping stuff hanging off,”director Jeremy Ian Thomas says in a preproduction meeting.(©2010 Hdi RAWworks. Used with permission.)
Thomas turns in his swivel chair, his Mac behind him, and spreadshis arms out as he shares his vision of the opening scene. “He's goingto be sweating, he's going to be tired; he's in the desert and he's goingto see this piggy bank sitting in the middle of the desert salt flats. Heknows that's what he's been looking for, but he doesn't know why. Sohe runs up on the piggy bank and he looks at it and he obviously hasan emotional connection to this specific piggy bank” (see Figure 11.4).

Figure 11.4 Actor Mike Wade reaches out to a piggy bank in The Chrysalis. “He knows that's whathe's been looking for, but he doesn't know why,” director Thomas discusses to his crew and actor in apreproduction meeting. “So he runs up to the piggy bank and he looks at it and he obviously has anemotional connection to this specific piggy bank.”(©2010 Hdi RAWworks. Used with permission.)
“He sits down Indian style and he empties his backpack and thenthere's a time piece, a camera, a stuffed animal (see Figure 11.5),”Thomas turns to the actor, Mike Wade, “and if you bring in any knick-knacks, it's going to be a bag of certain things, and he's going to setthem up in a half circle.” He has “an epiphany of what his life has beenabout. And then he realizes, there's something about the piggy bankthat's not right, so he crashes the piggy bank on the salt flats andshatters it and inside is a note [see Figure 11.6]. He opens the noteand it's a hand drawing, and it says ‘Me and Daddy’ and so it's fromhis son, and you'll hear some audio stuff that goes with that, maybe hisson calling his name.”

Figure 11.5 Actor Mike Wade empties out his backpack and holds an old timepiece in TheChrysalis. “So he sits down Indian style and he empties his backpack and then there's a time piece, acamera, a stuffed animal,” Thomas explains in the preproduction meeting.(©2010 Hdi RAWworks. Used with permission.)
Figure 11.6 Actor Mike Wade smashes the piggy bank and pulls out a glowing necklace.Originally, as discussed in the preproduction meeting, Wade was going to pull out a note, “a handdrawing, and it says ‘Me and Daddy’ and so it's from his son, and you'll hear some audio stuff thatgoes with that, maybe his son calling his name,” Thomas says. But the change to the glowingbutterfly necklace worked because it “represents the rebirth of this man growing from a moth to abutterfly,” Thomas explains to me later. The glow was created using After Effects.

(©2010 Hdi RAWworks. Used with permission.)
At this moment, Thomas continues, “off in the distance, you'll hear abit of a pulse, a pulsing noise low end that catches his attention and hepacks everything up and it's a crescendo. He's pushed and motivatedto do these things, but doesn't know why. So he runs up on this sound,and that's where 3D guy comes in,” he smiles at his CGI artist, KrisCabrera. “There's going to be a reflective sphere that's floating abovethe salt flats that's spinning, and you'll be able to see a reflection of thedesert and everything on it, and he's obviously going to have thismoment with this sphere; he's going to walk up on it.”
Thomas pauses. “We haven't quite decided what we're doing withthe sphere, but he's going to touch it (see Figures 11.7 and 11.8 ), andit's either going to expand into smaller balls and fall to the ground orturn into sand and go up his arm. But then we're going to cut out of thatimmediately and—the ending is a bit up in the air—but he's eithergoing to be on a street corner with blood coming out of his nose takinghis last breath as the camera pulls up and his wife is going to be overhim trying to revive him, or he's going to wake [up out of] a coma in ahospital bed and see his wife and child and realize that the greatestthings in life aren't things at all.”

Figure 11.7 Actor Mike Wade runs up to a spinning reflective sphere in The Chrysalis. The spherewas created using 3D Studio Max by Kris Cabrera.(©2010 Hdi RAWworks. Used with permission.)
Figure 11.8 The raw footage of the scene, before color grading and CGI art. See Figure 11.7 tosee the shot with the crystal and the blue added using Apple's Color. Thomas worked with KrisCabrera, who crafted the reflective sphere. Normally, they would use a C-stand and stick a greentennis ball on it, but they didn't have a large enough crew to carry it, so they ended up using a tripod.“Because it was all white and it was so contrasty, we were able to just use the tripod out there. It wascontrasty enough so that [Kris] was able to track off of that” in 3D Studio Max, Thomas explains.(©2010 Hdi RAWworks. Used with permission.)
The story takes place in “the space between life and death. And he'slearning in this place … so the time piece represents time; the piggybank represents money or belongings; the camera, memories; they allrepresent something,” Thomas explains. The camera was dropped;instead, a stuffed animal provided by Wade was prominent in thescene.
Ultimately, Thomas and his crew “wanted to see what we could do ina big white space,” he explains. “It is about the story, but it is moreabout the techniques to tell that story” that they're testing out in thehopes that they can do future projects together and get paid for it.

3D Visual Art with the Canon 7DKris Cabrera
For this shot (see Figure 11.9) I used 3DSMAX and Vray for rendering. For thesalt I used a plug-in for 3DSMAX called Krakatoa, which pretty much renders asmany particle points you want, and for compositing I used NUKE.
Figure 11.9 Actor Mike Wade holds up the glowing necklace and touches the sphere. Theglow and debris were created using After Effects. Jeremy Ian Thomas explains how he originallyconceived this shot in the preproduction meeting: “When he reaches his hand in, the tips of hisfingers are the focal point, and where he is reaching, that is the sphere and we hear a ‘whoowhoo’ sound, and where he is touching the sphere, we'll have the sand be reflective little beadsof sand trying to crawl up his body.”(©2010 Hdi RAWworks. Used with permission.)
Workflow with the 7D was pretty straightforward. Since I have used footagefrom the 7D before, there weren't really any surprises. I knew as soon as I heardthe 7D was being used I was thinking in my head, “All right, whatever is going tobe done in CG, it has to be perfect,” just because every little detail would showup. Making a sphere and having it fit into that space was a little tricky, justbecause it was a big sphere! For lighting I received about six 4k plates that Iended up stitching up in Photoshop and creating a reflection plate. There wasreally no light except for sunlight. So the hard work went into the compositingside.

They continue to talk and ask questions in the preproductionmeeting. Thomas listens and is open to ideas from his crew, but he'sadamant about holding to an opening shot he wants: “All I absolutelyhave to happen for me—and I'm wide open to trying a whole bunch ofother stuff—is that I want to be there an hour before the sun comes up.And I'm a little crazy, but I've started to sound design the opening shotwithout any pictures. I put some music and some wind chimes”together, he tells his crew.
In this moment, “I see him, a tight shot of him against that blue lightthat starts to happen before the sun comes up with that big opendesert sky,” Thomas continues. “I see him cracking a can of beans andstart eating the beans with the sound behind it. We go wide, and I wantit to be very abstract where you can't fully make it out who he is, wherehe is until the light starts to show itself. That I absolutely want.”However, despite the fact that they did shoot the scene, they did notend up using it in the final cut. “We actually shot Mike eating the beans.It was an amazing shot and really worked, but within the context of thewhole movie, we felt it wasn't needed. The movie is very ethereal andcontemplative and the pace is very deliberate, so upon watching itagain and again, [we decided] the beans scene was the only one wefelt we could take out, and once we did, it just pushed the action alongmuch quicker.”
I met up with Thomas after the shoot. They got out in the desert at 4a.m., and walked several miles to their location. It was freezing at 30°Fahrenheit, and when the sun came up, it reached 80°. Thomas sayshe “actually started to feel pretty dehydrated. I had to start reallydrinking water, and I couldn't keep the water down. I was throwing upthe water, and I got really worried. It's four miles back to the car, andthere is not even any solace from the weather back at the car. That'swhy on big shoots there are tents so people can cool off. We wereeating crackers and drinking water; it reminded me of when I was inthe military. I had to push through that emotionally.”
In the end, Thomas felt it was a good experience for the story, andfor the actor. “It was good for the actor because being out there, youstart to think, ‘Dude, what if I was actually lost out here and that was

what the story was about.’ It was an amazing experience. It was an eyeopener in a lot of ways.”
Working with the ActorThe realism helped because Thomas said they did not work off ascript. He talked to the actor, Mike Wade, “about what needed tohappen to move the story forward.” About the facial expressions, that“was all him,” Thomas explains. “I gave him the parameters and said,‘Action.’ He's a really, really good actor.” When Wade was walkingthrough the salt flats, Thomas gave him this parameter: “Imagine justbeing stuck here, and that's all the water you have in the canteen. Thatwas enough. That got him to the place that this is life or death,because that's what it is about.” Thomas would talk to Wade if therewas a beat in the performance that didn't feel right. “For the most part Ilet him interpret what we had talked about,” Thomas says.
Most of the scenes they did in two takes. The last scene with thesphere took about 10 takes, Thomas explains. “It was hard, because itwasn't fear, so much,” so he had to get Wade in the right frame ofmind. Thomas pulled out C.S. Lewis from memory. “There's a book byC.S. Lewis called The Problem of Pain, and he talks about the idea of“fearing God.” Thomas adds: “The word, fear, in the Hebrew is morelike reverence, awe. And it's hard to explain something like that [to theactor]. So that took a little while to say, you're not afraid, you're in awe.So it was difficult to get to that emotion. But we eventually got there.”
One of Thomas's favorite shots was the sunrise (see Figure 11.10).“Right as the sun started to come up across the mountains, it was thisnice bluish-pink light and the actor had a garb on all the time, a headwrap, and he had it over his head like this, and he's standing waitingfor direction because we are getting our next camera set up. So he'sjust standing there and the garb is flowing forward in the wind. He's juststanding, pointing the way the wind is going and I'm like ‘roll on that.’”

Figure 11.10 One of Jeremy Ian Thomas's favorite shots in The Chrysalis reveals actor MikeWade standing silhouetted in front of a mountain sunrise. “Look at that,” Thomas exclaims as he putsthe image up on the 10-bit plasma screen. “Isn't that gorgeous? How do you see everything, that's notblown [out], there's detail there. Isn't that amazing? It is almost like he's contemplating whether he isgoing to traverse or not. That is one of those happy accidents as a filmmaker. I'm like, ‘Wow’ Iwouldn't have set that shot up like that and it just happened,” Thomas explains. The details are in thecraggy ground and the folds of the head garb.(©2010 Hdi RAWworks. Used with permission.)
Postproduction on a 10-bit Plasma ScreenThomas was pleased with the performance of the Canon 7D. “Wecouldn't have pushed it any more than we did—all white with a blackactor. Between the sky and the ice, it was probably a nine stopdifference. So the fact that Dave got it all exposed is amazing. Thestuff that we are going to end up using, barely anything is blown out,”he says during the early phase of postproduction. “There is only oneshot where the sky is blown out. We shot it in a neutral way so it is allmilky, which I think works. I'm going to do some grading, and I'm goingto play around with it, but there is not a ton of latitude” in that shot. Thecolor palette was limited, Thomas explains. He points at the 10-bitplasma screen in his office as he punches buttons on his Mac. We seea shot of the desert. “This is literally white, blue, and brown, so youcan't really push it real, real far, so I'm going to go drastic with the look

and make it all blue,” he explains.
Thomas is a wizard on the computer. He pulls up a daily, shot with a100 mm Zeiss. “That's him walking towards the flats. The movie'sgoing to open with the wind and music and stuff playing here. See howbad the wind was on the edges of the frame? So bad, you'll see itmoving. For the first 20 seconds, it is just going to be this and you'llthink, ‘What is going on?’ And then here he comes. It is pretty coolstuff.”
The salt flats look like snow and ice. It “was almost like shooting amovie on a mirror,” Thomas muses. “A lot of people will think that isice, which is fine. See how the water was reflecting; we've got some ofthat.” But no matter what people think it is, the scene, Thomas smiles,is “otherworldly, dude.”
But as he gets into color grading, Thomas reveals that Marvels FilmProduction's cine-gamma curve picture style they used hindered hisvision.1 “Both my DP, Dave [Christenson], and I agree that we shouldhave shot more neutral. We shot MarvelCine, which at the timeseemed like it would be fine. But that's where some of that magenta'scoming from, too.” They didn't use SuperFlat—which Thomas typicallyfavors with the Canon DSLRs—because “we were fighting off so muchlight [from the salt flats] that trying to add more light via the SuperFlat(which means we want to see further into the shadows) would havescrewed up our gamma [curve]—which is our midtones. We wouldhave had way too much milk in the midtones—too much dynamicrange.” He would have liked to have shot it straight neutral. “TheMarvelCine adds a little bit of color, and now in retrospect it dictatedwhere we went with the color. If it was [shot in] neutral, I could havegone further in a different direction, because it already had a red toneto it and trying to fight off red with blue [in color grading] always givesyou magenta, so that's why it looks a little magenta,” Thomas explains.For the sake of the story, he adds, there's really nothing wrong withthat, but from the purity of the image, it doesn't work for him.
In addition, Thomas admits that they ran into some aliasing issuesbecause of a lot of square-type images they were shooting, “but it
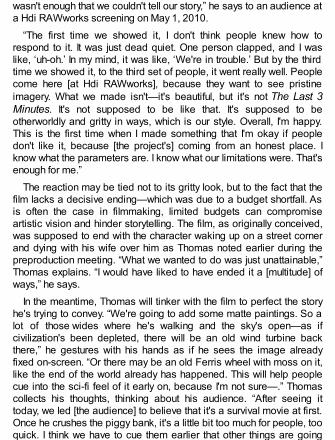
wasn't enough that we couldn't tell our story,” he says to an audience ata Hdi RAWworks screening on May 1, 2010.
“The first time we showed it, I don't think people knew how torespond to it. It was just dead quiet. One person clapped, and I waslike, ‘uh-oh.’ In my mind, it was like, ‘We're in trouble.’ But by the thirdtime we showed it, to the third set of people, it went really well. Peoplecome here [at Hdi RAWworks], because they want to see pristineimagery. What we made isn't—it's beautiful, but it's not The Last 3Minutes. It's not supposed to be like that. It's supposed to beotherworldly and gritty in ways, which is our style. Overall, I'm happy.This is the first time when I made something that I'm okay if peopledon't like it, because [the project's] coming from an honest place. Iknow what the parameters are. I know what our limitations were. That'senough for me.”
The reaction may be tied not to its gritty look, but to the fact that thefilm lacks a decisive ending—which was due to a budget shortfall. Asis often the case in filmmaking, limited budgets can compromiseartistic vision and hinder storytelling. The film, as originally conceived,was supposed to end with the character waking up on a street cornerand dying with his wife over him as Thomas noted earlier during thepreproduction meeting. “What we wanted to do was just unattainable,”Thomas explains. “I would have liked to have ended it a [multitude] ofways,” he says.
In the meantime, Thomas will tinker with the film to perfect the storyhe's trying to convey. “We're going to add some matte paintings. So alot of those wides where he's walking and the sky's open—as ifcivilization's been depleted, there will be an old wind turbine backthere,” he gestures with his hands as if he sees the image alreadyfixed on-screen. “Or there may be an old Ferris wheel with moss on it,like the end of the world already has happened. This will help peoplecue into the sci-fi feel of it early on, because I'm not sure—.” Thomascollects his thoughts, thinking about his audience. “After seeing ittoday, we led [the audience] to believe that it's a survival movie at first.Once he crushes the piggy bank, it's a little bit too much for people, tooquick. I think we have to cue them earlier that other things are going

on.” The matte painting will help foreshadow the surreal shift in the film.
In addition, Thomas would like to add an ending where the character“dies on a street corner after being shot, taking his last breath.” At thetime, the producer, Neil Smith, “felt it was too dark and suggested weshoot something sweeter and more of a Hollywood ending,” Thomasadmits. That's when they conceived “the idea [of] him being broughtback to life in a hospital” with his wife leaning over him with the butterflynecklace we saw him find earlier in the broken piggy bank—but itended up being too expensive to shoot.
Thomas would still like to go back and shoot his original ending. “Iwould like to do a jib shot from his eye up to reveal that there's thiswhole scene unfolding in an urban environment. So it starkly contrastsfrom this surreal otherworld we lived in for most of the movie, and he'scoming to, taking in his last breath with his wife over him, and otherpeople scurrying around.”
Whether this ending gets made or not, what can't be denied is howthe Canon 7D was able to cinematically deliver the evocation of anexpansive emptiness with high contrast (an African American actoragainst white salt flats) and how it holds up with the insertion of high-quality CGI effects.
1 The Marvels Cine style can be found athttp://marvelsfilm.wordpress.com/2009/10/19/canon-7d-picture-style-with-cine-gamma-s-curve-free-download/.


Chapter 12
Crafting the Film Look with Light, Composition,and Blocking
The Last 3 Minutes (2010), directed by Po Chan, director ofphotography Shane Hurlbut, ASC, United States, 5:18 min.
Lenses and Camera SettingsThe Canon 5D Mark II was used on this shoot. The following Canonlenses were used in the making of The Last 3 Minutes:
EF 24 mm f/1.4 L II USMEF 35 mm f/1.4 L USMEF 50 mm f/1.2 L USMEF 85 mm f/1.2 L II USMEF 100 mm f/2.8 L Macro IS USM
The Last 3 Minutes can be found athttp://vimeo.com/groups/5dmkii/videos/10570139.
Picture StyleNeutral, with −4 Contrast and −2 Saturation

Figure 12.1 Shane Hurlbut, ASC captures the beauty of Eli Jane in a sunset shot in The Last 3Minutes. The sun provides rim lighting from a ¾ rear key position.(©2010 Hurlbut Visuals. Used with permission.)
Shutter Speed1/50th sec
ISO SettingsDay exteriors: 160 (with Tiffen ND filters)Interiors: 320 and 640
Most of the shots were either handheld (free) or the camera wasattached to a helmet, for first-person perspective.
Sushi with Shane Hurlbut, ASCShane Hurlbut, ASC, is a tour de force. We sit at a sushi bar in MalibuBeach as the darkening spring sky brings out twinkling stars. It's beena long week shooting a short fiction written and directed bycollaborator Po Chan, with 15-hour shoots the norm, a demanding taskfor a low-budget film for Canon in a bid to show off the 5D Mark II'scapability as a cinema camera. Exhaustion ebbs around Hurlbut'seyes, but his effulgent passion for cinematic storytelling, his jovial flare

of expression, isn't tempered by fatigue. He insists that I try yellowtailtouched by cilantro and fire sauce—which sums up his enthusiasm forlife. “It's killer,” he remarks with a laugh. He knows when to party and isquick to laugh on set but sometimes impatient with those not firing asfast as he is.
Shane's unfailing work ethic grows from being raised on a farm inupstate New York. “I was on the tractor at eight years old. I'd wake upin the morning around 5:00 a.m., and I'd get on the tractor. Then around7:00 a.m., I would come in and grab some breakfast and head off toschool. My day would not end there. I'd practice sports after school,and then it was time to get back on the tractor, where I'd work till 10 or11 at night.” When did he have time to complete his homework? “Well,my dad welded this bookstand [onto the tractor] so I could read while Iwas driving it.” His mother was a sixth grade teacher, who becamepresident of the teacher's union. “I grew up seeing my parents workvery hard and have a passion for what they did.”
His parents, with what “little they had,” were willing to pay for college,Shane says. “I wanted to make sure I didn't spend their moneyfoolishly, so I initially chose a junior college to make sure my careerchoice was something that I wanted to do with my life.” The first year hestudied radio. “I loved it.” The second year “was TV and I loved thateven more.” In high school, his focus had been all about sports, andHurlbut earned B grades. “College was different because I waspassionate about what I was learning and graduated magna cumlaude with a full scholarship to complete my studies.”
But his motivation to earn better grades didn't just revolve around hiswork ethic. There was a girl, Lydia, whom he'd known since he wasthree. They started dating when Hurlbut was in tenth grade. She wentto Simmons College in Boston, a move that was encouraged by herparents to separate them because this was the first serious guy shehad ever dated. He says, “I remember walking in to the guidancecounselor's office at Herkimer County Community College and[saying], ‘Help me to find the best film school in Boston!’”
“I went chasing after the girl,” he laughs. Hurlbut enrolled in Emerson

College in Boston and studied mass communication, but switched tofilm after helping out a hometown friend from USC, Gabe Torres, whoshot a project over a summer break in Aurora, New York, where theyboth had grown up.
“I worked on Gabe's project and fell in love with film. It was sodifferent from TV, and I thought, ‘My God, this is it.’ So I went back thatnext semester, and I changed everything I had from TV and masscommunication to film, and then I did a four-year film degree in oneyear.”
After graduating from Emerson and getting engaged to Lydia,Shane thought that getting a job would be easy after college, since hehad all of these contacts. That false sense of security quickly fadedafter every job opportunity was met with, “You need more experience.”His parents knew what was best and insisted that he get any job just toget hands-on experience in the workforce. He swallowed his pride andworked at a film rental house in Boston, where he had formerly workedas an intern. “I started out packing trucks, and within six months I wasrunning the whole lighting and grip department.” But he realized thatLos Angeles was the place to be for high-volume film production.
He convinced Lydia that they should leave both their families on theEast Coast and move to California. She got a job at Children'sHospital, Los Angeles, when there was a nursing shortage and theyhelped pay for the move. “I got a job at Keylite, a rental house, and itworked really well because I worked my way up the ladder just like I didin Boston,” Shane explains. “Three months later I started on the moviePhantasm II [1988]. It was an amazing experience because it changedthe way I thought.” At first, he didn't plan to be a DP. He wanted to be astoryteller, a director. Lighting wasn't his first priority. But it all changedin a flash of inspiration. Shane worked as a grip truck driver on themovie, and one day was racing a flag into the key grip when his friendBrian Coyne, best boy electric on the project, asked him if he would bescared when sitting in the theater with the lighting that was being doneon the crematorium set. “Brian said, ‘Look, there are no shadows. Youcan see every nook and cranny in this place. Where is the mystery? It'sjust not scary.’ Snap! A light bulb went off in my head, and from that

point on, everything I looked at was light. That was 1988.” Shane fell inlove with cinematography. By 1991, he shot his first music video. “ThenI became a commercial cameraman in 1994 and then shot [my] firstfeature in 1998.”
Hurlbut was offered The Rat Pack (1998) for HBO as his firstfeature. That break came when director Rob Cohen had seen a DonnaSummer music video that Shane shot for Rob's film Daylight. He wasthrilled with the visuals from that music video and decided to take achance on Shane. Hurlbut went on to receive a cinematography awardnomination from the American Society of Cinematographers.
Hurlbut's approach to cinematography is to observe what's aroundhim. “I just looked at light wherever I went…. I think the best lightingcomes from just observing. Then, when I am asked to bring a director'svision to life, I pull from a variety of personal experiences andincorporate those visual references in my head into my lighting.”
Hurlbut's approach to cinematography is to observe what's around him. “I justlooked at light wherever I went.… I think the best lighting comes from justobserving. Then, when I am asked to bring a director's vision to life, I pull from avariety of personal experiences and incorporate those visual references in myhead into my lighting.”
The Last 3 Minutes became a project where Hurlbut wanted toshowcase the cinematic capabilities of the 5D Mark II. “I wanted tohave the opportunity to show Canon what the Hurlbut Visuals EliteTeam and I could do with the 5D in a short narrative piece.1 Lydianegotiated the deal with two Canon departments: education andmarketing. The behind-the-scenes segments were just as important toCanon as the footage itself.” They worked out the timing, gave Hurlbutthe 24P firmware update, and presented it at the National Associationof Broadcasters in Las Vegas in April 2010.
Po Chan's Story: From Hong Kong to HollywoodThe story of The Last 3 Minutes revolves around a weary 68-year-old

office janitor who dies from a heart attack. His life passes before hiseyes, and he lives through memories, both regrets and celebrations,starting from when his wife left him and then going back in time towhen he was born. Typically, when there's a story about someone's lifeflashing before his eyes, Hurlbut explains, “It's always the perfect lightand it's always at sunset. And that's awesome, but we wanted to takethis very mundane man” and show his “absolutely dead existence.” Butbeneath this surface, there are “many layers behind his life, and thoselayers are extraordinary,” revealing choices made, good and bad, thatled to the present moment.
The inspiration for the story came from Po Chan, the writer anddirector of the film, reflecting her own philosophy about life. Sheexplains, “I believe that life is like a big circle. We are all borninnocent, and no matter how many right or wrong things we have done,how many wrong decisions we have made in life, at the last minute,right before death, we will again become innocent.” She infused thistheme into her film, a theme that she feels comes from being born andraised in Hong Kong. “I grew up in the Eastern culture, surrounded byBuddhism philosophy. We believe everything comes in full circle—what goes around comes around. It's like yin and yang, so to speak.”
Besides the concept of the story, the second most importantelement in this film for Po is the music. She explains: “I think ourmemory is like the annual circles of a tree. The new memory will growon top of the older one; as we grow older, our memory layers will growthicker. I believe that the memory of music is in the core layer of ourmemory, especially the music that we heard when we were children.So the music in this film is the representation of the core memory of mymain character.” Po turned to a friend for bluegrass music suggestions“because my main character was born right after the GreatDepression.” After listening to over 1,000 tracks, one caught her ear,“Across the Wide Missouri,” a traditional American folk song about aroving trader in love with the daughter of an Indian chief. TimothyGodwin, a talented musician and friend of the Hurlbuts, listened to thesong for inspiration and then created the soundtrack for The Last 3Minutes.

Po enjoys the shift from living and working in film in Hong Kong tothe United States. “When I was growing up, I was taught to follow therules, not the dream,” she explains in her Cantonese accent. “Whenyou finish school, you go find a stable job and make money. It neveroccurred to me to become a filmmaker, even though I always lovedfilm. And I remember my very first film I saw in the theater when I waslittle; it was the Close Encounters of the Third Kind [1977]. I fell in lovewith that film; it blew my mind, and then I realized that it completelytransformed my life in that two hours.”
Like Hurlbut, Po had one of those Hollywood moments, where herexperience with watching Close Encounters would come full circleyears later. “I remember we did a job with Mr. Spielberg, and I was soshy, ‘O My God, it is Mr. Spielberg, the director [of] Close Encountersof the Third Kind, right?’ So I was hiding in a corner, and all of asudden he walks up to me, and he asks me what I do … and I said ‘Oh,I am a camera assistant for this job.’”
“And he said, ‘What do you want to do?’ That is what he asked me,and it came out of nowhere—Mr. Spielberg walked up to me and justasked me this question.”
“And I said, ‘I want to be a director, I want to be a filmmaker,’ and heput his hand on my shoulder and said, ‘Don't give up, girl.’ I just stoodthere frozen, thinking God has sent him here to tell me that. And youknow what? I will not give up.”
As for the process in writing the story for The Last 3 Minutes, Poexplains how her creative brain works. “Most people like to captureinteresting things or ideas by writing them down. I don't. I purposelydon't write them down. The reason is that I want it—whatever the entityis—put in my brain and this machine is going to mold it, change it intosomething else. Or combine it spontaneously with other random eventsI grabbed two days ago. It works better for me that way. Once I havethe core concept, the rest of the detail will come to me naturally,because they are all in my brain, filtered, molded, and ready to go. Themost important thing is I already have feelings for all of them becausethey have been living in me. We breathe, we eat, we live, and sure, we

will die together.”
Hurlbut has collaborated with Po Chan on about nine differentmovies, he says. He met her on the set of the HBO series Deadwood.Hurlbut was hired by HBO to shoot some promo pieces for the show.“And so Po was driving the producer from Beverley Hills out to the set,”Shane remembers. “I saw her dropping the producer off and Iwondered, ‘Who is that?’ I'm starting to line up a shot inside the set,and I remember her coming through the swinging doors, walking overwhile I was doing a shot and questioning why I chose a particular lens.”
“I turn to the producer and said, ‘Who is this person?’”
“‘That's Po Chan.’”
“‘What does she do?’”
“‘Well, she's from Hong Kong; she loves film. She loves it, breathesit.’”
They hit it off—Shane respects fearless and direct people. He hiredher as his assistant, and they became collaborators. In The Last 3Minutes, a script that Po wrote in one day, he talks about how “shehad incredible vision in the way she worked with actors and designedthe shots. She was very thorough with storyboards and a treatment thatwas so detailed. It made my job very easy.”
shaping a Point of View PerspectiveSo the story evolved into a script treatment that's bittersweet (seeAppendix 5). Hurlbut emphasizes that we see William's life in threeminutes: “the girl that got away, the best friend who dies, thecelebration of different life events. We see the tender moments, thesad moments, but [the flashbacks] didn't have to be perfect, and thelight didn't have to be perfect.” For example, in the sunset scene, “it'smuch more from a sense of how he would see it from his memory.”Visually, Hurlbut wanted to “capture the emotion of each characterthrough William's eyes”—from his point of view with the use of thesmall format Canon 5D Mark II.

What amazes Hurlbut the most is how the small form factor of thecamera allows him to get the kinds of shots he could never do with a35 mm cinema camera. “Never before have we been able tocinematically do a helmet cam, do something that really puts theviewer in a first person perspective,” Hurlbut emphasizes. “And that'swhat this camera really has enabled me to do. Tonight, we were on thebeach (see Figure 12.2), and my camera assistant is wearing thehelmet and he is able to look at her and caress her arms, and then sheturns and runs into the ocean. We start on a close-up of water drippingoff one strand of her hair into a wide shot of her running on the beach”(see Figures 12.3 to 12.5).
Figure 12.2 Shane Hurlbut looks through the Canon 5D (with a Z-Finder), the camera attached toa helmet worn by camera operator Bodie Orman, as they set up a shot on the beach with Eli Jane.Director Po Chan leans in screen right, with producer Greg Haggart observing in the background. Anassistant uses water from a water bottle to moisten Eli's hair, for the close-up of water dripping off herhair.(Photo by Kurt Lancaster).

Figure 12.3 First-person perspective from William's memories of stroking his girl's arm as waterdrips from her hair, from The Last 3 Minutes(©2010 Hurlbut Visuals. Used with permission.)
Figure 12.4 Actress Eli Jane looks into the camera to engage a first-person perspective of Williamlooking back at his memories in The Last 3 Minutes.(©2010 Hurlbut Visuals. Used with permission.)

Figure 12.5 Actress Eli Jane, who plays the love of William's life, coaxes him on by looking at thecamera in a first-person perspective in The Last 3 Minutes.(©2010 Hurlbut Visuals. Used with permission.)
Hurlbut explains that for first-person perspective, the Canon 5DMark II “is the device to do it. We used depth of field to make it filmic,and we took the audience on a life ride.” Po Chan explains how, “I donot want the audience just watching the film. I want them to be able tofeel the film. I want to enable the audience to feel what I feel. All theelements in this film, from the casting and the music to the wardrobe;from makeup (the choice of lipstick) to the hairstyles and hair colors;from the patterns and textures of the set dressing pieces to the looksof the crystal itself, are all carefully chosen so that they all work inharmony to tell the story.”
Lighting the Bedroom SceneIn one scene, after the main character's wife decides to leave him, shepacks her bags and heads out the door. There is a dress lying on thefloor. William goes over to pick it up, and time slips back into amemory of when, according to Chan's treatment, he sees from hispoint of view, “his wife wearing the same dress. She seductively takesoff the dress and crawls under the sheet with William…” (see Appendix

5).
Hurlbut explains how he wanted to keep that scene “very intimate,”but at the same time not make it look like a romantic “setup,” such asturning “the lights all down, and make it candlelit with soft focus—edgy.Everything's dark, and now I'm going to take my clothes off. That is theexact opposite of what I wanted to convey here.”
By avoiding the temptation to go for the moody “perfect light,”Hurlbut crafted a scene where “the lights were on. It's nighttime andthey just got back from an evening out, and she's still in her dress andhe's reading a book. She's coming in, and starts to play with him. Sothe lights are up, he's reading, then all of a sudden we're in a striptease scene. That's what I wanted to convey. Out of nowhere the guy isreading his book and all of a sudden looks up, and he's got a beautifulwoman in front of him with the dress she just wore out to the moviesand now she's taking it off.”
To tell this story visually, Hurlbut explains, “You start close, start onthat beautiful face. She walks away from the camera; she starts toperform a striptease act for her husband. You create that suspensewhere you think you're going see her but the sheet flies up into frameand blocks your view; then all of a sudden she slinks up under thesheets into a rocking close-up and tells William that she loves him”(see Figures 12.6 to 12.8).

Figure 12.6 Actress Eli Jane presents a seductive look to the camera, starting “close,” in Hurlbut'swords, “on the beautiful face” in The Last 3 Minutes.(©2010 Hurlbut Visuals. Used with permission.)
Figure 12.7 Hurlbut says, “She starts to perform a striptease act for her husband. You create thatsuspense where you think you're going see her strip, but the sheet flies up into frame and blocks yourview”…(Still from The Last 3 Minutes ©2010 Hurlbut Visuals. Used with permission.)
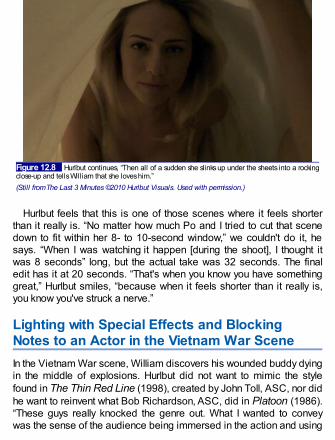
Figure 12.8 Hurlbut continues, “Then all of a sudden she slinks up under the sheets into a rockingclose-up and tells William that she loves him.”(Still from The Last 3 Minutes ©2010 Hurlbut Visuals. Used with permission.)
Hurlbut feels that this is one of those scenes where it feels shorterthan it really is. “No matter how much Po and I tried to cut that scenedown to fit within her 8- to 10-second window,” we couldn't do it, hesays. “When I was watching it happen [during the shoot], I thought itwas 8 seconds” long, but the actual take was 32 seconds. The finaledit has it at 20 seconds. “That's when you know you have somethinggreat,” Hurlbut smiles, “because when it feels shorter than it really is,you know you've struck a nerve.”
Lighting with Special Effects and BlockingNotes to an Actor in the Vietnam War SceneIn the Vietnam War scene, William discovers his wounded buddy dyingin the middle of explosions. Hurlbut did not want to mimic the stylefound in The Thin Red Line (1998), created by John Toll, ASC, nor didhe want to reinvent what Bob Richardson, ASC, did in Platoon (1986).“These guys really knocked the genre out. What I wanted to conveywas the sense of the audience being immersed in the action and using

debris mortars to change and filter the sunlight (see Figures 12.10 and12.11). We start with an explosion, and he goes down for cover. Hegets up, realizes his friend's been hit, and he runs to him. We blow offthis huge mortar explosion, because I wanted the world we've seen—this backlit sun dappled through the trees—to go completely overcast,forcing a mood change. So in an instant, you have a beautifulbacklight, completely soft ambiance, and when the explosion goes offand he starts moving towards him, the sun is taken out. It goes dark.The tonal range changes, dropping four to five stops in the lighting.And the camera did so well digging into the shadow areas. And thenthe sun comes back out once the explosion subsides” (see Figures12.12 and 12.13).
Figure 12.9 Camera operator Bodie Orman gears up with the helmet cam. The 5D Mark II's LCDscreen shows the scene about to be shot in The Last 3 Minutes.(Photo by Kurt Lancaster.)

Figure 12.10 The special effects crew sets up the spot fires around actor Alex Weber, used to helplight the scene in The Last 3 Minutes. Pyrotechnic gear and supplies in the foreground, with crew tothe right.(Photo by Kurt Lancaster.)
Figure 12.11 “We positioned spot fires to add color, we sent debris mortars into the air to diffusethe sun, and we used lawnmower smoke to cover up the brown tones in the scene that were notrealistic to a Vietnam jungle,” Hurlbut explains in this sequence from The Last 3 Minutes.

(©2010 Hurlbut Visuals. Used with permission.)
Figure 12.12 Actor Alex Weber raises his hand in the midst of explosions in The Last 3 Minutes.(©2010 Hurlbut Visuals. Used with permission.)
Figure 12.13 Actor Alex Weber provides his last look at his friend, William, who promises to givehis last letter to his friend's love in a POV shot from The Last 3 Minutes. Hurlbut explains how, as thesun lit the actor's face and the smoke cleared, “The timing was just perfect; it was like a sunray fromheaven during the death sequence.”(©2010 Hurlbut Visuals. Used with permission.)

Hurlbut explains how he collaborated with the special effects team tolight the scene. “We positioned spot fires to add color, we sent debrismortars into the air to diffuse the sun, and we used lawnmower smoketo cover up the brown tones in the scene that were not realistic to aVietnam jungle.” While working on Terminator Salvation, he learnedabout different mortar explosions, including trapezoids, flash pods, anda square pan. “You start to understand the terminology,” Hurlbut says,“and then you use it to your advantage for lighting. I wanted to take thesun away. So with one explosion it went away. And then it comes backright as William's friend died. The timing was just perfect; it was like asunray from heaven during the death sequence” (see Figure 12.13).
In the rehearsal for this scene, Po Chan explains the importance of alove letter to actor Alex Weber, who plays William's best friend in theVietnam War (see Figure 12.14).
Figure 12.14 Director Po Chan gives Alex Weber advice on how to reach into his pocket in TheLast 3 Minutes.(Photo by Kurt Lancaster.)
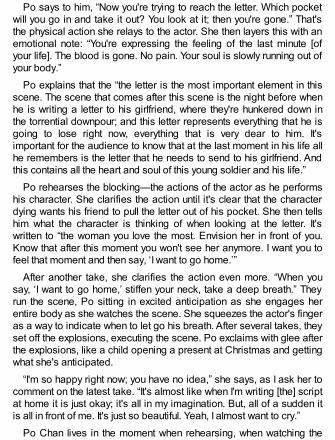
Po says to him, “Now you're trying to reach the letter. Which pocketwill you go in and take it out? You look at it; then you're gone.” That'sthe physical action she relays to the actor. She then layers this with anemotional note: “You're expressing the feeling of the last minute [ofyour life]. The blood is gone. No pain. Your soul is slowly running out ofyour body.”
Po explains that the “the letter is the most important element in thisscene. The scene that comes after this scene is the night before whenhe is writing a letter to his girlfriend, where they're hunkered down inthe torrential downpour; and this letter represents everything that he isgoing to lose right now, everything that is very dear to him. It'simportant for the audience to know that at the last moment in his life allhe remembers is the letter that he needs to send to his girlfriend. Andthis contains all the heart and soul of this young soldier and his life.”
Po rehearses the blocking—the actions of the actor as he performshis character. She clarifies the action until it's clear that the characterdying wants his friend to pull the letter out of his pocket. She then tellshim what the character is thinking of when looking at the letter. It'swritten to “the woman you love the most. Envision her in front of you.Know that after this moment you won't see her anymore. I want you tofeel that moment and then say, ‘I want to go home.’”
After another take, she clarifies the action even more. “When yousay, ‘I want to go home,’ stiffen your neck, take a deep breath.” Theyrun the scene, Po sitting in excited anticipation as she engages herentire body as she watches the scene. She squeezes the actor's fingeras a way to indicate when to let go his breath. After several takes, theyset off the explosions, executing the scene. Po exclaims with glee afterthe explosions, like a child opening a present at Christmas and gettingwhat she's anticipated.
“I'm so happy right now; you have no idea,” she says, as I ask her tocomment on the latest take. “It's almost like when I'm writing [the] scriptat home it is just okay; it's all in my imagination. But, all of a sudden itis all in front of me. It's just so beautiful. Yeah, I almost want to cry.”
Po Chan lives in the moment when rehearsing, when watching the

actors live her characters' lives: “Every moment when I'm looking at myactor even in rehearsal, even through the monitor, my whole world isthere. So every single inch of my skin, my muscle, is there. I'm not meanymore, I'm not Po anymore, I become one with my scene. That is myway to truly feel what I want for the scene.”
So the detail of grabbing for the letter, of letting out the character'slast breath, involves something more than just dying, or enacting adeath scene, Po explains. “I want—,” she sighs, searching for thewords. “It's funny because to people, it's death; it is very physical. Tome, death is very soulful. It is very spiritual. Life and death [are]something other than physical, to me. So what I was looking for earlierfrom Alex is how I want to see him suck his soul out in that last breath.”
Although Po is clear she's never been in a war, she feels a strongconnection to death. “My family was not very well off, and I witnessedmany deaths in my family. Then I came to this country all by myselfwithout friends and family.” The theme of regret is palpable throughoutthe film—not only her regrets in life, but, she adds, “the regrets thatbelong to someone very close to me and knowing how painful it wasfor that someone. Because somebody you love so much and youembrace everything that is, knowing that person has to go through thepain of regret—and it is really hard, when [there's] nothing you can doand just helplessly witness it.”
Getting the timing right throughout the production is an arduous taskbecause all the scenes—except the opening—require one take inorder to maintain the point of view Hurlbut and Po Chan need for thescenes. “When you do takes that are all in one, it requires everyone tobe perfect,” Hurlbut explains. Typically, when you do a scene, “you do aclose-up and then you do a wide shot, and you do a medium, then do areverse. You get the performance in three, four, five takes, no problem,and you're onto the next setup. But when the camera has to be thewide shot, the reverse, the close-up, the medium shot, and the spin-around all in one, you have to translate all that into one shot.” So,Hurlbut explains, “The actors' timing, my camera movement, thelighting, and performance all have to be in sync. It's nothing you canedit around. If you don't use all of it, you don't have the scene.”

It's also a challenge because the scenes are so short. “Trying to dosomething like this when you have 8 to 15 seconds to engage theaudience, inflict the emotion, and identify with a character—that's a lotto do in 8 seconds,” Hurlbut laughs as he eats another piece of sushi.
Behind the Scenes of The Last 3 MinutesElite Team member Tim Holterman shot and edited a series of shortdocumentaries on the making of The Last 3 Minutes. Seehttp://hurlbutvisuals.com/blog/tag/the-making-of/.
The Bathing SceneOne of Hurlbut's favorite scenes is the bathing scene. Originally, Pohad written a scene about the mother measuring the height of Williamas a child (see Appendix 5), but Hurlbut says they just couldn't find alocation for it; nothing worked. “It just didn't fit.” So the bathing scene“was something spontaneously created in a location that didn't reallylend itself to the surroundings of the house where we were shooting.But we found an angle with trees in the background and sheetsblowing on the line. The mom was so beautiful. She had that 1940sface of being on the farm and having survived rough times. It was awonderful, playful scene with the splashing water, playing with her sonand wiping his face. It was a very special moment” (see Figure 12.15).

Figure 12.15 Actress Rachel Kolar bathes baby William in The Last 3 Minutes. “She had that1940s face of being on the farm and having survived rough times,” Hurlbut says. “It was a wonderful,playful scene with the splashing water, playing with her son and wiping his face.” This scene was shotat ISO 160 with a Canon 35 mm L series lens, f/5.0 with a color temperature set to 5200 degrees K.(©2010 Hurlbut Visuals. Used with permission.)
The setup of the scene included a washtub full of water with thecamera handheld by Shane Hurlbut (see Figures 12.16 to 12.19).

Figure 12.16 Shane Hurlbut handholds a Canon 5D Mark II as director Po Chan gets ready tosplash water onto actress Rachel Kolar (off-screen)—the camera becoming baby William's perspectiveof his mother.(Photo by Kurt Lancaster.)


Figure 12.17 Shane Hurlbut watches the playback of a take on a field monitor (off-screen). Anassistant is ready with a reflector board in the background.(Photo by Kurt Lancaster.)
Figure 12.18 The field monitor observed by director Po Chan and cinematographer ShaneHurlbut.(Photo by Kurt Lancaster.)
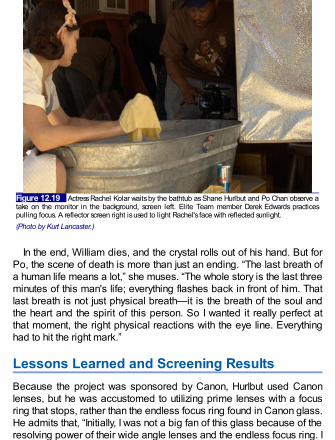
Figure 12.19 Actress Rachel Kolar waits by the bathtub as Shane Hurlbut and Po Chan observe atake on the monitor in the background, screen left. Elite Team member Derek Edwards practicespulling focus. A reflector screen right is used to light Rachel's face with reflected sunlight.(Photo by Kurt Lancaster.)
In the end, William dies, and the crystal rolls out of his hand. But forPo, the scene of death is more than just an ending. “The last breath ofa human life means a lot,” she muses. “The whole story is the last threeminutes of this man's life; everything flashes back in front of him. Thatlast breath is not just physical breath—it is the breath of the soul andthe heart and the spirit of this person. So I wanted it really perfect atthat moment, the right physical reactions with the eye line. Everythinghad to hit the right mark.”
Lessons Learned and Screening ResultsBecause the project was sponsored by Canon, Hurlbut used Canonlenses, but he was accustomed to utilizing prime lenses with a focusring that stops, rather than the endless focus ring found in Canon glass.He admits that, “Initially, I was not a big fan of this glass because of theresolving power of their wide angle lenses and the endless focus ring. I

made the wrong lens choices on the first day of the Navy SEAL movie[Act of Valor] and never looked back.” However, he has since changedhis mind. “Twelve months later and having completed a lot of researchand development, we were able to solve both of these problems whenusing the Canon lenses with a new remote follow focus system,”Hurlbut says.
Hurlbut was also pleasantly surprised by the results of Canon's L-series lenses.“I was blown away with the contrast, color, and resolving power of the 35 mm,50 mm, 85 mm, and the 100 mm Canon macro lenses. They became my go-tolenses on the short and gave me more latitude in the under exposed areas,much more than the Zeiss. The image was creamy but sharp” (Hurlbut Visuals,“Inside Track Newsletter” March 31, 2010).
The Last 3 Minutes was placed online in April 2010. Between April7 and April 28, 2010—in a period of three weeks—it received146,000 plays on Vimeo. The work was also presented at NAB in LasVegas later in the same month. Hurlbut attended NAB and discussedhis experiences with the 5D Mark II to an overflowing crowd on theCanon showroom floor in the large convention center exhibit hall.
A few of the standout responses on Vimeo include this post: “Thevideo completely took my breath away … I was captivated for thewhole thing and didn't come back to the real world until it was done.Excellent work. I wish to be as good as you are one day.”
D. M. Daly: “Wow … magical. Thanks for sending shivers my way,great feel!!!”
Chris Bishow: “My wife is making fun of me because I'm teary eyed,but it's probably the best piece of work I've seen with a DSLR. Youowe me a tissue.”
NAB 2010 became the first public screening for The Last 3Minutes, and the website became a place for Shane and Po toreceive written feedback. “The responses have been overwhelming,touching, and amazing,” Hurlbut says. “I feel honored to have workedwith Po, the Elite Team, and every person involved with the project to

deliver such a heartfelt short. The story struck a nerve because ittransported you on a journey through William's life, which initiallyappeared simple on the surface but as the memories unfold, so doesthe complexity of the piece. The 5D Mark II was the best tool to bringthis vision to life.”
Shane also realized that NAB 2010 was different. It was focused onthe 5D (as well as 3D film and television): “It should have been called5D-NAB because nearly every vendor had one—whether it wasequipment to move it, monitor it, rig it, lens it, post it, color it, edit it.You name it,” Hurlbut emphasizes.
But having this film projected on a large screen, first at HdiRAWworks, and then at Laser Pacific, was the biggest reward inseeing how the look and feel of the camera paid off for this short:“What I saw could easily [have] been on a 60-foot screen,” Hurlbutremarks. “I was so impressed with the image quality, color, andcontrast. The only minor snafu was a little rolling shutter when I ran intothe ocean due to camera vibration. Other than that, the HDSLRtechnology performed beautifully. This is another perfect example of aconcept and story that never could have been told with this first-personintimacy without the Canon 5D Mark II.”
Director Po Chan told one story where she said a Vietnam vetcontacted her after seeing the film online: “You have written awonderfully moving story. Congratulations, I expect to see your nameon many more movies in the future. Everyone needs to know thetechnical side, but the genius lies in your creative brain. Just look at allthe work and good things that spring forth as your story is born andbecomes of age. You get a gold Star for good work!” After receivingthis, she noted how deeply touched and grateful she was for thismessage.
It's what filmmaking's all about.
1 Elite Team members include professional filmmakers embracing DSLR technologywho work for Hurlbut Visuals for specific projects: Chris Moseley, Derek Edwards,Tim Holterman, Rudy Harbon, Mike Svitak, Darin Necessary, Marc Margulies, Bodie

Orman, Dave Knudsen, and John Guerra (see bios athttp://www.hurlbutvisuals.com/team.php).

Part 3Getting the Gear


Part 3. Getting the Gear
The Future of DSLR GearHybrid DSLRs started a cinematic revolution two years ago.Thousands of filmmakers, journalists, event videographers, and filmstudents have utilized them beyond what the original designers at firstconceived. Many purchased the camera and found the ergonomics atad difficult to wield. Shooting outdoors, the LCD screen is nearlyimpossible to see, and since you can't look through the viewfinder inlive view (except for the Panasonic Lumix GH1, because it's a 4/3system and not an SLR camera), you would need to throw a jacketover your head to see.
Video cameras don't have such issues. You can go out and buy avideo camera, and in most situations, that's all you need (aside fromspare batteries and a tripod). Prosumer models have built in neutraldensity filters (electronic), many of the higher end cameras have XLRconnectors with manual control of audio—and most have fixed lenses.
DSLRs are of a different breed. They're stills cameras and if youwant it to have the ergonomics and capabilities of a video camera(such as manual control of audio), you may need additional gear tomake it work for you. Dozens of companies have sprung up to meetthe need of filmmakers wanting better ergonomics. From RedrockMicro to Zakuto creating handheld and shoulder mounted rigs, fromBeachTek to juicedLink building XLR audio adapters with amicrophone preamp and manual gain control, and Zeiss designingprime lenses specifically for the DSLR market, companies understandthe needs and wants of DSLR shooters.
Indeed, because of the popularity of DSLRs being used as cinemacameras, the video camera industry has taken notice. Both Sony andPanasonic are releasing video cameras at the time of this book'spublication that not only include interchangeable lenses, but also APS-C-sized sensors. They've taken notice and stepped up to help makevideo more cinematic. Eventually the RED Scarlet will be released with

RED RAW codec. Canon will need to follow suite and release a newCanon 5D (or other model) that can shoot some form of RAW video.
But these video cameras will be expensive. Even now, Sony's oldHVR-A1U HDV miniDV camera sells for over $2100 and Canon's wayold GL2 miniDV standard definition video camera still costs about$2000.
DSLR shooters share the same secret. The Canon 7D, 60D, 5DMark II, and even the $900 Rebel T2i (550D) shoots much betterimages than these old video cameras. They even shoot better imagesthan the new Sony NEX-VG10 (which sells for around $2000). It shootsits full HD interlaced and only at 24mbps. The Panasonic AG-AF100, amicro 4/3 pro video camera is rumored at a price range of $6000.
Professionals may buy these new video cameras, and othercompanies will come out with video cameras with larger sensors andinterchangeable lenses—but they likely won't be of the same qualityand at the same price point as DSLRs.
DSLRs are not going away. As Philip Bloom noted when talkingabout these new video cameras coming down the pike, DSLRs arenot just a fad:
Is this fad over? No Chance. Video DSLRs will be with us for ahell of a long time to come. Students, indie filmmakers, eventvideographers and so many more simply won't be able to affordthese new cameras. The tech will improve and some of theissues will go away. Some will be here for a long time to comethough. But of course we are working with these limitations rightnow and incredible work is being done by so many despitethem. This will continue for many years. Also, take this job I amon now. I am shooting lots of timelapses as well as video. I caneasily put 3 or 4 bodies in my carry on luggage and it takes upno space and is less that the cost of, probably, one of thesenew video cameras with large sensors. The small size is amassive plus for me. I can also see the day soon when I travelwith a new large sensor video camera and still bring a couple of

DSLRs with me, second and third angles etc…it simply makessense.
So when you hear people say, “is this the end of thatDSLR fad then?”, tell them no. This “fad” is only justbeginning. It's just going to get better and better. Yes, Icannot see “House” or other major players choosing toshoot on DSLRs if affordable ($10K is affordable to procompanies) cameras are out there that do the job muchbetter. But for the rest of us, DSLRs will be our maincameras for many years to come.1
Technologies evolve with demand. What was the hot ticket last yearwill be subsumed by new models coming out in 2011. But DSLRs arehere to stay and what follows is a list of some of the cameras andequipment that were hot in 2010, some of which will remain hot in2011.
1 Bloom, P. (2010, Aug. 8). The future of video DSLRs. PhilipBloom.net .<http://philipbloom.net/2010/08/13/the-future-of-video-dslrs/.>


Chapter 13
DSLR Cinema Gear by Budget
This chapter provides a list of recommended gear in three budgetcategories, including the pros and cons of different video DSLRcameras and accessories, such as audio adapters, microphones,tripods, digital audio recorders, and cinema packages. Most of this ismy recommended list based on actual use in the field by myselfand/or working professionals I've encountered while writing thisbook.1 It is not an exhaustive list of everything available—far from it.For example, I cover Canon cameras and the Panasonic GH1because I've used them and the people profiled in this book used themin their projects. Other brands, including Nikon, were not included onlybecause I have not used their DSLRs and I did not encounter anyone,when writing this book, using these cameras. The same is true withother equipment that you may actually be using. Also, if I includedeverything available to date, this information would require its ownbook!
In any case, before you start shooting, it's recommended that youtest equipment to make sure it's what you want and it does what itneeds to do to meet your needs.
At the end of the chapter, I put together recommended packagesbased on shooting needs and budget. We don't recommend whereyou should purchase your equipment. The author consistently usesB&H Photo in New York City (bhphotovideo.com). Go tomanufacturers' websites for further information and dealers for eachproduct.
CamerasThe following section describe low- to higher-budget cameras.

CamerasLow-budget cameras: Canon Rebel T2i (550D) and Panasonic Lumix GH1(~$900; ~$1200; with kit lenses)
Midrange budget cameras: Canon 7D ($1,600 body only)Higher-budget cameras: Canon 5D Mark II: $2,500 (body only)
Low-Budget Camera: Canon Rebel T2i: $800body; $900 with kit lens (18–55 mm f/3.5-5.6)Important features:
APS-C sensor 22.3 mm×14.9 mm (nearly the same size as 35mm cinema film, 21 mm×14.9 mm, minus the section for audio).Full HD video (1920×1080P) at 30P, 24P, 25P, as well as a1280×720 size mode when shooting 60P and 50P—providingslow-motion capability after you bring it into your software andconform it to 24P. (The frame rates are NTSC, meaning 30P isactually 29.97, 24P is 23.976.)Microphone minijack. Essential for getting good audio.ISO settings range from 100 to 6,400, with the ability to go to12,800. All ISOs are native.Filter thread size of kit lens: 58 mm. (Take note of the filter threadsize so you can add protective glass and neutral density filters.)
Figure 13.1 The breakthrough budget camera offered by Canon in spring 2010. Although it has aplastic body, the chip size (APS-C 22.3 mm×14.9 mm) is nearly the same size as a 35 mm cinema

camera (minus the section for audio; 21 mm×16 mm) and the same size as the chip found in theCanon 7D which costs nearly double. It's also a lighter and smaller camera than the 7D. JarredAbrams, the news director for Cinema5D.com/news/, recommends this camera for its lightness andimage quality (nearly as good as the 7D).(Image courtesy of Canon USA, Inc.)
You are limited to 12-minute takes (as with all the Canon DSLRcameras).
The price with the kit lens includes a EF-SIS 18–55 mm (f/3.5–5.6).The S indicates a short mount designed for the APS-C chip sizes ofthe Rebel and 7D. IS indicates it contains image stabilization. If youcannot afford to buy additional lenses, this lens will do. It's not as fastas a prime lens, and the glass is lower quality, so it's recommendedthat you eventually get a faster zoom lens or a few primes.
In the field: Philip Bloom shot a poetic piece, Salton Sea Beach(available on Vimeo: http://vimeo.com/10314280), with this camera.Bloom used a Manfrotto tripod and the Kessler Crane Pocket DollyTraveler to achieve the smooth dolly looks in the film. The tripod hadthe Manfrotto 701 HDV head. His lenses included the Canon 100 mmF2.8L, Canon 50 mm F1.2L, and a Canon Zoom 70–200 mm F2.8LIS. In addition, Bloom used a Tokina 11–16 mm F2.8 lens and variableND filters. He also used the Zacuto Z-Finder eyepiece adapter.
As Bloom states in his blog:
Image-wise I have no idea if [the T2i] better or worse than the[Canon] 7D. I would literally have to shoot side by side andcompare. Certainly from what I got I am very happy with theimage out of the camera. I missed the extra dial, the dial inwhite balance, the mid ISOs and the top LCD panel. I really hatepressing a button and rotating a dial to get my iris to what I wantit at. But these are niggly issues. Nothing major.(http://philipbloom.co.uk/2010/03/20/saltonsea/, accessed29.03.2010.).

Figure 13.2 Still from Salton Sea Beach shot by Philip Bloom on a Canon Rebel T2i.
For the value and some great glass (and when you're saving moneyon the camera, it's worth paying extra for good lenses), DSLR cinemashooters can make this camera shine. The images certainly lookbetter than documentary images I shot on a Sony A1U HDV videocamera—which cost three times more. Factor in the good lenses andthe cost begins to even out. Yet, why pay $2,200 for an HDV videocamera that doesn't even come close to delivering images as good asan $800 stills camera that potentially shoots cinema-quality images?
Low-Budget Camera: Panasonic Lumix DMC-GH1: ~$1,200 (with 14–140 mm, f/4–5.8 Lens)Although it is not strictly a DSLR, the advantages of this camera are itssmall, lightweight form, due to its micro 4/3 mount, and a live LCDviewfinder that replaces the SLR mirror found in DSLRs. In addition,the LCD pulls out and swivels like the LCD screens found in videocameras. Most of the other DSLR models have a fixed LCD screen,making it difficult to shoot from low and high angles without an externalmonitor. (Canon's 60D includes a swivel LCD screen.)

Figure 13.3 Before Canon came out with the 7D and the firmware update for the 5D Mark II, thePanasonic GH1 captured the hearts of many potential filmmakers because of its 1920×1080i 24frame rate—the frame rate that helps attain the cinematic look. For many DSLR shooters, this was thecamera to get in mid-2009.(Image courtesy of Panasonic Corporation of North America.)
However, due to its smaller chip size (17.3×13.0 mm) as opposedto Canon's APS-C chip (22.3×14.9), this camera has been sincesubsumed by Canon's Rebel T2i, which offers more features at acheaper price. Panasonic's ISO settings are also limited from 100 to3,200, but see “Firmware Hack for the Panasonic Lumix GH1Transforms It into a Cinema Camera” (described below) to really soup-up this camera, making it truly cinematic and putting it in competitionwith the Canons!
The camera comes with a 14–140 mm f/4–5.8 lens, which, due tothe smaller chip size, is equivalent to a 28–280 mm zoom on a 35 mmcamera. This is a micro 4/3 mount lens, and you'll need an adapter tofit other manufacturers' lenses.

Figure 13.4 Ken Yiu utilizes the Panasonic GH1 with smooth clarity in Wedding Highlights(http://vimeo.com/6272661), along with the Merlin Steadicam.(©2009 Ken Yiu. Used with permission.)
The GH1 also has a microphone jack, which is smaller than astandard minijack plug, so you'll need to purchase a male–femaleadapter to fit a standard minijack mic or an XLR adapter's miniplug.
Important features:
Sensor size: 17.3 mm×13 mm.Full HD 1920×1080i at 24 fps. It can also shoot 1280×720 at 60fps and 30 fps. Note that the image is interlaced, so you'll needto deinterlace in post to maintain a film look.Microphone jack (sub minijack). Essential for getting goodaudio. Needs adapter to plug in a Rode VideoMic or XLRadapter.ISO settings range from 100 to 3,200.Filter thread size of kit lens: 62 mm. (Take note of the filter threadsize so you can add protective glass and neutral density filters.)Tilt and swivel 3-inch LCD screen—One of the few HDSLRsutilizing this useful feature found in pretty much all videocameras.

In the field: Ken Yiu's Wedding Highlights uses the GH1 with kit lensand the Merlin steadicam, providing smooth motion looks, and iscolor-graded using muted colors with Final Cut.
Firmware Hack for the Panasonic Lumix GH1 Transforms Itinto a Cinema CameraA couple of hackers have developed a firmware update to overcome Panasonic'slimited 17 Mbps bit rate, one by which the bitrate is increased to a 50 Mbpsmotion JPEG at 30P, while the other utilizes the AVCHD codec but increasesthe bitrate to 32 Mbps at 24P. In either case, those testing the firmware hack(which will void your warranty) claim “zero compression artifacts, zero mud, andmuch more photo-like gradients, tones, and textures” (seehttp://philipbloom.net/2010/06/11/3rd-party-firmware-transforms-wimpy-gh1-into-optimus-prime/). Some claim that it's superior to Canon's 5D Mark II codec, butBloom says he will still shoot on the 5D; however, it's “making me use my GH1again.”
A post on dvxuser.com by PappasArts claims a 70 Mbps throughput (seehttp://www.dvxuser.com/V6/showthread.php?t=213364).
For a beginner's guide to using this hack, seehttp://wiki.eoshd.com/index.php/Beginners_GH1_Custom_Firmware_Guide.
Midrange Budget Camera: Canon 7D: ~$1,700(body); ~$1,900 with Kits Lens (28–135 mmf/3.5–5.6)The Canon 7D has become the cinema camera to get for manyindependent filmmakers. It's not only cheaper than the 5D Mark II, butyou don't have to fight focus so much with the APS-C-sized sensor.Furthermore, Hot Rod Cameras will modify your 7D so it can acceptcinema lenses (PL mount). (They'll also modify the Panasonic LumixGH1 and Canon 5D Mark II.) (Seehttp://www.hotrodcameras.com/products/lens-mount-kits/pl-mount-and-mods/.) Includes a microphone jack, but the audio is limited toautomatic gain control, as of this writing; However, by the time thisbook is published, new firmware may be available to provide manual

control of audio, as in the 5D Mark II. This camera also allows for fullHD output to a field monitor (the 5D is limited to standard video outputin live shooting mode). The ISO ranges from 100 to 6,400 (with anexpansion to 12,800). Unlike the Canon Rebel T2i, the 7D contains anLCD screen on the top of the camera that allows you to quickly view avariety of settings, such as f-stop, ISO, and white balance. This featureis handy when you're not in live shooting mode. It also uses the moreexpensive Compact Flash card—but is more durable and less easy tolose than the SDHC cards found in the T2i.
Figure 13.5 Containing the APS-C chip 22.3 mm×14.9 mm, this model became the breakthroughcamera in late 2009 into 2010.(Image courtesy of Canon USA, Inc.)
Important features:
APS-C sensor 22.3 mm×14.9 mm (nearly the same size as 35mm cinema film).Video resolution: Full HD 1920×1080 at 24P, 25P, and 30P, aswell as 1280×720 at 50P and 60P.Microphone minijack.ISO settings range from 100 to 6,400, with the ability to expandto 12,800. Native ISOs: 160, 320, 640, 1,250, and 2,500 (theother ISOs will be noisier).Filter thread size of kit lens: 72 mm. (Take note of the filter threadsize so you can add protective glass and neutral density filters.)
In the field: The Canon 7D is a workhorse professional camera

provided at a great value. The chip is about the same size as in a 35mm cinema camera (minus the section of the film used for audio), andmuch larger than any video camera in its price range, providingstronger image quality than cameras five times its cost. The Canon 7Dbecame the first camera to be used in filming an independent featurethat won a best film award: Tiny Furniture by Lena Dunham (2010South by Southwest Film Festival). A preview of this film (found onVimeo: http://vimeo.com/9749563) reveals strong cinematography andimages that I've not seen in indies shot with unmodified prosumer HDvideo cameras. It was also used by Shane Hurlbut, ASC, for The Last3 Minutes (profiled in Chapter 12; see Figure 13.6), as well as JeremyIan Thomas in The Chrysalis (profiled in Chapter 11; see Figure 13.7).
Figure 13.6 Still from The Last 3 Minutes directed by Po Chan, cinematography by ShaneHurlbut, ASC. This scene was shot with the Canon 7D to take advantage of a needed slow-motionshot.(©2010 Hurlbut Visuals. Used with permission.)

Figure 13.7 Shot from The Chrysalis directed by Jeremy Ian Thomas with Dave Christenson asDP. Notice the tonal range of contrast of the salt flats against actor Mike Wade.(© 2010 by Hdi RAWworks. Used with permission.)
Higher-Budget Cameras: Canon 5D Mark II:$2,500 (Body); $3,300 with Zoom L-Series Lens(24–105 mm, f/4).Important features:
Full-frame sensor 36 mm×24 mm [nearly the same size asVistaVision cinema film (36 mm×25.17 mm), which is essentiallythe same size as film in a 35 mm stills camera].Video resolution: Full HD 1920×1080 at 24P and 30P.Microphone minijack.Manual control of audio levels.ISO settings range from 50 to 25,600. Native ISOs: 160, 320,640, 1,250, and 2,500 (the other ISOs will be noisier).Filter thread size of kit lens: 72 mm. (Take note of the filter threadsize so you can add protective glass and neutral density filters.)

Figure 13.8 The Canon 5D Mark II was the second HDSLR video camera to hit the market, and formany, it's still considered the best due to its 36 mm×24 mm full-frame sensor with full HD1920×1080P resolution. Jared Abrams of Cinema5D says it is the standard by which all the DSLRswill be measured. “It's the camera that will carry the HDSLR cinema movement,” he says. It has stronglight sensitivity and low video noise compared to many of the full HDSLRs (ISO 50–25,600). (TheNikon D3s with its full-frame sensor has ISO settings spreading to 102,400, but lacks full-size HD,instead using only 1280×720P.)(Image courtesy of Canon USA, Inc.)
In the field: The Canon 5D Mark II not only takes great photos, but isa great cinema camera—with the proper settings and lighting (which istrue of any camera). Shane Hurlbut, ASC, calls this DSLR the “King ofthe Hill.” He feels that this camera is superior to the 7D not onlybecause of its full-frame sensor allowing for great low-light sensitivity,but for its ability to gradually drop off shadows on a person's face, forexample. Its lightness and portability allow for shots not seen before incinema, Hurlbut claims. Eli Jane, an actress in the short, The Last 3Minutes, describes how she felt less intimidated with the smaller formfactor of the DSLR, even during auditions.

Figure 13.9 Still from The Last 3 Minutes directed by Po Chan and cinematography by ShaneHurlbut, ASC. The tonal range from Rachel Kolar's skin tones to the blue sky performed well with the5D Mark II's sensor.(©2010 Hurlbut Visuals. Used with permission.)
ViewfindersOne of the worst features of the DSLR is the inability to see the LCDscreen in daylight. Unlike regular video cameras, DSLRs do not utilizethe viewfinder in the live view mode.
ViewfindersLow- to mid-budget viewfinder: iDC Viewfinder: ~$200
High-range viewfinder: Zacuto's Z-Finder Pro: ~$375
Low-Budget Viewfinder: iDC Viewfinder: ~$200This piece of gear from iDC Photo Video is the best value of theexisting viewfinders because it includes a diopter (allowing you toadjust its focus for your eye) and the mounting base plate.

Figure 13.10 Bruce Dorn, one of Canon's Explorers of Light educators, designed a viewfinder witha diopter for those on a tight budget. The device attaches to the camera's LCD screen and is bracedby a baseplate adapter; it's one of the most affordable viewfinders on the market (and it includes adiopter for focusing the eyepiece). An optional hood cup with 3× magnifier costs an additional ~$40—which I highly recommend, because it will cushion your eye (important when you're using this pointof contact as a brace). (see http://www.idcphotography.com/kart/index.php?p=product&id=118&parent=30). The viewfinder comes with a plate adapter where you can mount astandard video quick release plate. Be aware that you must purchase the proper viewfinder for yourcamera (the 5D Mark II has a different setup than the 7D, for example). The available models are forthe Canon 5D Mark II, 7D, Rebel T2i, and Nikon D300s.(http://www.idcphotography.com.)
Figure 13.11 A bit expensive, the Zakuta Z-Finder Pro is the flagship of the DSLR viewfinderadapters. This model includes a diopter to focus it with your eye. The baseplate screws into thecamera and can be attached to a tripod. It includes nonfogging glass, probably the biggestadvantage of the Z-Finder's higher price—as well as its lifetime warranty. Philip Bloom, who is anaffiliate of Zacuto, recommends the purchase of a Zacuto Z-Finder even before buying good glassbecause it's an essential piece of gear for shooting outdoors. (He was a firm believer of the Z-Finderbefore becoming an affiliate.) The Zacuto Z-Finder is designed to magnify the LCD monitor of aDSLR, such as a Canon 5D and 7D, by 2.5× to 3×, allowing for increased ability not only to see alarger image—essential for achieving critical focus—but also to use an eye cup so you can see indaylight. (The 3× will show more details of the LCD pixels.)(http://store.zacuto.com/Z-Finder.html.)
Higher-Range Budget Viewfinder: Zacuto Z-

Finder Pro: ~$375In the field: The eye cup actually helps you to keep the camera steadywith handheld shots because it acts as an extra point of contactagainst your body. Absolutely necessary for daylight shots (see Figure13.12). Great for magnifying to get critical focus and a great tool whenlight is too bright to see the screen. Without it, you may need to throw ajacket over your head to see (see Figure 13.13).
Figure 13.12 Shane Hurlbut, ASC (l), directs elite team member Rudy Harbon (c) for a handheldshot with Zacuto's Z-Finder on location in The Last 3 Minutes, while actor David Scales observes (r).(Photo by Kurt Lancaster.)

Figure 13.13 Cinematographer Guga Millet and director Bernardo Uzedo look at the LCD screenof the Canon 5D Mark II, using a jacket to block light so they can see. Viewfinders help shooters getthe look they need without having to go dark.(Photo courtesy of Bernardo Uzedo. Used with permission.)
LensesThe following sections describe low- to higher-end lenses.
LensesLow-budget lenses: Kit lens
Midrange lenses: Used Prime Contax Zeiss lenses or used Leica R lensesHigher-end lenses: Zeiss Primes and Canon L series
Low-Budget LensIf you're on a tight budget and can't afford any lenses right away, besure to purchase the camera with a kit lens. The low-end Canon kitlenses (Rebel T2i, for example) are made of plastic and feel as if they'llbreak if you drop them. They will do an adequate job until you save upenough money and upgrade to better glass, and they're probablyequivalent to the kind of glass you'll find in the prosumer video cameramarket. (The Canon 5D Mark II kit lens is an exception with aprofessional L series lens, 24–105 mm, f/4.) In addition, these are not

fast lenses, so you'll need to be working with brighter light and higherISO settings to make them shine. You also won't get the full benefit of ashallow depth of field provided by fast lenses (probably a minimum off/4 is necessary; faster is always better when playing with shallowdepth of field). It's highly recommended that you upgrade lenses assoon as possible, especially if you want to take advantage of thecinematic quality of shallow depth of field. One of the reasons to shootwith HDSLRs is to take advantage of good glass, so even investingabout a $1,000 on a set of three used Zeiss primes is preferable tousing most of the kit lenses on the market.
Midrange Lenses: Used Prime Contax ZeissLenses or Used Leica R LensesIf you have an extra $1,000 or so, an affordable way to get nice primelenses is through the used market. The website www.KEHcamera.comis one such place that offers used Zeiss primes (made for the phased-out Contax stills camera) and even Leica R lenses at budget prices.You will need to purchase the proper adapter for your camera.
For around $1,000,2 you can equip the Rebel T2i and the PanasonicGH1, or most other DSLRs (with the proper mount adapter) with threeused Zeiss lenses. This is about the same cost as a Canon L serieslens. If you're working on an HDSLR project, you cannot go wrong withZeiss primes.
Zeiss Contax/Yashica—~$27–$80 (for Canon: seewww.fotodiox.com; the consumer model is ~$27, while the proversion runs close to $80)—but don't get the consumer modelwith the 5D; it does not fit properly and will jam the lens. Get thepro version for the Canon 5D Mark II.

Figure 13.14 Zeiss Contax/Yashica adapter for Canon cameras, allowing you to hook up Zeisslenses to the Rebel T2i, Canon 5D Mark II, and 7D (available at www.amazon.com andwww.fotodiox.com).(Image © Carl Zeiss.)
Some of the Zeiss Contax lenses listed on thewww.KEHcamera.com page are listed here. The market changes, sosome lenses may be available one week but not available the followingweek. Also, prices reflect the quality of the used lenses, ranging from“like new” to bargain.
Zeiss Contax Distagon f/2.8 28 mm can be purchased used foraround $300.Zeiss Contax Planar f/1.4 50 mm normally costs around $725,but a used one can be purchased for around $300.Zeiss Contax f/2.8 100 mm ~$500 (not pictured)Zeiss Contax Sonnar f/2.8 135 mm ~$250Zeiss Contax f/4 Tele Tessar 200 mm ~$235 (not pictured)

Figure 13.15 Zeiss Contax Distagon 28 mm f/2.8 lens.(Image © Carl Zeiss.)
Figure 13.16 Zeiss Contax Planar 50 mm f/1.4 lens.(Image © Carl Zeiss.)
Figure 13.17 Zeiss Contax Sonnar 135 mm f/2.8 lens.(Image © Carl Zeiss.)
These lenses lack autofocus and iris—you'll set your f-stop on the

barrel of the lens (as you would do with a professional cinema lens).But Zeiss does make glass for Canons, such as a Planar series EOSlenses, which has automatic focus and in-camera f-stops. Although notprofiled here, look up Lecia R series lenses on KEHphoto.com forcurrent used prices.
Higher-Budget Lenses: Canon L SeriesCanon L series lenses are the cream of the crop for Canon cameras.These lenses are designed for professional use and help bring acrosssome of the best-looking images in the business (for noncinemalenses).
In the field: Shane Hurlbut, ASC, used the L series 24 mm, 35 mm,50 mm, 85 mm, and 100 mm in The Last 3 Minutes (profiled inChapter 12). As he recently noted, Hurlbut was not a “big fan of thisglass because of the resolving power of their wide-angle lenses andthe endless focus ring. It took me down day one of the untitled NavySEAL [Act of Valor] movie because I made the wrong lens choicesand I have never looked back.” However, with the adoption of a remotecontrol follow focus, he worked around the focus ring issue. In The Last3 Minutes, Hurlbut was glad he went with the Canon lenses: “I wasblown away with the contrast, color and resolving power of the 50 mm,85 mm and the 100 mm Canon macro lenses. They became my go-tolenses on the short and gave me more latitude in the under-exposedareas, much more than the Zeiss. The image was creamy but sharp.When have you ever heard these words associated with one another?”(Hurlbut Visuals, “Inside Track Newsletter,” March 31, 2010). He notesthat the normal EF lenses (the non-L series) do not hold up on the bigscreen (http://hurlbutvisuals.com/blog/category/lenses/).
CANON EF 24 mm F/1.4L: ~$1,700

Figure 13.18 F-stop range goes from 1.4 to 22, with an 84-degree angle of view. Minimum focaldistance is 9.8 inches. Filter size: 77 mm.
Figure 13.19 Still from The Last 3 Minutes. Canon 24 mm L with f-stop at 1.4.(©2010 Hurlbut Visuals. Used with permission.)
CANON EF 35 mm F/1.4L: ~$1,400

Figure 13.20 F-stop range goes from 1.4 to 22, with a 63-degree angle of view. Minimum focaldistance is one foot. Filter size: 72 mm.(Image courtesy of Canon USA, Inc.)
Figure 13.21 Still from The Last 3 Minutes. Canon 35 mm L with f-stop at 5.0; color temp: 5200degrees K; ISO 160.(©2010 Hurlbut Visuals. Used with permission.)
CANON 50 mm F/1.2L: ~$1,500

Figure 13.22 F-stop range goes from 1.2 to 16, with a 46-degree angle of view. Minimum focaldistance is 1.5 feet. Filter size: 72 mm.(Image courtesy of Canon USA, Inc.)
Figure 13.23 Still from The Last 3 Minutes. Canon 35 mm L with f-stop at 4.0; color temp: 2800degrees K; ISO 640.(©2010 Hurlbut Visuals. Used with permission.)
CANON EF 85 mm F/1.2L: ~$1,900

Figure 13.24 F-stop range goes from 1.2 to 16, with a 28-degree angle of view. Minimum focaldistance is 3.2 feet. Filter size: 72 mm.(Image courtesy of Canon USA, Inc.)
Figure 13.25 Still from The Last 3 Minutes. Canon 85 mm L with f-stop at 3.5; color temp: 2800degrees K; ISO 320.(©2010 Hurlbut Visuals. Used with permission.)
CANON EF 100 mm F/2.8L: ~$950

Figure 13.26 F-stop range goes from 2.8 to 32, with a 23.4-degree angle. Minimum focaldistance is one foot. Filter size: 67 mm.(Image courtesy of Canon USA, Inc.)
Figure 13.27 Still from The Last 3 Minutes. Canon 100 mm L with f-stop at 3.5; color temp: 3400degrees K; ISO 640.(©2010 Hurlbut Visuals. Used with permission.)
CANON EF 70–200 mm F/2.8L: ~$1,900

Figure 13.28 The best of the best for Canon zoom lenses, the 70–200 mm f/2.8 with imagestabilization renders beautiful images and is fast, which is great for interior documentary work. Can beused instead of a set of primes in this zoom range. But it is a heavy lens and difficult for handheldwork—unless it's for short periods of time. You may want a tripod handy when using this lens.(Image courtesy of Canon USA, Inc.)
Figure 13.29 iDC Photography makes a “run-and-gun” adapter for long lenses, where you canconfigure a follow focus, and if desired, a follow zoom. (~$760 with both wheels and LCD viewfinderadapter; ~$630 with both wheels without the viewfinder.) (See www.idcphotography.com)(Image © iDC Photography)
LENSBABY LENSES—$150–350
Figure 13.30 Lensbaby (www.lensbaby.com). The Lensbaby lens allows you to adjust the focus ofthe lens by using an inexpensive tilt-shift technology. As of this writing, there are three differentmodels of the Lensbaby: Muse, Composer, and Control Freak (pictured here), with prices ranging from$100 (plastic lens) to those made with glass (up to ~$350). They can fit on Canon, Nikon, Pentax,Sony, and 4/3 DSLR mount cameras.

In the field: “Masbro” shot a Rome music video with the Lensbaby ona Canon 5D Mark II, providing artistically blurred images along theedge of each shot (see Figure 13.31).
Figure 13.31 Masbro's Rome video utilizes the Lensbaby on a Canon 5D Mark II. It provides asimilar effect as the more expensive tilt-shift lens (which can be seen in Vincent Laforet's Reverieprofiled in earlier chapters of this book).(©2009. Used with permission.)
Neutral Density FiltersDSLR cameras do not have built-in neutral density (ND) filter settingsas found in regular video cameras, so getting a set of ND filters isimportant, especially if you want to maintain your ISO settings andaperture for depth of field to get the best look for your project. If you'reon a budget, the Tiffen 58 mm (for the Canon T2i) is a decent choice.Buy all three: 0.3, 0.6, and 0.9. They will provide one stop, two stops,and three stops, respectively, on your DSLR. They run about $43 each.They are not the best choices but will get the job done. Tiffen makeshigher-quality (high transmission series) filters, which run higher. It's notrecommended to put low-end filters on high-end glass. Pay the extramoney for the high transmission series.
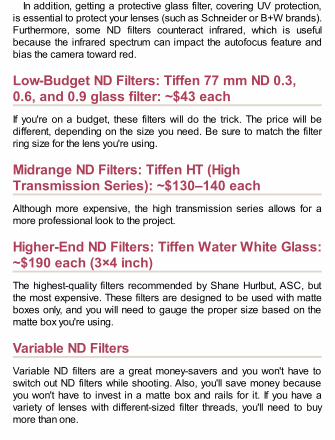
In addition, getting a protective glass filter, covering UV protection,is essential to protect your lenses (such as Schneider or B+W brands).Furthermore, some ND filters counteract infrared, which is usefulbecause the infrared spectrum can impact the autofocus feature andbias the camera toward red.
Low-Budget ND Filters: Tiffen 77 mm ND 0.3,0.6, and 0.9 glass filter: ~$43 eachIf you're on a budget, these filters will do the trick. The price will bedifferent, depending on the size you need. Be sure to match the filterring size for the lens you're using.
Midrange ND Filters: Tiffen HT (HighTransmission Series): ~$130–140 eachAlthough more expensive, the high transmission series allows for amore professional look to the project.
Higher-End ND Filters: Tiffen Water White Glass:~$190 each (3×4 inch)The highest-quality filters recommended by Shane Hurlbut, ASC, butthe most expensive. These filters are designed to be used with matteboxes only, and you will need to gauge the proper size based on thematte box you're using.
Variable ND FiltersVariable ND filters are a great money-savers and you won't have toswitch out ND filters while shooting. Also, you'll save money becauseyou won't have to invest in a matte box and rails for it. If you have avariety of lenses with different-sized filter threads, you'll need to buymore than one.

Light Craft Workshop 77 mm Vari-ND Filter: ~$125 (not pictured)Light Craft Workshop's 77 mm variable neutral density filter provides 2to 8 stops of light blocking. I use this filter and have no complaintsabout it. (See http://www.lightcraftworkshop.com/site/page1000.html.)
Singh-Ray 77 mm Vari-ND Filter ~$400
Figure 13.32 Philip Bloom swears by the Singh-Ray variable neutral density filter, which allowsfor up to 8 stops of light blockage. An affordable option when considering only using one filter. Testfor vignetting. (http://www.singh-ray.com/varind.html)(Image courtesy of Singh-Ray Filters.)
LightsAvailable lights are described in the following section.
LightsLow- to midrange budget light: Dot Line DL-DV60 LED Light: ~$100
Higher-range budget light:LitePanels LED light: ~$275LitePanels kit: LitePanels LED light field kit: ~$1,100
Low- to Midrange Budget Light: Dot Line DL-DV60 LED Light: ~$100In the field: The Dot Line DL-DV60 daylight balanced 5600°K LED isbest if used from a side angle, rather than having it sit directly on the

camera, which will flatten the look of your subject. Sculpt with light andshade. Use available practical lights and pull this out when you need toshape the scene a bit more; also useful to punch in a little eye light inthe subject. Battery operated, but you may want to purchase a sparebattery, especially if you're in the field for more than a couple of hours.There is no way to adjust the brightness of the light, so you may want totape on diffusion (such as the Rosco #116 filter: ~$6.50; in therecommended accessories on the B&H page for the Dot Line light).The film-like filter will also soften the light, which is great when using itas a fill and you don't want to use harsh lighting. Layer on more thanone sheet to dim the light and defuse it more. You can also purchasean optional barn door to help shape light placement (I've also usedblack tinfoil, available at B&H Photo).
Figure 13.33 Sixty LEDs brighten up a scene that may be a bit too dark.
If you want a three-point lighting kit, buy three of these lights, threesmaller tripods (such as the Smith-Victor RS75 for about $37 each),and a bag for the tripods, batteries, and lights. This will make a niceportable field kit for around $450.
Higher-Range Budget Light: LitePanels MicroLED Light: ~$275

Figure 13.34 For an additional ~$175, the LitePanels light (similar in size to the Dot Line model)provides a dimmable knob. The lamps are daylight-balanced at 5600 degrees K. It also can run off apower adapter, as well as four AA batteries. Buy three of these and three tripods (described above inthe Dot Line light) for a 3-point light kit.(Image courtesy of Litepanels, Inc.)
High-End LitePanels LED Light Field Kit: ~$1,100
Figure 13.35 The LitePanels field kit includes a minilight, as well as a series of filters, poweradapters, and a carrying case.(Image courtesy of Litepanels, Inc.)
Reflector: Impact 5-in-1 Collapsible ReflectorDisc 32″: ~$40In the field: A reflector is a great piece of gear when you need tobounce some light or diffuse light with the translucent screen. The goldis great for adding a warm tone to a subject. This disc can bepurchased in several sizes. You will need someone to hold this disc foryou, so it's not the best tool for solo work.

Figure 13.36 The five colors include gold, silver, silver/gold, white, and translucent. This reflectorfolds in on itself, making it just a bit over 10″ long, small enough to slide into a pouch.
AudioThe following sections describe low- to higher-budget audio options.
AudioLow-budget audio: Rode VideoMic: ~$150 and miniscreen: ~$80 (Total: $230)
Midrange budget audio: Rode NTG2 shotgun mic (~$250) with XLR adapter(~$400) and miniscreen: ~$730
Higher-budget audio: Rode NTG2 shotgun mic (~$250) and minscreen (~$80),and Tascam or Zoom digital audio recorder (~$400), and wireless lav (~$600):Total ~$1,230
When it comes to audio equipment, microphones do not goobsolete. If you already have a mic or are looking for older mics at arental house, take note of these classic mics:
Sennheiser MKH-416—the classic outdoor shotgun mic(~$1,000)Sennheiser ME-66/K6—a lower-end version of the MKH-416(~$500)Schoeps CMC641—one of the industry standards for indoorrecording (~$1,700)
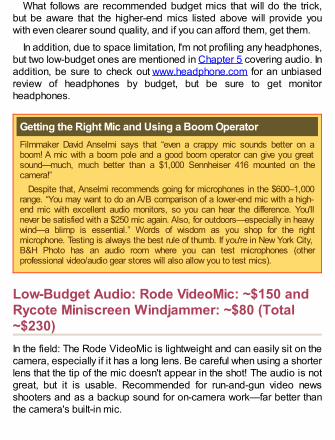
What follows are recommended budget mics that will do the trick,but be aware that the higher-end mics listed above will provide youwith even clearer sound quality, and if you can afford them, get them.
In addition, due to space limitation, I'm not profiling any headphones,but two low-budget ones are mentioned in Chapter 5 covering audio. Inaddition, be sure to check out www.headphone.com for an unbiasedreview of headphones by budget, but be sure to get monitorheadphones.
Getting the Right Mic and Using a Boom OperatorFilmmaker David Anselmi says that “even a crappy mic sounds better on aboom! A mic with a boom pole and a good boom operator can give you greatsound—much, much better than a $1,000 Sennheiser 416 mounted on thecamera!”
Despite that, Anselmi recommends going for microphones in the $600–1,000range. “You may want to do an A/B comparison of a lower-end mic with a high-end mic with excellent audio monitors, so you can hear the difference. You'llnever be satisfied with a $250 mic again. Also, for outdoors—especially in heavywind—a blimp is essential.” Words of wisdom as you shop for the rightmicrophone. Testing is always the best rule of thumb. If you're in New York City,B&H Photo has an audio room where you can test microphones (otherprofessional video/audio gear stores will also allow you to test mics).
Low-Budget Audio: Rode VideoMic: ~$150 andRycote Miniscreen Windjammer: ~$80 (Total~$230)In the field: The Rode VideoMic is lightweight and can easily sit on thecamera, especially if it has a long lens. Be careful when using a shorterlens that the tip of the mic doesn't appear in the shot! The audio is notgreat, but it is usable. Recommended for run-and-gun video newsshooters and as a backup sound for on-camera work—far better thanthe camera's built-in mic.

Figure 13.37 If you do not want to deal with XLR adapters or an external audio recorder, theRode VideoMic will do the trick. It's light—because it's made of plastic—but it also includes an LEDon light (the mic is powered by a 9 V battery), so you know when it's on.
Replace the foam windscreen with the Rycote MiniscreenWindscreen (see Figure 13.38), an essential piece of gear if you'reshooting outdoors with even a light wind.
Midrange Budget Audio Kit 1—On-Camera Audio: ~$1,000Kit option 1: Rode NTG2 shotgun mic: ~$250; windscreen kit: ~$120; XLRadapter: ~$400; on-camera shockmount and pistol grip: ~$200; XLR cable ofvarying lengths: ~$20 (see Figures 13.38 and 13.39).
Figure 13.38 The midrange audio gear lineup for Kit 1: Rode NTG-2 shotgun mic (one of thebest dialog mics for under $500), Rycote's Miniscreen Windscreen with the Miniscreen Windjammer(designed to fight unwanted wind noise when shooting outdoors), and BeachTek's DXA-SLR activeXLR audio adapter. This setup will provide professional audio recording when recording directly intoyour HDSLR. The BeachTek was profiled in Chapter 5. In short, it has the option of defeating theautomatic gain control of HDSLR cameras, provides 48 volts phantom power to two different XLRmics, and has a headphone input with its own volume control as well as input levels for each

microphone. In lieu of BeachTek's XLR adapter, you may consider getting juicedLink's DT454,described below.
Figure 13.39 JuicedLink's DT454 XLR adapter for HDSLRs. A powerful preamp with more featuresthan the BeachTek version. Profiled in Chapter 5 this device contains a headphone monitor with itsown volume control, two XLR inputs (with adjustable audio), a tip/ring input for a minijackmicrophone (such as the Rode VideoMic) or monitor playback, and volume levels for all three ofthese. It also includes a four-level LED meter with red LEDs for clipping indication.(Image courtesy of juicedLink, Inc.)
Juicedlink's XLR Preamp, the DT454 (~$420)What may stand out for audiophiles on this device is the bottom controlpanel (see Figure 13.40), where the discriminating sound artist canget into the details of the adjusting the different audio elements.
Figure 13.40 JuicedLink's DT454 bottom panel. Here, you can adjust the type of automatic gaincontrol disabling feature (whether it's off or whether you engage a tone or noise pattern), engage 48or 12 volts of phantom power, adjust microphone or line inputs, and place a low or high gain booston inputs, among other features.(Image courtesy of JuicedLink, Inc.)

If you do not want to use an XLR adapter (Kit 1), then you may wantto get a good microphone and an external digital audio recorder (Kit 2,described next).
Midrange Budget Audio Kit 2—External Audio: ~$1,050Kit option 2: Rode NTG2 shotgun mic: ~$250; windscreen kit: ~$120; externaldigital audio recorder: ~$300; Rode VideoMic: ~$150 (for on-camera recording ofreference and backup audio); on-camera shockmount and pistol grip forhandholding the mic: ~$200; and XLR cable: ~$20
Figure 13.41 This setup will provide crisp and clean audio. The Rode NTG-2 shotgun mic is oneof the best dialog mics for under $500, and Rycote's Miniscreen Windscreen with the MiniscreenWindjammer is a good price to fight unwanted wind noise when shooting outdoors. The Tascam DR-100 was profiled in Chapter 5 (along with the Zoom H4n); whether you choose the Zoom or theTascam is really up to personal preference. The Tascam is made of metal, more rugged, andincludes a minijack line out (useful for monitoring sound with Sound Device's MixPre, describedlater), while the Zoom's AA batteries will last longer than the Tascam unit (although the Tascamcontains a lithium rechargeable battery, which can be charged through a computer's USB port or youwill need to purchase the charger separately).
If going with Kit 2, be sure to use a slate or clap your audio on thecamera and don't forget to turn on the Rode VideoMic attached to thecamera. Both mics are necessary; at the very least, the Rode

VideoMic will provide adequate audio as a backup, as well as providea fairly clean reference. You will need to sync up the audio of theTascam or Zoom with the on-camera audio using PluralEyes software(~$150); otherwise, sync it up manually using David Anselmi's audiosync trick described in Chapter 6.
In addition to this equipment, you'll need either a pistol grip, boompole, or a shockmount for the microphone. If you're a doc or newsshooter and you have a crewmember running sound, you may want touse a pistol grip for in-close work; otherwise, you'll need a boom pole.
If you're shooting solo, you could mount the shotgun mic onto thehotshoe of the camera with Rycote's InVision adapter.
Rycote InVision Microphone Shockmount with HotshoeAdapter: ~$80
Figure 13.42 Rycote's InVision microphone shockmount. The adapter slides into the camera'shotshoe, while the shotgun mic sits inside the shockmount. The unit opens and closes, fitting snuglyaround the mic.(Image courtesy Rycote Microphone Windshields, Ltd.)
Rycote Lyre Mount and Pistol Grip: ~$120

Figure 13.43 Rycote Lyre Mount and Pistol Grip. Useful for up-close audio work, especially whenusing a Tascam or Zoom digital field recorder.(Image courtesy Rycote Microphone Windshields, Ltd.)
Figure 13.44 Sennheiser Evolution G3 100 series is one of the best wireless lavaliere setups youcan get. It includes the ability to add wireless to a shotgun mic, as well as one transmitter andreceiver for the lav, an ME2 lav mic, and cables for XLR and minijack setups.
Higher-Budget Audio Kit: ~$2,500Choose Kit 1 or Kit 2 from the midrange budget described above: ~$1,000
Sennheiser wireless lavaliere: ~$800Sound Devices MixPre field amplifier: ~$665
Sound Device's MixPre Portable Field Mixer and Preamp: ~$665

Figure 13.45 Sound Device's MixPre is a portable field mixer and mic preamp that containsunclippable limiters, so, if set properly, it will not blow out any sound. It's made of metal, so therugged device will hold up to some impact abuse. Use the tape out as the output that you will pluginto the camera's microphone input. The chief advantage is the ability to use XLR microphones, butyou can also monitor audio, adjust the levels, and view an LED level meter. If you want pristinesound, hook it up to the Tascam DR-100 or Zoom H4n when recording sound external to the camera.And when it comes to getting pristine sound, that should be your standard, because it'll save a lot oftime and money in post when you have to fix low-quality audio.
If you're hooking the Sound Device's MixPre directly to the DSLR,be sure to get a special cable made by Pinknoise(http://www.pinknoise-systems.co.uk/pinknoise-25-p-459.html). Itprovides a �25dB attenuation pad so the line level coming out of theMixPre isn't too hot for the DSLR. For buyers in the United States, youcan purchase the cable on eBay (or do a word search, “PinknoiseCable”).
Stabilization: Benro MC-91M8 Monopod: ~$130In the field: Some people use a tripod head, but if you're traveling light,just screw the Benro MC-91M8 monopod to the tripod hole on thebottom of the camera. Despite the fact it has legs, this is not a tripod,so don't walk away from it thinking the monopod is going to balance it!The legs help with extra steadiness so you can get that still shot withoutthe encumbrance of a tripod. If you can't afford a handheld support rig,such as Zacuto's Target Shooter (~$450), the monopod is aninexpensive way to get a handheld look to your piece. Philip Bloomused a monopod for some of his shots in a commercial forGreenpeace (see http://philipbloom.net/dslr-films/greenpeace-commercial-voices-of-change/).

Figure 13.46 A compact monopod constructed of carbon fiber with leg extenders for extrasteadiness—important in cinema work! It can extend to over 64″ and folds up to just a hair over 21″for storage. Four twist leg-lock sections. It also contains a dual ¼″ and 8″ male thread.
TripodThe following section describe various tripod options.
TripodLow-budget tripod (~$225): Manfrotto 190XB Tripod legs: ~$140 and Manfrotto700RC2 Mini Video Fluid Head: ~$85
Midrange budget tripod (~$435): Hakuba HG-503MX carbon fiber tripod ~$275and Manfrotto 701HDV fluid mini head: ~$160
Higher-budget tripod (~$800): Manfrotto 535 carbon fiber tripod: ~$400 andManfrotto 504HD fluid head: ~$400
Ball head: ~$80–300
Low-Budget Tripod: Manfrotto 190XB TripodLegs: ~$140 and Manfrotto 700RC2 Mini VideoFluid Head: ~$85In the field: Nothing beats small and portable. The lightness andsturdiness of the Manfrotto 190XB makes it a dream. Great forDSLRs. However, if you're using a large lens (such as the Canon 70–200 mm 2.8L), you may want a heavier tripod—see the midrange

budget tripod. You could just screw this tripod onto the camera withouta head, but a video head is recommended for smooth pans and tilts.You will want to avoid extending the smallest legs since the tripodwobbles too much. You could spend $225 and get sturdier legs withthe Manfrotto 190XP, and it'll be much sturdier, but a bit heavier.
Figure 13.47 These “sticks” are light and strong, but they're not as a light as a carbon fiber tripod,which can be a bit more pricy. It extends to just over 57" and can also sit as low as 3.3" with a lowangle adapter. It folds up to a nice compact size of just under 25" (without the head). If you canafford the video head from the midrange budget, go for it, but if you can't, this little one is adequate.It's a standard small fluid head for video work, enabling you to do fairly smooth pans and tilts withyour DSLR camera. You will need to use some pliers and pull out the plastic pin in the plate becauseDSLRs don't have the extra hole found in video cameras.
This package is small and light enough that you could close thesticks on this tripod and double it as a monopod (or even as asteadicam using the folded sticks as counterweight as you float thecamera through the air).
Midrange Budget Tripod (~$435): Hakuba HG-503MX Carbon Fiber Tripod ~$275 andManfrotto 701HDV Fluid Mini Head: ~$160

Figure 13.48 The Hakuba HG-503MX carbon fiber tripods is one of the lightest and mostpleasurable tripods I have used. The legs twist and drop. It has foam on the top part of the legs forsoft and easy grip. However, I recommend replacing the included head and getting the Manfrotto701HDV fluid head.
Higher-Budget Tripod (~$800): Manfrotto 535Carbon Fiber Tripod ~$400 and Manfrotto504HD Fluid Head: ~$400
Figure 13.49 A great combination: The Manfrotto 535 three-section carbon fiber tripod withManfrotto's 504HD fluid head. A rock-solid choice.
Advantages of Using a Ball Head Instead of a Fluid HeadFilmmaker David Anselmi recommends using a ball head because “it makessetting up nearly instantaneous, leveling the tripod in one quick motion. You caneven get a Manfrotto bolt-on version for low-end tripods, and it works great.” Theadvantage: “It replaces the ‘three-leg adjustment thrash' when setting up onnonlevel ground.” You can search for a variety of ball heads, instead of afluidhead. In Figure 13.50, the Manfrotto 494 mini ball head with an RC2 platesells for about $70, which would fit well with the low-budget tripod listed earlier.A higher-end model—better for the higher-budget tripods—such as the Acratech

GV2 will cost you about $350.
Figure 13.50 Manfrotto 494 mini ball head.
Tripod DollyKessler Crane Pocket Dolly Traveler (Version 2.0): ~$580 with crank and belt
Figure 13.51 An essential piece of gear, the Kessler Crane Pocket Dolley Traveler (Version 2.0)mounts onto a tripod and provides smooth, slow dolly shots—an essential element of cinematicstorytelling. The basic model does not come with the quick release plate (Manfrotto 577: $70 andGiottos MH621: $40). Be sure to get the more expensive crank and belt version because it allows forsmoother operation. The new version includes ball-bearing wheels that are silent and nearlyfrictionless, preventing any binding during movement (an occasional slight problem with the oldermodel). However, because the new version was released over the summer of 2010, you can scour theInternet for used versions of version 1 for possible deals because some filmmakers may be replacingtheir older models.
In the field: Kha lid Mohtaseb, Jonathan Bregel, and GeorgesYazbek provide a montage video of Egypt and Lebanon in adocumentary short, Egypt & Lebanon Montage (3:30) where they

made great use of the Kessler Crane Pocket Dolly (standard; seeFigure 13.52). See http://vimeo.com/7058755.
Figure 13.52 Khalid Mohtaseb, Jonathan Bregel, and Georges Yazbek make use of KesslerCrane's Pocket Dolly in a montage documentary, Egypt & Lebanon Montage (seehttp://vimeo.com/7058755). The camera tracks left in the first image, resulting in the ending shot inthe bottom image. Notice that the tracking shot doesn't move too much but, when viewed, feelspoetic. Placing objects in the foreground of a shot when moving the camera will help ascent thedolly move, such as the object out of focus screen left on the bottom image.
Handheld and Shoulder Support Rigs andFollow FocusFor many HDSLR shooters, the tripod isn't used as much as handheldshots. Due to the ergonomics of DSLRs, steady handheld shots aredifficult to attain. Furthermore, because focus is often challenging toachieve, a good follow-focus setup becomes a viable option forshooters. Several companies have designed a variety of handheld and

shoulder-mounted rigs designed for the HDSLR shooter.
The advantage of a shoulder-mounted system is the extra bracesupport allowing for fairly smooth operation and great yaw bracing; ittakes the pressure off your wrists and allows you to shoot much longerdurations than handheld. However, it is a lot more difficult to get thoselow-angle shots. The handheld support rigs give you more flexibility,allowing you to reach high and low and do some handheld cranemovements, but your wrists will get tired fast, so you'll be forced toshoot shorter durations.
“The Franken-Camera” by Travis FoxTravis Fox of Travis Fox Films (www.travisfox.com)—and formerly a videojournalist for the Washington Post—didn't like the feel of DSLR cinema rigs,which to him felt as though he was carrying a shoulder-mounted video camera.He missed the feel of his Sony Z1U “cradling it like a baby or a football as is mypractice,” he says. He continues:
I ended up saving money and getting a fit I could deal with. An $8 bracket(it's literally the cheapest flash bracket that B&H stocks) holds the Ikanmonitor out in front to the left of the lens just like the Z1U. I splurged onthe other bracket (it was a hundred bucks), which holds the audio gearand balances the camera out by moving weight to the back of thecamera. … (©2010 Travis Fox. (http://blog.travisfox.com/) Used withpermission.)
Fox's setup could be added to a Zacuto Target Shooter for body bracesupport.

Low-Budget Handheld and Shoulder SupportRigs with Viewfinder: ~$700
iDC Photo Video's viewfinder: ~$200 (featured early in thechapter)andiDC Photo's Video Run & Gun kit (follow focus and viewfinder):~$530orZacuto's Target Shooter (handheld support): ~$475orRedrock Micro's nano–RunningMan (handheld support): ~$470
Low-Budget Viewfinder and Follow Focus: iDCPhoto Video Run & Gun kit: ~$488

Figure 13.53 iDC's Run & Gun kit includes an adjustable baseplate, follow focus and viewfinder.Designed by photographer Bruce Dorn. For handheld work, where you need to get tight focus and seethe LCD better, this is one of the most affordable setups out there. Add this to Zacuto's TargetShooter, and you'll have a powerful combination for getting extra steady shots. When you considerRed Rock Micro's follow-focus setup costs just under $500, you can begin to see the advantage of thissetup because it includes a viewfinder. Screw on the Zacuto baseplate to the bottom of iDC'sbaseplate. Be sure to get the eye cup!(http://www.idcphotography.com)
Low-Budget Handheld SupportFollowing are the low-budget options.
Zacuto Target Shooter: ~$475
Figure 13.54 Zacuto's Target Shooter provides that extra level of handheld steadiness you mayneed on a shoot. The product pictured here includes the viewfinder but is not included with theTarget Shooter. Philip Bloom uses this device for much of his personal handheld work (he favors thetripod when doing hired shoots).(http://store.zacuto.com/Target-Shooter.html)

Figure 13.55 Philip Bloom sets up a shot using a Canon 5D Mark II, Zacuto's Z-Finder, and aTactical Shooter to steady the shot. (The Tactical Shooter has since been replaced by the TargetShooter.)(©2009 Philip Bloom.)
Redrock Micro's nano–RunningMan: ~$470
Figure 13.56 Redrock Micro's nano series presents a variety of handheld options for the DSLRshooter. The RunningMan is similar to Zacuto's Target Shooter in function and shape.(http://store.redrockmicro.com/Nano; Image courtesy of Redrock Micro.)
Midrange Budget Handheld and ShoulderSupport Rigs: ~$1,200–1,500
iDC viewfinder : $240 (with 3x eyecup)and

Redrock Micro's theEvent: ~$850orRedrock Micro's eyeSpy Standard: ~$825 (~$1100 withcounterbalance weights)orRedrock Micro's Captain Stubling: ~$1100orZacuto's Striker: ~$900
Redrock Micro theEvent: ~$850
Figure 13.57 Redrock Micro's theEvent allows for two-handed grip with extra body support.(http://store.redrockmicro.com/Catalog/DSLR-Handheld-Rigs/theEvent-DSLR-2-0-hybrid-rig; Imagecourtesy of Redrock Micro.)
Redrock Micro eyeSpy: ~$825
Figure 13.58 Redrock Micro's eyeSpy allows for shoulder-mounted steadiness with one handgrip,freeing up the other hand to focus. It may be a bit front heavy, depending on the camera and lensyou use. Counterweights can be added to help balance the weight (~$1,100 package).

(http://store.redrockmicro.com/Catalog/DSLRShoulderMountedRigs; Image courtesy of Redrock Micro.)
Redrock Micro Captain Stubling: ~$1,100
Figure 13.59 Redrock Micro's Captain Stubling provides handheld work with a follow-focus setup.It is designed for solo-shooting work, where the camera operator can use the follow focus without afocus-puller.(http://store.redrockmicro.com/Catalog/DSLR-2-0-accessories/Captain-Stubling-DSLR-Bundle; Imagecourtesy of Redrock Micro.)
Zacuto's Striker: ~$900
Figure 13.60 Zacuto's Striker provides a handgrip and body mount when setting up handheldshots.(http://store.zacuto.com/Striker.html; Image courtesy of Zacuto, USA.)

Higher-Budget Handheld and Shoulder SupportRigs: ~$3,000-3,500
Zakuto's Z-Finder Pro: ~$375andRedrock Micro's Cinema Bundle (matte box and follow focus fortripod support): ~$2,400 (~$3,000 with shoulder mount)orZacuto's Cross Fire (follow focus with handheld support):~$2,500orZacuto's Double Barrel (follow focus with shoulder mount):~$3,600
Redrock Micro's DSLR Cinema Bundle: ~$2,400
Figure 13.61 Redrock Micro's Cinema Bundle is designed to sit on a tripod. It includes a tophandgrip for lifting the unit, as well as a matte box. If you need shoulder-mount versatility, purchasethe microShoulderMount Delux Bundle for an additional ~$570.(http://store.redrockmicro.com/DSLR-Cinema-Bundle; Image courtesy of Redrock Micro.)
Zacuto's Cross Fire: ~$2,500
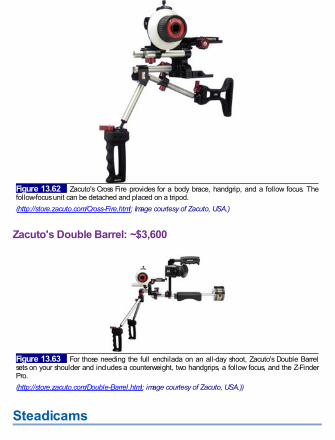
Figure 13.62 Zacuto's Cross Fire provides for a body brace, handgrip, and a follow focus. Thefollow-focus unit can be detached and placed on a tripod.(http://store.zacuto.com/Cross-Fire.html; Image courtesy of Zacuto, USA.)
Zacuto's Double Barrel: ~$3,600
Figure 13.63 For those needing the full enchilada on an all-day shoot, Zacuto's Double Barrelsets on your shoulder and includes a counterweight, two handgrips, a follow focus, and the Z-FinderPro.(http://store.zacuto.com/Double-Barrel.html; image courtesy of Zacuto, USA.))
Steadicams

If you're looking for a floating handheld steady camera that works forHDSLRs without spending thousands of dollars, Camera MotionResearch's Blackbird and Tiffen's Merlin are designed for extrasmooth handheld work but can be somewhat temperamental to use,requiring precision adjustments to evenly balance the camera. If youchange a lens, it'll need to be rebalanced, for example. And shootingon a windy day outdoors is nearly impossible because the wind willunbalance the camera. Neither of the products comes with a vest andswing-arm support such as with higher-end steadicams, so yourforearms may get tired when shooting lengthy takes. You will need towalk with your body held straight and knees slightly bent. It takespractice to really make these devices shine.
Once you master the balancing of these devices, you can achievereally nice camera motion, such as smooth swooping crane shots, aswell as push in dolly and tracking shots. When you follow performers asyou walk, it appears as if the camera is another person walking withthem.
CMR Blackbird: ~$485–675In the field: Sean Seah (www.firewerkzfilms.com) in Singapore offers areview and test video that shows off what the Blackbird can do with aCanon 5D Mark II attached to it (see http://vimeo.com/6463988).
Tiffen Merlin Steadicam: ~$800

Figure 13.64 Camera Motion Research's Blackbird is an affordable gimbal-based steady cameradevice utilizing an adjustable mounting plate with knobs for precise adjustments along the X-Y axis.The six-ball-bearing gimbal provides extra smooth precision, as well as friction. The unit can supportone to eight pounds of weight. You can purchase the basic model for ~$485, but the extra priceprovides a resting stand, so you can set the entire device down on the ground without removing thecamera.
In the field: See http://vimeo.com/6272661 for Ken Yiu's amazinguse of this Steadicam at a wedding. Rii Schroer also used it in her 16Teeth project profiled in Chapter 9.
Figure 13.65 The handle of the Tiffen Merlin Steadicam utilizes a three-axis gimbal for extraprecision. The center hinge allows for compact storage of under a foot, so a traveling package on the

go makes this a great Steadicam device. It comes with six counterbalance weights, dovetail plate,and tripod mounting plate. It can handle weights from ½ to 5 pounds.(Image courtesy of The Tiffen Company.)
Cases and BackpacksThe following sections describe options for cases and backpacks.
Cases and BackpacksCarry bag: PortaBrace CS-DC2R: ~$100 and CS-DC3R: ~$130
LowePro Pro Runner 350 AW backpack: ~$150Portabrace backpack (BC-1NR):~$150
Portable CS-DL2R: N$100 and CS-DC3R: N$130
Figure 13.66 The PortaBrace bag is a recommended piece of tough pro gear that includes aninterior brace, adding extra protection to your camera. It includes exterior and interior pockets andcan hold a DSLR as large as a Canon 5D with an attached zoom lens. It has room for two additionallenses. If you need extra room, PortaBrace makes additional sizes.(http://www.portabrace.com/dslr.php)
In the field: Great for portability and it's tough, including a rubberbottom so water and mud won't seep through when it's on the ground.Comfortable suede-padded shoulder strap and handles.
Backpack

Many companies make a variety of backpacks for camera and videogear. A nice piece of gear for traveling and hiking.
Lowepro Pro Runner 350 AW Backpack: ~$150In the field: Studio in a bag! Great backpack for the traveler. Includesspace for a laptop computer, with extra interior pockets for batteries,memory cards, notepad, and so forth. A small tripod and/or monopodcan be secured to the outside of the backpack.
Figure 13.67 The Lowepro backpack includes space for your DSLR camera and three to fourlenses. It also has a separate pocket for a laptop computer. You can also put in your audio gear intothis bag.
PortaBrace Backpack (BC-1NR): ~$350
Figure 13.68 A more expensive backpack, but PortaBrace products are handmade and durable.

(http://www.portabrace.com/productB-BC-1NR)
SoftwareI'm not recommending which editing software to purchase. It'sassumed that you already know how to edit, have a computer, and canuse the proper software. The professional Hollywood standard forlarge projects is Avid (for PC and Macs). Final Cut Pro for Macs isused by a lot of indies. Adobe Premiere Pro (for PC and Mac) isanother option. If you're on a PC, Sony Vegas Pro is one of the mostintuitive editing software packages out there (and probably containsthe most powerful built-in audio editor in the business).
Decompression SoftwareIn most situations you will want to decompress the camera's footage. Ifyou're shooting great hi-res HD, and if you're doing simple editing withno color grading, you can drop the files into some of these softwarepackages and just edit (Vegas Pro, Adobe Premiere Pro 5, and FinalCut Pro for Canon cameras). However, if you're doing any kind ofpostproduction color grading or using effects, you'll need todecompress your footage. Here are two:
Squared 5 MPEG Streamclip for Mac and Windows: Free,http://www.squared5.com/An essential tool if you're on a budget. The Mac version allowsconversion to Apple ProRes 422 (LT), 422 (HQ), 4444, as well asmany other formats. The PC version includes AVI, among others.
Red Giant Software Magic Bullet Grinder: ~$50,http://www.redgiantsoftware.com/products/all/magic-bullet-grinder/An inexpensive powerful tool, this software can utilize batch processesfor each of your computer's CPU cores, so if you have a fully decked-out Mac, conceivably you can render a separate file for each core (up

to eight). It's really compatible with Final Cut Pro with export format forApple ProRes 4444, Apple ProRes Standard, but it also includesPhotoJPEG High and Max qualities. You can also create a timecodestamp. In addition, the software can conform 30P and 60P frame ratesto 24P.
Color Grading: Red Giant Software's MagicBullet Looks: ~$300A plug and play software that allows you to tweak individual effects—from color correction to exposure control, Magic Bullet Looks is anessential piece of software for the HDSLR shooter when shaping yourcinematic look in post. It is more than plugging in a preset look. Itallows careful control of your film in the postproduction stage, making itone of the most powerful postproduction tools on the market (whenyou're on a budget). You can purchase the Magic Bullet Suite for~$700 and it includes Looks, Colorista, Frames, Instant HD, andSteady. The student price for the suite is under $400.(http://www.redgiantsoftware.com/products/all/magic-bullet-suite/)
In the field: Philip Bloom recommends that you shoot a neutral flatlook on your DSLR if you're planning to use Magic Bullet (or any othercolor correction software). He adds, “Because even if you are not aprofessional gradist you can get some affordable software like MagicBullet Quick Looks or Magic Bullet Looks. One is a hundred bucks,one's four hundred bucks and they work with every edit system outthere apart from the really, really basic ones.”
Audio Sync: Singular Software's PluralEyes:~$150 or DualEyes: ~$150PluralEyes was the software used by many HDSLR shooters needingto sync audio when doing external recording. The software wasspecifically designed for multicamera shoots (and is recommendedwhen you are doing a multicamera shoot), but the company has sinceengineered DualEyes, designed specifically for DSLR shooters using

external recorders (such as the Tascam DR-100 and Zoom H4n).There are versions for PC and Mac.
Alternative to Attain Audio SyncAn alternative free way to attain audio sync is to use this technique by DavidAnselmi of Practical Mystic Productions(http://www.practicalmysticproductions.com/):
1. Separate the audio tracks of the two separate recordings.2. Pan hard left on the first track and hard right on the other track.3. Adjust relative volume so both tracks match.4. Listen on headphones.5. Nudge one of the audio tracks back and forth, until the flanging—the
audio delay between the two—stops. And your sound is now synced.
HDSLR Suggested Gear PackagesThe following sections describe sets of packages based on yourbudget—this is only a guide. Create your own packages.
Low-Budget Packages: ~$2,100–4,000If you're a student filmmaker or journalist, a multimedia journalist doingsolo projects, an event shooter, or an indie shooter, these setups willprovide quality work while on a tight budget. The equipment listed hereis certainly not exhaustive. More accessories are seemingly addedweekly to the huge take-off of DSLR cinema cameras. Also, the pricesreflect summer 2010 costs. As competitors come out with newequipment, prices get lower, especially for cameras.
I feel this equipment package contains the minimum needed toengage at some level of cinematic quality in your work. If you want tojust grab a camera and shoot, then go for it. But if you're trying toperfect your work and attain a higher-level film look with your camera,then the following recommendation may work for you. Modify this list

and experiment. For example, you can get a Canon 7D and use it withthis equipment listed below.
The Basic Shooter: ~$2,150
CameraCanon Rebel T2i: ~$900 (with kit zoom lens) (If you want thePanasonic GH1, then add ~$300 to your budget.)Spare battery: ~$60SDHC memory cards (16 GB, class 6): ~$40 eachLight Craft Workshop ND filter: ~$125iDC viewfinder: ~$200
AudioRode VideoMic: ~$150Rycote Miniscreen Windjammer: ~$80
LightDot Line DL-DV60 LED light: ~$100Impact 5-in-1 Reflector: ~$40
StabilizationManfrotto 190XB Tripod legs: ~$140 and Manfrotto 700RC2Mini Video Fluid Head: ~$85 (or Manfrotto mini ball head ~$80).Benro MC-91M8 Monopod (for handheld stabilization): ~$130(Note: I'm recommending the monopod over Zacuto's TargetShooter ~$475, Redrock Micro's nano – RunningMan for ~$470,or Redrock Micro's nano–RunningMan ~$470 because the extraprice for these products doesn't justify their use over a monopod,but if you want to spend the extra money, add about another$500 to the budget!)
Carry Case

PortaBrace carry bag CS-DC2R: ~$100orLowePro Pro Runner 350 AW backpack: ~$150
The Basic Shooter with ONBOARD Audio: ~$2,800Same as the Basic Shooter listed above, but replace the listed audioequipment with this audio package:
Audio (~$900)Rode NTG2 shotgun mic: ~$250Rycote windscreen kit: ~$120XLR adapter (BeachTek DXA-SLR or juicedLink's DT454):~$400Rycote InVision on-camera shockmount: ~$80XLR cable: ~$20
The Basic Shooter with External Audio: ~$3,000Same as the Basic Shooter listed above (including the RodeVideoMic and Windscreen for audio reference), with the addition ofthis audio equipment for external recording:
Audio (~$900)Rode NTG2 shotgun mic: ~$250Rycote windscreen kit: ~$120Tascam DR-100 or Zoom H4n: ~$300Rycote InVision pistol grip: ~$120XLR cable: ~$20DualEyes or PluralEyes software: ~$150
The Basic Shooter with Used Prime Lenses: ~$3,300 (~$4,000with onboard Audio Package or ~$4,200 with External AudioPackage)

The same as the Basic Shooter listed above, but with these primelenses from www.KEHphoto.com:
Lenses (~$1,200)Zeiss Contax/Yashica adapter (for Canon): ~$80Zeiss Contax Distagon f/2.8 28 mm: ~$300–400 (used)Zeiss Contax Planar f/1.4 50 mm: ~$300–400 (used)Zeiss Contax Sonnar f/2.8 100 mm: ~$500 (used)
Note: These lenses do not work well with iDC Photo Video's followfocus.
Midlevel Budget PackagesFor those wanting to use a professional camera, a follow-focus setup,and a shoulder or handheld support device, the budget increasessignificantly.
This equipment contains the next level up in engaging cinematic-quality storytelling.
Midlevel Pro Shooter ~$7,200–7,400
CameraCanon 7D: ~$1900 (with kit lens: 28–135 mm f/3.5–5.6)Spare battery: ~$80Compact Flash card (16GB, minimum 200x speed): ~$50 eachSingh-Ray ND filter: ~$400iDC viewfinder: ~$240 (with 3x eyecup)
LensesZeiss Contax/Yashica adapter (for Canon): ~$240 (~$80 each×3 for an adapter fitted to each lens)Zeiss Contax Distagon f/2.8 28 mm: ~$300–400 (used)Zeiss Contax Sonnar f/2.8 135 mm: ~$250 (used)

Zeiss Contax f/4 Tele Tessar 200 mm: ~$235 (used)
Audio (On-Camera):Rode NTG2 shotgun mic: ~$250Rycote windscreen kit: ~$120XLR adapter (BeachTek DXA-SLR or juicedLink's DT454):~$400Rycote InVision on-camera shockmount and pistol grip: ~$200XLR cable: ~$20or
Audio (External Recording with On-Camera Reference):Rode VideoMic: ~$150Rycote Miniscreen Windscreen: ~$80Rode NTG2 shotgun mic: ~$250Rycote windscreen kit: ~$120Tascam DR-100 or Zoom H4n: ~$300Rycote InVision pistol grip: ~$120XLR cable: ~$20PluralEyes or DualEyes software: ~$150
LightLitePanels Micro LED light: ~$275Impact 5-in-1 Reflector: ~$40
Stabilization TripodHakuba HG-503MX carbon fiber tripod ~$275 and Manfrotto701HDV fluid mini head: ~$160
DollyKessler Crane Pocket Dolly Traveler (version 2): ~$580 (~$70

additional tripod plate)
Stabilization HandheldRedrock Micro theEvent: ~$850or
Stabilization Shoulder MountRedrock Micro eyeSpy: ~$825
Carry CasePortaBrace carry bag CS-DC3R: ~$130orLowePro Pro Runner 350 AW backpack: ~$150
Midlevel Pro Shooter with iDC Follow Focus 1: ~$7,500–7,700For those wanting to do follow-focus work, add one of these kits to theMidlevel Shooter package described above (subtract the iDCviewfinder for a package deal). However, this follow focus will not workwell with the Zeiss Contax lenses (because they're more narrow).
iDC viewfinder and follow-focus package: ~$500
Midlevel Pro Shooter with Redrock Micro Follow Focus 2:~$7,700–8,500You may get just the follow-focus attachment without the CaptainStubling setup.
Redrock Micro follow focus with three gears: ~$530Redrock Micro Captain Stubling: ~$1,100
This device will set down onto your tripod.
High-Level Budget PackagesFor those wanting to use the best HDSLR camera with a follow focus

and matte box setup, as well as a shoulder or handheld supportdevice, the budget increases significantly.
This equipment is more expensive, so you must gauge your needand budget your cinematic storytelling projects. These packagesassume you want the best lenses, but you could save money by gettingused lenses. You can swap recommended items with others andcreate your own list.
High-End Pro Shooter: ~$12,600
CameraCanon 5D Mark II: ~$2,500 (body only)Spare battery: ~$80Compact Flash card (16GB, minimum 200x speed): ~$50 eachSingh-Ray ND filter: ~$400Zacuto Z-Finder Pro: ~$375
LensesCanon EF 24 mm f/1.4L: ~$1,700Canon 50 mm f/1.2L: ~$1,500Canon 70–200 mm f/2.8L: ~$1,900
Audio (On-Camera)Rode NTG2 shotgun mic: ~$250Rycote windscreen kit: ~$120XLR adapter (BeachTek DXA-SLR or juicedLink's DT454):~$400Rycote InVision on-camera shockmount and pistol grip: ~$200XLR cable: ~$20or
Audio (External Recording with On-Camera Reference)

Rode VideoMic: ~$150Rycote Softie: ~$50Rode NTG2 shotgun mic: ~$250Rycote windscreen kit: ~$120Tascam DR-100 or Zoom H4n: ~$300Rycote InVision pistol grip: ~$120XLR cable: ~$20DualEyes or PluralEyes software: ~$150
LightLitePanels Micro LED light: ~$275Impact 5-in-1 Reflector: ~$40
Stabilization TripodManfrotto 535 carbon fiber tripod ~$400 and Manfrotto 504HDfluid head: ~$400
DollyKessler Crane Pocket Dolly Traveler (version 2): ~$580 (~$70additional tripod plate)
Stabilization HandheldZacuto's Striker: ~$900or
Stabilization Shoulder MountRedrock Micro eyeSpy: ~$825
Carry CasePortaBrace carry bag CS-DC3R: ~$130orPortaBrace backpack: ~$360

High-End Cinema Shooter (Matte Box and Wireless FollowFocus): ~$15,000Same as above, but take out Zacuto's Striker and add RedRockMicro's DSLR Cinema Bundle: ~$2,400, as well as RedRock Micro'swireless follow focus (basic): ~$1,000.
You can do the same with the other cinema bundles. You will alsoneed to get different filters for the matte box.
This is just some of the equipment you can get for your HDSLRcamera. Obviously, you could take the Basic Shooter package, takeout the Canon Rebel T2i, and add in a Canon 7D, for example, or 5DMark II with the Basic Shooter with Onboard Audio and Prime Lensesfor about $5,600. Mixing and matching to suit your needs is the bestway to create the best package for your needs.
The following is my kit used for short documentary and fictionprojects.
Author's Shooting Package: ~$9,000
CameraCanon 5D Mark II: ~$2,500 (body only)Spare battery: ~$80Compact Flash card (16GB, 200x speed) x2: ~$100Light Craft Workshop 77 mm Vari-ND filter: ~$125
LensesZeiss Contax/Yashica adapters: ~$80 eachZeiss Contax Distagon f/2.8 25 mm: ~$400 (used)Zeiss Contax Planar f/1.4 50 mm: ~$400 (used)Zeiss Contax Sonnar f/3.5 100 mm: ~$400 (used)Canon 70–200 mm f/2.8L: ~$1,900
Audio (External Recording with On-Camera Reference): $1,200

Rode VideoMic: ~$150Rycote Softie: ~$50Rode NTG2 shotgun mic: ~$250Rycote windscreen kit: ~$120Tascam DR-100: ~$300Rycote InVision pistol grip: ~$120XLR cable: ~$20PluralEyes software: ~$150
LightDot Line DL-DV60 LED light: ~$100Impact 5-in-1 Reflector: ~$40
Stabilization TripodHakuba HG-503MX carbon fiber tripod ~$275 and Manfrotto701RC2 fluid mini head: ~$150
DollyKessler Crane Pocket Dolly Traveler (version 2): ~$580 withManfrotto plate: ~$70
Stabilization HandheldManfrotto 894CX carbon fiber monopod: ~$180Motified Redrock Micro micro shoulder mount: ~$500
Carry CasePortaBrace carry bag CS-DC2R: ~$100LowPro backpack: ~$150Hakuba tripod case (holds tripod, monopod, and Pocket DollyTraveler): ~$40

1 Please also note that any prices listed in this chapter were based on knownprices at the time this book was being written. No guarantees of similar pricingmodels can be made.2 Checking KEH on 5 May 2010, I could pick up three used Zeiss Contax lenses:50 mm f/1.4, 135 mm f/2.8, and a 200 mm f/4 for $814.


Chapter 14
Conclusion
From Film to HDSLR Cinema
HDSLR cinema snuck up on us all. My first short movies were shot onthe Canon L2 Hi8 mm video camera. When I was doing doctoral workat NYU's Tisch School of the Arts, I enrolled in the NYU boot camp onesummer, and we shot on 16 mm black and white film with no syncsound—Arriflexes that had three fixed lenses that you could rotate intoposition. After that, I purchased the first generation PanasonicDVX100 24P miniDV camera and shot two fiction shorts and severaldocumentary projects. When I consulted with reporters in Spring 2008a t The Christian Science Monitor, our budget allowed only forconsumer HD cameras (a mix of Panasonic and JVC tapelesscameras), and they cost around $1,200. I shot my last documentary ona Sony A1U HDV miniDV camera, a $2,200 camera, nearly the priceof a Canon 5D Mark II body! And none of those cameras match theimage quality of the Canon Rebel T2i for $800!
I know digital video.
But none of the footage from these cameras looked as good as thetwo-minute rolls of film I shot on that Arriflex at NYU. Not even close.The smooth, creamy shots were unlike anything I've seen on video. Thesharpness of the glass was incomparable. But I lived with shooting onvideo because it was affordable, and artistic sensibility—thatcinematic feel I had previously seen in 16 mm film—wascompromised.
Until now.
Once I picked up the Canon 5D Mark II, there was no going back.The footage coming out of the camera—if not the same as thoseshorts I shot with an Arriflex—was the best thing I've seen since then. It

was cinematic. I, like Philip Bloom, dismissed the camera at firstbecause of the lack of controlling aperture.
But in the fall of 2009, I started watching videos on Vimeo byHDSLR shooters. The stuff looked good. I wanted one. I did moreresearch and convinced my colleagues at Northern ArizonaUniversity's School of Communication to get one—the Panasonic GH1(the only other serious contender at the time). One of my students,Shannon Sassone, shot her short fiction project with it in my intro videoproduction class. She was amazed at the quality of the image. And Ibecame convinced.
Later, I decided to write a book proposal that would address thecinematic needs of these students shooters, as well as forindependent filmmakers who saw the potential of these cameras butdidn't know where all the resources were to make effective use ofDSLRs as cinema cameras. I wanted to bring together some of thebest thinkers and practitioners engaging with this form of cinema—from Philip Bloom, who pioneered the sharing of information aboutDSLRs on his blog; to Rii Schroer, who is primarily a photojournalistwho wanted to make movies with this camera; to Shane Hurlbut, ASC,who had access to nearly any camera in the world but wants to shootfilms with the Canon 5D Mark II.
It's one thing to ignore shooters who get excited about putting up testshots online. It's another thing to look at Philip Bloom's San FranciscoPeople, Cherry Blossom Girl, or Skywalker Ranch, or even his SaltonSea Beach (shot on a Canon Rebel T2i), and not realize that there'ssomething going on here—something different from the kinds of videowe've seen over the past 15 years.
Then Philip Bloom announced 10 million views on his website as ofJune 1, 2010, and we're not talking about a celebrity site, but aworking man's view of HDSLR cinema and how he's doing it. Thisindicates a democratization of the cinema look, an inside peak at howit's done. And when Lucasfilm jumped on board, the tremor became anearthquake. As Shane Hurlbut, ASC, is fond of saying, Canon knockedover the applecart, burned it up, and decided to make applesauce.

How cinema and television are being done is starting to change.Hollywood is beginning to embrace the new aesthetic offered by thesecameras.
“… I'm not trying to create a film aesthetic. I'm trying to create its own aesthetic.I want it to be its own look, its own style.”
The season finale of House MD (2010) was shot on a Canon 5DMark II. “We started testing on episode 19, which I was directing,”Greg Yaitanes says in an interview with Philip Bloom.1 “We would runthe 5D next to our film cameras just to see how the 5D was reacting toour lighting, what our sets looked like, how actors looked, anything weneeded to be aware of. And we were very happy with these tests.”Everyone was surprised by how good the image looked. Everyone onthe production and postproduction team agreed—including thosehandling special effects; even the studio executives said it was goodenough for broadcast, Yaitanes explains.
In the end, Yaitanes said it looked “gorgeous. … It allowed us to tella story that we never told before.” The HDSLR camera changed howthe story was told. There was no examination of test charts. There waswhat they saw on-screen, and there was the emotion of the story.
Yaitanes embraced the aesthetics of the camera. And despitebanding issues, which does tend to occur when the camera overheats,he and his team didn't let that bother them. “We struggled a bit withbanding.… That was every once in a while and frankly it's part of alook,” Yaitanes says to Bloom. “You can try and fight these things awayand wish they weren't there, but then you're just comparing thataesthetic to something else. I'm not trying to create a film aesthetic. I'mtrying to create its own aesthetic. I want it to be its own look, its ownstyle. If there's some banding, … some motion blur, then for me, whocares? I feel like the story trumps all. These are, again, tools. Theseare, again, things that give you a look”.2
If anything, I hope this book shows how you can develop thatcinematic look—if not the look of film, then something else that looks

as cool. When Yaitanes went to film school, there was only film. But hewished that it “was not the only medium in which people would look at[motion pictures]. Back then no one would take something you shot onvideo seriously in terms of a narrative.” Conventional video just didn'thave an alternative look that felt aesthetically strong.
But that has now all changed. The HDSLR cinema movementembraces a new kind of digital video aesthetic, an HDSLR cinemaaesthetic made possible by an HD codec combined with a largesensor, small form factor, and interchangeable lenses.
The HDSLR cinema movement embraces a new kind of digital video aesthetic,an HDSLR cinema aesthetic made possible by an HD codec combined with alarge sensor, small form factor, and interchangeable lenses.
The image quality of these cameras outweighs the price by leapsand bounds. Yes, by the time this book is released, there will be smallconsumer cameras coming out with interchangeable lenses, and theentire prosumer video camera market will be retooled to keep up withthe DSLR revolution. But what began as a 30 fps video on a stillscamera (Canon 5D Mark II) designed for print journalists needing theconvenience of shooting “a little bit of video” to supplement their in-the-field assignments for newspaper websites has now become a tool forcinema.
It's not just a tool for the Hollywood elite budget, but for you and me,the independent filmmakers, as well as event video shooters, students,video journalists, documentary filmmakers—the do-it-yourselfers whohave been desiring cinematic quality on an affordable camera but hadto simply make do with miniDV and prosumer HD cameras that justweren't quite there due to their fixed lenses and small chips.
We can now gear up for a cinema-type project for around $2,000and not worry that our vision's being compromised. There is no excuseto shoot crappy-looking movies. You can still shoot bad images withthese cameras, but that'll be due to a lack of skill, and not the camera.
I hope this book helps you make the best-looking movie on the

lowest possible budget.
It can be done. And you can do it.
1 Bloom, P. Greg Yaitanes 'House' Interview transcription. Transcription by OliLewington. <http://philipbloom.net/other-stuff/case-studies/greg-yaitanes-house-interview-transcription/>, accessed July 2010.2 Bloom, P. (2010, April 19). In depth interview with Greg Yaitanes, ExecutiveProducer and Director of 'House' Season Finale shot on Canon 5DmkII.<http://philipbloom.net/2010/04/19/in-depth-interview-with-executive-producer-and-director-of-house-season-finale-shot-on-canon-5dmkii/>, accessed 20.04.2010.
Afterword
Philip Bloom
DSLRs that shoot HD video have snuck up on us and changedabsolutely everything. Even with all their faults and awkwardergonomics, they have changed the video camera landscape forever.I hated shooting with small sensor cameras as everything is in focus,and I was not alone. Before HDSLR cameras came out, we would tryto trick out cameras into thinking they had large sensors by using35mm adapters, but they were clunky, heavy, and needed a lot of light—but the results were good. Then out of nowhere, two DSLR camerascame out, and over a period of 18 months, they have been embracedby everyone from Lucasfilm to keen enthusiasts dabbling with videoover the weekend.The ability to control depth of field, to use wonderful 35mm optics, and—most importantly—all in a very affordable package, has excited anastonishing number of people. As someone who spends a lot of timetalking to everyone from very experienced Hollywood DPs to thosekeen enthusiasts, I am amazed at just how excited people are by thesecameras. This truly is the democratizing of filmmaking. Now that high-quality gear is in reach of everyone, it really does come down to thetalent behind the camera.This is easily the most exciting time I have experienced in my 20 or soyears in the business. The era of large sensor digital video cameras isupon us, and there is no going back now! Come and join the party!25 July 2010philipbloom.net
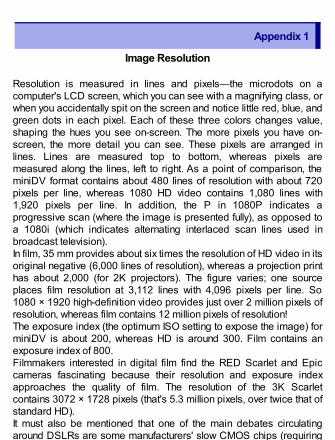
Appendix 1
Image Resolution
Resolution is measured in lines and pixels—the microdots on acomputer's LCD screen, which you can see with a magnifying class, orwhen you accidentally spit on the screen and notice little red, blue, andgreen dots in each pixel. Each of these three colors changes value,shaping the hues you see on-screen. The more pixels you have on-screen, the more detail you can see. These pixels are arranged inlines. Lines are measured top to bottom, whereas pixels aremeasured along the lines, left to right. As a point of comparison, theminiDV format contains about 480 lines of resolution with about 720pixels per line, whereas 1080 HD video contains 1,080 lines with1,920 pixels per line. In addition, the P in 1080P indicates aprogressive scan (where the image is presented fully), as opposed toa 1080i (which indicates alternating interlaced scan lines used inbroadcast television).In film, 35 mm provides about six times the resolution of HD video in itsoriginal negative (6,000 lines of resolution), whereas a projection printhas about 2,000 (for 2K projectors). The figure varies; one sourceplaces film resolution at 3,112 lines with 4,096 pixels per line. So1080 × 1920 high-definition video provides just over 2 million pixels ofresolution, whereas film contains 12 million pixels of resolution!The exposure index (the optimum ISO setting to expose the image) forminiDV is about 200, whereas HD is around 300. Film contains anexposure index of 800.Filmmakers interested in digital film find the RED Scarlet and Epiccameras fascinating because their resolution and exposure indexapproaches the quality of film. The resolution of the 3K Scarletcontains 3072 × 1728 pixels (that's 5.3 million pixels, over twice that ofstandard HD).It must also be mentioned that one of the main debates circulatingaround DSLRs are some manufacturers' slow CMOS chips (requiring

“line skipping” in the sensor's signal processing, resulting in linebending during camera pans). The RED company, which created oneof the first digital cinema cameras, the RED, followed by the new Epicand Scarlet models, did tests comparing its Mysterium-X sensor to theCanon 7D and Sony's F35 (see Figure A1.1).
Figure A1.1 As can be seen, the zone test reveals high amounts of pixilation in the Canon, withless in the Sony F35, while the RED provides nearly a flawless image. Debate went back and forth onReduser.net, some stating that it's an unfair test and that professional work is being shot with Canon5Ds and 7Ds, for example. RED owner Jim Jannard weighed in by stating that he's just putting factsout there and wants camera users to decide: “I guess the proliferation of misinformation about whatthe DSLRs can and can't do triggered a bit of frustration. I just believe that ‘good enough’ isn't aprofessional mindset.” He, among others, feel that professionals should be concerned with imageresolution.(http://reduser.net/forum/showthread.php?t=41220&page=3, accessed 25.02.2010)
Barry Green, testing the image quality of several DSLRs by recordingresolution charts (see Figure A1.2), argues on DVXuser.com thatmany DSLRs are cheating their resolution:
[T]he [Panasonic] GH1, the [Canon] 7D, and the 5D Mark II alllook like they're rendering incredibly sharp, highly detailedimages, but they're not. In reality, according to the resolutioncharts, they're rendering images that fall somewhere around a

standard-definition camera, and maybe a 720P camera. Anyadditional “sharpness” you see in the image is fake—it'saliasing, it's smoke and mirrors, it's image contamination.
Rarely will you see such obvious image contaminationas on a resolution chart. In a real-world image, it may bemuch harder to spot what's “real” and what's aliased“fake” detail. To an untrained eye, a heavily aliasedimage might even look good. Before you had the chartexplained to you, which image looked “sharper”—theone with the blur, or the one with the vertical lines?Granted, neither of them is a perfect representation ofwhat they're supposed to look like, but which of theseimages looks more like an accurate representation ofthe third chart?

Figure A1.2 Barry Green's resolution chart comparing the resolution of a video camera to a DSLR.The third image reveals the original chart.
Similar to the arguments found on Reduser.net, users on Prolost.comargued back and forth about the merits of shooting HD with DSLRs.Some claimed (correctly) that they're first and foremost stills cameraswith video added as an afterthought.Ted Schilowitz, the number two person at RED, said in a personalinterview that RED is concerned about resolution because it wants tocreate digital film, a form that's designed to replace analog film. “Ourworld is not about making sacrifices, our world is giving people thetools to make really, really good pictures. So, the Scarlet, with a 3Ksensor in it, the body is under three thousand bucks. A set of primelenses, they're super fast, are under five thousand for the whole set.And the Scarlet is a real RED camera right? It's not an SLR that ischeating and doing video scaling to get your 1080P image. This isdoing 3K RED code raw, just like its bigger brother the RED One.”They're setting themselves up for the 4K projection world of futurecinema.However, despite resolution tests, the most important point to makeout of this argument is not the resolution of the camera or whether ornot it's aliasing, but what the image feels like to the audience. Period.And because the Scarlet hasn't been released at the time writing wascompleted for this book in early summer 2010, it's really a mootargument. Cameras are tools for storytelling. Stephen van Vuuren, whocreated the film Outside In (a movie on Saturn composed of stillimaging techniques), noted on the Prolost.com site how he wasconcerned about the resolution tests, and debated whether or not toget a Canon 7D. However, after seeing Vincent Laforet's Nocturne,
I pulled the trigger. I absolutely knew about the [resolution-aliasing] issues and found it easy to figure out when theproblem occurs (see my test clip [http://vimeo.com/sv2studios]).Shoot fine horizontal detail stopped way down with high shutterspeed handheld—yowza.

However, after hours of shooting with my 7D, I've yet tosee this again. Occasionally I see some mild aliasing.
But here's the most important thing to me—non-technical and technical people I've worked for yearswatching my Canon XL-1, DVX100a, HV30 and otherfootage respond “Wow” upon seeing 7D on a native 25"1080P monitor.
I personally have not been this excited in a camerasince I bought [a] top-of-the-line Chinon Super 8 camerain 1988. I love it—the camera excites me. People whowatch the footage go “wow.” It cost $1900 with a lens,ready to shoot 24p 1080p images with Super 35 mmDOF with lovely low light and dynamic range. Yeah, ithas a few technical issues. But who cares. I don't, nor dothe people watching.
Van Vuuren, like many DSLR shooters, really doesn't care that muchabout resolution tests, and the minutia of such geek details are reallylost on them because they understand that the story comes first and ifthe weaknesses can be overcome, then good-quality cinema projectscan be created. Philip Bloom and Shane Hurlbut, ASC, use CanonDSLRs to make their movies despite such limitations because, forthem, like van Vuuren, clients are wooed over by the wow factor of theimage. They feel the image is good enough for professional use—even George Lucas.When Philip Bloom was invited to Skywalker Ranch to show off thecapabilities of DSLR cameras, he shot around the ranch using aCanon 5D and 7D, and then screened the results on a 40-foot screenfor Rick McCallum and George Lucas. They did not complain aboutthe footage, but were impressed.1 Lucasfilm used DSLRs in some oftheir work for Red Tails, a World War II film focused on an AfricanAmerican fighter squadron.One of the reasons people like to shoot on HD DSLRs as comparedto standard HD cameras is their ability to shoot in low light. MattBuchanan, a reporter for Gizmodo.com, discusses how cameracompanies marketed the quality of their image by pixel count but have
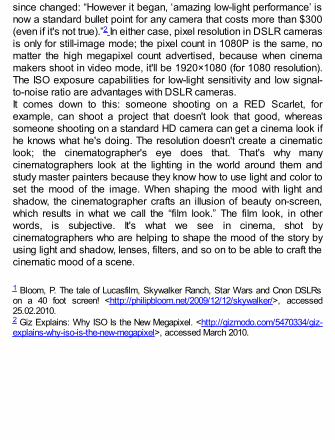
since changed: “However it began, ‘amazing low-light performance’ isnow a standard bullet point for any camera that costs more than $300(even if it's not true).”2 In either case, pixel resolution in DSLR camerasis only for still-image mode; the pixel count in 1080P is the same, nomatter the high megapixel count advertised, because when cinemamakers shoot in video mode, it'll be 1920×1080 (for 1080 resolution).The ISO exposure capabilities for low-light sensitivity and low signal-to-noise ratio are advantages with DSLR cameras.It comes down to this: someone shooting on a RED Scarlet, forexample, can shoot a project that doesn't look that good, whereassomeone shooting on a standard HD camera can get a cinema look ifhe knows what he's doing. The resolution doesn't create a cinematiclook; the cinematographer's eye does that. That's why manycinematographers look at the lighting in the world around them andstudy master painters because they know how to use light and color toset the mood of the image. When shaping the mood with light andshadow, the cinematographer crafts an illusion of beauty on-screen,which results in what we call the “film look.” The film look, in otherwords, is subjective. It's what we see in cinema, shot bycinematographers who are helping to shape the mood of the story byusing light and shadow, lenses, filters, and so on to be able to craft thecinematic mood of a scene.
1 Bloom, P. The tale of Lucasfilm, Skywalker Ranch, Star Wars and Cnon DSLRson a 40 foot screen! <http://philipbloom.net/2009/12/12/skywalker/>, accessed25.02.2010.2 Giz Explains: Why ISO Is the New Megapixel. <http://gizmodo.com/5470334/giz-explains-why-iso-is-the-new-megapixel>, accessed March 2010.

Appendix 2
ISO Tests for the Canon 5D Mark II and 7D
Shane Hurlbut, ASC, and his team conducted a comparison ISO testbetween the Canon 5D Mark II, 7D, and the 1D, showing how the 1Dmanufactured more noise than the 7D or the 5D (see Figure A2.1).
Figure A2.1 ISO test for the Canon 5D Mark II. Hurlbut Visuals newsletter, Jan. 29, 2010.(http://www.hurlbutvisuals.com/newsletter_archive.php, accessed 26 March 2010;http://hurlbutvisuals.com/images/isotest/5D_ISO_Test.png)
Canon's 1D revealed high levels of noise, far more than the 7D or 5DMark II. The test confirms the native settings of ISO 160, 320, 640, and1250. The Canon Rebel T2i has all of its settings native.The more noise in the test shot for the ISO shows how the 7D matchesup to the 5D Mark II (see Figure A2.2).

Figure A2.2 ISO test for the Canon 7D. Hurlbut Visuals newsletter, 29 Jan. 2010.(http://www.hurlbutvisuals.com/newsletter_archive.php, accessed 26.03.2010;http://hurlbutvisuals.com/images/isotest/7D_ISO_Test.png)

Appendix 3
Exposure and Dynamic Range
Technically, video exposure works differently than film exposure. Asidefrom the obvious chemical properties of film that allow for the emulsionprocess, film has a smooth “characteristic curve,” whereas video has asharp curve, leading to sudden drop-offs on the curve and toe (seeFigure A3.1). The characteristic curve is simply the amount ofchemical density on the film activated based on the intensity of light.This density can be plotted on a graph as a relatively straight line witha curve on the top (shoulder) and bottom (toe). The slope of this curveis called the gamma, and it essentially determines the contrast of thescene. Changing the gamma curve changes the contrast value of theshot. You can alter the curves some in postproduction, but you can alsomanipulate it in-camera before shooting (see Chapter 4).
Figure A3.1 The characteristic curve of film presents a rounded toe and shoulder, indicating asmooth exposure latitude. Video typically lacks this quality, resulting in more sudden drop-offs in theshadows and clipped highlights.(Image from http://www.answers.com/topic/characteristic-curve-2, accessed 01.03.2010)
Film has about 8 to 10 zones of dynamic range or a 512:1 contrastratio. Standard video has only a 25:1 contrast ratio. DSLR cameras,

with their larger sensors, have a much greater latitude than standardHD video cameras. According to Shane Hurlbut, ASC, the Canon 5DMark II contains the smoother film-like curve in the toe (see Chapter 3).The ISO setting determines the dynamic range of the image (seeFigure A3.2). The higher the ISO setting, the lower the contrast ratio ofthe dynamic range.
Figure A3.2 Dynamic range of the Canon 5D Mark II compared to the dynamic range of thePanasonic GH1 (below).(http://www.dxomark.com/index.php/eng/Image-Quality-Database/Canon/EOS-5D-Mark-II)
Notice that as you increase the ISO setting, the dynamic range rapidlyfalls off—with 11 when setting the ISO at around 100 and just about 7at 6400 (see Figure A3.3).

Figure A3.3 “Dynamic range or light sensitivity range of a sensor indicates the ratio of lightexposure between the highest brightness a camera can capture (saturation) and the lowest brightnessit can effectively capture (typically when noise becomes more important than signal, i.e., SNR<0 dB).This range indicates the maximum contrast that can be effectively captured by the sensor. The largerthe dynamic range, the better, as the sensor is able to capture higher-contrast scenes. Note thatdynamic range is expressed on a logarithmic scale in EV (same as f-stop), thus an increase of 1EVcorresponds to a doubling of dynamic range.”(http://www.dxomark.com/index.php/eng/Image-Quality-Database/Canon/EOS-5D-Mark-II)

Appendix 4
Luminance and Chrominance Compression
The number 444 refers to the luminance (light) and chrominance(color) compression (brightness and color) (see Figure A4.1).
Figure A4.1 Chroma-luminance bandwidth illustration, where a 4:4:4 has no subsampling (eachpixel contains the full luminance and chrominance value). In a 4:2:2 subsampling, half the pixelscontain full luminance and chrominance value, while the remaining half contain luminance.(http://lea.hamradio.si/~s51kq/V-BAS.HTM)

Appendix 5
Story Treatment to The Last 3 Minutes by Po Chan
[Each scene was accompanied by a photo capturing the feeling ofeach scene. The photos are not reproduced here for copyrightreasons. –Kurt Lancaster]
The Last 3 MinutesThe story of the last three minutes of William Turner's life and hisbeloved CRYSTAL.
by Po Chan
William Turner(Scene # 1)
William Turner, a weary 68-year-old office janitor who lives alone ina rusted trailer, with no family and friends. He is known to theemployees as a quiet old man with few words. Never likes to interactwith others. Keeps everything to himself.
One night William is working in the office alone as usual. Suddenlyhe feels a lightning pain in his chest. He drops to one knee, bead ofsweat starts to run down his forehead. Fear in his eyes. As the painintensifies, a crystal ball falls out from his pocket and rolls onto thefloor. He desperately tries to reach the crystal, but he loses his balanceand falls to the ground….
The Crystal(Scene # A1)He falls to the ground next to the crystal. His shaking hand struggles
to reach for it, he slowly holds it up to his eye. He looks deep into it. Healways loves to see the world around him through this crystal, but this

time, he sees more than he expected. His whole life starts to flashback in front of him, in reverse, through this crystal.
Camera as William's POV looks deep inside the crystal, we see awoman's face suddenly appear….
Transition to …TransitionWe are using transition effects throughout the film, which are the
reflection of his next memory that are layered over his previousmemory.
From transition into …The memory of his wife leaving him(Scene # 2)Transition back in time when William was 35 years old.… Everything
after this point does not even register in his mind. His memory stoppedafter his wife, who is carrying his unborn child, walked out the door.
William's POV through the crystal. He sees his pregnant wife's faceclose to the crystal. She is crying. He pulls the crystal away and hiswife walks off….
The memory of his wife leaving him(Scene # 2 continues)His wife walks to the bed and picks up a suitcase on the left side of
frame. We see a bottle of whiskey come into the right side of frame.
William is drinking. His wife looks at him one last time; tearscontinue to fall. She walks out the door. As she walks out, a dressdrops on the floor. William picks it up.
Transition to…The memory of his wife and her dress(Scene # 3)

Transition back in time when William was 30 years old….
William's POV sees his wife wearing the same dress. Sheseductively takes off the dress and crawls under the sheet withWilliam….
Transition to…The memory of the good time with his wife on the beach(Scene # 4)Transition back in time when William was 30 years old….
William's POV sees his wife lying next to him on the beach. Ahyperfocus view of the sea water and sand on his wife's beautiful skin,the water dropping down from her wet hair, her smile, her beautifulface, her lips. Setting sun flares behind her. She gets up and runs intothe water.
William follows. Waves splash into the lens, cut to…
The memory of his best friend dying in his arms during theVietnam War
(Scene # 5)A bomb blast…back in time when William was 26 years old….
Dirt, grass, fire… William's POV as he crawls to his best friend andsees him covered with blood. His best friend struggles to pull out anunsent letter to family from his uniform pocket…. His friend dies inWilliam's arms.
CU of the letter, we transition to…
The memory of seeing his best friend writing the letter(Scene # 6)Transition back to two days before his best friend died.…
William's POV sees his best friend using the flashlight on his helmet,writing a letter back home in the dark. He turns to William; the flashlightflares the camera (William's eyes); we still can see the silhouette of his

best friend's face, sadness in his eyes.
The flare transition to…The memory of marrying his wife with soda can tabs(Scene # 7)A flare transitions back in time when William was 18 years old….
William's POV of him and his wife exchanging soda can tabs aswedding rings. William leans in for a kiss. Focus blurs out.
Transition to…The memory of his Jr. Varsity baseball game(Scene # 8)Transition back in time when William was 13 years old….
William's POV as he slides into home plate. His team wins.Teammates rush to the camera and cheer.
A teammate offers him a hand to get up….
Hands, transition to…The memory of his father(Scene # 9)Transition back in time when William was 10 years old….
William's POV of CU of his father's rough hands working in the fieldon the family farm. His father gets up; William's POV follows. His fathertakes off his hat, wipes off sweat from his sun-drenched face. He looksat William with a smile. Playfully puts his hat on William's head, coversthe lens…
The memory of the first street fight he got himself into(Scene # 10)Transition back in time when William was 10 years old…
William's POV as he is about to start a fight with a kid; a girl tries to

separate them. The kid pushes the girl away, then pushes William(camera). He falls backward…
Cut to …The memory of migrant farmers on the road(Scene # 11)Transition back to when William was 5 years old….
William's POV as he rides in his father's truck. He sees a couple ofmigrant farmers walking on the side of the road, with everything theyown on their back. The farmers sadly look at William when the truckpasses by them.
Time is suspended as William makes eye contact with one of themigrant farmers.
The memory of the good time with parents(Scene # 12)The movement of the truck transitions to…
William's POV as his parents spin him around on the family farm.
Camera spins into…The memory of wonderful things in his childhood(Scene # 13)The weather vane spinning.
The memory of his mother measuring his height(Scene # 14)Transition back to…
William's POV sees his mother measuring his height by the wall. Heturns around and looks at the markings.
The memory of the wonderful things in his childhood(Scene # 15)

Transition back to…
William's POV of the grass dancing in the gentle wind; he touchesthe grass.
He looks up and sees…The memory of watching a sunset with his parents(Scene # 16)William's POV sees his parents arm in arm watching a sunset.
The memory of the wonderful things in his childhood(Scene # 17)The sound of the wind chime.
The wind blowing the white curtain…
Transition to …The memory of his mother and the clean laundry under the
sun(Scene # 18)Transition back in time when William was one year old…
William's POV as he stares at the white sheet dancing in the wind infront of him; he looks at his mother's face and the clean laundry underthe sun. She bends down, gives him a smile.
A white sheet wipes the frame into …The memory of the day he was born(Scene # 19)White fade into when William was born…
William's POV as newborn child. This is the first time he sees hisfather and mother.
A midwife wraps him in a towel and hands him to his mother. Hisfather looks at him, overjoyed. He reaches into his pocket and takes

out the crystal. He slowly puts it into William's eye (the lens). The crystalis the thread; it was a gift from his dad at birth.
Cut to …A look inside the Crystal(Scene # A19)Newborn William's POV, looks deep into the crystal.
Cut to…Back to present time(Scene # 20)We cut to a close-up of William's hand as the crystal rolls out of it.
His life ends.

Appendix 6
Twelve Steps for HDSLR Shooting
1. Choose and attach the lens.2. Choose a picture style (use Neutral or load or create a user
defined picture style, such as SuperFlat or ExtraFlat or other"flat" style if you're planning to do postproduction color grading).
3. Set the color temperature (white balance).4. Attach and turn on the XLR adapter and/or microphone and set
audio levels.5. Set the frame rate (24P, etc.).6. Set the shutter speed to 1/50 (or 1/40); don't use 1/60 in order to
avoid a video feel.7. Set the ISO (for the 5D Mark II and 7D, use the native ISOs: 160,
320, 640, 1250, and 2500).8. Set the f-stop.9. Focus.
10. Meter and adjust the f-stop and/or ISO (push the shutter buttonhalfway down).
11. Examine the histogram for tonal range to make sure your blacksare not crushed or your highlights blown out.
12. Press Record (press the Info button if you want to see the timelapse for recording).

Index
AAbrams, Jeremy
on picture style, 61, 74on sound quality, 75
acts (story structure), 137, 139–140
Adobe Photoshop, Golden Mean application for, 8–9
Adobe RGB color space, 60
AGC, See automatic gain control (audio)
Alien-Pauly story, 127, 137
angle of view, 52, 52f, 57
Anselmi, Davidon ball heads, 237on sound recording, 83storytelling exercise, 140
aperture, See f-stops
Apple Final Cut Pro, 97–99Canon EOS Plug-in for, 97–99Log and Transfer process, 99–103
Artemis app, 55–56, 55f
audience emotions, 120–121
audio gear, 230–235higher-budget, 230, 234low-budget, 231–235

midrange-budget, 230, 232
audio recording, 75Casulo case study, 153checklists, 87–88considerations, 76external recorders, 85–86, 85f, 86f
checklist for, 87–88
headphones, 86, 231microphone types, 78–82pistol grips and boom poles, 85, 85fsound quality, about, 75–78windscreens, 83, 231–235XLR adapters, See XLR connectors or adapters
audio syncfree technique for, 248with PluralEyes, 103–107software for, 247–248
automatic exposure, 164–165
automatic gain control (audio), 77
Bback lights
defined, 25rear key lighting, 27, 27f
background light, defined, 25
background streetlamps, 24–25
backpacks, 245–246
balance, See color temperature
ball head, fluid head vs., 237

battery power, microphone, 78
BeachTec DXA-SLR XLR adapter, 84
Benro MC-91M8 monopod, 235
blocking, 5, 9–13checklist for, 12–13The Last 3 Minutes case study, 189, 203possibilities for, 10
Bloom, Philip, 15, 20, 142, 167–169, 169f, 256, 262on camera settings, 62on Canon Rebel T2i, 214A Day at the Races case study, 167
being on location, 171–176retrofitting the Canon 7D, 170using cinema lenses, 170
examples (composition), 16f, 17f, 20f, 21fexamples (lighting), 26f, 28f, 32–34, 33f, 34fon exposure, 44–46on Jeremy Ian Thomas, 178on ND filters, 49on storytelling, 121
boom operation, 83
boom poles, 85
brightness, See luminance compression
Buchanan, Matt, 262
built-in microphones, 82
CCabrera, Kris, 183

camera cases and backpacks, 245–246
camera movement, 5, 13–22checklist for, 22handheld and shoulder-mounted rigs, 238–243
higher-budget, 239, 242–243low-budget, 239, 240midrange-budget, 217–218, 240–242
steadicams, 243–245types of, 14–15
cameras, 213–220 gearhigher-budget, 219low-budget, 214–216midrange-budget, 217–218
Cameron, James, 50
Canon 5D Mark camerasCanon 5D Mark II, 219ISO tests for, 163, 263f, 264f
Canon 7D, 217–218
Canon EOS Plug-in for Final Cut Pro, 97–99
Canon EOS Utility, 68f
Canon L series lenses, 223–227
Canon Rebel T2i, 214–215
Captain Stubling, 241
cardioid microphones, 78, 80, 78
cardioid pickup pattern, 78, 79f
carrying camera cases and backpacks, 245–246

case studiesCasulo (Bernardo Uzeda), 143
audio, 153color correction and grading, 153–155, 154f, 157film look: indoors night, 150–151film look: outdoors dusk, 152–153lighting design, 149–150postproduction workflow, 155–157production process, 148–149screening, 157–158story idea, 144–145texture and color, 146–147
The Chrysalis (Jeremy Ian Thomas), 177, 187preproduction vision, 179–188
A Day at the Races (Philip Bloom) case study, 167being on location, 171–176retrofitting the Canon 7D, 170using cinema lenses, 170
The Last 3 Minutes (Po Chan), 189lenses and camera settings, 189–190lighting (bathing scene), 204–205lighting (bedroom scene), 196–198lighting (war scene), 199–204point of view perspective, 194–196screening and lessons learned, 208–209storytelling, 192–194
16 Teeth (Rii Schroer) case study, 159being on location, 161documentary vs. TV style, 161–162DSLR advantages, 166editing approach, 165–166filmmaker background, 159–160transitioning to HD video, 163–165

cases and backpacks, 245–246
Casulo (Bernardo Uzeda), 143audio, 153color correction and grading, 153–155, 154f, 157film look: indoors night, 150–151film look: outdoors dusk, 152–153lighting design, 149–150postproduction workflow, 155–157production process, 148–149screening, 157–158story idea, 144–145texture and color, 146–147
CGI art case study (The Chrysalis), 177
Chaloupka, Vladimir, 19–20
Chan, Po, 9–10, 142, 192–194 205f The Last 3 Minutesexamples (composition), 10f, 11f
character blocking, See blocking
characterization, 119–120Casulo case study, 14616 Teeth (Rii Schroer) case study, 159uniqueness of shots and, 123
Charters, Rodney, 60
checklistsblocking, 12–13camera movement and stabilization, 22composition, 8HDSLR shooting, 275lenses, 56–57lighting, 36microphones, 87–88sound quality, 77

storytelling, exercises for, 125, 127–136, 140
Cherry Blossom Girl, 20, 20f, 21f, 33flighting setup examples, 32–34, 34f
chip size, 46, 48
Christenson, Dave, 178
chrominance compression, 267
The Chrysalis (Jeremy Ian Thomas) case study, 177color grading, 187preproduction vision, 179–188
Cineform Neo Scene Workflow software, 94–96
Cinema Bundle (Redrock Micro), 242
“cinematic look”, 2, 59 picture stylestesting before shooting, 61
cinematography, importance of, 1–2
CMOS sensorJell-O effect with, 14slowness of, 259
CMR Blackbird, 244
Cohen, Rob, 191–192
collapsible reflectors, 230
colorCasulo case study, 146–147chrominance compression, 267color balance, 73–74color space, 60removing color cast, 74 color correction
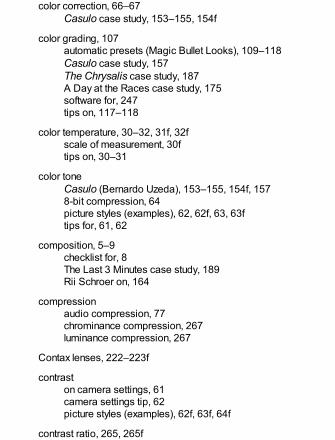
color correction, 66–67Casulo case study, 153–155, 154f
color grading, 107automatic presets (Magic Bullet Looks), 109–118Casulo case study, 157The Chrysalis case study, 187A Day at the Races case study, 175software for, 247tips on, 117–118
color temperature, 30–32, 31f, 32fscale of measurement, 30ftips on, 30–31
color toneCasulo (Bernardo Uzeda), 153–155, 154f, 1578-bit compression, 64picture styles (examples), 62, 62f, 63, 63ftips for, 61, 62
composition, 5–9checklist for, 8The Last 3 Minutes case study, 189Rii Schroer on, 164
compressionaudio compression, 77chrominance compression, 267luminance compression, 267
Contax lenses, 222–223f
contraston camera settings, 61camera settings tip, 62picture styles (examples), 62f, 63f, 64f
contrast ratio, 265, 265f

Coutard, Raoul, 3
crane, 15
Crosby, Ed, 130
Cross Fire (Zacuto), 243
Curves tool, Magic Bullet Looks, 112f
DA Day at the Races (Philip Bloom) case study, 167
being on location, 171–176retrofitting the Canon 7D, 170using cinema lenses, 170
decompression software, 246–247
deinterlacing, 90
density, See neutral density filters
depth of field, 51, 53, 56–57
Developing Story Ideas (Rabiger), 124
dialogsound for, 75writing, exercises for, 127–136
diffusing light, See soft light
direction of light, 24–29front lighting, 28, 28f
¾ frontal key lighting, 28–29, 28f, 29f
rear key lighting, 27, 27f back lights¾ rear key lighting, 27, 27f

shadows, See shadowsfrom side, 25, 26, 26f
discovering stories, 122–136
dollies, See tracking
Dorn, Bruce, 220f
Dot Line DL-DV60 LED, 229
Double Barrel (Zacuto), 243
DR-100 audio recorder, 85–86, 85fchecklist for, 87–88
dramatic structure, 136–140
DT454 XLR adapter, 232f
DualEyes, 247–248
DXA-SLR XLR adapter, 84
dynamic range, 38, 265, 265f, 266f, 266fexample images, 39, 39f
EeditingSee postproduction; postproduction case studies
8-bit color compression, 64
emotional equivalency, 52
emotions, of audience, 120–121
EOS Utility, 68f
equipment, See gear
exercises, storytelling, 125, 127–136, 140

exposition, 136–137
exposure, 265, 265f dynamic rangeautomatic exposure, 164–165checklist for, 51–52example images, 39, 39ffilm look and, 44–45film speed, See ISO settingsframe rates, 50–52f-stops, 38, 41–46, 42f, 43f, 44f, 51
depth of field and, 53reduction with ND filters, 38, 49t
lenses, See lensesND filters, See neutral density filtersshutter speed, 49–51 See entries at speed
film look and, 44–45
spot meter and, See spot meterzone scale, 37, 37f, 38, 39f
tips on, 39–40
exposure index, 259
exposure latitude, 51
external recorders, 85–86, 85f, 86fchecklist for, 87–88
ExtraFlat picture style, 62, 64, 64 f flat picture style SuperFlatpicture style
color grading with Magic Bullet, 117, 117f, 118f
eyeSpy, 241
Ff-stops, 38, 41–46, 42f, 43f, 44f, 51
depth of field and, 53

reduction with ND filters, 38, 49t
Faithful picture style, 63, 63f
fastnessSee entries at speed
Fauer, Jon, 2–3
files, getting into computer, 90
fill (light placement), 25
fill lights, 24–25
film look, 2, 262 case studiesCasulo case study, 150–15116 Teeth (Rii Schroer) case study, 161–162tips on, 44–45
film speed, shutter speed and, 49–50 ISO settings
Filmlike Color Curves, Magic Bullet Looks, 118f
filters, See neutral density filters
Filters windows, Magic Bullet Looks, 115f
Final Cut Pro, 97–99Canon EOS Plug-in for, 97–99Log and Transfer process, 99–103Magic Bullet Looks for, 109–118
flat picture style, 38, 60 ExtraFlat picture style SuperFlat picturestyle
color grading with Magic Bullet, 117, 117f, 118f
fluid head, ball head vs., 237
focal length, 52, 53f
follow focus, low-budget, 239

Fox, Travis, 19–20
frame rates, 50–52
franken-camera, 19–20, 19f, 239
Fricks, Charles, 147f
front lighting, 28, 28f¾ frontal key lighting, 28–29, 28f, 29f
full frontal lighting, See front lighting
Ggamma, 265, 265f
adjusting for picture style, 70, 70f
Garn, Jake, 5, 6f
gear, 213, 215–216audio gear, 230–235cameras, 213–220
low-budget, 214–216midrange-budget, 217–218higher-budget, 219
cases and backpacks, 245–246handheld and shoulder-mounted rigs, 238–243
low-budget, 239, 240midrange-budget, 217–218, 240–242higher-budget, 239, 242–243
lenses, 221–227 lenseslow-budget, 222midrange-budget, 222–223higher-budget, 223–227
lighting, 229–230 lightinglow- to midrange budget, 229

higher-budget, 229–230
neutral density filters, 227–229low-budget, 228midrange-budget, 228higher-budget, 228variable, 228–229
packages, suggested, 248–254low-budget, 248–250midrange-budget, 250–252higher-budget, 252–254
reflectors, 230software, 246–247stabilization and tripods, 235–238 camera movementsteadicams, 243–245tracking (dolly), 15, 237viewfinders, 220–221
low-budget, 220higher-budget, 220–221
XLR adapters, See XLR connectors or adapters
Giottos MT-9241 tripod legs, 235–236
Golden Mean application, 8–9
golden mean (golden ratio), 5, 6f, 7f, 8f
Grad Exposure filter, Magic Bullet Looks, 116f
Graeme, See 16 Teeth (Rii Schroer) case study
Green, Barry, 259–260, 261f
HH.264 codec, 89
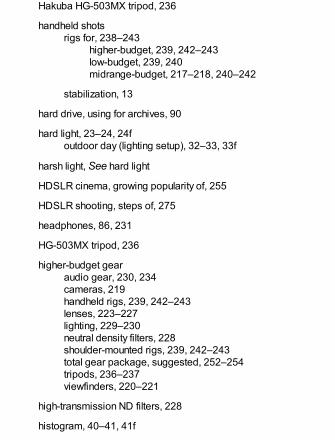
Hakuba HG-503MX tripod, 236
handheld shotsrigs for, 238–243
higher-budget, 239, 242–243low-budget, 239, 240midrange-budget, 217–218, 240–242
stabilization, 13
hard drive, using for archives, 90
hard light, 23–24, 24foutdoor day (lighting setup), 32–33, 33f
harsh light, See hard light
HDSLR cinema, growing popularity of, 255
HDSLR shooting, steps of, 275
headphones, 86, 231
HG-503MX tripod, 236
higher-budget gearaudio gear, 230, 234cameras, 219handheld rigs, 239, 242–243lenses, 223–227lighting, 229–230neutral density filters, 228shoulder-mounted rigs, 239, 242–243total gear package, suggested, 252–254tripods, 236–237viewfinders, 220–221
high-transmission ND filters, 228
histogram, 40–41, 41f

using, for shooting flat, 61
hook (in storytelling), 137
Hurlbut, Shane, 30–31, 32f, 142, 205f, 206f, 263about, 190–192camera settings, 61on chip size, 46on color balance, 73, 74on color compression, 65on color correction, 66–67, 153, 154fon ISO settings, 48on neutral density filters, 45on picture style, 63fwith Po Chan, See The Last 3 Minuteson shutter speed, 49–50on zone scale, 37–38
IiDC Viewfinder, 220
iDC's Run & Gun kit, 239
ideas, sources for, 122–136
image resolution, 259, 260f
Inácio, Thaís, 147f
indirect light, See soft light
indoor day (lighting setup), 34, 35, 34f, 35f
indoor night (lighting setup), 35–36, 35fCasulo case study, 150–151
introduction (in storytelling), 136–137
inverse square law, 40

InVision microphone shockmount, 233
iris, See f-stops
Isaacks, Levie, 3
ISO settings, 39, 51, 266, 266fexposure index, 259Shane Hurlbut on, 48
ISO tests (on Canon cameras), 263, 263f, 264f
JJane, Eli, See The Last 3 Minutes case study
Jell-O effect, 14
JuicedLink's DT454 XLR adapter, 232f
JuicedLink's Preamp DT454 adapter, 84
KKessler Crane Pocket Dolly Traveler, 15, 16f, 17f, 237
key (light placement), 25
kit lenses, 222
The Kitchen, 123–124
Kolar, Rachel, 204f, 207f
LL series lenses, 223–227
Laforet, Vincent, 6examples (composition), 7f, 8f

examples (exposure), 39, 39fexamples (lenses), 54, 54fexamples (lighting), 24f, 25f, 28f, 29f, 34–35 34f, 35fstorytelling of, 121, 139–140
Landscape picture style, 63, 63f
The Last 3 Minutes (Po Chan), 189examples (composition), 9–10, 10f, 11flenses and camera settings, 189–190lighting (bathing scene), 204–205lighting (bedroom scene), 196–198lighting (war scene), 199–204point of view perspective, 194–196screening and lessons learned, 208–209story treatment, 269storytelling, 192–194
Laszlo, Andrew, 3
lavaliere (lav) microphones, 78, 82, 82f, 234f
LED lights, 229–230
Leica R lenses, 222–223f
Lens tools, Magic Bullet Looks, 114f
Lensbaby lenses, 227
lenses, 52–57, 52f, 55f, 221–227angle of view, 52, 52f, 57Artemis app, 55–56, 55fchecklist for, 56–57A Day at the Races (Philip Bloom) case study, 167example images, 53f, 54fhigher-budget, 223–227The Last 3 Minutes case study, 189–190low-budget, 222

midrange-budget, 222–223tips on, 48
Light Craft Workshop's ND filers, 228
light sensitivity range, See dynamic range
lighting, 23, 229–230blocking with filters, See neutral density filtersCasulo case study, 149–150checklist for, 36color temperature, 30–32, 31f, 32f
scale of measurement, 30ftips on, 30–31
direction of light, 24–29exposure, See exposurehard vs. soft light, 23–24, 24f
examples, 25f
higher-budget, 229–230inverse square law, 40The Last 3 Minutes case study, 189
bathing scene, 204–205bedroom scene, 196–198war scene, 199–204
low- to midrange budget, 229placement terminology, 25sample setups for, 32–36
indoor day, 34, 35, 34f, 35findoor night, 35–36, 35f, 150–151outdoor day, 32–33, 33foutdoor dusk, 152–153outdoor night, 34, 34f
shadows, See shadowstips on, 40

limiters, 86
LitePanels Micro LED, 229–230
location, lightSee lighting; placement of lights
location case study (The Chrysalis), 177
Loli, Eugenia, 64
LooksBuilder editor, 110f
low-budget gearaudio gear, 231–235cameras, 214–216follow focus, 239handheld rigs, 239, 240lenses, 222lighting, 229neutral density filters, 228shoulder-mounted rigs, 239total gear package, suggested, 248–250tripods, 235–236viewfinders, 220, 239
Lowepro backpack, 246
luminance compression, 267
MMagic Bullet Grinder, 247
Magic Bullet Looks, 107–118, 247
“Magic Formula”, 16
Manfrotto 504HD fluid head, 236–237
Manfrotto 535 tripod, 236–237
Manfrotto 700RC2 mini video fluid head, 235–236
Manfrotto 701HDV fluid mini head, 236
Mathers, Jim, 47, 65–66
MC-91M8 monopod, 235
McClellen, Margo, 127
Merlin, See Tiffen's Steadicam Merlin
“Merlin Cookbook” website, 16
microphonesSee also, audio recordingchecklists for, 87–88external recorders, 85–86, 85f, 86f
checklist for, 87–88
pistol grips and boom poles, 85, 85fshockmount for, 233types of, 78–82windscreens, 83, 231–235XLR adapters, See XLR connectors or adapters
midrange-budget gearaudio gear, 230, 232cameras, 217–218handheld rigs, 240–242lenses, 222–223lighting, 229neutral density filters, 228shoulder-mounted rigs, 240–242total gear package, suggested, 250–252tripods, 236
Millet, Guga, 141–142, 146, 148, 149f
MixPre, 85–86, 86f, 234–235

Mohtaseb, Khalid, 107–108, 108f
motivated light, 24–25
mounts, lens, 56–57
movement, camera, See camera movement
movement of subjects in scene, See blocking
mp3 audio compression, 77
MPEG Streamclip, 90–94
MT-9241 tripod legs, 235–236
Mysterium-X sensor, 65–66
Nnarrative structure, 136–140
native files, editing, 89
ND filters, See neutral densityfilters
neutral density filters, 38, 48–49, 49t, 227–229considerations, 49film look and, 44–45higher-budget, 228low-budget, 228midrange-budget, 228tips on, 49variable, 228–229
Neutral picture style, 63, 63f
noise reduction (video), 108, 154–155
O

on-camera microphones, 80, 82
180-degree shutter speed rule, 49–50
original ideas, source for, 122–136
outdoor day (lighting setup), 32–33, 33f
outdoor dusk (lighting setup), 152–153
outdoor night (lighting setup), 34, 34f
PPanasonic Lumix DMC-GH1, 215–216
firmware hack for, 217
panning, 14, 15fJell-O effect, 14
Photoshop, Golden Mean application for, 8–9
Picture Style Editor, 68f
picture styles, 59color balance, 73–74color correction, 66–678-bit compression, 64examples, 62f, 63f, 64f, 67fThe Last 3 Minutes case study, 189–190procedure for, 67–73shooting the image flat, 59–65testing before shooting, 61
pistol grips, 85, 85f
pixels, 259 image resolution
placement of lightsSee also, lightingchecklist for, 36

sample setups for, 32–36indoor day, 34, 35, 34f, 35findoor night, 35–36, 35f, 150–151outdoor day, 32–33, 33foutdoor dusk, 152–153outdoor night, 34, 34f
terminology for, 25
placing subjects in scene, See blocking
PluralEyes, 103–107, 247–248
Pocket Dolly Traveler, 15, 16f, 17f
point of view perspective, 194–196
PortaBrace backpack, 246
PortaBrace bag, 245f
Portrait picture style, 62, 62f
postproduction, 89with Cineform Neo Scene Workflow software, 94–96color grading, 107, 109–118deinterlacing, 90Final Cut Pro Log and Transfer, 97–103getting files into computer, 90with Singular Software's PluralEyes, 103–107with Squared 5's MPEG Streamclip, 90–94
postproduction case studiesCasulo (Bernardo Uzeda), 143
audio, 153color correction and grading, 153–155, 154f, 157film look: indoors night, 150–151film look: outdoors dusk, 152–153lighting design, 149–150postproduction workflow, 155–157

production process, 148–149screening, 157–158story idea, 144–145texture and color, 146–147
The Chrysalis (Jeremy Ian Thomas), 177, 187preproduction vision, 179–188
A Day at the Races (Philip Bloom) case study, 167being on location, 171–176retrofitting the Canon 7D, 170using cinema lenses, 170
The Last 3 Minutes (Po Chan), 189lenses and camera settings, 189–190lighting (bathing scene), 204–205lighting (bedroom scene), 196–198lighting (war scene), 199–204point of view perspective, 194–196screening and lessons learned, 208–209storytelling, 192–194
16 Teeth (Rii Schroer) case study, 159being on location, 161documentary vs. TV style, 161–162DSLR advantages, 166editing approach, 165–166filmmaker background, 159–160transitioning to HD video, 163–165
power, microphone, 78
practical lighting, 150
Preamp DT454 adapter, 84
prime lenses, 56, 222–223f
pulling out, 15, 15f

pushing in, 15, 15f
Qquality, light, See lighting
RRabiger, Michael, 124
random movements, 9
rear key lighting, 27, 27f back lights¾ rear key lighting, 27, 27f
recording audio, See audio recording
RED camera, 259, 260f, 262Mysterium-X sensor, 65–66
Red Giant Software's Magic Bullet Grinder, 247
Red Giant Software's Magic Bullet Looks, 107–118, 247
Redrock Micro's Captain Stubling, 241
Redrock Micro's Cinema Bundle, 242
Redrock Micro's eyeSpy, 241
Redrock Micro's theEvent, 241
Redrock Micro's Ultraport DSLR Bundle, 240
reflecting light, See soft light
reflectivity, skin, 39–40
reflectors, 230
Reichmann, Michael, 41

Renaud, Brent and Craig, 121–122
resolution, See image resolution
Reverie, 6examples (composition), 7f, 8fexamples (exposure), 39, 39fexamples (lenses), 53–55, 54fexamples (lighting), 24–25, 24f, 25f, 28f, 29f, 34–36, 34f,35f
RGB color space, 60
rim lights, defined, 25
Rode NTG-2 microphone, 81, 81f
Rode VideoMic, 78–80, 80f, 231–235
room quality, sound and, 76
room tone, 77–78
Rudd, John, 162f 16 Teeth (Rii Schroer) case study
Rule of Thirds, 5
Rycote Lyre Mount and Pistol Grip, 234
Rycote Miniscreen Windjammer, 231–235
Rycote's InVision microphone shockmount, 233
SSachett, Isadora, 141–142, 144, 146
Salton Sea Beach, 16f, 17f
sampling rate, audio, 77
saturation

camera settings tip, 62picture styles (examples), 62, 63, 62f, 63f, 64ftips for, 61
Schilowitz, Ted, 261
Schoeps CMC641, 230
Schroer, Rii, 142on composition, 164examples (lighting), 26f, 27f, 35, 35fon lenses, 16516 Teeth case study, 159
being on location, 161documentary vs. TV style, 161–162DSLR advantages, 166editing approach, 165–166filmmaker background, 159–160transitioning to HD video, 163–165
screeningCasulo (Bernardo Uzeda), 157–158The Last 3 Minutes (Po Chan), 208–209
screenplays, See storytelling
Sennheiser Evolution G3 100 series, 234f
Sennheiser ME-66/K6, 230
Sennheiser MKH-416, 230
sensor size, 46, 48
setup (in storytelling), 136–137
700RC2 mini video fluid head, 235–236
701HDV fluid mini head, 236
shadows, 24–25, 29–30 direction of light lighting

Casulo case study, 151, 152zone scale, 37, 37f, 38, 39f
tips on, 39–40
sharpnesscamera settings tip, 62picture styles (examples), 62, 63, 62f, 63f, 64f
Shooter, See Zacuto's Tactical Shooter
shooting flat or superflat, 38, 59–65 ExtraFlat picture style flatpicture style SuperFlat picture style
shotgun microphones, 78, 81, 82Rode NTG-2 microphone, 81, 81fRode VideoMic, 78–80, 80f, 231–235
shoulder-mounted rigs, 238–243higher-budget, 239, 242–243low-budget, 239midrange-budget, 217–218, 240–242
shutter speed, 49–51film look and, 44–45
Shutterfreaks' Golden Mean application, 8–9
Sibley, Tansy, 161
side key lighting, 25, 26, 26f
Singh-Ray variable ND filters, 228
Singular Software's PluralEyes, 103–107
16 Teeth (Rii Schroer) case study, 159being on location, 161documentary vs. TV style, 161–162DSLR advantages, 166editing approach, 165–166

filmmaker background, 159–160transitioning to HD video, 163–165
skin reflectivity, 39–40
slownessSee entries at speed
Smith, Neil, 170, 172, 176, 178
soft light, 23–24outdoor day (lighting setup), 32–33, 33f
software, 246–247
Sound Device's MixPre, 85–86, 86f, 234–235
sound quality, 76–78 audio recordingchecklist for, 77
sound quality, about, 75–76
special effects (The Last 3 Minutes), 199–204
speed, film, See ISO settings
speed, frame, See frame rates
speed, lens, 55–57
speed, speed, See shutter speed
spot meter, 45f, 46how to use, 47
Squared 5's MPEG Streamclip, 90–94, 247
stabilization, cameraSee also camera movementchecklist for, 22devices for, 13gear for, 235 tripodslenses and, 56–57

Standard picture style, 62, 62f
Steadicam Merlin, 15–16, 18–19, 18f
steadicams, 243–245
story, depicting with characters, See blocking
storytellingSee also, characterizationCasulo case study, 144–145, 152exercises for, 125, 127–136, 140The Last 3 Minutes case study, 192–194
point of view perspective, 194–196
story structure, 136–140tapping into audience emotions, 120–121where good ideas come from, 122–136
streetlamps, 24–25
Striker (Zacuto), 242
subject movement in scene, See blocking
subject placement in scene, See blocking
supercardioid pickup pattern, 78, 79f
SuperFlat picture style, 38, 60, 64, 64fExtraFlat vs., 64
supplies, See gear
Swing-Tilt effect, Magic Bullet Looks, 117f
syncing audiofree technique for, 248with PluralEyes, 103–107software for, 247–248

TTactical Shooter, 20, 20f, 21f
Target Shooter, 240
Tascam DR-100 audio recorder, 85–86, 85fchecklist for, 87–88
telling stories, See storytelling
temperature, color, See color temperature
testing before shooting, 61
texture, shooting with, 146–147
theEvent, 241
Thomas, Jeremy Ian, 142The Chrysalis case study, 177
color grading, 187preproduction vision, 179–188
on color balance, 74A Day at the Races case study, 171–172, 175on picture style, 60
three dimensions, illusion of, 6
three-act structure (storytelling), 137, 139–140
¾ frontal key lighting, 28–29, 28f, 29f
¾ rear key lighting, 27, 27f
3-Way Color Corrector, Magic Bullet Looks, 116f
3D visual art, 183
Tiffen Merlin Steadicam, 244

Tiffen neutral density filters, 228
Tiffen's Steadicam Merlin, 15–16, 18–19, 18f
tilting, 14, 15f
tilt-shift lens, 53–55, 54f, 55f
time of day (for shooting), 36
tipscamera settings, 61, 62color temperature, 30–31exposure tests, 47film look, 44–45“flat” or “superflat” mode, 38histogram, using, 40–41, 41finverse square law (lighting), 40ISO setting, 48lens and sensor size, 48neutral density filters, 49white balance, 32zone scale, 39–40
tonal range, chip size and, 46
Torres, Gabe, 191
tracking (dolly), 15, 15ftools for, 15, 237
transcoded files, 89
tripods, 235 camera movementhigher-budget, 236–237low-budget, 235–236midrange-budget, 236using, 14
T-stops, 38, 42 f-stops

Turner, William, See The Last 3 Minutes
UUltraport DSLR Bundle, 240
Uncle Jack, 119–121, 123f, 124story arc, 137–138
used prime lenses, 222–223f
user-defined picture styles, See picture styles
Uzeda, Bernardo, 73, 141–142Casulo case study, 143
audio, 153color correction and grading, 153–155, 154, 157film look: indoors night, 150–151film look: outdoors dusk, 152–153lighting design, 149–150postproduction workflow, 155–157production process, 148–149screening, 157–158story idea, 144–145texture and color, 146–147
Vvan Vuuren, Stephen, 261, 262
variable ND filters, 228–229
“video look”, 2
view angle, See angle of view
viewfinders, 220–221higher-budget, 220–221low-budget, 220, 239

visual depiction of story, See blocking
voice, character, See characterization
WWade, Mike, See The Chrysalis (Jeremy Ian Thomas) casestudy
Water White Glass ND filters, 228
Weber, Alex, 200f, 201f, 202f
Wedding Highlights, 15–16, 18–19, 18f
Wexler, Haskell, on characters, 119–120
white balance, 30tips on, 32
wide angle lenses, 52, 57 angle of view
Willis, Gordon, 138
Winans, Jamin, 119, 120, 121, 124, 138
windscreens, 83Rycote Miniscreen Windjammer, 231–235
wireless lavs, See lavaliere (lav) microphones
XXLR connectors or adapters, 82, 84–85, 232, 232f
BeachTec DXA-SLR XLR adapter, 84checklist for, 87getting for headphones, 86Preamp DT454 adapter, 84

YYaitanes, Greg, 256
Yiu, Ken, 15–16, 18–19examples (composition), 18fexamples (lighting), 27f
ZZacuto Z-Finder Pro, 220–221
Zacuto's Cross Fire, 243
Zacuto's Double Barrel, 243
Zacuto's Striker, 242
Zacuto's Tactical Shooter, 20f, 21f, 20
Zacuto's Target Shooter, 240
Zeiss Contax lenses, 222–223f
zone scale, 37, 37f, 38, 39ftips on, 39–40
Zoom H4n audio recorder, 85, 85f
zoom lenses, 56–57, 165