drupal training manual new en basic_0
TRANSCRIPT

8/8/2019 Drupal Training Manual NEW en BASIC_0
http://slidepdf.com/reader/full/drupal-training-manual-new-en-basic0 1/36
BASIC DRUPAL END-USER TRAINING MANUAL
Logging In...............................................................................................2
User Accounts, Permissions/Access Control...........................................3New User Accounts.............................................................................3
Members Area.....................................................................................3
Overall Site Structure Review:................................................................5Editing Site Pages...................................................................................6
Advanced Editing Options: Styling Text..............................................8
Advanced Editing Options: Making Links...........................................10
Advanced Editing Options: Adding an Image to a Page....................15
Advanced Editing Options: Adding a Document to a Page/Story......18Advanced Editing Options: Deleting a Document.............................20
Editing Stories......................................................................................21Making Changes to Existing Stories..................................................21
About Categories:.............................................................................22
Creating a New page............................................................................23Adding Stories:.....................................................................................24Adding Events:.....................................................................................26Adding Categories:...............................................................................27
Sending an Email newsletter................................................................28Managing Newsletters..........................................................................30
Sent issues........................................................................................30
Drafts................................................................................................30
Newsletters.......................................................................................30
Subscriptions.....................................................................................31
Settings.............................................................................................32
Managing Blocks (Sidebar Content).....................................................33Logging Out..........................................................................................34Appendix: Licensing.............................................................................35
Page 1 of 36

8/8/2019 Drupal Training Manual NEW en BASIC_0
http://slidepdf.com/reader/full/drupal-training-manual-new-en-basic0 2/36
LOGGING IN
To login in to the site to make changes, begin by opening a webbrowser and going to:
www.yoursite.com/user
NB: This system can be accessed from any computer with an internetconnection.
If you forget your password:
On the login page there is a tab called “request a new password”. Youmust enter your user name or your email address, and the system willsend you a new password by email. If you enter your user name, it will
send your password to the email address that the system has on filefor you.
Page 2 of 36

8/8/2019 Drupal Training Manual NEW en BASIC_0
http://slidepdf.com/reader/full/drupal-training-manual-new-en-basic0 3/36
USER ACCOUNTS, PERMISSIONS/ACCESS CONTROL There are [x] main types of users for your Drupal website: [list userroles]. Each level of user has different permissions on the site,allowing them to access different parts of the site administration, and
manage content.
Anonymous: this user is the general public, and is not logged in onthe site.
Member: has the same access as an Anonymous user, andadditionally can view content in the Members Area [list membersarea URL].
Site Admin: has the highest level of access, and can add/edit/deleteall content, as well as manage things like menus, and user accounts.
New User AccountsMember Accounts: Signing up for member accounts can be done by[give instructions] or by going directly to[http://www.yoursite.com/user/register] which is the userregistration page. [The new user will then be sent a confirmationemail, with instructions that they must follow to activate their account. You do not need to approve their account manually.]
If a user loses their password, it can be reset through this same userpage by entering and saving the new password and emailing it tothem. If a Web Account user with an external email address loses theirpassword, they can simply click on the “Request new password” tab onthe login page.
Members Area[Provide instructions on logging into the Members Area.] Oncelogged in, they will see a page that looks like this:
[IMG]
[Provide instructions on how to navigate to the MembersArea.] There is also a “Log Out” link in this box.
The Members Area page looks like this:
[IMG]
Page 3 of 36

8/8/2019 Drupal Training Manual NEW en BASIC_0
http://slidepdf.com/reader/full/drupal-training-manual-new-en-basic0 4/36
[ADAPT instructions on managing Member Area content to site. The Members Area page is manually updated, which means thatcontent does not appear here automatically. You must manually entertext and link it to the content that you have added for the Members
Area. As a general rule, you will want to add content for this area byclicking the menu item Create Content Member Content, as thiscontent type will then be shown to logged-in members by default.
You will notice that the Members Area page (as well as other sitepages) has a new tab labelled “Access Control”. This area is used toset which types of users are able to view, edit, and delete content.Because the different content types have been set up with defaultbehaviours, you should not need to use this function.]
Page 4 of 36

8/8/2019 Drupal Training Manual NEW en BASIC_0
http://slidepdf.com/reader/full/drupal-training-manual-new-en-basic0 5/36
OVERALL SITE STRUCTURE REVIEW:
This manual was created to provide a reference point for administeringdifferent content related tasks on your website. There are several
general types of site content on this website:
● Event● Newsletter issue● Page● Story
In this type of website, which is a content management system (CMS),the terminology used to refer to each of those types of content is asfollows:
Event
Events are entries that have a set start and end date, and which canbe automatically archived from the live version of the site once the enddate has passed. Events will appear on the Events page(www.yoursite.com/event), and can also appear in a shortened form onthe homepage or all pages.
Newsletter Issue
For creating and sending email newsletters through the website.
Page (Regular Content Pages)
These pages are single pages, that can have a link from the mainmenu and contain regular content. They may contain documents,images or just regular text, and must be manually translated if youhave a multi-language site.
Story (Content as a page and in listings)
Stories display on their own individual pages, like a 'Page', but can also
be automatically displayed in listings of groups of stories that arecategorized by topic or other parameters.
Page 5 of 36
8/8/2019 Drupal Training Manual NEW en BASIC_0
http://slidepdf.com/reader/full/drupal-training-manual-new-en-basic0 6/36
EDITING SITE PAGES
To edit a regular Page of your website:
1. If you have added a menu item for this page, click the “Edit” tabat the top of the page
2. Begin by logging in at www.yoursite.com/user
3. You will now see a slightly different version of the site thatintroduces Editing tabs.
[IMG]
4. To edit any page, you must navigate to the page you wish to
make a change on, and click on the “Edit” tab at the top of thesite content. Your view of the page will now change to look likethis:
[IMG]
5. To make a change to site content, place your cursor in thecontent editing window and make your changes.
NB: You will see several formatting tabs at the top of this content editing window. These all function much like they do in a regular
word processing program (like OpenOffice or MS Word), or if they require more detailed instructions are covered in later sectionsof this manual. These include:
[IMG]
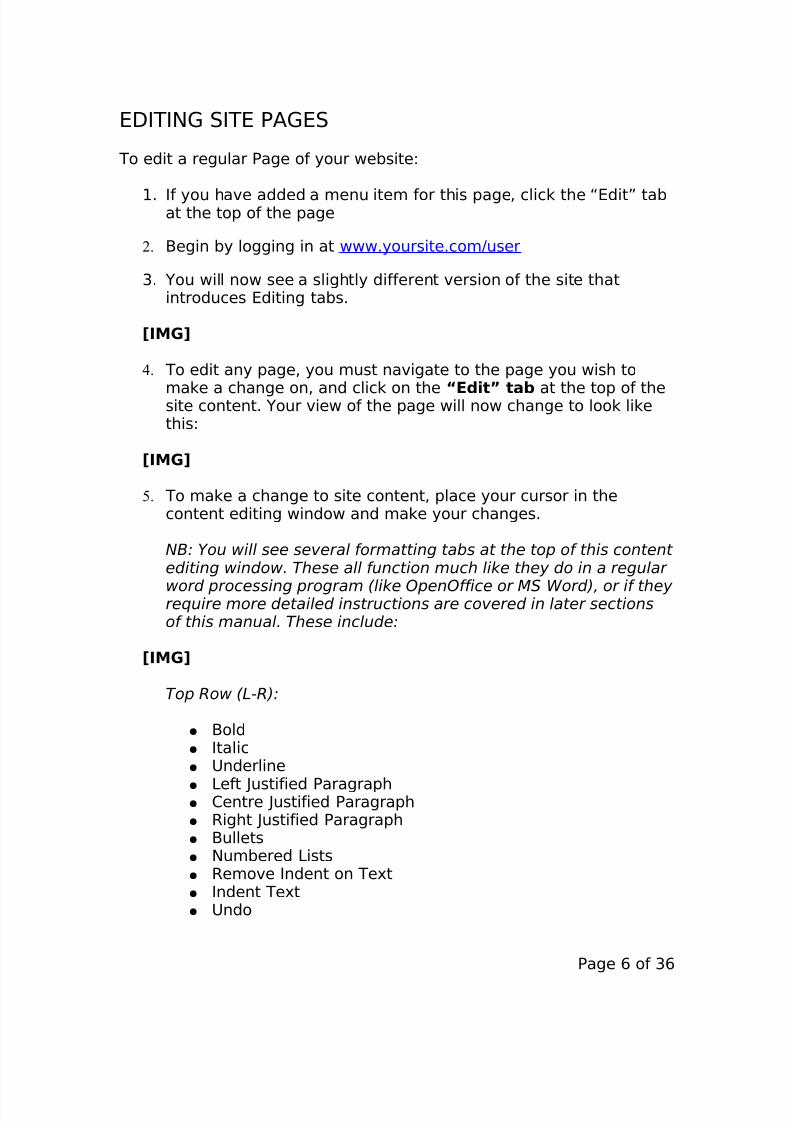
Top Row (L-R):
● Bold● Italic● Underline
● Left Justified Paragraph● Centre Justified Paragraph● Right Justified Paragraph● Bullets● Numbered Lists● Remove Indent on Text● Indent Text● Undo
Page 6 of 36

8/8/2019 Drupal Training Manual NEW en BASIC_0
http://slidepdf.com/reader/full/drupal-training-manual-new-en-basic0 7/36
● Redo● Link (for making links, covered in detail later in the
manual)● Remove Link (for removing existing links)● Anchor Link
Second Row (L-R):
● Text Formatting Box (to choose paragraph, Heading 2, etc.styles)
● Style Formatting Box (for styling text, more detail later inmanual)
● Insert An Image (covered in detail later in manual)● Superscript● HTML View (allows you to see the HTML code view)● Insert Horizontal Rule
Third Row:
● Cut● Copy● Paste● Clean up code tool● Special characters● Help● Paste Word Content as Plain Text● Insert A TableVarious Table formatting tools
6. When you are done, you can click “Preview” at the bottom of thepage to preview your change in the full site template.
7. When you are satisfied with your change, click “Submit” to saveyour change.
Page 7 of 36

8/8/2019 Drupal Training Manual NEW en BASIC_0
http://slidepdf.com/reader/full/drupal-training-manual-new-en-basic0 8/36
Advanced Editing Options: Styling Text
Within the site content, a stylesheet has been developed that pre-defines various heading styles for use on your website. You can apply
those heading styles to site content via the content editor, choosingfrom a “Format” drop down box which offers you six levels of headings:
1. Paragraph: [list styles]
[Sample sentence in paragraph style.]
2. Heading 1: Not used inside content area.
3. Heading 2: list styles
[Sample sentence in h2 style.]
4. Heading 3: list styles
[Sample sentence in h3 style.]
5. Heading 4: list styles
[Sample sentence in h4 style.]
6. Heading 5: list styles
[Sample sentence in h5 style.]
7. Heading 6: list styles
[Sample sentence in h6 style.]
To set a heading style, select the line of text that you wish to make aheading in the content window, and then choose a style from the
Page 8 of 36

8/8/2019 Drupal Training Manual NEW en BASIC_0
http://slidepdf.com/reader/full/drupal-training-manual-new-en-basic0 9/36
formatting drop down. Note that by default all regular text will be setas a Paragraph.
NB: In order to set a heading style the line that is being given the stylemust be separate from the next paragraph, ie. you can’t give
something a heading style in the middle of a sentence.
Page 9 of 36

8/8/2019 Drupal Training Manual NEW en BASIC_0
http://slidepdf.com/reader/full/drupal-training-manual-new-en-basic0 10/36
Advanced Editing Options: Making Links
There are three different types of links you can add to a web page:email links, absolute links and relative links. Email links are links that
go directly to someone’s email address, typically opening up an emailclient for the user to send a message to that address. Absolute andrelative links refer to two different types of links that will take you fromone page in a one website to a page in another, or from one page in awebsite to another within the same site. We will deal with absolute andrelatives links first, offering more information about them below, andthen will cover making email links.
Absolute vs. Relative Links:
Absolute link is a term that refers to links that go to other websites
outside of http://www.yoursite.com. To make absolute links work, theyneed a full prefix in front of them, for example:http://www.yoursite.com not just www.yoursite.com is required for thatlink to work. Often the easiest way to ensure that you have the correctURL for an absolute link (and don’t accidentally mistype something) issimply to copy the URL from the address bar of your browser to thenpaste it into the editing window (explained in detail below).
Relative links are links that go from one page of your website toanother. So for example, you may wish to make a link from the AboutUs page to the Contact Us page. Relative links do not need the http://
protocol in front of them, and in fact they do not even need thewww.yoursite.com, they need only the rest of the information from theURL. Where possible, we have tried to make the URLs for site pages onthis site “human friendly,” meaning that they are intended to followsome logic, so for example:
About Your Site = about
Contact Us = contact_us
NB: For a relative link that is not the default page link (ie. /node/287),
you must have defined the URL when you created the page or story,under the "URL path settings". If you did not previously do this, youcan go back to edit the page and define the URL path.
Some things to note:
● URLs can never have spaces in them, so where we intend aspace to exist a “ _ “ is generally used.
Page 10 of 36

8/8/2019 Drupal Training Manual NEW en BASIC_0
http://slidepdf.com/reader/full/drupal-training-manual-new-en-basic0 11/36
● As convention, the URL paths are typically all lower case.
Where things can start to get a bit tricky is when you get to sub pageswithin a section, so for example:
About Us: News = about/news
Contact Us: Location: Map = contact_us/location/map
What you’ll probably notice here is that the URL path becomes brokendown by sub sections. So pages that live, for example, in the Mediasection have “media” and then a “/” before you get to the actual pagename. The reasoning for this is that the website is built much like afolder structure on your harddrive, and all pages that are housed insideof Media Room, live in the Media Room folder. In order to set a link to asub page of a top level section, you must first indicate what top level
section (or folder) the page is in, ie. media_room/, and then include thename of the page itself: media_room/07_news_releases.
To Make An Absolute or Relative Link:
Follow the steps for Editing Site Pages up to and including Step Four[(pages 4-5)], then:
1. With your cursor, highlight the text you would like to make into alink.
2. You will now see the “Link” button on the editing window changefrom being greyed out to turning light blue, making it availableto click on:
Click on the link button and a pop-up window will open up.
Page 11 of 36

8/8/2019 Drupal Training Manual NEW en BASIC_0
http://slidepdf.com/reader/full/drupal-training-manual-new-en-basic0 12/36
3. The pop-up window will look similar to this image above. To setthe link you must first fill out the required boxes in the pop-upwindow. Start with the Link URL box where you will insert thelink itself. Remember, if it is a link to another website besure to include the http:// before the full link.
4. You can then choose the “Target” for the link, if you would like itto open in a new window. By default this box will stay at “Open inthis window/frame” which is fine for all internal links.
5. If you would like, you can also now set a Link Title, by filling inthe Title box. The Link Title is not necessary but helps toincrease the site’s accessibility giving extra information aboutwhere the link points to for users who are visually impaired andusing screen readers. The Link Title should just be descriptivetelling the user what link you are sending them to. So a link to a
newspaper article may have a link title like: “Newspaper articleon inequality in the workplace.” This step is not required for your link to function, but falls under the category of best practices.
To make an Email Link:
As above, follow the steps for Editing Site Pages up to and includingStep Four (pages 4-5), then:
1. With your cursor, highlight the text you would like to make into alink – in this case this will typically be an email address or
someone’s name.
2. You will now see the “Link” button on the editing window changefrom being greyed out to turning light blue, making it availableto click on:
Click on the link button and a pop-up window will open up.
Page 12 of 36

8/8/2019 Drupal Training Manual NEW en BASIC_0
http://slidepdf.com/reader/full/drupal-training-manual-new-en-basic0 13/36
3. The pop-up window will look similar to this image above. To setan email link you need only pay attention to the first box: Link URL. To make an email link you need to start by entering“mailto:” followed by the email address. So for example a link to
[email protected] would look like: mailto:[email protected]
4. You can now select Insert and your email link has been created.
To link to an uploaded PDF file:
As above, follow the steps for Editing Site Pages up to and includingStep Four (pages 4-5), then:
1. With your cursor, highlight the text you would like to make into alink – in this case this will typically be the name of a publication
or document.
2. You will now see the “Link” button on the editing window changefrom being greyed out to turning light blue, making it availableto click on:
Click on the link button and a pop-up window will open up.
Page 13 of 36

8/8/2019 Drupal Training Manual NEW en BASIC_0
http://slidepdf.com/reader/full/drupal-training-manual-new-en-basic0 14/36
3. The pop-up window will look similar to this image above. To linkto a document that you have already uploaded to the site, clickon the little blue/red box to the right of the Link URL field. Youwill now see a list of all the images and PDF files that have been
uploaded to the site:
4. Select the file you would like to link to, or use the “Browse”feature at the bottom of the page, to upload a new file. Click onthe “add” link to the right of the file name and the file’s path willbe added to the Link box.
5. You can now choose whether or not the file should open in a newwindow (the convention with PDF documents is that they open in
Page 14 of 36

8/8/2019 Drupal Training Manual NEW en BASIC_0
http://slidepdf.com/reader/full/drupal-training-manual-new-en-basic0 15/36
a new window). And add a title if you wish. You can then click theInsert button and your file link will have been added.
Page 15 of 36

8/8/2019 Drupal Training Manual NEW en BASIC_0
http://slidepdf.com/reader/full/drupal-training-manual-new-en-basic0 16/36
Advanced Editing Options: Adding an Image to a Page
Image formats for the web are somewhat restrictive. In order for animage to show up on the website, it must be saved as either a .jpg
or .gif file and should be saved at the final size that you would like theimage to display on the website.
In general, .jpg files are best for photographic images, while the .gif format is best for flat colour images like logos.
If you need to add a new image to a page on the website, ensure thatyou have saved it at the proper size and in the correct file formatbefore you proceed through the steps below. It is usually best not toupload images wider than the content area of your site's pages [x pxwide].
To Add An Image to a Page:
Adding an image to a page is quite straightforward and is done throughthe content editing box. Like with making a link, you start by followingSteps 1 – 5 in Editing Site Pages above. Once you have the page open,follow these steps to add an image:
1. Click on the Image icon in the editing toolbar (it looks like a littlegreen tree and is third from the right in the image below).
2. A pop-up box will appear that looks like this:
3. If you know the location of your image on the website’s server,you can enter that location in theImage URL field, but it is more
Page 16 of 36
8/8/2019 Drupal Training Manual NEW en BASIC_0
http://slidepdf.com/reader/full/drupal-training-manual-new-en-basic0 17/36
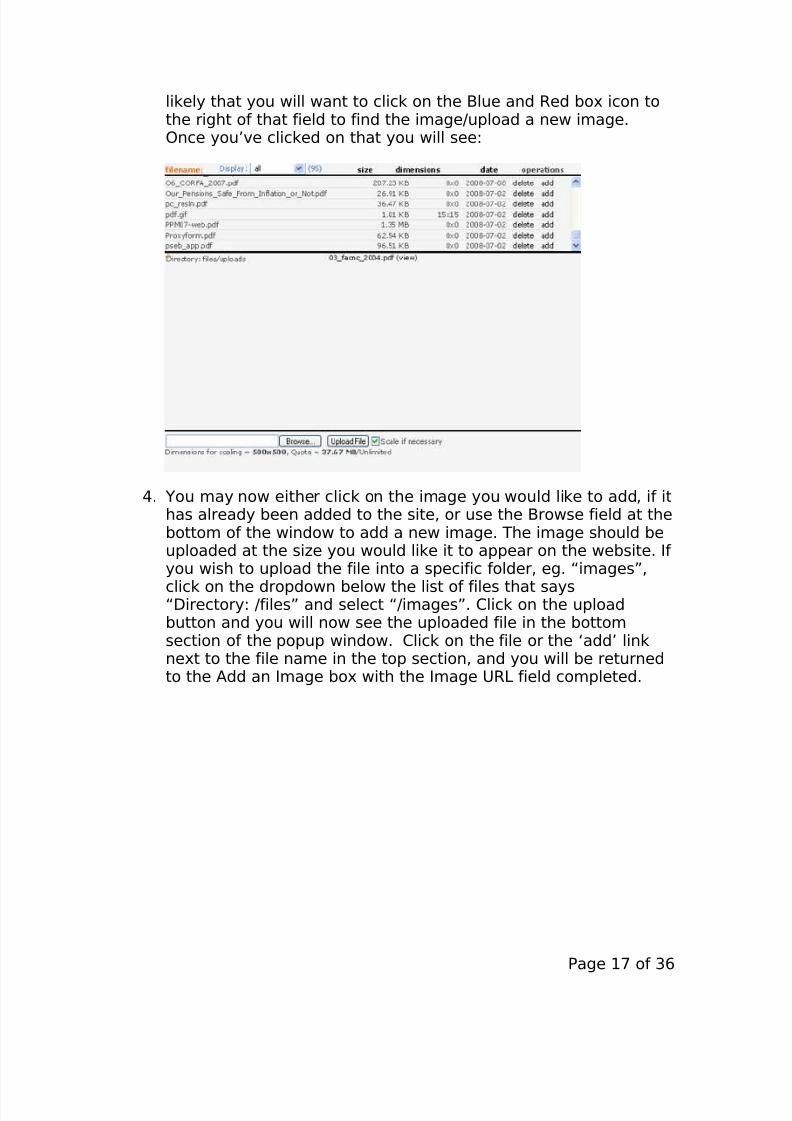
likely that you will want to click on the Blue and Red box icon tothe right of that field to find the image/upload a new image.Once you’ve clicked on that you will see:
4. You may now either click on the image you would like to add, if ithas already been added to the site, or use the Browse field at thebottom of the window to add a new image. The image should beuploaded at the size you would like it to appear on the website. If you wish to upload the file into a specific folder, eg. “images”,
click on the dropdown below the list of files that says“Directory: /files” and select “/images”. Click on the uploadbutton and you will now see the uploaded file in the bottomsection of the popup window. Click on the file or the ‘add’ linknext to the file name in the top section, and you will be returnedto the Add an Image box with the Image URL field completed.
Page 17 of 36

8/8/2019 Drupal Training Manual NEW en BASIC_0
http://slidepdf.com/reader/full/drupal-training-manual-new-en-basic0 18/36
5. You can now fill out the remaining fields:
● Image Description: filling this field out ensures that userswho browse the web with alternative technologies like
screen readers will know what the image is of (the screenreader will read this text).
● Alignment: allows you to position the image in relation tothe paragraph of text.
● Dimensions: these will be auto completed based on thesize of the image you uploaded.
● Border: if you would like to set a border on the image youmay do so here, but there is normally default border stylesset in the site’s stylesheet.
● Vertical and Horizontal space: insert empty/white spacebetween the image and the text. There is, by default some
vertical and horizontal space set by the site’s stylesheet,but if you would like to add more, use these fields.Measurements are all in pixels.
6. Submit the page to save.
Page 18 of 36

8/8/2019 Drupal Training Manual NEW en BASIC_0
http://slidepdf.com/reader/full/drupal-training-manual-new-en-basic0 19/36
Advanced Editing Options: Adding a Document to aPage/Story
In most cases, the documents being uploaded to the site should be
PDF documents, as they are more universally readable by site users,and can not be edited or altered by site users. In some cases you mayhave a need to upload a text document or spreadsheet file, all of thesefiles can be uploaded following the same steps as outlined below.
To upload a document to a site Page (the same instructions work forother content types), simply follow the same steps we reviewed forediting a site Page, which are outlined briefly again here:
1. Ensure you are logged in to the site. If not, login at:http://www.yoursite.com/user/
2. Either find the page that you would like to add the document to,or click on Create Content and select Page or the other type of content you would like to create.
3. Place your cursor in the content editing window.
4. With your cursor, highlight the text you would like to make into alink – in this case this will typically be the name of a publicationor document.
5. You will now see the “Link” button on the editing window changefrom being greyed out to turning light blue, making it availableto click on:
Click on the link button and a pop-up window will open up.
Page 19 of 36

8/8/2019 Drupal Training Manual NEW en BASIC_0
http://slidepdf.com/reader/full/drupal-training-manual-new-en-basic0 20/36
6. The pop-up window will look similar to this image above. To linkto a document that you have already uploaded to the site, clickon the little blue/red box to the right of the Link URL field. Youwill now see a list of all the images and PDF files that have beenuploaded to the site. If you want to look in the pdf’s or
documents upload folder, click on the dropdown below the list of files that says “Directory: files/” and select “/pdfs” or“/documents”. If you would like to sort the files displayed by filetype, click on the dropdown above the list of files that says“Display:” and select the file type (images, .pdf, .jpg, etc.) thatyou would like see.
7. Use the Browse field at the bottom of the window to find thedocument you wish to upload to the site. Once you have found it,click on the Upload file button and the document will beuploaded to the site (appearing now in the list at the top of thiswindow) and the file will appear in the bottom section of thepopup window. Click on the file or the ‘add’ link next to the filein the list if it has already been uploaded. The document’s linklocation will automatically be inserted into the Link box.
8. You can now choose whether or not the file should open in a newwindow (the convention with PDF documents is that they open ina new window). And add a title if you wish. You can then click theInsert button and your file link will have been added.
Page 20 of 36

8/8/2019 Drupal Training Manual NEW en BASIC_0
http://slidepdf.com/reader/full/drupal-training-manual-new-en-basic0 21/36
Advanced Editing Options: Deleting a Document
If, once you’ve uploaded a document, you realize it is the wrong one,or that you no longer need to attach it to the Page (or Story as covered
in a later section), you can easily remove the Document from the page.
Once your document has been uploaded, click on the Link dialogue boxas before, and locate the document, then click on “delete” to the rightof the document’s name. It will now be removed from the site. Pleaseremember, however, that if you had a link to this documentsomewhere, you will need to go remove that link or the link will notwork for site visitors.
Page 21 of 36

8/8/2019 Drupal Training Manual NEW en BASIC_0
http://slidepdf.com/reader/full/drupal-training-manual-new-en-basic0 22/36
EDITING STORIES
This section covers making changes to existing story content. It isworth noting that making changes to existing content here is much like
making changes to regular site Pages, which we covered above, with afew key differences which will be noted.
Making Changes to Existing Stories
It is worth noting that for the most part, you will rarely need to makechanges to this content as it is by its nature generally not regularly updated.
1. Ensure you are logged in to the site. If not, login at:http://www.yoursite.com/user/
2. Just as when editing Pages, you will now see a slightly differentversion of the site that introduces editing tabs.
3. Navigate to the Story content you would like to change. Click onthe “Edit” tab at the top of the site content. Your view of thepage will now look like this:
[IMG]
4. Just as with editing Page content, use the content editing window
to make your changes.
5. Formatting considerations for Story content: the contentyou enter in the title field will automatically be made an H2level heading. If the content requires additional headings withinthe body text, you should start with H3 styles and then cascadedown to H4 and H5 for sub and sub-sub headings.
6. Please be careful to ensure that the remainder of your body textis set with “Paragraph” formatting.
NB: All of these styles can be chosen from the Format dropdownbox as outlined on [Page 8].
7. Scroll down the page and click “Preview” to preview yourchange.
8. If you are satisfied with your change, hit the “Submit” button.
Page 22 of 36

8/8/2019 Drupal Training Manual NEW en BASIC_0
http://slidepdf.com/reader/full/drupal-training-manual-new-en-basic0 23/36
About Categories:
This website has introduced the ability to categorize content by anumber of descriptors. Specifically the following categories have beencreated for the site:
[List categories]
One or more of these categories can be applied to any one Story. Byapplying the correct Category, you are indicating where in the site thenew Story should be filed. [give example]
Page 23 of 36

8/8/2019 Drupal Training Manual NEW en BASIC_0
http://slidepdf.com/reader/full/drupal-training-manual-new-en-basic0 24/36
CREATING A NEW PAGE To add a Page to your website:
1. Begin by logging in at http://www.yoursite.com/user
2. Hover over the “Create Content” link at the top left corner of thepage and click “Page”. You will now see a page where you canenter all of the information for your new page.
[IMG]
3. Fill in the Title and Body content.
4. If you would like this page to have a specific URL (other than,e.g., node/54), enter the URL path you wish the page to display
on under “URL path settings”. (Enter only what would come afterthe main site address, e.g. “foo/bar")
5. If you would like this page to appear in the menu (if not, you cansimply link to it from text on another page), enter the menu infoin the “Menu settings” section. You must enter a title, set the“Parent item” (which can be either a top level menu, or a sectionof the site), and set the weight (how high up in the menu theitem should be relative to the other items).
6. Click “Submit”
7. If you have added a menu item for this page, click the “Edit” tabat the top of the page.
8. Under “Menu settings”, click the link “edit the advancedsettings”, and then click “Submit”. The new menu item may notappear until you do these last two steps.
Page 24 of 36

8/8/2019 Drupal Training Manual NEW en BASIC_0
http://slidepdf.com/reader/full/drupal-training-manual-new-en-basic0 25/36
ADDING STORIES:
The Story content type is used to add items that are not pages. Storycontent can be added to the site individually and the website will build
the listings that appear on the various site pages for you.
To add a new Story item:
1. Ensure you are logged in to the site. If not, login at:http;//www.yoursite.com/user/
2. Once you are logged in, you’ll notice that you now have a greymenu running along the top of the page. On the left-hand side of that menu is a drop down for “Create Content”, which is whatyou will always use to add new content to the site. Click on this
to get a drop down option and select “Story”
3. You will now be taken to a page to add your Story content, thatlooks like this:
[IMG]
4. Begin by giving the new item a Title.
5. You can now select the categories as they apply.
6. You can now enter the Body of the story into the Body field,using all the same formatting options covered earlier in thismanual.
7. If you need to attach a file to the entry, do so following the samemethod covered in Editing Site Pages: Advanced Editing Options:Adding a Document to a Page.
8. By default the system will insert the date that you create thisnew entry as its date. If you would like to backdate a resource,ie. an old piece of news or a past news release, you can do so byclicking on the phrase “Authoring Information” below the content
editing window. You will see your user name in the “Authoredby:” field, which you can leave (this will not show up on thepublic website). Then add the date for the release to the“Authored on:” box, following the format indicated: YYYY-MM-DD. The system will convert the date format to display properly onthe public version of the site.
Page 25 of 36
8/8/2019 Drupal Training Manual NEW en BASIC_0
http://slidepdf.com/reader/full/drupal-training-manual-new-en-basic0 26/36
9. If you wish to preview your item, click “Preview”. When you aresatisfied with your work, choose “Submit”.
Page 26 of 36

8/8/2019 Drupal Training Manual NEW en BASIC_0
http://slidepdf.com/reader/full/drupal-training-manual-new-en-basic0 27/36
ADDING EVENTS:
Events are content that gets sorted by date, but can also be archivedautomatically once a date is passed. Much like with stories, the system
will create the Event listing page for you, you simply need to add eachevent.
To add a new event:
1. Ensure you are logged in to the site. If not, login at:http://www.yoursite.com/user/
2. Once you are logged in, you’ll notice that you now have a greymenu running along the top of the page. On the left-hand side of that menu is a drop down for “Create Content”, which is what
you will always use to add new content to the site. Click on thisto get a drop down option and select “Event”
3. You can now start adding your Event details, your window willlook like this:
[IMG]
4. Enter the Event Title.
5. You may give the event categories if applicable.
6. Fill out all of the remaining fields as they are available.
7. If you need to add a file attachment to the event – perhaps aposter or registration PDF – do so following the same methodcovered in Editing Site Pages: Advanced Editing Options: Addinga Document to a Page/Story.
8. Now choose “Preview” to see your work.
9. When you are satisfied with your work, choose “Submit”.
Page 27 of 36

8/8/2019 Drupal Training Manual NEW en BASIC_0
http://slidepdf.com/reader/full/drupal-training-manual-new-en-basic0 28/36
ADDING CATEGORIES:
Categories are used to sort content into areas of the site. By tagging acontent item with a term belonging to a specific category it will then
show up both on its own page and additionally if set up this way, inlistings elsewhere on the site. To review, again we have severalvocabularies (or types of category):
[list vocabularies]
To add new terms to any of these lists, follow these steps:
1. Ensure you are logged in to the site. If not, login at:http://www.yoursite.com/user/
2. You will now see the grey drop down menu in the top of thescreen, for this item you will need to go into the “Administer”menu on the far right side. In Administer you’re going to:Administer Categories
WARNING: Once you go into this Administer section the pagedesign may change to the default Administration theme, whichlooks something like the image below, don’t worry, you didn’t break anything!
[IMG]
3. You can now add new terms to the vocabulary. Click on “Add Terms” to the right of each top level category (or vocabulary). Your screen will now look like this:
[IMG]
4. Enter the new term
5. You can now give the term a description, however this is notused on the front end of the site – this is optional.
6. You can ignore the Synonym box for this website.
7. Weight: the weight is used to order the terms. “heavier” terms(those with a 10 for example) will sink to the bottom, lighter ones(like “0” or “-10”) will float. Terms with the same weight willorder alphabetically.
8. Click Submit to add your new term.
Page 28 of 36

8/8/2019 Drupal Training Manual NEW en BASIC_0
http://slidepdf.com/reader/full/drupal-training-manual-new-en-basic0 29/36
SENDING AN EMAIL NEWSLETTER
The email newsletter module has been set up to send HTMLnewsletters via the website. They have a predefined template already
and can be created much like adding Pages or Stories to the system.
The system allows you to build an email newsletter, test it by sendingit to yourself and then once you are satisfied, send it to the mailing list.Upon the final send, the email newsletter can also be addedautomatically to the site’s newsletter archive.
To create an Email Newsletter:
1. Ensure you are logged in to the site. If not, login at:http://www.yoursite.com/user/
2. Once you are logged in, to create an Email Newsletter, navigateto Create Content Newsletter Issue. Your screen will now looklike this:
[IMG]
3. You can now enter a Title for the newsletter. The Title will showup on the newsletter archive page, on the top of the Newsletteritself and as the Subject Line for the Newsletter.
4. Under the Newsletter drop down, select the Newsletter categoryyou would like to apply this to – this will also determine themailing list to which the newsletter sends.
5. The Message field is then used to enter the main newslettercontent. You may add text and photos to these.
6. Under “Newsletter sending options” leave the settings as theyare when working on draft versions of the newsletter.
7. Once you are done working on the newsletter, click “Preview” topreview your work or “Submit” to save it. By default, thenewsletter will not be published or sent when you do this.
Page 29 of 36

8/8/2019 Drupal Training Manual NEW en BASIC_0
http://slidepdf.com/reader/full/drupal-training-manual-new-en-basic0 30/36
Testing a newsletter:
1. When you are satisfied with your work, it is important thatyou do a test sending of your email newsletter to yourself
and anyone else who may want to view it before it sends. To dothis, make sure you have clicked on the “Edit” tab.
2. Under “Newsletter sending options”, under “Sending” switch thesetting from “Don’t send now” to “Send one test newsletter tothe test address”. In the “Test e-mail addresses” field, add theaddresses to which the test will be sent, separated with commas.
3. When you are ready to send the test, click “Submit”.
4. You should get the test email in you inbox in 10-15 minutesdepending on system traffic. Return to the site to make any
necessary changes.
5. Be sure to check that the links work and that the layout and textare okay. Make any edits to the newsletter by clicking on the“Edit” tab, and then when you are finished, clicking “Submit” tosave, with or without sending another test email.
Sending/Publishing a newsletter:
1. When you are ready to send the newsletter, click on the “Edit”tab.
2. Under “Newsletter sending options”, under “Sending” switchthe setting to “Send newsletter”. Under “Publishingoptions” click “Published”. It is important that you do bothat the same time, and do not return to the page and re-submit it after the newsletter has sent, otherwise the system will reset theNewsletter to being Unsent and it may not appear on the publicside of the site.
3. When you are ready to send the newsletter, click “Submit”.
Page 30 of 36

8/8/2019 Drupal Training Manual NEW en BASIC_0
http://slidepdf.com/reader/full/drupal-training-manual-new-en-basic0 31/36
MANAGING NEWSLETTERS
The Newsletter module also allows you to manage the email newsletter—there are five parts to the Newletter administration—to begin in the
menu at the top of the page, navigate to Administer Contentmanagement Newsletters. You now have a page with five tabsacross the top that looks like this:
[IMG]
There are five Newsletter admin tabs:
Sent issues
This page provides a list of all newsletters that have been sent—you
can filter this list using the “Show issues from” dropdown.
Drafts
When you click on the Drafts tab, you will get a page that looks likethis:
[IMG]
This page provides a list of all newsletters whether sent, published, ordrafts—you can filter this list using the “Show issues from” dropdown.
You can also navigate to and/or edit drafts through this page byclicking on either the title of the newsletter, or the “edit” link next to anewsletter. The column labelled “sent” will display an icon with a greencheckmark once the newsletter send has completed—this can takeseveral minutes depending on how large your subscription list is.
Newsletters
When you click the Newsletters tab, you will get a page that looks likethis:
[IMG]
This page provides a list of all of the categories of newsletters/lists thatyou have created. From here, you can add a new category of newsletter or edit your existing newsletters. If you click on “Addnewsletter” or “edit newsletter”, you will see a page that looks likethis:
Page 31 of 36

8/8/2019 Drupal Training Manual NEW en BASIC_0
http://slidepdf.com/reader/full/drupal-training-manual-new-en-basic0 32/36
[IMG]
Here, you can add/edit the Newsletter name, a description of thenewsletter (optional), and then weight (which controls where it will bepositioned when in lists of newsletters).
Subscriptions
When you click the Subscription tab, you will get a page that looks likethis:
[IMG]
This page (the List subscriptions tab) provides a list of all of thesubscribers to your various newsletters. From here, you can filter toshow subscriptions to specific newsletters, and import or export
mailing lists.
Deactivating subscriptions: If you need to deactivate anysubscriptions (this will deactivate all subscriptions for the emailaddress), go to the List Subscriptions page, and click the “Inactivate”link to the right of the email address. You can also delete the addressfrom subscriptions altogether.
Importing (adding) and exporting subscriptions
When you click on the Import subscriptions tab, you get a page that
looks like this:
[IMG]
To import/add new email addresses:
1. Copy and paste them into the text box labelled “E-mailaddresses” – they must be in the form of plain text, with eachemail address separated with a comma.
2. Under “Subscribe imported addresses to the followingnewsletters”, check the boxes for the newsletter(s) to which you
would like to add the addresses.3. Click “Import”.4. If for any reason, some email addresses have not been added,
the confirmation message will contain an error listing theaddresses that have not been added. Normally, this will only occur if there is a formatting error in an address.
Page 32 of 36

8/8/2019 Drupal Training Manual NEW en BASIC_0
http://slidepdf.com/reader/full/drupal-training-manual-new-en-basic0 33/36
When you click on the Export subscriptions tab, you get a page thatlooks like this:
[IMG]
To export email addresses:
1. Check the lists you would like to filter for (Active/Inactive users;Newsletters subscribed to), and click “Export”. The e-mailaddresses will then appear in the box at the bottom in a comma-separated list, which you can copy and paste into a file on yourcomputer.
Settings
This area contains the technical settings for your newsletters. Pleasedo not make any changes in this section.
Page 33 of 36

8/8/2019 Drupal Training Manual NEW en BASIC_0
http://slidepdf.com/reader/full/drupal-training-manual-new-en-basic0 34/36
MANAGING BLOCKS (SIDEBAR CONTENT)Sidebar content, and other “blocks” can be managed much like regularpages. To manage the content in the sidebars:
1. Ensure you are logged in and navigate to AdministerSiteBuildingBlocks, there will be a list of blocks for the site:
[IMG]
2. Find the one with the title matching the block you wish to editand click 'configure'.
3. You can then edit the content like you would a regular page:
[IMG]
4. Click 'save block' when you're done.
Please note that editing information in this area other thanthe block content (which is edited through a regular content editing window) may cause sidebar content to stop displaying properly.
Page 34 of 36

8/8/2019 Drupal Training Manual NEW en BASIC_0
http://slidepdf.com/reader/full/drupal-training-manual-new-en-basic0 35/36
LOGGING OUT
Once you have finished all of your site updates and work, log out of thesystem. You will find the “Log out” link in the menubar. Click on the
“Logout” link and the system will log you out. If you have any troublelogging out, you can also type http://www.yoursite.com/logout into theaddress bar.
Page 35 of 36

8/8/2019 Drupal Training Manual NEW en BASIC_0
http://slidepdf.com/reader/full/drupal-training-manual-new-en-basic0 36/36
APPENDIX: LICENSING This document is © copyright 2008 by the Raised Eyebrow Web Studio,Inc. (http://www.raisedeyebrow.com) and Ariane Khachatourians(http://groups.drupal.org/user/984), and can be used in accordance
with the Creative Commons License, Attribution-ShareAlike3.0,http://creativecommons.org/licenses/by-sa/3.0/. This copyleft license(very similar to the GPL) allows anyone to copy, modify, andredistribute modifications of all or part of the Basic Drupal End-User Training Manual as long as :
● the license is included with all copies or redistributions.● the Basic Drupal End-User Training Manual is attributed as the
originating document.
These conditions can be waived only if permission is obtained from the
copyright holder(s). By posting comments to the thread(s) associatedwith this manual on http://groups.drupal.org, Drupal site membersagree that the comments can be revised and/or incorporatedwholesale into the Basic Drupal End-User Training Manual under thelicensing terms given above.