drumset maker the tabbed “drum sets' section of the … · drumset maker the tabbed “drum...
TRANSCRIPT

Drumset Maker
The tabbed “Drum Sets' section of the BB Manager (middle tab in bottom left window) allows you to create drumsets for the BeadBuddy by loading up your own samples. It also enables you to further customize or replace drum components of the existing default drum sets.Click on the tab “Drum Sets” to see a list of drumsets currently present in your BeatBuddy workspace/ project.

To create a new drum set, go to “File-> New Drumset”.
A basic default drumset mapping is created for you where you can begin loading up samples and making adjustments. To view and edit this new drumset, make sure that “Drum Sets” tab is selected. Right window will display elements (instruments) of the new set.

To view/ edit elements of an existing drumset, double-click on the name of drumset you want to edit in the list. Just like creating a new drumset, existing drumset will open up and display in the right window. A loading up dialog will pop-up showing the progress of opening up a drumset.
Maximum drumset size is 100MB. Progress bar on the top of the Drumset Maker window will display amount currently used in percentage %. The larger the drumset, the longer it will take for the BeatBuddy to load it up into RAM.
Drumset Maker overview
Each drum component (eg. Kick, snare, hi-hat....) is referred to as “instrument”. A drum set is made upof a number of instruments.
Each instrument consists of:
1. Instrument Details: this is also a button that, when clicked on, will open up essential settings for that instrument
2. Button to automatically sort samples by their dynamic layers3. Add a new sample to instrument4. Remove instrument5. Velocity range for a sample (dynamic layer setting)6. Name of sample loaded up7. Sample preview8. Add/ replace sample by browsing your computer's hard disc9. Remove sample from instrument
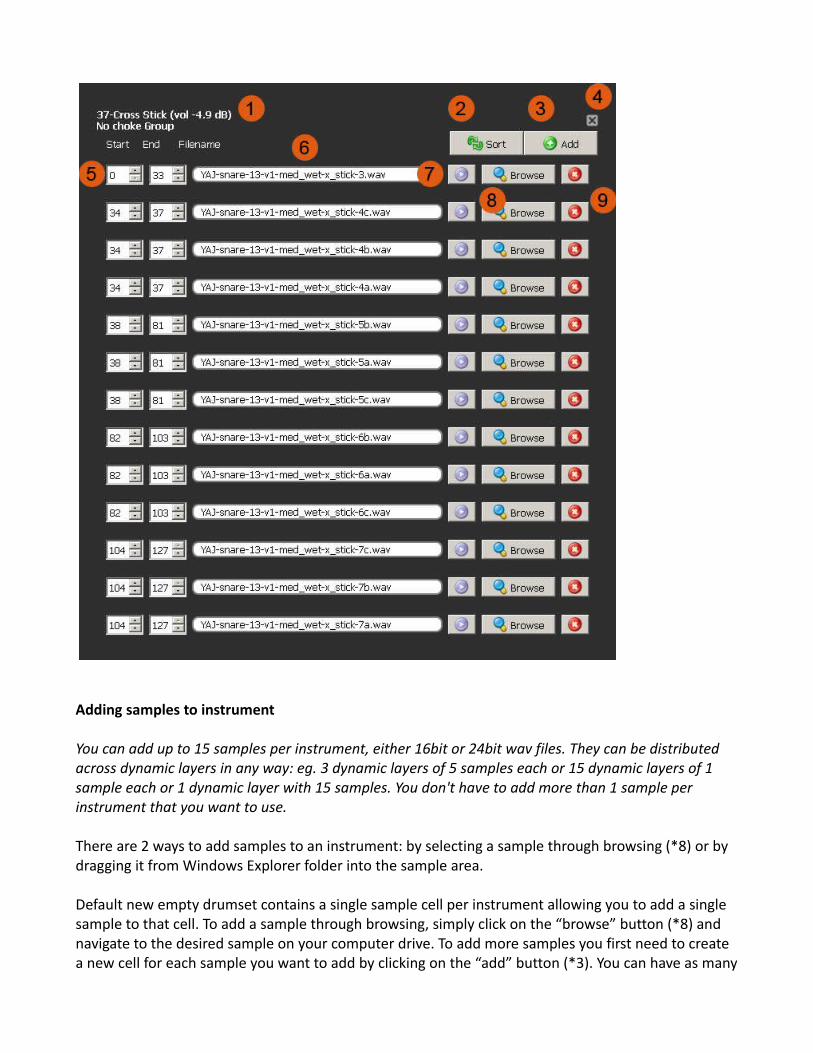
Adding samples to instrument
You can add up to 15 samples per instrument, either 16bit or 24bit wav files. They can be distributed across dynamic layers in any way: eg. 3 dynamic layers of 5 samples each or 15 dynamic layers of 1 sample each or 1 dynamic layer with 15 samples. You don't have to add more than 1 sample per instrument that you want to use.
There are 2 ways to add samples to an instrument: by selecting a sample through browsing (*8) or by dragging it from Windows Explorer folder into the sample area.
Default new empty drumset contains a single sample cell per instrument allowing you to add a single sample to that cell. To add a sample through browsing, simply click on the “browse” button (*8) and navigate to the desired sample on your computer drive. To add more samples you first need to create a new cell for each sample you want to add by clicking on the “add” button (*3). You can have as many

as 15 cells per instrument enabling you to add up to a total of 15 samples per instrument.
Drag n' drop is a preferred and a quicker way of adding samples. We recommend that you position theBB Manager to left side of your screen and Windows Explorer folder (that contains your samples) to the right, so you can easily drag the samples over.Drag a sample (wav file) from the Windows Explorer onto the desired instrument. It will highlight indicating that you can drop the sample there. Once a sample is dropped onto an instrument it will be added to that single sample cell. If you want add more samples to the same instrument, simply repeat the drag n' drop process. New cells will be automatically created to accommodate the samples being added.
To replace a sample within a cell, simply drag n' drop another sample onto the name area of a cell (*6)or browse to a replacement sample using the browse button of the respective sample cell.
To remove a sample, click on the “x” button (*9).
One of the best features of the BeatBuddy and what makes it sound natural is its ability to play back samples at random when the same note is being played sequentially. For example: lets say we have a snare drum fill consisting of eight 16ths notes played one after the other. If a single snare drum samplewas to be used to play back this fill, it would end up sounding like a machine gun, robotic, stutter-like. When a real drummer plays, no 2 notes sound exactly the same. Those subtle differences is what makeit sound real and natural.
In order to have natural-sounding results when playing back a drum fill (drum roll) we need to have

various samples of the same instrument play back at random, so that no sample is played back twice in a row.
As mentioned earlier, you can have up to 15 samples per instrument distributed across dynamic layers in any way. If we are to have 3 dynamic layers with 5 samples on each, then the BeatBuddy would alternate between 5 samples when playing back a drum roll on a single dynamic layer. Every time a note is played back a different sample is triggered (assuming there are multiple samples).
Please keep in mind that only samples within the same dynamic layer are alternated. For example: if you have 3 samples loaded up into an instrument and each one is placed on a different dynamic layer (total of 3 dynamic layers), then there will be no alternating of samples as only a single sample is present on a dynamic layer.
Assigning dynamic layers to samples
MIDI offers 128 velocity levels: 0-127. 0 is inaudible while 127 is the loudest.Each sample loaded up into an instrument needs to be assigned a velocity range (dynamic layer), so that the BeatBuddy knows what sample to play back at a particular midi velocity. Properly programmed or recorded MIDI drum loops will likely contain various note velocity values. Those variations in note velocities should translate to a dynamic and musical playback.
Prior to setting dynamic layers to samples, decide how many dynamic layers you are going to have for a particular instrument and at what velocity values those dynamic layers will interchange. That decision should be made according to your available samples. If a drum was sampled at 5 dynamic layers, you may want to have 5 dynamic layers for that drum instrument. Simply enter values from 0 to127 in the designated area (*5). For example: 0-35, 36-80, 81-100, 101-127.
Important! You must cover the entire range from 0-127. There can be no gaps between dynamic layersor the software will not let you save drumset.
To have multiple samples loaded up on the same dynamic layer (in order to have random sample playback), simply assign them the same values.
Example: sample 1: 0-35sample 2: 0-35sample 3: 0-35sample 4: 36-100sample 5: 101-127
In this example we have 5 samples distributed across 3 dynamic layers (0-35, 36-100, 101-127). 3 samples loaded up on the first dynamic layer (0-35) will play back at random, while the other 2 samples will repeat.
You can have any combination of samples and dynamic layers within the limit of 15 samples per instrument.

BeatBuddy features automatic volume mapping. That means that if a single sample is loaded into instrument, it will be automatically adjusted in volume during playback to reflect velocity values of midi being played. This allows for smooth transitions between dynamic layers, effectively creating 127 dynamic levels during playback.
Clicking on the “sort” button (*2) will sort all samples within instrument by their dynamic layers from the lowest (0) to the highest (127).
Setting up Instrument parameters
Clicking on instrument name (*1) will bring up a pop window with Instrument Details, where we can set a number of important parameters for that instrument.
Instrument Name: name the drum/ percussion component (eg. Snare, kick, tom 1, tom 2 …)
MIDI ID: Every MIDI note is represented by a MIDI ID. This is how all MIDI playback devices (software and hardware) know what note is being triggered and what sample to play back. This should

correspond to a drum map used to create drum loops you will be using.
For example: snare is MIDI ID# 38, kick #36, closed hi-hat #42. If a drum loop was created using this same mapping, then it will play back as expected. Some drum software makers utilize slightly differentdrum maps. If they were to create a loop with snare notes corresponding to MIDI ID #37, then those notes will not be played back by the BeatBuddy unless we assign the snare drum instrument to MIDI ID #37.
Default BeatBuddy content (loops and drumsets) were created using GM drum map for the most part and wherever possible. Latin set supplied with the default content far exceeds the number of midi id's used by GM drum map and it is therefore BeatBuddy specific.
To assign an instrument to a MIDI ID #, simply select it from the drop down list of available numbers. Ifa number has already being assigned to another instrument, it will not be available in the drop down list. No two instruments can have the same MIDI ID#.
Choke Group: it enables one instrument to “choke” or stop playback of another instrument placed in the same group. For example: closed hi-hat and open hi-hat can not be played at the same time in reallife. By placing closed hi-hat instrument in the same “choke group” as the open hi-hat instrument, it will ensure that whenever a closed hi-hat is played while open hi-hat is still sounding, the open hi-hat sound will cease as soon as the closed hi-hat starts sounding.
Another use for this would on a crash cymbal if you have a sample of a crash cymbal being physically choked by hand. You could replicate the same effect with this feature by placing crash cymbal instrument and choked cymbal instrument in the same “choke group”.
There are 15 available choke groups. 0 means that instrument is not being assigned to a choke group.
Fill Choke Group: not to be confused with “choke group” explained above, this feature has 2 uses. It helps avoid accidental flams at beginnings and endings of drum fills AND creates more natural transitions between fills and main beats.
Avoiding flams- For example, if a drum fill loop contains a kick drum at the end and superseding beat starts with a kick that is not quantized (perfectly “on the beat”), then it would result in unnatural-sounding two kick drums being played closed to each other, aka flamming. By placing a kick drum in a “fill choke group”, whenever there is a kick drum note at beginning or end of a drum fill in close proximity to kick drum note from main loop, only a single kick drum note will sound.
Natural transitions- in real life when a drummer plays a drum fill it usually ends with a crash and kick drum played together to accent the beginning of a groove. He/she will likely not play hi-hat ora ride cymbal at the same time as this accented kick/crash on beat 1. Crash cymbal practically replacesthis first hi-hat or ride cymbal note. In order to achieve the same result when transitioning from fills tomain beats, we need to strategically place crash cymbals in the same “fill choke group” as hi-hats and ride cymbal. Resulting transitions sound more natural.
You can set how close notes have to happen in order for superseding one to be ignored. Available options are 1/4, 1/8 and 1/16.

Volume: Enables you to mix individual instruments (drum components) within a drum set for a more uniform playback. You can only lower the volume of instrument, but not raise it. Values are displayed in “db”, decibels, audio measuring unit for sound pressure.From physics of sound we know that by lowering sound pressure (volume) by 6db, the resulting soundwill appear to sound half as loud (50% of the original volume). By lowering it further by 6db, it would sound half as loud again, or 25% of the original volume.
Polyphony: Specify how many samples of an instrument can sound at the same time. If ”1” is selected,then instrument is monophonic meaning that each sample played back will mute sample previously triggered and still currently sounding. If “0” is selected, than any number of samples for the instrument can sound at the same time. Experiment with values between 2-4 for optimal results.
Adding New Instrument to drumset
To add a new instrument to a drumset, navigate to the main menu on the top: Organize → Add Instrument