drawing 1 drawing skills - open college of the arts · 8 drawing 1: drawing skills your learning...
TRANSCRIPT
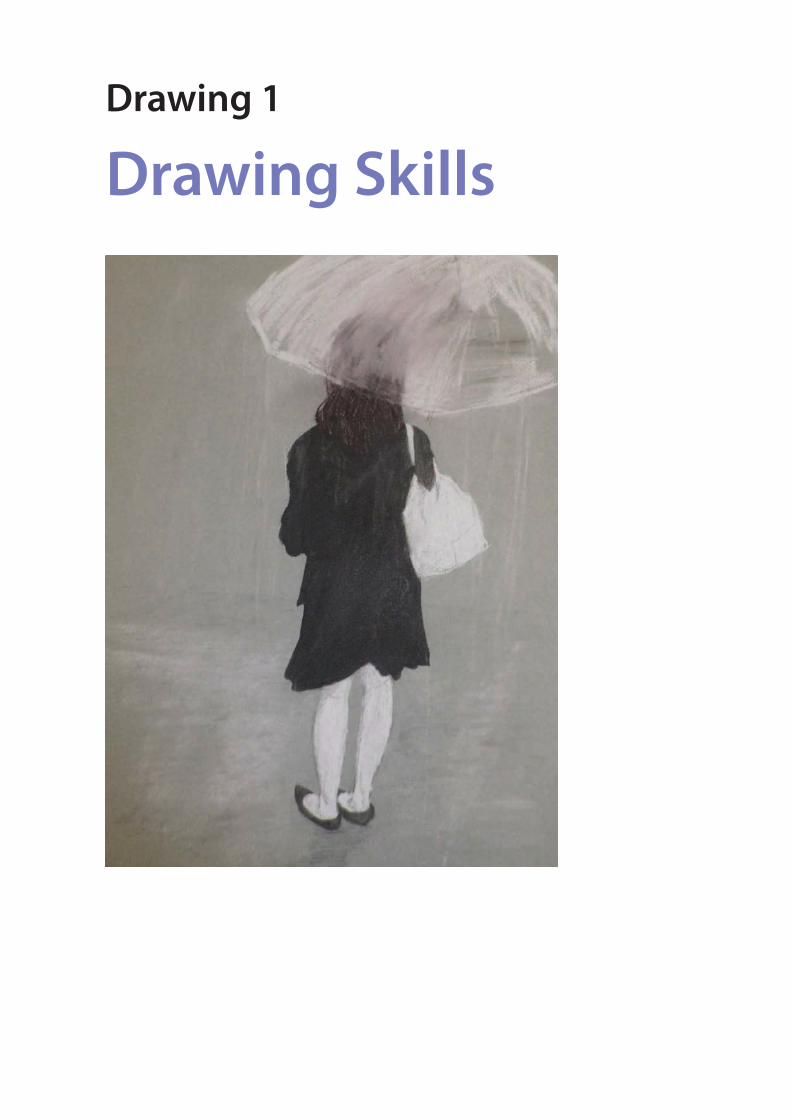
Drawing 1
Drawing Skills
2 Drawing 1: Drawing Skills
Open College of the Arts
Michael Young Arts Centre
Redbrook Business Park
Wilthorpe Road
Barnsley S75 1JN
0800 731 2116
weareoca.com
oca.ac.uk
Registered charity number: 327446
OCA is a company limited by guarantee and
registered in England under number 2125674.
Copyright OCA: 2014; Revised 2015
Document Control Number: DR1DS031115
No part of this publication may be reproduced, stored in a retrieval system, or transmitted in
any form or by any means - electronic, mechanical, photocopy, recording or otherwise - without
prior permission of the publisher (Open College of the Arts)

3 Drawing 1: Drawing Skills
Contents
Before you start 5
Introduction 12
Part one Form and GestureProject 1 Feeling and expression 18
Project 2 Basic shapes and fundamental form 21
Assignment one 27
Part two IntimacyProject 1 Composition 33
Project 2 Detailed observation of natural objects 38
Project 3 Still life 41
Project 4 At home 47
Assignment two 53
Part three ExpanseProject 1 Trees 58
Project 2 Landscape 62
Project 3 Composition 67
Project 4 Perspective 71
Project 5 Townscapes 78
Assignment three 84
Part four The figure and the headProject 1 Fabric and form 88
Project 2 Proportion 92
Project 3 Form 97
Project 4 Structure 101
Project 5 The moving figure 103
Project 6 The Head 105
Assignment four 111
Part five Personal project and written elementAssignment five The personal project 115

4 Drawing 1: Drawing Skills

5 Drawing 1: Drawing Skills
Before you start
Drawing 1: Drawing Skills provides a structured introduction to drawing using a wide range of
media and methods. You’ll learn to observe and look selectively and translate what you see into
your drawings. Topics include drawing outdoors and from nature, perspective and drawing the
human face and figure.
Alongside your practical work, you’ll be encouraged to research the work of other artists,
especially contemporary artists, both in books and online, and to make the effort to experience
drawing at first hand through visits to museums and galleries.
Course aims and outcomesThis course aims to give you the opportunity to:
• develop your drawing skills
• draw using a wide range of media and methods
• develop your visual and artistic awareness and ability to observe selectively
• develop self-reflective and critical skills.
On successful completion of the course, you’ll be able to:
• demonstrate drawing skills using a wide range of drawing media
• use drawing, tone and colour to represent three dimensions
• explain the rudiments of linear perspective and other drawing systems
• reflect perceptively upon your own learning experience.
Even if you don’t intend to submit your work for formal assessment, it’s useful to take on board
these outcomes to support your learning and use as a means of self-assessment. You can
check your progress against the learning outcomes in your learning log when you review your
progress against each assignment.
An Introduction to Studying in HEIt’s advisable to take this course before you study any of OCA’s Higher Education (HE) courses.
It’s designed to introduce you to some important concepts and practical techniques that will
help you as you prepare to study in HE, possibly for the first time.
www.oca-student.com/study-guides/introduction-studying-he

6 Drawing 1: Drawing Skills
Your tutorYour tutor is your main point of contact with OCA. Before you start work make sure that you’re
clear about your tuition arrangements. The OCA tuition system is explained in some detail in
your Student Handbook.
If you haven’t already done so, please write a paragraph or two about your experience to date.
Add background information about anything that you think may be relevant for your tutor to
know about you (your profile) – for example, your own practice, your reasons for exploring this
subject, what you expect to achieve from taking the course.
Email or post your profile to your tutor as soon as possible. This will help them understand how
best to support you during the course.
Your tutor will make arrangements with you for dealing with queries, reviewing progress and
submitting assignments. You’ll also need to arrange with your tutor how you’ll deal with any
queries that arise between assignments. This will usually be by email or phone. Please note that
tutors can only deal with occasional emails between assignments.
Course SupportCourse support are able to assist with things that you may find unclear in the exercises, projects
and assignments and technical issues such as locating course resources etc. They can act as a
point of contact in between tutor communications. Please email [email protected].
Formal assessmentRead the section on assessment in your Student Handbook at an early stage in the course.
The Assessment and how to get qualified study guide gives more detailed information about
assessment and accreditation. You’ll find this on the OCA student website. For assessment you’ll
need to submit a cross-section of the work you’ve done on the course:
• all five practical course assignments plus any amendments made in the light of tutor
comments
• your tutor reports
• your learning log or blog url.
Only work done during the course should be submitted to your tutor or for formal assessment.

7 Drawing 1: Drawing Skills
Assessment criteria
The assessment criteria listed below are central to the assessment process for this course, so
if you’re going to have your work assessed to gain formal credits, please make sure you take
note of these criteria and consider how each of the assignments you complete demonstrates
evidence of each criterion. On completion of each assignment, and before you send your
assignment to your tutor, test yourself against the criteria; in other words, do a self-assessment
and see how you think you would do. Note down your findings for each assignment you’ve
completed in your learning log, noting all your perceived strengths and weaknesses, taking into
account the criteria every step of the way. This will be helpful for your tutor to see, as well as
helping you prepare for assessment.
Assessment criteria points• Demonstration of technical and visual skills – materials, techniques, observational skills,
visual awareness, design and compositional skills (35%).
• Quality of outcome – content, application of knowledge, presentation of work in a coherent
manner, discernment, conceptualisation of thoughts, communication of ideas (20%).
• Demonstration of creativity – imagination, experimentation, invention, development of a
personal voice (25%).
• Context reflection – research, critical thinking (learning logs and, at second and third level,
critical reviews and essays) (20%).

8 Drawing 1: Drawing Skills
Your learning logYour learning log is an integral part of this and every other OCA course. If you’re new to OCA
courses, read the Introducing learning logs study guide. You’ll find this on the OCA student
website.
Use your learning log to record your progress through the course. It should contain:
• your thoughts on the work you produce for each project
• your ideas and observations as you work through the course
• your reflections on the reading you do and any research you carry out
• your tutor’s reports on assignments and your reactions to these.
You’re strongly recommended to set up your learning log as an online blog. This blog could
document your work for the projects and assignments and provide links to research material.
Setting up a blog is free and can be done through websites such as Blogger, Tumblr or
Wordpress. Alternatively you can set up a blog within the OCA student website.
Planning aheadThis Level 1 course represents 400 hours of learning time (although some students may
need to spend more than this). Allow around 20% of this time for reflection and learning log
development. The course should take about a year to complete if you spend around 8 hours
each week on it.
As with all OCA courses, these course materials are intended to be used flexibly but keep your
tutor fully informed about your progress. You’ll need to allow extra time if you decide to have
your work formally assessed.
Drawing 1 is divided into five parts corresponding to the five practical course assignments.
Each part of the course addresses a different aspect of drawing and is separated into a series
of projects designed to tackle the topic in bite-sized chunks. As well as information and advice,
each project offers exercises to encourage drawing and research ideas for you to follow up
independently. The exercises slowly build up into the assignments that you’ll send to your tutor.
The first assignment is diagnostic and is designed to give your tutor a feel for your work at an
early stage in the course. Your work on this assignment won’t count towards your final grade
although the assessors may wish to look at it to assess your progress.

9 Drawing 1: Drawing Skills
Getting feedbackAt the end of each part of the course you’ll need to submit your work so that your tutor can give
you some feedback on your progress. This submission should be a cross-section of the work
you’ve done, including:
• your assignment work, including finished pieces, preliminary work and your reflections
• a selection of work from the exercises in the relevant part of the course
• your learning log or blog url.
Show this work to your tutor by gathering it together and either posting or emailing it (you can
use a free file-sharing service if there’s a lot of material) or you can add it to your blog as you
work through each part of the course.
Make sure that you label any work that you send to your tutor with your name, student number
and the assignment number. Remember to email your tutor to tell them when you’re ready to
submit so that they know to look at your blog or expect a parcel. Your tutor will get back to you
as soon as possible after receiving your assignment but this may take a little time. Continue
with the course while you’re waiting.
It will be helpful for your tutor to see the work that you produce in between assignments. You
may agree, for instance, that you’ll send your tutor samples of your work or make your work
available on your blog, if you need your tutor to comment on something in particular or if you
have a problem that you need help with.
Do note that you’re encouraged to reflect carefully on all tutor feedback and, if appropriate, to
go back to the assignment you submitted and make adjustments to it based on your tutor’s
comments. If you decide to submit your work for formal assessment, making such adjustments
demonstrates responsiveness and learning and will help improve your mark.
10 Drawing 1: Drawing Skills
What you’ll need:Each assignment or project has its own set of materials and tools, but make sure you’ve got the
following basic toolkit:
• loose sheets of paper in varying sizes and colours (from A4 to A1 including found papers,
cartridge/sugar paper, etc.)
• sketchbooks in different sizes – a small pocket-sized one for carrying around and bigger
ones for larger experiments
• A4 and/or A3 ring binder
• a selection of B grade graphite pencils and graphite sticks
• willow charcoal sticks and compressed charcoal sticks
• oily and chalky pastels and conté sticks in a range of colours
• black water-soluble ink
• black acrylic paint (System 3, Cryla or similar)
• a selection of drawing materials and tools for experimentation (carpenter’s pencils,
calligraphy pen, oriental brush pen, etc.)
• PVA glue
• a range of soft and stiff brushes for acrylic paint, glue and ink
• masking tape and drawing pins
• craft knife, small and large scissors
• large smooth board (A1 size or larger)
• lightweight plastic portfolio (A1) to send assignments to your tutor.
Using your sketchbookDrawing hones our visual sense and teaches us to see the world around us in a unique way.
You’re expected to build and maintain those skills of looking and recording alongside your
project work. Be curious, collect images, record ideas. This will stand you in good stead when a
project gives you the opportunity to develop your own subject matter.
There’s no right way to keep a sketchbook, but make it your constant companion. Try to draw
every day, even if only for a few seconds. If all else fails, do ‘drawing in your head’. Spend time
actively looking, trying to judge the angle of a chair or the shape of someone’s nostril.
Your sketchbook and learning log aren’t simply a way for you to display to your tutor how hard
you’re working – they are learning tools for you, so make sure they work for you. You’ll find it
useful to read the Keeping sketchbooks study guide, available on the OCA student website.

11 Drawing 1: Drawing Skills
Reading and resourcesThe reading list at the end of this course guide will be the starting point for your research into
the work of contemporary artists so turn to this now and plan how you’ll access the texts you’ll
need. You’ll also find a list of useful websites to use as the basis for your online research.
Referencing your readingWhenever you read something that you might want to refer to in your projects and
assignments, get into the habit of taking down the full reference to the book, article or website
straight away. You must fully reference any other work that you draw on if you plan to go for
formal assessment. To do this you should use the Harvard system of referencing – there is a
guide to referencing using the Harvard system on the OCA student website. Getting down the
full reference at the time will save you the frustration of having to hunt for the details of a half-
remembered reference long after the event – and ensure that you don’t inadvertently plagiarise
someone else’s work.
OCA website and forumsThere are lots of other OCA students currently studying drawing. Use the OCA website forums
as a place to meet them, share experiences and to learn from one another. The forums are a
great place to ask questions of other students, perhaps from those who have already done the
course. The OCA student website also contains resource material and links to online archives
you’ll need to use. You may want to start by logging onto the forums and introducing yourself.
Find out who else is on the course and say hello.
12 Drawing 1: Drawing Skills
Introduction
Only by drawing often, drawing everything, drawing incessantly, that one fine day you
discern to your surprise, that you are rendering something in its true character.
Camille Pissarro
Paper, and other more exploratory surfaces, hold drawing on their flat planes and the fibre of
the support ‘bites’ into the medium that the artist uses. This demonstrates that even the very
substances used to create drawings aren’t passive, any more than the artist is passive in the
making. The activity of drawing is an immediate conduit between us and something else; it
produces a state of mental absorption, a place where we can become lost in our thoughts,
where time is measured in marks, rubbings, crumbs of charcoal, smuts on our fingers, drips and
spills of inks and washes, watercolour stains, oily streaks and smears of sticks and bars.
The activity of making a drawing is an extraordinary fusion of many factors and choices: What
shall I draw? How big? What paper? What to draw with? How long shall I draw for? In what
physical way shall I draw? Shall I stand? Shall I sit? Shall I draw outside in direct sunlight? Or
shall I draw inside? Shall I light my subject? Or shall I use the ambient changing light? Shall I
draw slowly? Shall I draw fast? Shall I observe carefully? Or shall I try to capture the essence of
the subject?
Practice helps us edit these choices, but in
the beginning it seems complex and very
challenging. Practice also helps us engage
in a meaningful way with the act of drawing
and helps us re-learn how to really see the
world. It changes our view and, importantly,
it begins to undo pre-conceived notions of
what ‘good drawing’ is. A good drawing is not
only measured by accuracy or attractiveness;
it is also elusive, fascinating, even disturbing,
with an energy that reaches out towards the
viewer, raising questions beyond those on the
surface.
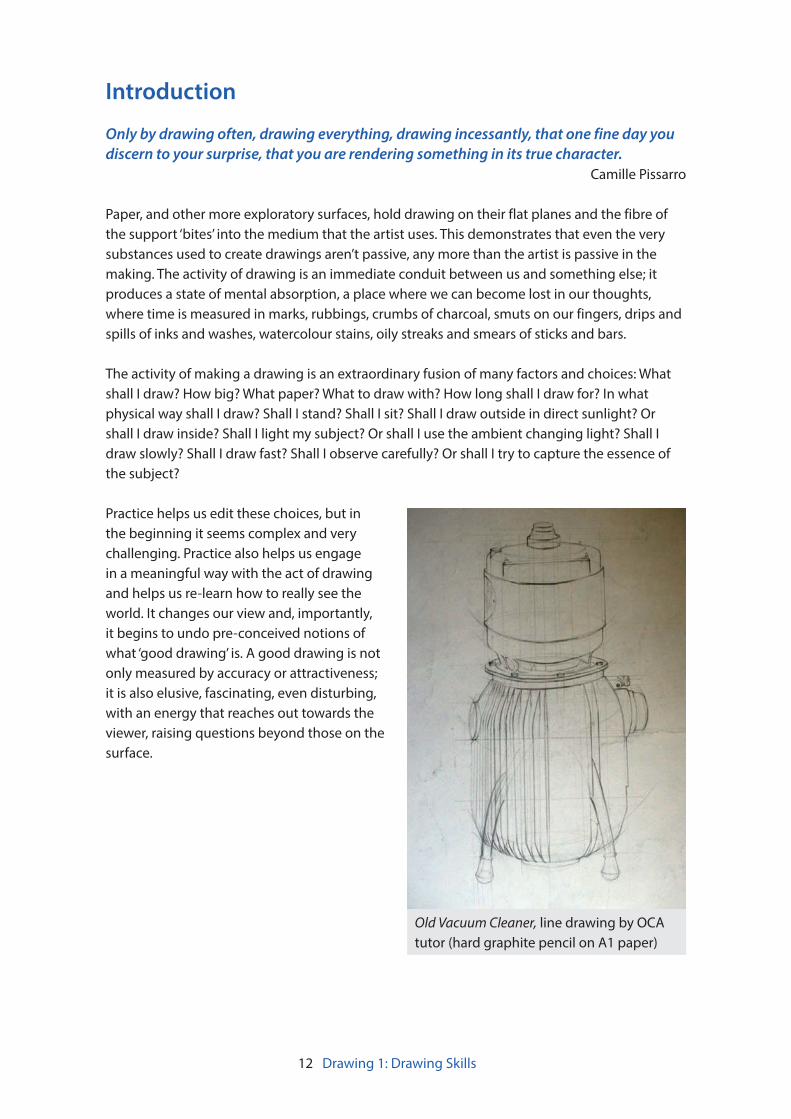
Old Vacuum Cleaner, line drawing by OCA
tutor (hard graphite pencil on A1 paper)
13 Drawing 1: Drawing Skills
A drawing may be functional, as in an exploded diagram of a commercial product, or it may
be exploratory as a means of bringing thought to paper. It may be a witness account of what
we see, recording a time spent sketching a view, a place, a person or a thing. Traditionally, the
sketch was regarded as something provisional, a stepping stone on the way to making a more
formalised image. Nowadays the sketch and the drawing have become more interchangeable
and the professional artist is left to present their own visual language in a way they feel
communicates best what they want to say.
The world around us has height, width, depth, angles, textures and tones. These are all words
associated with the practice of drawing. Drawing, like playing the piano or singing, is learned
through exercise. We must teach our eyes to see the world as an artist; our work is to observe,
sense, and translate our observations into visual form. To do this accurately, we must learn
the art of illusion – mastering perspective drawing, dealing with tone and form, etc. But direct
observation forms the greater part of our learning, whether it’s an object, view or person, or
observing the work of others past and present. Without direct observation we can’t hope to
master the language of drawing – and it is a language, a visual language, the basis of all art
practice. Whether it’s drawing a storyboard for a film, simply copying a photograph or trying
to articulate an imaginary form, drawing is the springboard that we use to bring us into direct
contact with seeing, thinking, sensing and emotions.
You can get an idea of what’s meant by a personal visual language by looking at some images
by the following artists from different art historic moments, each working in a very different
style, but each very firmly absorbed in the activity of drawing: Leonardo da Vinci, Käthe
Kollwitz, Cy Twombly and Jenny Saville.
There is drawing everywhere in our world. Mark-making is an essential aid to thinking, writing
and drawing as they cross over, become conjoined, one in the other. Drawing as a subject is
cavernous, huge. The deeper you explore into its crevices and hidden corners, the more exiting,
diverse, and thrilling it becomes.
We hope you enjoy your own drawing journey …

14 Drawing 1: Drawing Skills

15 Drawing 1: Drawing Skills
Drawing 1
Part oneForm and Gesture
OCA student, Wendy Ormerod, Line drawing

16 Drawing 1: Drawing Skills
Drawing out, drawing from, drawing attention to, absorption ...
Drawing is essentially about leaving your mark, usually on a surface, where a tool deposits
some kind of material trace on or into a flat plane. But drawing might also involve a collection
of virtual or temporary stains, smudges and trails within an everyday spatial environment. Think
of the soft lines a plane leaves in the sky, or a snail trail or spider’s web. If we think about these
in terms of ‘found’ drawings, we can more readily accept that drawing isn’t only done by artists.
Drawing from their environment, artists observe and reveal parts of their world in different and
interesting ways. Drawing in this sense is perhaps more about curiosity, noticing and pointing
out what already exists rather than creating something new, and so might be thought of as
drawing attention to...
At the other end of the scale, drawing sometimes involves deep solitude, the concentrated
act producing a state of absorption where we lose ourselves in intense thought, where time is
measured later in the marks we leave behind and the realisation that hours have passed.
The expressive potential of drawing is vast, and at first may seem complex and challenging, but
if we take it in its simplest form – leaving a trace of a thoughtful and performative activity – we
accept the slightest mark as important.
Part One will encourage you to draw with feeling and expression. Think of the first exercise as a
warm-up session to help you stretch your drawing muscle, with some temporary drawings.
17 Drawing 1: Drawing Skills
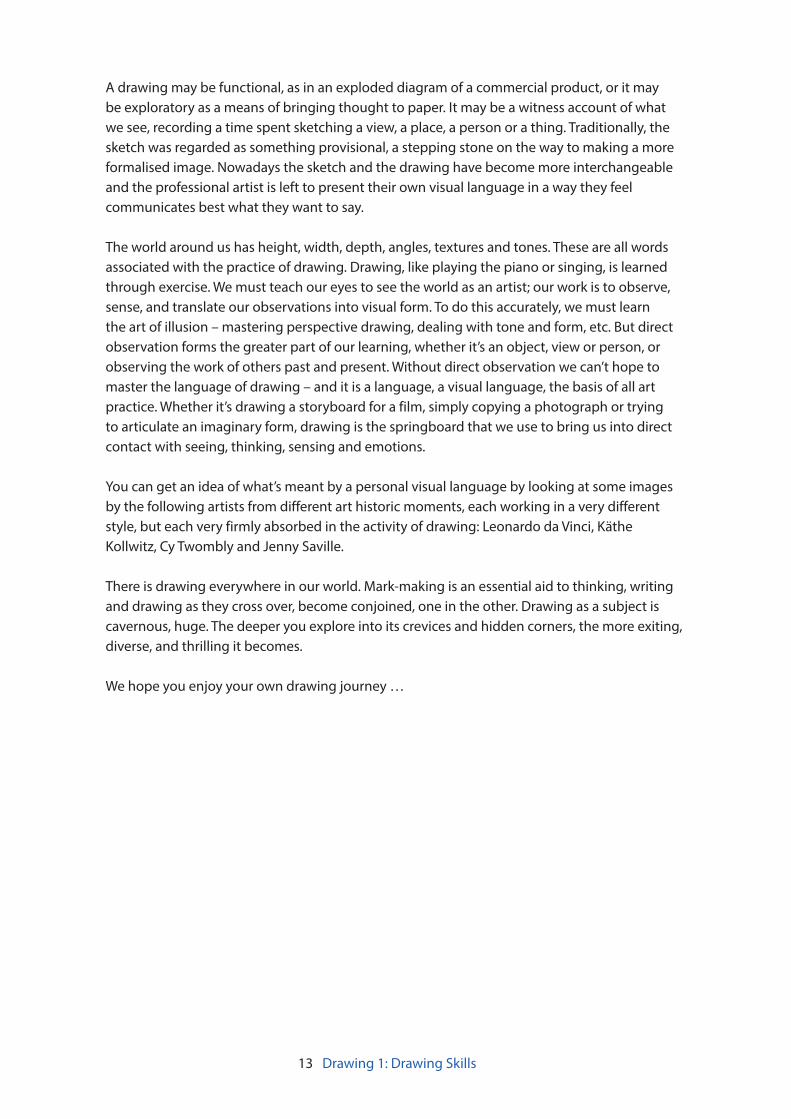
Exercise 1 Warm-up – temporary drawingsTry some of these unusual drawing activities. If you can, ask someone to photograph or
film you working. You can then look back, see yourself drawing and jot down your thoughts
after the temporary drawing has gone.
• Squeeze and drip washing up liquid into the sink.
• Drag a stick in the sand.
• Pull a bicycle through a puddle and create marks with the wet tyres.
• Go outside at night with a small torch or sparkler and wave it around.
These are just a few ideas to get you used to the idea of drawing as something fleeting,
expressive and playful. You may want to find other ways. Remember to document your
activities and reflect on what you’ve done in your learning log.
Student, Abi Latham
18 Drawing 1: Drawing Skills
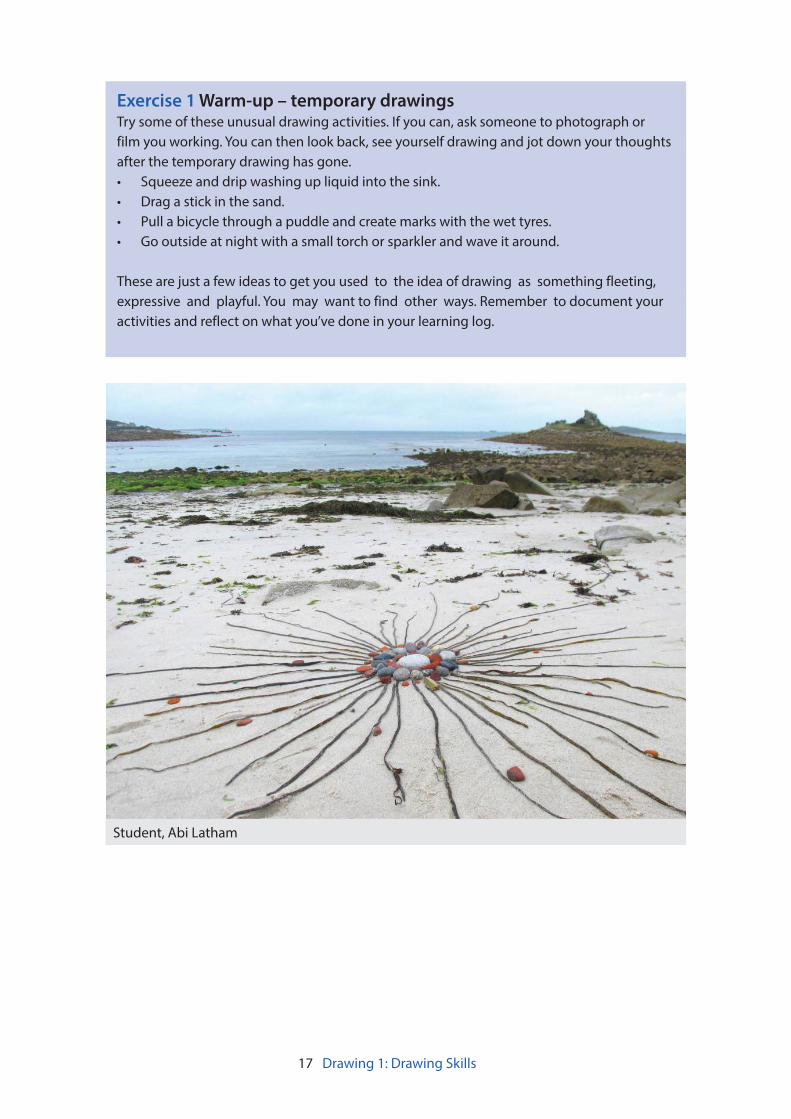
Project 1 Feeling and expression
Drawing can be a way of tapping into and showing your inner feelings, making marks via
physical, sensual, emotional (and other) responses to external and internal stimuli. Someone
experiencing an emotion like joy might leave a very different mark to that of someone who
feels timid. The former may be packed with energy while the latter might be delicate and
halting.
Looking at our sketchbooks and finding expressive images means we retrace our steps as
sentient beings, returning to times of contemplation, remembering emotions and physical
states experienced in the act of doing. In this sense drawing is a record of our emotional and
embodied selves, a primary act quite unlike any other. Here the act of drawing is intense, a
conduit between body and mind:
“…being completely involved in an activity for its own sake. The ego falls away: time
flies. Every action, movement, and thought follows inevitably from the previous one ...
your whole being is involved and you are using your skills to the utmost.”
(Marr, 2013, p 34)
Emma Hunt
19 Drawing 1: Drawing Skills
Beatrice Haines, Crucifix from the Sanitorium, 2012
Research pointLook for contemporary works where you sense some of the artist’s feeling – where the marks,
lines, etc., offer something of the artist’s state of mind. Look for speed, pressure, angles, curves,
jabbing marks, disjointed and rough marks, etc. For example, see Julie Brixey-Williams’ drawing
loctationotation at http://www.saatchiart.com/art/- loctationotation/91093/396898/view Make
notes in your learning log and consider whether art really is capable of expressing emotions.
After all, a drawing is not (usually) a human being so how might it act as an emotional conduit
between artist and viewer? Is it the image, the medium or the act that brought the art work into
being that makes it ‘expressive’ or ‘expressionist’? Or is it all of these and more?
Sarah Spackman, Studio Table, 2012 (charcoal, pencil and ink) (Jerwood Drawing Prize 2012
catalogue, p.73)
If you’ve already completed Pre-degree drawing: An introductory course, you’ll have
experienced similar exercises intended to help you undo rigid ideas about ‘right and wrong’
ways to draw. Physical and material approaches to mark-making will make you more aware
of what drawing can be and how you can embrace it as a way to express your own ideas with
confidence. Above all, though, drawing should be pleasurable. So please don’t be intimidated
by any of the activities – simply try them, take risks and enjoy the process. Even the most
accomplished artist experiences disasters from time to time, so don’t be put off if this happens.
It’s all part of the process of learning and of being an artist.
Exercise 1 Experimenting with expressive lines and marksThis exercise will help you begin to understand how to make your marks express a feeling,
using single words as a starting point.
You’ll need:
• four A1 sheets of paper
• a range of materials including charcoal, ink and a stick (a sharpened twig, wooden
chopstick or similar)
• greasy conté sticks, oil sticks or any other tool that will leave a varied mark depending
on the speed and pressure that you exert – use one colour only, either black, dark blue,
or dark brown.
Fold each A1 sheet in half (A2) and then in half again (A3). Unfold the sheet and tape it to
the board or table top by the corners using masking tape. You’ll have four (A3) panels on
each sheet.
In the corner of one of the sheets write ‘calm’, on another write ‘anger’, on the third write ‘joy’,
then decide on another feeling for the fourth sheet.
Create non-objective images, so no words and no figures, only lines, marks and abstract
shapes within each rectangle. Bear in mind that the edges created by the folds are all that
separate one image from the next. This will help you to become more aware of composition
and negative space.
Spend a little time trying to inhabit one of the emotions (memories associated with the
feeling may help) and when you feel sufficiently calm, angry, etc., take one of your drawing
tools and try to translate the feeling into one of the panels. When you’re confident that the
image works, change your medium and work on the next panel, still using the same word/
feeling as your driving force. Keep working on the same sheet, changing the medium as
you move to the next panel. When you’ve completed your first sheet, put it to one side and
reflect on how you felt when working. Simply jot down a free flow of thoughts and words,
similar to the way you engaged in a free flow of marks and lines.
Allow sufficient time between sheets to allow you to engage fully with the feeling required.
The feelings that prompt the drawing shouldn’t be forced or faked, so if you don’t feel ready
leave the next feeling sheet until another time.

20 Drawing 1: Drawing Skills
Exercise 2 Experimenting with TextureCollect a range of objects with different surface textures. These can be simple
domestic items such as pottery, clothing or other textiles with interesting surfaces and
skins, a bathroom sponge, fruit peel, woven material, tree bark, velvet, silk, etc.
In your sketchbook, divide a page into four squares and experiment with depicting the
textures. Make curved, straight and wiggly lines. Try streaking, smudging and dropping ink
onto wet and dry surfaces and try to describe what the texture feels and looks like. Be as
free as you can and experiment with materials and tools to create interesting effects.
Make notes in your learning log; these will help later when you come to look back at your
work.
Experiment with frottage. This involves placing paper over a rough surface (e.g.
grained wood) and rubbing the back with a pencil to create an impression of the surface
quality of the object. This can then be incorporated into your image to create an interesting
effect but it usually works best when confined to a small area.
The image below is a direct rubbing (or frottage) from a dinner tray used for many years
in the sick bay of a school. The shadow of a crucifix, embedded in the layers of scratched
words and images, adds a sense of time passing.
Michael Coombes
21 Drawing 1: Drawing Skills
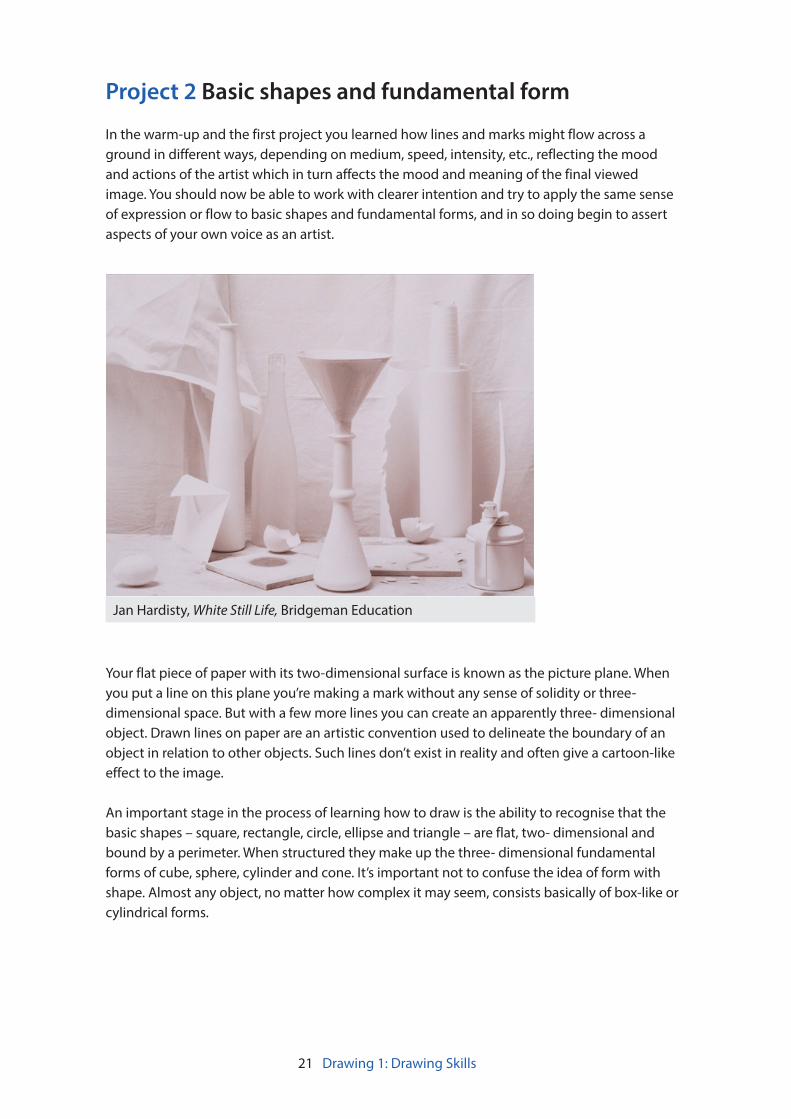
Project 2 Basic shapes and fundamental form
In the warm-up and the first project you learned how lines and marks might flow across a
ground in different ways, depending on medium, speed, intensity, etc., reflecting the mood
and actions of the artist which in turn affects the mood and meaning of the final viewed
image. You should now be able to work with clearer intention and try to apply the same sense
of expression or flow to basic shapes and fundamental forms, and in so doing begin to assert
aspects of your own voice as an artist.
Your flat piece of paper with its two-dimensional surface is known as the picture plane. When
you put a line on this plane you’re making a mark without any sense of solidity or three-
dimensional space. But with a few more lines you can create an apparently three- dimensional
object. Drawn lines on paper are an artistic convention used to delineate the boundary of an
object in relation to other objects. Such lines don’t exist in reality and often give a cartoon-like
effect to the image.
An important stage in the process of learning how to draw is the ability to recognise that the
basic shapes – square, rectangle, circle, ellipse and triangle – are flat, two- dimensional and
bound by a perimeter. When structured they make up the three- dimensional fundamental
forms of cube, sphere, cylinder and cone. It’s important not to confuse the idea of form with
shape. Almost any object, no matter how complex it may seem, consists basically of box-like or
cylindrical forms.
Jan Hardisty, White Still Life, Bridgeman Education

22 Drawing 1: Drawing Skills
Exercise 1 Groups of objectsChoose at least six objects of different sizes and shapes. Some of these should be three-
dimensional forms made from rectangles and cylinders – a paperback book, a cereal box, jar
of coffee, tin of beans, etc. – and others should be less regular in their form, for example a
net or loose plastic container
For the first image, work on a surface (A2 or A1) that seems appropriate for the image you
want to make. Be imaginative and don’t assume you have to use a bright white sheet of
paper. You might want to use a sheet of brown paper or an unfolded newspaper as your
support, for example.
Using just one colour (charcoal, conté, oil stick, ink and stick, etc.) and bearing in mind the
previous exercises, loosely describe the group of objects. Don’t forget their weight,
transparency, shine, etc., and don’t forget the spaces between them and the things they
are resting on or against. Remember that writing on labels will curve around cylindrical
objects and elements half hidden inside bags will jostle for space. Fill the sheet with
drawing.
Imagine you can see through the forms to the spaces inside. Try to evoke some kind of
expression in the marks you make and in the relationships you create inside and around
the edges of the forms and the picture plane.
Student, Michael Coombes

23 Drawing 1: Drawing Skills
Exercise 2 Observing shadow using blocks of toneThere are many ways to evoke the impression of ‘real’ space and the use of tone is a basic
drawing skill that will help you do this. Essentially it’s the depiction of light and dark on a
surface that offers the impression of three dimensionality – and sometimes mood.
To start, place two pale simple-shaped objects together and position a lamp so that they are
lit from just one side. (You can use natural light if it’s a bright day.) Observe the main areas
of light and dark. Make some quick sketches in a large (A2 or A1) sketchbook, mapping out
the broad areas of light and shade. Use a conté or charcoal stick on its side to achieve thick
bold strokes; break these into shorter pieces unless you’re working on a very large surface
(A1 or larger). Also make sure your surface has sufficient ‘tooth’ to capture the pigment –
smooth and shiny paper won’t work.
Next, block in all the gradations of tone. Look for variations of tonal value. Essentially this
means the degree of lightness or darkness. Begin with mid tones, then work in lighter and
darker tones, lifting and pressing down across the surface as you work.
Pause and take a long view to fully observe the pattern of shadows over the whole surface
of the picture plane, then look for the smaller details, the interlocking shadows and the
negative shapes between the objects.
You may find that light is reflected from one surface to another and interferes with and
complicates the shadow cast from the primary light source. Try to find the tonal gradations
that the reflected light causes. Try to get all areas of tone to work together in a series of
tonal shifts. Fill the entire sheet.
Student, Mark Graham
24 Drawing 1: Drawing Skills
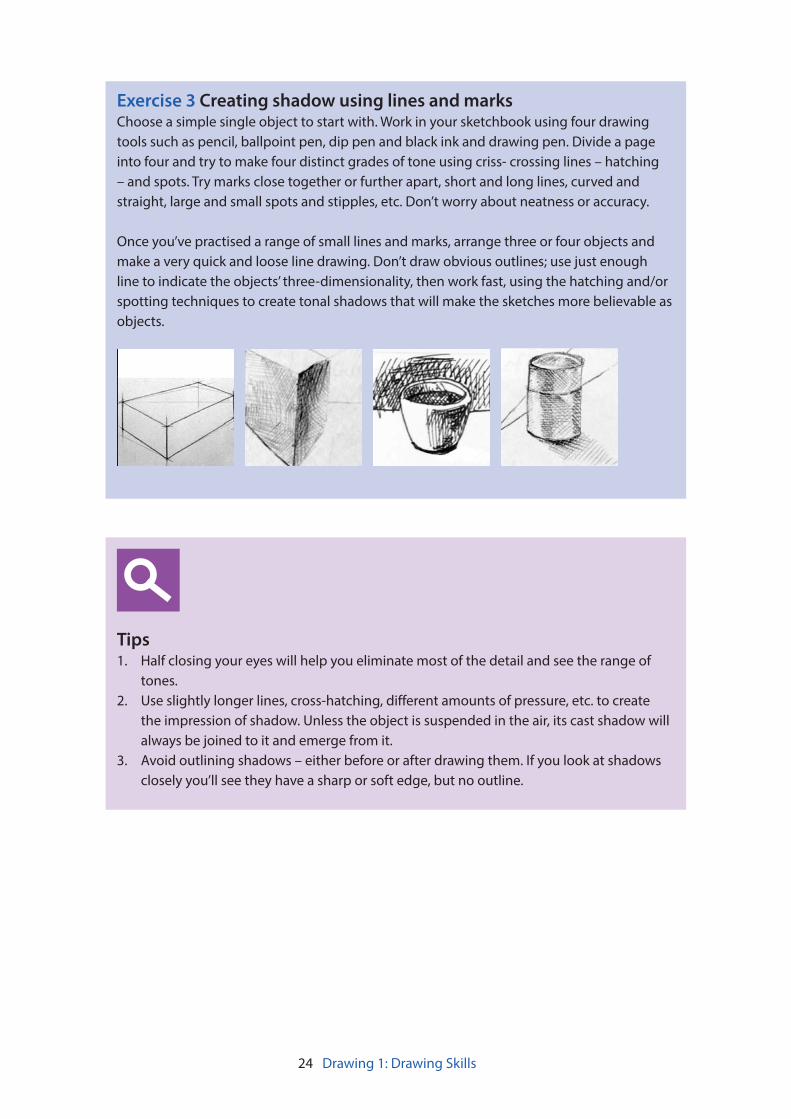
Exercise 3 Creating shadow using lines and marksChoose a simple single object to start with. Work in your sketchbook using four drawing
tools such as pencil, ballpoint pen, dip pen and black ink and drawing pen. Divide a page
into four and try to make four distinct grades of tone using criss- crossing lines – hatching
– and spots. Try marks close together or further apart, short and long lines, curved and
straight, large and small spots and stipples, etc. Don’t worry about neatness or accuracy.
Once you’ve practised a range of small lines and marks, arrange three or four objects and
make a very quick and loose line drawing. Don’t draw obvious outlines; use just enough
line to indicate the objects’ three-dimensionality, then work fast, using the hatching and/or
spotting techniques to create tonal shadows that will make the sketches more believable as
objects.
Tips1. Half closing your eyes will help you eliminate most of the detail and see the range of
tones.
2. Use slightly longer lines, cross-hatching, different amounts of pressure, etc. to create
the impression of shadow. Unless the object is suspended in the air, its cast shadow will
always be joined to it and emerge from it.
3. Avoid outlining shadows – either before or after drawing them. If you look at shadows
closely you’ll see they have a sharp or soft edge, but no outline.

25 Drawing 1: Drawing Skills
As you’ve probably realised by now, a flat area will never be evenly lit: the part closest to the
light will always have the lightest tones and there will be some gradations of middle tones,
however minimal. Look carefully at a flat surface such as a table top and see if you can identify
the gradations of tone. Some light sources provide a more even tone, for example a fluorescent
strip light or sunlight on a surface outside.
Review your work for the previous two exercises. How difficult did you find it to distinguish
between light from the primary light source and secondary reflected light? How has awareness
of tone affected your depiction of form? Make some notes in your learning log.
Research pointLook carefully at the image below. Note the artist’s expressive use of tone – blocks of dark
charcoal in sharp contrast to expanses of light, and then the smaller details, lines and spots
that pull the image together as an ambient scene. Try to find further work by the artist and
discuss the atmospheric potential of tone in your log.
Odilon Redon, Two Trees, c.1875
(charcoal on paper)
26 Drawing 1: Drawing Skills
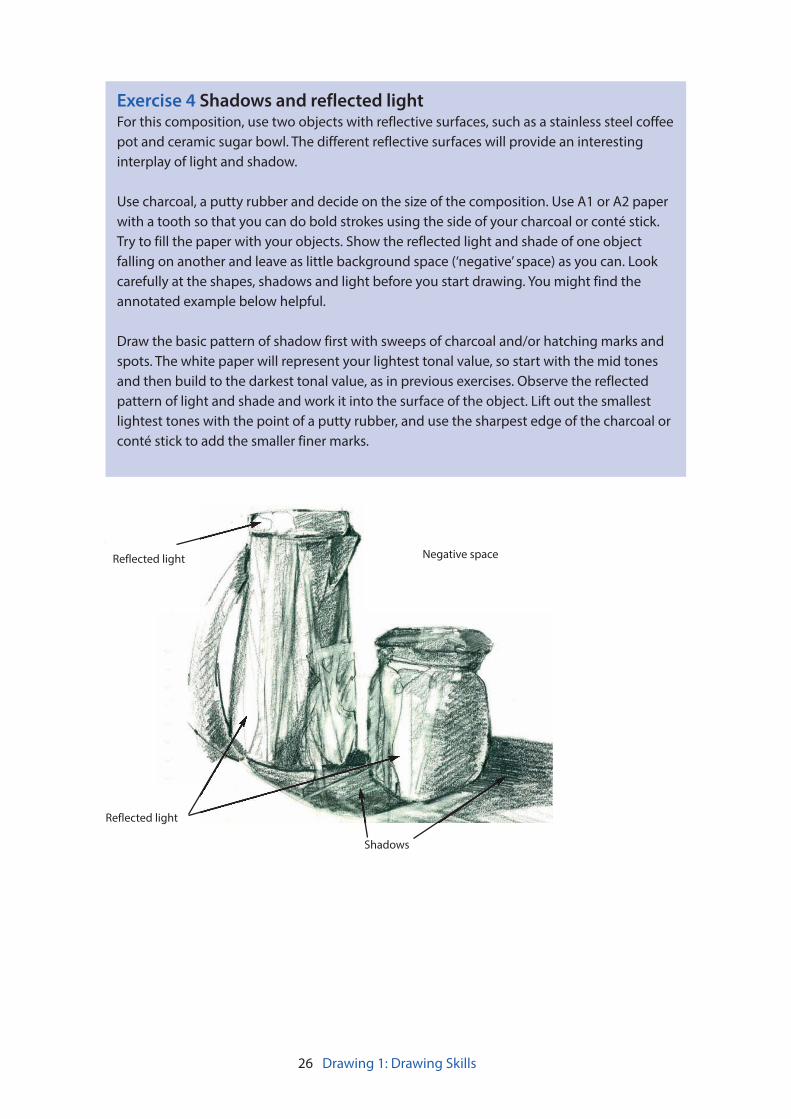
Exercise 4 Shadows and reflected lightFor this composition, use two objects with reflective surfaces, such as a stainless steel coffee
pot and ceramic sugar bowl. The different reflective surfaces will provide an interesting
interplay of light and shadow.
Use charcoal, a putty rubber and decide on the size of the composition. Use A1 or A2 paper
with a tooth so that you can do bold strokes using the side of your charcoal or conté stick.
Try to fill the paper with your objects. Show the reflected light and shade of one object
falling on another and leave as little background space (‘negative’ space) as you can. Look
carefully at the shapes, shadows and light before you start drawing. You might find the
annotated example below helpful.
Draw the basic pattern of shadow first with sweeps of charcoal and/or hatching marks and
spots. The white paper will represent your lightest tonal value, so start with the mid tones
and then build to the darkest tonal value, as in previous exercises. Observe the reflected
pattern of light and shade and work it into the surface of the object. Lift out the smallest
lightest tones with the point of a putty rubber, and use the sharpest edge of the charcoal or
conté stick to add the smaller finer marks.
Negative spaceReflected light
Shadows
Reflected light

27 Drawing 1: Drawing Skills
Assignment one
You spent a little time at the beginning of this course considering how artists convey feelings
through their art work, and also practice in creating believable shapes through the use of tone,
using light and shadow. In this assignment, you are asked to find a few objects that trigger a
response for you. These objects can be ordinary, funny, practical or ornamental or a mixture of
all these. They can be natural objects, made objects, big or small. Place these objects together
to form a still life. Set them up in a space so that they create interesting shapes and angles.
Make sure you set the objects up in a place where you have some good light hitting the objects
at an angle, in such a way that they make the tones on the object obvious and the light and
darks clear. A window with natural light is probably best but you could use a lamp to throw
light onto the objects instead. Look at the spaces between the objects as well as the objects
themselves.
Take the two experimental mark making sheets that you did exploring texture and gesture and
pin them up nearby. Working on a sheet of A3 or A2 paper, and using a range drawing tools,
create a drawing using your still life that utilizes some of the experimental mark making that
you have discovered. Use a focus on the original impetus for the selection of the source objects
to help you make decisions about the drawing as you proceed .
Write a paragraph about why you picked the objects you picked as well as reflecting on the
drawing that you have done and what you think went well and what did not, and why. Use this
as an opportunity to introduce yourself to your tutor as well as to show your tutor what level
your drawing skills are at this point in the course. These notes can go into your learning log (or
online blog).
Reflection on your progressBefore you send this assignment to your tutor, take a look at the assessment criteria for
this course, which will be used to mark your other assignments when your work is formally
assessed. The assessment criteria are listed in the introduction to this course guide.
Review your work using the criteria and make notes in your learning log. Send these reflections
to your tutor, along with your drawings, sketchbook, supporting studies and your learning log
or blog url.
Your tutor may take a while to get back to you so continue with the course while you’re waiting.
Reworking your assignmentFollowing feedback from your tutor, you may wish to rework some of your assignment,
especially if you are ultimately submitting your work for formal assessment. If you do this, make
sure you reflect on what you have done and why in your learning log.