draft ou campus web content management
TRANSCRIPT

DRAFT – DRAFT – DRAFT – DRAFT – DRAFT – DRAFT – DRAFT – DRAFT – DRAFT – DRAFT – DRAFT – DRAFT– DRAFT– DRAFT– DRAFT– DRAFT– DRAFT
Fresno State | Web Communication / 559-278-8595 | OU Campus Web Content Management Page 1
OU Campus Web Content Management
Table of Contents
OU Campus Web Content Management ................................................................................................................ 1
Introduction to OU Campus ................................................................................................................................ 2
Division/Unit Overview ....................................................................................................................................... 2
Workflow......................................................................................................................................................... 2
Staging and Production ................................................................................................................................... 3
Roles and Groups ............................................................................................................................................ 3
Page Structure ................................................................................................................................................. 4
Logging in ............................................................................................................................................................ 5
Accessing Pages .................................................................................................................................................. 6
Basic Editing ........................................................................................................................................................ 6
WYSIWYG Toolbar ........................................................................................................................................... 7
Inserting Text .................................................................................................................................................. 8
Inserting Images .............................................................................................................................................. 8
Inserting Hyperlinks ...................................................................................................................................... 14
Upload Multiple Files .................................................................................................................................... 17
Deleting ......................................................................................................................................................... 19
Saving & Publishing ........................................................................................................................................... 19
Schedule ........................................................................................................................................................ 20
Send to User .................................................................................................................................................. 21
Publish Multiple Pages .................................................................................................................................. 22
Views and Icons................................................................................................................................................. 23
Split screen (both views) ............................................................................................................................... 23
Check out pages ............................................................................................................................................ 24
Icons in Pages List ......................................................................................................................................... 24
Advanced Content Editing ................................................................................................................................ 25
Assets ............................................................................................................................................................ 25
Snippets ......................................................................................................................................................... 27
Modifying Breadcrumbs................................................................................................................................ 28
OU Campus Advanced Training .................................................................................................................... 29
Dashboard ......................................................................................................................................................... 29
Workflow....................................................................................................................................................... 29
Current Projects ............................................................................................................................................ 31
Logging out ........................................................................................................................................................ 31
Help & Support ................................................................................................................................................. 32
Fresno State Online Training & Support ....................................................................................................... 32
Help Desk Work Order .................................................................................................................................. 32
Vendor Resources ......................................................................................................................................... 32

DRAFT – DRAFT – DRAFT – DRAFT – DRAFT – DRAFT – DRAFT – DRAFT – DRAFT – DRAFT – DRAFT – DRAFT– DRAFT– DRAFT– DRAFT– DRAFT– DRAFT
Fresno State | Web Communication / 559-278-8595 | OU Campus Web Content Management Page 2
Introduction to OU Campus
OU Campus is a content management system hosted by Omni Update that allows publishing, editing and
modifying website content from any computer with an Internet connection. Users login with their Fresno
State username and password to access website content. OU Campus uses a What-You-See-Is-What-You-Get
(WYSIWYG) editor that is user-friendly. Users can upload images, documents, paste text, insert hyperlinks,
and utilize custom workflows and more.
Division/Unit Overview
All websites campus wide will be organized by a college or division. This helps with uniformity, maintenance
and user access. All sites in the WCMS will have the domain of “fresnostate.edu”. The previous domain of
“csufresno.edu” will automatically be redirected to the new domain “fresnostate.edu.” Websites in the
WCMS have the URL structure “fresnostate.edu/<college or division>/<dept>”. E.g. The Mathematics
department URL used to be “www.csufresno.edu/math”. Since the Math Department belongs to The College
of Science and Mathematics (CSM), the URL to the new website within the WCMS will be
“www.fresnostate.edu/csm/math”.
Workflow
There are two basic workflows in OU Campus, one where webpages can be directly published by a user or the
second where they are configured to have an approver, meaning somebody else reviews the page before
publishing. Assigning an approver to a webpage can be very helpful when multiple people need to review the
content before publishing. E.g. if a department has a graduate student that is modifying a particular page on
their website, a workflow can be used so that when the student wants to publish the page it is sent to a staff
member for approval. In addition that staff member may also have an approver; they can make changes or
keep the page the same and send it to another person for approval and so on until the final person of the
workflow publishes the page to go live.
It is important to note that if someone who is part of a workflow is on vacation when a page approval is
needed, a work order will need to be sent (see Help & Support section of this document) to have the approver
swapped to someone who can approve content in their place.

DRAFT – DRAFT – DRAFT – DRAFT – DRAFT – DRAFT – DRAFT – DRAFT – DRAFT – DRAFT – DRAFT – DRAFT– DRAFT– DRAFT– DRAFT– DRAFT– DRAFT
Fresno State | Web Communication / 559-278-8595 | OU Campus Web Content Management Page 3
Staging and Production
There are two servers, the Staging Server and the Production Server. Each one is represented in a separate
tab on the right side of the Page View. All editing of pages is done to files on the Staging Server. Once the
page is published on the Staging Server, it is pushed to the Production server and made live. The Production
Server is where the live content is stored.
*NOTE: All images and documents are automatically uploaded to the Production server by
default; you must click on the Production tab to view any images or documents that have
been uploaded. They will not appear under the Staging tab.
Roles and Groups
There are several authority levels having different functionality in OU Campus. At Fresno State Level 6 and
Level 8 are the most widely used levels. Level 6 is for Content Editors and Level 8 is for more advanced Site
Administrators. Depending on the level of access assigned to you, some functions may or may not be
available. The differences between the two are: Level 6 Content Editors cannot move, rename, or copy
images, documents, or folders nor can they assign editing rights. Customizable roles will be available in the
near future.
When a user is created they are associated with a group that is typically the college or division the site belongs
to. Groups are only assigned to their respective college or division webpages. Users will not be able to modify
any webpages they do not have authority to access.

DRAFT – DRAFT – DRAFT – DRAFT – DRAFT – DRAFT – DRAFT – DRAFT – DRAFT – DRAFT – DRAFT – DRAFT– DRAFT– DRAFT– DRAFT– DRAFT– DRAFT
Fresno State | Web Communication / 559-278-8595 | OU Campus Web Content Management Page 4
Page Structure
All Fresno State websites share a global university header and footer. The header includes the Fresno State
logo, a campus search field and quick links. Directly below the header is a red line that will expand to
automatically display emergency messages. These messages are created by Campus police and are similar to
the emergency messages that go out on the campus telephone system. The emergency notification will
appear across every Fresno State webpage within the WCMS. Under the red line, the blue banner displays the
department name and college or division. The middle of the webpage is customizable, but typically displays
navigation along the top or side of the page along with page content.
The footer is located at the bottom of the page. The department contact information appears at the bottom
left, along with the Last Updated link. Next to that will be important campus links and important campus-wide
promotional graphics on the far right side of the footer.
DRAFT – DRAFT – DRAFT – DRAFT – DRAFT – DRAFT – DRAFT – DRAFT – DRAFT – DRAFT – DRAFT – DRAFT– DRAFT– DRAFT– DRAFT– DRAFT– DRAFT
Fresno State | Web Communication / 559-278-8595 | OU Campus Web Content Management Page 5
Logging in
In order to have access to modify a Fresno State website, you must have attended training and have a Fresno
State username and password.
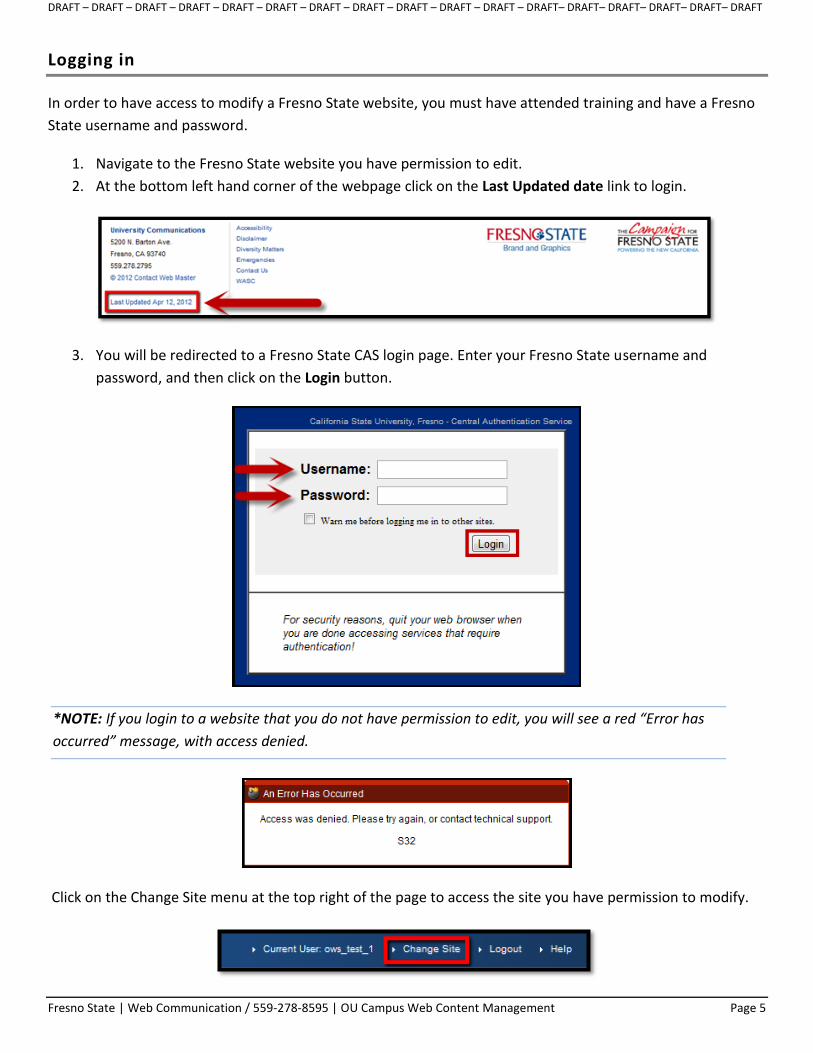
1. Navigate to the Fresno State website you have permission to edit.
2. At the bottom left hand corner of the webpage click on the Last Updated date link to login.
3. You will be redirected to a Fresno State CAS login page. Enter your Fresno State username and
password, and then click on the Login button.
*NOTE: If you login to a website that you do not have permission to edit, you will see a red “Error has
occurred” message, with access denied.
Click on the Change Site menu at the top right of the page to access the site you have permission to modify.
DRAFT – DRAFT – DRAFT – DRAFT – DRAFT – DRAFT – DRAFT – DRAFT – DRAFT – DRAFT – DRAFT – DRAFT– DRAFT– DRAFT– DRAFT– DRAFT– DRAFT
Fresno State | Web Communication / 559-278-8595 | OU Campus Web Content Management Page 6
Accessing Pages
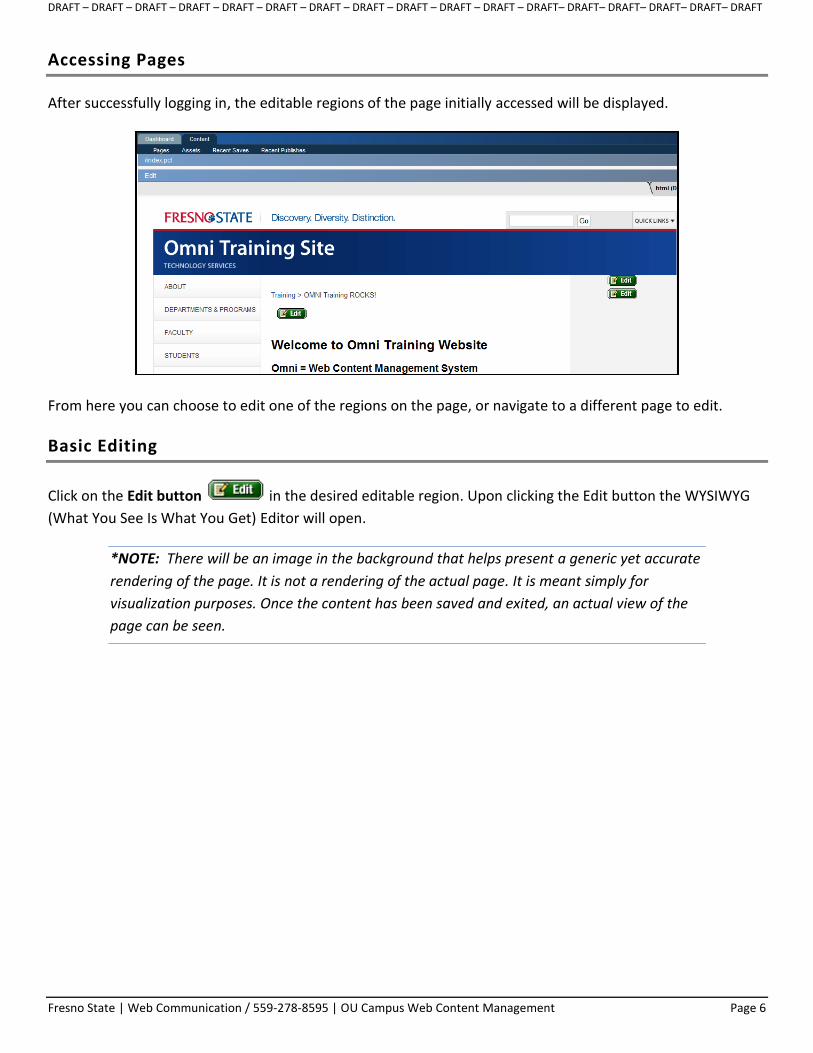
After successfully logging in, the editable regions of the page initially accessed will be displayed.
From here you can choose to edit one of the regions on the page, or navigate to a different page to edit.
Basic Editing
Click on the Edit button in the desired editable region. Upon clicking the Edit button the WYSIWYG
(What You See Is What You Get) Editor will open.
*NOTE: There will be an image in the background that helps present a generic yet accurate
rendering of the page. It is not a rendering of the actual page. It is meant simply for
visualization purposes. Once the content has been saved and exited, an actual view of the
page can be seen.
DRAFT – DRAFT – DRAFT – DRAFT – DRAFT – DRAFT – DRAFT – DRAFT – DRAFT – DRAFT – DRAFT – DRAFT– DRAFT– DRAFT– DRAFT– DRAFT– DRAFT
Fresno State | Web Communication / 559-278-8595 | OU Campus Web Content Management Page 7
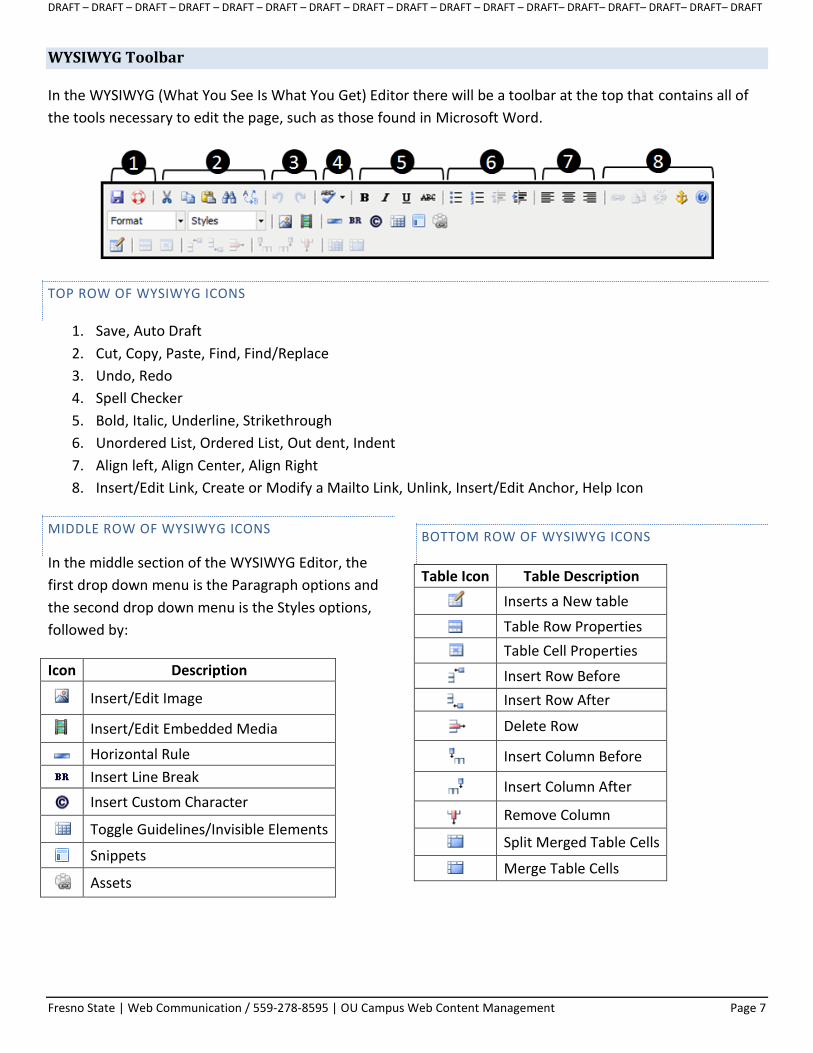
WYSIWYG Toolbar
In the WYSIWYG (What You See Is What You Get) Editor there will be a toolbar at the top that contains all of
the tools necessary to edit the page, such as those found in Microsoft Word.
TOP ROW OF WYSIWYG ICONS
1. Save, Auto Draft
2. Cut, Copy, Paste, Find, Find/Replace
3. Undo, Redo
4. Spell Checker
5. Bold, Italic, Underline, Strikethrough
6. Unordered List, Ordered List, Out dent, Indent
7. Align left, Align Center, Align Right
8. Insert/Edit Link, Create or Modify a Mailto Link, Unlink, Insert/Edit Anchor, Help Icon
MIDDLE ROW OF WYSIWYG ICONS
In the middle section of the WYSIWYG Editor, the
first drop down menu is the Paragraph options and
the second drop down menu is the Styles options,
followed by:
Icon Description
Insert/Edit Image
Insert/Edit Embedded Media
Horizontal Rule
Insert Line Break
Insert Custom Character
Toggle Guidelines/Invisible Elements
Snippets
Assets
BOTTOM ROW OF WYSIWYG ICONS
Table Icon Table Description
Inserts a New table
Table Row Properties
Table Cell Properties
Insert Row Before
Insert Row After
Delete Row
Insert Column Before
Insert Column After
Remove Column
Split Merged Table Cells
Merge Table Cells
DRAFT – DRAFT – DRAFT – DRAFT – DRAFT – DRAFT – DRAFT – DRAFT – DRAFT – DRAFT – DRAFT – DRAFT– DRAFT– DRAFT– DRAFT– DRAFT– DRAFT
Fresno State | Web Communication / 559-278-8595 | OU Campus Web Content Management Page 8
Inserting Text
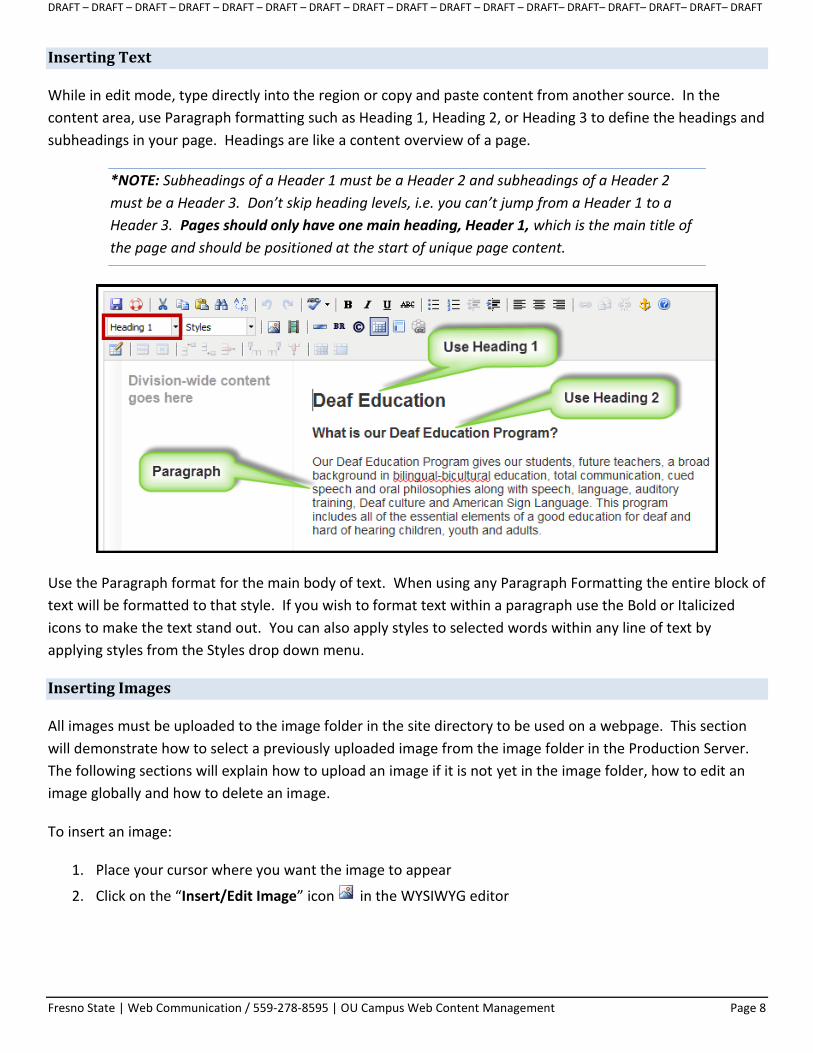
While in edit mode, type directly into the region or copy and paste content from another source. In the
content area, use Paragraph formatting such as Heading 1, Heading 2, or Heading 3 to define the headings and
subheadings in your page. Headings are like a content overview of a page.
*NOTE: Subheadings of a Header 1 must be a Header 2 and subheadings of a Header 2
must be a Header 3. Don’t skip heading levels, i.e. you can’t jump from a Header 1 to a
Header 3. Pages should only have one main heading, Header 1, which is the main title of
the page and should be positioned at the start of unique page content.
Use the Paragraph format for the main body of text. When using any Paragraph Formatting the entire block of
text will be formatted to that style. If you wish to format text within a paragraph use the Bold or Italicized
icons to make the text stand out. You can also apply styles to selected words within any line of text by
applying styles from the Styles drop down menu.
Inserting Images
All images must be uploaded to the image folder in the site directory to be used on a webpage. This section
will demonstrate how to select a previously uploaded image from the image folder in the Production Server.
The following sections will explain how to upload an image if it is not yet in the image folder, how to edit an
image globally and how to delete an image.
To insert an image:
1. Place your cursor where you want the image to appear
2. Click on the “Insert/Edit Image” icon in the WYSIWYG editor

DRAFT – DRAFT – DRAFT – DRAFT – DRAFT – DRAFT – DRAFT – DRAFT – DRAFT – DRAFT – DRAFT – DRAFT– DRAFT– DRAFT– DRAFT– DRAFT– DRAFT
Fresno State | Web Communication / 559-278-8595 | OU Campus Web Content Management Page 9
3. In the resulting pop-up window, enter the URL to the image (make sure you have permission from the
author if using an outside source) or click the browse button next to the “Image URL” field to select
an image already on the production server.
4. If browsing for an image in the File Browser, you must first navigate to the images folder of the site
you are editing. To do this make sure the breadcrumb at the top of the file browser reads “sites/
<college or division>/<department>/images. The images folder will appear in the college or division
folder and each department will have an images folder as well. Navigate to the appropriate images
folder i.e. sites / kremen / lee / images.
*NOTE: If you do not select the images folder you will not be able to select or upload an image
5. Once in the images folder, click the desired image once to preview it. To view thumbnails of all the
pictures choose the Show Thumbnails button under the Image Preview.

DRAFT – DRAFT – DRAFT – DRAFT – DRAFT – DRAFT – DRAFT – DRAFT – DRAFT – DRAFT – DRAFT – DRAFT– DRAFT– DRAFT– DRAFT– DRAFT– DRAFT
Fresno State | Web Communication / 559-278-8595 | OU Campus Web Content Management Page 10
6. Once you find the desired image, click “Select File.”
7. After selecting the image, you must add an “Image Description”, also known as an Alt Tag, for
accessibility compliance. The image description must be at least 7 characters long. If you attempt to
insert the image without the image description you will get an “Image description cannot be blank”
error message.
8. To change the alignment of the picture, choose an option in the Alignment drop down menu.
DRAFT – DRAFT – DRAFT – DRAFT – DRAFT – DRAFT – DRAFT – DRAFT – DRAFT – DRAFT – DRAFT – DRAFT– DRAFT– DRAFT– DRAFT– DRAFT– DRAFT
Fresno State | Web Communication / 559-278-8595 | OU Campus Web Content Management Page 11
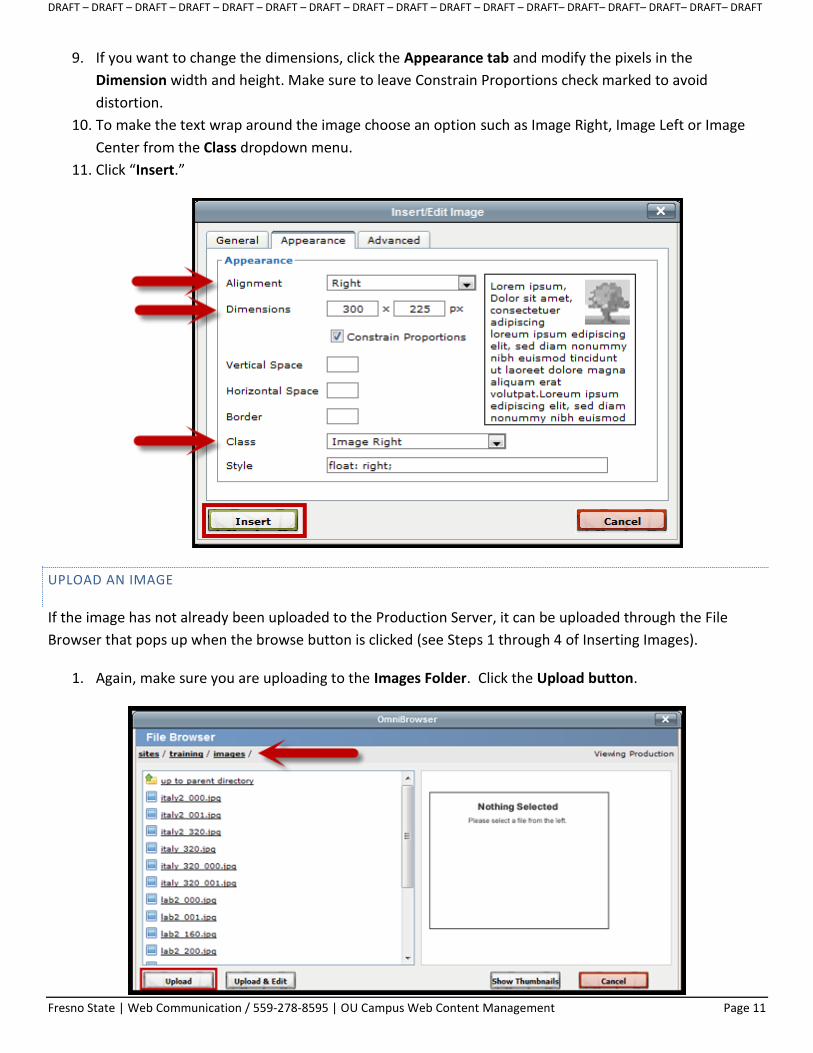
9. If you want to change the dimensions, click the Appearance tab and modify the pixels in the
Dimension width and height. Make sure to leave Constrain Proportions check marked to avoid
distortion.
10. To make the text wrap around the image choose an option such as Image Right, Image Left or Image
Center from the Class dropdown menu.
11. Click “Insert.”
UPLOAD AN IMAGE
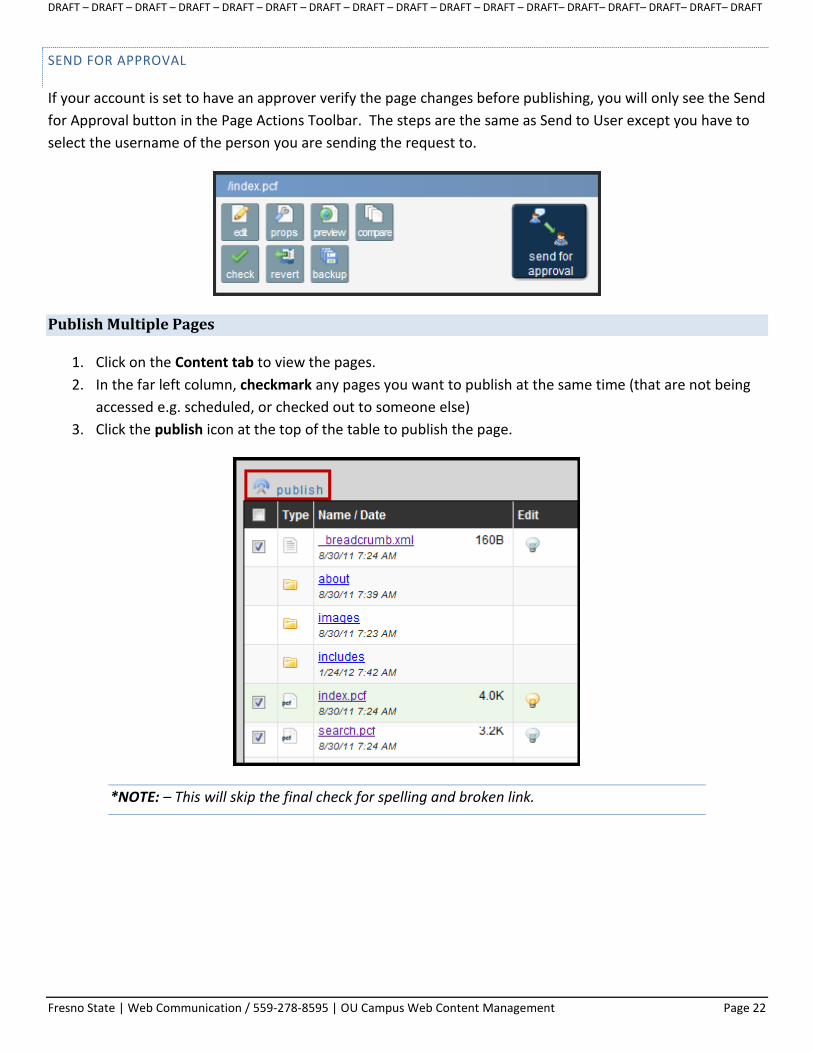
If the image has not already been uploaded to the Production Server, it can be uploaded through the File
Browser that pops up when the browse button is clicked (see Steps 1 through 4 of Inserting Images).
1. Again, make sure you are uploading to the Images Folder. Click the Upload button.

DRAFT – DRAFT – DRAFT – DRAFT – DRAFT – DRAFT – DRAFT – DRAFT – DRAFT – DRAFT – DRAFT – DRAFT– DRAFT– DRAFT– DRAFT– DRAFT– DRAFT
Fresno State | Web Communication / 559-278-8595 | OU Campus Web Content Management Page 12
2. In the File Upload window, click the Choose File button to locate the file you want to upload.
Allowable extensions include jpg, png, jpeg and gif.
3. Find the image to upload, and click open or double click it. If desired, rename the file by typing a new
name with the file extension in the New File Name (Optional) field.
4. Click Upload. Once successful, you will receive a success message in a new window.
*NOTE: If you receive an error message saying the image is an invalid file under the current
folder, make sure you are uploading jpg, png, jpeg or gif images to the images folder, see
Steps 1-4 of Inserting Images.
EDITING IMAGES
It is best practice to edit an image before uploading it to the production server. Only rotating, resizing and
cropping are allowed when editing an image in OU Campus. Also, if you resize a very large in OU Campus,
there will be significant degradation and the image will appear blurry. So it is best to make major image
changes in other image editing software like Photoshop.

DRAFT – DRAFT – DRAFT – DRAFT – DRAFT – DRAFT – DRAFT – DRAFT – DRAFT – DRAFT – DRAFT – DRAFT– DRAFT– DRAFT– DRAFT– DRAFT– DRAFT
Fresno State | Web Communication / 559-278-8595 | OU Campus Web Content Management Page 13
Changes made to an uploaded image may affect every instance of the image if the file name is overwritten.
Only Level 8 users can overwrite filenames. E.g. Denise uploads “Image1” to the Production server on Monday
and uses it in her Linguistics webpage. On Friday Brian decides to edit “Image1” and use it for a conference
page he is creating. If Brian saves the edited image by overwriting the file Denise is using, the changes will
occur on both of their webpages.
To edit an image:
1. Follow Inserting Images steps 1 through 4
2. Click on the Upload & Edit button
3. Select the image to be edited
4. Click the Open button
5. In the new window that appears, make the necessary changes to the size, cropping, and orientation
6. Click on the Upload As… button

DRAFT – DRAFT – DRAFT – DRAFT – DRAFT – DRAFT – DRAFT – DRAFT – DRAFT – DRAFT – DRAFT – DRAFT– DRAFT– DRAFT– DRAFT– DRAFT– DRAFT
Fresno State | Web Communication / 559-278-8595 | OU Campus Web Content Management Page 14
7. Name the edited image. Only Level 8 users
will have the ability to overwrite the
existing file with the newly edited file.
Remember, overwriting the file affects all
pages on which the image has been placed
and a file extension has to be used when
renaming a file.
8. Click OK
9. The image can now be selected and inserted as a modified image, see steps 5-8 of Inserting Images
Inserting Hyperlinks
1. In the WYSIWYG Editing page, type the text you want to become a hyperlink
2. Highlight the text (hold down the left mouse button and drag)
3. Click the Insert/Edit Link icon
4. To insert a Fresno State URL navigate to the site by clicking the Browse icon or type the URL directly
into the Link URL field, be sure to include “http://” first.
5. The Target is where the linked page will appear for the user upon clicking the link. The best practice
for accessibility is to set the Target field to “Open in This Window/Frame” and enter a Title. If you
would rather have the hyperlink open in a new window, change the Target to Open in New Window
(blank), but be sure to mention in the Title field that the page opens in a new window (see screenshot
in Step 9 of Link a Document).
6. Click Insert.

DRAFT – DRAFT – DRAFT – DRAFT – DRAFT – DRAFT – DRAFT – DRAFT – DRAFT – DRAFT – DRAFT – DRAFT– DRAFT– DRAFT– DRAFT– DRAFT– DRAFT
Fresno State | Web Communication / 559-278-8595 | OU Campus Web Content Management Page 15
LINK AN EMAIL ADDRESSES
To insert a hyperlink to an email address:
1. In the WYSIWYG Editing page, type the text you want to become a hyperlink
2. Highlight the text (hold down the left mouse button and drag)
3. Click the Mailto Link icon
4. Type the Recipient Email address and complete the Mail Subject field
5. Click Insert
LINK A DOCUMENT
To link a document in a webpage the steps are very similar to inserting an image, except documents are stored
in the Documents folder instead of the Images folder.
1. In the WYSIWYG Editing page, type the text you want to link to a document
2. Highlight the text (hold down the left mouse button and drag)
3. Click the Insert/Edit Link icon
4. In the resulting pop-up window, enter the Link URL to the document (make sure you have permission
from the author if using an outside source) or click the browse button next to the “Link URL” field to
select a document on the production server that has already been uploaded.

DRAFT – DRAFT – DRAFT – DRAFT – DRAFT – DRAFT – DRAFT – DRAFT – DRAFT – DRAFT – DRAFT – DRAFT– DRAFT– DRAFT– DRAFT– DRAFT– DRAFT
Fresno State | Web Communication / 559-278-8595 | OU Campus Web Content Management Page 16
5. If browsing for a document in the File Browser, you must first navigate to the documents folder of the
page you are editing. To do this make sure the breadcrumb at the top of the file browser reads “sites/
<college or division>/<department>/documents. The documents folder will appear in the college or
division folder and each department will have a documents folder as well. Navigate to the appropriate
documents folder i.e. sites / kremen / lee / images.
*NOTE: If you do not select the documents folder you will not be able to select or upload a
document
6. Once you find the desired document, click “Select File.”
7. The Target is where the linked item will appear for the user upon clicking the link. The best practice for
accessibility is to set the Target field to “Open in This Window/Frame” and enter a Title. If you would
rather have the hyperlink open in a new window, change the Target to Open in New Window (blank),
but be sure to mention in the Title field that the page opens in a new window.
8. If the document is large, be sure to inform users that the file size is in parentheses. As a user may not
want to open a large file due to cell phone data limitations or slow Internet speeds.
9. Click Insert.

DRAFT – DRAFT – DRAFT – DRAFT – DRAFT – DRAFT – DRAFT – DRAFT – DRAFT – DRAFT – DRAFT – DRAFT– DRAFT– DRAFT– DRAFT– DRAFT– DRAFT
Fresno State | Web Communication / 559-278-8595 | OU Campus Web Content Management Page 17
Upload Multiple Files
Images and other binary files (like PDF, Word, Excel, and PowerPoint) are uploaded to the Production Server
by default. These files never exist on the Staging Server. It is possible to upload multiple documents at one
time. This can be done by either uploading zip files or by browsing for files one by one.
1. Navigate to the Pages view by clicking on the Content tab at the top left of the page.
2. Open either the documents folder or the images folder depending on what you are uploading
*NOTE: If you are uploading documents you must navigate to the site’s documents folder
but if you are uploading images you must navigate to the site’s images folder.
3. Click on the Upload button under the Staging and Production tabs
4. Leave the default setting of Set access to: Everyone.
5. Choose upload type – either standard (doc, docx, xls, xlsx, ppt, pptx, pdf, jpg, png, jpeg, gif) or Zip files
6. Browse for files on your computer using the Choose File button
7. Open the desired file so that its name appears in the field to the right of Choose File
8. Click Upload

DRAFT – DRAFT – DRAFT – DRAFT – DRAFT – DRAFT – DRAFT – DRAFT – DRAFT – DRAFT – DRAFT – DRAFT– DRAFT– DRAFT– DRAFT– DRAFT– DRAFT
Fresno State | Web Communication / 559-278-8595 | OU Campus Web Content Management Page 18
9. You should receive a green Notice window of the status of the documents you uploaded to the
production server.
10. To check the documents uploaded successfully click on the Content tab at the top left of the page.
Navigate to either the Images folder or Documents folder you uploaded files to. Then click on the
Production Tab to see the uploaded files. Remember binary files will never appear on the Staging
Server.

DRAFT – DRAFT – DRAFT – DRAFT – DRAFT – DRAFT – DRAFT – DRAFT – DRAFT – DRAFT – DRAFT – DRAFT– DRAFT– DRAFT– DRAFT– DRAFT– DRAFT
Fresno State | Web Communication / 559-278-8595 | OU Campus Web Content Management Page 19
Deleting
Only Level 8 users have permission to delete images or documents, but remember you must be in the
Production tab and in the Images folder or Documents folder to do so. If you have a Level 6 and need to
delete a document, image or folder, put in a work order to have the content removed for you (see Help &
Support section in this document).
Saving & Publishing
After making any changes, click the Save button in the WYSIWYG editor. Doing this will exit you from the
Editing page. If you want to “Save in Place”, meaning to do a periodic save while you continue working, you
can use the keyboard shortcut CTRL + S (CMD + S for Mac users) and the file will be saved but you’ll remain
in WYSIWYG Editor.
Upon saving the page, a Page Actions Toolbar will appear at the top right side of the frame. To publish the
page click the Publish now icon. Users set up with an approver see “Send for Approval” section.
The validity page check will open in a new window. You can
manually perform checks such as spell checking by clicking the
green right pointing arrow next to the check. Check links is
automatically performed and the results can be reviewed by
clicking on the More or New Win links.

DRAFT – DRAFT – DRAFT – DRAFT – DRAFT – DRAFT – DRAFT – DRAFT – DRAFT – DRAFT – DRAFT – DRAFT– DRAFT– DRAFT– DRAFT– DRAFT– DRAFT
Fresno State | Web Communication / 559-278-8595 | OU Campus Web Content Management Page 20
You will receive a green Success message once the page has been published.
To view the changes you made there are three options:
View in this frame – allows you to see the published page in the current view as a frame
View in this window – replaces the entire window with the published page, you will have to click the
back button to return to OU Campus
View in new window - Opens a tab next to the current window so you have one tab where you are
logged in to OU campus and a second tab to see the published changes in a separate window.
Schedule
Upon saving a page, the Page Actions Toolbar will appear at the top right side of the frame. To schedule the
page to go live at a later time or date, click the Schedule button.
1. Select the date.
2. Select the time (hour and quarter hour).
3. Indicate whether or not the scheduled publish
should repeat.
4. Create an optional email message to be sent upon
completion of the scheduled publish to the
Dashboard.
- Keeping the checkbox next to “Send to email?”
checked will send the completed publish message to
your Fresno State email address as well as within the
OU Campus messaging system. If this is unchecked,
the message will only be sent through the OU
Campus messaging system
5. Click “Schedule.”

DRAFT – DRAFT – DRAFT – DRAFT – DRAFT – DRAFT – DRAFT – DRAFT – DRAFT – DRAFT – DRAFT – DRAFT– DRAFT– DRAFT– DRAFT– DRAFT– DRAFT
Fresno State | Web Communication / 559-278-8595 | OU Campus Web Content Management Page 21
Send to User
Upon saving a page, the Page Actions Toolbar will appear at the top right side of the frame. The Send to User
option is available to send the page to another Fresno State user for comments or editing. When the “Send to
User” button is clicked, a mail window will appear.
1. Select the recipient’s username from the drop-down next to the “To” field. If an approver has been
enforced, the “To” field will be auto-populated, and there will not be a drop-down available.
2. Enter a “Subject.”
3. Enter a “Message” to the user to whom the message is being sent providing any necessary
information.
*NOTE: As a general rule always check the box that says Send External Email. Otherwise
users will not know they have a message until they log into OU Campus. Doing this allows
the request for review to be sent to the user’s Fresno State email address. Unchecking this
option will only send the message through the OU Campus messaging system.
4. Checkmark the box “Send external email”
5. Click “Send.”
DRAFT – DRAFT – DRAFT – DRAFT – DRAFT – DRAFT – DRAFT – DRAFT – DRAFT – DRAFT – DRAFT – DRAFT– DRAFT– DRAFT– DRAFT– DRAFT– DRAFT
Fresno State | Web Communication / 559-278-8595 | OU Campus Web Content Management Page 22
SEND FOR APPROVAL
If your account is set to have an approver verify the page changes before publishing, you will only see the Send
for Approval button in the Page Actions Toolbar. The steps are the same as Send to User except you have to
select the username of the person you are sending the request to.
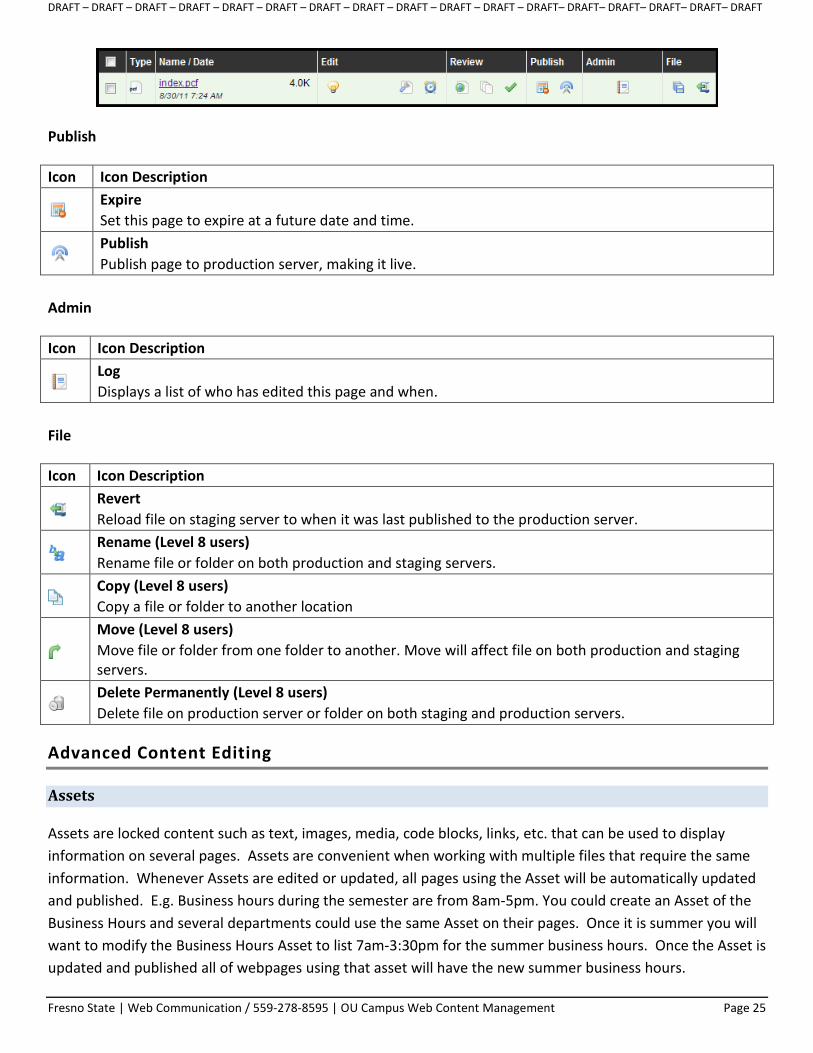
Publish Multiple Pages
1. Click on the Content tab to view the pages.
2. In the far left column, checkmark any pages you want to publish at the same time (that are not being
accessed e.g. scheduled, or checked out to someone else)
3. Click the publish icon at the top of the table to publish the page.
*NOTE: – This will skip the final check for spelling and broken link.

DRAFT – DRAFT – DRAFT – DRAFT – DRAFT – DRAFT – DRAFT – DRAFT – DRAFT – DRAFT – DRAFT – DRAFT– DRAFT– DRAFT– DRAFT– DRAFT– DRAFT
Fresno State | Web Communication / 559-278-8595 | OU Campus Web Content Management Page 23
Views and Icons
There are three main views in OU Campus:
Edit Page View Split Screen View Pages View
This view is simplistic; it is similar
to the preview of a page as it
concentrates on the formatted
look of the page. Editing is
performed by clicking on a green
Edit button in this view to access
the WYSIWYG Editor.
This view allows you to view the
pages list and view the page at the
same time. In this view you can
schedule a publish, send the page
to a user or an approver (if set up).
This view displays the list of pages
in a folder structure. It includes a
comprehensive set of functions
that can be performed on any
page. Uploading multiple files and
creating new pages can be added
here along with viewing the
Staging and Production servers
content.
Split screen (both views)
Upon clicking a page from the Pages View, there is the option to split the screen to view both the Pages View and the Edit Page View. Click the right pointing green arrow icon to view split screen.
From the split screen view, there is the option to
collapse the mini Pages View or to expand to the
Edit Page View. Use appropriate pointing arrow
icons to Expand/Split Screen or Collapse/Split
Screen.

DRAFT – DRAFT – DRAFT – DRAFT – DRAFT – DRAFT – DRAFT – DRAFT – DRAFT – DRAFT – DRAFT – DRAFT– DRAFT– DRAFT– DRAFT– DRAFT– DRAFT
Fresno State | Web Communication / 559-278-8595 | OU Campus Web Content Management Page 24
Check out pages
In OU campus only one page can be checked out to a person at a time. If somebody is editing a page that you
want to edit you have to wait for them to check it back into the system before you can begin editing it
yourself. This includes modifying the page properties or performing a backup of the page. To check out a
page click the unlit light bulb in the Pages View so that it becomes illuminated.
Icons in Pages List
Edit
Review
Icon Icon Description
Compare
Allows you to compare the page, using color-coded text, from how it looked before editing to how it looks after.
Check Pages
Checks spelling and link validation on the page.
Icon Icon Description
Checked In
Page is available to be checked out by a user
Currently Checked Out
Seen only on pages current user has checked out.
Locked
Seen when another user already has the file checked out.
Pending Approval
The page is pending approval by another user
Pending Your Approval
This page is pending your approval of changes made by another user
Page Properties
Edit page title, breadcrumb, meta tags like description, content, etc.
Reminders
Schedule a reminder for this page at a later date and/or time.
DRAFT – DRAFT – DRAFT – DRAFT – DRAFT – DRAFT – DRAFT – DRAFT – DRAFT – DRAFT – DRAFT – DRAFT– DRAFT– DRAFT– DRAFT– DRAFT– DRAFT
Fresno State | Web Communication / 559-278-8595 | OU Campus Web Content Management Page 25
Publish
Icon Icon Description
Expire
Set this page to expire at a future date and time.
Publish
Publish page to production server, making it live.
Admin
Icon Icon Description
Log
Displays a list of who has edited this page and when.
File
Icon Icon Description
Revert
Reload file on staging server to when it was last published to the production server.
Rename (Level 8 users)
Rename file or folder on both production and staging servers.
Copy (Level 8 users)
Copy a file or folder to another location
Move (Level 8 users)
Move file or folder from one folder to another. Move will affect file on both production and staging servers.
Delete Permanently (Level 8 users)
Delete file on production server or folder on both staging and production servers.
Advanced Content Editing
Assets
Assets are locked content such as text, images, media, code blocks, links, etc. that can be used to display
information on several pages. Assets are convenient when working with multiple files that require the same
information. Whenever Assets are edited or updated, all pages using the Asset will be automatically updated
and published. E.g. Business hours during the semester are from 8am-5pm. You could create an Asset of the
Business Hours and several departments could use the same Asset on their pages. Once it is summer you will
want to modify the Business Hours Asset to list 7am-3:30pm for the summer business hours. Once the Asset is
updated and published all of webpages using that asset will have the new summer business hours.
DRAFT – DRAFT – DRAFT – DRAFT – DRAFT – DRAFT – DRAFT – DRAFT – DRAFT – DRAFT – DRAFT – DRAFT– DRAFT– DRAFT– DRAFT– DRAFT– DRAFT
Fresno State | Web Communication / 559-278-8595 | OU Campus Web Content Management Page 26
*NOTE: To create a new Asset, put in a work order to Web Comm, (see Help and Support).
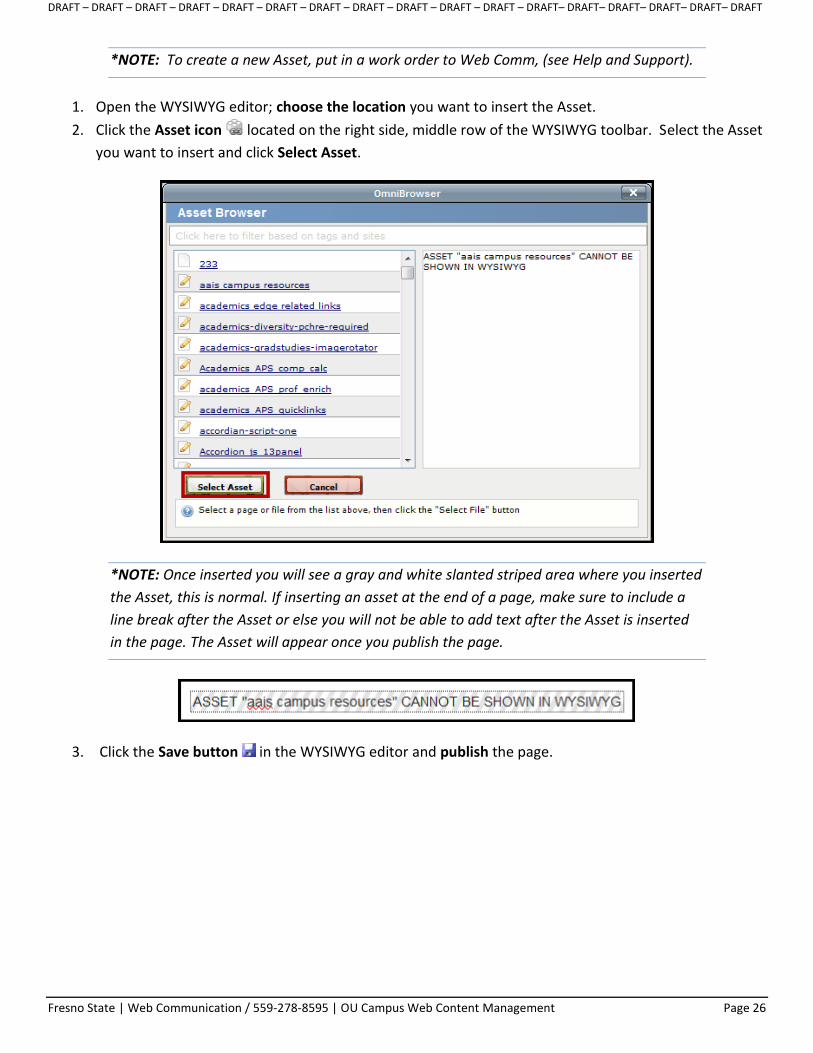
1. Open the WYSIWYG editor; choose the location you want to insert the Asset.
2. Click the Asset icon located on the right side, middle row of the WYSIWYG toolbar. Select the Asset
you want to insert and click Select Asset.
*NOTE: Once inserted you will see a gray and white slanted striped area where you inserted
the Asset, this is normal. If inserting an asset at the end of a page, make sure to include a
line break after the Asset or else you will not be able to add text after the Asset is inserted
in the page. The Asset will appear once you publish the page.
3. Click the Save button in the WYSIWYG editor and publish the page.

DRAFT – DRAFT – DRAFT – DRAFT – DRAFT – DRAFT – DRAFT – DRAFT – DRAFT – DRAFT – DRAFT – DRAFT– DRAFT– DRAFT– DRAFT– DRAFT– DRAFT
Fresno State | Web Communication / 559-278-8595 | OU Campus Web Content Management Page 27
Snippets
Snippets are the opposite of locked Assets. A snippet allows you to edit predefined pieces of code (tables,
forms, commonly used text or other HTML content). Snippets are similar to templates; they contain the
format you desire and you modify the content as needed.
1. To insert a snippet, open the WYSIWYG editor and click on the snippets icon located in the middle
row on the right side.
2. The snippets window will appear, select a category then choose a snippet within the existing
categories. The snippets window will also allow you to preview the snippet before inserting it into a
document.
3. Click Insert.
4. Modify the snippet text

DRAFT – DRAFT – DRAFT – DRAFT – DRAFT – DRAFT – DRAFT – DRAFT – DRAFT – DRAFT – DRAFT – DRAFT– DRAFT– DRAFT– DRAFT– DRAFT– DRAFT
Fresno State | Web Communication / 559-278-8595 | OU Campus Web Content Management Page 28
Modifying Breadcrumbs
A breadcrumb allows the user to visually see the path of page within a website. They provide links back to
each previous section the user has navigated through to get to the current page. Breadcrumbs are located at
the top of every Fresno State page. To modify the wording of a breadcrumb:
1. Go to the Pages View; locate the page where you want to edit the breadcrumb.
*NOTE: You can only modify pages that have not been checked out to someone else.
2. Click the Check-out icon so that the light bulb is lit.
3. Click the Edit Properties icon; this will open the Page Properties window.
4. In the Breadcrumb field, modify the text
5. Click Save
6. Publish the page to see the change

DRAFT – DRAFT – DRAFT – DRAFT – DRAFT – DRAFT – DRAFT – DRAFT – DRAFT – DRAFT – DRAFT – DRAFT– DRAFT– DRAFT– DRAFT– DRAFT– DRAFT
Fresno State | Web Communication / 559-278-8595 | OU Campus Web Content Management Page 29
OU Campus Advanced Training
The advanced training workshop is geared for Site Administrators with level 8 access and goes more in depth
on topics such as inserting tables, creating new folders, pages and sections and using the dependency
manager. Additionally covered is editing menu navigation, inserting media files such as movies and publishing
to Twitter and Facebook with OU Campus as well as multiple people workflows, fixing dependencies,
comparing webpages, reverting and backing up pages, setting expiration dates and reminders.
Dashboard
The Dashboard contains user-specific information such as Workflow, Current Projects, Fix Dependencies and
user Setting/Preferences.
Workflow
Workflow works as a mailbox in order to facilitate the sending and tracking of pages for approval. Workflow
includes the Inbox, Outbox, and Compose sections.
INBOX
The Inbox contains any messages that have been sent through the system and all requests for approval. From
the Inbox, the message can be opened, and users can navigate directly to the page to be reviewed. Messages
will have to be manually deleted from the Inbox after the task is completed.
OUTBOX
The Outbox shows all pages that were sent to another user for approval and the status of the pages. It is
possible to navigate to the page that was sent for approval by simply clicking on the link. It will also show any
messages that were sent from within OU Campus.

DRAFT – DRAFT – DRAFT – DRAFT – DRAFT – DRAFT – DRAFT – DRAFT – DRAFT – DRAFT – DRAFT – DRAFT– DRAFT– DRAFT– DRAFT– DRAFT– DRAFT
Fresno State | Web Communication / 559-278-8595 | OU Campus Web Content Management Page 30
COMPOSE
Compose allows the user to compose a message to another Fresno State user in OU Campus’s messaging
system. The message can also be sent to the user’s external Fresno State email as well.
REVIEWING/APPROVING A PAGE
If a page was sent to a user for review, it will appear in the Inbox window. Click the blue Subject title link to
open the message.
The message will include who it is from, the subject, when it was sent, the site name, the page that is awaiting
review/approval and the message from the sender. Click the View Page button on the right side to go directly
to the page.
DRAFT – DRAFT – DRAFT – DRAFT – DRAFT – DRAFT – DRAFT – DRAFT – DRAFT – DRAFT – DRAFT – DRAFT– DRAFT– DRAFT– DRAFT– DRAFT– DRAFT
Fresno State | Web Communication / 559-278-8595 | OU Campus Web Content Management Page 31
The options made available in the Page Actions Toolbar may include:
Publish now, Schedule and Send to user,
review the Saving & Publishing section of
this handout.
“Decline & Keep” will send the page back to the sender and keep all of the changes in place. A separate
message can be sent indicating any additional changes that may be desired.
“Decline & Revert” will send the page back to the sender and remove all changes, and revert the page
Back to its previous version; again allowing for a separate message to be sent with the reasoning.
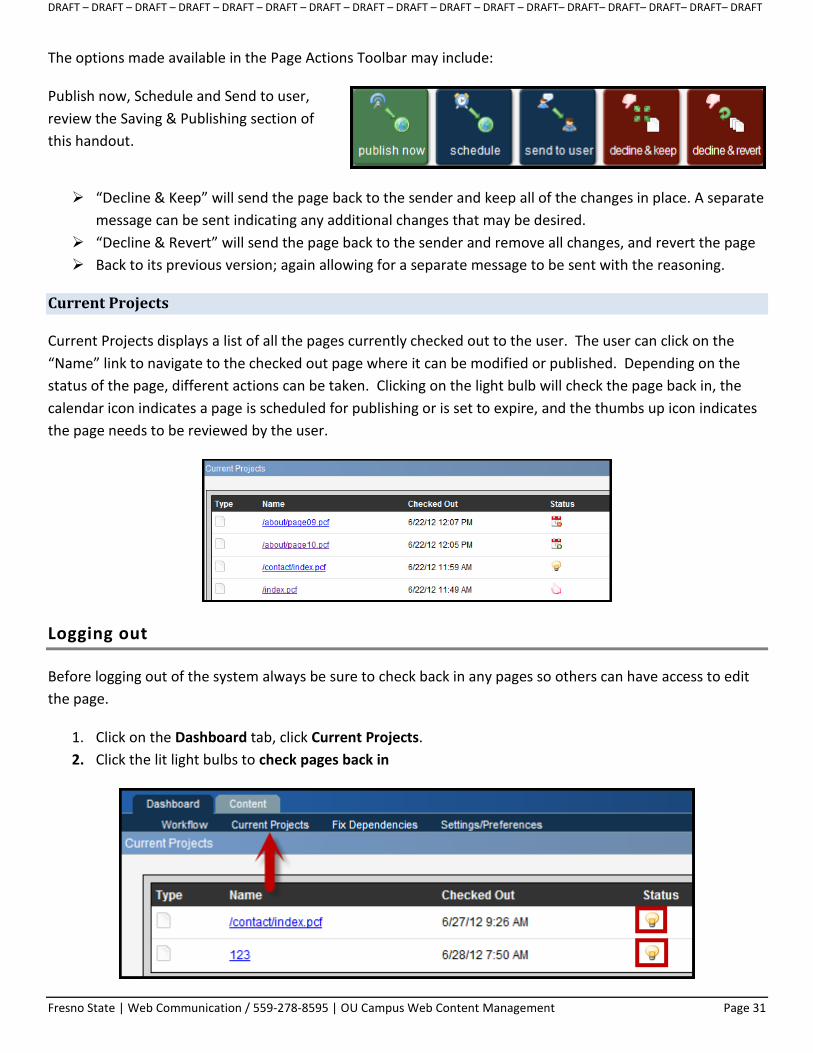
Current Projects
Current Projects displays a list of all the pages currently checked out to the user. The user can click on the
“Name” link to navigate to the checked out page where it can be modified or published. Depending on the
status of the page, different actions can be taken. Clicking on the light bulb will check the page back in, the
calendar icon indicates a page is scheduled for publishing or is set to expire, and the thumbs up icon indicates
the page needs to be reviewed by the user.
Logging out
Before logging out of the system always be sure to check back in any pages so others can have access to edit
the page.
1. Click on the Dashboard tab, click Current Projects.
2. Click the lit light bulbs to check pages back in

DRAFT – DRAFT – DRAFT – DRAFT – DRAFT – DRAFT – DRAFT – DRAFT – DRAFT – DRAFT – DRAFT – DRAFT– DRAFT– DRAFT– DRAFT– DRAFT– DRAFT
Fresno State | Web Communication / 559-278-8595 | OU Campus Web Content Management Page 32
3. Click Logout in the top right corner of the page
4. If asked “Are you sure you wish to log out of OU Campus?” Click OK.
Help & Support
Fresno State Online Training & Support
Contact your division’s site administrator for support. In addition you can find documentation, FAQ’s, and
tutorials specific to Fresno State websites in the Web Communications Blackboard Organization for OU
Campus. If you need additional assistance or are experiencing a technical issue please submit a work order to
the Help Desk. A member of Web Communications will assist you.
Help Desk Work Order
To submit a work order fill out the following form Help Desk’s Website Modification Work Order Form
(https://help.fresnostate.edu/forms/dept-change-web-request.php).
Vendor Resources
Users should first seek assistance from their division/university’s site administrators. However, additional
support is available through the OU Campus Support site (http://support.OU Campus.com). Also, the Support
Site can be accessed through the Help link in the upper, right-hand corner of the website once logged in.
The Support site includes user support on all the
features, as well as video and text tutorials.