dr-680 owner's manual -...
TRANSCRIPT

D01098520A
DR-680Portable Multitrack Recorder
OWNER'S MANUAL

2 TASCAM DR-680
The exclamation point within an equilateral triangle is intended to alert the user to the presence of important operating and maintenance (servicing) instructions in the literature accompanying the appliance.
The lightning flash with arrowhead symbol, within equilateral triangle, is intended to alert the user to the presence of uninsulated “dangerous voltage” within the product’s enclosure that may be of sufficient magnitude to constitute a risk of electric shock to persons.
CAUTION: TO REDUCE THE RISK OF ELECTRIC SHOCK, DO NOT REMOVE COVER (OR BACK). NO USER-SERVICEABLE PARTS INSIDE. REFER SERVICING TO QUALIFIED SERVICE PERSONNEL.
WARNING: TO PREVENT FIRE OR SHOCK HAZARD, DO NOT
EXPOSE THIS APPLIANCE TO RAIN OR
MOISTURE.
This appliance has a serial number located on the rear panel. Please record the model number and serial number and retain them for your records.
Model number
Serial number
TO THE USER This equipment has been tested and found to comply with the limits for a Class B digital dev ice, pursuant to Par t 15 of the FCC Rules. These limits are designed to provide reasonab le p ro tec t i on aga ins t ha rmfu l interference in a residential installation. This equipment generates, uses, and can radiate radio frequency energy and, if not installed and used in accordance with the instruction manual, may cause harmful interference to radio communications.
However, there is no guarantee that interference will not occur in a particular installation. If this equipment does cause harmful interference to radio or television reception, which can be determined by turning the equipment off and on, the user is encouraged to try to correct the interference by one or more of the following measures.
a) Reorient or relocate the receiving antenna.
b) Increase the separat ion between the equipment and receiver.
c) Connect the equipment into an outlet on a circuit different from that to which the receiver is connected.
d) Consult the dealer or an experienced radio/TV technician for help.
CAUTION:
Changes or modifications to this equipment not expressly approved by TEAC CORPORATION for compliance could void the user's authority to operate this equipment.
For U.S.A.
IMPORTANT SAFETY INSTRUCTIONS

TASCAM DR-680 3
IMPORTANT SAFETY INSTRUCTIONS 1 Read these instructions.
2 Keep these instructions.
3 Heed all warnings.
4 Follow all instructions.
5 Do not use this apparatus near water.
6 Clean only with dry cloth.
7 Do not block any ventilation openings. Install in accordance with the manufacturer's instructions.
8 Do not instal l near any heat sources such as radiators, heat registers, stoves, or other apparatus (including amplifiers) that produce heat.
9 Do not defeat the safety purpose of the polarized or grounding-type plug. A polarized plug has two blades with one wider than the other. A grounding type plug has two blades and a third grounding prong. The wide blade or the third prong are provided for your safety. If the provided plug does not fit into your outlet, consult an electrician for replacement of the obsolete outlet.
10 Protect the power cord from being walked on or pinched particularly at plugs, convenience receptacles, and the point where they exit from the apparatus.
11 Only use attachments/accessories specified by the manufacturer.
12 Use only with the cart, stand, tripod, bracket, or table specified by the manufacturer, or sold with the apparatus. When a cart is used, use caution when moving the cart/apparatus combination to avoid injury from tip-over.
13 Unplug this apparatus during lightning storms or when unused for long periods of time.
14 Refer all servicing to qualified service personnel. Servicing is required when the apparatus has been damaged in any way, such as power-supply cord or plug is damaged, liquid has been spilled or objects have fallen into the apparatus, the apparatus has been exposed to rain or moisture, does not operate normally, or has been dropped.
Do not expose this apparatus to drips or splashes.•
Do not place any objects filled with liquids, such as • vases, on the apparatus.
Do not install this apparatus in a confined space • such as a book case or similar unit.
The apparatus draws nominal non-operating power • from the AC outlet with its POWER or STANDBY/ON switch not in the ON position.
The apparatus should be located close enough • to the AC outlet so that you can easily grasp the power cord plug at any time.
The mains plug is used as the disconnect device, • the disconnect device shall remain readily operable.
If the product uses batteries (including a battery • pack or installed batteries), they should not be exposed to sunshine, fire or excessive heat.
CAUTION for products that use replaceable lithium • batteries: there is danger of explosion if a battery is replaced with an incorrect type of battery. Replace only with the same or equivalent type.
Caution should be taken when using earphones or • headphones with the product because excessive sound pressure (volume) from earphones or head-phones can cause hearing loss.

4 TASCAM DR-680
CAUTIONS ABOUT BATTERIESThis product uses batteries. Misuse of batteries could cause a leak, rupture or other trouble. Always abide by the following precautions when using batteries.
Never recharge non-rechargeable batteries. The • batteries could rupture or leak, causing fire or injury.
When installing batteries, pay attention to the polar-• ity indications (plus/minus (+/–) orientation), and install them correctly in the battery compartment as indicated. Putting them in backward could make the batteries rupture or leak, causing fire, injury or stains around them.
When you store or dispose of batteries, isolate their • terminals with insulating tape or similar to prevent them from contacting other batteries or metallic objects.
When throwing used batteries away, follow the • disposal instructions indicated on the batteries and the local disposal laws.
Do not use batteries other than those specified. • Do not mix and use new and old batteries or differ-ent types of batteries together. The batteries could rupture or leak, causing fire, injury or stains around them.
Do not carry or store batteries together with small • metal objects. The batteries could short, causing leak, rupture or other trouble.
Do not heat or disassemble batteries. Do not put • them in fire or water. Batteries could rupture or leak, causing fire, injury or stains around them.
If the battery fluid leaks, wipe away any fluid on • the battery case before inserting new batteries. If the battery fluid gets in an eye, it could cause loss of eyesight. If fluid does enter an eye, wash it out thoroughly with clean water without rubbing the eye and then consult a doctor immediately. If the fluid gets on a person’s body or clothing, it could cause skin injuries or burns. If this should happen, wash it off with clean water and then consult a doctor immediately.
Remove the batteries if you do not plan to use • the unit for a long time. Batteries could rupture or leak, causing fire, injury or stains around them. If the battery fluid leaks, wipe away any fluid on the battery compartment before inserting new batteries.
IMPORTANT SAFETY INSTRUCTIONS

TASCAM DR-680 5
Contents
1 – Introduction .........................................................7
Features .............................................................................7Items included with the product ....................................7Conventions used in this manual ...................................7Intellectual property rights .............................................8About SD cards .................................................................9
Precautions for use ............................................................9Beware of condensation .................................................9Cleaning the unit ..............................................................9
2 – Names and Functions of Parts...........10
Top panel .........................................................................10Front panel .....................................................................11Left side panel ...............................................................13Right side panel .............................................................14Bottom panel .................................................................15Home Screen ..................................................................16Menu structure ...............................................................17Using menus ...................................................................18Operation basics.............................................................18Functions Screen ............................................................18
Repeat activation .............................................................19Pre-record activation .......................................................19Auto-record activation .....................................................19Limiter activation .............................................................19Low-cut filter activation ...................................................19
3 – Preparations .......................................................20
Powering the unit ...........................................................20About the power supply...................................................20Using AA batteries ..........................................................20Using the AC adaptor ......................................................20
Turning the power on and putting the unit into standby .........................................................................21Turning the power on ......................................................21Putting the unit into standby ...........................................21
Inserting and removing SD cards .................................21Inserting an SD card .......................................................21Ejecting an SD card ..........................................................21
Preparing an SD card for use ........................................22Card write-protection ......................................................22
Setting the date and time .............................................22Monitoring playback with the built-in speaker .........22Connecting monitoring equipment .............................23 Adjusting the display contrast ...................................23
4 – Recording..............................................................24
Files and takes ................................................................24Recording settings .........................................................24
Setting the recording file format ......................................24Setting the sampling frequency .......................................24Setting the file recording mode ........................................25Stereo track recording settings .........................................25Creation of new takes when restarting recording .............25Setting the name given to recording takes .......................26Editing the user take names .............................................26Available recording time display .......................................26
Set the folder for saving takes .....................................27
Connecting other equipment .......................................27Input settings ..................................................................27
Setting the input sources .................................................27Phantom power ...............................................................27Selecting the inputs for recording to tracks 5 and 6 .........28
Adjusting the input levels .............................................28Recording a take ............................................................29Recording a stereo mix..................................................30Using the solo function .................................................30Automatically starting and pausing recording
(auto-record function) ................................................30Using the auto-record function ........................................30Auto-record settings ........................................................31Automatically cutting unnecessary silences when recording (silent cut function) ..........................................31Automatically adding marks at the position where recording restarts ............................................................31
Starting a new take and continuing to record ...........32Manually starting a new take during recording ................32Automatically starting a new take during recording .........32
Using the limiter .............................................................32Using the low-cut filter .................................................33
Turning the low-cut filter on and off ................................33Setting the cut-off frequency of the low-cut filter .............33
Using marks ....................................................................33Manually adding marks when recording and during playback .........................................................................33Moving to a mark ...........................................................33Erasing marks ..................................................................34
Pre-recording ..................................................................34Recording times ..............................................................35
5 – Take and folder operations (BROWSE screen) ...........................................36
Navigating the BROWSE screen ...................................36Icons on the BROWSE screen .......................................36Take operations ..............................................................36Folder operations ...........................................................37
6 – Playback .................................................................38
Playback ..........................................................................38Starting playback .............................................................38Stopping playback ...........................................................38Pausing playback .............................................................38Searching forward and backward .....................................38Selecting a take for playback ...........................................38Changing the playback position (scrubbing) .....................38
Mixing and outputting a multitrack recording ..........39Using the internal mixer ...................................................39Using the solo function ....................................................39
Playing a stereo track ....................................................39Setting the playback area .............................................40Selecting a folder for the playback area on the
BROWSE screen ...........................................................40Setting the search speed ...............................................40Repeat playback .............................................................41
7 – Connection with a computer .............42
Copying files to a computer .........................................42

6 TASCAM DR-680
Contents
Copying files from a computer .....................................42Ending the connection with a computer ....................43
8 – Other Settings and Information Display ................................................................... 44
Output settings ............................................................. 44Analog output settings ................................................... 44Digital output settings .................................................... 44
System settings ............................................................. 44Power AUTO OFF settings ................................................45Turning the backlight off automatically ............................45Cascade settings .............................................................45Setting the extent of the panel operation lock function ....45Setting the battery type .................................................. 46Initializing the unit .......................................................... 46Viewing system information ............................................ 46
Reformatting SD cards ................................................. 46Viewing card information .............................................47
9 – Messages ............................................................. 48
10 – Troubleshooting ..........................................50
11 – Specifications .................................................51
Recording media and formats ......................................51Input and output ............................................................51
Analog audio input and output .......................................51Digital audio input and output .........................................51Control input and output .................................................51
Audio performance ........................................................52Requirements for connected computers .....................52Other specifications .......................................................52Dimensions ......................................................................53Block diagrams ...............................................................54

TASCAM DR-680 7
Thank you very much for purchasing a TASCAM DR-680 Portable Multitrack Recorder. Please read this manual thoroughly before using the unit so that you understand correct operating procedures and can use its functions fully. We hope that you enjoy using this unit for many years.
Please keep this manual so that you can read it at any time. A digital copy of this manual can also be downloaded from our website (http://www.tascam.com/)
Features
8-track recording with a resolution of up to 24-bit, •96 kHz (6 analog inputs with stereo mix, or 6 analog inputs with digital stereo input)
2-track recording resolution of up to 24-bit, 192 •kHz
Recording/playback media: SD/SDHC cards (Class •4 or faster)
Recording/playback formats: BWF, WAV, MP3•
Recording up to 4 tracks in MP3 format simultane-•ously possible
Sampling frequencies: 44.1, 48, 96 and 192 kHz •
Quantization rates: 16-bit, 24-bit •
MP3 files can be recorded at resolutions of •96/128/192/320 kbps
6 balanced mic/line inputs (1–4 are XLR/TRS •combo jacks and 5–6 are TRS jacks)
Mic inputs can provide +48V phantom power•
Limiters on each input can automatically adjust •their levels appropriately if input levels are too high
Low-cut filters on each input are useful for reducing •low-frequency noise
6 unbalanced line outputs (RCA pin jacks)•
S/PDIF and AES/EBU digital input and output •(coaxial)
Cascade function allows the transport of multiple •DR-680 units to be controlled by a single master unit
Pre-record function allows up to 2 seconds of input •before the start of recording to be captured
Auto-record function allows the unit to start •recording automatically when it detects a set sound input level
Mark function allows movement to specific •playback positions
Key lock function can be used to prevent misop-•eration
Repeat playback function •
Mixer for monitoring with level and pan controls•
User can start a new take at any time without inter-•rupting recording
Take names can be based on a word set by the user •or the date
500-mW monaural output speaker built-in •
50-mW + 50-mW headphones output •
Operates on power from 8 AA batteries or an AC •adaptor (PS-1225L)
LCD with 128 x 64 pixel resolution and a backlight•
USB2.0 port •
USB cable included •
Items included with the product
The DR-680 package contains the following items.
Take care when opening the package not to damage the items. Keep the package materials for transportation in the future.
Please contact the store where you purchased this unit if any of these items are missing or have been damaged during transportation.
Main unit• .................................................................1
AC adaptor (TASCAM PS-1225L)• .........................1
USB cable (1.5 m)• ...................................................1
Shoulder strap• ..........................................................1
Warranty card• ..........................................................1
Owner’s manual (this document)• ............................1
Conventions used in this manual
The following conventions are used in this manual.
“SD memory card” is sometimes abbreviated as •“SD card.”
When we refer to a key or connector or control on •the DR-680, the typeface looks like this: MENU.
When we show messages, for example, that appear •on the screen, the typeface looks like this: BROWSE.
1 – Introduction

8 TASCAM DR-680
Additional information is introduced in the styles •below when needed:
TIP
We give hints and tips on using the DR-680 when you see this icon.
NOTE
A note provides additional explanations for special situations.
CAUTION
A caution shows that you may lose data (recordings) if you do not follow the instructions.
Intellectual property rights
TASCAM is a trademark of TEAC Corporation, •registered in the U.S. and other countries.
SDHC Logo is a trademark of SD-3C, LLC.•
Microsoft, Windows, Windows XP, Windows Vista, •and Windows 7 are either registered trademarks or trademarks of Microsoft Corporation in the United States and/or other countries.
Apple, Macintosh, iMac, Mac OS and Mac OS X •are trademarks of Apple Inc.
MPEG Layer-3 audio coding technology licensed •from Fraunhofer IIS and Thomson.
Supply of this product does not convey a license nor imply any right to distribute MPEG Layer-3 compliant content created with this product in revenue-generating broadcast systems (terrestrial, satellite, cable and/or other distribution channels), streaming applications (via Internet, intranets and/or other networks), other content distribution systems (pay-audio or audio-on-demand applications and the like) or on physical media (compact discs, digital versatile discs, semiconductor chips, hard drives, memory cards and the like). An independent license for such use is required. For details, please visit http://mp3licensing.com.
Other company names, product names and logos •in this document are the trademarks or registered trademarks of their respective owners.
Any data, including, but not limited to infor-mation, described herein are intended only as illus-trations of such data and/or information and not as thespecificationsforsuchdataand/orinformation.TEAC Corporation disclaims any warranty that any use of such data and/or information shall be free from infringement of any third party’s intel-lectual property rights or other proprietary rights, and further, assumes no liability of whatsoever nature in the event of any such infringement, or arising from or connected with or related to the use of such data and/or information.
This product is designed to help you record and reproduce sound works to which you own the copyright, or where you have obtained permission from the copyright holder or the rightful licensor. Unless you own the copyright, or have obtained the appropriate permission from the copyright holder or the rightful licensor, your unauthorized recording, reproduction or distribution thereof may result in severe criminal penalties under copyright laws and international copyright treaties. If you are uncertain about your rights, contact your legal advisor. Under no circumstances will TEAC Corporation be responsible for the conse-quences of any illegal copying performed using the recorder.
1 – Introduction

TASCAM DR-680 9
About SD cards
This unit uses SD cards for recording and playback.
A list of SD cards that have been tested with this unit can be found on the TASCAM web site (www.tascam.com).
Useofcardsthathavenotbeenverifiedforusewiththis unit could result in the unit not functioning properly.
Precautions for use
SD cards are delicate media. In order to avoid damaging a card or the card slot, please take the following precautions when handling them.
Do not leave in extremely hot or cold places.•
Do not leave them in extremely humid places. •
Do not let them get wet. •
Do not put things on top of them or twist them. •
Do not hit them. •
Beware of condensation
If the unit is moved from a cold to a warm place, or used after a sudden temperature change, there is a danger of condensation; vapor in the air could condense on the internal mechanism, making correct operation impossible. To prevent this, or if this occurs, let the unit sit for one or two hours at the new room temperature before using.
Cleaning the unit
Use a dry soft cloth to wipe the unit clean. Do not clean the unit with a chemically treated cloth or substances such as benzene, thinner and alcohol because they might cause damage to the surface of the unit.
1 – Introduction

10 TASCAM DR-680
2 – Names and Functions of Parts
Top panel
1 Built-in monaural speakerUse this built-in speaker for monitoring. Use the PHONES knob to adjust the volume. When headphones are connected, no sound is output from this speaker.
2 INPUT switchesUse these to set the inputs to LINE or MIC.
3 HOLD switch Slide this in the direction of the arrow to disable the STANDBY/ON button to prevent the power from accidentally being cut.
4 MIC GAIN switchesUse these to adjust the gain of the mic inputs.
5 STANDBY/ON button Press this to switch the unit power between ON and STANDBY.
6 PHANTOM switchesUse these to turn phantom power ON or OFF for input pairs 1/2, 3/4 and 5/6.
7 MULTI/STEREOPress to select whether the stereo track or the multi-track (6-track) is played back.
8 MENU key Press this key when the Home Screen is open to open the MENU screen.
Press this key when the MENU screen is open to return to the previous menu level.
9 DATA wheelUse this to select items and change values on various settings screens.
When the Home Screen is open, use the DATA wheel to move the playback position in the take.
0 ENTER key Use this to confirm selections, advance to the next level in a menu and respond “YES” to confirmation pop-up messages on various settings screens.

TASCAM DR-680 11
q / (cursor) keysUse these on various settings screens to move the cursor left and right.
On the BROWSE screen, use these to move up and down levels.
Use key to respond “NO” to confirmation pop-up messages on various settings screens or to cancel the current operation.
w Â/Ô keyPress this key during playback or when stopped in the middle of a take to return to the beginning of the current take.
Press when stopped at the beginning of the take to skip to the beginning of the previous take.
Press and hold to search backwards.
Press this key while pressing the MARK key on the front panel to move to the previous mark.
e /¯ key Press this key during playback or when stopped to skip to the beginning of the next take.
Press and hold to search forward.
Press this key while pressing the MARK key on the front panel to move to the next mark.
r STOP key Press to stop recording and playback and locate the transport to the beginning of the current take.
Press to end recording standby.
Press this key while pressing the MARK key on the front panel to erase the current mark.
t PLAY/PAUSE key Press when stopped or paused to start playback.
Press during playback to pause at that position.
Front panel
y PHONES jack and knob Use this standard stereo phone jack to connect headphones. Use the PHONES knob to adjust the headphones and speaker output level.
u Display This shows a variety of information related to the operation of the unit.
i HOME/FUNC key Press when any screen other than the Home Screen is open to return to the Home Screen.
Press when the Home Screen is open to open the Functions Screen.
o DISPLAY key Press to switch the counter display mode.
Turn the VALUE knob on the front panel while pressing this key to adjust the display contrast.
p MARK key Press during playback or recording to add a mark at that time.
Press the Â/Ô key on the top panel while pressing this key to move to the previous mark.
Press the ¯/ key on the top panel while pressing this key to move to the next mark.
Press the STOP key on the top panel while pressing this key to erase the current mark.
2 – Names and Functions of Parts

12 TASCAM DR-680
a MIX PAN key Press to open the PAN settings screen. Press when the PAN settings screen is open to close it and return to the Home Screen.
s VALUE knobUse this to change the value of the selected item on the TRIM, LEVEL and PAN settings screens.
On the Functions Screen, use this to select function items, and press the knob to turn each function item ON or OFF.
Turn this knob while pressing the DISPLAY key on the front panel to adjust the display contrast.
d PAUSE key and indicator Press when stopped or recording to start recording standby. The indicator lights when in recording standby.
Press when in recording standby to stop recording standby.
NOTE
The PAUSE key on the front panel functions only when recording. Use the PLAY/PAUSE key on the top of the unit to pause playback.
f REC key and indicator Press when stopped or in recording standby to start recording. The indicator lights when recording or in recording standby.
Press this key when recording to end the current take and continue recording a new take without pause.
g REC TRIM key Press to open the input TRIM settings screen.
When the input TRIM settings screen is open, press to close it and open the Home Screen.
h MIX LEVEL key Press to open the LEVEL settings screen.
Press when the LEVEL settings screen is open to close it and return to the Home Screen.
j1–6 keys Use these to select tracks on the TRIM, LEVEL and PAN settings screens.
Press when in recording standby to arm/disarm that track for recording.
On the Functions Screen, press to turn the selected function ON or OFF for that track.
Press and hold to enable/disable solo monitoring of that track.
k MIX (LOCK) keyOn the LEVEL settings screen, press to select the stereo track.
Press when in recording standby to arm/disarm the stereo track for recording.
During recording or when in recording standby, press and hold this key to enable monitoring of the stereo mix or the digital input signal
On the Home screen, press and hold this key to lock key operation of the panel. When locked, key operations of the top and/or front panels are disabled, preventing misoperation.
This function can be set to lock the key operations on both the top and front panels or either panel.
2 – Names and Functions of Parts

TASCAM DR-680 13
Left side panel
l MIC/LINE INPUTS (XLR/TRS) jacksThese are balanced analog XLR/TRS combo jacks for microphone and line level inputs (1: GND 2: HOT 3: COLD, Tip: HOT Ring: COLD Sleeve: GND).
; MIC/LINE INPUTS (TRS) jacks These are balanced analog TRS jacks for micro-phone and line level inputs (Tip: HOT Ring: COLD Sleeve: GND).
CAUTION
Confirm that phantom power is OFF before connecting • a line level device to a MIC/LINE INPUTS jack. If you connect a line level device while phantom power is being supplied, that device and this unit could be damaged.
When using a condenser microphone, before • connecting to and disconnecting from a MIC/LINE INPUTS jack, confirm that the phantom power for that jack is OFF. If you connect or disconnect a mic while phantom power is being supplied, that mic and this unit could be damaged.
Do not connect an unbalanced dynamic mic to an XLR • connector when phantom power is being supplied. Doing so could damage that mic and this unit.
2 – Names and Functions of Parts

14 TASCAM DR-680
Right side panel
z LINE OUTPUTS jacksThese RCA pin jacks are unbalanced analog output jacks. During the playback of multitrack files, the sound previously recorded on each track is output from these jacks.
During recording, the sound recorded to each track is output from these jacks.
During the playback of the multi-track, according to the unit setting, the stereo signal mixed by the internal mixer can be output from output jacks 1/2, 3/4 or 5/6.
During the playback of a stereo track, the sound of the stereo track is output through output jacks 1 and 2.
x DIGITAL/SYNC IN jack This is a digital input jack. The signal input through this jack can be recorded to tracks 5 and 6 or the stereo track. The unit automatically determines whether the input signal is S/PDIF (IEC60958-3) or AES3-2003/IEC60958-4 (AES/EBU), which are both supported.
Transmission occurs at double speed when the sampling frequency is 96 kHz and at quad speed when 192 kHz.
When linking two of these units using the cascade function, connect the DIGITAL/SYNC OUT jack of the other DR-680 to this jack.
c DIGITAL/SYNC OUT jack The stereo signal mixed by the internal mixer is output from this jack.
According to the unit setting, the signal is output in S/PDIF (IEC60958-3) or AES3-2003/IEC60958-4 (AES/EBU) format.
Transmission occurs at double speed when the sampling frequency is 96 kHz and at quad speed when 192 kHz.
When linking two of these units using the cascade function, connect the DIGITAL/SYNC IN jack of the other DR-680 to this jack.
v DC IN 12V jack Connect the included AC adaptor (PS-1225L), which matches the power specifications of this unit.
b SD card slot/USB port cover
n Cord holderSecure the cord of the included AC adaptor (PS-1225L) with this holder to prevent the plug from being disconnected accidentally.
m Kensington security slot
, SD card slot Insert SD cards here.
. USB port Connect this unit with a computer using a USB2.0 cable. The computer will recognize this unit as a mass storage device. No driver software is necessary.
Audio files can be transferred between an SD card in this unit and a computer by the USB connection.
2 – Names and Functions of Parts

TASCAM DR-680 15
Bottom panel
/ Hook for the shoulder strapAttach the included shoulder strap here.
! Stand Use this stand to raise the front of the unit when operating it on a flat surface.
@ Battery compartment cover
# Battery compartmentInstall batteries (8 AA) for powering the unit in this compartment. (See “Using AA batteries” on page 20.)
2 – Names and Functions of Parts
16 TASCAM DR-680
Home Screen
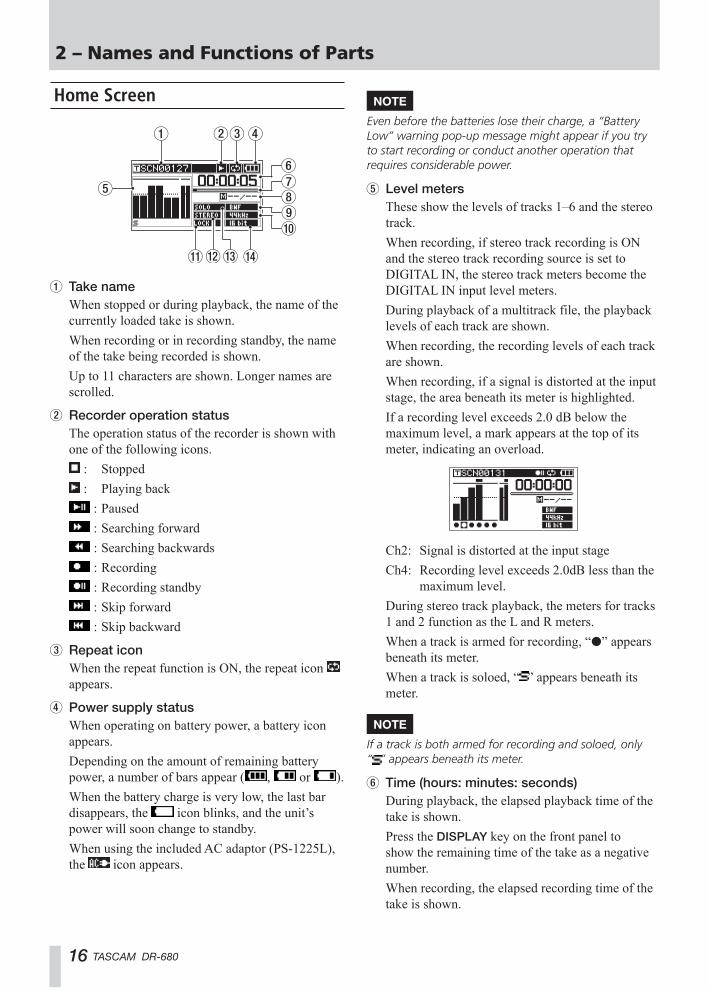
1 Take name When stopped or during playback, the name of the currently loaded take is shown.
When recording or in recording standby, the name of the take being recorded is shown.
Up to 11 characters are shown. Longer names are scrolled.
2 Recorder operation statusThe operation status of the recorder is shown with one of the following icons.
: Stopped
: Playing back
: Paused
: Searching forward
: Searching backwards
: Recording
: Recording standby
: Skip forward
: Skip backward
3 Repeat iconWhen the repeat function is ON, the repeat icon appears.
4 Power supply status When operating on battery power, a battery icon appears.
Depending on the amount of remaining battery power, a number of bars appear ( , or ).
When the battery charge is very low, the last bar disappears, the icon blinks, and the unit’s power will soon change to standby.
When using the included AC adaptor (PS-1225L), the icon appears.
NOTE
Even before the batteries lose their charge, a “Battery Low” warning pop-up message might appear if you try to start recording or conduct another operation that requires considerable power.
5 Level meters These show the levels of tracks 1–6 and the stereo track.
When recording, if stereo track recording is ON and the stereo track recording source is set to DIGITAL IN, the stereo track meters become the DIGITAL IN input level meters.
During playback of a multitrack file, the playback levels of each track are shown.
When recording, the recording levels of each track are shown.
When recording, if a signal is distorted at the input stage, the area beneath its meter is highlighted.
If a recording level exceeds 2.0 dB below the maximum level, a mark appears at the top of its meter, indicating an overload.
Ch2: Signal is distorted at the input stage
Ch4: Recording level exceeds 2.0dB less than the maximum level.
During stereo track playback, the meters for tracks 1 and 2 function as the L and R meters.
When a track is armed for recording, “º” appears beneath its meter.
When a track is soloed, “ ” appears beneath its meter.
NOTE
If a track is both armed for recording and soloed, only “ ” appears beneath its meter.
6 Time (hours: minutes: seconds)During playback, the elapsed playback time of the take is shown.
Press the DISPLAY key on the front panel to show the remaining time of the take as a negative number.
When recording, the elapsed recording time of the take is shown.
2 – Names and Functions of Parts

TASCAM DR-680 17
Press the DISPLAY key on the front panel to show the remaining available recording time for the take.
7 Playback positionThis bar shows the current playback position during playback or the amount of remaining time available for recording during recording. As recording or playback progresses, the bar darkens from the left.
8 Mark informationThe mark number and the total number of marks in the current take are shown.
During playback, the number of the mark that is before and closest to the current position is shown.
When recording, the last added mark number is shown.
9 File type indicatorWhen stopped or during playback, the file type of the currently loaded take is shown.
When recording or in recording standby, the file type of the take being recorded is shown.
: BWF
: WAV
: MP3
0 Sampling frequency indicatorWhen stopped or during playback, the sampling frequency of the currently loaded take is shown.
When recording or in recording standby, the sampling frequency of the take being recorded is shown.
: 44.1 kHz
: 48 kHz
: 96 kHz
: 192 kHz
q LOCK indicatorWhen the lock function for the front panel and/or top panel keys is ON, the indicator appears.
w STEREO indicatorWhen a stereo track is being played, the indicator appears. During stereo track playback, the meters for tracks 1 and 2 function as the L and R meters.
e SOLO indicatorWhen a track has been soloed, the indicator appears. An icon appears beneath the meter of the currently soloed track.
r Quantization/bit-rate indicatorWhen stopped or during playback, the quanti-zation/bit-rate of the currently loaded take is shown.
When recording or in recording standby, the quantization/bit-rate of the take being recorded is shown.
When the take being recorded or played is an MP3, its bit rate is shown.
BWF/WAV
: 16-bit
: 24-bit
MP3
: 96 kbps (48 kbps)
: 128 kbps (64 kbps)
: 192 kbps (96 kbps)
: 320 kbps (160 kbps)
NOTE
The bit rate in parentheses is for when recording a monaural take.
Menu structure
Press the MENU key on the top panel to open the MENU screen. The menu items are as follows.
NOTE
This screen cannot be accessed during recording or when in recording standby.
Menu item Contents Pages
BROWSE Work with takes and folders 36
REC Make recording settings 24
AUTO REC Make auto-recording settings
30
LOW CUT Make low cut filter settings 33
I/O Make input and output settings
27, 44
PLAY Make playback settings 40, 41
CARD Manage the SD card 46
SYSTEM Make system settings 44
DATE/TIME Set the date and time 22
2 – Names and Functions of Parts

18 TASCAM DR-680
Using menus
In this example, we show how to change the sampling frequency. 1 Press the MENU key to open the MENU screen.
2 Use the DATA wheel to select the desired menu item, and press the ENTER key to open the menu item screen.
3 Use the DATA wheel to select the desired item.
4 Press the key or ENTER key to move the cursor to the setting value.
5 Use the DATA wheel to change the setting.
6 If you want to set another item within the same menu, press the key to return to the selection of setting items, and use the DATA wheel to select the next item that you want to set.
7 Repeat steps 4–6 as necessary to set other items.
8 Press the MENU key to go back one level in the menu.
Press the HOME/FUNC key to return to the Home Screen.
Operation basics
Use the following controls to operate the various settings screens.
MENU key
Press to open the MENU screen when it is not already open.
When the MENU screen is open, press the MENU key to go back one level in the menu.
DATA wheel
Use to select items and to change values.
ENTER key
Presstoconfirmtheselectionofasettingitem,andtoselect“YES”onaconfirmationpop-upmessage.
key
Press to move the cursor right in a settings screen and to open a folder on the BROWSE screen.
key
Press to move the cursor left in a settings screen and to close a folder on the BROWSE screen.
Presstoselect“NO”onaconfirmationpop-upmessage.
HOME/FUNC key
When a settings screen is open, press the HOME/FUNC key to return to the Home Screen.
Functions Screen
When the Home Screen is open, press the HOME/FUNC key to open the Functions Screen.
NOTE
This screen cannot be accessed during recording or when in recording standby.
On the Functions Screen, you can view and activate the following items.
Repeat
Pre-record
Auto-record
Limiter
Low-cut filter
1 When the Home Screen is open, press the HOME/FUNC key to open the Functions Screen.
2 Use the VALUE knob to move the cursor to select the item to set.
2 – Names and Functions of Parts

TASCAM DR-680 19
3 Press the VALUE knob.
When selecting LIMITER or LOW CUT, press the VALUE knob or 1-6 keys.
4 When you have finished making the settings, press the HOME/FUNC key to return to the Home Screen.
Repeat activation
Use the REPEAT item to turn loop playback ON or OFF. The default value is OFF.
: Loop playback ON
: Loop playback OFF
Pre-record activation
Use the PRE.REC item to turn the pre-record function ON or OFF. The default value is OFF.
: Pre-record ON
: Pre-record OFF
Auto-record activation
Use the A.REC item to turn the auto-record function ON or OFF. The default value is OFF.
: Auto-record function ON
: Auto-record function OFF
Limiter activation
Use the LIMITER item to turn the limiter function ON or OFF for each input independently.
The limiter for an input is ON when its number appears light on a dark background. The default value is OFF for all inputs.
Press the VALUE knob to turn the limiter ON or OFF for all inputs at the same time.
Press the 1–6 keys to turn the limiter ON or OFF for each input independently.
If the limiter has been turned ON for one or more inputs, the LIMITER indicator appears with a dark background.
: Limiter ON for all inputs
: Limiter ON for input 1
: Limiter OFF for all inputs
Low-cut filter activation
Use the LOW CUTitemtoturnthelow-cutfilterfunctionON or OFF for each input independently.
Thelow-cutfilterforaninputisONwhenitsnumberappears light on a dark background. The default value is OFF for all inputs.
Press the VALUEknobtoturnthelow-cutfilterONorOFF for all inputs at the same time.
Press the 1–6keystoturnthelow-cutfilterONorOFFfor each input independently.
Ifthelow-cutfilterhasbeenturnedONforoneormore inputs, the LOW CUT indicator appears with a dark background.
: Low-cutfilterONforallinputs
: Low-cutfilterfunctionONforinput 1
: Low-cutfilterOFFforallinputs
NOTE
You can set the cut-off frequency with the FREQUENCY item of the the LOW CUT menu. (See “Using the low-cut filter” on page 33.)
2 – Names and Functions of Parts

20 TASCAM DR-680
3 – Preparations
Powering the unit
About the power supply
This unit can be powered by 8 AA batteries or the included PS-1225L AC adaptor, which matches the powerspecificationsofthisunit.
This unit can use alkaline or nickel-metal hydride AA batteries.
Using AA batteries
Slide off the battery compartment cover on the bottom panel of this unit, insert 8 AA batteries into the battery compartment according to the +/– indications, and close the compartment cover again.
When using AA batteries, set the battery type so that the unit can accurately display the remaining battery charge and determine the necessary minimum remaining charge for operation. (See “Setting the battery type” on page 46.)
CAUTION
Manganese AA batteries cannot be used. • This unit cannot recharge AA nickel-metal hydride • (NiMH) batteries. Use a commercially-available battery recharger to recharge NiMH batteries.
NOTE
A great amount of power is required to provide phantom power to a condenser microphone. If you use a condenser microphone while running the unit on AA batteries (NiMH rechargeable or alkaline), the operation time will be greatly shortened. If you need to operate the unit for a long time, use the AC adaptor.
Using the AC adaptor
Asshowninthefigure,connecttheincludedPS-1225LACadaptor,whichconformstothespecificationsofthis unit, to the DC IN 12V jack.
AC outlet
DC plug
TASCAMPS-1225L
Ahook(cordholder)tofixthecordoftheACadaptoris on the right side panel. Wrap the cord around the hook when connecting it to prevent it from being disconnected during use.
CAUTION
Use only the included PS-1225L AC adaptor, which conforms to the specifications of this unit. Use of an adaptor other than this model could cause malfunction, fire or electric shock.
NOTE
If power is available from both batteries and the AC adaptor, the power is supplied by the AC adaptor.

TASCAM DR-680 21
Turning the power on and putting the unit into standby
Turning the power on
When the power is in standby, press and hold the STANDBY/ON key until the startup screen with TASCAM DR-680 appears. The unit starts up and the Home Screen opens.
CAUTION
Do not remove or insert an SD card until the Home Screen appears.
Putting the unit into standby
When the power is ON, press and hold the STANDBY/ON key until the following shutdown screen appears.
After the unit completes shutting down, the unit’s power is set to standby.
CAUTION
Always use the STANDBY/ON key to put the unit power into standby. When the power is ON, if you remove the batteries or disconnect the power cord when using the PS-1225L AC adaptor, all recording data and settings, for example, are lost and such data cannot be recovered.
Inserting and removing SD cards
This unit can use SD cards with capacities of 2 GB or more that are compliant with the standards for Class 4 (or faster) SD/SDHC cards.
AlistofSD/SDHCcardsthathavebeenverifiedfor use with this unit can be found on the TASCAM website (http://www.tascam.com/).
Inserting an SD card
1 Open the SD card slot cover on the right side panel of the unit.
2 Insert the SD card in the direction shown in the illustration until it clicks into place.
CAUTION
Do not remove an SD card while it is in use (being read).
Ejecting an SD card
1 Open the SD card slot cover.
2 Push the SD card gently, and it will come out of the unit slightly and can be pulled out.
CAUTION
When connected with a computer by USB do not remove the SD card from the unit.
3 – Preparations

22 TASCAM DR-680
Preparing an SD card for use
An SD card must be formatted by this unit to be used with the unit.
CAUTION
Formatting erases all data on the card. • When formatting, use the included AC adaptor • (PS-1225L) or confirm that the remaining battery charge is sufficient.
1 Confirm that the SD card is inserted and turn the power ON.
2 If a new card or a card that has been formatted by a device other than this unit has been inserted, the following pop-up message appears.
3 Press the ENTER key to start formatting.
4 When formatting is complete, the Home Screen opens.
You can reformat a card at any time with this unit. (See “Reformatting SD cards” on page 46.)
Card write-protection
SD cards have lock (write-protection) switches.
Unprotected Protected
Slide the switch in the direction of the Lock arrow to preventtherecordingandeditingoffilesonthecard.Torecord,eraseorotherwisechangefilesonacard,disable the write-protection.
Setting the date and time
This unit adds date and time information to recorded filesusingitsinternalclock.1 Press the MENU key to open the MENU screen.
2 Use the DATA wheel to select the DATE/TIME menu item.
3 Press the ENTER key to open the DATE/TIME screen.
4 Use the / keys to move the cursor and use the DATA wheel to change the values.
5 Press the ENTER key to confirm and return to the MENU screen.
6 Press the MENU or HOME/FUNC key to return to the Home Screen.
NOTE
You can add the date and time set here to the take name. (See “Setting the name given to recording takes” on page 26.)
Monitoring playback with the built-in speaker
To monitor playback using the built-in speaker, adjust the volume using the PHONES knob.
CAUTION
Before using the built-in speaker, turn the PHONES knob to the minimum volume. Failure to do so could cause sudden loud noises to occur, which might damage your hearing or equipment.
3 – Preparations

TASCAM DR-680 23
NOTE
When headphones are connected, no sound is output from the speaker.
Connecting monitoring equipment
To monitor with headphones, connect them to the PHONES jack. Use the PHONES knob to adjust the headphones volume.
Headphones
CAUTION
Before connecting headphones, turn the PHONES knob to the minimum volume. Failure to do so could cause sudden loud noises to occur, which might damage your hearing or equipment.
To monitor with an external monitoring system (poweredmonitorspeakersoranamplifierandspeakers), connect it to the LINE OUTPUTS jack.
Powered monitor speakersor amplifier and speakers
CAUTION
Before using an external monitoring system, turn the volume to minimum. Failure to do so could cause sudden loud noises to occur, which might damage your hearing or equipment.
Adjusting the display contrast
Turn the VALUE knob while pressing and holding the DISPLAY key to adjust the display contrast.
3 – Preparations

24 TASCAM DR-680
This unit can record in the following formats.
WAV/BWF (16/24-bit, 44.1/48/96 kHz)•
6 tracks and a stereo mix
WAV/BWF (16/24-bit, 192 kHz)•
2 tracks
MP3 (96/128/192/320 kbps, 44.1/48 kHz)•
4 tracks
2 tracks and a stereo mix
Files and takes
Withthisunit,agroupofaudiofilesthatarerecordedat the same time are collectively called a “take.”
Dependingonthefilerecordingmodesetting,thefilesincluded in the recorded take will be as follows.
Example 1: 6 tracks and a stereo track recorded
MONO format set: 6 mono WAV files and a stereo •WAV file
STEREO format set: 3 stereo WAV files of inputs •pairs 1-2, 3-4 and 5-6 and a stereo WAV file of the mix
6ch format set: a 6-channel WAV file and a stereo •WAV file
Example 2: 4-track recording in MP3 format
MONO format set: 4 mono MP3 files•
STEREO format set: 2 stereo MP3 files•
AnSDcardinthisunitcanhaveupto5000filesandfolders and 1000 takes.
Recording settings
Setting the recording file format
Youcansettherecordingfileformat(BWF/WAV/MP3) and bit depth (BWF/WAV) or bit rate (MP3).
NOTE
WAV format recordings have a higher audio quality • than MP3 format recordings.
BWF, which is the broadcast wave format, has the • same sound quality as the standard wave (WAV) format.
MP3 format allows greater recording time than WAV • format.
With MP3 formats, higher bit rates record with better • audio quality.
For information about recording times, see “Recording • times” on page 35.
When the file format is set to MP3, the maximum • number of tracks is limited to 4 (4 mono, 2 stereo, or 2 mono and 1 stereo).
1 Press the MENU key to open the MENU screen.
2 Use the DATA wheel to select the REC menu item, and press the ENTER key to open the REC screen.
3 Use the DATA wheel to select the FORMAT item, and press the key.
4 Use the DATA wheel to select one of the following options:
BWF-16bit, BWF-24bit, WAV-16bit (default value), WAV-24bit, MP3-96kbps, MP3-128kbps, MP3-192kbps, or MP3-320kbps.
5 Press the key to return to the selection of items on the REC screen.
6 Press the MENU key to return to the MENU screen. Press the HOME/FUNC key to return to the Home Screen.
Setting the sampling frequency
You can set the sampling frequency and record BWF andWAVfilesat44.1,48,96or192kHz.
1 Press the MENU key to open the MENU screen.
2 Use the DATA wheel to select the REC menu item, and press the ENTER key to open the REC screen.
3 Use the DATA wheel to select the SAMPLE item, and press the key or ENTER key.
4 – Recording

TASCAM DR-680 25
4 Use the DATA wheel to select one of the following options: 44.1kHz (default value), 48kHz, 96kHz, or 192kHz.
NOTE
When the file format is MP3, 96 kHz and 192 kHz cannot be selected.
5 Press the key to return to the selection of items on the REC screen.
6 Press the MENU key to return to the MENU screen. Press the HOME/FUNC key to return to the Home Screen.
Setting the file recording mode
Thefilerecordingmodecanbesettoamonauralfile,astereofileora6-channelfile.
1 Press the MENU key to open the MENU screen.
2 Use the DATA wheel to select the REC menu item, and press the ENTER key to open the REC screen.
3 Use the DATA wheel to select the FILE item, and press the key or ENTER key.
4 Use the DATA wheel to select one of the following options: MONO, STEREO (default value), or 6ch.
NOTE
When set to MONO, a mono file is created for each • recorded track. When set to STEREO, a stereo file is created for each pair of tracks (1-2, 3-4 and 5-6). When set to 6ch, one 6-channel file is created for tracks 1-6.
6ch cannot be selected when the file format is set to • MP3 or the sampling frequency is set to 192 kHz.
5 Press the key to return to the selection of items on the REC screen.
6 Press the MENU key to return to the MENU screen. Press the HOME/FUNC key to return to the Home Screen.
Stereo track recording settings
You can set what is recorded on the stereo track.
1 Press the MENU key to open the MENU screen.
2 Use the DATA wheel to select the REC menu item, and press the ENTER key to open the REC screen.
3 Use the DATA wheel to select the ST REC item, and press the key or ENTER key.
4 Use the DATA wheel to select one of the following options.
MIX (default): Record a mix of the 6 inputs on the stereo track.
DIN : Record the signal from the DIGITAL/SYNC IN input jack on the stereo track.
5 Press the key to return to the selection of items on the REC screen.
6 Press the MENU key to return to the MENU screen. Press the HOME/FUNC key to return to the Home Screen.
Creation of new takes when restarting recording
Set whether the unit continues recording to the same take or begins a new take when restarting recording. This setting determines the take recorded to when you press the REC key again after having pressed the PAUSE key to put the unit in recording standby.
1 Press the MENU key to open the MENU screen.
2 Use the DATA wheel to select the REC menu item, and press the ENTER key to open the REC screen.
3 Use the DATA wheel to select the PAUSE item, and press the key or ENTER key.
4 – Recording

26 TASCAM DR-680
4 Use the DATA wheel to select one of the following options.
SAME TAKE (default value):
Continue recording to the same take.
NEW TAKE: Record to a new take.
5 Press the key to return to the selection of items on the REC screen.
6 Press the MENU key to return to the MENU screen. Press the HOME/FUNC key to return to the Home Screen.
Setting the name given to recording takes
Set whether take names are based on the date or one of three names that have been created on the NAME EDIT screen.
1 Press the MENU key to open the MENU screen.
2 Use the DATA wheel to select the REC menu item, and press the ENTER key to open the REC screen.
3 Use the DATA wheel to select the NAME item, and press the key.
4 Use the DATA wheel to select one of the following options.
DATE (default value):
The take name is based on the date.
USER 1 : The take name is based on a user word definedontheUSER WORD EDIT screen.
USER 2 : The take name is based on a user word definedontheUSER WORD EDIT screen.
USER 3 : The take name is based on a user word definedontheUSER WORD EDIT screen.
5 Press the key to return to the selection of items on the REC screen.
6 Press the MENU key to return to the MENU screen. Press the HOME/FUNC key to return to the Home Screen.
Editing the user take names
You can edit the user words used for take names on the NAME EDIT screen.
1 Press the MENU key to open the MENU screen.
2 Use the DATA wheel to select the REC menu item, and press the ENTER key to open the REC screen.
3 Use the DATA wheel to select the NAME item, and press the key.
4 Press the key again to open the USER WORD edit screen.
5 Use the DATA wheel to select the user word that you want to edit, and press the ENTER key.
6 Use the following keys to edit the user words.
/ keys: Move the cursor.
DATA wheel: Select characters.
¯ key: Add a space at the cursor position.
 key: Erase the character at the cursor position
7 When you have finished editing a user word, press the ENTER key.
8 Press the MENU key to return to the selection of items on the REC screen. Press the HOME/FUNC key to return to the Home Screen.
Available recording time display
Available recording time varies according to the SDcardcapacityandthefileformat,filemodeandsampling frequency settings. (See “Recording times” on page 35.)
You can check the amount of time available for recording using the inserted SD card on the Home
4 – Recording

TASCAM DR-680 27
Screen. When recording or in recording standby press the DISPLAY key to switch between showing the elapsed recording time (of the current recording) and the remaining available recording time. When the remaining available recording time is shown, it appears as a negative number.
Set the folder for saving takes
You can set the folder where recorded takes are saved. (See “Folder operations” on page 37.) By default, recorded takes are saved in the “PROJECT0000” folder that is automatically created under the "MUSIC" folder.
Connecting other equipment
Connect microphones and other external equipment as showninthefigurebelow.
Microphones
Input settings
This unit has 6 analog mic/line inputs and a stereo digital input.
6 tracks and a stereo track can be recorded for a total of 8 tracks.
The inputs recorded on the tracks are as follows.
Track Input
Tracks 1/2 Analog inputs 1/2
Tracks 3/4 Analog inputs 3/4
Tracks 5/6 Analog inputs 5/6 or digital input
Stereo track Stereo mix of inputs 1–6 or digital input
Set the recording source for the stereo track on the REC screen. (See “Stereo track recording settings” on page 25.)
Setting the input sources
Use the INPUT switches on the top panel to set the type of input for each track to either mic or line.
LINE: Set the switch to LINE when the line output jack of an external device is connected to the analog input on this unit.
MIC: Set this switch to MIC when a microphone is connected to this unit.
Phantom power
This unit can supply +48 V phantom power to condenser microphones.
Use the PHANTOM switches on the top panel to turn the phantom power supply ON or OFF for mic input pairs 1/2, 3/4 and 5/6.
CAUTION
Confirm that phantom power is OFF before connecting • a line level device to a MIC/LINE INPUTS jack. If you connect a line level device while phantom power is being supplied, that device and this unit could be damaged.
When using a condenser microphone, before • connecting it to and disconnecting it from a MIC/LINE INPUTS jack, confirm that the phantom power for that jack is OFF. If you connect or disconnect a mic while phantom power is being supplied, that mic and this unit could be damaged.
4 – Recording

28 TASCAM DR-680
Do not connect an unbalanced dynamic mic to a mic • input when phantom power is being supplied. Doing so could damage that mic and this unit.
Selecting the inputs for recording to tracks 5 and 6
Tracks 5 and 6 can be used to record either analog mic/line inputs or the digital input. 1 Press the MENU key to open the MENU screen.
2 Use the DATA wheel to select the I/O menu item, and press the ENTER key to open the I/O screen.
3 Use the DATA wheel to select the INPUT SEL menu item, and press the key or ENTER key.
4 Use the DATA wheel to select ANALOG (default value) or DIGITAL.
ANALOG : Record the signals of analog inputs 5 and 6 to tracks 5 and 6.
DIGITAL : Record the digital input signal to tracks 5 and 6.
NOTE
If the ST REC item is set to DIN, this setting has no effect. The unit will operate as though set to ANALOG.
Adjusting the input levels
1 Press the PAUSE key to enable recording standby. The PAUSE and REC indicators light.
PAUSE indicator REC indicator
2 Use the 1-6 and MIX keys to turn the record function ON for tracks that you want to record. When the record function is ON for a track, an º appears under its meter on the display.
NOTE
If the file recording mode is set to STEREO, the record • function is turned ON and OFF for channels in pairs. If the file recording mode is set to 6ch, the record function cannot be turned ON and OFF for individual channels.
The record function can only be turned ON/OFF when • record standby is enabled when the unit is stopped or during playback. It cannot be turned ON/OFF when record standby is caused by use of the Auto Rec function or record standby is enabled during recording.
3 If a mic is connected, set the MIC GAIN switch for that input to LOW.
NOTE
If an INPUT switch is set to LINE, the corresponding MIC GAIN switch is disabled.
4 Press the REC TRIM key to open the TRIM screen.
4 – Recording

TASCAM DR-680 29
5 Use this screen to set input levels. Use the 1–6 keys to select the input channels that you want to adjust.
6 Use the VALUE knob to adjust the input levels in a range of ±32 dB (default value: 0).
CAUTION
When recording with microphones, please pay attention to the following points.
Adjust the input level so that distortion does not occur • at the input stage. If distortion does occur at the input stage, the channel number to the left of the meter on the TRIM screen is shown as a light number on a dark background. In this case, the unit might record distorted sound even if the overload indicator for the meter has not appeared.
When adjusting the input level, at first, set the MIC • GAIN switch to LOW and adjust the input level on the TRIM screen. If the input level is still too low even when the trim is set to maximum, set the MIC GAIN switch to HIGH.
TIP
In addition to using the TRIM screen to adjust the • recording levels, try changing the orientation of the microphones and their distances from the sources of the sound. The orientation and distance of a microphone also changes the sound quality.
You can use the limiter function to prevent distortion • when recording even when loud sounds are input. (See “Using the limiter” on page 32.)
7 Press the REC TRIM or HOME/FUNC key to return to the Home Screen.
Recording a take
Before starting the following procedures, input selection and level adjustment for each track should be completed, and the Home Screen should be open.
1 Press the PAUSE key to start recording standby. The PAUSE and REC indicators light.
PAUSE indicator REC indicator
2 Press the REC key to start recording. During recording, the REC indicator lights, and the elapsed recording time or remaining recordable time appear on the display.
NOTE
You can also start recording by pressing the REC key first without pushing the PAUSE key beforehand.
3 Press the STOP key to stop recording.
Press the PAUSE key to pause recording. When paused, you can press the REC key again to restart recording.
NOTE
You can set whether recording continues in the same take or a new take is created when you start recording again after pausing. (See “Creation of new takes when restarting recording” on page 25.)
4 – Recording

30 TASCAM DR-680
Recording a stereo mix
With this unit, in addition to recording up to 6 discrete tracks from the 6 inputs, these inputs can also be mixed internally and recorded as a stereo track.
Before starting the following procedures, input selection and level adjustment for each track should be completed, and the Home Screen should be open.
1 Press the MIX LEVEL key to open the LEVEL screen.
2 On this screen you can adjust the mix levels of each input channel and the recording level of the stereo track. Use the 1–6 and MIX keys to select the channels that you want to adjust.
3 Use the VALUE knob to adjust each to a suitable recording level in a range from 0–100 (default value: 100).
NOTE
Adjust the levels so that overload indicators do not appear at the tops of the meters.
4 Next, press the MIX PAN key to open the PAN screen.
5 On this screen you can adjust the pan (stereo position) of each channel. Use the 1–6 keys to select the channel that you want to adjust.
6 Use the VALUE knob to adjust each to a suitable stereo position using values ranging from L10–L1 (left) to C (center) and R1–R10 (right).
(Odd number channels are set to L10 and even number channels are set to R10 by default.)
NOTE
Adjust the pan settings of the channels so that the mix is balanced as desired. You can check the balance with the MIX meters at the far right.
7 When you have finished making the settings, press the HOME/FUNC key to return to the Home Screen.
Using the solo function
Press and hold one of the 1–6 keys on the front panel to enable solo monitoring for that channel.
When solo monitoring, the indicator appears on the Home Screen, and the indicator appears for the soloed channel.
To stop solo monitoring, press and hold the key (1–6) for the soloed channel again.
Automatically starting and pausing recording (auto-record function)
If you turn the auto-record function ON, you can automatically start, stop and pause recording in response to the level of the input sound.
If an input level greater than the level set in advance is detected on any input channel, recording starts.
In addition, the unit can automatically cut silent parts and add marks at points where recording starts again.
NOTE
The levels of input on all channels must remain below the set level for at least one second before the auto-record function is activated.
Using the auto-record function
1 When the Home Screen is open, press the HOME/FUNC key to open the Functions Screen.
2 Use the VALUE knob to move the cursor and select the A.REC item.
3 Press the VALUE knob to turn auto-recording ON or OFF.
If auto-recording has been turned ON, the A.REC indicator appears with a dark background.
4 – Recording
TASCAM DR-680 31
4 When you have finished making the settings, press the HOME/FUNC key to return to the Home Screen.
Auto-record settings
1 Press the MENU key to open the MENU screen.
2 Use the DATA wheel to select the AUTO REC menu item, and press the ENTER key to open the AUTO REC screen.
3 Use the DATA wheel to select the LEVEL item, and press the key or ENTER key.
4 Set the level at which the unit determines that a signal is being input for starting and stopping automatic recording. Use the DATA wheel to set the value to –6dB, –12dB (default value), –24dB, or –48dB.
5 When you have finished making the settings, press the HOME/FUNC key to return to the Home Screen.
6 Press the PAUSE key to enter recording standby. When the input sound exceeds the level set by the LEVEL item, the unit automatically starts recording.
Automatically cutting unnecessary silences when recording (silent cut function)
When recording, the unit can pause when it detects silence for a certain amount of time, and then restart recording when it detects an input signal again. Since this cuts unnecessary silence during recording, space on the card can be conserved.1 Set AUTO REC and LEVEL as explained in the
previous section.
2 Open the AUTO REC screen of selecting items.
3 Use the DATA wheel to select the SILENT CUT item, and press the key or ENTER key.
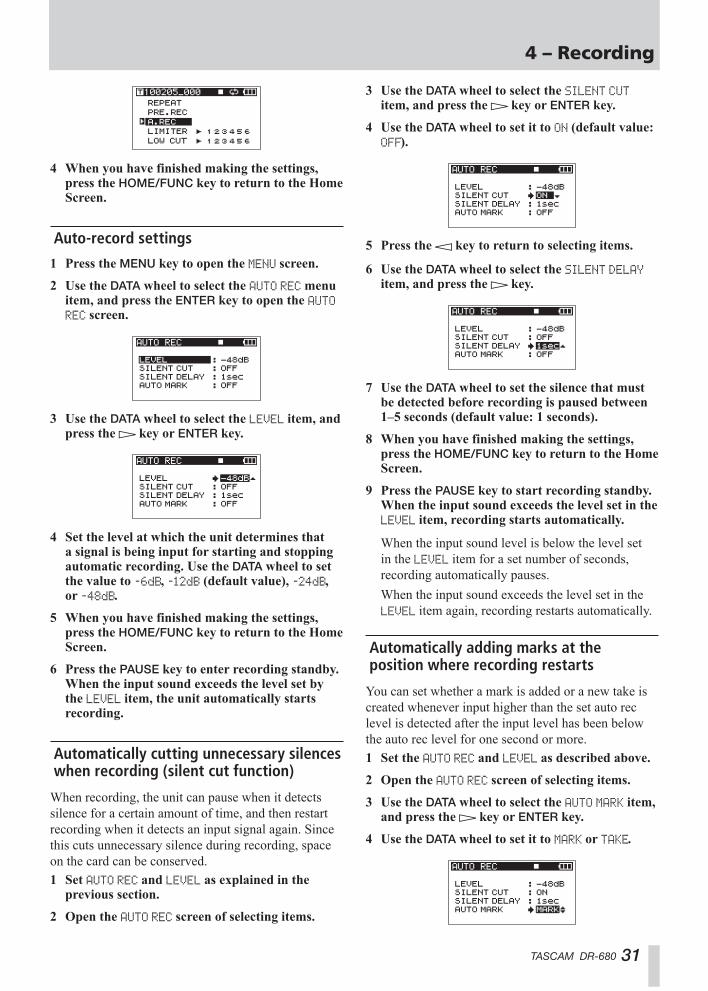
4 Use the DATA wheel to set it to ON (default value: OFF).
5 Press the key to return to selecting items.
6 Use the DATA wheel to select the SILENT DELAY item, and press the key.
7 Use the DATA wheel to set the silence that must be detected before recording is paused between 1–5 seconds (default value: 1 seconds).
8 When you have finished making the settings, press the HOME/FUNC key to return to the Home Screen.
9 Press the PAUSE key to start recording standby. When the input sound exceeds the level set in the LEVEL item, recording starts automatically.
When the input sound level is below the level set in the LEVEL item for a set number of seconds, recording automatically pauses.
When the input sound exceeds the level set in the LEVEL item again, recording restarts automatically.
Automatically adding marks at the position where recording restarts
You can set whether a mark is added or a new take is created whenever input higher than the set auto rec level is detected after the input level has been below the auto rec level for one second or more. 1 Set the AUTO REC and LEVEL as described above.
2 Open the AUTO REC screen of selecting items.
3 Use the DATA wheel to select the AUTO MARK item, and press the key or ENTER key.
4 Use the DATA wheel to set it to MARK or TAKE.
4 – Recording

32 TASCAM DR-680
OFF (default): Auto mark function off
MARK: After the input level has been below the set auto rec level for one second or more, when input higher than the auto rec level is detected again, a mark is added at that position. Recording continues in the same take.
TAKE: After the input level has been below the set auto rec level for one second or more, when input higher than the auto rec level is detected again, recording continues in a new take. After pausing because of activation of the silent cut function, recording restarts in a new take.
5 When you have finished making the settings, press the HOME/FUNC key to return to the Home Screen.
6 Press the PAUSE key to start recording standby. Depending on the setting, a mark is added or a new take is created when recording starts automatically.
Starting a new take and continuing to record
Withthisunit,themaximumrecordingfilesizeis2GB.Ifthefilesizereaches2GBwhilerecording,theunit automatically continues recording in a new take and stops recording the current take.
Manually starting a new take during recording
You can manually create a new take during recording at any time. Press the REC key during recording to create a
new take and continue recording.
NOTE
When a new take is created, the number at the end of the take name is increased by one.
CAUTION
If the total number of folders and files would exceed • 5000, a new take cannot be created.
If the total number of takes would exceed 1000, a • new take cannot be created.
A new take cannot be created if the recording time is • less than 4 seconds.
If the newly created take would have the same name • as an existing take, the numerical suffix is increased by one as many times as necessary until a unique name is created.
Automatically starting a new take during recording
Whenrecording,ifthesizeofthefilereachesoneofthe limits listed below, the unit stops recording the current take and starts recording in a new take without interrupting the recording.
WAV/BWF:Whenthefilesizereaches2GB
MP3:Whenthefilesizereaches2GBortherecordingtime reaches 24 hours
CAUTION
If the total number of folders and files would exceed • 5000, a new take cannot be created.
If the total number of takes would exceed 1000, a • new take cannot be created.
NOTE
Recording times are different for the same file size depending on the file format and recording mode.
Using the limiter
Turn the limiter function ON to make the unit automat-ically adjust the input level to prevent distortion if the input level is too loud. 1 When the Home Screen is open, press the HOME/
FUNC key to open the Functions Screen.
2 Use the VALUE knob to move the cursor and select the LIMITER menu item.
3 Press the VALUE knob.
4 Press the VALUE knob to turn the limiter ON or OFF for all inputs at the same time (default: all channels off).
Press the 1–6 keys to turn the limiter ON or OFF for each input independently.
If the limiter has been turned ON for one or more inputs, the LIMITER indicator appears with a dark background.
4 – Recording

TASCAM DR-680 33
5 When you have finished making the settings, press the HOME/FUNC key to return to the Home Screen.
Using the low-cut filter
Usethelow-cutfiltertoreducelow-frequencynoise.Set the cut-off frequency to 40 Hz, 80 Hz or 120 Hz according to the recording conditions.
Turning the low-cut filter on and off
1 When the Home Screen is open, press the HOME/FUNC key to open the Functions Screen.
2 Use the VALUE knob to move the cursor and select the LOW CUT menu item.
3 Press the VALUE knob.
4 Press the VALUE knob to turn the low-cut filter ON or OFF for all inputs at the same time (default: all channels off).
Press the 1–6 keys to turn the low-cut filter ON or OFF for each input independently.
If the low-cut filter has been turned ON for one or more inputs, the LOW CUT indicator appears with a dark background.
5 When you have finished making the settings, press the HOME/FUNC key to return to the Home Screen.
Setting the cut-off frequency of the low-cut filter
1 Press the MENU key to open the MENU screen.
2 Use the DATA wheel to select the LOW CUT menu item, and press the ENTER key to open the LOW CUT screen.
3 Use the DATA wheel to set the cut-off frequency to 40 Hz, 80 Hz (default value) or 120 Hz.
4 When you have finished making the settings, press the HOME/FUNC key to return to the Home Screen.
Using marks
Manually adding marks when recording and during playback
Press the MARK key when recording and during playback to add a mark at a desired position.
The mark number is shown when you do this.
NOTE
When a recording is paused and then restarted, a • mark is added at that point. Marks are numbered in each take from 01–99, and the mark data is saved with each take.
If you add a mark during playback, the mark is not • immediately saved in the file, but rather is saved when playback stops. If you change the take using the  or ¯ key without stopping, the addition of mark is not completed.
Moving to a mark
When stopped or during playback, press the ¯ key or  key while pressing and holding the MARK key to move backward or forward to the nearest mark in the selected take.
4 – Recording

34 TASCAM DR-680
You can use these marks to index places where you might want to resume playback.
NOTE
You cannot move to a mark in a different take.
Erasing marks
Press the STOP key while pressing and holding the MARK to erase the nearest mark before the current position.
NOTE
If you erase a mark during playback, the mark is not immediately erased, but rather is erased when playback stops. If you change the take using the  or ¯ key without stopping, the erasure of marks is not completed.
Pre-recording
When the unit is in recording standby, the unit can record up to two seconds before the start of recording and include it in the recording.1 When the Home Screen is open, press the HOME/
FUNC key to open the Functions Screen.
2 Use the VALUE knob to move the cursor and select the PRE.REC menu item.
3 Press the VALUE knob to turn pre-recording ON or OFF.
If pre-recording has been turned ON, the PRE.REC indicator appears with a dark background.
4 When you have finished making the settings, press the HOME/FUNC key to return to the Home Screen.
TIP
Used in combination with the auto-record function, you can capture recordings without losing the initial sound.
NOTE
If the unit has been in recording standby for less than two seconds, only the amount of time that the unit has been in standby can be recorded.
4 – Recording

TASCAM DR-680 35
Recording times
RecordingtimesfordifferentfileformatsandSD/SDHCcardcapacitiesareshowninthefollowingtable.
File recording format and number of recordable tracks 2GB 4GB 8GB 16GB 32GB
WAV BWF
16-bit, 44.1 kHz, 6 tracks
1 hour 2 minutes 2 hours 5 minutes
4 hours 11 minutes
8 hours 23 minutes
16 hours 47 minutes
16-bit, 44.1 kHz, 8 tracks
47 minutes 1 hour 34 minutes
3 hours 8 minutes
6 hours 17 minutes
12 hours 35 minutes
24-bit, 44.1 kHz, 6 tracks
41 minutes 1 hour 23 minutes
2 hours 47 minutes
5 hours 35 minutes
11 hours 11 minutes
24-bit, 44.1 kHz, 8 tracks
31 minutes 1 hour 2 minutes 2 hours 5 minutes
4 hours 11 minutes
8 hours 23 minutes
16-bit, 48 kHz, 6 tracks
57 minutes 1 hour 55 minutes
3 hours 51 minutes
7 hours 42 minutes
15 hours 25 minutes
16-bit, 48 kHz, 8 tracks
43 minutes 1 hour 26 minutes
2 hours 53 minutes
5 hours 47 minutes
11 hours 34 minutes
24-bit, 48 kHz, 6 tracks
38 minutes 1 hour 17 minutes
2 hours 34 minutes
5 hours 8 minutes
10 hours 17 minutes
24-bit, 48 kHz, 8 tracks
28 minutes 57 minutes 1 hour 55 minutes
3 hours 51 minutes
7 hours 42 minutes
16-bit, 96 kHz, 6 tracks
28 minutes 57 minutes 1 hour 55 minutes
3 hours 51 minutes
7 hours 42 minutes
16-bit, 96kHz, 8 tracks
21 minutes 43 minutes 1 hour26 minutes
2 hours 53 minutes
5 hours 47 minutes
24-bit, 96kHz, 6 tracks
19 minutes 38 minutes 1 hour17 minutes
2 hours 34 minutes
5 hours 8 minutes
24-bit, 96kHz, 8 tracks
14 minutes 28 minutes 57 minutes 1 hour55 minutes
3 hours 51 minutes
16-bit, 192kHz, 2 tracks
43 minutes 1 hour 26 minutes
2 hours 53 minutes
5 hours 47 minutes
11 hours 34 minutes
24-bit, 192kHz, 2 tracks
28 minutes 57 minutes 1 hour55 minutes
3 hours 51 minutes
7 hours 42 minutes
MP3
96kbps, 44.1 kHz/48 kHz, 4 tracks
23 hours 8 minutes
46 hours 17 minutes
92 hours 34 minutes
185 hours 10 minutes
370 hours 21 minutes
128kbps, 44.1 kHz/48 kHz, 4 tracks
17 hours 21 minutes
34 hours 42 minutes
69 hours 26 minutes
138 hours 52 minutes
277 hours 46 minutes
192kbps, 44.1 kHz/48 kHz, 4 tracks
11 hours 34 minutes
23 hours 8 minutes
46 hours 17 minutes
92 hours 35 minutes
185 hours 10 minutes
320kbps, 44.1 kHz/48 kHz, 4 tracks
6 hours 56 minutes
13 hours 53 minutes
27 hours 46 minutes
55 hours 33 minutes
111 hours 6 minutes
The above recording times are estimates, and might differ according to the SD/SDHC card.• The above recording times are not continuous recording times. They are total recording times for SD/SDHC card • capacities.
4 – Recording

36 TASCAM DR-680
On the BROWSE screen, you can view the contents of the MUSICFolder,whichiswheretakefilesarestoredon the SD card.
To open the BROWSE screen, press the MENU key to open the MENU screen. Then, use the DATA wheel to select the BROWSE menu item, and press the ENTER key.
The contents of the folder that contains the take that was selected on the Home Screen before the BROWSE screen was opened appears on the display.
Navigating the BROWSE screen
On the BROWSE screen, folders and takes appear in a hierarchical structure much like they would appear on a computer. On this unit, only one level of folders can be created.
Use the • DATA wheel to select takes and folders.
When a folder is selected, press the • key to show the contents of that folder.
When a taker folder is selected, press the • key to close the currently open folder and show the higher-level folder that contains it.
When a folder or take is selected, press the • ENTER key to open the pop-up menu.
Icons on the BROWSE screen
The meanings of the icons that appear on the BROWSE screen are as follows.
MUSIC folder ( )
The MUSIC folder is the highest-level folder (root folder) shown on the BROWSE screen.
Take ( )
This icon appears before the name of a recorded take.
Folder ( )
This icon shows a folder.
Open folder ( )
The contents of this folder are currently shown on the screen.
Take operations
Select the desired take on the BROWSE screen and press the ENTER key to open the pop-up window that is shown below.
Use the DATA wheel to select the desired item from the following options, and press the ENTER key to execute it.
PLAY
Choose this to select the take, return to the Home Screen and start playback of that take. If the playback area is set to FOLDER, the folder that contains this take becomes the playback area.
INFO
This shows information about the selected take. Press the ENTER key again to return to the BROWSE screen.
Shows the take name.
Shows the date that the take was created.
Shows the take size.
DELETE
If you choose this, a pop-up message appears to confirmthatyouwanttodeletethetake.PresstheENTER key to erase the take and return to the BROWSE screen.
Press the key to cancel deletion and reopen the pop-up menu.
CANCEL
Press this to not conduct any operation on the selected take.
5 – Take and folder operations (BROWSE screen)

TASCAM DR-680 37
Folder operations
Select the desired folder on the BROWSE screen, and press the ENTER key to open the following pop-up menu.
Use the DATA wheel to select the desired item from the following options, and press the ENTER key to execute it.
SELECT
ReturnstotheHomeScreenandselectsthefirsttakein the folder. This folder becomes the new playback area regardless of the previous playback area setting. New recorded takes are saved in this folder.
CREATE
Apop-upappearstoconfirmthatyouwanttocreateanew folder.
Press the ENTER key to create a new folder. New recorded takes are saved in this folder.
Press the key to cancel folder creation and reopen the pop-up menu.
ALLDEL
Apop-upappearstoconfirmthatyouwanttodeleteallthe takes in the selected folder at once.
Press the ENTER key to erase the takes and return to the BROWSE screen. Press the key to cancel deletion and reopen the pop-up menu.
NOTE
This unit cannot delete write-protected files and files that the unit does not recognize.
REBUILD
Apop-upappearstoconfirmthatyouwanttorebuildthe selected folder. Rebuilding refreshes the take infor-mationinsidetheselectedfolder,andrecognizesfilesthat are not contained in takes as independent takes, making their playback possible. Use this function after youhavecopiedfilestotheSDcardfromacomputer,for example.
Press the ENTER key to rebuild the folder and return to the BROWSE screen. Press the key to cancel rebuilding and reopen the pop-up menu.
NOTE
Files with formats that are not supported by this • unit will not be recognized even after rebuilding and cannot be played back.
Files with file names that contain characters other than • standard single-byte alphanumeric characters cannot be played back even after rebuilding.
CANCEL
Press this to not conduct any operation on the selected folder.
5 – Take and folder operations (BROWSE screen)

38 TASCAM DR-680
When the Home Screen is open, use the  and ¯ keys to select the take that you want to play. You can only select takes within the playback area that is currently set. When there are lots of takes on a card, for example, setting the play area to a limited number of takes can make selection easier. You can set the playback area to a single take, the current folder or all accessible takes on the SD card on the PLAY menu. You can also set a folder for playback on the BROWSE screen.
NOTE
On the BROWSE screen, regardless of the current playback area setting, you can select and play any take on the card.
Playback
Starting playback
On the Home Screen, when the unit is stopped, press the PLAY/PAUSE key to start playback.
NOTE
Only takes in the playback area can be played. (See • “Setting the playback area” on page 40.)
You can also start playback by selecting a take on the • BROWSE screen.
Stopping playback
On the Home Screen, press the STOP key during playback to stop playing a take and return to its beginning.
Pausing playback
On the Home Screen, press the PLAY/PAUSE key during playback to pause playback at the current position in the take.
Press the PLAY/PAUSE key again to restart playback from that position.
Searching forward and backward
On the Home Screen, when stopped or during playback, press and hold the  key or ¯ key to search backward or forward.
Selecting a take for playback
On the Home Screen, use the  and ¯ keys to select a take for playback.
When in the middle of a take, press the  key to return to the beginning of that take.
When stopped at the beginning of a take, press the  key to skip to the beginning of the previous take.
When at the beginning of or in the middle of a take, press the ¯ key to skip to the beginning of the next take.
NOTE
Only takes in the playback area can be played.• Information about the take being played, including • the name, is shown.
Changing the playback position (scrubbing)
On the Home Screen, when stopped or during playback, use the DATA wheel to change the playback position.
NOTE
No sound is output while you are turning the DATA • wheel.
6 – Playback

TASCAM DR-680 39
If you turn the DATA wheel during playback, playback • restarts at the position located when you stop turning the DATA wheel.
Mixing and outputting a multitrack recording
When playing back the sound of a multitrack recording, you can use the unit’s internal mixer to make a stereo mix and then output that.
Adjust the playback sound of tracks 1–6 using mixer channels 1–6. You can also adjust the overall level of the mix.
You can output the stereo mix that you have mixed using the internal mixer to the headphone and digital output jacks.
Moreover, by setting A.OUT SEL to MIX in the I/O menu, the stereo mix can be output from the LINE OUTPUTS jacks. When set this way, the sound of the left (L) channel is output through LINE OUTPUTS 1, 3 and 5 and the sound of the right (R) channel is output through LINE OUTPUTS 2, 4 and 6.
Using the internal mixer
1 Press the MIX LEVEL key to open the LEVEL screen.
2 Adjust the levels of channels 1–6 and the overall mix on this screen. Use the 1–6 and MIX (LOCK) keys to select the channels that you want to adjust.
3 Use the VALUE knob to adjust the optimal level in a range between 0 and 100 (default value is 100).
4 Press the MIX PAN key to open the PAN screen.
5 Use the pan controls on this screen to adjust the stereo position of each channel. Use the 1–6 keys to select the channels that you want to adjust.
6 Use the VALUE knob to adjust each to a suitable stereo position using values ranging from
L10–L1 (left) to C (center) and R1–R10 (right). (Odd number channels are set to L10 and even number channels are set to R10 by default.)
7 When you have finished making the settings, press the HOME key to return to the Home Screen.
NOTE
This function cannot be used when playing a stereo track.
Using the solo function
Press and hold one of the 1–6 keys on the front panel to enable solo monitoring for that channel.
When solo monitoring, the indicator appears on the Home Screen, and the indicator appears for the soloed channel.
To stop solo monitoring, press and hold the key (1–6 or MIX) for the soloed channel again.
NOTE
Solo monitoring can only be used with headphones and the built-in speaker.
Playing a stereo track
In addition to multitrack recording, this unit can also record a stereo track simultaneously. For example, a 6-track multitrack and a stereo track can be recorded at the same time.
During playback, press the MULTI/STEREO key to switch between the multitrack and the stereo track
6 – Playback

40 TASCAM DR-680
During playback of the stereo track, the icon appears on the Home Screen.
Setting the playback area
1 Press the MENU key to open the MENU screen.
2 Use the DATA wheel to select the PLAY menu item, and press the ENTER key to open the PLAY screen.
3 Use the DATA wheel to select the AREA item, and press the key or ENTER key.
4 Use the DATA wheel to set the playback area.
SINGLE:
Play only the selected take.
FOLDER (default value):
Play all the takes in the currently selected folder on the BROWSE screen.
ALL:
Play all takes in the MUSIC Folder on the SD card.
5 When you have finished making the settings, press the HOME/FUNC key to return to the Home Screen.
Selecting a folder for the playback area on the BROWSE screen
Regardless of the current playback area, if you play a take on the BROWSE screen, the playback area changes to the folder that contains that take.
1 Press the MENU key to open the MENU screen.
2 Use the DATA wheel to select the BROWSE menu item, and press the ENTER key to open the BROWSE screen.
3 Use the DATA wheel to select the folder that contains the take that you want to play.
NOTE
For additional information about how to navigate the BROWSE screen, see “Navigating the BROWSE screen” on page 36.
4 Press the key.
5 Select the take that you want to play.
6 Press the ENTER key to open the following pop-up menu.
Use the DATA wheel to choose PLAY, and press the ENTER key to return to the Home Screen.
The selected take begins to play. If the playback area is set to FOLDER, the folder that contains that take becomes the playback area.
Setting the search speed
1 Press the MENU key to open the MENU screen.
2 Use the DATA wheel to select the PLAY menu item, and press the ENTER key to open the PLAY screen.
3 Use the DATA wheel to select the SEARCH SPEED item, and press the key or ENTER key.
4 Use the DATA wheel to set the search speed to x2, x4, x8 (default value) or x10.
5 When you have finished making the settings, press the HOME/FUNC key to return to the Home Screen.
6 – Playback

TASCAM DR-680 41
Repeat playback
You can set the unit to repeatedly play a single take or all takes in a folder.1 When the Home Screen is open, press the HOME/
FUNC key to open the Functions Screen.
2 Use the VALUE knob to move the cursor and select the REPEAT menu item.
3 Press the VALUE knob to turn the repeat playback ON or OFF.
If the pre-recording has been turned ON, the REPEAT indicator appears with a dark background.
4 When you have finished making the settings, press the HOME/FUNC key to return to the Home Screen.
NOTE
The • icon appears on the Home Screen when the loop function is ON.
The takes in the currently set playback area are • repeated. (See “Setting the playback area” on page 41.)
6 – Playback

42 TASCAM DR-680
By connecting this unit with a computer using the includedUSBcable,youcancopyaudiofilesbetweenthe SD card in the unit and the computer.
This unit can handle MP3 (96, 128, 192, 320 kbps, 44.1/48 kHz) and WAV/BWF (44.1/48/96/192 kHz, 16/24-bit)audiofiles.
USB
Computer
NOTE
Instead of connecting this unit to a computer by USB, you can also perform the same operations by removing the SD card and connecting it directly to a computer using a card reader, for example.
ConfirmthatanSDcardisinsertedcorrectlyintotheunit. If an SD card is not inserted correctly when the unit is connected to a computer by USB, a “Can't Save Data” pop-up message appears.
When connected, “USB connected” appears on the display of this unit.
NOTE
Other unit functions cannot be used when it is connected to a computer by USB.
This unit appears on the computer as an external drive named “DR-680”.
On Windows, open “My computer” to show the “DR-680” drive.
On Mac OS X, the “DR-680” drive should appear on the desktop or in the Finder sidebar, depending on the system settings.
Click on the “DR-680” drive to show the “MUSIC” and “UTILITY” folders.
Copying files to a computer
Open the “MUSIC”folder,anddrag-and-dropthefilesthat you want to copy to any location on the computer.
Copying files from a computer
Draganddropfilesfromanywhereonthecomputertofolders that you create as desired in the “MUSIC” folder.
AfteryouhavecopiedfilestoanSDcardanddiscon-nected from the computer, on the BROWSE screen, selectthefolderthatyoucopiedthefilesintoandexecute the REBUILD operation. Rebuilding the folder makes it possible for this unit to play the copied files.
Beforerebuilding,makesurethefileandfoldernamescontain only single-byte alphanumeric characters.
NOTE
If you use a computer to change the name of a file or • folder created by this unit, the unit will not recognize the affected files as takes. Avoid changing names on a computer if you want to use them again on this unit.
Files with formats that are not supported by this • unit will not be recognized even after rebuilding and cannot be played back.
7 – Connection with a computer

TASCAM DR-680 43
TIP
You can also use the computer to manage the • contents of the “MUSIC” folder.
You can create subfolders inside the “MUSIC” • folder, but this unit can only recognize one level of subfolders. The unit ignores deeper folder levels and the files in them.
Since this unit can be set to play the contents of a • single folder, organizing folders by musical category or artist could be convenient.
Names given to subfolders and files are shown on the • unit’s Home Screen and the BROWSE screen.
This unit can only read files and folders with names • that contain only single-byte alphanumeric characters.
Ending the connection with a computer
Follow the correct computer procedures to disconnect the unit from the computer before disconnecting the USB cable. Please refer to your computer manual for information about the correct procedures for discon-necting an external drive.
After being disconnected, the power is set to standby.
7 – Connection with a computer

44 TASCAM DR-680
Output settings
You can make settings related to analog and digital output.
Analog output settings
You can set the analog outputs to output the sound of each channel directly or the stereo signal mixed by the internal mixer.
When set to output the MIX, the left and right channels of the stereo track are output through the analog output jack 1/2, 3/4 and 5/6 pairs.1 Press the MENU key to open the MENU screen.
2 Use the DATA wheel to select the I/O menu item, and press the ENTER key to open the I/O menu screen.
3 Use the DATA wheel to select the A.OUT SEL menu item, and press the key or ENTER key.
4 Use the DATA wheel to set it to DIRECT (default value) or MIX.
DIRECT : The sound of each channel is output directly.
MIX : The stereo signal mixed by the internal mixer is output.
5 When you have finished making the setting, press the HOME/FUNC key to return to the Home Screen.
Digital output settings
You can set the digital output format to SPDIF or AES/EBU. 1 Press the MENU key to open the MENU screen.
2 Use the DATA wheel to select the I/O menu item, and press the ENTER key to open the I/O menu screen.
3 Use the DATA wheel to select the D.OUT MODE menu item, and press the key or ENTER key.
4 Use the DATA wheel to select SPDIF (default value) or AES/EBU.
SPDIF : Output in SPDIF format.
AES/EBU : Output in AES/EBU format. 5 When you have finished making the setting,
press the HOME/FUNC key to return to the Home Screen.
System settings
Use the SYSTEM menu screen to make various settings to suit the environment and conditions in which the unit is to be used, as well as to view system infor-mation. 1 Press the MENU key to open the MENU screen.
2 Use the DATA wheel to select the SYSTEM menu item, and press the ENTER key to open the SYSTEM menu screen.
On the SYSTEM menu screen, you can make various settings described below.
Use the and keys, ENTER key and the DATA wheel to select each item.
3 When you have finished making the settings, press the HOME/FUNC key to return to the Home Screen.
8 – Other Settings and Information Display

TASCAM DR-680 45
Power AUTO OFF settings
Use the AUTO OFF item to set the amount of time since being last used until the unit’s power automatically turns OFF when operating on batteries.
Options: OFF (default value—AUTO OFF disabled), 3min, 5min, 10min, 30min
Turning the backlight off automatically
Use the BACKLIGHT item to set the amount of time since being last used until the backlight automatically turns OFF when operating on batteries.
Options: OFF, 5sec (default value), 10sec, 15sec, 30sec
Cascade settings
Use the CASCADE item to set the cascade function.
Using the cascade function, you can control two DR-680 units simultaneously.
When you use the transport controls on the DR-680 unit that is set as the master, the operation of the unit that is set as the slave is synchronized to it.
To connect two units for cascade operation, connect the DIGITAL OUT jack of the master unit to the DIGITAL IN jack of the slave unit.
Master unit
Slave unit
NOTE
The cascade function only synchronizes the transport controls. The input settings, internal mixer settings, record functions, take and folder operations, for example, are still controlled separately.
When using the cascade function, the digital output jack of the MASTER and the digital input of the SLAVE are used for the cascade function, so they cannot be used for digital signal input and output.
Options: OFF (default value—cascade disabled), MASTER, SLAVE
CAUTION
If the recording source for tracks 5/6 is set to DIGITAL, • cascade connections will not function properly.
Before changing the connection setting from OFF • to MASTER or SLAVE, set the recording source for tracks 5/6 to ANALOG. (See “Selecting the inputs for recording to tracks 5 and 6” on page 28.)
Setting the extent of the panel operation lock function
You can set which controls are disabled when you engage the panel operation lock function, which is activated by pressing and holding the MIX key.
TOP : Button operation of the top panel is disabled.
FRONT : Button operation of the front panel is disabled.
T+F : Button operation of both the front and top panels is disabled.
NOTE
The lock function does not affect the operation of the switches on the top of the unit.
8 – Other Settings and Information Display

46 TASCAM DR-680
Setting the battery type
Use the BATTERY item to set the type of battery used. The unit uses this setting to display the remaining battery charge and determine the minimum necessary remaining charge for correct operation.
Options: ALKALI (alkaline batteries (default value)), Ni-MH (nickel metal hydride batteries)
Initializing the unit
Use the INITIALIZE item to restore the various settings of this unit to their initial settings.
When selecting Exec item, press the ENTER key to open a confirmation screen.
Press the ENTER key to initialize the unit. Press the STOP key to cancel initialization.
After completing or canceling initialization, the SYSTEM menu screen reopens.
Viewing system information
Use the INFORMATION item to view information about theunit’ssystemsettingsandthefirmwareversion.
Press the ENTER key to open the system infor-mation screen.
This page shows information about the system firmware version.
When the INFORMATION screen is open, press the ENTER key to return to the SYSTEM screen.
Reformatting SD cards
You can reformat an SD card that is in the unit.
CAUTION
If you format a card, all information, including takes • and folders, on it is erased.
When formatting, use the AC adaptor or confirm • that the remaining battery charge is sufficient. If the batteries run out of power during this operation, the formatting might not be completed correctly.
1 Press the MENU key to open the MENU screen.
2 Use the DATA wheel to select the CARD menu item, and press the ENTER key to open the CARD menu screen.
3 Use the DATA wheel to select the FORMAT item, and press the key or ENTER key to open the following screen.
4 Press the ENTER key to open a confirmation screen.
5 Press the ENTER key again to start formatting.
6 When formatting completes, the CARD screen reopens.
8 – Other Settings and Information Display

TASCAM DR-680 47
Viewing card information
On the CARD page, information about the status of the currently inserted SD card is shown. 1 Press the MENU key to open the MENU screen.
2 Use the DATA wheel to select the CARD menu item, and press the ENTER key to open the CARD menu screen.
3 Use the DATA wheel to select the INFORMATION item, and press the or ENTER key.
4 Press the ENTER key to open the following screen.
TOTAL
Shows the total memory capacity of the SD card.
REMAIN
Shows the remaining capacity of the SD card.
FILE/FLDR
Shows the total number of files and folders inside the MUSIC folder.
8 – Other Settings and Information Display

48 TASCAM DR-680
The following is a list of the pop-up messages that might appear on the DR-680 under certain conditions.
Refer to this list if one of these pop-up messages appears and you want to check the meaning or determine a suitable response.
Message Meaning and response
Battery Empty The battery is almost out of power. Replace the AA batteries.
MBR Error Init CARD
The card is not formatted properly or the formatting is broken. Change the card or press the ENTER key when this message appears to format the card in FAT format.
CAUTION: Execution of FAT formatting erases all data currently on the card.
Format Error Format CARD
The FAT formatting of the card is abnormal or broken. This message also appears if you FAT formatted the card using a computer connected by USB and if a new card is inserted in the unit. Always use the DR-680 to conduct FAT formatting of cards to be used with it. Change the card or press the ENTER key when this message appears to format the card in FAT format.
CAUTION: Execution of FAT formatting erases all data currently on the card.
File Not Found Make Sys FileThe system file is missing. This unit requires a system file for operation. When this message appears, press ENTER to automatically create a system file.
Invalid SysFile Make Sys FileThe system file required to operate this unit is invalid. When this message appears, press ENTER to automatically create a system file.
Invalid Card Change Card Something might be wrong with the card. Change the card.
Protected Card Change CardThis appears when the card is protected and lacks the necessary MUSIC Folder and other folders and files. Unlock the write protect switch, restart the power and format the card.
Write Timeout
Writing to the card timed out.Backup files on the card to your computer, and format the card. If this problem still occurs even after formatting a card, the card transfer rate is not fast enough. Use a different card.
Card FullThe card has no remaining capacity. Erase unnecessary takes or move them to your computer to make open space.
Max File SizeThe file is larger than the designated size or the recording time exceeded 24 hours.
File FullThe total number of folders and files exceeds 5000. Erase unnecessary files or move them to your computer.
Take FullThe total number of takes exceeds 1000. Erase unnecessary takes or move them to your computer.
Card Error The card could not be handled properly. Replace the card.
File Protected The take includes the read only file and cannot be erased.
No Card No card is in the unit, so recording is not possible.
File Not Found in TAKEAn audio file could not be found inside the take. The audio files in the take might have been erased or renamed using a PC. Restore the files or erase the take using the BROWSE screen.
DIN unlock
When the DIGITAL IN input is selected, the DIGITAL IN connection has been lost or the sampling frequency is incorrect.
Confirm that the external digital device is connected to the DIGITAL/SYNC IN jack correctly. Confirm that the sampling frequency used by the external digital device and this unit are compatible.
Press the STOP key to close this message.
If you do this, you will not be able to use the DIGITAL IN, but otherwise recording will be possible.If this message appears during recording, noise might be recorded."
DIN lock
DIN unlock status has ended. DIGITAL IN has become possible.
Press the STOP key to close this message.
If this message appears during recording, noise might be recorded."
9 – Messages

TASCAM DR-680 49
Message Meaning and response
Not Continued
If any of these errors occur, turn the unit power OFF and restart it. If the power cannot be turned OFF, remove the batteries and disconnect the AC adaptor (if connected). If the error message continues to appear, please contact a TEAC Repair Center.
File Error
Can't Save Data
Player Error
Device Error
Writing Failed
Sys Rom Err
System Err 50
System Error 1
System Error 2
System Error 3
System Error 4
System Error 5
System Error 6
System Error 7
System Error 8
System Error 9
9 – Messages

50 TASCAM DR-680
If you are having trouble with the operation of this unit, please try the following before seeking repair. If these measures do not solve the problem, please contact the store where you bought the unit or a TASCAM Service Center.
Power will not turn ON. ª
Confirm that the batteries are not dead.•
Confirm that the batteries are installed with the •correct +/– orientations.
Confirm that the power plug of the AC adaptor •(PS-1225L) is connected securely.
The unit is not responding to operations. ª
Is the key lock function ON?•
SD card is not recognized. ª
Confirm that the SD card is inserted securely. •
Playback is not possible. ª
If it is a WAV/BWF file, confirm that it is of a •compatible sampling frequency.
If it is an MP3 file, confirm that it is of a compatible •bit-rate.
No sound is output from the built-in ªspeaker
Are headphones connected?•
Is the volume level of the headphones minimized?•
No sound is output from the headphones ª
Is the volume level of the headphones minimized?•
No sound is output from the monitoring ªsystem
Are headphones connected?•
Confirm that the monitoring system is connected •correctly.
Is the volume level of the connected monitoring •system minimized?
Is the output level of this unit minimized?•
Recording is not possible. ª
Reconfirm connections. •
Reconfirm the input settings. •
Check whether the recording level is too low.•
Confirm that the SD card is not full.•
Confirm that the maximum number of files or takes •has not been reached.
The recording level is low. ª
Is the trim setting too low?•
Is the • MIC GAIN set to LOW?
Is the output level of a connected external device •too low?
The sound I am trying to record is distorted. ª
Is the trim setting too high?•
Is the • MIC GAIN set to HIGH?
I cannot erase a file. ª
Confirm that the SD card is not write-protected.•
Files on this device do not appear on a ªcomputer.
Confirm that the USB port of the unit is connected •with the computer.
Is the unit recording or in recording standby?•
10 – Troubleshooting

TASCAM DR-680 51
Recording media and formats
Recording media
SD card (2 GB) Class 4 or faster
SDHC card (4 GB – 32 GB) Class 4 or faster
File system
FAT16 (2 GB Cards)
FAT32 (Cards larger than 4 GB)
Supported recording and playback formats
BWF: 16/24-bit, 44.1/48/96/192 kHz
WAV: 16/24-bit, 44.1/48/96/192 kHz
MP3: 96/128/192/320 kbps, 44.1/48 kHz
Number of tracks
6 tracks and a stereo mix track
BWF: 44.1/48/96 kHz
WAV: 44.1/48/96 kHz
MP3: 44.1/48 kHz
2 tracks
BWF: 192 kHz
WAV: 192 kHz
File recording modes
BWF: monaural, stereo, 6-channel
WAV: monaural, stereo, 6-channel
MP3: monaural, stereo
Input and output
Analog audio input and output
MIC/LINE INPUTS
Connectors: XLR-3-31/standard 6.3-mm (1/4”) TRS
(1: GND 2: HOT 3: COLD/Tip: HOT Ring: COLD Sleeve: GND)
INPUT switch set to MIC
Inputimpedance:2.4kΩ
Nominal input level:
GAIN LOW: –20 dBu (0.11 V)
GAIN HIGH: –44 dBu (6.91 mV)
Maximum input level:
GAIN LOW: +3 dBu (1.55 V)
GAIN HIGH: –21 dBu (0.098 V)
Minimum input level:
GAIN LOW: –51.5 dBu (2.0 mV)
GAIN HIGH: –75.5 dBu (0.1 mV)
INPUT switch set to LINE
Inputimpedance:10kΩ
Nominal input level: +4 dBu (1.23 V)
Maximum input level: +24 Bu (12.3 V)
Minimum input level: –27.5 dBu (0.05 V)
LINE OUTPUTS jacks
Connectors: standard RCA pin jacks
Outputimpedance:200Ω
Nominal output level: –10 dBV (0.3 V)
Maximum output level: +6 dBV (2.0 V)
PHONES jack
Connector: standard 6.3-mm (1/4”) stereo jack
Maximumoutput:50mW+50mW(into32Ωload)
Built-in speaker
500 mW (monaural)
Digital audio input and output
DIGITAL/SYNC IN jack
Connector: RCA pin jack
Format: IEC60958-3 (S/PDIF) or AES3-2003/IEC60958-4 (AES/EBU) automatically determined
DIGITAL/SYNC OUT jack
Connector: RCA pin jack
Format: IEC60958-3 (S/PDIF) or AES3-2003/IEC60958-4 (AES/EBU) set by user
Control input and output
USB connection
USB port connector: Mini-B type
Format: USB2.0 HIGH SPEED (480 Mbps)
11 – Specifications

52 TASCAM DR-680
Audio performance
(From LINE IN to LINE OUT, Input level = FS –1 dB)
Frequency response
20 Hz-20 kHz +0.5/–1.5 dB (44.1 kHz)
20 Hz-20 kHz +0.5/–0.5 dB (48 kHz)
20 Hz-40 kHz +0.5/–1.0 dB (96 kHz)
20 Hz-80 kHz +0.5/–5.0 dB (192 kHz)
Distortion
0.007% (1 kHz)
S/N ratio
98 dB (A-weighted)
Requirements for connected computers
See the TASCAM web site (http://www.tascam.com/) for the latest information about OS compatibility.
Windows computer
Pentium 300 MHz or faster
128 MB or more memory
USB port (USB2.0 recommended)
Macintosh computer
266 MHz Power PC, iMac, G3, G4 or faster
64 MB or more memory
USB port (USB2.0 recommended)
Intel USB host controller recommended
Supported Operating Systems
Windows XP, Windows Vista, Windows 7
Mac OS X 10.2 or newer
Other specifications
Power supply
8 AA batteries (alkaline or NiMH)
AC adaptor (TASCAM PS-1225L, included)
Power consumption
100-120V: 9W (Phantom on, AC Adaptor PS-1225L)
220-240V: 9.5W (Phantom on, AC Adaptor PS-1225L)
Battery operation time (when used continuously)
Alkaline batteries
About 4 hours recording (JEITA)
About 4 hours playback (JEITA)
NiMH batteries
About 4.5 hours recording (JEITA)
About 4.5 hours playback (JEITA)
Dimensions (width x height x depth)
216.4 x 56 x 188.4 mm
8.52 x 2.21 x 7.41 in
Weight
1.2 kg/2.646 lb (without batteries)
Operating temperature range
0–40º C/32–104º F
11 – Specifications

TASCAM DR-680 53
Dimensions
202 mm 54 mm
56 mm
188.
4 m
m
216.4 mm
Illustrations in this manual might differ from the actual product.•
In order to improve the product, specifications and appearance could be changed without prior notice.•
11 – Specifications

54 TASCAM DR-680
Block diagrams
Recording ª
Play ª
11 – Specifications

TASCAM DR-680 55
I/O ª
Input Type A
Input Type B
Typical Output
11 – Specifications

DR-680
TEAC CORPORATIONPhone: +81-42-356-9143 www.tascam.jp1-47 Ochiai, Tama-shi, Tokyo 206-8530, Japan TEAC AMERICA, INC.Phone: +1-323-726-0303 www.tascam.com7733 Telegraph Road, Montebello, California 90640 USA TEAC CANADA LTD.Phone: +1905-890-8008 Facsimile: +1905-890-9888 www.tascam.com5939 Wallace Street, Mississauga, Ontario L4Z 1Z8, Canada TEAC MEXICO, S.A. de C.V.Phone: +52-55-5010-6000 www.teacmexico.netRío Churubusco 364, Colonia Del Carmen, Delegación Coyoacán, CP 04100, México DF, México
TEAC UK LIMITEDPhone: +44-8451-302511 www.tascam.co.ukSuites 19 & 20, Building 6, Croxley Green Business Park, Hatters Lane, Watford, Hertfordshire, WD18 8TE, UK
TEAC EUROPE GmbHPhone: +49-611-71580 www.tascam.deBahnstrasse 12, 65205 Wiesbaden-Erbenheim, Germany
Printed in China