Download - Writen Instructions Wc

8/13/2019 Writen Instructions Wc
http://slidepdf.com/reader/full/writen-instructions-wc 1/12
1 of 12
22” Water Fall
Instructions

8/13/2019 Writen Instructions Wc
http://slidepdf.com/reader/full/writen-instructions-wc 2/12
2 of 12
Parts
Hood - 1
Tray - 1
Pebble Shelf - 1
Water Distribution Unit
with Baffling Pad - 1
Pebbles in bag - 1Pump - 1
2.5” Grabber
Screw - 5
1” Grabber
Screw - 15
Rubber
Stopper - 2 Zip Tie - 2
EZ Anchor - 12
Leveling Wedge - 1
Hose Clamp - 2
Wing Nut - 9
Pump Pad - 1Scotch BritePad - 1
Not Pictured:
• Hose
• Power cord
• Light Bulbs – GU 10 50W

8/13/2019 Writen Instructions Wc
http://slidepdf.com/reader/full/writen-instructions-wc 3/12
3 of 12
Tools Needs
You should be able to install your water feature using only basic and commonly hadtools. Be sure to have at least the following tools before you begin.
• Drill with a Philips head bit
• Carpenters level
• Stud finder
• Pencil
• Philips head screw driver
• Flat head screw driver
• Chisel
• Pair of pliers
• Knife and scissors
• Tape Measure
• Step Stool• A scrap piece of 2x4 or other wood
• And a good pair of working glovesfor everyone involved
Be sure to follow and understand all the safety suggestions and instructions before you
begin the installation.
Choosing a location
Most likely you have already decided on a location for your new Adagio Water Feature.
In the event that you are still undecided, we would like to discuss a few things to thinkabout as you make your decision.
Wall types: Your water feature can be hung on a number of different wall types. We
are going to discuss the steps to hang it on a wood studded sheet rock wall. But you can
hang it on tile, stone, concrete, block, or a sheet rock wall with metal studs.
Framing: As a general design idea it is often best to allow enough wall space to
properly frame the water feature. Depending on the surrounding décor, you may want toallow for open wall space on all four sides.
Access: The most demanding maintenance requirement associated with the water
feature is keeping it full of water. To facilitate maintaining the proper water level we
suggest placing the fountain in a location that is easily accessible.
Traffic: The hood and tray of the water feature project six inches out from the wall.
Because of this, if it is placed in a narrow walkway it can act as a barrier to traffic. Wesuggest placing it in an area that will not interfere with the traffic flow of the room.

8/13/2019 Writen Instructions Wc
http://slidepdf.com/reader/full/writen-instructions-wc 4/12
4 of 12
Power : The water feature requires 110 volt power and will operate at less than 2 amps.
When deciding on the location of your water feature you need to consider a power
source. For aesthetic reasons we suggest placing the outlet directly behind the stone.
This allows the cord to be hidden from sight. If you are going to have an electrician put
in an outlet, we suggest wiring it to a wall switch for ease of turning on and off. Thelocation of the outlet will be discussed later.
A - Unpacking the crate and box
Before beginning the installation we suggest unpacking and unwrapping everything. Besure to set it aside and out of the way to avoid damaging it or hurting yourself.
B - Marking the wall
Before you begin hanging the brackets you need to mark the wall in a few places.
(1) First, you need to have a clear idea of
where on the wall the water feature is going
to hang.
To help with this, your water feature is 46inches tall by 22 inches wide
(2) Next, using a pencil, put a small dot on
the wall to represent the top center of thewater feature.
(3)Lastly mark where each stud is in the
area of the water feature. These marks will be covered by the stone when everything is
completed. You may want to use a stud finder to insure the accuracy of the marks.
C - Assemble the EZ install Bracket
The EZ install bracket comes in 4 pieces;
the top, the bottom, and two straps. They
are fastened to each other with the
included wing nuts. Slide the straps overthe attached screws and ensure a snug fit.
Then thread the wing nuts and tighten.

8/13/2019 Writen Instructions Wc
http://slidepdf.com/reader/full/writen-instructions-wc 5/12
5 of 12
D - Install upper hanging screw and set bracket
(1) Approximately one half an inch below the dot
you marked as the top center; screw an EZ anchor
into the wall. If this spot happens to be where a stud is
do not insert the EZ anchor, simply screw one of the 2.5
inch grabber screws directly into the stud. Otherwisescrew the 1 inch grabber into the EZ anchor. Do not
tighten the screw all the way. Leave it about onequarter of an inch out from the wall.
(2) Next, hang the assembled EZ install bracket
on the screw by the key-hole shaped opening at
the top center. This opening will allow you to
remove and replace the bracket easily withoutunscrewing the screw, it will also allow you to
easily level the bracket.
(3) Using a carpenter’s level in the lip,
ensure that the bracket is level and mark
all the holes including the slots with a
pencil. Once this is done remove the
bracket and set it out of the way.
The holes at the top and the holes at the
bottom require EZ anchors unless they
happen to be over a stud. If so, no EZanchor is necessary as you can screw
directly into the stud.
The slotted holes toward the center of the bracket carry almost all the weight of the stone
and are the most critical. You must be able to fasten into at least one stud in
this area. If you can fasten to more than one stud or screw more than one screw into
the stud it is even better. (4) After determining where the stud intersects these slots,spread the remaining EZ anchors across the area as evenly as possible to disperse
the weight over a large area.
Now that the wall is fully prepared, it is time to mount the bracket. Hang it back on the
top center screw and check for level one more time. (5) When everything is ready,
screw the 2.5 inch grabber screws into the stud or studs and the 1 inch grabber

8/13/2019 Writen Instructions Wc
http://slidepdf.com/reader/full/writen-instructions-wc 6/12
6 of 12
screws into the EZ anchors. Make sure the bracket is level and all the screws are tight
including the top center screw.
(6) Next, press the one inch rubber stoppers onto the small screw pegs.
E - Preparing the stone and Water Distr ibution Unit
Because each water feature uses 100 % natural stone, each piece is unique and different.Because of this, we have designed the Water distribution unit to allow customization to
any stone.
While a helper holds the stone, fit the water distribution unit on the top. There are a few
things to look for and adjust while fitting the water distribution unit properly.
(1) First, be sure it fits tightly on to
the stone. You can adjust thetightness using the tabs on the back
of the unit.
(2) Next, insure the bottom front
lip forms to the face of the stone. Because the stone is natural and
unpredictable it may have edges andclefts that create gaps between the lip
and the face of the stone. The water
distribution is made of a very pliable
copper and designed to be bent bothin and out to fit the contours of the stone. Make the necessary adjustments to the lip by
bending it in and out until it fits properly and remains as flush as possible across the
stone.
Once you feel comfortable with the fit, (3) remove the water distribution from the
stone and fasten the hose to the nozzle. Be sure to use the supplied hose clamp or ziptie to strengthen the connection. In either
case, tighten the fitting to insure that no
water can escape. Then replace the waterdistribution on the top of the slab.
The next thing to notice is the baffling pad. The Water Distribution Unit should
come with the pad already installed, if it is
not or if you are replacing it, (4) simply
insert it into the Water Distribution
Unit in front of the water inlet nozzle. In the area of the water inlet make certain

8/13/2019 Writen Instructions Wc
http://slidepdf.com/reader/full/writen-instructions-wc 7/12
7 of 12
the baffling pad slides all the way down and in front of
the nozzle. Because the nozzle sticks out a little it has atendency to snag the baffling pad. Improper
installation of this pad may cause water to flow
unevenly or to spray out from the top.
There is one more set of adjusting tabs. These are the
outer edge adjusting tabs. (5) Generally these tabs
need to be
bent in just a
little. You can make any fine tuning
adjustments later.
(6) The final step in preparing the water
distribution is to clean the front surface with
the supplied scotch brite pad. Go back a forth
until the entire surface is noticeably cleaner andshinier. Be sure to cover the top edge and the
bottom lip thoroughly.
F - Electr ical outlet
You will notice the open space in the center of the
EZ install bracket. If you decide to wire an outlet
behind the stone to allow for a concealed powercord, this is the area you want the outlet to be.
We also recommend wiring the outlet to a wall
switch for ease of turning the water feature on andoff. It is also okay not to wire an outlet behind
the stone; we will cover how to run the cord for
this option later.
G - Hanging the stone
If you have wired an outlet behind the stone be sure to (1) plug in the power cord
before hanging the stone. Once the stone is on the wall it is very difficult to access the
outlet.

8/13/2019 Writen Instructions Wc
http://slidepdf.com/reader/full/writen-instructions-wc 8/12
8 of 12
This is how the pump should rest in the tray.
(Picture taken while tray is off the wall)
(2) Be careful when hanging the stone that the hose attached to the Water
Distribution Unit falls inside the notch of the stone bracket. You may use some tapeto insure it stays there.
The stone comes with a mounting bracket already attached to its back side. (3) To hang
the stone on the wall simply lift it until the downward pointing lip on the stonebracket nests with the upward pointing lip on the EZ install bracket. Near the
bottom, the slab should rest on the one inch rubber stoppers.
It is a good idea to use a scrap piece of wood
to set the stone on before you lift it. This willallow you to get your fingers underneath the
slab with out risk of hurting yourself.
(4) You may need to trim the hose a little
to allow the pump to point straight up. The hose should be cut approximately 1
inch below the bottom of the slab.
(5) Next apply the black pump pad to the
side of the pump. You will notice the
pump has sound dampening suction feet.
When installed it should rest on the feet andthe pump pad should be between the back of
the water tray and the pump. This will help
in quieting the sound of the motor.
(6) Now, slide the hose onto the water
nozzle and apply a hose clamp to ensure
a tight fit. You will notice a water flow
adjustment slide. We recommend pushingthis all the way to the positive side. Youcan adjust it down later if you need to. The
pump should be hanging beneath the slab.
Warning:Each slab is very heavy. We strongly
recommend using two or more people
to lift the stone onto the wall.

8/13/2019 Writen Instructions Wc
http://slidepdf.com/reader/full/writen-instructions-wc 9/12
9 of 12
H - Hanging the tray
You will notice small square cut outs on the back of the water tray. These squares
receive the hanging hooks on the EZ install
bracket. (1) Slide the plastic back-splash-
guard up and behind the stone, then line
up the squares with the hooks and press
the tray down and towards the wall until
it is hooked and firmly in place.
(2) If
you do
not have
an electrical outlet behind the stone we
recommend placing the power cord behind the
Water tray. Leave approximately 6 inches of
exposed cord. We can adjust the cord length later.
The electric cord from the pump should come up the
right side of the stone. Be sure it is free from any
kinks.
I - Testing water flow
Now is a good time the test the water flow. (1) First, go over the front lip of the waterdistribution with the scotch brite pad one more time to ensure it is clean.
(2) Then, fill the tray with water until the pump it completely submersed. We
strongly suggest using distilled water. This will not leave any hard water build-up on thestone or metal.
(3)Now, plug the pump into an outlet or extension cord. This is for testing purposes
only. It usually takes ten to twenty minutes for the entire stone to get completely wet.
After a few minutes you should be able to tell if
there are going to be any dry spots. If there is anyarea of the Water Distribution where water is not
coming over, (4) simply shut off the fountain, and
aggressively clean that area with the scotch brite
pad. Be sure the area is free from oils and debris.
You may need to do this two or three time before
the water will flow properly.
8/13/2019 Writen Instructions Wc
http://slidepdf.com/reader/full/writen-instructions-wc 10/12
10 of 12
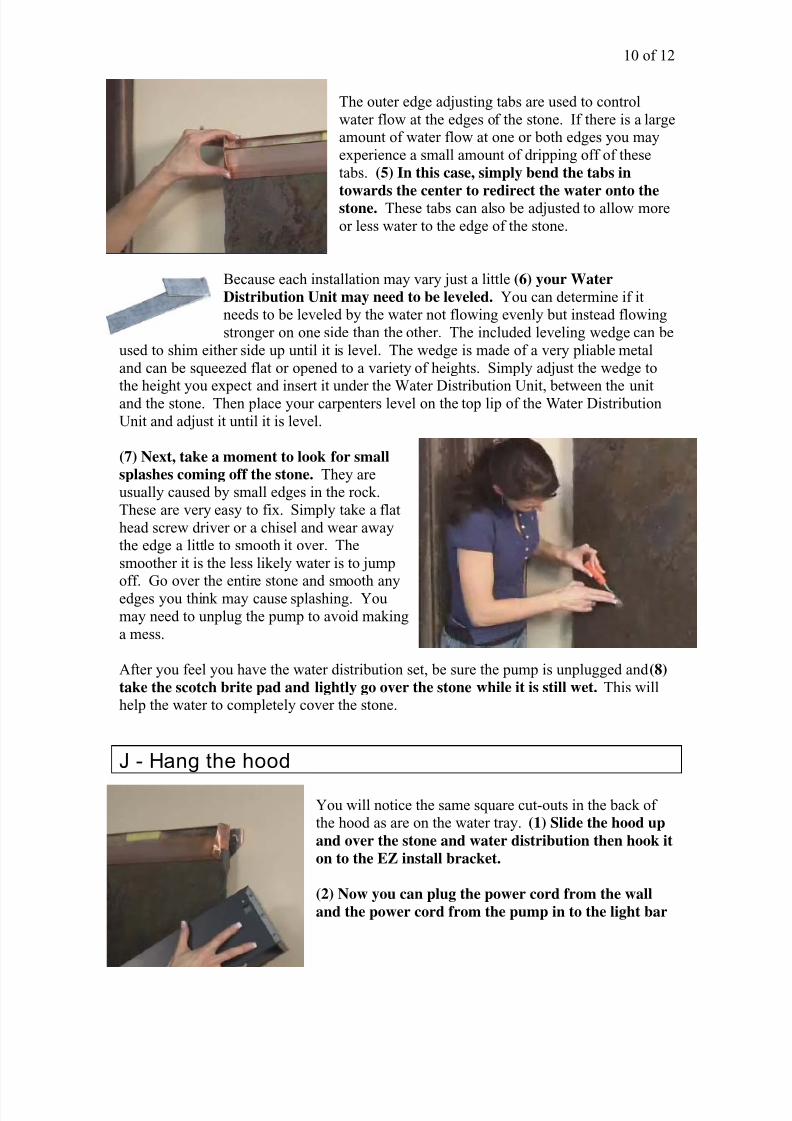
The outer edge adjusting tabs are used to control
water flow at the edges of the stone. If there is a largeamount of water flow at one or both edges you may
experience a small amount of dripping off of these
tabs. (5) In this case, simply bend the tabs in
towards the center to redirect the water onto thestone. These tabs can also be adjusted to allow more
or less water to the edge of the stone.
Because each installation may vary just a little (6) your Water
Distribution Unit may need to be leveled. You can determine if itneeds to be leveled by the water not flowing evenly but instead flowing
stronger on one side than the other. The included leveling wedge can be
used to shim either side up until it is level. The wedge is made of a very pliable metal
and can be squeezed flat or opened to a variety of heights. Simply adjust the wedge to
the height you expect and insert it under the Water Distribution Unit, between the unitand the stone. Then place your carpenters level on the top lip of the Water Distribution
Unit and adjust it until it is level.
(7) Next, take a moment to look for small
splashes coming off the stone. They areusually caused by small edges in the rock.
These are very easy to fix. Simply take a flat
head screw driver or a chisel and wear awaythe edge a little to smooth it over. The
smoother it is the less likely water is to jumpoff. Go over the entire stone and smooth any
edges you think may cause splashing. You
may need to unplug the pump to avoid making
a mess.
After you feel you have the water distribution set, be sure the pump is unplugged and (8)
take the scotch brite pad and lightly go over the stone while it is still wet. This willhelp the water to completely cover the stone.
J - Hang the hood
You will notice the same square cut-outs in the back ofthe hood as are on the water tray. (1) Slide the hood up
and over the stone and water distribution then hook it
on to the EZ install bracket.
(2) Now you can plug the power cord from the wall
and the power cord from the pump in to the light bar

8/13/2019 Writen Instructions Wc
http://slidepdf.com/reader/full/writen-instructions-wc 11/12
11 of 12
at the top. The power cord from the wall plugs into the left end and the power cord from
the pump plugs into the outlet on the right side. If there is excess cord you can tuck it behind the stone and water distribution.
(3) Next, screw the supplied light bulbs into the sockets:
50 watt halogen GU 10 bulbs are included and replacement bulbs can be purchased at
most hardware stores.
K - Install Pebble Beach
Slide the pebble shelf into the water tray and
adjust it to make it as level as possible. The
pebbles will rest on this shelf and help preventsplashing. When refilling the tray, stop when
the water level is equal the pebble shelf. Do
not over fill the water tray. This can cause the
tray to leak.
Thank you again for your interest in our
products. We hope your water feature will
bring tranquility into your surroundings foryears to come.
We are here to help in any way we can. If youever have any questions please feel free to call
our customer service representatives.
1-866-323-2446
www.22inchfalls.info
Warning: As always never remove or insert the power cords or light bulbs
while the water feature is turned on. Doing so could result in electric shock.

8/13/2019 Writen Instructions Wc
http://slidepdf.com/reader/full/writen-instructions-wc 12/12
12 of 12
Maintenance
Filling Water Tray:
The biggest maintenance requirement is keeping the water tray full of water. Because of
evaporation your water feature will put moisture into the air. The amount of use and theclimate will determine how often you need the fill it. Be sure the water level stays at
least above the top of the pump and no more than one and a half inches from the top ofthe tray. Filling the water tray any more than 1 and a half inches from the top can result
in water going over the top of the plastic liner and leaking onto the floor. We alsorecommend filling the water tray when the water feature is turned off.
To avoid almost all cleaning and to prolong the life of your water feature, we stronglysuggest using distilled water. This will not leave hard water build-up on the stone or
metal.
Cleaning Metal:When it is time to clean the metal portion of the water feature we recommend using a
non-abrasive cleaner with ammonia in it. Most window or glass cleaner works well.
Dull Stone:
Over time, if your stone color dulls or you begin to accumulate hard water buildup, turn
off the pump and scrub the stone vigorously with a firm bristled acrylic brush. Thisshould remove most of the build up. If it does not, the stone may require a more
aggressive cleaning with Lime-A-Way or CLR.
Flow Water / Algae:
If your water feature is in direct sunlight or near a window or door that is often open thestone may begin to grow algae. This manifests itself as a slight slime on the stone or a
foul water smell. The best way to combat this is with a few drops of bleach once or twicea month. We can not emphasize enough the importance of using only two or three drops
at a time and never more than once a week. Too much bleach will bleach the stone and
create an uncomfortable chlorine smell. The use of too much bleach will void allwarranties.
Full Fountain Cleaning:
We recommend doing a full fountain cleaning once or twice per year. This will involve
removing all the water from the water tray and cleaning it out, scrubbing down the stone
with an acrylic brush, and taking apart the Water Distribution Unit and cleaning it.
Custom Engraving:
If your stone has a custom engraving be sure NOT to use the scotch brite pad or an
acrylic brush over the area of the engraving. This could result in the custom color beingremoved from the stone.


