
PNNL-23182
Prepared for the U.S. Department of Energy
under Contract DE-AC05-76RL01830
VOLTTRON: User Guide RG Lutes JN Haack S Katipamula KE Monson BA Akyol BJ Carpenter ND Tenney April 2014

DISCLAIMER United States Government. Neither the United States Government nor any agency thereof, nor Battelle Memorial Institute, nor any of their employees, makes any warranty, express or implied, or assumes any legal liability or responsibility for the accuracy, completeness, or usefulness of any information, apparatus, product, or process disclosed, or represents that its use would not infringe privately owned rights. Reference herein to any specific commercial product, process, or service by trade name, trademark, manufacturer, or otherwise does not necessarily constitute or imply its endorsement, recommendation, or favoring by the United States Government or any agency thereof, or Battelle Memorial Institute. The views and opinions of authors expressed herein do not necessarily state or reflect those of the United States Government or any agency thereof.
PACIFIC NORTHWEST NATIONAL LABORATORY
operated by BATTELLE
for the UNITED STATES DEPARTMENT OF ENERGY
under Contract DE-AC05-76RL01830
Printed in the United States of America
Available to DOE and DOE contractors from the Office of Scientific and Technical Information,
P.O. Box 62, Oak Ridge, TN 37831-0062; ph: (865) 576-8401, fax: (865) 576-5728
email: [email protected]
Available to the public from the National Technical Information Service, U.S. Department of Commerce, 5285 Port Royal Rd., Springfield, VA 22161
ph: (800) 553-6847, fax: (703) 605-6900 email: [email protected]
online ordering: http://www.ntis.gov/ordering.htm
This document was printed on recycled paper. (8/00)

PNNL-23182 VOLTTRON: User Guide RG Lutes JN Haack S Katipamula KE Monson BA Akyol BJ Carpenter ND Tenney April 2014 Prepared for U.S. Department of Energy under Contract DE-AC05-76RL01830 Pacific Northwest National Laboratory Richland, Washington 99352

iii
Summary The Department of Energy’s (DOE’s) Building Technologies Office (BTO) is supporting the development of the concept of “transactional network” that supports energy, operational, and financial transactions between building systems (e.g., rooftop units -- RTUs), between building systems and the electric power grid using applications, or 'agents' that reside either on the equipment, on local building controllers or in the Cloud. As part of this Transactional Network initiative, BTO has funded Pacific Northwest National Laboratory to develop an open source, open architecture platform that enables a variety of site/equipment specific applications to transact in a cost effective and scalable way. The goal of this initiative is to lower the cost of entry for both existing and/or new service providers because the data transport or information exchange typically required for operational and energy-related products and services will be ubiquitous and interoperable. The transactional network platform consists of VOLTTRON™ agent execution software, a number of agents that perform a specific function (fault detection, demand response, weather service, logging service, etc.). The platform is intended to support energy, operational, and financial transactions between networked entities (equipment, organizations, buildings, grid, etc.). This document is a user guide for the deployment of the transactional network platform and agent/application development within VOLTTRON. The intent of this user guide is to provide a description of the functionality of the transactional network platform. This document describes how to deploy the platform, including installation, use, guidance, and limitations. It also describes how additional features can be added to enhance its current functionality.
iv
Table of Contents Summary ........................................................................................................................................... iii 1 Introduction ................................................................................................................................ 1
1.1 Background ........................................................................................................................ 1 1.2 Transactional Network Platform Overview ....................................................................... 1 1.3 VOLTTRON Overview ...................................................................................................... 3
1.3.1 VOLTTRON ........................................................................................................... 3 1.3.2 VOLTTRON Services ............................................................................................. 3
2 Deployment of VOLTTRON ...................................................................................................... 5 2.1 Installing Linux Virtual Machine ....................................................................................... 5 2.2 Running and Configuring Virtual Machine ........................................................................ 6 2.3 Installing Required Software ............................................................................................ 11 2.4 Installing the sMAP Server (Optional) ............................................................................. 13 2.5 Checking Out Transactional Network from Repository ................................................... 13 2.6 Building the VOLTTRON Platform ................................................................................ 13 2.7 Launching the Listener Agent .......................................................................................... 15 2.8 Launching the Weather Agent .......................................................................................... 16
2.8.1 Obtaining a Developer Key from WeatherUnderground ...................................... 16 2.8.2 Configuring WeatherAgent with Developer Key and Location ............................ 18 2.8.3 Launching the Weather Agent ............................................................................... 19
2.9 Configuring and Launching sMAP Driver ....................................................................... 21 2.9.1 Configuring sMAP driver ...................................................................................... 21 2.9.2 Launching the driver ............................................................................................. 24
2.10 Configuring and Launching the Actuator Agent .............................................................. 24 2.10.1 Configuring the Actuator Agent ............................................................................ 25 2.10.2 Scheduling a Task ................................................................................................. 26 2.10.3 Canceling a Task ................................................................................................... 27 2.10.4 Actuator Error Reply ............................................................................................. 27 2.10.5 Task Preemption and Schedule Failure ................................................................. 28 2.10.6 Actuator Agent Interaction .................................................................................... 29 2.10.7 Device Schedule State Announcements ................................................................ 30 2.10.8 Launching the Actuator Agent .............................................................................. 31 2.10.9 Tips for Working with the Actuator Agent ........................................................... 31
3 Sample Applications/Agents .................................................................................................... 33 3.1 Automated Fault Detection and Diagnostic Agent ........................................................... 33
3.1.1 Configuring the AFDD agent ................................................................................ 33

v
3.1.2 Launching the AFDD Agent ................................................................................. 36 3.2 The Demand Response (DR) Agent ................................................................................. 39
3.2.1 Configuring DR Agent .......................................................................................... 40 3.2.2 OpenADR (Open Automated Demand Response) ................................................ 43 3.2.3 DR Agent Output to sMAP ................................................................................... 44 3.2.4 Launching the Demand Response Agent .............................................................. 44
4 Agent Development in VOLTTRON ....................................................................................... 45 4.1 Example Agent Walkthrough ........................................................................................... 45 4.2 Explanation of Listener Agent ......................................................................................... 45 4.3 Agent Development in Eclipse ......................................................................................... 46
4.3.1 Setup a Run Configuration for the Platform ......................................................... 55 4.3.2 Setup a run configuration for the Listener Agent .................................................. 57
4.4 Agent Creation Walkthrough ........................................................................................... 59 4.4.1 Agent Folder Setup ................................................................................................ 59 4.4.2 Create Agent Code ................................................................................................ 59 4.4.3 Setting up a Subscription ....................................................................................... 60 4.4.4 Argument Parsing and Main ................................................................................. 60
4.5 Create Support Files for Test Agent ................................................................................. 60 4.5.1 Packaging Configuration ....................................................................................... 60 4.5.2 Launch Configuration ........................................................................................... 61 4.5.3 Packaging Agent ................................................................................................... 61 4.5.4 Testing the Agent .................................................................................................. 61 4.5.5 Reloading the Agent .............................................................................................. 62 4.5.6 In Eclipse ............................................................................................................... 63
4.6 Additional Features .......................................................................................................... 63 4.6.1 Subscribing to Weather Data ................................................................................. 63 4.6.2 Utilizing the Scheduler Agent ............................................................................... 64 4.6.3 Full TestAgent Code ............................................................................................. 65
Appendix .......................................................................................................................................... A1

vi
Figures
Figure 1: Illustration of the various components of the transactional network ................................. 2 Figure 2: VirtualBox download page .................................................................................................. 5 Figure 3: Linux Mint download page ................................................................................................. 6 Figure 4: Creating a Virtual Machine ................................................................................................. 7 Figure 5: Selecting Memory Size........................................................................................................ 7 Figure 6: Selecting Storage Size ......................................................................................................... 8 Figure 7: Creating Virtual Hard Drive ................................................................................................ 8 Figure 8: Selection of type of hard drive ............................................................................................ 9 Figure 9: Creating Virtual Hard Drive (continued)............................................................................. 9 Figure 10: Selection of display type ................................................................................................. 10 Figure 11: Selection of processor parameter ..................................................................................... 10 Figure 12: Loading Linux image ...................................................................................................... 11 Figure 13: Installing Linux Mint Operating System ......................................................................... 11 Figure 14: Linux Mint Terminal Window ........................................................................................ 12 Figure 15: Editing the Project Path ................................................................................................... 14 Figure 16: Editing “dev-config.ini” File ........................................................................................... 14 Figure 17: Sample Output from the Listener Agent.......................................................................... 16 Figure 18: WeatherUnderground Website ........................................................................................ 17 Figure 19: Setting up a Developer Account ...................................................................................... 17 Figure 20: Creating a WeatherUnderground API Key ...................................................................... 18 Figure 21: WeatherUnderground API Key ....................................................................................... 18 Figure 22: Entering the WeatherUnderground Developer Key ........................................................ 19 Figure 23: Entering Zip Code for the Location ................................................................................. 19 Figure 24: Example Output from the Weather Agent ....................................................................... 20 Figure 25: An Example Modbus Registry File ................................................................................. 21 Figure 26: An Example BACnet Registry File ................................................................................. 21 Figure 27: An Example sMAP Configuration File ........................................................................... 23 Figure 28: Example Actuator Agent Configuration File ................................................................... 25 Figure 29: Example AFDD Agent Configuration File ...................................................................... 34 Figure 30: File Selection Dialog Box when Inputting Data in a CSV File ....................................... 38 Figure 31: Sample of CSV Data for AFDD Agent ........................................................................... 39 Figure 32: Example Configuration File for the DR Agent ............................................................... 41 Figure 33: Installing Eclipse EGit Plug-in ....................................................................................... 47 Figure 34: Installing Eclipse Egit Plug-in (continued) ..................................................................... 47 Figure 35: Installing Eclipse Egit Plug-in (continued) .................................................................... 48 Figure 36: Installing Eclipse PyDev Plug-in ..................................................................................... 49 Figure 37: Checking Out Transactional Network with Eclipse ........................................................ 50

vii
Figure 38: Checking Out Transactional Network with Eclipse (continued) ..................................... 50 Figure 39: Checking Out Transactional Network with Eclipse (continued) .................................... 51 Figure 40: Checking Out Transactional Network with Eclipse (continued) .................................... 52 Figure 41: Checking Out Transactional Network with Eclipse (continued) .................................... 52 Figure 42: Checking Out Transactional Network With Eclipse (continued) ................................... 53 Figure 43: Configuring PyDev ......................................................................................................... 54 Figure 44: Setting as PyDev Project ................................................................................................. 54 Figure 45: Setting PyDev Perspective in Eclipse .............................................................................. 55 Figure 46: Running Platform Configuration in Eclipse ................................................................... 56 Figure 47: Running Platform Configuration in Eclipse (Continued) ................................................ 56 Figure 48: Running Platform Configuration in Eclipse (Continued) ............................................... 57 Figure 49: Configuring the ListenerAgent in Eclipse ...................................................................... 58 Figure 50: ListenerAgent Output on Eclipse Console ..................................................................... 59 Figure 51: Creating an Agent Test Folder ........................................................................................ 59 Figure 52: TestAgent Output in “volttron.log” ................................................................................. 62 Figure 53: Console Output for TestAgent ......................................................................................... 63 Figure 54: TestAgent Output when Subscribing to Weather Topic ................................................. 64

1
Introduction 1Pacific Northwest National Laboratory (PNNL), with funding from the Department of Energy’s (DOE’s) Building Technologies Office (BTO), designed, prototyped and tested a transactional network platform. The platform consists of VOLTTRON™ agent execution software, a number of agents that perform a specific function (fault detection, demand response, weather service, logging service, etc.). The platform is intended to support energy, operational and financial transactions between networked entities (equipment, organizations, buildings, grid, etc.). To encourage development and growth of the transactional network platform all the software related to VOLTTRON, platform services, and the agents within VOLTTRON are open source and employ a BSD (Berkeley Software Distribution) style license, allowing the free distribution and development of the transactional network platform. This guide is intended to give detailed instructions for the initial deployment of the transactional network platform and VOLTTRON, launch of agents (applications) on the platform, and help with development of new agents within the platform. This guide will also show how to communicate with devices (e.g., controllers, thermostats, etc.,) that utilize the Modbus or BACnet communication protocols.
Background 1.1Today's building systems do not participate significantly in the energy market or provide services to power system operators. However, new smart grid technologies are creating a significant potential for building systems to participate in energy markets by providing ancillary services to power system operators. Communication networks and advanced control systems are a necessary enabler of this new potential. The transactional network platform will demonstrate the utilization of building systems (e.g., RTUs) for providing energy services to utilities using autonomous controllers. This platform will also allow for development of the next-generation control strategies and validating the strategies by:
• Quantitative analysis of energy management opportunities within buildings • Design, prototype, and analysis of the advanced controller strategies for building systems • Design and analysis of communication network within building and external interfaces to utility
communication networks • Economics of control strategies.
The rate and granularity of the control for the building systems determines the types of utility services that can be provided.
Transactional Network Platform Overview 1.2In the transactional network platform, VOLTTRON connects devices (RTUs, building systems, meters, etc.) to applications implemented in the platform and in the Cloud, a data historian, and signals from the power grid. VOLTTRON is an agent execution platform providing services to its agents that allow them to easily communicate with physical devices and other resources. VOLTTRON also provides helper classes to ease development and deployment of agents into the environment. Figure 1 shows the various components of the Transactional Network platform. The driver communicates to the building system controllers using Modbus or BACnet. It periodically reads data off the controller

2
and both posts data to the sMAP historian and publishes data to the message bus on a topic for each device; it also provides a means to send control commands from various agents to controllers. The Actuator/Scheduler agent allows other applications on the platform to schedule times to interact with devices. This Scheduler agent ensures that multiple agents are not actively controlling a device and allows the user to set the relative priority of each application.
Figure 1: Illustration of the various components of the transactional network The Archiver, in Figure 1, allows agents to request data from sMAP over the message bus. This isolates agents from the historian and allows the platform the flexibility of using potentially different data storage solutions. For example, because sMAP does not accept string data, a separate database could be used, and the interface to the agents would remain unchanged. Agents and platform services shown in Figure 1 communicate with each other via the message bus using publish/subscribe over a variety of topics. For example, the weather agent would publish weather information to a “weather” topic that interested agents would subscribe to. The platform itself publishes platform related messages to the “platform” topic (such as “shutdown”). Topics are hierarchical following the format “topic/subtopic/subtopic”, allowing agents to get as general or as specific as they want with their subscriptions. For example, agents could subscribe to “weather/all” and get all weather data for a location or “weather/temperature” for only temperature data.

3
VOLTTRON Overview 1.3The transactional network platform is an open-source, open-architecture platform that enables a variety of site/equipment specific applications to be applied in a cost-effective and scalable way. Such an open-source platform will lower the cost of entry for both existing and new service providers because the data transport or information exchange typically required for operational and energy related products and services would be ubiquitous and interoperable. 1.3.1 VOLTTRON VOLTTRON serves as an integrating platform for the components of the transactional network. It provides an environment for agent execution and serves as a single point of contact for interfacing with devices (RTUs, building systems; meters, etc.), external resources, and platform services such as data archival and retrieval. VOLTTRON provides a collection of utility and helper classes, which simplifies agent development. VOLTTRON connects devices to applications implemented in the platform and in the Cloud, a data historian, and signals from the power grid. VOLTTRON incorporates a number of open source projects to build a flexible and powerful platform. The following is a summary of the various open source tools (software) that VOLTTRON utilizes:
• sMAP: VOLTTRON utilizes sMAP1 for data storage and retrieval. The VOLTTRON Modbus driver publishes data from devices to the platform and also stores the data in the sMAP historian. During development of this driver, the VOLTTRON team contributed error reports and resolved a bug in the sMAP software.
• Drivers for sMAP are written using another open source product called twistd2. Twistd is an event-based networking engine.
• 0MQ: The VOLTTRON message bus, which allows agents and services to exchange data, uses Zero MQ3. This free software is used by National Aeronautics and Space Administration (NASA), Cisco, etc. to provide scalable, reliable, and fast communication. The VOLTTRON team has reported security and bug fixes as well as changes to the software to correct the bugs were contributed back.
• PyModbus: The VOLTTRON Modbus4 driver builds on PyModbus5, which enables Python code
to easily interact with Modbus devices.
• Other open source Python modules being used are: o 'avro', 'configobj', 'gevent', 'flexible-jsonrpc', 'numpy', 'posix-clock', ‘pyopenssl',
'python-dateutil', 'requests', 'setuptools', 'simplejson', 'zope.interface'
1.3.2 VOLTTRON Services VOLTTRON’s services utilize the above mentioned open source tools in conjunction with other applications developed by collaborators, these services/applications include:
1 http://www.cs.berkeley.edu/~stevedh/smap2/index.html 2 http://twistedmatrix.com/trac/ 3 http://zeromq.org/ 4 http://www.modbus.org/ 5 http://code.google.com/p/pymodbus/

4
• Actuator Agent: This platform service is deployed in the form of an agent running on
VOLTTRON. The Actuator agent manages the control of external devices (e.g., RTUs) by agents within VOLTTRON.
o Device control: The Actuator agent will accept commands from other agents and issue the commands to the specified device. Currently MODBUS and BACnet compatible device communication is supported.
o Device access scheduling: This service allows the scheduling of agents’ access to
devices to prevent multiple agents from controlling the same device at the same time.
• Message Bus: All agents and services can publish and subscribe to topics on the message bus. This provides a single and uniform interface that abstracts the details of devices and agents from each other. At the most basic level, agents and components running in the platform produce and consume messages, events. The details of how agents produce events and how they process received events are left up to the agents.
• Weather Information: This platform service is deployed in the form of an agent running on
VOLTTRON. This agent periodically retrieves data from the Weather Underground site. It then reformats the data and publishes it out to the platform on a weather topic accessible to other agents.
• Logging Service: Agents can publish integer or double data to arbitrary paths to a logging topic
and this service will push them to the sMAP historian for later analysis. The primary use of the Logging Service is to allow agents to record actions or results from the agent executing its services.
Agents deployed on VOLTTRON can perform one or more roles, which can be broadly classified into the following groups:
• Cloud Agents: These agents are part of a remote application that needs access to the messages and data on the platform. A Cloud agent would subscribe to topics of interest to the remote (or Cloud) application and would allow it to publish data from remote application to the platform.
• Control Agents: These agents control the devices of interest and interact with other resources to
achieve a goal.
• Passive Agent: These agents subscribe to certain data from the building systems and perform certain actions to create knowledge (faulty operation). The information and knowledge that these agents create is posted to the historian or in a local file.

5
Deployment of VOLTTRON 2VOLTTRON has been developed for deployment on Linux operating systems. To use VOLTTRON on a Mac or Windows system VOLTTRON must be deployed on a virtual machine (VM). A VM is a software implementation of a machine (i.e., a computer) that executes programs like a physical machine. A system VM provides a complete system platform, which supports the execution of a complete operating system (OS). These usually emulate an existing architecture, and are built with the purpose of providing a platform to run programs where the real hardware is not available for use. This document will describe the steps necessary to install VOLTTRON on a Windows system using Oracle VirtualBox software (Figure 2).
Figure 2: VirtualBox download page
Installing Linux Virtual Machine 2.1VirtualBox is free and can be downloaded from https://www.virtualbox.org/wiki/Downloads. Figure 2 shows the VirtualBox download page. The Windows and Mac host OS is shown boxed in red in the figure.
To install on Windows choose: VirtualBox for Windows hosts x86/amd64

6
To install on Mac choose: VirtualBox for OS X hosts x86/amd64
The latest version of VirtualBox, when this guide was constructed, was VirtualBox 4.3.6. VOLTTRON should be compatible with future releases of VirtualBox. After the installation file is downloaded, run and install the VirtualBox software. It will also be necessary to download a Linux operating system image for use on the VM. Ubuntu 12.04 LTS or Linux Mint is the recommended Linux operating system for use with VOLTTRON. This document will describe the use of VOLTTRON with Linux Mint. Any distribution of Linux Mint or Ubuntu should work with VOLTTRON but this document will describe the development of agents within VOLTTRON where the Xfce desktop is used. The other desktops associated with Linux Mint are compatible with VOLTTRON and should provide similar functionality to the Xfce desktop (Figure 3). Linux Mint can be downloaded from the following URL http://www.linuxmint.com/download.php. Set up of the platform in Ubuntu is identical to the set up in Linux Mint6 except for changes in the appearance of the desktop. If running VOLTTRON on a system with limited hardware, less than 2 GB of RAM, a 32-bit version of Linux should be used.
Figure 3: Linux Mint download page
Running and Configuring Virtual Machine 2.2After the VirtualBox software is installed and the Linux Mint image has been downloaded, the virtual machine can be run and configured. The following steps will describe how to configure the VM for deployment of VOLTTRON: 6 Note that Linux Mint version could be different from the shown here. Also, on the download screen, you could pick any site, but preferably the site that is close to you.

7
1. Start VirtualBox and click “New” icon in the top left corner of Oracle VM VirtualBox Manager Window.
2. A selection box will appear; configure the selection as shown in Figure 4. Choose Next.
Figure 4: Creating a Virtual Machine
3. Choose the amount of memory to allot the VM as shown in following figure. Note that this memory will be unavailable to the host while running the VM (i.e., a computer with 4 GB of memory, could probably spare 1 GB for the VM). Choose Next.
Figure 5: Selecting Memory Size

8
4. Create hard drive for VM. Choose Create.
Figure 6: Selecting Storage Size
5. Choose disk type. As shown in the Figure 7, select VMDK and then select Next.
Figure 7: Creating Virtual Hard Drive
6. Choose Dynamically Allocated for the VM hard drive (Figure 8). This will allow the VM hard drive to only take storage space as is needed up to the size limit chosen in the previous step. Choose Continue.

9
Figure 8: Selection of type of hard drive
7. Choose the file size for the VM virtual hard drive. Keep in mind that Linux is over 1 GB just for the operating system (Figure 9). Choose Create.
Figure 9: Creating Virtual Hard Drive (continued)
8. With the newly created VM selected choose Machine from the VirtualBox menu in the top left corner of the VirtualBox window; from the drop down menu choose Settings. In the Display menu check Enable 3D Acceleration (Figure 10). Choose OK.

10
Figure 10: Selection of display type
9. With the newly created VM selected choose Machine from the VirtualBox menu in the top left corner of the VirtualBox window; from the drop down menu choose Settings. In the system menu go to the Processor tab and Enable PAE/NX (Figure 10). Choose OK.
Figure 11: Selection of processor parameter
10. With the newly created VM selected click start (or right click the VM and choose start). To load the Linux image, select the Linux Mint image file (iso file) you downloaded, then choose Start.

11
Figure 12: Loading Linux image
11. Choose Install Linux Mint (the install icon looks like a DVD media, as shown in Figure 13), proceed to configure installation (language, etc.). The VM will now have Linux Mint installed permanently.
Figure 13: Installing Linux Mint Operating System
Installing Required Software 2.3VOLTTRON requires the following Linux modules. To install them, open a terminal window and enter the following commands (terminal commands are bold):

12
Figure 14: Linux Mint Terminal Window
• Ensures the installer is up to date: o sudo apt-get update
• This installs Git. The transactional network source code including VOLTTRON and other agent
code is stored in a Git repository: o sudo apt-get install git
• This installs Python DevTools. This is a Python software development tool necessary for running
VOLTTRON: o sudo apt-get install python-dev
• g++ is a C++ compatible runtime library:
o sudo apt-get install g++
• Required development library: o sudo apt-get install libevent-dev o sudo apt-get install libssl-dev
• Required Python module:
o sudo apt-get install python-tk

13
Installing the sMAP Server (Optional) 2.4VOLTTRON uses sMAP as its data repository for storing data from devices and log messages from agents. If you have access to an existing sMAP server, you can configure your VOLTTRON instance to work with that as in 2.9.1.
To install your own sMAP instance, follow the installation instructions from the following URL: http://pythonhosted.org/Smap/install.html
We recommend skipping “Installing from Source” and installing it on the recommended OS.
Checking Out Transactional Network from Repository 2.5Ensure you have installed the required packages before proceeding. We recommend creating a directory, ~/workspace, some of the source code for VOLTTRON is configured assuming this file structure. Enter the following commands (terminal commands are bold).
1. Creates the workspace directory: • mkdir workspace
2. Go to workspace directory:
• cd workspace
3. Downloads the transactional network source code and creates a local copy on your machine: • git clone https://github.com/VOLTTRON/volttron
Building the VOLTTRON Platform 2.6In the workspace directory, enter the following commands (terminal commands are bold and any explanation is contained within parenthesis):
4. Go to volttron directory: • cd volttron
5. VOLTTRON includes scripts that automatically pull down dependencies and build the necessary libraries. The “bootstrap” script has to be run only once. The bootstrap process can take up to 20 minutes; allow the script to complete before proceeding:
• ./bootstrap
If the bootstrap fails before finishing (for instance from a timeout), run: • bin/buildout -N
• If bootstrap or buildout fails, try "bin/buildout -N" again.
Also, some packages (especially numpy) can be very verbose when they install. Please wait for the wall of text to finish and do not be alarmed by any warnings. If the script finishes without any exception, the bootstrap was successful.
14
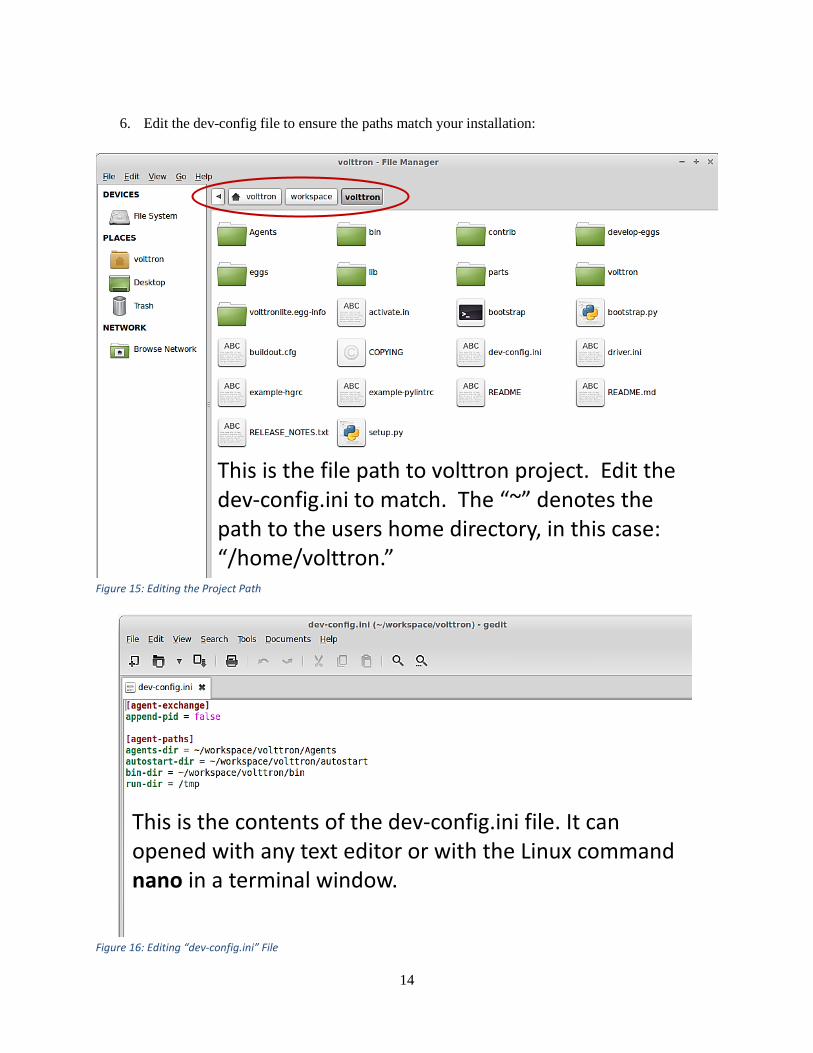
6. Edit the dev-config file to ensure the paths match your installation:
Figure 15: Editing the Project Path
Figure 16: Editing “dev-config.ini” File
This is the file path to volttron project. Edit the dev-config.ini to match. The “~” denotes the path to the users home directory, in this case: “/home/volttron.”
This is the contents of the dev-config.ini file. It can opened with any text editor or with the Linux command nano in a terminal window.

15
7. Starts VOLTTRON and logs platform activity in voltron.log (text file): • bin/volttron-lite -c dev-config.ini -l volttron.log -v -v &
At this point, all required software has been installed and basic configuration has been completed. Next, the installation has to be tested.
Launching the Listener Agent 2.7To test the VOLTTRON installation, build and deploy the Listener agent. If one plans on utilizing an integrated development environment (IDE) for agent development please refer to section 4.3 for information on installing and running agents in the Eclipse IDE. The Listener agent is a VOLTTRON platform agent. The Listener agent logs all activity on the message bus for a particular instance of VOLTTRON. This agent can be helpful when debugging an application or for monitoring what is being published on the message bus by other agents. From the volttron directory enter the following commands in a terminal window:
1. Build the Listener agent eggsecutable: • volttron/scripts/build-agent.sh ListenerAgent
2. Change permissions on the eggsecutable file:
• chmod +x Agents/listeneragent-0.1-py2.7.egg
3. Install the eggsecutable: • bin/volttron-ctrl install-executable Agents/listeneragent-0.1-py2.7.egg
4. Load the agent’s configuration file:
• bin/volttron-ctrl load-agent Agents/ListenerAgent/listeneragent.launch.json
5. Start the agent: • bin/volttron-ctrl start-agent listeneragent.launch.json
6. Show the Listener agent’s output, from the volttron.log:
• tail volttron.log
If changes are made to the Listener agent’s configuration file after the agent is launched it is necessary to stop and reload the agent. See section 4.5.5 on instructions for reloading an agent.

16
Figure 17: Sample Output from the Listener Agent
Launching the Weather Agent 2.8The Weather agent, another VOLTTRON service agent, retrieves weather information from the WeatherUnderground site and shares it with agents running on the platform. The first step to launching the Weather agent is to obtain a developer key from WeatherUnderground. 2.8.1 Obtaining a Developer Key from WeatherUnderground Follow these steps to create a WeatherUnderground account and obtain a developer key.
• Go to WeatherUnderground site (Figure 18) the following URL http://www.wunderground.com/weather/api/
• Select, Sign Up for FREE

17
Figure 18: WeatherUnderground Website
• The window should now look similar to Figure 19. Enter your information to create an account.
Figure 19: Setting up a Developer Account
• Select a plan that meets your needs. Login to with your username and password and click on
“Explore my options button.” For most applications the free plan will be adequate. The window should appear similar to Figure 20:

18
Figure 20: Creating a WeatherUnderground API Key
• You now have access to you WeatherUnderground API key. An example API key is shown in the red box of Figure 21:
Figure 21: WeatherUnderground API Key
2.8.2 Configuring WeatherAgent with Developer Key and Location The following steps will show how to configure the Weather agent with the developer key from WeatherUnderground and how to enter a zip code to get weather data from that zip code. Edit Agents/WeatherAgent/weather/settings.py with your WeatherUnderground key. From the volttron directory enter the following terminal commands:
19
1. Go to WeatherAgent directory:
• cd Agents • cd WeatherAgent • cd weather
2. Open settings.py with a text editor or nano:
• nano settings.py
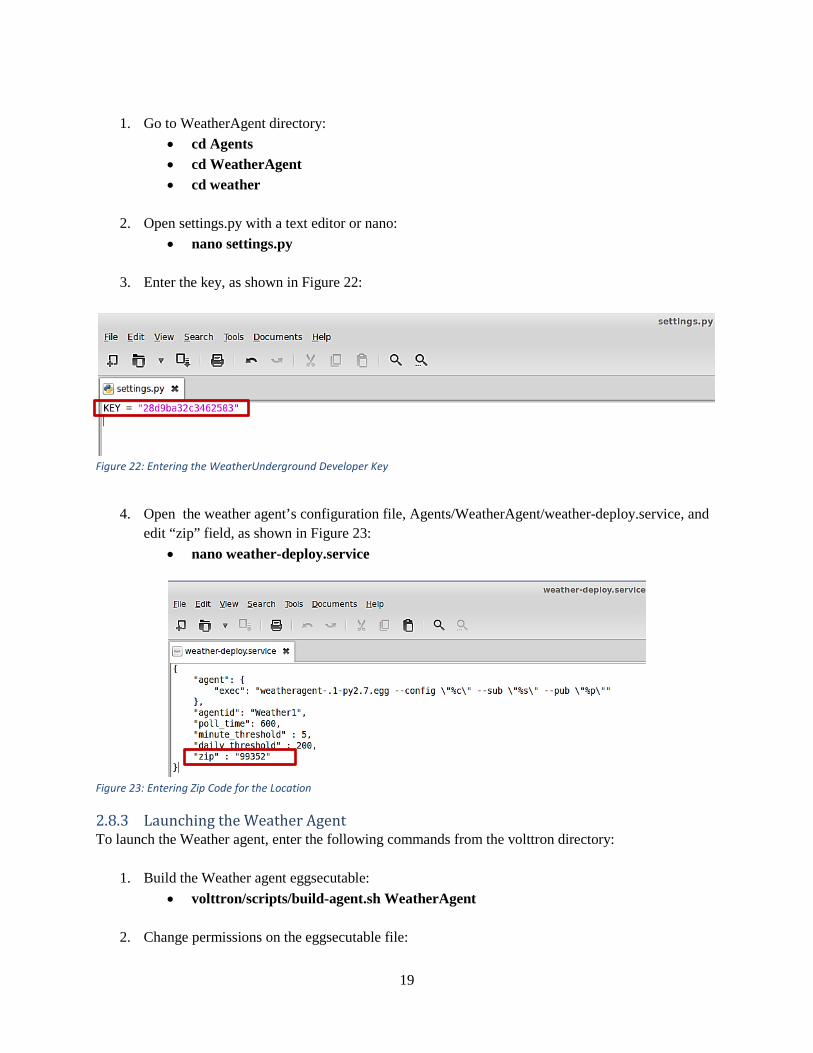
3. Enter the key, as shown in Figure 22:
Figure 22: Entering the WeatherUnderground Developer Key
4. Open the weather agent’s configuration file, Agents/WeatherAgent/weather-deploy.service, and edit “zip” field, as shown in Figure 23:
• nano weather-deploy.service
Figure 23: Entering Zip Code for the Location
2.8.3 Launching the Weather Agent To launch the Weather agent, enter the following commands from the volttron directory:
1. Build the Weather agent eggsecutable: • volttron/scripts/build-agent.sh WeatherAgent
2. Change permissions on the eggsecutable file:

20
• chmod +x Agents/weatheragent-.1-py2.7.egg
3. Install the eggsecutable: • bin/volttron-ctrl install-executable Agents/weatheragent-.1-py2.7.egg
4. Load the agent’s configuration file:
• bin/volttron-ctrl load-agent Agents/WeatherAgent/weather-deploy.service
5. Start the agent: bin/volttron-ctrl start-agent weather-deploy.service
6. Show the Weather agent’s output, from the volttron.log: • tail volttron.log
If changes are made to the Weather agent’s settings file or configuration file after the agent is launched it is necessary to stop and reload the agent for those changes to take effect. See section 4.5.5 on instructions for reloading an agent.
Figure 24: Example Output from the Weather Agent

21
Configuring and Launching sMAP Driver 2.9The sMAP driver allows a user to store time series data in the sMAP historian and to communicate with Modbus and BACnet compliant devices. Configuring the driver consists of creating a Modbus and/or a BACnet registry files and creating a sMAP driver configuration file. The Modbus and BACnet registry files tell the driver what the Modbus address is for each register, what data type it can hold, and if the register is writeable or read-only. The sMAP driver configuration file tells the sMAP driver where to find the Modbus and BACnet registry files, the location (URL) of the sMAP historian to write data to, and information related to the device you are monitoring or controlling.
2.9.1 Configuring sMAP driver The basic Modbus commands can instruct a device to change a value in one of its registers, control or read an I/O port, as well as command the device to send back one or more values contained in its registers. To utilize Modbus communications for a device, a key of the registers must be constructed. This key is a file, in comma separated value format, that contains the point name that is published on the message bus, the I/O type (Modbus or BACnet register), and the point/register address on the device (point address). An example of a Modbus registry file is shown in Figure 25, and an example BACnet registry file is shown in Figure 26.
1. Create the Modbus registry file and the BACnet registry file.
Figure 25: An Example Modbus Registry File
Figure 26: An Example BACnet Registry File
The data fields boxed in red in Figure 25 and Figure 26 are important for communication with the device(s) and/or control of the device(s). The fields boxed in blue are for informational purposes and are not required but often helpful, especially when using a registry key constructed by a third party. Save this file inside the workspace (i.e., ~/workspace/volttron/volttron/drivers/modbus.csv).

22
For more details on the Modbus registry file or BACnet registry file visit the Transactional Network Wiki: Modbus - https://github.com/VOLTTRON/volttron/wiki/ModbusDriver BACnet - https://github.com/VOLTTRON/volttron/wiki/BacnetDriver For information on auto-generating a BACnet registry file visit the Transactional Network Wiki: https://github.com/VOLTTRON/volttron/wiki/AutoBacnetConfigGeneration
2. Configure the sMAP configuration file, as shown in Figure 27.
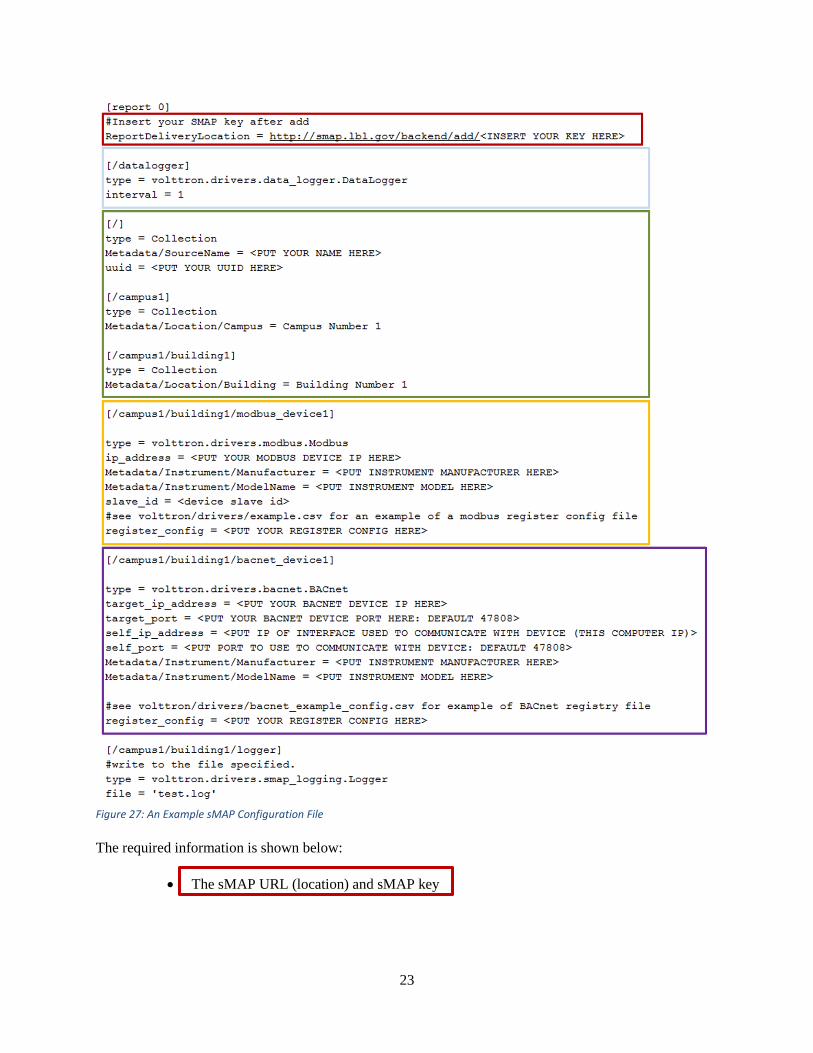
23
Figure 27: An Example sMAP Configuration File
The required information is shown below:
• The sMAP URL (location) and sMAP key

24
• sMAP metadata information
• /campus/building - path for publishing and subscribing to device data on the VOLTTRON message bus
• Modbus configurable parameters:
o Device IP address and slave identification (if applicable)
o Location of Modbus registry file
o Desired device metadata
• BACnet configurable parameters:
o Device IP address
o Location of BACnet registry file
o Desired device metadata
• The path to the data logger scripts. This information shows the sMAP driver where to find the logging code. The logging code allows an agent to publish information to the logging topic, where that information will then be pushed to sMAP. Copy this text and add it to your sMAP driver file.
3. Save the file within the transactional network workspace. Subsequent examples from this document will assume the file is saved as (~workspace/volttron/sMAP.ini).
2.9.2 Launching the driver After configuring the Modbus registry key and the sMAP cofiguration file, the driver can now be launched. From a terminal window in the volttron directory, enter the following commands:
4. Activate the project: • . bin/activate (note the space after the period)
5. Launch the sMAP driver:
• twistd -n smap sMAP.ini
Keep this terminal window open. The driver will continue to run and allow you to interact with the device through the Actuator agent.
Configuring and Launching the Actuator Agent 2.10The value contained in the registers on your Modbus or BACnet device will be published to the message bus at a regular interval (the read interval set in the sMAP configuration file). For on demand data or active control of the device, the Actuator agent must be configured and launched. The Actuator agent performs the following platform services:

25
• Device control: The Actuator agent will accept commands from other agents and issue the
commands to the specified device. Currently, communication with Modbus and BACnet compatible devices is supported.
• Device access scheduling: This service allows the scheduling of agents’ access to devices to prevent multiple agents from controlling the same device at the same time.
2.10.1 Configuring the Actuator Agent Before launching the Actuator agent, we must create or modify the Actuator agent’s configuration file (Figure 28).
Figure 28: Example Actuator Agent Configuration File
The configuration parameters shown in Figure 28 are defined as follows:
• schedule_publish_interval – The interval in seconds between schedule announcements for devices being managed by the Actuator agent. These are the devices configured within the sMAP driver and the published schedule shows agent access information including which agent has scheduled access to the device.
• preempt_grace_time – The amount of time given to an application of “low” and “preemptable” priority when a higher priority application requests access to the device.
• schedule_state_file – Saved schedule information for each device being managed by the Actuator agent.

26
• The parameters shown in the black box (in Figure 28) are related to construction of the agent eggsecutable. These parameters do not require modification.
• The parameters shown in the red box (in Error! Reference source not found.) are related to a device heartbeat. This is a register on the control device that the Actuator agent toggles to indicate proper communication with the platform has been established. The fields in red should be left blank unless your device has this register set up.
The Actuator agent will be able to facilitate communication and control of devices that are configured within the sMAP driver.
2.10.2 Scheduling a Task To have active control of a device, an agent can request a block of time be scheduled on the device. An agent can request a task be scheduled by publishing to the “RTU/actuators/schedule/request” with the following header: { 'type': 'NEW_SCHEDULE', 'requesterID': <Agent ID>, #The name of the requesting agent. 'taskID': <unique task ID>, #unique ID for scheduled task. 'priority': <task priority>, #The desired task priority, must be 'HIGH', 'LOW', or 'LOW_PREEMPT' }
The schedule request message should be formatted as follows (before converting to json): [ ["campus/building/device1", #First time slot. "2013-12-06 16:00:00", #Start of time slot. "2013-12-06 16:20:00"], #End of time slot. ["campus/building/device1", #Second time slot. "2013-12-06 18:00:00", #Start of time slot. "2013-12-06 18:20:00"], #End of time slot. ["campus/building/device2", #Third time slot. "2013-12-06 16:00:00", #Start of time slot. "2013-12-06 16:20:00"], #End of time slot. #etc... ]
When constructing a schedule request for a device, the following should be noted:
• Everything in the header is required. • A task schedule must have at least one time slot.

27
• The start and end times are parsed with dateutil's date/time parser. The default string representation of a python datetime object will parse without issue.
• Two tasks are considered conflicted if at least one time slot on a device from one task overlaps the time slot of the other on the same device.
• The start or end (or both) of a requested time slot on a device may touch other time slots without
overlapping and will not be considered in conflict.
• A request must not conflict with itself. A schedule block of time and the associated task can have three possible priorities, as noted below:
HIGH - This task cannot be preempted under any circumstance. This task may preempt other conflicting preemptable tasks.
LOW - This task cannot be preempted once it has started. A task is considered started once the earliest time slot on any device has been reached. This task may not preempt other tasks.
LOW_PREEMPT - This task may be preempted at any time. If the task is preempted once it has begun running, any current time slots will be given a grace period (configurable in the Actuator agent configuration file, defaults to 60 seconds) before being revoked. This task may not preempt other tasks.
2.10.3 Canceling a Task A task may be canceled by publishing to the "RTU/actuators/schedule/request" topic with the following header: { 'type': 'CANCEL_SCHEDULE', 'requesterID': <Agent ID>, #The name of the requesting agent. 'taskID': <unique task ID>, #ID of task being canceled }
When canceling a task, the following should be noted:
• The requesterID and taskID must match the original values from the original request header. • After a task’s time has passed, there is no need to cancel it. Doing so will result in a
"TASK_ID_DOES_NOT_EXIST" error. 2.10.4 Actuator Error Reply If something goes wrong, the Actuator agent will reply to both get and set on the error topic for an actuator: 'RTU/actuators/error/<full device path>/<actuation point>'
With this header:

28
{ 'requesterID': <Agent ID> }
The message will be in the following form: { 'type': <Error Type or name of the exception raised by the request> 'value': <Specific info about the error> }
2.10.5 Task Preemption and Schedule Failure In response to a task schedule request, the Actuator agent will respond on the topic "RTU/actuators/schedule/response" with the following header: { 'type': <'NEW_SCHEDULE', 'CANCEL_SCHEDULE'> 'requesterID': <Agent ID from the request>, 'taskID': <Task ID from the request> }
And, the following message (after parsing the json): { 'result': <'SUCCESS', 'FAILURE', 'PREEMPTED'>, 'info': <Failure reason, if any>, 'data': <Data about the failure or cancellation, if any> }
2.10.5.1 Preemption Message If a higher priority task preempts another scheduled task, the Actuator agent will publish the following message (the field type within the header will be contain CANCEL_SCHEDULE): { 'agentID': <Agent ID of preempting task>, 'taskID': <Task ID of preempting task> }
2.10.5.2 Failure Reasons In most cases the Actuator agent will try to give good feedback as to why a request failed. 2.10.5.3 Failure Responses from Actuator Agent The following list contains possible errors messages an agent may receive from the Actuator agent. This field corresponds to the info within the Actuator agent response message: INVALID_REQUEST_TYPE - Request type was not "NEW_SCHEDULE" or "CANCEL_SCHEDULE".
MISSING_TASK_ID - Failed to supply a taskID.

29
MISSING_AGENT_ID - AgentID not supplied.
TASK_ID_ALREADY_EXISTS - The supplied taskID already belongs to an existing task.
MISSING_PRIORITY - Failed to supply a priority for a task schedule request.
INVALID_PRIORITY - Priority not one of "HIGH", "LOW", or "LOW_PREEMPT".
MALFORMED_REQUEST_EMPTY - Request list is missing or empty.
REQUEST_CONFLICTS_WITH_SELF - Requested time slots on the same device overlap.
MALFORMED_REQUEST - Reported when the request parser raises an unhandled exception. The exception name and info are appended to this info string.
CONFLICTS_WITH_EXISTING_SCHEDULES - Schedule conflicts with an existing schedule that it cannot preempt. The data item for the results will contain info about the conflicts in this form (after parsing json):
{ '<agentID1>': { '<taskID1>': [ ["campus/building/device1", "2013-12-06 16:00:00", "2013-12-06 16:20:00"], ["campus/building/device1", "2013-12-06 18:00:00", "2013-12-06 18:20:00"] ] '<taskID2>':[...] } '<agentID2>': {...} }
TASK_ID_DOES_NOT_EXIST - Trying to cancel a task which does not exist. This error can also occur when trying to cancel a finished task.
AGENT_ID_TASK_ID_MISMATCH - A different agent ID is being used when trying to cancel a task
2.10.6 Actuator Agent Interaction Once a task has been scheduled and the time slot for one or more of the devices has started, an agent may interact with the device using the get and set topics. Both get and set receive the same response from the Actuator agent. 2.10.6.1 Getting values While the sMAP driver will periodically broadcast the state of a device, you may want an up-to-the-moment value for an actuation point on a device. To request a value, publish a message to the following topic: 'RTU/actuators/get/<full device path>/<actuation point>'

30
With this header: { 'requesterID': <Agent ID> }
2.10.6.2 Setting Values Values are set in a similar manner. To set a value, publish a message to the following topic: 'RTU/actuators/set/<full device path>/<actuation point>'
With this header: { 'requesterID': <Agent ID> }
The content of the message is the new, desired value for the actuation point. 2.10.6.3 Actuator Reply The Actuator agent will reply to both get and set on the value topic for an actuator point: 'RTU/actuators/value/<full device path>/<actuation point>'
With this header: { 'requesterID': <Agent ID> }
The message contains the value of the actuation point in JSON. The message can be parsed using jsonapi.loads method to parse to Python dictionary (from zmq.utils import jsonapi). 2.10.6.4 Common Error Types The following list contains possible errors messages an agent may receive from the Actuator agent. This field corresponds to the info within the Actuator agent response message:
LockError - Returned when a request is made when we do not have permission to use a device. (Forgot to schedule, preempted and we did not handle the preemption message correctly, ran out of time in time slot, etc...)
ValueError - Message missing or could not be parsed as JSON.
Other error types involve problem with communication between the Actuator agent and sMAP. 2.10.7 Device Schedule State Announcements Periodically the Actuator agent will publish the state of all currently used devices. For each device, the Actuator agent will publish to an associated topic: 'RTU/actuators/schedule/announce/<full device path>'
31
With the following header: { 'requesterID': <Agent with access>, 'taskID': <Task associated with the time slot> 'window': <Seconds remaining in the time slot> }
The frequency of the updates is configurable with the "schedule_publish_interval" setting. 2.10.8 Launching the Actuator Agent After the Actuator agent has been configured, the agent can be launched. To launch the Actuator agent from the volttron directory, enter the following commands in a terminal window:
1. Build the Actuator agent eggsecutable: • volttron/scripts/build-agent.sh ActuatorAgent
2. Change permissions on the eggsecutable file:
• chmod +x Agents/actuatoragent-0.1-py2.7.egg
3. Install the eggsecutable: • bin/volttron-ctrl install-executable Agents/ actuatoragent-0.1-py2.7.egg
4. Load the agent’s configuration file:
• bin/volttron-ctrl load-agent Agents/ActuatorAgent/actuator-deploy.service
5. Start the agent: • bin/volttron-ctrl start-agent actuator-deploy.service
6. Show the Actuator agent’s output, from the volttron.log:
• cat volttron.log
If changes are made to the Actuator agent’s configuration file after the agent is launched it is necessary to stop and reload the agent. See section 4.5.5 on instructions for reloading an agent.
The Actuator agent can now be used to interact with Modbus devices or simulated devices. Any device, existing or not, can be scheduled. This can be a beneficial debugging tool especially when testing the functionality of an agent under development. 2.10.9 Tips for Working with the Actuator Agent The following is a list of tips for working with the Actuator agent:
• An agent can watch the window value from device state announcements to perform scheduled actions within a time slot.

32
o If an Agent's task is LOW_PREEMPT priority, it can watch for device state announcements, where the window is less than or equal to the grace period (default 60 seconds).
• When considering whether to schedule long or multiple short time slots on a single device: o Do we need to ensure the device state for the duration between slots?
Yes. Schedule one long time slot instead. No. Is it all part of the same task or can we break it up in case there is a conflict
with one of our time slots?
• When considering time slots on multiple devices for a single task: o Is the task really dependent on all devices or is it actually multiple tasks?
• When considering priority:
o Does the task have to happen on an exact day? No. Consider LOW and reschedule if preempted. Yes. Use HIGH.
o Is it problematic to prematurely stop a task once started? No. Consider LOW_PREEMPT and watch the device state announcements for a
small window value. Yes. Consider LOW or HIGH.
• If an agent is only observing but needs to assure that no other task is going on while taking
readings, it can schedule the time to prevent other agents from “messing” with a devices state. The device state announcements can be used as a reminder as to when to start watching.
33
Sample Applications/Agents 3This section summarizes the use of the sample applications that are pre-packaged with VOLTTRON. For detailed information on these applications, refer to the report Transactional Network Platform: Applications.7
Automated Fault Detection and Diagnostic Agent 3.1The automated fault detection and diagnostic (AFDD) agent is used to identify problems in the operation and performance of air-handling units (AHUs) or packaged rooftop units (RTUs). Air-side economizers modulate controllable dampers to use outside air to cool instead of (or to supplement) mechanical cooling, when outdoor-air conditions are more favorable than the return-air conditions. Unfortunately, economizers often do not work properly, leading to increased energy use rather than saving energy. Common problems include incorrect control strategies, diverse types of damper linkage and actuator failures, and out-of-calibration sensors. These problems can be detected using sensor data used that is normally used to control the system. The AFDD requires the following data fields to perform the fault detection and diagnostics: outside-air temperature, return-air temperature, mixed-air temperature, outside-air damper position/signal, supply fan status, mechanical cooling status, heating status. The AFDD supports both real-time data via a Modbus or BACnet device, or input of data from a csv style text document. If the data input is a csv text file, a “timestamp” containing date and time in the following format is required mm – dd – yyyy hh:mm The following section will detail how to configure the AFDD agent, methods for data input (real-time data from a device or historical data in a comma separated value formatted text file), and launching the AFDD agent. 3.1.1 Configuring the AFDD agent Before launching the AFDD agent several parameters require configuration. The AFDD utilizes the same JSON style configuration file that the Actuator, Listener, and Weather agents use, which is documented in the previous sections of this document. The threshold parameters used for the fault detection algorithms are pre-configured and will work well for most RTUs or AHUs. Figure 29 shows an example configuration file for the AFDD agent. The parameters boxed in black (in Figure 29) are the pre-configured fault detection thresholds; these do not require any modification to run the AFDD agent. The parameters boxed in blue in the AFDD sample configuration file are related to creation of the AFDD agent eggsecutable and do not require modification. The parameters in the example configuration that are boxed in red will require user input. The following list describes each user configurable parameter and their possible values:
7 http://www.pnl.gov/main/publications/external/technical_reports/PNNL-22941.pdf

34
Figure 29: Example AFDD Agent Configuration File

35
agentid – This is the ID used when making schedule, set, or get requests to the Actuator agent; usually a string data type. campus – Campus name as configured in the sMAP driver. This parameter builds the device path that allows the Actuator agent set and get values on the device; usually a string data type. building – Building name as configured in the sMAP driver. This parameter builds the device path that allows the Actuator agent set and get values on the device; usually a string data type. unit – Device name as configured in the sMAP driver. This parameter builds the device path that allows the Actuator agent set and get values on the device; usually a string data type.
Note: The campus, building, and unit parameters are used to build the device path (campus/building/unit). The device path is used for communication on the message bus. Controller point names – When using real-time communication, the Actuator agent identifies what registers or values to set or get by the point name you specify. This name must match the “Point Name” Given in the Modbus registry file, as specified in section 2.9.1 Configuring sMAP driver. aggregate_data – When using real-time data sampled at an interval of less than 1 hour or when inputting data via a csv file sampled at less than 1 hour intervals, set this flag to “1.” Should be an integer or floating point number (i.e., 1 or 1.0) csv_input – Flag to indicate if inputting data from a csv text file. Set to “0” for use with real-time data from a device or “1” if data is input from a csv text file. It should be an integer or floating point number (i.e., 1 or 1.0) EER – Energy efficiency ratio for the AHU or RTU. It should be an integer or floating point number (i.e., 10 or 10.0) tonnage – Cooling capacity of the AHU or RTU in tons of cooling. It should be an integer or floating point number (i.e., 10 or 10.0) economizer_type – This field indicates what type of economizer control is used. Set to “0” for differential dry-bulb control or to “1” for high limit dry-bulb control. It should be an integer or floating point number. high_limit – If the economizer is using high limit dry-bulb control, then this value will indicates what the outside-air temperature high limit should be. The input should be floating point number (i.e., 60.0) matemp_missing – Flag used to indicate if the mixed-air temperature is missing for this system. If utilizing csv data input, simply set this flag to “1” and replace the mixed-air temperature column with discharge-air temperature data. If using real-time data input change the field “mat_point_name” under Point names section to the point name indicating the discharge-air temperature. It should be an integer or floating point number (i.e., 1 or 1.0)

36
OAE6 – This section contains the schedule information for the AHU or RTU. The default is to indicate a 24-hour schedule for each day of the week. To modify this, change the numbers in the bracketed list next to the corresponding day with which you are making operation schedule modifications. For example: “Saturday”: [0,0] (This indicates the system is off on Saturdays) 3.1.2 Launching the AFDD Agent The AFDD agent performs passive diagnostics on AHUs or RTUs, monitors and utilizes sensor data but does not actively control the devices. Therefore, the agent does not require interaction with the Actuator agent. Steps for launching the agent are as follows: In a terminal window, enter the following commands:
1. Build the AFDD agent eggsecutable: • volttron/scripts/build-agent.sh PassiveAFDD
2. Change permissions on the eggsecutable file:
• chmod +x Agents/passiveafdd-0.1-py2.7.egg
3. Install the eggsecutable: • bin/volttron-ctrl install-executable Agents/passiveafdd-0.1-py2.7.egg
4. Load the agent’s configuration file:
• bin/volttron-ctrl load-agent Agents/PassiveAFDD/passiveafdd.launch.json
5. Start the agent: • bin/volttron-ctrl start-agent passiveafdd.launch.json
6. Show the AFDD agent’s output, from the volttron.log:
• tail volttron.log
When the AFDD agent is monitoring a device via the message bus, the agent relies on the periodic data published from the sMAP driver. The AFDD agent then aggregates this data each hour and performs the diagnostics on the average hourly data. The result is written to a csv text file, which is appended if the file already exists. This file is in a folder titled “Results” under the “PassiveAFDD/passiveafdd/” directory. Below is a key that describes how to interpret the diagnostic results: Diagnostic
code Code Message AFDD-1 (Temperature Sensor Fault)
20 No faults detected 21 Temperature sensor fault 22 Conditions not favorable for diagnostic 23 Mixed-air temperature outside of expected range

37
24 Return-air temperature outside of expected range 25 Outside-air temperature outside of expected range 27 Missing data necessary for fault detection 29 Unit is off (No Fault)
AFDD-2 (RTU Economizing When it Should) 30 No faults detected 31 Unit is not currently cooling or conditions are not favorable for economizing (No Fault) 32 Insufficient outdoor air when economizing (Fault) 33 Outdoor-air damper is not fully open when the unit should be economizing (Fault) 36 Damper is open for economizing but conditions were not favorable for OAF calculaton (No Fault) 37 Missing data necessary for fault detection (No Fault) 38 Damper is fully open when economizing but OAF calculation led to an unexpected value (No Fault) 39 Unit is off (No Fault)
AFDD-3(Unit Economizing When it Should) 40 No faults detected 41 Damper should be at minimum position but is not (Fault) 42 Damper is at minimum for ventilation (No Fault) 43 Conditions favorable for economizing (No Fault) 47 Missing data necessary for fault detection (No Fault) 49 Unit is off (No Fault)
AFDD-4(Excess Outdoor-air Intake) 50 No faults detected 51 Excessive outdoor-air intake 52 Damper is at minimum but conditions are not favorable for OAF calculation (No Fault) 53 Damper is not at minimum (Fault) 56 Unit should be economizing (No Fault) 57 Missing data necessary for fault detection (No Fault) 58 Damper is at minimum but OAF calculation led to an unexpected value (No Fault) 59 Unit is off (No Fault)
AFDD-5 (Insufficient Outdoor-air Ventilation) 60 No faults detected 61 Insufficient outdoor-air intake (Fault) 62 Damper is at minimum but conditions are not favorable for OAF calculation (No Fault) 63 Damper is not at minimum when is should not be (Fault) 66 Unit should be economizing (No Fault) 67 Missing data necessary for fault detection (No Fault) 68 Damper is at minimum but conditions are not favorable for OAF calculation (No Fault) 69 Unit is off (No Fault)

38
AFDD-6 (Schedule)
70 Unit is operating correctly based on input on/off time (No Fault) 71 Unit is operating at a time designated in schedule as "off" time 77 Missing data
3.1.2.1 Launching the AFDD for CSV Data Input When utilizing the AFDD agent and inputting data via a CSV text file, set the csv_input parameter, contained in the AFDD configuration file, to “1.”
• Launch the agent normally, as described in Section 3.1.2. • A small file input box will appear. Navigate to the csv data file and select the csv file to input for
the diagnostic. • The result will be created for this RTU or AHU in the results folder described in Section Error!
Reference source not found.. Figure 30 shows the dialog box that is used to input the CSV data file.
Figure 30: File Selection Dialog Box when Inputting Data in a CSV File
If “Cancel” is pushed on the file input dialog box, the AFDD will acknowledge that no file was selected. The AFDD must be restarted to run the diagnostics. If a non-CSV file is selected, the AFDD will acknowledge the file selected was not a CSV file. The AFDD must be restarted to run the diagnostics.

39
To restart the AFDD, enter the commands in a terminal window from the volttron directory:
• bin/volttron-ctrl stop-agent passiveafdd.launch.json
• bin/volttron-ctrl start-agent passiveafdd.launch.json.
Note: This only restarts the agent. If modifications are also made to the passiveafdd.launch.json configuration file, then the AFDD configuration file must be unloaded and reloaded before the agent is restarted. For directions on reloading the agent, see Section 4.5.5. Figure 31 shows a sample input data in a CSV format.
Figure 31: Sample of CSV Data for AFDD Agent
Note that the column order is important. The data should be ordered as follows timestamp, outside-air temperature, return-air temperature, mixed-air temperature, mechanical cooling status, heating status, supply fan status, and outside-air damper signal. The header, or name for each column does not matter to the AFDD agent. Use a column name that is easy to identify and understand.
The Demand Response (DR) Agent 3.2Many utilities around the country have or are considering implementing dynamic electrical pricing programs that use time-of-use (TOU) electrical rates. TOU electrical rates vary based on the demand for electricity. Critical peak pricing (CPP), also referred to as critical peak days or event days, is an electrical rate where utilities charge an increased price above normal pricing for peak hours on the CPP day. CPP times coincide with peak demand on the utility; these CPP events are generally called between 5 to 15 times per year and occur when the electrical demand is high and the supply is low. Customers on a flat standard rate who enroll in a peak time rebate program receive rebates for using less electricity when a utility calls for a peak time event. Most CPP events occur during the summer season on very hot days. The initial implementation of the DR agent addresses CPP events where the RTU would normally be cooling. This implementation can be extended to handle CPP events for heating during the winter season as well. This implementation of the DR agent is specific to the CPP, but it can easily be modified to work with other incentive signals (real-time pricing, day head, etc.). The main goal of the building owner/operator is to minimize the electricity consumption during peak summer periods on a CPP day. To accomplish that goal, the DR agent performs three distinct functions: Step 1 – Pre-Cooling: Prior to the CPP event period, the cooling and heating (to ensure the RTU is not driven into a heating mode) set points are reset lower to allow for pre-cooling. This step allows the RTU to cool the building below its normal cooling set point while the electrical rates are still low (compared to CPP events). The cooling set point is typically lowered between 3 and 5oF below the normal. Rather than

40
change the set point to a value that is 3 to 5oF below the normal all at once, the set point gradually lowered over a period of time.
Step 2 – Event: During the CPP event, the cooling set point is raised to a value that is 4 to 5oF above the normal, the damper is commanded to a position that is slightly below the normal minimum (half the of the normal minimum), the fan speed is slightly reduced (by 10% to 20% of the normal speed, if the unit has a variable-frequency-drive (VFD)), and the second stage cooling differential (time delay between stage one and stage two cooling) is increased (by few degrees, if the unit has multiple stages). The modifications to the normal set points during the CPP event for the fan speed, minimum damper position, cooling set point, and second stage cooling differential are user adjustable. These steps will reduce the electrical consumption during the CPP event. The pre-cooling actions taken in step 1 will allow the temperature to slowly float up to the CPP cooling temperature set point and reduce occupant discomfort during the attempt to shed load. Step 3 – Post-Event. The DR agent will begin to return the RTU to normal operations by changing the cooling and heating set points to their normal values. Again, rather than changing the set point in one step, the set point is changed gradually over a period of time to avoid the “rebound” effect (a spike in energy consumption after the CPP event when RTU operations are returning to normal). The following section will detail how to configure and launch the DR agent. 3.2.1 Configuring DR Agent Before launching the DR agent, several parameters require configuration. The DR utilizes the same JSON style configuration file that the Actuator, Listener, and Weather agent use. A notable limitation of the DR agent is the DR agent requires active control of an RTU/AHU. The DR agent modifies set points on the controller or thermostat to reduce electrical consumption during a CPP event. The DR agent must be able to set certain values on the RTU/AHU controller or thermostat via the Actuator agent (Section 2.10). Figure 32 shows a sample configuration file for the DR agent:

41
Figure 32: Example Configuration File for the DR Agent

42
The parameters boxed in black (Figure 32) are the demand response parameters; these may require modification to ensure the DR agent and corresponding CPP event are executed as one desires. The parameters boxed in blue in the DR sample configuration file are related to the creation of the DR agent eggsecutable and do not require modification. The parameters in the example configuration that are boxed in red are the controller or thermostat points, as specified in the Modbus or BACnet (depending on what communication protocol your device uses) registry file, that the DR agent will set via the Actuator agent. These device points must be writeable, and configured as such, in the registry (Modbus or BACnet) file. The following list describes each user configurable parameter: agentid – This is the ID used when making schedule, set, or get requests to the Actuator agent; usually a string data type. campus – Campus name as configured in the sMAP driver. This parameter builds the device path that allows the Actuator agent set and get values on the device; usually a string data type. building – Building name as configured in the sMAP driver. This parameter builds the device path that allows the Actuator agent set and get values on the device; usually a string data type. unit – Device name as configured in the sMAP driver. This parameter builds the device path that allows the Actuator agent set and get values on the device; usually a string data type. Note: The campus, building, and unit parameters are used to build the device path (campus/building/unit). The device path is used for communication on the message bus. csp_pre – Pre-cooling space cooling temperature set point. csp_cpp – CPP event space cooling temperature set point.
normal_firststage_fanspeed – Normal operations, first stage fan speed set point.
normal_secondstage_fanspeed – Normal operations, second stage fan speed set point.
normal_damper_stpt – Normal operations, minimum outdoor-air damper set point.
normal_coolingstpt – Normal operations, space cooling temperature set point.
normal_heatingstpt – Normal operations, space heating temperature set point.
fan_reduction – Fractional reduction in fan speeds during CPP event (default: 0.1-10%).
damper_cpp – CPP event, minimum outdoor-air damper set point.
max_precool_hours – Maximum allotted time for pre-cooling, in hours.
cooling_stage_differential – Difference in actual space temperature and set-point temperature before second stage cooling is activated.

43
Schedule – Day of week occupancy schedule “0” indicate unoccupied day and “1” indicate occupied day (e.g., [1,1,1,1,1,1,1] = [Mon, Tue, Wed, Thu, Fri, Sat, Sun]). 3.2.2 OpenADR (Open Automated Demand Response) Open Automated Demand Response (OpenADR) is an open and standardized way for electricity providers and system operators to communicate DR signals with each other and with their customers using a common language over any existing IP-based communications network, such as the Internet. Lawrence Berkeley National Laboratory created an agent to receive DR signals from an external source, e.g., OpenADR server, and publish this information on the message bus. The demand response agent subscribes to the OpenADR topic and utilizes the contents of this message to coordinate the CPP event. The format of the OpenADR signal is formatted as follows: ‘openadr/event’,{'Content-Type': ['application/json'], 'requesterID': 'openadragent'}, '{"status": "near", "start_at": "2013-6-15 14:00:00", "end_at":"2013-10-15 18:00:00","mod_num":0,"id":"18455630-a5c4-4e4a-9d53-b3cf989ccf1b","signals":null}' The red text in the signal is the topic associated with CPP events that are published on the message bus. The text in dark blue is the message; this contains the relevant information on the CPP event for use by the DR agent. If one desires to test the behavior of a device when responding to a DR event, one may simulate such an event by manually publishing a DR signal on the message bus. From the rutnetwork directory, in a terminal window, enter the following commands:
• Activate project: o . bin/activate (not the space after the period)
• Start Python interpreter:
o python (this activates the Python interpreter)
• Import PublishMixin module: o from volttron.lite.agent.base import PublishMixin
• Create PublishMixin object:
o p=PublishMixin('ipc:///tmp/volttron-lite-agent-publish')
• Publish simulated OpenADR message: o p.publish_json('openadr/event',{},{'id': ‘event_id’,'status': 'active', 'start_at': '06-
10-14 14:00', ‘end_at’: '06-10-14 18:00'})
To cancel this event, enter the following command:

44
• p.publish_json('openadr/event',{},{'id': ‘event_id’,'status': ‘cancelled’, 'start_at': '06-10-14 14:00', ‘end_at’: '06-10-14 18:00'})
The DR agent will use the most current signal for a given day. This allows utilities/OpenADR to modify the signal up to the time prescribed for pre-cooling. 3.2.3 DR Agent Output to sMAP The Demand Response agent will output to the sMAP location prescribed in your sMAP configuration file. The specific “branch” within this sMAP database is specified in the DR agent’s configuration file. The DR agent will output the start time for the CPP event and the end time for the CPP event. These will be specified by a value of “1” for the start time and “2” for the end time. If the CPP event is cancelled or a user override is initiated, the DR agent will push a value of “3” to sMAP. 3.2.4 Launching the Demand Response Agent After the DR agent has been configured, the agent can be launched. To launch the DR agent from the volttron directory, enter the following commands in a terminal window:
• Build the DR agent eggsecutable: o volttron/scripts/build-agent.sh DRAgent
• Change permissions on the eggsecutable file:
o chmod +x Agents/DemandResponseagent-0.1-py2.7.egg
• Install the eggsecutable: o bin/volttron-ctrl install-executable Agents/DemandResponseagent-0.1-py2.7.egg
• Load the agent’s configuration file:
o bin/volttron-ctrl load-agent Agents/DemandResponseAgent/demandrepsonseagent.launch.agent
• Start the agent:
o bin/volttron-ctrl start-agent listeneragent.launch.json
• Show the DR agent’s output, from the volttron.log: o cat volttron.log

45
Agent Development in VOLTTRON 4VOLTTRON supports agents written in any language. The only requirement is that they can communicate over the message bus. However, Python-based agents were the focus of the original work, and an array of utilities have been created to speed development in that language. The “volttron.lite.agent” package contains these utilities (~/workspace/volttron/volttron/lite/agent.py). For the details of using them, please see the Wiki or read the comments in the code. These comments contain explanations and examples of usage.
The utility classes in this package, with a brief description, follow:
• base.py: BaseAgent class handles much of the low-level requirements for working in the platform. An agent that extends the BaseAgent can focus on its own functionality and override only the methods it needs.
• matching.py: Allows agents to easily subscribe to topics using decorators8
• cron.py: Allows agents to schedule their actions ahead of time
• green.py: Utilities for using greenlets9 with the BaseAgent
• sched.py: Used for scheduling objects
• utilities.py: Utilities for loading config files, parsing command line arguments, formatting log messages, etc.
The following sections will walkthrough an example agent and then give an overview of creating a simple agent from scratch.
Example Agent Walkthrough 4.1The Listener agent subscribes to all topics and is useful for testing that agents being developed are publishing correctly. It also provides a template for building other agents because it utilizes publish and subscribe mechanisms and contains the basic structure necessary to build a very simple agent.
Explanation of Listener Agent 4.2The Listener agent utilizes the PublishMixin and BaseAgent classes for its base functionality. Please see volttron/lite/agent/base.py for the details of these classes. The Listener agent publishes a heartbeat message using the PublishMixin. It also extends BaseAgent to get default functionality such as responding to platform commands. When creating agents, Mixins10 should be first in the class definition. 8 https://wiki.python.org/moin/PythonDecorators 9 https://pypi.python.org/pypi/greenlet 10 http://python.dzone.com/articles/mixins-python

46
class ListenerAgent(PublishMixin, BaseAgent): '''Listens to everything and publishes a heartbeat according to the heartbeat period specified in the settings module. '''
The Listener agent subscribes to all topics by using volttron/lite/agent/matching.py. This package contains decorators for simplifying subscriptions. The Listener agent uses match_all to receive all messages:
@matching.match_all def on_match(self, topic, headers, message, match): '''Use match_all to receive all messages and print them out.''' print "Topic: {topic}, Headers: {headers}, Message: {message}".format( topic=topic, headers=headers, message=message)
The Listener agent uses the @periodic decorator to execute the pubheartbeat method every HEARTBEAT_PERIOD seconds where HEARTBEAT_PERIOD is specified in the settings.py file. To publish, it creates a Header object to set the ContentType of the message, the time the event was created, and the ID of the agent sending it. This allows other agents to filter out messages of a certain type or from a certain agent. It also allows them to interpret the content appropriately. The message it then publishs out on the heartbeat topic.
# Demonstrate periodic decorator and settings access @periodic(settings.HEARTBEAT_PERIOD) def publish_heartbeat(self): '''Send heartbeat message every HEARTBEAT_PERIOD seconds. HEARTBEAT_PERIOD is set and can be adjusted in the settings module. ''' now = datetime.utcnow().isoformat(' ') + 'Z' headers = { 'AgentID': self._agent_id, headers_mod.CONTENT_TYPE: headers_mod.CONTENT_TYPE.PLAIN_TEXT, headers_mod.DATE: now, } self.publish('heartbeat/listeneragent', headers, now)
To see the Listener agent in action, please see Section 2.7.
Agent Development in Eclipse 4.3The Eclipse IDE is not required for agent development, but it can be a powerful developmental tool. For those wishing to use it, download the IDE (integrated development environment)

47
from: http://www.eclipse.org/ or through the Software Manager in Linux. The Transactional Network code is stored in a Git repository. There is a plugin available for Eclipse that makes development more convenient (note: you must have Git installed on the system and have built the project):
Figure 33: Installing Eclipse EGit Plug-in
• Help -> Install New Software
• Click on the "Add" button
Figure 34: Installing Eclipse Egit Plug-in (continued)
• For name use: EGit
• For location: http://download.eclipse.org/egit/updates

48
Figure 35: Installing Eclipse Egit Plug-in (continued)
• After hitting OK, check the Select All button
• Click through Next, Agree to Terms, then Finish
• Allow Eclipse to restart
After installing Eclipse, you must add the PyDev plugin to the environment. In Eclipse: • Help -> Install New Software
• Click on the "Add" button

49
Figure 36: Installing Eclipse PyDev Plug-in
• For name use: PyDev
• For location: http://pydev.org/updates
• Click OK
• Check the box for PyDev • Click through Next, Agree to Terms, Finish
• Allow Eclipse to restart
The project can now be checked out from the repository into Eclipse:
• Select File, then import as shown in Figure 37

50
Figure 37: Checking Out Transactional Network with Eclipse
• Select Git -> Projects from Git, then click the Next button
Figure 38: Checking Out Transactional Network with Eclipse (continued)

51
• Fill in https://github.com/VOLTTRON/volttron.git for the URI, and use your github account login (github account username and password in the User and Password as shown in Figure 39)
Figure 39: Checking Out Transactional Network with Eclipse (continued)
• Select the master branch (Figure 40)

52
Figure 40: Checking Out Transactional Network with Eclipse (continued)
• Select a location to save the local repository (Figure 41)
Figure 41: Checking Out Transactional Network with Eclipse (continued)

53
• Select Import as general project, select Next, then select Finish (Figure 42)
Figure 42: Checking Out Transactional Network With Eclipse (continued)
The project must now be built outside Eclipse. Please follow the directions in Section 2.6. After changing the file system outside Eclipse, right-click on the project name and select Refresh. PyDev must now be pointed at the correct version of Python:
• Window-> Preferences
• Expand PyDev
• Select Interpreter-Python
• Hit New
• Use Python as the Interpreter Name, and Hit Browse. In the bin directory for the volttron project select the file named Python, Then hit OK

54
Figure 43: Configuring PyDev
• Select All, then Hit OK
You may need to redo this after a platform update and buildout.
• In the Project/PackageExplorer view on the left, right-click on the project, PyDev-> Set as PyDev Project
Figure 44: Setting as PyDev Project

55
Switch to the PyDev perspective (if it has not already switched).
• Window -> Open Perspective -> PyDev or Window -> Open Perspective -> Other -> PyDev
Figure 45: Setting PyDev Perspective in Eclipse
Eclipse should now be configured to use the project's environment.
4.3.1 Setup a Run Configuration for the Platform The following steps will describe the process for configuring the platform within Eclispe:
• In the PyDev Package Explorer view, open the bin folder
• Right-click on volttron-lite and select Run As -> Python Run (this will create a run configuration but fail)

56
Figure 46: Running Platform Configuration in Eclipse
• On the menu bar, pick Run -> Run Configurations...
Figure 47: Running Platform Configuration in Eclipse (Continued)
• Under Python Run, pick "volttron volttron-lite"
• Click on the Argument tab
• Change Working Directory to Default

57
• In the Program arguments box, add: "-c dev-config.ini -v -v" This sets up running the platform in a development mode
Figure 48: Running Platform Configuration in Eclipse (Continued)
• Click Run, this launches the platform. If the run does not succeed, click the all stop icon (two red boxes overlaid) on the console and then retry.
4.3.2 Setup a run configuration for the Listener Agent The following steps will describe the process for configuring an agent within Eclispe:
• In the Package Explorer view, open Agents -> ListenerAgent --> listener
• Right-click on listeneragent.py and select Run As -> Python Run (this will create a run configuration but fail)
• On the menu bar, pick Run -> Run Configurations...

58
• Under Python Run pick "volttron listeneragent.py"
• Click on the Argument tab
• Change Working Directory to Default
• In the Program arguments box, add: o "--config Agents/ListenerAgent/listeneragent.launch.json --pub ipc:///tmp/volttron-lite-
agent-publish --sub ipc:///tmp/volttron-lite-agent-subscribe"
This configuration launches the agent with the dev settings the platform is using.
Figure 49: Configuring the ListenerAgent in Eclipse
• Click Run, this launches the agent

59
You should see the agent start to publish and receive its own heartbeat message
Figure 50: ListenerAgent Output on Eclipse Console
Agent Creation Walkthrough 4.4It is recommended that developers look at the Listener agent before developing their own agent. That agent illustrates the basic functionality of an agent. The following example will demonstrate the steps for creating an agent.
4.4.1 Agent Folder Setup Creating a folder within the workspace will help consolidate the code your agent will utilize.
• In the Agents directory, create a new folder TestAgent • In TestAgent, create a new folder tester, this is the package where our Python code will be
created
Figure 51: Creating an Agent Test Folder
4.4.2 Create Agent Code The following steps describe the necessary agent files and modules. • In tester, create a file called "__init__.py" which tells Python to treat this folder as a package
• In the tester package folder, create the file agent.py
• Create a class called TestAgent
• Import the packages and classes we will need:
import sys from volttron.lite.agent import BaseAgent, PublishMixin from volttron.lite.agent import utils, matching from volttron.lite.messaging import headers as headers_mod

60
This agent will inherit features from the BaseAgent extending the agent’s default functionality. Because we want to publish, we will use the PublishMixin. Mixins should be put first in the class definition.
class TestAgent(PublishMixin, BaseAgent):
BaseAgent has several methods we could overwrite if we needed to application specific actions (init, setup, etc.). For purposes of this demonstration we will use default behavior. 4.4.3 Setting up a Subscription We will set our agent up to listen to heartbeat messages (published by Listener agent). Using the matching package, we declare we want to match all topics that start with "heartbeat/listeneragent". This will give us all heartbeat messages from all listener agents but no others.
@matching.match_start('heartbeat/listeneragent') def on_heartbeat_topic(self, topic, headers, message, match): print "TestAgent got\nTopic: {topic}, {headers}, Message: {message}".format(topic=topic, headers=headers, message=message)
4.4.4 Argument Parsing and Main The test agent will need to be able to parse arguments being passed on the command line by the agent launcher. Use the utils.default_main method to handle argument parsing and other default behavior.
• Create a main method that can be called by the launcher.
def main(argv=sys.argv): '''Main method called by the eggsecutable.''' utils.default_main(TestAgent, description='TestAgent', argv=argv) if __name__ == '__main__': # Entry point for script try: sys.exit(main()) except KeyboardInterrupt: pass
Create Support Files for Test Agent 4.5VOLTTRON agents need configuration files for packaging, configuration, and launching. The “setup.py” file details the naming and Python package information. The launch configuration file is a JSON formatted text file used by the platform to launch instances of the agent.
4.5.1 Packaging Configuration In the TestAgent folder, create a file called "setup.py" (or copy the setup.py in ListenerAgent), which we will use to create an eggsecutable. This file sets up the name, version, required packages, method to execute, etc. for the agent. The packaging process will also use this information to name the resulting file.
from setuptools import setup, find_packages

61
packages = find_packages('.') package = packages[0] setup( name = package + 'agent', version = "0.1", install_requires = ['volttronlite'], packages = packages, entry_points = { 'setuptools.installation': [ 'eggsecutable = ' + package + '.agent:main', ] } )
4.5.2 Launch Configuration In TestAgent, create a file called "testagent.launch.json". This is the file the platform will use to launch the agent. It can also contain configuration information for the agent.
{ "agent": { "exec": "testeragent-0.1-py2.7.egg --config \"%c\" --sub \"%s\" --pub \"%p\"" }, "agentid": "Test1", "message": "hello" }
4.5.3 Packaging Agent The agent code must now be packaged for use by the platform. The build-agent.sh script will build the eggsecutable package using the setup.py file we defined earlier.
• On the command line, from the volttron directory: o volttron/scripts/build-agent.sh TestAgent
This creates an egg file in the Agents directory, which, along with the launch configuration file, would be sent to a deployed platform for installation. For local testing, you may need to change permissions on the file:
• chmod +x Agents/testeragent-0.1-py2.7.egg
4.5.4 Testing the Agent From the Command Line in the project directory:
• Start the platform (if it isn’t already) by running: o bin/volttron-lite -c dev-config.ini -l volttron.log -v –v
• Install the eggsecutable into the platform:

62
o bin/volttron-ctrl install-executable Agents/testeragent-.1-py2.7.egg
• Load the agent configuration file: o bin/volttron-ctrl load-agent Agents/TestAgent/testagent.launch.json"
• Launch the agent by running
o bin/volttron-ctrl start_agent testagent.launch.json
• Launch the Listener agent, as in Section 2.7. Check that both agents are running: o bin/volttron-ctrl list-agents
• Check the log file for messages:
o tail volttron.log
Figure 52: TestAgent Output in “volttron.log”
4.5.5 Reloading the Agent After making changes to the code, the agent egg must be rebuilt and reloaded into the platform. If the configuration file is modified, it also must be reloaded and redeployed.
From the command line in the project directory, do the following commands. These assume that the TestAgent is already installed and running. It stops the agent, unloads the eggsecutable and configuration file, reloads the new ones, and starts the agent back up.
• Stop the agent if it is running: o bin/volttron-ctrl stop-agent testagent.launch.json
• Rebuild the agent:
o volttron/scripts/build-agent.sh TestAgent
• Change permissions on the eggsecutable file: o chmod +x Agents/testeragent-0.1-py2.7.egg
• Remove the previously installed eggsecutable:
o bin/volttron-ctrl remove-executable testeragent-0.1-py2.7.egg
• Install the new eggsecutable: o bin/volttron-ctrl install-executable Agents/testeragent-0.1-py2.7.egg

63
• Unload the previous agent configuration:
o bin/volttron-ctrl unload-agent testagent.launch.json
• Load the new agent configuration: o bin/volttron-ctrl load-agent Agents/TestAgent/testagent.launch.json
• Start the agent:
o bin/volttron-ctrl start-agent testagent.launch.json 4.5.6 In Eclipse If you are working in Eclipse, create a run configuration for TestAgent based on the Listener agent configuration in EclipseDevEnvironment (Section 4.3).
• Launch the platform
• Launch the TestAgent
• Launch the Listener agent
• TestAgent should start receiving the heartbeats from Listener agent and the following should be
displayed in the console:
Figure 53: Console Output for TestAgent
Additional Features 4.6Additional code can be added to the TestAgent to utilize additional services in the platform. The following sections will show how to use the Weather agent and the Scheduler agent. After making modifications to the TestAgent to use these features, follow the instructions in Section 4.6.3. 4.6.1 Subscribing to Weather Data This agent can be modified to listen to weather data from the Weather agent by adding the following method. This will subscribe the agent to the temperature topic. For the full list of topics available, please see: https://github.com/VOLTTRON/volttron/wiki/WeatherAgentTopics
@matching.match_exact('weather/temperature/temp_f') def on_weather(self, topic, headers, message, match):

64
print "TestAgent got weather\nTopic: {topic}, {headers}, Message: {message}".format(topic=topic, headers=headers, message=message)
The platform log file should show:
Figure 54: TestAgent Output when Subscribing to Weather Topic
4.6.2 Utilizing the Scheduler Agent The TestAgent can be modified to publish a schedule to the Actuator agent by reserving time on fake devices. Modify the following code to include current time ranges and include a call to the publish schedule method in setup. The following example will post a simple schedule. For more detailed information on device scheduling, please see: https://github.com/VOLTTRON/volttron/wiki/ActuatorAgent
Ensure the Actuator agent is running as per Section 2.10. Then, import the messaging package so TestAgent can use the topics for the Scheduler:
from volttron.lite.messaging import topics
Then, create __init__ and setup methods so it can pull the agent id from its config file. These methods will override the BaseAgent methods, so we should call them with “super” so the default actions still happen. Then call the publish_schedule command, which is detailed later.
def __init__(self, config_path, **kwargs): super(TestAgent, self).__init__(**kwargs) self.config = utils.load_config(config_path) def setup(self): self._agent_id = self.config['agentid'] # Always call the base class setup() super(TestAgent, self).setup() self.publish_schedule()
This calls the following method, which pushes a schedule request message to the Actuator agent (Update the schedule with appropriate times):
def publish_schedule(self): headers = { 'AgentID': self._agent_id, 'type': 'NEW_SCHEDULE',

65
'requesterID': self._agent_id, #The name of the requesting agent. 'taskID': self._agent_id + "-TASK", #The desired task ID for this task. It must be unique among all other scheduled tasks. 'priority': 'LOW', #The desired task priority, must be 'HIGH', 'LOW', or 'LOW_PREEMPT' }
msg = [ ["campus/building/device1", #First time slot. "2014-1-31 12:27:00", #Start of time slot. "2014-1-31 12:29:00"], #End of time slot. ["campus/building/device1", #Second time slot. "2014-1-31 12:26:00", #Start of time slot. "2014-1-31 12:30:00"], #End of time slot. ["campus/building/device2", #Third time slot. "2014-1-31 12:30:00", #Start of time slot. "2014-1-31 12:32:00"], #End of time slot. #etc... ] self.publish_json(topics.ACTUATOR_SCHEDULE_REQUEST, headers, msg)
The agent can listen to the results of its request and get schedule announcements on the following topic:
@matching.match_start(topics.ACTUATOR_SCHEDULE_RESULT) def on_schedule_result(self, topic, headers, message, match): print "TestAgent schedule result \nTopic: {topic}, {headers}, Message: {message}".format(topic=topic, headers=headers, message=message)
4.6.3 Full TestAgent Code The following is the full TestAgent code built in the previous steps:
import sys from volttron.lite.agent import BaseAgent, PublishMixin from volttron.lite.agent import utils, matching from volttron.lite.messaging import headers as headers_mod from volttron.lite.messaging import topics class TestAgent(PublishMixin, BaseAgent): def __init__(self, config_path, **kwargs): super(TestAgent, self).__init__(**kwargs) self.config = utils.load_config(config_path)

66
def setup(self): self._agent_id = self.config['agentid'] # Always call the base class setup() super(TestAgent, self).setup() self.publish_schedule() @matching.match_start('heartbeat/listeneragent') def on_heartbeat_topic(self, topic, headers, message, match): print "TestAgent got\nTopic: {topic}, {headers}, Message: {message}".format(topic=topic, headers=headers, message=message) @matching.match_exact('weather/temperature/temp_f') def on_weather(self, topic, headers, message, match): print "TestAgent got weather\nTopic: {topic}, {headers}, Message: {message}".format(topic=topic, headers=headers, message=message) @matching.match_start(topics.ACTUATOR_SCHEDULE_RESULT) def on_schedule_result(self, topic, headers, message, match): print "TestAgent schedule result \nTopic: {topic}, {headers}, Message: {message}".format(topic=topic, headers=headers, message=message) def publish_schedule(self): headers = { 'AgentID': self._agent_id, 'type': 'NEW_SCHEDULE', 'requesterID': self._agent_id, #The name of the requesting agent. 'taskID': self._agent_id + "-TASK", #The desired task ID for this task. It must be unique among all other scheduled tasks. 'priority': 'LOW', #The desired task priority, must be 'HIGH', 'LOW', or 'LOW_PREEMPT' } msg = [ ["campus/building/device1", #First time slot. "2014-2-11 16:27:00", #Start of time slot. "2014-2-11 16:29:00"], #End of time slot. ["campus/building/device1", #Second time slot. "2014-2-11 16:36:00", #Start of time slot. "2014-2-11 16:39:00"], #End of time slot. ["campus/building/device2", #Third time slot.

67
"2014-2-11 16:30:00", #Start of time slot. "2014-2-11 16:32:00"], #End of time slot. #etc... ] self.publish_json(topics.ACTUATOR_SCHEDULE_REQUEST, headers, msg) def main(argv=sys.argv): '''Main method called by the eggsecutable.''' utils.default_main(TestAgent, description='Test Agent', argv=argv) if __name__ == '__main__': # Entry point for script try: sys.exit(main()) except KeyboardInterrupt: pass

A1
Appendix

Transactional Network Platform Overview
Getting started with Transactional NetworkDevelopment
ExampleAgents
Agent Development
Established Topics
Working with the Actuator Agent
DataOrganization
PlatformCommands
Home Pages History
Home
The project is in transition from another repository and wiki. We apologize for any
inconvenience during this phase.
As the wiki is being updated, you may run into problems with missing or confusing pages.
0 1 Star ForkVOLTTRON / volttron
Page History Clone URL
Welcome to the VOLTTRON(tm)wiki.
A2

PlatformStartup
PlatformServiceAgents
Working with the RTU Controller
Logging
ChangeLogs
Multi-building Messaging
BacnetDriver
Please file an Issue in github if you come across these pages and we will prioritize them.
Note: As part of this change, the project directory has changed from rtunetwork tovolttron.
VOLTTRON is an open source agent platform designed to enable researchers to interact with
devices and appliances without having to write drivers themselves
The main features of the VOLTTRON platform are:
Open, flexible and modular software platform
Ease of application development
Interoperable across vendors and applications
Isolates power and control system complexities from developers
Object oriented, modern software development environment
Language agnostic. Does not tie the applications to a specific language such as Java
Broad device and control systems protocols support built-in
ModBUS, BACNet, and others
Multiple types of controllers and sensors
Low CPU, memory and storage footprint requirements
Supports non-Intel CPUs
If you are new to VOLTTRON, please take a look at the VOLTTRON User's Guide for
instructions on how to get started. This guide will walk you through getting the code,
configuration, and running an example agent application.
New to VOLTTRON?
A3

ATES 2012 Paper Initial paper. Presented at ASME 2011
AAMAS 2013 Demo
Grid and Vehicles paper
VOLTTRON Overview Video
Transactional Network Platform Overview
Getting started with Transactional Network Development
ExampleAgents
Agent Development
Established Topics
Working with the Actuator Agent
DataOrganization
PlatformCommands
PlatformStartup
PlatformServiceAgents
Working with the RTU Controller
Reference Material
Transactional Network Documentation
A4

Last edited by jhaack, April 23, 2014
Logging
ChangeLogs
Multi-building Messaging
BacnetDriver
Status API Training Shop Blog About© 2014 GitHub, Inc. Terms Privacy Security Contact
A5

Transactional Network Platform Overview
Getting started with Transactional NetworkDevelopment
ExampleAgents
Agent Development
Established Topics
Working with the Actuator Agent
DataOrganization
PlatformCommands
Home Pages History
Development Prerequisites
The following packages will need to be installed if they are not already:
Install git: sudo apt-get install git
Install Python DevTools: sudo apt-get install python-dev
Install g++: sudo apt-get install g++
Install libevent-dev: sudo apt-get install libevent-dev
If you have an agent which requires the pyodbc package, install the following:
0 1 Star ForkVOLTTRON / volttron
Page History Clone URL
Required Sofware: Linux
A6

PlatformStartup
PlatformServiceAgents
Working with the RTU Controller
Logging
ChangeLogs
Multi-building Messaging
BacnetDriver
Install FreeTDS: sudo apt-get install freetds-bin
Install Unix ODBC: sudo apt-get install unixodbc-dev
Status API Training Shop Blog About© 2014 GitHub, Inc. Terms Privacy Security Contact
A7

Transactional Network Platform Overview
Getting started with Transactional NetworkDevelopment
ExampleAgents
Agent Development
Established Topics
Working with the Actuator Agent
DataOrganization
PlatformCommands
Home Pages History
Eclipse Dev Environment
This page is being updated to reflect the change from Mercurial to Git
The Eclipse IDE has a Python plugin which is already installed in the VOLTTRON VM. In order
to setup Eclipse outside the VM, download the IDE from: http://www.eclipse.org/ or through the
Software Manager in Linux.
The VOLTTRON code is stored in a git repository. There is a plugin available for Eclipse that
makes development more convenient (note: you must have Mercurial already installed on the
0 1 Star ForkVOLTTRON / volttron
Page History Clone URL
VOLTTRON Development in Eclipse
A8

PlatformStartup
PlatformServiceAgents
Working with the RTU Controller
Logging
ChangeLogs
Multi-building Messaging
BacnetDriver
system and have built the project):
Help -> Install New Software
Click on the "Add" button
For name use: Git
For location: http://download.eclipse.org/egit/updates
After hitting OK, check the box for: Check Select All
Click through Next, Agree to Terms, then Finish
Allow Eclipse to restart
After installing Eclipse, you must add the PyDev plugin to the environment. In Eclipse:
Help -> Install New Software
Click on the "Add" button
For name use: PyDev
For location: http://pydev.org/updates
Check the box for PyDev
Click through Next, Agree to Terms, Finish
Allow Eclipse to restart
The project can now be checked out from the repository into Eclipse.
Window -> Show View -> Other -> Mercurial -> Mercurial Repositories
In the Mercurial Repositories View, click on the New Repositories button
For Repository location, enter hg clone https://bitbucket.org/berkeleylab/rtunetwork
Enter your username and password, hit ok
Right-click on the repository, select Clone
Enter username/password if not filled in
Change clone directory name if desired (wiki assumes use of the default)
Next, Finish
The project must now be built outside Eclipse. Please follow the directions here and skip
A9

the hg clone portion.
After changing the filesystem outside Eclipse, right-click on the project name and select
Refresh
PyDev must now be pointed at the correct version of Python.
Window-> Preferences
Expand PyDev
Select Interpreter-Python
Hit New
Hit Browse and browse to the Python in the bin directory of the rtunetwork project.
Then hit Ok
Select All, then Hit Ok
You may need to redo this after a platform update and buildout
In the Project/PackageExplorer view on the left, right-click on the project, PyDev-> Set as
PyDev Project
Switch to the PyDev perspective (if it has not already switched), Window -> Open
Perspective -> PyDev
Eclipse should now be configured to use the project's environment.
To test the installation:
Setup a run configuration for the platform
In the Package Explorer view, open the bin folder
Righ-click on volttron-lite and select Run As -> Python Run (this will create a run
configuration but fail)
On the menu bar, pick Run -> Run Configurations...
Under Python Run pick "rtunetwork volttron-lite"
Click on the Argument tab
Change Working Directory to Default
In the Program arguments box, add: "-c dev-config.ini" This sets up running the
A10

Last edited by jhaack, April 23, 2014
platform in a development mode
Click Run, this launches the platform. If the run does not succeed, click the all stop
icon (two red boxes overlaid) on the console and then retry.
Setup a run configuration for the ListenerAgent
In the Package Explorer view, open Agents -> ListenerAgent --> listener
Righ-click on listeneragent.py and select Run As -> Python Run (this will create a run
configuration but fail)
On the menu bar, pick Run -> Run Configurations...
Under Python Run pick "rtunetwork listeneragent.py"
Click on the Argument tab
Change Working Directory to Default
In the Program arguments box, add: "--config
Agents/ListenerAgent/listeneragent.launch.json --pub ipc:///tmp/volttron-lite-agent-
publish --sub ipc:///tmp/volttron-lite-agent-subscribe" This launches the agent with the
dev settings the platform is using
Click Run, this launches the agent
You should see the agent start to publish and receive its own heartbeat message
Status API Training Shop Blog About© 2014 GitHub, Inc. Terms Privacy Security Contact
A11

Transactional Network Platform Overview
Getting started with Transactional NetworkDevelopment
ExampleAgents
Agent Development
Established Topics
Working with the Actuator Agent
DataOrganization
PlatformCommands
Home Pages History
Building The Project
The Volttron Lite project includes scripts which automatically pull down dependencies and build
the libraries: bootstrap is a one-time use script. Use it after the initial checkout, then use
"bin/buildout -N" after that.
Ensure you have installed the required packages before proceeding. Especially if you intend to
develop in Eclipse, we recommend creating a directory: ~/workspace In this directory:
git clone https://github.com/VOLTTRON/volttron
0 1 Star ForkVOLTTRON / volttron
Page History Clone URL
Building the Project
A12

PlatformStartup
PlatformServiceAgents
Working with the RTU Controller
Logging
ChangeLogs
Multi-building Messaging
BacnetDriver
Last edited by jhaack, April 23, 2014
cd volttron
./bootstrap
If bootstrap fails before finishing (for instance from a timeout), run: bin/buildout -N
Note: If bootstrap or buildout fails, try "bin/buildout -N" again. Also, some packages (especially
numpy) can be very verbose when they install. Please wait for the wall of text to finish.
To test that installation worked, start up the platform:
Edit the dev-config.ini file to ensure the paths match up to your installation
bin/volttron-lite -c dev-config.ini
If it starts with no errors then your setup is correct
If you are developing in Eclipse, then you should update the Python path at this point. See:
EclipseDevEnvironment
To test agent deployment and messaging, build and deploy ListenerAgent: From the rtunetwork
directory
volttron/scripts/build-agent.sh ListenerAgent
chmod +x Agents/listeneragent-0.1-py2.7.egg
bin/volttron-ctrl install-executable Agents/listeneragent-0.1-py2.7.egg bin/
bin/volttron-ctrl load-agent Agents/ListenerAgent/listeneragent.launch.json
bin/volttron-ctrl start-agent listeneragent.launch.json
To see that it's running: bin/volttron-ctrl list-agents
A13

Status API Training Shop Blog About© 2014 GitHub, Inc. Terms Privacy Security Contact
A14

Transactional Network Platform Overview
Getting started with Transactional NetworkDevelopment
ExampleAgents
Agent Development
Established Topics
Working with the Actuator Agent
DataOrganization
PlatformCommands
Home Pages History
Agent Development
It is recommended that developers look at the ListenerAgent before developing their own agent.
That agent expresses the basic functionality this example with walk through and being familiar
with the concepts will be useful.
In the Agents directory, create a new folder TestAgent
In TestAgent, create a new folder tester, this is the package where our python code will be
0 1 Star ForkVOLTTRON / volttron
Page History Clone URL
Agent Creation Walkthrough
Created Folders
A15

PlatformStartup
PlatformServiceAgents
Working with the RTU Controller
Logging
ChangeLogs
Multi-building Messaging
BacnetDriver
created
In tester, create a file called " <u>init</u>.py " which tells Python to treat this folder as a
package
In the tester package folder, create the file testagent.py
Create a class called TestAgent
Import the packages and classes we will need:
- This agent will extend BaseAgent to get all the default functionality
Since we want to publish we will use the PublishMixin. Mixins should be put first in the
class definition
We don't need to add anything to the BaseAgent init method so we will not create our own
We will set our agent up to listen to heartbeat messages (published by ListenerAgent). Using
the matching package, we declare we want to match all topics which start with
"heartbeat/listeneragent". This will give us all heartbeat messages from all listeneragents but no
others.
import sys
from volttron.lite.agent import BaseAgent, PublishMixin
from volttron.lite.agent import utils, matching
from volttron.lite.messaging import headers as headers_mod
class TestAgent(PublishMixin, BaseAgent):
Create Agent Code
Setting up a Subscription
A16

Our agent will need to be able to parse arguments being passed on the command line by the
agent launcher. Use the utils.default_main method to handle argument parsing and other
default behavior. Create a main method which can be called by the launcher.
Volttron-Lite agents need some configuration files for packaging, configuration, and launching.
@match_start('heartbeat/listeneragent')
def on_heartbeat_topic(self, topic, headers, message, match):
print "TestAgent got\nTopic: {topic}, {headers}, Message:
{message}".format(topic=topic, headers=headers, message=message)
def main(argv=sys.argv):
'''Main method called by the eggsecutable.'''
utils.default_main(TestAgent,
description='Test Agent',
argv=argv)
if <u>name</u> == '<u>main</u>':
# Entry point for script
try:
sys.exit(main())
except KeyboardInterrupt:
pass
Argument Parsing and Main
Create Support Files for Agent
Packaging Configuration
A17

In the TestAgent folder, create a file called "setup.py" (or copy the setup.py in ListenerAgent)
which we will use to create an eggsecutable. This file sets up the name, version, required
packages, method to execute, etc. for the agent. The packaging process will also use this
information to name the resulting file.
In TestAgent, create a file called "testagent.launch.json". This is the file the platform will use to
launch the agent. It can also contain configuration information for the agent.
For TestAgent,
from setuptools import setup, find_packages
packages = find_packages('.')
package = packages[0]
setup(
name = package + 'agent',
version = "0.1",
install_requires = ['volttronlite'],
packages = packages,
entry_points = {
'setuptools.installation': [
'eggsecutable = ' + package + '.agent:main',
]
}
)
{
"agent": {
"exec": "testeragent-0.1-py2.7.egg --config \"%c\" --sub \"%s\" --pub \"%p\""
},
Launch Configuration
A18

The agent code must now be packaged up for use by the platform. The build-agent.sh script will
build the eggsecutable package using the setup.py file we defined earlier.
From the rtunetwork directory: "scripts/build-agent.sh TestAgent".
This creates an egg file in the Agents directory which, along with the launch configuration file,
would be sent to a deployed platform for installation. For local testing, you may need to change
permissions on the file: "chmod +x Agents/testeragent-.1-py2.7.egg"
With the platform running, execute the following steps:
Install the executable into the platform: "bin/volttron-ctrl install-executable
Agents/testeragent-.1-py2.7.egg"
Load the agent configuration file: "bin/volttron-ctrl load-agent
Agents/TestAgent/testagent.launch.json"
Start the platform by running "bin/volttron-lite -c dev-config.ini -l volttron.log -v -v"
Launch the agent by running "bin/volttron-ctrl start_agent testagent.launch.json"
Check that it is running: "bin/volttron-ctrl list-agents"
Check the log file for messages: "tail volttron.log"
"agentid": "Test1",
"message": "hello"
}
Packaging Agent
Testing the Agent
From the Command Line
A19
Last edited by Jereme Haack, April 05, 2014
If you are working in Eclipse, create a run configuration for TestAgent based on the
ListenerAgent configuration in EclipseDevEnvironment.
Launch the platform
Launch the TestAgent
Launch the ListenerAgent
TestAgent should start receiving the heartbeats from ListenerAgent
In Eclipse
Status API Training Shop Blog About© 2014 GitHub, Inc. Terms Privacy Security Contact
A20

Transactional Network Platform Overview
Getting started with Transactional NetworkDevelopment
ExampleAgents
Agent Development
Established Topics
Working with the Actuator Agent
DataOrganization
PlatformCommands
Home Pages History
topics
Agents in VOLTTRON Lite communicate with each other using a publish/subscribe mechanism
built on the Zero MQ Python library. This allows for great flexibility as topics can be created
dynamically and the messages sent can be any format as long as the sender and receiver
understand it. An agent with data to share publishes to a topic, then any agents interested in
that data subscribe to that topic.
While this flexibility is powerful, it also could also lead to confusion if some standard is not
followed. The current conventions for communicating in the VOLTTRON Lite are:
0 1 Star ForkVOLTTRON / volttron
Page History Clone URL
Messaging
A21

PlatformStartup
PlatformServiceAgents
Working with the RTU Controller
Logging
ChangeLogs
Multi-building Messaging
BacnetDriver
Last edited by Jereme Haack, April 05, 2014
- Topics and subtopics follow the format: topic/subtopic/subtopic
Subscribers can subscribe to any and all levels. Subscriptions to "topic" will include
messages for the base topic and all subtopics. Subscriptions to "topic/subtopic1" will
only receive messages for that subtopic and any children subtopics. Subscriptions to
empty string ("") will receive ALL messages. This is not recommended.
All agents should subscribe to the "platform" topic. This is the topic the VOLTTRON
Lite will use to send messages to agents, such as "shutdown".
Agents should set the "From" header. This will allow agents to filter on the "To" message sent
back. This is especially useful for requests to the ArchiverAgent so agents do not receive
replies not meant for their request.
- platform - Base topic used by the platform to inform agents of platform events
platform/shutdown - General shutdown command. All agents should exit upon
receiving this. Message content will be a reason for the shutdown
platform/shutdown_agent - This topic will provide a specific agent id. Agents should
subscribe to this topic and exit if the id in the message matches their id.
See the documentation for the ActuatorAgent.
Topics
In VOLTTRON Lite
RTU Controller Agent Topics
A22

Status API Training Shop Blog About© 2014 GitHub, Inc. Terms Privacy Security Contact
A23

Transactional Network Platform Overview
Getting started with Transactional NetworkDevelopment
ExampleAgents
Agent Development
Established Topics
Working with the Actuator Agent
DataOrganization
PlatformCommands
Home Pages History
ActuatorAgent
This agent is used to access the control points of a controller. Agents may request scheduled
times, called Tasks, to interact with one or more RTUs.
This is handled via pub/sub. The available points for a Catalyst 472 are detailed here.
See the ExampleControllerAgent for an example of using the ActuatorAgent.
0 1 Star ForkVOLTTRON / volttron
Page History Clone URL
Actuator Agent
Actuator Agent Communication
A24

PlatformStartup
PlatformServiceAgents
Working with the RTU Controller
Logging
ChangeLogs
Multi-building Messaging
BacnetDriver
Last edited by Jereme Haack, April 05, 2014
Scheduling and canceling a Task.
Interacting with an RTU via the ActuatorAgent.
AcutatorAgent responses to a schedule or cancel request.
Schedule state announcements.
What happens when a running Task is preempted.
Setup heartbeat signal for a device.
ActuatorAgent configuration.
Notes on programming agents to work with the ActuatorAgent
Status API Training Shop Blog About© 2014 GitHub, Inc. Terms Privacy Security Contact
A25

Transactional Network Platform Overview
Getting started with Transactional NetworkDevelopment
ExampleAgents
Agent Development
Established Topics
Working with the Actuator Agent
DataOrganization
PlatformCommands
Home Pages History
ActuatorScheduleRequest
For information on responses see AcutatorAgent responses to a schedule or cancel requests.
The actuator agent expects all messages to be JSON and will parse them accordingly.Use publish_json to send messages where possible.
An agent can request a task schedule by publishing to the "RTU/actuators/schedule/request"
0 1 Star ForkVOLTTRON / volttron
Page History Clone URL
Requesting Schedule Changes
Scheduling a Tas
A26

PlatformStartup
PlatformServiceAgents
Working with the RTU Controller
Logging
ChangeLogs
Multi-building Messaging
BacnetDriver
topic with the following header:
with the following message (before converting to json):
Everything in the header is required.
A Task schedule must have at least one time slot.
The start and end times are parsed with dateutil's date/time parser. The default string
#python
{
'type': 'NEW_SCHEDULE',
'requesterID': <Agent ID>, #The name of the requesting agent.
'taskID': <unique task ID>, #The desired task ID for this task. It must be unique among
all other scheduled tasks.
'priority': <task priority>, #The desired task priority, must be 'HIGH', 'LOW', or
'LOW_PREEMPT'
}
#python
[
["campus/building/device1", #First time slot.
"2013-12-06 16:00:00", #Start of time slot.
"2013-12-06 16:20:00"], #End of time slot.
["campus/building/device1", #Second time slot.
"2013-12-06 18:00:00", #Start of time slot.
"2013-12-06 18:20:00"], #End of time slot.
["campus/building/device2", #Third time slot.
"2013-12-06 16:00:00", #Start of time slot.
"2013-12-06 16:20:00"], #End of time slot.
#etc...
]
Points on Task Scheduling
A27

representation of a python datetime object will parse without issue.Two Tasks are considered conflicted if at least one time slot on a device from one task
overlaps the time slot of the other on the same device.
The start or end (or both) of a requested time slot on a device may touch other time slots
without overlapping and not be conflicted.
A request must not conflict with itself.
If something goes wrong see this failure string list for an explanation of the error.
HIGH::
This Task cannot be preempted under any circumstance. This task may preempt other conflicting
preemptable Tasks. LOW:: This Task cannot be preempted once it has started . A Task is considered started once the earliest time slot on any device has been rea
ched. This Task may not preempt other Tasks. LOW_PREEMPT::
This Task may be preempted at any time. If the Task is preempted once it has begun running an
y current time slots will be given a grace period (configurable in the ActuatorAgent configurat
ion file, defaults to 60 seconds) before being revoked. This Task may not preempt other Tas
ks.
A task may be canceled by publishing to the "RTU/actuators/schedule/request" topic with the
following header:
#python
{
'type': 'CANCEL_SCHEDULE',
'requesterID': <Agent ID>, #The name of the requesting agent.
'taskID': <unique task ID>, #The desired task ID for this task. It must be unique among
all other scheduled tasks.
Task Priorities
Canceling a Task
A28

The requesterID and taskID must match the original values from the original request
header.
After a Tasks time has passed there is no need to cancel it. Doing so will result in a
"TASK_ID_DOES_NOT_EXIST" error.
If something goes wrong see this failure string list for an explanation of the error.
}
Points on Task Canceling
Status API Training Shop Blog About© 2014 GitHub, Inc. Terms Privacy Security Contact
A29

Transactional Network Platform Overview
Getting started with Transactional NetworkDevelopment
ExampleAgents
Agent Development
Established Topics
Working with the Actuator Agent
DataOrganization
PlatformCommands
Home Pages History
ActuatorValueRequest
Once an Task has been scheduled and the time slot for one or more of the devices has started
an agent may interact with the device using the get and set topics.
Both get and set are responded to the same way. See [#ActuatorReply Actuator Reply] below.
While the sMap driver for a device should always be setup to periodically broadcast the state of
0 1 Star ForkVOLTTRON / volttron
Page History Clone URL
ActuatorAgent Interaction
Getting values
A30
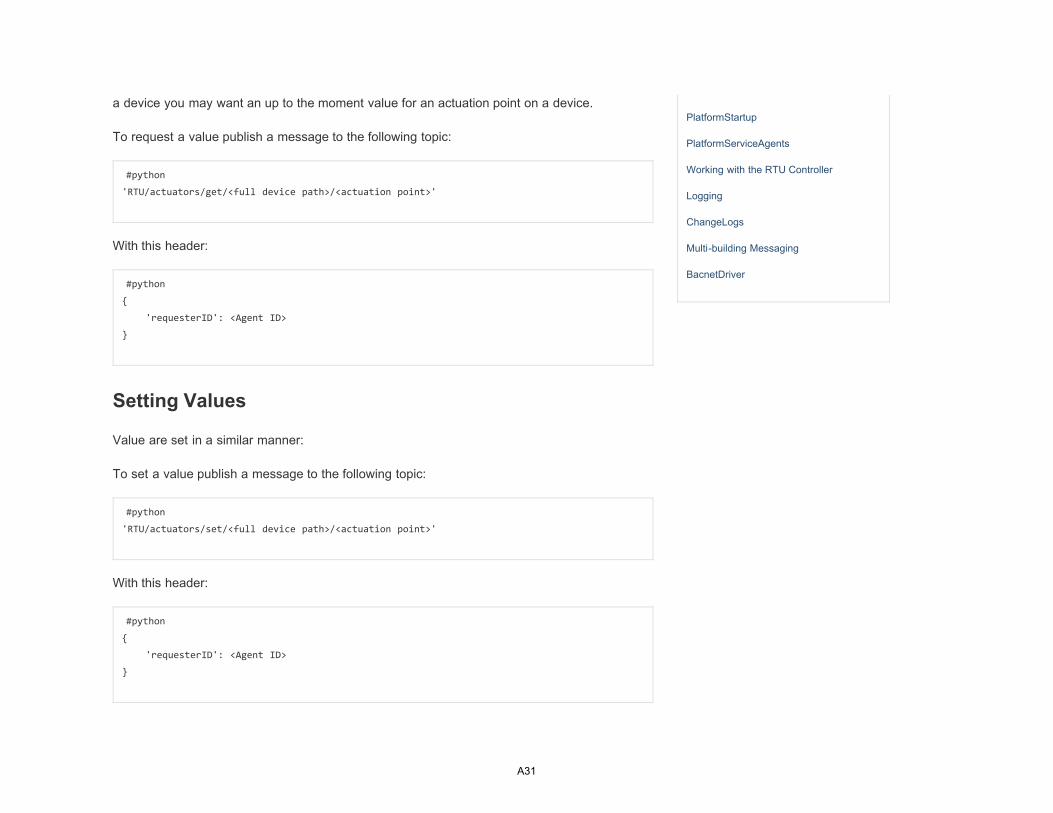
PlatformStartup
PlatformServiceAgents
Working with the RTU Controller
Logging
ChangeLogs
Multi-building Messaging
BacnetDriver
a device you may want an up to the moment value for an actuation point on a device.
To request a value publish a message to the following topic:
With this header:
Value are set in a similar manner:
To set a value publish a message to the following topic:
With this header:
#python
'RTU/actuators/get/<full device path>/<actuation point>'
#python
{
'requesterID': <Agent ID>
}
#python
'RTU/actuators/set/<full device path>/<actuation point>'
#python
{
'requesterID': <Agent ID>
}
Setting Values
A31

And the message contents being the new value of the actuator.
The actuator agent expects all messages to be JSON and will parse them accordingly.Use publish_json to send messages where possible. This is significant for Booleanvalues especially.
#ActuatorReply The ActuatorAgent will reply to both get and set ' on the value topic for an
actuator:
With this header:
With the message containing the value encoded in JSON.
If something goes wrong the ActuatorAgent will reply to both get and set ' on the error topic for
an actuator:
#python
'RTU/actuators/value/<full device path>/<actuation point>'
#python
{
'requesterID': <Agent ID>
}
#python
'RTU/actuators/error/<full device path>/<actuation point>'
Actuator Reply
Actuator Error Reply
A32

With this header:
The message will be in the following form:
LockError:: Returned when a request is made when we do not have permission to use a device. (
Forgot to schedule, preempted and we did not handle the preemption message correctly, ran out o
f time in time slot, etc...) ValueError:: Message missing or could not be parsed as JSON.
Other error types involve problem with communication between the ActuatorAgent and sMap.
#python
{
'requesterID': <Agent ID>
}
#python
{
'type': <Error Type or name of the exception raised by the request>
'value': <Specific info about the error>
}
Common Error Types
Status API Training Shop Blog About© 2014 GitHub, Inc. Terms Privacy Security Contact
A33

A34

Transactional Network Platform Overview
Getting started with Transactional NetworkDevelopment
ExampleAgents
Agent Development
Established Topics
Working with the Actuator Agent
DataOrganization
PlatformCommands
Home Pages History
ActuatorScheduleResponse
In response to a Task schedule request the ActuatorAgent will respond on the topic
"RTU/actuators/schedule/response" with the header:
#python
{
'type': <'NEW_SCHEDULE', 'CANCEL_SCHEDULE'>
'requesterID': <Agent ID from the request>,
'taskID': <Task ID from the request>
}
0 1 Star ForkVOLTTRON / volttron
Page History Clone URL
ActuatorAgent Respons
A35

PlatformStartup
PlatformServiceAgents
Working with the RTU Controller
Logging
ChangeLogs
Multi-building Messaging
BacnetDriver
And the message (after parsing the json):
The ActuatorAgent may publish cancellation notices for preempted Tasks using the
"PREEMPTED" result.
Preemption data takes the form:
In many cases the ActuatorAgent will try to give good feedback as to why a request failed.
INVALID_REQUEST_TYPE:: Request type was not "NEW_SCHEDULE" or "CANCEL_SCHEDULE".
#python
{
'result': <'SUCCESS', 'FAILURE', 'PREEMPTED'>,
'info': <Failure reason, if any>,
'data': <Data about the failure or cancellation, if any>
}
#python
{
'agentID': <Agent ID of preempting task>,
'taskID': <Task ID of preempting task>
}
Preemption Data
Failure Reasons
General Failures
A36

MISSING_TASK_ID:: Failed to supply a taskID. MISSING_AGENT_ID:: AgentID not supplied.
TASK_ID_ALREADY_EXISTS:: The supplied taskID already belongs to an existing task.
MISSING_PRIORITY:: Failed to supply a priority for a Task schedule request.
INVALID_PRIORITY:: Priority not one of "HIGH", "LOW", or "LOW_PREEMPT".
MALFORMED_REQUEST_EMPTY:: Request list is missing or empty.
REQUEST_CONFLICTS_WITH_SELF:: Requested time slots on the same device overlap.
MALFORMED_REQUEST:: Reported when the request parser raises an unhandled exception. The except
ion name and info are appended to this info string.
CONFLICTS_WITH_EXISTING_SCHEDULES:: This schedule conflict with an existing schedules that it
cannot preempt. The data item for the results will contain info about the conflicts in this fo
rm (after parsing json):
#python
{
'<agentID1>':
{
'<taskID1>':
[
["campus/building/device1",
"2013-12-06 16:00:00",
"2013-12-06 16:20:00"],
["campus/building/device1",
"2013-12-06 18:00:00",
"2013-12-06 18:20:00"]
]
'<taskID2>':[...]
}
'<agentID2>': {...}
}
Task Schedule Failures
A37

Last edited by jhaack, April 22, 2014
TASK_ID_DOES_NOT_EXIST:: Trying to cancel a Task which does not exist. This error can also occ
ur when trying to cancel a finished Task.
AGENT_ID_TASK_ID_MISMATCH:: A different agent ID is being used when trying to cancel a Task.
Task Cancel Failures
Status API Training Shop Blog About© 2014 GitHub, Inc. Terms Privacy Security Contact
A38

Transactional Network Platform Overview
Getting started with Transactional NetworkDevelopment
ExampleAgents
Agent Development
Established Topics
Working with the Actuator Agent
DataOrganization
PlatformCommands
Home Pages History
ActuatorScheduleState
Periodically the ActuatorAgent will publish the state of all currently used devices.
For each device the ActuatorAgent will publish to an associated topic:
With the following header:
#python
'RTU/actuators/schedule/announce/<full device path>'
0 1 Star ForkVOLTTRON / volttron
Page History Clone URL
Schedule State Broadcast
A39

PlatformStartup
PlatformServiceAgents
Working with the RTU Controller
Logging
ChangeLogs
Multi-building Messaging
BacnetDriverThe frequency of the updates is configurable with the "schedule_publish_interval" setting.
#python
{
'requesterID': <Agent with access>,
'taskID': <Task associated with the time slot>
'window': <Seconds remaining in the time slot>
}
Status API Training Shop Blog About© 2014 GitHub, Inc. Terms Privacy Security Contact
A40

Transactional Network Platform Overview
Getting started with Transactional NetworkDevelopment
ExampleAgents
Agent Development
Established Topics
Working with the Actuator Agent
DataOrganization
PlatformCommands
Home Pages History
ActuatorSchedulePreemption
Both LOW and LOW_PREEMPT priority Tasks can be preempted. LOW priority Tasks may be
preempted by a conflicting HIGH priority Task before it starts. LOW_PREEMPT priority Tasks
can be preempted by HIGH priority Tasks even after they start.
When a Task is preempted the ActuatorAgent will publish to
"RTU/actuators/schedule/response" with the following header:
#python
0 1 Star ForkVOLTTRON / volttron
Page History Clone URL
Task Preemption
A41

PlatformStartup
PlatformServiceAgents
Working with the RTU Controller
Logging
ChangeLogs
Multi-building Messaging
BacnetDriver
And the message (after parsing the json):
If a LOW_PREEMPT priority Task is preempted while it is running the Task will be given a
grace period to clean up before ending. For every device which has a current time slot the
window of remaining time will be reduced to the grace time. At the end of the grace time the
Task will finish. If the Task has no currently open time slots on any devices it will end
immediately.
{
'type': 'CANCEL_SCHEDULE',
'requesterID': <Agent ID for the preempted Task>,
'taskID': <Task ID for the preempted Task>
}
#python
{
'result': 'PREEMPTED',
'info': '',
'data':
{
'agentID': <Agent ID of preempting task>,
'taskID': <Task ID of preempting task>
}
}
Preemption Grace Time
A42

Status API Training Shop Blog About© 2014 GitHub, Inc. Terms Privacy Security Contact
A43
Transactional Network Platform Overview
Getting started with Transactional NetworkDevelopment
ExampleAgents
Agent Development
Established Topics
Working with the Actuator Agent
DataOrganization
PlatformCommands
Home Pages History
ActuatorHeartbeat
The ActuatorAgent can be configured to send a heartbeat message to the device to indicate the
platform is running. Ideally, if the heartbeat signal is not sent the device should take over and
resume normal operation.
The configuration has two parts, the interval (in seconds) for sending the heartbeat and the
specific point that should be modified each iteration.
The heart beat interval is specified with a global "heartbeat_interval" setting. The ActuatorAgent
0 1 Star ForkVOLTTRON / volttron
Page History Clone URL
Heartbeat Signal
A44

PlatformStartup
PlatformServiceAgents
Working with the RTU Controller
Logging
ChangeLogs
Multi-building Messaging
BacnetDriver
will automatically set the heartbeat point to alternating "1" and "0" values. Changes to the
heartbeat point will be published like any other value change on a device.
The heartbeat points are specified under "points" section of the configuration like so:
Note: this requires that the device has been setup with a heartbeat support. For Catalyst
controllers check with TWT if you're not sure.
"points":
{
"<path to a device>":
{
"heartbeat_point":"<heartbeat point>"
}
"<path to a device>":
{
"heartbeat_point":"<heartbeat point>"
}
}
Status API Training Shop Blog About© 2014 GitHub, Inc. Terms Privacy Security Contact
A45

Transactional Network Platform Overview
Getting started with Transactional NetworkDevelopment
ExampleAgents
Agent Development
Established Topics
Working with the Actuator Agent
DataOrganization
PlatformCommands
Home Pages History
ActuatorConfig
url:: Url which will be used to communicate with the sMap drivers running in twistd.
schedule_publish_interval:: Interval between published schedule
announcements in seconds. Defaults to 30. heartbeat_interval:: Interval between
heartbeats sent to a device in seconds. Defaults to 30.
preempt_grace_time:: Minimum time given to Tasks which have been preempted to clean up in seco
nds. Defaults to 60.
schedule_state_file:: File used to save and restore Task states if the ActuatorAgent restarts
for any reason. File will be created if it does not exist when it is needed.
0 1 Star ForkVOLTTRON / volttron
Page History Clone URL
ActuatorAgent Configuration
A46

PlatformStartup
PlatformServiceAgents
Working with the RTU Controller
Logging
ChangeLogs
Multi-building Messaging
BacnetDriver
points:: Devices and points which are specified as heartbeat points .
{
"agent": {
"exec": "actuatoragent-0.1-py2.7.egg --config \"%c\" --sub \"%s\" --pub \"%p\""
},
"url": "http://localhost:8080/data",
"schedule_publish_interval": 30,
"heartbeat_interval": 30,
"preempt_grace_time": 60,
"schedule_state_file": "actuator_state.pickle",
"points":
{
"lbnl/building46/fakecatalyst":
{
"heartbeat_point":"PlatformHeartBeat"
}
}
}
Sample configuration file
Status API Training Shop Blog About© 2014 GitHub, Inc. Terms Privacy Security Contact
A47

Transactional Network Platform Overview
Getting started with Transactional NetworkDevelopment
ExampleAgents
Agent Development
Established Topics
Working with the Actuator Agent
DataOrganization
PlatformCommands
Home Pages History
Actuator Agent Programming Notes
An agent can watch the window value from device state updates to perform scheduled
actions within a timeslot.
If an Agent's Task is LOW_PREEMPT priority it can watch for device state updates
where the window is less than or equal to the grace period (default 60.0).
When considering if to schedule long or multiple short time slots on a single device:
Do we need to ensure the device state for the duration between slots?
Yes. Schedule one long time slot instead.
No. Is it all part of the same Task or can we break it up in case there is a conflict with
0 1 Star ForkVOLTTRON / volttron
Page History Clone URL
Notes on Working With the ActuatorAgent
A48

PlatformStartup
PlatformServiceAgents
Working with the RTU Controller
Logging
ChangeLogs
Multi-building Messaging
BacnetDriver
one of our time slots?
When considering time slots on multiple devices for a single Task:
Is the Task really dependent on all devices or is it actually multiple Tasks?
When considering priority:
Does the Task have to happen on an exact day?
No. Consider LOW and reschedule if preempted.
Yes. Use HIGH.
Is it problematic to prematurely stop a Task once started?
No. Consider LOW_PREEMPT and watch the device state updates for a small
window value.
Yes. Consider LOW or HIGH.
If an agent is only observing but needs to assure that no another Task is going on while
taking readings it can schedule the time to prevent other agents from messing with a
devices state. The schedule updates can be used as a reminder as to when to start
watching.
Any device, existing or not, can be scheduled. This allows for agents to schedule fake
devices to create reminders to start working later rather then setting up their own internal
timers and schedules.
Status API Training Shop Blog About© 2014 GitHub, Inc. Terms Privacy Security Contact
A49

Transactional Network Platform Overview
Getting started with Transactional NetworkDevelopment
ExampleAgents
Agent Development
Established Topics
Working with the Actuator Agent
DataOrganization
PlatformCommands
Home Pages History
Platform Commands
To startup the platform, specify the config file with -c . To specify a log file, use: -l
bin/volttron-lite -c config.ini -l volttron.log
Full options:
Volttron Lite agent platform daemon
optional arguments:
0 1 Star ForkVOLTTRON / volttron
Page History Clone URL
Platform Command
A50

PlatformStartup
PlatformServiceAgents
Working with the RTU Controller
Logging
ChangeLogs
Multi-building Messaging
BacnetDriver
The platform can accept commands during operation using bin/volttron-ctrl
-b, --background background (daemonize) the process
-c FILE, --config FILE
read configuration from FILE
--gid GID change group to given GID; only used with -b
-l FILE, --log FILE send log output to FILE instead of stderr
-L FILE, --log-config FILE
read logging configuration from FILE
-p FILE, --pid-file FILE
write process ID to FILE; only used with -b
-q, --quiet decrease logger verboseness; may be used multiple
times
-s SECTION.NAME=VALUE, --set SECTION.NAME=VALUE
specify additional configuration
--uid UID change user to given UID; only used with -b
-v, --verbose increase logger verboseness; may be used multiple
times
--help show this help message and exit
--version show version information and exit
usage: volttron-ctrl command [options]
Control volttron and perform other related tasks
list of commands:
disable-agent prevent agent from starting automatically
enable-agent enable agent to start automatically
help display help about commands
install-executable install agent executable
list-agents list agents
list-executables list agent executables
load-agent install agent launch file
remove-executable remove agent executable
run-agent run agent(s) defined in config file(s)
A51

Last edited by Jereme Haack, April 05, 2014
shutdown stop all agents
start-agent start installed agent
stop-agent stop running agent
unload-agent remove agent launch file
Use <tt>volttron-ctrl -v</tt> to show aliases and global options.
Status API Training Shop Blog About© 2014 GitHub, Inc. Terms Privacy Security Contact
A52

Transactional Network Platform Overview
Getting started with Transactional NetworkDevelopment
ExampleAgents
Agent Development
Established Topics
Working with the Actuator Agent
DataOrganization
PlatformCommands
Home Pages History
ExampleSetupModify the driver.ini file
Add your SMAP Key to the url
Name your collection source
Give your collection a uuid
Enter your collection paths and metadata
If you are deploying the WeatherAgent update settings.py with your Weather Underground
key
By default the Catalyst registers are setup to work with a 372 with the latest changes from
TWT, if you have an older unit use the catalystreg.csv.371 file
Start the smap driver
0 1 Star ForkVOLTTRON / volttron
Page History Clone URL
A53

PlatformStartup
PlatformServiceAgents
Working with the RTU Controller
Logging
ChangeLogs
Multi-building Messaging
BacnetDriver
With the platform already running:
Build agent eggs
Make egg executable
Install egg into bin (must not already exist there)
Load agent config file
Enable agent for autostart
Do the same things for WeatherAgent if you plan to deploy it.
Control Application Example Install one executable but multiple launch configuration files. Each
instance of this agent will work with a different RTU.
. bin/activate
twistd -n smap driver.ini
volttron/scripts/build-agent.sh ArchiverAgent
chmod +x Agents/archiveragent-0.1-py2.7.egg
bin/volttron-ctrl install-executable Agents/archiveragent-0.1-py2.7.egg
bin/volttron-ctrl load-agent Agents/ArchiverAgent/archiver-deploy.service
bin/volttron-ctrl enable-agent archiver-deploy.service
bin/volttron-ctrl list-agents
AGENT AUTOSTART STATUS
archiver-deploy.service enabled
volttron/scripts/build-agent.sh ActuatorAgent
chmod +x Agents/actuatoragent-0.1-py2.7.egg
bin/volttron-ctrl install-executable Agents/actuatoragent-0.1-py2.7.egg
bin/volttron-ctrl load-agent Agents/ActuatorAgent/actuator-deploy.service
bin/volttron-ctrl enable-agent actuator-deploy.service
A54

Last edited by jhaack, April 22, 2014
Restart platform and agents you have enable for autostart should start up.
volttron/scripts/build-agent.sh SMDSAgent
chmod +x Agents/SMDSagent-0.1-py2.7.egg
bin/volttron-ctrl install-executable Agents/SMDSagent-0.1-py2.7.egg
bin/volttron-ctrl load-agent Agents/SMDSAgent/smds-lbnl1.agent
bin/volttron-ctrl load-agent Agents/SMDSAgent/smds-lbnl2.agent
bin/volttron-ctrl load-agent Agents/SMDSAgent/smds-lbnl3.agent
bin/volttron-ctrl load-agent Agents/SMDSAgent/smds-lbnl4.agent
bin/volttron-ctrl load-agent Agents/SMDSAgent/smds-lbnl5.agent
bin/volttron-ctrl load-agent Agents/SMDSAgent/smds-lbnl6.agent
bin/volttron-ctrl load-agent Agents/SMDSAgent/smds-lbnl7.agent
bin/volttron-ctrl load-agent Agents/SMDSAgent/smds-twt1.agent
bin/volttron-ctrl load-agent Agents/SMDSAgent/smds-twt2.agent
bin/volttron-ctrl load-agent Agents/SMDSAgent/smds-twt3.agent
bin/volttron-ctrl load-agent Agents/SMDSAgent/smds-twt4.agent
bin/volttron-ctrl enable-agent smds-lbnl1.agent
bin/volttron-ctrl enable-agent smds-lbnl2.agent
bin/volttron-ctrl enable-agent smds-lbnl3.agent
bin/volttron-ctrl enable-agent smds-lbnl4.agent
bin/volttron-ctrl enable-agent smds-lbnl5.agent
bin/volttron-ctrl enable-agent smds-lbnl6.agent
bin/volttron-ctrl enable-agent smds-lbnl7.agent
bin/volttron-ctrl enable-agent smds-twt1.agent
bin/volttron-ctrl enable-agent smds-twt2.agent
bin/volttron-ctrl enable-agent smds-twt3.agent
bin/volttron-ctrl enable-agent smds-twt4.agent
A55

Status API Training Shop Blog About© 2014 GitHub, Inc. Terms Privacy Security Contact
A56

Transactional Network Platform Overview
Getting started with Transactional NetworkDevelopment
ExampleAgents
Agent Development
Established Topics
Working with the Actuator Agent
DataOrganization
PlatformCommands
Home Pages History
ArchiverAgent
The SMDSAgent illustrates working with the ArchiverAgent.
publish('archiver/request/campus1/building1/realcatalyst1/CoolCall1',{},'(now -1h, now)')
publish('archiver/request/campus1/building1/realcatalyst1/CoolCall1',{},'(1374192541000.0,
1374193541000.0)')
The agent listens for messages on "archiver/request". The message that comes after is
extracted and used in the Archiver query and represents the path to the value desired. There is
0 1 Star ForkVOLTTRON / volttron
Page History Clone URL
Archiver Agent
A57

PlatformStartup
PlatformServiceAgents
Working with the RTU Controller
Logging
ChangeLogs
Multi-building Messaging
BacnetDriver
Last edited by jhaack, April 05, 2014
also a source name that needs to be specified. This is currently part of the launch config. The
data is returned as a list of lists:
1371851254000.0,1.0],[1371851314000.0,1.0],[1371851374000.0,1.0],[1371851434000.0,1.0],[
1371851494000.0,1.0],[1371851554000.0,1.0],[1371851614000.0,1.0],[1371851674000.0,1.0],[
1371851734000.0,1.0],[1371851794000.0,1.0],[1371851854000.0,1.0],[1371851914000.0,1.0],[
1371851974000.0,1.0],[1371852034000.0,1.0],[1371852094000.0,1.0],[1371852154000.0,1.0],[
1371852214000.0,1.0],[1371852274000.0,1.0],[1371852334000.0,1.0],[1371852394000.0,1.0],[
1371852454000.0,1.0],[1371852514000.0,1.0],[1371852574000.0,1.0],[1371852634000.0,1.0],[
1371852694000.0,1.0],[1371852754000.0,1.0],[1371852814000.0,1.0],[1371852874000.0,1.0],[
1371852934000.0,1.0],[1371852994000.0,1.0],[1371853054000.0,1.0],[1371853114000.0,1.0],[
1371853174000.0,1.0],[1371853234000.0,1.0],[1371853294000.0,1.0],[1371853354000.0,1.0],[
1371853414000.0,1.0],[1371853474000.0,1.0],[1371853534000.0,1.0],[1371853594000.0,1.0],[
1371853654000.0,1.0],[1371853714000.0,1.0],[1371853774000.0,1.0],[1371853834000.0,1.0],[
1371853894000.0,1.0],[1371853954000.0,1.0],[1371854005000.0,1.0
Currently, the format for the time is (start time, end time) as a string. In the example above, that
requests data for the last hour. For each item in the list, the first element is the time stamp of
the observation, and the second is the value. The smap archiver page indicates that you can
use a variety of ways to specify the time, but I’ve only used unix time, and the now -1h
constructs. This is what the smap page says:
You can select the time region queried using a range query, or a query relative to a reference
time stamp. In all these cases, the reference times must either be a timestamp in units of UNIX
milliseconds. The reference may be modified by appending a relative time string, using unix
“at”-style specifications. You can for instance say now + 1hour or now -1h -5m for the last 1:05.
Available relative time quantities are days, hours, minutes, and seconds.
A58

Status API Training Shop Blog About© 2014 GitHub, Inc. Terms Privacy Security Contact
A59

Transactional Network Platform Overview
Getting started with Transactional NetworkDevelopment
ExampleAgents
Agent Development
Established Topics
Working with the Actuator Agent
PlatformCommands
PlatformStartup
Home Pages History
LoggerAgentThe Logger agent will listen on the /logger topic for messages from other agents. These
messages will then be pushed to the sMap historian. Data sources can be dynamically created
by agents.
0 1 Star ForkVOLTTRON / volttron
Page History Clone URL
A60

PlatformServiceAgents
Working with the RTU Controller
Logging
ChangeLogs
Multi-building Messaging
BacnetDriver
Status API Training Shop Blog About© 2014 GitHub, Inc. Terms Privacy Security Contact
A61

Transactional Network Platform Overview
Getting started with Transactional NetworkDevelopment
ExampleAgents
Agent Development
Established Topics
Working with the Actuator Agent
PlatformCommands
PlatformStartup
Home Pages History
ControllerAccess
There are configuration files you must edit to use keys generated for your lab. Do not check
these files into the repository. You should keep them private.
The example smap driver ini file is "driver.ini" at the base of the project directory. Please edit
this file to reflect your setup:
ReportDeliveryLocation: requires an admin key from sMAP
Metadata/SourceName: The name of the source for your catalyst
0 1 Star ForkVOLTTRON / volttron
Page History Clone URL
Controller Access
A62

PlatformServiceAgents
Working with the RTU Controller
Logging
ChangeLogs
Multi-building Messaging
BacnetDriver
uuid: A unique identifier (can be any generated by any means)
When configuring a Modbus device be sure to setup the following:
ip_address: IP address of the Modbus device.
register_config: the csv file use to configure the Modbus device. You should specify the
absolute path name of the configuration file. See [ModbusDriver Configure Modbus sMAP
driver]
When configuring a BACnet device be sure to setup the following:
target_address: Address of the BACnet device.
self_address: IP address of the network interface used to communicate with the device.
This is required as the BACnet driver creates a virtual device to do it's communication and
it communicates via UDP.
register_config: the csv file use to configure the Modbus device. You should specify the
absolute path name of the configuration file. See [BacnetDriver Configure BACnet sMAP
driver]
[report 0]
#Insert your SMAP key after add
ReportDeliveryLocation = http://smap.lbl.gov/backend/add/<INSERT YOUR KEY HERE>
[/]
type = Collection
Metadata/SourceName = <PUT YOUR NAME HERE> Catalyst Data 2
uuid = <PUT YOUR UUID HERE>
[/campus1]
type = Collection
Metadata/Location/Campus = Campus Number 1
[/campus1/building1]
type = Collection
A63
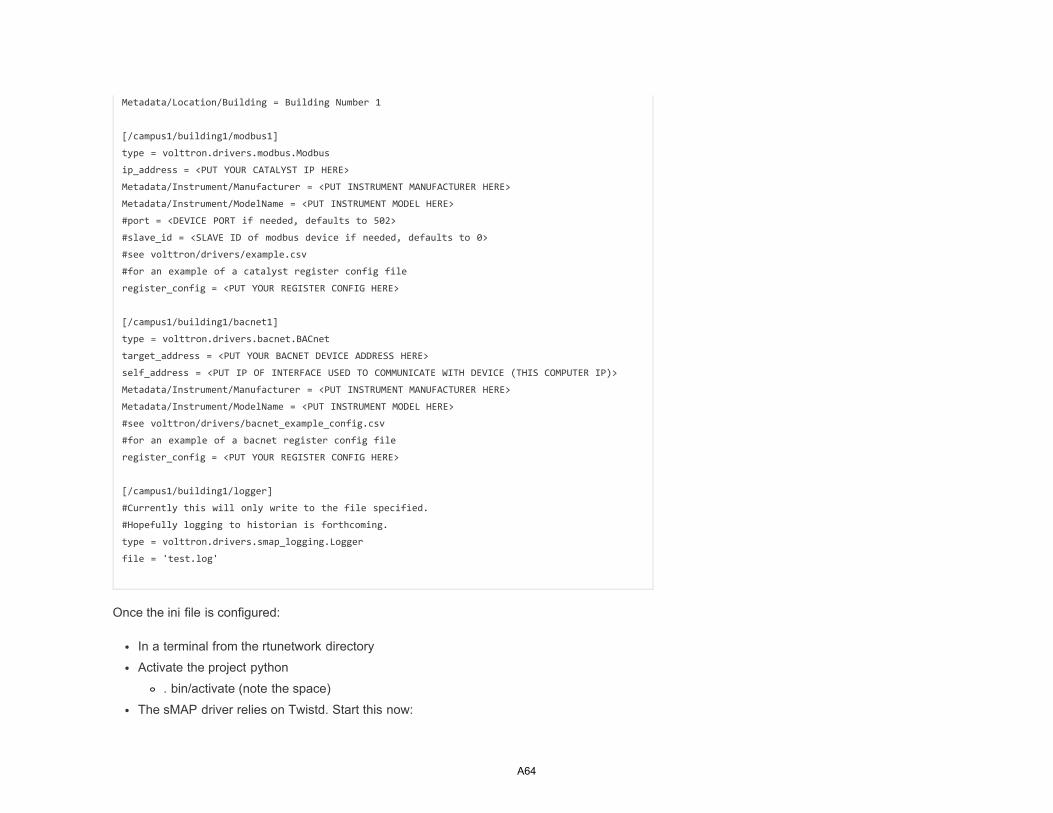
Once the ini file is configured:
In a terminal from the rtunetwork directory
Activate the project python
. bin/activate (note the space)
The sMAP driver relies on Twistd. Start this now:
Metadata/Location/Building = Building Number 1
[/campus1/building1/modbus1]
type = volttron.drivers.modbus.Modbus
ip_address = <PUT YOUR CATALYST IP HERE>
Metadata/Instrument/Manufacturer = <PUT INSTRUMENT MANUFACTURER HERE>
Metadata/Instrument/ModelName = <PUT INSTRUMENT MODEL HERE>
#port = <DEVICE PORT if needed, defaults to 502>
#slave_id = <SLAVE ID of modbus device if needed, defaults to 0>
#see volttron/drivers/example.csv
#for an example of a catalyst register config file
register_config = <PUT YOUR REGISTER CONFIG HERE>
[/campus1/building1/bacnet1]
type = volttron.drivers.bacnet.BACnet
target_address = <PUT YOUR BACNET DEVICE ADDRESS HERE>
self_address = <PUT IP OF INTERFACE USED TO COMMUNICATE WITH DEVICE (THIS COMPUTER IP)>
Metadata/Instrument/Manufacturer = <PUT INSTRUMENT MANUFACTURER HERE>
Metadata/Instrument/ModelName = <PUT INSTRUMENT MODEL HERE>
#see volttron/drivers/bacnet_example_config.csv
#for an example of a bacnet register config file
register_config = <PUT YOUR REGISTER CONFIG HERE>
[/campus1/building1/logger]
#Currently this will only write to the file specified.
#Hopefully logging to historian is forthcoming.
type = volttron.drivers.smap_logging.Logger
file = 'test.log'
A64

Last edited by kmonson, April 22, 2014
twistd -n smap
Data should now be getting scraped from the Catalyst controller, published to the platform, and
stored in the sMap historian. If you launch the ListenerAgent, you should see RTU data being
published once a minute.
In order to set points, you must start the ActuatorAgent. Launch this as you would launch any
other agent. In Eclipse, setup a run configuration with the following Program Arguments: {{--
config Agents/ActuatorAgent/actuatoragent.launch.json --pub ipc:///tmp/volttron-lite-agent-
publish --sub ipc:///tmp/volttron-lite-agent-subscribe
.
Please see the ExampleControllerAgent for making use of the ActuatorAgent.
Status API Training Shop Blog About© 2014 GitHub, Inc. Terms Privacy Security Contact
A65

Transactional Network Platform Overview
Getting started with Transactional NetworkDevelopment
ExampleAgents
Agent Development
Established Topics
Working with the Actuator Agent
PlatformCommands
PlatformStartup
Home Pages History
Logging
A mechanism for storing data in SMAP has been provided. The data logger is written as an
SMAP driver, but receives information in a zero MQ message sent to a topic prefixed with
datalogger/log. The source name is configured at the time the logger starts up and is defined
in the driver.ini file. The rest of the topic is extracted and used as the path in SMAP for the data
point. If the path already exists, the time series items will be added to the bottom of the list. For
example, if our source name is 'test data', and the topic we publish data to is
datalogger/log/campus1/building1/testdata, then our data will be posted to time series under
campus1/building1/testdata in the source name 'test data'.
0 1 Star ForkVOLTTRON / volttron
Page History Clone URL
Data Logging
A66

PlatformServiceAgents
Working with the RTU Controller
Logging
ChangeLogs
Multi-building Messaging
BacnetDriver
The Logger should be added to the sMAP configuration file alongside the Catalyst
configuration. The location listed in the configuration file will not be used unless no path is given
after datalogger/log.
Data sent to the data logger should be sent as a JSON object that consists of a dictionary of
dictionaries. The keys of the outer dictionary are used as the points in SMAP to store the data
items. The inner dictionary consists of 2 required fields and 1 optional. The required fields are
"Readings" and "Units". Readings contains the data that will be written to SMAP. It may contain
either a single value, or a list of lists which consists of timestamp/value pairs. Units is a string
that identifies the meaning of the scale values of the data. The optional entry is data_type,
which indicates the type of the data to be stored. This may be either long or double.
[/datalogger]
type = volttron.drivers.data_logger.DataLogger
interval = 1
{
"test3": {
"Readings": [[1377788595, 1.1],[1377788605,2.0]],
"Units": "KwH",
"data_type": "double"
},
"test4": {
"Readings": [[1377788595, 1.1],[1377788605,2.0]],
"Units": "TU",
"data_type": "double"
}
}
Data Logging Format
A67

The data logger reports the status of the storage request to topic called datalogger/status. The
response will either be success, or error, and the message will contain information on what
failed if there was an error. In addition, the data logger looks in the message headers for a field
called "from" to determine who should be the recipient of this message. The status message
contains a header called "to" that uses the value retrieved from "from" so that agents may filter
messages sent to datalogger/status using the match_headers decorator in a base agent
derived agent.
headers[headers_mod.FROM] = self._agent_id
headers[headers_mod.CONTENT_TYPE] = headers_mod.CONTENT_TYPE.JSON
mytime = int(time.time())
content = {
"listener": {
"Readings": [[mytime, 1.0]],
"Units": "TU",
"data_type": "double"
},
"hearbeat": {
"Readings": [[mytime, 1.0]],
"Units": "TU",
"data_type": "double"
}
}
Data Logger Response
Example Code
A68

self.publish('datalogger/log/', headers, json.dumps(content))
Status API Training Shop Blog About© 2014 GitHub, Inc. Terms Privacy Security Contact
A69

Home
Transactional Network Platform Overview
Getting started with Transactional NetworkDevelopment
ExampleAgents
Agent Development
Established Topics
Working with the Actuator Agent
PlatformCommands
Home Pages History
Multi-Building Messaging
Multi-building messaging is implemented as a service-style agent. Its use is optional and can be
enabled/disabled by simply enabling/disabling the multibuilding service agent. It is easily
configured using the service launch file and provides several new topics for use in the local
agent exchange bus.
The agent launch file may contain the declarations below:
0 1 Star ForkVOLTTRON / volttron
Page History Clone URL
Mult-building Messaging
Configuration
A70

PlatformStartup
PlatformServiceAgents
Working with the RTU Controller
Logging
Multi-building Messaging
BacnetDriver
building-publish-address::
A ØMQ address used to publish to the building's message bus. Defaults to 'tcp://0.0.0.0:916
1'.
building-subscribe-address::
A ØMQ address used to subscribe to the building's message bus. Defaults to 'tcp://0.0.0.0:9
160'.
cleanup-period::
Frequency, in seconds, to check for and close stale connections. Defaults to 600 seconds (1
0 minutes).
hosts::
A mapping (dictionary) of building names to publish/subscribe addresses. Each entry is of t
he form:
" CAMPUS / BUILDING ": {"pub": " PUB_ADDRESS ", "sub": " SUB_ADDRESS "}
where PUB_ADDRESS and SUB_ADDRESS are ØMQ addresses.
uuid::
A UUID to use in the Cookie header. If not given, one will be automatically generated.
Three topics are provided for inter-building messaging:
building/recv/ CAMPUS / BUILDING / TOPIC ::
Agents can subscribe to to this topic to receive messages sent to TOPIC at the building
specified by CAMPUS / BUILDING .
building/send/ CAMPUS / BUILDING / TOPIC ::
Sending and Receiving Inter-building Messages
A71

Agents can send messages to this topic to have them forwarded to TOPIC at the building s
pecified by CAMPUS / BUILDING .
building/error/ CAMPUS / BUILDING / TOPIC ::
Errors encountered during sending/receiving to/from the above two topics will be sent over t
his topic.
Requires opening multiple listening ports:: It would be nice to multiplex all inter-
building communications over a single port to decrease the attack footprint and ease firewall a
dministration.
There is no authentication, authorization, or encryption::
Data is currently open to sniffing, modification, and all sorts of malicious activity.
Remote host lookup is kept in a static file::
Ideally, host lookup would be done through some central directory service, but that is not
currently implemented.
Limitations and Future Work
Status API Training Shop Blog About© 2014 GitHub, Inc. Terms Privacy Security Contact
A72

Home
Transactional Network Platform Overview
Getting started with Transactional NetworkDevelopment
ExampleAgents
Agent Development
Established Topics
Working with the Actuator Agent
PlatformCommands
Home Pages History
Bacnet DriverTable of Contents
Configuring BACnet sMAP driver
PNNL Point Name
Units
BACnet Object Type
Property
Writable
Index
Notes
0 1 Star ForkVOLTTRON / volttron
Page History Clone URL
A73

PlatformStartup
PlatformServiceAgents
Working with the RTU Controller
Logging
Multi-building Messaging
BacnetDriver
The device type specific configuration of the BACnet sMAP driver takes place in a CSV file
specified in the sMAP configuration file. (See the register_config argument of the
volttron.drivers.bacnet.BACnet in the sMAP config example here.) An example file can be
found in the voltron repository at volttron/drivers/bacnet_example_config.csv
Most of the configuration file can be generated with the grab_bacnet_config.py utility. See
AutoBacnetConfigGeneration.
If the target device is behind an IP to MS/TP router then Remote Station addressing will
probably be needed for the driver to find the device.
If the device address is unknown then the bacnet_scan utility can be used to discover devices
on a network.
Currently the driver provides no method to access array type properties even if the members of
the array are of a supported type.
The CSV file should be comma delimited. An Excel spreadsheet converted to CSV should work
fine, even with commas in the data.
The CSV file requires a header line with the following columns labeled in any order (without
quotes):
Example
Configuring BACnet sMAP driver
PNNL Point Name
A74

The name to used access the point. References to this point will use this name.
Used for meta data when creating point information on the sMAP historian.
A string representing what kind of BACnet standard object the point belongs to. Examples
include:
analogInput
analogOutput
analogValue
binaryInput
binaryOutput
binaryValue
multiStateValue
A string representing the name of the property belonging to the object. Usually this will be
"presentValue".
Units
BACnet Object Type
Property
Writable
A75

Either TRUE or FALSE. Determines if the point can be written to. If TRUE an actuation point will
be created in addition to the normal point representing periodically scraped data. Only points
labeled TRUE can be accessed through the ActuatorAgent. Incorrectly labeled points will cause
an error to be returned if the user attempts to write to the point.
Object ID of the BACnet object.
Additional notes for the point.
Additional columns may be added at the user discretion as long as they are labeled differently.
The following is a simple example:
Point Name PNNL Point Name UnitsUnit
DetailsBACnet O
Typ
Building1/FCB.Local
Application.DA1-PSampleAnalogInput inchesOfWater
-0.20
to 5.00analogInp
Building1/FCB.Local
Application.CLG-OSampleAnalogOutput percent
0.00 to
100.00
(defaultanalogOu
Index
Notes
Example
A76
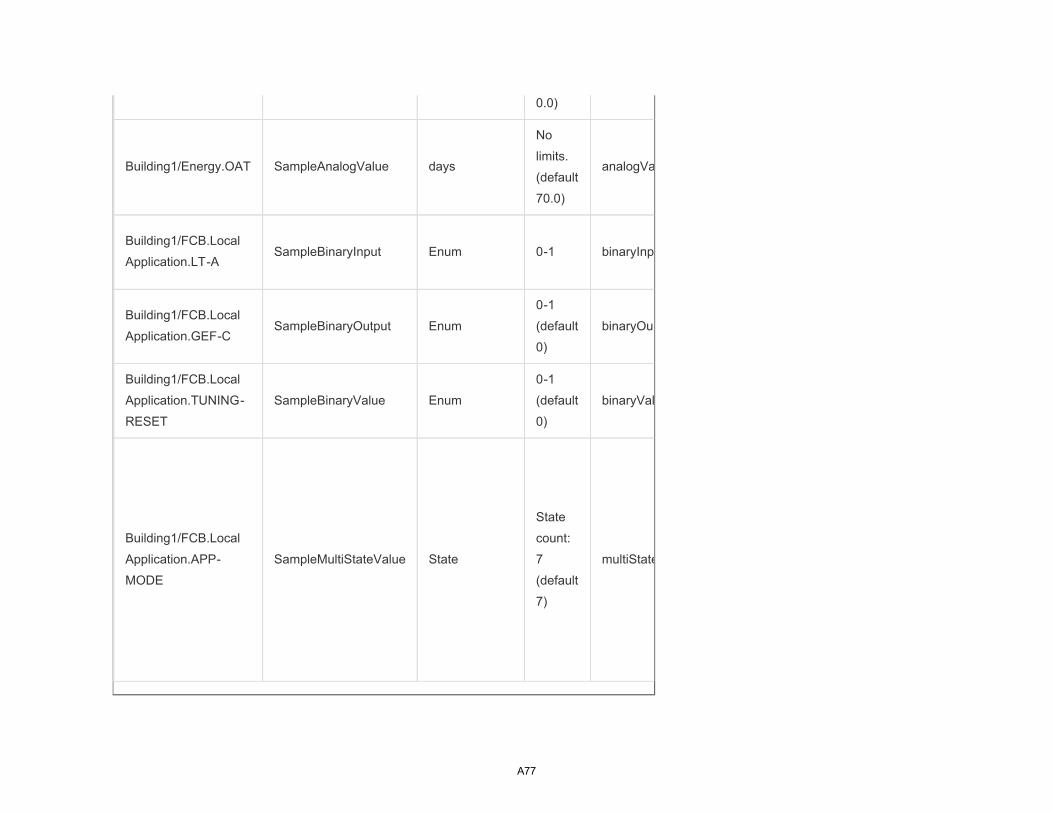
0.0)
Building1/Energy.OAT SampleAnalogValue days
No
limits.
(default
70.0)
analogVa
Building1/FCB.Local
Application.LT-ASampleBinaryInput Enum 0-1 binaryInp
Building1/FCB.Local
Application.GEF-CSampleBinaryOutput Enum
0-1
(default
0)
binaryOu
Building1/FCB.Local
Application.TUNING-
RESET
SampleBinaryValue Enum
0-1
(default
0)
binaryVal
Building1/FCB.Local
Application.APP-
MODE
SampleMultiStateValue State
State
count:
7
(default
7)
multiState
A77

Last edited by jhaack, April 23, 2014
Status API Training Shop Blog About© 2014 GitHub, Inc. Terms Privacy Security Contact
A78

Home
Transactional Network Platform Overview
Getting started with Transactional NetworkDevelopment
ExampleAgents
Agent Development
Established Topics
Working with the Actuator Agent
PlatformCommands
Home Pages History
ChangeLogs
The VOLTTRON(tm) 1.0 release includes the following features:
Scheduler 2.0: The new ActuatorAgent scheduler allows applications to reserve devices
ahead of time
SchedulerExample: This simple agent provides an example of publishing a schedule
request.
VOLTTRON v1.0 also includes features in a beta stage. These features are slated for release
0 1 Star ForkVOLTTRON / volttron
Page History Clone URL
1/31/2014
A79

PlatformStartup
PlatformServiceAgents
Working with the RTU Controller
Logging
Multi-building Messaging
BacnetDriver
in v1.1 but are included in 1.0 for those who wish to begin investigating them. These features
are:
Multi-node communication: Enables platforms to publish and subscribe to each other
BACNet Driver: Enables reading/writing to devices using the BACNet protocol
Included are PNNL developed applications: AFDD and DR which are in the process of being
modified to work with the new scheduler.DR will not currently function with Scheduler 2.0.
Renamed Catalyst driver to Modbus driver to reflect the generic nature of the driver.
Changed the configuration for the driver to fully take advantage of the Python struct
module.
Catalyst registry file update for 372s
catalystreg.csv.371 contains the points for the 371
Scheduling implemented
Logging implemented
11/7/2013
9/9/2013
9/4/2013
8/21/2013
A80

Added libevent-dev to required software
WeatherAgent updated and back into the repository.
The agent module was split into multiple pieces.
The BaseAgent and PublishMixin classes and the periodic decorator remain in the agent
package.
The matching module was moved under the agent package and is now available as
volttron.lite.agent.matching.
The utility functions, like run_agent (which is deprecated) and the base agent
ArgumentParser, were moved to volttron.lite.agent.utils.
All low-level messaging that is not agent-specific was moved to volttron.lite.messaging and
includes the following new submodules:
headers: contains common messaging headers, like CONTENT_TYPE, and values as
constants
topics: provides topic templates; see the module documentation for details
utils: includes the Topic class and other messaging/topic utilities
The listener, control, archiver, and actuator agents were updated to use and demonstrate the
changes above. Some of them also show how to use agent factories to perform dynamic
matching. Using mercurial to show the diffs between revisions is a good technique for others to
use to investigate how to migrate their agents.
8/6/2013
7/22/2017
A81

Initial version of ExampleControllerAgent committed. This agent monitors outdoor air temp
and randomly sets the coolsuppy fan if temp has risen since the last reading. Wiki
explanation for agent coming soon.
Updates to ActuatorAgent
ListenerAgent updated to reflect latest BaseAgent
Use -config option instead of -config_path when starting agents
Updated ArchiverAgent checked in.
ActuatorAgent for sending commands to the controller checked in.
Fixed a command line arg problem in ListenerAgent and updated wiki.
This is the initial release of the Volttron Lite platform. The features contained in it are:
Scripts for building the platform from scratch as well as updating
A BaseAgent which expresses the basic functionality for an agent in the platform as well as
hooks for adding functionality
6/24/2013
6/21/2013
6/19/2013
Version 1.0
A82

Example agents which utilize the BaseAgent to illustrate more complex behavior
In addition, this wiki will be constantly updated with documentation for working with the platform
and developing agents in it. We intend to document as much as possible but please submit
TRAC tickets in cases where documentation does not exist yet or there is difficulty locating it.
Also, this is a living document so feel free to add your own content to this wiki and even make
changes to the documentation if you can improve on its clarity and usefulness.
Please subscribe to this page to receive notification when new changelogs are posted for future
releases.
Status API Training Shop Blog About© 2014 GitHub, Inc. Terms Privacy Security Contact
A83


