Download - User Manual - Digitot

User Manual
Version 3.0
Author: Digitot
Digitot Call Centre
0861 1011 70
[email protected] 84 Adelaide Tambo Drive
Durban North 4051

Copyright © 2013 All rights reserved
Digitot.com All product names and trademarks are the property of their
respective owners.
This documentation contains trade secrets and confidential information, which are proprietary to Digitot. The use, reproduction, distribution, or disclosure of the documentation, in whole or in part, without the express written permission of Digitot is prohibited. This documentation is also an unpublished work protected under the copyright laws of South Africa and other countries. If this documentation becomes published, the following shall apply:
Copyright Digitot All Rights Reserved.
All product names and trademarks are the property of their respective owners.

Copyright © 2013 All rights reserved
Digitot.com All product names and trademarks are the property of their
respective owners.
1. Introduction ..................................................................................... 5 1.1. Overview of Digitot Inventory Control ............................................... 5 1.2. Running Digitot Inventory Control .................................................... 7
2 Setup ...................................................................................................... 8 2.8.1 Kitchen Recipes ........................................................................ 21 2.8.2 Kitchen Recipe Ingredients ........................................................ 22 2.8.3 Menu Items ............................................................................. 24 2.8.4 Menu Item Ingredients .............................................................. 25 2.9.1 Edit Revenue Centres ................................................................... 26 2.9.2 Capture Revenue Centre Items .................................................. 27 2.10 Capture Optimum Levels ........................................................... 31 2.11 Item Special Prices ................................................................... 32
3 Reports ................................................................................................. 35 3.1.2 Purchases by Category Report .................................................... 36 3.1.3 Purchases by Item Report .......................................................... 37 3.1.4 Purchases by Item by Category Report ........................................ 38 3.1.5 Purchases by Supplier Report ..................................................... 39 3.1.6 Purchases Breakdown Report ..................................................... 40 3.1.7 Invoice Summary Report ........................................................... 41 3.1.8 Invoice Summary by Vat Supplier Report .................................... 42 3.1.9 Invoice Summary by Payment Date Report .................................. 43 3.1.10 Invoice by Supplier Report ..................................................... 44 3.1.12 Invoice by Supplier Report Incl Tax ......................................... 45 3.2 Sales Report Menu Item Sales .................................................... 46 3.3 General Ledger Report .............................................................. 47 3.3.3 Optimum Levels ....................................................................... 50 3.3.4 View Sales / Stock Levels .......................................................... 51 3.4 Stock Reports (Revenue Centers) ............................................... 52 3.4.1 View Stock............................................................................... 52 3.4.2 View Issues ............................................................................. 53 3.4.3 View Optimum levels ................................................................ 54 3.4.4 Sales / Stock Levels .................................................................. 55 3.4.5 Stock Values ............................................................................ 56 3.5 Turnover ................................................................................. 57 3.6 Turnover vs Sales ..................................................................... 58 3.6.1 Theoretical(Excluding Stock) ...................................................... 58 3.6.2 Accurate(With Stock) ................................................................ 59 3.6.3 Multiple Report ......................................................................... 60 3.7 Price Changes .......................................................................... 61 3.8 Payments ................................................................................ 62
4 Admin ................................................................................................... 63 4.1 Calculators .............................................................................. 63 4.1.1 Add Vat ................................................................................... 63 4.1.2 Subtract Vat ............................................................................ 64 4.1.3 Discount .................................................................................. 65 4.2 Configure ................................................................................ 66 4.2.1 General ................................................................................... 66 4.2.2 Item Specific ............................................................................ 67 4.2.3 Digitag .......................................... Error! Bookmark not defined. 4.3 Users ...................................................................................... 69 4.3.1 Change Password ..................................................................... 69 4.3.2 Edit Users ................................................................................ 70
5 Operate ................................................................................................. 71 5.1 Invoice and Orders ................................................................... 71 5.2 Invoice Items ........................................................................... 73

Copyright © 2013 All rights reserved
Digitot.com All product names and trademarks are the property of their
respective owners.
5.3 Stocktake (Bulk) ...................................................................... 75 5.3.1 Capture Stock .......................................................................... 75 5.3.2 Capture Adjustments ................................................................ 76 5.4 Revenue Centres ...................................................................... 77 5.4.1 Capture Stock .......................................................................... 77 5.4.2 Import Sales ............................................................................ 78 5.4.3 Capture Issues ......................................................................... 79 5.5 Bottom Line ............................................................................. 80 5.5.1 Standard ................................................................................. 80 5.5.2 Custom ................................................................................... 82 5.6 Digitag .......................................... Error! Bookmark not defined. 5.6.1 Import .................................................................................... 84 5.6.2 Clear Stock Figures ................................................................... 85

Copyright © 2013 All rights reserved
Digitot.com All product names and trademarks are the property of their
respective owners.
1. Introduction
1.1. Overview of Digitot Inventory Control
Digitot Inventory Control is a comprehensive food service cost accounting
software package designed to isolate losses due to theft, shrinkage, over
portioning, incorrect purchasing, poor yields, over production and a host of
other mistakes that affect the bottom line. Our goal is to give your
management team the information they need to make correct decisions on a
timely basis that will substantially decrease food cost while increasing
profitability.
"This is a profit making organization.
That's the way you planned it... that's the way it is."
Foodservice is a manufacturing business. Raw products are turned into
finished products quicker in foodservice than any other industry. By
developing a systemic approach to the process of inventory, procurement,
receiving, recipe development, preparation, assembly and analyzing data
from menu sales one finds there are three costs of doing business for any
foodservice operation. From fast food to fine dining to catering to
institutional foodservice the understanding of the cause, effect and
interaction of each of the three food cost principles will play a key
role in the success or failure of your operation.
1. Targeted food cost: This is the food cost goal of your operation. This
ideal food cost helps you plan your profit. It is the food cost you must run in
order to make a profit. If your operation returns an 18% profit running a
32% food cost then you will likely be losing money if food cost climbs near
42%. Food cost can't just be allowed to happen. It must be targeted or
planned.
Copyright © 2013 All rights reserved
Digitot.com All product names and trademarks are the property of their
respective owners.
2. Theoretical food cost: This is the perfect food cost. It is based on the
principle of buying the correct product at the right price, receiving what is
paid for, preparing, producing and serving only what the guest is entitled to
receive all the while maintaining adequate security measures. It does not
include Rands that are lost due to waste, improper receiving, product
substitutions, waste, theft, spoilage, improper yield, over portioning and the
other host of lost profit pitfalls in the food service industry.
3. Actual food cost: This is the food cost that appears on your profit and
loss statement. It is calculated by (beginning inventory + purchases) -
(ending inventory). Read it and rejoice or read it and weep.
Shrinkage (or theft, to put it bluntly) is the enemy of profit. Shrinkage is the
difference between theoretical, or perfect food cost and the actual, or real
food cost. The difference between theoretical and actual in food service
ranges from 2% to 15%. That is 2-15% of sales in lost profits and often the
difference between a profitable food service operation and one that has
closed it's doors. Every food service operation has shrinkage--this number is
a management controllable. Digitot Inventory Control is designed to give
management timely reports on every item in inventory and subsequent tools
to recover lost profits. Once implemented, Digitot Inventory Control software
is like turning on your headlights at midnight… Everything is so much clearer.
Control of food cost is based upon planning.
We know that food service software must be easy to use, learn, and
maintain. Digitot Inventory Control is designed exclusively for food service.
You'll see that our screens, reports, help system, documentation, and even
our support and sales staff all show a real understanding of your business.
Food service has unique challenges and business demands. We understand
what it takes to keep your operation profitable and efficient, and translate it
to software that will help you every working day: Digitot Inventory Control

Copyright © 2013 All rights reserved
Digitot.com All product names and trademarks are the property of their
respective owners.
1.2. Running Digitot Stock Control
Double Click on the Digitot Stock Control Icon on the desktop,
Or
Select Start -> Programs -> Digitot Stock Control -> Digitot Stock
Control.exe
The Login page will be displayed.
Select your User Name from the Combo box, type in your password and
press ‘OK’.
When the program is run for the first time, the only existing user will be
‘Supervisor’, and the password will be blank.
If a valid password is entered, you will enter the ‘Digitot Inventory Control
program ’, otherwise an error message will be displayed.
If the program is being run over a network, select connection method
‘DSN’, otherwise select ‘Direct’.

Copyright © 2013 All rights reserved
Digitot.com All product names and trademarks are the property of their
respective owners.
2 Setup
2.1 Categories and Cost types
2.1.1 General Ledger Categories
Select ‘Setup’ -> ‘Categories & Cost Types’ -> ‘General Ledger Categories’.
General Ledger Categories are used for the General Ledger Report which
shows how much was spent on each General Ledger Category that was
vatable, non-vatable and the total.
You will be given a list of all your existing General Ledger Categories.
To add a new GL category, type in the GL category and press the ‘Add’
button.
To change a GL category, select it from the list, make the required
changes and press the ‘Change’ button.
To delete a GL category, select it from the list and press the ‘Delete’
button. You will not be allowed to delete categories that have items
assigned to them.
To Print the General Ledger Categories, press the ‘Print’ Button.

Copyright © 2013 All rights reserved
Digitot.com All product names and trademarks are the property of their
respective owners.
2.1.2 Buying Categories
Select ‘Setup’ -> ‘Categories & Cost Types’ -> ‘Buying Categories’.
You will be given a list of all your existing Categories.
To add a new category, type in the category, select whether it is a Food,
Beverage or Non F & B cost type, select a G/L Category and press the
‘Add’ button.
To change a category, select it from the list, make the required changes
and press the ‘Change’ button.
To delete a category, select it from the list and press the ‘Delete’ button.
You will not be allowed to delete categories that have items assigned to
them.
To Print the Categories, their cost type and their GL Category, press the
‘Print’ Button.
If you will be exporting to Pastel enter the Vatable and Non Vatable codes
for the Buying Category, if you are not exporting to Pastel these fields can
be left blank.

Copyright © 2013 All rights reserved
Digitot.com All product names and trademarks are the property of their
respective owners.
2.1.3 Cost Types
Select ‘Setup’ -> ‘Categories & Cost Types’ -> ‘Cost Types’.
Cost types are used to determine cost of sale for each different cost type.
You will be given a list of all your existing Cost Types.
To add a new Cost Type, type in the Cost Type and press the ‘Add’ button.
Select whether it is a type that gets resold or not and whether you want to
show import errors or not. Import errors occur when an item is sold
without a recipe attached to it, or if the recipe ingredients are not assigned
to the revenue centre that sold the item.
To change a Cost Type, select it from the list, make the required changes
and press the ‘Change’ button.
To delete a Cost Type, select it from the list and press the ‘Delete’ button.
You will not be allowed to delete categories that have items assigned to
them.
To Print the Cost Types, press the ‘Print’ Button.

Copyright © 2013 All rights reserved
Digitot.com All product names and trademarks are the property of their
respective owners.
2.2 Report Groups / Selling Categories
Select ‘Setup’ -> ‘Report Groups / Selling Categories’.
Report Groups / Selling Categories are the numbers used by the Point Of
sale System to represent each sales category.
You will be given a list of all your existing Selling Categories.
To add a new Report Group / Selling Category, type in the Report Group /
Selling Category Name, the number (PLU CODE) and select the Cost Type
and press the ‘Add’ button.
To change a Selling Category, select it from the list, make the required
changes and press the ‘Change’ button.
To delete a Report Group / Selling Category, select it from the list and
press the ‘Delete’ button. You will not be allowed to delete categories that
have items assigned to them.
To Print the Report Groups / Selling Categories, press the ‘Print’ Button.

Copyright © 2013 All rights reserved
Digitot.com All product names and trademarks are the property of their
respective owners.
2.3 Bulk Optimum Levels
Select ‘Setup’ -> ‘Bulk Optimum Levels’.
Select whether you would like to capture optimum levels by Cost Type,
Category Area or All Items.
Select if you would like to sort the items by Category Name or Item Name
and press run.
You will be given a list of all items, there categories, and there counting
unit.
Enter the optimum levels and press save.
To print a list of optimum levels, press the ‘Print’ Button.
To export the optimum levels to Excel press the ‘Export’ button.

Copyright © 2013 All rights reserved
Digitot.com All product names and trademarks are the property of their
respective owners.
2.4 Adjustment / Wastage Types
Select ‘Setup’ -> ‘Adjustment / Wastage Types’.
Adjustments are used to write off stock that has not been sold or issued.
You will be given a list of all your existing Adjustment Types.
To add a new Adjustment Type, type in the Adjustment Type Name and
press the ‘Add’ button.
To change an Adjustment Type, select it from the list, make the required
changes and press the ‘Change’ button.
To delete an Adjustment Type, select it from the list and press the ‘Delete’
button. You will not be allowed to delete categories that have items
assigned to them.
Copyright © 2013 All rights reserved
Digitot.com All product names and trademarks are the property of their
respective owners.
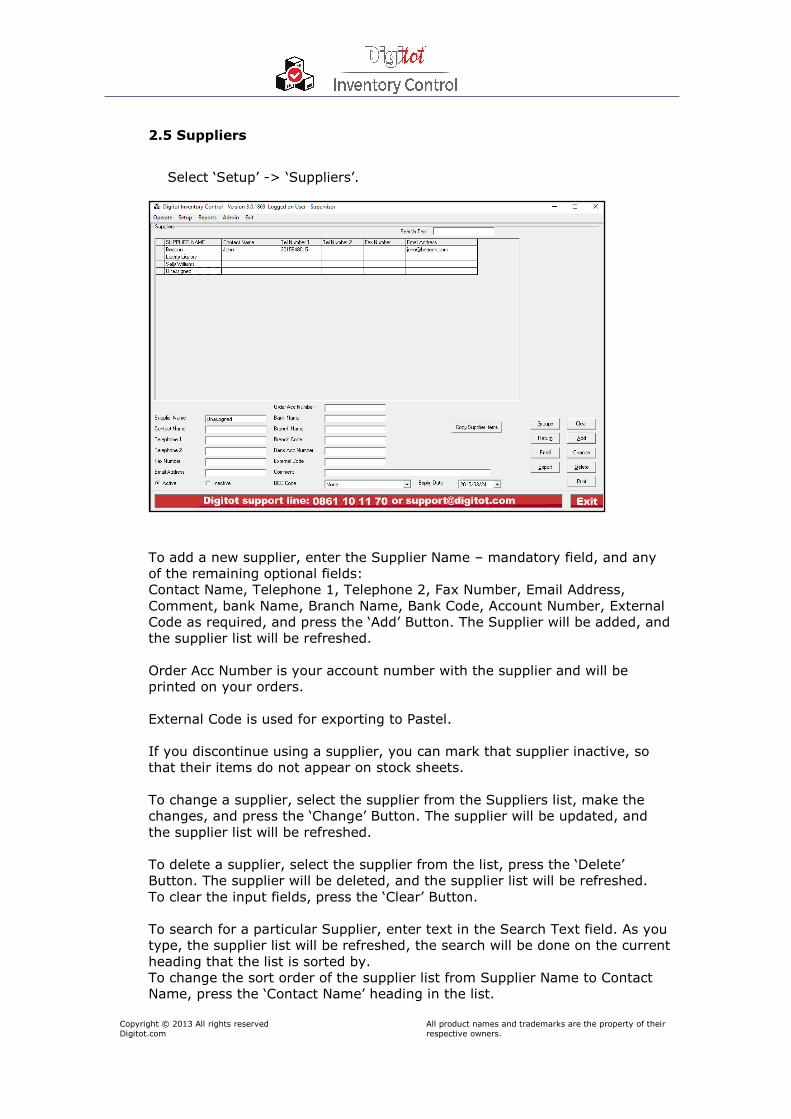
2.5 Suppliers
Select ‘Setup’ -> ‘Suppliers’.
To add a new supplier, enter the Supplier Name – mandatory field, and any
of the remaining optional fields:
Contact Name, Telephone 1, Telephone 2, Fax Number, Email Address,
Comment, bank Name, Branch Name, Bank Code, Account Number, External
Code as required, and press the ‘Add’ Button. The Supplier will be added, and
the supplier list will be refreshed.
Order Acc Number is your account number with the supplier and will be
printed on your orders.
External Code is used for exporting to Pastel.
If you discontinue using a supplier, you can mark that supplier inactive, so
that their items do not appear on stock sheets.
To change a supplier, select the supplier from the Suppliers list, make the
changes, and press the ‘Change’ Button. The supplier will be updated, and
the supplier list will be refreshed.
To delete a supplier, select the supplier from the list, press the ‘Delete’
Button. The supplier will be deleted, and the supplier list will be refreshed.
To clear the input fields, press the ‘Clear’ Button.
To search for a particular Supplier, enter text in the Search Text field. As you
type, the supplier list will be refreshed, the search will be done on the current
heading that the list is sorted by.
To change the sort order of the supplier list from Supplier Name to Contact
Name, press the ‘Contact Name’ heading in the list.

Copyright © 2013 All rights reserved
Digitot.com All product names and trademarks are the property of their
respective owners.
To print a list of suppliers, press the ‘Print’ Button.
To export the data to Excel press the ‘Export’ button.
2.6 Items
Select ‘Setup’ -> ‘Items’.
Selecting Active, Inactive or All will determine which items are displayed in
the list.
Selecting Food, Beverage or All will determine which items are displayed in
the list.
To change the sort order of the item list from Item Name to Category or
Supplier Name, select the Item, Category or Supplier option button.
To search for an item, enter text in the Search Text field. As you type, the
item list will be refreshed, the search will be done on the field that the list
is sorted by.
To add a new item, enter the Item Name – mandatory field. If possible
include the size eg. Coke 330ml or Onions 10Kg.
Select a buying category. (To edit Buying Categories: ‘Setup’->’Categories
and Cost Types’–>’Selling Categories’).
Select whether the item is Vatable.
Select whether the item is Active.
Enter a purchase unit – optional field.
Enter a counting unit – optional field. (See below)
Enter PP factor – mandatory field. (See below)
Enter the optimum level – Optional field
Enter bar code – optional field to be used to if linking to Digitag.
Supplier and Price:
In the supplier frame: Select a supplier. (To edit Suppliers: ‘Setup’->’Suppliers’).
Copyright © 2013 All rights reserved
Digitot.com All product names and trademarks are the property of their
respective owners.
Enter a price excluding Vat – mandatory field.
If you only have the price inclusive of VAT, press the ‘Subtract Vat’ button,
and vat will be taken off the supplier price you are editing. Enter the
suppliers item code – this field is optional and will be used if you create
orders on the system.
If you have a second supplier for the same item, select the existing item
from the grid, select the second supplier, enter the price excluding Vat and
the supplier code if required and press the ‘Add’ button inside the supplier
frame.
It is important that the purchase unit and PPFactor is the same for all suppliers of a particular item.
Purchase Unit is to be used for invoices. Please note this is the unit you
are charged for on the invoice, not necessarily the packaging unit – You
may receive your prawns in 2Kg boxes, but be invoiced by kg. In this case
the purchase unit is KG.
Counting Unit is to be used for stock take sheets. You may order/receive
an item by the case, but want to count it as a unit.
PP Factor is related to counting unit. Purchase Price Factor is the
relationship between the units you purchase your items in, compared to
the units you count them in for stock take. E.g. If you purchase an item in
packs of 12, but count them in units, the PP Factor is 1 / 12 or 0.83333. If
the purchase unit and the counting unit are the same, the PP Factor is 1.
If you would like the application to calculate the PPFactor for you, click on
the calculator icon.
Press the ‘Add’ Button. The item will be added. To change an item, select the item from the list, make the changes, and
press the ‘Change’ Button. The item will be changed.
To save loading time, the item list will not be refreshed after adding and
changing items. To refresh the list press the ‘Refresh’ button.
To delete an item, select the item from the list, press the ‘Delete’ Button.
The item will be deleted, and the item list will be refreshed.
To clear the input fields, press the ‘Clear’ Button.
To export the data to Excel press the ‘Export’ button.

Copyright © 2013 All rights reserved
Digitot.com All product names and trademarks are the property of their
respective owners.
2.7 Areas
Areas are used to divide your bulk stock into physical locations to print a separate
stock sheet for each area, to make counting stock easier.
Note: Although the stock in each area is counted and captured separately it is
stored globally.
2.7.1 Edit Item Areas
Select ‘Setup’ -> ‘Areas (Bulk Stock Take)’ -> ‘Edit Item Areas’.
Item Areas can be used for stock take purposes.
You will be given a list of all your existing Item Areas.
To add a new Item Area, type in the Item Area and press the ‘Add’ button.
To change an Item Area, select it from the list, make the required changes
and press the ‘Change’ button.
To delete an Item Area, select it from the list and press the ‘Delete’
button. You will not be allowed to delete Item Areas that have items
assigned to them.
To Print the Item Areas, press the ‘Print’ Button.
Copyright © 2013 All rights reserved
Digitot.com All product names and trademarks are the property of their
respective owners.
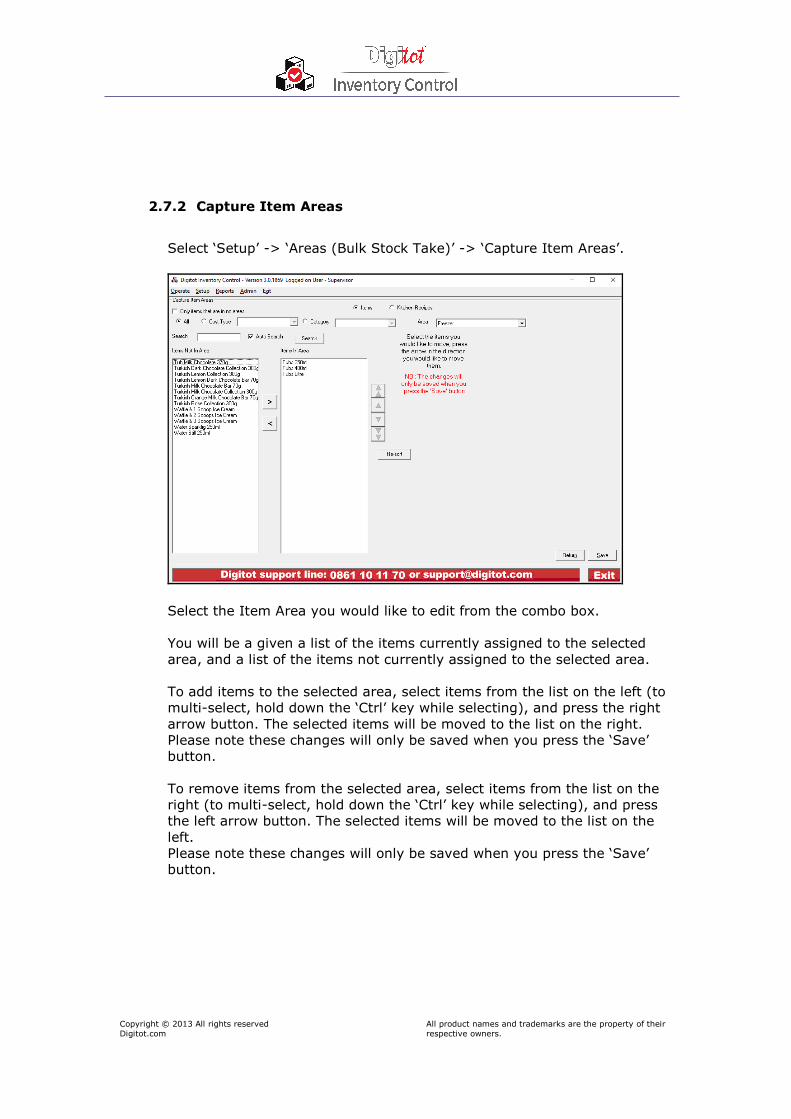
2.7.2 Capture Item Areas
Select ‘Setup’ -> ‘Areas (Bulk Stock Take)’ -> ‘Capture Item Areas’.
Select the Item Area you would like to edit from the combo box.
You will be a given a list of the items currently assigned to the selected
area, and a list of the items not currently assigned to the selected area.
To add items to the selected area, select items from the list on the left (to
multi-select, hold down the ‘Ctrl’ key while selecting), and press the right
arrow button. The selected items will be moved to the list on the right.
Please note these changes will only be saved when you press the ‘Save’
button.
To remove items from the selected area, select items from the list on the
right (to multi-select, hold down the ‘Ctrl’ key while selecting), and press
the left arrow button. The selected items will be moved to the list on the
left.
Please note these changes will only be saved when you press the ‘Save’
button.
Copyright © 2013 All rights reserved
Digitot.com All product names and trademarks are the property of their
respective owners.
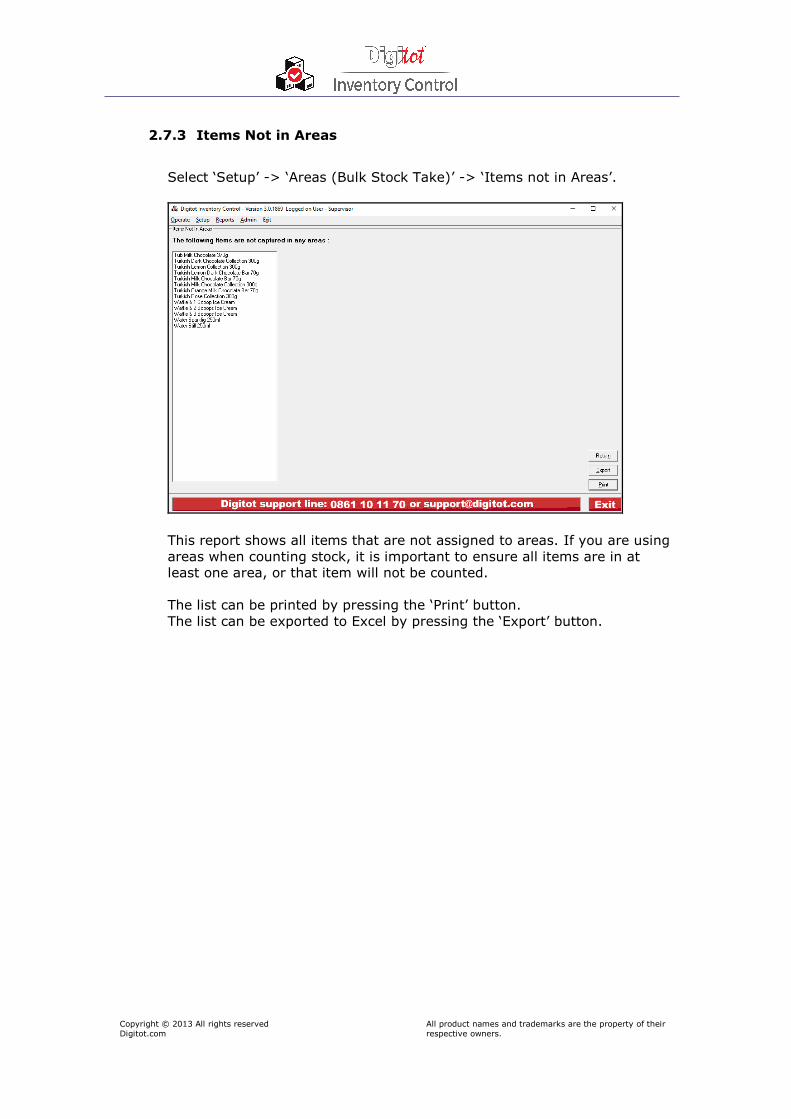
2.7.3 Items Not in Areas
Select ‘Setup’ -> ‘Areas (Bulk Stock Take)’ -> ‘Items not in Areas’.
This report shows all items that are not assigned to areas. If you are using
areas when counting stock, it is important to ensure all items are in at
least one area, or that item will not be counted.
The list can be printed by pressing the ‘Print’ button.
The list can be exported to Excel by pressing the ‘Export’ button.

Copyright © 2013 All rights reserved
Digitot.com All product names and trademarks are the property of their
respective owners.
2.7.4 Items Area Report
Select ‘Setup’ -> ‘Areas (Bulk Stock Take)’ -> ‘Items Area Report’.
This report displays what area(s) an item is assigned to.
Select the item on the left, and the list on the right will display the area(s)
the item is assigned to, if any.

Copyright © 2013 All rights reserved
Digitot.com All product names and trademarks are the property of their
respective owners.
2.8 Recipes
Recipes are used to capture the ingredients of all the items sold.
They are used to determine the cost of sale of all items, and to subtract used
items from stock when sales are imported.
2.8.1 Kitchen Recipes
Select ‘Setup’ -> ‘Recipes’ -> ‘Kitchen Recipes’.
Kitchen Recipe items are components of menu items made up from
ingredients (items) purchased.
To add a new kitchen recipe, enter the kitchen recipe name, the prepare
unit, the counting unit and the recipe PPFactor and press the ‘Add’
button.
PPFactor is the relationship between the units you prepare your kitchen
recipe or menu item in, compared to the units you count them in for
stocktake, e.g. If your prepare an item in units of 2.5 kg, but count them
in 1 kg units, the PP Factor is 1 / 2.5 or 0.4. If the prepared unit and the
counting unit are the same, the PP Factor is 1.
The kitchen recipe cost will be updated after the items have been added.
To change a kitchen recipe, select the kitchen recipe, make the changes
and press the ‘Change’ button.
To delete a kitchen recipe, select the kitchen recipe and press the ‘Delete’
button.
To print the kitchen recipes, press the ‘Print’ button.
To edit kitchen recipe ingredients, select the ‘Kitchen Recipe Ingredients’
tab.
Copyright © 2013 All rights reserved
Digitot.com All product names and trademarks are the property of their
respective owners.
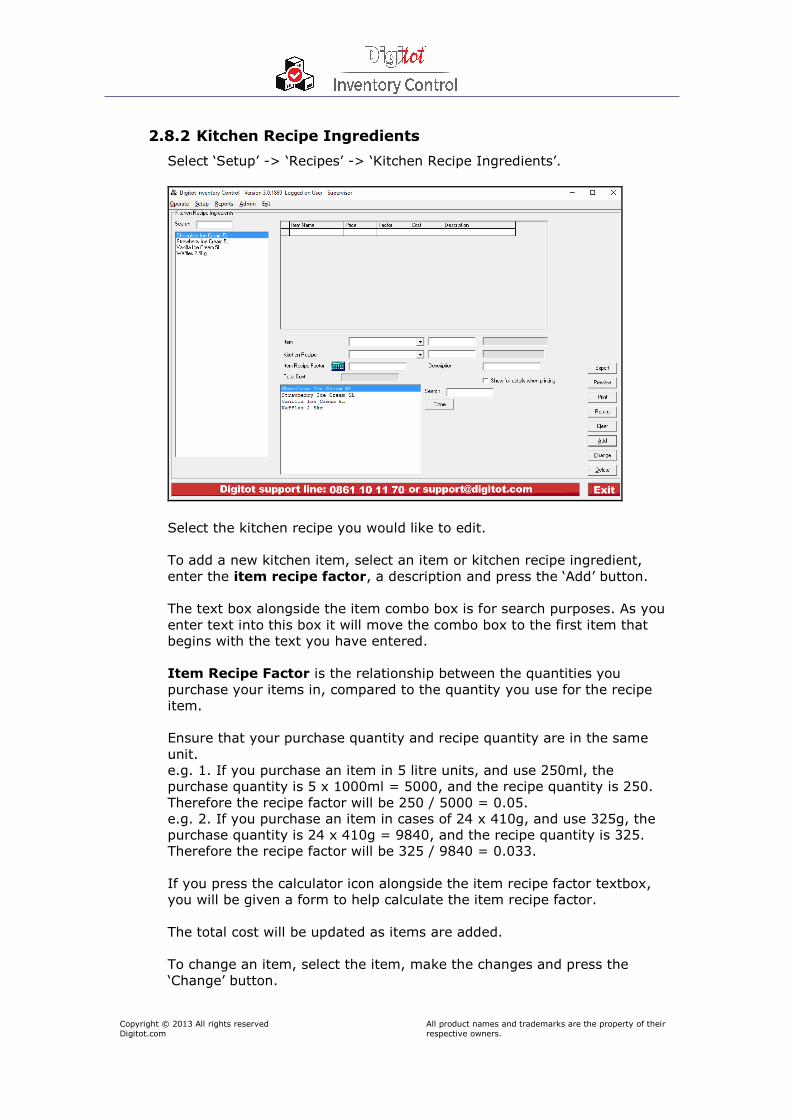
2.8.2 Kitchen Recipe Ingredients
Select ‘Setup’ -> ‘Recipes’ -> ‘Kitchen Recipe Ingredients’.
Select the kitchen recipe you would like to edit.
To add a new kitchen item, select an item or kitchen recipe ingredient,
enter the item recipe factor, a description and press the ‘Add’ button.
The text box alongside the item combo box is for search purposes. As you
enter text into this box it will move the combo box to the first item that
begins with the text you have entered.
Item Recipe Factor is the relationship between the quantities you
purchase your items in, compared to the quantity you use for the recipe
item.
Ensure that your purchase quantity and recipe quantity are in the same
unit.
e.g. 1. If you purchase an item in 5 litre units, and use 250ml, the
purchase quantity is 5 x 1000ml = 5000, and the recipe quantity is 250.
Therefore the recipe factor will be 250 / 5000 = 0.05.
e.g. 2. If you purchase an item in cases of 24 x 410g, and use 325g, the
purchase quantity is 24 x 410g = 9840, and the recipe quantity is 325.
Therefore the recipe factor will be 325 / 9840 = 0.033.
If you press the calculator icon alongside the item recipe factor textbox,
you will be given a form to help calculate the item recipe factor.
The total cost will be updated as items are added.
To change an item, select the item, make the changes and press the
‘Change’ button.

Copyright © 2013 All rights reserved
Digitot.com All product names and trademarks are the property of their
respective owners.
To delete an item, select the item and press the ‘Delete’ button.

Copyright © 2013 All rights reserved
Digitot.com All product names and trademarks are the property of their
respective owners.
2.8.3 Menu Items
Select ‘Setup’ -> ‘Recipes’ -> ‘Menu Items’.
Menu items are items listed on your menu. This feature is to calculate the
food cost percentage of a particular menu item and to setup what
ingredients should be removed from stock when the sales are imported.
Menu items can be made up of kitchen recipes and/or individual items.
To add a new menu item, enter the menu item name the selling price
excluding vat, the PLU Code and press the ‘Add’ button.
There is a subtract vat button, if you only have the price including vat.
The menu item cost and menu item cost percentage will be updated after
the items have been added.
To change a menu item, select the menu item, make the changes and
press the ‘Change’ button.
To delete a menu item, select the menu item and press the ‘Delete’
button.
To print the menu items, press the ‘Print’ button.

Copyright © 2013 All rights reserved
Digitot.com All product names and trademarks are the property of their
respective owners.
2.8.4 Menu Item Ingredients
Select ‘Setup’ -> ‘Recipes’ -> ‘Menu Item Ingredients’.
Select the menu item you would like to edit.
To add a new ingredient, select an item name or kitchen recipe, enter the
item recipe factor and a description and press the ‘Add’ button.
The text boxes alongside the item and kitchen recipe combo box are for
search purposes. As you enter text into this box it will move the combo
box to the first item that begins with the text you have entered.
Item Recipe Factor is the relationship between the quantity you
purchase your items in, or prepare your kitchen recipes in, compared to
the quantity you use for the recipe item.
Ensure that your purchase quantity and recipe quantity are in the same
unit.
e.g. 1. If you purchase an item in 5 litre units, and use 250ml, the
purchase quantity is 5 x 1000ml = 5000, and the recipe quantity is 250.
Therefore the recipe factor will be 250 / 5000 = 0.05.
e.g. 2. If you purchase an item in cases of 24 x 410g, and use 325g, the
purchase quantity is 24 x 410g = 9840, and the recipe quantity is 325.
Therefore the recipe factor will be 325 / 9840 = 0.033.
If you press the calculator icon alongside the item recipe factor textbox,
you will be given a form to help calculate the item recipe factor.
The total cost will be updated as items are added.
To change an item, select the item, make the changes and press the
‘Change’ button.
To delete an item, select the item and press the ‘Delete’ button.
Copyright © 2013 All rights reserved
Digitot.com All product names and trademarks are the property of their
respective owners.
2.9 Revenue Centres
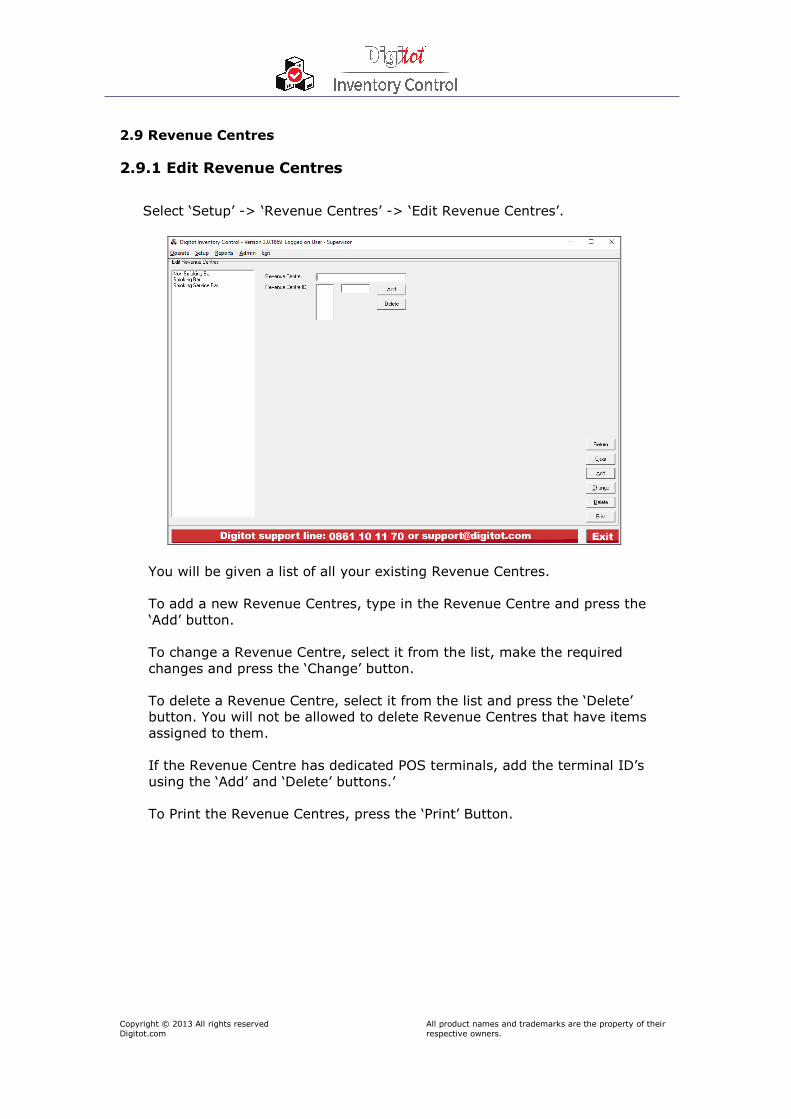
2.9.1 Edit Revenue Centres
Select ‘Setup’ -> ‘Revenue Centres’ -> ‘Edit Revenue Centres’.
You will be given a list of all your existing Revenue Centres.
To add a new Revenue Centres, type in the Revenue Centre and press the
‘Add’ button.
To change a Revenue Centre, select it from the list, make the required
changes and press the ‘Change’ button.
To delete a Revenue Centre, select it from the list and press the ‘Delete’
button. You will not be allowed to delete Revenue Centres that have items
assigned to them.
If the Revenue Centre has dedicated POS terminals, add the terminal ID’s
using the ‘Add’ and ‘Delete’ buttons.’
To Print the Revenue Centres, press the ‘Print’ Button.

Copyright © 2013 All rights reserved
Digitot.com All product names and trademarks are the property of their
respective owners.
2.9.2 Capture Revenue Centre Items
2.9.2.1 Assign Items
Select ‘Setup’ -> ‘Revenue Centres’ -> ‘Capture Revenue Centre Items’ ->
Assign Items’.
Select the Revenue Centre you would like to edit from the combo box.
You will be a given a list of the items currently assigned to the selected
Revenue Centre, and a list of the items not currently assigned to the selected
Revenue Centre.
To add items to the selected Revenue Centre, select items from the list on
the left (to multi-select, hold down the ‘Ctrl’ key while selecting), and press
the right arrow button. The selected items will be moved to the list on the
right.
Please note these changes will only be saved when you press the ‘Save’
button.
To remove items from the selected Revenue Centre, select items from the list
on the right (to multi-select, hold down the ‘Ctrl’ key while selecting), and
press the left arrow button. The selected items will be moved to the list on
the left.
Please note these changes will only be saved when you press the ‘Save’
button.
Copyright © 2013 All rights reserved
Digitot.com All product names and trademarks are the property of their
respective owners.
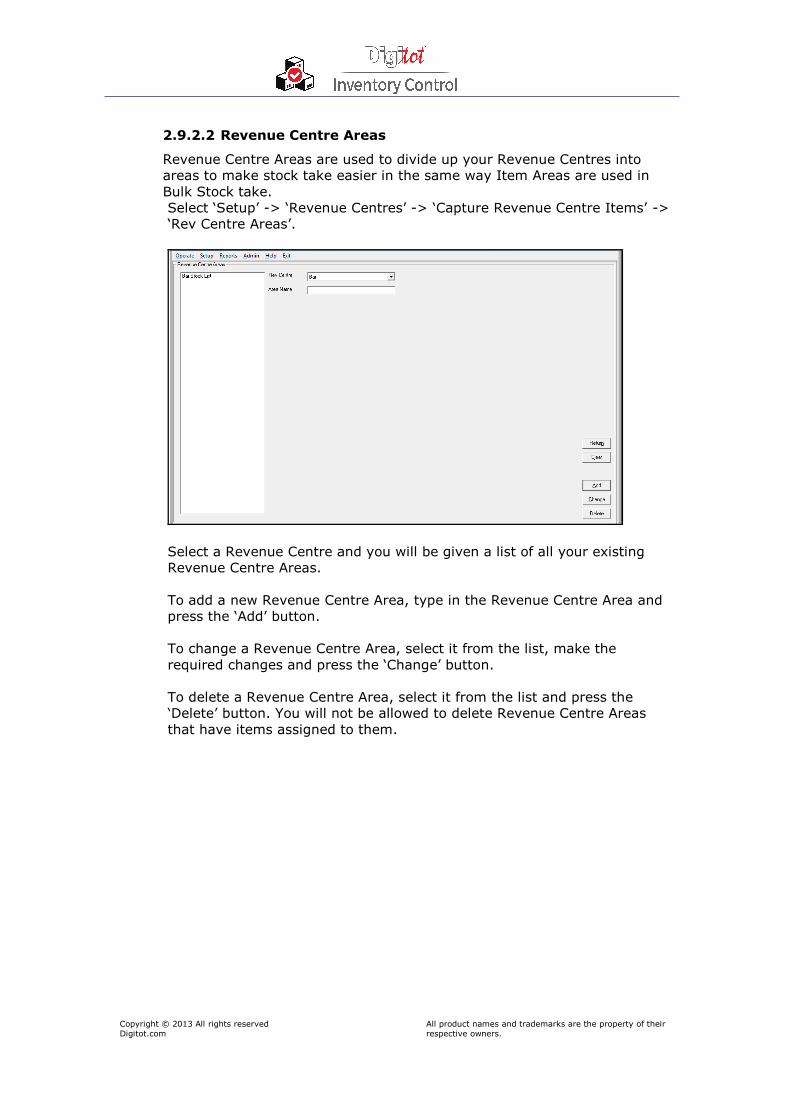
2.9.2.2 Revenue Centre Areas
Revenue Centre Areas are used to divide up your Revenue Centres into
areas to make stock take easier in the same way Item Areas are used in
Bulk Stock take.
Select ‘Setup’ -> ‘Revenue Centres’ -> ‘Capture Revenue Centre Items’ ->
‘Rev Centre Areas’.
Select a Revenue Centre and you will be given a list of all your existing
Revenue Centre Areas.
To add a new Revenue Centre Area, type in the Revenue Centre Area and
press the ‘Add’ button.
To change a Revenue Centre Area, select it from the list, make the
required changes and press the ‘Change’ button.
To delete a Revenue Centre Area, select it from the list and press the
‘Delete’ button. You will not be allowed to delete Revenue Centre Areas
that have items assigned to them.
Copyright © 2013 All rights reserved
Digitot.com All product names and trademarks are the property of their
respective owners.
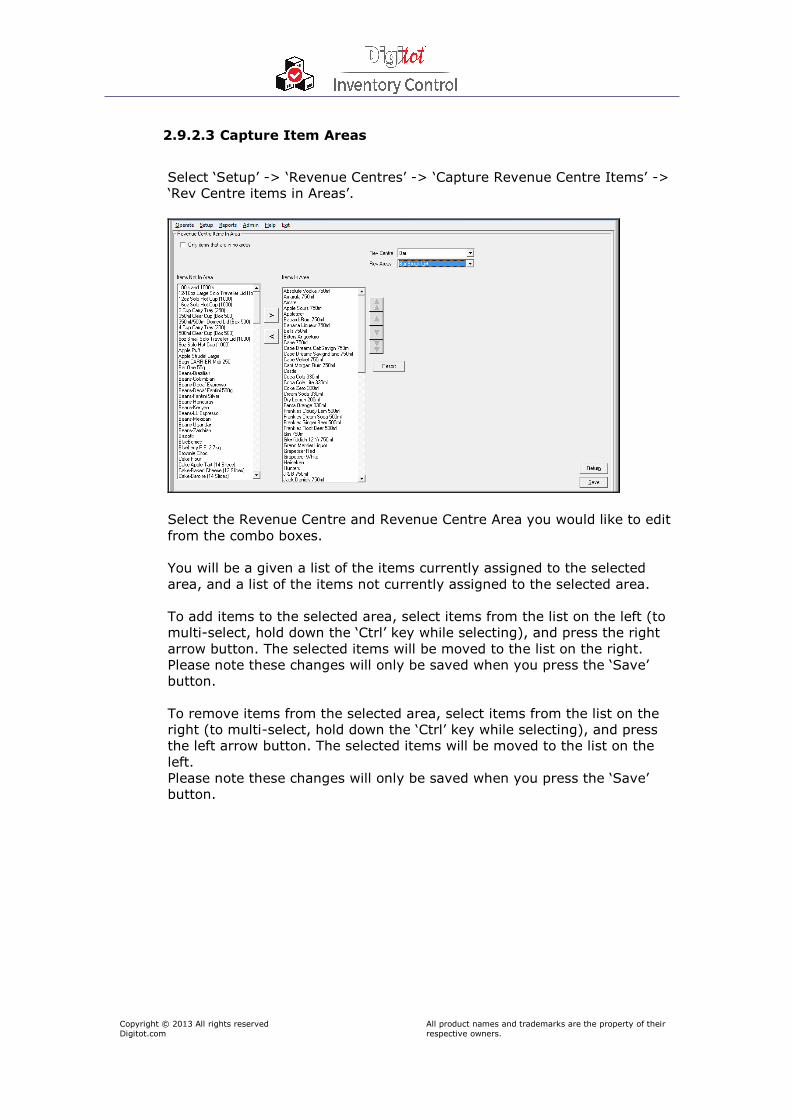
2.9.2.3 Capture Item Areas
Select ‘Setup’ -> ‘Revenue Centres’ -> ‘Capture Revenue Centre Items’ ->
‘Rev Centre items in Areas’.
Select the Revenue Centre and Revenue Centre Area you would like to edit
from the combo boxes.
You will be a given a list of the items currently assigned to the selected
area, and a list of the items not currently assigned to the selected area.
To add items to the selected area, select items from the list on the left (to
multi-select, hold down the ‘Ctrl’ key while selecting), and press the right
arrow button. The selected items will be moved to the list on the right.
Please note these changes will only be saved when you press the ‘Save’
button.
To remove items from the selected area, select items from the list on the
right (to multi-select, hold down the ‘Ctrl’ key while selecting), and press
the left arrow button. The selected items will be moved to the list on the
left.
Please note these changes will only be saved when you press the ‘Save’
button.
Copyright © 2013 All rights reserved
Digitot.com All product names and trademarks are the property of their
respective owners.
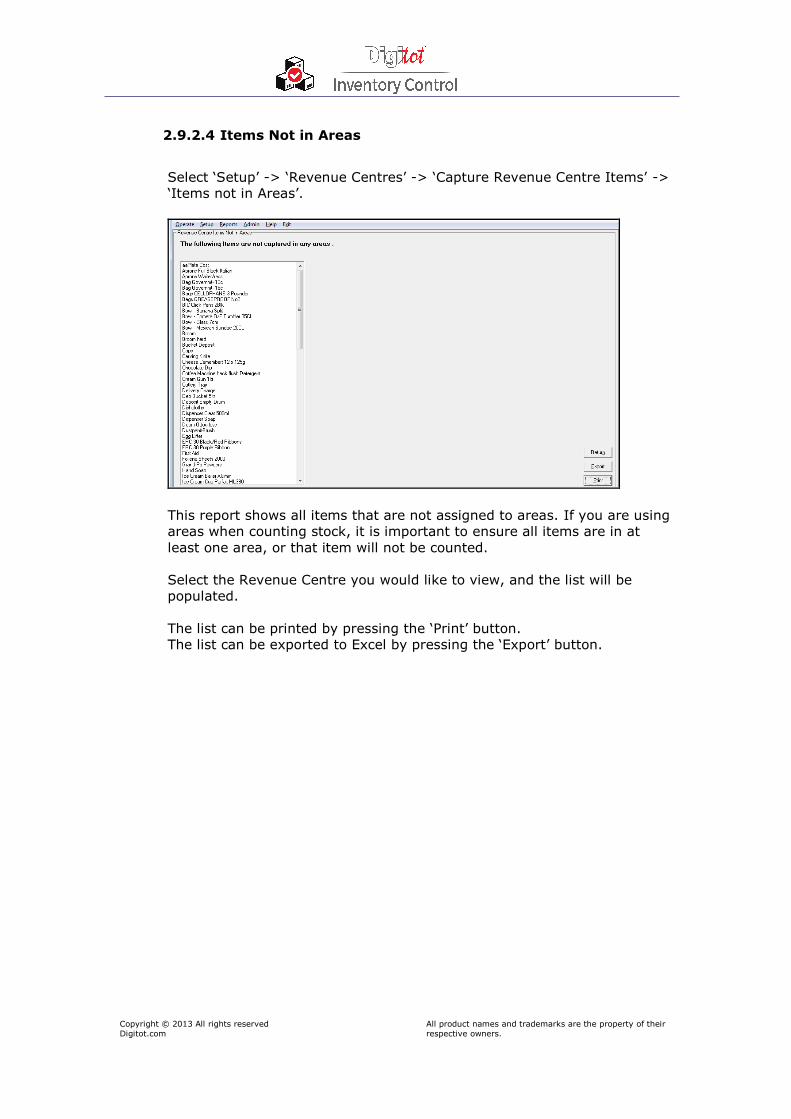
2.9.2.4 Items Not in Areas
Select ‘Setup’ -> ‘Revenue Centres’ -> ‘Capture Revenue Centre Items’ ->
‘Items not in Areas’.
This report shows all items that are not assigned to areas. If you are using
areas when counting stock, it is important to ensure all items are in at
least one area, or that item will not be counted.
Select the Revenue Centre you would like to view, and the list will be
populated.
The list can be printed by pressing the ‘Print’ button.
The list can be exported to Excel by pressing the ‘Export’ button.

Copyright © 2013 All rights reserved
Digitot.com All product names and trademarks are the property of their
respective owners.
2.10 Capture Optimum Levels
Select ‘Setup’ -> ‘Revenue Centres’ -> ‘Optimum Levels’.
Select
the Revenue Centre you would like to edit from the combo box and press the
‘Run’ button.
You will be a given a list of the items assigned to the selected Revenue
Centre with their existing optimum levels.
Type in the correct optimum levels and press the ‘Save’ button. Please note
the optimum levels will not be saved until you press the ‘Save’ button.
To change the sort order from category to item, press the ‘Item’ heading in
the list.
To print the optimum levels, press the ‘Print’ button.

Copyright © 2013 All rights reserved
Digitot.com All product names and trademarks are the property of their
respective owners.
2.11 Item Special Prices
Select ‘Setup’ -> ‘Item Special prices’.
The special prices function is used if a supplier has committed to supplying
a specific item at a specific price for a specific period of time.
You will enter the price and end date for each item, and if you capture an
invoice at a different price, you will be given a warning.
Select the supplier name, whether you would like to sort your items by
Item or Category Name and pres run.
Enter the price, the end date and select active for all affected items.
Press the save button.
To print the list, press the ‘Print’ button.
To export the list to Excel, press the ‘Export’ button.

Copyright © 2013 All rights reserved
Digitot.com All product names and trademarks are the property of their
respective owners.
Bottom Line
2.12 Headings
Select ‘Setup’ -> ‘Bottom Line’ -> ‘Headings’.
To add a new heading, enter the Heading Name – mandatory field, press
the ‘Add’ Button. The Heading will be added, and the heading list will be
refreshed.
To change a heading, select the heading from the heading list, make the
changes, and press the ‘Change’ Button. The heading will be updated, and
the heading list will be refreshed.
To delete a heading, select the heading from the list, press the ‘Delete’
Button. The heading will be deleted, and the heading list will be refreshed.
To clear the input fields, press the ‘Clear’ Button.
Copyright © 2013 All rights reserved
Digitot.com All product names and trademarks are the property of their
respective owners.
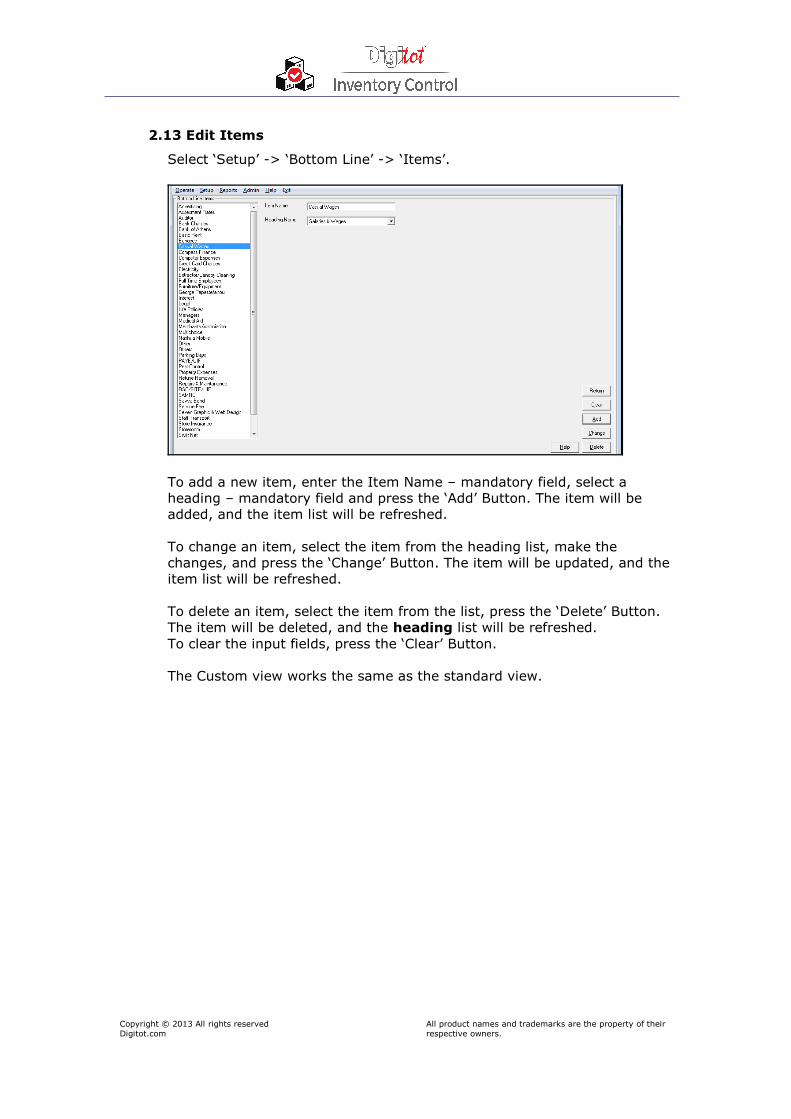
2.13 Edit Items
Select ‘Setup’ -> ‘Bottom Line’ -> ‘Items’.
To add a new item, enter the Item Name – mandatory field, select a
heading – mandatory field and press the ‘Add’ Button. The item will be
added, and the item list will be refreshed.
To change an item, select the item from the heading list, make the
changes, and press the ‘Change’ Button. The item will be updated, and the
item list will be refreshed.
To delete an item, select the item from the list, press the ‘Delete’ Button.
The item will be deleted, and the heading list will be refreshed.
To clear the input fields, press the ‘Clear’ Button.
The Custom view works the same as the standard view.

Copyright © 2013 All rights reserved
Digitot.com All product names and trademarks are the property of their
respective owners.
3 Reports
3.1 Purchase Reports
3.1.1 All
Select ‘Reports’ -> ‘Purchase Reports’ -> ‘All’.
The report can be viewed for a specific date range, by selecting the Date
option button, and selecting a Start Date and an End Date, or for a complete
month, by selecting the Month option button, and selecting a Month and a
Year. The report can be viewed for food purchases, beverage purchases, non
f & b purchases or all purchases.
Press the ‘Run’ button once you have selected your criteria.
You will be shown purchases for food, beverage and non f & B and the
purchases total, the total discount received as well as a list of all invoices and
their items for a selected period. You will also be shown a sub total for the
invoice.
You can search for a particular invoice, by entering an Invoice Number and
pressing the ‘Search’ button.
All fields are display only.
To change the sort order of the invoice list from Date to Invoice Number,
press the ‘Invoice Number’ heading in the list.
To print the report, press the ‘Print’ button.
To export the data to Excel press the ‘Export’ button.
Copyright © 2013 All rights reserved
Digitot.com All product names and trademarks are the property of their
respective owners.
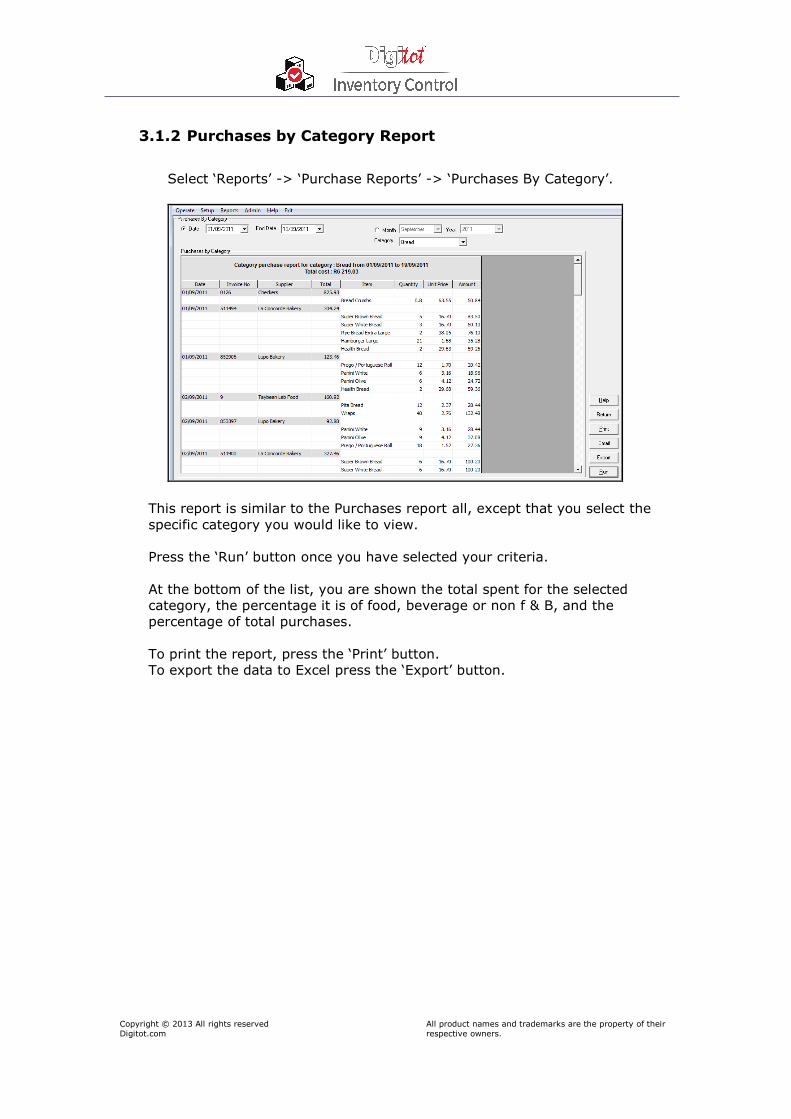
3.1.2 Purchases by Category Report
Select ‘Reports’ -> ‘Purchase Reports’ -> ‘Purchases By Category’.
This report is similar to the Purchases report all, except that you select the
specific category you would like to view.
Press the ‘Run’ button once you have selected your criteria.
At the bottom of the list, you are shown the total spent for the selected
category, the percentage it is of food, beverage or non f & B, and the
percentage of total purchases.
To print the report, press the ‘Print’ button.
To export the data to Excel press the ‘Export’ button.

Copyright © 2013 All rights reserved
Digitot.com All product names and trademarks are the property of their
respective owners.
3.1.3 Purchases by Item Report
Select ‘Reports’ -> ‘Purchase Reports’ -> ‘Purchases By Item’.
This report is similar to the Purchases report all, except that you select the
specific item you would like to view.
Press the ‘Run’ button once you have selected your criteria.
At the bottom of the list, you are shown the total spent for the selected item,
the percentage it is of food, beverage or non f & B, and the percentage of
total purchases.
To print the report, press the ‘Print’ button.
To export the data to Excel press the ‘Export’ button.

Copyright © 2013 All rights reserved
Digitot.com All product names and trademarks are the property of their
respective owners.
3.1.4 Purchases by Item by Category Report
Select ‘Reports’ -> ‘Purchase Reports’ -> ‘Purchases by Item by Category’.
The report can be viewed for a specific date range, by selecting the Date
option button, and selecting a Start Date and an End Date, or for a complete
month, by selecting the Month option button, and selecting a Month and a
Year. The report can be viewed for all categories or a selected category.
Press the ‘Run’ button once you have selected your criteria.
You will be shown all items for your selections.
The report will show the Item Name, the quantity bought for the selected
period, the purchase unit, the average cost and the total spent.
All fields are display only.
To print the report, press the ‘Print’ button.
To export the data to Excel press the ‘Export’ button.

Copyright © 2013 All rights reserved
Digitot.com All product names and trademarks are the property of their
respective owners.
3.1.5 Purchases by Supplier Report
Select ‘Reports’ -> ‘Purchase Reports’ -> ‘Purchases By Supplier’.
This report is similar to the Purchases report, except that you select the
specific supplier you would like to view.
Press the ‘Run’ button once you have selected your criteria.
At the bottom of the list, you are shown the total spent for the selected and
the percentage of total purchases.
To print the report, press the ‘Print’ button.
To export the data to Excel press the ‘Export’ button.

Copyright © 2013 All rights reserved
Digitot.com All product names and trademarks are the property of their
respective owners.
3.1.6 Purchases Breakdown Report
Select ‘Reports’ -> ‘Purchase Reports’ -> ‘Purchases Breakdown’.
The report can be viewed for a specific date range, by selecting the Date
option button, and selecting a Start Date and an End Date, or for a complete
month, by selecting the Month option button, and selecting a Month and a
Year.
Press the ‘Run’ button once you have selected your criteria.
You will be shown purchases for food, beverage and non f & B and the
purchases total.
You will also be given a list of all categories, the total spent on that category
for the selected period, as well as the percentage of food, beverage or non f
& B.
To print the report, press the ‘Print’ button.
To export the data to Excel press the ‘Export’ button.

Copyright © 2013 All rights reserved
Digitot.com All product names and trademarks are the property of their
respective owners.
3.1.7 Invoice Summary Report
Select ‘Reports’ -> ‘Purchase Reports’ -> ‘Invoice Summary’.
The report can be viewed for a specific date range, by selecting the Date
option button, and selecting a Start Date and an End Date, or for a complete
month, by selecting the Month option button, and selecting a Month and a
Year. The date range can apply to date of the invoice, or the date that the
invoice was captured, depending on which option you choose.
You also have the option of viewing invoices that are paid, unpaid or all
invoices.
Press the ‘Run’ button once you have selected your criteria.
You will be shown purchases for food, beverage and non f & B and the
purchases total, as well as a list of all invoices for a selected period. Invoice
items are not displayed on this report. You will also be shown a net total for
each invoice, which includes vat and discounts.
To change the sort order of the invoice list from Date to Invoice Number or
Supplier Name, press the ‘Invoice Number’ or ‘Supplier Name’ heading in the
list.
At the bottom of the report you will see the net totals for paid and unpaid
invoices, as well as the total discount received. The totals shown on the grid
for the invoices is before the discount has been subtracted.
To print the report, press the ‘Print’ button. To export the data to Excel press the ‘Export’ button.

Copyright © 2013 All rights reserved
Digitot.com All product names and trademarks are the property of their
respective owners.
3.1.8 Invoice Summary by Vat Supplier Report
Select ‘Reports’ -> ‘Purchase Reports’ -> ‘Invoice Summary Vat by
Supplier’.
This report shows the total invoiced to each supplier, and the total Vat paid
to each supplier for the selected period.
The report can be viewed for a specific date range, by selecting the Date
option button, and selecting a Start Date and an End Date, or for a complete
month, by selecting the Month option button, and selecting a Month and a
Year.
You can select a particular supplier or all suppliers, a particular payment type
or all, paid, not paid or all.
Press the ‘Run’ button once you have selected your criteria.
You will be shown all invoices for the selected period and supplier(s), showing
the ex vat total, the vat and the net total.
You will also see the total for each supplier.
To print the report, press the ‘Print’ button. To export the data to Excel press the ‘Export’ button.
Copyright © 2013 All rights reserved
Digitot.com All product names and trademarks are the property of their
respective owners.
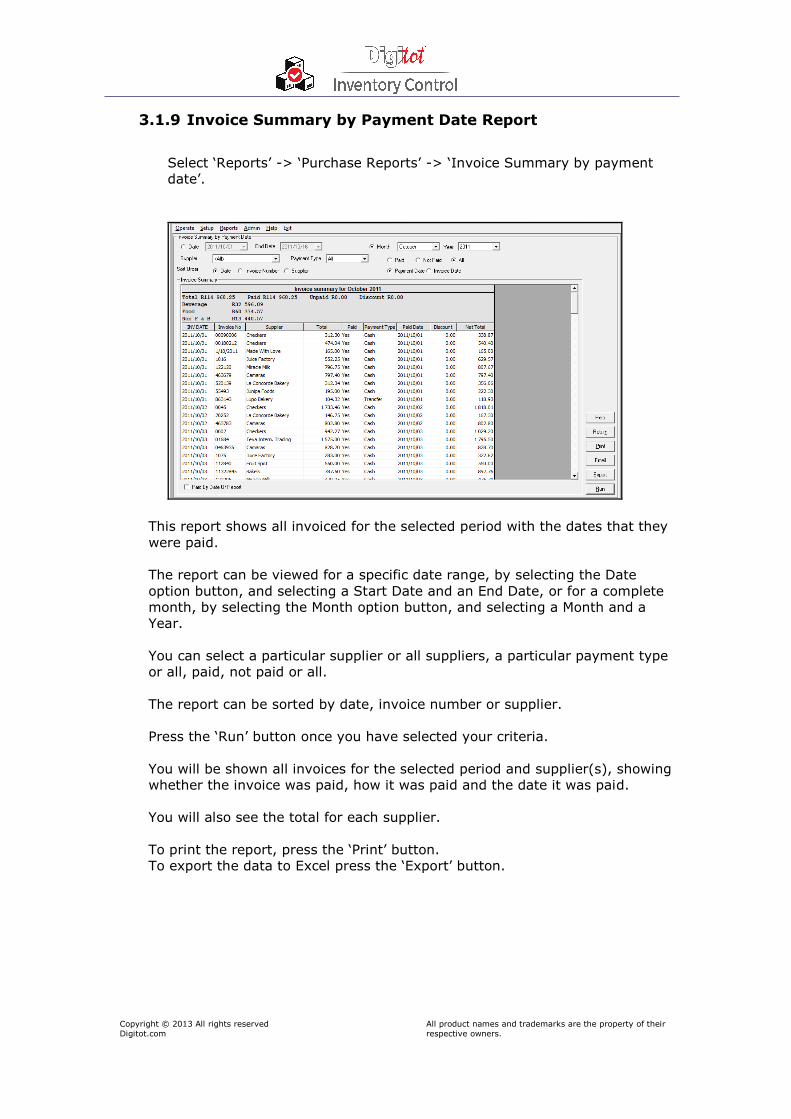
3.1.9 Invoice Summary by Payment Date Report
Select ‘Reports’ -> ‘Purchase Reports’ -> ‘Invoice Summary by payment
date’.
This report shows all invoiced for the selected period with the dates that they
were paid.
The report can be viewed for a specific date range, by selecting the Date
option button, and selecting a Start Date and an End Date, or for a complete
month, by selecting the Month option button, and selecting a Month and a
Year.
You can select a particular supplier or all suppliers, a particular payment type
or all, paid, not paid or all.
The report can be sorted by date, invoice number or supplier.
Press the ‘Run’ button once you have selected your criteria.
You will be shown all invoices for the selected period and supplier(s), showing
whether the invoice was paid, how it was paid and the date it was paid.
You will also see the total for each supplier.
To print the report, press the ‘Print’ button. To export the data to Excel press the ‘Export’ button.
Copyright © 2013 All rights reserved
Digitot.com All product names and trademarks are the property of their
respective owners.
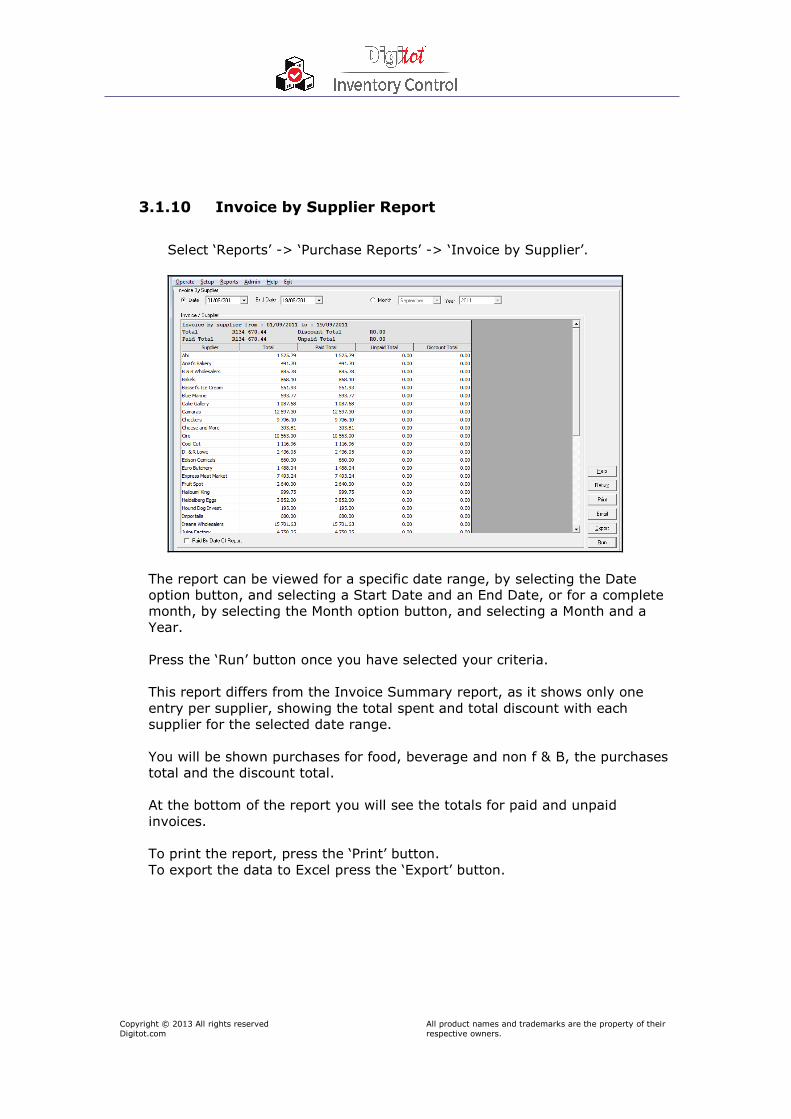
3.1.10 Invoice by Supplier Report
Select ‘Reports’ -> ‘Purchase Reports’ -> ‘Invoice by Supplier’.
The report can be viewed for a specific date range, by selecting the Date
option button, and selecting a Start Date and an End Date, or for a complete
month, by selecting the Month option button, and selecting a Month and a
Year.
Press the ‘Run’ button once you have selected your criteria.
This report differs from the Invoice Summary report, as it shows only one
entry per supplier, showing the total spent and total discount with each
supplier for the selected date range.
You will be shown purchases for food, beverage and non f & B, the purchases
total and the discount total.
At the bottom of the report you will see the totals for paid and unpaid
invoices.
To print the report, press the ‘Print’ button. To export the data to Excel press the ‘Export’ button.
Copyright © 2013 All rights reserved
Digitot.com All product names and trademarks are the property of their
respective owners.
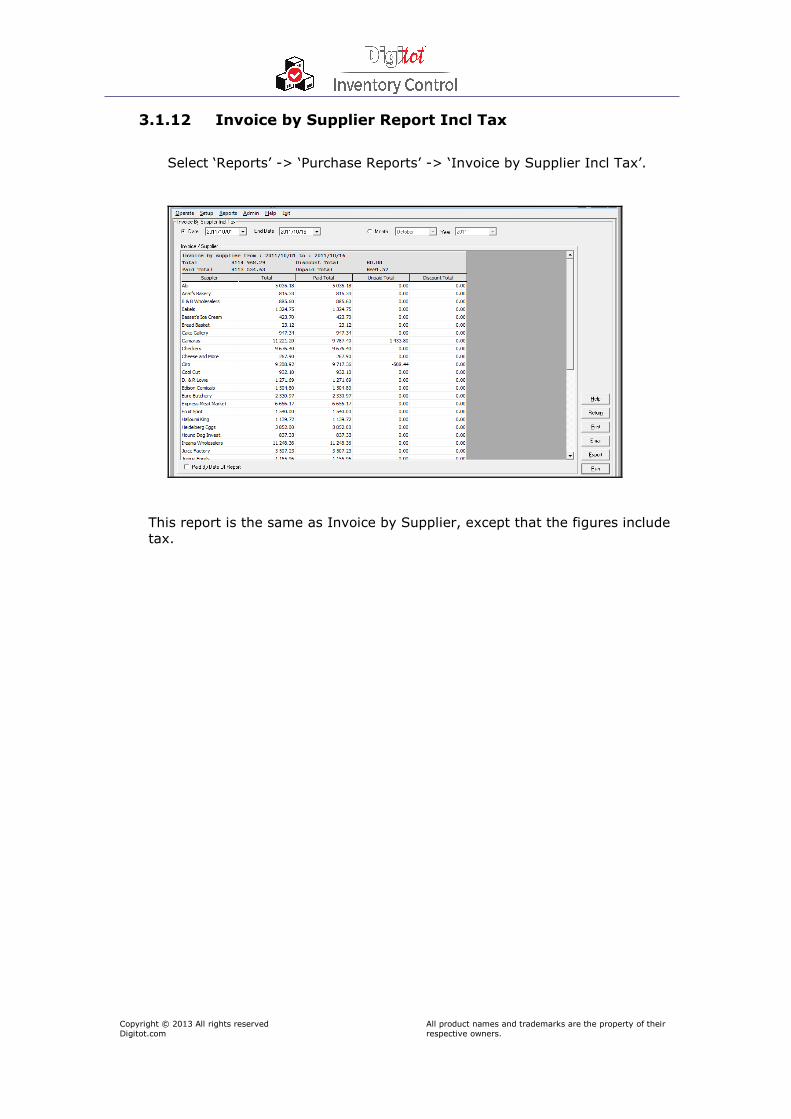
3.1.12 Invoice by Supplier Report Incl Tax
Select ‘Reports’ -> ‘Purchase Reports’ -> ‘Invoice by Supplier Incl Tax’.
This report is the same as Invoice by Supplier, except that the figures include
tax.

Copyright © 2013 All rights reserved
Digitot.com All product names and trademarks are the property of their
respective owners.
3.2 Sales Report Menu Item Sales
Select ‘Reports’ -> ‘Sales Report->Menu Item Sales’.
The report is used to view details of sales imported from the Point of Sales.
Can be viewed for a specific date range, by selecting the Date option button,
and selecting a Start Date and an End Date, or for a complete month, by
selecting the Month option button, and selecting a Month and a Year.
The report can be run for a selected Cost Type or all, and be sorted by item
or category.
Press the ‘Run’ button once you have selected your criteria.
This report shows the item name, the selling category the cost price, the
selling price, the cost %. The quantity sold, the cost and selling price for the
quantity sold and the cost % achieved.
To print the report, press the ‘Print’ button. To export the data to Excel press the ‘Export’ button.
Copyright © 2013 All rights reserved
Digitot.com All product names and trademarks are the property of their
respective owners.
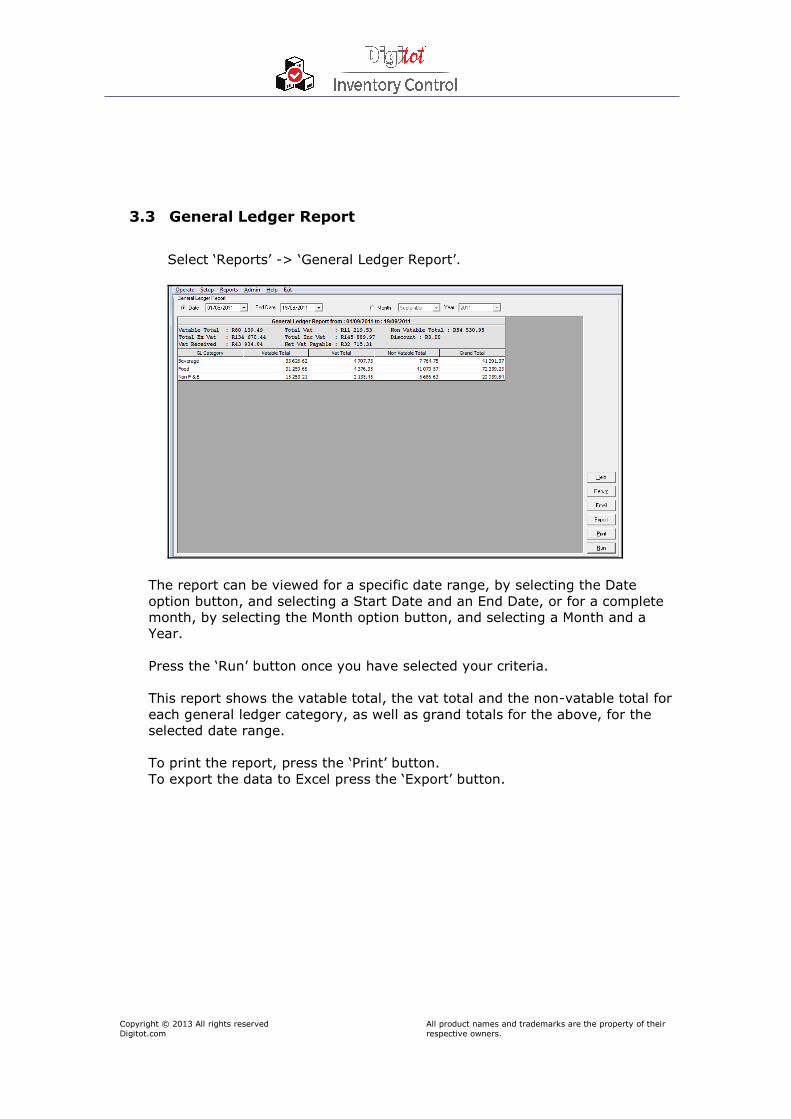
3.3 General Ledger Report
Select ‘Reports’ -> ‘General Ledger Report’.
The report can be viewed for a specific date range, by selecting the Date
option button, and selecting a Start Date and an End Date, or for a complete
month, by selecting the Month option button, and selecting a Month and a
Year.
Press the ‘Run’ button once you have selected your criteria.
This report shows the vatable total, the vat total and the non-vatable total for
each general ledger category, as well as grand totals for the above, for the
selected date range.
To print the report, press the ‘Print’ button. To export the data to Excel press the ‘Export’ button.

Copyright © 2013 All rights reserved
Digitot.com All product names and trademarks are the property of their
respective owners.
3.3 Stock Reports (Revenue Centre’s)
3.3.1 View Stock
Select ‘Reports’ -> ‘Stock Reports (Rev Centres)’ -> ‘View Stock’.
Select the open and closing dates and Revenue centre for which you would
like to view stock and press the ‘Run’ button.
You will be given a list of all items in the Revenue Centre.
To change the sort order from category to item, press the ‘Item’ heading in
the list.
The list will display the category of the item, the item name, the opening
stock, the issues, the sales, the closing stock, the variance (this is the
amount used, and is calculated by adding the opening stock and the issues,
and subtracting the sales and the closing stock), the percentage of the
variance in relation to sales, the counting unit, the cost per item (this is
calculated depending on how your system is configured. The default is
weighted average) and the value of the variance or the closing stock.
All fields listed below the grid are display only. These show opening stock
value, the issues value, the sales value, the closing stock value the cost of
the sales, the income and the cost percentage.
To print the list, press the ‘Print’ button. To export the data to Excel press the ‘Export’ button.

Copyright © 2013 All rights reserved
Digitot.com All product names and trademarks are the property of their
respective owners.
3.3.2 View Issues
Select ‘Reports’ -> ‘Stock Reports (Rev Centres)’ -> ‘View Issues’.
Select the open and closing dates and Revenue centre for which you would
like to view Issues and press the ‘Run’ button.
You will be given a list of all items issued in to the Revenue Centre.
To change the sort order from category to item, press the ‘Item’ heading in
the list.
To print the list, press the ‘Print’ button. To export the data to Excel press the ‘Export’ button.

Copyright © 2013 All rights reserved
Digitot.com All product names and trademarks are the property of their
respective owners.
3.3.3 Optimum Levels
Select ‘Reports’ -> ‘Stock Reports (Rev Centres)’ -> ‘Optimum Levels’.
Select the Revenue Centre from the combo box as well as the date you would
like to view and press the ‘Run’ button.
Please note optimum levels can only be viewed for days where closing stock
has been captured.
You will be a given a list of the items assigned to the selected Revenue
Centre with their existing optimum levels, the closing stock, how much stock
is required to replenish to optimum level and the counting unit.
To change the sort order from category to item, press the ‘Item’ heading in
the list.
All fields are display only.
To print the optimum levels, press the ‘Print’ button.
To export the data to Excel press the ‘Export’ button.

Copyright © 2013 All rights reserved
Digitot.com All product names and trademarks are the property of their
respective owners.
3.3.4 View Sales / Stock Levels
Select ‘Reports’ -> ‘Stock Reports (Rev Centres)’ -> ‘Sales / Stock Levels’.
Select the start and end date and Revenue Centre for which you would like
to view the sales / stock levels. This will default to the current date. Once
you have selected your criteria, press the ‘Run’ button.
You will be given a list of all items that you have selected.
To change the sort order from category to item, press the ‘Item’ heading
in the list.
The list will display the category of the item, the item name, the opening
stock, the purchases, the sales and the theoretical remaining stock.
All fields listed below the grid are display only
To print the list, press the ‘Print’ button.
To export the data to Excel press the ‘Export’ button.

Copyright © 2013 All rights reserved
Digitot.com All product names and trademarks are the property of their
respective owners.
3.4 Stock Reports (Bulk)
3.4.1 View Stock
Select ‘Reports’ -> ‘Stock Reports (Bulk)’ -> ‘View Stock’.
Select the month and year, or the opening and closing dates for which you
would like to view the stock take. This will default to the current month
and year. Once you have selected your criteria, press the ‘Run’ button.
Select whether you would like to view food items, beverage items, non F &
B items, all items, items for a particular area (see Item Areas under Admin
Functions) or items from a particular category.
You will be given a list of all items that you have captured.
To change the sort order from category to item, press the ‘Item’ heading
in the list.
You will have the option of viewing sales, issues or both. You may also
choose to add revenue centre values to the bulk values.
The list will display the category of the item, the item name, the opening
stock, the purchases which will be derived from the invoices captured, the
stock that has been sold or issued to revenue centres (this is a
configuration option ), the closing stock , the variance (this is the amount
used without being sold or issued, and is calculated by adding the opening
stock and the purchases, and subtracting the sales or issues and the
closing stock), the cost per item and the value of the variance or closing
stock.
All fields listed below the grid are display only. These show opening and
closing stock values.
To print the list, press the ‘Print’ button. To export the data to Excel press the ‘Export’ button.
Copyright © 2013 All rights reserved
Digitot.com All product names and trademarks are the property of their
respective owners.
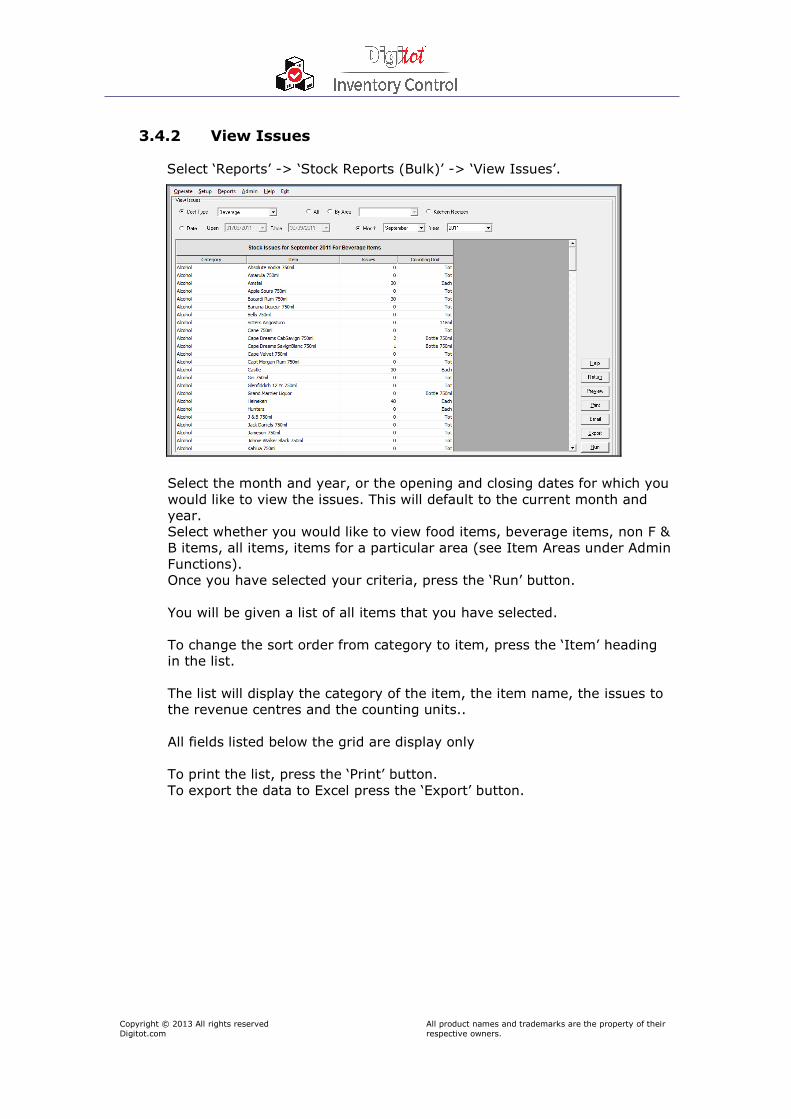
3.4.2 View Issues
Select ‘Reports’ -> ‘Stock Reports (Bulk)’ -> ‘View Issues’.
Select the month and year, or the opening and closing dates for which you
would like to view the issues. This will default to the current month and
year.
Select whether you would like to view food items, beverage items, non F &
B items, all items, items for a particular area (see Item Areas under Admin
Functions).
Once you have selected your criteria, press the ‘Run’ button.
You will be given a list of all items that you have selected.
To change the sort order from category to item, press the ‘Item’ heading
in the list.
The list will display the category of the item, the item name, the issues to
the revenue centres and the counting units..
All fields listed below the grid are display only
To print the list, press the ‘Print’ button.
To export the data to Excel press the ‘Export’ button.

Copyright © 2013 All rights reserved
Digitot.com All product names and trademarks are the property of their
respective owners.
3.4.3 View Optimum levels
Select ‘Reports’ -> ‘Stock Reports (Bulk)’ -> ‘View Optimum Levels’.
Select the date for which you would like to view the optimum levels. This
will default to the current date. Once you have selected your criteria, press
the ‘Run’ button.
Select whether you would like to view food items, beverage items, non F &
B items, all items, items for a particular area (see Item Areas under Admin
Functions), or for a particular supplier.
Select whether you would only like to see Bulk Stock values, or Revenue
Centre values as well.
Optimum levels can only be viewed for days where closing stock has been
captured.
You will be given a list of all items that you have selected.
To change the sort order from category to item, press the ‘Item’ heading
in the list.
The list will display the category of the item, the item name, the closing
stock, the optimum level and how much stock is required to replenish it.
All fields listed below the grid are display only
To print the list, press the ‘Print’ button.
To export the data to Excel press the ‘Export’ button.

Copyright © 2013 All rights reserved
Digitot.com All product names and trademarks are the property of their
respective owners.
3.4.4 Sales / Stock Levels
Select ‘Reports’ -> ‘Stock Reports (Bulk)’ -> ‘Sales / Stock Levels’.
Select the start and end date for which you would like to view the sales /
stock levels. This will default to the current date. Once you have selected
your criteria, press the ‘Run’ button.
Select whether you would like to view food items, beverage items, non F &
B items, all items, items for a particular area (see Item Areas under Admin
Functions) or Menu Items.
You will have the option to include revenue centre totals, an option to view
issues or sales.
You will be given a list of all items that you have selected.
To change the sort order from category to item, press the ‘Item’ heading
in the list.
The list will display the category of the item, the item name, the opening
stock, the purchases, the sales, the remaining stock, the optimum level
and how many are required to replenish the item.
All fields listed below the grid are display only
To print the list, press the ‘Print’ button.
To export the data to Excel press the ‘Export’ button.

Copyright © 2013 All rights reserved
Digitot.com All product names and trademarks are the property of their
respective owners.
3.4.5 Stock Values
Select ‘Reports’ -> ‘Stock Reports (Bulk)’ -> ‘Stock Values’.
This report shows the opening and closing Stock Values and issues values
for Bulk Stock for each cost type and Each Revenue Centre as well as
totals.
Select the start and end date for which you would like to view the stock
values. Once you have selected your criteria, press the ‘Run’ button.
All fields listed below the grid are display only
To print the list, press the ‘Print’ button.
To export the data to Excel press the ‘Export’ button.
Copyright © 2013 All rights reserved
Digitot.com All product names and trademarks are the property of their
respective owners.
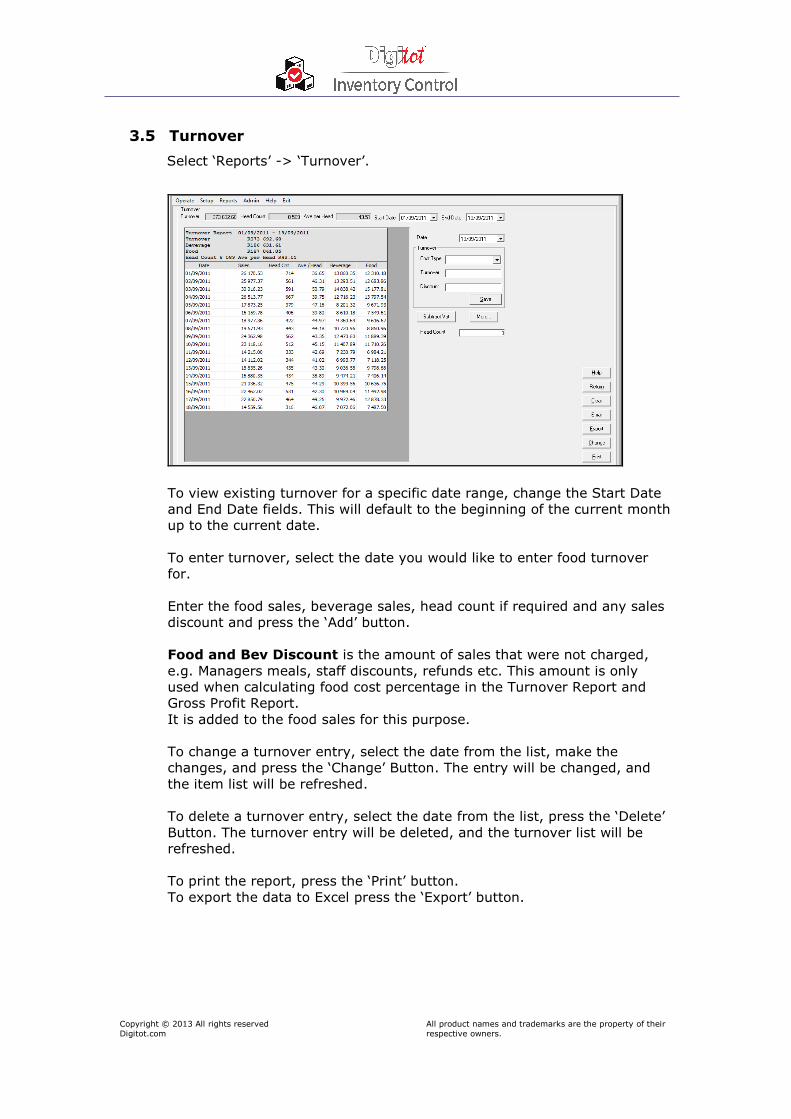
3.5 Turnover
Select ‘Reports’ -> ‘Turnover’.
To view existing turnover for a specific date range, change the Start Date
and End Date fields. This will default to the beginning of the current month
up to the current date.
To enter turnover, select the date you would like to enter food turnover
for.
Enter the food sales, beverage sales, head count if required and any sales
discount and press the ‘Add’ button.
Food and Bev Discount is the amount of sales that were not charged,
e.g. Managers meals, staff discounts, refunds etc. This amount is only
used when calculating food cost percentage in the Turnover Report and
Gross Profit Report.
It is added to the food sales for this purpose.
To change a turnover entry, select the date from the list, make the
changes, and press the ‘Change’ Button. The entry will be changed, and
the item list will be refreshed.
To delete a turnover entry, select the date from the list, press the ‘Delete’
Button. The turnover entry will be deleted, and the turnover list will be
refreshed.
To print the report, press the ‘Print’ button.
To export the data to Excel press the ‘Export’ button.
Copyright © 2013 All rights reserved
Digitot.com All product names and trademarks are the property of their
respective owners.
3.6 Turnover vs Sales
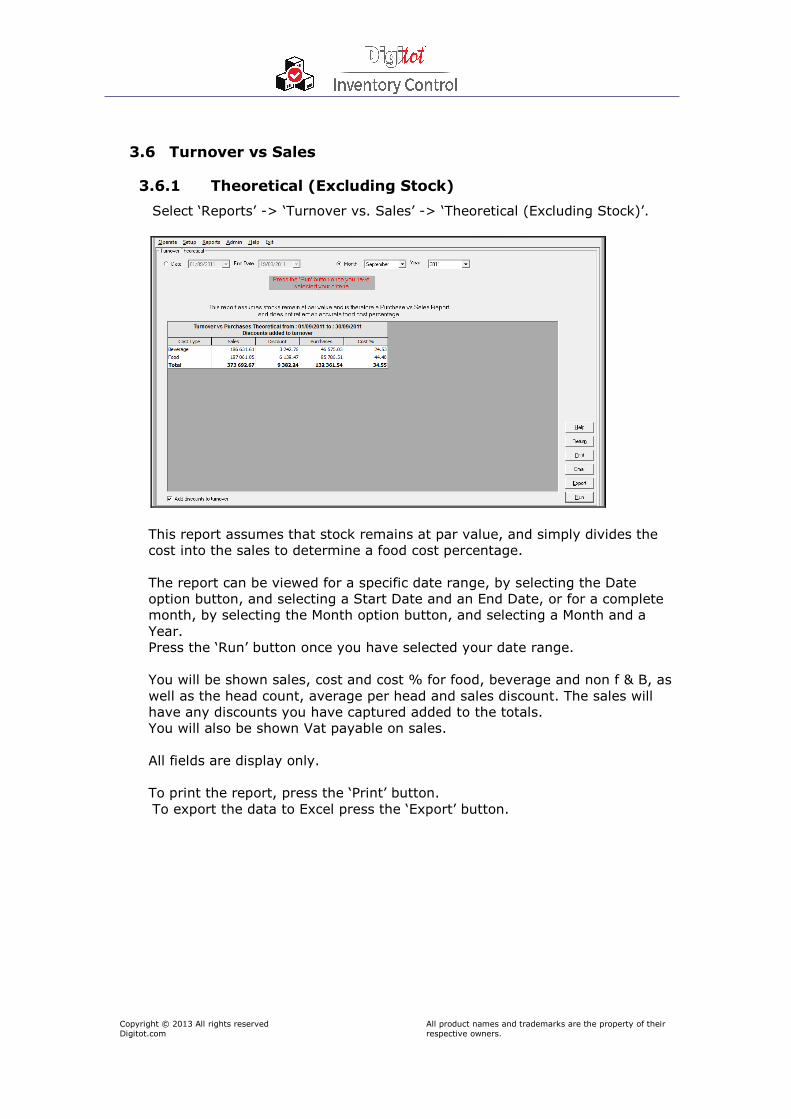
3.6.1 Theoretical (Excluding Stock)
Select ‘Reports’ -> ‘Turnover vs. Sales’ -> ‘Theoretical (Excluding Stock)’.
This report assumes that stock remains at par value, and simply divides the
cost into the sales to determine a food cost percentage.
The report can be viewed for a specific date range, by selecting the Date
option button, and selecting a Start Date and an End Date, or for a complete
month, by selecting the Month option button, and selecting a Month and a
Year.
Press the ‘Run’ button once you have selected your date range.
You will be shown sales, cost and cost % for food, beverage and non f & B, as
well as the head count, average per head and sales discount. The sales will
have any discounts you have captured added to the totals.
You will also be shown Vat payable on sales.
All fields are display only.
To print the report, press the ‘Print’ button.
To export the data to Excel press the ‘Export’ button.

Copyright © 2013 All rights reserved
Digitot.com All product names and trademarks are the property of their
respective owners.
3.6.2 Accurate (With Stock)
Select ‘Reports’ -> ‘Turnover vs. Sales’ -> ‘Accurate (With Stock)’.
This report calculates the opening and closing stock difference, and subtracts
it from the food cost, and then divides the result into the sales to determine
an accurate food cost percentage.
The report can be viewed for a specific date range, by selecting the Date
option button, and selecting a Start Date and an End Date, or for a complete
month, by selecting the Month option button, and selecting a Month and a
Year.
Press the ‘Run’ button once you have selected your date range.
You will be shown sales, cost and cost % for food, beverage and non f & B, as
well as the head count, average per head and sales discount. The accurate
report will also show the difference between open and closing stock. The
sales will have any discounts you have captured added to the totals.
You will also be shown Vat payable on sales.
Opening and closing stock values are also displayed.
All fields are display only.
To print the report, press the ‘Print’ button.
To export the data to Excel press the ‘Export’ button

Copyright © 2013 All rights reserved
Digitot.com All product names and trademarks are the property of their
respective owners.
3.6.3 Multiple Report
Select ‘Reports’ -> ‘Turnover vs. Sales’ -> ‘Multiple Report’.
This report is used to compare results over multiple (up to five) periods.
Enter the opening and closing stock dates for the required periods and press
the ‘Run’ button.
For each period you will be shown Opening Stock, Purchases, Closing Stock,
Usage, Sales and Cost %.
To print the report, press the ‘Print’ button.
To export the data to Excel press the ‘Export’ button.

Copyright © 2013 All rights reserved
Digitot.com All product names and trademarks are the property of their
respective owners.
3.7 Price Changes
Select ‘Reports’ -> ‘Price Changes’.
This report gives a list of all price changes entered using the ‘Update’ button
on the Invoice Item page (used when capturing Invoices). Please note the
change will not be recorded if it is done on the Item page.
The report can be viewed for a specific date range, by selecting the Date
option button, and selecting a Start Date and an End Date, or for a complete
month, by selecting the Month option button, and selecting a Month and a
Year.
You can select all suppliers or a particular supplier.
Press the ‘Run’ button once you have selected your criteria.
The report will show the date the price change was captured, the supplier,
the item the old price, the new price and the percentage change.
To print the report, press the ‘Print’ button. To export the data to Excel press the ‘Export’ button.

Copyright © 2013 All rights reserved
Digitot.com All product names and trademarks are the property of their
respective owners.
3.8 Payments
Select ‘Reports’ -> ‘Payments’.
This report gives the total of all invoice captured for the selected period.
Press the ‘Run’ button once you have selected your criteria.
The report will Break down the invoices into different payment types,
showing number of invoices paid and unpaid, value paid and unpaid and the
grand total.
To print the report, press the ‘Print’ button. To export the data to Excel press the ‘Export’ button.

Copyright © 2013 All rights reserved
Digitot.com All product names and trademarks are the property of their
respective owners.
4 Admin
4.1 Calculators
4.1.1 Add Vat
Select ‘Admin’ -> ‘Calculators’-> ‘Add Vat’.
This function is used when you have an amount that excludes Vat, and
you would like to calculate the amount including Vat.
Enter the amount excluding Vat.
Enter the Vat percentage if it is different to the figure currently displayed.
Press the ‘Add’ button. You will be shown the amount including Vat, and
the vat amount.

Copyright © 2013 All rights reserved
Digitot.com All product names and trademarks are the property of their
respective owners.
4.1.2 Subtract Vat
Select ‘Admin’ -> ‘Calculators’-> ‘Subtract Vat’.
This function is used when you have an amount that includes Vat, and you
would like to calculate the amount excluding Vat.
Enter the amount including Vat.
Enter the Vat percentage if it is different to the figure currently displayed.
Press the ‘Subtract’ button. You will be shown the amount excluding Vat,
and the vat amount.

Copyright © 2013 All rights reserved
Digitot.com All product names and trademarks are the property of their
respective owners.
4.1.3 Discount
Select ‘Admin’ -> ‘Calculators’-> ‘Discount’.
This function is used to calculate a percentage discount.
Enter the original price, enter the discounted price and press the
‘Calculate’ button.
You will be given the percentage discount on the original price.

Copyright © 2013 All rights reserved
Digitot.com All product names and trademarks are the property of their
respective owners.
4.2 Configure
4.2.1 General
Select ‘Admin’ -> ‘Configure’-> ‘General’.
This is used to configure the following:
The name of the store that appears on reports.
Whether you would like a confirm screen before exiting the program.
Whether you would like to hide the discount option from the invoice item
page.
Whether you would like to define your own order for stock take sheets.
Whether you would like to always update item price to last purchase price
Whether to round up fractions of cents when adding VAT to invoice items,
and from what amount to round up.
The currency symbol.
Whether tax is Vat or GST.
The tax percentage.
The variance percentage.
Whether to show variance percentage.
Whether you want to show consumption (issues plus variance combined).
Select whether searches in grids should look for text at the start of fields, or
anywhere in fields.
Whether to read zero values sales.
Whether to auto import sales and what time.
Whether to auto exit and after how long
Email details.
Address details.

Copyright © 2013 All rights reserved
Digitot.com All product names and trademarks are the property of their
respective owners.
4.2.2 Item Specific
Select ‘Admin’ -> ‘Configure’-> ‘Item Specific’.
This is used to configure the following:
Whether to give a warning if an item price fluctuates by more than a
certain percent when capturing invoices, and what that percent should be.
Whether item prices and turnover includes Vat.
Whether to use the Highest Price, Lowest Price, Average Price, Last
Purchase Price, Weighted Average or Primary supplier when calculating
stock value.
Whether to show sales or issues with stock view. This can be changed on
the report page as well.
Whether to import recipe sales as raw ingredients
Whether to show shortages (variances) as positive or negative.
Whether to show opening stock on stock sheets.
Whether to show Counting Unit First
Whether to auto generate item ID
Whether to use debit batches
Whether to use partial payment
Whether to confirm before saving stock
Whether to disable issue out

Copyright © 2013 All rights reserved
Digitot.com All product names and trademarks are the property of their
respective owners.
4.2.3 Digitag
Select ‘Admin’ -> ‘Configure’-> ‘Digitag.
This form is used to configure usage with the Digitag.
You are given a list containing Bulk Store and all existing Revenue Centres.
Assign the Digitag zones to each item, and select the port the Digitag will be
plugged into.
Select which version of the Digitag you would like to use.
Copyright © 2013 All rights reserved
Digitot.com All product names and trademarks are the property of their
respective owners.
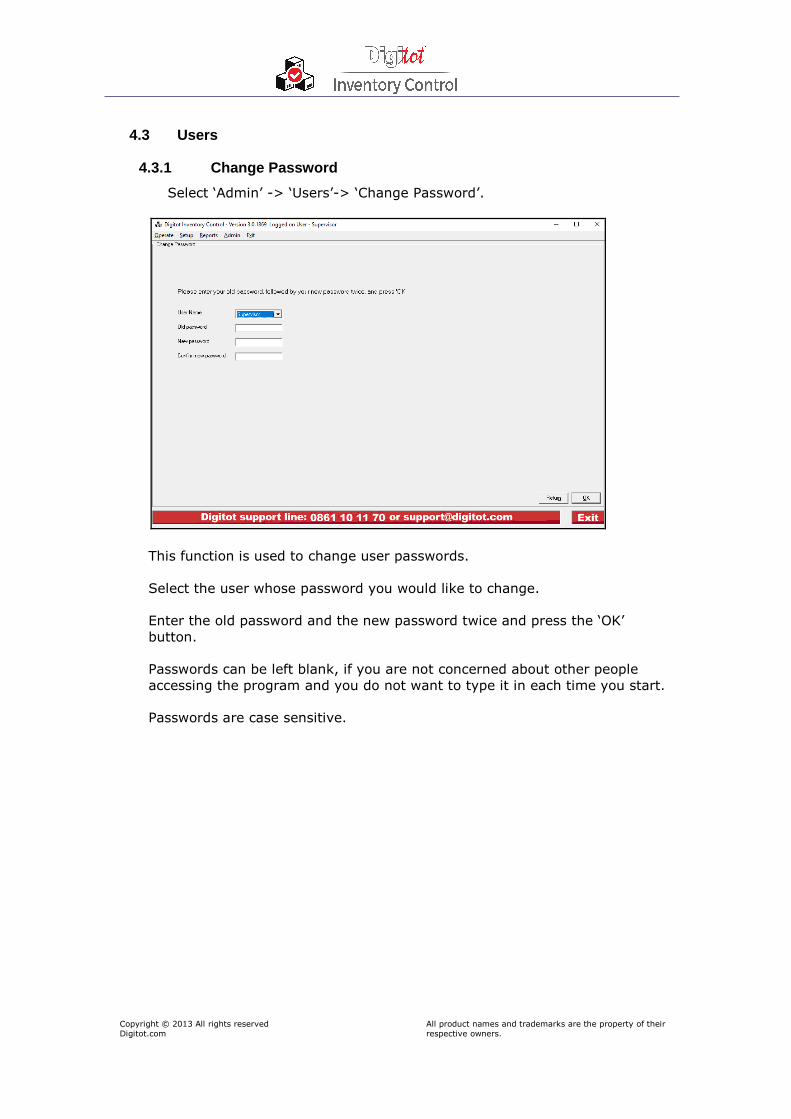
4.3 Users
4.3.1 Change Password
Select ‘Admin’ -> ‘Users’-> ‘Change Password’.
This function is used to change user passwords.
Select the user whose password you would like to change.
Enter the old password and the new password twice and press the ‘OK’
button.
Passwords can be left blank, if you are not concerned about other people
accessing the program and you do not want to type it in each time you start.
Passwords are case sensitive.

Copyright © 2013 All rights reserved
Digitot.com All product names and trademarks are the property of their
respective owners.
4.3.2 Edit Users
Select ‘Admin’ -> ‘Users’-> ‘Edit Users’.
You will be required to type in your password again to use this option.
Adding a user:
Type in the user name, select the options that the new user requires, and
press add. The new user will be created with a blank password. This can be
changed using the ‘Change Password’ function.
Deleting a user:
Select the user you would like to delete from the user list and press the
‘Delete’ button.
Please note that the user ‘Supervisor’ may not be deleted.
You will be asked to confirm the delete, and the user will be deleted.
Changing a user:
Select the user you would like to change from the user list, make the
required changes, and press the ‘Change’ button.
Please note that the user ‘Supervisor’ may not be changed.
Copyright © 2013 All rights reserved
Digitot.com All product names and trademarks are the property of their
respective owners.
5 Operate
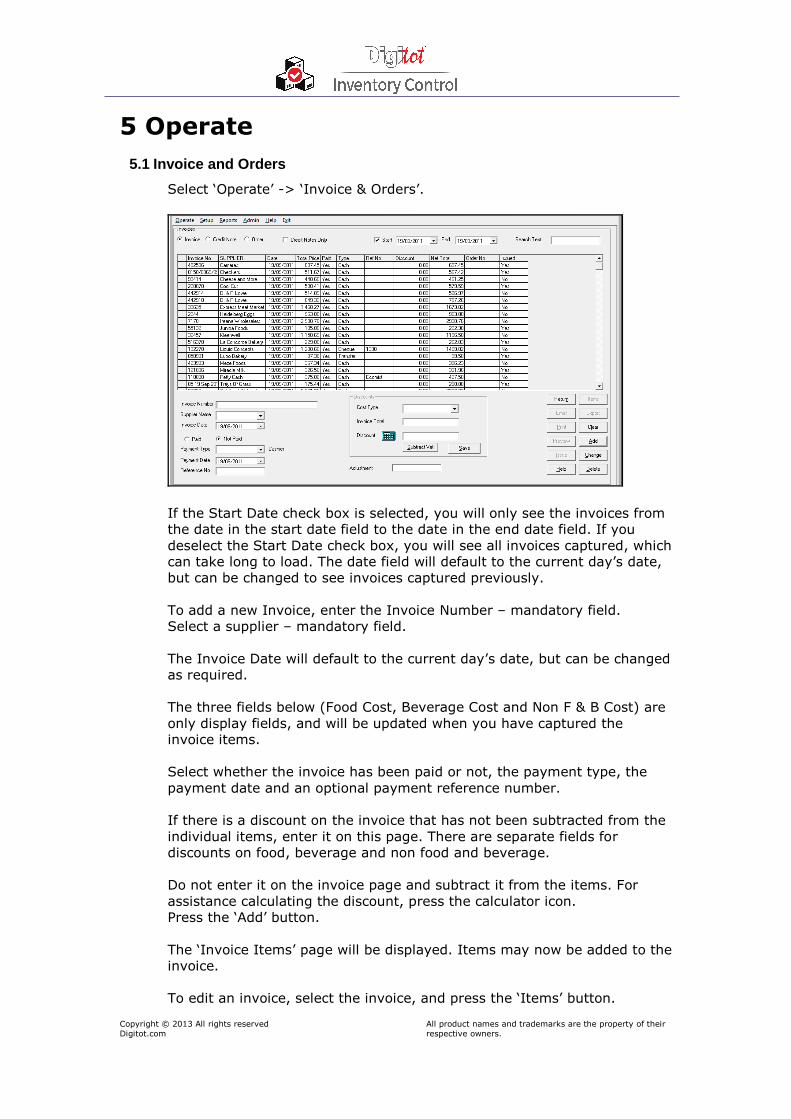
5.1 Invoice and Orders
Select ‘Operate’ -> ‘Invoice & Orders’.
If the Start Date check box is selected, you will only see the invoices from
the date in the start date field to the date in the end date field. If you
deselect the Start Date check box, you will see all invoices captured, which
can take long to load. The date field will default to the current day’s date,
but can be changed to see invoices captured previously.
To add a new Invoice, enter the Invoice Number – mandatory field.
Select a supplier – mandatory field.
The Invoice Date will default to the current day’s date, but can be changed
as required.
The three fields below (Food Cost, Beverage Cost and Non F & B Cost) are
only display fields, and will be updated when you have captured the
invoice items.
Select whether the invoice has been paid or not, the payment type, the
payment date and an optional payment reference number.
If there is a discount on the invoice that has not been subtracted from the
individual items, enter it on this page. There are separate fields for
discounts on food, beverage and non food and beverage.
Do not enter it on the invoice page and subtract it from the items. For
assistance calculating the discount, press the calculator icon.
Press the ‘Add’ button.
The ‘Invoice Items’ page will be displayed. Items may now be added to the
invoice.
To edit an invoice, select the invoice, and press the ‘Items’ button.

Copyright © 2013 All rights reserved
Digitot.com All product names and trademarks are the property of their
respective owners.
To delete an invoice, select the invoice, and press the ‘Delete’ button.
To clear the input fields, press the ‘Clear’ button.
To search for an invoice, enter text in the Search Text field. As you type,
the item list will be refreshed, the search will be done on the heading that
the list is sorted by.
To change the sort order of the invoice list from Invoice Number to
Supplier or Invoice Date, ‘ Supplier’ or ‘Invoice Date’ heading in the list.
The Net Total shown at the end of the grid is the total minus any invoice
discounts, and with vat added to vatable items.
To issue the items to a revenue centre, select the invoice, and press the
‘Issue’ button.

Copyright © 2013 All rights reserved
Digitot.com All product names and trademarks are the property of their
respective owners.
5.2 Invoice Items
The top three fields on the screen will display the invoice number, supplier
and date of the invoice you are currently working on.
To add a new Item, select the item – mandatory field. Only items for the
supplier you have selected will be displayed in the drop down box. If you
type text in the item lookup field, you will be taken to the first item
starting with the text you have typed.
The quantity will default to 1, but can be changed as required.
All suppliers who sell this item will be displayed with their current prices.
The current unit price will appear. This can be changed. If you would like
to make the price change permanent, as opposed to just for this particular
invoice, press the ‘Update’ button. This will update the price for the
selected item.
As you change the quantity and / or unit price, the total price will
automatically be updated. If you change the unit price field, the % Price
Change field will be updated to display how much more or less you are
being charged, compared to your normal saved price.
Prices can be entered including vat as required.
A discount can be subtracted from the item price.
Press the ‘Add’ button.
To edit an item, select the item, make the required changes and press the
‘Change’ button.
To delete an item, select the item, and press the ‘Delete’ button.
If an Item has not been added to the list of items yet, you can press the
‘Add Item to Item List’ button, to avoid having to leave the invoice items
page.

Copyright © 2013 All rights reserved
Digitot.com All product names and trademarks are the property of their
respective owners.
As you items are added, changed or deleted, a running total is displayed
of the invoice total including and excluding Vat. You must select whether
your prices include Vat.
To clear the input fields, press the ‘Clear’ button.
If you would like to subtract Vat from an item, select the item, ensure that
you are happy with the Vat percentage, and press the ‘Subtract’ button.
If you would like to subtract a discount from an item, select the item,
ensure that you are happy with the discount percentage, and press the
‘Subtract’ button.
The last figures you use for discount percentage, will be the default, the
next time you capture items.
To return to the invoice capture page, press the ‘Return’ button, or press
the ‘Invoices’ button on the toolbar.

Copyright © 2013 All rights reserved
Digitot.com All product names and trademarks are the property of their
respective owners.
5.3 Stocktake (Bulk)
5.3.1 Capture Stock
Select ‘Operate’ -> ‘Stocktake (Bulk)’-> ‘Capture Stock’.
Select the month and year, or the opening and closing dates for which you
would like to enter or view the stock take. This will default to the current
month and year. Once you have selected your criteria, press the ‘Run’
button.
Select whether you would like to edit food items, beverage items, non F &
B items , all items, items for a particular area (see Item Areas under
Admin Functions), kitchen recipes or a particular category.
You will be given a list of all items that you have captured.
To change the sort order from category to item, press the ‘Item’ heading
in the list.
The list will display the category of the item, the item name, the opening
stock (this field can be edited) and the closing stock (this field can be
edited) as well as the counting unit.
Enter your closing stock as required, and press the ‘Save’ button.
Saving the stock will copy the closing stock to the opening stock of the
following day
To print the list, press the ‘Print’ button. On printed lists, opening and
closing stocks of zero will be left blank, so that they can be filled in while
doing stock take.
To export the list to Excel press the ‘Export’ button.
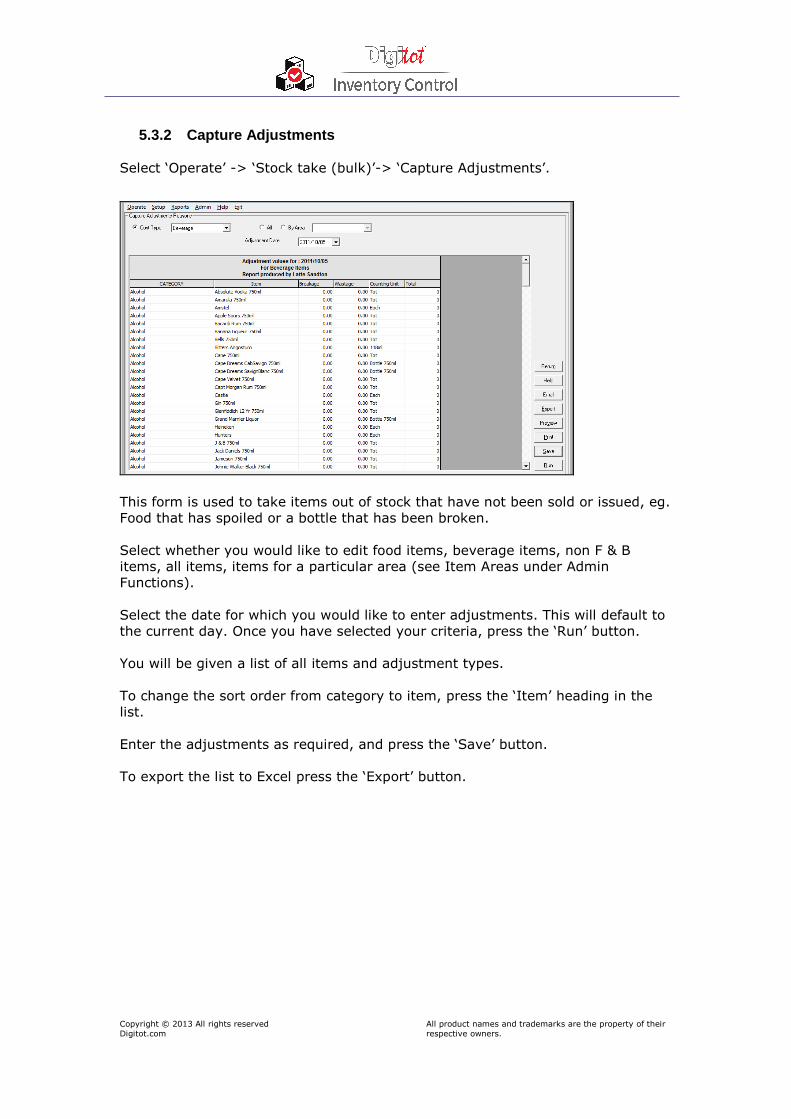
Copyright © 2013 All rights reserved
Digitot.com All product names and trademarks are the property of their
respective owners.
5.3.2 Capture Adjustments
Select ‘Operate’ -> ‘Stock take (bulk)’-> ‘Capture Adjustments’.
This form is used to take items out of stock that have not been sold or issued, eg.
Food that has spoiled or a bottle that has been broken.
Select whether you would like to edit food items, beverage items, non F & B
items, all items, items for a particular area (see Item Areas under Admin
Functions).
Select the date for which you would like to enter adjustments. This will default to
the current day. Once you have selected your criteria, press the ‘Run’ button.
You will be given a list of all items and adjustment types.
To change the sort order from category to item, press the ‘Item’ heading in the
list.
Enter the adjustments as required, and press the ‘Save’ button.
To export the list to Excel press the ‘Export’ button.
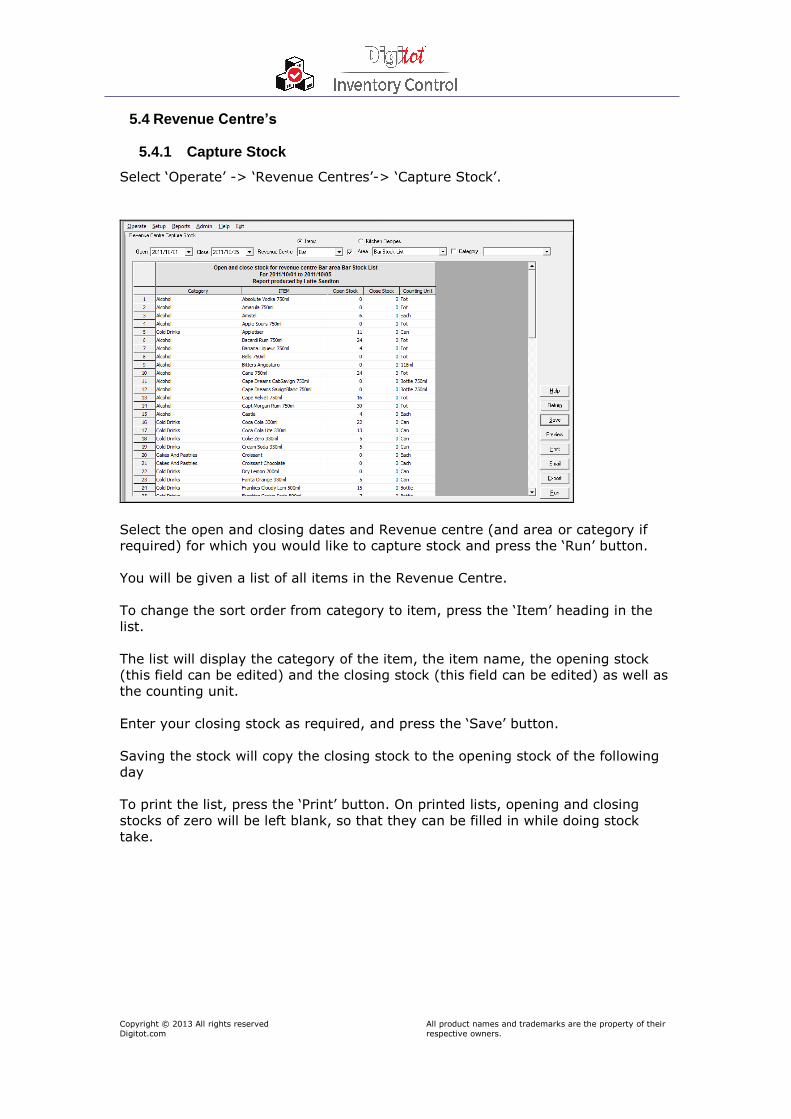
Copyright © 2013 All rights reserved
Digitot.com All product names and trademarks are the property of their
respective owners.
5.4 Revenue Centre’s
5.4.1 Capture Stock
Select ‘Operate’ -> ‘Revenue Centres’-> ‘Capture Stock’.
Select the open and closing dates and Revenue centre (and area or category if
required) for which you would like to capture stock and press the ‘Run’ button.
You will be given a list of all items in the Revenue Centre.
To change the sort order from category to item, press the ‘Item’ heading in the
list.
The list will display the category of the item, the item name, the opening stock
(this field can be edited) and the closing stock (this field can be edited) as well as
the counting unit.
Enter your closing stock as required, and press the ‘Save’ button.
Saving the stock will copy the closing stock to the opening stock of the following
day
To print the list, press the ‘Print’ button. On printed lists, opening and closing
stocks of zero will be left blank, so that they can be filled in while doing stock
take.

Copyright © 2013 All rights reserved
Digitot.com All product names and trademarks are the property of their
respective owners.
5.4.2 Import Sales
Select ‘Operate’ -> ‘Import Sales’.
This function is used to import sales from the POS system.
This function must be performed after the POS end of day.
Enter the drive and directory where the POS figures are kept.
Select the date for which you would like to import the sales and press the ‘Run’
button.
If you would like to add the sales to the revenue centre, according to the POS
unit it was sold from, select the ‘Assign Sale to Revenue ID’ check box , otherwise
leave it blank.
All sales will be imported. Any errors, such as an unrecognized POS Code or item
will be displayed.
To print the Error list, press the ‘Print’ button.

Copyright © 2013 All rights reserved
Digitot.com All product names and trademarks are the property of their
respective owners.
5.4.3 Capture Issues
Select ‘Operate’ -> ‘Revenue Centres’-> ‘Issues’.
Select the date, whether you are issuing in (from bulk store to revenue centre) or
out (from Revenue Centre to bulk store) and Revenue Centre (and area or
category if required) you would like to edit from the combo box and press the
‘Run’ button.
You will be a given a list of the items assigned to the selected Revenue Centre.
To change the sort order from category to item, press the ‘Item’ heading in the
list.
Type in the correct issue amount and press the ‘Save’ button. Please note the
issues will not be saved until you press the ‘Save’ button.
You can use the Issue1 or Issue2 column or both.
To print the list, press the ‘Print’ button.

Copyright © 2013 All rights reserved
Digitot.com All product names and trademarks are the property of their
respective owners.
5.5 Bottom Line
5.5.1 Standard
Select ‘Operate’ -> ‘Bottom Line’-> ‘Standard’.
Bottom line is captured / viewed for a specific month and year. The default is the
current month and year, but can be changed as required.
This page is used to capture your non-food expenses, such as salaries, rent,
electricity etc…, to calculate your net profit (Retention) for a specific month.
Total Sales, Food and Beverage cost of sales, as well as gross profit will be
calculated from the invoices and turnover that you have captured for the month.
The remaining figures will be calculated from the figures captured on this page.
Only the amount column fields that are not highlighted can be changed. The
remaining is totals and percentage of sales, and will be calculated by the
program. To enter an amount select the field, type in the amount, and press the
‘Enter’ or arrow down key. The ‘Enter’ key will not move the cursor from a field in
which you are not allowed to enter text. After entering figures press the ‘Save’
button.
The following is an explanation of the Total fields:
Total Sales: This is the total food and beverage turnover captured for the month.
F & B cost of sales : This is the total of all items invoiced, excluding non f & b,
for the month.
Gross Profit : This is Total Sales minus F & B cost of sales.
Non F & B cost of sales : This is the total of all amounts entered on this
page.
Non F & B Invoices : This is the total of all non F & B invoices captured..
Operating Expenditure : This is Total of F & B and Non F & B cost of sales.
Retention : This is Total Sales minus Operating Expenditure.

Copyright © 2013 All rights reserved
Digitot.com All product names and trademarks are the property of their
respective owners.
The ‘Percentage of sales’ column is the selected field, as a percentage of Total
Sales.
To print the page, press the ‘Print’ button. To export the list to Excel press the
‘Export’ button. Select the folder you would like to export to and press the ‘Save’
button.

Copyright © 2013 All rights reserved
Digitot.com All product names and trademarks are the property of their
respective owners.
5.5.2 Custom
Select ‘Operate’ -> ‘Bottom Line’-> ‘Custom’.
Bottom line is captured / viewed for a specific month and year. The default is the
current month and year, but can be changed as required.
This page is used to capture your non-food expenses, such as salaries, rent,
electricity etc…, to calculate your net profit (Retention) for a specific month.
Total Sales, Food and Beverage cost of sales, as well as gross profit will be
calculated from the invoices and turnover that you have captured for the month.
The remaining figures will be calculated from the figures captured on this page.
Only the amount column fields that are not highlighted can be changed. The
remaining is totals and percentage of sales, and will be calculated by the
program. To enter an amount select the field, type in the amount, and press the
‘Enter’ or arrow down key. The ‘Enter’ key will not move the cursor from a field in
which you are not allowed to enter text. After entering figures press the ‘Save’
button.
The following is an explanation of the Total fields:
Total Sales : This is the total food and beverage turnover captured for the
month.
F & B cost of sales : This is the total of all items invoiced, excluding non f & b,
for the month.
Gross Profit : This is Total Sales minus F & B cost of sales.
Non F & B cost of sales : This is the total of all amounts entered on this
page.
Non F & B Invoices : This is the total of all non F & B invoices captured..
Operating Expenditure : This is Total of F & B and Non F & B cost of sales.

Copyright © 2013 All rights reserved
Digitot.com All product names and trademarks are the property of their
respective owners.
Retention : This is Total Sales minus Operating Expenditure.
The ‘Percentage of sales’ column is the selected field, as a percentage of Total
Sales.
To print the page, press the ‘Print’ button. To export the list to Excel press the
‘Export’ button. Select the folder you would like to export to and press the ‘Save’
button.
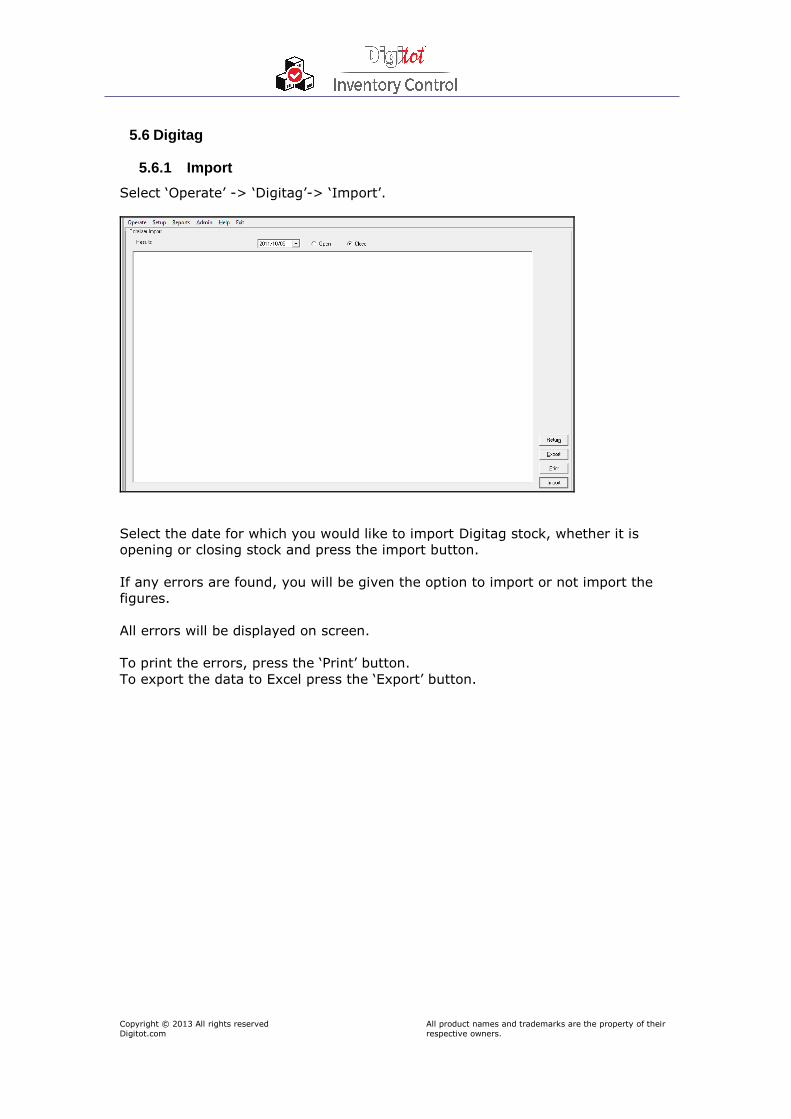
Copyright © 2013 All rights reserved
Digitot.com All product names and trademarks are the property of their
respective owners.
5.6 Digitag
5.6.1 Import
Select ‘Operate’ -> ‘Digitag’-> ‘Import’.
Select the date for which you would like to import Digitag stock, whether it is
opening or closing stock and press the import button.
If any errors are found, you will be given the option to import or not import the
figures.
All errors will be displayed on screen.
To print the errors, press the ‘Print’ button.
To export the data to Excel press the ‘Export’ button.

Copyright © 2013 All rights reserved
Digitot.com All product names and trademarks are the property of their
respective owners.
5.6.2 Clear Stock Figures
Select ‘Operate’ -> ‘Digitag’-> ‘Clear Stock Figures’.
This function is used to clear stock figures if they have been imported incorrectly.
Select whether it is bulk stock, or one of the revenue centres, the date, if it is
open or closing stock, and press the ‘Clear’ button.


