
**Formerly Serco Learning**
Advanced Learning (formerly Serco Learning), Ground Floor, 4/5 Ushers Court, Ushers Quay, Dublin 8, Ireland
Facility ePortal Teacher User Guide
Ground Floor, 4/5 Ushers Court, Ushers Quay, Dublin 8, Ireland
@advancedcomputersoftware.com t 01 672 2800 f 01 672 2039 www.progressomis.com
ePortal Teacher User Guide
Ground Floor, 4/5 Ushers Court, Ushers Quay, Dublin 8, Ireland
www.progressomis.com
ePortal Teacher User Guide

Advanced Learning (formerly Serco Learning), Ground Floor, 4/5 Ushers Court, Ushers Quay, Dublin 8, Ireland
© 2013 Advanced Learning
The Copyright in this work is
issued in confidence for the purpose only for which it is supplied. It must not be
reproduced in whole or in part or used for tendering or manufacturing purposes
except under an agreement or with the consent in writing of
and then only on the condition this notice is included in any such reproduction.
No information as to the contents or subject matter of this document or any part
thereof arising directly or indirectly shall be given orally or in writing or
communicated in any manner whatsoever to any employee therefore without
prior consent in writing of
Ground Floor, 4/5 Ushers Court, Ushers Quay, Dublin 8, Ireland
@advancedcomputersoftware.com t 1890 20 24 25 f 01 672 2039 www.progressomis.com
dvanced Learning (a subsidiary of ABS)
The Copyright in this work is vested in Advanced Learning and the document is
issued in confidence for the purpose only for which it is supplied. It must not be
reproduced in whole or in part or used for tendering or manufacturing purposes
except under an agreement or with the consent in writing of Advanced Lea
and then only on the condition this notice is included in any such reproduction.
No information as to the contents or subject matter of this document or any part
thereof arising directly or indirectly shall be given orally or in writing or
ted in any manner whatsoever to any employee therefore without
prior consent in writing of Advanced Learning
Ground Floor, 4/5 Ushers Court, Ushers Quay, Dublin 8, Ireland
www.progressomis.com
and the document is
issued in confidence for the purpose only for which it is supplied. It must not be
reproduced in whole or in part or used for tendering or manufacturing purposes
Advanced Learning
and then only on the condition this notice is included in any such reproduction.
No information as to the contents or subject matter of this document or any part
thereof arising directly or indirectly shall be given orally or in writing or
ted in any manner whatsoever to any employee therefore without
Advanced Learning (formerly Serco Learning), Ground Floor, 4/5 Ushers Court, Ushers Quay, Dublin 8, Ireland
1. Introduction ................................
1.1 Facility Terminology
1.2 Logging On ................................
1.3 Changing Your Password
2 Facility ePortal Teacher’s Overview
2.1 Bitlets ................................
2.1.1 Accessing More Information From a Bitlet Area
2.2 Minimising Bitlet Areas
2.3 Closing the Bitlet View
3 Viewing Timetables
3.1 Viewing My Timetable
3.2 Viewing Student Timetable
3.3 Viewing Teacher Timetables
4 Viewing My Teaching Groups
4.1 Viewing a Single Teaching Group
4.2 Viewing all Your Teaching Groups
5 Student Records ................................
5.1 Personal Information
5.2 Siblings ................................
5.3 Reports ................................
5.4 Student Aptitude, Merits and Conduct
5.5 Recording an Event
5.6 Viewing Student Results
5.7 Generating a Student List
6 Roll Call and Lesson
6.1 Stratigies for Recording Attendance
6.2 Lesson-by-Lesson Registration
6.2.1 Using the Keyboard
6.2.2 Accessing Lesson Registration via the Main Menu
6.2.3 Viewing Lesson History (Lesson
6.2.4 Graphical Representation of the Teaching Group Attendance
6.3 AM/PM Roll Call ................................
6.3.1 Resetting Values
6.3.2 Amend Roll Call
6.3.3 Graphical Representation of the Class Group Attendance
7 Assessment ................................
7.1 Adding Results ................................
Ground Floor, 4/5 Ushers Court, Ushers Quay, Dublin 8, Ireland
@advancedcomputersoftware.com t 01 672 2800 f 01 672 2039 www.progressomis.com
...........................................................................................
Facility Terminology ................................................................
....................................................................................
Changing Your Password ................................................................
Facility ePortal Teacher’s Overview .......................................................
............................................................................................
Accessing More Information From a Bitlet Area .............................
Minimising Bitlet Areas ................................................................
Closing the Bitlet View ................................................................
Viewing Timetables ................................................................
Viewing My Timetable ................................................................
ing Student Timetable ...............................................................
Viewing Teacher Timetables .............................................................
Viewing My Teaching Groups ...............................................................
Viewing a Single Teaching Group ....................................................
Viewing all Your Teaching Groups ....................................................
................................................................
Personal Information ................................................................
.......................................................................................
........................................................................................
Student Aptitude, Merits and Conduct ................................
Recording an Event ................................................................
Viewing Student Results ................................................................
Generating a Student List ..............................................................
Roll Call and Lesson-by-Lesson Registration ................................
Stratigies for Recording Attendance .................................................
Lesson Registration ........................................................
Using the Keyboard ................................................................
Accessing Lesson Registration via the Main Menu ........................
Viewing Lesson History (Lesson-by-Lesson Registration)
Graphical Representation of the Teaching Group Attendance
................................................................
Resetting Values ................................................................
Amend Roll Call ................................................................
Graphical Representation of the Class Group Attendance
..........................................................................................
................................................................
Ground Floor, 4/5 Ushers Court, Ushers Quay, Dublin 8, Ireland
www.progressomis.com
........................... 2
........................................ 2
.................... 3
.................................. 4
....................... 5
............................ 5
............................. 6
.................................... 7
..................................... 7
................................................ 8
...................................... 8
............................... 8
............................. 9
............................... 10
.................... 10
.................... 10
................................................... 11
..................................... 11
....................... 11
........................ 12
.............................................. 12
....................................... 13
................................ 14
.............................. 15
........................................ 17
................. 17
........................ 17
................................. 18
........................ 19
Lesson Registration) .............. 19
Graphical Representation of the Teaching Group Attendance ........ 20
............................................. 20
..................................... 21
...................................... 22
Graphical Representation of the Class Group Attendance ............. 22
.......................... 24
.............................................. 24

1. Introduction
The Facility ePortal application runs on Safari and Internet Explorer v6 or higher.
ePortal allows you to view your timetable, take roll call, perform lesson
registration, view student information, view your teaching groups, record student
events (behavioural problems, merits etc.), add exam results etc.; all from your
PC, Mac or IPad in the classroom or from anywhere with an internet connection.
This document describes the various features of the ePortal system and how
teachers can use the system to perform various tasks.
1.1 Facility Terminology
Before describing how to get the most fimportant to define certain terms that are used in the Facility
documentation in general and throughout this document in particular:
Term
Class Group
Teaching Group
Roll Call
Registration
Student Events
Bitlets
Reports
The Facility ePortal application runs on Safari and Internet Explorer v6 or higher.
allows you to view your timetable, take roll call, perform lesson
registration, view student information, view your teaching groups, record student
events (behavioural problems, merits etc.), add exam results etc.; all from your
in the classroom or from anywhere with an internet connection.
This document describes the various features of the ePortal system and how
teachers can use the system to perform various tasks.
Facility Terminology
Before describing how to get the most from the ePortal system it is important to define certain terms that are used in the Facility
documentation in general and throughout this document in particular:
Definition
A group of students who are grouped
together in their homeroom for the
purposes of roll call; also sometimes
referred to as a Tutor Group,
Registration Group or Homeroom
Group.
A group of students studying the
same subject with the same t
A check for attendance that is
generally performed before lessons
begin, once for AM sessions and
usually once for PM sessions.
A check for attendance that is carried
out in each lesson. Also referred to as
lesson-by-lesson registration.
Student events may include such
items as Awards, Detentions, Merits
etc. These are attributes that teachers
can apply to particular students when
required.
Areas on the ePortal screen that allow
you to quickly access the most
popular ePortal functions without
having to use a menu.
A Report refers to any information
that is created based on data in the
Facility database. Note: a Facility
Report should not be confused with a
‘Report Card’. In Facility terms a
‘Report Card’ is referred to as an
Assessment Report. In ePortal,
reports are stored as PDF (Po
Document Format) documents.
2
The Facility ePortal application runs on Safari and Internet Explorer v6 or higher.
allows you to view your timetable, take roll call, perform lesson-by-lesson
registration, view student information, view your teaching groups, record student
events (behavioural problems, merits etc.), add exam results etc.; all from your
in the classroom or from anywhere with an internet connection.
This document describes the various features of the ePortal system and how
rom the ePortal system it is important to define certain terms that are used in the Facility
documentation in general and throughout this document in particular:
A group of students who are grouped
together in their homeroom for the
purposes of roll call; also sometimes
referred to as a Tutor Group,
Registration Group or Homeroom
A group of students studying the
same subject with the same teacher.
A check for attendance that is
generally performed before lessons
begin, once for AM sessions and
usually once for PM sessions.
A check for attendance that is carried
out in each lesson. Also referred to as
lesson registration.
Student events may include such
items as Awards, Detentions, Merits
etc. These are attributes that teachers
can apply to particular students when
Areas on the ePortal screen that allow
you to quickly access the most
popular ePortal functions without
any information
that is created based on data in the
Facility database. Note: a Facility
Report should not be confused with a
Card’. In Facility terms a
‘Report Card’ is referred to as an
Assessment Report. In ePortal,
reports are stored as PDF (Portable
Document Format) documents.

1.2 Logging On
To log on to the ePortal system:
1. Open Internet Explorer
2. Type the ePortal URL into the Address bar. Your System Administrator will
provide you with the logon URL.
3. Type your user name and password. Your Administrator will provide you with
your user name and password. Please note, user names and passwords are case
sensitive.
Note: When you type your password, the characters appear as dots rather than
as the actual characters you type. This is a standard security precaution, similar
to the way an ATM machine displays a PIN, to ensure that no other user can look
over your shoulder, copy your password, and gain access to the system.
4. Click Login. Your ePortal home page is displayed.
If you are having difficulties logging on, ensure that Caps Lock is not
turned on. If you are still unable to access the system, contact your system administrator.
To log on to the ePortal system:
1. Open Internet Explorer or safari.
2. Type the ePortal URL into the Address bar. Your System Administrator will
provide you with the logon URL.
and password. Your Administrator will provide you with
your user name and password. Please note, user names and passwords are case
When you type your password, the characters appear as dots rather than
as the actual characters you type. This is a standard security precaution, similar
to the way an ATM machine displays a PIN, to ensure that no other user can look
py your password, and gain access to the system.
. Your ePortal home page is displayed.
If you are having difficulties logging on, ensure that Caps Lock is not
turned on. If you are still unable to access the system, contact your
3
2. Type the ePortal URL into the Address bar. Your System Administrator will
and password. Your Administrator will provide you with
your user name and password. Please note, user names and passwords are case-
When you type your password, the characters appear as dots rather than
as the actual characters you type. This is a standard security precaution, similar
to the way an ATM machine displays a PIN, to ensure that no other user can look
py your password, and gain access to the system.
If you are having difficulties logging on, ensure that Caps Lock is not
turned on. If you are still unable to access the system, contact your
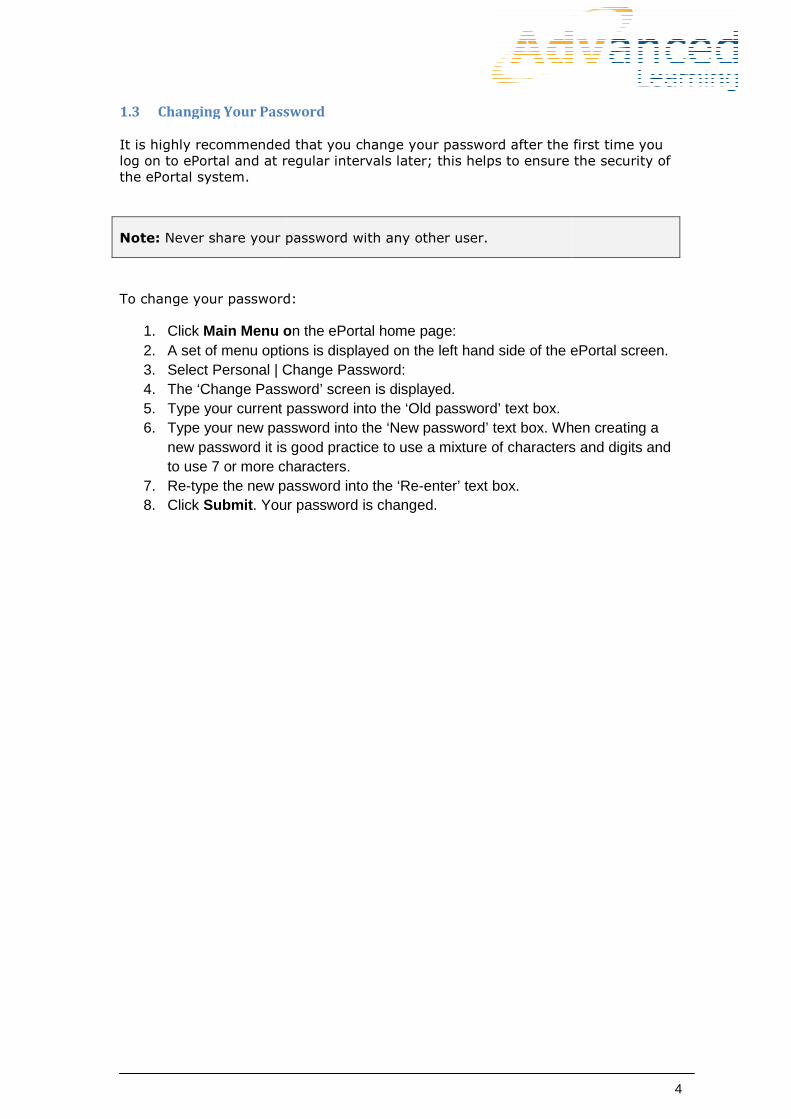
1.3 Changing Your Password
It is highly recommended that you change your password after the first time you
log on to ePortal and at regular intervals later; this helps to ensure the security of
the ePortal system.
Note: Never share your password with any other user.
To change your password:
1. Click Main Menu o2. A set of menu options is displayed on the left hand side of the ePortal screen. 3. Select Personal | Change Password: 4. The ‘Change Password’ screen is displayed. 5. Type your current password into the ‘Old password’ text box. 6. Type your new password into the ‘New password’ text box. When creating a
new password it is good practice to use a mixture of characters and digits and to use 7 or more characters.
7. Re-type the new password into the ‘Re8. Click Submit. Your
Changing Your Password
It is highly recommended that you change your password after the first time you
log on to ePortal and at regular intervals later; this helps to ensure the security of
our password with any other user.
To change your password:
Main Menu on the ePortal home page: A set of menu options is displayed on the left hand side of the ePortal screen. Select Personal | Change Password: The ‘Change Password’ screen is displayed. Type your current password into the ‘Old password’ text box. Type your new password into the ‘New password’ text box. When creating a new password it is good practice to use a mixture of characters and digits and to use 7 or more characters.
type the new password into the ‘Re-enter’ text box. . Your password is changed.
4
It is highly recommended that you change your password after the first time you
log on to ePortal and at regular intervals later; this helps to ensure the security of
A set of menu options is displayed on the left hand side of the ePortal screen.
Type your new password into the ‘New password’ text box. When creating a new password it is good practice to use a mixture of characters and digits and

2 Facility ePortal Teacher’s Overview
2.1 Bitlets
After the teacher’s username and password has been entered the teacher’s page
will be displayed. The first screen will have three columns of menu options.
Note: ‘Bitlets’ are areas on the ePortal home page where the most commonly
used functions are easily accessible without having to locate them via menu
options.
On the left hand side the following is displayed:
• Main Menu: this allows users to gain acc
Facility ePortal.
• Notice board: if the administrator has set
displayed here.
• Calendar: this is a school
administrator will add all school activit
information click More
In the centre of the screen, the following is displayed:
• Timetable: if the user clicks
displayed.
• My Class Groups: the
• My Teaching Groups
Facility ePortal Teacher’s Overview
After the teacher’s username and password has been entered the teacher’s page
will be displayed. The first screen will have three columns of menu options.
‘Bitlets’ are areas on the ePortal home page where the most commonly
used functions are easily accessible without having to locate them via menu
On the left hand side the following is displayed:
: this allows users to gain access to use the functionality of
: if the administrator has set-up any notice boards it will be
this is a school-centralised calendar. In most cases the school
administrator will add all school activities to the calendar. To view this
More and the calendar will be displayed.
In the centre of the screen, the following is displayed:
: if the user clicks More the teacher’s full timetable will be
the teacher’s roll/tutor class is displayed.
My Teaching Groups: a list of all groups that you teach is displayed.
5
After the teacher’s username and password has been entered the teacher’s page
will be displayed. The first screen will have three columns of menu options.
‘Bitlets’ are areas on the ePortal home page where the most commonly
used functions are easily accessible without having to locate them via menu
ess to use the functionality of
up any notice boards it will be
centralised calendar. In most cases the school
ies to the calendar. To view this
the teacher’s full timetable will be
: a list of all groups that you teach is displayed.
• Student Events: if a teacher has been linked to a class group, each time a
student event is entered by another teacher the teacher logged in wil
student events that are recorded.
On the right hand of the screen, the following is displayed:
• Roll Call: if a teacher has been linked to a particular class group they will be
given the ability to record the attendance for that class.
• Registration: a list of all teaching groups for that particular day is displayed.
• Find Student: the teacher can type in the name of the student and click
Find; the student profile will be displayed.
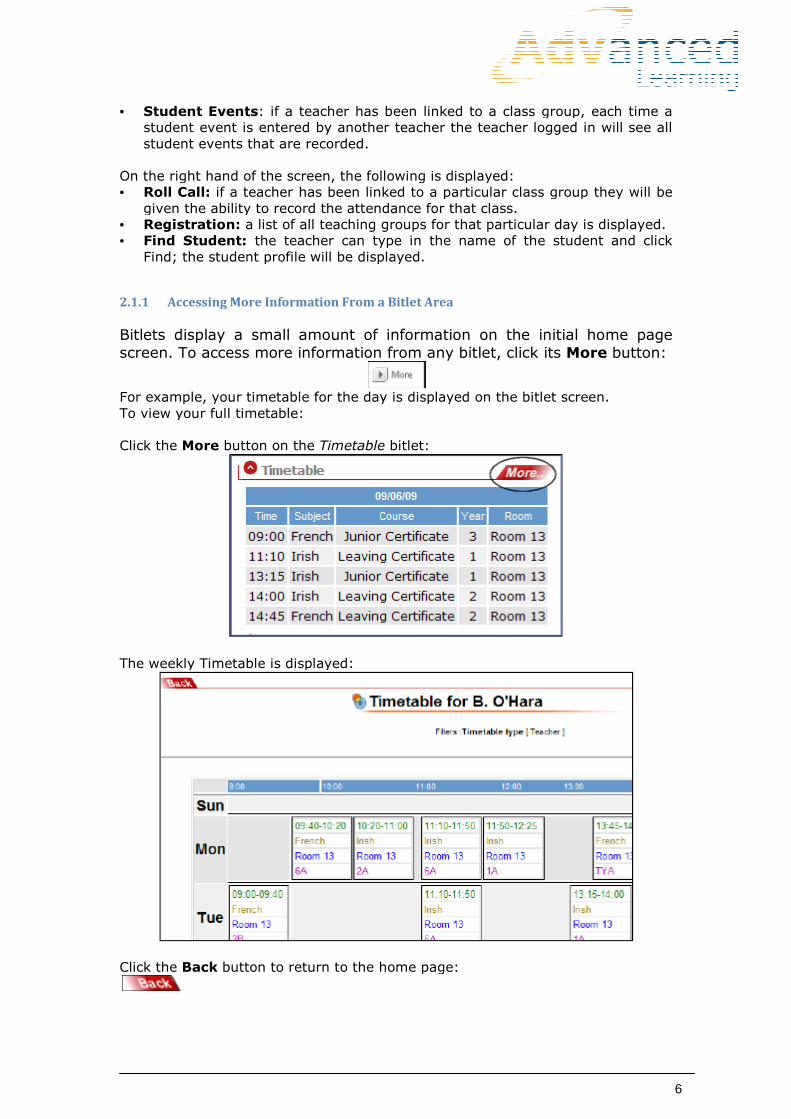
2.1.1 Accessing More Information From a Bitlet Area
Bitlets display a small amount of information on the initial home page
screen. To access more information from any bitlet, click its
For example, your timetable for the day is displayed on the bitlet screen.
To view your full timetable:
Click the More button on the
The weekly Timetable is displayed:
Click the Back button to return to the home page:
: if a teacher has been linked to a class group, each time a
student event is entered by another teacher the teacher logged in wil
student events that are recorded.
On the right hand of the screen, the following is displayed:
if a teacher has been linked to a particular class group they will be
given the ability to record the attendance for that class.
a list of all teaching groups for that particular day is displayed.
the teacher can type in the name of the student and click
Find; the student profile will be displayed.
Accessing More Information From a Bitlet Area
display a small amount of information on the initial home page
screen. To access more information from any bitlet, click its More
For example, your timetable for the day is displayed on the bitlet screen.
To view your full timetable:
button on the Timetable bitlet:
The weekly Timetable is displayed:
button to return to the home page:
6
: if a teacher has been linked to a class group, each time a
student event is entered by another teacher the teacher logged in will see all
if a teacher has been linked to a particular class group they will be
a list of all teaching groups for that particular day is displayed.
the teacher can type in the name of the student and click
display a small amount of information on the initial home page
More button:
For example, your timetable for the day is displayed on the bitlet screen.

2.2 Minimising Bitlet Areas
To minimize a bitlet area (today’s calendar, for example):
Click the calendar minimize
The calendar is minimized.
To maximize the calendar so that it is visible once again, click the maximize
button:
2.3 Closing the Bitlet View
To close the bitlet view:
1. Click Main Menu:
The Main Menu is displayed on the left hand side of the eP
Navigate to the functions you require via the menu. Click to the bitlet view.
Note: Certain options that are not available using the bitlets on the home page
are available via the menu options:
ing Bitlet Areas
To minimize a bitlet area (today’s calendar, for example):
Click the calendar minimize button:
The calendar is minimized.
To maximize the calendar so that it is visible once again, click the maximize
Closing the Bitlet View
The Main Menu is displayed on the left hand side of the ePortal screen.
Navigate to the functions you require via the menu. Click Home if you want to return
Certain options that are not available using the bitlets on the home page
are available via the menu options: Results Entry, for example.
7
To maximize the calendar so that it is visible once again, click the maximize
ortal screen.
if you want to return
Certain options that are not available using the bitlets on the home page
3 Viewing Timetables
With ePortal it is possible to view not only your own timetable but also
student timetables and also other teachers’ timetables.
3.1 Viewing My Timetable
As described in section 2.1.1, it is possible to view your timetable for the day on
the Timetable bitlet when you log on. Click
timetable.
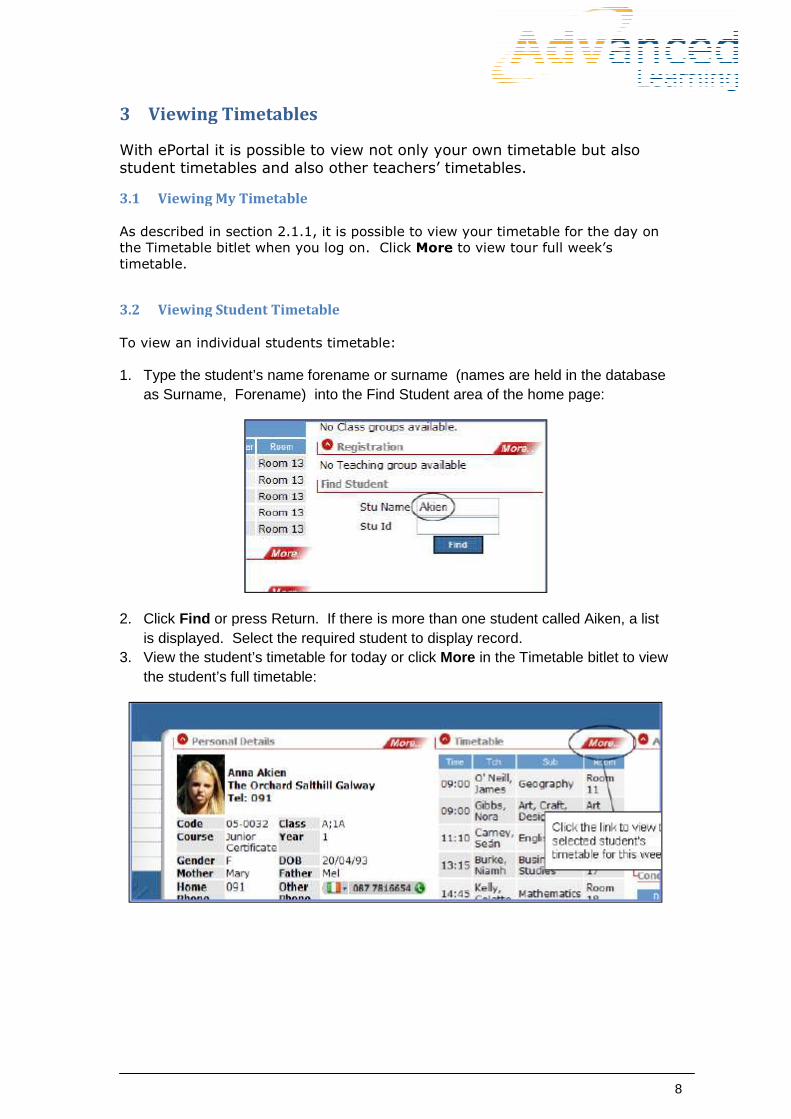
3.2 Viewing Student Timetable
To view an individual students timetable:
1. Type the student’s name forename or surname (names are held in the database as Surname, Forename) into the Find Student area of the home page:
2. Click Find or press Return. If there is more than one student called is displayed. Select the required stu
3. View the student’s timetable for today or click the student’s full timetable:
Viewing Timetables
With ePortal it is possible to view not only your own timetable but also
student timetables and also other teachers’ timetables.
Viewing My Timetable
As described in section 2.1.1, it is possible to view your timetable for the day on
the Timetable bitlet when you log on. Click More to view tour full week’s
Viewing Student Timetable
To view an individual students timetable:
t’s name forename or surname (names are held in the database as Surname, Forename) into the Find Student area of the home page:
or press Return. If there is more than one student called is displayed. Select the required student to display record. View the student’s timetable for today or click More in the Timetablethe student’s full timetable:
8
With ePortal it is possible to view not only your own timetable but also
As described in section 2.1.1, it is possible to view your timetable for the day on
to view tour full week’s
t’s name forename or surname (names are held in the database as Surname, Forename) into the Find Student area of the home page:
or press Return. If there is more than one student called Aiken, a list
Timetable bitlet to view
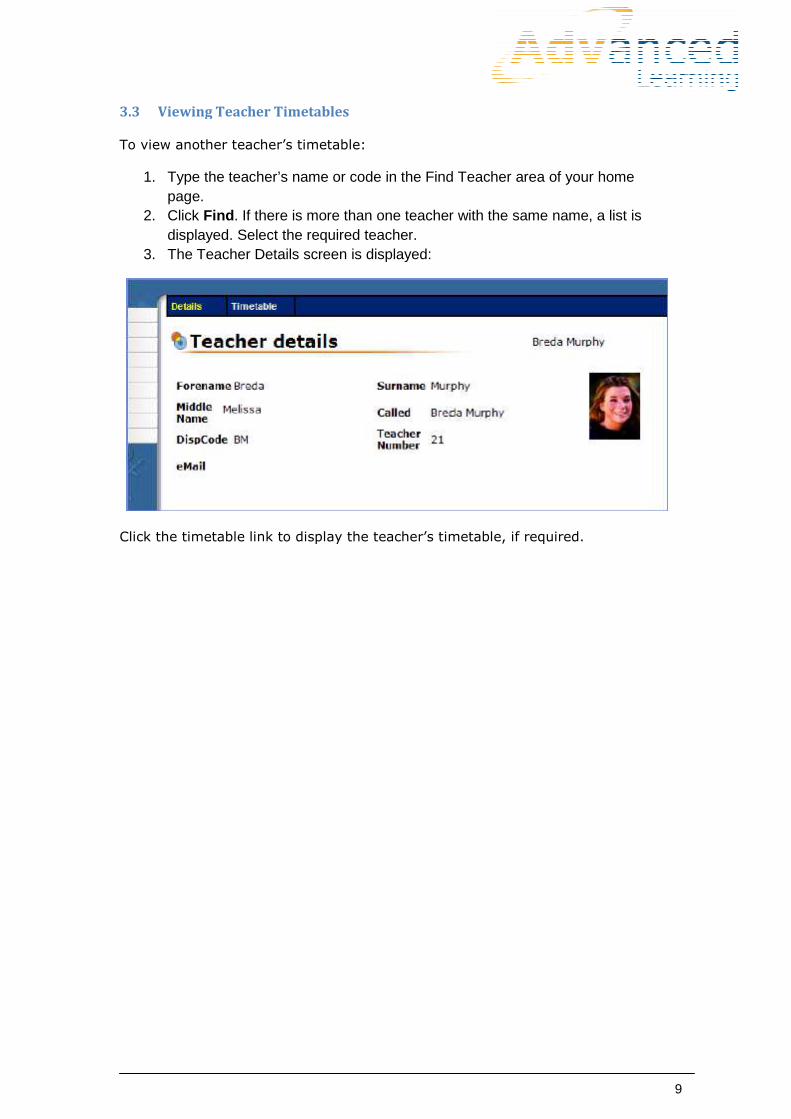
3.3 Viewing Teacher Timetables
To view another teacher’s timetable:
1. Type the teacher’s name or code in the Find Teacher area of your home page.
2. Click Find. If there is more than one teacher with the same name, a list is displayed. Select the required teacher.
3. The Teacher Details screen is displayed:
Click the timetable link to display the teacher’s timetable, if required.
Viewing Teacher Timetables
To view another teacher’s timetable:
Type the teacher’s name or code in the Find Teacher area of your home
. If there is more than one teacher with the same name, a list is displayed. Select the required teacher. The Teacher Details screen is displayed:
le link to display the teacher’s timetable, if required.
9
Type the teacher’s name or code in the Find Teacher area of your home
. If there is more than one teacher with the same name, a list is
le link to display the teacher’s timetable, if required.

4 Viewing My Teaching Groups
ePortal allows you to view your Teaching Groups from the Teaching Group bitlet
on the ePortal home page.
4.1 Viewing a Single Teaching Group
To view one of your Teaching Groups:
Open the ePortal home page.
Click the required Group code on the ‘My Teaching Groups’ bitlet:
The list of students within your selected Teaching Group is displayed:
Click a Student code to display the selected s
4.2 Viewing all Your Teaching Groups
To view all your Teaching Groups in summary format:
Click More on the Teaching Groups bitlet; the ‘My Teaching Groups’ screen is
displayed:
You can see at a glance the Subject(s) you are teaching, the Course, Year and the
number of students (Size) in each group.
If required, select this table, copy it, and paste it into a third party application,
Microsoft Excel, for example.
Viewing My Teaching Groups
ePortal allows you to view your Teaching Groups from the Teaching Group bitlet
on the ePortal home page.
Viewing a Single Teaching Group
To view one of your Teaching Groups:
Open the ePortal home page.
Click the required Group code on the ‘My Teaching Groups’ bitlet:
The list of students within your selected Teaching Group is displayed:
Click a Student code to display the selected student’s record.
Viewing all Your Teaching Groups
To view all your Teaching Groups in summary format:
on the Teaching Groups bitlet; the ‘My Teaching Groups’ screen is
You can see at a glance the Subject(s) you are teaching, the Course, Year and the
number of students (Size) in each group.
If required, select this table, copy it, and paste it into a third party application,
Microsoft Excel, for example.
10
ePortal allows you to view your Teaching Groups from the Teaching Group bitlet
The list of students within your selected Teaching Group is displayed:
on the Teaching Groups bitlet; the ‘My Teaching Groups’ screen is
You can see at a glance the Subject(s) you are teaching, the Course, Year and the
If required, select this table, copy it, and paste it into a third party application,

5 Student Records
There are various ways to access student records in ePortal:
Use the Find Student option on the home page
Use the menu: select Records | Students
Click a Student ID link when viewing your teaching or class group(s) as outlined
in section 4.1
Select the student name from a student list
The information on the Student Record page is similar in layout to your own
(Teacher) home page screen. As with the teacher’s home page, the student
record page is divided into a number of bitlets.
5.1 Personal Information
The ‘Personal Details’ bitlet allows you to see the student’s address, class, date of
birth, doctor’s information, etc. Expand the bitlet to view more detailed
information:
1. Click More on the Personal Details bitlet. The student’s Personal Details screen is displayed.
2. Information that may have been truncated on the bitlet is now visible.
5.2 Siblings
Where a student has brothers and/or sisters enrolled in the school, these students are listed under the Siblings area:
Note: To view the record of the selected student’s sibling, click the Code
hyperlink.
ds
There are various ways to access student records in ePortal:
Use the Find Student option on the home page
Records | Students
Click a Student ID link when viewing your teaching or class group(s) as outlined
ct the student name from a student list
The information on the Student Record page is similar in layout to your own
(Teacher) home page screen. As with the teacher’s home page, the student
record page is divided into a number of bitlets.
ation
The ‘Personal Details’ bitlet allows you to see the student’s address, class, date of
birth, doctor’s information, etc. Expand the bitlet to view more detailed
on the Personal Details bitlet. The student’s Personal Details screen is displayed. Information that may have been truncated on the bitlet is now visible.
Where a student has brothers and/or sisters enrolled in the school, these are listed under the Siblings area:
To view the record of the selected student’s sibling, click the Code
11
Click a Student ID link when viewing your teaching or class group(s) as outlined
The information on the Student Record page is similar in layout to your own
(Teacher) home page screen. As with the teacher’s home page, the student
The ‘Personal Details’ bitlet allows you to see the student’s address, class, date of
birth, doctor’s information, etc. Expand the bitlet to view more detailed
on the Personal Details bitlet. The student’s Personal Details
Information that may have been truncated on the bitlet is now visible.
Where a student has brothers and/or sisters enrolled in the school, these
To view the record of the selected student’s sibling, click the Code
5.3 Reports
If the student has any associated reports, they are displayed in the ‘Reports’
bitlet.
Note: You must purchase the Facility Document Storage module to be able to
view reports via ePortal and you must also have a PDF viewer (Adobe ® Acrobat
®, for example) installed on your computer.
Reports include report cards, letters that have been sent home etc.
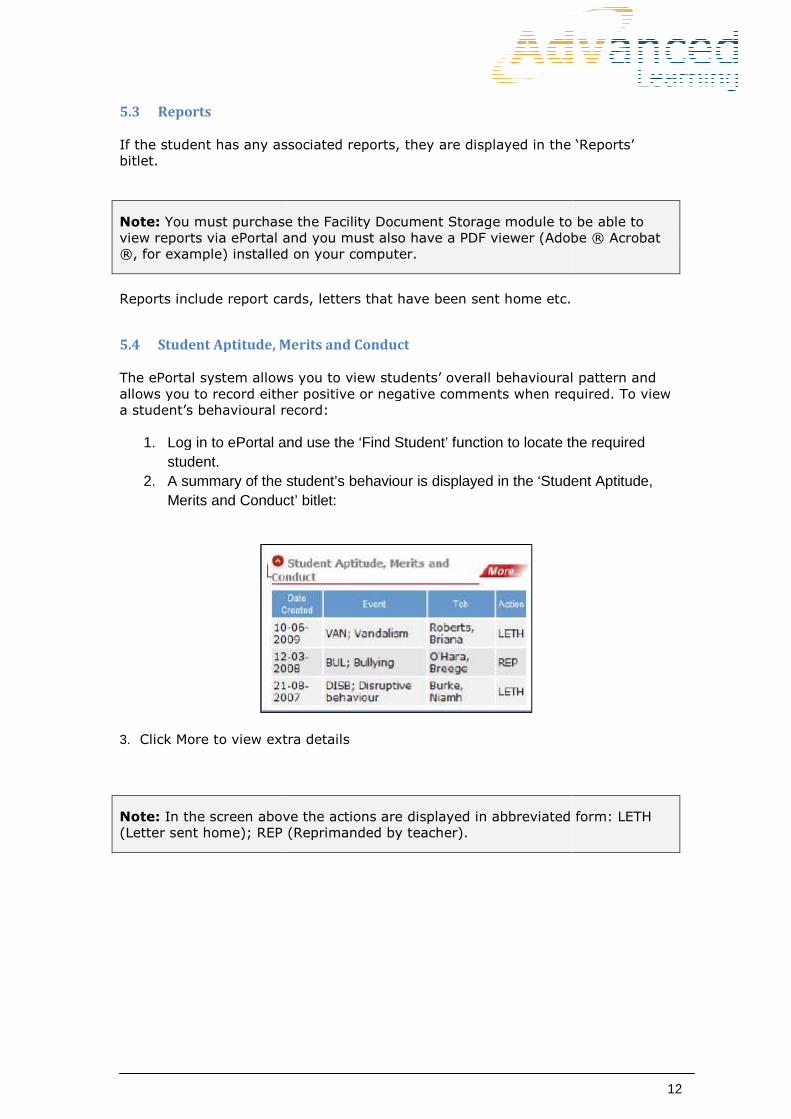
5.4 Student Aptitude, Merits and Conduct
The ePortal system allows you
allows you to record either positive or negative comments when required. To view
a student’s behavioural record:
1. Log in to ePortal and use the ‘Find Student’ function to locate the required student.
2. A summary of the student’s behaviour is displayed in the ‘Student Aptitude, Merits and Conduct’ bitlet:
3. Click More to view extra details
Note: In the screen above the actions are displayed in abbreviated form: LETH
(Letter sent home); REP (Reprimand
If the student has any associated reports, they are displayed in the ‘Reports’
You must purchase the Facility Document Storage module to be able to
w reports via ePortal and you must also have a PDF viewer (Adobe ® Acrobat
®, for example) installed on your computer.
ts include report cards, letters that have been sent home etc.
Student Aptitude, Merits and Conduct
The ePortal system allows you to view students’ overall behavioural pattern and
allows you to record either positive or negative comments when required. To view
a student’s behavioural record:
Log in to ePortal and use the ‘Find Student’ function to locate the required
ummary of the student’s behaviour is displayed in the ‘Student Aptitude, Merits and Conduct’ bitlet:
Click More to view extra details
In the screen above the actions are displayed in abbreviated form: LETH
(Letter sent home); REP (Reprimanded by teacher).
12
If the student has any associated reports, they are displayed in the ‘Reports’
You must purchase the Facility Document Storage module to be able to
w reports via ePortal and you must also have a PDF viewer (Adobe ® Acrobat
to view students’ overall behavioural pattern and
allows you to record either positive or negative comments when required. To view
Log in to ePortal and use the ‘Find Student’ function to locate the required
ummary of the student’s behaviour is displayed in the ‘Student Aptitude,
In the screen above the actions are displayed in abbreviated form: LETH

5.5 Recording an Event
To record an incident of good or bad behavior (What is refered to as an
Facility Terms):
1. Use the ‘Find Student’ Function to locate the required student.2. Click the Event Entry Screen
Conduct’ bitlet area:
3. Click Add an Event4. Select the event type, describe what actions were taken (if any), and type the
details. 5. The event is recorded and saved against the selected student’s record.
NOTE: It is not possible to delete an event via ePortal so ensure that the
information you add is accurate. If you do want to remove an event, you will
need to delete it via Facility Administration
administrator.
Recording an Event
record an incident of good or bad behavior (What is refered to as an
Use the ‘Find Student’ Function to locate the required student. Event Entry Screen link, under the ‘Student Aptitude, Merits and
Conduct’ bitlet area:
Add an Event Select the event type, describe what actions were taken (if any), and type the
The event is recorded and saved against the selected student’s record.
It is not possible to delete an event via ePortal so ensure that the
information you add is accurate. If you do want to remove an event, you will
need to delete it via Facility Administration – discuss this with your system
13
record an incident of good or bad behavior (What is refered to as an Event in
link, under the ‘Student Aptitude, Merits and
Select the event type, describe what actions were taken (if any), and type the
The event is recorded and saved against the selected student’s record.
It is not possible to delete an event via ePortal so ensure that the
information you add is accurate. If you do want to remove an event, you will
discuss this with your system
5.6 Viewing Student Results
It is possible to access student results from the Results bitlet.
Note: From the Student record screen it is only possible to view results. If you
want to input results for any specific examination, select
Entry from the main menu. See Chapter 7 for more information.
To view the student’s results:
1. Select a student record. 2. Click More on the Results bitlet. The student’s results screen is displayed. 3. The results for one examination are displayed by default. Your
will configure the results that are displayed.4. To see the results the student achieved for a specific exam: select the
required options from drop-down lists.
nt Results
It is possible to access student results from the Results bitlet.
From the Student record screen it is only possible to view results. If you
want to input results for any specific examination, select Assessment | Results
from the main menu. See Chapter 7 for more information.
To view the student’s results:
nt record. on the Results bitlet. The student’s results screen is displayed.
The results for one examination are displayed by default. Your will configure the results that are displayed. To see the results the student achieved for a specific exam: select the required options from the Exam, Data set (i.e. academic year) and Subject
14
From the Student record screen it is only possible to view results. If you
Assessment | Results
on the Results bitlet. The student’s results screen is displayed. The results for one examination are displayed by default. Your Administrator
To see the results the student achieved for a specific exam: select the the Exam, Data set (i.e. academic year) and Subject

5.7 Generating a Student List
ePortal offers you the option to easily assemble lists of students which can then
be printed, if required. You can assemble your list based on various criteria. For
example, assume a school excursion is being organised for all Junior Certificate
students and you want to create a list of all those who are eligible to go and note
the students who have returned signed permission letters from their guardians.
To create the list:
1. On the ePortal home page, click Main Menu2. On the left hand menu select
List’ screen is displayed. 3. Select the criteria you require. In this example we want to retrieve a list of all
3rd Year Junior Cert students. Select the Course and Year from the droplists.
4. Because we want to be on the excursion, we will add a new column called ‘Has Permission?’ To do this select the Spare Column 1 check box and type
Generating a Student List
ePortal offers you the option to easily assemble lists of students which can then
be printed, if required. You can assemble your list based on various criteria. For
example, assume a school excursion is being organised for all Junior Certificate
nd you want to create a list of all those who are eligible to go and note
the students who have returned signed permission letters from their guardians.
On the ePortal home page, click Main Menu. On the left hand menu select Records | Student Lists. The ‘Generate a Set List’ screen is displayed. Select the criteria you require. In this example we want to retrieve a list of all
Year Junior Cert students. Select the Course and Year from the drop
Because we want to be able to mark the students who have permission to go on the excursion, we will add a new column called ‘Has Permission?’ To do this select the Spare Column 1 check box and type Has Permission?
15
ePortal offers you the option to easily assemble lists of students which can then
be printed, if required. You can assemble your list based on various criteria. For
example, assume a school excursion is being organised for all Junior Certificate
nd you want to create a list of all those who are eligible to go and note
the students who have returned signed permission letters from their guardians.
. The ‘Generate a Set
Select the criteria you require. In this example we want to retrieve a list of all Year Junior Cert students. Select the Course and Year from the drop-down
able to mark the students who have permission to go on the excursion, we will add a new column called ‘Has Permission?’ To do
Has Permission?
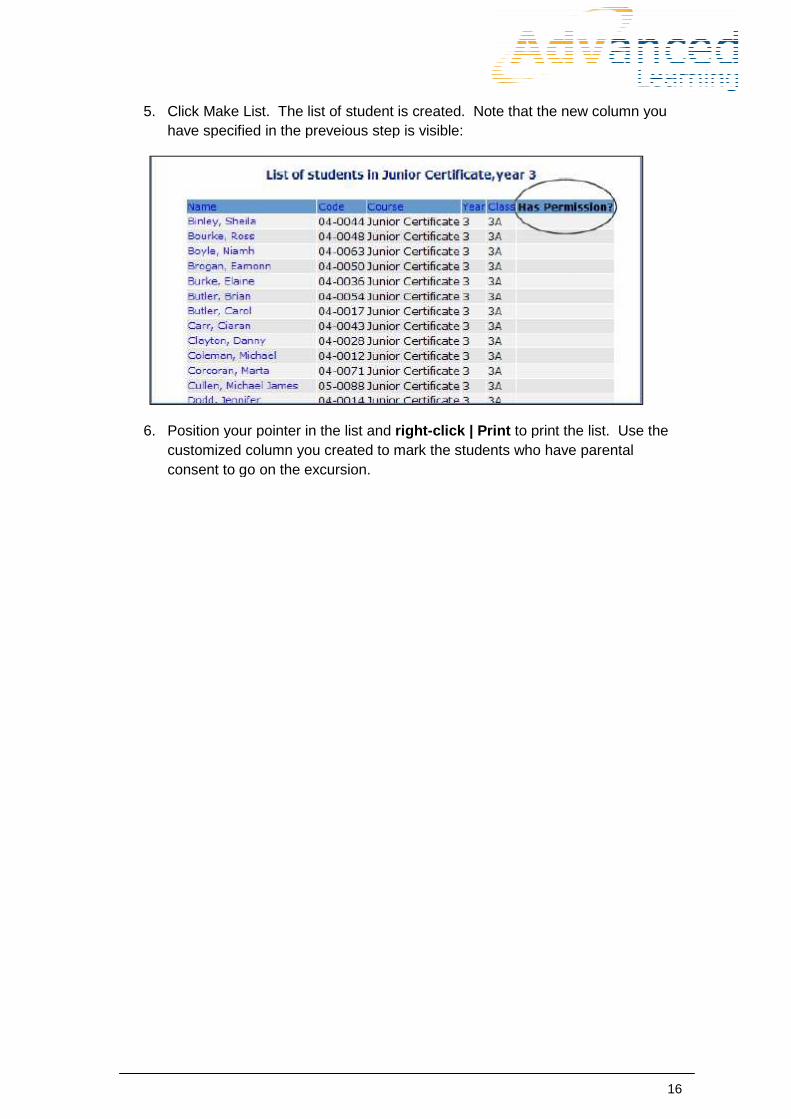
5. Click Make List. The list of student is created. Note that the new column you have specified in the preveious step is visible:
6. Position your pointer in the list and customized column you created to mark the students who consent to go on the excursion.
The list of student is created. Note that the new column you have specified in the preveious step is visible:
Position your pointer in the list and right-click | Print to print the list. Use the customized column you created to mark the students who have parental consent to go on the excursion.
16
The list of student is created. Note that the new column you
to print the list. Use the have parental
6 Roll Call and Lesson
Facility ePortal allows you to record attendance from your classroom PC Mac,
Ipad. ePortal also allows you to view students’ attendance patterns over a
specified period and allows you to mark specific students absent in advance
(where, for example, you know that a student will be absent for a specified period
due to illness).
6.1 Stratigies for Recording Attendance
Before describing how to record attendance with ePort
understand the different strategies that schools use when recording attendance.
Depending on the strategy that your school uses, some sections in this chapter
may not be relevant to you.
Where schools use roll call, the roll
students’ homeroom before classes begin. This grouping of students that are
brought together for an AM roll call is referred to (in Facility terms) as the
Group. Once the roll is taken, students disperse into
first lesson of the day.
If your schools use lesson
in each lesson (in each of their teaching groups). No roll call with a class group is
taken in this scenario.
Finally, in some schools a combination of both roll call and lesson
registration is used.
6.2 Lesson-by-Lesson Registration
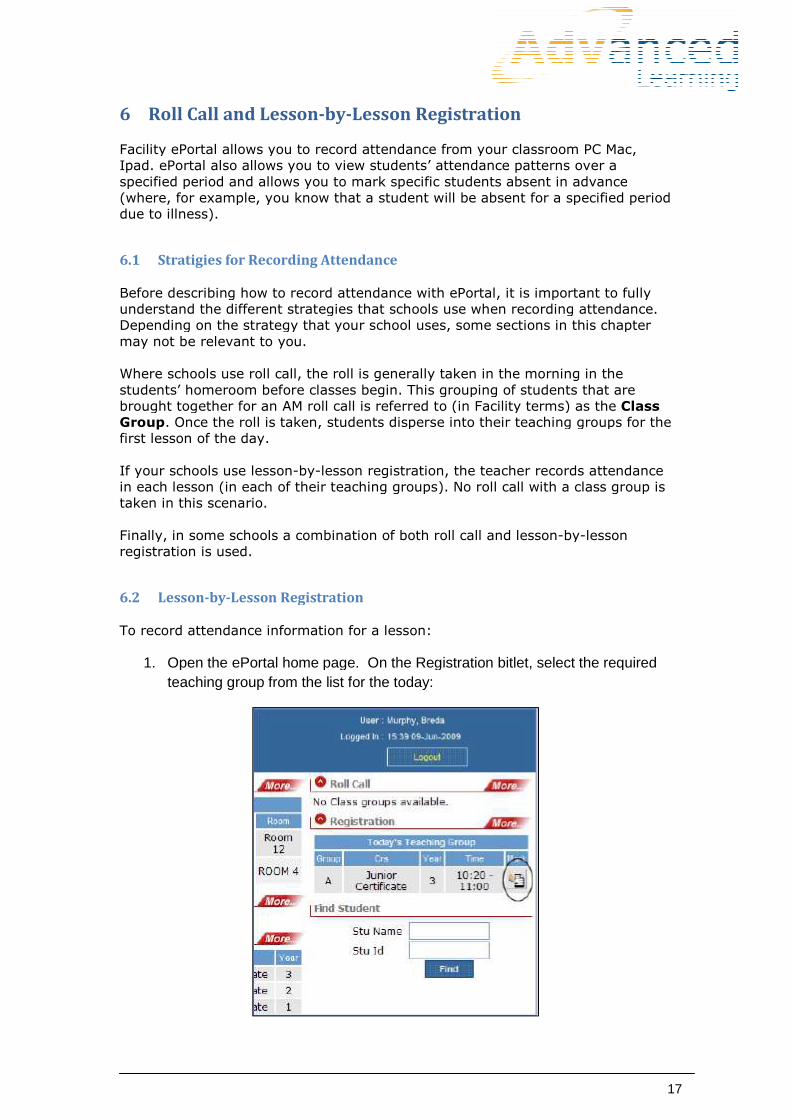
To record attendance information for a lesson:
1. Open the ePortal home page. On the Registration bitlet, select the requiredteaching group from the list for the today:
Roll Call and Lesson-by-Lesson Registration
Facility ePortal allows you to record attendance from your classroom PC Mac,
Ipad. ePortal also allows you to view students’ attendance patterns over a
eriod and allows you to mark specific students absent in advance
(where, for example, you know that a student will be absent for a specified period
Stratigies for Recording Attendance
Before describing how to record attendance with ePortal, it is important to fully
understand the different strategies that schools use when recording attendance.
Depending on the strategy that your school uses, some sections in this chapter
may not be relevant to you.
Where schools use roll call, the roll is generally taken in the morning in the
students’ homeroom before classes begin. This grouping of students that are
brought together for an AM roll call is referred to (in Facility terms) as the
. Once the roll is taken, students disperse into their teaching groups for the
If your schools use lesson-by-lesson registration, the teacher records attendance
in each lesson (in each of their teaching groups). No roll call with a class group is
Finally, in some schools a combination of both roll call and lesson-by
Lesson Registration
To record attendance information for a lesson:
Open the ePortal home page. On the Registration bitlet, select the requiredteaching group from the list for the today:
17
Facility ePortal allows you to record attendance from your classroom PC Mac,
Ipad. ePortal also allows you to view students’ attendance patterns over a
eriod and allows you to mark specific students absent in advance
(where, for example, you know that a student will be absent for a specified period
al, it is important to fully
understand the different strategies that schools use when recording attendance.
Depending on the strategy that your school uses, some sections in this chapter
is generally taken in the morning in the
students’ homeroom before classes begin. This grouping of students that are
brought together for an AM roll call is referred to (in Facility terms) as the Class
their teaching groups for the
lesson registration, the teacher records attendance
in each lesson (in each of their teaching groups). No roll call with a class group is
by-lesson
Open the ePortal home page. On the Registration bitlet, select the required

2. The registration screen for the selected teaching group is displayed. For this example, we will assume that there is one absence in the teaching group for this lesson.
To mark the absent student:
1. Select the ‘Absent’ option:
Note: For demonstration purposes, only four categories are being used in the
screen above; your school may use others.
2. Double-click the check boxes beside the names of the absent students. If you want you can use the keyboard to and type ‘O’ and press tab to move to the next student.
3. Click Submit Valuesautomatically marked as ‘Present’ and a warning message is displayed. Review the message and
4. Click OK. The database is updated.
If you make a mistake, it is possible to reset the values. See section
the process for resetting values is outlined. Note that the process for resetting
values for lesson-by-lesson registration and for the roll call is the same.
6.2.1 Using the Keyboard
It is possible to take the lesson registration without having to use the mouse. To use the keyboard to mark students: 1. Select the required student’s check box.
2. Type the code for the absence category. In the example above the codes are P=Present; O= Absent; L=Late. These codes will vary from school to school.
3. Press the TAB key to move to the next check box. If you want to move backwards in the list, press SHIFT and TAB.
The registration screen for the selected teaching group is displayed. For this example, we will assume that there is one absence in the teaching group for
To mark the absent student:
‘Absent’ option:
For demonstration purposes, only four categories are being used in the
screen above; your school may use others.
click the check boxes beside the names of the absent students. If you want you can use the keyboard to mark students: select the check box
’ and press tab to move to the next student. Submit Values. All the other students that you did not mark are
automatically marked as ‘Present’ and a warning message is displayed. Review the message and ensure that the details are correct.
The database is updated.
If you make a mistake, it is possible to reset the values. See section
the process for resetting values is outlined. Note that the process for resetting
lesson registration and for the roll call is the same.
Using the Keyboard
It is possible to take the lesson registration without having to use the mouse. To use the keyboard to mark students:
1. Select the required student’s check box.
2. Type the code for the absence category. In the example above the codes are P=Present; O= Absent; L=Late. These codes will vary from school to school.
3. Press the TAB key to move to the next check box. If you want to move backwards HIFT and TAB.
18
The registration screen for the selected teaching group is displayed. For this example, we will assume that there is one absence in the teaching group for
For demonstration purposes, only four categories are being used in the
click the check boxes beside the names of the absent students. If mark students: select the check box
All the other students that you did not mark are automatically marked as ‘Present’ and a warning message is displayed.
If you make a mistake, it is possible to reset the values. See section 6.3.1 where
the process for resetting values is outlined. Note that the process for resetting
lesson registration and for the roll call is the same.
It is possible to take the lesson registration without having to use the mouse. To use
2. Type the code for the absence category. In the example above the codes are P=Present; O= Absent; L=Late. These codes will vary from school to school.
3. Press the TAB key to move to the next check box. If you want to move backwards

4. Click Submit when you have marked all your student records.
6.2.2 Accessing Lesson Registration via the Main Menu
It is possible to access the Registration screens via the main menu: 1. Click Main Menu on the ePortal home page: 2. Select Registration | This Lesson 3. A list of all the students in your
students as described on page 20.
6.2.3 Viewing Lesson History (Lesson
If your school uses lessonstatistics for a teaching group over a specified date range. For example, if you want to view the attendance pattern for the students in one of your teaching groups for the month of February:
1. Select Registration | Lesson History2. Type the class group name and click 3. The Dates screen is displayed. Type the date range you require or click the
Calendar icons to select the Start and End dates:
Note: The longest range that you can vi
4. Click View Attendance
the teaching group is displayed for the selected range.
when you have marked all your student records.
Accessing Lesson Registration via the Main Menu
It is possible to access the Registration screens via the main menu: on the ePortal home page:
Registration | This Lesson from the left hand menu. A list of all the students in your current teaching group is displayed. Mark students as described on page 20.
Viewing Lesson History (Lesson-by-Lesson Registration)
If your school uses lesson-by-lesson registration it is possible to view attendance statistics for a teaching group over a specified date range. For example, if you want to view the attendance pattern for the students in one of your teaching groups for the
Registration | Lesson History. Type the class group name and click Find Class group. The Dates screen is displayed. Type the date range you require or click the Calendar icons to select the Start and End dates:
The longest range that you can view is four weeks.
View Attendance. A list of the attendance patterns for the students in the teaching group is displayed for the selected range.
19
teaching group is displayed. Mark
son registration it is possible to view attendance statistics for a teaching group over a specified date range. For example, if you want to view the attendance pattern for the students in one of your teaching groups for the
The Dates screen is displayed. Type the date range you require or click the
. A list of the attendance patterns for the students in

6.2.4 Graphical Representation of the Teaching Group Attendance
It is possible to view a graphical regroup if required.
1. Click More on the Registration bitlet. 2. A pie chart displaying attendance data for the first teaching group of the day
is displayed by default. 3. Click the View Graph icon to view the pie chart for any of your other teaching
groups.
Click an area of the pie chart to view the student names that make up that area.
6.3 AM/PM Roll Call
For schools that use roll call to record attendance, the process islesson registration. Some schools take a single roll call each day; others take two roll calls per day: an AM and a PM roll, as in the example below. To take a roll call:
1. Open the ePortal home page. On the Roll Call bitlet, click ththe required class group:
2. Alternatively you can access the Roll Call screen when you click and select Roll Call | For Today displayed.
Graphical Representation of the Teaching Group Attendance
It is possible to view a graphical representation of the attendance for a teaching
on the Registration bitlet. A pie chart displaying attendance data for the first teaching group of the day is displayed by default. Click the View Graph icon to view the pie chart for any of your other teaching
Click an area of the pie chart to view the student names that make up that area.
For schools that use roll call to record attendance, the process is similar to lessonlesson registration. Some schools take a single roll call each day; others take two roll calls per day: an AM and a PM roll, as in the example below. To take a roll call:
Open the ePortal home page. On the Roll Call bitlet, click the Mark icon for the required class group:
Alternatively you can access the Roll Call screen when you click Roll Call | For Today from the menu. The Roll Call screen is
20
presentation of the attendance for a teaching
A pie chart displaying attendance data for the first teaching group of the day
Click the View Graph icon to view the pie chart for any of your other teaching
Click an area of the pie chart to view the student names that make up that area.
similar to lesson-by-lesson registration. Some schools take a single roll call each day; others take two roll calls per day: an AM and a PM roll, as in the example below. To take a roll call:
e Mark icon for
Alternatively you can access the Roll Call screen when you click Main Menu from the menu. The Roll Call screen is

1. Select the absence category you require and double
box for the student to whom you want to apply the category. If you are taking the roll call for the morning, select the check boxes under the AM column. It is also possible to use 6.2.1 on page 21).
2. Click Submit Values3. Repeat the process for the afternoon roll call (if your school also takes an
afternoon roll call), marking the check boxes under the PM column.
6.3.1 Resetting Values
If you make a mistake and incorrectly mark a student as being absent, for example, it is possible to clear the error:
1. Click Reset Values 2. A warning message is displayed informing you that you will lose all your
changes. Click OK
If you have submitted the attendance data and realised that you have made a mistake, it is still possible to overwrite the data in the database. For example, if a student had been accidentally marked as present:
1. Select the required category for the studen2. Double-click the required student check box to apply the category. 3. Click Submit Values
that you had submitted is overwritten.
Select the absence category you require and double-click the required check box for the student to whom you want to apply the category. If you are taking the roll call for the morning, select the check boxes under the AM column. It is also possible to use your keyboard to input the attendance data (see section 6.2.1 on page 21).
Submit Values. The database is updated. Repeat the process for the afternoon roll call (if your school also takes an afternoon roll call), marking the check boxes under the PM column.
If you make a mistake and incorrectly mark a student as being absent, for example, it sible to clear the error:
Reset Values if the mistake occurs before you click SubmitA warning message is displayed informing you that you will lose all your
OK. All selections are cleared.
If you have submitted the attendance data and realised that you have made a mistake, it is still possible to overwrite the data in the database. For example, if a student had been accidentally marked as present:
Select the required category for the student, ‘Absent’ for example. click the required student check box to apply the category.
Submit Values. The roll call is updated: the original attendance record that you had submitted is overwritten.
21
click the required check box for the student to whom you want to apply the category. If you are taking the roll call for the morning, select the check boxes under the AM column. It is
your keyboard to input the attendance data (see section
Repeat the process for the afternoon roll call (if your school also takes an afternoon roll call), marking the check boxes under the PM column.
If you make a mistake and incorrectly mark a student as being absent, for example, it
Submit. A warning message is displayed informing you that you will lose all your
If you have submitted the attendance data and realised that you have made a mistake, it is still possible to overwrite the data in the database. For example, if a
t, ‘Absent’ for example. click the required student check box to apply the category.
. The roll call is updated: the original attendance record
6.3.2 Amend Roll Call
In some cases you may know that a particular student will be absent from school for a particular period. For example, if a student is ill and will not attend school for a number of weeks, it is possible to add this information to the database.
1. Click Main Menu on the 2. Select Roll Call | Amend Roll Calls
screen is displayed. 3. Type the start and end dates as required or click the calendar icons to select
the dates you require. 4. Click View Attendance5. Select the absence category you require (
roll call as required: 6. Click Submit. The database is updated. The selected student will be
automatically marked when the roll is taken between the specified dates.
It is also possible to use Amend Roll Call to select a date range in the past and correct any errors that may be present in the roll.
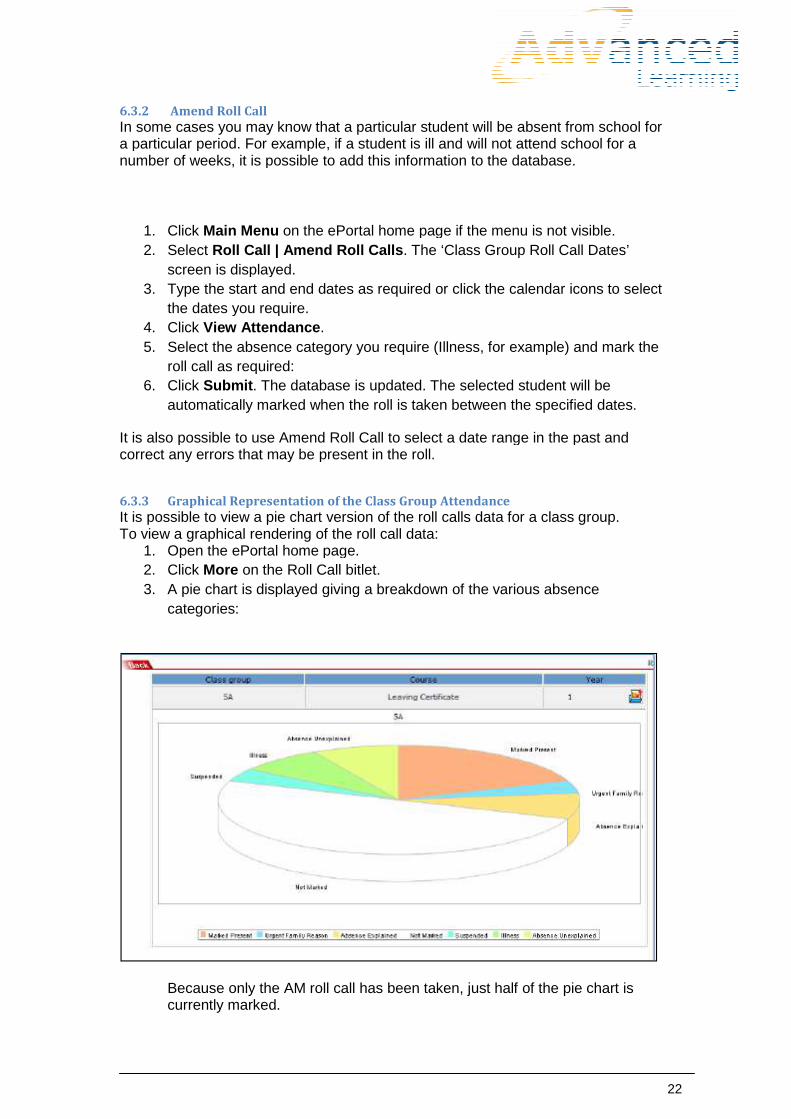
6.3.3 Graphical Representation of the Class Group Attendance
It is possible to view a pie chart version of the roll calls datTo view a graphical rendering of the roll call data:
1. Open the ePortal home page. 2. Click More on the Roll Call bitlet. 3. A pie chart is displayed giving a breakdown of the various absence
categories:
Because only the AM roll call has been taken, just half of the pie chart is currently marked.
may know that a particular student will be absent from school for a particular period. For example, if a student is ill and will not attend school for a number of weeks, it is possible to add this information to the database.
on the ePortal home page if the menu is not visible. Roll Call | Amend Roll Calls. The ‘Class Group Roll Call Dates’
screen is displayed. Type the start and end dates as required or click the calendar icons to select the dates you require.
tendance. Select the absence category you require (Illness, for example) and mark the roll call as required:
. The database is updated. The selected student will be automatically marked when the roll is taken between the specified dates.
It is also possible to use Amend Roll Call to select a date range in the past and correct any errors that may be present in the roll.
Graphical Representation of the Class Group Attendance
It is possible to view a pie chart version of the roll calls data for a class group. To view a graphical rendering of the roll call data:
Open the ePortal home page. on the Roll Call bitlet.
A pie chart is displayed giving a breakdown of the various absence
Because only the AM roll call has been taken, just half of the pie chart is
22
may know that a particular student will be absent from school for a particular period. For example, if a student is ill and will not attend school for a number of weeks, it is possible to add this information to the database.
ePortal home page if the menu is not visible. . The ‘Class Group Roll Call Dates’
Type the start and end dates as required or click the calendar icons to select
, for example) and mark the
. The database is updated. The selected student will be automatically marked when the roll is taken between the specified dates.
It is also possible to use Amend Roll Call to select a date range in the past and
a for a class group.
A pie chart is displayed giving a breakdown of the various absence
Because only the AM roll call has been taken, just half of the pie chart is

4. Click any area of the chart to view the students who make up that selected category.
Tip: If required, right-click | Print
students within the selected absence category.
Click any area of the chart to view the students who make up that selected
click | Print in the pop-up window to print a list of the
students within the selected absence category.
23
Click any area of the chart to view the students who make up that selected
up window to print a list of the
7 Assessment ePortal allows you to add results for examinations from any PC with an Internet connection (assuming that ePortal has been configured for external acc
7.1 Adding Results
To input results for a selected examination: 1. On the ePortal home page, click 2. Select Assessment | Results Entry
are displayed.
Note: A Result Entry Template is a saved set of conditions relevant to certain
subjects. A template will store assessment information relevant to each subject.
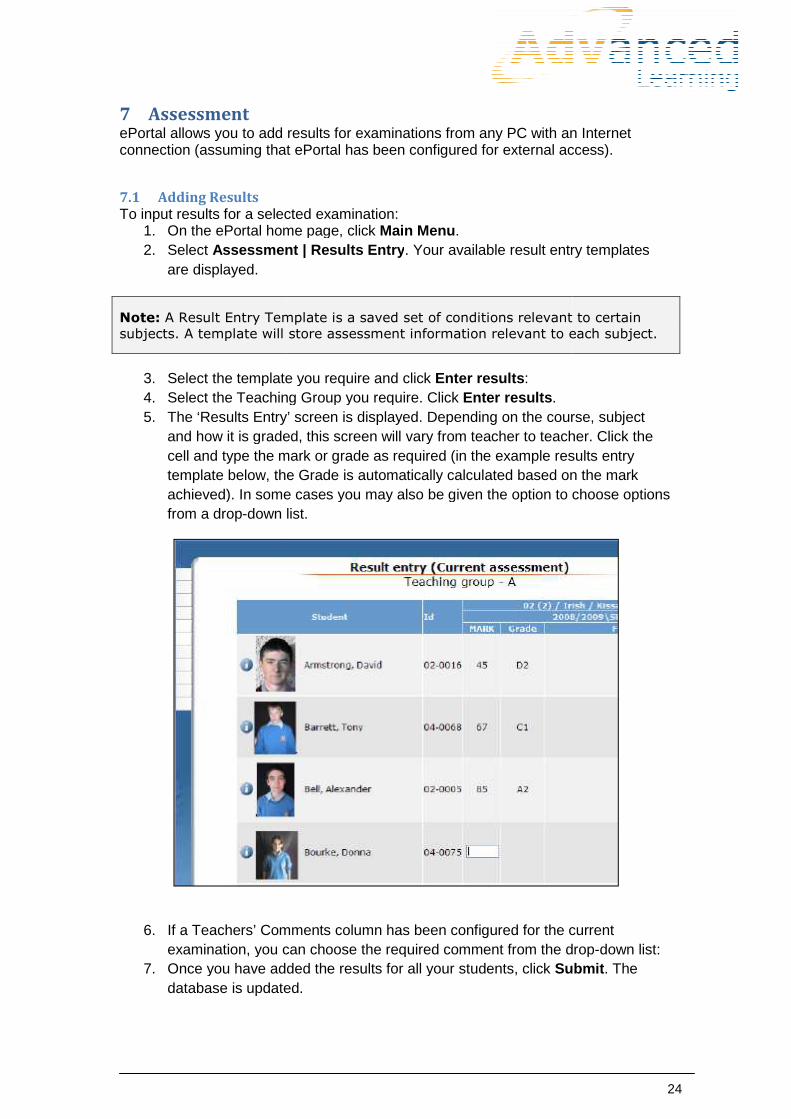
3. Select the template you require and click 4. Select the Teaching Group you require. Clic5. The ‘Results Entry’ screen is displayed. Depending on the course, subject
and how it is graded, this screen will vary from teacher to teacher. Click the cell and type the mark or grade as required (in the example results entry template below, the Grade is automatically calculated based on the mark achieved). In some cases you may also be given the option to choose options from a drop-down list.
6. If a Teachers’ Comments column has been configured for the current
examination, you can choose the required comment from the drop7. Once you have added the results for all your students, click
database is updated.
ePortal allows you to add results for examinations from any PC with an Internet connection (assuming that ePortal has been configured for external acc
To input results for a selected examination: On the ePortal home page, click Main Menu.
Assessment | Results Entry. Your available result entry templates
A Result Entry Template is a saved set of conditions relevant to certain
subjects. A template will store assessment information relevant to each subject.
Select the template you require and click Enter results: Select the Teaching Group you require. Click Enter results. The ‘Results Entry’ screen is displayed. Depending on the course, subject and how it is graded, this screen will vary from teacher to teacher. Click the cell and type the mark or grade as required (in the example results entry
low, the Grade is automatically calculated based on the mark achieved). In some cases you may also be given the option to choose options
down list.
If a Teachers’ Comments column has been configured for the current examination, you can choose the required comment from the dropOnce you have added the results for all your students, click Submitdatabase is updated.
24
ePortal allows you to add results for examinations from any PC with an Internet connection (assuming that ePortal has been configured for external access).
. Your available result entry templates
A Result Entry Template is a saved set of conditions relevant to certain
subjects. A template will store assessment information relevant to each subject.
The ‘Results Entry’ screen is displayed. Depending on the course, subject and how it is graded, this screen will vary from teacher to teacher. Click the cell and type the mark or grade as required (in the example results entry
low, the Grade is automatically calculated based on the mark achieved). In some cases you may also be given the option to choose options
If a Teachers’ Comments column has been configured for the current examination, you can choose the required comment from the drop-down list:
Submit. The


