WebSphere on z/OS V7
Staged Application Deployment in WebSphere on
z/OS V7
This document can be found on the web at:www.ibm.com/support/techdocs
Search for document number WP101641 under the category of "White Papers"
Version Date: February 25, 2010See "Document Change History" on page 3 for a description of the changes in this version of the document
Mike LoosConsulting IT [email protected]
(651) 270-3324
Written and provided by the WebSphere Application Server for z/OS team at the
IBM Advanced Technical Skills

WP101641 – Staged Application Deployment in WebSphere on z/OS V7
The WebSphere Application Server for z/OS support team at the WashingtonSystems Center consists of: John Hutchinson, Mike Kearney, Mike Loos,Louis Wilen, Lee-Win Tai, Steve Matulevich, and Don Bagwell.
Mike Cox, Distinguished Engineer, serves as technical consultant and advisor.
Brian Pierce and Dennis MacDonald provide invaluable system programmingsupport to the team.
For questions or comments regarding this document, e-mail Mike Loos at
© 2010, IBM Corporation Americas Advanced Technical Skills - 2 - ibm.com/support/techdocs
Version Date: Thursday, February 25, 2010
WP101641 – Staged Application Deployment in WebSphere on z/OS V7
Table of Contents
Overview...............................................................................................................4Assumptions........................................................................................................4Short Architecture Review..................................................................................4
Clustered Server in a Network Deployment Environment............................................................4Application installation...................................................................................................................5
Installing an Application in a Staged Fashion..................................................6Manually using the adminconsole.................................................................................................6
Initial install of the application..................................................................................................6Setup for a Staged Version Update........................................................................................13Install Version 2 of the Application into the Master Repository...........................................16
Staged Install Using the WSADMIN Scripting Interface.............................................................23Initial install of the application................................................................................................23Setup for a Staged Version Update........................................................................................25Install Version 2 of the Application into the Master Repository...........................................26
Some Additional Notes on the Scripts….........................................................28Initial Application Installation.......................................................................................................28Setup for Staged Install................................................................................................................28Finish up the Process...................................................................................................................29
Document Change History................................................................................31
© 2010, IBM Corporation Americas Advanced Technical Skills - 3 - ibm.com/support/techdocs
Version Date: Thursday, February 25, 2010
WP101641 – Staged Application Deployment in WebSphere on z/OS V7
OverviewThe staged deployment of a new version of an application is a component of maintaining high availability in a WebSphere Application Server on z/OS environment. Though not difficult to achieve, it is not automatic. This paper will attempt to demonstrate one method of deploying a new version of an application, both manually, and via the scripting interface, in an ND cell, over two members of an application server cluster.
AssumptionsLet’s start by assuming that we already have an application deployed in the cell and mapped to a particular server cluster. We will also assume that the new version of the application is built such that running both of the versions (1 and 2 in this case) simultaneously, will not cause any problems. This assumption would not be true in the case of a new version with, for instance, a different and inconsistent backend database structure. The other basic assumption is that this is something that the user wishes to do. It is certainly “okay” to simply deploy a new application version and have it take effect on all nodes at one time.The procedure we will be documenting here is for that occasion where what is desired is to put the new version of an application into one member (server) of a multi-member cluster and run it concurrently with the older version of the application in the remaining member(s) of the cluster. Then, once the new version has been “proven” in the production environment, the rest of the member(s) of the cluster may be switched to the new version either one at a time, or all at once.Conversely, if the new version of the application doesn’t seem to be working as expected, it can be removed from one member that is running it and the older version can be reinstated.
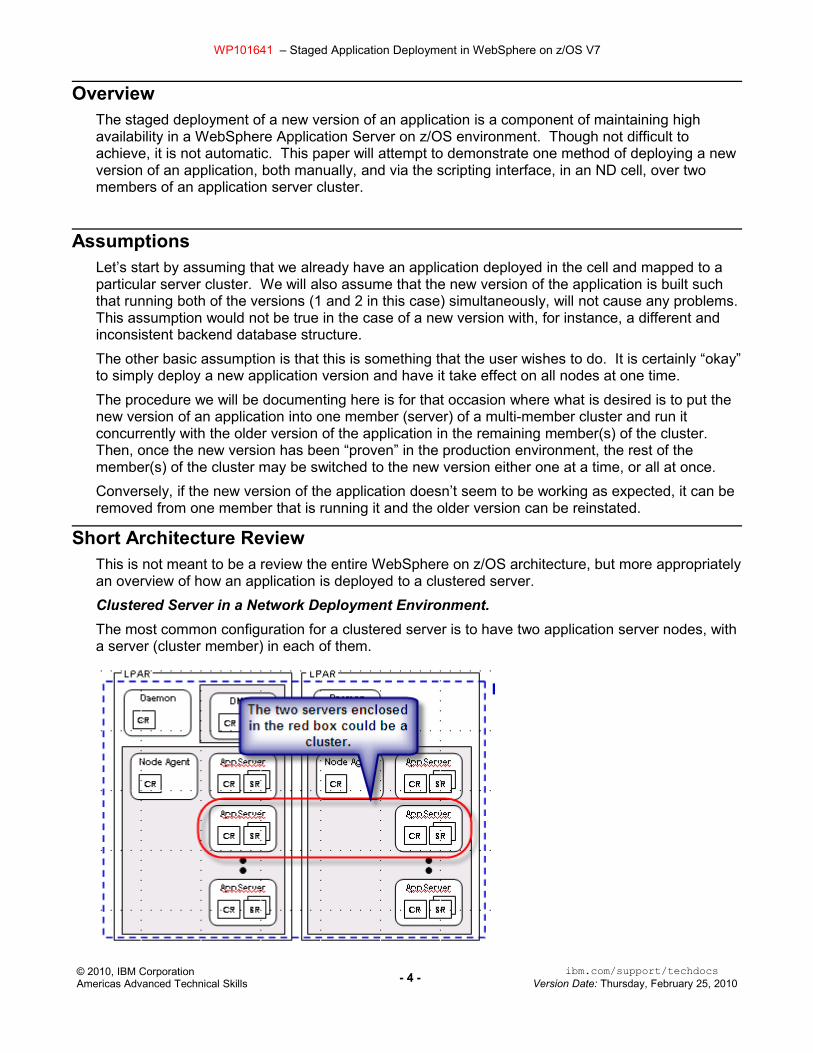
Short Architecture ReviewThis is not meant to be a review the entire WebSphere on z/OS architecture, but more appropriately an overview of how an application is deployed to a clustered server.Clustered Server in a Network Deployment Environment.The most common configuration for a clustered server is to have two application server nodes, with a server (cluster member) in each of them.
© 2010, IBM Corporation Americas Advanced Technical Skills - 4 - ibm.com/support/techdocs
Version Date: Thursday, February 25, 2010
WP101641 – Staged Application Deployment in WebSphere on z/OS V7
The members of the cluster are basically identical. They serve the same applications, have the same configuration, and usually listen on the same ports.
Application installation.
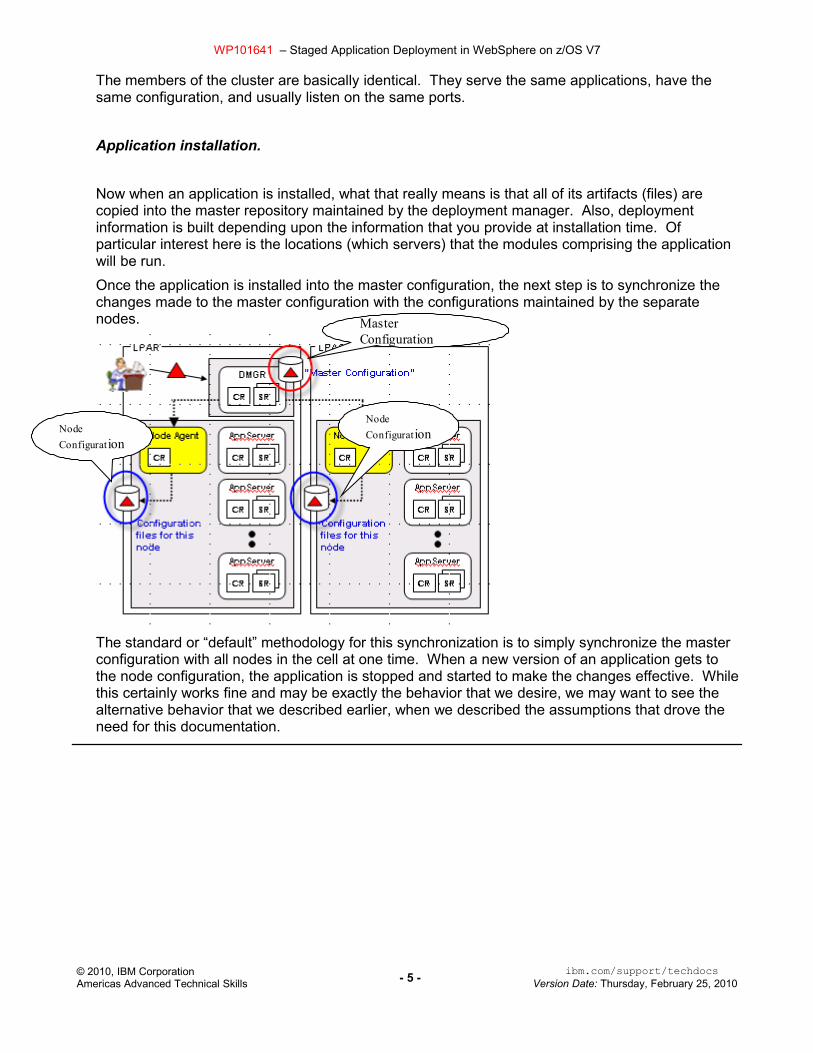
Now when an application is installed, what that really means is that all of its artifacts (files) are copied into the master repository maintained by the deployment manager. Also, deployment information is built depending upon the information that you provide at installation time. Of particular interest here is the locations (which servers) that the modules comprising the application will be run.Once the application is installed into the master configuration, the next step is to synchronize the changes made to the master configuration with the configurations maintained by the separate nodes.
The standard or “default” methodology for this synchronization is to simply synchronize the master configuration with all nodes in the cell at one time. When a new version of an application gets to the node configuration, the application is stopped and started to make the changes effective. While this certainly works fine and may be exactly the behavior that we desire, we may want to see the alternative behavior that we described earlier, when we described the assumptions that drove the need for this documentation.
© 2010, IBM Corporation Americas Advanced Technical Skills - 5 - ibm.com/support/techdocs
Version Date: Thursday, February 25, 2010
Node ConfigurationNode
Configuration
Master Configuration
WP101641 – Staged Application Deployment in WebSphere on z/OS V7
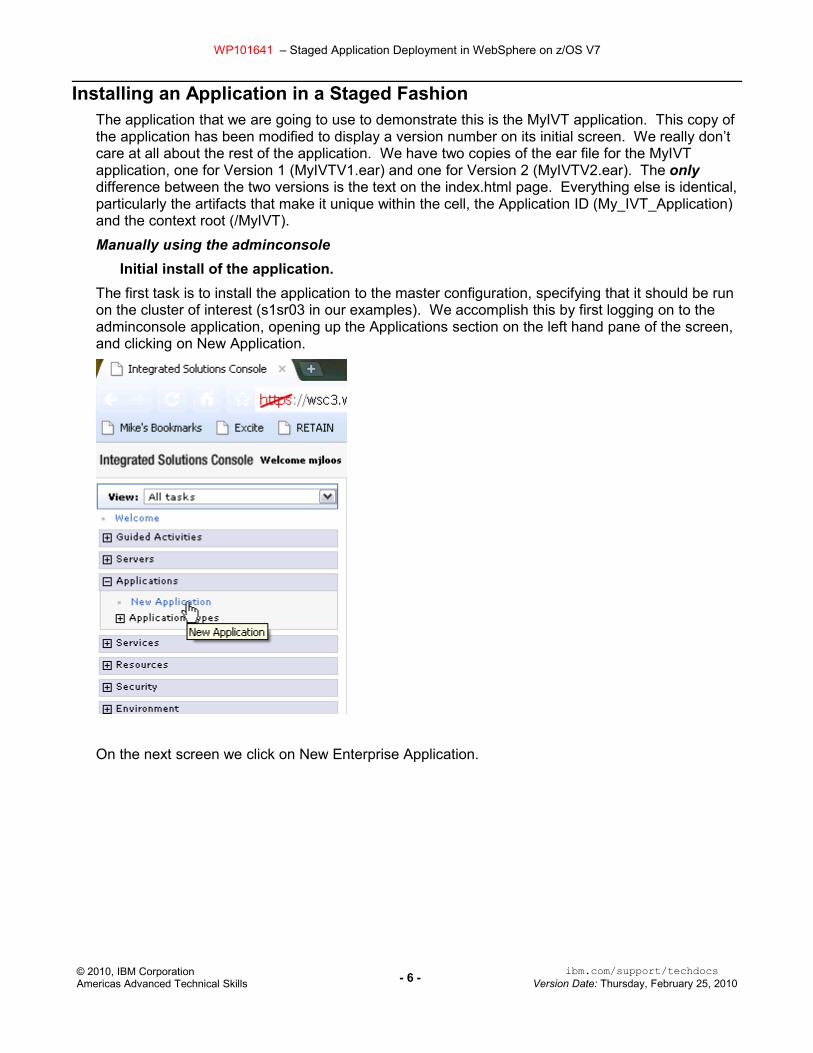
Installing an Application in a Staged FashionThe application that we are going to use to demonstrate this is the MyIVT application. This copy of the application has been modified to display a version number on its initial screen. We really don’t care at all about the rest of the application. We have two copies of the ear file for the MyIVT application, one for Version 1 (MyIVTV1.ear) and one for Version 2 (MyIVTV2.ear). The only difference between the two versions is the text on the index.html page. Everything else is identical, particularly the artifacts that make it unique within the cell, the Application ID (My_IVT_Application) and the context root (/MyIVT).Manually using the adminconsole
Initial install of the application.The first task is to install the application to the master configuration, specifying that it should be run on the cluster of interest (s1sr03 in our examples). We accomplish this by first logging on to the adminconsole application, opening up the Applications section on the left hand pane of the screen, and clicking on New Application.
On the next screen we click on New Enterprise Application.
© 2010, IBM Corporation Americas Advanced Technical Skills - 6 - ibm.com/support/techdocs
Version Date: Thursday, February 25, 2010
WP101641 – Staged Application Deployment in WebSphere on z/OS V7
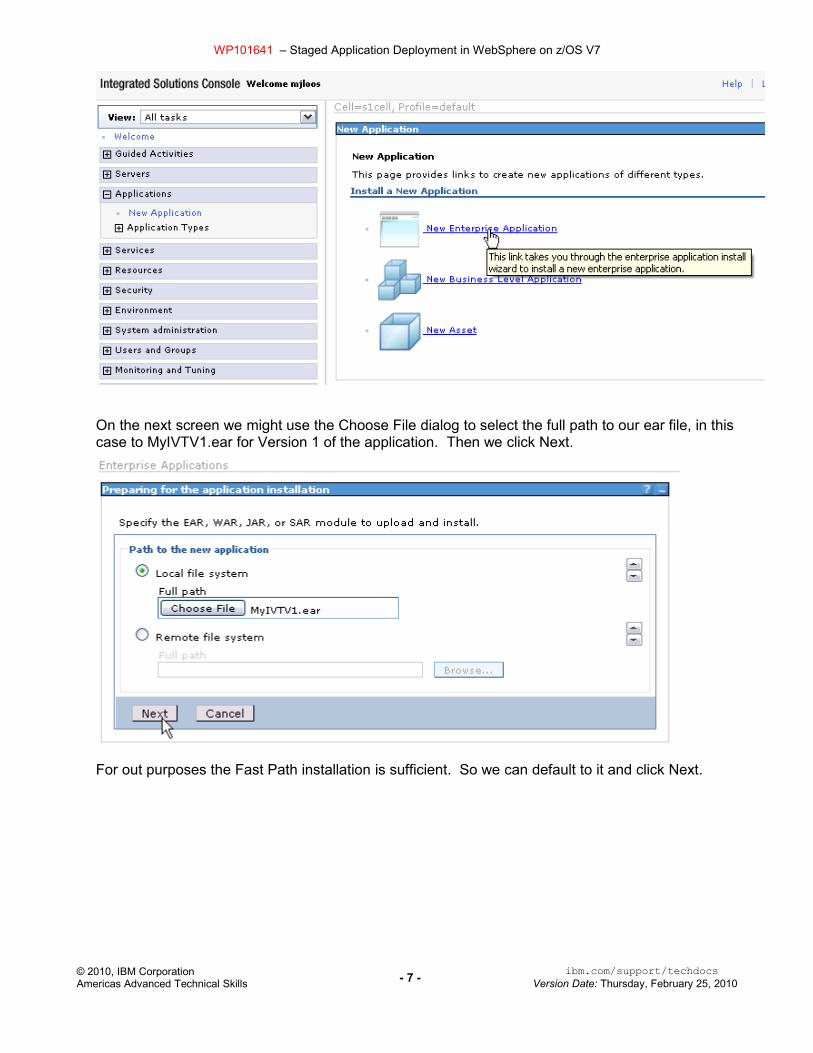
On the next screen we might use the Choose File dialog to select the full path to our ear file, in this case to MyIVTV1.ear for Version 1 of the application. Then we click Next.
For out purposes the Fast Path installation is sufficient. So we can default to it and click Next.
© 2010, IBM Corporation Americas Advanced Technical Skills - 7 - ibm.com/support/techdocs
Version Date: Thursday, February 25, 2010
WP101641 – Staged Application Deployment in WebSphere on z/OS V7
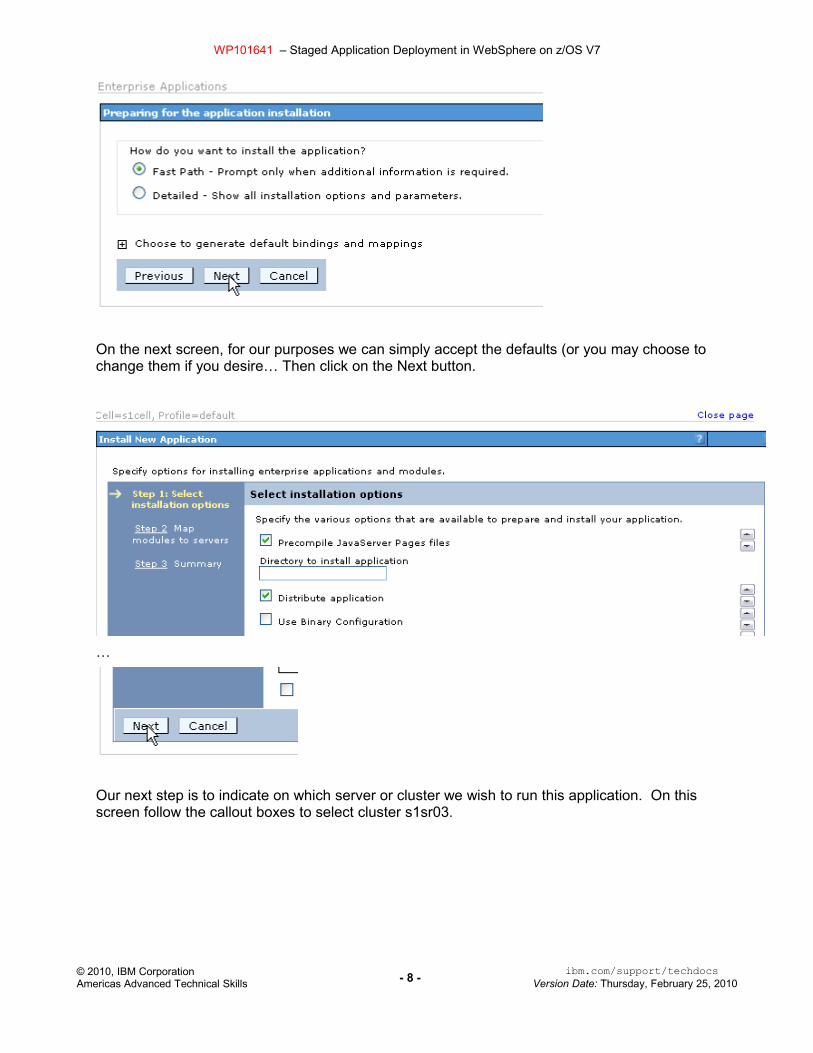
On the next screen, for our purposes we can simply accept the defaults (or you may choose to change them if you desire… Then click on the Next button.
…
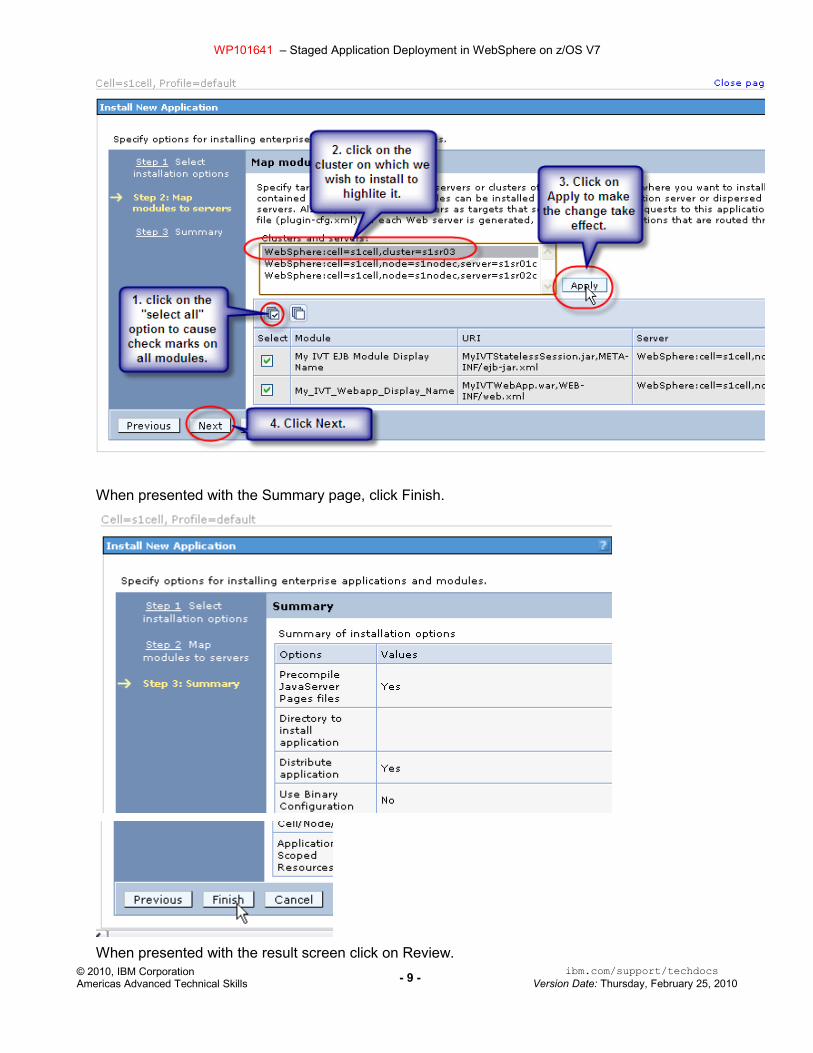
Our next step is to indicate on which server or cluster we wish to run this application. On this screen follow the callout boxes to select cluster s1sr03.
© 2010, IBM Corporation Americas Advanced Technical Skills - 8 - ibm.com/support/techdocs
Version Date: Thursday, February 25, 2010
WP101641 – Staged Application Deployment in WebSphere on z/OS V7
When presented with the Summary page, click Finish.
When presented with the result screen click on Review. © 2010, IBM Corporation Americas Advanced Technical Skills - 9 - ibm.com/support/techdocs
Version Date: Thursday, February 25, 2010
WP101641 – Staged Application Deployment in WebSphere on z/OS V7
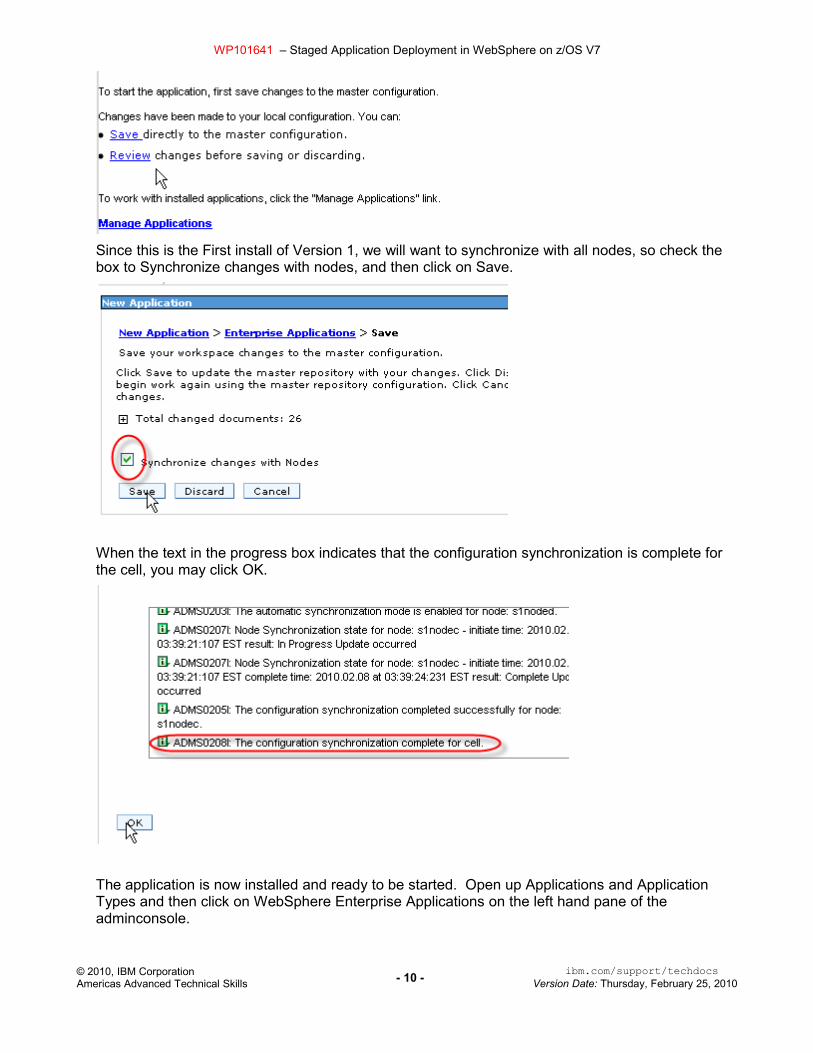
Since this is the First install of Version 1, we will want to synchronize with all nodes, so check the box to Synchronize changes with nodes, and then click on Save.
When the text in the progress box indicates that the configuration synchronization is complete for the cell, you may click OK.
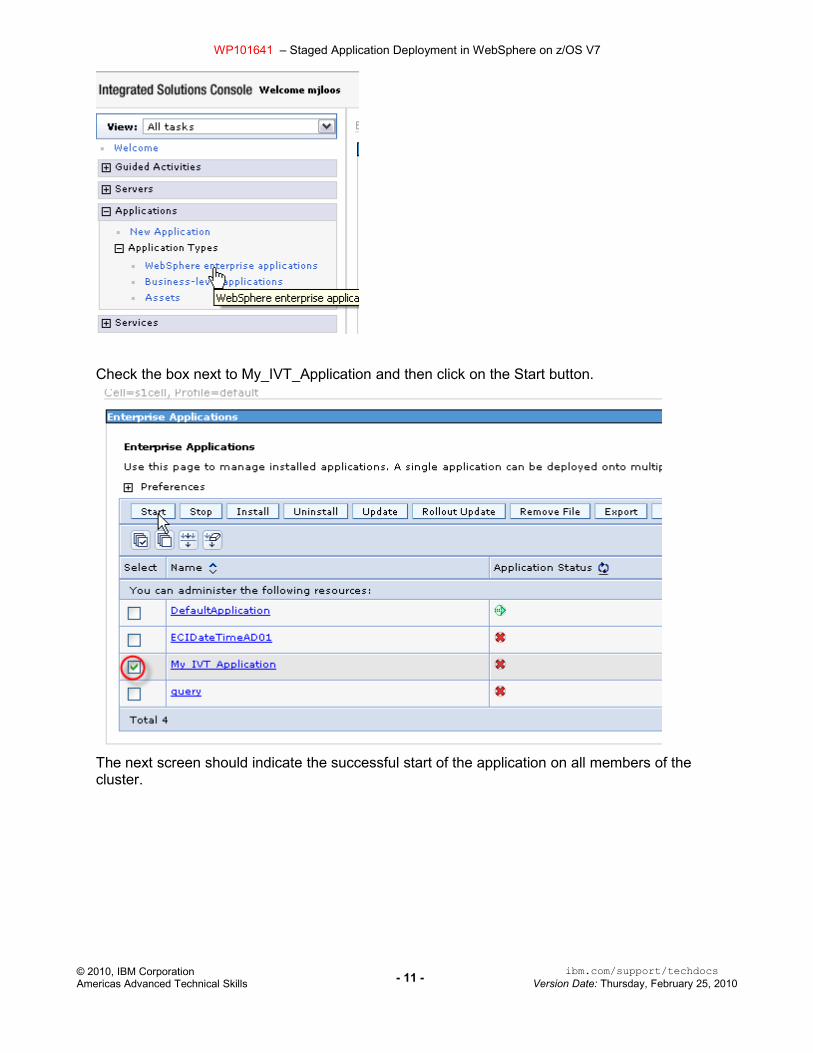
The application is now installed and ready to be started. Open up Applications and Application Types and then click on WebSphere Enterprise Applications on the left hand pane of the adminconsole.
© 2010, IBM Corporation Americas Advanced Technical Skills - 10 - ibm.com/support/techdocs
Version Date: Thursday, February 25, 2010
WP101641 – Staged Application Deployment in WebSphere on z/OS V7
Check the box next to My_IVT_Application and then click on the Start button.
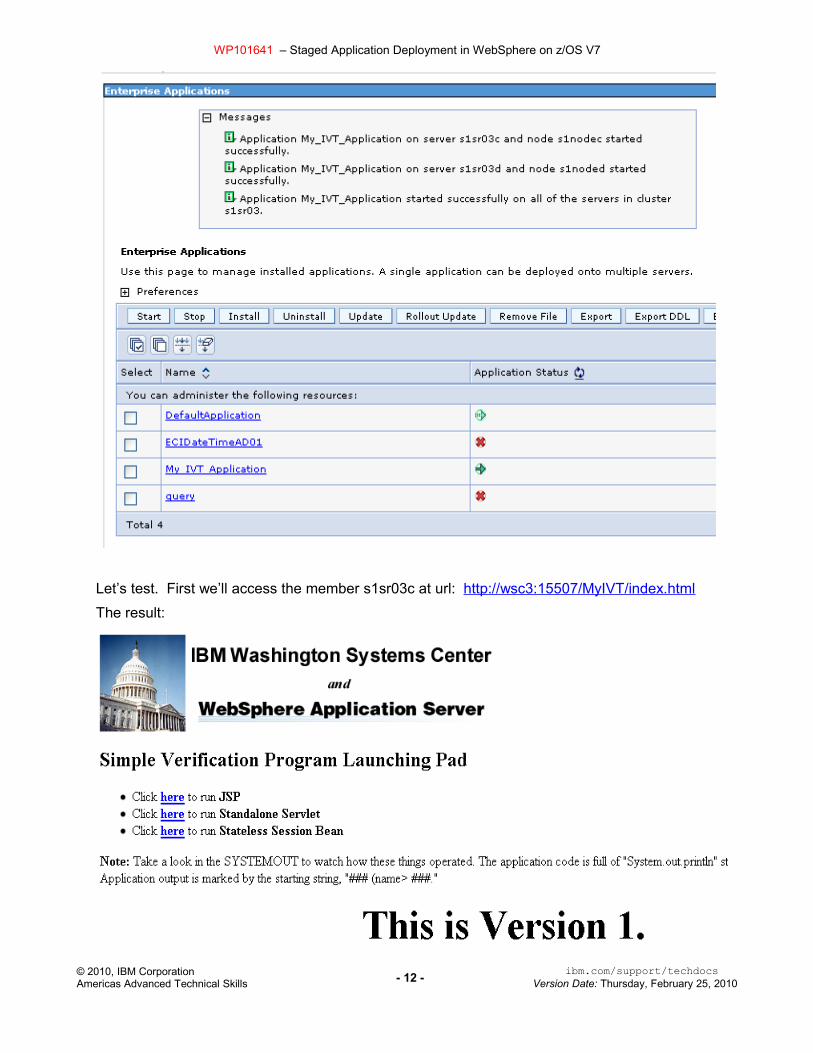
The next screen should indicate the successful start of the application on all members of the cluster.
© 2010, IBM Corporation Americas Advanced Technical Skills - 11 - ibm.com/support/techdocs
Version Date: Thursday, February 25, 2010
WP101641 – Staged Application Deployment in WebSphere on z/OS V7
Let’s test. First we’ll access the member s1sr03c at url: http://wsc3:15507/MyIVT/index.htmlThe result:
© 2010, IBM Corporation Americas Advanced Technical Skills - 12 - ibm.com/support/techdocs
Version Date: Thursday, February 25, 2010
WP101641 – Staged Application Deployment in WebSphere on z/OS V7
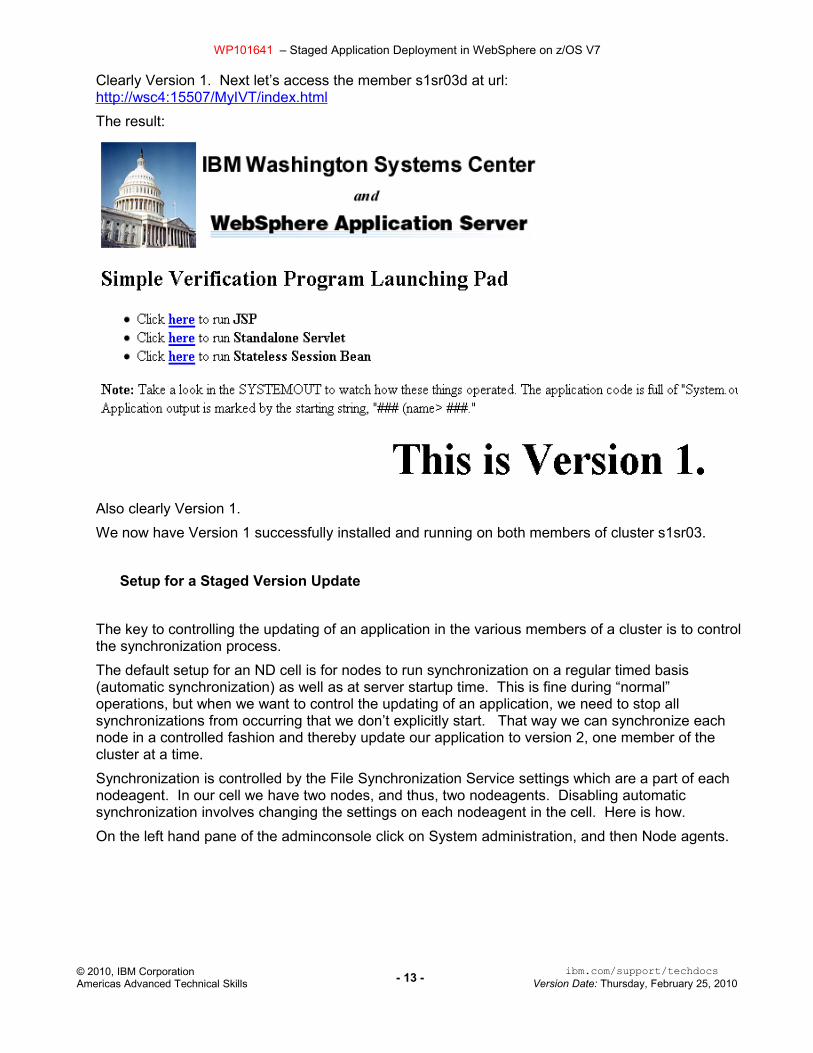
Clearly Version 1. Next let’s access the member s1sr03d at url: http://wsc4:15507/MyIVT/index.htmlThe result:
Also clearly Version 1.We now have Version 1 successfully installed and running on both members of cluster s1sr03.
Setup for a Staged Version Update
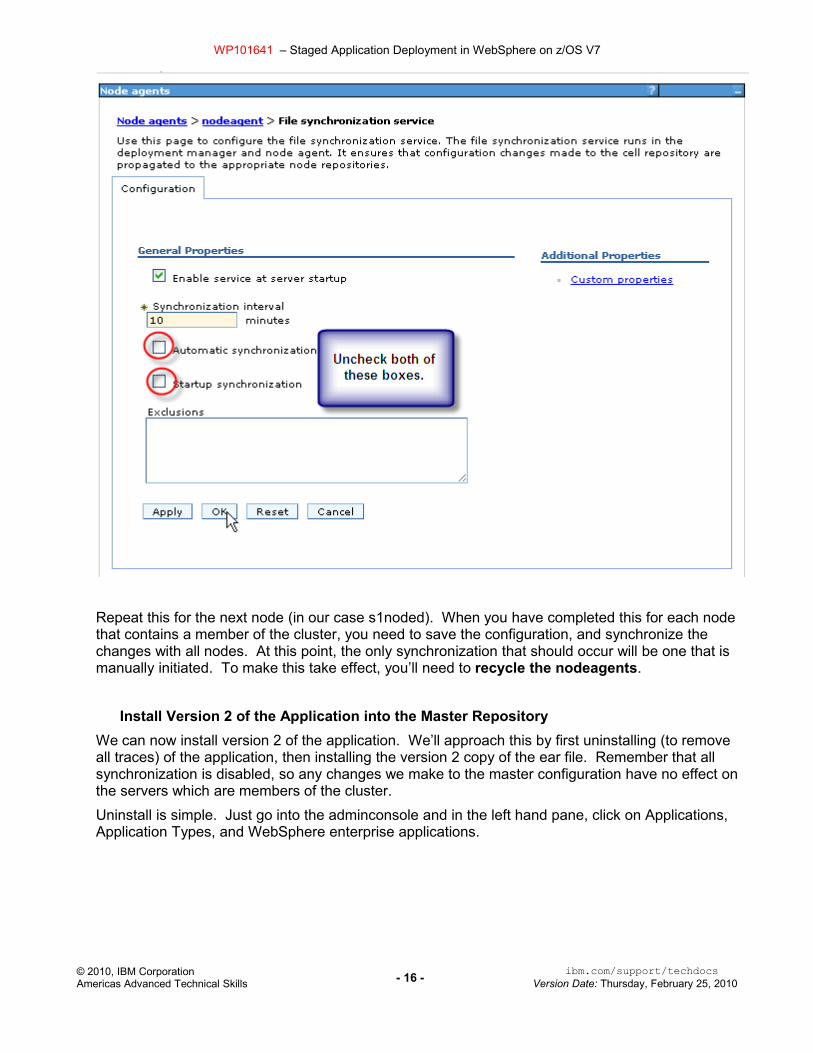
The key to controlling the updating of an application in the various members of a cluster is to control the synchronization process.The default setup for an ND cell is for nodes to run synchronization on a regular timed basis (automatic synchronization) as well as at server startup time. This is fine during “normal” operations, but when we want to control the updating of an application, we need to stop all synchronizations from occurring that we don’t explicitly start. That way we can synchronize each node in a controlled fashion and thereby update our application to version 2, one member of the cluster at a time.Synchronization is controlled by the File Synchronization Service settings which are a part of each nodeagent. In our cell we have two nodes, and thus, two nodeagents. Disabling automatic synchronization involves changing the settings on each nodeagent in the cell. Here is how.On the left hand pane of the adminconsole click on System administration, and then Node agents.
© 2010, IBM Corporation Americas Advanced Technical Skills - 13 - ibm.com/support/techdocs
Version Date: Thursday, February 25, 2010

WP101641 – Staged Application Deployment in WebSphere on z/OS V7
Then on the nodeagent list panel, click on the first nodeagent (in our case, the one for node s1nodec).
On the nodeagent configuration panel, click on File synchronization service.
© 2010, IBM Corporation Americas Advanced Technical Skills - 14 - ibm.com/support/techdocs
Version Date: Thursday, February 25, 2010
WP101641 – Staged Application Deployment in WebSphere on z/OS V7
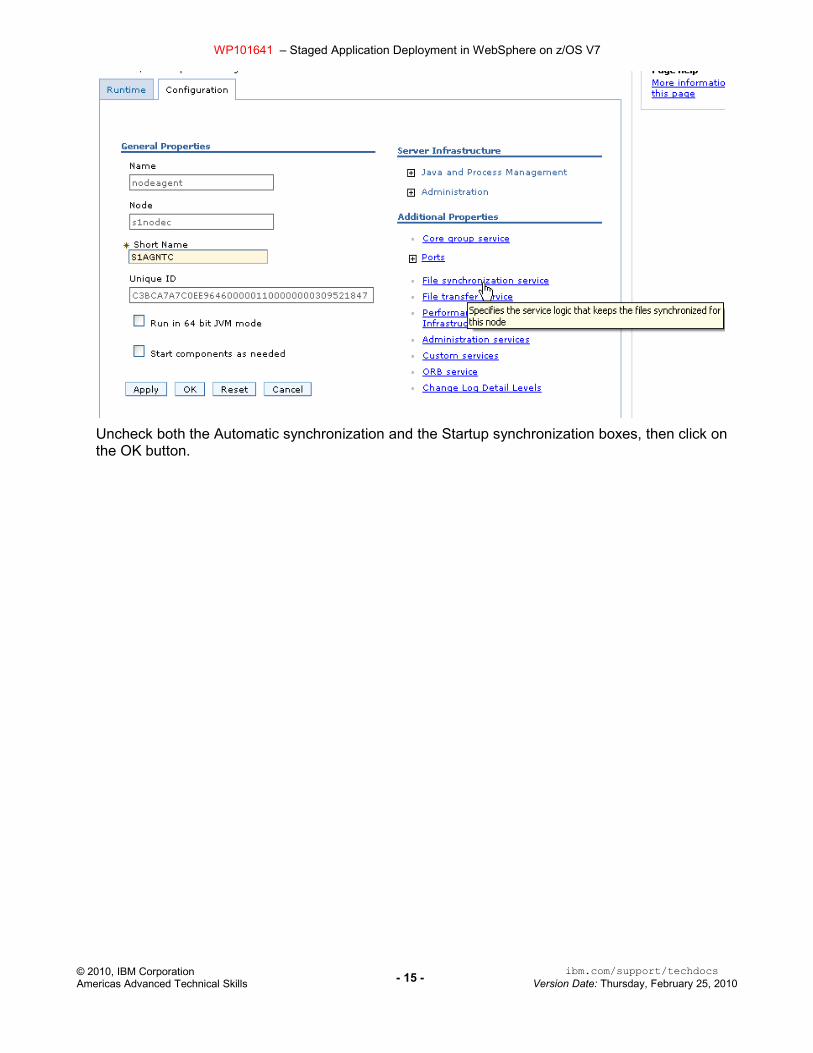
Uncheck both the Automatic synchronization and the Startup synchronization boxes, then click on the OK button.
© 2010, IBM Corporation Americas Advanced Technical Skills - 15 - ibm.com/support/techdocs
Version Date: Thursday, February 25, 2010
WP101641 – Staged Application Deployment in WebSphere on z/OS V7
Repeat this for the next node (in our case s1noded). When you have completed this for each node that contains a member of the cluster, you need to save the configuration, and synchronize the changes with all nodes. At this point, the only synchronization that should occur will be one that is manually initiated. To make this take effect, you’ll need to recycle the nodeagents.
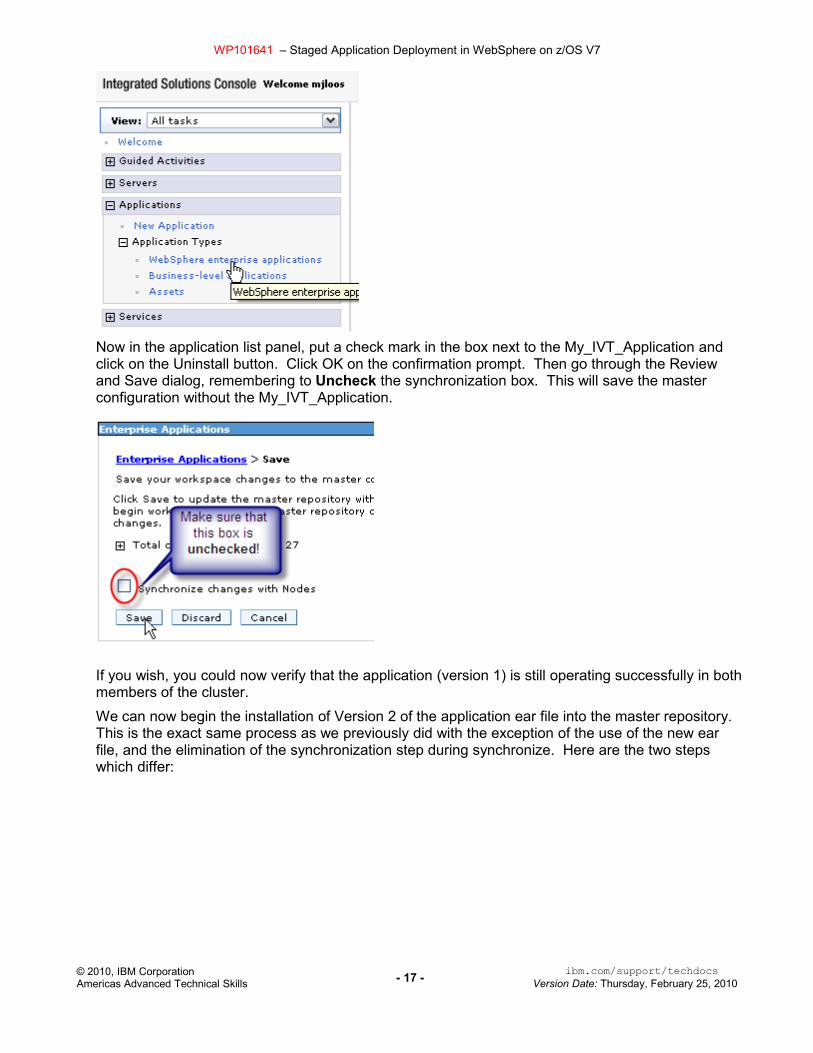
Install Version 2 of the Application into the Master RepositoryWe can now install version 2 of the application. We’ll approach this by first uninstalling (to remove all traces) of the application, then installing the version 2 copy of the ear file. Remember that all synchronization is disabled, so any changes we make to the master configuration have no effect on the servers which are members of the cluster.Uninstall is simple. Just go into the adminconsole and in the left hand pane, click on Applications, Application Types, and WebSphere enterprise applications.
© 2010, IBM Corporation Americas Advanced Technical Skills - 16 - ibm.com/support/techdocs
Version Date: Thursday, February 25, 2010
WP101641 – Staged Application Deployment in WebSphere on z/OS V7
Now in the application list panel, put a check mark in the box next to the My_IVT_Application and click on the Uninstall button. Click OK on the confirmation prompt. Then go through the Review and Save dialog, remembering to Uncheck the synchronization box. This will save the master configuration without the My_IVT_Application.
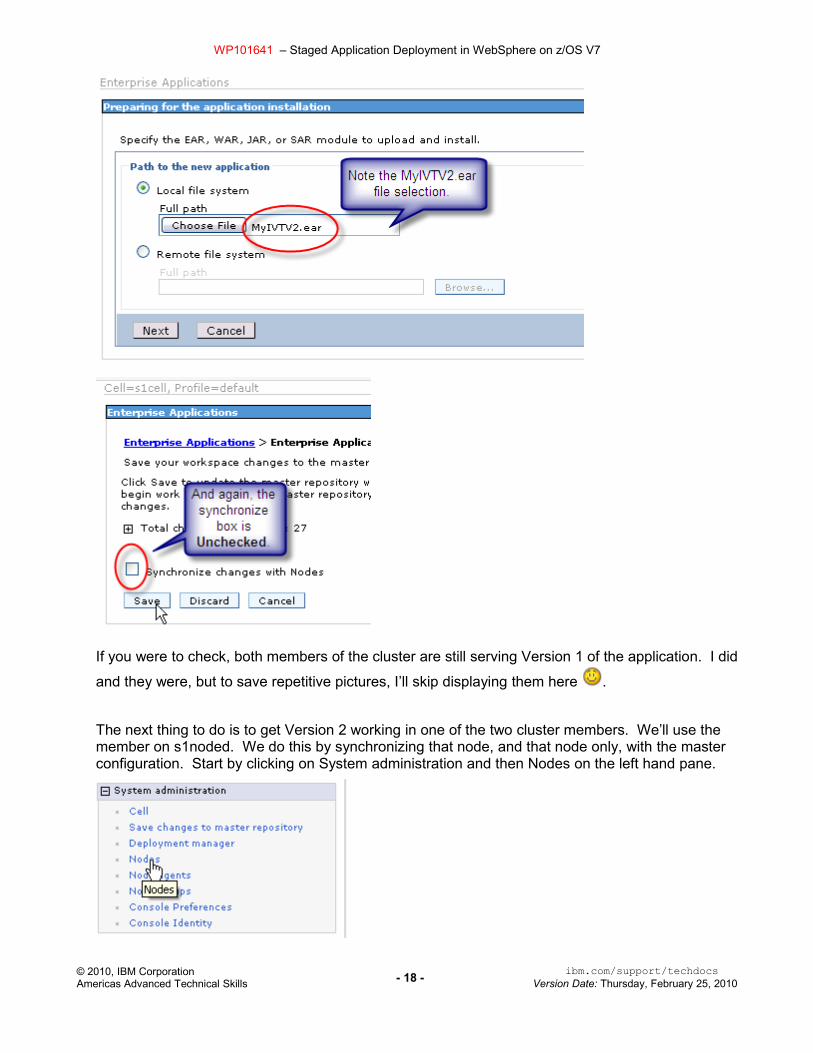
If you wish, you could now verify that the application (version 1) is still operating successfully in both members of the cluster.We can now begin the installation of Version 2 of the application ear file into the master repository. This is the exact same process as we previously did with the exception of the use of the new ear file, and the elimination of the synchronization step during synchronize. Here are the two steps which differ:
© 2010, IBM Corporation Americas Advanced Technical Skills - 17 - ibm.com/support/techdocs
Version Date: Thursday, February 25, 2010
WP101641 – Staged Application Deployment in WebSphere on z/OS V7
If you were to check, both members of the cluster are still serving Version 1 of the application. I did
and they were, but to save repetitive pictures, I’ll skip displaying them here .
The next thing to do is to get Version 2 working in one of the two cluster members. We’ll use the member on s1noded. We do this by synchronizing that node, and that node only, with the master configuration. Start by clicking on System administration and then Nodes on the left hand pane.
© 2010, IBM Corporation Americas Advanced Technical Skills - 18 - ibm.com/support/techdocs
Version Date: Thursday, February 25, 2010
WP101641 – Staged Application Deployment in WebSphere on z/OS V7
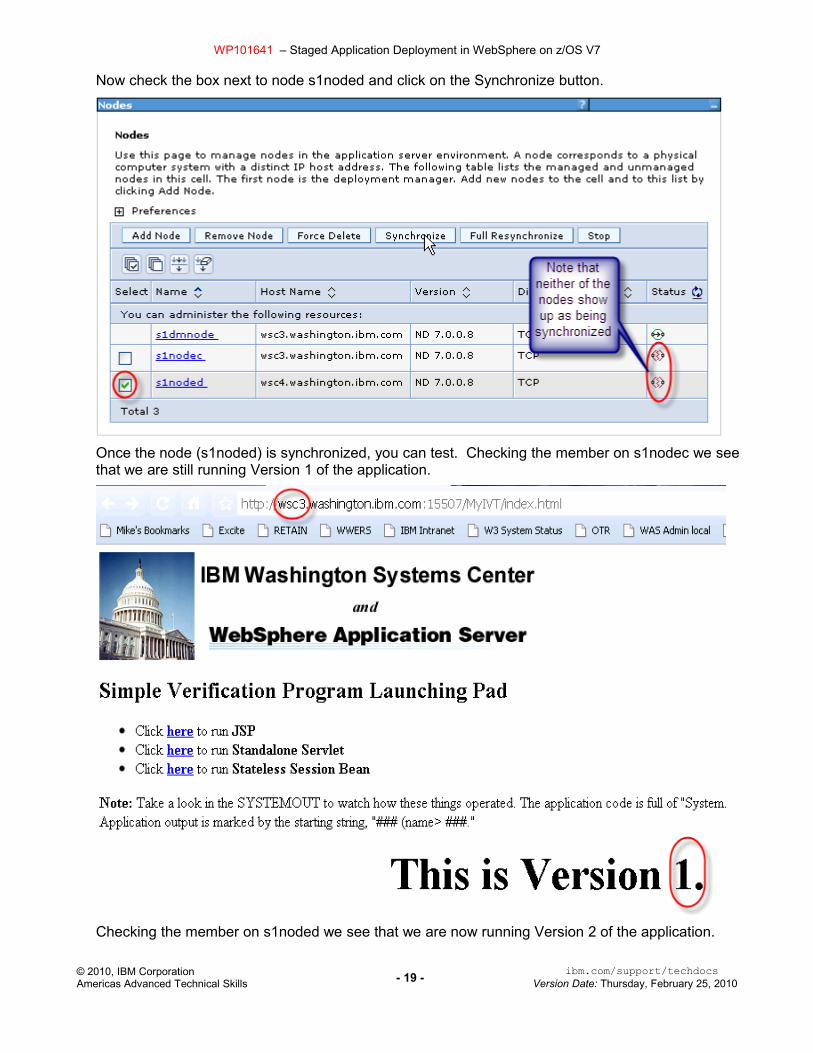
Now check the box next to node s1noded and click on the Synchronize button.
Once the node (s1noded) is synchronized, you can test. Checking the member on s1nodec we see that we are still running Version 1 of the application.
Checking the member on s1noded we see that we are now running Version 2 of the application.
© 2010, IBM Corporation Americas Advanced Technical Skills - 19 - ibm.com/support/techdocs
Version Date: Thursday, February 25, 2010
WP101641 – Staged Application Deployment in WebSphere on z/OS V7
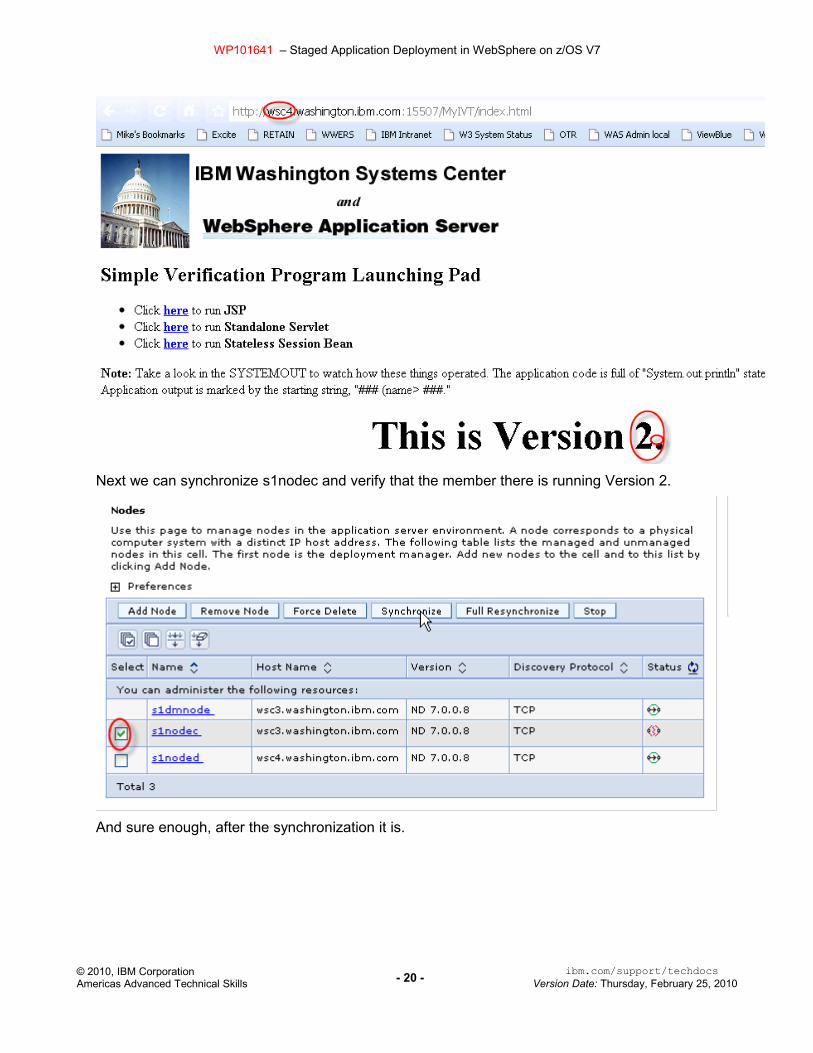
Next we can synchronize s1nodec and verify that the member there is running Version 2.
And sure enough, after the synchronization it is.
© 2010, IBM Corporation Americas Advanced Technical Skills - 20 - ibm.com/support/techdocs
Version Date: Thursday, February 25, 2010
WP101641 – Staged Application Deployment in WebSphere on z/OS V7
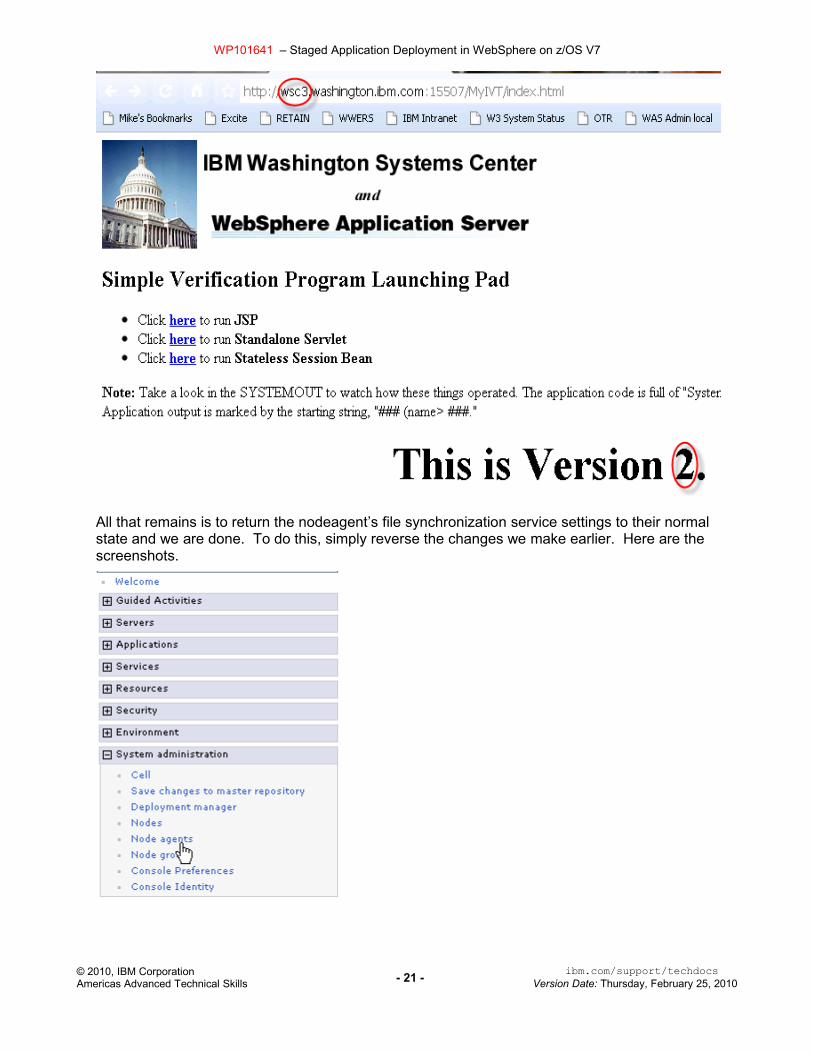
All that remains is to return the nodeagent’s file synchronization service settings to their normal state and we are done. To do this, simply reverse the changes we make earlier. Here are the screenshots.
© 2010, IBM Corporation Americas Advanced Technical Skills - 21 - ibm.com/support/techdocs
Version Date: Thursday, February 25, 2010

WP101641 – Staged Application Deployment in WebSphere on z/OS V7
Repeat for all nodes, then save and synchronize…
To return synchronization to normal operation, you’ll need to recycle the nodeagents.This completes the update cycle.
© 2010, IBM Corporation Americas Advanced Technical Skills - 22 - ibm.com/support/techdocs
Version Date: Thursday, February 25, 2010

WP101641 – Staged Application Deployment in WebSphere on z/OS V7
Staged Install Using the WSADMIN Scripting InterfaceThe install of the application using the scripting interface is done in exactly the same way as with the adminconsole. The same steps are performed, in the same order, with the same result. The only difference is that you avoid all of the “point and click” work, and avoiding that manual work, you have the potential for a greater degree of accuracy. The script fragments used in this demonstration have all been tested and are provided as part of this techdoc. Some of them depend upon the setting of a variable which is not set within the script. During testing, the variable was set interactively, followed by including the script file “fragment”. This allows the reader to later use these files as-is as part of a larger “controller” script.
Initial install of the application.As with the adminconsole install, the first task is to install the application to the master configuration, specifying that it should be run on the cluster of interest (s1sr03 in our examples). We accomplish this by first logging on to either telnet or starting OMVS from TSO. This could also very well be done in batch using either BPXBATCH directly or as a command under the terminal monitor program (IKJEFT01). For this demonstration, we’ll be running in a telnet session.The first script used depends on a variable (appversion) being set to the proper version number for the application. The rest of the scripting statements can be found in file myivtinst.py.
appversion = ‘V1’import sys## Sample invocation:## ./wsadmin.sh -lang jython -javaoption -Dscript.encoding=IBM-1047 -f /u/mjloos/tb/wp101641/myivtinst.py### Uninstall the app if it is there#applist = AdminApp.list().splitlines()#for ap in applist: if ap == "My_IVT_Application": print "Found and uninstalling ", print ap AdminApp.uninstall(ap) continue## Installing app## print "Installing application My_IVT_Application"##earfile = "/u/mjloos/tb/wp101641/MyIVT" + appversion + ".ear"
© 2010, IBM Corporation Americas Advanced Technical Skills - 23 - ibm.com/support/techdocs
Version Date: Thursday, February 25, 2010
WP101641 – Staged Application Deployment in WebSphere on z/OS V7
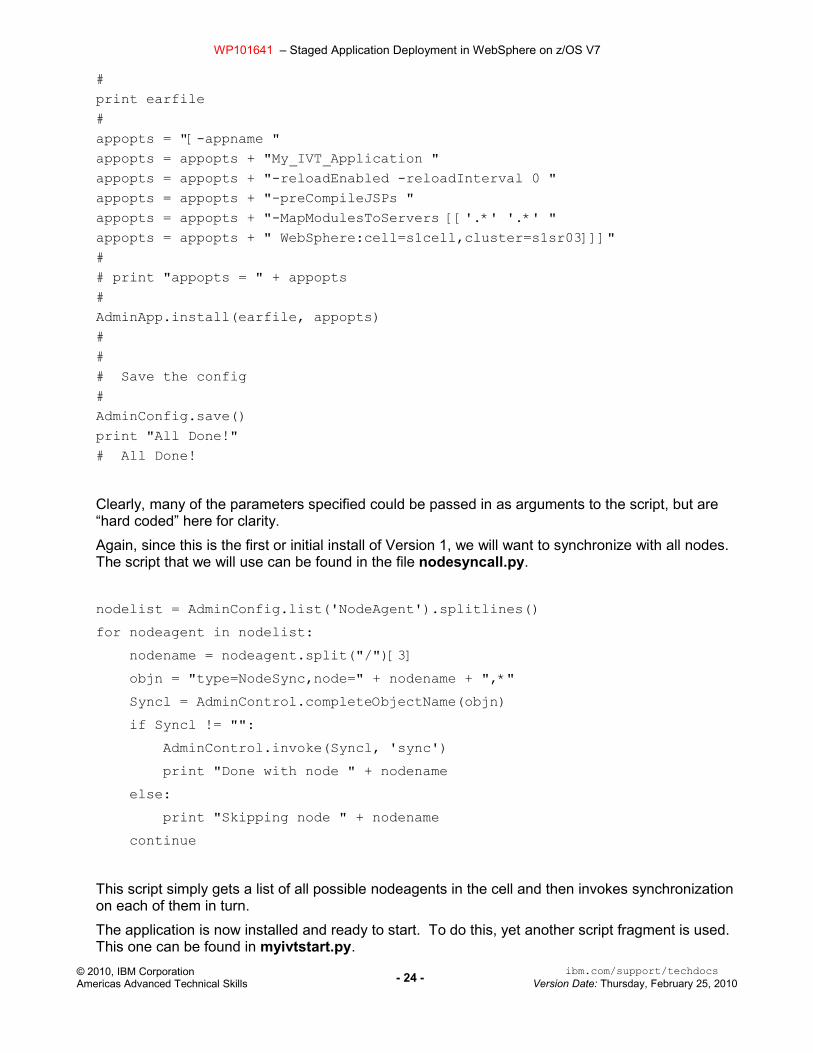
#print earfile#appopts = "[-appname "appopts = appopts + "My_IVT_Application "appopts = appopts + "-reloadEnabled -reloadInterval 0 "appopts = appopts + "-preCompileJSPs "appopts = appopts + "-MapModulesToServers [['.*' '.*' "appopts = appopts + " WebSphere:cell=s1cell,cluster=s1sr03]]]"## print "appopts = " + appopts#AdminApp.install(earfile, appopts)### Save the config#AdminConfig.save()print "All Done!"# All Done!
Clearly, many of the parameters specified could be passed in as arguments to the script, but are “hard coded” here for clarity.Again, since this is the first or initial install of Version 1, we will want to synchronize with all nodes. The script that we will use can be found in the file nodesyncall.py.
nodelist = AdminConfig.list('NodeAgent').splitlines()for nodeagent in nodelist: nodename = nodeagent.split("/")[3] objn = "type=NodeSync,node=" + nodename + ",*" Syncl = AdminControl.completeObjectName(objn) if Syncl != "": AdminControl.invoke(Syncl, 'sync') print "Done with node " + nodename else: print "Skipping node " + nodename continue
This script simply gets a list of all possible nodeagents in the cell and then invokes synchronization on each of them in turn. The application is now installed and ready to start. To do this, yet another script fragment is used. This one can be found in myivtstart.py.
© 2010, IBM Corporation Americas Advanced Technical Skills - 24 - ibm.com/support/techdocs
Version Date: Thursday, February 25, 2010
WP101641 – Staged Application Deployment in WebSphere on z/OS V7
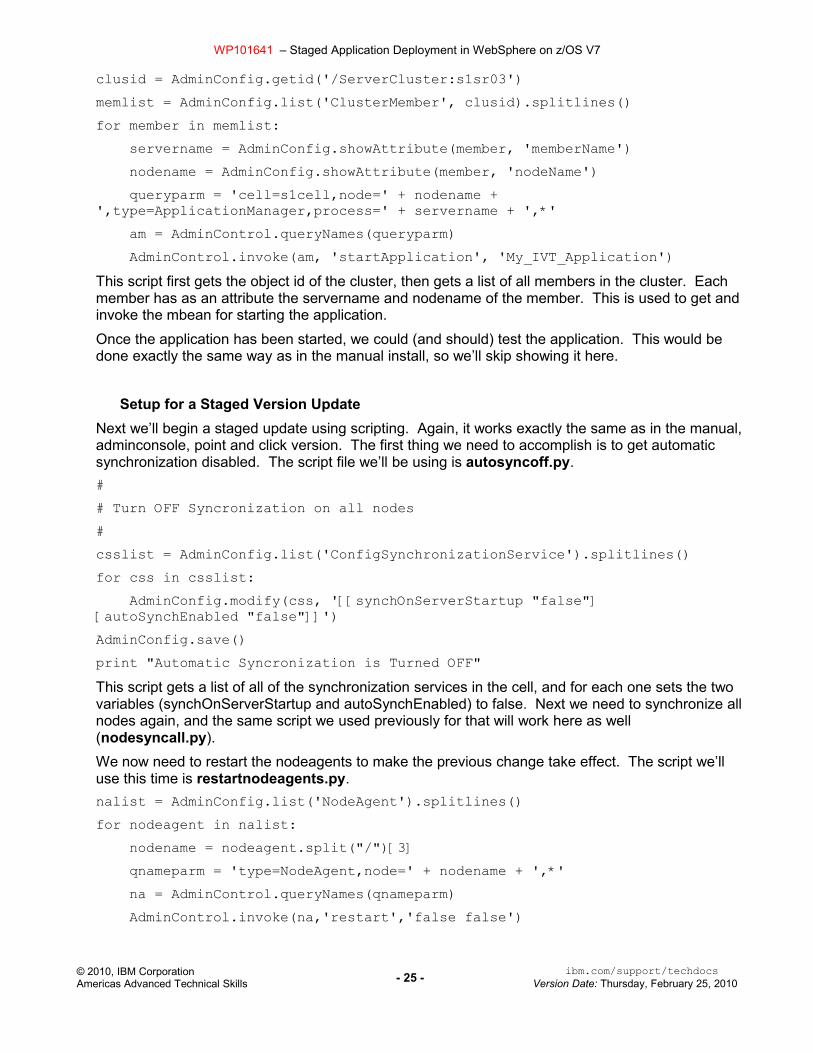
clusid = AdminConfig.getid('/ServerCluster:s1sr03')memlist = AdminConfig.list('ClusterMember', clusid).splitlines()for member in memlist: servername = AdminConfig.showAttribute(member, 'memberName') nodename = AdminConfig.showAttribute(member, 'nodeName') queryparm = 'cell=s1cell,node=' + nodename + ',type=ApplicationManager,process=' + servername + ',*' am = AdminControl.queryNames(queryparm) AdminControl.invoke(am, 'startApplication', 'My_IVT_Application')This script first gets the object id of the cluster, then gets a list of all members in the cluster. Each member has as an attribute the servername and nodename of the member. This is used to get and invoke the mbean for starting the application.Once the application has been started, we could (and should) test the application. This would be done exactly the same way as in the manual install, so we’ll skip showing it here.
Setup for a Staged Version UpdateNext we’ll begin a staged update using scripting. Again, it works exactly the same as in the manual, adminconsole, point and click version. The first thing we need to accomplish is to get automatic synchronization disabled. The script file we’ll be using is autosyncoff.py.## Turn OFF Syncronization on all nodes#csslist = AdminConfig.list('ConfigSynchronizationService').splitlines()for css in csslist: AdminConfig.modify(css, '[[synchOnServerStartup "false"] [autoSynchEnabled "false"]]')AdminConfig.save()print "Automatic Syncronization is Turned OFF"This script gets a list of all of the synchronization services in the cell, and for each one sets the two variables (synchOnServerStartup and autoSynchEnabled) to false. Next we need to synchronize all nodes again, and the same script we used previously for that will work here as well (nodesyncall.py).We now need to restart the nodeagents to make the previous change take effect. The script we’ll use this time is restartnodeagents.py.nalist = AdminConfig.list('NodeAgent').splitlines()for nodeagent in nalist: nodename = nodeagent.split("/")[3] qnameparm = 'type=NodeAgent,node=' + nodename + ',*' na = AdminControl.queryNames(qnameparm) AdminControl.invoke(na,'restart','false false')
© 2010, IBM Corporation Americas Advanced Technical Skills - 25 - ibm.com/support/techdocs
Version Date: Thursday, February 25, 2010
WP101641 – Staged Application Deployment in WebSphere on z/OS V7
This script gets a list of nodeagents in the cell, and for each nodeagent it extracts the node name. The node name is used in a parameter used to invoke the queryNames service. The result of that service is used to invoke a nodeagent restart service. The two “false” parameters are specified to prevent a synchronization from being run before the nodeagent is restarted, and to prevent all running application servers on the node from being restarted when the nodeagent restarts
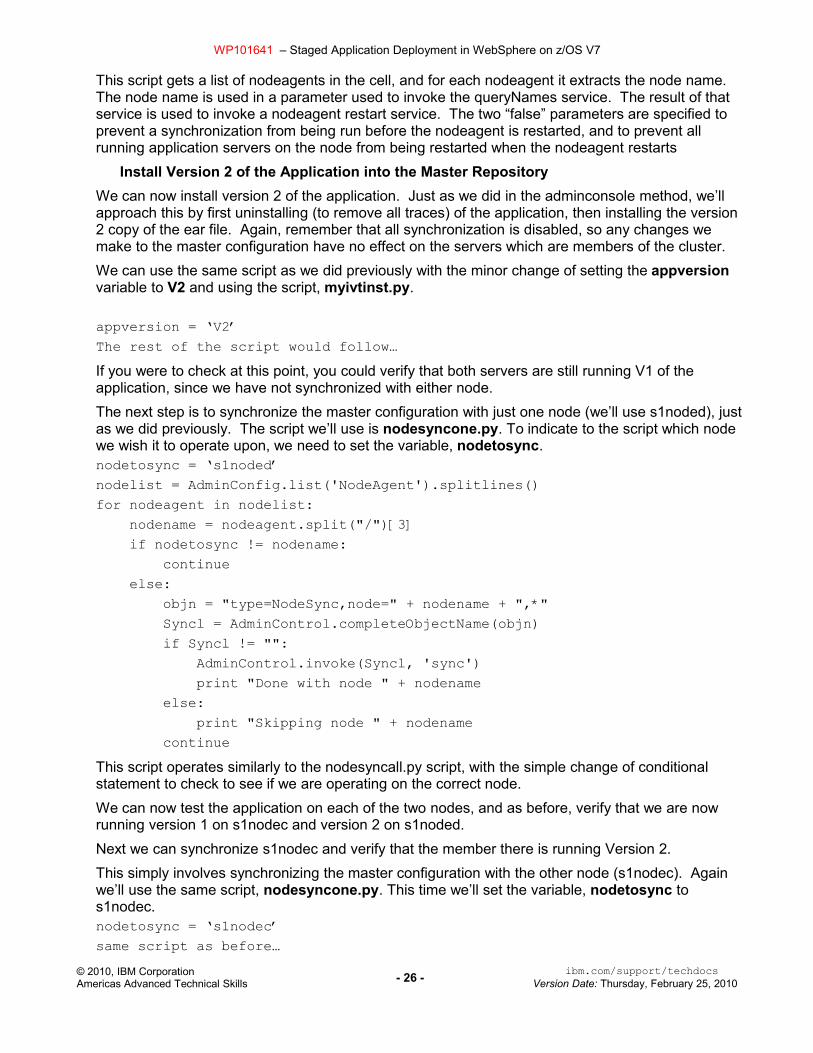
Install Version 2 of the Application into the Master RepositoryWe can now install version 2 of the application. Just as we did in the adminconsole method, we’ll approach this by first uninstalling (to remove all traces) of the application, then installing the version 2 copy of the ear file. Again, remember that all synchronization is disabled, so any changes we make to the master configuration have no effect on the servers which are members of the cluster.We can use the same script as we did previously with the minor change of setting the appversion variable to V2 and using the script, myivtinst.py.
appversion = ‘V2’The rest of the script would follow…If you were to check at this point, you could verify that both servers are still running V1 of the application, since we have not synchronized with either node.The next step is to synchronize the master configuration with just one node (we’ll use s1noded), just as we did previously. The script we’ll use is nodesyncone.py. To indicate to the script which node we wish it to operate upon, we need to set the variable, nodetosync.nodetosync = ‘s1noded’nodelist = AdminConfig.list('NodeAgent').splitlines()for nodeagent in nodelist: nodename = nodeagent.split("/")[3] if nodetosync != nodename: continue else: objn = "type=NodeSync,node=" + nodename + ",*" Syncl = AdminControl.completeObjectName(objn) if Syncl != "": AdminControl.invoke(Syncl, 'sync') print "Done with node " + nodename else: print "Skipping node " + nodename continueThis script operates similarly to the nodesyncall.py script, with the simple change of conditional statement to check to see if we are operating on the correct node.We can now test the application on each of the two nodes, and as before, verify that we are now running version 1 on s1nodec and version 2 on s1noded.Next we can synchronize s1nodec and verify that the member there is running Version 2.This simply involves synchronizing the master configuration with the other node (s1nodec). Again we’ll use the same script, nodesyncone.py. This time we’ll set the variable, nodetosync to s1nodec.nodetosync = ‘s1nodec’same script as before…
© 2010, IBM Corporation Americas Advanced Technical Skills - 26 - ibm.com/support/techdocs
Version Date: Thursday, February 25, 2010
WP101641 – Staged Application Deployment in WebSphere on z/OS V7
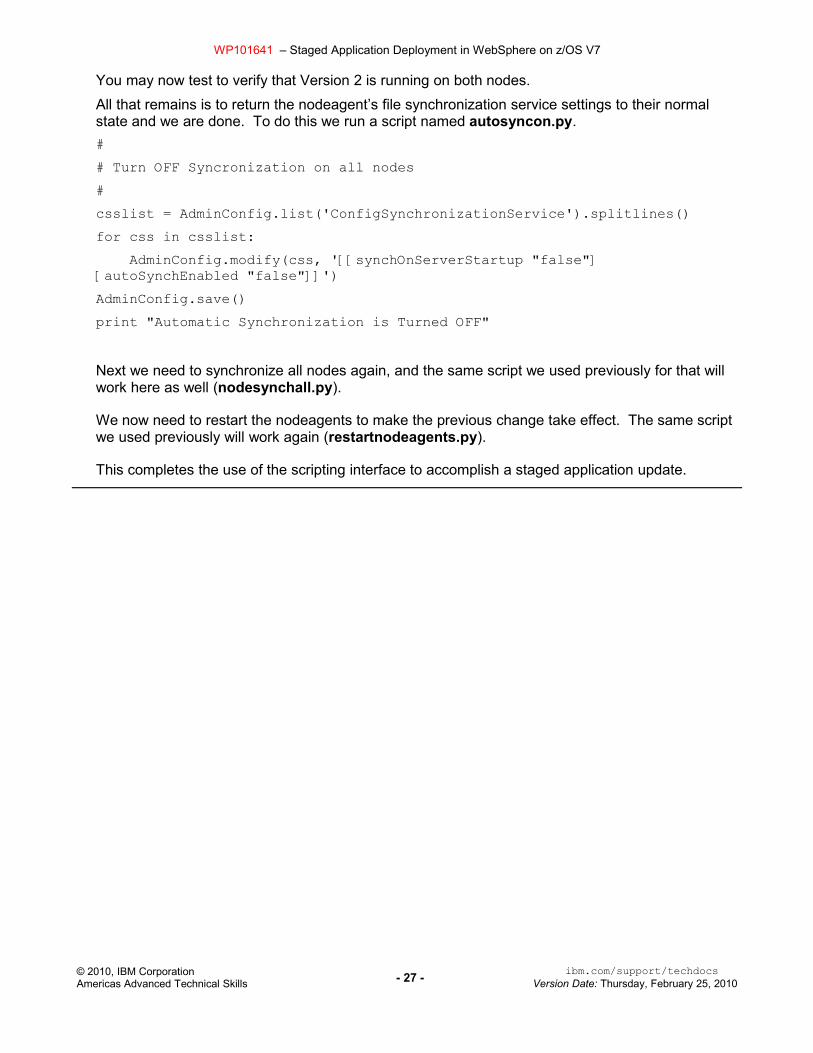
You may now test to verify that Version 2 is running on both nodes.All that remains is to return the nodeagent’s file synchronization service settings to their normal state and we are done. To do this we run a script named autosyncon.py.## Turn OFF Syncronization on all nodes#csslist = AdminConfig.list('ConfigSynchronizationService').splitlines()for css in csslist: AdminConfig.modify(css, '[[synchOnServerStartup "false"] [autoSynchEnabled "false"]]')AdminConfig.save()print "Automatic Synchronization is Turned OFF"
Next we need to synchronize all nodes again, and the same script we used previously for that will work here as well (nodesynchall.py).
We now need to restart the nodeagents to make the previous change take effect. The same script we used previously will work again (restartnodeagents.py).
This completes the use of the scripting interface to accomplish a staged application update.
© 2010, IBM Corporation Americas Advanced Technical Skills - 27 - ibm.com/support/techdocs
Version Date: Thursday, February 25, 2010

WP101641 – Staged Application Deployment in WebSphere on z/OS V7
Some Additional Notes on the Scripts…
The scripts which are provided with this document may be combined in various ways to create other scripts which could be used to run this or a similar installation process. The following is one possible set of groupings.
Initial Application Installation.
The following script uses the provided scripts to install the application the first time, synchronize the nodes, and start the application. It uses the provided scripts by using the execfile command to run them. This script is provided as file initialinst.py. A sample invocation of the script to install Version 1 of the application might be:
./wsadmin.sh –lang jython –user mjloos –password ******** -f /u/mjloos/tb/wp101641/initialinst.py V1
The script follows:
import sys#if(len(sys.argv) > 0): # get version id appversion = sys.argv[0] appversion = appversion.upper()else: print 'Version ID argument missing' sys.exit()# now we can install the MyIVT app...execfile('/u/mjloos/tb/wp101641/myivtinst.py')# synch with nodes...execfile('/u/mjloos/tb/wp101641/nodesyncall.py')# start the application...execfile('/u/mjloos/tb/wp101641/myivtstart.py')## All Done!#
Setup for Staged Install.
© 2010, IBM Corporation Americas Advanced Technical Skills - 28 - ibm.com/support/techdocs
Version Date: Thursday, February 25, 2010

WP101641 – Staged Application Deployment in WebSphere on z/OS V7
The following script uses the provided scripts to turn off automatic synchronization, synchronize the nodes, restart the nodeagents, install V2 of the application, and synchronize one node. This script is provided as file stagesetup1.py. A sample invocation of the script to install Version 2 of the application and synchronize node s1noded might be:
./wsadmin.sh –lang jython –user mjloos –password ******** -f /u/mjloos/tb/wp101641/stagesetup1.py V1 s1noded
The script follows:import sys#if(len(sys.argv) > 1): # get version id appversion = sys.argv[0] appversion = appversion.upper() nodetosync = sys.argv[1]else: print 'Version ID and/or node argument missing' sys.exit()# Turn off automatic synchronization...execfile('/u/mjloos/tb/wp101641/autosyncoff.py')# synch with nodes...execfile('/u/mjloos/tb/wp101641/nodesyncall.py')# restart the nodeagents...execfile('/u/mjloos/tb/wp101641/restartnodeagents.py')# Install the new version of the app...execfile('/u/mjloos/tb/wp101641/myivtinst.py')# synchronize with the designated node...execfile('/u/mjloos/tb/wp101641/nodesyncone.py')## All Done!#
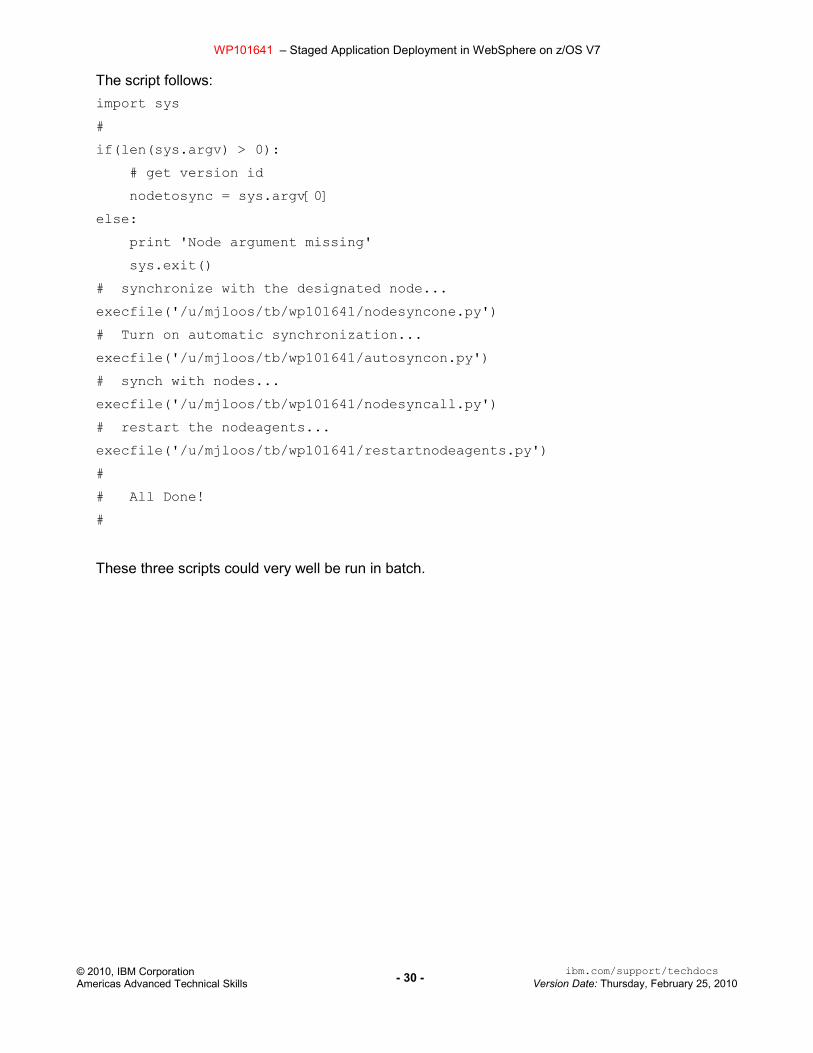
Finish up the ProcessThe following script uses the provided scripts to synchronize the other node, turn on automatic synchronization, synchronize the nodes, and restart the nodeagents. This script is provided as file finishup.py. A sample invocation of the script to synchronize node s1nodec might be:
./wsadmin.sh –lang jython –user mjloos –password ******** -f /u/mjloos/tb/wp101641/finishup.py s1noded
© 2010, IBM Corporation Americas Advanced Technical Skills - 29 - ibm.com/support/techdocs
Version Date: Thursday, February 25, 2010
WP101641 – Staged Application Deployment in WebSphere on z/OS V7
The script follows:import sys#if(len(sys.argv) > 0): # get version id nodetosync = sys.argv[0]else: print 'Node argument missing' sys.exit()# synchronize with the designated node...execfile('/u/mjloos/tb/wp101641/nodesyncone.py')# Turn on automatic synchronization...execfile('/u/mjloos/tb/wp101641/autosyncon.py')# synch with nodes...execfile('/u/mjloos/tb/wp101641/nodesyncall.py')# restart the nodeagents...execfile('/u/mjloos/tb/wp101641/restartnodeagents.py')## All Done!#
These three scripts could very well be run in batch.
© 2010, IBM Corporation Americas Advanced Technical Skills - 30 - ibm.com/support/techdocs
Version Date: Thursday, February 25, 2010

WP101641 – Staged Application Deployment in WebSphere on z/OS V7
Document Change HistoryCheck the date in the footer of the document for the version of the document.
February 23, 2010 Original document.
February 25, 2010 Updated with assigned WP101641 number and republished.
End of WP101641
© 2010, IBM Corporation Americas Advanced Technical Skills - 31 - ibm.com/support/techdocs
Version Date: Thursday, February 25, 2010


