S a v e M o n e y a n d I m p r o v e Y o u r P r i n t i n g
MIS Associates Inc 2901 Auburn Rd Auburn Hills, MI 48326 800-445-8296 http://www.inksupply.com Fax: 248-289-6013 Email: [email protected]
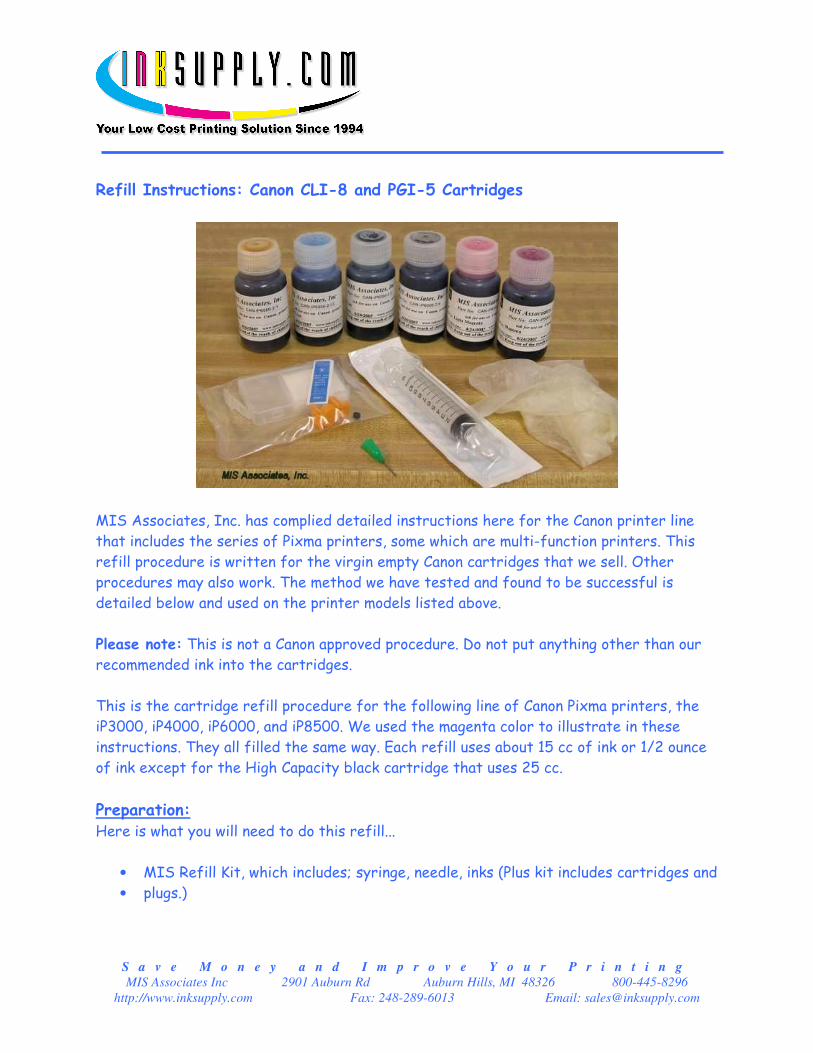
Refill Instructions: Canon CLI-8 and PGI-5 Cartridges
MIS Associates, Inc. has complied detailed instructions here for the Canon printer line
that includes the series of Pixma printers, some which are multi-function printers. This
refill procedure is written for the virgin empty Canon cartridges that we sell. Other
procedures may also work. The method we have tested and found to be successful is
detailed below and used on the printer models listed above.
Please note: This is not a Canon approved procedure. Do not put anything other than our
recommended ink into the cartridges.
This is the cartridge refill procedure for the following line of Canon Pixma printers, the
iP3000, iP4000, iP6000, and iP8500. We used the magenta color to illustrate in these
instructions. They all filled the same way. Each refill uses about 15 cc of ink or 1/2 ounce
of ink except for the High Capacity black cartridge that uses 25 cc.
Preparation: Here is what you will need to do this refill...
• MIS Refill Kit, which includes; syringe, needle, inks (Plus kit includes cartridges and
• plugs.)

S a v e M o n e y a n d I m p r o v e Y o u r P r i n t i n g
MIS Associates Inc 2901 Auburn Rd Auburn Hills, MI 48326 800-445-8296 http://www.inksupply.com Fax: 248-289-6013 Email: [email protected]
• Empty Canon Cartridge, either used or a virgin empty from MIS
• Newspaper and some paper towels
• A bench to work on where no damage will be done if you spill some ink
• Rubber gloves are optional (bleach and water will take ink off your hands)
• Follow along carefully, as the instructions for filling a virgin empty cartridge are a
• bit different then those for refilling a used cartridge.
Virgin Empty Filling: 1. To begin the project, be sure you have an adequately large work space and protect
it by covering it with old newspaper in case of an ink spill. Having some paper towel
near by is always a good idea. You will need some to dab up any ink over flow when
refilling cartridges.
2. Rubber gloves should be included in the kit and can be used to prevent ink stains on
the hands. The ink can be washed from skin with warm soapy water, and in extreme
cases a small amount of bleach.
3. Note the following characteristics of the cartridge. One, the plug port for filling,
locate the plug for sealing this port. Two, the orange cap covering the dispensing
port for the print head; this is located on the bottom of the cartridge. Three, the

S a v e M o n e y a n d I m p r o v e Y o u r P r i n t i n g
MIS Associates Inc 2901 Auburn Rd Auburn Hills, MI 48326 800-445-8296 http://www.inksupply.com Fax: 248-289-6013 Email: [email protected]
breather hole, initially covered by the foil pull-tab. Four, the open ink chamber side
of the cartridge. And five, the sponge filled side of the cartridge.
4. Foam is your enemy, if at any time foam begins to form to the point that it
obstructs filling. Set the cartridges down and allow a few hours for the foam to
dissipate.
5. The orange cap must be on the cartridge for all filling procedures. You should also
retain this cap for future use in the refilling procedure. The orange cap and plugs
for the fill port are NOT replaceable; if lost, you must purchase a replacement
virgin empty cartridge.
6. Starting with the virgin empty cartridge, begin with the sponge side downward and
the filling port toward you. Fill your syringe with 12 cc of ink.
7. Inject the ink slowly into the fill plug port opening. Allow the ink to soak into the
sponge before attempting to fill the reservoir chamber portion of the cartridge.

S a v e M o n e y a n d I m p r o v e Y o u r P r i n t i n g
MIS Associates Inc 2901 Auburn Rd Auburn Hills, MI 48326 800-445-8296 http://www.inksupply.com Fax: 248-289-6013 Email: [email protected]
8. Once the sponge appears to be 80% soaked, complete the filling of the reservoir.
You may need to add additional ink to the syringe.
9. Insert the plug into the fill plug port opening to seal it. If at all possible, allow the
cartridge to settle any foam build up remaining from the fill process. Some foam
may not dissipate.

S a v e M o n e y a n d I m p r o v e Y o u r P r i n t i n g
MIS Associates Inc 2901 Auburn Rd Auburn Hills, MI 48326 800-445-8296 http://www.inksupply.com Fax: 248-289-6013 Email: [email protected]
10. Remove the foil protecting the breather and the orange cap and install the
cartridge as usual to begin printing.
Refilling: 1. Upon removing an exhausted ink cartridge, replace the orange cap over the
dispensing port before beginning any refilling steps. Then remove the plug from the
fill port.
2. Next locate the correct inkbottle supply and the syringe and blunt needle.
3. Before putting ink in the syringe, check to fit the needle into the breather port on
the sponge side of the cartridge. You should be able to insert the needle portion
entirely into the sponge until the plastic portion of the needle touches the
cartridge.

S a v e M o n e y a n d I m p r o v e Y o u r P r i n t i n g
MIS Associates Inc 2901 Auburn Rd Auburn Hills, MI 48326 800-445-8296 http://www.inksupply.com Fax: 248-289-6013 Email: [email protected]
4. Next pull 10 cc of ink into the syringe from the correct bottle.
5. This step will cause ink spill if not done carefully. Begin injecting ink into the
breather port side of the cartridge to fill the sponge side first. This must be done
very slowly to avoid any foam build up and prevent spillage. At the first sign of ink
or foam leaking back out of the breather port, stop. You may see ink beginning to
fill the reservoir side of the cartridge, this is okay. Continue to fill the sponge side
until ink begins to leak from the breather port, and then stop.
6. Next inject ink into the reservoir side until it is full.
7. Reinstall the fill port plug.

S a v e M o n e y a n d I m p r o v e Y o u r P r i n t i n g
MIS Associates Inc 2901 Auburn Rd Auburn Hills, MI 48326 800-445-8296 http://www.inksupply.com Fax: 248-289-6013 Email: [email protected]
8. If at all possible allow the cartridge to settle any foam build up remaining from the
fill process. Some foam may not dissipate.
CHIP REPLACEMENT INSTRUCTIONS:
*WARNING: DO NOT PUT A CARTRIDGE WITHOUT A CHIP ON IT INTO THE PRINTER - IT WILL
CAUSE FATAL DAMAGE TO PRINTER!!!
The new Canon cartridges have chips on them. To use an aftermarket cartridge, you must
remove the chip from your OEM cartridge and install it on the aftermarket cartridge.
Note that these chip are color position specific. If you have an old cartridge, you can
reset the chip and return it to the Full condition. Use the SK155 chip resetter. The SK155
will only work on standard type chip, not on aftermarket chips.
Procedure: 1. To get the chip off, use a single sided razor blade and remove excess plastic from
the side post holding the chip in place. Only remove the plastic from one post.

S a v e M o n e y a n d I m p r o v e Y o u r P r i n t i n g
MIS Associates Inc 2901 Auburn Rd Auburn Hills, MI 48326 800-445-8296 http://www.inksupply.com Fax: 248-289-6013 Email: [email protected]
2. Use a knife blade or thin screwdriver blade to pry chip off of cartridge.
3. Slide new chip on to the posts on the new cartridge. Take advantage of the U
channel in the chip. When the chip is in place, push the posts down to retain the
chip.
4. If the chip is loose, remove it and then use a SMALL amount of super glue or
equivalent on the backside of the chip to keep it in place. CAUTION: Do not get
any glue on the gold pads. If the chip snapped in place you will not need any glue.
WARNING: If you insert a cartridge that does not have a chip on it down into the
cartridge holder, the small metal fingers that normally make contact with the chip will get
caught inside the cavity for the chip. Then when you pull the cartridge out, these fingers
will get bent and the printer will be ruined. DON'T DO THIS.

S a v e M o n e y a n d I m p r o v e Y o u r P r i n t i n g
MIS Associates Inc 2901 Auburn Rd Auburn Hills, MI 48326 800-445-8296 http://www.inksupply.com Fax: 248-289-6013 Email: [email protected]
OEM REFILL INSTRUCTIONS:
*Please note: This is not a Canon approved procedure. Do not put anything other than our
recommended ink into the cartridges.
Procedure: This is the procedure for all of the cartridges used in the Canon 3000, 6000, S400, S450,
S600, S800 and BJC-8200. We used the yellow one to illustrate the instructions. They all
fill the same way. Each refill uses about 15 cc of ink or 1/2 ounce.
Preparation: • Here is what you will need to do this refill...
• MIS Refill Kit which includes; syringe, needle, ink, yellow drill tool, rubber balls
• Empty Canon Cartridge, either used or a virgin empty from MIS
• Small hammer
• Black electrical tape
• Newspaper and some paper towels
• A bench to work on where no damage will be done if you spill some ink
• Rubber gloves are optional (bleach and water will take ink off your hands)
Refill: 1. Scrape away the thin plastic on top of the cartridge to reveal the ball in the
reservoir section.

S a v e M o n e y a n d I m p r o v e Y o u r P r i n t i n g
MIS Associates Inc 2901 Auburn Rd Auburn Hills, MI 48326 800-445-8296 http://www.inksupply.com Fax: 248-289-6013 Email: [email protected]
2. Use our black tool and a small hammer or equivalent device to push the ball into the
reservoir. It does not take much, just one sharp blow right on the plastic ball. (See
step 9 for alternative.)
3. Using our Yellow Drill Tool, make a hole in the top of the cartridge into the sponge
area.

S a v e M o n e y a n d I m p r o v e Y o u r P r i n t i n g
MIS Associates Inc 2901 Auburn Rd Auburn Hills, MI 48326 800-445-8296 http://www.inksupply.com Fax: 248-289-6013 Email: [email protected]
4. Use some black electrical tape and tape over the exit port on the bottom of the
cartridge. This is so ink will not leak out when you fill the sponge section or the
reservoir section.
5. Using the syringe, inject ink into the sponge area until full. Move the needle around
into different spots in the sponge to get it totally saturated. Leave the hole into
the sponge compartment open, do not cover or block. Next, inject ink into the
reservoir area until almost full. Leave just a little air space, so it does not overflow.
This is just to keep everything from getting messy.
6. Make sure the area where the ball was, is clean and free of any chips or plastic
film. Press the black rubber replacement ball (MIS-HPBALL) into the hole where
the original ball was located. Just use your finger nail to seat the ball so it is flush
with the surface of the cartridge. Don't go too far or it will get pushed inside the
cartridge. Do not cover or plug the hole you drilled in the sponge compartment. This
is the air vent and it must be left open. Remove tape from bottom exit port.
Note: If the ball does not make a perfect air tight seal, then ink will drip out of
the cartridge at the exit port until empty. If this happens, see step 7.
7. If the cartridge is dripping, let it drip into a cup or dish until it stops. Don't keep
the exit area, where the ink comes out in contact with any paper or cloth because it
will wick all of the ink out. If it has stopped dripping, put it back in the printer and
run a cleaning cycle. If it continues to drip for a long time, you may have an air leak
around the rubber ball. Make sure the ball is not damaged or gouged. Put a new one
in if it is damaged. If you damaged the ball seat when pushing it in or cut it
somehow, it will leak air. If you can't get a good seal with the ball, add some hot

S a v e M o n e y a n d I m p r o v e Y o u r P r i n t i n g
MIS Associates Inc 2901 Auburn Rd Auburn Hills, MI 48326 800-445-8296 http://www.inksupply.com Fax: 248-289-6013 Email: [email protected]
melt glue around it to help the sealing process. If you need more of the rubber
balls (MIS-HPBALL), you can order them from the accessory page.
8. The next time you are ready to refill you can reuse the rubber ball if you carefully
spear it from the side and remove it with a bulletin board stick pin. Don't push
down on the ball or it will pop into the reservoir area. This is not a problem, it just
means you will have to have another ball to seal the hole. If you are careful you can
reuse the rubber ball 3 or 4 times.
9. As an alternate procedure you can drill into the reservoir area, inject the ink and
then use hot melt glue to seal the hole AIR TIGHT. If you don't like drilling, then
try a heated paper clip to melt a hole in the reservoir. Hold it with pliers and heat
with a lighter or torch.
If your cartridge drips for a long time after refilling, this means there is an air
leak in the reservoir section.


