
PeopleSoft 8.3 Resume
Processing PeopleBook

PeopleSoft 8.3 Resume Processing PeopleBook
SKU HRMSr83RSP-B 1001
PeopleBooks Contributors: Teams from PeopleSoft Product Documentation and
Development.
Copyright © 2002 PeopleSoft, Inc. All rights reserved.
Printed in the United States.
All material contained in this documentation is proprietary and confidential to PeopleSoft,
Inc. ("PeopleSoft"), protected by copyright laws and subject to the nondisclosure provisions
of the applicable PeopleSoft agreement. No part of this documentation may be reproduced,
stored in a retrieval system, or transmitted in any form or by any means, including, but not
limited to, electronic, graphic, mechanical, photocopying, recording, or otherwise without the
prior written permission of PeopleSoft.
This documentation is subject to change without notice, and PeopleSoft does not warrant that
the material contained in this documentation is free of errors. Any errors found in this
document should be reported to PeopleSoft in writing.
The copyrighted software that accompanies this document is licensed for use only in strict
accordance with the applicable license agreement which should be read carefully as it
governs the terms of use of the software and this document, including the disclosure thereof.
PeopleSoft, the PeopleSoft logo, PeopleTools, PS/nVision, PeopleCode, PeopleBooks,
PeopleTalk, and Vantive are registered trademarks, and "People power the internet." and Pure
Internet Architecture are trademarks of PeopleSoft, Inc. All other company and product
names may be trademarks of their respective owners. The information contained herein is
subject to change without notice.

P E O P L E S O F T P R O P R I E T A R Y A N D C O N F I D E N T I A L C O N T E N T S i i i
C o n t e n t s
About the HRMS PeopleBooks
Before You Begin............................................................................................................. vii
PeopleSoft Application Fundamentals for HRMS PeopleBook....................................... vii
Related Documentation ................................................................................................... viii
Documentation on the Internet.................................................................................. viii
Documentation on CD-ROM .................................................................................... viii
Hardcopy Documentation ......................................................................................... viii
PeopleBooks Standard Page Element Definitions............................................................. ix
PeopleBook Standard Group Boxes ................................................................................. xii
Entering Name Information ....................................................................................... xii
Entering Address Information................................................................................... xiv
Entering or Viewing Pay Components........................................................................xv
Required Fields on Pages ............................................................................................... xvii
Typographical Conventions and Visual Cues ................................................................ xvii
Process Introductory Table............................................................................................ xviii
USF U.S. Federal Government Functionality.................................................................. xix
E&G Education and Government Functionality.............................................................. xix
Local Country Functionality............................................................................................ xix
Comments and Suggestions............................................................................................. xix
Chapter 1
About the PeopleSoft 8.3 Resume Process PeopleBook
Chapter 2
PeopleSoft Resume Processing Overview
Understanding PeopleSoft Resume Processing............................................................... 2-1
Extracting Applicant Information ............................................................................. 2-2
Automating Resume Entry .............................................................................................. 2-2
Automatically Populating Fields in Apply for Job .......................................................... 2-4
Chapter 3
Setting Up Resume Processing
Understanding the Extraction Process ............................................................................. 3-1
The Extraction Process for Automatic Resume Entry .............................................. 3-1

P E O P L E S O F T 8 . 3 R E S U M E P R O C E S S I N G P E O P L E B O O K
C O N T E N T S i v P E O P L E S O F T P R O P R I E T A R Y A N D C O N F I D E N T I A L
The Extraction Process for Apply for Job ................................................................. 3-2
Initialize Resume Processing Process ....................................................................... 3-3
Apply for Job PeopleCode ........................................................................................ 3-4
Resume Extractor ...................................................................................................... 3-4
Inbound Business Interlink........................................................................................ 3-6
FTP Server ................................................................................................................ 3-7
Overview of Resume Processing Setup ........................................................................... 3-7
Setting Up Resume Processing Directories ..................................................................... 3-7
Setting Up Your FTP Server and URLs .......................................................................... 3-9
Setting Up Resume Processing Parameters ................................................................... 3-10
Running the Initialize Resume Processing Process ....................................................... 3-10
Defining the Email Message Sent to Applicants ........................................................... 3-11
Running Up the Auto Populate Cleanup Process .......................................................... 3-12
Chapter 4
Processing Resumes
Starting Resume Processing............................................................................................. 4-1
Processing Hard Copy Resumes ...................................................................................... 4-2
Processing Soft Copy Resumes ....................................................................................... 4-2
Processing Resumes With Lower Confidence Levels ..................................................... 4-2
Pages Used to Process Resumes with Lower Confidence Levels ............................. 4-3
Viewing the Resume Queue...................................................................................... 4-3
Processing Resumes in the Queue............................................................................. 4-5
Index

P E O P L E S O F T P R O P R I E T A R Y A N D C O N F I D E N T I A L P R E F A C E v
About the HRMS PeopleBooks
The HRMS PeopleBooks provide you with the information you will need for implementing
and using PeopleSoft Human Resources Management System (HRMS) products.
This section describes information you should know before you begin working with
PeopleSoft products and documentation, including PeopleSoft-specific documentation
conventions, information specific to the PeopleSoft HRMS product line, how to order
additional copies of our documentation, and so on.
Before You Begin
To benefit fully from the information covered in these books, you need to have a basic
understanding of how to use PeopleSoft applications. We recommend that you complete at
least one PeopleSoft introductory training course.
You should be familiar with navigating around the system and adding, updating, and deleting
information using PeopleSoft windows, menus, and pages. You should also be comfortable
using the World Wide Web and the Microsoft® Windows or Windows NT graphical user
interface.
Because we assume you already know how to navigate the PeopleSoft system, much of the
information in these books is not procedural. That is, it does not typically provide step-by-
step instructions on using tables, pages, and menus. Instead, we provide you with all the
information you need to use the system most effectively and to implement your PeopleSoft
application according to your organizational or departmental needs. These books expand on
the material covered in PeopleSoft training classes.
PeopleSoft Application Fundamentals for HRMS PeopleBook
The individual HRMS PeopleBooks provide you with implementation and processing
information for the individual HRMS products. However, there is additional, essential
information describing the setup and design of each HRMS product contained in the
companion volume of documentation called PeopleSoft Application Fundamentals for HRMS
PeopleBook.
The PeopleSoft Application Fundamentals for HRMS PeopleBook consists of important topics
that apply to many or all PeopleSoft applications across the HRMS product line. Whether you
are implementing a single HRMS product, some combination of products within the product
line, or the entire PeopleSoft HRMS system, you should be familiar with the contents of this
central PeopleBook. It is the starting point for fundamentals such as setting up control tables
and administering security.
In the PeopleSoft Applications Fundamentals for HRMS PeopleBook, we've included common
information pertinent to all applications in the HRMS product line, such as defining general
options. If you're upgrading from a previous PeopleSoft release, you may notice that we've

P E O P L E S O F T 8 . 3 R E S U M E P R O C E S S I N G P E O P L E B O O K
P R E F A C E v i P E O P L E S O F T P R O P R I E T A R Y A N D C O N F I D E N T I A L
removed some topics or topic headings from the individual application PeopleBooks and
consolidated them in this single reference book. You’ll now find only application-specific
information in your individual application PeopleBooks. This makes the documentation as a
whole less redundant. Throughout each PeopleBook, we provide cross-references to
PeopleSoft Application Fundamentals for HRMS and other PeopleBooks.
Related Documentation
To add to your knowledge of PeopleSoft applications and tools, you may want to refer to the
documentation of other PeopleSoft applications. You can access additional documentation for
this release from PeopleSoft Customer Connection (www4.peoplesoft.com/cc). We post
updates, troubleshooting documentation, and other items on Customer Connection, as well. In
addition, documentation for this release is available on CD-ROM and in hard copy.
Important! Before upgrading, it is imperative that you check PeopleSoft Customer
Connection for updates to the upgrade instructions. We continually post updates as we refine
the upgrade process.
Documentation on the Internet
You can order printed, bound versions of the complete PeopleSoft documentation delivered on
your PeopleBooks CD-ROM. You can order additional copies of the PeopleBooks CDs
through the Documentation section of the PeopleSoft Customer Connection Web site:
http://www4.peoplesoft.com/cc
You’ll also find updates to the documentation for this and previous releases on Customer
Connection. Through the Documentation section of Customer Connection, you can download
files to add to your PeopleBook library. You'll find a variety of useful and timely materials,
including updates to the full PeopleSoft documentation delivered on your PeopleBooks CD.
Documentation on CD-ROM
Complete documentation for this release is provided on the CD-ROM PeopleSoft 8.3 HRMS
PeopleBooks, SKU HR83PBR0, and PeopleTools 8.14 PeopleBooks, SKU PTB814R0.
Note. Your access to PeopleSoft PeopleBooks depends on which PeopleSoft applications
you've licensed. You may not have access to some of the PeopleBooks listed here.
Hardcopy Documentation
To order printed, bound volumes of the complete PeopleSoft documentation delivered on your
PeopleBooks CD-ROM, visit the PeopleSoft Press Web site from the Documentation section
P E O P L E S O F T 8 . 3 R E S U M E P R O C E S S I N G P E O P L E B O O K
P E O P L E S O F T P R O P R I E T A R Y A N D C O N F I D E N T I A L P R E F A C E v i i
of PeopleSoft Customer Connection. The PeopleSoft Press Web site is a joint venture between
PeopleSoft and Consolidated Publications Incorporated (CPI), our book print vendor.
We make printed documentation for each major release available shortly after the software is
first shipped. Customers and partners can order printed PeopleSoft documentation using any
of the following methods:
Internet From the main PeopleSoft Internet site, go to the
Documentation section of Customer Connection. You can
find order information under the Ordering PeopleBooks
topic. Use a Customer Connection ID, credit card, or
purchase order to place your order.
PeopleSoft Internet site: http://www.peoplesoft.com.
Telephone Contact Consolidated Publishing Incorporated (CPI) at
800 888 3559.
Email Email CPI at [email protected].
PeopleBooks Standard Page Element Definitions
Throughout our product documentation, you will encounter fields that are used on many
application pages or panels. This section lists the most common fields and provides standard
definitions.
Field Definition
Address 1, Address 2,
Address 3
Freeflow text entry fields that enable you to describe street,
street number, apartment number, and other address
information.
As of Date The last date for which a report or process includes data.
Block (Bloque) In Spanish addresses, a building or buildings that are close
together may be called a Block (Bloque). Include the Block
name in the address, if necessary.
Business Unit An identification code that represents a high-level organization
of business information. You can use a business unit to define
regional or departmental units within a larger organization.
City Name of city for address.
Comment(s) Freeflow text entry that enables you to add comments.
Company A business organization. For US companies using PeopleSoft
Payroll for North America or PeopleSoft Pension
Administration, a business unit that has a unique federal
Employer Identification Number (EIN) for payroll reporting
purposes.

P E O P L E S O F T 8 . 3 R E S U M E P R O C E S S I N G P E O P L E B O O K
P R E F A C E v i i i P E O P L E S O F T P R O P R I E T A R Y A N D C O N F I D E N T I A L
Field Definition
Country Country for address. Other address fields will be adjusted to
reflect Country choice.
Select a country from the list of valid values and press TAB to
move through the field. The system automatically displays the
appropriate address fields using the standardized address
formats previously set up in the Country Table. Enter the
appropriate address data in the fields that appear.
County (also Prefecture and
Parish)
Name of county (prefecture/parish) for address, if applicable.
Currency Code The 3-letter code in which the currency is specified.
Description Freeflow text up to 36 characters that describes what you are
defining.
Department An identification code that represents an organization in a
company.
Door (Puerta) In Spanish addresses, identifies the door name or number.
Effective Date Date on which a table row becomes effective; the date that an
action begins. For example, if you want to close out a ledger
on June 30, the effective date for the ledger closing would be
July 1. This date also determines when you can view and
change the information. Pages or panels and batch processes
that use the information use the current row.
Email The email address for a person or organization.
EmplID (employee ID) Unique identification code for an individual associated with
your organization.
Empl Rcd# (Employee
Record Number)
A system-assigned number that indicate an employee has more
than one record in the system.
Fax (also Fax Number) The fax number for a person or organization.
Floor (Piso) In Spanish addresses, identifies the floor name or number.
House Identifies the type of house.
Initials Initials of individual.
Language Language spoken by employee/applicant/non-employee.
Language or Language Code The language in which you want the field labels and report
headings of your reports to print. The field values appear as
you enter them.
Language also refers to the language spoken by an employee,
applicant, or non-employee.
Last Run On The date that a report or process was last run.
Locality A tax location within an organization.
Name Name of individual.

P E O P L E S O F T 8 . 3 R E S U M E P R O C E S S I N G P E O P L E B O O K
P E O P L E S O F T P R O P R I E T A R Y A N D C O N F I D E N T I A L P R E F A C E i x
Field Definition
National ID Identification code used by countries to track information on
their residents for payroll, identification, benefits, and other
purposes. For example, for US residents this would be their
Social Security Number; for German residents it would be their
Social Insurance Number, and for UK residents it would be
their National Insurance Code.
Number The number related to a street, avenue, or other address field in
Spanish addresses. When an address has no number, enter s/n
(sin numero) to indicate that there is no number.
Phone The phone number for a person or organization.
Phone Extension The phone extension number for a person or organization.
Phone Type Identifies the type of phone number entered in the Telephone
field. Valid values are Business, Campus, Cellular,
Dormitory, FAX, Home, Other, Pager 1, Pager 2, or
Telex.
Post Code (also Postal) Postal code for address.
Prefix Prefix for individual (such as Mr., Ms., Mrs., Dr., and so on)
Process Frequency group box Designates the appropriate frequency in the Process
Frequency group box:
Once executes the request the next time the batch process runs.
After the batch process runs, the process frequency is
automatically set to Don't Run.
Always executes the request every time the batch process runs.
Don't Run ignores the request when the batch process runs.
Process Monitor This button takes you to the Process List page, where you can
view the status of submitted process requests.
Regulatory Region A regulatory region can be any region where there are specific
laws and regulations that are addressed by functionality in
PeopleSoft Human Resources. Many country-specific
transactions are driven by regulatory requirements where
Regulatory Region is used for transaction processing.
Report ID Identifies a report.
Report Manager This button takes you to the Report List page, where you can
view report content, check the status of a report, and see
content detail messages (which show you a description of the
report and the distribution list).
Request ID A request identification that represents a set of selection
criteria for a report or process.
Run This button takes you to the Process Scheduler request page,
where you can specify the location where a process or job runs
and the process output format.

P E O P L E S O F T 8 . 3 R E S U M E P R O C E S S I N G P E O P L E B O O K
P R E F A C E x P E O P L E S O F T P R O P R I E T A R Y A N D C O N F I D E N T I A L
Field Definition
Run Control ID Identifies specific run control settings for a panel.
Run Date The date that a process was run or a report was generated.
Run Time The time that a process was run or a report was generated.
SetID An identification code that represents a set of control table
information. SetIds enable the sharing of a set of control table
information across two or more Business Units.
Short Description Freeflow text up to 15 characters.
Stair (Escalera) In Spanish addresses, identifies the stair name or number.
State (also Province) State (Province) for address.
Status Indicates whether a row in a table is Active or Inactive.
Street Type Identifies whether an address is a place, street, avenue, road, or
so on. Spanish law requires addresses in official documents to
include the Street Type.
Telephone (Phone) The telephone number for a person or organization.
User ID The system identifier for the individual who generates a
transaction.
See Also
PeopleTools Development Tools: Application Designer PeopleBook, “Creating Field
Definitions,” Understanding Effective Dates
PeopleSoft Process Scheduler
PeopleBook Standard Group Boxes
The following group boxes and field groupings appear throughout PeopleSoft HRMS. We
have documented them once here.
Entering Name Information
The following fields appear wherever you enter or display naming information:
Format Using Select the country with name format appropriate for this
employee. The system will display the appropriate fields
for this format in the Person Name group box.
Refresh the Name Field Click to refresh the Name field after you’ve edited any of
the name fields. The system will refresh the name field
when you save.

P E O P L E S O F T 8 . 3 R E S U M E P R O C E S S I N G P E O P L E B O O K
P E O P L E S O F T P R O P R I E T A R Y A N D C O N F I D E N T I A L P R E F A C E x i
Person Name or Current Name
The following fields appear in the Person Name group box. You will not see all of the fields
listed below at any one time. The system displays the fields necessary for the country you
select in the Format Using field.
Title Select a title. If you are reporting employee information
under the German Duevo Directive, this field is required
and must be completed according to the Duevo rules.
Prefix and Name Prefix Select a Prefix or Name Prefix, if applicable.
Royal Prefix Select a Royal Prefix, if applicable.
First Name Enter the employee’s official first name.
Preferred First Name For The Netherlands, enter the employee’s preferred first
name, if different from the First Name. The system will
use the preferred name when you generate form letters or
mailing labels for this employee.
Last Name Preference For the Netherlands, choose this link to provide additional
name information for married employees. The Last Name
Preference page contains three fields: Last Name Partner,
Prefix Partner and Last Name Preference.
Middle Enter the employee’s middle name, if applicable.
Last Name Enter the employee’s official last name.
Suffix Select a suffix, if applicable.
Second Last Name For Spanish employees, enter the second surname
(mother’s surname).
Alternate Character Name Use this field to enter the employee’s name using alternate
characters (such as Japanese phonetic characters).
Note. You can enter names using Japanese characters
with or without a space between the surname and given
name. Names using Roman alphanumeric characters
require a comma delimiter.
Warning! Be sure to select the correct character set on the
Installation Table – Alternate Characters page. Using the
wrong character set generates an error message.
Royal Suffix Select the appropriate royal suffix. If you are reporting
employee information under the German Duevo Directive,
this field is required and must be completed according to
the Duevo rules.
Name The system displays the employee’s name as it will appear
in the system.

P E O P L E S O F T 8 . 3 R E S U M E P R O C E S S I N G P E O P L E B O O K
P R E F A C E x i i P E O P L E S O F T P R O P R I E T A R Y A N D C O N F I D E N T I A L
Displaying Japanese Names on Pages
Pages that display personal name fields usually display them in First Name, Last Name order.
When the country is Japan, however (JPN in the Format Using field), those fields appear in
the Last Name, First Name order.
Another difference is that the Name field displays “Last Name[space]First Name,” not “Last
Name,First Name”; that is, a space separates the last and first names, not a comma.
Japanese name format on a page
See Also
PeopleSoft Applications Fundamentals for HRMS PeopleBook, “Setting Up PeopleSoft
HRMS,” Working With Double-Byte Characters
Entering Address Information
The following fields appear in address group boxes throughout PeopleSoft HRMS. You may
not see all of the fields listed below as the system displays only the fields necessary for the
country in use. Determine which address fields are required for each country on the Country
Table – Address Format page.
Country Select the country with address format appropriate for this
address. The system will display the appropriate fields for
this format in the address group box.
Address 1, Address 2,
Address 3, and Address 4
Freeflow text entry fields that enable you to describe
street, street number, apartment number, and other address
information.
City Enter the city.
County Enter the county, if applicable.
State (State, Province, or
other)
Enter the state or province.
Postal Enter the postal, such as zip or postal code.
Number 1, and Number 2 Enter the number related to a street, avenue, or other
address field in Spanish addresses. When an address has
no number, enter s/n (sin numero) to indicate that there is
no number.

P E O P L E S O F T 8 . 3 R E S U M E P R O C E S S I N G P E O P L E B O O K
P E O P L E S O F T P R O P R I E T A R Y A N D C O N F I D E N T I A L P R E F A C E x i i i
House Type Enter the house type, if applicable.
Postal Search Click Postal Search to use international address formats.
Entering or Viewing Pay Components
Amounts Tab
Pay Components - Amounts
Rate Code Rate codes are IDs for pay components. The system
inserts any compensation information associated with this
rate code in the compensation grid.
Note. If a seniority rate code is inserted as a default value
on the Job Data - Compensation page, the values for these
rate codes are unavailable for entry.
Seq (sequence) The sequence number of the rate code if it is used more
than once.
Details Click the Details button to open the Comp Rate Code
Secondary Panel page.
Comp Rate, (compensation
rate) Currency, and
Frequency
The compensation rate, its currency, and the frequency
(for example, annually, weekly, or hourly) the comp rate
will be paid.
Apply FTE If selected, the system multiplies the rate code value by
the FTE factor for annualization and deannualization.
FTE is the percent of full time the employee should
normally work in the corresponding job. This field isn’t
available for Percent rate codes.
Points The salary points associated with this rate code, if any.
Percent If the rate code rate type is Percent, the system displays
the percent to be applied to the job compensation rate or to
a rate code group if you are using rate code groups.
Rate Code Group A rate code group enables you to be more specific when
calculating percentages based components as part of your
employee compensation package.

P E O P L E S O F T 8 . 3 R E S U M E P R O C E S S I N G P E O P L E B O O K
P R E F A C E x i v P E O P L E S O F T P R O P R I E T A R Y A N D C O N F I D E N T I A L
Comp Rate Code Secondary Panel
Access this page by clicking the Details link on the Amounts page. Displays additional
information about the rate code.
See Also
PeopleSoft Application Fundamentals for HRMS PeopleBook, “Working With Multiple
Components of Pay,” Defining Rate Codes
Changes Tab
Pay Components – Changes page
This page displays the change in an employee’s salary.
Manually Updated The system selects this if you have manually updated the
pay components.
Change Amount The overall change amount to this pay component rate.
Change Points The overall change amount (in points) to this pay
component, if applicable.
Change Percent The overall percentage change to this pay component, if
applicable.

P E O P L E S O F T 8 . 3 R E S U M E P R O C E S S I N G P E O P L E B O O K
P E O P L E S O F T P R O P R I E T A R Y A N D C O N F I D E N T I A L P R E F A C E x v
Pay Components – Conversion
This page displays the conversion rates in an employee’s salary.
Source The system displays the source of the rate code, such as
Absorbing Premium, Seniority Pay, Job Code, or
Manual.
Default Without Override Selected if the worker’s compensation package cannot be
manually updated on the Job Data – Compensation page.
Apply FTE Indicates if the converted rate code value will be
multiplied by the FTE factor for annualization and
deannualization.
Converted Comp Rate Displays the converted compensation rate for this pay
component. The system converts all base pay components
to the Job currency and compensation frequency.
Required Fields on Pages
When you see a field on a page with an asterisk ( * ) preceding the field name, it means the
field is required. You can not save a page without entering data into all of the required fields
on a page.
Example of a required field label
In some unique instances a field may be required even though there is no asterisk preceding
the field name. In such cases, you will be prompted to enter data in these fields before saving
the page.
Typographical Conventions and Visual Cues
To help you locate and interpret information, we use a number of standard conventions in our
online documentation.
Please take a moment to review the following typographical cues:
monospace fontIndicates PeopleCode.

P E O P L E S O F T 8 . 3 R E S U M E P R O C E S S I N G P E O P L E B O O K
P R E F A C E x v i P E O P L E S O F T P R O P R I E T A R Y A N D C O N F I D E N T I A L
Bold Indicates field names and other page elements, such as
buttons and group box labels, when these elements are
documented below the page on which they appear. When
we refer to these elements elsewhere in the
documentation, we set them in Normal style (not in bold).
We also use boldface when we refer to navigational paths,
menu names, or process actions (such as Save and Run).
Italics Indicates a PeopleSoft or other book-length publication.
We also use italics for emphasis and to indicate specific
field values. When we cite a field value under the page on
which it appears we use this style: field value.
We also use italics when we refer to words as words or
letters as letters, as in the following: Enter the number 0,
not the letter O.
KEY+KEY Indicates a key combination action. For example, a plus
sign (+) between keys means that you must hold down the
first key while you press the second key. For ALT+W,
hold down the ALT key while you press W.
See AlsoPeopleBooks provide cross-references under the heading
“See Also.” Capitalized titles in italics indicate the title of
a PeopleBook; titles in quotes indicate the title of a
chapter; titles in normal font refer to sections within the
PeopleBook. Here's an example:
See Also
About These HRMS PeopleBooks, PeopleSoft 8.3 HRMS
PeopleBooks Preface
Note. Text in this bar indicates information that you should pay particular attention to as you
work with your PeopleSoft system. If the note is preceded by Important!, the note is crucial
and includes information that concerns what you need to do for the system to function
properly.
Warning! Text within this bar indicates a crucial configuration consideration. Pay very
close attention to these warning messages.
Process Introductory Table
In the documentation, each business process in the application is accompanied by an
introductory table with pertinent information about the pages used in the process.

P E O P L E S O F T 8 . 3 R E S U M E P R O C E S S I N G P E O P L E B O O K
P E O P L E S O F T P R O P R I E T A R Y A N D C O N F I D E N T I A L P R E F A C E x v i i
Page System Name Navigation Usage
Name of the page. Gives the system name
of the page as specified
in the PeopleTools
Application Designer.
For example, the
system name of the
Detail Calendar panel
is
DETAIL_CALENDA
R1.
Provides the path for
accessing the page.
Describes how you
would use the page.
USF U.S. Federal Government Functionality
Any functionality that is specific to the U.S. Federal Government sector will be designated by
a USF marker. Most often this will appear at the beginning of a section heading (such as with
this section), but the USF designation might also appear in a note or within text, if appropriate.
E&G Education and Government Functionality
Any functionality that is specific to the Education and Government sector will be designated
by an E&G marker. Most often this will appear at the beginning of a section heading (such as
with this section), but the E&G designation might also appear in a note or within text, if
appropriate.
Local Country Functionality
Any functionality that is specific to an individual country will be designated by the three-
character ISO code for that country. For example, functionality specific to Germany would be
indicated by a DEU designation at the beginning of a section heading. Most often this will
appear at the beginning of a section heading (such as with this section), but the country
designation might also appear in a Note or within text, if appropriate.
Comments and Suggestions
Your comments are important to us. We encourage you to tell us what you like, or what you
would like changed about our documentation, PeopleBooks, and other PeopleSoft reference
and training materials. Please send your suggestions to:
PeopleSoft HRMS Product Documentation Manager
PeopleSoft, Inc.
4460 Hacienda Drive
Pleasanton, CA 94588
Or send comments by email to the authors of the PeopleSoft documentation at:

P E O P L E S O F T 8 . 3 R E S U M E P R O C E S S I N G P E O P L E B O O K
P R E F A C E x v i i i P E O P L E S O F T P R O P R I E T A R Y A N D C O N F I D E N T I A L
While we cannot guarantee to answer every email message, we will pay careful attention to
your comments and suggestions. We are always improving our product communications for
you.

P E O P L E S O F T P R O P R I E T A R Y A N D C O N F I D E N T I A L A B O U T T H E P E O P L E S O F T 8 . 3 R E S U M E P R O C E S S P E O P L E B O O K 1 - 1
C H A P T E R 1
About the PeopleSoft 8.3 Resume
Process PeopleBook
This book provides you with the information you will need for implementing and using
PeopleSoft Resume Processing.
This preface explains how to use the documentation for PeopleSoft Resume Processing.
General information you should know before you begin using PeopleSoft documentation is
presented in About the HRMS PeopleBooks.
Note. We strongly recommend that you read About the HRMS PeopleBooks. In particular,
the PeopleSoft HRMS Application Fundamentals section explains where you can find
information about topics that apply to many PeopleSoft applications across the HRMS product
line. For example, you can find information about setting up control tables, administering
security, and setting language and currency preferences in the PeopleSoft 8.3 Application
Fundamentals for HRMS PeopleBook.


P E O P L E S O F T P R O P R I E T A R Y A N D C O N F I D E N T I A L P E O P L E S O F T R E S U M E P R O C E S S I N G O V E R V I E W 2 - 1
C H A P T E R 2
PeopleSoft Resume Processing
Overview
This chapter provides an overview of PeopleSoft Resume Processing and explains how you
can use it to:
• Automate resume entry.
• Automatically populate fields in Apply for Job.
Understanding PeopleSoft Resume Processing
PeopleSoft Resume Processing builds on the recruitment functionality in PeopleSoft Human
Resources and PeopleSoft eRecruit, speeding up and automating the entry of applicant details
into your organization’s database.
You can use PeopleSoft Resume Processing in the following ways:
• To automate resume entry.
With PeopleSoft Human Resources, recruiting administrators enter applicant information
using the Applicant Data component. PeopleSoft Resume Processing automates the entry
of applicant information. It accepts resumes in a variety of formats, extracts applicant
information, and enters this information into your PeopleSoft Human Resources database.
• To make it easier and quicker for applicants to apply online.
If you have PeopleSoft eRecruit installed, you can use Resume Processing to
automatically populate fields in the Apply for Job self-service transaction.
See Also
PeopleSoft eRecruit, “Internal and External Applicant Transactions,” Applying for Jobs

P E O P L E S O F T 8 . 3 R E S U M E P R O C E S S I N G P E O P L E B O O K
2 - 2 P E O P L E S O F T R E S U M E P R O C E S S I N G O V E R V I E W P E O P L E S O F T P R O P R I E T A R Y A N D C O N F I D E N T I A L
Extracting Applicant Information
Whichever way you use PeopleSoft Resume Processing, extracting applicant information is
central to the process. The extraction process extracts the following information from an
applicant’s resume:
• Contact information:
� Applicant name.
� Home address.
� Telephone numbers.
� Email address.
• Prior work experience.
• Education and qualifications.
• Full resume text.
PeopleSoft Resume Processing accepts resumes in different languages and a variety of
formats, including Microsoft Word documents, ASCII, Portable Document Format (PDF),
Multipurpose Internet Mail Extensions (MIME), and HTML.
Automating Resume Entry
The following illustrates how PeopleSoft Resume Processing automates resume entry:

P E O P L E S O F T 8 . 3 R E S U M E P R O C E S S I N G P E O P L E B O O K
P E O P L E S O F T P R O P R I E T A R Y A N D C O N F I D E N T I A L P E O P L E S O F T R E S U M E P R O C E S S I N G O V E R V I E W 2 - 3
Resume Processing
OCR
software
Extract applicant
information
Is
confidence level >=
threshold?
Recruiting
Administrator
reviews/
updates data
Resume
added to
Resume Queue
Add to
database?
Resume deletedEmail sent to
applicant
Resume received
by mail or fax
Resume received
by email
Scanner
No
No
Yes
Yes
Soft copy resume
Applicant record
created
Overview of PeopleSoft Resume Processing
PeopleSoft Resume Processing accepts resumes from two sources:
• A designated email account.
You set up a central email account that is used exclusively for receiving resumes.
PeopleSoft Resume Processing monitors this account, and whenever a new email is
received, the system starts extracting applicant information from the email body text or
attachment.
• The PeopleSoft Resume Processing input directories.
P E O P L E S O F T 8 . 3 R E S U M E P R O C E S S I N G P E O P L E B O O K
2 - 4 P E O P L E S O F T R E S U M E P R O C E S S I N G O V E R V I E W P E O P L E S O F T P R O P R I E T A R Y A N D C O N F I D E N T I A L
The system automatically detects new resumes in these directories and starts the extraction
process. Typically, resumes are added to the input directories in two ways:
� By Optical Character Recognition (OCR) software.
Resumes received by fax or in the mail are scanned and processed by OCR software to
create an electronic resume. To feed these resumes into PeopleSoft Resume Processing,
direct the output of your OCR software to a resume processing input directory.
� By a recruiting administrator.
For example, an administrator receives a resume file on disk and copies the file to an input
directory.
Note. OCR software is not part of the PeopleSoft Resume Processing system and must be
installed and configured separately.
The extraction process calculates a confidence level that indicates the expected accuracy of the
extracted information. Depending on the confidence level returned by the extraction process,
the system either:
• Creates an applicant ID and automatically transfers the data into Applicant Data
tables.
• Adds the applicant to a resume queue.
Recruiting administrators review applicants in the resume queue to decide whether to add the
applicant to the applicant database.
To determine if a resume needs to be reviewed, the system compares the confidence level with
the confidence threshold parameter that you’ve previously defined. By adjusting the
confidence threshold, you can ensure that most resumes are processed automatically. Only
those resumes with a confidence level lower than your confidence threshold are reviewed by a
recruiting administrator.
The system automatically sends emails to applicants when their resumes have been entered
into your database. The emails include the Uniform Resource Locator (URL) addresses where
applicants can access and update their resumes using the Apply for Job self -service
transaction.
See Also
“Setting Up Resume Processing”
Automatically Populating Fields in Apply for Job
The following diagram shows how you can use PeopleSoft Resume Processing with the Apply
for Job self-service transaction:

P E O P L E S O F T 8 . 3 R E S U M E P R O C E S S I N G P E O P L E B O O K
P E O P L E S O F T P R O P R I E T A R Y A N D C O N F I D E N T I A L P E O P L E S O F T R E S U M E P R O C E S S I N G O V E R V I E W 2 - 5
Resume Processing
Extract applicant
information
Applicant record
created
Populate
Apply for Job
pages
Applicant checks and
submits application
Apply for Job
Applicant
attaches file or
copies resume text
PeopleSoft Resume Processing and Apply for Job
When you use PeopleSoft Resume Processing to populate fields in Apply for Job, the self-
service transaction initiates the extraction process.
Once the extraction is complete, the self-service transaction uses the extracted data to populate
the Apply for Job fields. Because applicants check and update the results of the extraction
before the information is submitted, the confidence level is ignored by Apply for Job. The
system populates the fields regardless of the confidence level.


P E O P L E S O F T P R O P R I E T A R Y A N D C O N F I D E N T I A L S E T T I N G U P R E S U M E P R O C E S S I N G 3 - 1
C H A P T E R 3
Setting Up Resume Processing
This chapter provides an overview of the extraction process and describes how to:
• Set up resume processing directories.
• Set up resume processing parameters.
• Set up the FTP server and URLs.
• Run the Initialize Resume Processing process.
• Define the email message sent to applicants.
• Run the Auto Populate Cleanup process.
Understanding the Extraction Process
Before you can set up resume processing, you need to understand how the system extracts
applicant data from resumes. The extraction process varies depending on how you’re using
PeopleSoft Resume Processing.
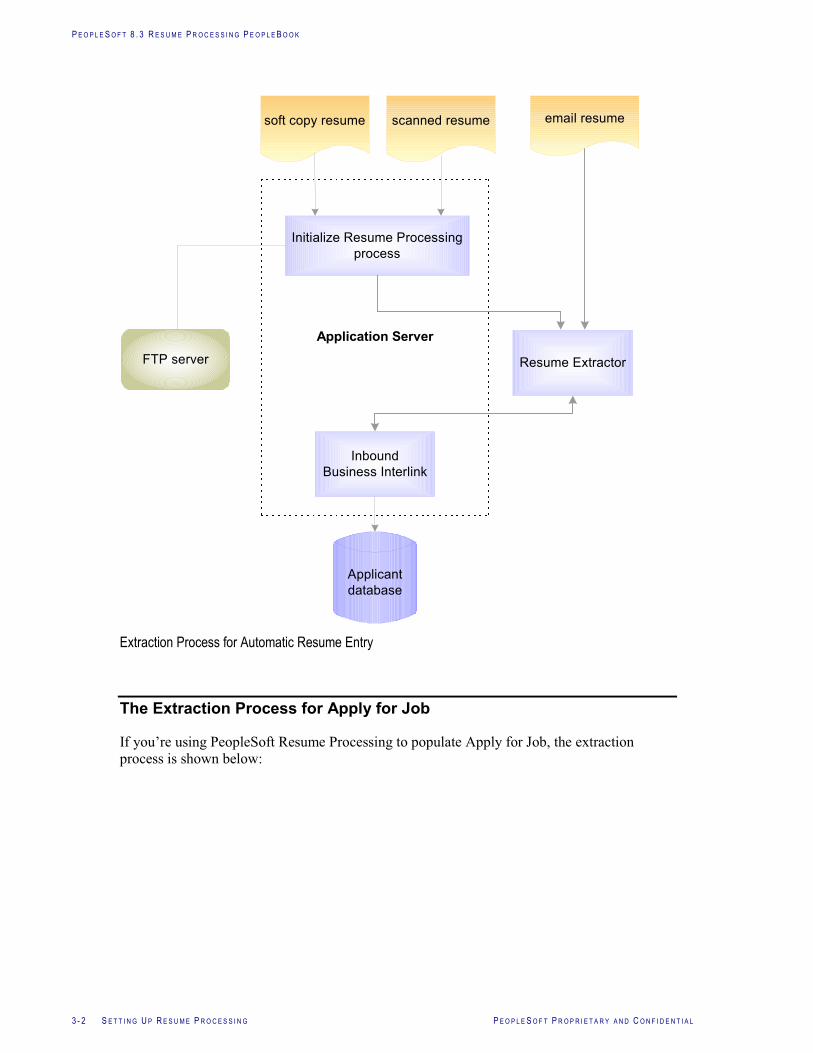
The Extraction Process for Automatic Resume Entry
The following illustration outlines the extraction process if you’re using PeopleSoft Resume
Processing to process resumes you received by email, in soft copy, or hard copy:
P E O P L E S O F T 8 . 3 R E S U M E P R O C E S S I N G P E O P L E B O O K
3 - 2 S E T T I N G U P R E S U M E P R O C E S S I N G P E O P L E S O F T P R O P R I E T A R Y A N D C O N F I D E N T I A L
Initialize Resume Processing
process
FTP server
Inbound
Business Interlink
Resume Extractor
Applicant
database
scanned resume email resumesoft copy resume
Application Server
Extraction Process for Automatic Resume Entry
The Extraction Process for Apply for Job
If you’re using PeopleSoft Resume Processing to populate Apply for Job, the extraction
process is shown below:

P E O P L E S O F T 8 . 3 R E S U M E P R O C E S S I N G P E O P L E B O O K
P E O P L E S O F T P R O P R I E T A R Y A N D C O N F I D E N T I A L S E T T I N G U P R E S U M E P R O C E S S I N G 3 - 3
FTP server
Inbound
Business Interlink
applicant resume
Auto
Populate
tables
Apply for Job
PeopleCode
Application Server
Resume Extractor
The Apply for Job Extraction Process
Initialize Resume Processing Process
The Initialize Resume Processing process (RP_INIT) runs at regular intervals, checking the
Resume Processing input directories for new resumes (see Overview of Resume Processing
Setup for details of directories required). When the process finds a new resume it does the
following:
1. Renames the resume, based on the Last Resume Number Used field on the eRecruit
Installation Options page.
Resume file names are of the form: resume_<resume_number>. This ensures that
resumes have a unique filename. The process moves the renamed resume to the Resume
Processing output directory.

P E O P L E S O F T 8 . 3 R E S U M E P R O C E S S I N G P E O P L E B O O K
3 - 4 S E T T I N G U P R E S U M E P R O C E S S I N G P E O P L E S O F T P R O P R I E T A R Y A N D C O N F I D E N T I A L
2. Creates an Extensible Markup Language (XML) control file that defines the filename and
location of the new resume.
3. Adds the XML control file to the Resume Extractor
INPUT_OUTPUT/CONTROL/REQUESTS directory.
4. Copies the renamed resume file to the Resume Extractor INPUT_OUTPUT/DATA
directory.
The Resume Extractor directories are set up when you install the Resume Extractor.
Note. The Initialize Resume Processing process isn’t required for the Apply for Job extraction
to work.
See Also
Running the Initialize Resume Processing Process
Apply for Job PeopleCode
PeopleCode in the Apply for Job self-service transaction performs the same function as the
Initialize Resume Processing process, but it works in a different way. When applicants attach
their resume file or copy their resume text, PeopleCode does the following:
1. If the applicant copied the text into Resume Text field, it creates a text file.
2. Creates an Extensible Markup Language (XML) control file that defines the filename and
location of the resume.
3. Adds the XML control file to the Resume Extractor
INPUT_OUTPUT/CONTROL/REQUESTS directory.
4. Copies the resume file to the Resume Extractor INPUT_OUTPUT/DATA directory.
You can use the same Resume Extractor directories for Apply for Job and the Initialize
Resume Processing process. However, if you have a high volume of resumes you might have
a separate installation of Resume Extractor dedicated to handling resumes from Apply for Job.
Resume Extractor
Resume Extractor extracts applicant data from resumes. The Resume Extractor software is
installed separately and runs on Windows NT only. Depending on the volume of resumes
your organization handles, you can install one copy of Resume Extractor to handle all
resumes, or you can have a separate installation that handles resumes received from Apply for
Job.

P E O P L E S O F T 8 . 3 R E S U M E P R O C E S S I N G P E O P L E B O O K
P E O P L E S O F T P R O P R I E T A R Y A N D C O N F I D E N T I A L S E T T I N G U P R E S U M E P R O C E S S I N G 3 - 5
Resume Extractor starts its extraction process when:
• The Initialize Resume Processing process (RP_INIT) or the Apply for Job
PeopleCode adds an XML control file to the Resume Extractor directory.
Using the control file, the Resume Extractor can locate the new resume.
• An email is received in a designated email account.
Resume Extractor monitors an email account that you define at installation. When it
detects a new email, Resume Extractor extracts applicant data from the email body text or
email attachment.
Resume Extractor extracts applicant data from the resume and calculates a confidence level
that indicates the expected accuracy of the extraction.
Using the extracted data, Resume Extractor posts an XML request, via http, to the Inbound
Business Interlink. This XML request defines the applicant data and the confidence level.
Confidence Level
The confidence level output by the Resume Extractor is a rating of the success of the
extraction process.
When the extraction process goes well, the extracted attributes have a high accuracy. When
the extraction process is less successful, the extracted attributes have a low accuracy. The
confidence level is an indicator of the probability that the extracted attributes have a high
accuracy. In general, the higher the confidence level, the more likely it is that the accuracy is
also high. However, confidence level is not a measurement of accuracy.
Resume Extractor uses a number of factors to determine the confidence level, including:
• The probabilities of all words on the page.
• The context of those words.
• Sequence of attributes extracted.
In practical terms, if you set the confidence threshold to Very High, fewer resumes meet the
threshold for automatic insertion into your applicant data table. However, those that meet or
exceed the threshold are, on average, more accurate. Similarly, by setting the confidence
threshold to Low, more resumes meet the threshold, but there are more mistakes, on average,
in those additional resumes.
Note. The system ignores the confidence level returned if the extraction is initiated by Apply
for Job.

P E O P L E S O F T 8 . 3 R E S U M E P R O C E S S I N G P E O P L E B O O K
3 - 6 S E T T I N G U P R E S U M E P R O C E S S I N G P E O P L E S O F T P R O P R I E T A R Y A N D C O N F I D E N T I A L
See Also
PeopleSoft Human Resources PeopleBook: Recruit Workforce, “Setting Up Recruit
Workforce,” Defining System Parameters
Inbound Business Interlink
Business Interlinks enable PeopleSoft applications to pass data to and receive data from
external systems in realtime. In PeopleSoft Resume Processing, an Inbound Business
Interlink receives XML requests from the Resume Extractor. Here’s how the Inbound
Business Interlink works if the extraction is triggered by:
• Initialize Resume Processing process
It compares the confidence level calculated by Resume Extractor with the confidence
threshold that you defined for your system on the eRecruit Installation page.
If the confidence level is equal to or greater than the confidence threshold, the Inbound
Business Interlink creates an applicant ID and adds the applicant’s data to the applicant
data tables. It also sends an email notifying the applicant that his or her details have been
added to your database.
If the confidence level is less than the confidence threshold, the Inbound Business
Interlink creates an applicant record in the temporary tables RP_QUEUE_APP,
RP_QUEUE_PHN, RP_QUEUE_WRKEXP, and RP_QUEUE_EDU.
A recruiting administrator processes the applicants in the temporary tables using the
Resume Queue page, deciding whether to transfer the applicant to the applicant data
tables.
• Apply for Job
It creates applicant records in the temporary auto populate tables.
There is no setup for the Inbound Business Interlink as it is automatically set up during
installation.
Enterprise Integration Point Between PeopleSoft Resume Processing and Resume
Extractor
Technical details of the enterprise integration points (EIPs) are in the EIP catalog. The EIP for
the Resume Processing inbound business interlink is PROCESS_RESUME.
Find the EIP Catalog database on the Customer Connection website under Open Integration
Framework in the Documentation section.
See Also
“Processing Resumes,” Processing Resumes With Lower Confidence Levels

P E O P L E S O F T 8 . 3 R E S U M E P R O C E S S I N G P E O P L E B O O K
P E O P L E S O F T P R O P R I E T A R Y A N D C O N F I D E N T I A L S E T T I N G U P R E S U M E P R O C E S S I N G 3 - 7
FTP Server
The Initialize Resume Processing process (RP_INIT) uses a File Transfer Protocol (FTP)
server to move the resume and control files.
The FTP server is not part of the PeopleSoft Resume Processing application. You can use the
FTP server of your choice.
See Also
Setting Up Your FTP Server and URLs
Overview of Resume Processing Setup
To set up your system to process resumes:
1. Set up the resume processing root directory and subdirectories.
2. Configure system parameters using the eRecruit Installation Options page.
Use the eRecruit Installation Options page to define parameters, such as the confidence
threshold, and the location of the resume processing directories.
3. Install an FTP server and set up Uniform Resource Locators (URLs) for the FTP server.
4. Set up the frequency of the Initialize Resume Processing Process.
5. Set up the standard email message that is sent to applicants when their details are added to
your database.
6. (Optional). Set up the frequency of the Auto Populate Cleanup process.
The setup steps are described in more detail in the sections that follow.
Setting Up Resume Processing Directories
PeopleSoft Resume Processing requires a root directory and the following subdirectories:
Directory Purpose
Input Contains unprocessed resumes created by your Optical Character Recognition
(OCR) software or added to the directory by an administrator. The Initialize
Resume Processing process (RP_INIT) checks this directory for new resumes.
This directory is not used by Apply for Job.
Output Contains resume files that have been renamed by the Initialize Resume
Processing process. The system uses this directory to retrieve a resume when
users select View Original Resume from the resume queue. This directory is
not used by Apply for Job.
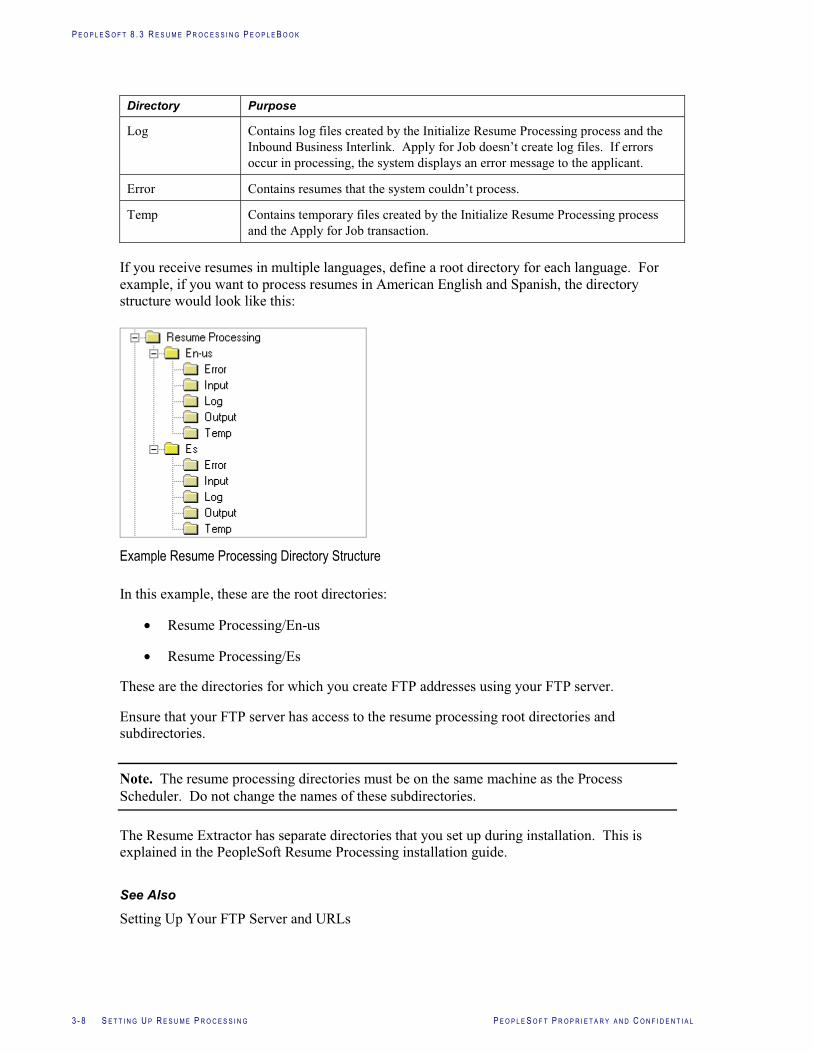
P E O P L E S O F T 8 . 3 R E S U M E P R O C E S S I N G P E O P L E B O O K
3 - 8 S E T T I N G U P R E S U M E P R O C E S S I N G P E O P L E S O F T P R O P R I E T A R Y A N D C O N F I D E N T I A L
Directory Purpose
Log Contains log files created by the Initialize Resume Processing process and the
Inbound Business Interlink. Apply for Job doesn’t create log files. If errors
occur in processing, the system displays an error message to the applicant.
Error Contains resumes that the system couldn’t process.
Temp Contains temporary files created by the Initialize Resume Processing process
and the Apply for Job transaction.
If you receive resumes in multiple languages, define a root directory for each language. For
example, if you want to process resumes in American English and Spanish, the directory
structure would look like this:
Example Resume Processing Directory Structure
In this example, these are the root directories:
• Resume Processing/En-us
• Resume Processing/Es
These are the directories for which you create FTP addresses using your FTP server.
Ensure that your FTP server has access to the resume processing root directories and
subdirectories.
Note. The resume processing directories must be on the same machine as the Process
Scheduler. Do not change the names of these subdirectories.
The Resume Extractor has separate directories that you set up during installation. This is
explained in the PeopleSoft Resume Processing installation guide.
See Also
Setting Up Your FTP Server and URLs
P E O P L E S O F T 8 . 3 R E S U M E P R O C E S S I N G P E O P L E B O O K
P E O P L E S O F T P R O P R I E T A R Y A N D C O N F I D E N T I A L S E T T I N G U P R E S U M E P R O C E S S I N G 3 - 9
Setting Up Your FTP Server and URLs
To set up your FTP URLs:
1. Define FTP addresses that point to the Resume Extractor and Resume Processing
directories.
Use your FTP server to define FTP addresses that point to these directories:
• Resume Processing root directories (one FTP address for each language)
• Resume Extractor input-output directories (one FTP address for each language)
• Resume Extractor input-output directory for Apply for Job.
If you have a separate installation of Resume Extractor to handle resumes from Apply
for Job, set up an FTP address for that installation.
Note. Don’t include a port number in the FTP address. Use the default port assigned by
your FTP server.
2. Define the URLs for the Resume Processing and Resume Extractor directories.
URLs are defined on the URL Maintenance page. From PeopleTools, select Utilities,
Use, URL Maintenance. PeopleSoft supply URL identifiers to use with Resume
Processing. Select the URL identifier and complete the URL field as follows:
URL Identifier URL field
RP_ROOT_FTP_lang (where lang is a
language code such as EN or DE)
Define a URL for the root directory for each
language you have defined. Enter the FTP address
that points to the resume processing root directory
for that language.
RP_EXTRACTOR_FTP_lang Define a URL for each language you want to
process. Enter the FTP address that points to the
Resume Extractor input-output directory for that
language.
AUTOPOP_EXTRACTOR_FTP This is optional. If you have a separate
installation of Resume Extractor for Apply for
Job, enter the FTP address of this Resume
Extractor input-output directory.
Warning! If your FTP server defaults to the root directory of a file system, you must
append the directory name to the FTP address. For example, suppose you have set up the
FTP address ftp://attachment_address that points to the directory c:\resume_files. When
you actually log in using the FTP server, it may default to c:\. If your FTP server does
this, you would enter ftp://attachment_address/resume_files in the URL field.
P E O P L E S O F T 8 . 3 R E S U M E P R O C E S S I N G P E O P L E B O O K
3 - 1 0 S E T T I N G U P R E S U M E P R O C E S S I N G P E O P L E S O F T P R O P R I E T A R Y A N D C O N F I D E N T I A L
See Also
PeopleTools PeopleBook: Data Management, “PeopleTools Utilities,” URL Maintenance
Setting Up Resume Processing Parameters
Once you have set up your resume processing directories and installed your FTP server, define
parameters for resume processing using the eRecruit Installation Options page. Navigate to
the page as follows:
• Develop Workforce, Recruit Workforce (GBL), Setup, eRecruit Installation
• Develop Workforce, Recruit Workforce (USF), Setup2, eRecruit Installation
Complete the fields in the Resume Processing Configuration group box. If you want to use
Resume Processing to automatically populate Apply for Job, you must also complete the fields
in the Apply for Job Self Service group box.
See Also
PeopleSoft Human Resources PeopleBook: Recruit Workforce, “Setting Up Recruit
Workforce,” Defining System Parameters
Running the Initialize Resume Processing Process
The Initialize Resume Processing process (RP_INIT) is designed to run throughout the day to
deal with new resumes.
The default recurrence definition associated with this process is RP_INIT, which means the
process runs every day at hourly intervals.
Depending on the volume of resumes that your organization receives via fax or mail, you may
want to run the process more or less frequently.
Change the frequency at which the RP_INIT process runs on the Recurrence Definitions page.
From PeopleTools, select Process Scheduler Manager, Use, Recurrence Definitions.
Select RP_INIT.
In the Every fields in the Repeat group box, enter the new frequency and time unit (Hours,
Minutes, or Seconds).
Once you have set up the schedule and started the Process Scheduler, the process runs
automatically without user intervention. However, if you need to run the process manually at
an unscheduled time, use the Initialize Resume Processing page. Navigate to this page as
follows:
• Develop Workforce, Recruit Workforce (GBL), Process, Initialize Resume Processing
• Develop Workforce, Recruit Workforce (USF), Process, Initialize Resume Processing

P E O P L E S O F T 8 . 3 R E S U M E P R O C E S S I N G P E O P L E B O O K
P E O P L E S O F T P R O P R I E T A R Y A N D C O N F I D E N T I A L S E T T I N G U P R E S U M E P R O C E S S I N G 3 - 1 1
The Initialize Resume Processing process creates a log file in the log directory so that you can
check the results of the process.
See Also
PeopleTools PeopleBook: Process Scheduler, “Process Scheduler Development,” Setting Up
Recurrence Definitions
Defining the Email Message Sent to Applicants
When resume processing creates new applicant records in the Applicant Data tables, it
automatically sends emails using the email addresses extracted from the resumes and notifies
the applicants that their resumes have been added to your database.
The email includes a URL address where applicants can access and update their resumes using
the Apply for Job self-service transaction.
Note. Resume processing doesn’t generate emails for resumes received from Apply for Job.
Before you start using resume processing, tailor the default message supplied by PeopleSoft
for your organization. For example, you could add your organization name or include a
contact name.
To set up resume processing email messages:
1. Make sure email is activated for workflow.
From PeopleTools, select Workflow Administrator, Use, Workflow System Defaults.
At the Worklist System Defaults page, select the Email Active check box.
2. Edit the default resume processing email.
From PeopleTools, select Utilities, Use, Message Catalog. Select and update the
message as follows:
a. Select Message Set Number 1117.
The system displays the Message Catalog page.
b. Select Message Number 12.
In the Message Text field, enter the text you want to appear in the subject of the email.
The default Message Text delivered by PeopleSoft includes the date that the resume
was processed (parameter %1).
c. Select Message Number 13.
This message forms the body of the email. Update the Explanation field to
personalize the message for your organization. The default Explanation delivered by
PeopleSoft includes the applicant’s first name (parameter %1), and the applicant’s

P E O P L E S O F T 8 . 3 R E S U M E P R O C E S S I N G P E O P L E B O O K
3 - 1 2 S E T T I N G U P R E S U M E P R O C E S S I N G P E O P L E S O F T P R O P R I E T A R Y A N D C O N F I D E N T I A L
password (parameter %2). The password is system-generated, and gives applicants
access to the Apply for Job self-service transaction. Do not delete the password
parameter from the message.
See Also
PeopleTools PeopleBook: PeopleSoft Workflow, “Administering Workflow,” Setting
Workflow Defaults
PeopleTools PeopleBook: Data Management, “PeopleTools Utilities,” Text Control
Running Up the Auto Populate Cleanup Process
The Auto Populate Cleanup process (RP_AP_CLEAN) deletes all rows over 2 days old in the
following temporary tables:
AUTOPOP_APP_TMP
AUTOPOP_EDU_TMP
AUTOPOP_PHN_TMP
AUTOPOP_WRK_TMP
Depending on your volume of online applications, run this process manually on an ad-hoc
basis or at a defined frequency.
If you want to run the process at regular intervals, define a recurrence definition for the
process. Once you have set up the schedule and started the Process Scheduler, the process
runs automatically without user intervention.
To run the process manually use the Auto Populate Cleanup process page. Navigate to this
page as follows:
• Develop Workforce, Recruit Workforce (GBL), Process, Auto Populate Cleanup
• Develop Workforce, Recruit Workforce (USF), Process, Auto Populate Cleanup
See Also
PeopleTools PeopleBook: Process Scheduler, “Process Scheduler Development,” Setting Up
Recurrence Definitions

P E O P L E S O F T P R O P R I E T A R Y A N D C O N F I D E N T I A L P R O C E S S I N G R E S U M E S 4 - 1
C H A P T E R 4
Processing Resumes
Once you have completed the setup steps described in Setting Up Resume Processing,
processing resumes is mostly automated.
This chapter describes how to:
• Start processing resumes.
• Process hard copy resumes.
• Process soft copy resumes.
• Process resumes with lower confidence levels.
Starting Resume Processing
To start the Resume Processing system:
1. Start your File Transfer Protocol (FTP) Server according to the instructions in your FTP
server documentation.
2. Start the Resume Extractor, if necessary.
When you install the Resume Extractor software, a Windows NT service called
Mohomine Resume Extractor is created. Normally, you don’t need to manually start the
service; it’s set to automatically start if the machine is rebooted.
However, if you need to restart the service, go to the Windows NT Start menu, Control
Panel, Services. From the Services dialog box, select Mohomine Resume Extractor and
click Start.
3. Start the Process Scheduler server from the PeopleSoft Process Scheduler Administration
menu.
See Also
PeopleTools PeopleBook: Process Scheduler, “Process Scheduler Administration”

P E O P L E S O F T 8 . 3 R E S U M E P R O C E S S I N G P E O P L E B O O K
4 - 2 P R O C E S S I N G R E S U M E S P E O P L E S O F T P R O P R I E T A R Y A N D C O N F I D E N T I A L
Processing Hard Copy Resumes
Resumes received via fax or mail must be scanned and processed by your optical character
recognition (OCR) software before they can be submitted to PeopleSoft Resume Processing.
You need to ensure that the files created by the OCR software are deposited in the appropriate
input directory for the language of the resume.
New resumes are added to <RESUME_PROCESSING>/input, where
<RESUME_PROCESSING> is a root directory defined on the eRecruit Installation Options
page.
Refer to the documentation for your scanner and OCR software for setup information.
See Also
“Setting Up Resume Processing,” Setting Up Resume Processing Directories
Processing Soft Copy Resumes
If you have a resume file that you want to process, move the file to the appropriate input
directory <RESUME_PROCESSING>/input, where <RESUME_PROCESSING> is a root
directory defined on the eRecruit Installation Options page.
See Also
PeopleSoft Human Resources PeopleBook: Recruit Workforce, “Setting Up Recruit
Workforce,” Defining System Parameters
“Setting Up Resume Processing,” Setting Up Resume Processing Directories
Processing Resumes With Lower Confidence Levels
The extraction process assigns a confidence level that indicates the expected accuracy of the
extracted information. When the confidence level is less than the confidence threshold
specified on the eRecruit Installation Options page, the system does not automatically add the
applicant to your applicant database. Instead, the applicant data is moved to temporary tables
and the resume is added to a queue.
This section describes how to:
• View the resume queue.
• Process resumes in the queue.
See Also
“Setting Up Resume Processing”

P E O P L E S O F T 8 . 3 R E S U M E P R O C E S S I N G P E O P L E B O O K
P E O P L E S O F T P R O P R I E T A R Y A N D C O N F I D E N T I A L P R O C E S S I N G R E S U M E S 4 - 3
Pages Used to Process Resumes with Lower Confidence Levels
Page Name Object Name Navigation Usage
Resume Queue RP_QUEUE Develop Workforce,
Recruit Workforce
(GBL), Use, Resume
Queue
Develop Workforce,
Recruit Workforce
(USF), Use, Resume
Queue
View a list of the
processed resumes that
are in the resume
queue.
Resume Details RP_QUEUE_DETAIL Click the Name link on
the Resume Queue
page.
Review and update
data extracted by
Resume Extractor. If
the data appears
correct, click Submit to
transfer it to your
Applicant Data tables
and create an ID for the
applicant. Or click
Delete to delete the
data.
Work Experience
Description
RP_QUEUE_WRK_S
EC
Click the Description
link on the Resume
Details page.
Review and update the
description of the
applicant’s work
experience that was
extracted from the
resume.
Viewing the Resume Queue
Access the Resume Queue page.

P E O P L E S O F T 8 . 3 R E S U M E P R O C E S S I N G P E O P L E B O O K
4 - 4 P R O C E S S I N G R E S U M E S P E O P L E S O F T P R O P R I E T A R Y A N D C O N F I D E N T I A L
Resume Queue page
Search Criteria
If you want to view a limited list of resumes in the resume queue, complete fields in Search
Criteria. Otherwise, click Search to list all the resumes in the queue.
Application Date To search for resumes that were processed within a certain
period, enter the start date in this field and the end date in
the Through field.
Minimum Confidence To search for resumes with a particular confidence level,
select the confidence level.
Remember that the resume queue includes only resumes
with a confidence level below the confidence threshold
specified on the eRecruit Installation Options page. All
other processed resumes are automatically added to your
database.
Name If you know the name of the applicant you want to
process, enter the applicant’s last name.
Email Address If you know the email address of the applicant you want to
process, enter the address or partial address.
Search Click to search for resumes that match the criteria you
specified.
Resume List
The system populates Resume List with resumes that match the search criteria you specified.
Click Name to display the Resume Details page, where you can review the applicant’s
information.

P E O P L E S O F T 8 . 3 R E S U M E P R O C E S S I N G P E O P L E B O O K
P E O P L E S O F T P R O P R I E T A R Y A N D C O N F I D E N T I A L P R O C E S S I N G R E S U M E S 4 - 5
Processing Resumes in the Queue
Access the Resume Details page.
Resume Details page (1 of 2)

P E O P L E S O F T 8 . 3 R E S U M E P R O C E S S I N G P E O P L E B O O K
4 - 6 P R O C E S S I N G R E S U M E S P E O P L E S O F T P R O P R I E T A R Y A N D C O N F I D E N T I A L
Resume Details page (2 of 2)
Confidence The system displays the confidence level assigned by
Resume Extractor. The confidence level indicates the
expected accuracy of the extraction process.
View Original Resume Click this link to view the applicant’s original file. The
system opens a new browser window containing the
resume in its original format. This is useful if you want to
check whether the applicant’s information has been
extracted correctly.
Contact Information, Telephone, Work Experience, Education
Review the information in these fields and update any data that wasn’t extracted correctly.
The system uses the Email Address to send the applicant an email notification.
Click the Description link to view the description of the applicant’s work experience.
Submit Click to transfer the applicant’s details to your PeopleSoft
database. The system displays a message showing the
applicant ID created.
The system automatically sends an email to inform
applicants that their details have been stored in your
system. The email includes the Uniform Resource
Locator (URL) addresses where the applicants can access
and update their resumes.
Delete Click to delete the data. The system removes the
applicant from the temporary tables.

P E O P L E S O F T 8 . 3 R E S U M E P R O C E S S I N G P E O P L E B O O K
P E O P L E S O F T P R O P R I E T A R Y A N D C O N F I D E N T I A L P R O C E S S I N G R E S U M E S 4 - 7
See Also
“Setting Up Resume Processing,” Defining the Email Message Sent to Applicants
PeopleSoft Human Resources PeopleBook: Recruit Workforce, “Setting Up Recruit
Workforce,” Defining System Parameters


P E O P L E S O F T P R O P R I E T A R Y A N D C O N F I D E N T I A L I N D E X 1
Index
A
applicant information 2-2
Apply for Job
auto-populate 3-2
auto-populate overview 2-4
auto populate cleanup process 3-12
AUTOPOP_EXTRACTOR_FTP 3-9
C
CD-ROM
ordering ii
confidence level 2-2, 3-4, 4-2
define threshold 3-10
D
directories
required 3-7
E
electronic resumes 4-2
applicants 3-11
monitor 2-2
enterprise integration point (EIP)
Resume Extractor 3-6
eRecruit Installation Options page 3-10
extraction process
overview 3-1
F
faxes 4-2
FTP Server 3-7
setup 3-9
H
hard copy resumes 4-2
I
Inbound Business Interlink 3-6
Initialize Resume Processing process 3-3, 3-10
P
paper resumes 4-2
PeopleBooks
CD-ROM, ordering ii
printed, ordering ii
R
Resume Details page 4-5
Resume Extractor 3-4
resume processing
extraction process 3-1
overview 2-2
resume queue 4-2
Resume Queue page 4-3
resumes
below confidence threshold 4-2
RP_AP_CLEAN process 3-12
RP_EXTRACTOR_FTP 3-9
RP_INIT process 3-10
RP_ROOT_FTP 3-9
S
setup
overview 3-7
soft copy resumes 4-2
U
URLs
setup 3-9
W
Work Experience Description page 4-3


