
Laboratory Course
ORGANIC CHEMISTRY II
Muzafera Paljevac and Peter Krajnc
Proofreader: Dr. Victor Kennedy
University of Maribor Faculty of Chemistry and Chemical Engineering Laboratory for Organic and Polymer Chemistry and Technology

1
1. THE LIST OF LABORATORY EXPERIMENTS IN ORGANIC CHEMISTRY II LAB COURSE
1. Determination of melting point
2. Continuous (fractional) distillation
3. Distillation with water steam
4. Recrystallization, Sublimation
5. Paper and thin layer chromatography
_____________________________________________________________________________________
6. Synthesis of acetylsalicylic acid
7. Synthesis of tert-butyl chloride
8. Synthesis of methyl orange
9. Synthesis of aniline
10. Synthesis of ethyl acetate
11. Synthesis of ethyl iodide

2
2. LABORATORY RULES AND REGULATIONS
- You must wear a lab coat at all times when working in the laboratory. You are expected to
provide your own lab coat, and you will not be allowed to work in the lab without one.
- Safety glasses and gloves will be supplied when required and must be worn where notices,
experimental instructions or supervisors say so.
- Long hair must be tied back when using open flames.
- Eating and drinking are strictly prohibited in the laboratory.
- Coats, backpacks, etc., should not be left on the lab benches and stools. There are coat racks just
outside the lab. Be aware that lab chemicals can destroy personal possessions.
- Always wash your hands before leaving the lab.
- Notify the instructor immediately in case of an accident.
- Before leaving the laboratory, ensure that gas lines and water
faucets are shut off.
- Consider all chemicals to be hazardous, and minimize
your exposure to them. Never taste chemicals; do not
inhale the vapors of volatile chemicals or the dust
of finely divided solids, and prevent contact between
chemicals and your skin, eyes and clothing.
- Always follow the instructions.
What to bring into the laboratory
- lab coat - safety gloves and glasses - scissors - matches - a calculator
Final evaluation of lab work
- Colloquium: experiments 1 - 5 - experiments 6 – 11: colloquium before starting the experiment (preparing for the synthesis) - Laboratory work / Results - Laboratory diary

3
3. SAFETY IN THE LABORATORY
PICTOGRAMS
PHYSICAL HAZARDS
Unstable explosives
Explosives, divisions 1.1, 1.2, 1.3, 1.4
Self-reactive substances and mixtures, types A, B
Organic peroxides, types A, B
Flammable gases, category 1
Flammable aerosols, categories 1, 2
Flammable liquids, categories 1, 2, 3
Flammable solids, categories 1, 2
Self-reactive substances and mixtures, types B, C, D, E, F
Pyrophoric liquids, category 1
Pyrophoric solids, category 1
Self-heating substances and mixtures, categories 1, 2
Substances and mixtures, which in contact with water, emit flammable gases, categories 1, 2, 3
Organic peroxides, types B, C, D, E, F
Oxidizing gases, category 1
Oxidizing liquids, categories 1, 2, 3
Oxidizing solids, categories 1, 2, 3
Compressed gases
Liquefied gases
Refrigerated liquefied gases
Dissolved gases

4
Corrosive to metals, category 1
HEALTH HAZARDS
Acute toxicity (oral, dermal, inhalation), categories 1, 2, 3
Skin corrosion, categories 1A, 1B, 1C
Serious eye damage, category 1
Acute toxicity (oral, dermal, inhalation), category 4
Skin irritation, categories 2, 3
Eye irritation, category 2A
Skin sensitization, category 1
Specific target organ toxicity following single exposure, category 3
Respiratory tract irritation
Narcotic effects
Not used with the "skull and crossbones" pictogram for skin or eye irritation if:
the "corrosion" pictogram also appears
the "health hazard" pictogram is used to indicate respiratory sensitization
Respiratory sensitization, category 1
Germ cell mutagenicity, categories 1A, 1B, 2
Carcinogenicity, categories 1A, 1B, 2
Reproductive toxicity, categories 1A, 1B, 2
Specific target organ toxicity following single exposure, categories 1, 2
Specific target organ toxicity following repeated exposure, categories 1, 2
Aspiration hazard, categories 1, 2

5
ENVIRONMENTAL HAZARDS
Acute hazards to the aquatic environment, category 1
Chronic hazards to the aquatic environment, categories 1, 2
H STATEMENTS (HAZARD STATEMENTS)
PHYSICAL HAZARDS
H200: Unstable explosive
H201: Explosive; mass explosion hazard
H202: Explosive; severe projection hazard
H203: Explosive; fire, blast or projection hazard
H204: Fire or projection hazard
H205: May mass explode in fire
H220: Extremely flammable gas
H221: Flammable gas
H222: Extremely flammable aerosol
H223: Flammable aerosol
H224: Extremely flammable liquid and vapor
H225: Highly flammable liquid and vapor
H226: Flammable liquid and vapor
H227: Combustible liquid
H228: Flammable solid
H240: Heating may cause an explosion
H241: Heating may cause a fire or explosion
H242: Heating may cause a fire
H250: Catches fire spontaneously if exposed to air
H251: Self-heating; may catch fire
H252: Self-heating in large quantities; may catch fire
H260: In contact with water releases flammable gases which may ignite spontaneously
H261: In contact with water releases flammable gas
H270: May cause or intensify fire; oxidizer
H271: May cause fire or explosion; strong oxidizer
H272: May intensify fire; oxidizer
H280: Contains gas under pressure; may explode if heated
H281: Contains refrigerated gas; may cause cryogenic burns or injury

6
H290: May be corrosive to metals
HEALTH HAZARDS
H300: Fatal if swallowed
H301: Toxic if swallowed
H302: Harmful if swallowed
H303: May be harmful if swallowed
H304: May be fatal if swallowed and enters airways
H305: May be harmful if swallowed and enters airways
H310: Fatal in contact with skin
H311: Toxic in contact with skin
H312: Harmful in contact with skin
H313: May be harmful in contact with skin
H314: Causes severe skin burns and eye damage
H315: Causes skin irritation
H316: Causes mild skin irritation
H317: May cause an allergic skin reaction
H318: Causes serious eye damage
H319: Causes serious eye irritation
H320: Causes eye irritation
H330: Fatal if inhaled
H331: Toxic if inhaled
H332: Harmful if inhaled
H333: May be harmful if inhaled
H334: May cause allergy or asthma symptoms or breathing difficulties if inhaled
H335: May cause respiratory irritation
H336: May cause drowsiness or dizziness
H340: May cause genetic defects
H341: Suspected of causing genetic defects
H350: May cause cancer
H351: Suspected of causing cancer
H360: May damage fertility or the unborn child
H361: Suspected of damaging fertility or the unborn child
H362: May cause harm to breast-fed children
H370: Causes damage to organs
H371: May cause damage to organs
H372: Causes damage to organs through prolonged or repeated exposure
H373: May cause damage to organs through prolonged or repeated exposure

7
ENVIRONMENTAL HAZARDS
H400: Very toxic to aquatic life
H401: Toxic to aquatic life
H402: Harmful to aquatic life
H410: Very toxic to aquatic life with long lasting effects
H411: Toxic to aquatic life with long lasting effects
H412: Harmful to aquatic life with long lasting effects
H413: May cause long lasting harmful effects to aquatic life
H420: Harms public health and the environment by destroying ozone in the upper atmosphere
COUNTRY-SPECIFIC HAZARD STATEMENTS
European Union
The European Union has implemented the GHS through the CLP Regulation. Nevertheless, the older system
based on the Dangerous Substances Directive will continue to be used in parallel until 2016. Some R-phrases
which do not have simple equivalents under the GHS have been retained under the CLP Regulation
PHYSICAL PROPERTIES
EUH001: Explosive when dry
EUH006: Explosive with or without contact with air
EUH014: Reacts violently with water
EUH018: In use may form flammable/explosive vapor-air mixture
EUH019: May form explosive peroxides
EUH044: Risk of explosion if heated under confinement
HEALTH PROPERTIES
EUH029: Contact with water liberates toxic gas
EUH031: Contact with acids liberates toxic gas
EUH032: Contact with acids liberates very toxic gas
EUH066: Repeated exposure may cause skin dryness or cracking
EUH070: Toxic by eye contact
EUH071: Corrosive to the respiratory tract
ENVIRONMENTAL PROPERTIES
EUH059: Hazardous to the ozone layer
OTHER EU HAZARD STATEMENTS
Some other hazard statements intended for use in very specific circumstances have also been retained under
the CLP Regulation. [6] Note that, in this case, the numbering of the EU specific hazard statements can coincide
with GHS hazard statements if the "EU" prefix is not included.
EUH201: Contains lead. Should not be used on surfaces liable to be chewed or sucked by children.

8
EUH201A: Warning! Contains lead.
EUH202: Cyanoacrylate. Danger. Bonds skin and eyes in seconds. Keep out of the reach of children.
EUH203: Contains chromium(VI). May produce an allergic reaction.
EUH204: Contains isocyanates. May produce an allergic reaction.
EUH205: Contains epoxy constituents. May produce an allergic reaction.
EUH206: Warning! Do not use together with other products. May release dangerous gases (chlorine).
EUH207: Warning! Contains cadmium. Dangerous fumes are formed during use. See information supplied by
the manufacturer. Comply with the safety instructions.
EUH208: Contains <name of sensitizing substance>. May produce an allergic reaction.
EUH209: Can become highly flammable in use.
EUH209A: Can become flammable in use.
EUH210: Safety data sheet available on request.
EUH401: To avoid risks to human health and the environment, comply with the instructions for use.
P STATEMENTS (PRECAUTIONARY STATEMENTS) GENERAL PRECAUTIONARY STATEMENTS
P101: If medical advice is needed, have product container or label at hand
P102: Keep out of reach of children
P103: Read label before use
PREVENTION PRECAUTIONARY STATEMENTS
P201: Obtain special instructions before use
P202: Do not handle until all safety precautions have been read and understood
P210: Keep away from heat/sparks/open flames/hot surfaces – No smoking
P211: Do not spray on an open flame or other ignition source
P220: Keep/Store away from clothing/…/combustible materials
P221: Take any precaution to avoid mixing with combustibles
P222: Do not allow contact with air
P223: Keep away from any possible contact with water, because of violent reaction and possible flash fire
P230: Keep wetted with …
P231: Handle under inert gas
P232: Protect from moisture
P233: Keep container tightly closed
P234: Keep only in original container
P235: Keep cool
P240: Ground/bond container and receiving equipment
P241: Use explosion-proof electrical/ventilating/light/…/equipment
P242: Use only non-sparking tools

9
P243: Take precautionary measures against static discharge
P244: Keep reduction valves free from grease and oil
P250: Do not subject to grinding/shock/…/friction
P251: Pressurized container – Do not pierce or burn, even after use
P260: Do not breathe dust/fume/gas/mist/vapors/spray
P261: Avoid breathing dust/fume/gas/mist/vapors/spray
P262: Do not get in eyes, on skin, or on clothing
P263: Avoid contact during pregnancy/while nursing
P264: Wash … thoroughly after handling
P270: Do not eat, drink or smoke when using this product
P271: Use only outdoors or in a well-ventilated area
P272: Contaminated work clothing should not be allowed out of the workplace
P273: Avoid release to the environment
P280: Wear protective gloves/protective clothing/eye protection/face protection
P281: Use personal protective equipment as required
P282: Wear cold insulating gloves/face shield/eye protection
P283: Wear fire/flame resistant/retardant clothing
P284: Wear respiratory protection
P285: In case of inadequate ventilation wear respiratory protection
P231+232: Handle under inert gas. Protect from moisture
P235+410: Keep cool. Protect from sunlight
RESPONSE PRECAUTIONARY STATEMENTS
P301: IF SWALLOWED:
P302: IF ON SKIN:
P303: IF ON SKIN (or hair):
P304: IF INHALED:
P305: IF IN EYES:
P306: IF ON CLOTHING:
P307: IF exposed:
P308: IF exposed or concerned:
P309: IF exposed or you feel unwell:
P310: Immediately call a POISON CENTER or doctor/physician
P311: Call a POISON CENTER or doctor/physician
P312: Call a POISON CENTER or doctor/physician if you feel unwell
P313: Get medical advice/attention
P314: Get Medical advice/attention if you feel unwell
P315: Get immediate medical advice/attention
P320: Specific treatment is urgent (see … on this label)

10
P321: Specific treatment (see … on this label)
P322: Specific measures (see … on this label)
P330: Rinse mouth
P331: Do NOT induce vomiting
P332: If skin irritation occurs:
P333: If skin irritation or a rash occurs:
P334: Immerse in cool water/wrap in wet bandages
P335: Brush off loose particles from skin
P336: Thaw frosted parts with lukewarm water. Do not rub affected areas
P337: If eye irritation persists:
P338: Remove contact lenses if present and easy to do. continue rinsing
P340: Remove victim to fresh air and keep at rest in a position comfortable for breathing
P341: If breathing is difficult, remove victim to fresh air and keep at rest in a position comfortable for breathing
P342: If experiencing respiratory symptoms:
P350: Gently wash with soap and water
P351: Rinse cautiously with water for several minutes
P352: Wash with soap and water
P353: Rinse skin with water/shower
P360: Rinse immediately contaminated clothing and skin with plenty of water before removing clothes
P361: Remove/Take off immediately all contaminated clothing
P362: Take off contaminated clothing and wash before reuse
P363: Wash contaminated clothing before reuse
P370: In case of fire:
P371: In case of major fire and large quantities:
P372: Explosion risk in case of fire
P373: DO NOT fight fire when fire reaches explosives
P374: Fight fire with normal precautions from a reasonable distance
P375: Fight fire remotely due to the risk of explosion
P376: Stop leak if safe to do so
P377: Leaking gas fire – do not extinguish unless leak can be stopped safely
P378: Use … for extinction
P380: Evacuate area
P381: Eliminate all ignition sources if safe to do so
P391: Collect spillage
P301+310: IF SWALLOWED: Immediately call a POISON CENTER or doctor/physician
P301+312: IF SWALLOWED: Call a POISON CENTER or doctor/physician if you feel unwell
P301+330+331: IF SWALLOWED: Rinse mouth. Do NOT induce vomiting
P302+334: IF ON SKIN: Immerse in cool water/wrap in wet bandages

11
P302+350: IF ON SKIN: Gently wash with soap and water
P302+352: IF ON SKIN: Wash with soap and water
P303+361+353: IF ON SKIN (or hair): Remove/Take off immediately all contaminated clothing. Rinse skin with
water/shower
P304+312: IF INHALED: Call a POISON CENTER or doctor/physician if you feel unwell
P304+340: IF INHALED: Remove victim to fresh air and keep at rest in a position comfortable for breathing
P304+341: IF INHALED: If breathing is difficult, remove victim to fresh air and keep at rest in a position
comfortable for breathing
P305+351+338: IF IN EYES: Rinse cautiously with water for several minutes. Remove contact lenses if present and
easy to do – continue rinsing
P306+360: IF ON CLOTHING: Rinse immediately contaminated clothing and skin with plenty of water before
removing clothes
P307+311: IF exposed: Call a POISON CENTER or doctor/physician
P308+313: IF exposed or concerned: Get medical advice/attention
P309+311: IF exposed or you feel unwell: Call a POISON CENTER or doctor/physician
P332+313: If skin irritation occurs: Get medical advice/attention
P333+313: If skin irritation or a rash occurs: Get medical advice/attention
P335+334: Brush off loose particles from skin. Immerse in cool water/wrap in wet bandages
P337+313: If eye irritation persists get medical advice/attention
P342+311: If experiencing respiratory symptoms: Call a POISON CENTER or doctor/physician
P370+376: In case of fire: Stop leak if safe to do so
P370+378: In case of fire: Use … for extinction
P370+380: In case of fire: Evacuate area
P370+380+375: In case of fire: Evacuate area. Fight fire remotely due to the risk of explosion
P371+380+375: In case of major fire and large quantities: Evacuate area. Fight fire remotely due to the risk of
explosion
STORAGE PRECAUTIONARY STATEMENTS
P401: Store …
P402: Store in a dry place
P403: Store in a well ventilated place
P404: Store in a closed container
P405: Store locked up
P406: Store in a corrosive resistant/… container with a resistant inner liner
P407: Maintain air gap between stacks/pallets
P410: Protect from sunlight
P411: Store at temperatures not exceeding … °C/… °F
P412: Do not expose to temperatures exceeding 50 °C/122 °F
P420: Store away from other materials

12
P422: Store contents under …
P402+404: Store in a dry place. Store in a closed container
P403+233: Store in a well ventilated place. Keep container tightly closed
P403+235: Store in a well ventilated place. Keep cool
P410+403: Protect from sunlight. Store in a well ventilated place
P410+412: Protect from sunlight. Do not expose to temperatures exceeding 50 °C/122 °F
P411+235: Store at temperatures not exceeding … °C/… °F. Keep cool
DISPOSAL PRECAUTIONARY STATEMENTS
P501: Dispose of contents/container to …
4. BASIC LABORATORY GLASSWARE AND EQUIPMENT
LIST OF INVENTORY FOR LABORATORY EXPERIMENTS IN ORGANIC CHEMISTRY
INVENTORY FOR WORK TABLE 1. Test tube 16x160 2. Test tube stand 3. Beaker: 100 mL 250 mL 400 mL 600 mL 1000 mL 4. Funnel 5. Watch Glass 6. Glass stir rod
12 pcs 1 pc 1 pc 1 pc 1 pc 1 pc 1 pc 1 pc 1 pc 1 pc
INVENTORY IN THE BASKET
1. Distillation flask (50 mL, 100 mL, 250 mL) 2. Connections for distillation or Claisen adapter 3. Adapter for steam distillation 4. Adapter for condenser 5. Liebig (water) condenser 6. Air condenser 7. Thermometer 8. Erlenmeyer flask 100 ml 9. Erlenmeyer flask 250 ml 10. Separatory funnel 11. Measuring cylinder (10ml, 25 ml, 100 ml) 12. Petri dish 13. Thiele tube 14. Dropper 15. Round Bottom Flask Cork Supporter 16. Spatula 17. Chemical spoon
4 pcs 1 pc 1 pc 1 pc 1 pc 1 pc 1 pc 1 pc 1 pc 1 pc 3 pcs 2 pcs 1 pc 1 pc 1 pc 1 pc 1 pc

13
JOINT INVENTORY IN THE DRAWER 1. Universal clamp 2. Clamp holder 3. Metal ring for funnel 4. Wooden test tube holder 5. Ceramic mesh 6. Safety eyeglasses 7. Instructions for safety in the laboratory
3 pcs 3 pcs 2 pcs 1 pc 2 pcs 1 pc 1 pc

14
test tube
test tube stand
funnel
watch glass
glass stir rod
beaker
Claisen adaptor
distillation adaptor
adapter for condenser
Liebig condenser
air condenser
thermometer
Erlenmeyer flask
separatory funnel
adapter for steam distillation
distillation flask

15
dropper
measuring cylinder
Petri dish
Thiele tube
Pasteur pipette
round bottom flask cork supporter
spoon
spatula
universal clamp
clamp holder
metal ring for funnel
wooden test tube holder
ceramic mesh safety eyeglasses
flask
cold finger Bunsen burner electronic scale

16
tweezers
Laboratory inventory.
glass mortar and pestle
tripod stand
support stand with rod
flat bottomed flask
Büchner funnel
conical vacuum flask
flask clamp burette clamp
wash bottle
tubing clamp
pipette
measuring flask
lifting table
electric heater
burette

17
EXPERIMENT 1: DETERMINATION OF MELTING AND BOILING POINT Aim: Determine the melting point and boiling point of an unknown sample. Introduction: The melting point of a compound is the temperature at which the solid phase is in equilibrium with the liquid phase (vapor pressures of both aggregate stations are the same). The melting point range is defined as the span of temperature from the point at which the crystals first begin to liquefy, to the point at which the entire sample is liquid. Most pure organic compounds melt over a narrow temperature range of 1-2°C. The presence of a soluble impurity almost always causes a decrease in the melting point expected for the pure compound (due to a reduction of the vapor pressure) and a broadening of the melting point range. This phenomenon is explained by Raoult's proprietary law, which is presented in the diagram of vapor pressure (Figure 1):
Pa = Pa0 ∙ xa
Pa – vapor pressure of a pure substance (S) in a mixture of (Z) Pa0 – vapor pressure of pure liquid substance (S) xa – share of pure substance (S) in a mixture of (Z), xa≤1
Figure 1. A-S: dependence of the vapor pressure of a pure solid substance on temperature S-B: dependence of the vapor pressure of a pure liquid substance on temperature S-C: dependence of the vapor pressure of cooled melt on temperature In point S all three phases are in equilibrium (vapor pressures are the same), TS is the melting point of a pure substance in a given external pressure. Z-D: dependence of the vapor pressure of the mixture (pure substance + impurities) on the temperature TZ is the melting point of the mixture (impurities) and is lower than the TS! In order to understand the effects of impurities on melting point behavior, consider the melting point-mass percent composition diagram for two different fictitious organic

18
compounds, X and Y, shown in Figure 2. The vertical axis represents temperature and the horizontal axis represents varying mass percent compositions of X and Y.
Figure 2. Melting point-mass percent composition diagram – eutectic diagram. Both compounds have sharp melting points. Compound X melts at 150°C, as shown on the left vertical axis, and Y melts at 148°C, as shown on the right vertical axis. As compound X is added to pure Y, the melting point of the mixture decreases along curve C-B until a minimum temperature of 130°C is reached. Point B corresponds to 40 mass percent X and 60 mass percent Y and is called the eutectic composition for the compound X and Y. Here, both solid X and solid Y are in equilibrium with the liquid. The eutectic temperature of 130°C is the lowest possible melting point for a mixture of X and Y. At temperatures below 130°C, mixtures of X and Y exist together only in solid form. The boiling point of a substance is the temperature at which the vapor pressure of the liquid equals the pressure surrounding the liquid and the liquid changes into a vapor (the liquid phase is in equilibrium with the vapor phase). The boiling point of a liquid varies with the surrounding atmospheric pressure. A liquid at a higher pressure has a higher boiling point than when that liquid is at a lower atmospheric pressure. Experimental procedure: DETERMINATION OF MELTING POINT Fill a Thiele tube with paraffin oil until the level of the oil is just above the top of the side-arm neck (see Figure 1.1) and fit it to a support stand. Obtain the sample from your instructor and crush it into a fine powder in a mortar. Put the well powdered sample into a capillary tube (about 5 mm in height) - in doing so, use an air condenser to help; to fill a capillary tube with a sample, the open end of the capillary is pressed gently into the substance several times. The powder is then pushed to the bottom of the tube by repeatedly pounding the bottom of the capillary against a hard surface. Alternatively, the capillary tube can be dropped onto a table through an air condenser. Attach the capillary tube to a thermometer with ordinary rubber and place the thermometer/capillary tube assembly into the Thiele tube until the

19
thermometer bulb and the sample in the capillary tube are submersed in the oil. The placement of the unit is important: 1. the capillary should be on the same side of the Thiele tube as the elbow, 2. neither the capillary nor the thermometer bulb should be touching the glass walls of the
Thiele tube, 3. the base of the capillary should be just below the joint to the upper part of the elbow, 4. the rubber should be placed well above the level of the oil in the Thiele tube. Do not let the
rubber come in contact with the oil. Now you can start heating the paraffin oil in the Thiele tube, very slowly. Carefully watch the capillary tube for the melting of the solid. Record the temperatures of the melting range: T1: Temperature at which 1st drop of liquid appears. T2: Temperature at which the last crystal disappears. As a result, give T2 (average value of three measurements) that you specified for the unknown sample. Allow the oil in the Thiele tube to cool to at least 35°C before new measurement and at the end before disassembling the apparatus.
Figure 1.1
DETERMINATION OF BOILING POINT Fill a Thiele tube with paraffin oil until the level of the oil is just above the top of the side-arm neck and fit it to a support stand. Obtain the sample from your instructor. In a micro test tube, introduce the liquid sample (no more than 5 mm in height) by Pasteur pipette and drop in a piece of melting point capillary tubing (sealed at one end), with the open end down. Attach the micro test tube assembly to a thermometer with an ordinary rubber and place the whole unit into a Thiele tube. The placement of the unit is important: 1. the micro test tube should be on the same side of the Thiele tube as the elbow,

20
2. neither the test tube nor the thermometer bulb should be touching the glass walls of the Thiele tube,
3. the base of the micro test tube should be just below the joint to the upper part of the elbow,
4. the rubber should be placed well above the level of the oil in the Thiele tube. Now you can begin to carefully heat the paraffin oil in the Thiele tube, very slowly. In a few moments you will observe an initial stream of bubbles as air is expelled and then, a little later, a rapid and continuous stream of bubbles will emerge from the inverted capillary tube. At this point, stop heating. Soon the stream of bubbles will slow down and stop. When it has stopped, the liquid sample will be drawn up into the capillary tube. The temperature when the liquid enters the capillary corresponds to the boiling point of the liquid (the vapor pressure of the compound inside the capillary is equal to the atmospheric pressure), and this temperature must be recorded. As a result, give Tbp (average value of three measurements) that you specified for the unknown sample. Allow the oil in the Thiele tube to cool to at least 35°C before new measurement and at the end before disassembling the apparatus. CAUTION: It may happen that your sample will evaporate or boil away during the heating. For all the measurements, you will use one capillary, so be careful when drying the capillary with a Bunsen burner (hold the capillary with wooden test tube holder and dry it holding it approx. 5 cm above the flame).

21
EXPERIMENT 2: CONTINUOUS (FRACTIONAL) DISTILLATION Aim: The separation of liquid mixtures by continuous distillation, determination of boiling points for obtained sample, distillate and for distillation residue. Introduction: Distillation is a method of separating liquid mixtures based on differences in the volatility of components in a boiling liquid mixture. The working principle of distillation is to heat a mixture at a specific temperature, collect the hot vapors and condense them to separate the component substance. In simpler terms, a highly volatile compound is separated from a less-volatile or non-volatile compound by using distillation. There are several methods of distillation depending on the procedure, the instrument setup and the volatility of components in a boiling liquid mixture:
• Simple Distillation (is practiced for a mixture in which the boiling points of the components differ by at least 20°C),
• Steam Distillation (is used for the purification of mixtures in which the components are temperature- or heat-sensitive),
• Vacuum Distillation (is a special method of separating compounds at pressures lower than the standard atmospheric pressure. Under this condition, the compounds boil below their normal boiling temperature. Hence, vacuum distillation is best suited for separation of compounds with higher boiling points (more than 200°C), which tend to decompose at their boiling temperature.),
• Fractional Distillation: Those mixtures in which the volatility of the components is nearly similar or differs by 25°C (at 1 atmosphere pressure) cannot be separated by simple distillation. In such cases, fractional distillation is used whereby the constituents are separated by a fractionating column. In the fractionating column, the plates are arranged, and the compound with the lowest boiling point is collected at the top, while those with higher boiling points collect at the bottom. A series of compounds are separated simultaneously one after another. An azeotrope is a special class of liquid mixture that boils at a constant temperature at a certain composition. At this condition, it behaves as if it were one component with one constant boiling point. A boiling liquid mixture at the azeotropic composition produces a vapor of exactly the same composition, and the liquid does not change its composition as it evaporates. Two types of azeotropes are known: minimum-boiling and maximum-boiling (less common). One of the best known minimum-boiling azeotropes is the ethanol-water system, which at 1 atm occurs at 89.4 mol% ethanol and has a boiling point of 78.2°C. The methanoic acid - water system at 1 atm occurs at 1.35 mol% MeCOOH and 110°C boiling point and occurs as a maximum-boiling azeotrope. Fractional distillation can be considered as a series of simple distillations, but rather than having many condensers and receivers, the evaporation/condensation cycles take place in a single distillation column. Distillation columns are high surface area tubes that allow multiple vaporization/condensation cycles to occur at once (Figure 2.1). In fractional distillation, vapor rises up the column and condenses on the packing, then re-evaporates, rises further up the column and condenses again. This evaporation/condensation continues up the column, and with each cycle the vapor becomes more and more pure in the lower boiling component. In this way, fractional distillation accomplishes in one apparatus what would require several simple distillation setups. The more vaporization/condensation cycles that the mixture goes

22
through, the better the separation. Although the larger surface area in the column leads to better separation, it also makes the distillation process slower.
Figure 2.1
Properties of ideal liquid mixtures: • Components of the mixture are miscible in all proportions. • The temperature remains constant during the mixing. • Volume of the mixture is equal to the sum of volumes of the components. • An ideal mixture is one which obeys Raoult's and Dalton's Law (vapor pressure of the mixture is entirely equal to the sum of partial vapor pressure) (Figure 2.2).
Figure 2.2 Properties of non-ideal mixtures: • Components of the mixture are miscible in all proportions. • The temperature rises or falls during mixing. • Volume of the mixture is not equal to the sum of volumes of the components.
Vapor pressure of a binary solution which obeys Raoult's law. The black line shows the total vapor pressure as a function of the mole fraction of component B, and the two green lines are the partial pressures of the two components.
Raoult's law: pA=pA0xA and pB=pB0xB
Dalton's Law: p=pA + pB

23
• A non-ideal mixture is one which doesn’t obey Raoult's (Positive and negative deviations from Raoult's Law) but • Obeys Dalton's Law. Negative deviations from Raoult's Law: Mixtures with vapor pressures that are lower than would be expected by Raoult's Law. The mixture has a minimum vapor pressure and a maximum boiling point (Figure 2.3) – azeotrope with maximum boiling point; distills first component present in excess, and then the azeotrope.
Figure 2.3 Positive deviations from Raoult's Law: Mixtures with vapor pressures which are higher than would be expected by Raoult's Law. The mixture has a maximum vapor pressure and a minimum boiling point (Figure 2.4) – azeotrope with minimum boiling point; distills first azeotrope.
Figure 2.4

24
A boiling temperature/concentration diagram is shown in Figure 2.5. Notice that there are two curves on the diagram, one giving the liquid concentrations and the other the vapor concentrations.
Figure 2.5 The concave curve indicates the dependence of the boiling point on the composition of the liquid phase of the mixture, and the convex curve shows the composition of the vapor phase mixture. Experimental procedure: You will receive 110 mL of an unknown liquid mixture. Use 100 mL for distillation and the rest for boiling point determination. In a 250 mL round-bottomed flask, introduce 100 mL of the unknown liquid mixture and 3 boiling chips. Assemble the apparatus for fractional distillation as shown in Figure 2.6. IMPORTANT! Immerse the flask in a water bath (1000 mL beaker with water) as low as it goes, and make sure that all glass joints are sealed. Once you have assembled the apparatus, slowly turn on the water for the condenser and begin heating. The temperature of the water bath should be 95°C. Monitor the temperature of the vapors; this is the boiling temperature of the present composition, which distills from the top of the column. At a given moment, the temperature will rapidly increase and remain constant for some time. When the temperature begins to fall, you can stop the distillation and plot the time dependence of temperature on the graph millimeter paper. Determine the boiling points for the distillate and for the residue of the distillation in the Thiele tube apparatus – as in Experiment 1. As the result, specify the boiling points for the obtained sample, for the distillate, for the residue, and the volume of the distillate and the distillation residue.

25
Figure 2.6
water in
water out
26
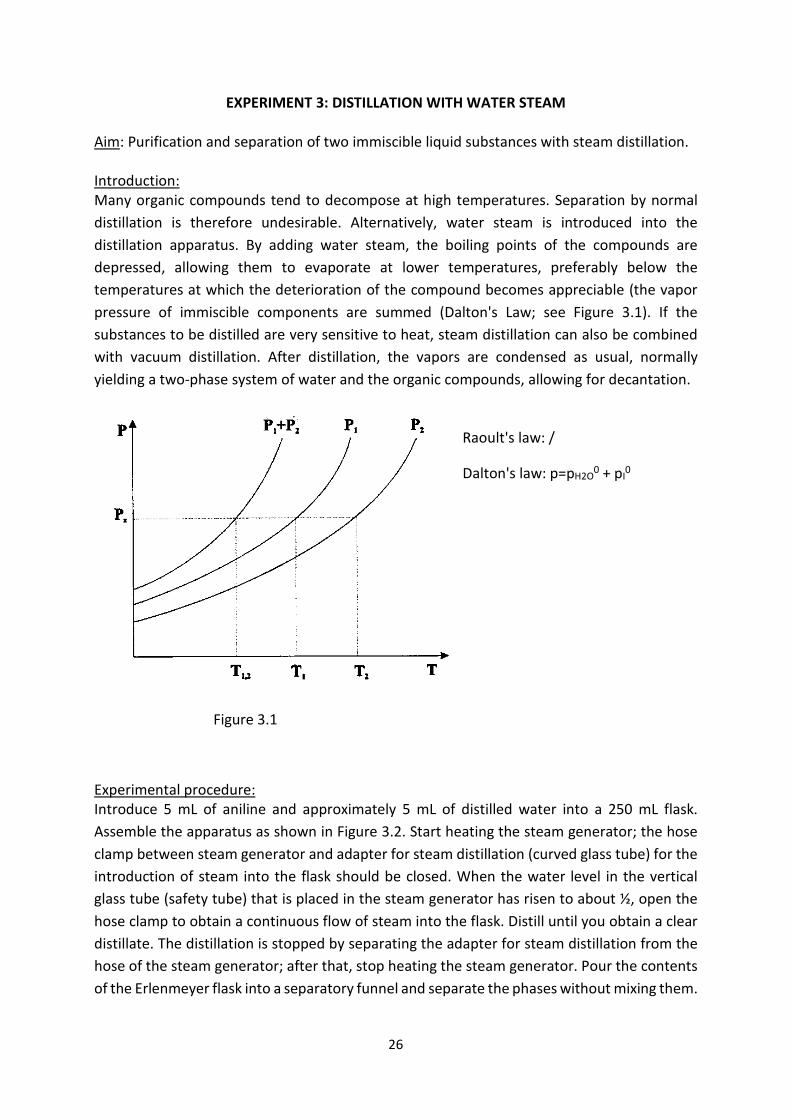
EXPERIMENT 3: DISTILLATION WITH WATER STEAM Aim: Purification and separation of two immiscible liquid substances with steam distillation. Introduction: Many organic compounds tend to decompose at high temperatures. Separation by normal distillation is therefore undesirable. Alternatively, water steam is introduced into the distillation apparatus. By adding water steam, the boiling points of the compounds are depressed, allowing them to evaporate at lower temperatures, preferably below the temperatures at which the deterioration of the compound becomes appreciable (the vapor pressure of immiscible components are summed (Dalton's Law; see Figure 3.1). If the substances to be distilled are very sensitive to heat, steam distillation can also be combined with vacuum distillation. After distillation, the vapors are condensed as usual, normally yielding a two-phase system of water and the organic compounds, allowing for decantation.
Figure 3.1
Experimental procedure: Introduce 5 mL of aniline and approximately 5 mL of distilled water into a 250 mL flask. Assemble the apparatus as shown in Figure 3.2. Start heating the steam generator; the hose clamp between steam generator and adapter for steam distillation (curved glass tube) for the introduction of steam into the flask should be closed. When the water level in the vertical glass tube (safety tube) that is placed in the steam generator has risen to about ½, open the hose clamp to obtain a continuous flow of steam into the flask. Distill until you obtain a clear distillate. The distillation is stopped by separating the adapter for steam distillation from the hose of the steam generator; after that, stop heating the steam generator. Pour the contents of the Erlenmeyer flask into a separatory funnel and separate the phases without mixing them.
Raoult's law: /
Dalton's law: p=pH2O0 + pI0

27
Collect the lower phase (the product) in the 10 mL graduated cylinder. As a result, specify the volume of the distillate. Submit the product to the assistant.
Figure 3.2
water in
water out

28
EXPERIMENT 4: SUBLIMATION AND RECRYSTALLIZATION Aim: Purify and separate solid substances (mixture of solids) of an unknown sample by sublimation and recrystallization. A) SUBLIMATION Introduction: Sublimation is a phase transition process from a solid to a gas without an intermediate liquid phase. The ability of any type of solid to sublime depends on the compound’s triple point based on its phase diagram: typically, the lower the pressure, the lower the sublimation temperature. The pressure and temperature of the desired substance must be below its triple point in order to sublime (Figure 4.1). For sublimation to occur at atmospheric pressure, a solid must exhibit a higher than usual vapor pressure: i.e. it must have weak intermolecular attractions.
Figure 4.1
Experimental procedure: Introduce the sample into a freshly dried, flat-bottomed flask (sublimation flask). Assemble the apparatus as shown in Figure 4.2. IMPORTANT: Immerse the sublimation flask in a 1000 mL beaker (water bath) as low as it goes and set the collector (“cold finger”) approximately 2 cm above the sample, so that it fits tightly into the flask. Slowly open the water, so that the cold finger is filled with cold water. Cautiously warm the water bath (80°C), and then maintain that temperature throughout the sublimation. Observe the collection process on the surface of the cold finger. You can collect the product into the petri dish during the sublimation or at

29
the end. In any case, the petri dish with the sample must be closed, otherwise your sample will evaporate. Submit the product to the assistant.
Figure 4.2
B) RECRYSTALLIZATION Introduction: Recrystallization of solids is an important technique, since it is one of the most commonly used methods for the purification of solids. Other techniques for purifying solids include sublimation, extraction and chromatography. Nevertheless, even when one of these alternative methods of purification has been used, the solid material thus isolated may still be recrystallized to achieve the highest possible purity. The process of recrystallization involves dissolving the solid in an appropriate solvent at an elevated temperature and the subsequent re-formation of the crystals upon cooling, so that any impurities remain in solution. This technique is termed solution recrystallization. Almost all solids are more soluble in a hot than in a cold solvent, and the solution recrystallization takes advantage of this. Thus, if a solid is first dissolved in an amount of hot solvent insufficient to dissolve it when cold, crystals should form when the hot solution is allowed to cool. The choice of solvent is the most critical step in the process of recrystallization, since the correct solvent must be selected to form a product of high purity and in good recovery or yield. Consequently, a solvent should satisfy certain criteria for use in recrystallization: • The desired compound should be reasonably soluble in the hot solvent, and insoluble or
nearly insoluble in the cold solvent.
water in water out

30
• Conversely, the impurities should either be insoluble in the solvent at all temperatures or must remain at least moderately soluble in the cold solvent.
• The boiling point of the solvent should be low enough so that it can readily be removed from the crystals.
• The boiling point of the solvent should be lower than the melting point of the solid being purified.
• The solvent should not react chemically with the substance being purified. The technique of solution recrystallization involves the following steps: 1. Selection of an appropriate solvent. 2. Dissolution of the solid to be purified in the solvent near or at its boiling point - the majority of the sample is dissolved in the solvent. 3. Discoloration with an activated form of carbon, if necessary, to remove colored impurities and filtration of the hot solution to remove insoluble impurities and the decolorizing carbon. 4. Hot filtration through the funnel for hot filtration. 5. Formation of crystalline solid from the solution as it cools. 6. Isolation of the purified solid by filtration. 7. Washing the crystals. 8. Drying the crystals. Experimental procedure: Turn on the funnel for hot filtration. Place the filter paper into the funnel and a smaller beaker under the funnel. IMPORTANT: The filter paper should be wetted with water and hot before filtration. In a 250 mL beaker, introduce the given sample and prepare a saturated solution by adding 20 mL of solvent (distilled water). Cover the beaker with a watch glass and carefully heat it on the electric heater so that the sample is dissolved in the solvent. If necessary, add more solvent; the total volume of solvent should not exceed 50 mL. Cool down the saturated solution, add small amount of activated carbon and heat the mixture again to the boil. Filter the hot solution through the funnel for hot filtration into a clean 100 mL beaker. Allow the mixture to cool down, and the crystals will precipitate. If crystals have not formed upon cooling, scratch the side of the beaker with a glass stirring rod. Filtrate the obtained crystals using a Büchner funnel and a Büchner flask, and rinse them with cold solvent (suction filtration). Place the product in a petri dish and let it air dry. As a result, specify the weight of pure product. Submit the product to the assistant.
Figure 4.3

31
EXPERIMENT 5: PAPER AND THIN LAYER CHROMATOGRAPHY Aim: To separate a mixture of sugars and color components by thin-layer chromatography (TLC). Introduction: Chromatography is a widely used experimental technique for the separation of a mixture of compounds into its individual components. The separation process is based on the fact that porous solids adsorb different substances to different extremes, depending upon their polarity. The term “adsorption” refers to the adhesion or stickiness of a substance to the surface of another substance, as opposed to the term “absorption” which refers to a substance penetrating into the inner structure of another substance. A mixture to be separated is first applied to a porous solid (like paper, or aluminum or fine silica sand) called the stationary phase. The components of the mixture then get “washed” along the porous solid by the flow of a solvent, in what is called the mobile phase. The mobile phase can be liquid (as in column, paper or thin-layer chromatography), or it can be a gas (as in gas chromatography). Each component of the mixture to be separated will be attracted differently to the porous stationary phase, depending on its polarity and the polarity of the stationary phase chosen. Remember that “like attracts like”. If the stationary phase is polar, then polar components will be attracted or stick more to it, but non-polar components will move across the surface easily. If the stationary phase is nonpolar, then nonpolar components will be more attracted to it, and the polar compounds will move along more quickly. Likewise, if the mobile phase or solvent that is washing over the components of a mixture is polar, then it will attract polar components of the mixture and carry them along easily, leaving the nonpolar components behind or moving slowly. A non-polar solvent will attract and carry along the non-polar components of a mixture but leave the polar substances behind or moving more slowly. As the mobile phase (solvent) moves through the porous stationary phase by capillary action, it "pulls" along the molecules of the mixture to be separated at different rates. Because of the different polarities of the molecules, the components have different attractions to the mobile and to the stationary phases, and therefore do not travel at the same speed through the stationary phase. This leads to a separation of the various molecules. Substances can be identified by the heights they reach on the completed chromatogram by calculating Rf (rate of flow or retention factor) values. The Rf value may be calculated from the following equation: Rf = distance of the center of the sample spot from the origin/distance of the solvent front from the origin The simplest types of chromatography, paper and thin-layer, will be used in this experiment. Other chromatographic methods, including column chromatography, gas chromatography (GC), and high performance liquid chromatography (HPLC) are used extensively in chemistry. Experimental procedure: Paper Chromatography: In paper chromatography, the stationary phase is a sheet of absorbent paper, such as filter paper. On a strip of filter paper, lightly draw a pencil line approximately 2 cm from one end of

32
the paper straight across (this marks the location of the spot for ink and is called the origin – start line). Using a coloured pen, put a drop of the mixture to be separated on the center of this line. In a chromatographic chamber, introduce 10 mL of water phase using a pipette. IMPORTANT: The chamber walls must be dried, otherwise the paper will stick to the walls and chromatography will not proceed properly. Suspend the filter paper vertically in the chromatographic chamber so that the bottom of the strip touches the solvent. IMPORTANT: The start line should remain above the solvent. The solvent will rise up the paper by capillary action, dragging the sample with it. Watch the color spot going up the strip and possibly separating into individual components. Remove the chromatogram from the chamber before the solvent reaches the top of the paper (at least 10 cm above the origin – solvent front). Mark where the solvent front is, as well as the middle of the color spots. Calculate Rf for the spots obtained on the chromatogram (Figure 5.1).
Figure 5.1 Thin-Layer Chromatography: Thin-layer chromatography is principally identical to paper chromatography. Instead of using paper, the stationary phase is a thin coating of adsorbent material, called the sorbent, on a sheet of glass, plastic or metal. On a TLC sheet, draw a pencil line approximately 1.5 cm from one end of the TLC straight across (this marks the location of the spot for ink and is called the origin – start line). Dip a small, clean capillary tube into the mixture and apply the mixture to the center of this line. The capillary should be held at right angles to the sheet. Do not scrape off the sorbent with the capillary tube. Wait until the spot dries out completely. In a dried 100 mL graduated cylinder, introduce 5 mL of a 50:40:10 propanol: ethyl acetate: water eluent mixture, using a pipette. Suspend the TLC sheet in the cylinder, making sure that the origin on the TLC sheet remains above the surface of the eluent mixture. The solvent will rise up the TLC by capillary action, dragging the sample with it. Remove the chromatogram from the cylinder when the solvent reaches at least 10 cm above the origin – solvent front. Mark where the solvent front is. The assistant will spray the surface of the TLC plate uniformly with reagent and place the plate in the oven at 100°C for 5 minutes; the spots will become visible. Calculate Rf for the resulting spots on the chromatogram.
distance fast dye moved
distance slow dye moved distance solventfront moved
start point

33
EXPERIMENT 6: SYNTHESIS OF ACETYL SALICYLIC ACID (ASPIRIN) Aim: Synthesis of acetyl salicylic acid via an esterification reaction. Introduction: To prepare acetyl salicylic acid, salicylic acid is reacted with an excess of acetic anhydride. A small amount of a strong acid is used as a catalyst to speed up the reaction. In this experiment, sulfuric acid will be used as the catalyst. Type of reaction: it is an acid-catalyzed esterification of the alcohol part of salicylic acid and acetic anhydride as the acid derivative. The result of the reaction is the conversion of the salicylic alcohol groups in the acetyl (R-OCOCH3) group. Reaction mechanism for aspirin synthesis:
OH
COOH+
O
O
O
CH3
CH3
O
COOH
O CH3
+ CH3COOH
O
O OH2SO4
O
O O H
O
O OH
COOHHO
O
O OH
OHHOOC
O
O OH
OHOOC
H
COOHO
OHH3C
+OH
O
HSO4
COOHO
H3C O
COOHO
H3C O

34
Experimental procedure: Introduce 2.5 g of salicylic acid and 5 mL of acetic anhydride into a 50 mL round-bottomed flask. Then, add 1 drop of concentrated sulfuric acid and attach an air condenser as shown in Figure 6.1. Start to heat the reaction mixture in a 600 mL beaker with water warmed to 65°C for 30 min while stirring by gently shaking the support stand. After 30 minutes of heating, pour the reaction mixture into a 100 mL beaker, add 40 mL of deionized water, and let the sample crystallize (cover the reaction mixture with a watch glass). Crystals may not initially form. One gets a viscous oil that will eventually solidify. If you get oil, stir it with a glass rod while it is in the ice bath. For the best results, make sure that the glass rod is "scratching" the flask's surface. After complete precipitation of the product, heat the mixture until complete dissolution and then let it cool down slowly. After recrystallisation, filter the crystals of aspirin usingsuctionfiltration and transfer them to a petri dish. Allow them to air dry overnight and weigh them. Calculate the percentage yield of the reaction. Record the FTIR spectrum of the dried product. Submit the product to the technical assistant.
Figure 6.1

35
EXPERIMENT 7: SYNTHESIS OF TERT-BUTYL CHLORIDE
Aim: Synthesis of tert-butyl chloride via an SN1 type reaction. Introduction: Tertiary alcohols can easily be converted to their corresponding alkyl chlorides by the addition of concentrated hydrochloric acid to the alcohol. In this experiment, concentrated hydrochloric acid is used to prepare tert-butyl chloride from tert-butyl alcohol via SN1 reaction. The mechanism of this SN1 reaction involves three steps. First, is the rapid protonation of the alcohol, followed by the much slower rate-determining step, the loss of water to give a relatively stable tertiary carbocation. In the final step, the carbocation is rapidly attacked by the chloride ion to form alkyl halide. Alkyl halide is insoluble in water, and thus it separates from the aqueous layer. Reaction mechanism for tert-butyl chloride synthesis:
Experimental procedure: Into a 250 mL Erlenmeyer flask, introduce 35 mL of concentrated hydrochloric acid (HCl) and 10 mL of tert-butyl alcohol. Cover the reaction mixture with a watch glass and slowly stir the reaction mixture for approximately 5 minutes. The reaction mixture will become opaque because of the tert-butyl chloride formation, which is not soluble in an excess of HCl. Allow the reaction mixture to stand for 30 minutes and shake it periodically. After that time, drain the reaction mixture into the separatory funnel. Two phases will occur. Separate the two phases (remove the lower aqueous layer in the beaker), and then wash the organic phase (upper phase) with 5 mL of saturated sodium bicarbonate water solution. Again, drain the lower (aqueous) layer into the beaker and transfer the organic layer (tert-butyl chloride) into a dried 50 mL Erlenmeyer flask. Add some beads of anhydrous calcium chloride to dry the product. After 5 minutes of drying, decant or pipette off the product into a 25 mL measuring cylinder. Measure the volume of your product and calculate the percentage yield of the reaction. Submit the product to the assistant.
CH3
OH
CH3
CH3H+
CH3
O+
CH3
CH3
HH
-H2OCH3 C
CH3
CH3
+ Cl-CH3
Cl
CH3
CH3

36
EXPERIMENT 8: SYNTHESIS OF METHYL ORANGE
Aim: Synthesis of aniline by reduction of nitro group in nitrobenzene to the amino group. Introduction: Methyl orange is a pH indicator which, because of its clear color change, is often used in titrations. It changes color at the pH of a mid-strength acid and is usually used in titrations as an acid-base indicator. In solutions that are more basic than pH 4, methyl orange exists almost entirely as the yellow negative ion. In solutions that are more acidic than pH 3, it is protonated to form a red dipolar ion. Given these properties, methyl orange can be used as an indicator for titrations that have their end points in the pH 3 to 4 region. The indicator is usually prepared as a 0.01% solution in water. Methyl orange is prepared from sulfanilic acid and N,N-dimethylaniline. The first product obtained from the coupling is the bright red acid form of methyl orange, called helianthin. In a base, helanthin is converted to the orange sodium salt, called methyl orange. Azo dyes have a nitrogen to nitrogen double bond as their chromophore. These dyes are created by taking a diazonium salt and adding it to a strongly activated aromatic system. In this experiment, you will synthesize methyl orange, an azo dye, by a diazonium coupling reaction with diazotized sulfanilic acid and N,N-dimethylaniline. Reaction mechanism for methyl orange synthesis:
HO3S NH2 + HNO2
HCl + NaNO2
-O3S N2+
NaO3S N N N
CH3
CH3
N
CH3
CH3
Methyl orange synthesis is performed in the following steps: Formation of nitrosonium ion
In order to obtain the nitrosonium ion (NO+), sodium nitrite has to be treated with hydrochlorid acid. During the addition of the acid, the sulfanilic acid is precipitated out of solution as a finely divided solid, which is immediately diazotized (see below).
Na+ -O N O H Cl+ OH N OH Cl
O+ N OH
H+N O

37
Formation of diazotized sulfanilic salt
NHH
SO3H
+ +N O
N+
H
H
SO3H
N O
+H+
-H+
NH
SO3H
N O
H+
N+H
SO3H
N OH
H+
N
SO3H
N O+
H
H
N+
SO3H
N
+H+
-H+
Addition to N,N-dimethylaniline The finely divided diazonium salt is allowed to react immediately with dimethylaniline in the solution in which it was precipitated.
N+
SO3H
N
+
NCH3CH3
Cl-
NaOH
-H2O N
SO3Na
N H
N+ CH3CH3
Cl-
-HCl
N
SO3Na
N
NCH3CH3
Experimental procedure: In a 150 mL beaker, dissolve 2.0 g of anhydrous sulfanilic acid in 6 mL of 2M sodium hydroxide water solution. While cooling the solution of salicylic acid in sodium hydroxide in an ice-water bath, add a solution of 0.8 g of NaNO2 in 10 mL of distilled water and stir the mixture. Afterwards, add 12 mL of 2M hydrochloric acid and stir the mixture. Keep this solution cold in the ice bath. It now contains diazonium salt, which will decompose if it becomes warm and will precipitate as a bluish-green solid. Then add 1.3 mL of N,N-dimethylaniline with constant stirring to the suspension of the diazonium salt, and stir the reaction mixture for 5-10 minutes while cooling in the ice-water bath to ensure complete reaction. Now, very slowly (drop by drop) add 2.0 M of sodium hydroxide solution while constantly stirring. Keep adding the sodium hydroxide until the solution becomes a basic, orange-brown colour. If the sodium hydroxide is added too quickly, then free dimethylaniline will separate out as an oily phase. This then leaves an equivalent amount of the diazonium salt unreacted. This excess salt decomposes to brown tar on warming to room temperature and contaminates the otherwise crystalline orange dye. Keep the mixture cool; allow the reaction mixture to stand in an ice bath for about 10 minutes (for the formation and growth of crystals). Filter the crystals by suction filtration and transfer them to a petri dish. Allow them to air dry overnight and weigh them. Calculate the yield of the reaction. Submit the product to the assistant.

38
EXPERIMENT 9: SYNTHESIS OF ANILINE
Aim: Synthesis of aniline by reduction of the nitro group in nitrobenzene to the amino group. Introduction: The nitro group of the aromatic compounds can be reduced with nascent hydrogen (formed by the effect of Zn on HCl), to form a variety of compounds, depending on the reaction conditions. Reduction of the nitro compounds may be: 1. in mineral acid solution, which produces the primary amines (Ph-NH2) 2. in a neutral or acidic medium, to form N-arylhydroxylamines (Ph-NHOH) 3. in an alkaline medium, where a bimolecular reduction takes place, which produces various intermediate products (for example, azobenzene Ph-N=N-Ph, hidrazobenzene Ph-NH-NH-Ph), which can be isolated by suitable reducing agents and conditions. Reaction for aniline synthesis:
NO2 NH2
3H2
Zn + HCl
+ 2H2O
Experimental procedure: Into a 250 mL round-bottomed flask equipped with a reflux condenser (see Figure 9.1), introduce 3.5 mL of nitrobenzene and 3.5 g of granulated Zn. In a 25 mL measuring cylinder, introduce 19 mL of concentrated hydrochloric acid. Pour 3 mL of acid through the condenser into the reaction mixture, and shake the contents of the flask steadily. As the mixture becomes warm, the flask should be immersed in cold water. After approximately one minute, pour another 3 mL of hydrochloric acid through the condenser; shake the flask steadily to ensure thorough mixing. Proceed in this way until all 19 mL of acid has been added. Finally, heat the mixture using a water bath for 30 minutes at 100˚C. Then cool the reaction mixture to room temperature and gradually add a solution of 11 g of sodium hydroxide in 34 mL of water. Equip the flask for steam distillation (see Figure 9.2), and pass steam into the warm mixture until clear water begins to distill. Transfer the distillate to a separatory funnel and allow the two layers to separate. Pour the aniline layer (lower layer) into a 100 mL beaker and dry it with a few beads of anhydrous calcium chloride. After 5 minutes of drying, decant or pipette off the product into a 10 mL measuring cylinder. Measure the volume of your product and calculate the yield of the reaction. Submit the product to the assistant.

39
Figure 9.1
Figure 9.2
water in
water out
water in
water out

40
EXPERIMENT 10: SYNTHESIS OF ETHYL ACETATE
Aim: Synthesis of ethyl acetate via a Fischer esterification reaction. Introduction: Esters are produced by the reaction between alcohols and carboxylic acids. Acid catalyzed esterification of carboxylic acids with alcohols to yield esters is a typical reaction in which the products and reactants are in equilibrium. The equilibrium may be influenced by either removing one product from the reaction mixture (for example, removal of the water by azeotropic distillation or absorption by molecular sieves) or employing an excess of one reactant. In ethyl acetate synthesis, addition of a proton (H2SO4) or a Lewis acid, leads to a more reactive electrophile. Nucleophilic attack of the alcohol gives a tetrahedral intermediate in which there are two equivalent hydroxyl groups. One of these hydroxyl groups is eliminated after a proton shift (tautomerism) to give water and the ester. Reaction mechanism for ethyl acetate synthesis:
CH3
O
OHCH3
OH+ CH3
O
O
CH3
OH2+

41
OH
OS
O
O
OH
OH
OH
OH
S
O
O
OH
O
H3C C H3C CO H
O H
O H
O H...
OH
H3C COH
OHOCH2CH3
H
H3C COH
OOCH2CH3
H
H
H3C COH
OCH2CH3
H3C CO
OCH2CH3
H3C CO
OCH2CH3
HSO4
H3C COCH2CH3
Oetilacetat
Experimental procedure: Into a 250 mL round-bottomed flask, introduce 2 mL of ethanol and 2 mL of concentrated sulfuric acid and equip the flask for distillation as shown in Figure 10.1. Start to heat the reaction mixture in a 600 mL boiling water bath. When the reaction mixture is heated (when the water bath temperature is approximately 95°C), add about 3 mL of the mixture from the dropping funnel and wait until the distillation begins. Afterwards, gradually add the reaction mixture through the funnel, at the same rate at which the ethyl acetate formed in the reaction distills. Collect the distillate in the Erlenmeyer flask. Transfer the distillate to a separatory funnel, and neutralize the distillate with a saturated aqueous solution of sodium carbonate to remove unreacted acid from the resulting ester (CO2-bubble formation). Allow the two layers to separate. Pour the water phase (lower layer) into a 250 mL beaker, and wash
ethyl acetate

42
the organic phase (upper layer) with 5 mL of saturated aqueous solution of calcium chloride to remove unreacted ethanol. Separate the organic upper layer into a 100 mL beaker and dry it with few beads of anhydrous calcium chloride. After 5 minutes of drying, decant or pipette off the product into a 25 mL measuring cylinder. Measure the volume of your product and calculate the yield of the reaction. Submit the product to the assistant.
Figure 10.1
water in
water out

43
EXPERIMENT 11: SYNTHESIS OF ETHYL IODIDE
Aim: Synthesis of ethyl iodide (alkyl halides) via a substitution reaction. Introduction: When one or more hydrogen atoms in a saturated hydrocarbon are substituted by halogen atoms, the compounds are known as haloalkanes. They may be mono, di, tri or tetra halogen derivatives, according to the halogen atoms present. The mono halogenalkanes are known as alkyl halides. The general formula for alkyl halide is represented by RX, where R stands for the alkyl group and X for the halide group. There are several known methods for the synthesis of alkyl halogenides. One of the synthetic techniques is the substitution of the hydroxyl group of the alcohol by a halogen. Substitution of the OH group of the alcohol by halogen is possible in three ways: ALCOHOL + halogen hydrochloric acid (eg, HCl, HBr, HI) ALCOHOL + phosphorus (III) halides (eg, PI3, PBr3) ALCOHOL + thionyl halogenides (or SOCl2. SOBr2)
In the case of the reaction of alcohol and PX3, the reaction takes place as soon as the resulting PX3 comes in contact with the alcohol. This is because PX3, especially PI3, is an extremely unstable solid compound with a dipole moment of almost 0 because of binding P-I, which has practically no dipole. The conventional method for PI3 preparation is the addition of elemental iodine to a solution of red phosphorus in CS2 according to the formula:
P4 + 6I2 4PI3 The PI3 preparation can take place in situ, meaning that elemental iodine (I2) is added to a solution of red phosphorus in an alcohol (e.g. ethanol), in which immediately after the occurrence of PI3, nucleophilic substitution of the OH groups of the alcohol with a nucleophile i.e. I, takes place:
Experimental procedure: Into a 50 mL round-bottomed flask, introduce 10 g of iodine and 10 mL of ethanol, and fit the flask into a water bath (a 600 mL beaker) as shown in Figure 11.1. Carefully add 1 g of red phosphorus while cooling the flask in cold water. OBSERVE THE ORDER: The liquid phase must always be BETWEEN THE TWO solid phases!!! Equip the flask with a reflux condenser and begin to heat. Heat the reaction mixture for one hour, and occasionally mix the reaction mixture by gently shaking the support stand. After one hour, remove the water bath and replace the position of the water condenser (see Figure 11.2). BE CAREFUL: The flask is HOT.
P I2
3C2H5OH PI3 3C2H5I H3PO3

44
Distill the mixture (simple distillation) using a weak direct flame through the ceramic mesh. Some reaction mixture should stay in the flask! Collect the distillate in the Erlenmeyer flask. Transfer the distillate to a separatory funnel and wash the product with:
1. 10 mL of water - to remove the unreacted ethanol (mixing the reaction mixture allows the two layers to separate; pour the water phase (upper layer) into a 250 mL beaker and leave the organic phase (lower layer) in the separatory funnel)
2. 10 mL of 2M Na2S2O3aq. - to remove excess iodine (discoloration of the product), (mixing the reaction mixture allows the two layers to separate; pour the water phase (upper layer) into a 250 mL beaker and leave the organic phase (lower layer) in the separatory funnel)
3. 10 mL of 2M NaOHaq. - to remove resulting H3PO3 (mixing the reaction mixture allows the two layers to separate; pour the water phase (upper layer) into a 250 mL beaker and leave the organic phase (lower layer) in the separatory funnel)
4. 10 mL of water (mixing the reaction mixture allows the two layers to separate; Pour the organic upper layer into a 100 mL beaker and dry it with few beads of anhydrous calcium chloride. After 5 minutes of drying, decant or pipette off the product into a 10 mL measuring cylinder. Measure the volume of your product and calculate the yield of the reaction.
Figure 11.1
water in
water out

45
Figure 11.2
water in
water out


