Download - MUSIC SEQUENCER -


MUSIC SEQUENCER
OWNER’S MANUAL

Contents
ZThe QY22: What It Is &What It Can Do ....................... 7What It Is .................................... 8
Voice Mode ............................ 9Song Mode ............................ 9
Pattern Mode ....................... 11
What It Can Do ........................ 12
About General MIDI ................. 14
XSetting Up: Power &Connections ......................... 15Power Supply ........................... 16
Using Batteries .................... 16When to Replace the Batteries . 17
Using a Power Adaptor ....... 18Setting Up Your System ........... 19
The Connectors ................... 19
Audio Connections .............. 21MIDI Connections ................ 22
CGetting to Know the QY22:How the Controls Work ..... 23The Controls ............................. 24
Play the Demo.......................... 34
VThe VOICE Mode: Selecting,Playing, & Assigning theQY22 Voices & Drums ....... 35Try Out the Voices ................... 37Making Voice-to-TrackAssignments ............................. 38
The Mute Buttons ..................... 38The Pan Pots ........................... 39The Faders ............................... 40
BEasy Accompaniment forOther Instruments ............... 41Selecting & Playing the PresetPatterns .................................... 42
Changing Chords ................. 47Muting Tracks ...................... 51
Record a CompleteAccompaniment ........................ 52
Realtime AccompanimentRecording ............................ 52Step AccompanimentRecording ............................ 59
Using the QY22 As a DrumMachine .................................... 75
NCreating Original Patterns .. 77Recording an OriginalABC Pattern ............................. 78
Realtime Pattern Recording ... 78Step Pattern Recording ....... 86
Playback In the Pattern Mode .. 94
Accompaniment Without theLimitations of ABC.................... 95The Pattern Jobs ...................... 96
1: Copy Pattern .................... 98
2: Quantize .......................... 993: Transpose ...................... 1004: Modify Velocity .............. 101
5: Modify Gate Time .......... 1026: Pattern Name ................ 1037: Clear Track .................... 104
8: Clear Pattern ................. 105
MCreating a Complete Song........................................... 107
Recording the SequencerTracks..................................... 108
Preparing to Record —Voice Assignments ............ 108

Contents
Z .........
X .........
C .........
V .........
B .........
N .........
M .........
< .........
> .........
? .........
[ .........
Index ......
Realtime Sequencer TrackRecording .......................... 109Step Sequencer TrackRecording .......................... 115
The Song Jobs ....................... 1221: Mix Track ....................... 1242: Copy Measure ............... 125
3: Create Measure ............. 1264: Quantize ........................ 1275: Delete Measure ............. 128
6: Erase Measure .............. 1297: Transpose ...................... 1308: Move Clock .................... 131
9: Remove Event ............... 13210: Modify Velocity ............ 13311: Modify Gate Time ........ 134
12: Song Name.................. 13513: Clear Track .................. 13614: Clear Song ................... 137
<Editing Songs & Patterns . 139Engaging the Edit Mode ......... 140
Change Mode Editing ............ 143Insert Mode Editing ................ 146
>Utility Functions ................ 157Accessing the Utility Mode ..... 158
System Parameters ................ 160Bulk Dump .............................. 163ABC Zone ............................... 165
Memory Initialize .................... 166
?The QY22 As A ToneGenerator/ABC Expander . 167As a Tone generator Module . 168As an ABC Expander ............. 170
[Appendix ............................. 171
Voice List ................................ 172Drum Kit List ........................... 176Preset Pattern List .................. 180
ABC Fingering Chart .............. 182Troubleshooting...................... 184Error Messages ...................... 186
Specifications ......................... 188
Index ..................................... 190


4 • • • • • • • • • • • • • • • • • • • • • • • • • • • • • • • • • • • • • • • • • • • • • • • • • • • • • • • • • • • • • • • • • • • • • • • • • • • • • • • • • • • • • • • • • • • • • • • • • • • • • • • • • • • • • • • • • • • • • • • • • • • • • • • • • • • •
Precautions
Your QY22 will give you years of reliable service if you follow the simple rules given below:
■ LocationDo not expose the instrument to the followingconditions to avoid deformation, discoloration,or more serious damage.
• Direct sunlight (e.g. near a window).• High temperatures (e.g. near a heat source,
outside, or in a car during the daytime).• Excessive humidity.• Excessive dust.• Strong vibration.
■ Power Supply• Turn the power switch OFF when the instru-
ment is not in use.• If you use an AC power adaptor, unplug the
adaptor from the AC outlet if the instrument isnot to be used for an extended period of time.
• Unplug the AC power adaptor during electricstorms.
• Avoid plugging an AC power adaptor used withthe QY22 into the same AC outlet as appli-ances with high power consumption, such aselectric heaters or ovens. Also avoid usingmulti-plug adaptors since these can result inreduced sound quality and possibly damage.
■ Turn Power OFF When Making Connections• To avoid damage to the instrument and other
devices to which it is connected (a sound sys-tem, for example), turn the power switches of allrelated devices OFF prior to connecting or dis-connecting audio and MIDI cables.
■ Handling and Transport• Never apply excessive force to the controls,
connectors or other parts of the instrument.• Always unplug cables by gripping the plug
firmly, not by pulling on the cable.• Disconnect all cables before moving the instru-
ment.

5• • • • • • • • • • • • • • • • • • • • • • • • • • • • • • • • • • • • • • • • • • • • • • • • • • • • • • • • • • • • • • • • • • • • • • • • • • • • • • • • • • • • • • • • • • • • • • • • • • • • • • • • • • • • • • • • • • • • • • • • • • • • • • • • • • • •
Precautions
The backup battery should last for severalyears. When the backup battery needs to bereplaced “Backup Batt. Low!” will appear on thedisplay when the power is turned on. When thishappens, have the backup battery replaced byqualified Yamaha service personnel. DO NOTATTEMPT TO REPLACE THE BACKUP BAT-TERY YOURSELF!
• Internal memory data can be corrupted due toincorrect operation. We recommend that youuse the QY22 MIDI bulk dump utility (see page163 for details) to transfer important data to aMIDI data recorder such as the Yamaha MDF2for safe long-term storage. Yamaha cannot beheld responsible for data loss caused by batteryfailure or improper operation of the QY22!
■ Service and Modification• The QY22 contains no user serviceable parts.
Opening it or tampering with it in anyway canlead to irreparable damage and possibly electricshock. Refer all servicing to qualified YAMAHApersonnel.
YAMAHA is not responsible for damage caused byimproper handling or operation.
• Physical shocks caused by dropping, bumping,or placing heavy objects on the instrument canresult in scratches and more serious damage.
■ Cleaning• Clean the cabinet and panel with a dry soft
cloth.• A slightly damp cloth may be used to remove
stubborn grime and dirt.• Never use cleaners such as alcohol or thinner.• Avoid placing vinyl objects on top of the instru-
ment (vinyl can stick to and discolor the sur-face).
■ Electrical Interference• This instrument contains digital circuitry and
may cause interference if placed too close toradio or television receivers. If this occurs,move the instrument further away from the af-fected equipment.
■ Data Backup• The QY22 contains a special long-life battery
that retains the contents of its internal RAMmemory even when the power is turned OFF.

6 • • • • • • • • • • • • • • • • • • • • • • • • • • • • • • • • • • • • • • • • • • • • • • • • • • • • • • • • • • • • • • • • • • • • • • • • • • • • • • • • • • • • • • • • • • • • • • • • • • • • • • • • • • • • • • • • • • • • • • • • • • • • • • • • • • • •
About This Manual
The following simple icons are used throughout this manual to draw attention to importantpoints and information where necessary. The icons also make it easier to differentiate be-tween information that you should read immediately and information that can be skippeduntil later, hopefully helping you to become familiar with the QY22 in the quickest, most effi-cient manner possible.
This icon warns of possible hardwaredamage, software malfunction, or any otherserious problem that may occur due to im-proper operation or set up.
This icon marks information that youmust read — i.e. important steps or proce-dures that are essential for proper, efficient,or easy operation.
The magnifying-glass icon indicates in-formation that may not be essential for gen-eral operation, but is a more detailed expla-nation of a feature, a description of theprinciple involved, etc. You can skip thisinformation if full details are not requiredimmediately.
Suggestions as to how a feature or func-tion can be applied musically are identifiedby this icon.
Hints or ideas that are not specificallymusical but may make operation easier ormore interesting are marked by the light-bulb icon.
CAUTION
DETAIL
IMPORTANT
MUSICALNOTE
HINT
7• • • • • • • • • • • • • • • • • • • • • • • • • • • • • • • • • • • • • • • • • • • • • • • • • • • • • • • • • • • • • • • • • • • • • • • • • • • • • • • • • • • • • • • • • • • • • • • • • • • • • • • • • • • • • • • • • • • • • • • • • • • • • • • • • • • •
1The QY22:What It Is & What It Can Do
What It Is ..................................................................... 8
Voice Mode .............................................................. 9
Song Mode............................................................... 9
Pattern Mode ......................................................... 11
What It Can Do ......................................................... 12
8 • • • • • • • • • • • • • • • • • • • • • • • • • • • • • • • • • • • • • • • • • • • • • • • • • • • • • • • • • • • • • • • • • • • • • • • • • • • • • • • • • • • • • • • • • • • • • • • • • • • • • • • • • • • • • • • • • • • • • • • • • • • • • • • • • • • •
SOUNDOUTPUT
QY22 Modes
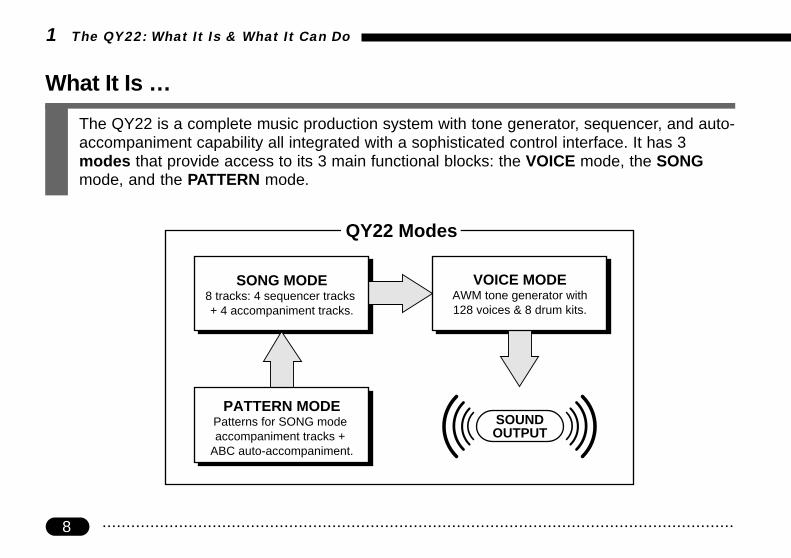
SONG MODE8 tracks: 4 sequencer tracks + 4 accompaniment tracks.
PATTERN MODEPatterns for SONG mode accompaniment tracks +
ABC auto-accompaniment.
VOICE MODEAWM tone generator with128 voices & 8 drum kits.
What It Is …
The QY22 is a complete music production system with tone generator, sequencer, and auto-accompaniment capability all integrated with a sophisticated control interface. It has 3modes that provide access to its 3 main functional blocks: the VOICE mode, the SONGmode, and the PATTERN mode.
1 The QY22: What It Is & What It Can Do

9• • • • • • • • • • • • • • • • • • • • • • • • • • • • • • • • • • • • • • • • • • • • • • • • • • • • • • • • • • • • • • • • • • • • • • • • • • • • • • • • • • • • • • • • • • • • • • • • • • • • • • • • • • • • • • • • • • • • • • • • • • • • • • • • • • • •
VOICE Mode ————————————————————————————
1 The QY22: What It Is & What It Can Do
The QY22’s internal AWM tone generator provides full GeneralMIDI Level 1 compatibility with 128 top-quality General MIDIvoices plus 8 complete drum kits with different drum and percussioninstruments assigned to different notes. You can assign any of thesevoices to the internal sequencer tracks (➪ page 38), or play them di-rectly from an external keyboard or other MIDI controller via theMIDI interface (➪ page 168).
DETAIL
See the Appendix (page 172) for a complete list of the QY22 voices.
Think of the QY22 SONG mode as an 8-track tape recorder or 8-part score that lets you record different parts of a musical compositionone at a time, and then play them back all together. You can even editcertain parts after they’ve been recorded to correct mistakes and fine-tune the overall sound. The QY22 has an internal memory that willhold up to 20 complete songs. For extra storage capacity you can usethe MIDI bulk dump utility to transmit the song data to a MIDI datarecorder such as the Yamaha MDF2 (➪ page 163).
The SONG mode’s 8 tracks are actually divided into 2 4-trackgroups: tracks 1 through 4 are the sequencer tracks, while the re-maining 4 tracks are the accompaniment tracks. The difference isdescribed below.
SONG Mode ————————————————————————————

10 • • • • • • • • • • • • • • • • • • • • • • • • • • • • • • • • • • • • • • • • • • • • • • • • • • • • • • • • • • • • • • • • • • • • • • • • • • • • • • • • • • • • • • • • • • • • • • • • • • • • • • • • • • • • • • • • • • • • • • • • • • • • • • • • • • • •
SONG Mode Tracks
Sequencer track 1 (“TR1”)
Sequencer track 2 (“TR2”)
Sequencer track 3 (“TR3”)
Sequencer track 4 (“TR4”)
Accompaniment chord 1 (“C1”)
Accompaniment chord 2 (“C2”)
Accompaniment bass (“Ba”)
Accompaniment drums (“Dr”)
Sequencer tracks.
Accomp. tracks
1 The QY22: What It Is & What It Can Do
● The Sequencer Tracks The QY22 sequencer has 4 “normal” sequencer tracks towhich you can individually assign any of the 128 internalvoices (or 8 drum kits if desired), and record just about any-thing you like either via the QY22’s own micro keyboard oran external keyboard connected to the QY22 MIDI IN connec-tor. You can use the real-time record mode (➪ page 109) sothat the QY22 records exactly what you play as you play it, orthe step record mode (➪ page 115) in which notes can be en-tered one at a time. The step record mode lets you record ex-tremely fast or complex passages that would be impossible toplay in real time.
The remaining four tracks are dedicated to producing accompani-ment: the chord 1 and chord 2 tracks, a bass track, and a drumtrack. The accompaniment tracks differ from the sequencer tracks in2 ways:
1. Accompaniments are produced by specifying a sequence of pat-terns to be played rather than by recording individual notes orchords (➪ page 52). The QY22 has 100 preset patterns that youcan simply select and use, and can store up to 100 original pat-terns you create in the PATTERN mode (➪ page 78).
● The AccompanimentTracks
11• • • • • • • • • • • • • • • • • • • • • • • • • • • • • • • • • • • • • • • • • • • • • • • • • • • • • • • • • • • • • • • • • • • • • • • • • • • • • • • • • • • • • • • • • • • • • • • • • • • • • • • • • • • • • • • • • • • • • • • • • • • • • • • • • • • •
PATTERN Mode ——————————————————————————
1 The QY22: What It Is & What It Can Do
2. The accompaniment tracks feature Yamaha’s advanced ABC(Auto Bass Chord) auto-accompaniment system (➪ page 47).Of course, you can create accompaniments without using ABCif you like.
The QY22 PATTERN mode produces the accompaniment patternsthat are used by the SONG mode accompaniment tracks. The best ofthe QY20’s preset patterns have been incorporated into the QY22’spreset patterns as well as some powerfully new patterns created espe-cially for the QY22. 100 preset patterns are provided (each with 6variations: Intro, Normal, Variation, Fill-in 1, Fill-in 2, and Ending)that you can simply select and use to create accompaniments in awide variety of styles (➪ page 42). In the PATTERN mode you canalso record entirely original patterns that you’ll later string together inthe SONG mode to create a complete accompaniment track (➪ page52). The ABC auto-accompaniment feature can be applied to yourown patterns. The QY22 can store up to 100 original patterns, andyou can use the MIDI bulk dump utility to transmit pattern data to aMIDI data recorder such as the Yamaha MDF2 if you want extra stor-age capacity (➪ page 163).
DETAIL
See the Appendix (page 180) for a complete list of the preset patterns.

12 • • • • • • • • • • • • • • • • • • • • • • • • • • • • • • • • • • • • • • • • • • • • • • • • • • • • • • • • • • • • • • • • • • • • • • • • • • • • • • • • • • • • • • • • • • • • • • • • • • • • • • • • • • • • • • • • • • • • • • • • • • • • • • • • • • • •
1 The QY22: What It Is & What It Can Do
What It Can Do …
Here are a few ideas on how you can use the QY22. There’s no way we can cover all pos-sibilities, but the ideas presented might help to spark some new and interesting applications.
Create accompaniments that you can practice with on your guitar,keyboard, or any other instrument (vocals too, of course). That wayyou have the advantage of practicing with a bass line and chords in-stead of just a metronome or drum machine (➪ page 52).
Use the drum kit voices to record on the sequencer tracks, or recorddrum-only patterns in the PATTERN mode that you can later stringtogether in the SONG mode. You can also use the drum tracks fromthe preset patterns (➪ page 75).
● A Super Practice Tool
● Use It As A Drum Machine

13• • • • • • • • • • • • • • • • • • • • • • • • • • • • • • • • • • • • • • • • • • • • • • • • • • • • • • • • • • • • • • • • • • • • • • • • • • • • • • • • • • • • • • • • • • • • • • • • • • • • • • • • • • • • • • • • • • • • • • • • • • • • • • • • • • • •
1 The QY22: What It Is & What It Can Do
● Compose & Arrange
● Serious Music Production
● Use It As a Tone Generator
● Add ABC Capability to YourMIDI Keyboard
The QY22’s outstanding voices, versatile sequencing capability,and in-depth editing features make it a perfect tool for trying out mu-sical ideas and arrangements. It’s also a great way to present yourideas to others (➪ page 108).
Use the QY22 as an adjunct to serious music recording and pro-duction. It can, for example, be MIDI-clock synchronized to otherMIDI equipment in order to add extra tracks to an arrangement (➪page 160).
The QY22’s AWM tone generator is in no way a compromise. Youget outstanding AWM sound quality that’s on a par with some of thefinest full-size synthesizers. You can select and play the QY22 voicesremotely from just about any MIDI keyboard, computer, or other con-troller (➪ page 168).
Use the QY22 as an “ABC expander” for your MIDI keyboard.Auto-accompaniment can make playing at home more fun, and it canbe a tremendous sound-booster at 1-performer live gigs (➪ page 170).

14 • • • • • • • • • • • • • • • • • • • • • • • • • • • • • • • • • • • • • • • • • • • • • • • • • • • • • • • • • • • • • • • • • • • • • • • • • • • • • • • • • • • • • • • • • • • • • • • • • • • • • • • • • • • • • • • • • • • • • • • • • • • • • • • • • • • •
About General MIDI
The QY22 is fully compatible with the General MIDI System Level 1 Standard.As you probably know, MIDI (Musical Instrument Digital Interface) makes it possi-
ble for various electronic musical instruments and other devices to “communicate” witheach other. For example, by connecting a sequencer to a synthesizer, you can play backa songs data on the sequencer using the voices of the synthesizer.
But until General MIDI came along, the problem has been that voice assignmentshad never been standardized. So, if you were to create a song using tone generator A’spiano voice and then play it back on tone generator B, it might be played back as anorgan voice. This is because each company has used it’s own voice assignments in it’sproducts.
The General MIDI Level 1 Standard was developed to solve this problem. The mostimportant feature of General MIDI is the standardization of voices. This means that asong recorded in the General MIDI format can be played back on any General MIDIcompatible tone generator and sound just as the composer had intended.
GENERAL
1 The QY22: What It Is & What It Can Do

15• • • • • • • • • • • • • • • • • • • • • • • • • • • • • • • • • • • • • • • • • • • • • • • • • • • • • • • • • • • • • • • • • • • • • • • • • • • • • • • • • • • • • • • • • • • • • • • • • • • • • • • • • • • • • • • • • • • • • • • • • • • • • • • • • • • •
2Setting Up:Power & Connections
Power Supply .......................................................... 16
Using Batteries ...................................................... 16
When to Replace the Batteries ..................................... 17
Using a Power Adaptor ......................................... 18
Setting Up Your System ....................................... 19
The Connectors .................................................... 19
Audio Connections ................................................ 21
MIDI Connections ................................................. 22
16 • • • • • • • • • • • • • • • • • • • • • • • • • • • • • • • • • • • • • • • • • • • • • • • • • • • • • • • • • • • • • • • • • • • • • • • • • • • • • • • • • • • • • • • • • • • • • • • • • • • • • • • • • • • • • • • • • • • • • • • • • • • • • • • • • • • •
2 Setting Up: Power & Connections
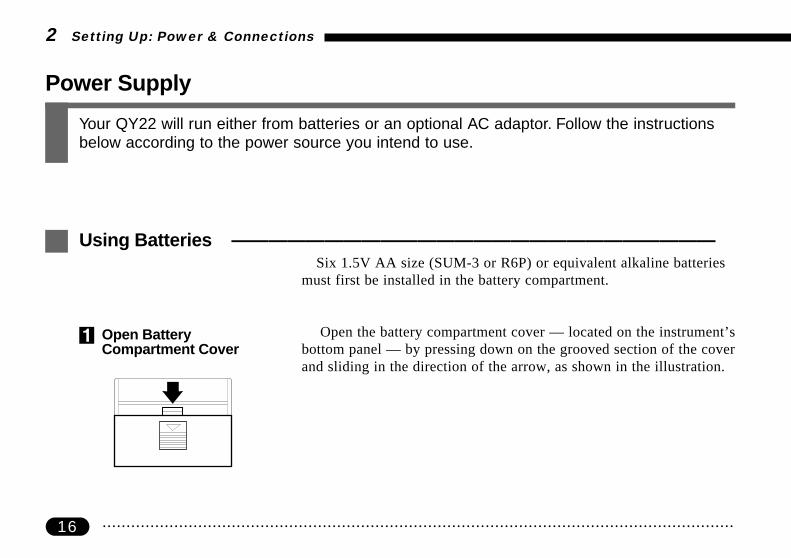
Six 1.5V AA size (SUM-3 or R6P) or equivalent alkaline batteriesmust first be installed in the battery compartment.
Open the battery compartment cover — located on the instrument’sbottom panel — by pressing down on the grooved section of the coverand sliding in the direction of the arrow, as shown in the illustration.
ZOpen BatteryCompartment Cover
Power Supply
Your QY22 will run either from batteries or an optional AC adaptor. Follow the instructionsbelow according to the power source you intend to use.
Using Batteries ——————————————————————————
17• • • • • • • • • • • • • • • • • • • • • • • • • • • • • • • • • • • • • • • • • • • • • • • • • • • • • • • • • • • • • • • • • • • • • • • • • • • • • • • • • • • • • • • • • • • • • • • • • • • • • • • • • • • • • • • • • • • • • • • • • • • • • • • • • • • •
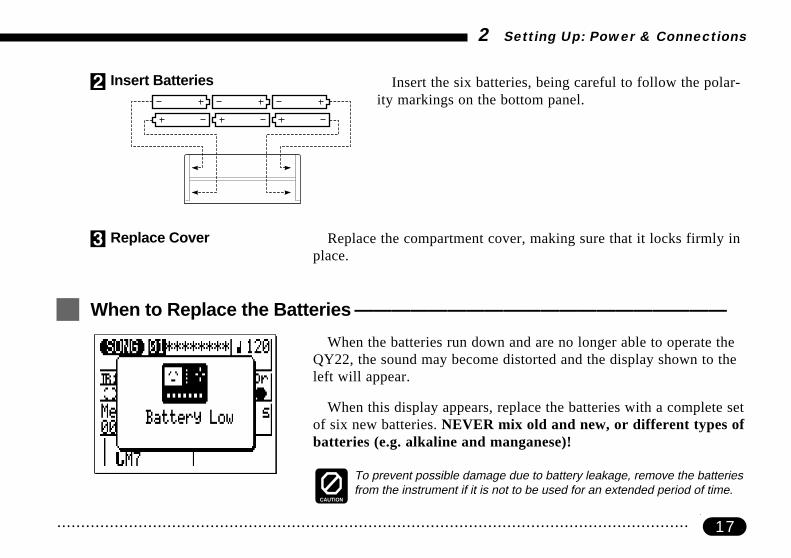
Insert the six batteries, being careful to follow the polar-ity markings on the bottom panel.
2 Setting Up: Power & Connections
XInsert Batteries
Replace the compartment cover, making sure that it locks firmly inplace.
When the batteries run down and are no longer able to operate theQY22, the sound may become distorted and the display shown to theleft will appear.
When this display appears, replace the batteries with a complete setof six new batteries. NEVER mix old and new, or different types ofbatteries (e.g. alkaline and manganese)!
CAUTION
To prevent possible damage due to battery leakage, remove the batteriesfrom the instrument if it is not to be used for an extended period of time.
CReplace Cover
When to Replace the Batteries ————————————————————

18 • • • • • • • • • • • • • • • • • • • • • • • • • • • • • • • • • • • • • • • • • • • • • • • • • • • • • • • • • • • • • • • • • • • • • • • • • • • • • • • • • • • • • • • • • • • • • • • • • • • • • • • • • • • • • • • • • • • • • • • • • • • • • • • • • • • •
DC IN
AC power socket.PA-3
PA-4
PA-40
2 Setting Up: Power & Connections
Using a Power Adaptor ———————————————————————Plug the DC output cable from a Yamaha PA-3, PA-4, or PA-40
AC Adaptor (available from your Yamaha dealer) into the DC IN jackon the rear panel, then plug the adaptor into a convenient wall ACpower socket.
CAUTION
Do not attempt to use an AC adaptor other than the specified unit or anappropriate replacement provided by your Yamaha dealer to power theQY22. The use of an incompatible adaptor may cause irreparable dam-age to the QY22, and might pose a serious shock hazard!Be sure to unplug the AC adaptor from the AC mains socket when theQY22 is not in use.

19• • • • • • • • • • • • • • • • • • • • • • • • • • • • • • • • • • • • • • • • • • • • • • • • • • • • • • • • • • • • • • • • • • • • • • • • • • • • • • • • • • • • • • • • • • • • • • • • • • • • • • • • • • • • • • • • • • • • • • • • • • • • • • • • • • • •
VOLUMEMIN MAX PHONESCONTRAST DC INOUT —— MIDI —— INLINE OUT
2 Setting Up: Power & Connections
Setting Up Your System
What you will connect the QY22 to, and what you will connect to the QY22, will depend en-tirely on your individual requirements, and it would be impossible to cover all possibilitieshere. A few examples are provided below to help you get started.
The Connectors ——————————————————————————
Right Side PanelRear Panel
42 13

20 • • • • • • • • • • • • • • • • • • • • • • • • • • • • • • • • • • • • • • • • • • • • • • • • • • • • • • • • • • • • • • • • • • • • • • • • • • • • • • • • • • • • • • • • • • • • • • • • • • • • • • • • • • • • • • • • • • • • • • • • • • • • • • • • • • • •
2 Setting Up: Power & Connections
This jack is only used when you are powering the QY22 from anoptional AC adaptor instead of batteries. The DC output cable froman optional Yamaha PA-3, PA-4, or PA-40 AC Power Adaptor isplugged in here.
DETAIL
The batteries are automatically disconnected when a plug is inserted intothe DC IN jack.
If you plan to use a MIDI keyboard or other instrument to play andprogram the QY22, it should be connected to QY22 MIDI IN connec-tor (see “MIDI Connections,” below). The MIDI OUT connector canbe connected to an external tone generator if you want to drive exter-nal voices from the QY22 sequencer, or a MIDI data recorder such asthe Yamaha MDF2 if you want to store your songs and patterns tofloppy disk (➪ page 163).
This miniature stereo phone plug delivers a line-level stereo outputsignal from the QY22 for connection to a stereo sound system (see“Audio Connections,” below). The output level is adjusted via theVOLUME control on the right side panel.
Any pair of stereo headphones with the miniature stereo phone plugcan be plugged in here for convenient monitoring. The PHONES out-put level is adjusted via the VOLUME control on the right side panel.
1 DC IN Jack
2 MIDI IN & OUT Connectors
4 PHONES Jack
3 LINE OUT Jack

21• • • • • • • • • • • • • • • • • • • • • • • • • • • • • • • • • • • • • • • • • • • • • • • • • • • • • • • • • • • • • • • • • • • • • • • • • • • • • • • • • • • • • • • • • • • • • • • • • • • • • • • • • • • • • • • • • • • • • • • • • • • • • • • • • • • •
Stereo sound system
LINE OUT
L R
2 Setting Up: Power & Connections
Audio Connections —————————————————————————The simplest way to monitor the QY22 sound is via a pair of stereo
headphones (miniature stereo phone plug type) plugged into thePHONES jack. If you want to use an external stereo sound system,however, use the LINE OUT jack and the supplied “Y” cable (minia-ture stereo phone plug to dual RCA pin plugs). The white RCA pinplug goes to the left-channel input of your stereo sound system andthe red plug goes to the right-channel input.
CAUTION
Make sure that both the QY22 and your sound system are turned OFFwhen making connections.

22 • • • • • • • • • • • • • • • • • • • • • • • • • • • • • • • • • • • • • • • • • • • • • • • • • • • • • • • • • • • • • • • • • • • • • • • • • • • • • • • • • • • • • • • • • • • • • • • • • • • • • • • • • • • • • • • • • • • • • • • • • • • • • • • • • • • •
OUT —— MIDI —— IN
with MIDI Interface
2 Setting Up: Power & Connections
MIDI Connections —————————————————————————Although the QY22 can be played and programmed from the built-in micro
keyboard, it can also be connected to an external keyboard or computer for addedbenefits. An external MIDI keyboard connected to the MIDI IN connector pro-vides the added advantages of standard keyboard size and key velocity sensitivity(if your keyboard has a velocity-sensitive keyboard). Connected to a computerwith sequencing software, the QY22’s high quality Voices and Multi-timbralcapabilities can easily expand your home studio setup. Connect the MIDI OUTconnector of the keyboard, or other control device, to the MIDI IN connector ofthe QY22, and make sure that your keyboard is set to transmit on the appropriateMIDI channel. The QY22 MIDI assignments are as follows:
MIDI Channel Voice1 ........................ Sequencer track TR12 ........................ Sequencer track TR23 ........................ Sequencer track TR34 ........................ Sequencer track TR45 ........................ Accompaniment track C1 (Chord 1)6 ........................ Accompaniment track C2 (Chord 2)7 ........................ Accompaniment track Ba (Bass)10 ...................... Accompaniment track Dr (Drums)
This simply means that if your keyboard transmits on MIDI channel 1, it will con-trol the QY22 voice that is currently assigned to sequencer track 1, and so on. Seepage 38 for instructions on how to assign different voices to the SONG mode tracks.
DETAIL
Data received on MIDI channels other than those listed above also produce sound,according to the received MIDI program change messages (see the “MIDI DataFormat” booklet). Also, if the QY22 is to be used as a General MIDI tone generator,the MIDI Ctl (MIDI Control) parameter should be set to “Off” (See page 160)
OUT —— MIDI —— IN
MIDI OUT

23• • • • • • • • • • • • • • • • • • • • • • • • • • • • • • • • • • • • • • • • • • • • • • • • • • • • • • • • • • • • • • • • • • • • • • • • • • • • • • • • • • • • • • • • • • • • • • • • • • • • • • • • • • • • • • • • • • • • • • • • • • • • • • • • • • • •
3Getting to Know the QY22:How the Controls Work
The Controls ............................................................... 24
Play the Demo ............................................................ 34
24 • • • • • • • • • • • • • • • • • • • • • • • • • • • • • • • • • • • • • • • • • • • • • • • • • • • • • • • • • • • • • • • • • • • • • • • • • • • • • • • • • • • • • • • • • • • • • • • • • • • • • • • • • • • • • • • • • • • • • • • • • • • • • • • • • • • •
VOLUMEMIN MAX PHONESON OFF POWER
CONTRAST DC INOUT —— MIDI —— INLINE OUT
3 Getting to Know the QY22: How the Controls Work
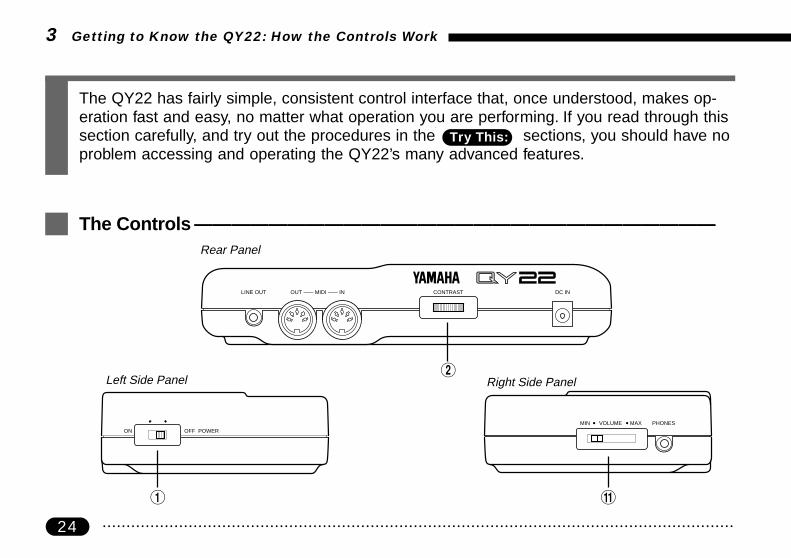
The QY22 has fairly simple, consistent control interface that, once understood, makes op-eration fast and easy, no matter what operation you are performing. If you read through thissection carefully, and try out the procedures in the
Try This: sections, you should have noproblem accessing and operating the QY22’s many advanced features.
Left Side Panel Right Side Panel
1 !
Rear Panel
2
The Controls ————————————————————————————

25• • • • • • • • • • • • • • • • • • • • • • • • • • • • • • • • • • • • • • • • • • • • • • • • • • • • • • • • • • • • • • • • • • • • • • • • • • • • • • • • • • • • • • • • • • • • • • • • • • • • • • • • • • • • • • • • • • • • • • • • • • • • • • • • • • • •
7( 11)
7( 5)
7( 13)
add9E F G A B C D
M M7 6 7 m7 m6m m7(b5)m7(b5)
add9 M9 aug 9 m9 mM7 m7(11)
AB
GA 7( 13 )
7(#9)
7(b9)
7sus4sus4 dim
– – –FG
DE
CD
MODE
MENU
–1 +1
NO YES
ENTER
INTRO NORMAL VARI. FILL1 FILL2 ENDING
CCBASS
OCTDOWN
OCTUP
GENERAL
MUSIC SEQUENCER
3 Getting to Know the QY22: How the Controls Work
4
5
8
9
736
0
Front Panel
2

26 • • • • • • • • • • • • • • • • • • • • • • • • • • • • • • • • • • • • • • • • • • • • • • • • • • • • • • • • • • • • • • • • • • • • • • • • • • • • • • • • • • • • • • • • • • • • • • • • • • • • • • • • • • • • • • • • • • • • • • • • • • • • • • • • • • • •
MODE
CONTRAST
ON OFF POWER
3 Getting to Know the QY22: How the Controls Work
Slide to the “ON” position to turn the QY22 on, and to the “OFF”position to turn it off.
IMPORTANT
Always turn the power switch off when not using your QY22.
This large multi-function liquid crystal display panel shows all pa-rameters and prompts you need to operate the QY22 with optimumease and efficiency.
Use the CONTRAST control on the rear panel to achieve the bestdisplay visibility (LCD visibility varies greatly with viewing angleand lighting).
Use this key to switch between the QY22’s SONG, VOICE, andPATTERN modes.
Try This: Turn your QY22 on (the power switch is on the leftside), then press the [MODE] key a few times andwatch how the display changes. The [MODE] key callsthe SONG, VOICE, and PATTERN mode displays insequence.
1 POWER Switch
2 LCD Display &CONTRAST Control
3 [MODE] Key

27• • • • • • • • • • • • • • • • • • • • • • • • • • • • • • • • • • • • • • • • • • • • • • • • • • • • • • • • • • • • • • • • • • • • • • • • • • • • • • • • • • • • • • • • • • • • • • • • • • • • • • • • • • • • • • • • • • • • • • • • • • • • • • • • • • • •
Down
Up
Left Right
3 Getting to Know the QY22: How the Controls Work
These 4 keys move the “cursor” around the display screen, high-lighting the various parameters that are available for editing (theQY22 cursor appears as a dark block with inverse characters).
Try This: Select the SONG mode display (use the [MODE] key,as described above), then try using the cursor keys tomove the cursor around the screen.
4 Cursor Keys
MODE
MODE
MODE

28 • • • • • • • • • • • • • • • • • • • • • • • • • • • • • • • • • • • • • • • • • • • • • • • • • • • • • • • • • • • • • • • • • • • • • • • • • • • • • • • • • • • • • • • • • • • • • • • • • • • • • • • • • • • • • • • • • • • • • • • • • • • • • • • • • • • •
–1 +1
NO YES
These keys are used to edit (change the value of) the parameter atwhich the cursor is currently located. The [−1/NO] key decrements(decreases stepwise) the value of the selected parameter, while the[+1/YES] key increments (increases stepwise) the parameter. Presseither key briefly to decrement or increment the parameter by one, orhold the key for continuous decrementing of incrementing in thespecified direction.
The [−1/NO] and [+1/YES] keys are also used to respond to “Areyou sure?” prompts when they appear. Press [+1/YES] to go aheadwith the operation, or [−1/NO] to cancel.
HINT
For even faster decrementing or incrementing, press the opposite incre-ment/decrement key while holding the key corresponding to the directionyou want to increment/decrement in.
Try This: Select the SONG mode display (use the [MODE] key,as described above), use the cursor keys to select thetranspose parameter (“Trns” on the display), then tryusing the [−1/NO] and [+1/YES] keys to change itsvalue. Set it back to “+00” before continuing.
3 Getting to Know the QY22: How the Controls Work
5 [−1/NO] and [+1/YES]Keys
m
This is the transposeparameter.
Use –1 +1
NO YES
to set.
29• • • • • • • • • • • • • • • • • • • • • • • • • • • • • • • • • • • • • • • • • • • • • • • • • • • • • • • • • • • • • • • • • • • • • • • • • • • • • • • • • • • • • • • • • • • • • • • • • • • • • • • • • • • • • • • • • • • • • • • • • • • • • • • • • • • •
MENU
3 Getting to Know the QY22: How the Controls Work
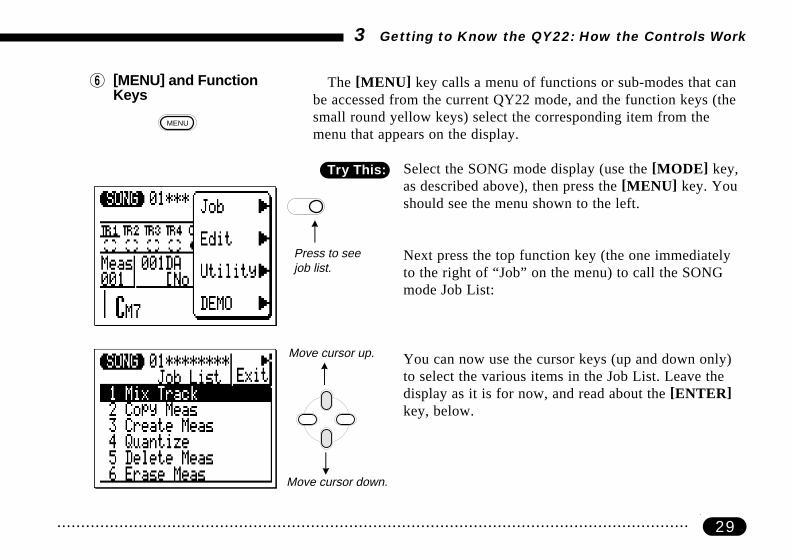
The [MENU] key calls a menu of functions or sub-modes that canbe accessed from the current QY22 mode, and the function keys (thesmall round yellow keys) select the corresponding item from themenu that appears on the display.
Try This: Select the SONG mode display (use the [MODE] key,as described above), then press the [MENU] key. Youshould see the menu shown to the left.
Next press the top function key (the one immediatelyto the right of “Job” on the menu) to call the SONGmode Job List:
You can now use the cursor keys (up and down only)to select the various items in the Job List. Leave thedisplay as it is for now, and read about the [ENTER]key, below.
6 [MENU] and FunctionKeys
m
Press to seejob list.
m
mMove cursor down.
Move cursor up.

30 • • • • • • • • • • • • • • • • • • • • • • • • • • • • • • • • • • • • • • • • • • • • • • • • • • • • • • • • • • • • • • • • • • • • • • • • • • • • • • • • • • • • • • • • • • • • • • • • • • • • • • • • • • • • • • • • • • • • • • • • • • • • • • • • • • • •
ENTER
In addition to “entering” chords in SONG and PATTERN modes(which we’ll learn about later), the [ENTER] key is used to “enter” aselected menu function.
Try This: Assuming that you’ve gone through the “Try this:”procedure for the [MENU] and Function keys, above,you should now have the SONG mode Job List on yourQY22 screen. Use the cursor keys (up and down only)to select job number 2 “Copy Meas”. Now press the[ENTER] key to actually engage the copy measure job— the display should appear as shown to the left.
Since we don’t really want to use the copy measurejob, press the [MODE] key to go back to the SONGmode. You could also press the top function key (nextto “Exit >” on the display) to first move back to theJob List, and then again to return to the SONG mode.
The sequencer keys control recording and playback in the SONGand PATTERN modes, and allow you to locate a specific measurewithin a song or pattern. Their layout and functions are similar to thetransport controls on a tape recorder.
3 Getting to Know the QY22: How the Controls Work
7 [ENTER] Key
8 Sequencer Keys

31• • • • • • • • • • • • • • • • • • • • • • • • • • • • • • • • • • • • • • • • • • • • • • • • • • • • • • • • • • • • • • • • • • • • • • • • • • • • • • • • • • • • • • • • • • • • • • • • • • • • • • • • • • • • • • • • • • • • • • • • • • • • • • • • • • • •
m7( 5)
7( 11)
7( 5)
7( 13)
7( 9)
7( 9)
E F G A B C DM M7 6 7 m7 m6m
add9 M9 aug 9 m9 mM7 m7(11)
AB
GA 7( 13 )
7sus4sus4 dim
– – –FG
DE
CD
INTRO NORMAL VARI. FILL1 FILL2 ENDING
CC
add9
RECORD READYPress this key to engage the record ready mode. You have to press START/STOP to actually start recording.
MOVE FORWARDPress briefly to move forward one measure, or hold for continuous scrolling.
START/STOPPress to start or stop recording or playback.
MOVE BACKPress briefly to move back one measure, or hold for continuous scrolling.
GO TO TOPThis key takes you straight to the first measure ("top") of the current song or pattern.
3 Getting to Know the QY22: How the Controls Work
When programming theaccompaniment tracks themicro-keyboard is also usedto specify the chord roots andtypes to be entered.
This tiny 2-octave keyboard makes it possible to program the QY22anywhere, anytime, without having to connect an external MIDI key-board. It’s even polyphonic, so you can directly enter chords as wellas single notes. The only thing it lacks is velocity sensitivity. TheQY22 does, however, accept velocity information from an externalMIDI keyboard.
9 Micro Keyboard

32 • • • • • • • • • • • • • • • • • • • • • • • • • • • • • • • • • • • • • • • • • • • • • • • • • • • • • • • • • • • • • • • • • • • • • • • • • • • • • • • • • • • • • • • • • • • • • • • • • • • • • • • • • • • • • • • • • • • • • • • • • • • • • • • • • • • •
BASS
OCTDOWN
OCTUP
Try This: In the SONG mode, use the cursor keys to place thecursor at the sequencer track 1 position (“TR1” on thedisplay).
Now play the micro keyboard. You should hear thevoice that is currently assigned to sequencer track 1.Also try moving the cursor to the accompaniment bass(“Ba”) and drum (“Dr”) tracks and playing the cur-rently assigned bass and drum voices. In the SONGmode, the micro keyboard plays the voice assigned tothe currently selected track (unless you’re recording theaccompaniment chord tracks, in which case it is used tospecify chords).
Since the 2-octave range of the micro-keyboard is not enough forserious music programming, the [OCT DOWN] and [OCT UP] keysallow the pitch of the keyboard to be shifted up or down in octavesteps, over a range of 8 octaves. Each time the [OCT DOWN] key ispressed the pitch of the keyboard is shifted down by one octave, untilthe lower limit is reached. The [OCT UP] key shifts the pitch of thekeyboard up in the same way.
3 Getting to Know the QY22: How the Controls Work
0 Octave Keys
Sequencertrack 1. m
33• • • • • • • • • • • • • • • • • • • • • • • • • • • • • • • • • • • • • • • • • • • • • • • • • • • • • • • • • • • • • • • • • • • • • • • • • • • • • • • • • • • • • • • • • • • • • • • • • • • • • • • • • • • • • • • • • • • • • • • • • • • • • • • • • • • •
VOLUMEMIN MAX
3 Getting to Know the QY22: How the Controls Work
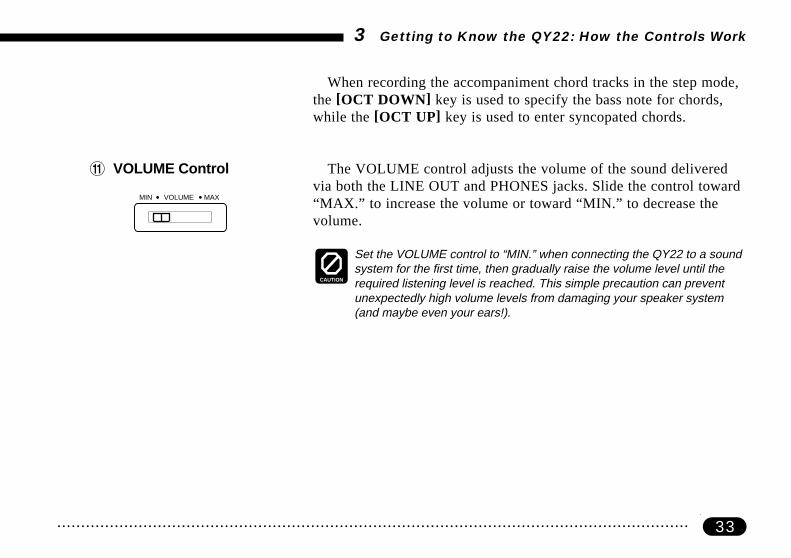
When recording the accompaniment chord tracks in the step mode,the [OCT DOWN] key is used to specify the bass note for chords,while the [OCT UP] key is used to enter syncopated chords.
The VOLUME control adjusts the volume of the sound deliveredvia both the LINE OUT and PHONES jacks. Slide the control toward“MAX.” to increase the volume or toward “MIN.” to decrease thevolume.
CAUTION
Set the VOLUME control to “MIN.” when connecting the QY22 to a soundsystem for the first time, then gradually raise the volume level until therequired listening level is reached. This simple precaution can preventunexpectedly high volume levels from damaging your speaker system(and maybe even your ears!).
! VOLUME Control

34 • • • • • • • • • • • • • • • • • • • • • • • • • • • • • • • • • • • • • • • • • • • • • • • • • • • • • • • • • • • • • • • • • • • • • • • • • • • • • • • • • • • • • • • • • • • • • • • • • • • • • • • • • • • • • • • • • • • • • • • • • • • • • • • • • • • •
MENU
Play the Demo ———————————————————————————
3 Getting to Know the QY22: How the Controls Work
Once you’ve set up your QY22 and become familiar with the con-trols, you might like to play back the pre-programmed demonstrationto hear what the QY22 can do.
Z From the SONG or VOICE mode display (use the [MODE] keyto select) press the [MENU] key.
X Press the function keyimmediately next to“DEMO” on the display.The initial demo displayshould appear.
C Press the [ ] key to start demo playback. The demo will playrepeatedly until stopped.
V Press the [ ] key to stop the demo, then press the [MODE]key to return to the mode from which the demo was engaged.
35• • • • • • • • • • • • • • • • • • • • • • • • • • • • • • • • • • • • • • • • • • • • • • • • • • • • • • • • • • • • • • • • • • • • • • • • • • • • • • • • • • • • • • • • • • • • • • • • • • • • • • • • • • • • • • • • • • • • • • • • • • • • • • • • • • • •
4The VOICE Mode:Selecting, Playing, & Assigningthe QY22 Voices & Drums
Try Out the Voices ...................................................... 37
Making Voice-to-Track Assignments .......................... 38
The Mute Buttons........................................................ 38
The Pan Pots .............................................................. 39
The Faders .................................................................. 40

36 • • • • • • • • • • • • • • • • • • • • • • • • • • • • • • • • • • • • • • • • • • • • • • • • • • • • • • • • • • • • • • • • • • • • • • • • • • • • • • • • • • • • • • • • • • • • • • • • • • • • • • • • • • • • • • • • • • • • • • • • • • • • • • • • • • • •
MODE
4 The VOICE Mode: Selecting, Playing, & Assigning the QY22 Voices & Drums
The QY22 has 128 voices and 8 drum kits that can be selected, played, and assigned to theSONG mode tracks in the VOICE mode. The voice mode also features a graphic on-screen“mixer” that has mute buttons, pan pots, and faders for each track.
Use the [MODE] key to select the VOICE mode display.
SONG mode tracks.
Current track.
Mute buttons.
Faders.
Voice numbers.
Voice assigned to current track.m mmmPan pots.
mmm

37• • • • • • • • • • • • • • • • • • • • • • • • • • • • • • • • • • • • • • • • • • • • • • • • • • • • • • • • • • • • • • • • • • • • • • • • • • • • • • • • • • • • • • • • • • • • • • • • • • • • • • • • • • • • • • • • • • • • • • • • • • • • • • • • • • • •
Try Out the Voices —————————————————————————Move the cursor to the voice number immediately below “TR1” on
the display (as in the display shown to the left). Note that the name ofthe voice currently assigned to TR1 appears in the upper right cornerof the display. Play the micro keyboard and you’ll hear that voice.
DETAIL
In any QY22 mode, the micro keyboard plays the voice assigned to thecurrently selected track. A MIDI keyboard connected to the MIDI IN con-nector, however, will only play the voice assigned to the track that re-ceives on the MIDI channel that the external keyboard is transmitting on:MIDI channel 1 plays TR1, channel 2 plays TR2, channel 3 plays TR3,channel 4 plays TR4, channel 5 plays C1, channel 6 plays C2, channel 7plays Ba, and channel 10 plays Dr. Channel 10 also plays any other trackto which a drum voice (“Dr1” through “Dr8”) is assigned.
Use the [+1/YES] key to step through the QY22’s 128 voices (youcan use the [−1/NO] key to step backward, too), trying out each voiceon the keyboard.
Keep incrementing past voice number 128 and you’ll select drumkits 1 through 8 (“Dr1” through “Dr8” on the display). Try these outon the keyboard, too.
DETAIL
See the Appendix (page 176) for a complete list of note assignments (i.e.which drum instruments are assigned to which notes) for all 8 drum kits.
HINT
If you’re playing the micro keyboard, use the octave keys to access thefull range of instruments in each drum kit.
4 The VOICE Mode: Selecting, Playing, & Assigning the QY22 Voices & Drums
Use –1 +1
NO YES
to select
voice numbers.

38 • • • • • • • • • • • • • • • • • • • • • • • • • • • • • • • • • • • • • • • • • • • • • • • • • • • • • • • • • • • • • • • • • • • • • • • • • • • • • • • • • • • • • • • • • • • • • • • • • • • • • • • • • • • • • • • • • • • • • • • • • • • • • • • • • • • •
Making Voice-to-Track Assignments —————————————————
4 The VOICE Mode: Selecting, Playing, & Assigning the QY22 Voices & Drums
When you record accompaniments (➪ page 52) or complete songs (➪page 108) in the SONG mode, you’ll need to specify which voices are to beplayed by which tracks. These assignments are made in the VOICE mode.To assign voices to the sequencer and accompaniment tracks, simply movethe cursor to the voice number of the desired track, then use the [−1/NO]and [+1/YES] keys to select the voice (or drum kit) for that track.
DETAIL
When a different pattern is selected in the SONG mode, the voice assignmentsfor that pattern are automatically recalled, overriding any voice assignmentsmade in the VOICE mode (the pan and volume settings are not changed).In the VOICE mode, any of the Normal voices (001...128) or Drum voices(Dr1...Dr8) can be assigned to any of the sequence tracks. However, in theSONG EDIT mode, only the Normal voices (001...128) can be assigned tosequencer tracks using the Program Change function. If you want to use aDrum voice in a sequencer track, use the VOICE mode to assign a Drum voiceto the desired track.
The mute “buttons” below the voice number for each track can be used tomute (turn off) the corresponding track. Move the cursor to the appropriatemute button, then press [+1/YES] to mute that track, or press [−1/NO] toturn a muted track back on.
The letter “M” appears in the mute buttons of tracks that are muted.Tracks that do not contain data cannot be muted, and their mute buttonsappear as white rather than dark blocks. In the display to the left, for exam-ple, TR1 through TR4 contain no data and are therefore white. The Ba trackhas been muted, and the cursor is currently over the C2 track mute button.
The Mute Buttons —————————————————————————

39• • • • • • • • • • • • • • • • • • • • • • • • • • • • • • • • • • • • • • • • • • • • • • • • • • • • • • • • • • • • • • • • • • • • • • • • • • • • • • • • • • • • • • • • • • • • • • • • • • • • • • • • • • • • • • • • • • • • • • • • • • • • • • • • • • • •
–1 +1
NO YES
Note that the status of the mute button over which the cursor is located isalso indicated in the upper right corner of the display (in this example,“Mute = off” for the C2 track).
MUSICALNOTE
The mute buttons are a handy way to simply turn tracks that you don’twant to hear off. When recording songs or patterns, they also make itpossible to mute a “busy” track that might make it difficult to hear an im-portant accompaniment track.
Like the pan pots on a mixing console, the VOICE mode pan potscan be used to position the sound of the corresponding track any-where from left to right in the stereo sound field. Position the cursorat the pan pot, then use the [−1/NO] and [+1/YES] keys to set the panposition. The graphic pan pot will rotate to the corresponding posi-tion. The pan positions also have numeric values (1 through 7) thatappear in the upper right corner of the display: “Left 7” is full left and“Right 7” is full right. In the display to the left, TR3 is panned abouthalf way to the left (“Left 4”).
4 The VOICE Mode: Selecting, Playing, & Assigning the QY22 Voices & Drums
m mMute on.Mute off.
–1 +1
NO YES
m m
Pan right.Pan left.
The Pan Pots ———————————————————————————

40 • • • • • • • • • • • • • • • • • • • • • • • • • • • • • • • • • • • • • • • • • • • • • • • • • • • • • • • • • • • • • • • • • • • • • • • • • • • • • • • • • • • • • • • • • • • • • • • • • • • • • • • • • • • • • • • • • • • • • • • • • • • • • • • • • • • •
–1 +1
NO YES
4 The VOICE Mode: Selecting, Playing, & Assigning the QY22 Voices & Drums
The Faders ————————————————————————————Each track has a graphic “fader” that can be set to produce the best
“mix” (balance) between the various voices. Position the cursor at afader, then use the [−1/NO] and [+1/YES] keys to set the fader level.The graphic fader will move to the corresponding position (higher forhigher volume, and lower for lower volume). The fader positions alsohave numeric values (000 through 127) that appear in the upper rightcorner of the display: “000” is minimum volume (no sound) and“127” is maximum volume. The default setting is “100” for all tracks.In the display to the left, the TR2 fader has been set to a quiet “50.”
HINT
You can switch back and forth between the SONG and VOICE modeseven while a song is playing, so you can adjust all VOICE mode param-eters (change voices, mute tracks, pan, and change volume settings)while listening to the results in real time!m m
Raise volume.Lower volume.

41• • • • • • • • • • • • • • • • • • • • • • • • • • • • • • • • • • • • • • • • • • • • • • • • • • • • • • • • • • • • • • • • • • • • • • • • • • • • • • • • • • • • • • • • • • • • • • • • • • • • • • • • • • • • • • • • • • • • • • • • • • • • • • • • • • • •
5Easy Accompaniment forOther Instruments
Selecting & Playing the Preset Patterns .......... 42
Changing Chords .................................................. 47
Muting Tracks ....................................................... 51
Record a Complete Accompaniment ................ 52
Realtime Accompaniment Recording ................... 52
Step Accompaniment Recording .......................... 59
Using the QY22 As a Drum Machine ................ 75

42 • • • • • • • • • • • • • • • • • • • • • • • • • • • • • • • • • • • • • • • • • • • • • • • • • • • • • • • • • • • • • • • • • • • • • • • • • • • • • • • • • • • • • • • • • • • • • • • • • • • • • • • • • • • • • • • • • • • • • • • • • • • • • • • • • • • •
5 Easy Accompaniment for Other Instruments
Selecting & Playing the Preset Patterns
Using the QY22 preset patterns you can easily create accompaniments that you can play orsing along with.The QY22 has 100 preset accompaniment patterns covering a wide variety of musicalstyles. Here’s how you can select and play the patterns while in the SONG mode.
In order to select and play the patterns as de-scribed in this section you must select an empty song(i.e. one in which nothing has been recorded). Emptysongs are indicated by a row of asterisks(“********”) following the song number. Differentsong numbers (1 through 20) are selected simply bymoving the cursor to the song number and using the[−1] and [+1] keys.
ZSelect the SONG modeand an “empty” song.
Song number (1 … 20).
Use –1 +1
NO YES
to set.m m
Asterisks (*) indicate anempty song.

43• • • • • • • • • • • • • • • • • • • • • • • • • • • • • • • • • • • • • • • • • • • • • • • • • • • • • • • • • • • • • • • • • • • • • • • • • • • • • • • • • • • • • • • • • • • • • • • • • • • • • • • • • • • • • • • • • • • • • • • • • • • • • • • • • • • •
5 Easy Accompaniment for Other Instruments
XSelect a pattern number. Use the cursor keys to move the cursor to the accompaniment pat-tern number, then use the [−1] and [+1] buttons to select the patternyou want to play. The preset patterns are numbers 001 through 100.
CStart playback. Press the [ ] key to start playback of the selected accompani-ment pattern. The play indicator will appear in the display and thegreen LED above the [ ] key will flash at the current playbacktempo.
Place the cursor here (this is theaccompaniment pattern number).
DETAIL
Note that the “Meas” (measure) numberon the display advances as each meas-ure is played. In this mode playback willcontinue up to measure “999” and thenrepeat from measure “001”.
m
m
Play indicator.
Measure number.

44 • • • • • • • • • • • • • • • • • • • • • • • • • • • • • • • • • • • • • • • • • • • • • • • • • • • • • • • • • • • • • • • • • • • • • • • • • • • • • • • • • • • • • • • • • • • • • • • • • • • • • • • • • • • • • • • • • • • • • • • • • • • • • • • • • • • •
5 Easy Accompaniment for Other Instruments
Each preset pattern has 6 variations or “sections” — INTRO, NOR-MAL, VARI., FILL1, FILL2, and ENDING.
INTRO ........ introductionNORMAL .... normal pattern, used for the “verse” of a song.VARI. .......... variation, normally used as a chorus or bridge.FILL1 .......... fill-in 1, transition from normal to variation.FILL2 .......... fill-in 2, transition from variation to normal.ENDING...... ending pattern.
IMPORTANT
When the INTRO, FILL1, and FILL2 sections are selected while playing apattern in the SONG mode, the section plays through once and is auto-matically followed by either the NORMAL or VARI. pattern. INTRO isfollowed by NORMAL, FILL1 is followed by VARI. and FILL2 is followedby NORM. The FILL1 and FILL2 patterns automatically provide smooth,“musical” transitions between the NORMAL and VARI. sections. Playbackstops automatically after the ENDING section.
The currently selected section is shown between square bracketsbelow the pattern number and name.
VListen to the pattern’svariations.
The “Normal” selectionis currently playing.

45• • • • • • • • • • • • • • • • • • • • • • • • • • • • • • • • • • • • • • • • • • • • • • • • • • • • • • • • • • • • • • • • • • • • • • • • • • • • • • • • • • • • • • • • • • • • • • • • • • • • • • • • • • • • • • • • • • • • • • • • • • • • • • • • • • • •
E F G A B C
INTRO NORMAL VARI. FILL1 FILL2 ENDING
5 Easy Accompaniment for Other Instruments
You can change patterns directly by pressing the appropriate key onthe micro-keyboard while the cursor is located at either the patternnumber or the section name on the display.
DETAIL
The micro-keyboard section keys do not produce any sound when used toswitch sections.
The newly selected section will begin playing from the top of thenext measure. “next” will appear below the pattern number until thenew section actually begins playing.
“Fill1” has been selected and will beginplaying from the top of the next measure.
DETAIL
You can also change sections by placing the cursor over the sectionname and using the [−1] and [+1] keys.
–1 +1
NO YES
to select sections.

46 • • • • • • • • • • • • • • • • • • • • • • • • • • • • • • • • • • • • • • • • • • • • • • • • • • • • • • • • • • • • • • • • • • • • • • • • • • • • • • • • • • • • • • • • • • • • • • • • • • • • • • • • • • • • • • • • • • • • • • • • • • • • • • • • • • • •
5 Easy Accompaniment for Other Instruments
With the cursor positioned over the pattern number you can use the[−1] and [+1] keys to select different patterns, and use the micro-key-board section keys to select different sections during playback. In allcases the newly selected pattern or section will begin playing from thetop of the next measure. “next” will appear below the pattern numberuntil the new pattern or section actually begins playing.
BSelect different patterns §ions.
NStop playback when done. Stop playback at any time by pressing the [ ] key. For a moremusical ending, select the ENDING section. Playback will stop auto-matically after the ENDING section.
DETAIL
Depending on the selected pattern, some voices may not sound if a pat-tern is started from a point in the middle of the pattern rather than at thebeginning.
HINT
If you move the cursor to the tempo parameter (indicated by a note sym-bol and a number in the upper right corner of the display), you can usethe [−1] and [+1] buttons to set the playback tempo to anywhere from 30to 250 beats per minute. Please note, however, that if you play a patternthat has a slow default tempo at a fast tempo, some notes may be un-naturally cut off.
–1 +1
NO YES
to set tempo from 30 to 250 beats per minute.

47• • • • • • • • • • • • • • • • • • • • • • • • • • • • • • • • • • • • • • • • • • • • • • • • • • • • • • • • • • • • • • • • • • • • • • • • • • • • • • • • • • • • • • • • • • • • • • • • • • • • • • • • • • • • • • • • • • • • • • • • • • • • • • • • • • • •
5 Easy Accompaniment for Other Instruments
Changing Chords —————————————————————————
ZPlay a pattern.
The QY22 features a sophisticated ABC (Auto Bass Chord) system that automatically re-harmonizesthe chord and bass tracks to match chords you specify. This makes creating complete accompanimenttracks fast and easy … just select a pattern, then specify the required chord changes (details in the nextsection). Here’s how you use the micro-keyboard to specify chord changes.
Select and play one of the preset patterns, as described in the pre-ceding section.
The micro-keyboard can be used to enter chords only when the cur-sor is located over the chord symbol on the display. Use the cursorkeys to move the cursor to the chord symbol at the bottom of the dis-play.
XMove the cursor to thechord symbol.
m
Chord symbol.

48 • • • • • • • • • • • • • • • • • • • • • • • • • • • • • • • • • • • • • • • • • • • • • • • • • • • • • • • • • • • • • • • • • • • • • • • • • • • • • • • • • • • • • • • • • • • • • • • • • • • • • • • • • • • • • • • • • • • • • • • • • • • • • • • • • • • •
G79
ENTER
m7( 5)
7( 11)
7( 5)
7( 13)
7( 9)
7( 9)
E F G A B C DM M7 6 7 m7 m6m
add9 M9 aug 9 m9 mM7 m7(11)
AB
GA 7( 13 )
7sus4sus4 dim
– – –FG
DE
CD
INTRO NORMAL VARI. FILL1 FILL2 ENDING
CC
add9
5 Easy Accompaniment for Other Instruments
CEnter a chord. Note that the lower octave of the micro-keyboard has chord rootnames “E” through “D” marked on the keys, and the upper octavekeys are marked with a variety of chord types.
To enter a chord, press the key corresponding to the desired chordroot, then the key corresponding to the desired chord type (the chordtype keys alternately select the lower and upper chord types marked… watch the display), and finally the [ENTER] key.
The chord is actually entered only when the [ENTER] key ispressed. Until the [ENTER] key is pressed, the newly specified chordroot and type will flash on the display.
DETAIL
Actually, you can press the chord type key and then the root key, theorder doesn’t matter.
Example: Enter a G7 chord.
49• • • • • • • • • • • • • • • • • • • • • • • • • • • • • • • • • • • • • • • • • • • • • • • • • • • • • • • • • • • • • • • • • • • • • • • • • • • • • • • • • • • • • • • • • • • • • • • • • • • • • • • • • • • • • • • • • • • • • • • • • • • • • • • • • • • •
5 Easy Accompaniment for Other Instruments
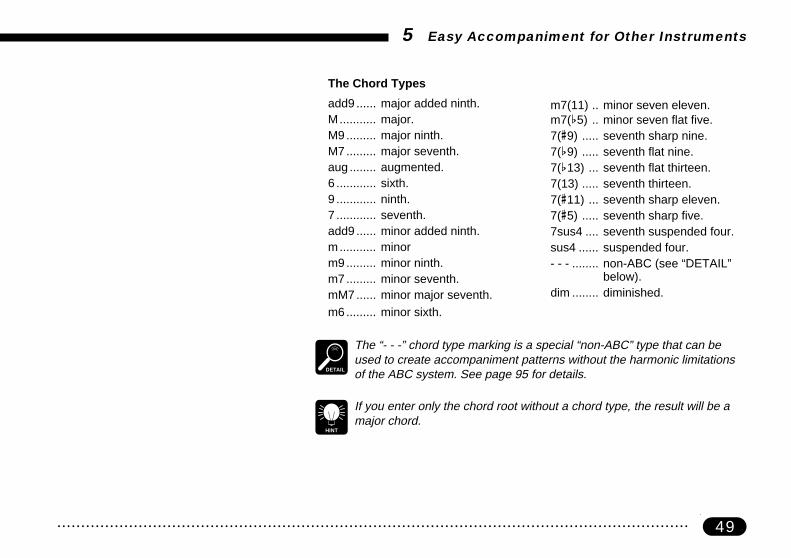
The Chord Types
add9 ...... major added ninth.M........... major.M9 ......... major ninth.M7 ......... major seventh.aug ........ augmented.6 ............ sixth.9 ............ ninth.7 ............ seventh.add9 ...... minor added ninth.m........... minorm9 ......... minor ninth.m7 ......... minor seventh.mM7 ...... minor major seventh.m6 ......... minor sixth.
m7(11) .. minor seven eleven.m7(b5) .. minor seven flat five.7(#9) ..... seventh sharp nine.7(b9) ..... seventh flat nine.7(b13) ... seventh flat thirteen.7(13) ..... seventh thirteen.7(#11) ... seventh sharp eleven.7(#5) ..... seventh sharp five.7sus4 .... seventh suspended four.sus4 ...... suspended four.- - - ........ non-ABC (see “DETAIL”
below).dim ........ diminished.
DETAIL
The “- - -” chord type marking is a special “non-ABC” type that can beused to create accompaniment patterns without the harmonic limitationsof the ABC system. See page 95 for details.
HINT
If you enter only the chord root without a chord type, the result will be amajor chord.
50 • • • • • • • • • • • • • • • • • • • • • • • • • • • • • • • • • • • • • • • • • • • • • • • • • • • • • • • • • • • • • • • • • • • • • • • • • • • • • • • • • • • • • • • • • • • • • • • • • • • • • • • • • • • • • • • • • • • • • • • • • • • • • • • • • • • •
5 Easy Accompaniment for Other Instruments
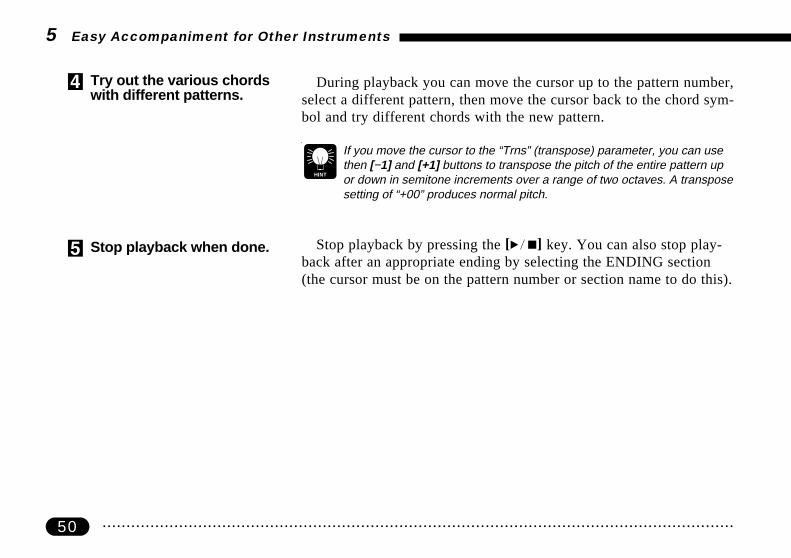
During playback you can move the cursor up to the pattern number,select a different pattern, then move the cursor back to the chord sym-bol and try different chords with the new pattern.
HINT
If you move the cursor to the “Trns” (transpose) parameter, you can usethen [−1] and [+1] buttons to transpose the pitch of the entire pattern upor down in semitone increments over a range of two octaves. A transposesetting of “+00” produces normal pitch.
Stop playback by pressing the [ ] key. You can also stop play-back after an appropriate ending by selecting the ENDING section(the cursor must be on the pattern number or section name to do this).
VTry out the various chordswith different patterns.
BStop playback when done.

51• • • • • • • • • • • • • • • • • • • • • • • • • • • • • • • • • • • • • • • • • • • • • • • • • • • • • • • • • • • • • • • • • • • • • • • • • • • • • • • • • • • • • • • • • • • • • • • • • • • • • • • • • • • • • • • • • • • • • • • • • • • • • • • • • • • •
–1 +1
NO YES
5 Easy Accompaniment for Other Instruments
Muting Tracks ———————————————————————————
The letter “M” appears in the mute buttons of tracks that are muted.Tracks that do not contain data cannot be muted, and their mute but-tons appear as white rather than dark blocks. Please note that a darkmute button will appear reversed when the cursor is placed over it(white against the dark cursor). In the display to the left, for example,TR1 through TR4 contain no data and are therefore white. The C1and C2 tracks have been muted, and the cursor is currently over theC2 track mute button.
MUSICALNOTE
The mute buttons are a handy way to turn tracks that you don’t want tohear off. In the example above, for example, the C1 and C2 tracks havebeen turned off, leaving only the bass and drum accompaniment. Youcould also mute the bass track if you just want drums.
The mute “buttons” below each track name can be used to mute(turn off) the corresponding track, either while playback is stopped orrunning. Move the cursor to the appropriate mute button, then press[+1/YES] to mute that track, or press [−1/NO] to turn a muted trackback on.
mm
Mute off. Mute on.

52 • • • • • • • • • • • • • • • • • • • • • • • • • • • • • • • • • • • • • • • • • • • • • • • • • • • • • • • • • • • • • • • • • • • • • • • • • • • • • • • • • • • • • • • • • • • • • • • • • • • • • • • • • • • • • • • • • • • • • • • • • • • • • • • • • • • •
5 Easy Accompaniment for Other Instruments
Record a Complete Accompaniment
The QY22 provides two ways to record an accompaniment by specifying patterns andchords: “realtime” and “step” recording. The realtime method is the fastest and easiest, let-ting you record pattern and chord changes “on the fly.” The step method gives you moredetailed control, and is an excellent way to add the finishing touches to an accompanimentrecorded in real time.
Realtime Accompaniment Recording —————————————————Once you know how to select patterns, sections, and enter chords
in the SONG mode (see the preceding sections), recording a basicaccompaniment in real time is easy. Repeats and tempo changes canbe added later using the step record method (page 59).
Use the [MODE] key to select the SONG mode and, with the cur-sor located over the song number at the top of the display, use the[−1] and [+1] keys to select an empty song number if necessary.Empty songs are indicated by a row of asterisks (“********”) follow-ing the song number.
ZSelect the SONG mode &an empty song.

53• • • • • • • • • • • • • • • • • • • • • • • • • • • • • • • • • • • • • • • • • • • • • • • • • • • • • • • • • • • • • • • • • • • • • • • • • • • • • • • • • • • • • • • • • • • • • • • • • • • • • • • • • • • • • • • • • • • • • • • • • • • • • • • • • • • •
MODE
5 Easy Accompaniment for Other Instruments
Asterisks (*) indicate an empty song.Song number (1 … 20).
DETAIL
If for some reason all 20 songs contain data, use the“Clear Song” function described on page 137 to clear asong for recording.
XEngage the record readymode.
Press the [● ] key to engage the record ready mode. The red LEDabove the [● ] key will light.
“REC” appears when therecord mode is engaged.

54 • • • • • • • • • • • • • • • • • • • • • • • • • • • • • • • • • • • • • • • • • • • • • • • • • • • • • • • • • • • • • • • • • • • • • • • • • • • • • • • • • • • • • • • • • • • • • • • • • • • • • • • • • • • • • • • • • • • • • • • • • • • • • • • • • • • •
5 Easy Accompaniment for Other Instruments
mPlace cursor here to selectthe realtime record mode.
CSelect the realtimerecord mode.
Move the cursor to the “REC REAL STEP” area of the display,then press the left cursor key to select the “REAL” mode (if it isn’talready selected). The selected record mode is indicated by a pair ofarrows on either side of the mode name — i.e. “>REAL<”. Onceselected, move the cursor vertically to move to other areas of thescreen. The arrows will remain positioned at the selected mode nomatter where you move the cursor.
VSelect the starting pat-tern, section, chord, &tempo.
Move the cursor to the pattern number, section, chord, and tempoparameters, and set as required.
HINT
It’s sometimes easier to set a slow tempo for realtime recording, so youhave plenty of time to enter pattern and chord changes.
55• • • • • • • • • • • • • • • • • • • • • • • • • • • • • • • • • • • • • • • • • • • • • • • • • • • • • • • • • • • • • • • • • • • • • • • • • • • • • • • • • • • • • • • • • • • • • • • • • • • • • • • • • • • • • • • • • • • • • • • • • • • • • • • • • • • •
5 Easy Accompaniment for Other Instruments
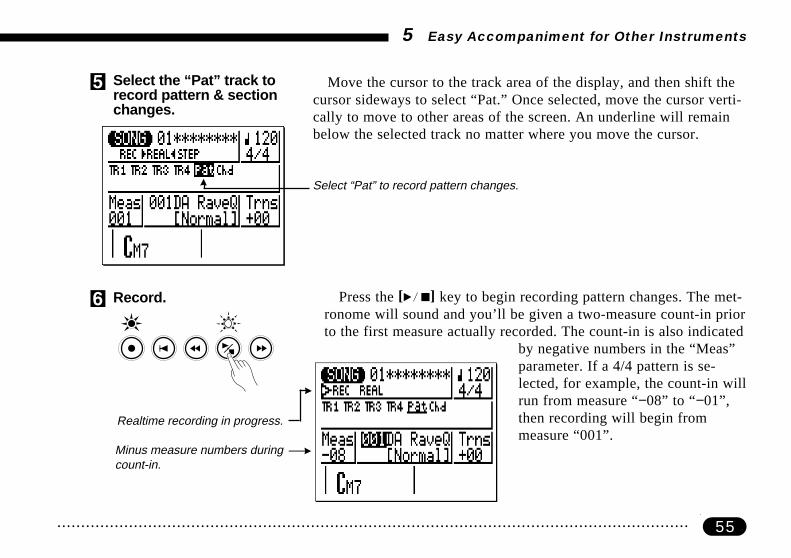
BSelect the “Pat” track torecord pattern & sectionchanges.
Move the cursor to the track area of the display, and then shift thecursor sideways to select “Pat.” Once selected, move the cursor verti-cally to move to other areas of the screen. An underline will remainbelow the selected track no matter where you move the cursor.
Select “Pat” to record pattern changes.
NRecord. Press the [ ] key to begin recording pattern changes. The met-ronome will sound and you’ll be given a two-measure count-in priorto the first measure actually recorded. The count-in is also indicated
by negative numbers in the “Meas”parameter. If a 4/4 pattern is se-lected, for example, the count-in willrun from measure “−08” to “−01”,then recording will begin frommeasure “001”.m
Realtime recording in progress.
Minus measure numbers duringcount-in.

56 • • • • • • • • • • • • • • • • • • • • • • • • • • • • • • • • • • • • • • • • • • • • • • • • • • • • • • • • • • • • • • • • • • • • • • • • • • • • • • • • • • • • • • • • • • • • • • • • • • • • • • • • • • • • • • • • • • • • • • • • • • • • • • • • • • • •
5 Easy Accompaniment for Other Instruments
Since you selected “Pat” recording, the cursor will automaticallymove to the pattern number when you start recording. All you have todo to record pattern and section changes is to select the required pat-tern numbers via the [−1] and [+1] keys, and section changes via theappropriate micro-keyboard keys. Remember that all pattern and sec-tion changes occur from the top of the next measure after the changeis entered. Also keep in mind that the INTRO will automaticallyswitch to the NORMAL pattern, FILL1 will automatically switch tothe VARI. pattern, and FILL2 will automatically switch to the NOR-MAL pattern.
DETAIL
The sequencer tracks (TR1 through TR4) will not sound during accompa-niment track recording even if they contain data.
Stop recording either by pressing the [ ] key or by selecting theENDING section. The normal SONG play mode is automatically re-selected when you stop recording.
MStop recording.

57• • • • • • • • • • • • • • • • • • • • • • • • • • • • • • • • • • • • • • • • • • • • • • • • • • • • • • • • • • • • • • • • • • • • • • • • • • • • • • • • • • • • • • • • • • • • • • • • • • • • • • • • • • • • • • • • • • • • • • • • • • • • • • • • • • • •
5 Easy Accompaniment for Other Instruments
Press the [● ] key to engage the record ready mode again (the“REAL” mode will still be selected), then move the cursor to thetrack section of the display and select “Chd” in order to record chordchanges.
<Engage record readyagain and select “Chd”.
Press the [ ] key to begin recording chord changes. The metro-nome will sound and you’ll be given a two-measure count-in.
Since you selected “Chd” recording, the cursor will automaticallymove to the chord when you start recording. All you have to do torecord chord changes is to enter the required chords as described inthe “Changing Chords” section (page 47).
HINT
Chord changes actually occur on quarter-note divisions, so try to pressthe [ENTER] key to enter each chord either exactly on the beat or a frac-tion of a section before the beat on which you want the chord change tooccur.
>Record.
Select “Chd” to recordchord changes.Asterisks have disappeared
because the song now con-tains data. Use the “SongName” job (page 135) to enteran original name.

58 • • • • • • • • • • • • • • • • • • • • • • • • • • • • • • • • • • • • • • • • • • • • • • • • • • • • • • • • • • • • • • • • • • • • • • • • • • • • • • • • • • • • • • • • • • • • • • • • • • • • • • • • • • • • • • • • • • • • • • • • • • • • • • • • • • • •
5 Easy Accompaniment for Other Instruments
Press the [ ] key to stop recording when all the required chordchanges have been entered. The normal SONG play mode is automati-cally re-selected when you stop recording.
Press the [ ] key to play back and check out the accompanimentyou’ve just recorded.
DETAIL
Note that the chord currently playing is shown in the normal chord symbollocation on the display, while the next chord is shown to its right. If thesame chord continues for more than 2 measures, however, the next chordis not shown.
HINT
Don’t worry if you’ve made a few mistakes. Simple slip-ups made in therealtime record mode can usually be corrected in the step record mode …described next.
[Listen to the results.
?Stop recording.
m m
The next chord is“G7”.
“Am7” currentlyplaying.

59• • • • • • • • • • • • • • • • • • • • • • • • • • • • • • • • • • • • • • • • • • • • • • • • • • • • • • • • • • • • • • • • • • • • • • • • • • • • • • • • • • • • • • • • • • • • • • • • • • • • • • • • • • • • • • • • • • • • • • • • • • • • • • • • • • • •
5 Easy Accompaniment for Other Instruments
Step Accompaniment Recording ———————————————————
The STEP record mode provides four different accompaniment-track data-entry displays: “Pat” (pattern changes), “Chd” (chordchanges), “Rpt” (repeats), and “Tmp” (tempo changes). In each ofthese you can individually enter or delete pattern, chord, repeat, andtempo changes at precisely the required locations.
Select an empty song if you want to record a new song in the steprecord mode, or select a song that already contains data if you want tomake changes or additions.
Press the [● ] key to engage the record ready mode. The red LEDabove the [● ] key will light.
ZSelect a song to record.
XEngage the record readymode.
60 • • • • • • • • • • • • • • • • • • • • • • • • • • • • • • • • • • • • • • • • • • • • • • • • • • • • • • • • • • • • • • • • • • • • • • • • • • • • • • • • • • • • • • • • • • • • • • • • • • • • • • • • • • • • • • • • • • • • • • • • • • • • • • • • • • • •
5 Easy Accompaniment for Other Instruments
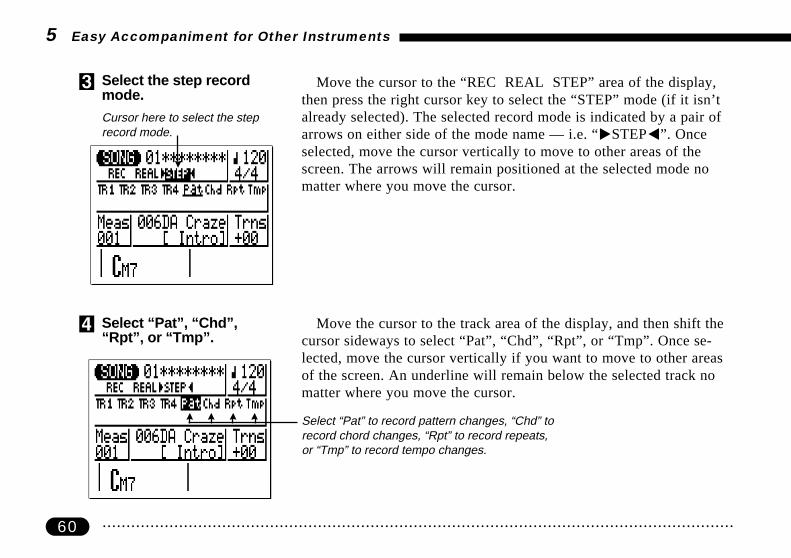
CSelect the step recordmode.
Move the cursor to the “REC REAL STEP” area of the display,then press the right cursor key to select the “STEP” mode (if it isn’talready selected). The selected record mode is indicated by a pair ofarrows on either side of the mode name — i.e. “>STEP<”. Onceselected, move the cursor vertically to move to other areas of thescreen. The arrows will remain positioned at the selected mode nomatter where you move the cursor.
Move the cursor to the track area of the display, and then shift thecursor sideways to select “Pat”, “Chd”, “Rpt”, or “Tmp”. Once se-lected, move the cursor vertically if you want to move to other areasof the screen. An underline will remain below the selected track nomatter where you move the cursor.
Cursor here to select the steprecord mode.
VSelect “Pat”, “Chd”,“Rpt”, or “Tmp”.
Select “Pat” to record pattern changes, “Chd” torecord chord changes, “Rpt” to record repeats,or “Tmp” to record tempo changes.

61• • • • • • • • • • • • • • • • • • • • • • • • • • • • • • • • • • • • • • • • • • • • • • • • • • • • • • • • • • • • • • • • • • • • • • • • • • • • • • • • • • • • • • • • • • • • • • • • • • • • • • • • • • • • • • • • • • • • • • • • • • • • • • • • • • • •
5 Easy Accompaniment for Other Instruments
Press the [ ] key to call the selected step record display.BStart recording.
Press the [ ] key to exit from the step record mode and return tothe normal SONG play mode.
MStop recording.
Refer to the following sections for details on how to use each of thestep-record mode data-entry displays.
NEnter the required pat-tern, chord, repeat, andtempo data.
mmmm
Go to “Pat” screen.
Go to “Chd” screen.
Go to “Rpt” screen.
Go to “Tmp” screen.
HINT
You can switch directly between thepattern, chord, repeat, and tempodata-entry displays while the recordmode is engaged by simply pressingthe [MENU] key to call the menushown here, and then the functionkey corresponding to the display youwant to go to.

62 • • • • • • • • • • • • • • • • • • • • • • • • • • • • • • • • • • • • • • • • • • • • • • • • • • • • • • • • • • • • • • • • • • • • • • • • • • • • • • • • • • • • • • • • • • • • • • • • • • • • • • • • • • • • • • • • • • • • • • • • • • • • • • • • • • • •
5 Easy Accompaniment for Other Instruments
Here’s how the STEP record pattern display will look if you’ve selected an empty song (the appro-priate pattern data will appear if the selected song contains data).
“Pat” — Step Record Pattern Changes
mmMeasure number.
Time signature.1st measure.
2nd measure.
Subsequent measures follow.
m
Cursor here toset section.
Cursor here to setpattern number.

63• • • • • • • • • • • • • • • • • • • • • • • • • • • • • • • • • • • • • • • • • • • • • • • • • • • • • • • • • • • • • • • • • • • • • • • • • • • • • • • • • • • • • • • • • • • • • • • • • • • • • • • • • • • • • • • • • • • • • • • • • • • • • • • • • • • •
5 Easy Accompaniment for Other Instruments
As usual, the cursor keys are used to move the cursor to the loca-tion at which you want to enter data, and the [−1] and [+1] keys areused to actually enter or change data.
The cursor keys also move you forward or backward through thesong: moving the cursor past the bottom of the screen accesses subse-quent measures, while moving it above the top of the screen accessesthe preceding measures (if there are any). In the pattern display mov-ing sideways takes you to the time signature, pattern number, andsection parameters.
In all of the STEP record displays the sequencer keys can also beused to move forward or backward through the song. The [p] keytakes you directly to the first measure.
● Moving Around &Entering Data
m
m
Scroll up (see lowermeasure numbers).
Scroll down (see highermeasure numbers).
mScroll up (see lowermeasure numbers).
m m
Go to first measure. Scroll down (see highermeasure numbers).

64 • • • • • • • • • • • • • • • • • • • • • • • • • • • • • • • • • • • • • • • • • • • • • • • • • • • • • • • • • • • • • • • • • • • • • • • • • • • • • • • • • • • • • • • • • • • • • • • • • • • • • • • • • • • • • • • • • • • • • • • • • • • • • • • • • • • •
Any pattern number from 001 through 200 (presets and user pat-terns) can be entered for each measure. Only the preset patterns, how-ever, have sections. The pattern name appears to the right of the pat-tern number. Only one pattern & section can be entered per measure,and that pattern will begin playing from the beginning of the measureat which it is entered.
A pattern entered once will continue to play until a different patternis entered. If you want to change sections without changing the pat-tern number, only the section need be entered.
In the example display to the left the intro section of pattern 006plays for the first measure, the normal section of the same pattern isselected in measure 2.
Although the default time signature for the selected pattern is auto-matically selected, the time signature value for each measure can bechanged as required. The available time signatures are:
1/16 ....... 16/161/8 ......... 16/81/4 ......... 8/4
5 Easy Accompaniment for Other Instruments
● Pattern Number andSection
● Time Signature

65• • • • • • • • • • • • • • • • • • • • • • • • • • • • • • • • • • • • • • • • • • • • • • • • • • • • • • • • • • • • • • • • • • • • • • • • • • • • • • • • • • • • • • • • • • • • • • • • • • • • • • • • • • • • • • • • • • • • • • • • • • • • • • • • • • • •
5 Easy Accompaniment for Other Instruments
If a time signature is selected that results in shorter measures thanthe pattern default, the pattern will be truncated (cut short) accord-ingly. If the selected time signature results in longer measures thanthe pattern default, the pattern will be repeated to fill the specifiedmeasure length.
The function key immediately to the right of “ers” on the displaycan be used to erase the time signature, pattern number, or sectiondata at which the cursor is located. If you erase a time signaturechange, the default time signature value for the current pattern will beautomatically re-selected.
● Erasing Pattern Changes
m
Press to erase pattern, section, or timesignature change at cursor location.

66 • • • • • • • • • • • • • • • • • • • • • • • • • • • • • • • • • • • • • • • • • • • • • • • • • • • • • • • • • • • • • • • • • • • • • • • • • • • • • • • • • • • • • • • • • • • • • • • • • • • • • • • • • • • • • • • • • • • • • • • • • • • • • • • • • • • •
5 Easy Accompaniment for Other Instruments
“Chd” — Step Record Chord ChangesHere’s how the STEP record chord display will look if you’ve selected an empty song (the appropri-
ate chord data will appear if the selected song contains data).
mmMeasure number.
Time signature.1st measure.
2nd measure.
Subsequent measures follow.
m
One beat.Place cursor at beaton which chord is tobe entered.
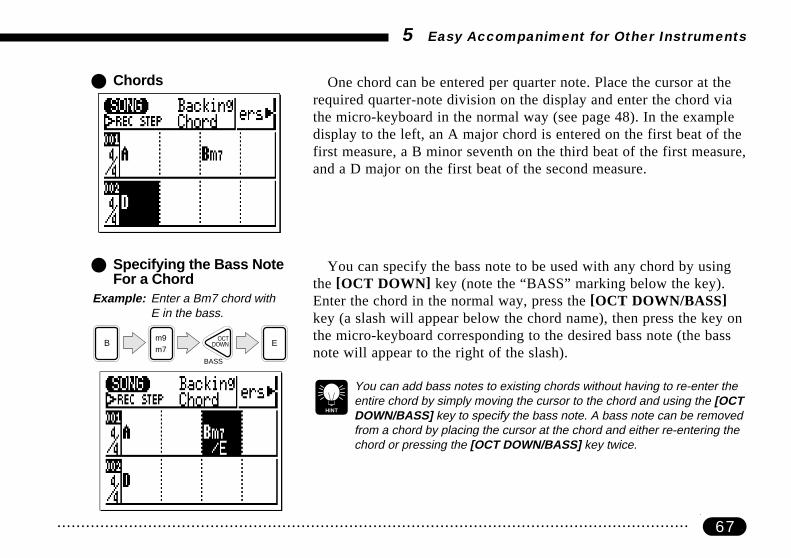
67• • • • • • • • • • • • • • • • • • • • • • • • • • • • • • • • • • • • • • • • • • • • • • • • • • • • • • • • • • • • • • • • • • • • • • • • • • • • • • • • • • • • • • • • • • • • • • • • • • • • • • • • • • • • • • • • • • • • • • • • • • • • • • • • • • • •
Bm7m9
BASS
OCTDOWN E
5 Easy Accompaniment for Other Instruments
● Chords One chord can be entered per quarter note. Place the cursor at therequired quarter-note division on the display and enter the chord viathe micro-keyboard in the normal way (see page 48). In the exampledisplay to the left, an A major chord is entered on the first beat of thefirst measure, a B minor seventh on the third beat of the first measure,and a D major on the first beat of the second measure.
● Specifying the Bass NoteFor a Chord
You can specify the bass note to be used with any chord by usingthe [OCT DOWN] key (note the “BASS” marking below the key).Enter the chord in the normal way, press the [OCT DOWN/BASS]key (a slash will appear below the chord name), then press the key onthe micro-keyboard corresponding to the desired bass note (the bassnote will appear to the right of the slash).
HINT
You can add bass notes to existing chords without having to re-enter theentire chord by simply moving the cursor to the chord and using the [OCTDOWN/BASS] key to specify the bass note. A bass note can be removedfrom a chord by placing the cursor at the chord and either re-entering thechord or pressing the [OCT DOWN/BASS] key twice.
Example: Enter a Bm7 chord withE in the bass.

68 • • • • • • • • • • • • • • • • • • • • • • • • • • • • • • • • • • • • • • • • • • • • • • • • • • • • • • • • • • • • • • • • • • • • • • • • • • • • • • • • • • • • • • • • • • • • • • • • • • • • • • • • • • • • • • • • • • • • • • • • • • • • • • • • • • • •
D OCTUP
5 Easy Accompaniment for Other Instruments
● Syncopated Chords Chords can be syncopated (i.e. the chord actually begins an eighth-note before the beat on which it is entered) by using the [OCT UP]key (note the “ec” marking below the key). Enter the chord in thenormal way, then press the [OCT UP] key (a syncopation symbol willappear below the chord name).
HINT
You can add syncopation to existing chords without having to re-enter theentire chord by simply moving the cursor to the chord and pressing the[OCT UP] key. Syncopation can be removed from a chord by placing thecursor at the chord and pressing the [OCT UP] key.
● Erasing Chords The function key immediately to the right of “ers” on the displaycan be used to erase the chord at which the cursor is located.
Press to erase chord atcursor location.
Example: Enter a syncopatedD chord.

69• • • • • • • • • • • • • • • • • • • • • • • • • • • • • • • • • • • • • • • • • • • • • • • • • • • • • • • • • • • • • • • • • • • • • • • • • • • • • • • • • • • • • • • • • • • • • • • • • • • • • • • • • • • • • • • • • • • • • • • • • • • • • • • • • • • •
5 Easy Accompaniment for Other Instruments
● The Chord DisplayDuring Playback
Chord bass notes and syncopation marks appear on the display asshown in the SONG playback mode.
mSyncopation mark.Chord actually be-gins 1/8-note earlier.
m“/E” indicates that Bm7is played with E bass.
mHalf-note indicateslength of chord.

70 • • • • • • • • • • • • • • • • • • • • • • • • • • • • • • • • • • • • • • • • • • • • • • • • • • • • • • • • • • • • • • • • • • • • • • • • • • • • • • • • • • • • • • • • • • • • • • • • • • • • • • • • • • • • • • • • • • • • • • • • • • • • • • • • • • • •
5 Easy Accompaniment for Other Instruments
“Rpt” — Step Record RepeatsThe STEP record “Rpt” display allows three different types of repeats to be entered at appropriate
points during the song: start repeat, end/number of repeats, and end song.
The start repeat ( ) or end of song mark ( ) canbe selected via the [−1] and [+1] keys when the cur-sor is located at the top of the measure, and the endrepeat mark ( ) can be selected when the cursor isplaced at the end of the measure. When the end ofrepeat mark is selected the [−1] and [+1] keys arealso used to select any number of repeats from 02 to99. When “X02” is selected, for example, the sec-
● Repeats
Cursor here to enter repeatat end of measure.
Cursor here to enter repeatat top of measure.
m
Number ofrepeats.m
End of song.
mEndrepeat.mStart
repeat.
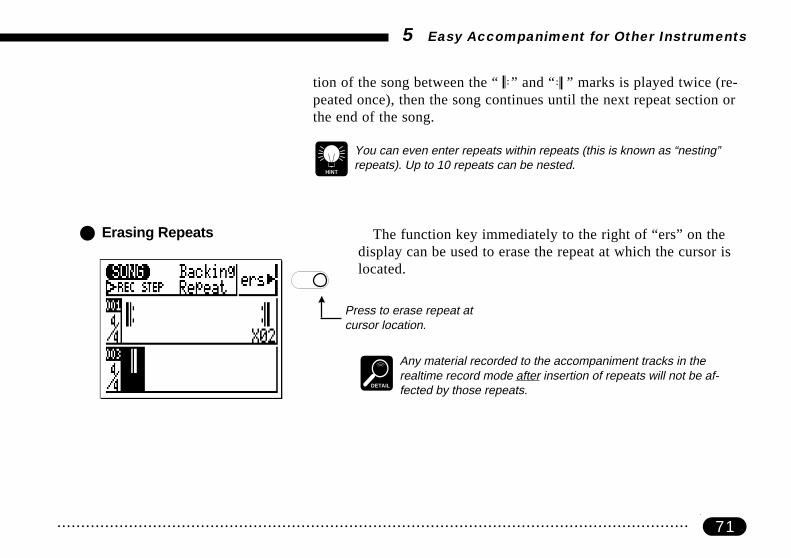
71• • • • • • • • • • • • • • • • • • • • • • • • • • • • • • • • • • • • • • • • • • • • • • • • • • • • • • • • • • • • • • • • • • • • • • • • • • • • • • • • • • • • • • • • • • • • • • • • • • • • • • • • • • • • • • • • • • • • • • • • • • • • • • • • • • • •
5 Easy Accompaniment for Other Instruments
tion of the song between the “ ” and “ ” marks is played twice (re-peated once), then the song continues until the next repeat section orthe end of the song.
HINT
You can even enter repeats within repeats (this is known as “nesting”repeats). Up to 10 repeats can be nested.
● Erasing Repeats The function key immediately to the right of “ers” on thedisplay can be used to erase the repeat at which the cursor islocated.
Press to erase repeat atcursor location.
DETAIL
Any material recorded to the accompaniment tracks in therealtime record mode after insertion of repeats will not be af-fected by those repeats.

72 • • • • • • • • • • • • • • • • • • • • • • • • • • • • • • • • • • • • • • • • • • • • • • • • • • • • • • • • • • • • • • • • • • • • • • • • • • • • • • • • • • • • • • • • • • • • • • • • • • • • • • • • • • • • • • • • • • • • • • • • • • • • • • • • • • • •
The STEP record mode “Tmp” display can be used to enter instantaneous tempo changes as well asgradual ritardando and accelerando tempo changes.
5 Easy Accompaniment for Other Instruments
“Tmp” — Step Record Tempo Changes
mmMeasure number.
Time signature.1st measure.
2nd measure.
Subsequent measures follow.
m
One beat.Place cursor at beat atwhich tempo change isto occur or begin.
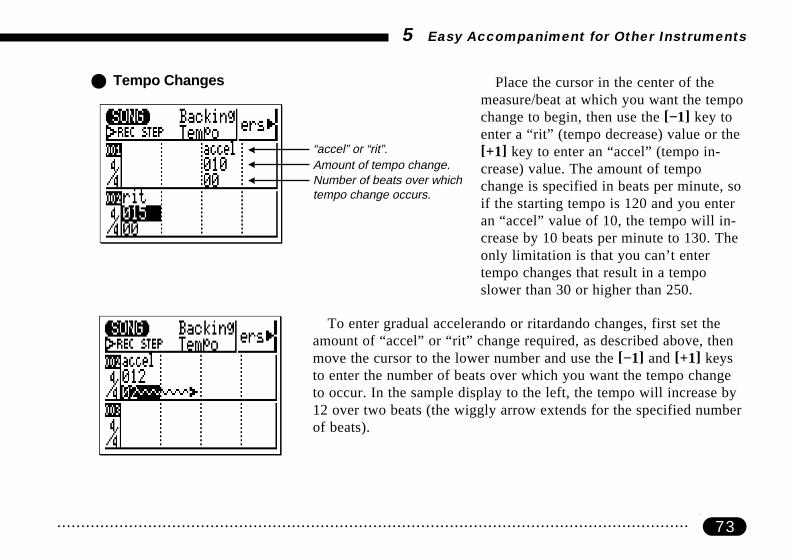
73• • • • • • • • • • • • • • • • • • • • • • • • • • • • • • • • • • • • • • • • • • • • • • • • • • • • • • • • • • • • • • • • • • • • • • • • • • • • • • • • • • • • • • • • • • • • • • • • • • • • • • • • • • • • • • • • • • • • • • • • • • • • • • • • • • • •
5 Easy Accompaniment for Other Instruments
● Tempo Changes Place the cursor in the center of themeasure/beat at which you want the tempochange to begin, then use the [−1] key toenter a “rit” (tempo decrease) value or the[+1] key to enter an “accel” (tempo in-crease) value. The amount of tempochange is specified in beats per minute, soif the starting tempo is 120 and you enteran “accel” value of 10, the tempo will in-crease by 10 beats per minute to 130. Theonly limitation is that you can’t entertempo changes that result in a temposlower than 30 or higher than 250.
“accel” or “rit”.Amount of tempo change.Number of beats over whichtempo change occurs.
To enter gradual accelerando or ritardando changes, first set theamount of “accel” or “rit” change required, as described above, thenmove the cursor to the lower number and use the [−1] and [+1] keysto enter the number of beats over which you want the tempo changeto occur. In the sample display to the left, the tempo will increase by12 over two beats (the wiggly arrow extends for the specified numberof beats).

74 • • • • • • • • • • • • • • • • • • • • • • • • • • • • • • • • • • • • • • • • • • • • • • • • • • • • • • • • • • • • • • • • • • • • • • • • • • • • • • • • • • • • • • • • • • • • • • • • • • • • • • • • • • • • • • • • • • • • • • • • • • • • • • • • • • • •
In the next sample display a ritardando of 25 beats per minute is setto occur over six beats.
DETAIL
The wiggly arrow that represents the duration of the tempo change onlyappears within the two measures shown on the display. You can entermuch longer tempo change lengths (up to a maximum of 99 measures),but the arrow will not appear when you scroll the screen to see subse-quent measures.
5 Easy Accompaniment for Other Instruments
● Erasing Tempo Changes
mPress to erase tempochange at cursor location.
The function key immediately to the right of “ers” on the displaycan be used to erase the tempo change at which the cursor is located.

75• • • • • • • • • • • • • • • • • • • • • • • • • • • • • • • • • • • • • • • • • • • • • • • • • • • • • • • • • • • • • • • • • • • • • • • • • • • • • • • • • • • • • • • • • • • • • • • • • • • • • • • • • • • • • • • • • • • • • • • • • • • • • • • • • • • •
5 Easy Accompaniment for Other Instruments
Using the QY22 As a Drum Machine
Although you can create complete accompaniments using the preset patterns as describedin the preceding section, you can also mute the C1, C2, and Ba tracks, leaving only the Drtrack, so the QY22 functions as a drum machine. You can create drum-only accompani-ments using the drum tracks from the preset patterns, or record original drum tracks for yourown patterns, as described in the following chapter.
It’s also possible to record drum voices to the sequencer tracks as described in the “Cre-ating a Complete Song” chapter (page 108).

76 • • • • • • • • • • • • • • • • • • • • • • • • • • • • • • • • • • • • • • • • • • • • • • • • • • • • • • • • • • • • • • • • • • • • • • • • • • • • • • • • • • • • • • • • • • • • • • • • • • • • • • • • • • • • • • • • • • • • • • • • • • • • • • • • • • • •

77• • • • • • • • • • • • • • • • • • • • • • • • • • • • • • • • • • • • • • • • • • • • • • • • • • • • • • • • • • • • • • • • • • • • • • • • • • • • • • • • • • • • • • • • • • • • • • • • • • • • • • • • • • • • • • • • • • • • • • • • • • • • • • • • • • • •
6Creating Original Patterns
Recording an OriginalABC Pattern .................................... 78
Realtime Pattern Recording ......... 78
Step Pattern Recording ............... 86
Playback In the Pattern Mode .... 94
Accompaniment Without theLimitations of ABC ....................... 95
The Pattern Jobs ........................... 96
1: Copy Pattern ............................ 98
2: Quantize................................... 99
3: Transpose .............................. 100
4: Modify Velocity ....................... 101
5: Modify Gate Time .................. 102
6: Pattern Name......................... 103
7: Clear Track ............................ 104
8: Clear Pattern .......................... 105

78 • • • • • • • • • • • • • • • • • • • • • • • • • • • • • • • • • • • • • • • • • • • • • • • • • • • • • • • • • • • • • • • • • • • • • • • • • • • • • • • • • • • • • • • • • • • • • • • • • • • • • • • • • • • • • • • • • • • • • • • • • • • • • • • • • • • •
6 Creating Original Patterns
Recording an Original ABC Pattern
The QY22 makes it easy to create original accompaniment patterns. In addition to the pre-set patterns residing in pattern memory locations 001 through 100, the QY22 has 100 morepattern memory locations (101 through 200) which can be used to store your own creations.Like the SONG mode, the PATTERN mode provides two ways to create original patterns:realtime and step recording.
Realtime Pattern Recording —————————————————————
In the realtime record mode you select the track you want torecord (C1, C2, Ba, or Dr), and then play the part on the micro-key-board or an external MIDI keyboard in real time.
Use the [MODE] key to select the PAT (pattern) mode and, withthe cursor located over the pattern number at the top of the display,use the [−1] and [+1] keys to select an empty user pattern number (theprogrammable user patterns are numbered 101 through 200). Emptypatterns are indicated by a row of asterisks (“********”) followingthe pattern number.
ZSelect the PATTERNmode & an empty userpattern.

79• • • • • • • • • • • • • • • • • • • • • • • • • • • • • • • • • • • • • • • • • • • • • • • • • • • • • • • • • • • • • • • • • • • • • • • • • • • • • • • • • • • • • • • • • • • • • • • • • • • • • • • • • • • • • • • • • • • • • • • • • • • • • • • • • • • •
–1 +1
NO YESMODE
6 Creating Original Patterns
DETAIL
If for some reason all 100 user patterns contain data, use the “Clear Pat-tern” function described on page 105 to clear a pattern for recording.
Press the [● ] key to engage the record ready mode. The red LEDabove the [● ] key will light.
XEngage the record readymode.
Asterisks (*) indicatean empty pattern.
Select user patternnumber (101 … 200).
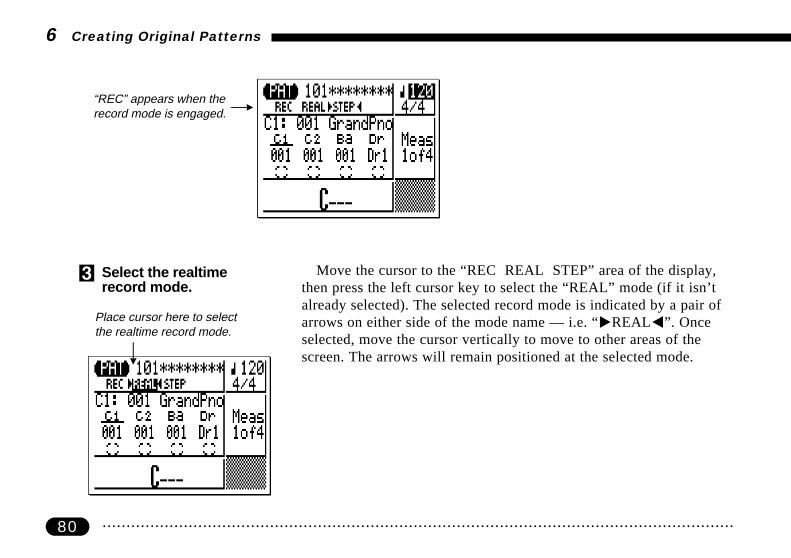
80 • • • • • • • • • • • • • • • • • • • • • • • • • • • • • • • • • • • • • • • • • • • • • • • • • • • • • • • • • • • • • • • • • • • • • • • • • • • • • • • • • • • • • • • • • • • • • • • • • • • • • • • • • • • • • • • • • • • • • • • • • • • • • • • • • • • •
6 Creating Original Patterns
“REC” appears when therecord mode is engaged. m
Move the cursor to the “REC REAL STEP” area of the display,then press the left cursor key to select the “REAL” mode (if it isn’talready selected). The selected record mode is indicated by a pair ofarrows on either side of the mode name — i.e. “>REAL<”. Onceselected, move the cursor vertically to move to other areas of thescreen. The arrows will remain positioned at the selected mode.
CSelect the realtimerecord mode.
mPlace cursor here to selectthe realtime record mode.

81• • • • • • • • • • • • • • • • • • • • • • • • • • • • • • • • • • • • • • • • • • • • • • • • • • • • • • • • • • • • • • • • • • • • • • • • • • • • • • • • • • • • • • • • • • • • • • • • • • • • • • • • • • • • • • • • • • • • • • • • • • • • • • • • • • • •
6 Creating Original Patterns
Move the cursor to the tempo, time signature, and pattern lengthparameters and set as required using the [−1] and [+1] keys.
VSelect the record tempo,time signature, andpattern length.
m
Record tempo.m
Time signature: 1/16 … 16/16,1/8 … 16/8,1/4 … 8/4.m
Length of pattern: “1of1” … “1 of 8”(max. length 8 measures).
HINT
It’s sometimes easier to set a slow tempo for realtime recording, so youhave plenty of time to enter the data.
Move the cursor to the track area of the display, and then shift thecursor sideways to select the track you want to record: “C1” = chord1, “C2” = chord 2, “Ba” = bass, “Dr” = drums. Once the track hasbeen selected use the [−1] and [+1] keys to select the voice you wantto use for that track. If you don’t intend to use a track, set the voicenumber to “OFF.”
Move the cursor vertically to move to other areas of the screen. Anunderline will remain below the selected track.
BSelect the track torecord and the voice forthat track.

82 • • • • • • • • • • • • • • • • • • • • • • • • • • • • • • • • • • • • • • • • • • • • • • • • • • • • • • • • • • • • • • • • • • • • • • • • • • • • • • • • • • • • • • • • • • • • • • • • • • • • • • • • • • • • • • • • • • • • • • • • • • • • • • • • • • • •
6 Creating Original Patterns
m
Number & name of voiceassigned to current trackshown here.
Cursor here to select the C1 (Chord 1) track.
–1 +1
NO YES to select C1 voice (001 …
128, Dr1 … Dr8, OFF). The same applies tothe C2, Ba, and Dr tracks, except that onlythe Dr1 … Dr8 voices and “OFF” can beassigned to the Dr track.
NRecord.
DETAIL
In the PATTERN PLAY or PATTERN RECORD modes, with the excep-tion of the Drum Track, it is possible to assign any of the Normal voices(001 ... 128) or Drum voices (Dr1 ... Dr8) to any of the sequencer tracks.However, in the PATTERN EDIT mode, with the exception of the DRUMtrack, only Normal voices (001 ... 128) can be assigned to the other tracksusing the Program Change function. Use the PATTERN PLAY or PAT-TERN RECORD modes to assign Drum voices to sequencer tracks.
HINT
You can also change the voice assignments later in the same way.
Press the [ ] key to begin recording. The metronome will soundand you’ll be given a two-measure count-in prior to the first measureactually recorded. The count-in is also indicated by negative numbersin the “Meas” parameter. If a 4/4 time signature is selected, for exam-ple, the count-in will run from measure “−08” to “−01”, then record-ing will begin from measure “001”.

83• • • • • • • • • • • • • • • • • • • • • • • • • • • • • • • • • • • • • • • • • • • • • • • • • • • • • • • • • • • • • • • • • • • • • • • • • • • • • • • • • • • • • • • • • • • • • • • • • • • • • • • • • • • • • • • • • • • • • • • • • • • • • • • • • • • •
6 Creating Original Patterns
Patterns can only be recorded in the key of C. Play the requiredpart either on the micro-keyboard or via an external MIDI keyboardtransmitting on the appropriate MIDI channel:
MIDI Channel Track5 ....................... C1 (Chord 1)6 ....................... C2 (Chord 2)7 ....................... Ba (Bass)
10 ....................... Dr (Drums)
The pattern will continue to repeat from the first to last measure, soyou can continue to add notes until the current part is complete.
mRealtime recordingin progress.
mMinus measure numbersduring count-in.

84 • • • • • • • • • • • • • • • • • • • • • • • • • • • • • • • • • • • • • • • • • • • • • • • • • • • • • • • • • • • • • • • • • • • • • • • • • • • • • • • • • • • • • • • • • • • • • • • • • • • • • • • • • • • • • • • • • • • • • • • • • • • • • • • • • • • •
6 Creating Original Patterns
MUSICALNOTE
Since your original ABC pattern will be automatically re-harmonized asrequired by the QY22 ABC system, there are a few rules you should fol-low to ensure the best results:
1: You’re recording in C, so think in C.2: Use primarily the root, 3rd, 5th, and major 7th.3: Keep it rhythmic … avoid melodic lines.
To delete mistakes, simply play the note to be deleted on the micro-keyboard while holding the function key next to “Del” on the display.All corresponding notes that occur while the micro-keyboard key isheld will be deleted.
MDelete mistakes asrequired.
mPress while holding a note on the micro-keyboard to delete all occurrences of thatnote for as long as the note is held.
Press the [ ] key to stop recording. The normal PAT play modeis automatically re-selected when you stop recording.
<Stop recording.

85• • • • • • • • • • • • • • • • • • • • • • • • • • • • • • • • • • • • • • • • • • • • • • • • • • • • • • • • • • • • • • • • • • • • • • • • • • • • • • • • • • • • • • • • • • • • • • • • • • • • • • • • • • • • • • • • • • • • • • • • • • • • • • • • • • • •
6 Creating Original Patterns
Note that when you return to the PAT play mode the block beloweach track that contains data will be filled (dark) while the blocksbelow empty tracks are empty (outline only).
>Record the remainingtracks.
Track contains data.
Track empty.
Complete the pattern by selecting the remaining tracks, assigningthe required voices, and recording as described in steps 5 through 8,above.
HINT
As long as the record mode is not engaged youcan press the [MODE] key while holding the[MENU] key to see the current pitch of the micro-keyboard as determined by the [OCT DOWN] and[OCT UP] keys, and a list of the drum instrumentscurrently played by the micro-keyboard keys.
DETAIL
See the “Editing Songs & Patterns” section , page140, for information on how to edit recorded pat-tern data.
The pitch of the lowestmicro-keyboard key(changes when theoctave keys are used).
Micro-keyboard.
mmm
Hold MENU and press MODE
Drum instrumentscurrently played bythe correspondingmicro-keyboard keys.

86 • • • • • • • • • • • • • • • • • • • • • • • • • • • • • • • • • • • • • • • • • • • • • • • • • • • • • • • • • • • • • • • • • • • • • • • • • • • • • • • • • • • • • • • • • • • • • • • • • • • • • • • • • • • • • • • • • • • • • • • • • • • • • • • • • • • •
MODE
–1 +1
NO YES
6 Creating Original Patterns
ZSelect the PATTERNmode & a user pattern.
Step Pattern Recording ———————————————————————The step pattern record mode lets you enter each track note-by-
note, with precise control over the timing, length, and loudness ofeach note. You can record entire tracks using the step mode, or use itto brush-up and add data to an existing track.
Use the [MODE] key to select the PAT (pattern) modeand, with the cursor located over the pattern number at thetop of the display, use the [−1] and [+1] keys to select thepattern you want to record (the programmable user patternsare numbered 101 through 200). You can select an emptypattern if you want to record a new pattern using the STEPmode, or a pattern that already contains data if you want toedit or add new data to the pattern.
Select user patternnumber (101 … 200).
Asterisks (*) indicatean empty pattern.m m

87• • • • • • • • • • • • • • • • • • • • • • • • • • • • • • • • • • • • • • • • • • • • • • • • • • • • • • • • • • • • • • • • • • • • • • • • • • • • • • • • • • • • • • • • • • • • • • • • • • • • • • • • • • • • • • • • • • • • • • • • • • • • • • • • • • • •
6 Creating Original Patterns
Press the [● ] key to engage the record ready mode. The red LEDabove the [● ] key will light.
XEngage the record readymode.
CSelect the step recordmode.
Move the cursor to the “REC REAL STEP” area of the display,then press the right cursor key to select the “STEP” mode (if it isn’talready selected). The selected record mode is indicated by a pair ofarrows on either side of the mode name — i.e. “>STEP<”. Onceselected, move the cursor vertically to move to other areas of thescreen. The arrows will remain positioned at the selected mode.
m“REC” appears when therecord mode is engaged.
Place cursor here to select the steprecord mode.
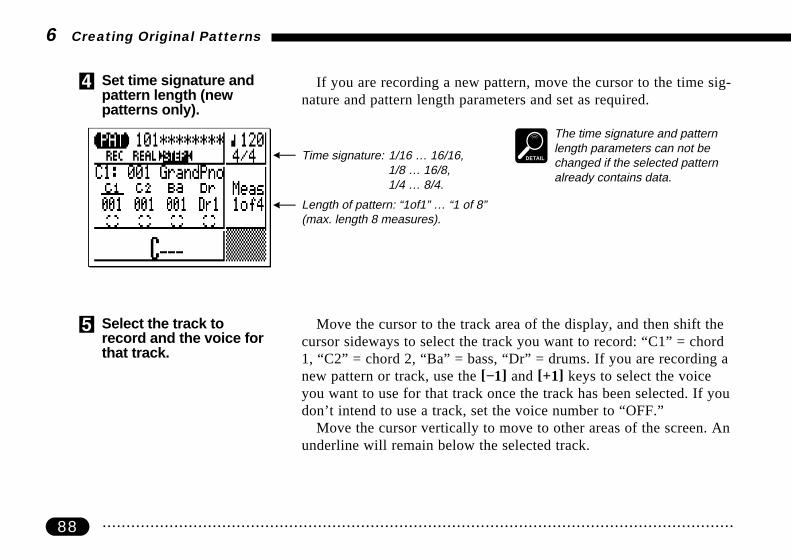
88 • • • • • • • • • • • • • • • • • • • • • • • • • • • • • • • • • • • • • • • • • • • • • • • • • • • • • • • • • • • • • • • • • • • • • • • • • • • • • • • • • • • • • • • • • • • • • • • • • • • • • • • • • • • • • • • • • • • • • • • • • • • • • • • • • • • •
6 Creating Original Patterns
If you are recording a new pattern, move the cursor to the time sig-nature and pattern length parameters and set as required.
VSet time signature andpattern length (newpatterns only).
DETAIL
The time signature and patternlength parameters can not bechanged if the selected patternalready contains data.
mm
Time signature: 1/16 … 16/16,1/8 … 16/8,1/4 … 8/4.
Length of pattern: “1of1” … “1 of 8”(max. length 8 measures).
Move the cursor to the track area of the display, and then shift thecursor sideways to select the track you want to record: “C1” = chord1, “C2” = chord 2, “Ba” = bass, “Dr” = drums. If you are recording anew pattern or track, use the [−1] and [+1] keys to select the voiceyou want to use for that track once the track has been selected. If youdon’t intend to use a track, set the voice number to “OFF.”
Move the cursor vertically to move to other areas of the screen. Anunderline will remain below the selected track.
BSelect the track torecord and the voice forthat track.

89• • • • • • • • • • • • • • • • • • • • • • • • • • • • • • • • • • • • • • • • • • • • • • • • • • • • • • • • • • • • • • • • • • • • • • • • • • • • • • • • • • • • • • • • • • • • • • • • • • • • • • • • • • • • • • • • • • • • • • • • • • • • • • • • • • • •
6 Creating Original Patterns
Cursor here to select the C1(Chord 1) track.
–1 +1
NO YES to select C1 voice
(001 … 128, Dr1 … Dr8, OFF).The same applies to the C2, Ba,and Dr tracks, except that only theDr1 … Dr8 voices and “OFF” canbe assigned to the Dr track.
Number & name of voice assignedto current track shown here.
mHINT
You can also change the voice as-signments later in the same way.
Press the [ ] key to begin recording. The step record displayshown below will appear.
NRecord.
mmmNote parameters.
Note display.
Time signature.
Measure/beat/clock display.

90 • • • • • • • • • • • • • • • • • • • • • • • • • • • • • • • • • • • • • • • • • • • • • • • • • • • • • • • • • • • • • • • • • • • • • • • • • • • • • • • • • • • • • • • • • • • • • • • • • • • • • • • • • • • • • • • • • • • • • • • • • • • • • • • • • • • •
6 Creating Original Patterns
MSet the note parametersas required.
Move the cursor to the note, velocity, and gate time parameters andset as required using the [−1] and [+1] keys for the first (or next) noteto be entered.
DETAIL
The velocity and gate time settings in the step recorddisplay correspond to the following numeric values inthe edit displays (to be described later):
Velocity “p” = 56“mf” = 88“f” = 120
Gate Time “Staccato” = 50% normal note length.“Normal” = 90% normal note length.“Slur” = 99% normal note length.
<Enter a note. Once the note parameter have been specified, the note can be en-tered simply by playing the appropriate key on the micro-keyboard(or on your external MIDI keyboard). A note symbol appears on thenote display and the note pointer advances to the next note position.The note symbol always appears as a 1/4-note, regardless of the actualnote entered (chords are also indicated by the 1/4-note symbol).Here’s how the display will look after two 8th notes have been en-tered.
Note (32nd, 16th triplet,16th, 8th triplet, 8th,1/4 triplet, 1/4,1/2 triplet, 1/2).
mGate time(Staccato,Normal, Slur).
Velocity(p = soft,mf = medium,f = loud).
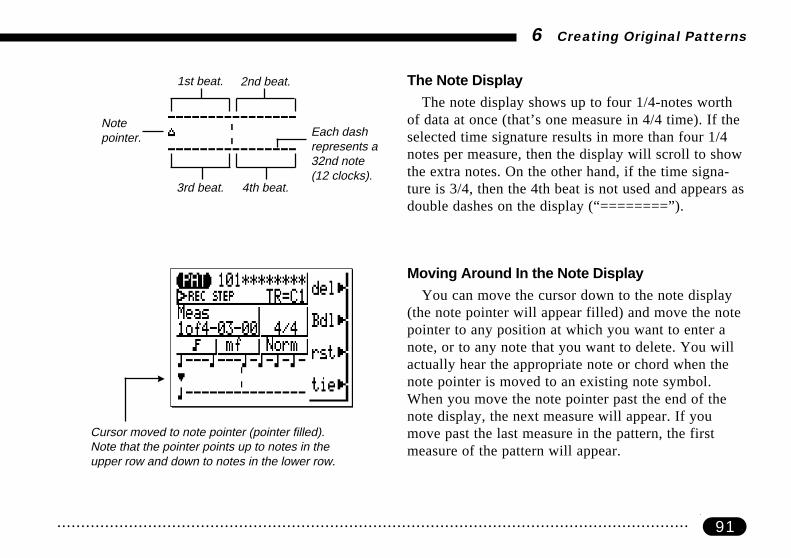
91• • • • • • • • • • • • • • • • • • • • • • • • • • • • • • • • • • • • • • • • • • • • • • • • • • • • • • • • • • • • • • • • • • • • • • • • • • • • • • • • • • • • • • • • • • • • • • • • • • • • • • • • • • • • • • • • • • • • • • • • • • • • • • • • • • • •
6 Creating Original Patterns
The Note DisplayThe note display shows up to four 1/4-notes worth
of data at once (that’s one measure in 4/4 time). If theselected time signature results in more than four 1/4notes per measure, then the display will scroll to showthe extra notes. On the other hand, if the time signa-ture is 3/4, then the 4th beat is not used and appears asdouble dashes on the display (“========”).
Moving Around In the Note DisplayYou can move the cursor down to the note display
(the note pointer will appear filled) and move the notepointer to any position at which you want to enter anote, or to any note that you want to delete. You willactually hear the appropriate note or chord when thenote pointer is moved to an existing note symbol.When you move the note pointer past the end of thenote display, the next measure will appear. If youmove past the last measure in the pattern, the firstmeasure of the pattern will appear.
1st beat. 2nd beat.
4th beat.3rd beat.
Each dashrepresents a32nd note(12 clocks).
Notepointer.
Cursor moved to note pointer (pointer filled).Note that the pointer points up to notes in theupper row and down to notes in the lower row.

92 • • • • • • • • • • • • • • • • • • • • • • • • • • • • • • • • • • • • • • • • • • • • • • • • • • • • • • • • • • • • • • • • • • • • • • • • • • • • • • • • • • • • • • • • • • • • • • • • • • • • • • • • • • • • • • • • • • • • • • • • • • • • • • • • • • • •
6 Creating Original Patterns
note pointer. The “Bdl” key movesthe note pointer backward by thecurrently selected note length anddeletes any notes that exist at thatlocation. The “rst” key enters a restof the currently selected note lengthat the note pointer position. And the“tie” key lengthens the previouslyentered note by “tying” another noteof the same length and pitch to it(the “tie” key only works immedi-ately after entering a note).
The Step Mode Function KeysThe four function keys immediately to the right of the dis-
play provide access to a number of handy functions in the steprecord mode. The “del” key deletes the note or chord at the
Step back by currentnote length and delete.
Enter a note of the samelength as the last note,tied to the last note (thiseffectively lengthens thelast note).
Enter rest of currentnote length.
Delete note at notepointer.m
m
m
m
The Measure/Beat/Clock DisplayThe “Meas” area of the step record display shows the cur-
rent position of the note pointer in measures, 1/4-note beats,and clocks (there are 96 clocks per 1/4 note). If you’re not surewhat measure you’re seeing on the note display while record-ing, check the measure/beat/clock display.
m
Measure (1 of 4,2 of 4, 3 of 4, 4of 4 if 4/4 time).
1/4-note beat(01, 02, 03, 04if 4/4 time).
Clock (96clocks per1/4 note).
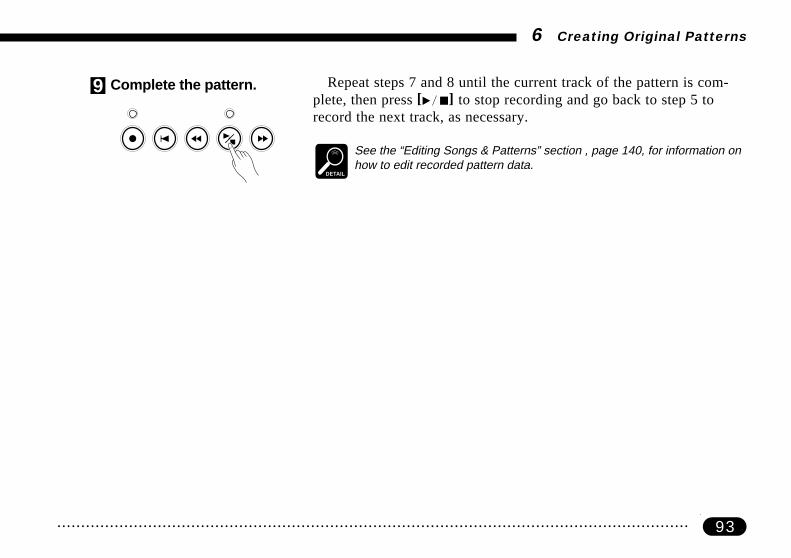
93• • • • • • • • • • • • • • • • • • • • • • • • • • • • • • • • • • • • • • • • • • • • • • • • • • • • • • • • • • • • • • • • • • • • • • • • • • • • • • • • • • • • • • • • • • • • • • • • • • • • • • • • • • • • • • • • • • • • • • • • • • • • • • • • • • • •
6 Creating Original Patterns
Repeat steps 7 and 8 until the current track of the pattern is com-plete, then press [ ] to stop recording and go back to step 5 torecord the next track, as necessary.
DETAIL
See the “Editing Songs & Patterns” section , page 140, for information onhow to edit recorded pattern data.
>Complete the pattern.

94 • • • • • • • • • • • • • • • • • • • • • • • • • • • • • • • • • • • • • • • • • • • • • • • • • • • • • • • • • • • • • • • • • • • • • • • • • • • • • • • • • • • • • • • • • • • • • • • • • • • • • • • • • • • • • • • • • • • • • • • • • • • • • • • • • • • •
6 Creating Original Patterns
Playback In the Pattern Mode
Patterns can be played in the PATTERN mode in much the same way as they are in theSONG mode.
Use the [ ] key to start and stop playback. The main differentbetween playback in the PATTERN mode and playback in the SONGmode is that in the PATTERN mode the sections don’t switch auto-matically. If you select “Fill1”, for example, “Fill1” will play repeat-edly until a different section is selected (in the SONG mode “Vari.” isautomatically selected after “Fill1” plays through once). Also, onlythe accompaniment tracks are available for playback in the PAT-TERN mode.
* Only preset patterns have sections. Nosection name appears when a user pat-tern is selected.
Pattern number. Sections can bechanged via micro-keyboard whencursor here or on section name.*
Section name.*
Pattern name.
Tempo
Voice numbers.
Mute buttons. Operation is thesame as in the SONG mode.
Chords can be changed via micro-keyboard when cursor here.

95• • • • • • • • • • • • • • • • • • • • • • • • • • • • • • • • • • • • • • • • • • • • • • • • • • • • • • • • • • • • • • • • • • • • • • • • • • • • • • • • • • • • • • • • • • • • • • • • • • • • • • • • • • • • • • • • • • • • • • • • • • • • • • • • • • • •
Accompaniment Without the Limitations of ABC
If you want total harmonic freedom in your accompaniment tracks, unrestrained by the limitsof the ABC system, simply record the accompaniment for your song in sections, recordingthe required chord/harmonic changes directly into as many patterns as your song requires(remember, patterns can be up to 8 measures long). Then, when recording the accompani-ment tracks in the SONG mode, use the “- - - ” chord type so that the pattern data is playedback unmodified. You might need to record several patterns containing the various chordchanges you need for your song, but you don’t have to worry about how the ABC systemmight alter your accompaniment when it is played back.
6 Creating Original Patterns

96 • • • • • • • • • • • • • • • • • • • • • • • • • • • • • • • • • • • • • • • • • • • • • • • • • • • • • • • • • • • • • • • • • • • • • • • • • • • • • • • • • • • • • • • • • • • • • • • • • • • • • • • • • • • • • • • • • • • • • • • • • • • • • • • • • • • •
MENU
The Pattern Jobs
The pattern mode includes 8 pattern “jobs” that perform a variety of important functions. Toaccess and use the pattern jobs, press the [MENU] key while in the normal PATTERN playmode, and then press the function key next to “Job” on the display.
6 Creating Original Patterns
This calls the pattern job list. You can select any job on the listsimply by moving the cursor to the required job and pressing[ENTER].
mPress forpatternjob list.
Pattern jobs 3 … 8(cursor at bottom of list).
Pattern jobs 1 … 6(cursor at top of list).

97• • • • • • • • • • • • • • • • • • • • • • • • • • • • • • • • • • • • • • • • • • • • • • • • • • • • • • • • • • • • • • • • • • • • • • • • • • • • • • • • • • • • • • • • • • • • • • • • • • • • • • • • • • • • • • • • • • • • • • • • • • • • • • • • • • • •
6 Creating Original Patterns
User Patterns Only!Since all of the pattern jobs modify the pattern data in some way,
they can only be used on user patterns (numbers 101 through 200). Ifyou attempt to use a pattern job while a preset pattern is selected, theerror display shown to the left will appear. Press any key (except themicro-keyboard) to return to the job list.
Returning to the Pattern Play ModeThe function button next to “Exit” on the display can be used to
exit from any pattern job, and then from the job list thereby returningyou to the normal pattern play mode.
m m
Press to exitto job list.
Press to exit to patternplay mode.
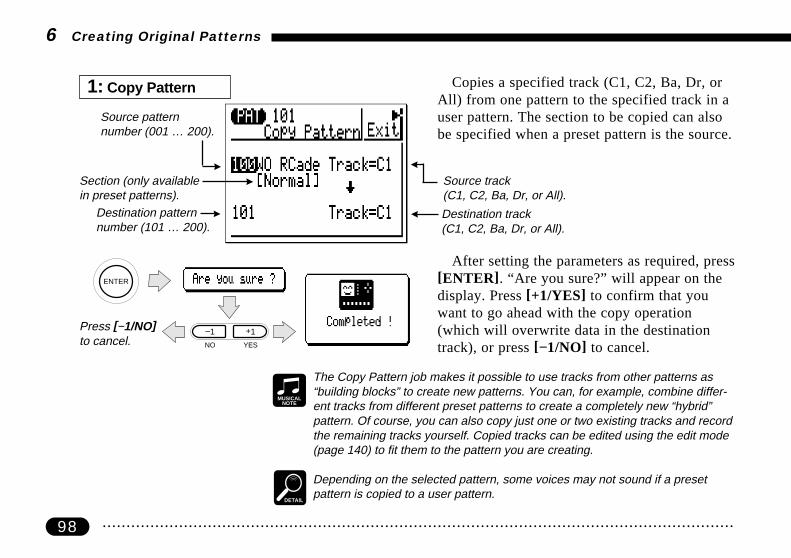
98 • • • • • • • • • • • • • • • • • • • • • • • • • • • • • • • • • • • • • • • • • • • • • • • • • • • • • • • • • • • • • • • • • • • • • • • • • • • • • • • • • • • • • • • • • • • • • • • • • • • • • • • • • • • • • • • • • • • • • • • • • • • • • • • • • • • •
–1 +1
NO YES
ENTER
6 Creating Original Patterns
Copies a specified track (C1, C2, Ba, Dr, orAll) from one pattern to the specified track in auser pattern. The section to be copied can alsobe specified when a preset pattern is the source.
After setting the parameters as required, press[ENTER]. “Are you sure?” will appear on thedisplay. Press [+1/YES] to confirm that youwant to go ahead with the copy operation(which will overwrite data in the destinationtrack), or press [−1/NO] to cancel.
MUSICALNOTE
The Copy Pattern job makes it possible to use tracks from other patterns as“building blocks” to create new patterns. You can, for example, combine differ-ent tracks from different preset patterns to create a completely new “hybrid”pattern. Of course, you can also copy just one or two existing tracks and recordthe remaining tracks yourself. Copied tracks can be edited using the edit mode(page 140) to fit them to the pattern you are creating.
DETAIL
Depending on the selected pattern, some voices may not sound if a presetpattern is copied to a user pattern.
Press [−1/NO]to cancel.
1: Copy Pattern
Destination track(C1, C2, Ba, Dr, or All).
Source track(C1, C2, Ba, Dr, or All).
Source patternnumber (001 … 200).
Section (only availablein preset patterns).
Destination patternnumber (101 … 200).

99• • • • • • • • • • • • • • • • • • • • • • • • • • • • • • • • • • • • • • • • • • • • • • • • • • • • • • • • • • • • • • • • • • • • • • • • • • • • • • • • • • • • • • • • • • • • • • • • • • • • • • • • • • • • • • • • • • • • • • • • • • • • • • • • • • • •
–1 +1
NO YES
ENTER
Press [−1/NO]to cancel.
6 Creating Original Patterns
Aligns notes in the specified track to the nearest specified beat.
MUSICALNOTE
Quantization is generally used to tighten up sloppy timing. Use it judi-ciously, however, because timing that is too perfect can sound cold andmechanical — unless, of course, you’re specifically aiming for a cold,mechanical feel. Always use a quantize value that is at least as “short” asthe shortest notes in the track to be quantized. If you quantize a trackcontaining 16th notes to 1/8 (8th notes), for example, some of the 16thnotes will be aligned with 8th note beats, thus ruining the track.
One measure of 8th notes beforequantization.
After quantization.
2: Quantize
Track to be quantized (C1, C2, Ba, or Dr).
Quantize note length (32nd note, 16thnote triplet, 16th note, 8th note triplet, 8thnote, 1/4-note triplet, 1/4-note, 1/2-notetriplet, 1/2-note).
After setting the parameters as required, press[ENTER]. “Are you sure?” will appear on thedisplay. Press [+1/YES] to confirm that youwant to go ahead with the quantize operation(which will irreversibly modify the data in thespecified track), or press [−1/NO] to cancel.

100 • • • • • • • • • • • • • • • • • • • • • • • • • • • • • • • • • • • • • • • • • • • • • • • • • • • • • • • • • • • • • • • • • • • • • • • • • • • • • • • • • • • • • • • • • • • • • • • • • • • • • • • • • • • • • • • • • • • • • • • • • • • • • • • • • • • •
–1 +1
NO YES
ENTER
Press [−1/NO]to cancel.
Transposes all notes in the specified track up or down by the speci-fied number of semitones. Minus (−) values transpose down whileplus (+) values transpose up.
After setting the parameters as required, press[ENTER]. “Are you sure?” will appear on thedisplay. Press [+1/YES] to confirm that youwant to go ahead with the transpose operation,or press [−1/NO] to cancel.
6 Creating Original Patterns
MUSICALNOTE
Of course, you can transpose all tracks as required to shift the entire pat-tern to a different key, but you could also transpose only the C2 track, forexample, to produce an interval (and therefore harmony) between the C1and C2 tracks.
3: Transpose
Amount or transposition insemitones (−12 … +00 … +12).
Track to be transposed(C1, C2 or Ba).

101• • • • • • • • • • • • • • • • • • • • • • • • • • • • • • • • • • • • • • • • • • • • • • • • • • • • • • • • • • • • • • • • • • • • • • • • • • • • • • • • • • • • • • • • • • • • • • • • • • • • • • • • • • • • • • • • • • • • • • • • • • • • • • • • • • • •
–1 +1
NO YES
ENTER
Press [−1/NO]to cancel.
Increases or decreases the velocity values of all notes in the speci-fied track and range of measures.
6 Creating Original Patterns
The “rate” parameter sets the ratio betweenthe lower and higher velocity values. A settingof “100%” maintains the original relationshipbetween the notes, lower values produce a nar-rower dynamic range, and higher values producea broader dynamic range.
The “offset” parameters determines theamount of velocity change. “−” settings reducethe velocity while “+” settings increase the ve-locity.
After setting the parameters as required, press[ENTER]. “Are you sure?” will appear on thedisplay. Press [+1/YES] to confirm that youwant to go ahead with the modify velocity op-eration, or press [−1/NO] to cancel.
MUSICALNOTE
The Modify Velocity job is a great way to “soften” the sound of a patternthat has too great a variation between the softest and loudest notes, or,conversely, to add extra punch to a dull-sounding pattern. Experimentwith the parameters to get a feel for what they do.
Amount of velocitychange(−99 … +00 … +99).
Track to be modified(C1, C2, Ba, or Dr).
Velocity ratio(000% … 200%).
4: Modify Velocity

102 • • • • • • • • • • • • • • • • • • • • • • • • • • • • • • • • • • • • • • • • • • • • • • • • • • • • • • • • • • • • • • • • • • • • • • • • • • • • • • • • • • • • • • • • • • • • • • • • • • • • • • • • • • • • • • • • • • • • • • • • • • • • • • • • • • • •
–1 +1
NO YES
ENTER
Press [−1/NO]to cancel.
6 Creating Original Patterns
Increases or decreases the gate times (length) of all notes in thespecified track and range of measures.
The “rate” parameter sets the ratio betweenthe shorter and longer gate time values. A settingof “100%” maintains the original relationshipbetween the notes, lower values produce a nar-rower gate time range, and higher values pro-duce a broader gate time range.
The “offset” parameter determines the amountof gate time modification. “−” settings shortenthe gate time while “+” settings increase the gatetime.
After setting the parameters as required, press[ENTER]. “Are you sure?” will appear on thedisplay. Press [+1/YES] to confirm that youwant to go ahead with the modify gate time op-eration, or press [−1/NO] to cancel.
Track to be modified(C1, C2, Ba, or Dr).
Amount of gate timechange(−99 … +00 … +99).
Gate time ratio(000% … 200%).
MUSICALNOTE
The Modify Gate Time job can be used to give the entire pattern a morestaccato or legato feel, as required. Experiment with the parameters toget a feel for what they do.
5: Modify Gate Time

103• • • • • • • • • • • • • • • • • • • • • • • • • • • • • • • • • • • • • • • • • • • • • • • • • • • • • • • • • • • • • • • • • • • • • • • • • • • • • • • • • • • • • • • • • • • • • • • • • • • • • • • • • • • • • • • • • • • • • • • • • • • • • • • • • • • •
Allows an original name of up to 8 characters to be assigned to thecurrent pattern.
6 Creating Original Patterns
To enter a character, use the cursor keys tomove the cursor to the character to be entered,then press the [ENTER] key. The characterwill appear at the character cursor location andthe character cursor will advance to the nextcharacter position.
To delete the last character entered place thecursor over “DEL” at the bottom of the displayand press [ENTER]. The character will bedeleted and character cursor will move back tothe last character position.
When the entire name has been entered, press the top function but-ton next to “Exit” on the display. The new name will appear next tothe pattern number at the top of the PATTERN mode display.
6: Pattern Name
Name area.
Character cursor. Moves forwardas each character is entered, orbackward when a character isdeleted.
Characters andDEL function.
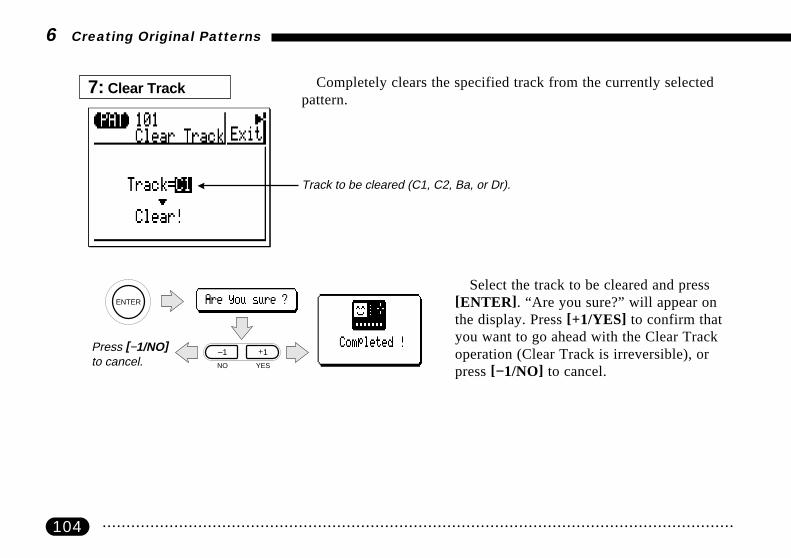
104 • • • • • • • • • • • • • • • • • • • • • • • • • • • • • • • • • • • • • • • • • • • • • • • • • • • • • • • • • • • • • • • • • • • • • • • • • • • • • • • • • • • • • • • • • • • • • • • • • • • • • • • • • • • • • • • • • • • • • • • • • • • • • • • • • • • •
–1 +1
NO YES
ENTER
Press [−1/NO]to cancel.
Completely clears the specified track from the currently selectedpattern.
6 Creating Original Patterns
Track to be cleared (C1, C2, Ba, or Dr).
Select the track to be cleared and press[ENTER]. “Are you sure?” will appear onthe display. Press [+1/YES] to confirm thatyou want to go ahead with the Clear Trackoperation (Clear Track is irreversible), orpress [−1/NO] to cancel.
7: Clear Track

105• • • • • • • • • • • • • • • • • • • • • • • • • • • • • • • • • • • • • • • • • • • • • • • • • • • • • • • • • • • • • • • • • • • • • • • • • • • • • • • • • • • • • • • • • • • • • • • • • • • • • • • • • • • • • • • • • • • • • • • • • • • • • • • • • • • •
–1 +1
NO YES
ENTER
Press [−1/NO]to cancel.
6 Creating Original Patterns
Completely clears the currently selected user pattern.
After selecting the Clear Pattern job, press[ENTER]. “Are you sure?” will appear on thedisplay. Press [+1/YES] to confirm that youwant to go ahead with the Clear Pattern op-eration (Clear Pattern is irreversible), or press[−1/NO] to cancel.
8: Clear Pattern

106 • • • • • • • • • • • • • • • • • • • • • • • • • • • • • • • • • • • • • • • • • • • • • • • • • • • • • • • • • • • • • • • • • • • • • • • • • • • • • • • • • • • • • • • • • • • • • • • • • • • • • • • • • • • • • • • • • • • • • • • • • • • • • • • • • • • •

107• • • • • • • • • • • • • • • • • • • • • • • • • • • • • • • • • • • • • • • • • • • • • • • • • • • • • • • • • • • • • • • • • • • • • • • • • • • • • • • • • • • • • • • • • • • • • • • • • • • • • • • • • • • • • • • • • • • • • • • • • • • • • • • • • • • •
7Creating a Complete Song
Recording the Sequencer Tracks . 108
Preparing to Record —Voice Assignments ....................... 108
Realtime Sequencer TrackRecording ...................................... 109
Step Sequencer Track Recording. 115
The Song Jobs ................................ 122
1: Mix Track .................................. 124
2: Copy Measure .......................... 125
3: Create Measure ........................ 126
4: Quantize.................................... 127
5: Delete Measure ........................ 128
6: Erase Measure ......................... 129
7: Transpose ................................. 130
8: Move Clock ............................... 131
9: Remove Event .......................... 132
10: Modify Velocity ........................ 133
11: Modify Gate Time ................... 134
12: Song Name ............................. 135
13: Clear Track ............................. 136
14: Clear Song .............................. 137

108 • • • • • • • • • • • • • • • • • • • • • • • • • • • • • • • • • • • • • • • • • • • • • • • • • • • • • • • • • • • • • • • • • • • • • • • • • • • • • • • • • • • • • • • • • • • • • • • • • • • • • • • • • • • • • • • • • • • • • • • • • • • • • • • • • • • •
MODE
7 Creating a Complete Song
Recording the Sequencer Tracks
After recording the accompaniment tracks in the SONG mode using either the preset pat-terns (chapter 5, page 52) or original patterns you have created in the PATTERN mode(chapter 6, page 78), record melody lines, harmony parts, counter-melodies, or any otherparts required to complete your composition on the SONG mode sequencer tracks (TR1,TR2, TR3, and TR4). The SONG mode provides realtime and step recording modes for thesequencer tracks as well as the accompaniment tracks.
Preparing to Record — Voice Assignments ——————————————Before actually beginning to record
you should switch to the VOICE modeand assign the desired voices to theSONG mode sequencer tracks (page 38).Of course, you can make these assign-ments later but it’s better to record withthe voices you actually intend to use inthe song.
SONG modetracks.
Mute buttons.
Faders.
Voicenumbers.
mmPan pots.
mmm
Current track. Voice assigned tocurrent track.

109• • • • • • • • • • • • • • • • • • • • • • • • • • • • • • • • • • • • • • • • • • • • • • • • • • • • • • • • • • • • • • • • • • • • • • • • • • • • • • • • • • • • • • • • • • • • • • • • • • • • • • • • • • • • • • • • • • • • • • • • • • • • • • • • • • • •
–1 +1
NO YES
MODE
7 Creating a Complete Song
Realtime Sequencer Track Recording ————————————————
In the realtime record mode you select the track you want to record(TR1, TR2, TR3, or TR4), and then play the part on the micro-key-board or an external MIDI keyboard in real time.
Use the [MODE] key to select the SONG mode and, with the cur-sor located over the song number at the top of the display, use the[−1] and [+1] keys to select the song you intend to record.
ZSelect the SONG mode &the song to be recorded
Select song number (01 … 20).
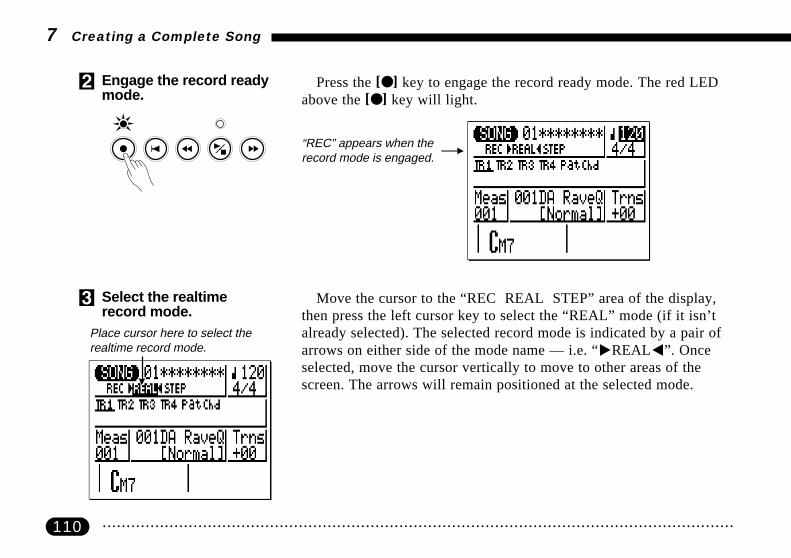
110 • • • • • • • • • • • • • • • • • • • • • • • • • • • • • • • • • • • • • • • • • • • • • • • • • • • • • • • • • • • • • • • • • • • • • • • • • • • • • • • • • • • • • • • • • • • • • • • • • • • • • • • • • • • • • • • • • • • • • • • • • • • • • • • • • • • •
XEngage the record readymode.
Press the [● ] key to engage the record ready mode. The red LEDabove the [● ] key will light.
Move the cursor to the “REC REAL STEP” area of the display,then press the left cursor key to select the “REAL” mode (if it isn’talready selected). The selected record mode is indicated by a pair ofarrows on either side of the mode name — i.e. “>REAL<”. Onceselected, move the cursor vertically to move to other areas of thescreen. The arrows will remain positioned at the selected mode.
“REC” appears when therecord mode is engaged. m
Place cursor here to select therealtime record mode.
CSelect the realtimerecord mode.
7 Creating a Complete Song

111• • • • • • • • • • • • • • • • • • • • • • • • • • • • • • • • • • • • • • • • • • • • • • • • • • • • • • • • • • • • • • • • • • • • • • • • • • • • • • • • • • • • • • • • • • • • • • • • • • • • • • • • • • • • • • • • • • • • • • • • • • • • • • • • • • • •
VSelect tempo and trans-pose parameters as re-quired.
Move the cursor to the tempo and transpose parameters and set asrequired using the [−1] and [+1] keys (since you’ve probably alreadyrecorded the accompaniment tracks, the time signature can’t bechanged).
Record tempo.
Transpose.
HINT
It’s sometimes easier to set a slow tempo for realtimerecording, so you have plenty of time to enter the data.
BSelect the track torecord.
Move the cursor to the track area of the display, andthen shift the cursor sideways to select the track youwant to record: TR1, TR2, TR3, or TR4. Move the cur-sor vertically to move to other areas of the screen. Anunderline will remain below the selected track.mCursor here
to select TR1for recording.
7 Creating a Complete Song

112 • • • • • • • • • • • • • • • • • • • • • • • • • • • • • • • • • • • • • • • • • • • • • • • • • • • • • • • • • • • • • • • • • • • • • • • • • • • • • • • • • • • • • • • • • • • • • • • • • • • • • • • • • • • • • • • • • • • • • • • • • • • • • • • • • • • •
7 Creating a Complete Song
NRecord. Press the [ ] key to begin recording. The metronome will soundand you’ll be given a two-measure count-in prior to the first measureactually recorded. The count-in is also indicated by negative numbersin the “Meas” parameter. If a 4/4 time signature is selected, for exam-ple, the count-in will run from measure “−08” to “−01”, then record-ing will begin from measure “001”.
Play the required part either on the micro-keyboardor via an external MIDI keyboard transmitting on theappropriate MIDI channel:
MIDI Channel Track1......................... TR12......................... TR23......................... TR34......................... TR4
Minus measurenumbers duringcount-in.
m
m
Realtime record-ing in progress.
HINT
If the track selected for recording contains previously-recorded data, theold data will be erased and replaced by the new data. If you want torecord several separate parts to the same track (using the same voice, ofcourse), use the “Mix Track” song job (page 124) to combine separatelyrecorded tracks.

113• • • • • • • • • • • • • • • • • • • • • • • • • • • • • • • • • • • • • • • • • • • • • • • • • • • • • • • • • • • • • • • • • • • • • • • • • • • • • • • • • • • • • • • • • • • • • • • • • • • • • • • • • • • • • • • • • • • • • • • • • • • • • • • • • • • •
7 Creating a Complete Song
Press the [ ] key to stop recording. The normal SONG playmode is automatically re-selected when you stop recording.
MStop recording.
mTrack containsdata.
Track empty.Note that when you return to the SONG play mode
the block below each track that contains data will befilled (dark) while the blocks below empty tracks areempty (outline only).
Complete the song by re-engaging the record mode, selecting thenext track to be recorded, and recording as described in steps 2 and 5through 7, above.
<Record the remainingtracks.

114 • • • • • • • • • • • • • • • • • • • • • • • • • • • • • • • • • • • • • • • • • • • • • • • • • • • • • • • • • • • • • • • • • • • • • • • • • • • • • • • • • • • • • • • • • • • • • • • • • • • • • • • • • • • • • • • • • • • • • • • • • • • • • • • • • • • •
OCTDOWN
OCTUP
HINT
As long as the record mode is not engaged youcan press the [MODE] key while holding the[MENU] key to see the current pitch of the micro-keyboard as determined by the [OCT DOWN] and[OCT UP] keys, and a list of the drum instrumentscurrently played by the micro-keyboard keys.
DETAIL
See the “Editing Songs & Patterns” section , page140, for information on how to edit recorded songdata.
Hold MENU and press MODE
mm
The pitch of the low-est micro-keyboardkey (changes whenthe octave keys areused).
Micro-keyboard.
mDrum instrumentscurrently played bythe correspondingmicro-keyboard keys.
● The “Used Memory” Display Press the [OCT DOWN] and [OCT UP] keys simultaneously atany time when the record mode is not engaged to see how much ofthe QY22’s memory has been used.
When the bar reaches “100%” the QY22 memory is full (or almostfull) and further recording may not be possible unless you deletesome unwanted data or transfer some data to an external data storagedevice using the MIDI bulk dump function (see page 163).
DETAIL
If the memory becomes full during realtime recording the “Memory Full”error message will appear and recording will stop automatically. Althoughthe used memory display may not show “100%” at this point, further re-cording will not be possible until some data is deleted.
7 Creating a Complete Song

115• • • • • • • • • • • • • • • • • • • • • • • • • • • • • • • • • • • • • • • • • • • • • • • • • • • • • • • • • • • • • • • • • • • • • • • • • • • • • • • • • • • • • • • • • • • • • • • • • • • • • • • • • • • • • • • • • • • • • • • • • • • • • • • • • • • •
–1 +1
NO YES
MODE
Select song number (01 … 20).
The step pattern record mode lets you enter each track note-by-note, with precise control over the timing, length, and loudness ofeach note. You can record entire tracks using the step mode, or use itto brush-up and add data to an existing track.
Use the [MODE] key to select the SONG mode and, with the cur-sor located over the song number at the top of the display, use the[−1] and [+1] keys to select the song you intend to record.
Step Sequencer Track Recording ——————————————————
ZSelect the SONG mode &the song to be recorded
7 Creating a Complete Song
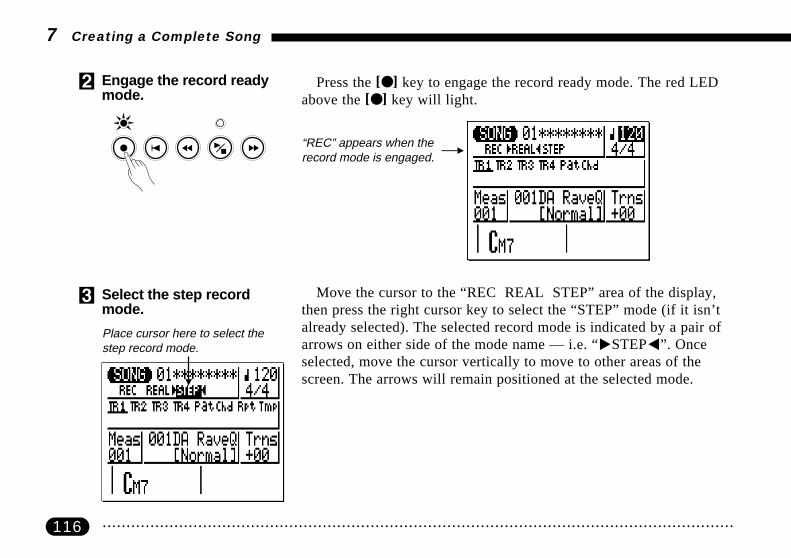
116 • • • • • • • • • • • • • • • • • • • • • • • • • • • • • • • • • • • • • • • • • • • • • • • • • • • • • • • • • • • • • • • • • • • • • • • • • • • • • • • • • • • • • • • • • • • • • • • • • • • • • • • • • • • • • • • • • • • • • • • • • • • • • • • • • • • •
XEngage the record readymode.
Press the [● ] key to engage the record ready mode. The red LEDabove the [● ] key will light.
“REC” appears when therecord mode is engaged. m
Place cursor here to select thestep record mode.
Move the cursor to the “REC REAL STEP” area of the display,then press the right cursor key to select the “STEP” mode (if it isn’talready selected). The selected record mode is indicated by a pair ofarrows on either side of the mode name — i.e. “>STEP<”. Onceselected, move the cursor vertically to move to other areas of thescreen. The arrows will remain positioned at the selected mode.
CSelect the step recordmode.
7 Creating a Complete Song

117• • • • • • • • • • • • • • • • • • • • • • • • • • • • • • • • • • • • • • • • • • • • • • • • • • • • • • • • • • • • • • • • • • • • • • • • • • • • • • • • • • • • • • • • • • • • • • • • • • • • • • • • • • • • • • • • • • • • • • • • • • • • • • • • • • • •
VSelect the track torecord.
Move the cursor to the track area of the display,and then shift the cursor sideways to select the trackyou want to record: TR1, TR2, TR3, or TR4. Movethe cursor vertically to move to other areas of thescreen. An underline will remain below the selectedtrack.TR2 selected for
step recording.
Time signature.
Note display.
Note parameters.
Measure/beat/clock display.
Press the [ ] key to begin recording. The step record displayshown below will appear.
BRecord.
Current record track.
7 Creating a Complete Song

118 • • • • • • • • • • • • • • • • • • • • • • • • • • • • • • • • • • • • • • • • • • • • • • • • • • • • • • • • • • • • • • • • • • • • • • • • • • • • • • • • • • • • • • • • • • • • • • • • • • • • • • • • • • • • • • • • • • • • • • • • • • • • • • • • • • • •
NSet the note parametersas required.
Move the cursor to the note, velocity, and gate time parameters andset as required using the [−1] and [+1] keys for the first (or next) noteto be entered.
DETAIL
The velocity and gate time settings in the step recorddisplay correspond to the following numeric values inthe edit displays (to be described later):
Velocity “p” = 56“mf” = 88“f” = 120
Gate Time “Staccato” = 50% normal note length.“Normal” = 90% normal note length.“Slur” = 99% normal note length.
Once the note parameter have been specified, the note can be en-tered simply by playing the appropriate key on the micro-keyboard(or on your external MIDI keyboard). A note symbol appears on thenote display an the note pointer advances to the next note position.The note symbol always appears as a 1/4-note, regardless of the actualnote entered (chords are also indicated by the 1/4-note symbol).Here’s how the display will look after two 8th notes have been en-tered.
MEnter a note.
Note (32nd, 16th triplet,16th, 8th triplet, 8th,1/4 triplet, 1/4,1/2 triplet, 1/2).
mGate time(Staccato,Normal, Slur).
Velocity(p = soft,mf = medium,f = loud).
7 Creating a Complete Song

119• • • • • • • • • • • • • • • • • • • • • • • • • • • • • • • • • • • • • • • • • • • • • • • • • • • • • • • • • • • • • • • • • • • • • • • • • • • • • • • • • • • • • • • • • • • • • • • • • • • • • • • • • • • • • • • • • • • • • • • • • • • • • • • • • • • •
The Note DisplayThe note display shows up to four 1/4-notes worth of
data at once (that’s one measure in 4/4 time). If the se-lected time signature results in more than four 1/4 notesper measure, then the display will scroll to show the ex-tra notes. On the other hand, if the time signature is 3/4,then the 4th beat is not used and appears as doubledashes on the display (“========”).
Moving Around In the Note DisplayYou can move the cursor down to the note display (the
note pointer will appear filled) and move the note pointerto any position at which you want to enter a note, or toany note that you want to delete. You will actually hearthe appropriate note or chord when the note pointer ismoved to an existing note symbol. When you move thenote pointer past the end of the note display, the nextmeasure will appear.
1st beat. 2nd beat.
4th beat.3rd beat.
Each dashrepresents a32nd note(12 clocks).
Notepointer.
Cursor moved to note pointer (pointer filled).Note that the pointer points up to notes in theupper row and down to notes in the lower row.
7 Creating a Complete Song

120 • • • • • • • • • • • • • • • • • • • • • • • • • • • • • • • • • • • • • • • • • • • • • • • • • • • • • • • • • • • • • • • • • • • • • • • • • • • • • • • • • • • • • • • • • • • • • • • • • • • • • • • • • • • • • • • • • • • • • • • • • • • • • • • • • • • •
The Step Mode Function KeysThe four function keys immediately to the right of the dis-
play provide access to a number of handy functions in the steprecord mode. The “del” key deletes the note or chord at the
note pointer. The “Bdl” key movesthe note pointer backward by thecurrently selected note length anddeletes any notes that exist at thatlocation. The “rst” key enters a restof the currently selected note lengthat the note pointer position. And the“tie” key lengthens the previouslyentered note by “tying” another noteof the same length and pitch to it(the “tie” key only works immedi-ately after entering a note).
Step back by currentnote length and delete.
Enter a note of the samelength as the last note,tied to the last note (thiseffectively lengthens thelast note).
Enter rest of currentnote length.
Delete note at notepointer.m
m
m
m
7 Creating a Complete Song
The Measure/Beat/Clock DisplayThe “Meas” area of the step record display shows the current
position of the note pointer in measures, 1/4-note beats, andclocks (there are 96 clocks per 1/4 note). If you’re not surewhat measure you’re seeing on the note display while record-ing, check the measure/beat/clock display.
m
Measure number(001 … 999).
1/4-note beat(01, 02, 03, 04if 4/4 time).
Clock (96clocks per1/4 note).

121• • • • • • • • • • • • • • • • • • • • • • • • • • • • • • • • • • • • • • • • • • • • • • • • • • • • • • • • • • • • • • • • • • • • • • • • • • • • • • • • • • • • • • • • • • • • • • • • • • • • • • • • • • • • • • • • • • • • • • • • • • • • • • • • • • • •
Repeat steps 7 and 8 until the current track of thesong is complete, then press [ ] to stop recordingand go back to step 5 to record the next track, as nec-essary.
DETAIL
See the “Editing Songs & Patterns” section , page 140,for information on how to edit recorded song data.
<Complete the song.
7 Creating a Complete Song

122 • • • • • • • • • • • • • • • • • • • • • • • • • • • • • • • • • • • • • • • • • • • • • • • • • • • • • • • • • • • • • • • • • • • • • • • • • • • • • • • • • • • • • • • • • • • • • • • • • • • • • • • • • • • • • • • • • • • • • • • • • • • • • • • • • • • •
MODE
The Song Jobs
The song mode includes 14 song “jobs” that perform a variety of important functions. To ac-cess and use the song jobs, press the [MENU] key while in the normal SONG play mode,and then press the function key next to “Job” on the display.
Press for song job list.
m
This calls the song job list. You can select any job on the listsimply by moving the cursor to the required job and pressing[ENTER].
7 Creating a Complete Song

123• • • • • • • • • • • • • • • • • • • • • • • • • • • • • • • • • • • • • • • • • • • • • • • • • • • • • • • • • • • • • • • • • • • • • • • • • • • • • • • • • • • • • • • • • • • • • • • • • • • • • • • • • • • • • • • • • • • • • • • • • • • • • • • • • • • •
Song jobs 1 … 6. Song jobs 7 … 12. Song jobs 9 … 14.
m
Press to exitto job list.
m
Press to exit tosong play mode.
Returning to the Song Play ModeThe function button next to “Exit” on the display can be used to
exit from any song job, and then from the job list thereby returningyou to the normal song play mode.
7 Creating a Complete Song

124 • • • • • • • • • • • • • • • • • • • • • • • • • • • • • • • • • • • • • • • • • • • • • • • • • • • • • • • • • • • • • • • • • • • • • • • • • • • • • • • • • • • • • • • • • • • • • • • • • • • • • • • • • • • • • • • • • • • • • • • • • • • • • • • • • • • •
–1 +1
NO YES
ENTER
Press [−1/NO]to cancel.
Combines the data contained in two specifiedsource tracks and places the result in a third des-tination track. The destination track can be thesame as either of the source tracks.
MUSICALNOTE
In many situations you may want to “overdub,” or add new material to a single track withoutdeleting the previous material. This is dangerous, however, since you can ruin one or morelayers of good material by making a mistake during a later overdub. The QY22 eliminatesthis possibility by allowing only “replace” recording (i.e. all material recorded to a trackerases and replaces any previous material on that track). In order to record more than onelayer of material to a single track (using the same voice, of course), first record the layerson separate tracks, then after ensuring that there are no mistakes, use the Mix Track job tocombine these separate tracks onto a single track.
Please note that if both source tracks are set to the same track number, the data fromthat track will simply be copied to the destination track.
7 Creating a Complete Song
Destination track(TR1 … TR4).
Second source track(TR1 … TR4).
First source track(TR1 … TR4). m
mm
1: Mix Track
After setting the parameters as required, press[ENTER]. “Are you sure?” will appear on thedisplay. Press [+1/YES] to confirm that youwant to go ahead with the Mix Track operation(which will overwrite data in the destinationtrack), or press [−1/NO] to cancel.

125• • • • • • • • • • • • • • • • • • • • • • • • • • • • • • • • • • • • • • • • • • • • • • • • • • • • • • • • • • • • • • • • • • • • • • • • • • • • • • • • • • • • • • • • • • • • • • • • • • • • • • • • • • • • • • • • • • • • • • • • • • • • • • • • • • • •
–1 +1
NO YES
ENTER
Press [−1/NO]to cancel.
Copies a specified range of measures fromone track to the specified measure in anothertrack. This operation overwrites the data fromthe beginning of the specified destinationmeasure with the data from the source meas-ure. Previous data in the overwritten measuresis therefore lost. If the “Chd” track is se-lected, the corresponding chord progression iscopied.
MUSICALNOTE
The Copy Measure job makes it easy to use phrases or even complete sections (an entire cho-rus, for example) in more that one place in a song. You can copy a phrase played by one voice,and have it repeated by a different voice later in the song. You can always edit the copied sec-tions to create variations.
7 Creating a Complete Song
2: Copy Measure
Measure to which source measuresare to be copied (001 … 999).
mm
Number of times specified range ofmeasures is to be copied (01 … 99).
Destination track(TR1 … TR4, Chd).
First measure in range tobe copied (001 … 999).
Last measure in range tobe copied (001 … 999).
After setting the parameters as required,press [ENTER]. “Are you sure?” will appearon the display. Press [+1/YES] to confirmthat you want to go ahead with the CopyMeasure operation (Copy Measure is irrevers-ible), or press [−1/NO] to cancel.
Source track(TR1 … TR4, Chd).

126 • • • • • • • • • • • • • • • • • • • • • • • • • • • • • • • • • • • • • • • • • • • • • • • • • • • • • • • • • • • • • • • • • • • • • • • • • • • • • • • • • • • • • • • • • • • • • • • • • • • • • • • • • • • • • • • • • • • • • • • • • • • • • • • • • • • •
–1 +1
NO YES
ENTER
Press [−1/NO]to cancel.
Creates a specified number of blank measureshaving the specified time signature for allsequencer tracks (TR1 ... TR4). The accompani-ment tracks are not affected. The created meas-ures are inserted at a specified measure number,and all subsequent measures are moved forwardto make room. Always set the time signature pa-rameter to the same time signature as the song,otherwise the difference between the specifiedtime signature and that of the accompaniment
After setting the parameters as required, press[ENTER]. “Are you sure?” will appear on thedisplay. Press [+1/YES] to confirm that you wantto go ahead with the Create Measure operation,or press [−1/NO] to cancel.
MUSICALNOTE
Use create measure when you want to add new material somewhere inthe middle of data you’ve already recorded, without erasing the existingdata. First create the required measures, then either copy the data fromexisting measures using the Copy Measure function, or record new dataas required.
7 Creating a Complete Song
3: Create Measure
Measure at whichcreated measuresare to be inserted(001 … 999).
Time signature of measures to be created(1/4 … 8/4, 1/8 … 16/8, 1/16 … 16/16).
Number of measures tobe created (01 … 99).
tracks makes it impossible to prop-erly create the specified measures.

127• • • • • • • • • • • • • • • • • • • • • • • • • • • • • • • • • • • • • • • • • • • • • • • • • • • • • • • • • • • • • • • • • • • • • • • • • • • • • • • • • • • • • • • • • • • • • • • • • • • • • • • • • • • • • • • • • • • • • • • • • • • • • • • • • • • •
–1 +1
NO YES
ENTER
Press [−1/NO]to cancel.
Aligns notes in the specified track to the near-est specified beat.
One measure of 8th notes beforequantization.
After quantization.
MUSICALNOTE
Quantization is generally used to tighten up sloppy timing. Use it judi-ciously, however, because timing that is too perfect can sound cold andmechanical — unless, of course, you’re specifically aiming for a cold,mechanical feel. Always use a quantize value that is at least as “short” asthe shortest notes in the track to be quantized. If you quantize a trackcontaining 16th notes to 1/8 (8th notes), for example, some of the 16thnotes will be aligned with 8th note beats, thus ruining the track.
7 Creating a Complete Song
4: Quantize
First measure in range tobe modified (001 … 999).
Track (TR1 … TR4).Quantize note length (32nd note, 16thnote triplet, 16th note, 8th note triplet, 8thnote, 1/4-note triplet, 1/4-note, 1/2-notetriplet, 1/2-note).
Last measure in range to be modified(001 … 999).
After setting the parameters as required, press[ENTER]. “Are you sure?” will appear on thedisplay. Press [+1/YES] to confirm that you wantto go ahead with the quantize operation (whichwill irreversibly modify the data in the specifiedtrack), or press [−1/NO] to cancel.

128 • • • • • • • • • • • • • • • • • • • • • • • • • • • • • • • • • • • • • • • • • • • • • • • • • • • • • • • • • • • • • • • • • • • • • • • • • • • • • • • • • • • • • • • • • • • • • • • • • • • • • • • • • • • • • • • • • • • • • • • • • • • • • • • • • • • •
–1 +1
NO YES
ENTER
Press [−1/NO]to cancel.
Deletes the specified range of measures from allsequencer tracks (TR1 ... TR4) simultaneously.The accompaniment tracks are not affected. Pleasenote that if the Delete Measure job is used to de-lete a measure or measures that have a differenttime signature from the rest of the song, the speci-fied measure or measures may not be properlydeleted due to the resulting difference between the
7 Creating a Complete Song
5: Delete Measure
Last measure in range tobe deleted (001 … 999).
MUSICALNOTE
Delete Measure is a great way to completely cut out unwanted data fromthe song. It’s important to remember , however, that a delete operationaffects all tracks simultaneously, and that measures following the deletedrange are moved back to take the place of the deleted measures.
After setting the parameters as required, press[ENTER]. “Are you sure?” will appear on thedisplay. Press [+1/YES] to confirm that you wantto go ahead with the Delete Measure operation(Delete Measure is irreversible), or press [−1/NO] to cancel.
First measure in range tobe deleted (001 … 999).
time signatures of thesequencer and accom-paniment tracks.

129• • • • • • • • • • • • • • • • • • • • • • • • • • • • • • • • • • • • • • • • • • • • • • • • • • • • • • • • • • • • • • • • • • • • • • • • • • • • • • • • • • • • • • • • • • • • • • • • • • • • • • • • • • • • • • • • • • • • • • • • • • • • • • • • • • • •
–1 +1
NO YES
ENTER
Press [−1/NO]to cancel.
Erases all note and event data from the speci-fied measure or range of measures in the speci-fied track. An erase operation leaves the speci-fied measures intact but blank.
After setting the parameters as required, press[ENTER]. “Are you sure?” will appear on thedisplay. Press [+1/YES] to confirm that you wantto go ahead with the Erase Measure operation(Erase Measure is irreversible), or press [−1/NO]to cancel.
MUSICALNOTE
Unlike the Delete Measure job, the Erase Measure job erases the datafrom the specified measures only in the specified track. Also, the data iserased but the measures remain intact (i.e. the subsequent measures arenot moved back). After an erase operation you can record new material inthe resulting blank measures as required.
7 Creating a Complete Song
Last measure in range tobe erased (001 … 999).
First measure in range tobe erased (001 … 999).
Track (TR1 … TR4).
6: Erase Measure

130 • • • • • • • • • • • • • • • • • • • • • • • • • • • • • • • • • • • • • • • • • • • • • • • • • • • • • • • • • • • • • • • • • • • • • • • • • • • • • • • • • • • • • • • • • • • • • • • • • • • • • • • • • • • • • • • • • • • • • • • • • • • • • • • • • • • •
–1 +1
NO YES
ENTER
Press [−1/NO]to cancel.
Transposes all notes in the specified part up ordown by the specified number of semitones. Mi-nus (−) values transpose down while plus (+)values transpose up.
First measure in range tobe modified (001 … 999).
Track (TR1 … TR4).
Last measure in range to be modified(001 … 999).
Amount of transposition in semitones(−12 … +00 … +12).
After setting the parameters as required, press[ENTER]. “Are you sure?” will appear on thedisplay. Press [+1/YES] to confirm that youwant to go ahead with the transpose operation,or press [−1/NO] to cancel.
MUSICALNOTE
Of course, you can transpose all tracks as required to shift the entire songto a different key, but the Transpose job is actually more suited to chang-ing the pitch of a section of a single track. This can be done to producetemporary “modulations” to another key, or to create harmony with an-other track.
7 Creating a Complete Song
7: Transpose

131• • • • • • • • • • • • • • • • • • • • • • • • • • • • • • • • • • • • • • • • • • • • • • • • • • • • • • • • • • • • • • • • • • • • • • • • • • • • • • • • • • • • • • • • • • • • • • • • • • • • • • • • • • • • • • • • • • • • • • • • • • • • • • • • • • • •
–1 +1
NO YES
ENTER
Press [−1/NO]to cancel.
Moves all notes and events in the specifiedtrack and range of measures forward or backwardby the specified number of clocks (96 clocks per1/4 note).
First measure in range tobe modified (001 … 999).
Track (TR1 … TR4).
Last measure in range to be modified(001 … 999).
After setting the parameters as required, press[ENTER]. “Are you sure?” will appear on thedisplay. Press [+1/YES] to confirm that you wantto go ahead with the Move Clock operation, orpress [−1/NO] to cancel.
MUSICALNOTE
Since the Move Clock job actually shifts the timing of all notes and otherevents in the specified measures forward or backward, it can significantlyalter the “feel” of the song. You could move the notes forward (“+” set-tings) to create a more “laid back” feel, or backward (“−” settings) to pro-duce a more “driving” feel. Of course, you can also use Clock Move tocorrect timing that is off in the first place.
Number of clocks by which data inspecified range are to be moved(−99 … +00 … +99).
7 Creating a Complete Song
8: Move Clock
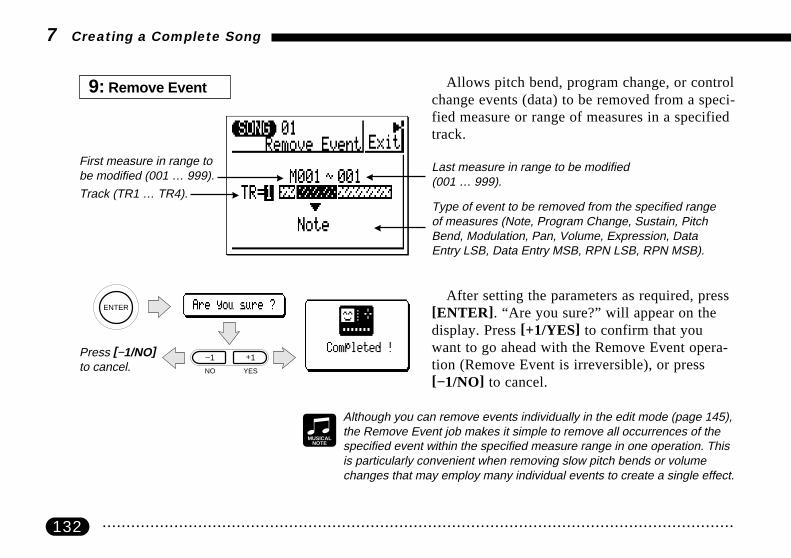
132 • • • • • • • • • • • • • • • • • • • • • • • • • • • • • • • • • • • • • • • • • • • • • • • • • • • • • • • • • • • • • • • • • • • • • • • • • • • • • • • • • • • • • • • • • • • • • • • • • • • • • • • • • • • • • • • • • • • • • • • • • • • • • • • • • • • •
–1 +1
NO YES
ENTER
Press [−1/NO]to cancel.
Allows pitch bend, program change, or controlchange events (data) to be removed from a speci-fied measure or range of measures in a specifiedtrack.
After setting the parameters as required, press[ENTER]. “Are you sure?” will appear on thedisplay. Press [+1/YES] to confirm that youwant to go ahead with the Remove Event opera-tion (Remove Event is irreversible), or press[−1/NO] to cancel.
MUSICALNOTE
Although you can remove events individually in the edit mode (page 145),the Remove Event job makes it simple to remove all occurrences of thespecified event within the specified measure range in one operation. Thisis particularly convenient when removing slow pitch bends or volumechanges that may employ many individual events to create a single effect.
First measure in range tobe modified (001 … 999).
Track (TR1 … TR4).
Last measure in range to be modified(001 … 999).
Type of event to be removed from the specified rangeof measures (Note, Program Change, Sustain, PitchBend, Modulation, Pan, Volume, Expression, DataEntry LSB, Data Entry MSB, RPN LSB, RPN MSB).
7 Creating a Complete Song
9: Remove Event
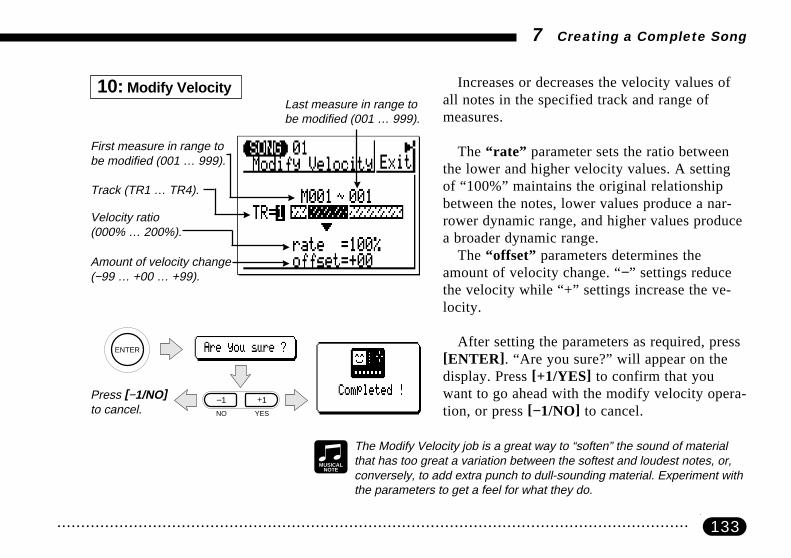
133• • • • • • • • • • • • • • • • • • • • • • • • • • • • • • • • • • • • • • • • • • • • • • • • • • • • • • • • • • • • • • • • • • • • • • • • • • • • • • • • • • • • • • • • • • • • • • • • • • • • • • • • • • • • • • • • • • • • • • • • • • • • • • • • • • • •
–1 +1
NO YES
ENTER
Press [−1/NO]to cancel.
Increases or decreases the velocity values ofall notes in the specified track and range ofmeasures.
The “rate” parameter sets the ratio betweenthe lower and higher velocity values. A settingof “100%” maintains the original relationshipbetween the notes, lower values produce a nar-rower dynamic range, and higher values producea broader dynamic range.
The “offset” parameters determines theamount of velocity change. “−” settings reducethe velocity while “+” settings increase the ve-locity.
After setting the parameters as required, press[ENTER]. “Are you sure?” will appear on thedisplay. Press [+1/YES] to confirm that youwant to go ahead with the modify velocity opera-tion, or press [−1/NO] to cancel.
MUSICALNOTE
The Modify Velocity job is a great way to “soften” the sound of materialthat has too great a variation between the softest and loudest notes, or,conversely, to add extra punch to dull-sounding material. Experiment withthe parameters to get a feel for what they do.
Last measure in range tobe modified (001 … 999).
7 Creating a Complete Song
10: Modify Velocity
First measure in range tobe modified (001 … 999).
Track (TR1 … TR4).
Velocity ratio(000% … 200%).
Amount of velocity change(−99 … +00 … +99).
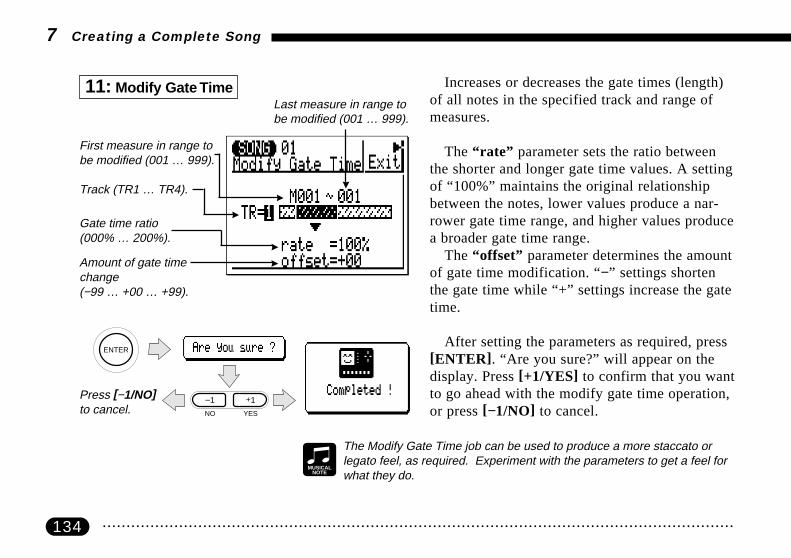
134 • • • • • • • • • • • • • • • • • • • • • • • • • • • • • • • • • • • • • • • • • • • • • • • • • • • • • • • • • • • • • • • • • • • • • • • • • • • • • • • • • • • • • • • • • • • • • • • • • • • • • • • • • • • • • • • • • • • • • • • • • • • • • • • • • • • •
–1 +1
NO YES
ENTER
Press [−1/NO]to cancel.
Increases or decreases the gate times (length)of all notes in the specified track and range ofmeasures.
The “rate” parameter sets the ratio betweenthe shorter and longer gate time values. A settingof “100%” maintains the original relationshipbetween the notes, lower values produce a nar-rower gate time range, and higher values producea broader gate time range.
The “offset” parameter determines the amountof gate time modification. “−” settings shortenthe gate time while “+” settings increase the gatetime.
After setting the parameters as required, press[ENTER]. “Are you sure?” will appear on thedisplay. Press [+1/YES] to confirm that you wantto go ahead with the modify gate time operation,or press [−1/NO] to cancel.
MUSICALNOTE
The Modify Gate Time job can be used to produce a more staccato orlegato feel, as required. Experiment with the parameters to get a feel forwhat they do.
Last measure in range tobe modified (001 … 999).
Amount of gate timechange(−99 … +00 … +99).
7 Creating a Complete Song
First measure in range tobe modified (001 … 999).
Track (TR1 … TR4).
Gate time ratio(000% … 200%).
11: Modify Gate Time
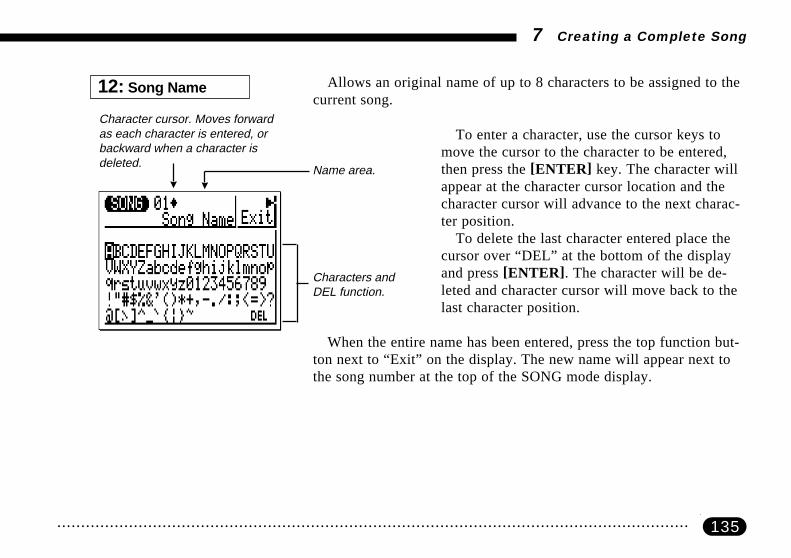
135• • • • • • • • • • • • • • • • • • • • • • • • • • • • • • • • • • • • • • • • • • • • • • • • • • • • • • • • • • • • • • • • • • • • • • • • • • • • • • • • • • • • • • • • • • • • • • • • • • • • • • • • • • • • • • • • • • • • • • • • • • • • • • • • • • • •
Allows an original name of up to 8 characters to be assigned to thecurrent song.
To enter a character, use the cursor keys tomove the cursor to the character to be entered,then press the [ENTER] key. The character willappear at the character cursor location and thecharacter cursor will advance to the next charac-ter position.
To delete the last character entered place thecursor over “DEL” at the bottom of the displayand press [ENTER]. The character will be de-leted and character cursor will move back to thelast character position.
When the entire name has been entered, press the top function but-ton next to “Exit” on the display. The new name will appear next tothe song number at the top of the SONG mode display.
7 Creating a Complete Song
12: Song Name
Name area.
Character cursor. Moves forwardas each character is entered, orbackward when a character isdeleted.
Characters andDEL function.

136 • • • • • • • • • • • • • • • • • • • • • • • • • • • • • • • • • • • • • • • • • • • • • • • • • • • • • • • • • • • • • • • • • • • • • • • • • • • • • • • • • • • • • • • • • • • • • • • • • • • • • • • • • • • • • • • • • • • • • • • • • • • • • • • • • • • •
–1 +1
NO YES
ENTER
Press [−1/NO]to cancel.
Completely clears the specified track from the currently selectedsong. If “BK” is selected, all accompaniment tracks are cleared.
Track to be cleared(TR1 … TR4, BK).
Select the track to be cleared and press [EN-TER]. “Are you sure?” will appear on the dis-play. Press [+1/YES] to confirm that you want togo ahead with the Clear Track operation (ClearTrack is irreversible), or press [−1/NO] to can-cel.
7 Creating a Complete Song
13: Clear Track

137• • • • • • • • • • • • • • • • • • • • • • • • • • • • • • • • • • • • • • • • • • • • • • • • • • • • • • • • • • • • • • • • • • • • • • • • • • • • • • • • • • • • • • • • • • • • • • • • • • • • • • • • • • • • • • • • • • • • • • • • • • • • • • • • • • • •
–1 +1
NO YES
ENTER
Press [−1/NO]to cancel.
Completely clears the currently selected song.
After selecting the Clear Song job, press [EN-TER]. “Are you sure?” will appear on the dis-play. Press [+1/YES] to confirm that you wantto go ahead with the Clear Song operation(Clear Song is irreversible), or press [−1/NO] tocancel.
7 Creating a Complete Song
14: Clear Song

138 • • • • • • • • • • • • • • • • • • • • • • • • • • • • • • • • • • • • • • • • • • • • • • • • • • • • • • • • • • • • • • • • • • • • • • • • • • • • • • • • • • • • • • • • • • • • • • • • • • • • • • • • • • • • • • • • • • • • • • • • • • • • • • • • • • • •

139• • • • • • • • • • • • • • • • • • • • • • • • • • • • • • • • • • • • • • • • • • • • • • • • • • • • • • • • • • • • • • • • • • • • • • • • • • • • • • • • • • • • • • • • • • • • • • • • • • • • • • • • • • • • • • • • • • • • • • • • • • • • • • • • • • • •
8Editing Songs & Patterns
Engaging the Edit Mode ........................................... 140
Change Mode Editing ............................................... 143
Insert Mode Editing ................................................... 146

140 • • • • • • • • • • • • • • • • • • • • • • • • • • • • • • • • • • • • • • • • • • • • • • • • • • • • • • • • • • • • • • • • • • • • • • • • • • • • • • • • • • • • • • • • • • • • • • • • • • • • • • • • • • • • • • • • • • • • • • • • • • • • • • • • • • • •
MENUMENU
8 Editing Songs & Patterns
The QY22’s editing capability makes it easy to correct mistakes made when recording songor pattern data, and to generally refine your sound.The song and pattern edit “change” mode lets you individually modify the timing, pitch, gatetime (length) and velocity (loudness) of each note in the pattern. There’s also an edit “insert”mode that allows insertion of note, program change, sustain on/off, pitch bend, modulation,pan, volume, expression, and other events at any point in the pattern.
To engage the edit mode, place the cursor at the track you want toedit in the normal SONG or PATTERN play mode, press the[MENU] key, and then the function key next to “Edit” on the display.
m
Press to entersong edit modefor current track.
m
From thePATTERNmode:
From theSONG mode:
Press to enterpattern edit modefor current track.
Engaging the Edit Mode———————————————————————

141• • • • • • • • • • • • • • • • • • • • • • • • • • • • • • • • • • • • • • • • • • • • • • • • • • • • • • • • • • • • • • • • • • • • • • • • • • • • • • • • • • • • • • • • • • • • • • • • • • • • • • • • • • • • • • • • • • • • • • • • • • • • • • • • • • • •
8 Editing Songs & Patterns
The edit display will look something like this(of course, the note data will be different).
mm
m m m m
m
m
Beat-clock. Note(pitch).
Gate time(beat-clock).
Velocity.
Edit “change” mode(this is the defaultmode).
Track being edited.
One note per line.
Top of song.
The pattern edit display is almost exactly the same. The only differ-ence is that the part being edited (C1, C2, Ba, or Dr) is displayed inthe upper right corner instead of the track.

142 • • • • • • • • • • • • • • • • • • • • • • • • • • • • • • • • • • • • • • • • • • • • • • • • • • • • • • • • • • • • • • • • • • • • • • • • • • • • • • • • • • • • • • • • • • • • • • • • • • • • • • • • • • • • • • • • • • • • • • • • • • • • • • • • • • • •
8 Editing Songs & Patterns
The timing, pitch, gate time, and velocity values for each note areshown on a single line of the display. The notes are arranged in orderfrom top to bottom. You can move around within the pattern by sim-ply moving the cursor. Move below the bottom of the display and thenote data will scroll up, moving towards the end of the pattern. Theopposite occurs when you move up above the top of the display.
In addition to the lines of note data, there are markers for the top ofthe song, measure lines, and the end of the song.
● Moving Around
mmMeasure line.
Cursor currentlyin measure 002.
m
End of song.
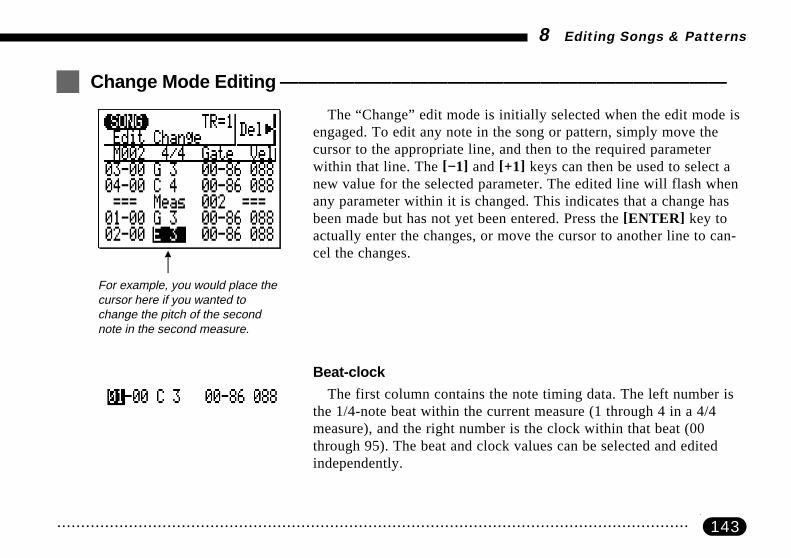
143• • • • • • • • • • • • • • • • • • • • • • • • • • • • • • • • • • • • • • • • • • • • • • • • • • • • • • • • • • • • • • • • • • • • • • • • • • • • • • • • • • • • • • • • • • • • • • • • • • • • • • • • • • • • • • • • • • • • • • • • • • • • • • • • • • • •
8 Editing Songs & Patterns
The “Change” edit mode is initially selected when the edit mode isengaged. To edit any note in the song or pattern, simply move thecursor to the appropriate line, and then to the required parameterwithin that line. The [−1] and [+1] keys can then be used to select anew value for the selected parameter. The edited line will flash whenany parameter within it is changed. This indicates that a change hasbeen made but has not yet been entered. Press the [ENTER] key toactually enter the changes, or move the cursor to another line to can-cel the changes.
Beat-clockThe first column contains the note timing data. The left number is
the 1/4-note beat within the current measure (1 through 4 in a 4/4measure), and the right number is the clock within that beat (00through 95). The beat and clock values can be selected and editedindependently.
Change Mode Editing ————————————————————————
For example, you would place thecursor here if you wanted tochange the pitch of the secondnote in the second measure.
m

144 • • • • • • • • • • • • • • • • • • • • • • • • • • • • • • • • • • • • • • • • • • • • • • • • • • • • • • • • • • • • • • • • • • • • • • • • • • • • • • • • • • • • • • • • • • • • • • • • • • • • • • • • • • • • • • • • • • • • • • • • • • • • • • • • • • • •
8 Editing Songs & Patterns
PitchThis is the actual pitch of the note. The range is from C-2 to G8.
Gate TimeGate time is the length of the note in clocks. A normal 1/4 note, for
example, is 86 clocks long. This is about 90% of the actual length ofa 1/4-note division, which is 96 clocks. The “normal” length of thenote is slightly shortened to prevent notes from running into eachother and sounding slurred (a slur is produced by setting the full notelength). The left number is 1/4-note beats (96-clock units) and theright number is clocks. The range is from 00-01 to 99-95.
VelocityThis parameter controls the velocity (loudness) of the note. The
range is from 001 to 127.
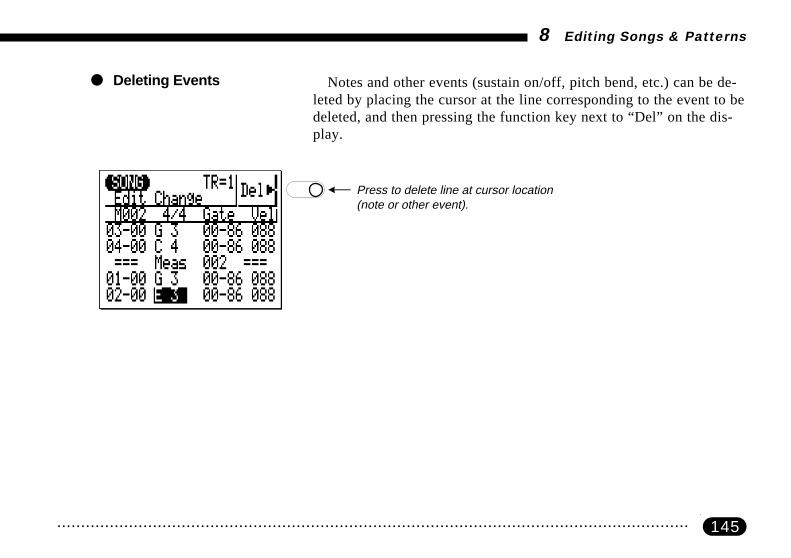
145• • • • • • • • • • • • • • • • • • • • • • • • • • • • • • • • • • • • • • • • • • • • • • • • • • • • • • • • • • • • • • • • • • • • • • • • • • • • • • • • • • • • • • • • • • • • • • • • • • • • • • • • • • • • • • • • • • • • • • • • • • • • • • • • • • • •
8 Editing Songs & Patterns
Notes and other events (sustain on/off, pitch bend, etc.) can be de-leted by placing the cursor at the line corresponding to the event to bedeleted, and then pressing the function key next to “Del” on the dis-play.
● Deleting Events
m
Press to delete line at cursor location(note or other event).

146 • • • • • • • • • • • • • • • • • • • • • • • • • • • • • • • • • • • • • • • • • • • • • • • • • • • • • • • • • • • • • • • • • • • • • • • • • • • • • • • • • • • • • • • • • • • • • • • • • • • • • • • • • • • • • • • • • • • • • • • • • • • • • • • • • • • •
8 Editing Songs & Patterns
The edit insert mode is used to insert new notes and other events ata specified location in the pattern.
Move the cursor to the edit line corresponding to (or near to) thelocation at which you want to insert the new data.
Insert Mode Editing —————————————————————————
ZPlace the cursor at theinsert location.
Press the [MENU] key and then the function key next to “Insert”on the display to switch to the insert edit mode.
XEngage the insert editmode.
mPlace cursor atinsert location.

147• • • • • • • • • • • • • • • • • • • • • • • • • • • • • • • • • • • • • • • • • • • • • • • • • • • • • • • • • • • • • • • • • • • • • • • • • • • • • • • • • • • • • • • • • • • • • • • • • • • • • • • • • • • • • • • • • • • • • • • • • • • • • • • • • • • •
MENU
8 Editing Songs & Patterns
If the display corresponding to the type ofevent you want to insert does not appear immedi-ately (the last selected event type will appear),press the function key next to “evt” on the displayto call the insert edit mode event list.
CCall the event list.
mPress to engageinsert edit mode.
mPress forevent list.
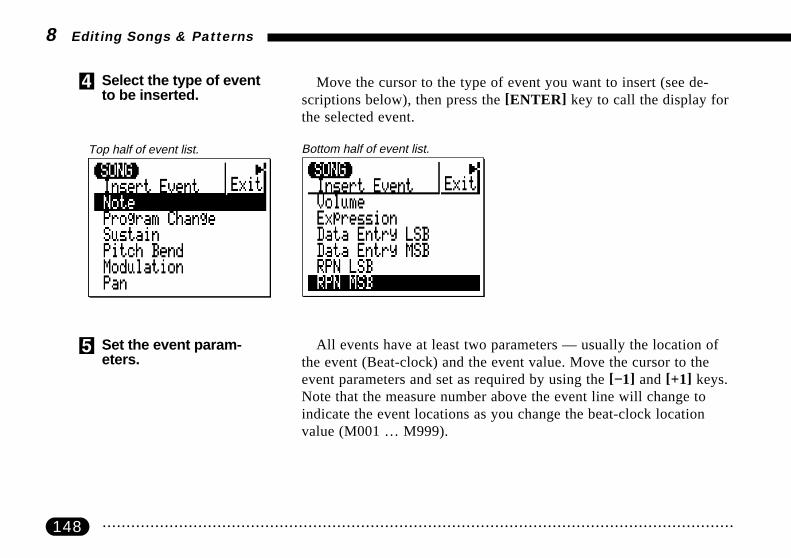
148 • • • • • • • • • • • • • • • • • • • • • • • • • • • • • • • • • • • • • • • • • • • • • • • • • • • • • • • • • • • • • • • • • • • • • • • • • • • • • • • • • • • • • • • • • • • • • • • • • • • • • • • • • • • • • • • • • • • • • • • • • • • • • • • • • • • •
8 Editing Songs & Patterns
Move the cursor to the type of event you want to insert (see de-scriptions below), then press the [ENTER] key to call the display forthe selected event.
VSelect the type of eventto be inserted.
Bottom half of event list.Top half of event list.
All events have at least two parameters — usually the location ofthe event (Beat-clock) and the event value. Move the cursor to theevent parameters and set as required by using the [−1] and [+1] keys.Note that the measure number above the event line will change toindicate the event locations as you change the beat-clock locationvalue (M001 … M999).
BSet the event param-eters.

149• • • • • • • • • • • • • • • • • • • • • • • • • • • • • • • • • • • • • • • • • • • • • • • • • • • • • • • • • • • • • • • • • • • • • • • • • • • • • • • • • • • • • • • • • • • • • • • • • • • • • • • • • • • • • • • • • • • • • • • • • • • • • • • • • • • •
8 Editing Songs & Patterns
NoteNew notes can be inserted at any specified location. The note range
is from “C-2” to “G8”. Gate time and velocity can also be specified.
Location. Pitch. Gatetime.
Velocity.
Location.
Program ChangeIn the SONG mode, Program Change events can be used to switch
voices at any point in the track. You can select voices “001” through“128”. The QY22’s Normal voice names are fully compatible with theGeneral MIDI System Level 1.
In the PATTERN mode it is possible to assign voices to tracks asfollows:
C1, C2, Ba Track .................. Normal voiceDr Track ................................ Drum voice
Both Normal voice and Drum voice names are fully compatiblewith General MIDI System Level 1.
Voicenumber.
Voice name(changes accord-ing to voicenumber selected).

150 • • • • • • • • • • • • • • • • • • • • • • • • • • • • • • • • • • • • • • • • • • • • • • • • • • • • • • • • • • • • • • • • • • • • • • • • • • • • • • • • • • • • • • • • • • • • • • • • • • • • • • • • • • • • • • • • • • • • • • • • • • • • • • • • • • • •
8 Editing Songs & Patterns
SustainInserting a sustain ON event has the same effect as pressing the
sustain pedal on a keyboard. All subsequent notes will be sustained(applicable voices only) until a sustain OFF event is encountered. Besure to select “ON” or “OFF”, as required, before entering a sustainevent.
Pitch BendPitch bend events can be used to produce pitch bend effects. The
amount of pitch bend produced by each event can be set from “−64”through “+00” to “+63”. To produce smooth pitch bends, you’ll needto insert several appropriately-spaced small pitch bend events. Re-member to use more pitch bend effects to return the pitch to normalafter a bend.
ON or OFF.Location.
Location. Amount of pitchchange.

151• • • • • • • • • • • • • • • • • • • • • • • • • • • • • • • • • • • • • • • • • • • • • • • • • • • • • • • • • • • • • • • • • • • • • • • • • • • • • • • • • • • • • • • • • • • • • • • • • • • • • • • • • • • • • • • • • • • • • • • • • • • • • • • • • • • •
8 Editing Songs & Patterns
ModulationModulation events apply pitch modulation (vibrato) to the voice.
The amount of modulation applied can be set from “000” (no modula-tion) to “127” (maximum modulation). Modulation remains in effectuntil a “000” modulation event is encountered.
Location. Amount of modulation.
PanPan events can be used to pan the current voice to a specified posi-
tion in the output stereo sound field (drum voices cannot be panned).The pan position can be set from “L7” (full left) through “C” (center)to “R7” (full right).
Location. Pan position.

152 • • • • • • • • • • • • • • • • • • • • • • • • • • • • • • • • • • • • • • • • • • • • • • • • • • • • • • • • • • • • • • • • • • • • • • • • • • • • • • • • • • • • • • • • • • • • • • • • • • • • • • • • • • • • • • • • • • • • • • • • • • • • • • • • • • • •
8 Editing Songs & Patterns
VolumeVolume events can be used to produce sudden volume changes or
gradual crescendos and decrescendos. The volume range is from“000” (minimum volume) to “127” (maximum volume). Use anumber of small volume events spaced at appropriate intervals to cre-ate gradual volume changes.
ExpressionExpression events function in much the same way as volume
events, but can be used to produce “finer” volume variations. Theexpression range is from “000” (lower volume) to “127” (higher vol-ume). Use a number of small expression events spaced at appropriateintervals to create gradual expression “swells” and other volumechanges.
Location.
Location.
Volume level.
Expression level.

153• • • • • • • • • • • • • • • • • • • • • • • • • • • • • • • • • • • • • • • • • • • • • • • • • • • • • • • • • • • • • • • • • • • • • • • • • • • • • • • • • • • • • • • • • • • • • • • • • • • • • • • • • • • • • • • • • • • • • • • • • • • • • • • • • • • •
8 Editing Songs & Patterns
Data Entry LSB & Data Entry MSBData entry events can be used in conjunction with RPN events (de-
scribed below) to control a wide variety of parameters. An RPN eventis used to specify the parameter to be controlled, then a data entryevent supplies the control value. A single data entry event consists oftwo bytes of data — the LSB (Least Significant Byte) and the MSB(Most Significant Byte). See the “MIDI Data Format” booklet fortechnical details.
Location. Data entry LSBvalue.
Location. Data entry MSBvalue.

154 • • • • • • • • • • • • • • • • • • • • • • • • • • • • • • • • • • • • • • • • • • • • • • • • • • • • • • • • • • • • • • • • • • • • • • • • • • • • • • • • • • • • • • • • • • • • • • • • • • • • • • • • • • • • • • • • • • • • • • • • • • • • • • • • • • • •
8 Editing Songs & Patterns
RPN LSB & RPN MSBRPN (Registered Parameter Number) events can be used in con-
junction with data entry events (described above) to control pitchbend sensitivity, tuning, and other basic tone generator settings. AnRPN event is used to specify the parameter to be controlled, then adata entry event supplies the control value. A single RPN event con-sists of two bytes of data — the LSB (Least Significant Byte) and theMSB (Most Significant Byte). See the “MIDI Data Format” bookletfor technical details.
Location. RPN LSB value.
Location. RPN MSB value.

155• • • • • • • • • • • • • • • • • • • • • • • • • • • • • • • • • • • • • • • • • • • • • • • • • • • • • • • • • • • • • • • • • • • • • • • • • • • • • • • • • • • • • • • • • • • • • • • • • • • • • • • • • • • • • • • • • • • • • • • • • • • • • • • • • • • •
MODE
MENU
CLICK!ENTER
8 Editing Songs & Patterns
NEnter the specifiedevent.
Press the [ENTER] key to enter the event as specified. A click willbe heard as the event is entered. Please note that the click sound willnot be heard if no drum voice is assigned to the drum track, or if thevolume is set to “0”.
<Exit from the edit mode.
MReturn to the changeedit mode.
Press the [MENU] key and then the function key next to “Change”on the display to return to the change edit display, and continue edit-ing as required.
mPress to returnto change editmode.
Pitch bend event inserted.Once inserted, you can editthe event’s location andvalue in the change mode.
Press the [MODE] key to exit from either the change or insert editmode and return to the normal SONG or PATTERN play mode.

156 • • • • • • • • • • • • • • • • • • • • • • • • • • • • • • • • • • • • • • • • • • • • • • • • • • • • • • • • • • • • • • • • • • • • • • • • • • • • • • • • • • • • • • • • • • • • • • • • • • • • • • • • • • • • • • • • • • • • • • • • • • • • • • • • • • • •

157• • • • • • • • • • • • • • • • • • • • • • • • • • • • • • • • • • • • • • • • • • • • • • • • • • • • • • • • • • • • • • • • • • • • • • • • • • • • • • • • • • • • • • • • • • • • • • • • • • • • • • • • • • • • • • • • • • • • • • • • • • • • • • • • • • • •
9Utility Functions
Accessing the Utility Mode ........................................ 158
System Parameters .................................................. 160
Bulk Dump ................................................................ 163
ABC Zone ................................................................. 165
Memory Initialize ....................................................... 166

158 • • • • • • • • • • • • • • • • • • • • • • • • • • • • • • • • • • • • • • • • • • • • • • • • • • • • • • • • • • • • • • • • • • • • • • • • • • • • • • • • • • • • • • • • • • • • • • • • • • • • • • • • • • • • • • • • • • • • • • • • • • • • • • • • • • • •
MENU
9 Utility Functions
mPress to engageutility mode.
The utility mode can be accessed from the SONG, VOICE, or PAT-TERN mode. Simply press the [MENU] key and then the functionkey next to “Utility” on the display.
Accessing the Utility Mode —————————————————————
The QY22 utility mode includes a number of functions that are important for general opera-tion — e.g. MIDI data handling, interfacing with external equipment, saving song and patterndata to an external storage device, ABC system operation, etc.

159• • • • • • • • • • • • • • • • • • • • • • • • • • • • • • • • • • • • • • • • • • • • • • • • • • • • • • • • • • • • • • • • • • • • • • • • • • • • • • • • • • • • • • • • • • • • • • • • • • • • • • • • • • • • • • • • • • • • • • • • • • • • • • • • • • • •
MENU
9 Utility Functions
Once the utility mode has been selected, any of the three utilitydisplays can be called by pressing the [MENU] key and then the ap-propriate function key, as shown below.
mPress to exit fromutility mode.
mmm
Press for utility modesystem parameters.
Press to set ABCkeyboard zone.
Press for MIDI bulkdump.
DETAIL
When the utility mode is first engagedfrom the SONG, PATTERN, or VOICEmode, the last utility display selected willinitially appear.
● Exiting From the UtilityMode
The function key next to “Exit” on thedisplay can be used to exit from any util-ity display and return to the SONG,VOICE, or PATTERN mode.

160 • • • • • • • • • • • • • • • • • • • • • • • • • • • • • • • • • • • • • • • • • • • • • • • • • • • • • • • • • • • • • • • • • • • • • • • • • • • • • • • • • • • • • • • • • • • • • • • • • • • • • • • • • • • • • • • • • • • • • • • • • • • • • • • • • • • •
9 Utility Functions
The “System” display includes 6 parameters that affect the basic op-eration of the QY22. Move the cursor to the parameter to be adjusted andset as required by using the [−1] and [+1] keys.
System Parameters—————————————————————————
MIDI Sync(MIDI synchronization mode)
Settings: Int, Ext
When this parameter is set to “Int” the QY22 is controlled by its owninternal clock.
When set to “Ext” the QY22 is controlled by a MIDI clock signal re-ceived from an external device such as a sequencer or music computer.Please note that the QY22 will not run on its own when this parameter isset to “Ext.”
This parameter simply turns MIDI control of the QY22 on or off.“On” is the normal setting, and with this setting the QY22 receives note,program change, and control change data from an external MIDI key-board or other controlling device. Transmission of start, stop, and con-tinue commands is also active, as is MIDI clock transmission.
When set to “Off” the QY22 will not respond to external MIDI control(start, stop, and continue commands only).
If the QY22 is to be used as a General MIDI tone generator, the MIDIcontrol parameter should be set to “Off”.
MIDI Ctl(MIDI control)
Settings: On, Off

161• • • • • • • • • • • • • • • • • • • • • • • • • • • • • • • • • • • • • • • • • • • • • • • • • • • • • • • • • • • • • • • • • • • • • • • • • • • • • • • • • • • • • • • • • • • • • • • • • • • • • • • • • • • • • • • • • • • • • • • • • • • • • • • • • • • •
9 Utility Functions
The Device Number setting determines the MIDI channel via whichMIDI exclusive data will be transmitted when a Bulk Dump operationis executed (page 163) or received when bulk data is received from anexternal device.
When set to “Off” no bulk data transfer occurs.When set to a channel number between 1 and 16 the bulk data
transfers occur via the specified channel.When set to “All” bulk data is transmitted and received on all
channels.
Tunes the overall pitch of the QY22 sound. The Master Tune rangeis from “−64” through “+00” to “+63”. Each increment correspondsto approximately 2 cents (a cent is 1/100th of a semitone). A settingof “+00” produces normal pitch: A4 = 440 Hz.
Determines when the QY22 metronome will sound. Normally theQY22 metronome sounds only during realtime recording — the“Record” setting. With this parameter, however, you can turn themetronome “Off” so that it never sounds, set it to “Rec/Ply” so thatit sounds during realtime recording and playback, or set it to “Al-ways” so that the metronome sounds at all times.
CAUTION
Internal data may be corrupted if the power is turned off while the metro-nome display is showing!
Device No.(MIDI device number)
Settings: Off, 1 … 16, All
Master Tune
Settings: −64 … +00 … +63
Metronome
Settings: Off, Record,Rec/Ply, Always

162 • • • • • • • • • • • • • • • • • • • • • • • • • • • • • • • • • • • • • • • • • • • • • • • • • • • • • • • • • • • • • • • • • • • • • • • • • • • • • • • • • • • • • • • • • • • • • • • • • • • • • • • • • • • • • • • • • • • • • • • • • • • • • • • • • • • •
9 Utility Functions
The Master Volume controls the overall volume of the QY22. It isrecommended to use the default setting of 127.
Master Vol(Master Volume)
Settings: 0 ... 127
DETAIL
When the QY22 is used as a General MIDI tone generator, it will receiveMaster Volume System Exclusive messages from other MIDI controllers.

163• • • • • • • • • • • • • • • • • • • • • • • • • • • • • • • • • • • • • • • • • • • • • • • • • • • • • • • • • • • • • • • • • • • • • • • • • • • • • • • • • • • • • • • • • • • • • • • • • • • • • • • • • • • • • • • • • • • • • • • • • • • • • • • • • • • •
OUT —— MIDI —— IN
MIDI IN
MDF2
9 Utility Functions
Bulk Dump ————————————————————————————Although the QY22 has memory for 20 songs and 100 user pat-
terns, you might want to save your song and pattern data to an exter-nal device to allow greater storage capacity or simply to protect yourdata from accidental erasure or corruption. An ideal storage device foruse with the QY22 is the Yamaha MDF2 MIDI Data Filer.
To save data from the QY22 to the MDF2, first connect the QY22MIDI OUT to the MDF2 MIDI IN via a MIDI cable, and prepare theMDF2 for reception (refer to the MDF2 operation manual). Alsomake sure that the Device Number parameter in the utility Systemscreen is set to the appropriate device number or “All.”
Next, select the utility mode Bulk Dump screen,select “Song” if you want to save the data for onesong or all songs, “Pattern” if you want to savethe data for one pattern or all patterns, or “All” ifyou want to save all song and pattern data.
If you select “Song”, move the cursor to thesong number parameter and select a song number(01 … 20), or “All” to save all songs.
If you select “Pattern”, move the cursor to thepattern number parameter and select a patternnumber (101 … 200), or “All” to save all patterns.
Type of data to betransmitted (Song,Pattern, or All)
Song or patternnumber (no numberavailable when “All”is selected above)

164 • • • • • • • • • • • • • • • • • • • • • • • • • • • • • • • • • • • • • • • • • • • • • • • • • • • • • • • • • • • • • • • • • • • • • • • • • • • • • • • • • • • • • • • • • • • • • • • • • • • • • • • • • • • • • • • • • • • • • • • • • • • • • • • • • • • •
OUT —— MIDI —— IN
MIDI OUT
MDF2
–1 +1
NO YES
ENTER
Press [−1/NO]to cancel.
9 Utility Functions
When the parameters have been set as re-quired, press [ENTER]. “Are you sure?” willappear on the display. Press [+1/YES] to goahead with the bulk dump operation, or [−1/NO]to cancel. “Transmitting” will appear on the dis-play while the data is being transmitted, and“Completed!” will appear when the transmissionis complete. Press any key (other than the micro-keyboard) to return to the Bulk Dump display.
● Bulk Reception of Song& Pattern Data
If no other operation is currently in progress (recording, for exam-ple) the QY22 will automatically receive bulk song and pattern datatransmitted from the MDF2. Make sure the QY22 song play mode isselected when receiving song data, and that the pattern play mode isselected when receiving pattern data. “ALL” data files including bothsong and pattern data can be received in the song play, pattern play,or voice mode.
To receive bulk data make sure that the MIDI OUT of the MDF2(or other device) is connected to the MIDI IN of the QY22. Alsomake sure that the Device Number parameter in the utility Systemscreen is set to the appropriate device number or “All.”
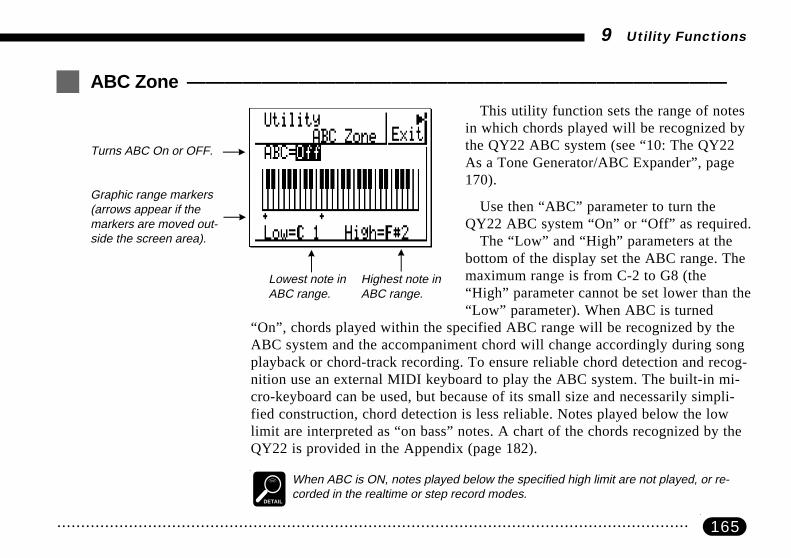
165• • • • • • • • • • • • • • • • • • • • • • • • • • • • • • • • • • • • • • • • • • • • • • • • • • • • • • • • • • • • • • • • • • • • • • • • • • • • • • • • • • • • • • • • • • • • • • • • • • • • • • • • • • • • • • • • • • • • • • • • • • • • • • • • • • • •
9 Utility Functions
ABC Zone —————————————————————————————
mTurns ABC On or OFF.
mGraphic range markers(arrows appear if themarkers are moved out-side the screen area).
m m
Lowest note inABC range.
Highest note inABC range.
This utility function sets the range of notesin which chords played will be recognized bythe QY22 ABC system (see “10: The QY22As a Tone Generator/ABC Expander”, page170).
Use then “ABC” parameter to turn theQY22 ABC system “On” or “Off” as required.
The “Low” and “High” parameters at thebottom of the display set the ABC range. Themaximum range is from C-2 to G8 (the“High” parameter cannot be set lower than the“Low” parameter). When ABC is turned
“On”, chords played within the specified ABC range will be recognized by theABC system and the accompaniment chord will change accordingly during songplayback or chord-track recording. To ensure reliable chord detection and recog-nition use an external MIDI keyboard to play the ABC system. The built-in mi-cro-keyboard can be used, but because of its small size and necessarily simpli-fied construction, chord detection is less reliable. Notes played below the lowlimit are interpreted as “on bass” notes. A chart of the chords recognized by theQY22 is provided in the Appendix (page 182).
DETAIL
When ABC is ON, notes played below the specified high limit are not played, or re-corded in the realtime or step record modes.

166 • • • • • • • • • • • • • • • • • • • • • • • • • • • • • • • • • • • • • • • • • • • • • • • • • • • • • • • • • • • • • • • • • • • • • • • • • • • • • • • • • • • • • • • • • • • • • • • • • • • • • • • • • • • • • • • • • • • • • • • • • • • • • • • • • • • •
GF AAG B
OCTDOWN
OCTUP
ON OFF POWER
Memory Initialize ——————————————————————————
9 Utility Functions
Although not on the utility mode job list, this function makes itpossible to clear and initialize all internal song and pattern memoryand reset all parameters in one single operation.
To initialize the QY22 memory, turn the power switch on whileholding the [OCT DOWN], [OCT UP] and [A#/Bb] keys simultane-ously — then release the keys as soon as the initial power-on displayappears.
Since all data in the internal memory will be erased, make sure anydata you want to keep has been saved to an external data storage de-vice (page 163) before initializing the memory.

167• • • • • • • • • • • • • • • • • • • • • • • • • • • • • • • • • • • • • • • • • • • • • • • • • • • • • • • • • • • • • • • • • • • • • • • • • • • • • • • • • • • • • • • • • • • • • • • • • • • • • • • • • • • • • • • • • • • • • • • • • • • • • • • • • • • •
10The QY22 As A Tone Generator/ABC Expander
As a Tone generator Module .................................... 168
As an ABC Expander ................................................ 170

168 • • • • • • • • • • • • • • • • • • • • • • • • • • • • • • • • • • • • • • • • • • • • • • • • • • • • • • • • • • • • • • • • • • • • • • • • • • • • • • • • • • • • • • • • • • • • • • • • • • • • • • • • • • • • • • • • • • • • • • • • • • • • • • • • • • • •
10 The QY22 As A Tone Generator/ABC Expander
In addition to being played from its own keyboard and internal sequencer, the QY22 can becontrolled from an external keyboard, sequencer, or music computer.
Used as a tone generator module, the QY22 allows 8 differentvoices (7 normal voices and one drum voice) to be played via differ-ent MIDI channels. The MIDI channel/voice assignments are nor-mally determined by the voice-to-track voice assignments made in theVOICE mode.
Each of the QY22 tracks is controlled by a different MIDI channel,as listed below.
MIDI Channel Voice1 ..................... Sequencer track TR12 ..................... Sequencer track TR23 ..................... Sequencer track TR34 ..................... Sequencer track TR45 ..................... Accompaniment track C1 (Chord 1)6 ..................... Accompaniment track C2 (Chord 2)7 ..................... Accompaniment track Ba (Bass)
10 ..................... Accompaniment track Dr (Drums)
As a Tone generator Module —————————————————————
Use –1 +1
NO YES to select
voice numbers.

169• • • • • • • • • • • • • • • • • • • • • • • • • • • • • • • • • • • • • • • • • • • • • • • • • • • • • • • • • • • • • • • • • • • • • • • • • • • • • • • • • • • • • • • • • • • • • • • • • • • • • • • • • • • • • • • • • • • • • • • • • • • • • • • • • • • •
10 The QY22 As A Tone Generator/ABC Expander
DETAIL
Data received on MIDI channels other than those listed above also pro-duce sound, according to the received MIDI program change messages(see the “MIDI Data Format” booklet).
You can assign any of the QY22’s 128 voices and 8 drum kits tothe tracks controlled via MIDI channels 1 through 7, but only drumkit voices can be assigned to the “Dr” track, controlled via MIDIchannel 10.

170 • • • • • • • • • • • • • • • • • • • • • • • • • • • • • • • • • • • • • • • • • • • • • • • • • • • • • • • • • • • • • • • • • • • • • • • • • • • • • • • • • • • • • • • • • • • • • • • • • • • • • • • • • • • • • • • • • • • • • • • • • • • • • • • • • • • •
GENERAL
MUSIC SEQUENCER
10 The QY22 As A Tone Generator/ABC Expander
As an ABC Expander ————————————————————————The QY22’s advanced ABC system can
also be controlled from an external keyboard,making it useful as an ABC expander mod-ule. Use the utility mode “ABC Zone” func-tion (page 165) to specify the range of notesin which you want the QY22 ABC system torecognize chords. Then you can change ac-companiment chords during song playbacksimply by playing the appropriate chord inthe specified section of the keyboard. See the“ABC Fingering Chart” in the Appendix(page 182) for a list of the chords that can berecognized by the QY22 ABC system.
HINT
If you place the cursor at the pattern numberor section name during song playback, youcan use the micro-keyboard section keys tochange sections as you play.
mTurns ABC On or OFF.
mGraphic range markers(arrows appear if themarkers are moved out-side the screen area).
m m
Lowest note inABC range.
Highest note inABC range.
ABC section.

171• • • • • • • • • • • • • • • • • • • • • • • • • • • • • • • • • • • • • • • • • • • • • • • • • • • • • • • • • • • • • • • • • • • • • • • • • • • • • • • • • • • • • • • • • • • • • • • • • • • • • • • • • • • • • • • • • • • • • • • • • • • • • • • • • • • •
11Appendix
Voice List .................................................................. 172
Drum Kit List ............................................................. 176
Preset Pattern List .................................................... 180
ABC Fingering Chart ................................................. 182
Troubleshooting ........................................................ 184
Error Messages ......................................................... 186
Specifications ............................................................ 188

172 • • • • • • • • • • • • • • • • • • • • • • • • • • • • • • • • • • • • • • • • • • • • • • • • • • • • • • • • • • • • • • • • • • • • • • • • • • • • • • • • • • • • • • • • • • • • • • • • • • • • • • • • • • • • • • • • • • • • • • • • • • • • • • • • • • • •
11 Appendix
Piano
001 GrandPno Acoustic Grand Piano 1 001002 BritePno Bright Acoustic Piano 1 002003 E.Grand Electric Grand Piano 2 003004 HnkyTonk Honky-tonk Piano 2 004005 E.Piano1 Electric Piano 1 2 005006 E.Piano2 Electric Piano 2 2 006007 Harpsi. Harpsichord 1 007008 Clavi. Clavi 1 008
Chromatic Percussion
009 Celesta Celesta 1 009010 Glocken Glockenspiel 1 010011 MusicBox Music Box 2 011012 Vibes Vibraphone 1 012013 Marimba Marimba 1 013014 Xylophon Xylophone 1 014015 TubulBel Tubular Bells 1 015016 Dulcimer Dulcimer 2 016
Organ
017 DrawOrgn Drawbar Organ 1 017018 PercOrgn Percussive Organ 1 018019 RockOrgn Rock Organ 1 019020 ChrchOrg Church Organ 2 020021 ReedOrgn Reed Organ 1 021022 Acordion Accordion 2 022023 Harmnica Hamonica 1 023024 TangoAcd Tango Accordion 2 024
Voice # LCD Voice Name Element Pgm#
Voice List (Voice# 001 — 096)———————————————————————
Guitar
025 NylonGtr Acoustic Guitar (nylon) 1 025026 SteelGtr Acoustic Guitar (steel) 1 026027 Jazz Gtr Electric Guitar (jazz) 1 027028 CleanGtr Electric Guitar (clean) 2 028029 Mute.Gtr Electric Guitar (muted) 1 029030 Ovrdrive Overdriven Guitar 1 030031 Dist.Gtr Distortion Guitar 1 031032 GtrHarmo Guitar Harmonics 1 032
Bass
033 Aco.Bass Acoustic Bass 1 033034 FngrBass Electric Bass (finger) 1 034035 PickBass Electric Bass (pick) 1 035036 Fretless Fretless Bass 1 036037 SlapBas1 Slap Bass 1 1 037038 SlapBas2 Slap Bass 2 1 038039 SynBass1 Synth Bass 1 1 039040 SynBass2 Synth Bass 2 1 040
Strings
041 Violin Violin 1 041042 Viola Viola 1 042043 Cello Cello 1 043044 ContraBs Contrabass 1 044045 Trem.Str Tremolo Strings 1 045046 Pizz.Str Pizzicato Strings 2 046047 Harp Orchestral Harp 1 047048 Timpani Timpani 1 048
Voice # LCD Voice Name Element Pgm#

173• • • • • • • • • • • • • • • • • • • • • • • • • • • • • • • • • • • • • • • • • • • • • • • • • • • • • • • • • • • • • • • • • • • • • • • • • • • • • • • • • • • • • • • • • • • • • • • • • • • • • • • • • • • • • • • • • • • • • • • • • • • • • • • • • • • •
11 Appendix
Voice # LCD Voice Name Element Pgm#
Ensemble
049 Strings1 String Ensemble 1 1 049050 Strings2 String Ensemble 2 1 050051 Syn.Str1 Synth Strings 1 2 051052 Syn.Str2 Synth Strings 2 2 052053 ChoirAah Choir Aahs 1 053054 VoiceOoh Voice Oohs 1 054055 SynVoice Synth Voice 1 055056 Orch.Hit Orchestra Hit 1 056
Brass
057 Trumpet Trumpet 1 057058 Trombone Trombone 1 058059 Tuba Tuba 1 059060 Mute.Trp Muted Trumpet 1 060061 Fr.Horn French Horn 1 061062 BrasSect Brass Section 1 062063 SynBras1 Synth Brass 1 2 063064 SynBras2 Synth Brass 2 2 064
Reed
065 SprnoSax Soprano Sax 1 065066 Alto Sax Alto Sax 1 066067 TenorSax Tenor Sax 1 067068 Bari.Sax Baritone Sax 1 068069 Oboe Oboe 1 069070 Eng.Horn English Horn 1 070071 Bassoon Bassoon 1 071072 Clarinet Clarinet 1 072
Voice # LCD Voice Name Element Pgm#
Pipe
073 Piccolo Piccolo 1 073074 Flute Flute 1 074075 Recorder Recorder 1 075076 PanFlute Pan Flute 1 076077 Bottle Blown Bottle 2 077078 Shakhchi Shakuhachi 2 078079 Whistle Whistle 1 079080 Ocarina Ocarina 1 080
Synth Lead
081 SquareLd Lead 1 (square) 2 081082 Saw.Lead Lead 2 (sawtooth) 2 082083 CaliopLd Lead 3 (calliope) 2 083084 Chiff Ld Lead 4 (chiff) 2 084085 CharanLd Lead 5 (charang) 2 085086 Voice Ld Lead 6 (voice) 2 086087 Fifth Ld Lead 7 (fifths) 2 087088 Bass &Ld Lead 8 (bass+lead) 2 088
Synth Pad
089 NewAgePd Pad 1 (new age) 2 089090 Warm Pad Pad 2 (warm) 2 090091 PolySyPd Pad 3 (polysynth) 2 091092 ChoirPad Pad 4 (choir) 2 092093 BowedPad Pad 5 (bowed) 2 093094 MetalPad Pad 6 (metallic) 2 094095 Halo Pad Pad 7 (halo) 2 095096 SweepPad Pad 8 (sweep) 2 096

174 • • • • • • • • • • • • • • • • • • • • • • • • • • • • • • • • • • • • • • • • • • • • • • • • • • • • • • • • • • • • • • • • • • • • • • • • • • • • • • • • • • • • • • • • • • • • • • • • • • • • • • • • • • • • • • • • • • • • • • • • • • • • • • • • • • • •
11 Appendix
Voice # LCD Voice Name Element Pgm#
Voice List (Voice# 097 — 128, Dr1 — Dr8)
Synth Effects
097 Rain FX 1 (rain) 2 097098 SoundTrk FX 2 (soundtrack) 2 098099 Crystal FX 3 (crystal) 2 099100 Atmosphr FX 4 (atmosphere) 2 100101 Bright FX 5 (brightness) 2 101102 Goblins FX 6 (goblins) 2 102103 Echoes FX 7 (echoes) 2 103104 SF FX 8 (sci-fi) 2 104
Ethnic
105 Sitar Sitar 1 105106 Banjo Banjo 1 106107 Shamisen Shamisen 1 107108 Koto Koto 1 108109 Kalimba Kalimba 1 109110 Bagpipe Bagpipe 2 110111 Fiddle Fiddle 1 111112 Shanai Shanai 1 112
Percussive
113 TnklBell Tinkle Bell 2 113114 Agogo Agogo 1 114115 SteelDrm Steel Drums 2 115116 WoodBlok Woodblock 1 116117 TaikoDrm Taiko Drum 1 117118 MelodTom Melodic Tom 1 118119 Syn.Drum Synth Drum 1 119120 RevCymbl Reverse Cymbal 1 120
Voice # LCD Voice Name Element Pgm#
Sound Effects
121 FretNoiz Guitar Fret Noise 1 121122 BrthNoiz Breath Noise 1 122123 Seashore Seashore 2 123124 Tweet Bird Tweet 2 124125 Telphone Telephone Ring 1 125126 Helicptr Helicopter 2 126127 Applause Applause 2 127128 Gunshot Gunshot 1 128
Drum Kit
Dr1 Standard Standard Kit 001Dr2 Room Room Kit 009Dr3 Rock Rock Kit 017Dr4 Elctrnic Electronic Kit 025Dr5 Analog Analog Kit 026Dr6 Jazz Jazz Kit 033Dr7 Brush Brush Kit 041Dr8 Classic Classic Kit 049

175• • • • • • • • • • • • • • • • • • • • • • • • • • • • • • • • • • • • • • • • • • • • • • • • • • • • • • • • • • • • • • • • • • • • • • • • • • • • • • • • • • • • • • • • • • • • • • • • • • • • • • • • • • • • • • • • • • • • • • • • • • • • • • • • • • • •
11 Appendix

176 • • • • • • • • • • • • • • • • • • • • • • • • • • • • • • • • • • • • • • • • • • • • • • • • • • • • • • • • • • • • • • • • • • • • • • • • • • • • • • • • • • • • • • • • • • • • • • • • • • • • • • • • • • • • • • • • • • • • • • • • • • • • • • • • • • • •
Drum Kit List (Note# 23 — 54) ——————————————————————
11 Appendix
23 B -1 Click L <— <— <—24 C 0 Click H <— <— <—25 C# 0 Brush Tap <— <— <—26 D 0 O Brush Swirl L <— <— <—27 D# 0 Brush Slap <— <—28 E 0 O Brush Swirl H <— <— Reverse Cymbal29 F 0 O Snare Roll <— <— <—30 F# 0 Castanet <— <— Hi Q31 G 0 Snare L <— SD Power M Snare M32 G# 0 Sticks <— <— <—33 A 0 Bass Drum L <— Bass Drum M Bass Drum H34 A# 0 Open Rim Shot <— <— <—35 B 0 Bass Drum M <— Bass Drum H BD Power36 C 1 Bass Drum H <— BD Power BD Gate37 C# 1 Side Stick <— <— <—38 D 1 Snare M <— SD Rock SD Power L39 D# 1 Hand Clap <— <— <—40 E 1 Snare H <— SD Power Rim SD Power H41 F 1 Floor Tom L Room Tom 1 Power Tom 1 E Tom 142 F# 1 1 Closed Hi Hat <— <— <—43 G 1 Floor Tom H Room Tom 2 Power Tom 2 E Tom 244 G# 1 1 Pedal Hi-Hat <— <— <—45 A 1 Low Tom Room Tom 3 Power Tom 3 E Tom 346 A# 1 1 Hi-Hat Open <— <— <—47 B 1 Mid Tom L Room Tom 4 Power Tom 4 E Tom 448 C 2 Mid Tom H Room Tom 5 Power Tom 5 E Tom 549 C# 2 Crash Cymbal 1 <— <— <—50 D 2 High Tom Room Tom 6 Power Tom 6 E Tom 651 D# 2 Ride Cymbal 1 <— <— <—52 E 2 Chinese Cymbal <— <— <—53 F 2 Ride Cymbal Cup <— <— <—54 F# 2 Tambourine <— <— <—
Program# 1 9 17 25Note# Note Key Off Alternate Dr1/Standard Kit Dr2/Room Kit Dr3/Rock Kit Dr4/Electronic Kit

177• • • • • • • • • • • • • • • • • • • • • • • • • • • • • • • • • • • • • • • • • • • • • • • • • • • • • • • • • • • • • • • • • • • • • • • • • • • • • • • • • • • • • • • • • • • • • • • • • • • • • • • • • • • • • • • • • • • • • • • • • • • • • • • • • • • •
11 Appendix
23 B -1 Click L <— <— <— <—24 C 0 Click H <— <— <— <—25 C# 0 Brush Tap <— <— <— <—26 D 0 Brush Swirl L <— <— <— <—27 D# 0 Brush Slap <— <— <— <—28 E 0 Brush Swirl H Reverse Cymbal <— <— <—29 F 0 Snare Roll <— <— <— <—30 F# 0 Castanet Hi Q <— <— <—31 G 0 Snare L SD Power H <— Brush Slap L <—32 G# 0 Sticks <— <— <— <—33 A 0 Bass Drum L Bass Drum M <— <— <—34 A# 0 Open Rim Shot <— <— <— <—35 B 0 Bass Drum M BD Analog L <— <— <—36 C 1 Bass Drum H BD Analog H <— <— Gran Cassa37 C# 1 Side Stick Analog Side Stick <— <— <—38 D 1 Snare M Analog Snare L <— Brush Slap <—39 D# 1 Hand Clap <— <— <— <—40 E 1 Snare H Analog Snare H <— Brush Tap <—41 F 1 Floor Tom L Analog Tom 1 Jazz Tom 1 Brush Tom 1 Jazz Tom 142 F# 1 Closed Hi Hat Analog HH Closed 1 <— <— <—43 G 1 Floor Tom H Analog Tom 2 Jazz Tom 2 Brush Tom 2 Jazz Tom 244 G# 1 Pedal Hi-Hat Analog HH Closed 2 <— <— <—45 A 1 Low Tom Analog Tom 3 Jazz Tom 3 Brush Tom 3 Jazz Tom 346 A# 1 Hi-Hat Open Analog HH Open <— <— <—47 B 1 Mid Tom L Analog Tom 4 Jazz Tom 4 Brush Tom 4 Jazz Tom 448 C 2 Mid Tom H Analog Tom 5 Jazz Tom 5 Brush Tom 5 Jazz Tom 549 C# 2 Crash Cymbal 1 <— <— <— Hand Cym.Open L50 D 2 High Tom Analog Tom 6 Jazz Tom 6 Brush Tom 6 Jazz Tom 651 D# 2 Ride Cymbal 1 <— <— <— Hand Cym.Closed L52 E 2 Chinese Cymbal <— <— <— <—53 F 2 Ride Cymbal Cup <— <— <— <—54 F# 2 Tambourine <— <— <— <—
pgm# 1 26 33 41 49Note# Note Dr1/Standard Kit Dr5/Analog Kit Dr6/Jazz Kit Dr7/Brush Kit Dr8/Classic Kit

178 • • • • • • • • • • • • • • • • • • • • • • • • • • • • • • • • • • • • • • • • • • • • • • • • • • • • • • • • • • • • • • • • • • • • • • • • • • • • • • • • • • • • • • • • • • • • • • • • • • • • • • • • • • • • • • • • • • • • • • • • • • • • • • • • • • • •
Drum Kit List (Note# 55 — 85)
11 Appendix
55 G 2 Splash Cymbal <— <— <—56 G# 2 Cowbell <— <— <—57 A 2 Crash Cymbal 2 <— <— <—58 A# 2 Vibraslap <— <— <—59 B 2 Ride Cymbal 2 <— <— <—60 C 3 Bongo H <— <— <—61 C# 3 Bongo L <— <— <—62 D 3 Conga H Mute <— <— <—63 D# 3 Conga H Open <— <— <—64 E 3 Conga L <— <— <—65 F 3 Timbale H <— <— <—66 F# 3 Timbale L <— <— <—67 G 3 High Agogo <— <— <—68 G# 3 Low Agogo <— <— <—69 A 3 Cabassa <— <— <—70 A# 3 Maracas <— <— <—71 B 3 O Samba Whistle H <— <— <—72 C 4 O Samba Whistle L <— <— <—73 C# 4 Guiro Short <— <— <—74 D 4 O Guiro Long <— <— <—75 D# 4 Claves <— <— <—76 E 4 Wood Block H <— <— <—77 F 4 Wood Block L <— <— <—78 F# 4 Cuica Mute <— <— Scratch Push79 G 4 Cuica Open <— <— Scratch Pull80 G# 4 2 Triangle Mute <— <— <—81 A 4 2 Triangle Open <— <— <—82 A# 4 Shaker <— <— <—83 B 4 Jingle Bell <— <— <—84 C 5 Bell Tree <— <— <—85 C# 5 Hi Q <— <— <—
Program# 1 9 17 25Note# Note Key Off Alternate Dr1/Standard Kit Dr2/Room Kit Dr3/Rock Kit Dr4/Electronic Kit

179• • • • • • • • • • • • • • • • • • • • • • • • • • • • • • • • • • • • • • • • • • • • • • • • • • • • • • • • • • • • • • • • • • • • • • • • • • • • • • • • • • • • • • • • • • • • • • • • • • • • • • • • • • • • • • • • • • • • • • • • • • • • • • • • • • • •
11 Appendix
55 G 2 Splash Cymbal <— <— <— <—56 G# 2 Cowbell <— <— <— <—57 A 2 Crash Cymbal 2 <— <— <— Hand Cym.Open H58 A# 2 Vibraslap <— <— <— <—59 B 2 Ride Cymbal 2 <— <— <— Hand Cym.Closed H60 C 3 Bongo H <— <— <— <—61 C# 3 Bongo L <— <— <— <—62 D 3 Conga H Mute Analog Conga H <— <— <—63 D# 3 Conga H Open Analog Conga M <— <— <—64 E 3 Conga L Analog Conga L <— <— <—65 F 3 Timbale H <— <— <— <—66 F# 3 Timbale L <— <— <— <—67 G 3 High Agogo <— <— <— <—68 G# 3 Low Agogo <— <— <— <—69 A 3 Cabassa <— <— <— <—70 A# 3 Maracas <— <— <— <—71 B 3 Samba Whistle H <— <— <— <—72 C 4 Samba Whistle L <— <— <— <—73 C# 4 Guiro Short <— <— <— <—74 D 4 Guiro Long <— <— <— <—75 D# 4 Claves <— <— <— <—76 E 4 Wood Block H <— <— <— <—77 F 4 Wood Block L <— <— <— <—78 F# 4 Cuica Mute Scratch Push <— <— <—79 G 4 Cuica Open Scratch Pull <— <— <—80 G# 4 Triangle Mute <— <— <— <—81 A 4 Triangle Open <— <— <— <—82 A# 4 Shaker <— <— <— <—83 B 4 Jingle Bell <— <— <— <—84 C 5 Bell Tree <— <— <— <—85 C# 5 Hi Q <— <— <— <—
pgm# 1 26 33 41 49Note# Note Dr1/Standard Kit Dr5/Analog Kit Dr6/Jazz Kit Dr7/Brush Kit Dr8/Classic Kit

180 • • • • • • • • • • • • • • • • • • • • • • • • • • • • • • • • • • • • • • • • • • • • • • • • • • • • • • • • • • • • • • • • • • • • • • • • • • • • • • • • • • • • • • • • • • • • • • • • • • • • • • • • • • • • • • • • • • • • • • • • • • • • • • • • • • • •
11 Appendix
QY20'sNo.No.
QY20'sNo.No.
TimeSignature
TimeSignature
Preset Pattern List —————————————————————————
Style NameStyle Name
Dance001 DA RaveQ Rave 4/4002 DA Tekno Techno 4/4 007003 DA Jazzy Acid Jazz 4/4004 DA AcidJ Cool Acid Jazz 4/4005 DA Light Techno House 4/4 010006 DA Craze House Pop Dance 4/4 008007 DA Grand Groundbeat 4/4 028008 DA Rappr Rap 4/4009 DA Dark? Dark Rap 4/4 016010 DA Mitch Rap Shuffle 4/4 017011 DA JackS New Jack Swing 4/4012 DA Mage! Heavy Dance 4/4 002013 DA Frame German Dance 4/4 003014 DA EuroB Eurobeat 4/4015 DA ABCDE ’80s Pop Dance 4/4 004016 DA Disco Disco 4/4 005017 DA Train ’70s Disco Funk 4/4 006018 DA Coast Dance Funk 4/4
Ballad019 BA Llade 8-Beat Ballad 4/4 019020 BA Group 8-Beat Pop Ballad 4/4 020021 BA Gofer Blue-eyed Soul Ballad 4/4 021022 BA Quiet Folk Ballad 4/4 022023 BA LovIt Country Ballad 4/4 023024 BA Magma Ambient House Ballad 4/4 024025 BA Venus 16-beat Ballad 4/4 025026 BA Human Dark Electronic Pop Ballad 4/4 026
027 BA RioDJ Latin Ballad 4/4 027028 BA Witby 6/8 Pop Ballad 4/4 029029 BA RWalz 6/4 Soul Ballad 6/4 030030 BA CWalz Country Ballad Waltz 3/4 031031 BA EWalz Slow Ballad Waltz 3/4 032
Rock & Pop032 RP Mouth Country Rock 4/4 033033 RP Party ’70s 8-Beat Pop 4/4034 RP GetUp Glam Rock 4/4 034035 RP Stone ’70s Mid-Tempo Rock 4/4036 RP Rozza ’80s Mid-Tempo Pop 4/4 035037 RP Faces ’80s Synth Pop 4/4 036038 RP Urple ’80s Dance Pop 4/4 037039 RP Rhino 16-Beat Pop 4/4 038040 RP N.Y.! New York Pop 4/4 039041 RP Start Country Rock Shuffle 4/4 041042 RP Troll Detroit Pop Shuffle 4/4 042043 RP Earth ’80s Mid-Tempo Pop Shuffle 4/4 044044 RP Candy Jazzy Pop Shuffle 4/4 045045 RP RkBgy Rock Boogie 4/4046 RP SeeYa Rock Shuffle 4/4 046047 RP River Southern Rock Shuffle 4/4 047048 RP Judge ’80s Dance Pop Shuffle 4/4 048
Rhythm&Bules049 RB Good! ’60s Rhythm & Blues 4/4050 RB Shore Mid-Tempo R&B 4/4 051051 RB Motor Detroit R&B 4/4 052052 RB Going Light Soul 4/4 053

181• • • • • • • • • • • • • • • • • • • • • • • • • • • • • • • • • • • • • • • • • • • • • • • • • • • • • • • • • • • • • • • • • • • • • • • • • • • • • • • • • • • • • • • • • • • • • • • • • • • • • • • • • • • • • • • • • • • • • • • • • • • • • • • • • • • •
11 Appendix
QY20'sNo.No. Style Name
QY20'sNo.No. Style Name
TimeSignature
TimeSignature
053 RB Funky ’60s Funk Shuffle 4/4 013054 RB Brass West Coast R&B Funk 4/4 054055 RB NFunk Modern Funk 4/4 055056 RB JFunk Jazz Funk 4/4057 RB CFS01 Blues Shuffle 4/4 057058 RB Blues 6/8 Blues 4/4059 RB SBlus Slow Blues 4/4060 RB Lucky Bluesy R&B 4/4 058061 RB South Southern Gospel 6/8 060062 RB Free! R&B Gospel 4/4
Hard Rock063 HR Speed Hi-Tempo Hard Rock 4/4 061064 HR Drive Mid-Tempo American Hard Rock 4/4 062065 HR HurtN Hard Rock Ballad 4/4 063066 HR Piles Slash Metal 4/4 065067 HR BoogE Hard Rock Shuffle 4/4 066068 HR Help! 6/8 Progressive Rock 6/8 067
Rock & Roll069 RR Twist Twist 4/4070 RR Crock ’50s Rock &Roll 4/4071 RR BgWgy Boogie Woogie 4/4072 RR Billy Rockabilly 4/4 072073 RR Gravy ’60s British Rock & Roll 4/4 069074 RR Jngle 16-Beat Rock & Roll 4/4
Jazz075 JA Dook! ’40s Jazz 4/4 074076 JA Swing Big Band Swing 4/4 075
077 JA Bebop Bebop 4/4078 JA Dixie Dixie 4/4 077079 JA Zzz.. Jazz Ballad 4/4 078080 JA Foxy! Slow Fox 4/4 079081 JA Vince Jazz Waltz 3/4 080082 JA WFuse West Coast Fusion 4/4083 JA EFuse ’80s Fusion 4/4 082
Latin084 LA Salsa Salsa 4/4 083085 LA Samba Jazz Samba 4/4 086086 LA Bossa Pop Bossa Nova 4/4 087087 LA TinRk Latin Rock 4/4088 LA Rumba Rumba 4/4 089089 LA Tango Tango 4/4 090090 LA Espag Rumba Espagnole 4/4
Reggae091 RE Cycle Traditional Reggae 4/4 091092 RE Tired Pop Reggae Shuffle 4/4 092093 RE Gular 16-Beat Pop Reggae 4/4 093094 RE SkyBt Ska 4/4
World095 WO Grass Bluegrass 4/4 095096 WO Polka Polka 4/4 096097 WO Mrch1 March 4/4 097098 WO Mrch2 6/8 March 4/4099 WO Waltz Vienna Waltz 3/4 099100 WO RCade Game Music 4/4 100

182 • • • • • • • • • • • • • • • • • • • • • • • • • • • • • • • • • • • • • • • • • • • • • • • • • • • • • • • • • • • • • • • • • • • • • • • • • • • • • • • • • • • • • • • • • • • • • • • • • • • • • • • • • • • • • • • • • • • • • • • • • • • • • • • • • • • •
ABC Fingering Chart ————————————————————————This chart shows the chord fingerings recognized by the QY22 ABC system. 3-, 4-, and 5-note
fingerings can be used, depending on the inversion and tensions required. In the fingerings “1” is the root,“3” is the 3rd, “7” is the seventh, and so on. The “Comments” column indicates inversions that should beavoided because they produce a different chord.
Chord Type 3-note Chord 4-note Chord 5-note Chord Comments (for C chords)1+3+7 Amadd9 when E is the lowest note.
Maj7 1+5+71+3+5+7
Maj 1+3+5
6 3+5+61+3+5+6 Am7 when lowest note is not C.
Maj9 1+3+7+91+3+5+7+9
add9 1+3+5+93+5+9 Em7 when E is the lowest note.
min 1+b3+5
min6 1+b3+5+6 F9 when Eb is the lowest note, Am7(b5) when G or A is the lowest note.1+b3+6
min7 1+b3+b7 Abadd9 when Eb or Bb is the lowest note.1+b3+5+b7 Eb6 when Eb is the lowest note.
min7(b5) 1+b3+b5+b7 Ebm6 when Eb is the lowest note, Ab9 when Gb is the lowest note.
mMaj7 1+b3+71+b3+5+7
min9 1+b3+b7+91+b3+5+b7+9
minadd9 1+b3+5+9b3+5+9 EbMaj7 when Eb or D is the lowest note.
11 Appendix
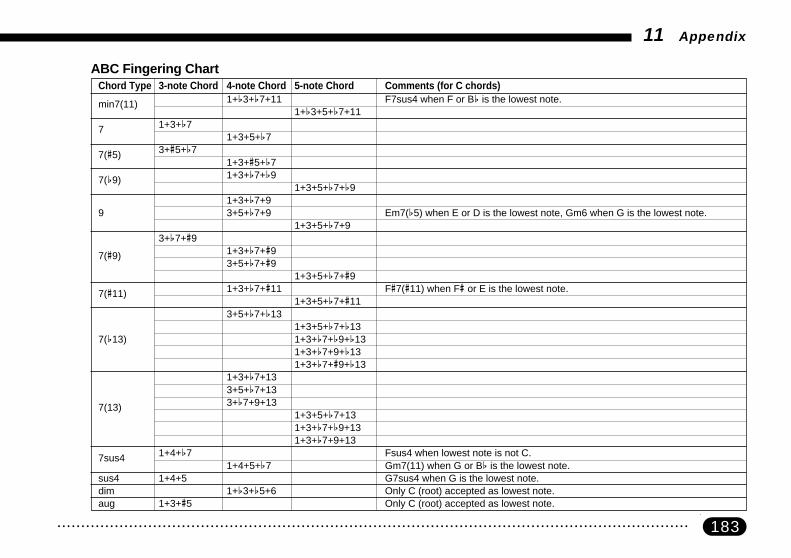
183• • • • • • • • • • • • • • • • • • • • • • • • • • • • • • • • • • • • • • • • • • • • • • • • • • • • • • • • • • • • • • • • • • • • • • • • • • • • • • • • • • • • • • • • • • • • • • • • • • • • • • • • • • • • • • • • • • • • • • • • • • • • • • • • • • • •
Chord Type 3-note Chord 4-note Chord 5-note Chord Comments (for C chords)
min7(11) 1+b3+b7+11 F7sus4 when F or Bb is the lowest note.1+b3+5+b7+11
7 1+3+b71+3+5+b7
7(#5) 3+#5+b71+3+#5+b7
7(b9) 1+3+b7+b91+3+5+b7+b9
1+3+b7+99 3+5+b7+9 Em7(b5) when E or D is the lowest note, Gm6 when G is the lowest note.
1+3+5+b7+93+b7+#9
7(#9) 1+3+b7+#93+5+b7+#9
1+3+5+b7+#9
7(#11) 1+3+b7+#11 F#7(#11) when F# or E is the lowest note.1+3+5+b7+#11
3+5+b7+b131+3+5+b7+b13
7(b13) 1+3+b7+b9+b131+3+b7+9+b131+3+b7+#9+b13
1+3+b7+133+5+b7+13
7(13) 3+b7+9+131+3+5+b7+131+3+b7+b9+131+3+b7+9+13
7sus4 1+4+b7 Fsus4 when lowest note is not C.1+4+5+b7 Gm7(11) when G or Bb is the lowest note.
sus4 1+4+5 G7sus4 when G is the lowest note.dim 1+b3+b5+6 Only C (root) accepted as lowest note.aug 1+3+#5 Only C (root) accepted as lowest note.
ABC Fingering Chart
11 Appendix

184 • • • • • • • • • • • • • • • • • • • • • • • • • • • • • • • • • • • • • • • • • • • • • • • • • • • • • • • • • • • • • • • • • • • • • • • • • • • • • • • • • • • • • • • • • • • • • • • • • • • • • • • • • • • • • • • • • • • • • • • • • • • • • • • • • • • •
Troubleshooting ——————————————————————————
If something doesn’t seem to be working right, please check the following points before assuming thatyour QY22 is faulty.
Symptom Possible CausesIf you are using an AC adaptor, is the adaptor properly plugged intoboth the AC outlet and the QY22? See page 18.
If you are using batteries, is a fresh set of batteries properly installedin the battery compartment? See page 16.
Is the volume control set to an appropriate level? See page 33.
Are the volume parameters for each track set to appropriate levels?See page 40.
Is the transpose parameter set to the normal value (“0”)? See page111.
Is the maximum polyphony of the QY22 being exceeded? The QY22can play no more than 28 notes at once.
You may have selected a song or pattern that contains no data? Seepage 42.
Playback can not be controlled from the QY22 panel when the MIDISync parameter is set to “Ext”. See page 160.
Power won’t turn on.
No sound.
Wrong pitch.
Notes are cut off or omitted.
Playback doesn’t beginwhen the [ ] key ispressed.
11 Appendix

185• • • • • • • • • • • • • • • • • • • • • • • • • • • • • • • • • • • • • • • • • • • • • • • • • • • • • • • • • • • • • • • • • • • • • • • • • • • • • • • • • • • • • • • • • • • • • • • • • • • • • • • • • • • • • • • • • • • • • • • • • • • • • • • • • • • •
Symptom Possible Causes
The time signature and/or pattern changes whenthe song is started.
The time signature cannot be changed for songs or patterns that alreadycontain data.
Have you inserted an end marker in the song? See page 70.
Have you inserted an ending section of a preset pattern in the middle ofthe song? See page 62.
The ABC Zone function may be turned OFF. See page 165.
Are the ABC Zone high and low limits set to appropriate notes? Seepage 165.
Is the cursor placed at a location other than the chord display? See page47.
Most likely the time signature and pattern changes have been recordedonto the accompaniment tracks. See page 62.
Is the QY22 device number set to match that of the transmitting device?See page 161.
Is the song play or pattern play display showing? See page 164.
If you are receiving a 1-song or 1-pattern bulk dump, is the currently se-lect song or pattern empty and therefore available to receive the data?
Bulk data cannot be received during song or pattern playback.
The time signature cannotbe changed.
ABC doesn’t work.
Playback stops in themiddle of a song.
Bulk data not received.
Troubleshooting
11 Appendix

186 • • • • • • • • • • • • • • • • • • • • • • • • • • • • • • • • • • • • • • • • • • • • • • • • • • • • • • • • • • • • • • • • • • • • • • • • • • • • • • • • • • • • • • • • • • • • • • • • • • • • • • • • • • • • • • • • • • • • • • • • • • • • • • • • • • • •
Error Messages ——————————————————————————
Errors do occur from time to time, and when they do the QY22 will usually display a message that indicateswhat type of problem has occurred so you can rectify it and return to normal operation as quickly as possible.
Illegal InputThis error appears if you attempt to enter a value
that is out of range or otherwise unacceptable in thecurrent situation.
Memory FullThe QY22 memory is full or almost full and the
specified operation cannot be performed. Deleteunwanted song and/or pattern data to make morememory available.
Battery LowThe battery voltage is too low for proper opera-
tion. The sound may also become distorted whenthis display appears. Replace the old batteries witha set of new ones as soon as possible. Internal datawill be retained while the batteries are replaced.
Backup Batt. LowAppears when the power is turned on if the inter-
nal memory backup battery is too low to maintainthe internal memory data. Have the backup batteryreplaced by qualified Yamaha service personnel.
Now WorkingThis error may appear if a data error is detected
when the QY22 power is turned on. The “Now Work-ing” display indicates that the data is being repaired... wait a few moments until the error message dis-appears.
Preset PatternSince the preset patterns cannot be changed in
any way, this error message will appear if you at-tempt to execute any operation that is intended toalter the pattern data while a preset pattern is se-lected.
Repeat ExistThis error message will appear if you copy a
chord part using the song job copy measure functionwhile one or more repeats exist in the accompani-ment tracks. Delete all repeats in the step recordmode and then execute the copy measure functionas required.
11 Appendix
187• • • • • • • • • • • • • • • • • • • • • • • • • • • • • • • • • • • • • • • • • • • • • • • • • • • • • • • • • • • • • • • • • • • • • • • • • • • • • • • • • • • • • • • • • • • • • • • • • • • • • • • • • • • • • • • • • • • • • • • • • • • • • • • • • • • •
MIDI DataAn error has been detected in the MIDI data re-
ceived by the QY22. Check all relevant settings,then try receiving the data again.
Check SumAn error has been detected in a MIDI bulk dump
received by the QY22. Check all relevant settings,then try receiving the data again.
Buffer FullToo much MIDI data is being received by the
QY22 at one time. Reduce the amount of data thatis being sent to the QY22.
Illegal DataUnrecognizable bulk data has been received by
the QY22. Make sure that all bulk data sent to theQY22 conforms with QY22 MIDI specifications.
Device# OffBulk data could not be transmitted or received
because the device number parameter is set to“Off”. Set an appropriate device number beforetransmitting or receiving bulk data.
Device# MismatchBulk data could not be received because the de-
vice number of the QY22 does not match that of thedata. Set the QY22 device number parameter to theappropriate number (or “All”), then try receiving thedata again.
Now RunningA MIDI bulk dump has been received during song
or pattern playback (in this case the bulk data islost). Stop playback and try receiving the bulk dataagain.
Data ExistA 1-song or 1-pattern bulk dump has been re-
ceived but the currently selected song or patternalready contains data so the received data was notloaded. Make sure an empty song or pattern is se-lected when receiving this type of data.
Bulk IgnoredBulk data was transmitted to the QY22 while it
was in a mode in which bulk data reception is notpossible. The QY22 can only receive bulk data whilethe song or pattern play display is showing.
11 Appendix
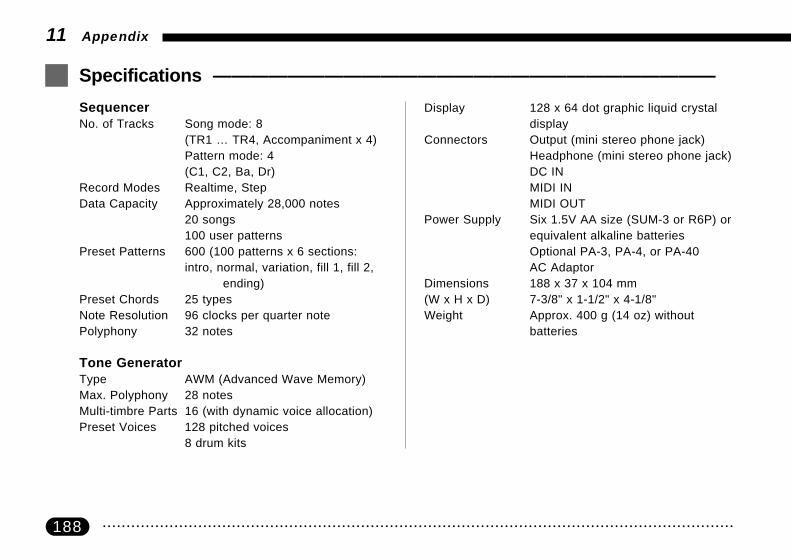
188 • • • • • • • • • • • • • • • • • • • • • • • • • • • • • • • • • • • • • • • • • • • • • • • • • • • • • • • • • • • • • • • • • • • • • • • • • • • • • • • • • • • • • • • • • • • • • • • • • • • • • • • • • • • • • • • • • • • • • • • • • • • • • • • • • • • •
Specifications ———————————————————————————
SequencerNo. of Tracks Song mode: 8
(TR1 … TR4, Accompaniment x 4)Pattern mode: 4(C1, C2, Ba, Dr)
Record Modes Realtime, StepData Capacity Approximately 28,000 notes
20 songs100 user patterns
Preset Patterns 600 (100 patterns x 6 sections:intro, normal, variation, fill 1, fill 2,
ending)Preset Chords 25 typesNote Resolution 96 clocks per quarter notePolyphony 32 notes
Tone GeneratorType AWM (Advanced Wave Memory)Max. Polyphony 28 notesMulti-timbre Parts 16 (with dynamic voice allocation)Preset Voices 128 pitched voices
8 drum kits
Display 128 x 64 dot graphic liquid crystaldisplay
Connectors Output (mini stereo phone jack)Headphone (mini stereo phone jack)DC INMIDI INMIDI OUT
Power Supply Six 1.5V AA size (SUM-3 or R6P) orequivalent alkaline batteriesOptional PA-3, PA-4, or PA-40AC Adaptor
Dimensions 188 x 37 x 104 mm(W x H x D) 7-3/8" x 1-1/2" x 4-1/8"Weight Approx. 400 g (14 oz) without
batteries
11 Appendix

189• • • • • • • • • • • • • • • • • • • • • • • • • • • • • • • • • • • • • • • • • • • • • • • • • • • • • • • • • • • • • • • • • • • • • • • • • • • • • • • • • • • • • • • • • • • • • • • • • • • • • • • • • • • • • • • • • • • • • • • • • • • • • • • • • • • •
11 Appendix

190 • • • • • • • • • • • • • • • • • • • • • • • • • • • • • • • • • • • • • • • • • • • • • • • • • • • • • • • • • • • • • • • • • • • • • • • • • • • • • • • • • • • • • • • • • • • • • • • • • • • • • • • • • • • • • • • • • • • • • • • • • • • • • • • • • • • •
Index
Clear Song ..................................................................... 137Clear Track, pattern .......................................................104
Clear Track, song .......................................................... 136Clock ................................................................................ 92Contrast control ............................................................... 26
Copy Measure ............................................................... 125Copy Pattern .................................................................... 98Count-in ...........................................................................55
Create Measure .............................................................126Cursor keys ..................................................................... 27
DData entry LSB & MSB events, insert edit .................... 153DC IN jack ....................................................................... 20
Delete during pattern record ............................................ 84Delete Measure .............................................................128Deleting events ..............................................................145
Demo, playing the ............................................................ 34Drum instrument display .................................................. 85Drum kit list ....................................................................176
Drum machine, using the QY22 as ................................. 75
EEdit mode, engaging ..................................................... 140Edit mode, moving around ............................................ 142
Empty pattern .................................................................. 78
AABC expander, the QY22 as an .................................... 170ABC fingering chart .......................................................182ABC zone ...................................................................... 165
Accompaniment recording, realtime ................................ 52Accompaniment recording, step ...................................... 59Accompaniment tracks, description ................................. 10
Audio connections ........................................................... 21
BBackup battery ................................................................... 5Bass note, specifying for a chord .................................... 67Batteries, using ................................................................ 16
Beat-clock data, edit mode ............................................ 143
CChange edit ...................................................................143“Chd” track ....................................................................... 57
Chord changes, step record ............................................ 66Chord display ................................................................... 69Chord symbol .................................................................. 47
Chord types ..................................................................... 49Chords, changing ............................................................ 47Chords, erasing ............................................................... 68
Chords, step recording .................................................... 67Clear Pattern ................................................................. 105

191• • • • • • • • • • • • • • • • • • • • • • • • • • • • • • • • • • • • • • • • • • • • • • • • • • • • • • • • • • • • • • • • • • • • • • • • • • • • • • • • • • • • • • • • • • • • • • • • • • • • • • • • • • • • • • • • • • • • • • • • • • • • • • • • • • • •
Index
Empty song ...................................................................... 42Enter key .........................................................................30
Erase Measure .............................................................. 129Error messages ............................................................. 186Event list, insert edit mode ............................................ 147
Expression events, insert edit ....................................... 152
FFaders ..............................................................................40Function keys ..................................................................29
Function keys, step record mode ........................... 92, 120
GGate time .................................................................90, 118
Gate time data, edit mode ............................................. 144
GM(General MIDI) System Level 1 .................................14
IIcons ..................................................................................6Insert edit ....................................................................... 146
LLCD display ..................................................................... 26
Line out jack ....................................................................20
MMaster tune parameter .................................................. 161Master Volume .............................................................. 162
MDF2 MIDI Data Filer ................................................... 163Measure number .............................................................43
Measure/beat/clock display .....................................92, 120Memory initialize ............................................................ 166Menu key .........................................................................29
Metronome parameter ................................................... 161Micro keyboard ................................................................ 31Micro-keyboard chord entry ............................................. 48
Micro-keyboard variation selection ..................................45MIDI bulk dump ............................................................. 163MIDI channel/QY22 track relationship .............................22
MIDI connections .......................................................20, 22MIDI control parameter .................................................. 160MIDI device number parameter ..................................... 161MIDI synchronization mode parameter ......................... 160
Mix Track ....................................................................... 124Mode diagram ....................................................................8Mode key .........................................................................26
Modify Gate Time, pattern ............................................. 102Modify Gate Time, song ................................................ 134Modify Velocity, pattern ................................................. 101
Modify Velocity, song..................................................... 133Modulation events, insert edit ........................................ 151Move Clock .................................................................... 131
Mute buttons ....................................................................38
192 • • • • • • • • • • • • • • • • • • • • • • • • • • • • • • • • • • • • • • • • • • • • • • • • • • • • • • • • • • • • • • • • • • • • • • • • • • • • • • • • • • • • • • • • • • • • • • • • • • • • • • • • • • • • • • • • • • • • • • • • • • • • • • • • • • • •
Index
NNon-ABC patterns ........................................................... 95Note display .............................................................91, 119Note events, insert edit .................................................. 149
Note parameters ......................................................90, 118
OOctave keys ..................................................................... 32
PPan events, insert edit ................................................... 151
Pan pots .......................................................................... 39“Pat” track ........................................................................ 55Pattern changes, erasing ................................................ 65Pattern changes, step record .......................................... 62
Pattern jobs ..................................................................... 96Pattern length ............................................................81, 88Pattern mode playback .................................................... 94
Pattern mode, description ................................................ 11Pattern Name ................................................................ 103Pattern number, selecting ................................................ 43
Pattern number, step record ............................................ 64Pattern record, realtime ................................................... 78Pattern record, step ......................................................... 86
Pattern selection .............................................................. 78
Pattern track & voice selection ................................. 81, 88Pattern variations (“sections”) .......................................... 44
Phones jack ..................................................................... 20Pitch bend events, insert edit ........................................ 150Pitch data, edit mode ..................................................... 144
Playback, starting ............................................................ 43Playback, stopping .......................................................... 46Power adaptor ................................................................. 18
Power supply ...............................................................4, 16Power switch ................................................................... 26Precautions ........................................................................ 4
Preset pattern list ........................................................... 180Program change events, insert edit .............................. 149
QQuantize, pattern ............................................................. 99Quantize, song ..............................................................127
RRecord tempo .................................................................. 81Remove Event ............................................................... 132Repeats, erasing ............................................................. 71
Repeats, step record ....................................................... 70RPN LSB & MSB events, insert edit .............................154

193• • • • • • • • • • • • • • • • • • • • • • • • • • • • • • • • • • • • • • • • • • • • • • • • • • • • • • • • • • • • • • • • • • • • • • • • • • • • • • • • • • • • • • • • • • • • • • • • • • • • • • • • • • • • • • • • • • • • • • • • • • • • • • • • • • • •
Index
SSection ............................................................................. 64Sequencer keys ............................................................... 30Sequencer record track selection .................................. 111
Sequencer track recording, realtime ............................. 109Sequencer track recording, step ................................... 115Sequencer tracks, description .........................................10
Song jobs ....................................................................... 122Song mode, description ..................................................... 9Song Name.................................................................... 135
Song, selecting ................................................................ 42Specifications................................................................. 185Sustain events, insert edit ............................................. 150Syncopated chords .......................................................... 68
System parameters ....................................................... 160
TTempo changes, erasing ................................................. 74Tempo changes, step record ........................................... 72
Tempo parameter ....................................................46, 111Time signature .................................................... 64, 81, 88Tone generator, the QY22 as a ..................................... 168
Track muting ....................................................................51Transpose job, pattern................................................... 100Transpose job, song ...................................................... 130
Transpose parameter .................................................... 111Troubleshooting ............................................................. 181
UUsed memory display .................................................... 114Utility mode, accessing .................................................. 158
VVelocity ....................................................................90, 118
Velocity data, edit mode ................................................ 144Voice assignments ..................................................38, 108Voice list ........................................................................ 172
Voice mode display ......................................................... 36Voice mode, description .................................................... 9Voices, selecting ..............................................................37Volume control ................................................................. 33
Volume events, insert edit ............................................. 152
−1/NO and +1/YES keys ................................................. 28

194 • • • • • • • • • • • • • • • • • • • • • • • • • • • • • • • • • • • • • • • • • • • • • • • • • • • • • • • • • • • • • • • • • • • • • • • • • • • • • • • • • • • • • • • • • • • • • • • • • • • • • • • • • • • • • • • • • • • • • • • • • • • • • • • • • • • •
FCC INFORMATION (U.S.A.)1. IMPORTANT NOTICE: DO NOT MODIFY THIS UNIT!
This product, when installed as indicated in the instructions contained in this manual, meets FCC requirements. Modifications notexpressly approved by Yamaha may void your authority, granted by the FCC, to use the product.
2. IMPORTANT: When connecting this product to accessories and/or another product use only high quality shielded cables. Cable/s supplied with this product MUST be used. Follow all installation instructions. Failure to follow instructions could void your FCCauthorization to use this product in the USA.
3. NOTE: This product has been tested and found to comply with the requirements listed in FCC Regulations, Part 15 for Class “B”digital devices. Compliance with these requirements provides a reasonable level of assurance that your use of this product in aresidential environment will not result in harmful interference with other electronic devices. This equipment generates/uses radiofrequencies and, if not installed and used according to the instructions found in the users manual, may cause interference harmfulto the operation of other electronic devices. Compliance with FCC regulations does not guarantee that interference will not occurin all installations. If this product is found to be the source of interference, which can be determined by turning the unit “OFF” and“ON”, please try to eliminate the problem by using one of the following measures:
Relocate either this product or the device that is being affected by the interference.
Utilize power outlets that are on different branch (circuit breaker or fuse) circuits or install AC line filter/s.
In the case of radio or TV interference, relocate/reorient the antenna. If the antenna lead-in is 300 ohm ribbon lead, change thelead-in to co-axial type cable.
If these corrective measures do not produce satisfactory results, please contact the local retailer authorized to distribute this typeof product. If you can not locate the appropriate retailer, please contact Yamaha Corporation of America, Electronic Service Divi-sion, 6600 Orangethorpe Ave, Buena Park, CA90620
The above statements apply ONLY to those products distributed by Yamaha Corporation of America or its subsidiaries.

195• • • • • • • • • • • • • • • • • • • • • • • • • • • • • • • • • • • • • • • • • • • • • • • • • • • • • • • • • • • • • • • • • • • • • • • • • • • • • • • • • • • • • • • • • • • • • • • • • • • • • • • • • • • • • • • • • • • • • • • • • • • • • • • • • • • •
CANADATHIS DIGITAL APPARATUS DOES NOT EXCEED THE “CLASS B”LIMITS FOR RADIO NOISE EMISSIONS FROM DIGITAL APPARATUSSET OUT IN THE RADIO INTERFERENCE REGULATION OF THECANADIAN DEPARTMENT OF COMMUNICATIONS.
LE PRESENT APPAREIL NUMERIQUE N’EMET PAS DE BRUITSRADIOELECTRIQUES DEPASSANT LES LIMITES APPLICABLES AUXAPPAREILS NUMERIQUES DE LA “CLASSE B” PRESCRITES DANSLE REGLEMENT SUR LE BROUILLAGE RADIOELECTRIQUE EDICTEPAR LE MINISTERE DES COMMUNICATIONS DU CANADA.
• This applies only to products distributed by Yamaha Canada Music Ltd.• Ceci ne s’applique qu’aux produits distribués par Yamaha Canada Music Ltd.
ADVARSEL!Lithiumbatteri—Eksplosionsfare ved fejlagtig håndtering. Udskiftningmå kun ske med batteri af samme fabrikat og type. Levér det brugtebatteri tilbage til leverandoren.
VARNINGExplosionsfara vid felaktigt batteribyte. Använd samma batterityp elleren ekvivalent typ som rekommenderas av apparattillverkaren. Kasseraanvänt batteri enligt fabrikantens instruktion.
VAROITUSParisto voi räjähtää, jos se on virheellisesti asennttu. Vaihda paristoainoastaan laitevalmistajan suosittelemaan tyyppiin. Hävitä käytettyparisto valmistajan ohjeiden mukaisesti.
Die Einzelheiten zu Produkten sind bei Ihrer unten aufgeführten Nie-derlassung und bei Yamaha Vertragshändlern in den jeweiligenBestimmungsländern erhältlich.
Para detalles sobre productos, contacte su tienda Yamaha más cercanao el distribuidor autorizado que se lista debajo.
For details of products, please contact your nearest Yamaha or theauthorized distributor listed below.
Pour plus de détails sur les produits, veuillez-vous adresser à Yamahaou au distributeur le plus proche de vous figurant dans la liste suivante.
ITALYYamaha Musica Italia S.P.A.,Combo DivisionViale Italia 88, 20020 Lainate (Milano), ItalyTel: 02-935-771
SPAINYamaha-Hazen Electronica Musical, S.A.Jorge Juan 30, 28001, Madrid, SpainTel: 91-577-7270
PORTUGALValentim de Carvalho CI SAEstrada de Porto Salvo, Paço de Arcos 2780 Oeiras,PortugalTel: 01-443-3398/4030/1823
GREECEPhilippe Nakas S.A.Navarinou Street 13, P.Code 10680, Athens, GreeceTel: 01-364-7111
SWEDENYamaha Scandinavia ABJ. A. Wettergrens Gata 1Box 30053S-400 43 Göteborg, SwedenTel: 031 89 34 00
DENMARKYS Copenhagen Liaison OfficeGeneratorvej 8BDK-2730 Herlev, DenmarkTel: 44 92 49 00
FINLANDWarner Music Finland OY/Fazer MusicAleksanterinkatu 11, P.O. Box 260SF-00101 Helsinki, FinlandTel: 0435 011
EUROPETHE UNITED KINGDOM
Yamaha-Kemble Music (U.K.) Ltd.Sherbourne Drive, Tilbrook, Milton Keynes,MK7 8BL, EnglandTel: 01908-366700
IRELANDDanfay Ltd.61D, Sallynoggin Road, Dun Laoghaire, Co. DublinTel: 01-2859177
GERMANY/SWITZERLANDYamaha Europa GmbH.Siemensstraße 22-34, D-2084 Rellingen, F.R. ofGermanyTel: 04101-3030
AUSTRIA/HUNGARY/SLOVENIA/ROMANIA/BULGARIA
Yamaha Music Austria Ges m b H.Schleiergasse 20, A-1100 Wien AustriaTel: 0222-60203900
THE NETHERLANDSYamaha Music Benelux B.V.,Verkoop AdministratieKanaalweg 18G, 3526KL, Utrecht, The NetherlandsTel: 030-828411
BELGIUM/LUXEMBOURGYamaha Music Benelux B.V.,Brussels-officeKeiberg Imperiastraat 8, 1930 Zaventem, BelgiumTel: 02-7258220
FRANCEYamaha Musique France,Division ProfessionnelleBP 70-77312 Marne-la-Valée Cedex 2, FranceTel: 01-64-61-4000
NORTH AMERICACANADA
Yamaha Canada Music Ltd.135 Milner Avenue, Scarborough, Ontario,M1S 3R1, CanadaTel: 416-298-1311
U.S.A.Yamaha Corporation of America6600 Orangethorpe Ave., Buena Park, Calif. 90620,U.S.A.Tel: 714-522-9011
MIDDLE & SOUTH AMERICAMEXICO
Yamaha De Mexico S.A. De C.V.,Departamento de ventasJavier Rojo Gomez No.1149, Col. Gpe DelMoral, Deleg. Iztapalapa, 09300 Mexico, D.F.Tel: 686-00-33
BRASILYamaha Musical Do Brasil LTDA.Ave. Reboucas 2636, São Paulo, BrasilTel: 011-853-1377
PANAMAYamaha De Panama S.A.Edificio Interseco, Calle Elvira Mendez no.10,Piso 3, Oficina #105, Ciudad de Panama, PanamaTel: 507-69-5311
OTHER LATIN AMERICAN COUNTRIESAND CARIBBEAN COUNTRIES
Yamaha Music Latin America Corp.6101 Blue Lagoon Drive, Miami, Florida 33126,U.S.A.Tel: 305-261-4111

HEAD OFFICE Yamaha Corporation, Electronic Musical Instrument DivisionNakazawa-cho 10-1, Hamamatsu, Japan 430Tel: 053-460-2445
OCEANIAAUSTRALIA
Yamaha Music Australia Pty. Ltd.17-33 Market Street, South Melbourne, Vic. 3205,AustraliaTel: 3-699-2388
NEW ZEALANDMusic Houses of N.Z. Ltd.146/148 Captain Springs Road, Te Papapa,Auckland, New ZealandTel: 9-634-0099
COUNTRIES AND TRUSTTERRITORIES IN PACIFIC OCEAN
Yamaha Corporation,International Marketing DivisionNakazawa-cho 10-1, Hamamatsu, Japan 430Tel: 053-460-2317
TAIWANKung Hsue She Trading Co., Ltd.No. 322, Section 1, Fu Hsing S. Road,Taipei 106, Taiwan. R.O.C.Tel: 02-709-1266
THAILANDSiam Music Yamaha Co., Ltd.865 Phornprapha Building, Rama I Road,Patumwan, Bangkok 10330, ThailandTel: 2-215-3443
THE PEOPLE’S REPUBLIC OF CHINAAND OTHER ASIAN COUNTRIES
Yamaha Corporation,International Marketing DivisionNakazawa-cho 10-1, Hamamatsu, Japan 430Tel: 053-460-2317
NORWAYNarud Yamaha ASGrini Næringspark 17N-1345 Østerås, NorwayTel: 67 14 47 90
ICELANDSkifan HFSkeifan 17 P.O. Box 8120IS-128 Reykjavik, IcelandTel: 525 5000
EAST EUROPEAN COUNTRIES(Except HUNGARY)
Yamaha Europa GmbH.Siemensstraße 22-34, D-2084 Rellingen, F.R. ofGermanyTel: 04101-3030
SY08
AFRICAYamaha Corporation,International Marketing DivisionNakazawa-cho 10-1, Hamamatsu, Japan 430Tel: 053-460-2312
MIDDLE EASTTURKEY/CYPRUS
Yamaha Musique France, Division ExportBP 70-77312 Marne-la-Valée Cedex 2, FranceTel: 01-64-61-4000
OTHER COUNTRIESYamaha Corporation,International Marketing DivisionNakazawa-cho 10-1, Hamamatsu, Japan 430Tel: 053-460-2312
ASIAHONG KONG
Tom Lee Music Co., Ltd.11/F., Silvercord Tower 1, 30 Canton Road,Tsimshatsui, Kowloon, Hong KongTel: 730-1098
INDONESIAPT. Yamaha Music Indonesia (Distributor)PT. NusantikGedung Yamaha Music Center, Jalan Jend. GatotSubroto Kav. 4, Jakarta 12930, IndonesiaTel: 21-520-2577
KOREACosmos Corporation#131-31, Neung-Dong, Sungdong-Ku, SeoulKoreaTel: 02-466-0021~5
MALAYSIAYamaha Music Malaysia, Sdn., Bhd.16-28, Jalan SS 2/72, Petaling Jaya, Selangor,MalaysiaTel: 3-717-8977
PHILIPPINESYupangco Music Corporation339 Gil J. Puyat Avenue, P.O. Box 885 MCPO,Makati, Metro Manila, PhilippinesTel: 819-7551
SINGAPOREYamaha Music Asia Pte., Ltd.Blk 17A Toa Payoh #01-190 Lorong 7Singapore 1231Tel: 354-0133


![Sequencer 1, Sequencer 2 or Drum - Arturiadownloads.arturia.com/products/beatstep-pro/manual/BeatStepPro... · —Sequencer 1, Sequencer 2 or Drum SHIFT + [>>] = Extend sequence SHIFT](https://cdn.vdocuments.mx/doc/165x107/5adbc3047f8b9add658e5b6e/sequencer-1-sequencer-2-or-drum-sequencer-1-sequencer-2-or-drum-shift-.jpg)


