
Mobile Print/Scan Guide for Brother iPrint&Scan
Version D
ENG

i
Definitions of notes
We use the following icon throughout this user’s guide:
Trademarks
The Brother logo is a registered trademark of Brother Industries, Ltd.
Android is a trademark of Google Inc.
Apple, Macintosh, Mac OS, iCloud, iPhone, iPod touch, iPad and Safari are trademarks of Apple Inc., registered in the U.S. and other countries.
Microsoft and Windows are registered trademarks of Microsoft Corporation in the United States and/or other countries.
Each company whose software title is mentioned in this manual has a Software License Agreement specific to its proprietary programs.
Any trade names and product names of companies appearing on Brother products, related documents and any other materials are all trademarks or registered trademarks of those respective companies.
©2011 Brother Industries, Ltd. All rights reserved.
Note Notes tell you how you should respond to a situation that may arise or give tips about how the operation works with other features.
ii
Table of Contents
Section I For Android™ Devices
1 Introduction 2
Overview....................................................................................................................................................2Hardware requirement ...............................................................................................................................3
Supported operating systems..............................................................................................................3Network settings ..................................................................................................................................3
Downloading Brother iPrint&Scan from the Android™ Market ..................................................................5
2 Printing 6
Printing from the mobile device’s memory card.........................................................................................6Printing photos.....................................................................................................................................6Printing PDF files.................................................................................................................................8
Printing from a web browser....................................................................................................................10Printing web pages ............................................................................................................................10
Printing from other applications ...............................................................................................................13Printing photos...................................................................................................................................13Printing PDF files...............................................................................................................................14Printing text files ................................................................................................................................16Printing web pages ............................................................................................................................17
Print Settings ...........................................................................................................................................19
3 Scanning 21
Scanning documents ...............................................................................................................................21Scanning directly to your mobile device’s memory card....................................................................21Opening scanned images in other applications.................................................................................23
Scan Settings ..........................................................................................................................................27
Section II For iOS Devices
4 Introduction 29
Overview..................................................................................................................................................29Hardware requirement .............................................................................................................................30
Supported devices and operating systems........................................................................................30Network settings ................................................................................................................................30
Downloading Brother iPrint&Scan from the App Store ............................................................................32

iii
5 Printing 33
Printing photos from your mobile device’s photo album ..........................................................................33For iPhone and iPod touch ................................................................................................................33For iPad .............................................................................................................................................34
Printing photos taken with Brother iPrint&Scan .......................................................................................37Printing from a web browser....................................................................................................................39
For iPhone and iPod touch ................................................................................................................39For iPad .............................................................................................................................................44
Printing data from the Clipboard..............................................................................................................49For iPhone and iPod touch ................................................................................................................49For iPad .............................................................................................................................................51
Printing PDF files from other applications................................................................................................53For iPhone and iPod touch ................................................................................................................53For iPad .............................................................................................................................................55
Print Settings ...........................................................................................................................................57
6 Scanning 59
Scanning documents ...............................................................................................................................59Scanning documents and saving them in your mobile device’s photo album ...................................59Sending by E-mail .............................................................................................................................63Scanning documents and saving them to iCloud ..............................................................................68Opening scanned images in other applications.................................................................................72
Scan Settings ..........................................................................................................................................76
Section III For Windows® Phone Devices
7 Introduction 78
Overview..................................................................................................................................................78Hardware requirement .............................................................................................................................79
Supported operating systems............................................................................................................79Network settings ................................................................................................................................79
Downloading Brother iPrint&Scan from the Windows® Phone Marketplace ...........................................81
8 Printing 82
Printing images stored in your mobile device ..........................................................................................82Printing photos taken with Brother iPrint&Scan .......................................................................................84Printing photos from other applications ...................................................................................................86Print Settings ...........................................................................................................................................88
9 Scanning 89
Scanning documents directly to your mobile device................................................................................89Scan Settings ..........................................................................................................................................91

Section I
For Android™ DevicesI
Introduction 2
Printing 6
Scanning 21

2
11
Overview 1
Brother iPrint&Scan allows you to use features of your Brother machine directly from your Android™ device, without using a computer.
Brother iPrint&Scan supports the following functions:
Printing
Even if your machine is not connected to your computer, you can print photos, PDFs, text files and web pages directly from your mobile device. (See Printing uu page 6.)
Scanning
Photos and documents scanned with your Brother machine can be saved directly to the memory card of your mobile device and opened with other applications. Additionally, if an E-mail application that supports JPEG and PDF files is installed on your mobile device, scanned images can be attached to outgoing E-mail messages and sent using your mobile device. (See Scanning uu page 21.)
Note
• For a list of models supported by Brother iPrint&Scan please visit the Brother web site at http://www.brother.com/apps/android/.
• If your machine does not have a scanner, you cannot use the scan functions of Brother iPrint&Scan.
Introduction 1

Introduction
3
1Hardware requirement 1
Supported operating systems 1
Brother iPrint&Scan is compatible with devices running Android™ 2.1 or greater.
NoteCertain features of Brother iPrint&Scan may not be supported by your mobile device.
Network settings 1
In order to use Brother iPrint&Scan, your mobile device must connect using Wi-Fi to the network that your Brother machine is connected to. Brother iPrint&Scan supports wireless connections that use infrastructure mode; ad-hoc mode is not supported.
To configure your mobile device for a Wi-Fi connection, please refer to your mobile device’s user’s guide.
To configure your Brother machine for a Wi-Fi connection, please refer to your machine’s Quick Setup Guide.
When the Brother machine is connected to the wireless access point/router using Wi-Fi:
1 Mobile device
2 Wireless access point/router
3 Wireless network machine (your machine)
321

Introduction
4
1 When the Brother machine is connected to the wireless access point/router using a network cable:
1 Mobile device
2 Wireless access point/router
3 Network cable
4 Network machine (your machine)
43
21

Introduction
5
1Downloading Brother iPrint&Scan from the Android™ Market1
You can download and install Brother iPrint&Scan from the Android™ Market. To take advantage of all the features supported by Brother iPrint&Scan, make sure you are using the latest version.
To download and install or uninstall Brother iPrint&Scan, please refer to the user’s guide for your mobile device.

6
2
2Printing from the mobile device’s memory card 2
Printing photos 2
You can print JPEG images that are saved on your mobile device’s memory card.
a Make sure the memory card has been inserted into the mobile device.
b Open the Launcher on the mobile device.
c Tap the Brother iPrint&Scan icon.
NoteWhen the license agreement screen appears, carefully read and accept the terms of the agreement.
d Tap Photo Print.
e Thumbnail photos are displayed. Tap the desired photo.
f Confirm the image on the print preview screen.
NoteTap the screen to hide or show the operation buttons.
g Tap .
Printing 2

Printing
7
2
h Make sure your machine is selected.Do one of the following:
If your machine is selected, go to step j.
If a different machine is selected or if No Device selected is displayed, make sure your machine is turned on and then tap Printer. Go to step i.
i The application will search your network and display a list of available machines. Tap your machine from the list.
j Do one of the following:
If you want to change other print settings, see Print Settings uu page 19. After changing the settings, go to step k.
If you do not want to change any settings, press the Back button and go to step k.
k Tap Print.The machine will start printing.

Printing
8
2
Printing PDF files 2
You can print PDF files saved on your mobile device’s memory card. Secure PDF files cannot be printed.
Note
• Some encrypted PDF files cannot be printed.
• When printing a PDF file that uses fonts that are not embedded in the file, characters may be replaced with characters of a different font, or may be garbled.
• When printing a PDF that includes transparent objects, the transparency setting will be ignored and the file will be printed with that setting off.
a Make sure the memory card has been inserted into the mobile device.
b Open the Launcher on the mobile device.
c Tap the Brother iPrint&Scan icon.
NoteWhen the license agreement screen appears, carefully read and accept the terms of the agreement.
d Tap PDF Print.The PDF file list is displayed.
e Tap the name of the file that you want to print.
f Confirm the image on the print preview screen.
Note
• Tap the screen to hide or show the operation buttons.
• You can view different pages in a multi-page PDF by tapping or .

Printing
9
2
g Tap .
h Make sure your machine is selected.Do one of the following:
If your machine is selected, go to step j.
If a different machine is selected or if No Device selected is displayed, make sure your machine is turned on and then tap Printer. Go to step i.
i The application will search your network and display a list of available machines. Tap your machine from the list.
j Do one of the following:
If you want to change other print settings, see Print Settings uu page 19. After changing the settings, go to step k.
If you do not want to change any settings, press the Back button and go to step k.
k Do one of the following:
Tap Print this to print the displayed page.
Tap Print all to print all pages of the PDF.
The machine will start printing.

Printing
10
2
Printing from a web browser 2
Printing web pages 2
You can print web pages using the web browser that is installed in Brother iPrint&Scan.
a Open the Launcher on the mobile device.
b Tap the Brother iPrint&Scan icon.
NoteWhen the license agreement screen appears, carefully read and accept the terms of the agreement.
c Tap Web Page Print.
d The web browser is displayed.
You can view a web page using one of the following methods:
Enter the URL directly
Tap the address field, and then enter the URL of the web page that you want to view.
Tap next to the address field, and then go to step e.
Search for keywords
Tap the address field, and then enter the keywords that you want to search for.
Tap next to the address field.
The search results are displayed in the web browser.
Tap the web page that you want to view, and then go to step e.

Printing
11
2
Tap a bookmark
Tap .
Tap the bookmark of the web page that you want to view, and then go to step e.
Tap the history
If you have viewed a web page previously, tap .
Tap History, and then tap the web page that you want to view.
Go to step e.
e The web page is displayed.Tap Print Preview.
f Confirm the image on the print preview screen.
Note• Tap the screen to hide or show the operation buttons.
• You can view different pages by tapping or .
g Tap .
h Make sure your machine is selected.Do one of the following:
If your machine is selected, go to step j.
If a different machine is selected or if No Device selected is displayed, make sure your machine is turned on and then tap Printer. Go to step i.

Printing
12
2
i The application will search your network and display a list of available machines. Tap your machine from the list.
j Do one of the following:
If you want to change other print settings, see Print Settings uu page 19. After changing the settings, go to step k.
If you do not want to change any settings, press the Back button and go to step k.
k Tap Print.The machine will start printing.
Deleting the browsing history 2
You can delete the browsing history.
a Tap .
b Tap History.
c Do one of the following:
If you want to delete a browsing history, touch the record and hold it until the pop-up screen appears.
A message will appear to confirm if you want to delete the browsing history.
Tap OK.
The browsing history will be cleared.
If you want to delete all of the browsing history, press the Menu button, and then tap Clear history.
A message will appear to confirm if you want to delete the browsing history.
Tap OK.
All of the browsing history will be cleared.
Note
If you delete the browsing history, it is not available when using other web browsers.

Printing
13
2
Printing from other applications 2
Documents can also be printed directly from other applications installed on your mobile device using Brother iPrint&Scan. For example, you can print photos that are attached to E-mail messages from your mobile device.
Printing photos 2
You can print JPEG/PNG/GIF/BMP images from other applications.
a Use the desired application to select the photo that you want to print, and share the photo with Brother
iPrint&Scan. For example, in some applications you can share a photo by tapping the share icon ( ). If the list of applications appears, select Brother iPrint&Scan.A print preview will be displayed.
NoteWhen the license agreement screen appears, carefully read and accept the terms of the agreement.
b Confirm the image on the print preview screen.
Note
• Tap the screen to hide or show the operation buttons.
• If multiple photos are selected, tap or to view a different photo.
c Tap .

Printing
14
2
d Make sure your machine is selected.Do one of the following:
If your machine is selected, go to step f.
If a different machine is selected or if No Device selected is displayed, make sure your machine is turned on and then tap Printer. Go to step e.
e The application will search your network and display a list of available machines. Tap your machine from the list.
f Do one of the following:
If you want to change other print settings, see Print Settings uu page 19. After changing the settings, go to step g.
If you do not want to change any settings, press the Back button and go to step g.
g Tap Print.The machine will start printing.
Printing PDF files 2
Note• Some encrypted PDF files cannot be printed.
• When printing a PDF file that uses fonts that are not embedded in the file, characters may be replaced with characters of a different font, or may be garbled.
• When printing a PDF that includes transparent objects, the transparency setting will be ignored and the file will be printed with that setting off.

Printing
15
2
a Use the desired application to select the PDF file that you want to print, and share the file with Brother
iPrint&Scan. For example, in some applications you can share the file by tapping the share icon ( ). If the list of applications appears, select Brother iPrint&Scan.A print preview will be displayed.
NoteWhen the license agreement screen appears, carefully read and accept the terms of the agreement.
b Confirm the image on the print preview screen.
Note
• Tap the screen to hide or show the operation buttons.
• You can view different pages in a multi-page PDF by tapping or .
c Tap .
d Make sure your machine is selected.Do one of the following:
If your machine is selected, go to step f.
If a different machine is selected or if No Device selected is displayed, make sure your machine is turned on and then tap Printer. Go to step e.
e The application will search your network and display a list of available machines. Tap your machine from the list.

Printing
16
2
f Do one of the following:
If you want to change other print settings, see Print Settings uu page 19. After changing the settings, go to step g.
If you do not want to change any settings, press the Back button and go to step g.
g Do one of the following:
Tap Print this to print the displayed page.
Tap Print all to print all pages of the PDF.
The machine will start printing.
Printing text files 2
You can print text (*.txt) files from text viewer applications.
a Use the desired application to select the text file that you want to print, and share the file with Brother
iPrint&Scan. For example, in some applications you can share the file by tapping the share icon ( ). If the list of applications appears, select Brother iPrint&Scan.A print preview will be displayed.
NoteWhen the license agreement screen appears, carefully read and accept the terms of the agreement.
b Confirm the image on the print preview screen.
Note• Tap the screen to hide or show the operation buttons.
• You can view different pages by tapping or .
c Tap .

Printing
17
2
d Make sure your machine is selected.Do one of the following:
If your machine is selected, go to step f.
If a different machine is selected or if No Device selected is displayed, make sure your machine is turned on and then tap Printer. Go to step e.
e The application will search your network and display a list of available machines. Tap your machine from the list.
f Do one of the following:
If you want to change other print settings, see Print Settings uu page 19. After changing the settings, go to step g.
If you do not want to change any settings, press the Back button and go to step g.
g Tap Print.The machine will start printing.
Printing web pages 2
You can print web pages from other web browsers.
a Use the desired web browser to select the web page that you want to print, and share the page with Brother iPrint&Scan. For example, in some applications you can share the page by pressing the Menu button, and then tap More, Share page. If the list of applications appears, select Brother iPrint&Scan.The web page is displayed.
NoteWhen the license agreement screen appears, carefully read and accept the terms of the agreement.

Printing
18
2
b Tap Print Preview.A print preview will be displayed.
c Confirm the image on the print preview screen.
Note• Tap the screen to hide or show the operation buttons.
• You can view different pages by tapping or .
d Tap .
e Make sure your machine is selected.Do one of the following:
If your machine is selected, go to step g.
If a different machine is selected or if No Device selected is displayed, make sure your machine is turned on and then tap Printer. Go to step f.
f The application will search your network and display a list of available machines. Tap your machine from the list.
g Do one of the following:
If you want to change other print settings, see Print Settings uu page 19. After changing the settings, go to step h.
If you do not want to change any settings, press the Back button and go to step h.
h Tap Print.The machine will start printing.

Printing
19
2
Print Settings 2
You can change the following print settings when you print from a mobile device.
Paper Size
Media Type 1
Copies
Layout 2 3 4
Color/Mono 2 4
Duplex (2sided) 2 3 4
1 Displayed only when printing photos.2 Displayed only when printing PDF files.3 Displayed only when printing text files.4 Displayed only when printing web pages.
NoteOnly settings that can be changed are displayed.
a On the Print Settings screen, tap the print option that you want to change.
b Choose an option.Repeat steps a and b if you want to change other options.
c Press the Back button.
Note• When you print photos
(Inkjet models)
Photos are printed borderless, and if the aspect ratios of the photos and the paper are different, the photos will be enlarged so that there is no margin on the printed photos. In this case, the portion of the photo that extends beyond the paper size is cut off and will not be printed.
(Laser models)
Photos are printed with borders, and if the aspect ratios of the photos and the paper are different, the photos will be reduced or enlarged so that the entire image is printed.
• When you print PDF files
PDF pages are printed with borders, and if the aspect ratios of the pages and the paper are different, the pages will be reduced or enlarged so that the entire page is printed.
• When you print text files
Text is printed with borders.

Printing
20
2
• When you print web pages
Web pages are printed with borders and will be reduced or enlarged according to the width of the paper. If the web pages are longer than the sheet length of the paper, the web pages will be printed on multiple sheets of paper.

21
3
3
Scanning documents 3
Scanning directly to your mobile device’s memory card 3
Make sure there is enough available space on your mobile device’s memory card.
a Make sure the memory card has been inserted into the mobile device.
b Load your document on to your machine.
c Open the Launcher on the mobile device.
d Tap the Brother iPrint&Scan icon.
NoteWhen the license agreement screen appears, carefully read and accept the terms of the agreement.
e Tap Scan.
f Tap .
g Make sure your machine is selected.Do one of the following:
If your machine is selected, go to step i.
If a different machine is selected or if No Device selected is displayed, make sure your machine is turned on and then tap Scanner. Go to step h.
Scanning 3

Scanning
22
3
h The application will search your network and display a list of available machines. Tap your machine from the list.
i Do one of the following:
If you want to change other scan settings, see Scan Settings uu page 27. After changing the settings, go to step j.
If you do not want to change any settings, press the Back button and go to step j.
j Tap Scan.The machine will start to scan the document. The scanned image will then be displayed on the screen. Confirm the scanned image.
Note
• Tap the screen to hide or show the operation buttons.
• If the scanned document has multiple pages, you can view different pages by tapping or .
k Do one of the following:
If you want to crop the scanned image, tap and then go to step l.
If you do not want to crop the scanned image, go to step n.
l The area inside the box will be cropped.
To change the size of the box, drag the edge of the box.
To move the position of the box, tap inside the box and drag the box.
When finished, tap Done.
m Confirm the cropped image. To start over and select the size of the box again, tap and then go back to step l.

Scanning
23
3
n Tap Save.
o Choose the file format (JPEG or PDF) used for the saved file.The scanned image will be saved on the memory card in the specified file format.
Note• If you chose “JPEG”, each page is saved as a separate file. If you chose “PDF”, all pages of the document
are saved in one file.
• File names are automatically created based on the current date and time. For example, the first image scanned at 10:33 PM and 55 seconds on July 1, 2011 would be named Scan07012011223355_001.jpg. Note that the region setting also determines the date format of the file name. (A sequential number may not be included in the file name.)
• Scanned images are saved in the following folder on the memory card: /sdcard/Brother/scan.
Opening scanned images in other applications 3
Photos and documents scanned with your Brother machine can be opened with other applications. For example, if an E-mail application that supports JPEG and PDF files is installed on your mobile device, scanned images can be attached to outgoing E-mail messages and sent using your mobile device by selecting the E-mail application.
a Make sure the memory card has been inserted into the mobile device.
b Load your document on to your machine.
c Open the Launcher on the mobile device.
d Tap the Brother iPrint&Scan icon.
NoteWhen the license agreement screen appears, carefully read and accept the terms of the agreement.
e Tap Scan.
f Tap .

Scanning
24
3
g Make sure your machine is selected.Do one of the following:
If your machine is selected, go to step i.
If a different machine is selected or if No Device selected is displayed, make sure your machine is turned on and then tap Scanner. Go to step h.
h The application will search your network and display a list of available machines. Tap your machine from the list.
i Do one of the following:
If you want to change other scan settings, see Scan Settings uu page 27. After changing the settings, go to step j.
If you do not want to change any settings, press the Back button and go to step j.

Scanning
25
3
j Tap Scan.The machine will start to scan the document. The scanned image will then be displayed on the screen. Confirm the scanned image.
Note
• Tap the screen to hide or show the operation buttons.
• If the scanned document has multiple pages, you can view different pages by tapping or .
k Do one of the following:
If you want to crop the scanned image, tap and then go to step l.
If you do not want to crop the scanned image, go to step n.
l The area inside the box will be cropped.
To change the size of the box, drag the edge of the box.
To move the position of the box, tap inside the box and drag the box.
When finished, tap Done.
m Confirm the cropped image. To start over and select the size of the box again, tap and then go back to step l.
n Tap .
o Choose the file format (JPEG or PDF) of the file that you want to open.A list of applications that can open the file is displayed.
p Tap the desired application.For information about operating the application, refer to the application’s user’s guide.

Scanning
26
3
NoteFile names are automatically created based on the current date and time. For example, the first image scanned at 10:33 PM and 55 seconds on July 1, 2011 would be named Scan07012011223355_001.jpg. Note that the region setting also determines the date format of the file name. (A sequential number may not be included in the file name.)

Scanning
27
3
Scan Settings 3
You can change the following scan settings when you use your mobile device to scan.
Document Size
Scan Type
Duplex 1
1 Displayed only when your machine supports duplex scan.
NoteOnly settings that can be changed are displayed.
a On the Scan Settings screen, tap the scan option that you want to change.
b Choose an option.Repeat steps a and b if you want to change other options.
c Press the Back button.
Section II
For iOS Devices II
Introduction 29
Printing 33
Scanning 59

29
4
4
Overview 4
Brother iPrint&Scan allows you to use features of your Brother machine directly from your iPhone, iPod touch, and iPad.
Brother iPrint&Scan supports the following functions:
Printing
Even if your machine is not connected to your computer, you can print photos, PDF files or text and web pages directly from your mobile device. (See Printing uu page 33.)
Scanning
Photos and documents scanned with your Brother machine can be saved directly to the photo album of your mobile device, attached to outgoing E-mail messages in your mobile device, saved directly to iCloud, or opened with other applications in your mobile device. (See Scanning uu page 59.)
Note
• For a list of models supported by Brother iPrint&Scan please visit the Brother web site at http://www.brother.com/apps/iphone/.
• If your machine does not have a scanner, you cannot use the scan functions of Brother iPrint&Scan.
Introduction 4
Introduction
30
4
Hardware requirement 4
Supported devices and operating systems 4
Brother iPrint&Scan is compatible with the following iOS devices:
iPhone (iOS 4.0 or greater)
iPod touch (iOS 4.0 or greater)
iPad (iOS 4.2 or greater)
NoteCertain features of Brother iPrint&Scan may not be supported by your mobile device.
Network settings 4
In order to use Brother iPrint&Scan, your mobile device must connect using Wi-Fi to the network that your Brother machine is connected to. Brother iPrint&Scan supports wireless connections that use infrastructure mode or ad-hoc mode.
To configure your mobile device for a Wi-Fi connection, please refer to your mobile device’s user’s guide. A link to your mobile device’s user’s guide, which can be viewed on the Apple web site, can be found in the Bookmarks folder of Safari by default.
To configure your Brother machine for a Wi-Fi connection, please refer to your machine’s Quick Setup and Network User’s Guide.
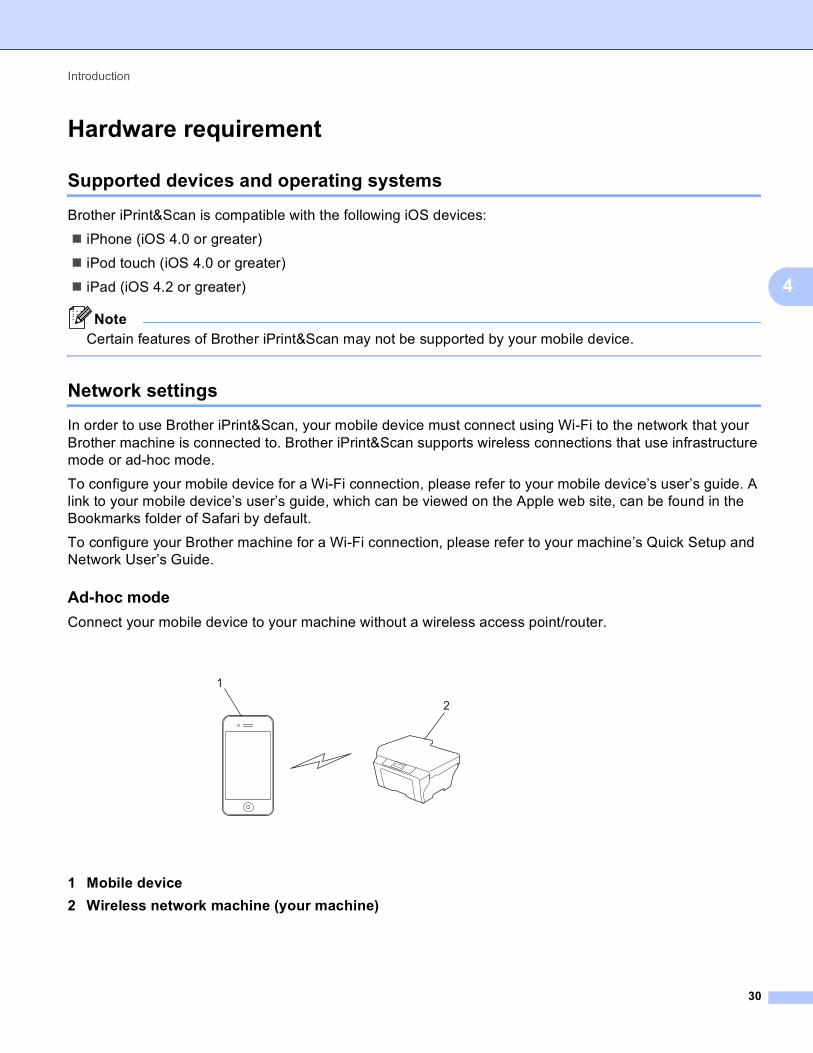
Ad-hoc mode 4
Connect your mobile device to your machine without a wireless access point/router.
1 Mobile device
2 Wireless network machine (your machine)
2
1
Introduction
31
4
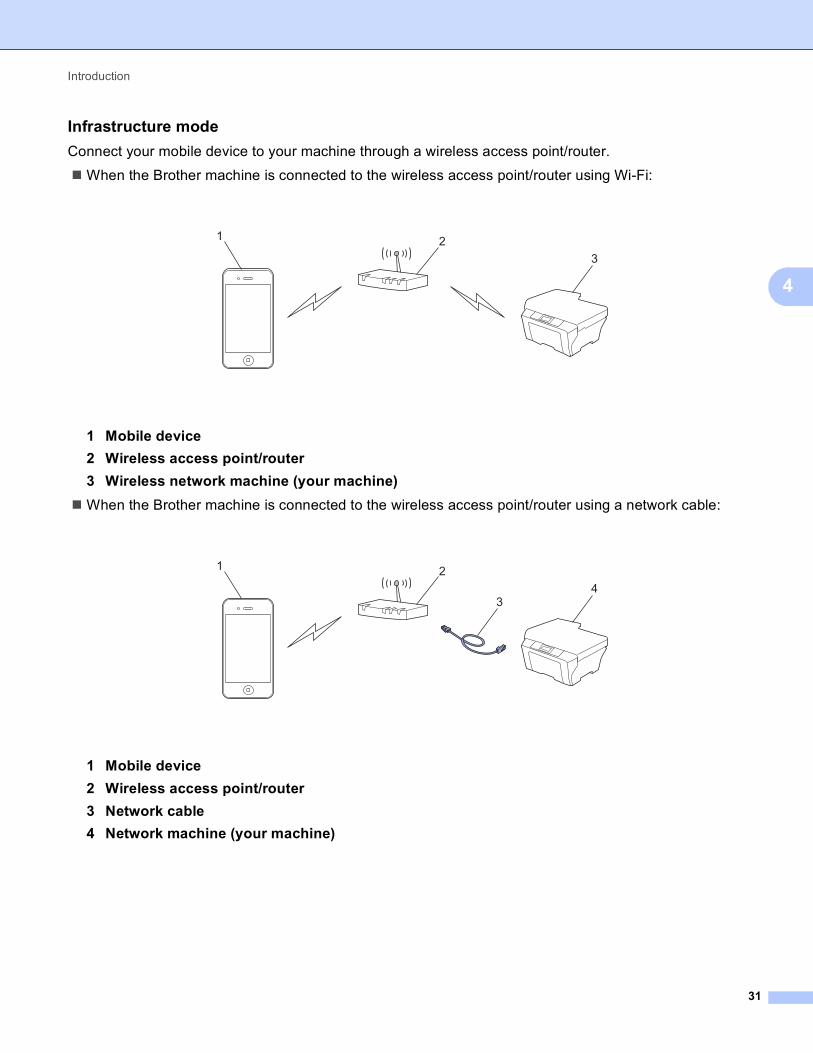
Infrastructure mode 4
Connect your mobile device to your machine through a wireless access point/router.
When the Brother machine is connected to the wireless access point/router using Wi-Fi:
1 Mobile device
2 Wireless access point/router
3 Wireless network machine (your machine)
When the Brother machine is connected to the wireless access point/router using a network cable:
1 Mobile device
2 Wireless access point/router
3 Network cable
4 Network machine (your machine)
321
43
21

Introduction
32
4
Downloading Brother iPrint&Scan from the App Store 4
You can download and install Brother iPrint&Scan from the App Store. To take advantage of all the features supported by Brother iPrint&Scan, make sure you are using the latest version.
To download and install or uninstall Brother iPrint&Scan, please refer to the user’s guide for your mobile device. A link to your mobile device’s user’s guide, which can be viewed on the Apple web site, can be found in the Bookmarks folder of Safari by default.

33
5
5
Printing photos from your mobile device’s photo album 5
You can print photos that are stored in your mobile device’s photo album.
For iPhone and iPod touch 5
a Tap the Brother iPrint&Scan icon on the Home screen.
b Tap Print from Photo Albums.
c Choose the photo album from the list.Thumbnails of the photos in the selected album are displayed.
d Tap the desired photo.
e Confirm the image on the print preview screen.
NoteTap the screen to hide or show the operation buttons.
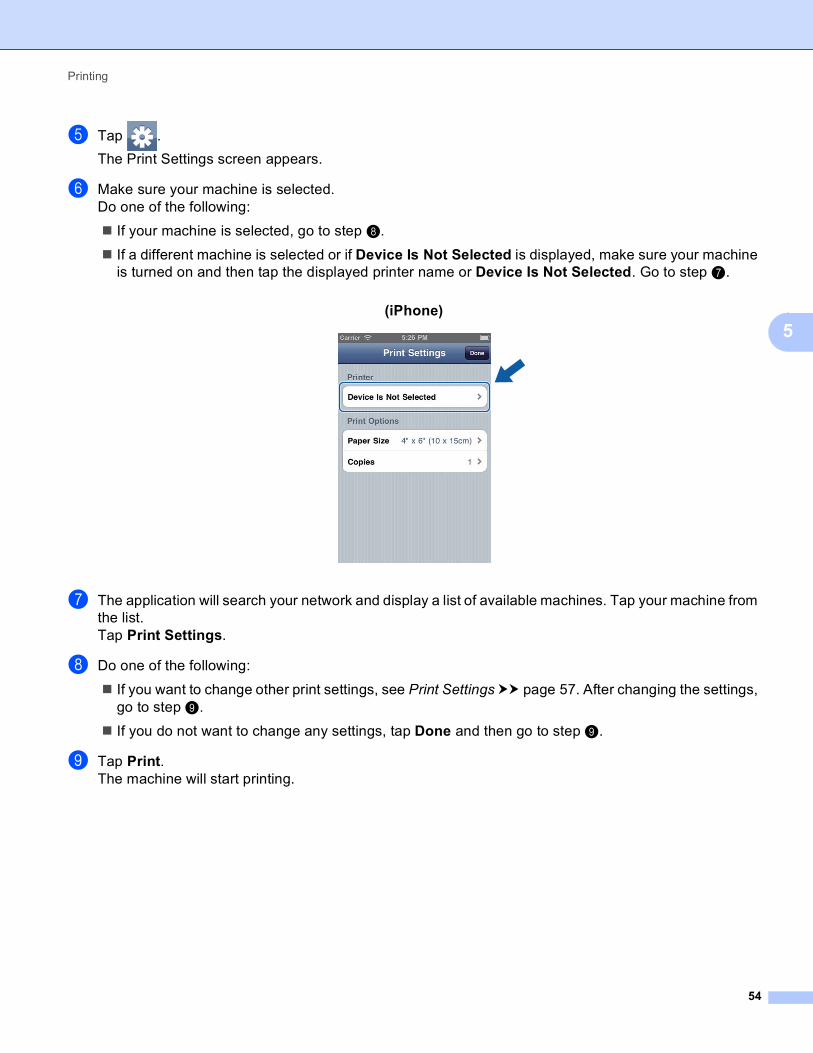
f Tap .
The Print Settings screen appears.
Printing 5
(iPhone) 5

Printing
34
5
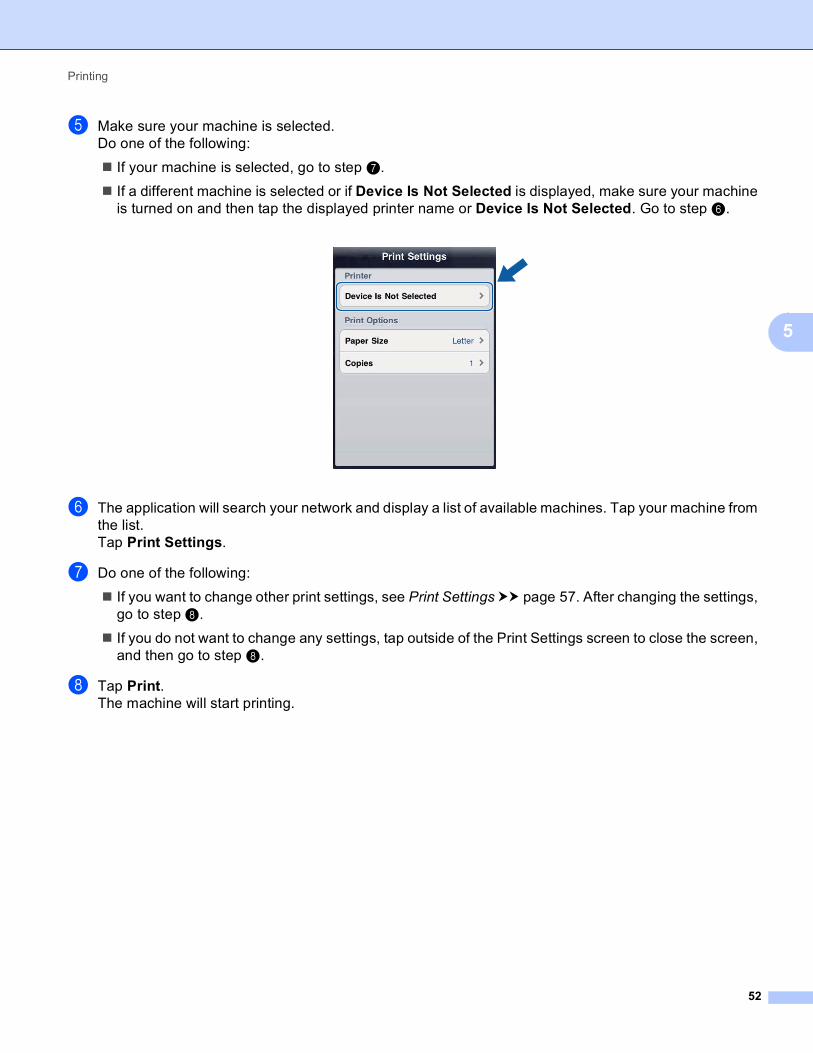
g Make sure your machine is selected.Do one of the following:
If your machine is selected, go to step i.
If a different machine is selected or if Device Is Not Selected is displayed, make sure your machine is turned on and then tap the displayed printer name or Device Is Not Selected. Go to step h.
h The application will search your network and display a list of available machines. Tap your machine from the list.Tap Print Settings.
i Do one of the following:
If you want to change other print settings, see Print Settings uu page 57. After changing the settings, go to step j.
If you do not want to change any settings, tap Done and then go to step j.
j Tap Print.The machine will start printing.
For iPad 5
a Tap the Brother iPrint&Scan icon on the Home screen.If the Web, Clipboard or Scan screen is displayed, switch to the photo print function by tapping Photo.
b Tap Photo Albums.
c Choose a photo album from the list.Thumbnails of the photos in the selected album are displayed.
d Tap the desired photo.
(iPhone) 5

Printing
35
5
e Confirm the image on the print preview screen.
f Tap Settings.The Print Settings screen appears.
g Make sure your machine is selected.Do one of the following:
If your machine is selected, go to step i.
If a different machine is selected or if Device Is Not Selected is displayed, make sure your machine is turned on and then tap the displayed printer name or Device Is Not Selected. Go to step h.

Printing
36
5
h The application will search your network and display a list of available machines. Tap your machine from the list.Tap Print Settings.
i Do one of the following:
If you want to change other print settings, see Print Settings uu page 57. After changing the settings, go to step j.
If you do not want to change any settings, tap outside of the Print Settings screen to close the screen, and then go to step j.
j Tap Print.The machine will start printing.

Printing
37
5
Printing photos taken with Brother iPrint&Scan 5
When using the built-in camera in your iPhone or iPod touch, photos can be taken using Brother iPrint&Scan and printed directly.
a Tap the Brother iPrint&Scan icon on the Home screen.
b Tap Print from Camera.
c Take a photo by tapping .
d The photo is displayed.Do one of the following:
To print the photo, tap Use, and then go to step e.
To retake the photo, tap Retake, and then go back to step c.
Note
The photo is automatically added to the mobile device’s photo album.
e Confirm the image on the print preview screen.
Note
Tap the screen to hide or show the operation buttons.
f Tap .
The Print Settings screen appears.
(iPhone) 5

Printing
38
5
g Make sure your machine is selected.Do one of the following:
If your machine is selected, go to step i.
If a different machine is selected or if Device Is Not Selected is displayed, make sure your machine is turned on and then tap the displayed printer name or Device Is Not Selected. Go to step h.
h The application will search your network and display a list of available machines. Tap your machine from the list.Tap Print Settings.
i Do one of the following:
If you want to change other print settings, see Print Settings uu page 57. After changing the settings, go to step j.
If you do not want to change any settings, tap Done and then go to step j.
j Tap Print.The machine will start printing.
(iPhone) 5

Printing
39
5
Printing from a web browser 5
For iPhone and iPod touch 5
Printing web pages 5
You can directly print web pages using the web browser that is installed in Brother iPrint&Scan.
a Tap the Brother iPrint&Scan icon on the Home screen.
b Tap Print from Web Page.
c The web browser is displayed.
You can view a web page using one of the following methods:
Enter the URL directly
Tap the address field, and then enter the URL of the web page that you want to view.
Tap Go, and then go to step d.
Search for a keyword
Tap .
The search screen will appear.
In the search field, enter the keywords that you want to search for.
Tap Search.
The search results are displayed in the web browser.
Tap the web page that you want to view, and then go to step d.
(iPhone) 5

Printing
40
5
Tap a bookmark
If you have already added a bookmark to the web page, tap .
Tap the bookmark of the web page that you want to view, and then go to step d.
Tap the history
If you have viewed a web page previously, tap .
Tap History, and then tap the web page that you want to view.
Go to step d.
NoteThe bookmarks and browsing history of other web browsers on your mobile device are not available.
d The web page is displayed.Tap Print Preview.
Note
If you want to add a bookmark to the web page, see Adding a bookmark to a web page uu page 42.
Do one of the following:
If the web page will be printed on multiple sheets of paper, go to step e.
If the web page will be printed on a single sheet of paper, go to step g.
e A thumbnail preview of the web page is displayed.Pages marked with a check mark will be printed. Tap a page and remove the check mark if you do not want to print that page.
Note• Tap Select All or Deselect All to select or deselect all pages.
• You can enlarge the thumbnails by tapping , and reduce by tapping .
(iPhone) 5

Printing
41
5
f Tap Done.
g Confirm the image on the print preview screen.
Note• Tap the screen to hide or show the operation buttons.
• You can view different pages in a multi-page web page by flicking left or right.
h Tap .
The Print Settings screen appears.
i Make sure your machine is selected.Do one of the following:
If your machine is selected, go to step k.
If a different machine is selected or if Device Is Not Selected is displayed, make sure your machine is turned on and then tap the displayed printer name or Device Is Not Selected. Go to step j.
j The application will search your network and display a list of available machines. Tap your machine from the list.Tap Print Settings.
k Do one of the following:
If you want to change other print settings, see Print Settings uu page 57. After changing the settings, go to step l.
If you do not want to change any settings, tap Done and then go to step l.
l Tap Print.The machine will start printing.
(iPhone) 5

Printing
42
5
Adding a bookmark to a web page 5
If you add a bookmark to your favorite web page, you can access the web page simply by tapping the bookmark.
a When the web page that you want to add a bookmark to is displayed, tap .
b Tap Save.
NoteYou can change the title. However, the bookmark title cannot be blank.
Editing bookmarks 5
You can edit the bookmarks.
a Tap .
b Tap Edit.
c Do one of the following:
If you want to delete a bookmark, tap on the left side of the title, and then tap Delete on the right side of the title.
Go to step d.
Note
If you tap again before tapping Delete, the Delete icon will be hidden.
(iPhone) 5

Printing
43
5
If you want to edit the title, tap it, and then edit the title.
Tap Save, and then go to step d.
d Repeat step c if you want to edit other bookmarks.Tap Done.
Deleting all of the browsing history 5
You can delete all of the browsing history.
Note
When deleting all of the browsing history, you cannot select and delete a single browsing history.
a Tap .
b Tap History.
c Tap Clear. A message will appear to confirm if you want to delete the browsing history. Tap Clear History.All of the browsing history will be cleared.
(iPhone) 5

Printing
44
5
For iPad 5
Printing web pages 5
You can directly print web pages using the web browser that is installed in Brother iPrint&Scan.
a Tap the Brother iPrint&Scan icon on the Home screen.If the Photo, Clipboard or Scan screen is displayed, switch to the web print function by tapping Web.
b The web browser is displayed.
You can view a web page using one of the following methods:
Enter the URL directly
Tap the address field, and then enter the URL of the web page that you want to view.
Tap Go, and then go to step c.
Search for a keyword
Tap .
In the search field, enter the keywords that you want to search for.
Tap Search.
The search results are displayed in the web browser.
Tap the web page that you want to view, and then go to step c.
Tap a bookmark
If you have already added a bookmark to the web page, tap .
Tap the bookmark of the web page that you want to view, and then go to step c.

Printing
45
5
Tap the history
If you have viewed a web page previously, tap .
Tap History, and then tap the web page that you want to view.
Go to step c.
Note
The bookmarks and browsing history of other web browsers on your mobile device are not available.
c The web page is displayed.Tap Print Preview.
NoteIf you want to add a bookmark to the web page, see Adding a bookmark to a web page uu page 46.
d Confirm the image on the print preview screen.Thumbnail previews of each page are displayed in the top of the screen. To view a page, tap its thumbnail.Pages marked with a check mark will be printed. If you do not want to print a page, tap its check mark to remove the check mark.
Note
Tap and then Select All or Deselect All to select or deselect all pages.
e Tap Settings.The Print Settings screen appears.

Printing
46
5
f Make sure your machine is selected.Do one of the following:
If your machine is selected, go to step h.
If a different machine is selected or if Device Is Not Selected is displayed, make sure your machine is turned on and then tap the displayed printer name or Device Is Not Selected. Go to step g.
g The application will search your network and display a list of available machines. Tap your machine from the list.Tap Print Settings.
h Do one of the following:
If you want to change other print settings, see Print Settings uu page 57. After changing the settings, go to step i.
If you do not want to change any settings, tap outside of the Print Settings screen to close the screen, and then go to step i.
i Tap Print.The machine will start printing.
Adding a bookmark to a web page 5
If you add a bookmark to your favorite web page, you can access the web page simply by tapping the bookmark.
a When the web page that you want to add a bookmark to is displayed, tap .

Printing
47
5
b Tap Save.
NoteYou can change the title. However, the bookmark title cannot be blank.
Editing bookmarks 5
You can edit the bookmarks.
a Tap .
b Tap Edit.
c Do one of the following:
If you want to delete a bookmark, tap on the left side of the title, and then tap Delete on the right side of the title.
Go to step d.
Note
If you tap again before tapping Delete, the Delete icon will be hidden.

Printing
48
5
If you want to edit the title, tap it, and then edit the title.
Tap Save, and then go to step d.
d Repeat step c if you want to edit other bookmarks.Tap Done.
Deleting all of the browsing history 5
You can delete all of the browsing history.
NoteWhen deleting all of the browsing history, you cannot select and delete a single browsing history.
a Tap .
b Tap History.
c Tap Clear. A message will appear to confirm if you want to delete the browsing history. Tap Clear History.All of the browsing history will be cleared.

Printing
49
5
Printing data from the Clipboard 5
You can directly print data, such as photos, text, and selected portions of web pages, that is copied to the Clipboard by other applications.
For iPhone and iPod touch 5
a Use the desired application to copy the data to the Clipboard.
b Tap the Brother iPrint&Scan icon on the Home screen.
c Tap Print from Clipboard.The data in the Clipboard will be loaded.Do one of the following:
If you want to print photos, go to step e in For iPhone and iPod touch uu page 33.
If you want to print text or a selected portion of a web page that will be printed on multiple sheets of paper, go to step d.
If you want to print text or a selected portion of a web page that will be printed on a single sheet of paper, go to step f.
d A thumbnail preview of the text or web page is displayed.Pages marked with a check mark will be printed. Tap a page and remove the check mark if you do not want to print that page.
Note• Tap Select All or Deselect All to select or deselect all pages.
• You can enlarge the thumbnails by tapping , and reduce by tapping .
e Tap Done.
(iPhone) 5

Printing
50
5
f Confirm the image on the print preview screen.
Note• Tap the screen to hide or show the operation buttons.
• You can view different pages in multi-page text or web pages by flicking left or right.
g Tap .
The Print Settings screen appears.
h Make sure your machine is selected.Do one of the following:
If your machine is selected, go to step j.
If a different machine is selected or if Device Is Not Selected is displayed, make sure your machine is turned on and then tap the displayed printer name or Device Is Not Selected. Go to step i.
i The application will search your network and display a list of available machines. Tap your machine from the list.Tap Print Settings.
j Do one of the following:
If you want to change other print settings, see Print Settings uu page 57. After changing the settings, go to step k.
If you do not want to change any settings, tap Done and then go to step k.
k Tap Print.The machine will start printing.
(iPhone) 5

Printing
51
5
For iPad 5
a Use the desired application to copy the data to the Clipboard.
b Tap the Brother iPrint&Scan icon on the Home screen.If the Photo, Web or Scan screen is displayed, switch to the Clipboard print function by tapping Clipboard.The data in the Clipboard will be loaded.Do one of the following:
If you want to print photos, go to step e in For iPad uu page 34.
If you want to print text or a selected portion of a web page, go to step c.
c Confirm the image on the print preview screen.Thumbnail previews of each page are displayed in the top of the screen. To view a page, tap its thumbnail.Pages marked with a check mark will be printed. If you do not want to print a page, tap its check mark to remove the check mark.
Note
Tap and then Select All or Deselect All to select or deselect all pages.
d Tap Settings.The Print Settings screen appears.
Printing
52
5
e Make sure your machine is selected.Do one of the following:
If your machine is selected, go to step g.
If a different machine is selected or if Device Is Not Selected is displayed, make sure your machine is turned on and then tap the displayed printer name or Device Is Not Selected. Go to step f.
f The application will search your network and display a list of available machines. Tap your machine from the list.Tap Print Settings.
g Do one of the following:
If you want to change other print settings, see Print Settings uu page 57. After changing the settings, go to step h.
If you do not want to change any settings, tap outside of the Print Settings screen to close the screen, and then go to step h.
h Tap Print.The machine will start printing.

Printing
53
5
Printing PDF files from other applications 5
PDF files can be printed directly from other applications installed on the mobile device using Brother iPrint&Scan.
For iPhone and iPod touch 5
a Use the desired application to select the PDF that you want to print, and open it in Brother iPrint&Scan. For example, if you are viewing a PDF using Safari, tap Open in... and then select Brother iPrint&Scan from the application list.
b A thumbnail preview of the PDF is displayed.Pages marked with a check mark will be printed. Tap a page and remove the check mark if you do not want to print that page.
Note• Tap Select All or Deselect All to select or deselect all pages.
• You can enlarge the thumbnails by tapping , and reduce by tapping .
• Secure PDF files that are configured to not allow printing cannot be printed. If a password-protected PDF file is opened, enter the password when prompted and tap OK.
c Tap Done.
d Confirm the image on the print preview screen.
Note• Tap the screen to hide or show the operation buttons.
• You can view different pages in a multi-page PDF by flicking left or right.
(iPhone) 5
Printing
54
5
e Tap .
The Print Settings screen appears.
f Make sure your machine is selected.Do one of the following:
If your machine is selected, go to step h.
If a different machine is selected or if Device Is Not Selected is displayed, make sure your machine is turned on and then tap the displayed printer name or Device Is Not Selected. Go to step g.
g The application will search your network and display a list of available machines. Tap your machine from the list.Tap Print Settings.
h Do one of the following:
If you want to change other print settings, see Print Settings uu page 57. After changing the settings, go to step i.
If you do not want to change any settings, tap Done and then go to step i.
i Tap Print.The machine will start printing.
(iPhone) 5

Printing
55
5
For iPad 5
a Use the desired application to select the PDF that you want to print, and open it in Brother iPrint&Scan. For example, if you are viewing a PDF using Safari, tap Open in... and then select Brother iPrint&Scan from the application list.
b Confirm the image on the print preview screen.Thumbnail previews of each page are displayed in the top of the screen. To view a page, tap its thumbnail.Pages marked with a check mark will be printed. If you do not want to print a page, tap its check mark to remove the check mark.
Note
• Tap and then Select All or Deselect All to select or deselect all pages.
• Secure PDF files that are configured to not allow printing cannot be printed. If a password-protected PDF file is opened, enter the password when prompted and tap OK.
c Tap Settings.The Print Settings screen appears.

Printing
56
5
d Make sure your machine is selected.Do one of the following:
If your machine is selected, go to step f.
If a different machine is selected or if Device Is Not Selected is displayed, make sure your machine is turned on and then tap the displayed printer name or Device Is Not Selected. Go to step e.
e The application will search your network and display a list of available machines. Tap your machine from the list.Tap Print Settings.
f Do one of the following:
If you want to change other print settings, see Print Settings uu page 57. After changing the settings, go to step g.
If you do not want to change any settings, tap outside of the Print Settings screen to close the screen, and then go to step g.
g Tap Print.The machine will start printing.

Printing
57
5
Print Settings 5
You can change the following print settings when you print from a mobile device.
Paper Size
Media Type 1
Copies
Layout 2 3 4
Color/Mono 2 4
Duplex 2 3 4
1 Displayed only when printing photos.2 Displayed only when printing PDF files.3 Displayed only when printing text.4 Displayed only when printing web pages.
NoteOnly settings that can be changed are displayed.
a On the Print Settings screen, tap the print option that you want to change.
b Choose an option and tap Print Settings.Repeat steps a and b if you want to change other options.
c (For iPhone and iPod touch)Tap Done.(For iPad)Tap outside of the Print Settings screen to close the screen.
Note• When you print photos
(Inkjet models)
Photos are printed borderless, and if the aspect ratios of the photos and the paper are different, the photos will be enlarged so that there is no margin on the printed photos. In this case, the portion of the photo that extends beyond the paper size is cut off and will not be printed.
(Laser models)
Photos are printed with borders, and if the aspect ratios of the photos and the paper are different, the photos will be reduced or enlarged so that the entire image is printed.
• When you print PDF files
PDF pages are printed with borders, and if the aspect ratios of the pages and the paper are different, the pages will be reduced or enlarged so that the entire page is printed.

Printing
58
5
• When you print text
Text is printed with borders and will be reduced or enlarged according to the width of the paper. If the text pages are longer than the sheet length of the paper, the text pages will be printed on multiple sheets of paper.
• When you print web pages
Web pages are printed with borders and will be reduced or enlarged according to the width of the paper. If the web pages are longer than the sheet length of the paper, the web pages will be printed on multiple sheets of paper.

59
6
6
Scanning documents 6
Scanning documents and saving them in your mobile device’s photo album 6
Make sure there is enough available space on your mobile device.
For iPhone and iPod touch 6
a Load your document on to your machine.
b Tap the Brother iPrint&Scan icon on the Home screen.
c Tap Scan.The Scan Settings screen will appear.
d Make sure your machine is selected.Do one of the following:
If your machine is selected, go to step f.
If a different machine is selected or if Device Is Not Selected is displayed, make sure your machine is turned on and then tap the displayed scanner name or Device Is Not Selected. Go to step e.
e The application will search your network and display a list of available machines. Tap your machine from the list.Tap Scan Settings.
f Do one of the following:
If you want to change other scan settings, see Scan Settings uu page 76. After changing the settings, go to step g.
Scanning 6
(iPhone) 6

Scanning
60
6
If you do not want to change any settings, go to step g.
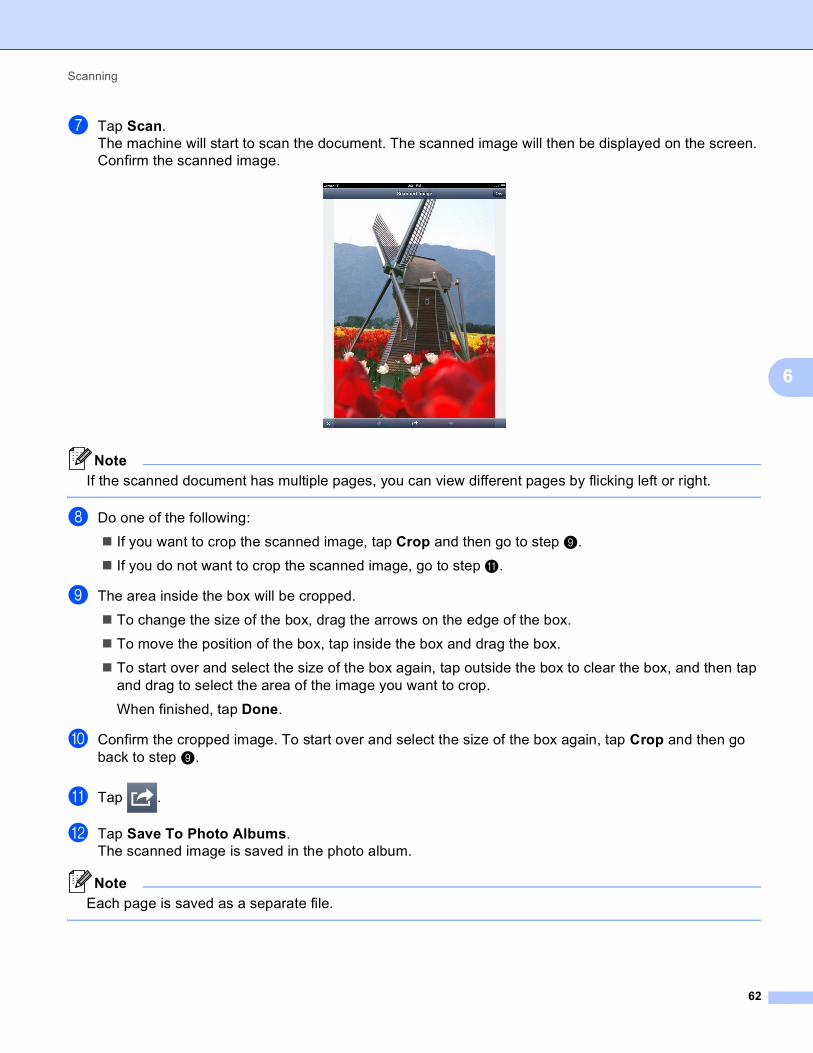
g Tap Scan.The machine will start to scan the document. The scanned image will then be displayed on the screen. Confirm the scanned image.
Note• Tap the screen to hide or show the operation buttons.
• If the scanned document has multiple pages, you can view different pages by flicking left or right.
h Do one of the following:
If you want to crop the scanned image, tap Crop and then go to step i.
If you do not want to crop the scanned image, go to step k.
i The area inside the box will be cropped.
To change the size of the box, drag the arrows on the edge of the box.
To move the position of the box, tap inside the box and drag the box.
To start over and select the size of the box again, tap outside the box to clear the box, and then tap and drag to select the area of the image you want to crop.
When finished, tap Done.
j Confirm the cropped image. To start over and select the size of the box again, tap Crop and then go back to step i.
k Tap .
l Tap Save To Photo Albums.The scanned image is saved in the photo album.
(iPhone) 6

Scanning
61
6
NoteEach page is saved as a separate file.
For iPad 6
a Load your document on to your machine.
b Tap the Brother iPrint&Scan icon on the Home screen.If the Photo, Web or Clipboard screen is displayed, switch to the scan function by tapping Scan.
c Tap Settings.The Scan Settings screen appears.
d Make sure your machine is selected.Do one of the following:
If your machine is selected, go to step f.
If a different machine is selected or if Device Is Not Selected is displayed, make sure your machine is turned on and then tap the displayed scanner name or Device Is Not Selected. Go to step e.
e The application will search your network and display a list of available machines. Tap your machine from the list.Tap Scan Settings.
f Do one of the following:
If you want to change other scan settings, see Scan Settings uu page 76. After changing the settings, go to step g.
If you do not want to change any settings, tap outside of the Scan Settings screen to close the screen, and then go to step g.
Scanning
62
6
g Tap Scan.The machine will start to scan the document. The scanned image will then be displayed on the screen. Confirm the scanned image.
Note
If the scanned document has multiple pages, you can view different pages by flicking left or right.
h Do one of the following:
If you want to crop the scanned image, tap Crop and then go to step i.
If you do not want to crop the scanned image, go to step k.
i The area inside the box will be cropped.
To change the size of the box, drag the arrows on the edge of the box.
To move the position of the box, tap inside the box and drag the box.
To start over and select the size of the box again, tap outside the box to clear the box, and then tap and drag to select the area of the image you want to crop.
When finished, tap Done.
j Confirm the cropped image. To start over and select the size of the box again, tap Crop and then go back to step i.
k Tap .
l Tap Save To Photo Albums.The scanned image is saved in the photo album.
Note
Each page is saved as a separate file.

Scanning
63
6
Sending by E-mail 6
For iPhone and iPod touch 6
a Load your document on to your machine.
b Tap the Brother iPrint&Scan icon on the Home screen.
c Tap Scan.The Scan Settings screen will appear.
d Make sure your machine is selected.Do one of the following:
If your machine is selected, go to step f.
If a different machine is selected or if Device Is Not Selected is displayed, make sure your machine is turned on and then tap the displayed scanner name or Device Is Not Selected. Go to step e.
e The application will search your network and display a list of available machines. Tap your machine from the list.Tap Scan Settings.
f Do one of the following:
If you want to change other scan settings, see Scan Settings uu page 76. After changing the settings, go to step g.
If you do not want to change any settings, go to step g.
(iPhone) 6

Scanning
64
6
g Tap Scan.The machine will start to scan the document. The scanned image will then be displayed on the screen. Confirm the scanned image.
Note• Tap the screen to hide or show the operation buttons.
• If the scanned document has multiple pages, you can view different pages by flicking left or right.
h Do one of the following:
If you want to crop the scanned image, tap Crop and then go to step i.
If you do not want to crop the scanned image, go to step k.
i The area inside the box will be cropped.
To change the size of the box, drag the arrows on the edge of the box.
To move the position of the box, tap inside the box and drag the box.
To start over and select the size of the box again, tap outside the box to clear the box, and then tap and drag to select the area of the image you want to crop.
When finished, tap Done.
j Confirm the cropped image. To start over and select the size of the box again, tap Crop and then go back to step i.
k Tap .
l Tap Email as JPEG or Email as PDF.The E-mail application automatically opens, a new outgoing E-mail message is created, and the scanned image is attached to the message.
(iPhone) 6

Scanning
65
6
Note• Images may not be able to be attached to an E-mail message depending on the size of the images or the
number of images. If an alert is displayed, you can choose to either continue or to save the scanned images in the mobile device's photo album.
• File names are automatically created based on the current date. For example, the first image scanned on July 1, 2011 would be named Scan07012011_001.jpg. Note that the region setting also determines the date format of the file name. (A sequential number may not be included in the file name.)
m Enter the destination, subject, the message content, and then send the message.
Note
For information about operating the E-mail application, refer to the application’s user’s guide.
For iPad 6
a Load your document on to your machine.
b Tap the Brother iPrint&Scan icon on the Home screen.If the Photo, Web or Clipboard screen is displayed, switch to the scan function by tapping Scan.
c Tap Settings.The Scan Settings screen appears.
d Make sure your machine is selected.Do one of the following:
If your machine is selected, go to step f.
If a different machine is selected or if Device Is Not Selected is displayed, make sure your machine is turned on and then tap the displayed scanner name or Device Is Not Selected. Go to step e.
e The application will search your network and display a list of available machines. Tap your machine from the list.Tap Scan Settings.

Scanning
66
6
f Do one of the following:
If you want to change other scan settings, see Scan Settings uu page 76. After changing the settings, go to step g.
If you do not want to change any settings, tap outside of the Scan Settings screen to close the screen, and then go to step g.
g Tap Scan.The machine will start to scan the document. The scanned image will then be displayed on the screen. Confirm the scanned image.
NoteIf the scanned document has multiple pages, you can view different pages by flicking left or right.
h Do one of the following:
If you want to crop the scanned image, tap Crop and then go to step i.
If you do not want to crop the scanned image, go to step k.
i The area inside the box will be cropped.
To change the size of the box, drag the arrows on the edge of the box.
To move the position of the box, tap inside the box and drag the box.
To start over and select the size of the box again, tap outside the box to clear the box, and then tap and drag to select the area of the image you want to crop.
When finished, tap Done.
j Confirm the cropped image. To start over and select the size of the box again, tap Crop and then go back to step i.
k Tap .

Scanning
67
6
l Tap Email as JPEG or Email as PDF.The E-mail application automatically opens, a new outgoing E-mail message is created, and the scanned image is attached to the message.
Note• Images may not be able to be attached to an E-mail message depending on the size of the images or the
number of images. If an alert is displayed, you can choose to either continue or to save the scanned images in the mobile device's photo album.
• File names are automatically created based on the current date. For example, the first image scanned on July 1, 2011 would be named Scan07012011_001.jpg. Note that the region setting also determines the date format of the file name. (A sequential number may not be included in the file name.)
m Enter the destination, subject, the message content, and then send the message.
NoteFor information about operating the E-mail application, refer to the application’s user’s guide.

Scanning
68
6
Scanning documents and saving them to iCloud 6
Scanned images can be saved to iCloud and viewed from a computer running Mac OS X 10.7.x. You cannot view the saved image on an iOS device.
iOS 5.0 or greater is required to use this feature. You need to enable iCloud on an iOS device.
For iPhone and iPod touch 6
a Load your document on to your machine.
b Tap the Brother iPrint&Scan icon on the Home screen.
c Tap Scan.The Scan Settings screen will appear.
d Make sure your machine is selected.Do one of the following:
If your machine is selected, go to step f.
If a different machine is selected or if Device Is Not Selected is displayed, make sure your machine is turned on and then tap the displayed scanner name or Device Is Not Selected. Go to step e.
e The application will search your network and display a list of available machines. Tap your machine from the list.Tap Scan Settings.
f Do one of the following:
If you want to change other scan settings, see Scan Settings uu page 76. After changing the settings, go to step g.
If you do not want to change any settings, go to step g.
(iPhone) 6

Scanning
69
6
g Tap Scan.The machine will start to scan the document. The scanned image will then be displayed on the screen. Confirm the scanned image.
Note• Tap the screen to hide or show the operation buttons.
• If the scanned document has multiple pages, you can view different pages by flicking left or right.
h Do one of the following:
If you want to crop the scanned image, tap Crop and then go to step i.
If you do not want to crop the scanned image, go to step k.
i The area inside the box will be cropped.
To change the size of the box, drag the arrows on the edge of the box.
To move the position of the box, tap inside the box and drag the box.
To start over and select the size of the box again, tap outside the box to clear the box, and then tap and drag to select the area of the image you want to crop.
When finished, tap Done.
j Confirm the cropped image. To start over and select the size of the box again, tap Crop and then go back to step i.
k Tap .
l Tap Save To iCloud as JPEG or Save To iCloud as PDF.The scanned image will be saved to iCloud.
(iPhone) 6

Scanning
70
6
Note• If you chose Save To iCloud as JPEG, each page is saved as a separate file. If you chose
Save To iCloud as PDF, all pages of the document are saved in one file.
• File names are automatically created based on the current date. For example, the first image scanned on July 1, 2011 would be named Scan07012011_001.jpg. Note that the region setting also determines the date format of the file name. (A sequential number may not be included in the file name.)
For iPad 6
a Load your document on to your machine.
b Tap the Brother iPrint&Scan icon on the Home screen.If the Photo, Web or Clipboard screen is displayed, switch to the scan function by tapping Scan.
c Tap Settings.The Scan Settings screen appears.
d Make sure your machine is selected.Do one of the following:
If your machine is selected, go to step f.
If a different machine is selected or if Device Is Not Selected is displayed, make sure your machine is turned on and then tap the displayed scanner name or Device Is Not Selected. Go to step e.
e The application will search your network and display a list of available machines. Tap your machine from the list.Tap Scan Settings.
f Do one of the following:
If you want to change other scan settings, see Scan Settings uu page 76. After changing the settings, go to step g.
If you do not want to change any settings, tap outside of the Scan Settings screen to close the screen, and then go to step g.

Scanning
71
6
g Tap Scan.The machine will start to scan the document. The scanned image will then be displayed on the screen. Confirm the scanned image.
NoteIf the scanned document has multiple pages, you can view different pages by flicking left or right.
h Do one of the following:
If you want to crop the scanned image, tap Crop and then go to step i.
If you do not want to crop the scanned image, go to step k.
i The area inside the box will be cropped.
To change the size of the box, drag the arrows on the edge of the box.
To move the position of the box, tap inside the box and drag the box.
To start over and select the size of the box again, tap outside the box to clear the box, and then tap and drag to select the area of the image you want to crop.
When finished, tap Done.
j Confirm the cropped image. To start over and select the size of the box again, tap Crop and then go back to step i.
k Tap .
l Tap Save To iCloud as JPEG or Save To iCloud as PDF.The scanned image will be saved to iCloud.
Note• If you chose Save To iCloud as JPEG, each page is saved as a separate file. If you chose
Save To iCloud as PDF, all pages of the document are saved in one file.
• File names are automatically created based on the current date. For example, the first image scanned on July 1, 2011 would be named Scan07012011_001.jpg. Note that the region setting also determines the date format of the file name. (A sequential number may not be included in the file name.)

Scanning
72
6
Opening scanned images in other applications 6
Scanned images can be converted to PDF files and opened using other applications. Make sure an application that can open PDF files is installed on your mobile device.
For iPhone and iPod touch 6
a Load your document on to your machine.
b Tap the Brother iPrint&Scan icon on the Home screen.
c Tap Scan.The Scan Settings screen will appear.
d Make sure your machine is selected.Do one of the following:
If your machine is selected, go to step f.
If a different machine is selected or if Device Is Not Selected is displayed, make sure your machine is turned on and then tap the displayed scanner name or Device Is Not Selected. Go to step e.
e The application will search your network and display a list of available machines. Tap your machine from the list.Tap Scan Settings.
f Do one of the following:
If you want to change other scan settings, see Scan Settings uu page 76. After changing the settings, go to step g.
If you do not want to change any settings, go to step g.
(iPhone) 6

Scanning
73
6
g Tap Scan.The machine will start to scan the document. The scanned image will then be displayed on the screen. Confirm the scanned image.
Note• Tap the screen to hide or show the operation buttons.
• If the scanned document has multiple pages, you can view different pages by flicking left or right.
h Do one of the following:
If you want to crop the scanned image, tap Crop and then go to step i.
If you do not want to crop the scanned image, go to step k.
i The area inside the box will be cropped.
To change the size of the box, drag the arrows on the edge of the box.
To move the position of the box, tap inside the box and drag the box.
To start over and select the size of the box again, tap outside the box to clear the box, and then tap and drag to select the area of the image you want to crop.
When finished, tap Done.
j Confirm the cropped image. To start over and select the size of the box again, tap Crop and then go back to step i.
k Tap .
l Tap Open Using Another App.A list of applications that can open PDF files is displayed.
m Select an application.The PDF file is opened in the selected application.
(iPhone) 6

Scanning
74
6
NoteFor information about viewing PDF files, refer to the application’s user’s guide.
For iPad 6
a Load your document on to your machine.
b Tap the Brother iPrint&Scan icon on the Home screen.If the Photo, Web or Clipboard screen is displayed, switch to the scan function by tapping Scan.
c Tap Settings.The Scan Settings screen appears.
d Make sure your machine is selected.Do one of the following:
If your machine is selected, go to step f.
If a different machine is selected or if Device Is Not Selected is displayed, make sure your machine is turned on and then tap the displayed scanner name or Device Is Not Selected. Go to step e.
e The application will search your network and display a list of available machines. Tap your machine from the list.Tap Scan Settings.
f Do one of the following:
If you want to change other scan settings, see Scan Settings uu page 76. After changing the settings, go to step g.
If you do not want to change any settings, tap outside of the Scan Settings screen to close the screen, and then go to step g.

Scanning
75
6
g Tap Scan.The machine will start to scan the document. The scanned image will then be displayed on the screen. Confirm the scanned image.
Note
If the scanned document has multiple pages, you can view different pages by flicking left or right.
h Do one of the following:
If you want to crop the scanned image, tap Crop and then go to step i.
If you do not want to crop the scanned image, go to step k.
i The area inside the box will be cropped.
To change the size of the box, drag the arrows on the edge of the box.
To move the position of the box, tap inside the box and drag the box.
To start over and select the size of the box again, tap outside the box to clear the box, and then tap and drag to select the area of the image you want to crop.
When finished, tap Done.
j Confirm the cropped image. To start over and select the size of the box again, tap Crop and then go back to step i.
k Tap .
l Tap Open Using Another App.A list of applications that can open PDF files is displayed.
m Select an application.The PDF file is opened in the selected application.
Note
For information about viewing PDF files, refer to the application’s user’s guide.

Scanning
76
6
Scan Settings 6
You can change the following scan settings when you use your mobile device to scan.
Document Size
Scan Type
Duplex 1
1 Displayed only when your machine supports duplex scan.
NoteOnly settings that can be changed are displayed.
a On the Scan Settings screen, tap the scan option that you want to change.
b Choose an option and tap Scan Settings.Repeat steps a and b if you want to change other options.
c (For iPad only)Tap outside of the Scan Settings screen to close the screen.

Section III
For Windows® Phone Devices III
Introduction 78
Printing 82
Scanning 89

78
7
7
Overview 7
Brother iPrint&Scan allows you to use features of your Brother machine directly from your Windows® Phone, without using a computer.
Brother iPrint&Scan supports the following functions:
Printing
Even if your machine is not connected to your computer, you can print photos directly from your mobile device. (See Printing uu page 82.)
Scanning
Photos and documents scanned with your Brother machine can be saved directly to your mobile device. (See Scanning uu page 89.)
Note
• Your machine must support Web Services protocol to use Brother iPrint&Scan functions.
• For a list of models supported by Brother iPrint&Scan please visit the Brother web site at http://www.brother.com/apps/wp/.
• If your machine does not have a scanner, you cannot use the scan functions of Brother iPrint&Scan.
Introduction 7

Introduction
79
7
Hardware requirement 7
Supported operating systems 7
Brother iPrint&Scan is compatible with devices running Windows® Phone 7 version 7.0 or greater.
Note
Certain features of Brother iPrint&Scan may not be supported by your mobile device.
Network settings 7
In order to use Brother iPrint&Scan, your mobile device must connect using Wi-Fi to the network that your Brother machine is connected to. Brother iPrint&Scan supports wireless connections that use infrastructure mode; ad-hoc mode is not supported.
To configure your mobile device for a Wi-Fi connection, please refer to your mobile device’s user’s guide.
To configure your Brother machine for a Wi-Fi connection, please refer to your machine’s Quick Setup Guide.
When the Brother machine is connected to the wireless access point/router using Wi-Fi:
1 Mobile device
2 Wireless access point/router
3 Wireless network machine (your machine)
321

Introduction
80
7
When the Brother machine is connected to the wireless access point/router using a network cable:
1 Mobile device
2 Wireless access point/router
3 Network cable
4 Network machine (your machine)
43
21

Introduction
81
7
Downloading Brother iPrint&Scan from the Windows® Phone Marketplace 7
You can download and install Brother iPrint&Scan from the Windows® Phone Marketplace. To take advantage of all the features supported by Brother iPrint&Scan, make sure you are using the latest version.
To download and install or to uninstall Brother iPrint&Scan, please refer to the user’s guide for your mobile device.

82
8
8
Printing images stored in your mobile device 8
You can print photos that are stored in your mobile device.
a Display the list of applications on your mobile device and tap the Brother iPrint&Scan icon.
Note
When the license agreement screen appears, carefully read and accept the terms of the agreement.
b Tap Print from Pictures.
c Choose the desired photo from the thumbnails.
d Confirm the image on the print preview screen.
NoteTap the upper portion of your mobile devices screen to show or hide the operation buttons.
e Tap .
Printing 8

Printing
83
8
f Make sure your machine is selected.Do one of the following:
If your machine is selected, go to step i.
If a different machine is selected or if Device Is Not Selected is displayed, make sure your machine is turned on and then tap Printer. Go to step g.
g Tap .
NoteIf the machine was used previously, you can select the machine from the device list.
h Enter your machine’s IP address, and then tap Connect.The machine’s model name is displayed when the machine is found. Tap the machine to select it.
NoteYou can see your machine’s IP address in the Network menu on the control panel of your machine. For more details, please refer to your machine’s Network User’s Guide.
i Do one of the following:
If you want to change other print settings, see Print Settings uu page 88. After changing the settings, go to step j.
If you do not want to change any settings, press the Back button and go to step j.
j Tap .
The machine will start printing.

Printing
84
8
Printing photos taken with Brother iPrint&Scan 8
If the mobile device features a camera, photos can be taken using Brother iPrint&Scan and printed directly.
a Display the list of applications on your mobile device and tap the Brother iPrint&Scan icon.
b Tap Print from Camera.
c Use the device to take a photo.
d The photo is displayed.Do one of the following:
To print the photo, tap accept, and then go to step e.
To retake the photo, tap retake, and then go back to step c.
NoteThe procedure used to handle a photo may vary by device.
e Confirm the image on the print preview screen.
NoteTap the upper portion of your mobile devices screen to show or hide the operation buttons.
f Tap .

Printing
85
8
g Make sure your machine is selected.Do one of the following:
If your machine is selected, go to step j.
If a different machine is selected or if Device Is Not Selected is displayed, make sure your machine is turned on and then tap Printer. Go to step h.
h Tap .
NoteIf the machine was used previously, you can select the machine from the device list.
i Enter your machine’s IP address, and then tap Connect.The machine’s model name is displayed when the machine is found. Tap the machine to select it.
NoteYou can see your machine’s IP address in the Network menu on the control panel of your machine. For more details, please refer to your machine’s Network User’s Guide.
j Do one of the following:
If you want to change other print settings, see Print Settings uu page 88. After changing the settings, go to step k.
If you do not want to change any settings, press the Back button and go to step k.
k Tap .
The machine will start printing.

Printing
86
8
Printing photos from other applications 8
Photos can be printed directly from pre-installed applications on your mobile device using Brother iPrint&Scan. For example, you can print photos that are saved in your mobile device's Pictures hub.
Note
You cannot print photos from third-party applications.
a Use the desired application to select the photo that you want to print, and share the photo with Brother iPrint&Scan. For example, from the Pictures hub you can share a photo by tapping the sequential dots ( ), and then tapping apps... If the list of applications appears, select Brother iPrint&Scan.A print preview will be displayed.
Note
• If apps... is not displayed though you have already downloaded Brother iPrint&Scan, your Brother
iPrint&Scan may be the old version. Download the latest version from the Windows® Phone Marketplace.
• When the license agreement screen appears, carefully read and accept the terms of the agreement.
b Confirm the image on the print preview screen.
NoteTap the upper portion of your mobile devices screen to show or hide the operation buttons.
c Tap .

Printing
87
8
d Make sure your machine is selected.Do one of the following:
If your machine is selected, go to step g.
If a different machine is selected or if Device Is Not Selected is displayed, make sure your machine is turned on and then tap Printer. Go to step e.
e Tap .
NoteIf the machine was used previously, you can select the machine from the device list.
f Enter your machine’s IP address, and then tap Connect.The machine’s model name is displayed when the machine is found. Tap the machine to select it.
NoteYou can see your machine’s IP address in the Network menu on the control panel of your machine. For more details, please refer to your machine’s Network User’s Guide.
g Do one of the following:
If you want to change other print settings, see Print Settings uu page 88. After changing the settings, go to step h.
If you do not want to change any settings, press the Back button and go to step h.
h Tap .
The machine will start printing.

Printing
88
8
Print Settings 8
You can change the following print settings when you print from a mobile device.
Paper Size
Media Type
Copies
NoteOnly settings that can be changed are displayed.
a On the Print Settings screen, tap the print option that you want to change.
b Choose an option.Repeat steps a and b if you want to change other options.
c Press the Back button.
NoteWhen you print photos
(Inkjet models)
Photos are printed borderless, and if the aspect ratios of the photos and the paper are different, the photos will be enlarged so that there is no margin on the printed photos. In this case, the portion of the photo that extends beyond the paper size is cut off and will not be printed.
(Laser models)
Photos are printed with borders, and if the aspect ratios of the photos and the paper are different, the photos will be reduced or enlarged so that the entire image is printed.

89
9
9
Scanning documents directly to your mobile device 9
Make sure there is enough available space on your mobile device.
a Load your document on to your machine.
b Display the list of applications on your mobile device and tap the Brother iPrint&Scan icon.
Note
When the license agreement screen appears, carefully read and accept the terms of the agreement.
c Tap Scan.
d Make sure your machine is selected.Do one of the following:
If your machine is selected, go to step g.
If a different machine is selected or if Device Is Not Selected is displayed, make sure your machine is turned on and then tap Scanner. Go to step e.
e Tap .
Note
If the machine was used previously, you can select the machine from the device list.
Scanning 9

Scanning
90
9
f Enter your machine’s IP address, and then tap Connect.The machine’s model name is displayed when the machine is found. Tap the machine to select it.
Note
You can see your machine’s IP address in the Network menu on the control panel of your machine. For more details, please refer to your machine’s Network User’s Guide.
g Do one of the following:
If you want to change other scan settings, see Scan Settings uu page 91. After changing the settings, go to step h.
If you do not want to change any settings, go to step h.
h Tap .
The machine will start to scan the document. The scanned image will then be displayed on the screen. Confirm the scanned image.
NoteIf the scanned document has multiple pages, you can view different pages by flicking left or right.
i Tap .
The scanned image will be saved in Pictures/Saved Pictures.
NoteEach page is saved as a separate image.

Scanning
91
9
Scan Settings 9
You can change the following scan settings when you use your mobile device to scan.
Document Size
Scan Type
NoteOnly settings that can be changed are displayed.
a On the Scan Settings screen, tap the scan option that you want to change.
b Choose an option.Repeat steps a and b if you want to change other options.


