Download - MCH Techniques NICU Umbilical Venous Line

MCH NICU
UMBILICUS VENOUS LINE Insertion & Removal
Techniques
Page | 1 of 20
Extract from Art Line Manual
Updated August 2015
Umbilical Venous Line INSERTION AND REMOVAL
Indications Administration of volume expanders (eg: blood, plasma) or medications to patients in shock in whom peripheral
lV's cannot be started. Delivery of dextrose solution > 15% in treatment of hypoglycemia and KCl > 60 mEq/l. Central venous pressure monitoring in sick neonate. Exchange transfusion. IV access (i.e. when peripheral IV route is impossible to obtain). Blood sampling is not routinely done via a UVL. Refer to Blood Sampling Guideline.
Contraindications Abdominal wall infections (i.e.: omphalitis, cellulitis) Suspected ischemic enteropathy (i.e.: necrotizing enterocolitis) Abdominal wall malformations (i.e.: gastroschesis, omphalocele). Infants > 3 days of life due to colonization of the umbilical cord and possibility of infection.
Procedure - Insertion
o Materials
Bring Interventional Cart to patient’s room (should be kept outside of room).
Gather appropriate tools as per plastified guide.
o Nurse’s role
Being at the bedside at the time of insertion aiding in the set-up and observing the baby's response to the procedure.
Ensure appropriate devices are place to keep line closed prior the end of the sterile procedure (2 microclaves for double lumen catheter; single purple clamp extension with microclave for single lumen catheter).
Accurate documentation of procedure and tolerance is essential. Call for X-Ray post insertion and before final securing to ensure proper catheter placement.

MCH NICU
UMBILICUS VENOUS LINE Insertion & Removal
Techniques
Page | 2 of 20
Extract from Art Line Manual
Updated August 2015
o What to observe on X-Ray
The line will enter umbilical vein up through ductus venosus into inferior vena cava
The line will be placed just above the diaphragm The line SHOULD NOT be entering right atrium, portal vein, hepatic vein, or mesenteric vein
o Taping
1. A suture is placed in the cord and tied around the umbilical catheter. 2. The catheter must be secured with an umbilical vessel catheter anchor (“BRIDGE”). 3. It is important to leave umbilicus visible to watch for bleeding, oozing, discharge and to allow for cleaning of cord.
4. NOTE: If Surgicel or gauze used to stop bleeding, it must NOT be left in place for longer than 24 hours. Additionally, dried blood should be cleaned off gently with sterile normal saline, if dried blood persist may use appropriate disinfectant swab followed by normal saline rinse. Moreover, cord tie should be removed as soon as bleeding is controlled (no longer than 24 hours).

MCH NICU
UMBILICUS VENOUS LINE Insertion & Removal
Techniques
Page | 3 of 20
Extract from Art Line Manual
Updated August 2015
Procedure – Removal
o When?
The central umbilical venous line may stay up to 10 days. However, if the patient requires long term intravenous access, earlier (3-5 days) PICC insertion should be considered to outweigh risks versus benefits.
Catheter is no longer needed. Catheter is obstructed. Septicemia (with suspected line source). Circulatory impairment to legs, buttocks, GI & GU systems. Severe condition such as pericardial tamponade, endocarditis, cardiac arrhythmias, and/or hydrothorax.
o Materials
Sterile sutures set removal kit Waterproof tape for compress dressing
o How?
Removal of the catheters should be done slowly to allow vessel spasm to occur at the catheter tip, thus reducing bleeding when the catheter is completely removed.
1. Turn off the pump. 2. Cut the suture (at the level of the skin to avoid catheter transection). 3. Remove the umbilical vessel catheter anchor (“BRIDGE”). 4. Pull the catheter out of the baby's umbilical vessel until 5 cm marking is visible, then pull it another 2 cm. (Length left to
be removed is actually 3 cm). 5. Pull the catheter 1 cm at a time every 5 minutes to minimize bleeding. 6. After catheter removal apply firm, constant pressure above the umbilicus for 5 minutes. If bleeding persists maintain
pressure for another 5 minutes. Notify physician if prolonged bleeding occurs and measure blood loss. 7. Apply compress dressing with a sterile 2" X 2" and waterproof tape for 24 hours, whether or not bleeding occurs at the
site.
o What to look for?
Watch for delayed bleeding especially with patient with thrombocytopenia and/or coagulopathy disorders.

MCH NICU
UMBILICAL ARTERIAL LINE
Insertion & Removal
Techniques
Page | 4 of 20
Extract from Art Line Manual
Updated August 2021
Umbilical Arterial Line INSERTION & REMOVAL
Indications Continuous intra-arterial blood pressure monitoring Blood procurement
Contraindications Abdominal wall infections (i.e.: omphalitis, cellulitis). Abdominal wall malformations (i.e.: gastroschisis, omphalocele). Suspected ischemic enteropathy (i.e.: necrotizing enterocolitis). Infant > 3 days of life due to colonization of the umbilical cord and possibility of infection.
Procedure – Insertion
o Materials
Bring Interventional Cart to patient’s room (should be kept outside of room).
Gather appropriate equipment as per plasticized guide attached to cart.
o Nurse’s role
Setting-up all equipment with inserter. Being present at the bedside at the time of insertion, observing the baby's response to the procedure,
and adjusting care accordingly. Ensure appropriate device is placed to keep the line closed prior the end of procedure (microclave and
extension with red marvelous valve stopcock ). Accurate documentation of procedure and tolerance is essential. Call for X-Ray post insertion and before final securing to ensure proper catheter placement. There are two recommended positions for umbilical artery catheter tip placement (safest because they
are not near the vessels providing flow to vital organs). The physician will make the final decision on placement:
High catheter placement in the aorta at the level of the diaphragm; vertebral level T6-9 Low catheter placement: above the aortic bifurcation and below origin of renal arteries; vertebral level L3-
L4

MCH NICU
UMBILICAL ARTERIAL LINE
Insertion & Removal
Techniques
Page | 5 of 20
Extract from Art Line Manual
Updated August 2021
o What to observe on X-Ray
The line will enter one of the two umbilical artery go down towards one of the two hypogastric aorta branches then up into the aorta. Tip of line should pass junction (around L5) to be placed just above at L3-4 or progress to diaphragm area between T6 – T9.

MCH NICU
UMBILICAL ARTERIAL LINE
Insertion & Removal
Techniques
Page | 6 of 20
Extract from Art Line Manual
Updated August 2021
o Taping
1. A suture is placed in the cord and tied around the umbilical catheter. 2. The catheter must be secured with an umbilical vessel catheter anchor “BRIDGE”. 3. If patient less than 29 weeks, silicone tape layers (mepitac) should be placed under each side of umbilicus to avoid placing
Bridge directly on skin. 4. It is important to leave umbilicus visible to watch for bleeding, oozing, discharge and to allow for cleaning of cord.

MCH NICU
UMBILICAL ARTERIAL LINE
Insertion & Removal
Techniques
Page | 7 of 20
Extract from Art Line Manual
Updated August 2021
NOTE: If Surgicel or gauze used to stop bleeding, it must NOT be left in place for longer than 24 hours. Additionally, dried blood should be cleaned off gently with sterile normal saline, if dried blood persist may use appropriate disinfectant swab followed by normal saline rinse. Moreover, cord tie should be removed as soon as bleeding is controlled (no longer than 24 hours).
o Risks and complications at insertion
Transient blanching or cyanosis of leg during or following catheterization, usually due to reflex arterial spasm. In such a case, a warm compress should be applied to the opposite limb for 10 minutes. This causes a reflex vasodilatation in the affected limb. If there has been no response to this treatment within half hour, the catheter should be removed.
Line may be diverted downward into femoral artery (via iliac artery) and thus impair circulation to the leg and/or buttock.
Line may perforate aorta or its branches.
Procedure – Removal
o When?
Catheter is no longer needed Malfunctioning of the catheter (unable to withdraw) Septicemia (with suspected line source) Circulatory impairment to legs, buttocks, GI & GU systems Suspected thrombi emboli and air emboli
o Materials
Sterile sutures set removal kit Waterproof tape for compress dressing Sterile 2" X 2"
o How?
Removal of the catheters should be done slowly to allow vessel spasm to occur at the catheter tip, thus reducing bleeding when the catheter is completely removed.
1. Turn off the pump. 2. Cut the suture (at the level of the skin to avoid catheter transection). 3. Remove the umbilical vessel catheter anchor “BRIDGE”. 4. Pull the catheter out of the baby's umbilical vessel until 5 cm marking is visible, then pull it another 2 cm slowly.
(Length left to be removed is actually 3 cm). 5. Pull the catheter 1 cm at a time every 5 minutes to allow vessel to spasm and minimize bleeding. 6. After catheter removal apply firm, constant pressure below the umbilicus for 5 minutes. If bleeding persists maintain
pressure for another 5 minutes. Notify physician if prolonged bleeding occurs and measure blood loss. 7. Apply compress dressing with a sterile 2" X 2" and appropriate waterproof tape for 24 hours, whether or not bleeding
occurs at the site.
o What to look for?
Watch for delayed bleeding especially with patient with thrombocytopenia and/or coagulopathy disorders.

MCH NICU
UMBILICAL ARTERIAL LINE
Insertion & Removal
Techniques
Page | 8 of 20
Extract from Art Line Manual
Updated August 2021

MCH NICU
PERIPHERAL ARTERIAL LINE Insertion & Removal
Techniques
Page | 9 of 20
Extract from Art Line Manual
Updated August 2015
Peripheral Arterial Line
INSERTION AND REMOVAL
Indications Continuous intra-arterial blood pressure monitoring Blood procurement
Key points Peripheral arterial lines will be inserted instead of umbilical catheter in these situations:
Umbilical artery access is limited because the neonate is older more than 3 days old Umbilical artery catheterization has failed There is an infection of the abdominal wall
omphalitis
cellulitis
There is a known or suspected Ischemic enteropathy necrotizing enterocolitis (NEC)
In the presence of abdominal defects gastroschesis
omphalocele
severe umbilical hernia
Contraindications Failure of Allen’s test for radial artery line Poor arm perfusion
Procedure - Allen’s test
o Why?
To ensure that ulnar artery can adequately supply blood to the hand
o When?
Before the insertion of catheter into the radial artery
o How?
1. Gently squeeze hand to partially empty it of blood. 2. Apply pressure to both the ulnar and the radial arteries. 3. Then remove pressure from the hand and the ulnar artery. 4. If the entire hand flushes and fills with blood, the ulnar artery can supply the hand with blood and the radial artery can
be safely cannulated.

MCH NICU
PERIPHERAL ARTERIAL LINE Insertion & Removal
Techniques
Page | 10 of 20
Extract from Art Line Manual
Updated August 2015
Procedure - Insertion
o Who?
By the MD, Resident, Fellow, NNP & trained nurses (with the accord of MD)
o Material
Appropriate adhesive securement (Pink tape, foam tape) Sterile 2x2 gauze (for roll) Appropriate disinfecting agent Non-sterile gloves Catheter (Angiocath, Jelco or Insyte) of appropriate size Single IV extension ( T-piece ) Heparinized 1/2normal saline with appropriate heparin added according to weight 3 mL syringe filled with heparinized 1/2normal saline
o How?
1. The catheter is sutured when a cutdown is performed otherwise there is no need to suture the catheter 2. The catheter is connected to a T-piece connector and a 6 inch extension followed by a three-way stopcock. 3. The catheter is well secured with appropriate adhesive securement, leaving skin above catheter and fingers/toes exposed
o Positioning
The wrist of the baby should be restrained in a hyperextended position.
Place a cushion or a roll underneath the wrist.
Restrain the leg on a board in an abducted position.
Restrain the leg on a board. Place a cushion or a roll underneath the foot and
secure well with tape.

MCH NICU
PERIPHERAL ARTERIAL LINE Insertion & Removal
Techniques
Page | 11 of 20
Extract from Art Line Manual
Updated August 2015
What to look for?
o Signs
Perfusion / Blanching / Discoloration of fingers or toes Infiltration Discharge at the site
o Complications long term
Localized infection Small areas of skin necrosis Ischemic necrosis of fingertips or toes
Procedure – Removal
o When?
Catheter is no longer needed Persistent skin blanching or erythema over the catheter tip Suspected thromboemboli; discoloration of the fingers or toes, clot formation manifested by inability to withdraw
blood or loss of the blood pressure tracing Leakage around insertion site Septicemia
o Materials
Sterile sutures set removal kit
Waterproof tape for compress dressing
o How?
1. Turn off the pump. 2. Apply firm, constant pressure with sterile gauze at the insertion site. 3. Pull the catheter out slowly while maintaining pressure at the insertion site for at least 5 minutes or until bleeding has
stopped. 4. Apply pressure dressing with a sterile 2" X 2" and waterproof tape for 24 hours site. If pressure is not maintained long
enough, a hematoma can result. 5. Notify physician if prolonged bleeding occurs and measure blood loss.
o By whom?
If a cut down was done, it has to be removed by surgery or the professional that inserted it. Resident, Fellow, NNP & MD. All RNs that reviewed the documentation and passed successfully the written and practical evaluation as per the
MCH-NICU protocol.

MCH NICU
SPECIAl considerations for UVL & UAL Potential problems & preventive interventions
Techniques
Page | 12 of 20
Extract from Art Line Manual
Updated December 2019
Potential problems with umbilical arterial/venous line in situ and preventives nursing interventions
Potential Problems Preventives Nursing Interventions
Potential hemorrhage Unobstructed view
Verify all connections
Catheter well secured
Observe oozing and/or bleeding
Restrain infant PRN
Avoid prone position with umbilical arterial line
Observe signs of shock
Potential anemia hypovolemia Record blood in and out
Follow Hgb-Hct
Potential impairment of circulation Inquire position on X-ray with MD team
Catheter well secured
Unobstructed view
Verify color and warmth of buttocks and legs
Verify blood pressure and pulses
Observe abdominal distention
Record urine in and out
Potential infection Aseptic technique all the time, as protocol
Keep umbilicus clean
Site uncovered and unobstructed view
Observe signs of infection
Change syringe/ solution, as protocol
Do blood culture PRN, as ordered
Potential hypervolemia and/or hypernatremia
Arterial solution ordered must be included in daily fluid
Use minimal rate as ordered
Flush line with minimal amount for clean line
Record fluids / urine in and out
Record weight daily or as ordered
Observe for signs of fluid overload
UAL: Potential emboli or air clot Inquire position on X-ray with MD team
Catheter well secured
Verify all connections
Use heparinized solution appropriate for patient
Clear line effectively after blood sampling
Verify and record blood pressure tracing and vital signs
UVL: if advanced too far, the line may pass into the right atrium or even into the left atrium and may cause cardiac arrhythmias, pericardial tamponade, endocarditis, hydrothorax.
Inquire position on X-ray with MD team
Record vital signs
Observe for cardiac rhythm
Observe for respiratory changes
Observe for increase FiO2 needs
Observe for signs of sepsis

Techniques
Arterial Line Set-Up, priming &
Intra-arterial blood pressure
monitoring
Extract from Art Line Manual
Updated December 2019
MCH NICU
Page | 13 of 20
Arterial Line Set-Up, Priming & Intra-
arterial blood pressure monitoring Materials
chlorhexidine 0.5% and alcohol 70% swabs (CHG/alcohol swab)
one alcohol antiseptic-cap
50-60 ml syringe with appropriate arterial heparinized solution 0.5 unit /1ml (baby < 1500g)
1 unit/1ml (baby > 1500g)
Microclave
Macrobore extension set
Arterial tubing with transducer and pre-attached “flush syringe”
Extension with red marvelous valve stopcock (only UAL – if radial, already in place at insertion)
Syringe Pump
Blood pressure monitoring cable & BP block
Transducer holder & White plaque
white sterile field
Level
non-sterile gloves
Procedure ( P=Patient & S=Solution)
1. Preparation & setting-up
Proceed with hand hygiene Gather all equipment needed Disinfect metal table & let it dry Proceed with hand hygiene Open packages in an aseptic way and
connect all tubings and extensions as shown in picture on the right
You are ready to PRIME
Extension with
red marvelous
valve stopcock

Techniques
Arterial Line Set-Up, priming &
Intra-arterial blood pressure
monitoring
Extract from Art Line Manual
Updated December 2019
MCH NICU
Page | 14 of 20
2. “Flush syringe” is full of air and must be emptied.
• Close top stopcock (attached to flush syringe) toward heparinized solution and push the air from the syringe into the line.
• This is completed prior to priming the line.
3. Close top and bottom stopcocks toward patient.
4. Open blue cap (“zeroing” cap). This cap can be twisted open but cannot (and should not) be removed. It prevents contamination of tubing during manipulation.
5. Prime “zeroing” stopcock by squeezing the yellow tabs and flushing the solution until you see a drop coming out of the blue cap and no air is left in the tubing.
6. Twist blue cap back into closed position.
7. Close stopcock toward blue cap.
8. Prime “flush syringe” by squeezing the yellow tabs and flushing the solution until “flush syringe” is full. There will be air trapped in the syringe.
9. Close top stopcock toward yellow tabs and push air out of “flush syringe” and into tubing toward patient.
10. Keep pushing solution until a maximum of 8ml is left in the “flush syringe”.
S
Techniques
Arterial Line Set-Up, priming &
Intra-arterial blood pressure
monitoring
Extract from Art Line Manual
Updated December 2019
MCH NICU
Page | 15 of 20
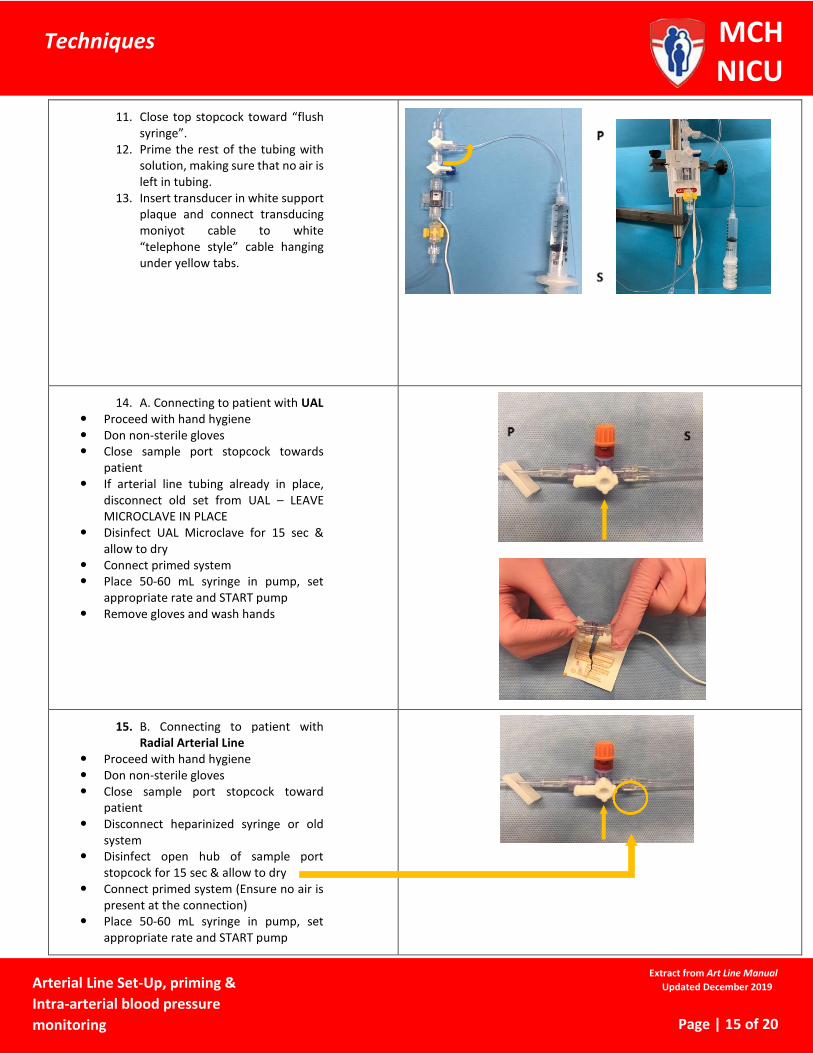
11. Close top stopcock toward “flush syringe”.
12. Prime the rest of the tubing with solution, making sure that no air is left in tubing.
13. Insert transducer in white support plaque and connect transducing moniyot cable to white “telephone style” cable hanging under yellow tabs.
14. A. Connecting to patient with UAL Proceed with hand hygiene Don non-sterile gloves Close sample port stopcock towards
patient If arterial line tubing already in place,
disconnect old set from UAL – LEAVE MICROCLAVE IN PLACE
Disinfect UAL Microclave for 15 sec & allow to dry
Connect primed system Place 50-60 mL syringe in pump, set
appropriate rate and START pump Remove gloves and wash hands
15. B. Connecting to patient with Radial Arterial Line
Proceed with hand hygiene Don non-sterile gloves Close sample port stopcock toward
patient Disconnect heparinized syringe or old
system Disinfect open hub of sample port
stopcock for 15 sec & allow to dry Connect primed system (Ensure no air is
present at the connection) Place 50-60 mL syringe in pump, set
appropriate rate and START pump

Techniques
Arterial Line Set-Up, priming &
Intra-arterial blood pressure
monitoring
Extract from Art Line Manual
Updated December 2019
MCH NICU
Page | 16 of 20
Remove gloves and Proceed with hand hygiene
16. Zeroing the system: Ensure that system is leveled
between mid-chest & mid–transducer at blue cap
Close the bottom stopcock (with blue cap) toward patient
Open blue cap to air without removing it completely
Press “zero” on monitor under Art line tracing & maintain until a “0” appears at the pressure reading (until you hear second beep)
Close blue cap & close bottom stopcock toward blue cap
Open sample port (“Off” position placed opposite to sample port)
17. End result once system is in place Extension with marvelous valve stopcock Attached to microclave on the UAL OR Extension with marvelous valve stopcock Attached directly to radial arterial catheter
OR

Techniques
Arterial Line Set-Up, priming &
Intra-arterial blood pressure
monitoring
Extract from Art Line Manual
Updated December 2019
MCH NICU
Page | 17 of 20
18. Marvelous valve stopcock No need to discard blood No need to use syringes to flush Can use in-line flushing No residual blood left after procedure Attach a new alcohol Swabcap on
marvelous valve https://www.youtube.com/watch?v=0X-
PLyKAiHw
Solution change 60 ml syringe Q 24 hrs Transducer, tubing and “marvelous” valve Q 96 hrs (unless radial art line –
“marvelous” valve stays on for the life of the radial line)
Calibration and leveling
o When?
Q 12 hrs PRN if mobilizing baby and transducer doesn’t follow in this mobilization PRN if change in BP quality tracing or readings Always follow same steps as in procedure step 13.
Quality tracing
o Definitions
The upstroke of the pressure wave formed during systole ascends steeply and correlates with the QRS complex of ECG
The notch in the downstroke is the "dicrotic notch" and represents closure of aortic valve
The highest point on pressure wave represents systolic pressure The diastolic pressure is the lowest point just before the next systole
o Troubleshooting a change in tracing quality
Calibrate your system Level your transducer Verify for any leaks, blood in line or air bubbles
If air bubbles, can flush out (not to patient)
If blood in line, try to flush back in (do not flush against high resistance as you may dislodge a clot)
Pull back some blood and verify patency of system (immediately flush)
Good blood return?
Resistance upon flushing?
Blanching of limb when you flush?
Techniques
ARTERIAL BLOOD SAMPLING UAL and Peripheral Art Line
Extract from Art Line Manual
Updated December 2019
MCH NICU
Page | 18 of 20
Arterial blood sampling UAL and Peripheral Art Line
Materials chlorhexidine 0.5% and alcohol 70% swabs (CHG/alcohol swab)
one alcohol antiseptic-cap
arterial blood gas syringe (if ordered)
3 or 5ml syringe (depending on volume needed & minimize entry into system)
sampling tubes
labels
non-sterile gloves
Procedure ( P=Patient & S=Solution)
1. Proceed with hand hygiene.
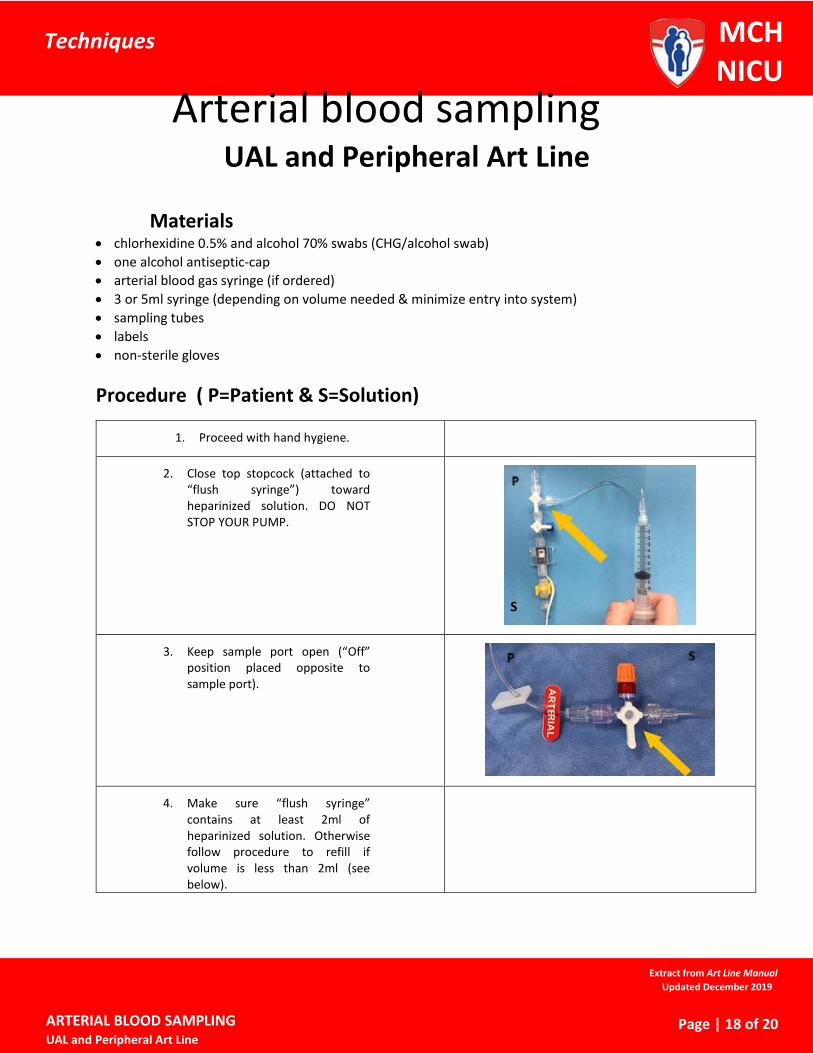
2. Close top stopcock (attached to “flush syringe”) toward heparinized solution. DO NOT STOP YOUR PUMP.
3. Keep sample port open (“Off” position placed opposite to sample port).
4. Make sure “flush syringe” contains at least 2ml of heparinized solution. Otherwise follow procedure to refill if volume is less than 2ml (see below).
S

Techniques
ARTERIAL BLOOD SAMPLING UAL and Peripheral Art Line
Extract from Art Line Manual
Updated December 2019
MCH NICU
Page | 19 of 20
5. Using “flush syringe”, gently withdraw blood up to the black line on the tubing.
6. Close sample port stopcock toward heparinized solution.
7. Proceed with hand hygiene and don non-sterile gloves.
8. Remove alcohol antiseptic-cap from sample port. Allow to dry.
9. If taking a sample for blood gas, prepare blood gas syringe by pushing down plunger to the 0.5ml mark. Connect blood gas syringe by inserting tip into sample port and twisting the syringe clockwise by ¼ turn. Ensure that syringe is well secured. Blood gas sampling should always be done first and collected directly using the arterial blood sample syringe. Collect 0.5ml of blood for your specimen by letting the blood flow into the syringe on its own. Remove syringe, place tip in filter cap and push plunger to fill cap with blood.
10. If other samples are needed, scrub the sample port with a new CHG/alcohol swab for 15 sec and allow to dry. Connect the appropriately sized syringe, gently withdraw the amount of blood needed and remove syringe.

Techniques
ARTERIAL BLOOD SAMPLING UAL and Peripheral Art Line
Extract from Art Line Manual
Updated December 2019
MCH NICU
Page | 20 of 20
11. Once the blood is collected, open the sample port (“Off” position placed opposite to sample port).
12. Holding the “flush syringe” in an upright position (keeping air out of the line) flush the line slowly with the heparinized solution using the stop-and-go technique until the line is properly cleared of blood (approximately 1.0 to 1.5 ml).
13. Once line is cleared, close top stopcock toward “flush syringe”.
14. Place a new alcohol antiseptic-cap on the sample port. Remove any blood present with a CHG/alcohol swab on the sample port prior placing the cap.
Procedure to refill flush syringe
1. Close top stopcock toward patient 2. Stop infusion pump and remove the 50-60ml syringe containing the heparinized solution
from syringe driver. 3. While squeezing the yellow flaps just below the transducer, flush heparinized solution
from big syringe into the “flush syringe” up to 8ml mark (maximum). 4. Replace the 50-60ml syringe onto the pump and restart the infusion. 5. Close top stopcock toward “flush syringe”.


