
Exploring Solar Systems Across the Universe
EssEntial QuEstion
Why is it important to explore other planets
and other planetary systems?
DurationTwo 45-minute class periods
GraDE lEvEl9–12
Le s s o n su m m a ry
This lesson investigates how exploration of our Solar System provides
information on the properties of planetary systems elsewhere in the Universe—
and vice versa. In the first activity, the students investigate Solar System data to
find clues to how our planetary system was formed. By the end of the activity,
the students come to understand that other stars form just like the Sun, and,
therefore, many stars could have planets around them. The second activity
examines how scientists can find these extrasolar planets. By observing the
behavior of a model star-planet system, the students come to understand that
it is possible to see the effect a planet has on its parent star even if the planet
cannot be seen directly. By comparing the properties of our Solar System with
other planetary systems, we can gain a deeper understanding of planetary
systems across the Universe. This is a great example of how exploration of
similar phenomena can benefit the different strands of investigation.
Figure 1. By offering points of comparison, studies of the other planets in the Solar System (e.g., MESSENGER mis-sion to Mercury; top left) help us better understand the properties of other planets, including the Earth (top right), as well as of the whole Solar System. Studies of extrasolar planets (e.g., an artist’s impression of a giant extrasolar planet located close to its star; bottom left) and environments in which stars and planets form (e.g. the Orion Nebula; bot-tom right) help us understand the origin and the evolution of the Solar System better. The reverse is also true: Solar System studies help us understand better the properties, ori-gin, and evolution of planetary systems across the Universe. (Picture credits: NASA/JHU-APL/CIW: http://messenger.jhuapl.edu/the_mission/artistimpression/atmercury_br.html; NASA: http://www.nasa.gov/vision/earth/features/bm_gal-
Mission
Des
ign
Lesson 1of the Grades 9-12Component of the
Mission Design Education Module
lery_1_prt.htm; NASA/JPL-Caltech: http://www.nasa.gov/images/content/169779main_A_ArtistConcept_final.tif; NASA/ESA/M.Robberto(STScI/ESA)/Hubble Space Telescope Orion Treasury Project Team: http://hubblesite.org/ gallery/album/entire_collection/pr2006001a/)
Le s s o n ov e rv i e w
Miss ion to Mer
cu
ry
MESSEN
GE
R
Exploring Solar Systems
LessonOverview
StandardsBenchmarks
Science Overview
LessonPlan
Resources AnswerKey
�

Exploring Solar Systems
LessonOverview
StandardsBenchmarks
Science Overview
LessonPlan
Resources AnswerKey
MESSENG
ER
�
ob j e c t i v e s
Students will be able to do the following:
▼ Investigate, compare, and describe patterns in Solar System data.
▼ Hypothesize about the formation of the Solar System based on data.
▼ Explain how extrasolar planets can be discovered.
co n c e p t s
▼ Scientists can understand how the Solar System was formed by looking for
clues in the properties of the Solar System objects today.
▼ The Solar System evolved over time, and it looks different today than when
it first formed.
▼ Other stars and their planets formed in a similar way to our Solar System.
▼ Scientists can detect planets around other stars even though they cannot see
them directly; they look for the effects that the planets have on their parent
stars.
messenGer mi s s i o n co n n e c t i o n
MESSENGER will study Mercury, the closest planet to the Sun. Because of the
environment in which the spacecraft has to operate, MESSENGER will also
learn a lot about the space environment at Mercury’s distance from the Sun.
It is in this kind of close proximity to their parent stars that many extrasolar
planets have been discovered. By learning more about the environment around
our own star, the Sun, we can learn about the environment around other stars
and the environments in which many extrasolar planets reside. In addition,
MESSENGER’s studies of Mercury may provide clues to the early history of the
Solar System.
Version 1.1 – June 2010This lesson was developed by the National Center for
Earth and Space Science Education (http://ncesse.org).

Exploring Solar Systems
Science Overview
LessonPlan
Resources AnswerKey
MESSENG
ER
�Standards
BenchmarksLesson
Overview
nat i o n a L sc i e n c e ed u c at i o n sta n d a r d s
Standard D3: The origin and evolution of the earth system
▼ The sun, the earth, and the rest of the solar system formed from a nebular cloud of dust and
gas 4.6 billion years ago. The early earth was very different from the planet we live on today.
Standard E2: Understandings about science and technology
▼ Science often advances with the introduction of new technologies. Solving technological
problems often results in new scientific knowledge. New technologies often extend the
current levels of scientific understanding and introduce new areas of research.
Standard G2: The nature of scientific knowledge
▼ Scientific explanations must meet certain criteria. First and foremost, they must be consistent
with experimental and observational evidence about nature, and must make accurate
predictions, when appropriate, about systems being studied. They should also be logical,
respect the rules of evidence, be open to criticism, report methods and procedures, and
make knowledge public. Explanations on how the natural world changes based on myths,
personal beliefs, religious values, mystical inspiration, superstition, or authority may be
personally useful and socially relevant, but they are not scientific.
aaas be n c h m a r k s f o r sc i e n c e Li t e r a c y
Benchmark 1A/H1:
▼ Science is based on the assumption that the universe is a vast single system in which the
basic rules are everywhere the same and that the things and events in the universe occur in
consistent patterns that are comprehensible through careful, systematic study.
Benchmark 4A/H1:
▼ The stars differ from each other in size, temperature, and age, but they appear to be made
up of the same elements that are found on the earth and to behave according to the same
physical principles.
Benchmark 4A/H2:
▼ Stars condensed by gravity out of clouds of molecules of the lightest elements until nuclear
fusion of the light elements into heavier ones began to occur. Fusion released great amounts
of energy over millions of years. Eventually, some stars exploded, producing clouds of
heavy elements from which other stars and planets could later condense. The process of star
formation and destruction continues.
sta n d a r d s & be n c h m a r k s

Exploring Solar Systems
LessonOverview
StandardsBenchmarks
Science Overview
LessonPlan
Resources AnswerKey
MESSENG
ER
�
Science can be a lot like detective work. Scientists
make observations of the phenomenon they are
investigating in a similar way that a detective
studies a crime scene for clues and evidence. A
detective uses the clues and evidence gathered from
a crime scene to produce a hypothetical scenario
of what happened, and, through questioning of
witnesses and interrogation of suspects, gathers
enough evidence to prove the case in court. In a
similar manner, scientists use observations as a
basis for a hypothesis to explain the properties,
origin and history of the phenomenon they are
investigating. The hypothesis is then tested to see
whether it holds true. If the tests are successful,
the hypothesis will become part of a larger theory.
For both the detective and the scientist, the story
of the object of interest is not clearly spelled out;
they have to use clues to piece the story together.
Oftentimes, even the clues may not be clear, and the
investigators have to compare observations from
many places or use indirect evidence to arrive at a
comprehensive hypothesis.
A great example of this idea—science as detective
work—is the discovery of the planet Neptune
and the dwarf planet Pluto. When scientists in
the 19th century observed the orbit of the planet
Uranus around the Sun, they noticed that the
orbit did not quite follow the pattern predicted
by Newton’s laws. They deduced that there must
be another planet-size object further out in the
Solar System gravitationally disturbing the orbit of
Uranus from the predicted path. Scientists started
scanning the skies for planets in the places where
the calculations suggested the planet would be,
and in 1846, Neptune was discovered close to the
predicted position. Further observations of the
orbits of Uranus and Neptune seemed to suggest
that there had to be yet another planet further
out in the Solar System. Scientists continued to
scan the skies, and in 1930 Pluto was discovered.
However, it later turned out that Pluto’s mass is
too small to cause the observed effects in the orbits
of Uranus and Neptune. Instead, Pluto’s discovery
turned out to be just fortunate happenstance. In
reality, the apparent problem with the observed
orbits of Uranus and Neptune was caused by
the fact that Neptune’s mass was not accurately
known at the time. The observed orbits now match
the calculations made with the proper mass of
Neptune, and no massive planet further out in the
Solar System is required to explain the behavior of
the two planets.
Formation of the Solar System
Another good example of science as detective work
is explaining the origin of the Solar System, which
has intrigued scientists over centuries and which
continues to be a hot topic of research even today.
It is a question that has attracted the attention
of some of the most prominent philosophers,
mathematicians, and scientists over the last few
centuries, from Descartes, Kant, and Laplace to
the scientists working today. The problem with
sc i e n c e ov e rv i e w

Exploring Solar Systems
LessonOverview
StandardsBenchmarks
Science Overview
LessonPlan
Resources AnswerKey
MESSENG
ER
�
studying the formation of the Solar System is
that it was a one-time event, it happened a long
time ago, and there were no scientists around to
record what happened. Instead, scientists have
observed the properties of the present-day Solar
System, as well as the formation of other planetary
systems elsewhere in the Universe, to formulate the
likeliest scenario of how our planetary system was
formed. What follows is the generally accepted
theory, though many of the details require further
confirmation to provide a complete picture of the
origin of the Solar System.
The Solar System was formed about 4.6 billion
years ago, when a giant cloud of interstellar gas and
dust started to contract under its own gravity. In
the central part of the cloud, a precursor of the Sun
called a protosun was formed, and around it formed
a rapidly spinning disk. The disk fed material onto
the growing protosun, while at the same time,
small grains of dust within the disk collided, stuck
together, and grew. Eventually the dust grains
became large chunks, which collided and merged
together, until planet-sized objects existed within
the disk. The planet-sized objects then “swept up”
remaining material, pulling leftover gas and dust
toward them, and continued to grow. At the same
time, the temperature inside the protosun rose, and
eventually the temperature became so high that
nuclear fusion, the process that powers the stars,
began. At this point, the Sun became a proper star.
The energetic, young Sun blew away remnant gas
from the disk around it, revealing the Sun’s family of
planets. Asteroids, comets, and other small objects
in the Solar System are thought to be material left
over from building the planets—material that did
not quite make it to become a planet or a major
moon around a planet.
This explanation for the origin of the Solar System
is the result of decades of research, including
observations of the present-day Solar System,
observations of stars and planets forming elsewhere
in the Universe, and detailed computer simulations
exploring different formation scenarios. The great
strength of the standard theory is that it explains the
observations quite well. For example, all planets
revolve around the Sun in the same direction
(counterclockwise, as seen from above the north
pole of the Sun), and most of them rotate around
their axis in a counterclockwise direction. In
addition, all the planets circle the Sun in nearly the
same plane. All this can be explained because the
planets formed out of the same rotating disk. The
scenario can also explain some of the differences
between the planets, primarily why the terrestrial
planets are small and rocky, while the Jovian ones
are gas giants. In the inner part of the Solar System,
the Sun made it too hot for much of the gas in the
disk to collect onto the growing planets. Only
small amounts of high-density materials like rock
and metals could be pulled together by gravity to
form the small, rocky planets. Farther out in the
disk, large planetary embryos were able to pull vast

Exploring Solar Systems
LessonOverview
StandardsBenchmarks
Science Overview
LessonPlan
Resources AnswerKey
MESSENG
ER
�
amounts of gases like hydrogen and helium toward
them, providing the extensive gaseous atmospheres
in these planets.
Another great strength of the scenario is that it
connects well with the formation of stars elsewhere
in the Universe (see Fig. 2.) In fact, the scenario of
the origin of the Solar System is basically the current
standard theory of star formation everywhere.
Extrasolar Planets
According to the standard theory of star formation,
planets should form as natural byproducts during
the birth of stars. Over the last few years scientists
have discovered that this, in fact, is the case. The
first discovery of a planet around a Sun-like star was
made in 1995. The number of observed extrasolar
planets (planets outside our Solar System) around
Sun-like stars grows all the time; the exact number
was 455 in June 2010. It is difficult to see planets
around other stars, because the planets appear
just as small specks of reflected starlight located
very close to the glare of their parent star. Directly
observing any planets around even the closest
star to the Sun would be similar to trying to see a
tiny moth hovering by a small bright spotlight in
San Diego by an observer located in Boston. As a
result, the vast majority of the extrasolar planets
discovered to date have not been seen directly in
images taken with a telescope; instead, a variety of
methods have been used to detect them indirectly.
Detecting Extrasolar Planets via Stellar Wobble
Two indirect extrasolar planet discovery methods
are based on detecting the small gravitational
tug that the planets exert on their parent stars.
According to Newton’s third law, as the star exerts
gravitational forces on a planet that keep the planet
on its orbit around the star, the planet also exerts
a gravitational force (of the same magnitude) on
the star. In fact, the planet is not really orbiting the
star; rather, the planet and the star are both orbiting
around the center of mass of the two objects.
The location of the center of mass—the point at
Figure 2. A picture of the Orion nebula taken with the Hubble Space Telescope. Stars and planets are being formed inside giant interstellar clouds such as the Orion nebula. The Solar System was born in a similar environ-ment about 4.6 billion years ago. (Picture credit: NASA/ESA/M.Robberto(STScI/ESA)/Hubble Space Telescope Orion Treasury Project Team; http://hubblesite.org/gal-lery/album/entire_collection/pr2006001a/

Exploring Solar Systems
LessonOverview
StandardsBenchmarks
Science Overview
LessonPlan
Resources AnswerKey
MESSENG
ER
�
which the two objects balance each other—can be
calculated from the formula
where r1 is the distance from body 1 to the center
of mass, rtot is the distance between the two bodies,
and m1 and m2 are the masses of the two bodies.
If the masses of the two bodies are similar (e.g., a
double star system), the center of mass is between
the two bodies, a little from the halfway point
toward the more massive object (see Fig. 3.) In
this case, it is possible to easily observe the orbits
of both bodies around the center of mass. If the
masses of the two bodies are very different (e.g., a
star and a planet), the center of mass is close to the
massive object (the star), and can even be located
inside the more massive object. In this case, the
orbit of the less massive object around the center
of mass can be observed easily, but the orbit of the
more massive object around the center of mass can
be seen only as a small wobble in its position.
Detecting the Wobble via the Astrometric Method
Scientists can try and directly observe the wobble
of the star caused by the presence of a planet. This
approach is called the astrometric method. Because
the stellar wobble is small and the stars are located
far away, scientists have to be able to measure
very small motions; in other words, scientists must
be able to measure the position of the star in the
sky very accurately. For example, Fig. 4 shows
the wobble of the Sun caused by the presence of
Jupiter as could be seen by an observer located at
a nearby star. The observable wobble in the sky is
minute, and the observing systems (telescopes and
measurement devices) have to be accurate enough
to see these small changes. Scientists are now
starting to have the technology capable of seeing
this effect. While no planets have been discovered
via this method to date (June 2010), it probably
r1 = rtot * m2
(m1+m2)r1 = rtot *
m2
(m1+m2)Center of mass
Center of mass
Body 1 (e.g., a star)
Body 2 (e.g., a star)
Body 2 (e.g., a planet)
Body 1 (e.g., a star)
Figure 3. The center of mass in a two-body system where the bodies are similar in mass (top), such as in a double star system, is located in space between the two objects. In contrast, the center of mass in a two-body system where one body is much more massive than the other one (bottom), such as in a star-planet system, is much closer to the center of the more massive body and can even be located inside the large body.

Exploring Solar Systems
LessonOverview
StandardsBenchmarks
Science Overview
LessonPlan
Resources AnswerKey
MESSENG
ER
�
is only a matter of time before the first discovery
is made this way. This method is most sensitive
to finding massive extrasolar planets, but in the
future, it may be possible to detect the presence of
Earth-size planets orbiting nearby Sun-like stars.
Detecting the Wobble via Doppler Shift
The second extrasolar planet discovery method that
is based on the wobble of the parent star does not
observe the wobble directly. Instead, it uses the
changes in the starlight coming from the moving
star to measure the Doppler shift of the starlight as
the star moves along its orbit around the center of
mass (see Fig. 5.) As a light source (the star) moves
toward an observer, the light waves are shifted
slightly toward the blue end of the light spectrum.
This is caused by the light waves becoming slightly
compressed when the light is coming from a source
moving toward the observer, causing an effect
called blueshift. When the light source moves
away from the observer, the light waves are slightly
spread out, and the light is redshifted. The faster
the light source is moving toward (or away) from
the observer, the larger the blueshift (or redshift).
By monitoring the Doppler shift of starlight, we
can detect the motion of the star around the center
of mass, and from that motion determine the
properties of the planet causing the wobble.
Just like the astrometric method, the Doppler shift
method can most easily detect massive planets.
In addition, the Doppler shift method works well
when the light source is moving fast, which is the
case for wobbles caused by planets orbiting close to
their parent star. Combined, this means that the
Doppler shift method is most sensitive to massive
planets in close orbits around the central star. The
vast majority (more than 90%) of the extrasolar
planets discovered to date have been detected first
via this method.
2020
2010
2000
20052015
1990
1995
0.001˚
0.001˚
Figure 4. The wobble of the Sun caused by the gravi-tational tug of Jupiter as could be seen by an observer located at the distance of some of the nearby stars (10 parsecs; 33 light-years; 3.09×10¹⁴ km; 1.92×10¹⁴ miles). The wobble is measured in thousandths of an arcsecond (noted as “ in the figure above on the axes), which is a way to measure sizes in the sky. Here, the wobble is less than 0.001 arcseconds. For comparison, the size of the full Moon as seen in the sky is 0.5 degrees, or about 1800 arcseconds. In other words, detecting the wobble of a star requires being able to see changes in its position of the size of 1.8 millionth the size of a full Moon. The dia-gram shows what the wobble of the Sun would look like over 30 years (between 1990 and 2020.) (Picture credit: NASA/JPL; http://planetquest.jpl.nasa.gov/science/find-ing_planets.cfm)

Exploring Solar Systems
LessonOverview
StandardsBenchmarks
Science Overview
LessonPlan
Resources AnswerKey
MESSENG
ER
�
Detecting extrasolar planets via other methods
Transit method
Sometimes a planet may pass in front of its parent
star and block a small portion of the starlight,
dimming the star’s light as viewed by observers
on the Earth. By observing this phenomenon, it is
possible to calculate details such as the orbit and
the size of the planet. This method is most sensitive
to large planets located close to their central star.
Some of the extrasolar planets detected through
the Doppler shift method have also been seen
transiting their parent star.
Microlensing
Einstein’s general theory of relativity suggests
that gravity can cause stars and planets to act as
cosmic magnifying glasses, bending and focusing
light much like a lens bends and focuses light in
a telescope. Through this effect, the light from
a background (“source”) star may be bent and
focused by the gravity of a foreground (“lens”) star
(see Fig. 6.) Because objects in space are moving,
the foreground object usually passes quickly in
front of the source star, as viewed from the Earth,
causing the background star to brighten only briefly
before its brightness returns to normal—creating
the microlensing event observed on the Earth. If
the lens star has a companion (such as a planet), it
is possible to see complicated spikes in the source
star’s brightening pattern, and an analysis of the
spikes reveals the presence of the otherwise unseen
planet. The strength of this method is that it can
detect planets of all masses.
Parent star
Observer
A
Unseenplanet
Center of mass of the star-planet
system
Parent star
Observer
B
Unseenplanet
Center of mass of the star-planet
system
Figure 5. Detecting extrasolar planets via the Doppler shift. The light emitted by a wobbling star is shifted toward the blue wavelengths when the star is moving toward the observer (A), and toward the red wavelengths when the star is moving away from the observer (B), as the star orbits the center of mass (or wobbles.) Analyzing the Doppler shift provides information on the unseen planet.

Exploring Solar Systems
LessonOverview
StandardsBenchmarks
Science Overview
LessonPlan
Resources AnswerKey
MESSENG
ER
�0
Direct Detection
The extrasolar planet detection methods described
above are indirect methods: the planets are not
seen directly. Scientists have been working hard
to overcome the technological obstacles of taking
direct images of these faint objects, and by June
2010, there are a dozen extrasolar planet candidates
detected via direct imaging. However, the detailed
properties of the objects remain uncertain and
need to be confirmed. With improved observing
techniques, refined planet detection methods, and
more sensitive telescopes, the number of extrasolar
planets observed directly is likely to rise significantly
in the future.
Pulsar Planets
The first extrasolar planet ever discovered was
actually not found around a Sun-like star (like
most of the planets discovered since), but around
an object called a pulsar, which is a remnant of a
star that died in a massive explosion. Even though
they are, in a sense, dead stars, pulsars send out
pulses of energy into surrounding space—pulses
which can be detected here on the Earth. By
monitoring the disturbances in the pulses of a
particular pulsar, scientists suggested in 1992 that
the observed disturbances could be explained best
by the presence of three planets orbiting the pulsar.
The interesting property of these pulsar planets is
that they are much smaller than the Jupiter-size
planets discovered to date around Sun-like stars—
in fact, most of the objects discovered to date by this
method are Earth-sized or smaller.
Solar System Analogs
The detection methods used to discover most of
the extrasolar planets to date are most sensitive to
finding large planets close to the stars. The masses
of the extrasolar planets around Sun-like stars
discovered to date range from about 0.006 to 25
times the mass of Jupiter. While the lower end of
the mass limit approaches Earth-size planets (the
mass of the Earth is 0.003 Jupiter masses), the vast
majority of the extrasolar planets are giant planets.
In the Solar System, Jupiter, the closest giant planet
to the Sun, is located about 5.2 times as far from the
Sun as the Earth. In contrast, the majority of the
extrasolar planets discovered around Sun-like stars
are located closer to their parent stars than the Earth
is located to the Sun. As these comparisons indicate,
the extrasolar planetary systems discovered to date
are quite different from the Solar System. In the
Observer
Lens star
Source star
Light from the source star
Planet
Figure 6. The gravity of a star (“lens star”) passing in front of another star (“source star”) as seen by an observer on the Earth can cause the light from the source star to be bent and focused much like in a lens of a tele-scope. If the lens star has a planet, the brightening of the source star exhibits a different pattern than if the lens star does not have a planet.

Exploring Solar Systems
LessonOverview
StandardsBenchmarks
Science Overview
LessonPlan
Resources AnswerKey
MESSENG
ER
��
future, improved observational methods may be
able to detect Earth-sized planets around other
stars, and discover Solar System analogs: planetary
systems with small rocky planets near the star and
gas giants further out. Once extrasolar Earth-like
planets can be detected, scientists can begin to
examine whether they could be hospitable for life
or even be inhabited. For the most recent discovery
data and statistics, see the Web sites listed in the
Internet Resources & References section; the Web sites
are updated almost daily.
Extrasolar Planet Detection Missions
Numerous observers around the world are using
ground-based and space telescopes to discover
and characterize extrasolar planets, and, in fact,
even amateur astronomers can monitor nearby
stars to see if their brightness dips enough to
reveal the presence of a transiting planet around
the star. In addition to making observations using
multi-purpose telescopes (that is, telescopes such
as Hubble and Spitzer space telescopes, which
are designed to observe many different kinds of
objects in the Universe), there are a few current
projects specifically designed to look for and
characterize extrasolar planets. NASA’s Extrasolar
Planet Observations and Characterization (EPOCh)
project used the existing Deep Impact spacecraft to
look for transiting extrasolar planets and wobbling
stars with planets, and to try and analyze the light
reflected off the surfaces of extrasolar planets.
NASA’s Kepler mission, launched in 2009, and the
European Space Agency’s Convection Rotation and
Planetary Transits (COROT) mission, launched in
2006, are looking for extrasolar planets through the
transit method. Since they are observing thousands
of stars in their surveys, Kepler and COROT are
likely to multiply the number of known extrasolar
planets and start to determine how common Earth-
like planets might be among the planetary systems
across the Universe. Future planned missions, such
as the Terrestrial Planet Finder, will help refine
these estimates.
Planetary Systems Across the Universe
One of the great scientific success stories of the last
few decades has been the increasing understanding
of how the Solar System was formed, how planetary
systems form elsewhere in the Universe, and
the discovery of the first extrasolar planets that
confirm the expectation that planetary systems are,
in fact, common, as the theory of star formation
suggests. The origin of the Solar System and the
formation of other stars have interested scientists
and philosophers for thousands of years, but it has
only been over the last couple of decades that the
theory of star formation in general, and the origin
of the Solar System in particular, have started to
become clear. Essential in all this has been great
advances in technology. Advances in observational
instruments and techniques have made it possible
for scientists to better understand the properties of
Solar System objects, as well as the regions in which
stars form elsewhere in the Universe. At the same
time, computer technologies have enabled detailed
theoretical studies and computer simulations of the

Exploring Solar Systems
LessonOverview
StandardsBenchmarks
Science Overview
LessonPlan
Resources AnswerKey
MESSENG
ER
��
processes involved in star and planet formation.
The same advances have also led to the discovery
of extrasolar planets, ushering in the era where
scientists can not only compare the properties of
different planets in our Solar System, but with
those in dozens of planetary systems elsewhere.
This work over the last few decades has created a
momentous shift in our view of the Universe. We
now know that the Solar System is not unique;
there are, certainly hundreds, but probably billions
of planetary systems out there across the Universe.
The investigations into the origin of the Solar System
and the presence of planets around other stars also
highlight an important philosophical aspect of
exploration. By exploring one phenomenon, we
not only learn about that topic but can also gain
great insight into other, related phenomena. By
studying other planets in the Solar System, we not
only learn about the properties of those planets, but
we also may gain insight into the Earth, and even
the origin and the evolution of the Solar System.
By studying other planetary systems, we not only
learn about the variety of different worlds across the
Universe, but also gain insight into our own Solar
System. This rationale for exploration is found
everywhere in science—and, indeed, throughout
human activity—but it shines especially bright in
space exploration, where scientists must gather
as much information as they can from usually a
limited number of directly observable sources to
formulate and refine their theories.

Exploring Solar Systems
StandardsBenchmarks
Science Overview
Resources AnswerKey
MESSENG
ER
��LessonPlan
LessonOverview
wa r m-up & pr e-as s e s s m e n t
1. Show students a picture. It could be any picture that shows the result of
interesting events; for example, a picture of a crime scene works well for
this purpose. Ask the students what they can see in the picture. Make
sure the students only make observations about what is visible in the
picture and do not infer what may have happened to lead up to the scene
depicted in the picture.
Le s s o n pL a n
Materials
▼ Picture of a crime scene (or similar)
2. Ask the students: if they only have a picture of the end result of
something that happened earlier, how could someone (such as a
detective) understand the events that lead up to that point? (Desired
answer: the detective can look for evidence in the scene and in other places to
put together a story of how things progressed to the situation shown in the
picture.) The kinds of evidence one would look for depends on the kind
of problem that is being solved. Ask the students to identify different
types of evidence that someone would look for to determine the events
that lead up to the scene depicted in the picture.
3. Draw analogies to the two activities the students will do in this lesson.
For the analogy to the first activity, ask the students how scientists might
know how the Solar System was formed, even though they were not
around to witness the event. The main clues that scientists have to lead
their thinking is an understanding of what the Solar System is like right
now. For the analogy to the second activity, discuss with the students
the discovery of Neptune. Scientists knew that a planetary-size object
must be out there based on how it was affecting the orbits of other
planets around the Sun (See the Science Overview for details.) Similarly,
how would astronomers know if there is an unseen object that affects
the behavior of another, visible object (such as might be the case with a
small planet orbiting a bright star)? Astronomers can look closely at light
coming from the visible object to see if there are clues to the existence of
an unseen object in the light, just like a detective needs to investigate a
crime scene carefully to find clues that may not be immediately clear.

Exploring Solar Systems
StandardsBenchmarks
Science Overview
Resources AnswerKey
MESSENG
ER
��LessonPlan
LessonOverview
ac t i v i t y 1: fo r m at i o n o f t h e so L a r sy s t e m
Students analyze information about the relative positions, sizes, and compositions
of the Sun, planets, asteroids, comets, and Kuiper Belt Objects to form a
hypothesis about the origin of the Solar System based on patterns they discover
in the data. The students compare their hypothesis with those of other students
to discover strengths and weaknesses of each. By investigating pictures of star-
forming interstellar clouds and planet-forming disks elsewhere in the Universe,
the students come to understand how scientists have come up with the current
theory of Solar System formation based on observations of our Solar System as
well as of planetary systems currently being formed elsewhere.
pr e pa r at i o n
1. Make overhead transparencies of the Planets and Orbits Transparency and the
Young Stars Transparency found in the back of the lesson, or make copies of
the pictures for each group of students.
2. Place students in groups of two or three.
pr o c e d u r e s
1. Present the Planets and Orbits Transparency on an overhead projector or hand
out copies to each group of students.
2. Have the students examine at the picture of the planets on the first page,
which shows the planets in their correct order from the Sun and at right
relative sizes (but not at relative distances from the Sun), and ask the
students to describe trends or patterns that they notice among the planets.
3. Have the students investigate the next two pages, which show the orbits
of the planets and location of some of the other Solar System objects. Ask
the students to describe trends or patterns they may notice among the Solar
System objects.
4. Ask the students how they could use this information to think about how
the Solar System might have formed. Discuss how the Solar System has
not always looked the same way; that it has evolved over time. Ask the
students to think back to the Warm-Up and their discussion about how
Materials
Per class:▼ Planets and Orbits
Transparency (3 pages)▼ Young Stars
Transparency (2 pages)
Per student:▼ Student Worksheet 1
Exploring Solar Systems
StandardsBenchmarks
Science Overview
Resources AnswerKey
MESSENG
ER
��LessonPlan
LessonOverview
scientists have to look at the properties of the present-day Solar System and use these clues
to determine how the Solar System was formed. Discuss with the students why they might
be interested in finding out how the Solar System was formed. Do the students think it is
because of basic curiosity about the Universe around them, or something else?
5. Hand out Student Worksheet 1. The students will follow the directions on the Worksheet to
come up with more observations on the properties of Solar System objects and eventually
create a hypothesis about how the Solar System could have formed.
di s c u s s i o n & re f L e c t i o n
1. Have each group of students present their hypotheses of how the Solar System was formed.
After a group has presented its idea, encourage other groups to challenge the proposal with
counter-evidence or to offer supportive evidence that the group may have overlooked.
2. As a class, come up with a coherent story of how the Solar System was formed based on the
evidence presented. It is acceptable if the story does not match the actual scientific theory,
as long as the students base their explanation on evidence.
3. Discuss the scientifically accepted theory for how the Solar System was formed (see the
Science Overview). Discuss which components of the students’ hypothesis agree with the
theory, and which do not. Ask the students to try to explain those parts that are not consistent
with their own hypothesis based on the evidence they have seen. Remind the students that
in reality, scientists had access to more information than the students had when coming up
with the theory of Solar System formation, such as ages of different Solar System objects.
Scientists have also been able to refine their hypotheses with the help of computer simulations
investigating the processes involved in the formation of the Solar System. A comprehensive
Teaching Tip
If your students are unfamiliar with any of the details in Table 1 in Student Worksheet 1,
be sure to discuss them as a class before starting work. For example, make sure that the
students understand that an Astronomical Unit (AU) is the average distance from the Earth
to the Sun, eccentricity measures how much an orbit deviates from a perfect circle (the
eccentricity of which is 0) toward a more elliptic orbit, and inclination measures the tilt of
an object’s orbit from the plane of the Earth’s orbit around the Sun.

Exploring Solar Systems
StandardsBenchmarks
Science Overview
Resources AnswerKey
MESSENG
ER
��LessonPlan
LessonOverview
theory requires a lot of data and a lot of work by many people over many years before
scientists are able to agree that the theory is comprehensive and correct; that, for example, this
is the way that the Solar System was formed.
4. Discuss with the students how the process they followed in Student Worksheet 1 is how
science really works. Observations and experiments are an essential part of a scientific
investigation, but a crucial part of the scientific process occurs when the scientists try and
interpret the gathered data; that is, when they try to explain the processes involved in creating
the situation depicted by the data.
4. Ask the students if they think other stars form the same way as the Sun. (Desired answer:
yes.) If other stars form like our own, how could we see evidence of this? (Desired answer:
look for planets around other stars, or look to see if there are any places in the Universe where stars
are forming right now and where we might be able to see the process in action, for example by seeing
disks around other stars that are in the process of forming planets.) Show the students the Young
Stars Transparency on an overhead projector or hand out copies to the class. The transparency
shows young stars forming in a cloud of gas with disks around them. Planets will eventually
form in these disks, if what happened in our Solar System happens around other stars (as
scientists think is the case.) By learning how the Solar System was formed and by comparing
it with stars forming today, the students can understand that other stars are born in the
same manner as the Sun. Similarly, scientists know more about how other stars form by
understanding how our Solar System was formed. But the reverse is also true: scientists can
use their observations of how other stars are born to refine the theory of how our Solar System
formed. The two strands of investigation feed off of one another: if we learn more about one,
we are likely to learn more about the other, as well. Have the students discuss whether the
connection between the formation of the Solar System and the birth of stars elsewhere in the
Universe means that other stars may have planetary systems of their own.
Teaching Tip
You can have the students look up the scientifically accepted theory of Solar System
formation in the library or on the Internet, either as homework or as a class. They could
also research and discuss other pieces of evidence scientists have used to derive the theory
and which the students may not have had available in formulating their own hypotheses.

Exploring Solar Systems
StandardsBenchmarks
Science Overview
Resources AnswerKey
MESSENG
ER
��LessonPlan
LessonOverview
ac t i v i t y 2: tu G G i n G t h e sta r
Students construct a model of a star and a planet orbiting the star by using a
grapefruit to represent the star and a smaller object to represent the planets. The
students connect the two objects with a tube, hang the model from its center of
mass, and monitor it as it rotates. The students discover that by observing the
rotation of the model star around the system’s center of mass, they could detect
the presence of the model planet even if they were not able to see it. Comparing
their model to a real planetary system, the students come to understand that
using this principle, scientists can learn about the presence and properties of
planets around their parent stars even if the planets cannot be seen directly. The
students also find out that it is easiest to observe massive planets like Jupiter
around other stars using this method of extrasolar planet detection.
pr e pa r at i o n
1. Make sure the students are familiar with the general concept of the center
of mass (see the Science Overview). This is a very important concept to
understand in order to conduct the activity.
2. Locate cardboard tubes for students to use in the activity. For example, the
cardboard tubes found on wire hangers used by drycleaners work well, but
any narrow tube of roughly 30 cm (12”) length works. Make sure that one
of the long pieces of string can be threaded through the tube, and that the
strings are strong enough to carry the weight of the apparatus (see Student
Worksheet 1 for details on how to construct the apparatus.)
3. Divide the students into groups of three.
Teaching Tip
The materials list includes suggestions for the different balls to use as the
model planets. However, you can use any balls of different masses you
can find. In fact, if you can find a large, low-mass ball and a small, high-
mass ball to use as two of the planets, you can use them to illustrate that
the center of mass and therefore the wobble of the host star depends on the
mass of the planet, and not the size.
Materials
Per group of 3:▼ Grapefruit▼ 3 balls of different
masses; we suggest a softball, a baseball, and a golf ball
▼ Binder clip (medium-size)
▼ Black marker▼ Cardboard tube▼ Laboratory scale ▼ Paperclip (small)▼ Ruler▼ Scissors▼ Sheet of white paper
at least 50 cm (about 1.5 ft) long; two sheets of 11” x 17” of paper taped together length-wise will suffice
▼ 4 short pieces of string (each about the length of your hand)
▼ 2 long pieces of string (each at least 1 m; 3.3 ft long)
Per student:▼ Student Worksheet 2

Exploring Solar Systems
StandardsBenchmarks
Science Overview
Resources AnswerKey
MESSENG
ER
��LessonPlan
LessonOverview
pr o c e d u r e s
1. Remind the students of Activity 1. They should have come to the conclusion that there may
be other planets around other stars that could have formed the same way that the planets
formed around our star, the Sun. These planets are called extrasolar planets because they are
outside of our Solar System. Ask the students why they might be interested in finding out
whether there are planets around other stars. What reasons do the students think scientists
have to look for the planets?
2. Ask the students to imagine looking at other stars and trying to detect planets around them.
Do any problems come to mind? (Desired answer: other stars (and their planets) are very far
away. In addition, planets do not shine their own light; they reflect the light of their parent star. As a
result, planets are very dim compared to the stars they orbit because the light from the star washes out
dim objects around it.) Planets are very difficult to see directly, even with powerful telescopes.
One to-scale analogy you can give the students is that looking for a planet around another
star would be like standing in Boston and trying to detect a moth that is hovering near a
small, bright spotlight that is located in San Diego.
3. Ask the students: if scientists cannot see extrasolar planets directly, what can they do?
(Desired answer: they can look for other kinds of evidence that the planets exist; refer to the Warm-
Up where the class discussed how detectives have to determine who committed a crime even if not all
evidence is clearly visible in the crime scene.)
4. Have the students brainstorm in their groups for a few minutes about how scientists could
detect planets without being able to see them directly. Come together as a class and review
the ideas. If the students need help coming up with the idea of celestial bodies affecting the
movements of each other, remind them about the discovery of Neptune discussed in the
Warm-Up. [Reminder: Scientists knew that a planetary-size object must be out there based on
how it was affecting the orbits of other planets around the Sun (see the Science Overview for
details.)] Similarly, how would astronomers know if there are planets around other stars when
the planets are too dim to see directly?
5. Remind the students that a planet does not just orbit its parent star; in fact, the planet and
the star both orbit the center of mass of the system of the two bodies. Because the star is
so much more massive than the planet, the center of mass is much closer to the star; in fact,
sometimes it is inside of the star. Even in this case, scientists can tell that a planet is orbiting

Exploring Solar Systems
StandardsBenchmarks
Science Overview
Resources AnswerKey
MESSENG
ER
��LessonPlan
LessonOverview
a star because the star will appear to “wobble” around the center of mass of the star-planet
system.
6. Ask the students how they could experiment with different types of star-planet systems in
the classroom. Discuss the ideas as a class and lead the discussion toward the experiment
the students will perform. Be sure to have the students discuss that if they experiment with
model planets of different masses, they might be able to see what kind of planets are easiest
to detect this way.
7. Hand out Student Worksheet 2, and have the students follow the instructions to conduct the
experiment and answer the questions.
di s c u s s i o n & re f L e c t i o n
1. Have the groups share which situation was best for detecting the wobble of the model star.
They should have discovered that the system with a massive model planet works best,
because in this case, the model star has a bigger, more easily detectable wobble.
2. Discuss the extrasolar planet detection methods based on the principle of stellar wobble.
Discuss the differences between the purely astrometric method (detecting the wobble
directly) and the Doppler shift method (detecting the wobble through changes in starlight.)
(See the Science Overview for an overview of the methods.)
3. Discuss the types of planets that have been found using these detection methods thus far
(see the Science Overview.) They are massive planets that are located close to their parent star.
Discuss with students how the extrasolar planetary systems compare with the Solar System.
Point out that since the detection methods are most sensitive to massive planets located close
to the parent star, this is exactly what scientists have found. Most of the extrasolar planets
discovered are giant planets similar to Jupiter but located very close to the parent star, as
close to or even closer than Mercury is to the Sun.
4. Ask the students what is the likelihood of finding life on the detected extrasolar planets.
(Desired answer: it is not very likely, because the planets do not resemble the Earth, which is the only
planet that we know has life. The detected extrasolar planets are gas giants, which probably do not
have a solid surface on which life forms could live. Most of the detected extrasolar planets are located
close to the parent star, which means that they are very hot and probably not suitable for life for that

Exploring Solar Systems
StandardsBenchmarks
Science Overview
Resources AnswerKey
MESSENG
ER
�0LessonPlan
LessonOverview
reason, either. However, the giant extrasolar planets could have large moons, and perhaps life could
survive on those moons. There are many extrasolar planetary systems where the giant planets are at
the same distance of their parent star as the Earth is from the Sun, perhaps making any large moons
they might have very habitable by some kind of life forms.)
5. Discuss the other methods of detecting extrasolar planets; a brief description of them can
be found in the Science Overview. Be sure to point out the difference between the purely
astrometric method, where the wobble of the star is detected directly, and the Doppler shift
method, where the wobble is detected through details in the wobbling star’s light.
6. Discuss with the students the idea of a “Solar System analog”: a planetary system that looks
more like the Solar System than the planetary systems discovered so far. Point out that the
technology has not been good enough to detect true Solar System analogs until now. Do the
students think scientists will discover planetary systems just like our own one day?
ex t e n s i o n s
▼ Have the students research alternate hypotheses of how the Solar System was formed. There
used to be many ideas for Solar System formation, but they have fallen out of favor because
of the evidence that supports the current standard theory.
▼ Amateur astronomers have become a part of the search for extrasolar planets, because even
small telescopes equipped with sensitive detectors can monitor nearby Sun-like stars to see if
any planets might transit over them. If the students have access to a suitable telescope, either
through school, a local observatory or by partnering with local amateur astronomers, you can
have the students start an extrasolar planet transit observation campaign. Visit http://www.
transitsearch.org/ for more details.
▼ NASA’s Kepler mission searches for extrasolar planets using the transit method. If you want to
have your students explore the concepts behind this approach in greater detail, visit the Kepler
education activities Web site http://kepler.nasa.gov/education/
cu r r i c u L u m co n n e c t i o n s
▼ Social Studies: Have the students research how ancient cultures believed the Solar System (or
the Earth) was formed. How do the ancient creation myths compare with the current theory
of Solar System formation?

Exploring Solar Systems
StandardsBenchmarks
Science Overview
Resources AnswerKey
MESSENG
ER
��LessonPlan
LessonOverview
▼ Literature: Find science fiction books or stories that describe planets around other stars, and
have the students write an essay on how well the author’s description of the planets matches
the properties of known extrasolar planetary systems.
▼ Math: Have the students research exactly how scientists can determine the properties of the
extrasolar planets using the different detection methods. For example, the Doppler shift method
tries to fit the observed data to mathematical descriptions of planetary orbits and requires a lot
of computing to solve the mathematical problem. The extrasolar planet Web sites listed in the
Internet Resources & References section describe the mathematical process.
cL o s i n G di s c u s s i o n
▼ Discuss with the students what motivations scientists may have for examining the origin of
the Solar System and the existence of extrasolar planets. Do the students think it is just basic
human curiosity? Perhaps scientists hope to learn more about the Solar System today (or in
the future) by understanding how our Solar System was formed and how it compares with
other planetary systems elsewhere in the Universe?
▼ Discuss how scientists have been able derive the standard theory of star formation and a
good explanation of the origin of the Solar System over the last couple of decades. Discuss
how modern technology has been essential for the progress by making it possible to
conduct detailed observations of Solar System objects and star-forming regions elsewhere
and to perform large-scale computer simulations that help distinguish between different
scenarios.
▼ Discuss how the view of our place in the Universe has changed with the discovery of
extrasolar planets. Until the 1990s, scientists knew of only one planetary system in the
Universe: the Solar System. We now know there are at least hundreds, and probably billions,
other planetary systems out there. Even though the extrasolar planetary systems discovered
so far have been a little different from the Solar System—with giant planets located close
to their parent star instead of a bit farther out as in the Solar System—the discoveries have
shown that planetary systems are common in the Universe. How do the students think this
affects our view on the possibility of finding life somewhere else in the Universe?
▼ Discuss how scientists have to explain why so many planetary systems appear to be at least
a little bit different from the Solar System. Did they form in a slightly different way from

Exploring Solar Systems
StandardsBenchmarks
Science Overview
Resources AnswerKey
MESSENG
ER
��LessonPlan
LessonOverview
the way our Solar System formed, at least in some details? Or do the exact properties of the
environment in which stars and planets form determine what they end up looking like in
the end? Right now, scientists do not know. The answers to these questions will provide
information on the formation of planetary systems across the Universe, and it will also give
us insight into the formation and evolution of our own Solar System. Similarly, by studying
the environments in our own Solar System at various distances from the Sun, we can
understand the environments in which extrasolar planets exist. This is a great example of
how exploring one phenomenon can provide important information on other, related topics.
This is, in fact, an important reason for exploration in general.
▼ Hand out copies of the Mission Information Sheet and the Mission Science Goals located at
the back of the lesson. Discuss with the students how the mission connects with the topics
discussed in this lesson.
as s e s s m e n t
4 points▼ Student identifies patterns in the Solar System data that could help explain the formation of
the Solar System in Activity 1.
▼ Student uses evidence to come up with a reasonable hypothesis for the formation of the Solar System in Activity 1.
▼ Student finds that more massive planets affect their parent stars more than less massive planets in Activity 2.
▼ Student completes both Worksheets.
3 points▼ Student meets three of the four above criteria.
2 points▼ Student meets two of the four above criteria.
1 point▼ Student meets one of the four above criteria.
0 points
▼ No work completed.

Exploring Solar Systems
StandardsBenchmarks
Science Overview
LessonPlan
AnswerKey
MESSENG
ER
��ResourcesLesson
Overview
MESSENGER Web Site
http://messenger.jhuapl.edu/
American Association for the Advancement of Science, Project 2061, Benchmarks for Science Literacy
http://www.project2061.org/publications/bsl/online/bolintro.htm
National Science Education Standards
http://www.nap.edu/html/nses/
COROT Mission Web Site
http://smsc.cnes.fr/COROT/
Exoplanet Data Explorer
http://exoplanets.org/
Extrasolar Planets Encyclopaedia
http://exoplanet.eu/
Hubble Space Telescope Gallery of Nebulae (Note that the collection includes images of other nebulae
besides star-forming clouds, since nebula is a more general term)
http://hubblesite.org/gallery/album/nebula_collection/
International Astronomical Union Minor Planet Center’s Transneptunian Object List
http://cfa-www.harvard.edu/iau/lists/TNOs.html
Kepler Mission Web Site
http://kepler.nasa.gov/
NASA National Space Science Data Center’s Planetary Fact Sheets
http://nssdc.gsfc.nasa.gov/planetary/planetfact.html
NASA/JPL Small Body Database
http://ssd.jpl.nasa.gov/sbdb_query.cgi
The Nine Planets Web Site
http://www.nineplanets.org/
PlanetQuest: Extrasolar Planets website at NASA/JPL
http://planetquest.jpl.nasa.gov/
Activity 2 has been adapted from the activity “The Mathematics of Rotating Objects (Extra-
Solar Planets)” (http://planetquest.jpl.nasa.gov/documents/Math_ExS.pdf) from NASA’s
PlanetQuest Educator Resources.
in t e r n e t re s o u r c e s & re f e r e n c e s
ac k n o w L e d G e m e n t
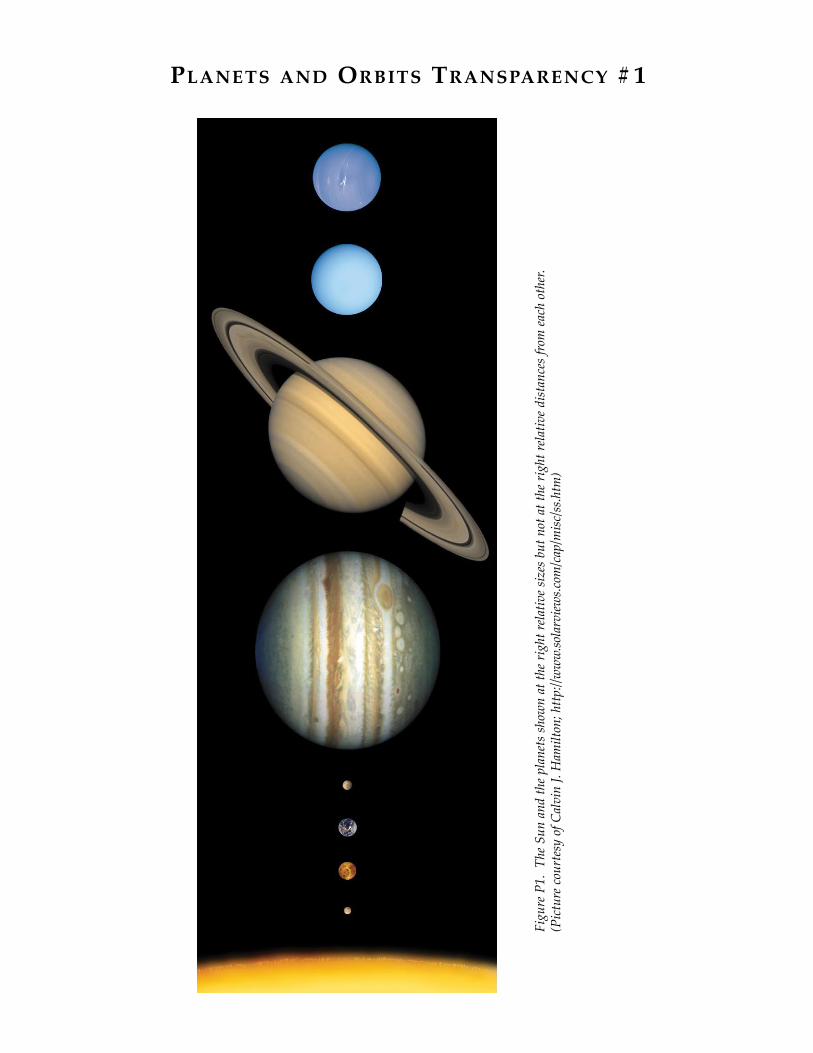
pLanets and orbits transparency #1
Figu
re P
1. T
he S
un a
nd th
e pla
nets
show
n at
the r
ight
rela
tive s
izes
but
not
at t
he ri
ght r
elativ
e dist
ance
s fro
m ea
ch o
ther
.
(Pict
ure c
ourt
esy
of C
alvi
n J.
Ham
ilton
; http
://w
ww.
sola
rview
s.com
/cap
/misc
/ss.h
tm)

pLanets and orbits transparency #2
Figure P2. Diagrams showing planets (in different color circles), asteroids (yellow dots) and comets (wedges) in the inner Solar System (A), and in the outer part of the planetary realm of the Solar System (B) on October 1, 2009. Also shown in the picture are the orbits of the planets Mercury, Venus, the Earth, Mars, and Jupiter (A) and the Earth, Jupiter, Saturn, Uranus, and Neptune, as well as the orbits of the dwarf planet Pluto and the comets Halley and Hale-Bopp (B). These views of the Solar System are from above the north pole of the Sun, high above the plane of the Earth’s orbit around the Sun. (Picture credit: Paul W. Chodas, NASA/JPL; http://ssd.jpl.nasa.gov/?orbits)
A
B

pLanets and orbits transparency #3
Figure P3. Diagrams showing the planets (in different color circles), asteroids (yellow dots) and comets (wedges) in the inner Solar System (A), and in the outer part of the planetary realm of the Solar System (B) on October 1, 2009. Also shown in the picture are the orbits of the planets Mercury, Venus, the Earth, Mars, and Jupiter (A) and the Earth, Jupiter, Saturn, Uranus, and Neptune, as well as the orbits of the dwarf planet Pluto and the comets Halley and Hale-Bopp (B). These views of the Solar System are from the edge of the plane of the Earth’s orbit around the Sun; the viewing angle is rotated 90º from the pictures in Fig. P2. (Picture credit: Paul W. Chodas, NASA/JPL; http://ssd.jpl.nasa.gov/?orbits)
A
B

younG stars transparency #1
Figure Y1. A picture of the Orion Nebula taken with the Hubble Space Telescope. Stars are being formed inside these kinds of nebulae: interstellar clouds made of massive quantities of gas and dust spread over a large area. Over millions of years, the gas molecules and dust particles come together and start to form stars. Each side of the picture above is about 4 parsecs, or 13 light years, or 1.2×10¹⁴ km; or 7.6×10¹³miles; or 8,000 Solar Systems wide (if the size of the Solar System is estimated as 100 times the average distance from the Earth to the Sun.) There is enough material in the cloud to form hundreds of thousands of stars as massive as the Sun; about 3,000 young stars of various sizes can be found in the picture. (Picture credit: NASA/ESA/M.Robberto (STScI/ESA)/Hubble Space Telescope Orion Treasury Project Team; http://hubblesite.org/gallery/album/entire_collection/pr2006001a/)

younG stars transparency #2
Figure Y2. A closeup view of the Orion Nebula shows that there are objects inside it where young stars (bright/red points in the callout boxes) are surrounded by a dark, disk-like patch of material. In some cases (the upper right-hand box), the disk is seen edge-on, and the star is hidden from our view by the disk material, while in others, the system is seen from the top or from an angle (the other three callout boxes.) The lower left-hand box shows that the disk structures are about the size of the Solar System. Many objects like this have been discovered in interstellar clouds where stars are being born. (Picture credit: NASA/ESA; http://hubblesite.org/gallery/album/entire_collection/pr1995045a/; http://hubblesite.org/gal-lery/album/entire_collection/pr1995045b/; http://hubblesite.org/gallery/album/entire_collection/pr1995045c/;)
Size of our Solar System

page 1 of 5
Miss io
n to Mercury
ME
SSE
NGER
Name: Date:
Introduction
You will look for patterns in Solar System data to create a hypothesis for the formation of the Solar System.
I. Describe, Compare, and Search for Patterns
Examine carefully the Planets and Orbits Transparency and Table S1. Discuss within your group any
patterns you detect among the objects in the Solar System in terms of size, shape, composition, distance
from the Sun, orbital inclination, orbital direction, etc. Come up with at least five general trends
or patterns and write them down below. The patterns may cover all Solar System objects, or just a
subgroup. The patterns may also cover just most of the objects in the subgroup, not always all of them.
For example: There seems to be two categories of planets in terms of size; the innermost four can be
grouped together as small inner planets, the other four can be grouped together as giant outer planets.
Pattern 1:
Pattern 2:
Pattern 3:
Pattern 4:
Student Worksheet 1: Formation of the Solar System
formation of the soLar system
Pattern 5:

MESSENG
ER
page 2 of 5
Table S1. Properties of Solar System objects. The table includes the actual values for the Sun and the planets, and ranges of values for asteroids, comets and Kuiper Belt Objects. Please note that the numbers for the three group entries may change as new objects are discovered and more accurate measurements are made. The distances from the Sun are given in terms of Astronomical Unit (AU), which is the average distance between the Earth and the Sun, or 150 million km (93 million miles). (Data from NASA National Space Science Data Center’s Planetary Fact Sheets http://nssdc.gsfc.nasa.gov/planetary/planetfact.html; International Astronomical Union Minor Planet Center’s Transneptunian Object List http://cfa-www.harvard.edu/iau/lists/TNOs.html; NASA/JPL Small Body Database http://ssd.jpl.nasa.gov/sbdb_query.cgi; Nine Planets web site http://www.nineplanets.org/, and references therein.)
The Sun Mercury Venus Earth Mars Jupiter Saturn
Mean Distance from the Sun
(Astronomical Units, AU)
N/A 0.387 0.723 1.000 1.524 5.204 9.582
Mass (Earth masses)
333,000 0.055 0.815 1.000 0.107 31.8 95.2
Orbital Period; or Length of One
Year
N/A 88 days 225 days 365.3 days 687 days 11.86 Earth years
29.46 Earth years
Diameter (kilometers)
1,390,000 4,880 12,300 12,800 6,790 143,000 121,000
Rotation Period 25 Earth days
59 Earth days
244 Earth days retrograde1
23 hours, 57 min
24 hours, 37 min
9 hours, 56 min
10 hours, 39 min
Main Composition
Gas Rocky Rocky Rocky Rocky Gas Gas
Atmosphere (main
components)
Hydrogen, Helium
Virtually a vacuum
Carbon Dioxide
Nitrogen, Oxygen
Carbon Dioxide
Hydrogen, Helium
Hydrogen, Helium
Orbital Eccentricity
N/A 0.21 0.0067 0.017 0.095 0.049 0.057
Orbital Inclination
(degrees)
N/A 7.0 3.4 0.0 1.9 1.3 2.5
Orbital Direction (as seen from the Sun’s north pole)
N/A Counter-clockwise
Counter-clockwise
Counter-clockwise
Counter-clockwise
Counter-clockwise
Counter-clockwise
Number of Moons
N/A 0 0 1 2 63 61
Student Worksheet 1: Formation of the Solar System

MESSENG
ER
page 3 of 5
Uranus Neptune Pluto (dwarf planet) Asteroids Comets Kuiper Belt
Objects
Mean Distance from the Sun
(Astronomical Units, AU)
19.201 30.047 39.482 Most between 1.1 - 3.0; some 14
2.2 – 1,170; perhaps up to 50,000
30-50; maybe up to 135
Mass (Earth masses)
14.5 17.1 0.00021 Much less than one-billionth to 0.00015
Much less than one-billionth
Varies; possibly up to 0.00021 or slightly more
Orbital Period; or Length of One
Year
84.01 Earth years
164.79 Earth years
247.68 Earth years
Most between 1.1 and 5.2 Earth years; some 51 Earth years
3.3 – 40,000 Earth years; maybe more for very distant objects
Typically 200-300 Earth years; maybe up to 770 Earth years
Diameter (kilometers)
51,100 49,500 2,390 1 to 960 A few to 20 37-200; maybe up to 2,400
Rotation Period 17 hours, 14 min retrograde1
16 hours, 7 min
6 days retrograde1
2.3 to 418 hours
3 to 70 hours 3 hours to a few Earth days
Main Composition
Gas, ice and rock
Gas and Ice Ice and rock Rocky Ice and rock Ice and rock
Atmosphere (main
components)
Hydrogen, Helium, Methane
Hydrogen, Helium, Methane
Methane, Nitrogen
None None (except as material blown off the nucleus when near the Sun)
Probably none
Orbital Eccentricity
0.046 0.011 0.25 0.1-0.8 0.5 – 0.9998 0.01 – 0.37
Orbital Inclination
(degrees)
0.77 1.8 17 0.9 - 35 4 - 162 0.2 - 48
Orbital Direction (as seen from the Sun’s north pole)
Counter-clockwise
Counter-clockwise
Counter-clockwise
Counter-clockwise
Varies Mostly counter-clockwise
Number of Moons
27 13 3 0 to 1 Unknown 0 to a few
Student Worksheet 1: Formation of the Solar System

MESSENG
ER
page 4 of 5
1 Note on the Rotation Period row in Table 1: One can imagine looking down on the Solar System from
high above the Sun’s north pole. From this vantage point, most of the planets are seen to rotate on their
axes counterclockwise. However, Venus, Uranus, and the dwarf planet Pluto (as well as many other
small objects), are seen to rotate clockwise and are said to be rotating ‘retrograde’. On the surface of an
object with retrograde rotation, the Sun would appear to rise from the west and set in the east.
II. Explain Similarities and Differences
Come up with an explanation for each pattern you identified in Part I: what could have caused it?
Provide one explanation per pattern:
Explanation for Pattern 1:
Explanation for Pattern 2:
Explanation for Pattern 3:
Explanation for Pattern 4:
Explanation for Pattern 5:
Student Worksheet 1: Formation of the Solar System

MESSENG
ER
page 5 of 5
III. Hypothesis for the Formation of the Solar System
Write a paragraph about how you think the Solar System was formed, based on your observations of
and explanations for the trends or patterns in the Solar System. Be sure to include why you think that
the Solar System formed the way you think it did. Be prepared to present your hypothesis to the whole
class and to defend it with your observations.
Student Worksheet 1: Formation of the Solar System

Miss io
n to Mercury
ME
SSE
NGER
page 1 of 7
Materials
▼ Grapefruit▼ 3 small balls of
different masses▼ Binder clip
(medium-size)▼ Black marker▼ Cardboard tube▼ Laboratory scale▼ Packaging tape▼ Paperclip (small)▼ Ruler▼ Scissors▼ Sheet of white paper
at least 50 cm long (about 1.5 ft)
▼ 4 short pieces of string (each about the length of your hand)
▼ 2 long pieces of string (each at least 1 m; 3.3 ft long)
Name:
Date:
Introduction
You will construct an apparatus with a model star (grapefruit) and a
model planet (small ball) to see how the presence of a planet around
a star can affect the star.
Preparation
1. Measure the length of the cardboard tube:
Length of tube: cm
2. Measure the masses of the three small balls. These represent
three planets of different masses.
Mass of model planet 1: g
Mass of model planet 2: g
Mass of model planet 3: g
3. Measure the mass of the grapefruit. This is your model star.
Mass of model star: g
Student Worksheet 2: Tugging the Star
tuGGinG the star
Constructing the Apparatus
1. Use a black marker to draw an amplitude scale similar to the one below on a sheet of paper. Make
sure that the scale is at least as long as your cardboard tube in both positive and negative directions.
For example, if your tube is 25 cm long, draw the amplitude scale at least from -25 cm to 25 cm.

MESSENG
ER
page 2 of 7
2. Tape a short piece of string (about the length of your hand) to the model star (see Figure S1.) Tape
the three other short pieces of string to the model planets. Make sure the strings are secure enough
that the model star and planets can hang from them.
3. Thread a long piece of string through the tube by taping a paper clip to the end of the string, and
then dropping the paper clip through the tube. The clip will pull the string through. (Tip: You may
have to straighten the paper clip to fit it through the tube. You also may have to shake the tube
slightly to make the clip slide through.) Remove the paper clip from the string. Tie the ends of the
string together, leaving a little slack, so that you have a triangle shape with the tube at one side.
Student Worksheet 2: Tugging the Star
string
tape
model star or planet
Figure S1. Setup for the model star and the model planets. Tape a short piece of string to the model star and the model planets and make sure the strings are securely attached.
Tube
Long piece of string threaded through the tube with enough slack to make a triangle shape
Long piece of string
Figure S2. The setup for the basic experiment apparatus: thread a long piece of string through the tube, and tie the ends of the string together to form a triangle shape with the tube on one side. Loop a second long piece of string around the first.

MESSENG
ER
page 3 of 7
4. Take the second long piece of string, loop it around the first, and tie its ends together (see Figure S2).
NOTE: this second loop must be able to slide freely along the first string.
5. Hang the second long string from the ceiling close to a wall (but far enough away from the wall that
the apparatus can rotate without hitting the wall), so that the apparatus is at about eye level.
Experiment
1. Attach the amplitude scale you made earlier to the wall behind the apparatus at eye level, so that
when you step a couple of feet away, you can see the scale right behind the model star and the model
planet, with the center of mass of the system (the point where the strings come together under the
binder clip) is right over the zero line of the amplitude scale.
2. Tie the string attached to the model star to one end of the tube. Select the lowest mass ball as your
first model planet and tie the string attached to it to the other end of the tube (see Figure S3.)
3. Find the center of mass of the model star-planet system. To do this, slide the loop hanging from the
ceiling back and forth along the loop threaded through the tube until you find the spot where the
tube hangs horizontally. You can slowly rotate the apparatus around the string hanging from the
ceiling to make sure the tube remains horizontal as it rotates. At this point, the two-body system
Student Worksheet 2: Tugging the Star
Model star Model planet
Tube
Long piece of string with enough slack to make a triangle shape
Long piece of stringhung from the ceiling
Binder clip
Figure S3. The setup for the apparatus. One long piece of string is threaded through the tube. A second long piece of string is looped through the first and hung from the ceiling so that the apparatus is roughly at eye level. The model star and the model planet are attached to the ends of the tube by the strings attached to the models. A binder clip is used to secure the apparatus once the center of mass of the system is located.

MESSENG
ER
page 4 of 7
(model star-planet) is balanced; you have located the center of mass of the system. Use a binder clip
to secure the point where the two long loops of string connect so that when you let go of the strings,
they do not slide and the tube still hangs horizontally.
4. Have one member of your team slowly rotate the apparatus around its center of mass, making
sure that the tube stays horizontal (see Figure S4). Another member stands a couple of feet away
to monitor the apparatus as it rotates to make sure the center of mass remains at the zero mark of
the amplitude scale. This person can then observe the amplitudes of the rotation for the model
star and the model planet as they rotate around the center of mass of the system; that is, observe
the maximum distances of the model star and planet from the 0 mark during their rotation. [For
example, in Figure S4, which shows a sample system at a time when both the model star and the
model planet have rotated to their maximum distances from the 0 mark, the model star is at the -4
mark, and so its amplitude is 4 cm, while the model planet is at the +22 mark, making the amplitude
of its rotation 22 cm.] Have the third member of your team record the amplitudes for your model
star and model planet in the Data Table on the next page.
5. Remove the model planet from the apparatus by cutting the string connecting it to the apparatus.
Replace it with another model planet with a different mass. Repeat the experiment (Steps 1-4) with
the second and third model planets to fill in the Data Table.
Student Worksheet 2: Tugging the Star
-5 0 5 10 15 20
Rotate the apparatusaround the string hung
from the ceiling
Amplitude (cm)
Figure S4. As the apparatus rotates around its center of mass, the amplitudes of the rotation (that is, the maximum distances from the 0 mark) for the model star and the model planet can be observed.

MESSENG
ER
page 5 of 7
Data Table
Mass of the model planet(g)
Amplitude of rotation of the model star (maximum distance from the model star to the center of mass)
(cm)
Amplitude of rotation of the model planet (maximum distance from the
model star to the center of mass) (cm)
Questions
1. What does the tube represent in the model? (Hint: what is the connection between the real star and
the real planet?)
2. What is the trend you observe in the Data Table between the mass of the model planet, and the
resulting amplitude of the model star’s rotation?
3. The situation you investigated in the experiment is a model of a two-body system (see illustration
below), in which case the center of mass can be calculated from the formula
r1 = rtot * m2
(m1+m2)
Student Worksheet 2: Tugging the Star
Centerof mass
Centerof mass
Body 1 (e.g., a star)
Body 2 (e.g., a star)
Body 2 (e.g., a planet)
Body 1 (e.g., a star)
Centerof body 1
where r1 is the distance from the center
of body 1 to the center of mass, rtot is the
distance between the two bodies, and m1
and m2 are the masses of the two bodies.

MESSENG
ER
page 6 of 7
Let’s designate the model star as body 1 and the model planet as body 2 in your experiment.
Calculate the location of the center of mass (the distance from the center of body 1) for each case:
a) model planet 1: r1 = cm
b) model planet 2: r1 = cm
c) model planet 3: r1 = cm
4. In your experiment, the masses of the model star and planets are more similar than is typically the
case for a real planet and a real star. Using the formula on the previous page and the data in Table
S2, and assuming body 1 = the Sun and body 2 = the planet, calculate the center of mass for:
a) the Sun – Jupiter system:
b) the Sun – the Earth system:
c) the Sun – Mercury system:
For each case, also determine whether the center of mass is inside or outside the surface of the Sun
by comparing the value you calculated (that is, the distance from the center of the Sun to the center
of mass) to the radius of the Sun. Write your answers next to to the numerical values above.
Table S2. Properties of a few Solar System objects.
The Sun Mercury Earth Jupiter
Mean Distance from the Sun (km)
0.0 5.79×10⁷ 1.50×10⁸ 7.79×10⁸
Mass (kg) 1.99×1030 3.30×10²³ 5.97×1024 1.90×1027
Diameter (km) 1,390,000 4,880 12,800 143,000
Student Worksheet 2: Tugging the Star

MESSENG
ER
page 7 of 7
5. Imagine that we modify the experiment so that the model planet is not visible (for example, if the
model planet was a clear glass ball which you cannot see from a few feet away) and you could only
observe the behavior of the model star. Imagine another case where there is no model planet in the
system at all, just the model star. How could you tell the difference between the two systems from
a distance based on just what you can observe of the behavior of the model star?
6. Since planets around other stars are very difficult to see directly, scientists are searching for these
so-called extrasolar planets by trying to detect the rotation of the star around the center of mass
caused by the presence of a planet; this effect is often called stellar wobble. This is exactly what you
modeled in your experiment. [One big difference is that instead of an amplitude scale against which
to measure the wobble, the scientists have to use the positions of other, background stars which do
not move (or at least do not move as rapidly as the observed star wobbles) as the basis for measuring
the effect.] Based on the experiment and your calculations, what kind of planets are most likely to
be detected this way?
Student Worksheet 2: Tugging the Star

Exploring Solar Systems
StandardsBenchmarks
Science Overview
LessonPlan
Resources
MESSENG
ER
��Answer
KeyLesson
Overview
st u d e n t wo r k s h e e t 1
I. Describe, Compare, and Search for Patterns
Answers will vary. Note that the patterns may cover all Solar System objects, or just a subgroup.
The patterns may also cover just most of the objects even in the subgroup, not always all of them.
All answers that are supported by data given to the students are acceptable. Some examples of
patterns include:
1) Sizes: There appear to be two categories among planets: small planets close to the
Sun and large planets farther away. Among other Solar System objects, there are
small bodies throughout the Solar System: asteroids mostly between the orbits of
Mars and Jupiter; Kuiper Belt objects in the outer parts, and comets throughout
(but mostly in the outer parts.)
2) Compositions: There appear to be two main categories among the planets: rocky,
Earth-like planets close to the Sun and gaseous, Jupiter-like planets farther away
(sometimes mixed with rock and ice). The students may also find three planet
categories, such as rocky planets, gas giants and gas-ice giants. Among other Solar
System objects, rocky asteroids are located mostly between the orbits of Mars and
Jupiter; icy Kuiper Belt objects in the outer parts, and icy comets throughout (but
mostly in the outer parts.) The amount of ice in the objects seems to increase as
one goes further away from the Sun.
3) Orbits: Planets orbit the Sun in almost circular orbits, except for Mercury. The
small bodies in the Solar System (including the dwarf planet Pluto) seem to have
a variety of orbital shapes.
4) Orbital direction: All objects orbit the Sun in the same direction (except for comets,
some of which orbit in the opposite direction.)
5) Orbital distances: Inner planets orbit the Sun with smaller average distances
between them; outer planets are further apart.
6) Orbital inclination: The planets orbit the Sun in pretty much the same plane.
Dwarf planets (such as Pluto), asteroids and Kuiper Belt objects orbit the Sun close
an s w e r ke y

Exploring Solar Systems
StandardsBenchmarks
Science Overview
LessonPlan
Resources
MESSENG
ER
��Answer
KeyLesson
Overview
to but not quite on the same plane. Comets can have large orbital inclinations.
7) Moons: The giant planets have lots of moons, while the smaller planets have fewer
moons; the closest planets to the Sun, Venus and Mercury, have none. The dwarf
planet Pluto, some asteroids and Kuiper Belt objects also have moons.
8) Atmospheres: A lot of variety for planetary atmospheres, except for the giant
planets, which have atmospheres made of mostly hydrogen and helium (same as
the Sun.)
9) The Sun seems to be in a category all its own. It is by far the biggest and most
massive object, and it is located near the center of the Solar System. [Note: The
Sun is near but not exactly at the center of the Solar System, since that is located
at the center-of-mass of the whole system, and so slightly offset from the center
of the Sun; this effect will be discussed in Activity 2 but is not important for the
present purposes.]
II. Explain Similarities and Differences
Answers will vary. All explanations that could explain the patterns the student observed in
Part I are acceptable. The possible explanations for the patterns described above include:
1) There may have been more material from which to make planets in the regions
where the giant planets formed. There may have been less material both close to
the Sun and in the outer parts of the Solar System.
2) Heat from the Sun may have made it difficult for gas and ice to exist in the inner
Solar System; that is why the small inner planets are rocky. There may have been
more gas in the region where the gas giants formed. Even further out, more ice
existed, and the composition of the objects becomes increasingly icy.
3) Planets may have formed in circular orbits, but perhaps the other objects did not.
Or perhaps all objects formed in circular orbits but the orbits of the smaller objects
changed over time to become more eccentric. (Scientists now think that the latter
explanation is the correct one, but either is an acceptable answer to this question
based on the data available to the students.)
4) Planets (and other objects) may have formed from a structure that was rotating

Exploring Solar Systems
StandardsBenchmarks
Science Overview
LessonPlan
Resources
MESSENG
ER
��Answer
KeyLesson
Overview
around the Sun in the same direction.
5) Massive planets may have needed more space from which material was gathered
to form their bulk, making it necessary for large gaps to exist between the planets.
Perhaps the smaller planets needed less space from which the material came to
form the planets, so they could form closer together. (Scientists now think that
the gravitational interactions between the forming planets also have made the
distances between the planets to what they are today, but the students cannot be
expected to know this based on the data given to them.)
6) Planets may have formed from a structure that was very thin, like a disk. Maybe
the other objects formed some other way. (Scientists think that all objects in the
Solar System formed from a thin disk that later dissipated, leaving the currently
observed objects behind. The objects that no longer orbit the Sun in the plane of
the former disk were probably scattered into their present orbits by gravitational
interactions with planets during the early history of the Solar System. However,
the data provided to the students is not sufficient to make this determination.)
7) Large planets may have had a lot of material left over from when they formed;
maybe this material became the many moons they have today. Smaller planets
may have had less material from which to make the moons. (Scientists now
think that many moons of the smaller Solar System objects were either captured
through gravitational interaction or formed after a massive collision, but the
students cannot be expected to know this based on the provided data.)
8) Hydrogen and helium may have been the main gases in the forming Solar System.
The larger objects were able to hold onto these light gases while smaller objects
were not.
9) The Sun may have formed near the center of the Solar System (and maybe formed
first) and the planets formed from the material around the young Sun.
III. Hypothesis for the Formation of the Solar System
Answers will vary. All answers are acceptable as long as they can be supported by the
observations of the Solar System data and the explanations the students have for the patterns.
See the Science Overview for the description of the current standard theory for the formation of
the Solar System.

Exploring Solar Systems
StandardsBenchmarks
Science Overview
LessonPlan
Resources
MESSENG
ER
��Answer
KeyLesson
Overview
st u d e n t wo r k s h e e t 2
Data Table
Answers will vary. Example values below are based on a 39-cm long tube, a 540-g grapefruit as
the model star, and a 180-g softball, a 145-g baseball and a 50-g golf ball as the model planets.
Mass of the model planet (g)
Amplitude of rotation of the model star (maximum distance from the
model star to the center of mass) (cm)
Amplitude of rotation of the model planet (maximum distance from the
model star to the center of mass) (cm)
50 5 34
145 10 29
180 12 27
Questions
1. The tube represents the gravitational force between the real planet and the real star.
2. The results should be similar to the sample data table and show that the more massive the
model planet, the larger the resulting amplitude of the model star’s rotation.
3. Answers will vary; example answers based on the system shown in the Data Table above:
a) 3.3 cm
b) 8.2 cm
c) 9.8 cm
4. a) 743,000 km (462,000 miles) from the center of the Sun; the center of mass is outside the Sun.
b) 450 km (280 miles) away from the center of the Sun; the center of mass is inside the Sun.
c) 9.6 km (6.0 miles) away from the center of the Sun; the center of mass is inside the Sun.
5. In the system with a model planet, the model star would rotate around the center of mass
of the model star-planet system, while in the system without a model planet, the model star
would not be observed moving against the amplitude scale.
6. A massive planet (such as Jupiter). If the student analyzes the formula for the location of the
center of mass, it is possible to conclude that the planet at a greater distance is easier to see
(since the effect is more pronounced), but this conclusion is not required.

MESSENGER Mission Information Sheet
MESSENGER is an unmanned NASA spacecraft that was launched in 2004 and will arrive at the planet Mercury in 2011, though it will not land. Instead, it will make its observations of the planet from orbit. MESSENGER will never return to Earth, but will stay in orbit around Mercury to gather data until at least 2012. MESSENGER is an acronym that stands for “MErcury Surface Space ENvironment, GEochemistry and Ranging,” but it is also a reference to the name of the ancient Roman messenger of the gods: Mercury, after whom the planet is named.
MESSENGER will be only the second spacecraft ever to study Mercury: In 1974 and 1975 Mariner 10 flew by the planet three times and took pictures of about half the planet’s surface. MESSENGER will stay in orbit around Mercury for one Earth year; its close-up observations will allow us to see the entire surface of the planet in detail for the first time.
Sending a spacecraft to Mercury is complicated. The planet is so close to the Sun that MESSENGER will be exposed to up to 11 times more sunlight than it would in space near Earth. To prevent the intense heat and radiation from having catastrophic consequences, the mission has been planned carefully to make sure the spacecraft can operate reliably in the harsh environment. To rendezvous with Mercury on its orbit around the Sun, MESSENGER uses a complex route: it flew by the Earth once, Venus twice, and Mercury three times before entering into orbit around Mercury.
The MESSENGER spacecraft is built with cutting-edge technology. Its components include a sunshade for protection against direct sunlight, two solar panels for power production, a thruster for trajectory changes, fuel tanks, and radio antennas for communications with the Earth. The instruments aboard MESSENGER will take pictures of Mercury, measure the properties of its magnetic field, investigate the height and depth of features on the planet’s surface, determine the composition of the surface, and in general observe the properties of the planet and its space environment in various parts of the electromagnetic spectrum and via particle radiation studies.
During its mission, MESSENGER will attempt to answer many questions about the mysterious planet. How was the planet formed and how has it changed? Mercury is the only rocky planet besides the Earth to have a global magnetic field; what are its properties and origin? Does ice really exist in the permanently shadowed craters near the planet’s poles? Answers to these scientific questions are expected to hold keys to many other puzzles, such as the origin and evolution of all rocky planets. As we discover more, we expect that new questions will arise. You could be the one answering these new questions!
For more information about the MESSENGER mission to Mercury, visit: http://messenger.jhuapl.edu/
MESSENG
ER

MESSENGER Mission Science Goals
The first in-depth investigation of the planet Mercury, MESSENGER is designed to address six broad scientific questions. The answers to these questions will not only increase our knowledge of the planet Mercury, but also help us better understand the whole Solar System.
Why is Mercury so dense? The density of each Earth-like planet reflects the balance between a dense core, and less dense mantle (surrounding the core) and crust (the topmost layer of rock on the planet.) MESSENGER’s measurements help determine why Mercury’s density is so high that its core appears to be twice as large (relative to the size of the planet) as the Earth’s core.
What is Mercury’s geologic history? By allowing us to see the whole surface of Mercury for the first time, MESSENGER helps determine what Mercury’s surface is like globally and how geologic processes (such as volcanism, tectonism, meteor impacts) have shaped it.
What is the structure of Mercury’s core? Earth’s magnetic field is thought to be generated by swirling motions in the molten outer portions of our planet’s core. MESSENGER’s measurements help determine if Mercury’s field is generated the same way.
What is the nature of Mercury’s magnetic field? Mercury’s magnetic field is thought to be a miniature version of the Earth’s magnetic field, but not much was known about it before MESSENGER. The new measurements help us understand how Mercury’s magnetic field compares with the Earth’s field.
What are the unusual materials at Mercury’s poles? Earth-based radar observations revealed the presence of unknown bright material in permanently shadowed craters near Mercury’s poles. MESSENGER’s observations will help determine whether the material is water ice, which is the currently favored explanation for the radar-bright materials.
What volatiles are important at Mercury? MESSENGER will help determine the origin and composition of Mercury’s atmosphere, which is so thin that it is really an exosphere. In an exosphere, volatiles (elements and compounds that turn easily to gas) are more likely to wander off into space rather than collide with each other, and so the exosphere must be replenished somehow.
Additional Science TopicsIn addition to improving our understanding of Mercury today, MESSENGER will also give a lot of information on the formation and later evolution of the planet, which in turn will provide clues to the formation and the early history of the whole Solar System, and especially of Earth-like planets. MESSENGER will also investigate the space environment close to the Sun, in this manner helping scientists gain a better understanding of the Sun’s influence at a close distance. Since most of the extrasolar planets discovered to date are at similar distances from their parent stars as Mercury is from the Sun, MESSENGER’s investigation will provide a unique perspective on comparing the properties of planetary systems across the Universe.
MESSENG
ER
For more information on the MESSENGER science goals, including what the spacecraft has discovered so far, visit http://messenger.jhuapl.edu/why_mercury/


