Download - Kettlebells From the Center: Dynami


Kettlebells From the Center: DynamiBy Brett Jones Master RKC, CSCS, CK-FMS
and Gray Cook RKC, OSPTWith Special “Coachʼs Corner” section provided by Jeff OʼConnor, Master RKC
Copyright 2010 Functional Movement Systems and Gray Cook 1
Foreword
I would like to thank Brett and Gray for providing this information. Almost all athletic training programs focus on strength and conditioning with no regard for movement. The first has created some unbelievably strong Frankenstein Monsters. The ones that don’t do that emphasize coordination and agility, with only a passing reference to strength training. This one makes smooth moving athletes that are athletically limited by their lack of strength. And worst of all, the “sport specific” programs that destroy athleticism. Any approach works on mutants, none of them does what’s best for the masses.
Getting out of your own way is the most important thing you can do as an athlete. Only when you remove your physical restrictions can you realize your true athletic potential. Coordination rules on the athletic field, not powerlifting totals. Perfect movement skill without power is useless. But, when all aspects of athleticism and sport skill are relatively equal, strength and conditioning rule the day. Dynami takes you through a progression of patterning and symmetry to strength and finally a near game speed expression of that strength. Following these progressions will reduce your risk of injury and give you the smooth application of power that is a difference maker in any physical contest. Finally, it will give you the ability to deliver that power time and time again. When everything else is equal, the last one standing wins the day.
It is a rare thing that two people with such unusual talent and ability combine their knowledge in such a complimentary way. The ongoing theme of move good and then condition good movement seems like a no-brainer. However no brains have ever put it together as well as these two.
The journey that was begun with Kalos Sthenos continues with Dynami. Utilizing the information provided will help you become the best athlete you are capable of.
Jeff O’Connor, Master RKC
Copyright 2010 Functional Movement Systems and Gray Cook 2

Table of Contents
Page 1 Title PagePage 2 ForewordPage 3 Table of ContentsPage 4 - 8 IntroductionPage 8 - 9 SafetyPage 10 - 13 Clearance TestsPage 14 - 20 Introduction for the Deadlift and SwingPage 21 - 24 Pattern Building the Deadlift and Swing Page 25 - 27 Slow Strength - The DeadliftPage 28 - 30 Symmetry - The Single Leg Deadlift Page 31 - 37 Dynami - The SwingPage 37 - 39 Common Mistakes in the SwingPage 40 - 48 Coachʼs Corner for the Deadlift and Swing Page 49 - 53 Introduction for the SquatPage 54 - 56 Pattern Building the SquatPage 57 - 60 Slow Strength - The SquatPage 61 - 63 Symmetry - The Bottom Up SquatPage 63 - 67 Coachʼs Corner for the Squat Page 68 - 71 Introduction for the PressPage 72 - 74 Pattern Building the PressPage 75 - 76 Slow Strength - The PressPage 77 Symmetry - The Bottom Up Press Page 78 - 80 Coachʼs Corner for the Press Page 81 - 83 Introduction for the Push-PressPage 84 - 87 Dynami - The Push-PressPage 88 Common Mistakes in the Push-PressPage 89 - 90 Coachʼs Corner for the Push-PressPage 91 - 93 Movement PrepPage 94 - 100 ProgrammingPage 101 ConclusionPage 102 Special Afterward by Gray Cook
Copyright 2010 Functional Movement Systems and Gray Cook 3

Kettlebells From the Center Dynami
Δύναµη Dynami – PowerNo matter the language, power ‐‐ physical power for our purposes ‐‐ is the goal of this DVD and Manual. But power of any kind can be misapplied and destructive if not properly cultivated and earned.
Power training is one of the hottest topics in Aitness today. Nearly everyone is talking about how to train for it and what tools are best for that training (see references throughout). Seniors, athletes, and those who strive to lose weight are all being told to train for power. But are they ready to train for power? The primary goal of this DVD and Manual set is to provide a systematic way to prepare for building power.
Our bodies are capable of amazing things. “Grandma lifts car off granddaughter” is a headline or story we have all seen. This phenomenon indicates the strength and power residing within us that we rarely tap into. Expecting a grandmother to lift a car outside of the extreme stress of the situation is equivalent to telling grandma to hit the gym and power through some medicine ball slams. This may be an extreme example, but too often Aitness recommendations are made without consideration of whether they are appropriate for the individual.
Every skill must be built upon a strong foundation, and “Kettlebells From the Center” will guide you through laying the foundation for your power. The following sequence of steps is repeated for building each movement shown in the DVD and Manual.
Pattern Building > Slow Strength > Symmetry > Dynami
Pattern BuildingTai Chi, Qigong, and martial arts in general use a tradition of pattern building sometimes called Katas. Katas can be deAined as the slow and precise rehearsal of goal movement patterns. We will be applying this mentality as we structure our pattern building for the Deadlift and all of the exercises in this manual.
Do Not Pass Go! Do Not Collect $200!
Stop here and ruminate a while…
Copyright 2010 Functional Movement Systems and Gray Cook 4
Pattern building is the step that most people breeze by and ignore at their peril.It is vital to slowly and precisely learn each movement pattern to the point that speed and load cannot disrupt it. Unfortunately, this attention to fundamentals is rare in the Aitness industry. Think about it. How do you know or learn how to perform an intricate movement pattern? You can Alail away, trying to hop right in and move “at sport speed,” or you can build a deep foundation for your movement by starting slow.
Slow StrengthA golf swing moves at about 2500 degrees per second. That’s fast! That’s why it is so hard to actively change or manipulate your swing while you’re performing it. It is just moving too fast. The Swing of a kettlebell is also a high‐speed maneuver. It is wise to cement the perfect groove while you learn the patterning, then begin to gradually add load to the pattern. Weight or load begins to lock in a pattern, so the program begins with unloaded patterning then progresses to loaded work. Spend your time here to cement a pattern that will hold up to your power.
SymmetryYou will notice a symmetry section for each exercise. This refers to symmetry‐of‐strength as opposed to the movement symmetry deAined by the FMS screen. We are assuming you will have taken care of this in some fashion prior to taking on these exercises. The Single Leg Deadlift (SLDL) is the symmetry check for the Deadlift pattern. This assesses your ability to use the right and left hip equally within an independent move before taking your hips into a symmetrical power move like the Swing.
In the Squat and Press, we impose a different symmetry‐of‐strength analysis through the Bottom Up Drills. These require an “even power Alow”, meaning that if one link in the chain falters during the exercise, the kettlebell will not stay bottom up. That symmetry‐of‐strength will be carried over to seamless power.
DynamiThis is the culmination of each of the movements – power. Power can be deAined as the time rate at which work is done or energy is transferred (about.com). The title of this product should indicate to you where that power is produced and transferred – your center. Throughout the manual, you will be advised to push into the ground and transfer that energy through your center to the weight. Both the Swing and the Push Press happen at high speed and are all about transfer of energy, providing two great examples of Dynami.
Copyright 2010 Functional Movement Systems and Gray Cook 5
Three Steps Before Dynami?That’s right. You must progress past 3 steps before you get to Dynami. Why?
Because:The Deadlift = the Dynami of the SwingThe Squat – Prelude to the Push Press The Press – Overhead stability for the Push PressThe Push Press = Dynami ‐ fast version of the Squat and overhead workAll of this structure exists to build efAicient linking of the segments.
Linking Segments As energy moves through the body it must be coordinated through the body in an efAicient manner. In Kettlebells From the Center, we are looking to coordinate and use this power moving through the body by “Linking Segments”. For a very simpliAied working deAinition, the key point is an efAicient transfer of energy through the body. Watch the Swing and Push Press and see if you can identify the links in the chain and the movement of energy through the body.
Push/Pull One of the oldest means of splitting up a training routine is by breaking the exercises into pushing and pulling categories. The upper‐body/lower‐body split might be the oldest, but push/pull has to be a close second. According to Dave Draper, “Pushing on one day and pulling on the next is a popular way to split up muscle groups to assure maximum like‐muscle action with a minimum liability of overtraining.” (davedraper.com)
Another way to coordinate push/pull workouts is to balance a pushing exercise with a pulling exercise – push‐ups followed by pull‐ups, for example. In Kettlebells from the Center, the Deadlift/Swing is the pull and the Press/Push Press is the push. Within the programming, you will see both variants discussed.
You’ll notice that the push and pull exercises are not your typical push‐and‐pull choices, but rest assured that they were picked for very good reasons.
It’s all in the Recipe …or how you mix the ingredients.
Copyright 2010 Functional Movement Systems and Gray Cook 6

There are a lot of recipes that have similar ingredients but reveal very different tastes due to the mix and/or amounts used. Exercises are similar in this regard, and there will be different ingredient mixes provided in the programming section. Patterning moves will be mixed with strength moves. Breathing patterns will be mixed, breaking rhythmic patterns with cyclic patterns (see the next section). Strength moves will be mixed with power moves.
BreathingOne of the unique aspects of these lifts is the opportunity to use contrasting breathing styles. So let’s deAine what breathing styles we will be using.
Anatomical Breathing – In this type of breathing, the body gets compressed as air gets squeezed out of you and expands as you take air in. Anatomical breathing is particularly effective for stretching and mobilization work.
Biomechanical Breathing is the opposite of Anatomical. When your body gets compressed, you have actually inhaled to produce a bubble of intra‐abdominal pressure. You expand when there is a forced exhalation. This is the style of breathing used for Swings and all of our strength and power movements. Within the Biomechanical style, there are two subsets – Rhythmic and Cyclic.
Rhythmic Breathing is apparent in the Swing where the relative sequencing or timing of the breath occurs in the same pattern (Sniff in during the hike and air gets forced out at the top.). Cyclic Breathing moves between inhales, breath holding (pressurization), and forced exhales over longer periods of time and “disturbed sequencing”. A Press or Push Press is a good example of this process. You inhale to initiate the pressurization, followed by a forced exhale to the top in a Press or a quick breath hold while “popping” the hips and transferring energy to the weight. Inhalation occurs at the top to re‐pressurize for the pull back down, followed by another tight, forced exhale. This “Disturbed Sequencing” means there is no rhythm to get into.
Rhythmic Breathing enables you to perform sets of 20, 50, or 100+ Swings in a row by providing a consistent exchange of gases. Cyclic Breathing disrupts the exchange of gases and creates a very different stress on the body. This is due to the extended forced exhales, breath holds, and multiple cycles of inhales and exhales during each repetition. These contrasting breathing styles are used to create unique impacts on conditioning during the programming. Monitoring breathing and your loss of control over the breathing pattern can indicate problems with conditioning or breathing patterns. When you have Aixed the breathing patterns, you will truly grasp and be able to monitor and improve your conditioning.
Copyright 2010 Functional Movement Systems and Gray Cook 7
Proper diaphragmatic breathing is key here, and Gray and I introduced Crocodile Breathing in our Secrets of… DVDs to check and begin to correct breathing patterns. Lie on your stomach with your forehead on your hands and breathe through your nose. There should not be any movement up into the upper back and neck. Rather, your breath should go down and make your stomach “push” into the ground as your lower back rises and falls with your breath.
The “push” into the ground is a natural action as opposed to sticking out your belly as in the old “belly bucking” contests. Your breath should also go wide (If someone pokes you in your obliques, your air should push their Aingers out.). Practice Crocodile Breathing for 5 minutes a day and then progress into other positions ‐‐ on the back, sitting, standing etc….
Safety!
A knife in the hands of a surgeon can heal but that same knife in the hands of a criminal can do great harm. You will be swinging weighted implements that resemble a cannonball or wrecking ball. It is therefore essential that safety be a primary focus.
So let’s lay down some rules:1) Keep a safe and clear working area.2) Do not move into pain.3) Move slowly to begin.4) Keep a safe and clear working area.5) Remember that no safety list can account for all possibilities.6) Remember that you alone are responsible for the safe and proper use of the
kettlebells.7) Do not “hope” that safety happens – Plan for it and make it happen!8) Adjust all movements and descriptions to Ait you.
Let us discuss each of these brieAly:A safe and clear working area should be clear enough, but remember to factor in the length of the kettlebells into your equations. Taking out an overhead light, lamp, or other valuable item will not win you any praise at home or in the gym. Also factor in a buffer zone where people or pets can enter the area AND give you time to stop.
Do not move into pain should also be clear, but in the high‐intensity world of extreme Aitness, the warning signs are often ignored. Pain exists for a reason, so ignore it at your own peril. Moving your body through its available ranges of motion should not hurt.
Copyright 2010 Functional Movement Systems and Gray Cook 8

If you run into a movement that does hurt, stop performing that motion and get evaluated by the appropriate medical professional or seek the advice and coaching of an appropriate Aitness professional.
Moving slowly to begin re‐emphasizes the progressions in this manual. From a safety perspective, this also seeks to have you groove movements at a speed that will not damage your body or your property. Once the kettlebells are swinging at a good rate of speed, they are capable of causing pain or damage.
A safe and clear working area is repeated not only to add length to the manual, but also to once again cement in your mind this essential safety point.
No safety list can account for all possibilities. This manual and DVD cannot possibly account for every risk and danger involved in exercise and kettlebell training. If a gnat Alies into your eye during a set of Swings or a pet jumps onto your stomach during a Kettlebell Get‐Up, you have run into the “unexpected”. The best policy is to expect it.
You, and you alone, are responsible for the safe and proper use of the kettlebells. Take your time to follow the instructions and advice and do not attempt to color outside the lines or innovate. It is your responsibility to use the kettlebell as the power tool they can be and to respect the advice and techniques presented herein.
Do not “hope” that safety happens – plan for it and make it happen. There is an old military saying: “failing to plan is planning to fail.” Safety is no different. If you fail to plan a safe working area, it will not be safe. Take the time to think a few steps ahead and plan safety into your routines.
Adjust all movements and descriptions to Ait you. You must move within your available ranges of motion and do NOT attempt to copy the model. Forcing yourself beyond your current ranges of motion in an attempt to copy the model will only get you injured. Terms like “fully” or “completely” are to be adjusted to your individual ability to achieve said positions. Remember not to move into pain and never go beyond your ranges of motion.
Copyright 2010 Functional Movement Systems and Gray Cook 9

Clearance Tests
While we expect you to have cleared any movement issues during “Kettlebells From the Ground Up” or through a full Functional Movement Screen, there can still be issues hiding within our bodies. The tests are intended to reveal pain. If they do provoke pain anywhere, you should seek the guidance of an appropriate Aitness professional or medical professional. Gone unaddressed, pain will cause the body to compensate around your pain or dysfunction.
Four tests should be performed before you begin. These tests identify whether certain postures/positions provoke pain or assess your range of motion and mobility. Any sensation of pain (a positive test) is reason for referral to the appropriate medical professional. Inadequate mobility means you need the assistance of a Fitness Professional skilled in dealing with such issues (an FMS CertiAied Professional). It will also be beneAicial to review and work on the Kettlebells From the Ground Up or the Secrets of the Shoulder programs. (Please visit www.functionalmovement.com for details on FMS CertiAied Professionals)
Test 1: Spine Flexion
Purpose: To place the spine and body into Alexion to see if pain is present.
Description:Start in a Tall Kneeling Position with the feet pointed behind you so the tops of your feet are on the ground.Bring your hips to your heels, fold forward at the waist, and place your hands on the ground in front of you (arms straight). Continue to fold until your abdomen is against your thighs and your forehead is on the ground.
This move will fully Alex the knees, hips, spine and shoulders and extend the ankles. If pain is noted in any of these areas, it is considered a positive test.
Copyright 2010 Functional Movement Systems and Gray Cook 10
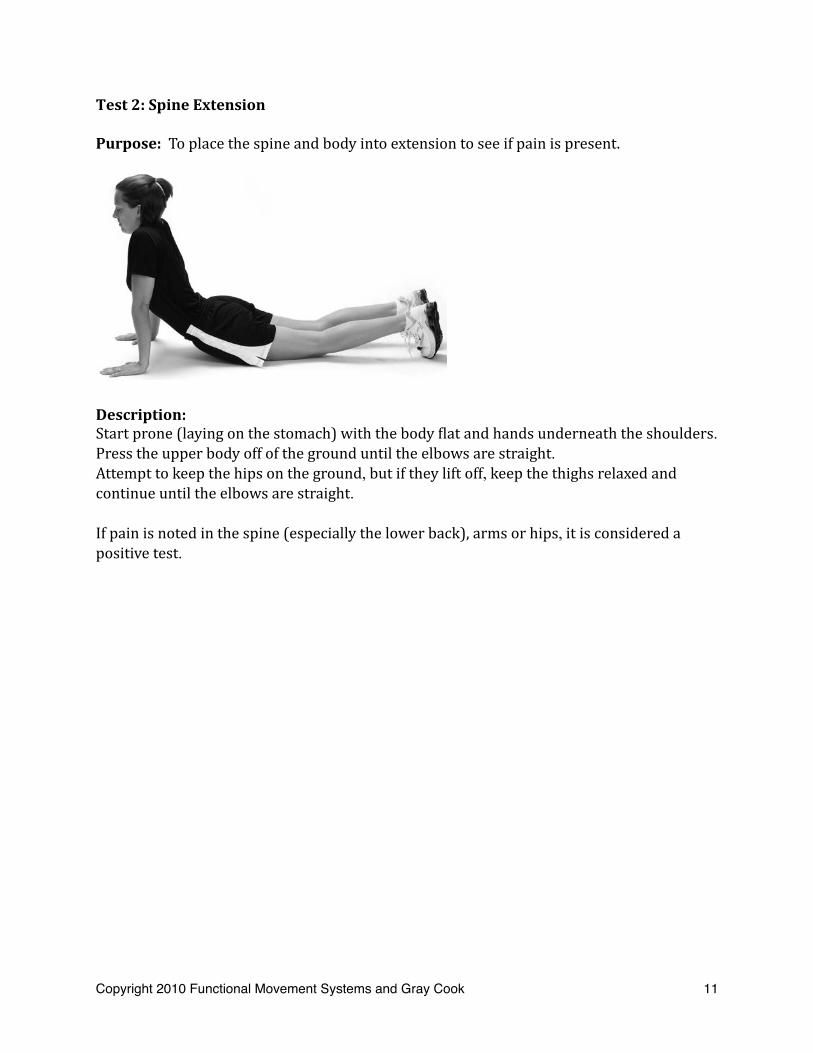
Test 2: Spine Extension
Purpose: To place the spine and body into extension to see if pain is present.
Description:Start prone (laying on the stomach) with the body Alat and hands underneath the shoulders.Press the upper body off of the ground until the elbows are straight.Attempt to keep the hips on the ground, but if they lift off, keep the thighs relaxed and continue until the elbows are straight.
If pain is noted in the spine (especially the lower back), arms or hips, it is considered a positive test.
Copyright 2010 Functional Movement Systems and Gray Cook 11
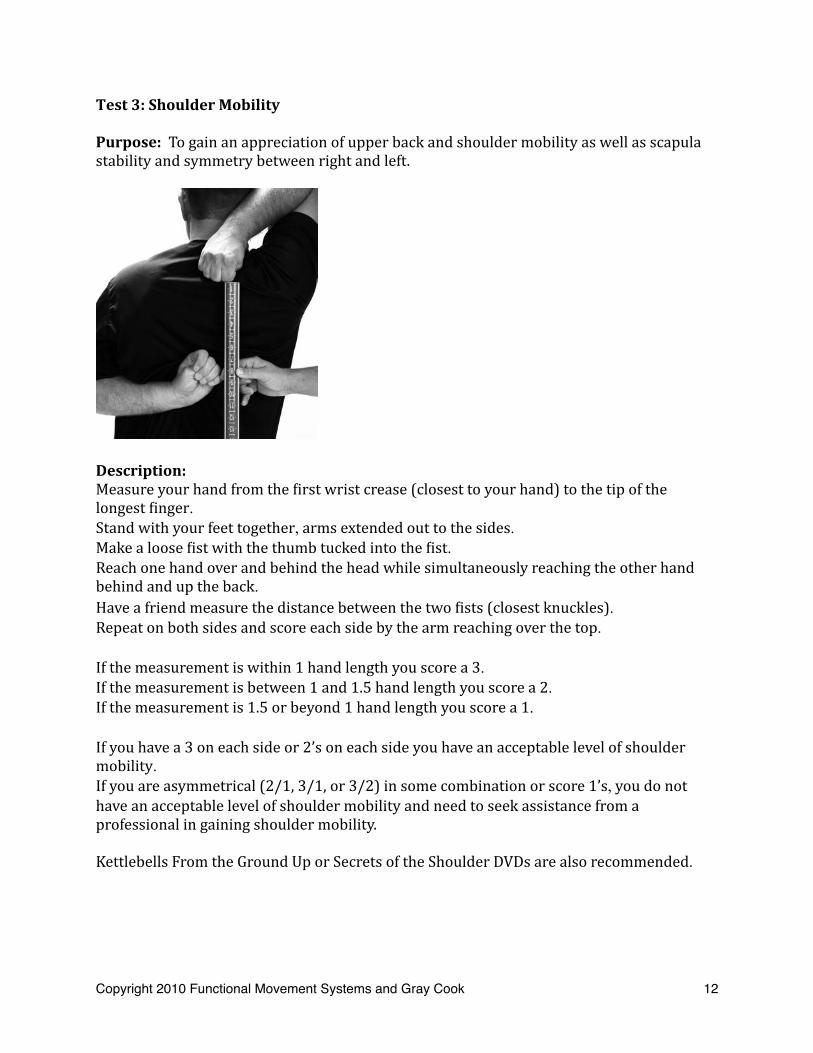
Test 3: Shoulder Mobility
Purpose: To gain an appreciation of upper back and shoulder mobility as well as scapula stability and symmetry between right and left.
Description:Measure your hand from the Airst wrist crease (closest to your hand) to the tip of the longest Ainger.Stand with your feet together, arms extended out to the sides.Make a loose Aist with the thumb tucked into the Aist.Reach one hand over and behind the head while simultaneously reaching the other hand behind and up the back.Have a friend measure the distance between the two Aists (closest knuckles).Repeat on both sides and score each side by the arm reaching over the top.
If the measurement is within 1 hand length you score a 3.If the measurement is between 1 and 1.5 hand length you score a 2.If the measurement is 1.5 or beyond 1 hand length you score a 1.
If you have a 3 on each side or 2’s on each side you have an acceptable level of shoulder mobility.If you are asymmetrical (2/1, 3/1, or 3/2) in some combination or score 1’s, you do not have an acceptable level of shoulder mobility and need to seek assistance from a professional in gaining shoulder mobility.
Kettlebells From the Ground Up or Secrets of the Shoulder DVDs are also recommended.
Copyright 2010 Functional Movement Systems and Gray Cook 12

Test 4: Impingement
Purpose: To determine if pain is present while placing the shoulder in an adducted, internally rotated and Alexed position.
Description:Stand with your feet together and reach across to place one hand (palm) on the opposite shoulder.Keeping the palm down and hinging at the wrist, lift the elbow as high as you can without losing contact with the palm.Does this cause pain or pinching?Repeat on the other side.
If this test does provoke pain, please seek referral to the appropriate medical professional.
Special Thanks to Functional Movement Systems for the Clearance Test and Shoulder Mobility pictures. For more information on the Functional Movement Screen log onto www.functionalmovement.com
So here we go…Dynami is waiting. But you must earn that power with purposeful progression through and mastery of the following exercises.
Copyright 2010 Functional Movement Systems and Gray Cook 13

The Deadlift and Swing
To quote Master RKC Mark ReiAkind, “The Swing is the center of the RKC Universe.”
This implies that the Swing is the foundational movement within the Russian Kettlebell Challenge (RKC) School of Strength. (www.russiankettlebell.com) The goal of the Swing section of this manual is to break the Swing down into its component parts. The Deadlift provides the structure for the Swing. Too often people are shown a Swing without the platform necessary to support the power and load imposed by this tremendous exercise. Here we will begin at step one, the Hip Hinge, and follow through to Dynami.
It is vital to understand that if you bring restrictions, asymmetries and faulty movement patterns to the Deadlift and Swing, these weaknesses can break you. I highly encourage you to check out both “Secrets of Core Training – The Backside” and “Kettlebells From the Ground Up – Kalos Sthenos.” The “Secrets of Core Training” DVD will progress you through clearing your mobility and stability patterns for the Deadlift. “Kettlebells From the Ground Up” will lead you through the Get‐Up, clearing up any mobility and stability patterns within the 7 steps. All advice to follow assumes that you have “cleared the slate”, so to speak, and that you are ready to take on the power of the Swing.
Pattern Building for the Deadlift and Swing The Hip HingeNow, I know what you are saying – “It’s just a Deadlift. No problem.”Well, based on my experience, it is a problem!Proper Deadlifts are about as rare as Bigfoot sightings, and things do not get any better when speed, load, and power are added to the equation.
Here is the sequence for Pattern Building the Deadlift/Swing ‐ The Hip Hinge:1) Touch the Wall2) Touch the Wall with Stick3) Touch the Wall Deadlift4) Good Morning with KB Behind Neck
Getting started is as simple as an empty bit of wall. Put your right heel against the wall and step the left foot forward the length of your foot. Bring the right foot the same distance from the wall, keeping the feet around shoulder width apart. You can adjust wider or narrower as needed. Reach back with your hips to touch the wall with your glutes. If you do it correctly (see the photos on page 21), your hips will touch the wall quickly and quite high. Now wiggle away and Aind the furthest point from the wall where you can still touch the wall without falling back into the wall.
Copyright 2010 Functional Movement Systems and Gray Cook 14

Incorporate the breathing as well – sniff in as you reach back with the hips and force air out as you bring the hips back underneath you. At the top, your glutes and abs are squeezed tight. Yes, this is a repeat of what you will read in the exercise descriptions to follow but it adds length to the manual ;‐) and it really is that important!
There are a few things I want to highlight before you go ahead to the exercise descriptions for this section:
1) Engaging the Lats2) Pushing into the Ground vs. Upper Body Pulling3) Grip Activation4) Elevated Deadlifting5) Achieving Symmetry6) Sets and/vs. Reps7) Being Barefoot8) Alignment of the Eyes and Neck9) There are No Small Points
Engaging the Lats (or latisimus dorsi)Eric Cressey has an excellent article titled “Lats: Not Just Good for Pulldowns” (http://ericcressey.com/lats‐not‐just‐good‐for‐pulldowns). It highlights the many ways in which the lats are involved in how we move and perform. Of particular interest for learning the Deadlift is the interaction between the lats and the thoracolumbar fascia and glutes. From your humerus and scapulae to your glutes, there is one interconnected chain! (Also see Anatomy Trains by Myers)
When you read the descriptions of keeping the arms against the ribs and activating the lats for your Deadlifts and Swings, this is intended to take advantage of this chain and to link the upper and lower body together as a unit. Ignore this piece of the puzzle and you’ll suffer the consequences! These include stress on the lower back, decreased power and strength, and an urge to sing show tunes ‐‐ and these simply won’t do!
Pushing into the Ground vs. Upper Body PullingEven though the Deadlift is referred to as a pulling movement, we are going to execute this pull by pushing into the ground rather than pulling with the upper body. Keep in mind that during the Touch the Wall Patterning Drill, you reach back with your hips and then bring them back underneath you. You initiate this by pushing your feet into the ground, then push against the ground and drive your hips back to lockout. When you do this with the lats engaged and a solid “core”, you will pull the weight along with you.
Copyright 2010 Functional Movement Systems and Gray Cook 15

If you simply pull with the arms and try to lead with the shoulders, you will throw stress quickly into the lower back and more than likely go into back extension at the top (not a good thing). So push down in order to pull up.
Grip ActivationWhen you grasp the kettlebell handle, you have the opportunity to activate your grip. Do not waste this opportunity! As Pavel points out in his book Naked Warrior, we can take advantage of irradiation by crush gripping the handle and increasing the number of links in the chain. Lat activation and shoulder stabilization (another under‐realized beneAit of Deadlifting) will be facilitated as well. Whenever possible, take the opportunity to engage and/or re‐engage your grip.
Elevated Deadlifting... or don’t try to Ait the round peg into the square hole!
There are times when we refuse to admit our limitations and try to force the issue. Observing most guys dance is a good example. Another is when our mobility ability is not up to the demands of a full‐range Deadlift (as deAined by the height of a barbell or kettlebell handle). If, during the Touch the Wall Deadlift, you discover that you cannot reach the kettlebell handle with perfect form, you must do two things:
1) Admit that you need to work on your Alexibility ‐‐ and actually work on it.2) Elevate the kettlebell to a level that allows you to perform the movement perfectly.
As your mobility ability improves, you can slowly and progressively lower the kettlebell until you can perform perfect Deadlifts from the Aloor. Another area where you will run into this is during the Single Leg Deadlifts (SLDLs). Swings don’t work from an elevation, so until your Deadlifts are perfect, no Swings for you!
{How do you work on your mobility ability? See an FMS or CK‐FMS expert www.functionalmovement.com and get the DVD “Secrets of Core Training – The Backside”}
Achieving SymmetryFor the Deadlift, this takes the form of the Single Leg Deadlift (SLDL). While this can have a movement or mobility aspect, we are looking to perform reps and weight within 10‐15% of each side. For example, your right leg can perform 10 Single Leg Deadlifts at 16 kg, but your left leg can only perform 7 reps at that weight. This 30% difference will carry over into your Swings.
Copyright 2010 Functional Movement Systems and Gray Cook 16
Try letting 30% of the air out of your tires on one side and see how driving feels! Correct this difference before expecting symmetrical hip power during the Swing.
Sets and/vs. RepsI often joke with my clients that the repetition police do not exist. People have a true fear of not hitting a certain number of reps that they may have laid out as a goal. They act as though some malady will transpire or global markets will fail if 10 reps are not hit. So, form be damned, they’ll do whatever is necessary to hit that number!
Stop and take a nice deep breath...
We want you to approach your sets and reps from two perspectives:1) For Deadlifts – 8 sets of 1 rep is preferred to 1 set of 8 reps.2) No matter the recommended reps, stop if form breaks.
What does it mean? Performing 8 sets of 1 rep allows the opportunity to focus entirely on each movement and to re‐engage the perfect sequence for every rep. 8 sets of 1 rep does not mean you should take a 5‐minute break between sets. It means you should rest only as long as you need to ensure perfect form on the next rep. Once you get to Swings, you will have to string together multiple reps but this is where you must stop once form breaks.
Being BarefootYour feet are amazing ‐‐ an incredible feat of neurological, mechanical, and structural engineering ‐‐ and you need every bit of their incredibleness while deadlifting and swinging. Pavel talks about the need for the proprioceptors in your feet to be maximally stimulated during the Deadlift in his book Power to the People. Dr. Eric Cobb and Z‐Health (www.zhealth.net) speak extensively about regaining all of the neurological functioning in your feet (and whole body). Even the book Born to Run makes reference to our feet and the need for them to be integrated into our movements.
Being barefoot for exercises like Deadlifts and Swings provides a zero impact opportunity to use your feet. Your weight should be evenly distributed through the center of your feet, not rocked forward to the toes or back to the heels. And being barefoot will allow you to feel precisely where the force is being placed.
Obviously, you have to abide by the rules of your gym, and being barefoot is not always an option. You can get a pair of wrestling shoes or Chuck Taylors.
Copyright 2010 Functional Movement Systems and Gray Cook 17

Alignment of the Eyes and NeckTraditional gym advice says to look up when squatting and deadlifting. You will notice that we do not use this cue. Rather, we want the neck and eyes kept in a neutral position. You will experience this neutral position when you practice the Touch the Wall Drill with the Stick Along Your Back. Once you learn neutral there is an allowable degree of neck extension (Jeff will cover this in the Coaches’ Corner).
Basically, we want the eyes on the horizon (meaning where the wall and the Aloor meet) during Deadlifts and Swings, and the eyes straight ahead while pressing or push pressing (the notable exception being the Bottom Up Press).
There are No Small Points... or the Devil is in the details!
But so is much of the beneAit, and that is the paradox of seeking perfect form. I demand perfect form and laser‐like focus from myself, and I expect it from you.
While it’s possible to get too deep into the details, there is a balance to be struck where you effectively journey toward perfection, experiencing the necessary struggles but still striving for perfection.
Watch the video – read the manual – take your own notes and video. Laugh and have fun but with an underlying determination that every rep is a step in the process toward perfect form.
Now, as you begin to add speed and power to the Deadlift by swinging, there are a few other aspects to highlight:
1) Lats ‐ Yes, Again!2) Projection of Energy3) Safe Finish4) Hips Lead the Race5) One Kettlebell vs. Two ‐ or ‐ Speed vs. Load6) Elevated Heels7) Don’t Be a Bobble Head
Lats – Yes, Again!Hiking the kettlebell behind you at the start of the Swing is where engaging the lats in the Swing begins. Don’t waste it!
Copyright 2010 Functional Movement Systems and Gray Cook 18

You will read repeatedly to get and/or keep the arm against the ribs as a cue. This is an essential part of efAicient energy transfer from the hips to the kettlebell. And it is once again based on activating the lats.
Projection of EnergyDuring the Towel Swing, you will be looking for the kettlebell to project straight away from you. There is a balance struck between the kettlebell projecting away from you and keeping the shoulders connected and your center stable. I’m only asking for everything, as I tell my clients. (And they don’t think it’s funny, either.)
Safe FinishWe are particular about how you begin a Swing, and we are equally as particular about how you Ainish your Swing, Deadlift, Clean, or Press…you get the idea. Always return to your perfect Deadlift position to decelerate the kettbell, and set it down safely. The set is not over until the kettlebell is safely on the ground. If you are sloppy setting the weight down, it is not a matter of whether you will get injured but when. Pay attention to how I set the kettlebell down during the video.
Hips Lead the RaceYour hips should lead the race to the top and the race to the bottom. Pay attention on the video to the sequencing of my Swing. Observe when my hips Ainish versus when the kettlebell reaches the top. The Towel Swing begins to teach this sequencing, since the kettlebell should project smoothly away and not jerk up or down. Where are your hips in the race?
One Kettlebell vs. Two – Or – Speed vs. Load(Yes, I was a “Rocky and Bullwinkle” fan as a kid.)
The question will arise as to which is better: one kettlebell or two? This is the same as asking if peanut butter is better than jelly. They are both great, and you can mix as you see Ait.
Speed vs. Load is a consideration inherent to the choice between one kettlebell and two. One kettlebell gives you a chance to achieve maximal acceleration, or what Mark ReiAkind refers to as “virtual force.” If you hike and accelerate the kettlebell going back, and you snap the hips and accelerate it to the top, the weight of the kettlebell “increases” under speed. This asymmetrical load creates unique activation. But two kettlebells places you under signiAicant overall weight or load. “Catching” double the weight only to redirect that force into an aggressive acceleration is load. Mix accordingly.
Copyright 2010 Functional Movement Systems and Gray Cook 19

Elevated HeelsIt is pretty much universally agreed that high heels are bad for you. But, for some reason, we turn a blind eye to the elevated heels of running shoes and most “cross training” shoes. The 1” to 2” of elevation at the heel throws your center of mass forward, making it nearly impossible to properly load the hips. Don’t fall for it. (Reread the Being Barefoot section.)
Don’t Be a Bobble Head!While popular as a promotion at baseball games, the bobble head belongs on your dashboard, not in your Swings. Pay attention to the section above about alignment of the eyes and neck. This alignment becomes crucial when the speed of the Swing kicks in. Hyper‐extending the neck at the bottom of the Swing not only places a lot of stress on the neck, but also hampers your ability to hinge properly into your hips. Then your neck will snap back to the top, or even “chicken” neck forward at the top, with neither of these being good for you. We have no problem with the idea that the back should be maintained in “neutral”. The neck is part of the spine, so treat it with the same attention you give to your lower back.
Copyright 2010 Functional Movement Systems and Gray Cook 20

Pattern Building the Deadlift and Swing
Touch the Wall Drill
Purpose: Introductory drill to learn the Hip Hinge
Execution: Stand a foot length from the wall in a symmetrical shoulder‐width stance.Without falling back into the wall, reach back and touch the wall with the glutes.If you are successful, move the feet away an inch and try again.Repeat, each time moving forward, until you Aind the furthest point from the wall where you can successfully touch the wall without falling backward.At this point you can practice the Hip Hinge, initially using the arms as a counter balance by reaching forward.Add an element of breathing. Inhale on the way back to touch the wall, then exhale at the top as you tighten the glutes and abs, creating a straight line from the ears to the ankles.
Key Points:The hips reach back Airst and stay high. The chest will tilt forward as the hips reach back.Don’t confuse an upright back with a Alat back.Don’t squat and lower the hips.
Copyright 2010 Functional Movement Systems and Gray Cook 21
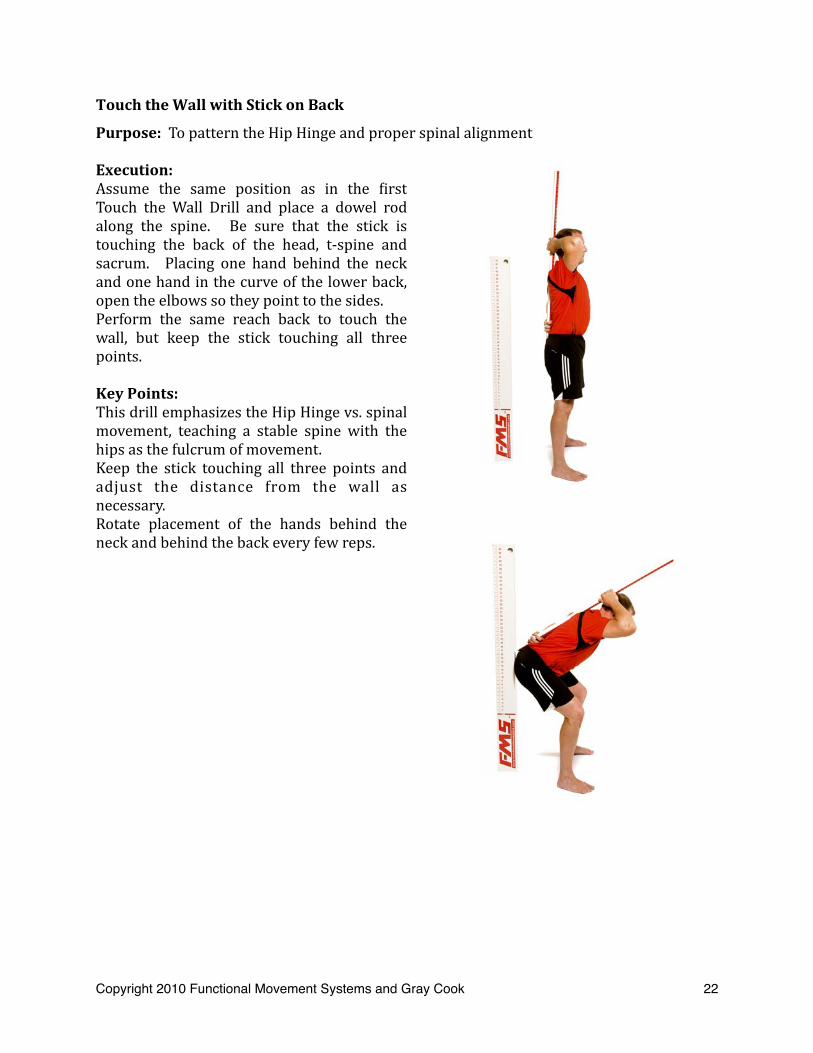
Touch the Wall with Stick on Back
Purpose: To pattern the Hip Hinge and proper spinal alignment
Execution:Assume the same position as in the Airst Touch the Wall Drill and place a dowel rod along the spine. Be sure that the stick is touching the back of the head, t‐spine and sacrum. Placing one hand behind the neck and one hand in the curve of the lower back, open the elbows so they point to the sides.Perform the same reach back to touch the wall, but keep the stick touching all three points.
Key Points:This drill emphasizes the Hip Hinge vs. spinal movement, teaching a stable spine with the hips as the fulcrum of movement.Keep the stick touching all three points and adjust the distance from the wall as necessary.Rotate placement of the hands behind the neck and behind the back every few reps.
Copyright 2010 Functional Movement Systems and Gray Cook 22
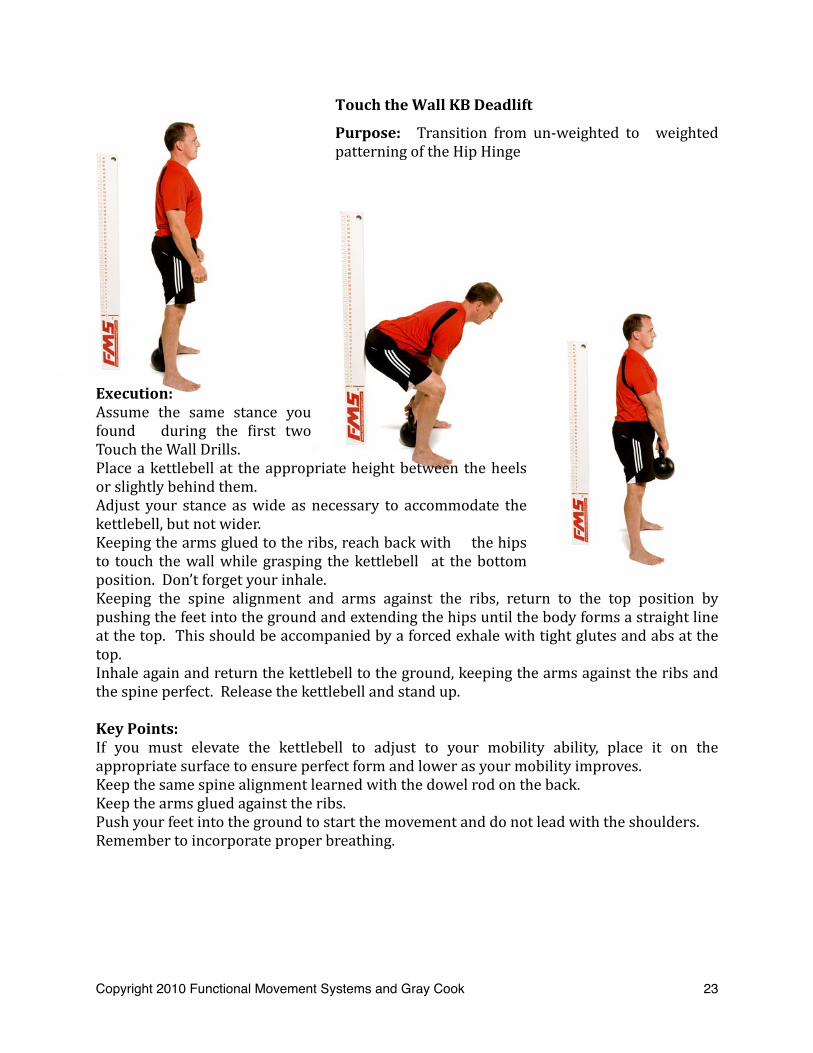
Touch the Wall KB Deadlift
Purpose: Transition from un‐weighted to weighted patterning of the Hip Hinge
Execution:Assume the same stance you found during the Airst two Touch the Wall Drills.Place a kettlebell at the appropriate height between the heels or slightly behind them.Adjust your stance as wide as necessary to accommodate the kettlebell, but not wider.Keeping the arms glued to the ribs, reach back with the hips to touch the wall while grasping the kettlebell at the bottom position. Don’t forget your inhale.Keeping the spine alignment and arms against the ribs, return to the top position by pushing the feet into the ground and extending the hips until the body forms a straight line at the top. This should be accompanied by a forced exhale with tight glutes and abs at the top.Inhale again and return the kettlebell to the ground, keeping the arms against the ribs and the spine perfect. Release the kettlebell and stand up.
Key Points:If you must elevate the kettlebell to adjust to your mobility ability, place it on the appropriate surface to ensure perfect form and lower as your mobility improves.Keep the same spine alignment learned with the dowel rod on the back.Keep the arms glued against the ribs.Push your feet into the ground to start the movement and do not lead with the shoulders.Remember to incorporate proper breathing.
Copyright 2010 Functional Movement Systems and Gray Cook 23

“Good Morning” Touch Wall with KB Behind the Neck
Purpose: To feel the loading of the hips with an elevated Center of Gravity
Execution:Assume the starting position for the Touch the Wall Drill and place a kettlebell behind the neck at the top of the spine.Perform the same Hip Hinge to reach back and touch the wall and return to the starting position.Incorporate your breathing.
Key Points:This drill is only used if you have trouble feeling the loading of the hips in the Touch the Wall Deadlift.Keep perfect spine alignment.Only perform as many reps as necessary to feel the loading of the hips.
Copyright 2010 Functional Movement Systems and Gray Cook 24
Slow Strength The Deadlift
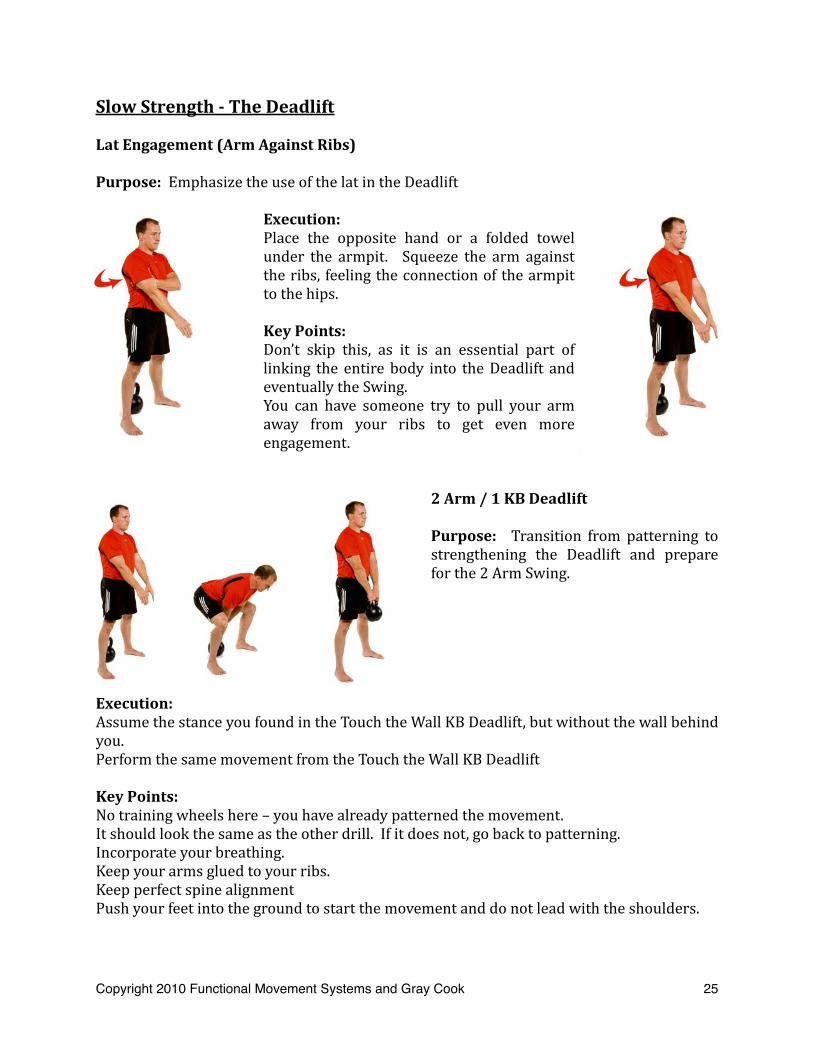
Lat Engagement (Arm Against Ribs)
Purpose: Emphasize the use of the lat in the Deadlift
Execution:Place the opposite hand or a folded towel under the armpit. Squeeze the arm against the ribs, feeling the connection of the armpit to the hips.
Key Points:Don’t skip this, as it is an essential part of linking the entire body into the Deadlift and eventually the Swing.You can have someone try to pull your arm away from your ribs to get even more engagement.
2 Arm / 1 KB Deadlift
Purpose: Transition from patterning to strengthening the Deadlift and prepare for the 2 Arm Swing.
Execution:Assume the stance you found in the Touch the Wall KB Deadlift, but without the wall behind you.Perform the same movement from the Touch the Wall KB Deadlift
Key Points:No training wheels here – you have already patterned the movement. It should look the same as the other drill. If it does not, go back to patterning.Incorporate your breathing.Keep your arms glued to your ribs.Keep perfect spine alignmentPush your feet into the ground to start the movement and do not lead with the shoulders.
Copyright 2010 Functional Movement Systems and Gray Cook 25
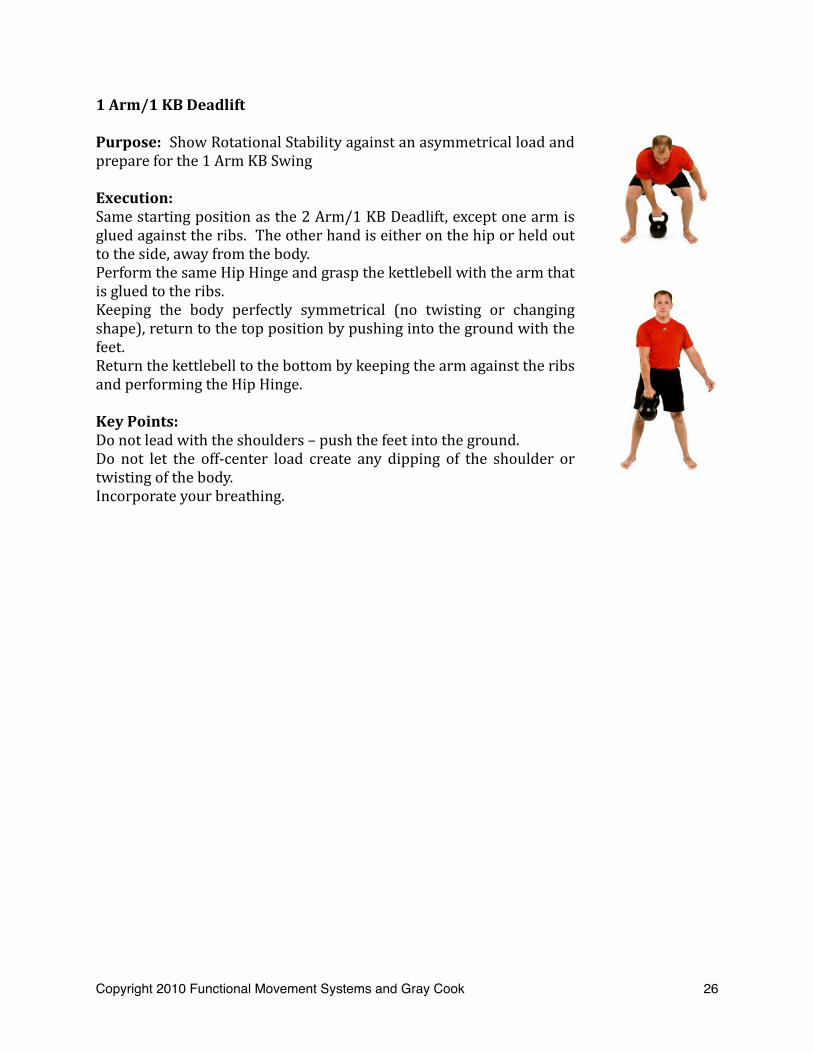
1 Arm/1 KB Deadlift
Purpose: Show Rotational Stability against an asymmetrical load and prepare for the 1 Arm KB Swing
Execution:Same starting position as the 2 Arm/1 KB Deadlift, except one arm is glued against the ribs. The other hand is either on the hip or held out to the side, away from the body.Perform the same Hip Hinge and grasp the kettlebell with the arm that is glued to the ribs. Keeping the body perfectly symmetrical (no twisting or changing shape), return to the top position by pushing into the ground with the feet.Return the kettlebell to the bottom by keeping the arm against the ribs and performing the Hip Hinge.
Key Points:Do not lead with the shoulders – push the feet into the ground.Do not let the off‐center load create any dipping of the shoulder or twisting of the body.Incorporate your breathing.
Copyright 2010 Functional Movement Systems and Gray Cook 26

2 KB Deadlift
Purpose: Increase the load of the Deadlift to cement the perfect Hip Hinge Deadlift form.
Execution:Assume a stance wide enough to allow for the two kettlebells, but no wider.Place the kettlebells even with or slightly behind your heels.
Glue the arms against the ribs and perform the Hip Hinge, grasping the kettlebells at the bottom.Keeping perfect spine alignment, push into the ground and extend the hips to form a straight line with the body at the top.Return the kettlebells to the bottom, reversing the Hip Hinge.
Key Points:Do not lead with the shoulders to pull the kettlebells up, but rather push into the ground with the feet.Keep perfect spine alignment.Incorporate your breathing.This is where things get heavy, so until this is perfect, you are not ready to Swing.
Copyright 2010 Functional Movement Systems and Gray Cook 27
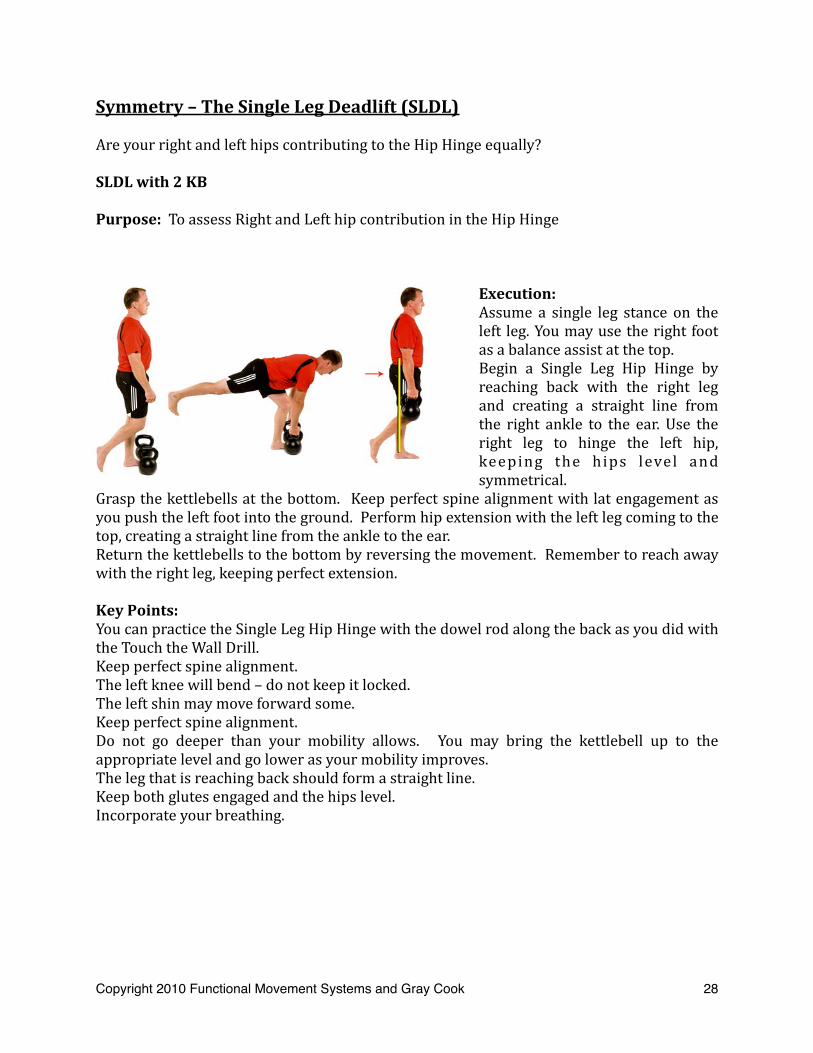
Symmetry – The Single Leg Deadlift (SLDL)
Are your right and left hips contributing to the Hip Hinge equally?
SLDL with 2 KB
Purpose: To assess Right and Left hip contribution in the Hip Hinge
Execution:Assume a single leg stance on the left leg. You may use the right foot as a balance assist at the top.Begin a Single Leg Hip Hinge by reaching back with the right leg and creating a straight line from the right ankle to the ear. Use the right leg to hinge the left hip, keeping the hips level and symmetrical.
Grasp the kettlebells at the bottom. Keep perfect spine alignment with lat engagement as you push the left foot into the ground. Perform hip extension with the left leg coming to the top, creating a straight line from the ankle to the ear.Return the kettlebells to the bottom by reversing the movement. Remember to reach away with the right leg, keeping perfect extension. Key Points:You can practice the Single Leg Hip Hinge with the dowel rod along the back as you did with the Touch the Wall Drill.Keep perfect spine alignment.The left knee will bend – do not keep it locked.The left shin may move forward some.Keep perfect spine alignment.Do not go deeper than your mobility allows. You may bring the kettlebell up to the appropriate level and go lower as your mobility improves.The leg that is reaching back should form a straight line. Keep both glutes engaged and the hips level.Incorporate your breathing.
Copyright 2010 Functional Movement Systems and Gray Cook 28

½ Way SLDL with 2 KB
Key Points:Notice here that you cannot tell if this is on the assent or decent of the movement.Note the extension of the “back” leg and the straight line up from the ankle to the ear.Note the position of the kettlebells with the lats engaged the kettlebells are in line with the shoulders and will come to rest aligned with the arch of the stance foot.
SLDL 1 KB Contralateral
Purpose: Assess right and left contribution to the Hip Hinge under an asymmetrical load
Execution:Assume the same starting position as you did for the SLDL with 2 KB, but place one kettlebell to the inside of the stance foot (up by the toes).Perform the same Single Leg Hip Hinge by reaching back with the right leg.All tips on alignment given for the SLDL with 2 KB apply.Do not allow the asymmetrical load to create any twisting in the spine or hips.The shoulders and hips should remain perfectly level and symmetrical.
Key Points:Keep perfect spine alignment.The left knee will bend – do not keep it locked.The left shin may move forward some.Keep perfect spine alignment.Do not go deeper than your mobility allows. You may bring the kettlebell up to the appropriate level and go lower as your mobility improves.The leg that is reaching back should form a straight line. Keep both glutes engaged and the hips level.Incorporate your breathing.
Copyright 2010 Functional Movement Systems and Gray Cook 29
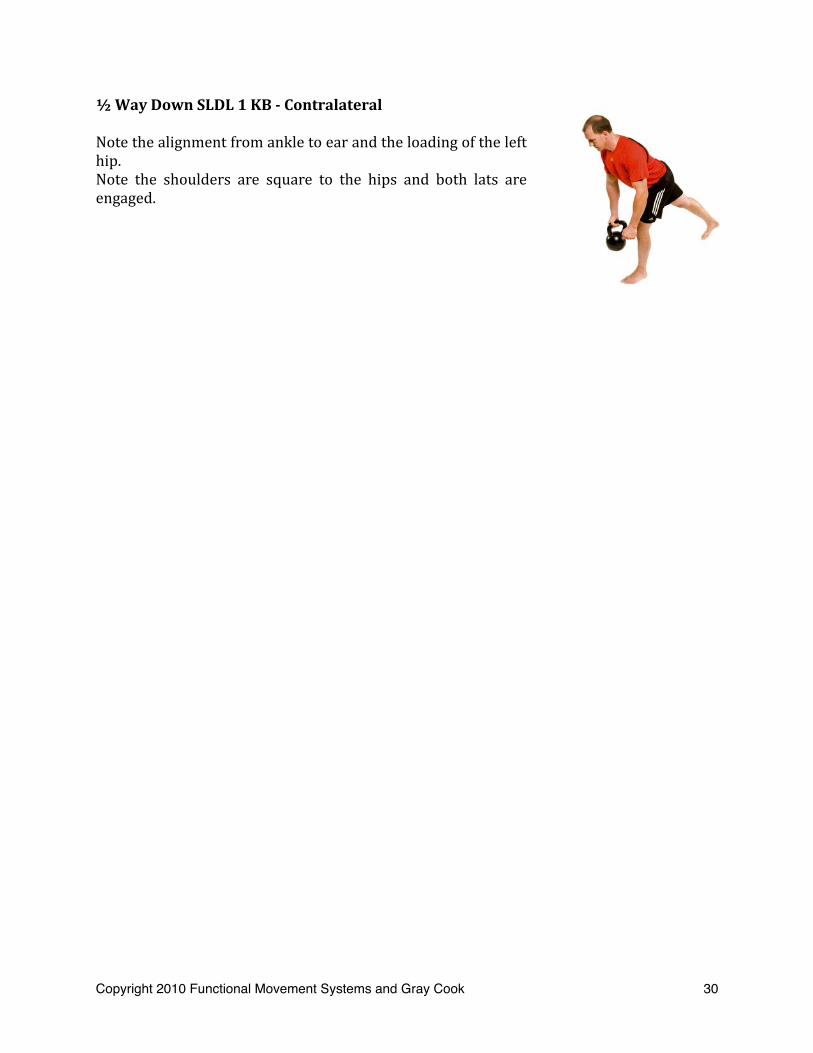
½ Way Down SLDL 1 KB Contralateral
Note the alignment from ankle to ear and the loading of the left hip.Note the shoulders are square to the hips and both lats are engaged.
Copyright 2010 Functional Movement Systems and Gray Cook 30

Dynami – The Swing
Transition from patterning and slow strength to speed and power.
Towel Swing
Purpose: The Towe l Sw ing disconnects you from the kettlebell, allowing you to feel and see the action of the Swing. The kettlebell should pull straight away on the towel at all times in a smooth motion.
There should not be any jerking, and the kettlebell should not hang down. This shows that it is being lifted with the arms.
Execution: Assume the same stance as you did for the 2 Arm/1 KB Deadlift, except now the kettlebell is set a foot or more in front of you with the towel threaded through the handle. Your perfect Deadlift position does not change!Grasp one side of the towel in each hand about one inch or so from the handle. DO NOT grab the very end of the towel. Your grip should be close to the handle. (Your Aloor, pets and possessions will thank you.) Once in the starting position, begin the Towel Swing with a sharp inhale through the nose. Hike the kettlebell back between the legs so that the upper arms are against the ribs, the forearms go high in the groin, and the kettlebell projects straight away behind you. The kettlebell should not point to the ground.At the moment of greatest load, perform an aggressive hip extension, keeping the arms against the ribs for as long as possible, do not lead with the shoulders, but rather push into the ground with the feet.Bring the hips through until the body forms one straight line from ear to ankle. Clench the glutes and abs tight at the top of the Swing and get some air knocked out (exhale under pressure).The kettlebell and your arms should form another straight line at the top of the Swing.As the kettlebell begins to fall back down, bring the upper arms against the ribs. Perform your Hip Hinge, catching the kettlebell at the bottom position again before extending the hips and returning to the top.
Copyright 2010 Functional Movement Systems and Gray Cook 31
Key Points:The Hip Hinge, spine alignment, and Ainish position are the same as in the Deadlift. This move is just happening at a much higher speed.Keep your arms glued to your ribs as much as possible. They will come off the ribs at the very Ainish of the hip extension, but reconnect them as soon as possible.Keep your forearms high in the groin during the hike. Be sure to keep the center of mass of the kettlebell as close to your center of mass at all times.This means the shoulders are stable and connected during the Swing as well. Do not let the kettlebell pull your shoulders forward – keep the armpits tight.There is a rhythm to the Swing. There will be a brief pause as you hold the top position, before the kettlebell begins to come back down and you re‐hike the kettlebell.Don’t rush the movement. The kettlebell catch at the bottom and the hip pop to the top are quick, but don’t lose the pause at the top.Drive the centers of the feet into the ground and stay centered on the feet. Do not rock forward to the toes or back to the heels.Trust your hips and do not try to lift the kettlebell with the shoulders. There should be a delay between the full extension of the hips and the kettlebell reaching the top. If there is no delay, you are not using your hips efAiciently.Do not lean back at the top.Coordinate your breathing biomechanically. Inhale at the bottom and get some air forced out at the top.DO NOT try to swing high on the Airst rep. Begin by swinging at belly‐button level and then add height as your hips allow until you’ve reached chest level.When you have completed the desired number of reps (or the number of reps that could be completed perfectly), DO NOT just quit on the exercise. You are not Ainished until the kettlebell is safely placed on the Aloor. Stay in your perfect Hip Hinge Position until the kettlebell can be safely put down. DO NOT round your back and just quit!
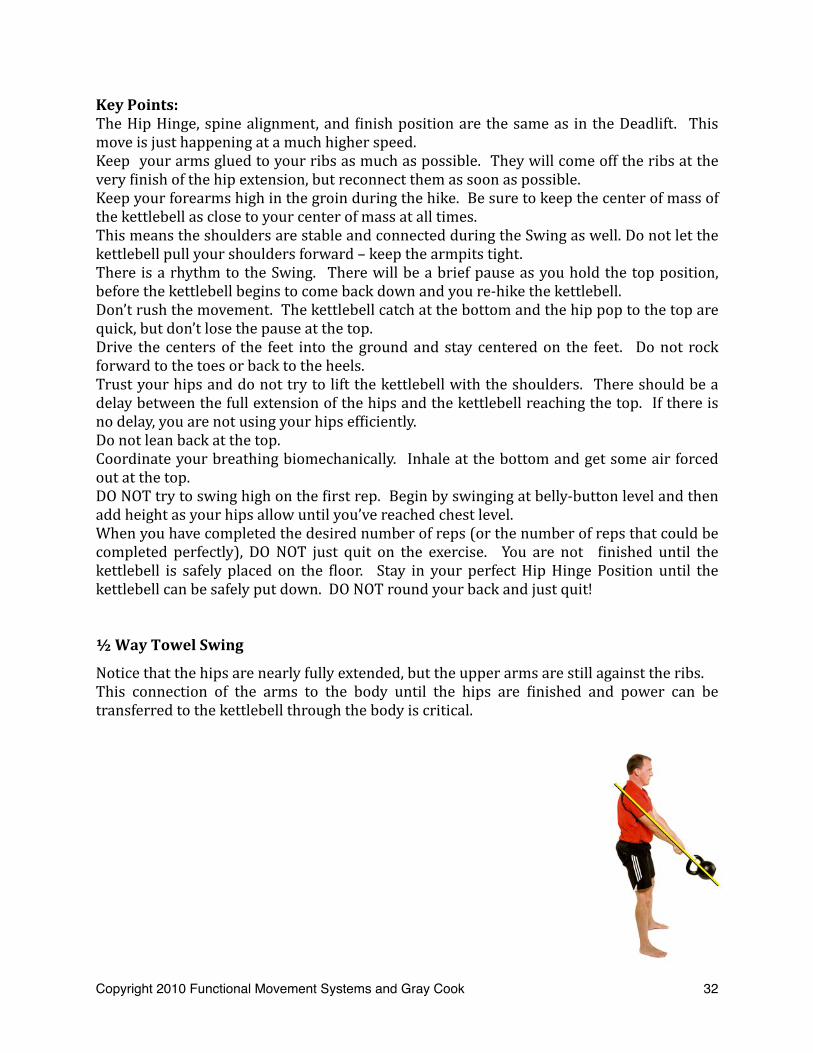
½ Way Towel Swing
Notice that the hips are nearly fully extended, but the upper arms are still against the ribs.This connection of the arms to the body until the hips are Ainished and power can be transferred to the kettlebell through the body is critical.
Copyright 2010 Functional Movement Systems and Gray Cook 32

2 Arm Swing
Purpose: In the Towel Swing, you learned to not lift with the arms and the rhythm of the Swing. Now achieve that same feel without the towel.
Execution:All tips for execution and key points (except those pertaining to the towel) apply.Assume your perfect Hip Hinge Posture with the kettlebell a few inches in front of the toes (your distance will vary based on your build and mobility) and grasp the kettlebell handle with both hands.Begin by taking a sharp sniff in through the nose and hike the kettlebell back between the legs. Your upper arms should be against the ribs and your forearms high in the groin.The kettlebell will project straight away behind you.Once the hips are loaded, perform an aggressive hip extension by pushing down into the ground with the feet. Do not lead with the shoulders.Finish the hips fully, bringing the body through to a straight line from ear to ankle with the glutes and abs clenched at the top. Get some air knocked out of you with a forced exhale.Do not lean back at the top.The shoulders stay connected throughout the swing.At the top, the kettlebell and arms form a straight line.DO NOT try to swing high on the Airst rep. Begin by swinging at belly‐button level and then add height as your hips allow until you’ve reached chest level.As the kettlebell begins to fall back down, return the upper arms to the ribs and hike the kettlebell back between the legs. Repeat the sequence for the desired number of reps.
Key Points:All alignment cues from deadlifting apply – spine perfect, neck in alignment.Remember all the key points from the Towel Swing and apply them here.Trust your hips and do not try to lift the kettlebell with the shoulders. There should be a delay between fully extending the hips and the kettlebell reaching the top. If there is no delay, you are not using your hips efAiciently.When you have completed the desired number of reps (or the number of reps that could be completed perfectly), DO NOT just quit on the exercise. You are not Ainished until the kettlebell is safely placed on the Aloor. Stay in your perfect Hip Hinge Position until the kettlebell can be safely put down. DO NOT round your back and just quit!
Copyright 2010 Functional Movement Systems and Gray Cook 33
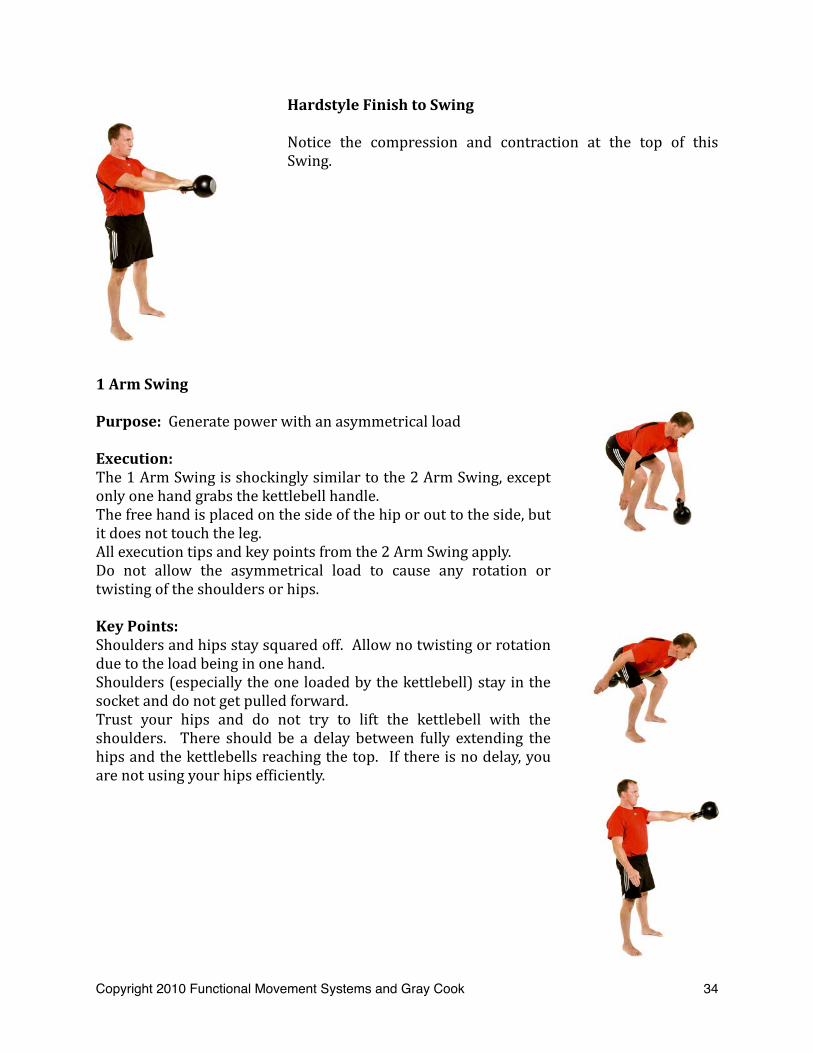
Hardstyle Finish to Swing
Notice the compression and contraction at the top of this Swing.
1 Arm Swing
Purpose: Generate power with an asymmetrical load
Execution:The 1 Arm Swing is shockingly similar to the 2 Arm Swing, except only one hand grabs the kettlebell handle.The free hand is placed on the side of the hip or out to the side, but it does not touch the leg.All execution tips and key points from the 2 Arm Swing apply.Do not allow the asymmetrical load to cause any rotation or twisting of the shoulders or hips.
Key Points:Shoulders and hips stay squared off. Allow no twisting or rotation due to the load being in one hand.Shoulders (especially the one loaded by the kettlebell) stay in the socket and do not get pulled forward.Trust your hips and do not try to lift the kettlebell with the shoulders. There should be a delay between fully extending the hips and the kettlebells reaching the top. If there is no delay, you are not using your hips efAiciently.
Copyright 2010 Functional Movement Systems and Gray Cook 34
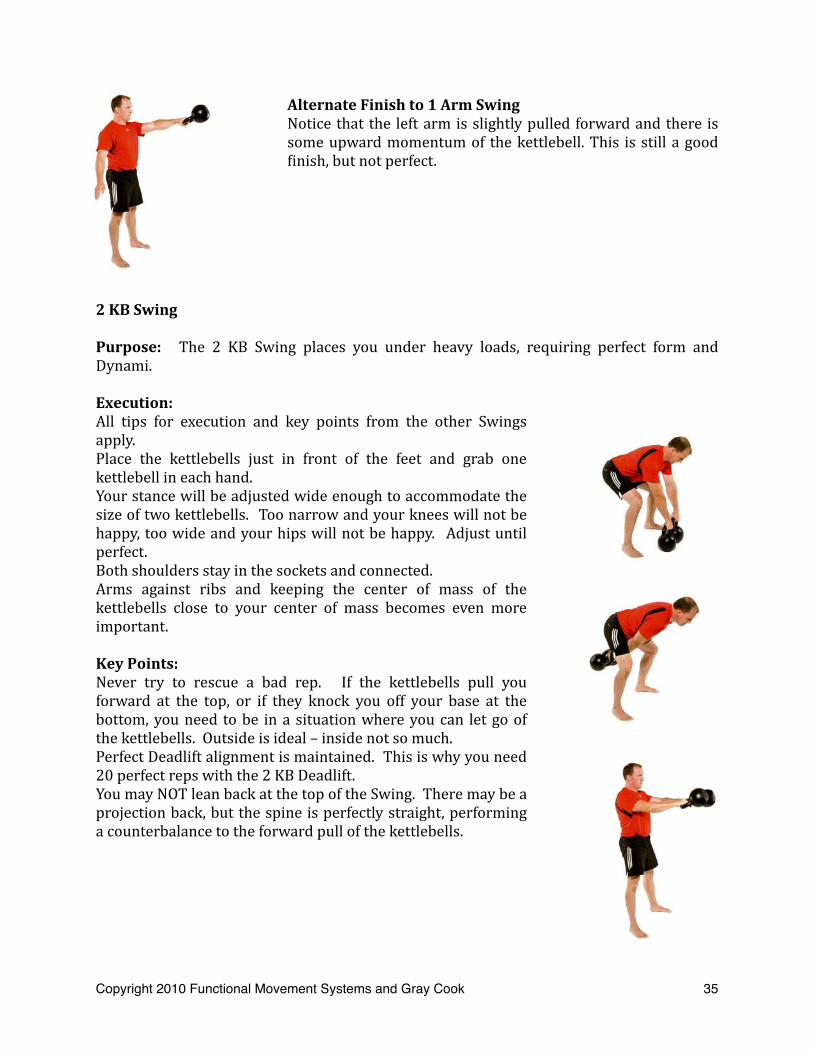
Alternate Finish to 1 Arm Swing Notice that the left arm is slightly pulled forward and there is some upward momentum of the kettlebell. This is still a good Ainish, but not perfect.
2 KB Swing
Purpose: The 2 KB Swing places you under heavy loads, requiring perfect form and Dynami.
Execution:All tips for execution and key points from the other Swings apply.Place the kettlebells just in front of the feet and grab one kettlebell in each hand.Your stance will be adjusted wide enough to accommodate the size of two kettlebells. Too narrow and your knees will not be happy, too wide and your hips will not be happy. Adjust until perfect.Both shoulders stay in the sockets and connected.Arms against ribs and keeping the center of mass of the kettlebells close to your center of mass becomes even more important. Key Points:Never try to rescue a bad rep. If the kettlebells pull you forward at the top, or if they knock you off your base at the bottom, you need to be in a situation where you can let go of the kettlebells. Outside is ideal – inside not so much.Perfect Deadlift alignment is maintained. This is why you need 20 perfect reps with the 2 KB Deadlift.You may NOT lean back at the top of the Swing. There may be a projection back, but the spine is perfectly straight, performing a counterbalance to the forward pull of the kettlebells.
Copyright 2010 Functional Movement Systems and Gray Cook 35
You must drive your feet into the ground and stay grounded. Remember to drive through the center of the foot, and do not lead with the shoulders.Trust your hips and do not try to lift the kettlebells with the shoulders. There should be a delay between fully extending the hips and the kettlebells reaching the top. If there is no delay, you are not using your hips efAiciently.
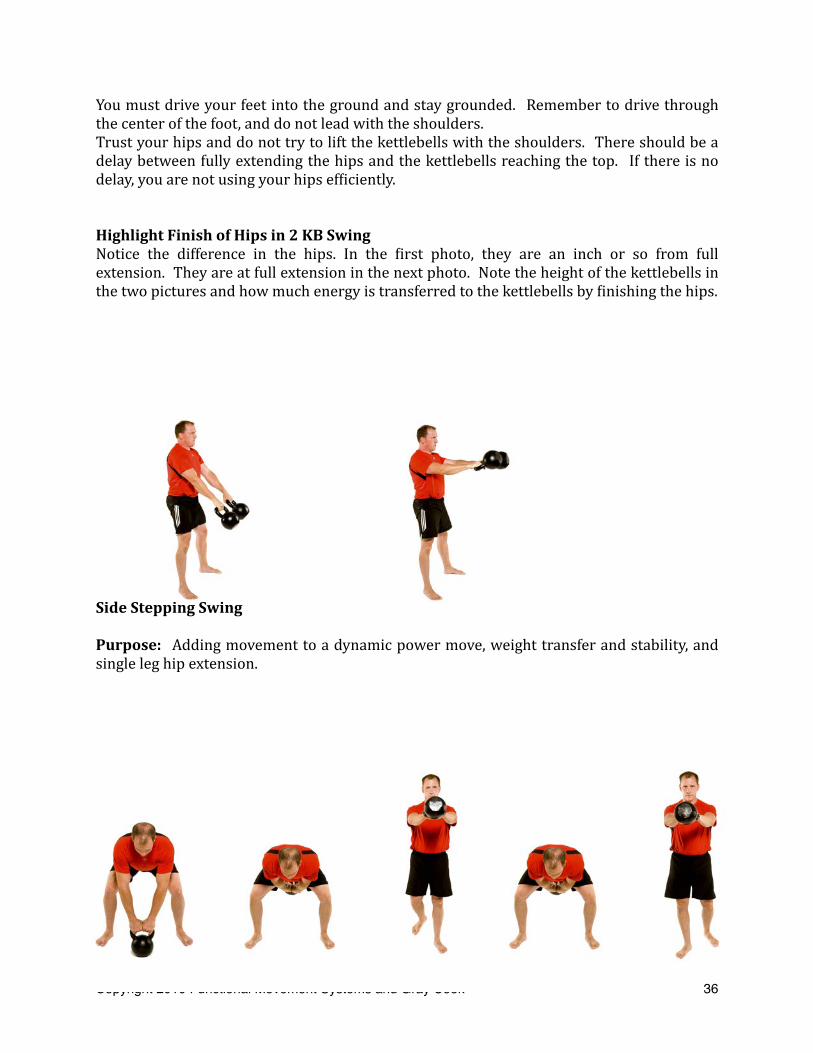
Highlight Finish of Hips in 2 KB SwingNotice the difference in the hips. In the Airst photo, they are an inch or so from full extension. They are at full extension in the next photo. Note the height of the kettlebells in the two pictures and how much energy is transferred to the kettlebells by Ainishing the hips.
Side Stepping Swing
Purpose: Adding movement to a dynamic power move, weight transfer and stability, and single leg hip extension.
Copyright 2010 Functional Movement Systems and Gray Cook 36

Execution:Assume the same starting position as the 2 Arm KB Swing.Begin by hiking the kettlebell back appropriately.As you are performing the hip extension, shift your weight to the left foot (un‐weighting the right foot) and achieve full hip extension on both hips (even though you are on one foot and do not twist or lose alignment).As the kettlebell is coming back down, get the arms against the ribs and step out with the right leg to return to the start position as you hike the kettlebell back.Once at the bottom of the hike, begin your hip extension again. But this time, shift your weight to the right foot (eventually un‐weighting the left foot) and achieve full hip extension on both hips (even though you are on one leg).Repeat for the desired number of reps, then return to the start position and safely place the kettlebell on the Aloor.
Key Points:It is HIGHLY recommended that your feet be apart when the kettlebell comes back down to the hike position.Again, there is a rhythm to this Swing variation.Do not step too far apart when returning to the hike position between reps.Take your time and build up the power on this move. Start low and easy to get a feel for the rhythm and timing.Incorporate your breathing and remember that all cues from the other Swings apply even if you are in movement and on one leg.
Common Mistakes in the Swing
Hyperextension of Neck
While some neck extension is allowable, it should not result in hyperextension (as shown) or the bobble‐head effect of bouncing the neck in and out of the straight position at the top and the hyperextended position at the bottom. Remember the spine alignment taught by the dowel rod along the back. That included the neck as neutral as well.
Copyright 2010 Functional Movement Systems and Gray Cook 37
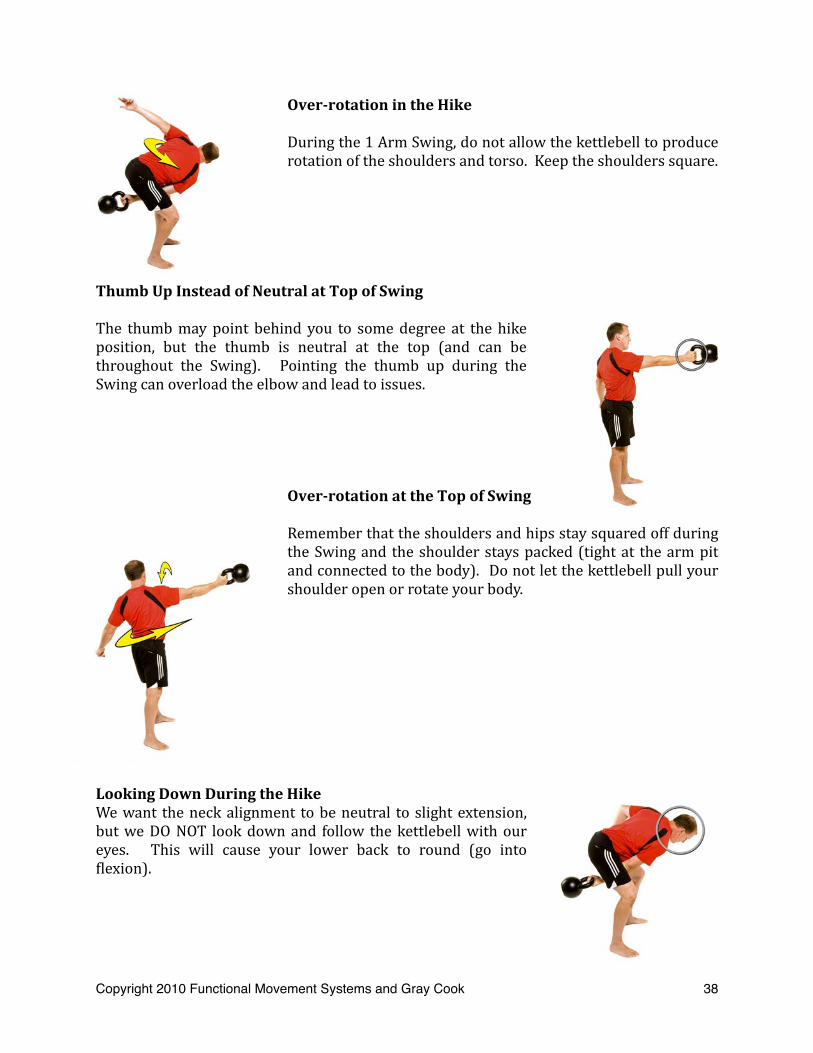
Overrotation in the Hike
During the 1 Arm Swing, do not allow the kettlebell to produce rotation of the shoulders and torso. Keep the shoulders square.
Thumb Up Instead of Neutral at Top of Swing
The thumb may point behind you to some degree at the hike position, but the thumb is neutral at the top (and can be throughout the Swing). Pointing the thumb up during the Swing can overload the elbow and lead to issues.
Overrotation at the Top of Swing
Remember that the shoulders and hips stay squared off during the Swing and the shoulder stays packed (tight at the arm pit and connected to the body). Do not let the kettlebell pull your shoulder open or rotate your body.
Looking Down During the HikeWe want the neck alignment to be neutral to slight extension, but we DO NOT look down and follow the kettlebell with our eyes. This will cause your lower back to round (go into Alexion).
Copyright 2010 Functional Movement Systems and Gray Cook 38
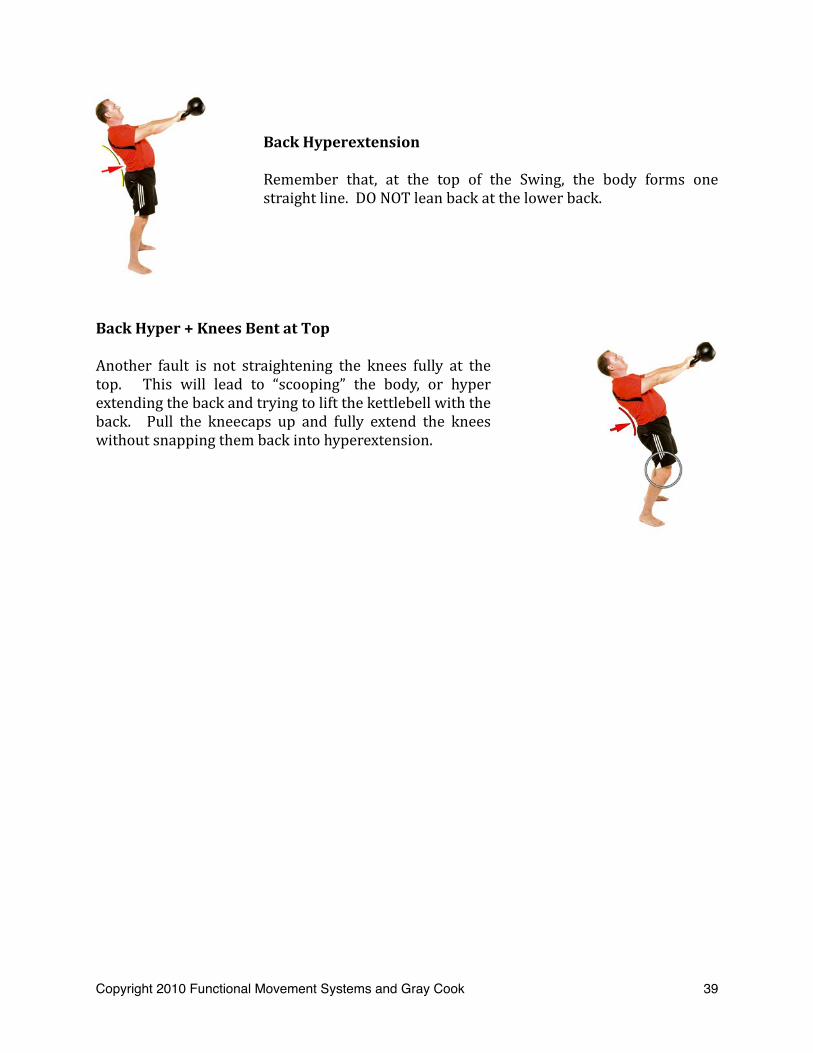
Back Hyperextension
Remember that, at the top of the Swing, the body forms one straight line. DO NOT lean back at the lower back.
Back Hyper + Knees Bent at Top
Another fault is not straightening the knees fully at the top. This will lead to “scooping” the body, or hyper extending the back and trying to lift the kettlebell with the back. Pull the kneecaps up and fully extend the knees without snapping them back into hyperextension.
Copyright 2010 Functional Movement Systems and Gray Cook 39

Coach’s Corner Patterning the Hip Hinge
Intent changes, principles don’t. Adding Dynami to a movement might slightly change the motion and expression of strength, but not the movement pattern. Note the commonality of the 3 photo’s. There is a difference of intended action of each, but they are all expressions of a Hip Hinge Pattern. There might be a slightly different joint angle in a Swing or Deadlift, because it is a slightly different motion, but the important things like neutral spine and moving from the hips rather than the knees always remain the same.
Coach’s Corner – Slow Strength – Deadlift
The lats aren’t the only thing that connect the shoulders to the core, but they are the upper body “super-muscle” that, when functioning properly will dramatically impact physical performance and improve shoulder and back health. Keeping the elbows locked and pressing them into the ribs will help you learn to engage the lats. These are critical cues when learning to perform a KB Swing. Although the elbows breaking contact with the ribs at the top of the Swing doesn’t necessarily mean the shoulders became disconnected, the intent to keep them “glued” down will help ensure that they don’t.
These subtle internalizations within an exercise are the difference between training and working out. Training is an activity that is performed with the intent to improve performance. Working out is a social activity.
Copyright 2010 Functional Movement Systems and Gray Cook 40
Now, just as the lats are the upper body “super-muscle” the glutes are the biggest difference maker in the lower body. “Gluteal Amnesia” (McGill) goes hand in hand with low back pain. If the glutes aren’t working to extend your hips when you run, jump, lift, etc., then more than likely your lumbar spine is hyperextending to compensate. From a health and performance standpoint this is a less than optimal movement pattern.
So, when we Hip Hinge, we want the spine to remain neutral and movement to come from the hips and shoulders without them “disconnecting” from the core. It may sound complicated, but it’s mostly a matter of getting out of your own way and allowing your body to work the way it’s designed to. For optimum performance the force directed into the ground needs to be transmitted through the body with as little interference as possible. And, as much as it might hurt, it has to be accepted that “isolation” movements like Crunches, Lat Pulldowns, and Leg Extensions can cause these interferences by destroying posture, reflexive stabilization, and coordination.
Even the most basic study of anatomy makes it apparent that nothing in the body stands alone. Everything is inter-related. Some things, however, have a much more direct connection than others. The lats and glutes fall into this category. Following the “Anatomy Train” (Myers) allows you to see that each lat “becomes” the opposite glute and vice versa. So the very act of “gluing the lats to the ribs” and “clenching the glutes” not only uses this connection to link the hips and shoulders together, but trains the body in it’s natural design rather than a as collection of body parts.
Using the cues that you’ve been given will help you to utilize the power of your super-muscles to find your true power and athleticism.
Lat Engagement, Head/Eye Position, Spine Alignment and Shin Angle
All parallel lines are approximate. Allowances can and should be made for individual structure along with current strength and flexibility levels. However, if in your Deadlift stance your hip to shoulder line isn’t straight and your shin and upper arm lines aren’t close to parallel then there is potentially a hip/torso/shoulder disconnect that is “leaking” power on your Deadlift. If it’s happening statically then you can be reasonably sure that it’s happening dynamically. It needs to be mentioned that we are referring to the KB Deadlift as it applies to both movement patterns and as a progression to the Swing. In a Barbell Deadlift, the shin/upper arm angle’s will change. However, everything else is constant. The lats are still engaged. Remember, the expression of strength might change, but the movement pattern doesn’t.
Copyright 2010 Functional Movement Systems and Gray Cook 41

Just as some allowances may be made for different bodies, they may be made for different training situations. Some examples of this would be things like bent elbows and shin angle. Your knees might bend slightly more or less than what Brett demonstrates here. That’s acceptable as long as they’re not forward of the toes, your spine remains neutral, once the concentric action begins there is no further flexion of the knees or ankles. Generally speaking, the less forward movement of the knee there is, the greater the glute and hamstring activity.
Although some very advanced trainees might, as a matter of preference, swing with bent elbows, this would usually indicate a shoulder restriction or disconnect in a newbie. However, in the case of very thick athletes like super heavyweight lifters or offensive linemen, the sheer girth of their legs and torso’s might be a limiting factor. If this is the case, 1 Arm or 2 KB Swings might be more appropriate. The important thing is the training effect of the shoulder, hip, and core connection. It’s not to fit everyone into a “cookie cutter” exercise model.
Another area of allowance is eye position. The eye positions demonstrated here are shown both as a teaching aide and to take advantage of certain neurological functions that may increase safety, strength and performance. Sometimes the eye movement up and down on the Deadlift and Swing create an overload and degrade the movement, if this is the case try a tip from Master instructor Geoff Neupert and “keep the eyes on the horizon”. Experiment and use what works best. Best is the one that makes the movement better, not necessarily the one you like.
Finally, neck position must be addressed. The neutral spine taught with the stick is great for beginners because most people don’t have reference point for moving from the hips and maintaining a stable torso. Also, there are indications that this neck position will allow the highest levels of force production in advanced strength athletes. Most of us, however, fall somewhere in between newbie and advanced, and the overall training effect must be considered.
Most athletes train to improve their sport, not just to be the best at exercise. And since the body adapts to whatever it does regularly, the eye and neck positions must be considered. For example, if a linebacker drops his eyes to the ground and keeps his cervical spine neutral when he hinges hips to make a tackle, nothing good can happen for him. Now, this might seem silly in most
Copyright 2010 Functional Movement Systems and Gray Cook 42

cases, and isn’t even worth consideration in some, but it must be remembered that under times of stress the body reverts to training. If this linebacker has hinged his hips thousands of times more for Swings than tackles....well, let’s hope for a missed tackle and not a neck injury.
If you’re teaching Swings to a professional linebacker, it probably wouldn’t be much of a concern, because his training to tackle should override his Swings. But, I train mostly kids, starting as young as 6. They’ve possibly performed thousands of Swings by the time they make their first tackle, and significantly more by the time they leave for college. This is all done while their nervous systems are the most plastic and open to suggestion. Because of this, I will normally encourage an “eyes up so you can see the play” not to be confused with “eyes to the sky” Swing. This brings their neck into the universal ready position. As Brett states in the video, some cervical extension is allowed, hyperextension should be avoided.
Because the head tries to maintain it’s relationship with the horizon, some extension is natural. But, because the nervous system is so complex, natural for you doesn’t necessarily mean more powerful, so consider your application and outcome. If you’re a beginner, blindly follow the DVD and manual. If you’re a powerlifter that performs a few sets of Swings for GPP (general physical preparedness) consider using the neck and eye position of your Deadlift or Squat but try all of the cues to see what works. But if you are (or train) an athlete like a football player or fighter, think about the long term effects of strength and conditioning on movement patterns and how it might affect sport. Please take note that I didn’t say anything about making a Swing sport specific. Don’t try it, it will only mess up the sport and conditioning. But as with anything else, think about what habits are developed and make sure they support the desired outcome.
Copyright 2010 Functional Movement Systems and Gray Cook 43

Coach’s Corner – Single Leg Deadlift (SLDL)
The hip flexion portion of the Deadlift isn’t passive. One common mistake is “bending over” instead of flexing the hips to reach the weight. Remember, the principles don’t change just because it’s one leg rather than two legged Deadlift. The body is designed so that extension of one hip facilitates flexion in the other. The intent to glue the elbows to the ribcage activates the lats which helps activate the glutes. The extension of the hip helps activate the lats. Are you seeing the pattern develop? This is what Brett means by “there are no small points”. Everything relates to everything. So if on the descent you “glue the elbows” and “reach for the wall with your heel” your body will do what it’s supposed to which is link the hips and shoulders to the core. I’m not sure if that’s been mentioned.
Note how much more stable and athletic Brett looks in the first picture. Everything matters when you’re training for a desired result. Not much does if you’re just spending time at the gym. If you don’t own it slowly, you won’t when it’s at game speed.
The SLDL is critical for developing and checking symmetry. If one side looks like the first picture and the other looks like the second but you insist on upping the intensity of your Swings and Deadlifts it is likely to show up sometime as injury. Sometimes it’s chronic, like that ache in your back that keeps you from training as often and hard as you like. And sometimes it’s a traumatic injury during a game.
Another consideration, is that if the movement is symmetrical when fresh, but the amount of weight or reps that you can perform differs from one side to another then one side will carry more load as fatigue sets in. To use Brett’s analogy, beefing up the engine without aligning the front end just allows for a more spectacular crash.
Copyright 2010 Functional Movement Systems and Gray Cook 44

Benecits of the SLDLIt is my contention that the Contralateral SLDL must be included in any program. From a general strength and conditioning standpoint, the body awareness and symmetry is critical for safety and performance. But from the standpoint of stride mechanics, this exercise is the best there is. Standing up on two legs to run is one of the biggest difference between us and all other members of the animal kingdom. It is quite simply what we are designed to do. The body is anatomically linked with facial “x’s” that support bipedal motion. These encourage energy absorption, storage, redirection and transfer. When one hip extends, it helps the other flex. But even more interesting is that it helps the opposite shoulder extend. The flexing hip flexes the opposite shoulder, ad infinitum.
When these x’s function properly in there strength/stability, tension/relaxation, and timing relationships you have a smooth and effective stride. So from a health standpoint, the more linkage and less leakage you have the better you’ll walk. This may not be a concern for most of you reading this, but go to a mall and watch people struggle to walk. Then go to a nursing home and watch people not walk. I’d bet most of those people didn’t think much about it either. There is no reason to lose our ability to ambulate with increased age. But it happens when the relationship of the x’s break down.
Now from the athletic standpoint, speed kills. I have never heard a coach say “we’re just too fast, let’s work on slowing down this off-season”. To run as fast as possible it stands to reason that having a smooth effective stride is pretty important. It’s obviously possible to run fast poorly, but you have to wonder what price is being paid for that ultra fast, galloping stride. Actually you don’t, the price is longevity. If the leg drive off of one leg is significantly different than the other, the stride length is different and energy is sent to unintended places. That must be compensated for to bring the force back to it’s target. That’s just wasted energy. If one arm is crossing the midline the same thing is happening. So as a coach, if you can help an athlete create a more symmetrical stride, it automatically will improve their endurance and reduce the risk of non-contact and/or chronic injury. This is very simply because there is less “bad” stress on the joints and the athlete isn’t expending unnecessary energy fighting there own disfunction. Those two things alone will allow the athlete to run more. Being able to practice more and better is a good start on getting faster. This can be done simply by patterning the movement. Once the athlete is symmetrical they can receive the true benefits of strength and conditioning. The better you move, the faster you’ll move and more importantly, the longer you’ll move.
Copyright 2010 Functional Movement Systems and Gray Cook 45

It makes no difference how perfect your program is or how hard you work if you’re hips and shoulders can’t remain linked to your core. If you’re not symmetrical you’re at best missing out on some of the performance you’re capable of and at worst, training for injury.
Coach’s Corner – Dynami – Swing
A properly performed Swing is a thing of beauty. Note the connection of the shoulder via the lats. The straight line of the shoulder elbow to the bell shows this connection. The Towel Swing allows you to see and correct power leakages.
It’s a great tool to teach connection without restriction. This is absolutely necessary to maximize longevity and performance.
The Swing should be smooth and powerful. Any rough or jerky movements are indicative of movement restrictions or power leakages. The breathing should be smooth, even, and match the force production.
Straight Line Finish of the Swing
The rhythmical action of the hips as they absorb, redirect and generate force is something every athlete needs.
The line from the shoulder, hip, knee, ankle ensures that the force is directed into the ground and not being leaked elsewhere. This is very much the same as jumping and the acceleration phase of running. When maximum force is applied to the ground, Newton’s 2nd Law comes into play. Because the earth is unlikely to move away from our feet, the force is redirected. Without interference, can be sent to our place of intent. When the right force is properly directed with correct timing, the result is power and speed.
Copyright 2010 Functional Movement Systems and Gray Cook 46
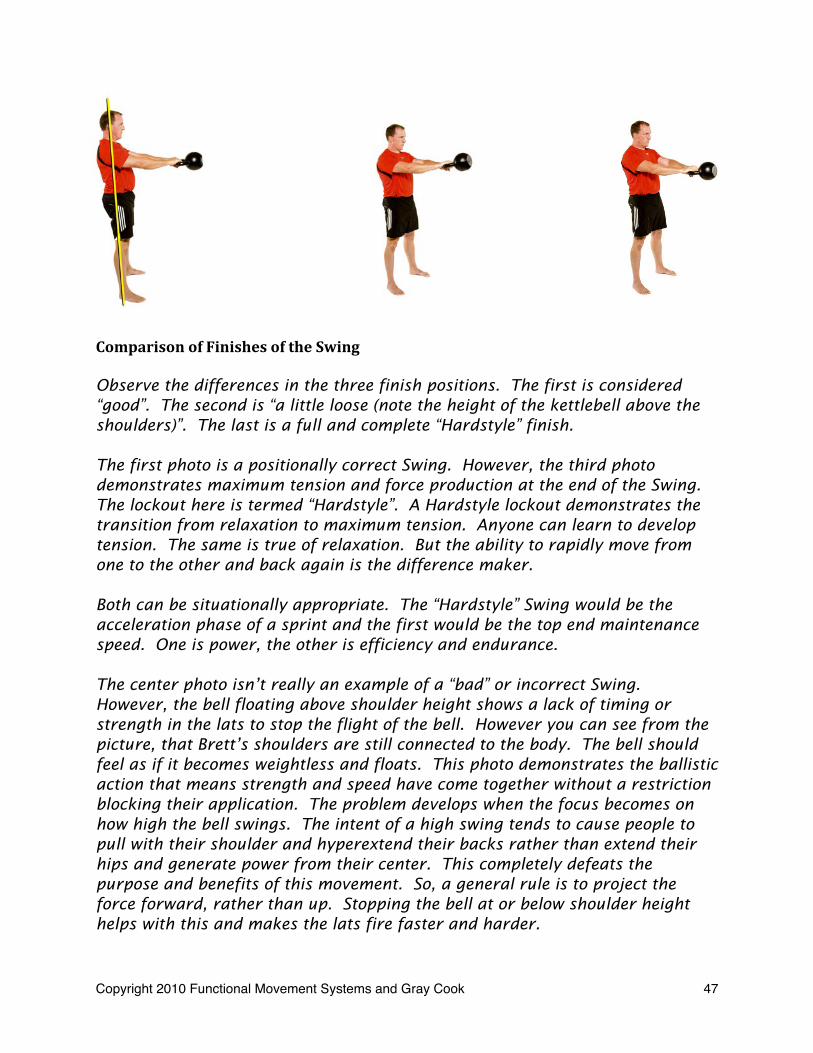
Comparison of Finishes of the Swing
Observe the differences in the three finish positions. The first is considered “good”. The second is “a little loose (note the height of the kettlebell above the shoulders)”. The last is a full and complete “Hardstyle” finish.
The first photo is a positionally correct Swing. However, the third photo demonstrates maximum tension and force production at the end of the Swing. The lockout here is termed “Hardstyle”. A Hardstyle lockout demonstrates the transition from relaxation to maximum tension. Anyone can learn to develop tension. The same is true of relaxation. But the ability to rapidly move from one to the other and back again is the difference maker.
Both can be situationally appropriate. The “Hardstyle” Swing would be the acceleration phase of a sprint and the first would be the top end maintenance speed. One is power, the other is efficiency and endurance.
The center photo isn’t really an example of a “bad” or incorrect Swing. However, the bell floating above shoulder height shows a lack of timing or strength in the lats to stop the flight of the bell. However you can see from the picture, that Brett’s shoulders are still connected to the body. The bell should feel as if it becomes weightless and floats. This photo demonstrates the ballistic action that means strength and speed have come together without a restriction blocking their application. The problem develops when the focus becomes on how high the bell swings. The intent of a high swing tends to cause people to pull with their shoulder and hyperextend their backs rather than extend their hips and generate power from their center. This completely defeats the purpose and benefits of this movement. So, a general rule is to project the force forward, rather than up. Stopping the bell at or below shoulder height helps with this and makes the lats fire faster and harder.
Copyright 2010 Functional Movement Systems and Gray Cook 47
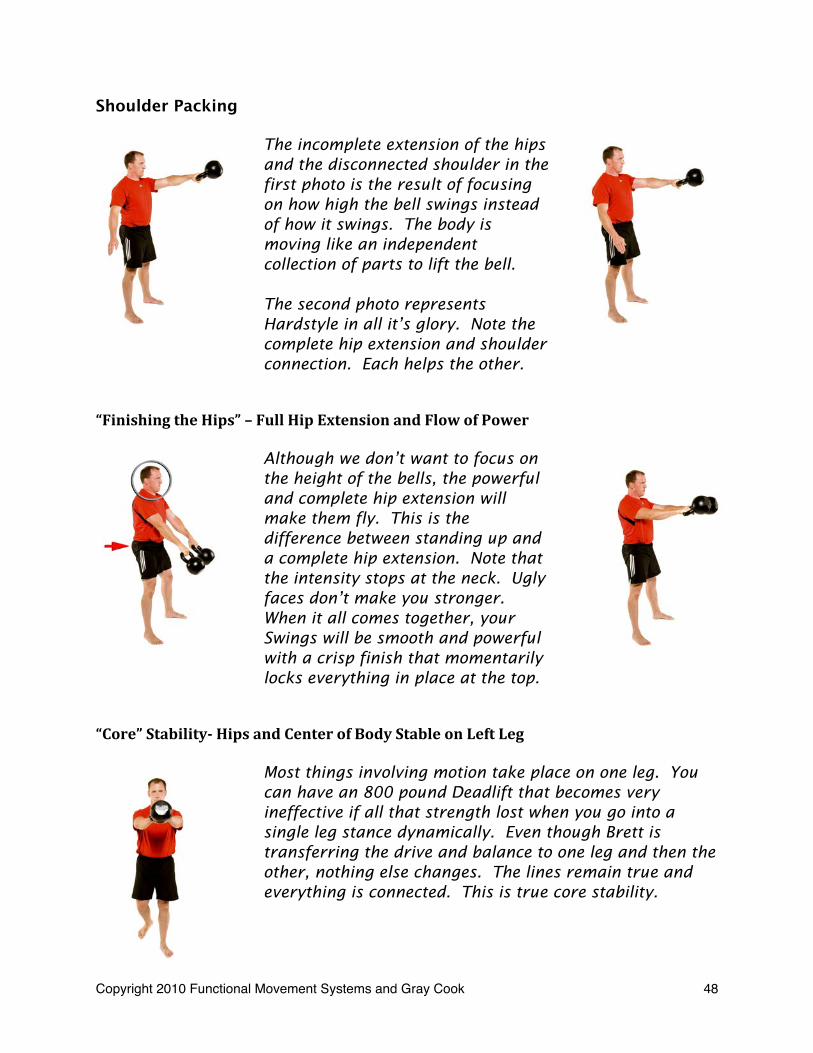
Shoulder Packing
The incomplete extension of the hips and the disconnected shoulder in the first photo is the result of focusing on how high the bell swings instead of how it swings. The body is moving like an independent collection of parts to lift the bell.
The second photo represents Hardstyle in all it’s glory. Note the complete hip extension and shoulder connection. Each helps the other.
“Finishing the Hips” – Full Hip Extension and Flow of Power
Although we don’t want to focus on the height of the bells, the powerful and complete hip extension will make them fly. This is the difference between standing up and a complete hip extension. Note that the intensity stops at the neck. Ugly faces don’t make you stronger. When it all comes together, your Swings will be smooth and powerful with a crisp finish that momentarily locks everything in place at the top.
“Core” Stability Hips and Center of Body Stable on Left Leg
Most things involving motion take place on one leg. You can have an 800 pound Deadlift that becomes very ineffective if all that strength lost when you go into a single leg stance dynamically. Even though Brett is transferring the drive and balance to one leg and then the other, nothing else changes. The lines remain true and everything is connected. This is true core stability.
Copyright 2010 Functional Movement Systems and Gray Cook 48
The Squat
Perhaps one of the most contentious exercises of our day, the Squat is considered everything from the panacea to all an athletic needs or the worst exercise of them all. Whatever your stance on the Squat (pun intended), it is what we consider an essential movement pattern. It is a movement that we screen in the Functional Movement Screen, but here we are going to assume your screen is clear and that you are ready to exercise.
The Squat section will again start with movements designed to pattern the correct Squat for you. To quote Dan John, “Squats don’t hurt your knees. The way you squat hurts your knees.” So approach the pattern building as a way to ensure a perfect pattern to load.
There are several aspects of squatting that will be highlighted:1) Spine Position2) Open the Hips3) Quad Dominance and Pelvis Position4) They Don’t Allow Training Wheels in NASCAR5) Screening vs. Exercise6) Squat Rack vs. Mobility7) Train the Deadlift – Pattern your Squat8) Depth of the Squat 9) Don’t Shoot your Hips10) Pulling Yourself into the Squat11) Symmetry in Your Squat
Spine PositionDr. Stu McGill has correctly identiAied Alexion of the lumbar spine as a risk factor and cause of lower back injury and pain. (See his book “Ultimate Back Health and Performance” for more information.) During the Squat, rounding of the lower back can be a factor, especially when the hips lack mobility and you don’t learn to pattern the squat correctly. When Dan John, (danjohn.net) an RKC from Utah, brought the Goblet Squat to our attention, we recognized it as a means to quickly and safely teach the Squat.
Notice in the pictures (starting on page 54) of the Goblet Squat how straight and extended my spine is kept. Take your time to learn this spine extension, and your back will thank you.
Copyright 2010 Functional Movement Systems and Gray Cook 49

Open the HipsBelieve it or not, there is great space available in your body. Pavel (in his book “Relax Into Stretch”) introduces the concept of Ainding space in the body, and the hips are an ideal example of this. During your Squat, you want to actively try to Aind space in your hips and literally open them up. Open hips have the ability to squat well. Open hips will align well with the knee and foot, and not create angles that place stress on the joints. You can literally “run into yourself” and impinge your hip joints if you do not open them up. Pay attention to my hips during the video and in the pictures.
Quad Dominance and Pelvis PositionWe sit a lot. I mean a lot. One‐to two‐hour commutes in a car. Eight hours behind a desk. You can add three to four hours of television a night to the tally. Then we sleep for 6‐8 hours a night. Not much of the day extends our hips and opens our body, and we therefore end up in a situation of quad dominance and an anterior tilted pelvis. And this is not good for your Squats, or your knees, or your back…and it doesn’t do wonders for your appearance, either.
Your quads are the front thigh muscles, but one of them crosses the hip joint, and the quads as a group are more than happy to take over when allowed. Take over what, you ask? Well, in Vladamir Janda’s Lower Cross syndrome, they take over and try to be your “core”. The pelvis then ends up in the anterior tilt position. (Google “lower cross syndrome” for details.)
What does this mean for your Squats?Well, if your quads are busy literally holding you up, they are not prepared to bend and stretch. (I mean, really, don’t you hate being asked to do two things at once?) If your pelvis is in the anterior tilted position, it creates hip impingement and lower‐back stress immediately in the Squat. Remember, we assume that you didn’t bring any of this to your Squat because you already practiced your Kalos Sthenos Get‐up or FMS Drills!
They Don’t Allow Training Wheels in NASCAROr – why not to use a heel lift!
One of the popular methods for compensating for a bad squat is to elevate the heels on a weight plate or piece of wood. This can provide relief from any of several issues. It offsets restricted ankles, provides an anterior weight shift by providing some artiAicial core activation, and makes for less demand on actual hip mobility. But as the title of this little section indicates, by the time you are allowed to go 200 MPH, you will have earned it and the training wheels will be off.
Copyright 2010 Functional Movement Systems and Gray Cook 50

By the time you are squatting fully under load or producing power in something like a Push Press, the training wheels should be off as well. Earn your Squat! Don’t compensate for it.
Screening vs. ExerciseI travel the world teaching the Functional Movement Screen, and our Airst screen is the Overhead Deep Squat movement pattern. The feet are straight ahead and shoulder width apart with a dowel rod overhead at lockout. You squat as deep as you can while keeping the dowel overhead. If you can’t do it on the Alat ground, we put you up on a 2x4 and try it again.
I can hear you now – “Oh yeah, what about the training wheels?” “What about having the feet straight ahead – it says here to point them out 10‐15 degrees?”Well, stop and understand or appreciate the difference between screening and exercising.
When we screen the Squat, we create a difAicult Squat that makes compensations easily revealed. But by the time we are using the Squat as an exercise, we have cleared the pattern and are ready for load. These are two very different goals.
Once we have cleared the pattern, the turn‐out of the feet provides a “buffer zone”, keeping the stress on the hip lower.
So don’t get confused by the instructions for the screen and the instructions for the exercise, as they are different for a reason.
Squat Rack Rules vs. MobilityContinuing on the same thought process of different goals for different movements/exercises, we should also touch on the difference between being in the squat rack and squatting for patterning/mobility. Once you are in the squat rack with a barbell across your back, a different set of guidelines kicks in… and for good reason. The center of mass for you and the barbell and the loads possible are just a couple of reasons for the different guidelines. When squatting for patterning or mobility, you will squat deeper and with a different body alignment.
Copyright 2010 Functional Movement Systems and Gray Cook 51
Train the Deadlift – Pattern your SquatBased on our experience in the FMS, we would recommend that you perfect your Deadlift and use it Airst in training, and that you pattern your Squat for all of the mobility it can provide. As stated in the section on quad dominance, most people already rely on their quads too much. Deadlifting takes you away from this and hits the inhibited glutes and posterior chain. Notice that we are not saying not to squat, but rather to put the Squat in its place until perfectly patterned and ready.
Depth of the Squat“Never squat below parallel.” This gym maxim is so often repeated that by now it may have become part of our genetic code. It is a well‐intentioned ‐ but misguided ‐ attempt to enforce “safety” for people not prepared to squat.
The point of greatest knee stress is at parallel. The knee, a hinge and glide joint, is mid hinge and mid glide. Does it make sense to stop there and reverse gears?
If you take the time to earn your Squat through proper patterning and use of the Goblet Squat, you will squat deeply and safely.
Notice that all of the Squats represented here have different alignment than the classic powerlifting Back Squat. There are different guidelines there, as stated earlier. For learning this type of Squat, look into Pavel’s “Enter the Kettlebell” book and DVD for details on the Wall Squat.
Also, just so we are clear, do not squat below your current mobility ability. If you cannot go deep without rounding your back or your knee(s) caving in, then you have not earned the privilege of squatting deep. Get back to work until you can, or seek out an FMS or CK‐FMS expert.
Don’t Shoot Your HipsRepeated frequently in the exercise descriptions of this section is the advice to not let the hips shoot back and up Airst on the ascent from the bottom of the Squat. The Squat is a synchronized and coordinated movement. You rise from the bottom of the Squat in one piece, as a solid unit. If you cannot ascend from the Squat without this happening, you have probably gone too heavy too soon or skipped your patterning.
This movement of shooting the hips back and up Airst ensures lots of back stress and potential misery. Don’t do it.
Copyright 2010 Functional Movement Systems and Gray Cook 52
Pulling Yourself into the SquatThis is a concept covered in detail in the “Secrets of the Knee and Hip” DVD ‐‐ actively using the hip Alexors to pull yourself down into your Squat. Fortunately, Jeff O’Connor revealed the Curl Goblet Squat as an effective means of teaching this technique. Pay attention to how I perform the Curl Goblet Squat on the DVD and to the instructions here in the manual.
Pulling into the Squat is half of the climbing pattern that was once present in our Aitness programming. Don’t skip this or assume that it does not apply to you. It most certainly does.
Symmetry in Your SquatThe symmetry‐of‐strength drill for the Squat is the Bottom Up Squat. Again, this is a check of the continuity or evenness of your strength through the entire squatting pattern. Look for any loss of control during the execution of this drill.
There are other ways to look for symmetry in the lower body, such as the Pistol or Single Leg Squat from Pavel’s Naked Warrior, or in the FMS screens. The Bottom Up Squat, however, looks for uniformity and smoothness of activation and transfer of energy through the Symmetrical Stance Loaded Squat.
Copyright 2010 Functional Movement Systems and Gray Cook 53
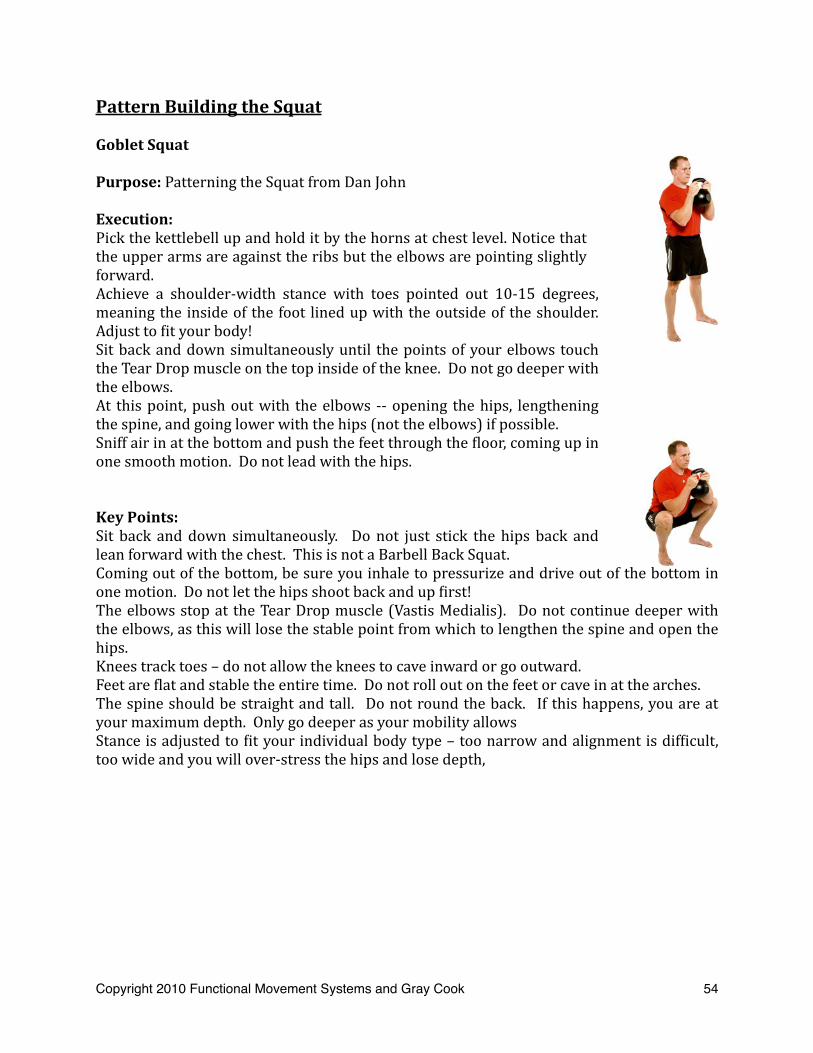
Pattern Building the Squat
Goblet Squat
Purpose: Patterning the Squat from Dan John
Execution:Pick the kettlebell up and hold it by the horns at chest level. Notice that the upper arms are against the ribs but the elbows are pointing slightly forward.Achieve a shoulder‐width stance with toes pointed out 10‐15 degrees, meaning the inside of the foot lined up with the outside of the shoulder. Adjust to Ait your body!Sit back and down simultaneously until the points of your elbows touch the Tear Drop muscle on the top inside of the knee. Do not go deeper with the elbows.At this point, push out with the elbows ‐‐ opening the hips, lengthening the spine, and going lower with the hips (not the elbows) if possible.Sniff air in at the bottom and push the feet through the Aloor, coming up in one smooth motion. Do not lead with the hips.
Key Points:Sit back and down simultaneously. Do not just stick the hips back and lean forward with the chest. This is not a Barbell Back Squat.Coming out of the bottom, be sure you inhale to pressurize and drive out of the bottom in one motion. Do not let the hips shoot back and up Airst!The elbows stop at the Tear Drop muscle (Vastis Medialis). Do not continue deeper with the elbows, as this will lose the stable point from which to lengthen the spine and open the hips.Knees track toes – do not allow the knees to cave inward or go outward.Feet are Alat and stable the entire time. Do not roll out on the feet or cave in at the arches.The spine should be straight and tall. Do not round the back. If this happens, you are at your maximum depth. Only go deeper as your mobility allowsStance is adjusted to Ait your individual body type – too narrow and alignment is difAicult, too wide and you will over‐stress the hips and lose depth,
Copyright 2010 Functional Movement Systems and Gray Cook 54

Goblet Squat ½ Way Down
Goblet Squat Side View
Note the spine alignment and control of the depth of the Squat
Copyright 2010 Functional Movement Systems and Gray Cook 55
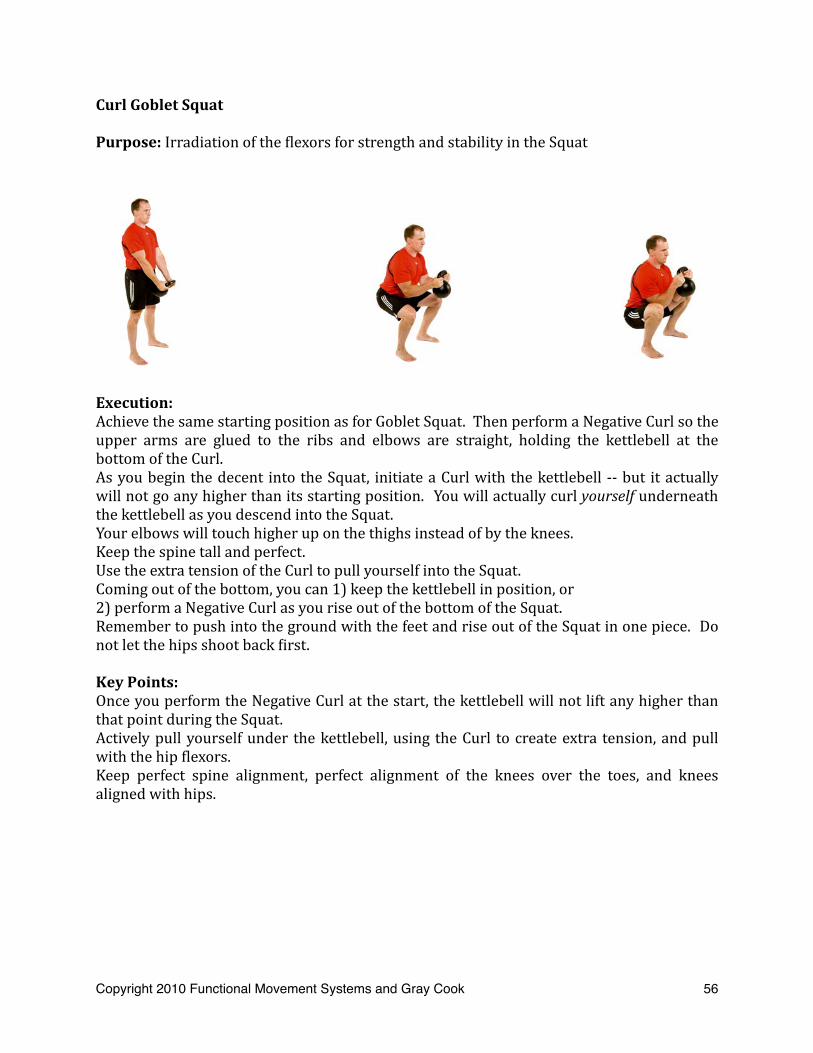
Curl Goblet Squat
Purpose: Irradiation of the Alexors for strength and stability in the Squat
Execution:Achieve the same starting position as for Goblet Squat. Then perform a Negative Curl so the upper arms are glued to the ribs and elbows are straight, holding the kettlebell at the bottom of the Curl.As you begin the decent into the Squat, initiate a Curl with the kettlebell ‐‐ but it actually will not go any higher than its starting position. You will actually curl yourself underneath the kettlebell as you descend into the Squat.Your elbows will touch higher up on the thighs instead of by the knees.Keep the spine tall and perfect.Use the extra tension of the Curl to pull yourself into the Squat.Coming out of the bottom, you can 1) keep the kettlebell in position, or 2) perform a Negative Curl as you rise out of the bottom of the Squat.Remember to push into the ground with the feet and rise out of the Squat in one piece. Do not let the hips shoot back Airst.
Key Points:Once you perform the Negative Curl at the start, the kettlebell will not lift any higher than that point during the Squat.Actively pull yourself under the kettlebell, using the Curl to create extra tension, and pull with the hip Alexors.Keep perfect spine alignment, perfect alignment of the knees over the toes, and knees aligned with hips.
Copyright 2010 Functional Movement Systems and Gray Cook 56
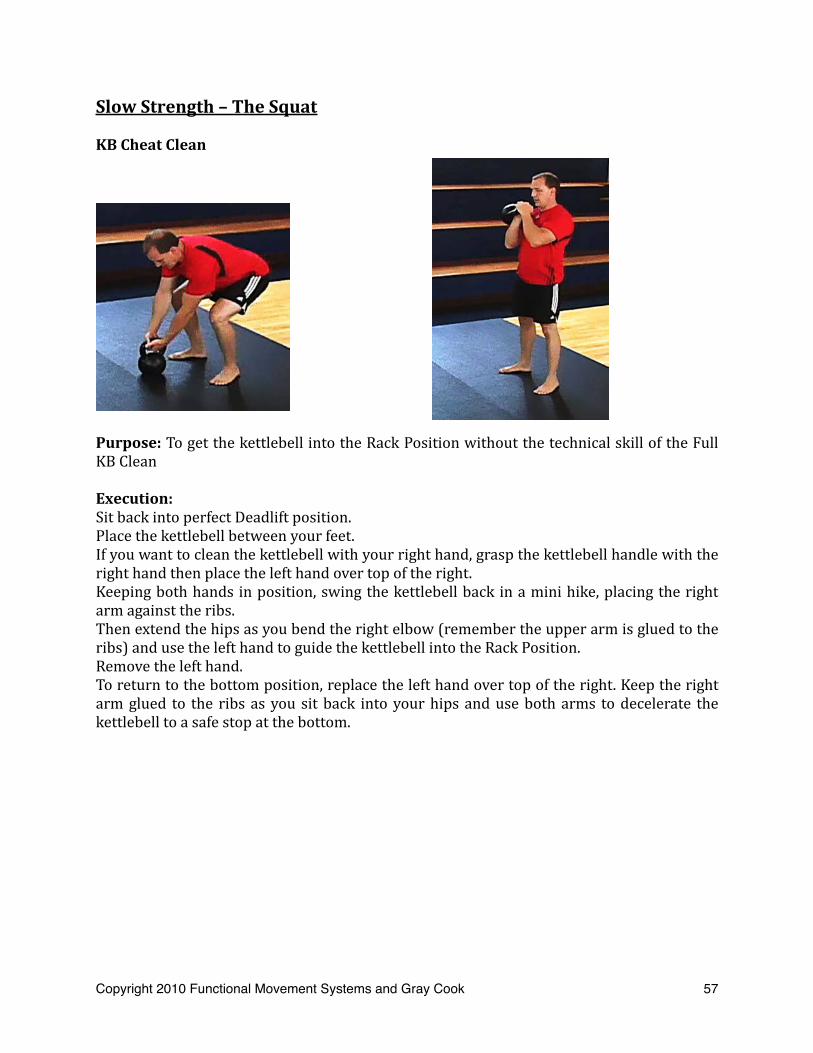
Slow Strength – The Squat
KB Cheat Clean
Purpose: To get the kettlebell into the Rack Position without the technical skill of the Full KB Clean
Execution:Sit back into perfect Deadlift position. Place the kettlebell between your feet.If you want to clean the kettlebell with your right hand, grasp the kettlebell handle with the right hand then place the left hand over top of the right.Keeping both hands in position, swing the kettlebell back in a mini hike, placing the right arm against the ribs.Then extend the hips as you bend the right elbow (remember the upper arm is glued to the ribs) and use the left hand to guide the kettlebell into the Rack Position.Remove the left hand.To return to the bottom position, replace the left hand over top of the right. Keep the right arm glued to the ribs as you sit back into your hips and use both arms to decelerate the kettlebell to a safe stop at the bottom.
Copyright 2010 Functional Movement Systems and Gray Cook 57
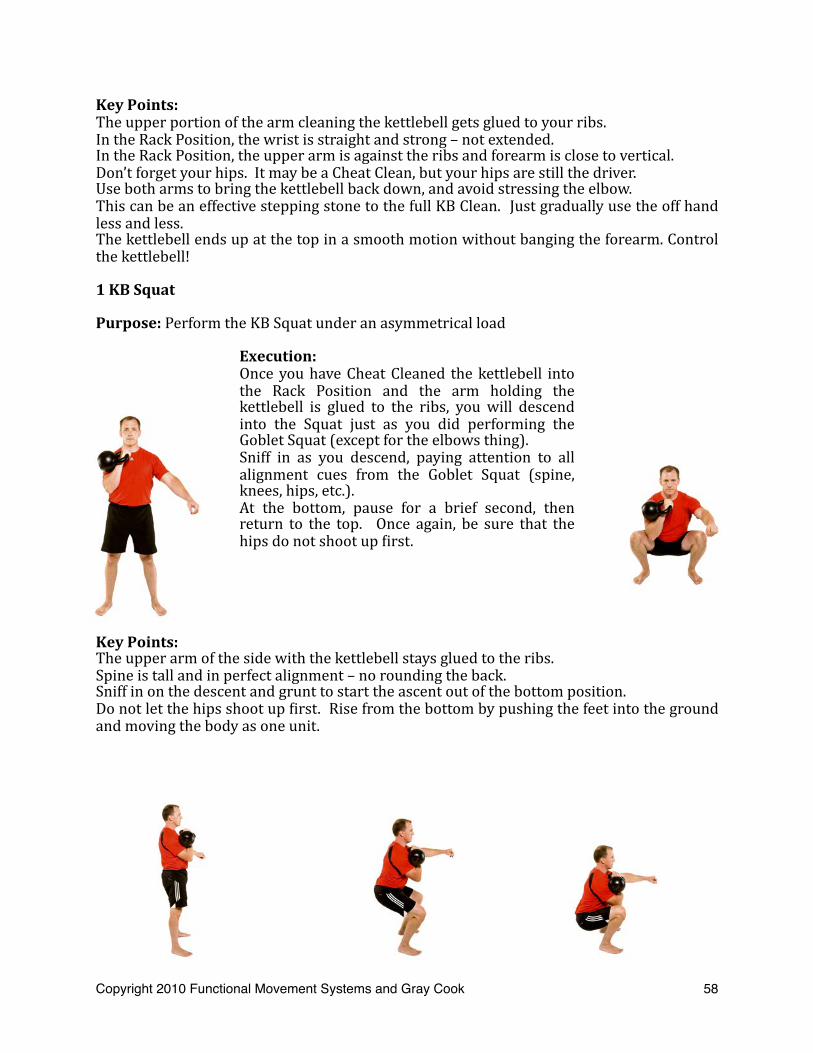
Key Points:The upper portion of the arm cleaning the kettlebell gets glued to your ribs.In the Rack Position, the wrist is straight and strong – not extended.In the Rack Position, the upper arm is against the ribs and forearm is close to vertical.Don’t forget your hips. It may be a Cheat Clean, but your hips are still the driver.Use both arms to bring the kettlebell back down, and avoid stressing the elbow.This can be an effective stepping stone to the full KB Clean. Just gradually use the off hand less and less.The kettlebell ends up at the top in a smooth motion without banging the forearm. Control the kettlebell!
1 KB Squat
Purpose: Perform the KB Squat under an asymmetrical load
Execution:Once you have Cheat Cleaned the kettlebell into the Rack Position and the arm holding the kettlebell is glued to the ribs, you will descend into the Squat just as you did performing the Goblet Squat (except for the elbows thing).Sniff in as you descend, paying attention to all alignment cues from the Goblet Squat (spine, knees, hips, etc.).At the bottom, pause for a brief second, then return to the top. Once again, be sure that the hips do not shoot up Airst.
Key Points:The upper arm of the side with the kettlebell stays glued to the ribs.Spine is tall and in perfect alignment – no rounding the back.Sniff in on the descent and grunt to start the ascent out of the bottom position.Do not let the hips shoot up Airst. Rise from the bottom by pushing the feet into the ground and moving the body as one unit.
Copyright 2010 Functional Movement Systems and Gray Cook 58

2 KB Clean
Purpose: To get both kettlebells into position for the 2 KB Squat or 2 KB Press
Execution:There is no way to Cheat Clean two kettlebells, so you have to learn to clean them both simultaneously.Achieve a starting position, the same as you did for the 2 KB Swing.Perform the hike of the kettlebells as you did for the 2 KB Swing.Out of the bottom position with the upper arms glued to the ribs, perform your hip extension. Allow the elbows to bend and guide the kettlebells to the Rack Position using the power from your hips.Adjust your hip power to bring the kettlbells in for a soft landing. Don’t use full power or you’ll bang your arms up.To lower both kettlebells from the Rack Position, keep the upper arms glued to the ribs and sit back into the hips as you guide the kettlebells back into the hike position, keeping them high and tight. Then, using the hips and perfect Deadlift alignment, decelerate them and place them on the ground safely.
Key Points:Dial in the right amount of effort to bring the kettlebells to the top in a smooth manner and in for a soft landing.Remember that the forearms are nearly vertical, the upper arms are glued to the ribs, and the body is tight and strong at the top of the Clean. You are braced and ready – not loose and sloppy! Watch your Aingers and do not let them get caught between the handles at the top of the Clean.Don’t forget your Hips!Do not allow the kettlebells to swing away on the way up or down. Keep them in tight.
Copyright 2010 Functional Movement Systems and Gray Cook 59
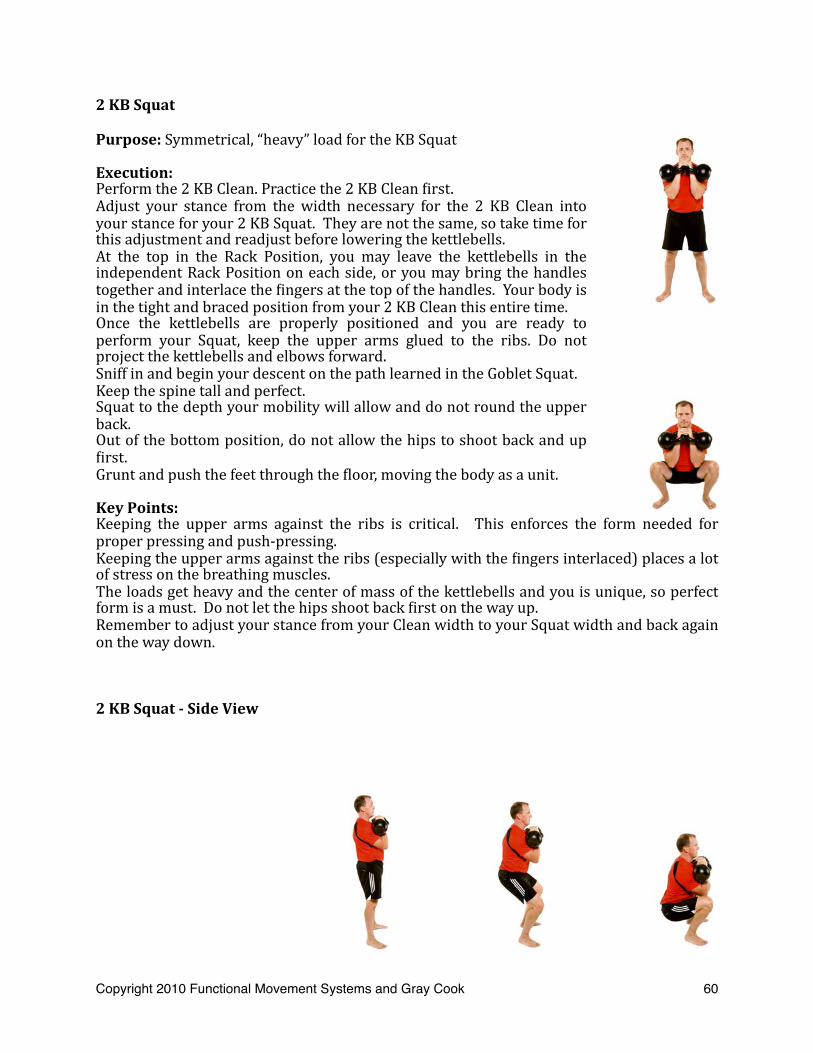
2 KB Squat
Purpose: Symmetrical, “heavy” load for the KB Squat
Execution:Perform the 2 KB Clean. Practice the 2 KB Clean Airst.Adjust your stance from the width necessary for the 2 KB Clean into your stance for your 2 KB Squat. They are not the same, so take time for this adjustment and readjust before lowering the kettlebells.At the top in the Rack Position, you may leave the kettlebells in the independent Rack Position on each side, or you may bring the handles together and interlace the Aingers at the top of the handles. Your body is in the tight and braced position from your 2 KB Clean this entire time.Once the kettlebells are properly positioned and you are ready to perform your Squat, keep the upper arms glued to the ribs. Do not project the kettlebells and elbows forward.Sniff in and begin your descent on the path learned in the Goblet Squat.Keep the spine tall and perfect. Squat to the depth your mobility will allow and do not round the upper back.Out of the bottom position, do not allow the hips to shoot back and up Airst.Grunt and push the feet through the Aloor, moving the body as a unit.
Key Points:Keeping the upper arms against the ribs is critical. This enforces the form needed for proper pressing and push‐pressing.Keeping the upper arms against the ribs (especially with the Aingers interlaced) places a lot of stress on the breathing muscles. The loads get heavy and the center of mass of the kettlebells and you is unique, so perfect form is a must. Do not let the hips shoot back Airst on the way up.Remember to adjust your stance from your Clean width to your Squat width and back again on the way down.
2 KB Squat Side View
Copyright 2010 Functional Movement Systems and Gray Cook 60
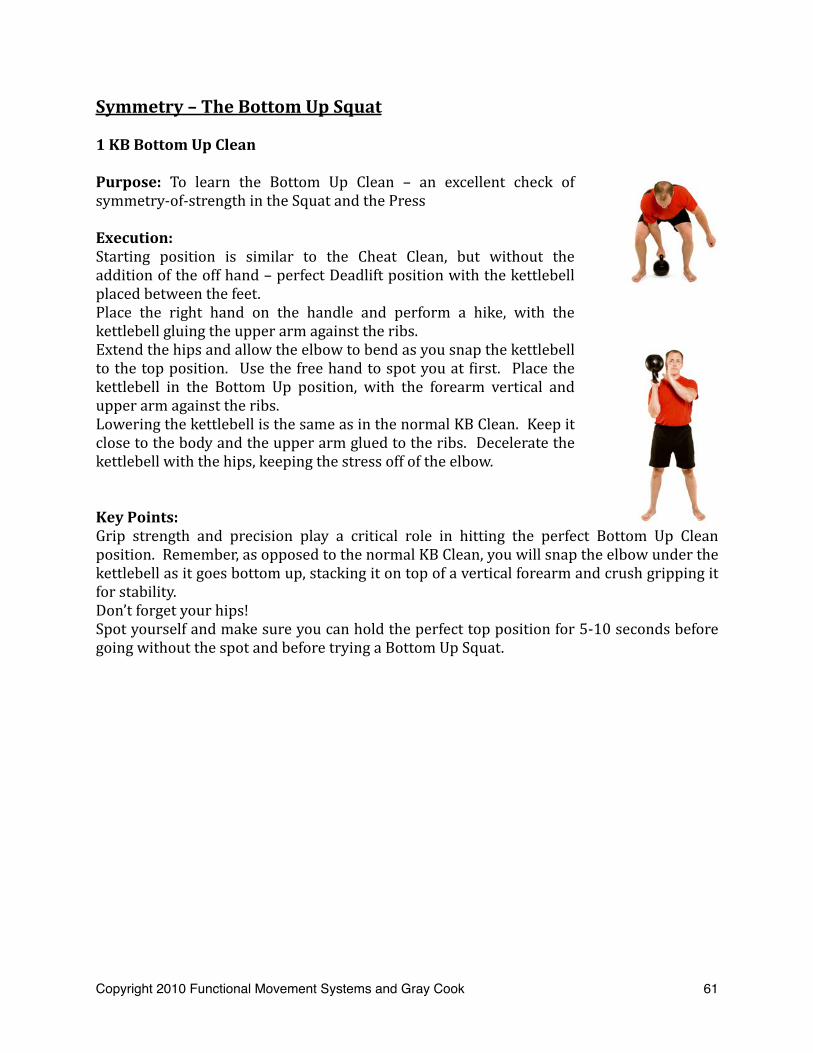
Symmetry – The Bottom Up Squat
1 KB Bottom Up Clean
Purpose: To learn the Bottom Up Clean – an excellent check of symmetry‐of‐strength in the Squat and the Press
Execution:Starting position is similar to the Cheat Clean, but without the addition of the off hand – perfect Deadlift position with the kettlebell placed between the feet.Place the right hand on the handle and perform a hike, with the kettlebell gluing the upper arm against the ribs.Extend the hips and allow the elbow to bend as you snap the kettlebell to the top position. Use the free hand to spot you at Airst. Place the kettlebell in the Bottom Up position, with the forearm vertical and upper arm against the ribs.Lowering the kettlebell is the same as in the normal KB Clean. Keep it close to the body and the upper arm glued to the ribs. Decelerate the kettlebell with the hips, keeping the stress off of the elbow.
Key Points:Grip strength and precision play a critical role in hitting the perfect Bottom Up Clean position. Remember, as opposed to the normal KB Clean, you will snap the elbow under the kettlebell as it goes bottom up, stacking it on top of a vertical forearm and crush gripping it for stability.Don’t forget your hips!Spot yourself and make sure you can hold the perfect top position for 5‐10 seconds before going without the spot and before trying a Bottom Up Squat.
Copyright 2010 Functional Movement Systems and Gray Cook 61
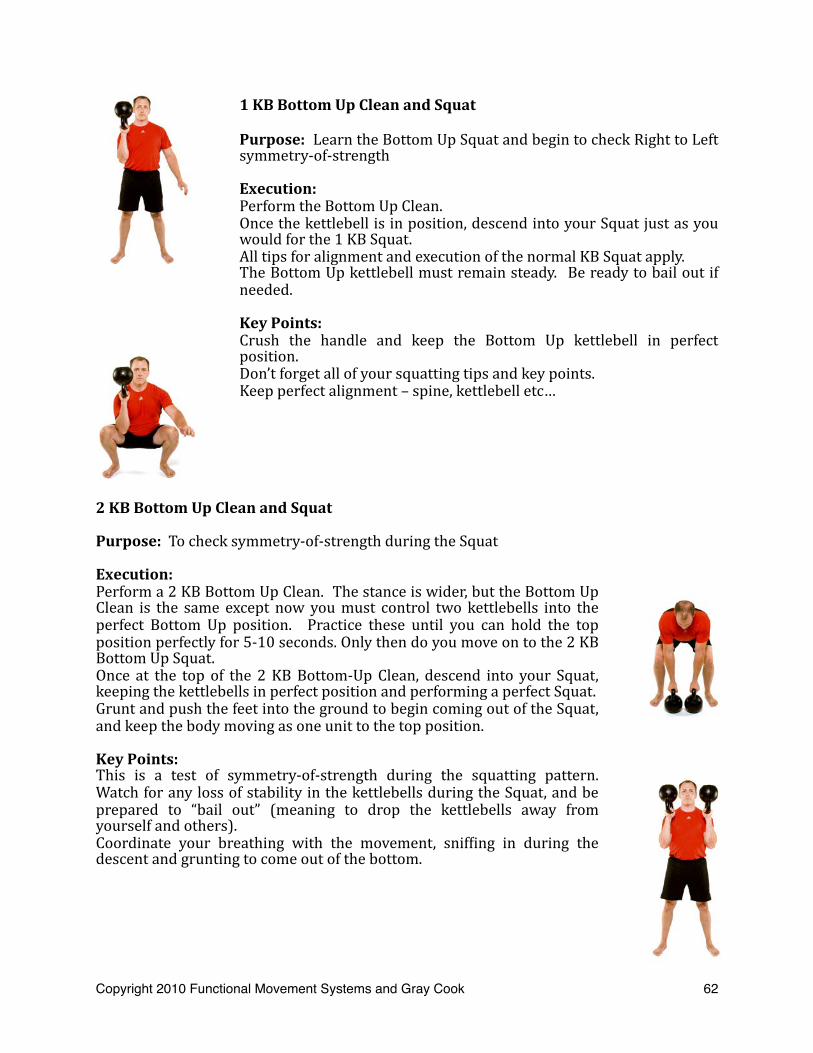
1 KB Bottom Up Clean and Squat
Purpose: Learn the Bottom Up Squat and begin to check Right to Left symmetry‐of‐strength
Execution:Perform the Bottom Up Clean.Once the kettlebell is in position, descend into your Squat just as you would for the 1 KB Squat.All tips for alignment and execution of the normal KB Squat apply. The Bottom Up kettlebell must remain steady. Be ready to bail out if needed.
Key Points:Crush the handle and keep the Bottom Up kettlebell in perfect position.Don’t forget all of your squatting tips and key points.Keep perfect alignment – spine, kettlebell etc…
2 KB Bottom Up Clean and Squat
Purpose: To check symmetry‐of‐strength during the Squat
Execution:Perform a 2 KB Bottom Up Clean. The stance is wider, but the Bottom Up Clean is the same except now you must control two kettlebells into the perfect Bottom Up position. Practice these until you can hold the top position perfectly for 5‐10 seconds. Only then do you move on to the 2 KB Bottom Up Squat.Once at the top of the 2 KB Bottom‐Up Clean, descend into your Squat, keeping the kettlebells in perfect position and performing a perfect Squat.Grunt and push the feet into the ground to begin coming out of the Squat, and keep the body moving as one unit to the top position.
Key Points:This is a test of symmetry‐of‐strength during the squatting pattern. Watch for any loss of stability in the kettlebells during the Squat, and be prepared to “bail out” (meaning to drop the kettlebells away from yourself and others).Coordinate your breathing with the movement, snifAing in during the descent and grunting to come out of the bottom.
Copyright 2010 Functional Movement Systems and Gray Cook 62

2 K B S q u a t Bottom Position
Coach’s Corner – Patterning the SquatOpening the Hips and Knees – Alignment, Breaking at the Hips First
Please understand that we are talking about patterning the Squat here. Many power and olympic lifters squat in ways that are potentially stressful to the knees, hips and back for the sake of their sport. They do this for a leverage advantage and are willing to take the risk to win the game they are playing. We’re not talking about world record lifts here, but a safe and effective Squat pattern. So, just because there is a fellow that squats a lot in your gym, doesn’t mean that his style is the best for you from a health and movement perspective.
The hips have to unlock first for the Squat to be smooth and effective. Movement will appear simultaneous from the hips and knees, but the hips have to “break” first.This is a skill all in itself and is not to be overlooked. The chopping action is the same as the Deadlift pattern, but the intent is more vertical. If the hips are chopped back, an anterior pelvic tilt will occur at the beginning of the Squat. This will make the hip flexors and quads think they’re supposed to be stabilizers and create lower back stress. So, instead of reaching back for the wall with your butt, reach for the floor just behind your heels and visualize a rope attached to the top of each knee that’s pulling them to the ceiling. This will help to stabilize the pelvis and torso properly and allow the hip flexors to do the job of pulling you down into the hole. Failure to get this correct will doom the movement from the start. Also, cuing the “knees out” will help to open the hips and align the knees.
Speaking of aligning the knees, there is a lot of misconception about what that actually means. The most important things to be aware of is that the femur is pointing in the same direction as the foot. If they’re not, then you’re potentially stressing the knee instead of loading the hips. Also, the knee generally shouldn’t extend past the toe. This once again indicates that you’re moving from the knees rather than the hips.
Copyright 2010 Functional Movement Systems and Gray Cook 63

As your strength and flexibility change, there is a good chance that your stance will need to also. Everyone is an individual, so continue to experiment until you’ve found the Squat stance that is best for you. Some people will need to squat wider than others to keep there spine from rounding. Be aware that as depth goes past “parallel” this can be quite stressful on the hips. Wide stance deep squatting just isn’t for everyone. A general guideline is that the further below parallel you squat with a neutral spine, the narrower your stance will be and the more foot turnout you’ll need to have to allow the ball and socket of the hip to articulate properly. Once again, we’re not talking about olympic or powerlifting here, just addressing the Squat pattern and joint health.
What is Different in the Squat and Deadlift and What is the Same in the Squat and Deadlift?
Although the Squat and Deadlift have different ranges of motion and intents, the principles remain constant. Note the same line from hips through shoulders and ears. The lats remain connected and the movements comes from the hips. The knees track the feet and the spine remains neutral.
The difference is mostly that instead of hinging the hips back and keeping knee movement to a minimum in a Deadlift, a Squat hinges the hips down for a greater range of motion in both hips and knees. There are exercises that blur the lines between the two. For example, the way some powerlifters perform Box Squats or Good Mornings. Once again, this is for a sporting intent. Don’t confuse the two. From a movement standpoint, it’s best to own both motions.
Copyright 2010 Functional Movement Systems and Gray Cook 64

Coach’s Corner Slow Strength – KB SquatKnee and Foot Alignment and Stable Center with Off Center Load
The unilateral load demonstrated here creates one of the best “core training” activities possible. Most alleged core exercises put the body in situations that actually worsen muscle recruitment patterns. One of the primary jobs of the torso is to resist rotational forces during motion. Also, the ankle, knee, and hip position is exactly the same on each side. With this in mind, notice the fact that although our fitness model has a load on one side of his body his position remains the same as in the Goblet Squat. The activation of core muscles to stabilize the hips and torso under this type of load and motion is exactly what we need for optimal performance. It’s also the way out body is most often loaded in real life or athletic activities.
Straight Back –Spine Alignment
Neutral spine. Have we mentioned it?. At the point where most people find restriction, they tend to round their back and “fall” through it. This can become very dangerous under load. As soon as you forfeit muscular support the stress goes directly and fully to the connective tissue. When combined with poor posture and alignment bad things tend to happen. Just because it may not create a traumatic injury initially doesn’t mean the chronic effects won’t build over time. Never give up stability to gain range of motion. It is critical to view the Squat from the side to spot this. Continue reaching for the ground the same as you reached for the wall in the Deadlift pattern.
Copyright 2010 Functional Movement Systems and Gray Cook 65
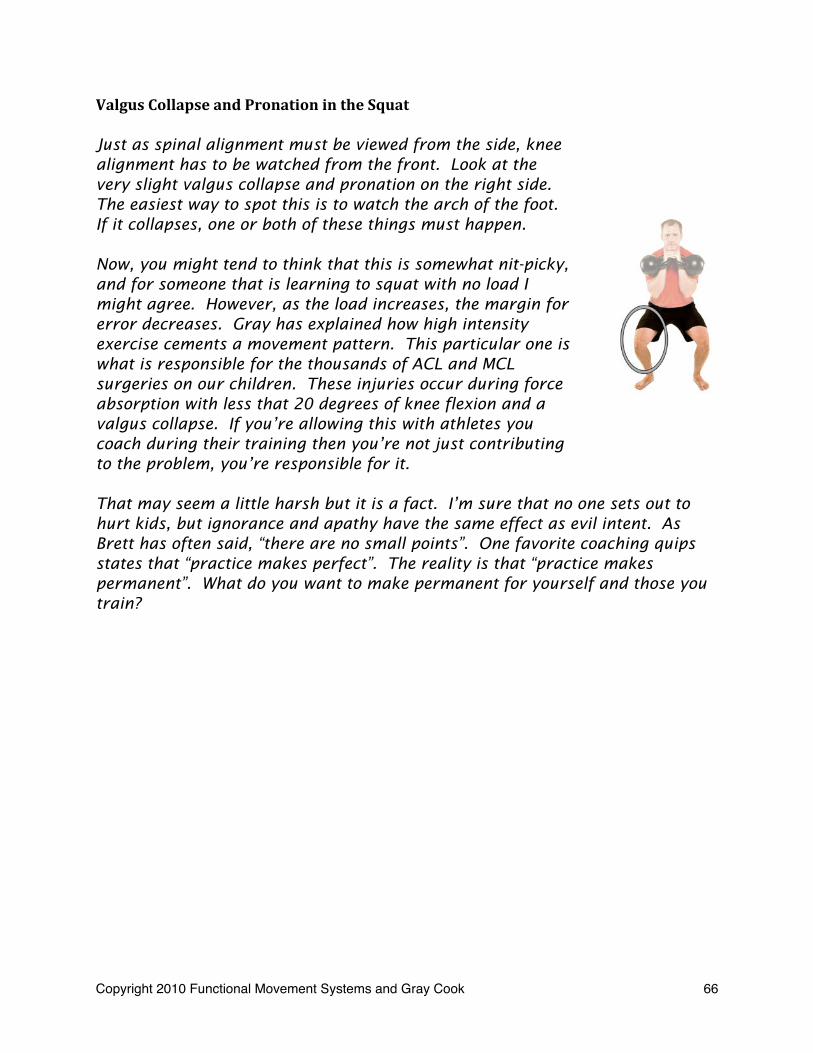
Valgus Collapse and Pronation in the Squat
Just as spinal alignment must be viewed from the side, knee alignment has to be watched from the front. Look at the very slight valgus collapse and pronation on the right side. The easiest way to spot this is to watch the arch of the foot. If it collapses, one or both of these things must happen.
Now, you might tend to think that this is somewhat nit-picky, and for someone that is learning to squat with no load I might agree. However, as the load increases, the margin for error decreases. Gray has explained how high intensity exercise cements a movement pattern. This particular one is what is responsible for the thousands of ACL and MCL surgeries on our children. These injuries occur during force absorption with less that 20 degrees of knee flexion and a valgus collapse. If you’re allowing this with athletes you coach during their training then you’re not just contributing to the problem, you’re responsible for it.
That may seem a little harsh but it is a fact. I’m sure that no one sets out to hurt kids, but ignorance and apathy have the same effect as evil intent. As Brett has often said, “there are no small points”. One favorite coaching quips states that “practice makes perfect”. The reality is that “practice makes permanent”. What do you want to make permanent for yourself and those you train?
Copyright 2010 Functional Movement Systems and Gray Cook 66

Coach’s Corner – Bottom Up SquatAlignment of “Weight and Force”
Even though the load resides outside the body, the intent is to remain “square”. The tension provided by focusing on keeping the hips and shoulders level and facing forward under a unilateral load creates the core activation necessary both for safety and performance.
The lines never change. Even when another bell is added and a Squat is performed.
Proper joint alignment and projection (or direction) is talked about a lot. However, like gymnastics, scoring it is somewhat subjective. A drill like this makes it nearly impossible to do wrong. Focusing on the lessons provided and applying them to a self-correcting drill will allow the body to re-learn what is has been designed to do. In this case how to properly align and direct force.
Being able to perform equally on each side of a Bottom Up Squat and with a 2 KB Bottom Up Squat is a pretty good indicator that you have it (the Squat) patterned and are ready to condition it.
This ability to stabilize the core and move from the hips is critical not just for safety, but critical for optimal athletic performance.
Copyright 2010 Functional Movement Systems and Gray Cook 67
The Press
How much weight you could put overhead was once THE test of strength. Benches did not really exist for bench pressing yet. So the question of “how much ya bench?” had not invaded the lexicon. Picking a weight up and placing it overhead was the goal of lifting, and the Overhead Press was the strength exercise of choice. Kenneth Jay, Master RKC, will have a book coming soon about the Press, and I highly recommend it. (And, yes, I have seen an advanced copy).
Now, you may have heard a variety of things about the Press ‐‐ the good, the bad, and the ugly, as it were. While not as divisive as the Squat, it is a good Airst runner up.
Well, I have to state once again that if you are here and ready to press, then you have cleared yourself through the Kalos Sthenos Get‐up or the “Secrets of the Shoulder” DVD. Bring a bad movement pattern to the Press (or any of these exercises, for that matter), and you can have trouble brewing quickly. So we assume that your thoracic spine is mobile, your scapulas are stable, and your glenohumeral joint is well timed and pain free as you begin your work on the Press.
There are several points to highlight with regard to the Press:1) Do Your Get‐Ups2) Hard to Get There If You Haven’t Been There3) Hips Level and Stable4) Keep it Vertical5) Grip6) Push into the Ground7) Find Your Arc8) Breathing9) Plyos Anyone?10) Tension and the Cardio of Strength Work
Do Your GetUpsWould you believe there’s an entire two‐DVD product and manual dedicated to one exercise? Who on earth would make it and why would anyone buy it?Well, “Kettlebells from the Ground Up – the Kalos Sthenos” is just such a product. Please see the product testimonials for it on the dragondoor.com website (http://www.dragondoor.com/dvs017.html).
This one exercise lays the foundation for your Overhead Pressing and more.So to state it simply, do your Get‐ups!
Copyright 2010 Functional Movement Systems and Gray Cook 68
Hard to Get There If You Haven’t Been ThereThere are a great number of people in this world that simply do not know what an Overhead Lockout should be like. You see, they actually have never been there, so it is hard to get there if you haven’t been there. Do not skip the patterning section here. While Overhead Holds and Overhead Marching score low on the Cirque De Soliel scale, they are an essential part of perfecting the correct Overhead Position for your shoulders. Once again, the Get‐Up Aills in quite nicely here.
Hips Level and StableYour Press, like every building, needs a solid base. The base for your Press is everything from the chest down, all solid and ready to act as a platform for a strong Press. Your hips should be level and stable during the Press. There is a Coaches’ Corner segment on this, so I don’t want to beat a dead horse here. However, there are some instances where you may kick a hip out during a heavy 1 Arm Press.
What’s heavy? Let’s say that over 50% of your bodyweight on a 1 Arm Press begins to qualify as heavy.
The patterning of our Press in this instance leads us to the Push Press, an exercise that does not allow for kicking the hips at any point. So keep the hips level and stable. An additional caveat and critical point here is that the spine stays solid and in alignment. You cannot at any time lean back at the lower back. Period.
The Overhead Press was eliminated from the Olympics for this reason, and it places your spine at great risk, so just avoid it all together. While there are some pressing subtleties like extending the thoracic spine at the Ainish of the Press, there is never a reason to lean back into the lower back.
Keep it VerticalDumbbell pressing has led to some unfortunate pressing habits for some people. Most notable of these is the tendency to angle the forearms in toward each other during the Press so you can bang the weights together in a half press/half an overhead Aly motion. Do not bring this motion to the KB Press. Instead, focus on keeping the forearm of the pressing arm perfectly vertical during the upward and downward motions. This alignment allows for the best pressing groove and application of strength in the Press. Imagine a booster rocket is strapped to the bottom of your elbow. If it is going to blast the forearm somewhere, I would suggest that it be straight up and not at an angle.
Copyright 2010 Functional Movement Systems and Gray Cook 69
GripSince the kettlebell is held in the hand, I must once again remind you to engage and re‐engage your grip before and during each Press. Irradiation from the grip will improve your strength and stability in this movement. Just grip it.
Push into the GroundYet again, the ground comes into play. And, yet again, I will advise you to push down in order to make the weight go up. People will typically try to lift the weight. This leads to the shoulders rising and the weight shifting up. The strength for your Press, as noted just above, comes from your base. Drive your base into the ground and the body will link up into your Press. This does not mean your knees bend or that you change shape in any way.
Find Your ArcOk, Indiana Jones, now get crackin’ on Ainding that Arc. But before you leave, remember that we are talking about the Press and not archeology.
The arc in your Press refers to the groove your shoulder will take between the Rack Position of the Clean and the Overhead Lockout Position. There is some serious real estate to cover between those two points, so the groove needs to be a good one.
By activating your lats (yes your lats – again!) and respecting the length of your upper arm bone while maintaining a vertical forearm, your body should show you the right arc. Some of you will press very straight ahead while others will open the shoulders quite dramatically. And some will create somewhere around a 45‐degree angle. Whatever it turns out to be, make sure you Aind your arc and do not force your body into someone else’s arc.
BreathingHow you synchronize your breathing for the Press is extremely important. At the top of the Clean, you should be braced, solid and ready, which includes snifAing air in to create intra‐abdominal pressure. To initiate the Press, you either grunt and hold the breath/pressure, or you begin a forced exhalation (tight hissing literally forcing the air out through a small opening). At the top, when you pause at lockout, sniff more air in and begin another forced exhale as the weight is pulled back to the Rack Position. The key point here is that there is never a loss of tension, and you do not fully exhale at any point. Full exhalation will leave the bubble of intra‐abdominal pressure empty, which places your spine at risk. See Naked Warrior by Pavel for full details on the high‐tension techniques.
Copyright 2010 Functional Movement Systems and Gray Cook 70

Plyos Anyone?Plyometrics have been popular since they fell out of the secret training techniques box from the former Eastern Block Countries, but simply “doing” plyos is a bad idea.
Why mention this here? Swings and Push Presses are variants of plyometrics. I believe the late Mel Siff would have called them powermetrics, since they lack the shock (impact) associated with true plyos. See his excellent book Supertraining for details.
Also, there is a serious strength base needed before plyometrics are both: A) safe and B) effective. So put your time in here on patterning, slow strength, and eventually Dynami before dropping into plyometrics. (Get it? – dropping into…)
Tension and the Cardio of Strength WorkI have been criticized for saying that anything over three reps is cardio. But after you truly apply the breathing and tension techniques, I think you will come to agree with me. Creating the tension through the body for a stable base for the Press is difAicult enough. But add to it the breathing and intra‐abdominal pressure, and you have serious work being done before the Press even leaves the Rack Position.
In order to keep focus and tension high, you will see only low reps recommended for the Press and the Squat. Don’t worry, Sunshine! You can always add sets! ;‐)
Symmetry in the PressOnce again, a Bottom Up Drill is used to check the symmetry of your strength through a Press. Seamless strength and integration are key here as well. What is important to note, however, is that as powerful a tool as the Bottom Up Press is, it lacks one thing. A perfect Lockout is difAicult to impossible to achieve on this style of Press. Note in the instructions that permission is given to look up (but NOT lean back), and this will make a perfect lockout very hard to perform. So use the Bottom Up Press as a part of your pressing practice, not the entire practice. It is a way to check symmetry‐of‐strength and can have great beneAit to your Press, but the goal is still the standard KB Press.
Copyright 2010 Functional Movement Systems and Gray Cook 71
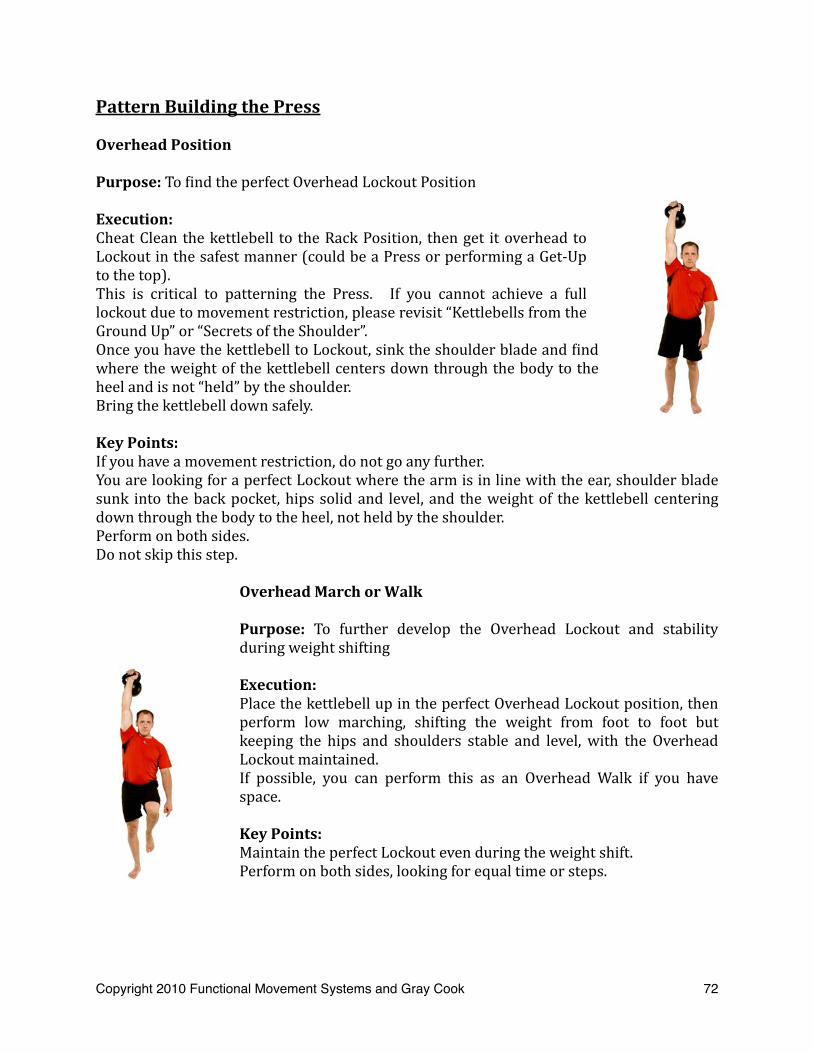
Pattern Building the Press
Overhead Position
Purpose: To Aind the perfect Overhead Lockout Position
Execution:Cheat Clean the kettlebell to the Rack Position, then get it overhead to Lockout in the safest manner (could be a Press or performing a Get‐Up to the top).This is critical to patterning the Press. If you cannot achieve a full lockout due to movement restriction, please revisit “Kettlebells from the Ground Up” or “Secrets of the Shoulder”.Once you have the kettlebell to Lockout, sink the shoulder blade and Aind where the weight of the kettlebell centers down through the body to the heel and is not “held” by the shoulder.Bring the kettlebell down safely.
Key Points:If you have a movement restriction, do not go any further.You are looking for a perfect Lockout where the arm is in line with the ear, shoulder blade sunk into the back pocket, hips solid and level, and the weight of the kettlebell centering down through the body to the heel, not held by the shoulder.Perform on both sides.Do not skip this step.
Overhead March or Walk
Purpose: To further develop the Overhead Lockout and stability during weight shifting
Execution:Place the kettlebell up in the perfect Overhead Lockout position, then perform low marching, shifting the weight from foot to foot but keeping the hips and shoulders stable and level, with the Overhead Lockout maintained.If possible, you can perform this as an Overhead Walk if you have space.
Key Points:Maintain the perfect Lockout even during the weight shift.Perform on both sides, looking for equal time or steps.
Copyright 2010 Functional Movement Systems and Gray Cook 72
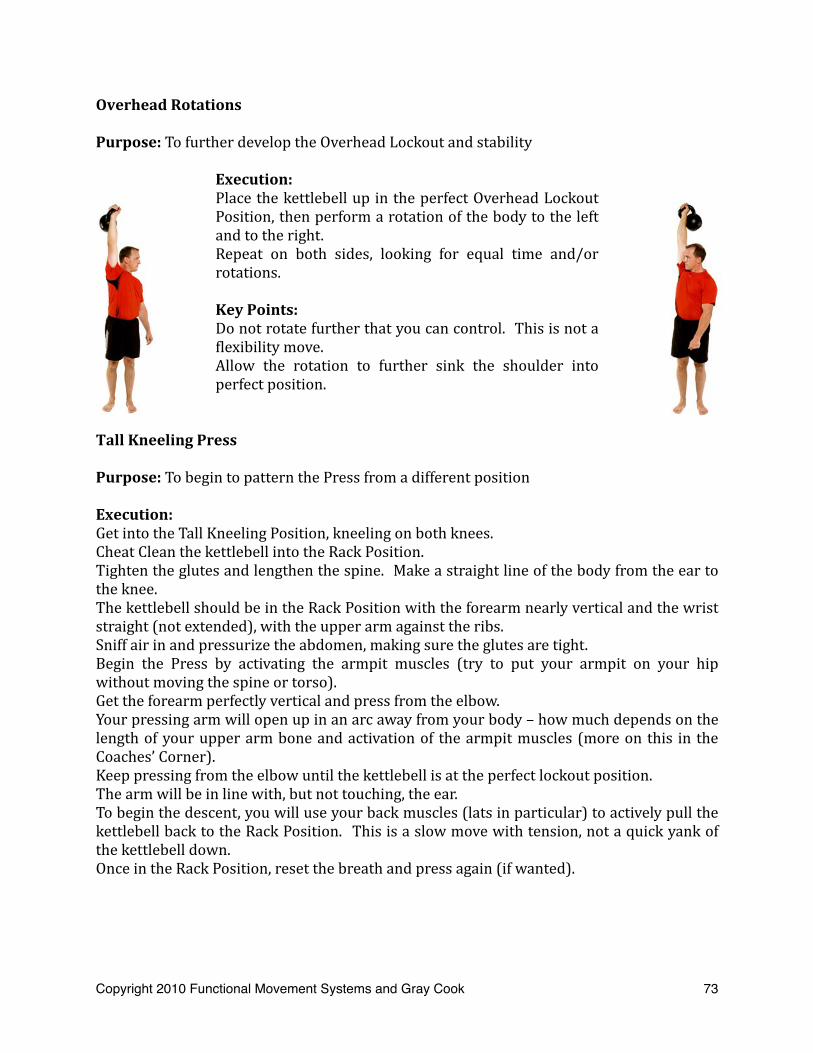
Overhead Rotations
Purpose: To further develop the Overhead Lockout and stability
Execution:Place the kettlebell up in the perfect Overhead Lockout Position, then perform a rotation of the body to the left and to the right.Repeat on both sides, looking for equal time and/or rotations.
Key Points:Do not rotate further that you can control. This is not a Alexibility move.Allow the rotation to further sink the shoulder into perfect position.
Tall Kneeling Press
Purpose: To begin to pattern the Press from a different position
Execution:Get into the Tall Kneeling Position, kneeling on both knees.Cheat Clean the kettlebell into the Rack Position.Tighten the glutes and lengthen the spine. Make a straight line of the body from the ear to the knee.The kettlebell should be in the Rack Position with the forearm nearly vertical and the wrist straight (not extended), with the upper arm against the ribs.Sniff air in and pressurize the abdomen, making sure the glutes are tight.Begin the Press by activating the armpit muscles (try to put your armpit on your hip without moving the spine or torso).Get the forearm perfectly vertical and press from the elbow.Your pressing arm will open up in an arc away from your body – how much depends on the length of your upper arm bone and activation of the armpit muscles (more on this in the Coaches’ Corner).Keep pressing from the elbow until the kettlebell is at the perfect lockout position.The arm will be in line with, but not touching, the ear.To begin the descent, you will use your back muscles (lats in particular) to actively pull the kettlebell back to the Rack Position. This is a slow move with tension, not a quick yank of the kettlebell down.Once in the Rack Position, reset the breath and press again (if wanted).
Copyright 2010 Functional Movement Systems and Gray Cook 73
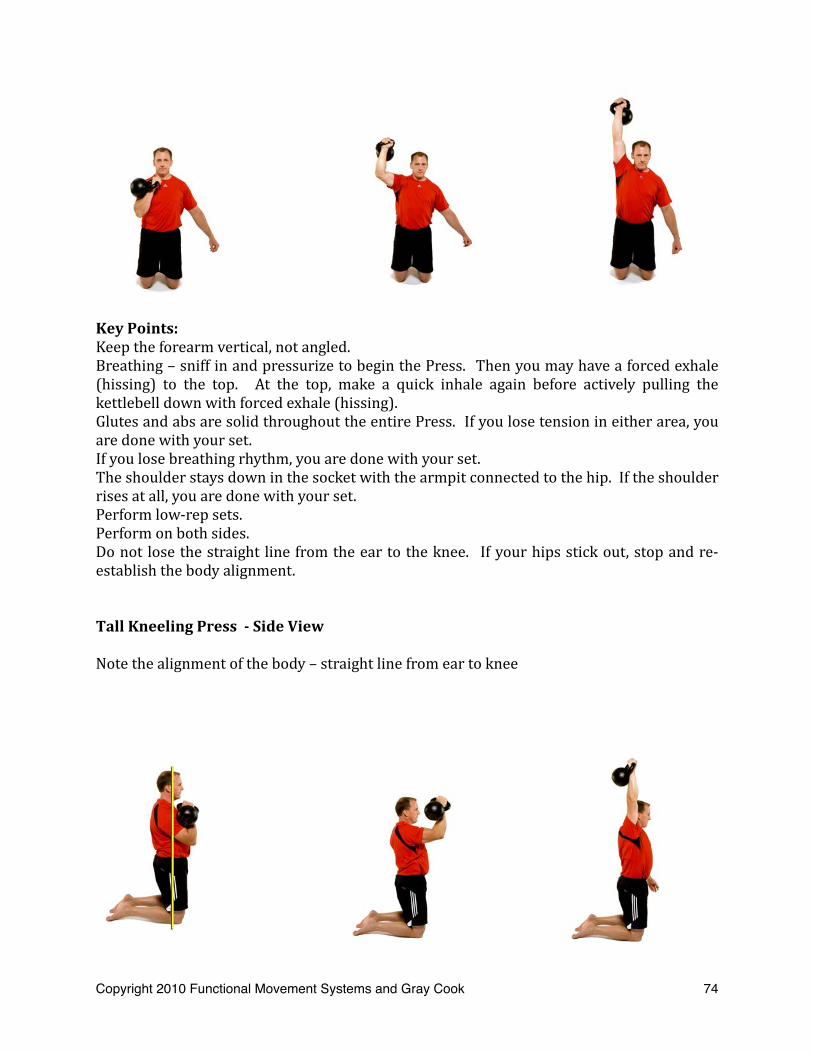
Key Points:Keep the forearm vertical, not angled.Breathing – sniff in and pressurize to begin the Press. Then you may have a forced exhale (hissing) to the top. At the top, make a quick inhale again before actively pulling the kettlebell down with forced exhale (hissing).Glutes and abs are solid throughout the entire Press. If you lose tension in either area, you are done with your set.If you lose breathing rhythm, you are done with your set.The shoulder stays down in the socket with the armpit connected to the hip. If the shoulder rises at all, you are done with your set.Perform low‐rep sets.Perform on both sides.Do not lose the straight line from the ear to the knee. If your hips stick out, stop and re‐establish the body alignment.
Tall Kneeling Press Side View
Note the alignment of the body – straight line from ear to knee
Copyright 2010 Functional Movement Systems and Gray Cook 74

Slow Strength – The Press
1 KB Press
Purpose: Strengthening the KB Press under an asymmetrical load
Execution:Perform a 1 KB Clean.Remember that your Rack Position/top of the Clean has the knees pulled up, glutes tight, and abs tight, as though you are made of cement from the chest down.Perform the Press as detailed in the Tall Kneeling Press.
Key Points:Now that you are standing, you will make a straight line down from the ear to the ankle – knees “pulled up”, glutes tight, and abs tight.Finish your Clean before starting your Press. There should be a brief second where the Clean is completed and the body is solid before starting the Press.You may not use the legs to start the Press.You may not lean back or lose tension in the glutes or abs.Press smoothly – don’t “blast off”.All of the pressing cues from the Tall Kneeling Press apply – vertical forearm, opening up, perfect lockout, pulling the kettlebell down, breathing, shoulder packed, etc.Keep the eyes focused straight ahead.
Highlight Individual Arc in PressNotice the difference in this halfway position vs. the other. You must Aind your individual arc.
Copyright 2010 Functional Movement Systems and Gray Cook 75

2 KB Press
Purpose: To practice symmetrical strength in the Overhead Press
Execution:Perform a 2 KB Clean.Remember, you are made of cement from the chest down, and there is a brief second between Ainishing the Clean and beginning the Press.From the Rack Position, inhale and pressurize, and perform a simultaneous press with both arms to the perfect Lockout Position.Actively pull the kettlebells back to the Rack Position.Reset for the next rep or safely put the kettlebells down.
Key Points:All pressing tips for a 1 KB Press (Tall Kneeling or Standing) apply but must now be applied equally to both arms at once.You may not use the legs to start the Press.You may not lean back or lose tension in the glutes or abs.Press smoothly – don’t “blast off”.Keep the eyes focused straight ahead of you.
Copyright 2010 Functional Movement Systems and Gray Cook 76

Symmetry – The Bottom Up Press
2 KB Bottom Up PressPurpose: To check symmetrical strength in the Overhead Press
Execution:Perform a 2 KB Bottom Up Clean.Once at the top of the Bottom Up Clean, perform a 2 KB Press, keeping the kettlebells in the perfect Bottom Up Position.Actively pull the kettlebells back down to the starting position.
Key Points:Remember to have practiced the 2 KB Bottom Up Clean to perfection before moving into the 2 KB Bottom Up Press.Notice at the Lockout you will be looking up at the kettlebells vs. looking straight ahead as in the other Presses.The kettlebells must remain steady and perfect. Be in a position to, and be ready to, “bail out” if necessary.All Pressing cues from the 2 KB and 1 KB Press apply.
Copyright 2010 Functional Movement Systems and Gray Cook 77

Coach’s Corner – Patterning the Press
Weight Shift and Alignment of Shoulder and Body
As stated earlier, a slight kicking out of the hip on the weighted side can occur on a heavy 1 arm Press. This isn’t it. When patterning the Press and looking for symmetry, a “neutral” position must be located to have a starting position. Square hips and shoulders with straight, even lines from ankle to shoulder give us this beginning position. Light weights and a lack of body awareness or a casual attitude can create bad movement patterns. The concept of leakage has been well covered. Just remember that it applies universally.
Right Foot Outturn and Proper Alignment
Note the loss of alignment on the right foot, knee, and hip. Although this is the Press section, Brett’s ongoing hip dysfunction drama gives us the opportunity to reinforce the point that there are no small points.
If you are training athletes, this loss of alignment under minimal nervous system stimulation and stress should be noted and addressed. This is not the “razor’s edge” positioning of the hip, knee, and ankle that we would like to see when and athlete sprints. Also, if this happens in an open chain movement, what is going on under the load of a heavy Squat or Deadlift? Everything is another opportunity for assessment. Every stimulus creates or reinforces adaptation. The question that you have to continually ask yourself as a coach or trainer is whether that adaptation is positive or negative.
Copyright 2010 Functional Movement Systems and Gray Cook 78

Hips Underneath and In Alignment
Aligning your structure to support the Press and Push Press is critical and the Tall Kneeling Press provides an excellent opportunity to learn how to get your hips underneath you and properly align yourself.
Loss of alignment is easily noted if there is any lean back or if the hips get “stuck out” behind you instead of staying stacked underneath the shoulders.
Coach’s Corner – Slow Strength – Press
Individual Pressing Arcs
One common mistake is trying to exactly duplicate someone else’s movement. This is especially true in the Press. Your individual structure, strength, and mobility will dictate the pressing groove. Be aware that as your strength and mobility change, your pressing groove might also. Focus on the tips provided and allow the groove to take care of itself.
Another mistake is “panicking” and bumping the weight with the body to start the Press. Save push pressing until you’ve earned it and get the full benefit from it. A great cue from Pavel is to visualize that you are pushing yourself away from the weight. Slow strength is first for a reason. Own it.
Remember that the Press is set up by and only as good as the Clean. Skipping mastery of this skill will keep you from optimizing the Press. Mastery of the Press is a requirement for Push Presses. Walk before you run.
Copyright 2010 Functional Movement Systems and Gray Cook 79
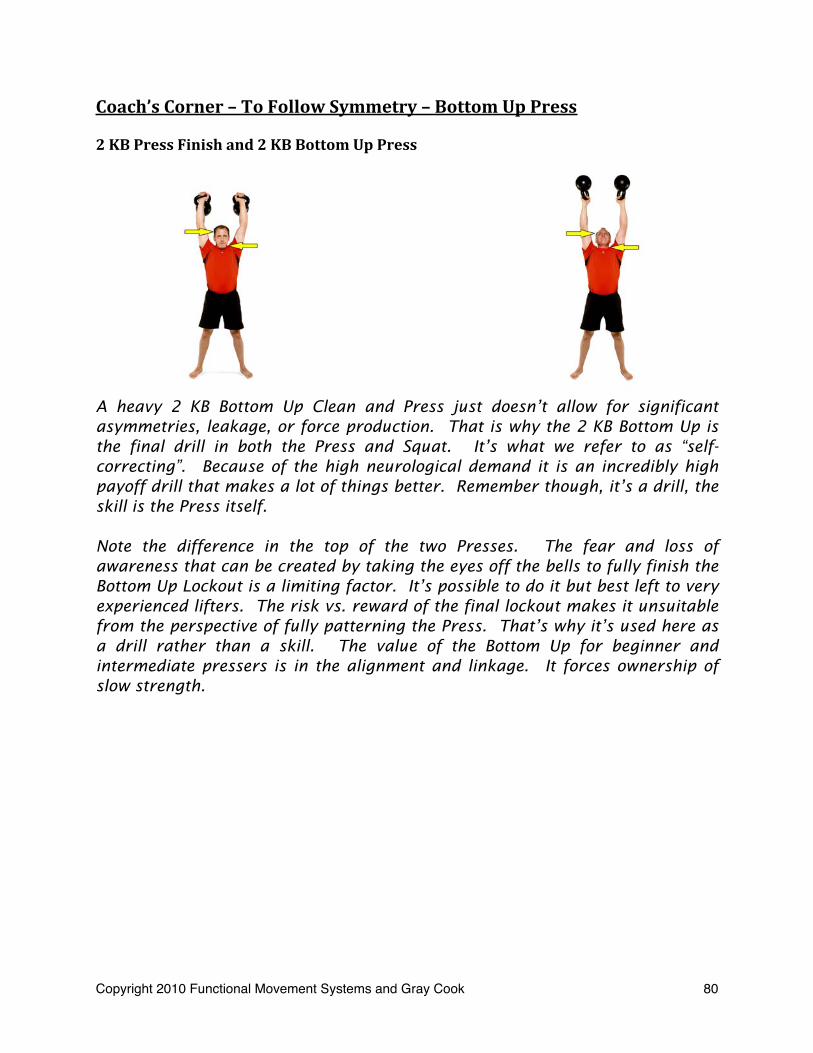
Coach’s Corner – To Follow Symmetry – Bottom Up Press
2 KB Press Finish and 2 KB Bottom Up Press
A heavy 2 KB Bottom Up Clean and Press just doesn’t allow for significant asymmetries, leakage, or force production. That is why the 2 KB Bottom Up is the final drill in both the Press and Squat. It’s what we refer to as “self-correcting”. Because of the high neurological demand it is an incredibly high payoff drill that makes a lot of things better. Remember though, it’s a drill, the skill is the Press itself.
Note the difference in the top of the two Presses. The fear and loss of awareness that can be created by taking the eyes off the bells to fully finish the Bottom Up Lockout is a limiting factor. It’s possible to do it but best left to very experienced lifters. The risk vs. reward of the final lockout makes it unsuitable from the perspective of fully patterning the Press. That’s why it’s used here as a drill rather than a skill. The value of the Bottom Up for beginner and intermediate pressers is in the alignment and linkage. It forces ownership of slow strength.
Copyright 2010 Functional Movement Systems and Gray Cook 80

The Push Press
The Deadlift lead directly to the Dynami of the Swing, but we had to go through the Squat and the Press to end up at the Dynami of the Push Press. Now that the pieces are in place, integrating the Squat into the Press is all that is left.
Contrary to popular gym mythos, I do not feel that Push Presses are the way to work toward pressing a heavier weight. There are other more effective ways to do that. The Push Press is a tremendous exercise in Kinetic Linking as discussed in the opening of this manual.
There are again a few aspects of the Push Press to highlight before the exercise descriptions themselves:
1) Mini Squat?2) Arm Against Ribs3) Blastoff is Different From Pressing4) How to Descend5) Long Push Press6) Keep Your Feet Grounded
Mini Squat?While nothing like your favorite mini bar, the Mini Squat is an essential athletic maneuver. Look at how athletes load up to jump or change direction and you will see a shallow Squat or move into the hips. So why did we spend so much time patterning and training a full Squat? Because having access to the full pattern is really important. It opens up a great buffer zone of safety because you are not bumping into your maximum depth and restrictions every time you want to move. Also, the squatting pattern is more important than the exercise. Huh?
A full and unrestricted Squat can tell us a lot about your movement restrictions. See functionalmovement.com for details.
Arm Against RibsOnce again, the cue to keep the arm against the ribs will be repeated many times during the exercise descriptions for the Push Press. Since kinetic linking is the goal of the exercise, it should make sense to be linked until the energy created literally drives the arm off of your body. If the arm disconnects too soon, you will have to press the weight, since the energy created by the drive will be lost. Or you will have to create a second drive of energy from the wrong places (upper traps or lower back) in order to get the weight overhead.
Copyright 2010 Functional Movement Systems and Gray Cook 81
The key to all of this “keep the arm against the ribs” stuff is patience. That’s right, patience. Arms disconnect early because people are in a rush and focused outwardly on the weight instead of being focused inwardly on efAicient transfer of energy. So get some patience (it is a virtue, after all), and keep those arms against the ribs as long as possible.
Blastoff is Different From PressingIn looking at the photos for the Push Press, you will notice some obvious differences and contradictions from the Press. But the apparent contradictions are not contradictions at all. You just tried to bring one answer over from another part of the test. Another way to put this is to paraphrase a famous title – “Yes, Virginia, there is more than one answer.”
Blastoff of a weight from the Rack Position is different from the slow, high‐tension grind of a Press from the Rack. In blastoff, the energy seeks a straight line to the top, so the arc and key points of the Press are not used here. The weight will be much closer to the head and driven up in a more vertical manner. Pressing in a slow grind requires an entirely different set of angles and support.
How to DescendThere are two options for descending once you are at Lockout. Recreate the active pull down from the Press, or let gravity do its job and have a quick descent. These are described in the exercise description section. Both have beneAits and should be mixed into the programming (which you will see in the programs recommended in the manual). Remember in the Breathing section of the manual where cyclic vs. rhythmic was described? Here is yet another opportunity to mix and disrupt breathing patterns, creating additional training stress and conditioning.
Long Push PressPay attention to this exercise, both on the DVD and the exercise descriptions here, because it is worth your time. Driving energy smoothly from a full Squat through to a full Lockout provides incredible time under tension, kinetic linking, breathing stress and conditioning beneAits. The key here again is patience. It is especially critical to keep the arms against the ribs and to fully transfer the energy to the weight at the right moment.
Copyright 2010 Functional Movement Systems and Gray Cook 82
Keep Your Feet GroundedDrive your feet down in order to drive the weight overhead. Sound familiar?One of the mistakes seen in the Push Press is bringing the feet off of the ground or coming up on the toes in an effort to lift the weight to the top. This is not the style of Push Press recommended here. Drive your feet into the ground. Drive your energy into the ground. Crisply extend the hips, pushing energy down so it can rebound through you to the weight. Losing your connection to the ground shows a lack of patience and focus on the weight, not on the energy transfer through the body.
For the Push Press, Swing, Deadlift and Press, I want to see an impression left in the ground by your feet.
Copyright 2010 Functional Movement Systems and Gray Cook 83
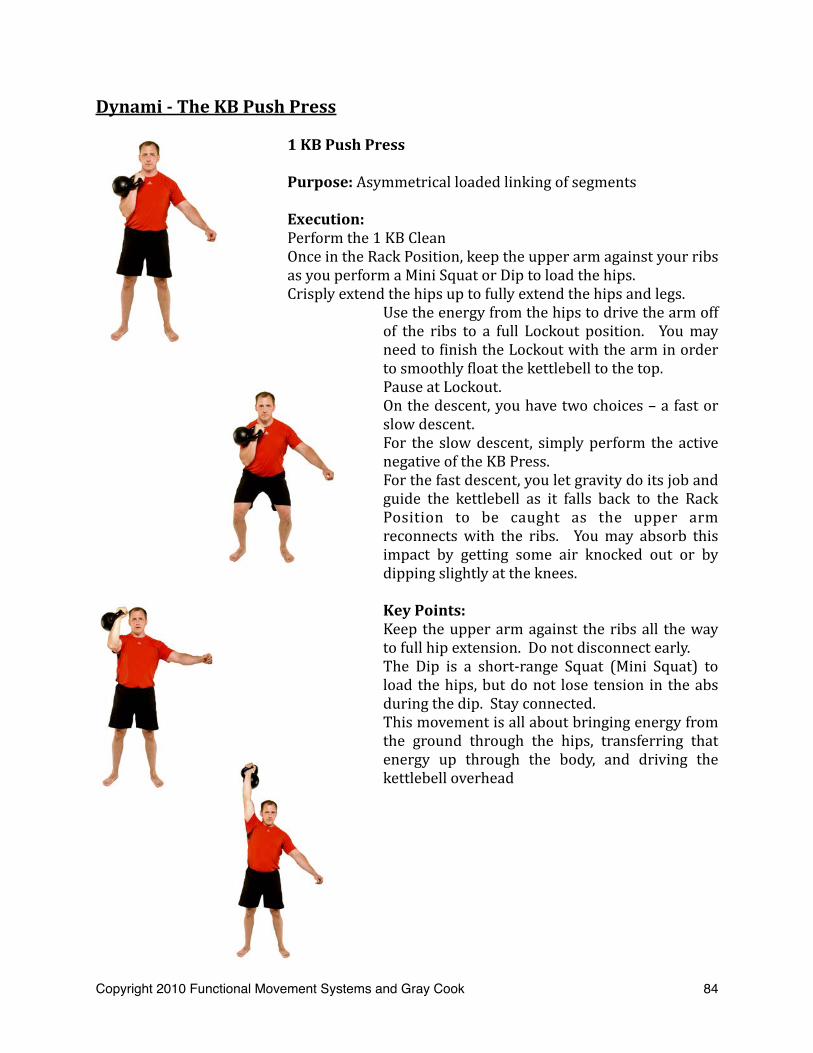
Dynami The KB Push Press
1 KB Push Press
Purpose: Asymmetrical loaded linking of segments
Execution:Perform the 1 KB CleanOnce in the Rack Position, keep the upper arm against your ribs as you perform a Mini Squat or Dip to load the hips.Crisply extend the hips up to fully extend the hips and legs.
Use the energy from the hips to drive the arm off of the ribs to a full Lockout position. You may need to Ainish the Lockout with the arm in order to smoothly Aloat the kettlebell to the top.Pause at Lockout.On the descent, you have two choices – a fast or slow descent.For the slow descent, simply perform the active negative of the KB Press.For the fast descent, you let gravity do its job and guide the kettlebell as it falls back to the Rack Position to be caught as the upper arm reconnects with the ribs. You may absorb this impact by getting some air knocked out or by dipping slightly at the knees.
Key Points:Keep the upper arm against the ribs all the way to full hip extension. Do not disconnect early.The Dip is a short‐range Squat (Mini Squat) to load the hips, but do not lose tension in the abs during the dip. Stay connected.This movement is all about bringing energy from the ground through the hips, transferring that energy up through the body, and driving the kettlebell overhead
Copyright 2010 Functional Movement Systems and Gray Cook 84

1 KB Push Press Side View
Highlight Difference Between Fast and Slow Descent
Notice the different paths of the kettlebell’s descent – can you tell which one is the slow descent and which is the fast descent?
Copyright 2010 Functional Movement Systems and Gray Cook 85
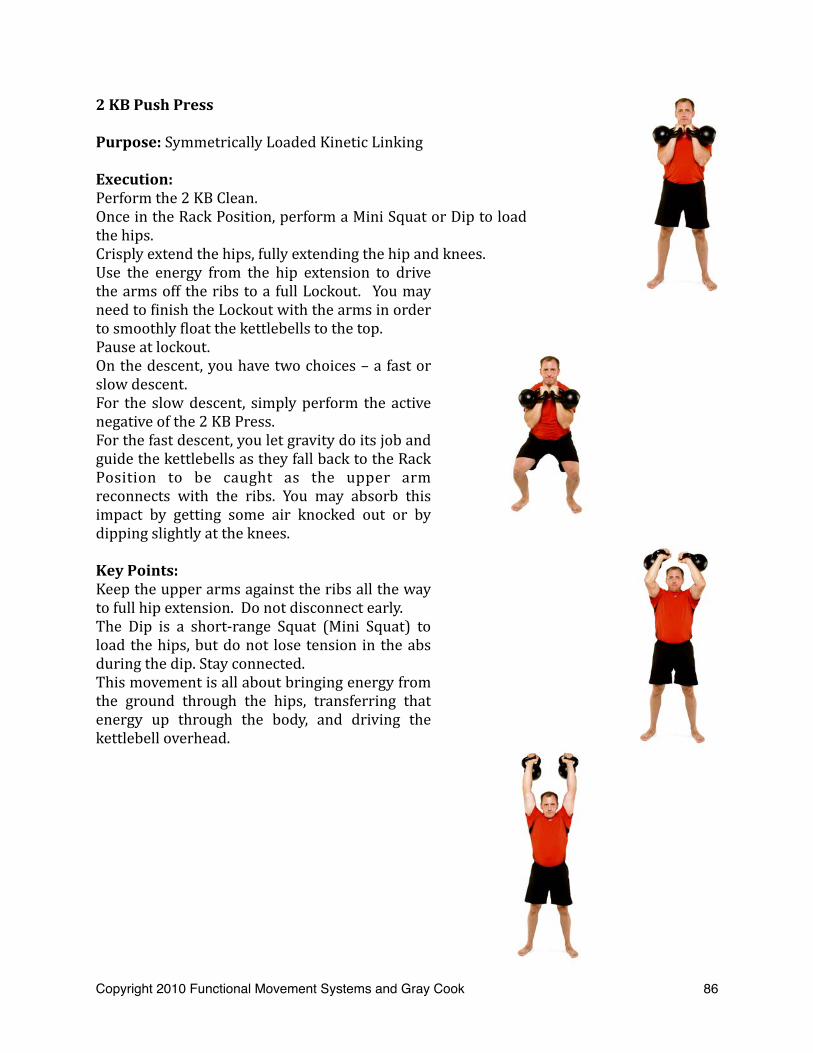
2 KB Push Press
Purpose: Symmetrically Loaded Kinetic Linking
Execution:Perform the 2 KB Clean.Once in the Rack Position, perform a Mini Squat or Dip to load the hips.Crisply extend the hips, fully extending the hip and knees.Use the energy from the hip extension to drive the arms off the ribs to a full Lockout. You may need to Ainish the Lockout with the arms in order to smoothly Aloat the kettlebells to the top.Pause at lockout.On the descent, you have two choices – a fast or slow descent.For the slow descent, simply perform the active negative of the 2 KB Press.For the fast descent, you let gravity do its job and guide the kettlebells as they fall back to the Rack Position to be caught as the upper arm reconnects with the ribs. You may absorb this impact by getting some air knocked out or by dipping slightly at the knees.
Key Points:Keep the upper arms against the ribs all the way to full hip extension. Do not disconnect early.The Dip is a short‐range Squat (Mini Squat) to load the hips, but do not lose tension in the abs during the dip. Stay connected. This movement is all about bringing energy from the ground through the hips, transferring that energy up through the body, and driving the kettlebell overhead.
Copyright 2010 Functional Movement Systems and Gray Cook 86

2 KB Long Push Press
Purpose: Incorporate a full Squat into the Push Press, lengthening the time under load and increasing the abdominal tension and conditioning impact
Execution:Perform the 2 KB Clean and SquatAs you are coming out of the Squat, keep the arms against the ribs and accelerate the body crisply to Lockout, transferring the energy from the hips to the kettelbells and driving them to Lockout. You may need to Ainish the Lockout with the arms in order to smoothly Aloat the kettlebells to the top.Pause at Lockout.On the descent, you have two choices – a fast or slow descent.For the slow descent, simply perform the active negative of the 2 kettlebell press.For the fast descent, you let gravity do its job and guide the kettlebell as they fall back to the Rack Position to be caught as the upper arm reconnects with the ribs. You may absorb this impact by getting some air knocked out or by dipping slightly at the knees.
Key Points:Keep the upper arms against the ribs all the way to full hip extension. Do not disconnect early.This movement is all about bringing energy from the ground through the hips, transferring that energy up through the body, and driving the kettlebells overhead.This can be performed with one or two kettlebells.
Copyright 2010 Functional Movement Systems and Gray Cook 87
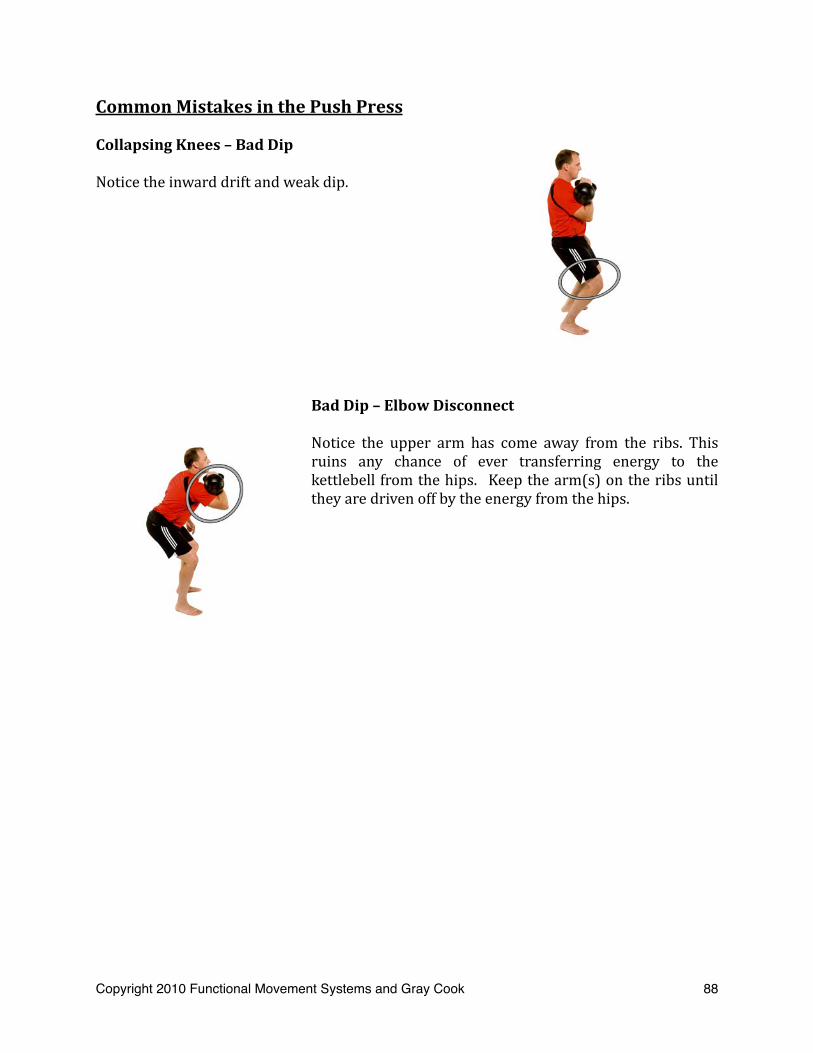
Common Mistakes in the Push Press
Collapsing Knees – Bad Dip
Notice the inward drift and weak dip.
Bad Dip – Elbow Disconnect
Notice the upper arm has come away from the ribs. This ruins any chance of ever transferring energy to the kettlebell from the hips. Keep the arm(s) on the ribs until they are driven off by the energy from the hips.
Copyright 2010 Functional Movement Systems and Gray Cook 88

Coach’s Corner – The Push Press
Center of Mass of the Kettlebell and the Difference Between Bottom Up and Rack Position
Anytime you add external load to the body it will automatically try to become efficient in the way it balances the load and forms a combined center of gravity. It does this because it doesn’t know how long it will be required to hold this load and is trying to conserve energy. For our purposes, however, we don’t want to allow this.
Note that even though the combined center of gravity changes in the two photos, nothing but the arm holding the kettlebell does. The hips and shoulders remain square and the torso is even and braced. Slouching to allow a more efficient combined center of gravity would promote energy leakage and lessen the desired training effect.
Depth of the Dip and Alignment
Remember, the Squat is the skill, the Push Press is the drill. Dropping too deep into a Squat causes you to miss out on the stretch reflex and will diminish the drive. It’s a “Dip” or “Mini-Squat”. The range is dependent on the individual and load. However, the thing to keep in mind is to go just low enough to make the Press smooth and strong. Save the Squats for Long Presses and...... Squats.
Copyright 2010 Functional Movement Systems and Gray Cook 89
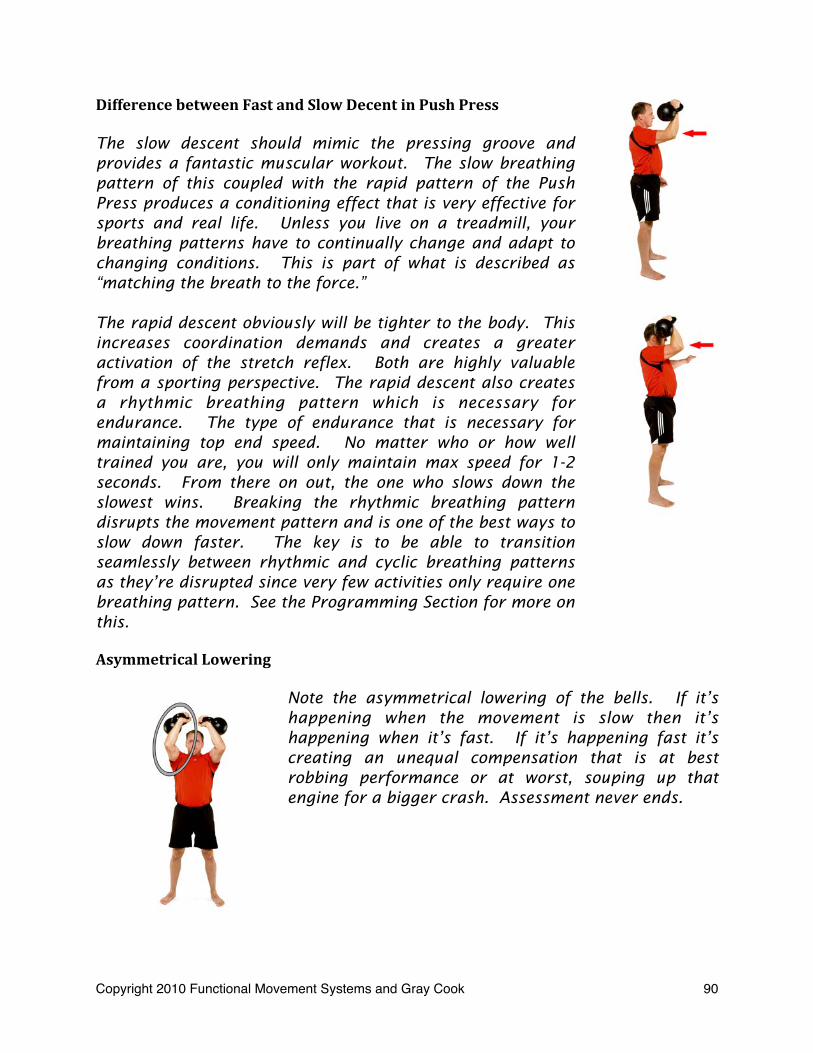
Difference between Fast and Slow Decent in Push Press
The slow descent should mimic the pressing groove and provides a fantastic muscular workout. The slow breathing pattern of this coupled with the rapid pattern of the Push Press produces a conditioning effect that is very effective for sports and real life. Unless you live on a treadmill, your breathing patterns have to continually change and adapt to changing conditions. This is part of what is described as “matching the breath to the force.”
The rapid descent obviously will be tighter to the body. This increases coordination demands and creates a greater activation of the stretch reflex. Both are highly valuable from a sporting perspective. The rapid descent also creates a rhythmic breathing pattern which is necessary for endurance. The type of endurance that is necessary for maintaining top end speed. No matter who or how well trained you are, you will only maintain max speed for 1-2 seconds. From there on out, the one who slows down the slowest wins. Breaking the rhythmic breathing pattern disrupts the movement pattern and is one of the best ways to slow down faster. The key is to be able to transition seamlessly between rhythmic and cyclic breathing patterns as they’re disrupted since very few activities only require one breathing pattern. See the Programming Section for more on this.
Asymmetrical Lowering
Note the asymmetrical lowering of the bells. If it’s happening when the movement is slow then it’s happening when it’s fast. If it’s happening fast it’s creating an unequal compensation that is at best robbing performance or at worst, souping up that engine for a bigger crash. Assessment never ends.
Copyright 2010 Functional Movement Systems and Gray Cook 90

Movement Prep
Movement prep is a strategy for preparing for training by addressing speciAic areas of restriction, concern, or patterns that will be challenged during the training session. For most people the hips (speciAically the hip Alexors) and shoulders (speciAically the thoracic spine) are in need of a bit of attention before loading during a workout. These movement prep moves should open the pattern so that you can achieve better alignment and move force through the body efAiciently without having to travel around restrictions. Please review these movements on the DVD.
It is recommended that you seek out a Functional Movement Screen specialist for a complete movement screen (details on www.functionalmovement.com) and we recommend that you have spent your time working on the Get‐up from Kettlebells from the Ground Up ‐ Kalos Sthenos.
Kalos Sthenos – Ankle and TSpine Mobility – Open ½ Kneeling, Ankle, TSpine
Begin in a Tall Kneeling Position, then move the left leg up and open to the left so that the left foot and leg line up with the right knee. The left knee is at 90 degrees with the foot Alat and is up pointed straight away to the left. The hips stay squared off and straight ahead with the right shin pointed straight back.
Move forward into the left ankle, bringing the left hand to the ground just inside the left foot. Perform 10‐20 small movements forward and back, rocking into the ankle without collapsing the arch.
Copyright 2010 Functional Movement Systems and Gray Cook 91

Move back to the start position. While keeping the spine straight, hinge into the right hip and bring the right hand to the ground while keeping the right arm straight.
Lift the left arm to the sky (straight line down to the right hand)
While keeping the hips and right arm still, reach down, inside and behind the right hand.
Exhale as you turn, reaching behind you. Then inhale and return to stretch the left arm up and slightly behind you.
Repeat 5 times.
Repeat the sequence on the other side.
Hip Flexor Mobility
Begin in ½ Kneeling (right knee up, left knee down), then extend the left leg back behind you. Point the toes away and straighten the left leg as you drop into a deep lunge, bringing the hands to the ground inside of the right leg, but place the right hand on the right big toe.While in the deep lunge, use the right hand to stabilize the right foot and circle the right knee (clockwise and counterclockwise), keeping the arch from collapsing.
Next, keep the left hand on the ground as you turn the shoulders toward the right and reach back to catch the left foot with the right hand, getting into a quad stretch while dropping the left hip toward the ground.Release the left foot and continue to shift the hips from side to side, Ainding any tightness or restriction.
Repeat on the other side.
Copyright 2010 Functional Movement Systems and Gray Cook 92
BreathingCritical during the movement prep is your breathing. While performing a movement for mobility, you will use the anatomical breathing described earlier in the manual. If you get compressed during the movement, let air get released. If you expand during the stretch, inhale. Pay special attention to any movements or positions where you lose or hold your breath. Stay in that position until you can breathe freely and easily.
Depth of a Stretch
“How deeply do I go into a stretch?”
“Do I have to do what the person on the DVD did?”
As to the Airst question of how deeply to move into a stretch or movement prep position, it is recommended that you only go until you Aind the beginning of the stretch do NOT continue until you have a maximum stretch. If you will begin at the beginning and ease into the positions your body will be more likely to open up willingly and more effectively. If you push into “as much stretch as you can take” and create pain or loss of breathing then your body will Aight you and it is a Aight you may lose.
For the second question the answer is NO you do not have to “copy” or replicate the positions I achieve on the DVD or pictures. If you follow the guidelines above and Aind the beginning of the stretch not the maximum stretch and focus on your breathing and alignment then you will Aind YOUR best stretch/movement prep position.
Copyright 2010 Functional Movement Systems and Gray Cook 93

Programming
As noted earlier in the manual, “It’s all in the recipe or in how you mix the ingredients.” Each recipe results in a different dish with Alavors unique to it but sometime the ingredients must be added in speciAic order to achieve the desire taste. And you thought being a Chef was easy.
What this means in reference to the programming for this manual is that we will be mixing the movements, slow strength, symmetry, Dynami and breathing patterns to achieve different effects from the workout. SpeciAically workouts designed for Strength, Metabolic Conditioning, Power and Neural Load.
A quick note on what weight kettlebell you should select for the workouts, you should select the appropriate weight for you. I cannot tell you which weight you should select speciAically but can tell you that it is the weight that makes the movement best. For a strength move it means a weight that requires perfect alignment but doesn’t push you into compensating. For a power move it means a weight that you can move with power but one that requires the correct alignment and force application. If the weight is too light it will Alop or feel out of control. Use your judgement to select the appropriate weight and if during a training session you realize the weight is too heavy and causing you to break form then go lighter or if the weight is too light to enforce good form then go a notch heavier. But it is your judgement.
Any of the programming suggestions below are only suggestions. If you are the “round peg” do not try to Ait into the “square hole”, in other words be willing to adjust to your individual needs.
Not So fast...
Before you get too excited remember that this manual and DVD are based on a sequence that leads to power by developing the proper base to support it so the Airst program is based on developing the patterning for each movement.
Copyright 2010 Functional Movement Systems and Gray Cook 94

Patterning Program #1Movement Prep DrillsTouch the Wall Drill x 20 reps x 3 setsOverhead Rotations x 5 reps each direction x 3 setsOverhead Marching (or walking) x 15 seconds each side x 3 setsAlternating sets of:Tall Kneeling Press x 5 reps each side x 3 setsGoblet Squat x 5 reps x 3 setsStretch and Movement Prep Drills
This program could have many variations please select the patterning drills that Ait your level of experience and your needs. You may need more squat patterning than overhead patterning etc... Just remember that this is a critical step in earning your power!
Patterning Program #2Movement Prep Touch the Wall Deadlift x 20 reps x 3 setsOverhead Marching x 15 seconds each side x 3 setsCurl Goblet Squat x 5 reps x 5 setsCheat Clean x 10 reps each side x 3 sets1 KB Bottoms Up Clean x 5 reps each side x 3 sets2 KB Single Leg Deadlift (SLDL) x 5 reps each side x 3 setsStretch and Movement Prep Drills
Another example of a program designed to gain familiarity with the movements and learn the proper pattern and positions. Work on the Cheat Clean, 1 KB Bottom Up Clean etc.... is also included since you should have great familiarity with those movements before loading them for strength. Again you should adjust the exercise selection and reps to Ait your needs and abilities.
A Quick Note on Reps
Repetition suggestions are only suggestions. If the “program” calls for 20 reps but you start to lose form on rep 11 then you to stop at rep 11. Period! This is critical not only for safety but for learning as well. If 11 out of 20 reps are good and the last 9 are poor form then your body will learn more from the poor reps. Yes you will go through the learning process of Ainding your form to begin with (which may include some less than perfect reps) but if you are now approaching these programs for patterning and conditioning the patterns you need to stop when form deteriorates.
Copyright 2010 Functional Movement Systems and Gray Cook 95

This is also important for strength work and power work. You should know you are going to successfully complete the next rep with great form. If you wiggle, shift and compensate for the last rep it didn’t count and you should have stopped with the previous rep. For power work the set is terminated when the kettlebell slows down. A loss of power (the kettlebell slowing down) means you need to stop the set and rest before beginning again.
To recap, repetitions provided in a program are only suggestions. Use the guidelines above and your judgement to stop the set when appropriate regardless of what the program says.
Strength Programs
Strength Program #1 Deadlift Symmetry, Pressing Slow Strength, Squat PatterningMovement Prep Drills1 KB Deadlift x 20 reps each side x 1 set 1 KB Single Leg Deadlift (SLDL) Contralateral x 8‐10 reps each leg x 3 sets2 KB Press x 3‐5 reps x 3‐5 sets1 KB Squat x 5 reps each side x 5 setsStretch and Movement Prep Drills
Strength Program #2 Deadlift Strength, Pressing Symmetry, Squat StrengthMovement Prep Drills2 KB Deadlift x 10 reps x 5 sets2 KB Bottom Up KB Press x 3 reps each side x 3 sets1 KB Squat x 5 reps each side x 5 setsStretch and Movement Prep Drills
Strength Program #3 Deadlift Patterning, Pressing Slow Strength, Squat SymmetryMovement Prep Drills2 KB Bottom Up KB Squat x 3 reps x 3 sets1 KB Press x 5 reps each side x 5 sets1 KB Deadlift x 10 reps each side x 5 setsStretch and Movement Prep Drills
Strength Programs can be any combination of Symmetry Drills, Slow Strength Drills and heavier Patterning Drills. Mix and match to hit the areas you need for your individual situation. Rest between sets as long as necessary to ensure perfect form and successful completion of the next set.
Copyright 2010 Functional Movement Systems and Gray Cook 96

Power Programs
Power Program #1Movement Prep Drills1 Arm KB Swing x 10 reps each side x 5 sets2 KB Push Press x 5 reps x 10 setsStretch and Movement Prep Drills
Power Program #2Movement Prep Drills2 KB Swing x 5‐8 reps x 5‐8 sets1 KB Push Press x 5‐8 reps per side x 8 setsStretch and Movement Prep Drills
Power Programs can be any combination of a Swing Dynami movement and Push Press Dynami movement including the Long Push Press (even a Long Push Press with a Clean between each rep). Rest between sets long enough to ensure perfect form and successful completion of the next set. Focus on speed of the movements
Metabolic Programs
Metabolic Program #1Movement Prep Drills2 KB Push Press with Slow Descent x 5Superset with1 KB Swing x 10 each sidex 5‐10 supersetsStretch and Movement Prep Drills
Metabolic Program #2Movement Prep Drills1Kb Push‐Press with Quick Descent x 10 each armSuperset with 2 Kb Squat x 5 repsx 5‐10 supersetsStretch and Movement Prep Drills
Copyright 2010 Functional Movement Systems and Gray Cook 97

Metabolic Program #3Movement Prep Drills2 KB Press x 5 repsTri‐set with2 KB Squat x 5 repsTri‐set with2 KB Push Press with Quick Descent x 5 repsx 5‐10 Tri‐setsStretch and Movement Prep Drills
Metabolic Programs are designed to stress conditioning and calorie burning. The programs listed here focus on switching between Cyclic and Rhythmic Breathing patterns. Metabolic Programs could also be as simple as timed intervals of Swings, for example: 30 seconds on and 30 seconds rest of Swings x 10 ‐ 20 sets, or Time Interval Ladders (see below).
Time Interval Ladder1st Rung/set of the ladder: 15 seconds work with 45 seconds recovery2nd Rung/set of the ladder: 30 seconds work with 30 seconds recovery3rd Rung/set of the ladder: 45 seconds work with 15 seconds recoveryrepeat the ladder for the desired number of setsThis could be used for any of the Swing or Push Press variations or in combination.
Neural Load Programs
Neural Load Program #1 Upper Body FocusMovement Prep DrillsOverhead Marching/Walking x 30 seconds each arm x 3 setsTall Kneeling Press x 5 reps each arm x 3 sets1 KB Push Press x 5 reps each arm x 3 setsStretch and Movement Prep Drills
Neural Load Program #2 Lower Body FocusMovement Prep Drills1 Kb Single Leg Deadlift (SLDL) Contralateral x 5 reps each leg x 3 setsCurl Goblet Squat x 5 reps x 3 setsSide Stepping Swing x 10 “steps”/Swings x 3‐5 setsStretch and Movement Prep Drills
Copyright 2010 Functional Movement Systems and Gray Cook 98

Neural Load Program #3 Breathing FocusMovement Prep Drills Goblet Squat x 10 repsBreathing Ladder Swings (see below)Stretch and Movement Prep Drills
Breathing Ladders are a technique to match number of breaths with number of breaths between sets. This forces breath control and slow diaphragmatic breathing.
For example: 2:1 Reps to Breathing Recovery ratio1 KB Swing Right + 1 KB Swing Left = 1 breath “recovery”2 KB Swings Right + 2 KB Swing Left = 2 breaths “recovery”3 Swings each arm (6 total reps) = 3 breathsAnd so on...up to 10 reps each arm with 10 breaths “recovery”This could also be done on a 1:1 Reps to Breathing recovery ratio (1 right + 1 left = 2 breaths). Rob Lawrence a former RKC Airst wrote about Breathing Ladders in this article on dragondoor.com: http://www.dragondoor.com/articler/mode3/72/
Neural Load training is designed to place less stress on metabolic, strength or power and more stress on the neurological aspects of training. Overhead Walking or Marching will tax the stabilizing system/motor control and produce some “shoulder fatigue” but it is a very different stress than 5 sets of a heavy Kettlebell Press. Heavy Kettlebell Presses will cause stress to the muscle tissue and increase the metabolic demands of the tissues. Neural Load training seeks to target motor control but not increase the metabolic demands of the muscles in the patterns worked.
Breathing Ladders will tax breath control and should be terminated if you hit a panic state of breathing. Meaning you begin “gasping” for breath or if you have to take more breaths than planned by your Reps to Breath ratio.
Programming Wrap Up
As you can see there are quite a few ingredients that can go into a given recipe/workout. The key is to know what you want to achieve from the workout. If you are designing a Metabolic Workout then be careful about putting heavy Strength work in the mix. Select the kettlebell weight according to the desired outcome as well. For example: lighter weights for Neural Load training, moderate weights for Power training, Heavy (for you) weights for Strength work etc...
Copyright 2010 Functional Movement Systems and Gray Cook 99

You can cycle the workout goals in two week “blocks” (power workouts for two weeks followed by strength workouts for two weeks) or mix the workout goals in a weekly rotation (strength, power, metabolic three days a week for three weeks and then one week of neural load training).
Remember that all recommendations are just that recommendations not unbreakable laws and you should follow the guidelines provided in adjusting rep ranges, weights, and everything in the recommendations to Ait your individual situation.
Special Author’s Note in regards to the use of the term High Tension and High Tension Techniques
In the DVD you can hear me talk about using Maximum Tension and High Tension for the Slow Strength Sections. Some of you may hear this and misinterpret what I intended to come across in the DVD.
When I refer to high tension and maximal tension I am referring to the use of tension in preventing “leakages of strength”. In a Press if the knee caps are not pulled up with the legs straight or if the knees are bent this is an area where energy for the Press can “leak” away from you. But this does not mean you should become a “Frankenstein” lifter with a tense and robotic effect.
Instead, as Pavel has so eloquently stated, you use as much tension as you can so that it HELPS with the lift but does not become the FOCUS of the lift. Being tense is not the goal of the lift but rather the pressing or squatting of the kettlebell is the goal. Tension just makes the Press better if used in the appropriate manner.
See Pavel’s Fast and Loose DVD for details on how Relaxation Drills can help you learn how to “shake off the tension”.
Copyright 2010 Functional Movement Systems and Gray Cook 100
Conclusion
In the end it all boils down to one thing. Patience.Patience to follow the program from patterning to slow strength to symmetry and eventually to power. Patience to allow for the proper linking of segments. And Patience in the earning of and application of power in your training.
This manual has set a suggested path to implement two of the best power moves around. Please allow for the patience to walk the path and not run before you are ready.
Special Thanks
We would like to send a special thanks to:Jeff O’ConnorPavelJohn DuCaneChris PoirierDanielle CookGeoff NeupertBrian Gill Paul Liggitt
Reference Section
The Greek word for power (dynami) can be found at:http://www.redroseministry.org/glossary_4.aspxDynami – power
The Greek spelling for Dynami comes from Google Translate - Δύναµη
Any mistakes in this manual are the fault of the author.
Copyright 2010 Functional Movement Systems and Gray Cook 101
Kettlebells From The Center ‐ Dynami
Following the popularity of the Kettlebells From the Ground Up – Kalos Sthenos DVD and manual, Brett Jones and I started planning our next project. We wanted to build on our interpretation of the nature of the Turkish get up. In Kalos Sthenos we introduced the get up, not as a lift, but as a self‐appraisal – a self‐screen if you will… We uncovered a user‐friendly model for mobility, stability, and movement right under our noses. We realized that the get up was not so much an awkward or difAicult lift – it was a way to frequently reconnect the circuits that give us coordination and are the source of our strength. By breaking the Turkish get up into 7 steps we forced ourselves and those we train to acknowledge the fundamental mobility and stability problems that were neglected and even reinforced with strengthening and conditioning efforts.
By cleaning up the “get up” – we were actually cleaning up movement patterns. Once movement patterns were clean, true conditioning and performance training could become the primary focus.
Having Kalos Sthenos behind us ‐ we wanted to introduce the fundamentals of strength and power training. We wanted to put the focus on a few well‐executed exercises and progressions instead of multiple exercise options. We wanted to create performance exercises for movement patterns not muscle groups. Once again we chose the kettlebell since it lends itself to unilateral training at both fast and slow speeds. We wanted to incorporate kettlebell movement training for the largest crosscetion of our exercising population – those in Aitness and athletics. We also chose basic pulling and pushing patterns. We also enlisted the help of Coach Jeff O’Connner as a resorce and co‐author for this manual. His insight working with young athletes as well as beat up old strong men has yielded a consistent theme that Aits every thing we do. Clean up movement, master your slow strength, and then make your slow strength functional by making it fast.
- Take time to move well… then move often…
Gray Cook
Copyright 2010 Functional Movement Systems and Gray Cook 102


