Download - instrucao AX relogio

7/30/2019 instrucao AX relogio
http://slidepdf.com/reader/full/instrucao-ax-relogio 1/20
2
ENGLISH
DATE MODELS
D nt chang th dat btwn
th hurs f 10pm and 2am. This is
th tim whn th mvmnt is in
psitin t carry ut th autmatic
dat chang, and any intrfrnc
may caus damag t th mvmnt.
Date Setting
1. Pull the crown out to position 1.
2. Turn the crown either clockwise or counter-clockwise and set the date
for the previous day. The direction that moves the date varies on different
watch models.
Time Setting
1. Pull crown out to position 2.
2. Turn counter-clockwise to advance the time and continue until the day changes
to the present day.
3. Set to the correct time.
ANALOG INSTRUCTIONS
Time Setting
1. Pull the crown out to position 2.
2. Turn the crown to set the hour and minute hands
to the desired time.
3. Return the crown to position 1.
0 1 2
Rotate to set hour &
minute hands. Date
advances with each
24 hour rotation of
hour hand.
RAPID CORRECTION
OF DATE
CLOSED
7/30/2019 instrucao AX relogio
http://slidepdf.com/reader/full/instrucao-ax-relogio 2/20
3
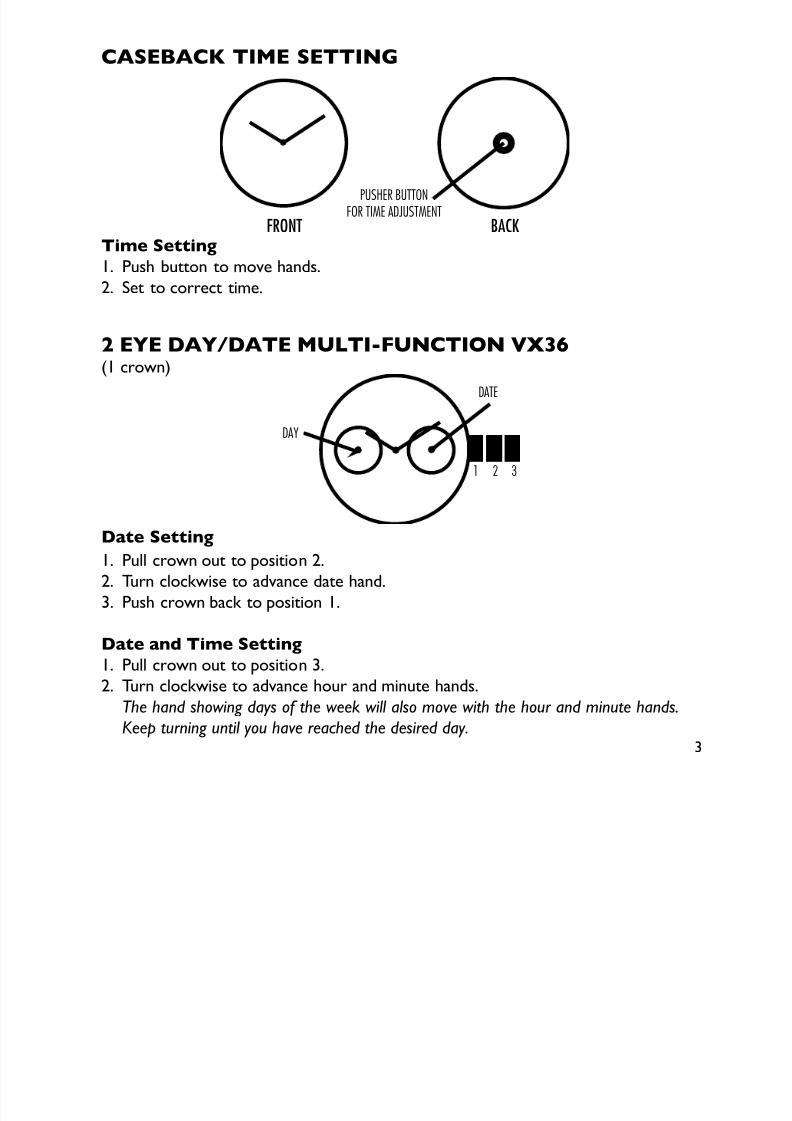
2 EYE DAY/DATE MULTI-FUNCTION VX36
(1 crown)
Date Setting
1. Pull crown out to position 2.
2. Turn clockwise to advance date hand.
3. Push crown back to position 1.
Date and Time Setting
1. Pull crown out to position 3.
2. Turn clockwise to advance hour and minute hands.
Th hand shwing days f th wk will als mv with th hur and minut hands.
Kp turning until yu hav rachd th dsird day.
FRONT
PUSHER BUTTON
FOR TIME ADJUSTMENT
BACK
CASEBACK TIME SETTING
Time Setting1. Push button to move hands.
2. Set to correct time.
1 2 3
DATE
DAY

7/30/2019 instrucao AX relogio
http://slidepdf.com/reader/full/instrucao-ax-relogio 3/20
4
THREE EYE MULTI-FUNCTION 6P29/6P79(1 crown)
Date Setting
1. Pull crown out to position 2.
2. Turn clockwise to advance the date hand.
3. Push crown back to position 1.
Day and Time Setting
1. Pull crown out to position 3.
2. Turn clockwise to advance hour and minute hands. Th hand shwing days f
th wk will als mv with th hur and minut hands. Kp turning until yu hav
rachd th dsird day.
24-Hour Sub-Dial Setting
The 24-hour hand moves correspondingly with the hour and minute hands. When
setting the time be sure to check that the 24-hour hand is set properly.
DATE
24-HOUR
DAY
7/30/2019 instrucao AX relogio
http://slidepdf.com/reader/full/instrucao-ax-relogio 4/20
5
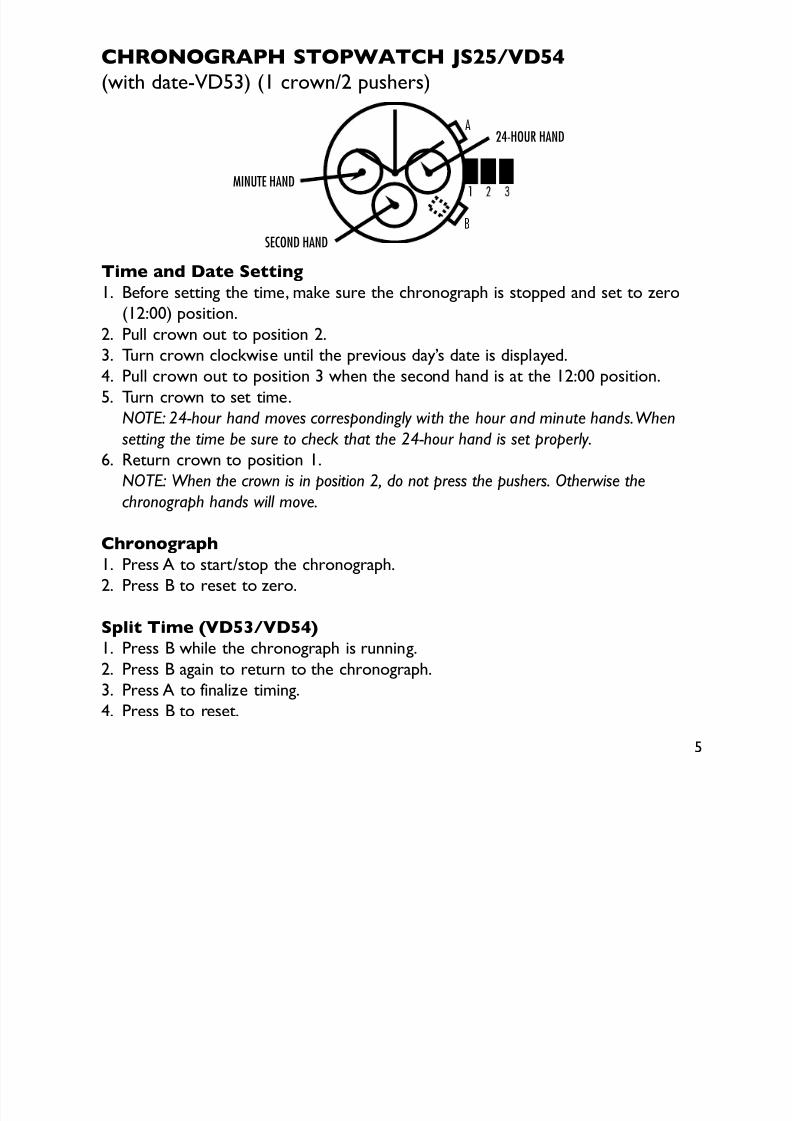
CHRONOGRAPH STOPwATCH JS25/VD54
(with date-VD53) (1 crown/2 pushers)
Time and Date Setting
1. Before setting the time, make sure the chronograph is stopped and set to zero
(12:00) position.
2. Pull crown out to position 2.
3. Turn crown clockwise until the previous day’s date is displayed.
4. Pull crown out to position 3 when the second hand is at the 12:00 position.
5. Turn crown to set time.
NoTe: 24-hur hand mvs crrspndingly with th hur and minut hands. Whn
stting th tim b sur t chck that th 24-hur hand is st prprly.
6. Return crown to position 1.
NoTe: Whn th crwn is in psitin 2, d nt prss th pushrs. othrwis thchrngraph hands will mv.
Chronograph
1. Press A to start/stop the chronograph.
2. Press B to reset to zero.
Split Time (VD53/VD54)
1. Press B while the chronograph is running.
2. Press B again to return to the chronograph.
3. Press A to finalize timing.
4. Press B to reset.
A
B
MINUTE HAND
SECOND HAND
24-HOUR HAND
7/30/2019 instrucao AX relogio
http://slidepdf.com/reader/full/instrucao-ax-relogio 5/20
6
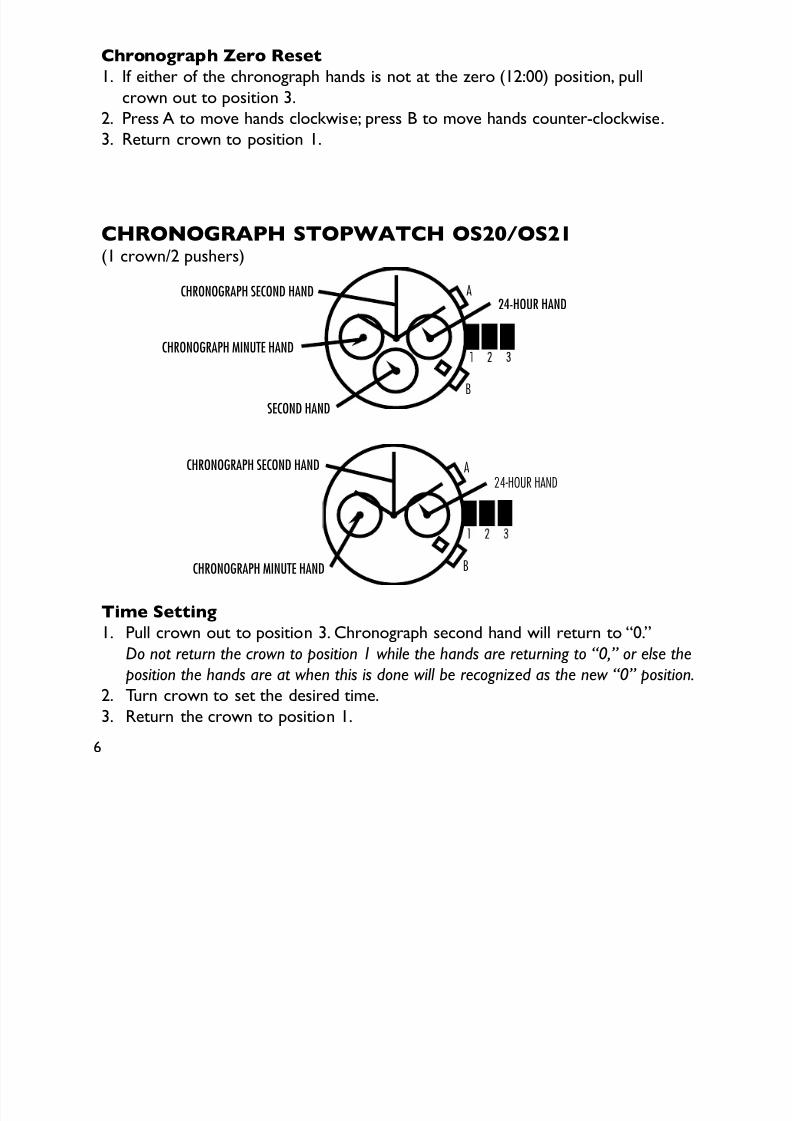
CHRONOGRAPH STOPwATCH OS20/OS21(1 crown/2 pushers)
Time Setting1. Pull crown out to position 3. Chronograph second hand will return to “0.”
D nt rturn th crwn t psitin 1 whil th hands ar rturning t “0,” r ls th
psitin th hands ar at whn this is dn will b rcgnizd as th nw “0” psitin.
2. Turn crown to set the desired time.
3. Return the crown to position 1.
A
B
CHRONOGRAPH MINUTE HAND
CHRONOGRAPH SECOND HAND
SECOND HAND
24-HOUR HAND
Chronograph Zero Reset
1. If either of the chronograph hands is not at the zero (12:00) position, pull
crown out to position 3.
2. Press A to move hands clockwise; press B to move hands counter-clockwise.3. Return crown to position 1.
A
B
24-HOUR HAND
CHRONOGRAPH MINUTE HAND
CHRONOGRAPH SECOND HAND
7/30/2019 instrucao AX relogio
http://slidepdf.com/reader/full/instrucao-ax-relogio 6/20
7
Date Setting
1. Pull crown out to position 2.
2. Turn crown counter-clockwise until the correct date is shown in the date
window.3. Return crown to position 1.
Chronograph Zero Reset
This procedure should be performed when the chronograph second hand does not
return to the “0” position after the chronograph has been reset.
1. Pull crown out to position 3.2. Press A to set the chronograph second hand to the “0” position.
NoTe: Th hands mv quickly if th pushrs ar kpt prssd.
3. Once the hand has been zeroed, reset the time and return the crown to
position 1.
D nt rturn th crwn t psitin 1 whil th hands ar rturning t “0.” Ding s
will caus th psitin f th hands t b rcgnizd as th nw “0” psitin.
Chronograph Operation
This chronograph is able to measure and display time in 1/1 second up to
maximum of 1 hour.
1. Press A to start/stop the chronograph.
2. Press B to reset the chronograph.
7/30/2019 instrucao AX relogio
http://slidepdf.com/reader/full/instrucao-ax-relogio 7/20
8
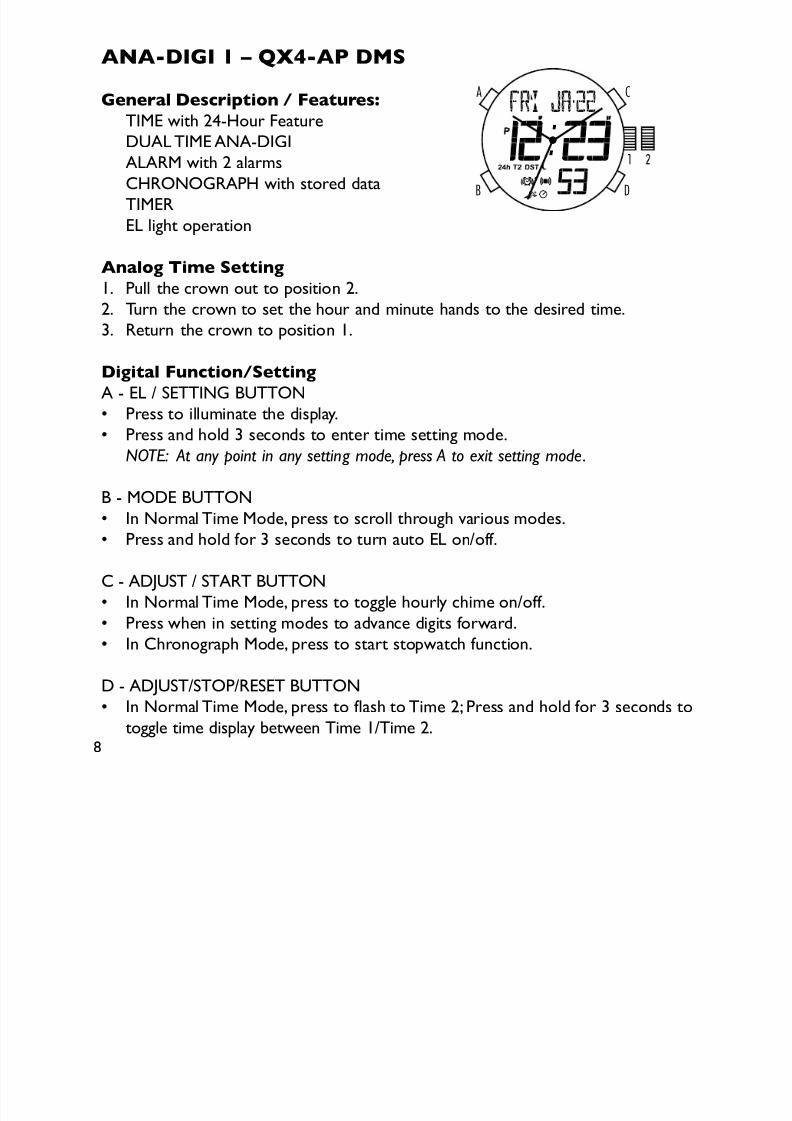
ANA-DIGI 1 – QX4-AP DMS
General Description / Features:
TIME with 24-Hour FeatureDUAL TIME ANA-DIGI
ALARM with 2 alarms
CHRONOGRAPH with stored data
TIMER
EL light operation
Analog Time Setting
1. Pull the crown out to position 2.
2. Turn the crown to set the hour and minute hands to the desired time.
3. Return the crown to position 1.
Digital Function/Setting
A - EL / SETTING BUTTON
• Presstoilluminatethedisplay.
• Pressandhold3secondstoentertimesettingmode.
NoTe: At any pint in any stting md, prss A t xit stting md.
B - MODE BUTTON
• InNormalTimeMode,presstoscrollthroughvariousmodes.
• Pressandholdfor3secondstoturnautoELon/off.
C - ADJUST / START BUTTON
• InNormalTimeMode,presstotogglehourlychimeon/off.• Presswheninsettingmodestoadvancedigitsforward.
• InChronographMode,presstostartstopwatchfunction.
D - ADJUST/STOP/RESET BUTTON
• InNormalTimeMode,presstoflashtoTime2;Pressandholdfor3secondsto
toggle time display between Time 1/Time 2.
A
B
C
D
7/30/2019 instrucao AX relogio
http://slidepdf.com/reader/full/instrucao-ax-relogio 8/20
9
• Presswheninsettingmodestoadvancedigitsbackwards.
• InChronographMode,presstostopchronograph;Pressandholdfor3seconds
to reset to zero.
NoTe: In any stting md, if thr is n activity fr 30 scnds, all changs will bsavd and th display will autmatically rturn t display md.
Time and Calendar Setting
1. In Normal Time Display, press and hold A button for 3 seconds to enter
setting mode.
2. Press C button to advance hour digit forward; press D to advance digitbackwards. Press B to set and advance to minute setting.
3. Press C button to advance minute digit forward; press D to advance digit
backwards. Press B to set and advance to seconds setting.
4. Press C or D button to reset seconds to 0. Press B to set and advance to
year setting.
5. Press C button to advance year digit forward; press D to advance digitbackwards. Press B to set and advance to month setting.
6. Press C button to advance month digit forward; press D to advance digit
backwards. Press B to set and advance to date setting.
7. Press C button to advance date digit forward; press D to advance digit
backwards. Press B to set and advance to 24 hour display setting.
8. Press C or D button to change from 12 hour to 24 hour display. Press B to set
and advance to date format display setting.
9. Press C or D button to change date format display setting.
10. Press B to exit setting mode.
11. To set Time 2, press and hold D 3 seconds in Normal Time Display to change
to Time 2. Then use steps 1-4 to set.
NoTe: Wkday is autmatically updatd upn xiting stting md.
Recall Mode
1. Press B to change to Recall Mode. If no data is stored, display will show NO
DATA. If data is stored, display will show current set.
2. Press C to switch between stored data: total time, best time, average time, and
7/30/2019 instrucao AX relogio
http://slidepdf.com/reader/full/instrucao-ax-relogio 9/20
10
lap (up to 100 laps).
3. Press D to display current set; press D again to switch to the next set.
4. Press and hold D 3 seconds to delete all stored data in the current set displayed.
Alarm Mode
1. Press B to change to Alarm Mode.
2. Press C to toggle alarm on/off.
3. Press D to switch between alarm 1/alarm 2.
4. In Alarm Mode, press and hold A 3 seconds to enter setting mode.
5. Press C to advance hour digit forward; press D to advance digit backwards.Press B to save and advance to minute setting.
6. Press C to advance minute digit forward; press D to advance digit backwards.
Press B to save and advance to Time selection.
7. Press C or D to change which time mode (Time 1/Time 2) the Alarm will
read from.
8. Press A to exit setting mode.NoTe: Alarm will sund fr 20 scnds. Prss any pushr t silnc alarm.
Countdon Timer
1. Press B to change to Timer Mode.
2. Press C to start the timer; press D to stop the timer.
3. Press and hold D 3 seconds to clear the countdown and reset the timer.
4. In Timer Mode, press and hold A 3 seconds to enter timer setting mode.
5. Press C to advance hour digit forward; press D to advance digit backwards.
Press B to set and advance to minute setting.
6. Press C to advance minute digit forward; press D to advance digit backwards.
Press B to set and advance to seconds setting. Press B to return to hour setting
if necessary.
7. Press A to exit timer setting mode.
7/30/2019 instrucao AX relogio
http://slidepdf.com/reader/full/instrucao-ax-relogio 10/20
11
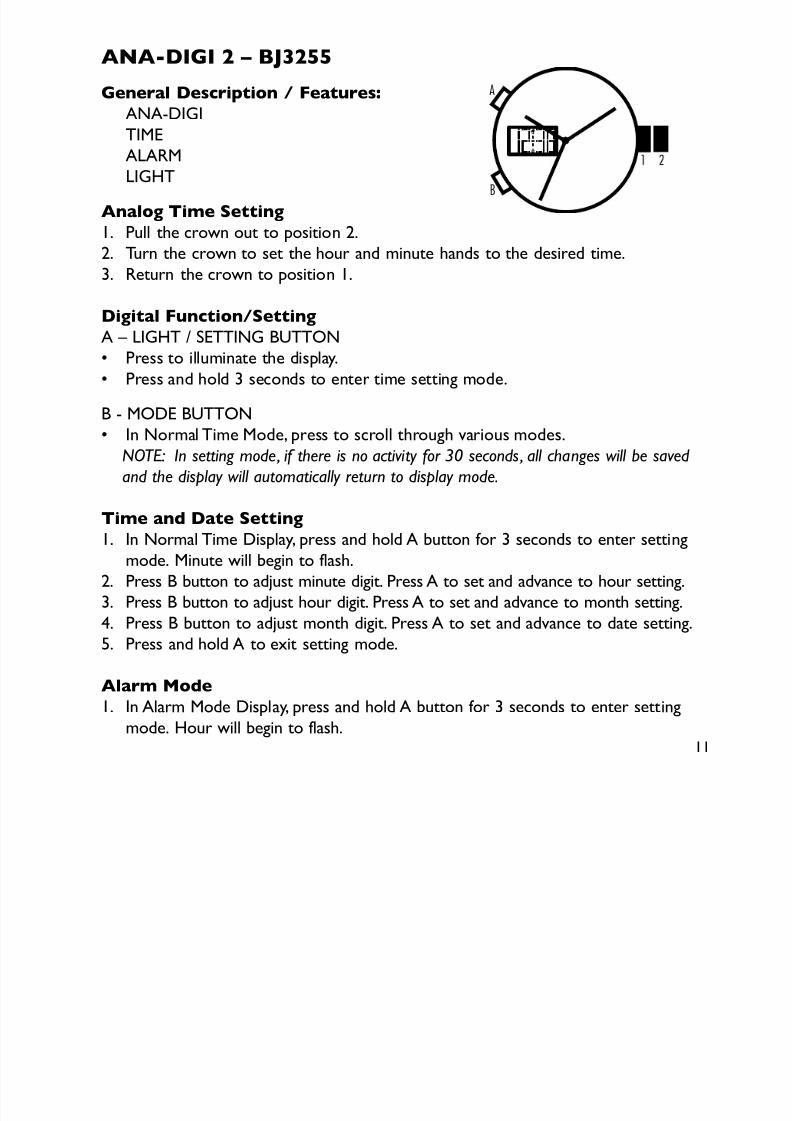
ANA-DIGI 2 – BJ3255
General Description / Features:
ANA-DIGI
TIME
ALARM
LIGHT
Analog Time Setting
1. Pull the crown out to position 2.
2. Turn the crown to set the hour and minute hands to the desired time.
3. Return the crown to position 1.
Digital Function/Setting
A – LIGHT / SETTING BUTTON
• Presstoilluminatethedisplay.• Pressandhold3secondstoentertimesettingmode.
B - MODE BUTTON
• InNormalTimeMode,presstoscrollthroughvariousmodes.
NoTe: In stting md, if thr is n activity fr 30 scnds, all changs will b savd
and th display will autmatically rturn t display md.
Time and Date Setting
1. In Normal Time Display, press and hold A button for 3 seconds to enter setting
mode. Minute will begin to flash.
2. Press B button to adjust minute digit. Press A to set and advance to hour setting.
3. Press B button to adjust hour digit. Press A to set and advance to month setting.4. Press B button to adjust month digit. Press A to set and advance to date setting.
5. Press and hold A to exit setting mode.
Alarm Mode
1. In Alarm Mode Display, press and hold A button for 3 seconds to enter setting
mode. Hour will begin to flash.
A
B
7/30/2019 instrucao AX relogio
http://slidepdf.com/reader/full/instrucao-ax-relogio 11/20
12
2. Press B button to adjust hour digit. Press A to set and advance to minute setting.
3. Press B button to adjust minute digit. Press A to set and advance to alarm on/
off selection.
4. Press B button to adjust alarm on/off. Press A to set and advance to chime on/off selection.
5. Press B button to adjust chime on/off.
6. Press and hold A to exit setting mode.
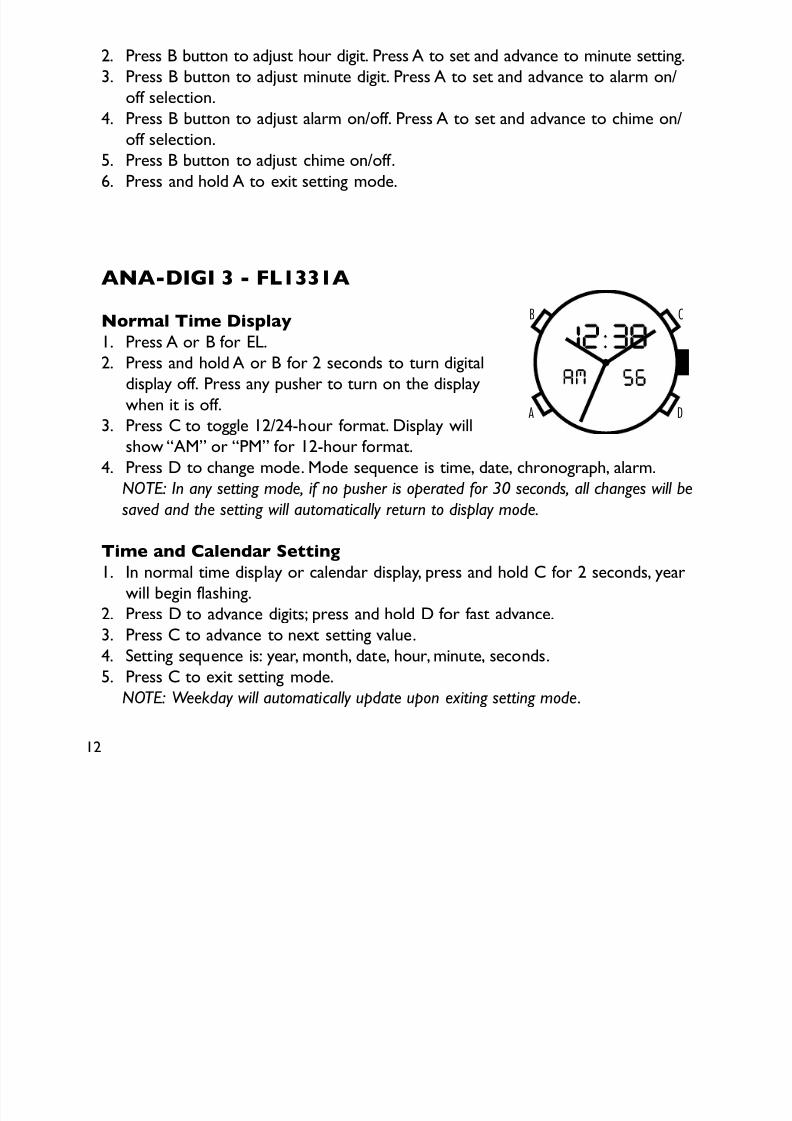
ANA-DIGI 3 - FL1331A
Normal Time Display
1. Press A or B for EL.
2. Press and hold A or B for 2 seconds to turn digitaldisplay off. Press any pusher to turn on the display
when it is off.
3. Press C to toggle 12/24-hour format. Display will
show “AM” or “PM” for 12-hour format.
4. Press D to change mode. Mode sequence is time, date, chronograph, alarm.
NoTe: In any stting md, if n pushr is pratd fr 30 scnds, all changs will bsavd and th stting will autmatically rturn t display md.
Time and Calendar Setting
1. In normal time display or calendar display, press and hold C for 2 seconds, year
will begin flashing.
2. Press D to advance digits; press and hold D for fast advance.3. Press C to advance to next setting value.
4. Setting sequence is: year, month, date, hour, minute, seconds.
5. Press C to exit setting mode.
NoTe: Wkday will autmatically updat upn xiting stting md.
B
A
C
D

7/30/2019 instrucao AX relogio
http://slidepdf.com/reader/full/instrucao-ax-relogio 12/20
13
Chronograph Mode
1. Press D to change to chronograph mode.
2. Press D and hold 2 seconds to reset chronograph to zero.
3. Press C to start/stop the chronograph.4. Press D to reset to zero.
Alarm Mode
1. Press D to change to alarm mode.
2. Press C to toggle alarm/chime on/off.
3. Alarm will sound at preset time for 20 seconds; press any pusher to silencealarm.
Alarm Setting
1. In alarm mode, press and hold C for 3 seconds; hour will begin flashing.
2. Press D to advance digit; press and hold D for fast advance.
3. Press C to set and advance to minute.4. Press D to advance digit; press and hold D for fast advance.
5. Press C to exit setting mode.
7/30/2019 instrucao AX relogio
http://slidepdf.com/reader/full/instrucao-ax-relogio 13/20
14
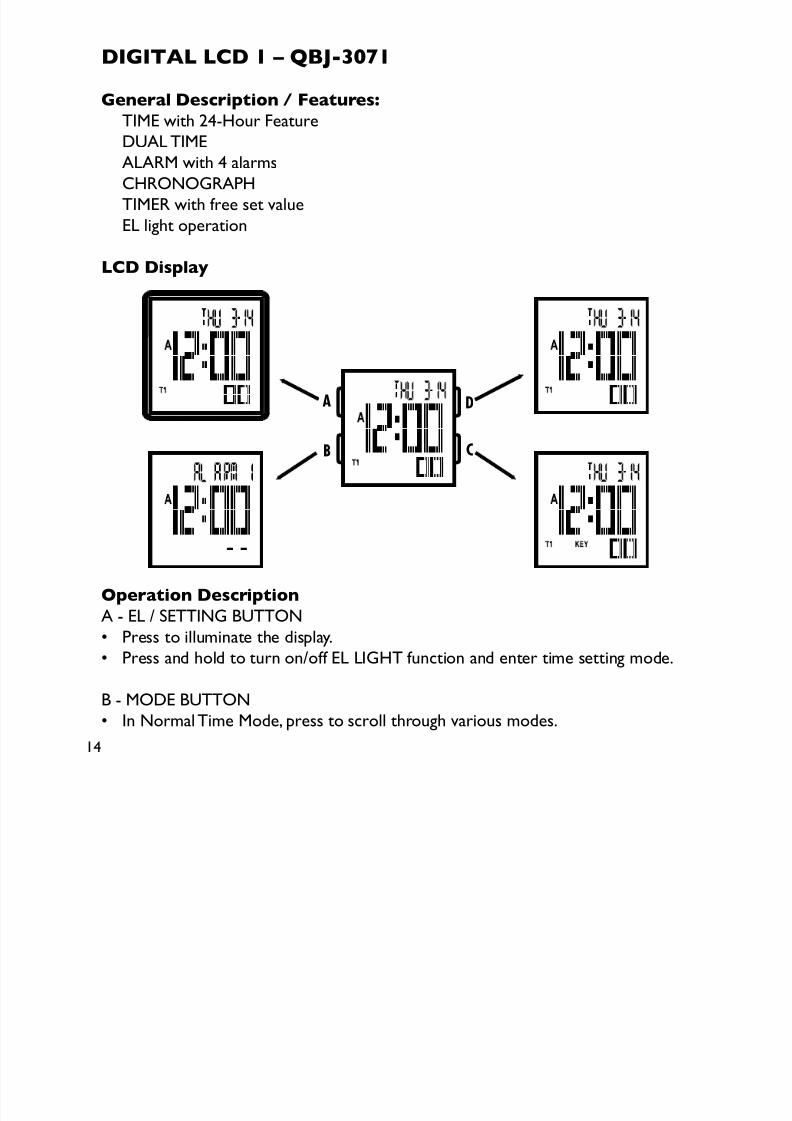
DIGITAL LCD 1 – QBJ-3071
General Description / Features:
TIME with 24-Hour FeatureDUAL TIME
ALARM with 4 alarms
CHRONOGRAPH
TIMER with free set value
EL light operation
LCD Display
Operation Description
A - EL / SETTING BUTTON• Presstoilluminatethedisplay.
• Pressandholdtoturnon/offELLIGHTfunctionandentertimesettingmode.
B - MODE BUTTON
• InNormalTimeMode,presstoscrollthroughvariousmodes.
B
A
C
D
7/30/2019 instrucao AX relogio
http://slidepdf.com/reader/full/instrucao-ax-relogio 14/20
15
• Presstoadvancetothenextadjustablesetofdigitswhensettingthetime,date
alarm, and countdown timer
C - ADJUST / RESET BUTTON• InNormalTimeMode,pressCbuttontoturnon/offkeytonefunction(KEY
icon will appear/disappear).
• Presstoresetthecountdowninthechronographortimermodes.
• Presswheninsettingmodestoadvancedigitsforward.
D - ADJUST/START/STOP BUTTON• Presstostart/stopthechronographortimermodes.
• Presstoresetthecountdowninthechronographortimermodes.
• Presswheninsettingmodestoadvancedigitsbackwards.
Time / Calendar
1. In Normal Time Display, press and hold A button for 3 seconds to enter settingmode. Press C or D button to turn the auto EL light function on or off. Light
will illuminate for 3 seconds when any button is pressed if function is on. Press B
button to advance to Chime setting.
2. Press C or D button to turn the hourly chime on or off. “CHM” will appear on
the display in Normal Time Mode when on. Press B button to advance to 12/24
hour mode.3. Press C or D button to switch between 12 and 24 hour display modes. Press B
button to advance to hour setting.
4. Press C or D button to advance hour display up or down. Press B button to
advance to minute setting.
5. Press C or D button to advance minute display up or down. Press B button to
advance to second setting.
6. Press C or D button to reset seconds to “00”. Press B button to advance to year
setting.
7. Press C or D button to advance year display up or down. Press B button to
advance to month setting.
7/30/2019 instrucao AX relogio
http://slidepdf.com/reader/full/instrucao-ax-relogio 15/20
16
8. Press C or D button to advance month display. Press B button to advance to
day setting.
9. Press C or D button to advance day display.
10. Press A button to exit setting mode at any time. If no button is pressed within 30seconds, display will automatically return to Normal Time Display.
Dual Time
1. In Normal Time Display, press and hold D button for 3 seconds to enter Dal
Time Mode. “T2” will appear on the display.
2. In Dual Time Mode, press and hold A button for 3 seconds to enter Dual Timesetting mode.
3. Press C or D to advance hour display up or down. Hour will always appear in 24
hour time in Dual Time setting mode.
4. Press A button to exit Dual Time setting mode.
5. To return to Normal Time Display, press and hold D button for 3 seconds.
Chronograph
1. In Chronograph Mode, press D button to start/stop.
2. When stopped, press and hold C button for 3 seconds to reset to zero.
3. While chronograph is running, press C button to record Lap time.
4. When chronograph is stopped press A to check Lap record.
5. When chronograph is stopped, press and hold C button for 3 seconds to clearLap record.
Timer
There are three functions in Timer Mode:
CD-STP - Timer will stop after countdown and return to preset value.
CD-REP - Timer will continue to countdown after timer expires up to 100 times.
CD-UP - Time will return to zero value after count-up is complete.
1. Press and hold A button for 3 seconds to enter Timer Mode setting.
2. Select Timer mode preference (CD-STP, CD-REP, or CD-UP) and press B to
adjust timer value.
7/30/2019 instrucao AX relogio
http://slidepdf.com/reader/full/instrucao-ax-relogio 16/20
17
3. Press C or D to advance the timer value up or down.
4. Press A to exit Timer setting mode.
AlarmThere are four possible alarms that can run simultaneously.
1. In Alarm Mode, press D to select Alarm 1-4. In each alarm, press C button to
turn on/off the alarm chime.
2. In the selected Alarm (1-4), press and hold A button for 3 seconds to enter
setting mode.
3. Press C or D button to advance hour up or down. Press B button to advance tominute setting.
4. Press C or D button to advance minute up or down. Press A button to finish
setting alarm.
5. When alarm sounds, press any button to turn off the chime or it will
automatically turn off in 30 seconds.
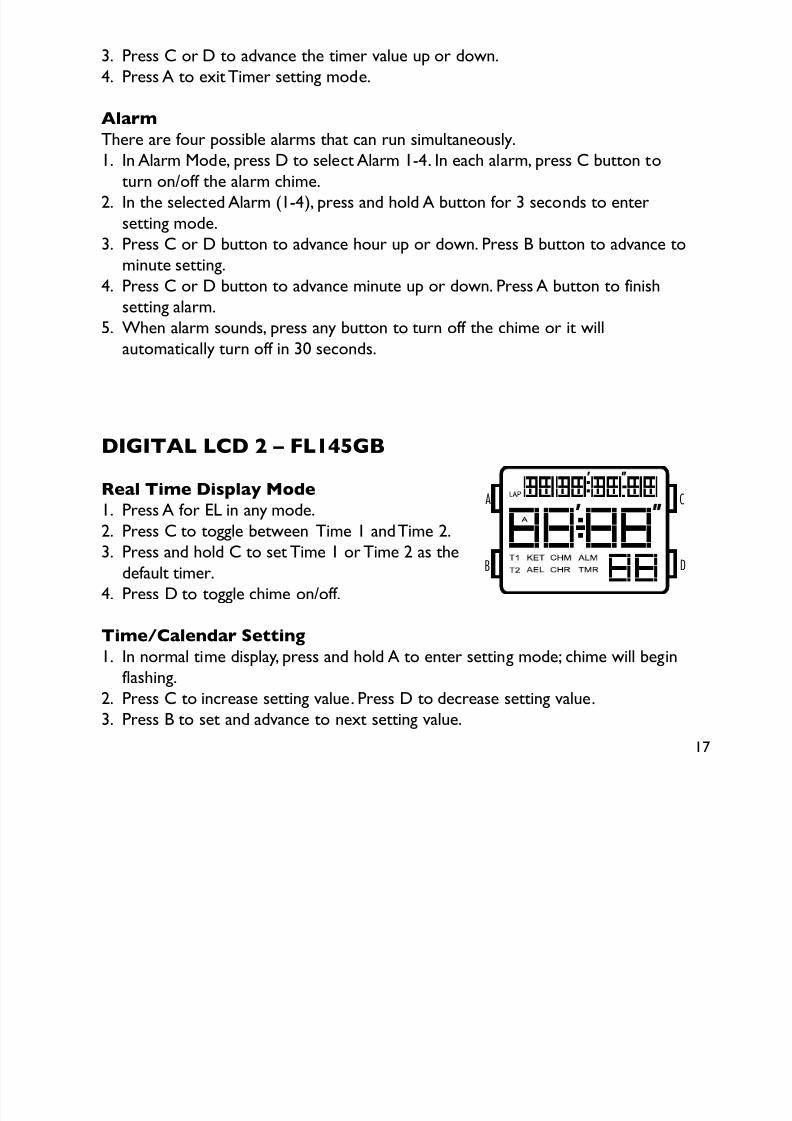
DIGITAL LCD 2 – FL145GB
Real Time Display Mode1. Press A for EL in any mode.
2. Press C to toggle between Time 1 and Time 2.
3. Press and hold C to set Time 1 or Time 2 as the
default timer.
4. Press D to toggle chime on/off.
Time/Calendar Setting
1. In normal time display, press and hold A to enter setting mode; chime will begin
flashing.
2. Press C to increase setting value. Press D to decrease setting value.
3. Press B to set and advance to next setting value.
A
B D
C
7/30/2019 instrucao AX relogio
http://slidepdf.com/reader/full/instrucao-ax-relogio 17/20
18
4. Setting sequence is chime, 12/24-hour time, hour, minute, second, year, month,
date, Auto EL.
5. Press A to save data and exit setting mode.
Chronograph Mode
1. Press B to change to chronograph mode.
2. Press C to start chronograph; press D for lap when the chronograph is running.
3. Press D to change views while chronograph is running.
4. Press C to stop chronograph.
NoTe: Whn running, thr is a maximum f 10 laps, aftrward last lap will bvrwrittn ach tim additinal lap is rcrdd.
Recall Mode
1. Press A to recall the memory when the chronograph is stopped.
2. Press A to view the next lap.
3. Press C or D to exit Recall Mode and go back to chronograph mode.
Timer Mode
1. Press B to change to timer mode.
2. Press C to start timer.
3. Press C to stop timer. Press D to reset the timer when it is stopped.
Timer Setting
1. In timer mode, press and hold A to enter setting mode; timer type will begin
flashing.
2. Press C and D to select count down stop, count down repeat, or count up timer.
3. Press B to advance to next setting field.
4. Press C to decrease and D to increase.
5. Press B to set and advance to next setting value.
6. Setting sequence is timer type, hour, minute, second.
7. Press A to save data and exit setting mode.
NoTe: Alarm will sund at 2 bps pr scnd, and will bp fr 30 scnds aftr
timr rachs zr.

7/30/2019 instrucao AX relogio
http://slidepdf.com/reader/full/instrucao-ax-relogio 18/20
19
Alarm Mode
1. Press B to change to alarm mode.
2. Press C to toggle between alarms 1, 2, 3, 4.
3. Press D to enable the alarm; press D again to disable the alarm.4. Press B to exit alarm mode.
Alarm Setting
1. In alarm mode, press and hold A to enter setting mode, hour will begin flashing.
2. Press C to increase; press D to decrease.
3. Press B to set and advance to next setting value.4. Setting sequence is hour, minute.
5. Press A to exit setting mode.

7/30/2019 instrucao AX relogio
http://slidepdf.com/reader/full/instrucao-ax-relogio 19/20
20
Link Removal
To remove a link from a pin link bracelet, you will need the bracelet holder, pin
pusher, and chain nose pliers (see pin link diagram).
1. Open the clasp on the bracelet.
2. Look on the inside of the bracelet and locate the arrows near the clasp (seediagram).
3. Place the band into the appropriate size slot of the bracelet holder with the
arrows pointing down (see diagram).
4. Center the desired pin to be removed over one of the holes in the bottom of
the bracelet holder.
5. With the pin pusher, push the pin, as far as possible, through the link.6. Remove the watch from the bracelet holder and simply finish pulling out the pin
with the chain nose pliers.
NoTe: Tw pins hld ach link in plac and must b takn ut bfr a link can b
rmvd. Plas nt that th pins ar partially split dwn th cntr.
PIN LINK DIAGRAM
BRACELET HOLDER
CHAIN NOSEPLIERS
PIN PUSHER
ARROWS
7/30/2019 instrucao AX relogio
http://slidepdf.com/reader/full/instrucao-ax-relogio 20/20
21
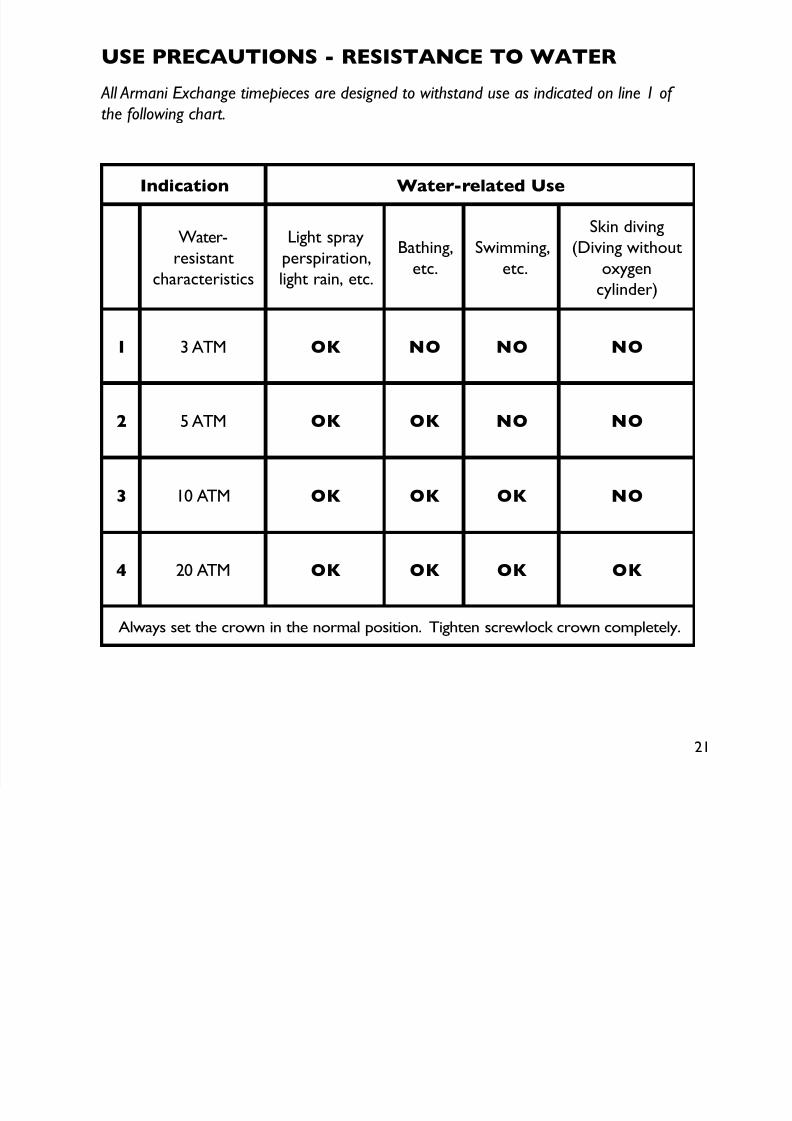
USE PRECAUTIONS - RESISTANCE TO wATER
All Armani e xchang timpics ar dsignd t withstand us as indicatd n lin 1 f
th fllwing chart.
Indication water-related Use
Water-
resistant
characteristics
Light spray
perspiration,
light rain, etc.
Bathing,etc.
Swimming,etc.
Skin diving
(Diving withoutoxygen
cylinder)
1 3 ATM OK NO NO NO
2 5 ATM OK OK NO NO
3 10 ATM OK OK OK NO
4 20 ATM OK OK OK OK
Always set the crown in the normal position. Tighten screwlock crown completely.


