
©2016 Rekluse Motor Sports, Inc. 12000 W Franklin Rd. Boise, Idaho 83709
208-426-0659 [email protected]
REKLUSE MOTOR SPORTS The Rekluse Core EXP Kit
INSTALLATION &
USER’S GUIDE
Doc ID: 191-7743A Doc Rev: 083116
OVERVIEW
This kit replaces the OEM core clutch components with high-quality billet components designed for
optimal operation specific to your bike model.
When this installation is performed, the bike’s basket assembly will be disassembled and then
reassembled using the Rekluse basket. This Rekluse basket is taller than the OEM one and is a
necessary component to achieve overall clutch performance and improve the life of the clutch basket.
NOTE: The Rekluse basket is compatible with the CoreEXP auto-clutch, CoreManual manual clutch, and the OEM clutch.
INSIDE THIS DOCUMENT
o PREP & DISASSEMBLY
o BASKET ASSEMBLY
o CLUTCH INSTALLATION
o SETTING THE INSTALLED GAP
o CHECKING LEVER FREE PLAY GAIN
o TROUBLESHOOTING GUIDE
o BREAK-IN
o ENGINE IDLE SETTING
o CLUTCH NOISE & DRAG
o EXP TUNING OPTIONS & ENGAGEMENT SETTINGS
o MAINTENANCE
o BUMP STARTING INSTRUCTIONS
o CONVERSION TO A MANUAL CLUTCH

Rekluse CoreEXP – KX 65 Page 2
TOOLS NEEDED
Metric socket set
Metric end-wrench set
Metric Allen keys/socket set
Dental pick tools
Torque wrench (in-lb & ft-lb, or N-m)
Electric drill or drill press
Motorcycle transmission oil & grease
Hammer and center-punch set
INSTALLATION TIPS
Watch the installation video by following this QR code or visiting
rekluse.com/support/videos.
Read this entire document before performing any steps, so you will know what to expect.
Be sure to use proper eye protection, and wear rubber gloves when handling oils and other fluids.
Laying the bike on its left side makes clutch work easier and eliminates the need to drain the oil.
An air or electric impact wrench works well to remove the center hub bolt, or you can place the bike in
top gear and hold the rear brake while loosening the center hub bolt with a socket.
Use clean, quality JASO-MA or JASO-MA2 certified transmission oil for best performance.
REPLACEMENT GASKETS:
It is recommended to replace the gaskets for the clutch cover and water pump cover whenever they are
removed from the bike. The shaft seals can be reused if they are in good condition.
The OEM part numbers for the gaskets and seals are:
o Clutch Cover Gasket: Kawasaki part # 11061-0121
o Water Pump Cover Gasket: Kawasaki part # 11061-0159
o Water Pump Shaft Seals: Kawasaki part #s 92049-1359, 92049-1366
o Kick-Start Shaft Seals: Kawasaki part # 92049-002
CLUTCH ASSEMBLY OVERVIEW

Rekluse CoreEXP – KX 65 Page 3
INCLUDED PARTS
Item # Item Type Qty
5 Pressure Plate 1
13 EXP Base * 2
24 Clutch Basket 1
27 Center Clutch Hub 1
47.1 Fastener – M6 Low-Head Screw 6
47.2 Fastener – M6 x 25 Button Head Screw 6
51 Fastener - 1/4-Turn Pin * (extra included) 4
60 EXP Adjustment Spring * (extra included, see tuning options) 4
67 Steel Drive Plate 7
70.1 Basket Backing Plate 1
70.2 Spring Push-Plate 1
85 Wedge Assembly * 6
* Denotes parts assembled as components of the EXP disk assembly
The picture above is representative only. See the parts list included with the product or visit Rekluse.com/support for a full parts fiche illustration and part numbers.

Rekluse CoreEXP – KX 65 Page 4
PREP & DISASSEMBLY
1. Place the Rekluse EXP disk in engine oil to
soak for at least 5 minutes.
2. With the bike standing vertically on a center stand, place a suitable container for catching the engine coolant under the water pump.
3. Use an 8mm socket to remove the coolant drain
bolt from the water pump cover, and then drain the engine coolant into the container.
4. Making sure that the engine/coolant is not hot, twist open the radiator cap to help evacuate all the coolant from the system into the container.
5. Turn off the fuel valve, and lay the bike on its
left side. Using a suitable catch pan, catch any fuel that might drain from the carburetor tubes.
6. Remove the kick-start lever using a 10mm
socket.
7. Remove the brake pedal pivot bolt using an 8mm Allen. Then, uncouple the spring from the pedal and move the pedal out of the way. This will provide access and clearance for the clutch cover to be removed in the next steps.
8. Remove the 3x bolts from the water pump cover, and move the cover aside. The coolant-in hose can remain coupled to the water pump cover.
Rekluse CoreEXP – KX 65 Page 5
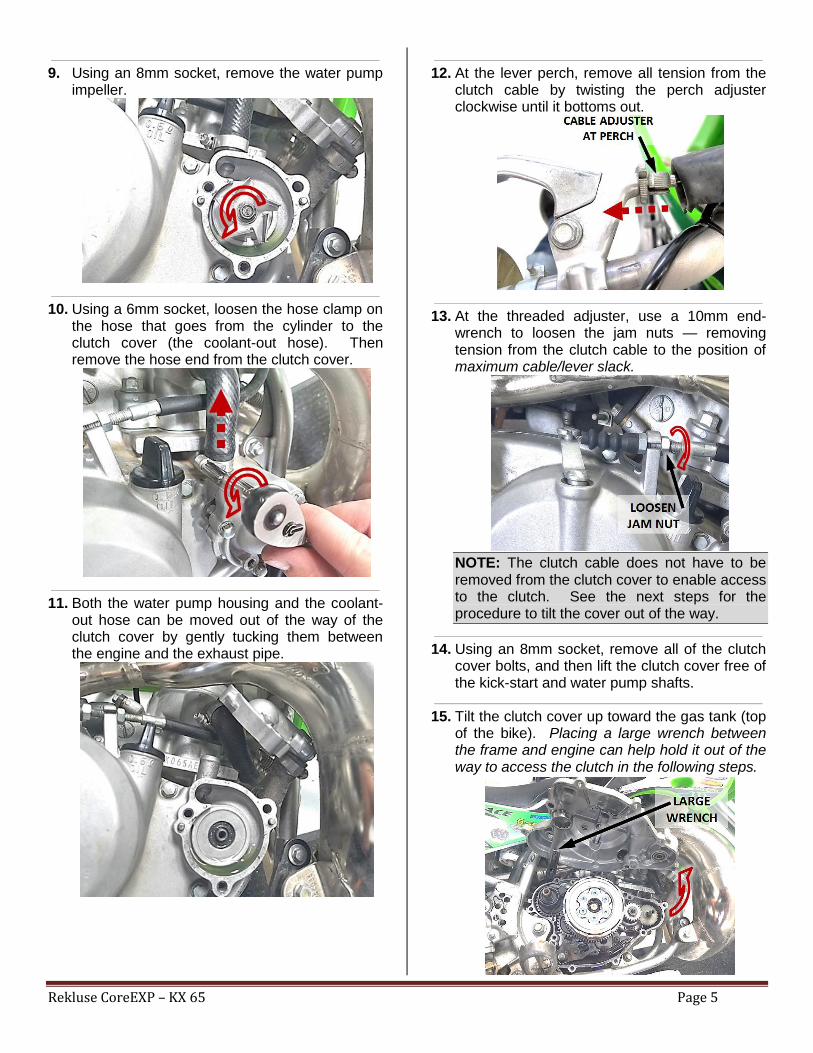
9. Using an 8mm socket, remove the water pump
impeller.
10. Using a 6mm socket, loosen the hose clamp on the hose that goes from the cylinder to the clutch cover (the coolant-out hose). Then remove the hose end from the clutch cover.
11. Both the water pump housing and the coolant-out hose can be moved out of the way of the clutch cover by gently tucking them between the engine and the exhaust pipe.
12. At the lever perch, remove all tension from the
clutch cable by twisting the perch adjuster clockwise until it bottoms out.
13. At the threaded adjuster, use a 10mm end-wrench to loosen the jam nuts — removing tension from the clutch cable to the position of maximum cable/lever slack.
NOTE: The clutch cable does not have to be removed from the clutch cover to enable access to the clutch. See the next steps for the procedure to tilt the cover out of the way.
14. Using an 8mm socket, remove all of the clutch
cover bolts, and then lift the clutch cover free of the kick-start and water pump shafts.
15. Tilt the clutch cover up toward the gas tank (top
of the bike). Placing a large wrench between the frame and engine can help hold it out of the way to access the clutch in the following steps.
Rekluse CoreEXP – KX 65 Page 6
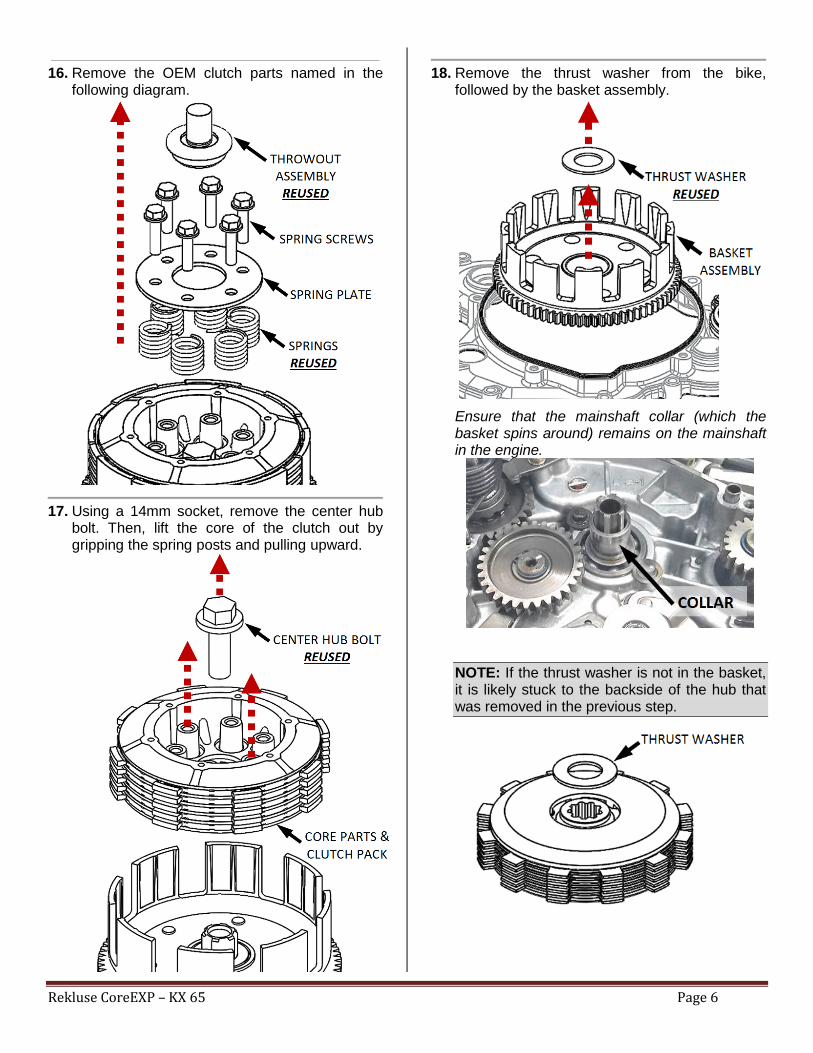
16. Remove the OEM clutch parts named in the
following diagram.
17. Using a 14mm socket, remove the center hub bolt. Then, lift the core of the clutch out by gripping the spring posts and pulling upward.
18. Remove the thrust washer from the bike,
followed by the basket assembly.
Ensure that the mainshaft collar (which the basket spins around) remains on the mainshaft in the engine.
NOTE: If the thrust washer is not in the basket, it is likely stuck to the backside of the hub that was removed in the previous step.

Rekluse CoreEXP – KX 65 Page 7
19. Set the OEM basket assembly on a workbench
with the ring gear facing upward. Using a center punch and hammer, punch a divot into the center of each of the rivet heads.
20. Using the drill bit provided, drill the heads off of each rivet, so that the backing plate can be removed from the assembly. Set your drill to 300-400 RPM and use proper cutting fluid or oil for best results.
21. Carefully pry off the backing plate and remove the ring gear and rubber dampers from the basket. The OEM basket and backing plate will not be reused.
22. Clean the rubber dampers and ring gear of all grit and rivet chips leftover from drilling.
BASKET ASSEMBLY
23. Using the provided Loctite® on the screw
threads, recompile the basket assembly using the supplied Rekluse basket, backing plate, and screws.
Torque the basket screws evenly to 80 in-lb (9 N-m) in a crisscross pattern.
24. Using the hammer and center punch, stake the
ends of the screws where they protrude through the inside of the clutch basket. Be sure to stake the screws… DO NOT stake the aluminum basket.
WARNING: It is critical that you apply Loctite and stake the ends of the screws or they can back out. Rekluse is not responsible for engine damage that may be caused by screws that back out.

Rekluse CoreEXP – KX 65 Page 8
CLUTCH INSTALLATION
Cross-Section Overview: CoreEXP
25. Install the newly-compiled basket assembly into the bike over the collar on the mainshaft, followed by the OEM thrust washer. To get the ring gear teeth to properly mesh with the crank and kick-starter gears, gently rotate the basket until it drops in and the teeth all mesh. DO NOT force the basket in or damage may occur.
26. Install the Rekluse pressure plate [#5] in the
orientation shown below. It will fit loosely in the basket until the clutch plates and hub are installed in the following steps.
Rekluse CoreEXP – KX 65 Page 9
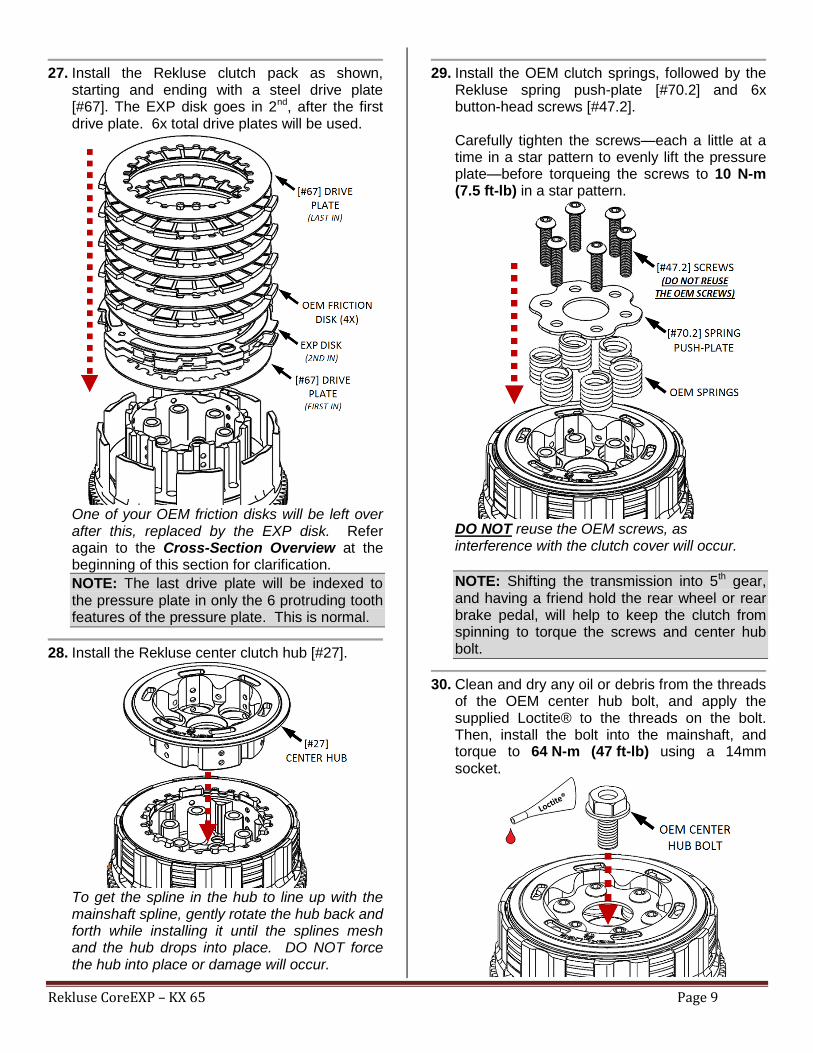
27. Install the Rekluse clutch pack as shown,
starting and ending with a steel drive plate [#67]. The EXP disk goes in 2nd, after the first drive plate. 6x total drive plates will be used.
One of your OEM friction disks will be left over after this, replaced by the EXP disk. Refer again to the Cross-Section Overview at the beginning of this section for clarification.
NOTE: The last drive plate will be indexed to the pressure plate in only the 6 protruding tooth features of the pressure plate. This is normal.
28. Install the Rekluse center clutch hub [#27].
To get the spline in the hub to line up with the mainshaft spline, gently rotate the hub back and forth while installing it until the splines mesh and the hub drops into place. DO NOT force the hub into place or damage will occur.
29. Install the OEM clutch springs, followed by the
Rekluse spring push-plate [#70.2] and 6x button-head screws [#47.2]. Carefully tighten the screws—each a little at a time in a star pattern to evenly lift the pressure plate—before torqueing the screws to 10 N-m (7.5 ft-lb) in a star pattern.
DO NOT reuse the OEM screws, as interference with the clutch cover will occur.
NOTE: Shifting the transmission into 5th gear, and having a friend hold the rear wheel or rear brake pedal, will help to keep the clutch from spinning to torque the screws and center hub bolt.
30. Clean and dry any oil or debris from the threads
of the OEM center hub bolt, and apply the supplied Loctite® to the threads on the bolt. Then, install the bolt into the mainshaft, and torque to 64 N-m (47 ft-lb) using a 14mm socket.
Rekluse CoreEXP – KX 65 Page 10
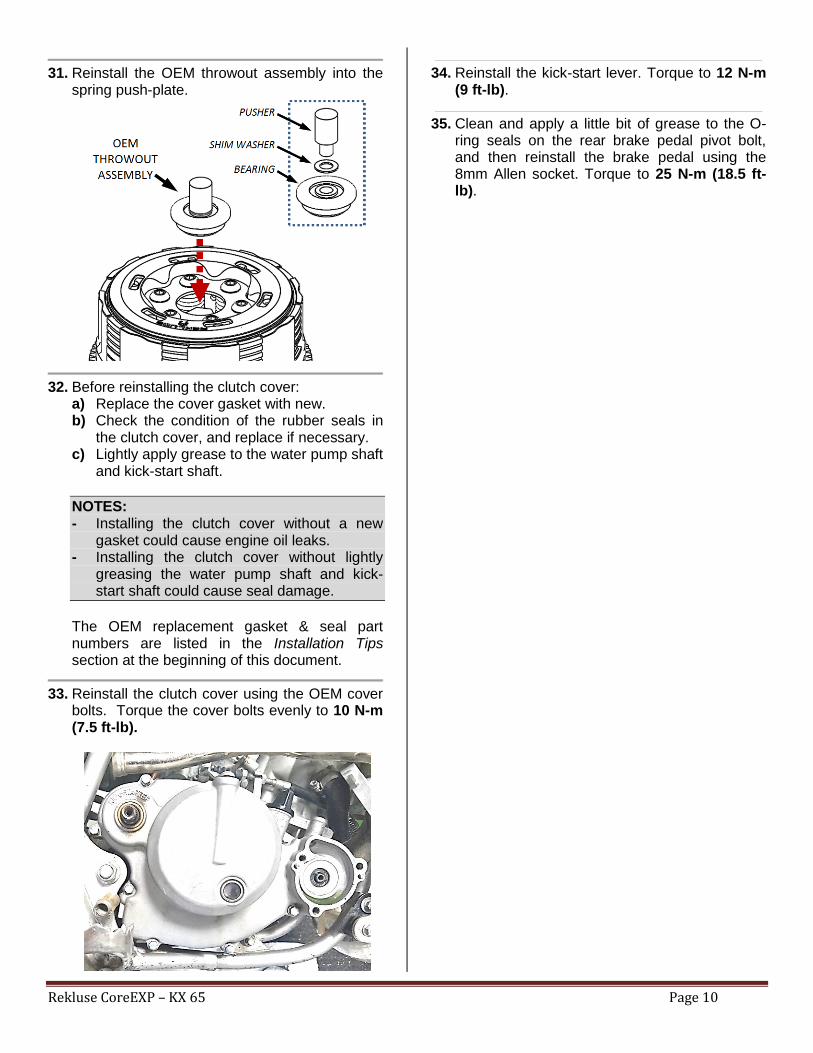
31. Reinstall the OEM throwout assembly into the
spring push-plate.
32. Before reinstalling the clutch cover: a) Replace the cover gasket with new. b) Check the condition of the rubber seals in
the clutch cover, and replace if necessary. c) Lightly apply grease to the water pump shaft
and kick-start shaft.
NOTES: - Installing the clutch cover without a new
gasket could cause engine oil leaks. - Installing the clutch cover without lightly
greasing the water pump shaft and kick-start shaft could cause seal damage.
The OEM replacement gasket & seal part numbers are listed in the Installation Tips section at the beginning of this document.
33. Reinstall the clutch cover using the OEM cover
bolts. Torque the cover bolts evenly to 10 N-m (7.5 ft-lb).
34. Reinstall the kick-start lever. Torque to 12 N-m
(9 ft-lb).
35. Clean and apply a little bit of grease to the O-
ring seals on the rear brake pedal pivot bolt, and then reinstall the brake pedal using the 8mm Allen socket. Torque to 25 N-m (18.5 ft-lb).
Rekluse CoreEXP – KX 65 Page 11
INSTALLED GAP SETTING
DEFINITION: “Installed Gap” is the separation in the clutch pack created by the adjustment of the clutch cable tension. This gap is what allows the clutch to spin freely until the desired RPM is reached for engagement; it must be set correctly for optimal performance, and rechecked before each ride.
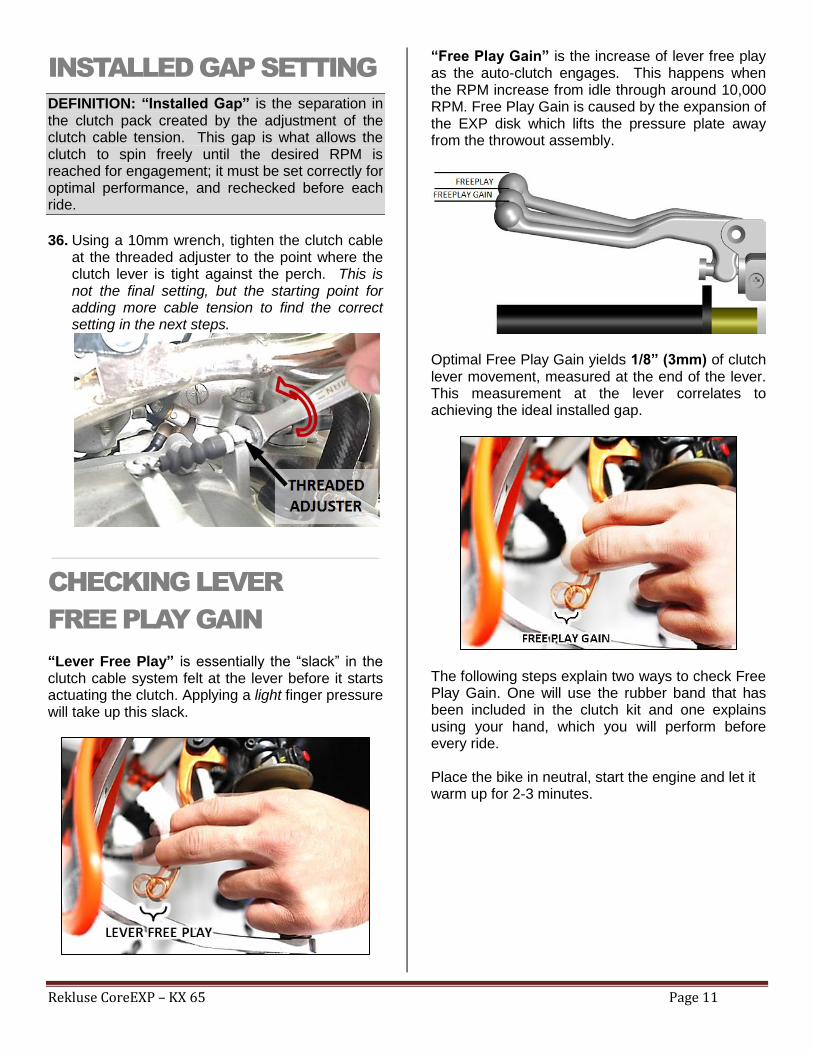
36. Using a 10mm wrench, tighten the clutch cable
at the threaded adjuster to the point where the clutch lever is tight against the perch. This is not the final setting, but the starting point for adding more cable tension to find the correct setting in the next steps.
CHECKING LEVER
FREE PLAY GAIN
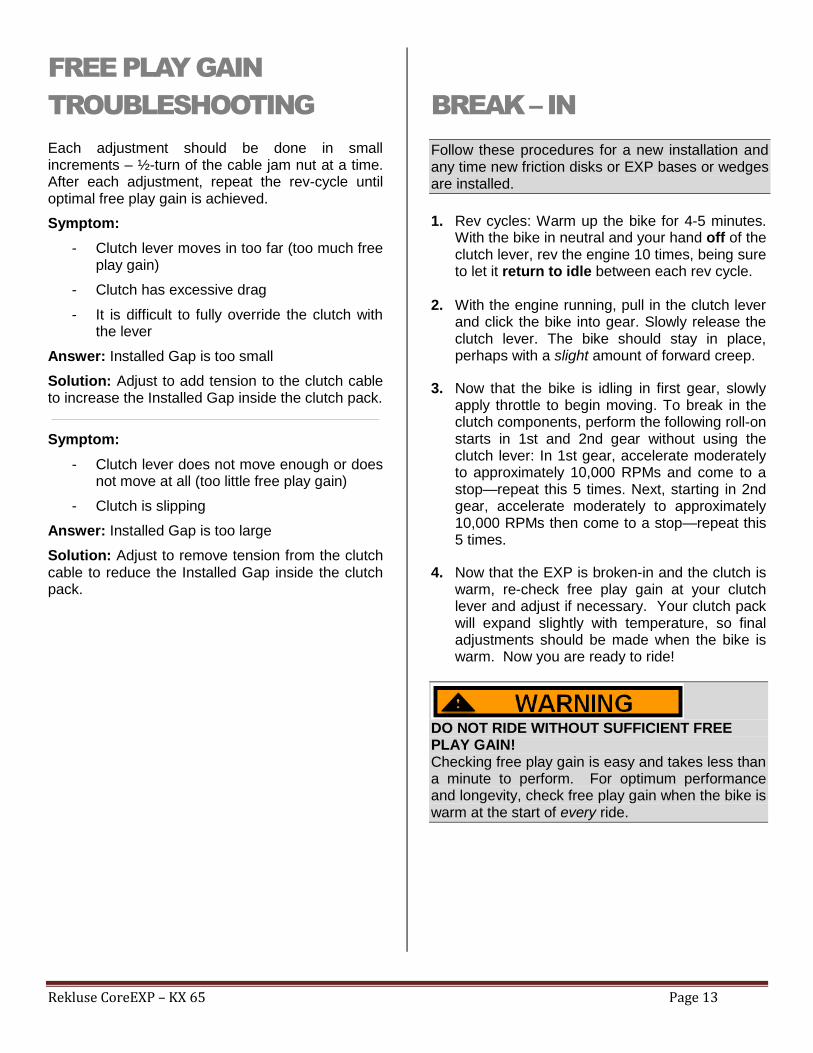
“Lever Free Play” is essentially the “slack” in the clutch cable system felt at the lever before it starts actuating the clutch. Applying a light finger pressure will take up this slack.
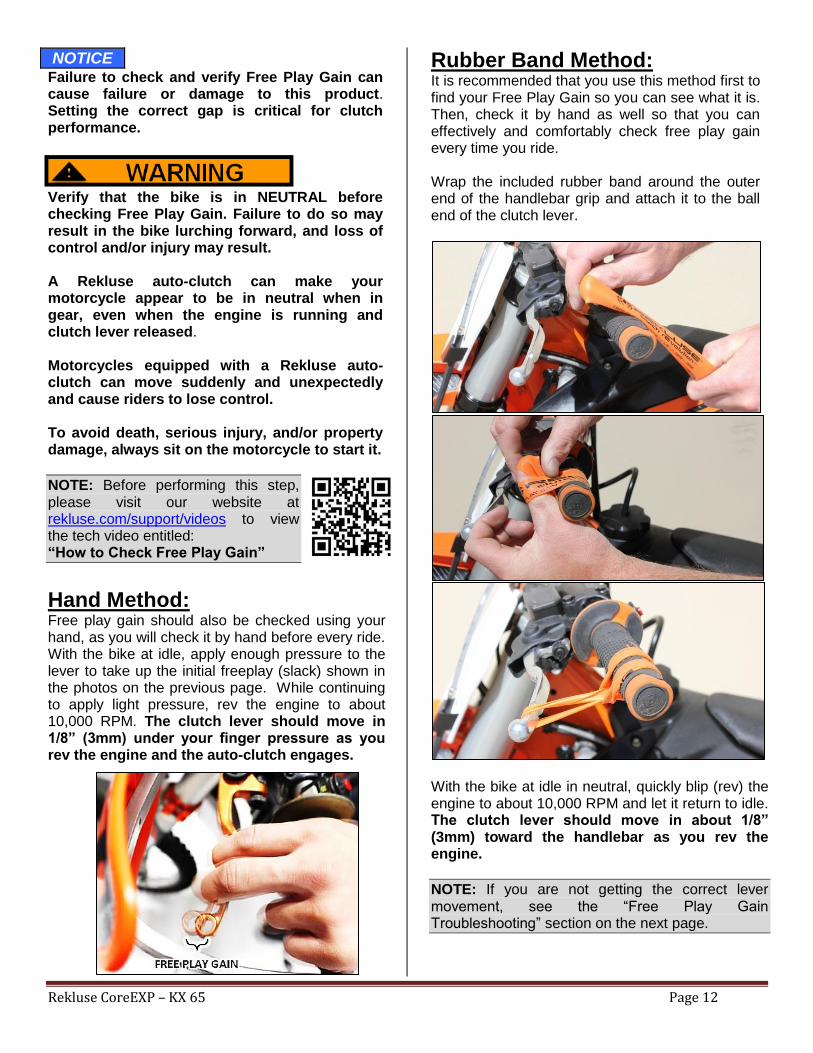
“Free Play Gain” is the increase of lever free play as the auto-clutch engages. This happens when the RPM increase from idle through around 10,000 RPM. Free Play Gain is caused by the expansion of the EXP disk which lifts the pressure plate away from the throwout assembly.
Optimal Free Play Gain yields 1/8” (3mm) of clutch lever movement, measured at the end of the lever. This measurement at the lever correlates to achieving the ideal installed gap.
The following steps explain two ways to check Free Play Gain. One will use the rubber band that has been included in the clutch kit and one explains using your hand, which you will perform before every ride. Place the bike in neutral, start the engine and let it warm up for 2-3 minutes.
Rekluse CoreEXP – KX 65 Page 12
NOTICE Failure to check and verify Free Play Gain can cause failure or damage to this product. Setting the correct gap is critical for clutch performance.
Verify that the bike is in NEUTRAL before checking Free Play Gain. Failure to do so may result in the bike lurching forward, and loss of control and/or injury may result. A Rekluse auto-clutch can make your motorcycle appear to be in neutral when in gear, even when the engine is running and clutch lever released. Motorcycles equipped with a Rekluse auto-clutch can move suddenly and unexpectedly and cause riders to lose control. To avoid death, serious injury, and/or property damage, always sit on the motorcycle to start it.
NOTE: Before performing this step, please visit our website at rekluse.com/support/videos to view the tech video entitled: “How to Check Free Play Gain”
Hand Method: Free play gain should also be checked using your hand, as you will check it by hand before every ride. With the bike at idle, apply enough pressure to the lever to take up the initial freeplay (slack) shown in the photos on the previous page. While continuing to apply light pressure, rev the engine to about 10,000 RPM. The clutch lever should move in 1/8” (3mm) under your finger pressure as you rev the engine and the auto-clutch engages.
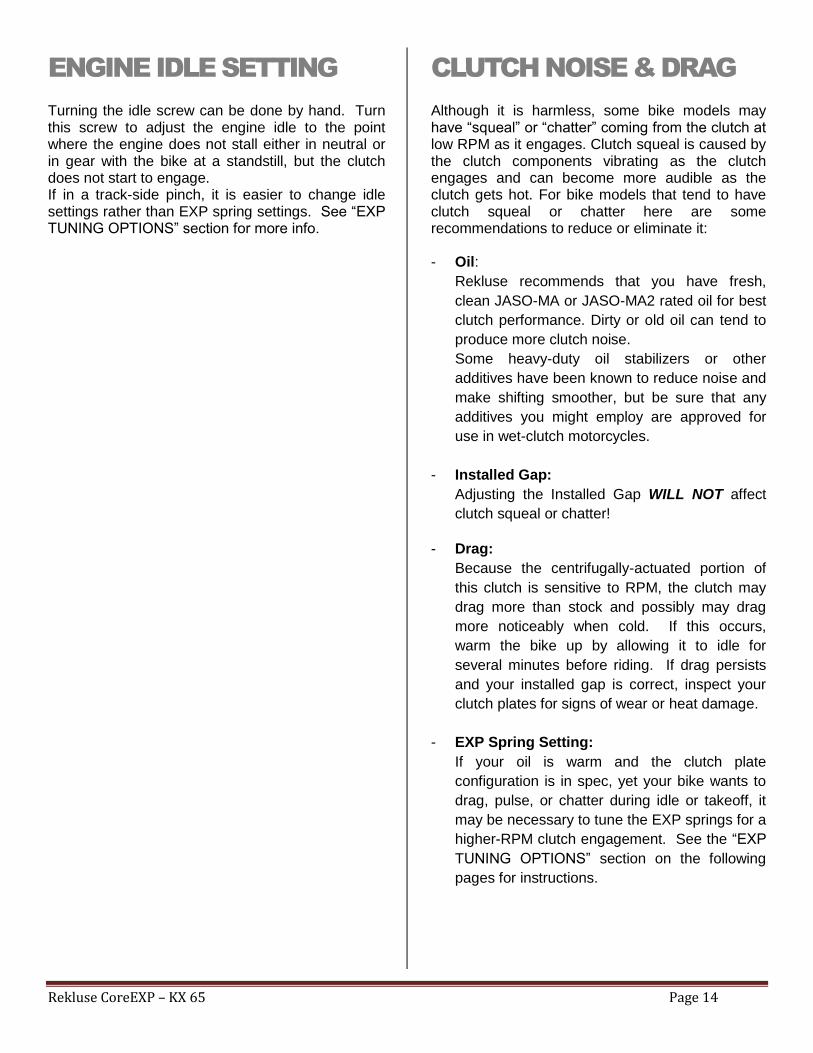
Rubber Band Method: It is recommended that you use this method first to find your Free Play Gain so you can see what it is. Then, check it by hand as well so that you can effectively and comfortably check free play gain every time you ride. Wrap the included rubber band around the outer end of the handlebar grip and attach it to the ball end of the clutch lever.
With the bike at idle in neutral, quickly blip (rev) the engine to about 10,000 RPM and let it return to idle. The clutch lever should move in about 1/8” (3mm) toward the handlebar as you rev the engine.
NOTE: If you are not getting the correct lever movement, see the “Free Play Gain Troubleshooting” section on the next page.
Rekluse CoreEXP – KX 65 Page 13
FREE PLAY GAIN
TROUBLESHOOTING
Each adjustment should be done in small increments – ½-turn of the cable jam nut at a time. After each adjustment, repeat the rev-cycle until optimal free play gain is achieved.
Symptom:
- Clutch lever moves in too far (too much free play gain)
- Clutch has excessive drag
- It is difficult to fully override the clutch with the lever
Answer: Installed Gap is too small
Solution: Adjust to add tension to the clutch cable to increase the Installed Gap inside the clutch pack.
Symptom:
- Clutch lever does not move enough or does not move at all (too little free play gain)
- Clutch is slipping
Answer: Installed Gap is too large
Solution: Adjust to remove tension from the clutch cable to reduce the Installed Gap inside the clutch pack.
BREAK – IN
Follow these procedures for a new installation and any time new friction disks or EXP bases or wedges are installed.
1. Rev cycles: Warm up the bike for 4-5 minutes.
With the bike in neutral and your hand off of the clutch lever, rev the engine 10 times, being sure to let it return to idle between each rev cycle.
2. With the engine running, pull in the clutch lever and click the bike into gear. Slowly release the clutch lever. The bike should stay in place, perhaps with a slight amount of forward creep.
3. Now that the bike is idling in first gear, slowly apply throttle to begin moving. To break in the clutch components, perform the following roll-on starts in 1st and 2nd gear without using the clutch lever: In 1st gear, accelerate moderately to approximately 10,000 RPMs and come to a stop—repeat this 5 times. Next, starting in 2nd gear, accelerate moderately to approximately 10,000 RPMs then come to a stop—repeat this 5 times.
4. Now that the EXP is broken-in and the clutch is warm, re-check free play gain at your clutch lever and adjust if necessary. Your clutch pack will expand slightly with temperature, so final adjustments should be made when the bike is warm. Now you are ready to ride!
DO NOT RIDE WITHOUT SUFFICIENT FREE PLAY GAIN! Checking free play gain is easy and takes less than a minute to perform. For optimum performance and longevity, check free play gain when the bike is warm at the start of every ride.
Rekluse CoreEXP – KX 65 Page 14
ENGINE IDLE SETTING
Turning the idle screw can be done by hand. Turn this screw to adjust the engine idle to the point where the engine does not stall either in neutral or in gear with the bike at a standstill, but the clutch does not start to engage. If in a track-side pinch, it is easier to change idle settings rather than EXP spring settings. See “EXP TUNING OPTIONS” section for more info.
CLUTCH NOISE & DRAG
Although it is harmless, some bike models may have “squeal” or “chatter” coming from the clutch at low RPM as it engages. Clutch squeal is caused by the clutch components vibrating as the clutch engages and can become more audible as the clutch gets hot. For bike models that tend to have clutch squeal or chatter here are some recommendations to reduce or eliminate it: - Oil:
Rekluse recommends that you have fresh,
clean JASO-MA or JASO-MA2 rated oil for best
clutch performance. Dirty or old oil can tend to
produce more clutch noise.
Some heavy-duty oil stabilizers or other
additives have been known to reduce noise and
make shifting smoother, but be sure that any
additives you might employ are approved for
use in wet-clutch motorcycles.
- Installed Gap:
Adjusting the Installed Gap WILL NOT affect
clutch squeal or chatter!
- Drag:
Because the centrifugally-actuated portion of
this clutch is sensitive to RPM, the clutch may
drag more than stock and possibly may drag
more noticeably when cold. If this occurs,
warm the bike up by allowing it to idle for
several minutes before riding. If drag persists
and your installed gap is correct, inspect your
clutch plates for signs of wear or heat damage.
- EXP Spring Setting:
If your oil is warm and the clutch plate
configuration is in spec, yet your bike wants to
drag, pulse, or chatter during idle or takeoff, it
may be necessary to tune the EXP springs for a
higher-RPM clutch engagement. See the “EXP
TUNING OPTIONS” section on the following
pages for instructions.
Rekluse CoreEXP – KX 65 Page 15
EXP TUNING OPTIONS
Included are spring options to tune the engagement RPM of the EXP disk. The EXP disk comes set with the recommended “Medium” setting from Rekluse. See the following chart for setting options.
Kawasaki KX 65 , Suzuki RM 65
ENGAGEMENT SETTING SPRING CONFIGURATION
Low 4 Red Springs
Medium (the EXP is pre-assembled with this setting) 2 Red & 2 Blue Springs
High 4 Blue Springs
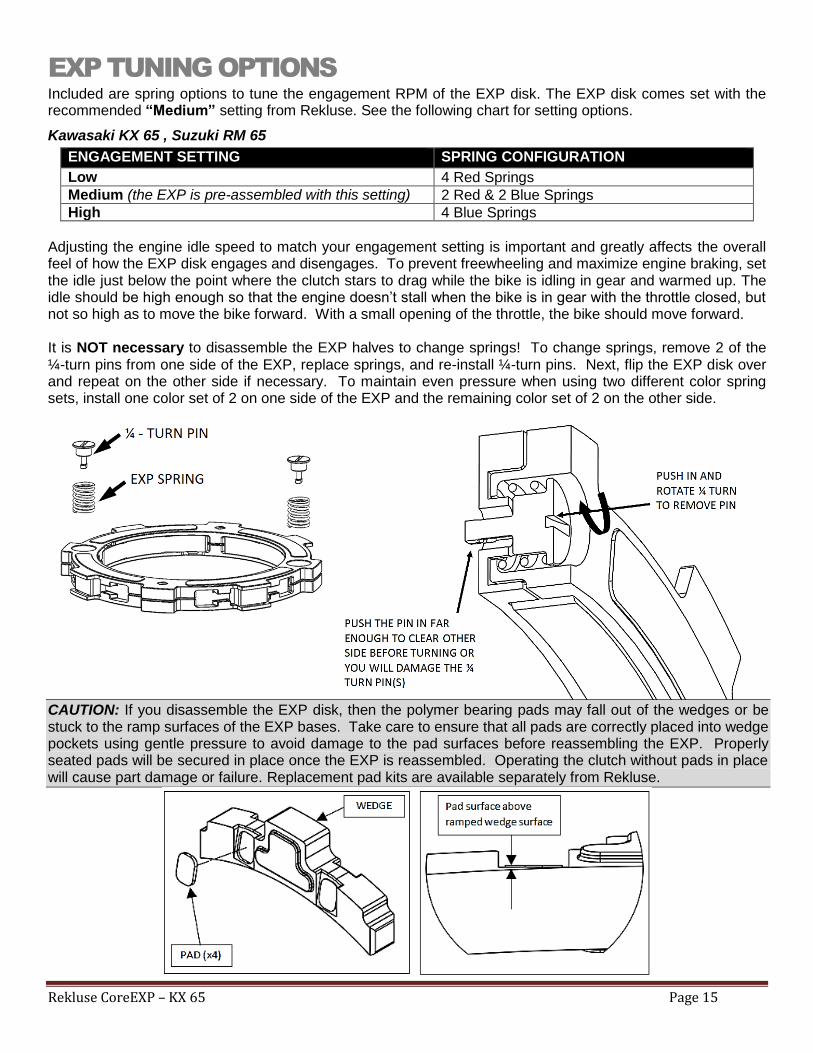
Adjusting the engine idle speed to match your engagement setting is important and greatly affects the overall feel of how the EXP disk engages and disengages. To prevent freewheeling and maximize engine braking, set the idle just below the point where the clutch stars to drag while the bike is idling in gear and warmed up. The idle should be high enough so that the engine doesn’t stall when the bike is in gear with the throttle closed, but not so high as to move the bike forward. With a small opening of the throttle, the bike should move forward. It is NOT necessary to disassemble the EXP halves to change springs! To change springs, remove 2 of the ¼-turn pins from one side of the EXP, replace springs, and re-install ¼-turn pins. Next, flip the EXP disk over and repeat on the other side if necessary. To maintain even pressure when using two different color spring sets, install one color set of 2 on one side of the EXP and the remaining color set of 2 on the other side.
CAUTION: If you disassemble the EXP disk, then the polymer bearing pads may fall out of the wedges or be stuck to the ramp surfaces of the EXP bases. Take care to ensure that all pads are correctly placed into wedge pockets using gentle pressure to avoid damage to the pad surfaces before reassembling the EXP. Properly seated pads will be secured in place once the EXP is reassembled. Operating the clutch without pads in place will cause part damage or failure. Replacement pad kits are available separately from Rekluse.
Rekluse CoreEXP – KX 65 Page 16
MAINTENANCE
- Maintain adequate free play gain, checking before every ride and adjusting if necessary. - Keep up with regular oil changes as per the bike manufacturer’s recommendations. Clutch function and
longevity depends on oil quality.
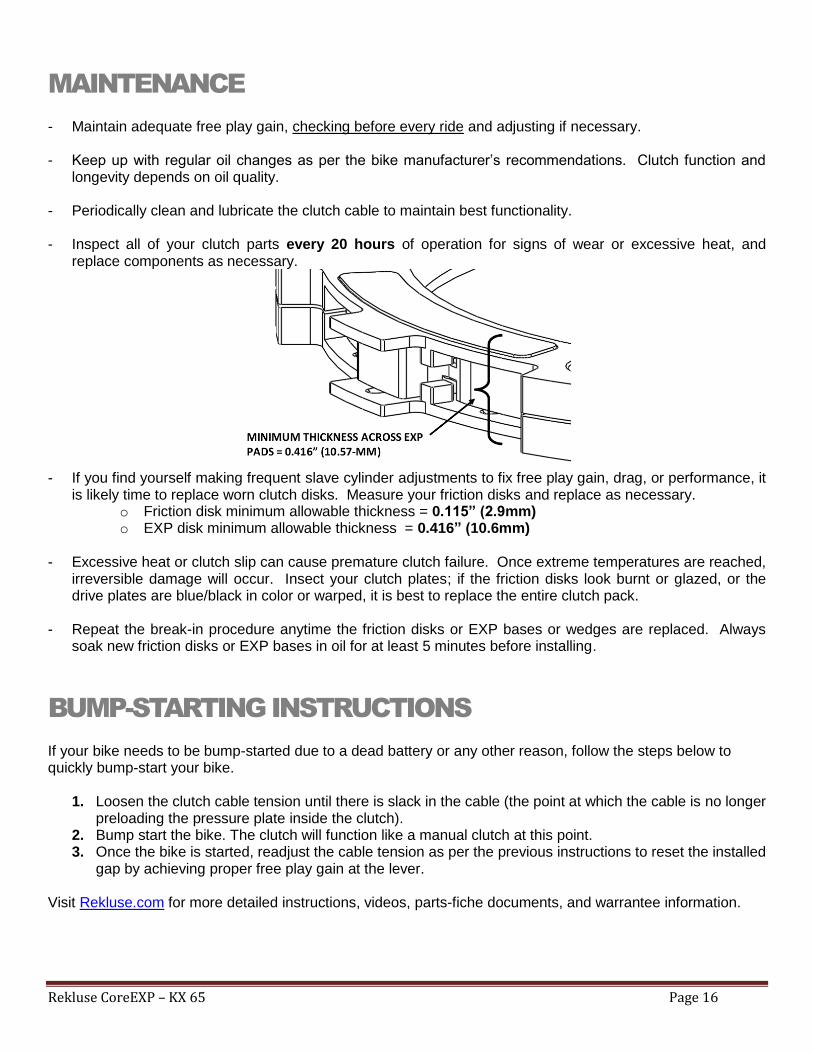
- Periodically clean and lubricate the clutch cable to maintain best functionality. - Inspect all of your clutch parts every 20 hours of operation for signs of wear or excessive heat, and
replace components as necessary.
- If you find yourself making frequent slave cylinder adjustments to fix free play gain, drag, or performance, it
is likely time to replace worn clutch disks. Measure your friction disks and replace as necessary. o Friction disk minimum allowable thickness = 0.115” (2.9mm) o EXP disk minimum allowable thickness = 0.416” (10.6mm)
- Excessive heat or clutch slip can cause premature clutch failure. Once extreme temperatures are reached,
irreversible damage will occur. Insect your clutch plates; if the friction disks look burnt or glazed, or the drive plates are blue/black in color or warped, it is best to replace the entire clutch pack.
- Repeat the break-in procedure anytime the friction disks or EXP bases or wedges are replaced. Always soak new friction disks or EXP bases in oil for at least 5 minutes before installing.
BUMP-STARTING INSTRUCTIONS
If your bike needs to be bump-started due to a dead battery or any other reason, follow the steps below to quickly bump-start your bike.
1. Loosen the clutch cable tension until there is slack in the cable (the point at which the cable is no longer preloading the pressure plate inside the clutch).
2. Bump start the bike. The clutch will function like a manual clutch at this point. 3. Once the bike is started, readjust the cable tension as per the previous instructions to reset the installed
gap by achieving proper free play gain at the lever. Visit Rekluse.com for more detailed instructions, videos, parts-fiche documents, and warrantee information.
Rekluse CoreEXP – KX 65 Page 17
CONVERTING TO A REKLUSE MANUAL CLUTCH (OPTIONAL)
NOTE: When the installation of the CoreEXP auto-clutch is performed, the bike’s basket assembly is disassembled and then reassembled using the Rekluse basket instead of the stock basket. The Rekluse basket is taller than the stock basket, which is required for Rekluse clutches to fit and function. This Rekluse basket is fully compatible with the stock clutch components, and can be used as a direct OEM basket replacement if desired.
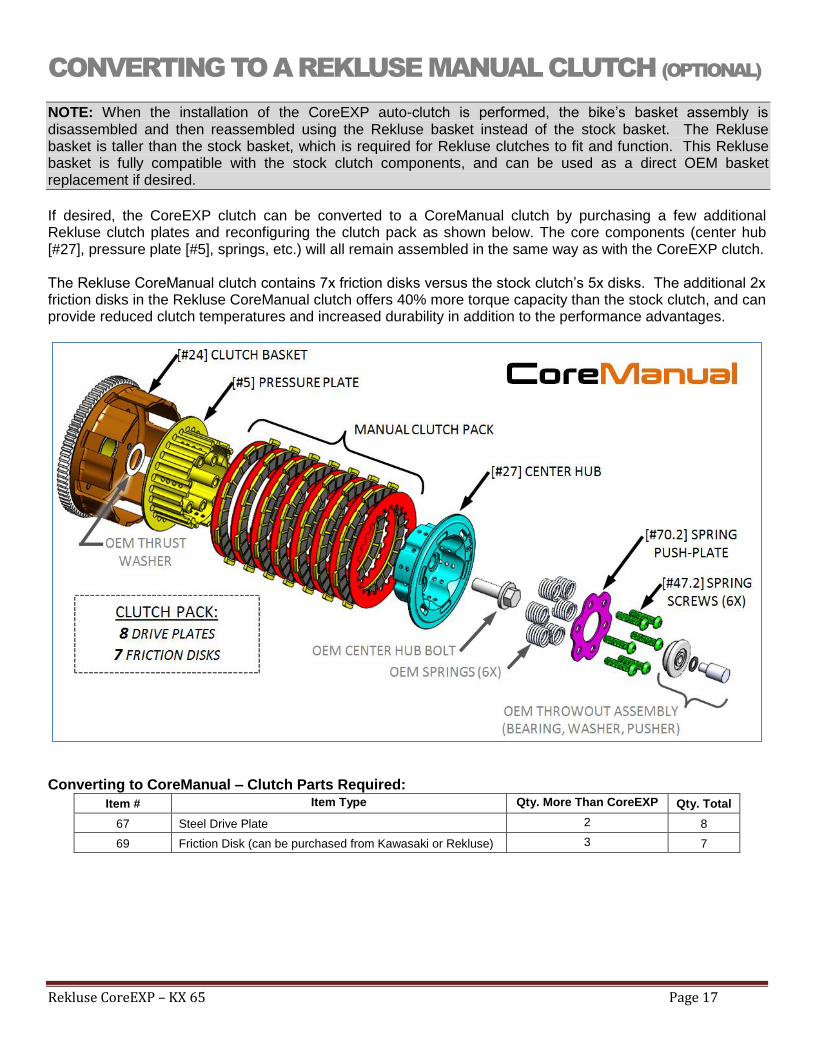
If desired, the CoreEXP clutch can be converted to a CoreManual clutch by purchasing a few additional Rekluse clutch plates and reconfiguring the clutch pack as shown below. The core components (center hub [#27], pressure plate [#5], springs, etc.) will all remain assembled in the same way as with the CoreEXP clutch. The Rekluse CoreManual clutch contains 7x friction disks versus the stock clutch’s 5x disks. The additional 2x friction disks in the Rekluse CoreManual clutch offers 40% more torque capacity than the stock clutch, and can provide reduced clutch temperatures and increased durability in addition to the performance advantages.
Converting to CoreManual – Clutch Parts Required:
Item # Item Type Qty. More Than CoreEXP Qty. Total
67 Steel Drive Plate 2 8
69 Friction Disk (can be purchased from Kawasaki or Rekluse) 3 7

Rekluse CoreEXP – KX 65 Page 18
Cross-Section Overview: CoreManual
1. To convert the CoreEXP clutch to a CoreManual clutch, you will first need to purchase an additional 2 steel drive plates [#67] and 3 friction disks [#69] from Rekluse (alternatively, the additional friction disks can be purchased from Kawasaki, since they are the same as the OEM disks).
2. Remove the clutch components from the bike down to the pressure plate [#27], including the clutch
pack.
3. Reconfigure the clutch pack to include 8x total drive plates [#67] and 7x total friction disks [#69], then reinstall the pressure plate, center hub, and the rest of the components up to the slave cylinder.
4. Set the cable tension to OEM spec (8 to13mm of clutch lever freeplay).


