Download - I. Lesson Overview - The Tech
1
201 S. Market St.
San Jose CA. 95113
1-408-294-8324
thetech.org
Engineering Takes Flight The Tech Challenge 2016 Flight Lesson 3: Developed by The Tech Academies of Innovation
I. Lesson Overview How can we design an aircraft that can deliver much needed medical supplies to a disaster
area located on an island?
Lesson Description: During this lesson, students need to design an aircraft that can rescue people and
deliver medical supplies to a flooded island. Students will test the flight characteristics of different materials and
apply this knowledge to solve the given problem. Students will document and present their optimal aircraft
design.
Grade Levels: 4-8
Education Outcomes:
Students will:
identify the flight characteristics of materials
find and document multiple solutions to a given design problem.
describe their process and defend why their final solution is optimal.
Education Standards
Met: (Note: bolded parts of the standards are fully met by this lesson)
Next Generation Science Standards (NGSS) Performance Expectations (PE)
3-5-ETS1-2: Generate and compare multiple possible solutions to a problem based on how well each is
likely to meet the criteria and constraints of the problem
3-5-ETS1-3: Plan and carry out fair tests in which variables are controlled and failure points are
considered to identify aspects of a model or prototype that can be improved.
MS-ETS1-3: Analyze data from tests to determine similarities and differences among several design solutions to
identify the best characteristics of each that can be combined into a new solution to better meet the
criteria for success.
NGSS Disciplinary Core Ideas (DCI)
3-5-ETS1.A: Defining and Delimiting Engineering Problems
Possible solutions to a problem are limited by available materials and resources (constraints). The
success of a designed solution is determined by considering the desired features of a solution
(criteria). Different proposals for solutions can be compared on the basis of how well each one meets the
specified criteria for success or how well each takes the constraints into account.
3-5-ETS1.C: Optimizing the Design Solution
Different solutions need to be tested in order to determine which of them best solves the problem,
given the criteria and the constraints.
2
201 S. Market St.
San Jose CA. 95113
1-408-294-8324
thetech.org
NGSS Science and Engineering Practices (SEP):
3-5 SEP 6: Constructing explanations and designing solutions
Generate and compare multiple solutions to a problem based on how well they meet the criteria
and constraints of the design problem.
6-8 SEP 7: Engaging in Argument from Evidence
Evaluate competing design solutions based on jointly developed and agreed-upon design criteria.
NGSS Crosscutting Concepts (CCC):
3-5-CCC-6. Structure and Function - The way an object is shaped or structured determines many of its
properties and functions.
Different materials have different substructures, which can sometimes be observed.
6-8-CCC-6. Structure and Function - The way an object is shaped or structured determines many of its
properties and functions.
Complex and microscopic structures and systems can be visualized, modeled, and used to describe how
their function depends on the shapes, composition, and relationships among its parts; therefore,
complex natural and designed structures/systems can be analyzed to determine how they function.
Common Core Standards:
CCSS.ELA-Literacy.SL.4.4 Presentation of knowledge and ideas:
Report on a topic or text, tell a story, or recount an experience in an organized manner, using appropriate
facts and relevant, descriptive details to support main ideas or themes; speak clearly at an
understandable pace.
CCSS.ELA-Literacy.SL.6.4 Presentation of knowledge and ideas:
Present claims and findings, sequencing ideas logically and using pertinent descriptions, facts, and
details to accentuate main ideas or themes; use appropriate eye contact, adequate volume, and clear
pronunciation.
Addressed: (The following standards are practiced in this lesson but are not explicitly taught and assessed)
Common Core Standards:
CCSS.ELA-Literacy.L.4.6 Vocabulary Acquisition and Use
Acquire and use accurately grade-appropriate general academic and domain-specific words and phrases,
including those that signal precise actions, emotions, or states of being (e.g., quizzed, whined, stammered)
and that are basic to a particular topic (e.g., wildlife, conservation, and endangered when discussing animal
preservation).
CCSS.ELA-Literacy.L.6.6 Vocabulary Acquisition and Use
Acquire and use accurately grade-appropriate general academic and domain-specific words and phrases;
gather vocabulary knowledge when considering a word or phrase important to comprehension or
expression.
CCSS.ELA-Literacy.W.4.7 Research to build and Present knowledge:
Conduct short research projects that build knowledge through investigation of different aspects of topic.
CCSS.ELA-Literacy.W.6.7 Research to build and Present knowledge:
Conduct short research projects to answer a question, drawing on several sources and refocusing the
inquiry when appropriate.

3
201 S. Market St.
San Jose CA. 95113
1-408-294-8324
thetech.org
English Language Development Standards:
Part 1A.1: Exchanging information and ideas with others through oral collaborative conversations on a range of
social and academic topics

4
201 S. Market St.
San Jose CA. 95113
1-408-294-8324
thetech.org
II. Advanced Prep & Set-Up for Lesson
General Materials
The following is a list of supplies needed for a class of 36:
Extra AA batteries
Clear tape (10 cm. per pair) (Must be Invisible Tape 32953 or similar. Wide, not shiny)
1 stopwatch per team (extension for middle school)
Scissors (1 per pair)
Rulers (1 per pair)
Protractor (to measure the angle of the electric launcher)
Tape measure (to measure the height if the table platform where the launcher shall rest)
Aircraft Material Test Set-Up
Materials
Wing materials to test, available for each group of 2-4 to choose from. (Each pair selects 1 material to test
and all materials should be tested, so provide no more than 3 pieces of each of the following materials). All
materials listed below must be pre-cut into 8.5 inch by 5.5 inch pieces.
○ Tissue paper
○ Newspaper print
○ Wax paper
○ Copy paper
○ Foil
○ Cardstock
Paper cone to use to mark landing locations (1-2 depending on how many trials you want to allow for each
material test.)
Launch tool attachment paper – regular weight paper cut
into 8.5 in. by 5.5 in. piece (1 per test material/ 2 per
group) (This allows each aircraft, when mounted, to feed
through the launcher easily. See “Aircraft Material Test
Directions” in Appendix C on how to create the Launch
Tool).
20 copies of Directions for Aircraft Material Test in plastic
sleeves (See “Directions for Aircraft Material Test,” in Appendix C)
20 copies of aircraft construction directions (see link here, or in Appendix B)
Electric Paper Airplane Launcher (purchase here or see Appendix B)
5
201 S. Market St.
San Jose CA. 95113
1-408-294-8324
thetech.org
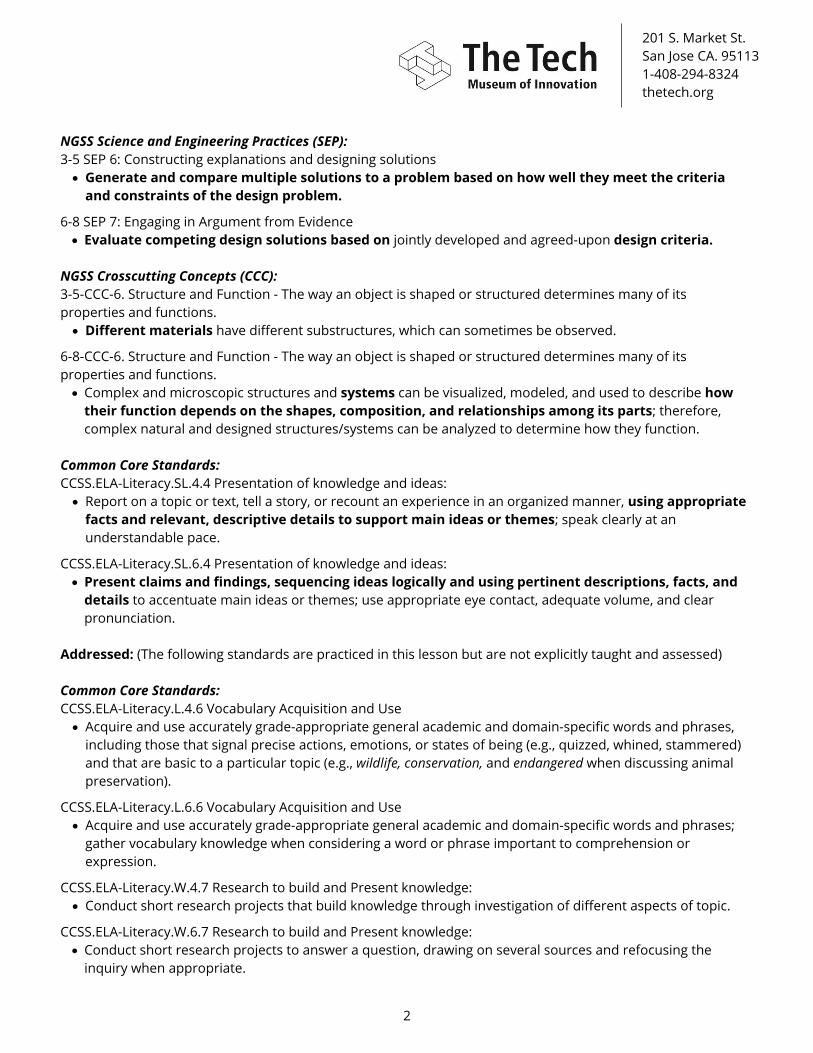
Aircraft Material Test Set-Up
1. Testing Set-Up
Launch point
○ Set Paper Airplane Launcher on table
top (Standard table height ~71 cm/28
inches high)
○ Launcher front raised to a 35 degree
angle relative to the table top
○ Secure the launcher feet with tape to
keep the launcher stable
○ Cover front nut (directly in front of
conveyor pieces) with tape to minimize
“take off” obstruction
Tape measurements on the floor to measure flight distance (intervals in feet or
meters) for a length of 15 feet or 5 meters.
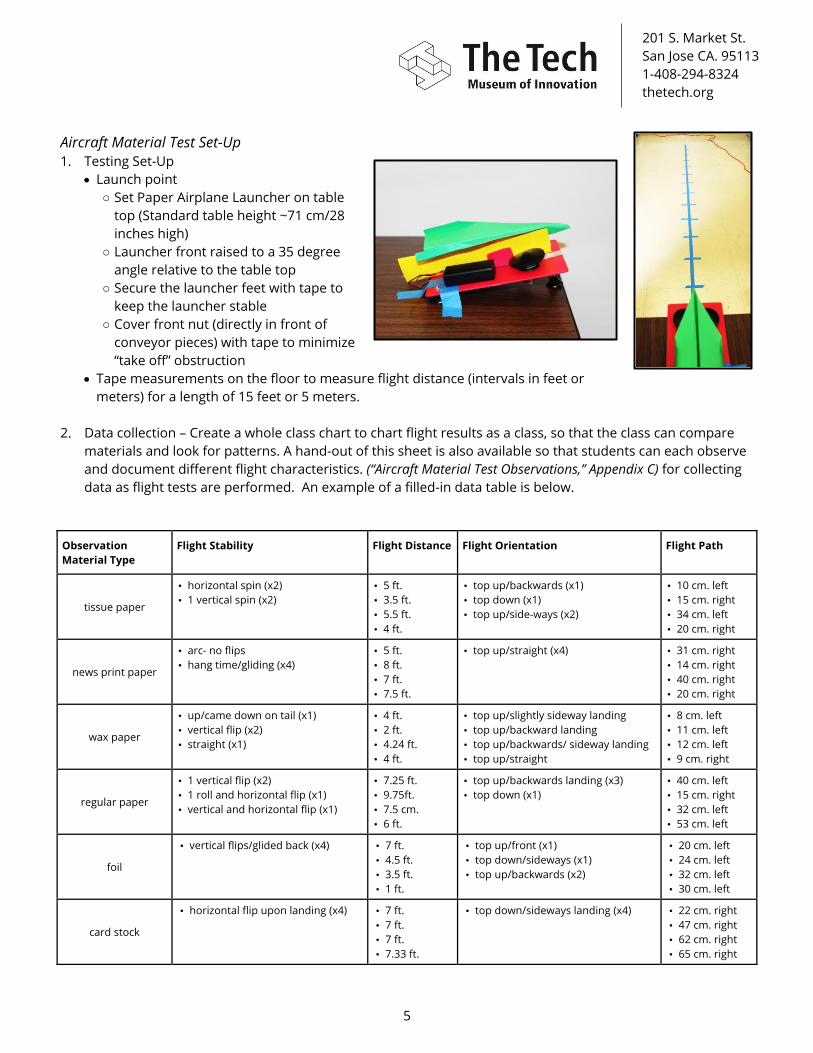
2. Data collection – Create a whole class chart to chart flight results as a class, so that the class can compare
materials and look for patterns. A hand-out of this sheet is also available so that students can each observe
and document different flight characteristics. (“Aircraft Material Test Observations,” Appendix C) for collecting
data as flight tests are performed. An example of a filled-in data table is below.
Observation
Material Type
Flight Stability Flight Distance Flight Orientation Flight Path
tissue paper
• horizontal spin (x2)
• 1 vertical spin (x2)
• 5 ft.
• 3.5 ft.
• 5.5 ft.
• 4 ft.
• top up/backwards (x1)
• top down (x1)
• top up/side-ways (x2)
• 10 cm. left
• 15 cm. right
• 34 cm. left
• 20 cm. right
news print paper
• arc- no flips
• hang time/gliding (x4)
• 5 ft.
• 8 ft.
• 7 ft.
• 7.5 ft.
• top up/straight (x4) • 31 cm. right
• 14 cm. right
• 40 cm. right
• 20 cm. right
wax paper
• up/came down on tail (x1)
• vertical flip (x2)
• straight (x1)
• 4 ft.
• 2 ft.
• 4.24 ft.
• 4 ft.
• top up/slightly sideway landing
• top up/backward landing
• top up/backwards/ sideway landing
• top up/straight
• 8 cm. left
• 11 cm. left
• 12 cm. left
• 9 cm. right
regular paper
• 1 vertical flip (x2)
• 1 roll and horizontal flip (x1)
• vertical and horizontal flip (x1)
• 7.25 ft.
• 9.75ft.
• 7.5 cm.
• 6 ft.
• top up/backwards landing (x3)
• top down (x1)
• 40 cm. left
• 15 cm. right
• 32 cm. left
• 53 cm. left
foil
• vertical flips/glided back (x4) • 7 ft.
• 4.5 ft.
• 3.5 ft.
• 1 ft.
• top up/front (x1)
• top down/sideways (x1)
• top up/backwards (x2)
• 20 cm. left
• 24 cm. left
• 32 cm. left
• 30 cm. left
card stock
• horizontal flip upon landing (x4) • 7 ft.
• 7 ft.
• 7 ft.
• 7.33 ft.
• top down/sideways landing (x4) • 22 cm. right
• 47 cm. right
• 62 cm. right
• 65 cm. right
6
201 S. Market St.
San Jose CA. 95113
1-408-294-8324
thetech.org
Aircraft Design Challenge Advanced Set-Up
Materials (for a class of 36)
Launch station supplies:
○ Electric paper airplane launcher (purchase here or see Appendix B)
○ Textbook (to hold electric launcher in place)
○ Measuring tape (to measure distance)
○ Masking tape (to mark distance)
○ 8 folders or binders (to act as mountain or bridge obstacles around the island)
○ Large Paper Plate (to be the island)
Each student group of 3-4 will need:
○ 1 copy of the Design Challenge Journal (“Design Challenge Journal,” Appendix C). (10 total)
○ 1 pencil (10 total)
○ 1 pair of scissors (10 total)
Aircraft building materials table:
○ 2 rolls of scotch tape
○ 1 roll of masking tape
○ Roll of wax paper
○ Roll of foil
○ 20 sheets of newspaper
○ 100 sheets of white copy paper
○ 20 sheets of cardstock
○ 20 sheets of tissue paper
○ 100 plastic pony beads
○ 100 straws
○ 100 popsicle sticks
○ 100 paper clips
○ 100 pipe cleaners
Aircraft Design Challenge Set-Up
1. Student Group Stations Set-Up: Set up a table for each group with the listed materials and handouts.
2. Set up a materials table that has all the materials listed above available to teams for building.
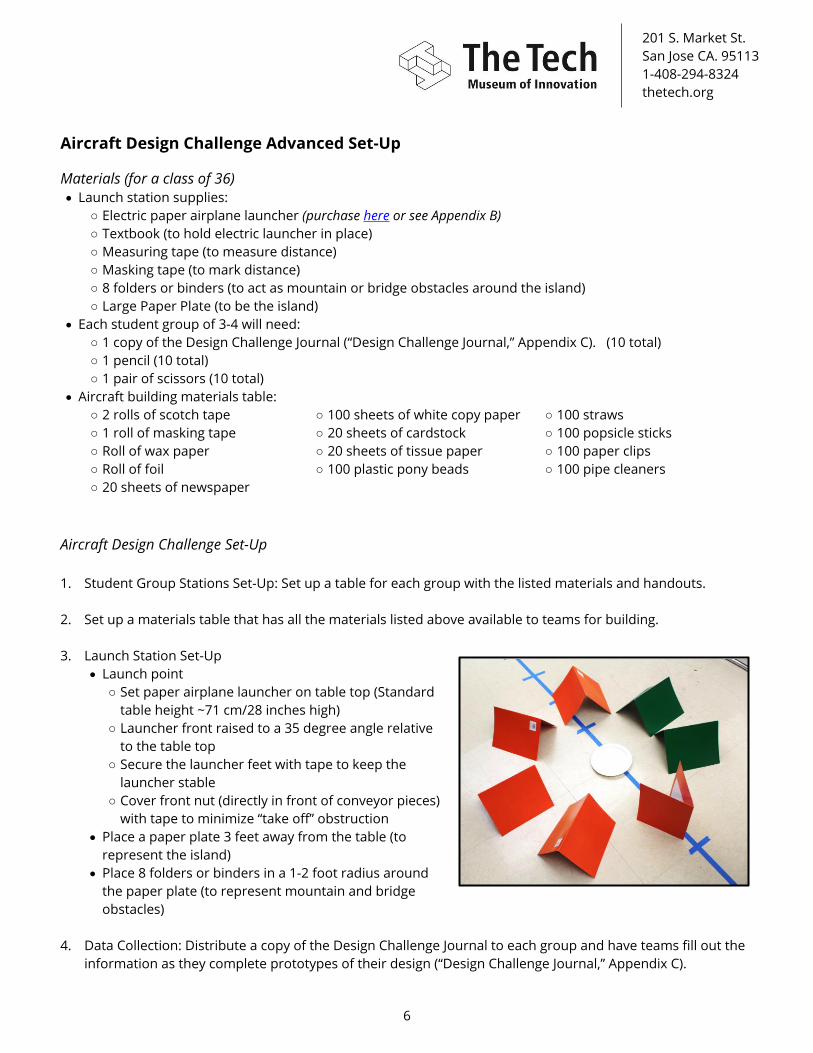
3. Launch Station Set-Up
Launch point
○ Set paper airplane launcher on table top (Standard
table height ~71 cm/28 inches high)
○ Launcher front raised to a 35 degree angle relative
to the table top
○ Secure the launcher feet with tape to keep the
launcher stable
○ Cover front nut (directly in front of conveyor pieces)
with tape to minimize “take off” obstruction
Place a paper plate 3 feet away from the table (to
represent the island)
Place 8 folders or binders in a 1-2 foot radius around
the paper plate (to represent mountain and bridge
obstacles)
4. Data Collection: Distribute a copy of the Design Challenge Journal to each group and have teams fill out the
information as they complete prototypes of their design (“Design Challenge Journal,” Appendix C).
7
201 S. Market St.
San Jose CA. 95113
1-408-294-8324
thetech.org
III. Engineering Takes Flight Lesson Guide
Guiding Question: How can we design an aircraft that can deliver much needed medical supplies to a
disaster area located on an island?
A. Introduction (30 minutes)
1. Introduce the big challenge. Suggested talking points might
include:
In the near future, we may experience extreme weather in
the Bay Area. One potential danger may be flooding.
The National Guard needs our help to design an aircraft that
can rescue people and deliver medical supplies to cities in
need.
As we work towards this challenge, we will explore and
experiment with materials to build an aircraft.
2. Lead a discussion that draws on students’ prior knowledge of
forces acting on an aircraft and the engineering design
process. Sample questions might include:
How does gravity act on an aircraft in flight?
How do forces act on an aircraft to allow it to fly?
How might we use the engineering design process to explore
flight?
3. Discuss materials testing and introduce core vocabulary for
this lesson
How might engineers decide what materials to build with?
Why is this important? (Materials testing is important
because it allows engineers to pick the optimal materials for
their aircraft designs (material or solution that works best
within the limitations of the design). It also lets engineers test
the materials under different variables and conditions so
that they can anticipate any weaknesses in the design or
structure of an aircraft).
Some additional engineering vocabulary that we will be using
today are:
○ Design criteria: The requirements or desired features of a design problem often describing the
purpose and standards that a system or device must meet.
○ Constraints: The limitations of a design problem which typically include budget and schedule
limitations but may also include other limitations such as maximum size restrictions.
Some examples of criteria:
○ purpose
○ goal of the product
○ how well it will perform
○ reliability
○ aesthetics
Some examples of constraints:
○ budget (cost)
○ time (delivery dates, deadlines)
○ legal codes/ethical constraints
○ practical real-world physical constraints (size, weight, power)
Facilitator Notes:
Discussion Tips and Suggestions
Through this discussion, review with students
that in order for an aircraft to fly, the force of
lift must be greater than gravity and thrust
must be greater than drag. These concepts are
taught in the second Tech Challenge 2016
Lesson: Lighter than Aircraft Design.
When introducing the concept of optimal
materials, ask students what the optimal way
to get to school is? If you live down the street,
it might be optimal to walk. If you live a few
miles away, it might be optimal to take the
bus. Depending on your situation, the optimal
mode of transportation will change.
One way to help students understand the
difference between criteria and constraints
is to introduce a real-world problem. You
might want to have students sort criteria and
constraints on a T-chart. One example would
be “Design a Healthy School Lunch:”
o Criteria (Desired Features):
• Less than 1,000 calories (Note: students
might think of this as a limitation, but it is
a desired feature of the design so is not a
limitation or constraint.)
• Includes a serving of fruit, vegetables,
protein, fat, carbohydrates, and dairy.
o Constraints (Limitations within which we
must work):
• Cost - not more than $2.00 per school
lunch
• Must be able to be prepared in 2 hours
Possible NASA Real World design challenge
extension focusing on criteria and constraints
(link here, or see Appendix B)
8
201 S. Market St.
San Jose CA. 95113
1-408-294-8324
thetech.org
B. Aircraft Material Test Experiment (20 minute build + 40 minute
whole class launch and recording of data and observations)
1. Introduce the aircraft material test: Today, as engineers, you will
all be exploring various materials and how they affect their flight.
Introduce the materials that will be used during this
experiment: tissue paper, wax paper, aluminum foil, regular
paper, cardstock and newspaper.
Point out that all materials are the same size.
Have students make some observations about the materials
and invite pairs to choose a specific material to test.
2. Discuss variables: When engineers test a material, scientists
conduct a fair test to ensure that everything stays exactly the same
except for the condition or variable that they are testing. A variable
is anything that can change during an experiment. Sample
questions might include:
What can change in this experiment? (e.g. Where the aircraft
is taped on the launch tool. How precisely a material is
folded. How an aircraft is placed in the launcher, etc.)
Which variable are we intentionally changing? (Material type)
3. Introduce the experiment question, design criteria, constraints, and directions.
Experimental Question:
What are the flight characteristics of 6 different possible wing materials?
Control Variables:
Use standard aircraft design provided (see link here, or in
Appendix B)
All aircraft must be mounted on a predetermined launcher
tool in the same configuration using clear tape. (See
“Directions for Aircraft Material Test,” in Appendix C)
All aircraft must launch from a standard launcher and launch
starting point.
Independent Variable:
Six different materials used for aircraft wings:
○ Foil
○ Wax Paper
○ News print
○ Copy Paper
○ Cardstock
○ Tissue Paper
Constraints (Design Limitations): Budget: Build 1 aircraft per pair, using only 1 of the materials provided in class per aircraft.
Schedule: To be built within 20 minutes
Facilitator Notes:
Experiment Tips
Prepare an indoor space that will allow up to
10 ft. of flight space and limit or avoid
turbulence that will affect flight.
In order to have all materials tested, have no
more than 2-3 sheets of each material so that
ideally there are at least 2 sets of pairs testing
each material. Invite each pair to select 1
material to test from those provided.
Facilitator Notes:
Experiment Tips
Remind students that they are merely
observing the behavior of the different
materials according to flight stability, flight
distance, flight path and flight orientation, and
not looking for the “optimal material.” Save
judgment and recommendations after all
materials have been tested and the
engineering challenge has been presented.
If a mis-launch occurs, the group must
relaunch their aircraft to establish valid data
compared to other trials that were done for
the same aircraft material.
All students must observe all groups’ launches
and record data for each.
Ensure that at least 2 groups work on each
material suggested to provide redundancy.
o Each group tests their aircraft at least 2
times.
o Each class must then expect at least 4
launches to make observations and record
data for each material.
9
201 S. Market St.
San Jose CA. 95113
1-408-294-8324
thetech.org
Testing:
Teacher launches from a height of 71 cm/28 inches (standard
table top), with the launcher pointed 35 degrees
Flight Observation: During all tests, observe and document
how each aircraft design behaves during flight.
All students observe all aircraft materials tested.
Considering the 6 different materials named in this section, it
is assumed that there will be 2 aircraft built by 2 different
pairs for any given material, creating the necessary
redundancy.
4. While the students are choosing their aircraft material and
folding them according to the provided aircraft directions (see
link here, or in Appendix B) walk around and ask questions.
Some suggested questions are:
What material did you choose? Why?
How do you predict your material will fly? Why do you think
so?
What will your team look for/observe during the testing?
What will you document?
How will you document? (Will different team members
observe/document different things? Who will document
what?)
What variables are you trying to control? How?
Why is it important to keep all variables the same except for
the experimental variable?
5. Prior to testing as a whole class, go over launch/safety
procedures.
Have all students move to the launch end of the testing area
so that airplanes are launched away from observers.
To control launch variables, the teacher should launch all
aircraft.
For each launch, be sure to use the same launcher position and angle.
The launcher will yell, “Clear the launch way,” prior to each launch and will only launch when there are no
people in the launch path.
Each student must be ready to record their observations in the data observation tool before each launch.
6. Before the tests, identify these observation points.
Flight distance: Using the prepared measurements in feet on the floor, record the approximate length
traveled from the launcher to the touch down.
Flight orientation: Record the position of the aircraft nose when the aircraft lands (position of nose, e.g.
right side up, or upside down; final position of aircraft, e.g. backwards facing, facing front, or sideways
facing).
Facilitator Notes:
Data and Results
Sample conclusions: According to the data
gathered during the development of this
activity, given the specific materials used, the
conditions in the testing room and the
controls set, the following generalizations
were drawn. (Please note that because
variations in construction, launch height,
force, angle, room conditions etc., your
classroom results may not be identical or
similar to the sample data given. It’s
important to help students point out evidence
to their claims based on the data they collect.)
Stability: Newspaper resulted in the most stable
flight of the materials tested. Our evidence is that
the aircraft made of newspaper never flipped or
rolled.
Distance: The cardstock material was the most
consistent in traveling the furthest distance. Our
evidence is that the aircraft made of cardstock
travelled 7 ft. for 3 trials and 7.33 ft. for the last
trial. (See sample table in Section II)
Orientation: Newspaper was most consistent in
its flight orientation performance. Our evidence
is that all 4 trials landed top up with no flips.
Path: Wax paper showed the least amount of
deviation from the center path. Our evidence is
that our data shows a deviation range of 8-12
cm. from the center path for all 4 trials.
Because 2 groups will construct the aircraft
with the same material, possible
inconsistencies may come up because of
differences in construction or quality of build.
If data appears inconsistent, 3rd and 4th trial
for the same exact aircraft might be necessary
to draw conclusions.
10
201 S. Market St.
San Jose CA. 95113
1-408-294-8324
thetech.org
Flight path: The actual course of an aircraft through the air. This must be recorded by measuring, in cm
or inches the flight deviation of the aircraft relative to the center, straight flight path. Record the shortest
distance from the final landing site of the aircraft to the center, straight flight path. Visual, qualitative
statements of flight path may also be included in this section (e.g. turned around, glided backwards,
glided in a circular path, flight went off path but came back, etc.)
Flight stability: The tendency of an airplane in flight to remain in straight, level, and upright flight. This
may also be described by recording flips or rolls (horizontal- parallel to the ground or vertical-
perpendicular to the ground). Landing observations may also be recorded in this section (landed on nose
or landed on tail).
7. Have a whole class discussion.
How do you predict each material will fly? Why?
8. Run the tests and have students record data from experiment. You may want to use a whole class flight
characteristics data collection table for documenting the class observations. Have a whole class discussion.
What do you notice about the characteristics of each material? What’s similar? What’s different?
Can you describe the flight path of each?
Do you see any differences in the way they flew?
What do you notice about how each flies? How would you describe the:
○ Flight stability?
○ Flight orientation?
○ Flight path?
○ Flight distance?
What conclusions can you draw? What evidence do you have from your data table to support this?
C. Content Learning (25 minutes)
1. Introduce key engineering vocabulary as revisiting the Design Challenge question (10 minutes)
Payload: goods carried by a vehicle
Prototyping: creating a full-scale model/demo of a new type or design of a construction used for testing.
(Not the final product)
Failure point: a design element that can cause an unsuccessful result. This is the point in a system that if
it fails, the whole system fails.
Design process: a series of steps that engineers use to guide them as they solve problems. The process is
non-linear but cyclical, meaning that engineers repeat the steps as many times as needed, making
improvements along the way of imagining, creating, reflecting, testing and iterating.
2. Discuss documentation and journal writing process as an engineering tool.
The purpose of journaling is to record and document the design process, solutions and testing results so
that the optimal solution can be identified and replicated.
Information that should be included:
o What should/can we record while conducting this challenge?,
o Is there additional information that you want to record in your journal? Why?
Examples of what you might document, includes:
○ Sketches and photos of design ideas and prototype
○ Materials list
○ Data from prototyping
11
201 S. Market St.
San Jose CA. 95113
1-408-294-8324
thetech.org
○ Careful documentation of the variables that are changed in each design (of materials, shapes, sizes,
load placement, etc.)
○ Documentation of both successful and unsuccessful designs and failure points—so that they can be
remedied in future designs
○ The process you went through to develop your solution
○ All the designs you tried and how you changed them
○ Your final design including measurements and materials used
○ What you learned through the process
○ Specific details that will set you apart from other teams (sketches, specific materials, budgets, number
of designs, testing procedures, attendance at Test Trials, meeting minutes, etc.)
○ Real world applicability (how would your device work in real life?)
3. Introduce four roles for documentation and have team members select roles. Students in a team may
switch roles for each test.
Data collector: during prototype, pay attention to and take notes on successful and unsuccessful points
of an aircraft flight
Design illustrator: Sketch an aircraft with details as much as possible
Materials manager: Manage and record all materials used for an aircraft design
Journal writer: in collaboration with the team, make sure all parts of journal are complete using the
sentence frames.
D. Aircraft Design Challenge (about 120 minutes)
1. Review Questions about Materials from the Aircraft Materials Experiment:
What did we learn about the materials that we tested?
How can we use this knowledge to create an aircraft that will land safely and accurately?
2. Review key engineering vocabulary
Optimal Design: The most desirable solution (design) that
best meets the constraints and criteria.
3. Introduce the Engineering Design Challenge:
Design Problem:
In the near future, we may experience extreme weather in
the Bay Area. One potential danger may be flooding. The
National Guard needs our help to design an aircraft that can
land in a specific area to rescue people and deliver a payload
of medical supplies to cities in need.
Criteria (Design Requirements/Desired Features):
The aircraft must:
be made out of at least two different materials
land as close to the target as possible
clear the mountain and bridge obstacles)
carry a payload of 6 pony beads (medical supplies)
land right side up on the island.
have a stable flight (no rolling or flipping)
Facilitator Notes:
Design Challenge
For design process, it may be helpful to refer
to The Tech’s Design Challenge Learning
resources (see link here, or Appendix B)
To introduce these vocabulary, you may need
to make connections between the vocabulary
and the actual situational words: payload-
medical supplies, model/demo-aircraft
In order to facilitate students’ documentation
and journal process, let each team write the
vocabulary on cardstocks and place them on a
table.
In addition, students might need to identify
aircraft parts vocabulary as well. If you post a
picture with the vocabulary on the wall,
students may easily refer to it. (For a picture,
see link here, or Appendix B)
See the Appendix B for the definitions of the
following aircraft parts vocabulary:
o Nose
o Fuselage
o Tail
o Wing
o Elevator
o Aileron
o Pitch
o Roll
o Rudder
o Yaw
12
201 S. Market St.
San Jose CA. 95113
1-408-294-8324
thetech.org
Constraints (Design Limitations): Schedule - must be completed within 2 class periods
Documentation - at least 3 different aircraft prototypes documented in the Design Challenge Journal
(“Design Challenge Journal Writing,” Appendix C)
Budget - must use the building materials and tools provided
Physical - must mount aircraft on launch tool
Testing:
Teacher launches from a height of 71 cm/28 inches (standard table top), with the launcher pointed 35
degrees
Flight Observation: During all tests, observe and document how each prototype aircraft design behaves
during flight and how closely it meets the design criteria.
4. Review key vocabulary words. One option is to use the online Kahoot game created just for this lesson (see
link here, or Appendix B)
5. Explain to students that they will work with their group to create three different prototypes using the
materials provided. They will need to use at least 2 different materials in their design and they must deliver
their payload of six beads to the target area safely.
Before testing each prototype, they will need to show their completed design sketch with materials on the
Design Challenge Journal (“Design Challenge Journal Writing,” Appendix C). Students may have different roles
for each prototype: Data Collector, Design Illustrator, Materials Manager, and Journal Writer.
6. While the students are working on their design prototypes,
teacher should walk around and ask questions. Some
suggested questions are:
What materials did you choose? Why?
How do you predict your aircraft will fly? Why do you think
so?
Why do you think the materials you chose would be optimal
for your aircraft?
What will your team look for/observe during the testing?
What will you document?
What variables are you trying to control? How?
7. Teacher will be at the launch testing site to launch each
completed prototype.
Go over launch/safety procedures.
Have all students move to the launch end of the testing area
so that airplanes are launched away from observers.
Teacher will be the only one to launch the airplanes.
For each launch, be sure to use the same launcher position
and angle.
The launcher will yell, “Clear the launch way,” prior to each
launch and will only launch when there are no people in the
launch path.
Facilitator Notes:
Optimal Design
To help students further understand optimal
design, share a few more scenarios that your
class can think about together:
o Your team has been contracted to design a
safe race car for NASCAR. What would be
the most important criteria to consider
when deciding on the optimal design?
A. cost of the design
B. selecting the fastest car
C. color of the car
D. reliable seat belts for the car
Facilitator Notes:
Prototyping To help students further understand
prototyping, share that it is similar to creating
several drafts of a paper or project.
o a first draft is similar to Prototype 1
o a second draft is similar to Prototype 2
o a third draft is similar to Prototype 3
o a final product/draft is similar to Optimal
Design
13
201 S. Market St.
San Jose CA. 95113
1-408-294-8324
thetech.org
8. Have students fill in the sentence stems for prototype 1 (see “Design Challenge Journal” in Appendix C).
9. Repeat the above process with Prototype 2 and 3.
10. Final testing of optimal designs:
When students are finished, they should share these observations with the teacher. Then they will
collaborate with their group to select and provide evidence for their optimal design. Their optimal design
should be the design that best meets the constraints and design criteria.
Have groups present in front of the class. Test all optimal group designs.
Suggested discussion questions:
○ (4-5th grades) How well does each design solution meet the criteria and constraints?
○ (6-8th) Which design best meets the criteria and constraints? How do you know?
○ (4-5th) What materials did you use on your aircraft and how did they affect the flight? What is the
function of each material?
○ (6-8th) How did the different materials in your aircraft work together to fly?
○ What do you notice about the design of each airplane that might contribute to these flight
characteristics?
○ After seeing all of the class prototypes, which do you think is the optimal design? Why?
○ What trade-offs might an engineer make when designing an aircraft?
14
201 S. Market St.
San Jose CA. 95113
1-408-294-8324
thetech.org
IV. Appendices
A. Vocabulary and Background Information
The following is the start of a suggested list of words to discuss as you read and discuss with students.
1. Flight Vocabulary
flight
distance
The length traveled by the aircraft from launch to the touch down
flight
orientation
How an aircraft faces when it lands (position of nose, e.g. pointing down, right
side up, and upside down).
flight path The path that an aircraft or device takes when it flies.
flight
stability
The tendency of an aircraft in fight to remain in straight, level and upright flight.
payload The goods carried by a vehicle.
2. Engineering Vocabulary
constraint The limitations of a design problem which typically include budget and schedule
limitations but may also include other limitations such as maximum size
restrictions.
criteria The requirements or desired features of a design problem often describing the
purpose and standards that a system or device must meet.
engineering
or design
process
A series of steps that engineers use to guide them as they solve problems. The
process is non-linear but cyclical, meaning that engineers repeat the steps as
many times as needed, making improvements along the way of imagining,
creating, reflecting, testing and iterating.
failure
point
The part of a system that, if it fails, will cause the entire system to stop working.
optimal
design
The most desirable solution (design) that best meets the constraints and criteria
of a design problem.
15
201 S. Market St.
San Jose CA. 95113
1-408-294-8324
thetech.org
prototype A first model of something, from which other forms are developed or copied.
variable Any factor, trait, or condition that can exist in differing amounts or types. An
experiment usually has three kinds of variables: independent, dependent, and
controlled. The independent variable is the one that is changed by the scientist.
3. Aircraft Vocabulary
aileron A hinged flight control surface usually on the back edge of each wing of a fixed-
wing aircraft. Moving an aircraft’s ailerons up or down controls the aircrafts roll.
elevator A control surface at the rear (tail) of an aircraft, making it climb or descend
(affects pitch).
fuselage The main part of an airplane that holds cargo, crew and/or passengers.
nose The forward end of an aircraft, usually cone shaped.
pitch The movement of the aircraft’s nose up or down causing the plane to descend
or climb (see image here)
roll When an aircraft’s wings tilt left or right (see image here)
rudder A control surface on the fixed fin on the tail of an aircraft moving left and right
that affects the side-to-side movement (yaw) of the aircraft
tail The rear portion of an aircraft, which usually includes a horizontal stabilizer and
elevators that control the up and down motion (pitch) of the aircraft
wing One of the long flat parts on both sides of an airplane that allow it to fly
yaw The turning of an aircraft, when the aircraft’s nose turns side to side (see image
here)
16
201 S. Market St.
San Jose CA. 95113
1-408-294-8324
thetech.org
B. References
"4M Electric Plane Launcher Kit." Amazon.com: Toys & Games. Web. 3 Sept. 2015.
<http://www.amazon.com/4M-Electric-Plane-Launcher-Kit/dp/B000NDPKOA>
"Design Challenge Learning" Web. 27 July 2015. <https://www.thetech.org/educator-
resources/design-challenge-learning>.
“DIY Paper Airplane Launcher” Web. 28 July 2015.
<https://www.youtube.com/watch?v=wC60S7d_Nr4>.
"How to Make a Paper Airplane" Web.
<https://www.diynetwork.com/made-and-remade/learn-it/5-basic-paper-airplanes>.
"Identify Criteria and Constraints." Web. 27 July 2015.
<http://www.nasarealworldinworld.org/portals/0/PDFs/RW_Student_Task2.pdf>.
"Kahoot! | Play This Quiz Now!" Kahoot! | Play This Quiz Now! Web. 10 Sept. 2015.
<https://play.kahoot.it/#/k/61a1901b-5bac-4a22-9044-2f700cfdbc4e>
"Parts of Airplane." Parts of Airplane. NASA. Web. 27 July 2015.
<https://www.grc.nasa.gov/www/k-12/airplane/airplane.html>.
"Roll, Pitch, and Yaw | How Things Fly." Roll, Pitch, and Yaw | How Things Fly. Web. 10 Sept. 2015. < https://howthingsfly.si.edu/flight-dynamics/roll-pitch-and-yaw>
17
201 S. Market St.
San Jose CA. 95113
1-408-294-8324
thetech.org
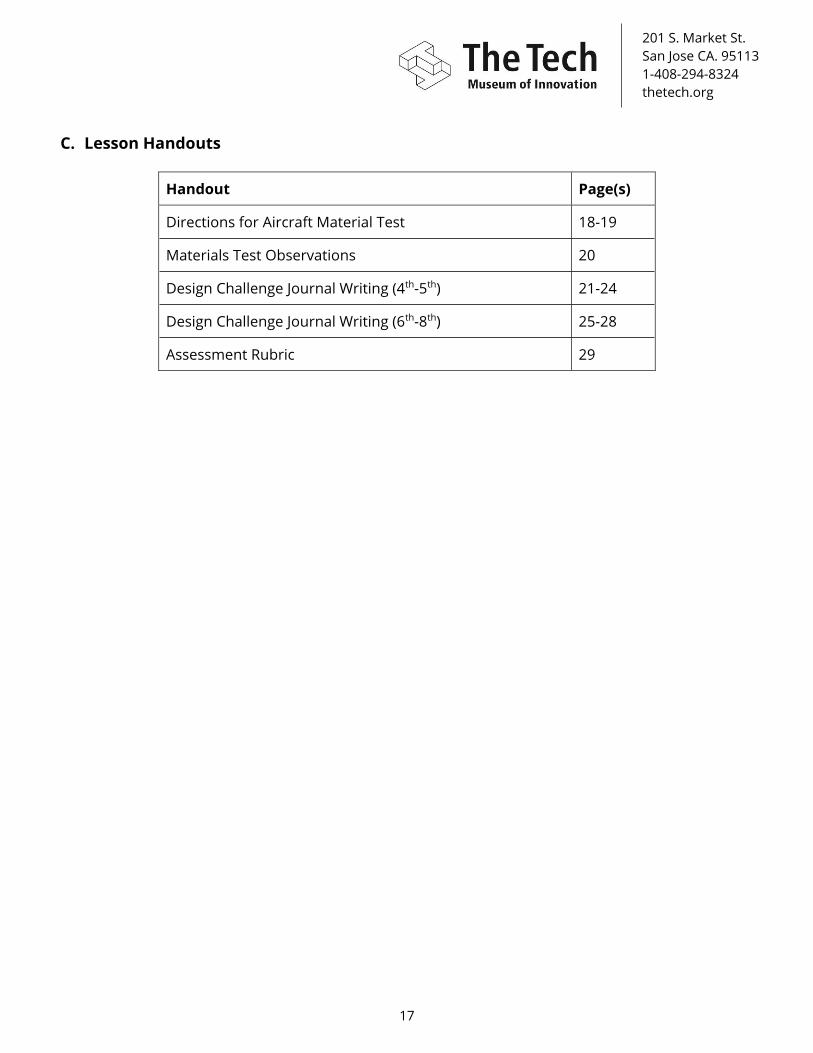
C. Lesson Handouts
Handout Page(s)
Directions for Aircraft Material Test 18-19
Materials Test Observations 20
Design Challenge Journal Writing (4th-5th) 21-24
Design Challenge Journal Writing (6th-8th) 25-28
Assessment Rubric 29
Engineering Takes Flight
Name: ______________________________________
Date: _____________ Class: ___________________
18
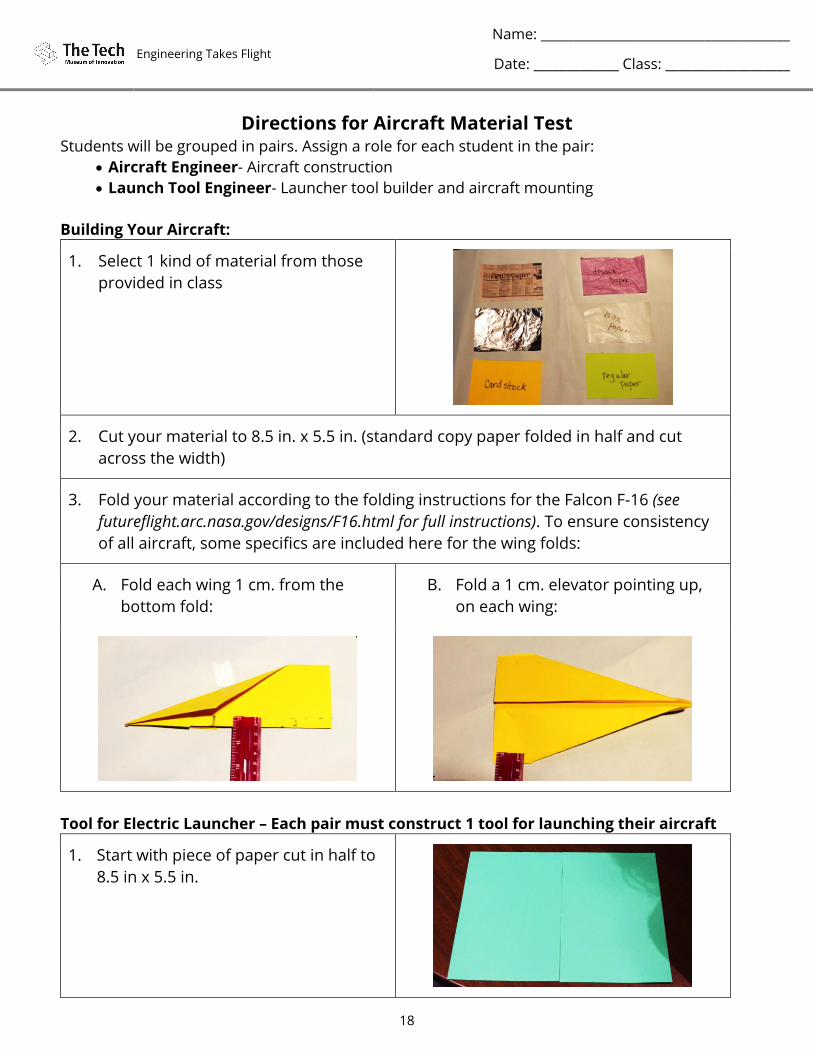
Directions for Aircraft Material Test Students will be grouped in pairs. Assign a role for each student in the pair:
Aircraft Engineer- Aircraft construction
Launch Tool Engineer- Launcher tool builder and aircraft mounting
Building Your Aircraft:
1. Select 1 kind of material from those
provided in class
2. Cut your material to 8.5 in. x 5.5 in. (standard copy paper folded in half and cut
across the width)
3. Fold your material according to the folding instructions for the Falcon F-16 (see
futureflight.arc.nasa.gov/designs/F16.html for full instructions). To ensure consistency
of all aircraft, some specifics are included here for the wing folds:
A. Fold each wing 1 cm. from the
bottom fold:
B. Fold a 1 cm. elevator pointing up,
on each wing:
Tool for Electric Launcher – Each pair must construct 1 tool for launching their aircraft
1. Start with piece of paper cut in half to
8.5 in x 5.5 in.
Engineering Takes Flight
Name: ______________________________________
Date: _____________ Class: ___________________
19
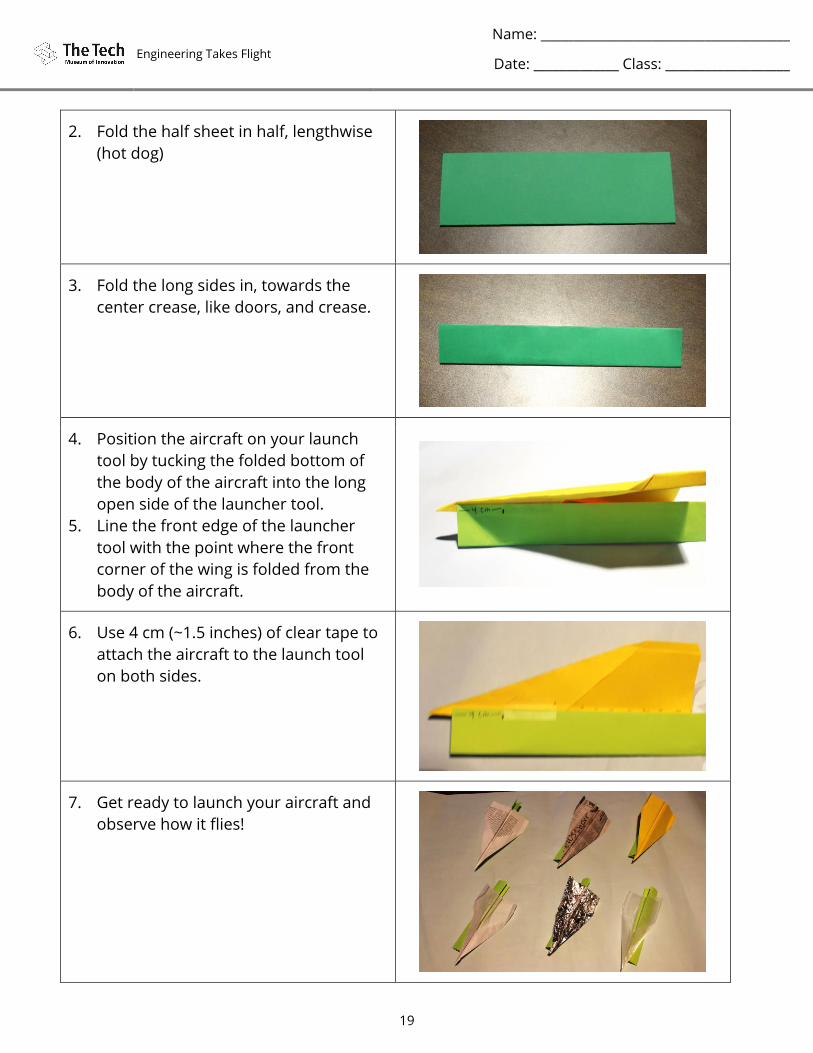
2. Fold the half sheet in half, lengthwise
(hot dog)
3. Fold the long sides in, towards the
center crease, like doors, and crease.
4. Position the aircraft on your launch
tool by tucking the folded bottom of
the body of the aircraft into the long
open side of the launcher tool.
5. Line the front edge of the launcher
tool with the point where the front
corner of the wing is folded from the
body of the aircraft.
6. Use 4 cm (~1.5 inches) of clear tape to
attach the aircraft to the launch tool
on both sides.
7. Get ready to launch your aircraft and
observe how it flies!
Engineering Takes Flight
Name: ______________________________________
Date: _____________ Class: ___________________
20
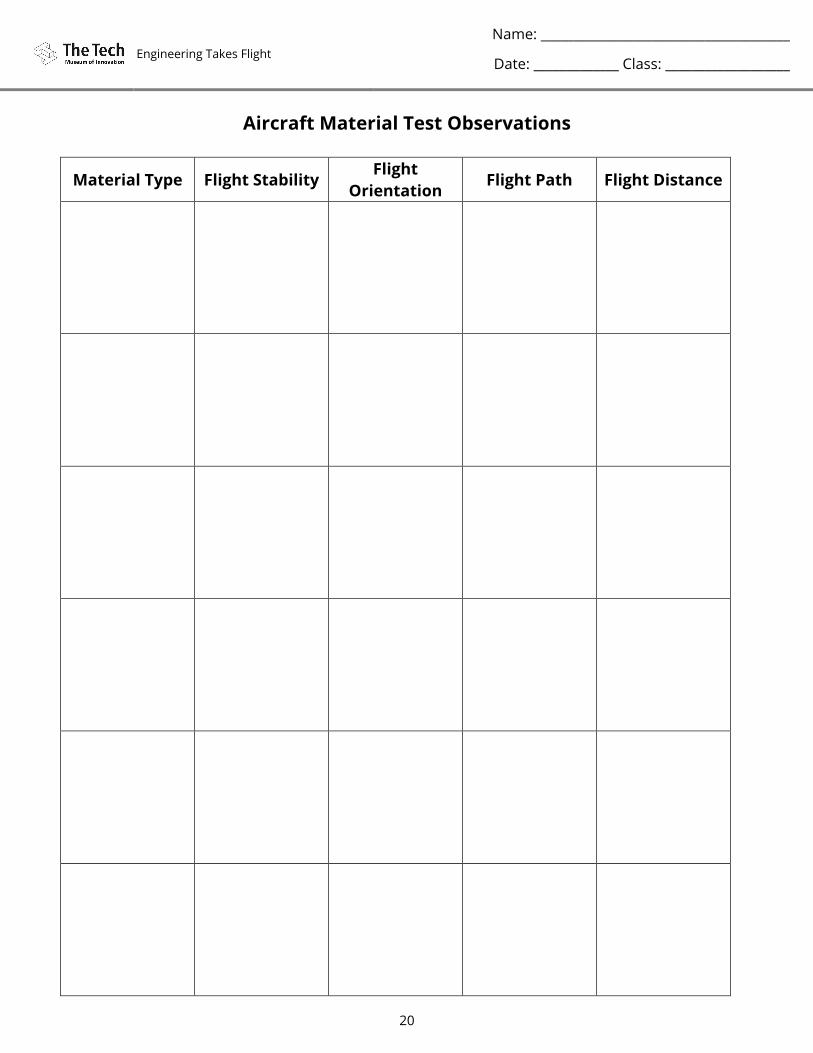
Aircraft Material Test Observations
Material Type Flight Stability Flight
Orientation Flight Path Flight Distance
Engineering Takes Flight
Name: ______________________________________
Date: _____________ Class: ___________________
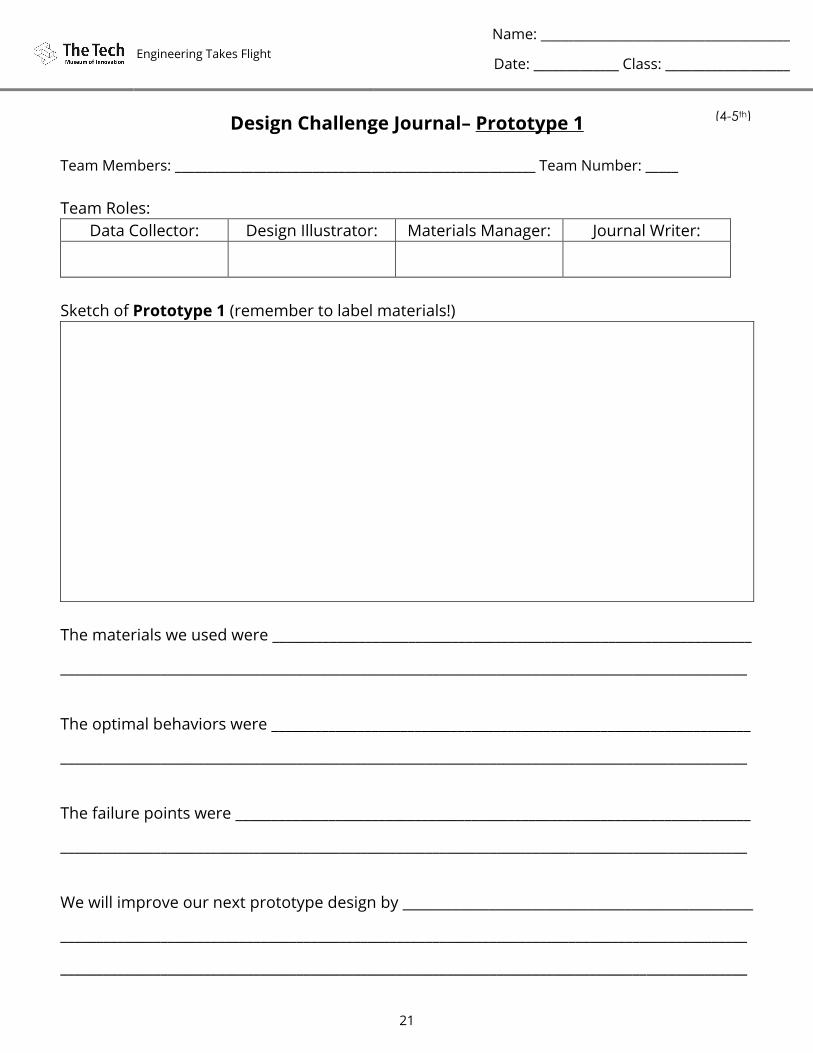
21
Design Challenge Journal– Prototype 1
Team Members: _______________________________________________________ Team Number: _____
Team Roles:
Data Collector: Design Illustrator: Materials Manager: Journal Writer:
Sketch of Prototype 1 (remember to label materials!)
The materials we used were ___________________________________________________________________
________________________________________________________________________________________________
The optimal behaviors were ___________________________________________________________________
________________________________________________________________________________________________
The failure points were ________________________________________________________________________
________________________________________________________________________________________________
We will improve our next prototype design by _________________________________________________
________________________________________________________________________________________________
________________________________________________________________________________________________
(4-5th)

Engineering Takes Flight
Name: ______________________________________
Date: _____________ Class: ___________________
22
Design Challenge Journal– Prototype 2
Team Members: _______________________________________________________ Team Number: _____
Team Roles:
Data Collector: Design Illustrator: Materials Manager: Journal Writer:
Sketch of Prototype 2 (remember to label materials!)
The materials we used were ___________________________________________________________________
________________________________________________________________________________________________
The optimal behaviors were ___________________________________________________________________
________________________________________________________________________________________________
The failure points were ________________________________________________________________________
________________________________________________________________________________________________
We will improve our next prototype design by _________________________________________________
________________________________________________________________________________________________
________________________________________________________________________________________________

Engineering Takes Flight
Name: ______________________________________
Date: _____________ Class: ___________________
23
Design Challenge Journal– Prototype 3
Team Members: _______________________________________________________ Team Number: _____
Team Roles:
Data Collector: Design Illustrator: Materials Manager: Journal Writer:
Sketch of Prototype 3 (remember to label materials!)
The materials we used were ___________________________________________________________________
________________________________________________________________________________________________
The optimal behaviors were ___________________________________________________________________
________________________________________________________________________________________________
The failure points were ________________________________________________________________________
________________________________________________________________________________________________
We will improve our next prototype design by _________________________________________________
________________________________________________________________________________________________
________________________________________________________________________________________________
Engineering Takes Flight
Name: ______________________________________
Date: _____________ Class: ___________________
24
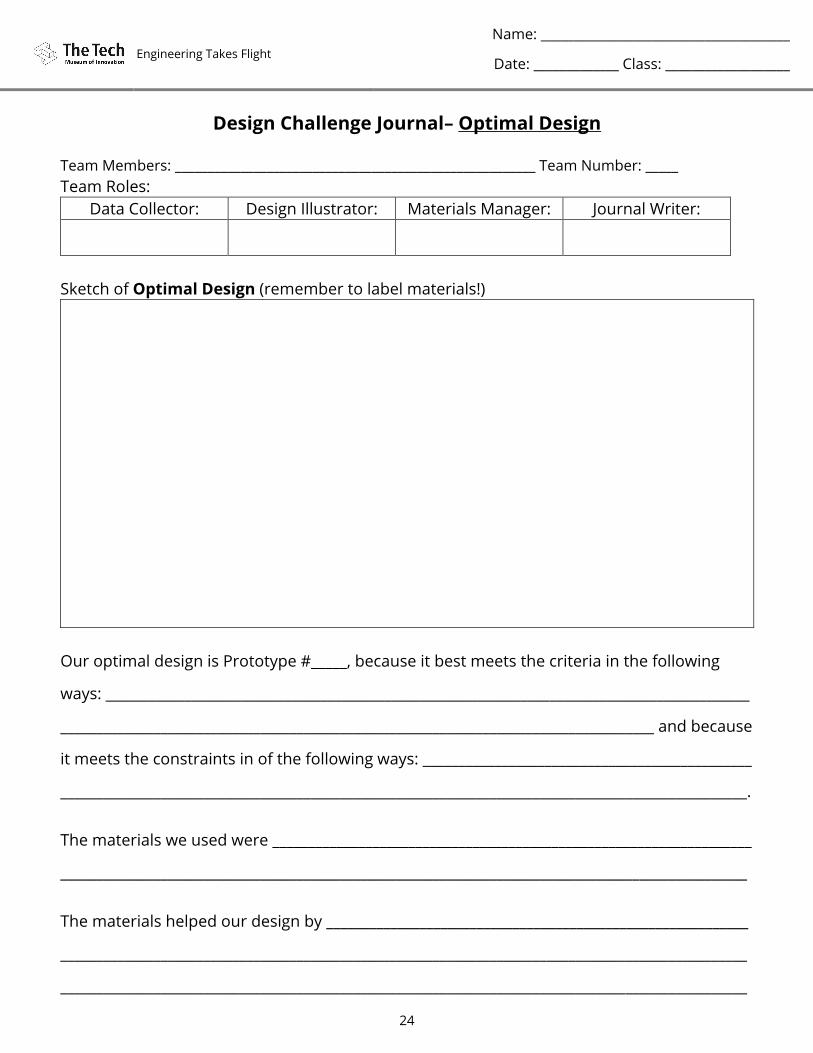
Design Challenge Journal– Optimal Design
Team Members: _______________________________________________________ Team Number: _____
Team Roles:
Data Collector: Design Illustrator: Materials Manager: Journal Writer:
Sketch of Optimal Design (remember to label materials!)
Our optimal design is Prototype #_____, because it best meets the criteria in the following
ways: __________________________________________________________________________________________
___________________________________________________________________________________ and because
it meets the constraints in of the following ways: ______________________________________________
________________________________________________________________________________________________.
The materials we used were ___________________________________________________________________
________________________________________________________________________________________________
The materials helped our design by ___________________________________________________________
________________________________________________________________________________________________
________________________________________________________________________________________________
Engineering Takes Flight
Name: ______________________________________
Date: _____________ Class: ___________________
25
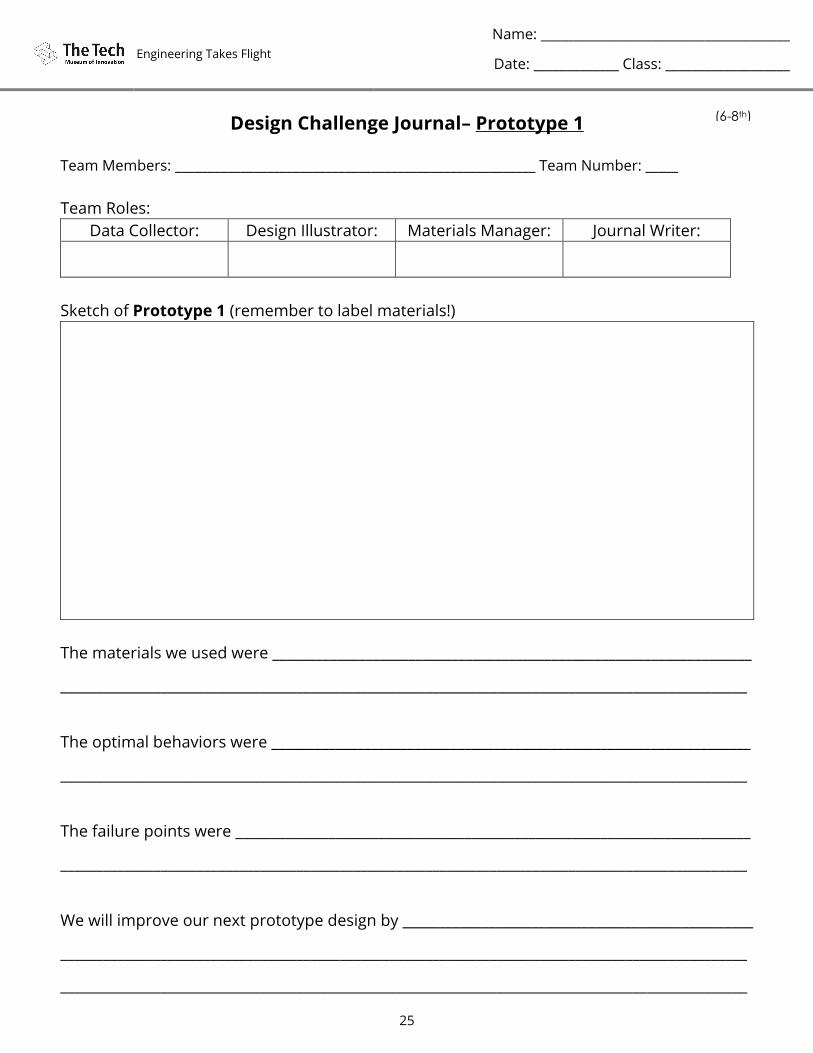
Design Challenge Journal– Prototype 1
Team Members: _______________________________________________________ Team Number: _____
Team Roles:
Data Collector: Design Illustrator: Materials Manager: Journal Writer:
Sketch of Prototype 1 (remember to label materials!)
The materials we used were ___________________________________________________________________
________________________________________________________________________________________________
The optimal behaviors were ___________________________________________________________________
________________________________________________________________________________________________
The failure points were ________________________________________________________________________
________________________________________________________________________________________________
We will improve our next prototype design by _________________________________________________
________________________________________________________________________________________________
________________________________________________________________________________________________
(6-8th)

Engineering Takes Flight
Name: ______________________________________
Date: _____________ Class: ___________________
26
Design Challenge Journal– Prototype 2
Team Members: _______________________________________________________ Team Number: _____
Team Roles:
Data Collector: Design Illustrator: Materials Manager: Journal Writer:
Sketch of Prototype 2 (remember to label materials!)
The materials we used were ___________________________________________________________________
________________________________________________________________________________________________
The optimal behaviors were ___________________________________________________________________
________________________________________________________________________________________________
The failure points were ________________________________________________________________________
________________________________________________________________________________________________
We will improve our next prototype design by _________________________________________________
________________________________________________________________________________________________
________________________________________________________________________________________________

Engineering Takes Flight
Name: ______________________________________
Date: _____________ Class: ___________________
27
Design Challenge Journal– Prototype 3
Team Members: _______________________________________________________ Team Number: _____
Team Roles:
Data Collector: Design Illustrator: Materials Manager: Journal Writer:
Sketch of Prototype 3 (remember to label materials!)
The materials we used were ___________________________________________________________________
________________________________________________________________________________________________
The optimal behaviors were ___________________________________________________________________
________________________________________________________________________________________________
The failure points were ________________________________________________________________________
________________________________________________________________________________________________
We will improve our next prototype design by _________________________________________________
________________________________________________________________________________________________
________________________________________________________________________________________________

Engineering Takes Flight
Name: ______________________________________
Date: _____________ Class: ___________________
28
Design Challenge Journal– Optimal Design
Team Members: _______________________________________________________ Team Number: _____
Team Roles:
Data Collector: Design Illustrator: Materials Manager: Journal Writer:
Sketch of Optimal Design (remember to label materials!)
Our optimal design is Prototype #_____, when we compare it to the other prototypes, it meets
the criteria and constraints better. It meets the criteria in terms of ___________________________
___________________________________________________________________________________ and the
constraints in terms of ________________________________________________________________________
________________________________________________________________________________________________.
The materials we used were ___________________________________________________________________
________________________________________________________________________________________________
The materials helped our design by ___________________________________________________________
________________________________________________________________________________________________
________________________________________________________________________________________________
Engineering Takes Flight
Name: ______________________________________
Date: _____________ Class: ___________________
29
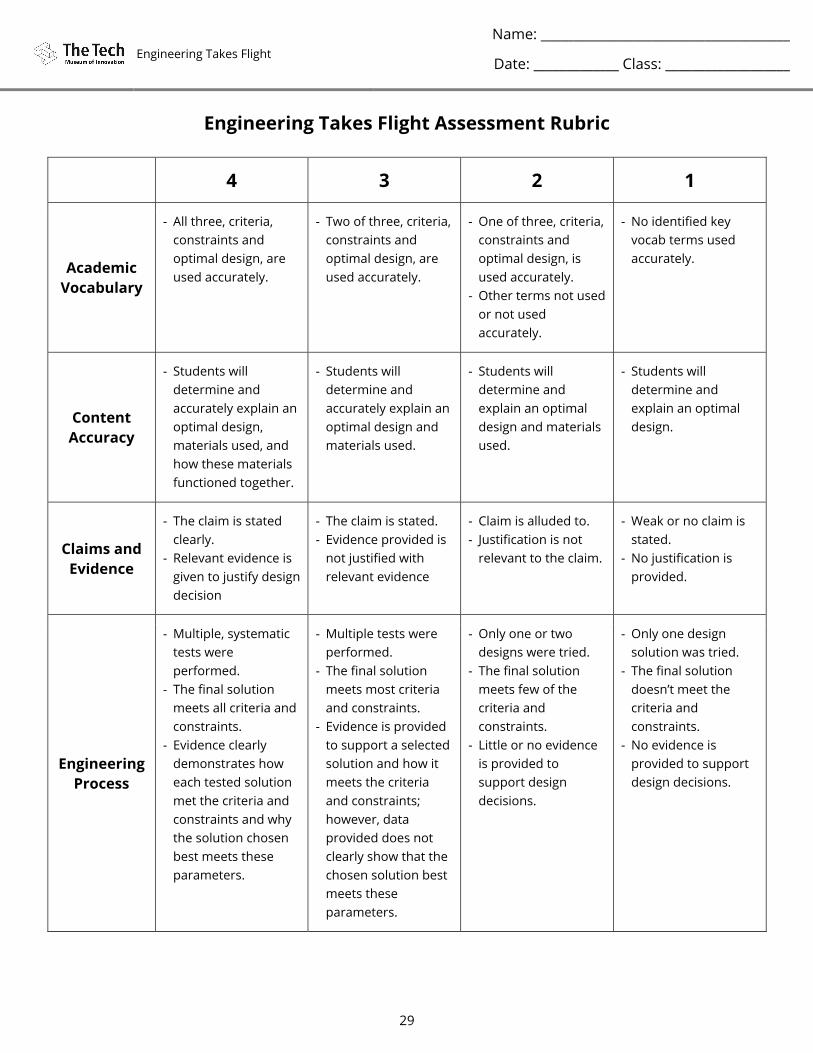
Engineering Takes Flight Assessment Rubric
4 3 2 1
Academic
Vocabulary
- All three, criteria,
constraints and
optimal design, are
used accurately.
- Two of three, criteria,
constraints and
optimal design, are
used accurately.
- One of three, criteria,
constraints and
optimal design, is
used accurately.
- Other terms not used
or not used
accurately.
- No identified key
vocab terms used
accurately.
Content
Accuracy
- Students will
determine and
accurately explain an
optimal design,
materials used, and
how these materials
functioned together.
- Students will
determine and
accurately explain an
optimal design and
materials used.
- Students will
determine and
explain an optimal
design and materials
used.
- Students will
determine and
explain an optimal
design.
Claims and
Evidence
- The claim is stated
clearly.
- Relevant evidence is
given to justify design
decision
- The claim is stated.
- Evidence provided is
not justified with
relevant evidence
- Claim is alluded to.
- Justification is not
relevant to the claim.
- Weak or no claim is
stated.
- No justification is
provided.
Engineering
Process
- Multiple, systematic
tests were
performed.
- The final solution
meets all criteria and
constraints.
- Evidence clearly
demonstrates how
each tested solution
met the criteria and
constraints and why
the solution chosen
best meets these
parameters.
- Multiple tests were
performed.
- The final solution
meets most criteria
and constraints.
- Evidence is provided
to support a selected
solution and how it
meets the criteria
and constraints;
however, data
provided does not
clearly show that the
chosen solution best
meets these
parameters.
- Only one or two
designs were tried.
- The final solution
meets few of the
criteria and
constraints.
- Little or no evidence
is provided to
support design
decisions.
- Only one design
solution was tried.
- The final solution
doesn’t meet the
criteria and
constraints.
- No evidence is
provided to support
design decisions.


