
HP Multifunction FinisherUser Guide


HP Multifunction Finisher
User Guide

Copyright and License
© 2005 Copyright Hewlett-Packard Development Company, L.P.
Reproduction, adaptation or translation without prior written permission is prohibited, except as allowed under the copyright laws.
The information contained herein is subject to change without notice.
The only warranties for HP products and services are set forth in the express warranty statements accompanying such products and services. Nothing herein should be construed as constituting an additional warranty. HP shall not be liable for technical or editorial errors or omissions contained herein.
Edition 1, 6/2005Part number: C8088-90908
Trademark Credits
Microsoft® and Windows® are U. S. registered trademarks of Microsoft Corporation.
PostScript® is a trademark of Adobe Systems Incorporated.

Contents
1 Product basics
Overview . . . . . . . . . . . . . . . . . . . . . . . . . . . . . . . . . . . . . . . . . . . . .5Features and benefits . . . . . . . . . . . . . . . . . . . . . . . . . . . . . . . . . . .6
Features . . . . . . . . . . . . . . . . . . . . . . . . . . . . . . . . . . . . . . . . . .6Identifying the HP Multifunction Finisher parts . . . . . . . . . . . . . . . .7Interpreting light patterns. . . . . . . . . . . . . . . . . . . . . . . . . . . . . . . . .8Compatibility with HP LaserJet 9000 and 9000mfp
Series products. . . . . . . . . . . . . . . . . . . . . . . . . . . . . . . . . . . . .9Attaching the HP Multifunction Finisher . . . . . . . . . . . . . . . . . . . .10
2 Finisher tasks
Overview . . . . . . . . . . . . . . . . . . . . . . . . . . . . . . . . . . . . . . . . . . . .11Configuring control-panel settings. . . . . . . . . . . . . . . . . . . . . . . . .12Booklet printing with the HP Multifunction Finisher . . . . . . . . . . . .15
About booklet printing . . . . . . . . . . . . . . . . . . . . . . . . . . . . . . .15Printing a booklet on Windows 95, Windows 98,
Windows Millennium Edition (Me), and Windows NT 4.0 computers . . . . . . . . . . . . . . . . . . . . . . .16
Printing a booklet on Windows 2000 and Windows XP computers . . . . . . . . . . . . . . . . . . . . . . . . . .17
Printing a booklet on Macintosh computers . . . . . . . . . . . . . .17Layout options for printing on both sides of the paper . . . . . .18Changing default settings on Windows computers. . . . . . . . .19Selecting a booklet cover using Microsoft Windows. . . . . . . .20Saddle stitching a booklet using Microsoft Windows . . . . . . .21Saddle stitching a booklet using Macintosh . . . . . . . . . . . . . .21Printing a two-page booklet on a single sheet of
paper without staples . . . . . . . . . . . . . . . . . . . . . . . . . . . .22Configuring the printer driver to recognize the
HP Multifunction Finisher . . . . . . . . . . . . . . . . . . . . . . . . . . . .23Windows . . . . . . . . . . . . . . . . . . . . . . . . . . . . . . . . . . . . . . . . .23Macintosh . . . . . . . . . . . . . . . . . . . . . . . . . . . . . . . . . . . . . . . .23
Using the stapler . . . . . . . . . . . . . . . . . . . . . . . . . . . . . . . . . . . . . .24Selecting the stapler . . . . . . . . . . . . . . . . . . . . . . . . . . . . . . . .24Loading the stapler cartridge . . . . . . . . . . . . . . . . . . . . . . . . .26
Choosing the output bin . . . . . . . . . . . . . . . . . . . . . . . . . . . . . . . .28Identifying the output bins. . . . . . . . . . . . . . . . . . . . . . . . . . . .28Selecting the output location. . . . . . . . . . . . . . . . . . . . . . . . . .29
ENWW Contents iii

3 Problem solving
Overview . . . . . . . . . . . . . . . . . . . . . . . . . . . . . . . . . . . . . . . . . . . .31Resolving common problems . . . . . . . . . . . . . . . . . . . . . . . . . . . .32Interpreting control-panel messages . . . . . . . . . . . . . . . . . . . . . .35Clearing jams . . . . . . . . . . . . . . . . . . . . . . . . . . . . . . . . . . . . . . . .38
Appendix A Specifications
Overview . . . . . . . . . . . . . . . . . . . . . . . . . . . . . . . . . . . . . . . . . . . .43Physical specifications . . . . . . . . . . . . . . . . . . . . . . . . . . . . . . . . .44Environmental specifications. . . . . . . . . . . . . . . . . . . . . . . . . . . . .46
Power consumption . . . . . . . . . . . . . . . . . . . . . . . . . . . . . . . .46Power requirements . . . . . . . . . . . . . . . . . . . . . . . . . . . . . . . .47Circuit capacity . . . . . . . . . . . . . . . . . . . . . . . . . . . . . . . . . . . .48Operating environment . . . . . . . . . . . . . . . . . . . . . . . . . . . . . .48Supported media types . . . . . . . . . . . . . . . . . . . . . . . . . . . . .49Supported media . . . . . . . . . . . . . . . . . . . . . . . . . . . . . . . . . .50
Appendix B Regulatory information
Overview . . . . . . . . . . . . . . . . . . . . . . . . . . . . . . . . . . . . . . . . . . . .53Declaration of Conformity . . . . . . . . . . . . . . . . . . . . . . . . . . . . . . .54Canadian DOC Regulations . . . . . . . . . . . . . . . . . . . . . . . . . . . . .55
Appendix C Service and support
Index
iv Contents ENWW

1 Product basics
Overview
Features and benefits
Identifying the HP Multifunction Finisher parts
Interpreting light patterns
Compatibility with HP LaserJet 9000 and 9000mfp Series products
Attaching the HP Multifunction Finisher
ENWW Overview 5
Features and benefits
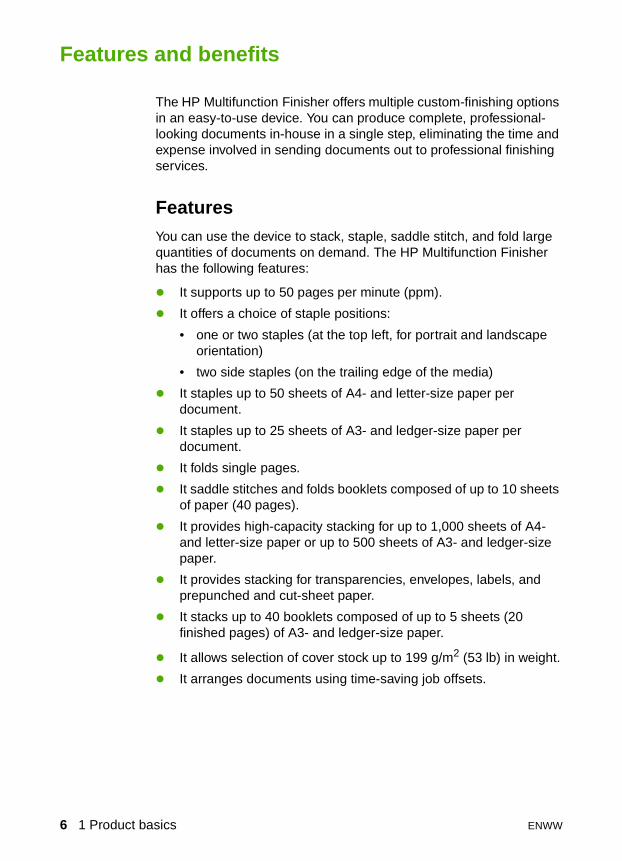
The HP Multifunction Finisher offers multiple custom-finishing options in an easy-to-use device. You can produce complete, professional-looking documents in-house in a single step, eliminating the time and expense involved in sending documents out to professional finishing services.
FeaturesYou can use the device to stack, staple, saddle stitch, and fold large quantities of documents on demand. The HP Multifunction Finisher has the following features:
It supports up to 50 pages per minute (ppm).
It offers a choice of staple positions:
• one or two staples (at the top left, for portrait and landscape orientation)
• two side staples (on the trailing edge of the media)
It staples up to 50 sheets of A4- and letter-size paper per document.
It staples up to 25 sheets of A3- and ledger-size paper per document.
It folds single pages.
It saddle stitches and folds booklets composed of up to 10 sheets of paper (40 pages).
It provides high-capacity stacking for up to 1,000 sheets of A4- and letter-size paper or up to 500 sheets of A3- and ledger-size paper.
It provides stacking for transparencies, envelopes, labels, and prepunched and cut-sheet paper.
It stacks up to 40 booklets composed of up to 5 sheets (20 finished pages) of A3- and ledger-size paper.
It allows selection of cover stock up to 199 g/m2 (53 lb) in weight.
It arranges documents using time-saving job offsets.
6 1 Product basics ENWW
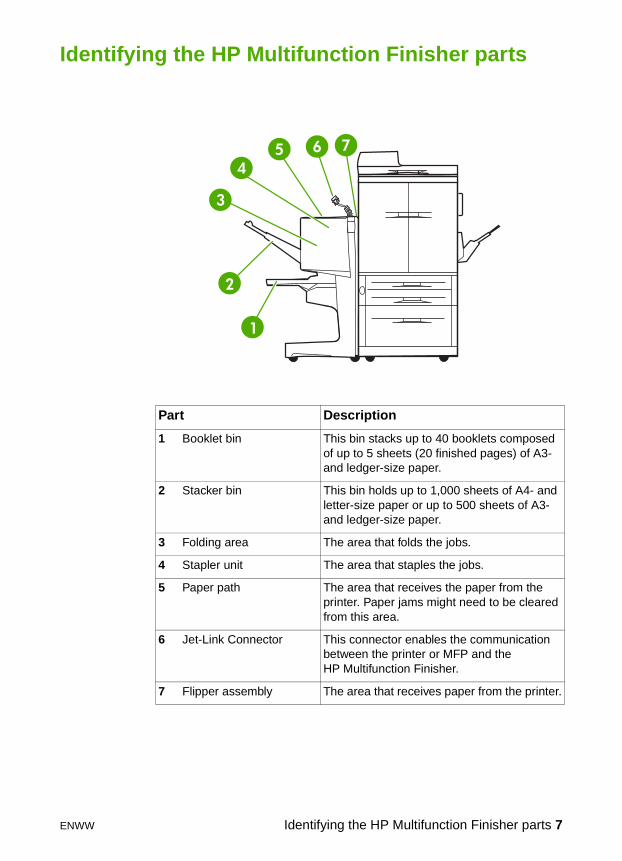
Identifying the HP Multifunction Finisher parts
Part Description
1 Booklet bin This bin stacks up to 40 booklets composed of up to 5 sheets (20 finished pages) of A3- and ledger-size paper.
2 Stacker bin This bin holds up to 1,000 sheets of A4- and letter-size paper or up to 500 sheets of A3- and ledger-size paper.
3 Folding area The area that folds the jobs.
4 Stapler unit The area that staples the jobs.
5 Paper path The area that receives the paper from the printer. Paper jams might need to be cleared from this area.
6 Jet-Link Connector This connector enables the communication between the printer or MFP and the HP Multifunction Finisher.
7 Flipper assembly The area that receives paper from the printer.
1
2
3
45 6 7
ENWW Identifying the HP Multifunction Finisher parts 7
Interpreting light patterns
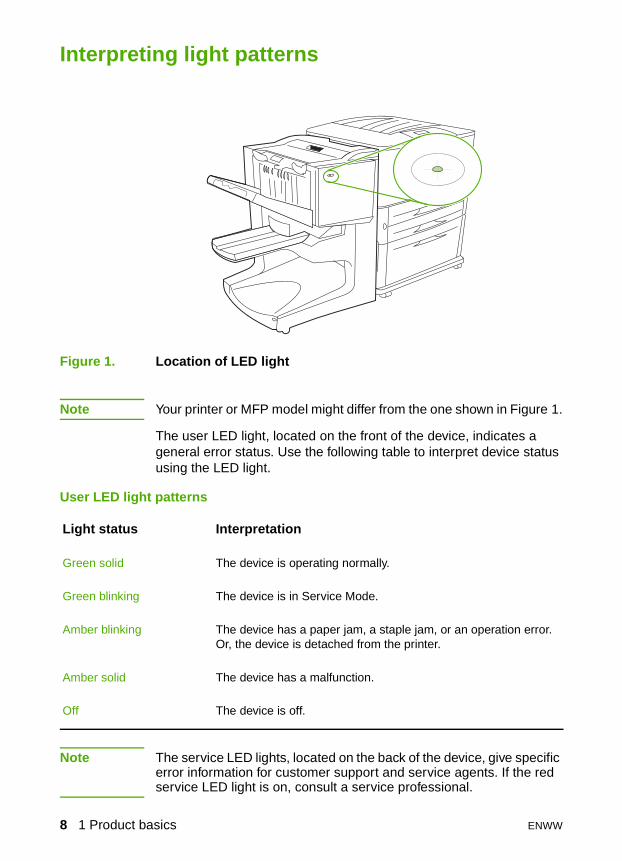
Figure 1. Location of LED light
Note Your printer or MFP model might differ from the one shown in Figure 1.
The user LED light, located on the front of the device, indicates a general error status. Use the following table to interpret device status using the LED light.
Note The service LED lights, located on the back of the device, give specific error information for customer support and service agents. If the red service LED light is on, consult a service professional.
User LED light patterns
Light status Interpretation
Green solid The device is operating normally.
Green blinking The device is in Service Mode.
Amber blinking The device has a paper jam, a staple jam, or an operation error. Or, the device is detached from the printer.
Amber solid The device has a malfunction.
Off The device is off.
8 1 Product basics ENWW

Compatibility with HP LaserJet 9000 and 9000mfp Series products
The HP Multifunction Finisher is compatible with the following devices:
HP LaserJet 9500
HP LaserJet 9050
HP LaserJet 9040
HP LaserJet 9050mfp
HP LaserJet 9040mfp
HP LaserJet 9500mfp Series products
For the HP Multifunction Finisher to work with the HP LaserJet 9000 and 9000mfp Series products, perform the following steps to update the firmware:
1 Find the firmware files for your printer at www.hp.com. The following are the latest firmware versions:
• HP LaserJet 9000 printer: 02.516.0A or later
• HP LaserJet 9000Lmfp and 9000mfp: 03.801.1 or later
Note These firmware versions install the required HP Multifunction Finisher 031010 version firmware during the firmware update to allow the Multifunction Finisher to work with the HP LaserJet 9000 and 9000mfp Series products.
2 Open the HP Printer Utility.
3 In the Configuration Settings list, select Firmware Update.
4 Click Choose, navigate to the firmware file to upload, and click OK.
5 Click Upload to update the firmware files.
ENWW Compatibility with HP LaserJet 9000 and 9000mfp Series products 9

Attaching the HP Multifunction Finisher
WARNING! To avoid a malfunction, do not attach the HP Multifunction Finisher by pushing on the stacker tray as shown in Figure 2. A 66.12.36 error message might display if the device is attached incorrectly.
Figure 2. Attaching the HP Multifunction Finisher - Incorrect method
To attach the HP Multifunction Finisher, hold the device on both sides of the side cover, and push the device towards the printer as shown in Figure 3.
Figure 3. Attaching the HP Multifunction Finisher - Correct method
10 1 Product basics ENWW

2 Finisher tasks
Overview
Configuring control-panel settings
Booklet printing with the HP Multifunction Finisher
Configuring the printer driver to recognize the HP Multifunction Finisher
Using the stapler
Choosing the output bin
ENWW Overview 11

Configuring control-panel settings
The device attaches to the left side of the HP printer. You can change the default job offset, default stapler actions, and default fold line adjustments through the printer control panel. To gain access to these options:
1 Press to enter the menus.
2 Use and to scroll to CONFIGURE DEVICE, and press .
3 Use and to scroll to MULTIFUNC. FINISHER, and press .
Note The system administrator can limit access to the job offset and default stapler actions.
Note The offset function is available only in the stacker bin (bin 1) and only for jobs that are not stapled.
You can select the available stapler action through the printer driver (for example, use of one staple or two staples).
OFFSET
No When the OFFSET mode is off, all of the jobs are stacked with no separation.
Yes When the OFFSET mode is on, the device automatically separates complete jobs or mopies (multiple original prints of a single job). Each job or mopy is separated by setting the jobs apart from each other (for unstapled jobs).
12 2 Finisher tasks ENWW

STAPLES
NONE If the default action is set to NONE, the job is not stapled.
ONE If the default action is set to ONE, the staple is placed in the top left corner of the document. If you are printing in landscape format, the staple location is automatically adjusted for placement in the top left corner of the landscape layout.
TWO If the default action is set to TWO, two staples are used with one job or with mopies. Both staples are placed parallel to the edge closest to the printer (the trailing edge).
STACK OPTION
Face Up If the default action is set to FACE UP, all of the printing jobs are stacked face-up.
Face Down If the default action is set to FACE DOWN, all of the printing jobs are stacked face-down.
ENWW Configuring control-panel settings 13
Adjust the fold-line position depending on the sheet size. Adjustments are in +/- .15 mm (0.006 inch) increments, with a maximum range of +/- 2.1 mm (0.082 inch).
Note If the fold line and the stitch position do not match, call for service.
FOLD LINE ADJUST
FOLD LINE ADJUST LTR-R and A4-R
Select LTR-R & A4-R to adjust the fold line for 8.5-by-11-inch or 8.26-by-11-inch sheets.
FOLD LINE ADJUST LEGAL and JISB4
Select LEGAL & JISB4 to adjust the fold line for 8.5-by-14-inch or JIS B4 sheets.
FOLD LINE ADJUST 11 by 17 and A3
Select 11x17 & A3 to adjust the fold line for 11-by-17-inch or A3 sheets.
STAPLES OUT
Continue If the default action is set to CONTINUE, the multifunction finisher continues handling jobs from the printer that require staples even if the stapler cartridge is empty.
Stop If the default action is set to STOP, the multifunction finisher goes offline until a new stapler cartridge is loaded when jobs from the printer require staples. See “Loading the stapler cartridge” on page 26.
SADDLE STITCH
Note This option is available only for color printers or MFPs.
Two Staples If the default action is set to TWO STAPLES, all of the jobs sent to bin 2 are saddle stitched with two staples.
Four Staples If the default action is set to FOUR STAPLES, all of the jobs sent to bin 2 are saddle stitched with four staples.
14 2 Finisher tasks ENWW

Booklet printing with the HP Multifunction Finisher
This section explains the steps involved in creating a booklet in the printer driver, and provides the steps for Windows and Macintosh computers.
Note Automatic folding and stapling of a booklet requires the HP Multifunction Finisher. If the printer does not have the HP Multifunction Finisher, the printer can print the pages in the correct order, and the pages can then be folded and stapled or bound manually.
About booklet printingIt is possible to gain access to the automatic booklet-printing feature in some software programs, such as desktop-publishing programs. See the documentation that came with the software program for information about making booklets.
If you are using a software program that does not support making booklets, you can create booklets by using HP printer drivers.
Note HP recommends that you use the software program to prepare and preview the document for printing, and then use the printer driver to print and saddle stitch the booklet.
The following steps are involved in creating a booklet in the printer driver:
Preparing the booklet: Arrange the pages on a sheet (booklet imposition) to create a booklet. Arrange the document in the software program or use the booklet-printing feature in the HP printer driver.
Adding a cover: Add a cover to the booklet by selecting a different first page that uses a different paper type. A cover of the same paper type as the booklet can also be used. Booklet covers must be the same size as the remainder of the sheets. However, the covers can be printed on a paper type that is different from the remainder of the booklet.
ENWW Booklet printing with the HP Multifunction Finisher 15

Saddle stitching: Media must be fed into the printer short-edge first. The finisher staples the center of the booklet (saddle stitching), and then folds the booklet. If the booklet is only one sheet of paper, the finisher folds the sheet but does not staple it. If the booklet consists of more than one sheet of paper, the finisher staples and then folds up to 10 sheets per booklet.
Use the booklet feature of the HP Multifunction Finisher to saddle stitch and fold booklets composed of the following media sizes:
A3
A4 (labeled A4-R)
Letter (labeled letter-R)
Legal
11 x 17 (ledger)
Printing a booklet on Windows 95, Windows 98, Windows Millennium Edition (Me), and Windows NT 4.0 computersUse the following steps to print a booklet from a software program on Windows 95, Windows 98, Windows Me, and Windows NT 4.0 computers.
Note The following procedure changes the printer settings temporarily for a print job. After the document prints, the printer settings return to the defaults that are configured in the printer driver. To change the printer default settings, see “Changing default settings on Windows computers” on page 19.
1 In the software program, open the document to be printed.
2 Click File, and then click Print.
3 Click the Finishing tab, and select a number from Print on Both Sides.
4 Select Flip Pages Up, if necessary.
5 On the Booklet Printing drop-down menu, select the booklet layout. The image to the right of the menu illustrates the layout.
6 Click OK.
16 2 Finisher tasks ENWW
Printing a booklet on Windows 2000 and Windows XP computersUse the following steps to print a booklet from a software program on Windows 2000 and Windows XP computers.
Note The following procedure changes the printer settings temporarily for a print job. After the document prints, the printer settings return to the defaults that are configured in the printer driver. To change the printer default settings, see “Changing default settings on Windows computers” on page 19.
1 In the software program, open the document to be printed.
2 Click File, and then click Print.
3 Click the Finishing tab, and select a number from Print on Both Sides.
4 Select Flip Pages Up, if necessary.
5 On the Booklet Layout drop-down menu, select the booklet layout. The image to the right of the menu illustrates the layout.
6 Click OK.
Printing a booklet on Macintosh computersUse the following steps to print a booklet from a software program on Macintosh computers.
Before printing a booklet for the first time, make sure that the HP Manual Duplex and Booklet software has been installed. This software requires a custom installation and is available for Mac OS 9.2.2 and earlier.
Note Mac OS X cannot print a booklet, but you can still use the HP Multifunction Finisher as an output device.
1 In the software program, open the document to be printed.
2 Click File, and then click Print.
3 Select Layout.
4 Click Print on Both Sides.
5 On the drop-down menu, select Plug-In Preferences, select Print-Time Filters, and select Booklet.
6 Click Save Settings.
ENWW Booklet printing with the HP Multifunction Finisher 17

7 Click Booklet Printing.
8 Click Format Booklet.
9 On the drop-down menu, select the paper size.
10 Click Print.
Layout options for printing on both sides of the paperThe available print layout options are shown in Figure 4 and Figure 5. Select the binding and orientation options for the print job from the page setup options of the software program, if possible
Note The terminology that is used to describe layout in Figure 4 might be different for different programs.
If it is not possible to set these options in the page setup options of the software program, set them in the printer driver.
Figure 4. Printing left-to-right (note the page numbers)
12
3
4
35
2
2 53
23
5
35
2
1 Long-edge portrait (default)2 Short-edge portrait3 Short-edge landscape4 Long-edge landscape
18 2 Finisher tasks ENWW

Figure 5. Printing right-to-left (note the page numbers)
Changing default settings on Windows computersUse the following procedures to change the default settings in the printer driver for all software programs used on the computer.
Windows 95, Windows 98, and Windows Millennium Edition (Me)
Use the following steps for Windows 95, Windows 98, and Windows Me computers.
1 Click Start.
2 Point to Settings.
3 Click Printers.
4 Right-click the HP Color LaserJet 9500 series printer icon.
5 Click Properties.
12
3
4
42
5
5 24
54
2
42
5
1 Long-edge portrait (default)2 Short-edge portrait3 Short-edge landscape4 Long-edge landscape
ENWW Booklet printing with the HP Multifunction Finisher 19
6 Change any of the settings on the tabs. These settings become the defaults for the printer.
7 Click OK to save the settings.
Windows NT 4.0
Use the following steps for Windows NT 4.0 computers.
1 Click Start.
2 Point to Settings.
3 Click Printers.
4 Right-click the HP Color LaserJet 9500 series printer icon.
5 Click Document Defaults.
6 Change any of the settings on the tabs. These settings become the defaults for the printer.
7 Click OK to save the settings.
Windows 2000 and Windows XP
Use the following steps for Windows 2000 and Windows XP computers.
1 Click Start.
2 Point to Settings.
3 Point to Printers (Windows 2000) or Printers and Faxes (Windows XP).
4 Right-click the HP Color LaserJet 9500 series printer icon.
5 Click Printing Preferences.
6 Change any of the settings on the tabs. These settings become the defaults for the printer.
7 Click OK to save the settings.
Selecting a booklet cover using Microsoft Windows1 Click File, click Print, and then click Properties.
2 Click the Paper tab.
3 Click the First Page tab, and select the Use different paper for first page box.
20 2 Finisher tasks ENWW

4 On the Size is, Source is, and Type is menus, select the settings that correspond to the paper being used.
5 Use different paper and corresponding settings.
Saddle stitching a booklet using Microsoft Windows
Windows 95 or Windows 98
Use the following steps to use a PS driver for Windows 95 or Windows 98 to saddle stitch a document.
1 Click File, click Print, and then click Properties.
2 Click the Paper tab, and click More Options.
3 Select None, and select Booklet Bin on the drop-down menu.
Windows NT, Windows 2000, or Windows XP
Use the following steps to use a PS driver for Windows NT, Windows 2000, or Windows XP to saddle stitch a document.
1 Click the Layout tab, and then click Advanced.
2 Select the appropriate settings for Document Options, Printer Features, Output Destination, and Saddle Stitch. Also, the saddle-stitch option is automatically selected if Booklet Bin in the Output Destination tab is selected.
Saddle stitching a booklet using Macintosh1 Click File, and then click Print.
2 On the drop-down menu, click Output Options.
3 On the drop-down menu, click Booklet Bin.
4 Click Fold/Saddle Stitch.
ENWW Booklet printing with the HP Multifunction Finisher 21

Printing a two-page booklet on a single sheet of paper without staplesUse the following steps to print a two-page booklet on a single sheet of paper without staples.
Note Supported sizes for this type of printing are Letter, A4, 11 x 17, and A3.
1 Insert two blank pages inside the document as the first and second page.
2 Fill in the document’s third and forth pages with the content, as if they were the first and second pages of the two-page document.
3 From within the software program, access the Finishing tab in the driver and configure it as follows.
• Print on Both Sides check box
• Fold/Saddle Stitch check box
4 After the driver is configured, click OK within the driver to exit and set the driver settings for the document.
5 Click File, and then click Print from the software program’s drop-down menus to send the file to the printer.
Note It might be necessary to check the Page Setup selection within the software program to ensure that the paper size specified matches the paper size desired for the document to be printed on.
22 2 Finisher tasks ENWW

Configuring the printer driver to recognize the HP Multifunction Finisher
Windows1 Open the Printers folder.
2 Select the printer model.
3 Click File, and then click Properties.
4 Click the Device Settings tab.
5 Use either of the following methods to select the HP Multifunction Finisher:
• Scroll down to Automatic Configuration, select Update Now, and click Apply.
• Scroll down to Accessory Output Bin, select HP Multifunction Finisher, and click Apply.
Macintosh1 Open the Printer Center utility.
2 Select the printer model.
3 Click File, and then click Show Info (X + I).
4 Click the Installable Options tab.
5 Scroll to Accessory Output Bins, and select HP Multifunction finisher.
6 Click Apply Changes.
ENWW Configuring the printer driver to recognize the HP Multifunction Finisher 23

Using the stapler
The device can staple documents consisting of a minimum of two pages and a maximum of 50 pages of 75-g/m2 (20-lb) Letter or A4 paper (a maximum of 25 pages for Ledger or A3 paper). The pages must be 64 to 199 g/m2 (17 to 53 lb) in weight for any paper size the product supports.
Consider these additional points:
The stacker bin can hold up to 1,000 sheets stacked (without staples).
Heavier or coated media might have a stapling limit of fewer than 50 pages.
If the job you want to have stapled consists of only one sheet, or if it consists of more than 50 sheets, the device delivers the job to the bin without staples.
Selecting the staplerYou usually can select the stapler through your program or driver, although some options might be available only through the driver.
Where and how you make selections depends on your program or driver. If you cannot select the stapler from the program or driver, select the stapler from the product control panel.
HP LaserJet 9040/9050/9500
1 Press to enter the menus.
2 Use and to scroll to CONFIGURE DEVICE and press .
3 Use and to scroll to MULTIFUNC. FINISHER and press .
4 Use and to scroll to STAPLES and press .
5 Use and to scroll to the desired stapling option and
press .
Your stapling options are None, One, or Two staples.
24 2 Finisher tasks ENWW
HP LaserJet 9040mfp/9050mfp/9500mfp
1 Touch Copy Settings.
2 At the Staple menu, touch Corner or Edge, depending on where you want the documents stapled, and then touch OK. If you selected Booklet from the Copies per Page menu, your stapling options are None, One, Two, and Saddle Stitch.
Note The page icon on the right side of the touch screen shows the position of the staple.
To staple documents
Windows
1 On the File menu, click Print, and then click Properties.
2 On the Output tab, click the Staple drop-down list, and click the desired stapling option.
Macintosh
1 On the File menu, click Print (Command + P).
2 Select the Finishing option.
3 For the Output destination, select Stapler.
4 In the Finishing option, select the desired stapling option.
ENWW Using the stapler 25

Loading the stapler cartridge
The message STAPLER LOW ON STAPLES appears on the printer control panel if the stapler cartridge has 20 to 50 staples remaining. The message STAPLER OUT OF STAPLES appears on the printer control panel if the stapler cartridge contains no more staples.
To load the stapler cartridge
1 Open the stapler-unit door.
2 Slide the stapler unit toward you.
3 Turn the large green knob until you see the blue dot (this indicates that the stapler is fully open).
4 Turn the small green knob at the top of the stapler unit clockwise until the staple cartridge moves to the left of the stapler unit.
CAUTIONThe blue dot must appear in the window of the stapler unit before you remove the staple cartridge. If you try to remove the staple cartridge before the blue dot appears in the window, you could damage the device.
2
3
4
1
26 2 Finisher tasks ENWW
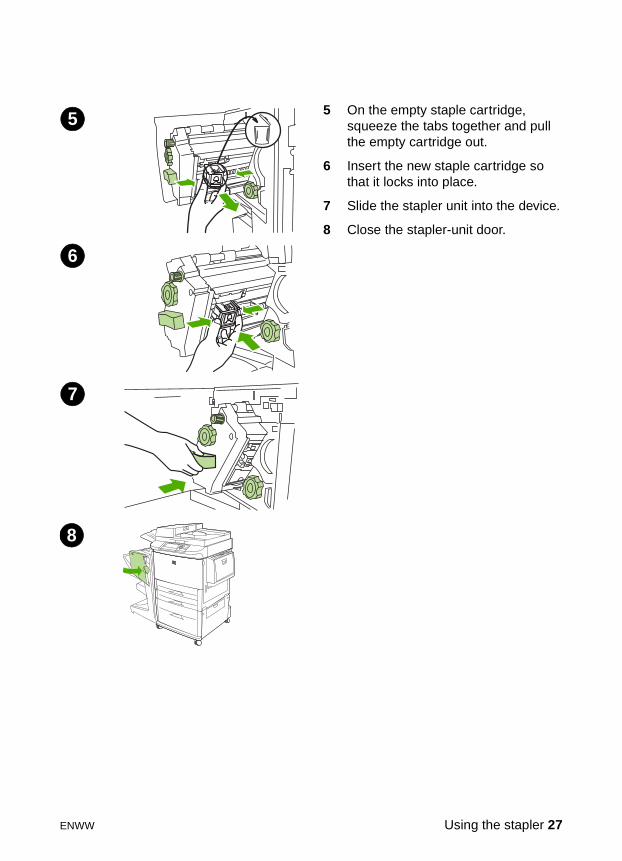
5 On the empty staple cartridge, squeeze the tabs together and pull the empty cartridge out.
6 Insert the new staple cartridge so that it locks into place.
7 Slide the stapler unit into the device.
8 Close the stapler-unit door.
6
7
5
8
ENWW Using the stapler 27
Choosing the output bin
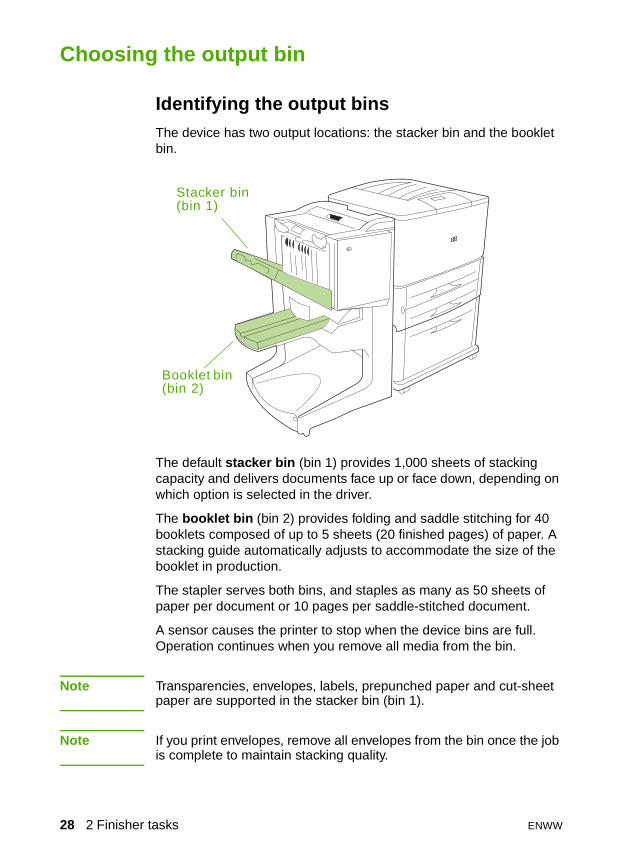
Identifying the output binsThe device has two output locations: the stacker bin and the booklet bin.
The default stacker bin (bin 1) provides 1,000 sheets of stacking capacity and delivers documents face up or face down, depending on which option is selected in the driver.
The booklet bin (bin 2) provides folding and saddle stitching for 40 booklets composed of up to 5 sheets (20 finished pages) of paper. A stacking guide automatically adjusts to accommodate the size of the booklet in production.
The stapler serves both bins, and staples as many as 50 sheets of paper per document or 10 pages per saddle-stitched document.
A sensor causes the printer to stop when the device bins are full. Operation continues when you remove all media from the bin.
Note Transparencies, envelopes, labels, prepunched paper and cut-sheet paper are supported in the stacker bin (bin 1).
Note If you print envelopes, remove all envelopes from the bin once the job is complete to maintain stacking quality.
Stacker bin (bin 1)
Booklet bin (bin 2)
28 2 Finisher tasks ENWW

Selecting the output locationYou can select an output location (bin) through the software application or through your printer driver. (Where and how you make selections depends on your program or driver.) If you cannot select an output location from the program or the driver, set the default output location from the printer control panel.
To select an output location from the control panel
On the touch screen of the graphical display (MFP only):
1 Touch MENU.
2 Touch CONFIGURE DEVICE.
3 Touch PRINTING.
4 Touch PAPER DESTINATION.
5 Scroll to the output bin or device you want, and then touch OK. Your network administrator might have changed the name of the device. An asterisk (*) appears next to your selection.
On the non-touch screen (printer only):
1 Use or to scroll to CONFIGURE DEVICE and press .
2 Use or to scroll to PRINTING and press .
3 Use or to scroll to PAPER DESTINATION and press .
4 Use or to scroll to the output bin or device you want and
press . Your network administrator might have changed the name of the device. An asterisk (*) appears next to your selection.
ENWW Choosing the output bin 29

30 2 Finisher tasks ENWW
3 Problem solving
Overview
Resolving common problems
Interpreting control-panel messages
Clearing jams
ENWW Overview 31

Resolving common problems
Common device problems
Situation Possible Reason
The device does not turn on.
Make sure that the power cord is firmly plugged into the 2,000-sheet input tray.
NoteThis does not apply to the HP LaserJet 9500mfp.
Turn the printer off, check all the cable connections, and turn the printer on.
The printer does not recognize the device or the user LED on the device is off.
Check the device power cord.Make sure that the device has been configured in the printer driver.Check the HP Jet-Link connector.
Print a configuration page to see if the device is operating normally.
If the printer still does not recognize the device, contact your local authorized HP service provider. (See “Service and support” on page 57.)
32 3 Problem solving ENWW

The job was not stapled. The stapler is out of staples and AUTO CONTINUE is set to ON. See "Loading the stapler cartridge" on page 26 for more information.A single-page job was sent to the stapler; one-page jobs are not stapled.The wrong size or type of paper was used for the job.
More than 50 sheets of 75-g/m2 (20-lb) media were sent to the stapler, exceeding its capacity.
NoteTransparencies, envelopes, labels, and cut-sheet paper are supported in the stacker bin. The stapler can staple jobs of 2 to
50 sheets of 75-g/m2 (20-lb) media. If the job is thicker than this, the job is ejected unstapled. The stacker bin can hold a maximum of 1,000 sheets, depending on the paper size and weight.
The stapler has bent or broken staples in the stapler head.A staple jam exists, or a staple jam was recently cleared (up to two sequential jobs might not be stapled).The job was sent to a bin other than the stapler bin because the wrong size or type of paper was used for the job.The interface cable to the stapler unit might be defective or is not connected properly.
The job went to a different output location than expected.
The paper does not meet the specifications for the output bin. (See "Specifications" on page 43, or go to http://www.hp.com/cposupport/.)Make sure that the correct output bin is selected in the printer driver. For more information about changing printer driver settings, see your printer user guide.
Common device problems
Situation Possible Reason
ENWW Resolving common problems 33

The print media jams. Make sure that you are using the supported media weights and sizes. (See “Supported media” on page 50.)
NoteUsing paper outside HP specifications might cause problems that require repair. This repair is not covered by the Hewlett-Packard warranty or service agreements. (See “Supported media” on page 50.)
Check the cables and connectors between the printer and the device.Repeated jams that occur when print media travels between the printer and the device might mean that the printer and device are set up on an uneven floor. Level the device. See the device installation guide for instructions about leveling the device.
You are experiencing general repeated stapler jam problems.
Check to see that the job to be stapled is less than 50 sheets thick.The stapler might have some trapped staple wires obstructing the cartridge. Remove loose staples and paper dust from the inside of the stapler. (See “To clear a staple jam from the device” on page 39.)
You are experiencing general repeated booklet jam problems.
The paper does not meet the specifications for the booklet bin. (See "Specifications" on page 43, or go to http://www.hp.com/cposupport/..)
To improve the quality of booklets, HP recommends that you use heavy media for the cover. If the booklets contain more than five pages, HP recommends including a 5-mm (0.19-inch) white margin at the seam.If booklet jams continue, contact your local authorized HP service provider. (See “Service and support” on page 57.)
Common device problems
Situation Possible Reason
34 3 Problem solving ENWW
Interpreting control-panel messages
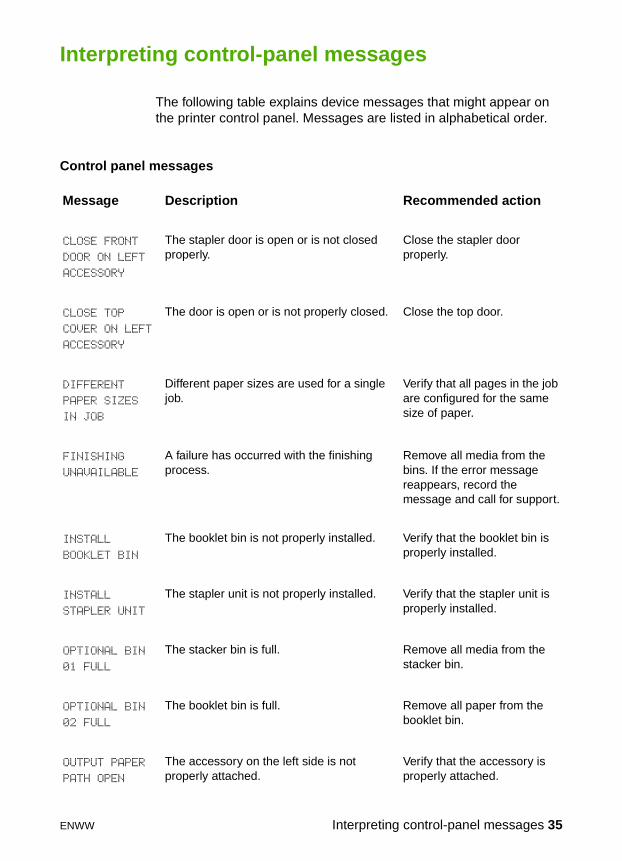
The following table explains device messages that might appear on the printer control panel. Messages are listed in alphabetical order.
Control panel messages
Message Description Recommended action
CLOSE FRONT
DOOR ON LEFT
ACCESSORY
The stapler door is open or is not closed properly.
Close the stapler door properly.
CLOSE TOP
COVER ON LEFT
ACCESSORY
The door is open or is not properly closed. Close the top door.
DIFFERENT
PAPER SIZES
IN JOB
Different paper sizes are used for a single job.
Verify that all pages in the job are configured for the same size of paper.
FINISHING
UNAVAILABLE
A failure has occurred with the finishing process.
Remove all media from the bins. If the error message reappears, record the message and call for support.
INSTALL
BOOKLET BIN
The booklet bin is not properly installed. Verify that the booklet bin is properly installed.
INSTALL
STAPLER UNIT
The stapler unit is not properly installed. Verify that the stapler unit is properly installed.
OPTIONAL BIN
01 FULL
The stacker bin is full. Remove all media from the stacker bin.
OPTIONAL BIN
02 FULL
The booklet bin is full. Remove all paper from the booklet bin.
OUTPUT PAPER
PATH OPEN
The accessory on the left side is not properly attached.
Verify that the accessory is properly attached.
ENWW Interpreting control-panel messages 35

STAPLE AREA
SAFETY
PROTECTION
ACTIVATED
A staple safety alert has occurred. Remove any obstruction from the stacker bin ejection area.
STAPLER LOW ON
STAPLES
The stapler cartridge has 20 to 50 staples remaining.
Replace the staple cartridge if you want to saddle stitch more than 10 sets in a job.
STAPLER OUT OF
STAPLES
The stapler cartridge contains no more staples.
Replace the stapler cartridge.See “Loading the stapler cartridge” on page 26.
TOO MANY PAGES
IN JOB TO
STAPLE
The job height is greater than the stapler capacity. The height of the job to be stapled should not exceed 50 sheets of 20-lb bond.
Verify that the job is within specifications to be stapled. See “Supported media” on page 50.
TOO MANY PAGES
TO MAKE
BOOKLET
The page content is too large to be saddle stitched.
Verify that the job is within specifications to be saddle stitched.
13.12.11
JAM IN STAPLER
A staple jam has occurred. Check for a jammed staple in the staple cartridge.
13.12.21
13.12.22
13.12.23
JAM IN LEFT
ACCESSORY
A paper jam exists in the flipper assembly. Check for jammed media in the output area of the printer or the input area of the device.
13.12.31
13.12.32
13.12.33
13.12.34
JAM IN LEFT
ACCESSORY
A paper jam exists in the paper-path area. Check for jammed media in the output area of the printer or the input area of the device.
Control panel messages
Message Description Recommended action
36 3 Problem solving ENWW

13.12.41
13.12.42
13.12.43
JAM IN LEFT
ACCESSORY
A paper jam exists in the folding area. Check for jammed media in the input area and the folding area of the device.
13.12.51
13.12.52
13.12.53
JAM IN LEFT
ACCESSORY
A paper jam exists in the booklet bin area. Check for jammed paper in the booklet bin area and in the folding mechanism.
66.12.zz
OUTPUT DEVICE
FAILURE
A failure has occurred with the device. Check cables and turn the product off and on again. If an error message reappears, record the message and call for support.
66.12.36 A failure has occurred because the device was attached incorrectly.
Remove and reattach the device, being careful not to hold the device by the stacker tray. See “Attaching the HP Multifunction Finisher” on page 10.
Control panel messages
Message Description Recommended action
ENWW Interpreting control-panel messages 37
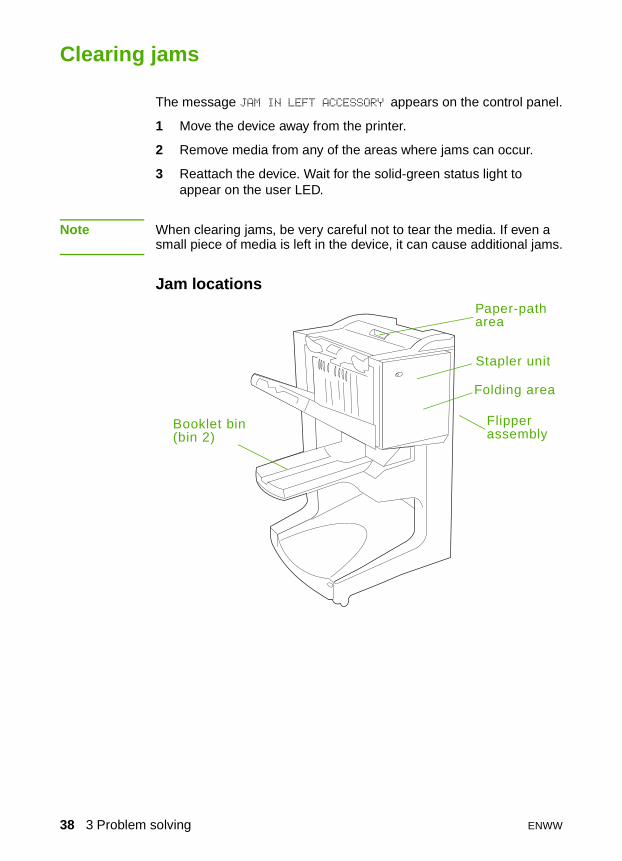
Clearing jams
The message JAM IN LEFT ACCESSORY appears on the control panel.
1 Move the device away from the printer.
2 Remove media from any of the areas where jams can occur.
3 Reattach the device. Wait for the solid-green status light to appear on the user LED.
Note When clearing jams, be very careful not to tear the media. If even a small piece of media is left in the device, it can cause additional jams.
Jam locations
Paper-path area
Booklet bin (bin 2)
Stapler unit
Flipper assembly
Folding area
38 3 Problem solving ENWW

To clear a staple jam from the device
1 Open the stapler-unit door.
2 Slide the stapler unit toward you.
3 Turn the large green knob until you see the blue dot (this indicates that the stapler is fully open).
4 Turn the small green knob at the top of the stapler unit clockwise until the staple cartridge moves to the left of the stapler unit.
CAUTIONThe blue dot must appear in the window of the stapler unit before you remove the staple cartridge. If you try to remove the staple cartridge before the blue dot appears in the window, you could damage the device.
1
2
4
3
ENWW Clearing jams 39

5 Remove the staple cartridge.
6 Pull up on the lever labeled with a green dot.
7 Remove the damaged staple.
8 Press down on the lever labeled with a green dot.
6
7
8
5
40 3 Problem solving ENWW
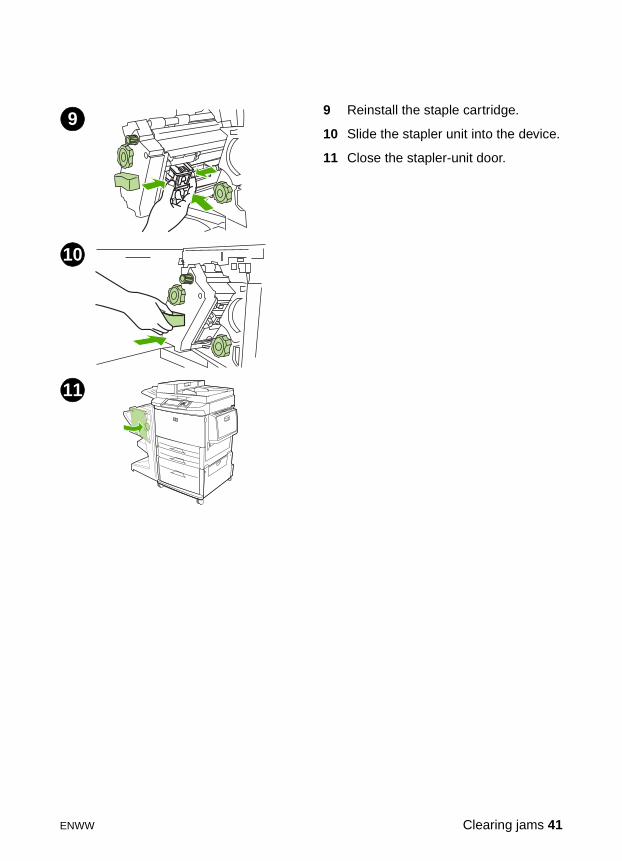
9 Reinstall the staple cartridge.
10 Slide the stapler unit into the device.
11 Close the stapler-unit door.
9
10
11
ENWW Clearing jams 41

To clear a jam in the upper half of the stapler head
1 Follow steps 1 through 4 of the procedure to clear a staple jam.
2 Locate the damaged staple at the back of the stapler head, and remove the staple.
3 Follow steps 10 through 11 of the procedure to clear a staple jam.
2
42 3 Problem solving ENWW
A Specifications
Overview
Physical specifications
Environmental specifications
Media specifications
ENWW Overview 43
Physical specifications
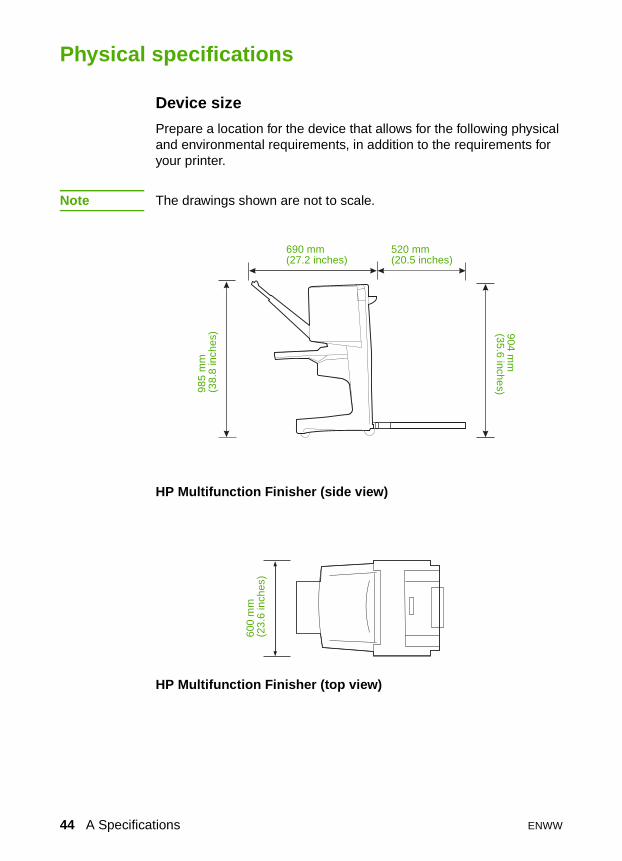
Device size
Prepare a location for the device that allows for the following physical and environmental requirements, in addition to the requirements for your printer.
Note The drawings shown are not to scale.
HP Multifunction Finisher (side view)
HP Multifunction Finisher (top view)
904 mm
(35.6 inches)985
mm
(38.
8 in
ches
)
690 mm(27.2 inches)
520 mm(20.5 inches)
600
mm
(23.
6 in
ches
)
44 A Specifications ENWW

Device weight of the HP Multifunction Finisher: 44.4 kg (98 lb)
Location requirements for the printer:
A level area on the floor
Space allowance around the printer
A well-ventilated room
No exposure to direct sunlight or chemicals, including ammonia-based cleaning solutions
Adequate power supply (15 A, 110 V, or 220 V circuit located near the printer)
A stable environment—no abrupt temperature or humidity changes
Relative humidity of 10 percent to 80 percent
Room temperature of 10° C to 32.5° C (50° F to 91° F)
ENWW Physical specifications 45

Environmental specifications
Power consumption
Product state Power consumption (average, in watts)
Power consumption with typical output device
Printing(110 to 127 V units)(220 to 240 V units)
1,075 watts1,075 watts
1,130 watts1,130 watts
Standby(110 to 127 V units)(220 to 240 V units)
440 watts440 watts
485 watts485 watts
PowerSave 1 (Fan is on)(110 to 127 V units)(220 to 240 V units)
70 watts70 watts
115 watts115 watts
Low power(100 to 127 V units)(220 to 240 V units)
230 watts230 watts
275 watts275 watts
Off(110 to 127 V units)(220 to 240 V units)
0.5 watts 1.3 watts
0.5 watts1.3 watts
ADF copying/printing(110 to 127 V units)(220 to 240 V units)
1,130 watts1,130 watts
1,185 watts1,185 watts
46 A Specifications ENWW

Power requirements
Power requirements (acceptable line voltage)
110 to 127 V (+/- 10%) 50 to 60 Hz (+/- 2 Hz)
220 to 240 V (+/- 10%) 50 Hz (+/- 2 Hz)
220 V (+/- 10%) 60 Hz (+/- 2 Hz)
ENWW Environmental specifications 47

Circuit capacity
Operating environment
Protecting the environment
Hewlett-Packard Company is committed to providing quality products in an environmentally sound manner.
The HP Multifunction Finisher has been designed with several attributes that minimize impacts on the environment.
Disposal of Waste Equipment by Users in Private Household in the European Union
Minimum recommended circuit capacity
110 to 127 V 15.0 amps
220 to 240 V 6.5 amps
Operating temperature 10° C to 32.5° C (50° F to 91° F)
Operating humidity 10 to 80 percent relative humidity
Storage temperature 0° C to 35° C (32° F to 95° F)
Storage humidity 10 to 95 percent relative humidity
Speed 50 ppm
This symbol on the product or on its packaging indicates that this product must not be disposed of with your other household waste. Instead, it is your responsibility to dispose of your waste equipment by handing it over to a designated collection point for the recycling of waste electrical and electronic equipment. The separate collection and recycling of your waste equipment at the time of disposal will help to conserve natural resources and ensure that it is recycled in a manner that protects human health and the environment. For more information about where you can drop off your waste equipment for recycling, please contact your local city office, your household waste disposal service or the shop where you purchased the product
48 A Specifications ENWW
Supported media types The following types of media are supported for the multifunction finisher:
plain paper
preprinted paper
letterhead (except raised letterhead and low-temperature inks)
transparencies
prepunched paper
labels
bond
recycled paper
color paper
card stock
rough paper
glossy paper
envelopes
cut-sheet paper
user-defined paper (five types)
ENWW Environmental specifications 49

Supported media
Supported media specifications
Note Transparencies, envelopes, prepunched, cut-sheet paper, and labels are only supported in bin 1.
Note Custom paper sizes are not supported for booklet making.
Output bin and Stapler
Capacity Media Weight
Stacker bin (bin 1)
Up to 1,000 sheets, stacked, of Letter/A4
Up to 500 sheets, stacked, of Ledger/A3
Standard paper sizes:letter, legal, executive, ISO A3, ISO A4, ISO A5, JIS B4, JIS B5, ledgerCustom paper sizes:Minimum: 98 by 191 mm(3.9 by 7.5 inches)Maximum: 312 by 470 mm (12.2 by 18.4 inches)Custom types: envelopes, labels, transparencies, heavy paperFace-up bin only: envelopes, labels, heavy paper up to 216 g/m 2 (58 lb bond)
64 to 216 g/m 2
(17 to 58 lb bond)
Booklet bin (bin 2)
Up to 40 booklets composed of 5 sheets
Standard paper sizes:letter, legal, ISO A3, ISO A4, JIS B4, ledger
64 to 199 g/m 2 (17 to 53 lb bond)
Stapler Maximum of 50 sheets of Letter/A4
Maximum of 25 sheets of Ledger/A3
NoteStapling capacity varies depending on the paper thickness or the coating characteristics.
Letter, ISO A4, legal, ledger, A3, JIS B4
64 to 199 g/m 2 (17 to 53 lb bond)
50 A Specifications ENWW

For more information about media guidelines, see the user guide supplied with your printer. Also see the HP LaserJet Media Specification Guide at http://www.hp.com.
*Denotes approximate numbers
Note When making booklets using media weight of 64 g/m2 (17 lb) to 80 g/m2 (21 lb), one cover sheet up to 199 g/m2 (53 lb) can be combined with the 10 sheets. Other combinations are not supported.
Table 1. Number of sheets that can be stapled, listed by media weight
Media weight Letter/A4 Ledger/A3 and Legal/B4
64 g/m2 (17 lb) *50 *25
75 g/m2 (20 lb) *50 *25
80 g/m2 (21 lb) *50 *25
90 g/m2 (24 lb) *44 *22
105 g/m2 (28 lb) *28 *14
163 g/m2 (43 lb) *18 *9
199 g/m2 (53 lb) *12 *6
Table 2. Number of sheets that can be stapled and folded, listed by media weight
Media weight Letter/A4, Ledger/A3 and Legal/B4
64 g/m2 (17 lb) to80 g/m2 (21 lb)
Maximum of 10 sheets
90 g/m2 (24 lb) to105 g/m2 (28 lb)
Maximum of 5 sheets
163 g/m2 (43 lb) to199 g/m2 (53 lb)
Maximum of 1 sheet.
ENWW Environmental specifications 51

52 A Specifications ENWW
B Regulatory information
Overview
Declaration of conformity
Canadian DOC Regulations
ENWW Overview 53

Declaration of Conformityaccording to ISO/IEC Guide 22 and CEN/CENELEC EN 45014
Manufacturer’s Name: Hewlett-Packard Company
Manufacturer’s Address:
Montemorelos 299Guadalajara Jalisco, 45060Mexico
Declares, that the product
Product Name: HP Multifunction Finisher
Model Numbers: C8088A, C8088B
Product Options: All
Is in conformity with:
Safety: IEC 60950:1999 / EN 60950:2000
EMC: CISPR 22:1997 / EN 55022:1998 Class A1
CISPR 24:1997 / EN 55024:1998
IEC 61000-3-2:2000/EN 61000-3-2:2000
IEC 61000-3-3:1994 +A1/EN 61000-3-3:1995 +A1
FCC Title 47 CFR, Part 15 Class A / ICES-003, Issue 4
Supplementary Information:
The product herewith complies with the requirements of the EMC Directive 89/336/EEC and the Low Voltage Directive 73/23/EEC, and carries the CE-Marking accordingly.
1) The product was tested in a typical configuration with Hewlett-Packard Personal Computer Systems.
2) This Device complies with Part 15 of the FCC Rules. Operation is subject to the following two Conditions:
(1) this device may not cause harmful interference, and(2) this device must accept any interference received, including interference that may cause undesired operation.
For Regulatory Topics Only:
Australia Contact: Product Regulations Manager, Hewlett-Packard Australia Ltd., 31-41 Joseph Street, Blackburn, Victoria 3130, Australia
European Contact: Your Local Hewlett-Packard Sales and Service Office or Hewlett-Packard Gmbh, Department HQ-TRE / Standards Europe, Herrenberger Straße 140, D-71034 Böblingen (FAX: +49-7031-14-3143)
USA Contact: Product Regulations Manager, Hewlett-Packard Company, PO Box 15, Mail Stop 160, Boise, Idaho 83707-0015 (Phone: 208-396-6000)
54 B Regulatory information ENWW

Canadian DOC Regulations
Complies with Canadian EMC Class A requirements.Conforme à la classe A des normes canadiennes de compatibilité électromagnétique (CEM).
VCCI Statement (Japan)
Korean EMI Statement
ENWW Canadian DOC Regulations 55

Taiwan
56 B Regulatory information ENWW
C Service and support
World Wide Web
Solutions to most issues can be found at www.hp.com. The HP Web site includes frequently asked questions (FAQ), troubleshooting help, information about maintenance and use, and manuals for the following products that can be used with the HP Multifunction Finisher:
HP LaserJet 9040mfp
HP LaserJet 9050 Series printers
HP LaserJet 9050mfp
HP LaserJet 9500mfp
Warranty information
See the warranty booklet that came with your printer or HP Multifunction Finisher for warranty information.
ENWW 57

58 C Service and support ENWW
Index
AA3 paper
stapling capability by weight 51stapling capability by weight,
booklets 51A4 paper
stapling capability by weight 51accessories
control panel messages 35adhesive labels 28amber light
interpreting 8troubleshooting 32
attaching device 10
Bbenefits of product 6bent staples in stapler head 33bins
description 28error messages 35location 28media supported 50selecting 29troubleshooting 33
blinking lightsinterpreting 8troubleshooting 32
booklet bindescription 28error messages 35location 28media supported 50selecting 28troubleshooting 33
bookletserror messages 36features 6layout options for both sides of paper 18media supported 16, 50
printing 15printing single sheet without staples 22saddle stitching 21selecting covers 20selecting output bin 28stacking 6stapling capability by media weight 51
broken staples in stapler head 33
CCanadian DOC regulations 55cardstock
stapling 24supported sizes 50
cartridge, staplererror messages 36troubleshooting 34
circuit capacity 48clearing jams
media 38stapler head 42
compatibility with other devices 9configuring printer driver 23consumption of power 46control panel
default settings 12selecting output location 29staple options 25troubleshooting messages 35
Corner Staple option 13custom media sizes supported 50customer support
warranty 57cut-sheet paper 28
DDeclaration of Conformity (DOC)
U.S. 54default printer driver settings,
changing 19
ENWW Index 59

default settings 12destinations
error messages 35media supported 50selecting 29troubleshooting 33
device not recognized 32DOC (Declaration of Conformity)
U.S. 54drivers
using to select stapler 24using to select stapling functions 12
Eelectrical specifications
circuit capacity 48power requirements 47
energy consumption 46energy specifications 46envelopes 28environmental specifications 45, 46error messages 35
Ffeatures of HP Multifunction Finisher 6folding
features 6frequent
media jams 34stapler jams 34
Ggreen light
interpreting 8troubleshooting 32
Hheavy media
stapling 24supported sizes 50supported types 49
humidity specifications 45, 48
Iidentifying parts 7
indicator lightsinterpreting 8troubleshooting 32
Jjams
clearing for media 38clearing for stapler head 42troubleshooting 34
Japanese VCCI statement 55jobs
offset mode 12stacking with or without separation 12
KKorean EMI statement 55
Llabels 28ledger paper
stapling capability by weight 51stapling capability by weight,
booklets 51LEDs
interpreting 8troubleshooting 32
letter paperstapling capability by weight 51
lightsinterpreting 8troubleshooting 32
line voltage requirements 47location
booklet and stacker bins 28lights 8placement of staples 13saddle stitch positions 14selecting for output 29site requirements 45
Mmailing labels 28media
error messages 35HP LaserJet Media Specification
Guide 51
60 Index ENWW

jams, clearing 38jams. troubleshooting 34stapling 24stapling capability by weight 51stapling capability by weight,
booklets 51supported sizes 50supported types 49
messages, control panel 35
NNo Staple option 13
Ooffset mode
description 12limiting access 12
One Staple option 13operating environment 45operating environment specifications 48options
default 12stapler 13, 24
output binsdescription 28error messages 35media supported 50selecting 29troubleshooting 33
overhead transparencies 28
Ppages per minute (ppm) 6paper
error messages 35HP LaserJet Media Specification
Guide 51jams, clearing 38jams, troubleshooting 34stapling 24stapling capability by weight 51stapling capability by weight,
booklets 51supported sizes 50supported types 49
paper-handling features 6
parts, identifying 7power
circuit capacity 48consumption 46requirements 47troubleshooting 32
PowerSave specifications 46ppm (pages per minute) 6prepunched paper 28print media
error messages 35HP LaserJet Media Specification
Guide 51jams, clearing 38jams, troubleshooting 34stapling 24supported sizes 50supported types 49
printer driverschanging default settings 19configuring 23using to select stapler 24using to select stapling functions 12
printing booklets 15problems, resolving common 32
Rrecognize device, printer does not 32red service LED light on 8regulations
U.S. DOC 54regulatory information 53relative humidity specifications 45, 48repeated
media jams 34stapler jams 34
room temperature specifications 45
Ssaddle stitching
features 6positions 14
saddle stitching booklets 21separating jobs 12service and support 57service LED lights 8
ENWW Index 61

settingsdefault 12stapler 13, 24
size specificationsHP Multifunction Finisher 44media supported 50
space requirements 45specifications
environmental 46location 45media 49, 50physical 44speed 6
speed specifications 6stacker bin
description 28location 28media supported 50selecting 28troubleshooting 33
stackingbooklets 6features 6with no separation 12
standby power consumption 46stapler
media supported 50selecting 24
stapler cartridgeerror messages 36troubleshooting 34
stapler headbent or broker staples 33clearing jams 42
staplingcapability for booklets by media
weight 51default settings 13documents 24error messages 36features 6limiting access 12number of sheets by media weight 51output bin, selecting 28performing 25positions 6
selecting functions through printer driver 12
troubleshooting 33, 34status lights
interpreting 8troubleshooting 32
stitching. See saddle stitchingstorage specifications 48support
warranty 57
TTaiwan regulatory statement 56temperature specifications 45, 48transparencies 28trapped staples 34troubleshooting
common problems 32control panel messages 35jams 34lights 8, 32output bins 33power 32stapling 33
turning on, troubleshooting 32Two Staples option 13
Uunrecognized device 32
Vvoltage requirements 47
Wwarranty 57weight
stapling capability by media 51weight specifications
HP Multifunction Finisher 45media 50
62 Index ENWW


© 2005 Hewlett-Packard Development Company, L.P.www.hp.com


