1
D E E P ™ C O L L E C T I O N I N S TA L L AT I O N U S E R M A N U A L
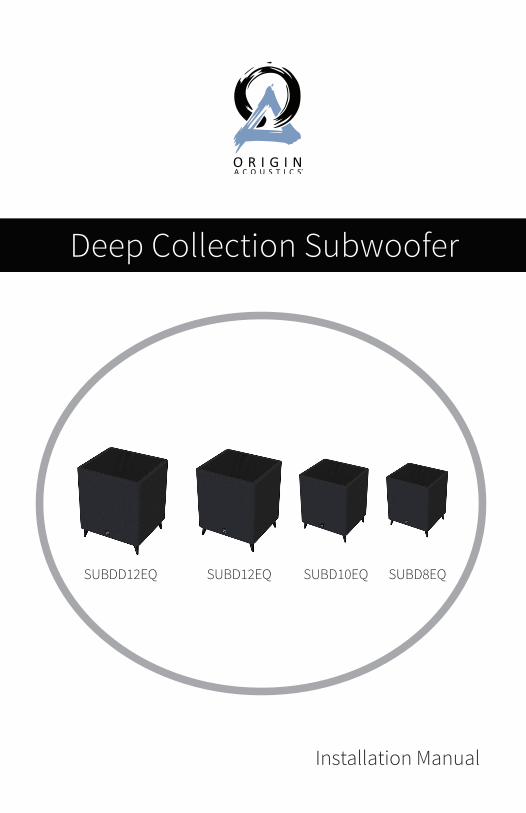
Installation Manual
Deep Collection Subwoofer
SUBDD12EQ SUBD12EQ SUBD10EQ SUBD8EQ
2
D E E P ™ C O L L E C T I O N I N S TA L L AT I O N U S E R M A N U A L
Table of ContentsIntroduction 1
Safety Instructions 2
Specifications 4
In Preparation 5
Bash Amplification 5
Controls and Indicators 6
Connecting The Deep™ Subwoofer 7
Deep™ Subwoofer Placement 7
Deep™ subwoofer App 8

1
D E E P ™ C O L L E C T I O N I N S TA L L AT I O N U S E R M A N U A L
Thank you for purchasing the Deep™ Subwoofer Collection. At Origin Acoustics, we take pride
in providing you with a high quality product. All of Origin Acoustics’ speakers are designed to
have excellent sound quality, longevity, and a simple installation process.
This instruction booklet covers the necessary information for a smooth installation, including:
the tools you will need, step-by-step instructions for installation, troubleshooting tips for any
errors that may occur, and all warranty information. If for any reason you experience problems
or if you have installation questions please call us at (844) 674-4461. Hours of operation are
8:00am to 5:00pm (Pacific Time), Monday through Friday.
Introduction
2
D E E P ™ C O L L E C T I O N I N S TA L L AT I O N U S E R M A N U A L
SAFETY INSTRUCTIONS General lnformation
• Please read and follow these safety instructions.
• Keep them safe for future reference
• Observe all warnings on the speaker and in the manual. Please check the speaker for
damage before use. The speaker must be in perfect working condition. Damaged parts may
lead to personal injury.
Caution! Deep™ Subwoofers and active speakers may be heavy. Be careful when lifting them
to prevent personal injury.
Use only as directed
• Connect the speakers according to the instructions in the manual.
• Deep™ Subwoofers are equipped with spikes/anti-slip feet. They are provided for leveling
the speaker. For leveling on an uneven floor, unscrew the spikes or anti-slip feet by 2-3 turns
of thread. The speakers should always be in perfect vertical alignment: the stability
of the speaker must not be compromised by using spikes/ant-slip feet as the speaker may
tip over.
Location
• Install the speakers on a level surface only.
• When choosing the location of these speakers do not place them in locations that are:
- In direct sunlight
- Very humid
- Prone to vibrations
- Exceptionally hot or cold
- Near CRT televisions (the speakers are not magnetically shielded and may cause color
issues with a CRT based tv)
- Close to magnetic cards (since the speakers are not magnetically shielded placing
magnetic cards such as credit cards or commuter may cause them to fail)

3
D E E P ™ C O L L E C T I O N I N S TA L L AT I O N U S E R M A N U A L
Warning Please ensure the product is perfectly stable to avoid injury from tip-over.
Please note, that stability can be increased by using spikes on carpeted surfaces.
However, the mounting of spikes must be carried out carefully due to their very
sharp ends which may cause injuries.
The stability on slippery floors can be increased by using velcro fastening tape or
double sided adhesive tape. Do not install the speaker near any heat sources such
as radiators, heating valves, stoves, or other apparatus (including amplifiers) that
produce heat, or in areas where there is a risk of explosion.

4
D E E P ™ C O L L E C T I O N I N S TA L L AT I O N U S E R M A N U A L
DEEPTM SUBWOOFER SPECIFICATIONS
• Woofer: Dual 12” Custom Resin Coated Paper
• Frequency Response: 17- 180HZ
• Amplifer Power: Bash 1200 Watts Peak
• Complete bluetooth control via phone app
• Crossover Frequency: 50-150HZ
• Weight: 63 lbs.
Model: SUBDD12EQ Part: SUBDDEQ1200
Model: SUBD12EQ Part: SUBDEQ12000
• Woofer: 10” Custom Resin Coated Paper Active, 10” Passive
• Frequency Response: 26-180Hz
• Amplifer Power: Bash 300 Watts Peak
• Complete bluetooth control via phone app
• Crossover Frequency: 50-150HZ
• Weight: 31 lbs.
Model: SUBD10EQ Part: SUBDEQ10000
Model: SUBD8EQ Part: SUBDEQ8000
• Woofer: 12” Custom Resin Coated Paper Active, 12” Passive
• Frequency Response: 22-180Hz
• Amplifer Power: Bash 500 Watts Peak
• Complete bluetooth control via phone app
• Crossover Frequency: 50-150HZ
• Weight: 55 lbs.
• Woofer: 8” Custom Resin Coated Paper Active, 8” Passive
• Frequency Response: 31-180Hz
• Amplifer Power: Bash 150 Watts Peak
1% THD+N
• Complete bluetooth control via phone app
• Crossover Frequency: 50-150HZ
• Weight: 24 lbs.
• Dimensions: 17 x 17 x 17” (432 x 432 x 432mm)
• Input LFE RCA
• Signal Sensing On/Off
• 115/230 Voltage Auto Switch
• Cabinet Finish – Cloth wrapped, Aluminum Top
• Dimensions: 17 x 17 x 17” (432 x 432 x 432mm)
• Input LFE RCA
• Signal Sensing On/Off
• 115/230 Voltage Auto Switch
• Cabinet Finish – Cloth Wrapped, Aluminum Top
• Dimensions: 13 3/5 x 13 3/5 x 13 3/5” (345 x 345 x 345mm)
• Input LFE RCA
• Signal Sensing On/Off
• 115/230 Voltage Auto Switch
• Cabinet Finish – Cloth Wrapped, Aluminum Top
• Dimensions: 11 x 11 x 11” (280 x 280 x 280mm)
• Input LFE RCA
• Signal Sensing On/Off
• 115/230 Voltage Auto Switch
• Cabinet Finish – Cloth Wrapped, Aluminum Top

5
D E E P ™ C O L L E C T I O N I N S TA L L AT I O N U S E R M A N U A L
IN PREPARATIONUnbox the subwoofer and set box and packing material aside. Turn off the entire audio
system before making any connections.
BASH AMPLIFICATIONThe amplifier in your DeepTM Subwoofer is a hybrid design utilizing the best of both
digital and analog technologies. This allows for extreme high-quality bass output and
dramatically reduced distortion. We have achieved this through an extraordinarily
advanced A/B output stage powered by Bash. This gives you all of the warmth and
musicality of an analog amplifier with the efficiency and power reserves of a digital
amplifier.
6
D E E P ™ C O L L E C T I O N I N S TA L L AT I O N U S E R M A N U A L
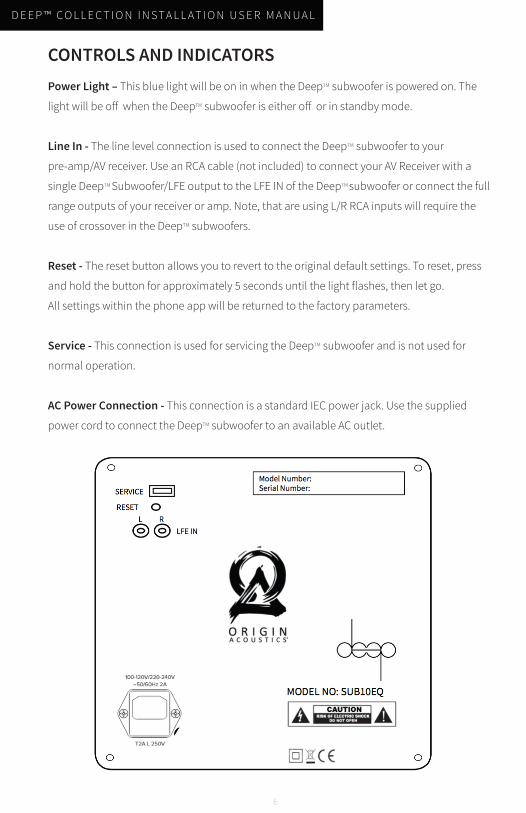
CONTROLS AND INDICATORSPower Light – This blue light will be on in when the DeepTM subwoofer is powered on. The
light will be off when the DeepTM subwoofer is either off or in standby mode.
Line In - The line level connection is used to connect the DeepTM subwoofer to your
pre-amp/AV receiver. Use an RCA cable (not included) to connect your AV Receiver with a
single DeepTM Subwoofer/LFE output to the LFE IN of the DeepTM subwoofer or connect the full
range outputs of your receiver or amp. Note, that are using L/R RCA inputs will require the
use of crossover in the DeepTM subwoofers.
Reset - The reset button allows you to revert to the original default settings. To reset, press
and hold the button for approximately 5 seconds until the light flashes, then let go.
All settings within the phone app will be returned to the factory parameters.
Service - This connection is used for servicing the DeepTM subwoofer and is not used for
normal operation.
AC Power Connection - This connection is a standard IEC power jack. Use the supplied
power cord to connect the DeepTM subwoofer to an available AC outlet.
7
D E E P ™ C O L L E C T I O N I N S TA L L AT I O N U S E R M A N U A L
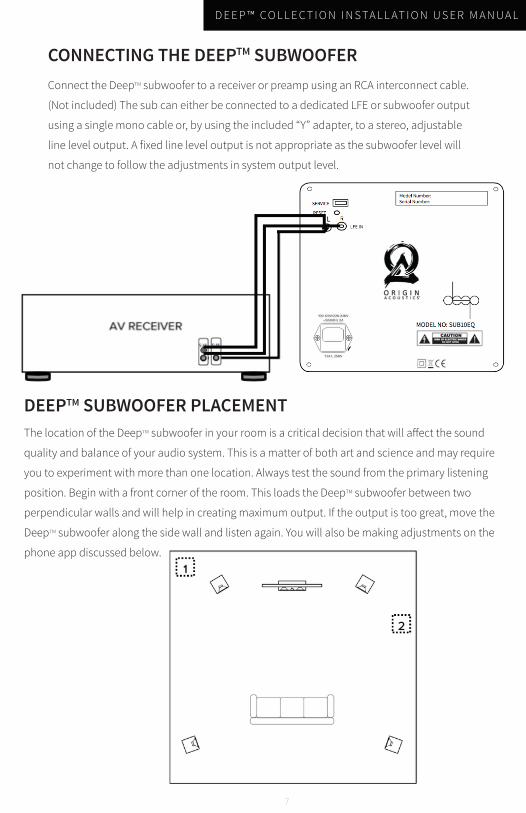
CONNECTING THE DEEPTM SUBWOOFERConnect the DeepTM subwoofer to a receiver or preamp using an RCA interconnect cable.
(Not included) The sub can either be connected to a dedicated LFE or subwoofer output
using a single mono cable or, by using the included “Y” adapter, to a stereo, adjustable
line level output. A fixed line level output is not appropriate as the subwoofer level will
not change to follow the adjustments in system output level.
DEEPTM SUBWOOFER PLACEMENTThe location of the DeepTM subwoofer in your room is a critical decision that will affect the sound
quality and balance of your audio system. This is a matter of both art and science and may require
you to experiment with more than one location. Always test the sound from the primary listening
position. Begin with a front corner of the room. This loads the DeepTM subwoofer between two
perpendicular walls and will help in creating maximum output. If the output is too great, move the
DeepTM subwoofer along the side wall and listen again. You will also be making adjustments on the
phone app discussed below.

8
D E E P ™ C O L L E C T I O N I N S TA L L AT I O N U S E R M A N U A L
DEEPTM SUBWOOFER APPYour Origin DEEPTM subwoofer app allows you to make several adjustments to fine-tune
the output using our proprietary app for you iPhone® or Android® device. Download the
app at the Apple® App Store or Google® Play Store.
Typical analog knobs and switches have been replaced by a digital signal processor
(DSP), which enables you to adjust the DeepTM subwoofer with great precision. Parameters
such as volume, cut-o frequency, phase, etc., as well as the automatic calibration func-
tions, can be adjusted with the through the app.
The app also eliminates the possibility of unwanted changes to the settings. A Bluetooth
4.0 low-energy Android or iOS device is required to set up and operate the DeepTM
subwoofers. If your mobile device asks for a 4-digit code to pair with the DeepTM
subwoofer, use “0000”
CINEMA
SET UPIn the set-up mode, you have the ability to
adjust various parameters to customize the
sound to your personal preferences.
9
D E E P ™ C O L L E C T I O N I N S TA L L AT I O N U S E R M A N U A L
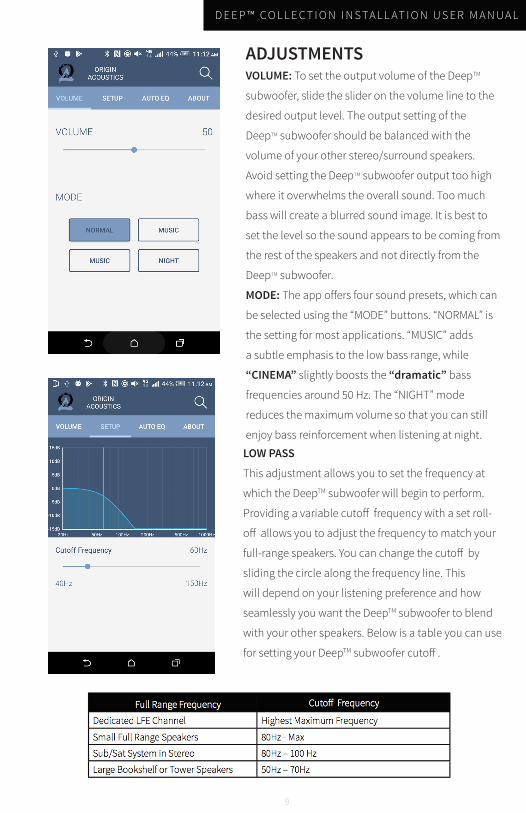
ADJUSTMENTSVOLUME: To set the output volume of the DeepTM
subwoofer, slide the slider on the volume line to the
desired output level. The output setting of the
DeepTM subwoofer should be balanced with the
volume of your other stereo/surround speakers.
Avoid setting the DeepTM subwoofer output too high
where it overwhelms the overall sound. Too much
bass will create a blurred sound image. It is best to
set the level so the sound appears to be coming from
the rest of the speakers and not directly from the
DeepTM subwoofer.
MODE: The app offers four sound presets, which can
be selected using the “MODE” buttons. “NORMAL” is
the setting for most applications. “MUSIC” adds
a subtle emphasis to the low bass range, while
“CINEMA” slightly boosts the “dramatic” bass
frequencies around 50 Hz. The “NIGHT” mode
reduces the maximum volume so that you can still
enjoy bass reinforcement when listening at night.
LOW PASS
This adjustment allows you to set the frequency at
which the DeepTM subwoofer will begin to perform.
Providing a variable cutoff frequency with a set roll-
off allows you to adjust the frequency to match your
full-range speakers. You can change the cutoff by
sliding the circle along the frequency line. This
will depend on your listening preference and how
seamlessly you want the DeepTM subwoofer to blend
with your other speakers. Below is a table you can use
for setting your DeepTM subwoofer cutoff .
10
D E E P ™ C O L L E C T I O N I N S TA L L AT I O N U S E R M A N U A L
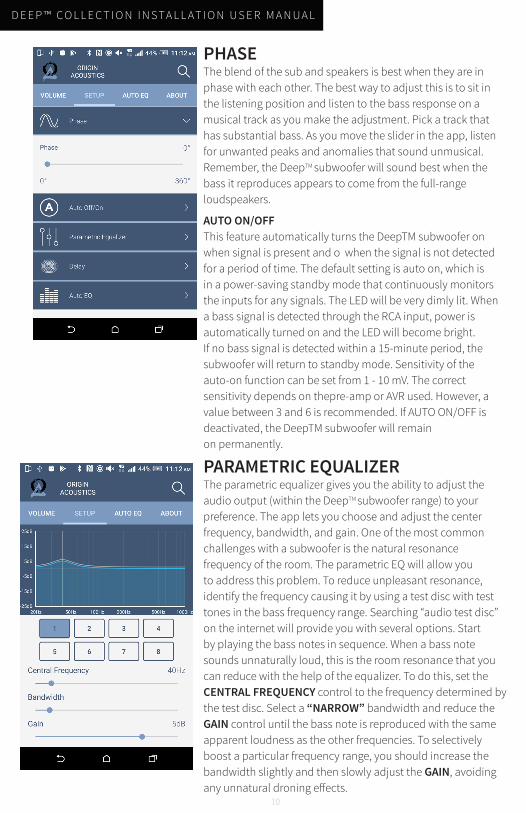
PHASEThe blend of the sub and speakers is best when they are in phase with each other. The best way to adjust this is to sit in the listening position and listen to the bass response on a musical track as you make the adjustment. Pick a track that has substantial bass. As you move the slider in the app, listen for unwanted peaks and anomalies that sound unmusical. Remember, the DeepTM subwoofer will sound best when the bass it reproduces appears to come from the full-range loudspeakers.
AUTO ON/OFFThis feature automatically turns the DeepTM subwoofer on when signal is present and o when the signal is not detected for a period of time. The default setting is auto on, which is in a power-saving standby mode that continuously monitors the inputs for any signals. The LED will be very dimly lit. When a bass signal is detected through the RCA input, power is automatically turned on and the LED will become bright. If no bass signal is detected within a 15-minute period, the subwoofer will return to standby mode. Sensitivity of the auto-on function can be set from 1 - 10 mV. The correct sensitivity depends on thepre-amp or AVR used. However, a value between 3 and 6 is recommended. If AUTO ON/OFF is deactivated, the DeepTM subwoofer will remain on permanently.
PARAMETRIC EQUALIZERThe parametric equalizer gives you the ability to adjust the audio output (within the DeepTM subwoofer range) to your preference. The app lets you choose and adjust the center frequency, bandwidth, and gain. One of the most common challenges with a subwoofer is the natural resonance frequency of the room. The parametric EQ will allow you to address this problem. To reduce unpleasant resonance, identify the frequency causing it by using a test disc with test tones in the bass frequency range. Searching “audio test disc” on the internet will provide you with several options. Start by playing the bass notes in sequence. When a bass note sounds unnaturally loud, this is the room resonance that you can reduce with the help of the equalizer. To do this, set the CENTRAL FREQUENCY control to the frequency determined by the test disc. Select a “NARROW” bandwidth and reduce the GAIN control until the bass note is reproduced with the same apparent loudness as the other frequencies. To selectively boost a particular frequency range, you should increase the bandwidth slightly and then slowly adjust the GAIN, avoiding any unnatural droning effects.

11
D E E P ™ C O L L E C T I O N I N S TA L L AT I O N U S E R M A N U A L
DELAYThe DELAY parameter enables you to delay playback of the DeepTM subwoofer audio signal. This is particularly helpful when the DeepTM subwoofer is placed closer to the listening position than the rest of your speakers. Increasing the delay time by 1 millisecond will have the same effect as moving the DeepTM subwoofer approximately 13 inches (33 cm) further away from the listening position. So, a setting of 20 milliseconds would be equivalent to increasing this distance by approximately 21.5 feet (6.6 meters). If you are using a surround-sound receiver or amplifier equipped with an automatic calibration function, its LFE output signal will automatically set the delay time internally so delay on the DeepTM subwoofer should be set to minimum.
AUTO EQYour DeepTM subwoofer is equipped with an easy-to-use and highly sophisticated automatic calibration function. This activates the DeepTM subwoofer via the APP and instructing it to play a measurement signal and uses the built-in microphone in your smartphone to show the measurement curve, within the range. Automatic room calibration is performed in two steps. The first calibrates the measurement environment, which includes the microphone and the sound reproduction chain. The second step measures the actual room frequency response. Follow the instructions in the APP to carry out a successful measurement. The Auto EQ measurement begins with you being asked to hold the smartphone close to the sound opening of the DeepTM subwoofer. The measurement can then be started.Once the calibration step is completed, the actual room measurement can be performed. Do this by holding your smartphone at the listening position and start step 2.After a successful measurement, the app provides visual parameters of the measured room along with the automatically calculated filter recommendations.
Press “APPLY” to use the filter data to compensate for the frequency response. Press “Redo” to start another measurement.
Once you have accepted the measurement with “APPLY”, the equalization curve is retained until it is overwritten by a new measurement. You can deactivate the automatically calculated frequency response compensation at any time by switching off the AUTO EQ function in the SETUP menu.

12
D E E P ™ C O L L E C T I O N I N S TA L L AT I O N U S E R M A N U A L
If possible, it’s often good to try to isolate the problem first. For example, if you’re playing
a DVD on a television and there’s no sound, try connecting an MP3 player to the system to
see if that works. If it does work, then the problem is with the television, DVD player, or the
cables connecting them. If it doesn’t work, the problem will be with the amplifier, speakers,
or those cables.
Troubleshooting
Problem Possible Cause
No Sound The volume may be turned down or muted. Check the volume settings on both the amplifier and the television/computer/CD player/etc.
No Sound Make sure the proper source is selected on the amplifier or receiver.
No Sound Check the cord connecting the amplifier with the source. The cord may be damaged or plugged into the wrong input or output.
No Sound Check the wires connecting the amplifier with the speakers. Make sure they’re connected properly and not damaged in any way.
Poor Sound Quality
If you hear something like static, or the sound is cutting in and out, check the audio cables. If the problem increases when a cable is being moved, then the cable is most likely faulty or not connected properly.
Poor Sound Quality
Today’s audio systems may have several places to adjust the volume, for example your MP3 player may have a volume control, and your amplifier may also have one. Check to be certain that the volume isn’t turned up past 80% on any device.
Poor Sound Quality
Try changing sources to be certain that the selection you’ve chosen is a good quality recording.

13
D E E P ™ C O L L E C T I O N I N S TA L L AT I O N U S E R M A N U A L
If you have any questions or concerns about installing or using this product, you can reach
us through one of the following methods:
Phone: (844) 674-4461
Hours of operation: 8:00am - 5:00pm (Pacific Time), Mon - Fri
Email: [email protected]
If you are having technical trouble, please include the model number and briefly explain
what steps you took to resolve the problem in your email, or be prepared to answer these
questions over the phone. If you are considering returning the product, it’s required that
you contact Origin Acoustics prior to any return attempts. This way we can determine
if the issue can be resolved without returning the product, or if needed we can provide
instructions and support for the return process.
Technical Assistance
14
D E E P ™ C O L L E C T I O N I N S TA L L AT I O N U S E R M A N U A L
Origin Acoustics warrants to the original retail purchaser only that this Origin
Acoustics product will be free from defects in materials and workmanship,
provided the speaker was purchased from an Origin Acoustics authorized dealer.
If the product is determined to be defective, it will be repaired or replaced at
Origin Acoustics’ discretion. If the product must be replaced yet it is no longer
manufactured, it will be replaced with a model of equal to or greater value that
is the most similar to the original. If this is the case, installing the replacement
model may require mounting modifications; Origin Acoustics will not be
responsible for any such related costs.
Limited Lifetime Warranty
This warranty may not be valid if the product was purchased through an
unauthorized dealer. This warranty only applies to the individual that made the
original purchase, and it cannot be applied to other purchases. The purchaser
must be prepared to provide proof of purchase (receipt). This warranty will not
be valid if the identifying number or serial number has been removed, defaced,
or altered.
Requirements & Warranty Coverage
15
D E E P ™ C O L L E C T I O N I N S TA L L AT I O N U S E R M A N U A L
• Accidental damage
• Damage caused by abuse or misuse
• Damage caused by attempted repairs/modifications by anyone other than Origin Acoustics or an authorized dealer
• Damage caused by improper installation
• Normal wear, maintenance, and environmental issues
• Damage caused by voltage inputs in excess of the rated maximum of the unit
• Damage inflicted during the return shipment
Not Covered by Warranty
Before making any return attempts, it is required that you first contact Origin
Acoustics. Return product to Origin Acoustics or your dealer, either in person or by
mail. It’s preferable if the product is returned in the original packaging. If this isn’t
possible, the customer is responsible for insuring the shipment for the full value of
the product.
This warranty is in lieu of all other expressed or implied warranties. Some states do
not allow limitations on implied warranties, so this may not apply depending on
the customer’s location. (For more information, see Magnuson-Moss Warranty Act.)
Return Process

6975 S. Decatur Blvd, Las Vegas, NV 89147• www.originacoustics.com • 844-674-4461
©2017 Origin Acoustics. All copyrighted, trademarked and patented elements mentioned herein are the sole property of Origin Acoustics.


