
CR06 HYBRID RECORDER
(DOTTING TYPE RECORDER) INSTRUCTION MANUAL
MANUAL CR06
OCT. 2006 (2nd Edition)
All Rights Reserved, Copyright © 2000-2006, Brainchild Electronics Co., Ltd.

For safety using Thank you for purchasing our CR06 Hybrid Recorder.
In order to this instrument to exhibit all of its functions effectively and correctly, read and understand this
instruction manual thoroughly before using the instrument.
The symbols below are used on this instrument for the cautioning information.
Symbols used on the instrument
This shows “Caution for handling”. This symbol is used on the parts need to reference the instruction manual for saving human body and the instrument.
This shows “Protective grounding”. Be sure to provide protective grounding prior to operate this instrument.
This shows “Risk of electric shock”. This symbol is used on the parts, which has a risk of electric shock.
Be sure to observe the following warnings/cautions and those provided in the text in order to secure safety in handling the instrument.
WARNING
In order to prevent electric shock; be sure to disconnect this instrument from the main power source when wiring it.
(1) In order to prevent an electric shock; be sure to provide protective
grounding prior to turning on this instrument.
(2) Do not cut a protective grounding conductor or disconnect protective grounding.
(1) Make sure that the supply voltage for this instrument conforms to the
voltage of the supply source.
(2) Attach a protective cover prior to turning on this instrument.
Do not operate this instrument in the environment where it is exposed to a combustible/explosive/corrosive gas or water/steam.
Provide input and output wiring after turning off the power.
General
Protective Grounding
Power Source
Working Environment
Input and Output Wiring
―1― MANUAL CR06
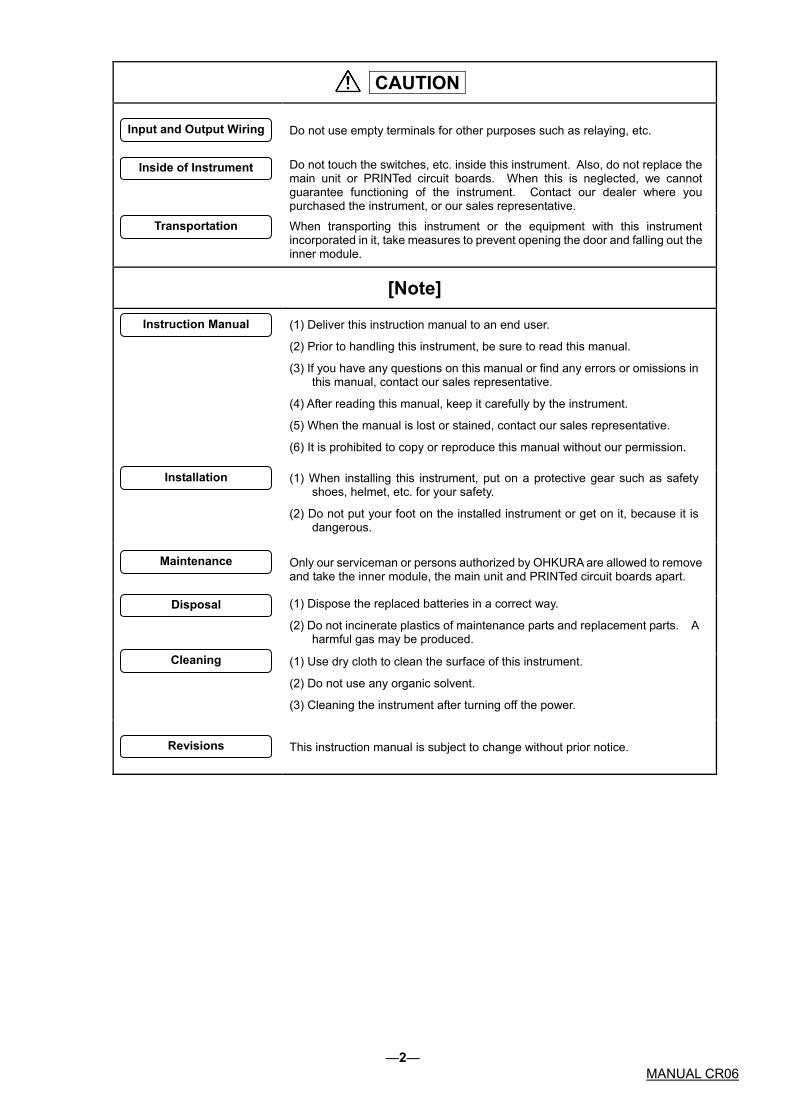
CAUTION
Do not use empty terminals for other purposes such as relaying, etc.
Do not touch the switches, etc. inside this instrument. Also, do not replace the main unit or PRINTed circuit boards. When this is neglected, we cannot guarantee functioning of the instrument. Contact our dealer where you purchased the instrument, or our sales representative.
When transporting this instrument or the equipment with this instrument incorporated in it, take measures to prevent opening the door and falling out the inner module.
[Note]
(1) Deliver this instruction manual to an end user.
(2) Prior to handling this instrument, be sure to read this manual.
(3) If you have any questions on this manual or find any errors or omissions in this manual, contact our sales representative.
(4) After reading this manual, keep it carefully by the instrument.
(5) When the manual is lost or stained, contact our sales representative.
(6) It is prohibited to copy or reproduce this manual without our permission.
(1) When installing this instrument, put on a protective gear such as safety
shoes, helmet, etc. for your safety.
(2) Do not put your foot on the installed instrument or get on it, because it is dangerous.
Only our serviceman or persons authorized by OHKURA are allowed to remove and take the inner module, the main unit and PRINTed circuit boards apart.
(1) Dispose the replaced batteries in a correct way.
(2) Do not incinerate plastics of maintenance parts and replacement parts. A harmful gas may be produced.
(1) Use dry cloth to clean the surface of this instrument.
(2) Do not use any organic solvent.
(3) Cleaning the instrument after turning off the power.
This instruction manual is subject to change without prior notice.
Input and Output Wiring
Inside of Instrument
Transportation
Instruction Manual
Installation
Maintenance
Disposal
Cleaning
Revisions
―2― MANUAL CR06

Using procedure for this manual
1.Using procedure This instruction manual consists of “For safety using”, “Contents” and “Chapter 1 to Chapter 11” as bellow.
Read the applying sections for your purpose to use this instrument.
Chapter and TITLE For purchase and install
For initial setting and
change setting
For daily operation
For using communication
For maintenance and
trouble-shootingFor safety using (page 1) ◎ ◎ ◎ ◎ ◎ 1. INTRODUCTION ◎ 2. CONSTRUCTION ○ ○ ○ ○ 3. INSTALLATION ◎ ○ 4. WIRING ◎ ○ ○ ○ ○ 5. PREPARATIONS FOR
OPERATION ○ ◎
6. OPERATION ○ ◎ 7. DEVICE SETTING ◎ ○ ○ 8.COMMUNICATIONS ◎ 9. MAINTENANCE ◎ 10. TROUBLESHOOTING ○ ◎ 11. SPECIFICATIONS ○ ○ ○
◎ :Be absolutely certain to read this. ○ :Be certain to read this if you need.
The symbols below are used on the warning and cautioning information in this manual.
Symbols used on this manual
WARNING Failure to observe this information could result in death or injury. Be absolutely certain to read this.
CAUTION Failure to observe this information could damage the instrument. Be certain to read it.
[Note] This is cautionary information for correct use of the instrument. Be certain to read it.
[Reference] This is information to help you use the functions of this instrument more effectively.
2.Guide of Instruction manual The instruction manuals of this instrument are as the table below.
Name Part No. Outline
1 CR06 Hybrid Recorder (Dotting type) instruction manual
MANUAL CR06
Explanation for installing, wiring, standard operation. And setting or operation for using this instrument.
This manual
2 CR06 Hybrid Recorder Communication Command instruction manual
HXPCR06mnC0005E Explanation for reading and writing data of the recorder by communication function.
―3― MANUAL CR06
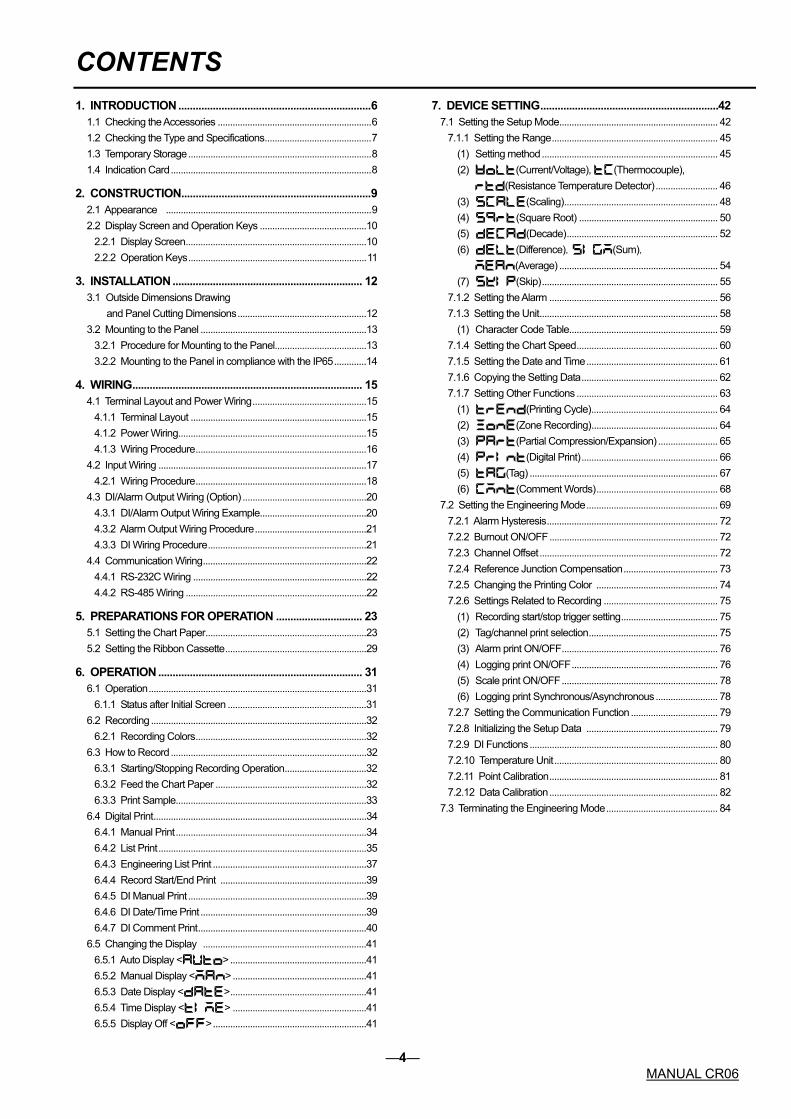
CONTENTS1. INTRODUCTION...................................................................6
1.1 Checking the Accessories ..............................................................6 1.2 Checking the Type and Specifications...........................................7 1.3 Temporary Storage..........................................................................8 1.4 Indication Card.................................................................................8
2. CONSTRUCTION..................................................................9 2.1 Appearance ...................................................................................9 2.2 Display Screen and Operation Keys ...........................................10
2.2.1 Display Screen.........................................................................10 2.2.2 Operation Keys........................................................................11
3. INSTALLATION.................................................................. 12 3.1 Outside Dimensions Drawing and Panel Cutting Dimensions....................................................12 3.2 Mounting to the Panel ...................................................................13
3.2.1 Procedure for Mounting to the Panel.....................................13 3.2.2 Mounting to the Panel in compliance with the IP65.............14
4. WIRING................................................................................ 15 4.1 Terminal Layout and Power Wiring..............................................15
4.1.1 Terminal Layout .......................................................................15 4.1.2 Power Wiring............................................................................15 4.1.3 Wiring Procedure.....................................................................16
4.2 Input Wiring ....................................................................................17 4.2.1 Wiring Procedure.....................................................................18
4.3 DI/Alarm Output Wiring (Option) ..................................................20 4.3.1 DI/Alarm Output Wiring Example...........................................20 4.3.2 Alarm Output Wiring Procedure.............................................21 4.3.3 DI Wiring Procedure................................................................21
4.4 Communication Wiring..................................................................22 4.4.1 RS-232C Wiring ......................................................................22 4.4.2 RS-485 Wiring .........................................................................22
5. PREPARATIONS FOR OPERATION .............................. 23 5.1 Setting the Chart Paper.................................................................23 5.2 Setting the Ribbon Cassette.........................................................29
6. OPERATION....................................................................... 31 6.1 Operation........................................................................................31
6.1.1 Status after Initial Screen ........................................................31 6.2 Recording .......................................................................................32
6.2.1 Recording Colors.....................................................................32 6.3 How to Record...............................................................................32
6.3.1 Starting/Stopping Recording Operation.................................32 6.3.2 Feed the Chart Paper .............................................................32 6.3.3 Print Sample.............................................................................33
6.4 Digital Print......................................................................................34 6.4.1 Manual Print.............................................................................34 6.4.2 List Print....................................................................................35 6.4.3 Engineering List Print ..............................................................37 6.4.4 Record Start/End Print ...........................................................39 6.4.5 DI Manual Print........................................................................39 6.4.6 DI Date/Time Print...................................................................39 6.4.7 DI Comment Print....................................................................40
6.5 Changing the Display ..................................................................41 6.5.1 Auto Display <>.......................................................41 6.5.2 Manual Display <>......................................................41 6.5.3 Date Display <>.......................................................41 6.5.4 Time Display <> ......................................................41 6.5.5 Display Off <>..............................................................41
7. DEVICE SETTING..............................................................42 7.1 Setting the Setup Mode................................................................ 42
7.1.1 Setting the Range................................................................... 45 (1) Setting method....................................................................... 45 (2) (Current/Voltage), (Thermocouple), (Resistance Temperature Detector)......................... 46 (3) (Scaling).............................................................. 48 (4) (Square Root) ........................................................ 50 (5) (Decade)............................................................. 52 (6) (Difference),(Sum), (Average) ................................................................ 54 (7) (Skip)....................................................................... 55
7.1.2 Setting the Alarm .................................................................... 56 7.1.3 Setting the Unit........................................................................ 58
(1) Character Code Table............................................................ 59 7.1.4 Setting the Chart Speed......................................................... 60 7.1.5 Setting the Date and Time..................................................... 61 7.1.6 Copying the Setting Data....................................................... 62 7.1.7 Setting Other Functions ......................................................... 63
(1) (Printing Cycle)................................................... 64 (2) (Zone Recording)................................................... 64 (3) (Partial Compression/Expansion) ........................ 65 (4) (Digital Print)....................................................... 66 (5) (Tag) ............................................................................ 67 (6) (Comment Words)................................................. 68
7.2 Setting the Engineering Mode..................................................... 69 7.2.1 Alarm Hysteresis..................................................................... 72 7.2.2 Burnout ON/OFF.................................................................... 72 7.2.3 Channel Offset........................................................................ 72 7.2.4 Reference Junction Compensation...................................... 73 7.2.5 Changing the Printing Color ................................................. 74 7.2.6 Settings Related to Recording .............................................. 75
(1) Recording start/stop trigger setting....................................... 75 (2) Tag/channel print selection.................................................... 75 (3) Alarm print ON/OFF............................................................... 76 (4) Logging print ON/OFF........................................................... 76 (5) Scale print ON/OFF............................................................... 78 (6) Logging print Synchronous/Asynchronous......................... 78
7.2.7 Setting the Communication Function................................... 79 7.2.8 Initializing the Setup Data ..................................................... 79 7.2.9 DI Functions............................................................................ 80 7.2.10 Temperature Unit.................................................................. 80 7.2.11 Point Calibration.................................................................... 81 7.2.12 Data Calibration.................................................................... 82
7.3 Terminating the Engineering Mode............................................. 84
―4― MANUAL CR06

8. COMMUNICATIONS......................................................... 85 10. TROUBLESHOOTING.....................................................97 8.1 General Description.......................................................................85 10.1 Troubleshooting .......................................................................... 97
8.1.1 General Description of Functions ..........................................85 10.1.1 Trouble Items........................................................................ 97 8.1.2 Transmission Specifications...................................................85 10.1.2 When the Recorder Dose not Work at All.......................... 97 8.1.3 Data Construction....................................................................85 10.1.3 When there is a Big Error .................................................... 98
8.2 Opening/Closing the Link..............................................................86 10.1.4 When the Trend Recording Deflected................................ 98 8.2.1 Open Command......................................................................86 10.1.5 When Records Nothing....................................................... 99 8.2.2 Close Command .....................................................................86 10.1.6 When Recording is Faint..................................................... 99
8.3 Outputting the Process Variable Data .........................................87 10.1.7 When the Chart Paper is not fed at All .............................100 8.3.1 Specifying the Process Variable Data Output.......................87 10.1.8 When the Chart Paper is not fed Properly.......................100 8.3.2 Updating the Data ...................................................................87 10.2 Self Diagnostics Function (ERROR) ......................................101 8.3.3 Specifying the Process Variable Data Output Order
(At BINARY Mode Output) ....................................................87 10.2.1 Self Diagnostic Items .........................................................101 10.2.2 Error Display .......................................................................102
8.3.4 Outputting the Data .................................................................87 11. SPECIFICATIONS.......................................................... 103 8.3.5 Process Variable Data Transmission Format (ASCII) .........88
11.1 Common Specifications ...........................................................103 8.3.6 Process Variable Data Transmission Format (BINARY).....89
11.1.1 Input Signal..........................................................................103 8.4 Outputting the Unit and Decimal Point Position Data ................90
11.1.2 Performance and Characteristics .....................................103 8.4.1 Specifying the Unit and Decimal Point Position
Data Output.............................................................................90 11.1.3 Structure...............................................................................104 11.1.4 Power Source .....................................................................104
8.4.2 Updating the Data ...................................................................90 11.1.5 Normal Operating Conditions............................................104
8.4.3 Outputting the Data .................................................................90 11.1.6 Alarm (Relay Output is Optional).......................................105
8.4.4 Data Format.............................................................................90 11.1.7 Safety Standard and EMI Standard..................................105
8.5 Outputting the Status.....................................................................91 11.1.8 DI Function (Option) ...........................................................105
8.5.1 Status Output Command........................................................91 11.1.9 Paper-empty Detecting Function (Option) .......................105
8.5.2 Status Output ...........................................................................91 11.2 Standard Setting Specifications...............................................106
8.6 Data Reception Example..............................................................92 11.2.1 Measurement Range.........................................................106
9. MAINTENANCE................................................................. 93 11.2.2 The Accuracy at the Computation.....................................109 9.1 Inspection .......................................................................................93 (1) Scaling ...................................................................................109 9.2 Cleaning..........................................................................................93 (2) Square root computation .....................................................109 9.3 Replacing Consumables...............................................................94 (3) Decade ...................................................................................110 9.4 Adjust Dot Printing Position (Point Calibration)...........................94 (4) Difference, Sum, and Average .............................................110 9.5 Calibration (Data Calibration) .......................................................94 11.2.3 Individual Specifications ......................................................111
(1) Calibration of Voltage..............................................................95 11.2.4 Standard Functions..............................................................112 (2) Calibration of Resistance temperature detector ..................95 11.3 Standard Setting Functions.......................................................113 (3) Calibration of Reference Junction Compensation...............96 11.3.1 Standard Setting Functions ................................................113
11.4 Optional Functions.....................................................................113 11.4.1 Remote Function of DI........................................................113 11.4.2 Alarm Board..........................................................................113 11.4.3 Communication unit.............................................................113
―5― MANUAL CR06
1. INTRODUCTION
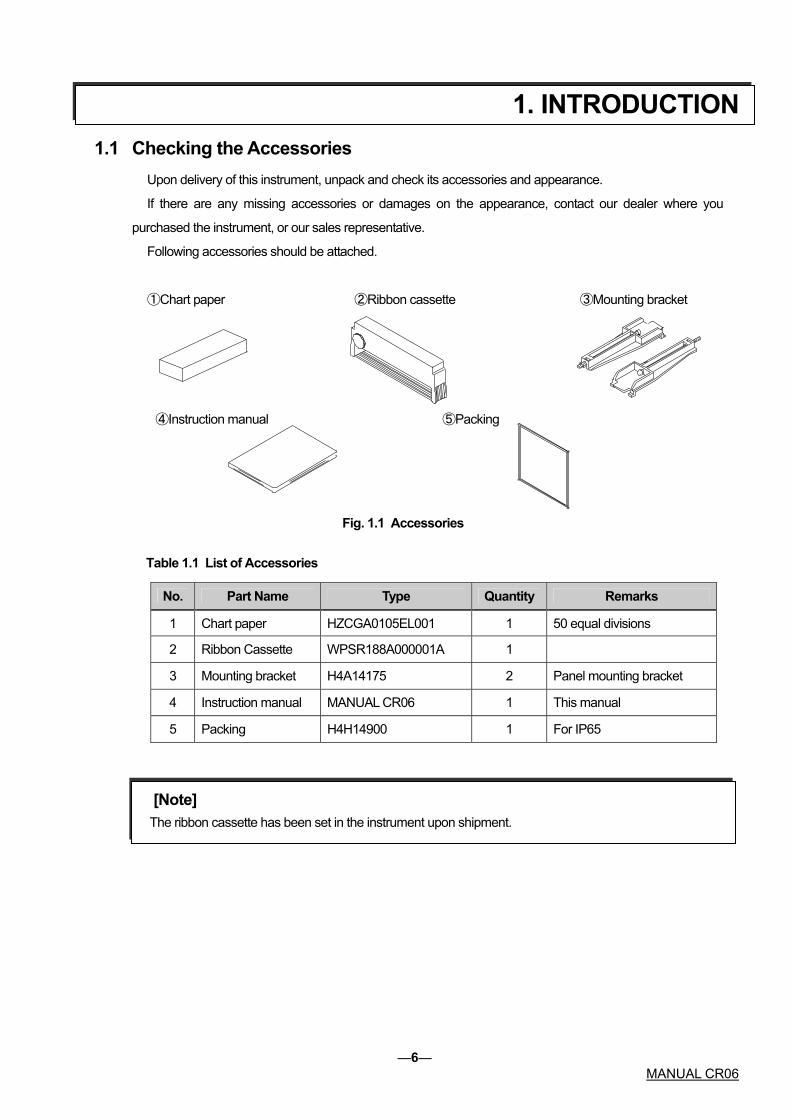
1.1 Checking the Accessories Upon delivery of this instrument, unpack and check its accessories and appearance.
If there are any missing accessories or damages on the appearance, contact our dealer where you
purchased the instrument, or our sales representative.
Following accessories should be attached.
①Chart paper ②Ribbon cassette ③Mounting bracket
④Instruction manual ⑤Packing
Fig. 1.1 Accessories
Table 1.1 List of Accessories
No. Part Name Type Quantity Remarks
1 Chart paper HZCGA0105EL001 1 50 equal divisions
2 Ribbon Cassette WPSR188A000001A 1
3 Mounting bracket H4A14175 2 Panel mounting bracket
4 Instruction manual MANUAL CR06 1 This manual
5 Packing H4H14900 1 For IP65
[Note] The ribbon cassette has been set in the instrument upon shipment.
―6― MANUAL CR06

1.2 Checking the Type and Specifications A nameplate is affixed to the inside of the instrument. Remove the chart holder and make sure that the
nameplate is affixed to the middle far side of the instrument.
Make sure that this instrument meets your requested specification, seeing the following tables.
Table 1.2 Type
6 1 2 3 4 5 7 8
R 0 6 - C
0 RS-232C(Standard)
Communication
1 RS-485(Option)
DI/DO(Option) Out-of-paper sensor(Option)
0 None
1 Yes
0 None
1 6 relay output
2 3 DI
3 3 DI + 6 relay output
―7― MANUAL CR06

1.3 Temporary Storage Store the instrument in the following environment.
When incorporated in the equipment, store it in the following environment as well.
CAUTION Storage in a poor environment may damage the appearance, functions, and service life of the instrument. Storage Environment ・A place with little dust. ・A place free from combustible, explosive, or corrosive gases ( SO2, H2S, etc. ). ・A place free from vibrations or shocks. ・A place frees from water or steam or high humidity (95% RH max.). ・A place free from direct sunshine or high temperature ( 50℃ max. ). ・A place free from an extremely low temperature ( -20℃ min. ).
1.4 Indication Card An indication card has been affixed to the door upon delivery. Enter a name as required.
CAUTION Note that if a non-original nameplate is attached, it may damage the door or mounting part.
―8― MANUAL CR06

2. CONSTRUCTION
2.1 Appearance
Ribbon cassette
Door
Chart holder
Dplay keyboard
Terminal block
Printer
Case
Mounting bracket
Indication card
Fig. 2.1 Appearance
―9― MANUAL CR06

2.2 Display Screen and Operation Keys
2.2.1 Display Screen
The following describes the display screen. Since the channel numbers and data are indicated by a
7-segment LED, alphabets are symbolized to represent them.
For the LED display, see " Symbolized Alphabets for Display" at [Reference] below.
Fig. 2.2 Display
[Reference] Symbolized Alphabets for Display
Display
Alphabet A B C D E F G H h I J K L l
Display
Alphabet M N O P Q R S T U V W X Y Z
Operation Keys
Use these keys for setting and
other operations.
RUN ALM
CH.No DATA
RUN MENU PRINT FEED ENT
ESC ▲
▲
Data Display
Indicates the process variable, time, setting screen, etc. in orange.
Alarm Type Display
Indicates an alarm type in red. "H" is illuminated when the alarm is High. And “L” is illuminated when the alarm is Low. Neither of them is illuminated when there is no alarm.
Status Display The "RUN" lamp (orange) is illuminated when
recording. The "ALM" lamp (red) is illuminated
when the alarm is being activated. denotes
that the lamp goes out and denotes that it
is illuminated.
H
L
Channel No. Display Indicates a channel number in orange.
―10― MANUAL CR06

2.2.2 Operation Keys
The following describes each operation key.
This manual represents the actual operation keys as shown in the figure below.
RUN ALM
RUN PRINT FEED ESC
MENU ENT
RUN MENU PRINT FEED ENT
▲ ESC ▲
CH. No. DATA
H
L
Fig. 2.3 Actual Display and Operation Keys
Table 2.1 Names of Operation Keys and Their Functions
Key Name Function
“RUN” key Starts/stops recording. To stop, hold down the “RUN” key for 3 seconds or more. (Gone out the “RUN” lamp.) To start, press the “RUN” key. (Illuminates the “RUN” lamp.)
“MENU” key MENU function Selects engineering list print and change to the setting mode.
“ESC” key ESC function Exits that menu halfway selecting a function.
“PRINT” key PRINT function Used to perform manual print or list print.
“△” key △ function Used to select a setting parameter (numeral or
built-in command)(ascending direction).
“FEED” key FEED function The chart paper is fed while the key is pressed, and stopped when released.
““ key function Used to shift a digit in setting a numeral.
“ENT” key Used for registering a setting parameter (numeral or built-in command) after selecting it, or executing a function. Pressing this key executes the setting.
RUN
ESC
MENU
FEED
ENT
―11― MANUAL CR06

3. INSTALLATION
3.1 Outside Dimensions Drawing and Panel Cutting Dimensions
Unit: mm <Front> <Rear>
<Side>
(128)
15 0 25
(Panel thickness)
7 MAX
(128)
DATA
ENT
CH, NO.
ESC
FEEDPRINTMENURUN ALM RUN (100)
Dimension required when the door is fully opened (135゜). (Wall on the left side).
2.5 3.5144
144
(56)
<Panel Cutting>
137
200 min
138+
1 -0
+1-013 8
200 min
137
Fig. 3.1 Outside Dimensions and Panel Cutting Dimensions
CAUTION For maintenance and safety of the instrument, it is recommended to secure the spacing larger than the parenthesized dimensions per unit.
―12― MANUAL CR06
3.2 Mounting to the Panel
WARNING Do not install the instrument in a place exposed to a combustible, explosive, or corrosive gas (SO2, H2S, etc.).
CAUTION Install the instrument in the following places ・A place free from where humidity often changes. ・A place of normal temperature (25℃ or so). ・ A place exposed to as little mechanical vibrations as possible. ・ A place with as little dusts as possible. ・ A place affected by the electromagnetic field as little as possible. ・ A place not directly exposed to high radiant heat. ・ A place where the altitude is up to 2000m. ・ Humidity has an effect on the chart paper and ink. Use the instrument in a humidity range of 20 to 80%RH (60%RH is optimum). ・ This instrument needs the inside installation. Mounting to the Panel
・ A steel plate not thinner than 1.2mm is recommended as a mounting panel. ・ The maximum thickness of the mounting panel is 7mm.
Inclination
・ Install the instrument horizontally. ・ The instrument should be installed so that its inclination should be 0゜at the front and within 30゜at the rear.
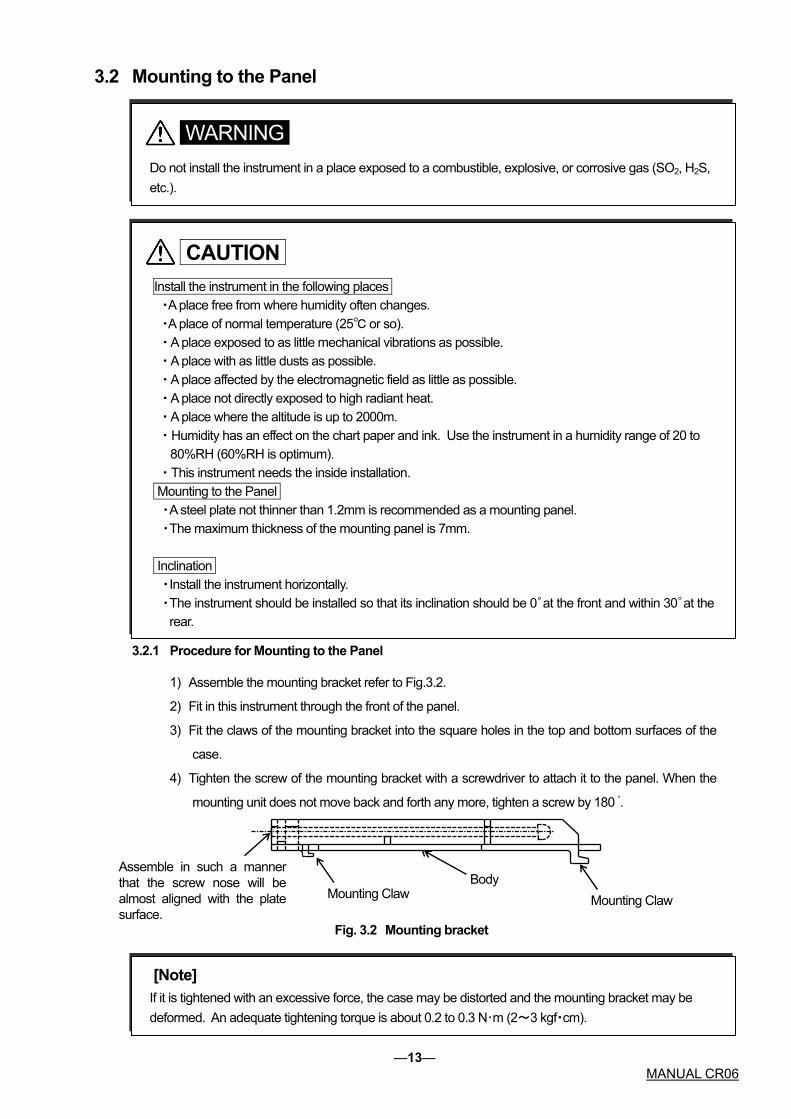
3.2.1 Procedure for Mounting to the Panel
1) Assemble the mounting bracket refer to Fig.3.2.
2) Fit in this instrument through the front of the panel.
3) Fit the claws of the mounting bracket into the square holes in the top and bottom surfaces of the
case.
4) Tighten the screw of the mounting bracket with a screwdriver to attach it to the panel. When the
mounting unit does not move back and forth any more, tighten a screw by 180 ゚.
Fig. 3.2 Mounting bracket
Mounting Claw Body
Mounting Claw
Assemble in such a manner that the screw nose will be almost aligned with the plate surface.
[Note] If it is tightened with an excessive force, the case may be distorted and the mounting bracket may be deformed. An adequate tightening torque is about 0.2 to 0.3 N・m (2~3 kgf・cm).
―13― MANUAL CR06

Panel
Mounting bracket
Screw
Fig. 3.3 Mounting to the Panel
3.2.2 Mounting to the Panel in compliance with the IP65
Prior to mounting the instrument to the panel, attach a packing to the position shown in the figure.
The rest of the procedure is the same.
r
n
cking
Mounting bracket
Panel
Packing
Mounting of Packing
Fig. 3.4 Mounting to the Panel(in compliance with the IP65)
―14― MANUAL CR06

4. WIRING
4.1 Terminal Layout and Power Wiring
4.1.1 Terminal Layout
Power source terminal block
Communication terminal block (RS-232C)
Input terminal block
L N
1A 2C2A1C 3A 4C4A3C 5A 6C6A5C
4+B
4-B
4A
5+B
5-B
5A
6+B
6-B
6A
1+B
1-B
1A
2+B
2-B
2A
3+B
3-B
3A
SGRDTD
+ -
DICOM
DI3
DI2
DI1
6 Relay outputs Communication terminal block (RS-485)
3DI terminal block
Fig. 4.1 Terminal Layout (Rear view)
4.1.2 Power Wiring
WARNING ① In order to prevent an electric shock, be sure to provide protective grounding prior to turning on the
instrument.
② Do not cut a protective grounding conductor or disconnect protective grounding.
③ Make sure that the supply voltage for the instrument conforms to the voltage of the supply source.
④ Attach a transparent protective cover prior to turning on the POWER of the instrument.
⑤ Any interruption of the protective conductor inside or outside the apparatus or disconnection of the
protective grounding terminal is likely to make the apparatus dangerous under some fault conditions.
Intentional interruption is prohibited.
―15― MANUAL CR06

CAUTION ① As an electric wire for the power source, use a 600 V vinyl insulated wire (IEC 227-3) or its equivalent
or above.
② Attach a round press-fitting terminal with insulated sleeve (for M3.5) to the end of the electric wire.
③ Connect a protective grounding (resistance:100Ωor lower, a minimum diameter of a grounding
conductor:1.6mm) to the protective grounding terminal.
④ If other instrument shares the protective grounding conductor, there may be an effect caused by
noise coming from the grounding conductor. It is recommended not to share it with other instrument.
⑤ In order to comply with the requirements of safety standard EN61010, the recorder shall have one of
the following as a disconnecting device, fitted within easy reach of the operator, and labeled as the
disconnecting device.
a.A switch or circuit breaker which complies with the requirements of IEC60947-1, IEC60947-2
and IEC60947-3.
b.A separable coupler which can be disconnected without the use of a tool.
c.A separable plug, without a locking device, to mate with a socket outlet in the building.
⑥ This product has designed to conform to IEC1010-1 installation CategoryⅡ and pollution
degree 2.
⑦ Please use the main power supply by the change within 10% of the rated voltage.
⑧ Transitional current might flow to the main power supply when the power supply is turned on.
4.1.3 Wiring Procedure
CAUTION The transparent protective cover should surely remove the left and right (both sides) hooks simultaneously. If it removes by turns, there is a possibility that it may damage.
1) Put your fingers on the left and right (both sides) hooks of the transparent protective cover on the
power source terminal block. Pushing them inside, take out the cover to this side.
2) Connect the power source electric wire refer to Fig. 4.2. Connect the protective grounding to the
terminal. Connect the non-grounding side of the power source to "L" terminal. Connect the
grounding side to the "N" terminal.
3) Put back the transparent protective cover.
L N
4) Make sure that protective grounding is properly provided.
Fig. 4.2 Power source Terminal block
―16― MANUAL CR06
4.2 Input Wiring
CAUTION ①Precautions for the input electric wire
See that no noise is mixed in input wiring. For input wiring, it is recommended to use a shielding
wire or twisted wire effective for noise.
In case of thermocouple input, connect a thermocouple wire directly or use a compensating lead
wire. It is recommended to use a shielded input line.
In case of resistance temperature detector input, dispersion of 3-wire line resistance should be
less than the below mentioned values. It is recommended to use a shielded input line.
For Pt 100, JPt 100 ;50mΩ max.
When it is likely to be affected by induction noise, particularly when wiring near the high-frequency
power source, it is recommended to use a shielded twisted wire.
Attach a round press-fitting terminal with insulated sleeve (for M3.5) to the end of the electric wire.
② Precautions for wiring
The wiring between the instrument and measurement point should be kept away from the power
circuit (25V or higher circuit or DO circuit).
Short-circuit unused input terminals. (Short-circuit between "+" and "-" in case of mV, V, or
thermocouple input, and short-circuit among A, B, and B in case of resistance temperature
detector input.)
Ground the shield of connecting wire.
―17― MANUAL CR06
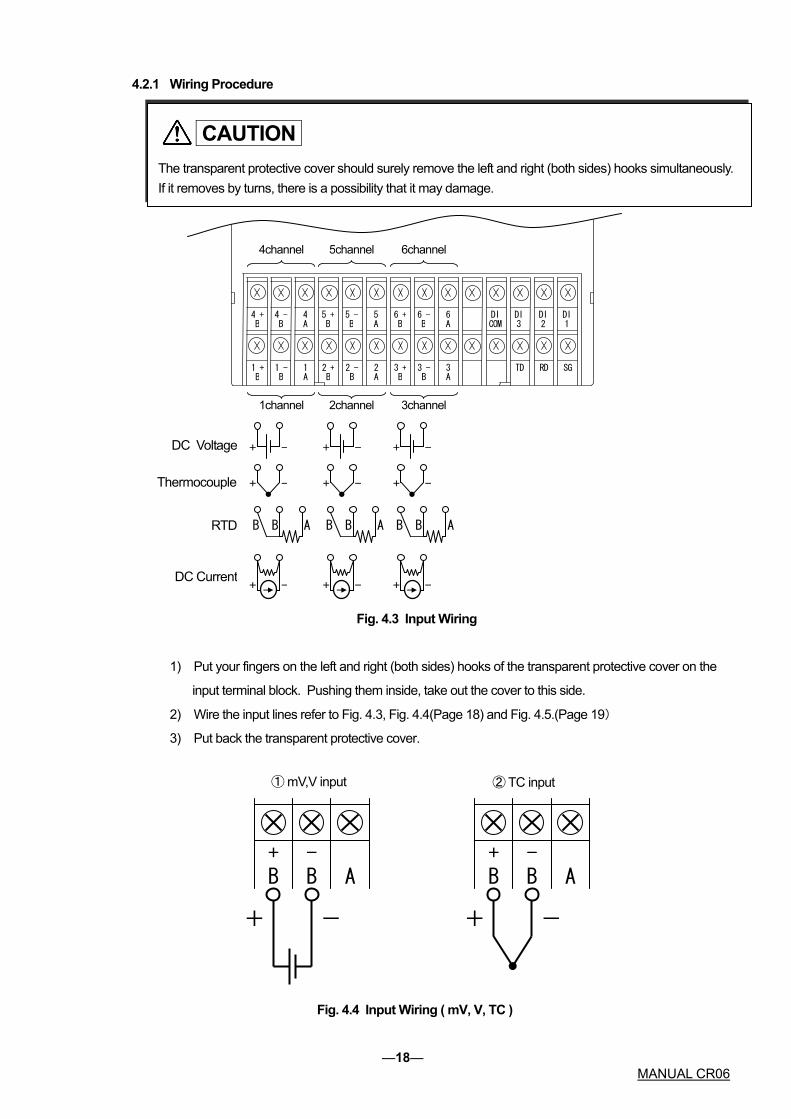
4.2.1 Wiring Procedure
Fig. 4.3 Input Wiring
CAUTION The transparent protective cover should surely remove the left and right (both sides) hooks simultaneously. If it removes by turns, there is a possibility that it may damage.
4channel 5channel 6channel
4 + B
4 - B
4 A
5 +B
5 -B
5A
6 +B
6 -B
6A
DICOM
DI3
DI2
DI 1
TD RD SG 1 + B
1 - B
1 A
2 +B
2 -B
2A
3 +B
3 -B
3A
3channel1channel 2channel
- + -+ -+DC Voltage
- + -+ -+Thermocouple
B B A B B A B B ARTD
+ - - -++DC Current
1) Put your fingers on the left and right (both sides) hooks of the transparent protective cover on the
input terminal block. Pushing them inside, take out the cover to this side.
2) Wire the input lines refer to Fig. 4.3, Fig. 4.4(Page 18) and Fig. 4.5.(Page 19)
3) Put back the transparent protective cover.
+
① mV,V input
+ - AB B
- +
Fig. 4.4 Input Wiring ( mV, V,
―18―
② TC input
+ -B B A
-
TC )
MANUAL CR06

① RTD input ② mA input
+ - B B A
B B A
+ -B B A
Shunt registor
+ -
Fig. 4.5 Input Wiring ( RTD,mA )
CAUTION ① Attach the shunt resistor to the input terminal block of the instrument.
② Input accuracy is effected with the shunt resistor. Use the following recommended resistor.
Resistance:250Ω, Rated power:1/4W, Tolerance:±0.1% max.
Temperature coefficient:±50ppm max.
―19― MANUAL CR06

4.3 DI/Alarm Output Wiring (Option)
WARNING ① Be sure to wire after turning off the POWER.
② When the power source has been connected to the Alarm output, turn off that power source.
③ When a hazardous voltage supplies to alarm terminal:
a) Never touch terminals preventing from electric shock.
b) Attach covers to terminals.
c) Wires should be double shielded.
d) Adopts round pressure terminal connectors with insulation cover for wire, preventing from lose
connection.
CAUTION Precautions for Wiring the DI ① DI input has the built-in drive power source. Do not apply a voltage to a DI input terminal from the
outside.
② A DI input contact capacity should be a withstand voltage of 50V DC, 16mA or more, ON
resistance of 20Ω max.(Wiring resistance included).
③ Do not use unused terminals as relay terminals.
Precautions for Wiring the Alarm Output ① An alarm output contact capacity is as follows:
250VAC : 3A at maximum (Resistive load)
30VDC : 3A at maximum (Resistive load)
125VDC : 0.5A at maximum (Resistive load)
0.1A at maximum L/R= 7ms at maximum (Inductive load)
② Attach an anti-surge protective circuit (surge absorbers, etc.) to an output terminal, as required.
③ Attach a round press-fitting terminal with insulated sleeve (for M3.5) to the end of an electric wire.
④ Keep alarm output wiring away from input wiring.
⑤ Do not use unused terminals as relay terminals.
4.3.1 DI/Alarm Output Wiring Example
Fig. 4.6 DI Wiring Example Fig. 4.7 Alarm Output Wiring Example
Terminal Block+12V
Recorder Side COM
Load
1A~6A
Terminal Block
Recorder Side
DI1~3
DI.COM
1C~6C
―20― MANUAL CR06
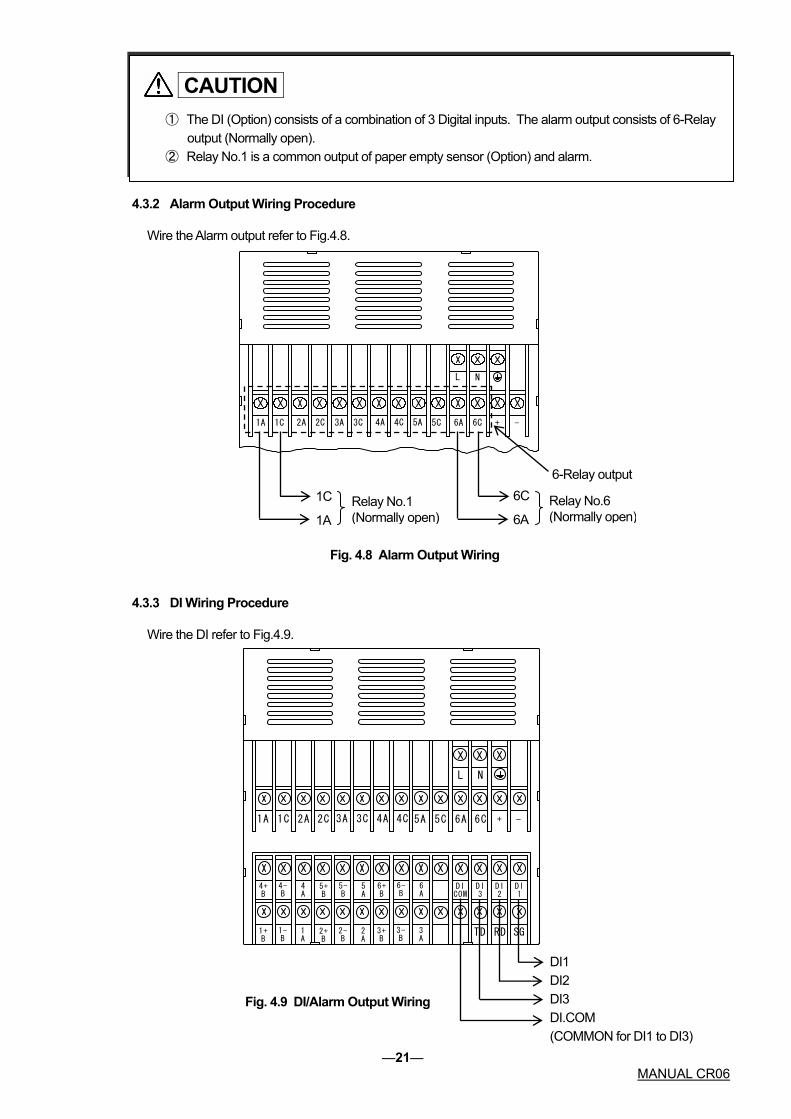
4.3.2 Alarm Output Wiring Procedure
Wire the Alarm output refer to Fig.4.8.
Fig. 4.8 Alarm Output Wiring
4.3.3 DI Wiring Procedure
Wire the DI refer to Fig.4.9.
Fig. 4.9 DI/Alarm Output Wiring
6-Relay output 1C
1A Relay No.1 (Normally open)
6C
6A Relay No.6 (Normally open)
L N
1A 1C 2A 2C 3A 3C 4A 4C 5A 5C 6A 6C + -
DI1 DI2 DI3 DI.COM (COMMON for DI1 to DI3)
L N
1A 2C2A1C 3A 4C4A3C 5A 6C6A5C
4+B
4-B
4A
5+B
5-B
5A
6+B
6-B
6A
1+B
1-B
1A
2+B
2-B
2A
3+B
3-B
3A
SGRDTD
DICOM
DI3
DI2
DI1
+ -
CAUTION ① The DI (Option) consists of a combination of 3 Digital inputs. The alarm output consists of 6-Relay
output (Normally open). ② Relay No.1 is a common output of paper empty sensor (Option) and alarm.
―21― MANUAL CR06
1A 2C2A1C 3A 4C4A3C 5A 6C6A5C
4+B
4-B
4A
5+B
5-B
5A
6+B
6-B
6A
1+B
1-B
1A
2+B
2-B
2A
3+B
3-B
3A
SGRDTD
DICOM
DI3
DI2
DI1
+ -
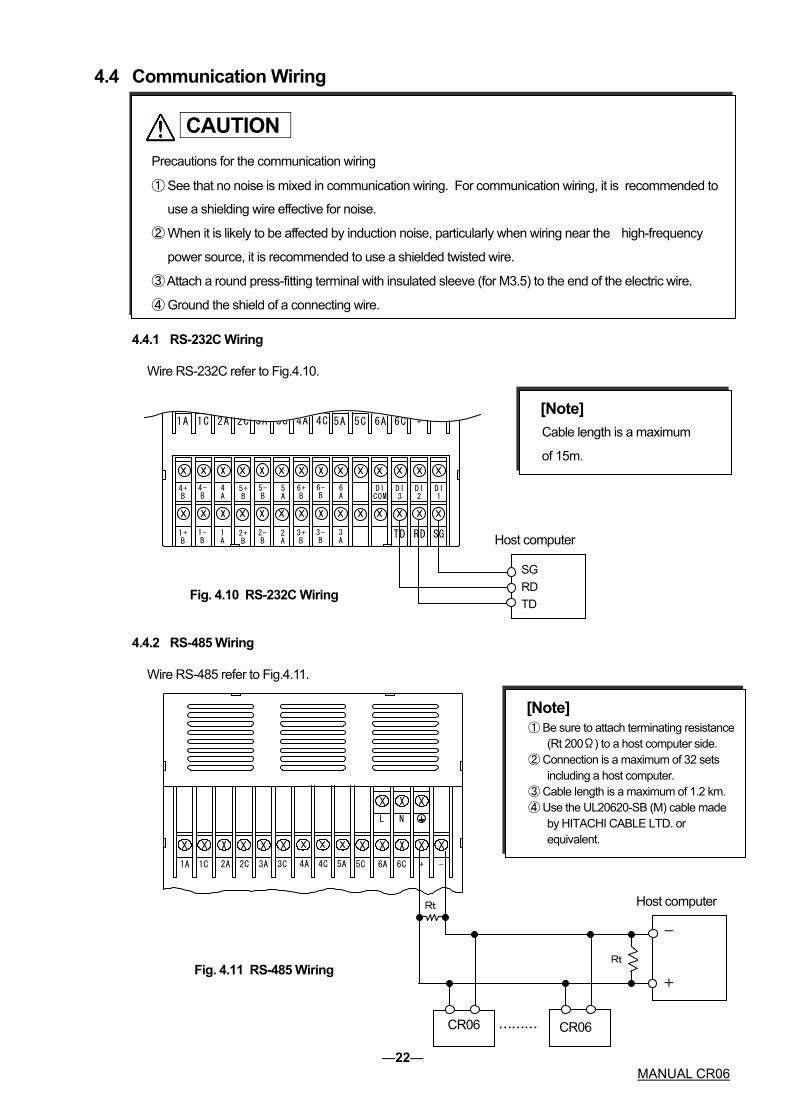
4.4 Communication Wiring
CAUTION Precautions for the communication wiring
① See that no noise is mixed in communication wiring. For communication wiring, it is recommended to
use a shielding wire effective for noise.
② When it is likely to be affected by induction noise, particularly when wiring near the high-frequency
power source, it is recommended to use a shielded twisted wire.
③ Attach a round press-fitting terminal with insulated sleeve (for M3.5) to the end of the electric wire.
④ Ground the shield of a connecting wire.
4.4.1 RS-232C Wiring
Wire RS-232C refer to Fig.4.10.
[Note] Cable length is a maximum
of 15m.
Host computer
SG RD TD
Fig. 4.10 RS-232C Wiring
L N
1A 1C 2A 2C 3A 3C 4A 4C 5A 5C 6A 6C + -
4.4.2 RS-485 Wiring
Wire RS-485 refer to Fig.4.11.
[Note] ① Be sure to attach terminating resistance
(Rt 200Ω) to a host computer side. ② Connection is a maximum of 32 sets
including a host computer. ③ Cable length is a maximum of 1.2 km. ④ Use the UL20620-SB (M) cable made
by HITACHI CABLE LTD. or equivalent.
Host computer
―22― MANUAL CR06
- +
CR06 ……… CR06
Rt
Rt Fig. 4.11 RS-485 Wiring
5. PREPARATIONS FOR OPERATION
5.1 Setting the Chart Paper
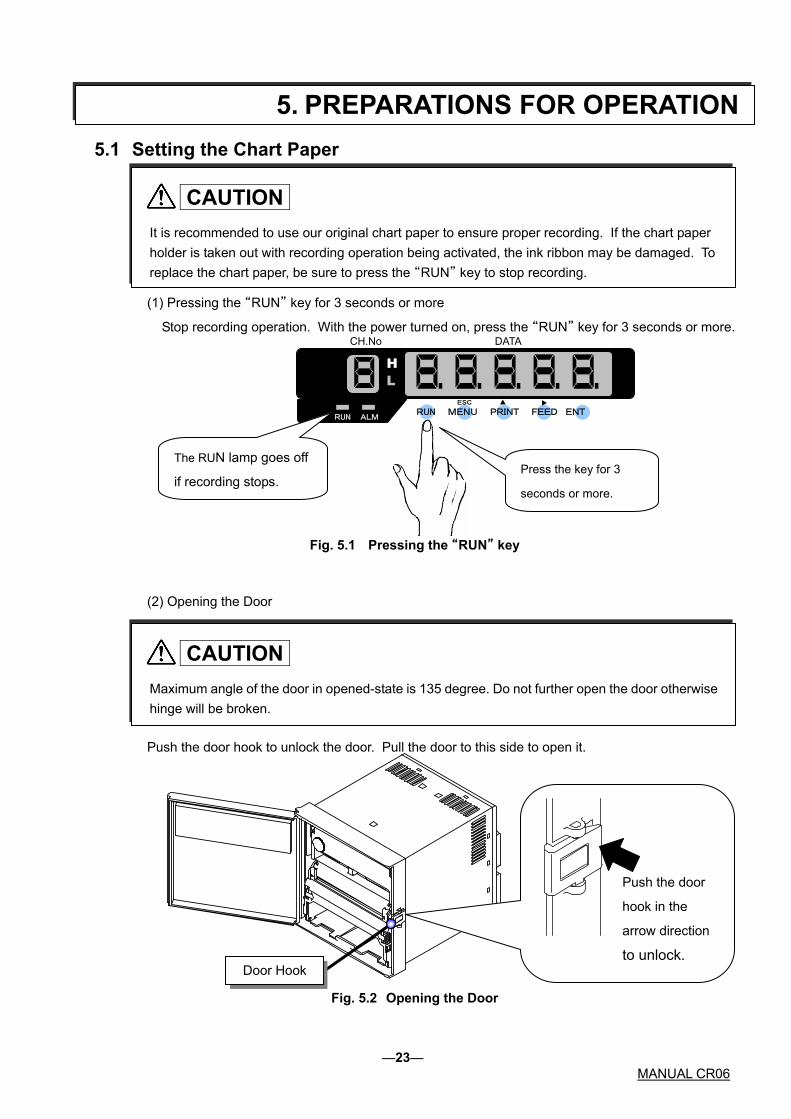
(1) Pressing the “RUN” key for 3 seconds or more
Stop recording operation. With the power turned on, press the “RUN” key for 3 seconds or more.
CAUTION It is recommended to use our original chart paper to ensure proper recording. If the chart paper holder is taken out with recording operation being activated, the ink ribbon may be damaged. To replace the chart paper, be sure to press the “RUN” key to stop recording.
Fig. 5.1 Pressing the “RUN” key
(2) Opening the Door
Push the door hook to unlock the door. Pull the door to this side to open it.
Door Hook
Push the door
hook in the
arrow direction
to unlock.
CAUTION Maximum angle of the door in opened-state is 135 degree. Do not further open the door otherwise hinge will be broken.
Press the key for 3
seconds or more.
RUN ALM
H L
ESC ▲
▲
RUN MENU PRINT FEED ENT
The RUN lamp goes off
if recording stops.
CH.No DATA
Fig. 5.2 Opening the Door
―23― MANUAL CR06

(3) Taking out the Chart Holder
Put your fingers onto the levers at both sides of the chart holder and pull it out to this side.
Pull out the chart holder to this side.
Lever
Fig. 5.3 Taking out the Chart Holder
(4) Opening the Chart Cover and Chart Guide
Open the chart guide and the chart cover outwardly.
Open in the arrow
direction.
Open in the arrow
direction.
Chart Cover (Black)
Chart Guide (Transparent)
Fig. 5.4 Opening the Chart Cover and Chart Guide
―24― MANUAL CR06

(5) Loosening the chart paper
The chart paper may not be proper fed, if it is stuck at perforations. Be sure to loosen the paper.
Fig. 5.5 Loosening the Chart Paper
(6) Setting the Chart Paper into the Storage Chamber
Unfold the chart paper by two plies. Holding the printing surface upward, set it in the storage
chamber.
Rectangular Holes to Right Square Holes to Left
Storage Chamber
Sprocket Drum
Fig. 5.6 Setting the Chart Paper
―25― MANUAL CR06

(7) Aligning the Chart Paper with the Sprocket Drum
Align the holes in the chart paper with the sprocket drum teeth. Set the chart paper along the
sprocket drum. Put the first ply of the chart paper into the chart receiver.
Storage Chamber Chart Receiver
Chart Paper
Chart Paper
Make the left and right holes
parallel with each other.
Fig. 5.7 Aligning the Chart Paper with Sprocket Drum (Chart Holder Sectional View)
(8) Closing the Chart Cover and Chart Guide
Close the chart cover and the chart guide in the arrow directions.
Chart Cover
Chart Guide
Sprocket Drum Teeth
Align the holes in the
paper properly with the
sprocket drum teeth.
Fig. 5.8 Closing the Chart Cover and Chart Guide
―26― MANUAL CR06

(9) Turning the Sprocket Drum Gear
Check paper feed with your hand. Turn the sprocket drum gear to feed out the chart paper.
(It is recommended to feed the chart paper by 4 plies.)
Turn the gear at the left end
of the sprocket drum in the
arrow direction.
Fig. 5.9 Checking Paper Feed
(10) Putting Back the Chart Paper Holder
Push in the chart holder horizontally into the case until it is locked.
Chart Receiver
When putting it back, push the paper receiver.
Chart guide
Fig. 5.10 Putting Back the Chart Holder
―27― MANUAL CR06

(11) Close the Door
Close the door and check a door lock.
(12) Pressing the “FEED” key to Check Paper Feed
Press the “FEED” key on the display keyboard to feed the chart paper.
RUN ALM
The chart paper is fed
while pressing the key.
Releasing the key stops
paper feed. The paper is
initially fed slowly when
the key is pressed.
ESC ▲
▲
RUN MENU PRINT FEED ENT
CH.No DATA
H L
Prior to operating the apparatus, be sure to confirm that the chart paper is being fed!!
Fig. 5.11 Pressing the “FEED” key
(13) Pressing the “RUN” Key to Restart Operation
―28― MANUAL CR06

5.2 Setting the Ribbon Cassette
(1) Pressing the “RUN” key for 3 seconds or more
Stop recording. With the power turned on, press the “RUN” key for 3 seconds or more.
Once recording stops, the RUN lamp goes off.(See Fig. 5.1 on page 23)
(2) Opening the Door
Push the door hook to unlock the door. Pull the door to this side to open it.
(See Fig.5.2 on page 23)
(3) Taking out the Ribbon Cassette
Grab the left side of the ribbon cassette. Holding down the ribbon holder, take out the ribbon
cassette to the front.
CAUTION If the chart holder is taken out with recording operation being activated, the ink ribbon may be damaged. To replace the ribbon cassette, be sure to press the “RUN” key to stop recording. If the ribbon cassette is not set properly, the recording color may change or the ribbon may be damaged.
CAUTION Maximum angle of the door in opened-state is 135 degree. Do not further open the door otherwise hinge will be broken.
Ribbon Cassette
Ribbon Holder
Ribbon Cassette
Fig. 5.12 Taking Out the Ribbon Cassette
―29― MANUAL CR06
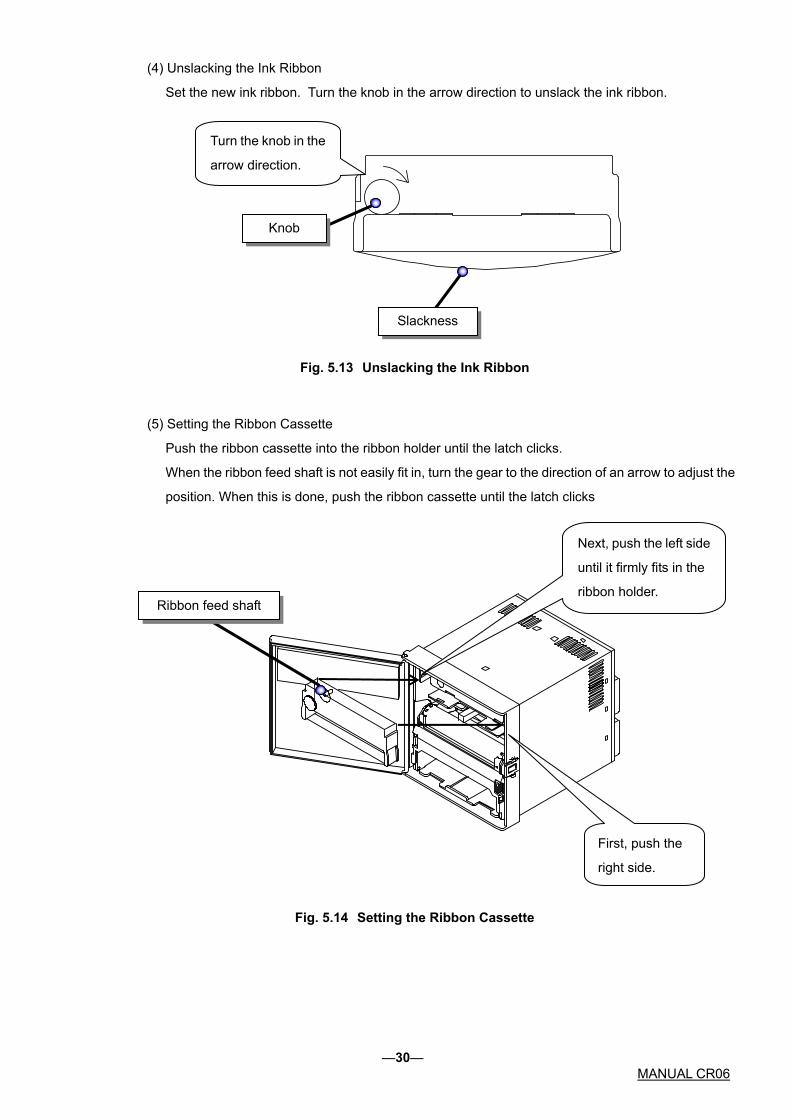
(4) Unslacking the Ink Ribbon
Set the new ink ribbon. Turn the knob in the arrow direction to unslack the ink ribbon.
Slackness
Knob
Turn the knob in the
arrow direction.
Fig. 5.13 Unslacking the Ink Ribbon
(5) Setting the Ribbon Cassette
Push the ribbon cassette into the ribbon holder until the latch clicks.
When the ribbon feed shaft is not easily fit in, turn the gear to the direction of an arrow to adjust the
position. When this is done, push the ribbon cassette until the latch clicks
Next, push the left side
until it firmly fits in the
ribbon holder.
First, push the
right side.
Ribbon feed shaft
Fig. 5.14 Setting the Ribbon Cassette
―30― MANUAL CR06
6. OPERATION
6.1 Operation
Once the power is turned on, the display on the front of the door is illuminated. The instrument will be
ready to run (user mode) in about 5 seconds, including the initial screen. If the RUN lamp is
unilluminated, press the “RUN” key to start recording operation.
WARNING Prior to turning on the power, make sure that the supply voltage meets the specifications for the instrument and the instrument is properly grounded.
CAUTION Prior to turning on the power, make sure that the chart paper is set in the chart holder.
If the printer is activated with no chart paper set, the sprocket drum (cylindrical part) of the chart holder may be damaged.
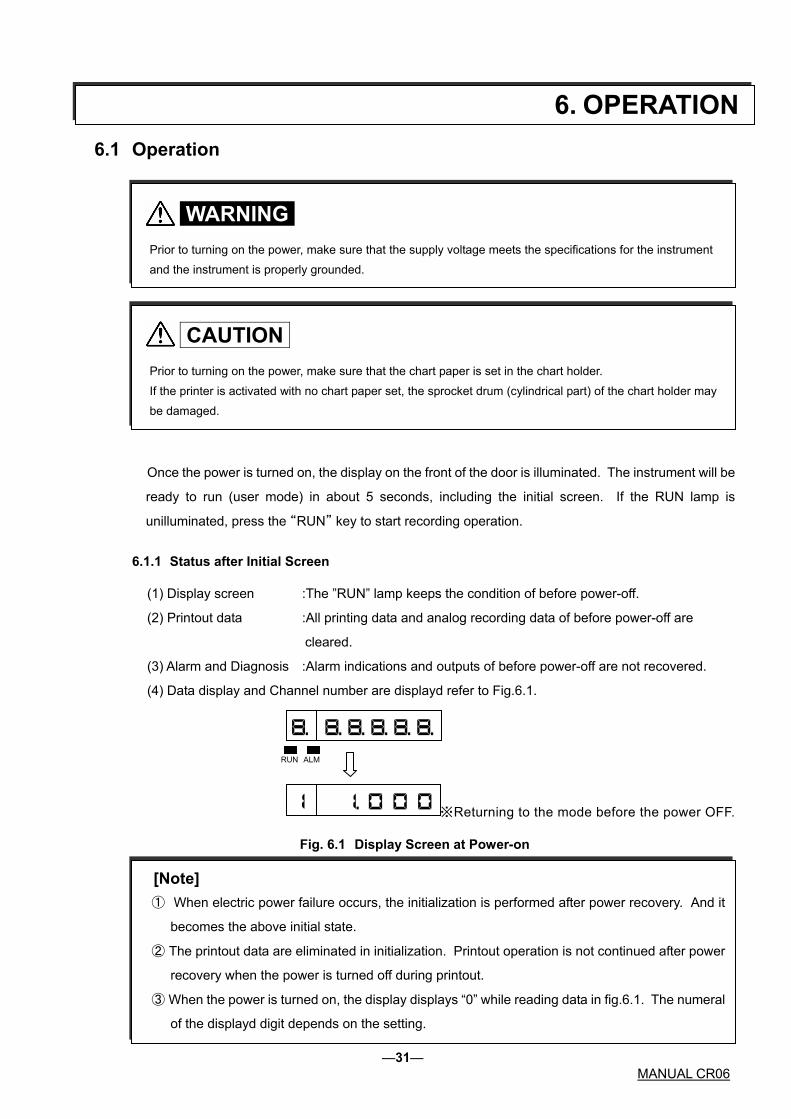
6.1.1 Status after Initial Screen
(1) Display screen :The ”RUN” lamp keeps the condition of before power-off.
(2) Printout data :All printing data and analog recording data of before power-off are
cleared.
(3) Alarm and Diagnosis :Alarm indications and outputs of before power-off are not recovered.
(4) Data display and Channel number are displayd refer to Fig.6.1.
※Returning to the mode before the power OFF.
RUN ALM
Fig. 6.1 Display Screen at Power-on
[Note] ① When electric power failure occurs, the initialization is performed after power recovery. And it
becomes the above initial state.
② The printout data are eliminated in initialization. Printout operation is not continued after power
recovery when the power is turned off during printout.
③ When the power is turned on, the display displays “0” while reading data in fig.6.1. The numeral
of the displayd digit depends on the setting.
―31― MANUAL CR06

6.2 Recording
6.2.1 Recording Colors
Table 6.1 lists the recording colors for each channel in analog recording.
You can select a recording color from 6 colors for every channel.
Table 6.1 Recording Colors(standard)
Channel No. Color 1 Purple 2 Red 3 Green 4 Blue 5 Brown 6 Black
6.3 How to Record
6.3.1 Starting/Stopping Recording Operation
To start/stop recording, press the “RUN” key.
To stop, hold down the “RUN” key for 3 seconds or more.
“RUN” lamp is unilluminated when step recording.
“RUN” lamp is unilluminated when stop recording.
CAUTION ① The instrument checks zero point for every recording. If the printer block is manually moved
during recording, a recording position may be dislocated.
② In order to protect the chart paper, dot printing is not performed when the distance between the
previous dot printing position and the next one for an identical channel is less than 0.4 ㎜ in the
chart paper feed direction or less than 0.5 ㎜ in the scale direction.
[Note] ① When the power is turned on, the previous state where you turned off is continued.
② When controlling a start/stop of recording through Digital Input (DI, option), you cannot switch
start/stop with the “RUN” key.
6.3.2 Feed the Chart Paper
The chart paper is fed while the “FEED” key is pressed, and stops when released.
―32― MANUAL CR06

6.3.3 Print Sample
Logging on print example and Alarm on print example
Fig. 6.2 Print Sample
May.10.06 20:00End▲ 2L2 19:37 ▼ 1H1 19:35 ▲ 1H1 19:33 ▼ 2L2 19:32 5.000 V ▲ 2L2 19:28 ▼ 1H1 19:27
May.10.06 19:00Start ▲ 1H1*18:25 ▼ 2L2 18:24
May.10.06 19:30 1:1.532V 2:2.105V 3:1.856V 4:3.790V 0.000 3CH 100 ㎜/h
Record end print
Alarm Print: Prints alarm occurrence/recovery, channel number, alarm type, and level. ▲ denotes alarm occurrence (in red) and ▼ denotes alarm recovery (in purple), respectively.
Date/Time
Chart speed
Scale
Logging Print: Prints date, channel number, process variable engineering unit and chart speed. The scale is printed sequentially from 1 channel in printing color.
Chart speed
Record start printSee [Reference] below
Process variable: Prints "*****" if skipped.
[Reference] Alarm print, Comment print,Date-and-Time print and Record Start/End print becomes waited-state if the other
printing is actuated.
CR06 stores up to six items of Alarm Occurrence/Recovery print and five items of Comment/Date-and-
Time/Record Start/Record end print. If printing commands are over, CR06 prints a marking "*" on the end of
the last printing. This mark is meaning of that over items would not be printed. For priority of respective printing, see next page; Priority in Reference.
[Note] Logging print will not be the wait printing state. At the start time of Logging print, if the prior Logging print is printing, the next one cannot print. Prolong the printing interval of Logging print in this case.
―33― MANUAL CR06

6.4 Digital Print The following digital prints operate by the key operation:
Manual print List print
Engineering list print Record Start/End print
The following digital prints operate by the DI input:
DI Manual print DI Date/Time print
DI Comment print
6.4.1 Manual Print
Print the following data on the chart paper:
Time/date (year, month, day)
Channel number or activated alarm type, latest process variable, engineering unit (all channels)
(1) Manual print operating procedure
① Press the “PRINT” key.
② Use the “PRINT” key to display “”, and press the “ENT” key.
③ Use the “PRINT” key to select “”. Pressing the “ENT” key executes manual print.
Once manual print starts, the display is automatically returned to the Data Display screen.
Upon termination of manual print, it is returned to it was prior to starting manual print.
[Reference] Printing is actuated in following priority. See following Priority Order. When multiple types of printing are activated
simultaneously, higher-priority printing takes effect first according as following order. In alarm printing activation,
lower category (Logging, DI Manual) also is activated. (See Fig. 6.2 that is example : Same time printing of Alarm
and Logging print).
The Synchronous printout synchronizes with the analog record and does a digital printout. In case of the
asynchronous printout, it stops an analog record and it executes a digital printout. It resumes an analog record after the digital printout completes.
High Priority Low
List print Manual print Engineering list print
Logging print (Sync.) DI Manual Print (Sync.)
Alarm Occurrence Print Alarm Recovery Print
DI Comment Print (Sync.) DI Date and Time Print (Sync.) Record Start/End Print (Sync.)
DI Manual print (Async.) Logging print (Async.)
DI Comment print (Async.) DI Date and Time print (Async.) Record Start/End Print (Async.)
[Note] ① Analog recording is interrupted while manual print is running. However, measurement/alarm
detection remains effective.
② If an alarm is activated while manual print is running, alarm print will be performed when
recording restarts.
―34― MANUAL CR06
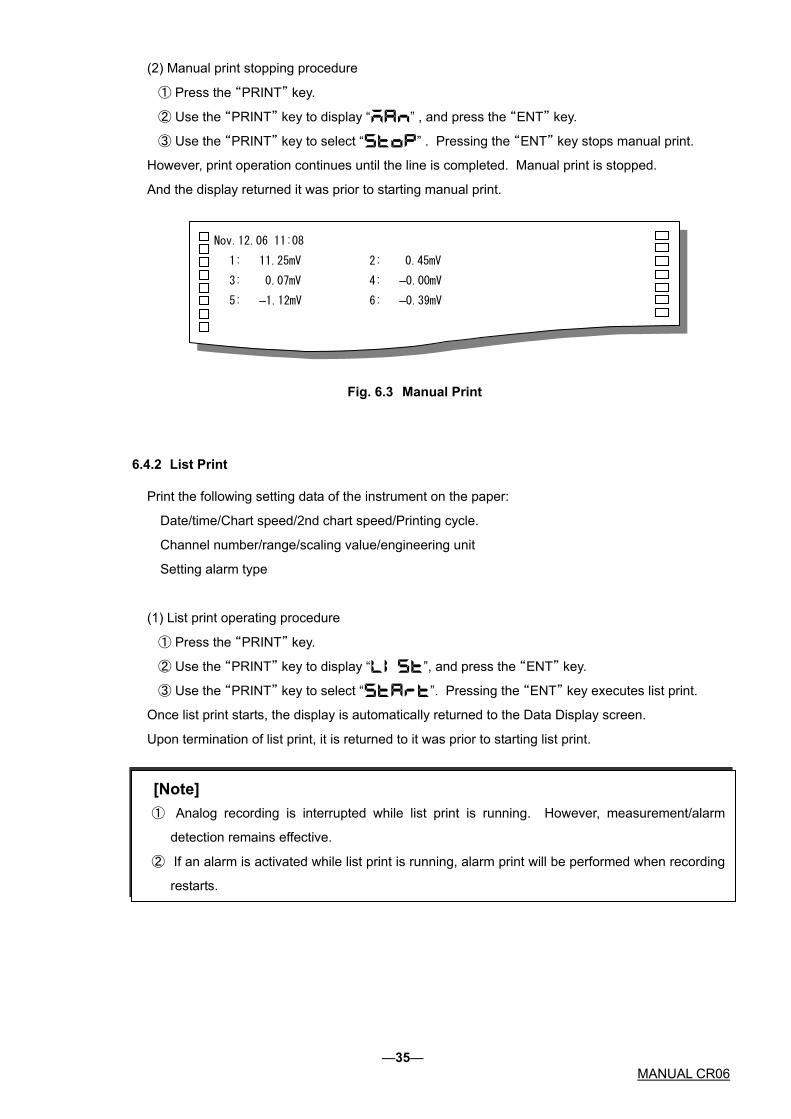
(2) Manual print stopping procedure
① Press the “PRINT” key.
② Use the “PRINT” key to display “” , and press the “ENT” key.
③ Use the “PRINT” key to select “” . Pressing the “ENT” key stops manual print.
However, print operation continues until the line is completed. Manual print is stopped.
And the display returned it was prior to starting manual print.
Nov.12.06 11:08 1: 11.25mV 2: 0.45mV
3: 0.07mV 4: –0.00mV
5: –1.12mV 6: –0.39mV
Fig. 6.3 Manual Print
6.4.2 List Print
Print the following setting data of the instrument on the paper:
Date/time/Chart speed/2nd chart speed/Printing cycle.
Channel number/range/scaling value/engineering unit
Setting alarm type
(1) List print operating procedure
① Press the “PRINT” key.
② Use the “PRINT” key to display “”, and press the “ENT” key.
③ Use the “PRINT” key to select “”. Pressing the “ENT” key executes list print.
Once list print starts, the display is automatically returned to the Data Display screen.
Upon termination of list print, it is returned to it was prior to starting list print.
[Note] ① Analog recording is interrupted while list print is running. However, measurement/alarm
detection remains effective.
② If an alarm is activated while list print is running, alarm print will be performed when recording
restarts.
―35― MANUAL CR06

(2) List print stopping procedure
① Press the “PRINT” key.
② Use the “PRINT” key to display “”, and press the “ENT” key.
③ Use the “PRINT” key to select “” . Pressing the “ENT” key stops list print.
However, print operation continues until the line is completed. List print is stopped.
And the display returned to it was prior to starting list print.
Fig. 6.4 List Print
CH RANGE LEFT END SCALE LEFT 2 10V -10.000V
Dec.01.05 06:00
CHART SPEED (1)50mm/h (2)100mm/h
TAG NO. RIGHT END SCALE RIGHT 1 10V -10.000V 10.000
ABCD 10.000 3 10V -10.000V 10.000 4 10V -10.000V 10.000 5 TYPE K -200.00℃ 100.00 *6 10V -10.000V 10.000
CH ALARM1 RLY ALARM2 RLY ALARM3 RLY ALARM4 RLY UNIT 1 H 8.000 L -5.000 V
CH DIGITAL ZONE(mm) PARTIAL 1 ON 0-100 2 OFF 0- 50 80% 0.000V 3 OFF 0-100 4 OFF 0-100 5 0N 50-100 6 OFF 0-100
COMMENT 1 = OPEN 2 = 3 =
Chart Speed Set value. 2nd Chart Speed (2) is effective for DI function.
Date and Time for List Print
Print alarm set values and relays.
Set values of the comment print. Effective with the DI option.
Prints Input range, Tag, Measurement range, and Scaling value for each channel. If skipped, the channel number is prefixed by "*".
Digital print ON/OFF, zone record, and partial compression/expansion set value for each channel.
―36― MANUAL CR06
6.4.3 Engineering List Print
Engineering list print provides the following setting data of the instrument on the chart paper.
Analog recording
Digital printing
Burnout/RJC etc.
(1) Engineering list print operating procedure
① Press the “MENU” key.
② Use the “PRINT” key to display “”, and press the “ENT” key.
③ Use the “PRINT” key to select “”. Pressing the “ENT” key executes engineering
list print.
Once engineering list print starts, the display is automatically returned to the Data Display screen.
Upon termination of engineering list print, it is returned to it was prior to starting engineering list print.
[Note] ① Analog recording is interrupted while engineering list print is running.
However, measurement/alarm detection remains effective.
② If an alarm is activated while engineering list print is running, alarm print will be performed when
recording restarts.
―37― MANUAL CR06
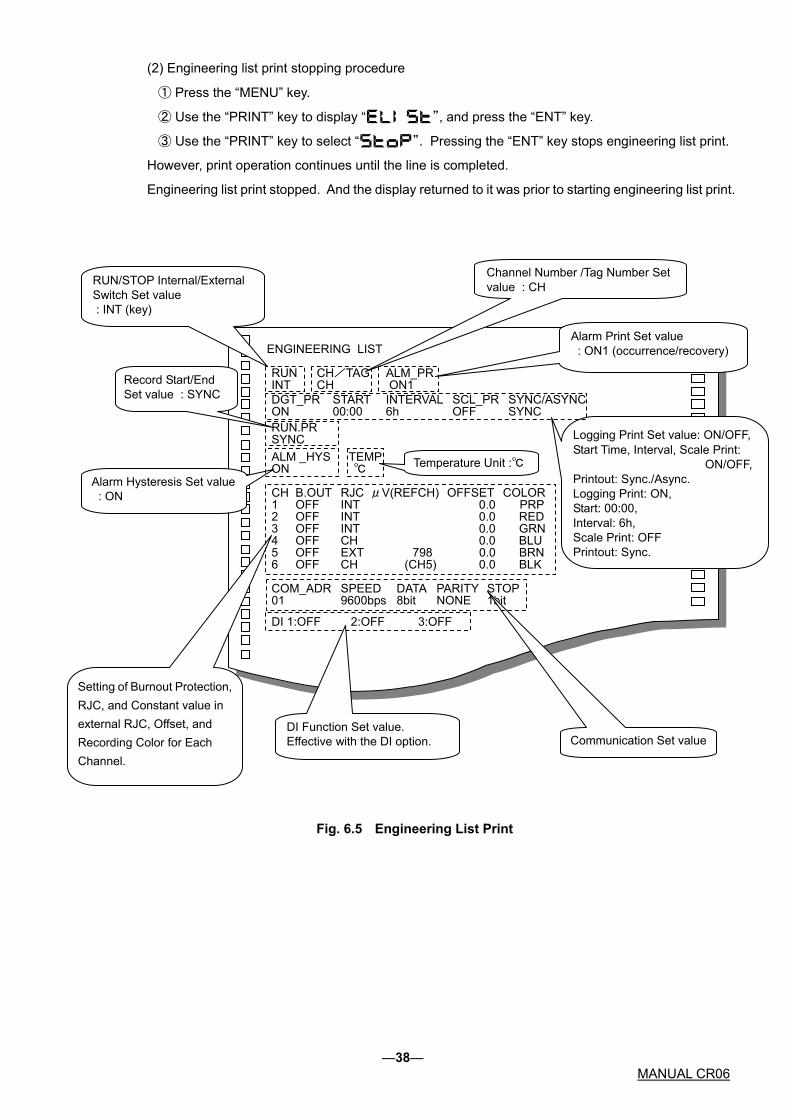
(2) Engineering list print stopping procedure
① Press the “MENU” key.
② Use the “PRINT” key to display “ ” , and press the “ENT” key.
③ Use the “PRINT” key to select “ ” . Pressing the “ENT” key stops engineering list print.
However, print operation continues until the line is completed.
Engineering list print stopped. And the display returned to it was prior to starting engineering list print.
ENGINEERING LIST RUN CH/TAG ALM_PR INT CH ON1 DGT_PR START INTERVAL SCL_PR SYNC/ASYNC SYNC
ON 00:00 6h OFF SYNC RUN.PR ALM _HYS TEMP ON ℃ CH B.OUT RJC μV(REFCH) OFFSET COLOR 1 OFF INT 0.0 PRP 2 OFF INT 0.0 RED 3 OFF INT 0.0 GRN 4 OFF CH 0.0 BLU 5 OFF EXT 798 0.0 BRN 6 OFF CH (CH5) 0.0 BLK COM_ADR SPEED DATA PARITY STOP 01 9600bps 8bit NONE 1bit DI 1:OFF 2:OFF 3:OFF
Alarm Print Set value : ON1 (occurrence/recovery)
Logging Print Set value: ON/OFF, Start Time, Interval, Scale Print: ON/OFF, Printout: Sync./Async. Logging Print: ON, Start: 00:00, Interval: 6h, Scale Print: OFF Printout: Sync.
Channel Number /Tag Number Set value : CH
Alarm Hysteresis Set value : ON
Setting of Burnout Protection, RJC, and Constant value in external RJC, Offset, and Recording Color for Each Channel.
Communication Set value
Record Start/End Set value : SYNC
Temperature Unit :℃
DI Function Set value. Effective with the DI option.
RUN/STOP Internal/External Switch Set value : INT (key)
Fig. 6.5 Engineering List Print
―38― MANUAL CR06
6.4.4 Record Start/End Print
Record Start/End print the beginning (or ending) time on the chart paper when beginning (or ending)
to record. Record Start/End operation is set in the engineering mode. (Refer to 7.2.6 "Record
Start/End print" )
"" ·············Record start print is synchronous print.
Record end print is asynchronous print.
"" ·········Record Start/End print is asynchronous print.
""················· Record Start/End print is not done.
(1) Record start print
When the record begins, the recorder prints the start time.
(2) Record end print
When the record is ended, the recorder prints the end time.
[Note] When the record operation is not a key but DI, the print is done by the operation by DI.
6.4.5 DI Manual Print (option)
DI manual print prints measurements and time on paper by turning on DI.
The content of the print is the same as 6.4.1 "Manual Print".
(1)"DI function" of the engineering mode is set.
Please refer to 7.2.9 "DI function" for details.
"" ·········Manual print is synchronous print.
"" ·········Manual print is asynchronous print.
(2)DI is operated.
DI manual print is printed by turning on DI.
6.4.6 DI Date/Time Print (option)
DI Date/Time print prints date and time on paper by turning on DI.
(1)"DI function" of the engineering mode is set.
Please refer to 7.2.9 "DI function" for details.
"" ·········Date/Time print is synchronous print.
"" ·········Date/Time print is asynchronous print.
(2)DI is operated.
DI manual print is printed by turning on DI.
―39― MANUAL CR06

6.4.7 DI Comment Print (option)
DI Comment print prints time and comment on paper by turning on DI.
The content of comment is set to the setup mode.
(1)"DI function" of the engineering mode is set.
Please refer to 7.2.9 "DI function" for details.
"","","" ···············Date/Time print is synchronous print.
"","","" ···············Date/Time print is asynchronous print.
(2)DI is operated.
DI manual print is printed by turning on DI.
May.10.06 20:30
20:10 No.01 OPEN
Comment Print
Fig. 6.6 Date/Time print, Comment print
Date/Time Print
―40― MANUAL CR06

6.5 Changing the Display
Display selection procedure
① Press the “MENU” key to display "", and press the “ENT” key.
② Use the “PRINT” key to select a required display screen from the menu below.
Press the “ENT” key.
③ " □ " is displayd in case of manual display. Use the “PRINT” key to select the channel number.
Press the “ENT” key.
“”(AUTO) :Auto display
“”(MAN) :Manual display
“”(DATE) :Date display
“”(TIME) :Time display
“”(OFF) :Display off
6.5.1 <Auto Display>
Displays the process variable of each channel sequentially at intervals of 2.5 seconds.
6.5.2 <Manual Display>
Displays the process variable of specific channel, it updates every measurement cycle.
The data is the same as Auto display. Pressing the “ENT” key changes the displayd channel number
(it increments).
6.5.3 <Date Display>
Displays the month and day. Leap year adjustment is automatic.
Example of October 18
6.5.4 <Time Display>
Displays hour and minute.
Example of 12:15
Process Variable (5-digt)
Channel Number (1-digit) H
H : Upper-limit Alarm L : Lower-limit Alarm
Month Day
6.5.5 <Display Off>
Turns off the process variable display. Key operation is the same as usual. To switch to other display,
take steps ① through ③ mentioned above.
Hour Minute
―41― MANUAL CR06

7. DEVICE SETTING
7.1 Setting the Setup Mode
Key Operation for Entering the Setup Mode
Press the “MENU” key for 3 seconds or more to enter the setup mode.
At the time, displays the version of the software approximately 1 seconds as below. After, displays the
setting screen of the range.
To return from the setup mode to the recording mode (user mode), press the “MENU” key for 3
seconds or more again.
The following describes how to set the following items.
The following shows a display map of the setup mode. Use the △key to operate.
7.1.1 Setting the Range
Channel Mode Setting
・ ・ ・ ・
Current/ Voltage Input Thermocouple Input Resistance temperature detector Input Scaling Square Root Decade Difference Sum Average Skip
Option 7.1.2 Setting the Alarm
Setting Channel Level ON/OFF Type Setting value Relay ON/OFF Relay No.
・ ・ ・ ・ ・
・ ・ ・ ・ ・
―42― MANUAL CR06

7.1.3 Setting the Unit
Setting Channel Char. No. Code No.
(゜)
()
End
・ ・ ・ ・
7.1.4 Setting the Chart Speed
1st/2nd Chart speed Chart speed Setting
7.1.5 Setting the Date and Time
Setting Year Month, Day Time
7.1.6 Copying the Setting Data
Copy-from Channel Copy-to ChannelSetting
・ ・ ・
・・ ・
7.1.7 Setting Other Functions (Printing Cycle, Zone Recording, Partial Compression/Expansion,
Digital Print, Tag, Comment Words)
Setting Mode
Printing Cycle Zone Recording Partial Compression/Expansion Digital Print Tag Comment Words
Shift to the engineering mode
Password Setting
Input the password to go to the engineering mode. See the key operation in page 69.
―43― MANUAL CR06

Table 7.1 Initial setting value of the setup mode
Setting items Initial set Remarks
★Range (all channels) ±10mV Scaling 0~100.0 (℃)
★Alarm (all channels) All levels are alarm OFF, relay OFF
★Engineering unit (all channels) ℃(BF 43 00)
★Chart speed (1) 20mm/h (2) 20mm/h
★Time 2000/01/01, 00:00
Sets up the present time. (Japan standard time) GMT+09:00
★Dot point interval 10 (s)
★Zone setting (all channels) 0~100 (%)
★Partial compression/expansion (all channels) OFF
★ Digital print (all channels) ON
★Tag print character (all channels) “Blank until the 7th character”
★Comment print word (1~3) “Blank until the 16th character”
―44― MANUAL CR06
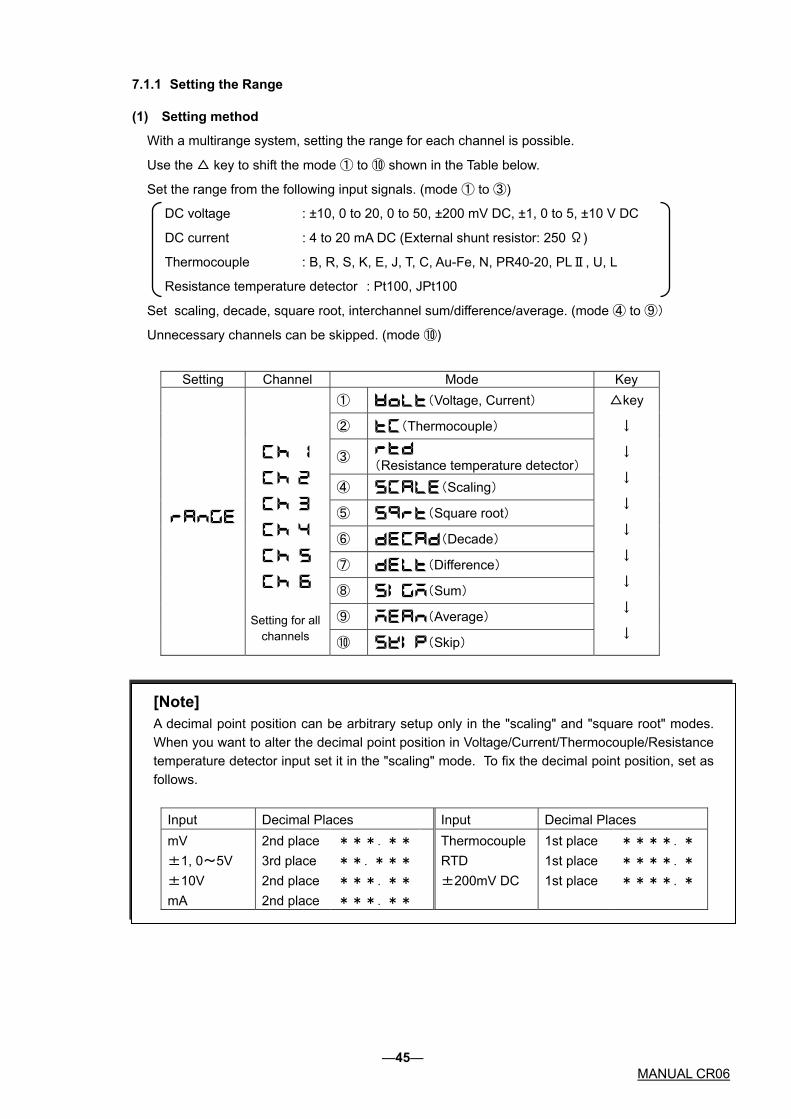
7.1.1 Setting the Range
(1) Setting method
With a multirange system, setting the range for each channel is possible.
Use the △ key to shift the mode ① to ⑩ shown in the Table below.
Set the range from the following input signals. (mode ① to ③)
DC voltage : ±10, 0 to 20, 0 to 50, ±200 mV DC, ±1, 0 to 5, ±10 V DC
DC current : 4 to 20 mA DC (External shunt resistor: 250 Ω)
Thermocouple : B, R, S, K, E, J, T, C, Au-Fe, N, PR40-20, PLⅡ, U, L
Resistance temperature detector : Pt100, JPt100
Set scaling, decade, square root, interchannel sum/difference/average. (mode ④ to ⑨)
Unnecessary channels can be skipped. (mode ⑩)
Setting Channel Mode Key
① (Voltage, Current)
② (Thermocouple)
③ (Resistance temperature detector)
④ (Scaling)
⑤ (Square root)
⑥ (Decade)
⑦ (Difference)
⑧ (Sum)
⑨ (Average)
⑩ (Skip)
△key
↓
↓
↓
↓
↓
↓
↓
↓
↓ Setting for all
channels
[Note] A decimal point position can be arbitrary setup only in the "scaling" and "square root" modes. When you want to alter the decimal point position in Voltage/Current/Thermocouple/Resistance temperature detector input set it in the "scaling" mode. To fix the decimal point position, set as follows.
Input Decimal Places Input Decimal Places mV ±1, 0~5V ±10V mA
2nd place 3rd place 2nd place 2nd place
***.**
**.***
***.**
***.**
ThermocoupleRTD ±200mV DC
1st place 1st place 1st place
****.* ****.* ****.*
―45― MANUAL CR06

(2) (Current/Voltage), (Thermocouple), (Resistance Temperature Detector)
Measurs Current, Voltage, Thermocouple and RTD.
Example) When setting Thermocouple T for Channel 1(T :-100 to 300 ℃)
Display Operation keys Description
ESC
MENU Hold down the “MENU” key for 3 seconds or more
to enter the setup mode. Displays "",
then, press the “ENT” key.
3sec ENT
PRINT Use the△ key to select the channel you want to set.
Press the “ENT” key.
ENT
PRINT ENT Use the △ key to select the mode. Press the
“ENT” key.
PRINT Use the △ key to select the type. Press the “ENT”
key.
ENT
PRINT FEED Use the △ key to select a sign and numeral.
Use the key to shift a digit. Press the “ENT” key. ENT (Zero setting)
PRINT FEED Use the △ key to select a sign and numeral.
Use the key to shift a digit. Press the “ENT” key. ENT (Span setting)
ENT Press the “ENT” key. Setting is completed. To return to the user mode, hold down the “MENU”
key for 3 seconds or more.
[Note] ① An entry of an incorrect numeral displays an error, or .
Press the “ENT” key and re-enter a correct numeral.
② For the range setting (When especially, don't change a decimal point position at the
thermocouple or in RTD) which doesn't have the necessity of the scaling, don't set a scaling.
―46― MANUAL CR06

「」
B R S K E J T C Au-Fe N PR40-20 PLⅡ U L
Pt100 JPt100
[Note] In the , , or mode, press the “ENT” key to select the range.
Use the △ key, you can select the type out of the range.
“ENT” key
Range
±10mV 0~20mV 0~50mV ±200mV ±1V 0~5V ±10V 4~20mA
Mode
―47― MANUAL CR06

(3) (Scaling)
Changes the input of VOLT, TC and RTD into a quantity.
Setting the unit is possible.(See 7.1.3 on page 58)
Example) When setting the voltage of 0 to 40 mV and scale of 000.00 to 100.00 for Channel 1.
Operation keys Description
Display
ESC
MENU Hold down the “MENU” key for 3 seconds or more
to enter the setup mode. Use the △ key to display
3sec PRINT ENT
"". Press the “ENT” key.
PRINT ENT Use the △ key to select the channel you want to set.
Press the “ENT” key.
PRINT ENT Use the △ key to select "".
Press the “ENT” key.
PRINT ENT Use the △ key to select "". Press the “ENT” key.
PRINT ENT Use the △ key to select a range(50 mV). Press the “ENT” key.
PRINT FEED Use the △ key to select a numeral.
Use the key to shift a digit. Press the “ENT” key. ENT (Zero input value)
[Note] When input TC and RTD, set the Zero input value equal to the Zero-side scale value. But, set a decimal point position to the standard position. (*1:next page)
PRINT FEED Use the △ key to select a numeral.
Use the key to shift a digit. Press the “ENT” key. ENT (Span input value)
[Note] When input TC and RTD, set the Span input value equal to the Span-side scale value. But, set a decimal point position to the standard position. (*2:next page)
―48― MANUAL CR06
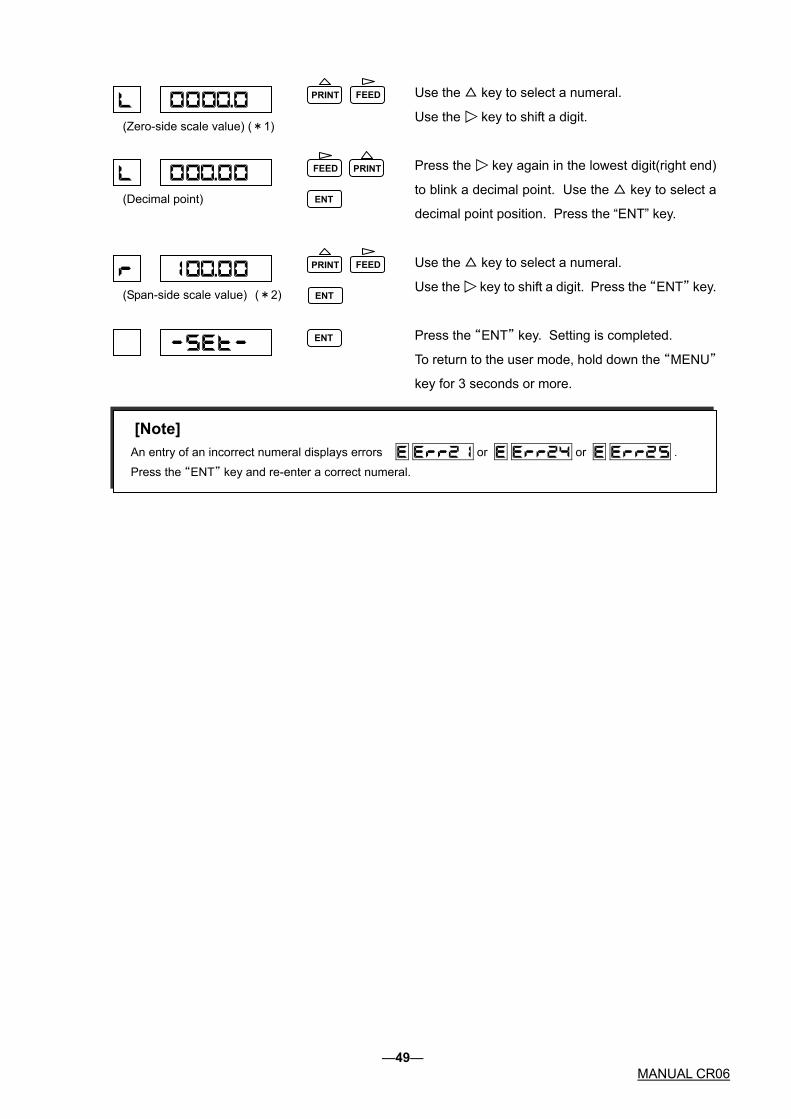
PRINT FEED Use the △ key to select a numeral.
Use the key to shift a digit. (Zero-side scale value) (*1)
PRINT FEED Press the key again in the lowest digit(right end)
to blink a decimal point. Use the △ key to select a
decimal point position. Press the “ENT” key.
ENT (Decimal point)
PRINT FEED Use the △ key to select a numeral.
Use the key to shift a digit. Press the “ENT” key. ENT (Span-side scale value) (*2)
Press the “ENT” key. Setting is completed. ENT To return to the user mode, hold down the “MENU”
key for 3 seconds or more.
[Note] An entry of an incorrect numeral displays errors or or . Press the “ENT” key and re-enter a correct numeral.
―49― MANUAL CR06
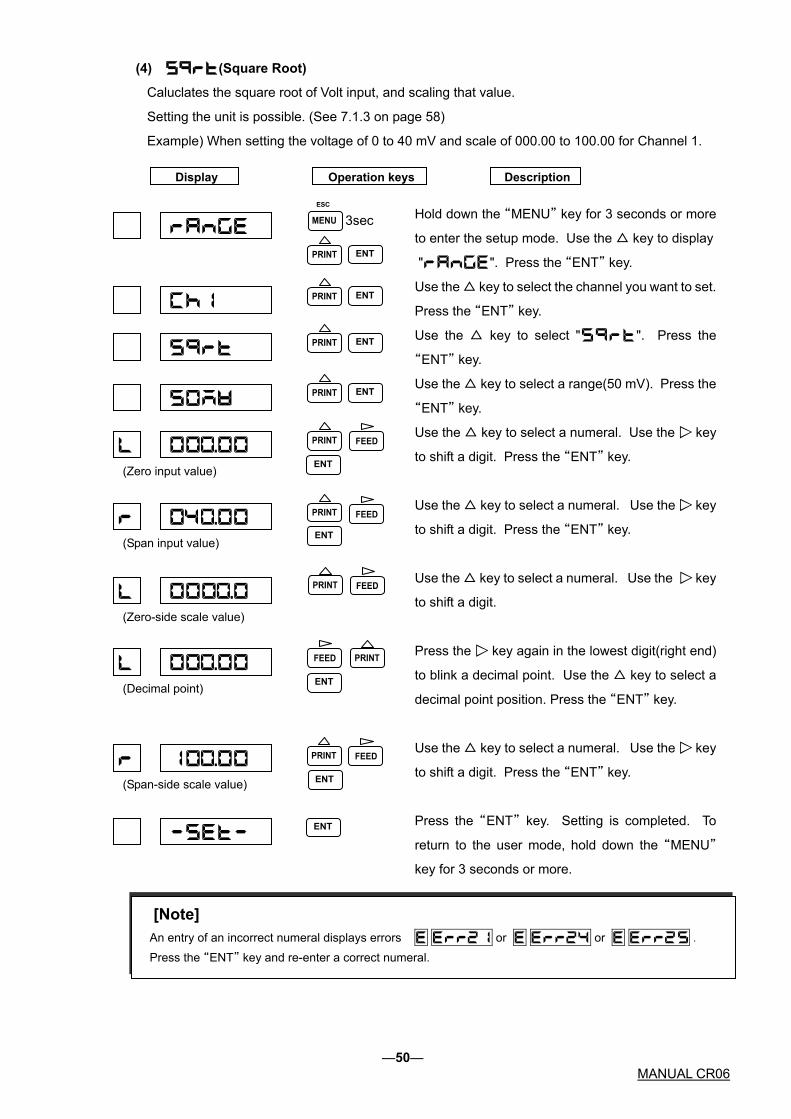
(4) (Square Root)
Caluclates the square root of Volt input, and scaling that value.
Setting the unit is possible. (See 7.1.3 on page 58)
Example) When setting the voltage of 0 to 40 mV and scale of 000.00 to 100.00 for Channel 1.
Display Operation keys Description
ESC
MENU Hold down the “MENU” key for 3 seconds or more
to enter the setup mode. Use the △ key to display 3sec
PRINT ENT "". Press the “ENT” key.
PRINTUse the △ key to select the channel you want to set.
Press the “ENT” key. ENT
PRINT Use the △ key to select "". Press the
“ENT” key. ENT
PRINTUse the △ key to select a range(50 mV). Press the
“ENT” key. ENT
PRINT FEED Use the △ key to select a numeral. Use the key
to shift a digit. Press the “ENT” key.
ENT (Zero input value)
ENT
PRINT FEED Use the △ key to select a numeral. Use the key
to shift a digit. Press the “ENT” key. (Span input value)
PRINT FEED Use the △ key to select a numeral. Use the key
to shift a digit. (Zero-side scale value)
FEED PRINT Press the key again in the lowest digit(right end)
to blink a decimal point. Use the △ key to select a
decimal point position. Press the “ENT” key.
ENT (Decimal point)
PRINT FEED Use the △ key to select a numeral. Use the key
to shift a digit. Press the “ENT” key.
ENT (Span-side scale value)
Press the “ENT” key. Setting is completed. To
return to the user mode, hold down the “MENU”
key for 3 seconds or more.
ENT
[Note] An entry of an incorrect numeral displays errors or or . Press the “ENT” key and re-enter a correct numeral.
―50― MANUAL CR06
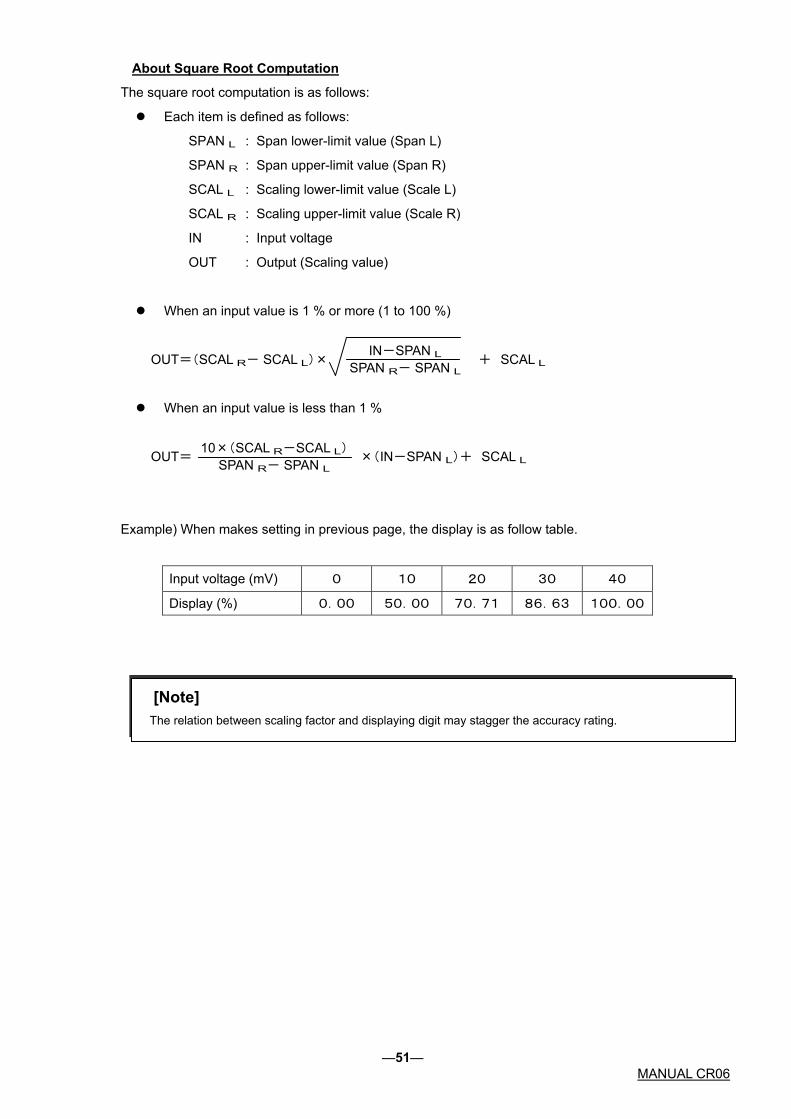
About Square Root Computation
The square root computation is as follows:
Each item is defined as follows:
SPAN L : Span lower-limit value (Span L)
SPAN R : Span upper-limit value (Span R)
SCAL L : Scaling lower-limit value (Scale L)
SCAL R : Scaling upper-limit value (Scale R)
IN : Input voltage
OUT : Output (Scaling value)
When an input value is 1 % or more (1 to 100 %)
OUT=(SCAL R- SCAL L)× + SCAL L
IN-SPAN L
SPAN R- SPAN L
When an input value is less than 1 %
OUT= ×(IN-SPAN L)+ SCAL L
10×(SCAL R-SCAL L)
SPAN R- SPAN L
Example) When makes setting in previous page, the display is as follow table.
Input voltage (mV) 0 10 20 30 40
Display (%) 0.00 50.00 70.71 86.63 100.00
[Note] The relation between scaling factor and displaying digit may stagger the accuracy rating.
―51― MANUAL CR06

(5) (Decade)
Scaling the VOLT input and displays the index number. Setting the unit is possible. (See 7.1.3 on
page 58)
Example) When setting the voltage of 0 to 5 V and decade of 1.0×100 to 1.0×10⁵ for Channel 1.
Display Operation keys Description
ESC
Hold down the “MENU” key for 3 seconds or more
to enter the setup mode. Use the △ key to display
3sec MENU
PRINT ENT "". Press the “ENT” key.
PRINT Use the △ key to select the channel you want to set.
Press the “ENT” key. ENT
PRINT Use the △ key to select "". Press the
“ENT” key.
ENT
PRINT ENT Use the △ key to select a range(5V). Press the
“ENT” key.
PRINT FEED Use the △ key to select a numeral. Use the key
to shift a digit. Press the “ENT” key. ENT (Zero input value)
PRINT FEED Use the △ key to select a numeral. Use the key
to shift a digit. Press the “ENT” key. ENT (Span input value)
PRINT FEED Use the △ key to select a numeral. Use the key
to shift a digit. Press the “ENT” key. ENT (Zero-side scale value)
FEED PRINT Use the △ key to select a numeral. Use the key
to shift a digit. Press the “ENT” key.
ENT (Span-side scale value)
Press the “ENT” key. Setting is completed. ENT To return to the user mode, hold down the “MENU”
key for 3 seconds or more.
[Note] An entry of an incorrect numeral displays errors or or . Press the “ENT” key and re-enter a correct numeral.
―52― MANUAL CR06

About Decade Display
Each item is defined as follows:
SPAN L : Span lower-limit value (Span L)
SPAN R : Span upper-limit value (Span R)
SCAL L : Scaling lower-limit value (Scale L)
SCAL R : Scaling upper-limit value (Scale R)
IN : Input voltage
OUT : Output (Scaling value)
XXEYY
XX: Mantissa section (1.0 to 9.9) YY: Exponent section (-19 to 19) Up to 5 decades. (Scaling upper limit)-(Scaling lower limit) is 1.0E5 or less.
Decade display abides by the following relational expression.
OUT1= IN× +
OUT = 10OUT1
LG SCAL L :Log10(SCAL L)
LG SCAL R :Log10(SCAL R)
Example) When makes setting in previous page, the display is as follow table.
LG SCAL -LG SCAL SPAN R×LGSCAL L- SPAN L×LGSCAL RSPAN R- SPAN L
R L
SPAN R- SPAN L
[Note] Decade output is used for display and print. It is not reflected on a printing position.
Input voltage (V) 0.0 1.0 2.5 3.0 5.0
Display 1.0E0 1.0E1 3.2E2 1.0E3 1.0E5
―53― MANUAL CR06

(6) (Difference),(Sum),(Average)
Caluclates the input of VOLT, TC, RTD or SCALE, and output.
Example) When subtracting the Ch 1 input data from the Ch 6 input data to set the
difference (0 to 40 mV). Records and displays on Ch 6 “Ch 6 (input) - Ch 1(input)”.
Display Operation keys Description
ESC
MENU Hold down the “MENU” key for 3 seconds or more
to enter the setup mode. Use the △ key to display
3sec PRINT ENT
"". Press the “ENT” key.
PRINT Use the △ key to select the channel you want to set.
Press the “ENT” key.
ENT (Setting channel)
PRINT Use the △ key to select "". Press the
“ENT” key. ENT
PRINT ENT Use the △ key to select the "channel you want to
subtract." Press the “ENT” key. (Reference channel)
PRINT FEED Use the △ key to select a numeral. Use the key
to shift a digit. Press the “ENT” key.
ENT (Zero input value after difference operation)
FEED PRINT Use the △ key to select a numeral. Use the key
to shift a digit. Press the “ENT” key.
ENT (Span input value after difference operation)
Press the “ENT” key. Setting is completed. ENT
To return to the user mode, hold down the “MENU”
key for 3 seconds or more.
Press the “ENT” key and re-enter a correct numeral. An entry of an incorrect numeral displays errors or or .
[Note]
About Difference, Sum, and Average
The channel to be set must be larger than the one on which computes the "difference, sum, or
average". When setting Channel 6, for example, you can subtract the Channel 1 to 5 value.
The range and scale of the set channel is the same as the channel on which computes the
"difference, sum, and average".
A range value after the computation cannot exceed the maximum range of the instrument.
Set for the reference channel only the voltage, current, thermocouple, resistance temperature
detector, and their scaling ranges.
―54― MANUAL CR06

(7) (Skip)
Setting SKIP on the Channel does not display and recording.
Example) When skipping Channel 6.
Hold down the “MENU” key for 3 seconds or more
to enter the setup mode. Use the △ key to display
"". Press the “ENT” key.
Use the △ key to select the channel you want to set.
Press the “ENT” key.
Use the △ key to select "". Press the
“ENT” key.
Press the “ENT” key. Setting is completed.
To return to the user mode, hold down the “MENU”
key for 3 seconds or more.
MENU
ESC
3sec
PRINT ENT
PRINT ENT
PRINT ENT
ENT
Display Operation keys Description
It is not possible to return it based on the setting skipped once. Please set range again.
The skip channel conducts measurement, but does not provide display, print, or alarm judgment. If input is
not connected, short-circuit a measurement terminal.
At least, one channel should be set to measurement.
Setting all the channels to Skip displays an error, .
[Note]
―55― MANUAL CR06

7.1.2 Setting the Alarm
Setting items
Alarm setting to the following two types for each channel is possible.
Alarm point can set up 4 levels for each channel.
Once sets up the alarm point, illuminated “ALM” when a process variable reaches alarm point, and
simultaneously, outputs the alarm print indicating an alarm occurrence to the chart paper.
: Upper-limit alarm ---- When the process variable is higher than the alarm set point,
issues an alarm.
: Lower-limit alarm ---- When the process variable is lower than the alarm set point,
issues an alarm. Option
Operation
Setting Channel Level ON/OFF
Setting valueType Relay ON/OFF
Relay No.
・
・ ・ ・ ・
・
・ ・ ・ ・
Example) When setting for the Channel 1 alarm point (Level 1) the upper-limit alarm, set value of
-2.000, and alarm output relay No. 1.
Display Operation keys Description
ESC
Hold down the “MENU” key for 3 seconds or more
to enter the setup mode. Use the △ key to display
3sec MENU
ENT PRINT "". Press the “ENT” key.
Use the △ key to select the channel you want to set.
Press the “ENT” key. ENT PRINT
PRINT ENT Use the △ key to select an alarm level. Press the
“ENT” key. Up to 4 levels can be set.
PRINT Use the △ key to select alarm setting ON. Press
the “ENT” key. Setting "" displays
ENT
"" and completes setting.
PRINT ENT Use the △ key to select an alarm type. Press the
“ENT” key.
PRINT FEED Set an alarm point. Use the key to shift a digit,
and use the △ key to select a numeral. Once setting
is completed, press the “ENT” key. A decimal point
position is fixed depending on the range.
ENT
―56― MANUAL CR06

When the “ENT” key is pressed in setting the alarm point. Display will be switched to the next setting display.
[Note]
Setting hereinafter is valid only for the model to which an alarm output relay option has been attached.
If the option has not been set, press the “ENT” key until "" is displayd.
Then, press the “ENT” key once more. Setting is completed.
Display Operation keys Description
PRINT When an alarm occurs, issues the alarm output
from the alarm output relay. Use the △ key to select
alarm output ON and press the “ENT” key.
ENT
If the alarm output is not used, select OFF and
press the “ENT” key.
PRINTIf the alarm output is set to ON, set the relay number.
Use the △ key to select the relay number out of 1 to
6, and press the “ENT” key.
ENT
Press the “ENT” key. Setting is completed. ENT When you want to continue to set for other channel,
press the △ key to select the channel, and start
setting. To return to the user mode, hold down the
“MENU” key for 3 seconds or more.
The tag setting does not effect on Alarm print setting. Prints channel numbers every time.
[Note]
―57― MANUAL CR06

7.1.3 Setting the Unit
Setting Items
Set the unit for each channel.
[Note] If you change the unit in the range of , or , setting the range to .
Operation
Setting Channel Char. No. Code No.
(゜)
(C)
End
・ ・ ・ ・
Example) Setting the unit(℃) for Channel 1.
Display Operation keys Description
ESC
Hold down the “MENU” key for 3 seconds or more
to enter the setup mode. Use the △ key to display
3sec MENU
PRINT ENT "". Then, press the “ENT” key.
PRINT Use the △ key to select the channel you want to set.
Then, press the “ENT” key.
ENT
PRINT FEED Use the △ or key to select the 1st character of
the code number, and press the “ENT” key.
ENT (Code No.)
See Characters Code Table on the next page.
PRINT FEED Set the 2nd character in the same manner.
ENT
PRINT FEED When the number of unit characters is less than 6,
enter a code() to end. Press the “ENT” key.
ENT
Press the “ENT” key. Setting is completed. ENT To return to the user mode, hold down the “MENU”
key for 3 seconds or more.
[Note] The unit setting effects only when the range setting is , or (including , and selected as the reference channel).
When the range setting is others, the unit sets appropriate unit for the range automatically.
―58― MANUAL CR06
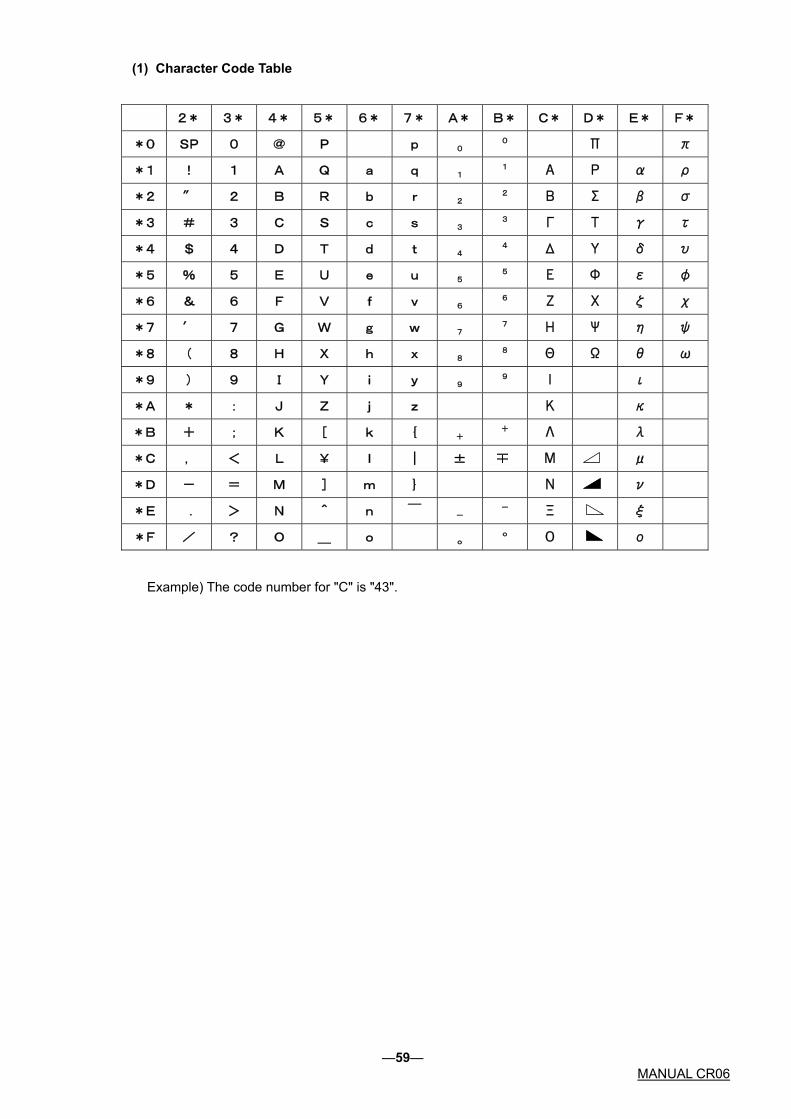
(1) Character Code Table
2* 3* 4* 5* 6* 7* A* B* C* D* E* F*
*0 SP 0 @ P p 00 Π π
*1 ! 1 A Q a q 11 Α Ρ α ρ
*2 ″ 2 B R b r 22 Β Σ β σ
*3 # 3 C S c s 33 Γ Τ γ τ
*4 $ 4 D T d t 44 Δ Υ δ υ
*5 % 5 E U e u 55 Ε Φ ε φ
*6 & 6 F V f v 66 Ζ Χ ζ χ
*7 ′ 7 G W g w 77 Η Ψ η ψ
*8 ( 8 H X h x 88 Θ Ω θ ω
*9 ) 9 I Y i y 99 Ι ι
*A * : J Z j z Κ κ
*B + ; K [ k { ++ Λ λ
*C , < L ¥ l | ± Μ μ
*D - = M ] m } Ν ν
*E . > N ^ n  ̄ -- Ξ ξ
*F / ? O _ o oo Ο ο
Example) The code number for "C" is "43".
―59― MANUAL CR06

7.1.4 Setting the Chart Speed
Setting Items
Set the chart speed. Select it from the table below.
Table 7.2 Chart Speed (Unit: ㎜/h)
0 1 2 3 4 5 10 15 20 25 30 40 50 60 75 80 90 100 120 150
160 180 200 240 300 360 375 450 600 720 750 900 1200 1500
Operation
1st/2nd Chart speed Chart speed Setting
Example) When setting the 1st chart speed to 1500 ㎜/h.
Display Operation keys Description
ESC
MENU Press the “MENU” key for 3 seconds or more to
enter the setup mode. Use the △ key to display
3sec PRINT ENT
"", and press the “ENT” key.
PRINT Use the △ key to select the 1st chart speed, and
press the “ENT” key.
ENT
[Note] When altering the chart speed with the DI option, set the 2nd chart speed. If the DI option is not attached, setting of the 2nd chart speed becomes invalid.
Display
Operation keys Description
Use the △ key to set the 1st chart speed, and press
the “ENT” key. PRINT ENT
Press the “ENT” key. To return to the user mode,
hold down the “MENU” key for 3 seconds or more.
ENT
―60― MANUAL CR06

7.1.5 Setting the Date and Time
Operation
The following describes how to set the date/time
Example) When setting the date and time to Jan
Ho
to
"
Se
an
Pr
Se
Op
Se
Op
Pr
ho
[Note] Restriction of printing
by chart speed
When the chart speed is 0 ㎜/h, it’s printed with forcib
㎜/h, not printing as shown the Table above.) List Pr
Comment print (ASync.) , DI Date and Time print (ASand Record Start/End print (ASync.) is printed regar
Alarm occurrence printDI Comment print (SynDI Manual print (Sync.)
Logging print (Sync.)
Month, Day
Year
Setting
Operation keysDisplay
ENT
PRINT FEED
ENT
PRINT FEED
ENT
ENT
PRINT FEED
ENT PRINT
3sec ESC
MENU
[Note] If you enter a non-existent dates or time, displa
Press the “ENT” key and re-enter a correct nu
―61―
Print type Chart speed(㎜/h)
, Alarm recovery print, Affix print, c.), DI Date and Time print (Sync.), ,Record Start/End Print(Sync.)
1~100
10~100
of the internal clock.
uary 1st, 2000, 6:00.
ld down the “MENU” key for 3 seconds or more
enter the setup mode. Use the △ key to display
," and press the “ENT” key.
t the year. Use the △ key to select a numeral,
d use the key to shift a digit.
ess the “ENT” key.
t the month and day.
erate in the same manner as setting the year.
t the time (hours and minutes).
erate in the same manner as setting the year.
ess the “ENT” key. To return to the user mode,
ld down the “MENU” key for 3 seconds or more.
le chart feed. (When the chart speed is more than 120
int, Engineering List Print , Manual Print (key), DI
ync.) , DI Manual print (ASync.) , Logging print (ASync.) dless of the chart speed.
Time
Description
ys an error .
meral.
MANUAL CR06

7.1.6 Copying the Setting Data
Setting Items
The following describes how to copy the setting data of any channel to other channel.
The copy-to channel must be bigger than the copy-from channel.
Operation
Copy-from Channel Copy-to Channel
Setting
・ ・ ・
・・ ・
Example) When copying the setting data of Channel 1 to Channel 2.
Display Operation keys Description
ESC
MENU 3sec Hold down the “MENU” key for 3 seconds or more
to enter the setup mode. Use the △ key to display
PRINT ENT
"", and press the “ENT” key.
PRINT ENT Use the △ key to select the copy-from channel, and
press the “ENT” key.
PRINT Use the △ key to select the copy-to channel, and
press the “ENT” key. ENT
ENT Press the “ENT” key. To return to the user mode,
hold down the “MENU” key for 3 seconds or more.
―62― MANUAL CR06

7.1.7 Setting Other Functions
Setting other functions as follows is possible.
Setting Items
① (Printing cycle)
Select a printing cycle from among 10, 20, 30, and 60 seconds.
② (Zone recording)
The data for each channel can be recorded separately in another area so that they will not overlap.
③ (Partial compression/expansion)
Record the measured data of the channel, partially compressed/expanded.
④ (Digital print)
Specify with ON/OFF whether the measured data for each channel is to be printed or not.
⑤ (Tag)
Set the tag, which is to be printed instead of a channel number, for logging print or manual print.
Setting up to 7 characters (select from character code table on page 57), as the tag for each
channel is possible.
⑥ (Comment words)
Set the comment words to be printed by DI. There are three kinds of comment words and setting
up to 16 characters (select from character code table on page 57) for each DI is possible.
Operation
Setting Mode
Printing Cycle Zone Recording Partial Compression/Expansion Digital Print Tag Comment Words
―63― MANUAL CR06

(1) (Printing Cycle)
Example) When setting the printing cycle to 60 seconds.
Display Operation keys Description
ESC
Hold down the “MENU” key for 3 seconds or more
to enter the setup mode. Use the △ key to display 3sec MENU
PRINT ENT "", and press the “ENT” key.
PRINT ENT Use the △ key to display "", and press
the “ENT” key.
PRINT Use the △ key to select the printing cycle "",
and press the “ENT” key. ENT
Press the “ENT” key. Setting is completed. ENT
To return to the user mode, hold down the “MENU”
key for 3 seconds or more.
(2) (Zone Recording)
Example) When setting the instrument so that Channel 1 zero/span will be recorded at the position of
20 to 50 %.
Display Operation keys Description
ESC
MENU Hold down the “MENU” key for 3 seconds or more
to enter the setup mode. Use the △ key to display
3sec
PRINT ENT "", and press the “ENT” key.
PRINT Use the △ key to display "", and press the
“ENT” key.
ENT
PRINT Use the △ key to select the channel you want to set,
and press the “ENT” key. ENT
PRINT FEED Set a zero point printing position in percentage (%).
Use the △ key to select a numeral, and use the
key to shift a digit. Press the “ENT” key.
ENT
(Setting of Left-end Position)
PRINT FEED Set a span printing position in percentage (%).
Operate in the same manner as setting the zero
point printing position.
ENT (Setting of Right-end Position)
Press the “ENT” key. Setting is completed. ENT
To return to the user mode, hold down the “MENU”
key for 3 seconds or more.
[Note]
If you enter an incorrect numeral, displays errors or . Press the “ENT” key and re-enter a correct numeral.
―64― MANUAL CR06

(3) (Partial Compression/Expansion)
Example) When setting Channel 1 scale of 0 to 1,000.0 ℃ to 500.0 ℃ at a boundary point of 30 %.
0℃ 500.0℃ 1000.0℃ (0%) (30%) 100%)
Display Operation keys Description
ESC
MENU 3sec Hold down the “MENU” key for 3 seconds or more
to enter the setup mode. Use the △ key to display PRINT ENT
"", and press the “ENT” key.
PRINT Use the △ key to select "", and press the
“ENT” key.
ENT
PRINT ENT Use the △ key to select the channel you want to set,
and press the “ENT” key.
PRINT Use the △ key to select "", and press the
“ENT” key.
ENT
PRINT FEED Set a boundary point position in percentage (%). Use the △ key to select a numeral, and use the
key to shift a digit. Press the “ENT” key. ENT
PRINT FEED Set a boundary point position to "0500.0". Use the
△ key to select a numeral, and use the key to
shift a digit. Press the “ENT” key.
ENT
Press the “ENT” key. Setting is completed. ENT
To return to the user mode, hold down the “MENU”
key for 3 seconds or more.
[Note]
If you enter an incorrect numeral, displays an error . Press the “ENT” key and re-enter a correct numeral.
―65― MANUAL CR06
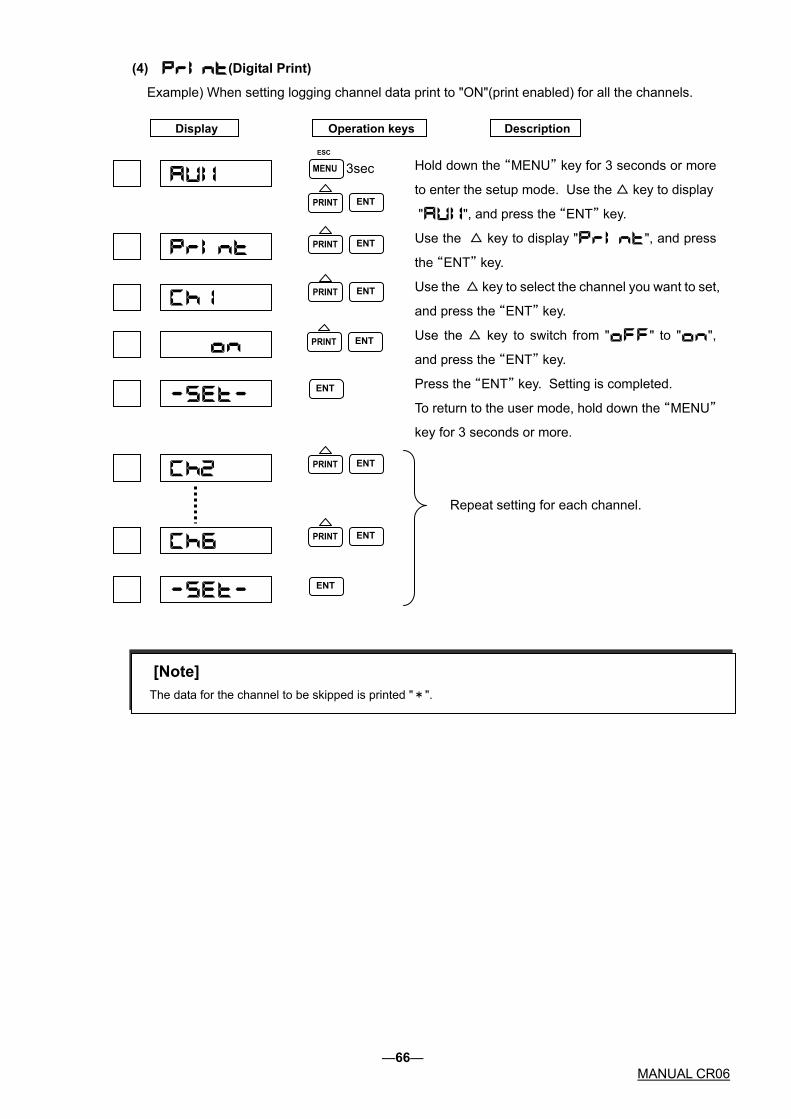
(4) (Digital Print)
Example) When setting logging channel data print to "ON"(print enabled) for all the channels.
Hold down the “MENU” key for 3 seconds or more
to enter the setup mode. Use the △ key to display
"", and press the “ENT” key.
Use the △ key to display "", and press
the “ENT” key.
Use the △ key to select the channel you want to set,
and press the “ENT” key.
Use the △ key to switch from "" to "",
and press the “ENT” key.
Press the “ENT” key. Setting is completed.
To return to the user mode, hold down the “MENU”
key for 3 seconds or more.
Repeat setting for each channel.
ENT
MENU
ESC
3sec
PRINT ENT
PRINT ENT
PRINT ENT
PRINT ENT
PRINT ENT
PRINT ENT
ENT
Display Operation keys Description
[Note]
The data for the channel to be skipped is printed "*".
―66― MANUAL CR06
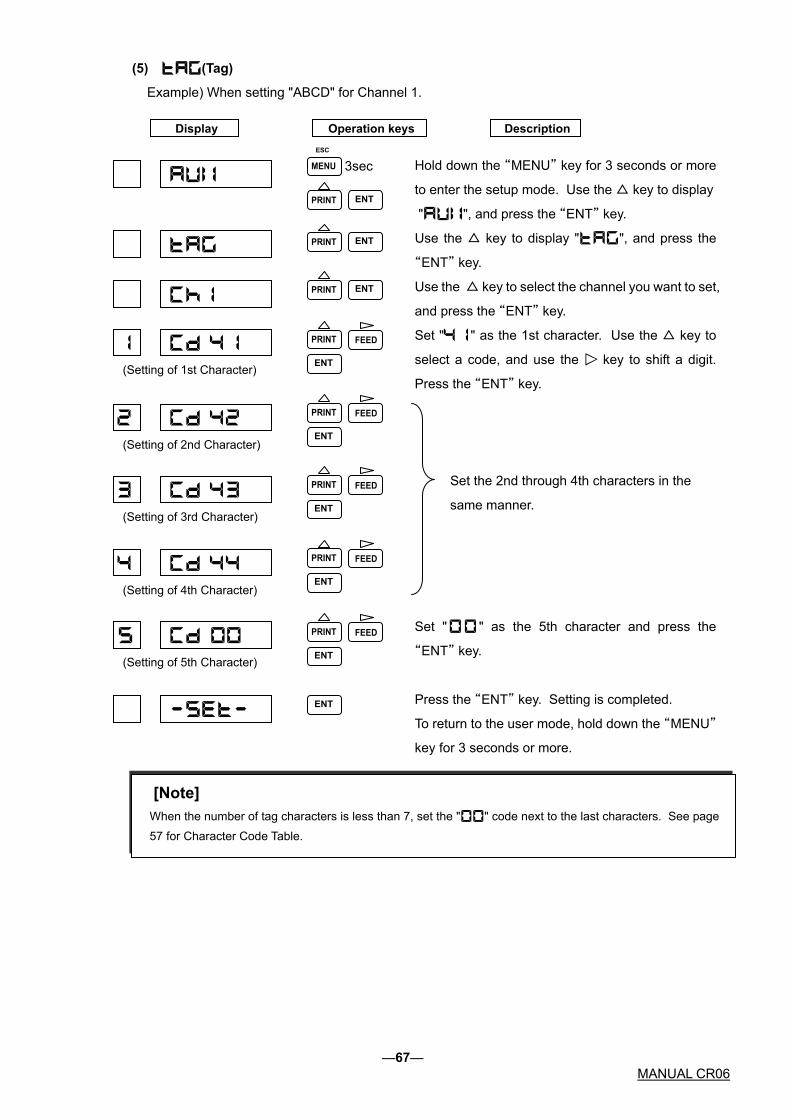
(5) (Tag)
Example) When setting "ABCD" for Channel 1.
Display Operation keys Description
ESC
Hold down the “MENU” key for 3 seconds or more
to enter the setup mode. Use the △ key to display
"", and press the “ENT” key.
Use the △ key to display "", and press the
“ENT” key.
Use the △ key to select the channel you want to set,
and press the “ENT” key.
Set "" as the 1st character. Use the △ key to
select a code, and use the key to shift a digit.
Press the “ENT” key.
Set the 2nd through 4th characters in the
same manner.
ENT
PRINT FEED
ENT
PRINT FEED
ENT
PRINT FEED
ENT
PRINT FEED
ENT PRINT
ENT PRINT
ENT PRINT
3sec MENU
(Setting of 1st Character)
(Setting of 2nd Character)
(Setting of 3rd Character)
(Setting of 4th Character)
PRINT FEED Set " " as the 5th character and press the
“ENT” key.
ENT (Setting of 5th Character)
Press the “ENT” key. Setting is completed. ENT To return to the user mode, hold down the “MENU”
key for 3 seconds or more.
[Note]
When the number of tag characters is less than 7, set the "" code next to the last characters. See page 57 for Character Code Table.
―67― MANUAL CR06

(6) (Comment Words)
Example) When setting "ON" for Comment 1().
Hold down the “MENU” key for 3 seconds or more
to enter the setup mode. Use the △ key to display "
", and press the “ENT” key.
Use the △ key to display "", and press the
“ENT” key.
Use the △ key to select a comment number.
Display "" and press the “ENT” key.
Set "" as the 1st character. Use the △ key to
select a code, and use the key to shift a digit.
Press the “ENT” key.
Set "" as the 2nd character.
Operate in the same manner as setting the 1st
character to end.
Set "" as the 3rd character.
Operate in the same manner as setting the 1st
character.
Repeat setting for each channel.
Press the “ENT” key. Setting is completed.
To return to the user mode, hold down the “MENU”
key for 3 seconds or more.
ENT
MENU
ESC
3sec
PRINT ENT
PRINT ENT
PRINT ENT
FEED PRINT
ENT
FEED PRINT
ENT
FEED PRINT
ENT
(Setting of 1st Character)
(Setting of 2nd Character)
(Setting of 3rd Character)
(Setting of 9th Character)
(Setting of 10th Character)
(Setting of 11th Character)
(Setting of 16th Character)
Display Operation keys Description
The comment setting is not effective without the DI option. Do not set the comment setting.
The digit is not display after setting the "".
[Note] When the number of comment characters is less than 16, set the "" code next to the last
characters. See page 57 for Character Code Table.
―68― MANUAL CR06

7.2 Setting the Engineering Mode
Key Operation to Enter the Engineering Mode
Hold down the “MENU” key for 3 seconds or more to enter the setup mode.
Use the △ key to select "", and press the “ENT” key then to display "0000".
Use the △ key to alter a numeral, and the key to shift a digit, enter the password "2222".
Press the “ENT” key then to display blinking "".
Press the “ENT” key. After reset, enter the engineering mode.
The following describes how to set the following items.
The following shows a display map of the Enginneering mode. Use the △key to operate.
7.2.1 Alarm Hysteresis
7.2.2 Burnout ON/OFF
7.2.3 Channel Offset
Setting
ON/OFF
Set the hysteresis width Cancel the hysteresis width
Setting Channel
ON/OFF
Set burnout Cancel burnout
Enter an offset value
Setting Channel OFFSET
7.2.4 Reference Junction Compensation
Setting Channel Function
Internal Compensation External Compensation Channel Input Compensation
―69― MANUAL CR06

7.2.5 Changing the Printing Color
Channel COLORSetting
Purple
Red Green Blue Brown Black
7.2.6 Settings Related to Recording
Function Setting
Recording start/stop INT/EXT selection
Tag/channel print selection Alarm print ON/OFF Logging print ON/OFF Scale prints ON/OFF Record Start/End print OFF/SYNC/ASYNC
7.2.7 Setting the Communication Function
7.2.8 Initializing the Setup Data
Setting
Setting the Communication Function Local Address Baud Rate Data Length Parity Bit Stop Bit
YES/NO Setting
7.2.9 DI Functions
Setting DI No. Function
No function Recording start/stop Chart speed selection Comment 1 print(Synchronous) Comment 2 print(Synchronous) Comment 3 print(Synchronous) Manual print(Synchronous) Date and time print(Synchronous) Comment 1 print(Asynchronous) Comment 2 print(Asynchronous) Comment 3 print(Asynchronous) Manual print(Asynchronous) Date and time print(Asynchronous)
7.2.10 Temperature Unit
Temp Unit Setting
Centigrade Unit Fahrenheit Unit
―70― MANUAL CR06

7.2.11 Point Calibration
Function Setting
Zero point calibration Span point calibration Hysteresis at left/right move Ribbon select calibration
7.2.12 Data Calibration
Function Setting
Voltage calibration Resistance temperature detector calibration Internal reference junction compensation calibration
7.3 Terminating the Engineering Mode
Function Setting
Save a set value Cancel a set value
Upon termination if you select "" and turn off the power without executing "", the setting will become invalid. For "" operation, see Page 84.
[Note]
Table 7.3 Initial setting value of the engineering mode
Setting items Initial set Remarks ★Alarm hysteresis ON(0.5%)
★Burnout (all channels) OFF
★Channel offset (all channels) 0.0
★RJC (all channels) Internal compensation INT
★Dot print color (1~6channel) Purple(1), Red(2), Green(3), Blue(4), Brown(5), Black(6)
★RUN record RUN/STOP trigger Channel/Tag print Alarm print Logging print Logging printing interval Logging print reference time Scale print Logging print Sync/Async Record Start/End print
INT Ch OFF ON 6H 00:00 OFF Sync print OFF
Use the RUN key
★COM (communication) Address Baud rate Data length Parity bit Stop bit
01 9600 8bit None 1bit
★DI (1~3 channel) OFF
★Temperature unit Centigrade Unit
―71― MANUAL CR06
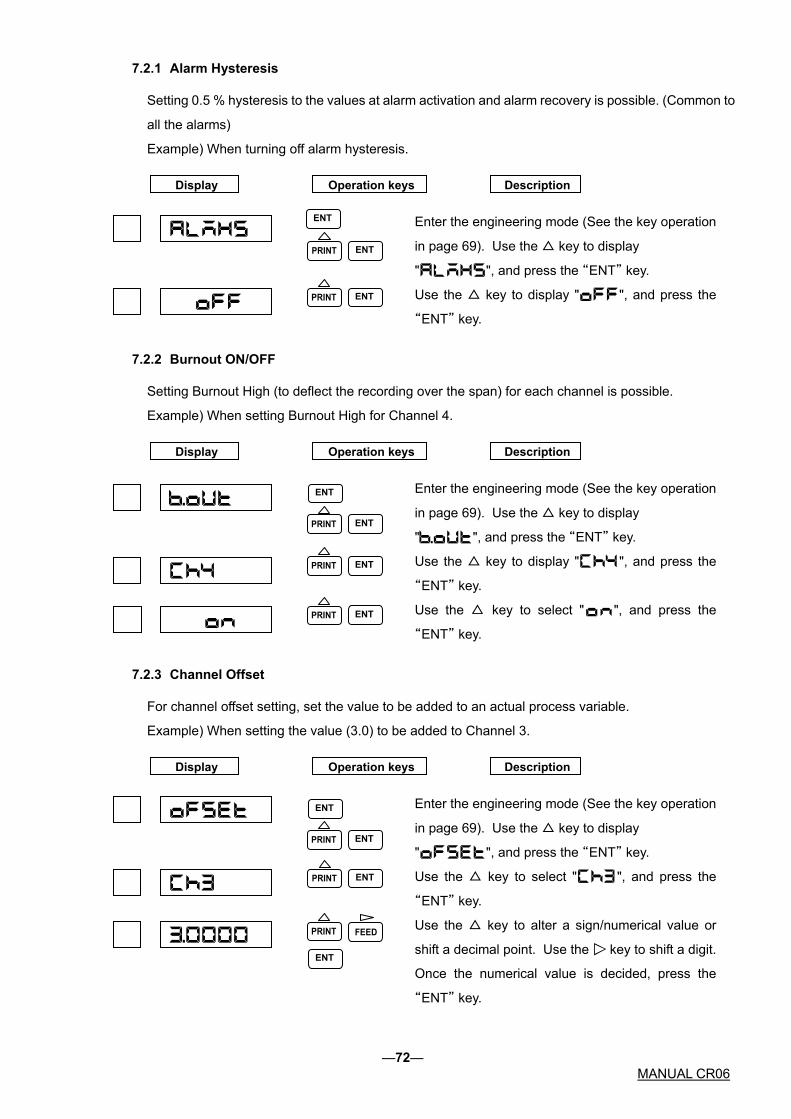
7.2.1 Alarm Hysteresis
Setting 0.5 % hysteresis to the values at alarm activation and alarm recovery is possible. (Common to
all the alarms)
Example) When turning off alarm hysteresis.
Enter the engineering mode (See the key operation
in page 69). Use the △ key to display
"", and press the “ENT” key.
Use the △ key to display "", and press the
“ENT” key.
Display Operation keys Description
ENT
ENT
PRINT ENT
7.2.2 Burnout ON/OFF
Setting Burnout High (to deflect the recording over the span) for each channel is possible.
Example) When setting Burnout High for Channel 4.
Enter the engineering mode (See the key operation
in page 69). Use the △ key to display
"", and press the “ENT” key.
Use the △ key to display "", and press the
“ENT” key.
Use the △ key to select "", and press the
“ENT” key.
Display Operation keys Description
ENT
PRINT ENT
PRINT ENT
PRINT ENT
7.2.3 Channel Offset
For channel offset setting, set the value to be added to an actual process variable.
Example) When setting the value (3.0) to be added to Channel 3.
Enter the engineering mode (See the key operation
in page 69). Use the △ key to display
"", and press the “ENT” key.
Use the △ key to select "", and press the
“ENT” key.
Use the △ key to alter a sign/numerical value or
shift a decimal point. Use the key to shift a digit.
Once the numerical value is decided, press the
“ENT” key.
Display Operation keys Description
ENT
ENT
PRINT ENT
ENT
FEED
―72― MANUAL CR06

7.2.4 Reference Junction Compensation
The following describes how to set the method for compensating an electromotive force generated
between a thermocouple wire or compensation lead wire and a terminal. There are the following three
compensating methods:
A method to compensate through the built-in temperature sensing element (INT: Internal
compensation)
A method to compensate by keeping an external compensator’s temperature constant (EXT:
External compensation)
A method to compensate by one input for the recorder temperature which gets external junction
box. (CH: Channel input compensation)
Internal compensation (INT) has been initially set.
Example) When setting the external compensator’s temperature constant voltage for Channel 6 to
391μV. Input the thermocouple T, compensate the external compensator’s temperature
10℃ and Input the electromotive force 391μV.
Enter the engineering mode (See the key operation
in page 69). Use the △ key to display
"", and press the “ENT” key
Use the △ key to select "", and press the
“ENT” key.
Use the △ key to select "", and press the
“ENT” key.
Use the △ key to alter a numerical value, or the
key to shift a digit. Once the numerical value is
decided, press the “ENT” key.
Setting is completed. Returned to the channel
setting.
Display Operation keys Description
ENT
PRINT ENT
ENT PRINT
PRINT ENT
FEED PRINT
ENT
―73― MANUAL CR06

Example) When Channel 1 input compensates Channel 6 reference junction.
Enter the engineering mode (See the key operation
in page 69). Use the △ key to display
"", and press the “ENT” key.
Use the △ key to select "", and press the
“ENT” key.
Use the △ key to select "", and press the
“ENT” key.
Use the △ key to select "", and press the
“ENT” key.
Setting is completed. Returned to the channel
setting.
Display Operation keys Description
ENT
PRINT ENT
PRINT ENT
PRINT ENT
PRINT ENT
7.2.5 Changing the Printing Color
Change a printing color can be changed for each channel.
Example) When setting the black color as a printing color.
Enter the engineering mode (See the key operation
in page 69). Use the △ key to display
"", and press the “ENT” key.
Use the △ key to select "", and press the
“ENT” key.
Use the △ key to display "", and press the
“ENT” key.
Setting is completed. Returned to the Printing Color
Setting screen.
Display Operation keys Description
PRINT ENT
ENT PRINT
ENT PRINT
ENT
PRINT FEED ENT
―74― MANUAL CR06

7.2.6 Settings Related to Recording
Setting a recording start/stop trigger, select tag/channel print selection, alarm print, logging print, and
scale print ON/OFF is possible.
(1) Recording start/stop trigger setting
Set whether the trigger of recording start/stop should be by the “RUN” key or DI.
Example) When setting DI as the recording start/stop trigger.
Display
Operation keys Description
PRINT ENT
ENT PRINT
ENT PRINT
ENT Enter the engineering mode (See the key operation
in page 69). Use the △ key to display
"", and press the “ENT” key.
Use the △ key to select "", and press the
“ENT” key.
Use the △ key to display "", and press the
“ENT” key.
PRINT FEED Setting is completed. Returned to the Recording
Start/Stop Setting screen. ENT
See DI functions in page 80. When displays "", “RUN/STOP” key does not operate. Set “ ” to DI.
[Note]
(2) Tag/channel print selection
In case of logging print; or manual print, set whether a tag or channel should be printed.
Example) When setting the tag.
Display Description
Operation keys
Enter the engineering mode (See the key operation
in page 69). Use the △ key to display
PRINT ENT
ENT PRINT
ENT PRINT
ENT
"", and press the “ENT” key.
Use the △ key to select "", and press the
“ENT” key.
Use the △ key to display "", and press the
“ENT” key.
Setting is completed. Returned to the Tag/Channel Setting screen.
―75― MANUAL CR06
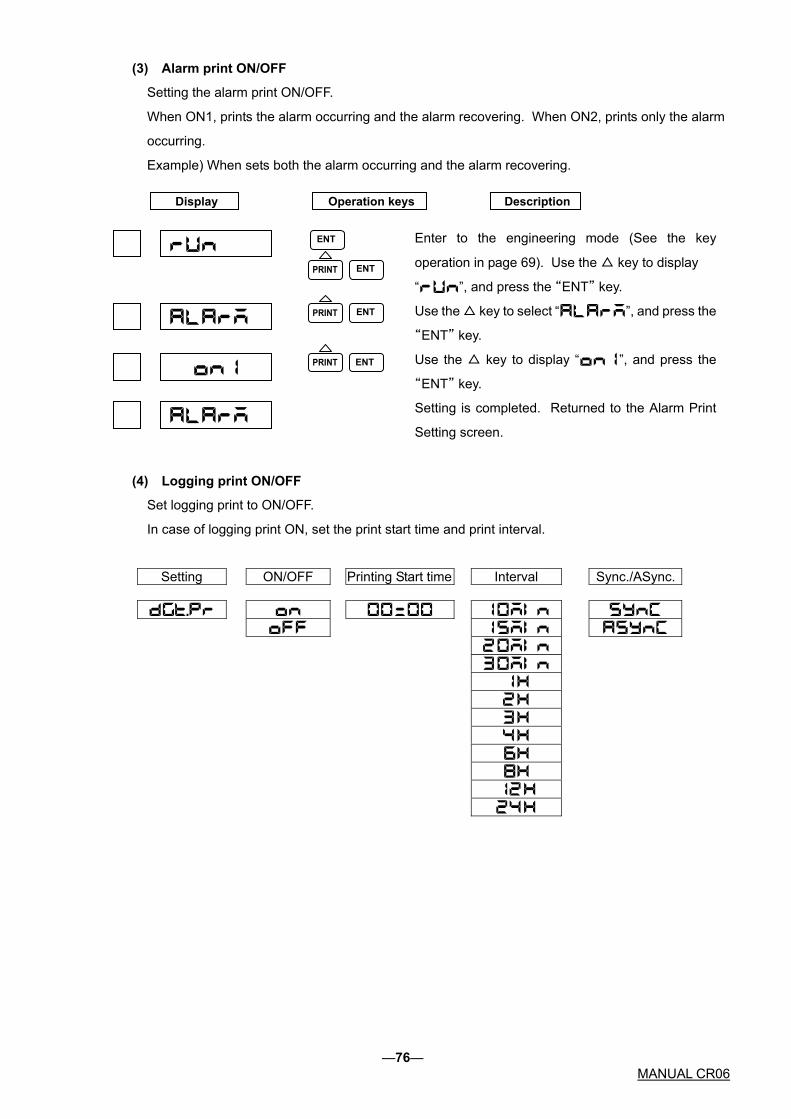
(3) Alarm print ON/OFF
Setting the alarm print ON/OFF.
When ON1, prints the alarm occurring and the alarm recovering. When ON2, prints only the alarm
occurring.
Example) When sets both the alarm occurring and the alarm recovering.
Display
Operation keys Description
PRINT ENT
ENT PRINT
ENT PRINT
ENT Enter to the engineering mode (See the key
operation in page 69). Use the △ key to display
“”, and press the “ENT” key.
Use the △ key to select “”, and press the
“ENT” key.
Use the △ key to display “”, and press the
“ENT” key.
Setting is completed. Returned to the Alarm Print
Setting screen.
(4) Logging print ON/OFF
Set logging print to ON/OFF.
In case of logging print ON, set the print start time and print interval.
Setting ON/OFF Printing Start time Interval Sync./ASync.
―76― MANUAL CR06
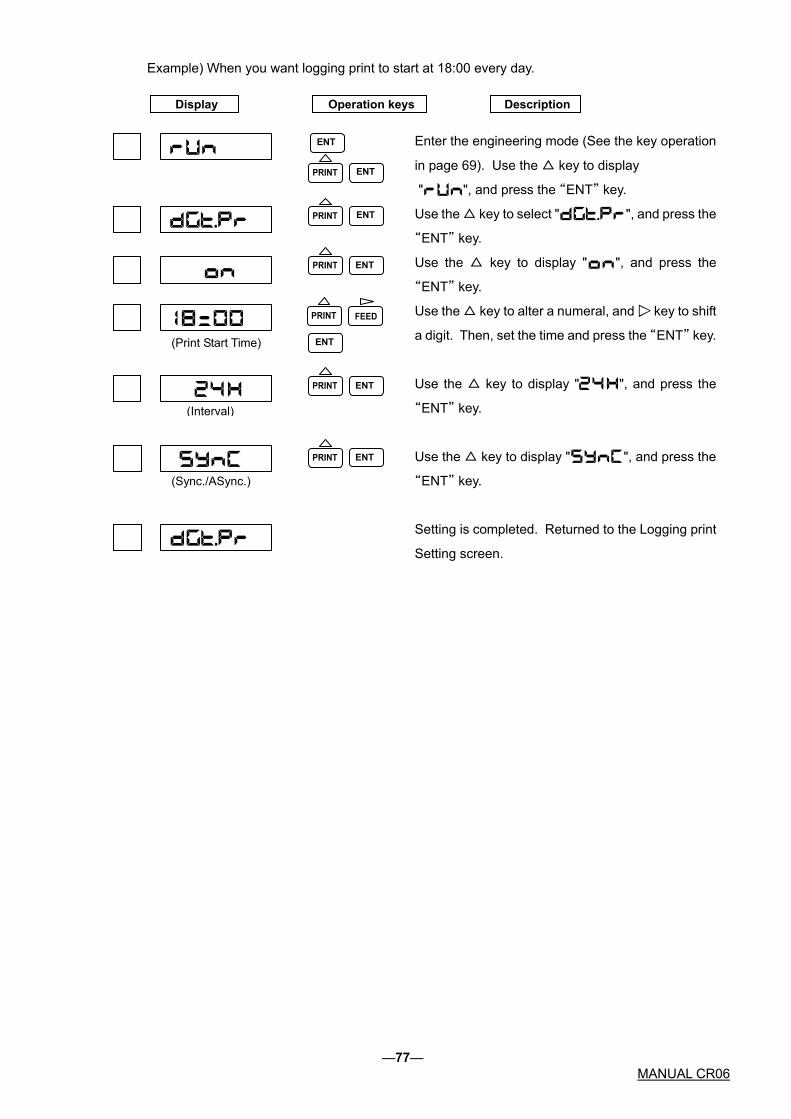
Example) When you want logging print to start at 18:00 every day.
Operation keys Description Display
Enter the engineering mode (See the key operation
in page 69). Use the △ key to display
PRINT ENT
ENT PRINT
PRINT ENT
ENT
"", and press the “ENT” key.
Use the △ key to select "", and press the
“ENT” key.
Use the △ key to display "", and press the
“ENT” key.
PRINT FEED Use the △ key to alter a numeral, and key to shift
a digit. Then, set the time and press the “ENT” key. ENT
ENT
(Interval)
(Print Start Time)
Use the △ key to display "", and press the
“ENT” key.
PRINT ENT Use the △ key to display "", and press the
“ENT” key. (Sync./ASync.)
Setting is completed. Returned to the Logging print
Setting screen.
―77― MANUAL CR06
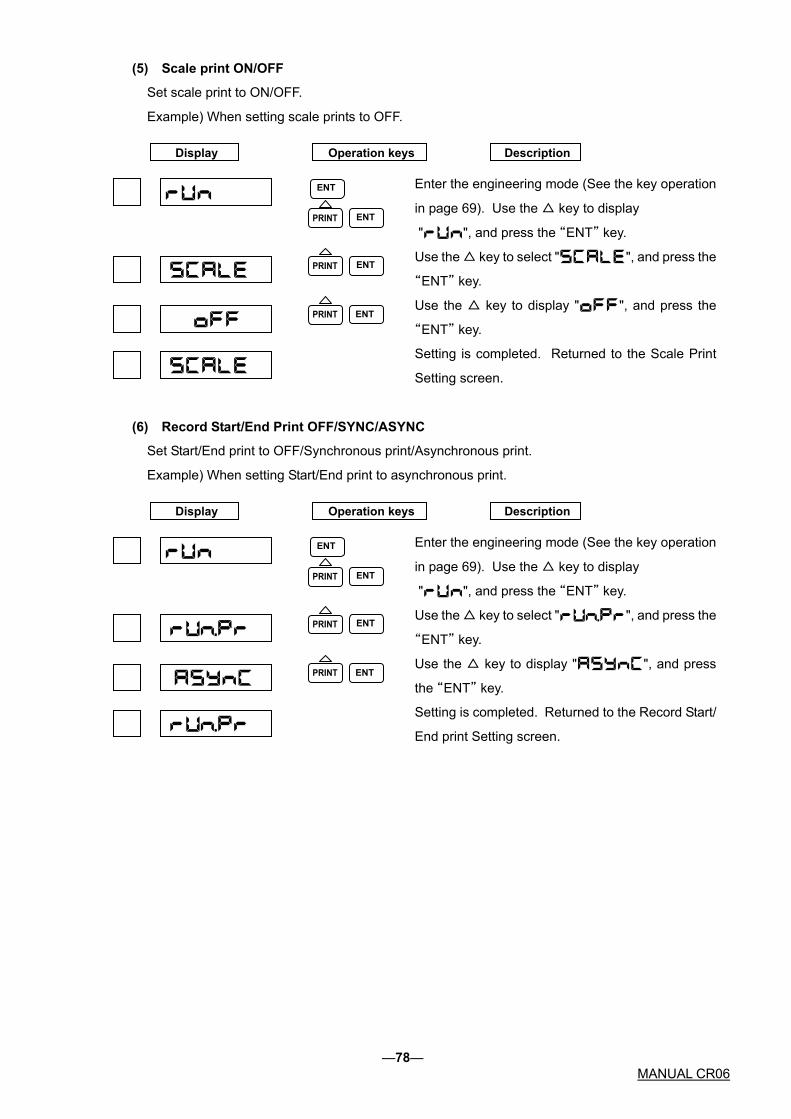
(5) Scale print ON/OFF
Set scale print to ON/OFF.
Example) When setting scale prints to OFF.
Operation keys Description Display
Enter the engineering mode (See the key operation
in page 69). Use the △ key to display
ENT
ENT
"", and press the “ENT” key.
Use the △ key to select "", and press the
“ENT” key. PRINT ENT
Use the △ key to display "", and press the
“ENT” key. ENT PRINT
Setting is completed. Returned to the Scale Print
Setting screen.
(6) Record Start/End Print OFF/SYNC/ASYNC
Set Start/End print to OFF/Synchronous print/Asynchronous print.
Example) When setting Start/End print to asynchronous print.
Display Operation keys Description
Enter the engineering mode (See the key operation
in page 69). Use the △ key to display
ENT
ENT
"", and press the “ENT” key.
Use the △ key to select "", and press the
“ENT” key. PRINT ENT
Use the △ key to display "", and press
the “ENT” key. ENT PRINT
Setting is completed. Returned to the Record Start/
End print Setting screen.
―78― MANUAL CR06

7.2.7 Setting the Communication Function
Set Local Address, Baud Rate (communication speed), Data Length, Parity Bit, and Stop Bit.
Example) Local Address: 02, Baud Rate: 1200bps, Data Length: 7 bit, Parity Bit: even, Stop Bit: 2 bit.
Enter the engineering mode (See the key operation
in page 69). Use the △ key to display
“", and press the “ENT” key.
Use the △ key to display "", and press
the “ENT” key.(Select from ~
)
Use the △ key to display "", and press the
“ENT” key. (Select from 1200, 2400, 4800, 9600)
Use the △ key to display "", and press the
“ENT” key.(Select from 7 bit, 8 bit)
Use the △ key to display "", and press the
“ENT” key. (Select from EVEN, ODD and NONE)
Use the △ key to display "", and press the
“ENT” key. (Select from 1 bit, 2 bit)
Setting is completed. Returned to the
Communication Function Setting screen.
Operation keys Description Display
ENT
ENT
PRINT ENT (Local address)
ENT PRINT
(Baud rate) PRINT ENT
(Data length) ENT PRINT
(Parity bit)PRINT
ENT (Stop bit)
7.2.8 Initializing the Setup Data
Put back the setup data to what they were at shipment from the factory.
Example) When you initialize the Setup Data.
Enter the engineering mode (See the key operation
in page 69). Use the △ key to display "",
and press the “ENT” key.
Use the △ key to select "", and press the
“ENT” key.
Initialization is completed.
Display Operation keys Description
ENT
PRINT ENT
PRINT ENT
.
―79― MANUAL CR06
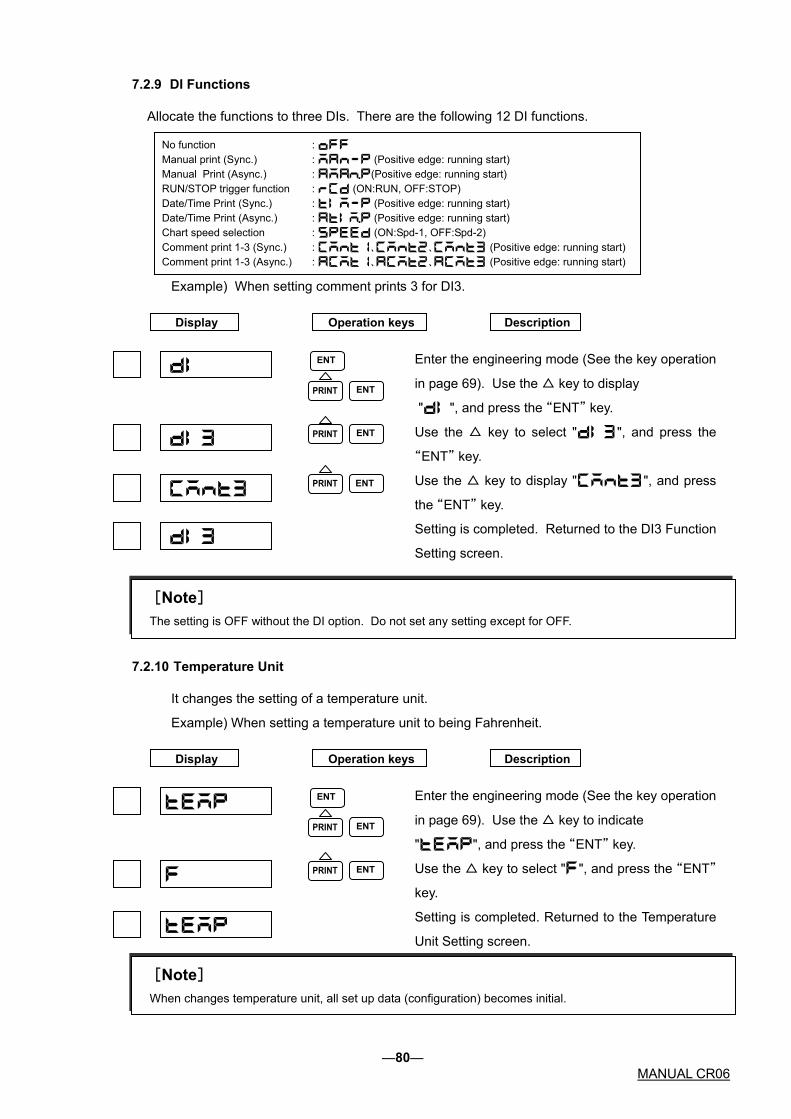
7.2.9 DI Functions
Allocate the functions to three DIs. There are the following 12 DI functions.
Example) When setting comment prints 3 for DI3.
Enter the engineering mode (See the key operation
in page 69). Use the △ key to display
"", and press the “ENT” key.
Use the △ key to select "", and press the
“ENT” key.
Use the △ key to display "", and press
the “ENT” key.
Setting is completed. Returned to the DI3 Function
Setting screen.
Chart speed selection : (ON:Spd-1, OFF:Spd-2) Comment print 1-3 (Sync.) : 、、 (Positive edge: running start) Comment print 1-3 (Async.) : 、、 (Positive edge: running start)
Date/Time Print (Async.) : (Positive edge: running start)
No function : Manual print (Sync.) : (Positive edge: running start) Manual Print (Async.) : (Positive edge: running start) RUN/STOP trigger function : (ON:RUN, OFF:STOP) Date/Time Print (Sync.) : (Positive edge: running start)
Display Operation keys Description
PRINT ENT
ENT PRINT
ENT PRINT
ENT
The setting is OFF without the DI option. Do not set any setting except for OFF.
[Note]
7.2.10 Temperature Unit
It changes the setting of a temperature unit.
Example) When setting a temperature unit to being Fahrenheit.
Enter the engineering mode (See the key operation
in page 69). Use the △ key to indicate
"", and press the “ENT” key.
Use the △ key to select "", and press the “ENT”
key.
Setting is completed. Returned to the Temperature
Unit Setting screen.
Display Operation keys Description
ENT
ENT
PRINT ENT
[Note] When changes temperature unit, all set up data (configuration) becomes initial.
―80― MANUAL CR06
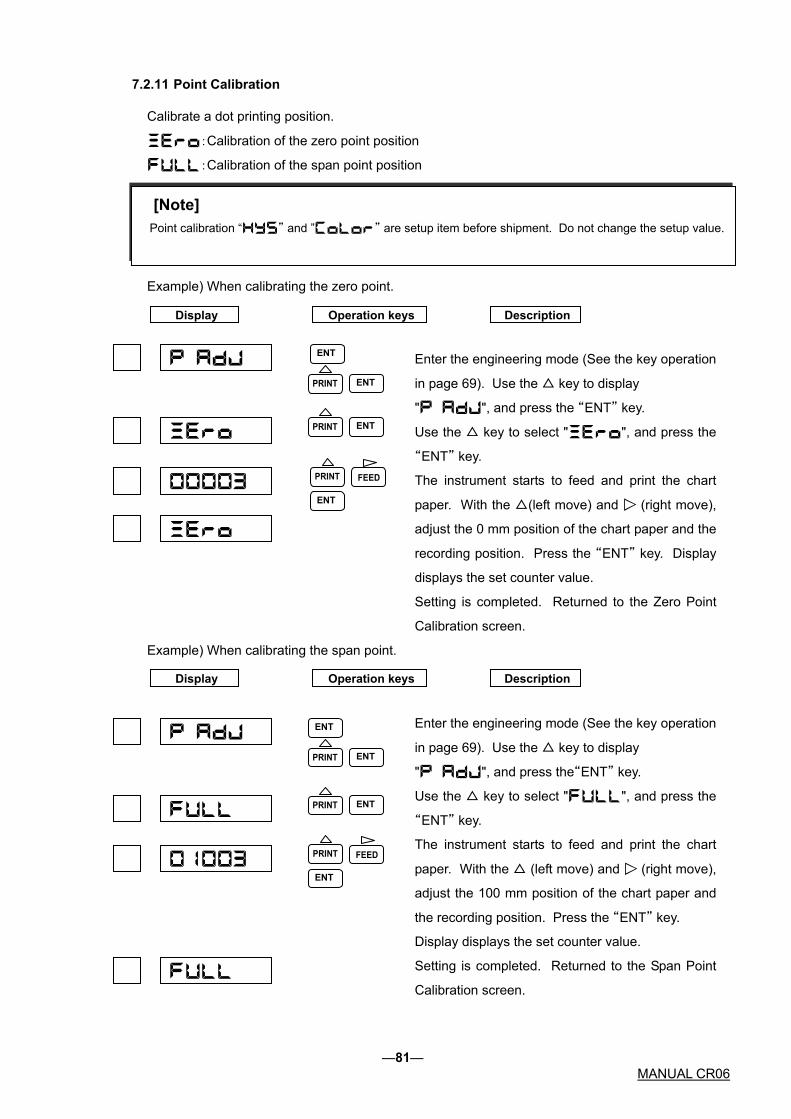
7.2.11 Point Calibration
Calibrate a dot printing position.
:Calibration of the zero point position
:Calibration of the span point position
Example) When calibrating the zero point.
Enter the engineering mode (See the key operation
in page 69). Use the △ key to display
" ", and press the “ENT” key.
Use the △ key to select "", and press the
“ENT” key.
The instrument starts to feed and print the chart
paper. With the △(left move) and (right move),
adjust the 0 mm position of the chart paper and the
recording position. Press the “ENT” key. Display
displays the set counter value.
Setting is completed. Returned to the Zero Point
Calibration screen.
Example) When calibrating the span point.
Enter the engineering mode (See the key operation
in page 69). Use the △ key to display
" ", and press the“ENT” key.
Use the △ key to select "", and press the
“ENT” key.
The instrument starts to feed and print the chart
paper. With the △ (left move) and (right move),
adjust the 100 mm position of the chart paper and
the recording position. Press the “ENT” key.
Display displays the set counter value.
Setting is completed. Returned to the Span Point
Calibration screen.
Point calibration “ ” and ” ” are setup item before shipment. Do not change the setup value.
[Note]
Display Operation keys Description
ENT
ENT
PRINT ENT
PRINT FEED ENT
Operation keys Description Display
ENT
ENT
PRINT ENT
FEED PRINT ENT
―81― MANUAL CR06
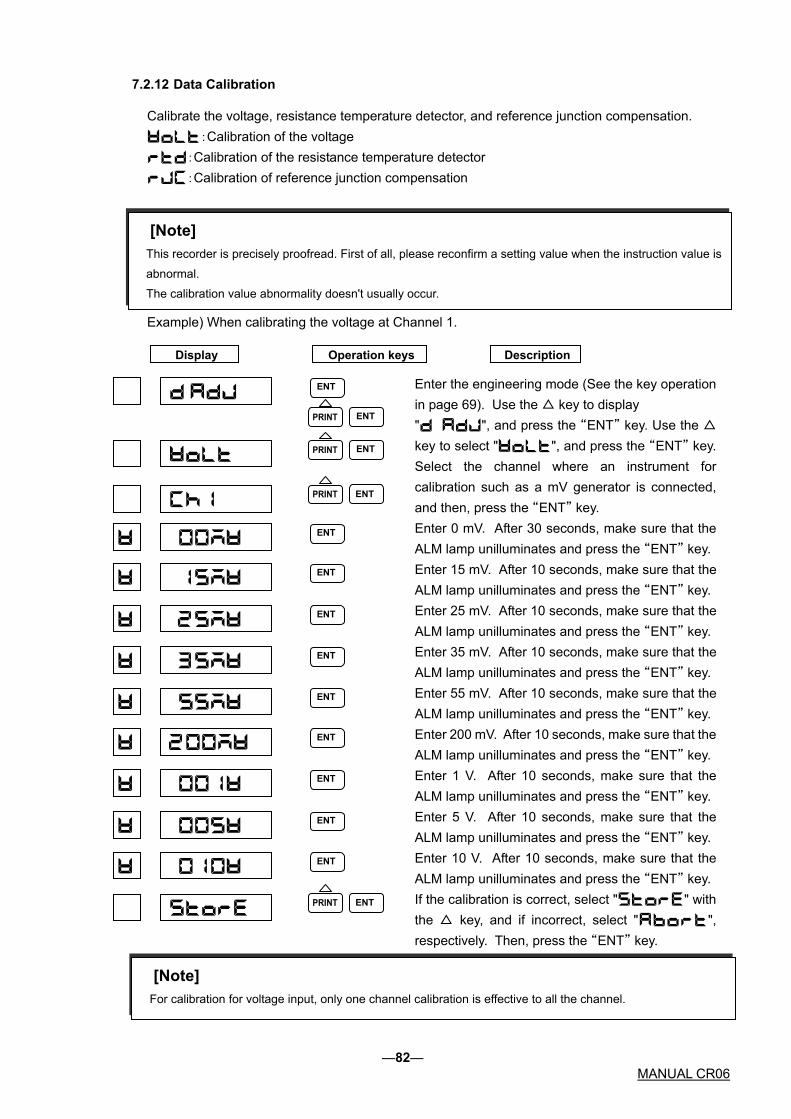
7.2.12 Data Calibration
Calibrate the voltage, resistance temperature detector, and reference junction compensation. :Calibration of the voltage :Calibration of the resistance temperature detector :Calibration of reference junction compensation Example) When calibrating the voltage at Channel 1.
Enter the engineering mode (See the key operation in page 69). Use the △ key to display " ", and press the “ENT” key. Use the △ key to select "", and press the “ENT” key. Select the channel where an instrument for calibration such as a mV generator is connected, and then, press the “ENT” key. Enter 0 mV. After 30 seconds, make sure that the ALM lamp unilluminates and press the “ENT” key. Enter 15 mV. After 10 seconds, make sure that the ALM lamp unilluminates and press the “ENT” key. Enter 25 mV. After 10 seconds, make sure that the ALM lamp unilluminates and press the “ENT” key. Enter 35 mV. After 10 seconds, make sure that the ALM lamp unilluminates and press the “ENT” key. Enter 55 mV. After 10 seconds, make sure that the ALM lamp unilluminates and press the “ENT” key. Enter 200 mV. After 10 seconds, make sure that the ALM lamp unilluminates and press the “ENT” key. Enter 1 V. After 10 seconds, make sure that the ALM lamp unilluminates and press the “ENT” key. Enter 5 V. After 10 seconds, make sure that the ALM lamp unilluminates and press the “ENT” key. Enter 10 V. After 10 seconds, make sure that the ALM lamp unilluminates and press the “ENT” key. If the calibration is correct, select "" with the △ key, and if incorrect, select "", respectively. Then, press the “ENT” key.
The calibration value abnormality doesn't usually occur.
This recorder is precisely proofread. First of all, please reconfirm a setting value when the instruction value is
abnormal.
[Note]
Display Operation keys Description
ENT ENT
PRINT ENT
ENT PRINT
ENT
ENT
ENT
ENT
ENT
ENT
ENT
ENT
ENT
ENT PRINT
For calibration for voltage input, only one channel calibration is effective to all the channel.
[Note]
―82― MANUAL CR06

Example) When calibrating the resistance temperature detector at Channel 2.
Enter the engineering mode (See the key operation
in page 69). Use the △ key to display
" ", and press the “ENT” key. Use the △
key to select "", and press the “ENT” key.
Select the channel where the instrument for
calibration such as a dial resistor is connected and
then, press the “ENT” key.
Enter 100Ω. After 10 seconds, make sure that the
ALM lamp unilluminates and press the “ENT” key.
Enter 150Ω. After 10 seconds, make sure that the
ALM lamp unilluminates and press the “ENT” key.
Enter 300Ω. After 10 seconds, make sure that the
ALM lamp unilluminates and press the “ENT” key.
If the calibration is correct, select "" with
the △ key, and if incorrect, select "",
respectively. Then, press the “ENT” key.
ENT
ENT PRINT
PRINT ENT
ENT
PRINT ENT
ENT
ENT
ENT PRINT
Display Operation keys Description
When calibrate RTD for a channel, the input terminals of the other channels are shortcut. Recording
requires RTD calibration for every channel.
[Note]
RUN ALM
CH.No
is properly or input is correctly. Make sure that the connection
The calibration Judges the input value.
is within the range.
③Illuminating the ALM lamp
RUN ALM
CH.No
RUN ALM
displays unilluminating the lamp.
displays illuminating the lamp.
CH.No
①Unilluminating the ALM lamp ②Blinking the ALM lamp
During calibration, ALM lamp displays following conditions below.
[Note]
―83― MANUAL CR06

Example) When setting the terminal temperature for Channel 1.
Enter the engineering mode (See the key operation
in page 69). Use the △ key to display
" ", and press the “ENT” key.
Use the △ key to select "", and press the
“ENT” key.
Select the Channel to set, and press the “ENT” key.
Measure and display the real time terminal
temperature. When press the “ENT” key, turn to
the setting temperature display.
Use the △ key to alter a numeral, and key to shift
a digit. Then, press the “ENT” key. See 9.5 (3)
Calibration of Reference Junction Compensation.
If the calibration is correct, select "" with
the △ key, and if incorrect, select "",
respectively. Then, press the “ENT” key.
Operation keys Description Display
ENT
PRINT ENT
PRINT ENT
ENT PRINT
ENT
PRINT FEED ENT
ENT PRINT
7.3 Terminating the Engineering Mode Example) The following describes how to save the setting data.
Use the △ key to display "", and press the
“ENT” key.
Use the △ key to select "", and press the
“ENT” key. The settings of the engineering mode
have been saved. Recording starts under the new
settings.
1)
[Note] When calibrate the terminal temperature, select a channel to calibrate for channel 1 to channel 3, and select another channel for channel 4 to channel 6. Calibrate these channels separately.
[Note] Upon termination, if you select "" and turn off the power without selecting
"", the settings will become invalid. Selecting "" invalidates the settings and starts recording under the previous settings.
Description Display Operation keys
ENT
PRINT ENT
―84― MANUAL CR06

8. COMMUNICATIONS
8.1 General Description
8.1.1 General Description of Functions
This Recorder has the following communication functions:
① Outputting the process variable
Process variable, alarms status, etc.
② Outputting the set value
Reading the setup data such as a range, chart speed, etc.
③ Inputting the set value
Writing the setup data such as a range, chart speed, etc.
④ Controlling of the recorder (Partially)
Selection to print, recording start/stop and changing display etc.
For the functions ② to ④, see the separate Communication Command Reference Manual
(charged). Setting the engineering mode is not capable with communication.
8.1.2 Transmission Specifications
(1) Communication system :Start-stop synchronous, half-duplex communications
(2) Connection :One-to-one(RS-232C), One-to-N(RS-485); N = 1 to 32
(3) Communication speed :1200, 2400, 4800, or 9600 bps
(4) Start bit :1 bit
(5) Stop bit :1 or 2 bits
(6) Parity :Even, Odd, or None
(7) Data length :7 or 8 bits
8.1.3 Data Construction
(1) Character construction
In order to send one data (byte) in start-stop synchronous communications, the following character
construction is assumed:
Start Bit (1) + Data Bit (7 or 8) + Parity Bit (1) + Stop Bit (1 or 2)
(2) Data format
The communication data is sent with data terminators added to multiple characters. Upon
receiving these terminators, the recorder starts analyzing the communication data.
A B CR LF C
Terminator 1 Character
―85― MANUAL CR06
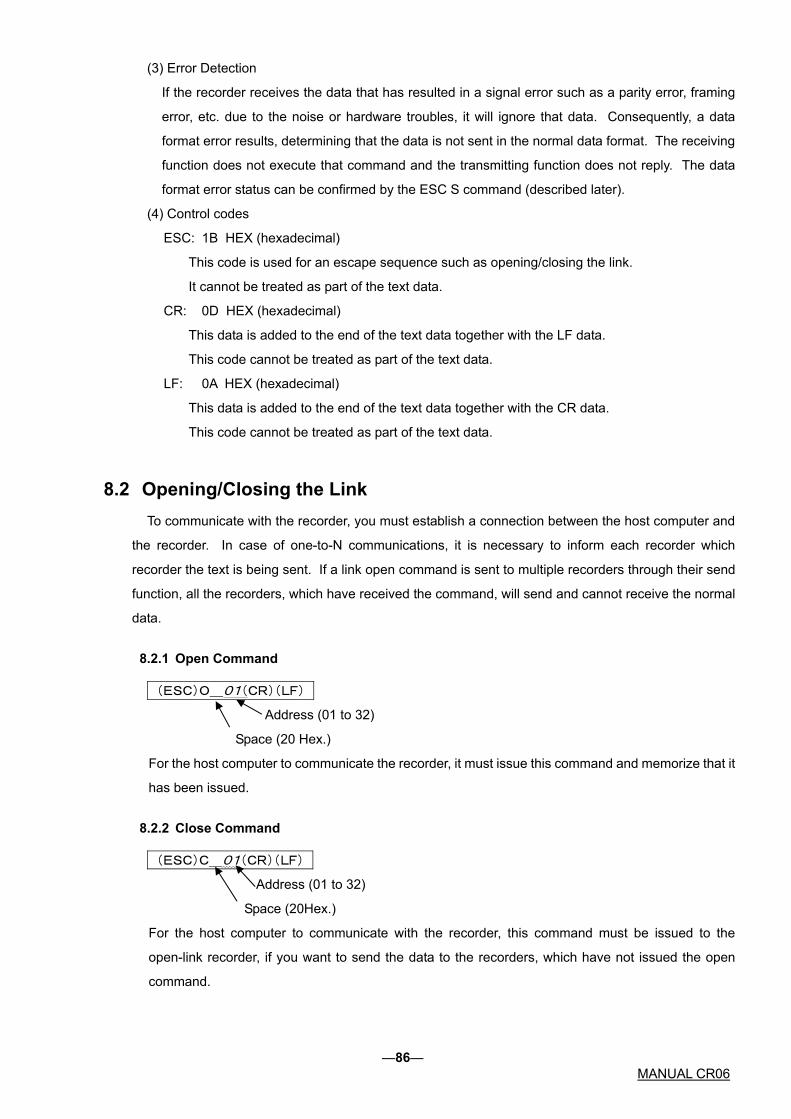
(3) Error Detection
If the recorder receives the data that has resulted in a signal error such as a parity error, framing
error, etc. due to the noise or hardware troubles, it will ignore that data. Consequently, a data
format error results, determining that the data is not sent in the normal data format. The receiving
function does not execute that command and the transmitting function does not reply. The data
format error status can be confirmed by the ESC S command (described later).
(4) Control codes
ESC: 1B HEX (hexadecimal)
This code is used for an escape sequence such as opening/closing the link.
It cannot be treated as part of the text data.
CR: 0D HEX (hexadecimal)
This data is added to the end of the text data together with the LF data.
This code cannot be treated as part of the text data.
LF: 0A HEX (hexadecimal)
This data is added to the end of the text data together with the CR data.
This code cannot be treated as part of the text data.
8.2 Opening/Closing the Link To communicate with the recorder, you must establish a connection between the host computer and
the recorder. In case of one-to-N communications, it is necessary to inform each recorder which
recorder the text is being sent. If a link open command is sent to multiple recorders through their send
function, all the recorders, which have received the command, will send and cannot receive the normal
data.
8.2.1 Open Command
(ESC)O_01(CR)(LF)
Address (01 to 32)
Space (20 Hex.)
For the host computer to communicate the recorder, it must issue this command and memorize that it
has been issued.
8.2.2 Close Command
(ESC)C_01(CR)(LF)
Address (01 to 32)
Space (20Hex.)
For the host computer to communicate with the recorder, this command must be issued to the
open-link recorder, if you want to send the data to the recorders, which have not issued the open
command.
―86― MANUAL CR06

8.3 Outputting the Process Variable Data
8.3.1 Specifying the Process Variable Data Output
TS0(CR)(LF)
Once this command is received, the recorder transfers the process variable data to the transmit buffer,
when the (ESC) T command is received.
8.3.2 Updating the Data
(ESC)T(CR)(LF)
Once this command is received, the recorder transfers the update process variable data to the
transmit buffer.
8.3.3 Specifying the Process Variable Data Output Order (At BINARY Mode Output)
BO0(CR)(LF) Outputs starting from the upper byte.
BO1(CR)(LF) Outputs starting from the lower byte.
The recorder outputs starting from the lower byte, unless otherwise specified.
8.3.4 Outputting the Data
FM0,S_CH,E_CH Specifies the ASCII mode output.
FM1,S_CH,E_CH Specifies the BINARY mode output.
S_CH :Output start channel 01 to 06
E_CH :Output end channel 01 to 06
※ When the number of channels is one, specify (S_CH) = (E_CH).
Example) FM0,01,06(CR)(LF)··············ASCII,01 to 06 channel output.
―87― MANUAL CR06
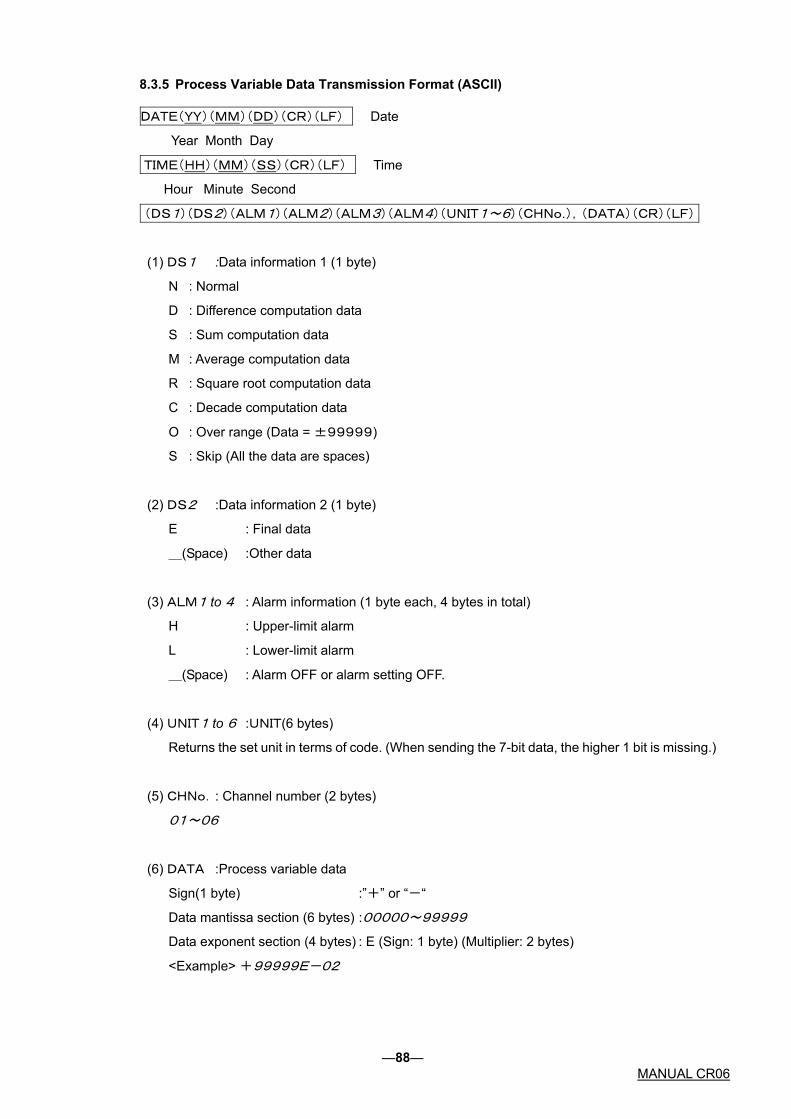
8.3.5 Process Variable Data Transmission Format (ASCII)
DATE(YY)(MM)(DD)(CR)(LF) Date
Year Month Day
TIME(HH)(MM)(SS)(CR)(LF) Time
Hour Minute Second
(DS1)(DS2)(ALM1)(ALM2)(ALM3)(ALM4)(UNIT1~6)(CHNo.),(DATA)(CR)(LF)
(1) DS1 :Data information 1 (1 byte)
N : Normal
D : Difference computation data
S : Sum computation data
M : Average computation data
R : Square root computation data
C : Decade computation data
O : Over range (Data = ±99999)
S : Skip (All the data are spaces)
(2) DS2 :Data information 2 (1 byte)
E : Final data
_(Space) :Other data
(3) ALM1 to 4 : Alarm information (1 byte each, 4 bytes in total)
H : Upper-limit alarm
L : Lower-limit alarm
_(Space) : Alarm OFF or alarm setting OFF.
(4) UNIT1 to 6 :UNIT(6 bytes)
Returns the set unit in terms of code. (When sending the 7-bit data, the higher 1 bit is missing.)
(5) CHNo. : Channel number (2 bytes)
01~06
(6) DATA :Process variable data
Sign(1 byte) :”+” or “-“
Data mantissa section (6 bytes) :00000~99999
Data exponent section (4 bytes) : E (Sign: 1 byte) (Multiplier: 2 bytes)
<Example> +99999E-02
―88― MANUAL CR06

8.3.6 Process Variable Data Transmission Format (BINARY)
Output bytes (2 bytes) :5×n (specified number of channels+6)
(1) Date and time (6 bytes):
① Year :00H to 63H (00H for the year 2000)
② Mouth :01H to 0CH
③ Day :01H to 1FH
④ Hour :00H to 17H (24-hour system)
⑤ Minute:00H to 3BH
⑥ Second:00H to 3BH
(2) Process variable (5 bytes):
CHNo.(1BYTE) :Channel number 01H~06H
A1 to A4 (2BYTES) :Alarm type activated at each alarm level.
1 :Upper-limit alarm
2 :Lower-limit alarm
0 :Alarm OFF or alarm setting OFF
Example) Bit Sequence.
LEVEL2H LEVEL1H LEVEL4H LEVEL3H
LEVEL2L LEVEL1L LEVEL4L LEVEL3L
LEVEL×H :Upper-limit alarm bit at the alarm level x
LEVEL×L :Lower-limit alarm bit at the alarm level x
DATA1,DATA2 (2BYTES) : Process variable data -32000 to +32000 (2-byte hexadecimal data) The higher and lower bytes can be reversed by the BO command. If Skip is specified, 8080H will be output.
Process variable 6 Process variable 1Date and time Output bytes
⑥⑤④③②①
A2 A1 A4 A3 DATA1 DATA2 CHNo.
0 0 1 0 0 0 0 1 0 0 0 1 0 0 1 0
[Note] Outputs a data over -32000 to +32000 as the overflow. An overflow 7E7E is output on plus
side, and 8181 is output on minus side. Excluding the Decade channel.
It outputs data output by the Decade channel as follows regardless of the BO command. The
upper byte outputs a mantissa (10 to 99). The lower byte outputs an exponent (-19 to 19). A
decimal point position is fixed on 1 digit.
―89― MANUAL CR06

8.4 Outputting the Unit and Decimal Point Position Data
8.4.1 Specifying the Unit and Decimal Point Position Data Output
TS2(CR)(LF)
Once this command is received, the recorder transfers the unit and decimal point position data to the
transmit buffer, when the (ESC) T command is received.
8.4.2 Updating the Data
(ESC)T(CR)(LF)
Once this command is received, the recorder transfers the update unit and decimal point position data
to the transmit buffer.
8.4.3 Outputting the Data
LF,S_CH,E_CH
S_CH :Output start channel 01 to 06
E_CH :Output end channel 01 to 06
※ When the number of channels is one, specify (S_CH) = (E_CH).
Example) LF,01,06(CR)(LF) ·················The unit and decimal point of 01 to 06 channel output.
8.4.4 Data Format
(DS1)(DS2)(CHNo.)(UNIT1~6)(DP)
(1) DS1 :Data information 1 (1 byte)
N : Normal
D : Difference computation data
S : Sum computation data
M : Average computation data
R : Square root computation data
C : Decade computation data,
O : Over range (Data = ±99999)
S : Skip (All the data are spaces)
(2) DS2 :Data information 2 (1 byte)
E :Final data,
_(Space) :Other data
(3) CHNo.:Channel number (2bytes) ;01~06
(4) UNIT 1 to 6 :UNIT
Returns the set unit in terms of code. (When sending the 7-bit data, the higher 1 bit is missing.)
(5) DP :Decimal point information (1 byte) ;0~4
[Note]
By the range setting, a decimal point position may differ from a display screen.
―90― MANUAL CR06
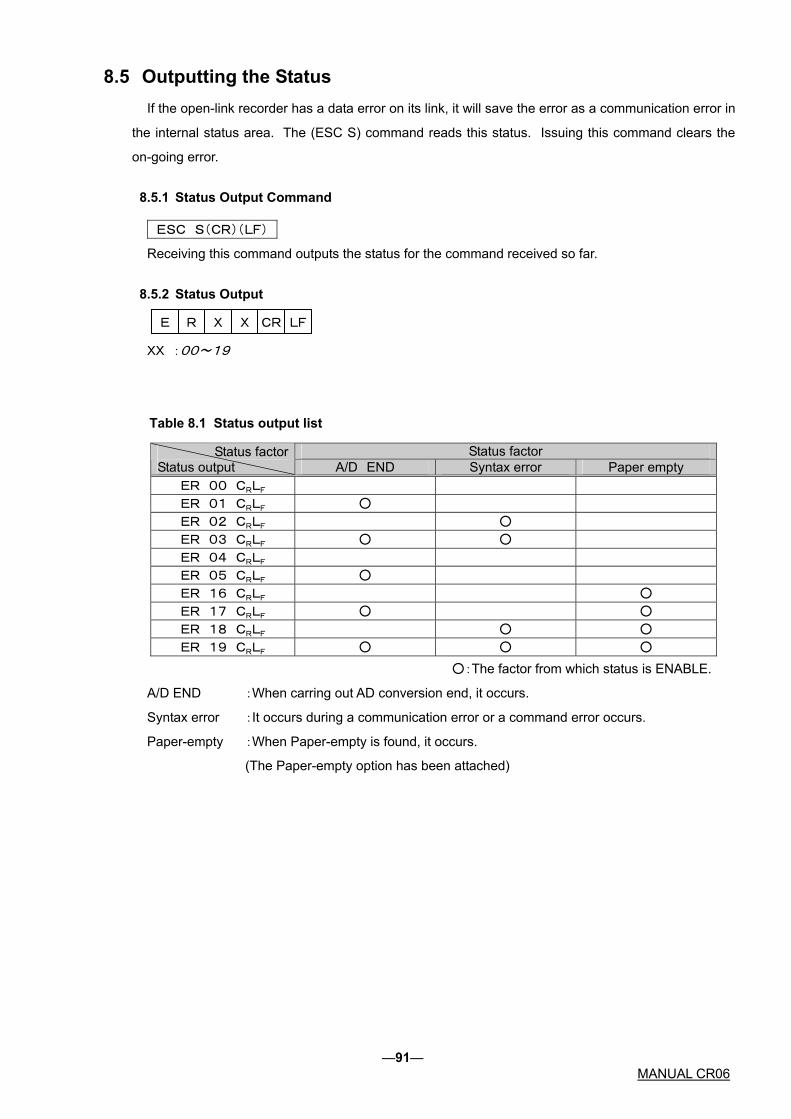
8.5 Outputting the Status If the open-link recorder has a data error on its link, it will save the error as a communication error in
the internal status area. The (ESC S) command reads this status. Issuing this command clears the
on-going error.
8.5.1 Status Output Command
ESC S(CR)(LF)
Receiving this command outputs the status for the command received so far.
8.5.2 Status Output
XX :00~19
CR LF X X R E
Table 8.1 Status output list
Status factor Status factor Status output A/D END Syntax error Paper empty
ER 00 CRLF ER 01 CRLF ○ ER 02 CRLF ○ ER 03 CRLF ○ ○ ER 04 CRLF ER 05 CRLF ○ ER 16 CRLF ○ ER 17 CRLF ○ ○ ER 18 CRLF ○ ○ ER 19 CRLF ○ ○ ○
○:The factor from which status is ENABLE.
A/D END :When carring out AD conversion end, it occurs.
Syntax error :It occurs during a communication error or a command error occurs.
Paper-empty :When Paper-empty is found, it occurs.
(The Paper-empty option has been attached)
―91― MANUAL CR06

8.6 Data Reception Example Host Computer Side Recorder Side
Open Command
Open the Link
Process Variable Data Output Designation Command (TS0)
Data Update Command (ESC T)
Data Output Request Command (FM)
Process Variable Data Output Order Designation (BO); BINARY Mode only
Closes the Link
Prepares For the Process Variable Data Output
Prepares the Update Data
Sends the Update Data
Determines the Process Variable Data Output Order
Close Command
Send the command to the recorder to which you want to start data transmission.
Send once to the recorder. Then, you need not to any more.
Send to the recorder every time.
Sends the command when you want to send to other recorder.
―92― MANUAL CR06

9. MAINTENANCE Inspect the following maintenance items in order to use this instrument effectively.
Inspection
Cleaning
Replace Consumables
Adjust Dot Printing Position
Calibration
9.1 Inspection Inspect the condition of operation to use effectively.
When a defect is found, see Chapter 10 “Trouble Shooting”.
◆Trend recording deflected?
◆Are recording indication done properly?
・ Any big error in indicated values or dot printing position?
・ Any improper dot printing?
・ Any blurred dot printing or printout?
・ Proper printout? ◆Is the chart paper feed properly?
・ Is the chart paper folded properly?
・ Aren’t the feed holes in the chart paper torn off or broken?
・ Is the chart speed correct? ◆Is there any abnormal sound?
9.2 Cleaning Many parts of this instrument are plastic. Use a dry cloth to wipe the parts should be clean.
[Note] Do not use any organic solvent.
―93― MANUAL CR06
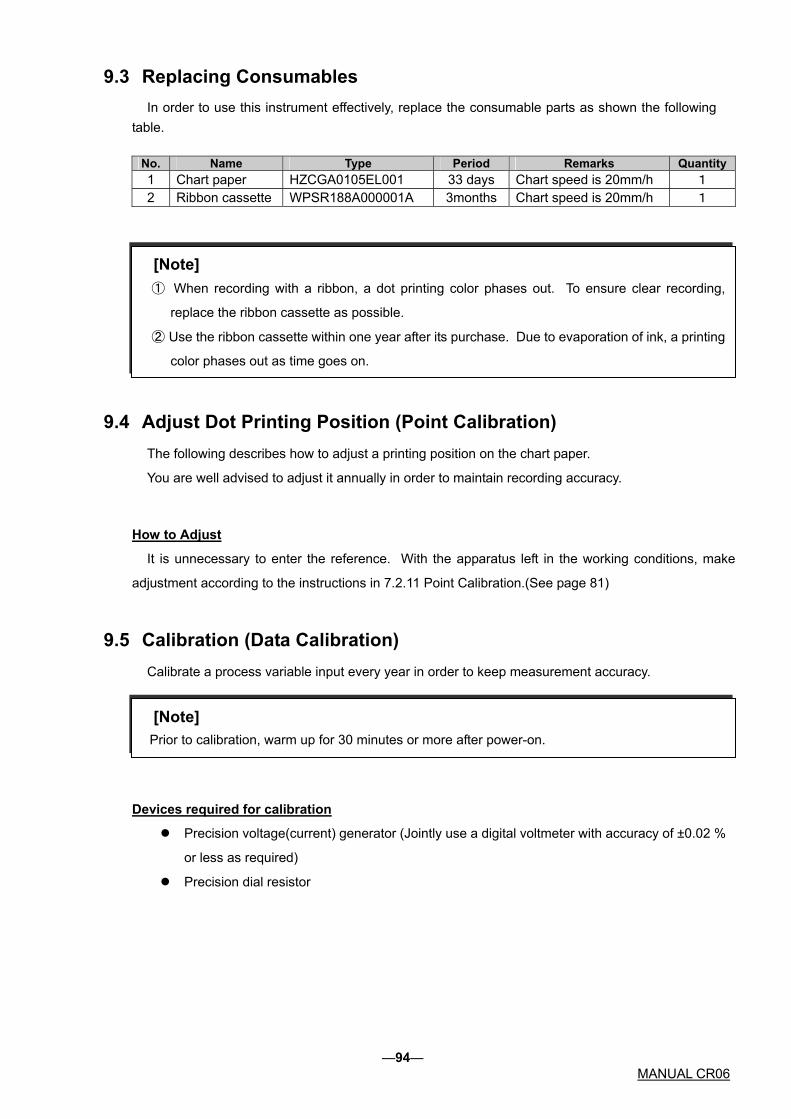
9.3 Replacing Consumables In order to use this instrument effectively, replace the consumable parts as shown the following
table.
No. Name Type Period Remarks Quantity1 Chart paper HZCGA0105EL001 33 days Chart speed is 20mm/h 1 2 Ribbon cassette WPSR188A000001A 3months Chart speed is 20mm/h 1
[Note] ① When recording with a ribbon, a dot printing color phases out. To ensure clear recording,
replace the ribbon cassette as possible.
② Use the ribbon cassette within one year after its purchase. Due to evaporation of ink, a printing
color phases out as time goes on.
9.4 Adjust Dot Printing Position (Point Calibration) The following describes how to adjust a printing position on the chart paper.
You are well advised to adjust it annually in order to maintain recording accuracy.
How to Adjust
It is unnecessary to enter the reference. With the apparatus left in the working conditions, make
adjustment according to the instructions in 7.2.11 Point Calibration.(See page 81)
9.5 Calibration (Data Calibration) Calibrate a process variable input every year in order to keep measurement accuracy.
Devices required for calibration
[Note] Prior to calibration, warm up for 30 minutes or more after power-on.
Precision voltage(current) generator (Jointly use a digital voltmeter with accuracy of ±0.02 %
or less as required)
Precision dial resistor
―94― MANUAL CR06

(1) Calibration of Voltage
Conduct calibration in case of voltage, current or thermocouple input. For thermocouple input,
calibrate reference junction compensation together.
Conduct calibration according to the instructions in 7.2.12 Data Calibration (Calibration of the
voltage).(See page 79)
(2) Calibration of Resistance temperature detector
Conduct calibration according to the instructions in 7.2.12 Data Calibration (Calibration of the
resistance temperature detector).(See page 83)
Wiring
Precision Voltage (Current) Generator
◯+ ◯-
Digital Voltmeter ◯+ ◯-
◯+ ◯-
CR06 Recorder Input Terminals
[Note] ① Calibrate at any one channel.
② When a shunt resistor is attached to the input terminal block in case of current input, detach it
prior to calibration.
Precision Dial
Resistor
◯A ◯B ◯B
Wiring
CR06 Recorder Input Terminals
[Note] A resistance value should not disperse greater than 6 mΩ from one wire to another. When calibrate RTD for a channel, the input terminals of the other channels are shortcut. Recording requires RTD calibration for every channel
―95― MANUAL CR06
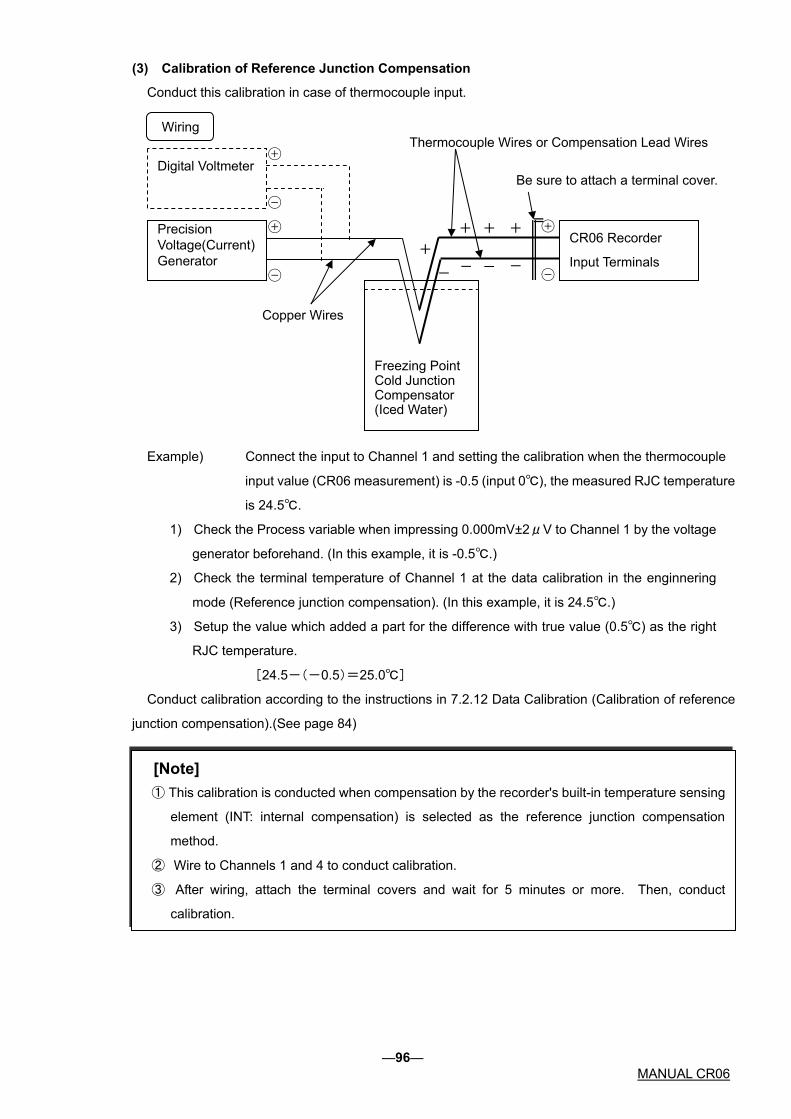
(3) Calibration of Reference Junction Compensation
Conduct this calibration in case of thermocouple input.
Example) Connect the input to Channel 1 and setting the calibration when the thermocouple
input value (CR06 measurement) is -0.5 (input 0℃), the measured RJC temperature
is 24.5℃.
Freezing Point Cold Junction Compensator (Iced Water)
Precision Voltage(Current) Generator
CR06 Recorder
Input Terminals
Digital Voltmeter
◯+
◯-
◯+
◯-
Wiring
Copper Wires
+ +
- - - -
+ + ◯+
◯-
Be sure to attach a terminal cover.
Thermocouple Wires or Compensation Lead Wires
1) Check the Process variable when impressing 0.000mV±2μV to Channel 1 by the voltage
generator beforehand. (In this example, it is -0.5℃.)
2) Check the terminal temperature of Channel 1 at the data calibration in the enginnering
mode (Reference junction compensation). (In this example, it is 24.5℃.)
3) Setup the value which added a part for the difference with true value (0.5℃) as the right
RJC temperature.
[24.5-(-0.5)=25.0℃]
Conduct calibration according to the instructions in 7.2.12 Data Calibration (Calibration of reference
junction compensation).(See page 84)
[Note] ① This calibration is conducted when compensation by the recorder's built-in temperature sensing
element (INT: internal compensation) is selected as the reference junction compensation
method.
② Wire to Channels 1 and 4 to conduct calibration.
③ After wiring, attach the terminal covers and wait for 5 minutes or more. Then, conduct
calibration.
―96― MANUAL CR06

10. TROUBLESHOOTING
10.1 Troubleshooting
10.1.1 Trouble Items
Dose not work at all
Big error
Recording error
Chart paper feed error
Trend recording deflected
Nothing is recorded at all
Faint printing
Chart paper is not fed at all
Improper feed
Inaccurate feed rate
Flow chart 6 (Page 100) Flow chart 7 (Page 100)
Contact our dealer where you purchased the instrument, or our sales representative.
Flow chart 5 (Page 99)
Flow chart 4 (Page 99)
Flow chart 3 (Page 98)
Flow chart 1 (Page 97)
Trouble Remedy
Flow chart 2 (Page 98)
10.1.2 When the Recorder Dose not Work at All
Flow chart 1
Power terminal connected properly?
Power supplied properly?
Connect properly (See 4.1 on Page 15)
YES
YES
YES
NO
NO
85 to 264VAC 45 to 65Hz
Supply properly
Power turned on? NO
Turn on the power
Dose not work at all
Contact our dealer where you purchased the instrument, or our sales representative.
―97― MANUAL CR06

10.1.3 When there is a Big Error
Flow chart 2
Scaling set properly?
Calibration corrects?
Calibrate again(See 9.5 on Page 94)
Set properly(See 7.1.1 on Page 48)
Calibrate zero/span of chart paper properly?
NO
YES
YESNO
NO
Contact our dealer where you purchased the instrument, or our sales representative.
Calibrate again (See 7.2.11 on Page 81)
YES
NO
YES
(Dot point error) Display or print value matching dot
prints value?
Big error
10.1.4 When the Trend Recording Deflected
Flow chart 3
Value and sign (+/-) of input
correct ?
Range and scale set properly
Input signal wiring correct? (Sensor disconnection, etc)
NO Wire correctly (See 4.2 on Page 17 to 19)
Contact our dealer where you purchased the instrument, or our sales representative.
Set correctly (See 7.1.1 on Page 48)
Apply a correct input (See 4.2 on Page 17 to 19)
YES
YES
YES
NO
NO
Trend Recording Deflected (0 or 100%)
―98― MANUAL CR06

10.1.5 When Records Nothing
Flow chart 4
Ribbon cassette set properly?
NO
NO
NO
YES
Select the RUN mode (See 2.2.2 on Page 11)
Set properly(See 5.2 on Page 29)
Ribbon fed properly?
YES
RUN mode selected?
NO
YES
NO Replace the ribbon cassette (See 5.2 on Page 29)
Contact our dealer where you purchased the instrument, or our sales representative.
(See 6.4 on Page 34 to 37)
YESDigital printout enabled?
Error message displayed?
YESTake remedy according to 10.2 on Page 101
No recording at all
10.1.6 When Recording is Faint
Flow chart 5
Ribbon out of life?
NO
Ribbon fed properly?
NO
YES
Replace the ribbon cassette (See 5.2 on Page 29)
Contact our dealer where you purchased the instrument, or our sales representative.
YES
Faint printing
―99― MANUAL CR06
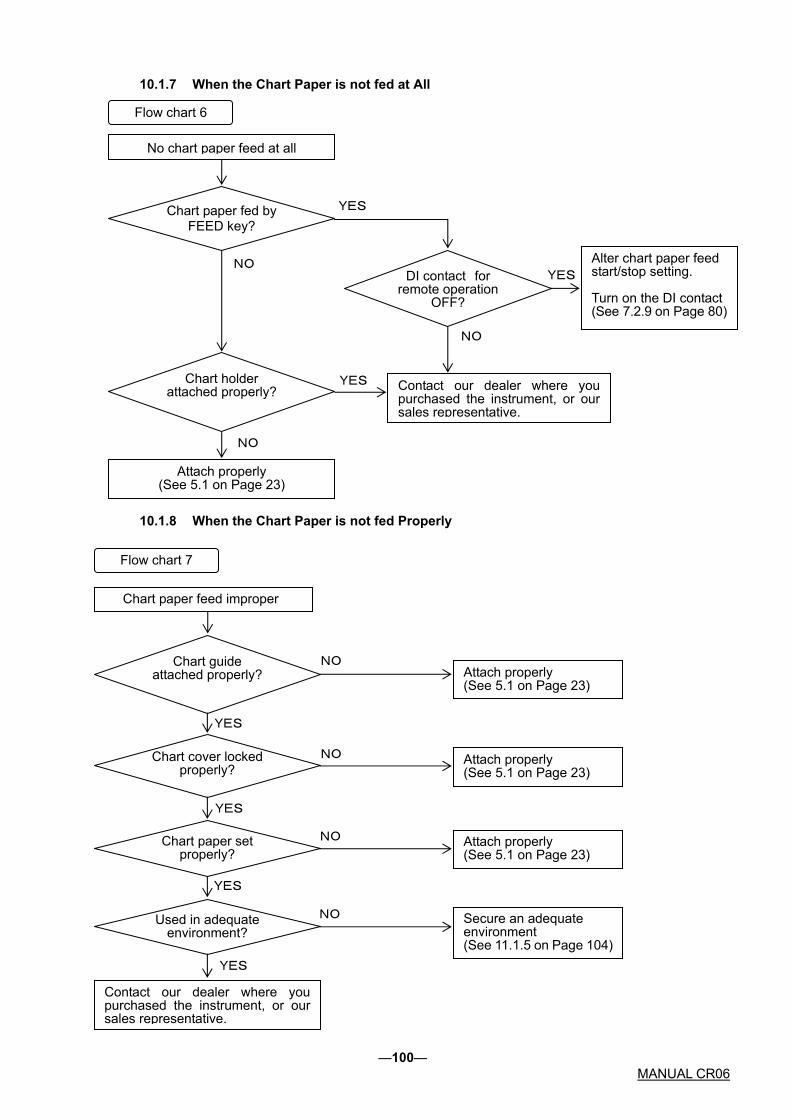
10.1.7 When the Chart Paper is not fed at All
Flow chart 6
Chart holder attached properly?
YES
YES
NO
Chart paper fed by FEED key?
DI contact for remote operation
OFF?
Alter chart paper feed start/stop setting. Turn on the DI contact (See 7.2.9 on Page 80)
Contact our dealer where you purchased the instrument, or our sales representative.
NO
NO
YES
Attach properly (See 5.1 on Page 23)
No chart paper feed at all
10.1.8 When the Chart Paper is not fed Properly
Flow chart 7
Chart cover locked properly?
Chart paper set properly?
Chart guide attached properly? Attach properly
(See 5.1 on Page 23)
NO
NO
YES
YES
YES
Attach properly (See 5.1 on Page 23)
Used in adequate environment?
YES
Secure an adequate environment (See 11.1.5 on Page 104)
NO
Attach properly (See 5.1 on Page 23)
NO
Chart paper feed improper
Contact our dealer where you purchased the instrument, or our sales representative.
―100― MANUAL CR06

10.2 Self Diagnostics Function (ERROR) This instrument always makes a self diagnostics on the items listed in Table 10.1 below. When an
error is found in the self diagnostics results, a relevant error number is displayed.
10.2.1 Self Diagnostic Items
Table 10.1 Status output list
Type Error message Parts Diagnostic Remedy
Zero point sensor
Zero point position of servomotor cannot be detected.
ADC AD conversion end error, Initializing error
IC for clock The clock battery runs down[Note1]
WDT Watchdog timer error
EEP WRITEWRITE Non-volatile memory Writing error
EEP READ1 Non-volatile memory Reading error (Setup data)
EEP READ2 Non-volatile memory Reading error (Engineering data)
EEP READ3 Non-volatile memory Reading error (ADC Calibration data)
Har
d w
are
erro
r
RJC ERROR The measurement is abnormal of the RJC internal temperature sensor.
Contact our dealer where you purchased the instrument or our sales representative.
Area error Input value is over the setting range.
Time error Clock time setting error
Setting range error
Setting the channel (CH1) which cannot set up the sum/difference/average operation.
Area error Span L ≧ Span R
Area error Scale L ≧ Scale R
Area error Zone L ≧ Zone R or Zone R-Zone L is less than 5mm.
Setting channel error
The reference channel range of the sum/difference/average operation is except Volt, TC, RTD and SCALE.
Ope
ratio
n er
ror
All channels skip error Setting the Skip all channels.
Set properly
[Note1]The lifetime of the cell assumes about 10 years but sometimes depends on the use environment.
―101― MANUAL CR06

10.2.2 Error Display
When multiple errors are encountered, their error numbers are displayed with automatic scrolling.
When an error restores, an error display can be canceled to the input of the “RUN” key.
CAUTION While indicates an error, dose not indicate Auto, Manual and Date/Time.
―102― MANUAL CR06

11. SPECIFICATIONS
11.1 Common Specifications
11.1.1 Input Signal
DC voltage :±10, 0 to 20, 0 to 50, ±200 mV DC, ±1, 0 to 5, ±10 V DC
Thermocouple :B, R, S, K, E, J, T, C, Au-Fe, N, PR40-20, PLⅡ, U, L
(Thermocouples not to be connected to hazardous voltage or
equipment.)
Resistance temperature detector :Pt100, JPt100
DC current :4 to 20mA DC (External shunt resistor: 250Ω <charged:HMSU3081A11>)
11.1.2 Performance and Characteristics
Digital accuracy rating :See 11.2.1
Input impedance :10MΩ min. in mV, TC input (without burnout)
200kΩ min. in mV, TC input (with burnout)
1MΩ min. in voltage input
250Ω(shunt resistance : external <charged:HMSU3081A11>)
in mA input
Allowable signal source resistance
:10kΩ max. in mV, TC input (without burnout)
100Ω max. in mV, TC input (with burnout)
1kΩ max. in Voltage input
10Ω max.(per line) in Resistance temperature detector input
Normal mode rejection ratio :60dB min.(50/60±0.1Hz)
Common mode rejection ratio :140dB min.(50/60±0.1Hz)
Isolation resistance :0.5kV DC 20MΩ min. between the each terminal and grounding terminal
Withstand Voltage :1.5kV AC for 1 minute between the power terminal and grounding terminal
:0.5kV AC for 1 minute between the input terminal and grounding terminal
:0.2kV AC for 1 minute between the input terminals
Interchannel maximum noise voltage: 200 V AC at 50/60 Hz
Vibration resistance :10 to 60Hz 1m/s2 max.
Shock resistance :2m/s2 max.
Clock precision :±50ppm max.
Chart feed accuracy :±0.1% max.
―103― MANUAL CR06

11.1.3 Structure
Mounting :Panel mount(vertical panel)
Allowable backward inclination : Within 30゜
Material(Color) : Case ;Polycarbonate(Black), Glass 10% UL94-V2
Door ;Polycarbonate UL94-V2(Clear)
;Dust-proof, drip-proof (Complies with the IEC529-IP65) not evaluated as
part of Underwriters Laboratories Listing certification.
11.1.4 Power Source
Rated supply voltage range :100 to 240V AC
Working supply voltage range :85 to 264V AC
Rated power frequency :50/60Hz
Working frequency range :45 to 65Hz
Table 11.1 Power consumption
100VAC Max. power consumption
6-dot recorder About 25VA About 30VA
11.1.5 Normal Operating Conditions
Ambient temperature :0 to 50℃
Ambient humidity :20 to 80%RH
Supply voltage :85 to 264V AC
Supply frequency :45 to 65Hz
Vibration :10 to 60Hz 0.2m/s2 max.
Shock :Unacceptable
Magnetic field :400A/m max. (DC and AC: 50/60Hz)
Noise :Normal mode(50/60Hz)
DC current, Thermocouple; Peak value lower than the span width
of the measurement range
Resistance temperature detector ; 50mV max.
Common mode (50/60Hz) ; 250V AC max.
Interchannel maximum noise voltage: 200 V AC at 50/60 Hz
Posture :Allowable backward inclination : within 30゜, Right-and-left level
Warming up time :30 minutes min. from the time of a power-on injection
―104― MANUAL CR06

11.1.6 Alarm (Relay Output is Optional)
Outputs :6 point(Built-in option, normally open)
Alarm types :2 types(H, L), total 4 levels/channel
Contact point capacity :250V AC, 3A max. (Resistive load)
30V DC, 3A max. (Resistive load)
125V DC, 0.5A max. (Resistive load)
Hysteresis width :0.5%
Setting accuracy :Digital display accuracy
11.1.7 Safety Standard and EMI Standard
Electrical safety :IEC1010-1,UL3101-1 Installation category Ⅱ and pollution degree 2.
Emissions :EN55011 Group1 Class A
Immunity :EN50082-2
11.1.8 DI Function (Option)
Set up point is a maximum of 3.
11.1.9 Paper-empty Detecting Function (Option)
Detects the Paper-empty to output an alarm.
―105― MANUAL CR06

11.2 Standard Setting Specifications
11.2.1 Measurement Range
The arbitrary setup is possible by the operation key.
A digital accuracy rating is as Table11.1 at Reference operating conditions. It is shown below.
Reference operating conditions :Temperature ; 23 ±2℃
Humidity ; 55 ±10%RH
Power source voltage ; 85 to 264V AC
Electric wave frequency ; 50/60%Hz ±1%
Warming up time ; 30 minutes min.
The performance in the state where nothing is vibration and a shock.
Terminal block reference junction compensation accuracy is not included in the digital accuracy rating.
It is shown below.
Terminal block reference junction compensation accuracy
◇B, R, S, Au-Fe, PR40-20 :±1℃
◇K, E, J, T, C, N, PLⅡ, U, L :±0.5℃
Table 11.2 Measurement Range
Measurement Digital Analog Type RANGE Measurement range
Accuracy Max. resolution Accuracy
-10 to 10mV ±(0.2% of rdg + 3digits) 10μV
0 to 20mV ±(0.2% of rdg + 3digits) 10μV
0 to 50mV ±(0.2% of rdg + 2digits) 10μV
-200 to 200mV ±(0.2% of rdg + 3digits) 100μV
-1 to 1V ±(0.1% of rdg + 3digits) 1mV
0 to 5V ±(0.2% of rdg + 2digits) 1mV
-10 to 10V ±(0.3% of rdg + 3digits) 10mV
DC
vol
tage
DC
con
tact
Inpu
t
4 to 20mA ±(0.2% of rdg + 2digits) 0.01mA
0.0 to 1820.0℃
±(0.15% of rdg + 1℃) 400 to 600℃, ±2℃ An accuracy is not compensated within a range of 0 to less than 400℃
B
32.0 to 3308.0゚F
±(0.15% of rdg + 1.8゚F) 752 to 1112゚F, ±3.6゚F An accuracy is not compensated within a range of 32 to less than 752゚F
0.0 to 1760.0℃ ±(0.15% of rdg + 1℃) ※0 to 100℃, ±3.7℃ 100 to 300℃, ±1.5℃
Ther
moc
oupl
e
R1
32.0 to 3200.0゚F ±(0.15% of rdg + 1.8゚F) ※32 to 212゚F, ±6.7゚F 212 to 572゚F, ±2.7゚F
0.1℃/0.18゚F
Digital accuracy ±(0.3% of span)
―106― MANUAL CR06

Measurement
Digital Analog Type RANGE Measurement rangeAccuracy Max.
resolution Accuracy
0.0 to 1200.0℃ ±(0.15% of rdg + 0.8℃) ※0 to 100℃, ±3.7℃ 100 to 300℃, ±1.5℃ R2
32.0 to 2192.0゚F ±(0.15% of rdg + 1.44゚F) ※32 to 212゚F, ±6.7゚F 212 to 572゚F, ±2.7゚F
0.0 to 1760.0℃ ±(0.15% of rdg + 1℃) ※0 to 100℃, ±3.7℃ 100 to 300℃, ±1.5℃
S
32.0 to 3200.0゚F ±(0.15% of rdg + 1.8゚F) ※32 to 212゚F, ±6.7゚F 212 to 572゚F, ±2.7゚F
-200.0 to 1370.0℃
±(0.15% of rdg + 0.7℃) ※-200 to -100℃, ±(0.15% of rdg + 1℃)
K1
-328.0 to 2498.0゚F±(0.15% of rdg + 1.3゚F) ※-328 to -148゚F, ±(0.15% of rdg + 1.8゚F)
-200.0 to 600.0℃ ±(0.15% of rdg + 0.4℃) ※-200 to -100℃, ±(0.15% of rdg + 1℃)
K2
-328.0 to 1112.0゚F±(0.15% of rdg + 0.7゚F) ※-328 to -148゚F, ±(0.15% of rdg + 1.8゚F)
-200.0 to 300.0℃ ±(0.15% of rdg + 0.3℃) ※-200 to -100℃, ±(0.15% of rdg + 1℃)
K3
-328.0 to 572.0゚F ±(0.15% of rdg + 0.5゚F) ※-328 to -148゚F, ±(0.15% of rdg + 1.8゚F)
-200.0 to 800.0℃ ±(0.15% of rdg + 0.5℃) E1
-328.0 to 1472.0゚F ±(0.15% of rdg + 0.9゚F) -200.0 to 300.0℃ ±(0.15% of rdg + 0.4℃)
E2 -328.0 to 572.0゚F ±(0.15% of rdg + 0.7゚F) -200.0 to 150.0℃ ±(0.15% of rdg + 0.3℃)
E3 -328.0 to 302.0゚F ±(0.15% of rdg +0.5゚F)
-200.0 to 1100.0℃
±(0.15% of rdg + 0.5℃) ※-200 to -100℃, ±(0.15% of rdg + 0.7℃)
J1
-328.0 to 2012.0゚F±(0.15% of rdg + 0.9゚F) ※-328 to -148゚F, ±(0.15% of rdg + 1.3゚F)
-200.0 to 400.0℃ ±(0.15% of rdg + 0.4℃) ※-200 to -100℃, ±(0.15% of rdg + 0.7℃)
J2
-328.0 to 752.0゚F ±(0.15% of rdg + 0.7゚F) ※-328 to -148゚F, ±(0.15% of rdg + 1.3゚F)
-200.0 to 200.0℃ ±(0.15% of rdg + 0.3℃) ※-200 to -100℃, ±(0.15% of rdg + 0.7℃)
Ther
moc
oupl
e
J3
-328.0 to 392.0゚F ±(0.15% of rdg + 0.5゚F) ※-328 to -148゚F, ±(0.15% of rdg + 1.3゚F)
0.1℃/0.18゚F Digital accuracy ±(0.3% of span)
―107― MANUAL CR06

Measurement Digital Analog Type RANGE Measurement range
Accuracy Max. resolution Accuracy
-200.0 to 400.0℃ ±(0.15% of rdg + 0.5℃) ※-200 to -100℃, ±(0.15% of rdg + 0.7℃) T1
-328.0 to 752.0゚F ±(0.15% of rdg + 0.9゚F) ※-328 to -148゚F, ±(0.15% of rdg + 1.3゚F)
-200.0 to 200.0℃ ±(0.15% of rdg + 0.4℃) ※-200 to -100℃, ±(0.15% of rdg + 0.7℃)
T2
-328.0 to 392.0゚F ±(0.15% of rdg + 0.7゚F) ※-328 to -148゚F, ±(0.15% of rdg + 1.3゚F)
0.0 to 2320.0℃ ±(0.15% of rdg + 1℃) C
32.0 to 4208.0゚F ±(0.15% of rdg + 1.8゚F)
0.1℃/0.18゚F
Au-Fe 1.0 to 300.0K ±(0.15% of rdg + 1K) ※1 to 20 K, ±2.4 K 0.1K
0.0 to 1300.0℃ ±(0.15% of rdg + 0.7℃) N
32.0 to 2372.0゚F ±(0.15% of rdg + 1.3゚F)
0.0 to 1880.0℃ ±(0.15% of rdg + 1℃) ※0 to 300℃, ±37.6℃ 300 to 800℃, ±18.8℃
PR40-20
32.0 to 3416.0゚F ±(0.15% of rdg + 1.8゚F) ※32 to 572゚F, ±67.7゚F 572 to 1472゚F, ±33.8゚F
0.0 to 1390.0℃ ±(0.15% of rdg + 0.7℃) PLⅡ 32.0 to 2534.0゚F ±(0.15% of rdg + 1.3゚F)
-200.0 to 400.0℃ ±(0.15% of rdg + 0.5℃) ※-200 to -100℃, ±(0.15% of rdg + 0.7℃)
U
-328.0 to 752.0゚F ±(0.15% of rdg + 0.9゚F) ※-328 to -148゚F, ±(0.15% of rdg + 1.3゚F)
-200.0 to 900.0℃ ±(0.15% of rdg + 0.5℃) ※-200 to -100℃, ±(0.15% of rdg + 0.7℃)
Ther
moc
oupl
e
L
-328.0 to 1652.0゚F±(0.15% of rdg + 0.9゚F) ※-328 to -148゚F, ±(0.15% of rdg + 1.3゚F)
-200.0 to 650.0℃ ±(0.15% of rdg + 0.3℃) Pt100-1
-328.0 to 1202.0゚F ±(0.15% of rdg + 0.6゚F) -200.0 to 200.0℃ ±(0.15% of rdg + 0.2℃)
Pt100-2 -328.0 to 392.0゚F ±(0.15% of rdg + 0.4゚F) -200.0 to 630.0℃ ±(0.15% of rdg + 0.3℃)
JPt100-1-328.0 to 1166.0゚F ±(0.15% of rdg + 0.6゚F) -200.0 to 200.0℃ ±(0.15% of rdg + 0.2℃)
Res
ista
nce
tem
pera
ture
det
ecto
r
JPt100-2-328.0 to 392.0゚F ±(0.15% of rdg + 0.4゚F)
0.1℃/0.18゚F
Digital accuracy ±(0.3% of span)
B,R,S,K,E,J,T,N :JIS C 1602-1995(IEC584-1) C :Made by “Hoskins” (WRe5-26) Au-Fe :ASTM COMMITTEE-20 ON TEMPERATURE MEASUREMENT PR40-20 :ASTM E1751-1995 PLⅡ :ASTM E1751-1995 U :DIN43710 :1985(Cu-CuNi) L :DIN43710 :1985(Fe-CuNi) Pt100 :JIS C 1604-1997(IEC751) JPt100 :(JIS C 1604-1981)
―108― MANUAL CR06

11.2.2 The Accuracy at the Computation
(1) Scaling The accuracy rating at the scaling is as following formula. Scaling accuracy (digits) = Range accuracy rating (digits) × Scaling factor +2 digits
Scaling span (digits) Measurement range span (digits)
But, Scaling factor = Example 1) When VOLT range is -1.000~1.000V and Scaling range is 0.00~100.00.
Range accuracy rating = 0.1%×1.000V+3 digits
(Input +1.000V) = 4 digits
Scaling factor = =5 Therefore, Scaling accuracy = ±(4×5+2)
= ±22 digits
Analog recording accuracy = ± 4+{1000-(-1000)}×
10000-0 1000-(-1000)
0.3 100
= ±10 digits
= ±0.01V
Example 2) When Type K is 0.0~200.0℃ and Scaling is 0.00~200.00.
Range accuracy rating =0.15%×200.0+0.3℃
(Input 200℃) =0.6℃
=6 digits
Scaling factor = =10
20000-0 2000-0
Therefore, Scaling accuracy =±(6×10+2)
=±62 digits
=±0.62℃
(2) Square root computation The square root computation is as following formula. Display value = 10 Process variable Display value accuracy rating:ε, Process variable accuracy: e, and Process variable: x (convert into %). Display value = 10 x±e ≒ 10 x ± Therefore, Display value accuracyε=
10e 2 x
5e x
―109― MANUAL CR06

When input 4~20mA, the square root computation accuracy:εis as following formula. Measuring 100% ε100 = = =0.16% rdg .125)5e
100 5(0.2+0
10 Measuring 50% ε50 = = =0.19% rdg
5e 50
5(0.1+0.167)
7.07 Measuring 9% ε9 = = =2.3% rdg
5e 9
5(0.018+1.39) 3
Measuring 1% ε1 = = 5(0.002+12.5) =62.5% rdg
5e 1
If the process variable is low as above, its accuracy rating is incorrect.
(3) Decade
The accuracy rating at the decade computation is defined the logarithm of display value. Normally,
the accuracy rating is less than 1 digit and you cannot read by significant digit.
(4) Difference, Sum, and Average
The accuracy rating of Difference, Sum, and Average is as following formula.
Difference and Sum : Reference channel accuracy rating ×2
Average : Reference channel accuracy rating
Example) When Reference channel VOLT is 00.00~10.00V and Difference is -10.00~10.00.
Reference channel accuracy rating = ±(0.3%×10.00V+3 digits)
= ±(1000×0.003+3)
= ±6 digits
Difference accuracy rating = ±6×2 = ±12 digits
―110― MANUAL CR06
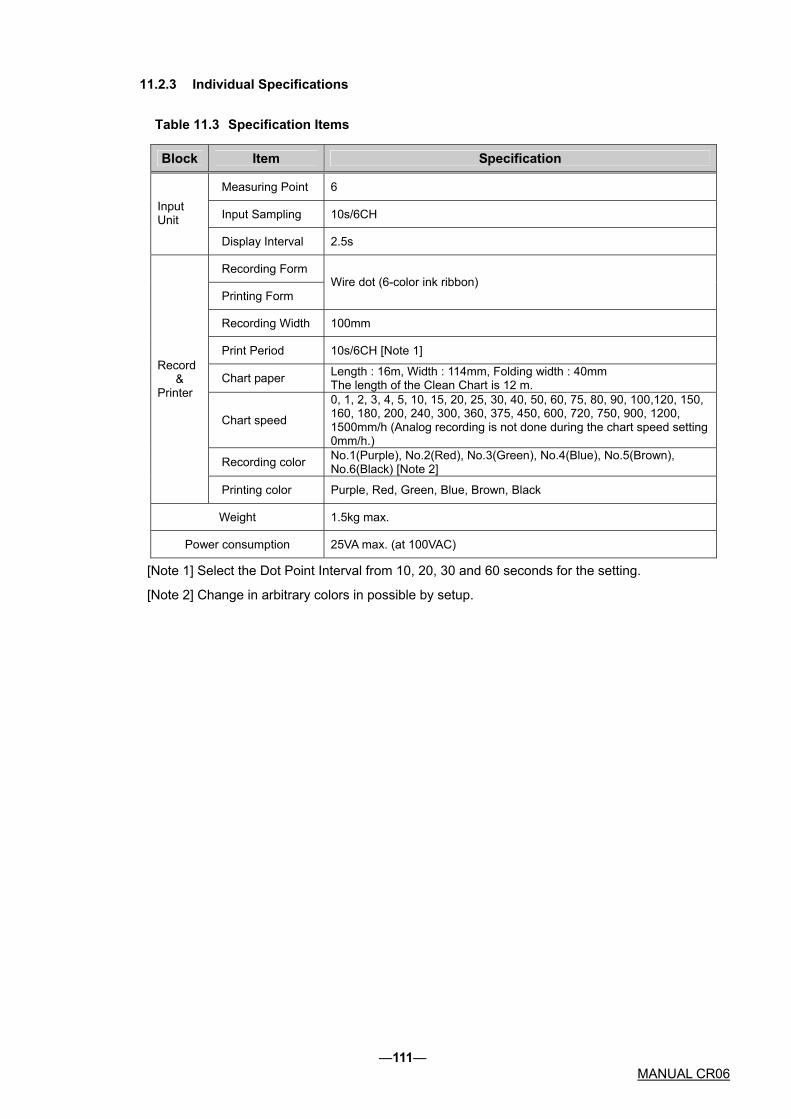
11.2.3 Individual Specifications
Table 11.3 Specification Items
Block Item Specification
Measuring Point 6
Input Sampling 10s/6CH Input Unit
Display Interval 2.5s
Recording Form
Printing Form Wire dot (6-color ink ribbon)
Recording Width 100mm
Print Period 10s/6CH [Note 1]
Chart paper Length : 16m, Width : 114mm, Folding width : 40mm The length of the Clean Chart is 12 m.
Chart speed
0, 1, 2, 3, 4, 5, 10, 15, 20, 25, 30, 40, 50, 60, 75, 80, 90, 100,120, 150, 160, 180, 200, 240, 300, 360, 375, 450, 600, 720, 750, 900, 1200, 1500mm/h (Analog recording is not done during the chart speed setting 0mm/h.)
Recording color No.1(Purple), No.2(Red), No.3(Green), No.4(Blue), No.5(Brown), No.6(Black) [Note 2]
Record &
Printer
Printing color Purple, Red, Green, Blue, Brown, Black
Weight 1.5kg max.
Power consumption 25VA max. (at 100VAC)
[Note 1] Select the Dot Point Interval from 10, 20, 30 and 60 seconds for the setting.
[Note 2] Change in arbitrary colors in possible by setup.
―111― MANUAL CR06

11.2.4 Standard Functions
Table 11.4 Standard Functions
Item Description
Analog indication None
Analog recording Makes analog recording with 6-color dot.
Engineering unit indication None
Digital display Indicates Channel No., Process variable data, Chart speed, Alarm setting value on the display.
Logging print Prints Date, Time, Scaling, Chart speed, Process variable and Engineering unit at a programmed interval. With the setting, it is possible for the synchronous print/Asynchronous print to choose.
List print Prints Chart speed, Sensor type, Measurement range, Engineering unit, Alarm setting value, Comment, Printing description, Logging print ON/OFF, Zone, Partial Compression/Expansion
Engineering list print Prints Channel or Tag, Alarm function, Logging print ON/OFF, Reference time, Interval, Scaling print ON/OFF, Logging print Sync./Async., Alarm hysteresis, Burn out, DI function(Option)
Affix print Prints Channel number by the analog recording.
Manual print Prints Measurement result by key input. Analog recording stops.
Dot print skip Skips recording of an unused channel.
Programming Programs Chart speed, Alarm setting value, Logging, Dot point skip, Date and Time.
Memory back up A built-in lithium battery protects the clock function. The battery life is 10 years. (total power off period of the instrument : 5 years) A non-volatile memory stores setting data and calibration data.
Alarm Sets 2 types (H, L) of alarms per channel. Sets a total of 4 level.
Chart speed Selects Chart speed from 34 types.
Clock indication Indicates Year, Month, Day, Hour and Minute. Sets the year in A.D, and adjusts leap year automatically.
Self diagnostics Occurring some type of the defect to indicate “E Err**”. (**: type of the defect)
Scaling Indicates and record the input of a unification signal etc. is changed into the engineering scales.
―112― MANUAL CR06

11.3 Standard Setting Functions
11.3.1 Standard Setting Functions
Table 11.5 Standard Setting Functions
Function Description
Burnout To deflect over toward 100% with disconnecting input. Specifies the every channel’s burnout. (DC voltage of ±50mV max., TC input )
Tag Number Sets a tag number by 7 figures every channel. (Prints at a logging print)
Reference Junction Compensation Specifies an inside/outside of the Reference Junction Compensation.
Copy Function Copies a channel setting up.
Setting input offset Setting input offset is possible for every channel.
Zone Recording (Track Recording) Specifies a recording area every channel to separate into Tracks.
Partial compression/expansion Records Partial Compression/Expansion to 1-crease line every channel.
Decade Recording Indication
Records and indicates by 5 decades. It is 2 figures that the effective number to indicate and print.
Alarm Print Prints Occurrence time, Occurrence channel, Setting No. and Alarm type in purple at occurring an alarm.
Alarm Recovery Print Prints Recovery time, Recovery channel, Setting No. and Alarm type in purple at recovering an alarm.
Record Start/End Print Prints time and comment (“Start” or ”End”) when record beginning or end.
Computation Computes Square root.
Interchannel Computation Computes Sum, Difference and Average computation.
Alarm Hysteresis Width Sets an alarm hysteresis width 0% FS or 0.5% FS.
11.4 Optional Functions
11.4.1 Remote Function of DI
Function Description
Chart Feed Start/Stop Starts with turning to ON. Stops with turning to OFF.
Changing Chart Speed Changes 1st with turning to ON and 2nd with OFF.
Comment Print (Sync./Async.) Prints Comment with turning to ON.
Manual Print (Sync./Async.) Prints Manual Print with turning to ON.
Date and Time Print (Sync./Async.) Prints Date and Time with turning to ON.
11.4.2 Alarm Board
6 relays
11.4.3 Communication unit
RS-232C(Standard)
RS-485(option)
―113― MANUAL CR06


