
Programming Laboratory-II Third Year Computer Engineering
SNJB’s Late Sau.KB Jain CoE , Chandwad
Assignment 18
Problem Definition:
Configure a Squid Proxy Server and Sarg for Log Capturing and Event Co-relation.
Prerequisite:
Latest version of Squid should be used.(version 2.5 or greater) A web server for testing purpose which can be used instead of Internet. Squid Version greater than 2.6 is required for Transparent squid proxy
configuration in this lab.
Learning Objectives:
To understand how Log Records are generated for Further Analysis. New Concepts:
Squid and Sarg
Theory 18.1 Introduction:
During the period of development of internet, users are allowed for unlimited access
to the resources due to less number of users. So there were less issues related to
accessing speed over internet.
With the increase in internet usage, many issues raised related to accessing speed,
effective bandwidth utilization etc. One method of overcoming these issues is,
maintaining a copy of webpage visited by a user in the cache so that the other user
who visits the same webpage will access the same website within a short period of
time. This method not only increases the accessing speed but also helps in utilizing
the bandwidth effectively.
The above said functionality can be achieved by maintaining a proxy server through
which all the users in the organization or a group access the internet. The most
widely used proxy server in Linux is Squid Proxy, which is free software released
General Public License.
R
(2)
N
(5)
Oral
(3)
Total
(10)
Dated Sign

Programming Laboratory-II Third Year Computer Engineering
SNJB’s Late Sau.KB Jain CoE , Chandwad
Squid provides proxy and cache services for Hyper Text Transfer Protocol (HTTP),
File Transfer Protocol (FTP), and various other protocols.
To configure a system as a proxy server, one should have a sufficient amount of
memory for maintaining the cache which in turn increases the performance.
In case if the internet connection is not available, setup one host as a web server in
place of internet and assign the IP address to the proxy server network interface in
the network, used by web server instead of public IP address assigned to that
interface.
18.2 Steps to Configure Squid Proxy:
1. Installation of Squid Package A Squid proxy server is generally installed on a separate server than the Web server
with the original files. Squid works by tracking object use over the network. Squid will
initially act as an intermediary, simply passing the client's request on to the server and
saving a copy of the requested object. If the same client or multiple clients request the
same object before it expires from Squid's cache, Squid can then immediately serve it,
accelerating the download and saving bandwidth.
sudo apt-get install squid
2. Accessing the Proxy Server configuration file
To configure squid proxy server we need to edit the /etc/squid/squid.conf file and the
default location of squid.conf file varies from distribution to distribution and from version
to version. We can edit the configuration file using vi editor through command prompt.
sudo gedit /etc/squid3/squid.conf
Then the content of the configuration file can be viewed as shown below in the figure.
Editing the squid configuration file
Search the TAG: auth_param and pest the following acl

Programming Laboratory-II Third Year Computer Engineering
SNJB’s Late Sau.KB Jain CoE , Chandwad
auth_param basic program /usr/lib/squid3/ncsa_auth /etc/squid3/users auth_param basic children 5 auth_param basic realm sumeet's Squid! auth_param basic credentialsttl 2 hours auth_param basic casesensitive off
Search TAG: acl and pest this line's >acl ncsa_users proxy_auth REQUIRED Search TAG: http_access and pest this line's >http_access allow ncsa_users and restart the service >sudo service squid3 restart Specifying the interface and port number on which the proxy server should listen. By default, the proxy server will listen on all the available network interfaces on
the system for requests. For Example, if one interface card is assigned a public ip from
which it is connected to internet and the other interface card is assigned an ip address
which belongs to your local area network. Then in order to make you proxy server to
listen for requests from your Local Area Network through a particular port, then change
the variable http_port 3128 in the squid configuration file to desired ip address and port
number in the format shown below.
http_port <ip address belonging to LAN>:<port number>
Example: For example, if your proxy server has an ip address 192.168.60.70 which belongs
to the local area network 192.168.60.0/24 and you want the server to listen for requests
from your LAN through a particular port say 3456, then you can change the variable
http_port as shown.
http_port 192.168.60.70:3456
Assigning Access Controls
By default, no user machine is allowed to connect to the proxy server except the localhost.
To allow the local machines access your proxy server, locate the acl section in the squid
configuration file starting with acl and at the end of the last acl line specify your access
control. For example to allow local area network 192.168.60.0/24 machines to access your
proxy server, specify the acl as

Programming Laboratory-II Third Year Computer Engineering
SNJB’s Late Sau.KB Jain CoE , Chandwad
acl mylan src 192.168.60.0/255.255.255.0
In the above example, mylan specifies the name of my access control. We can specify any
name other than my lan for access control. src specifies the source network.
Allow or Deny based on Access Control.
After specifying the access control for your local LAN, we need to provide allow permission
for the specified LAN using http_access variable in the squid configuration file as shown in
the example below.
Example: To allow the above specified access control ( i.e acl mylan src
192.168.60.0/255.255.255.0), we need to specify the http_access variable as
Copyright © 2009, Centre for Development of Advanced Computing, Hyderabad
http_access allow mylan
Here mylan specifies the access control used. Suppose if we want to allow all the networks
except the 192.168.60.0/24 network to access the proxy then we can specify the
http_access variable as
http_access deny !mylan
In the above line, !mylan specifies except mylan network.
Note:
The above specified http_access variable should be specified before the line http_access
deny all in the configuration file.
Saving the changes and exit the vi Editor
After making appropriate changes to your configuration file exit the vi editor window by
pressing Esc followed by :wq!. Here wq specifies save changes and exit the configuration
file.
18.2 Testing the Squid configuartion
To test the squid configuration, open a browser in any one of the pc in local area network
or on the proxy server and specify the proxy settings as the ipaddress of the proxy server
and port on which it is listening for requests. For example, in firefox web browser if we
want to set the proxy settings in the browser window goto Edit -->Preferences and
window similar to shown below will be displayed.

Programming Laboratory-II Third Year Computer Engineering
SNJB’s Late Sau.KB Jain CoE , Chandwad
Now select Advanced tab, and under advanced tab click on Network tab and click on
Settings option under Connection field. Then a window similar to the shown below will be
displayed.

Programming Laboratory-II Third Year Computer Engineering
SNJB’s Late Sau.KB Jain CoE , Chandwad
14.3 SARG – Squid Analysis Report Generator and Internet Bandwidth Monitoring
Tool
SARG is an open source tool that allows you to analyze the squid log files and generates
beautiful reports in HTML format with information’s about users, IP addresses, top
accessed sites, total bandwidth usage, elapsed time, downloads, access denied websites,
daily reports, weekly reports and monthly reports.
The SARG is very handy tool to view how much internet bandwidth is utilized by individual
machines on the network and can watch on which websites the network’s users are
accessing.
Installing Sarg from Source
The ‘sarg‘package by default not included in RedHat based distributions, so we need to
manually compile and install it from source tar ball. For this, we need some additional pre-
requisites packages to be installed on the system before compiling it from source.
$ sudo apt-get install sarg
Configuring Sarg
Now it’s time to edit some parameters in SARG main configuration file. The file contains
lots of options to edit, but we will only edit required parameters like:
Access logs path
Output directory
Date Format
Overwrite report for the same date.
Open sarg.conf file with your choice of editor and make changes as shown below.
# vi /usr/local/etc/sarg.conf [On RedHat based systems]
Now Uncomment and add the original path to your squid access log file.
# sarg.conf
#
# TAG: access_log file
# Where is the access.log file
# sarg -l file

Programming Laboratory-II Third Year Computer Engineering
SNJB’s Late Sau.KB Jain CoE , Chandwad
#
access_log /var/log/squid/access.log
Next, add the correct Output directory path to save the generate squid reports in that
directory. Please note, under Debian based distributions the Apache web root directory is
‘/var/www‘. So, please be careful while adding correct web root paths under your Linux
distributions.
# TAG: output_dir
# The reports will be saved in that directory
# sarg -o dir
#
output_dir /var/www/html/squid-reports
Set the correct date format for reports. For example, ‘date_format e‘ will display
reports in ‘dd/mm/yy‘ format.
# TAG: date_format
# Date format in reports: e (European=dd/mm/yy), u (American=mm/dd/yy), w
(Weekly=yy.ww)
#
date_format e
Next, uncomment and set Overwrite report to ‘Yes’.
# TAG: overwrite_report yes|no
# yes - if report date already exist then will be overwritten.
# no - if report date already exist then will be renamed to filename.n, filename.n+1
#
overwrite_report yes
That’s it! Save and close the file.
Step 3: Generating Sarg Report
Once, you’ve done with the configuration part, it’s time to generate the squid log report
using the following command.
# sarg -x [On RedHat based systems]

Programming Laboratory-II Third Year Computer Engineering
SNJB’s Late Sau.KB Jain CoE , Chandwad
Assessing Sarg Report
The generated reports placed under ‘/var/www/html/squid-reports/‘ or
‘/var/www/squid-reports/‘ which can be accessed from the web browser using the
address.
http://localhost/squid-reports
OR
http://ip-address/squid-reports
Fig.1 Sarg Main Window

Programming Laboratory-II Third Year Computer Engineering
SNJB’s Late Sau.KB Jain CoE , Chandwad
Fig2.User Report
Fig 3. Specific Date
Programming Laboratory-II Third Year Computer Engineering
SNJB’s Late Sau.KB Jain CoE , Chandwad
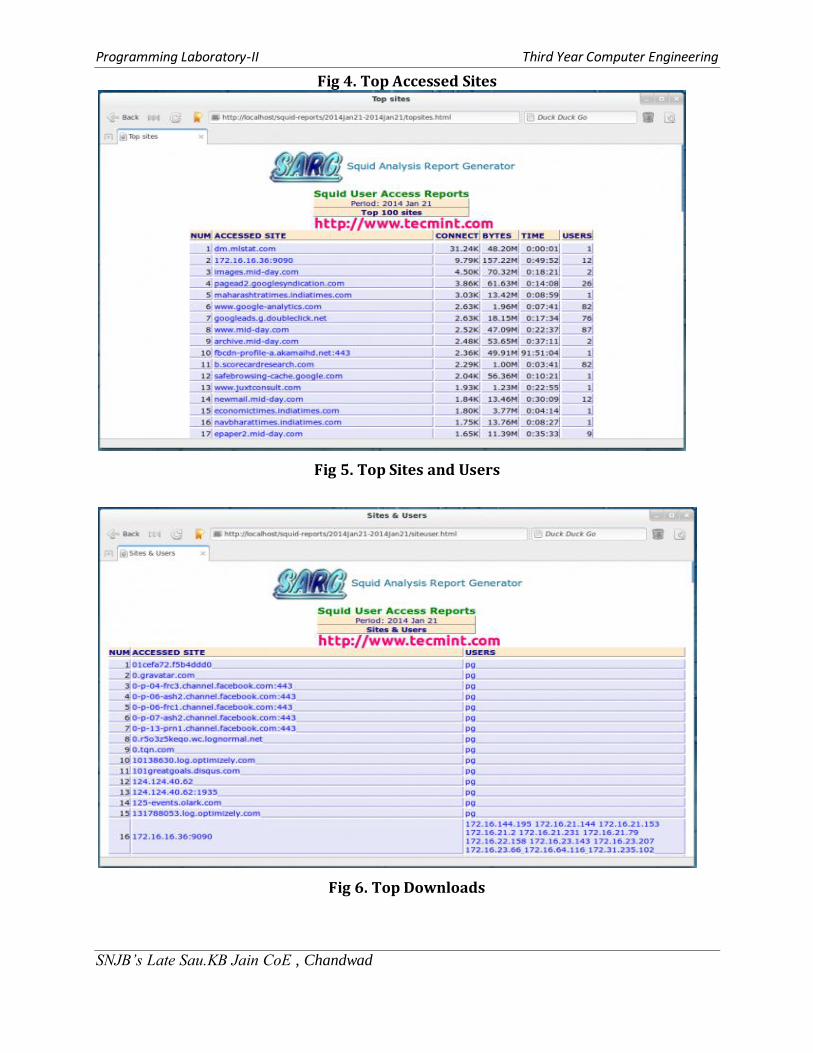
Fig 4. Top Accessed Sites
Fig 5. Top Sites and Users
Fig 6. Top Downloads

Programming Laboratory-II Third Year Computer Engineering
SNJB’s Late Sau.KB Jain CoE , Chandwad
Fig 7. Denied Access
Fig 8. Authentication Failures

Programming Laboratory-II Third Year Computer Engineering
SNJB’s Late Sau.KB Jain CoE , Chandwad
18.4 Assignment Questions:
1. Why to Configure Proxy Server? 2. What is SARG? 3. Which Parameter is there in SARG Report? 4. What do you mean by Log and Event Co-relation?
Conclusion: By configuring this Network Administrator can easily analyze the Network
Traffic and Bandwidth Utilization.


