Appendices for SAP Applications Built on FlexPod
Last Updated: May 12, 2013
Building Architectures to Solve Business Problems

2About Cisco Validated Design (CVD) Program
About Cisco Validated Design (CVD) Program
The CVD program consists of systems and solutions designed, tested, and documented to facilitate
faster, more reliable, and more predictable customer deployments. For more information visit
http://www.cisco.com/go/designzone.
ALL DESIGNS, SPECIFICATIONS, STATEMENTS, INFORMATION, AND RECOMMENDATIONS (COLLEC-
TIVELY, "DESIGNS") IN THIS MANUAL ARE PRESENTED "AS IS," WITH ALL FAULTS. CISCO AND ITS SUP-
PLIERS DISCLAIM ALL WARRANTIES, INCLUDING, WITHOUT LIMITATION, THE WARRANTY OF
MERCHANTABILITY, FITNESS FOR A PARTICULAR PURPOSE AND NONINFRINGEMENT OR ARISING
FROM A COURSE OF DEALING, USAGE, OR TRADE PRACTICE. IN NO EVENT SHALL CISCO OR ITS
SUPPLIERS BE LIABLE FOR ANY INDIRECT, SPECIAL, CONSEQUENTIAL, OR INCIDENTAL DAMAGES,
INCLUDING, WITHOUT LIMITATION, LOST PROFITS OR LOSS OR DAMAGE TO DATA ARISING OUT OF
THE USE OR INABILITY TO USE THE DESIGNS, EVEN IF CISCO OR ITS SUPPLIERS HAVE BEEN ADVISED
OF THE POSSIBILITY OF SUCH DAMAGES.
THE DESIGNS ARE SUBJECT TO CHANGE WITHOUT NOTICE. USERS ARE SOLELY RESPONSIBLE FOR
THEIR APPLICATION OF THE DESIGNS. THE DESIGNS DO NOT CONSTITUTE THE TECHNICAL OR
OTHER PROFESSIONAL ADVICE OF CISCO, ITS SUPPLIERS OR PARTNERS. USERS SHOULD CONSULT
THEIR OWN TECHNICAL ADVISORS BEFORE IMPLEMENTING THE DESIGNS. RESULTS MAY VARY
DEPENDING ON FACTORS NOT TESTED BY CISCO.
CCDE, CCENT, Cisco Eos, Cisco Lumin, Cisco Nexus, Cisco StadiumVision, Cisco TelePresence, Cisco
WebEx, the Cisco logo, DCE, and Welcome to the Human Network are trademarks; Changing the Way We
Work, Live, Play, and Learn and Cisco Store are service marks; and Access Registrar, Aironet, AsyncOS,
Bringing the Meeting To You, Catalyst, CCDA, CCDP, CCIE, CCIP, CCNA, CCNP, CCSP, CCVP, Cisco, the
Cisco Certified Internetwork Expert logo, Cisco IOS, Cisco Press, Cisco Systems, Cisco Systems Capital,
the Cisco Systems logo, Cisco Unity, Collaboration Without Limitation, EtherFast, EtherSwitch, Event Cen-
ter, Fast Step, Follow Me Browsing, FormShare, GigaDrive, HomeLink, Internet Quotient, IOS, iPhone,
iQuick Study, IronPort, the IronPort logo, LightStream, Linksys, MediaTone, MeetingPlace, MeetingPlace
Chime Sound, MGX, Networkers, Networking Academy, Network Registrar, PCNow, PIX, PowerPanels,
ProConnect, ScriptShare, SenderBase, SMARTnet, Spectrum Expert, StackWise, The Fastest Way to
Increase Your Internet Quotient, TransPath, WebEx, and the WebEx logo are registered trademarks of
Cisco Systems, Inc. and/or its affiliates in the United States and certain other countries.
All other trademarks mentioned in this document or website are the property of their respective owners.
The use of the word partner does not imply a partnership relationship between Cisco and any other com-
pany. (0809R)
© 2013 Cisco Systems, Inc. All rights reserved

Appendix
Appendix A Installing SuSE Linux Enterprise ServerSuSE Linux Enterprise Server (SLES) is installed by means of a graphical user interface. In addition to the standard installation shown in this appendix (including the special software components that must be installed), a few post-installation procedures must be added to build an OS for use in a FlexPod environment.
SuSE Linux Installation (SLES 11)
The following are the installation steps as carried out on a virtual machine (see section "Linux Template Creation"). After the boot process has completed, mount the installation DVD to start the SuSE installation.
Corporate Headquarters:
Copyright © 2013 Cisco Systems, Inc. All rights reserv
Cisco Systems, Inc., 170 West Tasman Drive, San Jose, CA 95134-1706 USA
Appendix A Installing SuSE Linux Enterprise Server
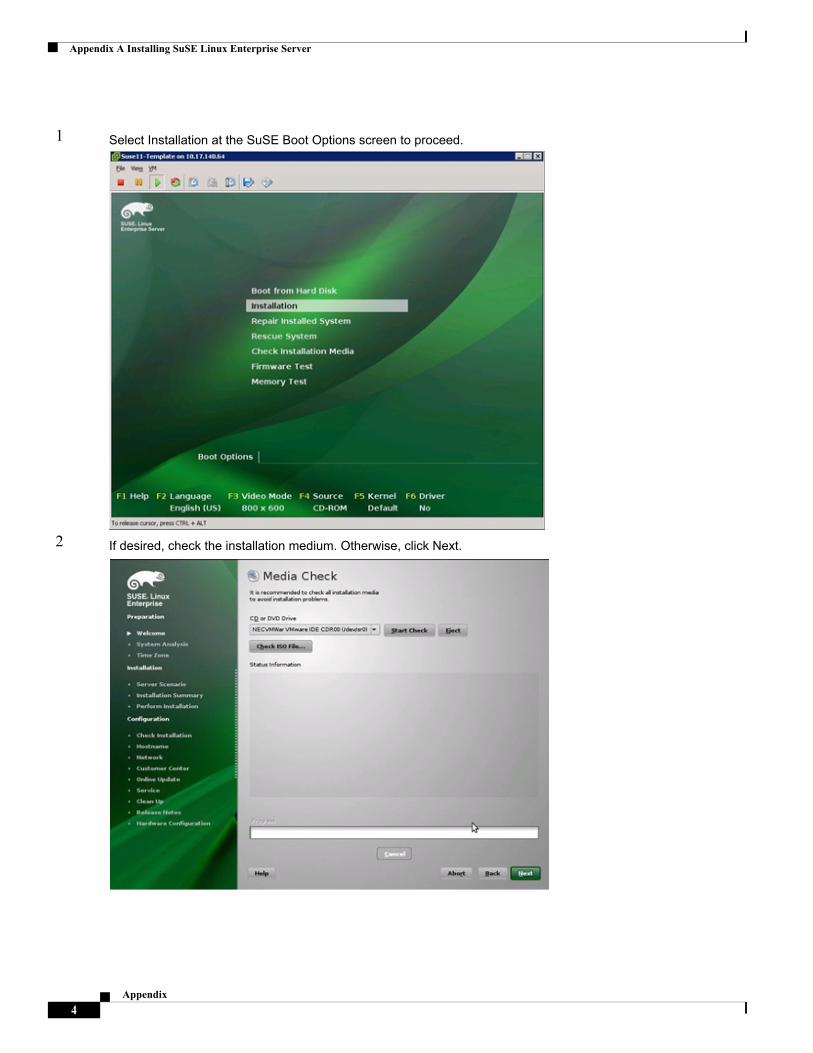
1 Select Installation at the SuSE Boot Options screen to proceed.
2 If desired, check the installation medium. Otherwise, click Next.
4Appendix
Appendix A Installing SuSE Linux Enterprise Server
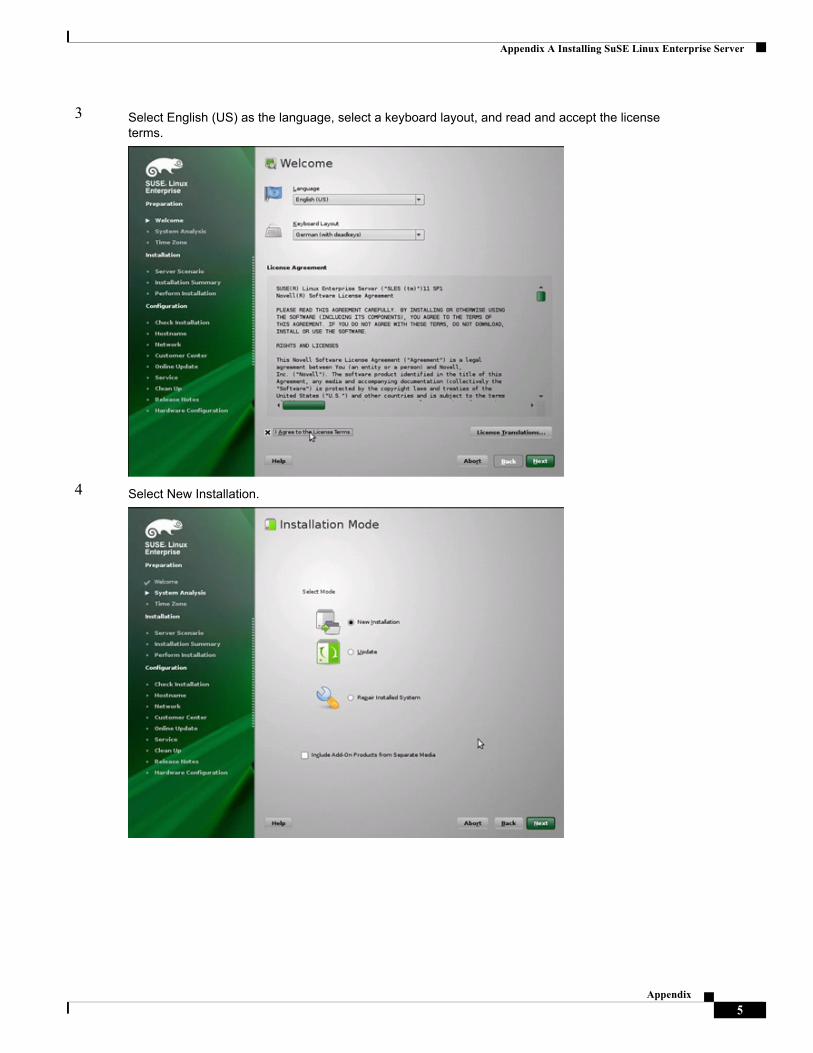
3 Select English (US) as the language, select a keyboard layout, and read and accept the license terms.
4 Select New Installation.
5Appendix
Appendix A Installing SuSE Linux Enterprise Server
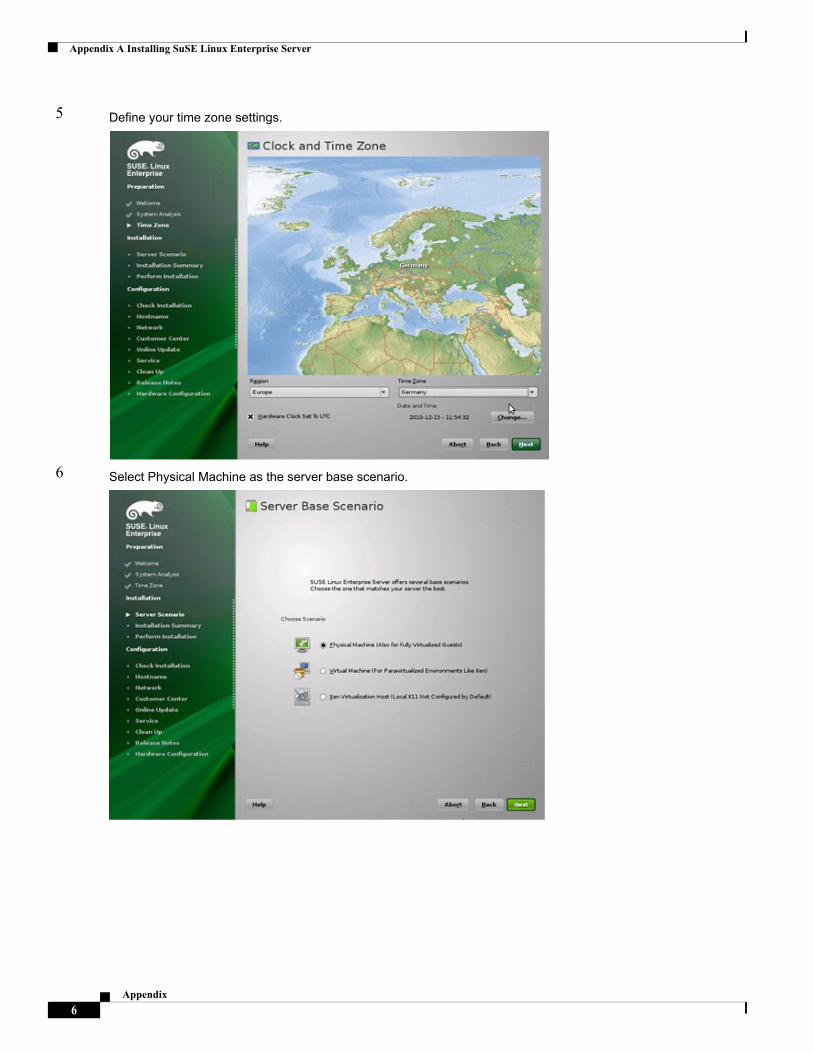
5 Define your time zone settings.
6 Select Physical Machine as the server base scenario.
6Appendix

Appendix A Installing SuSE Linux Enterprise Server
7 On the Expert tab under Installation Settings, change the partitioning of the hard disk and the software components to be installed.
8 Select the Custom Partitioning option to prepare the hard disk.
7Appendix
Appendix A Installing SuSE Linux Enterprise Server
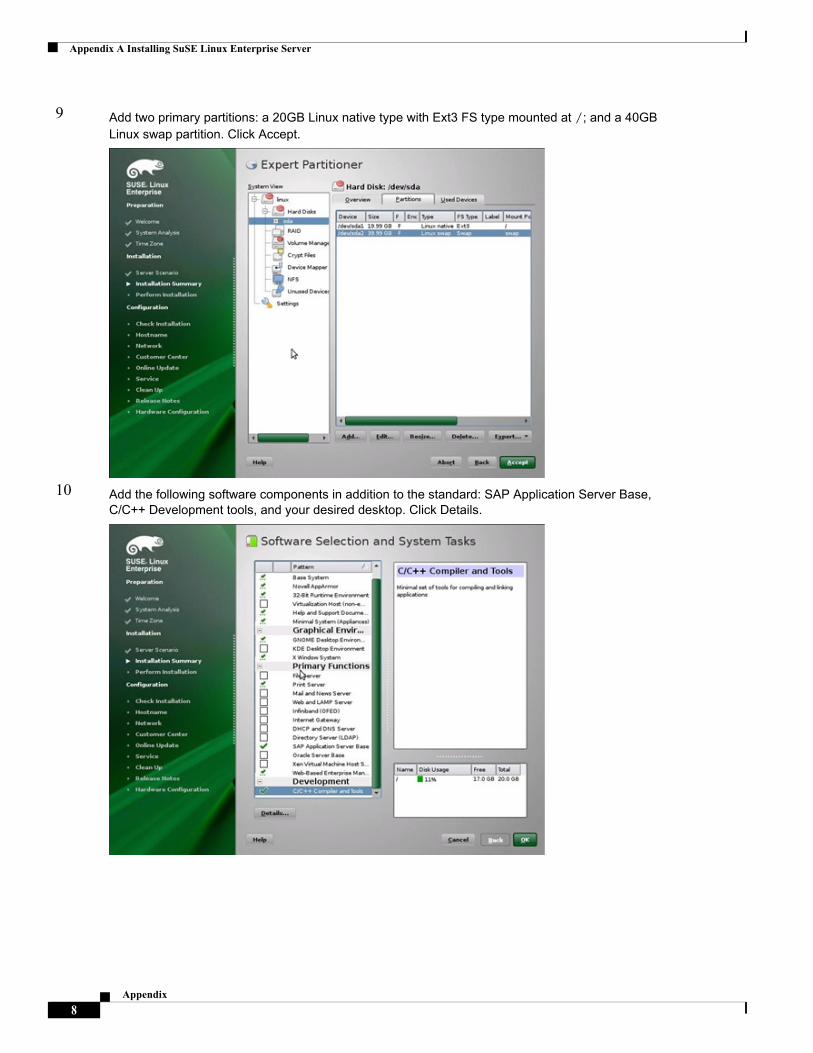
9 Add two primary partitions: a 20GB Linux native type with Ext3 FS type mounted at /; and a 40GB Linux swap partition. Click Accept.
10 Add the following software components in addition to the standard: SAP Application Server Base, C/C++ Development tools, and your desired desktop. Click Details.
8Appendix
Appendix A Installing SuSE Linux Enterprise Server
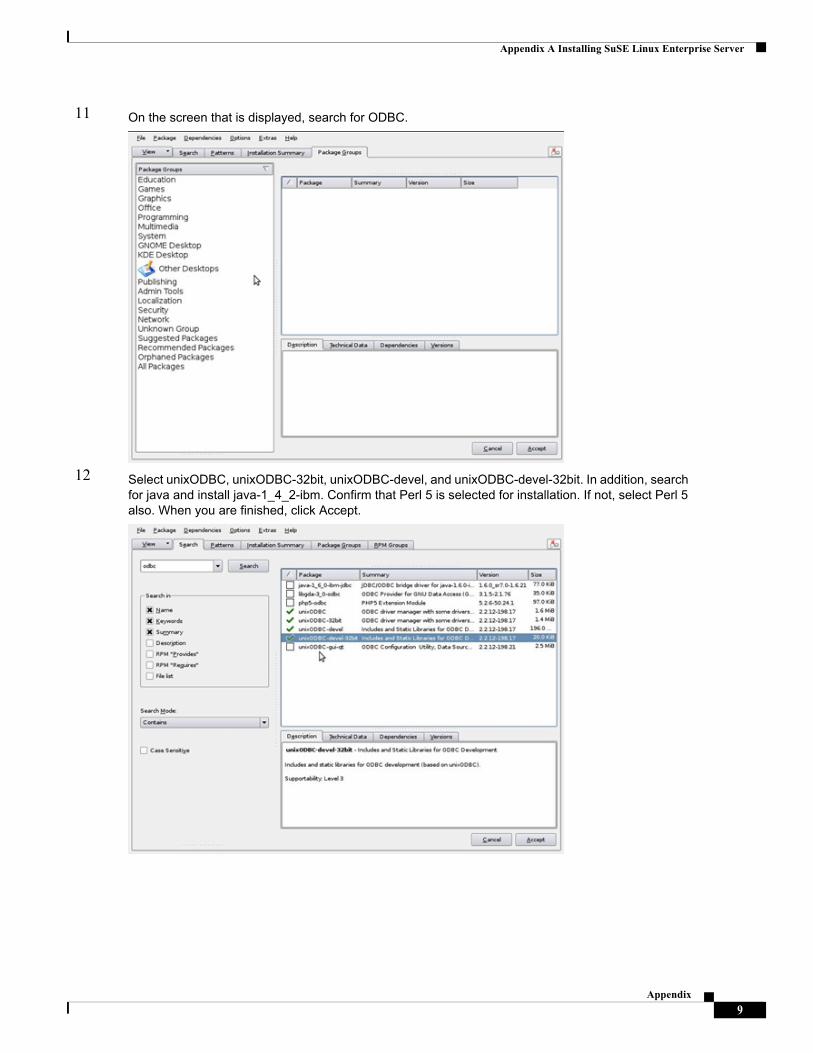
11 On the screen that is displayed, search for ODBC.
12 Select unixODBC, unixODBC-32bit, unixODBC-devel, and unixODBC-devel-32bit. In addition, search for java and install java-1_4_2-ibm. Confirm that Perl 5 is selected for installation. If not, select Perl 5 also. When you are finished, click Accept.
9Appendix

Appendix A Installing SuSE Linux Enterprise Server
13 Click Install to start the installation.
14 After the components have been installed, click Next.
10Appendix
Appendix A Installing SuSE Linux Enterprise Server
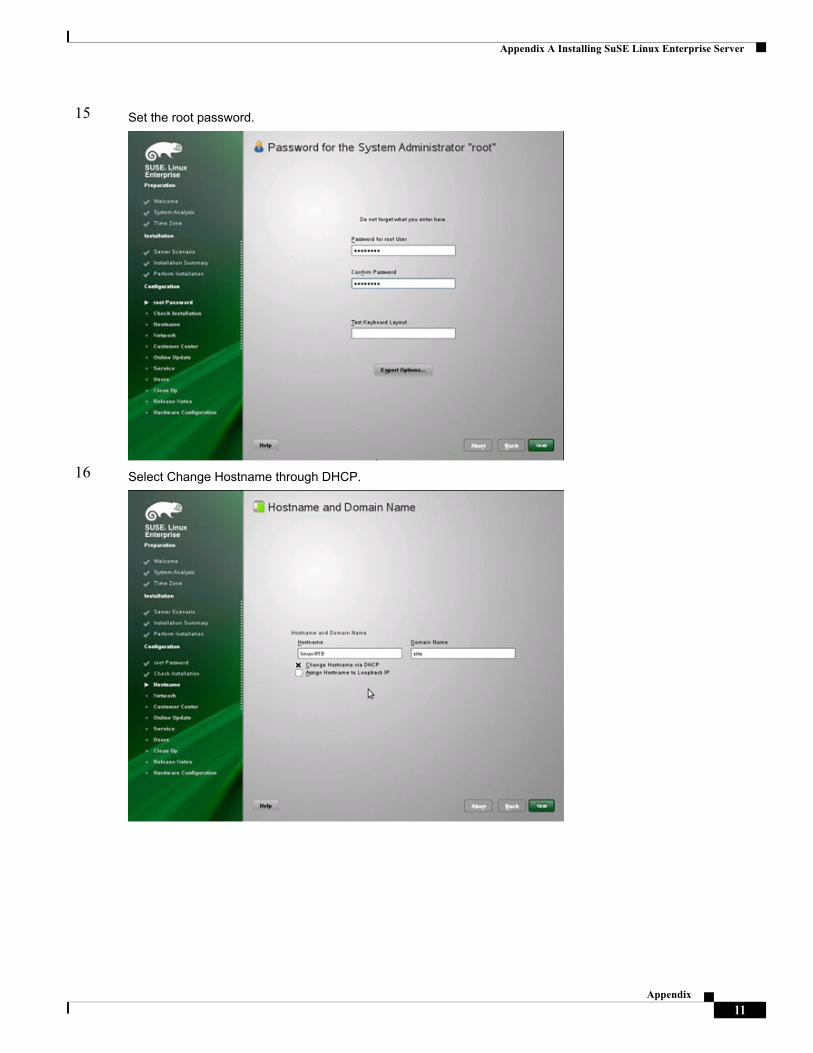
15 Set the root password.
16 Select Change Hostname through DHCP.
11Appendix

Appendix A Installing SuSE Linux Enterprise Server
17 Open the SSH ports in the firewall and set the network interfaces (eth0-ethX) to internal networks.
18 Use the default network services configuration.
12Appendix

Appendix A Installing SuSE Linux Enterprise Server
19 Skip the network test.
20 Change the User Authentication Method to NIS.
13Appendix
Appendix A Installing SuSE Linux Enterprise Server
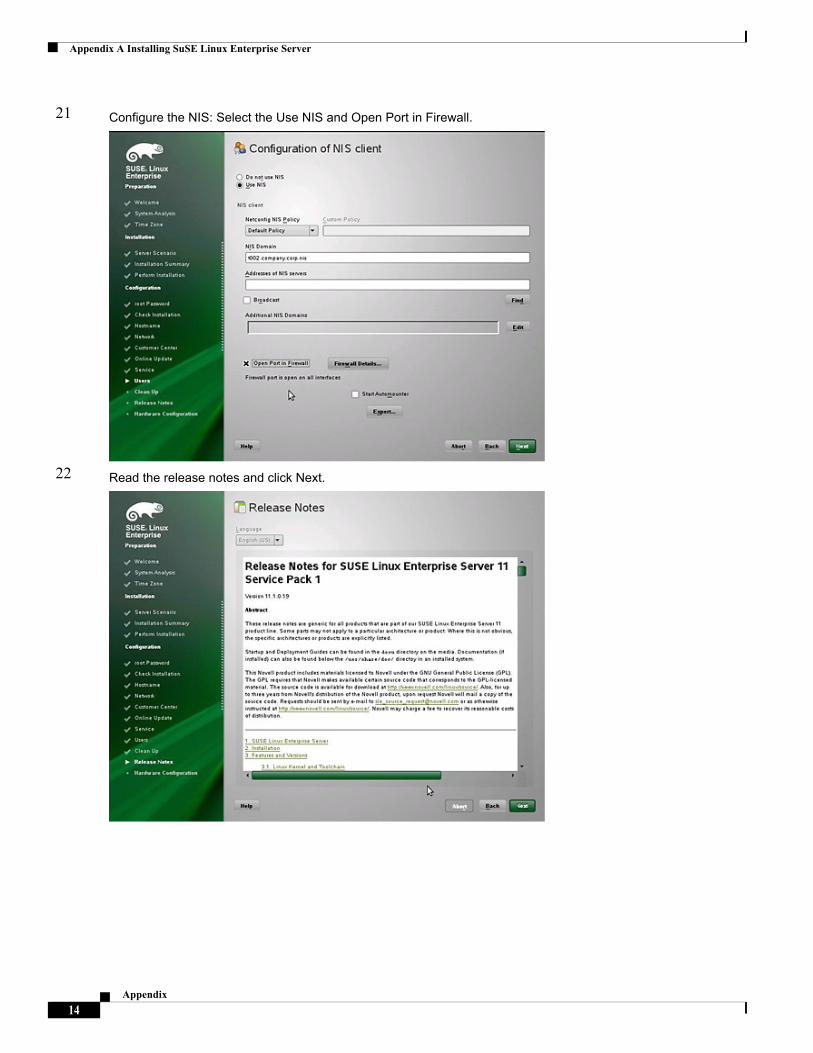
21 Configure the NIS: Select the Use NIS and Open Port in Firewall.
22 Read the release notes and click Next.
14Appendix
Appendix A Installing SuSE Linux Enterprise Server
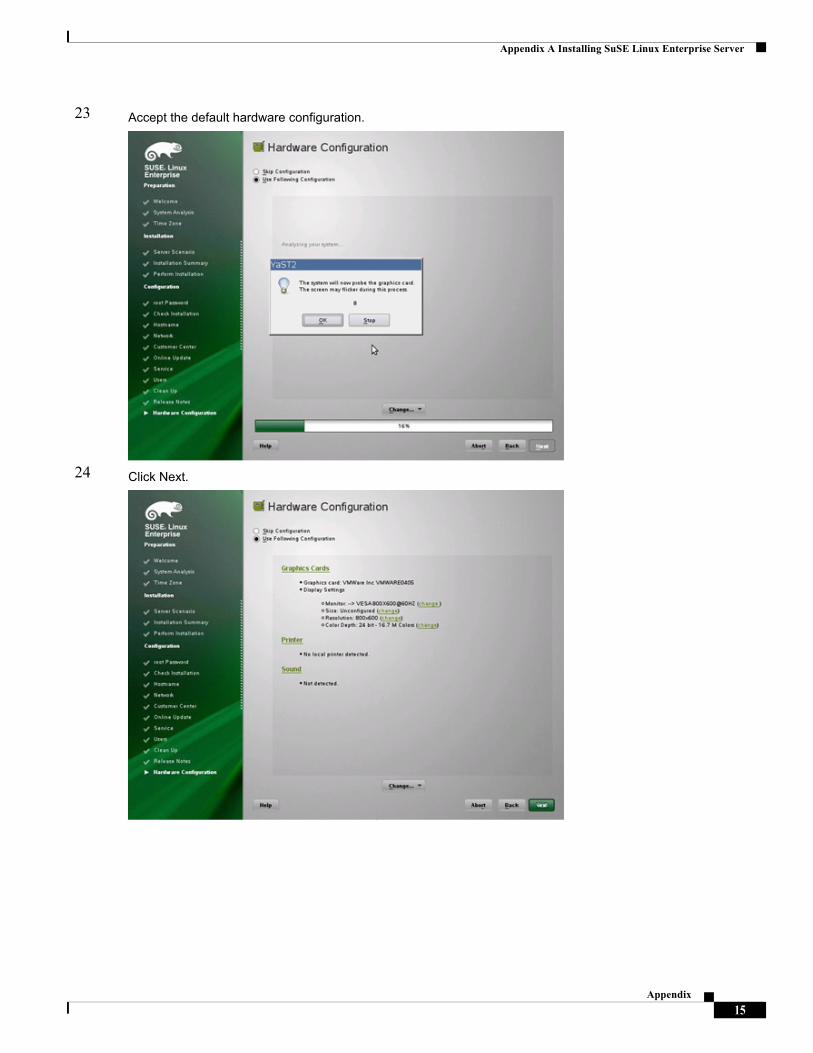
23 Accept the default hardware configuration.
24 Click Next.
15Appendix
Appendix A Installing SuSE Linux Enterprise Server
DHCP Client Configuration
This section describes the required DHCP client configuration and other network-related configurations.
Set the DHCP client timeout to 99 seconds. This prevents the DHCP client from going into the background to get the DHCP lease. This is necessary to prevent other scripts or services that require network access from failing to start at boot time. Edit /etc/sysconfig/network/dhcp and change the timeout value to 99:
DHClient_TIMEOUT='99'
Because all interfaces should get the same hostname, insert the line hostname > /etc/HOSTNAME into the section case$state in /etc/sysconfig/network/scripts/dhcpd-:
…case $state inup) write_cached_config_data dhcp4_state up $INTERFACE commit_cached_config_data $INTERFACE
$debug && NC_OPTIONS="-v" /sbin/netconfig modify -s "dhcpcd" \ -i $INTERFACE $NC_OPTIONS \ -l $leaseinfo 2>&1 | $log_dbg
hostname > /etc/HOSTNAME
In addition, it is necessary for all other interfaces to wait until the first interface (eth0) is up and gets the new hostname assigned. Therefore add the following line to the configuration files (for example, /etc/sysconfig/network/ifcfg-eth1 for eth1) of all interfaces except for eth0:
PRE_UP_SCRIPT='wait4eth0'
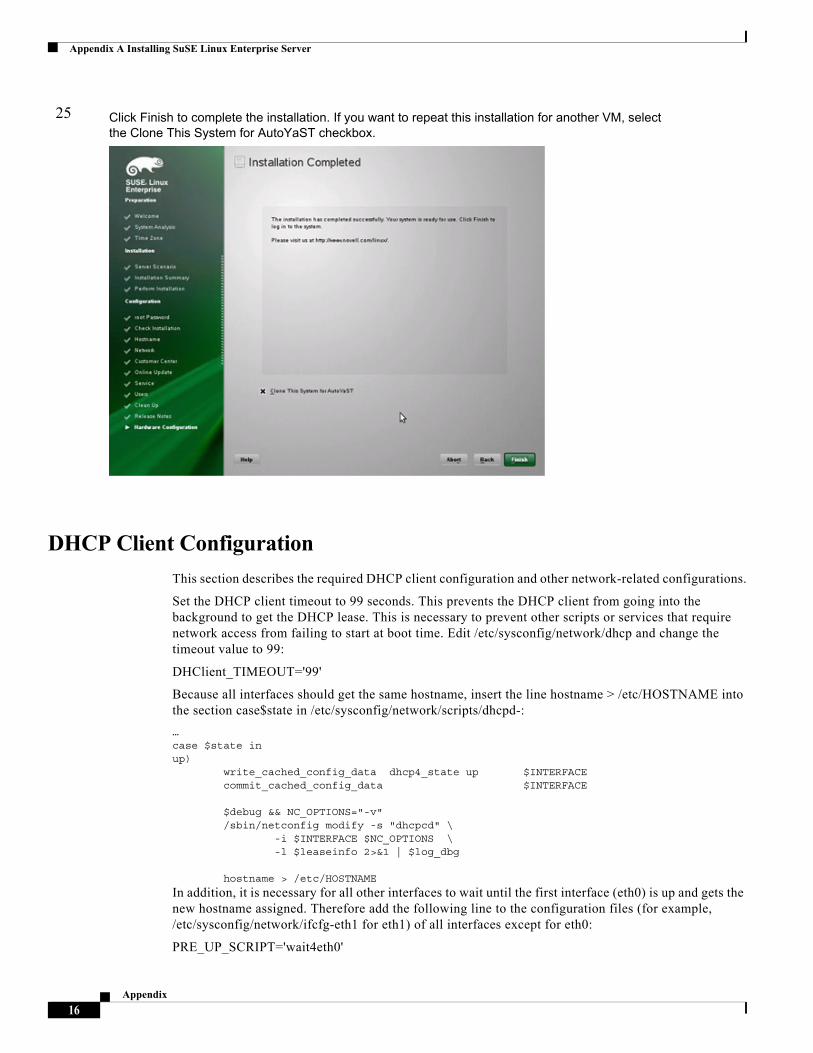
25 Click Finish to complete the installation. If you want to repeat this installation for another VM, select the Clone This System for AutoYaST checkbox.
16Appendix

Appendix A Installing SuSE Linux Enterprise Server
Then create the script wait4eth0 in the directory /etc/sysconfig/network/script with the following content:
#!/bin/bashifstatus eth0eth0up=$?while [ $eth0up -gt 0 ]; do echo "waiting for eth0..."; sleep 5; ifstatus eth0; eth0up=$?;done
Disable the use of persistent network device names by clearing the UDEV configuration for network interfaces according to the Novell/SUSE TID 3048119:
cat< /dev/null > /etc/udev/rules.d/70-persistent-net.rules
This step must be repeated if the template is started or rebooted for other changes.
Check whether the network interfaces are set to internal networks at the firewall.
Open /etc/sysconfig/SuSEfirewall2 and check whether the network interfaces are included in FW_DEV_INT:
FW_DEV_INT="eth0 eth1 eth2"
NIS Configuration
The OS template is configured to run a NIS client communicating with a NIS server to provide central user management capabilities. The following maps are provided by the NIS server: passwd, group, services. This section describes the necessary configurations.
nsswitch
The file /etc/nsswitch.conf configures the source of data for the different user configuration files. The OS template should contain the following nsswitch.conf entries:
passwd: compatshadow: filesgroup: compat
hosts: dns filesnetworks: files dns
services: nis
passwd
If it is not already present, the following line must be appended to the file /etc/passwd to merge NIS users with local users:
+::::::
Groups
If it is not already present, the following line must be appended to the file /etc/group to merge NIS groups with local groups:
+:::
17Appendix

Appendix B Installing Red Hat Enterprise Linux
Services
The services definition is retrieved solely from the NIS server. No local services are possible.
Linux Kernel Configuration
No special kernel settings are required for the SAP Applications built on FlexPod landscape other than the ones mentioned in SAP note 1310037 for SLES 11 installations. The most important item to install is the sapconf (fka sapinit) package. This is done automatically when you select the pattern SAP Application Server Base during the SLES installation procedure.
Appendix B Installing Red Hat Enterprise LinuxThis section describes the creation of a VMware template for Red Hat Enterprise Linux (RHEL) 5.5.
The first sections ("OS Template Installation" and "Post-installation Activities") describe the standard OS installation and post-installation procedures required to install RHEL on a virtual machine.
The final section, "Preparing Red Hat for a Kickstart Installation on Bare Metal", focuses on an automated procedure that uses a predefined kickstart file.
OS Template Installation
The standard RHEL installation procedure starts when the virtual machine (or physical server) is booted with the installation DVD mounted in the CD-ROM (physical or virtual) drive. The following lists the installation steps:
18Appendix
Appendix B Installing Red Hat Enterprise Linux
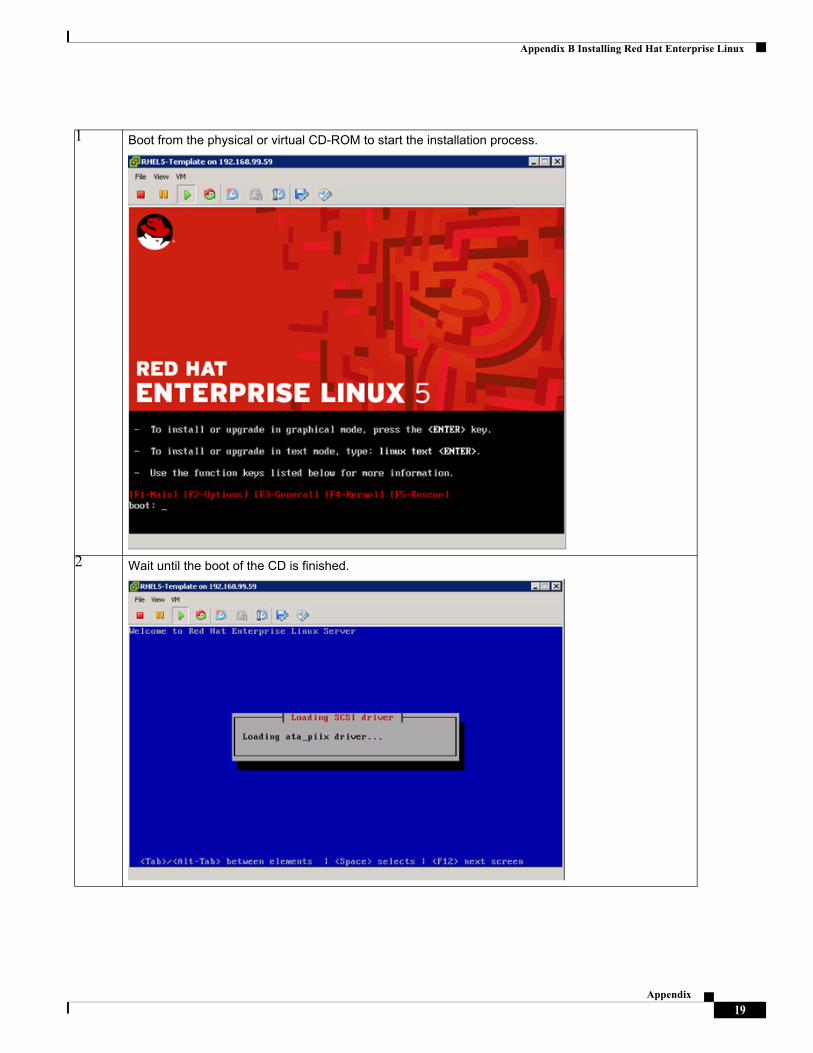
1 Boot from the physical or virtual CD-ROM to start the installation process.
2 Wait until the boot of the CD is finished.
19Appendix

Appendix B Installing Red Hat Enterprise Linux
3 Click Skip to skip the media test.
4 Click Next.
20Appendix
Appendix B Installing Red Hat Enterprise Linux
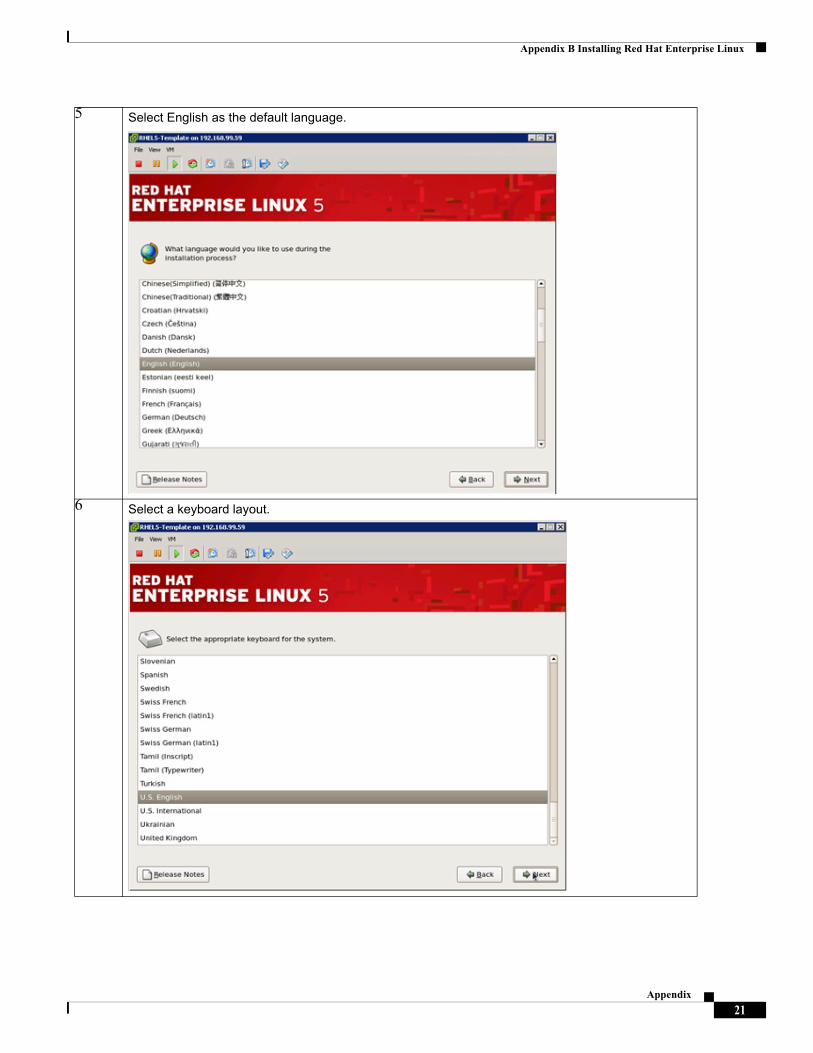
5 Select English as the default language.
6 Select a keyboard layout.
21Appendix

Appendix B Installing Red Hat Enterprise Linux
7 Skip the step of entering the installation number.
8 Click Skip to acknowledge that you have skipped entering the installation number.
9 Click Yes to initialize the disk.
22Appendix
Appendix B Installing Red Hat Enterprise Linux
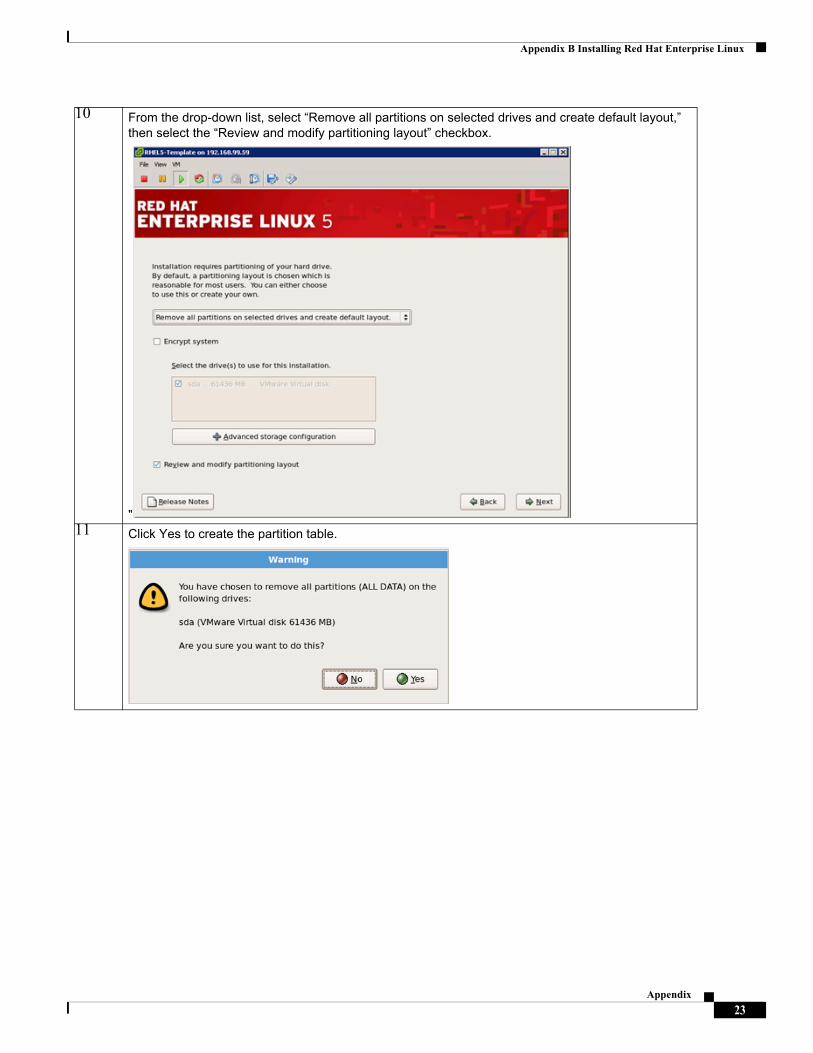
10 From the drop-down list, select “Remove all partitions on selected drives and create default layout,” then select the “Review and modify partitioning layout” checkbox.
"11 Click Yes to create the partition table.
23Appendix

Appendix B Installing Red Hat Enterprise Linux
12 Review the new disk layout.
13 Review the boot loader configuration.
24Appendix
Appendix B Installing Red Hat Enterprise Linux
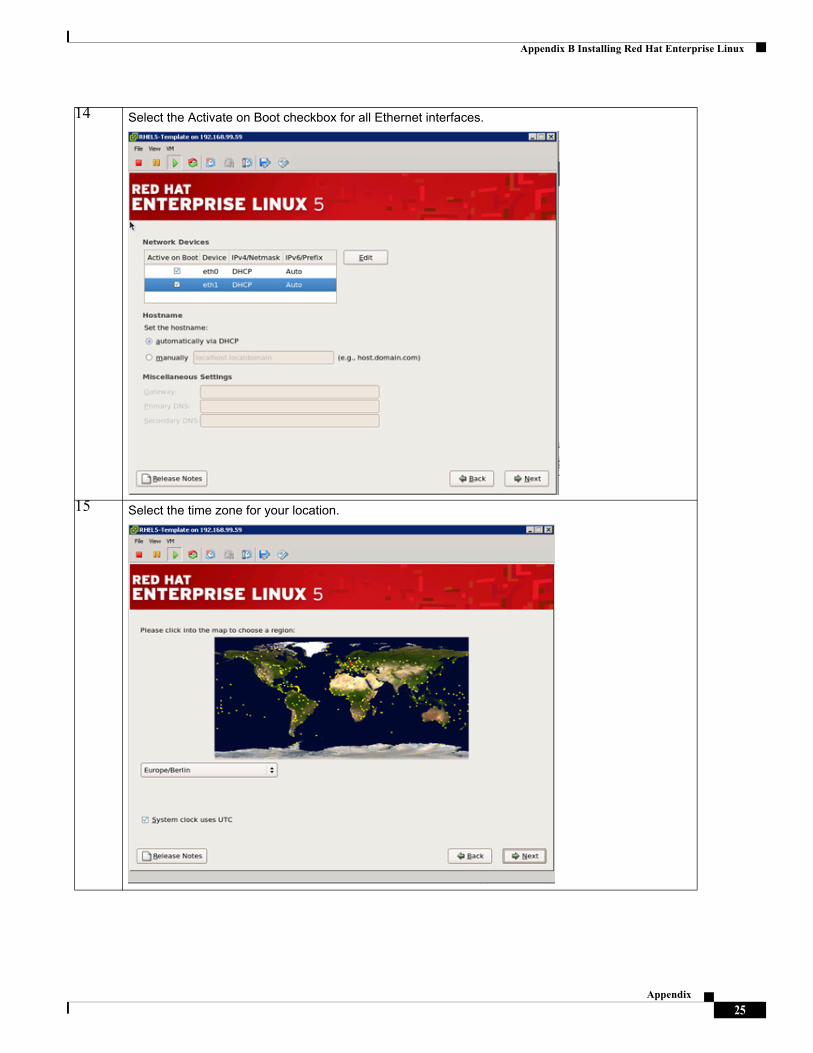
14 Select the Activate on Boot checkbox for all Ethernet interfaces.
15 Select the time zone for your location.
25Appendix
Appendix B Installing Red Hat Enterprise Linux
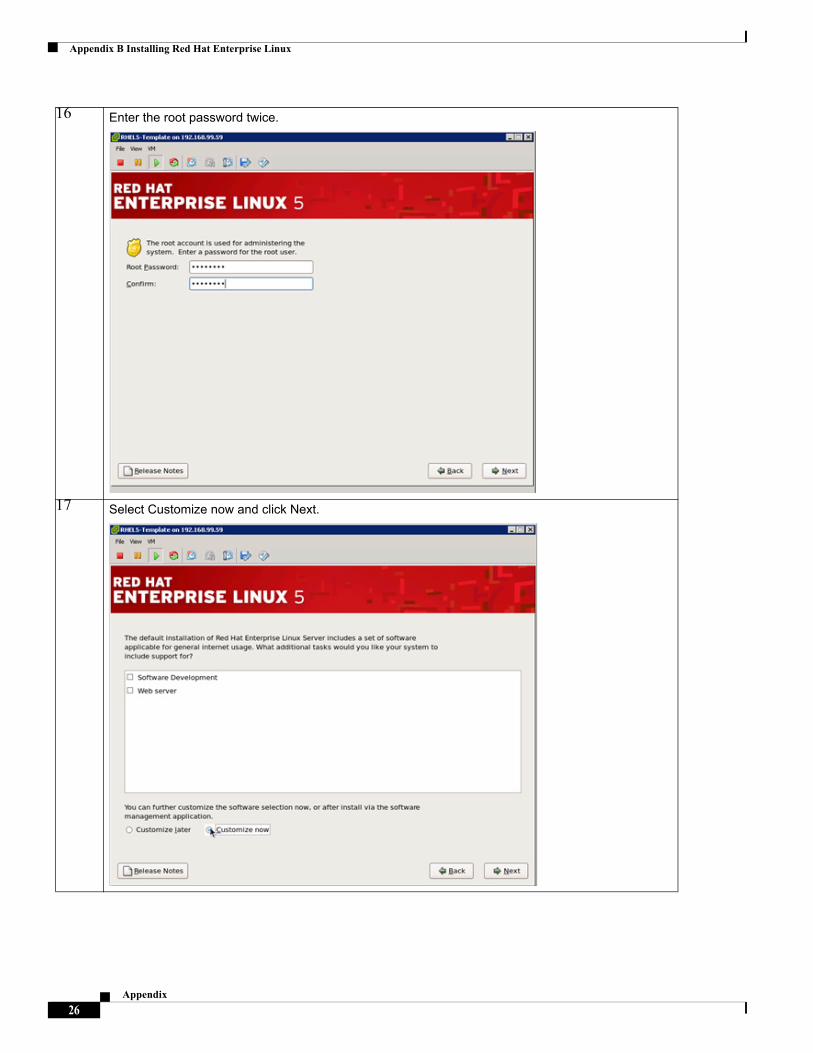
16 Enter the root password twice.
17 Select Customize now and click Next.
26Appendix

Appendix B Installing Red Hat Enterprise Linux
18 Select or deselect the GNOME or KDE desktop.
19 Select Development, select Development Libraries and Development Tools, and click Next.
27Appendix
Appendix B Installing Red Hat Enterprise Linux
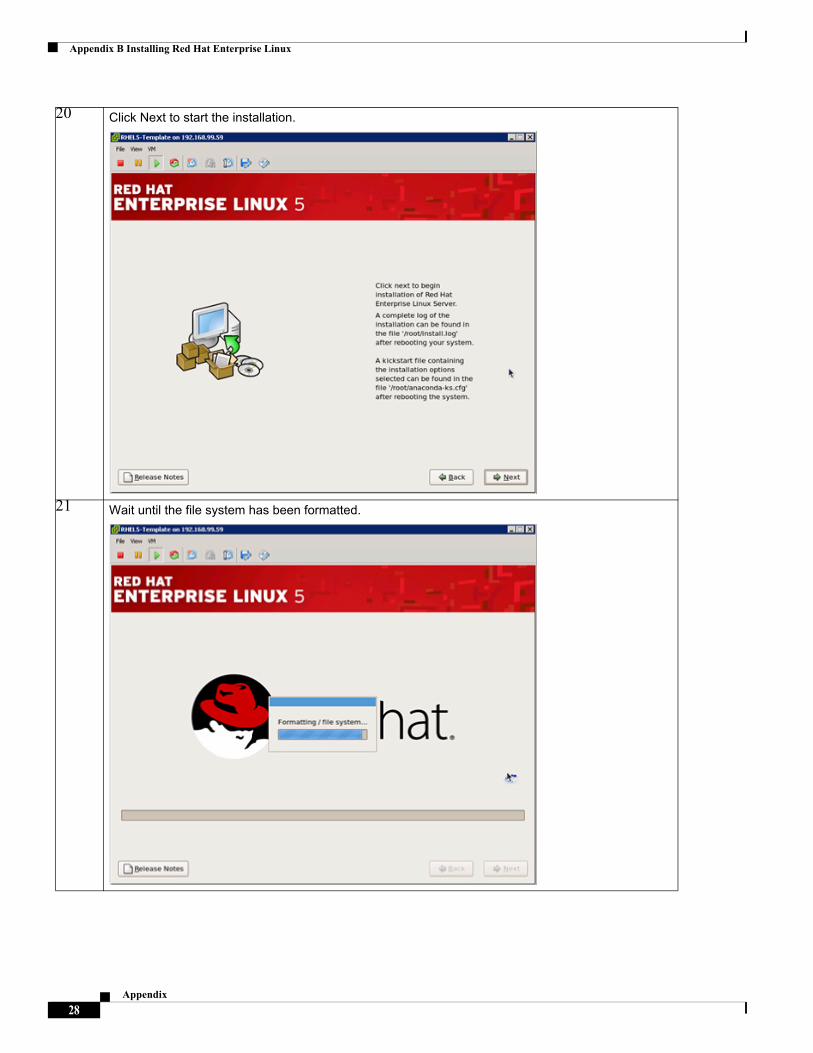
20 Click Next to start the installation.
21 Wait until the file system has been formatted.
28Appendix

Appendix B Installing Red Hat Enterprise Linux
22 Wait until the installation of the packages is finished.
23 Click Reboot to restart the server.
29Appendix
Appendix B Installing Red Hat Enterprise Linux
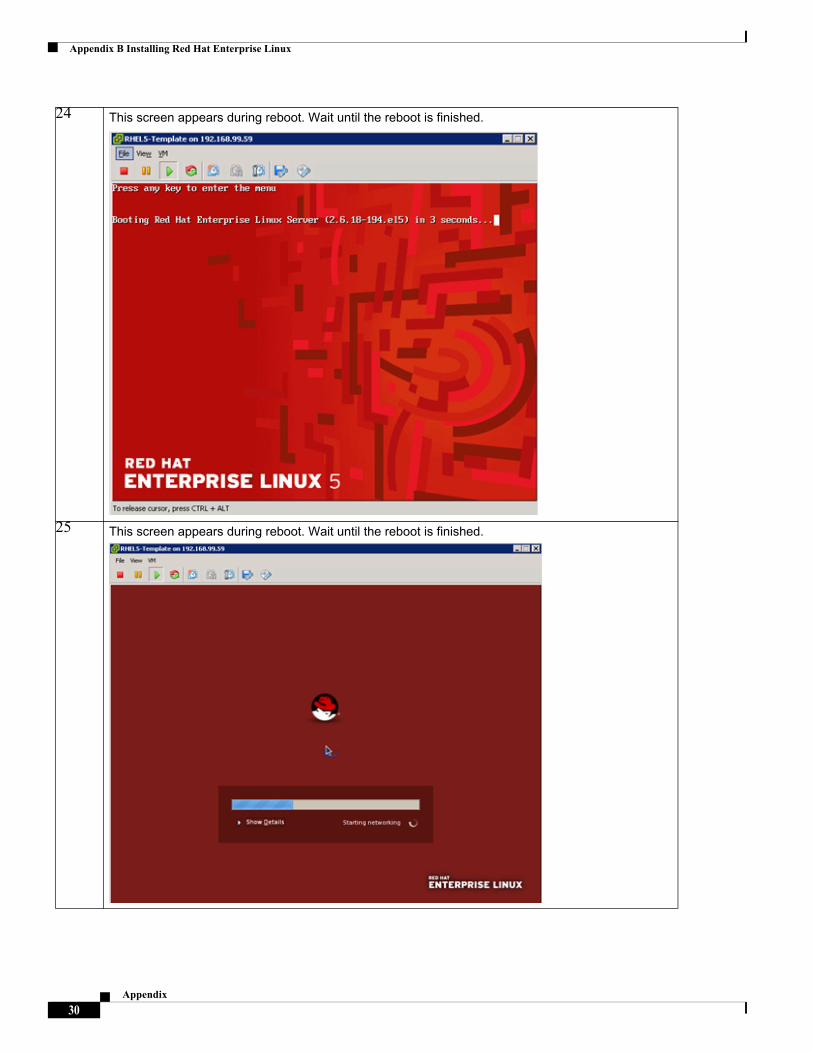
24 This screen appears during reboot. Wait until the reboot is finished.
25 This screen appears during reboot. Wait until the reboot is finished.
30Appendix
Appendix B Installing Red Hat Enterprise Linux
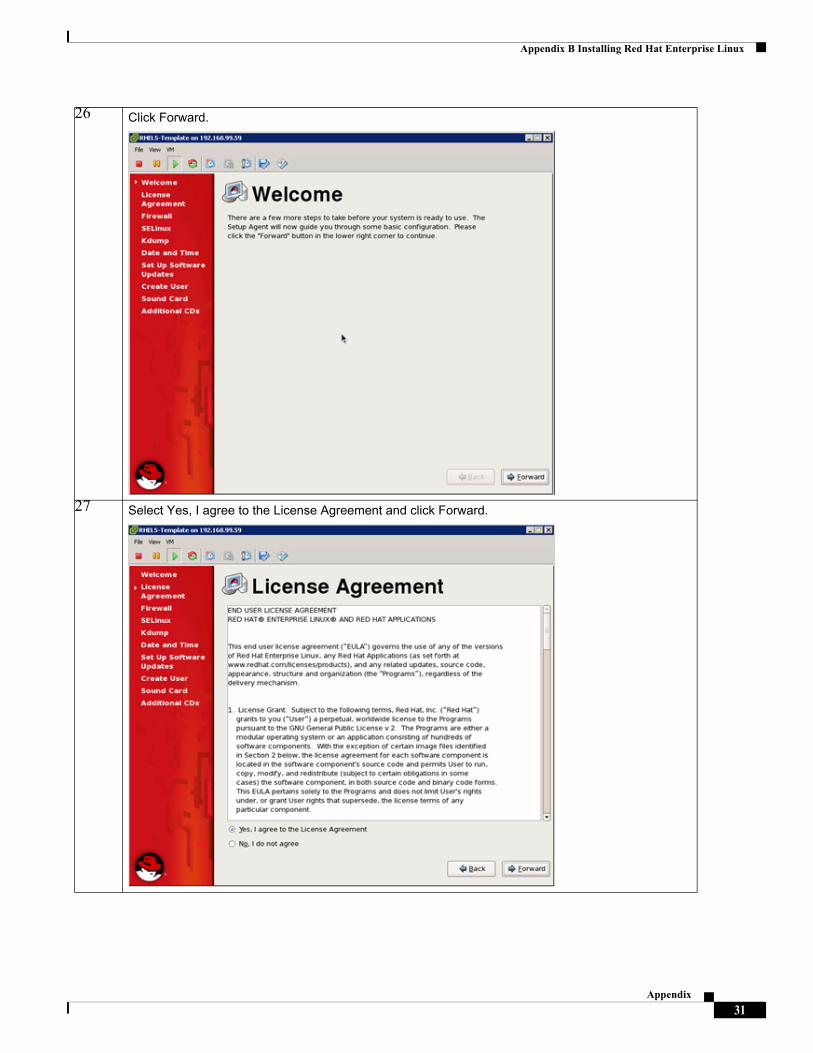
26 Click Forward.
27 Select Yes, I agree to the License Agreement and click Forward.
31Appendix

Appendix B Installing Red Hat Enterprise Linux
28 Disable the firewall and click Forward.
29 Click Yes.
32Appendix
Appendix B Installing Red Hat Enterprise Linux
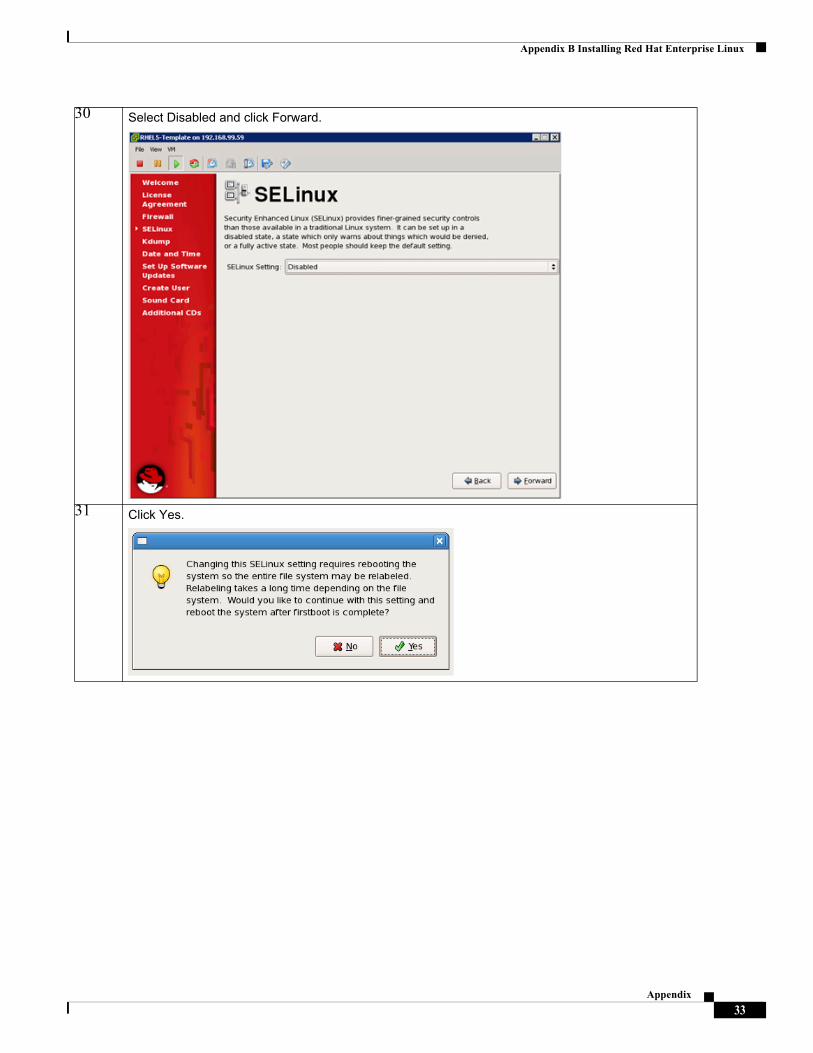
30 Select Disabled and click Forward.
31 Click Yes.
33Appendix

Appendix B Installing Red Hat Enterprise Linux
32 Leave the Enable kdump? checkbox unselected (the default) and click Forward.
33 Configure the date and time and click Forward.
34Appendix
Appendix B Installing Red Hat Enterprise Linux
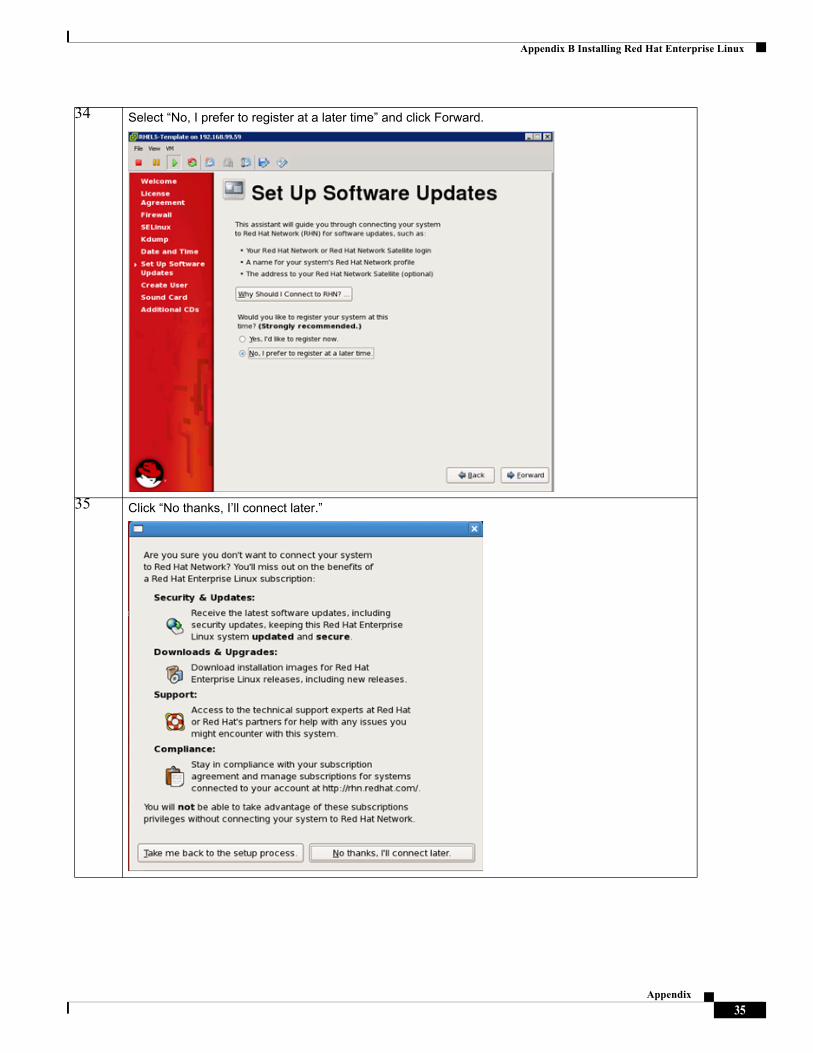
34 Select “No, I prefer to register at a later time” and click Forward.
35 Click “No thanks, I’ll connect later.”
35Appendix
Appendix B Installing Red Hat Enterprise Linux
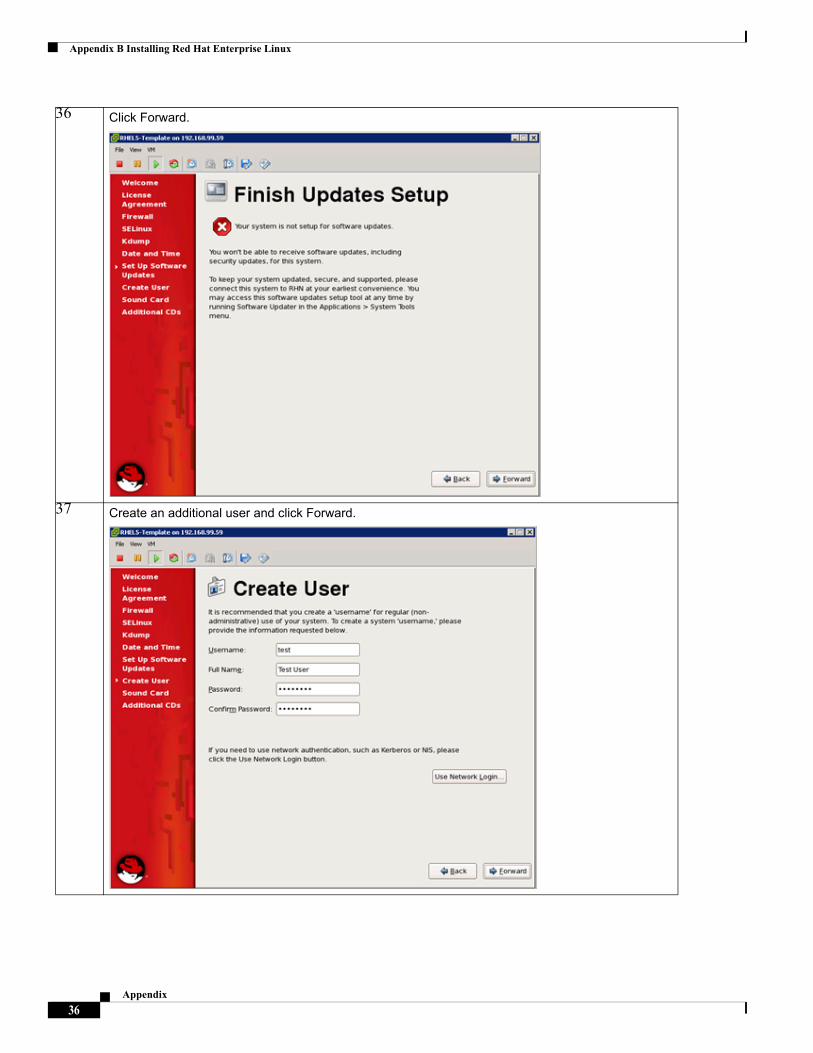
36 Click Forward.
37 Create an additional user and click Forward.
36Appendix
Appendix B Installing Red Hat Enterprise Linux
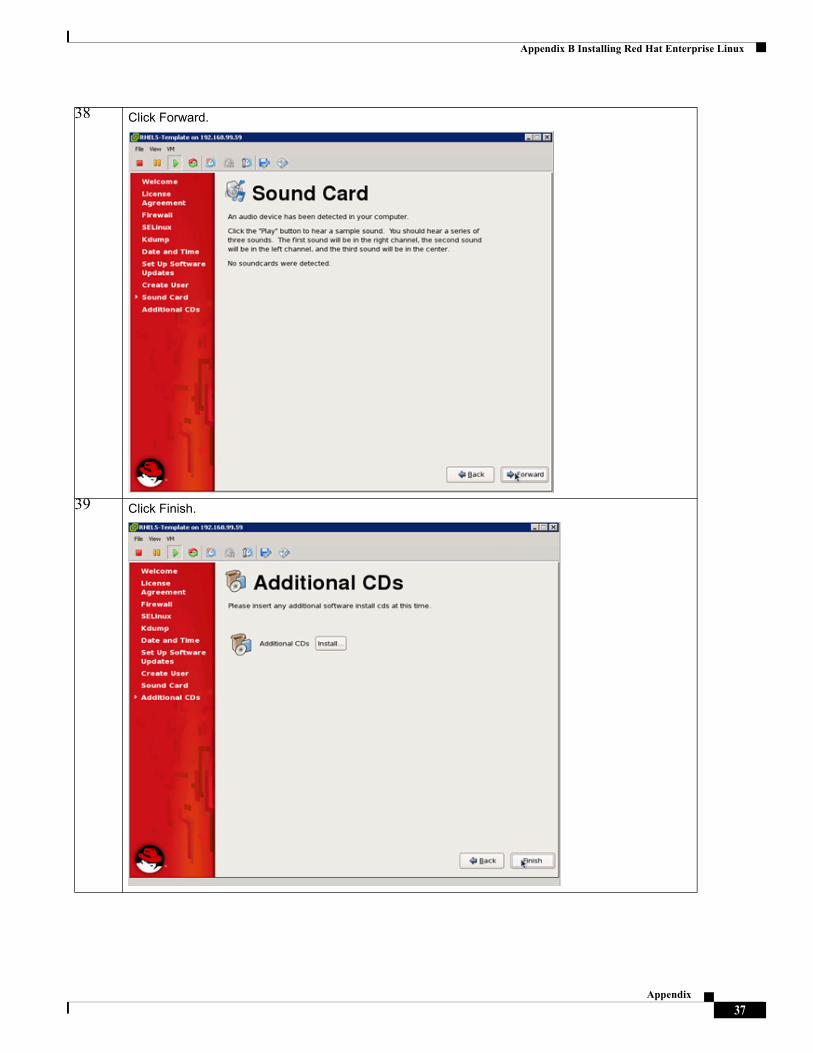
38 Click Forward.
39 Click Finish.
37Appendix
Appendix B Installing Red Hat Enterprise Linux
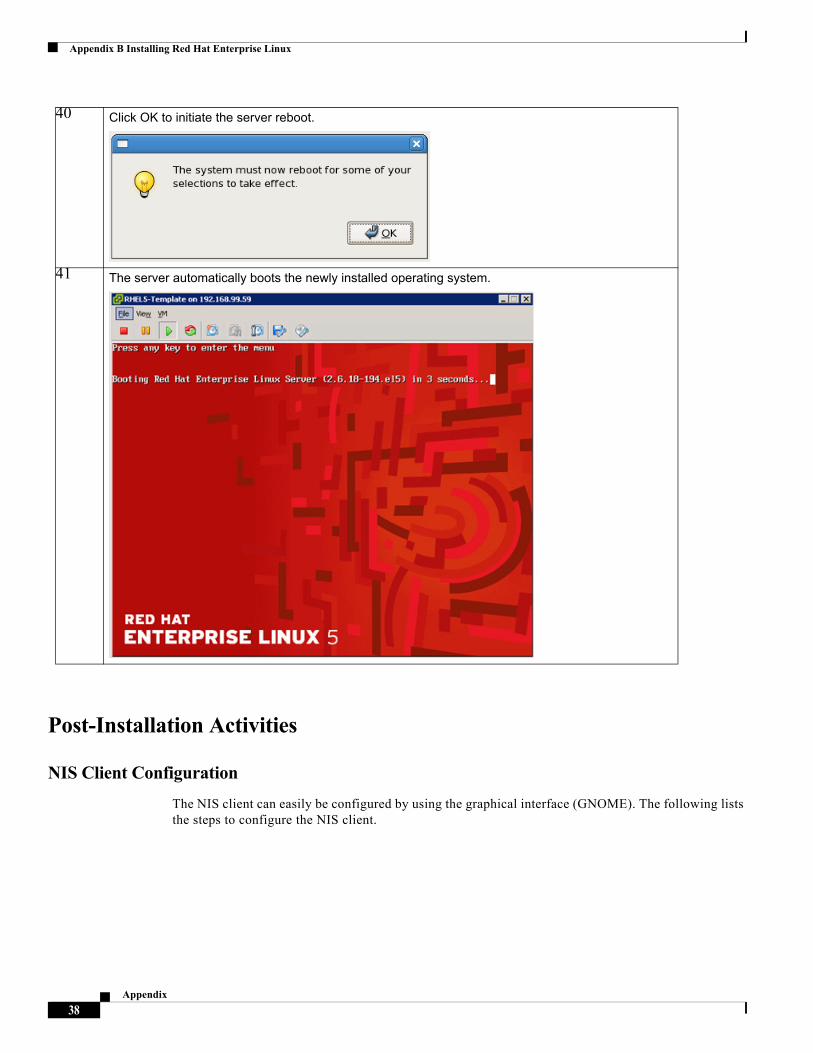
Post-Installation Activities
NIS Client Configuration
The NIS client can easily be configured by using the graphical interface (GNOME). The following lists the steps to configure the NIS client.
40 Click OK to initiate the server reboot.
41 The server automatically boots the newly installed operating system.
38Appendix
Appendix B Installing Red Hat Enterprise Linux
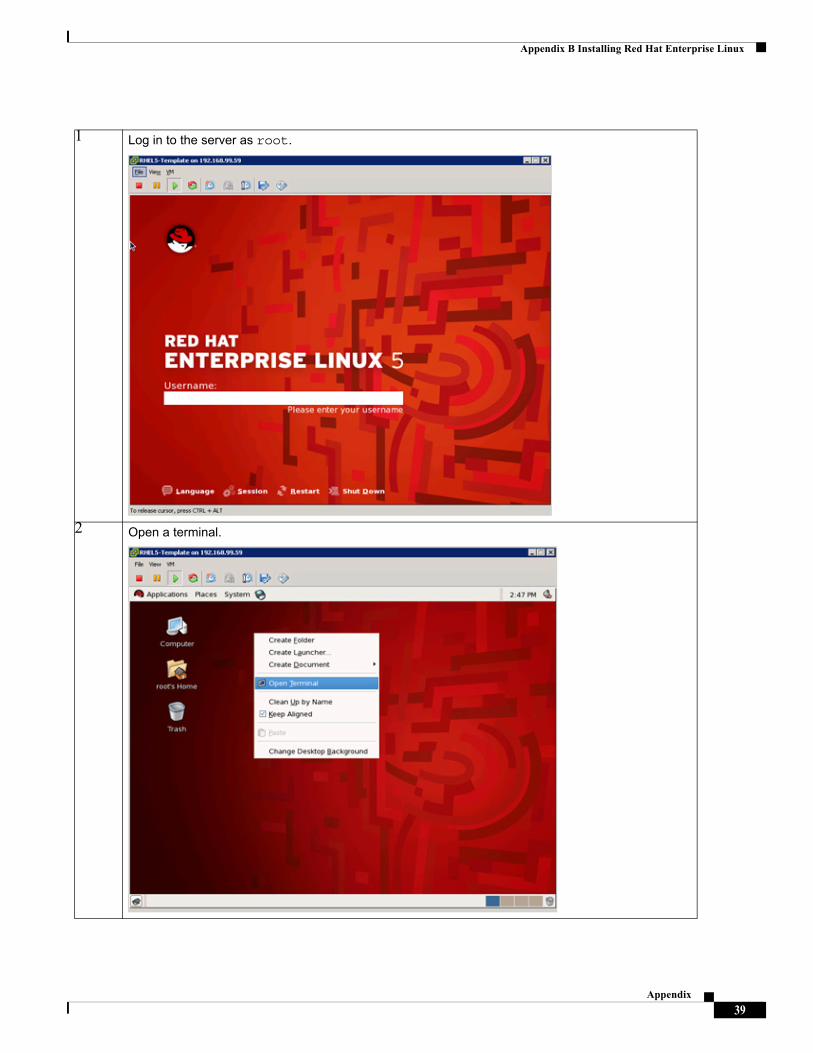
1 Log in to the server as root.
2 Open a terminal.
39Appendix

Appendix B Installing Red Hat Enterprise Linux
3 Select System > Authentication. In the Authentication Configuration window, User Information tab, select Enable NIS Support and click Configure NIS.
4 Enter t002.company.corp.nis as the NIS Domain and leave the NIS Server field empty. Click OK to close the NIS Settings window.
5 In the Authentication Configuration window, click OK to accept the NIS configuration and close the window.
40Appendix
Appendix B Installing Red Hat Enterprise Linux
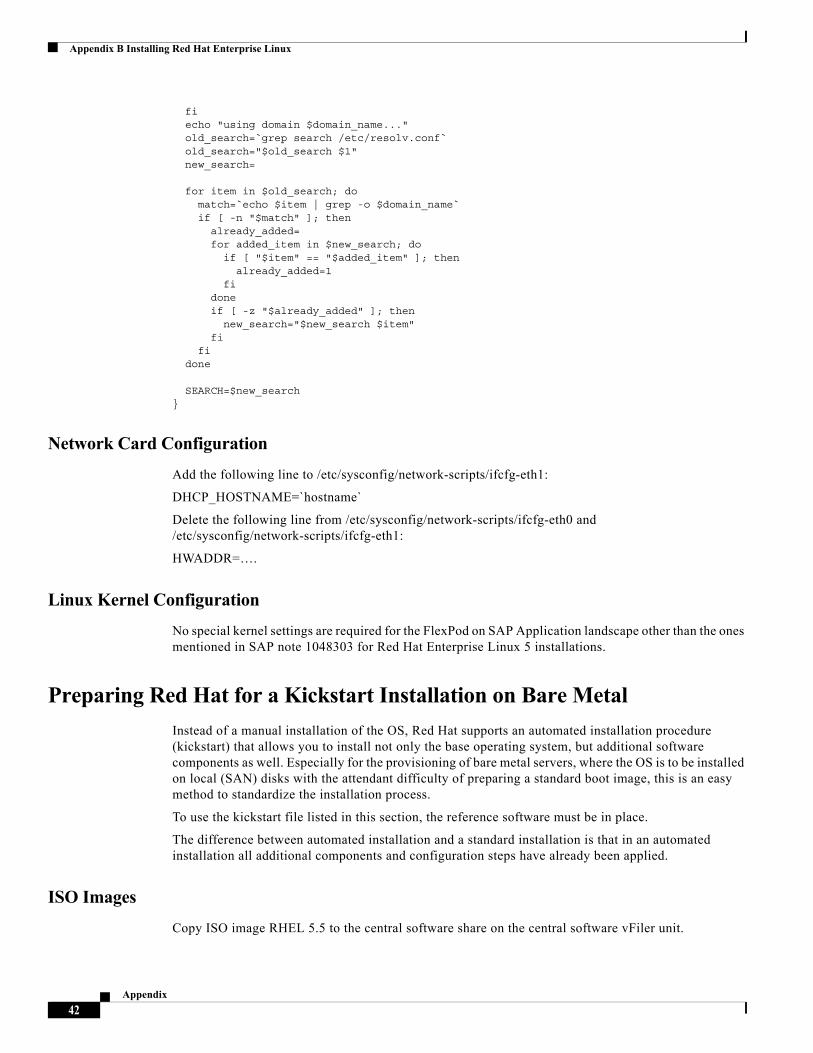
DHCP Client Hook
To retain all necessary search domains in the /etc/resolv.conf file, a custom DHCP client hook is needed. Therefore the file /etc/dhclient-enter-hooks must be created with the following content.
Copy the function make_resolv_conf() from the original /sbin/dhclient-script to the file. Replace the if [ -n "$SEARCH" ]; … fi clause with the following:
if [ -z "$SEARCH" ]; then make_search $new_domain_namefiecho search $SEARCH >> $rscf
Add the following function to the file:
make_search() { domain_name=`dnsdomainname` if [ -z "$domain_name" ] || [ "$domain_name" == "localdomain" ]; then domain_name=$1
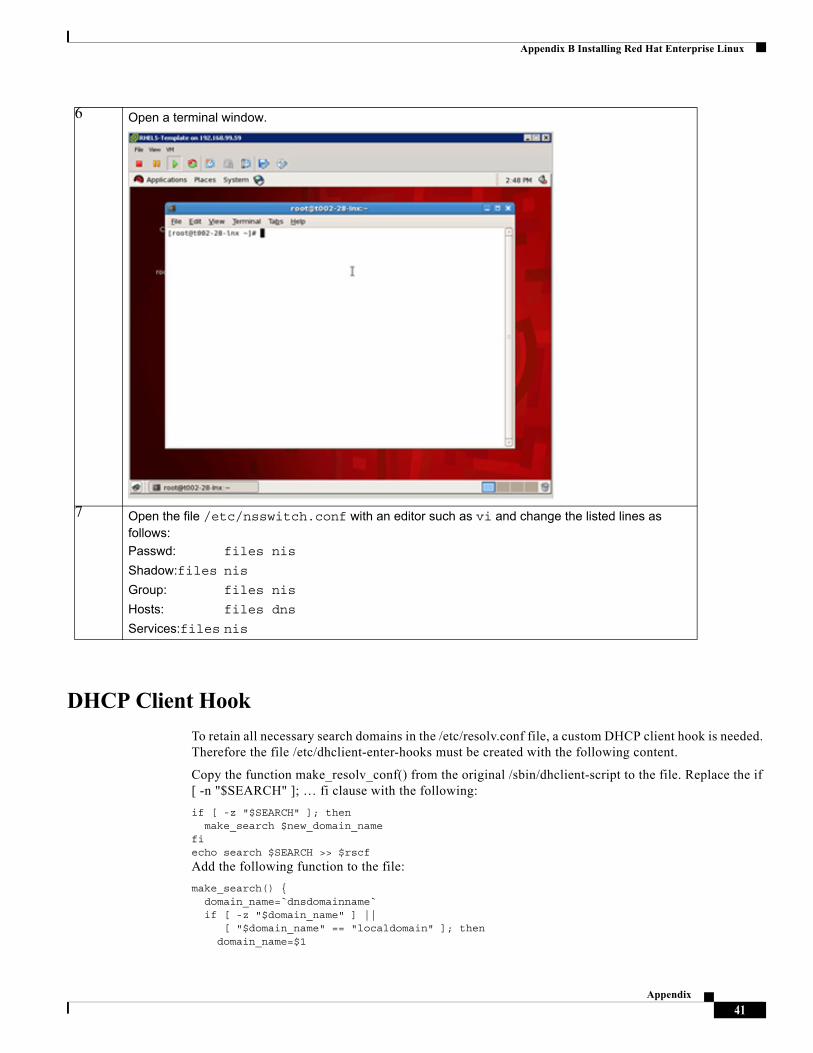
6 Open a terminal window.
7 Open the file /etc/nsswitch.conf with an editor such as vi and change the listed lines as follows:
Passwd: files nis
Shadow:files nis
Group: files nis
Hosts: files dns
Services:files nis
41Appendix
Appendix B Installing Red Hat Enterprise Linux
fi echo "using domain $domain_name..." old_search=`grep search /etc/resolv.conf` old_search="$old_search $1" new_search= for item in $old_search; do match=`echo $item | grep -o $domain_name` if [ -n "$match" ]; then already_added= for added_item in $new_search; do if [ "$item" == "$added_item" ]; then already_added=1 fi done if [ -z "$already_added" ]; then new_search="$new_search $item" fi fi done SEARCH=$new_search}
Network Card Configuration
Add the following line to /etc/sysconfig/network-scripts/ifcfg-eth1:
DHCP_HOSTNAME=`hostname`
Delete the following line from /etc/sysconfig/network-scripts/ifcfg-eth0 and /etc/sysconfig/network-scripts/ifcfg-eth1:
HWADDR=….
Linux Kernel Configuration
No special kernel settings are required for the FlexPod on SAP Application landscape other than the ones mentioned in SAP note 1048303 for Red Hat Enterprise Linux 5 installations.
Preparing Red Hat for a Kickstart Installation on Bare Metal
Instead of a manual installation of the OS, Red Hat supports an automated installation procedure (kickstart) that allows you to install not only the base operating system, but additional software components as well. Especially for the provisioning of bare metal servers, where the OS is to be installed on local (SAN) disks with the attendant difficulty of preparing a standard boot image, this is an easy method to standardize the installation process.
To use the kickstart file listed in this section, the reference software must be in place.
The difference between automated installation and a standard installation is that in an automated installation all additional components and configuration steps have already been applied.
ISO Images
Copy ISO image RHEL 5.5 to the central software share on the central software vFiler unit.
42Appendix
Appendix B Installing Red Hat Enterprise Linux
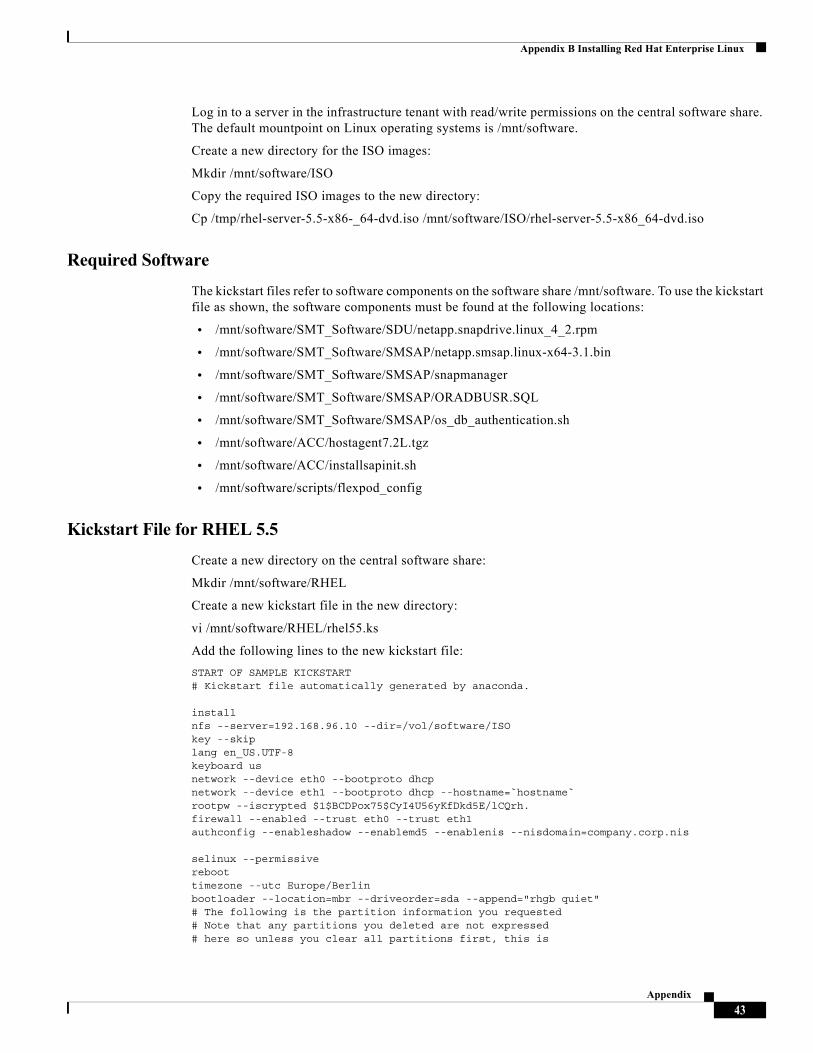
Log in to a server in the infrastructure tenant with read/write permissions on the central software share. The default mountpoint on Linux operating systems is /mnt/software.
Create a new directory for the ISO images:
Mkdir /mnt/software/ISO
Copy the required ISO images to the new directory:
Cp /tmp/rhel-server-5.5-x86-_64-dvd.iso /mnt/software/ISO/rhel-server-5.5-x86_64-dvd.iso
Required Software
The kickstart files refer to software components on the software share /mnt/software. To use the kickstart file as shown, the software components must be found at the following locations:
• /mnt/software/SMT_Software/SDU/netapp.snapdrive.linux_4_2.rpm
• /mnt/software/SMT_Software/SMSAP/netapp.smsap.linux-x64-3.1.bin
• /mnt/software/SMT_Software/SMSAP/snapmanager
• /mnt/software/SMT_Software/SMSAP/ORADBUSR.SQL
• /mnt/software/SMT_Software/SMSAP/os_db_authentication.sh
• /mnt/software/ACC/hostagent7.2L.tgz
• /mnt/software/ACC/installsapinit.sh
• /mnt/software/scripts/flexpod_config
Kickstart File for RHEL 5.5
Create a new directory on the central software share:
Mkdir /mnt/software/RHEL
Create a new kickstart file in the new directory:
vi /mnt/software/RHEL/rhel55.ks
Add the following lines to the new kickstart file:
START OF SAMPLE KICKSTART# Kickstart file automatically generated by anaconda.
installnfs --server=192.168.96.10 --dir=/vol/software/ISOkey --skiplang en_US.UTF-8keyboard usnetwork --device eth0 --bootproto dhcpnetwork --device eth1 --bootproto dhcp --hostname=`hostname`rootpw --iscrypted $1$BCDPox75$CyI4U56yKfDkd5E/lCQrh.firewall --enabled --trust eth0 --trust eth1authconfig --enableshadow --enablemd5 --enablenis --nisdomain=company.corp.nis
selinux --permissivereboottimezone --utc Europe/Berlinbootloader --location=mbr --driveorder=sda --append="rhgb quiet"# The following is the partition information you requested# Note that any partitions you deleted are not expressed# here so unless you clear all partitions first, this is
43Appendix
Appendix B Installing Red Hat Enterprise Linux
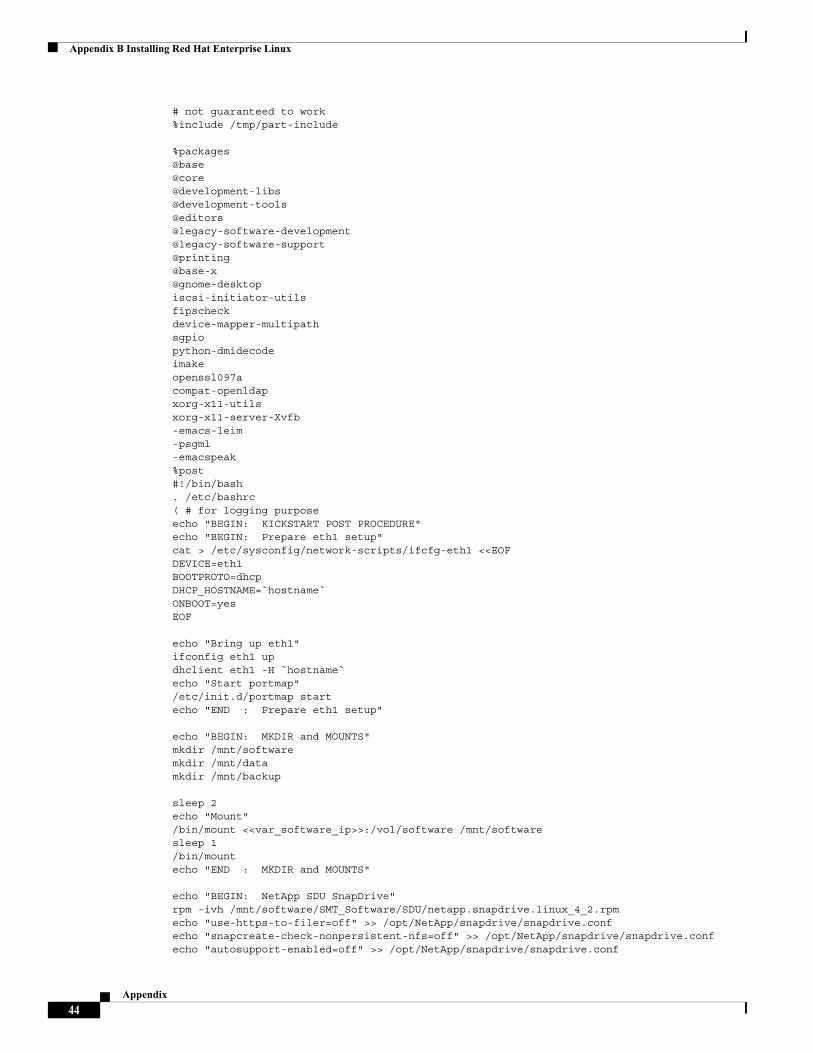
# not guaranteed to work%include /tmp/part-include
%packages@base@core@development-libs@development-tools@editors@legacy-software-development@legacy-software-support@printing@base-x@gnome-desktopiscsi-initiator-utilsfipscheckdevice-mapper-multipathsgpiopython-dmidecodeimakeopenssl097acompat-openldapxorg-x11-utilsxorg-x11-server-Xvfb-emacs-leim-psgml-emacspeak%post#!/bin/bash. /etc/bashrc( # for logging purposeecho "BEGIN: KICKSTART POST PROCEDURE"echo "BEGIN: Prepare eth1 setup"cat > /etc/sysconfig/network-scripts/ifcfg-eth1 <<EOFDEVICE=eth1BOOTPROTO=dhcpDHCP_HOSTNAME=`hostname`ONBOOT=yesEOF
echo "Bring up eth1"ifconfig eth1 updhclient eth1 -H `hostname`echo "Start portmap"/etc/init.d/portmap startecho "END : Prepare eth1 setup"
echo "BEGIN: MKDIR and MOUNTS"mkdir /mnt/softwaremkdir /mnt/datamkdir /mnt/backup
sleep 2echo "Mount"/bin/mount <<var_software_ip>>:/vol/software /mnt/softwaresleep 1/bin/mountecho "END : MKDIR and MOUNTS"
echo "BEGIN: NetApp SDU SnapDrive"rpm -ivh /mnt/software/SMT_Software/SDU/netapp.snapdrive.linux_4_2.rpmecho "use-https-to-filer=off" >> /opt/NetApp/snapdrive/snapdrive.confecho "snapcreate-check-nonpersistent-nfs=off" >> /opt/NetApp/snapdrive/snapdrive.confecho "autosupport-enabled=off" >> /opt/NetApp/snapdrive/snapdrive.conf
44Appendix
Appendix B Installing Red Hat Enterprise Linux
echo "END : NetApp SDU SnapDrive"
echo "BEGIN: NetApp SnapManager for SAP"/mnt/software/SMT_Software/SMSAP/netapp.smsap.linux-x64-3.1.bin <<EOF
rootroot1
EOFecho "auto_support.on=off" >> /opt/NetApp/smsap/properties/smsap.configcp /mnt/software/SMT_Software/SMSAP/snapmanager /etc/pam.d/snapmanagercp /opt/NetApp/smsap/plugins/examples/clone/create/post/*activities.sh /opt/NetApp/smsap/plugins/clone/create/post/cp /opt/NetApp/smsap/plugins/examples/clone/create/post/os_db_auth*.sh /opt/NetApp/smsap/plugins/clone/create/post/cp /mnt/software/SMT_Software/SMSAP/ORADBUSR.SQL /opt/NetApp/smsap/plugins/clone/create/post/cp /mnt/software/SMT_Software/SMSAP/os_db_authentication.sh /opt/NetApp/smsap/plugins/clone/create/post/echo "END : NetApp SnapManager for SAP"
echo "BEGIN: SAP Hostagent "cd /tmptar -xf /mnt/software/ACC/hostagent7.2L.tgzgroupadd sapsysuseradd -g sapsys sapadmcd /tmp/hostctrlcp -fp /mnt/software/ACC/installsapinit.sh ../saphostexec -installecho "END : SAP Hostagent "
echo "BEGIN: FlexPod bootscript config "mkdir /opt/NetApp/FlexPodsleep 1cp /mnt/software/scripts/flexpod_config /etc/init.d/sbin/chkconfig --add flexpod_configecho "END : FlexPod bootscript config "
echo "END : KICKSTART POST PROCEDURE"
%pre#!/bin/bash# VMs may have different device name for 1st hddif [ -b /dev/vda ]; then disk=vda disk2=vdaelif [ -b /dev/mapper/mpath0 ]; then disk=mapper/mpath0 disk2=dm-0elif [ -b /dev/sda ]; then disk=sda disk2=sdafi
# decide whether to use LVM or not (size < 40gb ==> no LVM)size=$(grep "$disk2$" /proc/partitions | awk '{ print $3 }')
if [ -z "$size" ]; then echo "E: could not get size of installation disk" exit 1fi
45Appendix
Appendix C Configuring PXE Boot with SuSE Linux Enterprise Server
if [ "$size" -gt 40000000 ]; then # lvm setup, 100m /boot, 2g swap, 10g root cat > /tmp/part-include <<-EOF bootloader --location=mbr --append=selinux=0 clearpart --all --initlabel --drives=$disk part /boot --fstype ext3 --size 100 part pv.01 --size 1000 --grow --ondisk=$disk volgroup vg0 pv.01 logvol swap --fstype swap --name=swap --vgname=vg0 --size=40000 logvol / --fstype ext3 --name=root --vgname=vg0 --size=10000 EOFelse # small disk, use one big plain parititon, no swap cat > /tmp/part-include <<-EOF bootloader --location=mbr --append=selinux=0 clearpart --all --initlabel --drives=$disk part / --fstype ext3 --size 100 --grow EOFfi%end
%end
Appendix C Configuring PXE Boot with SuSE Linux Enterprise Server
This Appendix explains the process of configuring a PXE boot process for the SAP Application built on FlexPod environment. The goal of this configuration is to support the use of physical blades in almost the same way as booting a virtual machine.
The following overview summarizes the procedure:
1. For every server that should be used as a physical blade in a tenant, a dedicated server profile must be created, except that in this case the servers are configured diskless and they boot by using the storage LAN NIC.
2. Because network traffic is isolated in a tenant, the PXE boot server is configured in a tenant. The tenant-specific services VM with dnsmasq is used for a TFTP service that assigns the MAC address of the created server to an IP address and OS image.
3. The OS image must be provisioned from the vFiler unit in a tenant. Once created globally, an OS image needs only minor adaptations in a given tenant. As usual with PXE boot, the image is mapped 1:1 to a server profile by using the MAC addresses.
This three-step procedure assumes that an OS image has already been created in such a way that it includes all the tools and procedures to be started by means of PXE boot and all the features and tools that are required for the SAP Application built on FlexPod environment.
Creating a Server Profile
Most of the settings and definitions in the Cisco UCS Manger can be reused. Only new settings are covered in this section.
46Appendix
Appendix C Configuring PXE Boot with SuSE Linux Enterprise Server
Creating Required Policies
To simplify the server profile creation, you must create the following policies:
• No local storage usage
• Boot using storage LAN (eth1)
The following describes the steps to create the required boot policies.
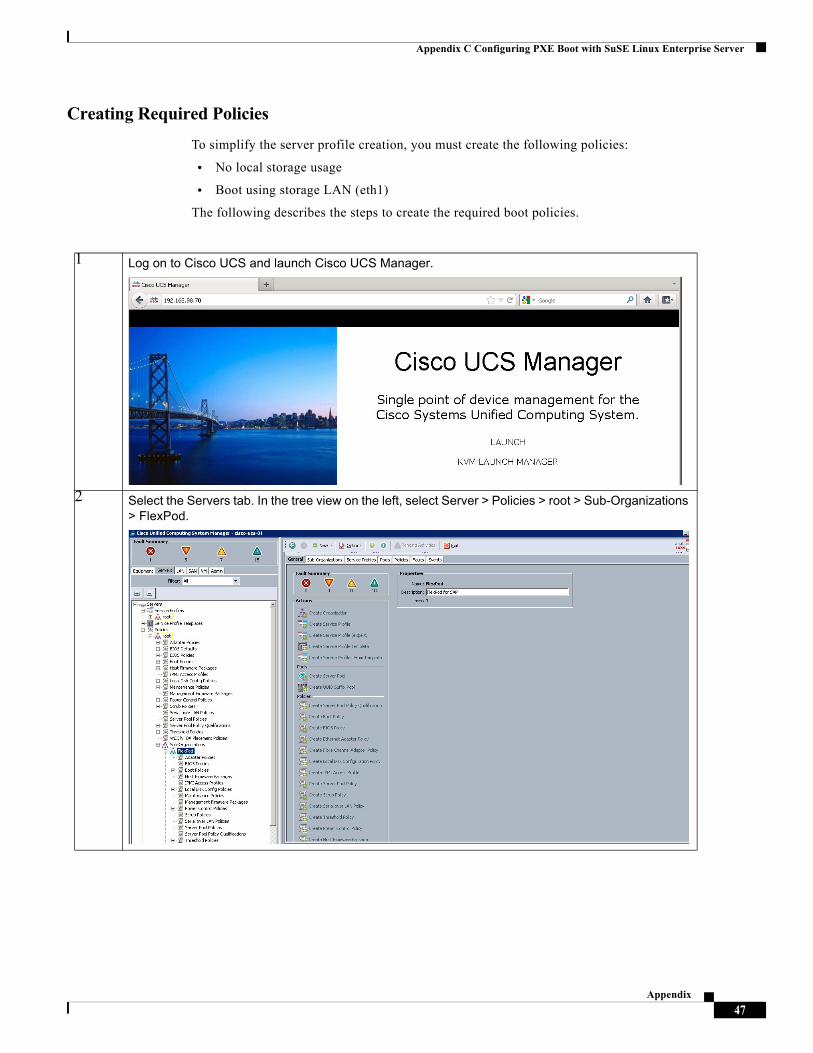
1 Log on to Cisco UCS and launch Cisco UCS Manager.
2 Select the Servers tab. In the tree view on the left, select Server > Policies > root > Sub-Organizations > FlexPod.
47Appendix
Appendix C Configuring PXE Boot with SuSE Linux Enterprise Server
Create a Service Template
The following describes the steps to create a service template that can be used to provision service profiles for a tenant.
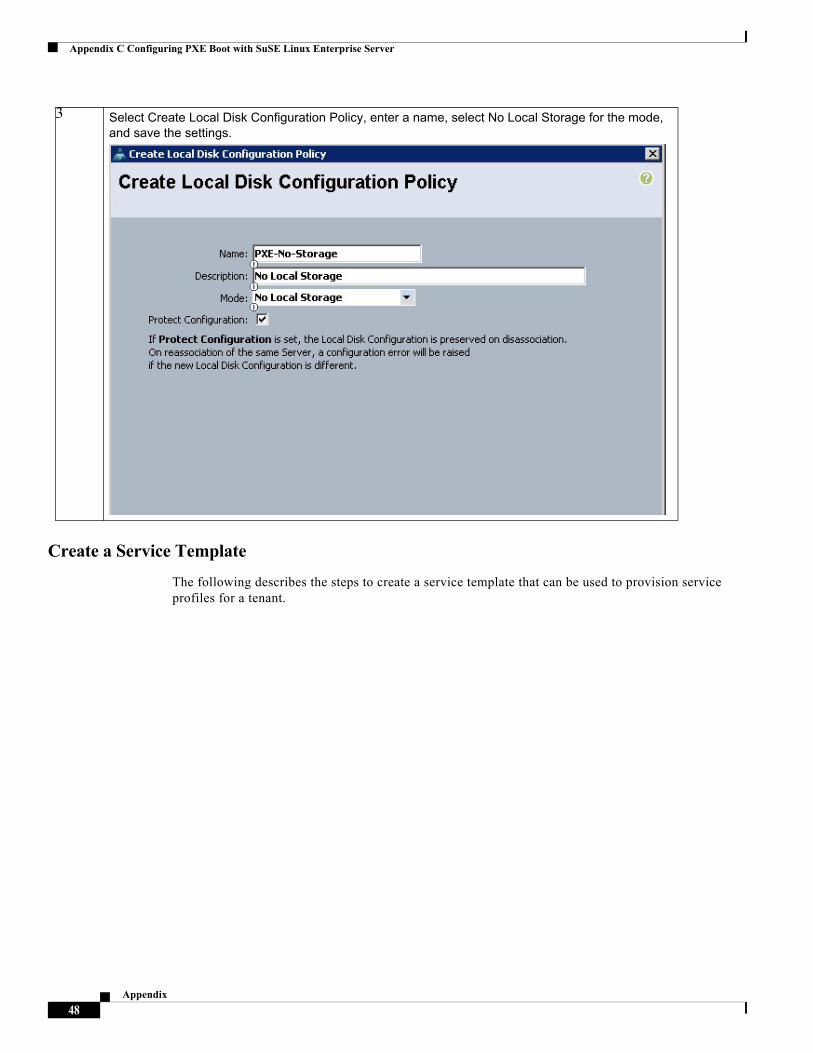
3 Select Create Local Disk Configuration Policy, enter a name, select No Local Storage for the mode, and save the settings.
48Appendix
Appendix C Configuring PXE Boot with SuSE Linux Enterprise Server
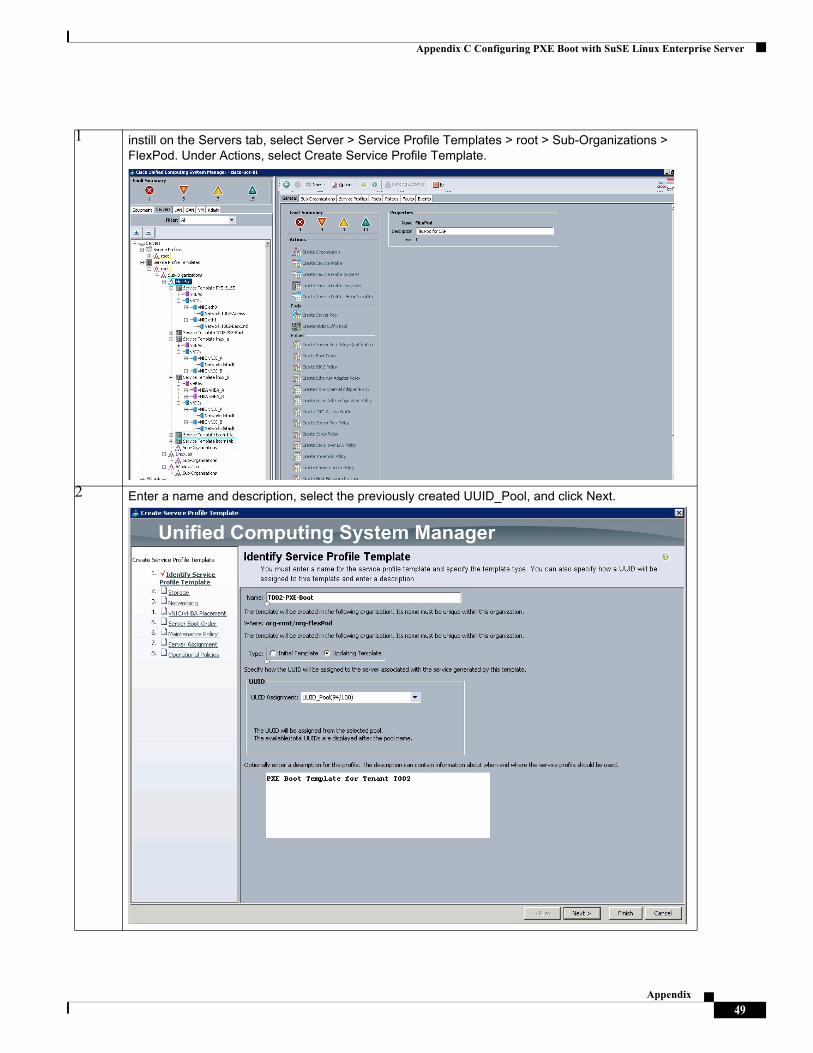
1 instill on the Servers tab, select Server > Service Profile Templates > root > Sub-Organizations > FlexPod. Under Actions, select Create Service Profile Template.
2 Enter a name and description, select the previously created UUID_Pool, and click Next.
49Appendix
Appendix C Configuring PXE Boot with SuSE Linux Enterprise Server
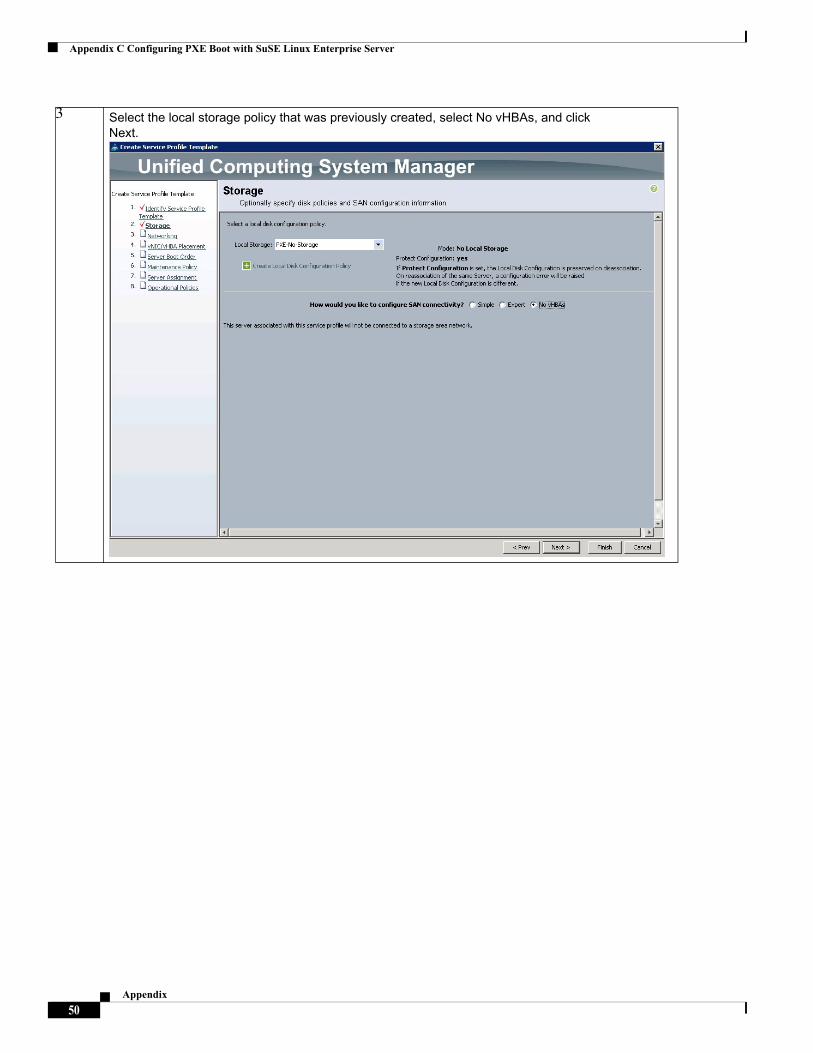
3 Select the local storage policy that was previously created, select No vHBAs, and click Next.
50Appendix
Appendix C Configuring PXE Boot with SuSE Linux Enterprise Server
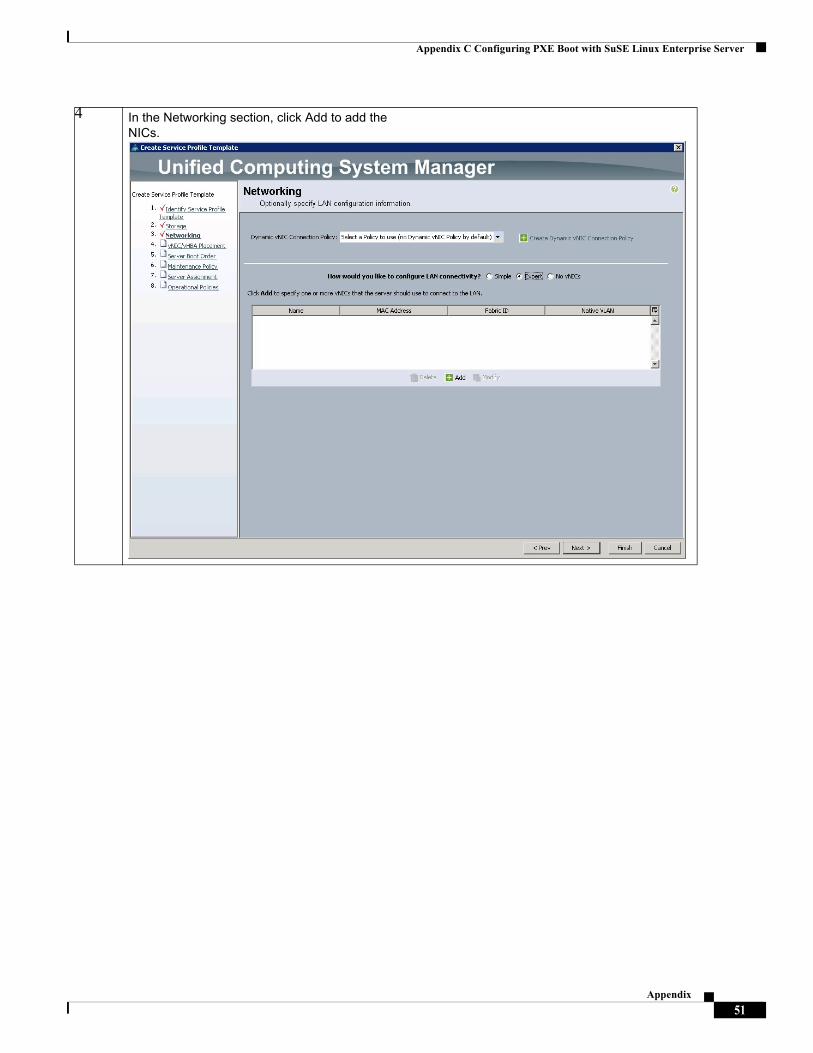
4 In the Networking section, click Add to add the NICs.
51Appendix

Appendix C Configuring PXE Boot with SuSE Linux Enterprise Server
5 Create eth0 for the access LAN of tenant 002.
52Appendix
Appendix C Configuring PXE Boot with SuSE Linux Enterprise Server
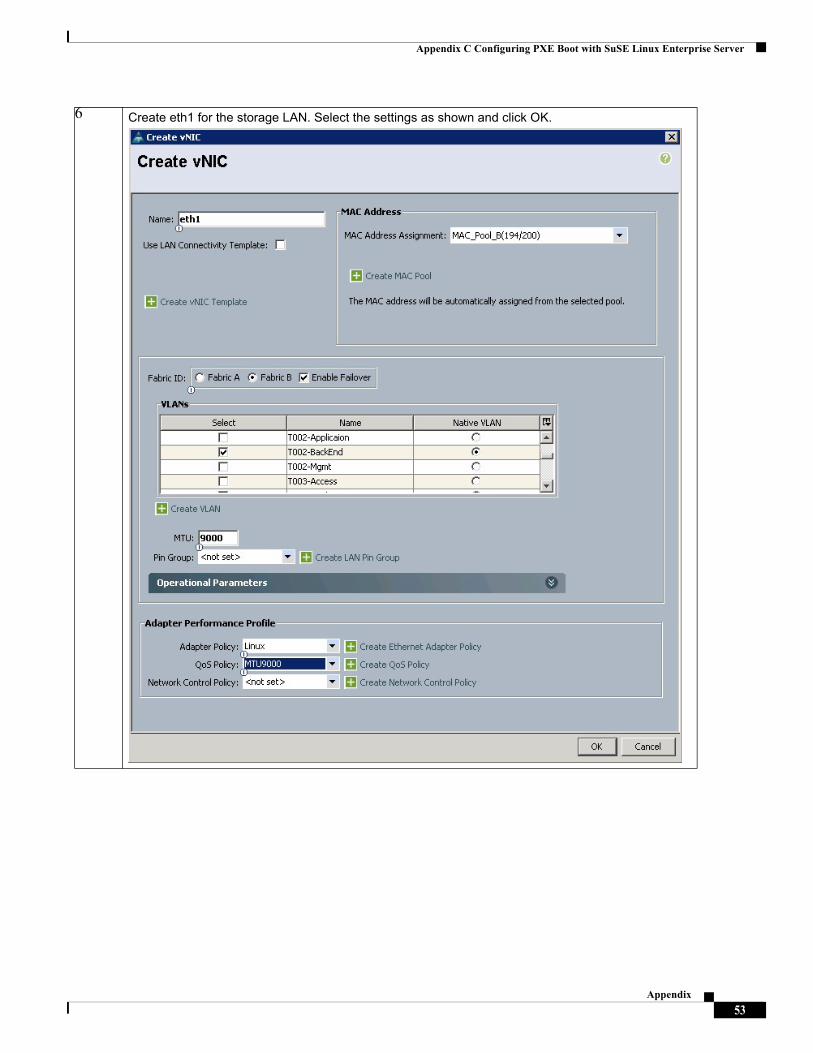
6 Create eth1 for the storage LAN. Select the settings as shown and click OK.
53Appendix
Appendix C Configuring PXE Boot with SuSE Linux Enterprise Server
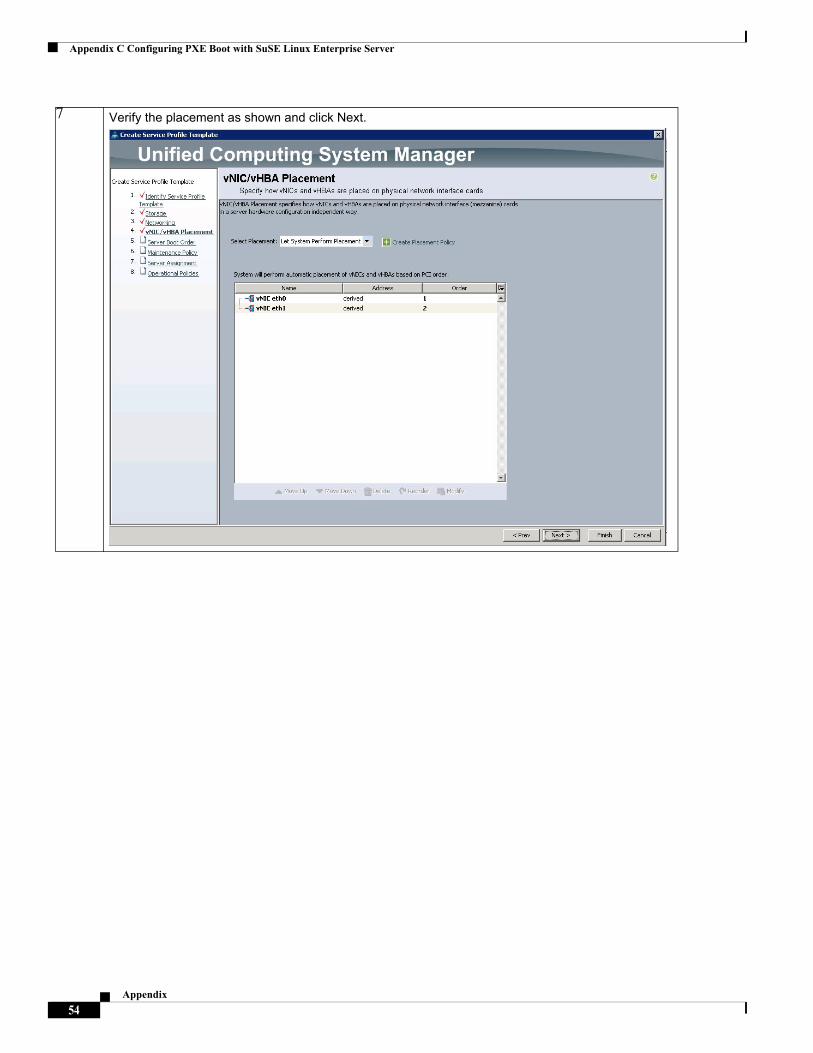
7 Verify the placement as shown and click Next.
54Appendix

Appendix C Configuring PXE Boot with SuSE Linux Enterprise Server
Create Service Profiles from the Template
The following describes the steps to create the service profiles from the template.
8 In The Server Boot Order section, select your boot policy and verify that the server boots by using eth1.
9 All the other sections are defaults. Save your settings.
55Appendix
Appendix C Configuring PXE Boot with SuSE Linux Enterprise Server
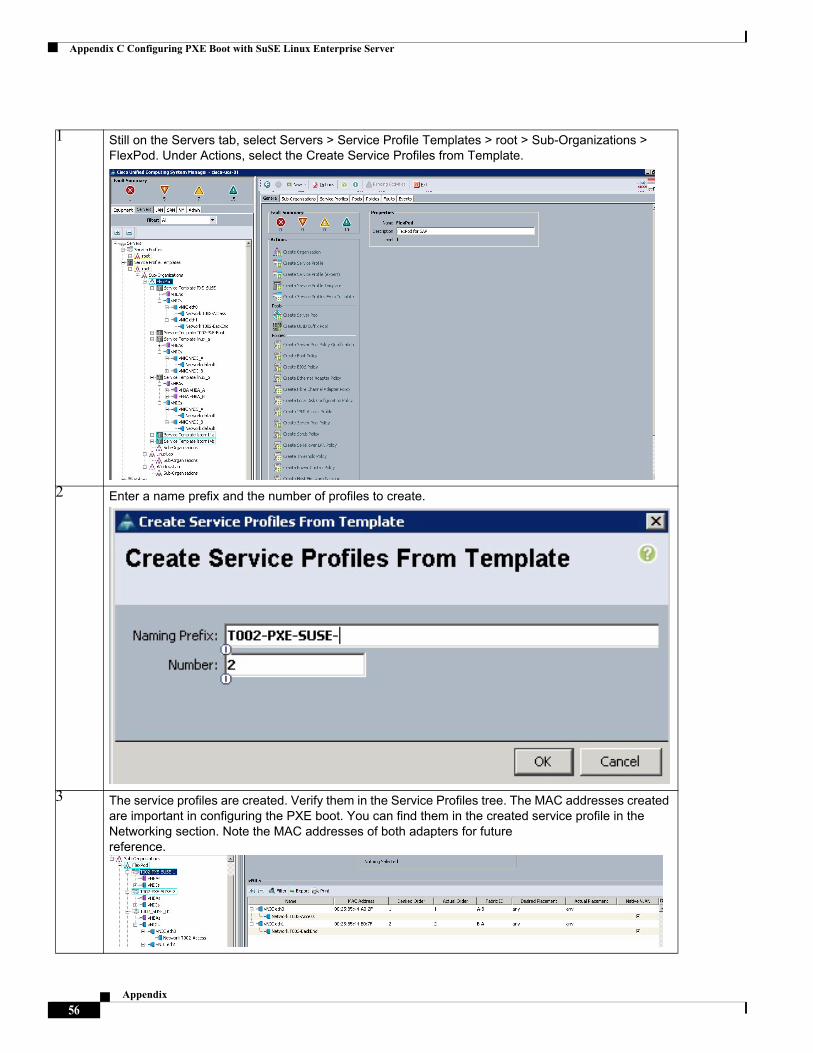
1 Still on the Servers tab, select Servers > Service Profile Templates > root > Sub-Organizations > FlexPod. Under Actions, select the Create Service Profiles from Template.
2 Enter a name prefix and the number of profiles to create.
3 The service profiles are created. Verify them in the Service Profiles tree. The MAC addresses created are important in configuring the PXE boot. You can find them in the created service profile in the Networking section. Note the MAC addresses of both adapters for future reference.
56Appendix
Appendix C Configuring PXE Boot with SuSE Linux Enterprise Server
Required Storage Layout
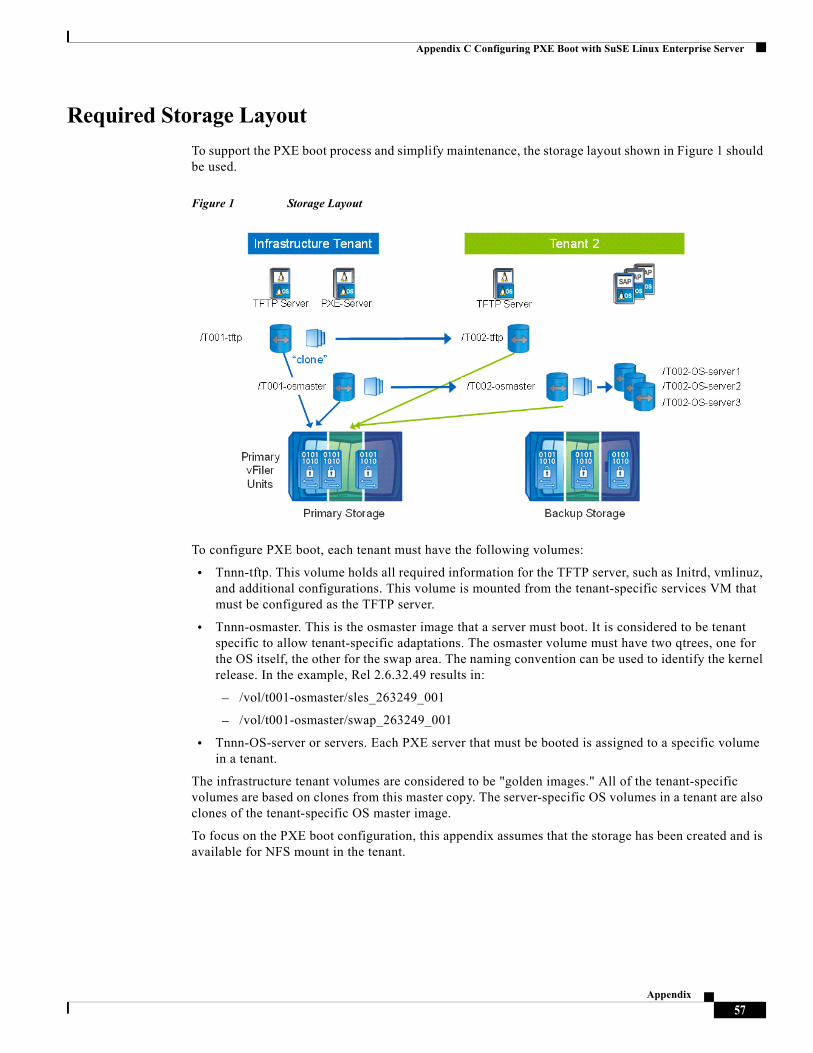
To support the PXE boot process and simplify maintenance, the storage layout shown in Figure 1 should be used.
Figure 1 Storage Layout
To configure PXE boot, each tenant must have the following volumes:
• Tnnn-tftp. This volume holds all required information for the TFTP server, such as Initrd, vmlinuz, and additional configurations. This volume is mounted from the tenant-specific services VM that must be configured as the TFTP server.
• Tnnn-osmaster. This is the osmaster image that a server must boot. It is considered to be tenant specific to allow tenant-specific adaptations. The osmaster volume must have two qtrees, one for the OS itself, the other for the swap area. The naming convention can be used to identify the kernel release. In the example, Rel 2.6.32.49 results in:
– /vol/t001-osmaster/sles_263249_001
– /vol/t001-osmaster/swap_263249_001
• Tnnn-OS-server or servers. Each PXE server that must be booted is assigned to a specific volume in a tenant.
The infrastructure tenant volumes are considered to be "golden images." All of the tenant-specific volumes are based on clones from this master copy. The server-specific OS volumes in a tenant are also clones of the tenant-specific OS master image.
To focus on the PXE boot configuration, this appendix assumes that the storage has been created and is available for NFS mount in the tenant.
57Appendix

Appendix C Configuring PXE Boot with SuSE Linux Enterprise Server
Golden Image Creation
In the example configuration, the golden image creation occurs in the infrastructure tenant. It is also possible to create a dedicated test tenant in which all of the golden image preparation steps can be applied. This test tenant can also be used for SAP installation and other administrative tests. The rest of this appendix uses the infrastructure tenant.
The following steps are required to create the golden image:
1. Extract the SuSE DVD.
2. Mount the golden TFTP and osmaster volumes.
3. Prepare the TFTP boot volume
4. Configure dnsmasq
5. Install Linux
Extract the SuSE DVD
On the software vFiler unit, create a folder to hold the SuSE installation DVD. It is assumed that DVD.iso is copied to /mnt/software/SLES.
T001-0-lnx:~ # cd /mnt/software/SLEST001-0-lnx:~ # mkdir ISOT001-0-lnx:~ # mount -o loop SLES-11-SP1-DVD-x86_64-GM-DVD1.iso ISOT001-0-lnx:~ # mkdir SLES11T001-0-lnx:~ # cp ISO/* SLES11/
Mount the Golden TFTP and Osmaster Volumes
Create the folder structure and mount the volumes:
T001-0-lnx:~ # mkdir /NetAppT001-0-lnx:~ # mkdir /NetApp/osmasterT001-0-lnx:~ # mkdir /NetApp/tftpbootT001-0-lnx:~ # mount -t nfs software:/vol/t001-osmaster /NetApp/osmasterT001-0-lnx:~ # mount -t nfs software:/vol/t001-tftp /NetApp/tftpbootT001-0-lnx:~ # ln -s /NetApp/tftpboot /tftpboot
Prepare the TFTP Boot Volume for the First Installation
To start the SLES installation by means of PXE boot, you must prepare the tftpboot folder for the first installation: pxelinux.0 must be copied from an existing Linux installation (such as the tenant-specific services VM) and the boot configuration files must be created.
T001-0-lnx:~ # cp /usr/share/syslinux/pxelinux.0 /tftpbootT001-0-lnx:~ # cd /mnt/software/SLES/ISO/boot/x64_64/loaderT001-0-lnx:~ # cp initrd /tftpboot/initrd-isoT001-0-lnx:~ # cp linux /tftpboot/linux-isoT001-0-lnx:~ # cd /tftpbootT001-0-lnx:~ # mkdir pxelinux.cfgT001-0-lnx:~ # cd pxelinux.cfg/T001-0-lnx:~ # vi defaultT001-0-lnx:~ #
The default configuration must contain the following:
# SAP UCS PXE Boot Definitiondisplay ../boot.msgdefault Install
58Appendix
Appendix C Configuring PXE Boot with SuSE Linux Enterprise Server
#prompt 1timeout 10LABEL Install KERNEL linux-iso APPEND initrd=initrd-iso install=nfs://192.168.96.10:/vol/software/SLES/SLES11/?device=eth1
Create the file boot.msg:
T001-0-lnx:~ # cd /tftpboot/T001-0-lnx:~ # vi boot.msgT001-0-lnx:~ #
The content should be:
############################################################################################### ################### ####### CISCO Systems Inc. #### SAP Applications built on FlexPod ####### ##################### #############################################################################################
Configure dnsmask
Dnsmask is already used for DNS and DHCP. The extension to enable tftpboot is quite simple.
To adapt the configuration file /etc/dnsmasq.conf, insert these lines:
## Activate MAC address based ip's#read-ethers
Also enter the tfpt boot activation at the end of the file:
enable-tftptftp-root=/tftpbootdhcp-boot=pxelinux.0tftp-no-blocksize
If you have not yet enabled the infrastructure tenant dhcp functionality, dnsmasq.conf should also contain:
# 1: Subnet Maskdhcp-option=1,255.255.255.0
# 3: Router (default gateway)dhcp-option=tag:access,3,192.168.99.1dhcp-option=tag:backend,3
# 6: Domain Name Server#dhcp-option=tag:access,6,192.168.99.50#dhcp-option=tag:backend,6,192.168.101.50dhcp-option=6,192.168.99.50
# 119: DNS domain search listdhcp-option=119,t001.company.corp,bknd.t001.company.corp
59Appendix
Appendix C Configuring PXE Boot with SuSE Linux Enterprise Server
Create or add the file /etc/ethers. Here you need the MAC addresses of your service profile:
00:25:B5:44:A0:5F 192.168.99.5100:25:B5:44:B0:4F 192.168.101.51
Add the appropriate hostnames to the file /etc/hosts, assuming that t001-1-lnx is the host name:
# PXE Boot pairs192.168.99.51 t001-1-lnx.t002.company.corp t001-1-lnx192.168.101.51 t001-1-lnx.bknd.t002.company.corp
Install SuSE Linux
With these settings in place, the server profile is ready to boot the SuSE installation. The following describes the PXE boot-specific installation steps.
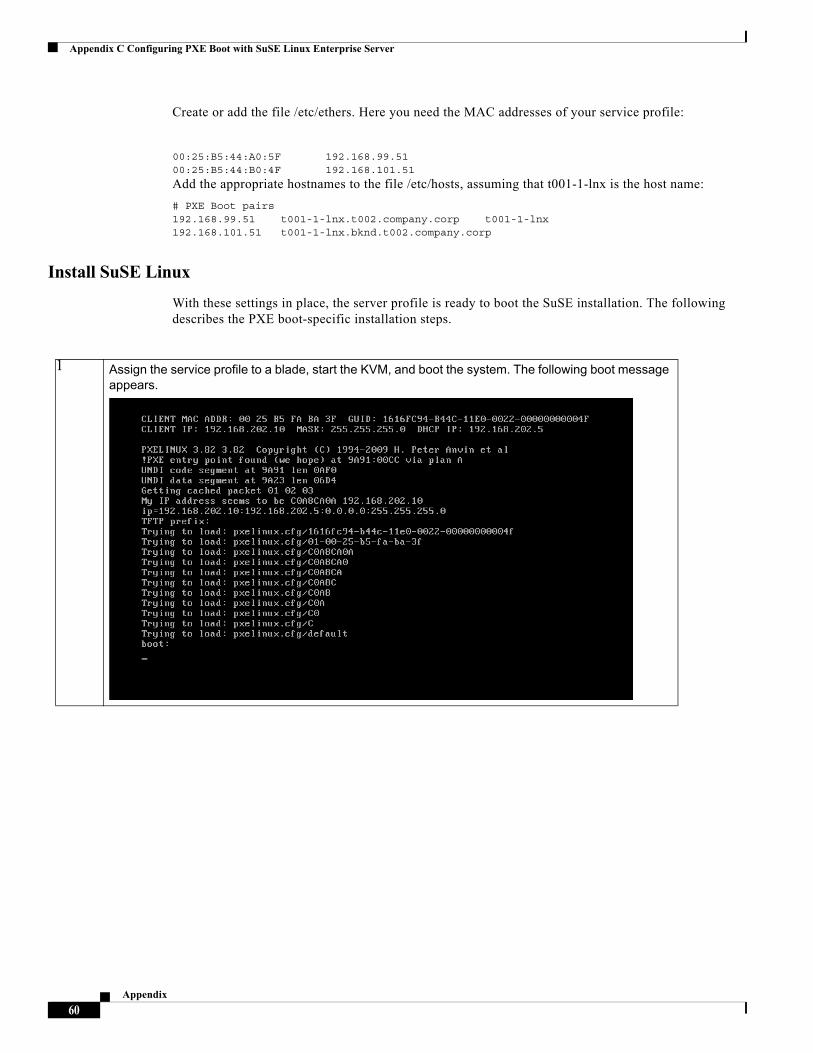
1 Assign the service profile to a blade, start the KVM, and boot the system. The following boot message appears.
60Appendix

Appendix C Configuring PXE Boot with SuSE Linux Enterprise Server
Create the nfsroot initrd
At this point, the newly created initrd must be customized for a PXE boot.
Initially, kernel version 2.6.32.12 is installed.
1. Mount the newly created OS master, copy the initrd to the tftpboot folder, and unpack it in a temporary folder.
T001-0-lnx:/tftpboot # mount -t nfs 192.168.99.10:/vol/t001-osmaster/sles_263249_001 /NetApp/osmasterT001-0-lnx:/tftpboot # cd /NetApp/osmaster/boot T001-0-lnx:/tftpboot # cp initrd-2.6.32.12-0.7-default /tftpboot/initrd-2.6.32.12-0.7-default.gzT001-0-lnx:/tftpboot # cp vmlinuz-2.6.32.12-0.7-default /tftpboot/T001-0-lnx:/tftpboot # cd /tftpbootT001-0-lnx:/tftpboot # gunzip initrd-2.6.32.12-0.7-default.gzT001-0-lnx:/tftpboot # mkdir tmp_12T001-0-lnx:/tftpboot # cd tmp_12T001-0-lnx:/tftpboot/tmp_12 # cpio -idumf < ../initrd-2.6.32.12-0.7-default
2 The Linux installation starts. Proceed
until you reach the disk portioning step. Select an expert partitioner. You must add the volume /vol/t001-osmaster/sles_263249_001 from the vFiler unit and
mount it as root. (The screenshot shows different values.)
3 Finalize the installation, as shown in steps 9–25 Do not reboot the system.
61Appendix
Appendix C Configuring PXE Boot with SuSE Linux Enterprise Server
2. Edit run_all.sh in the unpacked initrd and change the following sections to reflect the location of the boot image.
...
..
.source boot/02-start.sh[ "$modules" ] && load_modules[ "$debug" ] && echo preping 03-storage.sh[ "$fallback_rootdev" ] || fallback_rootdev='192.168.101.10:/vol/t001-osmaster/sles_263249_001 '[ "$rootdev" ] || rootdev='192.168.101.10:/vol/t001-osmaster/sles_263249_001 '[ "$rootfsopts" ] || rootfsopts='defaults'......[ "$debug" ] && echo preping 12-network.sh[ "$nettype" ] || nettype='dhcp'[ "$ip" ] || ip=':::::eth1:none'[ "$interface" ] || interface='eth1'[ "$macaddress" ] || macaddress=''[ "$drvlink" ] || drvlink=''if [ "$interface" -o "$dhcp" -o "$ip" -o "$nfsaddrs" -o "$drvlink" ]; thenmodules=" af_packet $bonding_module"......[ "$debug" ] && echo running 82-resume.kernel.shsource boot/82-resume.kernel.sh[ "$modules" ] && load_modules[ "$debug" ] && echo preping 83-mount.sh[ "$rootdev" ] || rootdev='192.168.101.10:/vol/t001-osmaster/sles_263249_001 'if [ ! "$root_already_mounted" ]; then[ "$debug" ] && echo running 83-mount.shsource boot/83-mount.sh[ "$modules" ] && load_modules
3. Recreate the new initrd.
T001-0-lnx:/tftpboot/tmp_12 # find . |cpio --create --format='newc' > ../initrd_nfsroot_2.6.32.12-cisco31301 blocksT001-0-lnx:/tftpboot/tmp_12 # cd ..mgmtsrv02:/tftpboot # gzip -9 initrd_nfsroot_2.6.32.12-ciscomgmtsrv02:/tftpboot #
4. In the mounted OS image, disable the network resources during shutdown; otherwise the system will not shut down completely.
T001-0-lnx: # cd /NetApp/osmaster/etc/init.d/rc3.dT001-0-lnx:/NetApp/osmaster/etc/init.d/rc3.d # rm K04nfs K07network K05rpcbindT001-0-lnx:/ NetApp/osmaster/etc/init.d/rc3.d # cd ../rc5.dT001-0-lnx:/ NetApp/osmaster/etc/init.d/rc5.d # rm K04nfs K07network K05rpcbindT001-0-lnx:/ NetApp/osmaster/etc/init.d/rc5.d #
5. Disable the cups daemon, smartd, samba fs, splash, kernel dump, and raid-manager.
T001-0-lnx:~ # chkconfig cups offT001-0-lnx:~ # chkconfig smartd offT001-0-lnx:~ # chkconfig smbfs offT001-0-lnx:~ # chkconfig splash offT001-0-lnx:~ # chkconfig boot.kdump offT001-0-lnx:~ # chkconfig boot.md offT001-0-lnx:~ # chkconfig boot.cycle offT001-0-lnx:~ # chkconfig postfix off
6. Extend the PXE default configuration to include the new kernel (initrd, vmlinuz).
62Appendix
Appendix C Configuring PXE Boot with SuSE Linux Enterprise Server
T001-0-lnx:~ # cd /tftpboot/pxelinux.cfg/T001-0-lnx:~ # vi defaultT001-0-lnx:~ #
7. Add the following lines, so that the final default content is:
# SAP UCS PXE Boot Definitiondisplay ../boot.msg#default Installdefault SLES11_12#prompt 1timeout 10LABEL Install KERNEL linux-iso APPEND initrd=initrd-iso install=nfs://192.168.96.10:/vol/software/SLES/SLES11/?device=eth1LABEL SLES11_12 KERNEL vmlinuz-2.6.32.12-0.7-default APPEND initrd=initrd_nfsroot_2.6.32.12-cisco.gz rw rootdev=192.168.101.10:/vol/t001-osmaster/sles_263249_001 rootfsopts=default ip=::::::dhcp
8. Reboot the system to activate the kernel.
Online Update
The process described throughout this document assumes that an online update is performed to reach the most recent kernel version (currently 2.6.32.49). While online, you must apply an online update. Depending on your network scenario, you may have to adjust the proxy settings.
After the online upgrade, do not reboot. Instead, apply the similar steps previously described to adapt the initrd and PXE boot configuration for the new kernel.
From the KVM, reboot the system to activate the new kernel. If everything is fine, the OS master image must be cleaned of temporary files.
Clean up the OS master image:
T001-0-lnx:/ # cd /NetApp/osmasterT001-0-lnx: /NetApp/osmaster # rm -rf tmp/*T001-0-lnx: /NetApp/osmaster # rm -rf tmp/.*rm: cannot remove `.' directory `tmp/.'rm: cannot remove `..' directory `tmp/..'T001-0-lnx: /NetApp/osmaster # cd var/logT001-0-lnx: /NetApp/osmaster/var/log # rm *rm: cannot remove `ConsoleKit': Is a directoryrm: cannot remove `YaST2': Is a directoryrm: cannot remove `apparmor': Is a directoryrm: cannot remove `audit': Is a directoryrm: cannot remove `cups': Is a directoryrm: cannot remove `gdm': Is a directoryrm: cannot remove `krb5': Is a directoryrm: cannot remove `news': Is a directoryrm: cannot remove `puppet': Is a directoryrm: cannot remove `sa': Is a directoryrm: cannot remove `samba': Is a directoryrm: cannot remove `zypp': Is a directoryT001-0-lnx: /NetApp/osmaster/var/log # rm ConsoleKit/* YaST2/* apparmor/* audit/* cups/* gdm/* krb5/* news/* puppet/* sa/* samba/* zypp/*rm: cannot remove `apparmor/reports': Is a directoryrm: cannot remove `apparmor/reports-archived': Is a directoryrm: cannot remove `apparmor/reports-exported': Is a directory
63Appendix
Appendix C Configuring PXE Boot with SuSE Linux Enterprise Server
rm: cannot remove `krb5/*': No such file or directoryrm: cannot remove `puppet/*': No such file or directoryrm: cannot remove `samba/*': No such file or directoryT001-0-lnx: /NetApp/osmaster1/var/log #T001-0-lnx:/NetApp/osmaster1/var/log # cd ../../etc
At this point, all of the FlexPod specific installations and configurations as described throughout the VM template creation process must have been applied. See section "Installation of Additional Software Components" for details.
After all steps have been tested and the cleanup procedures described in section "Converting the Virtual Machine to a Template" have been performed, create a golden Snapshot copy of the osmaster image and the tftpboot volume. Create the Snapshot copy by using the snap create command (with the desired options) at the command line of the controller that contains the volumes.
This Snapshot copy must be used to create the template volumes for each tenant.
Preparation for PXE Boot in a Tenant
At this point it is assumed that the new tenant has clones of the tftpboot and osmaster images with the following names:
• Tnnn-tftpboot
• Tnnn-osmaster
In a new tenant, the preparations for the PXE boot must be done similarly to the steps described in "Golden Image Creation," earlier in this appendix. The following is a general checklist:
1. Mount the tnnn-tftpboot in the tenant /tftpboot folder.
2. Configure dnsmasq to enable tftpboot.
3. Configure a tenant service profile template and create the required number of service profiles. Note the MAC address for each of the service profiles that you create.
4. Edit the /etc/ethers and /etc/hosts files to define the host names and IP addresses for the newly created service profiles.
Based on this checklist, the following additional steps must be performed:
Clone the Osmaster for Each of the Servers
Based on the mapped MAC-to-IP address, calculate the ex IP for each server (storage LAN).
If the IP for server T002-1-lnx is 192.168.102.44:
• Using the MAC address 00:25:B5:44:A0:2F, run the command gethostip 192.168.102.44, resulting in 192.168.102.44 192.168.102.44 C0A8662C>
The hex IP is used to create a unique name for the OS master volume. Create a clone of the OS template and name it as the hex IP. This name is unique through the whole infrastructure.
Adapt the tftpboot Configuration
The tftp boot configuration must be adapted so that every server can find its own image.
T002-0-lnx:/tftpboot # cd pxelinux.cfg/T002-0-lnx:/tftpboot/pxelinux.cfg # cat default# SAP UCS PXE Boot Definitiondisplay ../boot.msg
64Appendix

Appendix C Configuring PXE Boot with SuSE Linux Enterprise Server
#default Installdefault SLES11_49prompt 1timeout 10LABEL Install KERNEL linux-iso APPEND initrd=initrd-iso install=nfs://192.168.96.10:/vol/software/SLES/SLES11/?device=eth1LABEL SLES11_12 KERNEL vmlinuz-2.6.32.49-0.3-default APPEND initrd=initrd_nfsroot_2.6.32.49-cisco.gz rw rootdev=192.168.101.10:/vol/osmaster/sles_263249_001 rootfsopts=default ip=::::::dhcp
T002-0-lnx:/tftpboot/pxelinux.cfg # cp default C0A8662CT002-0-lnx:/tftpboot/pxelinux.cfg # vi C0A8662C# SAP UCS PXE Boot Definitiondisplay ../boot.msg#default Installdefault SLES11_49prompt 1timeout 10LABEL Install KERNEL linux-iso APPEND initrd=initrd-iso install=nfs://192.168.96.10:/vol/software/SLES/SLES11/?device=eth1LABEL SLES11_49 KERNEL vmlinuz-2.6.32.49-0.3-default APPEND initrd=initrd_nfsroot_2.6.32.49-cisco.gz rw rootdev=192.168.102.10:/vol/C0A8662C /sles_263249_001 rootfsopts=default ip=::::::dhcp OS_VOLUME=C0A8662CT002-0-lnx:/tftpboot/pxelinux.cfg #
First Boot
Before you can boot the server for the first time, the individual swap file must be configured.
Create the Swap Partition
Boot the server and log in as root (assuming server name T002-1-lnx):
T002-1-lnx:~ # mkdir /swapT002-1-lnx:~ # mount -t nfs 192.168.102.10:/vol/C0A8662C/swap_263249_001 /swapT002-1-lnx:~ # dd if=/dev/zero of=/swap/swap-0001 bs=1M count=10241024+0 records in1024+0 records out1073741824 bytes (1.1 GB) copied, 9.99352 s, 107 MB/sT002-1-lnx:~ #T002-1-lnx:~ # mkswap /swap/swap-0001Setting up swapspace version 1, size = 1048572 KiBno label, UUID=7a8fabb2-b4a5-456c-8853-fe0f4033b42aT002-1-lnx:~ # swapon /swap/swap-0001T002-1-lnx:~ # swapon -sFilename Type Size Used Priority/swap/swap-0001 file 1048568 0 -1T002-1-lnx:~ #T002-1-lnx:/etc/init.d # cp splash_early nfs-swap
65Appendix

Appendix C Configuring PXE Boot with SuSE Linux Enterprise Server
Create an Automatic Swap Mount File
T002-1-lnx:/etc/init.d # vi nfs-swap#! /bin/sh## /etc/init.d/nfs-swap#### BEGIN INIT INFO# Provides: nfs-swap# Required-Start:# Should-Start: $network $syslog# Required-Stop:# Should-Stop: $syslog# Default-Start: 2 3 5# Default-Stop: 0 1 4 6# Description: kills animation after network start### END INIT INFO
. /etc/rc.status
case "$1" in start) echo -n "Starting swap: " mount -o vers=3,proto=tcp,rsize=32768,wsize=32768,hard,intr 192.168.102.10:/vol/C0A8662C /swap_263249_001 /swap sleep 1 swapon /swap/swap-0001 echo "done" ;; stop) echo -n "Stopping swap: " swapoff /swap/swap-0001 umount -l /swap echo "done" ;; restart) swapoff /swap/swap-0001 swapon /swap/swap-0001 ;; *) echo "Usage: swap { start | stop | restart }" >&2 exit 1 ;;esac
rc_exitT002-1-lnx:/etc/init.d #T002-1-lnx:/etc/init.d # chmod 755 nfs-swapT002-1-lnx:/etc/init.d # chkconfig nfs-swapnfs-swap offT002-1-lnx:/etc/init.d # chkconfig nfs-swap onT002-1-lnx:/etc/init.d # ./nfs-swap stopStopping swap: doneT002-1-lnx:/etc/init.d # swapon -sFilename Type Size Used PriorityT002-1-lnx:/etc/init.d # ./nfs-swap startStarting swap: doneT002-1-lnx:/etc/init.d # swapon -sFilename Type Size Used Priority/swap/swap-0001 file 1048568 0 -1T002-1-lnx:/etc/init.d #
66Appendix
Appendix D Configuring Cisco VM-FEX with the Cisco UCS Manager
The new server with the previously mentioned IP now uses the C0A8662C configuration for PXE boot. Create a dedicated configuration for each of the servers in a tenant.
Each server profile now has its own preconfigured image and can be PXE booted into the tenant.
Appendix D Configuring Cisco VM-FEX with the Cisco UCS Manager
Background
FlexPod for VMware and thus SAP applications built on FlexPod utilize a distributed switch to manage the VLAN settings on a VMware vCenter from a central point. This not only simplifies the management but also provide additional features.
While the previous version used Cisco Nexus 1000 / Cisco Nexus 1000V, the new available hardware used in this setup allow using the built-in functionality within the Cisco UCS Manager. This offers several advantages.
1. There is no need for an extra hardware such as Cisco Nexus 1010.
2. Cisco Unified Computing System provides a central configuration environment with which the administrator is already familiar
3. Compared to using the Cisco Nexus 1010 V as virtual appliances within the VMware vCenter itself, this setup avoids a SPOF and common restart issues when running the distributed switches in an environment in which they are required for the network functionality of the ESX servers they are running on. This is a common problem that needs to be taken care in the solution design.
The Cisco UCS Manager dramatically simplifies the hardware setup and operation utilizing the new HW features to its fullest.
Process Overview
The setup and configuration of the distributed switches (Cisco Nexus 1000/V) in the previous setup is described in TR-3939: VMware vSphere Built on FlexPod Implementation Guide in detail and is also distributed and embedded in various sections of the document. This section provides a detailed overview of all related topics such as setup, configuration, and operation using the Cisco UCS Manager.
The following sections provide:
• Background information on VM-FEX on Cisco UCS
• Initial set up and configuration
• Operation, i.e. adding networks for additional tenants
Initial Setup
The initial setup is a three-step procedure:
• Create a vNIC Connection policy in the Cisco UCS Manager
• Install the VEM software on the ESX server
67Appendix

Appendix D Configuring Cisco VM-FEX with the Cisco UCS Manager
• Install the plug-in into the VMware vCenter.
Create a vNIC Connection Policy
To create a vNIC connection policy, follow these steps:
Step Action
Log in to the Cisco UCS Manager.
Select the LAN tab in the left navigation pane and click LAN > Policies > root > Sub-organizations > > FPD(name of the sub-organization in this example) > Dynamic vNIC Connection Profile. Right-click and select Create Dynamic vNIC Connection Policy to start the wizard.
68Appendix

Appendix D Configuring Cisco VM-FEX with the Cisco UCS Manager
Type a name and description for the vNIC connection policy. Select VMWare from the Adapter Policy drop-down menu. Select the Protected option. Click OK.
In the Main section, retain the platform defaults.
69Appendix

Appendix D Configuring Cisco VM-FEX with the Cisco UCS Manager
For Intel Directed IO, select enabled.
70Appendix
Appendix D Configuring Cisco VM-FEX with the Cisco UCS Manager
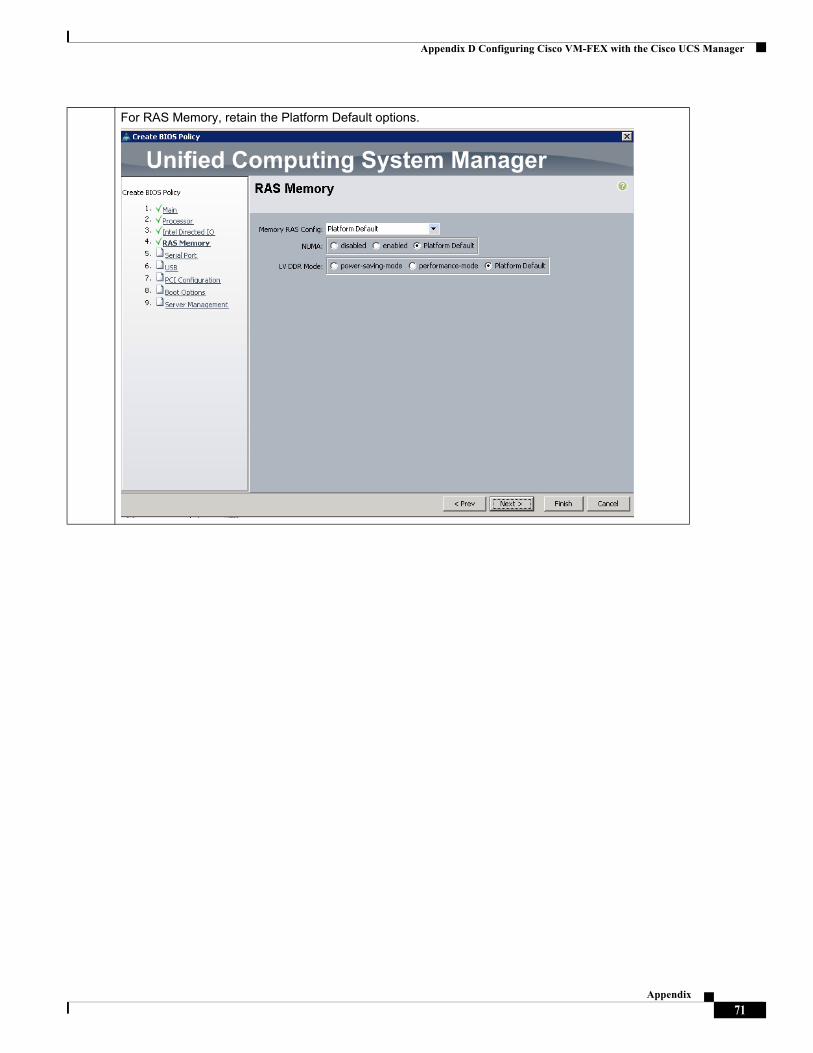
For RAS Memory, retain the Platform Default options.
71Appendix

Appendix D Configuring Cisco VM-FEX with the Cisco UCS Manager
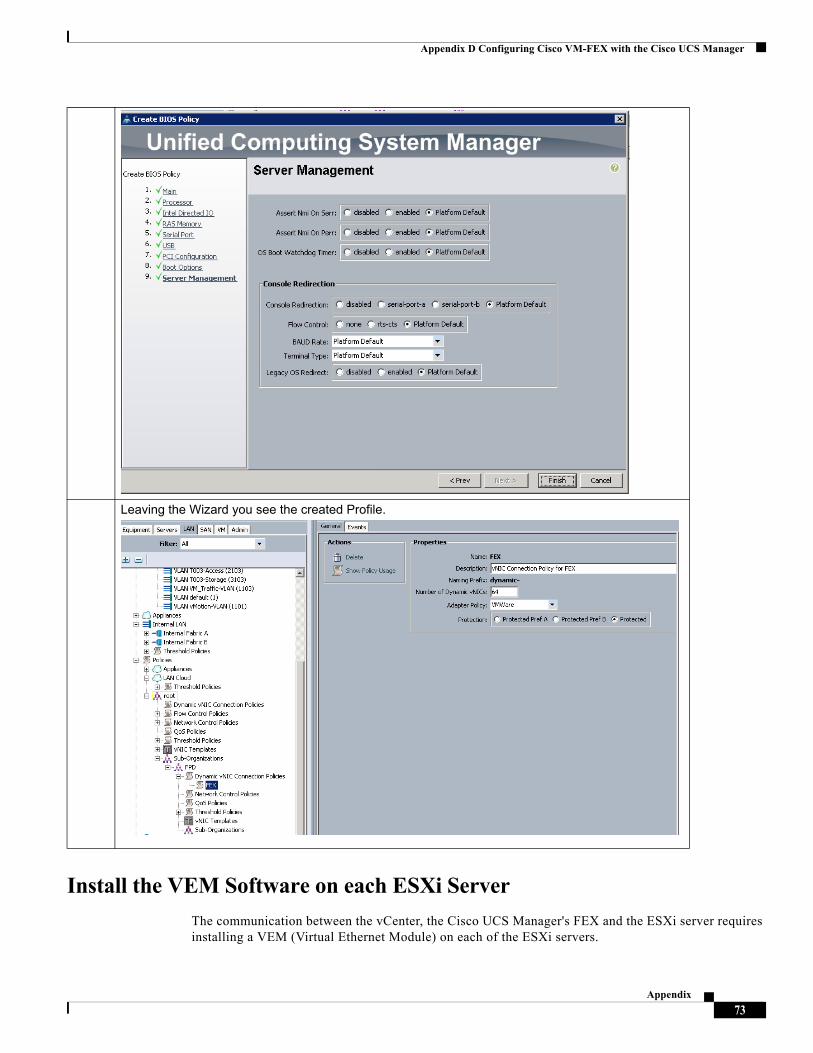
Retain the Platform Default option for the remaining sections of the Create BIOS Policy wizard. Click Next on each of these windows and then click Finish to complete the wizard
72Appendix
Appendix D Configuring Cisco VM-FEX with the Cisco UCS Manager
Install the VEM Software on each ESXi Server
The communication between the vCenter, the Cisco UCS Manager's FEX and the ESXi server requires installing a VEM (Virtual Ethernet Module) on each of the ESXi servers.
Leaving the Wizard you see the created Profile.
73Appendix
Appendix D Configuring Cisco VM-FEX with the Cisco UCS Manager
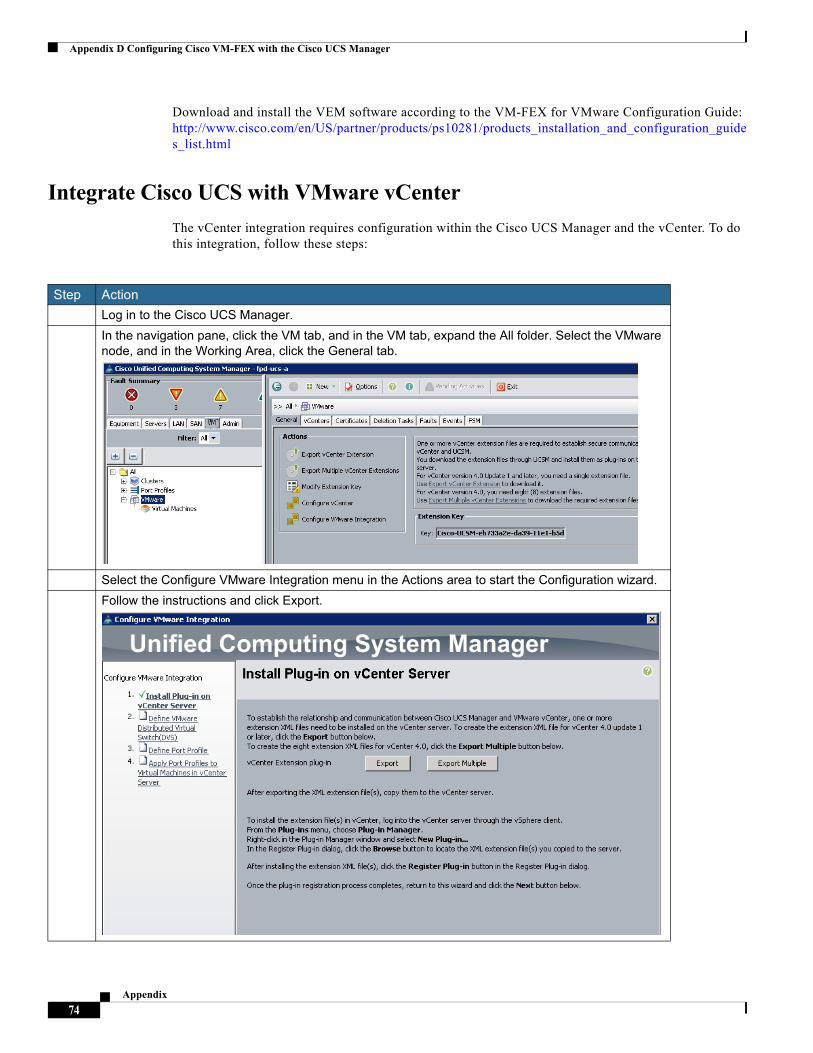
Download and install the VEM software according to the VM-FEX for VMware Configuration Guide: http://www.cisco.com/en/US/partner/products/ps10281/products_installation_and_configuration_guides_list.html
Integrate Cisco UCS with VMware vCenter
The vCenter integration requires configuration within the Cisco UCS Manager and the vCenter. To do this integration, follow these steps:
Step Action
1 Log in to the Cisco UCS Manager.
In the navigation pane, click the VM tab, and in the VM tab, expand the All folder. Select the VMware node, and in the Working Area, click the General tab.
2 Select the Configure VMware Integration menu in the Actions area to start the Configuration wizard.
Follow the instructions and click Export.
74Appendix
Appendix D Configuring Cisco VM-FEX with the Cisco UCS Manager
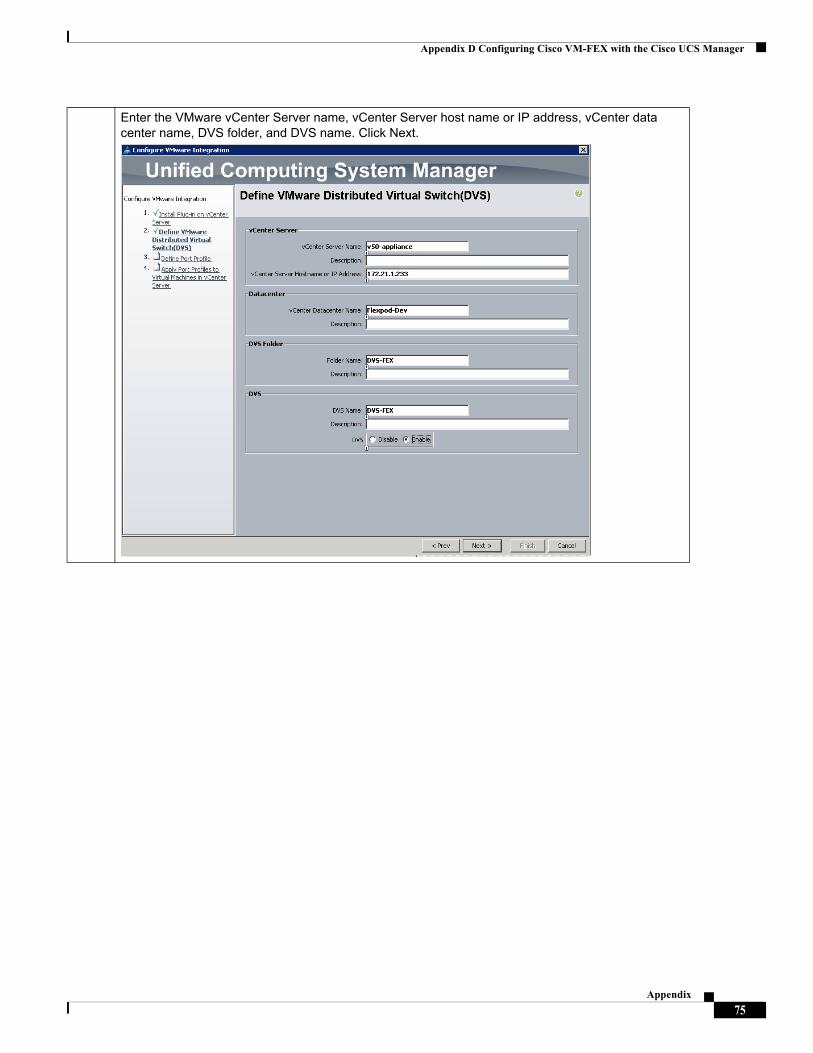
3 Enter the VMware vCenter Server name, vCenter Server host name or IP address, vCenter data center name, DVS folder, and DVS name. Click Next.
75Appendix

Appendix D Configuring Cisco VM-FEX with the Cisco UCS Manager
4 Define the port profiles. It is important to select the basic VLANs that are required to communicate with the VEM and the vCenter that have been previously defined in the Cisco Nexus switches and the Cisco UCS Manager accordingly. Select MGMT-VLAN_T001 and indicate it is the native VLAN..
76Appendix

Appendix D Configuring Cisco VM-FEX with the Cisco UCS Manager
Validate Settings in VMware vCenter
To validate the successful installation of the Cisco UCS Manager plug-in, complete the following steps:
5
When finishing the Wizard, the Cisco UCS Manager connects to the vCenter and adds the plug-in.
77Appendix
Appendix D Configuring Cisco VM-FEX with the Cisco UCS Manager
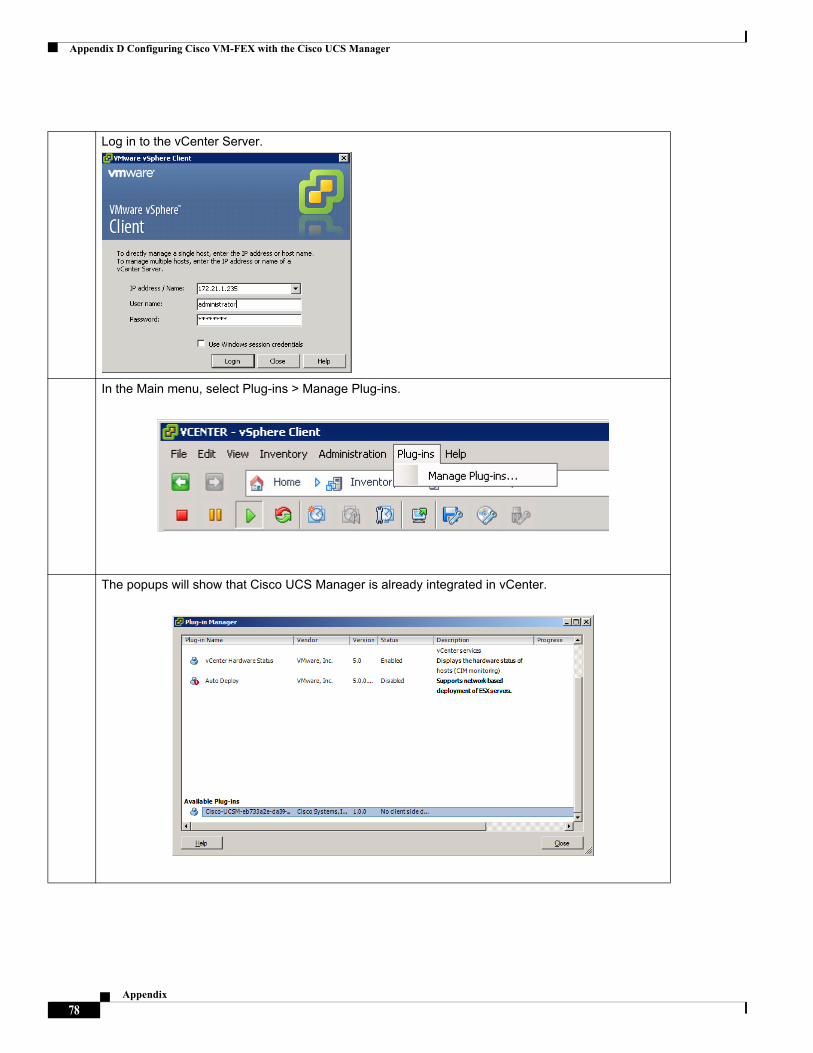
Log in to the vCenter Server.
In the Main menu, select Plug-ins > Manage Plug-ins.
The popups will show that Cisco UCS Manager is already integrated in vCenter.
78Appendix

Appendix D Configuring Cisco VM-FEX with the Cisco UCS Manager
Standard Operations
As part of standard operations such as the Tenant provisioning, the Network environment and such the additional port profiles (VLANS) at the distributed switch must be created. The following section shows in detail how to add this "additional" VLAN's i.e. distributed Port Groups.
Add Distributed Port Group to the VDS (vSphere Distributed Switch)
Port Profiles
Port profiles contain the properties and settings that you can use to configure virtual interfaces in Cisco UCS for VM-FEX. The port profiles are created and administered in Cisco UCS Manager. After a port profile is created, assigned to, and actively used by one or more distributed virtual switches (DVSs), any changes made to the networking properties of the port profile in Cisco UCS Manager are immediately applied to those DVSs.
In VMware vCenter, a port profile is represented as a port group. Cisco UCS Manager pushes the port profile names to VMware vCenter, which displays the names as port groups. None of the specific networking properties or settings in the port profile is visible in VMware vCenter. You must configure at least one port profile client for a port profile if you want Cisco UCS Manager to push the port profile to VMware vCenter.
Port Profile Client
The port profile client determines the DVSs to which a port profile is applied. By default, the port profile client specifies that the associated port profile applies to all DVSs in VMware vCenter. However, you can configure the client to apply the port profile to all DVSs in a specific data center or data center folder or to only one DVS.
Complete the following steps to create VM-FEX port profiles for use on the Cisco UCS distributed virtual switch.
Click Inventory > Networking to see FEX added to distributed switch from Cisco UCS.
79Appendix
Appendix D Configuring Cisco VM-FEX with the Cisco UCS Manager
Step Action
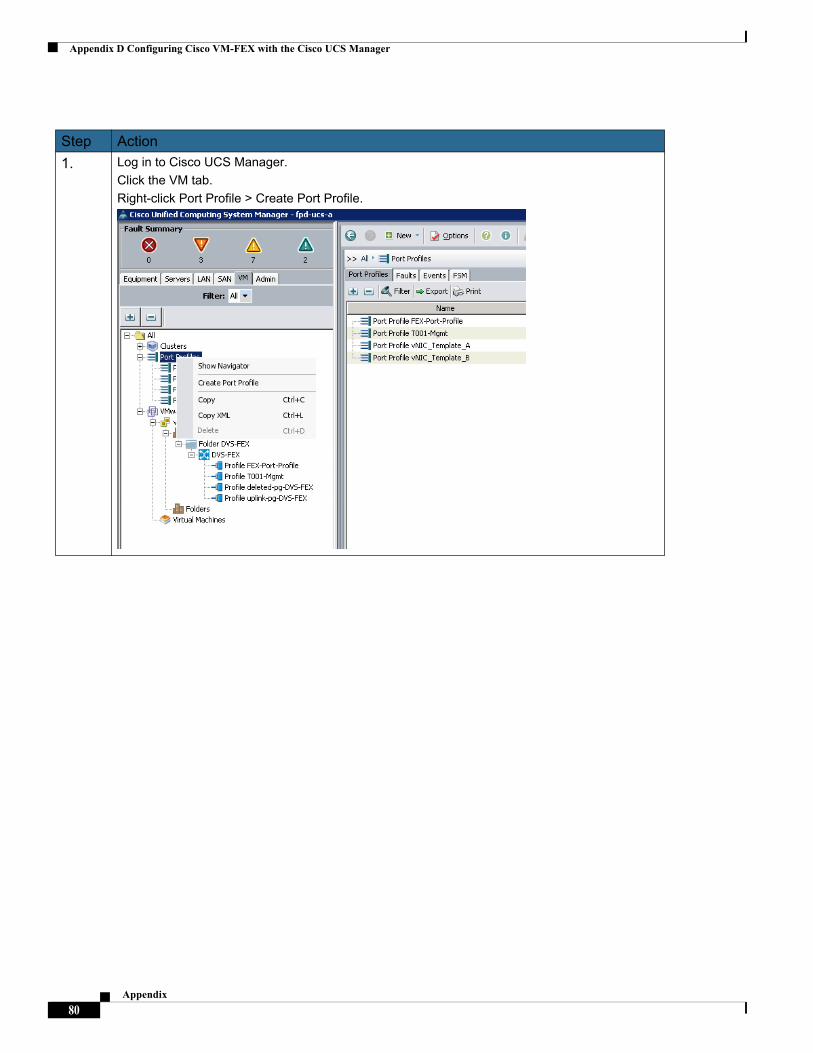
1. Log in to Cisco UCS Manager.
Click the VM tab.
Right-click Port Profile > Create Port Profile.
80Appendix
Appendix D Configuring Cisco VM-FEX with the Cisco UCS Manager
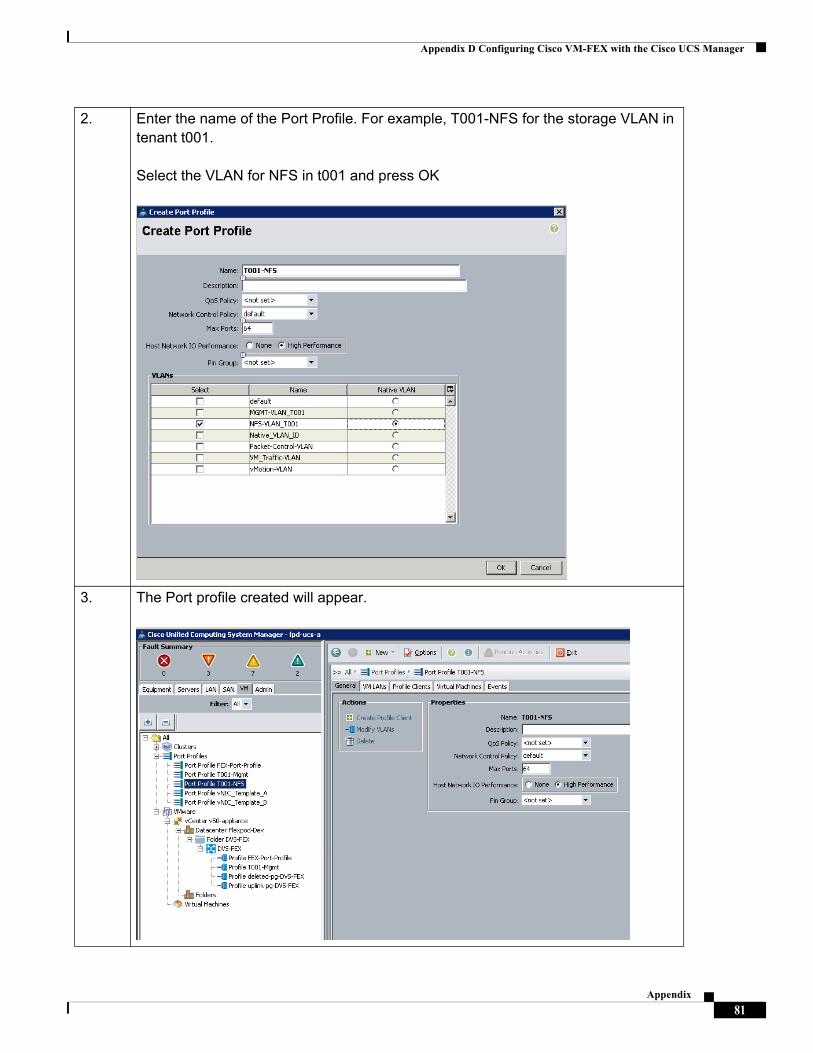
2. Enter the name of the Port Profile. For example, T001-NFS for the storage VLAN in tenant t001. Select the VLAN for NFS in t001 and press OK
3. The Port profile created will appear.
81Appendix

Appendix D Configuring Cisco VM-FEX with the Cisco UCS Manager
4. Create the profile client to be integrated in the vCenter as a distributed port group in vDS.
To create profile client, right-click Port Profile T001-NFS and click Create Profile Client.
Choose the data center created in your vCenter Server, folder, and distributed virtual switch previously created.Click OK.
The client profile created will appear in your distributed virtual switch DVS-FEX.
82Appendix

Appendix D Configuring Cisco VM-FEX with the Cisco UCS Manager
5. Log into vCenter to see the vSphere Distributed Switch (VDS) created along with T001-NFS port group.
6. Repeat the these steps for creating a distributed port group for T001-Mgmt.
83Appendix

Appendix D Configuring Cisco VM-FEX with the Cisco UCS Manager
Adding Additional Tenant to Distributed Port Group to vCenter
As described in section, "Tenant Provisioning" part of the task to provision a tenant is to create the required networks, as follows:
• Access LAN (txxx-access)
• Storage or backend LAN (txxx-storage)
To create the network setting, the following configuration steps must be completed.
1. Create the VLAN on "Cisco Nexus" (not part of this section).
2. Create the VLAN in Cisco UCS Manager.
3. Uplink/Server port assignment (not part of this section)
4. Create the VM-FEX port profile.
5. Create the VM-FEX port client.
Steps 2, 4, and 5 are required for adding the tenant network to the vCenter and are described in detail. For all other network configurations, refer section, "Tenant Provisioning."
Step Action
1 Create VLAN.
Log in to Cisco UCS Manager. Click the LAN tab and click Create VLANs.
84Appendix
Appendix D Configuring Cisco VM-FEX with the Cisco UCS Manager
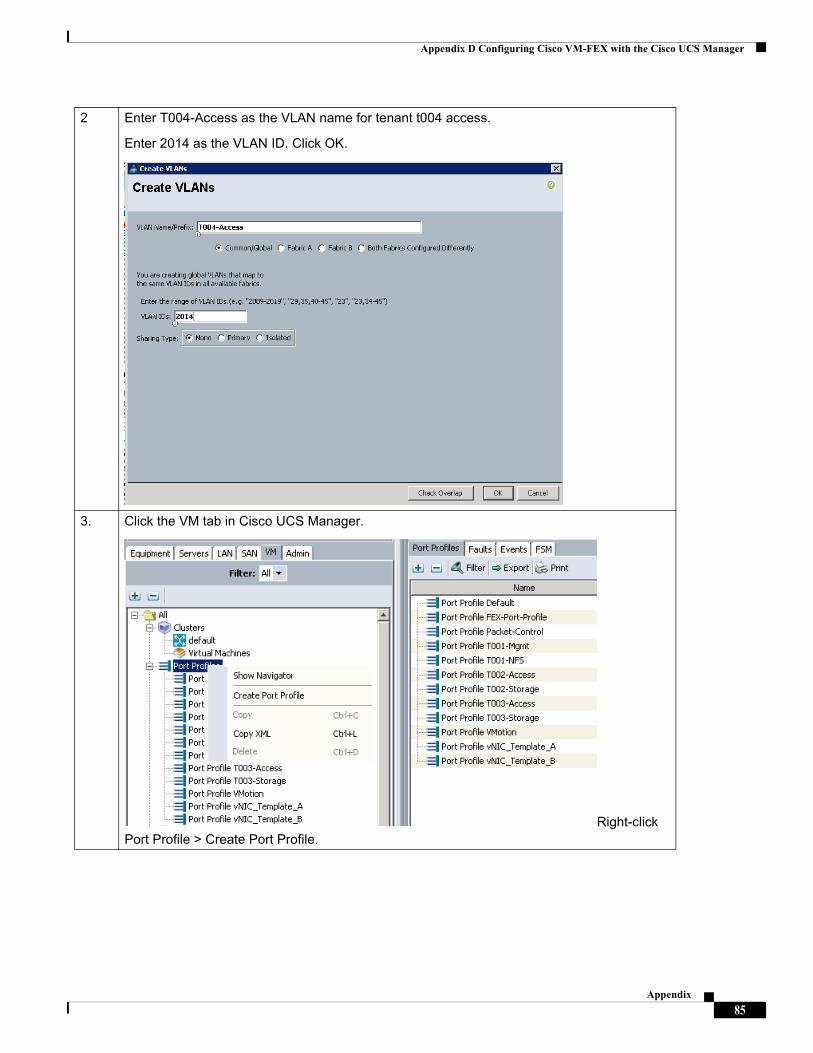
2 Enter T004-Access as the VLAN name for tenant t004 access.
Enter 2014 as the VLAN ID. Click OK.
3. Click the VM tab in Cisco UCS Manager.
Right-click Port Profile > Create Port Profile.
85Appendix

Appendix D Configuring Cisco VM-FEX with the Cisco UCS Manager
4. Enter T004-Access as name of the port profile. Select T004-Access, and select the Native VLAN button.
5 Port profile created displays.
86Appendix

Appendix D Configuring Cisco VM-FEX with the Cisco UCS Manager
6 Create the Profile Client: Right-click the T004-Access Port Profile and click Create Profile Client.
7. Enter a name of the Distributed port group on the vCenter
Select the data center. Select the folder for vDS.
Select FEX for Distributed Virtual Switch. Click OK.
87Appendix

Appendix D Configuring Cisco VM-FEX with the Cisco UCS Manager
8. Log in to vCenter and click Inventory >Networking.
9
The T004-Access distributed port group will be created in the vDS.
9. Repeat the steps to add the T004-Storage distributed port group.
88Appendix


![[Webcast] La Nube como centro de Cómputo · PDF file•Oracle Linux 6.4+, 7.0+ •RHEL 6.7+, 7.1+ •SLES 11 SP3+, SLES 12+ y •SLES para SAP 11.3+ •openSUSE 13.1+ ... C#, Java,](https://cdn.vdocuments.mx/doc/165x107/5a72f8c37f8b9aa7538e258e/webcast-la-nube-como-centro-de-computo-oracle-linux-64-70-rhel.jpg)
