
Patrick Seymour
Adobe
Illustrator CC2014 release
CLASSROOM IN A BOOK®
The official training workbook from Adobe
Brian Wood

CLASSROOM IN A BOOK®
The official training workbook from Adobe
Brian Wood
Patrick Seymour
Adobe
Illustrator CC2014 release

Adobe® Illustrator® CC Classroom in a Book® (2014 release)
© 2015 Adobe Systems Incorporated and its licensors. All rights reserved.
If this guide is distributed with software that includes an end user license agreement, this guide, as well
as the software described in it, is furnished under license and may be used or copied only in accordance
with the terms of such license. Except as permitted by any such license, no part of this guide may
be reproduced, stored in a retrieval system, or transmitted, in any form or by any means, electronic,
mechanical, recording, or otherwise, without the prior written permission of Adobe Systems Incorporated.
Please note that the content in this guide is protected under copyright law even if it is not distributed with
software that includes an end user license agreement.
The content of this guide is furnished for informational use only, is subject to change without notice, and
should not be construed as a commitment by Adobe Systems Incorporated. Adobe Systems Incorporated
assumes no responsibility or liability for any errors or inaccuracies that may appear in the informational
content contained in this guide.
Please remember that existing artwork or images that you may want to include in your project may be
protected under copyright law. The unauthorized incorporation of such material into your new work
could be a violation of the rights of the copyright owner. Please be sure to obtain any permission required
from the copyright owner.
Any references to company names in sample files are for demonstration purposes only and are not
intended to refer to any actual organization.
Adobe, the Adobe logo, Acrobat, Classroom in a Book, Flash, Illustrator, InDesign, Dreamweaver,
Fireworks, Photoshop, Bridge, Muse, PostScript, and PostScript 3 are either registered trademarks or
trademarks of Adobe Systems Incorporated in the United States and/or other countries.
Apple, iPhone, Mac, Mac OS, and Macintosh are trademarks of Apple Inc., registered in the U.S. and other
countries. Microsoft, Windows, Windows XP, Windows 7, and Windows 8 are either registered trade-
marks or trademarks of Microsoft Corporation in the U.S. and/or other countries. Wacom and Intuos are
trademarks of Wacom Company Ltd. PANTONE®, myPANTONE™ and other Pantone LLC properties are
trademarks or registered trademarks of Pantone LLC in the United States and other countries. All rights
reserved. NVIDIA is a trademark and/or registered trademark of NVIDIA Corporation in the U.S. and/or
other countries. All other trademarks are the property of their respective owners.
Adobe Systems Incorporated, 345 Park Avenue, San Jose, California 95110-2704, USA
Notice to U.S. Government End Users. The Software and Documentation are “Commercial Items,” as that
term is defined at 48 C.F.R. §2.101, consisting of “Commercial Computer Software” and “Commercial
Computer Software Documentation,” as such terms are used in 48 C.F.R. §12.212 or 48 C.F.R. §227.7202,
as applicable. Consistent with 48 C.F.R. §12.212 or 48 C.F.R. §§227.7202-1 through 227.7202-4, as
applicable, the Commercial Computer Software and Commercial Computer Software Documentation
are being licensed to U.S. Government end users (a) only as Commercial Items and (b) with only those
rights as are granted to all other end users pursuant to the terms and conditions herein. Unpublished-
rights reserved under the copyright laws of the United States. Adobe Systems Incorporated, 345 Park
Avenue, San Jose, CA 95110-2704, USA. For U.S. Government End Users, Adobe agrees to comply with
all applicable equal opportunity laws including, if appropriate, the provisions of Executive Order 11246,
as amended, Section 402 of the Vietnam Era Veterans Readjustment Assistance Act of 1974 (38 USC
4212), and Section 503 of the Rehabilitation Act of 1973, as amended, and the regulations at 41 CFR Parts
60-1 through 60-60, 60-250, and 60-741. The affirmative action clause and regulations contained in the
preceding sentence shall be incorporated by reference.
Adobe Press books are published by Peachpit, a division of Pearson Education located in San Francisco,
California. For the latest on Adobe Press books, go to www.adobepress.com. To report errors, please send
a note to [email protected]. For information on getting permission for reprints and excerpts, contact
Printed and bound in the United States of America
ISBN-13: 978-0-133-90565-6
ISBN-10: 0-133-90565-9
9 8 7 6 5 4 3 2 1
iv CONTENTS
CONTENTS
WHERE ARE THE LESSON FILES? iii
GETTING STARTED 1About Classroom in a Book . . . . . . . . . . . . . . . . . . . . . . . . . . . . . . . . . . . . 1
Prerequisites . . . . . . . . . . . . . . . . . . . . . . . . . . . . . . . . . . . . . . . . . . . . . . . . . . 1
Installing the program . . . . . . . . . . . . . . . . . . . . . . . . . . . . . . . . . . . . . . . . . 2
Fonts used in this book . . . . . . . . . . . . . . . . . . . . . . . . . . . . . . . . . . . . . . . . 2
Accessing the Classroom in a Book files . . . . . . . . . . . . . . . . . . . . . . . . 2
Restoring default preferences . . . . . . . . . . . . . . . . . . . . . . . . . . . . . . . . . . 3
To delete or save the current Illustrator preferences file . . . . . . . . . 3
To restore saved preferences after completing the lessons . . . . . . 4
Additional resources . . . . . . . . . . . . . . . . . . . . . . . . . . . . . . . . . . . . . . . . . . . 4
Adobe Authorized Training Centers . . . . . . . . . . . . . . . . . . . . . . . . . . . . 5
Sync settings using Adobe Creative Cloud . . . . . . . . . . . . . . . . . . . . . . 5
WHAT’S NEW IN ADOBE ILLUSTRATOR CC (2014 RELEASE) 6Creative Cloud Libraries . . . . . . . . . . . . . . . . . . . . . . . . . . . . . . . . . . . . . . . 6
Curvature tool . . . . . . . . . . . . . . . . . . . . . . . . . . . . . . . . . . . . . . . . . . . . . . . . . 6
Touch workspace . . . . . . . . . . . . . . . . . . . . . . . . . . . . . . . . . . . . . . . . . . . . . . 7
Area type Autosizing . . . . . . . . . . . . . . . . . . . . . . . . . . . . . . . . . . . . . . . . . . 7
Live Shapes . . . . . . . . . . . . . . . . . . . . . . . . . . . . . . . . . . . . . . . . . . . . . . . . . . . 7
Typekit integration . . . . . . . . . . . . . . . . . . . . . . . . . . . . . . . . . . . . . . . . . . . . 8
Pen tool preview and drawing-related enhancements . . . . . . . . . . 8
Pencil tool enhancements . . . . . . . . . . . . . . . . . . . . . . . . . . . . . . . . . . . . . 8
Path segment reshaping . . . . . . . . . . . . . . . . . . . . . . . . . . . . . . . . . . . . . . . 8
Join tool . . . . . . . . . . . . . . . . . . . . . . . . . . . . . . . . . . . . . . . . . . . . . . . . . . . . . . 9
Other enhancements . . . . . . . . . . . . . . . . . . . . . . . . . . . . . . . . . . . . . . . . . . 9

ADOBE ILLUSTRATOR CC CLASSROOM IN A BOOK 2014 RELEASE v
A QUICK TOUR OF ADOBE® ILLUSTRATOR® CC (2014 RELEASE) 10Getting started . . . . . . . . . . . . . . . . . . . . . . . . . . . . . . . . . . . . . . . . . . . . . . . 12
Creating a new document . . . . . . . . . . . . . . . . . . . . . . . . . . . . . . . . . . . . 12
Sync settings using Adobe Creative Cloud . . . . . . . . . . . . . . . . . . . . . 12
Drawing shapes . . . . . . . . . . . . . . . . . . . . . . . . . . . . . . . . . . . . . . . . . . . . . . 13
Applying color . . . . . . . . . . . . . . . . . . . . . . . . . . . . . . . . . . . . . . . . . . . . . . . 14
Working with layers . . . . . . . . . . . . . . . . . . . . . . . . . . . . . . . . . . . . . . . . . . 14
Drawing with the Pencil tool . . . . . . . . . . . . . . . . . . . . . . . . . . . . . . . . . . 15
Editing strokes . . . . . . . . . . . . . . . . . . . . . . . . . . . . . . . . . . . . . . . . . . . . . . . 16
Working with the Width tool . . . . . . . . . . . . . . . . . . . . . . . . . . . . . . . . . . 17
Creating shapes using the Shape Builder tool . . . . . . . . . . . . . . . . . 18
Copying content . . . . . . . . . . . . . . . . . . . . . . . . . . . . . . . . . . . . . . . . . . . . . 19
Working with symbols . . . . . . . . . . . . . . . . . . . . . . . . . . . . . . . . . . . . . . . . 20
Placing images in Illustrator . . . . . . . . . . . . . . . . . . . . . . . . . . . . . . . . . . . 22
Using Image Trace . . . . . . . . . . . . . . . . . . . . . . . . . . . . . . . . . . . . . . . . . . . . 22
Creating a clipping mask . . . . . . . . . . . . . . . . . . . . . . . . . . . . . . . . . . . . . 23
Creating and editing gradients . . . . . . . . . . . . . . . . . . . . . . . . . . . . . . . . 24
Working with type . . . . . . . . . . . . . . . . . . . . . . . . . . . . . . . . . . . . . . . . . . . . 26
Warping text . . . . . . . . . . . . . . . . . . . . . . . . . . . . . . . . . . . . . . . . . . . . . . . . . 28
Working with brushes . . . . . . . . . . . . . . . . . . . . . . . . . . . . . . . . . . . . . . . . 28
Working with effects . . . . . . . . . . . . . . . . . . . . . . . . . . . . . . . . . . . . . . . . . 29
1 GETTING TO KNOW THE WORK AREA 30Introducing Adobe Illustrator . . . . . . . . . . . . . . . . . . . . . . . . . . . . . . . . . 32
Starting Illustrator and opening a file . . . . . . . . . . . . . . . . . . . . . . . . . . 32
Understanding the workspace . . . . . . . . . . . . . . . . . . . . . . . . . . . . . . . . 34
Adjusting the user-interface brightness . . . . . . . . . . . . . . . . . . . . . . . 36
Working with the Tools panel . . . . . . . . . . . . . . . . . . . . . . . . . . . . . . . . . 37
Exploring the Control panel . . . . . . . . . . . . . . . . . . . . . . . . . . . . . . . . . . . 40
Working with panels . . . . . . . . . . . . . . . . . . . . . . . . . . . . . . . . . . . . . . . . . . 42
Editing panel groups . . . . . . . . . . . . . . . . . . . . . . . . . . . . . . . . . . . . . . . . . 44
Resetting and saving your workspace . . . . . . . . . . . . . . . . . . . . . . . . . 46
Using panel menus . . . . . . . . . . . . . . . . . . . . . . . . . . . . . . . . . . . . . . . . . . . 47
Changing the view of artwork . . . . . . . . . . . . . . . . . . . . . . . . . . . . . . . . 48

vi CONTENTS
Using view commands . . . . . . . . . . . . . . . . . . . . . . . . . . . . . . . . . . . . . . . 48
Using the Zoom tool . . . . . . . . . . . . . . . . . . . . . . . . . . . . . . . . . . . . . . . . . . 48
Scrolling through a document . . . . . . . . . . . . . . . . . . . . . . . . . . . . . . . . 50
Viewing artwork . . . . . . . . . . . . . . . . . . . . . . . . . . . . . . . . . . . . . . . . . . . . . . 51
Navigating multiple artboards . . . . . . . . . . . . . . . . . . . . . . . . . . . . . . . . 52
Using the Navigator panel . . . . . . . . . . . . . . . . . . . . . . . . . . . . . . . . . . . . 54
Arranging multiple documents . . . . . . . . . . . . . . . . . . . . . . . . . . . . . . . 56
Finding resources for using Illustrator . . . . . . . . . . . . . . . . . . . . . . . . . 58
2 TECHNIQUES FOR SELECTING ARTWORK 60Getting started . . . . . . . . . . . . . . . . . . . . . . . . . . . . . . . . . . . . . . . . . . . . . . . 62
Selecting objects . . . . . . . . . . . . . . . . . . . . . . . . . . . . . . . . . . . . . . . . . . . . . 62
Using the Selection tool . . . . . . . . . . . . . . . . . . . . . . . . . . . . . . . . . . . . . . 62
Using the Direct Selection tool . . . . . . . . . . . . . . . . . . . . . . . . . . . . . . . . 64
Creating selections with a marquee . . . . . . . . . . . . . . . . . . . . . . . . . . . 65
Creating selections with the Magic Wand tool . . . . . . . . . . . . . . . . . 66
Selecting similar objects . . . . . . . . . . . . . . . . . . . . . . . . . . . . . . . . . . . . . . 67
Selecting in Outline mode . . . . . . . . . . . . . . . . . . . . . . . . . . . . . . . . . . . . 68
Aligning objects . . . . . . . . . . . . . . . . . . . . . . . . . . . . . . . . . . . . . . . . . . . . . . 69
Aligning objects to each other . . . . . . . . . . . . . . . . . . . . . . . . . . . . . . . . 69
Aligning to a key object . . . . . . . . . . . . . . . . . . . . . . . . . . . . . . . . . . . . . . 69
Aligning anchor points . . . . . . . . . . . . . . . . . . . . . . . . . . . . . . . . . . . . . . . 70
Distributing objects . . . . . . . . . . . . . . . . . . . . . . . . . . . . . . . . . . . . . . . . . . 70
Aligning to the artboard . . . . . . . . . . . . . . . . . . . . . . . . . . . . . . . . . . . . . . 71
Working with groups . . . . . . . . . . . . . . . . . . . . . . . . . . . . . . . . . . . . . . . . . 72
Grouping items . . . . . . . . . . . . . . . . . . . . . . . . . . . . . . . . . . . . . . . . . . . . . . 72
Working in Isolation mode . . . . . . . . . . . . . . . . . . . . . . . . . . . . . . . . . . . . 72
Creating a nested group . . . . . . . . . . . . . . . . . . . . . . . . . . . . . . . . . . . . . . 73
Exploring object arrangement . . . . . . . . . . . . . . . . . . . . . . . . . . . . . . . . 74
Arranging objects . . . . . . . . . . . . . . . . . . . . . . . . . . . . . . . . . . . . . . . . . . . . 74
Selecting objects behind . . . . . . . . . . . . . . . . . . . . . . . . . . . . . . . . . . . . . 75
Hiding and locking objects . . . . . . . . . . . . . . . . . . . . . . . . . . . . . . . . . . . 76
3 USING SHAPES TO CREATE ARTWORK FOR A POSTCARD 78Getting started . . . . . . . . . . . . . . . . . . . . . . . . . . . . . . . . . . . . . . . . . . . . . . . 80
Creating a new document . . . . . . . . . . . . . . . . . . . . . . . . . . . . . . . . . . . . 80
Working with basic shapes . . . . . . . . . . . . . . . . . . . . . . . . . . . . . . . . . . . . 82
Creating rectangles . . . . . . . . . . . . . . . . . . . . . . . . . . . . . . . . . . . . . . . . . . . 82

ADOBE ILLUSTRATOR CC CLASSROOM IN A BOOK 2014 RELEASE vii
Creating a rounded rectangle . . . . . . . . . . . . . . . . . . . . . . . . . . . . . . . . . 85
Editing the corners of a Live Shape . . . . . . . . . . . . . . . . . . . . . . . . . . . . 86
Creating an ellipse . . . . . . . . . . . . . . . . . . . . . . . . . . . . . . . . . . . . . . . . . . . . 88
Creating polygons . . . . . . . . . . . . . . . . . . . . . . . . . . . . . . . . . . . . . . . . . . . . 89
Creating stars . . . . . . . . . . . . . . . . . . . . . . . . . . . . . . . . . . . . . . . . . . . . . . . . 90
Changing stroke width and alignment . . . . . . . . . . . . . . . . . . . . . . . . 92
Working with lines . . . . . . . . . . . . . . . . . . . . . . . . . . . . . . . . . . . . . . . . . . . 93
Joining paths . . . . . . . . . . . . . . . . . . . . . . . . . . . . . . . . . . . . . . . . . . . . . . . . . 95
Editing and combining paths and shapes . . . . . . . . . . . . . . . . . . . . . 96
Using the Width tool . . . . . . . . . . . . . . . . . . . . . . . . . . . . . . . . . . . . . . . . . . 96
Outlining strokes . . . . . . . . . . . . . . . . . . . . . . . . . . . . . . . . . . . . . . . . . . . . 100
Working with the Shape Builder tool . . . . . . . . . . . . . . . . . . . . . . . . . 101
Working with the Pathfinder panel . . . . . . . . . . . . . . . . . . . . . . . . . . . 103
Using the Eraser tool . . . . . . . . . . . . . . . . . . . . . . . . . . . . . . . . . . . . . . . . 105
Working with drawing modes . . . . . . . . . . . . . . . . . . . . . . . . . . . . . . . . 106
Working with Draw Behind mode . . . . . . . . . . . . . . . . . . . . . . . . . . . . 106
Using the Draw Inside mode . . . . . . . . . . . . . . . . . . . . . . . . . . . . . . . . . 107
Editing content drawn inside . . . . . . . . . . . . . . . . . . . . . . . . . . . . . . . . 108
Using Image Trace to create shapes . . . . . . . . . . . . . . . . . . . . . . . . . . 110
4 TRANSFORMING ARTWORK 114Getting started . . . . . . . . . . . . . . . . . . . . . . . . . . . . . . . . . . . . . . . . . . . . . . 116
Working with artboards . . . . . . . . . . . . . . . . . . . . . . . . . . . . . . . . . . . . . 117
Adding artboards to the document . . . . . . . . . . . . . . . . . . . . . . . . . . 117
Editing artboards . . . . . . . . . . . . . . . . . . . . . . . . . . . . . . . . . . . . . . . . . . . . 118
Renaming artboards . . . . . . . . . . . . . . . . . . . . . . . . . . . . . . . . . . . . . . . . . 119
Reordering artboards . . . . . . . . . . . . . . . . . . . . . . . . . . . . . . . . . . . . . . . . 120
Transforming content . . . . . . . . . . . . . . . . . . . . . . . . . . . . . . . . . . . . . . . 122
Working with rulers and guides . . . . . . . . . . . . . . . . . . . . . . . . . . . . . . 122
Positioning objects precisely . . . . . . . . . . . . . . . . . . . . . . . . . . . . . . . . . 125
Scaling objects . . . . . . . . . . . . . . . . . . . . . . . . . . . . . . . . . . . . . . . . . . . . . . 126
Reflecting objects . . . . . . . . . . . . . . . . . . . . . . . . . . . . . . . . . . . . . . . . . . . 128
Distorting objects with effects . . . . . . . . . . . . . . . . . . . . . . . . . . . . . . . 129
Rotating objects . . . . . . . . . . . . . . . . . . . . . . . . . . . . . . . . . . . . . . . . . . . . . 131
Shearing objects . . . . . . . . . . . . . . . . . . . . . . . . . . . . . . . . . . . . . . . . . . . . 133
Transforming with the Free Transform tool . . . . . . . . . . . . . . . . . . . 135
Creating a PDF . . . . . . . . . . . . . . . . . . . . . . . . . . . . . . . . . . . . . . . . . . . . . . 138
viii CONTENTS
5 CREATING AN ILLUSTRATION WITH THE DRAWING TOOLS 140Getting started . . . . . . . . . . . . . . . . . . . . . . . . . . . . . . . . . . . . . . . . . . . . . . 142
Getting started with the Pen tool . . . . . . . . . . . . . . . . . . . . . . . . . . . . 142
Selecting paths . . . . . . . . . . . . . . . . . . . . . . . . . . . . . . . . . . . . . . . . . . . . . . 144
Constraining lines . . . . . . . . . . . . . . . . . . . . . . . . . . . . . . . . . . . . . . . . . . . 145
Introducing curved paths . . . . . . . . . . . . . . . . . . . . . . . . . . . . . . . . . . . . 147
Drawing a curve with the Pen tool . . . . . . . . . . . . . . . . . . . . . . . . . . . 148
Drawing a series of curves with the Pen tool . . . . . . . . . . . . . . . . . . 149
Converting smooth points to corner points . . . . . . . . . . . . . . . . . . . 150
Combining curves and straight lines . . . . . . . . . . . . . . . . . . . . . . . . . 152
Creating the ice cream illustration . . . . . . . . . . . . . . . . . . . . . . . . . . . . 153
Drawing the ice cream with the Pen tool . . . . . . . . . . . . . . . . . . . . . 153
Drawing the dish with the Curvature tool . . . . . . . . . . . . . . . . . . . . 156
Finishing the ice cream dish . . . . . . . . . . . . . . . . . . . . . . . . . . . . . . . . . 159
Editing curves . . . . . . . . . . . . . . . . . . . . . . . . . . . . . . . . . . . . . . . . . . . . . . . 160
Deleting and adding anchor points . . . . . . . . . . . . . . . . . . . . . . . . . . 162
Converting between smooth points and corner points . . . . . . . 163
Working with the Anchor Point tool . . . . . . . . . . . . . . . . . . . . . . . . . . 164
Cutting with the Scissors tool . . . . . . . . . . . . . . . . . . . . . . . . . . . . . . . . 165
Creating a dashed line . . . . . . . . . . . . . . . . . . . . . . . . . . . . . . . . . . . . . . . 166
Cutting with the Knife tool . . . . . . . . . . . . . . . . . . . . . . . . . . . . . . . . . . . 167
Adding arrowheads . . . . . . . . . . . . . . . . . . . . . . . . . . . . . . . . . . . . . . . . . 168
Drawing and editing with the Pencil tool . . . . . . . . . . . . . . . . . . . . . 170
6 USING COLOR AND PATTERNS TO ENHANCE SIGNAGE 174Getting started . . . . . . . . . . . . . . . . . . . . . . . . . . . . . . . . . . . . . . . . . . . . . . 176
Understanding color . . . . . . . . . . . . . . . . . . . . . . . . . . . . . . . . . . . . . . . . 177
Exploring color modes . . . . . . . . . . . . . . . . . . . . . . . . . . . . . . . . . . . . . . . 177
Understanding the main color controls . . . . . . . . . . . . . . . . . . . . . . . 178
Working with color . . . . . . . . . . . . . . . . . . . . . . . . . . . . . . . . . . . . . . . . . . 180
Applying an existing color . . . . . . . . . . . . . . . . . . . . . . . . . . . . . . . . . . . 180
Creating and saving a custom color as a swatch . . . . . . . . . . . . . . 181
Creating a copy of a swatch . . . . . . . . . . . . . . . . . . . . . . . . . . . . . . . . . . 182
Editing a swatch . . . . . . . . . . . . . . . . . . . . . . . . . . . . . . . . . . . . . . . . . . . . . 183
Creating and editing a global swatch . . . . . . . . . . . . . . . . . . . . . . . . . 183
Using the Color Picker to create color . . . . . . . . . . . . . . . . . . . . . . . . 185
Using Illustrator swatch libraries . . . . . . . . . . . . . . . . . . . . . . . . . . . . . 186
Creating a spot color . . . . . . . . . . . . . . . . . . . . . . . . . . . . . . . . . . . . . . . . 186

ADOBE ILLUSTRATOR CC CLASSROOM IN A BOOK 2014 RELEASE ix
Creating and saving a tint of a color . . . . . . . . . . . . . . . . . . . . . . . . . . 188
Adjusting colors . . . . . . . . . . . . . . . . . . . . . . . . . . . . . . . . . . . . . . . . . . . . . 189
Copying appearance attributes . . . . . . . . . . . . . . . . . . . . . . . . . . . . . . 189
Creating a color group . . . . . . . . . . . . . . . . . . . . . . . . . . . . . . . . . . . . . . . 190
Working with color in the Color Guide panel . . . . . . . . . . . . . . . . . 191
Editing a color group in the Edit Colors dialog box . . . . . . . . . . . . 193
Editing colors in artwork . . . . . . . . . . . . . . . . . . . . . . . . . . . . . . . . . . . . . 196
Assigning colors to your artwork . . . . . . . . . . . . . . . . . . . . . . . . . . . . . 198
Painting with patterns . . . . . . . . . . . . . . . . . . . . . . . . . . . . . . . . . . . . . . . 201
Applying existing patterns . . . . . . . . . . . . . . . . . . . . . . . . . . . . . . . . . . . 201
Creating your own pattern . . . . . . . . . . . . . . . . . . . . . . . . . . . . . . . . . . . 201
Applying your pattern . . . . . . . . . . . . . . . . . . . . . . . . . . . . . . . . . . . . . . . 204
Editing your pattern . . . . . . . . . . . . . . . . . . . . . . . . . . . . . . . . . . . . . . . . . 204
Working with Live Paint . . . . . . . . . . . . . . . . . . . . . . . . . . . . . . . . . . . . . . 206
Creating a Live Paint group . . . . . . . . . . . . . . . . . . . . . . . . . . . . . . . . . . 206
Painting with the Live Paint Bucket tool . . . . . . . . . . . . . . . . . . . . . . 207
Modifying a Live Paint group . . . . . . . . . . . . . . . . . . . . . . . . . . . . . . . . 208
7 ADDING TYPE TO A POSTER 210Getting started . . . . . . . . . . . . . . . . . . . . . . . . . . . . . . . . . . . . . . . . . . . . . . 212
Adding type to the poster . . . . . . . . . . . . . . . . . . . . . . . . . . . . . . . . . . . 213
Adding text at a point . . . . . . . . . . . . . . . . . . . . . . . . . . . . . . . . . . . . . . . 213
Adding area type . . . . . . . . . . . . . . . . . . . . . . . . . . . . . . . . . . . . . . . . . . . . 214
Converting between area and point type . . . . . . . . . . . . . . . . . . . . . 215
Importing a plain text file . . . . . . . . . . . . . . . . . . . . . . . . . . . . . . . . . . . . 216
Working with overflow text and text reflow . . . . . . . . . . . . . . . . . . 218
Threading text . . . . . . . . . . . . . . . . . . . . . . . . . . . . . . . . . . . . . . . . . . . . . . 218
Creating columns of text . . . . . . . . . . . . . . . . . . . . . . . . . . . . . . . . . . . . . 220
Formatting type . . . . . . . . . . . . . . . . . . . . . . . . . . . . . . . . . . . . . . . . . . . . . 220
Changing font family and font style . . . . . . . . . . . . . . . . . . . . . . . . . . 221
Changing font size . . . . . . . . . . . . . . . . . . . . . . . . . . . . . . . . . . . . . . . . . . 225
Changing font color . . . . . . . . . . . . . . . . . . . . . . . . . . . . . . . . . . . . . . . . . 226
Changing additional text attributes . . . . . . . . . . . . . . . . . . . . . . . . . . 227
Modifying text with the Touch Type tool . . . . . . . . . . . . . . . . . . . . . . 229
Changing paragraph attributes . . . . . . . . . . . . . . . . . . . . . . . . . . . . . . 232
Resizing and reshaping type objects . . . . . . . . . . . . . . . . . . . . . . . . . 233
Creating and applying text styles . . . . . . . . . . . . . . . . . . . . . . . . . . . . 235
Creating and applying a paragraph style . . . . . . . . . . . . . . . . . . . . . 236

x CONTENTS
Editing a paragraph style . . . . . . . . . . . . . . . . . . . . . . . . . . . . . . . . . . . . 237
Creating and applying a character style . . . . . . . . . . . . . . . . . . . . . . 237
Editing a character style . . . . . . . . . . . . . . . . . . . . . . . . . . . . . . . . . . . . . 239
Sampling text formatting . . . . . . . . . . . . . . . . . . . . . . . . . . . . . . . . . . . . 239
Warping text . . . . . . . . . . . . . . . . . . . . . . . . . . . . . . . . . . . . . . . . . . . . . . . . 239
Reshaping text with a preset envelope warp . . . . . . . . . . . . . . . . . 240
Editing the envelope warp . . . . . . . . . . . . . . . . . . . . . . . . . . . . . . . . . . . 241
Working with type on a path . . . . . . . . . . . . . . . . . . . . . . . . . . . . . . . . . 242
Creating type on a path . . . . . . . . . . . . . . . . . . . . . . . . . . . . . . . . . . . . . . 242
Creating type on a closed path . . . . . . . . . . . . . . . . . . . . . . . . . . . . . . . 243
Editing type on a path options . . . . . . . . . . . . . . . . . . . . . . . . . . . . . . . 244
Wrapping text around an object . . . . . . . . . . . . . . . . . . . . . . . . . . . . . 245
Creating text outlines . . . . . . . . . . . . . . . . . . . . . . . . . . . . . . . . . . . . . . . . 246
8 ORGANIZING YOUR ARTWORK WITH LAYERS 248Getting started . . . . . . . . . . . . . . . . . . . . . . . . . . . . . . . . . . . . . . . . . . . . . . 250
Understanding layers . . . . . . . . . . . . . . . . . . . . . . . . . . . . . . . . . . . . . . . . 250
Creating layers and sublayers . . . . . . . . . . . . . . . . . . . . . . . . . . . . . . . . 252
Editing layers and objects . . . . . . . . . . . . . . . . . . . . . . . . . . . . . . . . . . . . 255
Locating layers . . . . . . . . . . . . . . . . . . . . . . . . . . . . . . . . . . . . . . . . . . . . . . 255
Moving layers and content between layers . . . . . . . . . . . . . . . . . . . 256
Duplicating layer content . . . . . . . . . . . . . . . . . . . . . . . . . . . . . . . . . . . . 258
Merging layers . . . . . . . . . . . . . . . . . . . . . . . . . . . . . . . . . . . . . . . . . . . . . . 260
Pasting layers . . . . . . . . . . . . . . . . . . . . . . . . . . . . . . . . . . . . . . . . . . . . . . . 262
Changing layer order . . . . . . . . . . . . . . . . . . . . . . . . . . . . . . . . . . . . . . . . 264
Viewing layers . . . . . . . . . . . . . . . . . . . . . . . . . . . . . . . . . . . . . . . . . . . . . . . 265
Applying appearance attributes to layers . . . . . . . . . . . . . . . . . . . . . 266
Creating a clipping mask . . . . . . . . . . . . . . . . . . . . . . . . . . . . . . . . . . . . 268
9 BLENDING COLORS AND SHAPES 272Getting started . . . . . . . . . . . . . . . . . . . . . . . . . . . . . . . . . . . . . . . . . . . . . . 274
Working with gradients . . . . . . . . . . . . . . . . . . . . . . . . . . . . . . . . . . . . . . 275
Creating and applying a linear gradient to a fill . . . . . . . . . . . . . . . 275
Adjusting the direction and angle of a gradient fill . . . . . . . . . . . . 278
Applying and editing a gradient on a stroke . . . . . . . . . . . . . . . . . . 280
Creating and applying a radial gradient . . . . . . . . . . . . . . . . . . . . . . 282
Editing the radial gradient colors . . . . . . . . . . . . . . . . . . . . . . . . . . . . . 283
Adjusting the radial gradient . . . . . . . . . . . . . . . . . . . . . . . . . . . . . . . . 285
Applying gradients to multiple objects . . . . . . . . . . . . . . . . . . . . . . . 287
ADOBE ILLUSTRATOR CC CLASSROOM IN A BOOK 2014 RELEASE xi
Adding transparency to gradients . . . . . . . . . . . . . . . . . . . . . . . . . . . . 288
Working with blended objects . . . . . . . . . . . . . . . . . . . . . . . . . . . . . . . 290
Creating a blend with specified steps . . . . . . . . . . . . . . . . . . . . . . . . 290
Modifying a blend . . . . . . . . . . . . . . . . . . . . . . . . . . . . . . . . . . . . . . . . . . . 292
Finishing the blend . . . . . . . . . . . . . . . . . . . . . . . . . . . . . . . . . . . . . . . . . . 295
Creating and editing a smooth color blend . . . . . . . . . . . . . . . . . . . 296
10 USING BRUSHES TO CREATE A POSTER 300Getting started . . . . . . . . . . . . . . . . . . . . . . . . . . . . . . . . . . . . . . . . . . . . . . 302
Working with brushes . . . . . . . . . . . . . . . . . . . . . . . . . . . . . . . . . . . . . . . 303
Using Calligraphic brushes . . . . . . . . . . . . . . . . . . . . . . . . . . . . . . . . . . . 303
Applying a Calligraphic brush to artwork . . . . . . . . . . . . . . . . . . . . . 303
Drawing with the Paintbrush tool . . . . . . . . . . . . . . . . . . . . . . . . . . . . 304
Editing paths with the Paintbrush tool . . . . . . . . . . . . . . . . . . . . . . . 306
Editing a brush . . . . . . . . . . . . . . . . . . . . . . . . . . . . . . . . . . . . . . . . . . . . . . 307
Removing a brush stroke . . . . . . . . . . . . . . . . . . . . . . . . . . . . . . . . . . . . 308
Using Art brushes . . . . . . . . . . . . . . . . . . . . . . . . . . . . . . . . . . . . . . . . . . . 309
Applying an existing Art brush . . . . . . . . . . . . . . . . . . . . . . . . . . . . . . . 309
Creating an Art brush using a raster image . . . . . . . . . . . . . . . . . . . 310
Editing an Art brush . . . . . . . . . . . . . . . . . . . . . . . . . . . . . . . . . . . . . . . . . 312
Using Bristle brushes . . . . . . . . . . . . . . . . . . . . . . . . . . . . . . . . . . . . . . . . 313
Changing Bristle brush options . . . . . . . . . . . . . . . . . . . . . . . . . . . . . . 313
Painting with a Bristle brush . . . . . . . . . . . . . . . . . . . . . . . . . . . . . . . . . 314
Using Pattern brushes . . . . . . . . . . . . . . . . . . . . . . . . . . . . . . . . . . . . . . . 316
Creating a Pattern brush . . . . . . . . . . . . . . . . . . . . . . . . . . . . . . . . . . . . . 318
Applying a Pattern brush . . . . . . . . . . . . . . . . . . . . . . . . . . . . . . . . . . . . 320
Editing the Pattern brush . . . . . . . . . . . . . . . . . . . . . . . . . . . . . . . . . . . . 320
Working with the Blob Brush tool . . . . . . . . . . . . . . . . . . . . . . . . . . . . 322
Drawing with the Blob Brush tool . . . . . . . . . . . . . . . . . . . . . . . . . . . . 322
Merging paths with the Blob Brush tool . . . . . . . . . . . . . . . . . . . . . . 324
Editing with the Eraser tool . . . . . . . . . . . . . . . . . . . . . . . . . . . . . . . . . . 325
11 EXPLORING CREATIVE USES OF EFFECTS AND GRAPHIC STYLES 328Getting started . . . . . . . . . . . . . . . . . . . . . . . . . . . . . . . . . . . . . . . . . . . . . . 330
Using the Appearance panel . . . . . . . . . . . . . . . . . . . . . . . . . . . . . . . . . 332
Editing appearance attributes . . . . . . . . . . . . . . . . . . . . . . . . . . . . . . . 333
Adding another stroke and fill . . . . . . . . . . . . . . . . . . . . . . . . . . . . . . . 335
Reordering appearance attributes . . . . . . . . . . . . . . . . . . . . . . . . . . . 338
xii CONTENTS
Using live effects . . . . . . . . . . . . . . . . . . . . . . . . . . . . . . . . . . . . . . . . . . . . 339
Applying an effect . . . . . . . . . . . . . . . . . . . . . . . . . . . . . . . . . . . . . . . . . . . 340
Editing an effect . . . . . . . . . . . . . . . . . . . . . . . . . . . . . . . . . . . . . . . . . . . . . 340
Styling text with a Warp effect . . . . . . . . . . . . . . . . . . . . . . . . . . . . . . . 341
Applying the Offset Path effect . . . . . . . . . . . . . . . . . . . . . . . . . . . . . . 343
Applying a raster effect . . . . . . . . . . . . . . . . . . . . . . . . . . . . . . . . . . . . . . 344
Working with 3D effects . . . . . . . . . . . . . . . . . . . . . . . . . . . . . . . . . . . . . 346
Applying a 3D Rotate effect . . . . . . . . . . . . . . . . . . . . . . . . . . . . . . . . . . 346
Using graphic styles . . . . . . . . . . . . . . . . . . . . . . . . . . . . . . . . . . . . . . . . . 348
Applying an existing graphic style . . . . . . . . . . . . . . . . . . . . . . . . . . . 348
Creating and applying a graphic style . . . . . . . . . . . . . . . . . . . . . . . . 349
Updating a graphic style . . . . . . . . . . . . . . . . . . . . . . . . . . . . . . . . . . . . . 352
Applying a graphic style to a layer . . . . . . . . . . . . . . . . . . . . . . . . . . . 354
Scaling strokes and effects . . . . . . . . . . . . . . . . . . . . . . . . . . . . . . . . . . . 356
12 CREATING A PRODUCT MOCKUP IN PERSPECTIVE 358Getting started . . . . . . . . . . . . . . . . . . . . . . . . . . . . . . . . . . . . . . . . . . . . . . 360
Understanding the perspective grid . . . . . . . . . . . . . . . . . . . . . . . . . . 361
Working with the perspective grid . . . . . . . . . . . . . . . . . . . . . . . . . . . 362
Using a preset grid . . . . . . . . . . . . . . . . . . . . . . . . . . . . . . . . . . . . . . . . . . 362
Adjusting the perspective grid . . . . . . . . . . . . . . . . . . . . . . . . . . . . . . . 362
Drawing objects in perspective . . . . . . . . . . . . . . . . . . . . . . . . . . . . . . 365
Selecting and transforming objects in perspective . . . . . . . . . . . . 367
Duplicating content in perspective . . . . . . . . . . . . . . . . . . . . . . . . . . . 369
Moving objects in a perpendicular direction . . . . . . . . . . . . . . . . . . 370
Moving planes and objects together . . . . . . . . . . . . . . . . . . . . . . . . . 370
Bringing content into perspective . . . . . . . . . . . . . . . . . . . . . . . . . . . . 373
Drawing with no active grid . . . . . . . . . . . . . . . . . . . . . . . . . . . . . . . . . 374
Adding and editing text in perspective . . . . . . . . . . . . . . . . . . . . . . . 375
Moving a plane to match an object . . . . . . . . . . . . . . . . . . . . . . . . . . 376
Adding symbols to the perspective grid . . . . . . . . . . . . . . . . . . . . . . 378
Editing symbols in perspective . . . . . . . . . . . . . . . . . . . . . . . . . . . . . . . 378
Grouping content in perspective . . . . . . . . . . . . . . . . . . . . . . . . . . . . . 379
Releasing content from perspective . . . . . . . . . . . . . . . . . . . . . . . . . . 380

ADOBE ILLUSTRATOR CC CLASSROOM IN A BOOK 2014 RELEASE xiii
13 USING SYMBOLS TO CREATE A MAP 382Getting started . . . . . . . . . . . . . . . . . . . . . . . . . . . . . . . . . . . . . . . . . . . . . . 384
Working with symbols . . . . . . . . . . . . . . . . . . . . . . . . . . . . . . . . . . . . . . . 385
Using existing Illustrator symbol libraries . . . . . . . . . . . . . . . . . . . . . 385
Editing a symbol . . . . . . . . . . . . . . . . . . . . . . . . . . . . . . . . . . . . . . . . . . . . 387
Creating symbols . . . . . . . . . . . . . . . . . . . . . . . . . . . . . . . . . . . . . . . . . . . . 388
Duplicating symbols . . . . . . . . . . . . . . . . . . . . . . . . . . . . . . . . . . . . . . . . . 390
Replacing symbols . . . . . . . . . . . . . . . . . . . . . . . . . . . . . . . . . . . . . . . . . . 391
Breaking a link to a symbol . . . . . . . . . . . . . . . . . . . . . . . . . . . . . . . . . . 393
Editing symbol options . . . . . . . . . . . . . . . . . . . . . . . . . . . . . . . . . . . . . . 394
Working with the Symbolism tools . . . . . . . . . . . . . . . . . . . . . . . . . . . 394
Spraying symbol instances . . . . . . . . . . . . . . . . . . . . . . . . . . . . . . . . . . . 394
Editing symbols with the Symbolism tools . . . . . . . . . . . . . . . . . . . 396
14 USING ILLUSTRATOR CC WITH OTHER ADOBE APPLICATIONS 400Getting started . . . . . . . . . . . . . . . . . . . . . . . . . . . . . . . . . . . . . . . . . . . . . . 402
Combining artwork . . . . . . . . . . . . . . . . . . . . . . . . . . . . . . . . . . . . . . . . . . 403
Placing image files . . . . . . . . . . . . . . . . . . . . . . . . . . . . . . . . . . . . . . . . . . 404
Placing an image . . . . . . . . . . . . . . . . . . . . . . . . . . . . . . . . . . . . . . . . . . . . 404
Scaling a placed image . . . . . . . . . . . . . . . . . . . . . . . . . . . . . . . . . . . . . . 405
Placing a Photoshop image with Show Import Options . . . . . . . 406
Placing multiple images . . . . . . . . . . . . . . . . . . . . . . . . . . . . . . . . . . . . . 409
Applying color edits to an image . . . . . . . . . . . . . . . . . . . . . . . . . . . . . 410
Masking images . . . . . . . . . . . . . . . . . . . . . . . . . . . . . . . . . . . . . . . . . . . . . 411
Applying a simple mask to an image . . . . . . . . . . . . . . . . . . . . . . . . . 411
Editing a clipping path (mask) . . . . . . . . . . . . . . . . . . . . . . . . . . . . . . . 412
Masking an object with text . . . . . . . . . . . . . . . . . . . . . . . . . . . . . . . . . 414
Creating an opacity mask . . . . . . . . . . . . . . . . . . . . . . . . . . . . . . . . . . . . 415
Editing an opacity mask . . . . . . . . . . . . . . . . . . . . . . . . . . . . . . . . . . . . . 417
Sampling colors in placed images . . . . . . . . . . . . . . . . . . . . . . . . . . . . 419
Working with image links . . . . . . . . . . . . . . . . . . . . . . . . . . . . . . . . . . . . 419
Finding link information . . . . . . . . . . . . . . . . . . . . . . . . . . . . . . . . . . . . . 420
Embedding and unembedding images . . . . . . . . . . . . . . . . . . . . . . 421
Replacing a linked image . . . . . . . . . . . . . . . . . . . . . . . . . . . . . . . . . . . . 421
Packaging a file . . . . . . . . . . . . . . . . . . . . . . . . . . . . . . . . . . . . . . . . . . . . . 424

xiv CONTENTS
15 PREPARING CONTENT FOR THE WEB 426Getting started . . . . . . . . . . . . . . . . . . . . . . . . . . . . . . . . . . . . . . . . . . . . . . 428
Saving content for the Web . . . . . . . . . . . . . . . . . . . . . . . . . . . . . . . . . . 429
Aligning content to the pixel grid . . . . . . . . . . . . . . . . . . . . . . . . . . . . 429
Slicing content . . . . . . . . . . . . . . . . . . . . . . . . . . . . . . . . . . . . . . . . . . . . . . 432
Selecting and editing slices . . . . . . . . . . . . . . . . . . . . . . . . . . . . . . . . . . 434
Using the Save For Web command . . . . . . . . . . . . . . . . . . . . . . . . . . . 435
Creating CSS code . . . . . . . . . . . . . . . . . . . . . . . . . . . . . . . . . . . . . . . . . . . 437
Setting up your design for generating CSS . . . . . . . . . . . . . . . . . . . 438
Working with character styles and CSS code . . . . . . . . . . . . . . . . . . 441
Working with graphic styles and CSS code . . . . . . . . . . . . . . . . . . . 443
Copying CSS . . . . . . . . . . . . . . . . . . . . . . . . . . . . . . . . . . . . . . . . . . . . . . . . 444
Exporting CSS . . . . . . . . . . . . . . . . . . . . . . . . . . . . . . . . . . . . . . . . . . . . . . . 446
Saving artwork as SVG . . . . . . . . . . . . . . . . . . . . . . . . . . . . . . . . . . . . . . . 447
INDEX 452

ADOBE ILLUSTRATOR CC CLASSROOM IN A BOOK 2014 RELEASE 1
Adobe® Illustrator® CC is the industry-standard illustration application for
print, multimedia, and online graphics. Whether you are a designer or a
technical illustrator producing artwork for print publishing, an artist producing
multimedia graphics, or a creator of web pages or online content, Adobe
Illustrator offers you the tools you need to get professional-quality results.
About Classroom in a Book
Adobe Illustrator CC Classroom in a Book® (2014 release) is part of the official
training series for Adobe graphics and publishing software developed with the
support of Adobe product experts.
The lessons are designed so that you can learn at your own pace. If you’re
new to Adobe Illustrator, you’ll learn the fundamentals you need to master
to put the application to work. If you are an experienced user, you’ll find that
Classroom in a Book teaches many advanced features, including tips and
techniques for using the latest version of Adobe Illustrator.
Although each lesson provides step-by-step instructions for creating a specific
project, there’s room for exploration and experimentation. You can follow
the book from start to finish, or do only the lessons that correspond to your
interests and needs. Each lesson concludes with a review section summarizing
what you’ve covered.
Prerequisites
Before beginning to use Adobe Illustrator CC Classroom in a Book (2014
release), you should have working knowledge of your computer and its
operating system. Make sure that you know how to use the mouse and standard
menus and commands, and also how to open, save, and close files. If you need
to review these techniques, see the printed or online documentation for your
Windows or Mac OS.
� Note: When instructions differ by platform, Mac OS commands appear first, and then the Windows commands, with the platform noted in parentheses. For example, “press the Option (Mac OS) or Alt (Windows) key and click away from the artwork.”
GETTING STARTED

2 GETTING STARTED
Installing the program
Before you begin using Adobe Illustrator CC Classroom in a Book (2014 release),
make sure that your system is set up correctly and that you’ve installed the required
software and hardware.
You must purchase the Adobe Illustrator CC software separately. For complete
instructions on installing the software, visit helpx.adobe.com/illustrator.html. You
must install Illustrator from Adobe Creative Cloud onto your hard disk. Follow the
onscreen instructions.
Fonts used in this book
The Classroom in a Book lesson files use fonts that are a part of the Typekit
Portfolio plan included with your Creative Cloud subscription, and trial Creative
Cloud members have access to a selection of fonts from Typekit for web and
desktop use.
For more information about fonts and installation, see the Adobe Illustrator CC
Read Me file on the web at helpx.adobe.com/illustrator.html.
Accessing the Classroom in a Book files
In order to work through the projects in this book, you will need to download the
lesson files from peachpit.com. You can download the files for individual lessons, or
download them all in a single file. Although each lesson stands alone, some lessons
use files from other lessons, so you’ll need to keep the entire collection of lesson
assets on your computer as you work through the book.
To access the Classroom in a Book files:
1 On a Mac or PC, go to www.peachpit.com/redeem and enter the code found at
the back of your book.
2 If you do not have a Peachpit.com account, you will be prompted to create one.
3 The downloadable files will be listed under Lesson & Update Files tab on your
Account page.
4 Click the lesson file links to download them to your computer. The files are
compressed into Zip archives to speed up download time and to protect the
contents from damage during transfer. You must uncompress (or “unzip”) the
files to restore them to their original size and format before you use them with
the book. Modern Mac and Windows systems are set up to open Zip archives by
simply double-clicking.

ADOBE ILLUSTRATOR CC CLASSROOM IN A BOOK 2014 RELEASE 3
5 On your hard drive, create a new folder in a convenient location and give it the
name “Lessons,” following the standard procedure for your operating system:
• If you’re running Windows, right-click and choose New > Folder. Then enter
the new name for your folder.
• If you’re using Mac OS, in the Finder, choose File > New Folder. Type the
new name and drag the folder to the location you want to use.
6 Drag the unzipped Lessons folder (which contains folders named Lesson01,
Lesson02, and so on) that you downloaded onto your hard drive to your new
folder named “Lessons.” When you begin each lesson, navigate to the folder with
that lesson number to access all the assets you need to complete the lesson.
Restoring default preferences
The preferences file controls how command settings appear on your screen when
you open the Adobe Illustrator program. Each time you quit Adobe Illustrator,
the position of the panels and certain command settings are recorded in different
preference files. If you want to restore the tools and settings to their original default
settings, you can delete the current Adobe Illustrator CC preferences file. Adobe
Illustrator creates a new preferences file, if one doesn’t already exist, the next time
you start the program and save a file.
You must restore the default preferences for Illustrator before you begin each
lesson. This ensures that the tools and panels function as described in this book.
When you have finished the book, you can restore your saved settings, if you like.
To delete or save the current Illustrator preferences file
1 Exit Adobe Illustrator CC.
2 Locate the Adobe Illustrator Prefs file as follows:
• (Mac OS 10.7 and later**) The Adobe Illustrator Prefs file is located in
the folder [startup drive]/Users/[username]/Library/Preferences/Adobe
Illustrator 18 Settings/en_US*.
• (Windows 7 [Service Pack 1], or Windows 8) The Adobe Illustrator Prefs file
is located in the folder [startup drive]\Users\[username]\AppData\Roaming\
Adobe\Adobe Illustrator 18 Settings\en_US*\x86 or x64.
*Folder name may be different depending on the language version you have installed.**On Mac OS 10.7 (Lion) and later, the Library folder is hidden by default. To access this folder, in Finder, choose Go > Go To Folder. Type ~/Library in the Go To The Folder dialog box and then click Go.
� Note: If you cannot locate the preferences file, try using your operating system’s Find command, and search for “Adobe Illustrator Prefs.”
� Note: In Windows 7 or later, the AppData folder is hidden by default. To make it visible, open Folder Options in Control Panel and click the View tab. In the Advanced Settings pane, find Hidden Files and folders and select Show Hidden Files and Folders or Show hidden files, folders, or drives.

4 GETTING STARTED
If you can’t find the file, you either haven’t started Adobe Illustrator CC yet or
you have moved the preferences file. The preferences file is created after you quit
the program the first time and is updated thereafter.
� Tip: To quickly locate and delete the Adobe Illustrator preferences file each time you begin a new lesson, create a shortcut (Windows) or an alias (Mac OS) to the Adobe Illustrator 18 Settings folder.
3 Copy the file and save it to another folder on your hard disk (if you wish to
restore those preferences) or Delete it.
4 Start Adobe Illustrator CC. You most likely will see a dialog box that asks if you
would like to use the settings from the cloud. Click Disable Sync Settings.
To restore saved preferences after completing the lessons
1 Exit Adobe Illustrator CC.
2 Delete the current preferences file. Find the original preferences file that you
saved and move it to the Adobe Illustrator 18 Settings folder.
� Note: You can move the original preferences file rather than renaming it.
Additional resources
Adobe Illustrator CC Classroom in a Book (2014 release) is not meant to replace
documentation that comes with the program or to be a comprehensive reference
for every feature. Only the commands and options used in the lessons are explained
in this book. For comprehensive information about program features and tutorials,
please refer to these resources:
Adobe Illustrator Help and Support: helpx.adobe.com/illustrator.html is where
you can find and browse Help and Support content on adobe.com. Adobe Illustrator
Help and Adobe Illustrator Support Center are accessible from the Help menu in
Illustrator CC 2014 (2014 release) or by pressing F1.
Adobe Creative Cloud Learning: for inspiration, key techniques, cross-product
workflows, and updates on new features go to the Creative Cloud Learn page
helpx.adobe.com/creative-cloud/learn/tutorials.html. Available to all.
Adobe Forums: forums.adobe.com lets you tap into peer-to-peer discussions,
questions and answers on Adobe products.
Adobe TV: tv.adobe.com is an online video resource for expert instruction and
inspiration about Adobe products, including a How To channel to get you started
with your product.
ADOBE ILLUSTRATOR CC CLASSROOM IN A BOOK 2014 RELEASE 5
Adobe Inspire: www.adobe.com/inspire.html offers thoughtful articles on design
and design issues, a gallery showcasing the work of top-notch designers, tutorials,
and more.
Resources for educators: www.adobe.com/education and edex.adobe.com offer a
treasure trove of information for instructors who teach classes on Adobe software.
Find solutions for education at all levels, including free curricula that use an
integrated approach to teaching Adobe software and can be used to prepare for the
Adobe Certified Associate exams.
Also check out these useful links:
Adobe Illustrator CC product home page: www.adobe.com/products/illustrator
Adobe Add-ons: creative.adobe.com/addons is a central resource for finding
tools, services, extensions, code samples, and more to supplement and extend your
Adobe products.
Adobe Authorized Training Centers
Adobe Authorized Training Centers offer instructor-led courses and training on
Adobe products. A directory of AATCs is available at partners.adobe.com.
Sync settings using Adobe Creative Cloud
When you work on multiple machines, managing and syncing preferences, presets,
and libraries among the machines can be time-consuming, complex, and prone
to error. The Sync Settings feature enables individual users to sync their preferences,
presets, and libraries to the Creative Cloud. This means that if you use two
machines, say one at home and the other at work, the Sync Settings feature makes
it easy for you to keep those settings synchronized across two machines. Also, if you
have replaced your old machine with a new one and have re-installed Illustrator, this
feature will let you bring back all those settings on the new machine.
For more information about syncing, visit
helpx.adobe.com/illustrator/using/sync-settings.html

6 What’s New in Adobe Illustrator CC (2014 release)
WHAT’S NEW IN ADOBE ILLUSTRATOR CC (2014 RELEASE)
Adobe® Illustrator® CC (2014 release) is packed with new and innovative features
to help you produce artwork more efficiently for print, Web, and digital video
publication. In this section, you’ll learn about many of these new features—how they
function and how you can use them in your work.
Creative Cloud Libraries
With Creative Cloud Libraries, you can organize
creative assets, such as colors, type styles, brushes and
graphics, and automatically sync them to Creative
Cloud, allowing you to access them whenever and
wherever you need them from a single, convenient
panel within Illustrator. Libraries make it easy to
maintain design consistency across projects, and not
have to dig around in files and folders to find the assets
you need.
Curvature tool
With the new Curvature tool ( ), you can draw and
edit paths quickly and visually to create paths with
smooth refined curves and straight lines. Click once to
place points and see the drawing curve “flex” around
the points dynamically. Double-click to create corner
points for straight lines.
Edit paths while drawing or after the path is complete
using the same tool; no need to hassle with anchor
points and handles. Just by clicking or double-clicking
on the curvature points creates smooth points or
corner points at any time. But if you need the fine control you’re used to with
traditional anchor points and handles, just edit your drawing with any of the
Illustrator path editing tools.

ADOBE ILLUSTRATOR CC CLASSROOM IN A BOOK 2014 RELEASE 7
Touch workspace
The Touch workspace lets you create on the go what you could once only
accomplish sitting at your desk: it’s Illustrator you can take with you. Designed for
Windows 8 tablets, the Touch workspace surfaces the essential tools and controls
for drawing and editing with a pressure-sensitive pen and multi-touch gestures.
You can create logos, icons, explore custom lettering and typography, create UI
wireframes, and more.
The Touch workspace brings traditional drawing templates and French curves to
the Illustrator workspace. These templates and curves project a scalable, movable
outline that can be traced against to quickly create refined curves. At any time, you
can immediately switch between the Touch and traditional workspaces to access the
full range of Illustrator tools and controls.
Area type Autosizing
With area type Autosizing, you can automatically resize the height of area type
frames when you add, delete, or edit text. As the text is edited and re-edited, the
frame shrinks and grows to accommodate the changing amount of copy, and
eliminates overset text without manually sizing and resizing frames. You can easily
toggle Autosizing on or off, so it’s there when it’s needed and off when it’s not, e.g.,
when main text flows, or threads, across layout elements like columns or artboards.
Live Shapes
All rectangles and rounded rectangles
have modifiable corners. While each
corner can have an independent radius
value, all attributes are retained even
when you scale or rotate the rectangle.
Rectangles and rounded rectangles now
remember all modifications made, be it
width, height, rotation, corner treatment.
This capability means you can always
return to the original shape of the object.

8 What’s New in Adobe Illustrator CC (2014 release)
Typekit integration
When you open an Illustrator artwork file, and find fonts missing, the online
Typekit desktop font library is automatically searched for the missing font (you
must have an Internet connection for this function). If the missing font is available
online, you have the option of syncing it to your current computer. If you choose
not to fix the missing fonts when the file is opened in Illustrator, text elements using
unavailable fonts are highlighted in pink and rendered using a default font.
Pen tool preview and drawing-related enhancements
The Pen tool displays a preview of what will be
drawn on your artboard before you click and
drop the next point. This helps you visualize
the next curve before you commit to the next
point and saves you the time spent in drawing,
reviewing, and then redrawing paths that need
to be redone.
Pencil tool enhancements
The Pencil tool has been updated with an additional Fidelity setting for finer control
over the paths you draw. This additional level has been extended to the Paintbrush
and Blob Brush tools as well.
Path segment reshaping
Drag path segments into the shape you desire.
New path reshaping technology, available in
the Anchor Point and Direct Selection tools
and accessible from the Pen tool, provides
a more direct and intuitive way to edit
path segments.

ADOBE ILLUSTRATOR CC CLASSROOM IN A BOOK 2014 RELEASE 9
Join tool
Use the Join tool ( ) to intelligently join paths that cross, overlap, or have
open ends without affecting the original paths. Using the same tool, you
can simultaneously join paths and trim unwanted segments using intuitive
scrubbing gestures.
Other enhancements
• Windows GPU acceleration—New GPU acceleration for Windows lets you
work faster on Windows 7 or 8 computers. This feature requires an Adobe-
certified NVIDIA graphics card with at least 1GB of VRAM.
• SVG enhancements—In the SVG Save Options dialog, the “Use <textPath>...”
check box is selected by default. This reduces generated markup, resulting in
smaller SVG output files. Markup for generated preview HTML has also been
cleaned up.
• Anchor point enhancements—Fine adjustment of curves is now easier. New
anchor point controls allow unequal or different-direction handles to be dragged
as you draw to control the smoothness of each segment. You can even change a
corner point to smooth without ruining your shape.
• Custom Tools panels—Create specialized Tools panels by dragging and
dropping just the tools you need—like drawing, editing, or selection tools—into
a custom panel. The full Tools panel can then be hidden, allowing for a clean,
efficient workspace.
• Settings import and export—Share your Illustrator settings across multiple
computers. Simply export them to a folder where they can then be imported
by other users. While Sync Settings lets you standardize settings on your own
computers, now you can also share them across your organization.
Although this list touches on just a few of the new and enhanced features of
Illustrator CC (2014 release), it exemplifies Adobe’s commitment to providing the
best tools possible for your publishing needs. We hope you enjoy working with
Illustrator CC (2014 release) as much as we do.
—The Adobe Illustrator CC (2014 release) Classroom in a Book Team

10
A QUICK TOUR OF ADOBE® ILLUSTRATOR® CC (2014 RELEASE)
Lesson overview
In this interactive demonstration of Adobe Illustrator CC (2014
release), you’ll get an overview of the main features of the application.
This lesson takes approximately 60 minutes to complete.
Download the project files for this lesson from the Lesson & Update Files
tab on your Account page at www.peachpit.com and store them on your
computer in a convenient location, as described in the Getting Started
section of this book.
Your Account page is also where you’ll find any updates to the chapters
or to the lesson files. Look on the Lesson & Update Files tab to access the
most current content.

11
In this demonstration of Adobe Illustrator CC, you will be introduced to some key fundamentals for working in the application.

12 A Quick Tour of Adobe® Illustrator® CC (2014 release)
Getting started
For the first lesson of this book, you will get a quick tour of the tools and features in
Adobe Illustrator CC, offering a sense of the many possibilities. Along the way, you
will create artwork for an amusement park.
1 To ensure that the tools and panels function exactly as described in this lesson,
delete or deactivate (by renaming) the Adobe Illustrator CC preferences file. See
“Restoring default preferences” in the Getting Started section at the beginning of
the book.
� Note: If you have not already downloaded the project files for this lesson to your computer from your Account page, make sure to do so now. See “Getting Started” at the beginning of the book.
2 Start Adobe Illustrator CC.
Creating a new document
An Illustrator document can contain up to 100 artboards (artboards are similar to
pages in a program like Adobe InDesign®). Next, you will create a document with
only one artboard.
1 Choose Window > Workspace > Reset Essentials.
� Note: If you don’t see “Reset Essentials” in the Workspace menu, choose Window > Workspace > Essentials before choosing Window > Workspace > Reset Essentials.
2 Choose File > New.
3 In the New Document dialog
box, change only the following
options (leaving the rest at their
default settings):
• Name: AmusementWorld
• Units: Inches
• Width: 16 in
• Height: 14 in
4 Click OK. A new blank
document appears.
Sync settings using Adobe Creative Cloud™
When you launch Adobe Illustrator CC for the first time, with no previous sync
information available, you will see a prompt asking whether you want to start a sync
with Adobe Creative Cloud.
• Click Disable Sync Settings (if the dialog box appears).
� Note: Learnmore about creating and editing artboards in Lesson 4, “Transforming Artwork.”
� Note: For more information on syncing with the Creative Cloud, see “Sync settings using Adobe Creative Cloud” in the Getting Started section of this book.
ADOBE ILLUSTRATOR CC CLASSROOM IN A BOOK 2014 RELEASE 13
1 Choose File > Save As. In the Save As dialog box, leave the name as
AmusementWorld.ai and navigate to the Lessons > Lesson00 folder. Leave the
Format option set to Adobe Illustrator (ai) (Mac OS) or Save As Type option
set to Adobe Illustrator (*.AI) (Windows), and click Save. In the Illustrator
Options dialog box, leave the Illustrator options at their default settings, and then
click OK.
2 Choose View > Rulers > Show Rulers to show rulers in the Document window.
3 Choose View > Fit Artboard In Window, and then choose View > Zoom Out.
The white area is the artboard, and where your printable artwork will go.
Drawing shapes
Drawing shapes is the cornerstone of Illustrator, and you will create many of them in
the coming lessons. Next, you will create several shapes.
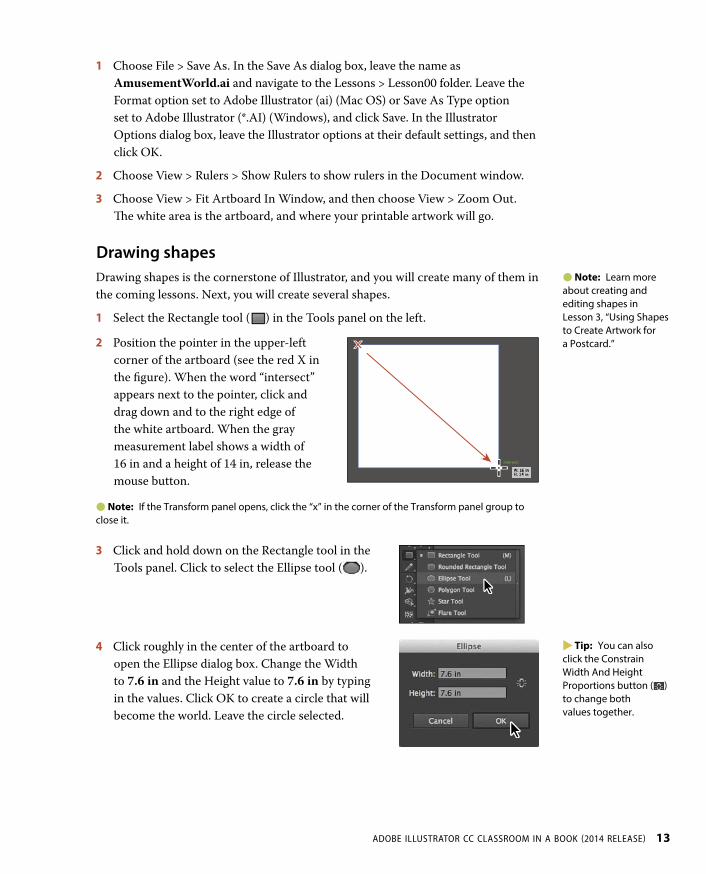
1 Select the Rectangle tool ( ) in the Tools panel on the left.
2 Position the pointer in the upper-left
corner of the artboard (see the red X in
the figure). When the word “intersect”
appears next to the pointer, click and
drag down and to the right edge of
the white artboard. When the gray
measurement label shows a width of
16 in and a height of 14 in, release the
mouse button.
� Note: If the Transform panel opens, click the “x” in the corner of the Transform panel group to close it.
3 Click and hold down on the Rectangle tool in the
Tools panel. Click to select the Ellipse tool ( ).
4 Click roughly in the center of the artboard to
open the Ellipse dialog box. Change the Width
to 7.6 in and the Height value to 7.6 in by typing
in the values. Click OK to create a circle that will
become the world. Leave the circle selected.
� Note: Learn more about creating and editing shapes in Lesson 3, “Using Shapes to Create Artwork for a Postcard.”
� Tip: You can also click the Constrain Width And Height Proportions button ( )to change both values together.

14 A Quick Tour of Adobe® Illustrator® CC (2014 release)
Applying color
Applying colors to artwork is a common Illustrator task. Experimenting and
applying color is easy using the Color panel, Swatches panel, Color Guide panel, and
Edit Colors/Recolor Artwork dialog box.
1 Select the Selection tool ( ) in the
Tools panel on the left. With the circle
still selected, click the Fill color in the
Control panel (circled in the figure)
to reveal the Swatches panel. Position
the pointer over a blue swatch (in the
second row of colors). When the tool tip
appears that shows “C=85, M=50, Y=0,
K=0,” click to apply the blue swatch to the fill.
2 Press the Escape key to hide the Swatches panel.
3 Click the Stroke color in the Control
panel (circled in the figure). Click the
None color ( ) to remove the stroke
(border) of the circle. Press the Escape
key to hide the Swatches panel.
4 Choose Select > Deselect, and then
choose File > Save.
Working with layers
Layers allow you to organize and more easily select artwork. Next, using the Layers
panel, you will organize your artwork.
1 Choose Window > Layers to show the Layers panel in the workspace.
2 Double-click directly on the text “Layer 1” (the layer
name) in the Layers panel. Type Background, and
press Enter or Return to change the layer name.
Naming layers can be helpful when organizing
content. Currently, all artwork is on this layer.
� Note: Learnmore about creating and applying color in Lesson 6, “Using Color and Patterns to Enhance Signage.”
� Note: Learn more about working with layers and the Layers panel in Lesson 8, “Organizing Your Artwork with Layers.”

ADOBE ILLUSTRATOR CC CLASSROOM IN A BOOK 2014 RELEASE 15
3 Click the Create New Layer button ( ) at the bottom
of the Layers panel. Double-click “Layer 2” (the new
layer name), and type Content. Press Enter or Return.
4 With the Selection tool ( ) selected, click to select the
blue circle. Choose Edit > Cut.
5 Choose View > Fit Artboard In Window.
6 Click once on the layer named Content to select it in
the Layers panel. New artwork is added to the selected layer.
7 Choose Edit > Paste to paste the circle on the selected layer (Content), in the
center of the artboard.
8 Choose Select > Deselect.
Drawing with the Pencil tool
The Pencil tool ( ) lets you draw free-form open and closed paths that contain
curves and straight lines. As you draw with the Pencil tool, anchor points are created
on the path where necessary and according to the Pencil tool options you set.
1 Double-click the Pencil tool ( ) in the Tools
panel on the left to open the Pencil Tool
Options dialog box. Drag the Fidelity
slider all the way to the right (to Smooth).
Click OK.
Changing the Fidelity will help to smooth
out the path as you draw.
2 Press the letter D to set the default fill
(White) and stroke (Black) for the artwork
you are about to create.
� Note: Learn more about working with the Pencil tool and other drawing tools in Lesson 5, “Creating an Illustration with the Drawing Tools.”

16 A Quick Tour of Adobe® Illustrator® CC (2014 release)
3 Choose Window > Swatches to show
the Swatches panel. Click the Fill box
(circled in the figure) and select the
None ( ) swatch to remove the fill.
Leave the Swatches panel open.
Next, you’ll create a figure similar to the
one shown below. The path you draw won’t
match exactly as shown, and that’s okay.
4 On the artboard, starting where you
see the red X in the figure, click and
drag to create a path around the blue
circle. Draw all the way around the
blue circle and come back close to
where you started drawing. Make sure
that you don’t see a circle ( ) next to
the Pencil tool, indicating that the path
will be closed. If you see the circle next
to the Pencil, release the mouse button,
press Delete and try the path again.
Release the mouse button to stop
drawing the path.
5 Leave the path selected.
Editing strokes
In addition to changing the color of strokes, you can also format them in many other
ways. That’s what you’ll do next with the path you just drew.
1 With the path still selected, click the word
“Stroke” in the Control panel above the
document to open the Stroke panel. Change
the following options:
• Stroke Weight: 60 pt
• Dashed Line: Selected
• Dash: 28 pt
• Gap: 3 pt
2 Press the Escape key to hide the Stroke panel.
3 In the Swatches panel, click the Stroke box, and then select the “CMYK Red”
swatch in the first row of colors. Leave the shape selected.
� Note: Learn more about working with strokes in Lesson 3, “Using Shapes to Create Artwork for a Postcard.”

ADOBE ILLUSTRATOR CC CLASSROOM IN A BOOK 2014 RELEASE 17
Working with the Width tool
The Width tool ( ) allows you to create a variable width stroke and to save the
width as a profile that can be applied to other objects. Next, you’ll change the width
of the red path.
1 Select the Width tool ( ) in the Tools panel. Position the pointer over the left
side of the red path (see the figure). When the pointer shows a plus sign (+) next
to it, drag toward the center of the path. When the gray measurement label next
to the pointer shows a Width of approximately 0.2 in, release the mouse button.
2 Position the pointer at the bottom of the path on the curve (see the figure
below). When the pointer shows a plus sign (+) next to it, drag away from the
red path. When the gray measurement label shows a Width of approximately
0.5 in, release the mouse button.
3 Move to the right side of the path and drag away from the path to make the
stroke wider (see the second part of the following figure).
4 Move to the top loop and drag toward the path to make the width narrower
(see the third part of the following figure).
� Note: Learn more about the Width tool in Lesson 3, “Using Shapes to Create Artwork for a Postcard.”
� Note: A width point is created on the path where you dragged. This allows you to edit that width at any time.
� Tip: You can always choose Edit > Undo Width Point Change to remove the last point and try again.
18 A Quick Tour of Adobe® Illustrator® CC (2014 release)
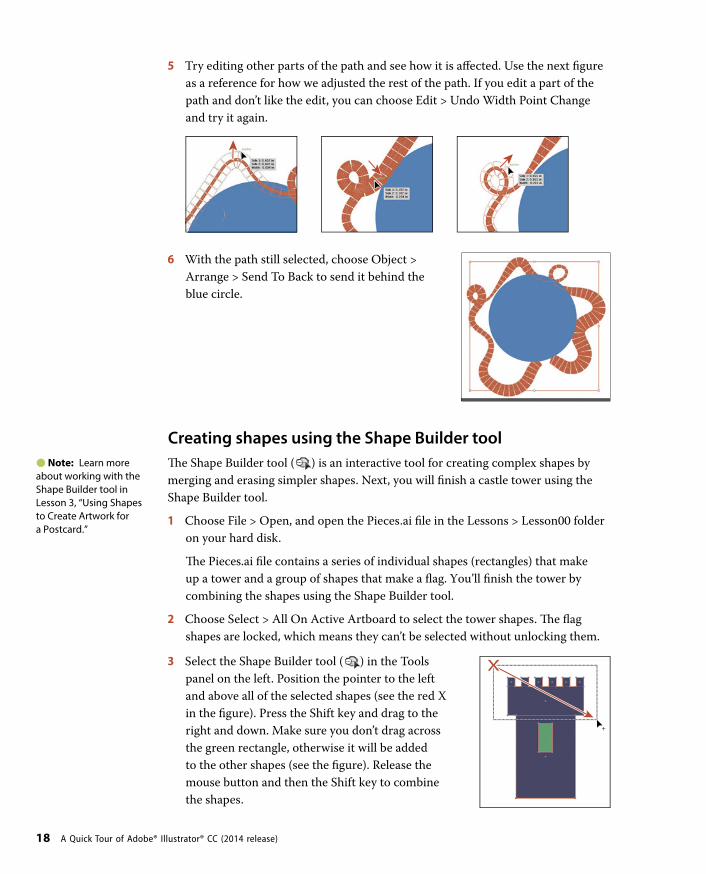
5 Try editing other parts of the path and see how it is affected. Use the next figure
as a reference for how we adjusted the rest of the path. If you edit a part of the
path and don’t like the edit, you can choose Edit > Undo Width Point Change
and try it again.
6 With the path still selected, choose Object >
Arrange > Send To Back to send it behind the
blue circle.
Creating shapes using the Shape Builder tool
The Shape Builder tool ( ) is an interactive tool for creating complex shapes by
merging and erasing simpler shapes. Next, you will finish a castle tower using the
Shape Builder tool.
1 Choose File > Open, and open the Pieces.ai file in the Lessons > Lesson00 folder
on your hard disk.
The Pieces.ai file contains a series of individual shapes (rectangles) that make
up a tower and a group of shapes that make a flag. You’ll finish the tower by
combining the shapes using the Shape Builder tool.
2 Choose Select > All On Active Artboard to select the tower shapes. The flag
shapes are locked, which means they can’t be selected without unlocking them.
3 Select the Shape Builder tool ( ) in the Tools
panel on the left. Position the pointer to the left
and above all of the selected shapes (see the red X
in the figure). Press the Shift key and drag to the
right and down. Make sure you don’t drag across
the green rectangle, otherwise it will be added
to the other shapes (see the figure). Release the
mouse button and then the Shift key to combine
the shapes.
� Note: Learn more about working with the Shape Builder tool in Lesson 3, “Using Shapes to Create Artwork for a Postcard.”
ADOBE ILLUSTRATOR CC CLASSROOM IN A BOOK 2014 RELEASE 19
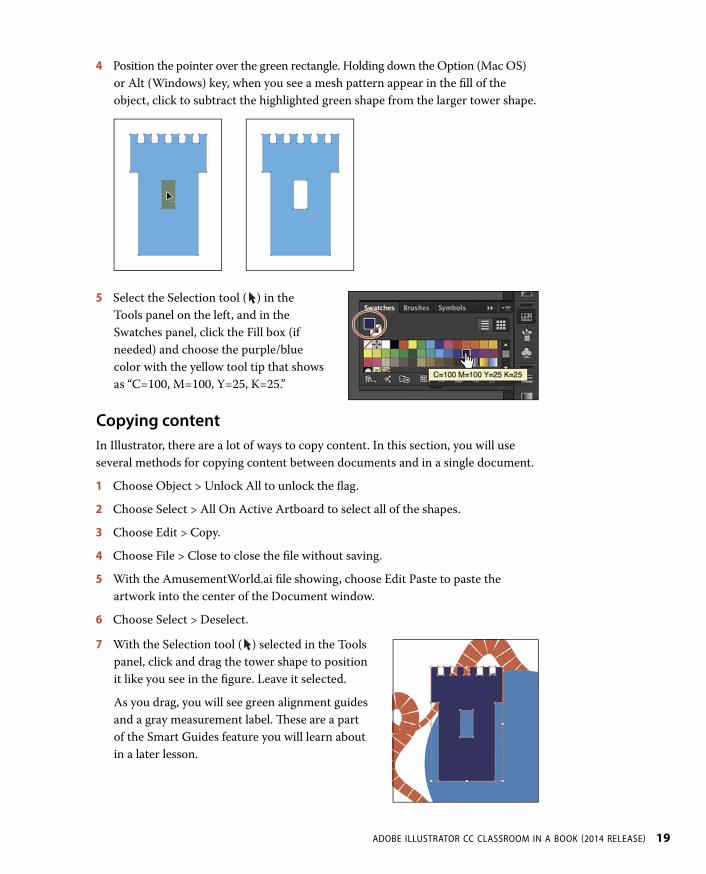
4 Position the pointer over the green rectangle. Holding down the Option (Mac OS)
or Alt (Windows) key, when you see a mesh pattern appear in the fill of the
object, click to subtract the highlighted green shape from the larger tower shape.
5 Select the Selection tool ( ) in the
Tools panel on the left, and in the
Swatches panel, click the Fill box (if
needed) and choose the purple/blue
color with the yellow tool tip that shows
as “C=100, M=100, Y=25, K=25.”
Copying content
In Illustrator, there are a lot of ways to copy content. In this section, you will use
several methods for copying content between documents and in a single document.
1 Choose Object > Unlock All to unlock the flag.
2 Choose Select > All On Active Artboard to select all of the shapes.
3 Choose Edit > Copy.
4 Choose File > Close to close the file without saving.
5 With the AmusementWorld.ai file showing, choose Edit Paste to paste the
artwork into the center of the Document window.
6 Choose Select > Deselect.
7 With the Selection tool ( ) selected in the Tools
panel, click and drag the tower shape to position
it like you see in the figure. Leave it selected.
As you drag, you will see green alignment guides
and a gray measurement label. These are a part
of the Smart Guides feature you will learn about
in a later lesson.
20 A Quick Tour of Adobe® Illustrator® CC (2014 release)
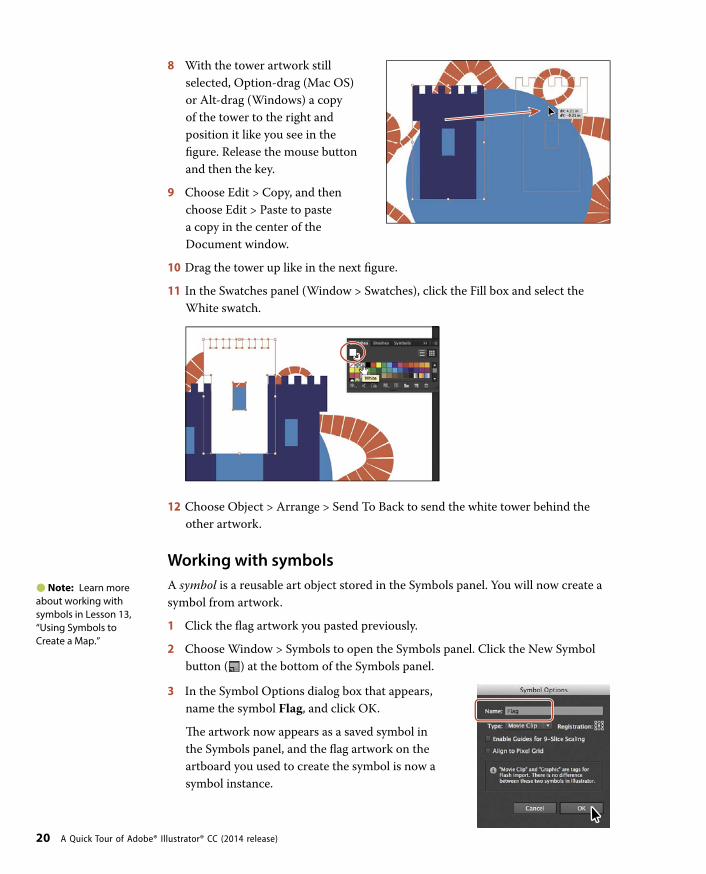
8 With the tower artwork still
selected, Option-drag (Mac OS)
or Alt-drag (Windows) a copy
of the tower to the right and
position it like you see in the
figure. Release the mouse button
and then the key.
9 Choose Edit > Copy, and then
choose Edit > Paste to paste
a copy in the center of the
Document window.
10 Drag the tower up like in the next figure.
11 In the Swatches panel (Window > Swatches), click the Fill box and select the
White swatch.
12 Choose Object > Arrange > Send To Back to send the white tower behind the
other artwork.
Working with symbols
A symbol is a reusable art object stored in the Symbols panel. You will now create a
symbol from artwork.
1 Click the flag artwork you pasted previously.
2 Choose Window > Symbols to open the Symbols panel. Click the New Symbol
button ( ) at the bottom of the Symbols panel.
3 In the Symbol Options dialog box that appears,
name the symbol Flag, and click OK.
The artwork now appears as a saved symbol in
the Symbols panel, and the flag artwork on the
artboard you used to create the symbol is now a
symbol instance.
� Note: Learn more about working with symbols in Lesson 13, “Using Symbols to Create a Map.”

ADOBE ILLUSTRATOR CC CLASSROOM IN A BOOK 2014 RELEASE 21
4 Choose View > Outline to see the artwork without
fills. Drag the flag by the stroke (border), up to the
top of the white tower.
You’ll need to select the flag by the stroke (border)
since there is no fill to click on in Outline mode.
5 Choose Object > Arrange > Send To Back.
6 Choose View > Preview.
7 From the Symbols panel, drag the Flag symbol
thumbnail onto the artboard like you see in the
figure. Drag one more Flag symbol from the
Symbols panel onto the artboard and position it like
you see in the figure. Leave the last symbol instance
on the artboard selected.
� Note: Your Flag symbol instances may be in different locations than those in the figure. That’s okay.
8 With one of the flags selected, click the Edit Symbol button in the Control panel
above the artwork. This allows you to edit the symbol artwork in Isolation mode
without affecting the other artwork.
9 In the dialog box that appears, click OK.
10 Click the gray flag shape on the artboard.
Click the Fill color in the Control panel
and select the yellow swatch with the tool
tip that shows “C=0, M=10, Y=95, K=0” to
change the fill color of the flag. Press the
Escape key to close the Swatches panel.
11 Press the Escape key to exit the editing
(Isolation) mode and notice that the other flags have changed.
� Tip: You can also double-click away from the selected artwork to exit Isolation mode.
12 Click one of the blue towers, and then Shift-click the other blue tower to select
both. Choose Object > Arrange > Bring To Front to arrange the towers on top of
the flags.

22 A Quick Tour of Adobe® Illustrator® CC (2014 release)
13 Click the blue circle, and choose
Object > Arrange > Bring To Front to
place the circle on the towers. Drag it into
position like you see in the figure.
Placing images in Illustrator
In Illustrator, you can place raster images, like JPEG (jpg, jpeg, jpe) and Adobe
Photoshop® (psd, pdd) files, and either link to them or embed them. Next, you will
place an image of a map.
1 Choose File > Place. In the Place
dialog box, navigate to the Lesson00
folder in the Lessons folder and select
the Map.psd file. Make sure that
the Link option in the dialog box is
selected, and click Place.
2 Click to place the map on the
artboard. Drag the map over the blue
circle so it is positioned roughly like
you see in the figure.
3 Choose File > Save.
Using Image Trace
You can use Image Trace to convert photographs (raster images) into vector
artwork. Next, you will trace the Photoshop file.
1 Choose Window > Image Trace to open the Image Trace panel.
2 In the Image Trace panel, choose “3 Colors” from the Preset menu.
The image is converted to vector paths, but it is not yet editable.
� Note: Learn more about placing images in Lesson 14, “Using Illustrator CC with Other Adobe Applications.”
� Note: Learn more about Image Trace in Lesson 3, “Using Shapes to Create Artwork for a Postcard.”

ADOBE ILLUSTRATOR CC CLASSROOM IN A BOOK 2014 RELEASE 23
3 In the Image Trace panel, click the toggle arrow to the left of Advanced. Select
Ignore White near the bottom of the panel. Close the Image Trace panel by
clicking the small “x” in the corner.
4 With the map still selected, click the Expand button in the Control panel to make
the object editable artwork.
The map image is now a series of vector shapes that are grouped together.
5 Choose Object > Arrange > Send Backward to put the map behind the
blue circle.
6 Choose Window > Workspace > Reset Essentials.
Creating a clipping mask
A clipping mask is an object that masks other artwork so that only areas that lie
within its shape are visible—in effect, clipping the artwork to the shape of the mask.
Next, you will copy the blue circle and use the copy to mask the map.
1 With the Selection tool ( ) selected, click the blue circle.
2 Choose Edit > Copy, and then choose Edit > Paste In Front to paste a copy of the
circle directly on top of the original circle.
3 With the circle still selected, press the Shift key, and click the map artwork to
select it as well.
4 Choose Object > Clipping Mask > Make.
� Note: Learn more about working with clipping masks in Lesson 14, “Using Illustrator CC with Other Adobe Applications.”

24 A Quick Tour of Adobe® Illustrator® CC (2014 release)
Creating and editing gradients
Gradients are color blends of two or more colors that you can apply to the fill or
stroke of artwork. Next, you will apply a gradient to the background shape.
1 Click the white rectangle in the background to select it.
2 Choose Window > Gradient to show the
Gradient panel on the right side of
the workspace. In the Gradient panel,
change the following options:
• Click the white Fill box (circled in the
figure), if it’s not already selected, so
that you can apply the gradient to the
fill of the rectangle shape.
• Click the Gradient menu button ( ) to the left of the word “Type,” and
choose “White, Black” from the menu.
• Choose 90 from the Angle menu.
3 Drag the white color stop in the Gradient panel (see the figure below) to the right
until the Location value below it shows roughly 50%.
4 Double-click the black color stop on the right side of the gradient slider in the
Gradient panel (circled in the figure below). In the panel that appears, click the
Color button ( ) (if it’s not already selected), and change the color values to
C=75, M=0, Y=15, K=0. Press the Escape key to hide the Color panel.
5 Click the Stroke color in the Control panel
(circled in the figure). Click the None
color ( ) to remove the stroke (border) of
the rectangle (if necessary). Press the Escape
key to hide the Swatches panel.
Next, you’ll create a circle and apply a
transparent gradient on the world.
� Note: Learnmore about working with gradients in Lesson 9, “Blending Colors and Shapes.”

ADOBE ILLUSTRATOR CC CLASSROOM IN A BOOK 2014 RELEASE 25
6 Click within the green of the map artwork, and choose Object >
Lock > Selection.
7 Click again on the map, and you will select the blue circle behind it since the
map artwork is locked and can’t be selected.
8 Choose Edit > Copy, and then Edit > Paste In Place to paste it on top of all
other artwork.
9 In the Gradient panel, change the following options:
• Click the Fill box (circled in the figure), if it’s not already selected, so that you
can apply the gradient to the fill of the rectangle shape.
• Click the Gradient menu button ( ) to the left of the word “Type,” and
choose “White, Black” from the menu.
• Choose Radial from the Type menu.
10 Double-click the black color
stop on the right side of
the gradient slider in the
Gradient panel (circled in
the figure). In the panel that
appears, click the Swatches
button ( ), and select the
white swatch. Change the
Opacity to 0. Press Enter or
Return to hide the Color panel.
11 Select the Gradient tool ( ) in the Tools
panel on the left. Click and drag across the
circle, starting at the red X in the figure, to
reposition and resize the gradient.
12 Choose Object > Lock > Selection to lock
the gradient circle.
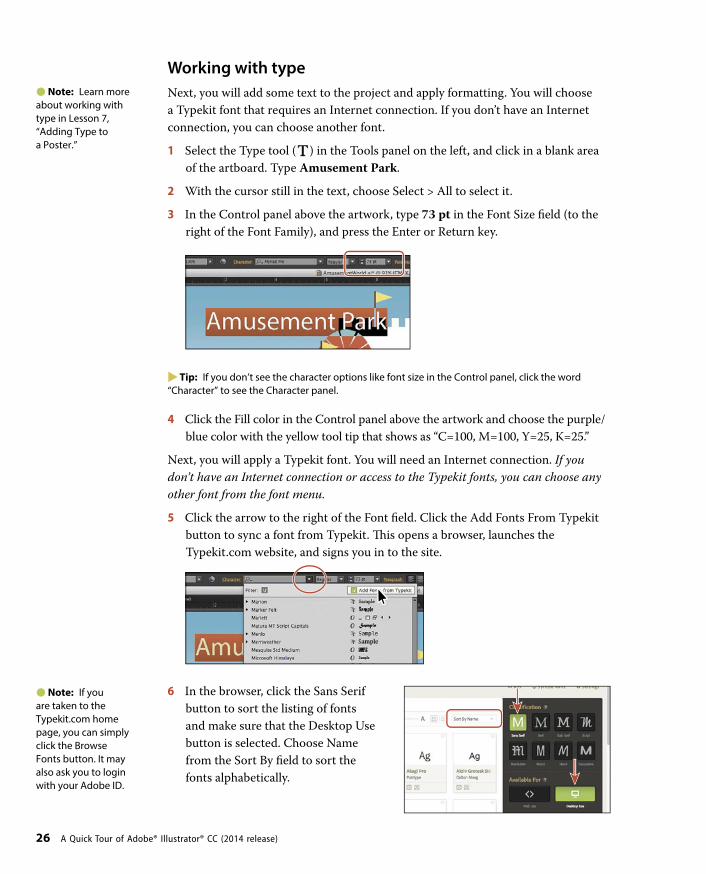
26 A Quick Tour of Adobe® Illustrator® CC (2014 release)
Working with type
Next, you will add some text to the project and apply formatting. You will choose
a Typekit font that requires an Internet connection. If you don’t have an Internet
connection, you can choose another font.
1 Select the Type tool ( ) in the Tools panel on the left, and click in a blank area
of the artboard. Type Amusement Park.
2 With the cursor still in the text, choose Select > All to select it.
3 In the Control panel above the artwork, type 73 pt in the Font Size field (to the
right of the Font Family), and press the Enter or Return key.
� Tip: If you don’t see the character options like font size in the Control panel, click the word “Character” to see the Character panel.
4 Click the Fill color in the Control panel above the artwork and choose the purple/
blue color with the yellow tool tip that shows as “C=100, M=100, Y=25, K=25.”
Next, you will apply a Typekit font. You will need an Internet connection. If you
don’t have an Internet connection or access to the Typekit fonts, you can choose any
other font from the font menu.
5 Click the arrow to the right of the Font field. Click the Add Fonts From Typekit
button to sync a font from Typekit. This opens a browser, launches the
Typekit.com website, and signs you in to the site.
6 In the browser, click the Sans Serif
button to sort the listing of fonts
and make sure that the Desktop Use
button is selected. Choose Name
from the Sort By field to sort the
fonts alphabetically.
� Note: Learn more about working with type in Lesson 7, “Adding Type to a Poster.”
� Note: If you are taken to the Typekit.com home page, you can simply click the Browse Fonts button. It may also ask you to login with your Adobe ID.

ADOBE ILLUSTRATOR CC CLASSROOM IN A BOOK 2014 RELEASE 27
7 Find Azo Sans Uber in the list
(or another font, if you don’t see
that one). Hover over it and click
+Use Fonts.
8 Click Sync Selected Fonts in the
window that appears.
9 After it is synced, click the Launch
The Creative Cloud Application
button to open the Creative Cloud
Desktop application.
In the Creative Cloud desktop
application, you will be able to
see any messages indicating that
font syncing is turned off (turn it on
in that case) or any other issues.
10 Return to Illustrator. With the text
still selected, in the Font field in the
Control panel, begin typing Azo.
11 Click Azo Sans Uber Regular in the
menu that appears to apply the font.
12 Select the Selection tool ( ), and drag the text roughly into position over the
world, like you see in the figure and leave it selected.
� Note: It may take a few minutes for the font to sync with your computer.

28 A Quick Tour of Adobe® Illustrator® CC (2014 release)
Warping text
Next, you will see how you can warp text into different shapes using a preset
envelope warp.
1 With the text object still selected, choose Object > Envelope Distort >
Make With Warp.
2 In the Warp Options dialog box, make sure that Arc is chosen from the Style
menu. Change the Bend to 36% and select Preview. Click OK.
Working with brushes
Brushes let you stylize the appearance of paths. You can apply brush strokes to
existing paths, or you can use the Paintbrush tool ( ) to draw a path and apply a
brush stroke simultaneously.
1 Select the Line Segment tool ( ) in the Tools panel on the left. Pressing the Shift
key, click and drag from the left side of the artboard (see the red X in the figure)
to the right. When the gray measurement label shows a width of roughly 15.3 in,
release the mouse button and then the key.
2 Choose Window > Brush Libraries > Decorative > Decorative_Banners And
Seals to open the brush library as a panel.
3 Click the Banner 1 brush in the panel to apply it to the path. Click the “x” in the
corner of the Decorative_Banners And Seals panel to close it.
� Note: Learnmore about working with a warp in Lesson 7, “Adding Type to a Poster.”
� Note: Learn more about working with brushes in Lesson 10, “Using Brushes to Create a Poster.”

ADOBE ILLUSTRATOR CC CLASSROOM IN A BOOK 2014 RELEASE 29
4 Change the Stroke weight to
5 pt in the Control panel above
the artwork.
The brush is an art brush, which
means that it stretches the
banner artwork (in this case)
along the path.
5 Choose Object > Arrange > Send
Backward to arrange the banner behind the text.
6 Select the Selection tool ( ) and drag both into position like you see in the figure.
Working with effects
Effects alter the appearance of an object without changing the base object. Next,
you will apply the Drop Shadow effect to the world artwork.
1 With the Selection tool ( ), click the blue circle.
2 Choose Effect > Stylize > Drop Shadow.
In the Drop Shadow dialog box, set the
following options (if necessary):
• Mode: Multiply (the default setting)
• Opacity: 75% (the default setting)
• X Offset and Y Offset: 0.1 in (the
default setting)
• Blur: 0.07 in (the default setting)
3 Select Preview, and then click OK.
4 Choose File > Save, and then choose File > Close.
� Note: Learn more about effects in Lesson 11, “Exploring Creative Uses of Effects and Graphic Styles.”

114
4 TRANSFORMING ARTWORK
Lesson overview
In this lesson, you’ll learn how to do the following:
• Add, edit, rename, and reorder artboards in an existing document.
• Navigate artboards.
• Work with rulers and guides.
• Move, scale, and rotate objects using a variety of methods.
• Reflect, shear, and distort objects.
• Position objects with precision.
• Position and align content with Smart Guides.
• Use the Free Transform tool to distort an object.
• Create a PDF.
This lesson takes approximately 60 minutes to complete.
Download the project files for this lesson from the Lesson & Update Files
tab on your Account page at www.peachpit.com and store them on your
computer in a convenient location, as described in the Getting Started
section of this book.
Your Account page is also where you’ll find any updates to the chapters
or to the lesson files. Look on the Lesson & Update Files tab to access the
most current content.

115
You can modify objects in many ways as you create artwork, by quickly and precisely controlling their size, shape, and orientation. In this lesson, you’ll explore creating and editing artboards, the various Transform commands, and specialized tools, while creating several pieces of artwork.

116 LESSON 4 Transforming Artwork
Getting started
In this lesson, you’ll create content and use it in a ticket for a sporting event. Before
you begin, you’ll restore the default preferences for Adobe Illustrator and then open
a file containing the finished artwork to see what you’ll create.
1 To ensure that the tools and panels function exactly as described in this lesson,
delete or deactivate (by renaming) the Adobe Illustrator CC preferences file. See
“Restoring default preferences” in the Getting Started section at the beginning of
the book.
2 Start Adobe Illustrator CC.
3 Choose File > Open, and open the L4_end.ai file in the Lessons > Lesson04 folder
on your hard disk.
This file contains the three artboards that make up the front, back, and inside of
a folding ticket for a sporting event.
4 Choose View > Fit All In Window, and leave the artwork onscreen as you work.
If you don’t want to leave the file open, choose File > Close (without saving).
To begin working, you’ll open an existing art file.
5 Choose File > Open to open the L4_start.ai file in the Lesson04 folder, located in
the Lessons folder on your hard disk.
6 Choose File > Save As. In the Save As dialog box, name the file Ticket.ai, and
navigate to the Lesson04 folder. Leave the Format option set to Adobe Illustrator
(ai) (Mac OS) or Save As Type option set to Adobe Illustrator (*.AI) (Windows),
and then click Save. In the Illustrator Options dialog box, leave the Illustrator
options at their default settings, and then click OK.
7 Choose Window > Workspace > Reset Essentials.
� Note: If you have not already downloaded the project files for this lesson to your computer from your Account page, make sure to do so now. See the “Getting Started” section at the beginning of the book.
� Note: If you don’t see “Reset Essentials” in the Workspace menu, choose Window > Workspace > Essentials before choosing Window > Workspace > Reset Essentials.

ADOBE ILLUSTRATOR CC CLASSROOM IN A BOOK 2014 RELEASE 117
Working with artboards
Artboards represent the regions that can contain printable artwork, similar to pages
in Adobe InDesign. You can use multiple artboards for creating a variety of things,
such as multiple-page PDF files, printed pages with different sizes or different
elements, independent elements for websites, or video storyboards, for instance.
Adding artboards to the document
You can add and remove artboards at any time while working in a document. You
can create artboards in different sizes, resize them with the Artboard tool ( ) or
Artboards panel ( ), and position them anywhere in the Document window. All
artboards are numbered and can have a unique name assigned to them.
Next, you will add two more artboards to the document. Since this is a ticket for
a sporting event that will fold, each artboard will be a different face of the ticket
(front, inside, and back).
1 Choose View > Fit Artboard In Window, then press Command+– (Mac OS) or
Ctrl+– (Windows) to zoom out.
2 Press the spacebar to temporarily access the Hand tool ( ). Drag the artboard
to the left to see more of the darker canvas off the right side of the artboard.
3 Select the Artboard tool ( ) in the Tools panel.
Position the Artboard tool pointer to the right of
the existing artboard and in line with its top edge
(a green alignment guide appears). Drag down
and to the right to create an artboard that is
3.5 in (width) by 6 in (height). The measurement
label indicates the artboard size.
� Tip: If you zoom in on an artboard, the measurement label has smaller increments.
4 Click the Artboards panel icon ( ) on the right
side of the workspace to show it.
The Artboards panel allows you to see how
many artboards the document currently
contains. It also allows you to reorder, rename,
add, and delete artboards and to choose many
other options related to artboards. Notice that
Artboard 2 is highlighted in the panel. The
active artboard is always highlighted in this panel.
Next, you will create a copy of an artboard using this panel.
� Tip: If you find it difficult to make the width value exactly 3.5 in, you can always change the W: (width) value in the Control panel, after you finish drawing the artboard.

118 LESSON 4 Transforming Artwork
5 Click the New Artboard button ( ) at the bottom
of the panel to create a copy of Artboard 2, called
Artboard 3. The copy is placed to the right of
Artboard 2 in the Document window.
� Tip: You can also create a new artboard by clicking the New Artboard button ( ) in the Control panel. This allows you to create a duplicate of the last selected artboard. After clicking the button, position the pointer in the canvas area and click to create a new artboard.
6 Choose View > Fit All In
Window to see all of your
artboards and leave the
Artboard tool selected.
Editing artboards
After creating artboards, you can edit or delete artboards at any time by using the
Artboard tool ( ), menu commands, or the Artboards panel. Next, you will reposi-
tion and change the sizes of several of the artboards using multiple methods.
1 Press Command+– (Mac OS) or Ctrl+– (Windows) twice to zoom out further.
2 With the Artboard tool ( ) still selected, drag Artboard 3 from the center, to
the left of the original (larger) artboard. You can reposition artboards at any time
and even overlap them, if necessary.
3 With the Artboard tool selected, drag the bottom-center
bounding point of the artboard down until the height is
8 in, as shown in the measurement label. The bottom will
snap to the bottom of the larger artboard to its right and
a green alignment (smart) guide will appear.
� Tip: To delete an artboard, select the artboard with the Artboard tool ( ) and either press Delete, click the Delete Artboard button ( ) in the Control panel, or click the Delete icon ( ) in the upper-right corner of an artboard. You can delete all but one artboard.
� Tip: With the Artboard tool ( ),you can also copy an artboard by holding down the Option (Mac OS) or Alt (Windows) key and dragging away from the original artboard. When creating new artboards, you can place them anywhere—you can even overlap them.

ADOBE ILLUSTRATOR CC CLASSROOM IN A BOOK 2014 RELEASE 119
Another way to resize an artboard is to do so by entering values in the Control
panel, which is what you’ll do next.
4 Click Artboard 2, to the right of the larger artboard in the middle. “Artboard 2”
will be highlighted in the Artboards panel. Select the upper-middle point in the
reference point locator ( ) in the Control panel. Change the height to 8 in the
Control panel and press Enter or Return to accept the value.
Selecting the upper-middle point allows you to resize an artboard from the top,
center of the artboard. By default, artboards are resized from their center.
In the Control panel, with the Artboard tool selected, you will see many options
for editing the currently active artboard. The Preset menu lets you change a
selected artboard to a set size. Notice that the sizes in the Preset menu include
typical print, video, tablet, and Web sizes. You can also fit the artboard to the
artwork bounds or the selected art, which is a great way to fit an artboard to
a logo, for instance. Other options in the Control panel include the ability to
switch orientation, rename or delete the artboard, even show other helpful
guides like a center point or video-safe areas.
� Tip: You can see the Constrain Width and Height Proportions icon ( ) in the Control panel, between the Width and Height fields. This icon, if selected ( ), allows the width and height to change in proportion to each other.
5 Select the Selection tool ( ), and choose View > Fit All In Window.
Notice the very subtle black outline around Artboard 2, with “2” showing in
the Artboard Navigation menu (lower-left corner of the Document window),
and “Artboard 2” highlighted in the Artboards panel, all of which indicate
that Artboard 2 is the currently active artboard. There can only be one active
artboard at a time. Commands such as View > Fit Artboard In Window apply to
the active artboard.
Renaming artboards
By default, artboards are assigned a number and a name. When you navigate the
artboards in a document, it can be helpful to name them. Next, you are going to
rename the artboards so that the names are more useful.
1 In the Artboards panel, double-click the name
“Artboard 1.” Change the name to Inside, and press
Enter or Return.
� Tip: You can also change the name of an artboard by double-clicking the Artboard tool ( ) in the Tools panel. Doing so changes the name for the currently active artboard in the Artboard Options dialog box. You can make an artboard the currently active artboard by clicking it with the Selection tool ( ).
� Tip: With the Artboard tool ( )selected, you can press the Shift key to resize an artboard proportionally or press the Option (Mac OS) or Alt (Windows) key and drag to resize an artboard from its center.
� Note: If you don’t see the Width (W) and Height (H) fields in the Control panel, click the Artboard Options button ( ) in the Control panel and enter the values in the dialog box that appears.

120 LESSON 4 Transforming Artwork
You will now rename the rest of the artboards.
2 Double-click the Artboard Options icon ( ) to the
right of the name “Artboard 2” in the Artboards
panel. This opens the Artboard Options dialog box.
� Tip: The Artboard Options icon ( ) appears to the right of the name of each artboard in the Artboards panel. It not only allows access to the artboard options for each artboard but also indicates the orientation (vertical or horizontal) of the artboard. You only need to single-click the icon when the artboard name is highlighted in the panel.
3 In the Artboard Options dialog
box, change the Name to Back
and click OK.
The Artboard Options dialog box
has a lot of extra options as well
as a few we’ve already seen, like
width and height.
4 Double-click the name
“Artboard 3” in the panel, and change the name to Front.
Press Enter or Return to accept the name.
5 Choose File > Save, and keep the Artboards panel showing for the next steps.
Reordering artboards
When you navigate your document, the order in which the artboards appear can be
important, especially if you are navigating the document using the Next artboard
( ) and Previous artboard ( ) buttons. By default, artboards are ordered according
to the order in which they are created, but you can change that order. Next, you will
reorder the artboards in the Artboards panel.
1 With the Artboards panel still open, double-click the number 1 to the left of the
name “Inside” in the panel. This makes the artboard named “Inside” the active
artboard and fits it in the Document window.
2 Click and drag the “Front” artboard name up until
a line appears above the artboard named “Inside.”
Release the mouse button.
This moves the artboard up in order so that it
becomes the first artboard in the list.
3 Double-click to the right or left of the name “Front”
in the Artboards panel to fit that artboard in the
Document window, if necessary.
� Tip: You can also reorder the artboards by selecting an artboard in the Artboards panel and clicking the Move Up ( ) or Move Down ( ) button at the bottom of the panel.

ADOBE ILLUSTRATOR CC CLASSROOM IN A BOOK 2014 RELEASE 121
4 Click the Next artboard button ( ) in the lower-left corner of the Document
window to navigate to the next artboard (Inside). This fits the Inside artboard in
the Document window.
If you had not changed the order, the next artboard would have been dimmed
since it was the last artboard in the Artboards panel (there was no artboard
after it).
5 Choose File > Save.
Now that the artboards are set up, you will concentrate on transforming artwork to
create the content for your project.
Editing document setup options
When working with artboards for the current document, you can change default setup options, like units of measure, bleed guides, type settings (such as language), and more in the Document Setup dialog box. To access the Document Setup dialog box, you can either choose File > Document Setup, or, if nothing is selected in the Document window, click the Document Setup button in the Control panel.
There are two sets of options in the Document Setup dialog box that will be worth exploring: General and Type. In the General options, you can change the units and set bleed guides, among a host of other options.
122 LESSON 4 Transforming Artwork
Transforming content
Transforming content allows you to move, rotate, reflect, scale, shear, and either
free distort or perspective distort objects. Objects can be transformed using the
Transform panel, selection tools, specialized tools, Transform commands, guides,
Smart Guides, and more. For the remainder of the lesson, you will transform
content using a variety of methods and tools.
Working with rulers and guides
Rulers help you accurately place and measure objects. They appear at the top
and left in the Document window and can be shown and hidden. Guides are
non-printing lines created from the rulers that help you align objects. Next, you
will create a few guides based on ruler measurements so that later you can more
accurately align content.
1 Choose View > Rulers > Show Rulers, if you don’t see the rulers.
2 Choose View > Fit All In Window.
3 With the Selection tool ( ) selected, click each of the artboards and, as you do,
look at the horizontal and vertical rulers. Notice that the 0 (zero) for each ruler is
always in the upper-left corner of the active (selected) artboard.
The point on each ruler (horizontal and vertical) where the 0 appears is called
the ruler origin. By default, the ruler origin is in the upper-left corner of the
active artboard. As you can see, the 0 point on both rulers corresponds to the
edges of the active artboard.
There are two types of rulers in Illustrator: artboard rulers and global rulers.
Artboard rulers, which are the default rulers that you are seeing, set the ruler
origin at the upper-left corner of the active artboard. Global rulers set the ruler
origin at the upper-left corner of the first artboard, or the artboard that is at the
top of the list in the Artboards panel, no matter which artboard is active.
� Note: You could switch between artboard and global rulers by choosing View > Rulers > and selecting Change To Global Rulers or Change To Artboard Rulers, (depending on which option is currently chosen), but don’t do that now.
4 Click the leftmost artboard, called “Front.”
5 Open the Layers panel by choosing Window >
Layers, and select the layer named Edit.

ADOBE ILLUSTRATOR CC CLASSROOM IN A BOOK 2014 RELEASE 123
6 Shift-drag from the left vertical ruler right to create
a vertical guide at 1 inch on the horizontal ruler
(the ruler above the artboard) on the “Front”
artboard. Release the mouse button, and then
release the Shift key.
Dragging with the Shift key pressed “snaps” guides
to the measurements on the ruler. The guide is
selected and when selected, its color matches the
color of the layer that it’s associated with (red in this
case). By default, guides that are not selected are aqua in color.
� Note: Guides are similar to drawn objects in that they can be selected like a drawn line, and they can be deleted by pressing the Backspace or Delete key, and they also are on the active layer in the Layers panel.
7 With the guide still selected (it should be red in color), change the X value in the
Control panel to 0.25 in, and press Enter or Return.
On the horizontal ruler, measurements to the right of 0 (zero) are positive and
to the left are negative. On the vertical ruler, measurements below 0 (zero) are
positive and above are negative.
� Note: If you don’t see the X value, you can click the word “Transform” in the Control panel or open the Transform panel (Window > Transform).
8 Position the pointer in the upper-left corner of the Document
window, where the rulers intersect ( ), and drag the pointer
to the lower-left corner of the artboard. When the word
“intersect” appears, release the mouse button.
As you drag, a crosshair in the window and in the rulers
indicates the changing ruler origin. This sets the ruler origin
(0,0) to the lower-left corner of the artboard. This can be very
useful when you need to place content a set distance from the
bottom edge of the artboard, for instance.
� Tip: If you Command-drag (Mac OS) or Ctrl-drag (Windows) from the ruler intersect, you create a horizontal and vertical guide that intersects where you release the mouse button and then release the Ctrl or Command key.
Next, you’ll add a guide using a different method that can
sometimes be faster.
9 Select the Zoom tool ( ) and click several times, slowly,
on the lower-left corner of the artboard until you see
1/4-inch measurements on the ruler. We had to click at
least four times.
� Tip: To change the units for a document, you can right-click either ruler and choose the new units.

124 LESSON 4 Transforming Artwork
10 Shift-double-click the vertical ruler at the 1/4-inch
mark (the ruler to the left of the artboard), above
the 0 on the ruler. This creates a guide that crosses
the bottom edge of the artboard at –0.25 in from
the bottom.
11 Position the pointer in the upper-left corner of the
Document window, where the rulers intersect ( ),
and double-click to reset the ruler origin.
12 Choose View > Guides > Lock Guides to prevent them from being
accidentally moved.
The guides are no longer selected and are aqua in color by default.
� Tip: You can also hide and show guides by pressing Command+; (Mac OS) or Ctrl+; (Windows).
13 Choose View > Fit All In Window.
14 With the Selection tool ( ) selected, select the white text “ALL CITY.”
15 Choose View > Hide Edges so you only see the bounding box of the
grouped paths.
This hides the inside edges of the shapes, but not the bounding box. It can make
it easier to move and position the artwork.
16 Drag the text group into the lower-left corner of the artboard with the guides.
When the left and bottom edges snap to the guides, release the mouse button.

ADOBE ILLUSTRATOR CC CLASSROOM IN A BOOK 2014 RELEASE 125
Positioning objects precisely
At times, you may want to position objects more precisely—either relative to other
objects or to the artboard. You could use the alignments options, like you saw in
Lesson 2 “Techniques for Selecting Artwork,” but you can also use Smart Guides
and the Transform panel to move objects to exact coordinates on the x and y axes
and to control the position of objects in relation to the edge of the artboard.
Next, you’ll add content to the backgrounds of two artboards and then position that
content precisely.
1 Press Command+– (Mac OS) or Ctrl+– (Windows) (or View > Zoom Out) three
times to zoom out. You should see content off the bottom edge of the artboards.
2 Click the artboard with the guides on it (the artboard named Front) to ensure
that it is the active artboard (check the origin of the rulers and make sure that
0,0 starts in the upper-left corner of the artboard).
3 With the Selection tool ( ), click to select the large background shape on the
left, below the artboards (see the next figure for which shape).
4 Click the upper-left point of the
reference point locator ( ) in the
Control panel. Then, change the X
value to 0 and the Y value to 0.
� Note: Again, depending on the resolution of your screen, the Transform options may not appear in the Control panel. If they do not appear, you can click the word “Transform” to see the Transform panel, or you can choose Window > Transform.
The content should now be precisely
positioned on the artboard, since it
was the same size as the artboard to
begin with.
5 In the Artboards panel, select the artboard named Back to make it the
active artboard.
6 Select the group with the “City Arena” text in it below the artboards. You may
need to either zoom out or scroll over and down to see it.

126 LESSON 4 Transforming Artwork
7 With the upper-left point of the reference point
locator ( ) selected in the Control panel, change
the X value to 0 and the Y value to 0.
Next, you will use Smart Guides to move content.
When moving objects with Smart Guides turned on
(View > Smart Guides), measurement labels appear
next to the pointer and display the distance (X and
Y) from the object’s original location. You will use
these to make sure that an object is a certain distance
from the edge of the artboard.
8 With the Selection tool, click to select the
basketball hoop with net below the artboards.
With the upper-left point of the reference point
locator ( ) in the Control panel selected, change the X value to 0 and the Y
value to 0.
9 Choose View > Fit Artboard In Window.
10 Using the Selection tool, position the pointer
over the selected basketball hoop with net
and drag the group down and to the right. As
you drag, press the Shift key to constrain the
movement to 45°. When the measurement label
shows approximately dX: 0.25 in and dY: 0.25 in,
release the mouse button, and then the Shift key.
Leave the artwork selected.
The dX indicates the distance moved along the
x axis (horizontally), and dY indicates the distance moved along the y axis
(vertically). Don’t worry if you can’t get the exact values, it’s difficult when
zoomed out so far. Also, because there is other content on the canvas, Smart
Guides are attempting to snap to it. You can always change the X and Y values in
the Control panel or Transform panel.
� Note: You can also choose Illustrator > Preferences > Smart Guides (Mac OS) or Edit > Preferences > Smart Guides (Windows) and deselect the Measurement Labels option to turn off just the measurement labels when Smart Guides are on.
11 Choose File > Save.
Scaling objects
So far in this book, you’ve scaled most content with the selection tools. In this
lesson, you’ll use several other methods to scale objects.
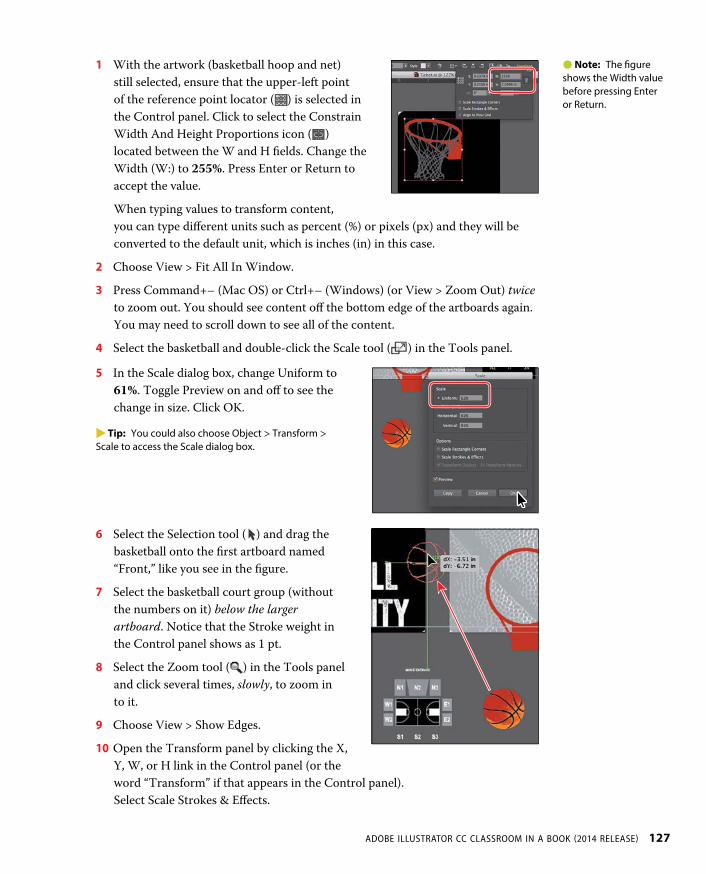
ADOBE ILLUSTRATOR CC CLASSROOM IN A BOOK 2014 RELEASE 127
1 With the artwork (basketball hoop and net)
still selected, ensure that the upper-left point
of the reference point locator ( ) is selected in
the Control panel. Click to select the Constrain
Width And Height Proportions icon ( )
located between the W and H fields. Change the
Width (W:) to 255%. Press Enter or Return to
accept the value.
When typing values to transform content,
you can type different units such as percent (%) or pixels (px) and they will be
converted to the default unit, which is inches (in) in this case.
2 Choose View > Fit All In Window.
3 Press Command+– (Mac OS) or Ctrl+– (Windows) (or View > Zoom Out) twice
to zoom out. You should see content off the bottom edge of the artboards again.
You may need to scroll down to see all of the content.
4 Select the basketball and double-click the Scale tool ( ) in the Tools panel.
5 In the Scale dialog box, change Uniform to
61%. Toggle Preview on and off to see the
change in size. Click OK.
� Tip: You could also choose Object > Transform > Scale to access the Scale dialog box.
6 Select the Selection tool ( ) and drag the
basketball onto the first artboard named
“Front,” like you see in the figure.
7 Select the basketball court group (without
the numbers on it) below the larger
artboard. Notice that the Stroke weight in
the Control panel shows as 1 pt.
8 Select the Zoom tool ( ) in the Tools panel
and click several times, slowly, to zoom in
to it.
9 Choose View > Show Edges.
10 Open the Transform panel by clicking the X,
Y, W, or H link in the Control panel (or the
word “Transform” if that appears in the Control panel).
Select Scale Strokes & Effects.
� Note: The figure shows the Width value before pressing Enter or Return.
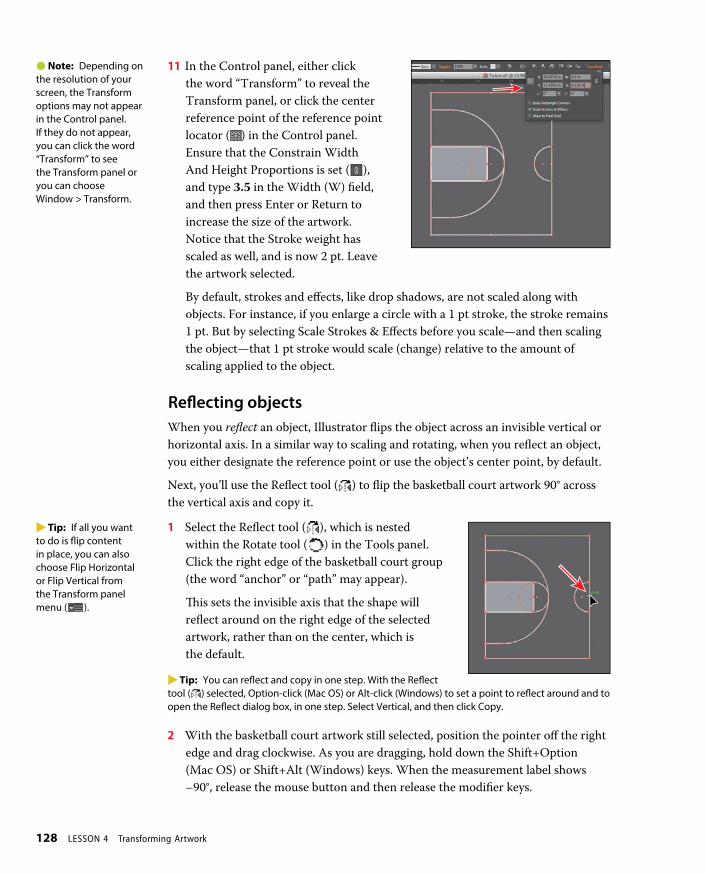
128 LESSON 4 Transforming Artwork
11 In the Control panel, either click
the word “Transform” to reveal the
Transform panel, or click the center
reference point of the reference point
locator ( ) in the Control panel.
Ensure that the Constrain Width
And Height Proportions is set ( ),
and type 3.5 in the Width (W) field,
and then press Enter or Return to
increase the size of the artwork.
Notice that the Stroke weight has
scaled as well, and is now 2 pt. Leave
the artwork selected.
By default, strokes and effects, like drop shadows, are not scaled along with
objects. For instance, if you enlarge a circle with a 1 pt stroke, the stroke remains
1 pt. But by selecting Scale Strokes & Effects before you scale—and then scaling
the object—that 1 pt stroke would scale (change) relative to the amount of
scaling applied to the object.
Reflecting objects
When you reflect an object, Illustrator flips the object across an invisible vertical or
horizontal axis. In a similar way to scaling and rotating, when you reflect an object,
you either designate the reference point or use the object’s center point, by default.
Next, you’ll use the Reflect tool ( ) to flip the basketball court artwork 90° across
the vertical axis and copy it.
1 Select the Reflect tool ( ), which is nested
within the Rotate tool ( ) in the Tools panel.
Click the right edge of the basketball court group
(the word “anchor” or “path” may appear).
This sets the invisible axis that the shape will
reflect around on the right edge of the selected
artwork, rather than on the center, which is
the default.
� Tip: You can reflect and copy in one step. With the Reflect tool ( ) selected, Option-click (Mac OS) or Alt-click (Windows) to set a point to reflect around and to open the Reflect dialog box, in one step. Select Vertical, and then click Copy.
2 With the basketball court artwork still selected, position the pointer off the right
edge and drag clockwise. As you are dragging, hold down the Shift+Option
(Mac OS) or Shift+Alt (Windows) keys. When the measurement label shows
–90°, release the mouse button and then release the modifier keys.
� Note: Depending on the resolution of your screen, the Transform options may not appear in the Control panel. If they do not appear, you can click the word “Transform” to see the Transform panel or you can choose Window > Transform.
� Tip: If all you want to do is flip content in place, you can also choose Flip Horizontal or Flip Vertical from the Transform panel menu ( ).

ADOBE ILLUSTRATOR CC CLASSROOM IN A BOOK 2014 RELEASE 129
The Shift key constrains the rotation to 45° as the artwork is reflected, and the
Option (Alt) key will copy the artwork. Leave the new court artwork where it is
for now. You’ll move it later.
3 Select the Selection tool ( ) and drag across both groups, then choose
Object > Group.
Distorting objects with effects
You can distort the original shapes of objects in different ways, using various tools.
Now you’ll distort the basketball net using the Pucker & Bloat effect. These are
different types of transformations because they are applied as effects, which means
you could ultimately edit the effect later or remove it in the Appearance panel.
1 Choose “2 Inside” from the Artboard Navigation menu to fit the larger artboard
in the Document window.
2 Click the Layers panel icon ( ) to open the
panel, and then click the visibility column (an
arrow is pointing to it in the figure) to the left
of the Net layer name to show that content,
and click the eye icon ( ) to the left of the
Background layer to hide its contents.
You are going to create a net for the basketball
hoop that is already on the artboard.
3 Click to select the red triangle shape. Choose Effect > Distort & Transform >
Pucker & Bloat.
4 In the Pucker & Bloat dialog box, select Preview and drag the slider to the left to
change the value to roughly –20%, which distorts the triangle. Click OK.
� Note: To learn more about effects, see Lesson 11, “Exploring Creative Uses of Effects and Graphic Styles.”

130 LESSON 4 Transforming Artwork
5 Drag across the triangle and
circle to select them both.
Choose Object > Transform >
Rotate. In the Rotate dialog
box, change the Angle to 30,
select Preview, and then click
Copy. You will learn more
about rotating artwork in the
next section.
6 Choose Object > Transform > Transform Again to repeat the transformation on
the selected shapes.
7 Press Command+D (Mac OS) or Ctrl+D
(Windows) once to apply the transformation
one more time.
8 Choose Select > Deselect, and then drag across
the edge of the circle (see the figure below) to
select all of the copies and press Delete.
9 Drag across the triangles to select them all and
choose Object > Group.
10 Drag the group down onto the basketball hoop and visually center-align them.
Change the Stroke color to White in the Control panel.
11 In the Layers panel, click the visibility column to the left of the Background and
the Text layers to show the content for each.
� Tip: To access the Rotate dialog box, you can also double-click the Rotate tool ( ) in the Tools panel. The Transform panel (Window > Transform) also has a rotate option.
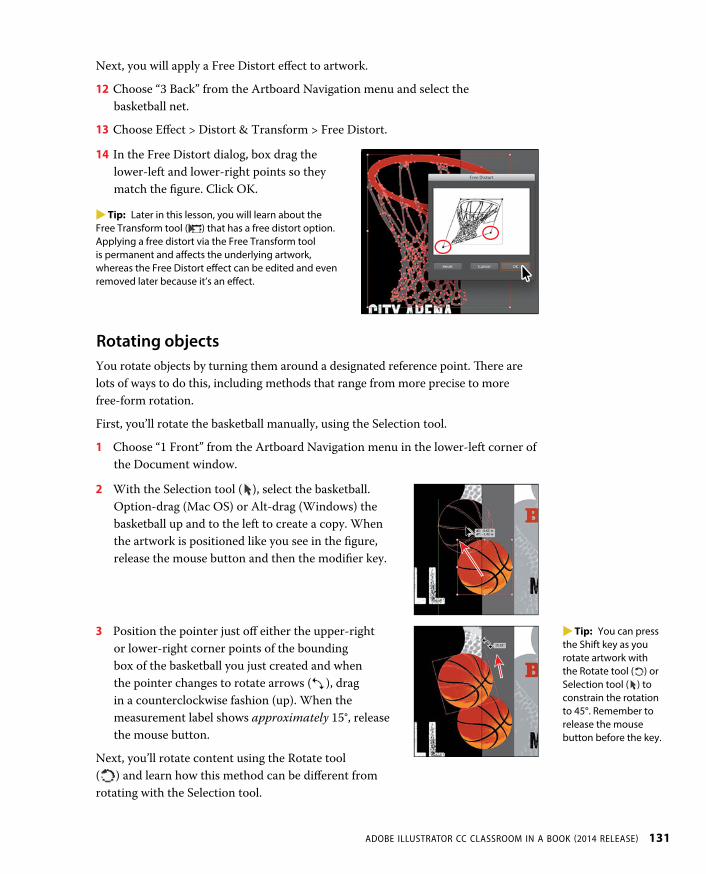
ADOBE ILLUSTRATOR CC CLASSROOM IN A BOOK 2014 RELEASE 131
Next, you will apply a Free Distort effect to artwork.
12 Choose “3 Back” from the Artboard Navigation menu and select the
basketball net.
13 Choose Effect > Distort & Transform > Free Distort.
14 In the Free Distort dialog, box drag the
lower-left and lower-right points so they
match the figure. Click OK.
� Tip: Later in this lesson, you will learn about the Free Transform tool ( ) that has a free distort option. Applying a free distort via the Free Transform tool is permanent and affects the underlying artwork, whereas the Free Distort effect can be edited and even removed later because it’s an effect.
Rotating objects
You rotate objects by turning them around a designated reference point. There are
lots of ways to do this, including methods that range from more precise to more
free-form rotation.
First, you’ll rotate the basketball manually, using the Selection tool.
1 Choose “1 Front” from the Artboard Navigation menu in the lower-left corner of
the Document window.
2 With the Selection tool ( ), select the basketball.
Option-drag (Mac OS) or Alt-drag (Windows) the
basketball up and to the left to create a copy. When
the artwork is positioned like you see in the figure,
release the mouse button and then the modifier key.
3 Position the pointer just off either the upper-right
or lower-right corner points of the bounding
box of the basketball you just created and when
the pointer changes to rotate arrows ( ), drag
in a counterclockwise fashion (up). When the
measurement label shows approximately 15°, release
the mouse button.
Next, you’ll rotate content using the Rotate tool
( ) and learn how this method can be different from
rotating with the Selection tool.
� Tip: You can press the Shift key as you rotate artwork with the Rotate tool ( ) or Selection tool ( ) to constrain the rotation to 45°. Remember to release the mouse button before the key.
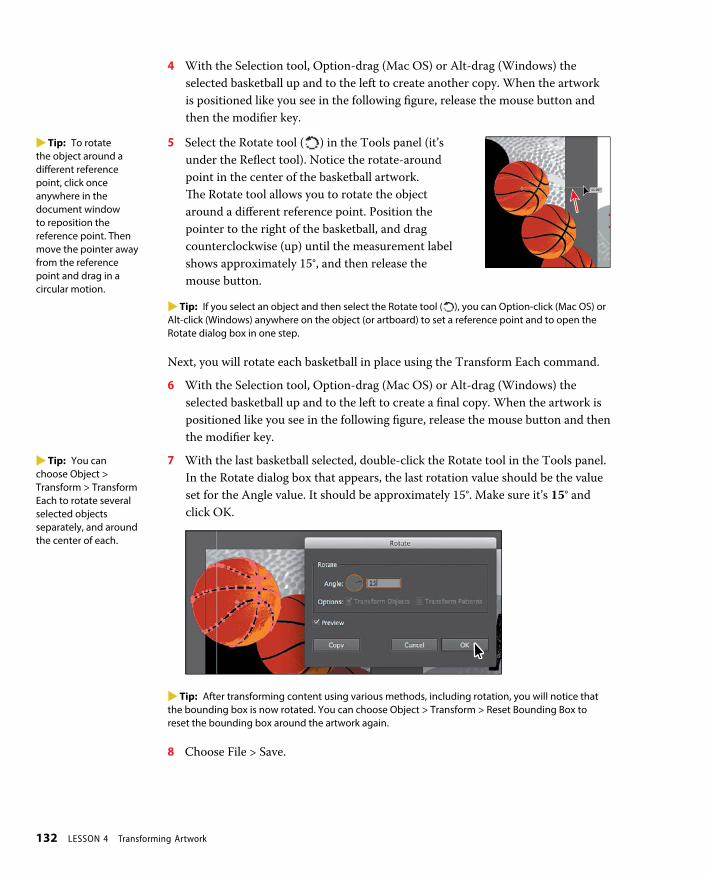
132 LESSON 4 Transforming Artwork
4 With the Selection tool, Option-drag (Mac OS) or Alt-drag (Windows) the
selected basketball up and to the left to create another copy. When the artwork
is positioned like you see in the following figure, release the mouse button and
then the modifier key.
5 Select the Rotate tool ( ) in the Tools panel (it’s
under the Reflect tool). Notice the rotate-around
point in the center of the basketball artwork.
The Rotate tool allows you to rotate the object
around a different reference point. Position the
pointer to the right of the basketball, and drag
counterclockwise (up) until the measurement label
shows approximately 15°, and then release the
mouse button.
� Tip: If you select an object and then select the Rotate tool ( ), you can Option-click (Mac OS) or Alt-click (Windows) anywhere on the object (or artboard) to set a reference point and to open the Rotate dialog box in one step.
Next, you will rotate each basketball in place using the Transform Each command.
6 With the Selection tool, Option-drag (Mac OS) or Alt-drag (Windows) the
selected basketball up and to the left to create a final copy. When the artwork is
positioned like you see in the following figure, release the mouse button and then
the modifier key.
7 With the last basketball selected, double-click the Rotate tool in the Tools panel.
In the Rotate dialog box that appears, the last rotation value should be the value
set for the Angle value. It should be approximately 15°. Make sure it’s 15° and
click OK.
� Tip: After transforming content using various methods, including rotation, you will notice that the bounding box is now rotated. You can choose Object > Transform > Reset Bounding Box to reset the bounding box around the artwork again.
8 Choose File > Save.
� Tip: To rotate the object around a different reference point, click once anywhere in the document window to reposition the reference point. Then move the pointer away from the reference point and drag in a circular motion.
� Tip: You can choose Object > Transform > Transform Each to rotate several selected objects separately, and around the center of each.
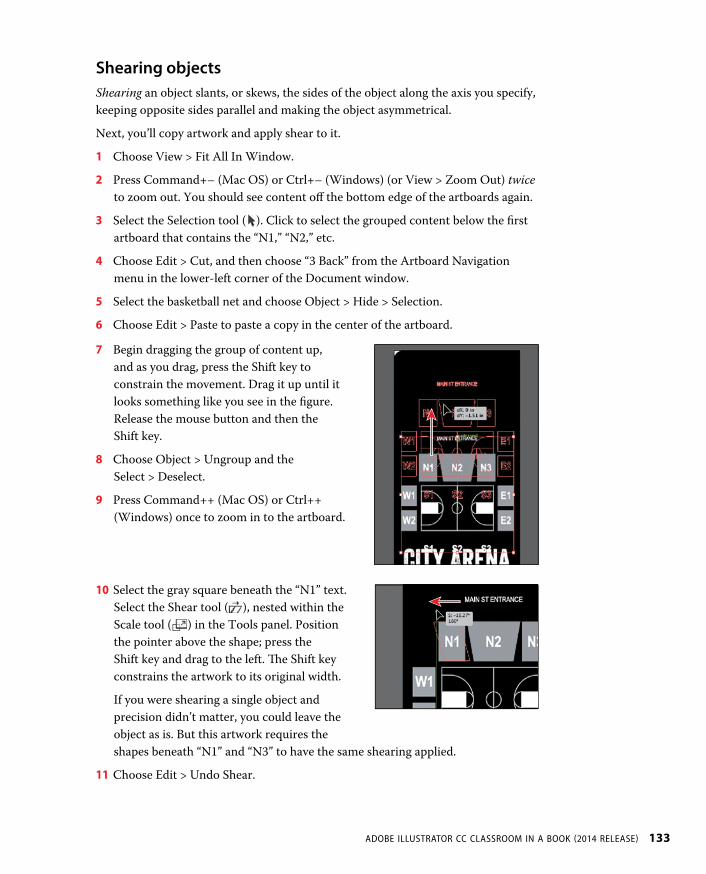
ADOBE ILLUSTRATOR CC CLASSROOM IN A BOOK 2014 RELEASE 133
Shearing objects
Shearing an object slants, or skews, the sides of the object along the axis you specify,
keeping opposite sides parallel and making the object asymmetrical.
Next, you’ll copy artwork and apply shear to it.
1 Choose View > Fit All In Window.
2 Press Command+– (Mac OS) or Ctrl+– (Windows) (or View > Zoom Out) twice
to zoom out. You should see content off the bottom edge of the artboards again.
3 Select the Selection tool ( ). Click to select the grouped content below the first
artboard that contains the “N1,” “N2,” etc.
4 Choose Edit > Cut, and then choose “3 Back” from the Artboard Navigation
menu in the lower-left corner of the Document window.
5 Select the basketball net and choose Object > Hide > Selection.
6 Choose Edit > Paste to paste a copy in the center of the artboard.
7 Begin dragging the group of content up,
and as you drag, press the Shift key to
constrain the movement. Drag it up until it
looks something like you see in the figure.
Release the mouse button and then the
Shift key.
8 Choose Object > Ungroup and the
Select > Deselect.
9 Press Command++ (Mac OS) or Ctrl++
(Windows) once to zoom in to the artboard.
10 Select the gray square beneath the “N1” text.
Select the Shear tool ( ), nested within the
Scale tool ( ) in the Tools panel. Position
the pointer above the shape; press the
Shift key and drag to the left. The Shift key
constrains the artwork to its original width.
If you were shearing a single object and
precision didn’t matter, you could leave the
object as is. But this artwork requires the
shapes beneath “N1” and “N3” to have the same shearing applied.
11 Choose Edit > Undo Shear.

134 LESSON 4 Transforming Artwork
12 With the rectangle still selected, double-
click the Shear tool. In the Shear dialog
box, change the Shear Angle to 170, select
Preview, and click OK.
13 With the Selection tool, select the gray
rectangle beneath the “N3” text. Double-
click the Shear tool in the Tools panel and
change the Shear Angle to –170, select
Preview, and click OK. Leave the
rectangle selected.
� Tip: You can also apply shear numerically in the Transform panel (Window > Transform) or in the Shear dialog box (Object > Transform > Shear).
14 Select the Selection tool, and with the Shift key pressed, select the gray rectangles
behind the “N1” and “N2” text to select all three.
15 Choose Object > Group.
16 Select the Rotate tool ( ) and position the pointer over the center of the
circle below (circled in the figure). When the green word “center” appears,
Option-click (Mac OS) or Alt-click (Windows). In the Rotate dialog box, change
the Angle to 180 and click Copy.
17 Choose Object > Show All to show the basketball net you hid earlier.
18 Choose Select > Deselect, and then choose File > Save.
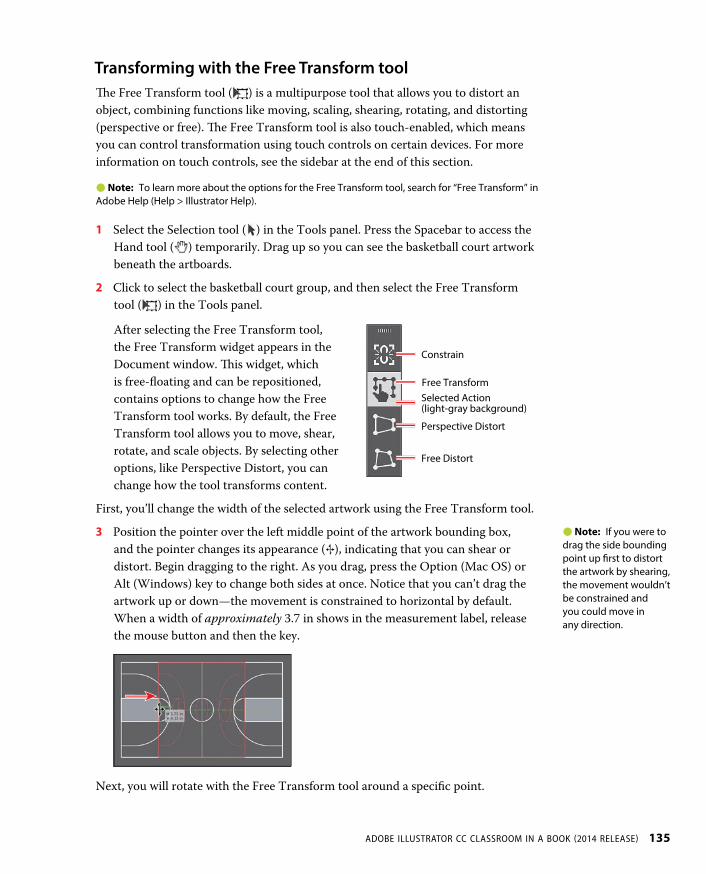
ADOBE ILLUSTRATOR CC CLASSROOM IN A BOOK 2014 RELEASE 135
Transforming with the Free Transform tool
The Free Transform tool ( ) is a multipurpose tool that allows you to distort an
object, combining functions like moving, scaling, shearing, rotating, and distorting
(perspective or free). The Free Transform tool is also touch-enabled, which means
you can control transformation using touch controls on certain devices. For more
information on touch controls, see the sidebar at the end of this section.
� Note: To learn more about the options for the Free Transform tool, search for “Free Transform” in Adobe Help (Help > Illustrator Help).
1 Select the Selection tool ( ) in the Tools panel. Press the Spacebar to access the
Hand tool ( ) temporarily. Drag up so you can see the basketball court artwork
beneath the artboards.
2 Click to select the basketball court group, and then select the Free Transform
tool ( ) in the Tools panel.
After selecting the Free Transform tool,
the Free Transform widget appears in the
Document window. This widget, which
is free-floating and can be repositioned,
contains options to change how the Free
Transform tool works. By default, the Free
Transform tool allows you to move, shear,
rotate, and scale objects. By selecting other
options, like Perspective Distort, you can
change how the tool transforms content.
First, you’ll change the width of the selected artwork using the Free Transform tool.
3 Position the pointer over the left middle point of the artwork bounding box,
and the pointer changes its appearance ( ), indicating that you can shear or
distort. Begin dragging to the right. As you drag, press the Option (Mac OS) or
Alt (Windows) key to change both sides at once. Notice that you can’t drag the
artwork up or down—the movement is constrained to horizontal by default.
When a width of approximately 3.7 in shows in the measurement label, release
the mouse button and then the key.
Next, you will rotate with the Free Transform tool around a specific point.
� Note: If you were to drag the side bounding point up first to distort the artwork by shearing, the movement wouldn’t be constrained and you could move in any direction.
Constrain
Selected Action (light-gray background)
Free Transform
Perspective Distort
Free Distort

136 LESSON 4 Transforming Artwork
4 Position the pointer over the lower-
left corner and double-click when
the pointer looks like this ( ).
This moves the reference point and
ensures that the artwork will rotate
around it. Press the Shift key and
drag the upper-right corner in a
counterclockwise fashion until you
see 90° in the measurement label. Release the mouse button and then the
Shift key.
� Note: If you find that, by trying to rotate, you are instead scaling, stop dragging and choose Edit > Undo Scale and try again.
Like other transform tools, by holding down the Shift key while dragging
with the Free Transform tool, you can constrain the movement for most of
the transformations. If you don’t want to hold down the Shift key, you can also
select the Constrain option in the Free Transform widget before transforming,
to constrain movement automatically. After dragging, the Constrain option
is deselected.
5 Position the pointer over the
right middle point of the artwork
bounding box, and drag to the
right. Drag until a width of
approximately 7.7 in shows in the
measurement label.
6 With the Free Transform tool
still selected, click the Perspective Distort option in the Free Transform widget
(circled in the figure below).
With this option selected, you can drag a corner point of the bounding box to
distort the perspective.
7 Position the pointer over
the upper-left corner of the
bounding box, and the pointer
changes in appearance ( ).
Drag to the right until it looks
like the figure.
8 Change the Opacity to 60% in
the Control panel.
9 Press Command+– (Mac OS) or Ctrl+– (Windows) several times to zoom out,
until you see the artboard with the basketballs on it.
� Tip: You can also drag the reference point to a location. You can double-click the reference point to reset its position.
� Note: The Constrain option cannot be selected when the Perspective Distort option is selected.
� Note: The Free Distort option of the Free Transform tool ( ) allows you to freely distort the selected content by dragging one of the corner bounding points.

ADOBE ILLUSTRATOR CC CLASSROOM IN A BOOK 2014 RELEASE 137
10 Select the Selection tool
and drag the artwork
onto the artboard
similar to what you see
in the figure.
� Note: If the artwork appears on top of the text, choose Object > Arrange > Send To Back as many times as necessary to arrange it behind the text.
11 Select the Artboard tool ( ) in the Tools
panel. Drag the 1 Front artboard to the
left until the basketball court is no longer
overlapping the artboard to the right.
� Note: When you drag an artboard with content on it, the art moves with the artboard, by default. If you want to move an artboard but not the art on it, select the Artboard tool ( ) and then click to deselect Move/Copy Artwork With Artboard ( ) in the Control panel.
12 Choose View > Fit All In Window and then
choose Choose File > Save.
The Free Transform tool and
touch-enabled devices
In Illustrator CC, the Free Transform tool is touch-enabled. This means that, if you are using either a Windows 7– or 8–based touchscreen PC or a Touchscreen device like Wacom Cintiq 24HD Touch, you can utilize certain touch-enabled features.
Here are a few noteworthy examples:
• You can touch and drag from the center of an object and move the reference point.
• Double tapping on any of the corner points moves the reference point for the object to that point.
• Double tapping on the reference point resets it to the default position (if it’s not already there).
• To constrain movement, you can tap the Constrain option in the widget before transforming.
� Tip: You could also simply mask the content that is outside of the artboard. You will learn about clipping masks in Lesson 14, “Using Illustrator CC with Other Adobe Applications.”

138 LESSON 4 Transforming Artwork
Creating a PDF
Portable Document Format (PDF) is a universal file format that preserves the fonts,
images, and layout of source documents created on a wide range of applications
and platforms. Adobe PDF is the standard for the secure, reliable distribution and
exchange of electronic documents and forms around the world. Adobe PDF files are
compact and complete, and can be shared, viewed, and printed by anyone with free
Adobe Reader® software.
You can create different types of PDF files from within Illustrator. You can create
multipage PDFs, layered PDFs, and PDF/x-compliant files. Layered PDFs allow you
to save one PDF with layers that can be used in different contexts. PDF/X compliant
files ease the burden of color, font, and trapping issues in printing. Next, you will save
this project as a PDF so that you can send it to someone else to view.
1 Choose File > Save As. In the Save As dialog box, choose Adobe PDF (pdf) from
the Format menu (Mac OS) or Adobe PDF (*.PDF) from the Save As Type menu
(Windows). Navigate to the Lessons > Lesson04 folder, if necessary. Notice that
you have the option, at the bottom of the dialog box, to save all of the artboards
in the PDF or a range of artboards. Click Save.
2 In the Save Adobe PDF dialog box, click the Adobe PDF Preset menu to see all
of the different PDF presets available. Ensure that [Illustrator Default] is chosen
and click Save PDF.
There are many ways that you can customize the creation of a PDF. Creating a
PDF using the [Illustrator Default] preset creates a PDF in which all Illustrator
data is preserved. PDFs created with this preset can be reopened in Illustrator
without any loss of data. If you are planning on saving a PDF for a particular
purpose, such as viewing on the Web or printing, you may wish to choose
another preset or adjust the options.
3 Choose File > Save, if necessary, and then choose File > Close.
� Note: If you want to learn about the options and other presets in the Save Adobe PDF dialog box, choose Help > Illustrator Help and search for “Creating Adobe PDF files.”
ADOBE ILLUSTRATOR CC CLASSROOM IN A BOOK 2014 RELEASE 139
Review questions
1 Name two ways to change the size of an existing active artboard.
2 How can you rename an artboard?
3 What is the ruler origin?
4 What is the difference between artboard rulers and global rulers?
5 Briefly describe what the Scale Strokes & Effects option does.
6 Name at least three transformations that can be applied with the Free Transform tool.
Review answers
1 To change the size of an existing artboard, you can double-click the Artboard tool ( )
and edit the dimensions of the active artboard in the Artboard Options dialog box.
Select the Artboard tool, position the pointer over an edge or corner of the artboard,
and drag to resize. Select the Artboard tool, click an artboard in the Document window,
and change the dimensions in the Control panel.
2 To rename an artboard, you can select the Artboard tool ( ) and click within the
bounds of an artboard to select it. Then, change the name in the Name field in the
Control panel. You can also double-click the name of the artboard in the Artboards
panel ( ) to rename it or click the Options button ( ) in the Artboards panel to enter
the name in the Artboard Options dialog box.
3 The ruler origin is the point where 0 (zero) appears on each ruler. By default, the ruler
origin is set to be 0 (zero) in the top-left corner of the active artboard.
4 There are two types of rulers in Illustrator: artboard rulers and global rulers. Artboard
rulers, which are the default rulers, set the ruler origin at the upper-left corner of the
active artboard. Global rulers set the ruler origin at the upper-left corner of the first
artboard, no matter which artboard is active.
5 The Scale Strokes & Effects option, found in the Transform panel (or in Illustrator >
Preferences > General [Mac OS] or Edit > Preferences > General [Windows]), scales
any strokes and effects as the object is scaled. This option can be turned on and off,
depending on the current need.
6 The Free Transform tool ( ) can perform a multitude of transformation operations,
including move, scale, rotate, shear, and distort (perspective distort and free distort).

452 INDEX452 INDEX
INDEX
SYMBOLS
* (asterisk), 305
[ ] (Bracket keys), 105, 323
A
Account page, 10
Add New Effect button, 357
Adobe. See also specific applications
additional resources from, 4–5
Authorized Training Centers for, 5
syncing settings using Creative Cloud, 5, 9, 12–13, 58
Adobe Bridge, 403
Adobe Creative Cloud
launching desktop app for, 221, 251
learning resources for, 4
libraries for, 6, 398
syncing settings using, 5, 9, 12–13, 58
viewing fonts with, 223
Adobe Flash symbols, 389
Adobe Illustrator
about, 32
Bridge with, 403
combining images from other apps in, 403
compatibility of imported text, 216
copying/pasting artwork from, 449
drawing modes for, 106–109
generating CSS from artwork in, 437–438
help for, 58
installing software for, 2
placed Microsoft documents in, 218
placing images in, 22, 404–411
starting and opening files in, 32–34
syncing settings with other computers, 5, 9, 12–13, 58
Typekit with older versions, 225
using Photoshop raster effects in, 339, 357
using raster images in, 22
vector effects in, 339, 357
Adobe Photoshop
editing color in images from, 410–411
importing files from, 406–408
importing layers as objects, 407
unembedding images from, 421
using raster effects in Illustrator, 339, 357
aligning
to artboard, 71, 77
content to pixel grid, 429–432, 451
objects, 69–71, 77
text in perspective, 375
alignment guides. See guides
Anchor Point tool, 164, 173
anchor points. See also corner points; smooth
points
about, 148
adding, 162–163
aligning, 70
closing, 156
converting smooth to corner, 150–151, 163, 164, 173
deleting, 158, 162–163
displaying location of, 64
enhancements to, 9
joining specific, 95
nudging, 161
setting with Curvature tool, 157
setting with Pen tool, 154
showing selection preferences for, 65
viewing handles for multiple, 161
anchors. See anchor points
angle of gradient, 278–280, 299
appearance attributes. See also graphic styles
applying to layers, 266–267, 271, 339, 357
blending, 350
copying object’s, 189
defined, 332
deleting, 354
editing, 333–334
found on Appearance panel, 332
ordering rows of, 332, 337
removing, 354
reordering, 338
saving as graphic styles, 348
selecting like, 66–67
Appearance panel
accessing effect options from, 357
adding second stroke and fill from, 335–337
Clear Appearance button, 353

ADOBE ILLUSTRATOR CC CLASSROOM IN A BOOK 2014 RELEASE 453
deleting attribute rows in, 341
options on, 332
reordering appearance attributes, 338
Application bar, 35
area type
autosizing, 7, 214–215
column text, 220
converting between point and, 215–216
using, 214–215
Area Type Options dialog box, 220
arranging objects, 74–75
arrow icon, 44
arrowheads, 168–169
Art brushes, 309–312
applying existing, 309–310
editing, 312
making from raster image, 310–311, 327
selecting artwork before creating, 327
uses for, 309, 327
Artboard Options dialog box, 120,
139
Artboard tool, 118, 139
artboards
about, 117
adding to document, 117–118
aligning objects to, 71, 77
centering, 48
clicking to create type object, 219, 247
defined, 54
determining SVG file dimensions, 448
editing, 118–119
fitting in window, 48
multiple, 52–54, 80–81
navigating, 54–56, 59, 119
opening, 33
overview of, 54
positioning objects on, 83
renaming, 53, 119–120, 139
reordering, 120–121
resizing, 119, 139
rulers for, 122, 139
Artboards panel, 53, 117–118
artwork. See also images
adding second stroke or fill to, 335–337, 357
applying color to, 14, 198–200
becoming instance of new symbol, 389
changing view of, 48–51, 59
cleaning up traced, 112
combining shapes for, 101–103
converting color modes for, 189
copying, 19–20
creating custom views of, 51, 59
drawing shape inside, 107–108
drawing shapes behind selected, 106–107
embedding raster images in, 310–311, 327
erasing, 105–106
flipping in place, 128
generating CSS from, 437–438
graphic styles applied to, 354, 357
grouping content in perspective, 379
impact of Clear Appearance button on, 353
live effects for, 339–342
merging layers of, 260–262
moving between layers, 256–258
organizing in layers, 250
Photoshop effects used on, 357
releasing content from perspective, 379, 380
removing brush stroke from, 308
reordering appearance attributes for, 338
saving as SVG, 447–449
saving for Web, 435–437
slicing, 432–435
using raster effects in, 339, 357
attributes. See also appearance
attributes
drop shadow, 334
paragraph, 232–233
text, 227–229
auto slices, 433
automatic plane positioning, 377
autosizing area type, 7, 214–215
B
baseline shift, 229, 232
Bezier curves. See curves
bitmap images. See raster images
bleed, 54, 81
Blend Options dialog box, 291,
296–297
Blend tool, 273
blended objects
copying, 295–296
defined, 290
editing, 291
expanding, 293
working with, 290
blends
adjusting in gradient, 299
combining shapes into smooth color, 296–298
creating, 290–292
gradients vs., 299
lesson files for, 274
modifying, 292–294
positioning groups in and copying, 295–296
reversing, 295
Blob Brush tool, 322–326
drawing with, 322–323
erasing shapes made with, 325–326
merging paths with, 324
path features of, 322
pointer for, 325
size of, 323
uses for, 327
Border Pattern brush, 320–321
bounding box, 63
Bridge, 403
Bristle Brush Options dialog box, 313
Bristle brushes, 313–316
changing options for, 313
painting with, 314–316
paths created by, 313, 316
rasterizing paths created by, 316
uses for, 313
Brush Libraries menu, 305, 313, 317,
319
brushes, 300–327. See also specific
brushes
Art, 309–312, 327
Blob Brush, 322–326
Bristle, 313–316
Calligraphic, 303–305, 307, 327
changing color for, 303
editing, 307–308
lesson files for, 302
libraries for, 305, 313, 317, 319
overview, 327
Paintbrush tool, 304–307, 327
Pattern, 316–321
removing strokes of, 308
saving, 319
types of, 303
working with, 28–29
Brushes panel, 304
C
Calligraphic Brush Options dialog
box, 307
Calligraphic brushes, 303–305, 307,
327

454 INDEX454 INDEX
canceling object alignment, 70
canvas, 48, 54
Cascading Style Sheets. See CSS
center point, 83
Character panel
displaying, 222
options in, 227
showing from Control panel, 225
character styles. See also CSS
appearance when applied, 243
creating and applying, 237–238
defined, 235
editing, 239
paragraph styles vs., 247
Character Styles Option dialog box,
238
characters. See also character styles;
CSS
formatting with Touch Type tool, 229–232, 247
glyph, 233
styling with CSS, 441–442
check mark icon, 42
Clear Appearance button, 353
clipping masks
about, 411
applying to image, 411–412
creating, 268–270, 271
defined, 23, 268
editing, 412–414
opacity masks vs., 415
releasing, 108, 269
ways to edit, 413
clipping set, 411
closed paths, 96, 243–244
closing
anchor points, 156
panels, 38, 43, 335
path with Curvature tool, 158
CMYK color mode, 177
collapsing. See expanding/collapsing
collapsing/docking floating panels,
38–39, 40
color. See also color groups; color
modes; gradients; swatches
adding to fill in shapes, 102
adjusting, 189
applying, 14, 180
assigned to layers, 254, 260, 271
assigning to artwork, 198–200
changing artwork, 196–197
changing brush, 303
choosing with Color Picker, 185–186
color harmonies, 191, 196, 209
customizing and saving swatch, 181–182, 209
duplicating gradient, 282
effects for modifying object, 425
filling open path with, 95
font, 226–227
global, 183–184, 209
Harmony Rules for, 191
key object outline, 69
saving in color groups, 190, 195, 197, 209
Smart Guide, 86
spot, 186–187, 209
swapping stroke and fill, 93
tints of, 188
ways to apply, 178–179
color groups
editing, 193–195
saving color in, 190, 195, 197, 209
viewing name of, 206
Color Guide panel, 179, 191–192
color harmonies, 191, 196, 209
Color Mode menu (New Swatch
dialog box), 182
color modes
CMYK and RGB, 177
converting images to different, 410
converting to RGB, 189
importing Photoshop images in different, 407
Color panel, 178
Color Picker, 185–186
color stops
adding, 275, 282, 299
defined, 275
duplicating or deleting, 282
editing color of, 281, 282
Color Swatches button (Color
Picker), 185–186
Color Themes panel, 197
color warning dialog box, 407
columns of text, 220
compound paths, 100–101
compound shapes, 104–105
computers. See also Mac OS
platforms; Windows platforms
syncing settings with other, 5, 9, 12–13, 58
using Mac OS and Windows, 1
constraining
changes to width and height, 119
direction handles, 150, 161
Eraser tool, 106
lines, 145–146
object rotation, 131
Pencil tool lines, 172
content. See transforming content;
artwork; Web content
context-sensitive commands, 47
Control panel
displaying Paragraph panel from, 243
Document Setup button in, 81
Edit Symbol button on, 387
illustrated, 35
removing anchor points from, 163
setting artboard options in, 119
showing Character panel from, 225
using, 40–41
viewing Align options in, 69, 205
convert-point icon, 155
Convert to RGB (Edit Color menu),
189
copying/pasting
appearance attributes, 189
artwork from Illustrator, 449
blend objects, 295–296
content, 19–20
CSS code, 444–445
layer content, 258–259
layers, 262–264, 271
perspective drawings, 369–370
reflections, 128–129
swatches, 182
symbols, 386, 390–391, 397
width points, 98
corner points
about, 143, 148
Anchor Point tool for converting, 164, 173
converting smooth points to, 150–151, 163, 173
drawing on curved line, 173
corners
drawing with Pen tool, 153–156
Pattern brush, 318–319
scaling Live Shape, 86–87
Creative Cloud. See Adobe Creative
Cloud
cropping images with masks, 411
crosshair icon, 143, 167, 170
CSS (Cascading Style Sheets)
about, 437
character styles with, 441–442
copying, 444–445
exporting, 446–447

ADOBE ILLUSTRATOR CC CLASSROOM IN A BOOK 2014 RELEASE 455
generating class styles, 439
graphic styles with, 443
setting up design for, 438–440
styling unnamed content, 433, 451
CSS Properties panel
export options of, 446
generating CSS code in, 441–445
using, 438–440
Curvature tool
about, 6
creating paths with, 6, 158
drawing with, 156–158
curved paths, 6, 147–148, 158
curves. See also Curvature tool; Pen
tool
combining with straight lines, 152–153, 173
corner points on, 173
drawing, 148–149, 153–158
editing, 155, 160–161
customizing
artwork views, 51, 59
color and saving to swatch, 181–182, 209
Tools panel, 9, 40
D
dashed lines, 166–167
default preferences file, 3–4. See also
Preferences dialog box
Define Perspective Grid dialog box,
364
deleting
anchor points, 158, 162–163
appearance attributes, 354
artboards, 118
attribute rows, 341
current preferences file, 3–4
drop shadow attribute, 334
effects, 341
guides, 122
layers, 252
multiple shapes, 102
saved workspace, 46
symbol sets, 395
width points, 97
deselecting
objects, 149
paths, 97, 149
Photoshop Link option, 406
Preview for 3D effects, 347
DeviceN raster support, 404
Direct Selection tool
editing anchor points with, 77
editing segment on curved line, 173
selecting paths with, 144–145
solid square next to pointer, 144
direction handles
about, 65
adjusting, 149
constraining, 150, 161
defined, 97, 147
viewing for multiple points, 161
direction of gradients, 278–280, 299
discontinuous width points, 98
distorting objects with effects,
129–131
distributing object spacing, 70–71
docking
Control panel, 41
floating panels, 38–39, 40
panel groups, 45
panels, 46
Document Setup dialog box, 81, 121
Document window
arranging, 59
illustrated, 35
maximizing size of, 62
documents. See also Document
window
accessing symbols from other, 399
adding JPEG image in, 404–405
aligning content to pixel grid in, 429–432
arranging multiple, 56–58
bleed for, 81
changing ruler units of measure, 123
creating, 12
cycling between open, 56
embedding images and brushes in, 311
multiple artboards in, 52–54, 80–81
output preferences for, 81
pasting content into similarly named layers, 263
scrolling through, 50–51
seeing artboards in, 54–56
showing/hiding grid in, 84
downloading lesson files, 10
dragging
Control panel with gripper bar, 41
panel to another panel group, 43–44
text, 223
Draw Behind mode, 106–107
Draw Inside mode, 106, 107–109, 314
Draw Normal mode, 106, 315
drawing. See also drawing tools;
perspective drawing; shapes
behind selected artwork, 106–107
constraining lines while, 145–146
curves, 148–149, 153–158
guides, 122
Illustrator modes for, 106–109
inside artwork, 107–108
lines, 93–94, 97
objects from center point, 83
shapes, 13
drawing tools. See also specific
drawing tools
painting with, 327
Pencil vs. Pen tool, 141
shape tools, 113
Drop Shadow dialog box, 340, 341
drop shadows
adding as graphic style, 354–355
editing, 340–341
hiding or deleting, 334
setting up, 29
E
Edit Colors dialog box, 193–195
Edit Colors menu, 189
Edit Symbol button (Control panel),
387
editing. See also copying/pasting;
precision editing
appearance attributes, 333–334
Art brushes, 312
artboards, 53, 118–119
artwork color, 196–197
blends, 292–294
Blob Brush shapes, 325–326
character styles, 239
clipping masks, 412–414
color groups, 193–195
color of color stop, 281, 282
colors, 189
compound shapes, 105
content drawn inside, 108–109
corner radius of rounded rectangle, 85
curves, 155, 160–161
cutting paths, 94
document options, 121
envelope warp, 241–242
font color, 226–227
global swatches, 183–184
gradients, 24–25, 280–282
Isolation mode for, 72–73
keyboard shortcuts, 38

456 INDEX456 INDEX
live effects, 340–341
Live Paint groups and paths, 206, 208
opacity masks, 417–419
panel groups, 44–45
paragraph styles, 237
paths with Paintbrush, 306–307, 327
Pattern brushes, 320–321
patterns, 204–205
Pencil tool paths, 170–172
perspective grid, 362–364
polygons, 113
radial gradient, 283–285
shapes and paths, 96–100
shapes with Pathfinder effect, 342
slices, 434–435
spine of path, 292, 294
strokes, 16–17
swatches, 183
symbols, 378–379, 385, 387–388
text, 244–245, 375
width points, 98
Effect menu, 340, 357
effects, 330–347
applying, 340, 357
deleting, 341
drop shadow, 29
editing, 340–341
layers with applied, 266–267, 271
lesson files for, 330–331
live, 339–342
modifying object color with, 425
Offset Path, 343–344
Pathfinder, 103–104, 342
raster, 339, 344–345, 357
scaling strokes and, 356
styling text with Warp, 341–342
3D, 346–347
using Filter Gallery, 344–345
ellipse
drawing, 13, 88–89
editing radial colors in, 283–286
modifying in Ellipse dialog box, 95
using elliptical gradients, 285–286
embedded images
applying color edits to, 410–411
creating embedded raster images with Art brush, 310–311, 327
Illustrator placed files as, 405
linked vs., 404, 425
replacing, 421–424, 425
unembedding, 421
using from Photoshop, 406–407
envelope warp, 240, 241–242
Eraser tool
constraining, 106
editing Blob Brush shapes with, 325–326
erasing artwork, 105–106
pointer for, 325
using, 105–106
Eraser Tool Options dialog box, 105,
325
exiting Isolation mode, 73, 108,
315–316
expanding/collapsing
blended objects, 293
collapsing panel to icon, 42
panel dock, 43
panels, 44
exporting
content with Save For Web command, 429
CSS code, 437, 446–447
shared Illustrator settings, 9, 58
Extrude & Bevel 3D effect, 346
Eyedropper tool
copying appearance attributes with, 189
sampling placed image colors, 419
sampling text formats, 239
F
Fidelity slider (Pencil Tool Options
dialog box), 170
files. See also lesson files; SVG files
accessing lesson, 2–3
compatibility of imported text, 216
embedded vs. linked, 404, 425
folders for project, 424–425
formats for raster image, 22
formats for Web, 429
opening, 32–34
packaging, 424, 425
pasting layers into other, 262–264, 271
PDF, 138
placing image, 404–411
restoring default preferences, 3–4
reusing brushes with other, 319
reverting to last version of, 66
saving for Web, 435–437
fill. See also gradients
adding second, 335–337, 357
changing opacity of, 334, 335
creating linear gradient, 275–277
editing attributes for, 333–334
effect of Outline mode on color, 93
hierarchy of colors when using graphic styles with, 352
selecting color of, 14
selecting objects without, 63, 77, 113
Filter Gallery dialog box, 344
finding
fonts, 223–224
hidden panels, 42
hidden tools, 38
preferences file, 3–4
flipping content in place, 128
floating panels, 38–39, 40
folders for project files, 424–425
Font menu, 222
fonts. See also Typekit fonts
adjusting size and leading for, 235
changing family and style of, 221–224
changing size of, 225–226
editing color of, 226–227
finding missing, 330–331
formatting perspective text, 375
searching for, 223–224
SVG options for, 450
used in book, 2
formatting text. See also character
styles; paragraph styles
adjusting with Touch Type, 229–232, 247
changing font family and style, 221–224
changing font size, 225–226
CSS character styles for, 441–442
editing font color, 226–227
formatting perspective text, 375
overview, 220–221
sampling formats, 239
selecting text objects and, 227
Type tool for, 26–27
Free Transform tool, 135–137, 139
G
gestures, 50
getting started. See also quick tour
about lessons, 1
accessing lesson files, 2–3
fonts in book, 2
installing Illustrator software, 2
new features, 6–9
prerequisites for book, 2
restoring default preferences, 3–4
ADOBE ILLUSTRATOR CC CLASSROOM IN A BOOK 2014 RELEASE 457
global color, 183–184, 209
global rulers, 122, 139
global swatches, 183–184
Glyphs panel, 233
gradient annotator bar, 278, 283, 285
gradient color stop. See color stops
Gradient panel, 275, 285
Gradient tool, 273
gradients. See also color stops
adding color to, 299
adjusting color of, 281, 299
applying and editing on stroke, 280–282
applying to multiple objects, 287
blends vs., 299
creating and editing, 24–25
defined, 24, 273, 275, 299
direction and angle of, 278–280, 299
editing radial, 283–285
elliptical, 285–286
fading to transparency, 288–290
hiding annotator, 278
lesson files for, 274
radial, 282–283
rotating, 279–280, 299
saving, 276
two-color linear, 275–277
graphic styles, 348–356
adding to perspective drawing, 366, 374
applying, 348
applying to layers, 354–355
artwork appearance using, 354, 357
creating and applying, 349–352
defined, 348
lesson files for, 330–331
libraries of, 348–349
multiple, 355
updating, 352–354
using CSS, 443
Graphic Styles Options dialog box,
351
Graphic Styles panel, 348, 355
graphic tablets, 316
graphs, 106
grid. See also guides; perspective grid;
rulers
aligning content to pixel, 429–432, 451
showing/hiding in documents, 84
snapping to, 84, 365
grid plane control, 371, 381
grid planes. See also perspective
drawing
choosing, 365, 373, 374, 381
moving, 370–372, 381
gripper bar, 41
Group Selection tool, 77
grouping content in perspective, 379
groups
dragging panels to panel, 43–44
Live Paint, 206
nested, 73–74
organizing layers in, 255–256
selecting items in, 72
guides. See also Smart Guides
drawing and deleting, 122
positioning objects using, 125–126
H
Hand tool, 50
handles. See direction handles
Harmony Rules, 191, 196, 209
height
changing rectangle, 83
constraining changes to, 119
resizing in Transform panel, 105
help, 4, 58, 81
hiding. See showing/hiding
horizontal distribution of objects,
70–71
I
icons
accessing thumbnail link, 418
arrow, 44
check mark, 42
collapsing panel to, 42
convert-point, 155
crosshair, 143, 167, 170
Illustrator. See also getting started;
new features; quick tour
Illustrator. See Adobe Illustrator
Image Trace, 22–23, 110–112
images. See also embedded images;
masking images; raster images
cleaning up traced vector, 112
placing, 22, 404–405
tracing raster, 22–23, 110–112
importing
Microsoft Word text, 218
Photoshop files, 406–408
Photoshop layers as objects, 407
shared Illustrator settings, 9, 58
text, 216–217
in port, 218, 219
installing Illustrator software, 2
Internet connections, 26, 221, 330
Isolation mode
editing in, 72–73
entering/exiting, 73, 108, 315–316
modifying layers in, 268–269
using in perspective drawing, 375
J
joining paths, 9, 95–96, 171
Join tool, 9, 95, 171–172
K
kerning text, 229
key objects, 69–70
keyboard shortcuts
accessing Hand tool in text, 50
Blob Brush tool adjustments with, 322
changing eraser size with Bracket keys, 105
conflicts for Mac OS Zoom tool, 49
drawing stars with, 90
editing font size with, 225
modifying, 38
moving objects between perspective planes, 368
moving objects perpendicularly, 370
nudging anchor points, 161
nudging text with, 231
repositioning images with, 413
used with perspective drawings, 365
zooming with, 48
Knife tool
crosshair icon for, 167
cutting paths with, 94, 167–168
Scissors vs., 165
L
launching Creative Cloud desktop
app, 221, 251
layer comps, 407
Layer Options dialog box, 253, 254
layers, 248–271
adding content to perspective, 374
appearance attributes applied to, 266–267, 271, 339, 357
benefits of, 271

458 INDEX458 INDEX
bringing symbols to foreground with, 397
clipping mask, 268–270, 271
color of, 254, 260, 271
creating, 252–254
defined, 250
deleting, 252
duplicating content of, 258–259
flattening Photoshop, 406
graphic styles applied to, 354–355
importing Photoshop, 407
inserting symbols on selected, 385, 393
Isolation mode for, 268–269
lesson files for, 250
merging content of, 260–262
moving layers and content between layers, 256–258
naming, 253
navigating content in, 257
organizing in groups, 255–256
pasting into other file, 262–264, 271
renaming, 252
reversing ordering of, 264
saving before modifying text, 246
selecting nonsequential, 260
showing/hiding, 251, 271
stacking order of, 255, 257, 264
undoing reordering of, 257
using, 14–15
viewing, 265–266
Layers panel
colors for layers in, 254, 260, 271
menu for, 253
navigating content in panel, 257
options of, 251
Paste Remembers Layers option, 263, 271
leading, 235, 441
Left Vanishing Point dialog box, 372
lesson files
accessing, 2–3
adding symbols to map, 384
adding type to poster, 212
artwork selection techniques, 62
brushes, 302
creating artwork with shapes, 80
downloading, 10
gradients and blends, 274
park sign and logo, 176
perspective drawing, 360
sporting event ticket, 116
using drawing tools, 142
using Illustrator with other apps, 402–403
using layers, 250
Web content, 428–429
letter-spacing, 441
libraries
brush, 305, 313, 317, 319
Creative Cloud, 6, 398
graphic styles, 348
swatch, 186
symbol, 385–387, 398
line-height, 441
Line Segment tool, 94
Line Segment Tool Options dialog
box, 97
linear gradients, 275–277
lines
combining curves with straight, 152–153, 173
constraining, 145–146
dashed, 166–167
drawing, 93–94, 97
selecting, 144–145
linked images
accessing Links panel for, 420
applying color edits to Photoshop, 410–411
deselecting Photoshop Link option, 406
effect of transformations on original, 405
embedded vs., 404, 425
finding information for, 420
managing with Links panel, 419
replacing, 421–424, 425
unavailable as symbols, 399
linking/unlinking
Harmony Colors, 194, 196
symbol instances, 393–394
Links panel, 419, 420
Live Corners widget, 160
live effects, 339–342
applying, 340
editing, 340–341
vector and raster, 339
Live Paint, 206–207, 209
Live Paint Bucket tool, 207
Live Shapes
about, 7
defined, 113
ellipse not, 88
scaling corners of, 86–87
Locate Object button, 255
locking/unlocking
objects, 76, 77
perspective grid, 364
slices, 435
M
Mac OS platforms
location of Windows menus in, 57
specific instructions for, 1
Zoom tool shortcuts on, 49
Magic Wand tool, 66–67
magnifying artwork, 48–50, 59
Make Mask button (Transparency
panel), 416
markers, 194
marquee selection, 65–66, 102, 106
masking images, 411–418
about clipping paths, 411
applying clipping masks, 411–412
editing clipping masks, 412–414
objects used as masks, 425
opacity masks, 415–419
using text for, 414
measurement labels
about, 64
increments when zooming in, 117
Smart Guide, 82
turning off, 126
menus
Brush Libraries, 305, 313, 317, 319
Color Mode, 182
Edit Colors, 189
Effect, 340, 357
Font, 222
Layers panel, 253
location of Mac OS Windows, 57
panel, 47
Symbol panel, 386
merging
content unavailable for, 262
layers, 260–262
objects, 103–104
paths with Blob Brush tool, 324
Microsoft Word documents
placing formatted text in Illustrator, 237
placing in Illustrator, 218
Microsoft Word Options dialog box,
218
Missing Fonts dialog box, 251, 330,
331, 428
mobile devices, touch-enabled, 137
Mop brush, 314–316
moving
artwork between layers, 256–258
grid planes and objects together, 370–372, 381
objects in perspective, 368, 370, 372, 381
vanishing point, 363

ADOBE ILLUSTRATOR CC CLASSROOM IN A BOOK 2014 RELEASE 459
multiple anchor points, 161, 163
multiple artboards
creating, 80–81
navigating, 52–54, 59
multiple graphic styles, 355
multiple image placements, 409–410
N
named vs. unnamed Web content,
433, 451
naming
layers, 253
selections, 67, 77
sublayers, 254
navigating
artboards, 54–56, 119
content in Layers panel, 257
multiple artboards, 52–54, 59
between text fields, 276
Navigator panel, 54–56, 59
nested groups, 73–74
New Brush dialog box, 311
New Document dialog box
illustrated, 12
setting and saving options for, 80–81
setting color mode in, 177
new features, 6–9
Creative Cloud Libraries, 6, 398
Curvature tool, 6, 156–158
Illustrator enhancements, 9
Join tool, 9, 95, 171–172
Live Shapes, 7, 86–87, 88, 113
path segment reshaping, 8
Pen tool preview and enhancements, 8
Pencil tool enhancements, 8
Touch workspace, 7
Typekit font library, 8, 26–27, 221, 225, 251
New Swatch button (Swatches panel),
276
New Swatch dialog box, 181
New Workspace dialog box, 46
nonprintable area, 54
nudging
anchor points, 161
text, 231
O
objects
adding effects to, 357
adjusting plane to match, 376–377
aligning, 69–71, 77
applying gradient to multiple, 287
arranging, 74–75
choosing items without fill, 63, 77, 113
color controls for painting, 178–179
coloring, 14, 180
converting to Live Paint group, 206
copying appearance attributes of, 189
distorting with effects, 129–131
distributing spacing of, 70–71
drawing from center point, 83
drawing in perspective, 365–366
editing blend options for, 291
hiding and locking, 76, 77
joining paths of, 95–96
locating layer of, 254, 271
making graphic style from, 350
mapping artwork to 3D, 399
masking with, 425
measurement labels for, 64
modifying color with effects, 425
moving in perspective, 368, 370, 372, 381
outlining stroke of, 100–101
Pathfinder effects on, 103–104
perspective alignment for, 373
positioning precisely, 125–126
reflecting, 128–129, 159–160
resizing and reshaping type, 233–235
rotating, 131–132
scaling, 126–128, 139
scaling rectangle corners of, 86–87
selecting and transforming in perspective, 367–368
selecting behind, 75
selecting similar, 67
Selection tool for choosing, 62–64
shearing, 133–134
snapping to grid, 84, 365
text for masking, 414
threading text between, 218–219, 247
unable to erase, 106
ungrouping, 72
wrapping text around, 245
Offset Path effect, 343–344
one-point perspective, 362, 381
opacity
adding transparency to gradient, 288–290
brush stroke, 312
changing fill, 334, 335
opacity masks, 415–419
clipping masks vs., 415
creating, 415–416, 425
editing, 417–419
open paths, 95, 96
opening
artboards, 33
Illustrator files, 32–34
out port, 218, 219, 234, 247
Outline mode
effect on paint attributes, 93
making selections in, 68
toggling between Preview and, 51
viewing layer artwork in, 265
outlining
key objects, 69
strokes, 100–101
text, 246, 247
text with SVG paths, 450
output for documents, 81
overflow text, 216, 218, 247
Overprint mode, 51
overrides for paragraph styles, 236
P
Package command
packaging files, 424, 425
using Typekit fonts with, 225
Paintbrush tool
drawing with, 304–305, 327
editing paths with, 306–307, 314, 327
painting with drawing tools vs., 327
paths using Blob Brush vs., 322
precision painting with, 309
using Bristle brushes, 313–316
Paintbrush Tool Options dialog box,
306
painting. See also brushes
with Bristle brush, 314–316
creating Live Paint group, 206
with patterns, 201–205
with precision using Paintbrush pointer, 309
using Live Paint Bucket tool, 207
using Paintbrush tool vs. drawing tools for, 327
panel dock, 43
panel groups, 43–45
panel menus, 47
panels
closing, 38, 43, 335

460 INDEX460 INDEX
collapsing/docking floating, 38–39, 40
collapsing to icon, 42
Control, 40–41
custom Tools, 9, 40
docking, 46
dragging to panel group, 43–44
hiding all, 44
illustrated, 35
moving between text fields in, 276
resetting, 42
resizing, 39, 44
using panel menus, 47
Pantone Plus library, 186
Paragraph panel, 232–233, 243
Paragraph Style Option dialog box,
237
paragraph styles
character styles vs., 247
creating and applying, 236–237
defined, 235
editing, 237
overrides for, 236
Paragraph Styles panel, 236–237
paragraphs, 232–233, 235
Paste Remembers Layers option
(Layers panel), 263, 271
pasting. See copying/pasting
Path Eraser tool, 306
Pathfinder effects, 103–104, 342
Pathfinder panel, 103–105
paths. See also curves; lines
adding with Pen tool, 143
aligning stroke along, 92–93, 167
applying brush strokes to, 303
arrowheads added to, 168–169
brackets within type on, 244
Bristle brush, 313, 316
clipping, 108, 411
closing with Curvature tool, 158
components of, 148
compound, 100–101
converting smooth to corner points on, 150–151, 163, 173
Curvature tool for creating, 6, 158
curved, 147–148
cutting, 94, 165–168
defined, 96
deselecting, 97, 149
drawing with Pencil, 170–172
editing and combining shapes and, 96–100
editing with Paintbrush, 306–307, 327
filling open path with color, 95
inserting text on, 242–243
joining, 9, 95–96, 171
Live Paint, 208
merging, 324
open vs. closed, 96
placing text on closed, 243–244
reshaping segments of, 8
selecting, 144–145
spine of, 292, 294
Pattern brushes, 316–321
about, 316
applying, 316–317, 320
creating, 318–319
editing, 320–321
using with raster images, 327
patterns. See also tiles
about, 202
adding to Swatches panel, 204, 209
applying, 201, 204
creating, 201–204
defined, 201
designing pattern tiles, 202–203
editing, 204–205
saving and creating variations in, 204
PDF (Portable Document Format),
138
Pen tool
adding/deleting points with, 162–163
benefits of, 143
crosshair icon for, 143
cursor symbols for, 145
drawing curves with, 148–150, 153–156, 173
learning to use, 142–144, 173
new features of, 8
Pencil vs., 141
toggling between Selection and, 144
undoing drawings with, 150
Pencil tool
adjusting options for, 170, 173
close path circle indicator for, 16
crosshair icon for, 170
drawing with, 15–16, 170–172
enhancements for, 8
Pen vs., 141
performance
impact of embedded images and brushes, 311
previewing 3D effects, 347
perspective drawing, 358–381. See
also perspective grid
adjusting plane to match object, 376–377
aligning content to perspective, 373
automatic plane positioning for, 377
choosing correct grid plane, 365, 373, 374, 381
drawing objects in perspective, 365–366
duplicating content in, 369–370
editing symbols in, 378–379
grid for, 361
grouping content in perspective, 379
moving objects between perspective planes, 368
moving objects perpendicularly, 370, 381
moving planes and objects together, 370–372
releasing content from perspective, 379, 380
selecting and transforming objects in, 367–368
text in, 375
tools for, 365
perspective grid
adding symbols to, 378
adjusting, 362–364
drawing without active, 374
editing, 362–364
illustrated, 361
moving planes and objects together, 370–372, 381
releasing content from, 379, 380
saving as preset, 364
showing/hiding, 366, 370, 381
using preset, 362, 364, 381
Perspective Grid Options dialog box,
377
Perspective Grid tool, 361, 381
Perspective Selection tool, 361, 367,
373, 381
Photoshop. See Adobe Photoshop
Photoshop Import Option dialog
box, 407
pixel grid, 429–432, 451
Pixel Preview mode, 51, 429
Place command, 404
Place dialog box, 110, 407, 409
placing
imported Photoshop files, 406–408
JPEG image, 22, 404–405
Microsoft documents, 218
placing multiple images, 409–410
sampling colors in placed images, 419

ADOBE ILLUSTRATOR CC CLASSROOM IN A BOOK 2014 RELEASE 461
Plane Switching Widget, 361, 365,
373, 374, 381
point type, 213, 215–216
polygons, 89–90, 113
positioning objects
on artboard, 83
automatic plane positioning, 377
precisely, 125–126
precision editing
crosshair icon, 143, 167
painting with Paintbrush pointer, 309
Pen tool for, 143
Pencil tool, 170
positioning objects with, 125–126
resizing shapes precisely, 105, 370
Preferences dialog box
adjusting user interface brightness, 36
restoring default preferences, 3–4
setting anchor point options, 65
Preserves Exact Dash And Gap
Lengths button, 166
presets
envelope warp, 240
PDF, 138
perspective grid, 362, 364, 381
Preview mode, 51
printable area, 54
process color, 209
profile width, 100
proxy view area, 55, 59
Pucker & Bloat effect, 129–131
Q
quick tour, 10–29
applying color, 14
brushes, 28–29
clipping masks, 23
copying content, 19–20
creating documents, 12
drawing shapes, 13
drop shadow effects, 29
editing strokes, 16–17
gradients, 24–25
Image Trace, 22–23
Pencil tool, 15–16
placing images in Illustrator, 22
Shape Builder tool, 18–19
symbols, 20–22
syncing settings, 5, 9, 12–13, 58
type, 26–27
using layers, 14–15
warping text, 28
Width tool, 17–18
R
radial gradient, 282–285
raster effects
applying Photoshop, 339, 357
defined, 339
using, 344–345
raster images
about, 32
converting to vector artwork, 22–23, 110–112, 113
embedding with Art brush, 310–311, 327
placing in Illustrator, 404–405
rasterizing Bristle brush paths, 316
scaling placed, 405–406
tracing, 22–23, 110–112
using Art, Pattern, and Scatter brushes with, 327
Recolor Artwork dialog box, 196–
200, 209
Rectangle dialog box, 84
Rectangle tool, 13
rectangles
creating, 82–84
preventing snapping to content, 101
rounded, 85–86
reference point for rotations, 132
Reflect dialog box, 159, 160
reflecting objects, 128–129, 159–160
reflowing text, 218
releasing
clipping masks, 108, 269
content from perspective grid, 379, 380
Relink button, 425
removing
appearance attributes, 354
blend from objects, 293
brush stroke, 308
renaming
artboards, 53, 119–120, 139
layers, 252
symbols, 394
reordering
appearance attributes, 338
artboards, 120–121
panel groups, 45
symbol thumbnails, 389
replacing
linked images, 421–424, 425
symbols, 391–392
repositioning
artboard, 118
images with keyboard shortcuts, 413
resetting
panels, 42
workspace, 46, 331
reshaping
text with envelope warp, 239–242
type object shapes, 233–235
resizing
artboards, 119, 139
content in perspective, 367
panels, 39, 44
placed images, 406
slices, 435
type object shapes, 233–235
restoring default preferences, 3–4,
46, 331
reversing
blends, 295
layer order, 264
reverting to last version of file, 66
Revolve 3D effect, 346
RGB color mode, 177
Right Vanishing Point dialog box, 371
Rotate dialog box, 130
Rotate 3D effect, 346
rotating
gradients, 279–280, 299
objects, 131–132
text, 229, 230–231
rounded rectangles, 85–86
ruler origin, 122, 123, 139
rulers
changing units of measure for, 123
showing/hiding, 82
types of, 122, 139
S
sampling
color in placed images, 419
text formats, 239
Save Adobe PDF dialog box, 138
Save As dialog box, 34
Save For Web command
exporting content with, 429
saving slices with, 432, 435–437
saving
appearance attributes as graphic styles, 348

462 INDEX462 INDEX
artwork as SVG, 447–449
brushes, 319
color groups, 190, 195, 197, 209
current Illustrator preferences file, 3–4
custom color to swatch, 181–182, 209
custom work areas, 51, 59
documents with Bristle brush paths, 316
files, 34
gradient, 276
perspective grid presets, 364
selections, 77
stroke width profiles, 100
symbols in library, 398
tints, 188
Web content, 429–437, 451
workspaces, 46
Scale dialog box, 286
Scale Strokes & Effects option
(Transform panel), 139
scaling
Live Shape corners, 86–87
objects, 126–128, 139
placed images, 405–406
point type, 213
strokes and effects, 356
symbol instances, 396
text horizontally or vertically, 229, 230
Scatter brushes, 303, 327
Scissors tool, 94, 165–166
scrubbing across paths, 171
searching. See finding
Selection tool
choosing objects with, 62–64
selecting fill and stroke color, 14
selecting paths, 144–145
toggling between Pen and, 144
selections, 60–77
aligning objects within, 69–71, 77
anchor point options for, 65
choosing similar objects, 67
Direct Selection tool for, 64
groups and items in groups, 72–74
Isolation mode for, 72–73
Magic Wand tool for, 66–67
making in nested groups, 73–74
object, 62–64, 74–76
Outline mode for making, 68
saving, 77
selecting nonsequential layers, 260
selecting paths, 144–145
Selection tool for, 62–64
slices, 434–435
tools for, 38, 59
using selection marquees, 63, 65–66
Shape Builder tool, 18–19, 102–103,
113
shape modes, 104
shapes
Blob Brush for editing filled, 327
building combined, 101–103, 113
combining into smooth color blend, 296–298
compound, 104–105
creating clipping masks from multiple, 415
deleting multiple, 102
drawing, 13
drawing behind selection, 106–107
drawing inside artwork, 107–108
editing and combining, 96–100
ellipse, 88–89, 283–286
filling with color, 95
merging, 103–104
Pathfinder effects for editing, 342
polygons, 89–90, 113
rectangles, 82–84
resizing precisely, 105
rounded rectangles, 85–86
selecting without fill, 63, 77, 113
stars, 90–92
stroke width and alignment for, 92–93
tools for, 113
tracing raster, 110–112
warping text into, 28, 239–242
shearing objects, 133–134
Show Import Options (Place dialog
box), 407
showing/hiding
document grid, 84
drop shadow attribute, 334
gradient annotator bar, 278
layer content, 257
layers, 251, 271
objects, 76, 77
panels, 42, 44
perspective grid, 366, 370, 381
rulers, 82
tools, 38
Simplify dialog box, 112
slices
creating, 432–435
saving, 432, 435–437
selecting and editing, 434–435
Smart Guides
color of, 86
constraining paths with, 145, 146
measurement label for, 63, 82, 126
turning off, 88
using with perspective grid, 362
viewing alignment guides when on, 63
smooth points
Anchor Point tool for converting, 164, 173
converting to corner points, 150–151, 163
defined, 147, 148
Smooth tool, 306
Snap Curves To Lines option (Image
Trace panel), 111
snapping to grid, 84, 365
spine of path, 292, 294
spot color, 186–187, 209
spraying symbol instances, 394–396
stacking order
appearance attributes, 332, 337, 338
defined, 74
layer, 255, 257
selecting objects behind, 75
stars, 90–92
Status bar, 35
stroke. See also gradients
adding second, 335–337, 357
adjusting width of, 96–100
applying and editing gradient on, 280–282
changing width and alignment of, 92–93
choosing color of, 14
dashed lines applied to, 166–167
editing, 16–17
effect of Outline mode on color, 93
joining paths to display around fill, 95
modifying attributes for, 333–334
outlining, 100–101
removing brush, 308
saving width profiles for, 100
scaling effects and, 356
selecting, 63, 77
varying with Width tool, 17–18
width of, 92–93
Stroke Options (Pattern Brush) dialog
box, 317
Stroke panel, 16–17, 92
styling text with Warp effect,
341–342
sublayers

ADOBE ILLUSTRATOR CC CLASSROOM IN A BOOK 2014 RELEASE 463
applying appearance attributes to, 339, 357
creating, 254
deleting, 252
merging, 260–262
SVG (Scalable Vector Graphics) files
about, 447, 451
fonts in, 450
Illustrator enhancements for, 9
saving artwork as, 447–449
viewing code for, 449
SVG filters, 344, 357
SVG Options dialog box, 448, 450
swapping stroke and fill color, 93
swatch libraries, 186
swatches
copying, 182
customizing and saving, 181–182, 209
displaying gradient, 277
displaying in Color Picker, 185
editing, 183
global, 183–184
identifying Pantone, 187
saving gradient, 276–277
sorting pattern, 201
Swatches panel
applying pattern from, 204, 209
displaying only gradient swatches, 277
displaying swatches in Color Picker, 185
features of, 179
identifying Pantone swatches in, 187
switching between
artboard and global rulers, 122
multiple workspaces, 34
perspective planes, 365, 373, 374, 381
symbol instances
about, 385, 387
breaking link to, 393–394
copying/pasting, 386
preventing artwork becoming, 389
sizing, 399
spraying, 394–396
symbol libraries, 385–387, 398
Symbol Options dialog box, 20, 389
Symbol panel, 386
symbol sets, 395, 397
Symbolism tools, 394–397
Symbol Sizer tool, 397, 399
Symbol Sprayer tool, 394–396
Symbol Styler tool, 397
symbols. See also symbol instances
accessing from other documents, 399
adding to perspective grid, 378
breaking link to, 393–394
creating, 388–389
defined, 20, 385
duplicating, 390–391
editing, 385, 387–388, 396–397
editing in perspective, 378–379
incompatible with perspective drawing, 378
inserting on layers, 385, 393
lesson files for, 384
linked images unavailable as, 399
renaming, 394
reordering thumbnails of, 389
replacing, 391–392
updating, 399
uses of, 383, 399
using in pattern tiles, 202–203
viewing in Symbol panel menu, 386
working with, 20–22
Symbols panel
creating symbols in, 388
options on, 385
reordering symbol thumbnails in, 389
storing and retrieving artwork in, 398
syncing
libraries to Creative Cloud, 398
settings, 5, 9, 12–13, 58
Typekit fonts, 221, 223, 251, 330–331
T
text, 210–247. See also area type;
fonts; formatting text
adding second stroke to, 336
area type, 214–215
autosizing area type, 7, 214–215
changing attributes of, 227–229
changing between area and point type, 215–216
columns of, 220
converting to outlines, 246, 247
CSS characters styles for, 441–442
glyphs, 233
graphic styles with, 352
importing, 216–217
masking images with, 414
navigating fields of, 276
nudging, 231
overflow, 216, 218, 247
paragraph attributes for, 232–233
placing Microsoft text in Illustrator, 218
point type, 213, 215–216
reflowing, 218
reshaping, 233–235, 239–242
Rotate 3D effect for, 346–347
rotating, 229, 230–231
sampling format of, 239
scaling, 229, 230
selecting and dragging, 223
threading, 218–219, 247
Touch Type tool for editing, 229–232
type on path, 242–245
Type tool for creating, 247
using in perspective, 375
warping, 28, 239–242, 341–342
working with, 26–27
wrapping around objects, 245
Text Import Options dialog box, 217
Texturizer dialog box, 345
threading text, 218–219, 247
three-point perspective, 362, 381
3D effects, 346–347
3D Rotate Options dialog box,
346–347
thumbnails
accessing link icon for image, 418
reordering symbol, 389
tiled windows, 57, 59
tiles
about pattern, 201
changing Pattern brush, 321
creating, 202–203
Pattern brush, 316, 318–319
tints, 188
toggling
between Preview/Outline modes, 51
between Selection/Pen tool, 144
Transform panel on/off, 82
tool tips, 38
tools. See also Tools panel; and
specific tools
displaying hidden, 38
found on Tools panel, 37
selecting, 38, 59
Symbolism, 394–397, 399
tool tips for, 38
used for perspective drawing, 365
Tools panel
column display for, 39, 178
creating custom, 9, 40

464 INDEX464 INDEX
illustrated, 35
shape tools on, 113
tools found on, 37
Touch Type tool, 229–232, 247
Touch workspace, 7, 50
Transform panel
aligning to pixel grid, 431
resizing shape width and height, 105
scaling placed images from, 405–406
scaling strokes and effects from, 356
toggling on/off, 82
transforming content, 122–137
distorting objects with effects, 129–131
positioning objects precisely, 125–126
rotating objects, 131–132
shearing objects, 133–134
using Free Transform tool, 135–137, 139
using rulers and guides, 122–124
turning on/off
grid snapping, 84, 365
measurement labels, 126
Pen tool preview, 143
pixel grid, 430
tool tips, 38
Typekit fonts, 221
two-point perspective, 362, 381
Type On A Path Options dialog box,
244–245
type on path, 242–245
Type tool
adding area type with, 214–215
adding point type with, 213
creating text areas with, 247
Typekit fonts
about, 2, 8, 221
applying, 26–27
Internet connections for, 26, 221, 330
syncing, 221, 223, 251, 330–331
turning on, 221
using with Package command, 225
U
undoing
bristle strokes, 314
edits to perspective grid, 371
Pen tool drawings, 150
reordering of layers, 257
symbol spraying, 395
type options, 222
width point changes, 17
unembedding images, 421
ungrouping objects, 72
units of measure
changing for document, 123
ruler’s, 82
unlocking. See locking/unlocking
unnamed content, 433, 451
updating
graphic styles, 352–354
linked files, 404
symbols, 399
user interface brightness, 36
V
vanishing point, 363
vector artwork
about, 32
cleaning up traced, 112
converting raster to, 22–23, 110–112, 113
using Live Paint on, 206–207, 209
vector effects, 339
version compatibility for Typekit, 225
vertical extent of perspective, 363
Vertical Grid Extent point, 363
View menu, 59
viewing
layers, 265–266
symbols in Symbol panel menu, 386
views
creating custom artwork, 51, 59
showing/hiding rulers in, 82
Visibility column (Layers panel), 251,
271
W
Warp effect, 341–342
Warp Options dialog box, 240, 341
warping text
about, 28
envelope warp, 239–242
styling text with Warp effect, 341–342
Web content, 426–451
aligning to pixel grid, 429–432, 451
lesson file for, 428–429
named vs. unnamed, 433, 451
saving, 429–437, 451
slicing, 432–435
width
changing rectangle, 83
constraining changes to, 119
width profiles, 100
width points
creating, 97, 99
defined, 17
editing, 98
Width tool
adjusting stroke width with, 96–100
paths with outlined stroke uneditable with, 100
working with, 17–18
windows. See also artboards;
Document window
fitting artboard to active, 48
tiled, 57, 59
Windows platforms
GPU acceleration for, 9
showing AppData folder for, 3
specific instructions for, 1
Touch workspaces for, 7, 50
workspaces, 30–59
adjusting brightness of, 36
artboards in, 53–54
changing artwork views, 48–51
Control panel, 40–41
custom Tools panel, 9, 40
defined, 34
deleting saved, 46
elements of, 35
magnifying artwork with Zoom tool, 48–50
navigating multiple artboards, 52–54, 59
panel menus in, 47
panels in, 42–44
resetting, 46, 331
saving, 46
switching between multiple, 34
syncing with Creative Cloud, 58
Tools panel, 37–39
Touch, 7, 50
wrapping text, 245
Z
Zoom tool, 48–50
zooming in/out
of artwork, 48, 59
keyboard shortcuts for, 48
measurement label increments when, 117
precision shape resizing with, 105, 370
resizing content in perspective by, 367
selecting out port by, 218, 234

ADOBE ILLUSTRATOR CC CLASSROOM IN A BOOK 2014 RELEASE 465
Contributor
Brian Wood is a web developer and the author of ten books and numerous training titles
covering Adobe products such as Muse, Dreamweaver, InDesign, and Illustrator; as well as
training videos on Dreamweaver & CSS, InDesign, Illustrator, Acrobat, Muse, and others.
In addition to training many clients large and small, Brian speaks regularly at national
conferences, such as Adobe MAX and the HOW conference, as well as events hosted by
AIGA and other industry organizations. To learn more, check out www.youtube.com/
askbrianwood or visit www.brianwoodtraining.com.
Production NotesThe Adobe Illustrator CC Classroom in a Book (2014 release) was created electronically using
Adobe InDesign CC 2014. Art was produced using Adobe InDesign, Adobe Illustrator, and
Adobe Photoshop.
References to company names, websites, or addresses in the lessons are for demonstration purposes only
and are not intended to refer to any actual organization or person.
Images
Photographic images and illustrations are intended for use with the tutorials.
Typefaces used
Adobe Myriad Pro and Adobe Warnock Pro are used throughout this book. For more information about
OpenType and Adobe fonts, visit www.adobe.com/type/opentype/.
Team credits
The following individuals contributed to the development of this edition of the
Adobe Illustrator CC Classroom in a Book (2014 release):
Writer: Brian Wood
Design: Jolynne Roorda
Project Editor: Valerie Witte
Production Editor: David Van Ness, Danielle Foster
Technical Editor: Jean-Claude Tremblay
Keystroking: Mark Stricker, Jean-Claude Tremblay, John Cruise
Compositor: Brian Wood
Copyeditor: Patricia J. Pane
Proofreader: Patricia J. Pane, Wyndham Wood
Indexer: Rebecca Plunkett
Cover design: Eddie Yuen
Interior design: Mimi Heft

Classroom in a Book®, the best-selling
series of hands-on software training
books, helps you learn the features of
Adobe software quickly and easily.
The Classroom in a Book series off ers
what no other book or training program
does—an offi cial training series from
Adobe Systems, developed with the
support of Adobe product experts.
To see a complete list of our
Adobe Creative Cloud titles go to:
www.adobepress.com/adobecc2014
The fastest, easiest, most comprehensive way to learnAdobe® Creative Cloud™
Adobe Photoshop CC Classroom in a Book (2014 Release)
ISBN: 9780133924442
Adobe Illustrator CC Classroom in a Book (2014 Release)
ISBN: 9780133905656
Adobe InDesign CC Classroom in a Book (2014 Release)
ISBN: 9780133904390
Adobe Muse CC Classroom in a Book (2014 release) *eBook Only
ISBN: 9780133854145
Adobe Dreamweaver CC Classroom in a Book (2014 Release)
ISBN: 9780133924404
Adobe Flash Professional CC Classroom in a Book (2014 Release)
ISBN: 9780133927108
Adobe Premiere Pro CC Classroom in a Book (2014 Release)
ISBN: 9780133927054
Adobe After Eff ects CC Classroom in a Book (2014 Release)
ISBN: 9780133927030


