1
Adobe After Effects 5.0
Effects, part 1
This PDF file contains documentation for effects from the following effect categories: 3D Channel, Adjust,
Audio, Blur & Sharpen, Channel, Distort, and Image Control.
3D Channel effects (PB only)
The After Effects Production Bundle provides tools to integrate 3D scenes into 2D composites, and to make
changes to those 3D scenes. You can import 3D channel image files saved in RLA, Softimage PIC/ZPIC, and
Electric Image EI/EIZ formats. For PIC and EI files, the 3D channel information lives in the ZPIC or EIZ
files, respectively. You don’t actually import ZPIC and EIZ files, but as long as they’re stored in the same
folder with the PIC and EI files, you have access to their 3D channels using the effects in the 3D Channel
Pack. The 3D channel effects have no effect on other types of files.
3D Channel effects read and manipulate the additional channels of information, including
z-
depth, surface
normals, object ID, texture coordinates, background color, unclamped RGB, and material ID. You can
matte 3D elements along a
z
axis, insert other elements in a 3D scene, blur areas in a 3D scene, isolate 3D
elements, apply a foggy effect with depth, and extract 3D channel information for use as parameters in
other effects.
Note:
Apply 3D Channel effects to 2D layers that have the auxiliary information. If you convert a layer to 3D
and view it from anywhere else but the front and center, it will not display as expected.
3D Channel Extract
This effect makes auxiliary channels visible as either grayscale or multichannel color images. You can then
use the resulting layer as parameters for other effects. For example, extract the
z
-depth information in a 3D
channel file and then use it as an influence map in the Particle Playground effect, or extract values from the
Unclamped RGB channel to produce a matte that generates glowing highlights.
Adjust the following controls for the 3D Channel Extract effect:
3D Channel
Specifies the channel that you want to extract from the 3D channel image file. You can extract
Z Depth, Object ID, Texture UV, Surface Normals, Coverage, Background RGB, Unclamped RGB, and
Material ID.
White/Black Point
Specify the value that is mapped to white or black.

2
ADOBE AFTER EFFECTS 5.0
Effects, part 1
Depth Matte
This effect reads the
z
-depth information in a 3D channel image file and can slice the image anywhere along
that
z
axis. Use this effect to matte everything in front of or behind the value you specify. For example,
remove a background in a 3D scene or insert objects into a 3D scene. Simply create two layers with the 3D
channel file; then, in one layer, matte everything behind a certain point. In the other layer, matte everything
in front of that same point, so that the two layers together make up the original image; then insert a layer
between them with the object that you want to composite into the scene.
Adjust the following controls for the Depth Matte effect:
Depth
Specifies the depth of the z-axis where you want to slice the image.
Feather
Specifies the amount of feather along the slice.
Invert
Inverts the feather.
Depth of Field
This effect simulates a camera that’s focusing in on one area in a 3D scene (along the
z
axis) while allowing
other areas to blur.
Adjust the following controls for the Depth of Field effect:
Focal Plane
Specifies the specific distance, or plane, along the
z
axis that you want to focus on in the 3D
scene. Identify this distance by clicking different parts of the 3D scene in the Composition window, while
keeping an eye on the
z
-axis values that appear in the Info palette. Note that you must select the effect in
the Effect Controls window before you click.
Maximum Radius
Describes how much blur is applied to objects outside of this plane.
Focal Plane Thickness
Determines the depth of the region that’s in focus.
Focal Bias
Sets the speed with which the out-of-focus elements lose focus. This value works like a gamma
correction: the higher the value, the more quickly elements drop out of focus.
Fog 3D
This effect applies fog along the
z
axis, so the distant parts of a 3D scene look hazier or disappear behind
the fog. Fog 3D simulates fog by behaving as though there is a scattering medium in the air that makes
objects look more and more diffuse as they get more distant along the
z
axis.
Adjust the following controls for the Fog 3D effect:
Fog Color
Specifies the color of the fog.
Fog Start Depth
Determines where along the
z
axis the diffuse scattering begins. To specify this point, first
select different elements in the 3D scene and check their z depth in the Info palette.
Fog End Depth
Determines where the most diffuse area appears along the
z
axis.
Fog Opacity
Determines the opacity of the fog.
Scattering Density
Determines how quickly the scattering occurs. This value works like a gamma
correction: the higher the value, the more dense the fog appears from its starting point.

3
ADOBE AFTER EFFECTS 5.0
Effects, part 1
Foggy Background
Selected by default. Deselect to create transparency at the back of the 3D scene for
compositing on top of another image or scene.
Gradient Layer
Specifies a grayscale layer to use as medium for increasing or decreasing the fog density.
After Effects reads the luminance value in the grayscale image and applies it as the scattering medium. You
could, for example, create a gradient layer from a swirling, drifting texture to create a more atmospheric
fog effect. For best results, make sure that the dimensions of the gradient layer are the same as the footage,
not the composition.
Layer Contribution
Specifies how much the gradient layer affects the resulting fog.
ID Matte
This effect isolates elements in a 3D channel image. Many 3D programs tag each element in a scene with a
unique Object ID. After Effects uses this information to create a matte that excludes everything in the scene
except the element you want. Identify each object’s ID by applying the ID Matte effect and then clicking
different parts of the image in the Composition window as you watch the Info palette. (You can also
identify object IDs in the Layer window if you select the effect from the Layer window menu first.) If you
select Object ID for the Auxiliary Channel parameter in the Effect Controls window, the slider automati-
cally reflects the ID for each object you select. In addition, you can isolate objects based on their Material
ID as well.
Adjust the following controls for the ID Matte effect:
Auxiliary Channel
Specifies whether you’re isolating elements based on their Object IDs or their
Material IDs.
ID Selection
Identifies the unique ID value assigned to each element in a 3D scene.
Feather
Specifies the amount of feather along the matte’s edges.
Invert
Inverts the feather.
Use Coverage
Creates a cleaner matte by decontaminating the pixels along the edge of the matte. It
removes the colors stored behind the object from these pixels. This is applicable only if your 3D channel
image file contains a coverage channel that stores information about the colors behind objects.
Adjust effects
Use the Adjust effects to adjust color in a layer.
Brightness & Contrast
This effect adjusts the brightness and contrast of the entire layer (not individual channels). The center
point of each slider is neutral and indicates no effect. The layer’s quality setting does not affect Brightness
& Contrast. Using the Brightness & Contrast effect is the easiest way to make simple adjustments to the
tonal range of the image. It adjusts all pixel values in the image at once—highlights, shadows, and
midtones.
4
ADOBE AFTER EFFECTS 5.0
Effects, part 1
Channel Mixer
This effect modifies a color channel using a mix of the current color channels. Use it to make creative color
adjustments not easily done with the other color adjustment tools: create high-quality grayscale images by
choosing the percentage contribution from each color channel, create high-quality sepia-tone or other
tinted images, and swap or duplicate channels. The Constant option specifies the base amount of the input
channel to be added to the output channel. Monochrome applies the same settings to all the output
channels, creating a color image that contains only gray values. This is useful for images that you plan to
convert to grayscale. If you select and then deselect Monochrome, you can modify the blend of each
channel separately, creating a hand-tinted appearance.
Color Balance
This effect changes the amount of red, green, and blue color in a layer. The center point of each slider is
neutral and indicates no effect. A setting of –100 removes all of the color; a setting of +100 intensifies the
color. The layer’s quality setting does not affect Color Balance.
The Shadow/Midtone/Hilight (Channel) Balance option specifies the amount of a channel’s color in the
darker, middle, and lighter color intensity ranges of a layer. Preserve Luminosity preserves the average
brightness of the image while changing the color. This option maintains the tonal balance in the image.
Curves
Use this effect to adjust the tonal range of an image. You can also use Levels to do this, but Curves gives you
more control in the process when you need it. Instead of making the adjustments using just three variables
(highlights, shadows, and midtones) as Levels does, Curves can adjust any point along the input scale while
keeping up to 15 other values constant.
When you apply the Curves effect, After Effects displays a graph in the Effect Controls window that you use
to specify a curve.
The horizontal axis of the graph represents the original brightness values of the pixels (input levels); the
vertical axis represents the new brightness values (output levels). In the default diagonal line, all pixels have
identical input and output values. Curves displays brightness values from 0 to 255 (8 bit) or 32768 (16 bit),
with shadows (0) on the left.
Use the Arbitrary Map option to draw a tonal curve by dragging. This feature helps you create a variety of
interesting tonal and color effects. In addition, you can import curves and arbitrary maps from Photoshop.
Curves supports .amp files (Windows) and Photoshop lookup files (Mac OS) created by using the pencil
tool, and .acv files (Windows) and Photoshop spline files (Mac OS) created by using the graph tool.
Adjust the curve in the graph, and adjust the following control for the Curves effect:
Channel
Specifies the color channel or alpha channel to be modified.
To use the Curves effect:
1
Choose Effect > Adjust > Curves.
2
If the image has more than one color channel, choose the channel you want to adjust from the Channel
menu. RGB alters all channels using a single curve.

5
ADOBE AFTER EFFECTS 5.0
Effects, part 1
3
Select Bezier ( ).
4
Click the part of the curve you want to adjust.
5
Click any points on the curve that you want to remain fixed. For example, if you want to adjust the
midtones while minimizing the effect on the highlights and shadows, click the quarter and three-quarter
points on the curve. You can add up to 14 points to the curve, locking those values.
6
To remove a fixed point, drag it off the graph.
7
Adjust the curve by dragging it.
To use the Arbitrary Map option in the Curves effect:
1
Click the pencil tool to the right of the Curves graph.
2
Drag to draw the curve you want in the Curves graph.
3
If desired, click Smooth ( ) to smooth the curve.
Hue/Saturation
This effect adjusts the hue, saturation, and lightness of individual color components in an image. This
effect is based on the color wheel. Adjusting the hue, or color, represents a move around the color wheel.
Adjusting the saturation, or purity of the color, represents a move across its radius. Use the Colorize option
to add color to a grayscale image converted to RGB, or to add color to an RGB image.
Adjust the following controls for the Hue/Saturation effect:
Channel Control
Specifies the color channel you want to adjust. Choose Master to adjust all colors at once.
Channel Range
Specifies the definition of the color channel selected in the Channel Control menu. Two
color bars represent the colors in their order on the color wheel. The upper color bar shows the color before
the adjustment; the lower bar shows how the adjustment affects all of the hues at full saturation. Use the
adjustment slider to edit any range of hues.
Master Hue
Specifies the overall hue of the channel selected in the Channel Control menu. Use the dial,
which represents the color wheel, to change the overall hue. The underlined value displayed above the dial
reflects the number of degrees of rotation around the wheel from the pixel’s original color. A positive value
indicates clockwise rotation; a negative value indicates counterclockwise rotation. Values range from –180
to +180.
Master Saturation and Master Lightness
Specify the overall saturation and lightness of the channel
selected in the Channel Control menu. Values range from –100 to +100.
Colorize
Adds color to a grayscale image converted to RGB, or adds color to an RGB image—for example,
to make it look like a duotone image by reducing its color values to one hue.
Colorize Hue, Saturation, and Lightness
Specify the hue, saturation, and lightness of the color range you
selected in the Channel menu. After Effects displays only the sliders for the Channel menu selection.
To adjust an image using Hue/Saturation:
1
Choose Effect > Adjust > Hue/Saturation.
2
From the Channel menu, choose which colors to adjust:

6
ADOBE AFTER EFFECTS 5.0
Effects, part 1
•
Choose Master to adjust all colors at once.
•
Choose a preset color range for the color you want to adjust, and then use the sliders for that color range.
3
For Hue, type a value or drag the slider.
4
For Saturation, type a value or drag the slider. The color shifts away from or toward the center of the
color wheel, relative to the beginning color values of the selected pixels. Values range from –100 to +100.
5
For Lightness, type a value or drag the slider. Values range from –100 to +100.
To modify the range of an adjustment slider:
1
From the Edit menu, choose an individual color.
By default, the range of color selected when you choose
a color component is 30° wide, with 30° of fall-off on either side. Setting the fall-off too low can produce
dithering in the image.
2
Do any of the following:
•
Drag one or both of the white triangles to adjust the amount of feather without affecting the range.
•
Drag one or both of the vertical white bars to adjust the range. Increasing the range decreases the fall-off,
and vice versa.
A.
Adjusts feather without affecting range
B.
Adjusts range of color
To colorize an image or create a monotone effect:
1
Choose Effect > Adjust > Hue/Saturation.
2
Select Colorize. The image is converted to the hue of the current foreground color. The lightness value
of each pixel does not change.
3
Drag the Colorize Hue slider to select a new color if desired.
4
Drag the Colorize Saturation and Colorize Lightness sliders.
Levels
This effect remaps the range of input color levels onto a new range of output color levels, and changes the
gamma correction curve at the same time. The Levels effect is useful for basic image quality adjustment.
This effect functions the same as the Levels adjustment in Photoshop and displays in the same way if
monitor calibration is off.
The gamma of any curve is its slope, expressed as the ratio of the logs of the output to input values. For
example, a gamma value of 1.0 equals an output-to-input ratio of 1:1. Moving the midpoint of the curve
up (in an RGB readout) lowers the gamma value; moving the midpoint down raises the gamma value.
Gamma specifies contrast that affects the midtones in a range.
A B

7
ADOBE AFTER EFFECTS 5.0
Effects, part 1
You can adjust the brightness, contrast, and gamma in an image. Use Levels to adjust the gamma to change
the brightness values of the middle range of gray tones without dramatically altering the shadows and
highlights.
Adjust the following controls for the Levels effect:
Channel
Specifies the color channel to be modified.
Histogram
Shows how the pixel values are distributed in an image. The horizontal axis of the histogram
represents the brightness value. The vertical axis represents the number of pixels at each brightness level. No
pixels can be darker than the output black level, and no pixel can be brighter than the output white level.
Input Black
Specifies the threshold of the black value for the input image. Pixels below the input black level
are mapped as black on the input image. The input black value is represented by the upper left triangle
below the histogram.
Output Black
Specifies the limit of the black value for the output image. The output black value is repre-
sented by the lower left triangle below the histogram.
Gamma
Specifies the gamma value, which is represented by the middle triangle below the histogram.
Output White
Specifies the limit of the white value for the output image. The output white value is repre-
sented by the lower right triangle below the histogram.
Input White
Specifies the threshold of the white value for the input image. Pixels below the input white
level are mapped as white on the input image. The input white value is represented by the upper right
triangle below the histogram.
Posterize
Use this effect to specify the number of tonal levels (or brightness values) for each channel in an image.
Posterize then maps pixels to the closest matching level. For example, choosing two tonal levels in an RGB
image gives you two tones for red, two tones for green, and two tones for blue. Values range from 2 to 255.
Although the results of this effect are most evident when you reduce the number of gray levels in a grayscale
image, Posterize also produces interesting effects in color images.
Use Level to adjust the number of tonal levels for each channel to which Posterize will map existing colors.
A.
Original image
B.
Posterize applied with five levels of color
C.
Threshold applied
A B C

8
ADOBE AFTER EFFECTS 5.0
Effects, part 1
Threshold
Use this effect to convert grayscale or color images to high-contrast, black-and-white images. Specify a
certain level as a threshold; all pixels lighter than the threshold are converted to white and all pixels darker
to black.
Audio effects
This category contains audio effects that add ambience to a layer, enhance or correct audio characteristics,
and create effects. You can apply audio effects to existing audio footage, or synthesize just about any sound
by combining the Tone effect with other audio effects.
Backwards
This effect reverses an audio footage item by playing it from the last frame or keyframe to the first frame
or keyframe. The frames remain in their original order when viewed in the Timeline window.
Bass & Treble
Make basic adjustments to the audio tone of an audio layer using this effect by specifying the amount of
boost or cut applied to the low frequencies (bass) or the high frequencies (treble) of the audio layer. If you
need greater control in working with audio tone, use the Parametric Equalization effect in the After Effects
Production Bundle. The Bass/Treble option specifies the amount of boost or cut applied to the low
frequencies of the audio layer.
Delay
This effect repeats the sounds in the audio layer after a specified amount of time. This simulates sound
bouncing off a surface, such as a wall some distance away.
To simulate the acoustic ambience of a room, use the Reverb effect in the After Effects Production Bundle.
Adjust the following controls for the Delay effect:
Delay Time
Specifies the interval of time between the original sound and its echo, in milliseconds. Drag
the slider to the right to increase the time between the original sound and its echo.
Delay Amount
Specifies the level of the first delayed audio. Drag the slider to the right to increase the
amount of the original sound that is sent as echo.
Feedback
Specifies the amount of the echo that is fed back into the delay line to create subsequent echoes.
Drag the slider to the right to increase the amount of echo signal fed back into the delay line.
Dry Out, Wet Out
Specify the balance of the original (dry) sound to the delayed (wet) sound in the final
output. Values of 50% are commonly used.
Flange & Chorus (PB only)
This effect combines two separate audio effects, Flange and Chorus, into a single effect. Chorus is
commonly used to add depth and character to audio footage that contains a single instrument or voice.
Chorus makes one voice sound like many voices.

9
ADOBE AFTER EFFECTS 5.0
Effects, part 1
Flange applies a copy of the sound that is detuned, or played at a frequency slightly offset from the original.
By experimenting with the voice separation time and the modulation depth, you can create a wavy, rushing
sound. The default settings apply to the Flange effect alone.
Adjust the following controls for the Flange & Chorus effect:
Voice Separation Time (ms)
Specifies the time in milliseconds that separates each voice. Each voice is a
delayed version of the original sound. Low values are commonly used for flange, and higher values for
chorus.
Voices
Specifies the number of voices in the processed (wet) audio. Increasing this value applies more of a
chorus effect.
Modulation Rate
Specifies the rate in Hz at which the frequency modulates.
Modulation Depth
Specifies the amount of frequency modulation.
Voice Phase Change
Specifies the modulation phase difference in degrees between each subsequent voice.
Invert Phase
Inverts the phase of the processed (wet) audio. Inverting the phase accents more of the
high frequencies, whereas not inverting the phase accents more of the low frequencies.
Stereo Voices
Alternates each voice between two channels so that the first voice appears in the left
channel, the second in the right channel, the third in the left, and so on. To hear stereo voices, you
must preview the audio in stereo or render the movie in stereo.
Dry Out/Wet Out
Specify the mix of unprocessed (dry) audio to processed (wet) audio in the final output.
Values of 50% are commonly used.
To apply the Chorus effect without Flange:
Adjust the following controls:
•
For Voice Separation Time (ms), select a value of about 40. For a deeper chorus effect, increase this value.
•
For Voices, select 4.
•
For Modulation Rate, select a value of about 0.1.
• For Modulation Depth, select 50%.
• For Voice Phase Change, select 90, and then select the Stereo Voices option. To quickly find an optimal
phase change based on the number of voices you have chosen, use the formula P=360/x, where P is the
phase change and x is the number of voices.
• For Dry Out/Wet Out, select 50% each. To make voices appear from more than one direction and get
louder over time, select Stereo Voices, drag the Dry Out slider to 0.0 so you hear just the effect, and then
set keyframes so that the voices fade in over time.
High-Low Pass (PB only)
This effect sets a limit above or below which frequencies can pass. High Pass allows frequencies above the
limit and blocks frequencies below. Conversely, Low Pass allows frequencies below the limit and blocks
frequencies above. Use High-Low Pass to do the following:

10ADOBE AFTER EFFECTS 5.0Effects, part 1
• Enhance or attenuate (reduce) a sound. For example, a High Pass effect can reduce traffic noise, which
often is concentrated at low frequencies, while minimally affecting a voice recording. A Low Pass effect can
remove high-frequency sounds, such as static and buzzing.
• Change the focus from one sound to another over time. For example, in audio that contains both music
and voice, you can fade out the music while gradually bringing in the voice.
• Protect equipment from potentially damaging frequencies.
• Direct certain frequencies to specific equipment. For example, a Low Pass effect can isolate sounds
intended for a subwoofer.
Adjust the following controls for the High-Low Pass effect:
Filter Options Specifies whether to apply High Pass or Low Pass.
Cutoff Frequency For High Pass, specifies the frequency below which the footage is not audible. For Low
Pass, specifies the frequency above which the footage is not audible.
Dry Out/Wet Out Specify the mix of unprocessed (dry) audio to processed (wet) audio in the final output.
Common values for removing frequencies are 0% for Dry Out and 100% for Wet Out.
To remove frequencies using the High-Low Pass effect:
1 Determine if the unwanted sound has predominantly high- or low-frequency content.
2 For Filter Options, choose High Pass if the unwanted sound has low-frequency content; otherwise,
choose Low Pass.
3 Adjust the cutoff frequency to isolate the unwanted sound from the frequencies you want to keep. To
help isolate the unwanted sound, apply the Audio Spectrum effect to a motion footage layer to see the
magnitude of the frequencies in the range you define.
4 Choose 0% for Dry Out and 100% for Wet Out.
5 To verify that the frequencies you are cutting off are the ones you want to remove, switch to the opposite
filter and then preview the audio.
6 To identify which cutoff frequencies work best, do one of the following:
• Continue to adjust the cutoff frequency and preview the audio until you reduce or remove the unwanted
sound while minimally affecting the frequencies you want to keep.
• Set keyframes for different cutoff frequencies, and then preview the audio.
7 Before closing the Effect Controls window, make sure that you have selected the same effect you applied
in step 3.
Modulator (PB only)
This effect adds both vibrato and tremolo to audio by modulating (varying) the frequency and amplitude.
Using Modulator, you can create a Doppler effect, such as when a train whistle gets higher in pitch as it
approaches an observer, and then drops in pitch as it passes.
Adjust the following controls for the Modulator effect:
Modulation Type Specifies the type of waveform to use.
11ADOBE AFTER EFFECTS 5.0Effects, part 1
Sine waves Produce the purest sounds.
Triangle waves Produce more distorted sounds.
Modulation Rate Specifies the rate in Hz at which the frequency modulates.
Modulation Depth Specifies the amount of frequency modulation.
Amplitude Modulation Specifies the amount of amplitude modulation.
Parametric EQ (PB only)
This effect either emphasizes or attenuates specific frequency ranges. Parametric EQ is useful for enhancing
music, such as boosting low frequencies to bring up bass. Using this effect, you can enhance up to three
different bands of the audio footage. As you specify controls, a Frequency Response graph indicates the
combined equalization curve you create. On the Frequency Response graph, Band 1 is red, Band 2 is green,
and Band 3 is blue. You may find it easier to specify controls if you determine in advance the frequency-
response curve you want.
Adjust the following controls for the Parametric EQ effect:
Band Enabled Activates an equalization band and its controls.
Frequency Specifies which frequency to modify. This frequency acts as the peak of the effect—the center
of the bandwidth you specify.
Bandwidth Sets the range of frequencies to enhance above and below the frequency you chose to modify.
Boost/Cut Specifies the amount of boost or cut applied to the amplitude of the frequencies inside the
specified bandwidth. Positive values boost; negative values cut.
If you have audio with an unwanted sound (such as a beep from a forklift in the background), you can
isolate and cut the frequency range of the beep to attenuate the sound. You may need to experiment with
several settings to isolate the frequency range. To do this, set keyframes for different Parametric EQ
properties, and then preview the audio. You can also apply the Audio Spectrum effect to a motion footage
layer to see the magnitude of the frequencies in the range you define.
Reverb (PB only)
This effect simulates a spacious or acoustically live interior by simulating random reflections of a sound off
of a surface.
Adjust the following controls for the Reverb effect:
Reverb Time (ms) Specifies the average time in milliseconds between the original audio and the rever-
berated audio.
Diffusion Specifies how much the effect scatters the original audio. More diffusion can make the audio
sound further from the microphone.
Decay Specifies the amount of time it takes for the effect to subside. A longer decay simulates a larger space.
Brightness Specifies the amount of detail preserved from the original audio. More brightness can simulate
a room with live, or highly reflective, acoustics.

12ADOBE AFTER EFFECTS 5.0Effects, part 1
Dry Out/Wet Out Specify the mix of the unprocessed (dry) audio to the processed (wet) audio in the final
output.
Stereo Mixer
Use this effect to mix the left and right channels of an audio layer and pan the entire signal from one
channel to the other.
Left Level, Right Level Specifies the level of the left or right audio channel of an audio layer. A value of 2.00
is full level.
Left Pan, Right Pan Shifts the mixed stereo signal from one audio channel to the other. Values of –1.00 for
Left pan and +1.00 for Right pan produce an even balance.
Invert Phase Inverts the phase of both channels of the stereo signal. Use this to prevent two sounds at the
same frequency from canceling each other out.
Tone (PB only)
This effect synthesizes simple tones to create effects such as the low rumble of a submarine, a telephone
ringing in the background, sirens, or a laser blast. You can add up to five tones for each effect to create a
chord, for example, in a composition. When you apply this effect to audio footage, the dry (unprocessed)
audio is ignored, and only the tone plays.
You can also apply the Tone effect to a layer that has no audio, such as an Adobe Illustrator object, to
synthesize audio. When you render the movie, make sure that you select an output format that supports
audio, for example, QuickTime or Video for Windows.
Adjust the following controls for the Tone effect:
Waveform Options Specifies the type of waveform to use.
Sine waves Produce the purest tones.
Square waves Produce the most distorted tones.
Triangle waves Have elements of both, but are closer to Sine.
Saw waves Have elements of both, but are closer to Square.
Frequency 1...5 Specifies the frequency in Hz of the first through the fifth tones. To turn off a tone, set its
frequency to 0.0.
Level Changes the amplitude of all tones. If you hear clicking when you preview or play the audio, you may
have set the Level value too high. To produce a clean sound, use a percentage less than or equal to 100
divided by the number of frequencies you use. For example, if you use all five frequencies, choose 20%.
To avoid clicks at the end of a tone, set a keyframe for the desired amplitude level at the frame just before
the end of the tone, and then set another keyframe for a level of 0.0 at the end of the tone. This technique
works well for any music you end abruptly.

13ADOBE AFTER EFFECTS 5.0Effects, part 1
Blur and Sharpen effects in Adobe After EffectsUse these effects to soften or sharpen an image.
Channel Blur
This effect blurs a layer’s red, green, blue, or alpha channels individually. You can specify that the blur is
horizontal, vertical, or both. At Best quality, the blur is smooth. Use this effect for glow effects or if you want
a blur that does not become transparent near the edges of the layer. The Edge Behavior option describes how
to treat the edges of a blurred image. If you deselect it, pixels outside of the image are transparent, which
makes the edges of the blurred image semitransparent. Select the Repeat Edge Pixels option to repeat the
pixels around the edges, preventing the edges from darkening and becoming more transparent.
Compound Blur
This effect blurs pixels in the selected layer based on the luminance values of a blur layer, also known as a
blurring map. The blur layer, which can be any layer that contains pixels of different luminance values, is
essentially overlaid on top of the selected layer and the pixels of both layers are matched, one to one. Where
the blur layer is black, no blurring occurs in the same location in the selected layer. The blur layer is used
only as a map; it is not visible in the composition.
The Blur Layer specifies the layer in the composition to use as the blurring map. Bright values in the blur
layer correspond to more blurring of the affected layer, while dark values correspond to less blurring.
Maximum Blur specifies the maximum amount, in pixels, that any part of the affected layer can be blurred.
The Stretch Map to Fit option stretches the blur layer to the dimensions of the layer to which it is applied;
otherwise, it is centered. Invert Blur inverts the values, so areas that were previously more blurred will be
less blurred, and vice versa.
This effect is useful for simulating smudges and fingerprints, or changes in visibility due to atmospheric
conditions such as smoke or heat, especially with animated blurring layers. Compound Blur is especially
effective in combination with other effects, such as Displacement Map.
Directional Blur
This effect gives a layer the illusion of motion. In previous versions of After Effects, this effects was called
Motion Blur. At Draft quality, the effect is a blur of the image in which each pixel is the unweighted average
of its adjacent pixels. At Best quality, the effect uses Gaussian weighting, producing a smoother, more
graduated blur. The Direction option specifies the direction of the blur. The blur is applied equally around
a pixel’s center; therefore, a setting of 180 degrees and a setting of 0 degrees look the same.
A. Original B. Directional Blur C. Radial Blur
A B C

14ADOBE AFTER EFFECTS 5.0Effects, part 1
Fast Blur
Use this effect to blur an image. Specify whether the blur is horizontal, vertical, or both. At Best quality, the
Fast Blur effect is a close approximation of a Gaussian Blur, but it blurs large areas more quickly. Select
Repeat Edge Pixels to blur the contents of the layer while keeping the edges of the layer sharp.
Gaussian Blur
This effect blurs and softens the image and can reduce noise. Specify whether the blur is horizontal,
vertical, or both. The layer’s quality setting does not affect Gaussian Blur.
Radial Blur
This effect creates blurs around a specific point in a layer, simulating the effects of a zooming or rotating
camera. At Draft quality, the blur appears somewhat grainy. You may prefer the draft results for special
effects, but the grain may flicker on interlaced displays.
The Amount option specifies the amount of blur, depending on the selection for Type. For a Spin blur,
which applies blurs in circles around the center point, the Amount value indicates the degree of rotation.
For a Zoom blur, which applies blur that radiates out from the center point, the Amount value specifies the
degree of radial blurring. You can specify the level of anti-aliasing applied at Best quality; no anti-aliasing
is applied at Draft quality.
Sharpen
This effect increases the contrast where color changes occur. The layer’s quality setting does not affect
Sharpen.
A. Original image B. Sharpen C. Unsharp Mask
Unsharp Mask
This effect increases the contrast between colors that define an edge. Use the Radius option to specify the
depth of pixels that will be affected at an edge. If you specify a high value, more of the pixels surrounding
the edge are adjusted for contrast. If you specify a low value, only pixels at the edge are adjusted. Use the
Threshold option to specify a tolerance to define edges and prevent overall contrast adjustment that might
generate noise or cause unexpected results. Values define the range of contrast allowed between adjacent
pixels before contrast is adjusted. A lower value produces a more pronounced effect.
A B C

15ADOBE AFTER EFFECTS 5.0Effects, part 1
Channel effectsUse these effects to manipulate, extract, insert, and convert the channels of an image. The channels
themselves include the component color values (red, green, and blue); calculated color values (hue,
saturation, and luminance); and transparency values (alpha channel).
Alpha Levels (PB only)
This effect increases or decreases the transparency of a matte. Use Alpha Levels to adjust pure black or pure
white areas of a matte to be semitransparent, or to adjust grays (semitransparent areas) to be pure black
and white. Alpha values are converted using Input limits, Output limits, and the Gamma value.
Adjust the following controls for the Alpha Levels effect:
Input and Output limits Specify where transparency begins and ends.
Gamma Affects the range of gray values that are converted. A Gamma value of 1 produces a gradual
(linear) distribution of gray values. A Gamma value of less than 1 creates darker gray values and more
transparency. A gamma value of greater than 1 creates lighter gray values and less transparency.
To convert grays in the matte to pure black or white:
1 Set the Input Black Level to a gray value. Alpha values at this level or lower become fully transparent
(black).
2 Set the Input White Level to a gray value. Alpha values at this level or higher become fully opaque (white).
3 Leave the Output Black Level set to 0 and the Output White Level set to 255.
4 If necessary, adjust the Gamma value to increase or decrease transparency.
To convert pure black and white in the matte into gray areas:
1 Leave the Input Black Level at 0 and the Input White Level at 255.
2 Set the Output Black Level slider to a gray value. Alpha values below this value are raised to this value.
3 Set the Output White Level to a gray value. Alpha values above this value are lowered to this value.
Arithmetic
This effect performs various simple mathematical operations on an image’s red, green, and blue channels.
The Operator option specifies the mathematical operation to perform between the value you specify for
each channel and the existing value of that channel for each pixel in the image: And, Or, and Xor apply
bitwise logical combinations of the specified value; Add, Subtract, and Difference apply basic math
functions using the specified value; Max selects each pixel in the color channel that is less than the specified
value and sets it at the specified value; Min selects each pixel in the channel that is greater than the specified
value and sets it at the specified value. Block Above and Block Below turn the channel off everywhere that it
is respectively greater or less than the specified value; Slice turns the channel off where it is below the value
specified and turns it on where it is above the specified value.
The Clip Result Values option prevents all functions from creating color values that exceed the valid range.
If this option is not selected, some color values may wrap around from on to off, or vice versa.
16ADOBE AFTER EFFECTS 5.0Effects, part 1
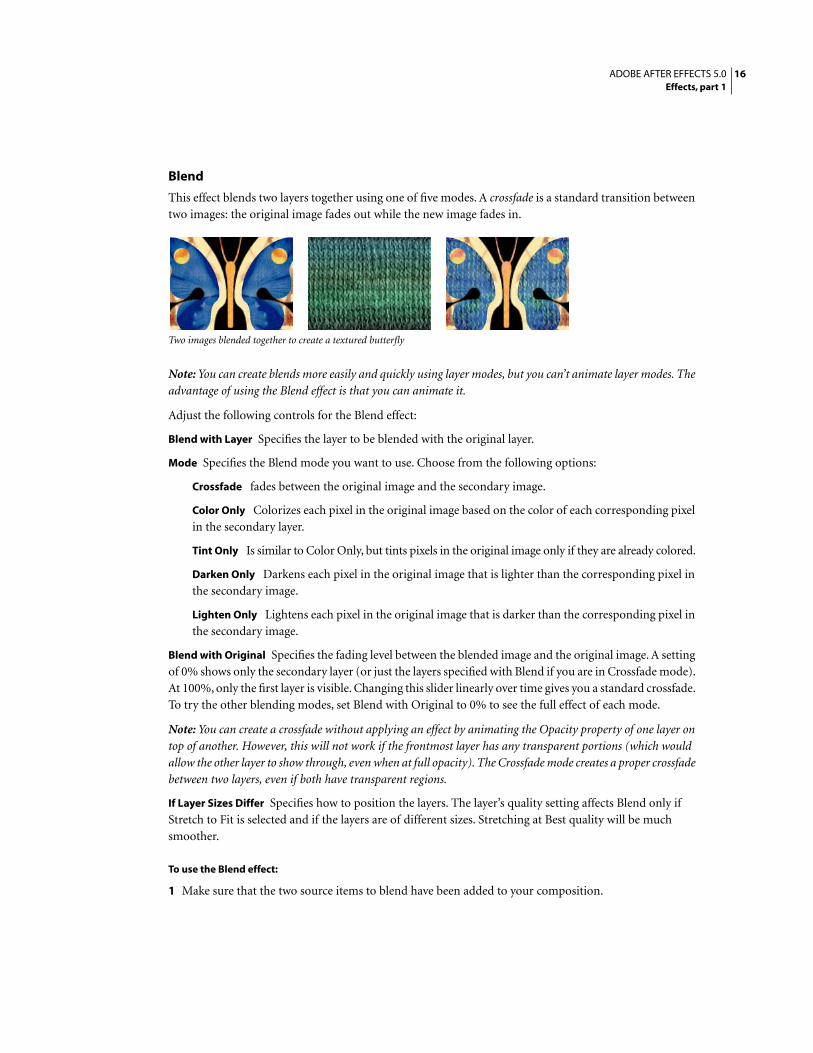
Blend
This effect blends two layers together using one of five modes. A crossfade is a standard transition between
two images: the original image fades out while the new image fades in.
Two images blended together to create a textured butterfly
Note: You can create blends more easily and quickly using layer modes, but you can’t animate layer modes. The
advantage of using the Blend effect is that you can animate it.
Adjust the following controls for the Blend effect:
Blend with Layer Specifies the layer to be blended with the original layer.
Mode Specifies the Blend mode you want to use. Choose from the following options:
Crossfade fades between the original image and the secondary image.
Color Only Colorizes each pixel in the original image based on the color of each corresponding pixel
in the secondary layer.
Tint Only Is similar to Color Only, but tints pixels in the original image only if they are already colored.
Darken Only Darkens each pixel in the original image that is lighter than the corresponding pixel in
the secondary image.
Lighten Only Lightens each pixel in the original image that is darker than the corresponding pixel in
the secondary image.
Blend with Original Specifies the fading level between the blended image and the original image. A setting
of 0% shows only the secondary layer (or just the layers specified with Blend if you are in Crossfade mode).
At 100%, only the first layer is visible. Changing this slider linearly over time gives you a standard crossfade.
To try the other blending modes, set Blend with Original to 0% to see the full effect of each mode.
Note: You can create a crossfade without applying an effect by animating the Opacity property of one layer on
top of another. However, this will not work if the frontmost layer has any transparent portions (which would
allow the other layer to show through, even when at full opacity). The Crossfade mode creates a proper crossfade
between two layers, even if both have transparent regions.
If Layer Sizes Differ Specifies how to position the layers. The layer’s quality setting affects Blend only if
Stretch to Fit is selected and if the layers are of different sizes. Stretching at Best quality will be much
smoother.
To use the Blend effect:
1 Make sure that the two source items to blend have been added to your composition.
17ADOBE AFTER EFFECTS 5.0Effects, part 1
2 Apply the Blend to one layer (A) and choose the name of the other layer (B) in the Blend with Layer pop-
up menu.
3 Hide layer B by clicking the Video switch next to the layer in the Audio/Video Features panel in the
Timeline window.
Cineon Converter
This effect provides a high degree of control over color conversions of Cineon frames. In After Effects 5.0,
you can convert the color in a Cineon file using controls in the Interpret Footage dialog box or using the
Cineon Converter effect. To use the Cineon Converter, import a Cineon file and leave it in its default state;
After Effects will either condense the colors to 8 bit or expand them to 16 bit, depending on the mode you
are working in. You can then apply the Cineon Converter to the file and precisely adjust the colors while
interactively viewing the results in the Composition window. Set keyframes to adjust for changes in tone
over time—use keyframe interpolation and ease handles to precisely match the most irregular lighting
changes, or leave the file in its default state and use the converter.
The 10 bits of data available in each Cineon channel make it easier to enhance an important range of tones
while preserving overall tonal balance. By carefully specifying the range, you can create a version of the
image that faithfully resembles the original.
Adjust the following controls with the Cineon Converter:
Conversion Type Specifies how the Cineon file is converted. Choose one of the following (obsolete options
of each are available for compatibility with projects converted from older versions of After Effects):
Log to Linear Converts an 8-bit logarithmic non-Cineon layer that you plan to render as a Cineon
sequence.
Linear to Log Converts a layer containing an 8-bit linear proxy of a Cineon file into an 8-bit
logarithmic file so that its display characteristics are consistent with the original Cineon file.
Log to Log Detects an 8- or 10-bit logarithmic Cineon file when you plan to render it as an 8-bit
logarithmic proxy.
10 Bit Black Point Specifies the black point (minimum density) for converting a 10-bit logarithmic
Cineon layer.
Internal Black Point Specifies the black point used for the layer in After Effects.
10 Bit White Point Specifies the white point (maximum density) for converting a 10-bit logarithmic
Cineon layer.
Internal White Point Specifies the white point used for the layer in After Effects.
Gamma Specifies the value of midtones.
Highlight Rolloff Specifies the rolloff value used to correct bright highlights.
To control the tonal balance of a Cineon file:
1 Import the Cineon file into After Effects and add it to a composition.
2 Select the Cineon file layer in the Composition or Timeline window and choose Effect > Cineon Tools
> Cineon Converter.

18ADOBE AFTER EFFECTS 5.0Effects, part 1
3 Choose an option from the Conversion Type menu.
4 Adjust the black point:
• To darken areas or make areas black, drag the 10 Bit Black Point slider to the right.
• To lighten black areas and make details in dark areas visible, drag the 10 Bit Black Point slider to the left.
5 Adjust the white point:
• To whiten gray areas, drag the 10 Bit White Point slider to the left.
• To darken white areas or make the lightest details visible, drag the 10 Bit White Point slider to the right.
If adjusting the brightest areas makes the rest of the image appear too dark, use the Highlight Rolloff slider
to adjust these bright highlights.
6 Adjust midtones by dragging the Gamma slider to the left to darken midtones, or to the right to lighten
midtones.
7 If highlights appear as white blotches, drag the Highlight Rolloff slider to the right until details are
visible. An image with high contrast may require a high rolloff value.
Note: Each computer monitor has unique display characteristics that affect your perception of color on-screen.
For best results when evaluating tonal balance, use the Info palette in After Effects to see the true color values of
pixels as you move the pointer over them.
Compound Arithmetic
This effect mathematically combines the layer to which it is applied with another layer. The Compound
Arithmetic effect is intended only to provide compatibility with projects created in earlier versions of After
Effects that use the Compound Arithmetic effect. Using layer modes is more effective than using the
Compound Arithmetic effect in most situations.
Adjust the following controls for the Compound Arithmetic effect:
Second Source Layer Specifies the layer to use with the current layer in the given operation.
Operator Specifies the operation to perform between the two layers.
Operate on Channels Specifies the channels to which the effect is applied.
Overflow Behavior Specifies how pixel values that exceed the allowed range are treated. Choose from the
following options:
Clip Indicates that the values will be limited to the allowed range.
Wrap Indicates that values exceeding the allowed range will wrap around from full on to full off, and
vice versa.
Scale Indicates that the maximum and minimum values will be calculated and the results will be
stretched down from that full range to the range of allowable values.
Stretch Second Source to Fit Scales the second layer to match the size (width and height) of the current
layer. If this option is deselected, the second layer is placed at its source’s current size, aligned with the
upper left corner of the source layer.
Blend with Original Adjusts the opacity of the second source layer so it blends with the original layer.

19ADOBE AFTER EFFECTS 5.0Effects, part 1
Invert
This effect inverts the color information of an image.
Adjust the following controls for the Invert effect:
Channel Specifies which channel or channels to invert. Each group of items operates in a particular color
space, inverting either the entire image in that color space or just a single channel.
RGB Consists of three additive color channels: red, green, and blue.
HLS Consists of three calculated color channels: hue, lightness, and saturation.
YIQ Is the NTSC luminance and chrominance color space, where Y is the luminance signal, and I and
Q are the inphase and quadrature chrominance signals.
Alpha (not a color space) Provides a way to invert the alpha channel of the image.
Blend with Original Combines the inverted image with the original. You can apply a fade to the inverted
image.
Minimax
This effect enlarges or reduces a matte for a specific channel or all channels. It assigns each pixel the
minimum or maximum pixel value found within a specified radius. For example, a white solid layer with
a square mask shrinks one pixel on each side using Minimum and a radius of 1. The layer’s quality setting
does not affect Minimax.
Adjust the following controls for the Minimax effect:
Operation Specifies how the effect processes the matte:
Minimum Replaces a pixel with the smallest pixel value within the radius specified.
Maximum Replaces a pixel with the largest pixel value within the radius specified.
Minimum Then Maximum Performs the Minimum operation on the layer followed by the Maximum
operation using the Radius setting.
Maximum Then Minimum Does the opposite of Minimum Then Maximum.
Radius Specifies how many pixels to examine for the Minimum or Maximum operation.
Channel Specifies the channel.
Color Affects the color channels only.
Alpha and Color Affects all channels.
Red, Green, Blue, and Alpha Affect only the respective channels.
Direction Specifies the direction of scanning for values.
Horizontal & Vertical Scans all directions for the minimum or maximum pixel.
Just Horizontal and Just Vertical Scan only left and right or up and down, respectively.
20ADOBE AFTER EFFECTS 5.0Effects, part 1
Remove Color Matting
This effect removes color fringes from layers that are premultiplied with a color. It is useful when merging
alpha and fill from separate files. If you import footage with a premultiplied alpha channel, or if you create
alpha channels with After Effects, you may need to remove halos from an image. Halos are caused by a large
contrast between the image’s color and the background, or matte, color. Removing or changing the color
of the matte can remove the halos. (Halos can also be caused by a misinterpretation of an alpha channel’s
premultiplied color.)
Use Background Color to specify the new background color when you want to change the color of a matte.
Set Channels
This effect copies channels from other layers to the red, green, blue, and alpha channels of the current
layer. For example, you can take the luminance of one layer and put it into the color channel of the
selected layer. All source layers are centered in the current layer. With Best quality selected, any stretched
layers are anti-aliased.
Use Stretch Layers to Fit to resize all other layers to the size of the layer to which Set Channels is being applied.
Set Matte
This effect replaces the alpha channel (matte) of a layer with a channel from another layer above it for the
creation of traveling matte effects.The Set Matte effect is intended only to provide compatibility with
projects created in earlier versions of After Effects that use the Set Matte effect.
To create a traveling matte using the Set Matte effect, set up the motion of the matte layer and precompose
that layer with all properties. Use the resulting composition as the layer from which to take the matte.
Although you can use Set Matte for a traveling matte, it is easier and faster to create traveling mattes by
using a track matte.
Adjust the following controls for the Set Matte effect:
Take Matte from Layer Specifies the layer to use as the replacement matte. You can specify any layer in the
composition.
Use for Matte Specifies the channel of the specified layer to use for the matte.
Invert Matte Inverts the transparency values of the matte.
Stretch Matte to Fit Scales the selected layer to match the size of the current layer. If unselected, the layer
designated as the matte is centered in the first layer.
Composite Matte with Original Composites the new matte with the current layer, rather than replacing it.
The resulting matte allows the image to show through only where the current matte and the new matte
both have some opacity.

21ADOBE AFTER EFFECTS 5.0Effects, part 1
Shift Channels
This effect replaces red, green, blue, and alpha channels in the image with other channels. In Take
(Channel) From, specify which channel to use as a source.
Note: You can use this effect to display the alpha channel for a layer if you set the RGB channels to Alpha and
set the alpha channel to Full.
Distort effectsUse these effects to geometrically distort an image.
Bezier Warp
This effect shapes an image using a closed Bezier curve along the boundary of a layer. The curve consists of
four segments. Each segment has four control points (two vertices and two tangents). The vertices control
the position of the segments, and the tangents control the curvature of the segments.
A. Vertex 1 B. Tangent 1 C. Tangent 2 D. Vertex 2 E. Tangent and vertex positioned to create a curved edge
The positions of vertices and tangents determine the size and shape of a curved segment. Dragging these
points reshapes the curves that form the edge, thus distorting the image. For example, you can use Bezier
Warp to reshape one image to fit another, as in wrapping a label around a jar. Bezier Warp is also useful for
correcting lens aberrations, such as the fish-eye effect (barrel distortion) that can occur when using a wide-
angle lens. Using Bezier Warp, you can bend the image back to achieve an undistorted look. By animating
the effect and choosing a high elasticity setting, you can create fluid visual effects, such as a jiggling gelatin
dessert or a fluttering flag.
Adjust the following controls for the Bezier Warp effect:
Top Left Vertex Specifies the starting vertex for the top segment or the ending vertex for the left segment.
Top Left Tangent Specifies the starting tangent for the top segment
Top Right Tangent Specifies the ending tangent for the top segment.
Right Top Vertex Specifies the ending vertex for the top segment or the starting vertex for the right
segment.
Right Top Tangent Specifies the starting tangent for the right segment.
Right Bottom Tangent Specifies the ending tangent for the right segment.
Bottom Right Vertex Specifies the ending vertex for the right segment or the starting vertex for the bottom
segment.
Bottom Right Tangent Specifies the ending tangent for the bottom segment.
A EB C D
22ADOBE AFTER EFFECTS 5.0Effects, part 1
Bottom Left Tangent Specifies the starting tangent for the bottom segment.
Left Bottom Vertex Specifies the ending vertex for the bottom segment or the starting vertex for the left
segment.
Left Bottom Tangent Specifies the ending tangent for the left segment.
Left Top Tangent Specifies the starting tangent for the left segment.
Elasticity Specifies how closely the image follows the shape defined by the curve. Higher elasticity settings
require more rendering time.
Stiff Acts like cold rubber, allowing the image to distort the least amount.
Normal Has both Stiff and Liquid elements, but is closer to Stiff.
Loose Has both Still and Liquid elements, but is closer to Liquid.
Liquid Acts like hot rubber, allowing the image to distort in a fluid fashion.
Note: When adjusting curves, avoid creating foldovers (areas of an image that overlap adjacent areas). A jagged
edge may appear on the image where the foldover occurs. Also, avoid creating obtuse angles (angles greater than
90 degrees between two tangents), because the image may not follow the shape closely. Increasing the amount
of elasticity may help to correct foldovers and undesired results from obtuse angles.
Bulge
This effect distorts an image around a specified point, making the image appear to bulge toward or away
from the viewer, depending on the options you select.
Adjust the following controls for the Bulge effect:
Horizontal Radius Sets the width of the bulge, measured in pixels. You can also set the radius values by
dragging the selection handles in the layer.
Vertical Radius Sets the length of the bulge, measured in pixels. You can also set the radius values by
dragging the selection handles in the layer.
Bulge Height Sets the depth of the bulge. Positive values push the bulge toward the viewer. Negative values
pull the bulge away from the viewer. A bulge height of 0 produces no bulge, which can be useful for setting
keyframes so the bulge fades in over time.
Taper Radius Sets the steepness of the sides of the bulge. A taper radius of 0 produces a steep, pronounced
bulge. Increasing the taper radius produces a more gradual bulge.
Antialiasing Sets the amount of edge smoothing (blending of colors) at the boundaries of the bulge. Anti-
aliasing is applied only when Best Quality is selected for the layer. For many layers, choosing a setting of
Low produces satisfactory results. A setting of High produces more smoothing but can significantly
increase rendering time.
Pin All Edges Prevents the edges of the layer from bulging.
23ADOBE AFTER EFFECTS 5.0Effects, part 1
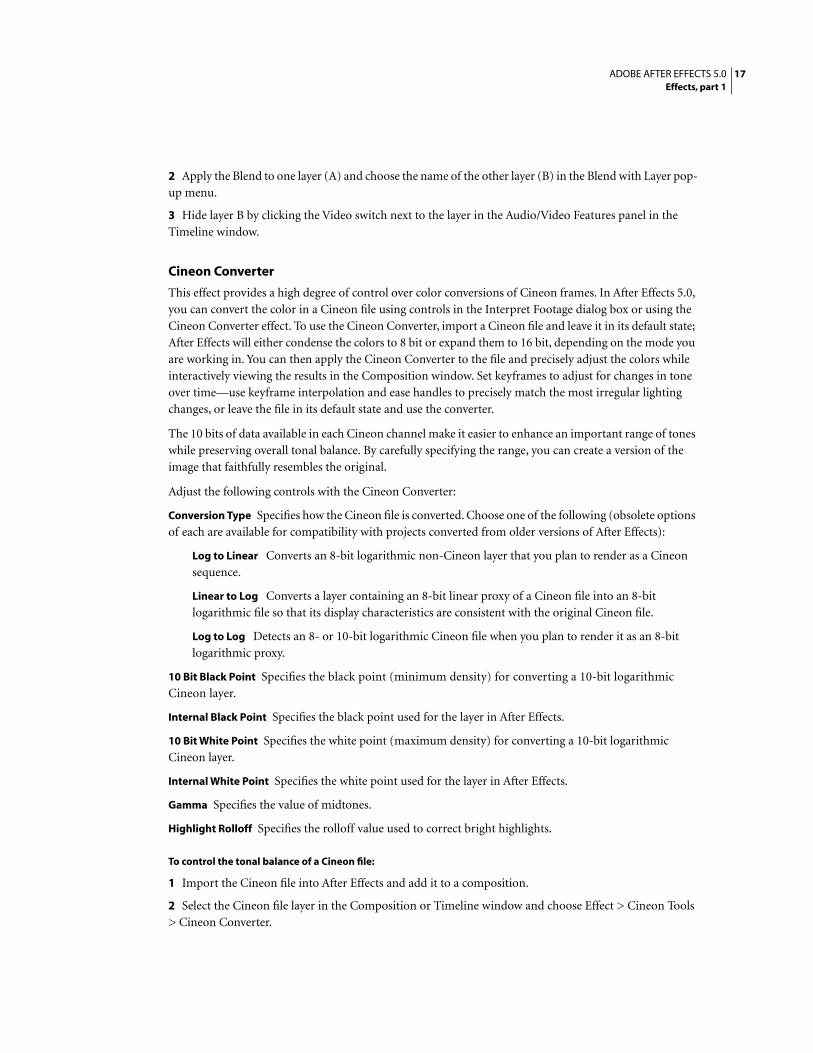
Corner Pin (PB only)
This effect distorts an image by changing the position of each of its four corners. Use it to stretch, shrink,
skew, or twist an image, or to simulate perspective or movement that pivots from the edge of a layer, such
as a door opening. You can also use it to attach a layer to a moving rectangular region tracked by the Motion
Tracker. You can move the corner pins in the Composition window or the Effect Controls window.
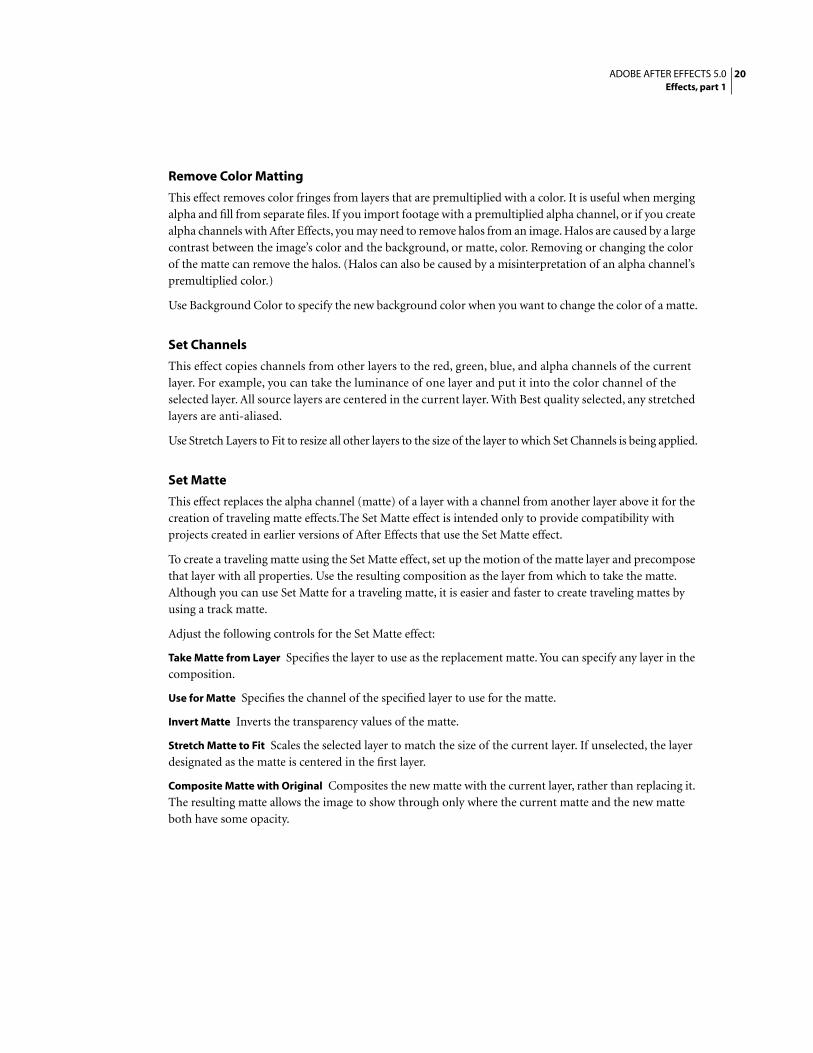
Displacement Map
This effect distorts a layer by displacing pixels horizontally and vertically based on the color values of pixels
in a second layer, called the displacement map. The type of distortion created by the Displacement Map
effect can vary greatly, depending on the displacement map and options you select.
You can use any layer as a displacement map. To understand how pixels are displaced, think of the
displacement occurring in steps:
1 After Effects overlays the displacement map layer on top of the layer you are distorting. You can specify
whether the map is centered, tiled, or stretched to fit.
A. Displacement map B. Map centered C. Map stretched D. Map tiled
2 You specify a color channel on which to base horizontal displacement and vertical displacement, and
then you specify a maximum displacement value in pixels.
3 For the specified channel, the color value of each pixel in the displacement map is used to calculate the
displacement of the corresponding pixel in the image.
The color value range extends from 0 to 255, which is converted into a scale ranging from -1 to 1. The
displacement amount is calculated by multiplying the converted value by the maximum displacement
amount you specify. A color value of 0 produces maximum negative displacement (–1 maximum
displacement). A color value of 255 produces maximum positive displacement. A color value of 128
produces no displacement. For other values, you can calculate the displacement amount, in pixels, using
the following equation:
Displacement amount = maximum_displacement * (2 * (color value – 128)/256)
A B C D

24ADOBE AFTER EFFECTS 5.0Effects, part 1
4 After Effects creates a new grid with the same dimensions as the image. For each pixel in the original
image, displacement occurs by using the displacement amount (calculated in step 3) to find the new pixel.
The new pixels are then inserted sequentially into the new grid. This method of displacement makes the
image appear to shift in the opposite direction of the displacement.
An example of a displacement map
Suppose you specify the red channel as the color channel for vertical displacement, and you specify 100
pixels as the maximum displacement amount. Using the red values of pixels in the displacement map, After
Effects calculates the displacement amount for each corresponding pixel in the original image. If the first
pixel in the upper left corner of the displacement map has a red value of 150, then the displacement amount
is 17 pixels (using the equation above and a maximum displacement of 100). Because the direction of
positive vertical in graphics coordinates is downward, After Effects finds the new pixel for the upper left
corner by counting downward 17 pixels. This pixel is then inserted in the upper left corner of the new grid
for the displaced image. Subsequent pixels are found in the same way, and each one is inserted sequentially
in the new grid, creating a new image.
Using displacement maps
Different displacement maps distort the same image in different ways. In the following examples,
displacement occurs both horizontally and vertically, using the red channel for both directions. Each
displacement map is the same size as the image and is centered. The maximum displacement amount is 50
pixels, and the Wrap option is selected.
Grayscale steps used as a displacement map (left) displace light and dark areas in opposite directions (right). Neutral gray (50% gray) produces no displacement.
Adjust the following controls for the Displacement Map effect:
Displacement Map Layer Specifies the layer in the composition to use as the displacement map.
Note: After Effects uses the layer you select in its original form, without any masking, effects, or transformations
you may have applied. If you want to use the layer with those alterations included in the displacement map,
you must precompose that layer using the Move All Attributes Into the New Composition option.
Use for Horizontal Displacement and Use for Vertical Displacement Specify the color property used to
obtain color values to calculate the horizontal and vertical displacements. After Effects can obtain color
values from any RGB channel, or from luminance, hue, lightness, or saturation. To displace all pixels the
maximum positive amount, choose Full. To displace all pixels the maximum negative amount, choose Off.
Choosing Half produces no displacement.

25ADOBE AFTER EFFECTS 5.0Effects, part 1
Max Horizontal Displacement and Max Vertical Displacement Specify the maximum distance, in pixels,
that pixels are displaced. Maximum displacement occurs only when the value of the specified color
property is either 0 or 255. Negative values reverse the direction of displacement. Values between 0 and 255
produce displacements calculated using the following equation:
Displacement amount = maximum_displacement * (2 * (color value – 128)/256)
Displacement Map Behavior Specifies how to place the displacement map in the layer you are distorting.
Center Map places the map in the center of the layer. Choose this option if the dimensions of the
displacement map are the same as those of the layer you are distorting. Stretch Map to Fit stretches or
shrinks the displacement map to the size of the selected layer. Scaling the displacement map by using
Stretch Map to Fit can produce jagged edges and can affect the distortion. Tile Map fills the dimensions of
the selected layer with as many copies of the map as can fit.
Note: For more control over the position of the displacement map on the layer you are distorting, you can create
a separate composition for the displacement map, and then drag the new composition into the first composition
containing the layer. The new composition becomes another layer, which you can specify as the displacement
map. To overlay the displacement map at any location on the layer, move the displacement map in the Layer
window.
Edge Behavior Determines how the displacement affects pixels at the edges of the image. If Wrap Pixels
Around is selected, displacement at the edges of the image uses pixels from the wrapped image. If this
option is not selected, displacement beyond the edge of the image uses transparent pixels.
Mesh Warp
This effect applies a grid of Bezier patches (squares in the grid) over a layer, which you can manipulate to
distort areas of an image. Each corner of a patch includes a vertex and from two to four tangents (points
that control the curvature of the line segment that makes up the edge of the patch). The number of tangents
depends on whether the vertex is in a corner, on an edge, or inside the grid. By moving the vertices and
tangents, you can manipulate the shape of the curved line segment. The finer the grid, the tighter the
adjustments you can make to the area of the image inside the patch.
You can also use Mesh Warp to create smooth transitions between multiple images and layers. Using
keyframes for effects and opacity, you can animate the transition between layers, revealing and distorting
layers over time.
A. Original layer with grid applied B. Same layer with modified grid C. Final image
A B C

26ADOBE AFTER EFFECTS 5.0Effects, part 1
Adjust the following controls for the Mesh Warp effect:
Rows/Columns Specify up to 127 patches vertically (Rows) or horizontally (Columns). For broader
distortion, use fewer patches. For finer control, use more. Drag the vertices and tangents to change the grid
shape. The image follows the grid shape according to the elasticity setting you have chosen and the boundary
created by the adjacent patch.
Elasticity Specifies how closely the image follows the shape defined by the curve. Higher elasticity settings
require more rendering time.
Stiff Acts like cold rubber, allowing the image to distort the least amount.
Normal Has both Stiff and Liquid elements, but is closer to Stiff.
Loose Has both Still and Liquid elements, but is closer to Liquid.
Liquid Acts like hot rubber, allowing the image to distort in a fluid fashion.
Grid Values Displays the resolution (in rows and columns of patches) that will be used to render the movie.
If you change the resolution (add or remove rows and columns) but don’t change the shape of the grid
(drag a vertex or tangent), the grid values don’t change. Whenever you change the shape of the grid, the
grid values update.
Note: Each patch becomes a boundary for the distortion. For example, when you stretch a patch, the area of the
image in the patch stretches, squishing the area of the image in the adjacent patch. The boundary of the adjacent
patch protects the image inside it from being squished to zero. In other words, you can’t push an image out of
its patch.
Mirror
This effect splits the image along a line and reflects one side onto the other. The Reflection Center specifies
the position of the line.The Reflection Angle determines which side is reflected and where the reflection
appears. An angle of 0 degrees reflects the left side onto the right. An angle of 180 degrees reflects the right
side onto the left. An angle of 90 degrees reflects the top onto the bottom. An angle of 270 degrees reflects
the bottom onto the top. The layer’s quality setting influences the Mirror effect. At Best quality, the
reflected image is smoother and more accurate.
Offset
This effect pans the image within a layer. Visual information pushed off one side of the image appears on
the opposite side. At Best quality, the offset is performed with subpixel precision.
The Shift Center To option specifies the new position of the original image’s center point. Blend with
Original specifies the amount by which the offset image is blended with the original image.

27ADOBE AFTER EFFECTS 5.0Effects, part 1
Optics Compensation
Use this effect to add or remove camera lens distortions. Elements composited with mismatched lens
distortion cause anomalies in the animation. For example, tracked objects in a distorted scene don’t match
the scene area, because linear objects don’t follow the distortion of the scene.
A. Original image B. Corrected using Optics Compensation C. Original image with computer graphics D. Corrected image with computer graphics
Adjust the following controls for the Optics Compensation effect:
Field of View (FOV) Specifies the field of view of the distorted footage. For example, a wide-angle lens has
a high FOV value. The FOV is relative to the size of the source layer and the selected FOV Orientation. The
distortion amount is relative to FOV.
To find the correct FOV, find an edge or line in the footage that is distorted. Adjust the FOV until the edge
is straight, and then apply that same value in reverse to computer-generated material to match the
distortion of the footage. This process composites the computer-generated element with the footage using
a matching lens distortion.
There is no general rule as to what FOV value applies to different lenses. Finding the correct FOV value is
a manual process. A number of properties affect this value, including the lens, zoom factor, and inner
optics of the camera. Zooming in reduces the FOV and zooming out increases it; consequently, if footage
includes different zoom values you’ll need to keyframe the FOV value.
When adding distortion, higher FOV values require larger sources. To add wide-angle distortion, make
sure that the source layer is larger than the final output. A wide-angle lens reveals areas that are not visible
with a narrower lens; if the revealed areas are not in the source, they appear transparent. The Resize option
can automatically set the layer size to accommodate the distortion.
Reverse Lens Distortion Reverses the lens distortion. For example, to remove wide-angle lens distortion,
set Field of View to 40.0 and select Reverse Lens Distortion.When selected, the Resize control is enabled.
BA
DC
28ADOBE AFTER EFFECTS 5.0Effects, part 1
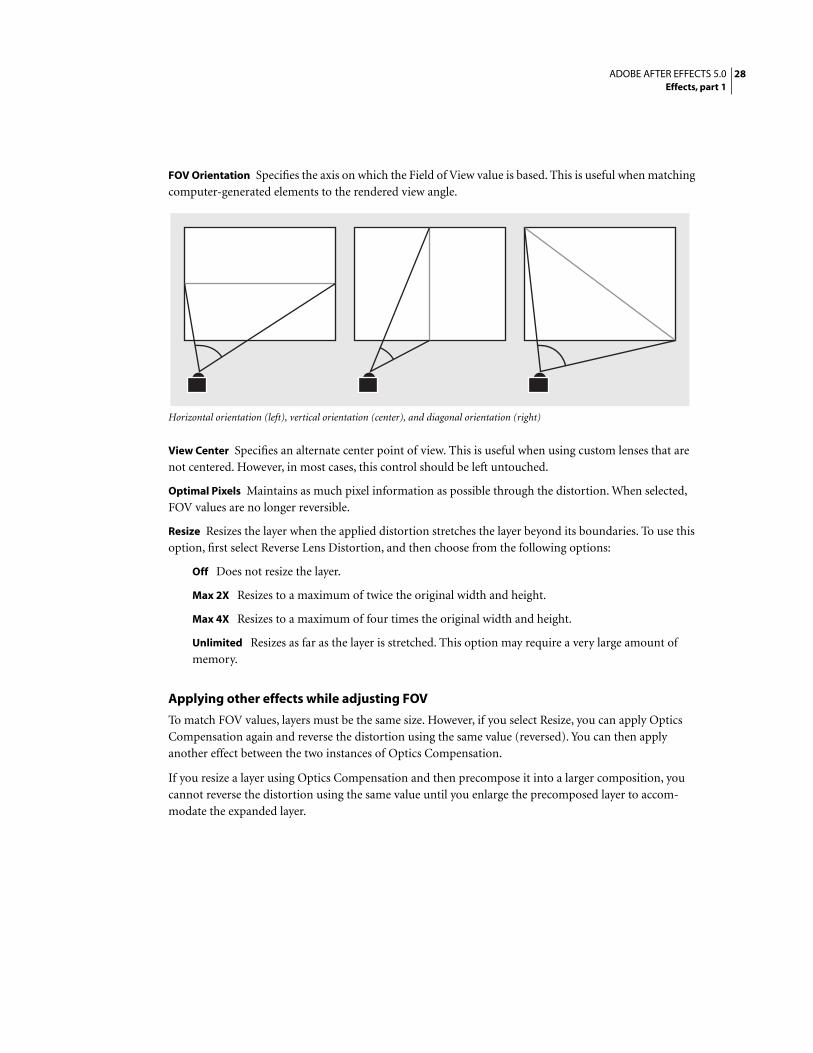
FOV Orientation Specifies the axis on which the Field of View value is based. This is useful when matching
computer-generated elements to the rendered view angle.
Horizontal orientation (left), vertical orientation (center), and diagonal orientation (right)
View Center Specifies an alternate center point of view. This is useful when using custom lenses that are
not centered. However, in most cases, this control should be left untouched.
Optimal Pixels Maintains as much pixel information as possible through the distortion. When selected,
FOV values are no longer reversible.
Resize Resizes the layer when the applied distortion stretches the layer beyond its boundaries. To use this
option, first select Reverse Lens Distortion, and then choose from the following options:
Off Does not resize the layer.
Max 2X Resizes to a maximum of twice the original width and height.
Max 4X Resizes to a maximum of four times the original width and height.
Unlimited Resizes as far as the layer is stretched. This option may require a very large amount of
memory.
Applying other effects while adjusting FOV
To match FOV values, layers must be the same size. However, if you select Resize, you can apply Optics
Compensation again and reverse the distortion using the same value (reversed). You can then apply
another effect between the two instances of Optics Compensation.
If you resize a layer using Optics Compensation and then precompose it into a larger composition, you
cannot reverse the distortion using the same value until you enlarge the precomposed layer to accom-
modate the expanded layer.
29ADOBE AFTER EFFECTS 5.0Effects, part 1
Matching FOV with computer graphics
The following example uses footage shot with a wide-angle lens and a FOV of 46 degrees. The roof edge is
curved by the lens distortion.
To match the distortion with computer graphics:
1 Select 46 for Reverse FOV. This value flattens the footage, making it possible to match the flat surface to
the wall.
2 Precompose the layer. Then turn off the Optics Compensation effect for the footage layer.
3 Apply Optics Compensation to the precomposed layer, and select 46 for the FOV. This process makes it
possible to match footage to computer graphics and computer graphics to footage. In either case, you must
flatten the footage as shown in step 1.
Polar Coordinates
This effect distorts a layer by transposing each pixel in the layer’s x,y coordinate system to the corre-
sponding position in the polar coordinate system, or the reverse. This effect produces unusual and
surprising distortions that can vary greatly depending on the image and the controls you select. The
standard coordinate system specifies points by measuring the horizontal distance (x axis) and the vertical
distance (y axis) from the origin. Each point is specified as (x,y). The polar coordinate system specifies
points by measuring the length of a radius from the origin (r) and its angle from the x axis (θ). Each point
is specified as (r, θ).
Adjust the following controls for the Polar Coordinates effect:
Interpolation Specifies the amount of distortion. At 0% there is no distortion.

30ADOBE AFTER EFFECTS 5.0Effects, part 1
Type of Conversion Specifies the conversion process to use. Choose one of the following options:
Rect to Polar Moves pixels by using x,y coordinates from each pixel as r, θ coordinates. For example,
an x,y coordinate of 2,3 becomes a polar coordinate with a radius of 2 and a degree of 3. Horizontal
lines distort into circles and vertical lines into radial lines.
Polar to Rect Moves pixels by using the r,θ coordinates from each pixel as the x,y coordinates. For
example, a polar coordinate of radius 10 and 45 degrees becomes an x,y coordinate of 10,45.
PS+Pinch
See the Adobe Photoshop online Help for information on using this effect.
PS+Ripple
See the Adobe Photoshop online Help for information on using this effect.
PS+Spherize
See the Adobe Photoshop online Help for information on using this effect.
PS+Twirl
See the Adobe Photoshop online Help for information on using this effect.
PS+Wave
See the Adobe Photoshop online Help for information on using this effect.
PS+Zig Zag
See the Adobe Photoshop online Help for information on using this effect.
Reshape
This effect transforms one shape into another shape on the same layer, dragging the underlying image
with it. The image is distorted to fit the shape of the new area. You create masks to define the area you
want to distort.

31ADOBE AFTER EFFECTS 5.0Effects, part 1
First create or import three masks: the source mask, the destination mask, and the boundary mask
(optional). After Effects assigns the masks a function, such as source, destination, or boundary, based on
the order you create or import them. You can create masks in the Layer window in After Effects, or use
masks created in Adobe Illustrator. Use a closed path for your mask. If you use an open path, After Effects
automatically closes it, giving unpredictable results. All three masks must be on the same layer as the
footage to which you will apply the Reshape effect, although you can copy masks from another layer.
A. Source mask B. Destination mask C. Reshaped image within the rectangular boundary mask
Note: As with the Mesh Warp effect, you can use Reshape to create unusual transitions between multiple images
and layers. Using keyframes for effects and opacity, you can animate the transition between layers, revealing
and distorting layers over time.
Adjust the following controls for the Reshape effect:
Source Mask Specifies the mask that contains the image area you want to reshape. By default, After Effects
selects the second mask you create or import as the source mask, although you can assign one of the other
two masks to be the source mask if you want. In the Composition and Layer windows, a red outline defines
the source mask.
Destination Mask Specifies the mask that determines the shape of the final image. By default, After Effects
selects the third mask you create or import as the destination mask, although you can assign one of the
other two masks to be the destination mask if you want. In the Composition and Layer windows, a yellow
outline defines the destination mask.
Boundary Mask Specifies what part of the image is reshaped. Anything outside the boundary is not altered.
By default, After Effects selects the first mask you create or import as the boundary mask, although you can
assign one of the other two masks to be the boundary mask if you want. In the Composition and Layer
windows, a blue outline defines the boundary mask.
Percent Specifies the percent of the reshape you want performed. This value is useful for creating partial
distortions that grow over time.
Elasticity Specifies how closely the image follows the shape defined by the curve. Stiff acts like cold rubber,
allowing the image to distort the least amount. Super Fluid acts like hot rubber, allowing the image to distort
in a fluid fashion. The other settings fall between. More fluid elasticity settings require more rendering time.
If the final image doesn’t follow the curve as expected, use the following elasticity guidelines:
• In general, use the stiffest setting possible that doesn’t create a polygonal image.
• Use Stiff, Less Stiff, or Below Normal if the source and destination masks are similar in shape and have
low curvature (few curved segments that change direction radically).
A B C

32ADOBE AFTER EFFECTS 5.0Effects, part 1
• Use Normal, Absolutely Normal, or Above Average if the source and destination masks are dissimilar and
have mild curvature.
• Use Loose, Liquid, or Super Fluid if the masks are very dissimilar and have extreme curvature.
• In general, use a higher elasticity setting if the final image looks polygonal, but the curves are smooth.
Correspondence Points Specifies the number of points on the source mask that are associated with, or
mapped to, points on the destination mask. These points appear in the Composition window and control
the interpolation of the distortion through space. To control the precision of the effect, you can add, delete,
or move the points on either mask. A mask can have an unlimited number of points, but the more points
you have, the longer the effect takes to render. If the distortion appears twisted, try adding more correspon-
dence points at distinguishing points along the masks. (If the arc lengths of the curves between correspon-
dence points are too different, twisting may result.)
Reshaped image will not be twisted (left). Reshaped image will be twisted (right).
Interpolation Method Specifies how After Effects determines the distortion of each video or animation
frame in the interval between keyframes or when no keyframes exist.
Discrete Requires no keyframes because it calculates the distortion at each frame. Discrete produces
the most accurate results but requires more rendering time.
Linear (the default) Requires two or more keyframes and performs a straight-line interpolation
between the keyframes. Linear produces steady changes between keyframes and sharp changes at
keyframes.
Smooth Requires three or more keyframes and approximates the distortion using cubic curves,
producing distortions with graceful motion.
To apply the Reshape effect:
1 Double-click the layer in the Composition window to open it in a Layer window.
2 Create or import the source, destination, and boundary masks into the layer.
Name each mask so that you can easily recognize it in the Mask menu in the Effect
Controls window.
3 Position the boundary mask to specify the area of the image that will remain unaltered. Keep the
boundary mask as far away as possible from the source and destination masks to avoid foldovers.

33ADOBE AFTER EFFECTS 5.0Effects, part 1
4 Scale and position the source mask over the image you want to reshape. Scale and position the desti-
nation mask to indicate the final shape. Distortions work best if the source and destination masks are
roughly in the same location.
5 Make the Composition or Timeline window active, select the layer, and then choose Effect > Distort >
Reshape.
6 From the Mask menus, choose the source, destination, and boundary masks.
7 Adjust the Percent control and choose an option for Elasticity.
8 In the Composition window, add, delete, or move correspondence points on the masks to control the
distortion:
• To add a point, Alt-click (Windows) or Option-click (Mac OS) the mask.
• To delete a point, Alt-click or Option-click an existing point.
• To move a point, drag it to a new location.
• To change the interpolation of a pair of points, Shift-click a point. If the point icon changes to a circle,
you have chosen smooth interpolation, which works best with round masks. If the point icon changes to a
square, you have chosen linear interpolation, which works best with angular masks. You can combine
smooth and linear interpolation in the same composition.
9 Choose an Interpolation Method and preview the distortion. If Linear or Smooth interpolation
produces undesired results, add more keyframes. If Discrete interpolation produces undesired results,
choose another method.
Ripple
This effect creates the appearance of ripples in a specified layer, moving away from a center point in
concentric circles. The effect is similar to dropping a stone in a pond. You can also specify that ripples move
toward the center point.
Animate ripples at a constant speed using the Wave Speed control. This control does not require keyframes
for animation. Animate ripples at varying speeds by creating keyframes for the Ripple Phase control.
Adjust the following controls for the Ripple effect:
Radius Controls the distance the ripples travel from the center point. The radius value is a percentage of
the image size. If the center of the ripple is placed in the center of the layer and the radius is set to 100, for
example, the ripples travel to the edge of the image. A value of 0 produces no ripples. Like ripples in water,
ripples in the layer become smaller as they travel farther from the center. To create a single-wave ripple, set
Radius to 100, Wave Width between 90 and 100, and Wave Height as desired.
Type of Conversion Specifies how the ripples are created.
Asymmetric Produces more realistic-looking ripples; asymmetric ripples include lateral motion and
produce more distortion.
Symmetric Produces motion that travels only outward from the center point; symmetric ripples
produce less distortion.
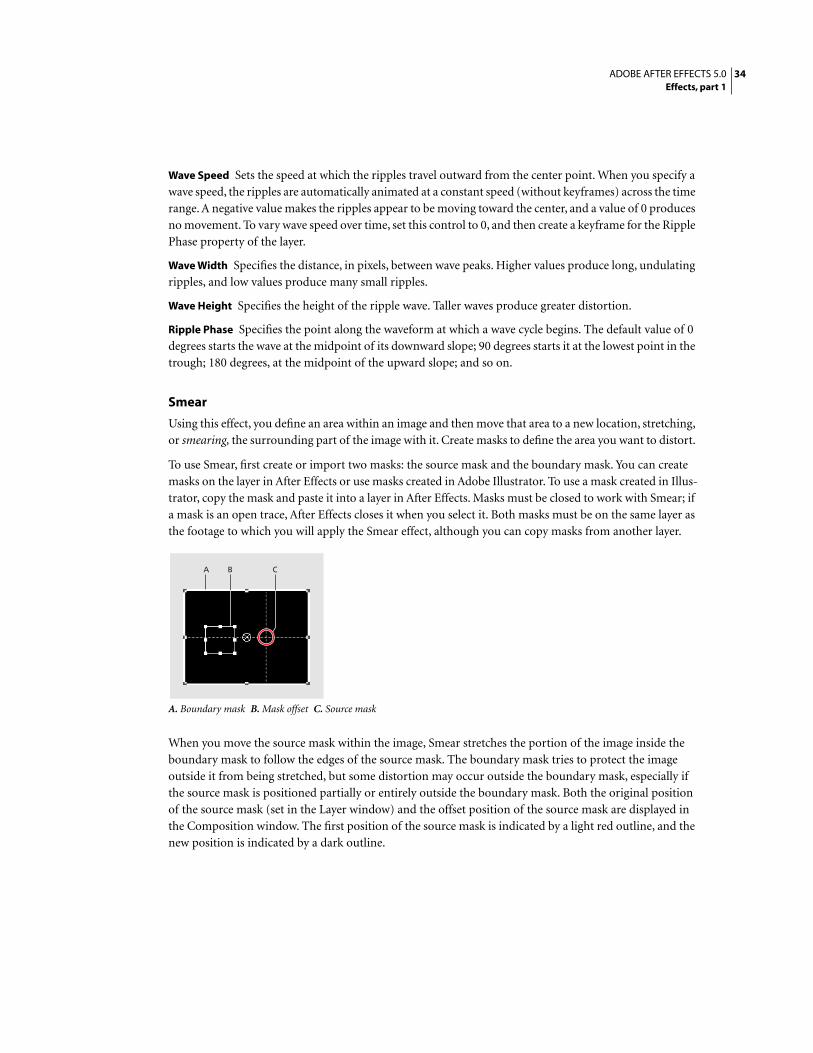
34ADOBE AFTER EFFECTS 5.0Effects, part 1
Wave Speed Sets the speed at which the ripples travel outward from the center point. When you specify a
wave speed, the ripples are automatically animated at a constant speed (without keyframes) across the time
range. A negative value makes the ripples appear to be moving toward the center, and a value of 0 produces
no movement. To vary wave speed over time, set this control to 0, and then create a keyframe for the Ripple
Phase property of the layer.
Wave Width Specifies the distance, in pixels, between wave peaks. Higher values produce long, undulating
ripples, and low values produce many small ripples.
Wave Height Specifies the height of the ripple wave. Taller waves produce greater distortion.
Ripple Phase Specifies the point along the waveform at which a wave cycle begins. The default value of 0
degrees starts the wave at the midpoint of its downward slope; 90 degrees starts it at the lowest point in the
trough; 180 degrees, at the midpoint of the upward slope; and so on.
Smear
Using this effect, you define an area within an image and then move that area to a new location, stretching,
or smearing, the surrounding part of the image with it. Create masks to define the area you want to distort.
To use Smear, first create or import two masks: the source mask and the boundary mask. You can create
masks on the layer in After Effects or use masks created in Adobe Illustrator. To use a mask created in Illus-
trator, copy the mask and paste it into a layer in After Effects. Masks must be closed to work with Smear; if
a mask is an open trace, After Effects closes it when you select it. Both masks must be on the same layer as
the footage to which you will apply the Smear effect, although you can copy masks from another layer.
A. Boundary mask B. Mask offset C. Source mask
When you move the source mask within the image, Smear stretches the portion of the image inside the
boundary mask to follow the edges of the source mask. The boundary mask tries to protect the image
outside it from being stretched, but some distortion may occur outside the boundary mask, especially if
the source mask is positioned partially or entirely outside the boundary mask. Both the original position
of the source mask (set in the Layer window) and the offset position of the source mask are displayed in
the Composition window. The first position of the source mask is indicated by a light red outline, and the
new position is indicated by a dark outline.
A CB

35ADOBE AFTER EFFECTS 5.0Effects, part 1
Using keyframes, you can animate the position, size, and rotation of the source mask as it moves to its offset
position. You can also animate the original position of the source mask in the Layer window using keyframes.
A. Original B. Source and Boundary masks set C. Resulting smear
Processing can take up to several minutes with certain settings. Computation time increases as the source
mask gets closer to the boundary mask. Processing is interrupted when you click a control.
Adjust the following controls for the Smear effect:
Source Mask Specifies a mask as the source mask. By default, After Effects selects the second mask you
create for the layer as the source mask.
Note: You must specify both a boundary mask and a source mask to create a distortion.
Boundary Mask Specifies a mask as the boundary mask. By default, After Effects selects the first mask you
create as the boundary mask.
Mask Offset Specifies a destination position for the source mask. The offset is a position specified by x and
y coordinates, which are displayed to the right of the Offset button. To set an offset location, click the Offset
button, move the pointer on the image to the desired location, and press the mouse button to set that
position. To set the offset position numerically, type a new value for each axis. When you don’t need the
precision provided by Mask Offset, you can simply drag the source mask offset in the Composition
window.
Note: Unwanted undulations may occur if the source mask is close to the boundary mask during animation.
Mask Rotation Rotates the source mask around its center point, between 0 and 360 degrees.
Mask Scale Scales the source mask (at its offset position) larger or smaller, in relation to its original position.
Percent Specifies what percent of the smear is actually performed. For example, when Percent is set to
50%, Smear performs half of the smear you have specified by moving, scaling, and rotating the source
mask. This value doesn’t affect the location of the original and offset positions of the source mask; it affects
only the percent of the effect that is performed.
Elasticity Specifies the elasticity of the Smear effect. The degree of elasticity affects how the image distorts.
Imagine the image on a sheet of rubber; as you move the source mask, the sheet stretches. The stiffer the
rubber, the less the sheet stretches. The highest setting is Loose, which requires the most time to compute
but gives the closest fit to the distortion.
A B C

36ADOBE AFTER EFFECTS 5.0Effects, part 1
Interpolation Method Specifies a method for the interpolation that Smear performs between keyframes.
This control offers two settings, Linear and Smooth. Linear requires two or more keyframes and performs
a straight-line interpolation between the keyframes. Linear produces robot-like animations in which the
distortions change at keyframes. Smooth requires three or more keyframes and approximates the
distortion using cubic curves, producing distortions with graceful motion. If you need further accuracy in
the animation between keyframes, add more keyframes. For example, a distortion representing a 90-degree
rotation between two keyframes will appear as a folding of the image. To make this distortion more fluid,
add a keyframe for every 10 degrees.
To use Smear:
1 Double-click the layer in the Composition window to open it in a Layer window.
2 Create or paste the masks you will use as the boundary mask and the source mask.
3 Position the boundary mask to specify the area of the layer you do not want Smear to affect.
4 Scale and position the source mask over the area you want to move.
5 Make the Composition window active and choose Effects > Distort > Smear.
6 In the Composition window, move the source mask to its destination position by dragging it or by using
the Mask Offset value.
7 Use Rotation to rotate the source mask, and use Mask Scale to scale it.
8 Drag the Percent slider as needed and select the desired setting for Elasticity.
Spherize
This effect distorts a layer by wrapping a region of the image onto a spherical shape of variable size. The
layer’s quality setting influences the Spherize effect. Best quality samples the displaced pixels to subpixel
accuracy; Draft quality samples to the nearest whole pixel.
The Radius option specifies the radius of the sphere in pixels. You can exceed the highest slider value by
clicking the Radius value and typing a higher number in the dialog box. Center of Sphere specifies the
position of the sphere’s center on the layer.
Transform
This effect applies 2D geometric transformations to the source layer. This effect supplements the transform
properties available for each layer in the Timeline window. Using the Transform effect, you can skew a layer
along any axis. Also, if motion blur is enabled, you can specify motion blur independently of the compo-
sition’s shutter angle. Anchor Point, Position, Rotation, and Opacity function the same as the layer
transform properties in the Timeline window.
Note: This effect is relative to the input layer. Therefore, to make a layer rotate around the upper left corner,
open the layer window, choose Transform from the Layer window menu, and then move the anchor point and
the position to the upper left corner.
Adjust the following controls for the Transform effect:
Scale Height Scales height up or down as a percent of the current layer height.

37ADOBE AFTER EFFECTS 5.0Effects, part 1
Scale Width Scales width up or down as a percent of the current layer width.
Skew Specifies skew amount.
Skew Axis The axis on which the skew is based. Changing the axis has no effect if Skew is 0.
Use Composition’s Shutter Angle If selected, the Transform effect uses the shutter angle of the compo-
sition when performing motion blur. If not selected, the Transform effect uses the Shutter Angle option
that follows.
Shutter Angle Determines the amount of motion blur to apply when motion blurring the layer.
Note: Motion Blur must be enabled for the layer for Shutter Angle to have any effect.
Twirl
The Twirl effect twirls the pixels of an image around a specified point at a specified amount. Pixels nearer
the center point are twirled faster than pixels in outer regions, resulting in a whirlpool effect. Because
distortion in this effect is significant, After Effects uses special anti-aliasing techniques to produce the
highest-quality image. As a result, the Twirl effect can be particularly slow to render.
Adjust the following controls for the Twirl effect:
Angle Specifies how far and in which direction to twirl the image around the Twirl Center. Positive angles
twirl the image clockwise; negative angles twirl it counterclockwise. To animate the twirl as a whirlpool, set
keyframes for the angle.
Twirl Radius Specifies how far the twirl extends from the twirl center. This value is based on a percentage
of the maximum horizontal or vertical distance of the layer, whichever is greater. A value of 50, for example,
produces a twirl that extends to the edge of the layer.
Wave Warp
The Wave Warp effect produces the appearance of a wave traveling across an image. You can produce a
variety of different wave shapes, including square, circular, and sine waves. The Wave Warp effect is
automatically animated at a constant speed across the time range (without keyframes). To vary speeds, you
need to set keyframes.
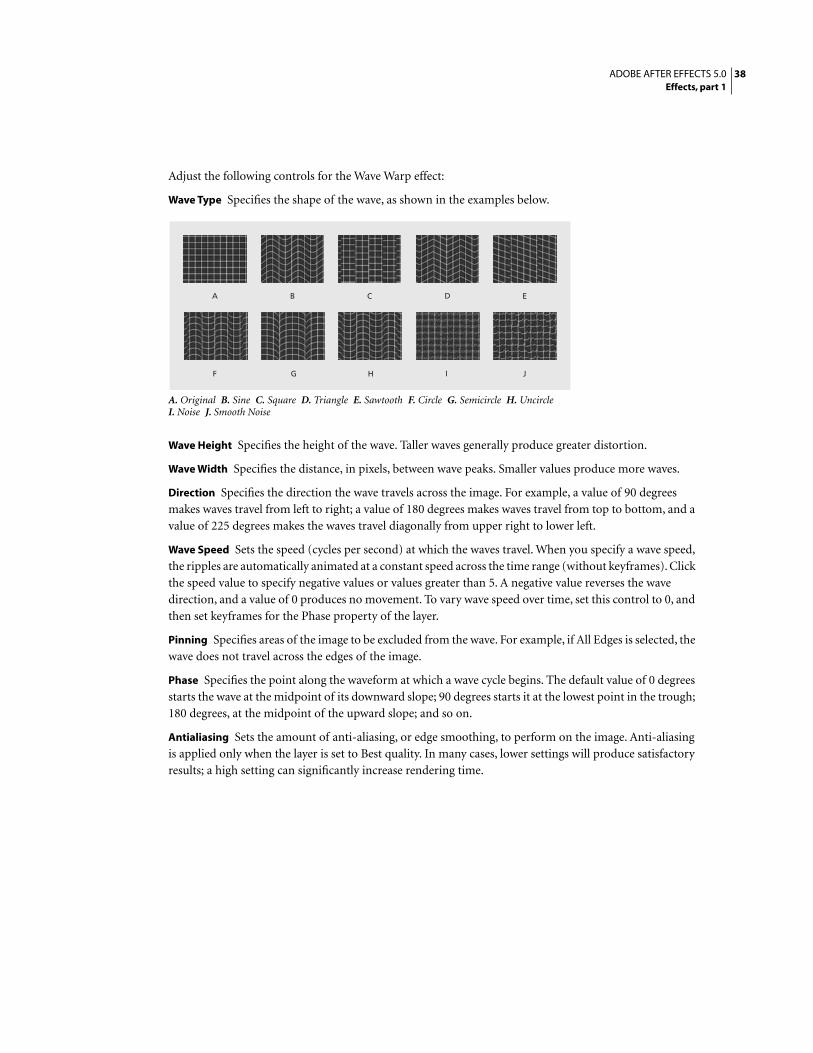
38ADOBE AFTER EFFECTS 5.0Effects, part 1
Adjust the following controls for the Wave Warp effect:
Wave Type Specifies the shape of the wave, as shown in the examples below.
A. Original B. Sine C. Square D. Triangle E. Sawtooth F. Circle G. Semicircle H. UncircleI. Noise J. Smooth Noise
Wave Height Specifies the height of the wave. Taller waves generally produce greater distortion.
Wave Width Specifies the distance, in pixels, between wave peaks. Smaller values produce more waves.
Direction Specifies the direction the wave travels across the image. For example, a value of 90 degrees
makes waves travel from left to right; a value of 180 degrees makes waves travel from top to bottom, and a
value of 225 degrees makes the waves travel diagonally from upper right to lower left.
Wave Speed Sets the speed (cycles per second) at which the waves travel. When you specify a wave speed,
the ripples are automatically animated at a constant speed across the time range (without keyframes). Click
the speed value to specify negative values or values greater than 5. A negative value reverses the wave
direction, and a value of 0 produces no movement. To vary wave speed over time, set this control to 0, and
then set keyframes for the Phase property of the layer.
Pinning Specifies areas of the image to be excluded from the wave. For example, if All Edges is selected, the
wave does not travel across the edges of the image.
Phase Specifies the point along the waveform at which a wave cycle begins. The default value of 0 degrees
starts the wave at the midpoint of its downward slope; 90 degrees starts it at the lowest point in the trough;
180 degrees, at the midpoint of the upward slope; and so on.
Antialiasing Sets the amount of anti-aliasing, or edge smoothing, to perform on the image. Anti-aliasing
is applied only when the layer is set to Best quality. In many cases, lower settings will produce satisfactory
results; a high setting can significantly increase rendering time.
A B C D E
F G H I J

39ADOBE AFTER EFFECTS 5.0Effects, part 1
Image Control effectsUse these effects to alter an image’s color values.
Change Color
This effect adjusts the hue, saturation, and lightness of a range of colors. Choose the range by specifying a
base color and similarity values. The similarity can be an RGB similarity, a hue similarity, or a chroma
similarity.
Adjust the following controls for the Change Color effect:
View Specifies what to view in the composition.
Corrected Layer Shows the results of the Change Color effect.
Color Correction Mask Shows the areas of the layer that will be changed. White areas in the color
correction mask are transformed the most, and dark areas are transformed the least.
Hue Transform Specifies the amount, in degrees, to adjust the hue of the selected colors.
Lightness Transform Specifies the amount to increase or decrease the lightness of the selected colors.
Positive values brighten the selected regions; negative values darken them.
Saturation Transform Specifies the amount to increase or decrease the saturation of the selected colors.
Positive values saturate the selected regions (moving toward pure color); negative values desaturate the
selected regions (moving toward gray).
Color to Change Specifies the color to be changed. Matching Tolerance and Matching Softness both use
this color as a target for building the color correction mask.
Matching Tolerance Specifies the degree of color matching before the color is affected by the color
correction. With low tolerances, only colors very similar to the change color are added to the color
correction mask. Larger tolerances add more of the image to the color correction mask.
Matching Softness Specifies the softness of the color correction. This does not always soften the color
correction mask geometrically, but it affects the severity of the color correction for regions similar to the
base color.
Match Colors Specifies the criterion for determining similarity of two colors.
RGB Uses the red, green, and blue components.
Hue Matches colors based on hue. For example, bright red, light pink, and burgundy have similar hue
values (a hue of red, but differing values of saturation and lightness).
Chroma Uses the two chromatic components to determine similarity, ignoring brightness. Chroma
matching would therefore be sensitive to saturation and hue differences, but not to lightness differences.
Invert Color Correction Mask Inverts the mask that determines which colors to affect. If selected, all colors
will be color-corrected, except those selected by using Color to Change and matching controls.

40ADOBE AFTER EFFECTS 5.0Effects, part 1
Color Balance (HLS)
This effect alters an image’s levels of hue, lightness, and saturation. It is intended only to provide compat-
ibility with projects created in earlier versions of After Effects that use the Color Balance (HLS) effect. For
new projects, use the Hue/Saturation effect, which operates the same as the Hue/Saturation command in
Adobe Photoshop. You can convert a movie to grayscale by setting the Saturation to –100.
Colorama
This effect assigns a custom palette to an element in a layer and then cycles the palette. First you colorize
an image with a specified palette, and then you cycle the colors in that palette—that is, change them
smoothly around the Output Cycle palette or color wheel. Color cycling is a quick way to animate pulsing
colors that follow a gradient path, colors that zoom out of a radial gradient, and many other effects.
Colorama works by first converting a specified property to grayscale and then remapping the grayscale
values to the specified color palette. The current color palette appears on the Output Cycle color wheel.
The grayscale is then “wrapped around” the color wheel. Black pixels are mapped to the color at the top of
the cycle, while increasingly lighter grays are mapped to successive colors going clockwise around the cycle,
until this process wraps around to the start again at full white. For example, with the default “Hue cycle”
palette, pixels corresponding to black become red, while pixels that have been converted to 50% gray
become cyan. You can animate the cycle so that in one revolution, each pixel of the layer travels through
the complete color cycle.
The original image (left) and image with Colorama applied (right)
Adjust the following controls for the Colorama effect:
Input Phase Specifies which layer and property is colorized by the Colorama effect using the following
controls:
Get Phase From Specifies the property to which the Output Cycle is applied. Select Zero if you want
to use a property from another layer.
Add Phase Specifies the other layer containing the property that you want to apply to the Output
Cycle. To use this layer instead of the first layer, select Zero for Get Phase From; otherwise, this layer
becomes a secondary property to the first property.
Add Phase From Specifies the property to use from the Add Phase layer.
Add Mode Specifies how Colorama combines properties from two layers using one of the following
options:
Wrap Adds the values of the two properties for each pixel. A pixel can not be whiter than 100%,
so sum values above 100% are wrapped around the cycle again. For example, a sum of 150%
wraps back to 50%.

41ADOBE AFTER EFFECTS 5.0Effects, part 1
Clamp Adds the values up to 100%. The sum of any two pixels that is greater than 100% is
rounded back down to 100%.
Average Adds two pixels together and then divides by two. Average values never wrap or clamp,
making this option the safest choice for predictable output.
Screen Screens the second layer over the original layer; the brighter areas in the second layer
brighten the first layer, and the darker areas in the second layer are discarded. Screen mode is
especially useful for compositing fire, lens flares, and other lighting effects.
Phase Shift Shifts the colors around the color wheel. Animating Phase Shift results in the modified
pixels cycling among the colors defined in the Output Cycle palette. A positive value moves the pixels
in a clockwise direction; a negative value moves them counterclockwise.
Animate Phase Shift to cycle the colors around the color wheel. Phase Shift is the most commonly
animated parameter.
Output Cycle Specifies the colors used to colorize the image using the following controls:
Use Preset Palette Specifies the palette for the color cycle. The top palettes are designed for quick
color-management tasks. The bottom choices offer a variety of built-in color effects.
Output Cycle Specifies the color palette you are currently working with. The triangles specify the
location on the color wheel where a specific color occurs. The color between triangles is smoothly
interpolated, unless Interpolate Palette is off. You can add up to a total of 64 triangles per Output
Cycle. See “Working with Output Cycle triangles” on page 43.
Note: When you keyframe the Output Cycle, a triangle’s position and color are interpolated between
keyframes. For best results, make sure that all keyframes have the same number of Output Cycle triangles.
Cycle Repetitions Controls how the Output Cycle pixels are applied to the Input Phase. The default
value of 1 maps the Output Cycle once from Input Phase black to Input Phase white. A value of 2 maps
the Output Cycle twice, once from 1% to 50%, and again from 51% to 100%. Use this option to create
a simple palette and repeat it many times throughout a gradient. For example, you can create running
lights, in which one cycle repeated 20 times generates 20 lights.
Interpolate Specifies whether or not colors between triangles are interpolated smoothly. When it is not
selected, the output is posterized. For example, with Interpolate Palette not selected, the default Hue
Cycle palette becomes a useful tool for preparing custom shatter maps for use with the Shatter effect.
Interpolate Palette selected (left) and not selected (right)

42ADOBE AFTER EFFECTS 5.0Effects, part 1
Modify Specifies which properties are modified by the Colorama effect. Once the Input Phase pixels are
mapped to a color on the Output Cycle, the results are applied to the property selected here. You can get a
great deal of selective control by choosing the same property for the Input Phase and the Modify property,
along with an appropriate Output Cycle.
Note: Because the input layer is represented as a grayscale file, the Ramp Grey preset palette works well and is
most predictable with any Modify setting other than All.
Modify Specifies the specific property to be modified.
Modify Alpha Specifies whether or not the opacity information in your Output Cycle is applied to the
output. Selecting Modify Alpha changes the alpha information along with the other channels selected
from the Modify menu. Modify Alpha works in conjunction with the Change Empty Pixels option in
determining the final change in opacity.
Note: If you apply Colorama to a layer with an alpha channel, and the Output Cycle does not contain
alpha information, the anti-aliased edges of the layer may appear pixelated. To smooth the edges, deselect
Modify Alpha. If Modify Alpha is selected and the Output Cycle contains alpha information, the output is
affected even if you’ve selected None from the Modify menu. This is how you can adjust the levels of just
the alpha channel without also changing the RGB information.
Change Empty Pixel Specifies whether you want Colorama’s effects to extend into the completely
transparent areas of your layer as well. (This works only when Modify Alpha is selected.)
Pixel Selection Precisely controls which colors in your image you want to affect. For the Matching controls
to work, Matching Mode must be set to anything other than Off.
Matching Color Specifies the specific pixel color to which you want to apply Colorama. To select a
specific color in the image using the eyedropper tool, turn off the Colorama effect temporarily.
Matching Tolerance Specifies how close a color has to be to the Matching Color option before it is
affected by Colorama. When Matching Tolerance is 0, only the exact color selected for Matching Color
is affected by Colorama. As the Matching Tolerance value increases, Colorama becomes more tolerant
to colors that are close to the Matching Color, so they are affected as well. With Matching Tolerance at
1, Colorama is completely tolerant of all colors; this value in effect turns the Matching Mode off.
Matching Softness Specifies the softness between the selected and nonselected areas. This doesn’t
necessarily affect the softness of the features in an image (as a blur would); rather, it controls how
smoothly the Colorama effect blends into the rest of the image.
For example, if you have an image of a man wearing a red shirt and blue jeans, and you want to change
the color of the shirt from red to blue, subtly adjust Matching Softness to spread the selection from
the red in the shirt into the shadows of the shirt’s folds. If you adjust it too high, the selection spreads
to the healthy pink of the man’s skin; if you adjust it even higher, the selection spreads to his blue jeans.
Matching Mode Specifies the criterion used to determine whether a pixel is close to the Matching
Color. If Matching Tolerance doesn’t increase the selection into the desired areas, change the Matching
Mode. In general, use RGB for high-contrast graphics and Chroma for photographic images.
Masking Use these controls to specify the pixels you want to change using the luminance or alpha channel
of another layer.
Mask Layer Specifies the layer you want to use for your mask.

43ADOBE AFTER EFFECTS 5.0Effects, part 1
Masking Mode Specifies the Mask Layer property to use.
Composite Over Specifies whether you want to see only the selected pixels or the selected pixels on top of
the original layer (the default).
Blend with Original Specifies the relative percentages of the original layer and the affected layer that you
see. Use this control to fade out the Colorama effect.
Working with Output Cycle triangles
You can customize any palette by altering the colors and locations of the triangles around the Output Cycle,
using any of the following procedures.
To add a triangle:
Click in or near the color wheel, and select a color from the color picker.
To duplicate a triangle:
Press Ctrl (Windows) or Command (Mac OS) and drag the triangle to the new position.
To change the color of a triangle:
Do either of the following:
• Double-click a triangle and select a color from the color picker.
• To make a triangle ignore its original color and instead “sample” the color of its new location on the color
wheel, click the triangle and then press Ctrl (Windows) or Command (Mac OS). To avoid deleting the
original color, you may want to duplicate the triangle first.
• To change the opacity, select a triangle on the color wheel and then drag the attached triangle above the
opacity slider. Make sure that Modify Alpha is selected if you want the opacity information to affect your
output.
To change where the color of a specific triangle appears on the color wheel:
Do any of the following:
• Drag a triangle.
• Press Shift as you drag to snap the triangles to the 45-degree increments around the wheel.
• To snap a triangle to the start or end point of the color wheel, press Shift and move the pointer slightly
to the right (start point) or left (end point) of the top of the wheel.
To delete a triangle:
Drag it away from the color wheel.
Adjusting levels using Colorama
You can use the Modify option in Colorama to adjust the levels of an image. The following examples
describe two methods of adjusting levels:

44ADOBE AFTER EFFECTS 5.0Effects, part 1
• Choose Lightness from the Get Phase From menu, Ramp Grey from the Use Preset Palette menu, and
Lightness from the Modify menu. To simultaneously expand the shadows and the highlights of an image,
while compressing the midtones, add a triangle to the Output Cycle at 3 o’clock and another at 9 o’clock.
Then drag them toward 6 o’clock; the midtones of the image compress and the shadows and highlights
expand.
• Choose Hue from both the Get Phase From menu and the Modify menu, and choose Hue Cycle from the
Use Preset Palette menu. It appears that you’re working with the original image, but if you animate the
Phase Shift you can cycle the hues in the image. You can also choose animated gradient layer from the Add
Phase menu and use it to modulate the hue.
Equalize
This effect alters an image’s pixel values to produce a more consistent brightness or color component distri-
bution. The effect works similarly to the Equalize command in Photoshop. Equalization can be performed
using either RGB values or the brightness component. Pixels with 0 alpha (completely transparent) values
are not considered, so masked layers are equalized based on the mask area. Layer quality settings do not
affect Equalize.
Adjust the following controls for the Equalize effect:
Equalize Specifies which equalization method to use. RGB equalizes the image based on red, green, and
blue components.
Brightness Equalizes the image based on the brightness of each pixel.
Photoshop Style Equalizes by redistributing the brightness values of the pixels in an image so that
they more evenly represent the entire range of brightness levels.
Amount to Equalize Specifies how much to redistribute the brightness values. At 100%, the pixel values are
spread as evenly as possible, while lower percentages redistribute fewer pixel values.
Gamma/Pedestal/Gain
This effect adjusts the response curve independently for each channel. For pedestal and gain, a value of 0.0
is completely off, and a value of 1.0 is completely on.
The Black Stretch option remaps the low pixel values of all channels. Large Black Stretch values brighten
dark areas. The effect is the same in all quality settings. Gamma specifies an exponent describing the shape
of the intermediate curve. The Pedestal and Gain options specify the lowest and highest attainable output
value for a channel.
Median
This effect replaces each pixel with the median pixel value of neighboring pixels within a given radius. At
low values, this effect is useful for reducing some types of noise. At higher values, this effect gives a layer a
painterly effect. This effect is the same at both Draft and Best quality. Use Radius to specify how many
pixels to examine for the Median effect. For instance, when Radius is set to 1, the Median is performed on
the eight neighboring pixels that are within one pixel of the center pixel.
45ADOBE AFTER EFFECTS 5.0Effects, part 1
Adobe Systems Incorporated345 Park AvenueSan Jose, CA 95110-2704 USAWorld Wide Webwww.adobe.com
Adobe, the Adobe logo, Adobe Premiere, After Effects, Illustrator, and Photoshop are either registered trademarks or trademarks of Adobe Systems Incorpo-
rated in the United States and/or other countries. Apple, Macintosh, and Mac OS are trademarks of Apple Computer, Inc., registered in the U.S. and other
countries. Microsoft, Windows, and Windows NT are registered trademarks of Microsoft Corporation in the U.S. and/or other countries. All other trademarks
are the property of their respective owners. © 2001 Adobe Systems Incorporated. All rights reserved
PS Arbitrary Map
This effect applies a Photoshop arbitrary map file to a layer. An arbitrary map adjusts the brightness levels
of an image, remapping a specified brightness range to darker or brighter tones. In the Curves window in
Photoshop, you can create an arbitrary map file for the entire image or for individual channels. The PS
Arbitrary Map effect is intended only to provide compatibility with projects created in earlier versions of
After Effects that use the Arbitrary Map effect. For new work, use the Curves effect.
When loaded into After Effects, the specified arbitrary map is applied to the layer or to one or more
channels of the layer, depending on how it was created. If you do not select an arbitrary map, After Effects
applies the default map (linear distribution of brightness) to the layer. For more information on arbitrary
maps, see the Adobe Photoshop 6.0 online Help topic “Using the Curves command.”
Adjust the following controls for the PS Arbitrary Map effect:
Phase Cycles through the arbitrary map. Increasing the phase shifts the arbitrary map to the right (as
viewed in the Curves dialog box); decreasing the phase shifts the map to the left.
Apply Phase Map to Alpha Applies the specified map and phase to the layer’s alpha channel. If the specified
map does not include an alpha channel, After Effects uses the default map (linear distribution of
brightness) for the alpha channel.
In the Effect Controls window, click Options and then select an arbitrary map file. Although you can’t
import .avc files or Photoshop spline files into the After Effects PS Arbitrary Map effect, you can convert
these files in Photoshop to create files that are compatible with the After Effects Curves effect.
To convert .avc and Photoshop spline files:
1 In the Curves dialog box in Photoshop, load the .acv file (Windows) or the Photoshop spline file (Mac OS).
2 Click the pencil tool and then save the file as a .amp file (Windows) or a Photoshop lookup file.
Tint
This effect alters an image’s color information. For each pixel, the luminance value specifies a blend
between two colors. Map Black To and Map White To specify the colors to which dark and bright pixels are
mapped. Intermediate pixels are assigned intermediate values. Amount to Tint specifies the intensity of the
effect. The layer’s quality setting does not affect Tint. For more complex tinting, use the Colorama effect.


