
1 53 7
2 64 8
Features You can access the Features available in your LCD/LED TV using Feature Menu on screen. • PressMenu/i key on remote control or MenukeyonControlPanelofLCD/LEDTVtodisplay main TV Menu. • PressCH on remote control or CH+onControlPanelofLCD/LEDTVtoselectFeatures. BelowarethefeatureswhichyoucanaccessintheFeatureMenu.
1. OSD Transparency 2. Wake Up Alarm 3. Sleep Timer 4. Blue Screen 5. Backlight (Optional) 6. Current Time
AfterselectingtherequiredoptionyoucanadjustitbyV+/V-keyseitherfromremotecontrolorcontrolpaneloftheTV.
PC 16/05/2013 11051937
2. TV Installation.
I N S T R U C T I O N M A N U A L
1. Quick Set-UpAfterunpackingthecarton,pleasemakesurethefollowingaccessoriesarepresent. Accessories*
• InstructionManual• USBCable(Optional) • Two1.5VAAABatteries • RemoteControl • WallMountBracket(Optional) • Screws,WallMountSpacers(Asapplicable) •Silica-GelBag(Optional) •ComponentAudioINCable(Optional) • AVOutCable(Optional) •ComponentINCable(Optional) •StandBase(Optional)Incaseyoufindanyitemmissing,contactyourdealer.*SubjecttochangeasperModel.
Installation Options:•YoucaninstalltheTVonawallorplaceitonatable-likesurface.
•ToeliminateanyriskofinjuryfromtheTVfalling,itshouldbemounted/placedsecurely.
Wall Installation
DonotinstalltheTVonaweakwallsurface,likeplasteretc.
3. Remote Control3. Remote Control
Remote Control TheremotecancontrolallthefunctionsofTV.Somefunctionscan alsobeadjustedwiththeKeysonthecontrolpaneloftheTVSET. Pleaseinstallthebatteriesbeforeyouusetheremote. 1. STANDBY ( ): ThiskeyisusedtoturntheLCD/LEDTVONfrom standbymodeorputtheTVtostandbymode.
2. NUMBER KEY (0-9) : Thesekeyareusedtoselectchannelnumber bydirectlypressingnumberkeys.
3. CH. MGR: TheusercanpressCH. MGR key to view the CH. Manager menu.
4. MY VIEW : TheusercanpressMYVIEWkeytoviewthelistoffavorite channels.
5. MUTE : TheusercanpressMUTEkeytomutethesoundofLCD/LEDTV, whentheTVisalreadyinMUTE,theusercanun-mutetheTVby pressingthiskey.
6. BROWSE BOX : TheusercanpressBROWSE BOXkeytobrowsethetuned channelsinRFsource.
7. CH[Up]/CH[Down] : Theusercanselectthechannelinupward/ downwarddirection.Thiskeycanalsobeusedas / navigation in menu.
8. V+/V-: Theusercanpressthesekeystoadjust(Increase/decrease) thevolumelevel.Thiskeycanalsobeusedas / navigation menu.
9. OK( ) : TheusercanpressOKkeytoconfirmtheselectionwhile doingmenusetting.
10. Back / : PressBack / keytoexitfrommenuandsubmenudisplay. WhentheUserMenuisnotdisplayed,PressingofBack / key once will swapbetweencurrentviewedchanneltopreviouslyviewchannel.
11. iPLAYON : PressiPLAYONkeytoenterintoUSB(iPLAYON)mode. PressiPLAYONagaintocomeoutfromUSBmode.
12. MENU / i : DisplaythemainmenuonscreenwhenMenukeyispressed onceandexitsfrommainmenuwhenMenukeyispressedagain.
13. SOURCE : Thiskeyisusedtodisplaythesourcemenuwhere theusercanselectbetweenthegiveninputsources.
14. S.MODE : Thiskeyenablesusertoselectdifferentsoundmodes (Normal,Music,Flat&Movie).
15. SURR : Thiskeyenablestheusertoselectfromthefollowingsurround options(ON/OFF)
16. P.SIZE : Thiskeyenablesusertochangethepicturesizeto16:9, Zoom1,Zoom2,Autoand4:3.
17. P.MODE : Thiskeyenablestheusertoselectdifferentpicturemodes (Normal,Vivid,Cinema,NewsandSports).
18. BASS+ : Notavailable/optional,PresstheBass+keytomakethe WooferOn/Off.
3. Remote Control
Multimedia Keys Stop playback[ ]
1. PressSTOPkeytostoptherunningVideo/Audiocontentplaying fromtheUSB.
Previous [ ]and Next [ ]
Duringplaying,press keytoskipbacktotheprevious chapter,theneachpressofthekeywillskipachaptertillthestart ofthedisc.
Eachpressof keyduringplayingwillskipthecurrentchapter andplaythenextone.
Fast Forward [ ]and Fast Rewind [ ]
FFKEYS-FastForwardcontentswithspeedsof2x,4x,8x,16x
FRKEYS-FastRewindcontentswithspeedsof2x,4x,8x,16x
Pause Playback [ II ]
1. Press II kettopauseplayback(stillmode).Thesoundwillbe mutedduringstillmode.
2.PressPAUSEtoresumenormalplayback.
1.4 Basic Operations
ToviewtheTVanduseitsfeaturesyouhavetoturnthesetONasperfollowingprocedure:
1.ConnecttheACpowercordofLCD/LED TV to AC outlet.
2.Pressthe STANDBY KeyonremodecontrolorSTANDBY key on ControlPanelofLCD/LEDTVtoswitchthesetON.
Volume Adjustment 1. PresstheV+/V- keys on remote control or V+/V-keysonControlPanelofLCD/LED TVtoadjustvolume.
2. IfyouwanttoswitchthesoundOFF,press the MUTEKeyonremotecontrol.
3. Toun-mutetheLCD/LED TV,pressMUTE KeyonremotecontrolorV+/V- keys to turn theVolumeON.
Programme Selection1. PressCH ( ) / ( ) key on remote control or / Key oncontrolpanelof LCD/LED TV tobrowseprogrammesin upwardordownwarddirection.Channel numberisdisplayedontherightuppercorner oftheLCD/LED TV. Channelstartsfrom01.
X MUTE
0101
4. Key Controls
1. Menu:Displaystheon-screenusermenu.PressMenukeyonControlPanelofthesettodisplaythe user menu on LCD / LED TV screen. 2. CH+/CH- (Channel Up / Channel Down):
Itisusedtoselectaprogramormenuitem.UseCH+KeytochangeprogramtothenextchannelorCH-KeytochangeprogramtothepreviousChannel.WheninTVMENU,CH+selects‘FEATURES’andCH-selects‘SETUP’.IntheonscreenmenuuseCH+/CH-KeystonavigateUP/DOWNsimilarto keys on remote control to select menu item. WhentheLED/LCDTVisinStand-bymode,thenCH+/CH-keyisusedtoswitchitON. 3. V+/ V- (Volume Up / Volume Down):
Itisusedtoadjustthevolume/adjusttheMenuSettings,UseV+KeytoincreasethevolumeandpressV-Keytodecreasethevolume.WheninTVMENU,V+selectsthe‘SOUND’andV-selectsthe‘PICTURE’adjustment.Intheon-screenmenuuseV+/V-keysas you use the keysonremotecontroltoadjustmenusetting. 4. Stand-by:
TurnstheLCD/LEDTVON/OFF. 5. Source (Optional):
Displaythesourceselectionmenuwheretheusercanselectthedesiredinputsource.
Note: ForControlKeysreferCabinet Picturespage.
5. Setting Up TV MENU Program SETUP
Navigating Through Menu
The TV MENUdisplayallowsusertoaccesstheFEATURES/SOUND/SETUP/PICTUREadjustmentsare available in LCD/LED TV. To navigate through the TV MENUpresstheMenu key on remote control or MenuKeyonControlPanelofLCD/LED TVtodisplayTV MENU.
Features PresstheCH( )keyonremotecontrolorCH+onFrontControlPanelofLCD/LEDTVtoselect FEATURES Menu.
Setup PresstheCH( )keyonremotecontrolorCH- keyonFrontControlPanelofLCD/LEDTVtoselect SETUP Menu.
Sound PresstheV+( )keyonremotecontrolorV+ keyonFrontControlPanelofLCD/LEDTVtoselect SOUND Menu.
Picture PresstheV-( )keyonremotecontrolorV- keyonFrontControlPanelofLCD/LEDTVtoselect PICTURE Menu.
6. Setup 7. Features
Setup • PressMenu/ikeyonremotecontroltodisplayTVMenu. • PresstheCH key on remote or CH-keyoncontrolpaneltodisplaysetupmenu. • PressCH / CH keys on remote or CH+/CH-oncontrolpaneltoselectfromfollowingoptions. 1. Language 2. Source 3. Auto Tuning 4. Manual Adjust 5.Channel Manager
Language TheusercanselecttheLanguageofhispreferencethroughthisoption. • PressMenu/i key on remote control or MenukeyonControlPanelofLCD/LED TVtodisplay main TV Menu. • PressCH key on remote control or CH- keyonControlPanelofLCD/LED TVtoselectSetup. • PressCH / CH key on remote control or CH+ / CH- keyonControlPanelofLCD/LED TV to select Language. • Press V+( ) / V- ( )keyonyourremotecontroloronControlPanelofLCD/LED TV to select the desirelanguagefromtheavailablelist. • PresstheMenu/i key once or Back key on remote control or MenuKeyonControlPanelof LCD/LED TVtoreturntothepreviousmenu.RepeatedlypressMenu/i key or Back key on remote controlorMenuKeyonControlPanelofLCD/LED TVtoexitfromdisplay.
Auto Tuning
• ThisprocessallowstheusertosetallthechannelsoftheLocalCableNetwork. • PressMenu/i key on remote control or MenukeyonControlPanelofLCD/LED TV to displaymainTVMenu • PressCH key on remote control or CH-keyonControlPanelofLCD/LED TVtoselectsetup. • PressCH / CH key on remote control or CH+/ CH-KeyonControlPanelofLCD/LED TV to the select Auto Tuning. • Press V+ key on your remote control or V+ keyoncontrolpaneltoselectAutoTuningand thenpressOKkeyonremoteorCH+keyoncontrolpaneltoconfirmyourselection. • WhenOKkeyispressedonAutoTuneconfirmscreen,Autotuningscreenappearswhich indicatestheRFfrequencytuningstatus. • PressOK or Menu/i key on remote control or MenukeyonControlPanelofLCD/LED TV to stoptheautotuning.
Picture
• PressMenu/i key on remote control or MenubuttononControlPanelofLCD/LEDTVtodisplay main TV Menu. • PressV- keyonyourremotecontrolofyourLCD/LEDTVtoselectPictureMenu. • PressCH ( ) / CH ( )buttononyourremotecontroltotheselectfromfollowingoptions
1. Picture Mode 2. Brightness 3. Contrast 4. Color 5. Hue 6. Sharpness 7. Advanced
Afterselectingtherequiredoptionyoucanadjustitby V+/V-keyseitherfromremotecontrolorcontrolpanel oftheTV.
8. Picture
9 11 13 15
10 12 14 16
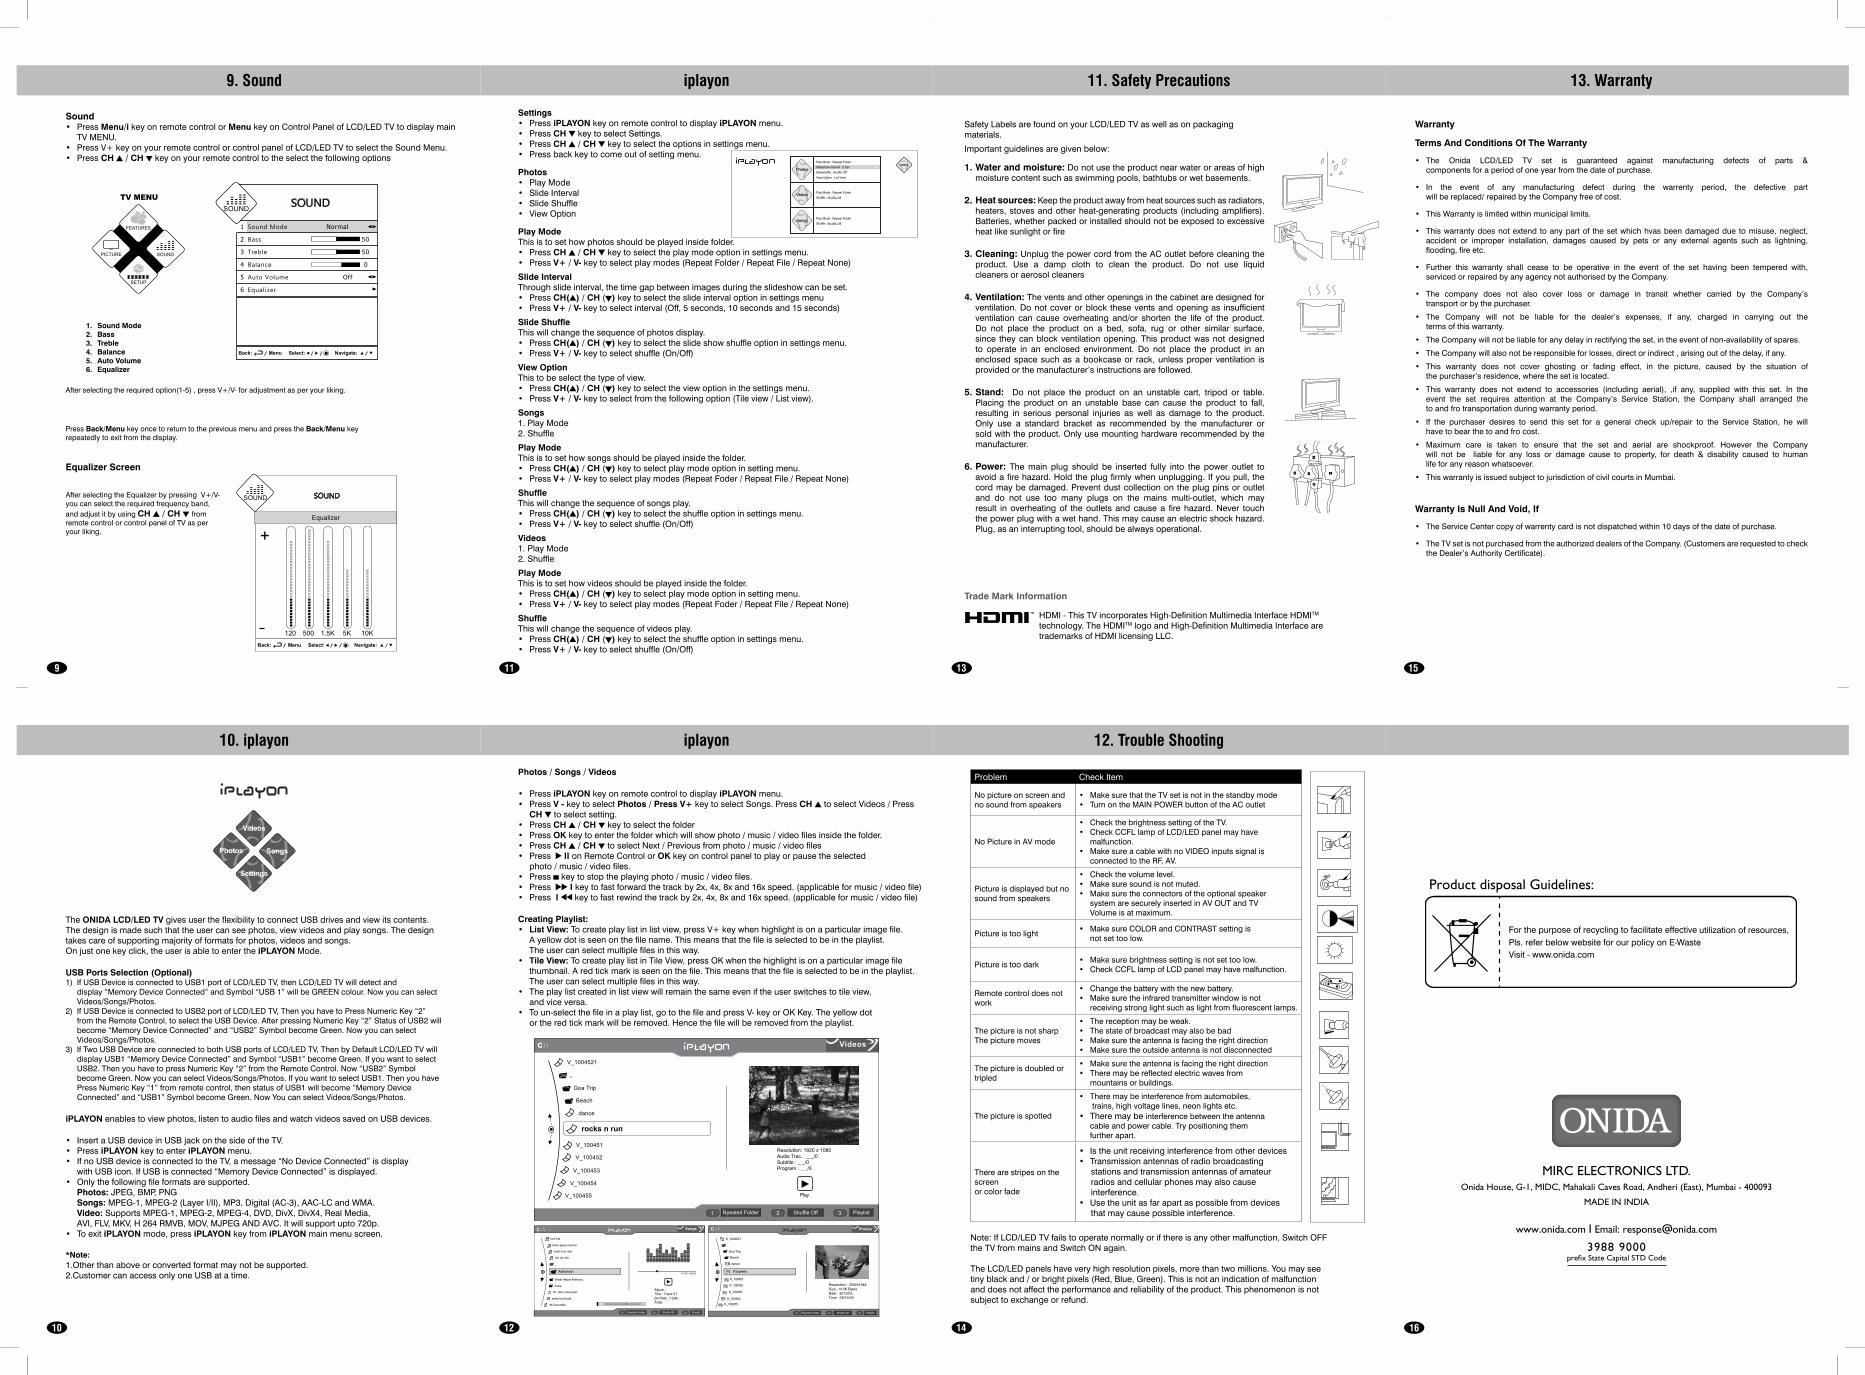
9. Sound
Sound • PressMenu/i key on remote control or MenukeyonControlPanelofLCD/LEDTVtodisplaymain TVMENU. • PressV+keyonyourremotecontrolorcontrolpanelofLCD/LEDTVtoselecttheSoundMenu. • PressCH / CH keyonyourremotecontroltotheselectthefollowingoptions
PressBack/MenukeyoncetoreturntothepreviousmenuandpresstheBack/Menu key repeatedlytoexitfromthedisplay.
Afterselectingtherequiredoption(1-5),pressV+/V-foradjustmentasperyourliking.
AfterselectingtheEqualizerbypressingV+/V-youcanselecttherequiredfrequencyband,andadjustitbyusingCH / CH fromremotecontrolorcontrolpanelofTVasperyour liking.
Equalizer Screen
1. Sound Mode 2. Bass 3. Treble 4. Balance 5. Auto Volume 6. Equalizer
10. iplayon
The ONIDA LCD/LED TVgivesusertheflexibilitytoconnectUSBdrivesandviewitscontents.Thedesignismadesuchthattheusercanseephotos,viewvideosandplaysongs.Thedesigntakescareofsupportingmajorityofformatsforphotos,videosandsongs. Onjustonekeyclick,theuserisabletoentertheiPLAYONMode.
USB Ports Selection (Optional) 1) IfUSBDeviceisconnectedtoUSB1portofLCD/LEDTV,thenLCD/LEDTVwilldetectand display“MemoryDeviceConnected”andSymbol“USB1”willbeGREENcolour.Nowyoucanselect Videos/Songs/Photos. 2) IfUSBDeviceisconnectedtoUSB2portofLCD/LEDTV,ThenyouhavetoPressNumericKey“2” fromtheRemoteControl,toselecttheUSBDevice.AfterpressingNumericKey“2”StatusofUSB2will become“MemoryDeviceConnected”and“USB2”SymbolbecomeGreen.Nowyoucanselect Videos/Songs/Photos. 3) IfTwoUSBDeviceareconnectedtobothUSBportsofLCD/LEDTV,ThenbyDefaultLCD/LEDTVwill displayUSB1“MemoryDeviceConnected”andSymbol“USB1”becomeGreen.Ifyouwanttoselect USB2.ThenyouhavetopressNumericKey“2”fromtheRemoteControl.Now“USB2”Symbol becomeGreen.NowyoucanselectVideos/Songs/Photos.IfyouwanttoselectUSB1.Thenyouhave PressNumericKey“1”fromremotecontrol,thenstatusofUSB1willbecome“MemoryDevice Connected”and“USB1”SymbolbecomeGreen.NowYoucanselectVideos/Songs/Photos.
iPLAYONenablestoviewphotos,listentoaudiofilesandwatchvideossavedonUSBdevices.
• InsertaUSBdeviceinUSBjackonthesideoftheTV. • PressiPLAYON key to enter iPLAYON menu. • IfnoUSBdeviceisconnectedtotheTV,amessage“NoDeviceConnected”isdisplay withUSBicon.IfUSBisconnected“MemoryDeviceConnected”isdisplayed. • Onlythefollowingfileformatsaresupported. Photos:JPEG,BMP,PNG Songs:MPEG-1,MPEG-2(LayerI/II),MP3,Digital(AC-3),AAC-LCandWMA. Video:SupportsMPEG-1,MPEG-2,MPEG-4,DVD,DivX,DivX4,RealMedia, AVI,FLV,MKV,H264RMVB,MOV,MJPEGANDAVC.Itwillsupportupto720p. • ToexitiPLAYONmode,pressiPLAYONkeyfromiPLAYON main menu screen.
*Note: 1.Otherthanaboveorconvertedformatmaynotbesupported. 2.CustomercanaccessonlyoneUSBatatime.
iplayon
Settings • Press iPLAYONkeyonremotecontroltodisplayiPLAYON menu. • PressCH keytoselectSettings. • PressCH / CH keytoselecttheoptionsinsettingsmenu. • Pressbackkeytocomeoutofsettingmenu.
Photos • PlayMode • SlideInterval • SlideShuffle • ViewOption
Play Mode Thisistosethowphotosshouldbeplayedinsidefolder. • PressCH / CH keytoselecttheplaymodeoptioninsettingsmenu. • PressV+ / V- keytoselectplaymodes(RepeatFolder/RepeatFile/RepeatNone)
Slide Interval Throughslideinterval,thetimegapbetweenimagesduringtheslideshowcanbeset. • PressCH( ) / CH( ) keytoselecttheslideintervaloptioninsettingsmenu • PressV+ / V- keytoselectinterval(Off,5seconds,10secondsand15seconds)
Slide Shuffle Thiswillchangethesequenceofphotosdisplay. • PressCH( ) / CH( ) keytoselecttheslideshowshuffleoptioninsettingsmenu. • PressV+ / V- keytoselectshuffle(On/Off)
View Option Thistobeselectthetypeofview. • PressCH( ) / CH( ) keytoselecttheviewoptioninthesettingsmenu. • PressV+ / V- keytoselectfromthefollowingoption(Tileview/Listview).
Songs 1.PlayMode 2.Shuffle
Play Mode Thisistosethowsongsshouldbeplayedinsidethefolder. • PressCH( ) / CH( ) keytoselectplaymodeoptioninsettingmenu. • PressV+ / V- keytoselectplaymodes(RepeatFoder/RepeatFile/RepeatNone)
Shuffle Thiswillchangethesequenceofsongsplay. • PressCH( ) / CH( ) keytoselecttheshuffleoptioninsettingsmenu. • PressV+ / V- keytoselectshuffle(On/Off)
Videos 1.PlayMode 2.Shuffle
Play Mode Thisistosethowvideosshouldbeplayedinsidethefolder. • PressCH( ) / CH( ) keytoselectplaymodeoptioninsettingmenu. • PressV+ / V- keytoselectplaymodes(RepeatFoder/RepeatFile/RepeatNone)
Shuffle Thiswillchangethesequenceofvideosplay. • PressCH( ) / CH( ) keytoselecttheshuffleoptioninsettingsmenu. • PressV+ / V- keytoselectshuffle(On/Off)
Photos / Songs / Videos
• PressiPLAYONkeyonremotecontroltodisplay iPLAYON menu. • PressV - key to select Photos / Press V+ keytoselectSongs.PressCH toselectVideos/Press CH to select setting. • PressCH / CH keytoselectthefolder • PressOK keytoenterthefolderwhichwillshowphoto/music/videofilesinsidethefolder. • PressCH / CH toselectNext/Previousfromphoto/music/videofiles • Press II onRemoteControlorOK keyoncontrolpaneltoplayorpausetheselected photo/music/videofiles. • Press keytostoptheplayingphoto/music/videofiles. • Press I keytofastforwardthetrackby2x,4x,8xand16xspeed.(applicableformusic/videofile) • PressI keytofastrewindthetrackby2x,4x,8xand16xspeed.(applicableformusic/videofile)
Creating Playlist: • List View: Tocreateplaylistinlistview,pressV+keywhenhighlightisonaparticularimagefile. Ayellowdotisseenonthefilename.Thismeansthatthefileisselectedtobeintheplaylist. Theusercanselectmultiplefilesinthisway. • Tile View: TocreateplaylistinTileView,pressOKwhenthehighlightisonaparticularimagefile thumbnail.Aredtickmarkisseenonthefile.Thismeansthatthefileisselectedtobeintheplaylist. Theusercanselectmultiplefilesinthisway. • Theplaylistcreatedinlistviewwillremainthesameeveniftheuserswitchestotileview, andviceversa. • Toun-selectthefileinaplaylist,gotothefileandpressV-keyorOKKey.Theyellowdot ortheredtickmarkwillberemoved.Hencethefilewillberemovedfromtheplaylist.
Resolution: 1920 x 1080Audio Trac.. _ _/0Subtitle : _ _/0Program : _ _/0
Album :Title : Track 01Bit Rate : 129KArtist:
C : \
Resolution : 2592x1944Size : 413K BytesDate : 2013/03..Time : 09/15/49
C : \
iplayon
11. Safety Precautions
SafetyLabelsarefoundonyourLCD/LEDTVaswellasonpackagingmaterials.
Importantguidelinesaregivenbelow:
1. Water and moisture:Donotusetheproductnearwaterorareasofhigh moisturecontentsuchasswimmingpools,bathtubsorwetbasements.
2. Heat sources:Keeptheproductawayfromheatsourcessuchasradiators, heaters,stovesandotherheat-generatingproducts(includingamplifiers). Batteries,whetherpackedorinstalledshouldnotbeexposedtoexcessive heatlikesunlightorfire
3. Cleaning:UnplugthepowercordfromtheACoutletbeforecleaningthe product. Use a damp cloth to clean the product. Do not use liquid cleaners or aerosol cleaners
4. Ventilation:Theventsandotheropeningsinthecabinetaredesignedfor ventilation.Donotcoverorblock theseventsandopeningas insufficient ventilation can cause overheating and/or shorten the life of the product. Do not place the product on a bed, sofa, rug or other similar surface, since theycanblockventilationopening.Thisproductwasnotdesigned to operate in an enclosed environment. Do not place the product in an enclosedspacesuchasabookcaseor rack,unlessproperventilation is providedorthemanufacturer’sinstructionsarefollowed.
5. Stand: Do not place the product on an unstable cart, tripod or table. Placing the product on an unstable base can cause the product to fall, resulting in serious personal injuries as well as damage to the product. Only use a standard bracket as recommended by the manufacturer or soldwiththeproduct.Onlyusemountinghardwarerecommendedbythe manufacturer.
6. Power: Themain plug should be inserted fully into the power outlet to avoidafirehazard.Holdtheplugfirmlywhenunplugging.Ifyoupull,the cordmaybedamaged.Preventdustcollectionontheplugpinsoroutlet and do not use too many plugs on the mains multi-outlet, which may result inoverheatingof theoutlets andcausea firehazard.Never touch thepowerplugwithawethand.Thismaycauseanelectricshockhazard. Plug,asaninterruptingtool,shouldbealwaysoperational.
Trade Mark Information
HDMI-ThisTVincorporatesHigh-DefinitionMultimediaInterfaceHDMITM technology.TheHDMITMlogoandHigh-DefinitionMultimediaInterfacearetrademarksofHDMIlicensingLLC.
14
12. Trouble Shooting
Problem CheckItem
Nopictureonscreenand nosoundfromspeakers
• MakesurethattheTVsetisnotinthestandbymode • TurnontheMAINPOWERbuttonoftheACoutlet
NoPictureinAVmode
• CheckthebrightnesssettingoftheTV. • CheckCCFLlampofLCD/LEDpanelmayhave malfunction. • MakesureacablewithnoVIDEOinputssignalis connectedtotheRF,AV.
Pictureisdisplayedbutno soundfromspeakers
• Checkthevolumelevel. • Makesuresoundisnotmuted. • Makesuretheconnectorsoftheoptionalspeaker systemaresecurelyinsertedinAVOUTandTV Volume is at maximum.
Pictureistoolight• MakesureCOLORandCONTRASTsettingis not set too low.
Pictureistoodark• Makesurebrightnesssettingisnotsettoolow. • CheckCCFLlampofLCDpanelmayhavemalfunction.
Remotecontroldoesnotwork
• Changethebatterywiththenewbattery. • Makesuretheinfraredtransmitterwindowisnot receivingstronglightsuchaslightfromfluorescentlamps.
Thepictureisnotsharp Thepicturemoves
• Thereceptionmaybeweak. • Thestateofbroadcastmayalsobebad • Makesuretheantennaisfacingtherightdirection • Makesuretheoutsideantennaisnotdisconnected
Thepictureisdoubledortripled
• Makesuretheantennaisfacingtherightdirection • Theremaybereflectedelectricwavesfrom mountainsorbuildings.
Thepictureisspotted
• Theremaybeinterferencefromautomobiles, trains,highvoltagelines,neonlightsetc. • Theremaybeinterferencebetweentheantenna cableandpowercable.Trypositioningthem furtherapart.
Therearestripesonthescreen orcolorfade
• Istheunitreceivinginterferencefromotherdevices • Transmissionantennasofradiobroadcasting stationsandtransmissionantennasofamateur radiosandcellularphonesmayalsocause interference. • Usetheunitasfarapartaspossiblefromdevices thatmaycausepossibleinterference.
Note:IfLCD/LEDTVfailstooperatenormallyorifthereisanyothermalfunction,SwitchOFFtheTVfrommainsandSwitchONagain. TheLCD/LEDpanelshaveveryhighresolutionpixels,morethantwomillions.Youmaysee tinyblackand/orbrightpixels(Red,Blue,Green).Thisisnotanindicationofmalfunction anddoesnotaffecttheperformanceandreliabilityoftheproduct.Thisphenomenonisnot subjecttoexchangeorrefund.
MIRC ELECTRONICS LTD.Onida House, G-1, MIDC, Mahakali Caves Road, Andheri (East), Mumbai - 400093
MADE IN INDIA
www.onida.com I Email: [email protected]
3988 9000 prefix State Capital STD Code
13. Warranty
Warranty
Terms And Conditions Of The Warranty
• The Onida LCD/LED TV set is guaranteed against manufacturing defects of parts & componentsforaperiodofoneyearfromthedateofpurchase.
• In the event of any manufacturing defect during the warrenty period, the defective part willbereplaced/repairedbytheCompanyfreeofcost.
• ThisWarrantyislimitedwithinmunicipallimits.
• Thiswarrantydoesnotextend toanypartof thesetwhichhvasbeendamageddue tomisuse,neglect, accident or improper installation, damages caused by pets or any external agents such as lightning, flooding,fireetc.
• Further this warranty shall cease to be operative in the event of the set having been tempered with, servicedorrepairedbyanyagencynotauthorisedbytheCompany.
• The company does not also cover loss or damage in transit whether carried by the Company’s transportorbythepurchaser.
• The Company will not be liable for the dealer’s expenses, if any, charged in carrying out the termsofthiswarranty.
• TheCompanywillnotbeliableforanydelayinrectifyingtheset,intheeventofnon-availabilityofspares.
• TheCompanywillalsonotberesponsibleforlosses,directorindirect,arisingoutofthedelay,ifany.
• This warranty does not cover ghosting or fading effect, in the picture, caused by the situation of thepurchaser’sresidence,wherethesetislocated.
• This warranty does not extend to accessories (including aerial), ,if any, supplied with this set. In the event the set requires attention at the Company’s Service Station, the Company shall arranged the toandfrotransportationduringwarrantyperiod.
• If the purchaser desires to send this set for a general check up/repair to the Service Station, he will havetobearthetoandfrocost.
• Maximum care is taken to ensure that the set and aerial are shockproof. However the Company will not be liable for any loss or damage cause to property, for death & disability caused to human lifeforanyreasonwhatsoever.
• ThiswarrantyisissuedsubjecttojurisdictionofcivilcourtsinMumbai.
Warranty Is Null And Void, If
• TheServiceCentercopyofwarrentycardisnotdispatchedwithin10daysofthedateofpurchase.
• TheTVsetisnotpurchasedfromtheauthorizeddealersoftheCompany.(Customersarerequestedtocheck theDealer’sAuthorityCertificate).


