MANAGER Copy
FAST Lit. Part No. 229-51311 Rev. B (MANAGER) 07/13/2006 PITCO L20-306 Rev 0 11/06 Page 1 © 2005-2006 Food Automation – Service Techniques, Inc. All Rights Reserved
This document contains confidential information. The dissemination, publication, copying, or duplication of this document without prior written authorization is strictly prohibited.
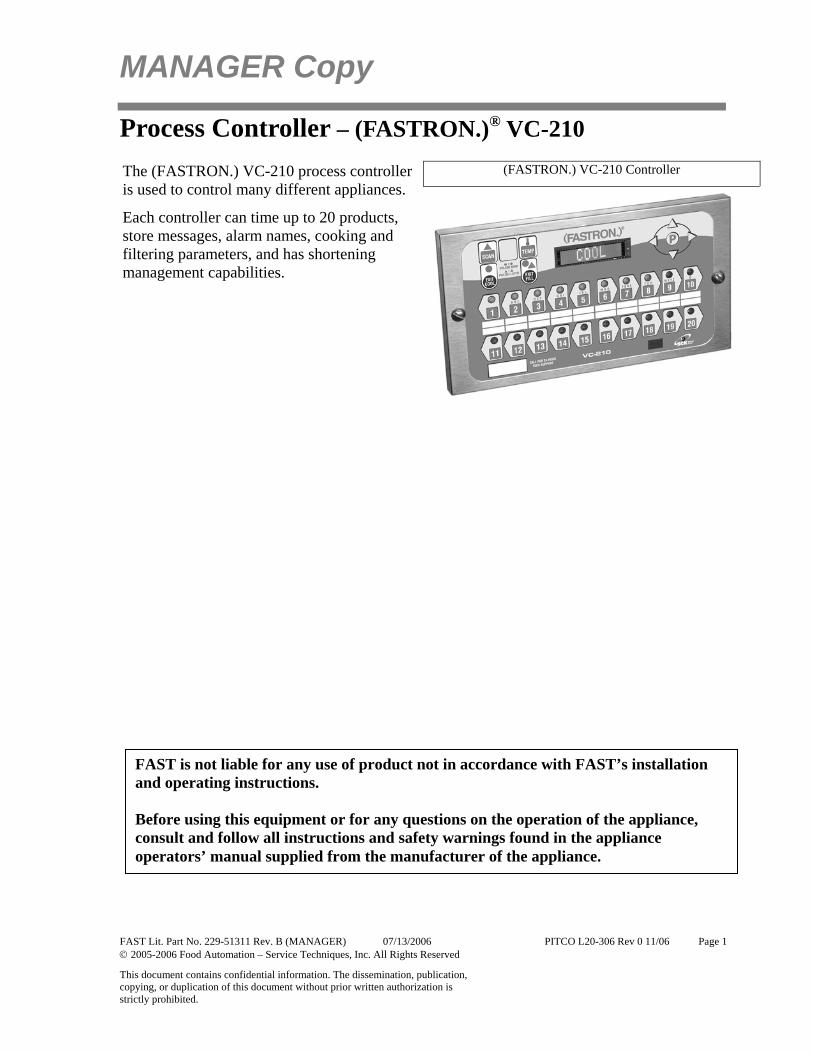
Process Controller – (FASTRON.)® VC-210
(FASTRON.) VC-210 Controller The (FASTRON.) VC-210 process controller is used to control many different appliances.
Each controller can time up to 20 products, store messages, alarm names, cooking and filtering parameters, and has shortening management capabilities.
FAST is not liable for any use of product not in accordance with FAST’s installation and operating instructions. Before using this equipment or for any questions on the operation of the appliance, consult and follow all instructions and safety warnings found in the appliance operators’ manual supplied from the manufacturer of the appliance.

Process Controllers
FAST Lit. Part No. 229-51311 Rev. B (MANAGER) 07/13/2006 PITCO L20-306 Rev 0 11/06 Page 2 © 2005-2006 Food Automation – Service Techniques, Inc. All Rights Reserved
This document contains confidential information. The dissemination, publication, copying, or duplication of this document without prior written authorization is strictly prohibited.
Installing the (FASTRON.) VC-210 Controller REMOVE EXISTING (FASTRON.)
1 Unplug fryer
2 Remove the two (2) screws from the bezel securing the (FASTRON.) controller in the header cavity. Remove the bezel.
3 Remove the controller by disconnecting the 9-pin and 2-pin connectors. (Several pressure and split vat fryers will have additional connectors that will have to be removed.)
INSTALL THE NEW (FASTRON.)
1 Remove the two (2) 5/32” screws from the NEW controller.
2 Plug the 9- and 2-pin connectors into the corresponding connectors in the fryer. (Several pressure and split vat fryers will have additional connectors that will have to be connected.) NOTE: The 3-pin connector coming from the controller has no corresponding connector. It is for future use.
3 Insert the controller back into the fryer header cavity. Re-attach the bezel (frame) to the controller.
4 Secure the controller and bezel to the fryer header with the two (2) 5/32” hex screws provided.
Process Controllers
FAST Lit. Part No. 229-51311 Rev. B (MANAGER) 07/13/2006 PITCO L20-306 Rev 0 11/06 Page 3 © 2005-2006 Food Automation – Service Techniques, Inc. All Rights Reserved
This document contains confidential information. The dissemination, publication, copying, or duplication of this document without prior written authorization is strictly prohibited.
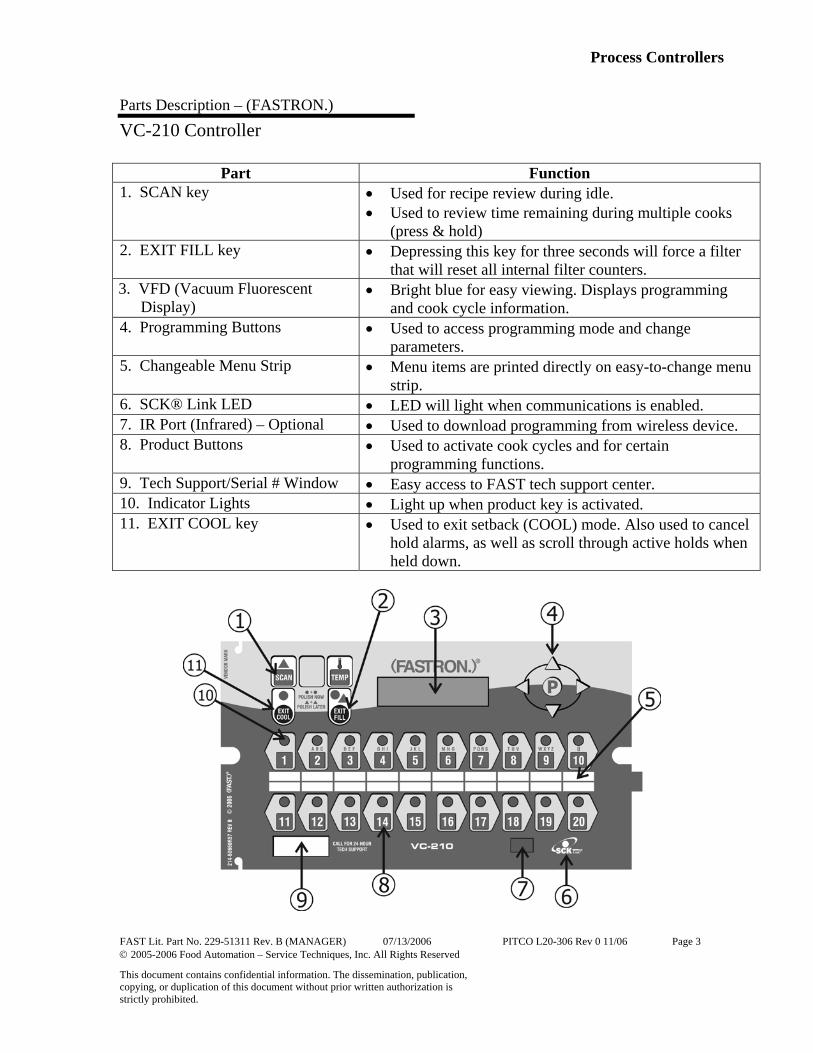
Parts Description – (FASTRON.) VC-210 Controller
Part Function 1. SCAN key • Used for recipe review during idle.
• Used to review time remaining during multiple cooks (press & hold)
2. EXIT FILL key • Depressing this key for three seconds will force a filter that will reset all internal filter counters.
3. VFD (Vacuum Fluorescent Display)
• Bright blue for easy viewing. Displays programming and cook cycle information.
4. Programming Buttons • Used to access programming mode and change parameters.
5. Changeable Menu Strip • Menu items are printed directly on easy-to-change menu strip.
6. SCK® Link LED • LED will light when communications is enabled. 7. IR Port (Infrared) – Optional • Used to download programming from wireless device. 8. Product Buttons • Used to activate cook cycles and for certain
programming functions. 9. Tech Support/Serial # Window • Easy access to FAST tech support center. 10. Indicator Lights • Light up when product key is activated. 11. EXIT COOL key • Used to exit setback (COOL) mode. Also used to cancel
hold alarms, as well as scroll through active holds when held down.

Process Controllers
FAST Lit. Part No. 229-51311 Rev. B (MANAGER) 07/13/2006 PITCO L20-306 Rev 0 11/06 Page 4 © 2005-2006 Food Automation – Service Techniques, Inc. All Rights Reserved
This document contains confidential information. The dissemination, publication, copying, or duplication of this document without prior written authorization is strictly prohibited.
Glossary of Terms and Features Daylight Savings Time: Some countries have a one-hour change to their clocks in the Spring and Fall to allow for more daylight hours. Spring / Fall programming as described in this manual allows the operator to quickly and easily change the time by one hour without accessing the other polish programmable parameters.
Instant On: When turned "On" this feature automatically causes the electric element or gas burner to turn "On" for a pre-determined time (0-60 seconds) when a cook cycle is started. This helps prevent excessive temperature drop when product is introduced to the fryer, thereby ensuring product quality.
Polish: The circulation of the shortening through the filter for a period of time, as opposed to filtering which passes the shortening through the filter only once.
Polish Later: The polish later command is active at all times UNLESS the delay time is programmed to ZERO. The polish later command is used if a fryer has entered the polish command, yet it is needed to produce product at that time. The delay time programmed will start counting, and at the end of the delay time the operator will be forced to polish the shortening. The delay can only be activated once.
Polish Now: The “polish now” command is active at all times once the event times are activated. If a Polish Now is entered and completed within 3 hours of a scheduled event polish time, the event polish time will be canceled. This allows an operator to polish a fryer and get credit for the polish before the actual polish command sounds. This is useful in a store with many fryers where the operator wants to "get ahead" of the polish work if they have time available.
Polish Scheme: There are 4 events. An event is a polish sequence. (See pages 17 & 18)
Stagger Times: (This is for the 2nd event only) Some operators prefer all the fryers to enter polish at the same time. In this case, all fryers start beeping at the same time and the need to polish is obvious. The delay command can then be used to delay those fryers that are needed for cooking. Other operators prefer a staggering of the Polish activation time (less noise in the kitchen, and can polish in a sequence). Staggered time programming as described in this manual allows the operator to quickly and easily customize their preference without accessing the other polish programmable parameters. Staggers are available in 15-minute increments from the set polish time up 45 minutes.
Process Controllers
FAST Lit. Part No. 229-51311 Rev. B (MANAGER) 07/13/2006 PITCO L20-306 Rev 0 11/06 Page 5 © 2005-2006 Food Automation – Service Techniques, Inc. All Rights Reserved
This document contains confidential information. The dissemination, publication, copying, or duplication of this document without prior written authorization is strictly prohibited.
Using the (FASTRON.) VC-210 Controller: Operational Test Procedure
1 Plug fryer into electrical source
2 NOTE: This scrolling can be bypassed by pressing SCAN. The controller will scroll through the following: a. Appliance Type b. Software # c. Download # d. Current Date e. Time of Day f. SCK Address g. “COOL”
3 Turn the fryer power switch on.
4 Press the EXIT COOL key once.
5 Press any illuminated product key.
6 The cook cycle will count down in the display.
NOTE: A cook cycle can be canceled by pressing and holding the active product key for 3 seconds. Pressing the product key for less than 3 seconds will not cancel the cook cycle. If the cycle is canceled during the first 25% of the cook time, the cook cycle simply gets canceled and the display shows either “COOL” or the actual temperature, depending on the appliance. Canceling the cycle during the last 75% of the cook time will either put the controller in the filter mode or subtract one from its cycle count toward filter lockout.

Process Controllers
FAST Lit. Part No. 229-51311 Rev. B (MANAGER) 07/13/2006 PITCO L20-306 Rev 0 11/06 Page 6 © 2005-2006 Food Automation – Service Techniques, Inc. All Rights Reserved
This document contains confidential information. The dissemination, publication, copying, or duplication of this document without prior written authorization is strictly prohibited.
Operating the (FASTRON.) VC-210 Controller RECIPE REVIEW — Quickly see what is programmed for each product key
1. Press the SCAN key.
2. Select any product key previously programmed–LED will be lit above the key.
3. Press the DOWN arrow key to scroll through the list.
4. Press SCAN to exit.
VIEW TEMPERATURE SETTING 1. Press the TEMP key ‘once’ to view Actual temperature, or
2. Press the TEMP key ‘twice’ to view Set temperature.
ACTIVATING THE POLISH FEATURE 1. To Polish ‘NOW’, press and hold the EXIT COOL and EXIT FILL keys at the same time.
2. To Polish ‘LATER’, press and hold the SCAN and EXIT FILL keys at the same time. NOTE: Polish
will only be delayed IF a non-zero polish delay time is set.
DISPLAY TIME OF DAY—2 second display of the current time of day. NOTE: Can only be done if the controller is at COOL or idle mode.
1. Press and hold the SCAN and EXIT COOL keys at the same time.
DISPLAY APPLIANCE TYPE AND DOWNLOAD INFORMATION—2 second scrolling display of the Appliance Type, Software #, Download #, Current Date, Time of Day and SCK Address.
1. Press the SCAN and TEMP keys at the same time.

Process Controllers
FAST Lit. Part No. 229-51311 Rev. B (MANAGER) 07/13/2006 PITCO L20-306 Rev 0 11/06 Page 7 © 2005-2006 Food Automation – Service Techniques, Inc. All Rights Reserved
This document contains confidential information. The dissemination, publication, copying, or duplication of this document without prior written authorization is strictly prohibited.
Programming the (FASTRON.) VC-210 Controller Programming Mode for the Vision Controller is entered by pressing the “P” key for three (3) seconds. Multiple programming modes are available on the VC-210 as follows:
Passcode Access Level Syst
em
Rec
ipe
Prod
Nam
e L
ibra
ry
Ala
rm
Lib
rary
Clo
ck/D
ate
SMS
Act
ivat
e
Inst
ant O
n
SCK
A
ddre
ss
6647 Manager X X X X X X X NOTES:
• Pressing the “P” key saves the previous parameter. • If no key is pressed within 2 minutes while in Programming mode, the controller will
automatically return to idle mode. • All scrolling will loop back through allowed values.

Process Controllers
FAST Lit. Part No. 229-51311 Rev. B (MANAGER) 07/13/2006 PITCO L20-306 Rev 0 11/06 Page 8 © 2005-2006 Food Automation – Service Techniques, Inc. All Rights Reserved
This document contains confidential information. The dissemination, publication, copying, or duplication of this document without prior written authorization is strictly prohibited.
Changing the Menu Strip on a (FASTRON.) VC-210 Process Controller
1 • Turn off the fryer power.
2 • With a flat screwdriver, remove the two screws that secure the bezel of the VC-210 in place. Remove the bezel.
3 • Remove the existing menu strip(s) by lifting the tab and pulling the menu strip out from the right side of the controller.
4 • Using the tab as a guide, slide the new menu strip in.
5 • Replace the bezel and screws that secure it to the controller.
6 • Turn on the fryer power.
Replacement Parts List Part Number Description 150-10202 1/4-20X3/4" SLOT RD HD BLK O 150-11025 NUT 1/4-20 TINNERMAN SPRING 214-50291 SHEETMETAL BEZEL 214-50660-57 OVERLAY 214-51003-57 MENU STRIP

Process Controllers
FAST Lit. Part No. 229-51311 Rev. B (MANAGER) 07/13/2006 PITCO L20-306 Rev 0 11/06 Page 9 © 2005-2006 Food Automation – Service Techniques, Inc. All Rights Reserved
This document contains confidential information. The dissemination, publication, copying, or duplication of this document without prior written authorization is strictly prohibited.
SYSTEM PROGRAMMING (6647) KEY PRESS DISPLAY ACTION
1 Enter Program mode
OR
• To enter programming mode, press and hold the "P" key for 3 seconds.
• Scroll Down to Programming.
• Press the “P” key to lock in your entry.
2 Enter pass code
ENTER CODE ****
• Enter pass code 6 6 4 7.
• Press the “P” key when “System” is displayed.
• Press the “P” key again to enter System Programming.
3 Confirm or Select Appliance Type
OR
APPLIANCE TYPE XXXXXXXX
• Press the LEFT or RIGHT arrow keys to select from a pre-programmed list of appliances.
NOTE: Changing appliance type clears all current recipe programs.
• Press the “P” key to lock in your entry
4 Select Language
OR
SELECT LANGUAGE (English, Other)
• Press the LEFT or RIGHT arrow key to select language
• Press the “P” key to lock in your entry
NOTE: ‘Other’ is downloadable.
Process Controllers
FAST Lit. Part No. 229-51311 Rev. B (MANAGER) 07/13/2006 PITCO L20-306 Rev 0 11/06 Page 10 © 2005-2006 Food Automation – Service Techniques, Inc. All Rights Reserved
This document contains confidential information. The dissemination, publication, copying, or duplication of this document without prior written authorization is strictly prohibited.
5 Set Tone Level
OR
TONE LEVEL (None, 1, 2, 3, 4, 5)
• Press the LEFT or RIGHT arrow keys to select a tone level. At each level the controller will continuously sound the selected tone.
• Press the “P” key to lock in your entry
6 Set Temperature Mode
OR
TEMPERATURE F = FAHRENHEIT or
C = CELSIUS
• Press the LEFT or RIGHT arrow keys to select the method that all temperatures will be displayed in.
• Press the “P” key to lock in your entry
7 Set Profile Timing
OR
PROFILE TIMING (NO, YES)
• Press the LEFT or RIGHT arrow keys to activate Profile Timing to monitor each individual stage of the cook time.
• Press the “P” key to lock in your entry
8 Program Setback Time
SETBACK TIME HH:MM
• Press the numbered product keys to select the time in hh:mm format for activating Setback mode.
• Press the “P” key to lock in your entry
9 Program Setback Temperature
SETBACK TEMP XXX
• Press the numbered product keys to select the Setback temperature in the range of 200 to 375°F.
• Press the “P” key to lock in your entry

Process Controllers
FAST Lit. Part No. 229-51311 Rev. B (MANAGER) 07/13/2006 PITCO L20-306 Rev 0 11/06 Page 11 © 2005-2006 Food Automation – Service Techniques, Inc. All Rights Reserved
This document contains confidential information. The dissemination, publication, copying, or duplication of this document without prior written authorization is strictly prohibited.
10 Program Global Filter Lockout
GLOBAL FLTR CNT XX
(“0” to “99”)
• Type in the number of cooks allowed on all keys before forcing Filtering by pressing the appropriate numbered product key(s). The range is 0 to 99, where 0 means No Global Filtering.
• Press the “P” key to lock in your entry
11 Set Repair Function
OR
REPAIR FUNCTION (YES, NO)
• Press the LEFT or RIGHT arrow keys to select whether the Repair Function will be active or not.
• Press the “P” key to lock in your entry
12 Set Repair Fail Time
REPAIR FAIL TIME MM:SS
This option will only appear if the Repair Function is enabled.
• Press the numbers to set Repair Fail time in minutes/seconds. The range is 0 to 59:59 minutes.
• Press the “P” key to lock in your entry
13 Set Daylight Savings Mode
OR
DAYLIGHT SAVINGS (SPRING, FALL)
• Press the LEFT or RIGHT arrow keys to select the appropriate Daylight Savings choice.
• Press the “P” key to lock in your entry
14 Set Stagger Time
OR
SELECT STAGGER (00 MINUTES, 15 MINUTES, 30 MINUTES, 45 MINUTES, 60 MINUTES)
• Press the LEFT or RIGHT arrow keys to select the SMS stagger time.
• Press the “P” key to lock in your entry
15 Set # of RQI Trackers
OR
# RQI TRACKERS NONE, 1-30
• Press the LEFT or RIGHT arrow keys to select number of RQI Trackers.
• Press the “P” key to lock in your entry

Process Controllers
FAST Lit. Part No. 229-51311 Rev. B (MANAGER) 07/13/2006 PITCO L20-306 Rev 0 11/06 Page 12 © 2005-2006 Food Automation – Service Techniques, Inc. All Rights Reserved
This document contains confidential information. The dissemination, publication, copying, or duplication of this document without prior written authorization is strictly prohibited.
16 Set SCK Status Sound
OR
SCK STATUS SOUNDYES or NO
• Press the LEFT or RIGHT arrow keys to change.
• Press the “P” key to lock in your choice.
17 Set Communication Error Display
OR
COM ERROR DISP YES or NO
• Press the LEFT or RIGHT arrow keys to change.
• Press the “P” key to lock in your choice.
18 Exit Program Mode
OR
EXIT • Press the UP or DOWN arrow keys to scroll to “Exit.”
19
• Press the “P” key to return to idle mode.

Process Controllers
FAST Lit. Part No. 229-51311 Rev. B (MANAGER) 07/13/2006 PITCO L20-306 Rev 0 11/06 Page 13 © 2005-2006 Food Automation – Service Techniques, Inc. All Rights Reserved
This document contains confidential information. The dissemination, publication, copying, or duplication of this document without prior written authorization is strictly prohibited.
PRODUCT OR ALARM NAME LIBRARIES (6647) KEY PRESS DISPLAY ACTION
1 Enter Program mode
OR
• To enter programming mode, press and hold the "P" key for 3 seconds.
• Scroll Down to Programming.
• Press the “P” key to lock in your entry.
2 Enter Pass Code
SYSTEM PROGRAMMING
****
• Enter pass code 6 6 4 7.
• Press the “P” key to lock in your entry.
3 OR
PROD NAME LIB Or
ALARM LIB
• Scroll to “Prod Name Lib” or “Alarm Lib”
• Press the “P” key to advance.
From this point, you can either MODIFY an Existing Name, or ADD a New Name.
4a MODIFY or ADD an Existing Product or Alarm Name
OR
Prod Name Lib xxxxxxxx
OR
Alarm Name Lib
xxxx
• Start spelling the name (predictive method) using keys 1-10, OR
• Use the UP and DOWN arrow keys to scroll through the library (traditional method).
4b
• Once name is located, press the SCAN key to toggle from predictive text input to traditional text input.
4c OR
• Use the LEFT and RIGHT arrow keys to move the

Process Controllers
FAST Lit. Part No. 229-51311 Rev. B (MANAGER) 07/13/2006 PITCO L20-306 Rev 0 11/06 Page 14 © 2005-2006 Food Automation – Service Techniques, Inc. All Rights Reserved
This document contains confidential information. The dissemination, publication, copying, or duplication of this document without prior written authorization is strictly prohibited.
cursor.
• Press “Exit Fill” to toggle between Upper and Lower case.
• “Exit Cool” can be used to clear the existing product name.
• Press the “P” key to complete.
4d OR
SAVE LIBRARY
MODIFY, ADD, CANCEL
• Press the LEFT or RIGHT arrow keys to select “Modify” or “Add.”
• Press the “P” key.
NOTE: Selecting “Cancel” allows you to exit without making any changes.
4e Exit Program Mode
OR
EXIT • Press the UP or DOWN arrow keys to scroll to “Exit.”

Process Controllers
FAST Lit. Part No. 229-51311 Rev. B (MANAGER) 07/13/2006 PITCO L20-306 Rev 0 11/06 Page 15 © 2005-2006 Food Automation – Service Techniques, Inc. All Rights Reserved
This document contains confidential information. The dissemination, publication, copying, or duplication of this document without prior written authorization is strictly prohibited.
CLOCK/DATE PROGRAMMING (6647) KEY PRESS DISPLAY ACTION
1 Enter Program mode
OR
• To enter programming mode, press and hold the "P" key for 3 seconds.
• Scroll to Programming.
• Press the “P” key.
• The display will prompt user to enter a pass code.
2 Enter Pass Code
OR
CLOCK/DATE ****
• Enter pass code 6 6 4 7.
• Press the “P” key to lock in your entry.
• Scroll to Clock/Date
• Press the “P” key to advance.

Process Controllers
FAST Lit. Part No. 229-51311 Rev. B (MANAGER) 07/13/2006 PITCO L20-306 Rev 0 11/06 Page 16 © 2005-2006 Food Automation – Service Techniques, Inc. All Rights Reserved
This document contains confidential information. The dissemination, publication, copying, or duplication of this document without prior written authorization is strictly prohibited.
3 Set Time of Day
OR
TIME OF DAY HH:MM
CURRENT YEAR
“XXXX”
CURRENT MONTH “XXXXXXXXX”
CURRENT DATE
“XX”
CURRENT DAY “XXXXXXXX”
• Use the numbered product keys to set the time of day. The range is from 00:00 to 23:59.
• Press the “P” key.
• Press the LEFT and RIGHT arrow keys to set the Year.
• Press the “P” key.
• Press the LEFT and RIGHT arrow keys to set the current Month.
• Press the “P” key.
• Press the LEFT and RIGHT arrow keys to set the current Date.
• Press the “P” key.
• Press the LEFT and RIGHT arrow keys to set the Day.
• Press the “P” key.
4 Exit Clock/Date Programming
OR
• Scroll to Exit.
• Press the “P” key to return to idle mode.

Process Controllers
FAST Lit. Part No. 229-51311 Rev. B (MANAGER) 07/13/2006 PITCO L20-306 Rev 0 11/06 Page 17 © 2005-2006 Food Automation – Service Techniques, Inc. All Rights Reserved
This document contains confidential information. The dissemination, publication, copying, or duplication of this document without prior written authorization is strictly prohibited.
SMS ACTIVATION PROGRAMMING (6647) KEY PRESS DISPLAY ACTION
1 Enter Program mode
OR
SMS ACTIVATE • To enter programming mode, press and hold the "P" key for 3 seconds.
• Scroll to “Programming.”
• Press the “P” key.
• The display will prompt user to enter a pass code.
2 Enter Pass Code
ENTER CODE ****
• Enter pass code 6 6 4 7.
• Press the “P” key to lock in your entry.
• Scroll to “SMS Activate.”
• Press the “P” key.
3 Setting SMS Activation Time NOTE: Depending on the scheme entered (see below), one of four SMS Activation times will be selected.
3a SCHEME 1
OR
Set SMS Timing For SMS use:
• Event 1 = 7:00 A.M., 30 Min. Duration, 0 Hour Delay
Event 2 = 2:00 P.M., 30 Min. Duration, 3 Hour Delay
OR
3b SCHEME 2
OR
Set SMS Timing For SMS use:
• Event 1 = 7:00 A.M., 15 Min. Duration, 0 Hour Delay
• Event 2 = 2:00 P.M., 15 Min. Duration, 3 Hour Delay
OR
Process Controllers
FAST Lit. Part No. 229-51311 Rev. B (MANAGER) 07/13/2006 PITCO L20-306 Rev 0 11/06 Page 18 © 2005-2006 Food Automation – Service Techniques, Inc. All Rights Reserved
This document contains confidential information. The dissemination, publication, copying, or duplication of this document without prior written authorization is strictly prohibited.
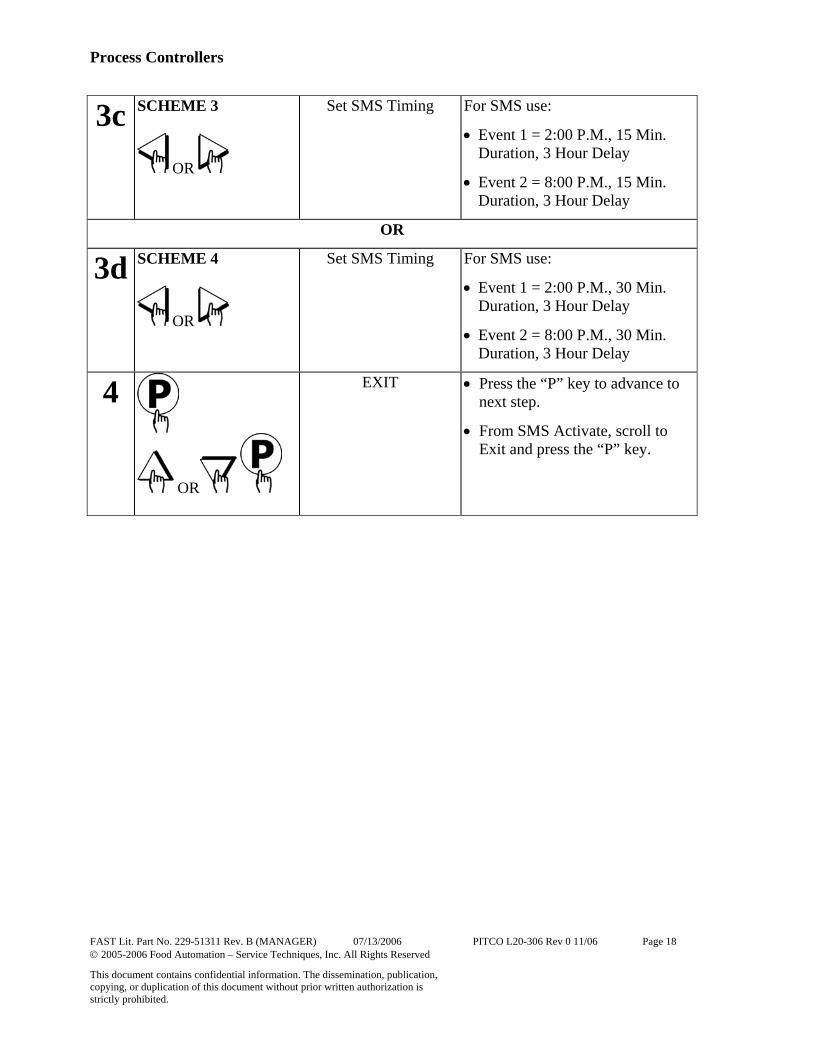
3c SCHEME 3
OR
Set SMS Timing For SMS use:
• Event 1 = 2:00 P.M., 15 Min. Duration, 3 Hour Delay
• Event 2 = 8:00 P.M., 15 Min. Duration, 3 Hour Delay
OR
3d SCHEME 4
OR
Set SMS Timing For SMS use:
• Event 1 = 2:00 P.M., 30 Min. Duration, 3 Hour Delay
• Event 2 = 8:00 P.M., 30 Min. Duration, 3 Hour Delay
4
OR
EXIT • Press the “P” key to advance to next step.
• From SMS Activate, scroll to Exit and press the “P” key.

Process Controllers
FAST Lit. Part No. 229-51311 Rev. B (MANAGER) 07/13/2006 PITCO L20-306 Rev 0 11/06 Page 19 © 2005-2006 Food Automation – Service Techniques, Inc. All Rights Reserved
This document contains confidential information. The dissemination, publication, copying, or duplication of this document without prior written authorization is strictly prohibited.
SET INSTANT ON (6647) KEY PRESS DISPLAY ACTION
1 Enter Program mode
OR
• To enter programming mode, press and hold the "P" key for 3 seconds.
• Scroll to “Programming.”
• Press the “P” key.
• The display will prompt user to enter a pass code.
2 Enter Pass Code
ENTER CODE ****
• Enter pass code 6 6 4 7.
• Press the “P” key to lock in your entry.
• Scroll to “Instant On.”
• Press the “P” key.
3
SELECT PRODUCT TO PROGRAM
• Select a Product Key
4
INSTANT ON
:XX
• Use Product Keys to enter 0-60.
5
SELECT PRODUCT TO PROGRAM
• To program additional products, select another product key.
6 Exit Instant On Programming
OR
• Scroll to Exit.
• Press the “P” key to return to idle mode.

Process Controllers
FAST Lit. Part No. 229-51311 Rev. B (MANAGER) 07/13/2006 PITCO L20-306 Rev 0 11/06 Page 20 © 2005-2006 Food Automation – Service Techniques, Inc. All Rights Reserved
This document contains confidential information. The dissemination, publication, copying, or duplication of this document without prior written authorization is strictly prohibited.
SCK® ADDRESS (6647) KEY PRESS DISPLAY ACTION
1 Enter Program Mode
OR
• To enter programming mode, press and hold the "P" key for 3 seconds.
• Scroll to Programming.
• Press the “P” key.
• The display will prompt user to enter a pass code.
2 Enter Pass Code
OR
ENTER CODE ****
• Enter pass code 6 6 4 7.
• Press the “P” key to lock in your entry.
• Scroll to SCK Address.
• Press “P” to advance.
3 Set SCK Address
OR
SCK ADDRESS XX
• Press the LEFT or RIGHT arrow keys to scroll through the SCK address to be used for this controller. The range is from 1 to 31, or “Auto Assign.”
• Press the “P” key to lock in your selection.
Process Controllers
FAST Lit. Part No. 229-51311 Rev. B (MANAGER) 07/13/2006 PITCO L20-306 Rev 0 11/06 Page 21 © 2005-2006 Food Automation – Service Techniques, Inc. All Rights Reserved
This document contains confidential information. The dissemination, publication, copying, or duplication of this document without prior written authorization is strictly prohibited.
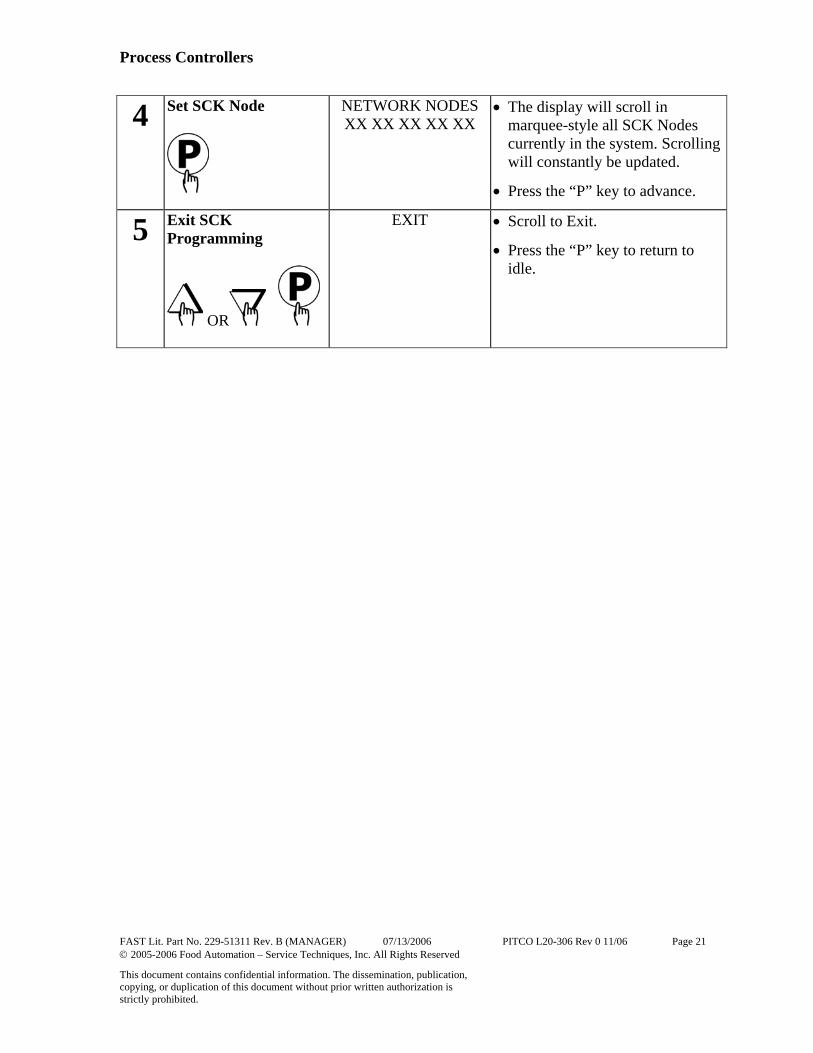
4 Set SCK Node
NETWORK NODES XX XX XX XX XX
• The display will scroll in marquee-style all SCK Nodes currently in the system. Scrolling will constantly be updated.
• Press the “P” key to advance.
5 Exit SCK Programming
OR
EXIT • Scroll to Exit.
• Press the “P” key to return to idle.

Process Controllers
FAST Lit. Part No. 229-51311 Rev. B (MANAGER) 07/13/2006 PITCO L20-306 Rev 0 11/06 Page 22 © 2005-2006 Food Automation – Service Techniques, Inc. All Rights Reserved
This document contains confidential information. The dissemination, publication, copying, or duplication of this document without prior written authorization is strictly prohibited.
This page left intentionally blank. NOTES:

Process Controllers
FAST Lit. Part No. 229-51311 Rev. B (MANAGER) 07/13/2006 PITCO L20-306 Rev 0 11/06 Page 23 © 2005-2006 Food Automation – Service Techniques, Inc. All Rights Reserved
This document contains confidential information. The dissemination, publication, copying, or duplication of this document without prior written authorization is strictly prohibited.
This page left intentionally blank. NOTES:
Process Controllers
FAST Lit. Part No. 229-51311 Rev. B (MANAGER) 07/13/2006 PITCO L20-306 Rev 0 11/06 Page 24 © 2005-2006 Food Automation – Service Techniques, Inc. All Rights Reserved
This document contains confidential information. The dissemination, publication, copying, or duplication of this document without prior written authorization is strictly prohibited.
PATENTS The products manufactured by FAST are protected under one or more of the following U.S. Patents: 4,782,445 4,812,625 4,812,963 4,864,498 4,911,068 4,920,948 5,043,860 5,171,974 5,331,575 5,539,671 5,711,606 5,723,846 5,726,424 5,875,430 6,142,666 6,339,930 6,401,467 6,505,546 6,581,391 7,015,433 Plus foreign patents and patents pending. Plus licensed patent 4,858,119 Specifications subject to change without notice. This document contains confidential information. The dissemination, publication, copying, or duplication of this document without prior written authorization is strictly prohibited.
Food Automation - Service Techniques, Inc. 905 Honeyspot Road Stratford, CT 06615-7147 USA Phone: +1-203-377-4414 Sales: 1-800-FASTRON Fax: +1-203-377-8187 International Callers: +1-203-378-6860 Toll-free technical support 24/7 from the U.S., Canada, and Caribbean: 1-800-243-9271 International offices are located in: China: +86 13916854613 Singapore: +65 98315927 United Kingdom: +44 0 1268 544000 www.fastinc.com


