zenworks best practices guide
TRANSCRIPT
ZENworks 2020Best Practices Guide

Legal NoticeFor information about legal notices, trademarks, disclaimers, warranties, export and other use restrictions, U.S. Government rights, patent policy, and FIPS compliance, see https://www.novell.com/company/legal/.
Copyright © 2008 - 2021 Micro Focus Software Inc. All rights reserved.
The only warranties for products and services of Micro Focus and its affiliates and licensors (“Micro Focus”) are set forth in the express warranty statements accompanying such products and services. Nothing herein should be construed as constituting an additional warranty. Micro Focus shall not be liable for technical or editorial errors or omissions contained herein. The information contained herein is subject to change without notice.
2
Contents
About This Guide 11
1 ZENworks Best Practices Overview 131.1 The Goal: Total Management, Zero Effort . . . . . . . . . . . . . . . . . . . . . . . . . . . . . . . . . . . . . . . . . . . . . . . 131.2 The Management Paradigm . . . . . . . . . . . . . . . . . . . . . . . . . . . . . . . . . . . . . . . . . . . . . . . . . . . . . . . . . . 14
1.2.1 Management By Exception . . . . . . . . . . . . . . . . . . . . . . . . . . . . . . . . . . . . . . . . . . . . . . . . . . . 141.2.2 User-Centric Management. . . . . . . . . . . . . . . . . . . . . . . . . . . . . . . . . . . . . . . . . . . . . . . . . . . . 141.2.3 Device-Centric Management . . . . . . . . . . . . . . . . . . . . . . . . . . . . . . . . . . . . . . . . . . . . . . . . . . 151.2.4 Location Awareness Management . . . . . . . . . . . . . . . . . . . . . . . . . . . . . . . . . . . . . . . . . . . . . 15
1.3 The Solution: Micro Focus ZENworks. . . . . . . . . . . . . . . . . . . . . . . . . . . . . . . . . . . . . . . . . . . . . . . . . . . 161.4 About the Structure of this Guide . . . . . . . . . . . . . . . . . . . . . . . . . . . . . . . . . . . . . . . . . . . . . . . . . . . . . 16
Part I ZENworks Administrator 17
2 Pre-Design and Planning 19Performing a Business Assessment . . . . . . . . . . . . . . . . . . . . . . . . . . . . . . . . . . . . . . . . . . . . . . . . . . . . . . . . . . 19Performing a Technical Assessment . . . . . . . . . . . . . . . . . . . . . . . . . . . . . . . . . . . . . . . . . . . . . . . . . . . . . . . . . 20Gather Other Important Information . . . . . . . . . . . . . . . . . . . . . . . . . . . . . . . . . . . . . . . . . . . . . . . . . . . . . . . . 21Develop a High-Level Design . . . . . . . . . . . . . . . . . . . . . . . . . . . . . . . . . . . . . . . . . . . . . . . . . . . . . . . . . . . . . . . 22Develop Documentation. . . . . . . . . . . . . . . . . . . . . . . . . . . . . . . . . . . . . . . . . . . . . . . . . . . . . . . . . . . . . . . . . . . 23Outputs from Pre-Design Activities and Workshops . . . . . . . . . . . . . . . . . . . . . . . . . . . . . . . . . . . . . . . . . . . . 23Critical Information Required for the System Design. . . . . . . . . . . . . . . . . . . . . . . . . . . . . . . . . . . . . . . . . . . . 23Decisions from the System Design. . . . . . . . . . . . . . . . . . . . . . . . . . . . . . . . . . . . . . . . . . . . . . . . . . . . . . . . . . . 23
Required Functionality . . . . . . . . . . . . . . . . . . . . . . . . . . . . . . . . . . . . . . . . . . . . . . . . . . . . . . . . . . . . . . 24Certificate Authority . . . . . . . . . . . . . . . . . . . . . . . . . . . . . . . . . . . . . . . . . . . . . . . . . . . . . . . . . . . . . . . . 24Management Structure . . . . . . . . . . . . . . . . . . . . . . . . . . . . . . . . . . . . . . . . . . . . . . . . . . . . . . . . . . . . . . 24Content Store . . . . . . . . . . . . . . . . . . . . . . . . . . . . . . . . . . . . . . . . . . . . . . . . . . . . . . . . . . . . . . . . . . . . . . 25Staging and Grouping . . . . . . . . . . . . . . . . . . . . . . . . . . . . . . . . . . . . . . . . . . . . . . . . . . . . . . . . . . . . . . . 26
3 Design 27Infrastructure Structure and Placement . . . . . . . . . . . . . . . . . . . . . . . . . . . . . . . . . . . . . . . . . . . . . . . . . . . . . . 27
Primary Servers . . . . . . . . . . . . . . . . . . . . . . . . . . . . . . . . . . . . . . . . . . . . . . . . . . . . . . . . . . . . . . . . . . . . 28Satellite Servers . . . . . . . . . . . . . . . . . . . . . . . . . . . . . . . . . . . . . . . . . . . . . . . . . . . . . . . . . . . . . . . . . . . . 31Database. . . . . . . . . . . . . . . . . . . . . . . . . . . . . . . . . . . . . . . . . . . . . . . . . . . . . . . . . . . . . . . . . . . . . . . . . . 35
Single Zone or Multiple Zones . . . . . . . . . . . . . . . . . . . . . . . . . . . . . . . . . . . . . . . . . . . . . . . . . . . . . . . . . . . . . . 35Licensing ZENworks Products. . . . . . . . . . . . . . . . . . . . . . . . . . . . . . . . . . . . . . . . . . . . . . . . . . . . . . . . . . . . . . . 36Discovery and Deployment Strategies. . . . . . . . . . . . . . . . . . . . . . . . . . . . . . . . . . . . . . . . . . . . . . . . . . . . . . . . 37
Device Discovery . . . . . . . . . . . . . . . . . . . . . . . . . . . . . . . . . . . . . . . . . . . . . . . . . . . . . . . . . . . . . . . . . . . 37ZENworks Agent Deployment . . . . . . . . . . . . . . . . . . . . . . . . . . . . . . . . . . . . . . . . . . . . . . . . . . . . . . . . . 39Registration . . . . . . . . . . . . . . . . . . . . . . . . . . . . . . . . . . . . . . . . . . . . . . . . . . . . . . . . . . . . . . . . . . . . . . . 40
Windows 10 Device Management. . . . . . . . . . . . . . . . . . . . . . . . . . . . . . . . . . . . . . . . . . . . . . . . . . . . . . . . . . . 42Remote Management. . . . . . . . . . . . . . . . . . . . . . . . . . . . . . . . . . . . . . . . . . . . . . . . . . . . . . . . . . . . . . . . . . . . . 42
Security. . . . . . . . . . . . . . . . . . . . . . . . . . . . . . . . . . . . . . . . . . . . . . . . . . . . . . . . . . . . . . . . . . . . . . . . . . . 42
Contents 3
Performance. . . . . . . . . . . . . . . . . . . . . . . . . . . . . . . . . . . . . . . . . . . . . . . . . . . . . . . . . . . . . . . . . . . . . . . 43Join Proxy . . . . . . . . . . . . . . . . . . . . . . . . . . . . . . . . . . . . . . . . . . . . . . . . . . . . . . . . . . . . . . . . . . . . . . . . . 43Auditing . . . . . . . . . . . . . . . . . . . . . . . . . . . . . . . . . . . . . . . . . . . . . . . . . . . . . . . . . . . . . . . . . . . . . . . . . . 44
Inventory . . . . . . . . . . . . . . . . . . . . . . . . . . . . . . . . . . . . . . . . . . . . . . . . . . . . . . . . . . . . . . . . . . . . . . . . . . . . . . . 44Inventory Settings and Scheduling . . . . . . . . . . . . . . . . . . . . . . . . . . . . . . . . . . . . . . . . . . . . . . . . . . . . . 44Software File Information . . . . . . . . . . . . . . . . . . . . . . . . . . . . . . . . . . . . . . . . . . . . . . . . . . . . . . . . . . . . 46Collection Data Form and Collection Data Form Scheduling . . . . . . . . . . . . . . . . . . . . . . . . . . . . . . . . 46Inventory Pruning . . . . . . . . . . . . . . . . . . . . . . . . . . . . . . . . . . . . . . . . . . . . . . . . . . . . . . . . . . . . . . . . . . 47Inventory Loader Thread Configuration. . . . . . . . . . . . . . . . . . . . . . . . . . . . . . . . . . . . . . . . . . . . . . . . . 47
Policy Management . . . . . . . . . . . . . . . . . . . . . . . . . . . . . . . . . . . . . . . . . . . . . . . . . . . . . . . . . . . . . . . . . . . . . . 48Recommendations for Managing Policies . . . . . . . . . . . . . . . . . . . . . . . . . . . . . . . . . . . . . . . . . . . . . . . 49Linux Puppet Policies. . . . . . . . . . . . . . . . . . . . . . . . . . . . . . . . . . . . . . . . . . . . . . . . . . . . . . . . . . . . . . . . 49
Application Management. . . . . . . . . . . . . . . . . . . . . . . . . . . . . . . . . . . . . . . . . . . . . . . . . . . . . . . . . . . . . . . . . . 50Recommendations for Organizing Bundles . . . . . . . . . . . . . . . . . . . . . . . . . . . . . . . . . . . . . . . . . . . . . . 50Assigning Bundles . . . . . . . . . . . . . . . . . . . . . . . . . . . . . . . . . . . . . . . . . . . . . . . . . . . . . . . . . . . . . . . . . . 51Testing Bundle Changes. . . . . . . . . . . . . . . . . . . . . . . . . . . . . . . . . . . . . . . . . . . . . . . . . . . . . . . . . . . . . . 52
Linux Package Management. . . . . . . . . . . . . . . . . . . . . . . . . . . . . . . . . . . . . . . . . . . . . . . . . . . . . . . . . . . . . . . . 53Linux Bundles . . . . . . . . . . . . . . . . . . . . . . . . . . . . . . . . . . . . . . . . . . . . . . . . . . . . . . . . . . . . . . . . . . . . . . 53Linux Dependency Bundles . . . . . . . . . . . . . . . . . . . . . . . . . . . . . . . . . . . . . . . . . . . . . . . . . . . . . . . . . . . 54External Services Policies . . . . . . . . . . . . . . . . . . . . . . . . . . . . . . . . . . . . . . . . . . . . . . . . . . . . . . . . . . . . 54Publishing ZENworks Bundles as YUM Repositories . . . . . . . . . . . . . . . . . . . . . . . . . . . . . . . . . . . . . . . 55Linux Package Management Best Practices. . . . . . . . . . . . . . . . . . . . . . . . . . . . . . . . . . . . . . . . . . . . . . 55
Content Management. . . . . . . . . . . . . . . . . . . . . . . . . . . . . . . . . . . . . . . . . . . . . . . . . . . . . . . . . . . . . . . . . . . . . 56Content Delivery Mechanisms . . . . . . . . . . . . . . . . . . . . . . . . . . . . . . . . . . . . . . . . . . . . . . . . . . . . . . . . 56Defining the “What” in Content Management . . . . . . . . . . . . . . . . . . . . . . . . . . . . . . . . . . . . . . . . . . . 59Organizing Bundles . . . . . . . . . . . . . . . . . . . . . . . . . . . . . . . . . . . . . . . . . . . . . . . . . . . . . . . . . . . . . . . . . 61Defining the “How” in Content Management . . . . . . . . . . . . . . . . . . . . . . . . . . . . . . . . . . . . . . . . . . . . 62Critical Information Required To Determine Content Synchronization Settings. . . . . . . . . . . . . . . . . 63Offline Content Replication and Management . . . . . . . . . . . . . . . . . . . . . . . . . . . . . . . . . . . . . . . . . . . 64
Imaging . . . . . . . . . . . . . . . . . . . . . . . . . . . . . . . . . . . . . . . . . . . . . . . . . . . . . . . . . . . . . . . . . . . . . . . . . . . . . . . . 65General Recommendations . . . . . . . . . . . . . . . . . . . . . . . . . . . . . . . . . . . . . . . . . . . . . . . . . . . . . . . . . . 65ZENworks Imaging Recommendations. . . . . . . . . . . . . . . . . . . . . . . . . . . . . . . . . . . . . . . . . . . . . . . . . . 66Third-Party Imaging Recommendations . . . . . . . . . . . . . . . . . . . . . . . . . . . . . . . . . . . . . . . . . . . . . . . . 66Recommendations for Imaging UEFI Devices . . . . . . . . . . . . . . . . . . . . . . . . . . . . . . . . . . . . . . . . . . . . 67Recommendations for Replication of TFTP Imaging Content. . . . . . . . . . . . . . . . . . . . . . . . . . . . . . . . 67
Antimalware . . . . . . . . . . . . . . . . . . . . . . . . . . . . . . . . . . . . . . . . . . . . . . . . . . . . . . . . . . . . . . . . . . . . . . . . . . . . 67Antimalware Agent . . . . . . . . . . . . . . . . . . . . . . . . . . . . . . . . . . . . . . . . . . . . . . . . . . . . . . . . . . . . . . . . . 67Ondemand Content System . . . . . . . . . . . . . . . . . . . . . . . . . . . . . . . . . . . . . . . . . . . . . . . . . . . . . . . . . . 70Antimalware Database . . . . . . . . . . . . . . . . . . . . . . . . . . . . . . . . . . . . . . . . . . . . . . . . . . . . . . . . . . . . . . 74Antimalware Event Processing . . . . . . . . . . . . . . . . . . . . . . . . . . . . . . . . . . . . . . . . . . . . . . . . . . . . . . . . 75
Other ZENworks Settings Recommendations . . . . . . . . . . . . . . . . . . . . . . . . . . . . . . . . . . . . . . . . . . . . . . . . . . 76Content Blackout Schedule . . . . . . . . . . . . . . . . . . . . . . . . . . . . . . . . . . . . . . . . . . . . . . . . . . . . . . . . . . . 76Content Replication Setting . . . . . . . . . . . . . . . . . . . . . . . . . . . . . . . . . . . . . . . . . . . . . . . . . . . . . . . . . . 77Local Device Logging . . . . . . . . . . . . . . . . . . . . . . . . . . . . . . . . . . . . . . . . . . . . . . . . . . . . . . . . . . . . . . . . 77ZENworks Agent Settings . . . . . . . . . . . . . . . . . . . . . . . . . . . . . . . . . . . . . . . . . . . . . . . . . . . . . . . . . . . . 78Device Refresh Schedule . . . . . . . . . . . . . . . . . . . . . . . . . . . . . . . . . . . . . . . . . . . . . . . . . . . . . . . . . . . . . 79Device Removal Schedule . . . . . . . . . . . . . . . . . . . . . . . . . . . . . . . . . . . . . . . . . . . . . . . . . . . . . . . . . . . . 79Dynamic Group Refresh Schedule . . . . . . . . . . . . . . . . . . . . . . . . . . . . . . . . . . . . . . . . . . . . . . . . . . . . . 80ZENworks Explorer Configuration. . . . . . . . . . . . . . . . . . . . . . . . . . . . . . . . . . . . . . . . . . . . . . . . . . . . . . 81System Variables . . . . . . . . . . . . . . . . . . . . . . . . . . . . . . . . . . . . . . . . . . . . . . . . . . . . . . . . . . . . . . . . . . . 81
System Update . . . . . . . . . . . . . . . . . . . . . . . . . . . . . . . . . . . . . . . . . . . . . . . . . . . . . . . . . . . . . . . . . . . . . . . . . . 82Update Prerequisites . . . . . . . . . . . . . . . . . . . . . . . . . . . . . . . . . . . . . . . . . . . . . . . . . . . . . . . . . . . . . . . . 83Precautions. . . . . . . . . . . . . . . . . . . . . . . . . . . . . . . . . . . . . . . . . . . . . . . . . . . . . . . . . . . . . . . . . . . . . . . . 83System Update Agent Settings . . . . . . . . . . . . . . . . . . . . . . . . . . . . . . . . . . . . . . . . . . . . . . . . . . . . . . . . 83
4
System Update Server . . . . . . . . . . . . . . . . . . . . . . . . . . . . . . . . . . . . . . . . . . . . . . . . . . . . . . . . . . . . . . . 83System Update Stages . . . . . . . . . . . . . . . . . . . . . . . . . . . . . . . . . . . . . . . . . . . . . . . . . . . . . . . . . . . . . . . 84Standalone System Updater . . . . . . . . . . . . . . . . . . . . . . . . . . . . . . . . . . . . . . . . . . . . . . . . . . . . . . . . . . 84
Lab Testing and Validation . . . . . . . . . . . . . . . . . . . . . . . . . . . . . . . . . . . . . . . . . . . . . . . . . . . . . . . . . . . . . . . . . 84Optimizing Primary Server Performance. . . . . . . . . . . . . . . . . . . . . . . . . . . . . . . . . . . . . . . . . . . . . . . . . . . . . . 85Documentation . . . . . . . . . . . . . . . . . . . . . . . . . . . . . . . . . . . . . . . . . . . . . . . . . . . . . . . . . . . . . . . . . . . . . . . . . . 86
4 Monitoring and Tuning 87Tuning the ZENworks Primary Servers . . . . . . . . . . . . . . . . . . . . . . . . . . . . . . . . . . . . . . . . . . . . . . . . . . . . . . . 87
Maximum HTTP / HTTPS Tomcat Threads . . . . . . . . . . . . . . . . . . . . . . . . . . . . . . . . . . . . . . . . . . . . . . . 88Heap Memory Size for ZENworks Services . . . . . . . . . . . . . . . . . . . . . . . . . . . . . . . . . . . . . . . . . . . . . . 89Limiting Heap Memory Size for ZENServer Web Requests. . . . . . . . . . . . . . . . . . . . . . . . . . . . . . . . . . 92Connection Pool Tuning for the ZENworks Primary Server . . . . . . . . . . . . . . . . . . . . . . . . . . . . . . . . . 93Tuning the Threads Allocated to Loader Storer Processes . . . . . . . . . . . . . . . . . . . . . . . . . . . . . . . . . . 97Tuning the Tomcat NIO Connector Used for Quick Tasks . . . . . . . . . . . . . . . . . . . . . . . . . . . . . . . . . . . 98
Using the ZENworks Diagnostics Tools . . . . . . . . . . . . . . . . . . . . . . . . . . . . . . . . . . . . . . . . . . . . . . . . . . . . . .100Understanding the Diagnostics Landing Page . . . . . . . . . . . . . . . . . . . . . . . . . . . . . . . . . . . . . . . . . . .100ZENworks Probe. . . . . . . . . . . . . . . . . . . . . . . . . . . . . . . . . . . . . . . . . . . . . . . . . . . . . . . . . . . . . . . . . . .102
Monitoring Your ZENworks Server Using Visual VM . . . . . . . . . . . . . . . . . . . . . . . . . . . . . . . . . . . . . . . . . . .106How to Launch Visual VM on a Windows Primary Server . . . . . . . . . . . . . . . . . . . . . . . . . . . . . . . . .106How to Launch Visual VM on a Linux Primary Server . . . . . . . . . . . . . . . . . . . . . . . . . . . . . . . . . . . . .106How to Install the MBeans Plugin for Visual VM. . . . . . . . . . . . . . . . . . . . . . . . . . . . . . . . . . . . . . . . .107How to Add JMX Connections in Visual VM . . . . . . . . . . . . . . . . . . . . . . . . . . . . . . . . . . . . . . . . . . . .107Monitoring ehCache . . . . . . . . . . . . . . . . . . . . . . . . . . . . . . . . . . . . . . . . . . . . . . . . . . . . . . . . . . . . . . .107Monitoring Connection Pools . . . . . . . . . . . . . . . . . . . . . . . . . . . . . . . . . . . . . . . . . . . . . . . . . . . . . . . .108
Tuning the ZENworks Agent . . . . . . . . . . . . . . . . . . . . . . . . . . . . . . . . . . . . . . . . . . . . . . . . . . . . . . . . . . . . . . .108Disabling the Credential Provider and Enabling the Credential Manager. . . . . . . . . . . . . . . . . . . . .109Disabling ZENworks Authentication . . . . . . . . . . . . . . . . . . . . . . . . . . . . . . . . . . . . . . . . . . . . . . . . . . .109Controlling Collection Upload Frequency . . . . . . . . . . . . . . . . . . . . . . . . . . . . . . . . . . . . . . . . . . . . . .110SQL Maintenance. . . . . . . . . . . . . . . . . . . . . . . . . . . . . . . . . . . . . . . . . . . . . . . . . . . . . . . . . . . . . . . . . .111Additional Tuning via Registry Keys . . . . . . . . . . . . . . . . . . . . . . . . . . . . . . . . . . . . . . . . . . . . . . . . . . .111
Tuning the Antimalware Service . . . . . . . . . . . . . . . . . . . . . . . . . . . . . . . . . . . . . . . . . . . . . . . . . . . . . . . . . . .111Tuning Antimalware Event Processing . . . . . . . . . . . . . . . . . . . . . . . . . . . . . . . . . . . . . . . . . . . . . . . . .112Tuning Tomcat . . . . . . . . . . . . . . . . . . . . . . . . . . . . . . . . . . . . . . . . . . . . . . . . . . . . . . . . . . . . . . . . . . . .114Tuning Antimalware Database Connections . . . . . . . . . . . . . . . . . . . . . . . . . . . . . . . . . . . . . . . . . . . .115Tuning the Cached Settings Time-to-Live. . . . . . . . . . . . . . . . . . . . . . . . . . . . . . . . . . . . . . . . . . . . . . .115Tuning Database Queries . . . . . . . . . . . . . . . . . . . . . . . . . . . . . . . . . . . . . . . . . . . . . . . . . . . . . . . . . . .116
Tuning Antimalware Database Synchronization . . . . . . . . . . . . . . . . . . . . . . . . . . . . . . . . . . . . . . . . . . . . . . .117Kafka RDBMS Producer Settings . . . . . . . . . . . . . . . . . . . . . . . . . . . . . . . . . . . . . . . . . . . . . . . . . . . . . .117Kafka Antimalware Consumer Settings . . . . . . . . . . . . . . . . . . . . . . . . . . . . . . . . . . . . . . . . . . . . . . . .118Antimalware Database Connections . . . . . . . . . . . . . . . . . . . . . . . . . . . . . . . . . . . . . . . . . . . . . . . . . .119
Optimizing Performance of Primary Server with Kafka . . . . . . . . . . . . . . . . . . . . . . . . . . . . . . . . . . . . . . . . .119
5 Advanced Concepts 121Tomcat Valve Logging . . . . . . . . . . . . . . . . . . . . . . . . . . . . . . . . . . . . . . . . . . . . . . . . . . . . . . . . . . . . . . . . . . . .121Hibernate Logging. . . . . . . . . . . . . . . . . . . . . . . . . . . . . . . . . . . . . . . . . . . . . . . . . . . . . . . . . . . . . . . . . . . . . . .121C3PO Logging. . . . . . . . . . . . . . . . . . . . . . . . . . . . . . . . . . . . . . . . . . . . . . . . . . . . . . . . . . . . . . . . . . . . . . . . . . .122JDBC Logging using P6spy Module . . . . . . . . . . . . . . . . . . . . . . . . . . . . . . . . . . . . . . . . . . . . . . . . . . . . . . . . .123
Contents 5

6 Con
Part II Database Administrator 131
6 All Databases 133Dedicated Database Server for ZENworks Database . . . . . . . . . . . . . . . . . . . . . . . . . . . . . . . . . . . . . . . . . . .133Virtualizing the ZENworks Database Server . . . . . . . . . . . . . . . . . . . . . . . . . . . . . . . . . . . . . . . . . . . . . . . . . .133ZENworks Database Scalability . . . . . . . . . . . . . . . . . . . . . . . . . . . . . . . . . . . . . . . . . . . . . . . . . . . . . . . . . . . .133ZENworks Database Sizing and Performance Considerations . . . . . . . . . . . . . . . . . . . . . . . . . . . . . . . . . . . .134
ZENworks Database Sizing . . . . . . . . . . . . . . . . . . . . . . . . . . . . . . . . . . . . . . . . . . . . . . . . . . . . . . . . . .134ZENworks Audit Database Sizing . . . . . . . . . . . . . . . . . . . . . . . . . . . . . . . . . . . . . . . . . . . . . . . . . . . . .136ZENworks Antimalware Database Sizing . . . . . . . . . . . . . . . . . . . . . . . . . . . . . . . . . . . . . . . . . . . . . . .137
7 PostgreSQL 139Design and Planning . . . . . . . . . . . . . . . . . . . . . . . . . . . . . . . . . . . . . . . . . . . . . . . . . . . . . . . . . . . . . . . . . . . . .139
Database Size and File Locations . . . . . . . . . . . . . . . . . . . . . . . . . . . . . . . . . . . . . . . . . . . . . . . . . . . . .139Saving the ZENworks Database Password . . . . . . . . . . . . . . . . . . . . . . . . . . . . . . . . . . . . . . . . . . . . . .139
Monitoring and Tuning . . . . . . . . . . . . . . . . . . . . . . . . . . . . . . . . . . . . . . . . . . . . . . . . . . . . . . . . . . . . . . . . . . .140Backing Up the Database . . . . . . . . . . . . . . . . . . . . . . . . . . . . . . . . . . . . . . . . . . . . . . . . . . . . . . . . . . .140Database Validation. . . . . . . . . . . . . . . . . . . . . . . . . . . . . . . . . . . . . . . . . . . . . . . . . . . . . . . . . . . . . . . .141Database Recovery . . . . . . . . . . . . . . . . . . . . . . . . . . . . . . . . . . . . . . . . . . . . . . . . . . . . . . . . . . . . . . . .142PostgreSQL Tuning and Maintenance . . . . . . . . . . . . . . . . . . . . . . . . . . . . . . . . . . . . . . . . . . . . . . . . .142PostgreSQL Logging . . . . . . . . . . . . . . . . . . . . . . . . . . . . . . . . . . . . . . . . . . . . . . . . . . . . . . . . . . . . . . . .145Moving Database Files . . . . . . . . . . . . . . . . . . . . . . . . . . . . . . . . . . . . . . . . . . . . . . . . . . . . . . . . . . . . .148PostgreSQL Performance Monitoring . . . . . . . . . . . . . . . . . . . . . . . . . . . . . . . . . . . . . . . . . . . . . . . . .148Index Fragmentation . . . . . . . . . . . . . . . . . . . . . . . . . . . . . . . . . . . . . . . . . . . . . . . . . . . . . . . . . . . . . . .151Table Fragmentation . . . . . . . . . . . . . . . . . . . . . . . . . . . . . . . . . . . . . . . . . . . . . . . . . . . . . . . . . . . . . . .151Rebuilding the PostgreSQL Database . . . . . . . . . . . . . . . . . . . . . . . . . . . . . . . . . . . . . . . . . . . . . . . . . .152Engaging with Micro Focus Support. . . . . . . . . . . . . . . . . . . . . . . . . . . . . . . . . . . . . . . . . . . . . . . . . . .152Using PostgreSQL Mirroring to Enable High Availability of the PostgreSQL Database. . . . . . . . . . .153
Useful Reference Sites for PostgreSQL . . . . . . . . . . . . . . . . . . . . . . . . . . . . . . . . . . . . . . . . . . . . . . . . . . . . . .153
8 Microsoft SQL Server 155Design and Planning . . . . . . . . . . . . . . . . . . . . . . . . . . . . . . . . . . . . . . . . . . . . . . . . . . . . . . . . . . . . . . . . . . . . .155
Storage . . . . . . . . . . . . . . . . . . . . . . . . . . . . . . . . . . . . . . . . . . . . . . . . . . . . . . . . . . . . . . . . . . . . . . . . . .155Memory Management Resource Planning . . . . . . . . . . . . . . . . . . . . . . . . . . . . . . . . . . . . . . . . . . . . .157Read Committed Snapshot . . . . . . . . . . . . . . . . . . . . . . . . . . . . . . . . . . . . . . . . . . . . . . . . . . . . . . . . . .158High Availability Solutions. . . . . . . . . . . . . . . . . . . . . . . . . . . . . . . . . . . . . . . . . . . . . . . . . . . . . . . . . . .158Other Useful Design Information . . . . . . . . . . . . . . . . . . . . . . . . . . . . . . . . . . . . . . . . . . . . . . . . . . . . .160
Monitoring and Tuning . . . . . . . . . . . . . . . . . . . . . . . . . . . . . . . . . . . . . . . . . . . . . . . . . . . . . . . . . . . . . . . . . . .160Managing Large Transaction Logs. . . . . . . . . . . . . . . . . . . . . . . . . . . . . . . . . . . . . . . . . . . . . . . . . . . . .161Index Fragmentation . . . . . . . . . . . . . . . . . . . . . . . . . . . . . . . . . . . . . . . . . . . . . . . . . . . . . . . . . . . . . . .162ERRORLOG Location. . . . . . . . . . . . . . . . . . . . . . . . . . . . . . . . . . . . . . . . . . . . . . . . . . . . . . . . . . . . . . . .162Backing Up Microsoft SQL Databases . . . . . . . . . . . . . . . . . . . . . . . . . . . . . . . . . . . . . . . . . . . . . . . . .163SQL Server Profiler. . . . . . . . . . . . . . . . . . . . . . . . . . . . . . . . . . . . . . . . . . . . . . . . . . . . . . . . . . . . . . . . .165
Advanced MS SQL Concepts. . . . . . . . . . . . . . . . . . . . . . . . . . . . . . . . . . . . . . . . . . . . . . . . . . . . . . . . . . . . . . .166Useful MS SQL Tools . . . . . . . . . . . . . . . . . . . . . . . . . . . . . . . . . . . . . . . . . . . . . . . . . . . . . . . . . . . . . . .166High CPU Utilization. . . . . . . . . . . . . . . . . . . . . . . . . . . . . . . . . . . . . . . . . . . . . . . . . . . . . . . . . . . . . . . .168TempDB Impact on Performance . . . . . . . . . . . . . . . . . . . . . . . . . . . . . . . . . . . . . . . . . . . . . . . . . . . . .169Custom MSSQL Defragmentation Script . . . . . . . . . . . . . . . . . . . . . . . . . . . . . . . . . . . . . . . . . . . . . . .170Custom MSSQL Trace Blocked Session Script . . . . . . . . . . . . . . . . . . . . . . . . . . . . . . . . . . . . . . . . . . .171
tents
9 Oracle 173Design and Planning . . . . . . . . . . . . . . . . . . . . . . . . . . . . . . . . . . . . . . . . . . . . . . . . . . . . . . . . . . . . . . . . . . . . .173
Virtualizing the ZENworks Database . . . . . . . . . . . . . . . . . . . . . . . . . . . . . . . . . . . . . . . . . . . . . . . . . .174Shared vs Dedicated Server Modes . . . . . . . . . . . . . . . . . . . . . . . . . . . . . . . . . . . . . . . . . . . . . . . . . . .174Character Encoding . . . . . . . . . . . . . . . . . . . . . . . . . . . . . . . . . . . . . . . . . . . . . . . . . . . . . . . . . . . . . . . .174Disk Size and RAM Size Requirements . . . . . . . . . . . . . . . . . . . . . . . . . . . . . . . . . . . . . . . . . . . . . . . . .174Memory Management . . . . . . . . . . . . . . . . . . . . . . . . . . . . . . . . . . . . . . . . . . . . . . . . . . . . . . . . . . . . .175Storage . . . . . . . . . . . . . . . . . . . . . . . . . . . . . . . . . . . . . . . . . . . . . . . . . . . . . . . . . . . . . . . . . . . . . . . . . .176Oracle Parameters . . . . . . . . . . . . . . . . . . . . . . . . . . . . . . . . . . . . . . . . . . . . . . . . . . . . . . . . . . . . . . . . .178LOBs Storage Parameters . . . . . . . . . . . . . . . . . . . . . . . . . . . . . . . . . . . . . . . . . . . . . . . . . . . . . . . . . . .179Checkpoints and Redo Log Files . . . . . . . . . . . . . . . . . . . . . . . . . . . . . . . . . . . . . . . . . . . . . . . . . . . . . .179Important Log Locations . . . . . . . . . . . . . . . . . . . . . . . . . . . . . . . . . . . . . . . . . . . . . . . . . . . . . . . . . . . .179Oracle RAC . . . . . . . . . . . . . . . . . . . . . . . . . . . . . . . . . . . . . . . . . . . . . . . . . . . . . . . . . . . . . . . . . . . . . . .180Oracle RAC One Node . . . . . . . . . . . . . . . . . . . . . . . . . . . . . . . . . . . . . . . . . . . . . . . . . . . . . . . . . . . . . .181
Monitoring and Tuning . . . . . . . . . . . . . . . . . . . . . . . . . . . . . . . . . . . . . . . . . . . . . . . . . . . . . . . . . . . . . . . . . . .181Tuning Memory to Avoid OS Paging . . . . . . . . . . . . . . . . . . . . . . . . . . . . . . . . . . . . . . . . . . . . . . . . . . .182Tuning the Library Cache. . . . . . . . . . . . . . . . . . . . . . . . . . . . . . . . . . . . . . . . . . . . . . . . . . . . . . . . . . . .182Tuning the Shared Pool . . . . . . . . . . . . . . . . . . . . . . . . . . . . . . . . . . . . . . . . . . . . . . . . . . . . . . . . . . . . .183Tuning the Dictionary Cache . . . . . . . . . . . . . . . . . . . . . . . . . . . . . . . . . . . . . . . . . . . . . . . . . . . . . . . . .183Tuning the Program Global Area . . . . . . . . . . . . . . . . . . . . . . . . . . . . . . . . . . . . . . . . . . . . . . . . . . . . .184Tuning the Buffer Cache . . . . . . . . . . . . . . . . . . . . . . . . . . . . . . . . . . . . . . . . . . . . . . . . . . . . . . . . . . . .184Backup . . . . . . . . . . . . . . . . . . . . . . . . . . . . . . . . . . . . . . . . . . . . . . . . . . . . . . . . . . . . . . . . . . . . . . . . . .185Fragmentation . . . . . . . . . . . . . . . . . . . . . . . . . . . . . . . . . . . . . . . . . . . . . . . . . . . . . . . . . . . . . . . . . . . .186Trace . . . . . . . . . . . . . . . . . . . . . . . . . . . . . . . . . . . . . . . . . . . . . . . . . . . . . . . . . . . . . . . . . . . . . . . . . . . .187
Advanced Concepts . . . . . . . . . . . . . . . . . . . . . . . . . . . . . . . . . . . . . . . . . . . . . . . . . . . . . . . . . . . . . . . . . . . . .187Recommendations for ZENworks on ORACLE Database. . . . . . . . . . . . . . . . . . . . . . . . . . . . . . . . . . .187Trace Tools . . . . . . . . . . . . . . . . . . . . . . . . . . . . . . . . . . . . . . . . . . . . . . . . . . . . . . . . . . . . . . . . . . . . . . .188Important System Views . . . . . . . . . . . . . . . . . . . . . . . . . . . . . . . . . . . . . . . . . . . . . . . . . . . . . . . . . . . .191Queries to Identify Hot Tables / Segments . . . . . . . . . . . . . . . . . . . . . . . . . . . . . . . . . . . . . . . . . . . . .191Configuration Changes that Can Have a Negative Impact . . . . . . . . . . . . . . . . . . . . . . . . . . . . . . . . .191
Part III Network Administrator 193
10 Pre-Design and Planning 195Primary and Database Server Connectivity . . . . . . . . . . . . . . . . . . . . . . . . . . . . . . . . . . . . . . . . . . . . . . . . . .196Satellite Servers. . . . . . . . . . . . . . . . . . . . . . . . . . . . . . . . . . . . . . . . . . . . . . . . . . . . . . . . . . . . . . . . . . . . . . . . .196
11 Design 197Understanding Closest Servers . . . . . . . . . . . . . . . . . . . . . . . . . . . . . . . . . . . . . . . . . . . . . . . . . . . . . . . . . . . .197Load Balancing Between Primary and Satellites. . . . . . . . . . . . . . . . . . . . . . . . . . . . . . . . . . . . . . . . . . . . . . .198
Load Balancing Using Server Groups . . . . . . . . . . . . . . . . . . . . . . . . . . . . . . . . . . . . . . . . . . . . . . . . . .198Load Balancing Using an L4 Switch. . . . . . . . . . . . . . . . . . . . . . . . . . . . . . . . . . . . . . . . . . . . . . . . . . . .199
ZENworks Network Ports . . . . . . . . . . . . . . . . . . . . . . . . . . . . . . . . . . . . . . . . . . . . . . . . . . . . . . . . . . . . . . . . .200Supporting NAT’d Devices . . . . . . . . . . . . . . . . . . . . . . . . . . . . . . . . . . . . . . . . . . . . . . . . . . . . . . . . . . . . . . . .200
Supporting NAT’d Servers . . . . . . . . . . . . . . . . . . . . . . . . . . . . . . . . . . . . . . . . . . . . . . . . . . . . . . . . . . .200Support NAT’d Devices . . . . . . . . . . . . . . . . . . . . . . . . . . . . . . . . . . . . . . . . . . . . . . . . . . . . . . . . . . . . .200
HTTP Proxy. . . . . . . . . . . . . . . . . . . . . . . . . . . . . . . . . . . . . . . . . . . . . . . . . . . . . . . . . . . . . . . . . . . . . . . . . . . . .201Imaging Considerations . . . . . . . . . . . . . . . . . . . . . . . . . . . . . . . . . . . . . . . . . . . . . . . . . . . . . . . . . . . . . . . . . .201
Supporting ZENworks Preboot Services. . . . . . . . . . . . . . . . . . . . . . . . . . . . . . . . . . . . . . . . . . . . . . . .201Supporting Multicast Imaging. . . . . . . . . . . . . . . . . . . . . . . . . . . . . . . . . . . . . . . . . . . . . . . . . . . . . . . .202
Contents 7

8 Con
12 Monitoring and Tuning 203Monitoring Network Usage . . . . . . . . . . . . . . . . . . . . . . . . . . . . . . . . . . . . . . . . . . . . . . . . . . . . . . . . . . . . . . .203Bandwidth Throttling . . . . . . . . . . . . . . . . . . . . . . . . . . . . . . . . . . . . . . . . . . . . . . . . . . . . . . . . . . . . . . . . . . . .203
13 Advanced Concepts 205Wake-On LAN . . . . . . . . . . . . . . . . . . . . . . . . . . . . . . . . . . . . . . . . . . . . . . . . . . . . . . . . . . . . . . . . . . . . . . . . . .205
Detailed WOL Operation . . . . . . . . . . . . . . . . . . . . . . . . . . . . . . . . . . . . . . . . . . . . . . . . . . . . . . . . . . . .205
Part IV Security Administrator 207
14 Design 209SSL Certificates . . . . . . . . . . . . . . . . . . . . . . . . . . . . . . . . . . . . . . . . . . . . . . . . . . . . . . . . . . . . . . . . . . . . . . . . .209
Internal Certificate Authority . . . . . . . . . . . . . . . . . . . . . . . . . . . . . . . . . . . . . . . . . . . . . . . . . . . . . . . .209External Certificate Authority . . . . . . . . . . . . . . . . . . . . . . . . . . . . . . . . . . . . . . . . . . . . . . . . . . . . . . . .210
Secure Communication between Managed Devices and ZENworks Servers . . . . . . . . . . . . . . . . . . . . . . . .211
Recommendations for a New ZENworks System. . . . . . . . . . . . . . . . . . . . . . . . . . . . . . . . . . . . . . . . .212Recommendations for an Upgraded ZENworks System . . . . . . . . . . . . . . . . . . . . . . . . . . . . . . . . . . .212
Securing the Communication between Managed Devices and Satellite Servers. . . . . . . . . . . . . . . . . . . . .214Enabling SSL on Satellite Servers . . . . . . . . . . . . . . . . . . . . . . . . . . . . . . . . . . . . . . . . . . . . . . . . . . . . .214Satellite Servers Authentication . . . . . . . . . . . . . . . . . . . . . . . . . . . . . . . . . . . . . . . . . . . . . . . . . . . . . .214Remove server information from HTTP Header . . . . . . . . . . . . . . . . . . . . . . . . . . . . . . . . . . . . . . . . .215Running Jetty Service as A Non-Root User . . . . . . . . . . . . . . . . . . . . . . . . . . . . . . . . . . . . . . . . . . . . .215
Securing ZENworks 2020 Update 2 by Disabling Older Security Protocols . . . . . . . . . . . . . . . . . . . . . . . . .216Identifying the Supported Protocols . . . . . . . . . . . . . . . . . . . . . . . . . . . . . . . . . . . . . . . . . . . . . . . . . .216Securing Managed Devices . . . . . . . . . . . . . . . . . . . . . . . . . . . . . . . . . . . . . . . . . . . . . . . . . . . . . . . . . .216Securing Satellite Servers . . . . . . . . . . . . . . . . . . . . . . . . . . . . . . . . . . . . . . . . . . . . . . . . . . . . . . . . . . .218Securing Primary Servers . . . . . . . . . . . . . . . . . . . . . . . . . . . . . . . . . . . . . . . . . . . . . . . . . . . . . . . . . . .218
Authorized Registration Methods . . . . . . . . . . . . . . . . . . . . . . . . . . . . . . . . . . . . . . . . . . . . . . . . . . . . . . . . . .219Authorization Keys. . . . . . . . . . . . . . . . . . . . . . . . . . . . . . . . . . . . . . . . . . . . . . . . . . . . . . . . . . . . . . . . .219Pre-approved Devices . . . . . . . . . . . . . . . . . . . . . . . . . . . . . . . . . . . . . . . . . . . . . . . . . . . . . . . . . . . . . .219Authorized Registration for Device Imaging . . . . . . . . . . . . . . . . . . . . . . . . . . . . . . . . . . . . . . . . . . . .220
Remote Management Authentication. . . . . . . . . . . . . . . . . . . . . . . . . . . . . . . . . . . . . . . . . . . . . . . . . . . . . . .220OpenID Support for ZENworks Service Desk. . . . . . . . . . . . . . . . . . . . . . . . . . . . . . . . . . . . . . . . . . . . . . . . . .220Prevention of SQL Injection Attacks on ZENworks . . . . . . . . . . . . . . . . . . . . . . . . . . . . . . . . . . . . . . . . . . . . .220Controlling Agent Web Services. . . . . . . . . . . . . . . . . . . . . . . . . . . . . . . . . . . . . . . . . . . . . . . . . . . . . . . . . . . .220Disabling OSP Login in ZCC . . . . . . . . . . . . . . . . . . . . . . . . . . . . . . . . . . . . . . . . . . . . . . . . . . . . . . . . . . . . . . . .222Configuring OSP for Additional DNS or L4 Switch. . . . . . . . . . . . . . . . . . . . . . . . . . . . . . . . . . . . . . . . . . . . . .222Security Logs . . . . . . . . . . . . . . . . . . . . . . . . . . . . . . . . . . . . . . . . . . . . . . . . . . . . . . . . . . . . . . . . . . . . . . . . . . .223
Changing the Message Log Level . . . . . . . . . . . . . . . . . . . . . . . . . . . . . . . . . . . . . . . . . . . . . . . . . . . . .223Disabling HTTP Strict Transport Security (HSTS). . . . . . . . . . . . . . . . . . . . . . . . . . . . . . . . . . . . . . . . . . . . . . .224Enabling the Non-secure Port . . . . . . . . . . . . . . . . . . . . . . . . . . . . . . . . . . . . . . . . . . . . . . . . . . . . . . . . . . . . .225
15 Monitoring and Tuning 227Configuring Satellite Certificates When Using an External Certificate Authority . . . . . . . . . . . . . . . . . . . .227Backing Up the Internal Certificate Authority. . . . . . . . . . . . . . . . . . . . . . . . . . . . . . . . . . . . . . . . . . . . . . . . .227Restoring the Internal Certificate Authority from Backup . . . . . . . . . . . . . . . . . . . . . . . . . . . . . . . . . . . . . . .228Reminting Certificates . . . . . . . . . . . . . . . . . . . . . . . . . . . . . . . . . . . . . . . . . . . . . . . . . . . . . . . . . . . . . . . . . . .228
tents
Part V LDAP Directory Admin 229
16 Design and Deployment 231Gathering Information . . . . . . . . . . . . . . . . . . . . . . . . . . . . . . . . . . . . . . . . . . . . . . . . . . . . . . . . . . . . . . . . . . .231Planning Your Deployment. . . . . . . . . . . . . . . . . . . . . . . . . . . . . . . . . . . . . . . . . . . . . . . . . . . . . . . . . . . . . . . .231Providing LDAP Load Balancing and Fault Tolerance . . . . . . . . . . . . . . . . . . . . . . . . . . . . . . . . . . . . . . . . . . .232
17 Monitoring and Tuning 233Defining User Containers . . . . . . . . . . . . . . . . . . . . . . . . . . . . . . . . . . . . . . . . . . . . . . . . . . . . . . . . . . . . . . . . .233LDAP Replica Configuration for eDirectory Servers . . . . . . . . . . . . . . . . . . . . . . . . . . . . . . . . . . . . . . . . . . . .234Configuring Nested Group Support for Active Directory . . . . . . . . . . . . . . . . . . . . . . . . . . . . . . . . . . . . . . . .235Configuring Dynamic Group Support for eDirectory . . . . . . . . . . . . . . . . . . . . . . . . . . . . . . . . . . . . . . . . . . .235Configuring LDAP Connections . . . . . . . . . . . . . . . . . . . . . . . . . . . . . . . . . . . . . . . . . . . . . . . . . . . . . . . . . . . .235Enabling LDAP Round Robin on a Primary Server to Balance LDAP Queries Between Multiple LDAP Servers . . . . . . . . . . . . . . . . . . . . . . . . . . . . . . . . . . . . . . . . . . . . . . . . . . . . . . . . . . . . . . . . . . . . . . . . . . . . . . . .236Upgrade ZCM Agents to 11.2 or Higher for DN Caching Support . . . . . . . . . . . . . . . . . . . . . . . . . . . . . . . . .236Reduce LDAP Overhead for DLU . . . . . . . . . . . . . . . . . . . . . . . . . . . . . . . . . . . . . . . . . . . . . . . . . . . . . . . . . . .236Increasing LDAP Caching Values. . . . . . . . . . . . . . . . . . . . . . . . . . . . . . . . . . . . . . . . . . . . . . . . . . . . . . . . . . . .237
Part VI Citrix Best Practices 239
18 Pre-Design and Planning 241Perform a Technical Assessment . . . . . . . . . . . . . . . . . . . . . . . . . . . . . . . . . . . . . . . . . . . . . . . . . . . . . . . . . . .241Factors Influencing Scalability . . . . . . . . . . . . . . . . . . . . . . . . . . . . . . . . . . . . . . . . . . . . . . . . . . . . . . . . . . . . .242Ports Used by the ZENworks Agent . . . . . . . . . . . . . . . . . . . . . . . . . . . . . . . . . . . . . . . . . . . . . . . . . . . . . . . . .243Performing Lab Tests and Validation . . . . . . . . . . . . . . . . . . . . . . . . . . . . . . . . . . . . . . . . . . . . . . . . . . . . . . . .243
19 Design and Deployment 245Tasks to be Performed after Deploying the Agent on Citrix Servers . . . . . . . . . . . . . . . . . . . . . . . . . . . . . . .245
20 Monitoring and Tuning 247User Sessions on a Citrix Server Fail to Terminate . . . . . . . . . . . . . . . . . . . . . . . . . . . . . . . . . . . . . . . . . . . . .247High Utilization of Resources on Citrix Server . . . . . . . . . . . . . . . . . . . . . . . . . . . . . . . . . . . . . . . . . . . . . . . .247High Consumption of Memory on a Citrix Server. . . . . . . . . . . . . . . . . . . . . . . . . . . . . . . . . . . . . . . . . . . . . .248Disabling Random Refresh Might Cause the ZENworks Agent to Crash on a Citrix Server . . . . . . . . . . . . .248Logging in to the User Source is Slow . . . . . . . . . . . . . . . . . . . . . . . . . . . . . . . . . . . . . . . . . . . . . . . . . . . . . . .248
Part VII DMZ Configuration 249
21 ZENworks DMZ Server 251Server Connections. . . . . . . . . . . . . . . . . . . . . . . . . . . . . . . . . . . . . . . . . . . . . . . . . . . . . . . . . . . . . . . . . . . . . .251
ZENworks Databases . . . . . . . . . . . . . . . . . . . . . . . . . . . . . . . . . . . . . . . . . . . . . . . . . . . . . . . . . . . . . . .251ZENworks User Source (LDAP Directory) . . . . . . . . . . . . . . . . . . . . . . . . . . . . . . . . . . . . . . . . . . . . . . .252ActiveSync Servers. . . . . . . . . . . . . . . . . . . . . . . . . . . . . . . . . . . . . . . . . . . . . . . . . . . . . . . . . . . . . . . . .252ZENworks Primary Servers . . . . . . . . . . . . . . . . . . . . . . . . . . . . . . . . . . . . . . . . . . . . . . . . . . . . . . . . . .253
Contents 9
10 Con
MDM Server Connections . . . . . . . . . . . . . . . . . . . . . . . . . . . . . . . . . . . . . . . . . . . . . . . . . . . . . . . . . . .253Zone Administration . . . . . . . . . . . . . . . . . . . . . . . . . . . . . . . . . . . . . . . . . . . . . . . . . . . . . . . . . . . . . . . . . . . . .253
ZENworks Control Center (ZCC) and Admin Services . . . . . . . . . . . . . . . . . . . . . . . . . . . . . . . . . . . . .253ZENworks Download (zenworks-setup) . . . . . . . . . . . . . . . . . . . . . . . . . . . . . . . . . . . . . . . . . . . . . . . .255Diagnostics . . . . . . . . . . . . . . . . . . . . . . . . . . . . . . . . . . . . . . . . . . . . . . . . . . . . . . . . . . . . . . . . . . . . . . .256ZENworks Appliance Console . . . . . . . . . . . . . . . . . . . . . . . . . . . . . . . . . . . . . . . . . . . . . . . . . . . . . . . .256
Device Management. . . . . . . . . . . . . . . . . . . . . . . . . . . . . . . . . . . . . . . . . . . . . . . . . . . . . . . . . . . . . . . . . . . . .257Internal Device Management . . . . . . . . . . . . . . . . . . . . . . . . . . . . . . . . . . . . . . . . . . . . . . . . . . . . . . . .257Client Webservices . . . . . . . . . . . . . . . . . . . . . . . . . . . . . . . . . . . . . . . . . . . . . . . . . . . . . . . . . . . . . . . .258Registration . . . . . . . . . . . . . . . . . . . . . . . . . . . . . . . . . . . . . . . . . . . . . . . . . . . . . . . . . . . . . . . . . . . . . .259Content Service . . . . . . . . . . . . . . . . . . . . . . . . . . . . . . . . . . . . . . . . . . . . . . . . . . . . . . . . . . . . . . . . . . .259Collection Service . . . . . . . . . . . . . . . . . . . . . . . . . . . . . . . . . . . . . . . . . . . . . . . . . . . . . . . . . . . . . . . . .259Authentication Service . . . . . . . . . . . . . . . . . . . . . . . . . . . . . . . . . . . . . . . . . . . . . . . . . . . . . . . . . . . . .259Authentication Port (2645) . . . . . . . . . . . . . . . . . . . . . . . . . . . . . . . . . . . . . . . . . . . . . . . . . . . . . . . . . .261MDM Endpoint Services . . . . . . . . . . . . . . . . . . . . . . . . . . . . . . . . . . . . . . . . . . . . . . . . . . . . . . . . . . . .261Remote SSH Service. . . . . . . . . . . . . . . . . . . . . . . . . . . . . . . . . . . . . . . . . . . . . . . . . . . . . . . . . . . . . . . .262Join Proxy Service . . . . . . . . . . . . . . . . . . . . . . . . . . . . . . . . . . . . . . . . . . . . . . . . . . . . . . . . . . . . . . . . .263Quick Tasks . . . . . . . . . . . . . . . . . . . . . . . . . . . . . . . . . . . . . . . . . . . . . . . . . . . . . . . . . . . . . . . . . . . . . . .263
DMZ Server Management . . . . . . . . . . . . . . . . . . . . . . . . . . . . . . . . . . . . . . . . . . . . . . . . . . . . . . . . . . . . . . . .264Remote Control/VNC. . . . . . . . . . . . . . . . . . . . . . . . . . . . . . . . . . . . . . . . . . . . . . . . . . . . . . . . . . . . . . .264Imaging Service . . . . . . . . . . . . . . . . . . . . . . . . . . . . . . . . . . . . . . . . . . . . . . . . . . . . . . . . . . . . . . . . . . .265
Securing DMZ Servers. . . . . . . . . . . . . . . . . . . . . . . . . . . . . . . . . . . . . . . . . . . . . . . . . . . . . . . . . . . . . . . . . . . .265Optimizing DMZ Server Performance . . . . . . . . . . . . . . . . . . . . . . . . . . . . . . . . . . . . . . . . . . . . . . . . . . . . . . .266
tents
About This Guide
Welcome to the ZENworks Best Practices Guide. In this guide you learn the best practices for deploying and managing the core ZENworks infrastructure and the integrated ZENworks products -- ZENworks Configuration Management, ZENworks Asset Management, ZENworks Endpoint Security, ZENworks Full Disk Encryption, and ZENworks Patch Management. To help you better understand what each of the administrators in your organization must consider, this document is broken up by administrator roles so that the person in your organization who is responsible for that role can read only that section. If you are in a small organization and responsible for all the roles, please review all sections of this document to ensure an efficient and stable deployment of ZENworks in your environment.
AudienceThis guide is intended for any of the administrators responsible for maintaining a part of the ZENworks infrastructure, or those who manage the network, security, or database aspects in today’s complex environments.
FeedbackWe want to hear your comments and suggestions about this manual and the other documentation included with this product. Please use the User Comments feature at the bottom of each page of the online documentation.
Additional DocumentationZENworks is supported by other documentation (in both PDF and HTML formats) that you can use to learn about and implement the product. For additional documentation, see the .
About This Guide 11

12 About This Guide
1 1ZENworks Best Practices Overview
The purpose of this Best Practices Guide is to provide information about what you need to consider (including potential issues) when designing a ZENworks solution, and deploying it across small and large scale enterprises. This guide supplements the ZENworks administration documentation (http://www.novell.com/documentation/zenworks-2020-update-2) and references it frequently for the steps required to perform best practices tasks.
The following sections provide more information:
Section 1.1, “The Goal: Total Management, Zero Effort,” on page 13 Section 1.2, “The Management Paradigm,” on page 14 Section 1.3, “The Solution: Micro Focus ZENworks,” on page 16 Section 1.4, “About the Structure of this Guide,” on page 16
1.1 The Goal: Total Management, Zero EffortOver the last two decades, ZENworks has provided the gold standard for unified endpoint management in today’s complex and heterogeneous corporate networks. The suite of integrated ZENworks products enables policy-based automation of software and patch deployment, asset tracking, endpoint security, OS (operating system) migration, and many other routine tasks.
With ZENworks, the IT staff can synchronize their heterogeneous environment (Windows, Mac, Linux, and mobile devices) with their organization’s business policies, while saving IT time, budget, and resources for strategic projects. All of this focuses on the goal to provide total network management while bringing the associated management effort as close to zero as possible.
ZENworks offers the following:
Provides a single modular architecture, platform, and agent for all ZENworks products. Provides a unified, web-based administration console. Includes built-in audit capabilities for the entire zone. Allows bundles and policies to be shared between zones. Uses only standards-based protocols. Reduces the overall wire traffic. Allows full manageability over the Internet. Simplifies and speeds installation, deployment, and updates. Scales to support a maximum limit of 100,000 devices in a single Management Zone, with the
appropriate database in place.
ZENworks Best Practices Overview 13
1.2 The Management ParadigmAll design features of the ZENworks architecture flow from the basic Micro Focus philosophy of the Open Enterprise: a simple, secure, productive, and integrated IT environment across mixed systems. ZENworks empowers IT staff to manage systems to support real users, with all their various security, location, device, and other needs, while keeping simple, centralized control over the entire end-user environment. It also supports the idea that IT staff should be empowered to manage systems according to the paradigm that best reflects the organization’s business policies and the IT staff’s preferred working style.
ZENworks provides the flexibility to manage systems tactically (on a device-by-device basis) or strategically, using any combination of the following four distinct management paradigms:
Section 1.2.1, “Management By Exception,” on page 14 Section 1.2.2, “User-Centric Management,” on page 14 Section 1.2.3, “Device-Centric Management,” on page 15 Section 1.2.4, “Location Awareness Management,” on page 15
1.2.1 Management By ExceptionTwo of the most important considerations when evaluating any unified endpoint management solution are how well the administration design scales and what burdens it places on the IT staff as they update the solution to accommodate changing business policies. Micro Focus is a pioneer of “management by exception,” and ZENworks continues to offer this powerful method of continuously adapting, with minimal IT effort.
Management by exception is a complement to policy-driven management. It allows the general rules of configuration management to be at a high level across user or device groups, while permitting exceptions at a more granular level to accommodate more specialized needs.
For example, normal business policies might allow employees to remotely access the corporate network. However, applying this policy across the board to all desktops, including devices in the finance and legal departments, could expose the organization to regulatory penalties and corporate spies. Exception-based management allows IT staff to create and automatically enforce general access policies, as well as more restrictive policies that are enforced on top of the general policies, to protect devices and users that require a higher degree of security. In this case, the exception policy restricts access to normal business hours, on-site, and by authorized users. Exception-based management allows complete management flexibility in accordance with business policies, without requiring IT staff to manage separate policy silos for each type of user and machine.
1.2.2 User-Centric ManagementUser-centric management, which leverages user identities, group roles, and business policies, is the gold standard for automation, security, and IT control, and has always been a ZENworks strength.
True user-centric configuration management separates users from the specific devices they use, and treats the users as the company’s most valuable asset to be managed. Devices serve their proper role as tools. Allowing users, rather than devices, to be managed as a first-class configured entity means that policies, applications, and other configuration details can follow users from device to device. User-based management also ties IT policies directly to business policies, which increases
14 ZENworks Best Practices Overview

responsiveness to the changing business conditions. User centric management also leverages identity stores and business systems across the enterprise to eliminate errors, increase security, standardize workflows, document regulatory compliance, and support effective decision making.
User-centric management can be defined as strategic, while device-based management is tactical. In ZENworks, both can be mixed and matched according to business and IT requirements, by using management by exception. For example, a general policy can be applied to a specific device and then overridden, depending on the identity information for the user who is currently logged on. Or, a general policy based on user identities and roles can be overridden, depending on the device being used and its context, such as a mobile device attempting to access the network from beyond the firewall.
1.2.3 Device-Centric ManagementThe ZENworks architecture adds device-centric management as a tool that can be used, in addition to the other management styles, to fill specialized needs. For example, manufacturing-floor devices, public kiosks, and call centers where multiple users work different shifts and share a single device are all instances where device-centric management might be more appropriate than user-based management. Additionally, companies that normally rely on user-centric management might need the ability to quickly set up a device for one-time use. For example, a customer might need to configure a device to auto-run a presentation in a conference center without having to bother about creating a new user for this one instance. With the ZENworks architecture, customers have the option of using device-based management whenever it suits their specific needs.
Because device-centric management is the most familiar method for most IT professionals, and because it is the fastest way to configure a device in a short term, before setting up long-term user-based policies, device-centric management is the default management model after installing ZENworks.
1.2.4 Location Awareness ManagementZENworks introduces the concept of locations to endpoint management to further enhance the flexibility and power of managing endpoints. Locations can use the concept of Closest Server Rules (first introduced in ZENworks 10) to allow the administrator to define in detail all locations that contain managed devices.
Locations can be defined using very specific criteria such as DNS server, gateway, and subnet. After a location and its network environments have been defined, ZENworks policies and bundles can be applied to allow ZENworks to automatically adjust the configuration and security posture of the device.
Location awareness originates from the ZENworks Endpoint Security Management product, which is one of the products integrated in the common ZENworks architecture. The ability to utilize locations is another example of the benefits of an integrated architecture for all unified endpoint management products.
ZENworks Best Practices Overview 15
1.3 The Solution: Micro Focus ZENworksZENworks is based on a web-services architecture designed to provide a secure, highly usable, open environment for managing all your Windows, Linux, MacOS, and mobile devices. ZENworks provides you with a single, modular architecture that maximizes flexibility and scalability, simplifies and speeds management throughout the device life cycle, minimizes processing demands on managed clients, reduces bandwidth consumption for management processes, and uses standards-based protocols to seamlessly integrate with your choice of user directories and object databases.
ZENworks lets you manage systems based on user identities, roles, groups, and locations, so IT can work seamlessly with the company’s business organization and policies. ZENworks gives you a secure, web-based console for unified control over all management tasks, from virtually anywhere.
ZENworks is the only unified endpoint management tool in the market that provides management based on the following three key criteria:
What device are you on? The device chosen by the user to access resources. Who are you? The end user’s identity in the corporate directory. Where you are? The end user’s physical location.
Combining these three criteria, ZENworks can automatically invoke different security and configuration postures as the user changes devices, locations, and roles within the enterprise. For example, when a user travels to a remote office, ZENworks can automatically and transparently enforce different printer policies, provide group policies to configure the device, offer an alternative method to access an application (such as thin version), and define security details (such as the applications that can run, the firewall settings, and what removable storage can be used by the device). No other endpoint management tool can come close to offering this level of flexibility. For more information on locations, refer to “Creating and Managing Locations”.
If your organization is undertaking an Information Technology Infrastructure Library (ITIL) initiative, ZENworks is the right choice for you. It has been built as a modular set of components that uses industry standards to build a product and set of solutions that completely align with ITIL best practices and disciplines.
1.4 About the Structure of this GuideThe purpose of this guide is to serve as a one-stop location for all best practices related to ZENworks. This guide has been structured based on user roles to enable you to easily locate information. The roles include:
ZENworks Administrator Network Administrator Security Administrator Database Administrator
We recommend that you review all the information in the roles that are pertinent to you and have other users review those that are not, and then meet together to ensure a proper and efficient deployment of ZENworks.
16 ZENworks Best Practices Overview
I IZENworks Administrator
This section focuses on what the administrator, who is responsible for maintaining the ZENworks Primary Servers, ZENworks Satellite Servers, and ZENworks Agents, needs to consider while planning, designing, implementing and operating ZENworks. This section highlights all the important aspects that you need to know to ensure a stable and robust deployment of ZENworks in your environment.
Chapter 2, “Pre-Design and Planning,” on page 19 Chapter 3, “Design,” on page 27 Chapter 4, “Monitoring and Tuning,” on page 87 Chapter 5, “Advanced Concepts,” on page 121
ZENworks Administrator 17

18 ZENworks Administrator

2 2Pre-Design and Planning
A firm understanding of the organization’s business and technical requirements and the existing infrastructure components that will take part in the Micro Focus ZENworks system is the first step in developing a solid design that meets the immediate and future needs of the organization.
IMPORTANT: Throughout this document, we refer to the need for proper documentation of the ZENworks system as it is of utmost importance. Documentation is a complete and accurate reference to the system you have designed and built, but most importantly, it is a reference for the future. As individuals transition in and out of the IT organization, the design documents become a reference as new employees learn the infrastructure they support, including techniques, policies, and design decisions. This documentation is also a good reference for others within the organization who might not be involved in the day-to-day management of the ZENworks environment, but are involved in the management of other projects that might have an impact on the ZENworks environment, including dependencies.
The following activities should be performed during the pre-design phase of implementing ZENworks:
“Performing a Business Assessment” on page 19 “Performing a Technical Assessment” on page 20 “Gather Other Important Information” on page 21 “Develop a High-Level Design” on page 22 “Develop Documentation” on page 23 “Outputs from Pre-Design Activities and Workshops” on page 23 “Critical Information Required for the System Design” on page 23 “Decisions from the System Design” on page 23
Performing a Business AssessmentYou first need a detailed business assessment. If you do not have a solid understanding of what the overall business (or individual business units) needs or desires, you cannot design a solution to meet the business needs.
Systems management software affects the entire business, so the various departments should provide inputs and influence what the system should look like. This does not mean that departments outside of IT need to understand the technical complexities of the infrastructure and how it is designed; they simply need to provide business requirements to the IT organization so that their needs are met.
The best way to handle this is through a set of informal workshops, which include a high-level introduction to the technology, what it does, how the departments and end users benefit, and possibly a short demonstration of the product. The three main reasons you hold these workshops
Pre-Design and Planning 19

are to inform departments of what you are doing, get their buy-in, and get their feedback in the form of technical requirements. The meetings should sufficiently inform department members so they begin to give you feedback as to how they will leverage the system.
The following list provides pointers on how to perform the business assessment. You might think of more ideas; use your imagination and tailor your business assessment according to your organization's unique landscape.
Hold informal workshops and invite leaders from each department. Survey departmental leaders and find out what they need in order to become more effective in
their roles. Find out how their staff can become more effective, given the software that you are deploying. Getting departmental leaders to answer a written survey can be very effective and can give you details that can be used when building both the high-level and the detailed designs.
Ensure that you completely understand how the organization is dispersed and which departments of the organization are represented at each of its physical locations.
Ensure that you understand the monthly cycles for each of the departments in the organization. This will assist you with determining peak times when the organization cannot afford to be impacted by downtime.
Determine whether the organization is going through an ITIL (IT Infrastructure Library) initiative. This has a direct impact on the solution you design and the services you provide. If there is an initiative underway, you need to be involved in it and be completely informed. You want to avoid making design changes mid-project because of the output from another project.
Performing a Technical AssessmentYour next need is for a technical assessment to review what you already have, identify what you need, and document your requirements.
It is important to note that the technical assessment should be performed at the same time as the business assessment. The two assessments should take no longer than a week to perform, depending on the size and complexity of the organization and its infrastructure.
You need to have a good understanding of the existing infrastructure well before you introduce ZENworks into the environment. In order to do this, you should hold a set of workshops or meetings to obtain the information you need.
The two main outputs from a technical assessment are documentation of your findings and a set of tasks that you need to perform. Information that should be gathered include the following:
Which operating systems must be supported? Will the current servers support the ZENworks services? Which database is required and how will this be set up and configured? For more information
about database considerations, see Part II, “Database Administrator,” on page 125. How many users must be supported by the proposed solution? Will there be support for roaming users? How many offices and sites must the solution support and how many users are at each
location? Where are the data centers located?
20 Pre-Design and Planning
What is the network architecture? Gather details about information such as link speeds. Will the existing servers be leveraged to support the ZENworks infrastructure? If so, you should
gather the following software and hardware information: Service pack levels (and whether they meet the minimum requirements for ZENworks as
listed in the Primary Server Requirements section of the ZENworks Server Installation). Other software, for example, .NET. CPU and memory requirements (and whether they meet the minimum requirements for
ZENworks). IP addressing for all servers and other devices that will be part of the ZENworks
infrastructure. Previous versions of ZENworks that might already be hosted.
What is the DNS infrastructure? What is the DHCP infrastructure? How should the IP subnet design be handled? Which network access methods (VPN, Access Manager, and so forth) must be supported? Which network infrastructure components and design (DMZ, NAT, and so forth) must be
supported? What is the directory services design? Which directory services are being utilized (eDirectory,
Microsoft Active Directory, and so forth.) and for what purpose (application support, LDAP, and so forth.)?
Gather Other Important InformationYou should also be familiar with other services that are running on the network and that rely on the infrastructure. You should prioritize these services to better understand bandwidth utilization and service levels that have been assigned to specific functions. If you are implementing ITIL best practices, you should know about all disciplines that are currently being leveraged.
You should collect information about the following:
Which Service Desk software is currently used and how does the deployment of ZENworks fit within this framework?
Does your organization have a formal Service Level Agreement (SLA) process in place? If yes, what is it and can you access the documentation that explains it?
What are your organization’s Disaster Recovery and Service Continuity plans? How does this impact the ZENworks design?
How does your organization plan for availability of services and resources? Are you fully aware of availability requirements?
Does your organization leverage a Configuration Management Database (CMDB)? If so, which CMDB? Does your organization have plans to include information that is stored in the ZENworks database in their CMDB?
Does your organization have a formal method to keep track of changes to applications that are published to the end-user communities?
Pre-Design and Planning 21
Does your organization have a Definitive Software Library (DSL) and Definitive Hardware Library (DHL)?
Is your organization using another framework product in its infrastructure, such as IBM Tivoli, CA Unicenter, or HP OpenView?
Does your organization leverage other products, such as SAP? What other major projects are currently taking place in your organization?
Develop a High-Level DesignAfter you gather the data that is required to build the design of the infrastructure, you can develop a high-level design. It is important at this point to understand what the infrastructure is going to look like, so documenting your high-level thoughts and plans is critical to the success of the project.
Developing a high-level design consists of building two main outputs:
Assessment Document: A high-level design document that outlines the general placement of services across the company's infrastructure. This document does not need to identify servers to be utilized or deployed to host the specific ZENworks services. The document should simply outline the services themselves and where they will reside across the network. Your high-level design should include the following information: Number of ZENworks Management Zones needed Interconnection for ZENworks Management Zones Number and placement of Primary Servers Number and placement of Satellite Servers Placement of the Database Server Services that run at each location based on the requirements gathered during the business
assessment. Configuration of network services Utilization of network infrastructure such as L4 switches to front the Primary Servers if
required Remote access capabilities through the demilitarized zone (DMZ) or Join Proxy.
High-level Graphic Design Diagram: As a supplement to the assessment document, you should also develop a graphical representation of the infrastructure. This diagram should reflect exactly what you have described in the document. It should be at a high level so that everyone can see what the infrastructure is going to look like after the ZENworks deployment is complete.
For detailed information about the design process, see Chapter 3, “Design,” on page 27.
22 Pre-Design and Planning
Develop DocumentationIt is important to develop your documentation and then discuss it with all parties that have an interest in the success of the project. Discussing the findings and recommendations in detail is important to the success of this phase of the project and the success of the more detailed design phase.
After you have conducted meetings to discuss the findings and recommendations, there will be items in the high-level design that must be modified or changed. Ensure that you capture the changes and include them in the documents that you created during this phase. This ensures that you have accurate information throughout the life cycle of the project. The information in these documents will be leveraged during the design phase, so it needs to be complete and accurate.
Outputs from Pre-Design Activities and WorkshopsAs mentioned in “Develop a High-Level Design” on page 22, there are two main outputs (or deliverables) from your pre-design activities:
Assessment Document: This document highlights the findings from the business and technical assessments that you perform. It is the foundation for performing your design activities and needs to be kept up to date. This document includes the following information:
Requirements gathered during meetings and workshops with department leaders and others inside the organization that will influence the services that ZENworks will deliver.
A detailed summary of your technical findings and what needs to change in order to support ZENworks in the infrastructure. Suggestions should include best practices and detailed recommendations to resolve any known issues.
High-level design information, including general placement of services and other infrastructure components.
High-level Graphical Design Diagram: This diagram is used to visually understand what the infrastructure will look like after the deployment is complete. This is a foundational document and it should be further refined during the design phase of your project.
Critical Information Required for the System DesignAfter you have created your high-level design, you need to gather additional information to help you design your specific implementation. Introducing Micro Focus ZENworks into an environment involves effort, considerations, and input from multiple sources. These inputs are discussed in detail through the rest of this document.
Decisions from the System DesignThe following decisions should be made before installing the first ZENworks Primary Server:
“Required Functionality” on page 24 “Certificate Authority” on page 24 “Management Structure” on page 24
Pre-Design and Planning 23

“Content Store” on page 25 “Staging and Grouping” on page 26
Required FunctionalityOnly the functionality that is required by your organization should be enabled. Start with a simple approach, harden the implementation, and then expand it in the future. For example, if Patch Management and User Sources are not required for current requirements, do not enable or install them.
Certificate AuthorityZENworks provides the choice of using an external Certificate Authority (CA) or an internal ZENworks CA. If you choose an internal ZENworks CA, it is created during the installation of the first ZENworks Primary Server and is used throughout the life of that ZENworks Management Zone. The current lifespan of the internal certificate is 10 years.
See the ZENworks Server Installation for further details on the Certificate Authority. It is a good practice to backup the CA and ensure that the backup is stored in a safe place.
For more information on the pros and cons of Internal versus External certificates, see Chapter 14, “Design,” on page 203.
Management StructureWith ZENworks 7 or earlier, the technology was tied closely to eDirectory. In traditional NetWare or eDirectory environments, ZENworks infrastructure is structured according to the design of eDirectory and was therefore based on geography. However, geography is no longer a requirement for the structure of folders in the Management Zone. Because devices can connect to any Primary Server, and all Primary Servers should be linked over fast links, the structure of management can be based on other criteria.
You might want to base the folder structures for devices on business functions, such as Human Resources, Finance, Sales, and so forth.
Basing the device folder structure on geography is still possible. You might want to implement policies and applications site-by-site, room-by-room, and so forth.
The choice of a folder structure should also take into account the potential use of dynamic groups. Dynamic groups are groups whose members are automatically decided based on rules. In some environments, departments have a pool of devices for their users, so the standard tools remain static over its life. However, the location of the device can change frequently based on mobility of the user. In this scenario, the departmental structure of the business can be created by using folders, because the folders are fairly static and the geographical locations can be modelled using dynamic groups. This allows for easy definition of standard tool sets and configurations for common-interest groups, but still allows for updates to be rolled out on a location-by-location basis.
24 Pre-Design and Planning
Content StoreHistoric ZENworks implementations require file repositories to store application content. Users and devices access this content via mapped network drives or directly via UNC paths defined in the application object. Although this fits well with a traditional file and print model, it has the following drawbacks:
Synchronization: If an application is to be made available to all users, the source content must be copied to all servers. This requires additional products and processes to be introduced to manage the location of content, such as the Tiered Electronic Distribution component of ZENworks Server Management.
Rights: When files are stored in a traditional file and print model, the rights to these locations must be managed carefully. If you roam between sites, you might need access to all application repositories to ensure that applications can be installed and verified at any location. In a traditional model, if you have the read access to an application store, you have the ability to manually install any application that resides there, provided you know where to look.
With ZENworks, bundles can be created to install applications from mapped network drives and UNC paths as before. If you use mapped drives and UNC paths, file synchronization and the rights to those files must be managed outside of ZENworks.
ZENworks also allows for application content to be injected into the ZENworks Content Repository. By default, the Content Repository is synchronized between all Primary Servers and is downloaded by devices using HTTP, although CIFS is also supported. You can, however, specify which of the Primary Servers host content (at least one Primary Server must host the content). You can do the same to specify which Satellite Server to replicate the content to. You can do the same in order to specify to which Satellite Server you need to replicate content.
Using the ZENworks Content Repository has the following advantages:
Synchronization: Content is automatically synchronized to other Primary Servers and the defined Satellite devices. This allows devices to download content from the most appropriate location. The synchronization schedule and bandwidth consumption can be tightly controlled to avoid negative impacts on your organization’s network. ZENworks 11.2.3a and higher allow content to be distributed through the normal closest servers hierarchy.
Rights: Rights to files do not need to be managed. Only devices and users who are assigned to the content via relationships to Bundles and Policies in ZENworks have access to that content. If a user accesses a ZENworks Content Repository, the content files are encrypted and cannot be used.
Content is firewall and location friendly: Files are securely delivered in an encrypted fashion via HTTP protocol. This means that there is no need for the user to have the correct drive mapping with the necessary rights. If the user has been assigned the content, it is downloaded via HTTP from the most suitable location.
Downsides to using the Content Repository include the following:
Disk Space: Additional disk space is required. Many customers have extremely large application repositories distributed over many servers. These repositories must be re-created in ZENworks. If a customer has a 100 GB application repository, ZENworks requires at least 100 GB on each Primary Server with a content role to store applications, in addition to the space needed for other content, such as patches and system updates.
Pre-Design and Planning 25
MSI applications cannot be easily changed: After an MSI application is uploaded to the Content Repository, it cannot be changed. To make changes, the original MSI must be updated and then re-injected back into the Content Repository. In this scenario, a master store of all applications must reside outside ZENworks to allow for edits.
Staging and GroupingGrouping devices is very important in ZENworks because it allows applications, policies, and system updates to be deployed in a staged manner.
In ZENworks, if a change is made to an application or a policy, everyone receives the change. Controlling the introduction of change is vitally important in maintaining a secure and stable environment.
We recommend that you identify the following groups in your environment:
Test Devices: Identify test devices that are the first to receive updates. Ensure that build versions are represented for each operating system in the field.
IT Department: Identify IT staff that are typically the first users to receive live updates and applications.
Early Adopters: Identify early adopters who will test the deployment in each business unit and geographical location.
Home Users/VPN Users: Identify home workers or users who use a VPN so they can help test deployment via DMZ and VPN connections.
VIP Users: Identify important users whose devices require special focus and attention. You might want to transition executive laptops and workstations at the end of deployment.
General Populate: Create logical groups for the rest of the managed devices, based on business function or geography.
Creating these groups or folders is an important factor in releasing new configurations, applications, and updates in a controlled manner to the managed environment.
In situations where an application or policy is already live in an environment, grouping does not help in executing a change on this object in a controlled manner. After the bundle or policy has been changed, all users and devices with an association or inheritance receive the change automatically on the next refresh. To provide control in this scenario, ZENworks introduced change and release management capabilities through the concept of sandboxing for all policies and bundle types in ZENworks. This feature of ZENworks can be leveraged after you have identified and designated specific devices to be “test devices”.
Sandboxing enables devices and users to be marked as test devices or users, and when a change is made to a bundle or policy, only the test devices or users will receive the change. This allows selected devices and users in different locations and departments to test and ensure the quality of the change before it is released to the rest of the environment.
26 Pre-Design and Planning
3 3Design
In order to ensure that your ZENworks implementation is sound, efficient and robust, you need to ensure that you have properly designed it for the needs discovered in your pre-design work. You must also have a good understanding of the decisions that need to be made and the factors that need to be considered when making those decisions.
The following sections deal with decisions and activities that must be managed by a system architect, or someone with the abilities to make critical decisions for the design and implementation of the ZENworks system across the organization.
“Infrastructure Structure and Placement” on page 27 “Single Zone or Multiple Zones” on page 35 “Licensing ZENworks Products” on page 36 “Discovery and Deployment Strategies” on page 37 “Windows 10 Device Management” on page 42 “Remote Management” on page 42 “Inventory” on page 44 “Policy Management” on page 48 “Application Management” on page 50 “Linux Package Management” on page 53 “Content Management” on page 56 “Imaging” on page 65 “Antimalware” on page 67 “Other ZENworks Settings Recommendations” on page 76 “System Update” on page 82 “Lab Testing and Validation” on page 84 “Optimizing Primary Server Performance” on page 85 “Documentation” on page 86
Infrastructure Structure and PlacementIn order to calculate what infrastructure is required and where it should be located, you need to plan for the scalability of ZENworks.
Design 27

Based on the connection information, the number of ZENworks Primary Servers and Satellite devices needed to support thousands of devices can be calculated. The important things to consider when designing your ZENworks infrastructure include the following:
“Primary Servers” on page 28 “Satellite Servers” on page 31 “Database” on page 35
Primary ServersEach Primary Server must be connected to all other Primary Server, the database, and the user source by LAN speed or close links. Placing Primary Servers behind strong links allows for content synchronization, credential verification from the user source, and access to the ZENworks Database Server to occur quickly and efficiently. Performance suffers, including response times when you use ZENworks Control Center (ZCC) to perform administrative tasks, if there are any barriers or slow links between Primary Servers and the Database Server.
IMPORTANT: The Primary Server and the Database server MUST be connected by a low-latency, 10 Mbp/s or higher connection to ensure proper operation. Micro Focus does not support anything slower than this and recommends a 1 Gbps connection between the Database and its attached Primary Servers.
Scalability of Primary ServersThe following scale assumptions can be made when building the design of the infrastructure. These actual scale assumptions might be different based on the services you are providing and how you break up the services across multiple servers.
ZENworks Primary Server: A single ZENworks Primary Server can provide all ZENworks services (content, collection, authentication, and configuration) for as many as 10,000 devices in a ZENworks Management Zone. For planning, Micro Focus recommends the following:
A Primary Server for the first 5,000 devices Additional Primary Servers for more than 5,000 devices at a rate of 10,000 per Primary Server
Thus, an organization with 15,000 devices would require a minimum of two Primary Servers.
This is general guidance. Depending on how Primary Servers are used, and based on the hardware specifications in your environment, you might see variations in the number of devices that a Primary Server can support. For additional details on how these figures can change, and what you need to consider to ensure that you are scaling to meet the needs of the organization by building a proper design, and tuning your Primary Servers to perform at an optimal level, see “Scaling Primary Servers in the Real World” on page 30.
Understanding the scalability of the individual components that make up the ZENworks infrastructure is very important. You need to understand the limitations and where you can expect to see performance degradation to ensure that you build an infrastructure that can perform well, regardless of the load that your end-user community places on it.
28 Design
The first area that you need to consider is the scalability of the Primary Server. It is important to design your Primary Server placement based on the information that you collected during your assessment phase and what you anticipate your overall design will require. You should design your infrastructure so that there are always Primary Servers available to service devices and the administrators that are managing the system.
Factors Influencing ScalabilityThe main physical factors that govern the scalability of the Primary Servers are as follows:
CPU: The number of processors/cores and the speed will have an impact on the number of operations that a CPU can handle simultaneously.
RAM: Majority of the operations are performed by zenserver and zenloader. Each of these services can consume the appropriate amount of RAM, based on how you have tuned the server.
Disk I/O: Disk I/O is used when serving content for applications and updates. Network I/O: Network I/O can become a bottleneck when a device is serving a large number of
content requests or clients. If you face this issue, consider using NIC teaming to improve network I/O.
The minimum hardware recommendations are listed in the “Primary Server Requirements” section in the “ZENworks Server Installation”. If you can provide hardware that exceeds these recommendations, your system will perform better. Additional processing power and faster drives can make the systems more responsive. For example:
Using a quad core processor, which is almost a minimum standard these days. Using 16 GB RAM (recommended) Allocating as much disk space as you can (such as RAID 5 with separate physical drives to
separate content and ZENworks from the OS)
You also need to consider the following requirements:
Device refresh frequency Number of Primary Servers being used to deliver content to the managed devices (software,
policies, images, patches, inventory collection, and so forth) Number of administrators who have access to ZENworks Control Center Frequency of uploading content in the ZENworks Content Repository Number and frequency of reports run by administrators Whether the server (JVM/HTTP) is tuned to perform at an optimal level Amount of collection (inventory, messages, status, audit) getting uploaded from managed
devices. Number of subscriptions being performed or provided. Number of users logging in to the devices or querying the server, almost simultaneously.
Design 29

Scaling Primary Servers in the Real WorldScalability is achieved through the proper placement of services, a well thought-out design, and the proper configuration of services within the ZENworks system itself.
For example, even though a Primary Server can manage 10,000 devices, you should never deploy only one Primary Server in a 10,000-device environment. In fact, the rules have changed a little for this type of scenario. For this situation, we recommend the following as a starting point:
Two Primary Servers to manage the load and build a system that is fault tolerant A dedicated Database Server using Oracle or Microsoft SQL Server
This system should be further enhanced by considering the following:
Using a ZENworks Server Group or an L4 switch to manage fault tolerance and load balancing. Using DNS and aliases for managing the load placed on Primary Servers during deployment and
registration. Using Closest Server Rules in ZENworks locations or network environments to designate certain
servers for specific functions (for example, content and collection), and to exclude servers from specific functions or all functions. If a Primary Server is not listed in the Closest Server Rule of a location for a particular role, then devices do not attempt to connect to it for that feature.
Using a dedicated Primary Server or Satellite Server for imaging. Using a dedicated Primary Server for ZENworks Control Center. This is done mainly to control
where the administrators upload content to ensure that the load is dedicated to a single Primary Server.
Using Satellite devices for the distribution of content.
Primary Servers are the heart of your ZENworks environment. You want to protect these systems from major disruption. Primary Servers can be used for distribution of content, but this needs to be factored into your design.
Some of the major factors that you need to consider with ZENworks and Primary Servers are as follows:
Each Primary Server can handle many concurrent connections based on the amount of RAM installed. For more information about tuning a Primary Server, see “Tuning the ZENworks Primary Servers” on page 87.
Each Primary Server can manage up to 10,000 devices that are registered with the ZENworks Management Zone.
A ZENworks Management Zone can scale to 40,000 devices when using either Microsoft SQL Server Standard or Enterprise, or Oracle. A ZENworks Management Zone can scale up to 100,000 devices when using Oracle Enterprise (with partitioning). For information about partitioning, see Oracle Enterprise with Partitioning.
We also recommend that Primary Servers and the Database Server be on the same network, in the same data center. We do not recommend spanning WAN links with Primary Servers because replication of the Content Repository can cause utilization issues. Placement of services in a multi-site environment is done by utilizing the Satellite role, which is discussed in more detail in “Scalability of Satellite Servers” on page 31.
30 Design
Satellite ServersWhen you configure Satellite devices, consider the following:
Currently, Satellite devices are primarily designed to reduce the load on the network, not to reduce the load on the Primary Servers, although they do this as well to a certain degree.
Consider a scenario in which a Primary Server is located at Site1 and 10 managed devices are located at Site2. Site1 is connected to Site2 over a WAN or a slow link. The managed devices are on a LAN or a high-speed link. If you do not choose to configure a Satellite at Site2, then each managed device must traverse the network to get content from the Primary Server. If you choose to configure a Satellite Server at Site2, then only the Satellite traverses the network to get content from the Primary Server and all the managed devices get the content that is locally available at the Satellite. This example can be further expanded by introducing a Site 3 that talks to Site 2. You can configure a Satellite Server at Site 3 to talk to the Satellite Server at Site 2 in order to get content (and other information), rather than have to go all the way back to a Primary Server at Site 1.
In other words, use Satellite Servers to the fullest.
Bandwidth calculations are based on ZENworks having access to a known percentage of the total bandwidth for a given link.
Satellite devices should be located at remote sites in order to provide content local to devices on the local network.
Scalability of Satellite ServersDepending on the Satellite Server hardware you use, you can plan on servicing a different number of devices. For planning, consider the following:
Server-grade Satellite Servers: A single ZENworks Satellite Server (dedicated server) can provide content services for as many as 1,000 concurrent devices.
This is not real-world. See “Satellite Scaling in the Real World” on page 32 for additional details on how these figures can change and what you need to consider to ensure that you are scaling to meet the needs of the organization.
Workstation-grade Satellite Servers: A single ZENworks Satellite (dedicated workstation) can provide content services for as many as 250 concurrent devices.This is not real-world. See “Satellite Scaling in the Real World” on page 32 for additional details on how these figures can change and what you need to consider to ensure that you are scaling to meet the needs of the organization.
The second area that you should carefully consider is the scalability of the Satellite Servers. Satellite Servers are primarily designed to reduce the load on the network, not to reduce the load on the Primary Servers. Satellite Servers help reduce redundant traffic, load, and utilization from the WAN. Even if devices are located at a remote site, they connect to the central site to check with the Primary Servers if there is any work to be done. The actual work should be performed with remote Satellite devices strategically placed to service work requests from managed devices
Design 31
Factors Influencing Satellite Server ScalabilityThe major factors influencing the scalability of Satellite devices include the following:
Disk I/O and the requests that the Satellite device is concurrently managing Size of the subnets and their respective network speed Services that the Satellite device is performing (imaging, inventory collection, and distribution) Disk capacity (the Satellite device must have enough capacity to cope with the required
content) Physical memory (RAM) installed on the Satellite device Number of managed devices that the Satellite device is managing Frequency of distributions and the number of concurrent connections Whether inventory collection or software distributions are randomized Whether an L4 switch fronts the Satellite devices at a particular location Whether Satellite device groups are used Class of hardware (server-class hardware performs better than workstation-class hardware) Class of operating system (a Satellite device running on a Windows server can handle more
requests and workload than a Satellite device running on Windows XP or Windows)
Keeping these factors in mind, you should build your design to manage the known devices and estimated ongoing workload.
Satellite Scaling in the Real WorldEach organization is unique and has very different needs when it comes to managing devices at a remote site, but it is safe to assume that by performing the following tasks, you can achieve the level of scalability that you need:
For larger sites (more than 250 managed devices):
Have a dedicated Satellite device for imaging purposes. Have a dedicated Satellite device for inventory collection if the collection frequency is high. In
other words, if you are collecting daily, you want the server to be dedicated; if you are collecting monthly, you can collapse this service into another Satellite device on-site.
Have a dedicated set of Satellite devices for software and patch distributions if the frequency of distributions is high. You want to randomize the distribution of software and avoid a massive number of devices hitting the Satellite device at the same time.
Randomize the refreshes of managed devices at the site with Satellite devices.
For smaller sites (fewer than 250 devices):
Have multiple Satellite devices that share the load and responsibility. Do not be significantly concerned about designating specific servers for specific functions. Randomize the refreshes of managed devices at the site with Satellite devices.
32 Design
Understanding Parent PrimariesEach ZENworks Satellite has to be tied to a defined parent Primary Server. This is done when you select a Primary Server in the Server Hierarchy snapshot and select Add Satellite Server. The Satellite’s parent Primary Server is used as follows:
For the Content role, the parent Primary Server acts as a safety net to make sure at least one Primary Server in the system has all the content its child Satellites might need. To enforce this, if you attempt to include a bundle or policy to a Satellite Server, the system automatically checks to ensure that it is also included on the parent Primary Server. If not, you will be prompted to add it to this server. Prior to ZENworks 11.2.3a, parent Primary Servers were the only servers that a Satellite Server would pull content from. However, in 11.2.3a you can now choose to have the Satellite Server use its closest server rules to retrieve content.
For the Imaging role, the parent Primary Server acts as the configuration server for imaging requests. When a device PXE boots from its local imaging server, it is necessary for the Satellite Server to make configuration calls to some Primary Server. In ZENworks these calls are always directed to the parent Primary Server.
For the Collection role, the parent Primary Server acts as the target for collection roll up. When a Satellite Server receives content and then rolls it up, it always rolls the content to the parent Primary Server.
The parent Primary Server has no impact on the Join Proxy or Authentication server roles.
Satellite Server RolesThere are several different roles that servers in the ZENworks environment can perform. Primary Servers always have the capability to act in all roles, while Satellite Servers can perform only a limited set of roles. The following table lists the roles and indicates which devices can perform that role.
Role Description Types of Servers
Configuration This role is responsible for reading configuration metadata, such as bundle information and policies, from the ZENworks Database.
Primary Servers
Content This role is responsible for providing the actual file contents required to install bundles and updates, as well as apply policies. Content is automatically replicated to the Satellite Servers based on assignments.
Primary Servers
Satellite Servers
Collection This role is responsible for collecting inventory data from clients and then rolling that data up to either a Primary Server or the Database.
Primary Servers collect and store in the database.
Satellite Servers collect and forward to the parent Primary Server.
Design 33
Authentication Satellite Best PracticesAs indicated in the table above, a majority of roles can be hosted by a Satellite device. The ZENworks Authentication role was previously restricted to ZENworks Primary Servers. However, the role has been available on Satellite devices from ZENworks 10 SP3 Configuration Management or later. Configuring the Authentication role on a Satellite device allows for additional connections to be made to an eDirectory or Active Directory user source through a device that is local to the devices at a given location. For example, a customer using eDirectory will most likely create partitions dedicated to the resources for a given site and store a replica of the partition on a local server.
If a remote site has a local Directory server with LDAP enabled, a Satellite device can be configured with the Authentication role so that the authentication process can occur locally on the LAN. The authentication process is as follows:
1. The user authenticates to eDirectory or Active Directory as part of the Windows logon process.2. The credentials are intercepted and passed to a ZENworks server hosting the Authentication
role.3. The Authentication server searches for the user in the user source via LDAP(s). This information
is used to determine the policies and bundles that should be applied for users, based on their location in the directory and their group memberships.
The process of configuring local Satellite authentication is as follows:
1 Define an additional connection to the User Source.2 Assign the User Source Connection to the Satellite device.
For more information on how to configure Authentication Satellites, see “Authentication Role” in the ZENworks Primary Server and Satellite Reference.
Authentication This role performs an LDAP bind or Kerberos 5 request to authenticate the end user to the attached user source.
Primary Servers
Satellite Servers
Imaging This role provides Proxy DHCP, TFTP, and ZENworks Imaging services.
Primary Servers
Satellite Servers (must be able to contact Primary Servers for work to do check)
Join Proxy This role is used to provide remote management behind a NAT. Both the managed device and the administrator’s PC must be able to reach this device.
Primary Servers
Satellite Servers
Role Description Types of Servers
34 Design
DatabaseAs a part of your design, you will need to determine the database platform that you want to use and how to configure that database. In most cases, this will be dictated by two factors. First, whether there are existing database licenses and DBA skills in your organization and second, the number of devices you expect to manage with ZENworks. The high-level guidance for ZENworks administrators is as follows:
If you have 1,000 or fewer devices, you can safely use any of the database options available, including Microsoft SQL Server or Oracle.
If you have 1,000-5,000 devices, you can safely use any of the external database options. If you have 5,000-40,000 devices, you can use Microsoft SQL Server or Oracle. If you have more than 40,000-100,000 devices, you need to use the Oracle Enterprise Edition
(with partitioning). For information about partitioning, see Oracle Enterprise with Partitioning.
For more information about database sizing and scaling see, Part II, “Database Administrator,” on page 125.
Single Zone or Multiple ZonesIn most organizations, you will be able to implement a single ZENworks zone for the management of your production devices. A zone is a collection of Primary Servers, Satellite Servers, and a Database that is used to manage a set of devices. As long as you have 100,000 devices or less, there is no sizing limitation that would necessitate multiple zones. However, there are times when you might want to consider multiple zones for non-scaling reasons, such as the following:
Testing Zone: The most common reason for a separate zone is to have a test zone. This is useful when you want to test a newer version of the product before an upgrade and to test how a new application might impact the system.
Geographic Reasons: While Satellite Servers can generally be used to solve the challenges associated with a large distributed environment, if you have a situation where there is very limited bandwidth, where the configuration data that must come from the Primary Server is simply too much, you might want to consider separate zones.
Political Reasons: In rare cases, ZENworks is used in a company that has very rigid boundaries between different parts of the organization. They want to ensure that all the data is secure and only available to their own administrators and the reporting group. While ZENworks provides role-based administration, full isolation might necessitate a separate zone.
In each of these cases, it should be noted that creating a separate zone is not without overhead. Each zone must have its own Primary Servers, Satellite Servers, and Database. Additionally, each zone uses a separate ZENworks Control Center instance, so it is not currently possible to manage across zones from a single ZENworks Control Center.
The latest version of ZENworks does, however, add the capability to replicate bundles and policies between zones. This can help to reduce the administrative overhead by allowing you to create a bundle or policy once and then have the system automatically replicate it. For more information about configuring zone sharing, see the ZENworks Subscribe and Share Reference.
Design 35
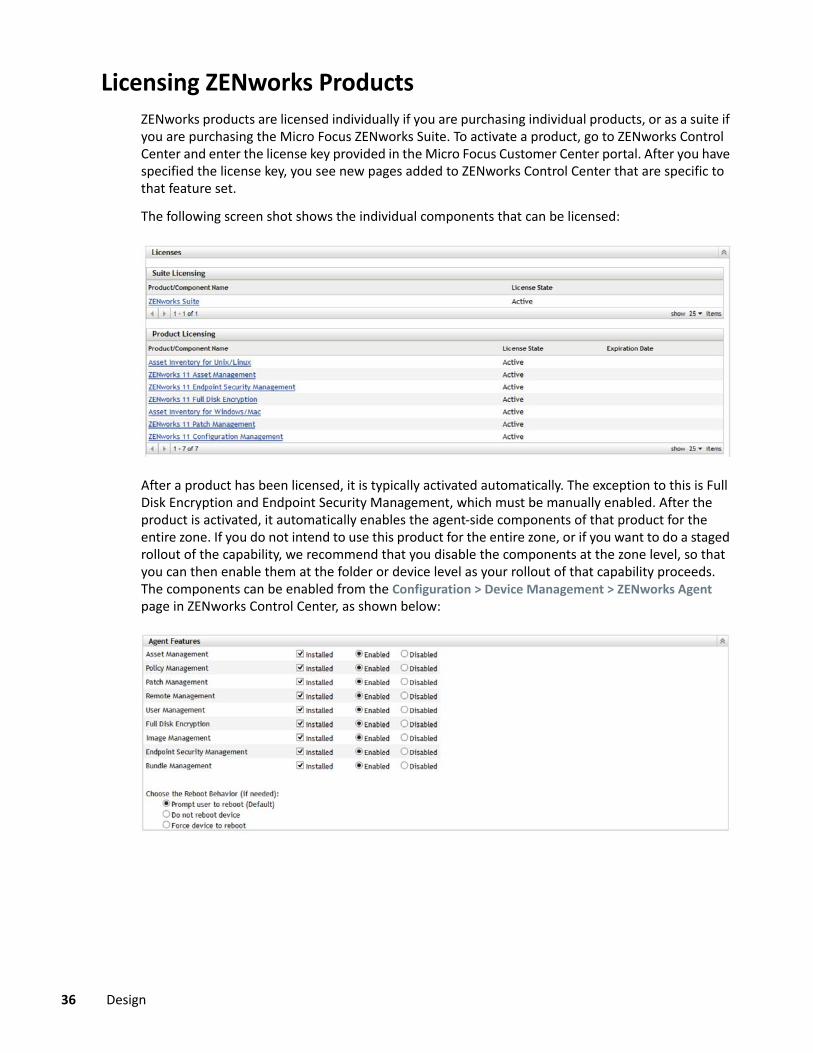
Licensing ZENworks ProductsZENworks products are licensed individually if you are purchasing individual products, or as a suite if you are purchasing the Micro Focus ZENworks Suite. To activate a product, go to ZENworks Control Center and enter the license key provided in the Micro Focus Customer Center portal. After you have specified the license key, you see new pages added to ZENworks Control Center that are specific to that feature set.
The following screen shot shows the individual components that can be licensed:
After a product has been licensed, it is typically activated automatically. The exception to this is Full Disk Encryption and Endpoint Security Management, which must be manually enabled. After the product is activated, it automatically enables the agent-side components of that product for the entire zone. If you do not intend to use this product for the entire zone, or if you want to do a staged rollout of the capability, we recommend that you disable the components at the zone level, so that you can then enable them at the folder or device level as your rollout of that capability proceeds. The components can be enabled from the Configuration > Device Management > ZENworks Agent page in ZENworks Control Center, as shown below:
36 Design
Discovery and Deployment StrategiesAs a core part of all of the integrated ZENworks products, Micro Focus provides the ability to discover network-attached devices and then to perform a push deployment of the ZENworks Agent to the devices that can be managed by ZENworks. This section describes the best practices for the device discovery and deployment capabilities of ZENworks products.
Device DiscoveryWhen it comes to device discovery, you need to perform your discoveries and deployments in stages. Use the recommendations in this section for discovery and deployment in order to avoid massive amounts of discovery traffic on the LAN/WAN.
Consider the following when considering device discovery:
Discover assets subnet-by-subnet. Discover assets building-by-building. Discover assets site-by-site. Import devices from Active Directory or eDirectory by using LDAP discovery tasks. Import devices from a spreadsheet (CSV) if they are well documented and the list is available for
you to use. Use the ZENworks Migration wizard to migrate your devices from eDirectory and target them
for deployment to avoid discovery of the initial assets that are already part of an existing ZENworks system.
Use pilot groups.
These tips help you discover assets and roll out the ZENworks Agent in a very manageable way, which avoids failures for deployment and installation.
Table 3-1 lists the duration and CPU usage for a discovery task performed by using the MAC Address technology. This information helps you to configure the discovery settings in an efficient way.
Table 3-1 Discovery Task Time and CPU expectations
IP Address Range Duration of Discovery Task Additional Details
Single IP Less than 1 minute This discovery task starts immediately when it is launched.
/24 Subnet (254 devices) 10 minutes This discovery task starts immediately when it is launched.
/16 Subnet (65534 devices) 30 hours This discovery task starts immediately when it is launched.
Design 37
There are several things you can do to increase the speed of IP Discovery tasks.
Increase the Maximum Concurrent Discoveries from 5 to 20. This allows more addresses to be scanned simultaneously.
Select only the discovery technologies that are required. We recommend enabling only the discovery technologies that are configured within the environment. If SSH, NMAP, or SNMP is not available or is not configured in the environment, do not enable it. Every discovery technology that is scanned for an IP address adds time to the discovery task. As a rule of thumb, start with only WinAPI and the ZENworks discovery technologies enabled for the Management Zone. You can override discovery technologies in the discovery task, which means that specific discovery technologies can be directed at certain subnets.
Configure only the necessary authentication credentials. The more authentication credentials configured, the longer each scan takes.
Disable the MAC Address discovery technology. Any device with a MAC address is discovered via this technology. The devices show up in the discovered list with an unknown operating system, which causes the deployable device list to be inaccurate.
All discoveries are performed from the Deployment tab in ZENworks Control Center.
Agent StateA discovery task returns Management Zone information to devices with a ZENworks agent installed. The discovered devices can be viewed from the ZENworks Control Center > Devices > Discovered tab. It is possible to see which devices are registered with another Management Zone and which agents are currently unregistered.
The name of a managed device residing within the same Management Zone as the Primary Server is displayed in green and the name of a managed device residing in a different Management Zone is displayed in yellow.
ScheduleA Discovery task returns device information only if the device is turned on, and it can be contacted. A Discovery task should be run regularly on different days and times to ensure that the entire environment is captured.
For more information, see the ZENworks Discovery, Deployment, and Retirement Reference.
/8 Subnet (16,277,214 devices) Always in a Pending state This discovery task is not started. The status of the task remains as Pending.
CPU usage is normal,10 minutes after the discovery task is launched.
If any other discovery or loader task is running simultaneously, it might take a considerable time to complete.
IP Address Range Duration of Discovery Task Additional Details
38 Design
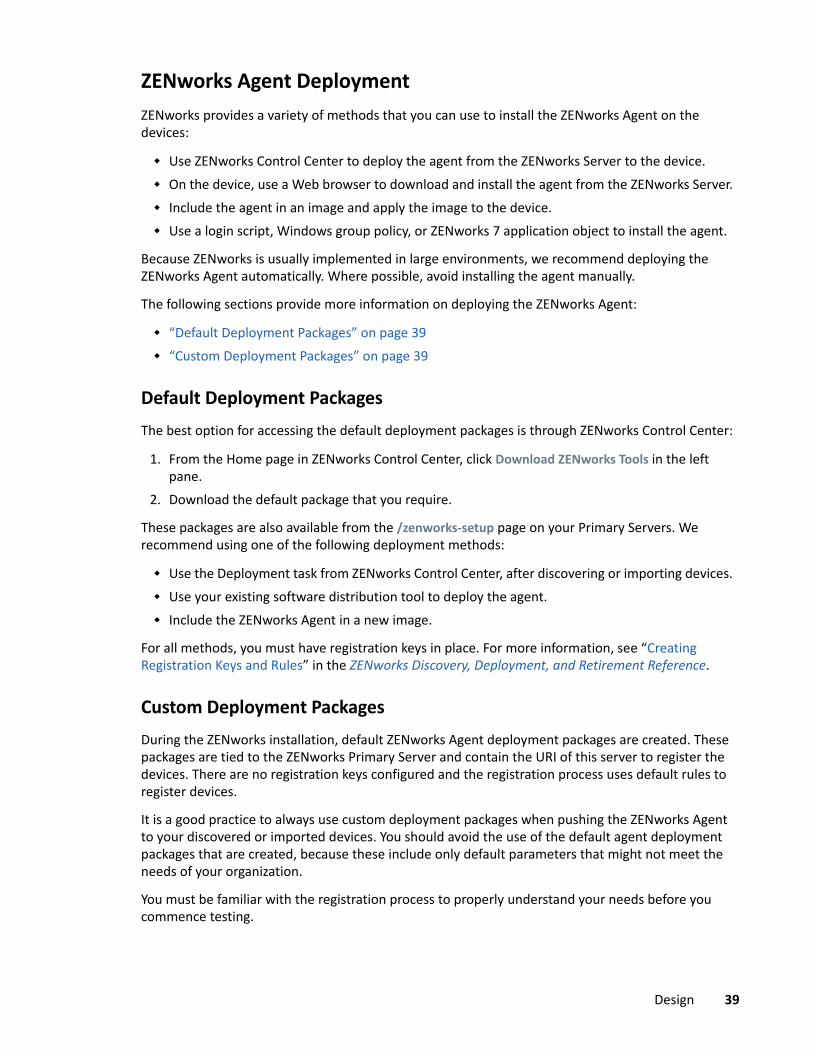
ZENworks Agent DeploymentZENworks provides a variety of methods that you can use to install the ZENworks Agent on the devices:
Use ZENworks Control Center to deploy the agent from the ZENworks Server to the device. On the device, use a Web browser to download and install the agent from the ZENworks Server. Include the agent in an image and apply the image to the device. Use a login script, Windows group policy, or ZENworks 7 application object to install the agent.
Because ZENworks is usually implemented in large environments, we recommend deploying the ZENworks Agent automatically. Where possible, avoid installing the agent manually.
The following sections provide more information on deploying the ZENworks Agent:
“Default Deployment Packages” on page 39 “Custom Deployment Packages” on page 39
Default Deployment PackagesThe best option for accessing the default deployment packages is through ZENworks Control Center:
1. From the Home page in ZENworks Control Center, click Download ZENworks Tools in the left pane.
2. Download the default package that you require.
These packages are also available from the /zenworks-setup page on your Primary Servers. We recommend using one of the following deployment methods:
Use the Deployment task from ZENworks Control Center, after discovering or importing devices. Use your existing software distribution tool to deploy the agent. Include the ZENworks Agent in a new image.
For all methods, you must have registration keys in place. For more information, see “Creating Registration Keys and Rules” in the ZENworks Discovery, Deployment, and Retirement Reference.
Custom Deployment PackagesDuring the ZENworks installation, default ZENworks Agent deployment packages are created. These packages are tied to the ZENworks Primary Server and contain the URI of this server to register the devices. There are no registration keys configured and the registration process uses default rules to register devices.
It is a good practice to always use custom deployment packages when pushing the ZENworks Agent to your discovered or imported devices. You should avoid the use of the default agent deployment packages that are created, because these include only default parameters that might not meet the needs of your organization.
You must be familiar with the registration process to properly understand your needs before you commence testing.
Design 39
RegistrationRegistration is the process of enrolling the ZENworks device into the ZENworks zone. During registration, a workstation or server object is created to represent the managed device. Once an object is created, you can assign configuration policies and software bundles, and modify the settings of those bundles.
By default, the host name of a device is used as its ZENworks name. It is added to the /Servers or /Workstations folder, and it is not given membership in any group. You can manually move devices to other folders and add them to groups, but this can be a difficult task if you have a large number of devices, or if you are consistently adding new devices. The best way to manage a large number of devices is to have them automatically added to the correct folders and groups during registration.
To add devices to folders and groups during registration, you can use registration keys, registration rules, or both. Both registration keys and registration rules let you assign folder and group memberships to a device. However, there are differences between keys and rules that you should know before choosing whether you want to use one or both methods for registration.
The following sections contain more information:
“Registration Rules” on page 40 “Registration Keys” on page 41 “Registration Settings” on page 41
Registration RulesIf you do not want to enter a registration key during deployment, or if you want devices to be automatically added to different folders and groups based on predefined criteria (for example, operating system type, CPU, or IP address), you can use registration rules.
ZENworks includes a default registration rule for servers and another one for workstations. If a device registers without a key, the default registration rules are applied to determine the folder and group assignments. These two default rules ensure that all servers are added to the /Servers folder and all workstations to the /Workstations folder.
These two default rules are designed to ensure that no server or workstation registration fails. Therefore, you cannot delete or modify these two default rules. You can, however, define additional rules that enable you to filter devices as they register, and add them to different folders and groups. If you have established folders for devices with similar configuration settings and groups for devices with similar assignments, newly registered devices automatically receive the appropriate configuration settings and assignments.
Additionally, in some highly secure environments, it may be desirable to disable the default registration rules from the Registration Settings page. This means that a device will only register in the zone if it meets either a pre-defined rule or a key is specified at the time of registration.
The best practice is to utilize registration rules where possible, as this provides the most hands-off way for registering the device.
For more information, see the ZENworks Quick Start Reference.
40 Design
Registration KeysA registration key is an alphanumeric string that you manually define or randomly generate. During the deployment of the ZENworks Agent on a device, the registration key must be provided. When the device connects to a ZENworks server for the first time, the device is added to the folder and groups defined within the key.
You can create one or more registration keys to ensure that devices are placed in the desired folders and groups. For example, you might want to ensure that all the workstations belonging to the Sales department are added to the /Workstations/Sales folder. However, they should be divided into three different groups (SalesTeam1, SalesTeam2, or SalesTeam3), depending on their team assignments. You could create three different registration keys and configure each one to add the sales workstations to the /Workstations/Sales folder and the appropriate team group. As long as each workstation uses the correct registration key, it is added to the appropriate folder and group.
Registration keys should be used to register devices that should be an exception to the rules that you have created.
For more information, see the ZENworks Quick Start Reference.
Registration SettingsRegistration settings can be set only at a zone-wide level, and they allow you to control the following:
Whether the default registration rules are enabled: Generally we recommend you keep these rules enabled, unless your environmental security requirements dictate otherwise.
Whether devices should be automatically renamed in the console when their naming attributes change on the device: We recommend enabling this setting to help keep the ZENworks view of the device in sync with the local view.This feature provides a very flexible way to handle some desktop management processes such as renaming or re-installation. During the ZENworks framework-based installation process, the device name changes to a randomly generated name. However, if this feature is in place and you have a working imaging partition, all references are automatically maintained by the ZENworks Agent registration process.
If and how device reconciliation should be achieved: Device reconciliation allows devices to re-register to the system in the case of a system failure or other event when the agent loses knowledge of its identity in the zone. From the registration settings you can determine whether the Serial Number, MAC Address or Host name are used to uniquely identify the device in your environment so that these attributes can be used for reconciliation. It is recommended that you do not disable reconciliation to prevent duplicate device objects in the zone.
For more information, see the ZENworks Management Zone Settings Reference.
Design 41
Windows 10 Device ManagementZENworks Configuration Management lets you manage the life cycle of Windows 10 devices using the built-in MDM agent on those devices rather than using the ZENworks agent.
The management capabilities include enrolling Windows 10 devices, deploying Windows 10 MDM bundles, and performing various quick tasks such as registering, deleting, retiring, and unregistering devices. Additional capabilities continue to be added each release. For detailed information, see the Windows MDM Reference.
Currently, ZENworks supports a maximum of 10,000 Windows 10 MDM devices in a zone.
Remote ManagementRemote Management capabilities in ZENworks allow you to assist users when problems occur. From a best practices perspective, the following are the important topics to consider:
“Security” on page 42 “Performance” on page 43 “Join Proxy” on page 43 “Auditing” on page 44
SecurityTo prevent unauthorized access to managed devices, the Remote Management service on the managed devices provides the following modes of authentication:
Rights-Based Authentication
In rights-based authentication, rights are assigned to the remote operator to launch a remote session on the managed device. By default, ZENworks administrators who have been granted rights to remote manage devices have rights to perform remote operations on all the managed devices, regardless of whether the local user or the ZENworks user is logged into the device. To limit this you can implement a Remote Management policy.
The remote operator does not need any exclusive rights to perform a remote session on the managed device if you have not logged into the managed device, or if you have logged into the managed device but not into ZENworks. However, the remote operator needs exclusive Remote Management rights to perform the remote operation on a managed device when a ZENworks user has logged in to the device. We strongly recommend using rights-based authentication because it is safe and secure.
For rights-based authentication to function properly, it is recommended that the managed device, the console device, Primary Servers, and database server are all pointing to a common network time source, ensuring time is synchronized. This is required as the rights-based authentication system utilizes tickets that have an expiry of 5 minutes.
Password-Based Authentication
42 Design
In password-based authentication, the remote operator is prompted to enter a password to launch the remote session on the managed device. There are two types of password authentication schemes: ZENworks Password: This scheme is based on the Secure Remote Password (SRP) protocol
(version 6a). The maximum length of a ZENworks password is 255 characters. VNC Password: This is the traditional VNC password authentication scheme. The maximum
length of a VNC password is 8 characters. This password scheme is inherently weak and is provided only for interoperability with the open source components.
If you use password-based authentication, we strongly recommend using the ZENworks Password scheme because it is safer and more secure than the VNC Password scheme. Ensure that passwords used are of an adequate length and complexity.Password schemes operate in the following modes: Session Mode: A password that is set in this mode is valid only for the current session. The
user on the managed device must set the password at the start of the remote session and communicate the password to the remote operator through out-of-band means. If you use password-based authentication, we strongly recommend that you use this mode of authentication because the password is valid only for the current session and is not saved on the managed device.
Persistent Mode: The password can be set by the administrator through the Remote Management policy or by the managed device user, through the ZENworks icon if the Allow user to override default passwords on managed device option is selected in the security settings of the Remote Management policy.
If the password is set by both a remote control policy and the user, the password set by the user takes precedence over the password configured in the policy.
PerformanceThe performance features are enabled by default in the Remote Management policy or configuration page. They can be disabled, but we do not recommend it.
For more information, see the ZENworks Management Zone Settings Reference.
Join ProxyThe ZENworks Join Proxy can be hosted on either a Primary Server or a Satellite Server. The purpose of the Join Proxy is to allow you to remote manage devices that may not be normally reachable by the administrative device. For instance, when the device that needs to be managed is behind Network Address Translation. The following best practices apply to the join proxy:
Only configure locations where the device is likely to be unreachable to use a join proxy. The join proxy server of the device is configured like any other closest server -- as a property of the location or network environment. To ensure that only those devices that are likely to need the join proxy are using the join proxy, you should only configure a join proxy on locations and network environments that might be unreachable directly from the corporate network. Doing
Design 43
this will ensure that you do not maintain unneeded connections to the Primary or Satellite Server that is acting as the join proxy. Generally, you can also include a join proxy in the Unknown Location Servers list.
Ensure that the managed device can access both a Primary Server and the Join Proxy server if they are two different machines. The device must be able to contact a Primary Server to indicate that it has a connection to a Join Proxy. This is used by the remote management console to determine which Join Proxy should be used in the environment when connecting to the device. This is only required if you are using rights-based management, not if you are using password-based management.
AuditingIf your organization requires auditing of remote management tasks it is important that you enable the auditing events that are of interest, and configure a proper time to store those events. You should also ensure that you configure audit pruning to ensure that excess audit data is not being stored in the database.
For more information about remote management auditing, see “Remote Management:”in the ZENworks Audit Management Reference.
InventoryZENworks contains a powerful feature for collection and reporting on software and hardware inventory in the environment. The configuration of the inventory collection should be managed before deployment to ensure that the devices are collecting only relevant information.
Inventory Settings and SchedulingInventory collection settings are split into three main sections. Each section is configured independent of the other.
Scan Now: For devices that are manually forced to perform inventory scans. First Scan: For scans that need to be performed on agents that are installed for the first time.
This scan is controlled by the Logins before first scan configuration settings in ZENworks Control Center. This setting should complement the build process of the devices.
Recurring Scan: This scan is controlled by the Inventory Scan Schedule. For more information, see “Scheduling an Inventory Scan” in the ZENworks Asset Inventory Reference.
Inventory scan frequency depends on how often the hardware and software in the environment change, and how accurate the information needs to be. Under normal circumstances, it should be adequate to collect inventory data on a weekly, biweekly, or monthly basis, but this might not be sufficient for all deployments. Be aware of the workload placed on the ZENworks Primary Servers. Every inventory scan a device does must be processed by the ZENworks Primary Server and stored in the ZENworks database. Ensure that the schedule does not unnecessarily scan thousands of devices on a daily basis, but if this is necessary, closely monitor the load and performance of both the Primary and database servers. Inventory schedules can be set at the Management Zone folder, and device level. We recommend that you configure inventory schedules on a folder basis to ensure that the load is spread through a given time period. If you must immediately update the inventory of a device, a scan-now request can be sent to the device via ZENworks Control Center.
44 Design
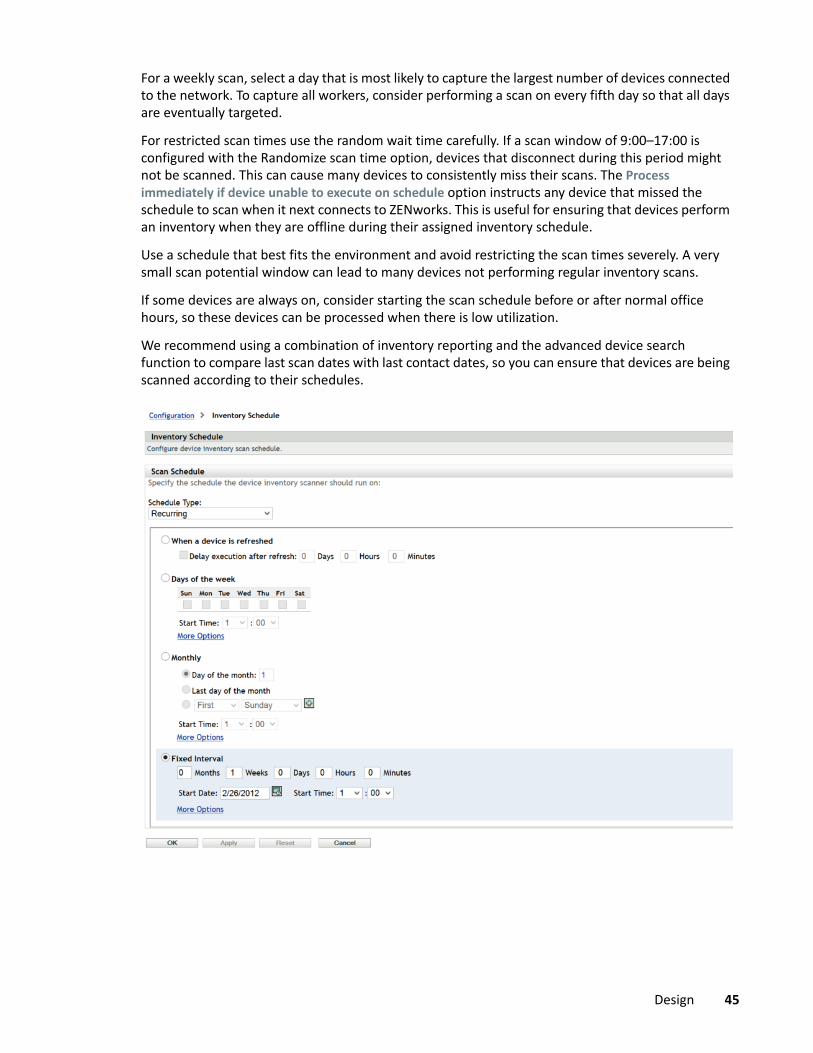
For a weekly scan, select a day that is most likely to capture the largest number of devices connected to the network. To capture all workers, consider performing a scan on every fifth day so that all days are eventually targeted.
For restricted scan times use the random wait time carefully. If a scan window of 9:00–17:00 is configured with the Randomize scan time option, devices that disconnect during this period might not be scanned. This can cause many devices to consistently miss their scans. The Process immediately if device unable to execute on schedule option instructs any device that missed the schedule to scan when it next connects to ZENworks. This is useful for ensuring that devices perform an inventory when they are offline during their assigned inventory schedule.
Use a schedule that best fits the environment and avoid restricting the scan times severely. A very small scan potential window can lead to many devices not performing regular inventory scans.
If some devices are always on, consider starting the scan schedule before or after normal office hours, so these devices can be processed when there is low utilization.
We recommend using a combination of inventory reporting and the advanced device search function to compare last scan dates with last contact dates, so you can ensure that devices are being scanned according to their schedules.
Design 45
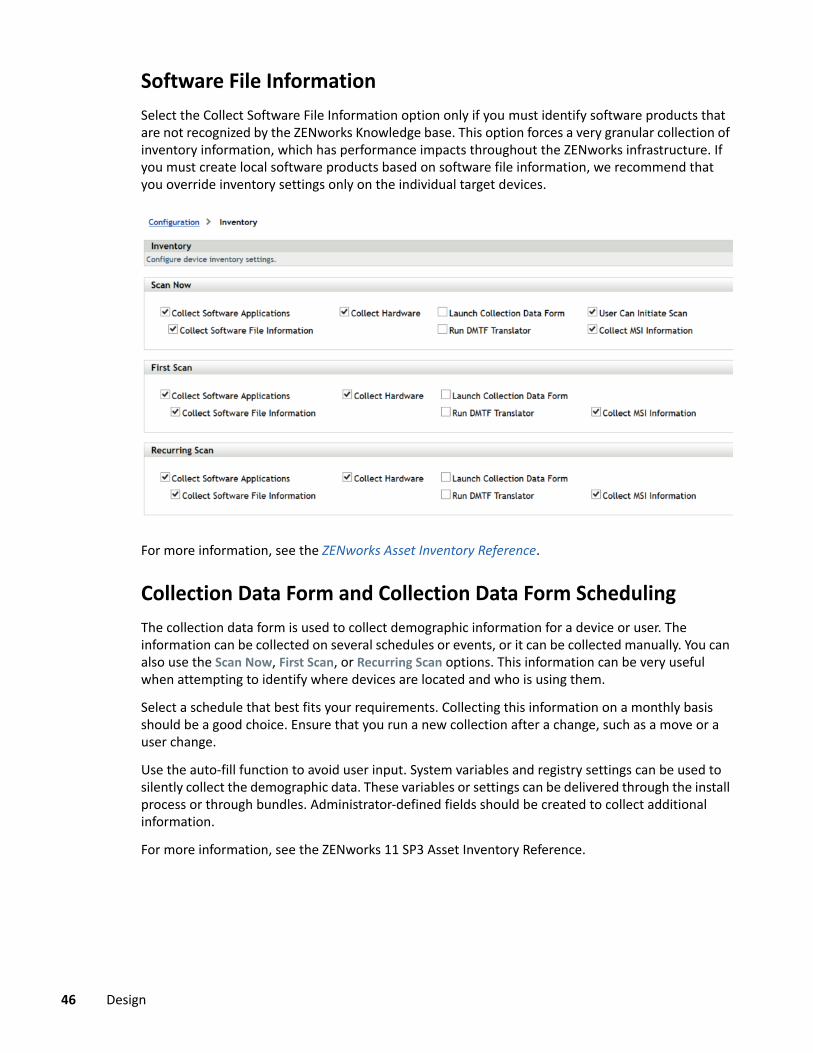
Software File InformationSelect the Collect Software File Information option only if you must identify software products that are not recognized by the ZENworks Knowledge base. This option forces a very granular collection of inventory information, which has performance impacts throughout the ZENworks infrastructure. If you must create local software products based on software file information, we recommend that you override inventory settings only on the individual target devices.
For more information, see the ZENworks Asset Inventory Reference.
Collection Data Form and Collection Data Form SchedulingThe collection data form is used to collect demographic information for a device or user. The information can be collected on several schedules or events, or it can be collected manually. You can also use the Scan Now, First Scan, or Recurring Scan options. This information can be very useful when attempting to identify where devices are located and who is using them.
Select a schedule that best fits your requirements. Collecting this information on a monthly basis should be a good choice. Ensure that you run a new collection after a change, such as a move or a user change.
Use the auto-fill function to avoid user input. System variables and registry settings can be used to silently collect the demographic data. These variables or settings can be delivered through the install process or through bundles. Administrator-defined fields should be created to collect additional information.
For more information, see the ZENworks 11 SP3 Asset Inventory Reference.
46 Design
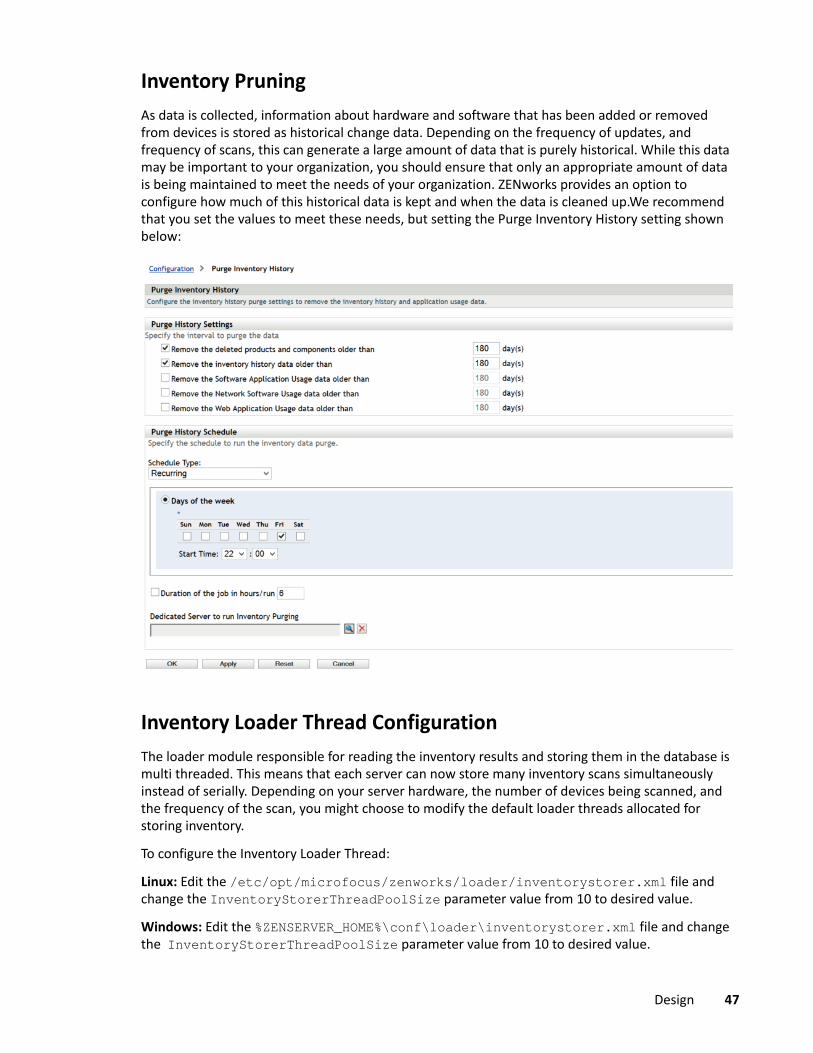
Inventory PruningAs data is collected, information about hardware and software that has been added or removed from devices is stored as historical change data. Depending on the frequency of updates, and frequency of scans, this can generate a large amount of data that is purely historical. While this data may be important to your organization, you should ensure that only an appropriate amount of data is being maintained to meet the needs of your organization. ZENworks provides an option to configure how much of this historical data is kept and when the data is cleaned up.We recommend that you set the values to meet these needs, but setting the Purge Inventory History setting shown below:
Inventory Loader Thread ConfigurationThe loader module responsible for reading the inventory results and storing them in the database is multi threaded. This means that each server can now store many inventory scans simultaneously instead of serially. Depending on your server hardware, the number of devices being scanned, and the frequency of the scan, you might choose to modify the default loader threads allocated for storing inventory.
To configure the Inventory Loader Thread:
Linux: Edit the /etc/opt/microfocus/zenworks/loader/inventorystorer.xml file and change the InventoryStorerThreadPoolSize parameter value from 10 to desired value.
Windows: Edit the %ZENSERVER_HOME%\conf\loader\inventorystorer.xml file and change the InventoryStorerThreadPoolSize parameter value from 10 to desired value.
Design 47
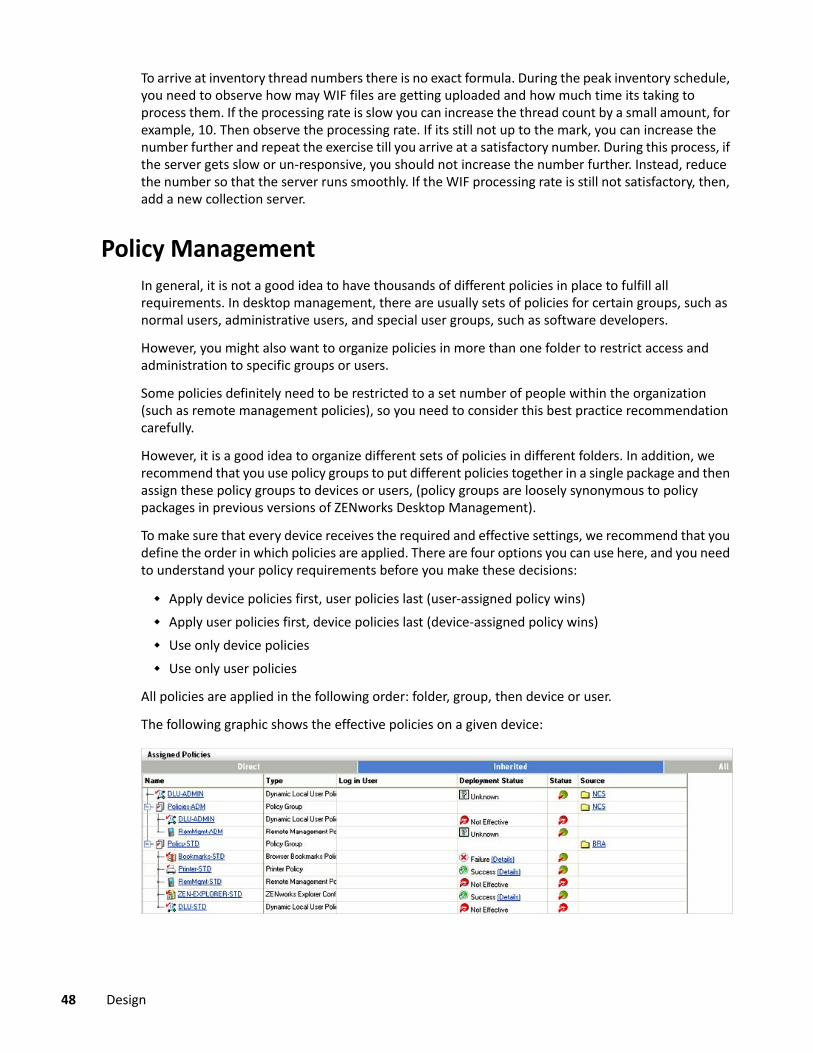
To arrive at inventory thread numbers there is no exact formula. During the peak inventory schedule, you need to observe how may WIF files are getting uploaded and how much time its taking to process them. If the processing rate is slow you can increase the thread count by a small amount, for example, 10. Then observe the processing rate. If its still not up to the mark, you can increase the number further and repeat the exercise till you arrive at a satisfactory number. During this process, if the server gets slow or un-responsive, you should not increase the number further. Instead, reduce the number so that the server runs smoothly. If the WIF processing rate is still not satisfactory, then, add a new collection server.
Policy ManagementIn general, it is not a good idea to have thousands of different policies in place to fulfill all requirements. In desktop management, there are usually sets of policies for certain groups, such as normal users, administrative users, and special user groups, such as software developers.
However, you might also want to organize policies in more than one folder to restrict access and administration to specific groups or users.
Some policies definitely need to be restricted to a set number of people within the organization (such as remote management policies), so you need to consider this best practice recommendation carefully.
However, it is a good idea to organize different sets of policies in different folders. In addition, we recommend that you use policy groups to put different policies together in a single package and then assign these policy groups to devices or users, (policy groups are loosely synonymous to policy packages in previous versions of ZENworks Desktop Management).
To make sure that every device receives the required and effective settings, we recommend that you define the order in which policies are applied. There are four options you can use here, and you need to understand your policy requirements before you make these decisions:
Apply device policies first, user policies last (user-assigned policy wins) Apply user policies first, device policies last (device-assigned policy wins) Use only device policies Use only user policies
All policies are applied in the following order: folder, group, then device or user.
The following graphic shows the effective policies on a given device:
48 Design
In the above example, there is a policy group assigned to a folder named BRA. This group contains all policy settings (Policy-STD) that are required for all users in BRA. Additionally, there is a policy group assigned to the NCS folder (below BRA). Finally, there is a direct policy assignment to the NCS folder that modifies the DLU settings only.
Recommendations for Managing PoliciesOrganizing policies into folders and policy groups makes it easier to manage the assignment process to devices and users. When managing policies, you should consider the following items:
Define user and device categories during the assessment phase, such as Standard-user, Administrative-user, Management-user, Help Desk-device, and so forth.
Define the required policies and sets that can be used for policy groups. Define the order in which policies are applied. Assign policy groups to folders as needed. Use folder or group assignments wherever possible. In an Active Directory Domain environment, use Active Directory to implement group policies
or roaming profiles.
Linux Puppet PoliciesThe Puppet policy follows a client/server deployment model to automate the configuration management of multiple hosts in the ZENworks environment. As a client/server model, the ZENworks Server replaces the role of puppet master, allowing it to centrally store and deploy the puppet configuration resources and catalogs by using the Puppet policy.
The ZENworks managed device acts as the puppet client to invoke the puppet standalone executable as part of its policy enforcement, to locally compile and apply the puppet catalogs and scripts to every managed node. The puppet content is distributed as either manifest (puppet programs) or modules (self-contained archives with a collection of manifests, types, templates, libraries and files) in puppet directory structure and format. These configuration changes are applied as root on every refresh of the device node. ZENworks managed devices running Linux use the custom packaging for puppet (supported version = 0.24.8), Ruby, and Facter packages with ZENworks puppet configurations. It does not use the system puppet if it is already installed. Using the ZENworks puppet client to communicate with a standard puppet master is not supported, and standard puppet clients are not authorized to retrieve puppet configuration information from a ZENworks Server.
Unlike the standard puppet master, the Puppet policy stores the imported puppet content in the content repository, on the ZENworks Server, and does not maintain the directory structure. However, the ZENworks puppet client maintains the directory structure under the configured modules path for the deployed modules.
The ZENworks puppet client polling interval is based on the device refresh interval (the default value is 24 hours). The puppet client is pre-configured to use the default puppet settings (for example, modulepath, confdir and log path) for ZENworks. These settings can be modified or overwritten in the policy settings, based on the requirement.
You must ensure that the same puppet module is not deployed to the identical node as part of different policies, and you must also avoid using dependencies among modules. The puppet catalogs (module) can be imported as an archive to different policy versions and deployed to all managed
Design 49
devices on refresh. This allows you to keep it in sync with the central repository on the server and apply changes to achieve baseline configurations. Puppet policies can serve as the best way to scale up basic Puppet deployment through ZENworks, so you can configure and manage more hosts per server.
Refer to the following resources to learn more about Puppet policies and how to utilize them:
Puppet Official Web Site (http://www.puppetlabs.com/) Find and share Puppet modules (http://forge.puppetlabs.com/) Additional Modules (http://projects.puppetlabs.com/projects/1/wiki/Puppet_Modules)
Application ManagementYou are not required to organize bundles into different folders, but we recommend that you use a minimal folder structure to divide applications and images. If bundles are organized logically and with granularity, it becomes very easy to create special administrative accounts that only have limited rights to a given folder or set of folders.
Recommendations for Organizing BundlesEvery organization is different and has different requirements for organizing content. The important thing to keep in mind is that you should always organize your content according to how your organization views it. If you do not organize the content and simply put everything into the default folder, it becomes unmanageable within a very short time.
Keeping this in mind, some best practices for organizing your bundle objects include:
Create a root folder for application bundles. Create a root folder for imaging bundles. Create a folder for bundles that you may subscribe to, from other ZENworks zones.
The ZPM folder is an auto-generated folder that contains all ZPM service-related bundles. Although the bundles in this folder can be changed and additional ones created, we recommend that you do not change the folder and the bundles within it.
We recommend that you create folders under the base Bundles folder to group imaging and application bundles together. The following list provides examples of the types of folders that can be created:
Create a folder for software vendors. Create a folder for special applications. Create a folder for base images. Create a folder for add-on images. Create a folder for bundles that you share with other zones.
Categorizing application and imaging bundles into separate folders also allows for administrator roles to be created so you can limit the bundles that an administrator can edit or assign to devices.
50 Design
The important thing is to arrange your content with your company organization in mind. This might be different with each company or site. This information should be gathered during the design phase of the project and detailed in the design document.
For more information, see the ZENworks Software Distribution Reference.
Bundle GroupsIn addition to using folders, it is a good idea to create bundle groups for some applications to make assignments easier. Each group contains a set of bundles that belong together. These groups can be organized for special functions or tasks.
The following are some examples of how you might want to leverage bundle groups to keep things simple:
APPS-Base: Contains all applications needed by all users. Finance-Applications: Contains bundles needed to work with finance applications. Help Desk-Tools: Contains bundles that are related to the Help Desk.
For more information, see the ZENworks 11 SP3 Software Distribution Reference.
Assigning BundlesA major feature in ZENworks is the ability to inherit assignments from multiple places within the system. With this feature, it is very easy to assign a bundle or bundle group to many devices in seconds. You do not need to assign bundles to each device, which saves time and money.
Based on your folder and group design, we recommend that you use folder or group assignments instead of direct assignments. Use these indirect assignments wherever possible to increase speed and reduce administration effort. If you utilize folders and groups for as many of your assignments as possible, you can deliver updates to hundreds of devices when you need to get them there, even immediately.
Best practices on how to leverage folders and groups include the following:
If you have a set of bundles that are required for all devices in a site, use the site folder to assign these bundles or bundle groups.
If you have special bundles that are used in one or more departments, assign these bundles only to the department folders.
If you have bundles that are used by several devices in different folders, set up groups for assignments.
Only use direct assignments if a single device or a small number of devices need special assignments.
For more information, see the ZENworks 11 SP3 Software Distribution Reference.
Design 51
Testing Bundle ChangesMicro Focus’s best practice dictates that a new application or change to an existing application in the environment should use a testing phase that does not affect the production network. To accomplish this there are three approaches that you can take:
Use built-in bundle change management: Beginning with ZENworks 11, any time you make a change to a bundle, the changes are automatically saved to a sandbox. These changes can only be seen by test users or devices that have been flagged by the administrator.
Create a test zone that can be used to test the bundle: This zone will have different devices and different bundles that you can use to test. You can then use the mutlizone content sharing and subscription capabilities to subscribe your production zone to the test zone, allowing you to quickly and easily import test bundles into production.
Create a test zone that can be used to test the bundle, but instead of setting up multizone content sharing and subscription you can manually import and export the bundles between zones as described below. This is useful if you want to store the bundle for offline disaster recovery.
Importing and Exporting BundlesTo import and export bundles manually between zones you can do the following:
To export bundles:
1 From your test zone Primary Server, export the bundle to a specific export directory, by using the following command:zman bundle-export-to-file /bundle_path/bundle_name bundle_filename.xml -cIf the application has no dependencies and is not a Windows MSI bundle, a single bundle_filename.xml is created. If there are dependencies or MSI content to be imported into the Content Repository, two files will be created: bundle_filename.xml and bundle_filename_ActionContentInfo.xml. Additionally, because you used the -c parameter, the actual MSI or other file content associated with the bundle will be exported.For example, you can export the officeXP bundle to officeXP.xml by using the zman bundle-export-to-file officeXP officeXP.xml -c command. The officeXP.xml and officeXP_ActionContentInfo.xml files are created along with a folder containing the content.
2 Copy the entire directory by whatever method of communication is approved from the DEV-ZONE server to the PROD-ZONE server.
3 Create the bundle on the PROD-ZONE ZCM server by using the following command:zman bundle-create new_bundle_name bundle_xml_filename.xml bundlefolder --actioninfo bundle_name_ActionContentInfo.xml (using /bundlefolder/bundlename results in an error because of invalid characters).For example, use the following command to create a bundle called ApplicationX:zman bundle-create OfficeXP officeXP.xml "/Bundles/Microsoft Applications" --actioninfo officeXP_ActionContentInfo.xml
52 Design
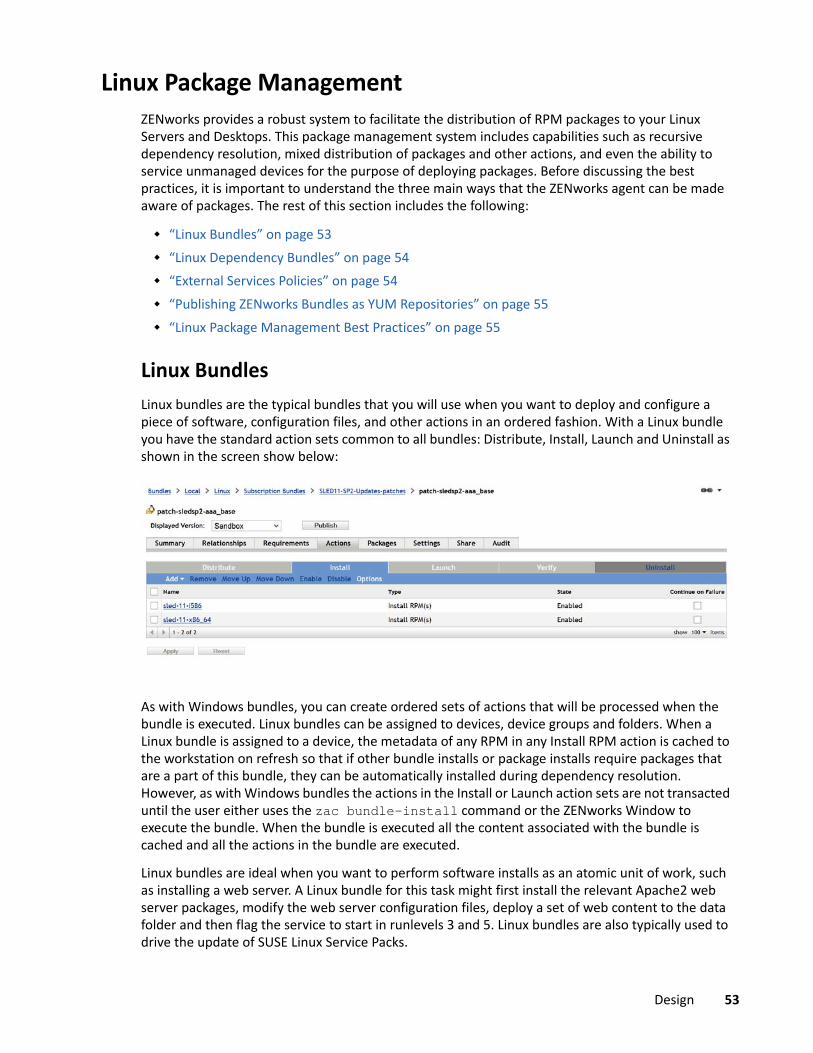
Linux Package ManagementZENworks provides a robust system to facilitate the distribution of RPM packages to your Linux Servers and Desktops. This package management system includes capabilities such as recursive dependency resolution, mixed distribution of packages and other actions, and even the ability to service unmanaged devices for the purpose of deploying packages. Before discussing the best practices, it is important to understand the three main ways that the ZENworks agent can be made aware of packages. The rest of this section includes the following:
“Linux Bundles” on page 53 “Linux Dependency Bundles” on page 54 “External Services Policies” on page 54 “Publishing ZENworks Bundles as YUM Repositories” on page 55 “Linux Package Management Best Practices” on page 55
Linux BundlesLinux bundles are the typical bundles that you will use when you want to deploy and configure a piece of software, configuration files, and other actions in an ordered fashion. With a Linux bundle you have the standard action sets common to all bundles: Distribute, Install, Launch and Uninstall as shown in the screen show below:
As with Windows bundles, you can create ordered sets of actions that will be processed when the bundle is executed. Linux bundles can be assigned to devices, device groups and folders. When a Linux bundle is assigned to a device, the metadata of any RPM in any Install RPM action is cached to the workstation on refresh so that if other bundle installs or package installs require packages that are a part of this bundle, they can be automatically installed during dependency resolution. However, as with Windows bundles the actions in the Install or Launch action sets are not transacted until the user either uses the zac bundle-install command or the ZENworks Window to execute the bundle. When the bundle is executed all the content associated with the bundle is cached and all the actions in the bundle are executed.
Linux bundles are ideal when you want to perform software installs as an atomic unit of work, such as installing a web server. A Linux bundle for this task might first install the relevant Apache2 web server packages, modify the web server configuration files, deploy a set of web content to the data folder and then flag the service to start in runlevels 3 and 5. Linux bundles are also typically used to drive the update of SUSE Linux Service Packs.
Design 53
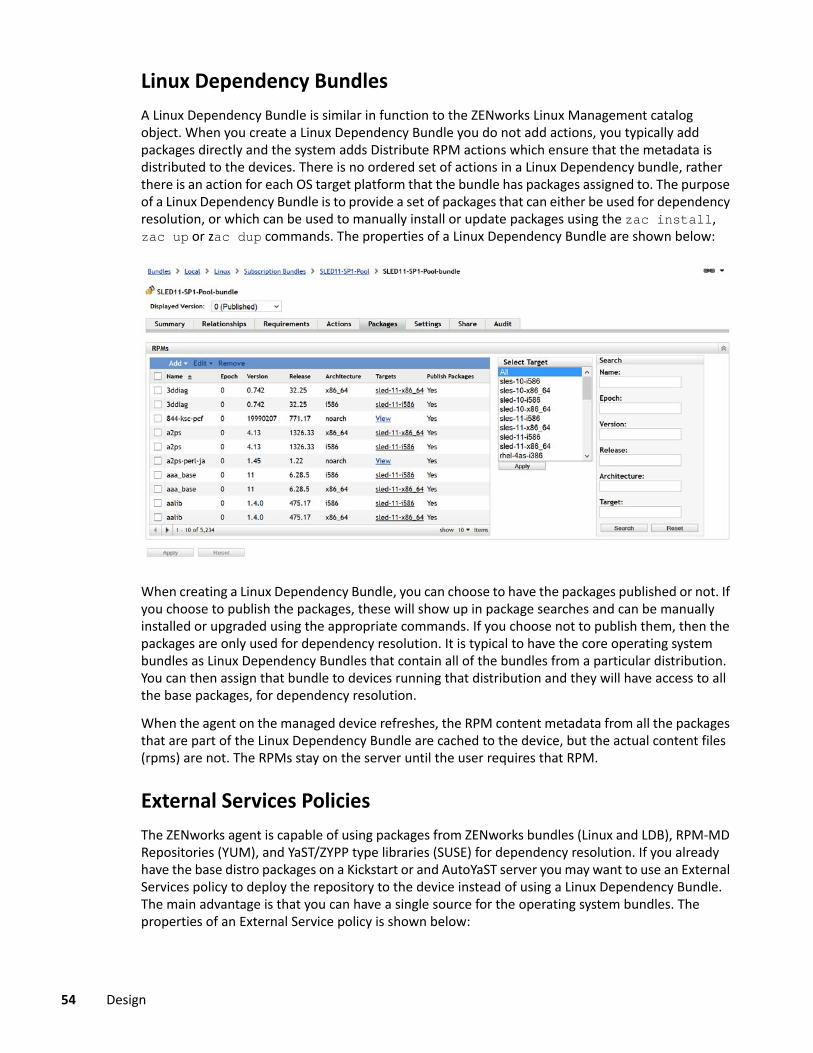
Linux Dependency BundlesA Linux Dependency Bundle is similar in function to the ZENworks Linux Management catalog object. When you create a Linux Dependency Bundle you do not add actions, you typically add packages directly and the system adds Distribute RPM actions which ensure that the metadata is distributed to the devices. There is no ordered set of actions in a Linux Dependency bundle, rather there is an action for each OS target platform that the bundle has packages assigned to. The purpose of a Linux Dependency Bundle is to provide a set of packages that can either be used for dependency resolution, or which can be used to manually install or update packages using the zac install, zac up or zac dup commands. The properties of a Linux Dependency Bundle are shown below:
When creating a Linux Dependency Bundle, you can choose to have the packages published or not. If you choose to publish the packages, these will show up in package searches and can be manually installed or upgraded using the appropriate commands. If you choose not to publish them, then the packages are only used for dependency resolution. It is typical to have the core operating system bundles as Linux Dependency Bundles that contain all of the bundles from a particular distribution. You can then assign that bundle to devices running that distribution and they will have access to all the base packages, for dependency resolution.
When the agent on the managed device refreshes, the RPM content metadata from all the packages that are part of the Linux Dependency Bundle are cached to the device, but the actual content files (rpms) are not. The RPMs stay on the server until the user requires that RPM.
External Services PoliciesThe ZENworks agent is capable of using packages from ZENworks bundles (Linux and LDB), RPM-MD Repositories (YUM), and YaST/ZYPP type libraries (SUSE) for dependency resolution. If you already have the base distro packages on a Kickstart or and AutoYaST server you may want to use an External Services policy to deploy the repository to the device instead of using a Linux Dependency Bundle. The main advantage is that you can have a single source for the operating system bundles. The properties of an External Service policy is shown below:
54 Design
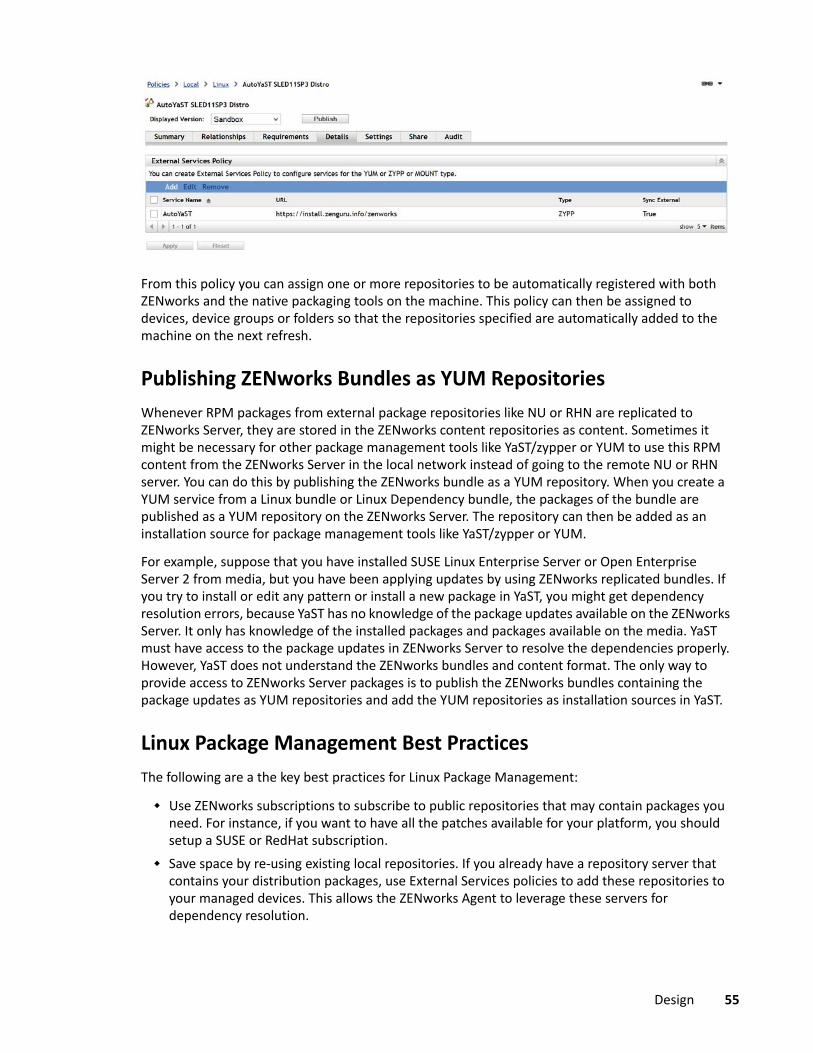
From this policy you can assign one or more repositories to be automatically registered with both ZENworks and the native packaging tools on the machine. This policy can then be assigned to devices, device groups or folders so that the repositories specified are automatically added to the machine on the next refresh.
Publishing ZENworks Bundles as YUM RepositoriesWhenever RPM packages from external package repositories like NU or RHN are replicated to ZENworks Server, they are stored in the ZENworks content repositories as content. Sometimes it might be necessary for other package management tools like YaST/zypper or YUM to use this RPM content from the ZENworks Server in the local network instead of going to the remote NU or RHN server. You can do this by publishing the ZENworks bundle as a YUM repository. When you create a YUM service from a Linux bundle or Linux Dependency bundle, the packages of the bundle are published as a YUM repository on the ZENworks Server. The repository can then be added as an installation source for package management tools like YaST/zypper or YUM.
For example, suppose that you have installed SUSE Linux Enterprise Server or Open Enterprise Server 2 from media, but you have been applying updates by using ZENworks replicated bundles. If you try to install or edit any pattern or install a new package in YaST, you might get dependency resolution errors, because YaST has no knowledge of the package updates available on the ZENworks Server. It only has knowledge of the installed packages and packages available on the media. YaST must have access to the package updates in ZENworks Server to resolve the dependencies properly. However, YaST does not understand the ZENworks bundles and content format. The only way to provide access to ZENworks Server packages is to publish the ZENworks bundles containing the package updates as YUM repositories and add the YUM repositories as installation sources in YaST.
Linux Package Management Best PracticesThe following are a the key best practices for Linux Package Management:
Use ZENworks subscriptions to subscribe to public repositories that may contain packages you need. For instance, if you want to have all the patches available for your platform, you should setup a SUSE or RedHat subscription.
Save space by re-using existing local repositories. If you already have a repository server that contains your distribution packages, use External Services policies to add these repositories to your managed devices. This allows the ZENworks Agent to leverage these servers for dependency resolution.
Design 55
Use the option to create YUM repositories from a bundle or bundle group to allow a ZENworks server to act as a repository for unmanaged devices.
Use Linux Dependency Bundles if you want the user or dependency resolution to install packages.
Use Linux Bundles if you want ZENworks to install packages. Use Linux Bundles if you need to do additional work above, beyond the package transaction. Make sure that your Linux servers’ have a nearby content server as the Content servers are used
to download all the RPM metadata and the actual RPMs themselves.
Content ManagementThe content in this guide is data that has been uploaded to the ZENworks zone for distribution to a managed endpoint. After the content is uploaded, it may be compressed and encrypted and then distributed to other Primary Servers and Satellite Content Servers in the zone. The ZENworks content repository is accessed by managed devices, by using HTTP, a firewall-friendly protocol, allowing content to be provisioned to devices in any location, even outside the corporate firewall.
A few examples of content include Windows Bundles, Patch Remediation data in ZENworks Patch Management, and ZENworks System Update content. After the content resides centrally on the Primary Servers of the zone, the next stage is to define which content belongs at which Satellite Server location and how to send the content to that location.
This section covers the following topics:
“Content Delivery Mechanisms” on page 56 “Defining the “What” in Content Management” on page 59 “Organizing Bundles” on page 61 “Defining the “How” in Content Management” on page 62 “Critical Information Required To Determine Content Synchronization Settings” on page 63 “Offline Content Replication and Management” on page 64
Content Delivery MechanismsZENworks provides a number of different methods for distributing content to managed devices. This allows you to use the method(s) that are appropriate for your environment and management goals. The supported delivery methods include:
“ZENworks Content Repository (Tomcat via HTTP)” on page 57 “ZENworks Content Repository (via CIFS)” on page 57 “Proxy Distribution of Content in ZENworks Content Repository via HTTP” on page 58 “Network File Servers (CIFS, NCP, or other supported servers)” on page 59 “Micro Focus Recommendations for Bundle Content Delivery” on page 59
56 Design
ZENworks Content Repository (Tomcat via HTTP)ZENworks provides an integrated content repository for being able to deliver application, update and policy content to managed devices via the firewall-friendly HTTP protocol. When you use this method to distribute bundle content you receive the following benefits:
ZENworks controls the replication of content to the various Satellite devices and Primary Servers that exist within the Management Zone.
By default, data is encrypted within Tomcat, so anyone with file access to the server will not be able to access applications. When you upload content to a bundle you can select whether the content should be encrypted and compressed or not.
HTTP is used to deliver content, rather than SSL, so there is no overhead to re-encrypt the content for transmission.
Access to data is based upon the relationships defined within ZENworks. If you are not a target device or user of ZENworks you have no access to application, image, or policy data.
Because the ZENworks Content Repository is a replicated content repository, and because devices receive a list of closest servers, this method offers built-in fault tolerance and load balancing capabilities across servers to deploy the content.
This is a firewall-friendly solution. It is very easy to allow DMZ access to content for remote, Internet-based devices, without cumbersome configuration changes on routers, switches, and firewalls.
Drawbacks related to using the ZENworks content repository include:
The ZENworks server becomes less scalable because it is serving more HTTP requests from managed devices. Most ZENworks servers are capable of serving between 200-1000 http requests simultaneously, based on the configuration of the server.
It can take some time before an application has finished encrypting and injecting its data into the Web server.
You need to know where the content needs to be available, so that the appropriate Primary Servers and Satellite Servers can have the content included.
ZENworks Content Repository (via CIFS)Versions of ZENworks after 10.3 allow the ZENworks agent to leverage a CIFS share path as its primary content repository source. When this is configured in the network environment or location that the device is at, it will first attempt to retrieve the encrypted and compressed content from the URL specified. This allows you to offload the content distribution from the Tomcat HTTP stack. In this case, you are still using the ZENworks content repository, you are simply making that repository available via CIFS. The benefits of this are:
ZENworks controls the replication of content to the various Satellite devices and Primary Servers that exist within the Management Zone.
By default, data is encrypted within Tomcat, so anyone with file access to the server will not be able to access applications. When you upload content to a bundle you can select whether the content should be encrypted and compressed or not.
Design 57
CIFS is used as a protocol to distribute the content to the agent. This means that the Tomcat server can continue to serve HTTP/HTTPS requests while the CIFS modules on the server serves up the content.
Access to data is based on the relationships defined within ZENworks. If you are not a target device or user of ZENworks you have no access to application, image, or policy data.
This method has the following drawbacks:
Because CIFS is typically not opened on the firewall, this method is not useful for distributing content to devices outside of the corporate firewall. However, this can be addressed by not specifying a CIFS share for locations or network environments that indicate the device is outside the firewall.
Only a single CIFS share can be specified for a given location, failback is always to a HTTP server. You must manually share the content repository and ensure that it is publicly accessible.
Proxy Distribution of Content in ZENworks Content Repository via HTTPZENworks 11.2.3a or higher provides the ability to have network environment or location-specific HTTP proxies defined. This opens up yet another method for deploying content to the device. With this method you could place an HTTP proxy server on the agent’s local network and then all the content calls will be sent to the Proxy Server first. Content can then be requested from the closest servers that have the content and cached by the HTTP proxy. This option is typically used in conjunction with the ZENworks Content Repository via the HTTP method. Many times you may have the proxy and the Satellite installed on the same machine. This way if the Satellite can answer the request, it will, and if not, the proxy server will and can cache the content. This is useful if you do not know what content needs to be available at a site and want is to be delivered in a more on-demand fashion.
The benefits of this distribution method include the following:
For content that you know needs to be on the local site, you can pre-replicate the content through normal Satellite replication means.
For content that you do not know needs to be on the site, but which might be required by a user, you can simply ensure that the content is available on some server in the agent’s closest server list. If the content is needed it will be requested on the WAN the first time, but then cached by the HTTP proxy for subsequent requests.
This method is firewall friendly as it utilizes the standard HTTP port.
The drawbacks of this distribution method include the following:
You will need to manage the HTTP Proxy server independently from ZENworks. Not all content that the agent uses will be directly on the local satellite, only the pre-cached
content will be on the local satellite.
58 Design
Network File Servers (CIFS, NCP, or other supported servers)ZENworks can also leverage files that are stored on other network servers such as Novell NetWare servers, Novell Open Enterprise Server servers, Microsoft Windows servers, WebDAV servers, or other servers for which a Windows file system provider exists. Strictly speaking, this is not content as defined throughout the rest of this section. This option provides the following benefits:
Uses the existing infrastructure. Less overhead is required on the ZENworks server.
While this does have some advantages, it also has the following disadvantages:
ZENworks has no control over the distribution of application content. The replication of content must be managed outside ZENworks with products such as ZENworks Server Management or rSync.
ZENworks has no control over who has access to the data. Application content is not encrypted and can potentially be installed by anyone with access to
the server. This is not a firewall-friendly solution. Access from outside the firewall requires VPN access in
order to deliver applications.
Micro Focus Recommendations for Bundle Content DeliveryThe mechanism you decide to use for delivering your content depends on your objectives. However the following general rules apply:
Use the ZENworks Content Repository unless you have a good reason not to. This provides the best way to manage content that needs to be delivered by ZENworks.
Use CIFS or Network options to offload the Tomcat instance on the Primary Server if want your Primary Server to scale to more clients.
Ensure that you mark any sensitive content that you upload in a bundle as Encrypted, Compressed so that the content can only be read by designated clients.
Use HTTP Proxy servers if it makes sense in your environment. ZENworks 11.2.3a and later provide an option to have Satellite Servers replicate their content
from other servers defined in their closest server rules, make sure you leverage this if your organization’s network layout makes it more efficient to do so.
Properly tune the Primary Servers that will serve content requests as discussed in “Tuning the ZENworks Primary Servers” on page 87.
Defining the “What” in Content ManagementAn important improvement in Content Management is the ability to define content replication at the bundle-folder level. This ability provides several advantages over previous releases of ZENworks because it allows groups of applications or patches to be sent to sites with a few mouse clicks.
To define the Satellite devices to which the content located in the folder should be replicated, click the Details hyperlink of any bundle folder and click the Settings tab. If bundles are subsequently created in the folder, the content synchronization rules of the bundle folder are automatically applied.
Design 59
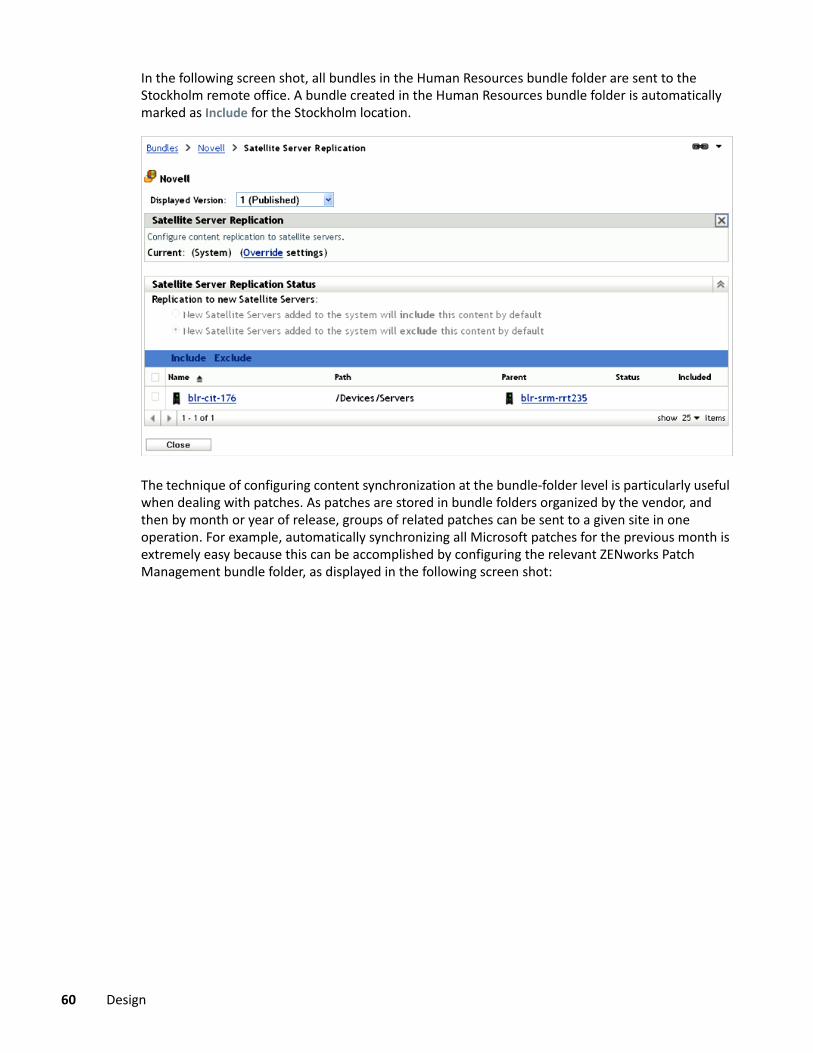
In the following screen shot, all bundles in the Human Resources bundle folder are sent to the Stockholm remote office. A bundle created in the Human Resources bundle folder is automatically marked as Include for the Stockholm location.
The technique of configuring content synchronization at the bundle-folder level is particularly useful when dealing with patches. As patches are stored in bundle folders organized by the vendor, and then by month or year of release, groups of related patches can be sent to a given site in one operation. For example, automatically synchronizing all Microsoft patches for the previous month is extremely easy because this can be accomplished by configuring the relevant ZENworks Patch Management bundle folder, as displayed in the following screen shot:
60 Design
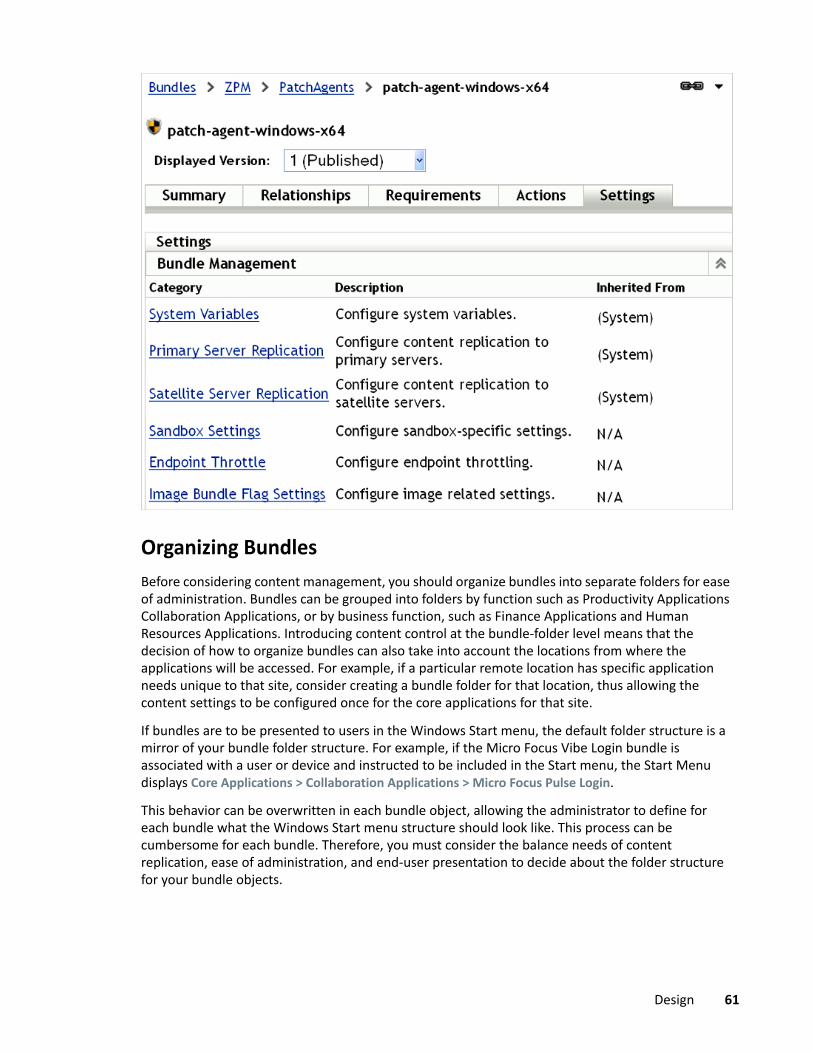
Organizing BundlesBefore considering content management, you should organize bundles into separate folders for ease of administration. Bundles can be grouped into folders by function such as Productivity Applications Collaboration Applications, or by business function, such as Finance Applications and Human Resources Applications. Introducing content control at the bundle-folder level means that the decision of how to organize bundles can also take into account the locations from where the applications will be accessed. For example, if a particular remote location has specific application needs unique to that site, consider creating a bundle folder for that location, thus allowing the content settings to be configured once for the core applications for that site.
If bundles are to be presented to users in the Windows Start menu, the default folder structure is a mirror of your bundle folder structure. For example, if the Micro Focus Vibe Login bundle is associated with a user or device and instructed to be included in the Start menu, the Start Menu displays Core Applications > Collaboration Applications > Micro Focus Pulse Login.
This behavior can be overwritten in each bundle object, allowing the administrator to define for each bundle what the Windows Start menu structure should look like. This process can be cumbersome for each bundle. Therefore, you must consider the balance needs of content replication, ease of administration, and end-user presentation to decide about the folder structure for your bundle objects.
Design 61

Defining the “How” in Content ManagementZENworks 11 contains power mechanisms for granular control over content that should be hosted at specific locations. When you distribute content to Satellite locations, the concept of creating a window of opportunity for synchronization becomes very important. A window of opportunity involves defining the amount of time and the amount of bandwidth available to transfer a particular piece of content. In the versions of ZENworks prior to ZENworks 10 SP3, all content was treated the same way. However, in ZENworks 11, several content types are exposed in ZENworks Control Center. The list of content types have been expanded since version 10 SP3.
The following figure highlights the specific content types that you can configure in ZENworks 11.
After you have defined what content should be available, the next stage is to define how and when it gets to the defined locations. For each content type, the administrator can specify the window of opportunity for synchronization, the recurrence period, and the bandwidth to be consumed during these operations. Administrators can now ensure that other services at remote sites are not affected by content delivery. If the window of opportunity and throttled bandwidth rate is not sufficient to completely synchronize all content, the process resumes from where it stopped when the window of opportunity opens again.
The following screen shot shows that Critical Security Patches have the opportunity to synchronize every 4 hours for up to 2 hours, consuming only 300 KB/s during the transfer.
62 Design
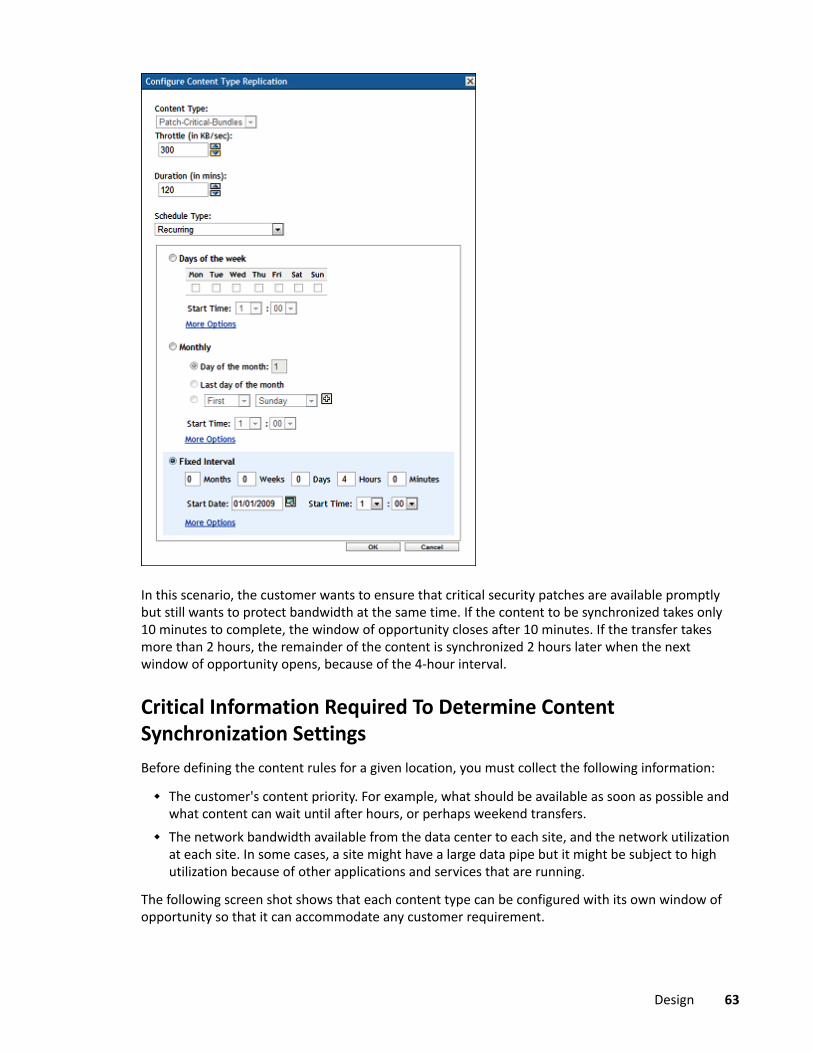
In this scenario, the customer wants to ensure that critical security patches are available promptly but still wants to protect bandwidth at the same time. If the content to be synchronized takes only 10 minutes to complete, the window of opportunity closes after 10 minutes. If the transfer takes more than 2 hours, the remainder of the content is synchronized 2 hours later when the next window of opportunity opens, because of the 4-hour interval.
Critical Information Required To Determine Content Synchronization SettingsBefore defining the content rules for a given location, you must collect the following information:
The customer's content priority. For example, what should be available as soon as possible and what content can wait until after hours, or perhaps weekend transfers.
The network bandwidth available from the data center to each site, and the network utilization at each site. In some cases, a site might have a large data pipe but it might be subject to high utilization because of other applications and services that are running.
The following screen shot shows that each content type can be configured with its own window of opportunity so that it can accommodate any customer requirement.
Design 63
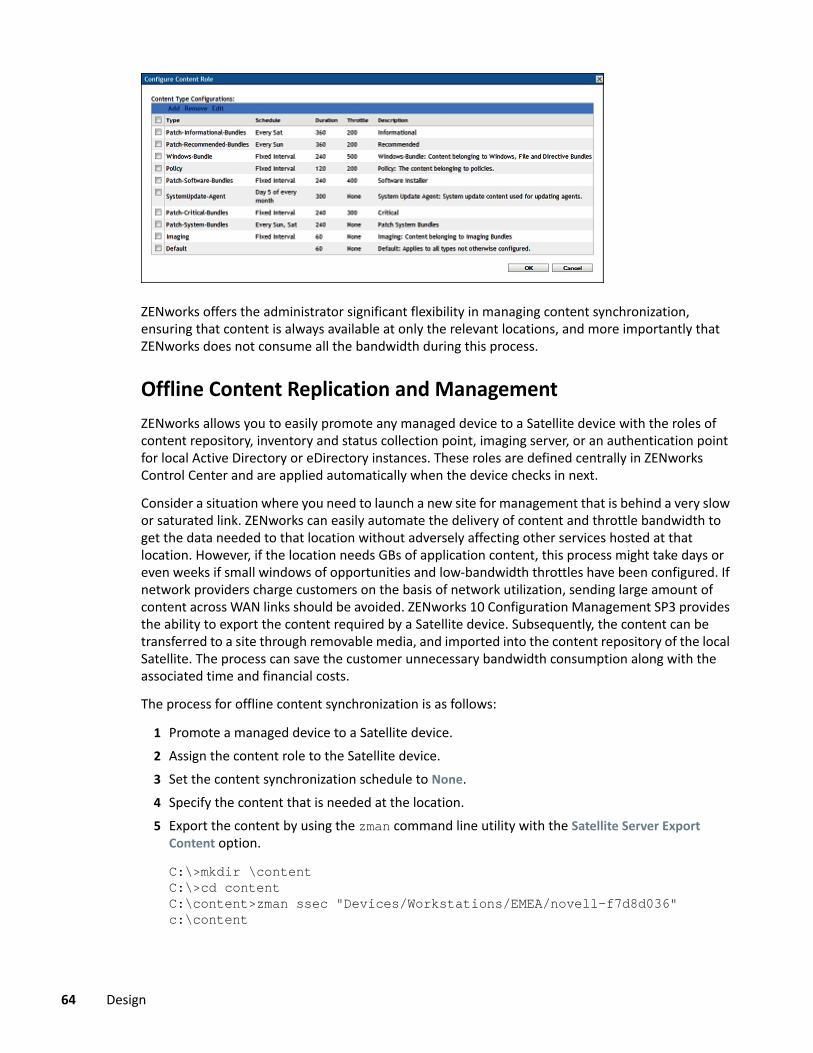
ZENworks offers the administrator significant flexibility in managing content synchronization, ensuring that content is always available at only the relevant locations, and more importantly that ZENworks does not consume all the bandwidth during this process.
Offline Content Replication and ManagementZENworks allows you to easily promote any managed device to a Satellite device with the roles of content repository, inventory and status collection point, imaging server, or an authentication point for local Active Directory or eDirectory instances. These roles are defined centrally in ZENworks Control Center and are applied automatically when the device checks in next.
Consider a situation where you need to launch a new site for management that is behind a very slow or saturated link. ZENworks can easily automate the delivery of content and throttle bandwidth to get the data needed to that location without adversely affecting other services hosted at that location. However, if the location needs GBs of application content, this process might take days or even weeks if small windows of opportunities and low-bandwidth throttles have been configured. If network providers charge customers on the basis of network utilization, sending large amount of content across WAN links should be avoided. ZENworks 10 Configuration Management SP3 provides the ability to export the content required by a Satellite device. Subsequently, the content can be transferred to a site through removable media, and imported into the content repository of the local Satellite. The process can save the customer unnecessary bandwidth consumption along with the associated time and financial costs.
The process for offline content synchronization is as follows:
1 Promote a managed device to a Satellite device.2 Assign the content role to the Satellite device.3 Set the content synchronization schedule to None.4 Specify the content that is needed at the location.5 Export the content by using the zman command line utility with the Satellite Server Export
Content option.
C:\>mkdir \content C:\>cd content C:\content>zman ssec "Devices/Workstations/EMEA/novell-f7d8d036" c:\content
64 Design
The command looks up the content that is marked as Include for a given Satellite that is currently not available, and exports the content to the defined location. If this is a new site, Step 3 and Step 4 ensure that this is all the required content to launch the site.
6 Copy the content to a removable media and send it to the remote location.7 After the data is available at the remote site, import it by using the zac command line utility
with the Content Import option.
C:\>zac cic c:\tools\content -l:c:\content.log Importing 125 items for content type Default...Imported 125 items.Successfully imported content (125 items).
8 After the content has been successfully imported, configure the content schedule and bandwidth throttling as is required for the site.
After this process is complete, setting the content synchronization schedule instructs ZENworks to ensure all subsequent delta changes are automatically synchronized.
ImagingWe highly recommend that you adopt a methodology for creating and delivering Universal Images to your devices. A Universal Image is a single image of the Windows XP, Windows Vista, Windows 7, or Windows 8 operating systems that can be deployed to multiple hardware devices. After you have established the Universal Images, you can deliver core applications and line-of-business applications as add-on images during the imaging process. This method can be further extended to provide hardware-specific drivers during the imaging process. Tools such as ENGL's Imaging Toolkit for ZENworks can be used to make the process of creating a Universal Image very easy to manage.
General RecommendationsThe following general recommendations should be followed for imaging devices with ZENworks:
When you have one master image for different hardware (hardware-independent imaging), configure the systems with sysprep auto-answer file configured to install the necessary drivers for all target hardware before taking the image of the system. Non-sysprep images are not hardware independent.
Servers that use Advanced Format (AF) or SSD drives for storing images result in better Imaging performance.
The BIOS Hard Drive settings (SATA operations) should be in the same mode for both the base and the restored machine.
Run the chkdsk /f command on the base machine, and make sure that there are no issues reported before taking an image.
Run the zac fsg -d and zac cc commands before taking an image of a managed device.
Design 65
ZENworks Imaging RecommendationsWhen using the Linux-based ZENworks imaging solution, you should follow these recommendations:
If you are using the Tuxera high-performance driver, you should re-upload the tntfs driver file after each ZCM system update or major upgrade.
During an imaging operation, in the distro mode, do not access the partition mount points under the /mnt directory.
If an NTFS partition is created using the legacy driver, run the following command to make the partition usable:# mkntfs -f /dev/sdXnwhere sdXn is the Device name of the partition as shown by img p.
While taking a local image, store the image in a mounted partition. Do not disable the Disk cache setting. This setting is persistent across multiple boots and may
affect the Imaging performance adversely.
Third-Party Imaging RecommendationsThe third-party imaging capabilities of ZENworks allow you to use the ZENworks bundle assignment system and preboot services components to drive imaging operations performed by the Microsoft ImageX tool or Symantec Ghost. When using third-party imaging, you should follow these recommendations:
To support third-party imaging for all types of client architectures (x86_BIOS, x64_BIOS, X64_UEFI), upload both WAIK32/WADK32 and WADK64.
Do not upload 32-bit and 64-bit WADK & imagex during the same upload instance. Ensure that WADK32 is uploaded before performing third-party imaging operations on
Windows 8 machines. Re-upload the third-party tools when you move to a newer version of ZCM. Ensure that all the third-party PXE clients should able to connect to the Windows or Samba
share. Before you perform a third-party imaging check, the status of the imagex.exe or ghost.exe
and WAIK or WADK in Preboot Services snapshot. They should be available. Ensure that the uploaded imagex.exe or ghost.exe is compatible with the uploaded WAIK
or WADK.
66 Design
Recommendations for Imaging UEFI DevicesNewer machines use the Unified Extensible Firmware Interface (UEFI) instead of the traditional BIOS mode when booting. These devices can be imaged by ZENworks 11.2.4 or higher, but you should be aware of the following recommendations:
A BIOS device should be PXE booted in BIOS mode and a UEFI device in UEFI mode. Imaging writes to the ISD as per the boot mode in which a device PXE boots. Cross-boot may lead to corruption of the GPT Partition Table.
Configure the IPv4 Network stack to enable it on the UEFI machine before trying a PXE boot operation.
Recommendations for Replication of TFTP Imaging ContentThe contents of the TFTP folder can be replicated. This allows you to ensure that all your imaging servers are using a consistent set of boot files. At this time it is not possible to replicate ZENworks images through normal content replication as the image files are not linked as content. We anticipate this will change in a future release of ZENworks. You should follow these recommendations when replicating TFTP and third-party imaging content:
Before the TFTP replication, ensure that all Primary and imaging Satellite Servers are on the same ZENworks version.
Ensure that the imaging Satellite Servers are not in the excluded list of content replication (if excluded, third-party contents will not replicate).
To prevent the TFTP replication failure, ensure that the tftp folder does not contain files or folder names with unsupported special characters.
Configure the replication schedule for imaging Satellite Servers while promoting the Satellites.
AntimalwareZENworks Endpoint Security Antimalware is a capability available in the ZENworks Endpoint Security Management product. The following sections provide information you should understand and consider as you design your Antimalware implementation:
“Antimalware Agent” on page 67 “Ondemand Content System” on page 70 “Antimalware Database” on page 74 “Antimalware Event Processing” on page 75
Antimalware AgentThe Antimalware Agent, or scan engine, detects malware threats on a device and remediates those threats. There are decisions you need to make related to the installation, update, re-registration, and uninstall workflows.
“Incompatibility with other Security Software” on page 68 “Installation” on page 68
Design 67
“Update” on page 69 “Uninstall” on page 69 “Unregistration/Reregistration” on page 70
Incompatibility with other Security SoftwareThe Antimalware Agent is not compatible with other antimalware or antivirus security software. Running the ZENworks Antimalware Agent simultaneously with other security software on an endpoint device may affect their operation and cause problems with the system.
Best practice would be to ensure that no other antimalware/antivirus solution is on the endpoint before installing the Antimalware Agent. To assist with this, the Antimalware Agent does the following during installation:
On Windows 10, checks to see if another antimalware/antivirus solution is registered with Windows Security for virus and threat protection. If so, the installation fails and an error is returned to ZENworks Control Center.
On Windows Server (all supported versions), no check is made. With servers, the expectation is that you have complete control over what is running and can ensure that no other antimalware/antivirus solution is installed.
On all endpoints, Windows Defender is disabled during installation.
InstallationThe Antimalware Agent installation package is approximately 750 MB. By default, the agent is downloaded and installed on a device during enforcement of the Antimalware Enforcement policy. Download and installation is done at enforcement time to make it easy to set up Antimalware in a small ZENworks zone or a test zone environment.
In a production zone with a large number of devices, you should download and install the agent during policy enforcement. This can cause issues with both the ZENworks server and network bandwidth consumption. Instead, you should use a scheduled installation using one of the following best practices:
Antimalware Agent Installation Schedule: You can modify the agent installation schedule for device folders or individual devices to randomize the download and installation time. The agent installation schedule allows for both daily and monthly schedules with start and end times that provide randomization within the installation window. For example, you could choose to install the agent on a specific day between set start and end times (for example, Tuesday between 9:00 am and 6:00 pm). By using a start and end time, the agent installation is randomized across the target devices during the designated installation period. For instructions, see Security Settings in the ZENworks Management Zone Settings Reference.
Staged Policy Rollout: Rather than assign the Antimalware Enforcement policy to all devices at one time, assign the policy to smaller, targeted device groups to stage the rollout of the Antimalware Agent. For example, rather than assign the policy to the Windows 10 Workstations dynamic group that includes all Windows 10 workstations, create smaller device groups based on logical groupings such as organizations or departments and stage the rollout to those groups. Or use existing device folder structures to accomplish the same purpose.
68 Design
ZENworks servers are configured to use one-third (1/3) of their Tomcat thread count for content download. The default thread count is 1000, which means that approximately 350 devices could successfully download the agent from one server at one time. This is an approximation and could vary depending on server hardware and network performance. For information about tuning the maximum number of Tomcat threads used, see “Maximum HTTPS Tomcat Threads” on page 88.
UpdateThe Antimalware Agent performs two types of updates:
Agent Updates: This updates the scan engine and related Antimalware Agent files. The default schedule causes the Antimalware Agent to check for agent updates every four hours. This ensures that the agent receives an update shortly after it is released. Increasing the schedule interval can reduce network traffic, but Micro Focus recommends that you not increase the interval beyond a week.
Be aware that increasing the agent update intervals does affect how quickly the Antimalware Agent is updated after initial installation. If you want to increase the schedule but have the Antimalware Agent still update after installation, you can use the Update Antimalware Agent quick task in ZENworks Control Center to force updates after the agent installation is complete.
For instructions about how to change the agent update schedule, see Antimalware Agent Schedules in the ZENworks Endpoint Security Antimalware Reference.
Malware Signature Updates: This updates the Antimalware Agent’s database of known malware signatures. The default schedule causes the agent to check for signature updates every hour. Because signature updates can occur multiple times per day, Micro Focus recommends that you not increase this interval beyond a daily check (i.e, every 24 hours).Because malware signature updates are more critical than agent updates, a signature update is performed immediately after the agent installation is complete.For instructions about how to change the malware signature update schedule, see Antimalware Agent Schedules in the ZENworks Endpoint Security Antimalware Reference.
UninstallThe Antimalware Agent is automatically uninstalled when the following occurs:
ZENworks Agent Uninstalled: When the ZENworks Agent is removed from a device, the Antimalware Agent is also removed.
Antimalware Enforcement Policy Unassigned: When the Antimalware Enforcement policy is unassigned from a device and the device receives the assignment change during the next ZENworks Agent refresh, the Antimalware Agent is uninstalled from the device. The uninstall is delayed 10 minutes to ensure that the assignment removal was intentional.You can use the ZAV.UninstallWindow system variable in ZENworks Control Center to increase the uninstall delay at the zone level for all devices (Configuration > Management Zone Settings > Device Management > System Variables), at the device folder (folder > Settings > Device Management > System Variables), or the device (device > Settings > Device Management > System Variables). For example, ZAV.UninstallWindow with a value of 60 increases the delay to one hour.
Design 69
The zac malware-remove-agent (mr) command can also be used on a device to uninstall the Antimalware Agent. The command requires ZENworks administrator credentials. In addition, if the Antimalware Enforcement policy is also not removed from the device, the Antimalware Agent will be reinstalled at the next refresh to comply with the policy.
Unregistration/ReregistrationThe Antimalware Agent remains installed when a device is unregistered from its ZENworks management zone.
If the device is registered to a new zone or reregistered with its old zone, one of the following occurs:
If the device has an Antimalware Enforcement policy assignment in the zone, the Antimalware Agent remains installed.
If the device does not have an Antimalware Enforcement policy assignment, the Antimalware Agent is removed after the 10 minute delay.
If a device is unregistered and will not be reregistered, the zac malware-remove-agent (mr) command can be used to uninstall the Antimalware Agent. The command requires ZENworks administrator credentials.
Ondemand Content SystemAntimalware content consists of malware signature updates and Antimalware Agent updates. Unlike other ZENworks content, Antimalware content is pulled “ondemand” through the ZENworks system of Content Servers (Primaries and Satellites).
The Antimalware Agent initiates requests for content and each request moves upstream through the Content Server channels until the request can be fulfilled by a Content Server. Unfulfilled requests continue upstream until they reach a Primary Server functioning as an Ondemand Content Master. If the Ondemand Content Master does not have the requested content, it contacts the external Antimalware cloud service to request the content.
70 Design

There are decisions you need to make regarding your Ondemand Content flow to ensure best performance within your network environment:
“Ondemand Content Masters” on page 72 “Content Server Requirements” on page 72 “Ondemand Content Settings” on page 73 “Closest Server Rules” on page 73 “External User Support” on page 74
Design 71
Ondemand Content MastersOndemand Content Masters (OCMs) are the ZENworks Primary Servers assigned to request Antimalware content from the external Antimalware cloud service. During initial Antimalware configuration, one Primary Server is designated as the Antimalware Server to perform Antimalware-related maintenance tasks for system. By default, this Antimalware Server is also designated as an OCM.
You can have a single OCM or multiple OCMs depending on bandwidth and geographic needs. Not all Primary Servers must be OCMs. Any Primary Server that is not an OCM will contact an OCM when it does not already have the requested content.
OCM RequirementsAn Ondemand Content Master must:
Have firewall access to the following external Antimalware cloud service URL:
https://microfocus-2dcb60a8-26c9-4560-9cc2-34a16ea5f6e6.2d7dd.cdn.bitdefender.net
If a proxy server is required for external access, the ODCExternalConfig.json file on the OCM must be configured with the proxy server details. For instructions, see Ondemand Content Master - Requirements in the ZENworks Ondemand Content Reference.
Have at least 10 GB of free disk space. By default, an OCM is configured to: Use a maximum of 1000 GB of disk space Not use the last 4 GB of free disk space Clean up unused content after 30 days
If the OCM has less than 4 GB of free disk space when it tries to cache requested content, it will delete older cached content to make room for the new content. If there is no cached content to delete, content requests will fail because it will not use the last 4 GB of free disk space. Therefore, Micro Focus recommends a minimum of 10 GB of free disk space. The maximum cache size, minimum disk space, and content retention period are all configurable. For configuration instructions see Ondemand Content Configuration in the ZENworks Ondemand Content Reference.
Content Server RequirementsEvery Content Server (Primary Server or Satellite Content Server) can serve ondemand content. To do so, a Content Server must:
Have at least 10 GB of free disk space. By default, a Content Server is configured to: Use a maximum of 1000 GB of disk space for ondemand content Not use the last 4 GB of free disk space for ondemand content Clean up unused ondemand content after 30 days
If a Content Server has less than 4 GB of free disk space when it tries to cache requested content, it will delete older cached content to make room for the new content. If there is no cached content to delete, content requests will fail because it will not use the last 4 GB of free disk space. Therefore, Micro Focus recommends a minimum of 10 GB of free disk space. The
72 Design
maximum cache size, minimum disk space, and content retention period are all configurable. For configuration instructions see Ondemand Content Configuration in the ZENworks Ondemand Content Reference.
Use SSL. Primary Servers automatically use SSL for content. However, Satellite Content Servers do not use SSL by default for content and must be enabled. For instructions, see Content Role in the ZENworks Primary Server and Satellite Reference.
Ondemand Content SettingsBy default, all Content Servers (Primary Servers, Satellites, and OCMs) have the following Ondemand Content settings:
Schedule and Throttling: Content can be downloaded from an upstream source at any time without any bandwidth restrictions.
Maximum Cache Size: The Content Server can use up to 1000 GB of disk space for ondemand content.
Minimum Free Disk Space: The Content Server will not use the last 4 remaining GB of disk space.
Content Retention: The Content Server cleans up unused ondemand content after 30 days. Cached File Time to Live (TTL): There are two types of files with different times to live. Micro
Focus recommends not modifying the settings unless you are experiencing bandwidth issues. Increasing the TTL will reduce bandwidth usage but can result in stale, outdated content. Antimalware Metadata: These files represent the types of Antimalware content - malware
signature updates and agent updates. The default TTL is 10 minutes, which means that when a request comes in for an update, if the metadata files are older than 10 minutes (i.e. they are stale) then the Content Server requests new update content from its upstream sources.
Antimalware Content: These files are the actual update content referenced by the metadata. The default TTL is 7 days.
For information about changing the Ondemand Content settings, see Ondemand Content Configuration in the ZENworks Ondemand Content Reference.
Closest Server RulesThe Ondemand Content system uses the Closest Server rules and Ondemand Content Master configuration to determine the routing of ondemand content requests:
Managed Devices: When a managed device’s Antimalware Agent requests a malware signature update or an agent update, its closest Content Server list is used. The agent contacts the first Content Server in the list and works down the list until it makes a successful connection. Because Ondemand Content requests require an SSL connection, any Satellite Content Server that is not enabled for SSL is ignored. Therefore, Micro Focus recommends that you either ensure that at least one Satellite in the closest Content Server list is configured for SSL or the list includes at least one Primary Server.
Design 73
Satellite Content Server: When a Satellite Content Server receives a request that it cannot fulfill, it uses its closest Content Server list to determine its upstream source. As with managed devices, if a Satellite’s closest Content Servers list includes other Satellite Content Servers, you need to have enabled at least one of those Satellites for SSL or ensure that the list includes at least one Primary Server.
Primary Servers: Primary Servers require no special consideration or configuration. They are already enabled for SSL, each Primary Server knows the Ondemand Content Masters to contact if they can’t fulfill a request, and each Primary Server can contact all other Primary Servers.
External User SupportThe Antimalware Agent must be able to contact a ZENworks Content Server in order to request and receive malware signature updates and agent updates. To support users who are external to your network, you have the following options:
DMZ Primary Server: Place a Primary Server in the DMZ and configure devices to use it as their Content Server when they are not on your internal network. Micro Focus recommends that you make the DMZ Primary Server an Ondemand Content Master so that it can fetch content directly from the external Antimalware content source; this removes hops in the content request process and reduces traffic from the DMZ Primary Server to internal OCMs. However, this is not a requirement provided the DMZ Primary Server has access to an internal OCM. For best practices for configuring Primary Servers in a DMZ, see Chapter 21, “ZENworks DMZ Server,” on page 243.
VPN: Have managed devices connect via VPN. This is only recommended if you can ensure regulare VPN connections during scheduled update request times. Otherwise updates will fail and leave devices at risk.
Antimalware DatabaseZENworks Endpoint Security Antimalware requires its own database, separate from the ZENworks database, ZENworks Audit database, or optional Vertica database. The database stores Antimalware-related data such as detected malware threats and current malware status for devices.
Unlike the ZENworks database and the ZENworks Audit database, the Antimalware database is not created during system installation. It is created as part of the setup process when you decide to use Antimalware.
Database RequirementsThe Antimalware database must be the same database type (PostgreSQL, MSSQL, or Oracle) as your ZENworks database.
For information about the database’s disk space and memory requirements, see “ZENworks Antimalware Database Sizing” on page 131.
74 Design
Database SynchronizationThe Antimalware database requires data--such as devices, policies, assignments, and configuration settings--to be synced to it from the ZENworks database. This data is required in order to correctly associate malware data with devices and display the data in ZENworks Control Center.
The data synchronization is implemented through a Change Data Capture (CDC) mechanism that uses Apache Kafka to stream data between the two databases. Apache Kafka is supported on Linux platforms only which means that you must have a Linux Primary Server to use Antimalware.
If you do not already have a Primary Server on Linux, Micro Focus recommends that you use the ZENworks Virtual Appliance. The Appliance is built on a customized SUSE Linux Enterprise Server (SLES) distribution and comes pre-installed with ZENworks. The Appliance can be deployed on VMware ESXi, Microsoft Hyper-V Server, XEN on SLES, and Citrix XenServer. For detailed requirements and installation instructions, see the ZENworks Appliance Deployment and Administration Reference.
The CDC requires no special consideration during the Antimalware design process. However, there are settings you can use to tune its performance. See “Tuning Antimalware Database Synchronization” on page 118 for details.
Antimalware Event ProcessingWhenever a malware threat is detected or an malware scan is run, the Antimalware Agent reports the event to the ZENworks server so that the malware threat and device status can be monitored in ZENworks Control Center.
Antimalware event files are rolled up via the Collection system. Every 5 minutes, the ZENworks Agent transfers any generated Antimalware events to its designated Collection Server as determined by its closest Collection Server list. If this is a Primary Server, the server’s Antimalware Service processes the event files and adds the events to the Antimalware database. If the Collection Server is a Satellite, it rolls the event files up to its parent Primary Server according to its Collection Roll-Up Schedule which is every 2 hours by default. The Primary Server then adds the event files to the Antimalware database.
Satellite Collection Roll-Up Schedule RecommendationMicro Focus recommends that you keep your Satellite’s Collection Roll-Up Schedules to no more than every 2 hours. Longer intervals will result in delays reporting detected malware threats and device status to ZENworks Control Center.
Antimalware Service As mentioned previously, the Antimalware service runs on Primary Servers and is responsible for processing Antimalware event files into the Antimalware database. On Linux Primary Servers, the service is a dockerized microservice. On Windows Primary Servers, its an application microservice.
The Antimalware service listens on 61100 (web server) port and 61195 (JMX) port.
In general, there are no design considerations for the Antimalware service. The service is configured--including opening the required ports--and started when you perform the Antimalware setup. For performance tuning details see “Tuning the Antimalware Service” on page 112.
Design 75

Other ZENworks Settings RecommendationsThere are a number of other settings that should be configured on the Settings tab of a device or from the Configuration page of the zone. This includes:
“Content Blackout Schedule” on page 76 “Content Replication Setting” on page 76 “Local Device Logging” on page 77 “ZENworks Agent Settings” on page 78 “Device Refresh Schedule” on page 79 “Device Removal Schedule” on page 79 “Dynamic Group Refresh Schedule” on page 80 “ZENworks Explorer Configuration” on page 81 “System Variables” on page 81
Content Blackout ScheduleYou should define a Management Zone setting only if you are sure that you want to use this setting for all devices. In normal environments, you should not use a common blackout schedule for all devices.
A content blackout schedule is needed only for special devices, such as a device in the finance department or production PCs that are used for controlling production processes.
The following graphic shows a corporate (global) blackout schedule of the last Friday of every month, from 12:00 a.m. to 7:00 a.m. In this case, no content is sent to managed devices during this time.
For more information, see the ZENworks Management Zone Settings Reference.
Content Replication SettingThese settings dictate how frequently Primary Servers replicate content in the content repository, along with settings for throttling and checksums.
When ZENworks is initially set up, the replication schedule is set to run every 5 minutes. You should change this to something more realistic for your environment, based on how frequently you anticipate making changes to the system and how quickly you need the changes replicated to other Primary Servers in your Management Zone. You might want to start by setting it to run every 20 minutes.
76 Design
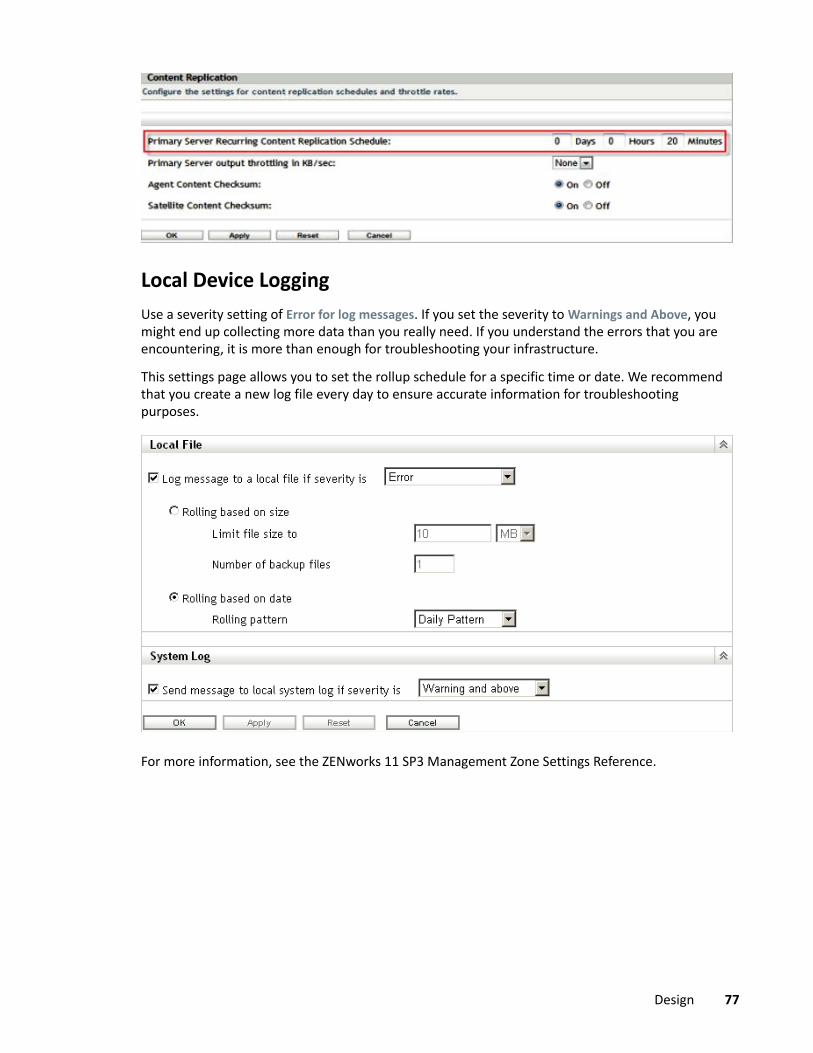
Local Device LoggingUse a severity setting of Error for log messages. If you set the severity to Warnings and Above, you might end up collecting more data than you really need. If you understand the errors that you are encountering, it is more than enough for troubleshooting your infrastructure.
This settings page allows you to set the rollup schedule for a specific time or date. We recommend that you create a new log file every day to ensure accurate information for troubleshooting purposes.
For more information, see the ZENworks 11 SP3 Management Zone Settings Reference.
Design 77
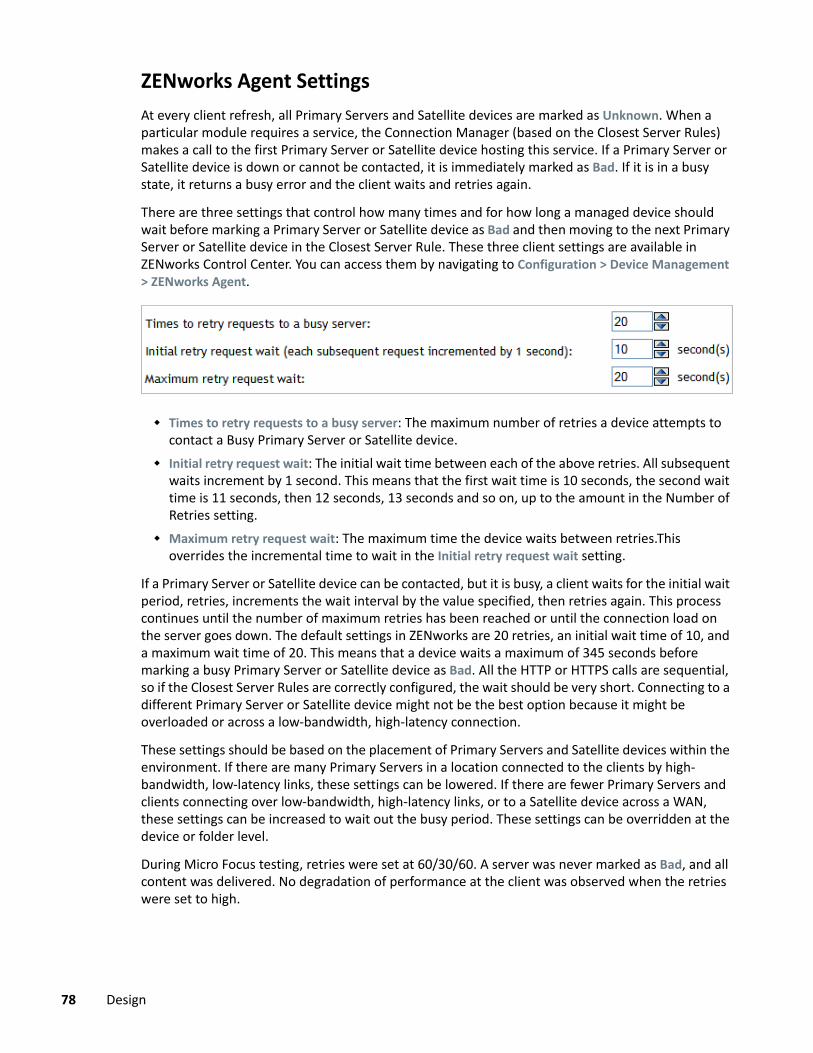
ZENworks Agent SettingsAt every client refresh, all Primary Servers and Satellite devices are marked as Unknown. When a particular module requires a service, the Connection Manager (based on the Closest Server Rules) makes a call to the first Primary Server or Satellite device hosting this service. If a Primary Server or Satellite device is down or cannot be contacted, it is immediately marked as Bad. If it is in a busy state, it returns a busy error and the client waits and retries again.
There are three settings that control how many times and for how long a managed device should wait before marking a Primary Server or Satellite device as Bad and then moving to the next Primary Server or Satellite device in the Closest Server Rule. These three client settings are available in ZENworks Control Center. You can access them by navigating to Configuration > Device Management > ZENworks Agent.
Times to retry requests to a busy server: The maximum number of retries a device attempts to contact a Busy Primary Server or Satellite device.
Initial retry request wait: The initial wait time between each of the above retries. All subsequent waits increment by 1 second. This means that the first wait time is 10 seconds, the second wait time is 11 seconds, then 12 seconds, 13 seconds and so on, up to the amount in the Number of Retries setting.
Maximum retry request wait: The maximum time the device waits between retries.This overrides the incremental time to wait in the Initial retry request wait setting.
If a Primary Server or Satellite device can be contacted, but it is busy, a client waits for the initial wait period, retries, increments the wait interval by the value specified, then retries again. This process continues until the number of maximum retries has been reached or until the connection load on the server goes down. The default settings in ZENworks are 20 retries, an initial wait time of 10, and a maximum wait time of 20. This means that a device waits a maximum of 345 seconds before marking a busy Primary Server or Satellite device as Bad. All the HTTP or HTTPS calls are sequential, so if the Closest Server Rules are correctly configured, the wait should be very short. Connecting to a different Primary Server or Satellite device might not be the best option because it might be overloaded or across a low-bandwidth, high-latency connection.
These settings should be based on the placement of Primary Servers and Satellite devices within the environment. If there are many Primary Servers in a location connected to the clients by high-bandwidth, low-latency links, these settings can be lowered. If there are fewer Primary Servers and clients connecting over low-bandwidth, high-latency links, or to a Satellite device across a WAN, these settings can be increased to wait out the busy period. These settings can be overridden at the device or folder level.
During Micro Focus testing, retries were set at 60/30/60. A server was never marked as Bad, and all content was delivered. No degradation of performance at the client was observed when the retries were set to high.
78 Design
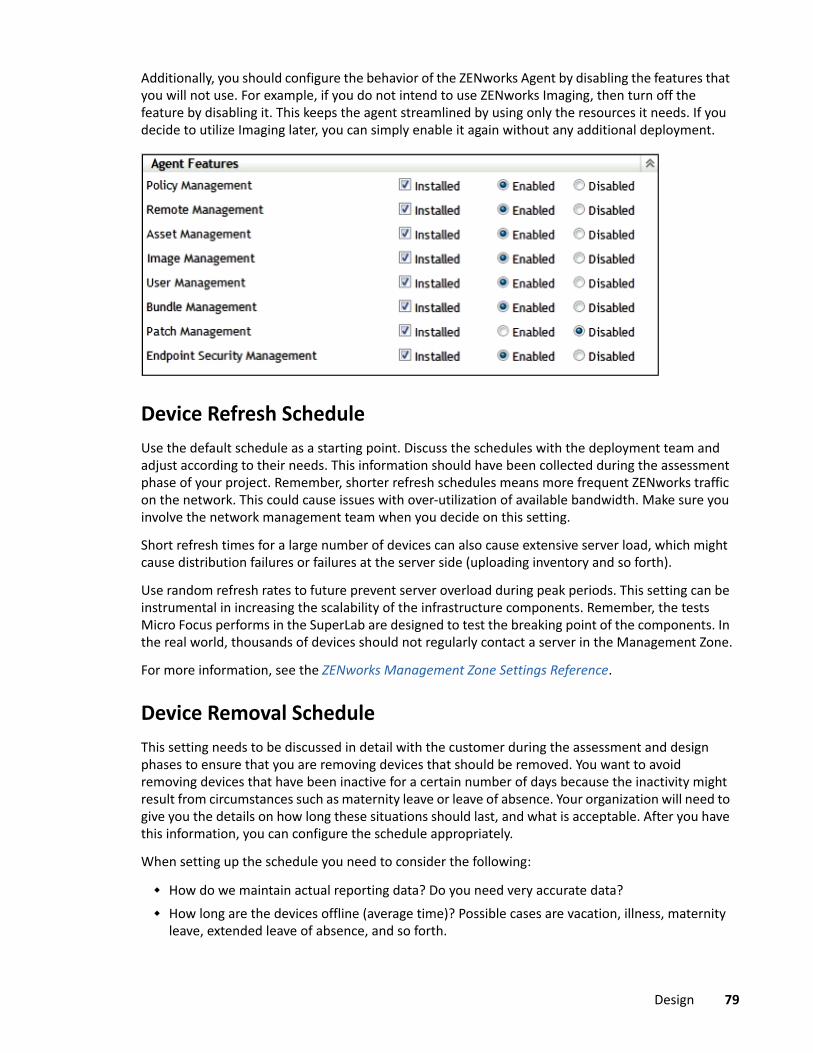
Additionally, you should configure the behavior of the ZENworks Agent by disabling the features that you will not use. For example, if you do not intend to use ZENworks Imaging, then turn off the feature by disabling it. This keeps the agent streamlined by using only the resources it needs. If you decide to utilize Imaging later, you can simply enable it again without any additional deployment.
Device Refresh ScheduleUse the default schedule as a starting point. Discuss the schedules with the deployment team and adjust according to their needs. This information should have been collected during the assessment phase of your project. Remember, shorter refresh schedules means more frequent ZENworks traffic on the network. This could cause issues with over-utilization of available bandwidth. Make sure you involve the network management team when you decide on this setting.
Short refresh times for a large number of devices can also cause extensive server load, which might cause distribution failures or failures at the server side (uploading inventory and so forth).
Use random refresh rates to future prevent server overload during peak periods. This setting can be instrumental in increasing the scalability of the infrastructure components. Remember, the tests Micro Focus performs in the SuperLab are designed to test the breaking point of the components. In the real world, thousands of devices should not regularly contact a server in the Management Zone.
For more information, see the ZENworks Management Zone Settings Reference.
Device Removal ScheduleThis setting needs to be discussed in detail with the customer during the assessment and design phases to ensure that you are removing devices that should be removed. You want to avoid removing devices that have been inactive for a certain number of days because the inactivity might result from circumstances such as maternity leave or leave of absence. Your organization will need to give you the details on how long these situations should last, and what is acceptable. After you have this information, you can configure the schedule appropriately.
When setting up the schedule you need to consider the following:
How do we maintain actual reporting data? Do you need very accurate data? How long are the devices offline (average time)? Possible cases are vacation, illness, maternity
leave, extended leave of absence, and so forth.
Design 79
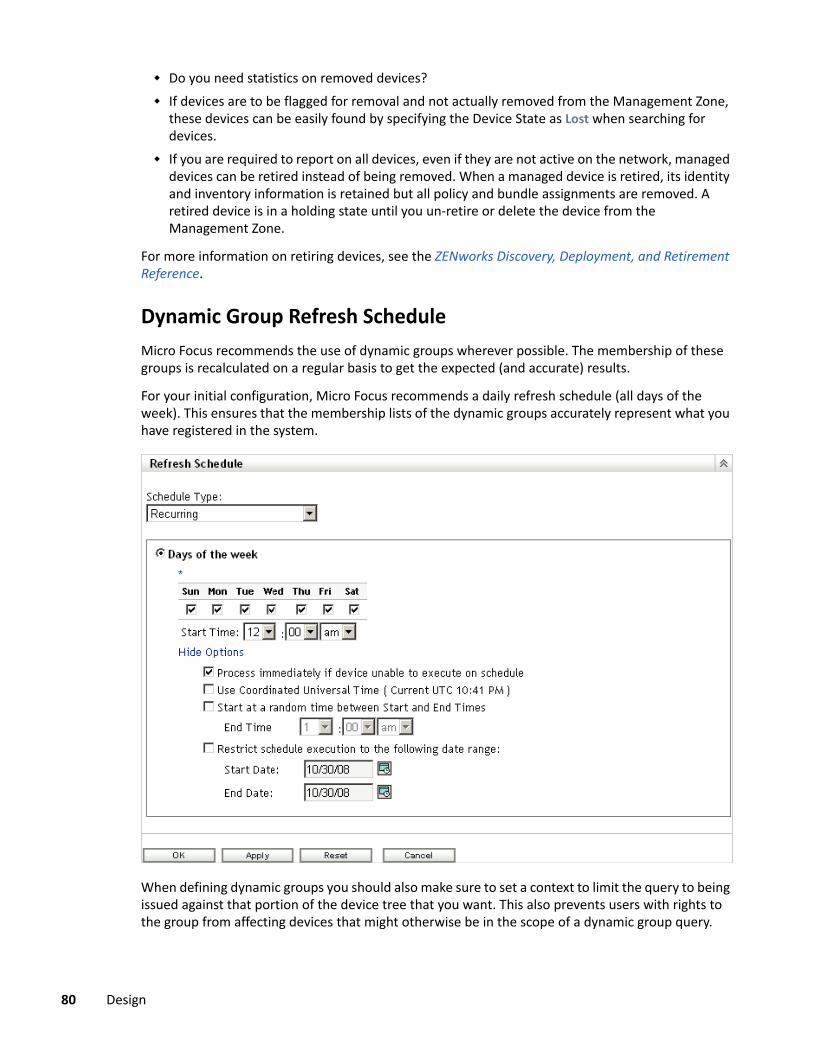
Do you need statistics on removed devices? If devices are to be flagged for removal and not actually removed from the Management Zone,
these devices can be easily found by specifying the Device State as Lost when searching for devices.
If you are required to report on all devices, even if they are not active on the network, managed devices can be retired instead of being removed. When a managed device is retired, its identity and inventory information is retained but all policy and bundle assignments are removed. A retired device is in a holding state until you un-retire or delete the device from the Management Zone.
For more information on retiring devices, see the ZENworks Discovery, Deployment, and Retirement Reference.
Dynamic Group Refresh ScheduleMicro Focus recommends the use of dynamic groups wherever possible. The membership of these groups is recalculated on a regular basis to get the expected (and accurate) results.
For your initial configuration, Micro Focus recommends a daily refresh schedule (all days of the week). This ensures that the membership lists of the dynamic groups accurately represent what you have registered in the system.
When defining dynamic groups you should also make sure to set a context to limit the query to being issued against that portion of the device tree that you want. This also prevents users with rights to the group from affecting devices that might otherwise be in the scope of a dynamic group query.
80 Design
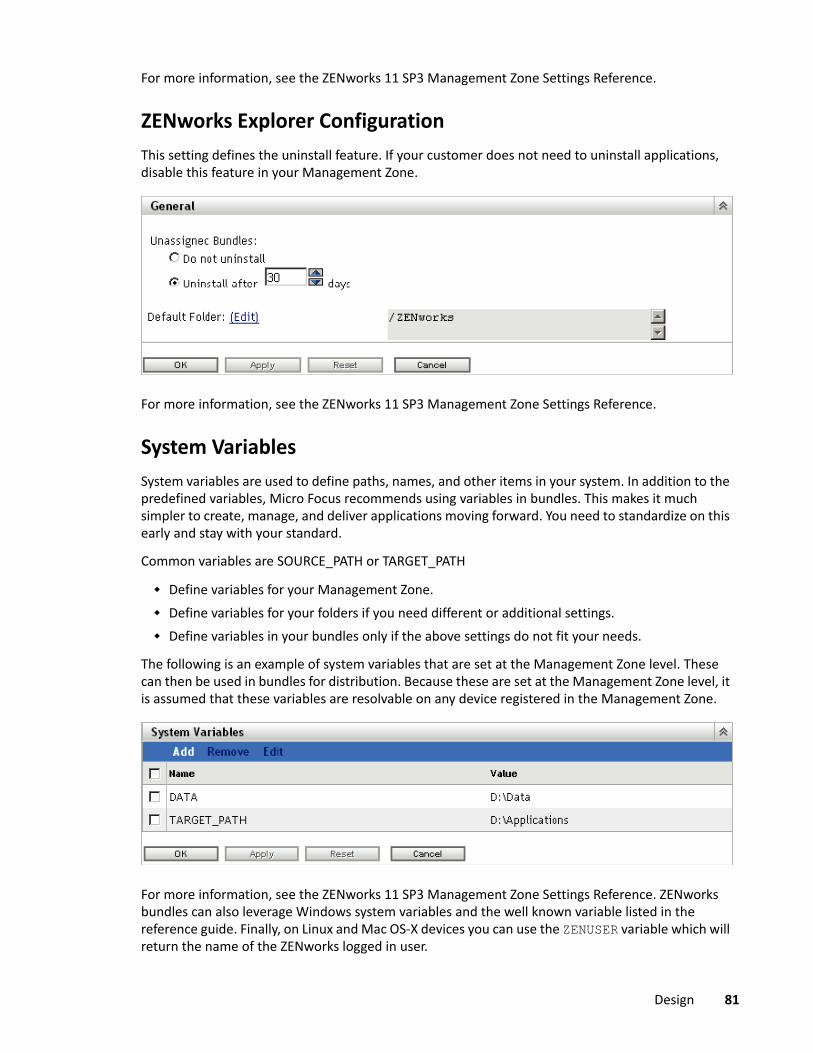
For more information, see the ZENworks 11 SP3 Management Zone Settings Reference.
ZENworks Explorer ConfigurationThis setting defines the uninstall feature. If your customer does not need to uninstall applications, disable this feature in your Management Zone.
For more information, see the ZENworks 11 SP3 Management Zone Settings Reference.
System VariablesSystem variables are used to define paths, names, and other items in your system. In addition to the predefined variables, Micro Focus recommends using variables in bundles. This makes it much simpler to create, manage, and deliver applications moving forward. You need to standardize on this early and stay with your standard.
Common variables are SOURCE_PATH or TARGET_PATH
Define variables for your Management Zone. Define variables for your folders if you need different or additional settings. Define variables in your bundles only if the above settings do not fit your needs.
The following is an example of system variables that are set at the Management Zone level. These can then be used in bundles for distribution. Because these are set at the Management Zone level, it is assumed that these variables are resolvable on any device registered in the Management Zone.
For more information, see the ZENworks 11 SP3 Management Zone Settings Reference. ZENworks bundles can also leverage Windows system variables and the well known variable listed in the reference guide. Finally, on Linux and Mac OS-X devices you can use the ZENUSER variable which will return the name of the ZENworks logged in user.
Design 81
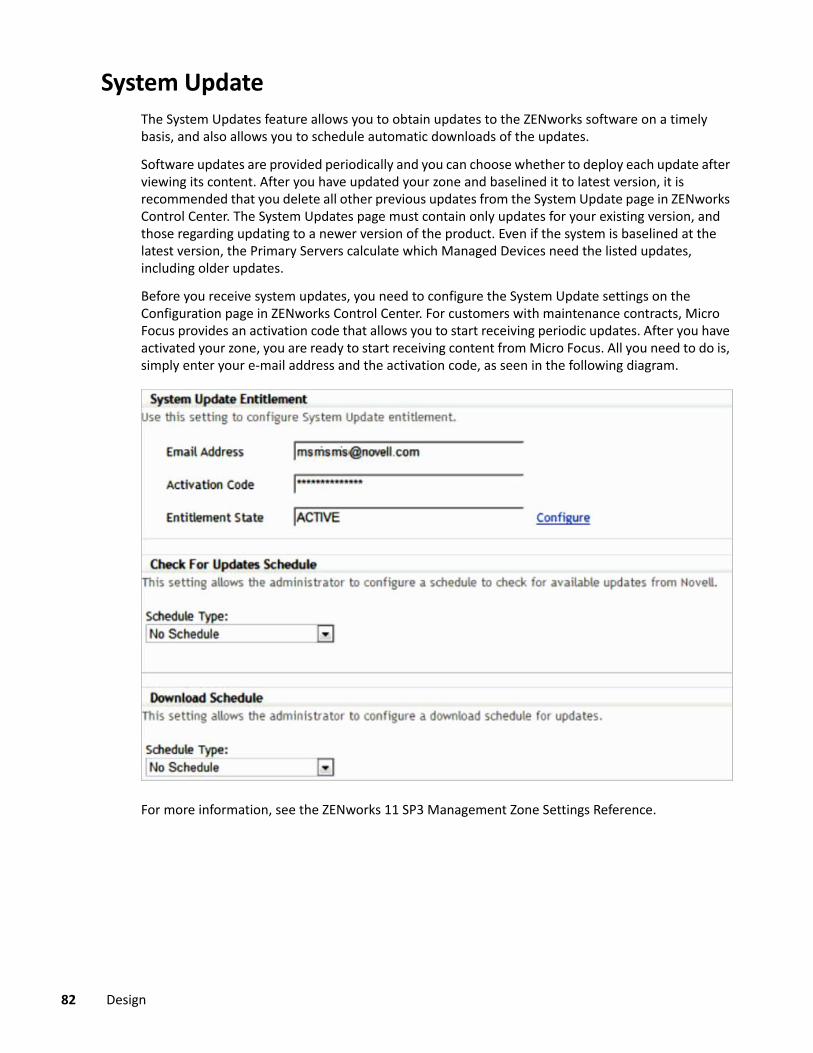
System UpdateThe System Updates feature allows you to obtain updates to the ZENworks software on a timely basis, and also allows you to schedule automatic downloads of the updates.
Software updates are provided periodically and you can choose whether to deploy each update after viewing its content. After you have updated your zone and baselined it to latest version, it is recommended that you delete all other previous updates from the System Update page in ZENworks Control Center. The System Updates page must contain only updates for your existing version, and those regarding updating to a newer version of the product. Even if the system is baselined at the latest version, the Primary Servers calculate which Managed Devices need the listed updates, including older updates.
Before you receive system updates, you need to configure the System Update settings on the Configuration page in ZENworks Control Center. For customers with maintenance contracts, Micro Focus provides an activation code that allows you to start receiving periodic updates. After you have activated your zone, you are ready to start receiving content from Micro Focus. All you need to do is, simply enter your e-mail address and the activation code, as seen in the following diagram.
For more information, see the ZENworks 11 SP3 Management Zone Settings Reference.
82 Design
Update PrerequisitesBefore the deployment of System Update to the first Primary Server in the zone, the ZENLoader and ZENServer services of all other Primary Servers must be stopped. This is to prevent the database tables from being in use by other servers while the database gets updated.
For Windows devices, ensure Windows is up-to-date and preferably disable the Windows update.
PrecautionsBefore deploying the updates, ensure that the health of the Primary Servers and the database in the Management Zone is conducive for the deployment by performing diagnostic tests on the Primary Server using the ZENworks Diagnostic Center tool.
Take a reliable backup of the database and the certificate authority.
Ensure the system update content is replicated to all Primary or Content servers before updating servers and managed devices. If an update is patched using zman supf ensure that the patched content is replicated to all Primary and Content servers.
Do not reboot the device while the system update is in progress. If an update fails, refrain from launching ZENUpdater manually. A failed update has to be redeployed from ZCC or can be run manually by creating a Standalone Update Installer and executing it.
Do not clear managed device cache between SU being assigned and the Update is launched stages.
Ensure all Primary Servers get updated at once before starting updates of managed devices.
System Update Agent SettingsThe settings for applying the update, rebooting, and prompts that the user is given can be configured in the System Update Agent Settings page. It is recommended that prior to performing a system update deployment you review these options and set them appropriately for your environment.
System Update ServerIn order to download updates in restrictive environments, the administrator should select a server as a dedicated server that has access to the Internet through the proxy. Otherwise, system updates are randomly downloaded by a Primary Server in the zone. It is always advisable to have a dedicated server in the zone and update it first in order to avoid issues that can arise due to different servers picking up some of the initial system update activities like downloading the update, and database schema update.
Design 83
System Update StagesThe system update stages allow you to deploy an update in stages, such as to a test group first, then to the managed devices. E-mail notifications can let you know when each stage has completed.
Following are some of the reasons for creating deployment stages:
Testing the system update on certain devices before deploying it to your production environment.
Ensuring the updates are deployed to Primary and Satellite devices before being deployed to agents.
You can group the workstations in several stages so that the update process isn’t too intensive for the Primary Server being used to perform the updates.
Standalone System UpdaterThe Standalone Agent Updater is an independent executable to update Windows managed devices and Windows Satellite Servers. Even if the device is unable to connect to the server, the Standalone Agent Updater will update the device to the latest version of the agent.
Standalone Agent Updater can be used in a zone with low bandwidth. The exe can be copied on an external hard disk and can be directly executed on the device.
For more information see the “ZENworks Command Line Utilities” in the “ZENworks Command Line Utilities Reference”.
Lab Testing and ValidationOne of the key parts of the design phase is the testing and validation that is done in the organization’s lab environment, prior to any deployment being completed. This is your opportunity to do the following:
Prove that the design and design decisions you made are accurate and correct, and meet the very specific requirements of the organization.
Verify that software components are functioning properly, and that users are receiving the results that they should expect.
Prove that the deployment will be successful.
The organization should use the lab to develop acceptance tests that are run by the project team and tracked for completion and success. The best way to do this is to document individual acceptance tests (a simple spreadsheet can be used if you want), and complete the tests according to the steps you need to take. After the individual tests have been run successfully and validated (proven successful), you can document this and move on until all tests have been completed.
If individual tests are unsuccessful, you need to make changes (this could also include your design), and run the test until it is successfully completed.
The idea is not to create more work for you, but to prove the overall design quality and increase the probability of a successful ZENworks deployment.
84 Design
Your lab environment must reflect your existing infrastructure as closely as possible, and the ZENworks infrastructure in the lab must accurately reflect the design that you are creating.
The lab should contain a real world layout (design) to ensure that the ZENworks design fits well within the existing environment. You need to include the following:
Design of directory services infrastructures, including eDirectory and Microsoft Active Directory: If you can, replicate the directory services in the lab to ensure that the lab environment is isolated from the actual production systems. You may want to avoid causing issues with the endpoints on the production network due to the testing in the lab.
Major network infrastructure components that need to be tested: This includes a replica of the main data center layouts, and the major classifications of remote sites that need to be tested for Satellite distributions and collections.
Exact replica of the ZENworks infrastructure design that you are creating: This needs to be kept up-to-date. If any changes are made to the design, you need to immediately reflect these changes in the lab environment.
You should test actual packages, content, collection, and so forth, and this needs to reflect the decisions made in the design phase. For example, you should test inventory collection based on the decisions you have made for inventory collection schedules. This is also true for all major components of ZENworks that are being deployed.
You should perform all endpoint testing with actual base images that are being used in production. This includes a sample set of the actual line-of-business applications and custom OS configurations.
It is beneficial to have a sample set of departmental devices to use here. For example, use a typical workstation you would find in Accounting, Human Resources, Engineering, IT, and so forth.
When building your lab, you do not need to build the entire lab with physical hardware. You are not testing the breaking point here. You are testing functionality and whether or not there are any major issues found with the overall design. You should use actual production hardware to test functionality at the device level, but the server infrastructure could be virtualized to save hardware costs. The idea is to reflect the design so you can prove that it is solid.
Optimizing Primary Server PerformanceIf you are using Kafka, Wake On LAN, DMZ Servers, you can use zman qes and optimize your zenworks server to either perform only critical tasks or exclude servers from performing such tasks that require specific environments.
Use Case:
1. Excluding a few servers from running a specific Queue Action: If you have two ZENworks servers in the zone in two different networks - one in DMZ and the other in the Intranet, and Server_1 being the DMZ server cannot reach the Managed Devices in the Intranet - if this server will perform Wake-on-LAN, then the action fails; whereas the Server_2 can reach the Managed Devices in the network and can perform Wake-on-LAN. In this case, we can exclude the Server_1 from running WOL_QUICK_ACTION_TYPE (Wake on LAN queue action), using the following command:
zman qes WOL_QUICK_ACTION_TYPE -g server_guid1
Design 85
2. RUN_ASSIGNED_TASKS_ONLY: If Kafka is configured in the zone, and as Kafka is heavy on Input/Output, to avoid the ZENworks server from performing other non-mandatory, regular queue actions and ONLY perform the mandatory queue actions related to Remint, System Update, Kafka; use the following command:zman qes RUN_ASSIGNED_TASKS_ONLY -g server_guid
NOTE
If a Primary Server is deleted from the zone or if a Primary Server is excluded from performing specific queue actions, the list of Primary Servers in the zone or the exclusion list might not get updated immediately, it might take around 30 minutes for the update to reflect. In between those 30 minutes, if any queue action gets assigned to the deleted server, it might fail; and if any queue action gets assigned to the Primary Server which was excluded, it might let the same Primary Server run the queue action, until it gets updated.
If a Primary Server has been excluded from running a specific queue action for example: WOL_QUICK_ACTION_TYPE and the same Primary Server is set to run only directly assigned (mandatory) queue actions using RUN_ASSIGNED_TASKS_ONLY, in that case, specific queue action: WOL_QUICK_ACTION_TYPE gets priority over RUN_ASSIGNED_TASKS_ONLY.
Multicast servers are the servers with specific roles for example: MDM servers. If all the Multicast servers are set to run only directly assigned (mandatory) queue actions using RUN_ASSIGNED_TASKS_ONLY, then the exclusion list is NOT honored. As if a queue action has to be run by a multicast server, and if all such servers are configured to run only directly assigned tasks, then no multicast server would be available to run these server-role specific queue actions and these queue actions will fail, for that reason, in this scenario, the excluded servers would NOT be honored.
DocumentationDocumentation is the most important aspect of the design phase. It is critical that you document all decisions that are made during the design phase and keep these items up-to-date. After the document has been finalized, it is important to keep it up-to-date to reflect all changes to both the ZENworks infrastructure that is in place, as well as the infrastructure and services that ZENworks relies on.
In addition to reflecting the infrastructure, the design document can prove to be a useful and powerful knowledge transfer document. As individuals within the organization move in and out of the IT Services division, they can use this document to better understand what was put in place, and how the system is connected and interconnected. It is a tool to provide insight into what was decided during the project and beyond.
We recommend that you store the design document in a documentation repository if you have one, and you should provide access to the document as required. However, you should limit who has write access to the document so that it is not updated by unauthorized personnel.
86 Design
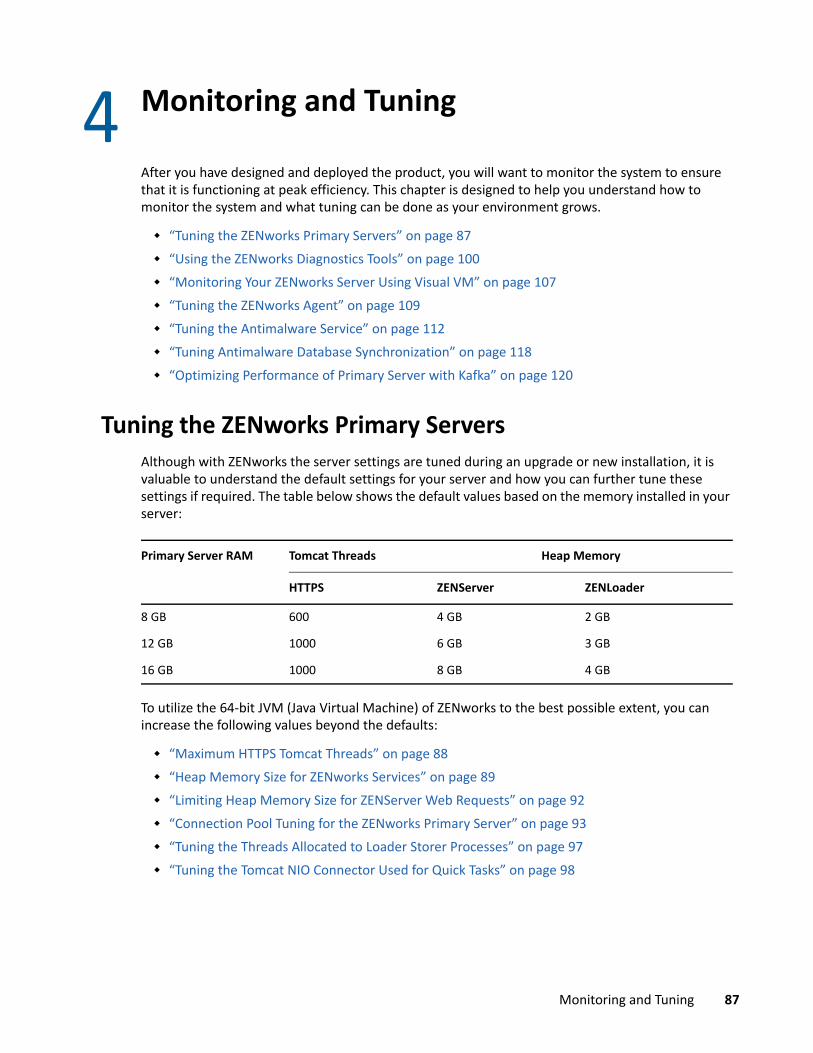
4 4Monitoring and Tuning
After you have designed and deployed the product, you will want to monitor the system to ensure that it is functioning at peak efficiency. This chapter is designed to help you understand how to monitor the system and what tuning can be done as your environment grows.
“Tuning the ZENworks Primary Servers” on page 87 “Using the ZENworks Diagnostics Tools” on page 100 “Monitoring Your ZENworks Server Using Visual VM” on page 107 “Tuning the ZENworks Agent” on page 109 “Tuning the Antimalware Service” on page 112 “Tuning Antimalware Database Synchronization” on page 118 “Optimizing Performance of Primary Server with Kafka” on page 120
Tuning the ZENworks Primary ServersAlthough with ZENworks the server settings are tuned during an upgrade or new installation, it is valuable to understand the default settings for your server and how you can further tune these settings if required. The table below shows the default values based on the memory installed in your server:
To utilize the 64-bit JVM (Java Virtual Machine) of ZENworks to the best possible extent, you can increase the following values beyond the defaults:
“Maximum HTTPS Tomcat Threads” on page 88 “Heap Memory Size for ZENworks Services” on page 89 “Limiting Heap Memory Size for ZENServer Web Requests” on page 92 “Connection Pool Tuning for the ZENworks Primary Server” on page 93 “Tuning the Threads Allocated to Loader Storer Processes” on page 97 “Tuning the Tomcat NIO Connector Used for Quick Tasks” on page 98
Primary Server RAM Tomcat Threads Heap Memory
HTTPS ZENServer ZENLoader
8 GB 600 4 GB 2 GB
12 GB 1000 6 GB 3 GB
16 GB 1000 8 GB 4 GB
Monitoring and Tuning 87
Maximum HTTPS Tomcat ThreadsZENworks uses HTTPS threads to service incoming configuration and authentication web requests; it uses HTTPS threads for content and collection requests. By default, these threads are set to 1000 for HTTPS. This was originally a limitation of the 32-bit JVM, but it is no longer necessary because ZENworks now uses the 64-bit JVM only.
These values together dictate the maximum number of simultaneous web requests that the server will service. When these are exhausted, the server will begin returning a 503 error to agents indicating that it is busy. This will cause the busy retry logic to be executed. You can monitor the overall threads in use from the Diagnostics tab of the ZENworks Primary Server and, if necessary, adjust appropriately.
These values are found in the server.xml file in the following locations:
Windows: %ZENSERVER_HOME%\services\zenserver\conf Linux: /opt/microfocus/zenworks/share\tomcat\conf
To achieve further performance increases from your Primary Servers, you can change the thread values:
1 Stop the ZENworks services (ZENmonitor, ZENserver, and ZENloader).2 Open the server.xml file for the operating system on which the Primary Server is running.3 Locate the line with the text <Connector port="80" and change the value for maxThreads
as required. You should consider increasing this number if the server is servicing a large number of content or collection requests.As the ports in ZENworks can be customized, if you do not find a connector on port 80, search for the port number that you normally use to connect for content.
4 Locate the line with the text <Connector port="443" and change the value for maxThreads as desired. Ensure that the values for the two ports are the same. You should consider increasing this number if the server is servicing a large number of configuration or authentication requests.As the ports in ZENworks can be customized, if you don’t find a connector on port 80, search for the port number that you normally use to connect to ZENworks Control Center.
5 Save the file.6 Start the ZENworks services again.
If you increase the number of threads, you will also want to monitor the Java heap usage of the ZENServer service. If this begins to approach the allocated amount of memory, you will also want to look at increasing the heap size, or reducing the threads.
88 Monitoring and Tuning
Heap Memory Size for ZENworks ServicesZENworks uses the 64-bit JVM, so you can tune the Java memory allocations to allow ZENworks services to utilize more memory if required. The sample settings in the following procedures were tested in the engineering lab on a server with 16 GB of RAM.
“Configuring the Maximum Heap Memory Size for ZENworks Server Service on a Linux Primary Server” on page 89
“Configuring the Maximum Heap Memory Size for ZENworks Loader Service on a Linux Primary Server” on page 90
“Configuring the Maximum Heap Memory Size for ZENworks JoinProxy Service on a Linux Primary Server” on page 90
“Configuring the Maximum Heap Memory Size for ZENworks Server Service on a Windows Primary Server” on page 91
“Configuring the Maximum Heap Memory Size for ZENworks Loader Service on a Windows Primary Server” on page 91
“Configuring the Maximum Heap Memory Size for ZENworks JoinProxy Service on a Windows Primary Server” on page 92
Configuring the Maximum Heap Memory Size for ZENworks Server Service on a Linux Primary ServerThe ZENworks Server service is the Tomcat instance used by the ZENworks Primary Server. It services agent requests, ZENworks Control Center, and the zenworks-setup page. If you find that ZENworks Server runs out of heap space, you can increase the heap size by doing the following:
1 Stop the ZENworks services (ZENMonitor, ZENServer, and ZENLoader).2 Using a Linux text editor such as vi or gedit, create or modify the /opt/microfocus/zenworks/bin/zenserversettings.sh file with the following content:
JAVA_MIN_HEAP="-Xms1024m" JAVA_MAX_HEAP="-Xmx1024m" JAVA_MIN_PERM_SIZE="-XX:PermSize=128m" JAVA_MAX_PERM_SIZE="-XX:MaxPermSize=256m" JAVA_THREAD_STACK_SIZE="-Xss1m"
IMPORTANT: Change the JAVA_MAX_HEAP value from -Xmx1024m to -Xmx<desired memory in MB>m. For example, -Xmx4096m to configure 4GB.
You need to reserve RAM for the operating system, so change the values in increments that make sense.
3 Save the file.4 Run the following commands:
chown zenworks.zenworks /opt/microfocus/zenworks/bin/zenserversettings.sh chown zenworks.zenworks /opt/microfocus/zenworks/bin/zenloadersettings.sh
5 Restart the ZENworks Server service by running /etc/init.d/novell-zenserver restart.
Monitoring and Tuning 89
Configuring the Maximum Heap Memory Size for ZENworks Loader Service on a Linux Primary ServerThe ZENwork Loader service is responsible for performing background operations such as subscribing to external zones, packaging content, storing collection data in the database, processing audit events, and much more. If you have a server that is doing a lot of these background tasks and you see the heap memory decrease for the ZENLoader service, you can increase the heap size by doing the following:
1 Using a Linux text editor such as vi or gedit, create or modify the /opt/microfocus/zenworks/bin/zenloadersettings.sh file with the following content:
JAVA_MIN_HEAP="-Xms256m" JAVA_MAX_HEAP="-Xmx1024m"JAVA_MIN_PERM_SIZE="-XX:PermSize=128m" JAVA_MAX_PERM_SIZE="-XX:MaxPermSize=128m"
IMPORTANT: Change the JAVA_MAX_HEAP value from -Xmx1024m to -Xmx<desired memory in MB>m. For example, -Xmx4096m to configure 4GB.
You need to reserve RAM for the operating system, so change the values in increments that make sense.
2 Save the file.3 Run the following commands:
chmod 755 /opt/microfocus/zenworks/bin/zenserversettings.sh chmod 755 /opt/microfocus/zenworks/bin/zenloadersettings.sh
4 Start the ZENworks Loader service by running /etc/init.d/novell-zenloader restart.
Configuring the Maximum Heap Memory Size for ZENworks JoinProxy Service on a Linux Primary ServerThe ZENworks Join Proxy service handles the Remote Management requests from agents in a private network or outside the DMZ. By default, the maximum number of connections that a Join Proxy service can handle is 100 for a Primary Server and 1000 from a Satellite Server. If required, you can modify the number of connections. By increasing the number of connections, if you find that ZENjoinProxy runs out of heap space, you can increase the heap size by performing the following steps.
Perform the following steps on a Linux Primary Server to increase the heap space for the ZENJoinProxy service:
1 Stop the ZENworks services (zenmntr and zenjoinproxy).2 Using a Linux text editor such as vi or gedit, open the systemd-zenjoinproxy file from the
following location:/opt/microfocus/zenworks/lib/systemd/system/systemd-zenjoinproxy
3 Modify the maximum heap space value from -Xmx512m to -Xmx<desired memory in MB>m. For example: -Xmx1024m to configure 1GB.
90 Monitoring and Tuning
NOTE: Before changing the value, ensure that you reserve enough RAM for the operating system.
4 Save the file.5 Restart the ZENworks services (zenmntr and zenjoinproxy).
Configuring the Maximum Heap Memory Size for ZENworks Server Service on a Windows Primary ServerThe ZENworks Server service is the Tomcat instance used by the ZENworks Primary Server. It services agent requests, ZENworks Control Center, and the zenworks-setup page. If you find that ZENworks Server runs out of heap space, you can increase the heap size by doing the following:
1 Stop the ZENworks services (ZENMonitor, ZENServer, and ZENLoader).2 Run ZENworksServerw.3 On the Java tab, change the Maximum memory pool from 1024 to a higher value. For example,
4096.You need to reserve RAM for the operating system, so change the values in increments that make sense.
4 Click Apply, then click OK.5 Start the ZENworks services.
Configuring the Maximum Heap Memory Size for ZENworks Loader Service on a Windows Primary ServerThe ZENworks Loader service is responsible for performing background operations such as subscribing to external zones, packaging content, storing collection data in the database, processing audit events and much more. If you have a server that is doing a lot of these background tasks and if you see the heap memory get low for the ZENworksLoader service, you can increase the heap size by doing the following:
1 Stop the ZENworks services (ZENMonitor, ZENworksServer, and ZENworksLoader).2 Run ZENworksLoaderw. 3 On the Java tab, change the Maximum memory pool from 1024 to a desired value. For example
4096.You need to reserve RAM for the operating system, so change the values in increments that make sense.
4 Click Apply, then click OK.5 Start the ZENworks services.
Monitoring and Tuning 91
Configuring the Maximum Heap Memory Size for ZENworks JoinProxy Service on a Windows Primary ServerThe ZENworks Join Proxy service handles the Remote Management requests from agents in a private network or outside DMZ. By default, the maximum number of connections that a Join Proxy service can handle is 100 for a Primary Server and 1000 from a Satellite Server. If required, you can modify the number of connections. By increasing the number of connections, if you find that ZENjoinProxy runs out of heap space, you can increase the heap size by performing the following steps.
Perform the following steps on a Windows Primary Server to increase the heap space for the ZENworksJoinProxy service:
1 Stop the ZENMonitor, ZENworksServer, ZENworksLoader and ZENworks Join Proxy services.2 Run ZENworksJoinProxyw in the command prompt.3 In the ZENworks Join Proxy Properties window, click the Java tab.4 Modify the Maximum memory pool from 1024 to a higher value.
NOTE: Before changing the value, ensure that you reserve enough RAM for the operating system.
5 Click Apply or OK to save the changes.6 Start the ZENMonitor, ZENworksServer, ZENworksLoader and ZENworks Join Proxy services.
Limiting Heap Memory Size for ZENServer Web RequestsIn large ZENworks deployment zones, if you experience “OutofMemoryExceptions” frequently, you can limit the web service requests coming to the ZENworks primary server by configuring maximum permitted heap limit.
To configure maximum permitted heap limit:
1 Stop the ZENworks services on the Primary Servers.2 Add the following line within the Engine properties of the server.xml file:<Valve className="com.novell.zenworks.tomcat.ZENRequestValve" debug="false" maxUsedHeapPercent="90"/>Path for server.xml on Linux: /opt/microfocus/zenworks/share/tomcat/conf/ Path for server.xml on Windows: %ZENSERVER_HOME%\services\zenserver\conf
NOTE: It is not recommended to configure the maxUsedHeapPercent value for the ZENworks Primary Server, which is used for accessing ZENworks Control Center. This could result in blank pages during peak loads that exceed the configured permitted heap limit.
3 You can enable valve debug logging by configuring the debug value as True. 4 Start the ZENworks services.
Valve logs can be found at following location:Linux: /opt/microfocus/zenworks/share/tomcat/logs/Windows: %ZENSERVER_HOME%\services\zenserver\logs\
92 Monitoring and Tuning
NOTE: When the heap memory usage by the ZENServer process reaches the maximum permitted heap, web service requests coming from managed devices will be rejected with status 503. You can find the message Request would exceed the maximum permitted heap limit in valve debug logs.
Even after configuring the maxUsedHeapPercent value, if you observe that the ZENworks Primary Server is not responsive or is in a busy state for a long time, revert the configuration and consult the Micro Focus Customer Support team.
Connection Pool Tuning for the ZENworks Primary Server Database connections are often expensive to create because of the overhead of establishing a network connection and initializing a database connection session in the back-end database. Hence, ZENworks uses the c3p0 library which helps in maintaining a pool of connections to the database to perform at optimal levels. Like any other pooling mechanism, you will need to tune the connections to your needs. This section will explain the various options available for your tuning needs.
Understanding the Different ZENworks Connection PoolsYou can tune each of the following connection pools independently:
ZENLoader Connection Pool: This connection pool is used for most of the ZENworks Loader functions that require access to the database, including storing inventory database; recording content repository data during packaging, patch subscriptions, zone-to-zone subscriptions, and all other tasks performed by the ZENworks Loader; and storing the device message and status.
ZENLoader Batch Connection Pool: This connection pool is used by ZENworks Loader for storing device message and status information such as install or launch bundle status. This status is stored in batches and, as such, uses a separate connection pool.
ZENServer Connection Pool: This connection pool is used by the ZENworks Server process to retrieve data from the database. This is most heavily used by Configuration and Authentication requests.
InvUI Connection Pool: This connection pool is used when browsing inventory data on devices or when running canned reports from ZENworks Control Center.
Audit ZENServer Connection Pool: This connection pool is used by the ZENworks Server process to retrieve data from the Audit database. This is used mainly by ZENworks Control Center servers.
Audit ZENLoader Connection Pool: This connection pool is used by the ZENworks Server process to store data in the Audit database. This is mainly used by Collection servers.
ZENworks Database Connection Pool Parameters (zdm.xml)ZENworks provides the following parameters for tuning the connection pools used to connect to the ZENworks database.
MinPoolSize: This value specifies the minimum number of connections available for a given connection pool. For instance, if this value is set to 5, then the connection pool will always have at least 5 connections to the database.
Monitoring and Tuning 93
ZENServer.MinPoolSize: This value specifies the minimum number of connections available for a ZENServer connection pool. If this value is not set, then the MinPoolSize parameter value is used to determine the minimum ZENServer connection pool size.
ZENLoader.MinPoolSize: This value specifies the minimum number of connections available for the ZENLoader connection pool. If this value is not set, then the MinPoolSize parameter value is used to determine the minimum ZENLoader connection pool size.
Batch.MinPoolSize: This value specifies the minimum number of connections available for a the ZENLoader batch connection pool. If this value is not set then the MinPoolSize parameter value is used to determine the minimum ZENLoader batch connection pool size.
MaxPoolSize: This value specifies the maximum number of connections available for a given connection pool. The pool size will grow dynamically from the minimum size to the maximum size as required by the requests being made to the server. Once the request volume reduces, the number of threads will reduce after the specified period of time.
ZENServer.MaxPoolSize: This value specifies the maximum number of connections available to the ZENServer connection pool. If this value is not set, the maximum number is determined by the MaxPoolSize parameter.
ZENLoader.MaxPoolSize: This value specifies the maximum number of connections available to the ZENLoader connection pool. If this value is not set, then the maximum number is determined by the MaxPoolSize parameter.
Batch.MaxPoolSize: This value specifies the maximum number of connections available to the ZENLoader batch connection pool. If this value is not set, then the maximum number is determined by the MaxPoolSize parameter.
MaxIdleTimeExcessConnections: This value is set in number of seconds and controls how long before the server should end unused connections. This is useful for situations such as first thing in the morning when a large number of clients are logging in, causing a lot of database activity. After this initial login, the number of requests typically drops dramatically. After the specified number of seconds passes, the database connections that are no longer required for active work will be closed.
ZENServer.MaxIdleTimeExcessConnections: This value controls the amount of time before the excess threads used by the ZENServer connection pool. If this value is not present in the zdm.xml file, then the MaxIdleTimeExcessConnections value is used to determine this value.
ZENLoader.MaxIdleTimeExcessConnections: This value controls the amount of time before the excess threads are used by the ZENLoader connection pool. If this value is not present in the zdm.xml file, then the MaxIdleTimeExcessConnections value is used to determine this value.
Batch.MaxIdleTimeExcessConnections: This value controls the amount of time before the excess threads are used by the ZENLoader batch connection pool. If this value is not present in the zdm.xml file, then the MaxIdleTimeExcessConnections value is used to determine this value.
The columns to the right of the parameter identify the recommended parameter value based on the role(s) the server will be performing in your organization. If a server will be acting in multiple roles, you should plan on setting the parameter to the highest value in the row.
XML Parameter Config/Auth Server
Collection Server ZCC Server Other/Default
MinPoolSize 5 5 5 5
94 Monitoring and Tuning
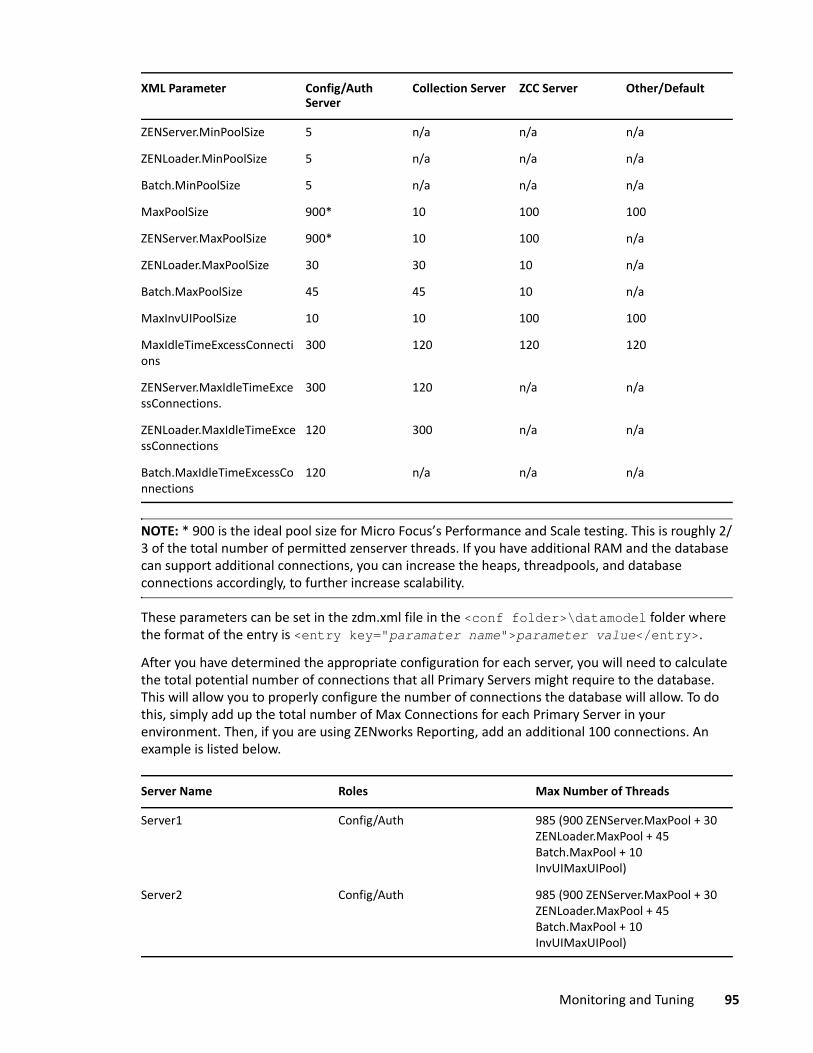
NOTE: * 900 is the ideal pool size for Micro Focus’s Performance and Scale testing. This is roughly 2/3 of the total number of permitted zenserver threads. If you have additional RAM and the database can support additional connections, you can increase the heaps, threadpools, and database connections accordingly, to further increase scalability.
These parameters can be set in the zdm.xml file in the <conf folder>\datamodel folder where the format of the entry is <entry key="paramater name">parameter value</entry>.
After you have determined the appropriate configuration for each server, you will need to calculate the total potential number of connections that all Primary Servers might require to the database. This will allow you to properly configure the number of connections the database will allow. To do this, simply add up the total number of Max Connections for each Primary Server in your environment. Then, if you are using ZENworks Reporting, add an additional 100 connections. An example is listed below.
ZENServer.MinPoolSize 5 n/a n/a n/a
ZENLoader.MinPoolSize 5 n/a n/a n/a
Batch.MinPoolSize 5 n/a n/a n/a
MaxPoolSize 900* 10 100 100
ZENServer.MaxPoolSize 900* 10 100 n/a
ZENLoader.MaxPoolSize 30 30 10 n/a
Batch.MaxPoolSize 45 45 10 n/a
MaxInvUIPoolSize 10 10 100 100
MaxIdleTimeExcessConnections
300 120 120 120
ZENServer.MaxIdleTimeExcessConnections.
300 120 n/a n/a
ZENLoader.MaxIdleTimeExcessConnections
120 300 n/a n/a
Batch.MaxIdleTimeExcessConnections
120 n/a n/a n/a
Server Name Roles Max Number of Threads
Server1 Config/Auth 985 (900 ZENServer.MaxPool + 30 ZENLoader.MaxPool + 45 Batch.MaxPool + 10 InvUIMaxUIPool)
Server2 Config/Auth 985 (900 ZENServer.MaxPool + 30 ZENLoader.MaxPool + 45 Batch.MaxPool + 10 InvUIMaxUIPool)
XML Parameter Config/Auth Server
Collection Server ZCC Server Other/Default
Monitoring and Tuning 95
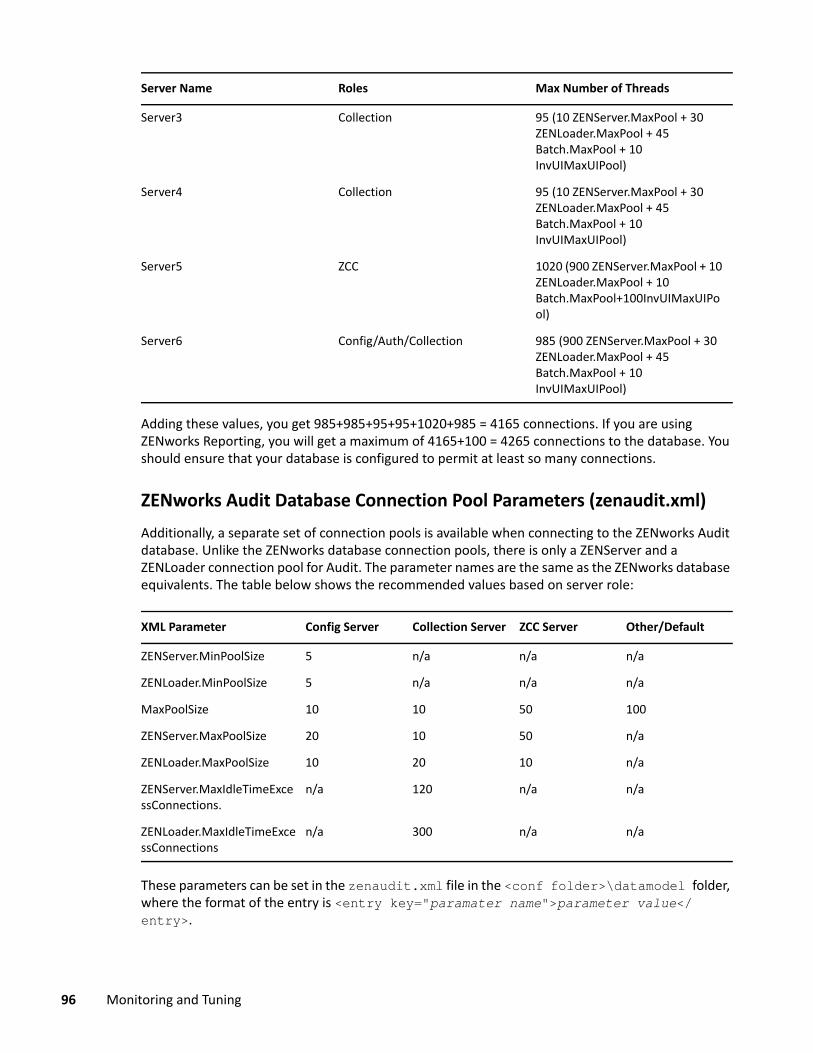
Adding these values, you get 985+985+95+95+1020+985 = 4165 connections. If you are using ZENworks Reporting, you will get a maximum of 4165+100 = 4265 connections to the database. You should ensure that your database is configured to permit at least so many connections.
ZENworks Audit Database Connection Pool Parameters (zenaudit.xml)Additionally, a separate set of connection pools is available when connecting to the ZENworks Audit database. Unlike the ZENworks database connection pools, there is only a ZENServer and a ZENLoader connection pool for Audit. The parameter names are the same as the ZENworks database equivalents. The table below shows the recommended values based on server role:
These parameters can be set in the zenaudit.xml file in the <conf folder>\datamodel folder, where the format of the entry is <entry key="paramater name">parameter value</entry>.
Server3 Collection 95 (10 ZENServer.MaxPool + 30 ZENLoader.MaxPool + 45 Batch.MaxPool + 10 InvUIMaxUIPool)
Server4 Collection 95 (10 ZENServer.MaxPool + 30 ZENLoader.MaxPool + 45 Batch.MaxPool + 10 InvUIMaxUIPool)
Server5 ZCC 1020 (900 ZENServer.MaxPool + 10 ZENLoader.MaxPool + 10 Batch.MaxPool+100InvUIMaxUIPool)
Server6 Config/Auth/Collection 985 (900 ZENServer.MaxPool + 30 ZENLoader.MaxPool + 45 Batch.MaxPool + 10 InvUIMaxUIPool)
XML Parameter Config Server Collection Server ZCC Server Other/Default
ZENServer.MinPoolSize 5 n/a n/a n/a
ZENLoader.MinPoolSize 5 n/a n/a n/a
MaxPoolSize 10 10 50 100
ZENServer.MaxPoolSize 20 10 50 n/a
ZENLoader.MaxPoolSize 10 20 10 n/a
ZENServer.MaxIdleTimeExcessConnections.
n/a 120 n/a n/a
ZENLoader.MaxIdleTimeExcessConnections
n/a 300 n/a n/a
Server Name Roles Max Number of Threads
96 Monitoring and Tuning
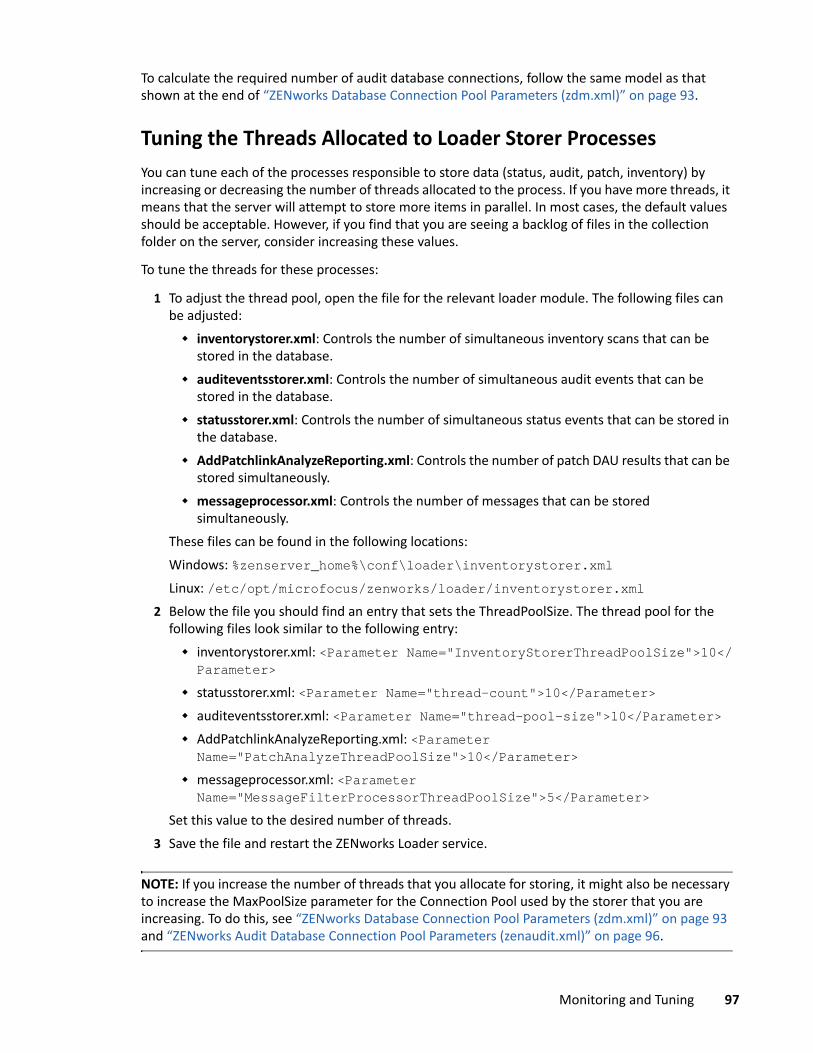
To calculate the required number of audit database connections, follow the same model as that shown at the end of “ZENworks Database Connection Pool Parameters (zdm.xml)” on page 93.
Tuning the Threads Allocated to Loader Storer ProcessesYou can tune each of the processes responsible to store data (status, audit, patch, inventory) by increasing or decreasing the number of threads allocated to the process. If you have more threads, it means that the server will attempt to store more items in parallel. In most cases, the default values should be acceptable. However, if you find that you are seeing a backlog of files in the collection folder on the server, consider increasing these values.
To tune the threads for these processes:
1 To adjust the thread pool, open the file for the relevant loader module. The following files can be adjusted: inventorystorer.xml: Controls the number of simultaneous inventory scans that can be
stored in the database. auditeventsstorer.xml: Controls the number of simultaneous audit events that can be
stored in the database. statusstorer.xml: Controls the number of simultaneous status events that can be stored in
the database. AddPatchlinkAnalyzeReporting.xml: Controls the number of patch DAU results that can be
stored simultaneously. messageprocessor.xml: Controls the number of messages that can be stored
simultaneously.These files can be found in the following locations:Windows: %zenserver_home%\conf\loader\inventorystorer.xmlLinux: /etc/opt/microfocus/zenworks/loader/inventorystorer.xml
2 Below the file you should find an entry that sets the ThreadPoolSize. The thread pool for the following files look similar to the following entry: inventorystorer.xml: <Parameter Name="InventoryStorerThreadPoolSize">10</Parameter>
statusstorer.xml: <Parameter Name="thread-count">10</Parameter> auditeventsstorer.xml: <Parameter Name="thread-pool-size">10</Parameter> AddPatchlinkAnalyzeReporting.xml: <Parameter Name="PatchAnalyzeThreadPoolSize">10</Parameter>
messageprocessor.xml: <Parameter Name="MessageFilterProcessorThreadPoolSize">5</Parameter>
Set this value to the desired number of threads.3 Save the file and restart the ZENworks Loader service.
NOTE: If you increase the number of threads that you allocate for storing, it might also be necessary to increase the MaxPoolSize parameter for the Connection Pool used by the storer that you are increasing. To do this, see “ZENworks Database Connection Pool Parameters (zdm.xml)” on page 93 and “ZENworks Audit Database Connection Pool Parameters (zenaudit.xml)” on page 96.
Monitoring and Tuning 97
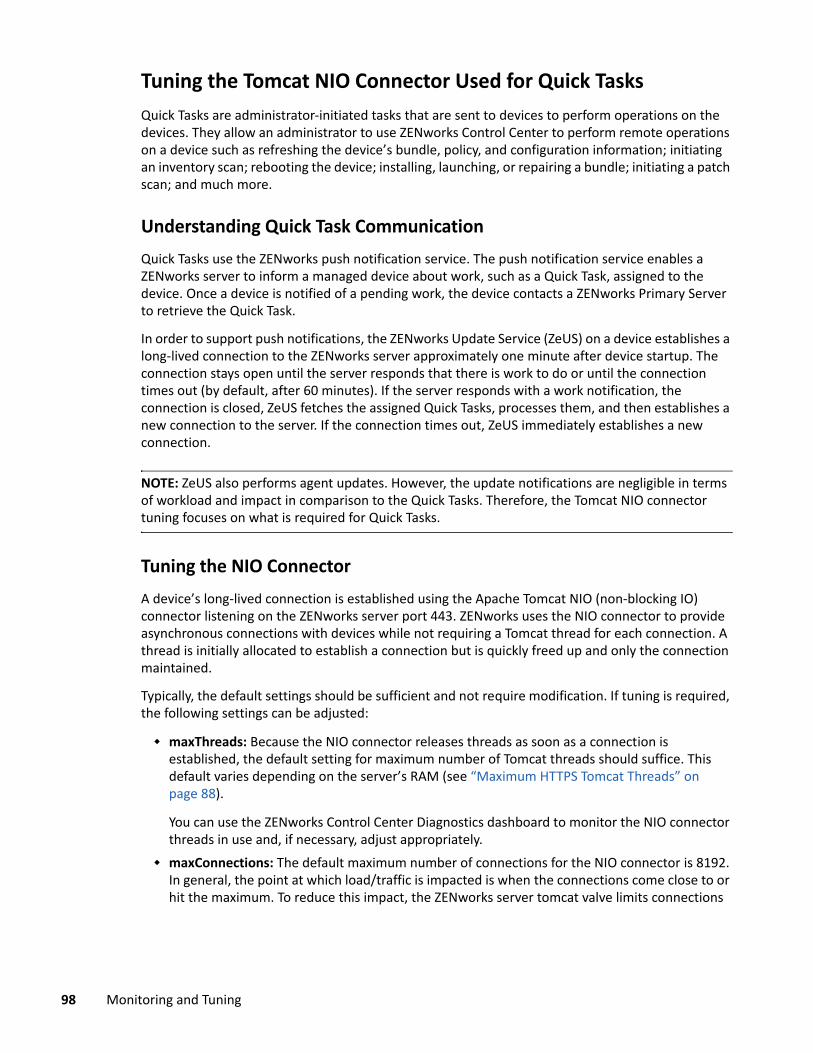
Tuning the Tomcat NIO Connector Used for Quick TasksQuick Tasks are administrator-initiated tasks that are sent to devices to perform operations on the devices. They allow an administrator to use ZENworks Control Center to perform remote operations on a device such as refreshing the device’s bundle, policy, and configuration information; initiating an inventory scan; rebooting the device; installing, launching, or repairing a bundle; initiating a patch scan; and much more.
Understanding Quick Task CommunicationQuick Tasks use the ZENworks push notification service. The push notification service enables a ZENworks server to inform a managed device about work, such as a Quick Task, assigned to the device. Once a device is notified of a pending work, the device contacts a ZENworks Primary Server to retrieve the Quick Task.
In order to support push notifications, the ZENworks Update Service (ZeUS) on a device establishes a long-lived connection to the ZENworks server approximately one minute after device startup. The connection stays open until the server responds that there is work to do or until the connection times out (by default, after 60 minutes). If the server responds with a work notification, the connection is closed, ZeUS fetches the assigned Quick Tasks, processes them, and then establishes a new connection to the server. If the connection times out, ZeUS immediately establishes a new connection.
NOTE: ZeUS also performs agent updates. However, the update notifications are negligible in terms of workload and impact in comparison to the Quick Tasks. Therefore, the Tomcat NIO connector tuning focuses on what is required for Quick Tasks.
Tuning the NIO Connector A device’s long-lived connection is established using the Apache Tomcat NIO (non-blocking IO) connector listening on the ZENworks server port 443. ZENworks uses the NIO connector to provide asynchronous connections with devices while not requiring a Tomcat thread for each connection. A thread is initially allocated to establish a connection but is quickly freed up and only the connection maintained.
Typically, the default settings should be sufficient and not require modification. If tuning is required, the following settings can be adjusted:
maxThreads: Because the NIO connector releases threads as soon as a connection is established, the default setting for maximum number of Tomcat threads should suffice. This default varies depending on the server’s RAM (see “Maximum HTTPS Tomcat Threads” on page 88).
You can use the ZENworks Control Center Diagnostics dashboard to monitor the NIO connector threads in use and, if necessary, adjust appropriately.
maxConnections: The default maximum number of connections for the NIO connector is 8192. In general, the point at which load/traffic is impacted is when the connections come close to or hit the maximum. To reduce this impact, the ZENworks server tomcat valve limits connections
98 Monitoring and Tuning
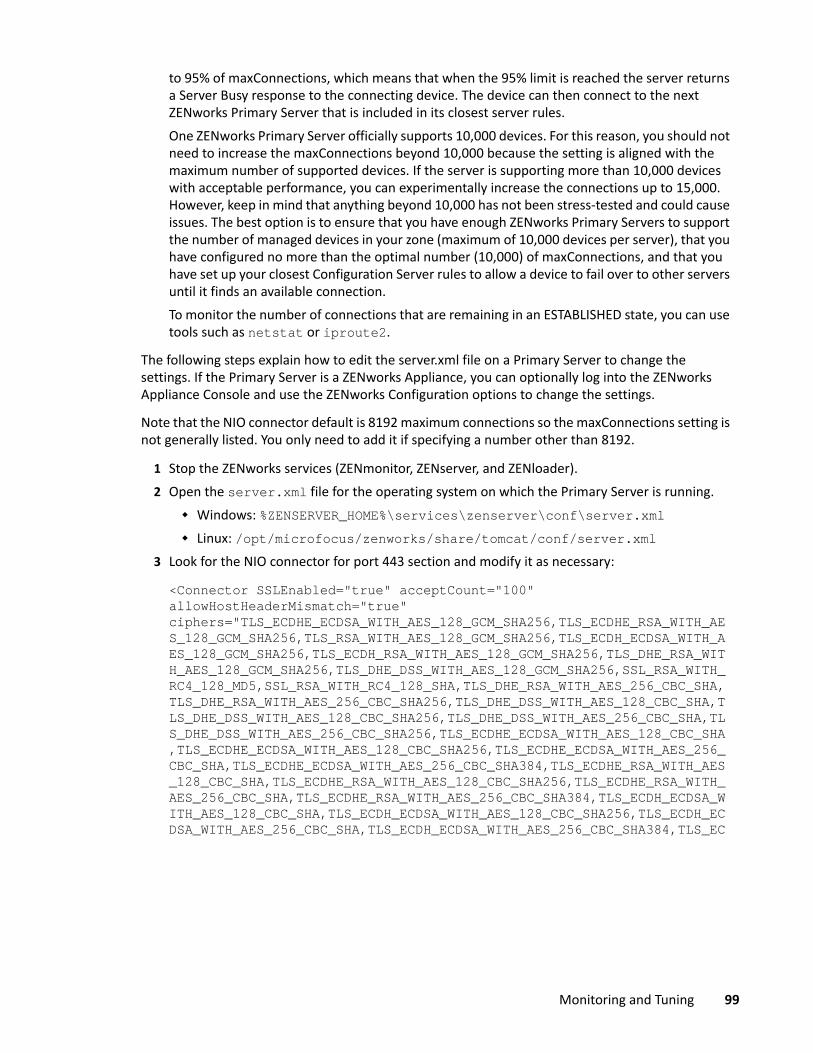
to 95% of maxConnections, which means that when the 95% limit is reached the server returns a Server Busy response to the connecting device. The device can then connect to the next ZENworks Primary Server that is included in its closest server rules.One ZENworks Primary Server officially supports 10,000 devices. For this reason, you should not need to increase the maxConnections beyond 10,000 because the setting is aligned with the maximum number of supported devices. If the server is supporting more than 10,000 devices with acceptable performance, you can experimentally increase the connections up to 15,000. However, keep in mind that anything beyond 10,000 has not been stress-tested and could cause issues. The best option is to ensure that you have enough ZENworks Primary Servers to support the number of managed devices in your zone (maximum of 10,000 devices per server), that you have configured no more than the optimal number (10,000) of maxConnections, and that you have set up your closest Configuration Server rules to allow a device to fail over to other servers until it finds an available connection.To monitor the number of connections that are remaining in an ESTABLISHED state, you can use tools such as netstat or iproute2.
The following steps explain how to edit the server.xml file on a Primary Server to change the settings. If the Primary Server is a ZENworks Appliance, you can optionally log into the ZENworks Appliance Console and use the ZENworks Configuration options to change the settings.
Note that the NIO connector default is 8192 maximum connections so the maxConnections setting is not generally listed. You only need to add it if specifying a number other than 8192.
1 Stop the ZENworks services (ZENmonitor, ZENserver, and ZENloader).2 Open the server.xml file for the operating system on which the Primary Server is running.
Windows: %ZENSERVER_HOME%\services\zenserver\conf\server.xml Linux: /opt/microfocus/zenworks/share/tomcat/conf/server.xml
3 Look for the NIO connector for port 443 section and modify it as necessary:
<Connector SSLEnabled="true" acceptCount="100" allowHostHeaderMismatch="true" ciphers="TLS_ECDHE_ECDSA_WITH_AES_128_GCM_SHA256,TLS_ECDHE_RSA_WITH_AES_128_GCM_SHA256,TLS_RSA_WITH_AES_128_GCM_SHA256,TLS_ECDH_ECDSA_WITH_AES_128_GCM_SHA256,TLS_ECDH_RSA_WITH_AES_128_GCM_SHA256,TLS_DHE_RSA_WITH_AES_128_GCM_SHA256,TLS_DHE_DSS_WITH_AES_128_GCM_SHA256,SSL_RSA_WITH_RC4_128_MD5,SSL_RSA_WITH_RC4_128_SHA,TLS_DHE_RSA_WITH_AES_256_CBC_SHA,TLS_DHE_RSA_WITH_AES_256_CBC_SHA256,TLS_DHE_DSS_WITH_AES_128_CBC_SHA,TLS_DHE_DSS_WITH_AES_128_CBC_SHA256,TLS_DHE_DSS_WITH_AES_256_CBC_SHA,TLS_DHE_DSS_WITH_AES_256_CBC_SHA256,TLS_ECDHE_ECDSA_WITH_AES_128_CBC_SHA,TLS_ECDHE_ECDSA_WITH_AES_128_CBC_SHA256,TLS_ECDHE_ECDSA_WITH_AES_256_CBC_SHA,TLS_ECDHE_ECDSA_WITH_AES_256_CBC_SHA384,TLS_ECDHE_RSA_WITH_AES_128_CBC_SHA,TLS_ECDHE_RSA_WITH_AES_128_CBC_SHA256,TLS_ECDHE_RSA_WITH_AES_256_CBC_SHA,TLS_ECDHE_RSA_WITH_AES_256_CBC_SHA384,TLS_ECDH_ECDSA_WITH_AES_128_CBC_SHA,TLS_ECDH_ECDSA_WITH_AES_128_CBC_SHA256,TLS_ECDH_ECDSA_WITH_AES_256_CBC_SHA,TLS_ECDH_ECDSA_WITH_AES_256_CBC_SHA384,TLS_EC
Monitoring and Tuning 99

DH_RSA_WITH_AES_128_CBC_SHA,TLS_ECDH_RSA_WITH_AES_128_CBC_SHA256,TLS_ECDH_RSA_WITH_AES_256_CBC_SHA,TLS_ECDH_RSA_WITH_AES_256_CBC_SHA384,TLS_RSA_WITH_AES_128_CBC_SHA,TLS_RSA_WITH_AES_128_CBC_SHA256,TLS_RSA_WITH_AES_256_CBC_SHA,TLS_RSA_WITH_AES_256_CBC_SHA256" clientAuth="false" disableUploadTimeout="true" enableLookups="false" keyAlias="tomcat" keystoreFile="C:\Program Files (x86)\Micro Focus\ZENworks\conf\security\server.keystore" keystorePass="74721885bbe85e4ed31504aa80caaa5b" maxHttpHeaderSize="8192" maxPostSize="-1" maxSpareThreads="75" maxThreads="1000" minSpareThreads="25" maxConnections="12000" port="443" protocol="org.apache.coyote.http11.Http11NioProtocol" scheme="https" secure="true" sslEnabledProtocols="TLSv1,TLSv1.1,TLSv1.2,SSLv2Hello" sslProtocol="TLS" />
4 Save the file.5 (Conditional) If you have applied ZCM_20.2.0_FTF_Server_1002.zip and above FTF on the
Primary Server, and if you have performed the above configuration, then set com.novell.zenworks.zeus.worktodo.maxconnections=<the number of maxConnections configured in the server.xml can be added here> in the following files: On Windows: %ZENSERVER_HOME%\conf\worktodoservlet.properties Linux: /etc/opt/microfocus/zenworks/worktodoservlet.properties
The number of com.novell.zenworks.zeus.worktodo.maxconnections being configured should always be lesser than or equal to the maxConnections configured in server.xml.
NOTE: if the worktodoservlet.properties file does not exist, then create the file and add the com.novell.zenworks.zeus.worktodo.maxconnections property.
Connections are required for every request made to the server. In the case of other web requests made during agent refresh, also a connection is consumed, although for a short period of time until the request is serviced. In the case of Push Notification connections, the connections are long-lived. So, the max number of connections that should be configured should be a total of devices that we expect to connect for push notification and the number of tomcat threads configured, which might all get consumed during a burst load.Therefore, to set apart a quota of connections for other web requests during agent refresh, it is important to limit the number of push notification connections. This can be done by configuring the maximum number of push notification connections allowed via the worktoservlet.properties file.
6 Start the ZENworks services again.
For more information about the other connector settings, see the Apache Tomcat Configuration Reference (http://tomcat.apache.org/tomcat-8.0-doc/config/http.html).
Using the ZENworks Diagnostics ToolsA new diagnostics dashboard and diagnostics tool is available in ZENworks Control Center to monitor the health of your zone and troubleshoot. Using ZENworks Diagnostics, it is possible to use the ZENworks Control Center interface to inspect and debug the state of the ZENworks servers in the zone. ZENworks Diagnostics provides the ZENworks Administrator an intuitive portal to check the state of the LDAP sources (eDirectory or Active Directory). It also provides a probe feature wherein
100 Monitoring and Tuning
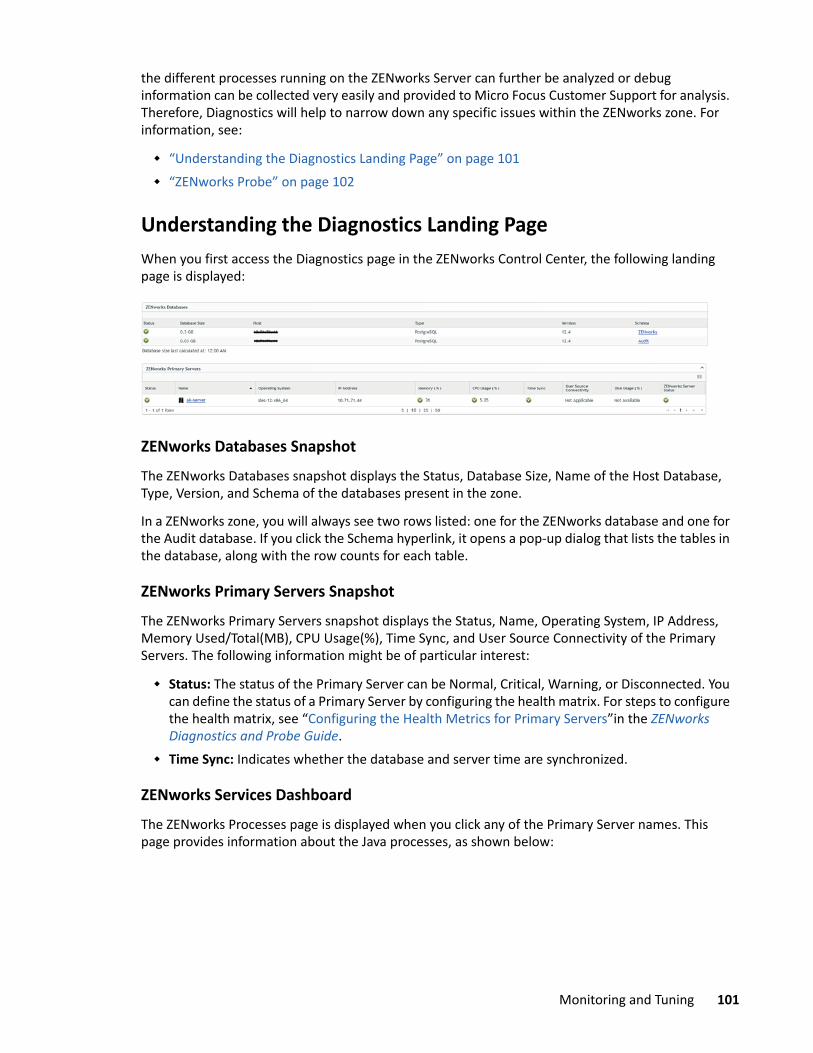
the different processes running on the ZENworks Server can further be analyzed or debug information can be collected very easily and provided to Micro Focus Customer Support for analysis. Therefore, Diagnostics will help to narrow down any specific issues within the ZENworks zone. For information, see:
“Understanding the Diagnostics Landing Page” on page 101 “ZENworks Probe” on page 102
Understanding the Diagnostics Landing PageWhen you first access the Diagnostics page in the ZENworks Control Center, the following landing page is displayed:
ZENworks Databases SnapshotThe ZENworks Databases snapshot displays the Status, Database Size, Name of the Host Database, Type, Version, and Schema of the databases present in the zone.
In a ZENworks zone, you will always see two rows listed: one for the ZENworks database and one for the Audit database. If you click the Schema hyperlink, it opens a pop-up dialog that lists the tables in the database, along with the row counts for each table.
ZENworks Primary Servers SnapshotThe ZENworks Primary Servers snapshot displays the Status, Name, Operating System, IP Address, Memory Used/Total(MB), CPU Usage(%), Time Sync, and User Source Connectivity of the Primary Servers. The following information might be of particular interest:
Status: The status of the Primary Server can be Normal, Critical, Warning, or Disconnected. You can define the status of a Primary Server by configuring the health matrix. For steps to configure the health matrix, see “Configuring the Health Metrics for Primary Servers”in the ZENworks Diagnostics and Probe Guide.
Time Sync: Indicates whether the database and server time are synchronized.
ZENworks Services DashboardThe ZENworks Processes page is displayed when you click any of the Primary Server names. This page provides information about the Java processes, as shown below:
Monitoring and Tuning 101
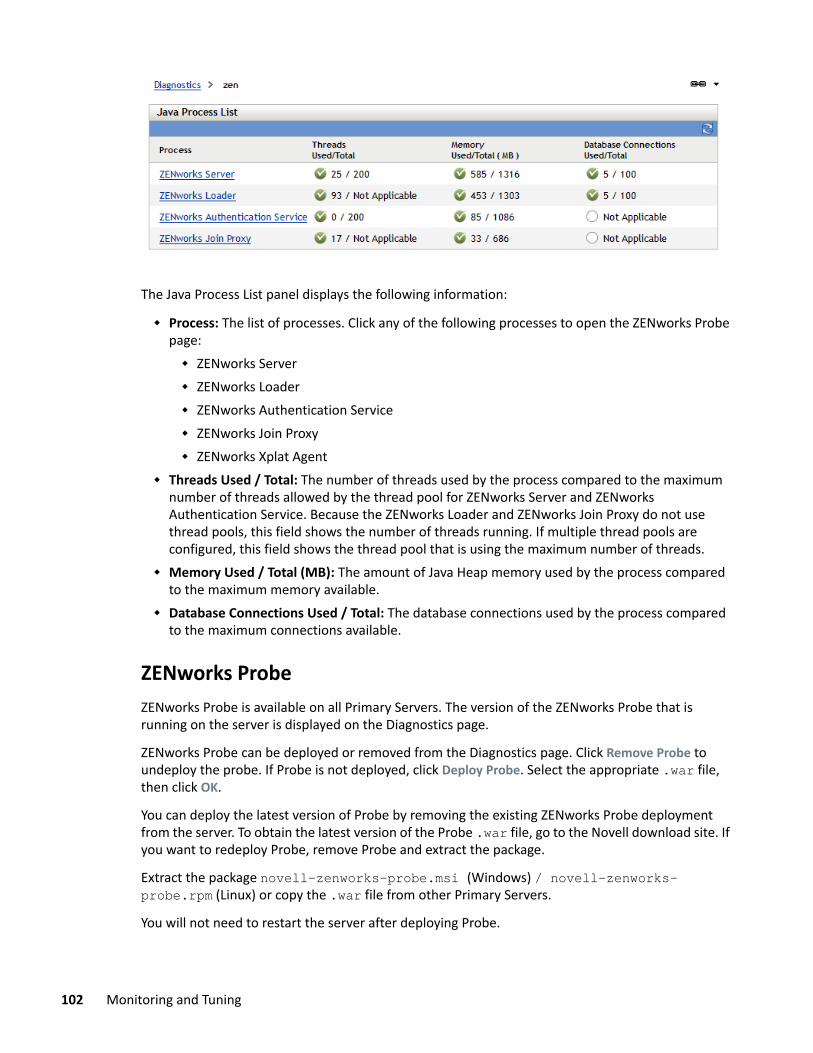
The Java Process List panel displays the following information:
Process: The list of processes. Click any of the following processes to open the ZENworks Probe page: ZENworks Server ZENworks Loader ZENworks Authentication Service ZENworks Join Proxy ZENworks Xplat Agent
Threads Used / Total: The number of threads used by the process compared to the maximum number of threads allowed by the thread pool for ZENworks Server and ZENworks Authentication Service. Because the ZENworks Loader and ZENworks Join Proxy do not use thread pools, this field shows the number of threads running. If multiple thread pools are configured, this field shows the thread pool that is using the maximum number of threads.
Memory Used / Total (MB): The amount of Java Heap memory used by the process compared to the maximum memory available.
Database Connections Used / Total: The database connections used by the process compared to the maximum connections available.
ZENworks ProbeZENworks Probe is available on all Primary Servers. The version of the ZENworks Probe that is running on the server is displayed on the Diagnostics page.
ZENworks Probe can be deployed or removed from the Diagnostics page. Click Remove Probe to undeploy the probe. If Probe is not deployed, click Deploy Probe. Select the appropriate .war file, then click OK.
You can deploy the latest version of Probe by removing the existing ZENworks Probe deployment from the server. To obtain the latest version of the Probe .war file, go to the Novell download site. If you want to redeploy Probe, remove Probe and extract the package.
Extract the package novell-zenworks-probe.msi (Windows) / novell-zenworks-probe.rpm (Linux) or copy the .war file from other Primary Servers.
You will not need to restart the server after deploying Probe.
102 Monitoring and Tuning
NOTE: Generally you will use the ZENworks Probe utility under the direction of a Micro Focus Customer Support engineer.
The ZENworks Probe page has the following tabs:
“Applications” on page 103 “Threads” on page 104 “System” on page 104 “Connectors” on page 106
ApplicationsThe Application tab provides the following information about each web application deployed on the Tomcat server: the name of the web application and the total number of requests processed, whether it is running, the total number of sessions, session timeout, and whether it is distributable.
When you click on any application, the following information is presented:
“Application Summary” on page 103 “Application Deployment Descriptor” on page 103 “Application Servlet” on page 104
Application SummaryThe Application Summary page gives you the information that is specific to the selected application, including: Doc.Base, Servlet Version, Number of servlets present for that application, Session Timeout, and whether it is serial or not.
The graphical representation of NUMBER OF REQUESTS and AVERAGE RESPONSE TIME helps users determine the load for that application at any given time.
The Application Information panel displays the Application name, Doc.base, Description, Servlet Version, Servlet count, Session Timeout, and Clustered Application information.
The Statistics Charts panel displays the following statistics for the application:
Number of Requests: A chart with coordinates corresponding to the REQUEST COUNT (Total number of requests for that application) and ERROR COUNT (Number of errors).
Average Response Time (MS): A chart with coordinates corresponding to PROCESSING TIME (processing time for the request), MIN TIME (minimum time), MAX TIME (maximum time), and AVG RESPONSE TIME (average response time). This can be useful in identifying the normal time and then looking for periods of time outside the normal value.
Application Deployment DescriptorThe Application Deployment Descriptor page displays the web.xml file of the application. This contains important information such as url-mapping, which helps you understand which servlet will be called for a specific type of URL.
Monitoring and Tuning 103
Application ServletThe Application Servlet page displays the following information:
Name: Name of the servlet. Avail: Availability of the servlet. Startup: Sequence in which the servlet is loaded at the servlet container startup. Req: Number of requests processed by each servlet. Proc Time: The time taken by the servlet to process all the request received. Err: Error count. Min Time: Minimum time taken to process the request. Max Time: Maximum time taken to process the request. Multi Thrd: Whether the servlet is multithreaded. Servlet Mappings: Opens the Servlet Mapping page.
The Servlet Mapping page displays the following information: URL, SERVLET NAME, SERVLET CLASS, and AVAIL mapping between the servlets and the URLs.
Show All: Opens the Servlet page, which lists the information for all servlets on the Tomcat server.
ThreadsThe Threads tab displays the following information and allows you to dump the thread pool information for the current Java Virtual Machine.
Exexx Point: The current execution point for the thread. In.Native: Whether the thread is executing native code. Susp: Whether the thread is suspended. WC: The total number of times the thread was in wait notification state. That is, the number of
times a thread has been in java.lang.Thread.State.WAITING state or java.lang.Thread.State.TIMED_WAITING state.
BC: The total number of times the thread was blocked. That is, the number of times a thread has been in the java.lang.Thread.State.BLOCKED state.
Threads Pool: Click this link to open the Threads Pools page. Dump All Threads: Click this link to access the thread dump of the system in its present state.
This can be saved on the local machine and opened in any thread dump analyzer. This is a commonly requested operation by Micro Focus Customer Support and Micro Focus Engineering.
SystemThe System page of the ZENworks Probe utility provides links to the following system information:
“Overview” on page 105 “Memory Utilization” on page 105
104 Monitoring and Tuning
“System Properties” on page 106 “OS Information” on page 106
OverviewThe Overview page provides information about memory utilization, operating system, the Tomcat container, and the JVM being used.
From this page you can see the following information:
Free: The amount of Java Heap space available for this JVM. Total: The total memory space. Max: The maximum memory space available. Dump Heap: Click this link to generate the memory dump of the JVM. This is stored in the
machine where the target JVM is running.
Memory UtilizationThe Memory Utilization page displays the memory utilization for Java objects in different generations and based on the usage, can even advise for garbage collection. This page has the following panels:
Current Memory Usage Name: Name of the pool. Usage Score: The usage score bar chart. Plot: Hides or unhides the memory usage graph. Used: The amount of memory currently used, including the memory occupied by all objects,
both reachable and unreachable. Committed: The amount of memory guaranteed to be available for use by the JVM. The
amount of committed memory might change over time. For example, the Java virtual machine might release memory to the system, so the amount of committed memory could be less than the amount of memory initially allocated at startup. The amount of committed memory will always be greater than or equal to the amount of used memory.
Maximum: The maximum amount of memory that can be used for memory management. Its value could change or be undefined. A memory allocation could fail if the Java VM attempts to increase the used memory to an amount greater than committed memory, even if the amount used is less than or equal to maximum value (for example, when the system is low on virtual memory).
Initial: Initial memory allocated. Total: Total memory allocated.
From here you can also initiate the garbage collection process and initiate a Java Heap dump if requested to do so by Micro Focus Customer Support or Micro Focus Engineering.
Monitoring and Tuning 105

MEMORY USAGE HISTORY Permanent Generation (non-heap): The pool containing all of the reflective data on the virtual
machine itself, such as class and method objects. With Java VMs that use class data sharing, this generation is divided into read-only and read-write areas.
Tenured Generation (heap): The pool containing objects that have existed for some time in the survivor space.
Survivor Space (heap): The pool containing objects that have survived the garbage collection of the Eden space.
Code Cache (non-heap): The HotSpot JVM also includes a code cache, containing memory that is used for the compilation and storage of native code.
Eden Space (heap): The pool from which memory is initially allocated for most objects.
System PropertiesThis page shows you all the system properties that are known in the Java Virtual Machine environment.
OS InformationThe OS Information panel displays information about the OS Name and Version, overall memory usage, and information related to swap file usage. This page is a good indicator that you might be low on memory if you are seeing a large amount of swapping.
From this page you can also see graphs over time for JVM CPU Utilization, OS and Java Memory Usage, and Swap Usage.
ConnectorsThe Connectors page provides the list of connectors and its information for Tomcat servers. The charts in this tab help users find out the number of incoming requests for each connector, how much time it took to process at each interval, and the amount of data that was transferred at each interval. The user can find the remote IP that is requesting for a particular URL and the time it took to process that request.
The following chart is displayed for each connector type:
Number of Requests in Each Interval: Number of requests in each interval. Processing Time (MS) in Each Interval: Processing time spent for the requests in each interval. Traffic Volume (Bytes) in Each Interval: Traffic volume in each interval.
This page also shows the remote IP of the request, the stage of the request, processing time for the request, and the originating URL of the request.
106 Monitoring and Tuning
Monitoring Your ZENworks Server Using Visual VMYou can monitor the performance parameters such as threads, heap memory, ehCache, and database connections of the Primary Server using Java Visual VM bundled with ZENworks. VisualVM uses secured JMX connections to monitor ZENworks processes through JVM and MBeans.
From ZENworks 11.4.1 release onwards, JMX logs are located at the following:
Windows: %ZENSERVER_HOME%/logs/jmxagentLinux: /var/opt/microfocus/log/zenworks/jmxagent
How to Launch Visual VM on a Windows Primary ServerTo monitor your Windows Primary Server with Visual VM you must do the following:
1 Create a batch script with the following command (in single line):"C:\Program Files (x86)\Micro Focus\ZENworks\share\java\bin\jvisualvm.exe" -J-Djavax.net.ssl.keyStore="C:\Program Files (x86)\Micro Focus\ZENworks\conf\security\server.keystore" -J-Djavax.net.ssl.trustStore="C:\Program Files (x86)\Micro Focus\ZENworks\conf\security\zenCaCertStore" -J-Djavax.net.ssl.keyStorePassword=640e9e279dbaed6eae4ee783f1c0d02d -J-Djavax.net.ssl.trustStorePassword=633f59db6639664c5f172699c3a36d7f
2 Change the jvisualvm.exe, keystore and trustStore file paths according to your zone %ZENSERVER_HOME%
3 Change keyStorePassword as in %ZENSERVER_HOME%\conf\security\passphrase.txt4 Change trustStorePassword as in %ZENSERVER_HOME%\conf\security\zenCacertPassphrase.txt
5 Save the batch script6 Launch the batch script.
How to Launch Visual VM on a Linux Primary ServerVisualVM is a GUI application that requires a terminal session attached to the X display on your Primary Server. To monitor your Linux Primary Server with Visual VM:
1 Create a shell script with the following command (in single line):/opt/microfocus/zenworks/share/java/bin/jvisualvm -J-Djavax.net.ssl.keyStore="/etc/opt/microfocus/zenworks/security/server.keystore" -J-Djavax.net.ssl.trustStore="/etc/opt/microfocus/zenworks/security/zenCaCertStore" -J-Djavax.net.ssl.keyStorePassword=`cat /etc/opt/microfocus/zenworks/security/passphrase.txt` -J-Djavax.net.ssl.trustStorePassword=`cat /etc/opt/microfocus/zenworks/security/zenCacertPassphrase.txt`
2 Save the shell script.
Monitoring and Tuning 107
3 Give execute permissions to the shell script.4 Launch the shell script.
How to Install the MBeans Plugin for Visual VMTo enable the monitoring of all necessary resources, you must install the MBeans plugin for Visual VM.
1 Launch Java VisualVM.2 Click Tools.3 Click Plugins.4 Click the Available Plugins tab.5 Select VisualVM- MBeans, then click Install.
How to Add JMX Connections in Visual VMTo use Visual VM for monitoring the ZENworks services you need to connect Visual VM to the JMX instance.
1 Launch Java VisualVM.2 Add the jmx connection using the toolbar icon.3 Specify the connection value as <IP Address of Primary Server>:<Port>4 Specify the port values:
61495 for ZENServer 61491 for ZENLoader 61493 for CASA
Monitoring ehCacheZENworks utilizes ehCache for caching commonly used information from the database into memory for faster performance and better scalability. You can use Visual VM to monitor the effectiveness of ehCache.
1 Install the MBeans plugin for Java VisualVM.2 Add the JMX connection for the process for which you want to monitor the ehCache.3 Double click the JMX connection.4 Click the MBeans tab.5 Expand com.novell.zenworks.diagnostics.mbeans.6 Expand DMCache.7 Expand System_xxxxxxxxxx.8 Verify the cache HitToMissRatio, Evicts, Expires values.9 Back up the cache configuration xml files of Primary Servers in following locations:
Linux: /etc/opt/microfocus/zenworks/datamodel/caching/default
108 Monitoring and Tuning
Windows: %ZENSERVER_HOME%\conf\datamodel\caching\default10 Determine the suitable values for SizePossible for all cache settings based on the
HitToMissRatio, Evicts, Expires values.11 To update the customized values for SizePossible of all cache settings, by changing the value of
maxElementsInMemory in cache xml files.
NOTE: Changing the cache size values without proper analysis and monitoring might affect the performance of Primary Servers.
Higher values for maxElementsInMemory might cause Out Of Memory issues.
Monitoring Connection PoolsYou can also use Visual VM to monitor the connection pools used by the ZENworks Server processes:
1 Install the MBeans plugin for Java VisualVM.2 Add the JMX connection for the process for which you want to monitor the connection pools.3 Double click the JMX connection.4 Click the MBeans tab.5 Expand com.mchange.v2.c3p0.6 Expand the connection pool IDs to identify the names.7 Select ZENServer.Core ,ZENServer.Audit, ZENLoader.Core, ZENLoader.Audit, or ZENLoader.Batch.8 Verify the MaxPoolSize, MinPoolSize, numConnections, > numBusyConnections,
numIdleConnections, and numThreadsAwaitingCheckoutDefaultUser values. 9 Determine the suitable values for MaxPoolSize, MinPoolSize, based on the connections usage
and busy state. 10 To update the customized values of MaxPoolSize, MinPoolSize for connections pools, follow the
instructions in “Connection Pool Tuning for the ZENworks Primary Server” on page 93.
NOTE: Changing the connection pool values without proper analysis and monitoring might affect the performance of the Primary Servers, database, and zone.
Tuning the ZENworks AgentThis section describes ways to tune the ZENworks Agent. This can provide better login performance, reduced memory and CPU usage, and other benefits.
“Disabling the Credential Provider and Enabling the Credential Manager” on page 110 “Disabling ZENworks Authentication” on page 110 “Controlling Collection Upload Frequency” on page 111 “SQL Maintenance” on page 112 “Additional Tuning via Registry Keys” on page 112
Monitoring and Tuning 109
Disabling the Credential Provider and Enabling the Credential ManagerSince ZENworks 11 SP2, the ZENworks Agent includes a Network Credential Manager that supplements the ZENworks Credential Provider wrapper. Network Credential Manager facilitates passive mode authentication when users log in with any third-party credential provider.
The following capabilities are not available while using a third-party credential manager:
Dynamic Local User Windows Roaming Profile Policies Windows Group Policies
The Credential Manager is installed by default, but if ZENworks Credential Provider is available, it takes preference.
In your Management Zone, if you do not have any of the policies mentioned above, it is advisable to disable the ZENworks Credential Provider for an improved login experience.
To disable the ZENworks Credential Provider, set the following:
Registry Key Name: DisableZENCredentialProviderRegistry Key Path: HKLM\Software\Novell\ZCM\ZenLgnRegistry Key Type: DWORDRegistry Key Value: 1
Disabling ZENworks AuthenticationBy default, if a user source is defined in the ZENworks Management Zone, the ZENworks Agent attempts to authenticate users to the zone when they log in through the Microsoft or Novell client.
If necessary, you can disable user authentication to the zone. For example, you might have some users who only receive device-assigned content, so you do not want the overhead of having them logged into the zone.
To disable user authentication to the zone:
1 Locate the following key in the registry on the user’s device:HKLM\SOFTWARE\Novell\ZCM\ZenLgn
2 (Conditional) If you want to disable login, add the following DWORD value:Value name: DisablePassiveModeLoginValue data: Any non-zero value (for example, 1, 2, 3, 100)With login disabled, no attempt is made to authenticate to the Management Zone when the user logs in through the Microsoft or Novell client.
3 (Conditional) If you want to disable the ZENworks login prompt that appears when the login through the Microsoft client or Novell client fails, add the following DWORD value:Value name: DisablePassiveModeLoginPromptValue data: Any non-zero value (for example, 1, 2, 3, 100)
110 Monitoring and Tuning
Normally, the Agent attempts to authenticate the user to the zone by using the credentials entered in the Microsoft or Novell client. If login fails, the ZENworks login prompt is displayed in order to give the user an opportunity to authenticate with different credentials.
This value setting disables the ZENworks login prompt.
Controlling Collection Upload FrequencyZENworks collects a lot of data from the managed device. This data is rolled up from the device to its collection server periodically. Each process that uploads data has a default interval for uploading that data. In your environment you can choose to modify these defaults. This section helps you understand how to modify them.
“Changing the Status Upload Frequency on a Linux or Mac OS-X Device” on page 111 “Changing the Status Upload Frequency on a Windows Device” on page 111 “Changing the Audit Upload Frequency on a Windows Device” on page 112
Changing the Status Upload Frequency on a Linux or Mac OS-X DeviceThe default status upload frequency of the ZENworks Agent is 30 minutes. You can choose to override the default status upload frequency by configuring the following preferences on a Linux or Mac OS-X device:
1 On a Linux managed device, open the /etc/opt/microfocus/zenworks/conf/xplatzmd.properties file in a text editor.
2 Add the SleepTime parameter as SleepTime=nn ,where nn is the repeat frequency in minutes.
Changing the Status Upload Frequency on a Windows DeviceThe default status upload frequency of the ZENworks Agent is 30 minutes. You can choose to override the default status upload frequency by configuring the following preferences on a Windows device:
1 On a Windows managed device, open the <CONF_DIR>/StatusSenderConfig.xml file in a text editor.
2 Provide the following values:<configuration><StatusSender> <Parameter SleepTime=nnn></StatusSender></configuration>where nnn is the SleepTime in seconds.
Monitoring and Tuning 111
Changing the Audit Upload Frequency on a Windows DeviceThe default audit upload frequency of the ZENworks Agent is 60 minutes. You can choose to override the default audit upload frequency by configuring the following preferences:
1 On a Windows managed device, open the <CONF_DIR>/audit/AuditLoggerConfig.xml file.
2 Change the following value:<UploadIntervalInMin>nn</UploadIntervalInMin>, where nn is frequency in minutes.
Currently Linux and OS-X devices do not generate audit events.
SQL MaintenanceOn the managed device, ZENworks cache uses SQLite DB for persistence. SQLite has an Asynchronous IO extension to improve the performance of the write operations. This has been enabled by default and should not be turned off.
Normally, when SQLite writes to a database file, it waits until the write operation is finished before returning control to the calling application. Because writing to the file system is usually very slow when compared with CPU bound operations, this can be a performance bottleneck. The asynchronous I/O back end is an extension that causes SQLite to perform all write requests using a separate thread running in the background. Although this does not reduce the overall system resources (CPU, disk bandwidth etc.), it does allow SQLite to return control to the caller quickly, even when writing to the database.
Additional Tuning via Registry KeysAdditional tuning can be performed by configuring the registry keys on a Windows agent. For more information see the ZENworks Registry Keys Reference.
Tuning the Antimalware ServiceThe Antimalware Service, which runs on ZENworks Primary Servers, processes the Antimalware events data rolled up from managed devices and provides ZCC dashlet access (via the Antimalware Rest API) to the Antimalware database.
The Antimalware Service is a Spring Boot application. The following sections provide tuning information for the service:
“Tuning Antimalware Event Processing” on page 113 “Tuning Tomcat” on page 115 “Tuning Antimalware Database Connections” on page 116 “Tuning the Cached Settings Time-to-Live” on page 116 “Tuning Database Queries” on page 117
112 Monitoring and Tuning
Tuning Antimalware Event ProcessingWhenever a malware threat is detected, an ondemand malware scan occurs, or the ZENworks agent refreshes, one or more Antimalware event files is generated and rolled up via the Collection System to a Primary Server. The Antimalware Service then processes the data into the Antimalware database. The following sections describe settings you modify to tune event processing performance:
“Thread Pool” on page 113 “Event Polling” on page 113 “Event Retention” on page 114 “Batch Processing” on page 115
Thread PoolEvent files are processed as a background activity in a multithreaded environment using ThreadPoolTaskExecutor. Generally the default settings are sufficient. However, if you find that the Antimalware Service’s CPU usage is too high you can reduce the number of available threads. Recognize that reducing the number of threads can slow down event file processing. Likewise, the number of threads in the pool could be increased if event files are accumulating in the queue and the server hardware supports the increase.
The thread pool settings are in the application.properties file:
Linux: /etc/opt/microfocus/antimalware/application.propertiesWindows: %ZENSERVER_HOME%\services\antimalware\conf\application.properties
Event PollingThe Antimalware Service picks up event files in batches at a specified interval. Increasing the files per polling batch or the polling interval increases the number of files processed per hour but also increases the load on the Antimalware Service and Antimalware database.
The event polling settings are in the application.properties file:
Setting Description
ameprocessor.threadpool.maxPoolSize The maximum number of threads that can ever be created to process event files. When a task is submitted, if queueCapacity is full and fewer than maxPoolSize threads are running, a new thread is created. The default is 10.
ameprocessor.threadpool.corePoolSize The minimum number of worker threads to keep alive. When a task is submitted and fewer than corePoolSize threads are running, even if the threads exist but are idle, a new thread is created. The default is 5.
ameprocessor.threadpool.queueCapacity The number of items that determine a full queue. New threads will only be created when queueCapacity is full. The default is 20.
Monitoring and Tuning 113

Linux: /etc/opt/microfocus/antimalware/application.propertiesWindows: %ZENSERVER_HOME%\services\antimalware\conf\application.properties
Event RetentionAfter processing, event files are moved to success or failure directories. The following settings control how long the files are retained.
The event retention settings are in the application.properties file:
Linux: /etc/opt/microfocus/antimalware/application.propertiesWindows: %ZENSERVER_HOME%\services\antimalware\conf\application.properties
Setting Description
poller.maxMessagesPerPoll The maximum number of event files that can be picked up during one polling interval. The default is 100.
poller.fequency The time, in milliseconds, between event polls. The default is 60000.
poller.wait.beforeRelease The time, in milliseconds, the poller waits for the maxMessagesPerPoll number of events before processing the available events. The default is 100.
retry.poller.frequency Event processing can fail in scenarios where the Antimalware database does not yet contain the parent information for the event files. For example, device data may not yet be synced from the ZENworks database to the Antimalware database or a parent event record has not yet arrived from a managed device.
This setting determines the time, in milliseconds, between polls for files that have failed and need to be retried. The default is 300000 (5 minutes). The recommendation is to keep it above 4 minutes to give a failed database sync time to retry before the event processing retries.
ame.retry.count The number of times that processing of failed files will be retried. The default is 3.
Setting Description
success.retention.days The number of days that successfully processed event files are retained. The default is 1.
failure.retention.days The number of days that event files that failed processing are retained. The default is 15.
purge.lookup.schedule Allows you to schedule when the purge of the success and failure directories occurs. Cron format is used with the default being 0 0 0 * * * (midnight).
114 Monitoring and Tuning
Batch ProcessingAntimalware event files are processed together so that the benefits of jdbc batch and bulk copy are realized. The default setting values have been derived from scale tests run in the Micro Focus lab and, in general, should not require changes. The batch processing settings are in the amedatasource.properties file:
Linux: /etc/opt/microfocus/antimalware/amedatasource.propertiesWindows: %ZENSERVER_HOME%\services\antimalware\conf\amedatasource.properties
Tuning TomcatThe Antimalware Service uses embedded Tomcat. The table below lists the Tomcat settings that can be adjusted for performance tuning. These settings are in the application.properties file:
Linux: /etc/opt/microfocus/antimalware/application.propertiesWindows: %ZENSERVER_HOME%\services\antimalware\conf\application.properties
Setting Description
ame.datasource.bulkcopy.batch.size The bulk copy batch size used for database persistence. The default is 10000.
ame.datasource.jdbcbatch.batch.size The jdbc batch size used for database persistence. The default is 10000.
Setting Description
server.tomcat.max-connections The maximum number of connections that the server accepts and processes at any given time. Once the limit has been reached, the operating system may still accept connections based on the "acceptCount" property. The default is 100.
server.tomcat.accept-count The maximum queue length for incoming connection requests when all possible request processing threads are in use. The default is 10.
server.connection-timeout Time (in seconds) that connectors wait for another HTTP request before closing the connection. The default is 10.
server.tomcat.threads.max The maximum number of worker threads in server under top load. In other words, maximum number of simultaneous requests that can be handled. The default is 100.
server.tomcat.min-spare-threads The minimum number of threads always kept running. This includes both active and idle threads. The default is 5.
Monitoring and Tuning 115
Tuning Antimalware Database ConnectionsThe Antimalware Service uses a C3p0 library to manage the database connections. The table below lists the c3p0 settings that can be adjusted for performance tuning. These settings are in the c3p0.properties file:
Linux: /etc/opt/microfocus/antimalware/c3p0.propertiesWindows: %ZENSERVER_HOME%\services\antimalware\conf\c3p0.properties
Tuning the Cached Settings Time-to-LiveAntimalware scan schedule settings are stored in the ZENworks database and synced to the Antimalware database. Once in the Antimalware database, a calculation is performed to determine a device’s Next Scan time. At that point, the device’s Next Scan time can be displayed in the Antimalware dashlets and ZCC pages that access the Antimalware database for data.
The Next Scan times are calculated and cached every two hours. This can be modified if ZENworks administrators are making frequent changes to scan schedules and want to reduce the time required for updated Next Scan times to be available in ZENworks Control Center.
The following setting controls how long the cached Next Scan times live before it is recalculated and recached. The setting is in the application.properties file:
Linux: /etc/opt/microfocus/antimalware/application.propertiesWindows: %ZENSERVER_HOME%\services\antimalware\conf\application.properties
Setting Description
spring.ame-datasource.min-poolsize The default is 6.
spring.ame-datasource.max-poolsize The default is 100.
spring.ame-datasource.num-helper-threads
The default is 5.
spring.ame-datasource.max-statements The default is 1000.
spring.ame-datasource.max-statements-per-connection
The default is 100.
spring.ame-datasource.max-connection-age
The default is 14400.
spring.ame-datasource.max-idle-time The default is 3600.
spring.ame-datasource.max-idle-time-excess-connections
The default is 120.
spring.ame-datasource.idle-connection-test-period
The default is 600
116 Monitoring and Tuning
Tuning Database QueriesZENworks Control Center uses a Rest API to the Antimalware service to query the Antimalware database for Antimalware data to display.
The ThreadPoolTaskExecutor helps execute simultaneous queries. Generally the default settings are sufficient. However, if you find that the Antimalware Service’s CPU usage is too high you can reduce the number of available threads. Recognize that reducing the number of threads can slow down query results. Likewise, the number of threads in the pool could be increased if queries are not being executed because of the load and the server hardware supports the increase.
The thread pool settings are in the application.properties file:
Linux: /etc/opt/microfocus/antimalware/application.propertiesWindows: %ZENSERVER_HOME%\services\antimalware\conf\application.properties
Setting Description
am.settings.cache.timetolive The time, in milliseconds, that the cached data lives before it is refreshed. The default is 7200 (2 hours).
Setting Description
restapi.maximum.pool.size The maximum number of threads that can ever be created to process event files. When a task is submitted, if queue capacity is full and fewer than the maximum threads are running, a new thread is created. The default is 100.
restapi.core.pool.size The minimum number of worker threads to keep alive without timing out. When a task is submitted and fewer than the minimum threads are running, even if the threads exist but are idle, a new thread is created. The default is 5.
restapi.queue.capacity The number of items that determine a full queue. New threads will only be created when queue capacity is full. The default is 10.
restapi.keep.alive.seconds The time, in seconds, for an idle worker thread to wait for more work before timing out. The default is 60.
restapi.async.request.timeout.milliseconds The timeout period, in milliseconds for requests. The deault is 360000.
Monitoring and Tuning 117
Tuning Antimalware Database SynchronizationThe ZENworks database syncs data--such as devices, policies, assignments, and configuration settings--to the Antimalware database. With this synced data and the malware event data received directly from devices, ZENworks Control Center only has to query the Antimalware database when displaying Antimalware data.
Antimalware database synchronization is implemented through an Apache Kafka Change Data Capture (CDC) workflow that streams data from the ZENworks database to the Antimalware database. This workflow is documented in detail in the Kafka Reference Guide.
Typically, you should not need to tune the Antimalware database synchronization process. The following information is provided for reference if adjustments are required under the direction of Micro Focus support or development when resolving performance issues.
“Kafka RDBMS Producer Settings” on page 118 “Kafka Antimalware Consumer Settings” on page 119 “Antimalware Database Connections” on page 120
Kafka RDBMS Producer SettingsThe Kafka RDBMS producer is responsible for identifying changes in the ZENworks database (RDBMS) tables and publishing those changes to topics in Kafka. The connector-configs.xml file contains the producer settings:
Linux: /etc/opt/microfocus/zenworks/connector-configs.xmlWindows: %ZENSERVER_HOME%\conf\connector-configs.xmlEach synced database table, along with its synchronization settings, is defined in a <connector-config> section of the file. For example, the zvpolicy table is defined as:
<connector-config name="ZENconnector-zvpolicy"> <config name="poll.interval.ms" value="90000"/> <config name="timestamp.delay.interval.ms" value="120000"/></connector-config>This allows independent adjustments to the synchronization frequency of each database table. For example, reducing the poll interval for the zvpolicy database table would cause policy data to be synced more frequently. You should be aware of the following before adjusting settings:
Care should be taken to ensure that the poll interval for child tables (such as zvpolicy) is paired with parent tables (such as zenobject). Otherwise, the producer may try to add child data to a topic before its parent data is available in the topic.
The Kafka RDBMS producer (and its connectors) publishes data that is consumed by both the Antimalware database and the Vertica database. Changes to the settings affect both consumers.
118 Monitoring and Tuning
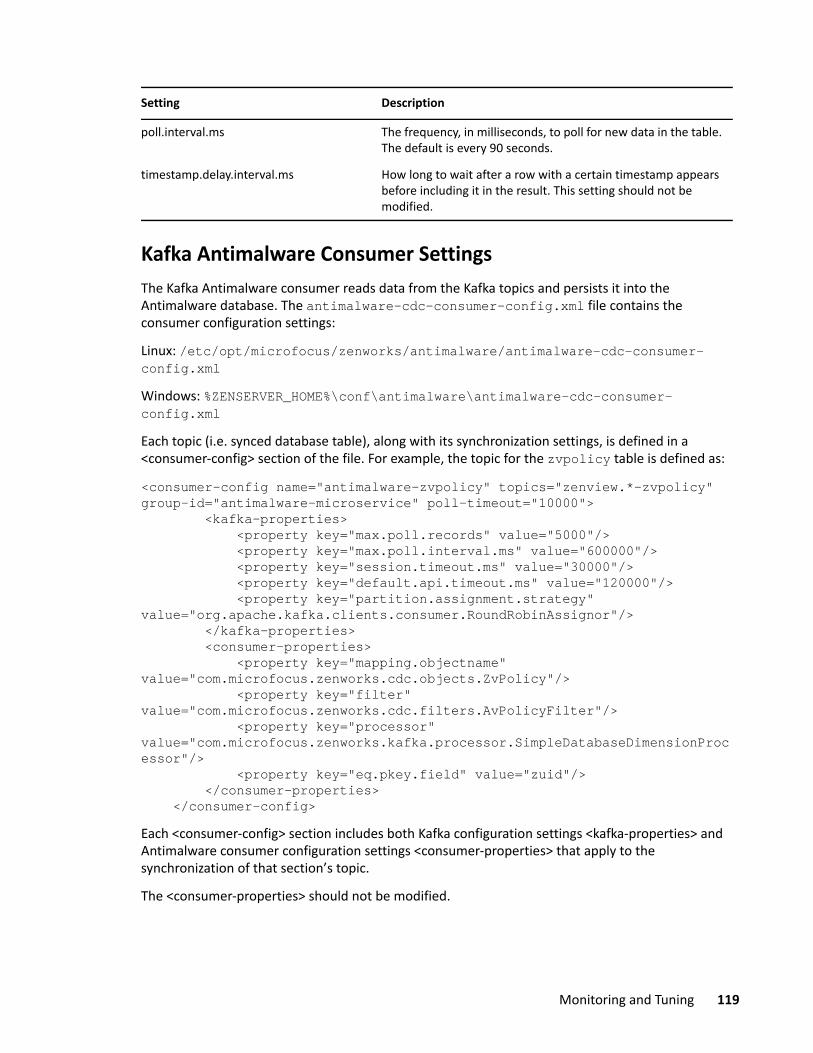
Kafka Antimalware Consumer SettingsThe Kafka Antimalware consumer reads data from the Kafka topics and persists it into the Antimalware database. The antimalware-cdc-consumer-config.xml file contains the consumer configuration settings:
Linux: /etc/opt/microfocus/zenworks/antimalware/antimalware-cdc-consumer-config.xmlWindows: %ZENSERVER_HOME%\conf\antimalware\antimalware-cdc-consumer-config.xmlEach topic (i.e. synced database table), along with its synchronization settings, is defined in a <consumer-config> section of the file. For example, the topic for the zvpolicy table is defined as:
<consumer-config name="antimalware-zvpolicy" topics="zenview.*-zvpolicy" group-id="antimalware-microservice" poll-timeout="10000"> <kafka-properties> <property key="max.poll.records" value="5000"/> <property key="max.poll.interval.ms" value="600000"/> <property key="session.timeout.ms" value="30000"/> <property key="default.api.timeout.ms" value="120000"/> <property key="partition.assignment.strategy" value="org.apache.kafka.clients.consumer.RoundRobinAssignor"/> </kafka-properties> <consumer-properties> <property key="mapping.objectname" value="com.microfocus.zenworks.cdc.objects.ZvPolicy"/> <property key="filter" value="com.microfocus.zenworks.cdc.filters.AvPolicyFilter"/> <property key="processor" value="com.microfocus.zenworks.kafka.processor.SimpleDatabaseDimensionProcessor"/> <property key="eq.pkey.field" value="zuid"/> </consumer-properties> </consumer-config>Each <consumer-config> section includes both Kafka configuration settings <kafka-properties> and Antimalware consumer configuration settings <consumer-properties> that apply to the synchronization of that section’s topic.
The <consumer-properties> should not be modified.
Setting Description
poll.interval.ms The frequency, in milliseconds, to poll for new data in the table. The default is every 90 seconds.
timestamp.delay.interval.ms How long to wait after a row with a certain timestamp appears before including it in the result. This setting should not be modified.
Monitoring and Tuning 119
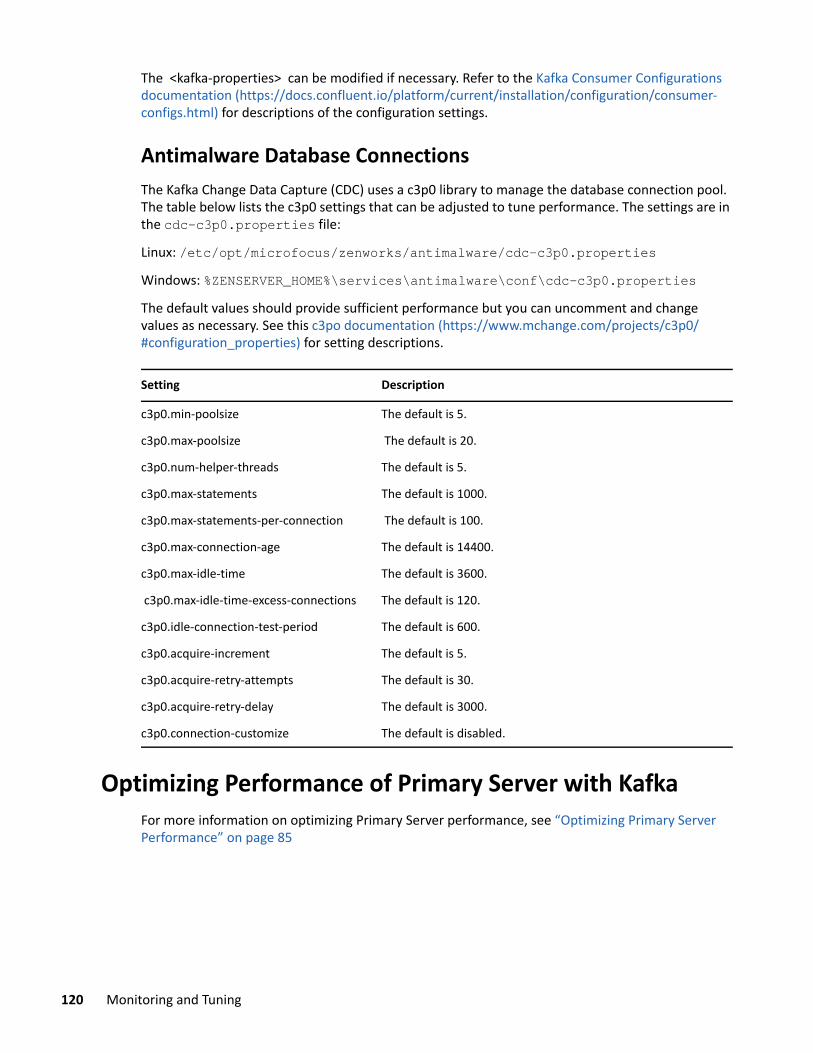
The <kafka-properties> can be modified if necessary. Refer to the Kafka Consumer Configurations documentation (https://docs.confluent.io/platform/current/installation/configuration/consumer-configs.html) for descriptions of the configuration settings.
Antimalware Database ConnectionsThe Kafka Change Data Capture (CDC) uses a c3p0 library to manage the database connection pool. The table below lists the c3p0 settings that can be adjusted to tune performance. The settings are in the cdc-c3p0.properties file:
Linux: /etc/opt/microfocus/zenworks/antimalware/cdc-c3p0.propertiesWindows: %ZENSERVER_HOME%\services\antimalware\conf\cdc-c3p0.propertiesThe default values should provide sufficient performance but you can uncomment and change values as necessary. See this c3po documentation (https://www.mchange.com/projects/c3p0/#configuration_properties) for setting descriptions.
Optimizing Performance of Primary Server with KafkaFor more information on optimizing Primary Server performance, see “Optimizing Primary Server Performance” on page 85
Setting Description
c3p0.min-poolsize The default is 5.
c3p0.max-poolsize The default is 20.
c3p0.num-helper-threads The default is 5.
c3p0.max-statements The default is 1000.
c3p0.max-statements-per-connection The default is 100.
c3p0.max-connection-age The default is 14400.
c3p0.max-idle-time The default is 3600.
c3p0.max-idle-time-excess-connections The default is 120.
c3p0.idle-connection-test-period The default is 600.
c3p0.acquire-increment The default is 5.
c3p0.acquire-retry-attempts The default is 30.
c3p0.acquire-retry-delay The default is 3000.
c3p0.connection-customize The default is disabled.
120 Monitoring and Tuning
5 5Advanced Concepts
This chapter provides additional, advanced information that can be useful in understanding the operation of the ZENworks system.
“Tomcat Valve Logging” on page 121 “Hibernate Logging” on page 121 “C3PO Logging” on page 122 “JDBC Logging using P6spy Module” on page 123
Tomcat Valve LoggingYou can monitor the web service’s load on the ZENworks Primary Server using valve logs. Response time of the various web service requests coming to the ZENworks Primary Server can also be logged.
IMPORTANT: Valve debug logging is a heavy I/O operation. Performance of the ZENworks Primary Server is affected when valve logging is enabled. Disable or do not enable the Valve logging when you are not debugging.
To enable the valve debug logs:
1 Stop the ZENworks services on the Primary Servers.2 Add debug="true" to the following line within the Engine properties of the server.xml file.<Valve className="com.novell.zenworks.tomcat.ZENRequestValve" debug="true"/>Path for the server.xml file:Linux: /opt/microfocus/zenworks/share/tomcat/conf/ Windows: %ZENSERVER_HOME%\services\zenserver\conf
3 Start the ZENworks services.Valve logs can be found at the following location:Linux: /opt/microfocus/zenworks/share/tomcat/logs/ Windows: %ZENSERVER_HOME%\services\zenserver\logs\
To disable the valve logging, simply comment or remove the lines added in the server.xml file and restart the ZENworks services.
Hibernate LoggingUsing Hibernate logging, you can debug the calls happening from ZENworks at the hibernate level, such as calls to the database, and mapping between the ZENworks objects and the database entries.
Advanced Concepts 121
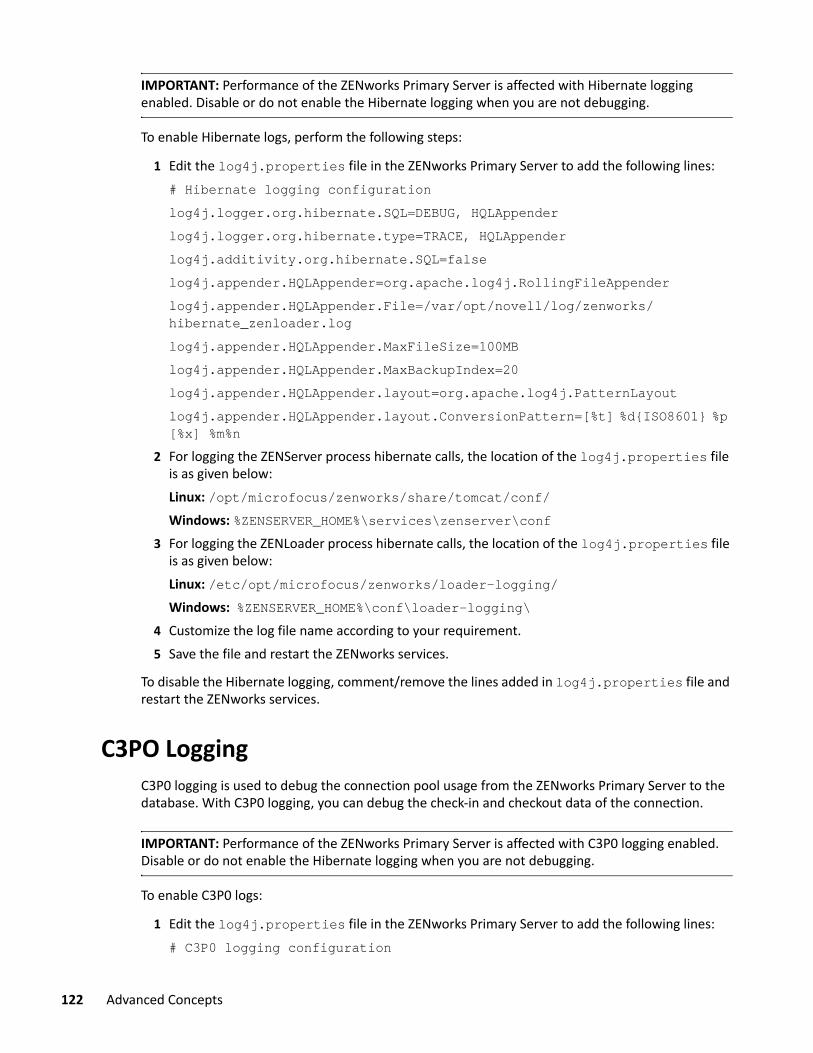
IMPORTANT: Performance of the ZENworks Primary Server is affected with Hibernate logging enabled. Disable or do not enable the Hibernate logging when you are not debugging.
To enable Hibernate logs, perform the following steps:
1 Edit the log4j.properties file in the ZENworks Primary Server to add the following lines:# Hibernate logging configurationlog4j.logger.org.hibernate.SQL=DEBUG, HQLAppenderlog4j.logger.org.hibernate.type=TRACE, HQLAppenderlog4j.additivity.org.hibernate.SQL=falselog4j.appender.HQLAppender=org.apache.log4j.RollingFileAppenderlog4j.appender.HQLAppender.File=/var/opt/novell/log/zenworks/hibernate_zenloader.loglog4j.appender.HQLAppender.MaxFileSize=100MBlog4j.appender.HQLAppender.MaxBackupIndex=20log4j.appender.HQLAppender.layout=org.apache.log4j.PatternLayoutlog4j.appender.HQLAppender.layout.ConversionPattern=[%t] %d{ISO8601} %p [%x] %m%n
2 For logging the ZENServer process hibernate calls, the location of the log4j.properties file is as given below:Linux: /opt/microfocus/zenworks/share/tomcat/conf/ Windows: %ZENSERVER_HOME%\services\zenserver\conf
3 For logging the ZENLoader process hibernate calls, the location of the log4j.properties file is as given below:Linux: /etc/opt/microfocus/zenworks/loader-logging/ Windows: %ZENSERVER_HOME%\conf\loader-logging\
4 Customize the log file name according to your requirement.5 Save the file and restart the ZENworks services.
To disable the Hibernate logging, comment/remove the lines added in log4j.properties file and restart the ZENworks services.
C3PO LoggingC3P0 logging is used to debug the connection pool usage from the ZENworks Primary Server to the database. With C3P0 logging, you can debug the check-in and checkout data of the connection.
IMPORTANT: Performance of the ZENworks Primary Server is affected with C3P0 logging enabled. Disable or do not enable the Hibernate logging when you are not debugging.
To enable C3P0 logs:
1 Edit the log4j.properties file in the ZENworks Primary Server to add the following lines:# C3P0 logging configuration
122 Advanced Concepts
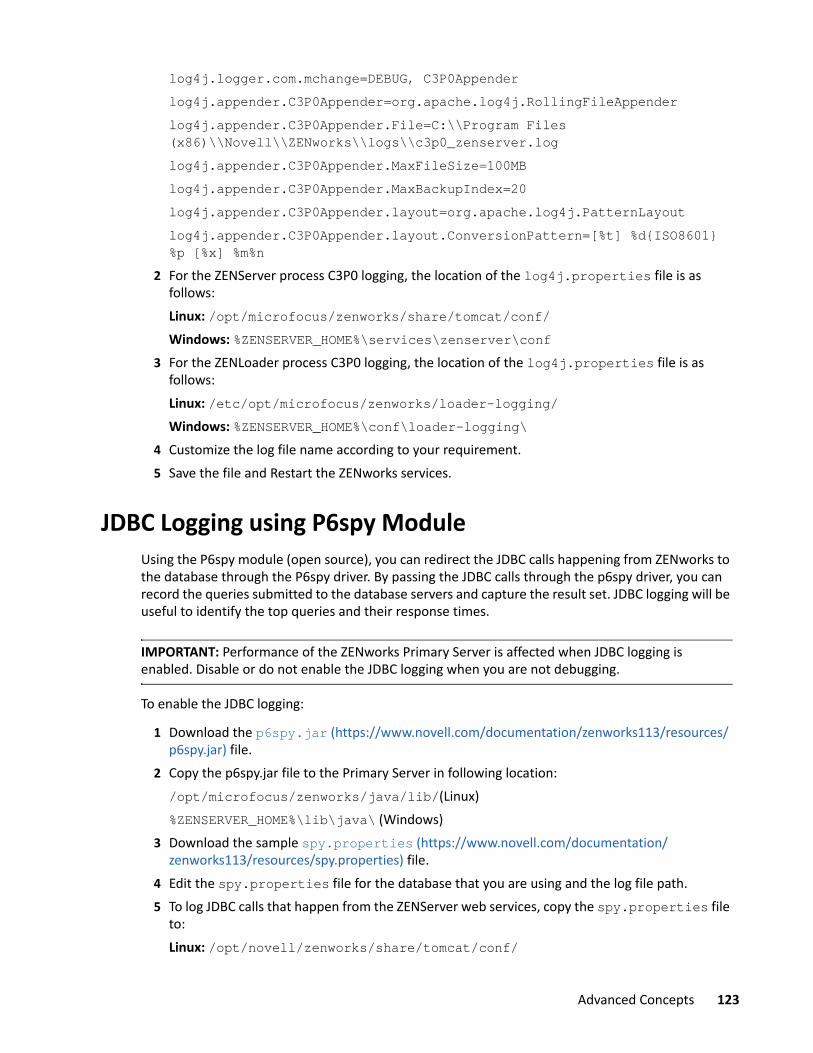
log4j.logger.com.mchange=DEBUG, C3P0Appenderlog4j.appender.C3P0Appender=org.apache.log4j.RollingFileAppenderlog4j.appender.C3P0Appender.File=C:\\Program Files (x86)\\Novell\\ZENworks\\logs\\c3p0_zenserver.loglog4j.appender.C3P0Appender.MaxFileSize=100MBlog4j.appender.C3P0Appender.MaxBackupIndex=20log4j.appender.C3P0Appender.layout=org.apache.log4j.PatternLayoutlog4j.appender.C3P0Appender.layout.ConversionPattern=[%t] %d{ISO8601} %p [%x] %m%n
2 For the ZENServer process C3P0 logging, the location of the log4j.properties file is as follows:Linux: /opt/microfocus/zenworks/share/tomcat/conf/ Windows: %ZENSERVER_HOME%\services\zenserver\conf
3 For the ZENLoader process C3P0 logging, the location of the log4j.properties file is as follows:Linux: /etc/opt/microfocus/zenworks/loader-logging/Windows: %ZENSERVER_HOME%\conf\loader-logging\
4 Customize the log file name according to your requirement.5 Save the file and Restart the ZENworks services.
JDBC Logging using P6spy ModuleUsing the P6spy module (open source), you can redirect the JDBC calls happening from ZENworks to the database through the P6spy driver. By passing the JDBC calls through the p6spy driver, you can record the queries submitted to the database servers and capture the result set. JDBC logging will be useful to identify the top queries and their response times.
IMPORTANT: Performance of the ZENworks Primary Server is affected when JDBC logging is enabled. Disable or do not enable the JDBC logging when you are not debugging.
To enable the JDBC logging:
1 Download the p6spy.jar (https://www.novell.com/documentation/zenworks113/resources/p6spy.jar) file.
2 Copy the p6spy.jar file to the Primary Server in following location:/opt/microfocus/zenworks/java/lib/(Linux)%ZENSERVER_HOME%\lib\java\ (Windows)
3 Download the sample spy.properties (https://www.novell.com/documentation/zenworks113/resources/spy.properties) file.
4 Edit the spy.properties file for the database that you are using and the log file path.5 To log JDBC calls that happen from the ZENServer web services, copy the spy.properties file
to:Linux: /opt/novell/zenworks/share/tomcat/conf/
Advanced Concepts 123
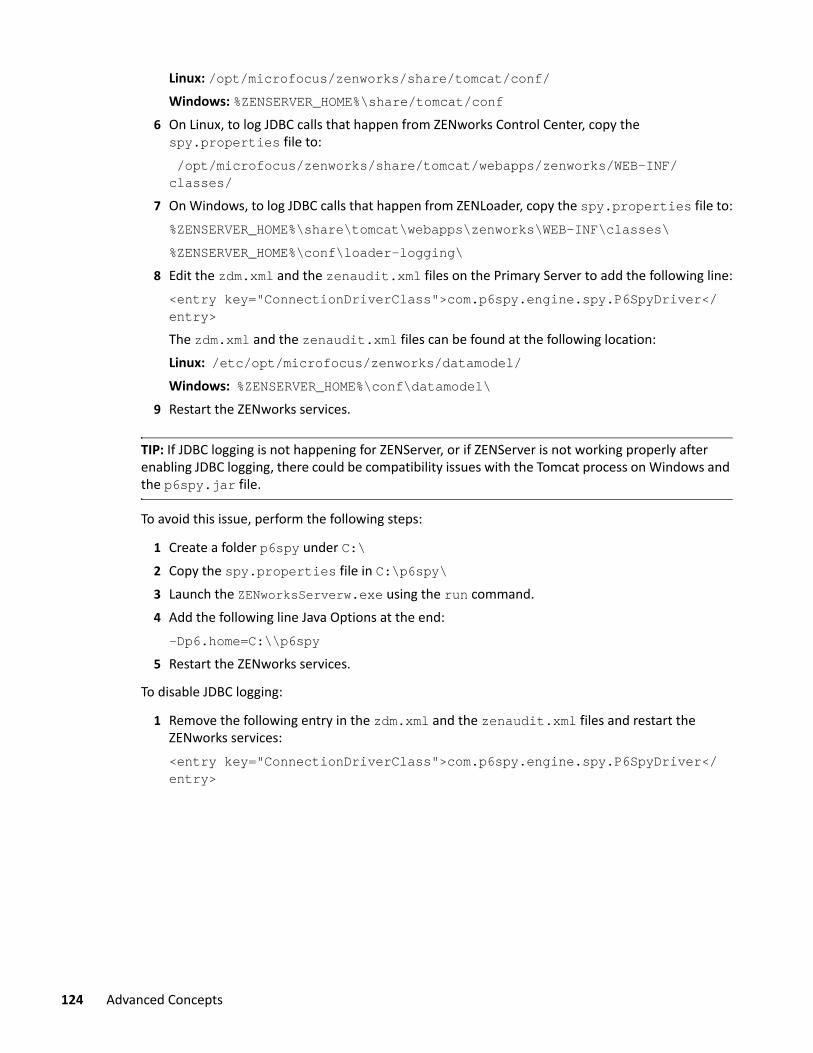
Linux: /opt/microfocus/zenworks/share/tomcat/conf/ Windows: %ZENSERVER_HOME%\share/tomcat/conf
6 On Linux, to log JDBC calls that happen from ZENworks Control Center, copy the spy.properties file to: /opt/microfocus/zenworks/share/tomcat/webapps/zenworks/WEB-INF/classes/
7 On Windows, to log JDBC calls that happen from ZENLoader, copy the spy.properties file to:%ZENSERVER_HOME%\share\tomcat\webapps\zenworks\WEB-INF\classes\ %ZENSERVER_HOME%\conf\loader-logging\
8 Edit the zdm.xml and the zenaudit.xml files on the Primary Server to add the following line:<entry key="ConnectionDriverClass">com.p6spy.engine.spy.P6SpyDriver</entry>The zdm.xml and the zenaudit.xml files can be found at the following location:Linux: /etc/opt/microfocus/zenworks/datamodel/ Windows: %ZENSERVER_HOME%\conf\datamodel\
9 Restart the ZENworks services.
TIP: If JDBC logging is not happening for ZENServer, or if ZENServer is not working properly after enabling JDBC logging, there could be compatibility issues with the Tomcat process on Windows and the p6spy.jar file.
To avoid this issue, perform the following steps:
1 Create a folder p6spy under C:\2 Copy the spy.properties file in C:\p6spy\3 Launch the ZENworksServerw.exe using the run command.4 Add the following line Java Options at the end:-Dp6.home=C:\\p6spy
5 Restart the ZENworks services.
To disable JDBC logging:
1 Remove the following entry in the zdm.xml and the zenaudit.xml files and restart the ZENworks services:<entry key="ConnectionDriverClass">com.p6spy.engine.spy.P6SpyDriver</entry>
124 Advanced Concepts
II IIDatabase Administrator
This part of the Best Practices guide focuses on what the administrator who is responsible for maintaining the ZENworks Database and the ZENworks Audit Database should know.
The ZENworks database is the most important aspect of the ZENworks infrastructure and it contains information about bundles, policies, configuration, and how these features apply to the managed devices and users.
The main considerations that influence the choice of the ZENworks database platform are as follows:
Number of devices you manage: Different databases offer different scalability. Therefore, review “Database” on page 35 to decide which platform to use.
Using clustering technologies for fault tolerance of the database: Clustering ensures that the database is always available.
The following sections provide best practices that are general to all database types as well as best practices that are specific to each database type:
Chapter 6, “All Databases,” on page 127 Chapter 7, “PostgreSQL,” on page 133 Chapter 8, “Microsoft SQL Server,” on page 149 Chapter 9, “Oracle,” on page 167
Database Administrator 125

126 Database Administrator
6 6All Databases
The following information applies regardless of the database you use:
“Dedicated Database Server for ZENworks Database” on page 127 “Virtualizing the ZENworks Database Server” on page 127 “ZENworks Database Scalability” on page 127 “ZENworks Database Sizing and Performance Considerations” on page 128
Dedicated Database Server for ZENworks DatabaseMicro Focus strongly recommends a dedicated database server for the ZENworks database. Placing the ZENworks database on a dedicated server ensures that other processes cannot take resources that ZENworks might need in order to provide an efficient and scalable experience. Placing the database on a server with other virtual machines can lead to performance degradation, which in turn can affect other aspects of ZENworks, from the performance of ZENworks Control Center to the responsiveness of ZENworks on managed devices.
Virtualizing the ZENworks Database ServerMicro Focus does not recommend virtualization of the ZENworks Database server. However, if you do, you should ensure that you follow the database vendor's best practice. In addition, you should use a dedicated server for the ZENworks database to ensure that the available resources for the database are known and are under control. Placing the database on a server with other virtual machines can lead to performance degradation, which in turn can affect other aspects of ZENworks, from the performance of the ZENworks Control Center to the responsiveness of ZENworks on managed devices.
ZENworks Database ScalabilityThe size and performance of the database is dependent on a number of factors, including number of managed devices, database hardware configuration, database features, and more. In the Micro Focus Superlab testing we have certified the database platforms to support a specific number of managed devices as shown in the table below. Depending on your hardware configuration, it is possible that your real-world results might vary.
Database Platform Number of Devices
PostgreSQL (embedded on ZENworks Primary) Up to 5,000
PostgreSQL (external) Up to 20,000
Microsoft SQL Server and Oracle Standard Edition Up to 40,000
All Databases 127
NOTE: Sybase is no longer supported as a database option in ZENworks 2020. The ZENworks 2020 update performs a forced migration to PostgreSQL.
ZENworks Database Sizing and Performance Considerations
This chapter provides some guidance on how to appropriately size the following databases.
“ZENworks Database Sizing” on page 128 “ZENworks Audit Database Sizing” on page 130 “ZENworks Antimalware Database Sizing” on page 131
ZENworks Database SizingThe ZENworks database is the database that is used to store all the configuration information received from the devices. Although it is not possible to accurately predict the size of the ZENworks database, it is possible to identify the factors that influence the database size and provide some basic guidelines. The factors that affect the size of the ZENworks database are as follows:
Number of users under management Number of devices under management Number of bundles Number of ZENworks policies Products that are enabled in the ZENworks zone, such as Asset Management, Configuration
Management, Patch Management, and Endpoint Security Management.
The following chart gives an indication of the database sizes to expect based on the numbers of users and devices in a zone with 100 bundles.
Oracle Enterprise Edition (with Partitioning) for information about partitioning, see Oracle Enterprise with Partitioning.
Up to 100,000
Database Platform Number of Devices
128 All Databases

The following chart gives an indication of the database sizes to expect based on the number of bundles, devices, and users in a ZENworks zone.
Disk space requirements are not the only consideration to make when designing the Database Server. Best practices for fault tolerance, maintenance, and performance need to be considered along with the general calculations for the overall database size.
Most large customers have Service Level Agreements that commit to minimal downtime and require robust storage capabilities. For sites with more than 10,000 devices, RAID10 (1+0), mirror with stripe) is recommended for the database, the transaction log, the TempDB, and the TempDB log. In fact, these four items need to be located on four separate LUNs (four separate disks or four separate logical arrays of disks). This addresses potential reliability issues.
All Databases 129
Database servers are very sensitive to disk performance. More small disks are always faster than a few large disks. This must be discussed while planning the database because a single 10 GB drive for a site with 10,000 devices might not perform adequately, although it might meet the database sizing formula. Ten smaller drives should perform much better.
Testing and monitoring are an essential part of database configuration. You must measure the throughput (MB/sec) that the application is demanding of the database and size the disk array accordingly. In addition, the operating system and executables do not have high I/O requirements and can reside on a mirrored array (a single mirrored pair) to provide reliability with no added performance.
ZENworks requires a dedicated database server that is not shared with other database applications. This needs to be discussed during the design phase so that everyone involved in the project (especially the database administrator) is completely aware of the requirements. This might not be the case in very small implementations of ZENworks.
ZENworks Audit Database SizingThe ZENworks Audit database is used to store change and agent audit events that you have enabled. The amount of data that will be present in the database depends on the following data:
How many devices do you have? How frequently are objects changed? Which events are enabled? How frequently do those events occur? How long is the data configured to be stored in the database?
While it is difficult to give an exact size for the database, Micro Focus recommends at least 10 GB of hard disk size for every 5,000 devices and 512 MB RAM for every 5,000 devices if you have enabled all the events. However, if it is a dedicated server for the Audit database, it is recommended to maintain at least 4 GB of RAM for the initial 5,000 devices.
Based on the Micro Focus Superlab testing and internal production testing, the following are the approximate values. Based on the size of the zone and type of events enabled, these values might differ in your environment.
With these values, the 10 GB recommendation was arrived at using the following formulas:
Total Change Audit Size
Device Audit Events Change Audit Events
Number of enabled events 20 183
Number of devices or administrators
5000 (devices) 3 (admins)
Average events/day 5/device 5/administrator
Number of days to keep events 30 days 30 days
Average size of events in the database
.5 KB .4 KB
130 All Databases
Events x Devices x Events/Day x Days to Keep x Average Size / 1024 / 1024 = total size in GB
20*5000*5*30*.5 / 1024 /1024 = 7.15 GB Total Device Audit Size
Events x Admins x Changes per Admin per Day x Days to Keep x Average Size / 1024 / 1024 = total size in GB183*3*5*30*.4=0.31 GB
Reference TablesReference tables allow names to be properly mapped in the Audit database. For every 5,000 devices, these tables are approximately 2 GB in size.
ZENworks Antimalware Database SizingThe ZENworks Antimalware database is used to store Antimalware-related data such as detected malware threats and current malware status for devices. In addition, the Antimalware database also stores data--such as devices, policies, assignments, and configuration settings--that are synced to it from the ZENworks database. This data is required in order to correctly associate malware data with devices and display the data in ZENworks Control Center.
NOTE: Unlike the ZENworks database and ZENworks Audit database, the ZENworks Antimalware database is not created during system installation. It is only required if ZENworks Endpoint Security Antimalware is used so is therefore created when you decide to use Antimalware.
The amount of data that will be present in the database depends on the following:
How many devices do you have? How many malware threats are detected? How many files are impacted by each threat? How long is malware threat data retained in the database?
While it is difficult to give an exact size for the database, Micro Focus recommends the following for hard disk space:
At least 10 GB disk space for the first 5000 devices At least 5 GB disk space for each additional 5,000 devices
For memory, Micro Focus recommends the following:
512 MB RAM for every 5,000 devices If it is a dedicated server for the Antimalware database, it is recommended to maintain at least
4 GB of RAM for the initial 5,000 devices.
Below is the general calculation used to arrive at the disk space size:
Files x Devices x Days of History x Average Row Length / 1024 / 1024 = DataFor example, using 20 infected files per device, 5000 devices, and 180 days of data gives the following estimate:
20*5000*180*223 / 1024 /1024 = 3.8 GB
All Databases 131

132 All Databases
7 7PostgreSQL
PostgreSQL is the database that is included with ZENworks. It is intended to be used by smaller organizations and in test environments. For organizations exceeding 5,000 managed devices, a MS SQL server or Oracle server implementation is highly recommended. If you start with a PostgreSQL database and find that your environment has outgrown it, ZENworks includes a database migration tool that allows you to easily upgrade from PostgreSQL to either Oracle or MS SQL.
“Design and Planning” on page 133 “Monitoring and Tuning” on page 134 “Useful Reference Sites for PostgreSQL” on page 147
This chapter provides best practices when using PostgreSQL with ZENworks. For detailed PostgreSQL documentation and information, visit the PostgreSQL website (https://www.postgresql.org/docs/11/index.html).
Design and PlanningThe following are key considerations when planning your PostgreSQL implementation:
“Database Size and File Locations” on page 133 “Saving the ZENworks Database Password” on page 133
Database Size and File LocationsZENworks recommends 10 GB of hard disk space for every 1,000 devices. A minimum 4GB RAM is recommended for the external PostgreSQL server or the machine that hosts PostgreSQL.
Database file organization significantly impacts the performance of the database. Database performance can be improved when database files are placed in separate drives that are attached to different I/O controllers. It is recommended that you put temporary files on the fastest device, physically separate from the one that holds the actual database file.
Saving the ZENworks Database PasswordWhen you create a new ZENworks zone, a database password is generated and subsequently used by each Primary Server. To back up the ZENworks database passwords, run the following commands and save the retrieved passwords in a secure location:
zenadmin: zman dgc zenauditadmin: zman dgca zenadmin (superuser): zman dgcs
PostgreSQL 133
Monitoring and TuningYou should consider the following tasks for monitoring and tuning the PostgreSQL database:
“Backing Up the Database” on page 134 “Database Validation” on page 135 “Database Recovery” on page 136 “PostgreSQL Tuning and Maintenance” on page 136 “PostgreSQL Logging” on page 139 “Moving Database Files” on page 142 “PostgreSQL Performance Monitoring” on page 142 “Index Fragmentation” on page 145 “Table Fragmentation” on page 145 “Rebuilding the PostgreSQL Database” on page 146 “Engaging with Micro Focus Support” on page 146 “Using PostgreSQL Mirroring to Enable High Availability of the PostgreSQL Database” on
page 147
Backing Up the DatabaseA backup is a full or partial copy of the information in a database, held in a physically separate location. You should make regular backups of the ZENworks database. If the database becomes unavailable, you can restore it from the backup.
Backing up a running database provides a snapshot of the database where the data is in a consistent state, even though other users are modifying the database.
If the operating system or database server fails, or if the database server does not shut down properly, then the database must be recovered. On database startup, the database server checks to see if the database was shut down cleanly at the end of the previous session. If it was not, the database server runs an automatic recovery process to restore all changes up to the most recently committed transaction.
For detailed information, see Embedded Database Maintenance in the ZENworks Database Management Reference.
The rest of this section describes the different types of backups and how to back up the database:
“Determining a Backup Strategy” on page 134 “Online Backups” on page 135 “Offline Backups” on page 135
Determining a Backup StrategyConsider these tips when defining your database backup strategy:
Back up your database before and after every ZENworks upgrade.
134 PostgreSQL
Ensure that your database backup has the same name as your current database. Check disk space. This can impact the best strategy for your backup. Events and notifications can be scheduled through the database server itself.
Online BackupsAn online backup is performed against a running database. Backing up a running database provides a snapshot of the database where the data is in a consistent state, even though other users are modifying the database. This is referred to as a logical backup because the data is backed up, not the database files.
You can use the PostgreSQL pg_dump command to do a full online backup. This extracts the PostgreSQL database into an archive file.
pg_dump -U zenadmin -p 54327 -W -d zenworks > zenworks_dump.sqlFor more information about pg_dump, see pg_dump (https://www.postgresql.org/docs/11/app-pgdump.html) on the PostgreSQL website.
Offline BackupsAn offline database backup requires the database server to be stopped. Once the database is not running, you can make a backup by copying the database files to another location. You should only perform an offline backup when the database is not running and when the database server has shut down properly.
This method can be used in conjunction with a scheduling mechanism, such as Windows Task Scheduler or crontab, to automate the process. Offline backups can use incremental backup (transaction logs only) or full backup and lend itself better to do a full backup quickly. They are used with full backups at less frequent intervals.
For information about copying the database files, see File System Level Backup (https://www.postgresql.org/docs/11/backup-file.html) on the PostgreSQL website.
Database ValidationPostgreSQL does not include built-in commands for database validation. However, to help maintain the validity of the database, we recommend that active production databases be vacuumed frequently (at least nightly) in order to remove dead rows.
After adding or deleting a large number of rows, it is a good idea to issue a VACUUM ANALYZE command for the affected table. This command updates the system catalogs with the results of all recent changes and allows the PostgreSQL query planner to make better choices in planning queries.
For information about using the VACUUM commands, see “Table Fragmentation” on page 145.
PostgreSQL 135
Database RecoveryThe amcheck module provides functions that allow you to verify the logical consistency of the structure of relations. If the structure appears to be valid, no error is raised.
The pageinspect module provides functions that allow you to inspect the contents of database pages at a low level, which is useful for debugging purposes. All of these functions may be used only by superusers.
pg_resetwal resets the write-ahead log and other control information of a PostgreSQL database cluster.
For more information, see, amcheck (https://www.postgresql.org/docs/11/amcheck.html) on the PostgreSQL website.
PostgreSQL Tuning and MaintenanceTuning the database parameters listed below can improve the performance of ZENworks. The postgresql.conf file contains the parameters and is located in the following locations:
Linux: /var/opt/microfocus/pgsql/data/ Windows: %ZENWORKS_HOME%\database\pgsql\data
Restarting the PostgreSQL service is necessary after changing some parameters. If a restart is necessary, it is called out in the parameter description.
shared_buffersThis parameter designates the amount of shared memory dedicated to the server for caching data.
Default Value: 128MB
Recommended Value: Set as follows:
Below 32GB memory, set the value of shared_buffers to 25% of total system memory. Above 32GB memory, set the value of shared_buffers to 8GB
Restart Required: Yes
For more information about shared_buffers, see Resource Consumption (https://www.postgresql.org/docs/11/runtime-config-resource.html) on the PostgreSQL website.
work_memThis parameter specifies the amount of memory to be used by internal sort operations and hash tables before writing to temporary disk files. If a lot of complex sorts are happening, and you have enough memory, then increasing the work_mem parameter allows PostgreSQL to do larger in-memory sorts which will be faster than disk-based equivalents.
Default Value: 4MB
Recommended Value: Set as follows:
Start with a low value: 32 to 64MB.
136 PostgreSQL

Look for ‘temporary file’ lines in the logs. Set the parameter to 2 to 3 times the largest temp file.
Restart Required: No
For more information about work_mem, see Resource Consumption (https://www.postgresql.org/docs/11/runtime-config-resource.html) on the PostgreSQL website.
maintenance_work_memThis parameter specifies the maximum amount of memory used by maintenance operations such as VACUUM, CREATE INDEX and ALTER TABLE ADD FOREIGN KEY. Since only one of these operations can be executed at a time by a database session and a PostgreSQL installation doesn’t have many of them running concurrently, it is safe to set the value of maintenance_work_mem significantly larger than work_mem.
Default Value: 64MB
Recommended Value: Set as follows:
Set the value 10% of system memory, up to 1GB. Set the value higher if you are having VACUUM problems.
Restart Required: No
For more information about maintenance_work_mem, see Resource Consumption (https://www.postgresql.org/docs/11/runtime-config-resource.html) on the PostgreSQL website.
effective_cache_sizeThe effective_cache_size should be set to an estimate of how much memory is available for disk caching by the operating system and within the database itself. This is a guideline for how much memory you expect to be available in the operating system and PostgreSQL buffer caches, not an allocation.
Default Value: 4MB
Recommended Value: Set as follows:
Set the value to the amount of file system cache available. If you don’t know the amount of available file system cache, set the value to 50% of the total
system memory.
Restart Required: No
For more information about effective_cache_size, see Query Planning (https://www.postgresql.org/docs/11/runtime-config-query.html) on the PostgreSQL website.
temp_buffersThis parameter sets the maximum number of temporary buffers used by each database session. The session local buffers are used only for access to temporary tables. These will be cleared when the connection is closed.
PostgreSQL 137
Default Value: 8MB
Recommended Value: 64MB, increasing value based on database size and usage
Restart Required: No
For more information about temp_buffers, see Resource Consumption (https://www.postgresql.org/docs/11/runtime-config-resource.html) on the PostgreSQL website.
max_locks_per_transaction & max_pred_locks_per_transactionThe max_locks_per_transaction value indicates the number of database objects that can be locked simultaneously. By default, it's set to 64, which means that PostgreSQL is prepared to track up to 64 X number of open transactions locks. The reason to have a limit is to avoid using dedicated shared memory if you don't need more locks than that.
Default Value: 64
Recommended Value: In most cases, the default value of 64 is sufficient. However, when loading a large number of datasets (for example, several thousand) at once, the number of concurrent object locks for the transaction can exceed 64.
To see if you need to increase this value, check for "ERROR: out of shared memory HINT: You might need to increase max_locks_per_transaction" messages in the following PostgreSQL log files:
On Linux: /var/lib/pgsql/data/pg_log/*.log /var/lib/pgsql/data/log/*.log /var/lib/pgsql/data/*.log
On Windows: %ZENSERVER_HOME%\database\pgsql\data\*.log %ZENSERVER_HOME%\database\pgsql\data\pg_log\*.log %ZENSERVER_HOME%\database\pgsql\data\log\*.log
Restart Required: Yes
For more information about max_locks_per_transaction and max_pred_locks_per_transaction, see Lock Management (https://www.postgresql.org/docs/11/runtime-config-locks.html) on the PostgreSQL website.
max_connections The max_connections determines the maximum number of concurrent connections from ZENworks to the database server. By default, the number of connections will be 100.
Default Value: 500 (embedded database)
Recommended Value: max_connections = Number of primary severs * 300
138 PostgreSQL
For more information about max_connections, see Lock Management (https://www.postgresql.org/docs/11/runtime-config-connection.html#GUC-MAX-CONNECTIONS) on the PostgreSQL website.
PostgreSQL LoggingPostgreSQL file logging is enabled and customized via postgressql.conf parameters. If you are using an external PostgreSQL database, file logging is turned on by default. If you are using the embedded PostgreSQL database, logging is turned off.
The following sections explain how to enable\disable file logging and customize the logging parameters. For complete information about logging parameters, see Error Reporting and Logging (https://www.postgresql.org/docs/11/runtime-config-logging.html) on the PostgreSQL website.
“Enabling Logging” on page 139 “Controlling Location and Size” on page 139 “Controlling Log Content” on page 140
Enabling Logging1 Edit the postgressql.conf file. The file is located in:
Linux: /var/opt/microfocus/pgsql/data/ Windows: %ZENWORKS_HOME%\database\pgsql\data
2 Set the logging_collector parameter to on:
logging_collector = on3 Customize any logging parameters listed in the following sections.4 Restart the PostgreSQL service. This is required.
Controlling Location and SizeThe following parameters can be used to control the location and size of logs.
“log_directory” on page 139 “log_rotation_age” on page 140 “log_rotation_size” on page 140 “log_truncate_on_rotation” on page 140
log_directoryThis parameter defines the directory in which log files are created. Please note that if you have enabled detailed logging it is recommended to have a separate disk—different from the data directory disk—allocated for log_directory. Example:
log_directory = /this_is_a_new_disk/pg_logRestart Required: No
PostgreSQL 139
log_rotation_ageThis parameter determines the maximum life span for a log file, forcing its rotation once this threshold is reached. This parameter is usually set in terms of hours or days; the minimum granularity is a minute. However, if log_rotation_size is reached first, the log gets rotated anyway, irrespective of this setting. The following example sets the rotation age to one day:
log_rotation_age = 1dThis parameter can be used with the log_filename and log_truncate_on rotation parameters to effectively control the disk space used by the log files. For example, the following parameter usage would result in one log file created each day of the week with each day’s file being overwritten the following week.
log_filename = log.%alog_rotation_age = 1dlog_truncate_on_rotation = onRestart Required: No
log_rotation_sizeThis parameter defines the size limit for each log file; once it reaches this threshold the log file is rotated. The following example limits the size of each log file to 10 MB:
log_rotation_size = 10MBRestart Required: No
log_truncate_on_rotationThis parameter can be used with the log_rotation_age parameter to reduce the number of stored log files and disk space required. It causes log files of the same name to be overwritten rather than appended to when rotation occurs based on time.
log_truncate_on_rotation = onRestart Required: No
Controlling Log ContentThe following parameters can be used to control what is logged:
“log_line_prefix” on page 141 “log_duration” on page 141 “log_statement” on page 141 “log_min_error_statement” on page 141
140 PostgreSQL
log_line_prefixThis parameter helps you customize every log line being printed in the PostgreSQL log file. You can log the process id, application name, database name and other details for every statement as required. The following log_line_prefix may be helpful in most scenarios:
log_line_prefix = '%t [%p]: [%l-1] user=%u,db=%d,app=%a,client=%h'The above setting records the following for every statement being logged:
%t : Time stamp without milliseconds %p : Process id %l-1 : Number of the log line for each session or process, starting at 1 %u : User name %d : Database name %a : Application name %h : Remote host name or IP address
Restart Required: No
log_durationThis parameter records the duration of every completed statement in PostgreSQL log, irrespective of any duration limit enforced by the log_min_duration_statement parameter. Note that, as with log_min_duration_statement, enabling this parameter may increase log file usage and affect the server’s general performance. For this reason, if you already have log_min_duration_statement enabled it is often suggested to disable log_duration unless you have a specific need to keep track of both.
Restart Required: No
log_statementThis parameter controls what type of SQL statements are logged. The recommended setting is DDL, which logs all data definition statements (CREATE, ALTER, DROP) that are executed. Tracking DDLs allow you to later audit when a given DDL was executed and by whom. By monitoring and understanding the amount of information it may write to the log file you may consider modifying this setting.
Other possible values are none, mod (includes DDLs plus DMLs), and all.
Restart Required: No
log_min_error_statementThis parameter controls which SQL statements that cause error conditions are recorded in the server log. The default is ERROR, which logs all errors, log messages, fatal errors, and panics. You can reduce the number of statements written to the log (and hence the log size) but using a more restrictive setting such as FATAL or PANIC.
Example:
log_min_error_statement = FATAL
PostgreSQL 141
Restart Required: No
Moving Database FilesOn a Linux server, if you need to move the database files, such as to a new separate physical disk, this operation is as simple as a folder copy. When the folder has been moved, take a backup, and then modify the zenpostgresql file’s POSTGRES_DATADIR parameter to point to the new location. The file is located in /opt/microfocus/zenworks/share/pgsql/sysconfig/On a Windows server, unregister the PostgreSQL service by using following command:
"C:\Program Files (x86)\Novell\ZENworks\share\postgres\bin\pg_ctl.exe" unregister -N "Novell ZENworks Embedded Datastore - PostgreSQL"Re-registrer the service again with the new data folder location:
"C:\Program Files (x86)\Novell\ZENworks\share\postgres\bin\pg_ctl.exe" register -N "Novell ZENworks Embedded Datastore - PostgreSQL" -U "NT AUTHORITY\NetworkService" -D "C:\Program Files
PostgreSQL Performance MonitoringThe primary tool for monitoring database activity and analyzing performance is the PostgreSQL statistics collector. The statistics collector provides a rich set of views and functions for collecting and reporting information about server activity. This information falls into two main categories:
Dynamic statistics about the system’s current activity Collected statistics (gathered since the statistics collector subsystem was last reset)
This section lists a few of the ways you can use the statistics collector. However, for detailed information, you should refer to Monitoring Database Activity (https://www.postgresql.org/docs/11/monitoring-stats.html) on the PostgreSQL website. The website also explains how to use regular Linux monitoring programs such as ps, top, iostat, and vmstat. In addition, you can use the pg_stat_statements module to track executation statistics for all SQL statements executed by the server.
On Windows, you can use performance monitoring tools such as Process Monitor, Process Explorer, and FileMon. For more information about both Windows and Linux tools, see Performance Analysis Tools (https://wiki.postgresql.org/wiki/Performance_Analysis_Tools) on the PostgreSQL Wiki site.
142 PostgreSQL
Dynamic Statistics ViewsThe PostgreSQL statistics collector is a subsystem that supports collection and reporting of information about server activity. The collector tracks the total number of rows in each table, and information about vacuum and analyze actions for each table. It can also count calls to user-defined functions and the total time spent in each one.
PostgreSQL supports reporting dynamic information about exactly what is going on in the system right now, such as the exact command currently being executed by other server processes, and which other connections exist in the system. A couple of useful predefined views that you should be aware of are pg_stat_activity and pg_stat_progress_vacuum.
For these views to be enabled you need to make sure that the system configuration parameter track_activities is on. To have enable these views for all server processes, set the parameter in the postgresql.conf file. The file is located in:
Linux: /var/opt/microfocus/pgsql/data/ Windows: %ZENWORKS_HOME%\database\pgsql\data
You can also turn on the parameter for individual sessions by using the SET command.
pg_stat_activityYou can use pg_stat_activity to view the current activity for the various backend processes. A sample SQL query is:
Select pid, usename, application_name ,client_addr, backend_start,xact_start,query_start,state, backend_xid, backend_xmin,query,backend_type from pg_stat_activity where usename ='zenadmin' and state='active'By adding the wait_event_type and wait_event columns to the query, tpg_stat_activity can also be very helpful in determining blocked queries.
pg_stat_progress_vacuumYou can use pg_stat_progress_vacuum to view one row for each backend process that is currently vacuuming. A sample SQL query is:
PostgreSQL 143
SELECT p.pid, now() - a.xact_start AS duration, coalesce(wait_event_type ||'.'|| wait_event, 'f') AS waiting, CASE WHEN a.query ~ '^autovacuum.*to prevent wraparound' THEN 'wraparound' WHEN a.query ~ '^vacuum' THEN 'user' ELSE 'regular' END AS mode, round(100.0 * p.heap_blks_scanned / p.heap_blks_total, 1) AS scanned_pct, round(100.0 * p.heap_blks_vacuumed / p.heap_blks_total, 1) AS vacuumed_pct, p.index_vacuum_count, round(100.0 * p.num_dead_tuples / p.max_dead_tuples,1) AS dead_pctFROM pg_stat_progress_vacuum pJOIN pg_stat_activity a using (pid)ORDER BY now() - a.xact_start DESC;
System ViewsPostgreSQL provides several built-in views that provide access to commonly used queries on the system catalogs. The pg_locks view provides real-time information about the current locks held by active processes in the system.
If you think that long lock waits are impacting performance, you can:
1. Set the log_lock_waits parameter for PostgreSQL logging to generate a log message whenever a session waits longer than the deadlock_timeout to acquire a lock. See “PostgreSQL Logging” on page 139 and Error Reporting and Logging on the PostgreSQL website).
2. Use the following SQL query to identify the queries that are causing the locks:
SELECT a.datname, l.relation::regclass, l.transactionid, l.mode, l.GRANTED, a.usename, a.query, a.query_start, age(now(), a.query_start) AS "age", a.pidFROM pg_stat_activity aJOIN pg_locks l ON l.pid = a.pidORDER BY a.query_start;
3. Collect the following logs to send to Micro Focus Customer Support: On Linux:
/var/lib/pgsql/data/pg_log/*.log /var/lib/pgsql/data/log/*.log /var/lib/pgsql/data/*.log
144 PostgreSQL
On Windows: %ZENSERVER_HOME%\database\pgsql\data\*.log %ZENSERVER_HOME%\database\pgsql\data\pg_log\*.log %ZENSERVER_HOME%\database\pgsql\data\log\*.log
Index FragmentationFragmented and bloated indexes are a top reason for performance degradation of the ZENworks database. A bloated index contains many empty or nearly-empty pages. This can occur with B-tree indexes in PostgreSQL under certain uncommon access patterns.
Micro Focus recommends that you check the indexes and rebuild in the following scenarios:
System Update After enabling ZENworks Patch Management in the zone After adding a large number of devices After adding a large number of bundles or bundles with lots of content defined
You can use the REINDEX command to rebuild the indexes. For detailed information, see REINDEX (https://www.postgresql.org/docs/9.4/sql-reindex.html) on the PostgreSQL website.
Table FragmentationPostgreSQL uses Multi-Version Concurrency Control to manage concurrent access to data. With this approach, reads don’t block writes because INSERT and UPDATE operations create a new version of the row every time. But these operations don’t immediately remove the old version of the row. Instead, old versions of rows are eventually removed by the VACUUM operation.
To check for table fragmentation that can be caused by this process, use the following query:
SELECT * FROM pgstattuple('public.zzenobject');For more information about the pgstattuple command, see pgstattuple (https://www.postgresql.org/docs/current/pgstattuple.html) on the PostgreSQL website.
When fragmentation exists, you can use the VACUUM command to reclaim space still used by data that had been updated. In PostgreSQL, updated key-value tuples are not removed from the tables when rows are changed, so the VACUUM command should be run occasionally to do this.
VACUUM can be run on its own, or with ANALYZE. Common commands and examples are:
VACUUM Frees up space for reuse.Example: VACUUM tablename
VACUUM(FULL) Locks the database table, and reclaims more space than VACUUM.Example: VACUUM(FULL) tablename
PostgreSQL 145
VACUUM(FULL, ANALAYZE) Performs a FULL VACUUM and gathers new statistics on query executions paths using ANALYZE.Example: VACUUM(FULL, ANALYZE) tablename
VACUUM(FULL, ANALAYZE, VERBOSE) Performs a FULL VACUUM and gathers new statistics on query executions paths using ANALYZE; provides VERBOSE progress output.Example: VACUUM(FULL, ANALYZE) tablename
For more information about the VACUUM command, see VACUUM (https://www.postgresql.org/docs/current/sql-vacuum.html) on the PostgreSQL website.
Rebuilding the PostgreSQL DatabaseAt its basic level, PostgreSQL is one giant append-only log. When you insert a new record, the new record is appended. When you delete a record, the record is simply flagged as invisible, it’s not actually removed from disk immediately. When you update a record, the old record is flagged as invisible and a new record is written.
If fragmentation exists on numerous tables and the database is large, a faster method for fixing fragmentation is to rebuild the entire database by using the following PostgreSQL applications:
vacuumdb: This application (command) is a wrapper around the SQL command VACUUM(ANALYZE). For more details see vacuumdb (https://www.postgresql.org/docs/11/app-vacuumdb.html) on the PostgreSQL website.
reindexdb: This application (command) is a wrapper around the SQL command REINDEX. For more details see reindexdb (https://www.postgresql.org/docs/11/app-reindexdb.html) on the PostgreSQL website.
A few tips when rebuilding the database:
Make sure to stop the PostgreSQL service before starting. Use the “-j njobs” option to execute the vacuum or analyze commands in parallel by running
njobs commands simultaneously. This option reduces the time of the processing but it also increases the load on the database server.
Engaging with Micro Focus SupportIf you encounter problems with your database, collect the following information before engaging with Micro Focus Support:
The output from the log file that is enabled and specified in the postgresql.conf file. The version of the database that you are running. Use “select version()” to find the version. The date of your last backup. Optional: Deadlock information, connection information, and profiling statistics from the logs.
146 PostgreSQL
Using PostgreSQL Mirroring to Enable High Availability of the PostgreSQL DatabasePostgreSQL supports database mirroring as a method to implement high availability and fault tolerance. This technique requires multiple database servers and is therefore not set up by default with ZENworks.
NOTE: Mirroring should not be implemented as a means to distribute the database work to remote locations. Mirrored database servers should be connected over a high-speed link.
For more information, see High Availability, Load Balancing, and Replication (https://www.postgresql.org/docs/11/high-availability.html) on the PostgreSQL website.
Useful Reference Sites for PostgreSQL PostgreSQL Reference Documentation
All Versions (https://www.postgresql.org/docs/manuals/) Version 11 (https://www.postgresql.org/docs/11/index.html)
Automated Database Backup Windows (https://wiki.postgresql.org/wiki/Automated_Backup_on_Windows) Linux (https://wiki.postgresql.org/wiki/Automated_Backup_on_Linux)
Setting up Mirroring (High Availability) Replication, Clustering, and Connection Pooling (https://wiki.postgresql.org/wiki/
Replication,_Clustering,_and_Connection_Pooling) Backing up the database using ZMAN
ZENworks Database Management Reference PostgreSQL Tools
pgAdmin (https://www.pgadmin.org/) DBeaver Community (https://dbeaver.io/)
PostgreSQL 147

148 PostgreSQL
8 8Microsoft SQL Server
If you are using Microsoft SQL Server as your database, consider the following:
“Design and Planning” on page 149 “Monitoring and Tuning” on page 154 “Advanced MS SQL Concepts” on page 160
Design and Planning There must be regular database backup routines in place. This should also be documented in
the design document. There must be regular database maintenance routines in place. This should also be documented
in the design document. Considerations for clustering (high availability) of the Database Server should be made and
documented. In general, Micro Focus does not recommend virtualizing the ZENworks database server.
However, it is possible to run Microsoft SQL Server on a virtual host. See the following documentation for more information: Best Practices for SQL Server Best Practices for Virtualizing and Managing SQL Server 2012 Virtualizing Microsoft SQL Server on VMware ESXi. DBA Guide to Databases on VMware Architecting Microsoft SQL Server on VMware vSphere
Place data and log files on separate drives for the database [zenworks_database] on a server [server_name].
Check the database integrity at least every 14 days for the database [zenworks_database] on a server [server_name].
Keep the TempDB database and log files in a separate drive. Keep backups in a separate drive. Network shared drive can also be used to take daily backup. Ensure that you have the skills in-house, or readily available (contractor, consultant, or partner)
to manage and maintain the Microsoft SQL Server, based on the best practices that Microsoft outlines for regular database management.
Microsoft also offers the SQL Server Best Practices Analyzer Tool (http://www.microsoft.com/en-in/download/details.aspx?id=15289). This tool addresses a wide variety of best practices as outlined by Microsoft. This tool can be found on the Microsoft website.
Microsoft SQL Server 149
StorageSQL Server supports the following types of storage for data files:
Local Disk Shared Storage SMB/CIFS File Share
SQL Server failover cluster installation supports Local Disk only for installing the tempdb files. Ensure that the path specified for the tempdb data and log files is valid on all the cluster nodes. During failover, if the tempdb directories are not available on the failover target node, the SQL Server resource will fail to come online.
Storage ArchitectureSQL Server supports Direct Attached Storage (DAS), Storage Area Network (SAN), and Network Attached Storage (NAS) storage architectures.
Direct Attached Storage (DAS): DAS is a digital storage system that is directly attached to a server or workstation, without a storage network in between. DAS physical disk types include Serial Attached SCSI (SAS) and Serial Attached ATA (SATA).
Network Attached Storage (NAS): A NAS unit is a self-contained computer that is connected to a network.
Storage Area Network (SAN): SAN is an architecture to attach remote computer storage devices (such as disk arrays and tape libraries) to servers in such a way that the devices appear as locally attached to the operating system (for example, block storage).
In general, Micro Focus recommends a SAN when the benefits of shared storage are important to your organization. The benefits of shared storage include the following:
Easier to reallocate disk storage between servers Can serve multiple servers No limitations on the number of disks that can be accessed
For more information on storage architecture, see: SQL Server and Network Attached Storage (http://blogs.msdn.com/b/sqlblog/archive/2006/10/03/sql-server-and-network-attached-storage-_2800_nas_2900_.aspx).
Disk TypesThe disk types that you use in the system can affect reliability and performance. When everything else is equal, larger drives increase the mean seek time. SQL Server supports the following types of drives:
Small Computer System Interface (SCSI) Serial Advanced Technology Attachment (SATA) Serial-attached SCSI (SAS) Fibre Channel (FC)
150 Microsoft SQL Server
Integrated Device Electronics (IDE) Solid State Drive (SSD) or Flash Disk
For optimal performance, store the different files in different drives, preferably on different I/O controllers.
For Example:
For OS use C:\
For SQL Binaries use D:\For TempDB (1 file per processor, equi-sized) use E:\ F:\ DataG:\ LogH:\ BackupMicro Focus recommends using SAN Storage or Solid State Drives for ZENworks databases to obtain optimal performance.
General SAN and RAID RecommendationsIf you are using a SAN in conjunction with MS SQL, consider the following best practices:
Consider the bandwidth of the data channel that depends on the I/O demands for the SQL Server.
Consider the way the SAN abstracts the physical devices it presents to the system to take maximum advantage of parallelism.
Choose an appropriate RAID level for the SAN. For ZENworks database, RAID 10 is recommended. When you configure a RAID array, ensure that you align the file system to the offset that is supplied by the vendor.
For more information on RAID, see:
MS TechNet Article on SQL RAID (http://technet.microsoft.com/en-us/library/ms190764(v=sql.105).aspx)
Hard Drive Configurations for SQL Server (http://www.mssqltips.com/sqlservertip/1328/hard-drive-configurations-for-sql-server/)
For more information on storage in general, see:
MS TechNet Article on SQL Storage (http://technet.microsoft.com/en-us/library/cc298801.aspx#Section3)
Memory Management Resource PlanningThroughput of any database server is greatly influenced by the resources allocated for the server. In most cases, it is best to keep them to the default values for better results.
Set the maximum worker threads to 0.
Microsoft SQL Server 151
This ensures that the database server manages the needed threads that give the best throughput.
Set the max server memory to the default value (2147483647 MB). Update the database server with the latest service packs.
Other factors that might influence the memory that is required, include the following:
The use of SQL Server mirroring The frequent use of files larger than 15 MB
Read Committed SnapshotRead Committed Snapshot allows transactions to share locks to databases so that you can allow two distinct processes to update the same table at the same time. If this setting is not enabled, large amounts of blocking can occur that decreases ZENworks performance.
To enable Read Committed Snapshot, run the following command from an SQL editor:
ALTER DATABASE <database name> SET SINGLE_USER WITH ROLLBACK IMMEDIATE; GO ALTER DATABASE <database name> SET READ_COMMITTED_SNAPSHOT ON;GOALTER DATABASE <database name> SET MULTI_USER;GOTo verify that the Read Committed Snapshot has been successfully enabled, run the following:
SELECT is_read_committed_snapshot_on FROM sys.databases WHERE name= '<database name>' For more detailed information on snapshot isolation and transaction isolation, see the following links:
Snapshot Isolation in SQL Server (http://msdn.microsoft.com/en-us/library/tcbchxcb(v=vs.110).aspx)
How to Set Transaction Isolation Level (http://technet.microsoft.com/en-us/library/ms173763.aspx)
High Availability SolutionsBecause ZENworks uses a shared database for all Primaries, it is important that the database server be available at all times. The MS SQL Server provides several options to create high availability for a server or database:
“AlwaysOn Failover Cluster Instances” on page 153 “AlwaysOn Availability Groups” on page 153 “Log Shipping” on page 153 “Database Mirroring” on page 154
152 Microsoft SQL Server
For additional information on the MS SQL Server high availability, see the SQL Server High Availability (http://technet.microsoft.com/en-us/library/ms190202.aspx) guide.
AlwaysOn Failover Cluster InstancesThis provides local high availability through redundancy at the server-instance level.
Benefits:
Protection at the instance level through redundancy. Automatic failover in the event of a failure (hardware failures, operating system failures, and
application or service failures). Support for a broad array of storage solutions, including WSFC cluster disks (iSCSI, Fiber
Channel, and so on) and server message block (SMB) file shares. Disaster recovery solution using a multi-subnet FCI or running an FCI-hosted database inside an
AlwaysOn availability group. With the new multi-subnet support in Microsoft SQL Server 2012, a multi-subnet FCI no longer requires a virtual LAN, increasing the manageability and security of a multi-subnet FCI.
Zero re-configuration of applications and clients during failovers. Flexible failover policy for granular Trigger events for automatic failovers. Reliable failovers through periodic and detailed health detection using dedicated and persisted
connections. Configurability and predictability in failover time through indirect background checkpoints. Throttled resource usage during failovers.
For more information on AlwaysOn Failover Cluster Instances, see AlwaysOn Failover Cluster Instances (http://technet.microsoft.com/en-us/library/ms189134.aspx).
AlwaysOn Availability GroupsIntroduced in SQL Server 2012, AlwaysOn Availability Groups maximize the availability of a set of user databases for an enterprise. An availability group supports a failover environment for a discrete set of user databases, known as availability databases.
For more information on AlwaysOn Availability Groups, see AlwaysOn Availability Groups (http://technet.microsoft.com/en-us/library/hh510230.aspx).
Log ShippingSQL Server Log Shipping allows you to automatically send transaction log backups from a primary database on a Primary Server instance to one or more secondary databases on separate secondary server instances. The transaction log backups are applied to each of the secondary databases,
Microsoft SQL Server 153
individually. An optional third server instance, known as the monitor server, records the history and status of backup and restore operations, and optionally raises alerts if these operations fail to occur as scheduled.
Benefits:
Provides a disaster-recovery solution for a single primary database and one or more secondary databases, each on a separate instance of SQL Server.
Supports limited read-only access to secondary databases (during the interval between restore jobs).
Allows a user-specified delay between when the Primary Server backs up the log of the primary database and when the secondary servers must restore (apply) the log backup.
For more information on Log Shipping, see Log Shipping (http://technet.microsoft.com/en-us/library/hh510230.aspx).
Database MirroringDatabase Mirroring is a solution for increasing the availability of an SQL Server database. Mirroring is implemented on a per-database basis and works only with databases that use the full recovery model.
Benefits:
Increases the availability of a database. Increases data protection. Improves the availability of the production database during upgrades.
This feature will be removed in a future version of Microsoft SQL Server. Use Always-On Availability Groups instead.
For More information on mirroring, see Database Mirroring (http://technet.microsoft.com/en-us/library/ms189852.aspx).
Other Useful Design InformationThe MS SQL Best Practices Page (http://technet.microsoft.com/en-us/sqlserver/bb671430.aspx) provides additional best practices for SQL Server design, planning, and maintenance.
Monitoring and TuningMicrosoft SQL Server has a Maintenance Plan Wizard in the SQL Server Management Studio. This tool should be readily available to customers who utilize Microsoft SQL Server in their data centers.
Maintenance tasks that can be scheduled include the following:
Check database integrity Shrink database Reorganize index Rebuild index
154 Microsoft SQL Server
Update statistics Backup database
A good overview of the Maintenance Plan Wizard is found on the Microsoft website: Sample Maintenance Plan (http://technet.microsoft.com/en-us/library/ms191002.aspx).
These tasks should be thoroughly understood before performing them on a live system that is hosting the ZENworks database.
Microsoft recommends the following best practices for managing Microsoft SQL Server 2008 R2:
Backups should be performed daily. A Database Integrity Check should be performed every 14 days. Reorganizing or rebuilding indexes should be done when fragmentation is excessive. If
fragmentation is greater than 30 percent, an index should be rebuilt. To determine the fragmentation of the indexes in your database, use the dynamic memory view sys.dm_db_index_physical_stats. Micro Focus recommends that rebuilding indexes should be done at least once a week, because the clustered indexes will be fragmented over 75 percent within a few days of the insert or update activity. This is a contributing factor to lag, escalating locks, and eventual deadlocks.
The Microsoft SQL Server Tuning Wizard makes suggestions about indexes that you might want to add to the database. However, it uses the term missing indexes, which is misleading to anyone who might interpret this as a mandate. Each of these suggestions must be analyzed, balancing the performance trade-offs between inserting or updating data in a given table versus the variety of queries that might be made against a table. Indexes slow inserts and updates, while benefiting specific queries. There are a number of ways this analysis can be performed. The tuning wizard is just a first step. You should use SQL tracing tools and analyze the SQL demands that ZENworks is making on the database while it performs various functions such as registration, bundle creation and deployment, policy enforcement, inventory, and so forth. After you have accurate information on what kind of load ZENworks is placing on the database, you can then add your indexes.
Managing Large Transaction LogsLarge and growing transactions are an indication that a backup plan could be optimized. For example, it is not desirable to have transactions logs larger than the database. Large transaction logs are typically caused by three factors:
1. Old transactions not being disregarded as part of the backup. When configuring the backup, it is important that old transactions from the backup are not included, because they have already been committed into the database.
2. Infrequent backups.3. Initial transaction log size set too low and the auto-grow size percentage is not set large
enough.
Microsoft SQL Server 155
For more information, see the following links and excerpts:
http://sqlblog.com/blogs/aaron_bertrand/archive/2009/07/27/oh-the-horror-please-stop-telling-people-they-should-shrink-their-log-files.aspx (http://sqlblog.com/blogs/aaron_bertrand/archive/2009/07/27/oh-the-horror-please-stop-telling-people-they-should-shrink-their-log-files.aspx)
http://support.microsoft.com/kb/873235 (http://support.microsoft.com/kb/873235)
In rare cases, you might need to shrink the transaction log, because of a performance issue or otherwise. Run the following commands:
--Shrink the transaction log a lot!!USE <database_name>;GODBCC SHRINKFILE(<database_name>_log, 1)BACKUP LOG <database_name> WITH TRUNCATE_ONLYDBCC SHRINKFILE(<database_name>_log, 1)GOWhere <database_name> is the name of the database on which you want to shrink the transaction log.
For more information, see:
http://www.karaszi.com/SQLServer/info_dont_shrink.asp (http://www.karaszi.com)
Index FragmentationData modification operations (INSERT, UPDATE, or DELETE statements) will increase index fragmentation. Fragmented index data can cause the SQL Server to perform unnecessary data reads and switching across different pages. This can cause severe query performance issues against a heavily fragmented table.
sys.dm_db_index_physical_stats view can be used to identify the fragmentation levels of each index.
For more information, see http://technet.microsoft.com/en-us/library/ms188917.aspx (http://technet.microsoft.com/en-us/library/ms188917.aspx).
To reduce the fragmentation, rebuild the indexes or reorganize the indexes based on the fragmentation percentage. Micro Focus recommends that you defragment indexes every two weeks. You can do this by creating scripts or by using third-party utilities to easily defragment the entire database. You can use the following scripts to rebuild indexes and detect fragmentation in the MS SQL server:
DBCC SHOWCONTIG DBCC DBREINDEX If a table or index is more than 50% fragmented, you should re-index it to increase performance.
156 Microsoft SQL Server
For more information, see:
http://www.mssqlcity.com/Articles/Adm/index_fragmentation.htm (http://www.mssqlcity.com/Articles/Adm/index_fragmentation.htm)
http://www.sql-server-performance.com/tips/rebuilding_indexes_p1.aspx (http://www.sql-server-performance.com/2017/rebuilding-indexes/)
In Advanced concepts, a custom script is provided to rebuild the indexes. This script should be included in the weekly maintenance plan.
ERRORLOG LocationMicrosoft SQL Server stores all the server-related errors or information messages in the ERRORLOG file.
The ERRORLOG file location details can be gathered using the following SQL:
SELECT SERVERPROPERTY('ErrorLogFileName')To view the SQL Server error log:
1 In Object Explorer, expand a server, expand Management, then expand SQL Server Logs.2 Right-click a log and click View SQL Server Log.
(OR)EXEC sp_readerrorlog 0GO
For more information, see http://msdn.microsoft.com/en-us/library/ms187885.aspx (http://msdn.microsoft.com/en-us/library/ms187885.aspx).
Backing Up Microsoft SQL DatabasesMicro Focus recommends that you use Microsoft SQL Server Management Studio to manage backups. Alternatively, you can create automatic scripts to do regular backups. MS SQL allows the following types of backups:
Full Differential Transaction Log
Micro Focus recommends the following:
Test backups by restoring periodically. Store copies of backups in a safe, off-site location in order to protect them from potentially
catastrophic data loss. A network drive can be used as a direct backup destination. Transaction Log backup is used to do a Point in time restore, so if someone accidentally deletes
all the data in a database, you can recover the database to the point in time just before the delete occurred.
Take a backup of particular tables before applying a patch.
Microsoft SQL Server 157
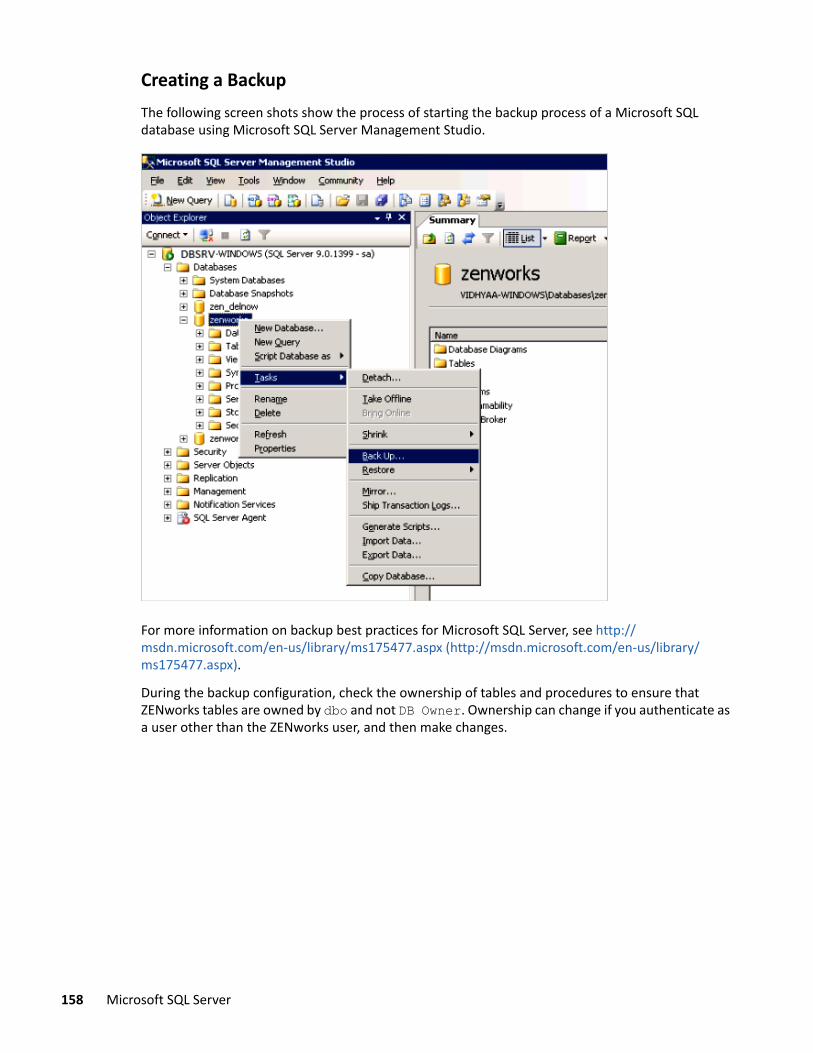
Creating a BackupThe following screen shots show the process of starting the backup process of a Microsoft SQL database using Microsoft SQL Server Management Studio.
For more information on backup best practices for Microsoft SQL Server, see http://msdn.microsoft.com/en-us/library/ms175477.aspx (http://msdn.microsoft.com/en-us/library/ms175477.aspx).
During the backup configuration, check the ownership of tables and procedures to ensure that ZENworks tables are owned by dbo and not DB Owner. Ownership can change if you authenticate as a user other than the ZENworks user, and then make changes.
158 Microsoft SQL Server
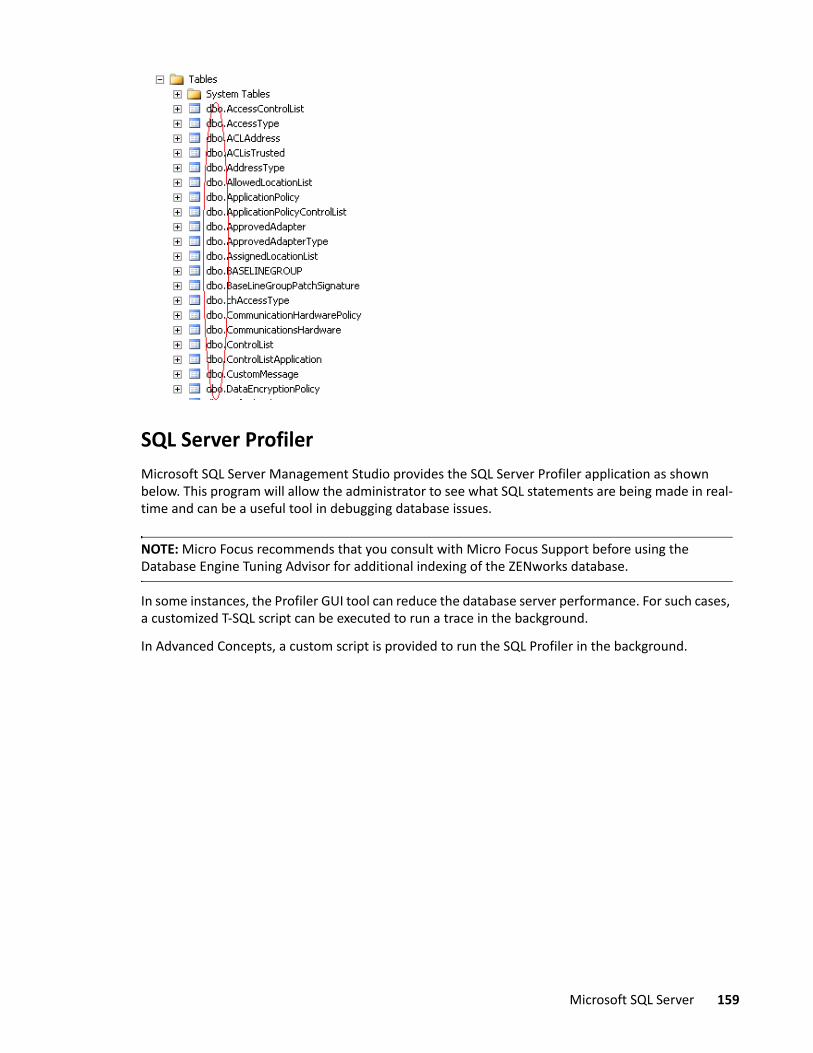
SQL Server ProfilerMicrosoft SQL Server Management Studio provides the SQL Server Profiler application as shown below. This program will allow the administrator to see what SQL statements are being made in real-time and can be a useful tool in debugging database issues.
NOTE: Micro Focus recommends that you consult with Micro Focus Support before using the Database Engine Tuning Advisor for additional indexing of the ZENworks database.
In some instances, the Profiler GUI tool can reduce the database server performance. For such cases, a customized T-SQL script can be executed to run a trace in the background.
In Advanced Concepts, a custom script is provided to run the SQL Profiler in the background.
Microsoft SQL Server 159

Advanced MS SQL ConceptsThis section provides information on advanced concepts that are important when using MS SQL as your ZENworks database, including:
“Useful MS SQL Tools” on page 160 “High CPU Utilization” on page 162 “TempDB Impact on Performance” on page 163 “Custom MSSQL Defragmentation Script” on page 164 “Custom MSSQL Trace Blocked Session Script” on page 165
Useful MS SQL ToolsThe following are some of the key tools built into MS SQL to help you troubleshoot, monitor, and diagnose the database:
“Monitoring the Error Logs” on page 161 “DBCC (Transact-SQL)” on page 161 “System-Stored Procedures (Transact-SQL)” on page 161 “Trace Flags” on page 161 “sp_trace_setfilter (Transact-SQL)” on page 161 “Monitoring Resource Usage (System Monitor)” on page 161
160 Microsoft SQL Server
“Tuning the Physical Database Design” on page 162 “Activity Monitor (SQL Server Management Studio)” on page 162
Monitoring the Error LogsThe Windows application event log provides an overall picture of events occurring on the Windows Server and Windows operating systems as a whole, as well as events in SQL Server, SQL Server Agent, and full-text search. It contains information about events in SQL Server that is not available elsewhere. You can use the information in the error log to troubleshoot SQL Server-related problems.
DBCC (Transact-SQL)DBCC (Database Console Command) statements enable you to check performance statistics and the logical and physical consistency of a database.
System-Stored Procedures (Transact-SQL)The following SQL Server system-stored procedures provide a powerful alternative for many monitoring tasks:
sp_who (Transact-SQL) - Reports snapshot information about current SQL Server users and processes, including the currently executing statement and whether the statement is blocked.
sp_lock (Transact-SQL) - Reports snapshot information about locks, including the object ID, index ID, type of lock, and type of resource to which the lock applies.
sp_spaceused (Transact-SQL) - Displays an estimate of the current amount of disk space used by a table (or a whole database).
sp_monitor (Transact-SQL) - Displays statistics, including CPU usage, I/O usage, and the amount of idle time since sp_monitor was last executed.
Trace FlagsTrace flags display information about a specific activity within the server and are used to diagnose problems or performance issues (for example, deadlock chains).
sp_trace_setfilter (Transact-SQL)SQL Server Profiler tracks engine process events, such as the start of a batch or a transaction, enabling you to monitor server and database activity (for example, deadlocks, fatal errors, or login activity). You can capture SQL Server Profiler data to a SQL Server table or a file for later analysis, and you can also replay the events captured on SQL Server, step by step, to see exactly what happened.
Monitoring Resource Usage (System Monitor)System Monitor primarily tracks resource usage, such as the number of buffer manager page requests in use, enabling you to monitor server performance and activity using predefined objects and counters or user-defined counters to monitor events. System Monitor (Performance Monitor in
Microsoft SQL Server 161
Microsoft Windows NT 4.0) collects counts and rates rather than data about the events (for example, memory usage, number of active transactions, number of blocked locks, or CPU activity). You can set thresholds for specific counters to generate alerts that notify operators.
System Monitor works on Microsoft Windows Server and Windows operating systems. It can monitor (remotely or locally) an instance of SQL Server on Windows NT 4.0 or later.
The key difference between SQL Server Profiler and System Monitor is that SQL Server Profiler monitors Database Engine events, whereas System Monitor monitors the resource usage associated with server processes.
Tuning the Physical Database DesignDatabase Engine Tuning Advisor analyzes the performance effects of Transact-SQL statements executed against those databases that you want to tune. Database Engine Tuning Advisor provides recommendations to add, remove, or modify indexes, indexed views, and partitioning.
Activity Monitor (SQL Server Management Studio)The Activity Monitor in SQL Server Management Studio graphically displays information about:
Processes running on an instance of SQL Server Blocked processes Locks User activity
This is useful for ad hoc views of current activity.
High CPU UtilizationA large number of open transactions or repeated SQL calls of the same query can cause high CPU utilization.
The following SQL statement can be used to find out the queries which are causing the high CPU utilization. This query will give all the information about the servers, physical_io, CPU, wait events and status.
SELECT ST.TEXT, SP.* FROM SYS.SYSPROCESSES SP CROSS APPLY SYS.DM_EXEC_SQL_TEXT (SP.SQL_HANDLE) ST ORDER BY CPU DESCOr, you can right-click the SQL Server instance and click on the Activity Monitor.
For more information, see http://technet.microsoft.com/en-us/library/hh212951.aspx (http://technet.microsoft.com/en-us/library/hh212951.aspx).
You can use the KILL command to clean the unwanted, long-running session:
KILL <<spid>>
162 Microsoft SQL Server

TempDB Impact on PerformanceTempDB system database is used to hold temporary user objects, internal objects, and row versions. When the TempDB is heavily used, the SQL Server might experience contention during page allocation. This might cause queries and requests that involve TempDB to be unresponsive sporadically. Hence, the size and physical placement of TempDB can affect the performance.
To reduce the contention, adjust the data file in TempDB using the following formula:
If (logical processors <= 8) the TempDB data files should be number of logical processors. Otherwise TempDB data files should be 8 (increment it by 4 if contention continues).
Recommendations:
Set the recovery model of TempDB to SIMPLE. This model automatically reclaims log space to keep space requirements small.
Set auto grow to ON for TempDB Each data file must be the same size; this allows for optimal proportional-fill performance. Put the TempDB database on a fast I/O subsystem and preferably on disks that differ from those
that are used by user databases. Pre-allocate space for all TempDB files. Set the file growth increment to a reasonable size to avoid the TempDB files from growing too
small when compared to what is being written into them by offsetting performance.
TempDB Size EstimationUse the following query to show the current TempDB size:
SELECT (unallocated_extent_page_count +version_store_reserved_page_count+user_object_reserved_page_count+internal_object_reserved_page_count+mixed_extent_page_count)*8/1024. ,
unallocated_extent_page_count *8/1024.,
version_store_reserved_page_count,
version_store_reserved_page_count*8/1024.
FROM sys.dm_db_file_space_usage;To check how much space it requires without actually executing the command:
Microsoft SQL Server 163

USE TempDB
GO
DBCC CHECKDB WITH ESTIMATEONLY
GOIt returns the result set for the estimated TempDB space needed for CHECKALLOC(KB) and estimated TempDB space needed for CHECKTABLES(KB).
For more information, see http://technet.microsoft.com/en-us/library/ms345368(v=sql.105).aspx (http://technet.microsoft.com/en-us/library/ms345368(v=sql.105).aspx).
Resizing or Moving TempDBRun the following code to get the file names of TempDB:
USE TempDB
GO
EXEC sp_helpfile
GORun the following code to move the mdf and ldf files:
ALTER DATABASE TempDB MODIFY FILE (NAME = tempdev, FILENAME = 'd:datatempdb.mdf')
GO
ALTER DATABASE TempDB MODIFY FILE (NAME = templog, FILENAME = 'e:datatemplog.ldf')
GOFor more information, see http://technet.microsoft.com/en-us/library/ms345408.aspx (http://technet.microsoft.com/en-us/library/ms345408.aspx).
Custom MSSQL Defragmentation ScriptThis SQL Script (https://www.novell.com/documentation/zenworks113/resources/mssql_defrag_script.sql) can be used to defragment indexes. This script contains multiple options that can be configured:
Defrag completely (Y/N) – The default value is N. If it is Y, defragment all the indexes, else it will defragment the remaining indexes that were left in the last execution.
Number of Hours to Execute – Default is 4.
164 Microsoft SQL Server
Change the database recovery mode to SIMPLE/FULL (Y/N). Default to N. If it is N, it means that the script will not change the recovery mode. This can be used when the Primary Servers are running. If it is Y, the script assumes that the Primary Servers are stopped and recovery mode will be set to SIMPLE. After the execution is complete, it will convert to FULL.
Index File Group Name – The default value is PRIMARY. If the customer is using a different file group for indexes, this can be modified.
Custom MSSQL Trace Blocked Session ScriptThis SQL script (https://www.novell.com/documentation/zenworks113/resources/mssql_trace_script_with_blocked_sessions.sql)can be used to trace the blocked sessions.
Multiple options can be configured:
@TraceLoc is the name of your trace file name and location. For example, @TraceLoc = N'C:\Trace1'
@TimeToRun is the duration of the trace, in minutes. For example, @TimeToRun = 15 @maxfilesize is maximum trace file size in MB. For example, @maxfilesize = 5,0000
Microsoft SQL Server 165

166 Microsoft SQL Server
9 9Oracle
Before choosing to use Oracle as your data store you should ensure that you have the required skills in-house or readily available (contractor, consultant, or partner) to manage and maintain the Oracle Database Server, based on the best practices that Oracle outlines for database management. Individuals who are responsible for the day-to-day management of the Oracle infrastructure must be involved in the ZENworks deployment project from the beginning.
However, the ZENworks administrator should also become familiar with some of the administrative concepts and performance tuning concepts related to Oracle database management.
For more information on Oracle Performance tuning, see the following link:
http://docs.oracle.com/cd/E11882_01/server.112/e41573/toc.htm (http://docs.oracle.com/cd/E11882_01/server.112/e41573/toc.htm)
Best practice information suggested by Oracle regarding backup and recovery can be found at the following location:
http://docs.oracle.com/cd/E11882_01/backup.112/e10642/toc.htm (http://docs.oracle.com/cd/E11882_01/backup.112/e10642/toc.htm)
Onsite Oracle database administrators should be familiar with these concepts and procedures. The administrators simply need to know what additional information they need to backup as a result of the implementation of ZENworks.
“Design and Planning” on page 167 “Monitoring and Tuning” on page 175 “Advanced Concepts” on page 181
Design and PlanningBasic install recommendations during the design and planning phase include:
Estimating the processors, and sessions according to the number of Primary Servers. Updating the database server with the latest service packs. Planning the Memory and Disk I/O requirements. Eliminating database contention if the database supports other applications Tuning the operating system
Oracle 167
Virtualizing the ZENworks DatabaseMicro Focus does not recommend virtualization of the ZENworks Database server. However, if you do, you should ensure that you follow the database vendor's best practice. Refer to your vendor’s documentation as well as the following documentation:
Oracle Databases on VMware Best Practices Guide DBA Guide to Databases on VMware
Shared vs Dedicated Server ModesMost customers use the Dedicated Server Mode as default. However, in some cases the Shared Connection Mode can be used. At any given point in time a ZENworks Primary Server can have up to approximately 150 connections to the ZENworks database. Each connection with Oracle utilizes a certain amount of RAM. If the number of Primary Servers multiplied by the number of connections causes the required RAM to exceed what can be addressed by the operating system, such as with a 32-bit OS which is limited to 4GB, the Shared Server Mode can be used to handle such scenarios. The Shared Server Mode allows connections to be pooled and shared across a single memory allocation.
If you notice a large number of dedicated connections being rejected, use the following command to determine the status of connection rejection for a particular listener:
lsnrctl statusFor more information, see Dedicated vs. shared servers (http://www.dba-oracle.com/t_mts_multithreaded_servers_shared.htm).
Character EncodingOracle supports some hybrid versions of UTF-8, but ZENworks requires true UTF-8 or UTF-16. The following commands report on the character encoding supported by the database:
select value from nls_database_parameters where parameter = 'NLS_CHARACTERSET';
select value from nls_database_parameters where parameter = 'NLS_NCHAR_CHARACTERSET';
Disk Size and RAM Size RequirementsFor ZENworks, the recommended minimum hard disk size is 10 GB for every 1,000 devices. We need to maintain separate disks for the database to avoid issues and for the slowing down of simultaneous access to the disk. Different disks refer to different physical disks, possibly using different controllers.
For the initial 3000 devices, a minimum of 4 GB RAM is recommended, beyond which, for every subsequent 3000 devices, 1 GB of additional RAM would be required.
For more information on disk size and type information, see, Disk Management for Oracle (http://www.dba-oracle.com/oracle_tips_pga_size.htm),
168 Oracle
Memory ManagementOracle Automatic Memory Management is a reactive tool to re-size the RAM regions, which is fine for smaller ZENworks systems. For large ZENworks systems, Micro Focus strongly recommends a Manual Memory Management configuration because Automatic Memory Management will not anticipate high transaction time and will not allocate additional data buffers. In the Micro Focus lab, we have observed better results with manual memory management when testing a large ZENworks system.
After the initial configuration of a database, monitoring and tuning an instance regularly is important, to eliminate any potential performance bottlenecks in the database. Oracle provides V$ views to identify these bottlenecks and provide recommendations.
Reserving RAM for Database ConnectionsThe Oracle database administrator needs to determine the optimal RAM allocation based on the operating system on the database server and the number of database connections. The total RAM demands for Oracle are as follows:
OS RAM: 20 percent of the total RAM for Microsoft Windows, 10% of RAM for UNIX. Oracle SGA RAM: Determined with the show sga command. Oracle database connections RAM: Each Oracle connection (when not using the Oracle multi-
threaded server) will use approximately two megabytes of RAM and Sort_Area_Size and Hash_Area_Size. (or pga_aggregate_target alocation).
Oracle PGADetermining the PGA size is a critical part of Oracle RAM tuning. A PGA RAM region is allocated for every dedicated connection. The size is determined as follows:
OS Overhead: Program Global Area (PGA): OS Overhead – 2 MB of RAM has been reserved for Windows and 1 MB for UNIX.
Sort_area_size parameter value: Program Global Area (PGA): Sort_Area_Size – This RAM is used for data row sorting inside the PGA.
Hash_area_size parameter value: Program Global Area (PGA):Hash_Area_Size – This RAM defaults to 1.5 times the Sort_Area_Size value and is used for performing hash joins of Oracle tables.
Select <number of connections>*(2048576+a.value+b.value) pga_size from v$parameter a, v$parameter b, where a.name = 'sort_area_size', and b.name = 'hash_area_size';
Oracle SGA The size of an Oracle SGA is based on the following parameter settings:
shared_pool_size: Sizes the administrative RAM for Oracle and the library cache.
Oracle 169
db_cache_size: Determines the size of the RAM for the data buffers.
large_pool_size: The size used for shared servers (MTS, not recommended) and parallel queries. Parallel execution allocates buffers out of the large pool only. whenparallel_automatic_tuning parameter is true.
log_buffer: The size of the RAM buffer for redo logs.
For more information, see:
Optimize your Oracle PGA RAM (http://www.dba-oracle.com/oracle_tips_pga_size.htm)
Oracle PGA Memory Allocation for Dedicated Connections (http://www.praetoriate.com/t_%20tuning_pga_memory.htm)
Optimizing Oracle RAM for SGA & PGA (http://www.dba-oracle.com/art_dbazine_ram.htm)
StorageThis section lists important information related to the storage aspect of Oracle, including:
“Oracle Automatic Storage Management” on page 170 “ZENworks Tablespaces” on page 171 “RAID” on page 171 “Asynchronous I/O” on page 172
Oracle Automatic Storage ManagementAutomatic Storage Management (ASM) is a volume manager and a file system for Oracle database files that supports single-instance Oracle Database and Oracle Real Application Cluster (Oracle RAC) configurations. ASM is Oracle's recommended storage management solution that provides an alternative to conventional volume managers, file systems, and raw devices.
ASM uses disk groups to store data files. An ASM disk group is a collection of disks that ASM manages as a unit. Within a disk group, ASM exposes a file system interface for Oracle database files. The content of files that are stored in a disk group are evenly distributed, or striped, to eliminate hot spots and to provide uniform performance across the disks. The performance is comparable to the performance of raw devices.
You can add or remove disks from a disk group while a database continues to access files from the disk group. When you add or remove disks from a disk group, ASM automatically redistributes the file contents and eliminates the need for downtime when redistributing the content.
The ASM volume manager functionality provides flexible, server-based mirroring options. The ASM normal and high redundancy disk groups enable two-way and three-way mirroring respectively. You can use external redundancy to enable a Redundant Array of Inexpensive Disks (RAID) storage subsystem to perform the mirroring protection function.
ASM also uses the Oracle Managed Files (OMF) feature to simplify database file management. OMF automatically creates files in designated locations. OMF also names files and removes them while relinquishing space when tablespaces or files are deleted.
170 Oracle

ASM reduces the administrative overhead for managing database storage by consolidating data storage into a small number of disk groups. This enables you to consolidate the storage for multiple databases and to provide for improved I/O performance.
ASM files can coexist with other storage management options such as raw disks and third-party file systems. This capability simplifies the integration of ASM into pre-existing environments.
Oracle Enterprise Manager includes a wizard that enables you to migrate non-ASM database files to ASM. ASM also has easy to use management interfaces such as SQL*Plus, the ASMCMD command-line interface, and Oracle Enterprise Manager.
For more information, see http://docs.oracle.com/cd/B28359_01/server.111/b31107/toc.htm (http://docs.oracle.com/cd/B28359_01/server.111/b31107/toc.htm).
ZENworks TablespacesIn the ZENworks install or upgrade wizard, you have the option to segregate the tables and indexes into two separate Tablespaces. This helps to balance disk I/O usage and improve the performance. It is recommended that you host the data files from both of the tablespaces in separate hard disks.
Spreading objects to different disks helps obtain better performance. To do so, use multiple tablespaces, allocating them to different disks. Move objects among different tablespaces, or add multiple data files spread among different disks to the same tablespace, and allocate extents for the database objects to these data files.
Use the DBA_HIST_SEG_STAT view to identify the most-accessed segments from the instance startup.
For more information, see:
http://docs.oracle.com/cd/E18283_01/server.112/e17120/tspaces007.htm (http://docs.oracle.com/cd/E18283_01/server.112/e17120/tspaces007.htm)
RAIDRAID is the acronym for Redundant Arrays of Inexpensive Disks, a common configuration in a storage subsystem. It is used to obtain low-cost, fault-tolerant configurations for high performance in the non-mainframe market by using multiple inexpensive disks in different configurations.
A RAID can be software-based at the operating system and firmware level or hardware-based. The latter offers guaranteed performance and no overhead on the CPU.
The following steps will demonstrate the various RAID levels; you can chose the right RAID level based on the following:
RAID 0+1 is preferable for your Oracle database installations. RAID 5 has a significant write penalty, so do not use it for storing write-intensive data files (if
RAID 0+1 is available), redo log files, archived redo log files, and undo segments. You can use it for control files and for data files with moderate write activity.
LGWR writes online redo logs sequentially using RAID 5 on the disks, where online redo logs are stored. This can lead to poor performance due to the slower write times that characterize this type of disk array. Using RAID 0+1 is preferable.
Oracle 171
For more information, see http://www.dba-oracle.com/oracle_tips_raid_usage.htm (http://www.dba-oracle.com/oracle_tips_raid_usage.htm).
Asynchronous I/OThe Oracle database can use synchronous or asynchronous I/O calls. With synchronous I/O, the write process will block until the operation is completed.
Using asynchronous I/O, while the I/O request is still executing, the calling process continues its work without blocking. This is why asynchronous I/O can lead to performance gain in processing writes to Oracle database files.
Enable asynchronous I/O if it is not enabled:
ALTER SYSTEM SET FILESYSTEMIO_OPTIONS=SETALL SCOPE=SPFILE;
Restart the database to set the new parameters.
On platforms that don't support asynchronous I/O, you can enable multiple database writer-slave processes. A single DBWR process will use multiple slave processes to write data on disks, simulating something similar to asynchronous I/O.
For more information, see http://www.dba-oracle.com/art_dbazine_disk.htm (http://www.dba-oracle.com/art_dbazine_disk.htm).
Oracle ParametersThe following parameters are provided based on the scale test performed in the Micro Focus lab on a dedicated Oracle database server with all the ZENworks processes enabled.
These parameters might differ if the Oracle server is shared for applications other than ZENworks and the hardware configuration.
Recommended Parameter Settings:
DB_BLOCK_SIZE: 8KB, which is the default value.
Number of Process: 200 * Number of Primary Servers
Memory Management: Manual memory management
PGA: Number of processes * 6 MB
SGA: Minimum 2 GB or SGA = Total RAM size – OS allotted RAM – PGA
OPEN_CURSORS: Number of opened sessions * 1.5
172 Oracle
LOBs Storage ParametersLarge Objects (LOBs) are a particular data type, used to store large binary or character objects inside or outside the database when using BFILEs.
Micro Focus recommends that you store the LOB data as SECUREFILEs by setting the following parameter. We recommend that you set this parameters before creating the ZENworks zone or before creating the ZENworks schema.
Oracle 12C: ALTER SYSTEM SET db_securefile = 'ALWAYS';While creating the LOB field, by default, the ENABLE STORAGE IN ROW clause will be enabled, which means store the data in the same DB block in which other fields of the row are stored. When the size of the LOB field is greater than 4000 bytes it is always stored off-line. The same behavior occurs when the DB block size is large enough to accommodate the LOB field. By default an 8 KB block size is good enough to support most of the ZENworks cases.
For more information, see the Oracle website.
Checkpoints and Redo Log FilesCKPT process signals the DBWn processes to write the dirty (modified) buffers from the database buffer cache in memory to the data files.
SELECT NAME, VALUE FROM V$SYSSTAT WHERE NAME LIKE 'background check%';If the number of started checkpoints is greater than the value of completed checkpoints by more than one, in the first query you need to enlarge the Redo Log File size. In this situation, checkpoints are not completed between log file switches. This is because the log file switches occur too often and log files are very small. Increasing the Redo Log File size will limit the number of log switches required, allowing checkpoints to complete between them.
A redo log switch should occur every 15 to 30 minutes. Switching too often leads to performance issues, while not switching often enough can cause a recovery operation to take longer.
SELECT * FROM V$LOGFILE;Query V$LOGFILE to know the redo log files in our database and some information on their status.
In a production database, you need at least two members for each group, and, according to the transaction load on the database, more redo log groups could be required.
For more information, see http://docs.oracle.com/cd/E18283_01/server.112/e17120/onlineredo002.htm (http://docs.oracle.com/cd/E18283_01/server.112/e17120/onlineredo002.htm).
Important Log LocationsThe alert.log is located at the path specified by the SQL command:
Show parameter BACKGROUND_DUMP_DEST The Alert log will display all the deadlock errors, I/O issues, and memory issues.
Oracle 173
Oracle will generate a specific trace file for each error and the file location will be available in the Alert log.
The Oracle instance restart/ shutdown timings and instance abnormal termination details will be logged in this file. This file should be sent to Micro Focus Support for better understanding about the issue.
The listener.log file is found by checking the Listener Log File path, after running lsnrctl status from a command prompt.
See the following links for more information:
• http://download.oracle.com/docs/cd/B14117_01/network.101/b10775/listenercfg.htm (http://download.oracle.com/docs/cd/B14117_01/network.101/b10775/listenercfg.htm)
• http://www.orafaq.com/wiki/Alert_log (http://www.orafaq.com/wiki/Alert_log)
Oracle RACTHe Oracle RAC database system involves the configuration of multiple hosts or servers joined together with clustering software and accessing the shared disk storage structures. On each of the hosts in the cluster, an Oracle database instance is launched that uses the shared storage structures to provide the logical database objects. Thus, multiple database instances provide a common database access for the users. Users can access the same database from any of the instances.
Basic features include:
Multiple instances accessing the same database. One set of data files and control files, but separate Redo Log files and Undo segments for each
instance. Locking and Concurrency Maintenance is extended to multiple instances. Multiple instances access the same shared storage structures. Provides HA and Scalability Solution.
Advanced features of Oracle Net include failover and load balancing. They are mostly used in a RAC environment.
Failover
In the context of Oracle Net, failover refers to the mechanism of switching over to an alternate resource when the connection to the primary resource is terminated for any reason. Connection failure can be broadly categorized as follows:
Those that occur while making the initial connection. Those that occur after a connection has been successfully established.
Load Balancing
Load balancing can be defined as distributing a job or piece of work to multiple resources. RAC is an ideal environment for distributing a load among multiple instances accessing the same physical database.
Client Load Balancing: You can configure load balancing either at the client end or at the server end.
174 Oracle
Connection Load Balancing: This feature improves connection performance by allowing the listener to distribute new connections to different dispatchers and instances.
For more information, see the following links:
http://docs.oracle.com/cd/E11882_01/rac.112/e41960/admcon.htm (http://docs.oracle.com/cd/E11882_01/rac.112/e41960/admcon.htm)
http://www.oracle.com/technetwork/database/options/clustering/rac-wp-12c-1896129.pdf?ssSourceSiteId=ocomen (http://www.oracle.com/technetwork/database/options/clustering/rac-wp-12c-1896129.pdf?ssSourceSiteId=ocomen)
Oracle RAC One NodeThis option is available with the Enterprise edition only. It provides a cold failover solution for Oracle databases. It is a single instance of Oracle RAC running on one node of the cluster while the second node is in a cold standby mode. If the instance fails for some reason, then RAC One Node detects it and first tries to restart the instance on the same node. The instance is relocated to the second node in case there is a failure or fault in the first node and the instance cannot be restarted on the same node. The benefit of this feature is that it automates the instance relocation without any down time and does not need manual intervention. It uses a technology called Omotion, which facilitates the instance migration/relocation. Additional benefits include:
Built-in cluster fail-over for HA but not to load balance, unlike regular RAC. It is useful for some maintenance tasks, such as rolling upgrade or proactive upgrade. It is capable of online upgrade to real RAC.
For more information about Oracle one node, see:
http://www.oracle.com/technetwork/database/options/clustering/rac-one-node-wp-12c-1896130.pdf?ssSourceSiteId=ocomen (http://www.oracle.com/technetwork/database/options/clustering/rac-one-node-wp-12c-1896130.pdf?ssSourceSiteId=ocomen)
http://www.dba-oracle.com/t_rac_one_node.htm (http://www.dba-oracle.com/t_rac_one_node.htm)
Monitoring and TuningThis section provides information on tuning your Oracle server to optimize the behavior of your ZENworks system:
“Tuning Memory to Avoid OS Paging” on page 176 “Tuning the Library Cache” on page 176 “Tuning the Shared Pool” on page 177 “Tuning the Dictionary Cache” on page 177 “Tuning the Program Global Area” on page 178 “Tuning the Buffer Cache” on page 178 “Backup” on page 179
Oracle 175

“Fragmentation” on page 180 “Trace” on page 181
Tuning Memory to Avoid OS Paging1 Query the V$SGAINFO dynamic performance view to show more details about memory usage:SELECT * FROM V$SGAINFO;
2 Connect to Oracle Enterprise Manager as SYSDBA and navigate to Advisor Central.3 Choose Memory Advisors to verify if Automatic Memory Management (AMM) is enabled, the
total (and maximum) memory size configured, and the allocation history graph.4 Click Advice to see the Memory Size Advice graph. This enables you to choose the right value for
the total memory size.
To avoid paging and swapping at the operating system level, do not exceed the limit of available physical memory when using Oracle Enterprise Manager or the ALTER SYSTEM command.
To obtain maximum performance from the Oracle database, a better option is to keep all the required memory structures in the physical memory, if enough memory is available. In order to do this, it is advisable to keep the SGA limit below the available physical memory.
On the Linux Platform, you can use hugepages to obtain a page size of 2 MB instead of the older 4 KB. The memory space used by hugepages is locked and cannot be paged out.
For more information, see http://docs.oracle.com/cd/E11882_01/server.112/e16638/memory.htm#PFGRF014 (http://docs.oracle.com/cd/E11882_01/server.112/e16638/memory.htm#PFGRF014).
Tuning the Library CacheLibrary Cache is part of the Shared Pool, inside the System Global Area. In this section, we will see how to inspect the use of the Library Cache, and how to tune it to obtain the best performance from the database.
To tune the Library Cache:
1 Query the V$LIBRARYCACHE dynamic performance view:SELECT NAMESPACE, GETS, GETHITRATIO, PINS, PINHITRATIO,RELOADS, INVALIDATIONS FROM V$LIBRARYCACHE;
2 Calculate the Library Cache Hit ratio:SELECT SUM(PINS - RELOADS)*100/SUM(PINS) AS "Hit Ratio" FROM V$LIBRARYCACHE;
The Library Cache Hit Ratio is an important parameter to evaluate the use of Library Cache.The result should be around 99.9 percent.
The Library Cache stores parsed SQL statements, execution plans, PL/SQL blocks, and Java classes, ready to be executed. The application code shared in the Library Cache can be easily reused by different database sessions. The reuse of a piece of code already in the cache is called a Library Cache Hit. A Library Cache Miss occurs when the execution of a piece of code cannot find the already parsed code in the Library Cache.
176 Oracle
The Library Cache Hit is also called a soft parse; the Library Cache Miss is called a hard parse.
The main reasons to tune the Library Cache are to minimize misses (reparsing) and avoid invalidations.
To minimize misses:
Increase the size of the SHARED_POOL_SIZE parameter. Change the CURSOR_SHARING parameter to determine when SQL statements are considered
identical, therefore sharing the corresponding execution plan in the Library Cache.
For more information, see the following links:
http://www.dba-oracle.com/m_library_cache_hit_ratio.htm (http://www.dba-oracle.com/m_library_cache_hit_ratio.htm)
http://docs.oracle.com/cd/E11882_01/server.112/e16638/memory.htm#PFGRF94288 (http://docs.oracle.com/cd/E11882_01/server.112/e16638/memory.htm#PFGRF94288)
Tuning the Shared Pool1 Inspect the shared pool reserved memory:SELECT * FROM V$SHARED_POOL_RESERVED;
2 Inspect the data dictionary cache statistics:SELECT PARAMETER, GETS, GETMISSES, (GETS-GETMISSES)*100/GETS AS "Hit Ratio", MODIFICATIONS, FLUSHES FROM V$ROWCACHE WHERE GETS > 0;
Querying the V$SHARED_POOL_RESERVED dynamic performance view, inspect the statistics about the use of reserved space in the Shared Pool. The goal is to minimize the REQUEST_MISSES and REQUEST_FAILURES, similar to the Library Cache. If the number of failed requests is increasing, we need to expand the Reserved Pool (and probably also the Shared Pool).
To increase the shared pool size:
To size the Reserved Pool, use the SHARED_POOL_RESERVED_SIZE initialization parameter. The value of this parameter cannot exceed 50 percent of the SHARED_POOL_SIZE parameter.
You can use the V$SHARED_POOL_ADVICE dynamic performance view to obtain information about estimated parse time in the shared pool for different shared pool sizes, with a range from 10 percent to 200 percent of the current shared pool size, in equal intervals.
The column ESTD_LC_TIME_SAVED indicates the estimated elapsed parse time saved in seconds, while the ESTD_LC_LOAD_TIME column contains estimated elapsed time in seconds for parsing.
For more information, see http://docs.oracle.com/cd/E11882_01/server.112/e16638/memory.htm#PFGRF94288 (http://docs.oracle.com/cd/E11882_01/server.112/e16638/memory.htm#PFGRF94288).
Tuning the Dictionary CacheSELECT SUM(GETS—GETMISSES) / SUM(GETS) AS "Hit Ratio" FROM V$ROWCACHE;Keep this value above 85 percent.
Oracle 177
The first time, the objects need to be loaded into the cache, so there can never be a 100 percent value for the Hit Ratio.
The size of the Dictionary Cache cannot be changed; It is a part of the Shared Pool and is automatically maintained by the database. The database uses an algorithm that prefers to keep dictionary data rather than library cache data in the shared pool, because the performance benefits achieved by using the former approach are more significant. You can only size the Shared Pool using the SHARED_POOL_SIZE initialization parameter
For more information, see http://docs.oracle.com/cd/E11882_01/server.112/e16638/memory.htm#PFGRF94288 (http://docs.oracle.com/cd/E11882_01/server.112/e16638/memory.htm#PFGRF94288).
Tuning the Program Global AreaThe PGA is used to store real values of bind variables, sort areas, and cursor state information. In a dedicated server environment, this area is in private user memory.
In a shared-server environment, the session stack space remains in the PGA, while session data and cursor state are moved into the shared pool.
Parameters related to cursor management:
OPEN_CURSORS defines the number of concurrent cursors that a user process can use to reference private SQL areas. Increasing the value associated to this parameter allows the user to use more cursors simultaneously, but the memory consumption will be greater.
SESSION_CACHED_CURSORS allows defining the number of session cursors cached. Setting this parameter to a value greater than zero results in a performance gain, where there are repeated parse calls to the same SQL statements. Closed cursors will be cached within the session, ready to be reused.
CURSOR_SHARING allows you to define whether the cursors are shared only when they match exactly (using EXACT) or also in other situations (using FORCE and SIMILAR).
For more information, see http://docs.oracle.com/cd/E11882_01/server.112/e16638/memory.htm#PFGRF01401 (http://docs.oracle.com/cd/E11882_01/server.112/e16638/memory.htm#PFGRF01401).
Tuning the Buffer CacheBuffer Cache is used to store the data read from disk onto the database blocks. Due to the I/O operation, which is slower on disk than on memory, it is preferable that the database makes a few I/O operations on-disk. This result is achievable when most of the requests are satisfied by the data already in the Buffer Cache.
The Buffer Cache operates using an LRU list in order to keep track of the database blocks most often used and a dirty list. The dirty list stores the modified blocks that are required to be written to the disks.
The main use of the LRU list is to add blocks to the LRU end using a full table scan, while the normal operations add blocks to the MRU end of the list, and therefore they are quickly replaced by the blocks required for subsequent operations.
178 Oracle
To tune the Buffer Cache:
1 Query the statistics related to the Buffer Cache:SELECT NAME, VALUE FROM V$SYSSTAT WHERE NAME LIKE '%buffer%';
2 Estimate the performance with various sizes for the Buffer Cache and different database block sizes:SELECT BLOCK_SIZE, SIZE_FOR_ESTIMATE, BUFFERS_FOR_ESTIMATE, ESTD_PHYSICAL_READS FROM V$DB_CACHE_ADVICE ORDER BY BLOCK_SIZE, SIZE_FOR_ESTIMATE;
3 Evaluate the Buffer Cache Hit Ratio from statistics:SELECT PR.VALUE AS "phy. reads", PRD.VALUE AS "phy. reads direct", PRDL.VALUE AS "phy. reads direct (lob)", SLR.VALUE AS "session logical reads", 1 - (PR.VALUE - PRD.VALUE - PRDL.VALUE) / SLR.VALUE AS "hit ratio" FROM V$SYSSTAT PR, V$SYSSTAT PRD, V$SYSSTAT PRDL, V$SYSSTAT SLR WHERE PR.NAME = 'physical reads' AND PRD.NAME = 'physical reads direct' AND PRDL.NAME = 'physical reads direct (lob)' AND SLR.NAME = 'session logical reads';
4 Evaluate the statistics and Hit Ratio for various Buffer Pools:SELECT NAME, PHYSICAL_READS AS "physical reads", DB_BLOCK_GETS AS "DB block gets", CONSISTENT_GETS AS "consistent gets", 1 - (PHYSICAL_READS / (DB_BLOCK_GETS + CONSISTENT_GETS)) AS "hit ratio" FROM V$BUFFER_POOL_STATISTICS WHERE DB_BLOCK_GETS + CONSISTENT_GETS > 0;
For more information, see http://docs.oracle.com/cd/E11882_01/server.112/e16638/memory.htm#PFGRF94264 (http://docs.oracle.com/cd/E11882_01/server.112/e16638/memory.htm#PFGRF94264).
BackupAlmost everything in ZENworks is stored in a database. If you do not create frequent backups of your database, the entire health of the zone is at risk. Therefore, ensure that you design a strategy for database backup and recovery.
Additionally, backups of a database are useful for routine administrative purposes such as copying a database from one server to another, setting up “AlwaysOn Availability Groups” or database mirroring, and archiving. The following backup types are supported by Oracle:
Physical Backup Logical Bakcup
The tools and methods below can be used to create backups:
Export/Import: Exports are "logical" database backups as they extract logical definitions and data from the database to a file.
The following is an example of the schema export and import syntax:
expdp zenadmin/novell@zen11sp2 schemas=zenadmin directory=TEST_DIR dumpfile=zenadmin.dmp logfile=expdpzenadmin.log
Oracle 179
impdp zenadmin/novell@zen11sp2 schemas=zenadmin directory=TEST_DIR dumpfile=zenadmin.dmp logfile=impdpzenadmin.log
Cold or Offline Backups: Shut the database down and backup up all the data, log, and control files.
Hot or Online Backups. If the database is available and in ARCHIVELOG mode, set the tablespaces into backup mode and backup the files. Also remember to backup the control files and archived redo log files.
RMAN Backups: When the database is offline or online, use the rman utility to backup the database.
See the links below:
http://docs.oracle.com/cd/E11882_01/backup.112/e10642/toc.htm (http://docs.oracle.com/cd/E11882_01/backup.112/e10642/toc.htm)
http://technology.amis.nl/2013/01/14/how-to-backup-oracle-rac-11gr2-database-with-rman/ (http://technology.amis.nl/2013/01/14/how-to-backup-oracle-rac-11gr2-database-with-rman/)
http://blogs.adobe.com/shwetank/2011/10/19/manual-backuprestore-of-an-oracle-11gr2-database/ (http://blogs.adobe.com/shwetank/2011/10/19/manual-backuprestore-of-an-oracle-11gr2-database/)
http://www.dba-oracle.com/concepts/rman_online_offline_backups.htm (http://www.dba-oracle.com/concepts/rman_online_offline_backups.htm)
FragmentationIn Oracle, DML operations will not release free space from the table below the High Water Mark and it will increase table fragmentation. Fragmentation causes Oracle optimizer to ignore the index full table scan and, in turn, reduce the performance of database.
Tablespace fragmentation Table fragmentation
To identify the fragmentation compare the actual data size and table size.
Table size (with fragmentation):
select table_name,round((blocks*8),2)||'kb' "size" from user_tables group by table_name;After capturing the table statistics, calculate the actual data in the table:
select table_name, round((num_rows*avg_row_len/1024),2)||'kb' "size" from user_tables group by table_name;Oracle provides many methods for defragmenting a table. Any process that copies all the table rows can be used to defragment a table:
Coalesce tablespace Alter table <tablename> shrink space compact Deallocate unused space
180 Oracle
CTAS (or "alter table xxx move"): This will defragment the table by copying the rows into their pristine state. dbms_redefinition can also be used to defragment an Oracle table.
Data Pump export/import: The table is dropped and re-created to make it unfragmented.
NOTE: Sometimes, fragmentation is caused by an incorrect setting for the PCTFREE parameter.
For more information, see http://www.dba-oracle.com/t_reclaiming_disk_space.htm (http://www.dba-oracle.com/t_reclaiming_disk_space.htm).
TraceThe Oracle database provides several tracing tools that can help you monitor and analyze applications running against an Oracle database.
End-to-end application tracing can identify the source of an excessive workload such as a high load SQL statement, by client identifier, service, module, action, session, instance, or an entire database. This isolates the problem to a specific user, service, session, or application component.
Oracle Database provides the trcsess command line utility that consolidates tracing information based on specific criteria.
The SQL Trace facility and TKPROF are two basic performance diagnostic tools that can help you monitor applications running against the Oracle database.
For more information, see http://docs.oracle.com/cd/E25054_01/server.1111/e16638/sqltrace.htm (http://docs.oracle.com/cd/E25054_01/server.1111/e16638/sqltrace.htm).
Advanced ConceptsThis section covers the following advanced concepts:
“Recommendations for ZENworks on ORACLE Database” on page 181 “Trace Tools” on page 182 “Important System Views” on page 185 “Queries to Identify Hot Tables / Segments” on page 185 “Configuration Changes that Can Have a Negative Impact” on page 185
Recommendations for ZENworks on ORACLE DatabaseThis section presents several recommendations related to using Oracle as your ZENworks database, including:
“Renice LGWR Process on Linux” on page 182 “Avoid Automatic Memory Management” on page 182 “UNDO_RETENTION and UNDO Tablespace Size” on page 182
Oracle 181
Renice LGWR Process on LinuxRenice the Redo log writer process in Linux DB servers: Change the Nice priority of the REDO LOG writer process to improve the performance:
Command : $ renice -20 -p <<spid>>
Avoid Automatic Memory ManagementZENworks give its best performance with the manual memory management. Total memory can be divided into 3 parts.
20% RAM for the Operating system PGA: Can be calculated using the following SQL statement:select&hwm*(2048576+a.value+b.value) pga_size from v$parameter a, v$parameter b where a.name = 'sort_area_size' and b.name = 'hash_area_size'; hwm is the number of database connections.
SGA: Rest of the memory can be used as SGA.
db_writer_processes: Change this initialization parameter to increase the number of processes. For ZENworks, the number of db_writer_processes can be the number of hard disks.
UNDO_RETENTION and UNDO Tablespace SizeUNDO tablespace should be large enough to handle the amount of UNDO generated by ZENworks. If both parameters are not configured properly, then a ORA-01555: Snapshot too old, rollback segment too small error will be raised.
To estimate the UNDO tablespace size and UNDO_RETENTION value, check the below links:
http://www.dba-oracle.com/t_undo_retention.htm (http://www.dba-oracle.com/t_undo_retention.htm)
http://www.akadia.com/services/ora_optimize_undo.html (http://www.akadia.com/services/ora_optimize_undo.html)
Trace ToolsOracle requires constant tuning and monitoring of various parameters to achieve the best throughput.
To monitor and trace the issues, Oracle provided the following tools:
TKProf Statspack Oracle Enterprise Manager - Tuning Pack (cost option) Old UTLBSTAT.SQL and UTLESTAT.SQL - Begin and end stats monitoring ADDM (Automated Database Diagnostics Monitor) introduced in Oracle 10g
182 Oracle
SQL TraceSession trace:
To start a SQL trace for the current session, execute:
ALTER SESSION SET sql_trace = true;
ALTER SESSION SET tracefile_identifier = mysqltrace;To stop SQL tracing for the current session, execute:
ALTER SESSION SET sql_trace = false;Tracing an entire database:
To enable SQL tracing for the entire database, execute:
ALTER SYSTEM SET sql_trace = true SCOPE=MEMORY;To stop SQL Tracing:
ALTER SYSTEM SET sql_trace = false SCOPE=MEMORY;The following query gives the Folder location, File size and File name details of the Trace file:
SELECT * FROM V$PARAMETER WHERE NAME IN ('tracefile_identifier', 'user_dump_dest', 'max_dump_file_size', 'timed_statistics');The default trace file name is “INSTANCE_PID_ora_TRACEID.trc”, where:
INSTANCE is the name of the Oracle instance.
PID is the operating system process ID (V$PROCESS.OSPID).
TRACEID is a character string of your choosing.
TKPROF & TRCSESSTKPROF is used for formatting a trace file into a more readable format for performance analysis.
tkprof filename1 filename2 [waits=yes|no] [sort=option] [print=n][aggregate=yes|no] [insert=filename3] [sys=yes|no] [table=schema.table] [explain=user/password] [record=filename4] [width=n]
TRCSESS allows trace information from multiple trace files to be identified and consolidated into a single trace file.
trcsess [output=output_file_name] [session=session_id] [clientid=client_id] [service=service_name] [action=action_name]
[module=module_name] [trace_files]
For more information, see: http://docs.oracle.com/cd/E11882_01/server.112/e16638/sqltrace.htm#PFGRF01020 (http://docs.oracle.com/cd/E11882_01/server.112/e16638/sqltrace.htm#PFGRF01020).
Oracle 183
Custom Script for TracingThe scripts below should be created in the ZENworks user using SQL*PLUS or SQL Developer. This user should have alter session privileges. After the trace is completed, these triggers can be dropped or disabled.
CREATE OR REPLACE TRIGGER ZENWORKS.after_logon_trgAFTER LOGON ON ZENWORKS.SCHEMADECLARE V_NAME VARCHAR2(100);BEGIN DBMS_SESSION.set_identifier('ZENworks'); EXECUTE IMMEDIATE 'ALTER SESSION SET timed_statistics=TRUE'; EXECUTE IMMEDIATE 'ALTER SESSION SET MAX_DUMP_FILE_SIZE=UNLIMITED'; SELECT SYS_CONTEXT('USERENV','HOST') INTO V_NAME FROM dual; EXECUTE IMMEDIATE 'ALTER SESSION SET TRACEFILE_IDENTIFIER='''||trim(substr(trim(v_name),1,10))||'_'||to_char(sysdate,'DD')||''''; EXECUTE IMMEDIATE 'ALTER SESSION SET EVENTS ''10046 trace name context forever, level 12''';END;/CREATE OR REPLACE TRIGGER ZENWORKS.before_logoff_trg BEFORE LOGOFF ON ZENWORKS.SCHEMABEGIN EXECUTE IMMEDIATE 'ALTER SESSION SET timed_statistics=FALSE'; EXECUTE IMMEDIATE 'ALTER SESSION SET EVENTS ''10046 trace name context off''';END;/
184 Oracle

Important System ViewsOracle provides V$ views to identify these bottlenecks and provide recommendations:
CPU usage related views:
V$SYSSTAT V$SESSTAT
Memory Related views:
V$MEMORY_TARGET_ADVICE V$SGA_TARGET_ADVICE V$PGA_TARGET_ADVICE
Queries to Identify Hot Tables / SegmentsYou can use the queries in this section to identify highly used tables and segments.
select disk_reads, sql_text from v$sqlarea where disk_reads > 10000 order by disk_reads desc;select buffer_gets, sql_text from v$sqlarea where buffer_gets > 200000 order by buffer_gets desc;select * from V$segment_Statistics;SELECT T.OWNER,T.TABLE_NAME,LR.VALUE+PR.VALUE AS TOTAL_READS FROM (SELECT owner,object_name,value FROM v$segment_statistics WHERE statistic_name='logical reads') lr,
(SELECT owner,object_name,value FROM v$segment_statisticsWHERE statistic_name='logical reads') pr, dba_tables t WHERE lr.owner=pr.owner AND lr.object_name=pr.object_name AND LR.OWNER=T.OWNER AND LR.OBJECT_NAME=T.TABLE_NAMEand T.owner like 'ZENWORKS%' ORDER BY 3 desc;
Configuration Changes that Can Have a Negative ImpactOracle databases require constant tuning and monitoring of various parameters to get the best throughput. However, changing the configuration can have a negative impact.
Consider the following questions if you notice an impact to performance:
Has OPTIMIZER_MODE been changed in INIT<SID>.ORA? Has the DEGREE of parallelism been defined or changed on any table? Have the statistics changed? Has the SPFILE/ INIT<SID>.ORA parameter, DB_FILE_MULTIBLOCK_READ_COUNT, been
changed? Has the INIT<SID>.ORA parameter, SORT_AREA_SIZE, been changed?
Oracle 185

Have any other INIT<SID>.ORA parameters been changed? Which tables are currently analyzed? Were they previously analyzed? (That is, was the query
using RBO and now CBO?) Have the tables been re-analyzed? Were the tables analyzed using an estimate or a compute? If
estimate, what percentage was used?
186 Oracle
III IIINetwork Administrator
This part of the guide focuses on the tasks of the administrator who is responsible for maintaining the network infrastructure, including routers, switches, and firewalls.
Chapter 10, “Pre-Design and Planning,” on page 195 Chapter 11, “Design,” on page 197 Chapter 12, “Monitoring and Tuning,” on page 203 Chapter 13, “Advanced Concepts,” on page 205
Network Administrator 193

194 Network Administrator
10 10Pre-Design and Planning
Prior to designing and implementing your ZENworks environment, you should perform an assessment of the impact that ZENworks might have on your environment and the constraints that might exist.
As with any network application, ZENworks will impact the traffic on your network. The impact includes the following:
Managed devices communicating with their Primary Servers to receive configuration metadata Managed devices sending data to their collection servers (Primary or Satellite) Managed devices requesting content from their content servers (Primary or Satellite) Devices being imaged using ZENworks imaging (unicast or multicast) Content servers replicating content stored in the ZENworks content store Primary Servers communicating with the ZENworks database Primary Servers communicating with Primary Servers in other zones for subscription content Primary servers communicating with patch sources such as the Novell Customer Center,
ZENworks Patch Management repository, and Linux subscriptions Authentication servers communicating with their configured LDAP sources
Before deploying ZENworks, it is important to understand your network topology so that the infrastructure can be properly deployed and configured. Consider these key questions before deploying and using ZENworks:
How fast is my LAN and WAN speed and what are its peak and non-peak hours? Do I have bandwidth control (throttling) requirements? Given my server and satellite hardware, how many simultaneous connections can I enable? For
more information, see Chapter 4, “Monitoring and Tuning,” on page 87. What are the TCP/UDP ports used by ZENworks so that firewall exceptions can be added for
them? Do I have any devices behind NAT (Network Address Translation)? Do I need ZENworks web traffic to go through the corporate web proxy? Can I reuse my file servers for content? Do I need Out of Band Management?
Wake On Lan support? IAMT support?
How current does the data that ZENworks maintains for the following need to be? Inventory Audit Messages
Pre-Design and Planning 195
Status Patch status
This chapter includes the following sections:
“Primary and Database Server Connectivity” on page 196 “Satellite Servers” on page 196
Primary and Database Server ConnectivityIt is critical for both performance and reliability that the Primary Servers and their associated Database are on the same low-latency, fast network (at least 10 Mbp/s, preferably 1 Gbp/s). This ensures that SQL queries made by the Primary Servers can be answered in a timely fashion, allowing the Primary Servers to properly service ZENworks requests.
Satellite ServersSatellite Servers should be used to off-load content, imaging, collection, authentication, and join proxy capabilities to a network close to the user. This is especially important if you have a low bandwidth connection between the managed device and the Primary Server and have more than a few managed devices on the site.
For more information about Satellite Servers and the capabilities they provide, see “Satellite Servers” on page 31.
196 Pre-Design and Planning
11 11Design
This chapter highlights the design aspects that are related to the network when ZENworks is installed in the environment. See the following topics:
“Understanding Closest Servers” on page 197 “Load Balancing Between Primary and Satellites” on page 198 “ZENworks Network Ports” on page 200 “Supporting NAT’d Devices” on page 200 “HTTP Proxy” on page 201 “Imaging Considerations” on page 201
Understanding Closest ServersZENworks provides a means for allowing agents to communicate with different servers, at different locations, for different information. In a default installation, all of the agents will communicate only with the Primary Servers and will default to communicating with the first server installed, then the next, and so on until such time as no server is available to respond. To ensure performance and fault tolerance, it is important to properly configure your closest servers so that the traffic flows appropriately based on your network topology.
Closest servers can be configured in the following places within ZENworks:
Network Location: A network location is a logical grouping of one or more network environments, for instance a location called Office might represent any of your offices around the world. A location called Provo might represent all of the networks in your Provo office. There is also a special location called Unknown which indicates that you are in a location not defined by the administrator. The unknown location is often used to control which servers should be used for devices connecting via the network.
Network Environment: A network environment represents a unique logical network of devices. It can consist of several conditions that define the network, including DNS server, Gateway, IP address, ESSID, WINS server, and more. Networks are typically created to represent each site managed by ZENworks, and are often used for defining the closest servers.
Default Closest Servers: If a location or network environment set of closest servers is not configured, or if they are configured to include the default closest servers, the default closest servers are used. Default closest servers include all the existing Primary Servers in the zone.
The closest server list is an ordered list, which means that the managed devices will always attempt to contact the first server in the list, and then the next, until it runs out of servers that have been configured for it. This means that in the default configuration, all your agents will attempt to communicate with the first server in the zone, even if you have multiple, other servers. Therefore, it is critical that you configure the closest server rules. Additionally, you might want to configure Closest Server Groups or use an L4 switch as discussed in “Load Balancing Between Primary and Satellites” on page 198.
Design 197
Within each closest server rules list there are multiple role-based server rules that can be defined. This enables you to control the functions that a server provides to a set of clients. For instance, you might want to use a server as a dedicated ZENworks Control Center server and a packaging source for content. In this case you would want to ensure that no managed devices reference this server; rather, only the Content Satellites that need to get the packaged content from the server. The following roles are available to define closest servers:
Content: This role is used by the agent to determine the server(s) from which it should request content (from the content repository). When an agent makes a request for content, it asks the servers that have that content as a source and that exist in its effective content servers list. Beginning with ZENworks 11.2.3a, Content Satellites can be configured to replicate content in the same fashion, allowing Satellites to pull content from other Satellites when replicating where appropriate.
Authentication: This role is used to determine the server that will perform LDAP authentication operations on behalf of the managed device. This should be configured to point to a server close to the Active Directory Server or eDirectory replica server on which you want to perform the LDAP authentication. All managed devices will attempt to connect to a Configuration Server after authenticating to LDAP to obtain configuration data.
Configuration: This role is used to read and write data from the ZENworks database. This role is only provided by Primary Servers. It is required that all Primary Servers and the database be located on a low latency, 10 Mbp/s connection with each other, preferably on a 1 Gbp/s network.
Collection: This role is used to send most data from the managed agent to the server, including audit events, status information, messages, effective policy data, patch scan results, and more. If you have more than a few workstations on a site, it is recommended that you have a Collection Satellite that will collect the data, aggregate and compress it, and then roll-it up to its Parent Primary Server.
Join Proxy: This role is used to provide remote management capabilities for devices that are on the Internet. Generally, you will only configure join proxy servers on locations that are known to be, or highly likely to be, behind a NAT.
Closest server configuration is crucial to a properly functioning ZENworks system and to ensure that the impact on your overall network is minimized.
Load Balancing Between Primary and SatellitesBy default, ZENworks uses ordered closest server lists. This means that even if you have 5 servers in your zone, all the agents will use the first one, unless otherwise configured. ZENworks provides two methods for enabling load balancing of your servers:
“Load Balancing Using Server Groups” on page 198 “Load Balancing Using an L4 Switch” on page 199
Load Balancing Using Server GroupsThe first load balancing method is to define a Server Group within the closest server rule and then add the servers that you want to load balance to the group. This will cause the managed device to randomize the servers in the group during closest server rule evaluation. If none of the servers in the group are available and there are other servers in the list, then those servers will be tried only
198 Design
after all the servers in the group. This means that if there are 6 servers that are all co-located (that is, the network latency to each of these servers from the agents are similar), it is better to create a single group to hold all 6 servers rather than spreading them into multiple groups.
Server Groups are the preferred means of implementing load balancing in ZENworks. The advantages of using a Server Group over an L4 switch include the following:
No costs involved. Load balancing takes into account the load on the servers dynamically as compared to L4,
which can do this only based on connection counts and round robin. If a server behind a group is busy, all other servers are also tried before failing over to the next
group. In the case of L4, when a server that the managed device is talking to is busy, the entire L4 group is marked as busy.
All the certificate-related issues with an L4 switch is not applicable for a server group. Ease of configuration and use.
For more information on how to configure server groups, see the ZENworks Primary Server and Satellite Reference.
Load Balancing Using an L4 SwitchThe second means of load balancing is to use a Layer-4 switch. In this scenario, you deploy a network load balancer (hardware or software) and then manually define an L4 switch object in the closest server list. When defining an L4 switch, you specify a DNS or IP address and the ZENworks servers that are being front-ended by the switch. When the agent receives the information, it will attempt to contact the L4 switch any time it wants to talk to one of the servers behind the switch. In this configuration if one of the servers is too busy or unavailable, it is the responsibility of the switch to find the most usable server and send the packet to that server.
Following are the two properties which can be configured in osp-configuration.properties for any DNS/IP:
The osp-configuration.properties is available in the following location:
On Windows: %ZENSERVER_HOME%\conf\security\osp On Linux: /etc/opt/microfocus/zenworks/security/osp
com.microfocus.osp.l4.addresses: This is used to add any Load Balancers/Reverse Proxies/API Gateway/ IPV4/IPV6/FQDN/ address.
com.microfocus.osp.additional.hostnames: This can be used to add any additional hostnames assigned to the ZCC server.
Both these properties behaves in the same way and supports comma separated list of address and optionally port number.
Example: com.microfocus.osp.l4.addresses=10.10.10.10, 10.10.10.10:8443, [::1]:8443
For more details on L4 switch configuration, see the “Support for L4 Switches” in the ZENworks Primary Server and Satellite Reference. Not all ZENworks features currently support L4 switches.
Design 199
ZENworks Network PortsFor a list of network ports used by ZENworks, see ZENworks 2020 TCP and UDP ports.
Supporting NAT’d DevicesZENworks uses standard protocols such as HTTP and HTTPS to communicate with the agent and server. As such, in most environments there are no special requirements to manage devices on the other side of a NAT. There are two important considerations:
“Supporting NAT’d Servers” on page 200 “Support NAT’d Devices” on page 200
Supporting NAT’d ServersIf your Primary Server is behind a NAT from the devices that are being managed, you will need to ensure that you add Undiscoverable IP Addresses and/or Additional DNS names in the Primary Server object Settings tab. This provides the ZENworks system with information about the DNS Name(s) and IP Address(es) that clients will be using to connect to the system. This information is used when closest server lists are built and sent to clients. In addition to adding addresses that might not be discoverable, you can also restrict which addresses are sent to the clients by excluding addresses for adapters that you do not wish them to connect on.
For more information on how to configure these settings see the ZENworks Primary Server and Satellite Reference.
Support NAT’d DevicesIf you are managing devices that are behind a NAT, be aware that QuickTasks will not function. This is because a QuickTask is an outbound packet sent from the Primary Server, directed to the IP address of the device object, which in the case of a NAT’d environment, is not a reachable address. In this type of an environment, QuickTasks will be automatically executed on the next refresh, assuming that the QuickTask does not expire before that checkin.
Another important consideration for NAT’d devices is that in order to remote manage a device on the other side of a NAT, you must deploy a ZENworks join proxy, in a location where both the administrator and the managed device can make an outgoing connection. When the managed device boots up or changes location, if the location has a configured join proxy server, it will make an outbound connection on the port configured and then periodically check back to keep the connection alive. When an administrator initiates a remote management session, packets are sent to the join proxy, which connects the administrator and the device connections, allowing a remote management session to be established.
For more information on configuring the join proxy, see “Configuring the Join Proxy Role ”in “ZENworks Remote Management - Using Join Proxy.”
200 Design
HTTP ProxyThe ZENworks Agent offers the ability to use an HTTP proxy to communicate with the ZENworks Servers. This proxy is different from the Internet proxy used by the workstation. Depending on your network environment and deployment, this might be a good way to reduce the amount of background replication. For more information about HTTP proxy, see “Proxy Distribution of Content in ZENworks Content Repository via HTTP” on page 58.
Imaging ConsiderationsImaging devices can have a significant impact on the network, both from the sheer amount of data that is transmitted and from a configuration perspective. The amount of network traffic will be based on the size of the image being deployed and the number of images being deployed. On sites separated from the Primary Server by a slow or saturated link, it is important that you place a local imaging Satellite to ensure successful performance imaging. From a network configuration issue perspective there are two important considerations:
“Supporting ZENworks Preboot Services” on page 201 “Supporting Multicast Imaging” on page 202
Supporting ZENworks Preboot ServicesIf you want to allow managed devices to be automatically imaged over the network via ZENworks imaging and PXE, you might need to make the following changes to your network:
Ensure that there is a ZENworks Imaging server with Proxy DHCP enabled on the subnet as the managed device, or configure a secondary IP Helper on the router or switch such that it routes DHCP requests not only to your DHCP server, but also to a ZENworks Imaging server.
If you are installing the ZENworks Imaging server with Proxy DHCP on the same machine as your DHCP server, you will need to properly configure the Proxy DHCP server to listen for requests on the alternate DHCP port (4011) and configure the novell-proxydhcp.conf file to indicate that there is a local DHCP server.
The spanning tree protocol (STP) is available on certain switches and is designed to detect loops in the network. When a device (typically a network hub or a device) is patched into a port on the switch, the switch indicates to the device that the link is active. However, instead of forwarding frames from the port to the rest of the network, the switch checks each frame for loops and then drops it. The switch can remain in this listening state from 15 to 45 seconds.The effect of this is to cause the DHCP requests issued by PXE to be dropped by the switch, causing the Preboot Services session to fail.It is normally possible to see that the STP is in progress by looking at the link light on the switch. When the device is off, the link light on the switch is obviously off. When the device is turned on, the link light changes to amber. After a period of time it changes to a normal green indicator. As long as the link light is amber, STP is in progress.
Design 201
This problem only affects PXE devices that are patched directly into an Ethernet switch. To correct this problem, do one of the following: Turn off STP on the switch entirely. Set STP to Port Fast for every port on the network switch where a PXE device is attached.
After the problem is resolved, the link light on the port should change to green almost immediately after a device connected to that port is turned on.
Supporting Multicast ImagingIf you plan to use multicast to image a large number of machines simultaneously with the same image, you might need to make the following changes:
Ensure that any switch or router between the Primary Server and the devices being imaged is configured to forward multicast packets.
Ensure that any switch or router between the Primary Server is configured to use IGMP so that multicast packets are only forwarded to those devices that register with the multicast group being used for a given multicast session.
202 Design
12 12Monitoring and Tuning
This chapter describes information related to network usage by ZENworks.
“Monitoring Network Usage” on page 203 “Bandwidth Throttling” on page 203
Monitoring Network UsageStandard network monitoring and packet analysis tools can be utilized to monitor the load of the network. Additionally, statistical information is gathered by each server and is available in ZENworks Control Center or the Diagnostics tools included in ZENworks Control Center.
Because most communication occurs over SSL, it is necessary to modify the system to use non-Diffie-Helman ciphers if you want to utilize tools such as Wireshark to review the unencrypted traffic. This is not recommended in a production environment because it reduces the overall security of the system, but it might be useful in a lab environment to better understand the communication between agents, Satellites, and Primaries.
Bandwidth ThrottlingZENworks provides the ability to throttle a number of different aspects of the traffic it generates. This includes the following:
Subscription Traffic: ZENworks offers the ability to throttle the amount of bandwidth used for performing subscription operations to other ZENworks zones or Linux content repositories. This throttle can be configured at either the Sharing server (limiting the total amount of outgoing bandwith) or at the Subscription, limiting the total incoming bandwidth on a per subscription basis. For more information, see “Configuring the Subscription Settings” in the ZENworks Linux Package Management Reference.
Content Replication Throttling: The content replicated between Primary and Satellite Servers can also be throttled and scheduled. The outgoing throttle can be configured on the Primary Server properties, while the download throttle can be controlled for each content type configured on the satellite server. For more information on how to configure this throttle, see “Configuring Content Replication at the Management Zone Level” in the ZENworks Primary Server and Satellite Reference.
Content Distribution Throttling: Content distribution throttling allows you to control how quickly a managed device downloads content from its content servers. This can be configured by setting a throttle rate at either the Network Environment or Location object in the zone. For more information, see “Content Delivery” in the ZENworks Primary Server and Satellite Reference.
Monitoring and Tuning 203

204 Monitoring and Tuning
13 13Advanced Concepts
This chapter covers the following advanced concepts:
“Wake-On LAN” on page 205
Wake-On LAN Wake-on-LAN (WOL) is an Ethernet standard that allows a machine to be awakened when a specific network message is received. In order for WOL to function, the machine BIOS/UEFI must be configured to do so, the network card must support it, the operating system must place the machine in the appropriate power state, and the correct packet must get to the device. For more information on how to configure the machine or operation system for WOL, check with your hardware or OS vendor. After configuring the machine, review the considerations described in this section to ensure that the WOL message can be sent to the device.
ZENworks implements the WOL standard message format (referred to as the magic packet), which consists of a packet destined to the subnet broadcast address and contains the Mac address of the device to be awaked. In order for this magic packet to reach the device, one of the following must be true:
The Primary Server and the managed devices being awakened must be on the IP subnet, such that the device will receive subnet broadcasts.
The Primary Server and the managed devices being awakened are on separate IP subnets, but the router or switch has been configured to forward subnet broadcasts sent by the server to the subnets where the managed devices exist.
The Primary Server and the managed devices being awakened are on separate IP subnets. The the router or switch is not configured to pass subnet broadcasts, but a Satellite Server exists on the subnet. In this case, you can configure the satellite device to act as a WOL proxy to wake up the devices on its subnet.
The Primary Server and the managed devices being awakened are on separate IP subnets. The router or switch is not configured to pass subnet broadcasts and no Satellite Server exists on the subnet. Ensure that at least one managed device is running on the subnet where the target machine exists so that the device can be used as a WOL proxy. In this case, the Primary Server sends a unicast message to the proxy so that it can send the magic packet on its behalf.
Detailed WOL OperationIf you are a ZENworks administrator and want to wake up all the devices that are inside a folder named IT users, consider following questions before configuring the WOL feature (in ZENworks) to wake up the devices:
Are all the devices in the folder that you want to wake up in the same subnet?
Advanced Concepts 205
How many Primary Servers are available in the zone. Is there is a Primary Server on each subnet?
Is there is a Satellite Server on each subnet in the zone?
With a proper understanding of your network topology, the WOL will function as described below:
Devices in the folder that are to be awakened are on the same subnet along with a Primary Server: If devices in the folder that are to be awakened are on the same subnet and if there is a Primary Server available in the same subnet, then you need to select the Primary Server under the option Primary or Proxy Servers that send wake-up request to the managed devices.
Devices in the folder that are to be awakened are on different subnets: If devices in the folder that are to be awakened are spread across different subnets and if there is a Primary Server available in each of the subnets, you need to select all of the Primary Servers that are in those subnets in the WOL options. You can select the Automatically detect the primary server option in order to automatically detect the right Primary Server on the subnet, to send magic packets to the devices on that subnet.
No Primary Server on each of the subnets of the devices that are to be awakened: When there is no Primary Server on one or more of the subnets of the devices that are to be awakened, if the network infrastructure is configured in such a way that routers connecting networks are enabled to forward broadcast traffic, then the magic packets will reach the devices, and they are woken up. In most normal circumstances, routers are not configured to allow broadcast traffic in order to avoid network traffic collision and crippling of the network.
A Satellite Server present in each of the subnets in the zone: If there is a Satellite Server on each of the subnets in the zone, then you need to first identify Satellite devices in each subnet of the devices that are to be woken up. Next, select a Satellite device as a Proxy WOL sender. You can add one Satellite device per subnet in the list of those devices that send WOL packets. You can group devices that are to be woken up based mainly on the subnet. The proxy device in that subnet will be enhanced to send WOL packets to all the devices in that subnet. After the magic packet has been sent to the device, the boot-up time for each device might vary depending on the hardware and software products that are active during the startup.ZENworks pings port 7628 after two minutes of sending the wake-up request to know if a device is active. On this port, on the managed device, the ZENworks agent service listens to service requests from the server to process quick tasks. If the device is up within 2 minutes, then the response is received and the device is up. If a device takes more time to come up, then the status is lost. For better results, configure the number of retries in the WOL option to be more than one. The recommended number of retries to be configured is at least three and the time interval between retries should be at least 3 minutes in the WOL options.
206 Advanced Concepts
IV IVSecurity Administrator
This part of the guide focuses on the tasks that need to be performed by the administrator who is responsible for security. This includes concepts such as SSL management and others.
Chapter 14, “Design,” on page 203 Chapter 15, “Monitoring and Tuning,” on page 219
Security Administrator 201

202 Security Administrator

14 14Design
This chapter focuses on the security aspects that need to be considered as a part of your ZENworks deployment. It contains the following information:
“SSL Certificates” on page 203 “Secure Communication between Managed Devices and ZENworks Servers” on page 205 “Securing the Communication between Managed Devices and Satellite Servers” on page 207 “Securing ZENworks 2020 Update 2 by Disabling Older Security Protocols” on page 209 “Authorized Registration Methods” on page 212 “Remote Management Authentication” on page 213 “OpenID Support for ZENworks Service Desk” on page 214 “Prevention of SQL Injection Attacks on ZENworks” on page 214 “Controlling Agent Web Services” on page 214 “Disabling OSP Login in ZCC” on page 216 “Configuring OSP for Additional DNS or L4 Switch” on page 216 “Security Logs” on page 217
SSL CertificatesZENworks Primary Servers use SSL to securely transport data among the various ZENworks components.
ZENworks provides the choice to use an external Certificate Authority (CA) or an internal ZENworks CA for your certificates. Making this decision depends on the assessment of various factors, including the business needs, and a thorough understanding of the pros and cons offered by these options:
“Internal Certificate Authority” on page 203 “External Certificate Authority” on page 204
Internal Certificate AuthorityIf you choose to utilize the internal ZENworks CA, the Public Key Infrastructure (PKI) needed to support the CA will be automatically created by ZENworks on the first Primary Server and it will be used throughout the life of the Management Zone. The current lifespan of the internal certificate is 2 years.
Design 203
Advantages of Using an Internal Certificate AuthorityKey benefits of using the internal CA include the following:
Ease of installation: When using the internal CA, the necessary certificates are automatically generated and trusted as a part of the ZENworks Primary Server installation process. Additionally, when other Primary Servers or Authentication Satellites are brought online in a zone using an internal CA, the certificates are automatically generated.
Simplified remote management: When using the internal CA, there is no need to generate certificates for each administrator who will remotely manage the device; this is handled automatically. If you use an external CA, you must mint a User Certificate for each administrative user, and they must provide that certificate each time they remote manage a device.
NOTE: It is possible to remove this requirement by configuring the policy so that it does not require this certificate. However, when this is done, the visible notification (if configured) will show the remote management session being performed by an Unknown User.
Cost: There is no cost per certificate when you use an internal CA.
Disadvantages of Using an Internal Certificate AuthorityKey drawback of using the internal CA include the following:
Ownership: The security and accountability of Public Key Infrastructure (PKI) used by the internal CA is a responsibility of the customer
Trust: Normally, external parties will not trust a digital certificate signed by an internal CA. One by-product of this is that your administrators will receive an SSL certificate warning.
Certificate Revocation: Certificate Revocation is currently not supported by ZENworks. Fault Tolerance: There is only a single internal CA in the domain. If this server is unavailable,
you will not be able to perform any operations that require minting of certificates. For instance, you would be unable to install a new Primary Server if the Internal CA is down. This also means that you need to ensure that you have a good backup of the CA in case of a disaster.
External Certificate AuthorityIf you choose to use an External Certificate Authority, it is your responsibility to obtain the necessary certificates from the External Certificate Authority and provide them to ZENworks as part of the installation. Currently, ZENworks has the following requirements for using external certificates:
The root certificate should be a self-signed certificate. Each ZENworks server should have certificates issued by the same root certificate.
Advantages of Using an External Certificate AuthorityThe following are the advantages of using an external CA:
Trust: External parties normally trust a digital certificate signed by a trusted external CA, such as VeriSign, Thwate, Comodo, and SecureNet. This means that when you access ZENworks Control Center or external zones subscribed to the zone, you will receive a certificate warning.
204 Design
Ownership: The security and management of the public key infrastructure required for the CA is the responsibility of the external CA.
Fault Tolerance: When using an external CA, all Primary Servers are the same. You do not have to worry about whether the first server is up when provisioning new servers.
Disadvantages of Using an External Certificate AuthorityThe following are the disadvantages of using an external CA:
Certificate Expiration: Unlike the internal CA, the expiration date on most externally issued certificates tends to be much shorter. Many external certificates must be renewed on an annual basis. It is critical that the certificates be renewed before they expire and that they then be added to the ZENworks system in enough time for the agents to receive the updated certificates; otherwise devices will lose the connection to the server.
Cost: Assuming that you are using a public CA (such as Verisign, Thawte, or Entrust), there will be a cost associated with each certificate that you need to issue.
Remote Management: In order to secure remote management sessions to be established, ZENworks expects the administrators to present a certificate to the device to validate their identity. If you are not using an internal CA you either need to manually issue user certificates for each administrator or you will have to downgrade the security options in the Remote Management policy.
NOTE: It is possible to remove this requirement by configuring the policy not to require this certificate. However, when this is done the visible notification (if configured) will show the remote management session being performed by an Unknown User.
Secure Communication between Managed Devices and ZENworks Servers
The ZENworks Agent on managed devices communicates with ZENworks Primary Servers and Satellites for tasks such as registering devices, authenticating identity, downloading content, and uploading collected data.
ZENworks uses a combination of transport encryption (SSL), authorization, and authentication to secure communication between managed devices and servers:
Primary Server SSL: The Primary Server uses SSL for all communication with managed devices. Satellite SSL: By default, Satellites do not use SSL when communicating with managed devices.
However, you can enable SSL on a Satellite so that identity authentication, content, and collection use secure communication. On Satellites performing identity authentication, SSL is required.
Authorized Registration: Only devices that are authorized by ZENworks administrators can register to ZENworks. Authorization methods include the use of predefined Authorization Keys or pre-approved devices lists.
Authentication Headers: Once a device is registered as a managed device, the ZENworks Agent uses authentication headers when communicating with ZENworks servers. Any communication that does not include the correct authentication header is rejected.
Design 205

Recommendations for a New ZENworks SystemIn a new installation of a ZENworks 2020 Update 2 system, the following secure communication methods are enabled by default:
Primary Server SSL Authorized Registration Authentication Headers
Micro Focus strongly recommends that you also do the following:
Satellite SSL: Enable SSL on any Satellites with Authentication, Content Server, or Collection Server roles. This ensures that all Satellite-managed device communication for identity authentication, content downloads, and data collection is secure. The primary reason SSL is not enabled on Satellites by default is to ensure that you have the necessary resources and time to procure and configure SSL certificates on Satellites when using an external Certificate Authority. If you are using the internal ZENworks Certificate Authority, Satellites are automatically configured with SSL certificates when you enable SSL so you should enable SSL immediately.
For instructions see Adding and Configuring Satellite Devices in the ZENworks Primary Server and Satellite Reference.
TLS v1.2: TLS v1.2 is required on managed devices. Ensure that all ZENworks-managed devices have TLS v1.2 installed and configured. If you have older devices that require configuration, see “Securing ZENworks 2020 Update 2 by Disabling Older Security Protocols” on page 209.
Recommendations for an Upgraded ZENworks SystemIn a ZENworks 2020 Update 2 system upgraded from an earlier version, the following secure communication methods are enabled by default:
Primary Server SSL
The other methods (Authorized Registration, Authentication Headers, and Satellite SSL) are not enabled on upgrade. This is to ensure that communication between your existing managed devices and Primary Servers/Satellites is not disrupted. Pre-Update 2 ZENworks Agents do not support authorized registration and authentication headers and therefore cannot communicate with Primary Servers/Satellites that have those methods enabled.
To best protect your ZENworks system, Micro Focus strongly recommends that you enable all secure communication methods as soon as possible using an approach that meets the security requirements for your organization. These recommendations, and implementation considerations, are:
Authorized Registration/Authentication Headers: You enable these secure communication methods together and on one Primary Server/Satellite at a time. Because pre-Update 2 ZENworks Agents cannot communicate with “secured” Primary Servers and Satellites, you should consider the following as you plan your implementation: Any Internet-facing Primary Servers (i.e. in the DMZ) are at greatest risk, so enabling the
secure communication methods on them should be your first priority. After you enable a DMZ server, only managed devices with the Update 2 ZENworks Agent (or newer) will be
206 Design
able to communicate with the server. Therefore, ensure that managed devices that connect to the DMZ server are running the Update 2 ZENworks Agent before securing the DMZ server. For instructions to enable or disable the secured communication, see Security Commands in the ZENworks Command Line Utilities Reference.
Non-Internet-facing Primary Servers/Satellites (i.e. on your internal network) should be enabled for secure communication as soon as possible. If you have pre-Update 2 managed devices, one approach would be to maintain a non-secured Primary Server/Satellite and configure those devices to access the non-secured server.
Be aware that the following processes will require workflow modifications in order to work on a secured Primary Server/Satellite: Registration: To register devices, you will need to create Authorization Keys or Pre-
Approved Devices lists to support the enforced authorized registration. For information, see Registering Devices in the ZENworks Discovery, Deployment, and Retirement Reference.
Reconciliation: Reconciliation is the process used when an existing device is re-registered into the zone. The reconciliation process matches the physical device with its existing ZENworks device object so that the device regains all of its assignments and configuration. To reconcile devices, you will also need to use Authorization Keys or Pre-Approved Devices lists. For information, see Registering Devices in the ZENworks Discovery, Deployment, and Retirement Reference
Imaging: When including the ZENworks Agent in an image, you need to include an Authorization Key in the image or add the imaged device to the pre-approved devices list prior to imaging it. For information, see “Authorized Registration for Device Imaging” on page 213.
For information about enabling secure communication (Authorized Registration/Authentication Headers) on a Satellite, see “Securing the Communication between Managed Devices and Satellite Servers” on page 207.
Satellite SSL: Enable SSL on any Satellites with Authentication, Content Server, or Collection Server roles. This ensures that all Satellite-managed device communication for identity authentication, content downloads, and data collection is secure. For instructions see Adding and Configuring Satellite Devices in the ZENworks Primary Server and Satellite Reference.
TLS v1.2: ZENworks systems that are upgraded to ZENworks 2020 Update 2 do not require TLS v1.2 on managed devices. Instead, the Primary Servers and Satellites retain their configuration that allows agents to use older TLS versions. However, as TLS v1.2 provides the best security, Micro Focus recommends that you configure an upgraded ZENworks system to support only TLS v1.2. For information, see “Securing ZENworks 2020 Update 2 by Disabling Older Security Protocols” on page 209.
Securing the Communication between Managed Devices and Satellite Servers
Similar to Primary Servers, even the Managed Devices secured communication with the Satellite Servers are also enhanced. From ZENworks 2020 Update 2 onwards, devices that are promoted as Satellite Server with Content or Collection roles will communicate using SSL. This enhanced secured communication between Managed Devices and Satellite Servers can be configured by Enabling SSL on Satellite Servers.
Design 207
Enabling SSL on Satellite ServersThe SSL can be enabled for Collection, Content and Authentication Satellite Servers. For more information on enabling SSL, see Adding and Configuring Satellite Devices in the ZENworks Primary Server and Satellite Reference.
Satellite Servers AuthenticationTo achieve authentication at Satellite Servers, a token based authentication is introduced. By default, the Satellite Servers will not be able to perform the basic authentication. However, the security setting on Satellite Server can be configured by performing the following steps:
1. In ZCC, click Devices.2. Click Servers, and then click the required Satellite Server.3. Click Settings > Device Management > System Variables.4. In System Variables, add the variables as shown in below tables. 5. Click Apply.
After upgrading all agents that are communicating with Satellite Servers to ZENworks 2020 Update 2 or above, enable the enhanced security feature and add the following system variables at zone, folder or device levels:
Modifying the value of the “security.authfilter.allowLegacyDevice” parameter as false ensures that the requests without authentication header or requests with basic header is not authenticated.
However, if you have older agents in your zone, then the following configuration enables these agents to communicate with the Satellite Servers. The requests from agent with version ZENworks 2020 Update 2 or above sends bearer token as authorized header and will be allowed only if the token is valid.
Modifying the value of the “security.authfilter.allowLegacyDevice” parameter as true ensures that the requests without authentication header or requests with basic header is also authenticated.
Name Value
authfilter.requireAuth true
security.authfilter.allowLegacyDevice false
Name Value
authfilter.requireAuth true
security.authfilter.allowLegacyDevice true
208 Design
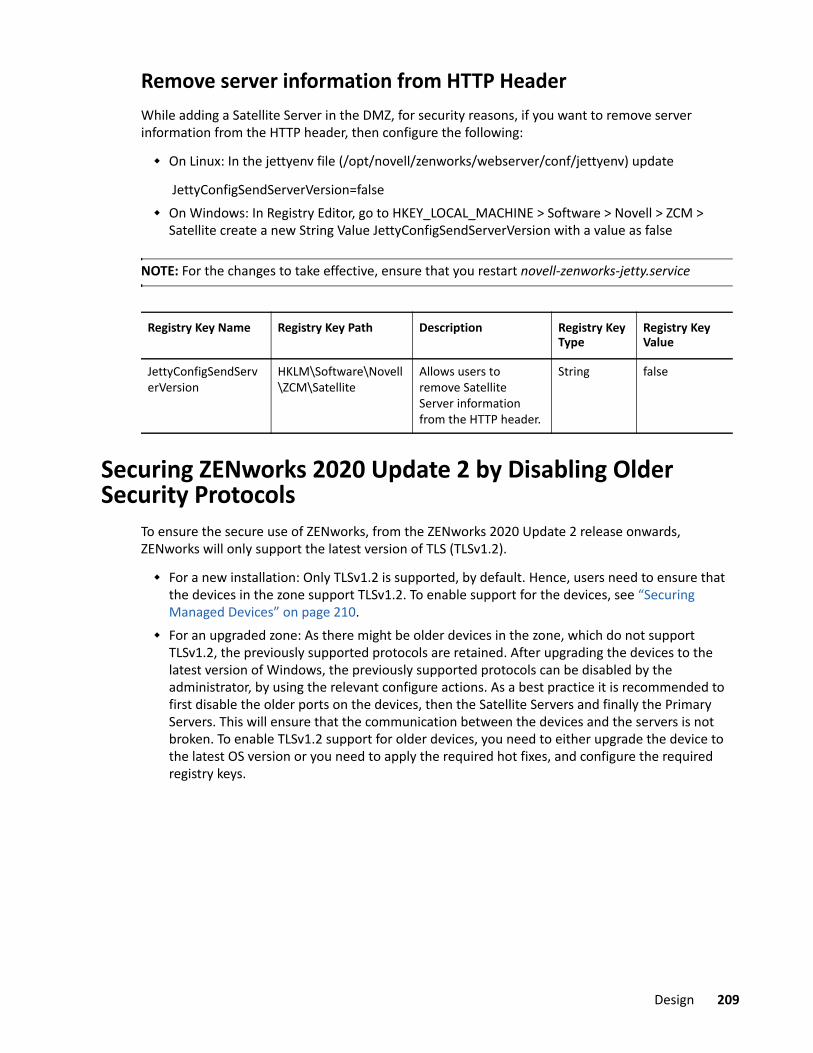
Remove server information from HTTP HeaderWhile adding a Satellite Server in the DMZ, for security reasons, if you want to remove server information from the HTTP header, then configure the following:
On Linux: In the jettyenv file (/opt/novell/zenworks/webserver/conf/jettyenv) update
JettyConfigSendServerVersion=false On Windows: In Registry Editor, go to HKEY_LOCAL_MACHINE > Software > Novell > ZCM >
Satellite create a new String Value JettyConfigSendServerVersion with a value as false
NOTE: For the changes to take effective, ensure that you restart novell-zenworks-jetty.service
Securing ZENworks 2020 Update 2 by Disabling Older Security Protocols
To ensure the secure use of ZENworks, from the ZENworks 2020 Update 2 release onwards, ZENworks will only support the latest version of TLS (TLSv1.2).
For a new installation: Only TLSv1.2 is supported, by default. Hence, users need to ensure that the devices in the zone support TLSv1.2. To enable support for the devices, see “Securing Managed Devices” on page 210.
For an upgraded zone: As there might be older devices in the zone, which do not support TLSv1.2, the previously supported protocols are retained. After upgrading the devices to the latest version of Windows, the previously supported protocols can be disabled by the administrator, by using the relevant configure actions. As a best practice it is recommended to first disable the older ports on the devices, then the Satellite Servers and finally the Primary Servers. This will ensure that the communication between the devices and the servers is not broken. To enable TLSv1.2 support for older devices, you need to either upgrade the device to the latest OS version or you need to apply the required hot fixes, and configure the required registry keys.
Registry Key Name Registry Key Path Description Registry Key Type
Registry Key Value
JettyConfigSendServerVersion
HKLM\Software\Novell\ZCM\Satellite
Allows users to remove Satellite Server information from the HTTP header.
String false
Design 209
Identifying the Supported ProtocolsTo identify the supported protocols in the zone, perform the following steps:
1 Run the following query in the database.: select * from zopaquedata where name='zenps.allowed.tlsversions';
2 (Conditional) If the TLSv1.2 entry is present in the database, locate the server.xmlfile on the Primary Servers and confirm if the file includes the following value: sslEnabledProtocols="TLSv1.2": On Windows Primary Servers: %ZENSERVER_HOME%\services\zenserver\conf On Linux Primary Servers: /opt/microfocus/zenworks/share/tomcat/conf
If the query does not return any value, it indicates that the zone supports the traditional set of protocols (TLSv1, TLSv1.1, TLSv1.2, SSLv2Hello) and any new Primary Server installed in the zone will support the same protocols.
Securing Managed DevicesTo secure the communication between Windows devices and the ZENworks Primary Servers, you need to enable support for TLSv1.2 on the Windows devices:
“Enabling TLSv1.2 on Windows 7 SP1 Devices” on page 210 “Enabling TLSv1.2 on Windows 8 or higher devices” on page 211
Enabling TLSv1.2 on Windows 7 SP1 DevicesTo enable support for the TLSv1.2 protocol on Windows 7 SP1 devices.
1 Apply the Microsoft Hotfix based on the system architecture.2 Install the Microsoft Dot Net version 4.7+.3 Add the following registry keys to force the agent to communicate over ‘TLSv1.2’.
For 32-bit devices:
[HKEY_LOCAL_MACHINE\SOFTWARE\Microsoft\.NETFramework\v2.0.50727"SystemDefaultTlsVersions"=dword:00000001"SchUseStrongCrypto"=dword:00000001
[HKEY_LOCAL_MACHINE\SOFTWARE\Microsoft\.NETFramework\v4.0.30319"SystemDefaultTlsVersions"=dword:00000001"SchUseStrongCrypto"=dword:00000001
[HKEY_LOCAL_MACHINE\SYSTEM\CurrentControlSet\Control\SecurityProviders\SCHANNEL\Protocols\TLS 1.2\Client]"DisabledByDefault"=dword:00000000"Enabled"=dword:00000001For 64-bit devices:
210 Design
[HKEY_LOCAL_MACHINE\SOFTWARE\Microsoft\.NETFramework\v2.0.50727"SystemDefaultTlsVersions"=dword:00000001"SchUseStrongCrypto"=dword:00000001
[HKEY_LOCAL_MACHINE\SOFTWARE\Microsoft\.NETFramework\v4.0.30319"SystemDefaultTlsVersions"=dword:00000001"SchUseStrongCrypto"=dword:00000001
[HKEY_LOCAL_MACHINE\SYSTEM\CurrentControlSet\Control\SecurityProviders\SCHANNEL\Protocols\TLS 1.2\Client]"DisabledByDefault"=dword:00000000"Enabled"=dword:00000001
[HKEY_LOCAL_MACHINE\SOFTWARE\WOW6432Node\Microsoft\.NETFramework\v2.0.50727]"SystemDefaultTlsVersions"=dword:00000001"SchUseStrongCrypto"=dword:00000001
[HKEY_LOCAL_MACHINE\SOFTWARE\WOW6432Node\Microsoft\.NETFramework\v4.0.30319]"SystemDefaultTlsVersions"=dword:00000001"SchUseStrongCrypto"=dword:00000001
NOTE: With these Registry Key changes, the operating system will communicate only over TLSv1.2, and it will restrict communication through the older protocols. This might cause some applications, which do not use TLS v1.2 for communication, to not work properly.
Enabling TLSv1.2 on Windows 8 or higher devicesTo enable TLSv1.2 on Windows 8 or higher devices, you need to install the Microsoft Dot Net version 4.7+
Securing Satellite ServersTo ensure that only TLSv1.2 is supported on Satellite Servers, perform the following steps:
On Windows: In the registry under HKLM\Software\Novell\ZCM, create a key named ZenJettyServer.ExcludedProtocolsand specify the values as TLSv1, TLSv1.1. After creating the registry key, stop the Novell ZENworks Jetty Server service, run the zac ref command, and then restart the service.
On Linux: In the xplatzmd.properties file, add ExcludedProtocols=TLSv1,TLSv1.1 and restart the agent service.
NOTE: Specify the value as TLSv1, instead of TLSv1.0. Else it might not work on Linux or Java-based programs.
Design 211
Securing Primary ServersTo drop support for older SSL/TLS protocols, you need to run two configure actions that will persist the information in the database and any new Primary Server additions to the zone will inherit these settings. To enable TLSv1.2 as the default protocol for upgraded ZENworks 2020 Update 2 Primary Servers, you need to perform the following steps:
1 Run the SetTLSVersionConfigureAction configure action on any one Primary Server in the zone. For example, microfocus-zenworks-configure -c SetTLSVersionConfigureAction.
2 Run the UpdateTLSVersionConfigureAction configure action on all the Primary Servers in the zone. After running the configure action, restart the ZENworks server services. For example, microfocus-zenworks-configure -c UpdateTLSVersionConfigureAction. This configure action will modify the attribute sslEnabledProtocols in the server.xml with the value ‘TLSv1.2’.
3 Restart the Microfocus ZENworks Server service: On Linux: systemctl restart microfocus-zenserver.service On Windows: 'Micro Focus ZENworks Server' service from the service manager
The SetTLSVersionConfigureAction updates the database with the TLSv1.2 version and the UpdateTLSVersionConfigureAction updates the file system. Restart ZENworks server services after running the configure action. After running the SetTLSVersionConfigureAction action on the first Primary Server, when a new Primary Server is added, by default, it will support the protocols that are supported by the first Primary Server, which in this case will be TLSv1.2.
Enabling the Older Security Protocol on Primary ServersTo enable the older security protocol on Primary Servers, perform the following steps:
1. On Primary Servers, run microfocus-zenworks-configure -c SetTLSVersionConfigureAction -Dallowed.tls.versions="<tls_versions>" Example: microfocus-zenworks-configure -c SetTLSVersionConfigureAction -Dallowed.tls.versions="TLSv1,TLSv1.1,TLSv1.2,SSLv2Hello”
In the above example, TLSv1,TLSv1.1,TLSv1.2,SSLv2Hello protocols are enabled. 2. Run UpdateTLSVersionConfigureAction on all the Primary Servers.
This updates sslEnabledProtocols attribute in the server.xml file on Primary Servers with 'TLSv1,TLSv1.1,TLSv1.2,SSLv2Hello' value.
3. Restart server and loader services on all the Primary Servers.
Authorized Registration MethodsZENworks systems that are enabled for agent-server secure communication allow only authorized devices to register. The available authorization methods are discussed below along with recommendations for each method.
212 Design
Authorization KeysAuthorization keys can be entered during ZENworks Agent installation to allow the agent to register to the zone. Best security practices for Authorization keys include:
Use the maximum number of characters (10) Use mixed case and numbers Restrict the number of times the key can be used Specify a short expiry date
For instructions on using Authorization keys, see Registering Devices in the ZENworks Discovery, Deployment, and Retirement Reference.
Pre-approved DevicesDevices can be pre-approved for registration. Best security practices for pre-approved devices include:
Select as many device match values as possible Enable differentiation Specify a short expiry date Set the preapproval to expire on registration or on reconciliation
For instructions on using a pre-approved devices list, see Registering Devices in the ZENworks Discovery, Deployment, and Retirement Reference.
Authorized Registration for Device ImagingWhen including the ZENworks Agent in an image:
You can create an add-on image with a plain-text Authorization key embedded in it for mass deployments
For stronger security, use pre-approved devices
Remote Management AuthenticationZENworks uses TightVNC as its remote management platform. However, Micro Focus has provided additional authentication and encryption capabilities to improve the standard security of TightVNC. The encryption is performed by the Micro Focus TLS encryption add-on, which ensures that the remote management session data itself is secured using the TLS platform.
For more information on how Remote Management authentication works, see “Security” on page 42.
Design 213

OpenID Support for ZENworks Service DeskEvery ZENworks Primary Server acts as an OpenID provider for single sign-on support. This ability is used in providing single sign-on with ZENworks Service Desk. For more information, see the Using ZENworks with ZENworks Service Desk Guide (https://www.novell.com/documentation/zenworks-service-desk-82/service_desk_with_zenworks/data/bookinfo.html).
Prevention of SQL Injection Attacks on ZENworksBecause ZENworks has a strong implementation of the access control layer through its roles and rights, by properly configuring these for the users, you can ensure that they have access only to relevant information.
Restrict the access to ZCC servers only to authorized persons. You can restrict ZCC access from a network subnet or IP range, so that unauthorized access to ZCC is prevented. For more information, see ““Securing DMZ Servers” on page 261” in the ZENworks Control Center Reference.
Controlling Agent Web ServicesBased on your security setting of the Primary Server, a default setting will be set for agent web services, which is available in the auth-filter-settings.json file. The file is available in the following location:
Linux: /opt/microfocus/zenworks/share/tomcat/conf/auth-filter-settings.jsonWindows: %ZENSERVER_HOME%\services\zenserver\conf\auth-filter-settings.jsonSecurity of the web services is controlled though 'requireAuth' and 'allowLegacy' servlet filter parameters.
When security is ON, requireAuth is set to true and allowLegacy is set to false. This means that any request coming to the server should have an authorization header and the server will accept only if the header is valid. This is represented in the JSON file as shown below and is applicable for all the agent web services.
{ "location":"/", "requireAuth":"true", "allowLegacy":"false"}Exception to any of the web services has to be override as shown below.
{ "location":"zenworks-downloads", "requireAuth":"false"}Here for "zenworks-downloads" agent does not have to send the authorization header. The complete JSON file will be as shown below:
214 Design
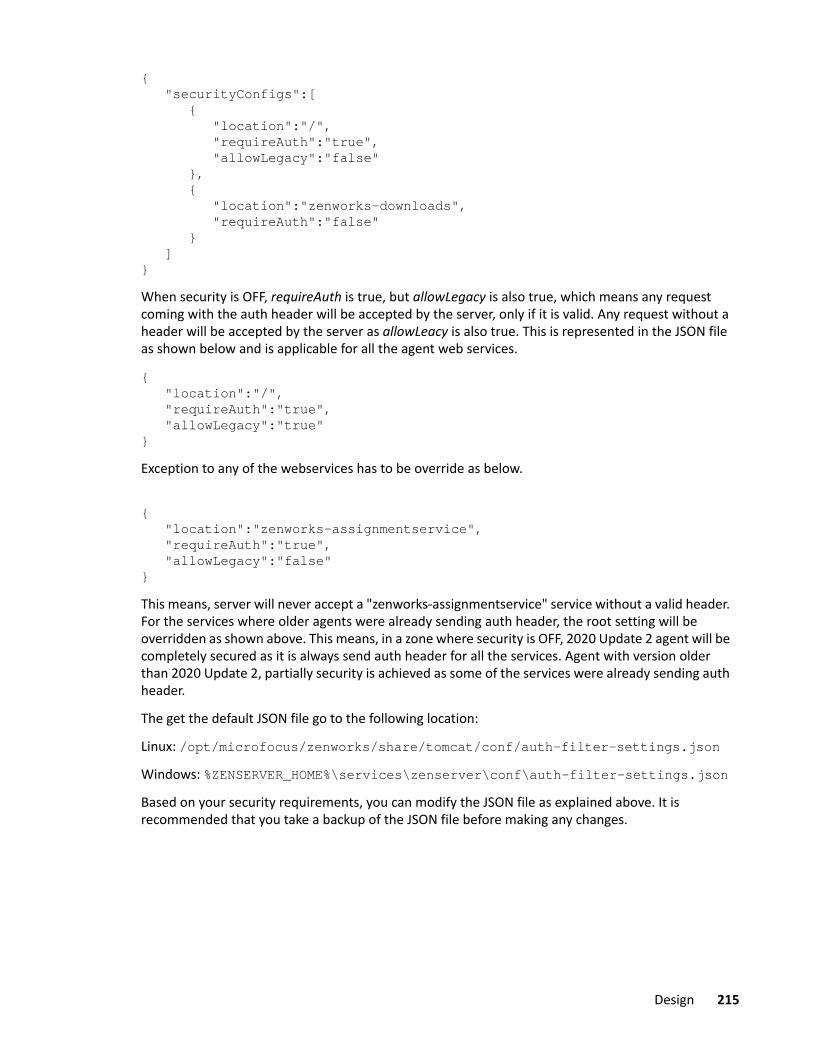
{ "securityConfigs":[ { "location":"/", "requireAuth":"true", "allowLegacy":"false" }, { "location":"zenworks-downloads", "requireAuth":"false" } ]}When security is OFF, requireAuth is true, but allowLegacy is also true, which means any request coming with the auth header will be accepted by the server, only if it is valid. Any request without a header will be accepted by the server as allowLeacy is also true. This is represented in the JSON file as shown below and is applicable for all the agent web services.
{ "location":"/", "requireAuth":"true", "allowLegacy":"true"}Exception to any of the webservices has to be override as below.
{ "location":"zenworks-assignmentservice", "requireAuth":"true", "allowLegacy":"false"}This means, server will never accept a "zenworks-assignmentservice" service without a valid header. For the services where older agents were already sending auth header, the root setting will be overridden as shown above. This means, in a zone where security is OFF, 2020 Update 2 agent will be completely secured as it is always send auth header for all the services. Agent with version older than 2020 Update 2, partially security is achieved as some of the services were already sending auth header.
The get the default JSON file go to the following location:
Linux: /opt/microfocus/zenworks/share/tomcat/conf/auth-filter-settings.jsonWindows: %ZENSERVER_HOME%\services\zenserver\conf\auth-filter-settings.jsonBased on your security requirements, you can modify the JSON file as explained above. It is recommended that you take a backup of the JSON file before making any changes.
Design 215
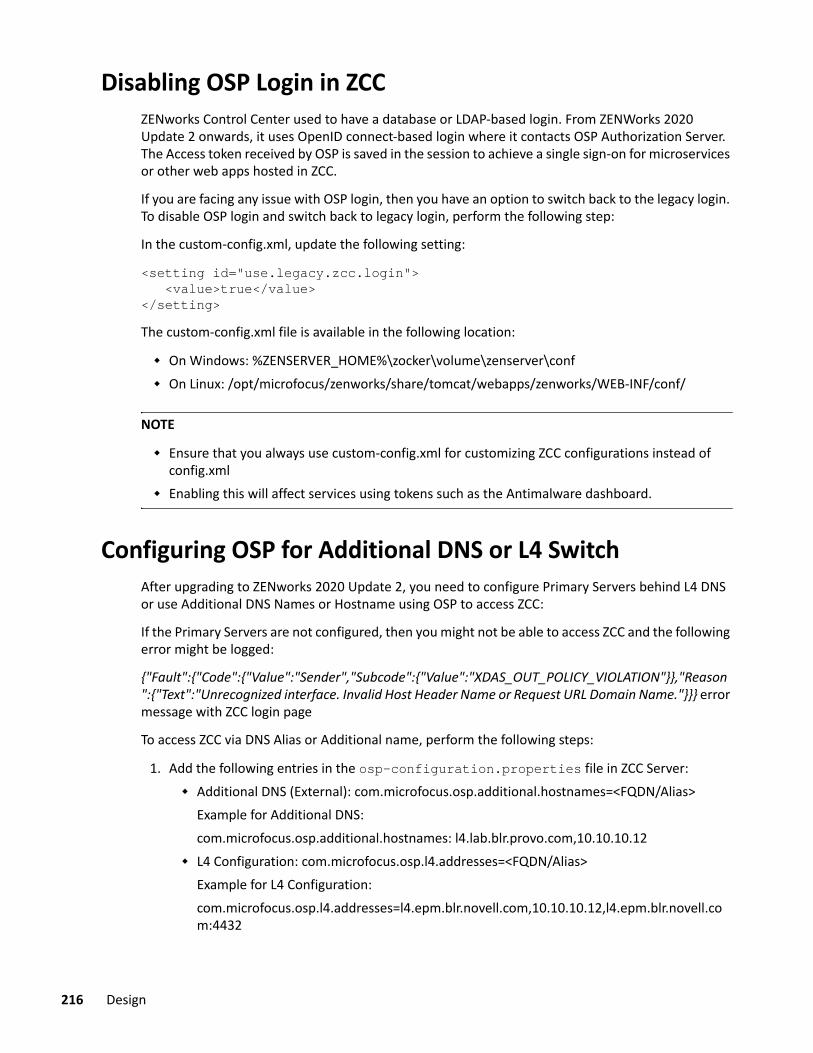
Disabling OSP Login in ZCCZENworks Control Center used to have a database or LDAP-based login. From ZENWorks 2020 Update 2 onwards, it uses OpenID connect-based login where it contacts OSP Authorization Server. The Access token received by OSP is saved in the session to achieve a single sign-on for microservices or other web apps hosted in ZCC.
If you are facing any issue with OSP login, then you have an option to switch back to the legacy login. To disable OSP login and switch back to legacy login, perform the following step:
In the custom-config.xml, update the following setting:
<setting id="use.legacy.zcc.login"> <value>true</value></setting>The custom-config.xml file is available in the following location:
On Windows: %ZENSERVER_HOME%\zocker\volume\zenserver\conf On Linux: /opt/microfocus/zenworks/share/tomcat/webapps/zenworks/WEB-INF/conf/
NOTE
Ensure that you always use custom-config.xml for customizing ZCC configurations instead of config.xml
Enabling this will affect services using tokens such as the Antimalware dashboard.
Configuring OSP for Additional DNS or L4 SwitchAfter upgrading to ZENworks 2020 Update 2, you need to configure Primary Servers behind L4 DNS or use Additional DNS Names or Hostname using OSP to access ZCC:
If the Primary Servers are not configured, then you might not be able to access ZCC and the following error might be logged:
{"Fault":{"Code":{"Value":"Sender","Subcode":{"Value":"XDAS_OUT_POLICY_VIOLATION"}},"Reason":{"Text":"Unrecognized interface. Invalid Host Header Name or Request URL Domain Name."}}} error message with ZCC login page
To access ZCC via DNS Alias or Additional name, perform the following steps:
1. Add the following entries in the osp-configuration.properties file in ZCC Server: Additional DNS (External): com.microfocus.osp.additional.hostnames=<FQDN/Alias>
Example for Additional DNS: com.microfocus.osp.additional.hostnames: l4.lab.blr.provo.com,10.10.10.12
L4 Configuration: com.microfocus.osp.l4.addresses=<FQDN/Alias>Example for L4 Configuration:com.microfocus.osp.l4.addresses=l4.epm.blr.novell.com,10.10.10.12,l4.epm.blr.novell.com:4432
216 Design
The osp-configuration.properties file is available in the following location: On Linux: /etc/opt/microfocus/zenworks/security/osp/osp-configuration.properties On Windows: %ZENSERVER_HOME%\conf\security\osp\osp-configuration.properties
2. After updating the file, restart ZENworks server services.
Security LogsWhile using ZENworks Control Center, if any security verification failure or any other security information, then it will be logged in the server-security-messages.log and loader-security-messages.log files. Each message is assigned a severity level: information, warning, error, or debug.
The server-security-messages.log and loader-security-messages.log file is available in the following location:
On Linux: /var/opt/microfocus/log/zenworks On Windows: %ZENSERVER_HOME% \logs
Changing the Message Log LevelBy default, your ZENworks administrator controls what types of messages are stored in the message log file. If an administrator needs to change the log level setting so that additional information is logged, perform the following:
1. Go to the log4j2.properties file in the following location: On Linux: /etc/opt/microfocus/zenworks/tomcat-conf/ On Windows: %ZENSERVER_HOME% \services\zenserver\conf
2. Open the properties file, and then depending on the required log level setting, update the following field to Errors, Warning, Info, or Debug:
logger.securityLogger.level = INFO
Design 217

218 Design
15 15Monitoring and Tuning
This chapter provides information on additional security-related tasks that you might need to perform:
“Configuring Satellite Certificates When Using an External Certificate Authority” on page 219 “Backing Up the Internal Certificate Authority” on page 219 “Restoring the Internal Certificate Authority from Backup” on page 220 “Reminting Certificates” on page 220
Configuring Satellite Certificates When Using an External Certificate Authority
By default, Satellites are not configured for SSL. However, Micro Focus recommends that you enable SSL on Satellites with Content Server or Collection Server roles. Additionally, SSL is required on any Satellite with the Authentication role.
You will need to ensure that a unique certificate is issued to each Satellite so that a proper SSL session can be established with the device. If you are using an internal CA this process is handled automatically by the system. However, if you are using an external CA you must do the following:
1 Ensure that the Satellite has its own individual server certificate and private key.For detailed information on how to create to an external certificate, see “Creating an External Certificate”in the ZENworks Server Installation.
2 Import the external certificate by using the zac iac command on the Satellite.For more information about zac, view the zac man page (man zac) on the Satellite or see the ZENworks Command Line Utilities Reference.
For more information on how to configure the Satellite roles, see “Adding and Configuring Satellite Devices” in the ZENworks Primary Server and Satellite Reference.
NOTE: You must import the external certificate each time you promote a Satellite to the Content Server, Collection Server, or Authentication role.
Backing Up the Internal Certificate AuthorityTo back up the CA files on the Primary Server that is configured to be the ZENworks internal CA:
1 At the command prompt of the ZENworks Server, enter the following command:zman certificate-authority-export (certificate-authority-export/cae) [options] (file path)This command exports the key-pair credentials of the zone certificate authority to a file.
Monitoring and Tuning 219
2 Enter the username and password of the super administrator of the Management Zone.3 Enter a passphrase for the file encryption.The passphrase is used in the encryption of the
backed-up file.
Ensure that you store this backup in a secure location so that it can be used to restore the CA in the event of a disaster.
Restoring the Internal Certificate Authority from BackupIn the event of a crash of the Primary Server that holds the internal CA, you can restore the CA from backup:
1 At the command prompt of the ZENworks Server, enter the following zman command:zman certificate-authority-import (certificate-authority-import/cai) (file path) This command imports the key-pair credentials of the zone certificate authority from a file.
2 Enter the user name and password of the Management Zone administrator.3 Enter the file encryption passphrase that you specified when you backed up the Certificate
Authority file.
Reminting CertificatesIf your server or certificate authority certificates expire, devices will be unable to establish an SSL connection to the server. It is important that before this occurs, you remint the certificate and distribute this certificate to your managed devices.
For information on Reminting Certificates, see Reminting Server Certificates in the ZENworks SSL Management Reference.
220 Monitoring and Tuning
V VLDAP Directory Admin
This section provides the administrator of the LDAP directory with information on how ZENworks utilizes the directory and provide best practices related to linking ZENworks with your Active Directory or eDirectory environment.
Chapter 16, “Design and Deployment,” on page 231 Chapter 17, “Monitoring and Tuning,” on page 233
LDAP Directory Admin 229

230 LDAP Directory Admin
16 16Design and Deployment
ZENworks uses your corporate user directory in order to allow end users to authenticate to the system. ZENworks also stores references to your directory when users, groups, or folders in the LDAP directory are assigned to the bundles and policies in the ZENworks zone. See the following sections for planning and deployment information:
“Gathering Information” on page 231 “Planning Your Deployment” on page 231 “Providing LDAP Load Balancing and Fault Tolerance” on page 232
Gathering InformationTo ensure a high quality experience to your users, it is important that you consider the following before implementing User Management in your environment:
What is the number of users who log into ZCM concurrently during peak load? This will help you understand what the overall load on the directory servers will be during peak times.
How often are assignments modified for users in the zone? How often are users moved to different groups, and how often are modifications done? What is the network infrastructure like, and which branches or geographic sites will your users
be logging on from? How many at each? Are the users members of several groups or nested groups? How are the assignments made to groups or users in the organization? This is important
because if the majority of end users fall into similar categories, a group-based assignment is highly recommended. However, if the end users are fairly segregated in multiple groups and the policies are widespread, then the design choices might differ significantly.
What authentication mechanisms do you want to support? ZENworks supports simple user name and password authentication, Kerberos authentication (AD only), and Shared Secret (eDirectory only) methods.
Planning Your DeploymentAfter you gather the appropriate information you now need to determine the following:
How many LDAP replicas are required to handle the load? How many LDAP servers will be configured for each Primary Server and in what order? How many Satellite Servers will have the Authentication role and an associated LDAP server to
be deployed?
You can use Primary Servers and Satellite devices that have the Authentication role to authenticate users to the ZENworks Management Zone. To improve performance, you can create multiple connections to local replicas of eDirectory or Active Directory trees so that Satellites do not have to
Design and Deployment 231
authenticate users over a WAN or slow link. Creating connections to local LDAP user sources also provides fault tolerance by providing failover to other user source connections in the event that one connection does not work.
Satellite devices with the Authentication role can speed the authentication process by spreading the workload among various devices and by performing authentication locally. In addition, each Satellite can have multiple connections to each user source to provide failover.
Providing LDAP Load Balancing and Fault ToleranceIf you have multiple LDAP servers for access to your user source (directory), you can configure your ZENworks Servers to recognize each of the LDAP servers. This provides both load balancing and fault tolerance.
For example, if you have multiple ZENworks servers, you can configure each one to access the user source through a different LDAP server. This distributes the workload more evenly among the LDAP servers.
Likewise, for each ZENworks server, you can list multiple LDAP servers through which it can connect to the user source. If one of the LDAP servers becomes unavailable, the ZENworks Server uses another LDAP server.
232 Design and Deployment
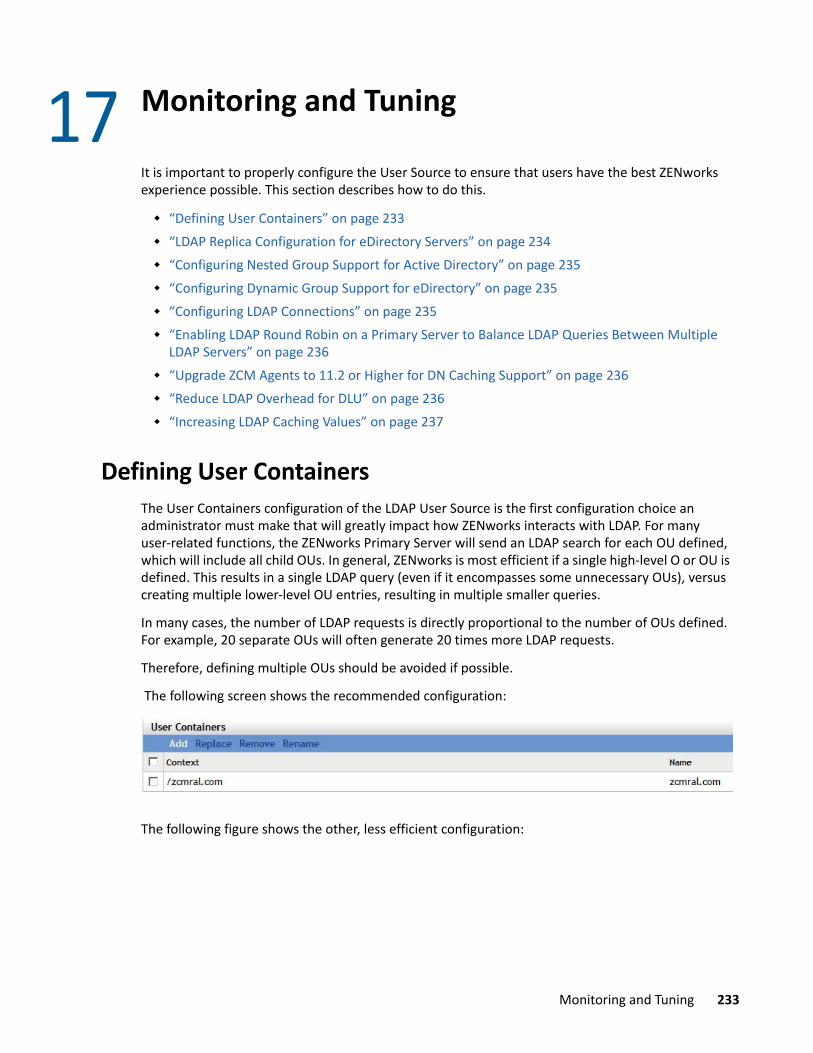
17 17Monitoring and Tuning
It is important to properly configure the User Source to ensure that users have the best ZENworks experience possible. This section describes how to do this.
“Defining User Containers” on page 233 “LDAP Replica Configuration for eDirectory Servers” on page 234 “Configuring Nested Group Support for Active Directory” on page 235 “Configuring Dynamic Group Support for eDirectory” on page 235 “Configuring LDAP Connections” on page 235 “Enabling LDAP Round Robin on a Primary Server to Balance LDAP Queries Between Multiple
LDAP Servers” on page 236 “Upgrade ZCM Agents to 11.2 or Higher for DN Caching Support” on page 236 “Reduce LDAP Overhead for DLU” on page 236 “Increasing LDAP Caching Values” on page 237
Defining User ContainersThe User Containers configuration of the LDAP User Source is the first configuration choice an administrator must make that will greatly impact how ZENworks interacts with LDAP. For many user-related functions, the ZENworks Primary Server will send an LDAP search for each OU defined, which will include all child OUs. In general, ZENworks is most efficient if a single high-level O or OU is defined. This results in a single LDAP query (even if it encompasses some unnecessary OUs), versus creating multiple lower-level OU entries, resulting in multiple smaller queries.
In many cases, the number of LDAP requests is directly proportional to the number of OUs defined. For example, 20 separate OUs will often generate 20 times more LDAP requests.
Therefore, defining multiple OUs should be avoided if possible.
The following screen shows the recommended configuration:
The following figure shows the other, less efficient configuration:
Monitoring and Tuning 233
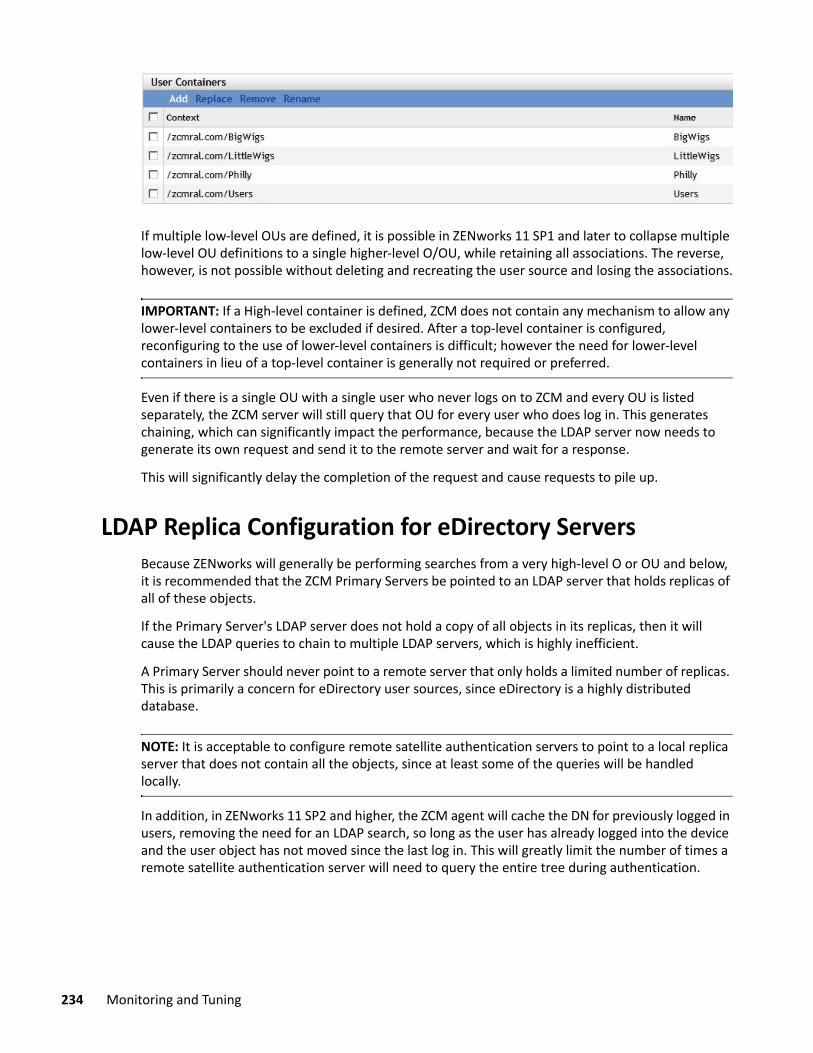
If multiple low-level OUs are defined, it is possible in ZENworks 11 SP1 and later to collapse multiple low-level OU definitions to a single higher-level O/OU, while retaining all associations. The reverse, however, is not possible without deleting and recreating the user source and losing the associations.
IMPORTANT: If a High-level container is defined, ZCM does not contain any mechanism to allow any lower-level containers to be excluded if desired. After a top-level container is configured, reconfiguring to the use of lower-level containers is difficult; however the need for lower-level containers in lieu of a top-level container is generally not required or preferred.
Even if there is a single OU with a single user who never logs on to ZCM and every OU is listed separately, the ZCM server will still query that OU for every user who does log in. This generates chaining, which can significantly impact the performance, because the LDAP server now needs to generate its own request and send it to the remote server and wait for a response.
This will significantly delay the completion of the request and cause requests to pile up.
LDAP Replica Configuration for eDirectory ServersBecause ZENworks will generally be performing searches from a very high-level O or OU and below, it is recommended that the ZCM Primary Servers be pointed to an LDAP server that holds replicas of all of these objects.
If the Primary Server's LDAP server does not hold a copy of all objects in its replicas, then it will cause the LDAP queries to chain to multiple LDAP servers, which is highly inefficient.
A Primary Server should never point to a remote server that only holds a limited number of replicas. This is primarily a concern for eDirectory user sources, since eDirectory is a highly distributed database.
NOTE: It is acceptable to configure remote satellite authentication servers to point to a local replica server that does not contain all the objects, since at least some of the queries will be handled locally.
In addition, in ZENworks 11 SP2 and higher, the ZCM agent will cache the DN for previously logged in users, removing the need for an LDAP search, so long as the user has already logged into the device and the user object has not moved since the last log in. This will greatly limit the number of times a remote satellite authentication server will need to query the entire tree during authentication.
234 Monitoring and Tuning
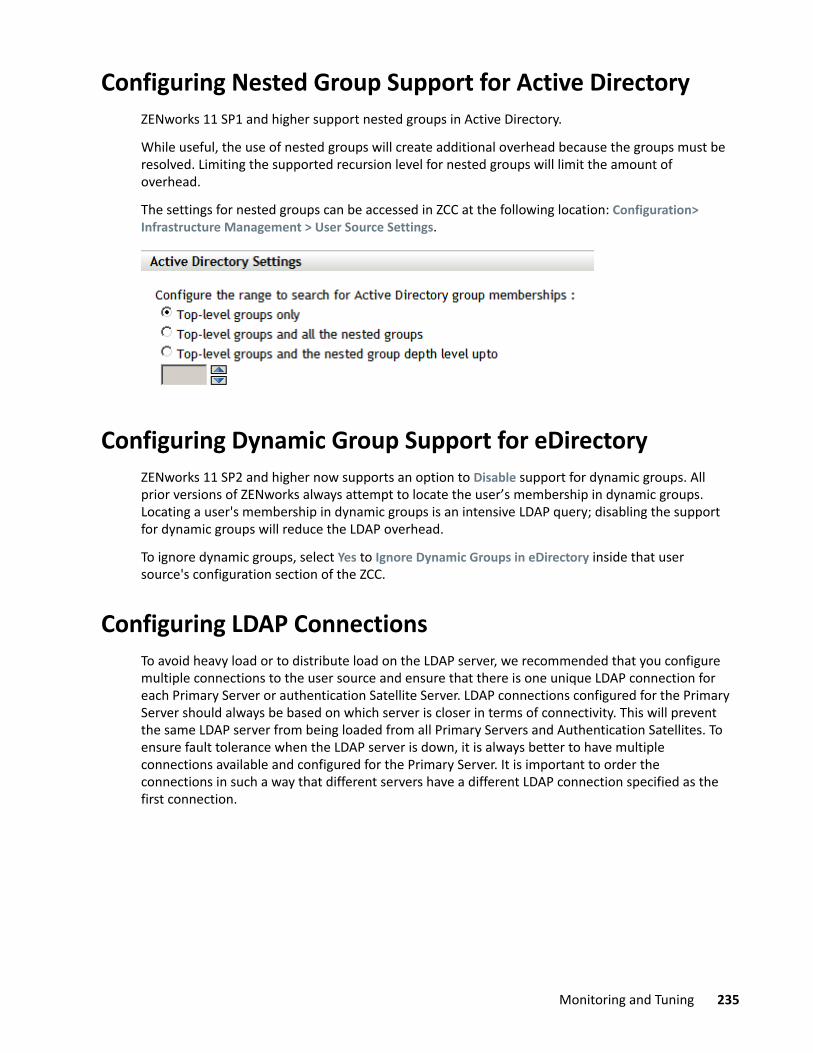
Configuring Nested Group Support for Active DirectoryZENworks 11 SP1 and higher support nested groups in Active Directory.
While useful, the use of nested groups will create additional overhead because the groups must be resolved. Limiting the supported recursion level for nested groups will limit the amount of overhead.
The settings for nested groups can be accessed in ZCC at the following location: Configuration> Infrastructure Management > User Source Settings.
Configuring Dynamic Group Support for eDirectoryZENworks 11 SP2 and higher now supports an option to Disable support for dynamic groups. All prior versions of ZENworks always attempt to locate the user’s membership in dynamic groups. Locating a user's membership in dynamic groups is an intensive LDAP query; disabling the support for dynamic groups will reduce the LDAP overhead.
To ignore dynamic groups, select Yes to Ignore Dynamic Groups in eDirectory inside that user source's configuration section of the ZCC.
Configuring LDAP Connections To avoid heavy load or to distribute load on the LDAP server, we recommended that you configure multiple connections to the user source and ensure that there is one unique LDAP connection for each Primary Server or authentication Satellite Server. LDAP connections configured for the Primary Server should always be based on which server is closer in terms of connectivity. This will prevent the same LDAP server from being loaded from all Primary Servers and Authentication Satellites. To ensure fault tolerance when the LDAP server is down, it is always better to have multiple connections available and configured for the Primary Server. It is important to order the connections in such a way that different servers have a different LDAP connection specified as the first connection.
Monitoring and Tuning 235
Enabling LDAP Round Robin on a Primary Server to Balance LDAP Queries Between Multiple LDAP Servers
As previously explained, you can define multiple LDAP server connections for a ZENworks Primary Server to access its user source. By default, a Primary Server sends all requests to the first LDAP server in its list. If the request times out, it sends the request to the next LDAP server and so on.
If you want to balance the workload so that the first LDAP server connection doesn’t receive the majority of work, you can enable LDAP round robin on a Primary Server. This will cause LDAP requests from the server to be equally balanced among all of its configured LDAP server connections.
To enable LDAP Round Robin, modify the following file:
In this file, change:
<DoConnectionRoundRobin>false</DoConnectionRoundRobin>
to
<DoConnectionRoundRobin>true</DoConnectionRoundRobin> and restart the ZENworks Services.
Upgrade ZCM Agents to 11.2 or Higher for DN Caching Support
The ZENworks agent version 11 SP2 and higher will cache the DN of user objects after a user logs into a device. The next time the user logs into that device, instead of searching the tree for the user ID, it will attempt to use the previous DN of the user object for authentication. If the object no longer exists, it will search the tree to see if the object has been moved. The reduced number of searches for user DNs will help reduce the overall LDAP overhead.
Reduce LDAP Overhead for DLUSet HKLM\Software\Novell\ZCM\AgentSettings\DoNotFetchUserGroups = True
This key does not prevent the use of groups with ZENworks; the registry key name is not a clear indication of its function. This key disables a very specific feature of the DLU policy package that is not used by majority of the customers who use DLU policy packages. In the Login Restrictions portion of a DLU package, you can explicitly exclude users from the DLU package who were assigned the policy package. This exclusion can be made for individuals or groups. Support for groups in the exclusion portion of the DLU package causes a user's group memberships to be read a second time, even if the policy package does not use this feature.
236 Monitoring and Tuning
Enabling this key on the workstation will disable support for groups, for this single feature, and eliminate a group membership request. Group membership requests take slightly longer than other requests due to the time required to search for Dynamic eDirectory Groups and verify membership in those groups if located. This delay can occur even if Dynamic eDirectory Groups do not exist, because the search to locate any that might exist must still occur.
Increasing LDAP Caching ValuesConsider increasing the LDAP Cache values from the current default value of 600 seconds to 14400 seconds, per TID7003298 (http://www.novell.com/support/kb/doc.php?id=7003298).
Unlike the previous LDAP recommendations, which have little negative impact, increasing the cache values significantly could cause changes in the LDAP source to be recognized much more slowly by the ZCM agent as it pulls old information from cache instead of from the new changed details.
This drawback is why this recommendation is listed last.
Monitoring and Tuning 237

238 Monitoring and Tuning
VI VICitrix Best Practices
This section describes the items you need to consider when deploying Novell ZENworks 11 on a Citrix server. This information is intended to supplement the online resources that Novell provides to give you a better understanding of the design-related topics and requirements when deploying a Novell ZENworks 11 solution on a Citrix server.
ZENworks is also supported by other documentation (in both PDF and HTML formats) that you can use to learn about and implement the product. For additional documentation, see the ZENworks documentation (https://www.novell.com/documentation/zenworks114/).
The information in this document is organized as follows:
Chapter 18, “Pre-Design and Planning,” on page 241 Chapter 19, “Design and Deployment,” on page 245 Chapter 20, “Monitoring and Tuning,” on page 247
Citrix Best Practices 239

240 Citrix Best Practices

18 18Pre-Design and Planning
When ZENworks and the Citrix Server are properly integrated, these powerful solutions provide a functionally rich and manageable solution that is not possible when they are implemented in isolation. It is important to provide additional functionality without losing the functionality or reliability of either of the components.
By integrating Novell ZENworks and the Citrix Server, you achieve the following benefits:
Improved application accessibility and manageability Strengthened security through Patch Management Improved compliance through Asset Management Improved remote access of applications that are on the Citrix server Simple and one-click access to the applications on the Citrix server Reduced complexity and increased productivity by having all of your local and remote software
in one place
In order to realize these benefits, it is critical that you plan and implement the solution appropriately. This chapter provides information on the planning that needs to be done to ensure a proper deployment:
“Perform a Technical Assessment” on page 241 “Factors Influencing Scalability” on page 242 “Ports Used by the ZENworks Agent” on page 243 “Performing Lab Tests and Validation” on page 243
Perform a Technical AssessmentYou need to perform a technical assessment to review what you already have, identify what you need, and document your requirements. You also need to have a good understanding of the existing infrastructure. To do this, you should hold a set of workshops or meetings to obtain all the information you need. The following are the key questions you need to answer in order to plan your deployment:
Which version of Citrix XenApp should you use?
For more information on the supported versions of Citrix XenApp, see the ZENworks Server Installation Guide (http://www.novell.com/documentation/zenworks114/zen11_installation/data/bookinfo.html#bookinfo).
What is the maximum number of user sessions per server that can be active on Citrix XenApp?If the maximum number of user sessions per server is more than the recommended number, try adding more servers to the Citrix farm. In general, Novell recommends that each server supports no more than 20 to 25 users.
Is user-based management used?
Pre-Design and Planning 241
If it is used, a policy or bundle must be assigned to the users only if the policy or bundle is not applicable to all the users logging into the server. However, if the policy or bundle is applicable to all the users logging into the server, assign it to the device instead of assigning it to all the users.For example, if there are 150 bundles that are assigned to the users and 50 bundles are common to all the users logging into a device, assign these 50 bundles to the device instead of the user.
Are servers available in the Citrix farm? If they are, how many servers are available and are these servers load balanced?Ensure that no single server is overloaded. For information on load balancing mechanisms, see the Citrix website (http://www.citrix.com/).
Is the Novell Client installed on a Citrix server?If the Novell Client is not installed on a Citrix server, the Citrix server session might crash during login. To avoid this issue, see “Tasks to be Performed after Deploying the Agent on Citrix Servers” on page 245.
Do you plan to use the DLU policy? If yes, are the profiles volatile?If there is more than one Citrix server in a farm, you must use the volatile DLU and Roaming Profile policies to enable the users and their profiles to exist on all the servers in the farm. If you do not use the volatile DLU and Roaming Profile policies, a profile synchronization issue might exist among the servers.
Do you have a mechanism to handle idle and disconnected sessions? If yes, how often is it used?The idle and disconnected sessions should be periodically logged out to enable ZENworks events such as memory release and policy unenforcement to occur. Otherwise, the server might have high memory consumption.
Are the Citrix servers used only to distribute applications, or are they also used as terminal servers?You must deploy ZENworks 11 on a Citrix server only if you want the Citrix server to be used as a terminal server in addition to distributing applications. However, if you only intend to distribute applications, you can create thin client bundles and assign them to devices or users.
Factors Influencing ScalabilityThe main physical factor that governs the scalability of Citrix servers is the RAM. The majority of the operations are performed by three services: zenworksWindowsService, ZenNotifyIcon, and zenUserDaemon. The RAM consumption depends on the number of sessions and the number of effective assignments for each session.
For the minimum hardware recommendations, refer to the Citrix website (http://www.citrix.com/). If you can provide hardware that exceeds these recommendations, your system will perform better. Additional processing power and faster drives can make the systems more responsive.
The other factors that you need to consider include the following:
Device refresh frequency
242 Pre-Design and Planning
Bundle schedules System requirements
Ports Used by the ZENworks AgentFor information on the ports used by the ZENworks Agent, see the Managed Device Requirements in ZENworks 2020 Update 3 System Requirements.
Performing Lab Tests and ValidationBefore deploying ZENworks on a Citrix server in a production environment, we recommend that you test ZENworks on the Citrix server with the exact load that needs to be in the production environment.
Pre-Design and Planning 243

244 Pre-Design and Planning
19 19Design and Deployment
After planning the deployment see the “ZENworks Agent Deployment” section in the ZENworks Discovery, Deployment, and Retirement Reference (http://www.novell.com/documentation/zenworks2017/zen_discovery_deployment/data/bookinfo.html#bookinfo) to deploy the agent to your Citrix XenApp server. After you have completed the deployment of the agent, review the rest of this chapter for additional, post deployment recommendations:
“Tasks to be Performed after Deploying the Agent on Citrix Servers” on page 245
Tasks to be Performed after Deploying the Agent on Citrix Servers
After deploying the ZENworks Agent on Citrix servers hosted on Windows 2003 or 2003 R2, perform either of the following steps on the Citrix servers before launching a terminal session with the server:
Rename NWGina.dll:
1 In the c:\windows\system32 directory, rename NWGina.dll.2 In the Registry Editor, go to
HKLM\Software\Microsoft\WindowsNT\CurrentVersion\Winlogon, and change the value of the CtxGinaDLL key to the new name of NWGina.dll.
3 Reboot the server.orInstall the Novell Client.
IMPORTANT: If you fail to perform the preceding tasks, you will encounter ICA login session issues when you try to launch a terminal session with the Citrix server. For more information, see Unable to launch a terminal session with a Citrix Server that has ZENworks Agent installed in the ZENworks Agent Reference (http://www.novell.com/documentation/zenworks2017/zen_sys_adaptive_agent/data/bg0ubjpx.html#bjua8mf).
Design and Deployment 245

246 Design and Deployment
20 20Monitoring and Tuning
This chapter provides information about the scenarios you might encounter if the parameters configured for a Citrix server are not appropriately tuned. This includes the following:
“User Sessions on a Citrix Server Fail to Terminate” on page 247 “High Utilization of Resources on Citrix Server” on page 247 “High Consumption of Memory on a Citrix Server” on page 248 “Disabling Random Refresh Might Cause the ZENworks Agent to Crash on a Citrix Server” on
page 248 “Logging in to the User Source is Slow” on page 248
User Sessions on a Citrix Server Fail to TerminateTerminating a thin client application that is running on a Citrix server might not close the user session on the server. Consequently, when the user logs out of the server, the roaming profile data for the user session is not saved.
To close the user session on the Citrix server, perform the following steps on the server:
1 Open the Registry Editor.2 Go to HKEY_LOCAL_MACHINE\SYSTEM\CurrentControlSet\Control\Citrix\wfshell\TWI.
3 Change the value of LogoffCheckSysModules from ZCMUMHelper.exe to ZenUserDaemon.exe.
4 Reboot the device.
High Utilization of Resources on Citrix ServerDuring a partial or general refresh of the ZENworks Agent on a terminal session of a Citrix server, the agent simultaneously refreshes the sessions of all the users logged into the terminal server. If too many users have logged into the terminal server, this might cause high usage of system resources, and subsequently the ZENworks Agent might take considerable time to refresh the terminal server.
To avoid high utilization of resources on the Citrix server:
1 Open the Registry Editor.2 Go to HKLM\Software\Novell\ZCM\.
Monitoring and Tuning 247

3 Create a string called EnableBatchRefresh and set its value to 1. By doing so, user sessions will be refreshed in parallel. By default, the number of user sessions that can be simultaneously refreshed is 5.
4 (Optional) If you want to change the default number of user sessions that must be simultaneously refreshed, create a string called maxUserRefreshThreads and set the desired value.
High Consumption of Memory on a Citrix ServerOn a Citrix server or a terminal server, if a user disconnects a session without logging out from it, the session exists in the disconnected state. This might cause high memory consumption of the agent service.
To avoid high consumption of memory on the Citrix server, do one of the following:
Ensure that the users log out from a session instead of just disconnecting the session. Set a time limit to automatically log out from a disconnected session. For detailed information,
see the Citrix Support Knowledge Center (http://support.citrix.com/article/CTX127318).
Disabling Random Refresh Might Cause the ZENworks Agent to Crash on a Citrix Server
If Random Refresh for the ZENWorks Agent is disabled and if multiple users log in to the Citrix server at the same time, then all the sessions try to refresh at the same time. This can cause resource contention, and subsequently cause the agent to crash because the cache access is not synchronized. To avoid this, Random Refresh must be enabled for the ZENWorks Agent.
Logging in to the User Source is SlowLogging in to the user source on a ZENworks server from the managed device might take some time because the login process executes the device refresh synchronously.
To speed up the login process, perform the following steps to execute the device refresh asynchronously:
1 Open the Registry Editor.2 Go to HKEY_LOCAL_MACHINE\Software\Novell\ZCM3 Create a string called ZENLoginUserRefreshAsync and set its value to TRUE.4 Log in to the device again.
IMPORTANT: If you change the login process to execute the device refresh asynchronously, the latest policies might not be immediately available. With this change, you make the login performance more important than the accuracy of the policies.
248 Monitoring and Tuning
VII VIIDMZ Configuration
This section provides information about hosting a ZENworks server in your DMZ in order to provide managed services to ZENworks devices located outside your network perimeter.
Chapter 21, “ZENworks DMZ Server,” on page 243
DMZ Configuration 241

242 DMZ Configuration

21 21ZENworks DMZ Server
The following sections provide information about how to secure a ZENworks Server running in a demilitarized (DMZ) network.
“Server Connections” on page 243 “Zone Administration” on page 245 “Device Management” on page 249 “DMZ Server Management” on page 259 “Securing DMZ Servers” on page 261 “Optimizing DMZ Server Performance” on page 262
Server ConnectionsThe following sections provide information about controlling access between the ZENworks DMZ Server and other ZENworks back-end components:
“ZENworks Databases” on page 243 “ZENworks User Source (LDAP Directory)” on page 244 “ActiveSync Servers” on page 244 “ZENworks Primary Servers” on page 245 “MDM Server Connections” on page 245
ZENworks Databases
Description The ZENworks Zone has three databases: the ZENworks database, the ZENworks Audit database, and the ZENworks Antimalware database.
The ZENworks database stores information about devices, users, software bundles, policies, hardware and software inventories, centralized system messages, license tracking and usage data, and other transactional data. It also stores information about the actions scheduled to take place within the zone.
The ZENworks Audit database stores information for audited events. This includes changes made to the zone configuration and actions that occur on managed devices.
The ZENworks Antimalware database stores data such as detected malware threats and current malware status for devices. In addition, the Antimalware database also stores data--such as devices, policies, assignments, and configuration settings--that are synced to it from the ZENworks database.
ZENworks DMZ Server 243
ZENworks User Source (LDAP Directory)
ActiveSync Servers
Database:Port Oracle: 1521
Microsoft SQL: 1433
Embedded PostgreSQL: 54327
External PostgreSQL: 5432
Recommendation The ZENworks DMZ Server requires direct access to the databases.
How to Secure Access Configure the firewall to allow communication on the database port between the ZENworks DMZ Server and the database server. Follow firewall best practices for restricting access to the port and the ZENworks DMZ Server IP address/DNS hostname.
Description An LDAP directory (eDirectory or ActiveDirectory) that is referenced to enable capabilities such as user-based assignments, user association with devices, and ZENworks administrator accounts.
Port LDAP: 389/3268
LDAPS: 636/3269
Recommendation The ZENworks DMZ Server requires direct access to the LDAP directory.
How to Secure Access Do not use unsecure ports 389/3268.
Configure the firewall to allow communication on the secure port 636/3269 between the ZENworks DMZ Server and the LDAP server. Follow firewall best practices for restricting access to the port and the ZENworks DMZ Server IP address/DNS hostname.
Description An ActiveSync Server is used with mobile management. The ZENworks MDM Server can act as a gateway to relay email between the ActiveSync Server and ZENworks-managed mobile devices.
ZENworks supports both the Microsoft Exchange and GroupWise Mobility Servers.
Port 443 (default)
Recommendation If the ZENworks MDM Server is not functioning as an ActiveSync email gateway, you do not need to do anything. Otherwise, secure access as instructed below.
How to Secure Access Configure the firewall to allow communication on the secure port 443 between the ZENworks DMZ Server and the ActiveSync server. Follow firewall best practices for restricting access to the port and the ZENworks DMZ Server IP address/DNS hostname.
244 ZENworks DMZ Server
ZENworks Primary Servers
MDM Server Connections
Zone AdministrationLike other ZENworks Servers, the ZENworks DMZ Server provides the capabilities required for administration of the ZENworks Management Zone. The following sections provide information about controlling access to these administration capabilities:
“ZENworks Control Center (ZCC) and Admin Services” on page 245 “ZENworks Download (zenworks-setup)” on page 247 “Diagnostics” on page 248 “ZENworks Appliance Console” on page 248
ZENworks Control Center (ZCC) and Admin ServicesThis section explains methods to restrict access to ZCC and admin services. The access can be restricted using the following methods:
Method 1: Restrict access using MDM Server Method 2: Restrict access using the valve parameter in the server.xml file.
Description The ZENworks DMZ Server communicates with other ZENworks Servers for purposes such as content replication.
Port 443 and 80
Recommendation Ensure that the ZENworks DMZ server can communicate with the server required to replicate its content. Additionally, if an Internal CA is being used, ensure that the DMZ Primary has the ability to access the Primary Server with the CA role.
How to Secure Access Configure the firewall to allow communication on the secure port 443 between the ZENworks DMZ Server and any internal ZENworks Primary Servers. Follow firewall best practices for restricting access to the port and the ZENworks DMZ Server IP address/DNS hostname.
Description When the ZENworks DMZ Server is configured as an MDM Server, it must be able to reach certain endpoints to access apps and services.
Refer to Firewall Configuration in the ZENworks Mobile Management Reference.
Ports Various
Recommendation Ensure you have properly configured the Firewall to have outgoing stateful access to the appropriate services required to communicate with Apple and Google.
How to Secure Access Follow the instructions in the Firewall Configuration document to configure the ports and URLs.
ZENworks DMZ Server 245
Restrict access using MDM Server
Restricting Access using the Valve Parameter
Description Administrative console used to manage the ZENworks Zone. ZENworks Control Center is available on each ZENworks Primary Server.
Service ZENworks Server (Tomcat)
Port 443 and 80; port 80 access redirects to port 443
Recommendation Disable access to both external and internal addresses. ZENworks management can be performed by launching ZCC from any ZENworks Primary Server. We recommend that you use internal ZENworks Servers for management and do not use the ZENworks DMZ Server.
How to Secure Access Define the ZENworks DMZ Server as an MDM server and use the access control settings to deny ZCC access to external devices.
1. In ZCC, click Configuration > Management Zone Settings > Infrastructure Management > MDM Servers.
2. In the MDM Servers list, add the ZENworks Server.
3. In the Access Control column for the server, click to display the Configure Administration Access dialog.
4. In the IP Address / Range list, change the --ALL-- entry to Deny access. This denies ZCC access to all IP addresses(Optional) At the top of the list, insert an entry that includes all IP addresses (in regular or CIDR format) for which you want to allow ZCC access, then select Allow as the access. This is not recommended.
For more information, see Securing MDM Servers in the ZENworks Mobile Management Reference.
Description These are the Tomcat webapps used for ZENworks administration.
Service ZENworks Server (Tomcat)
Port 443 and 80
Recommendation Disable access to both external and internal addresses. ZENworks management can be performed by any ZENworks Primary Server. We recommend that you use internal ZENworks Servers for management and do not use the ZENworks DMZ Server.
246 ZENworks DMZ Server
ZENworks Download (zenworks-setup)
How to Secure Access Use the Tomcat Remote Address Filter to block external access to the Admin Webservices.
If you want to block external access to all Tomcat Webservices:
1. Edit the server.xml file:
Linux: /opt/microfocus/zenworks/share/tomcat/conf/server.xml
Windows: %ZENSERVER_HOME%\services\zenserver\conf\server.xml2. Add the following entry with the appropriate IP address range. The example
blocks requests from IP addresses in the 10.200.x.x range:
<Valve className="org.apache.catalina.valves.RemoteAddrValve" deny="10\.200\.\d+\.\d+"/>(Optional) If you want, you can allow access to internal addresses so that ZMAN could be run from internal devices. However, this is not recommended.
3. Restart the server services.
Notes:
Webservice configuration changes are lost whenever a system update is applied to the ZENworks server. You must reconfigure the webservices after the system update.
In addition to disabling ZMAN access, blocking the Admin Webservices denies access to any applications that are using the Admin SOAP interface.
Description Download page for ZENworks agent installation files as well as administrative, inventory, and imaging tools.
Service ZENworks Server (Tomcat)
Port 443 and 80; port 80 access redirects to port 443
Recommendation Disable access to both external and internal addresses. Access to the ZENworks Download page can be gained from any ZENworks Primary Server. We recommend that you use internal ZENworks Servers for this purpose and do not use the ZENworks DMZ Server.
Be aware that if you disable the ZENworks Download page, any external devices that you want to register to the zone will need to get the Agent installation files another way, such as using VPN to access an internal server or downloading the files from another secure external-facing repository that you’ve copied them too.
ZENworks DMZ Server 247
Diagnostics
ZENworks Appliance Console
How to Secure Access Define the ZENworks server as an MDM server and use the access control settngs to deny Download page access to external devices.
1. In ZCC, click Configuration > Management Zone Settings > Infrastructure Management > MDM Servers.
2. In the MDM Servers list, add the ZENworks Server.
3. In the Access Control column for the server, click to display the Configure ZENworks Tools Access dialog.
4. In the IP Address / Range list, change the --ALL-- entry to Deny access. This denies Download age access to all IP addresses(Optional) At the top of the list, insert an entry that includes all IP addresses (in regular or CIDR format) for which you want to allow Download page access, then select Allow as the access. This is not recommended.
For more information, see Securing MDM Servers in the ZENworks Mobile Management Reference.
Description Diagnostics ports used to get the current status of ZENworks processes.
Service:Port: ZENworks Loader: 61491
ZENworks Join Proxy: 61492
ZENworks CASA: 61493
ZENworks Xplat Agent: 61494
ZENworks Antimalware Service: 61195
Recommendation All Diagnostics probe requests go from one ZENworks Primary Server to another. Allow access to internal ZENworks Servers but disable access to all external addresses.
How to Secure Access Configure the firewall to prevent inbound connections on these ZENworks DMZ Server ports from external addresses. Allow inbound connections from any internal ZENworks Servers.
Description The management console for the ZENworks Appliance.
Port 9443
Recommendation Disable access to external addresses. Restrict internal access to the IP address of a device, either in the DMZ or on the internal network, from which you can launch a Web browser for the Appliance console
248 ZENworks DMZ Server
Device ManagementThe following sections provide information about controlling access to the capabilities used for management of devices:
“Internal Device Management” on page 249 “Client Webservices” on page 250 “Registration” on page 251 “Content Service” on page 252 “Collection Service” on page 253 “Authentication Service” on page 255 “Authentication Port (2645)” on page 256 “MDM Endpoint Services” on page 257 “Remote SSH Service” on page 258 “Join Proxy Service” on page 258 “Quick Tasks” on page 259
Internal Device Management
How to Secure Access In the ZENworks Appliance console:
1. Click Network.2. In Appliance Administration UI (port 9443) Access Restrictions, add the IP
addresses (or address range) of internal devices from which the console can be accessed.
OR
Configure the firewall to prevent inbound traffic on this port from external addresses and internal addresses other than the IP address of the designated administration device.
Description Internal devices are those devices physically located within your internal network perimeter or devices that have a VPN connection to your internal network.
Recommendation For best security, internal ZENworks-managed devices should not be allowed to access the DMZ Primary Server. You should restrict access by hiding the DMZ server’s internal IP addresses from the internal devices. Hiding the internal IP addresses ensures that the server is not included in the closest server lists for any of the roles (configuration, collection, content, etc.) and is therefore unreachable by internal devices.
How to Secure Access For detailed instructions, see Configuring Restricted Access to a ZENworks Server in the ZENworks Primary Server and Satellite Reference. Use the instructions to restrict access to any of the server’s internal addresses so that they are not advertised to devices.
ZENworks DMZ Server 249
Client Webservices
Description These are the Tomcat webapps used for device management. For example, the ZENworks agent pulls down assignments, settings, and policies using these services.
The Client Webservices are used by the ZENworks agent on traditional Windows, Mac, and Linux client. To control access by MDM clients, see “MDM Endpoint Services” on page 257.
Service ZENworks Server (Tomcat)
ZENworks Server (JSON)
Port 443 and 80
Recommendation The Client webservices run on secure port 443.
For best security, we strongly recommend that you enable server-agent secure communication as explained in “Secure Communication between Managed Devices and ZENworks Servers” on page 205. When the ZENworks DMZ Server is “secured”, the webservices only accept authenticated communication (via authentication headers) from the ZENworks agent.
If this is not sufficiently secure, you can block access to individual webservices that provide functionality not being used by the ZENworks agent.
250 ZENworks DMZ Server
Registration
How to Secure Access To control individual web service level security, refer to the “Controlling Agent Web Services” on page 214 section.
Additionally, you can use the Tomcat Remote Address Filter to block access to any unused Client Webservices.
1. On the ZENworks server, go to the WebApps directory:
Windows: %ZENSERVER_HOME%\share\tomcat\webapps
Linux: /opt/microfocus/zenworks/share/tomcat/webapps2. List all Webservices that are not ZCC-related or end in *admin. These are the
Client Webservices.3. Modify the <service>/WEB-INF/web.xml file each Client Webservice to
add a Tomcat Remote Address Filter that denies access to external IP addresses.For details about how to do this (and explanation of an alternate method), see ZENworks Control Center (ZCC) and Admin Services.(Optional) If you want, you can allow access to internal addresses so that the ZENworks DMZ Server can manage internal devices. However, this is not recommended.
4. Restart the server services.
Notes:
Webservice configuration changes are lost whenever a system update is applied to the ZENworks server. You must reconfigure the webservices after the system update.
Be aware that denying access to some Client Webservices but not others can result in users receiving unexpected error messages related to denied services.
Description This is the Tomcat webservice that enables new devices to register to the ZENworks Management Zone.
Service ZENworks Server (Tomcat)
Port 443
Recommendation If you need to register external devices, we strongly recommend that you enable server-agent secure communication as explained in “Secure Communication between Managed Devices and ZENworks Servers” on page 205. When the ZENworks DMZ Server is “secured”, only authorized devices can register through the server.
If you don’t need to register external devices, disabling this webservice in combination with disabling “ZENworks Download (zenworks-setup)” on page 247 ensures that no devices can use the DMZ server to register.
ZENworks DMZ Server 251
Content Service
How to Secure Access Enable server-agent secure communication as explained in “Secure Communication between Managed Devices and ZENworks Servers” on page 205.
or
Use the Registration webservice configuration file to disalllow registration.
1. On the ZENworks server, go to the following directory:
Linux: /opt/microfocus/zenworks/share/tomcat/webapps/zenworks-registration/WEB-INF
Windows: %ZENSERVER_HOME%\share\tomcat\webapps/zenworks-registration/WEB-INF
2. In the config.json file, change the <AllowNewRegistration> setting to false:<AllowNewRegistration>false</AllowNewRegistration>Devices can reconcile only if they are registering with Authorization key or Pre-approved header. If administrator decides not to allow reconciliation using any one of the authentication methods, then they can turn off the following settings with value false."AllowReconciliationWithPreapprovedHeader": "true""AllowReconciliationWithPreapprovedHeader": "true"
3. Restart the server services.
Description This is the Tomcat Client webservice that streams content files (bundles, policies, patches, and system updates) from the ZENworks server to the managed device.
Service ZENserver (Tomcat)
Port 443
Recommendation ZENworks content is encrypted (SSL) when a Primary Server transfers it to another Primary Server, to a Satellite, or to a managed device.
For best security, we strongly recommend that you enable server-agent secure communication as explained in “Secure Communication between Managed Devices and ZENworks Servers” on page 205. When the ZENworks DMZ Server is “secured”, the Content Service only accepts authenticated communication (via authentication headers) from the ZENworks agent.
If this is not sufficiently secure, you can disable the Content Service on the ZENworks DMZ Server and require managed devices to periodically connect to your internal network via VPN to receive content updates.
252 ZENworks DMZ Server
Collection Service
How to Secure Access Enable server-agent secure communication as explained in “Secure Communication between Managed Devices and ZENworks Servers” on page 205.
If you want to stop ZENworks managed devices from accessing content (note that this does not stop attacks against the services), remove the ZENworks DMZ Server from the Unknown location’s list of available Content servers:
1. In ZCC, click Configuration > Locations to display the Locations list.2. In the Locations list, click Unknown, then click the Servers tab.3. Turn on the Exclude the Closest Server Default Rule option.4. In the Content Servers list, remove the ZENworks DMZ Server.
If you want to disable access to the Content Service (to block all attacks against the service), use the Tomcat Remote Address Filter to block access to the zenworks-contentservice and zenworks-content webservices.
1. On the ZENworks server, go to the WebApps directory:
Linux: /opt/microfocus/zenworks/share/tomcat/webapps
Windows: %ZENSERVER_HOME%\share\tomcat\webapps2. Modify the zenworks-contentservice/WEB-INF/web.xml and
zenworks-content/WEB-INF/web.xml files to add a Tomcat Remote Address Filter that denies access to external IP addresses.For details about how to do this (and explanation of an alternate method), see ZENworks Control Center (ZCC) and Admin Services.(Optional) If you want, you can allow access to internal addresses so that the ZENworks DMZ Server can manage internal devices. However, this is not recommended.
3. Restart the server services.
Notes:
Webservice configuration changes are lost whenever a system update is applied to the ZENworks server. You must reconfigure the webservice after the system update.
Description This is the Client webservice that uploads inventory, audit, and message files from managed devices to the ZENworks server.
Service ZENworks Server (Tomcat)
Port 443
ZENworks DMZ Server 253
Recommendation ZENworks collection data is encrypted (SSL) when it is transferred between a managed device’s ZENworks agent and the Collection Server (Primary Server or Satellite).
For best security, we strongly recommend that you enable server-agent secure communication as explained in “Secure Communication between Managed Devices and ZENworks Servers” on page 205. When the ZENworks DMZ Server is “secured”, the Content Service only accepts authenticated communication (via authentication headers) from the ZENworks agent.
If this is not sufficiently secure, you can disable the Collection Service on the ZENworks DMZ Server and require managed devices to periodically connect to your internal network via VPN to upload collection data.
How to Secure Access Enable server-agent secure communication as explained in “Secure Communication between Managed Devices and ZENworks Servers” on page 205.
or
If you want to stop ZENworks managed devices from uploading inventory, audit, and message data to the server (note that this does not stop attacks against the service), remove the ZENworks DMZ Server from the Unknown location’s list of available Collection servers:
1. In ZCC, click Configuration > Locations to display the Locations list.2. In the Locations list, click Unknown, then click the Servers tab.3. Turn on the Exclude the Closest Server Default Rule option.4. In the Collection Servers list, remove the ZENworks DMZ Server.
If you want to disable access to the Collection Service (to block all attacks against the service), use the Tomcat Remote Address Filter to block access to the zenworks-fileupload webservice.
1. On the ZENworks server, go to the WebApps directory:
Linux: /opt/microfocus/zenworks/share/tomcat/webapps
Windows: %ZENSERVER_HOME%\share\tomcat\webapps2. Modify the zenworks-fileupload/WEB-INF/web.xml file to add a
Tomcat Remote Address Filter that denies access to external IP addresses.For details about how to do this (and explanation of an alternate method), see ZENworks Control Center (ZCC) and Admin Services.(Optional) If you want, you can allow access to internal addresses so that the ZENworks DMZ Server can manage internal devices. However, this is not recommended.
3. Restart the server services.
Notes:
Webservice configuration changes are lost whenever a system update is applied to the ZENworks server. You must reconfigure the webservices after the system update.
254 ZENworks DMZ Server

Authentication Service
Description This is the Client webservice that authenticates managed devices (end users) to ZENworks.
Service ZENworks Server (Tomcat)
Port 443 and 2645
Recommendation For best security, we strongly recommend that you enable server-agent secure communication as explained in “Secure Communication between Managed Devices and ZENworks Servers” on page 205. When the ZENworks DMZ Server is “secured”, the Authentication Service only accepts authenticated communication (via authentication headers) from the ZENworks agent.
If your ZENworks system does not use User Authentication, we recommend that you disable this webservice.
If you do use User Authentication, the authentication occurs on Tomcat secure port 443. To provide additional security, you should block inbound connections on port 2645 (see Authentication Port (2645)).
ZENworks DMZ Server 255
Authentication Port (2645)
How to Secure Access Enable server-agent secure communication as explained in “Secure Communication between Managed Devices and ZENworks Servers” on page 205.
or
If you want to stop ZENworks managed devices from authenticating (note that this does not stop attacks against the service), remove the ZENworks DMZ Server from the Unknown location’s list of available Authentication servers:
1. In ZCC, click Configuration > Locations to display the Locations list.2. In the Locations list, click Unknown, then click the Servers tab.3. Turn on the Exclude the Closest Server Default Rule option.4. In the Authentication Servers list, remove the ZENworks DMZ Server.
If you want to disable access to the Authentication Service (to block all attacks against the service), use the Tomcat Remote Address Filter to block access to the CasaAuthTokenSvc webservice.
1. On the ZENworks server, go to the WebApps directory:
Linux: /opt/microfocus/zenworks/share/tomcat/webapps
Windows: %ZENSERVER_HOME%\share\tomcat\webapps2. Modify the CasaAuthTokenSvc/WEB-INF/web.xml file to add a Tomcat
Remote Address Filter that denies access to external IP addresses.For details about how to do this (and explanation of an alternate method), see ZENworks Control Center (ZCC) and Admin Services.(Optional) If you want, you can allow access to internal addresses so that the ZENworks DMZ Server can manage internal devices. However, this is not recommended.
3. Restart the server services.
Notes:
Webservice configuration changes are lost whenever a system update is applied to the ZENworks server. You must reconfigure the webservices after the system update.
Description Additional Tomcat port that is used by Windows managed devices for authentication.
Service External Casa
Port 2645
Recommendation Disable inbound connections on this port. Allowing inbound connections exposes all existing services (not just the Authentication service) to external attacks. When the port is blocked, authentication takes place through Tomcat port 443.
How to Secure Access Configure the firewall to prevent inbound traffic on this port from external addresses.
256 ZENworks DMZ Server
MDM Endpoint Services
Description These are the Tomcat Client Webservices used for mobile device management. This includes ActiveSync and ZENworks End User Portal access.
Service ZENworks Server (Tomcat)
Port 443 and 80
Recommendation If you are not using ZENworks to manage mobile devices, disable these Client webservices.
If you are managing mobile devices, these Client webservices use secure port 443. If this is not sufficiently secure, you can restrict access to specific IP addresses or ranges of addresses.
How to Secure Access To completely disable the MDM Endpoint Services, use the Tomcat Remote Address Filter to block access to the endpoint webservice:
1. On the ZENworks server, go to the WebApps directory:
Linux: /opt/microfocus/zenworks/share/tomcat/webapps
Windows: \%ZENSERVER_HOME%\share\tomcat\webapps2. Modify the endpoint/WEB-INF/web.xml file to add a Tomcat Remote
Address Filter that denies access to external IP addresses.For details about how to do this (and explanation of an alternate method), see ZENworks Control Center (ZCC) and Admin Services.(Optional) If you want, you can allow access to internal addresses so that the ZENworks DMZ Server can manage internal devices. However, this is not recommended.
3. Restart the server services.
To restrict access to specific IP addresses, use the MDM Server access control settings to specify the IP addresses:
1. In ZCC, click Configuration > Management Zone Settings > Infrastructure Management > MDM Servers.
2. In the MDM Servers list, locate the ZENworks DMZ Server.
3. In the Access Control column for the server, click to display the Configure Endpoint Access dialog.
4. In the IP Address / Range list:a. At the top of the list, insert an entry that includes all IP addresses (in
regular or CIDR format) of devices to which you want to allow access, then select Allow as the access.
b. Change the --ALL-- entry to Deny access. This denies access to any devices not allowed by the first entry.
For more information, see Securing MDM Servers in the ZENworks Mobile Management Reference.
ZENworks DMZ Server 257
Remote SSH Service
Join Proxy Service
Description The Tomcat Client webservice that serves the JNLP files required when using Remote Management to remote SSH to Linux Servers.
Service ZENworks Server (Tomcat)
Port 443
Recommendation Remote Management can be performed from any ZENworks Server. You should not use the ZENworks DMZ Server to perform remote management of devices.
Disable access to both internal and external addresses.
How to Secure Access Use the Tomcat Remote Address Filter to block access to the zenworks-remote-ssh webservice.
1. On the ZENworks server, go to the WebApps directory:
Windows: \novell\zenworks\share\tomcat\webapps
Linux: /opt/microfocus/zenworks/share/tomcat/webapps
Windows: %ZENSERVER_HOME%\share\tomcat\webapps2. Modify the zenworks-remote-ssh/WEB-INF/web.xml file to add a
Tomcat Remote Address Filter that denies access to all IP addresses.For details about how to do this (and explanation of an alternate method), see ZENworks Control Center (ZCC) and Admin Services.
3. Restart the server services.
Notes:
Webservice configuration changes are lost whenever a system update is applied to the ZENworks server. You must reconfigure the webservices after the system update.
Description The service that maintains connections between two devices on different private networks (for example, devices on opposite sides of a firewall or a NAT-enabled router). When used with ZENworks Remote Management, Join Proxy allows a device on the internal network to perform remote management of a device on an external network.
Port 7019, 7950
Recommendation Block the ports to inbound connections if you are not using the ZENworks DMZ Server as a Join Proxy.
If you use the server as a Join Proxy, allow both inbound connections from external ZENworks managed devices as well as internal devices. Authentication is used to secure the connections.
258 ZENworks DMZ Server
Quick Tasks
DMZ Server ManagementThe following sections provide information about controlling access to the capabilities used to manage the ZENworks DMZ Server.
“Remote Control/VNC” on page 259 “Imaging Service” on page 260
NOTE: Because the ZENworks DMZ Server is also a managed device, the information provided in “Device Management” on page 249 applies to managing the device capabilities of the server.
Remote Control/VNC
How to Secure Access If the ZENworks DMZ Server is not functioning as a Join Proxy:
Configure the firewall to prevent traffic on these ports 7019 and 7950 from internal and external addresses.
OR
Stop the microfocus-zenjoinproxy.service on the ZENworks server.
Description Used by the ZENworks agent for Quick Tasks.
Service Webservice
Port 7628
Recommendation Connection uses authentication. Allow.
How to Secure Access Configure the firewall to prevent traffic on this ports from external addresses.
Description Component that enables the ZENworks DMZ Server 1) to be managed by a remote administrator and 2) to be used by a local administrator to manage other remote devices. It includes multiple pieces:
Remote Management Service: A service that enables a remote administrator to perform management operations on the device.
Remote Management Viewer: A management console application that enables a local administrator to perform operations on a remote device.
Remote Management Listener: A management console application that enables a local administrator to accept assistance requests from remote devices.
Port Remote Management Service: 5950
Remote Management Listener: 5500
ZENworks DMZ Server 259
Imaging Service
Recommendation Remote Management can be performed from any ZENworks Server. You should not use the ZENworks DMZ Server to perform remote management of devices.
If you want to manage the ZENworks DMZ Server remotely, you should perform the remote management from an internal device or an external device that has a VPN connection to your internal network. This allows you to block the Remote Management ports to all external IP addresses.
NOTE: The ZENworks DMZ Server can still be used as a Join Proxy service to allow Remote Management of external devices from an internal ZENworks Server.
How to Secure Access If you don’t need to manage the ZENworks DMZ Server remotely, stop the service:
Linux: Stop novell-rm-x11vnc.socket and novell-rm-xvnc.socket
Window: Stop Novell ZENworks Remote Management Service
If you do want to manage the ZENworks DMZ Server remotely but only from an internal address, configure the firewall to block inbound connections on port 5950 and 5500 from external addresses.
Description Components that are required for various imaging tasks on the ZENworks DMZ Server.
Service: Port TFTP Service: 69
Preboot Service: 998
Preboot Policy Service: 13331
DHCP Service: 67 and 4011
Recommendation Imaging can be performed from any ZENworks Server. You should not use the ZENworks DMZ Server to perform imaging of devices.
Disable access to both internal and external addresses.
How to Secure Access Configure the firewall to prevent traffic on these ports from all addresses.
OR
Stop the service:
Linux: Stop microfocus-tftp.service, microfocus-pbserv.service, microfocus-proxydhcp.service, and microfocus-zmgprebootpolicy.service
Window: Stop microfocus-tftp, microfocus-pbserv, microfocus-zmgprebootpolicy, and microfocus-proxydhcp
260 ZENworks DMZ Server

Securing DMZ ServersSince ZENworks Servers are exposed to the Internet at all times, it becomes important to secure access to the services on these servers. The services are categorized into Administration, Endpoint, and the ZENworks Setup page. ZENworks allows you to control access to each of these categories by clicking any of the following icons appearing against a configured server:
To access the page, in ZCC go to Configuration > Infrastructure Management > MDM Servers.
Click Add and select a server as an MDM Server and then configure the Access Control, as required.
Administration Access: Click to allow or deny specific IP addresses from accessing Administration functions such as ZCC, ZMAN and so on.
NOTE: You need to ensure that administration access is not denied for all or else ZCC will remain inaccessible, except from the server in which the access was allowed or denied. Ensure that all Primary Servers in your zone are allowed access so that the internal operations between these servers are not restricted. However, these filters are not applicable for an Appliance web console.
Endpoint Access: Click to allow or deny certain IP addresses from accessing endpoint functions such as the ZENworks User Portal, the ZENworks Agent app and so on.
NOTE: Ensure that all Primary Servers in your zone are allowed access so that the internal operations between the ZENworks Servers will not be restricted.
Tools Access: Click to allow or deny certain IP addresses from accessing tools and downloads through the ZENworks Setup URL.
For each of these categories, you can configure filters by clicking . By default, access is allowed for all devices. For each filter, you need to specify the following:
Specific IP address, comma separated IP addresses, or an IP range. Each IP address can be specified in CIDR format or the regular format.
Allow or Deny access to the specified IP address A short description about the specified set of IP addresses.
Filters are evaluated in the order in which they are listed. If the same IP address appears in multiple filters, then the type of access specified in the first filter is given precedence over the type of access specified in the second filter. For example: The IP address 10.0.0.1 specified in the first filter is denied administration access. However, if the same IP address, appearing as a part of an IP range (10.0.0.0 - 10.255.255.255) that is specified in the second filter, is allowed administration access, then precedence is given to the first filter and IP address 10.0.0.1 will be denied administration access. You can also look up an IP address to identify whether access is allowed or denied for it, by specifying it in the Test access for an IP field. This action is also performed based on the order in which the filters are listed.
After configuring the access controls for one server, you can replicate the same access control configuration in another server. To do this, you need to select the Server for which the access controls are already configured. Subsequently, click Copy Access Controls. In the Copy Access Controls window, select the access controls that you want to copy and Add the server to which these access controls need to be copied.
ZENworks DMZ Server 261
NOTE: Configuring access controls for a Server that is an Appliance does not secure the Appliance Administration Console. To secure it, you need to specify access restrictions in the Appliance Administration Console itself. For details, see ZENworks Appliance Deployment and Administration Reference.
If a device’s IP address is denied access but the device is still able to contact the ZENworks Server, then you need to check whether the device is communicating with ZENworks using the proxy server. In this case, you need to deny access to the proxy server’s IP address, if you are sure that no other devices are using this proxy server.
Optimizing DMZ Server PerformanceFor more information on optimizing DMZ server Performance, see “Optimizing Primary Server Performance” on page 85
262 ZENworks DMZ Server