wvr610a & wvr611a waveform rasterizers user manual
TRANSCRIPT
User Manual
WVR610A &WVR611A
Waveform Rasterizers
071-1199-02
This manual supports software versions 1.1 and
above.
www.tektronix.com
Copyright © Tektronix, Inc. All rights reserved.
Tektronix products are covered by U.S. and foreign patents, issued and pending. Information in this publication supercedes
that in all previously published material. Specifications and price change privileges reserved.
Tektronix, Inc., P.O. Box 500, Beaverton, OR 97077
TEKTRONIX and TEK are registered trademarks of Tektronix, Inc.
FlexVu is a trademark of Tektronix, Inc.
WARRANTY
Tektronix warrants that the products that it manufactures and sells will be free from defects in materials and
workmanship for a period of one (1) year from the date of shipment. If a product proves defective during this
warranty period, Tektronix, at its option, either will repair the defective product without charge for parts and labor,
or will provide a replacement in exchange for the defective product.
In order to obtain service under this warranty, Customer must notify Tektronix of the defect before the expiration
of the warranty period and make suitable arrangements for the performance of service. Customer shall be
responsible for packaging and shipping the defective product to the service center designated by Tektronix, with
shipping charges prepaid. Tektronix shall pay for the return of the product to Customer if the shipment is to a
location within the country in which the Tektronix service center is located. Customer shall be responsible for
paying all shipping charges, duties, taxes, and any other charges for products returned to any other locations.
This warranty shall not apply to any defect, failure or damage caused by improper use or improper or inadequate
maintenance and care. Tektronix shall not be obligated to furnish service under this warranty a) to repair damage
resulting from attempts by personnel other than Tektronix representatives to install, repair or service the product;
b) to repair damage resulting from improper use or connection to incompatible equipment; c) to repair any
damage or malfunction caused by the use of non-Tektronix supplies; or d) to service a product that has been
modified or integrated with other products when the effect of such modification or integration increases the time
or difficulty of servicing the product.
THIS WARRANTY IS GIVEN BY TEKTRONIX IN LIEU OF ANY OTHERWARRANTIES, EXPRESS
OR IMPLIED. TEKTRONIX AND ITS VENDORS DISCLAIM ANY IMPLIED WARRANTIES OF
MERCHANTABILITY OR FITNESS FOR A PARTICULAR PURPOSE. TEKTRONIX’
RESPONSIBILITY TO REPAIR OR REPLACE DEFECTIVE PRODUCTS IS THE SOLE AND
EXCLUSIVE REMEDY PROVIDED TO THE CUSTOMER FOR BREACH OF THIS WARRANTY.
TEKTRONIX AND ITS VENDORS WILL NOT BE LIABLE FOR ANY INDIRECT, SPECIAL,
INCIDENTAL, OR CONSEQUENTIAL DAMAGES IRRESPECTIVE OF WHETHER TEKTRONIX OR
THE VENDOR HAS ADVANCE NOTICE OF THE POSSIBILITY OF SUCH DAMAGES.

WVR610A & WVR611A Waveform Rasterizers User Manual i
Table of Contents
General Safety Summary xiii. . . . . . . . . . . . . . . . . . . . . . . . . . . . . . . . . . .
Preface xv. . . . . . . . . . . . . . . . . . . . . . . . . . . . . . . . . . . . . . . . . . . . . . . . . . .
About this Manual xvi. . . . . . . . . . . . . . . . . . . . . . . . . . . . . . . . . . . . . . . . . . . . . . .
Additional Information xvi. . . . . . . . . . . . . . . . . . . . . . . . . . . . . . . . . . . . . . . . . . . .
Contacting Tektronix xvii. . . . . . . . . . . . . . . . . . . . . . . . . . . . . . . . . . . . . . . . . . . . .
Getting Started
Product Description 1--1. . . . . . . . . . . . . . . . . . . . . . . . . . . . . . . . . . . . . . . . . . . . . .
Options 1--2. . . . . . . . . . . . . . . . . . . . . . . . . . . . . . . . . . . . . . . . . . . . . . . . . . . . . . . .
Standard Accessories 1--3. . . . . . . . . . . . . . . . . . . . . . . . . . . . . . . . . . . . . . . . . . . . .
Optional Accessories 1--4. . . . . . . . . . . . . . . . . . . . . . . . . . . . . . . . . . . . . . . . . . . . .
Installation 1--5. . . . . . . . . . . . . . . . . . . . . . . . . . . . . . . . . . . . . . . . . . . . . . .
Rackmount Installation 1--5. . . . . . . . . . . . . . . . . . . . . . . . . . . . . . . . . . . . . . . . . . . .
Connecting a Display 1--10. . . . . . . . . . . . . . . . . . . . . . . . . . . . . . . . . . . . . . . . . . . . .
Connecting Power 1--10. . . . . . . . . . . . . . . . . . . . . . . . . . . . . . . . . . . . . . . . . . . . . . . .
Installing the Waveform Rasterizer in a Video System 1--11. . . . . . . . . . . . . . . . . . .
Operating Basics
Overview 2--1. . . . . . . . . . . . . . . . . . . . . . . . . . . . . . . . . . . . . . . . . . . . . . . . . . . . . . .
Three Levels of Control 2--3. . . . . . . . . . . . . . . . . . . . . . . . . . . . . . . . . . . . . . . . . . .
Tile Settings 2--4. . . . . . . . . . . . . . . . . . . . . . . . . . . . . . . . . . . . . . . . . . . . . . . . . . . .
Status Bar 2--10. . . . . . . . . . . . . . . . . . . . . . . . . . . . . . . . . . . . . . . . . . . . . . . . . . . . . .
Waveform Display 2--12. . . . . . . . . . . . . . . . . . . . . . . . . . . . . . . . . . . . . . . . . . . . . . .
Vector Display 2--15. . . . . . . . . . . . . . . . . . . . . . . . . . . . . . . . . . . . . . . . . . . . . . . . . .
Measure Display 2--18. . . . . . . . . . . . . . . . . . . . . . . . . . . . . . . . . . . . . . . . . . . . . . . . .
Picture Display 2--20. . . . . . . . . . . . . . . . . . . . . . . . . . . . . . . . . . . . . . . . . . . . . . . . . .
Audio Display 2--21. . . . . . . . . . . . . . . . . . . . . . . . . . . . . . . . . . . . . . . . . . . . . . . . . . .
In-bar Warning Messages 2--23. . . . . . . . . . . . . . . . . . . . . . . . . . . . . . . . . . . . . .
Other Display 2--26. . . . . . . . . . . . . . . . . . . . . . . . . . . . . . . . . . . . . . . . . . . . . . . . . . .
Gamut Display 2--27. . . . . . . . . . . . . . . . . . . . . . . . . . . . . . . . . . . . . . . . . . . . . . . . . .
Status Display 2--29. . . . . . . . . . . . . . . . . . . . . . . . . . . . . . . . . . . . . . . . . . . . . . . . . . .
Navigating Menus 2--30. . . . . . . . . . . . . . . . . . . . . . . . . . . . . . . . . . . . . . . . . . . . . . . .
Setting the Active Tile 2--31. . . . . . . . . . . . . . . . . . . . . . . . . . . . . . . . . . . . . . . . . . . .
Displaying a Tile in Full-screen Mode 2--33. . . . . . . . . . . . . . . . . . . . . . . . . . . . . . . .
Selecting a Measurement for the Active Tile 2--34. . . . . . . . . . . . . . . . . . . . . . . . . .
Using the FREEZE Feature 2--35. . . . . . . . . . . . . . . . . . . . . . . . . . . . . . . . . . . . . . . .
Using Online Help 2--37. . . . . . . . . . . . . . . . . . . . . . . . . . . . . . . . . . . . . . . . . . . . . . .
Using Cursors 2--38. . . . . . . . . . . . . . . . . . . . . . . . . . . . . . . . . . . . . . . . . . . . . . . . . . .
Rear Panel Connections 2--41. . . . . . . . . . . . . . . . . . . . . . . . . . . . . . . . . . . . . . . . . . .
Changing Instrument Settings 2--49. . . . . . . . . . . . . . . . . . . . . . . . . . . . . . .
SDI Input Settings 2--49. . . . . . . . . . . . . . . . . . . . . . . . . . . . . . . . . . . . . . . . . . . . . . .
Composite Input Settings 2--50. . . . . . . . . . . . . . . . . . . . . . . . . . . . . . . . . . . . . . . . . .
External Reference Setting 2--51. . . . . . . . . . . . . . . . . . . . . . . . . . . . . . . . . . . . . . . . .
Analog Audio Displays Settings 2--52. . . . . . . . . . . . . . . . . . . . . . . . . . . . . . . . . . . .
Digital Audio Displays Settings 2--56. . . . . . . . . . . . . . . . . . . . . . . . . . . . . . . . . . . . .
Table of Contents
ii WVR610A & WVR611A Waveform Rasterizers User Manual
Audio Inputs/Outputs 2--60. . . . . . . . . . . . . . . . . . . . . . . . . . . . . . . . . . . . . . . . . . . . .
Setting Up AES B Connectors as Outputs 2--65. . . . . . . . . . . . . . . . . . . . . . . . .
Gamut Thresholds Menu 2--66. . . . . . . . . . . . . . . . . . . . . . . . . . . . . . . . . . . . . . . . . .
Display Settings Menu 2--69. . . . . . . . . . . . . . . . . . . . . . . . . . . . . . . . . . . . . . . . . . . .
LTC / VITC Menu 2--72. . . . . . . . . . . . . . . . . . . . . . . . . . . . . . . . . . . . . . . . . . . . . . .
Readouts Menu 2--72. . . . . . . . . . . . . . . . . . . . . . . . . . . . . . . . . . . . . . . . . . . . . . . . . .
Graticules Menu 2--73. . . . . . . . . . . . . . . . . . . . . . . . . . . . . . . . . . . . . . . . . . . . . . . . .
Network Settings Menu 2--74. . . . . . . . . . . . . . . . . . . . . . . . . . . . . . . . . . . . . . . . . . .
Utilities Menu 2--82. . . . . . . . . . . . . . . . . . . . . . . . . . . . . . . . . . . . . . . . . . . . . . . . . . .
Reference
Displaying and Monitoring Video 3--1. . . . . . . . . . . . . . . . . . . . . . . . . . . .
Monitoring a Waveform 3--1. . . . . . . . . . . . . . . . . . . . . . . . . . . . . . . . . . . . . . . . . . .
Checking Black Level 3--2. . . . . . . . . . . . . . . . . . . . . . . . . . . . . . . . . . . . . . . . . . . .
Checking Gain 3--3. . . . . . . . . . . . . . . . . . . . . . . . . . . . . . . . . . . . . . . . . . . . . . . . . .
Selecting a Line for Viewing 3--3. . . . . . . . . . . . . . . . . . . . . . . . . . . . . . . . . . . . . . .
Measuring Rise Times 3--5. . . . . . . . . . . . . . . . . . . . . . . . . . . . . . . . . . . . . . . . . . . .
Ensuring Regulatory Compliance 3--6. . . . . . . . . . . . . . . . . . . . . . . . . . . . . . . . . . .
Matching Sources 3--9. . . . . . . . . . . . . . . . . . . . . . . . . . . . . . . . . . . . . . . . . . . . . . . .
Shading a Camera 3--10. . . . . . . . . . . . . . . . . . . . . . . . . . . . . . . . . . . . . . . . . . . . . . . .
Timing a Studio 3--11. . . . . . . . . . . . . . . . . . . . . . . . . . . . . . . . . . . . . . . . . . . . . . . . .
Using the Traditional Method 3--12. . . . . . . . . . . . . . . . . . . . . . . . . . . . . . . . . . .
Using the Timing Display 3--12. . . . . . . . . . . . . . . . . . . . . . . . . . . . . . . . . . . . . .
Investigating a Flaw in a Picture 3--15. . . . . . . . . . . . . . . . . . . . . . . . . . . . . . . . . . . .
Checking VITS 3--16. . . . . . . . . . . . . . . . . . . . . . . . . . . . . . . . . . . . . . . . . . . . . . . . . .
Verifying Closed-captioning Presence 3--17. . . . . . . . . . . . . . . . . . . . . . . . . . . . . . . .
Checking Gamut 3--18. . . . . . . . . . . . . . . . . . . . . . . . . . . . . . . . . . . . . . . . . . . . . . . . .
Diamond Display 3--18. . . . . . . . . . . . . . . . . . . . . . . . . . . . . . . . . . . . . . . . . . . . .
Arrowhead Gamut 3--21. . . . . . . . . . . . . . . . . . . . . . . . . . . . . . . . . . . . . . . . . . . .
Checking Frequency Response 3--24. . . . . . . . . . . . . . . . . . . . . . . . . . . . . . . . . . . . . .
Selecting and Monitoring Audio 3--27. . . . . . . . . . . . . . . . . . . . . . . . . . . . .
Selecting the Audio Input 3--27. . . . . . . . . . . . . . . . . . . . . . . . . . . . . . . . . . . . . . . . . .
Checking Audio Level 3--29. . . . . . . . . . . . . . . . . . . . . . . . . . . . . . . . . . . . . . . . . . . .
Checking Audio Phase 3--30. . . . . . . . . . . . . . . . . . . . . . . . . . . . . . . . . . . . . . . . . . . .
Using Presets 3--33. . . . . . . . . . . . . . . . . . . . . . . . . . . . . . . . . . . . . . . . . . . . .
Creating Presets 3--33. . . . . . . . . . . . . . . . . . . . . . . . . . . . . . . . . . . . . . . . . . . . . . . . .
Recalling Presets 3--34. . . . . . . . . . . . . . . . . . . . . . . . . . . . . . . . . . . . . . . . . . . . . . . .
Recalling the Factory Defaults 3--35. . . . . . . . . . . . . . . . . . . . . . . . . . . . . . . . . . . . . .
Contents of a Preset 3--36. . . . . . . . . . . . . . . . . . . . . . . . . . . . . . . . . . . . . . . . . . . . . .
Configuring Alarms and Viewing Status 3--37. . . . . . . . . . . . . . . . . . . . . . .
Enabling and Disabling Alarms 3--37. . . . . . . . . . . . . . . . . . . . . . . . . . . . . . . . . . . . .
Enabling and Disabling Alarms 3--38. . . . . . . . . . . . . . . . . . . . . . . . . . . . . . . . .
Alarm Conditions That Can Be Monitored 3--38. . . . . . . . . . . . . . . . . . . . . . . . . . . .
Setting Up Alarm Reporting Options 3--42. . . . . . . . . . . . . . . . . . . . . . . . . . . . . . . . .
Setting Alarms by Group 3--42. . . . . . . . . . . . . . . . . . . . . . . . . . . . . . . . . . . . . . .
Setting Alarms by Mask 3--42. . . . . . . . . . . . . . . . . . . . . . . . . . . . . . . . . . . . . . .
Available Alarm Reporting Options 3--43. . . . . . . . . . . . . . . . . . . . . . . . . . . . . .
Muting Alarms 3--44. . . . . . . . . . . . . . . . . . . . . . . . . . . . . . . . . . . . . . . . . . . . . . .
Viewing Alarm Status 3--44. . . . . . . . . . . . . . . . . . . . . . . . . . . . . . . . . . . . . . . . . . . . .
Elements of the Display 3--45. . . . . . . . . . . . . . . . . . . . . . . . . . . . . . . . . . . . . . .
Table of Contents
WVR610A & WVR611A Waveform Rasterizers User Manual iii
Displaying Errors 3--47. . . . . . . . . . . . . . . . . . . . . . . . . . . . . . . . . . . . . . . . . . . . . . . .
Elements of the Display 3--48. . . . . . . . . . . . . . . . . . . . . . . . . . . . . . . . . . . . . . .
Displaying Video Session Status 3--49. . . . . . . . . . . . . . . . . . . . . . . . . . . . . . . . . . . .
Resetting Video Session Statistics 3--50. . . . . . . . . . . . . . . . . . . . . . . . . . . . . . . .
Stopping and Restarting Video Session Updating 3--51. . . . . . . . . . . . . . . . . . .
Video Session Display for SDI Inputs 3--52. . . . . . . . . . . . . . . . . . . . . . . . . . . . . . . .
Video Session Display for Composite Inputs 3--57. . . . . . . . . . . . . . . . . . . . . . . . . . .
Check Audio Status 3--58. . . . . . . . . . . . . . . . . . . . . . . . . . . . . . . . . . . . . . . . . . . . . .
Elements of the Audio Session Display 3--59. . . . . . . . . . . . . . . . . . . . . . . . . . .
Resetting the Audio Session Statistics 3--60. . . . . . . . . . . . . . . . . . . . . . . . . . . .
Stopping and Restarting Audio Session Updating 3--61. . . . . . . . . . . . . . . . . . .
Displaying Audio Status 3--62. . . . . . . . . . . . . . . . . . . . . . . . . . . . . . . . . . . . . . .
Elements of the Display 3--63. . . . . . . . . . . . . . . . . . . . . . . . . . . . . . . . . . . . . . .
Error Log 3--64. . . . . . . . . . . . . . . . . . . . . . . . . . . . . . . . . . . . . . . . . . . . . . . . . . .
Controlling Error Logging 3--66. . . . . . . . . . . . . . . . . . . . . . . . . . . . . . . . . . . . . . . . .
Displaying Pages of the Error Log 3--66. . . . . . . . . . . . . . . . . . . . . . . . . . . . . . .
Activating Logging 3--67. . . . . . . . . . . . . . . . . . . . . . . . . . . . . . . . . . . . . . . . . . .
Resetting the Log File 3--67. . . . . . . . . . . . . . . . . . . . . . . . . . . . . . . . . . . . . . . . .
Appendices
Appendix A: Specifications A--1. . . . . . . . . . . . . . . . . . . . . . . . . . . . . . . . . .
Electrical Specifications A--1. . . . . . . . . . . . . . . . . . . . . . . . . . . . . . . . . . . . . . . . . . .
Physical Specifications A--25. . . . . . . . . . . . . . . . . . . . . . . . . . . . . . . . . . . . . . . . . . . .
Certifications and Compliances A--27. . . . . . . . . . . . . . . . . . . . . . . . . . . . . . . . . . . . .
Appendix B: Using the Remote Interface B--1. . . . . . . . . . . . . . . . . . . . . .
Using a Web Browser B--1. . . . . . . . . . . . . . . . . . . . . . . . . . . . . . . . . . . . . . . . . . . . .
Using the Java Applet B--3. . . . . . . . . . . . . . . . . . . . . . . . . . . . . . . . . . . . . . . . . . . . .
Appendix C: WVR610A &WVR611A Waveform Rasterizers MIB C--1
SNMP Command and Web Interface Interaction C--1. . . . . . . . . . . . . . . . . . . . . . . .
wvr61x MIB Definitions C--1. . . . . . . . . . . . . . . . . . . . . . . . . . . . . . . . . . . . . . . . . .
Waveform Monitor MIB Definitions C--9. . . . . . . . . . . . . . . . . . . . . . . . . . . . . . . .
Appendix D: Upgrading the Waveform Rasterizer Firmware D--1. . . . .
PC System Requirements D--1. . . . . . . . . . . . . . . . . . . . . . . . . . . . . . . . . . . . . . . . . .
Firmware Package Download D--2. . . . . . . . . . . . . . . . . . . . . . . . . . . . . . . . . . . . . . .
Preparing for the System Upgrade D--2. . . . . . . . . . . . . . . . . . . . . . . . . . . . . . . . . . .
Installing the Firmware D--4. . . . . . . . . . . . . . . . . . . . . . . . . . . . . . . . . . . . . . . . . . .
Upgrading Multiple Instruments D--7. . . . . . . . . . . . . . . . . . . . . . . . . . . . . . . . . . . .
Verifying the Upgrade D--7. . . . . . . . . . . . . . . . . . . . . . . . . . . . . . . . . . . . . . . . . . . .
Appendix E: Incoming Inspection E--1. . . . . . . . . . . . . . . . . . . . . . . . . . . .
List of Tests E--1. . . . . . . . . . . . . . . . . . . . . . . . . . . . . . . . . . . . . . . . . . . . . . . . . . . .
Required Equipment E--4. . . . . . . . . . . . . . . . . . . . . . . . . . . . . . . . . . . . . . . . . . . . . .
Basic Turn On and Self Test E--5. . . . . . . . . . . . . . . . . . . . . . . . . . . . . . . . . . . . . . . .
Front Panel Test E--5. . . . . . . . . . . . . . . . . . . . . . . . . . . . . . . . . . . . . . . . . . . . . . . . .
XGA and Extended Diagnostics Test E--6. . . . . . . . . . . . . . . . . . . . . . . . . . . . . . . . .
Fan Test E--7. . . . . . . . . . . . . . . . . . . . . . . . . . . . . . . . . . . . . . . . . . . . . . . . . . . . . . . .
SDI Input – Check Bit Integrity E--7. . . . . . . . . . . . . . . . . . . . . . . . . . . . . . . . . . . . .
External Reference E--8. . . . . . . . . . . . . . . . . . . . . . . . . . . . . . . . . . . . . . . . . . . . . . .
Composite Input E--9. . . . . . . . . . . . . . . . . . . . . . . . . . . . . . . . . . . . . . . . . . . . . . . . .
Analog Audio Input E--9. . . . . . . . . . . . . . . . . . . . . . . . . . . . . . . . . . . . . . . . . . . . . .
Analog Audio Output E--10. . . . . . . . . . . . . . . . . . . . . . . . . . . . . . . . . . . . . . . . . . . . .
Table of Contents
iv WVR610A & WVR611A Waveform Rasterizers User Manual
Digital Audio Input E--11. . . . . . . . . . . . . . . . . . . . . . . . . . . . . . . . . . . . . . . . . . . . . . .
Digital Audio Output E--12. . . . . . . . . . . . . . . . . . . . . . . . . . . . . . . . . . . . . . . . . . . . .
LTC Decode and Waveform Test E--13. . . . . . . . . . . . . . . . . . . . . . . . . . . . . . . . . . . .
Ground Closure Remote E--14. . . . . . . . . . . . . . . . . . . . . . . . . . . . . . . . . . . . . . . . . . .
Ethernet Test E--15. . . . . . . . . . . . . . . . . . . . . . . . . . . . . . . . . . . . . . . . . . . . . . . . . . . .
Appendix F: User Maintenance F--1. . . . . . . . . . . . . . . . . . . . . . . . . . . . . .
Cleaning F--1. . . . . . . . . . . . . . . . . . . . . . . . . . . . . . . . . . . . . . . . . . . . . . . . . . . . . . .
Preventive Maintenance F--1. . . . . . . . . . . . . . . . . . . . . . . . . . . . . . . . . . . . . . . . . . .
Glossary
Index
Table of Contents
WVR610A & WVR611A Waveform Rasterizers User Manual v
List of Figures
Figure 1--1: Dimensions of the waveform rasterizer 1--5. . . . . . . . . . . . . .
Figure 1--2: Front rail mount 1--6. . . . . . . . . . . . . . . . . . . . . . . . . . . . . . . .
Figure 1--3: Deep rackmount 1--7. . . . . . . . . . . . . . . . . . . . . . . . . . . . . . . .
Figure 1--4: Shallow rackmount 1--7. . . . . . . . . . . . . . . . . . . . . . . . . . . . . .
Figure 1--5: Assembly of rackmounting hardware 1--8. . . . . . . . . . . . . . .
Figure 1--6: Installing or removing the instrument 1--9. . . . . . . . . . . . . .
Figure 1--7: Monitoring the video bit stream of a serial receiver 1--11. . .
Figure 1--8: Monitoring serial digital signals around a routing
switcher 1--12. . . . . . . . . . . . . . . . . . . . . . . . . . . . . . . . . . . . . . . . . . . . . .
Figure 2--1: A display with all four tiles visible 2--1. . . . . . . . . . . . . . . . . .
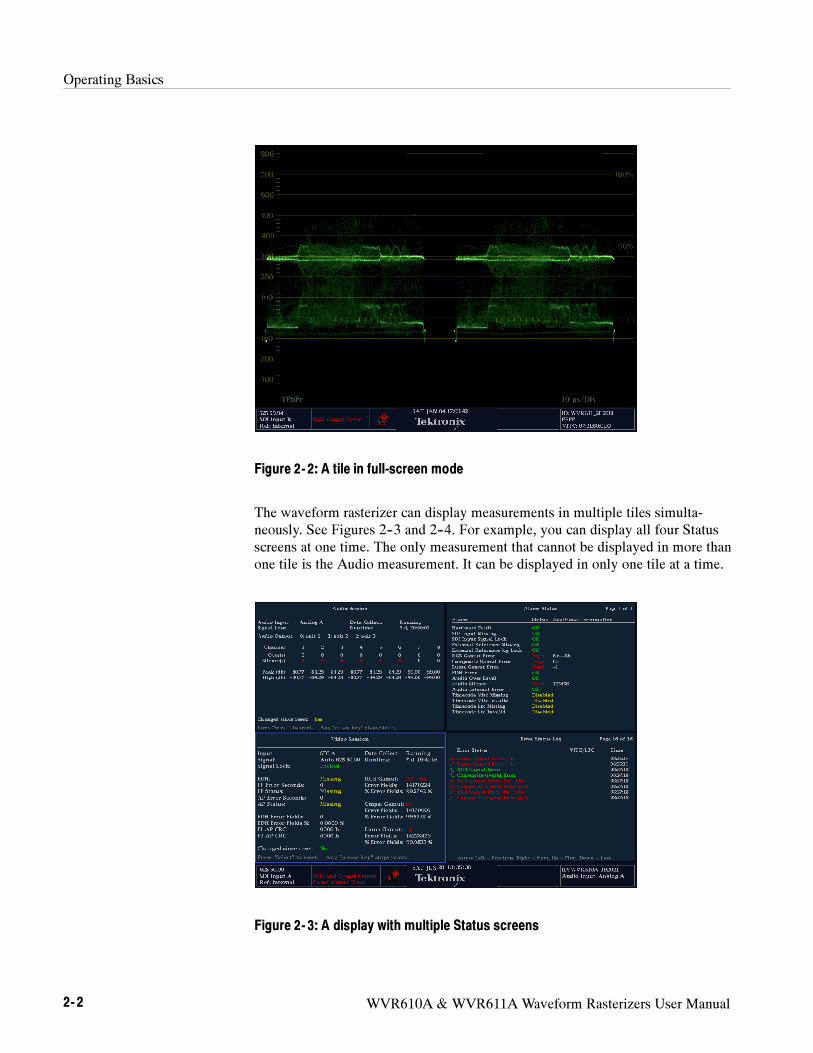
Figure 2--2: A tile in full-screen mode 2--2. . . . . . . . . . . . . . . . . . . . . . . . .
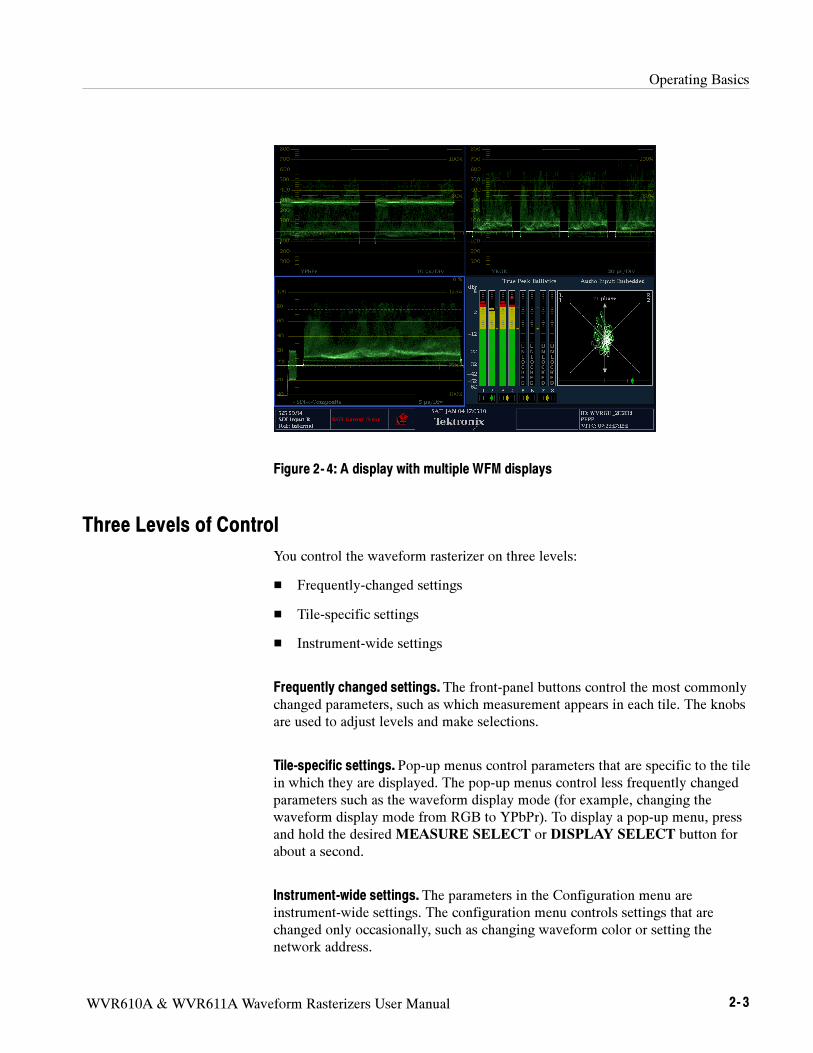
Figure 2--3: A display with multiple Status screens 2--2. . . . . . . . . . . . . .
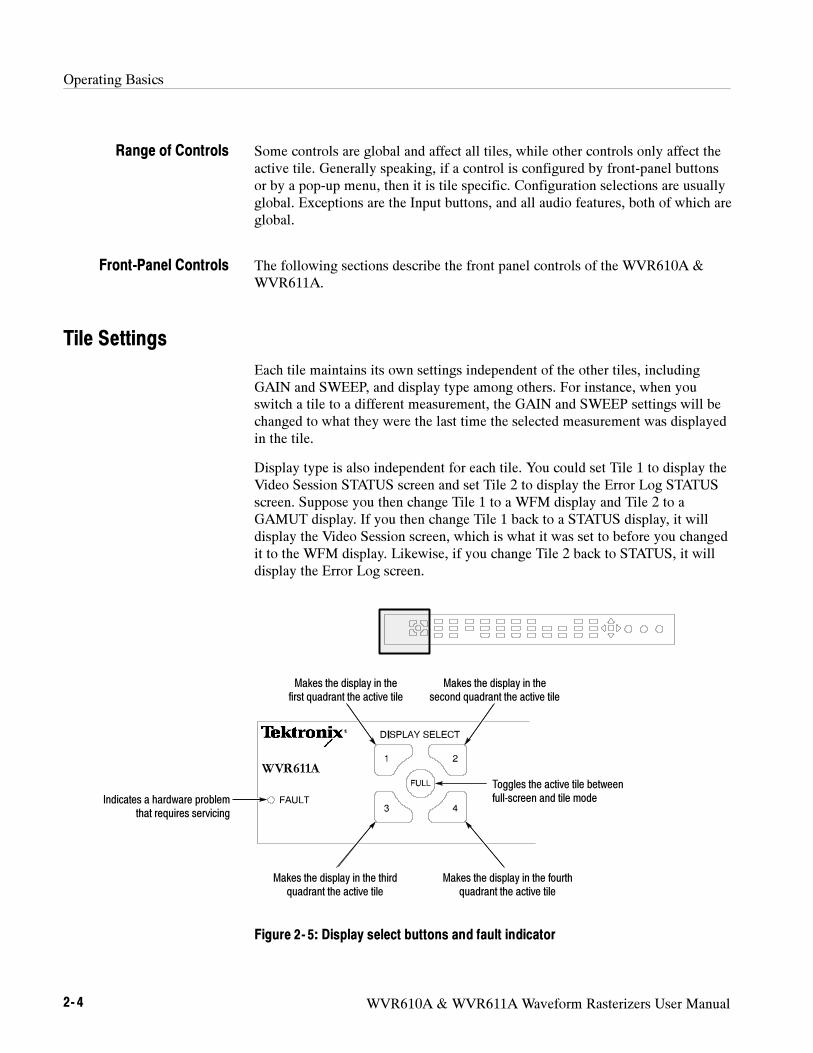
Figure 2--4: A display with multiple WFM displays 2--3. . . . . . . . . . . . . .
Figure 2--5: Display select buttons and fault indicator 2--4. . . . . . . . . . .
Figure 2--6: Measure select buttons 2--5. . . . . . . . . . . . . . . . . . . . . . . . . . .
Figure 2--7: Gain buttons 2--5. . . . . . . . . . . . . . . . . . . . . . . . . . . . . . . . . . .
Figure 2--8: Sweep buttons 2--6. . . . . . . . . . . . . . . . . . . . . . . . . . . . . . . . . .
Figure 2--9: Presets buttons 2--6. . . . . . . . . . . . . . . . . . . . . . . . . . . . . . . . . .
Figure 2--10: Input select buttons 2--7. . . . . . . . . . . . . . . . . . . . . . . . . . . . .
Figure 2--11: General function buttons 2--7. . . . . . . . . . . . . . . . . . . . . . . .
Figure 2--12: Arrow keys and SEL button 2--7. . . . . . . . . . . . . . . . . . . . . .
Figure 2--13: Control knobs 2--8. . . . . . . . . . . . . . . . . . . . . . . . . . . . . . . . .
Figure 2--14: The WFM pop-up menu with display mode set to
YPbPr 2--9. . . . . . . . . . . . . . . . . . . . . . . . . . . . . . . . . . . . . . . . . . . . . . . .
Figure 2--15: The WFM pop-up menu display mode set to RGB 2--9. . .
Figure 2--16: The configuration menu 2--10. . . . . . . . . . . . . . . . . . . . . . . . .
Figure 2--17: Elements of the status bar 2--11. . . . . . . . . . . . . . . . . . . . . . .
Figure 2--18: Waveform display elements 2--13. . . . . . . . . . . . . . . . . . . . . .
Figure 2--19: Vector display elements 2--16. . . . . . . . . . . . . . . . . . . . . . . . . .
Figure 2--20: Timing display 2--18. . . . . . . . . . . . . . . . . . . . . . . . . . . . . . . . .
Figure 2--21: Picture display 2--20. . . . . . . . . . . . . . . . . . . . . . . . . . . . . . . . .
Figure 2--22: Audio display with phase display 2--22. . . . . . . . . . . . . . . . .
Figure 2--23: Other display elements 2--26. . . . . . . . . . . . . . . . . . . . . . . . . .
Figure 2--24: Gamut display elements 2--27. . . . . . . . . . . . . . . . . . . . . . . . .
Figure 2--25: A STATUS display in all four tiles 2--29. . . . . . . . . . . . . . . . .
Table of Contents
vi WVR610A & WVR611A Waveform Rasterizers User Manual
Figure 2--26: Panes in a menu 2--30. . . . . . . . . . . . . . . . . . . . . . . . . . . . . . . .
Figure 2--27: Knob icon 2--31. . . . . . . . . . . . . . . . . . . . . . . . . . . . . . . . . . . . .
Figure 2--28: Tile positions in the display 2--32. . . . . . . . . . . . . . . . . . . . . .
Figure 2--29: Identifying the active tile 2--32. . . . . . . . . . . . . . . . . . . . . . . .
Figure 2--30: Press a numbered button to set the active tile 2--33. . . . . . .
Figure 2--31: Full-screen mode 2--34. . . . . . . . . . . . . . . . . . . . . . . . . . . . . . .
Figure 2--32: Measure select buttons 2--34. . . . . . . . . . . . . . . . . . . . . . . . . .
Figure 2--33: The three sections of the online help 2--37. . . . . . . . . . . . . . .
Figure 2--34: The Cursor display 2--39. . . . . . . . . . . . . . . . . . . . . . . . . . . . .
Figure 2--35: Rear-panel connectors 2--41. . . . . . . . . . . . . . . . . . . . . . . . . .
Figure 2--36: Analog I/O connector pin diagram 2--42. . . . . . . . . . . . . . . .
Figure 2--37: XGA output connector pin diagram 2--45. . . . . . . . . . . . . . .
Figure 2--38: REMOTE connector pin diagram 2--46. . . . . . . . . . . . . . . . .
Figure 2--39: RJ-45 Ethernet connector 2--47. . . . . . . . . . . . . . . . . . . . . . . .
Figure 2--40: Mapping inputs to bars 2--62. . . . . . . . . . . . . . . . . . . . . . . . .
Figure 2--41: Analog out map 2--63. . . . . . . . . . . . . . . . . . . . . . . . . . . . . . . .
Figure 2--42: Configuring audio inputs 2--63. . . . . . . . . . . . . . . . . . . . . . . .
Figure 2--43: Bar to input mapping 2--64. . . . . . . . . . . . . . . . . . . . . . . . . . .
Figure 2--44: Mapping analog output 2--64. . . . . . . . . . . . . . . . . . . . . . . . .
Figure 2--45: Video to audio mapping 2--65. . . . . . . . . . . . . . . . . . . . . . . . .
Figure 2--46: Configuring AES B as an output 2--66. . . . . . . . . . . . . . . . . .
Figure 2--47: Setting IP address 2--75. . . . . . . . . . . . . . . . . . . . . . . . . . . . . .
Figure 2--48: Setting subnet mask 2--76. . . . . . . . . . . . . . . . . . . . . . . . . . . .
Figure 2--49: Setting the instrument name 2--78. . . . . . . . . . . . . . . . . . . . .
Figure 2--50: Setting the SNMP public community string 2--79. . . . . . . . .
Figure 2--51: Setting the SNMP private community string 2--80. . . . . . . .
Figure 2--52: Setting the SNMP trap address 2--81. . . . . . . . . . . . . . . . . . .
Figure 2--53: Viewing hw/sw version numbers 2--83. . . . . . . . . . . . . . . . . .
Figure 2--54: Setting the internal clock 2--84. . . . . . . . . . . . . . . . . . . . . . . .
Figure 2--55: CPU color palette 2--85. . . . . . . . . . . . . . . . . . . . . . . . . . . . . .
Figure 2--56: Power-up diagnostics passed 2--86. . . . . . . . . . . . . . . . . . . . .
Figure 2--57: Advanced diagnostics dialog box 2--87. . . . . . . . . . . . . . . . . .
Figure 2--58: Diagnostics log 2--88. . . . . . . . . . . . . . . . . . . . . . . . . . . . . . . . .
Figure 3--1: Waveform mode 3--1. . . . . . . . . . . . . . . . . . . . . . . . . . . . . . . . .
Figure 3--2: Selecting a line for display 3--4. . . . . . . . . . . . . . . . . . . . . . . .
Figure 3--3: Measuring rise time with cursors 3--6. . . . . . . . . . . . . . . . . .
Figure 3--4: Investigating a line in a picture 3--16. . . . . . . . . . . . . . . . . . . .
Figure 3--5: Verifying closed captioning presence 3--17. . . . . . . . . . . . . . . .
Table of Contents
WVR610A & WVR611A Waveform Rasterizers User Manual vii
Figure 3--6: Construction of the Diamond display 3--19. . . . . . . . . . . . . . .
Figure 3--7: Diamond display showing out of gamut signal 3--20. . . . . . .
Figure 3--8: Out-of-gamut signals on a Diamond display 3--21. . . . . . . . .
Figure 3--9: NTSC and PAL Arrowhead gamut displays 3--22. . . . . . . . .
Figure 3--10: Arrowhead display 3--23. . . . . . . . . . . . . . . . . . . . . . . . . . . . .
Figure 3--11: Audio pop-up menu 3--28. . . . . . . . . . . . . . . . . . . . . . . . . . . . .
Figure 3--12: Audio level meters 3--29. . . . . . . . . . . . . . . . . . . . . . . . . . . . . .
Figure 3--13: Audio phase display 3--30. . . . . . . . . . . . . . . . . . . . . . . . . . . .
Figure 3--14: Audio phase displays 3--31. . . . . . . . . . . . . . . . . . . . . . . . . . . .
Figure 3--15: Audio phase display 3--32. . . . . . . . . . . . . . . . . . . . . . . . . . . .
Figure 3--16: Saving a preset using the Remote Interface software 3--34.
Figure 3--17: Recalling presets using the web interface software 3--35. . .
Figure 3--18: Alarms menu 3--37. . . . . . . . . . . . . . . . . . . . . . . . . . . . . . . . . .
Figure 3--19: Setting alarm reporting options 3--42. . . . . . . . . . . . . . . . . . .
Figure 3--20: Setting alarm reporting options for all alarm groups 3--43.
Figure 3--21: Selecting the alarm status display 3--45. . . . . . . . . . . . . . . . .
Figure 3--22: Error log display 3--47. . . . . . . . . . . . . . . . . . . . . . . . . . . . . . .
Figure 3--23: Video session status display for an SDI input 3--50. . . . . . .
Figure 3--24: Sections of video session display 3--52. . . . . . . . . . . . . . . . . .
Figure 3--25: Video session status display for a CMPST input 3--57. . . . .
Figure 3--26: Audio session display 3--59. . . . . . . . . . . . . . . . . . . . . . . . . . .
Figure 3--27: Embedded audio status display 3--62. . . . . . . . . . . . . . . . . . .
Figure 3--28: Alarm display showing audio errors 3--63. . . . . . . . . . . . . . .
Figure 3--29: Error log displaying audio errors 3--64. . . . . . . . . . . . . . . . .
Figure 3--30: Error status log 3--66. . . . . . . . . . . . . . . . . . . . . . . . . . . . . . . .
Figure 3--31: Use the arrow keys to navigate the error log 3--67. . . . . . . .
Figure 3--32: Activating logging 3--67. . . . . . . . . . . . . . . . . . . . . . . . . . . . . .
Figure B--1: Accessing the remote interface with a Web browser B--2. . .
Figure B--2: Java applet B--5. . . . . . . . . . . . . . . . . . . . . . . . . . . . . . . . . . . .
Figure B--3: Java applet window B--6. . . . . . . . . . . . . . . . . . . . . . . . . . . . .
Figure B--4: Control panel B--6. . . . . . . . . . . . . . . . . . . . . . . . . . . . . . . . . .
Figure B--5: Waveform display window B--7. . . . . . . . . . . . . . . . . . . . . . .
Figure B--6: Displaying online help B--8. . . . . . . . . . . . . . . . . . . . . . . . . . .
Figure B--7: Adjusting vertical position B--11. . . . . . . . . . . . . . . . . . . . . . . .
Figure B--8: Displaying pop-up menus B--12. . . . . . . . . . . . . . . . . . . . . . . .
Figure B--9: The vector menu pop-up menu B--12. . . . . . . . . . . . . . . . . . . .

Table of Contents
viii WVR610A & WVR611A Waveform Rasterizers User Manual
Figure D--1: Select continue to begin the firmware upgrade process D--4
Figure D--2: Transfer utility window D--5. . . . . . . . . . . . . . . . . . . . . . . . . .
Figure D--3: Done appears when the software upgrade completes D--6. .
Table of Contents
WVR610A & WVR611A Waveform Rasterizers User Manual ix
List of Tables
Table 1--1: Power cord identification 1--3. . . . . . . . . . . . . . . . . . . . . . . . .
Table 2--1: Status bar element descriptions 2--11. . . . . . . . . . . . . . . . . . . .
Table 2--2: Status bar icons 2--12. . . . . . . . . . . . . . . . . . . . . . . . . . . . . . . . .
Table 2--3: Waveform display element descriptions 2--13. . . . . . . . . . . . .
Table 2--4: Vector/Lightning display element descriptions 2--16. . . . . . . .
Table 2--5: Timing display element descriptions 2--18. . . . . . . . . . . . . . . .
Table 2--6: Audio display element descriptions 2--22. . . . . . . . . . . . . . . . .
Table 2--7: Other display element descriptions 2--26. . . . . . . . . . . . . . . . .
Table 2--8: Waveform display element descriptions 2--27. . . . . . . . . . . . .
Table 2--9: AES Connectors 2--42. . . . . . . . . . . . . . . . . . . . . . . . . . . . . . . . .
Table 2--10: Analog I/O connector pin-out 2--43. . . . . . . . . . . . . . . . . . . . .
Table 2--11: Channel pair to analog input mapping 2--44. . . . . . . . . . . . .
Table 2--12: XGA connector pin-out 2--45. . . . . . . . . . . . . . . . . . . . . . . . . .
Table 2--13: REMOTE connector pin-out 2--46. . . . . . . . . . . . . . . . . . . . .
Table 2--14: Ethernet connector LEDs 2--47. . . . . . . . . . . . . . . . . . . . . . . .
Table 2--15: Ethernet connector pin-out 2--47. . . . . . . . . . . . . . . . . . . . . . .
Table 2--16: SDI input settings 2--49. . . . . . . . . . . . . . . . . . . . . . . . . . . . . . .
Table 2--17: Composite input settings 2--50. . . . . . . . . . . . . . . . . . . . . . . . .
Table 2--18: External reference settings 2--52. . . . . . . . . . . . . . . . . . . . . . .
Table 2--19: Analog Audio display settings 2--53. . . . . . . . . . . . . . . . . . . . .
Table 2--20: Characteristics of meter types 2--55. . . . . . . . . . . . . . . . . . . .
Table 2--21: Digital Audio display settings 2--57. . . . . . . . . . . . . . . . . . . . .
Table 2--22: Audio Inputs and Outputs 2--61. . . . . . . . . . . . . . . . . . . . . . .
Table 2--23: Gamut thresholds 2--67. . . . . . . . . . . . . . . . . . . . . . . . . . . . . . .
Table 2--24: EBU-R103 recommended limits for Gamut and Luma 2--69
Table 2--25: Display settings 2--69. . . . . . . . . . . . . . . . . . . . . . . . . . . . . . . . .
Table 2--26: LTC / VITC settings 2--72. . . . . . . . . . . . . . . . . . . . . . . . . . . .
Table 2--27: Readouts settings 2--72. . . . . . . . . . . . . . . . . . . . . . . . . . . . . . .
Table 2--28: Graticule settings 2--73. . . . . . . . . . . . . . . . . . . . . . . . . . . . . . .
Table 2--29: Network settings 2--74. . . . . . . . . . . . . . . . . . . . . . . . . . . . . . . .
Table 2--30: Utilities settings 2--83. . . . . . . . . . . . . . . . . . . . . . . . . . . . . . . .
Table 2--31: Diagnostic log contents 2--89. . . . . . . . . . . . . . . . . . . . . . . . . .
Table 3--1: Correlation meter response times 3--32. . . . . . . . . . . . . . . . . . .
Table 3--2: Alarms 3--38. . . . . . . . . . . . . . . . . . . . . . . . . . . . . . . . . . . . . . . . .
Table of Contents
x WVR610A & WVR611A Waveform Rasterizers User Manual
Table 3--3: Alarm reporting options 3--43. . . . . . . . . . . . . . . . . . . . . . . . . .
Table 3--4: Error status log icons 3--48. . . . . . . . . . . . . . . . . . . . . . . . . . . . .
Table 3--5: Audio session readouts 3--59. . . . . . . . . . . . . . . . . . . . . . . . . . .
Table 3--6: Embedded audio status bar readouts 3--62. . . . . . . . . . . . . . .
Table 3--7: Error status log icons 3--65. . . . . . . . . . . . . . . . . . . . . . . . . . . . .
Table A--1: SDI Input waveform vertical characteristics A--1. . . . . . . . .
Table A--2: Serial digital video (SDI inputs A and B) interface
physical layer characteristics A--2. . . . . . . . . . . . . . . . . . . . . . . . . . . .
Table A--3: Composite analog input waveform vertical
characteristics A--2. . . . . . . . . . . . . . . . . . . . . . . . . . . . . . . . . . . . . . . . .
Table A--4: Composite analog inputs A and B physical layer
characteristics A--3. . . . . . . . . . . . . . . . . . . . . . . . . . . . . . . . . . . . . . . . .
Table A--5: External reference characteristics A--5. . . . . . . . . . . . . . . . . .
Table A--6: Waveform sweep (horizontal) characteristics A--6. . . . . . . . .
Table A--7: Waveform mode filter characteristics A--7. . . . . . . . . . . . . . .
Table A--8: Component vector mode A--7. . . . . . . . . . . . . . . . . . . . . . . . . .
Table A--9: Composite vector mode characteristics A--8. . . . . . . . . . . . . .
Table A--10: Lightning and Diamond modes display A--8. . . . . . . . . . . .
Table A--11: RGB gamut error indication (Diamond displays) A--9. . . .
Table A--12: Arrowhead mode (NTSC/PAL composite limit
display of component input mode) A--9. . . . . . . . . . . . . . . . . . . . . . . .
Table A--13: Program error alarms and
“Background Measurement Alarms” A--10. . . . . . . . . . . . . . . . . . . . . .
Table A--14: Miscellaneous measurements and displays A--11. . . . . . . . . .
Table A--15: Picture display mode A--11. . . . . . . . . . . . . . . . . . . . . . . . . . . .
Table A--16: Measure display A--12. . . . . . . . . . . . . . . . . . . . . . . . . . . . . . .
Table A--17: Other display A--12. . . . . . . . . . . . . . . . . . . . . . . . . . . . . . . . . .
Table A--18: Audio bar displays A--13. . . . . . . . . . . . . . . . . . . . . . . . . . . . .
Table A--19: Audio bar and lissajous displays A--15. . . . . . . . . . . . . . . . . .
Table A--20: Audio text displays A--16. . . . . . . . . . . . . . . . . . . . . . . . . . . . .
Table A--21: AES audio inputs A--16. . . . . . . . . . . . . . . . . . . . . . . . . . . . . .
Table A--22: AES audio outputs A--17. . . . . . . . . . . . . . . . . . . . . . . . . . . . .
Table A--23: Embedded audio extraction and monitoring on
status bar A--18. . . . . . . . . . . . . . . . . . . . . . . . . . . . . . . . . . . . . . . . . . . . .
Table A--24: Analog audio inputs A--19. . . . . . . . . . . . . . . . . . . . . . . . . . . .
Table A--25: Analog audio outputs A--20. . . . . . . . . . . . . . . . . . . . . . . . . . .
Table A--26: Ground closure Remote/LTC input A--22. . . . . . . . . . . . . . . .
Table A--27: Ethernet A--22. . . . . . . . . . . . . . . . . . . . . . . . . . . . . . . . . . . . . .
Table A--28: XGA Picture monitor output A--22. . . . . . . . . . . . . . . . . . . . .
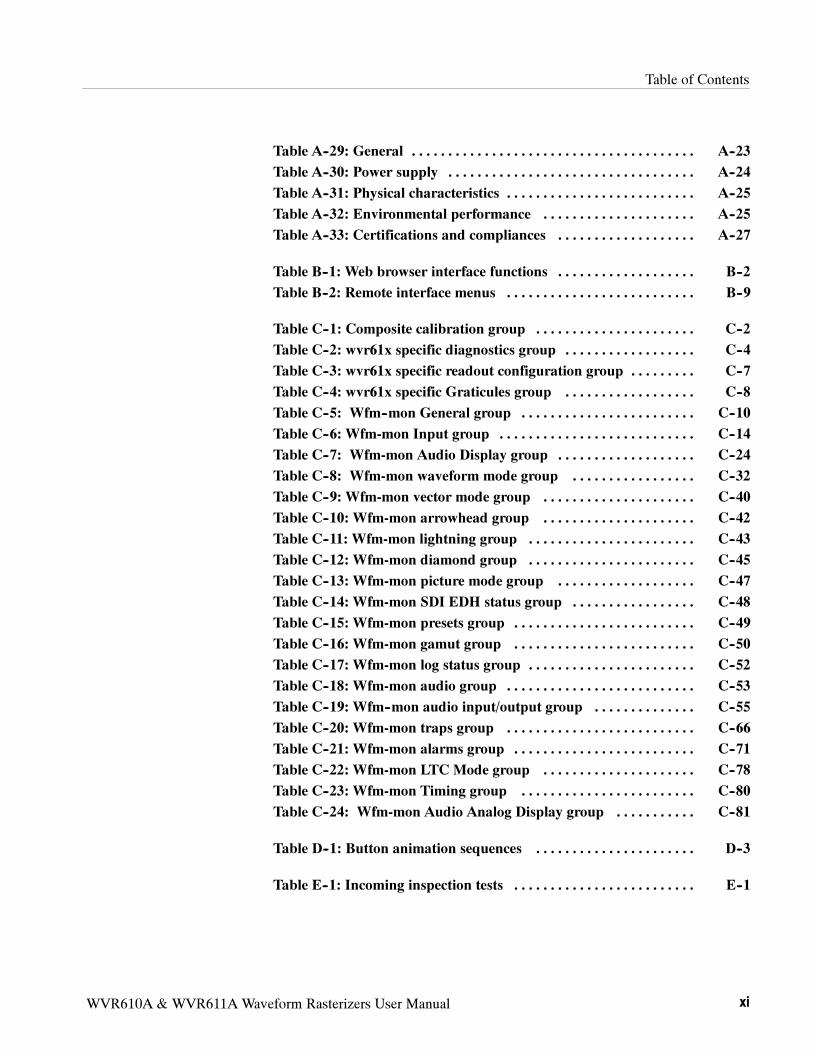
Table of Contents
WVR610A & WVR611A Waveform Rasterizers User Manual xi
Table A--29: General A--23. . . . . . . . . . . . . . . . . . . . . . . . . . . . . . . . . . . . . . .
Table A--30: Power supply A--24. . . . . . . . . . . . . . . . . . . . . . . . . . . . . . . . . .
Table A--31: Physical characteristics A--25. . . . . . . . . . . . . . . . . . . . . . . . . .
Table A--32: Environmental performance A--25. . . . . . . . . . . . . . . . . . . . .
Table A--33: Certifications and compliances A--27. . . . . . . . . . . . . . . . . . .
Table B--1: Web browser interface functions B--2. . . . . . . . . . . . . . . . . . .
Table B--2: Remote interface menus B--9. . . . . . . . . . . . . . . . . . . . . . . . . .
Table C--1: Composite calibration group C--2. . . . . . . . . . . . . . . . . . . . . .
Table C--2: wvr61x specific diagnostics group C--4. . . . . . . . . . . . . . . . . .
Table C--3: wvr61x specific readout configuration group C--7. . . . . . . . .
Table C--4: wvr61x specific Graticules group C--8. . . . . . . . . . . . . . . . . .
Table C--5: Wfm--mon General group C--10. . . . . . . . . . . . . . . . . . . . . . . .
Table C--6: Wfm-mon Input group C--14. . . . . . . . . . . . . . . . . . . . . . . . . . .
Table C--7: Wfm-mon Audio Display group C--24. . . . . . . . . . . . . . . . . . .
Table C--8: Wfm-mon waveform mode group C--32. . . . . . . . . . . . . . . . .
Table C--9: Wfm-mon vector mode group C--40. . . . . . . . . . . . . . . . . . . . .
Table C--10: Wfm-mon arrowhead group C--42. . . . . . . . . . . . . . . . . . . . .
Table C--11: Wfm-mon lightning group C--43. . . . . . . . . . . . . . . . . . . . . . .
Table C--12: Wfm-mon diamond group C--45. . . . . . . . . . . . . . . . . . . . . . .
Table C--13: Wfm-mon picture mode group C--47. . . . . . . . . . . . . . . . . . .
Table C--14: Wfm-mon SDI EDH status group C--48. . . . . . . . . . . . . . . . .
Table C--15: Wfm-mon presets group C--49. . . . . . . . . . . . . . . . . . . . . . . . .
Table C--16: Wfm-mon gamut group C--50. . . . . . . . . . . . . . . . . . . . . . . . .
Table C--17: Wfm-mon log status group C--52. . . . . . . . . . . . . . . . . . . . . . .
Table C--18: Wfm-mon audio group C--53. . . . . . . . . . . . . . . . . . . . . . . . . .
Table C--19: Wfm--mon audio input/output group C--55. . . . . . . . . . . . . .
Table C--20: Wfm-mon traps group C--66. . . . . . . . . . . . . . . . . . . . . . . . . .
Table C--21: Wfm-mon alarms group C--71. . . . . . . . . . . . . . . . . . . . . . . . .
Table C--22: Wfm-mon LTC Mode group C--78. . . . . . . . . . . . . . . . . . . . .
Table C--23: Wfm-mon Timing group C--80. . . . . . . . . . . . . . . . . . . . . . . .
Table C--24: Wfm-mon Audio Analog Display group C--81. . . . . . . . . . .
Table D--1: Button animation sequences D--3. . . . . . . . . . . . . . . . . . . . . .
Table E--1: Incoming inspection tests E--1. . . . . . . . . . . . . . . . . . . . . . . . .

Table of Contents
xii WVR610A & WVR611A Waveform Rasterizers User Manual
WVR610A & WVR611A Waveform Rasterizers User Manual xiii
General Safety Summary
Review the following safety precautions to avoid injury and prevent damage to
this product or any products connected to it. To avoid potential hazards, use this
product only as specified.
Only qualified personnel should perform service procedures.
Use Proper Power Cord. Use only the power cord specified for this product and
certified for the country of use.
Connect and Disconnect Properly. Do not connect or disconnect probes or test
leads while they are connected to a voltage source.
Ground the Product. This product is grounded through the grounding conductor
of the power cord. To avoid electric shock, the grounding conductor must be
connected to earth ground. Before making connections to the input or output
terminals of the product, ensure that the product is properly grounded.
Observe All Terminal Ratings. To avoid fire or shock hazard, observe all ratings
and markings on the product. Consult the product manual for further ratings
information before making connections to the product.
Do not apply a potential to any terminal, including the common terminal, that
exceeds the maximum rating of that terminal.
Do Not Operate Without Covers. Do not operate this product with covers or panels
removed.
Use Proper Fuse. Use only the fuse type and rating specified for this product.
Avoid Exposed Circuitry. Do not touch exposed connections and components
when power is present.
Do Not Operate With Suspected Failures. If you suspect there is damage to this
product, have it inspected by qualified service personnel.
Do Not Operate in Wet/Damp Conditions.
Do Not Operate in an Explosive Atmosphere.
Keep Product Surfaces Clean and Dry.
Provide Proper Ventilation. Refer to the manual’s installation instructions for
details on installing the product so it has proper ventilation.
Terms in this Manual. These terms may appear in this manual:
To Avoid Fire or
Personal Injury
Symbols and Terms
General Safety Summary
xiv WVR610A & WVR611A Waveform Rasterizers User Manual
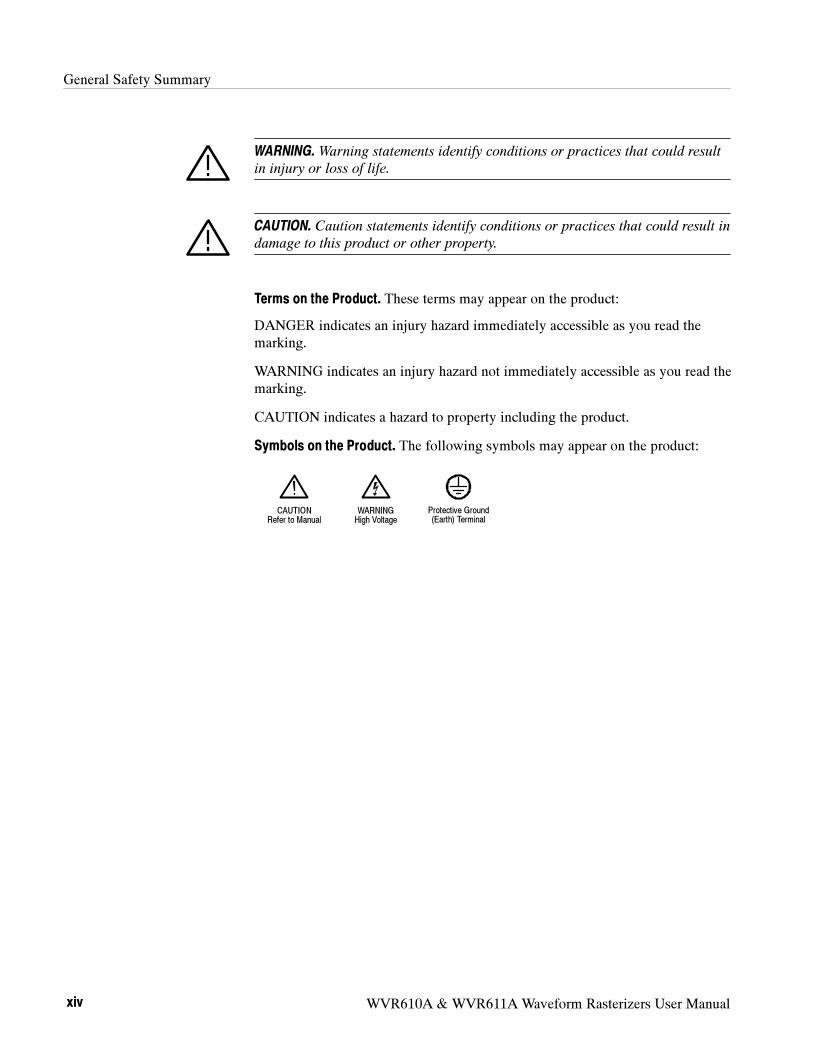
WARNING.Warning statements identify conditions or practices that could result
in injury or loss of life.
CAUTION. Caution statements identify conditions or practices that could result in
damage to this product or other property.
Terms on the Product. These terms may appear on the product:
DANGER indicates an injury hazard immediately accessible as you read the
marking.
WARNING indicates an injury hazard not immediately accessible as you read the
marking.
CAUTION indicates a hazard to property including the product.
Symbols on the Product. The following symbols may appear on the product:
CAUTION
Refer to Manual
WARNING
High Voltage
Protective Ground
(Earth) Terminal
WVR610A & WVR611A Waveform Rasterizers User Manual xv
Preface
The WVR610A & WVR611A rasterize serial digital video and composite video
signals (depending on installed options) for display on XGA displays, providing
a new standard of display quality and flexibility.
The WVR610A & WVR611A are single RU instruments, offering both SD
component and composite inputs, as well as audio monitoring options. The
waveform rasterizers offer full support for traditional waveform display, both
overlaid and parade; vector display, both traditional and Lightning; gamut
monitoring including Arrowhead, Diamond, and Split Diamond; support for
AES, analog, and embedded audio, both level and phase relationship; as well as
gain, sweep, and magnification controls.
Key WVR610A & WVR611A features include:
FlexVu, a multiple-tiled display enabling you to monitor several aspects of
the signal at the same time
Fully Digital Processing for accurate, repeatable, drift-free operation
A friendly menu-driven user interface that requires fewer keystrokes for the
most common operations
Instrument Presets for quick recall of commonly used configurations
High-resolution XGA output for crisp, easy-to-read displays
The WVR610A, with Serial Digital Interface (SDI) inputs, supports digital
applications and the WVR611A, with SDI and Composite inputs, supports
digital or hybrid applications
Exclusive Tektronix measurements and displays that help check performance
and solve problems faster
Configurable alarms and error logging
Exclusive Session screens for content status at a glance
Full remote control for complete installation flexibility
Audio Option for analog, digital AES/EBU, or both
Preface
xvi WVR610A & WVR611A Waveform Rasterizers User Manual
About this Manual
This manual is divided into four sections:
Getting Started explains how to start using your waveform rasterizer.
Operating Basics shows you how to operate the waveform rasterizer.
Reference explains how to perform specific tests with the waveform rasterizer.
The Appendices contain reference information such as specifications, how to use
the remote interface, an incoming inspection procedure, SNMP usage informa-
tion and other information that you might need occasionally.
Additional Information
The WVR610A & WVR611A contain online help to enable you to quickly get
explanations of how to use your waveform rasterizer. The online help provides
descriptions of how to perform tasks with the waveform rasterizer along with
descriptions of controls, displays, and instrument settings.
TheWVR610A & WVR611A Waveform Rasterizers Service Manual is an optional
accessory that provides module-level service information, as well as a complete
performance verification procedure.
Preface
WVR610A & WVR611A Waveform Rasterizers User Manual xvii
Contacting Tektronix
Phone 1-800-833-9200*
Address Tektronix, Inc.
Department or name (if known)
14200 SW Karl Braun Drive
P.O. Box 500
Beaverton, OR 97077
USA
Web site www.tektronix.com
Sales support 1-800-833-9200, select option 1*
Service support 1-800-833-9200, select option 2*
Technical support www.tektronix.com/support
1-800-833-9200, select option 3*
6:00 a.m. -- 5:00 p.m. Pacific Standard Time
* This phone number is toll free in North America. After office hours, please leave a voice mail
message.
Outside North America, contact a Tektronix sales office or distributor; see the Tektronix web
site for a list of offices.

Preface
xviii WVR610A & WVR611A Waveform Rasterizers User Manual

Getting Started

WVR610A & WVR611A Waveform Rasterizers User Manual 1- 1
Getting Started
This section contains a product description, list of accessories and installation
procedure. For instrument specifications, refer to Appendix A. An incoming
inspection procedure to verify the primary functions of the waveform rasterizer is
located in Appendix E.
Product Description
The WVR610A & WVR611A use fully digital processing that ensures accurate,
stable, and repeatable measurements. The WVR610A & WVR611A provide a
powerful monitoring solution for broadcasting, production, and post-production
environments. The combination of Tektronix exclusive gamut displays, session
screens, alarms, and error logging help you speed and simplify the process of
solving problems with your content.
The WVR610A supports only standard definition (SDI) inputs, while the
WVR611A supports both standard definition and analog composite inputs. They
are ideally suited to facilities transitioning from analog to digital environments.
Both models offer audio options to allow multiple-channel audio monitoring.
The digital architecture of the WVR610A & WVR611A delivers important
benefits to users. Digital instruments offer accuracy and stability that is
unattainable in traditional analog designs. Analog components age and drift with
fluctuations in ambient temperature, and systems based on these components
require periodic calibration. The fully digital architecture of the WVR610A &
WVR611A provides accuracy, repeatability, and stability that surpasses
traditional analog designs.
The high-quality display of the WVR610A & WVR611A is well suited to meet
the needs of production and post-production applications including camera
shading and alignment, color balancing, film-to-tape and format conversion, and
special effects work.
Sometimes you simply need to know that your signal is valid. You need to
ensure that a signal will be compatible with compliant operational equipment
such as when you combine content from many sources including live in-studio,
tape, contribution feeds, and perhaps mobile feeds. Any of these sources might
deliver content with errors that could affect the quality of your transmission. The
tiled-display of the WVR610A & WVR611A enables you to quickly check the
integrity of the signal by displaying up to four views of the signal simultaneous-
ly.
Getting Started
1- 2 WVR610A & WVR611A Waveform Rasterizers User Manual
Options
The waveform rasterizer can be ordered with options to support analog audio,
digital audio, or both analog and digital audio.
Three audio options are available:
Option AN. Two groups of three pairs of analog inputs, one group of three
pairs of analog outputs.
Option DG. Four pairs of AES/EBU inputs and four pairs of bi-directional
AES/EBU outputs selected from eight embedded pairs.
Option DA. Both analog and digital capabilities installed.
The following service options are available for the WVR610A & WVR611A:
Option R3. Extends the instrument warranty to 3 years.
Option R5. Extends the instrument warranty to 5 years.
Option C3. Provides calibration services for 3 years.
Option C5. Provides calibration services for 5 years.
Option D3. Provides test data for 3 years.
Option D5. Provides test data for 5 years.
Audio Options
Service Options
Getting Started
WVR610A & WVR611A Waveform Rasterizers User Manual 1- 3
Standard Accessories
The following accessories are shipped with each waveform monitor:
The following documents are standard accessories:
WVR610A & WVR611A Waveform Rasterizers User Manual, Tektronix part
number 071-1199-XX.
WVR610A & WVR611A Waveform Rasterizers Release Notes, Tektronix part
number 061-4260-XX.
All WVR610A & WVR611A Waveform Rasterizers are shipped with one of the
following power cord options. Power cords for use in North America are UL
listed and CSA certified. Cords for use in areas other than North America are
approved by at least one authority acceptable in the country to which the product
is shipped.
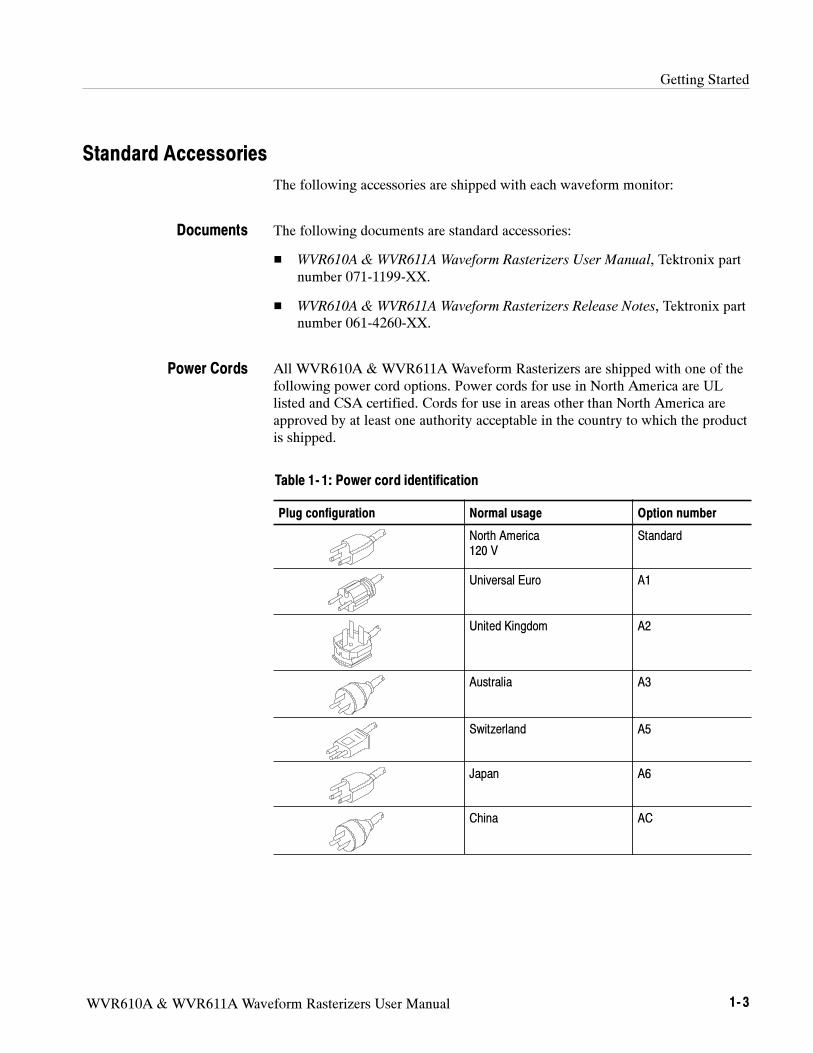
Table 1- 1: Power cord identification
Plug configuration Normal usage Option number
North America
120 V
Standard
Universal Euro A1
United Kingdom A2
Australia A3
Switzerland A5
Japan A6
China AC
Documents
Power Cords
Getting Started
1- 4 WVR610A & WVR611A Waveform Rasterizers User Manual
Optional Accessories
The following items are optional accessories:
WVR610A & WVR611A Waveform Rasterizers Service Manual, Tektronix
part number 071-1243-XX.
Analog/Audio Breakout Cable Assembly, Tektronix part number
012-1658-01.
WVR610A & WVR611A Waveform Rasterizers User Manual 1--5
Installation
This section provides instructions for installing the waveform rasterizer into a
standard instrumentation rack. At installation time, save the shipping carton and
packing materials (including the anti-static bag) in case you need to ship the
instrument.
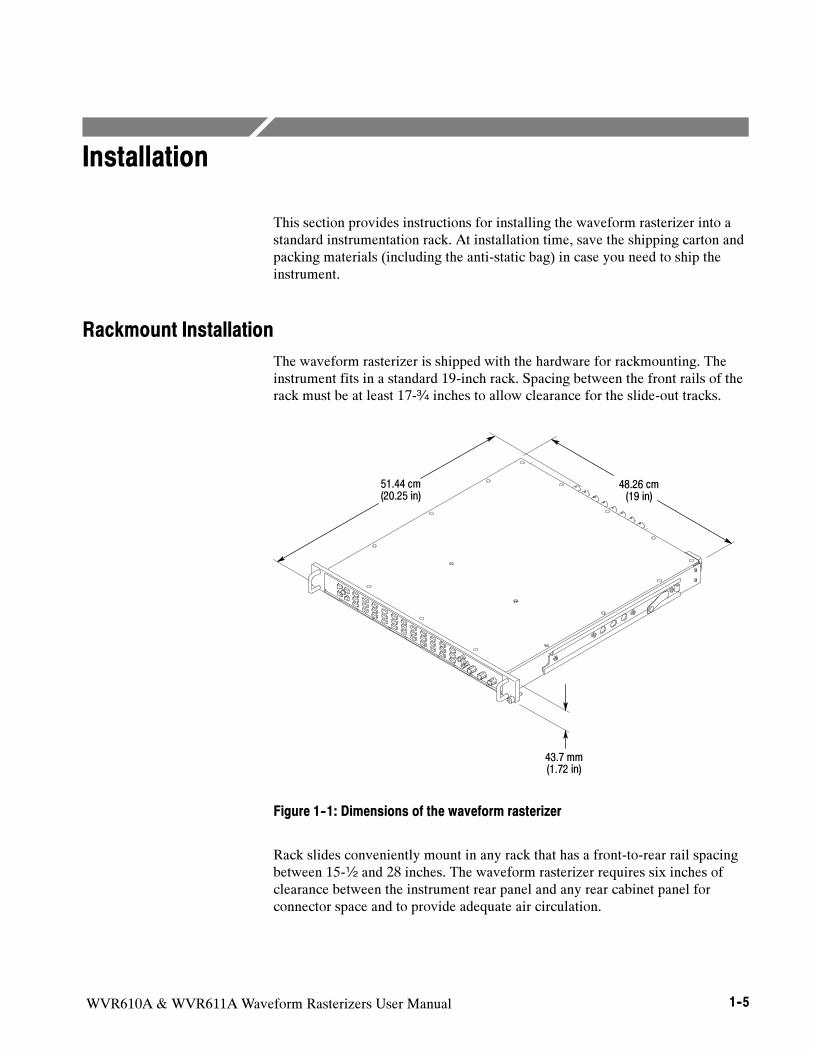
Rackmount Installation
The waveform rasterizer is shipped with the hardware for rackmounting. The
instrument fits in a standard 19-inch rack. Spacing between the front rails of the
rack must be at least 17-¾ inches to allow clearance for the slide-out tracks.
43.7 mm
(1.72 in)
48.26 cm
(19 in)
51.44 cm
(20.25 in)
Figure 1--1: Dimensions of the waveform rasterizer
Rack slides conveniently mount in any rack that has a front-to-rear rail spacing
between 15-½ and 28 inches. The waveform rasterizer requires six inches of
clearance between the instrument rear panel and any rear cabinet panel for
connector space and to provide adequate air circulation.
Installation
1--6 WVR610A & WVR611A Waveform Rasterizers User Manual
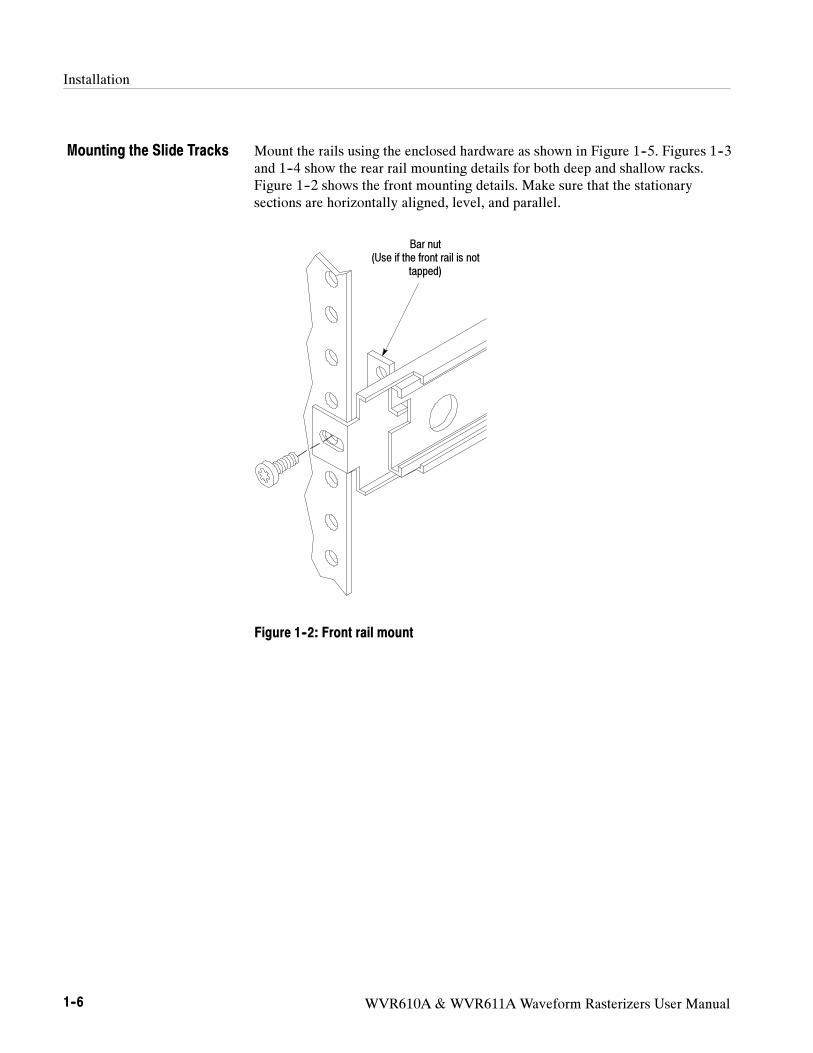
Mount the rails using the enclosed hardware as shown in Figure 1--5. Figures 1--3
and 1--4 show the rear rail mounting details for both deep and shallow racks.
Figure 1--2 shows the front mounting details. Make sure that the stationary
sections are horizontally aligned, level, and parallel.
Bar nut
(Use if the front rail is not
tapped)
Figure 1--2: Front rail mount
Mounting the Slide Tracks
Installation
WVR610A & WVR611A Waveform Rasterizers User Manual 1--7
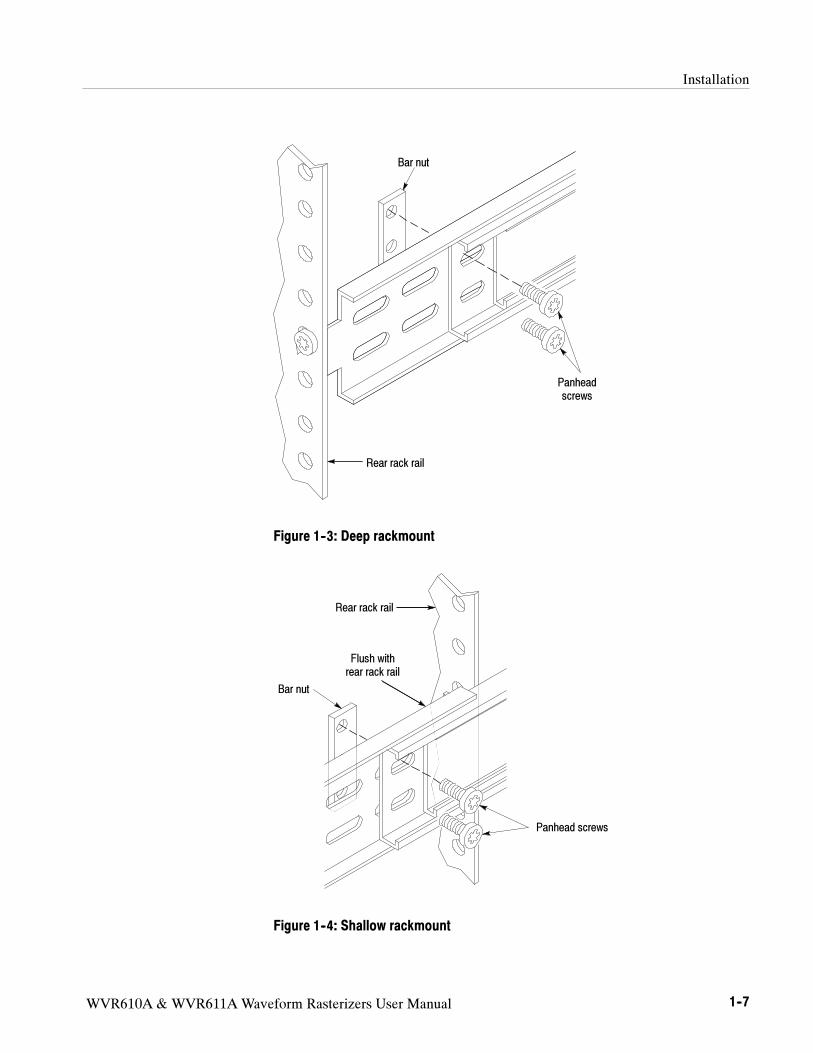
Bar nut
Rear rack rail
Panhead
screws
Figure 1--3: Deep rackmount
Rear rack rail
Panhead screws
Bar nut
Flush with
rear rack rail
Figure 1--4: Shallow rackmount
Installation
1--8 WVR610A & WVR611A Waveform Rasterizers User Manual
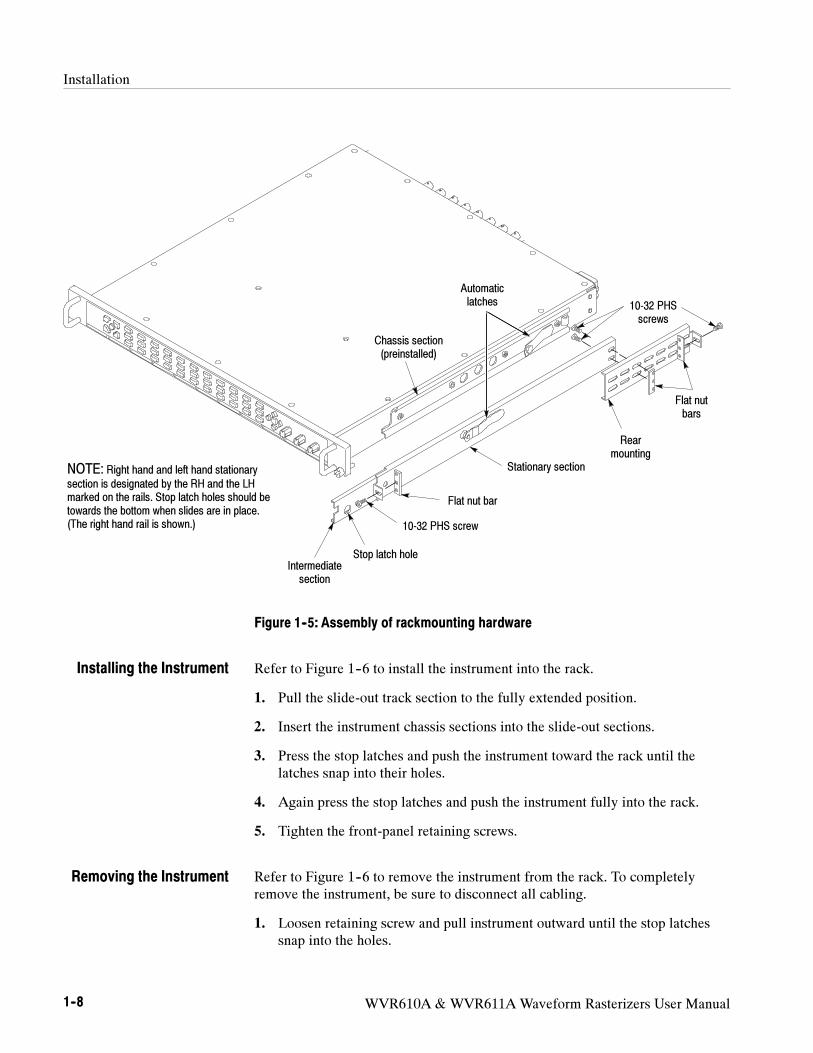
Chassis section
(preinstalled)
Automatic
latches
Stationary section
10-32 PHS screw
10-32 PHS
screws
Flat nut
bars
Flat nut bar
Intermediate
section
Stop latch hole
Rear
mounting
NOTE: Right hand and left hand stationary
section is designated by the RH and the LH
marked on the rails. Stop latch holes should be
towards the bottom when slides are in place.
(The right hand rail is shown.)
Figure 1--5: Assembly of rackmounting hardware
Refer to Figure 1--6 to install the instrument into the rack.
1. Pull the slide-out track section to the fully extended position.
2. Insert the instrument chassis sections into the slide-out sections.
3. Press the stop latches and push the instrument toward the rack until the
latches snap into their holes.
4. Again press the stop latches and push the instrument fully into the rack.
5. Tighten the front-panel retaining screws.
Refer to Figure 1--6 to remove the instrument from the rack. To completely
remove the instrument, be sure to disconnect all cabling.
1. Loosen retaining screw and pull instrument outward until the stop latches
snap into the holes.
Installing the Instrument
Removing the Instrument
Installation
WVR610A & WVR611A Waveform Rasterizers User Manual 1--9
2. Press stop latches (visible in the stop-latch holes) and carefully slide the
instrument free from the tracks.
Stop latch
Figure 1--6: Installing or removing the instrument
After installation, if not properly adjusted, the slide tracks may bind. To adjust
the tracks, slide the instrument out about 10 inches, slightly loosen the screws
holding the tracks to the front rails, and allow the tracks to seek an unbound
position. Retighten the screws and check the tracks for smooth operation by
sliding the instrument in and out of the rack several times.
Once the instrument is in place within the rack, tighten the knurled retaining
screw to fasten it securely into the rack.
The slide-out tracks do not require lubrication. The dark gray finish on the tracks
is a permanent, lubricated coating.
First, loosen the front-panel knurled retaining screw. See Figure 1--6. Grasp the
front handles and pull the instrument out until all three slide sections latch. The
instrument is firmly held in this position.
You are now ready to connect power and signal cables to the instrument.
Rack Adjustments
Rack Slide Maintenance
Removing the Instrument
Installation
1--10 WVR610A & WVR611A Waveform Rasterizers User Manual
Connecting a Display
The WVR610A & WVR611A supports standard analog PC monitors, either CRT
or LCD. The display resolution is 1024 X 768 (XGA). Connect the external
display to the rear-panel XGA OUTPUT connector. The XGA OUTPUT
connector is a standard 15-pin D-type connector with socket contacts.
Connecting Power
The waveform rasterizer operates from a single-phase power source with the
neutral conductor at or near earth ground. The line conductor is fused for
over-current protection. A protective ground connection through the grounding
conductor in the power cord is essential for safe operation.
The waveform rasterizer operates from an AC line frequency of 50 or 60 Hz,
over the range of 100--240 Volts, without the need for configuration, except the
power cord. Refer to page 1--3 for the power cord options. The typical power
draw is 50 W. Refer to Appendix A: Specifications for additional information on
power and environmental requirements.
Connect the supplied power cord to the rear-panel power connector. There is no
power switch on the waveform rasterizer, so the instrument will turn on as soon
as you apply power.
AC Power Requirements
Installation
WVR610A & WVR611A Waveform Rasterizers User Manual 1--11
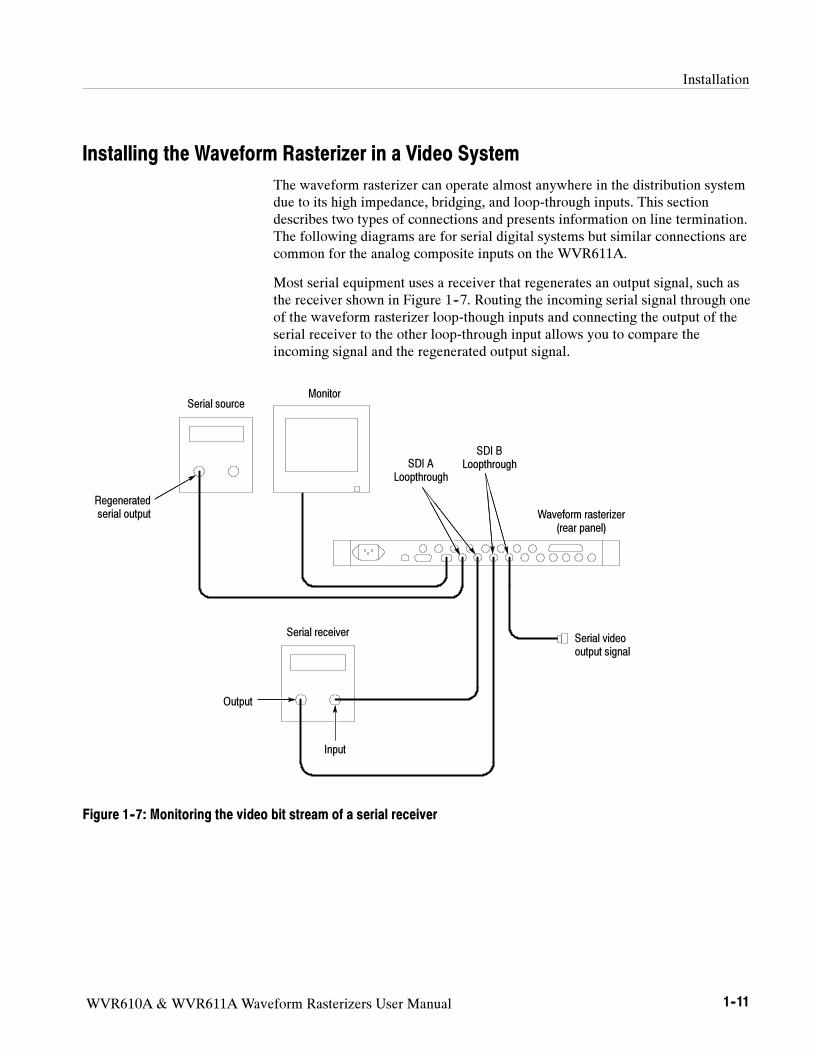
Installing the Waveform Rasterizer in a Video System
The waveform rasterizer can operate almost anywhere in the distribution system
due to its high impedance, bridging, and loop-through inputs. This section
describes two types of connections and presents information on line termination.
The following diagrams are for serial digital systems but similar connections are
common for the analog composite inputs on the WVR611A.
Most serial equipment uses a receiver that regenerates an output signal, such as
the receiver shown in Figure 1--7. Routing the incoming serial signal through one
of the waveform rasterizer loop-though inputs and connecting the output of the
serial receiver to the other loop-through input allows you to compare the
incoming signal and the regenerated output signal.
Serial source
Regenerated
serial output Waveform rasterizer
(rear panel)
Serial receiver
Output
Input
Serial video
output signal
SDI A
Loopthrough
SDI B
Loopthrough
Monitor
Figure 1--7: Monitoring the video bit stream of a serial receiver
Installation
1--12 WVR610A & WVR611A Waveform Rasterizers User Manual
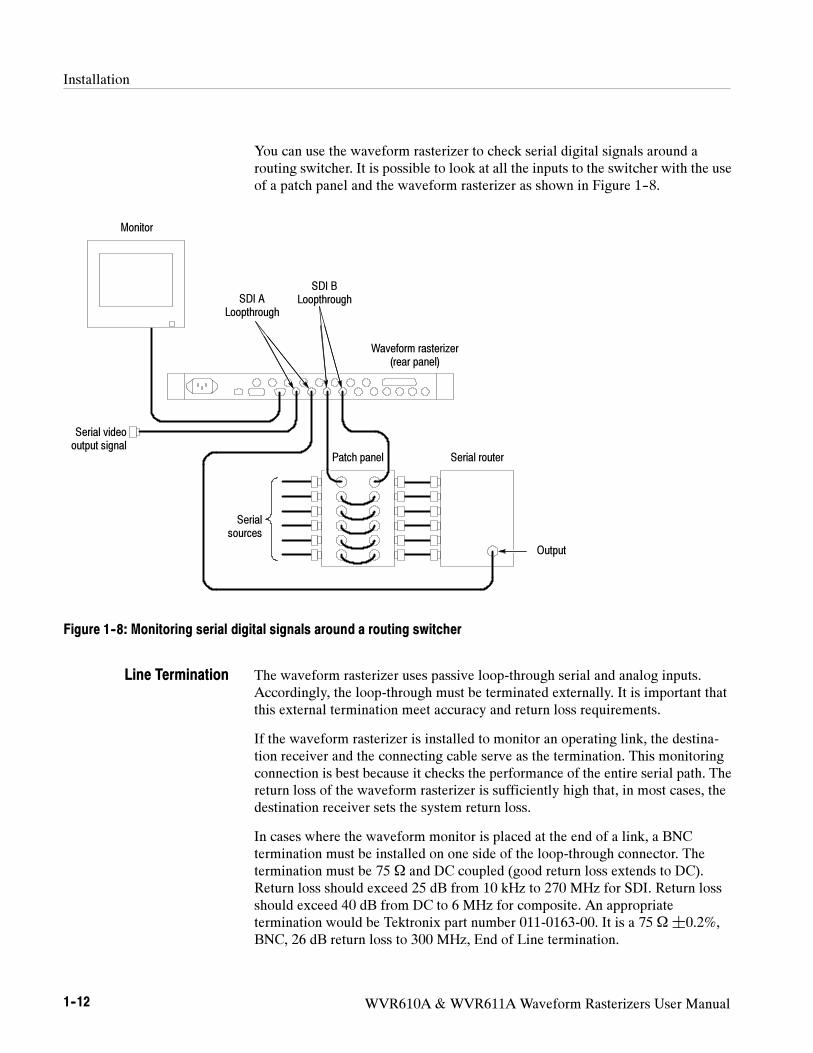
You can use the waveform rasterizer to check serial digital signals around a
routing switcher. It is possible to look at all the inputs to the switcher with the use
of a patch panel and the waveform rasterizer as shown in Figure 1--8.
Serial video
output signal
Serial
sources
Patch panel Serial router
Output
Waveform rasterizer
(rear panel)
SDI A
Loopthrough
SDI B
Loopthrough
Monitor
Figure 1--8: Monitoring serial digital signals around a routing switcher
The waveform rasterizer uses passive loop-through serial and analog inputs.
Accordingly, the loop-through must be terminated externally. It is important that
this external termination meet accuracy and return loss requirements.
If the waveform rasterizer is installed to monitor an operating link, the destina-
tion receiver and the connecting cable serve as the termination. This monitoring
connection is best because it checks the performance of the entire serial path. The
return loss of the waveform rasterizer is sufficiently high that, in most cases, the
destination receiver sets the system return loss.
In cases where the waveform monitor is placed at the end of a link, a BNC
termination must be installed on one side of the loop-through connector. The
termination must be 75 Ω and DC coupled (good return loss extends to DC).
Return loss should exceed 25 dB from 10 kHz to 270 MHz for SDI. Return loss
should exceed 40 dB from DC to 6 MHz for composite. An appropriate
termination would be Tektronix part number 011-0163-00. It is a 75 Ω ¦0.2%,
BNC, 26 dB return loss to 300 MHz, End of Line termination.
Line Termination
Installation
WVR610A & WVR611A Waveform Rasterizers User Manual 1--13
Compatibility of BNC Center Pins.Most video equipment BNC connectors,
whether 50 or 75 Ω, use a 50 Ω standard center pin. Some laboratory 75 Ω BNC
connectors use a smaller diameter center pin. The BNC connectors on the
waveform rasterizer are designed to work with the 50 Ω standard (large
diameter) center pins.
Do not use connectors or terminators with the smaller center pins. They could
cause intermittent connections.
Some monitors or projectors may have trouble adapting to the XGA output from
the waveform rasterizer. This is because there may not be any significant signal
in all four corners of the raster, so the monitor cannot find the edges of the active
area. To overcome this, select Status in all four tiles of the waveform rasterizer
display, and then cycle the power on the monitor to force it to re-configure. If
necessary, adjust the horizontal and vertical position and size to optimize the
image.
Connecting to Monitors
and Projectors

Installation
1--14 WVR610A & WVR611A Waveform Rasterizers User Manual

Operating Basics

WVR610A & WVR611A Waveform Rasterizers User Manual 2- 1
Operating Basics
This chapter provides basic operating information for the WVR610A &
WVR611A Waveform Rasterizers.
Overview
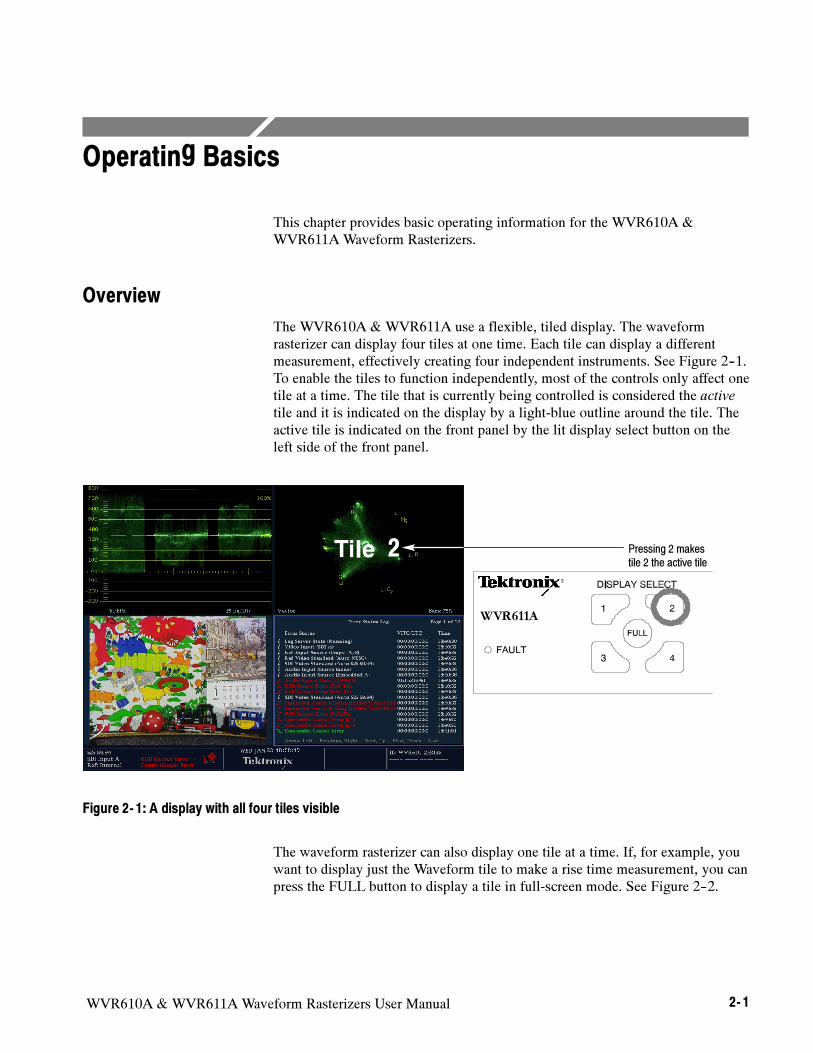
The WVR610A & WVR611A use a flexible, tiled display. The waveform
rasterizer can display four tiles at one time. Each tile can display a different
measurement, effectively creating four independent instruments. See Figure 2--1.
To enable the tiles to function independently, most of the controls only affect one
tile at a time. The tile that is currently being controlled is considered the active
tile and it is indicated on the display by a light-blue outline around the tile. The
active tile is indicated on the front panel by the lit display select button on the
left side of the front panel.
Pressing 2 makes
tile 2 the active tile
2
Figure 2- 1: A display with all four tiles visible
The waveform rasterizer can also display one tile at a time. If, for example, you
want to display just the Waveform tile to make a rise time measurement, you can
press the FULL button to display a tile in full-screen mode. See Figure 2--2.
Operating Basics
2- 2 WVR610A & WVR611A Waveform Rasterizers User Manual
Figure 2- 2: A tile in full-screen mode
The waveform rasterizer can display measurements in multiple tiles simulta-
neously. See Figures 2--3 and 2--4. For example, you can display all four Status
screens at one time. The only measurement that cannot be displayed in more than
one tile is the Audio measurement. It can be displayed in only one tile at a time.
Figure 2- 3: A display with multiple Status screens
Operating Basics
WVR610A & WVR611A Waveform Rasterizers User Manual 2- 3
Figure 2- 4: A display with multiple WFM displays
Three Levels of Control
You control the waveform rasterizer on three levels:
Frequently-changed settings
Tile-specific settings
Instrument-wide settings
Frequently changed settings. The front-panel buttons control the most commonly
changed parameters, such as which measurement appears in each tile. The knobs
are used to adjust levels and make selections.
Tile-specific settings. Pop-up menus control parameters that are specific to the tile
in which they are displayed. The pop-up menus control less frequently changed
parameters such as the waveform display mode (for example, changing the
waveform display mode from RGB to YPbPr). To display a pop-up menu, press
and hold the desiredMEASURE SELECT or DISPLAY SELECT button for
about a second.
Instrument-wide settings. The parameters in the Configuration menu are
instrument-wide settings. The configuration menu controls settings that are
changed only occasionally, such as changing waveform color or setting the
network address.
Operating Basics
2- 4 WVR610A & WVR611A Waveform Rasterizers User Manual
Some controls are global and affect all tiles, while other controls only affect the
active tile. Generally speaking, if a control is configured by front-panel buttons
or by a pop-up menu, then it is tile specific. Configuration selections are usually
global. Exceptions are the Input buttons, and all audio features, both of which are
global.
The following sections describe the front panel controls of the WVR610A &
WVR611A.
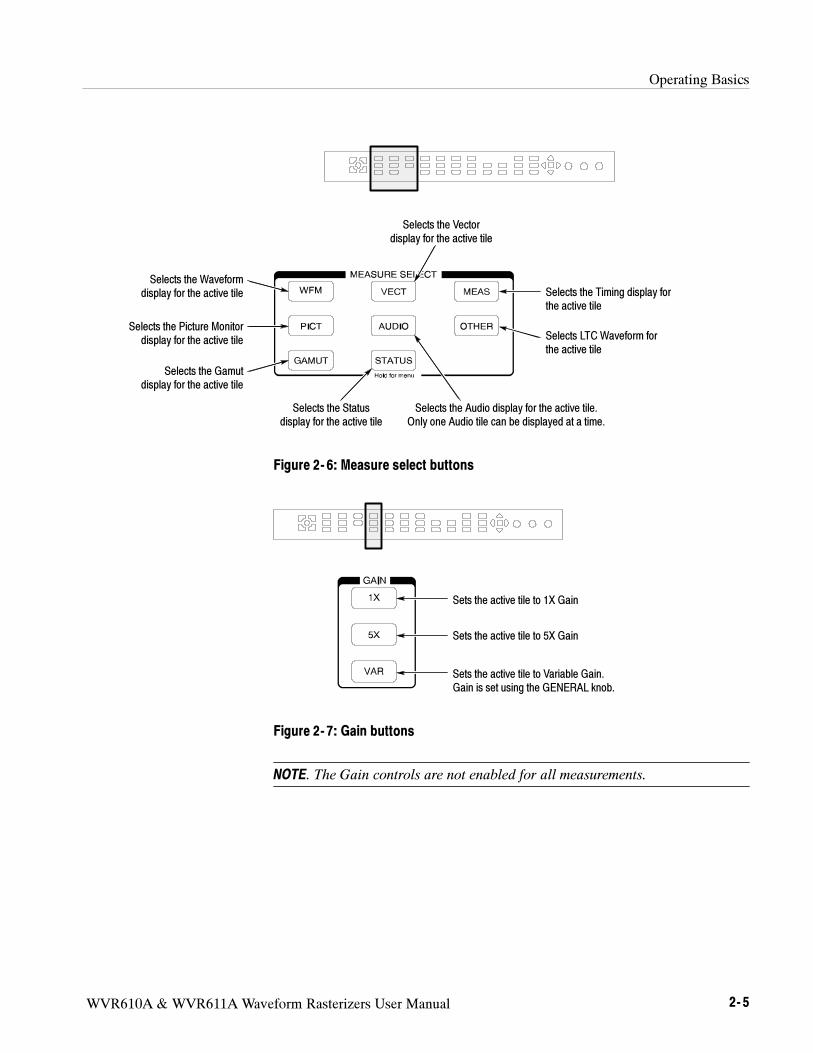
Tile Settings
Each tile maintains its own settings independent of the other tiles, including
GAIN and SWEEP, and display type among others. For instance, when you
switch a tile to a different measurement, the GAIN and SWEEP settings will be
changed to what they were the last time the selected measurement was displayed
in the tile.
Display type is also independent for each tile. You could set Tile 1 to display the
Video Session STATUS screen and set Tile 2 to display the Error Log STATUS
screen. Suppose you then change Tile 1 to a WFM display and Tile 2 to a
GAMUT display. If you then change Tile 1 back to a STATUS display, it will
display the Video Session screen, which is what it was set to before you changed
it to the WFM display. Likewise, if you change Tile 2 back to STATUS, it will
display the Error Log screen.
Makes the display in the
first quadrant the active tile
Makes the display in the
second quadrant the active tile
Makes the display in the third
quadrant the active tile
Makes the display in the fourth
quadrant the active tile
Toggles the active tile between
full-screen and tile modeIndicates a hardware problem
that requires servicing
Figure 2- 5: Display select buttons and fault indicator
Range of Controls
Front-Panel Controls
Operating Basics
WVR610A & WVR611A Waveform Rasterizers User Manual 2- 5
Selects the Waveform
display for the active tile
Selects the Picture Monitor
display for the active tile
Selects the Gamut
display for the active tile
Selects the Timing display for
the active tile
Selects LTC Waveform for
the active tile
Selects the Vector
display for the active tile
Selects the Audio display for the active tile.
Only one Audio tile can be displayed at a time.
Selects the Status
display for the active tile
Figure 2- 6: Measure select buttons
Sets the active tile to 1X Gain
Sets the active tile to 5X Gain
Sets the active tile to Variable Gain.
Gain is set using the GENERAL knob.
Figure 2- 7: Gain buttons
NOTE. The Gain controls are not enabled for all measurements.
Operating Basics
2- 6 WVR610A & WVR611A Waveform Rasterizers User Manual
Sets the active tile to the current Line rate sweep
or 2 Line sweep
Sets the active tile to the current Field rate sweep
or 2 Field sweep
Magnifies the active tile sweep rate
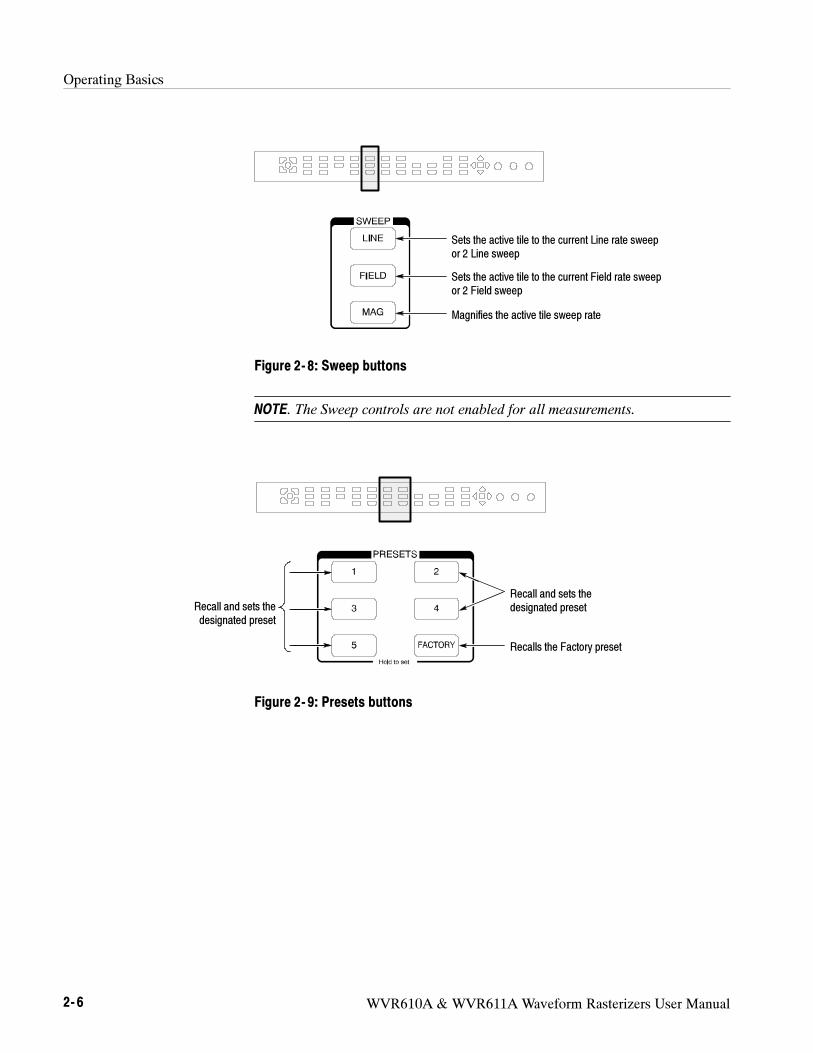
Figure 2- 8: Sweep buttons
NOTE. The Sweep controls are not enabled for all measurements.
Recalls the Factory preset
Recall and sets the
designated presetRecall and sets the
designated preset
Figure 2- 9: Presets buttons
Operating Basics
WVR610A & WVR611A Waveform Rasterizers User Manual 2- 7
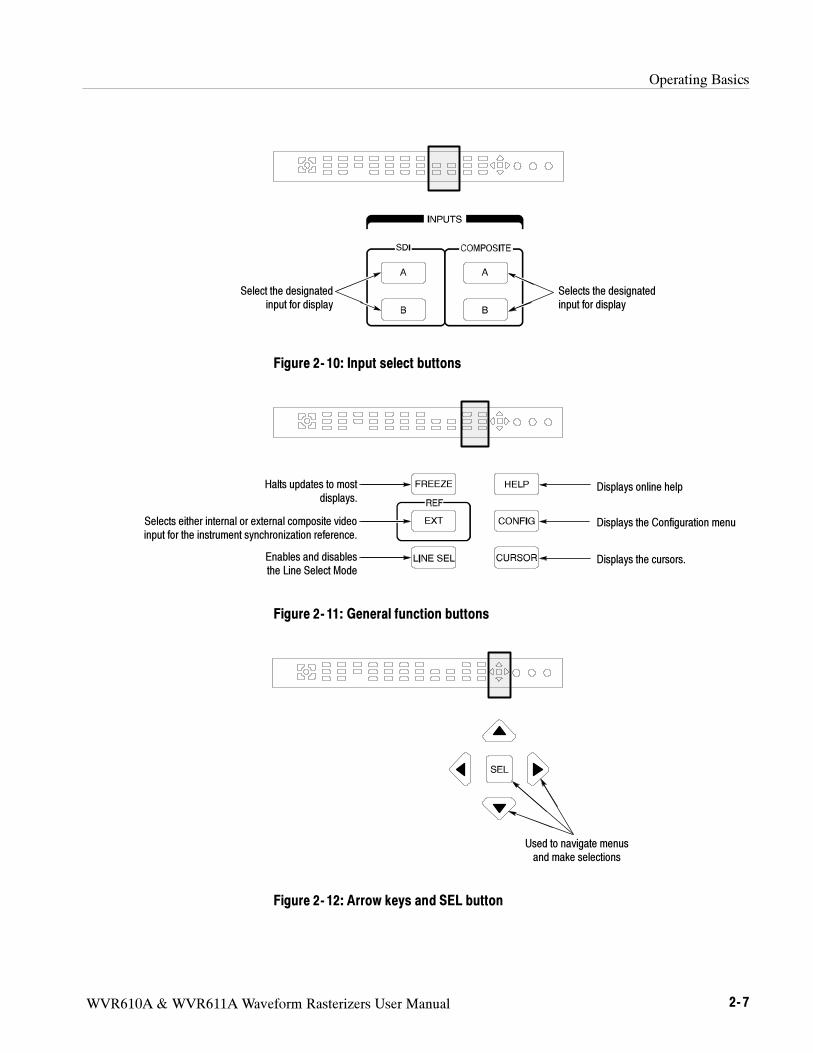
Select the designated
input for display
Selects the designated
input for display
Figure 2- 10: Input select buttons
Halts updates to most
displays.
Selects either internal or external composite video
input for the instrument synchronization reference.
Enables and disables
the Line Select Mode
Displays online help
Displays the Configuration menu
Displays the cursors.
Figure 2- 11: General function buttons
Used to navigate menus
and make selections
Figure 2- 12: Arrow keys and SEL button
Operating Basics
2- 8 WVR610A & WVR611A Waveform Rasterizers User Manual
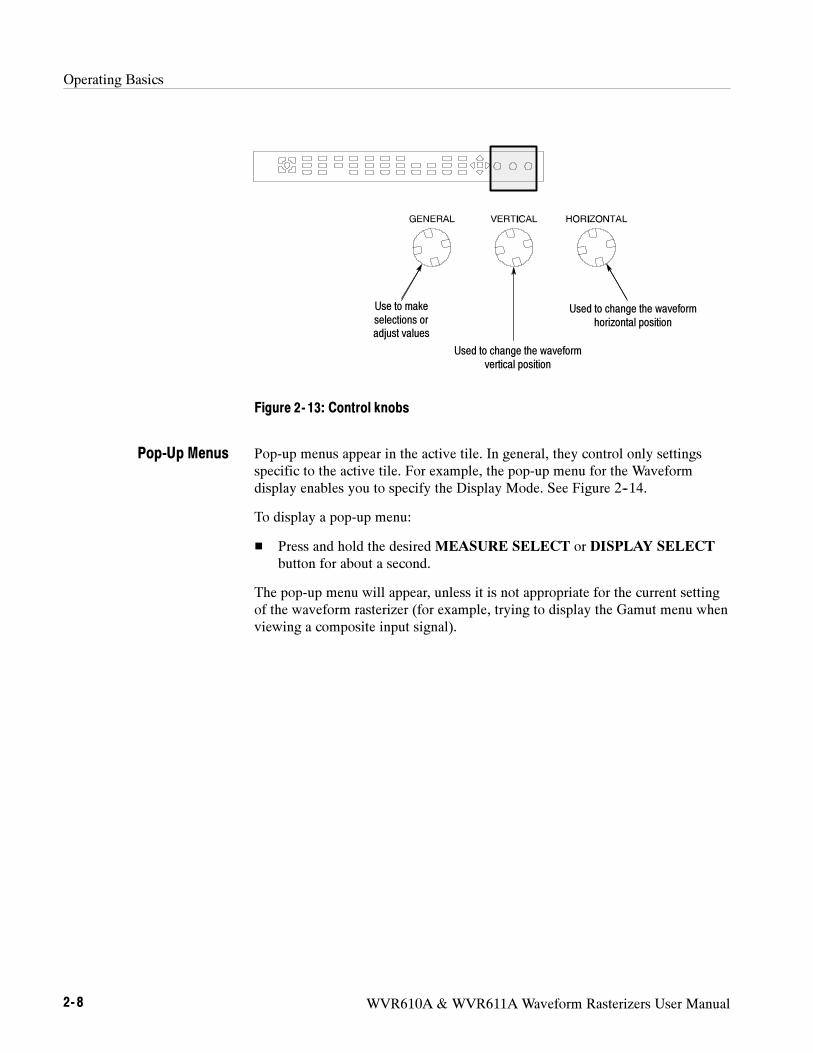
Use to make
selections or
adjust values
Used to change the waveform
vertical position
Used to change the waveform
horizontal position
Figure 2- 13: Control knobs
Pop-up menus appear in the active tile. In general, they control only settings
specific to the active tile. For example, the pop-up menu for the Waveform
display enables you to specify the Display Mode. See Figure 2--14.
To display a pop-up menu:
Press and hold the desiredMEASURE SELECT or DISPLAY SELECT
button for about a second.
The pop-up menu will appear, unless it is not appropriate for the current setting
of the waveform rasterizer (for example, trying to display the Gamut menu when
viewing a composite input signal).
Pop-Up Menus
Operating Basics
WVR610A & WVR611A Waveform Rasterizers User Manual 2- 9
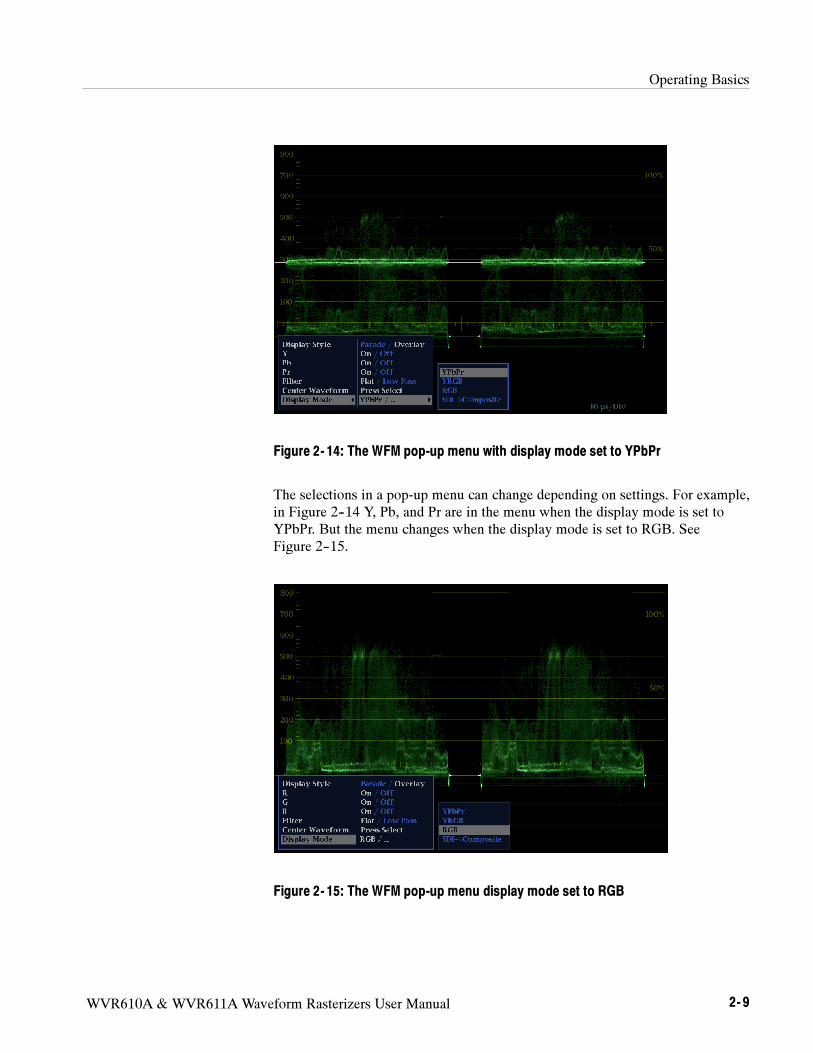
Figure 2- 14: The WFM pop-up menu with display mode set to YPbPr
The selections in a pop-up menu can change depending on settings. For example,
in Figure 2--14 Y, Pb, and Pr are in the menu when the display mode is set to
YPbPr. But the menu changes when the display mode is set to RGB. See
Figure 2--15.
Figure 2- 15: The WFM pop-up menu display mode set to RGB
Operating Basics
2- 10 WVR610A & WVR611A Waveform Rasterizers User Manual
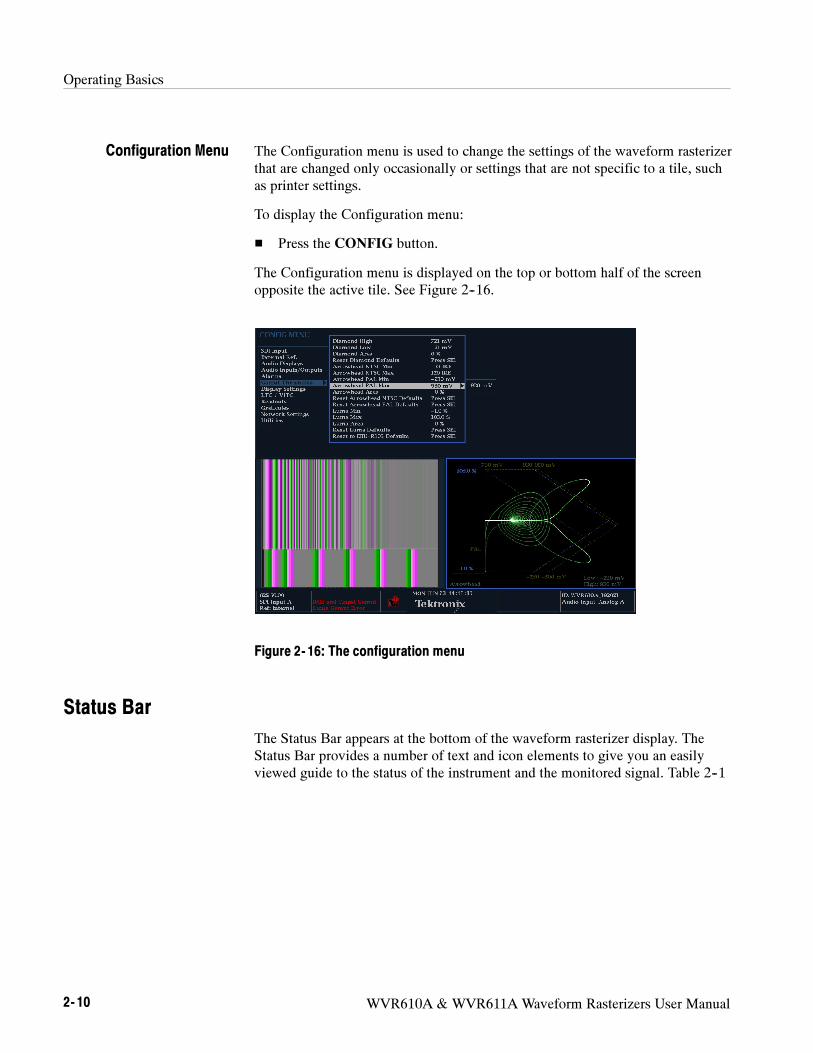
The Configuration menu is used to change the settings of the waveform rasterizer
that are changed only occasionally or settings that are not specific to a tile, such
as printer settings.
To display the Configuration menu:
Press the CONFIG button.
The Configuration menu is displayed on the top or bottom half of the screen
opposite the active tile. See Figure 2--16.
Figure 2- 16: The configuration menu
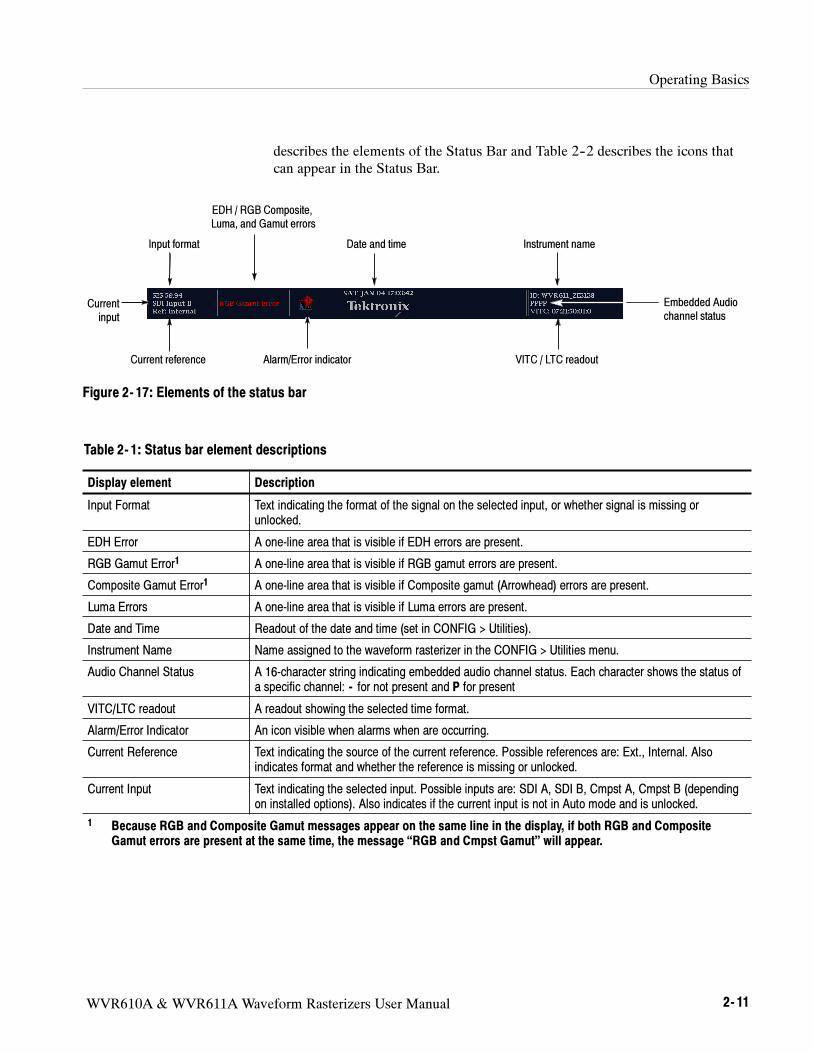
Status Bar
The Status Bar appears at the bottom of the waveform rasterizer display. The
Status Bar provides a number of text and icon elements to give you an easily
viewed guide to the status of the instrument and the monitored signal. Table 2--1
Configuration Menu
Operating Basics
WVR610A & WVR611A Waveform Rasterizers User Manual 2- 11
describes the elements of the Status Bar and Table 2--2 describes the icons that
can appear in the Status Bar.
Embedded Audio
channel status
Current
input
Date and time
Alarm/Error indicatorCurrent reference
Input format
EDH / RGB Composite,
Luma, and Gamut errors
VITC / LTC readout
Instrument name
Figure 2- 17: Elements of the status bar
Table 2- 1: Status bar element descriptions
Display element Description
Input Format Text indicating the format of the signal on the selected input, or whether signal is missing or
unlocked.
EDH Error A one-line area that is visible if EDH errors are present.
RGB Gamut Error1
A one-line area that is visible if RGB gamut errors are present.
Composite Gamut Error1
A one-line area that is visible if Composite gamut (Arrowhead) errors are present.
Luma Errors A one-line area that is visible if Luma errors are present.
Date and Time Readout of the date and time (set in CONFIG > Utilities).
Instrument Name Name assigned to the waveform rasterizer in the CONFIG > Utilities menu.
Audio Channel Status A 16-character string indicating embedded audio channel status. Each character shows the status of
a specific channel: - for not present and P for present
VITC/LTC readout A readout showing the selected time format.
Alarm/Error Indicator An icon visible when alarms when are occurring.
Current Reference Text indicating the source of the current reference. Possible references are: Ext., Internal. Also
indicates format and whether the reference is missing or unlocked.
Current Input Text indicating the selected input. Possible inputs are: SDI A, SDI B, Cmpst A, Cmpst B (depending
on installed options). Also indicates if the current input is not in Auto mode and is unlocked.
1Because RGB and Composite Gamut messages appear on the same line in the display, if both RGB and Composite
Gamut errors are present at the same time, the message “RGB and Cmpst Gamut” will appear.
Operating Basics
2- 12 WVR610A & WVR611A Waveform Rasterizers User Manual
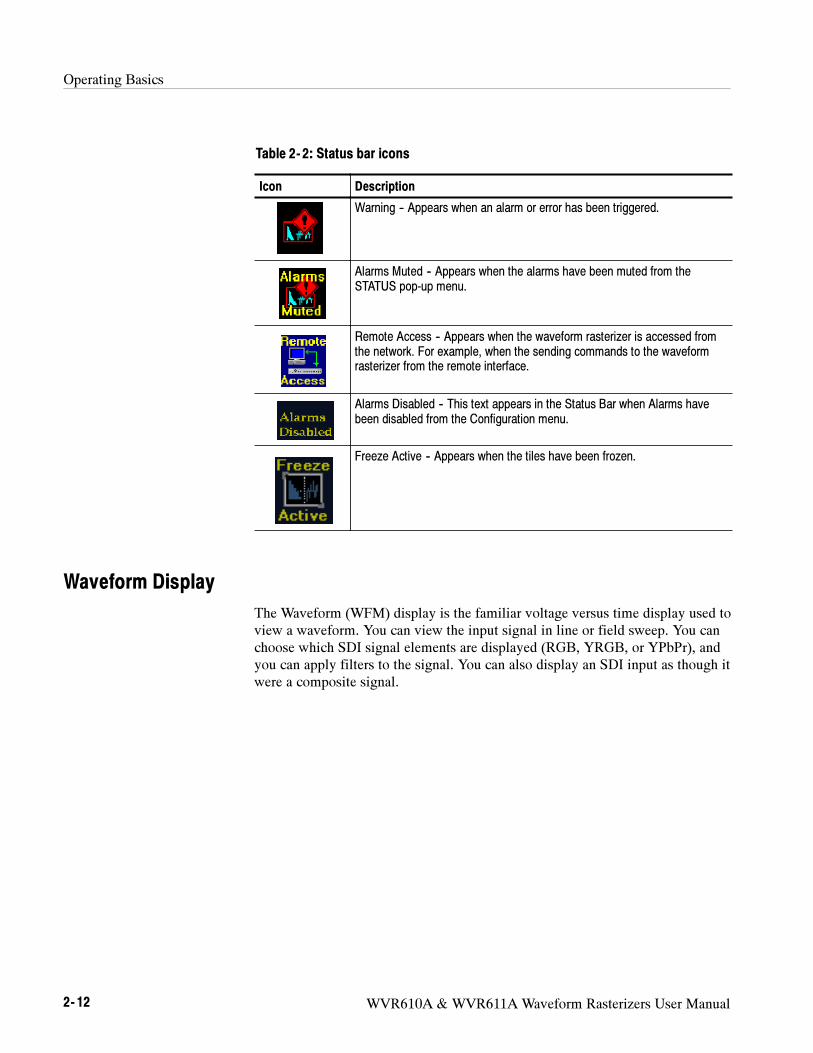
Table 2- 2: Status bar icons
Icon Description
Warning -- Appears when an alarm or error has been triggered.
Alarms Muted -- Appears when the alarms have been muted from the
STATUS pop-up menu.
Remote Access -- Appears when the waveform rasterizer is accessed from
the network. For example, when the sending commands to the waveform
rasterizer from the remote interface.
Alarms Disabled -- This text appears in the Status Bar when Alarms have
been disabled from the Configuration menu.
Freeze Active -- Appears when the tiles have been frozen.
Waveform Display
The Waveform (WFM) display is the familiar voltage versus time display used to
view a waveform. You can view the input signal in line or field sweep. You can
choose which SDI signal elements are displayed (RGB, YRGB, or YPbPr), and
you can apply filters to the signal. You can also display an SDI input as though it
were a composite signal.
Operating Basics
WVR610A & WVR611A Waveform Rasterizers User Manual 2- 13
Waveform components
displayed
Sweep rate
Sweep Mag
enabled
Variable gain
setting
Field and line select
Figure 2- 18: Waveform display elements
Table 2- 3: Waveform display element descriptions
Display element Description
Gain Setting A text string indicating the gain setting. Possible readouts are V Gain: x5, and V Gain: 1.50. When
the Gain is set to a value other than 1, it will appear in a bright yellow color. The gain setting is not
displayed when it is X1.
Waveform components
displayed
A text string showing the current waveform color space components displayed. Non-displayed
components are indicated by dashes: ----.
Field and Line Select A readout displaying the currently selected field and line.
Sweep rate A readout showing the current sweep rate in a tile.
Sweep rate, Mag A readout showing when the Mag button is pressed; if pressed, Mag is displayed next to the sweep
rate in yellow text.
The Waveform pop-up menu enables you to choose the display style and display
mode used in the active tile (SDI inputs only), select a filter to apply to the input
signal, or center the waveform in the display.
To display the Waveform pop-up menu:
Press and holdWFM to display the pop-up menu.
Waveform Pop-up menu
Operating Basics
2- 14 WVR610A & WVR611A Waveform Rasterizers User Manual
The choices for Display Mode (only available while displaying SDI inputs) are:
YPbPr -- Displays the input as Luminance (Y) and color difference (Pb, Pr)
components.
YRGB -- Displays the input as Luminance (Y), Red (R), Green (G), and
Blue (B) components.
RGB -- Displays the input as Red (R), Green (G), and Blue (B) components.
SDI --> Composite -- Displays the SDI input as if it has been encoded into
composite. The sync and burst in this mode are synthetic and convey no
information about signal quality.
To change the Waveform display mode (for SDI signals):
1. Press and holdWFM to display the pop-up menu.
2. Use the up/down arrow keys to select Display Mode.
3. Press the right-arrow key to select the submenu.
4. Use the up/down arrow keys to select the display mode.
5. Press SEL to accept the selection.
6. PressWFM to to remove the pop-up menu.
When viewing 525-line SDI input as a composite waveform while using line
select mode, both burst phases may appear when you would expect to see only
one. This is because the line selection in SDI Mode is an odd/even selection,
while composite signals are normally viewed with a one-of-four or one-of-eight
line selection.
The Waveform pop-up menu Display Style setting (SDI inputs only) enables you
to choose how the signal components are displayed in the active tile:
Parade style has all the components shown one beside the other like cars in
a parade.
Overlay style has all the components drawn at the same location so that they
appear one on top of the other.
To change the Waveform display style:
1. Press and holdWFM to display the pop-up menu.
2. Use the arrow buttons to select Display Style.
3. Press SEL to toggle between Parade and Overlay.
The Waveform pop-up menu Filter selection allows you to select filters to be
applied to the video. This is useful to isolate a specific characteristic of the input.
Operating Basics
WVR610A & WVR611A Waveform Rasterizers User Manual 2- 15
For example, to measure amplitude you may want to use a Luma or Low pass
filter to remove the high frequency components.
Different display modes have different filters available. For SDI displays, such as
RGB mode, Flat and Low Pass are available. For Composite displays, the filter
selections are Flat, Luma, Chroma, and Flat + Luma. The Flat + Luma mode
shows two waveforms in parade configuration.
The function of each filter is as follows:
Flat -- Display with the full available bandwidth.
Luma or Low Pass -- Display only the low-frequency portion of the signal.
Chroma -- Display only the portion of the signal with frequencies near the
color sub-carrier. For Composite inputs only.
Flat + Luma -- A combination of a Flat and a Luma waveform from a
Composite input.
To apply a filter to the Waveform display:
1. PressWFM to display the pop-up menu.
2. Select Filter and press the right-arrow key to change the menu focus to the
submenu.
3. Select the desired filter. Only filters appropriate for the selected input are
displayed.
4. PressWFM to remove the menu.
The Center Waveform function is used to cancel any horizontal or vertical
position adjustments and restore the trace to the default position. For a tile in
WFM mode, this puts the baseline at the zero graticule.
To center the waveform:
1. PressWFM to display the pop-up menu.
2. Select Center Waveform and press SEL to center the waveform.
3. PressWFM to remove the menu.
Vector Display
The Vector display provides two display types: Vector and the Tektronix
proprietary Lightning display (SDI signals only). The Vector display shows a
plot of the R-Y signal on one axis and the B-Y signal on the other. It is useful for
looking at hue and saturation of the colors, but does not show luminance
information. The Lightning display shows the same color signals as in vector,

Operating Basics
2- 16 WVR610A & WVR611A Waveform Rasterizers User Manual
but they are plotted versus luminance. One color difference signal in the top half
and the other in the bottom. Lightning is useful for checking chroma and luma
gain, and for checking chroma to luma delay via the timing marks that show
errors in the green to magenta transition on a color bar signal.
Display type Bar target setting
Line
Field
Mag
Figure 2- 19: Vector display elements
Table 2- 4: Vector/Lightning display element descriptions
Display element Description
Line Pressing the LINE button sets the horizontal gain to 1X.
Field Pressing the FIELD button sets the horizontal gain to 5X.
Mag Pressing the MAG buttons enables you to adjust the horizontal gain using the GENERAL knob.
Display type The selected display, either Lightning or Vector.
Bar target setting The bar target setting, either 75% or 100%.
Phase Appears in Composite Vector display only.
The Vector pop-up menu enables you to specify the display type (SDI inputs
only), to set the bar targets, and to center the waveform in the display.
To display the Vector pop-up menu:
Press and hold VECT to display the pop-up menu.
Vector Pop-up Menu
Operating Basics
WVR610A & WVR611A Waveform Rasterizers User Manual 2- 17
To specify the display type (SDI inputs only):
1. Press and hold VECT to display the pop-up menu.
2. Use the up/down arrow keys to select Display Type.
3. Press SEL to select either Vector or Lightning.
4. Press VECT to remove the pop-up menu.
The Vector display shows a plot of the R-Y signal on one axis and the B-Y
signal on the other. This display is useful for looking at hue and saturation of the
colors, but does not show luminance information.
The Lightning display shows the same color signals as in vector, but they are
plotted versus luminance. One color difference signal in the top half and the
other in the bottom. Lightning is useful for checking chroma and luma gain, and
for checking chroma to luma delay via the timing marks that show errors in the
green to magenta transition on a color bar signal.
The Bar Targets setting allows you to select which scaling should be used in the
active tile for either the Vector or Lighting displays.
To specify the bar target scaling:
1. Press and hold VECT to display the pop-up menu.
2. Use the up/down arrow keys to select Bar Targets.
3. Press SEL to select either 75% or 100%.
4. Press VECT to to remove the pop-up menu.
The Center Waveform function is used to cancel any horizontal or vertical
position adjustments and restore the trace to the default position. For a Lightning
display type, this function sets the trace back to the center of the tile. For a
Vector display type, this function shifts the trace to locate the selected color at
the center of the display.
To center the waveform:
1. Press VECT to display the pop-up menu.
2. Use the up/down arrow keys to select Center Waveform.
3. For a Lightning display, press SEL to center the waveform.
4. For a Vector display, press the right-arrow key to select the color you want to
locate at the center of the display.
5. PressWFM to remove the menu.
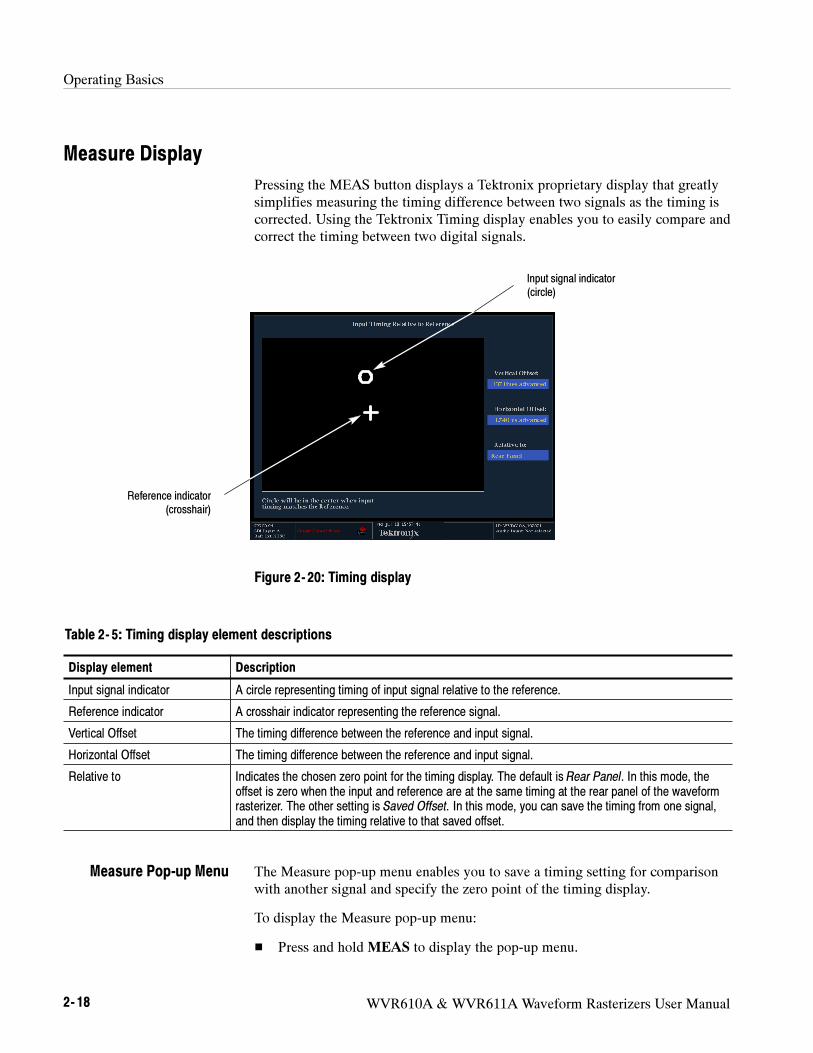
Operating Basics
2- 18 WVR610A & WVR611A Waveform Rasterizers User Manual
Measure Display
Pressing the MEAS button displays a Tektronix proprietary display that greatly
simplifies measuring the timing difference between two signals as the timing is
corrected. Using the Tektronix Timing display enables you to easily compare and
correct the timing between two digital signals.
Reference indicator
(crosshair)
Input signal indicator
(circle)
Figure 2- 20: Timing display
Table 2- 5: Timing display element descriptions
Display element Description
Input signal indicator A circle representing timing of input signal relative to the reference.
Reference indicator A crosshair indicator representing the reference signal.
Vertical Offset The timing difference between the reference and input signal.
Horizontal Offset The timing difference between the reference and input signal.
Relative to Indicates the chosen zero point for the timing display. The default is Rear Panel. In this mode, the
offset is zero when the input and reference are at the same timing at the rear panel of the waveform
rasterizer. The other setting is Saved Offset. In this mode, you can save the timing from one signal,
and then display the timing relative to that saved offset.
The Measure pop-up menu enables you to save a timing setting for comparison
with another signal and specify the zero point of the timing display.
To display the Measure pop-up menu:
Press and holdMEAS to display the pop-up menu.
Measure Pop-up Menu
Operating Basics
WVR610A & WVR611A Waveform Rasterizers User Manual 2- 19
The Save Offset pop-up menu entry allows you to save the timing of the current
input as an offset to the timing display. This saved timing then becomes the zero
point for the timing display. This applies to both the cross-hair target in the
middle of the display and the numeric readouts. Save Offset allows you to
measure the timing between inputs or to match multiple signals.
To save the timing of the current input:
1. PressMEAS to display the pop-up menu.
2. Use the up/down arrow keys to select Save Offset.
3. Press SEL to save the timing of the current input.
4. PressMEAS to remove the menu.
NOTE. You cannot save the timing offset if either the input or reference is missing
or unlocked. You also cannot save a reference when in internal mode. Saving an
offset in these conditions would lead to misleading results so it is not allowed by
the instrument. A warning message will appear on the screen if you attempt to
save the offset when it is not allowed.
The Relative To: pop-up menu entry allows you to select one of two definitions
for the zero timing offset in the timing display. This selection changes both the
numeric readouts and the target in the middle of the timing display.
The choices are Rear Panel which means the timing offset will be shown as zero
when the two signals are timed down at the rear of the waveform rasterizer, and
Saved Offset which means that the timing will be shown as zero offset when the
input signal matches the timing of the signal that was present when the offset
was saved.
To change the Relative to setting:
1. PressMEAS to display the pop-up menu.
2. Use the up/down arrow keys to select Relative To.
3. Press SEL to select Rear Panel or Saved Offset.
4. PressMEAS to remove the menu.
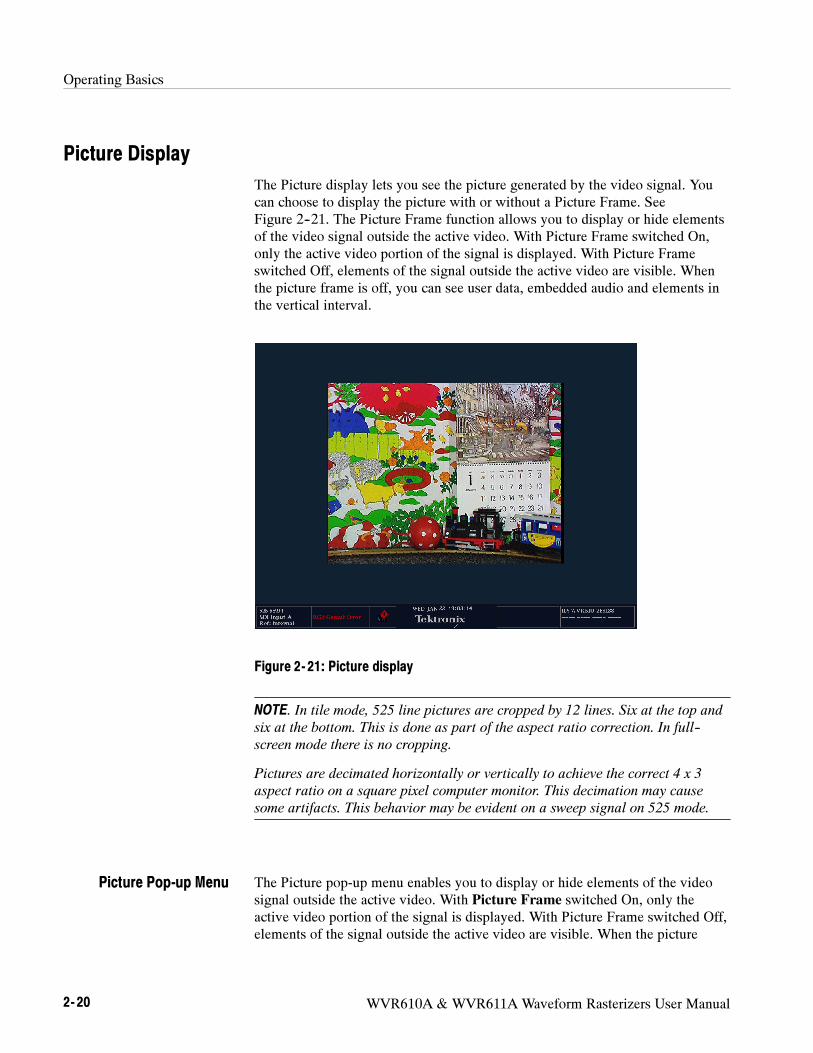
Operating Basics
2- 20 WVR610A & WVR611A Waveform Rasterizers User Manual
Picture Display
The Picture display lets you see the picture generated by the video signal. You
can choose to display the picture with or without a Picture Frame. See
Figure 2--21. The Picture Frame function allows you to display or hide elements
of the video signal outside the active video. With Picture Frame switched On,
only the active video portion of the signal is displayed. With Picture Frame
switched Off, elements of the signal outside the active video are visible. When
the picture frame is off, you can see user data, embedded audio and elements in
the vertical interval.
Figure 2- 21: Picture display
NOTE. In tile mode, 525 line pictures are cropped by 12 lines. Six at the top and
six at the bottom. This is done as part of the aspect ratio correction. In full--
screen mode there is no cropping.
Pictures are decimated horizontally or vertically to achieve the correct 4 x 3
aspect ratio on a square pixel computer monitor. This decimation may cause
some artifacts. This behavior may be evident on a sweep signal on 525 mode.
The Picture pop-up menu enables you to display or hide elements of the video
signal outside the active video. With Picture Frame switched On, only the
active video portion of the signal is displayed. With Picture Frame switched Off,
elements of the signal outside the active video are visible. When the picture
Picture Pop-up Menu
Operating Basics
WVR610A & WVR611A Waveform Rasterizers User Manual 2- 21
frame is off, you can see user data, embedded audio, and elements in the vertical
interval.
To switch the Picture Frame On or Off:
1. Press and hold PICT to display the pop-up menu.
2. Press SEL to select On or Off as desired.
3. Press PICT to remove the pop-up menu.
NOTE. You can see signal elements outside the active video only when the PICT
display is set to FULL. You will not be able to see sync signal elements on
Composite signals.
Audio Display
The Audio display provides level meters and a phase display for monitoring
audio signals. The Audio display always shows the level meters and correlation
meters. When you choose to display the phase plot (also known as Lissajous),
the left portion of the Audio tile displays the level meters and the right portion
the Phase display. See Figure 2--22.
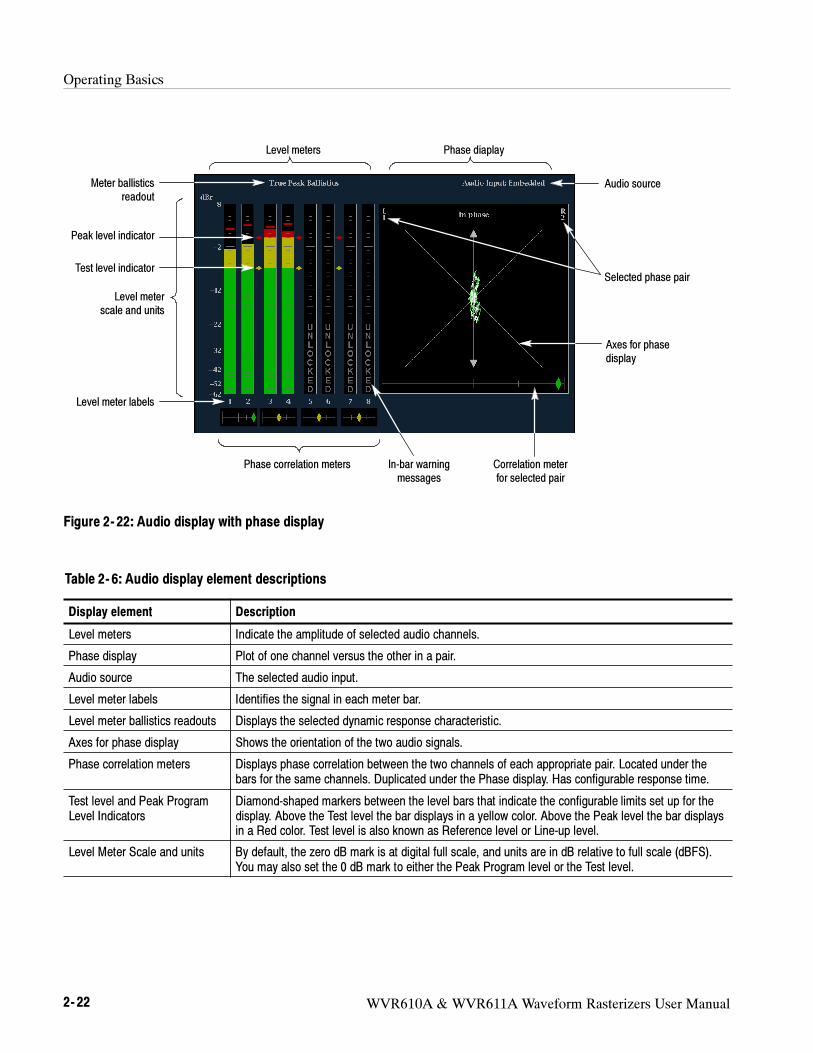
Operating Basics
2- 22 WVR610A & WVR611A Waveform Rasterizers User Manual
Meter ballistics
readout
Phase correlation meters
Level meter labels
Level meter
scale and units
Correlation meter
for selected pair
Test level indicator
Peak level indicator
Axes for phase
display
Selected phase pair
Audio source
In-bar warning
messages
Level meters Phase diaplay
Figure 2- 22: Audio display with phase display
Table 2- 6: Audio display element descriptions
Display element Description
Level meters Indicate the amplitude of selected audio channels.
Phase display Plot of one channel versus the other in a pair.
Audio source The selected audio input.
Level meter labels Identifies the signal in each meter bar.
Level meter ballistics readouts Displays the selected dynamic response characteristic.
Axes for phase display Shows the orientation of the two audio signals.
Phase correlation meters Displays phase correlation between the two channels of each appropriate pair. Located under the
bars for the same channels. Duplicated under the Phase display. Has configurable response time.
Test level and Peak Program
Level Indicators
Diamond-shaped markers between the level bars that indicate the configurable limits set up for the
display. Above the Test level the bar displays in a yellow color. Above the Peak level the bar displays
in a Red color. Test level is also known as Reference level or Line-up level.
Level Meter Scale and units By default, the zero dB mark is at digital full scale, and units are in dB relative to full scale (dBFS).
You may also set the 0 dB mark to either the Peak Program level or the Test level.
Operating Basics
WVR610A & WVR611A Waveform Rasterizers User Manual 2- 23
The WVR610A & WVR611A display warning messages above the level meter
bars. The warning messages that can appear above the bars are shown below.
CLIP. The number of consecutive samples is at or exceeds the # Samples for Clip
setting.
OVER. The signal has been at or above the specified Over Level for a time
exceeding the Duration for Over setting.
The WVR610A & WVR611A display warning messages within the level meter
bars. The warning messages that can appear are shown below in order of priority.
UNLOCKED. The instrument is not locked to an incoming signal on the indicated
input channel. Data cannot be decoded and all data and other errors are ignored.
This means that if an AES input is selected, nothing recognizable is present on
the input, or if embedded audio is selected, the VIDEO input is unrecognizable.
AES PARITY. The incoming subframe does not have even parity as specified by
the digital audio standards. The data sample is unreliable and is ignored. The
level meters and Lissajous display treat the sample as a zero sample.
AES CRC ERROR. The CRC code in the AES channel status packet is incorrect.
Sometimes the CRC code is set to zero, indicating that the signal is missing;
when this is the case, this message is not displayed.
MUTE. The number of consecutive all-zero samples is at or exceed the # Samples
for Mute setting.
SILENCE. The signal has been at or below the specified Silence Level for a time
exceeding the Duration for Silence setting.
DISABLED.Disabled can appear for three reasons:
Analog audio is selected as the bar source, this causes bars 7 and 8 to say
DISABLED since there are only 6 analog inputs.
Embedded audio is selected as the bar source when Composite video is
selected as the video input. Since there is no embedded audio in composite,
all of the bars will say DISABLED.
If the currently selected audio source’s Bar to Input Map does not have all of
the bars mapped to inputs, any bars that are unmapped will say DISABLED.
Above-bar Warning
Messages
In-bar Warning Messages
Operating Basics
2- 24 WVR610A & WVR611A Waveform Rasterizers User Manual
AES V BIT. Indicates that the Validity bit is set high for one or more data samples.
In the AES/EBU standard, a set validity bit indicates that the sample is not
suitable for conversion to audio. By default, the level meter bars and Lissajous
display treat the affected samples as zero samples.
The Audio pop-up menu enables you to select the audio input source and specify
whether or not the signal phase is displayed. If the signal phase is displayed, you
can also specify the style of the phase display and which pair of inputs is shown
in the phase display.
To display the Audio pop-up menu:
Press and hold AUDIO to display the pop-up menu.
Audio Input. This entry in the Audio pop-up menu enables you to select the
source for the Audio display. The number of available sources depends on which
audio option is installed.
Choosing any given input will make that audio the monitored signal regardless
of which video input is active.
Alternatively, choose Follows video to enable the mapping that allows changing
the audio source as the video input selection is changed.
To specify the Audio input source:
1. Press AUDIO to display the pop-up menu.
2. Use the up/down arrow keys to select Audio Input.
3. Press SEL to change the focus to the submenu.
4. Use the up/down arrow keys to select the desired audio input source. (The
choices available depend on which audio option is installed.)
5. Press AUDIO to remove the menu.
NOTE. Use the CONFIG menu to select the mapping of input to bar, the meter
type, and the Follows video mapping of audio to video.
Phase Display. This setting in the AUDIO pop-up menu allows a 2-channel phase
display to be added to the audio tile. A phase display is also called a “Lissajous”
display.
To turn the Phase Display on or off:
1. Press AUDIO to display the pop-up menu.
Audio Pop-up Menu
Operating Basics
WVR610A & WVR611A Waveform Rasterizers User Manual 2- 25
2. Use the up/down arrow keys to select Phase Display.
3. Press SEL to toggle the setting on or off.
4. Press AUDIO to remove the pop-up menu.
Phase Style. This entry in the AUDIO pop-up menu allows you to choose the
axis style of the phase display.
There are two axis styles in the phase display:
Lissajous Snd (Sound) Stage has axes rotated at a 45 degrees.
X-Y has axes that are horizontal and vertical.
To change the axis style used in the Phase display:
1. Press AUDIO to display the pop--up menu.
2. Use the up/down arrow keys to select Phase Style.
3. Press SEL to select the preferred axis style.
4. Press AUDIO to remove the pop-up menu.
Phase Pair. This entry in the AUDIO pop-up menu allows you to choose which
pair of inputs are displayed in the phase display.
You can not select channels from separate pairs since the relative timing cannot
be ensured.
To choose the pair of inputs displayed in the Phase display:
1. Press AUDIO to display the pop-up menu.
2. Use the up/down arrow keys to select Phase Pair.
3. Use the right-arrow key to select the submenu.
4. Use the up/down arrow keys to select which pair to display.
5. Press SEL to accept the selection.
6. Press AUDIO to remove the pop-up menu.
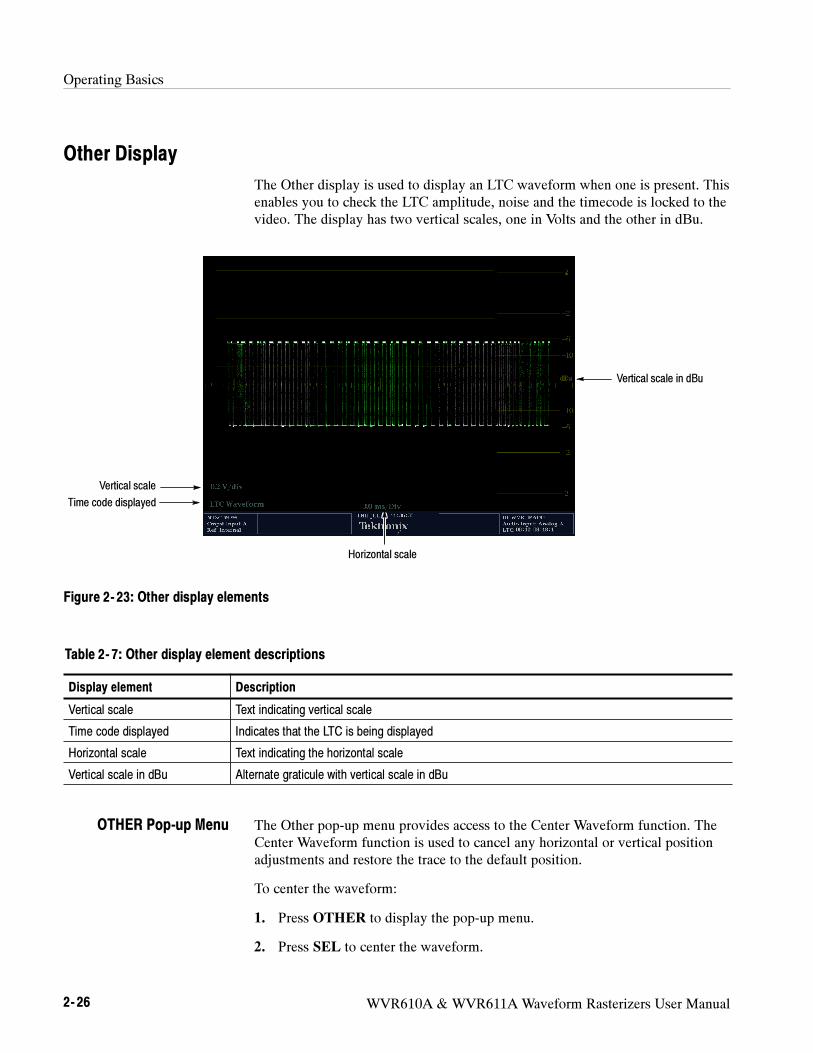
Operating Basics
2- 26 WVR610A & WVR611A Waveform Rasterizers User Manual
Other Display
The Other display is used to display an LTC waveform when one is present. This
enables you to check the LTC amplitude, noise and the timecode is locked to the
video. The display has two vertical scales, one in Volts and the other in dBu.
Vertical scale in dBu
Time code displayed
Vertical scale
Horizontal scale
Figure 2- 23: Other display elements
Table 2- 7: Other display element descriptions
Display element Description
Vertical scale Text indicating vertical scale
Time code displayed Indicates that the LTC is being displayed
Horizontal scale Text indicating the horizontal scale
Vertical scale in dBu Alternate graticule with vertical scale in dBu
The Other pop-up menu provides access to the Center Waveform function. The
Center Waveform function is used to cancel any horizontal or vertical position
adjustments and restore the trace to the default position.
To center the waveform:
1. Press OTHER to display the pop-up menu.
2. Press SEL to center the waveform.
OTHER Pop-up Menu
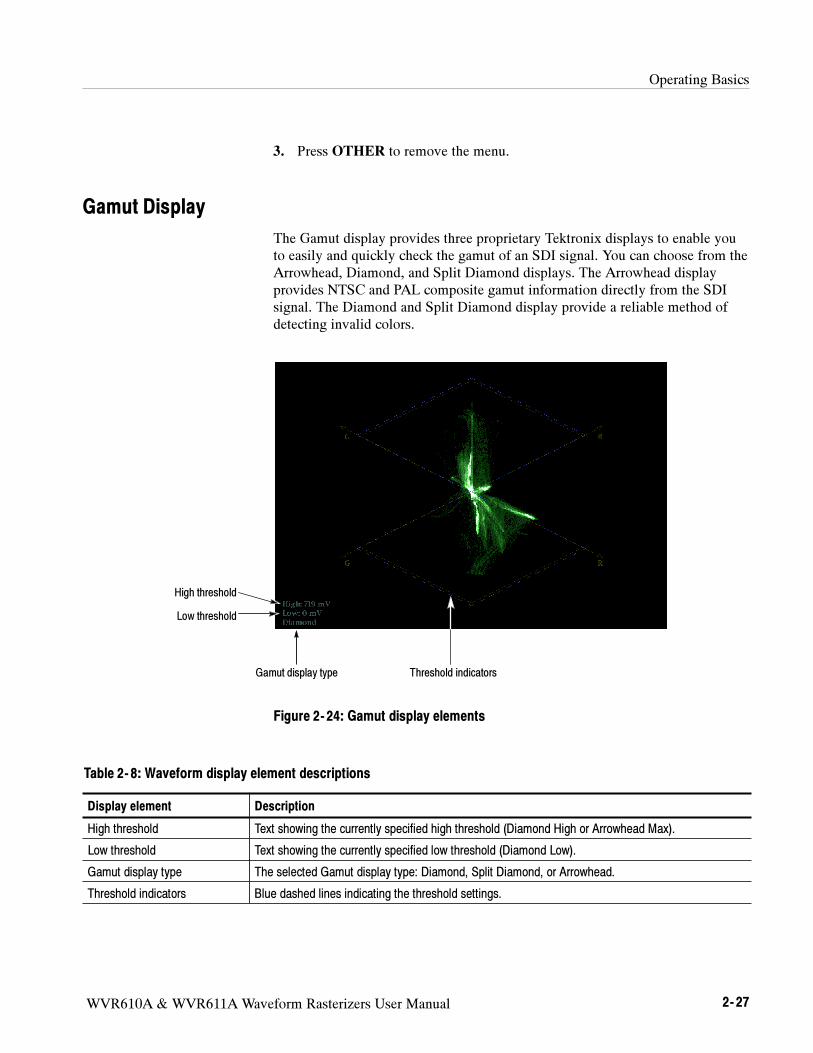
Operating Basics
WVR610A & WVR611A Waveform Rasterizers User Manual 2- 27
3. Press OTHER to remove the menu.
Gamut Display
The Gamut display provides three proprietary Tektronix displays to enable you
to easily and quickly check the gamut of an SDI signal. You can choose from the
Arrowhead, Diamond, and Split Diamond displays. The Arrowhead display
provides NTSC and PAL composite gamut information directly from the SDI
signal. The Diamond and Split Diamond display provide a reliable method of
detecting invalid colors.
Low threshold
High threshold
Gamut display type Threshold indicators
Figure 2- 24: Gamut display elements
Table 2- 8: Waveform display element descriptions
Display element Description
High threshold Text showing the currently specified high threshold (Diamond High or Arrowhead Max).
Low threshold Text showing the currently specified low threshold (Diamond Low).
Gamut display type The selected Gamut display type: Diamond, Split Diamond, or Arrowhead.
Threshold indicators Blue dashed lines indicating the threshold settings.
Operating Basics
2- 28 WVR610A & WVR611A Waveform Rasterizers User Manual
The GAMUT pop-up menu allows you to select the type of gamut display shown
in the active tile.
To change the display type in the GAMUT display:
1. Press GAMUT to display the pop-up menu.
2. Press SEL to change the menu focus to the submenu.
3. Use the up/down arrow key to select the desired display type.
4. Press GAMUT to remove the menu.
The three types of displays available in the GAMUT pop-up menu are:
Diamond shows Gamut violations of the SDI input if translated to RGB
color space.
Split Diamond offsets the two halves of the Diamond to allow you to better
see negative RGB Gamut errors.
Arrowhead shows Gamut violations of the SDI input if it were translated to
the Composite domain.
GAMUT Pop-up Menu
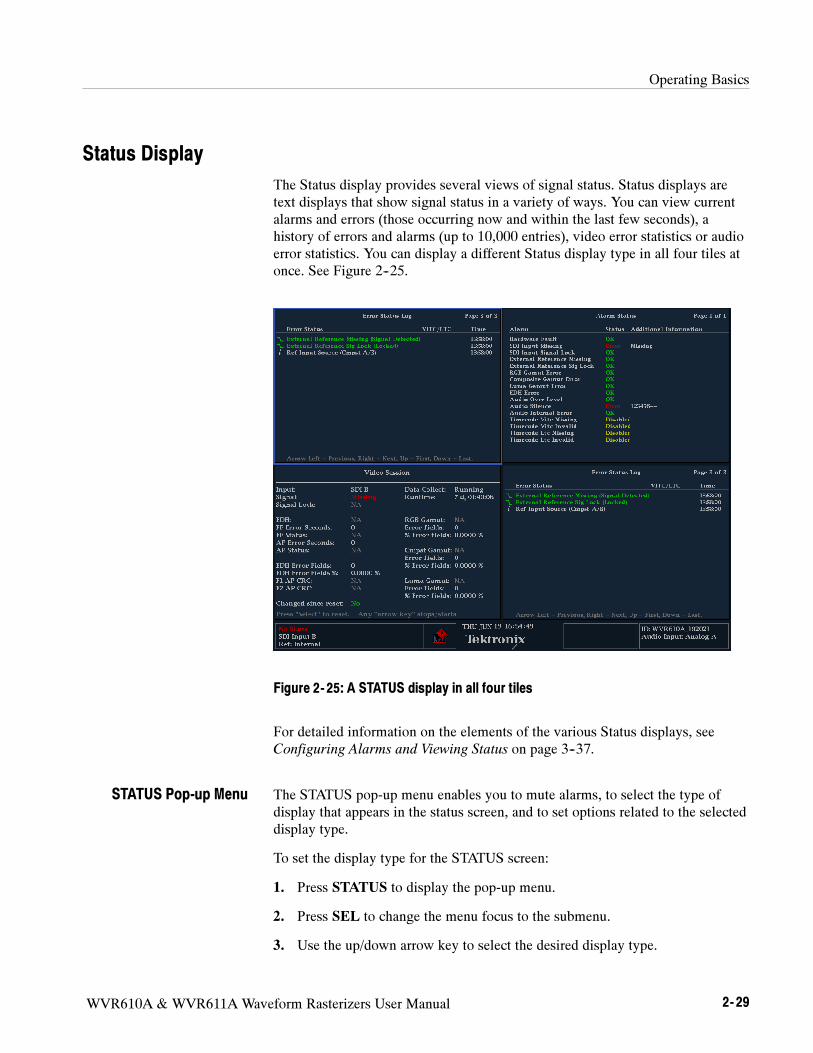
Operating Basics
WVR610A & WVR611A Waveform Rasterizers User Manual 2- 29
Status Display
The Status display provides several views of signal status. Status displays are
text displays that show signal status in a variety of ways. You can view current
alarms and errors (those occurring now and within the last few seconds), a
history of errors and alarms (up to 10,000 entries), video error statistics or audio
error statistics. You can display a different Status display type in all four tiles at
once. See Figure 2--25.
Figure 2- 25: A STATUS display in all four tiles
For detailed information on the elements of the various Status displays, see
Configuring Alarms and Viewing Status on page 3--37.
The STATUS pop-up menu enables you to mute alarms, to select the type of
display that appears in the status screen, and to set options related to the selected
display type.
To set the display type for the STATUS screen:
1. Press STATUS to display the pop-up menu.
2. Press SEL to change the menu focus to the submenu.
3. Use the up/down arrow key to select the desired display type.
STATUS Pop-up Menu
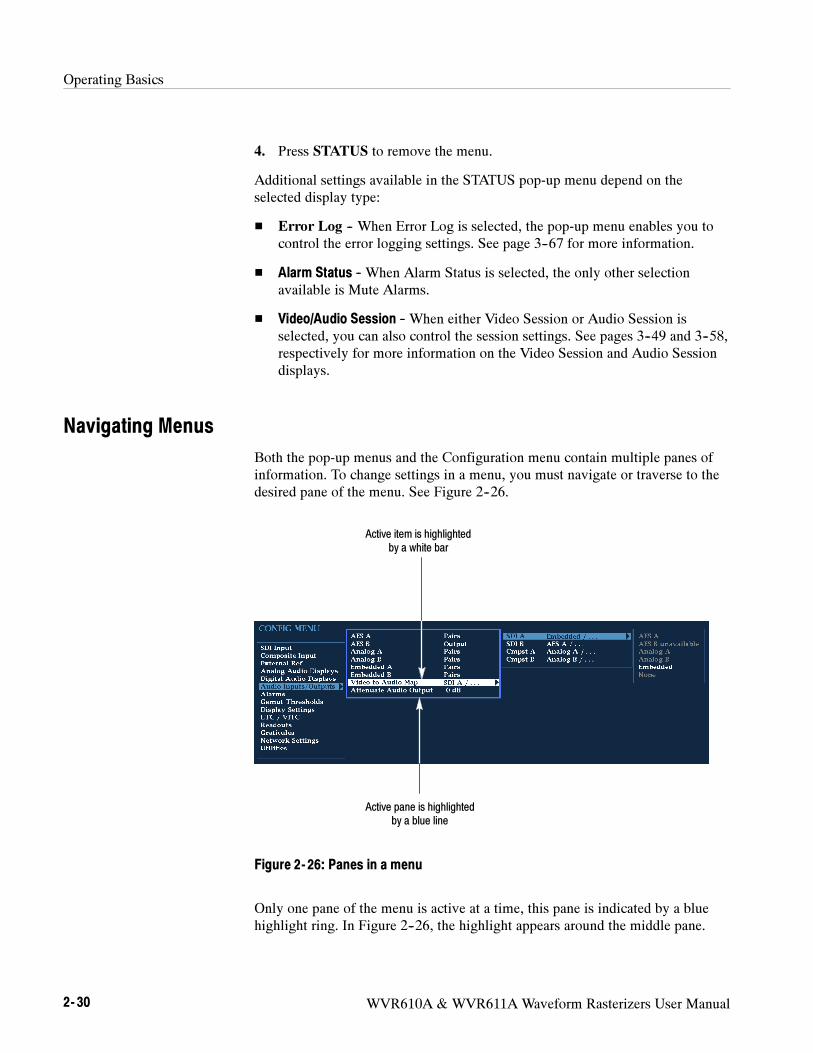
Operating Basics
2- 30 WVR610A & WVR611A Waveform Rasterizers User Manual
4. Press STATUS to remove the menu.
Additional settings available in the STATUS pop-up menu depend on the
selected display type:
Error Log -- When Error Log is selected, the pop-up menu enables you to
control the error logging settings. See page 3--67 for more information.
Alarm Status -- When Alarm Status is selected, the only other selection
available is Mute Alarms.
Video/Audio Session -- When either Video Session or Audio Session is
selected, you can also control the session settings. See pages 3--49 and 3--58,
respectively for more information on the Video Session and Audio Session
displays.
Navigating Menus
Both the pop-up menus and the Configuration menu contain multiple panes of
information. To change settings in a menu, you must navigate or traverse to the
desired pane of the menu. See Figure 2--26.
Active pane is highlighted
by a blue line
Active item is highlighted
by a white bar
Figure 2- 26: Panes in a menu
Only one pane of the menu is active at a time, this pane is indicated by a blue
highlight ring. In Figure 2--26, the highlight appears around the middle pane.
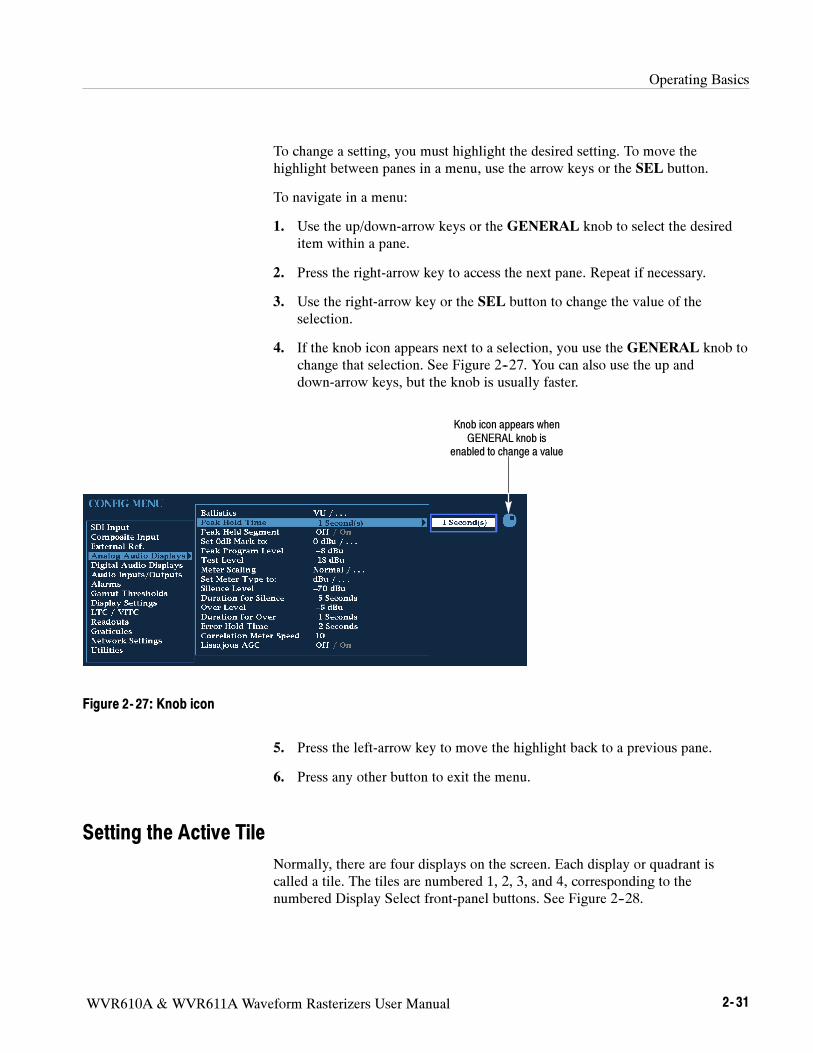
Operating Basics
WVR610A & WVR611A Waveform Rasterizers User Manual 2- 31
To change a setting, you must highlight the desired setting. To move the
highlight between panes in a menu, use the arrow keys or the SEL button.
To navigate in a menu:
1. Use the up/down-arrow keys or the GENERAL knob to select the desired
item within a pane.
2. Press the right-arrow key to access the next pane. Repeat if necessary.
3. Use the right-arrow key or the SEL button to change the value of the
selection.
4. If the knob icon appears next to a selection, you use the GENERAL knob to
change that selection. See Figure 2--27. You can also use the up and
down-arrow keys, but the knob is usually faster.
Knob icon appears when
GENERAL knob is
enabled to change a value
Figure 2- 27: Knob icon
5. Press the left-arrow key to move the highlight back to a previous pane.
6. Press any other button to exit the menu.
Setting the Active Tile
Normally, there are four displays on the screen. Each display or quadrant is
called a tile. The tiles are numbered 1, 2, 3, and 4, corresponding to the
numbered Display Select front-panel buttons. See Figure 2--28.
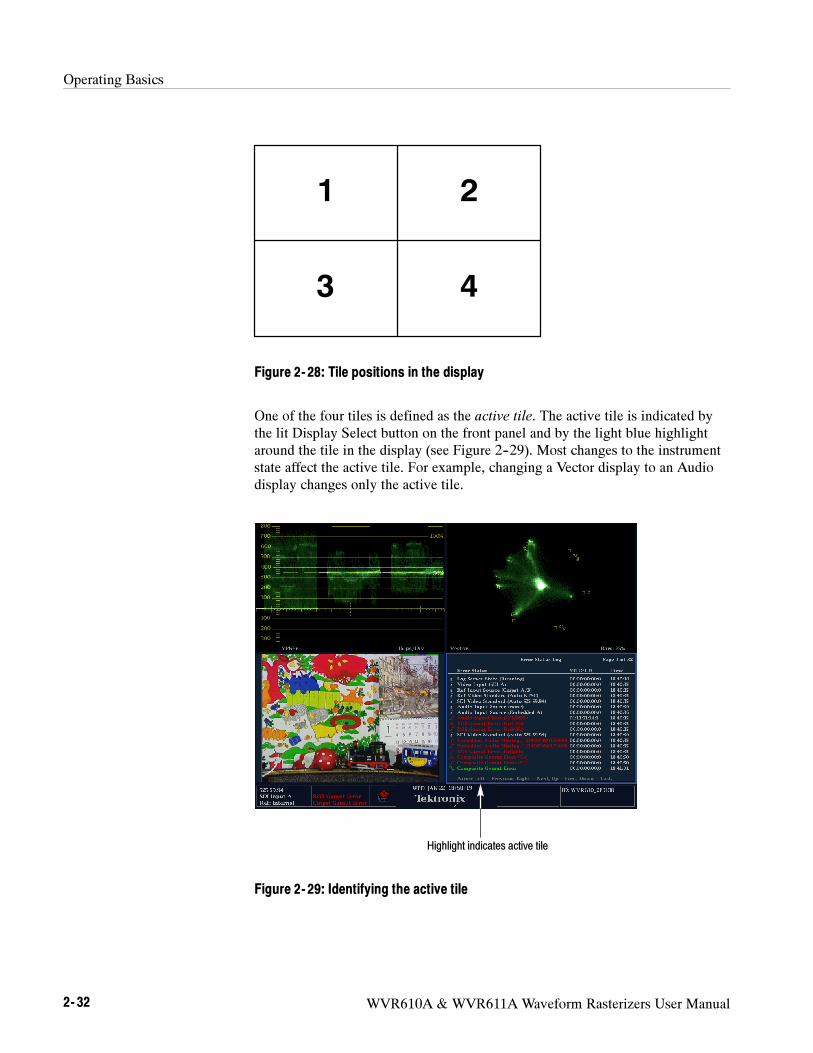
Operating Basics
2- 32 WVR610A & WVR611A Waveform Rasterizers User Manual
1 2
3 4
Figure 2- 28: Tile positions in the display
One of the four tiles is defined as the active tile. The active tile is indicated by
the lit Display Select button on the front panel and by the light blue highlight
around the tile in the display (see Figure 2--29). Most changes to the instrument
state affect the active tile. For example, changing a Vector display to an Audio
display changes only the active tile.
Highlight indicates active tile
Figure 2- 29: Identifying the active tile
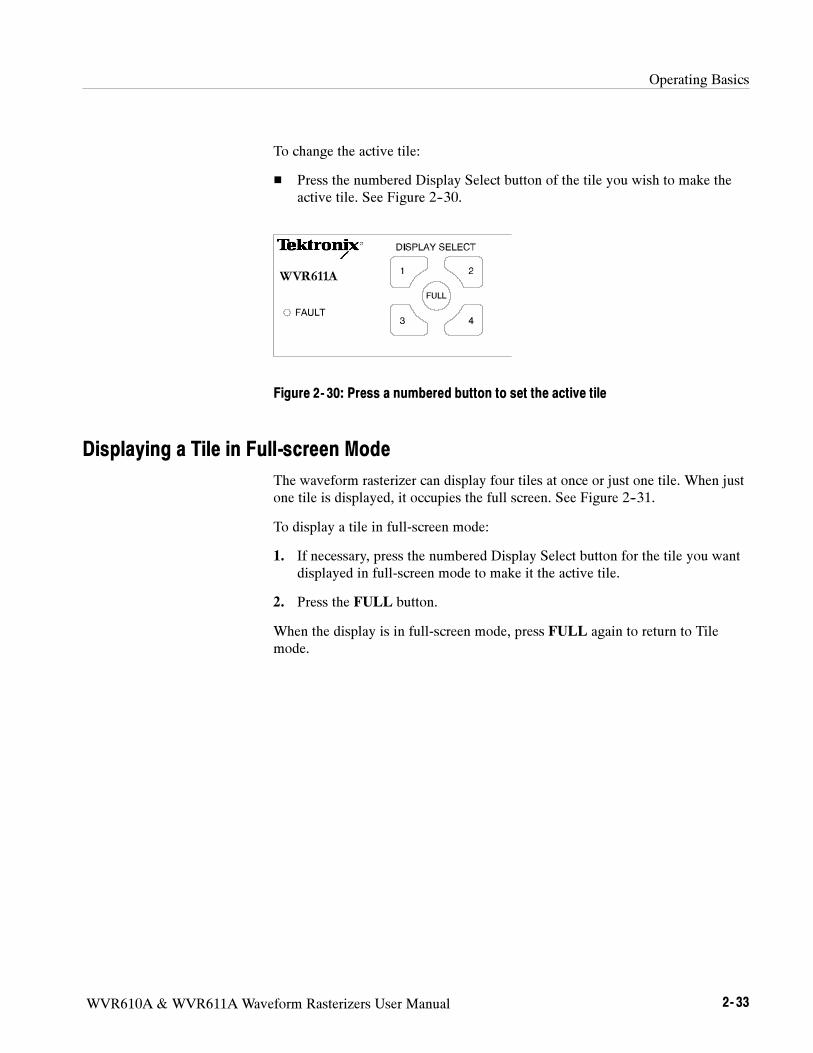
Operating Basics
WVR610A & WVR611A Waveform Rasterizers User Manual 2- 33
To change the active tile:
Press the numbered Display Select button of the tile you wish to make the
active tile. See Figure 2--30.
Figure 2- 30: Press a numbered button to set the active tile
Displaying a Tile in Full-screen Mode
The waveform rasterizer can display four tiles at once or just one tile. When just
one tile is displayed, it occupies the full screen. See Figure 2--31.
To display a tile in full-screen mode:
1. If necessary, press the numbered Display Select button for the tile you want
displayed in full-screen mode to make it the active tile.
2. Press the FULL button.
When the display is in full-screen mode, press FULL again to return to Tile
mode.
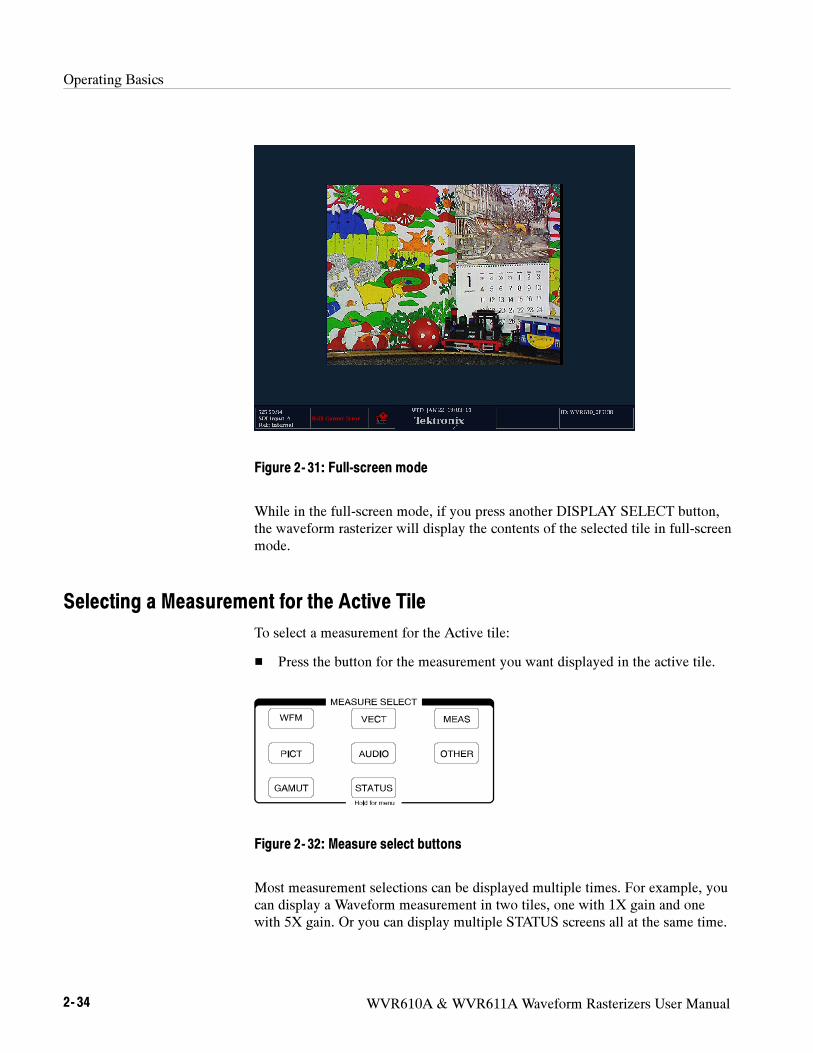
Operating Basics
2- 34 WVR610A & WVR611A Waveform Rasterizers User Manual
Figure 2- 31: Full-screen mode
While in the full-screen mode, if you press another DISPLAY SELECT button,
the waveform rasterizer will display the contents of the selected tile in full-screen
mode.
Selecting a Measurement for the Active Tile
To select a measurement for the Active tile:
Press the button for the measurement you want displayed in the active tile.
Figure 2- 32: Measure select buttons
Most measurement selections can be displayed multiple times. For example, you
can display a Waveform measurement in two tiles, one with 1X gain and one
with 5X gain. Or you can display multiple STATUS screens all at the same time.
Operating Basics
WVR610A & WVR611A Waveform Rasterizers User Manual 2- 35
The exception is the AUDIO measurement; only one instance of the AUDIO tile
can be displayed at a time.
Using the FREEZE Feature
Pushing the FREEZE button captures the current image for traces (waveform,
gamut, and vector), picture, status and audio measurements if selected. Freeze is
useful for comparing sources or for capturing transient events. Press FREEZE to
capture a display you wish to keep or show to someone else. In this application,
the Frozen Only display mode may be best. For comparing sources, the Frozen
+ Live display mode is useful. To use this feature, select one source, press
FREEZE to capture an image, then select the second source and compare.
Not all displays react identically to freeze. WFM displays capture a trace. For
text displays, such as Status, pressing FREEZE halts updates to the display. This
allows you to view the different status displays without numbers or status
readouts changing. The waveform rasterizer continues to log error status in the
background while the display is frozen.
FREEZE works in both tile and full-screen modes, but frozen images do not
change from tile to full or full to tile. That is, if you freeze a trace in tile mode,
the frozen image will not be shown if you go to full-screen mode. The frozen
image will still be available if you go back to tile mode. Likewise, if you freeze a
Waveform image in a tile and then switch the tile to another measurement such
as Vector, the frozen waveform image will be hidden. If you then change the tile
back to Waveform, the frozen image will reappear.
For waveform displays, the frozen image is shown in a different color to
distinguish it from the live image.
The FREEZE pop-up menu allows you to delete frozen images and select how
frozen images are displayed.
There can be only one frozen image in each tile. So you must delete any frozen
image before you can capture another.
To delete an image:
1. Push FREEZE to display the pop-up menu.
2. Because Delete Frozen Image is automatically selected, just press SEL to
delete the frozen image.
The pop-up menu is automatically removed from the display when the frozen
image is deleted.
If FREEZE is configured for Active Tile mode, this will only delete the image in
that tile. If FREEZE is in global mode, then the image in all tiles will be deleted.
FREEZE Pop-up Menu
Operating Basics
2- 36 WVR610A & WVR611A Waveform Rasterizers User Manual
NOTE. Cursors track the live trace, so they may not be correctly registered on a
frozen trace. If you change parameters such as position, sweep rate, or gain,
then the cursors may not be accurate relative to a frozen trace.
The Display Mode sub-menu displays three choices:
Live Only
Frozen Only
Live + Frozen
The Live Only mode allows you to keep a frozen image, but not display it.
The Frozen Only mode makes it easier to see artifacts in the frozen trace.
The Live + Frozen mode is useful for comparisons and matching. Note that the
STATUS and AUDIO displays do not support this mode.
The FREEZE Display Mode setting is specific to each tile.
To change the FREEZE Display Mode:
1. Press the FREEZE button to display the FREEZE pop-up menu.
2. Use the navigation keys to select the desired mode, then press SEL to set the
desired mode.
FREEZE can be configured to act on only the active tile or on all tiles. To
change the FREEZE from Active Tile to All Tiles, you must go to the Display
Settings Configuration menu.
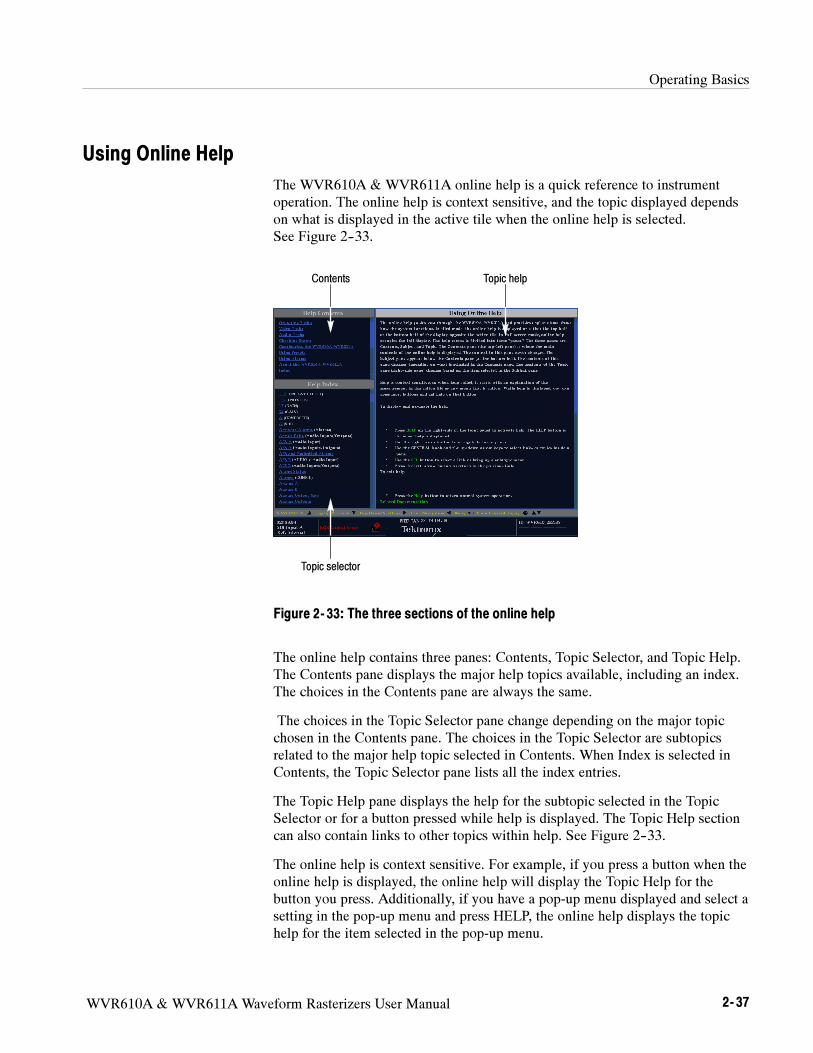
Operating Basics
WVR610A & WVR611A Waveform Rasterizers User Manual 2- 37
Using Online Help
The WVR610A & WVR611A online help is a quick reference to instrument
operation. The online help is context sensitive, and the topic displayed depends
on what is displayed in the active tile when the online help is selected.
See Figure 2--33.
Contents Topic help
Topic selector
Figure 2- 33: The three sections of the online help
The online help contains three panes: Contents, Topic Selector, and Topic Help.
The Contents pane displays the major help topics available, including an index.
The choices in the Contents pane are always the same.
The choices in the Topic Selector pane change depending on the major topic
chosen in the Contents pane. The choices in the Topic Selector are subtopics
related to the major help topic selected in Contents. When Index is selected in
Contents, the Topic Selector pane lists all the index entries.
The Topic Help pane displays the help for the subtopic selected in the Topic
Selector or for a button pressed while help is displayed. The Topic Help section
can also contain links to other topics within help. See Figure 2--33.
The online help is context sensitive. For example, if you press a button when the
online help is displayed, the online help will display the Topic Help for the
button you press. Additionally, if you have a pop-up menu displayed and select a
setting in the pop-up menu and press HELP, the online help displays the topic
help for the item selected in the pop-up menu.
Operating Basics
2- 38 WVR610A & WVR611A Waveform Rasterizers User Manual
To display the online help:
Press HELP on the right side of the front panel.
To navigate the online help:
Press the right-arrow key to move the selection highlight to the next pane.
Use the GENERAL knob and the up / down arrow keys to select a topic you
wish to display.
Press SEL to display a selected topic.
To follow a link within topic help, highlight the link using the GENERAL
knob or the up / down arrow keys, then press SEL.
Press the left-arrow key to go back to the previous link.
To exit the online help:
Press HELP.
Using Cursors
Cursors enable you to measure time or voltage on a waveform. Cursors appear
only in a tile set to Waveform mode. If the active tile is not in Waveform mode,
then an error message is displayed.
To display Cursors:
Press CURSOR. See Figure 2--34.
To remove Cursors:
Press CURSOR again.
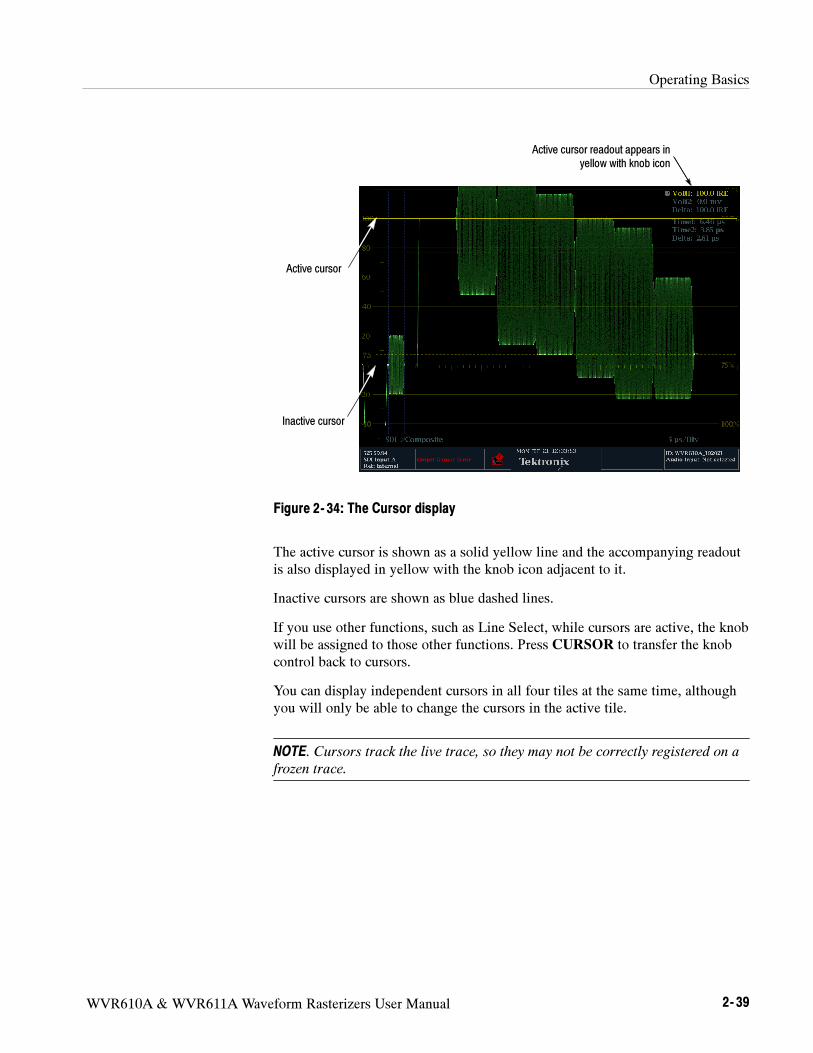
Operating Basics
WVR610A & WVR611A Waveform Rasterizers User Manual 2- 39
Active cursor
Inactive cursor
Active cursor readout appears in
yellow with knob icon
Figure 2- 34: The Cursor display
The active cursor is shown as a solid yellow line and the accompanying readout
is also displayed in yellow with the knob icon adjacent to it.
Inactive cursors are shown as blue dashed lines.
If you use other functions, such as Line Select, while cursors are active, the knob
will be assigned to those other functions. Press CURSOR to transfer the knob
control back to cursors.
You can display independent cursors in all four tiles at the same time, although
you will only be able to change the cursors in the active tile.
NOTE. Cursors track the live trace, so they may not be correctly registered on a
frozen trace.
Operating Basics
2- 40 WVR610A & WVR611A Waveform Rasterizers User Manual
The Cursor pop-up menu enables you to center the cursors and select the style of
cursors displayed.
The three styles of cursors available are:
Voltage -- Voltage cursors display the voltage level at each cursor and the
voltage difference between the two cursors.
Time -- Time cursors display the position of each cursor relative to the start
of the sweep and the difference between the two cursors.
Voltage + Time -- Displays both the Voltage and Time cursors.
To display the Cursor pop-up menu:
Press and hold the CURSOR button.
To select the type of cursor displayed:
1. Press and hold CURSOR to display the Cursor pop-up menu.
2. Select Cursor Style and press SEL to change the focus to the submenu.
3. Select the desired cursor type using the up/down arrow keys.
To change the active cursor when both Voltage and Time cursors are displayed:
For voltage cursors, press either of the up/down arrow keys to change the
active cursor.
For time cursors, press either of the left/right arrow keys to change the active
cursor.
To change the active cursor when only Voltage or Time cursors are displayed:
Press any arrow key to change the active cursor.
To move the active cursor to the center of the screen:
Press and hold the SEL button.
Cursor Pop-up menu
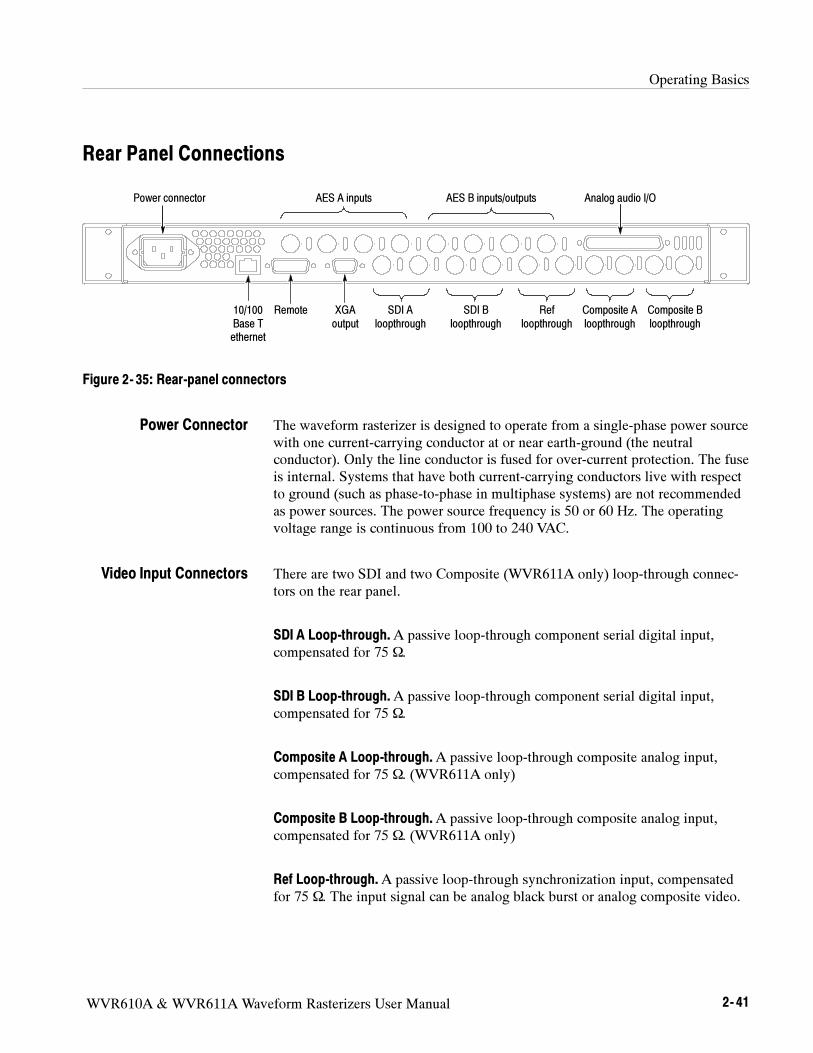
Operating Basics
WVR610A & WVR611A Waveform Rasterizers User Manual 2- 41
Rear Panel Connections
SDI A
loopthrough
SDI B
loopthrough
Ref
loopthrough
Composite A
loopthrough
Composite B
loopthrough
10/100
Base T
ethernet
Remote XGA
output
Power connector AES A inputs AES B inputs/outputs Analog audio I/O
Figure 2- 35: Rear-panel connectors
The waveform rasterizer is designed to operate from a single-phase power source
with one current-carrying conductor at or near earth-ground (the neutral
conductor). Only the line conductor is fused for over-current protection. The fuse
is internal. Systems that have both current-carrying conductors live with respect
to ground (such as phase-to-phase in multiphase systems) are not recommended
as power sources. The power source frequency is 50 or 60 Hz. The operating
voltage range is continuous from 100 to 240 VAC.
There are two SDI and two Composite (WVR611A only) loop-through connec-
tors on the rear panel.
SDI A Loop-through.A passive loop-through component serial digital input,
compensated for 75 Ω.
SDI B Loop-through.A passive loop-through component serial digital input,
compensated for 75 Ω.
Composite A Loop-through.A passive loop-through composite analog input,
compensated for 75 Ω. (WVR611A only)
Composite B Loop-through.A passive loop-through composite analog input,
compensated for 75 Ω. (WVR611A only)
Ref Loop-through.A passive loop-through synchronization input, compensated
for 75 Ω. The input signal can be analog black burst or analog composite video.
Power Connector
Video Input Connectors
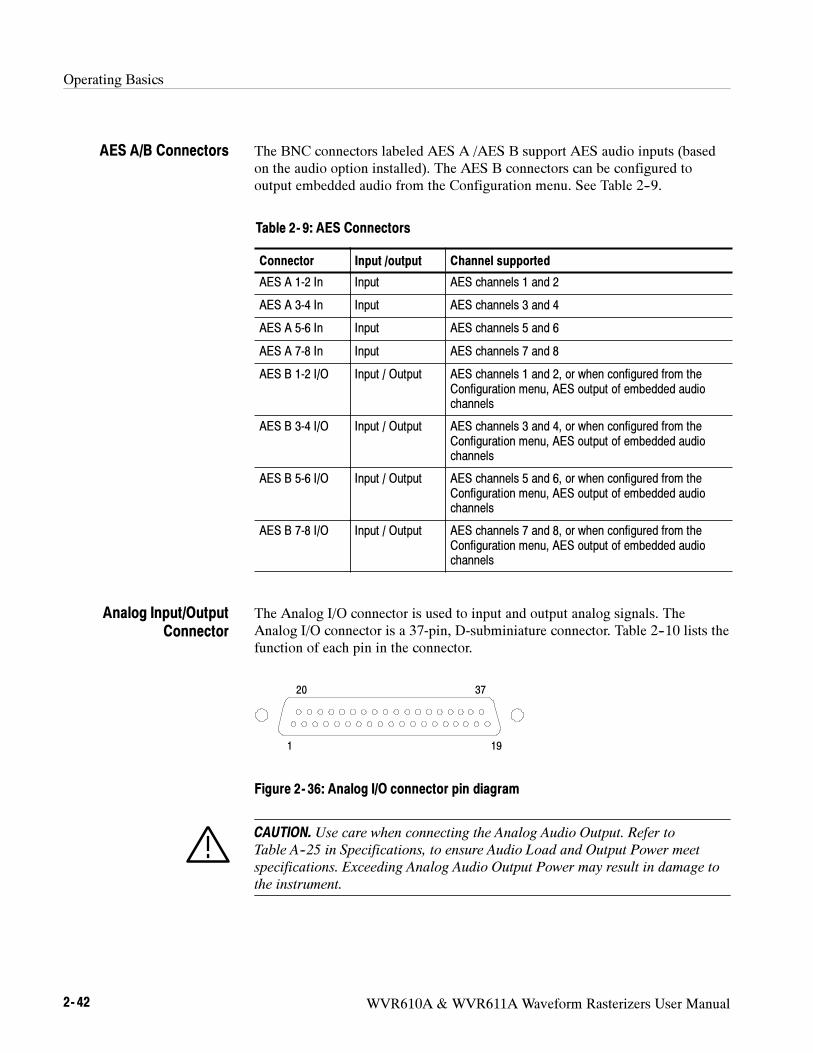
Operating Basics
2- 42 WVR610A & WVR611A Waveform Rasterizers User Manual
The BNC connectors labeled AES A /AES B support AES audio inputs (based
on the audio option installed). The AES B connectors can be configured to
output embedded audio from the Configuration menu. See Table 2--9.
Table 2- 9: AES Connectors
Connector Input /output Channel supported
AES A 1-2 In Input AES channels 1 and 2
AES A 3-4 In Input AES channels 3 and 4
AES A 5-6 In Input AES channels 5 and 6
AES A 7-8 In Input AES channels 7 and 8
AES B 1-2 I/O Input / Output AES channels 1 and 2, or when configured from the
Configuration menu, AES output of embedded audio
channels
AES B 3-4 I/O Input / Output AES channels 3 and 4, or when configured from the
Configuration menu, AES output of embedded audio
channels
AES B 5-6 I/O Input / Output AES channels 5 and 6, or when configured from the
Configuration menu, AES output of embedded audio
channels
AES B 7-8 I/O Input / Output AES channels 7 and 8, or when configured from the
Configuration menu, AES output of embedded audio
channels
The Analog I/O connector is used to input and output analog signals. The
Analog I/O connector is a 37-pin, D-subminiature connector. Table 2--10 lists the
function of each pin in the connector.
1 19
20 37
Figure 2- 36: Analog I/O connector pin diagram
CAUTION. Use care when connecting the Analog Audio Output. Refer to
Table A--25 in Specifications, to ensure Audio Load and Output Power meet
specifications. Exceeding Analog Audio Output Power may result in damage to
the instrument.
AES A/B Connectors
Analog Input/Output
Connector
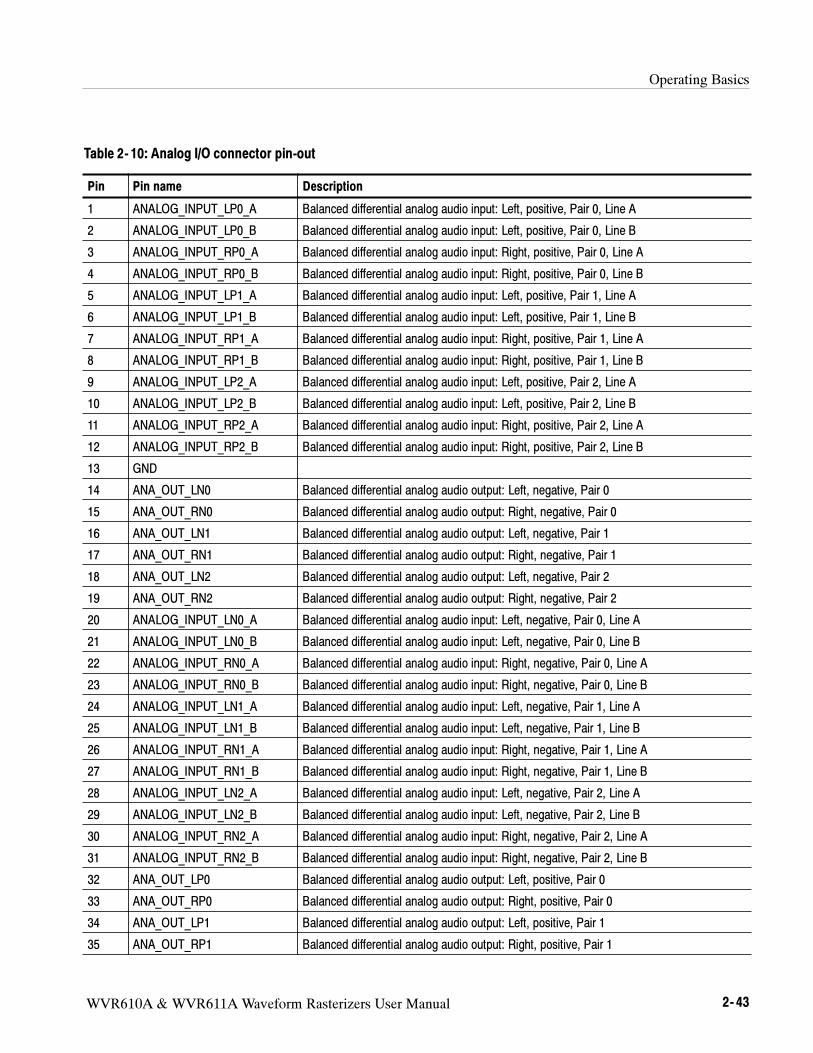
Operating Basics
WVR610A & WVR611A Waveform Rasterizers User Manual 2- 43
Table 2- 10: Analog I/O connector pin-out
Pin Pin name Description
1 ANALOG_INPUT_LP0_A Balanced differential analog audio input: Left, positive, Pair 0, Line A
2 ANALOG_INPUT_LP0_B Balanced differential analog audio input: Left, positive, Pair 0, Line B
3 ANALOG_INPUT_RP0_A Balanced differential analog audio input: Right, positive, Pair 0, Line A
4 ANALOG_INPUT_RP0_B Balanced differential analog audio input: Right, positive, Pair 0, Line B
5 ANALOG_INPUT_LP1_A Balanced differential analog audio input: Left, positive, Pair 1, Line A
6 ANALOG_INPUT_LP1_B Balanced differential analog audio input: Left, positive, Pair 1, Line B
7 ANALOG_INPUT_RP1_A Balanced differential analog audio input: Right, positive, Pair 1, Line A
8 ANALOG_INPUT_RP1_B Balanced differential analog audio input: Right, positive, Pair 1, Line B
9 ANALOG_INPUT_LP2_A Balanced differential analog audio input: Left, positive, Pair 2, Line A
10 ANALOG_INPUT_LP2_B Balanced differential analog audio input: Left, positive, Pair 2, Line B
11 ANALOG_INPUT_RP2_A Balanced differential analog audio input: Right, positive, Pair 2, Line A
12 ANALOG_INPUT_RP2_B Balanced differential analog audio input: Right, positive, Pair 2, Line B
13 GND
14 ANA_OUT_LN0 Balanced differential analog audio output: Left, negative, Pair 0
15 ANA_OUT_RN0 Balanced differential analog audio output: Right, negative, Pair 0
16 ANA_OUT_LN1 Balanced differential analog audio output: Left, negative, Pair 1
17 ANA_OUT_RN1 Balanced differential analog audio output: Right, negative, Pair 1
18 ANA_OUT_LN2 Balanced differential analog audio output: Left, negative, Pair 2
19 ANA_OUT_RN2 Balanced differential analog audio output: Right, negative, Pair 2
20 ANALOG_INPUT_LN0_A Balanced differential analog audio input: Left, negative, Pair 0, Line A
21 ANALOG_INPUT_LN0_B Balanced differential analog audio input: Left, negative, Pair 0, Line B
22 ANALOG_INPUT_RN0_A Balanced differential analog audio input: Right, negative, Pair 0, Line A
23 ANALOG_INPUT_RN0_B Balanced differential analog audio input: Right, negative, Pair 0, Line B
24 ANALOG_INPUT_LN1_A Balanced differential analog audio input: Left, negative, Pair 1, Line A
25 ANALOG_INPUT_LN1_B Balanced differential analog audio input: Left, negative, Pair 1, Line B
26 ANALOG_INPUT_RN1_A Balanced differential analog audio input: Right, negative, Pair 1, Line A
27 ANALOG_INPUT_RN1_B Balanced differential analog audio input: Right, negative, Pair 1, Line B
28 ANALOG_INPUT_LN2_A Balanced differential analog audio input: Left, negative, Pair 2, Line A
29 ANALOG_INPUT_LN2_B Balanced differential analog audio input: Left, negative, Pair 2, Line B
30 ANALOG_INPUT_RN2_A Balanced differential analog audio input: Right, negative, Pair 2, Line A
31 ANALOG_INPUT_RN2_B Balanced differential analog audio input: Right, negative, Pair 2, Line B
32 ANA_OUT_LP0 Balanced differential analog audio output: Left, positive, Pair 0
33 ANA_OUT_RP0 Balanced differential analog audio output: Right, positive, Pair 0
34 ANA_OUT_LP1 Balanced differential analog audio output: Left, positive, Pair 1
35 ANA_OUT_RP1 Balanced differential analog audio output: Right, positive, Pair 1
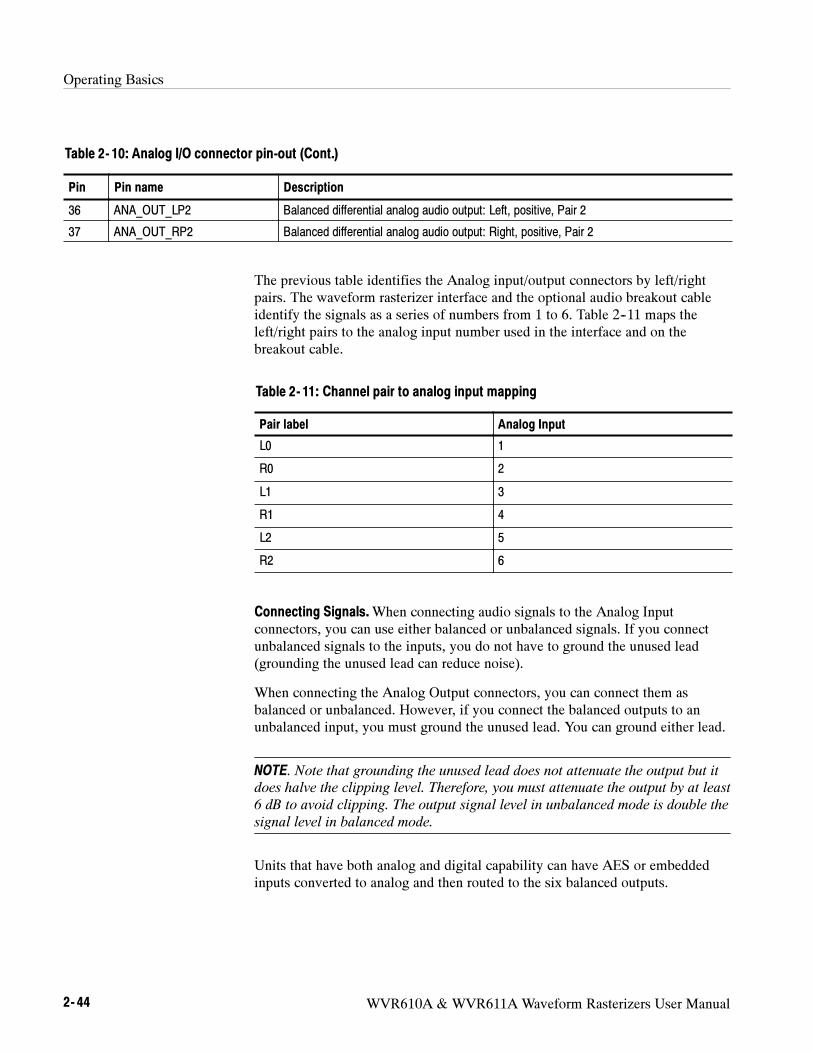
Operating Basics
2- 44 WVR610A & WVR611A Waveform Rasterizers User Manual
Table 2- 10: Analog I/O connector pin-out (Cont.)
Pin DescriptionPin name
36 ANA_OUT_LP2 Balanced differential analog audio output: Left, positive, Pair 2
37 ANA_OUT_RP2 Balanced differential analog audio output: Right, positive, Pair 2
The previous table identifies the Analog input/output connectors by left/right
pairs. The waveform rasterizer interface and the optional audio breakout cable
identify the signals as a series of numbers from 1 to 6. Table 2--11 maps the
left/right pairs to the analog input number used in the interface and on the
breakout cable.
Table 2- 11: Channel pair to analog input mapping
Pair label Analog Input
L0 1
R0 2
L1 3
R1 4
L2 5
R2 6
Connecting Signals.When connecting audio signals to the Analog Input
connectors, you can use either balanced or unbalanced signals. If you connect
unbalanced signals to the inputs, you do not have to ground the unused lead
(grounding the unused lead can reduce noise).
When connecting the Analog Output connectors, you can connect them as
balanced or unbalanced. However, if you connect the balanced outputs to an
unbalanced input, you must ground the unused lead. You can ground either lead.
NOTE. Note that grounding the unused lead does not attenuate the output but it
does halve the clipping level. Therefore, you must attenuate the output by at least
6 dB to avoid clipping. The output signal level in unbalanced mode is double the
signal level in balanced mode.
Units that have both analog and digital capability can have AES or embedded
inputs converted to analog and then routed to the six balanced outputs.
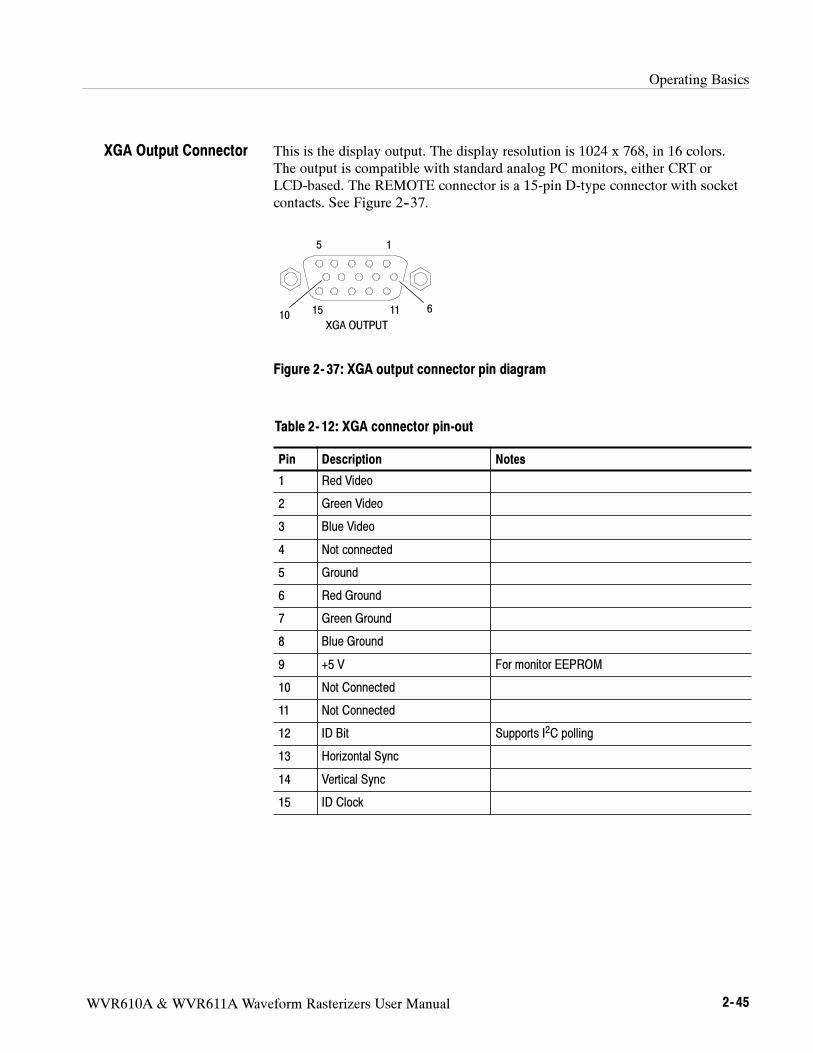
Operating Basics
WVR610A & WVR611A Waveform Rasterizers User Manual 2- 45
This is the display output. The display resolution is 1024 x 768, in 16 colors.
The output is compatible with standard analog PC monitors, either CRT or
LCD-based. The REMOTE connector is a 15-pin D-type connector with socket
contacts. See Figure 2--37.
15
1115 610
Figure 2- 37: XGA output connector pin diagram
Table 2- 12: XGA connector pin-out
Pin Description Notes
1 Red Video
2 Green Video
3 Blue Video
4 Not connected
5 Ground
6 Red Ground
7 Green Ground
8 Blue Ground
9 +5 V For monitor EEPROM
10 Not Connected
11 Not Connected
12 ID Bit Supports I2C polling
13 Horizontal Sync
14 Vertical Sync
15 ID Clock
XGA Output Connector

Operating Basics
2- 46 WVR610A & WVR611A Waveform Rasterizers User Manual
The REMOTE connector interface uses ground closures for remote control and
indicating to external equipment when alarms have occurred. The input of LTC
is through the REMOTE connector. The REMOTE connector is a 15-pin D-type
connector with socket contacts. See Figure 2--38 and Table 2--13.
8 1
915
Figure 2- 38: REMOTE connector pin diagram
Table 2- 13: REMOTE connector pin-out
Pin Description Direction Notes
1 Reserved for future use ----
2 GND
3 Reserved for future use ----
4 Reserved for future use ----
5 Preset 1 IN Recall Preset 1
6 GND
7 +Time Code IN LTC (longitudinal time code) input.
8 --Time Code IN
9 Output OUT This line goes to ground when asserted. It
is asserted when an alarm occurs, if
enabled.
10 Reserved for future use ----
11 Reserved for future use ----
12 Reserved for future use ----
13 Preset 2 IN Recall front-panel presets. Asserting one of
the Preset signals causes the associated
14 Preset 3 IN
the Preset signals causes the associated
front-panel preset to be applied to the
waveform rasterizer Assert a pin by
15 Preset 4 IN
waveform rasterizer. Assert a pin by
connecting it to ground.
Ground Closure
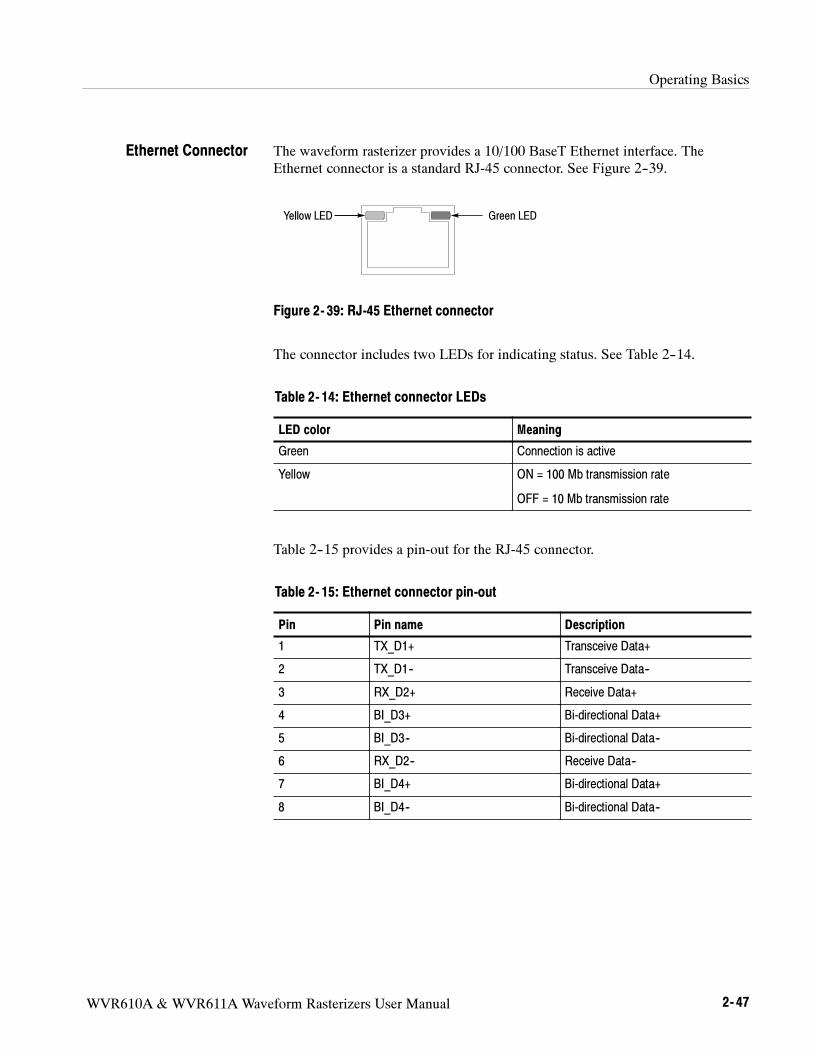
Operating Basics
WVR610A & WVR611A Waveform Rasterizers User Manual 2- 47
The waveform rasterizer provides a 10/100 BaseT Ethernet interface. The
Ethernet connector is a standard RJ-45 connector. See Figure 2--39.
Green LEDYellow LED
Figure 2- 39: RJ-45 Ethernet connector
The connector includes two LEDs for indicating status. See Table 2--14.
Table 2- 14: Ethernet connector LEDs
LED color Meaning
Green Connection is active
Yellow ON = 100 Mb transmission rate
OFF = 10 Mb transmission rate
Table 2--15 provides a pin-out for the RJ-45 connector.
Table 2- 15: Ethernet connector pin-out
Pin Pin name Description
1 TX_D1+ Transceive Data+
2 TX_D1-- Transceive Data--
3 RX_D2+ Receive Data+
4 BI_D3+ Bi-directional Data+
5 BI_D3-- Bi-directional Data--
6 RX_D2-- Receive Data--
7 BI_D4+ Bi-directional Data+
8 BI_D4-- Bi-directional Data--
Ethernet Connector

Operating Basics
2- 48 WVR610A & WVR611A Waveform Rasterizers User Manual
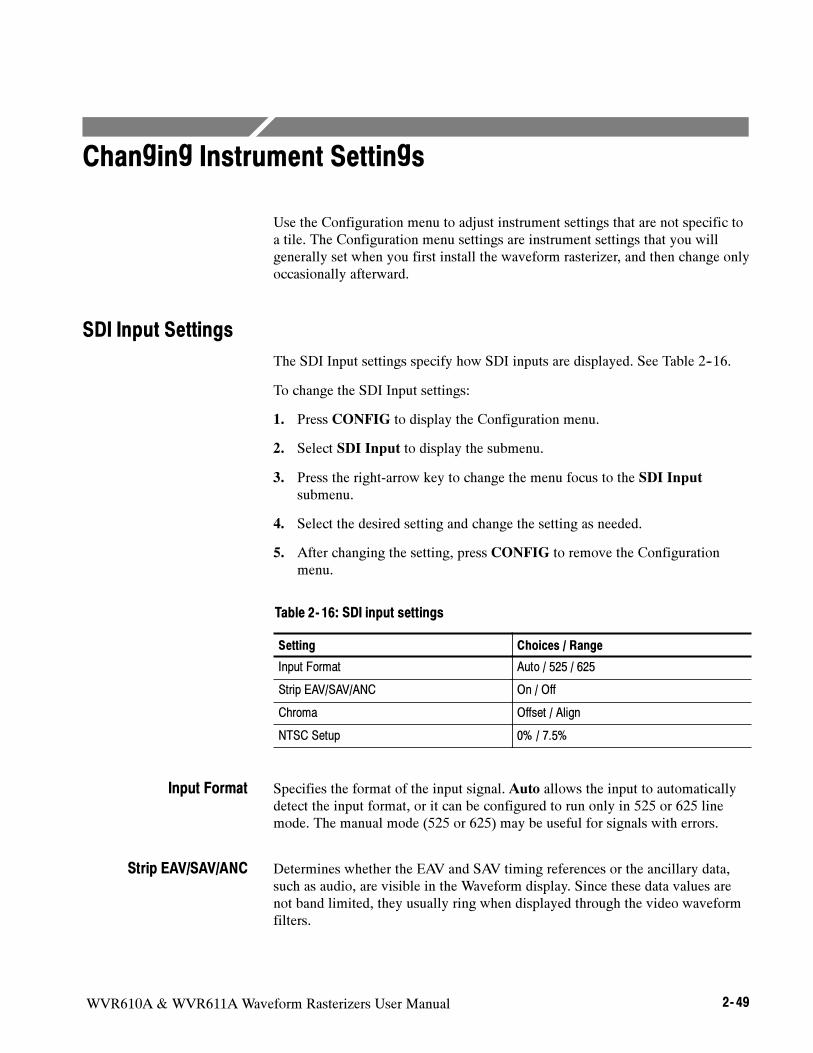
WVR610A & WVR611A Waveform Rasterizers User Manual 2- 49
Changing Instrument Settings
Use the Configuration menu to adjust instrument settings that are not specific to
a tile. The Configuration menu settings are instrument settings that you will
generally set when you first install the waveform rasterizer, and then change only
occasionally afterward.
SDI Input Settings
The SDI Input settings specify how SDI inputs are displayed. See Table 2--16.
To change the SDI Input settings:
1. Press CONFIG to display the Configuration menu.
2. Select SDI Input to display the submenu.
3. Press the right-arrow key to change the menu focus to the SDI Input
submenu.
4. Select the desired setting and change the setting as needed.
5. After changing the setting, press CONFIG to remove the Configuration
menu.
Table 2- 16: SDI input settings
Setting Choices / Range
Input Format Auto / 525 / 625
Strip EAV/SAV/ANC On / Off
Chroma Offset / Align
NTSC Setup 0% / 7.5%
Specifies the format of the input signal. Auto allows the input to automatically
detect the input format, or it can be configured to run only in 525 or 625 line
mode. The manual mode (525 or 625) may be useful for signals with errors.
Determines whether the EAV and SAV timing references or the ancillary data,
such as audio, are visible in the Waveform display. Since these data values are
not band limited, they usually ring when displayed through the video waveform
filters.
Input Format
Strip EAV/SAV/ANC
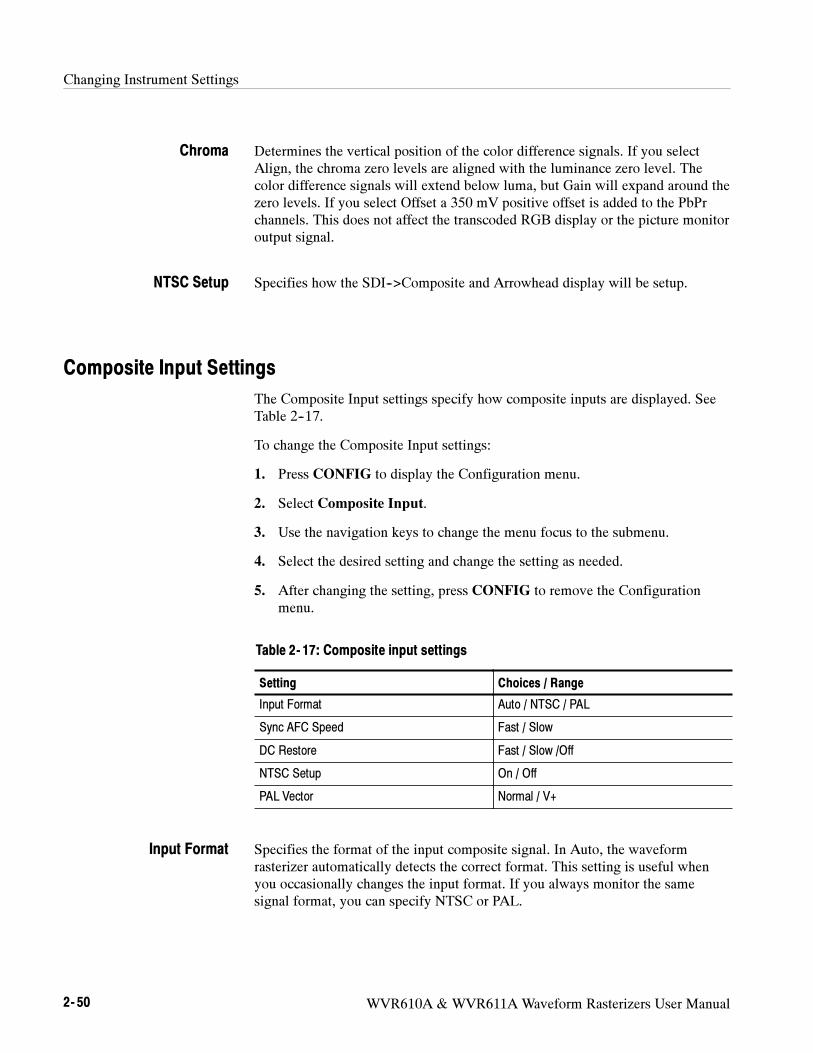
Changing Instrument Settings
2- 50 WVR610A & WVR611A Waveform Rasterizers User Manual
Determines the vertical position of the color difference signals. If you select
Align, the chroma zero levels are aligned with the luminance zero level. The
color difference signals will extend below luma, but Gain will expand around the
zero levels. If you select Offset a 350 mV positive offset is added to the PbPr
channels. This does not affect the transcoded RGB display or the picture monitor
output signal.
Specifies how the SDI-->Composite and Arrowhead display will be setup.
Composite Input Settings
The Composite Input settings specify how composite inputs are displayed. See
Table 2--17.
To change the Composite Input settings:
1. Press CONFIG to display the Configuration menu.
2. Select Composite Input.
3. Use the navigation keys to change the menu focus to the submenu.
4. Select the desired setting and change the setting as needed.
5. After changing the setting, press CONFIG to remove the Configuration
menu.
Table 2- 17: Composite input settings
Setting Choices / Range
Input Format Auto / NTSC / PAL
Sync AFC Speed Fast / Slow
DC Restore Fast / Slow /Off
NTSC Setup On / Off
PAL Vector Normal / V+
Specifies the format of the input composite signal. In Auto, the waveform
rasterizer automatically detects the correct format. This setting is useful when
you occasionally changes the input format. If you always monitor the same
signal format, you can specify NTSC or PAL.
Chroma
NTSC Setup
Input Format
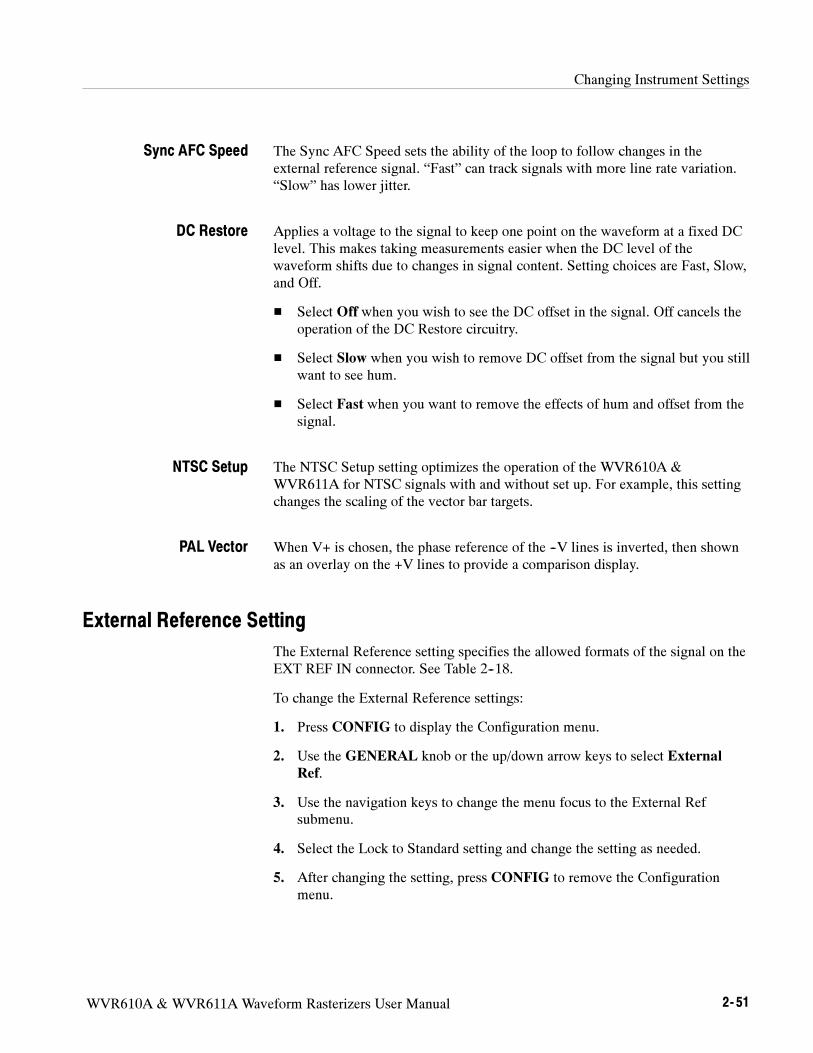
Changing Instrument Settings
WVR610A & WVR611A Waveform Rasterizers User Manual 2- 51
The Sync AFC Speed sets the ability of the loop to follow changes in the
external reference signal. “Fast” can track signals with more line rate variation.
“Slow” has lower jitter.
Applies a voltage to the signal to keep one point on the waveform at a fixed DC
level. This makes taking measurements easier when the DC level of the
waveform shifts due to changes in signal content. Setting choices are Fast, Slow,
and Off.
Select Off when you wish to see the DC offset in the signal. Off cancels the
operation of the DC Restore circuitry.
Select Slow when you wish to remove DC offset from the signal but you still
want to see hum.
Select Fast when you want to remove the effects of hum and offset from the
signal.
The NTSC Setup setting optimizes the operation of the WVR610A &
WVR611A for NTSC signals with and without set up. For example, this setting
changes the scaling of the vector bar targets.
When V+ is chosen, the phase reference of the --V lines is inverted, then shown
as an overlay on the +V lines to provide a comparison display.
External Reference Setting
The External Reference setting specifies the allowed formats of the signal on the
EXT REF IN connector. See Table 2--18.
To change the External Reference settings:
1. Press CONFIG to display the Configuration menu.
2. Use the GENERAL knob or the up/down arrow keys to select External
Ref.
3. Use the navigation keys to change the menu focus to the External Ref
submenu.
4. Select the Lock to Standard setting and change the setting as needed.
5. After changing the setting, press CONFIG to remove the Configuration
menu.
Sync AFC Speed
DC Restore
NTSC Setup
PAL Vector
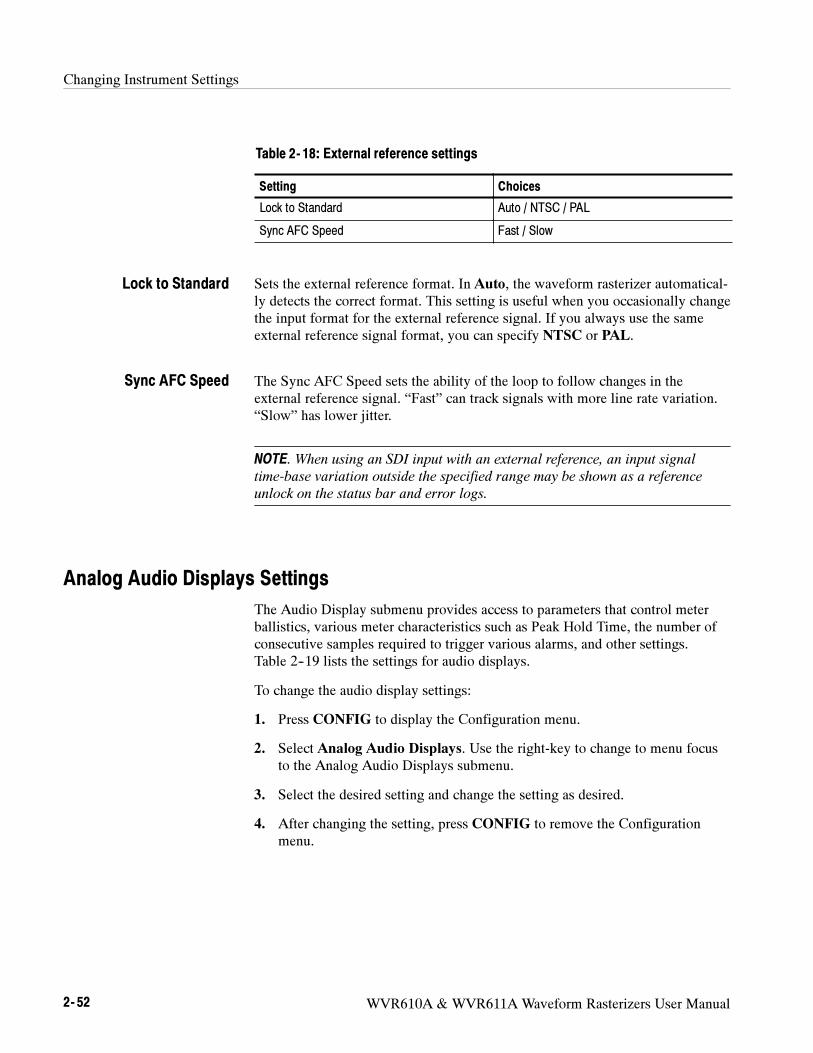
Changing Instrument Settings
2- 52 WVR610A & WVR611A Waveform Rasterizers User Manual
Table 2- 18: External reference settings
Setting Choices
Lock to Standard Auto / NTSC / PAL
Sync AFC Speed Fast / Slow
Sets the external reference format. In Auto, the waveform rasterizer automatical-
ly detects the correct format. This setting is useful when you occasionally change
the input format for the external reference signal. If you always use the same
external reference signal format, you can specify NTSC or PAL.
The Sync AFC Speed sets the ability of the loop to follow changes in the
external reference signal. “Fast” can track signals with more line rate variation.
“Slow” has lower jitter.
NOTE. When using an SDI input with an external reference, an input signal
time-base variation outside the specified range may be shown as a reference
unlock on the status bar and error logs.
Analog Audio Displays Settings
The Audio Display submenu provides access to parameters that control meter
ballistics, various meter characteristics such as Peak Hold Time, the number of
consecutive samples required to trigger various alarms, and other settings.
Table 2--19 lists the settings for audio displays.
To change the audio display settings:
1. Press CONFIG to display the Configuration menu.
2. Select Analog Audio Displays. Use the right-key to change to menu focus
to the Analog Audio Displays submenu.
3. Select the desired setting and change the setting as desired.
4. After changing the setting, press CONFIG to remove the Configuration
menu.
Lock to Standard
Sync AFC Speed
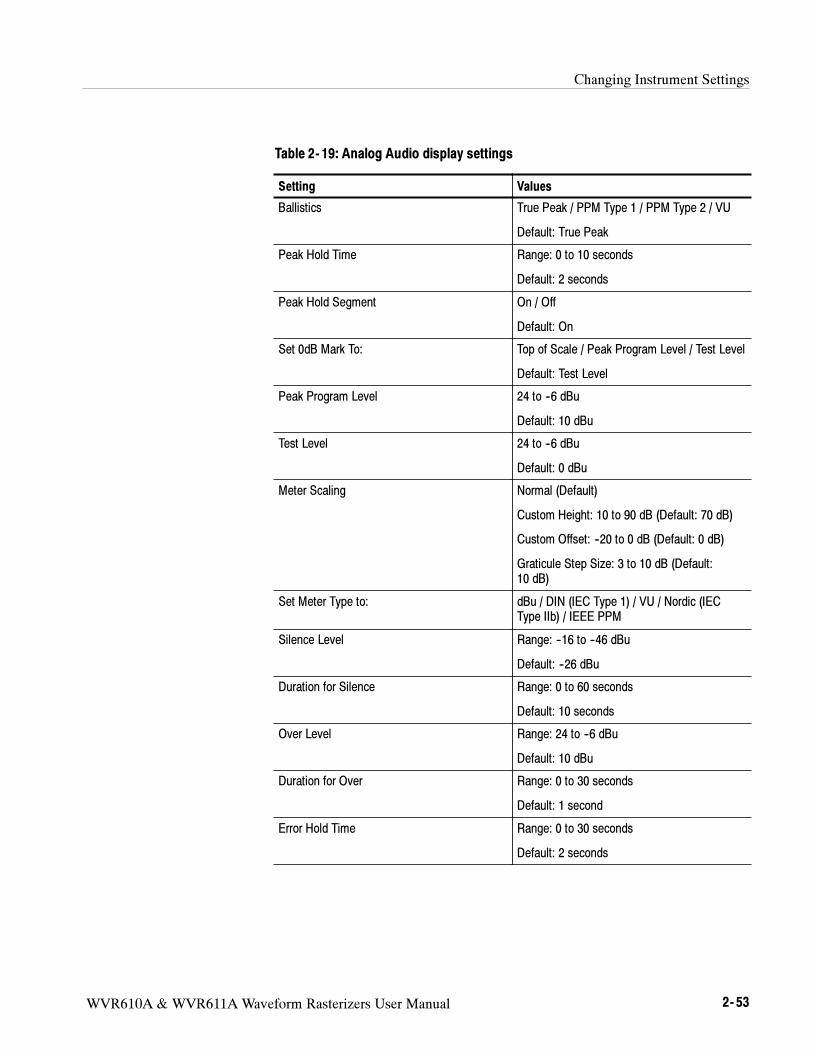
Changing Instrument Settings
WVR610A & WVR611A Waveform Rasterizers User Manual 2- 53
Table 2- 19: Analog Audio display settings
Setting Values
Ballistics True Peak / PPM Type 1 / PPM Type 2 / VU
Default: True Peak
Peak Hold Time Range: 0 to 10 seconds
Default: 2 seconds
Peak Hold Segment On / Off
Default: On
Set 0dB Mark To: Top of Scale / Peak Program Level / Test Level
Default: Test Level
Peak Program Level 24 to --6 dBu
Default: 10 dBu
Test Level 24 to --6 dBu
Default: 0 dBu
Meter Scaling Normal (Default)
Custom Height: 10 to 90 dB (Default: 70 dB)
Custom Offset: --20 to 0 dB (Default: 0 dB)
Graticule Step Size: 3 to 10 dB (Default:
10 dB)
Set Meter Type to: dBu / DIN (IEC Type 1) / VU / Nordic (IEC
Type IIb) / IEEE PPM
Silence Level Range: --16 to --46 dBu
Default: --26 dBu
Duration for Silence Range: 0 to 60 seconds
Default: 10 seconds
Over Level Range: 24 to --6 dBu
Default: 10 dBu
Duration for Over Range: 0 to 30 seconds
Default: 1 second
Error Hold Time Range: 0 to 30 seconds
Default: 2 seconds
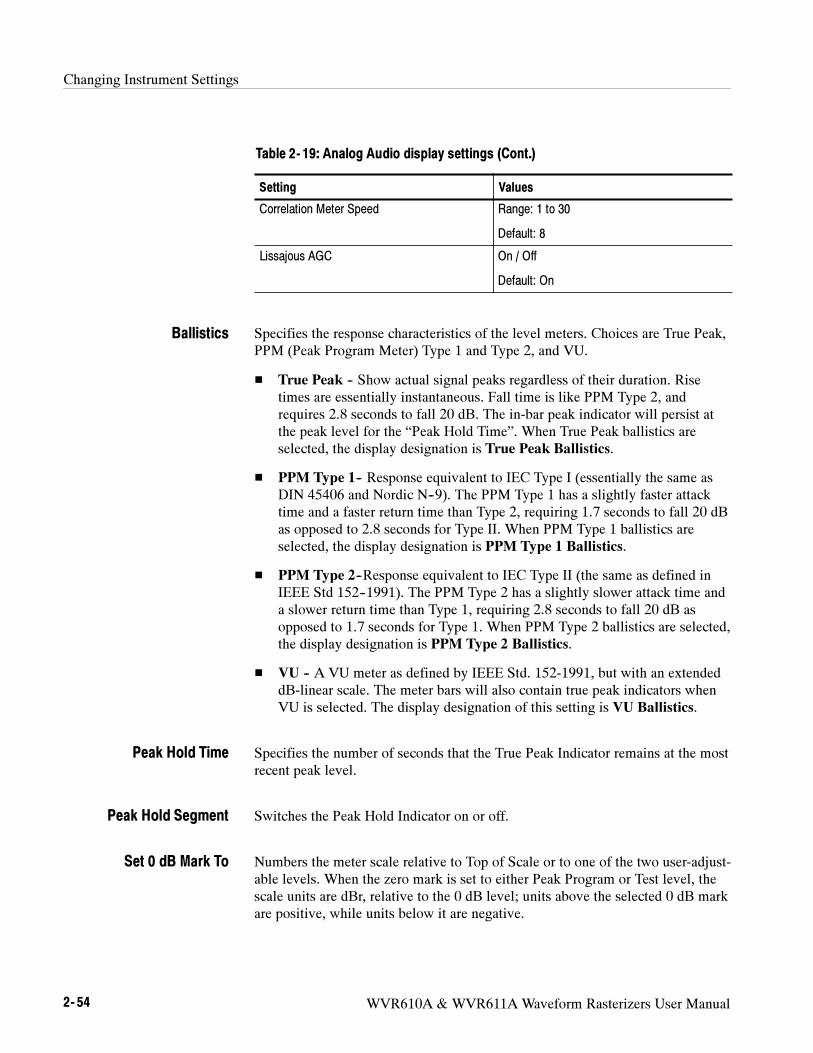
Changing Instrument Settings
2- 54 WVR610A & WVR611A Waveform Rasterizers User Manual
Table 2- 19: Analog Audio display settings (Cont.)
Setting Values
Correlation Meter Speed Range: 1 to 30
Default: 8
Lissajous AGC On / Off
Default: On
Specifies the response characteristics of the level meters. Choices are True Peak,
PPM (Peak Program Meter) Type 1 and Type 2, and VU.
True Peak -- Show actual signal peaks regardless of their duration. Rise
times are essentially instantaneous. Fall time is like PPM Type 2, and
requires 2.8 seconds to fall 20 dB. The in-bar peak indicator will persist at
the peak level for the “Peak Hold Time”. When True Peak ballistics are
selected, the display designation is True Peak Ballistics.
PPM Type 1-- Response equivalent to IEC Type I (essentially the same as
DIN 45406 and Nordic N--9). The PPM Type 1 has a slightly faster attack
time and a faster return time than Type 2, requiring 1.7 seconds to fall 20 dB
as opposed to 2.8 seconds for Type II. When PPM Type 1 ballistics are
selected, the display designation is PPM Type 1 Ballistics.
PPM Type 2--Response equivalent to IEC Type II (the same as defined in
IEEE Std 152--1991). The PPM Type 2 has a slightly slower attack time and
a slower return time than Type 1, requiring 2.8 seconds to fall 20 dB as
opposed to 1.7 seconds for Type 1. When PPM Type 2 ballistics are selected,
the display designation is PPM Type 2 Ballistics.
VU -- A VU meter as defined by IEEE Std. 152-1991, but with an extended
dB-linear scale. The meter bars will also contain true peak indicators when
VU is selected. The display designation of this setting is VU Ballistics.
Specifies the number of seconds that the True Peak Indicator remains at the most
recent peak level.
Switches the Peak Hold Indicator on or off.
Numbers the meter scale relative to Top of Scale or to one of the two user-adjust-
able levels. When the zero mark is set to either Peak Program or Test level, the
scale units are dBr, relative to the 0 dB level; units above the selected 0 dB mark
are positive, while units below it are negative.
Ballistics
Peak Hold Time
Peak Hold Segment
Set 0 dB Mark To
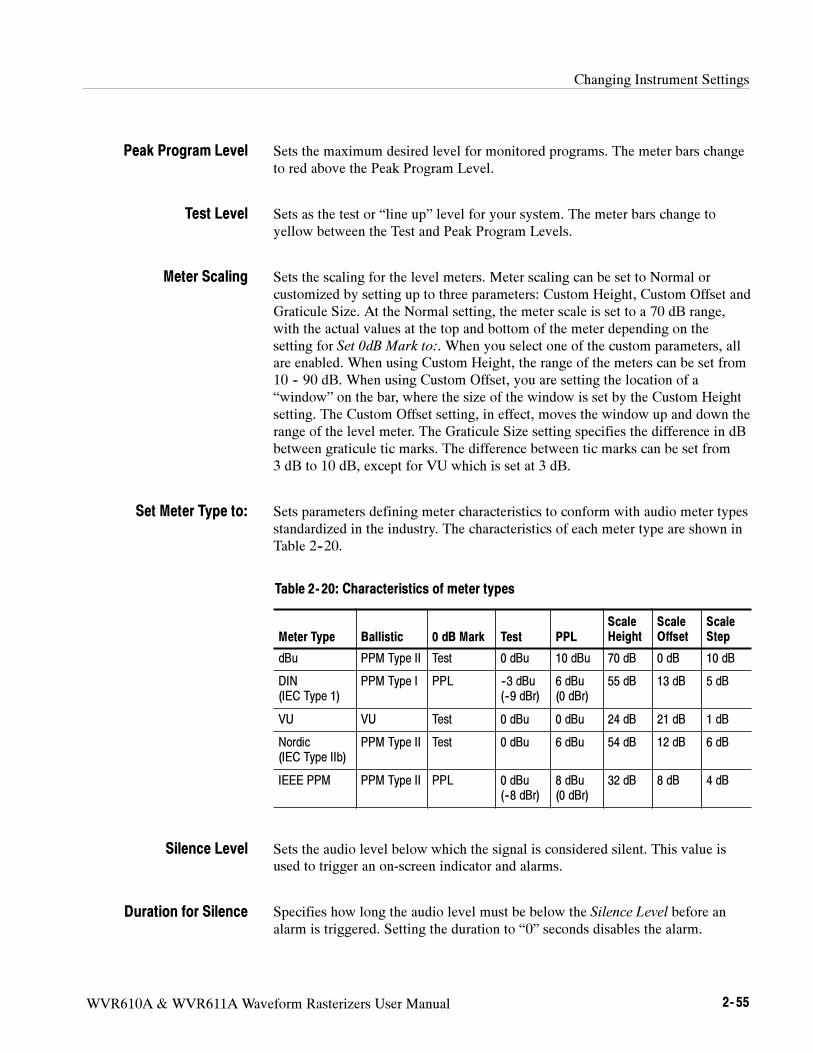
Changing Instrument Settings
WVR610A & WVR611A Waveform Rasterizers User Manual 2- 55
Sets the maximum desired level for monitored programs. The meter bars change
to red above the Peak Program Level.
Sets as the test or “line up” level for your system. The meter bars change to
yellow between the Test and Peak Program Levels.
Sets the scaling for the level meters. Meter scaling can be set to Normal or
customized by setting up to three parameters: Custom Height, Custom Offset and
Graticule Size. At the Normal setting, the meter scale is set to a 70 dB range,
with the actual values at the top and bottom of the meter depending on the
setting for Set 0dB Mark to:. When you select one of the custom parameters, all
are enabled. When using Custom Height, the range of the meters can be set from
10 -- 90 dB. When using Custom Offset, you are setting the location of a
“window” on the bar, where the size of the window is set by the Custom Height
setting. The Custom Offset setting, in effect, moves the window up and down the
range of the level meter. The Graticule Size setting specifies the difference in dB
between graticule tic marks. The difference between tic marks can be set from
3 dB to 10 dB, except for VU which is set at 3 dB.
Sets parameters defining meter characteristics to conform with audio meter types
standardized in the industry. The characteristics of each meter type are shown in
Table 2--20.
Table 2- 20: Characteristics of meter types
Meter Type Ballistic 0 dB Mark Test PPL
Scale
Height
Scale
Offset
Scale
Step
dBu PPM Type II Test 0 dBu 10 dBu 70 dB 0 dB 10 dB
DIN
(IEC Type 1)
PPM Type I PPL --3 dBu
(--9 dBr)
6 dBu
(0 dBr)
55 dB 13 dB 5 dB
VU VU Test 0 dBu 0 dBu 24 dB 21 dB 1 dB
Nordic
(IEC Type IIb)
PPM Type II Test 0 dBu 6 dBu 54 dB 12 dB 6 dB
IEEE PPM PPM Type II PPL 0 dBu
(--8 dBr)
8 dBu
(0 dBr)
32 dB 8 dB 4 dB
Sets the audio level below which the signal is considered silent. This value is
used to trigger an on-screen indicator and alarms.
Specifies how long the audio level must be below the Silence Level before an
alarm is triggered. Setting the duration to “0” seconds disables the alarm.
Peak Program Level
Test Level
Meter Scaling
Set Meter Type to:
Silence Level
Duration for Silence
Changing Instrument Settings
2- 56 WVR610A & WVR611A Waveform Rasterizers User Manual
Specifies the audio level above which the signal is considered “over”. This
setting is used to trigger on-screen indicators and alarms.
Specifies how long the audio level must be above the Over Level before an alarm
will be triggered.
Specifies the length of time the in-bar error messages are displayed after the error
has been removed.
Determines how quickly the meter reacts to changes in phase relationship. The
meter reading is actually an average of correlation over time and this setting
determines how many samples are used to calculate the average. Lower settings
result in a faster meter response. Experiment to find the setting that best fits your
needs. The default setting is 8, which is 1.5 seconds.
When On, allows the Lissajous or Phase display to change gain and keep the
display well scaled. When Off, puts the display in fixed gain mode with the Peak
Program level at the perimeter of the active area.
NOTE. The audio pop-up menu allows selection of input and allows the optional
phase display to be added to the audio tile.
Digital Audio Displays Settings
The Digital Audio Display submenu provides access to parameters that control
meter ballistics, various meter characteristics such as Peak Hold Time, the
number of consecutive samples required to trigger various alarms, and other
settings. Table 2--19 lists the settings for audio displays.
To change the audio display settings:
1. Press CONFIG to display the Configuration menu.
2. Select Digital Audio Displays. Use the right-key to change to menu focus to
the Digital Audio Displays submenu.
3. Select the desired setting and change the setting as desired.
4. After changing the setting, press CONFIG to remove the Configuration
menu.
Over Level
Duration for Over
Error Hold Time
Correlation Meter Speed
Lissajous AGC
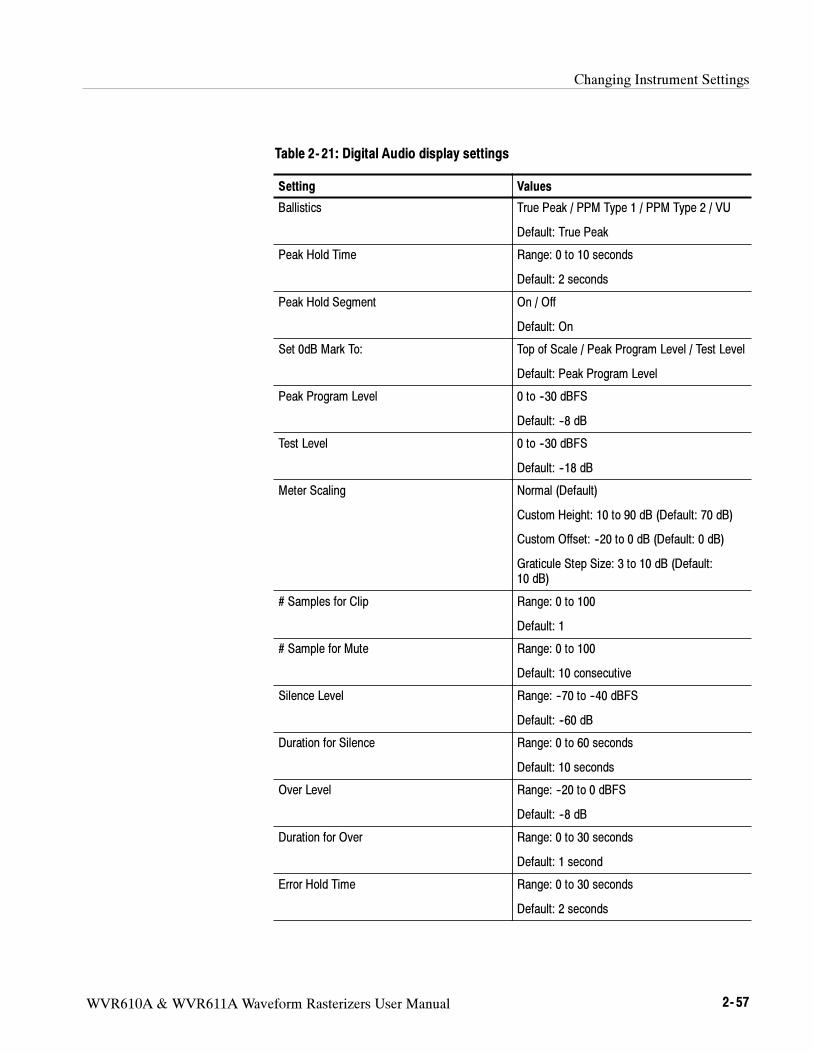
Changing Instrument Settings
WVR610A & WVR611A Waveform Rasterizers User Manual 2- 57
Table 2- 21: Digital Audio display settings
Setting Values
Ballistics True Peak / PPM Type 1 / PPM Type 2 / VU
Default: True Peak
Peak Hold Time Range: 0 to 10 seconds
Default: 2 seconds
Peak Hold Segment On / Off
Default: On
Set 0dB Mark To: Top of Scale / Peak Program Level / Test Level
Default: Peak Program Level
Peak Program Level 0 to --30 dBFS
Default: --8 dB
Test Level 0 to --30 dBFS
Default: --18 dB
Meter Scaling Normal (Default)
Custom Height: 10 to 90 dB (Default: 70 dB)
Custom Offset: --20 to 0 dB (Default: 0 dB)
Graticule Step Size: 3 to 10 dB (Default:
10 dB)
# Samples for Clip Range: 0 to 100
Default: 1
# Sample for Mute Range: 0 to 100
Default: 10 consecutive
Silence Level Range: --70 to --40 dBFS
Default: --60 dB
Duration for Silence Range: 0 to 60 seconds
Default: 10 seconds
Over Level Range: --20 to 0 dBFS
Default: --8 dB
Duration for Over Range: 0 to 30 seconds
Default: 1 second
Error Hold Time Range: 0 to 30 seconds
Default: 2 seconds

Changing Instrument Settings
2- 58 WVR610A & WVR611A Waveform Rasterizers User Manual
Table 2- 21: Digital Audio display settings (Cont.)
Setting Values
Correlation Meter Speed Range: 1 to 30
Default: 8
Lissajous AGC On / Off
Default: On
Specifies the response characteristics of the level meters. Choices are True Peak,
PPM (Peak Program Meter) Type 1 and Type 2, and VU.
True Peak -- Show actual signal peaks regardless of their duration. Rise
times are essentially instantaneous. Fall time is like PPM Type 2, and
requires 2.8 seconds to fall 20 dB. The in-bar peak indicator will persist at
the peak level for the “Peak Hold Time”. When True Peak ballistics are
selected, the display designation is True Peak Ballistics.
PPM Type 1-- Response equivalent to IEC Type I (essentially the same as
DIN 45406 and Nordic N--9). The PPM Type 1 has a slightly faster attack
time and a faster return time than Type 2, requiring 1.7 seconds to fall 20 dB
as opposed to 2.8 seconds for Type II. When PPM Type 1 ballistics are
selected, the display designation is PPM Type 1 Ballistics.
PPM Type 2--Response equivalent to IEC Type II (the same as defined in
IEEE Std 152--1991). The PPM Type 2 has a slightly slower attack time and
a slower return time than Type 1, requiring 2.8 seconds to fall 20 dB as
opposed to 1.7 seconds for Type 1. When PPM Type 2 ballistics are selected,
the display designation is PPM Type 2 Ballistics.
VU -- A VU meter as defined by IEEE Std. 152-1991, but with an extended
dB-linear scale. The meter bars will also contain true peak indicators when
VU is selected. The display designation of this setting is VU Ballistics.
Specifies the number of seconds that the True Peak Indicator remains at the most
recent peak level.
Switches the Peak Hold Indicator on or off.
Numbers the meter scale relative to Top of Scale or to one of the two user-adjust-
able levels. When the zero mark is set to either Peak Program or Test level, the
scale units are dBr, relative to the 0 dB level; units above the selected 0 dB mark
are positive, while units below it are negative.
Ballistics
Peak Hold Time
Peak Hold Segment
Set 0 dB Mark To
Changing Instrument Settings
WVR610A & WVR611A Waveform Rasterizers User Manual 2- 59
Sets the maximum desired level for monitored programs relative to digital full
scale. The meter bars change to red above the Peak Program Level.
Sets as the test or “line up” level for your system relative to digital full scale.
The meter bars change to yellow between the Test and Peak Program Levels.
Sets the scaling for the level meters. Meter scaling can be set to Normal or
customized by setting up to three parameters: Custom Height, Custom Offset,
and Graticule Size. At the Normal setting, the meter scale is set to a 70 dB range,
with the actual values at the top and bottom of the meter depending on the
setting for Set 0dB Mark to:. When you select one of the custom settings, all are
enabled. When using Custom Height, the range of the meters can be set from
10 -- 90 dB. When using Custom Offset, you are setting the location of a
“window” on the bar, where the size of the window is set by the Custom Height
setting. The Custom Offset setting, in effect, moves the window up and down the
range of the level meter. The Graticule Size setting specifies the difference in dB
between graticule tic marks. The difference between tic marks can be set from
3 to 10 dB.
Specifies the number of consecutive Full Scale samples that must occur for a clip
indication to appear. Setting the number of samples to “0” disables the alarm.
Specifies the number of consecutive “0” samples that must occur for a mute
indication to appear. Setting the number of samples to “0” disables the alarm.
Sets the audio level below which the signal is considered silent. This value is
used to trigger an on-screen indicator and alarms.
Specifies how long the audio level must be below the Silence Level before an
alarm is triggered. Setting the duration to “0” seconds disables the alarm.
Specifies the audio level above which the signal is considered “over”. This
setting is used to trigger on-screen indicators and alarms.
Specifies how long the audio level must be above the Over Level before an alarm
will be triggered.
Specifies the length of time the in-bar error messages are displayed after the error
has been removed.
Peak Program Level
Test Level
Meter Scaling
# Samples for Clip
# Samples for Mute
Silence Level
Duration for Silence
Over Level
Duration for Over
Error Hold Time
Changing Instrument Settings
2- 60 WVR610A & WVR611A Waveform Rasterizers User Manual
Determines how the waveform rasterizer reacts to a high (value 1) validity bit in
the input data. In AES3-1992 digital audio, a high validity bit indicates that the
sample word is not suitable for conversion to audio. When this setting is set to
the factory default of Off, the waveform rasterizer will ignore any sample
accompanied by a high validity bit, display a “V BIT” flag on the meter display
and report invalid samples on the session report. When set to On, invalid sample
reporting will be turned Off, and the waveform rasterizer will treat all samples as
valid.
Determines how quickly the meter reacts to changes in phase relationship. The
meter reading is actually an average of correlation over time and this setting
determines how many samples are used to calculate the average. Lower settings
result in a faster meter response. Experiment to find the setting that best fits your
needs. The default setting is 8, which is 1.5 seconds.
When On, allows the Lissajous or Phase display to change gain and keep the
display well scaled. When Off, puts the display in fixed gain mode with the Peak
Program level at the perimeter of the active area.
NOTE. The audio pop-up menu allows selection of input and allows the optional
phase display to be added to the audio tile.
Audio Inputs/Outputs
There are three CONFIG submenus for audio: Analog Audio Displays, Digital
Audio Displays, and Audio Inputs / Outputs. Audio Inputs/Outputs controls
which audio input is active. Audio inputs and outputs must be configured before
they can be used. Analog Audio Displays and Digital Audio Displays control
general audio configuration settings for parameters such as meter ballistics. See
Analog Audio Displays Settings on page 2--52 and Digital Audio Displays
Settings on page 2--56.
Control of which audio input is active is located in the AUDIO pop-up menu.
To set up audio inputs/outputs, first each input group should be configured. Then
if desired, a “Video to Audio Map” can be defined so that as you change video
inputs the audio source you want will be selected automatically. Finally, any
desired “Analog Audio Out Mapping” can be configured.
For units with digital audio capability, there are four AES pair inputs in the “A”
bank and four in the “B” bank. Four pairs of audio signals can also be extracted
(de-embedded) from the active serial video input. The “B” input bank can be
Ignore Validity Bit
Correlation Meter Speed
Lissajous AGC
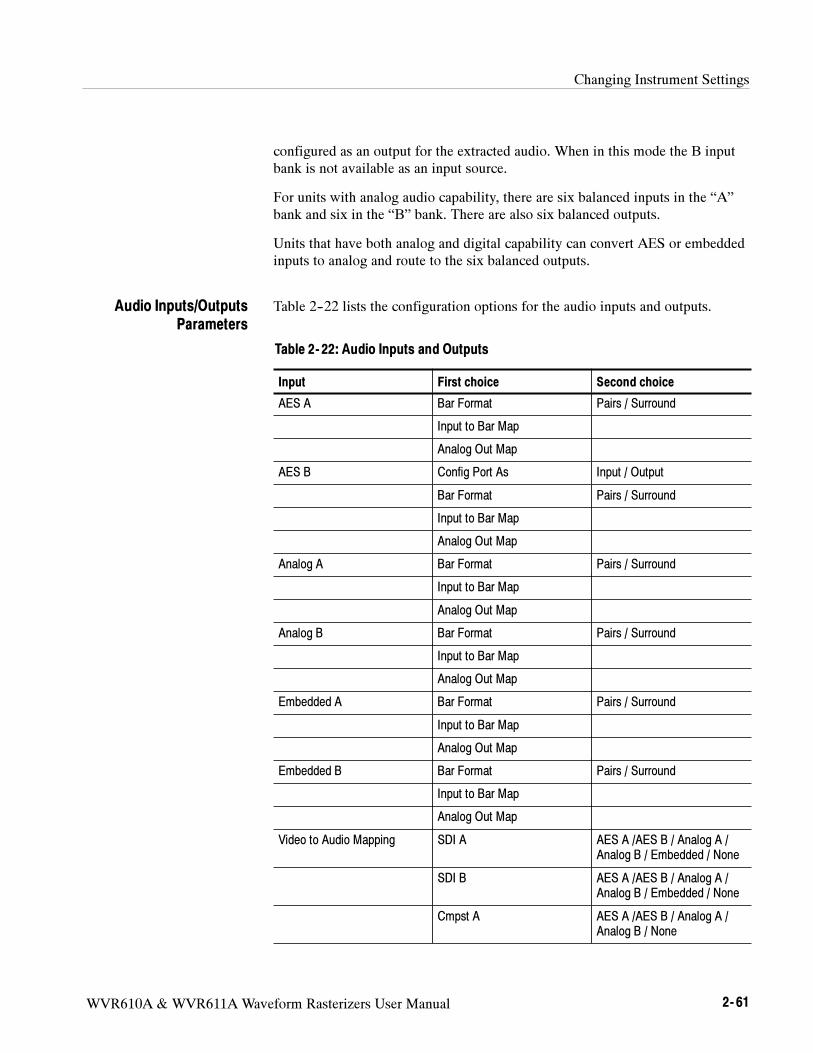
Changing Instrument Settings
WVR610A & WVR611A Waveform Rasterizers User Manual 2- 61
configured as an output for the extracted audio. When in this mode the B input
bank is not available as an input source.
For units with analog audio capability, there are six balanced inputs in the “A”
bank and six in the “B” bank. There are also six balanced outputs.
Units that have both analog and digital capability can convert AES or embedded
inputs to analog and route to the six balanced outputs.
Table 2--22 lists the configuration options for the audio inputs and outputs.
Table 2- 22: Audio Inputs and Outputs
Input First choice Second choice
AES A Bar Format Pairs / Surround
Input to Bar Map
Analog Out Map
AES B Config Port As Input / Output
Bar Format Pairs / Surround
Input to Bar Map
Analog Out Map
Analog A Bar Format Pairs / Surround
Input to Bar Map
Analog Out Map
Analog B Bar Format Pairs / Surround
Input to Bar Map
Analog Out Map
Embedded A Bar Format Pairs / Surround
Input to Bar Map
Analog Out Map
Embedded B Bar Format Pairs / Surround
Input to Bar Map
Analog Out Map
Video to Audio Mapping SDI A AES A /AES B / Analog A /
Analog B / Embedded / None
SDI B AES A /AES B / Analog A /
Analog B / Embedded / None
Cmpst A AES A /AES B / Analog A /
Analog B / None
Audio Inputs/Outputs
Parameters
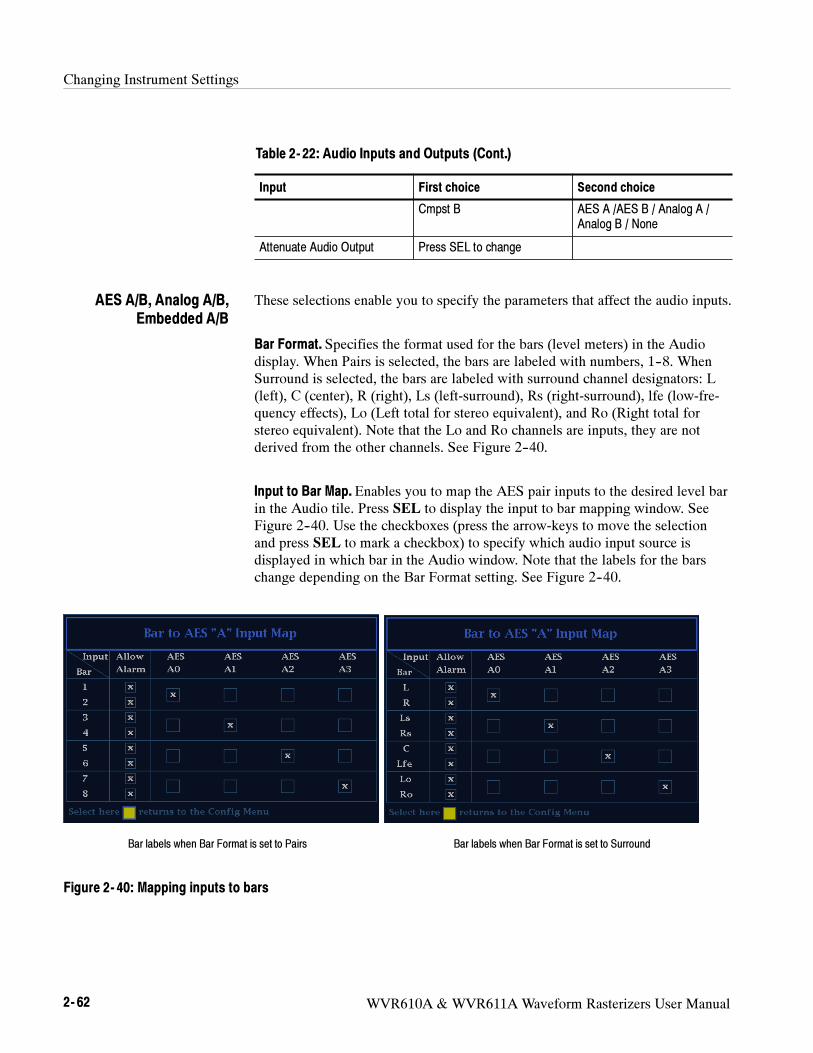
Changing Instrument Settings
2- 62 WVR610A & WVR611A Waveform Rasterizers User Manual
Table 2- 22: Audio Inputs and Outputs (Cont.)
Input Second choiceFirst choice
Cmpst B AES A /AES B / Analog A /
Analog B / None
Attenuate Audio Output Press SEL to change
These selections enable you to specify the parameters that affect the audio inputs.
Bar Format. Specifies the format used for the bars (level meters) in the Audio
display. When Pairs is selected, the bars are labeled with numbers, 1--8. When
Surround is selected, the bars are labeled with surround channel designators: L
(left), C (center), R (right), Ls (left-surround), Rs (right-surround), lfe (low-fre-
quency effects), Lo (Left total for stereo equivalent), and Ro (Right total for
stereo equivalent). Note that the Lo and Ro channels are inputs, they are not
derived from the other channels. See Figure 2--40.
Input to Bar Map. Enables you to map the AES pair inputs to the desired level bar
in the Audio tile. Press SEL to display the input to bar mapping window. See
Figure 2--40. Use the checkboxes (press the arrow-keys to move the selection
and press SEL to mark a checkbox) to specify which audio input source is
displayed in which bar in the Audio window. Note that the labels for the bars
change depending on the Bar Format setting. See Figure 2--40.
Bar labels when Bar Format is set to Pairs Bar labels when Bar Format is set to Surround
Figure 2- 40: Mapping inputs to bars
AES A/B, Analog A/B,
Embedded A/B
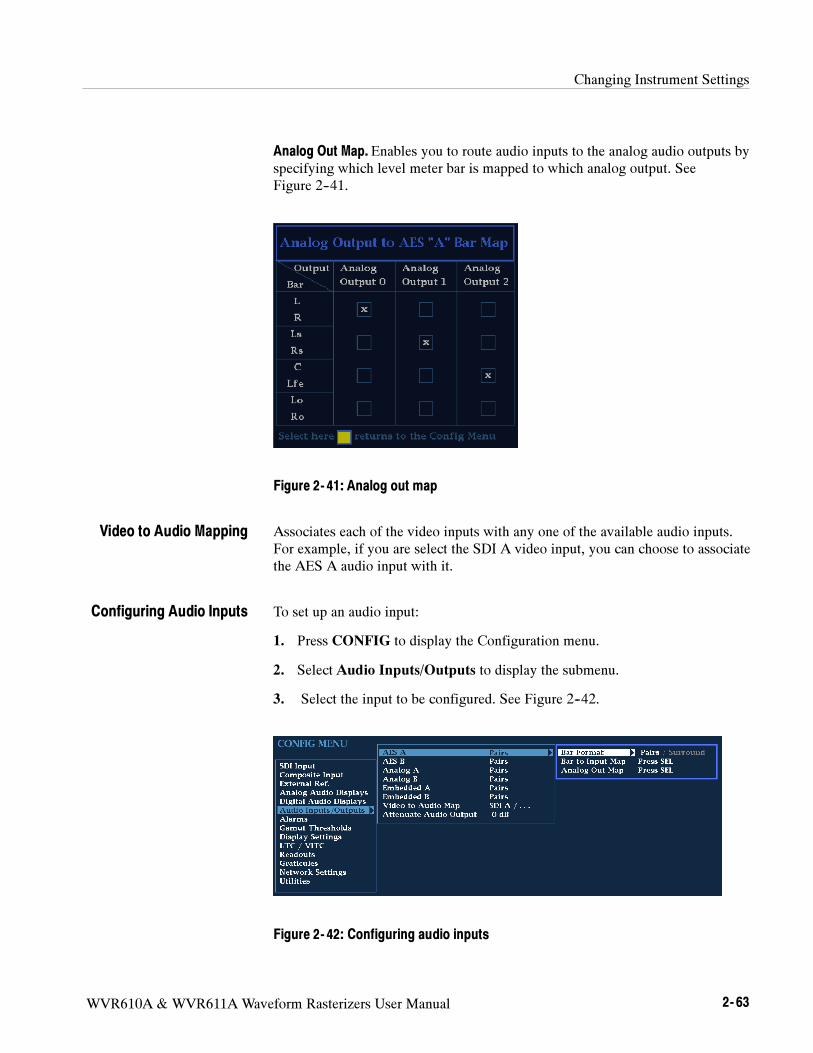
Changing Instrument Settings
WVR610A & WVR611A Waveform Rasterizers User Manual 2- 63
Analog Out Map. Enables you to route audio inputs to the analog audio outputs by
specifying which level meter bar is mapped to which analog output. See
Figure 2--41.
Figure 2- 41: Analog out map
Associates each of the video inputs with any one of the available audio inputs.
For example, if you are select the SDI A video input, you can choose to associate
the AES A audio input with it.
To set up an audio input:
1. Press CONFIG to display the Configuration menu.
2. Select Audio Inputs/Outputs to display the submenu.
3. Select the input to be configured. See Figure 2--42.
Figure 2- 42: Configuring audio inputs
Video to Audio Mapping
Configuring Audio Inputs
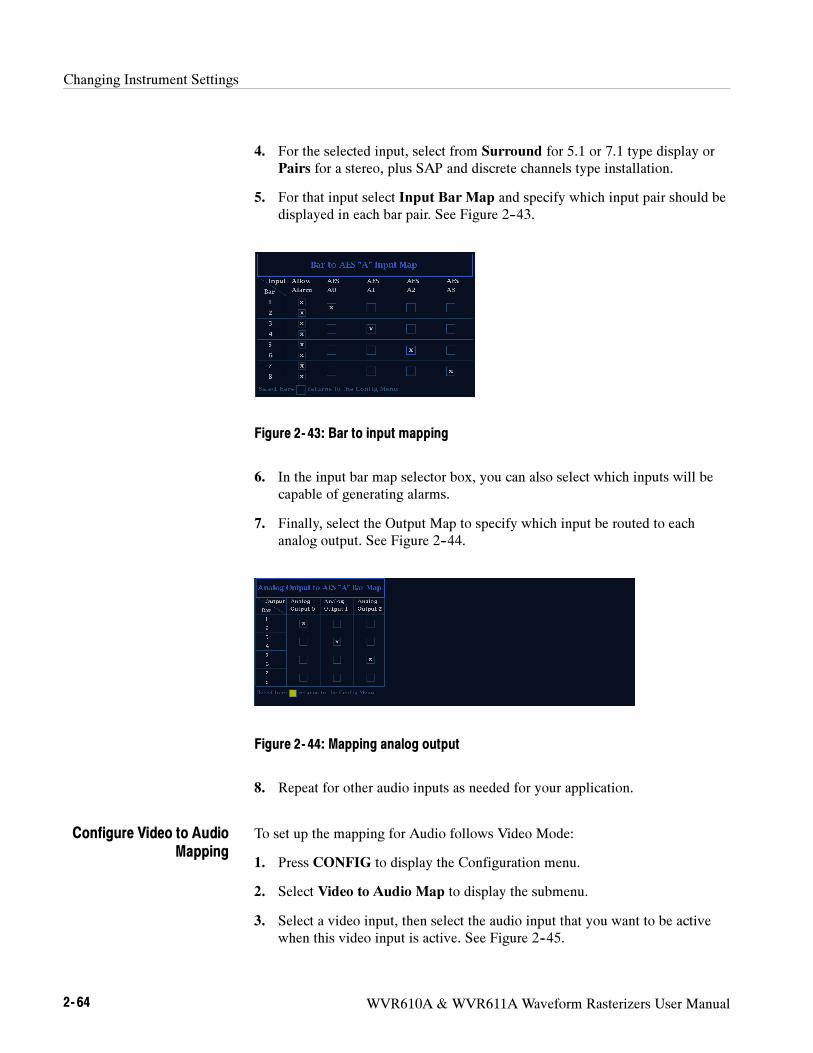
Changing Instrument Settings
2- 64 WVR610A & WVR611A Waveform Rasterizers User Manual
4. For the selected input, select from Surround for 5.1 or 7.1 type display or
Pairs for a stereo, plus SAP and discrete channels type installation.
5. For that input select Input Bar Map and specify which input pair should be
displayed in each bar pair. See Figure 2--43.
Figure 2- 43: Bar to input mapping
6. In the input bar map selector box, you can also select which inputs will be
capable of generating alarms.
7. Finally, select the Output Map to specify which input be routed to each
analog output. See Figure 2--44.
Figure 2- 44: Mapping analog output
8. Repeat for other audio inputs as needed for your application.
To set up the mapping for Audio follows Video Mode:
1. Press CONFIG to display the Configuration menu.
2. Select Video to Audio Map to display the submenu.
3. Select a video input, then select the audio input that you want to be active
when this video input is active. See Figure 2--45.
Configure Video to Audio
Mapping
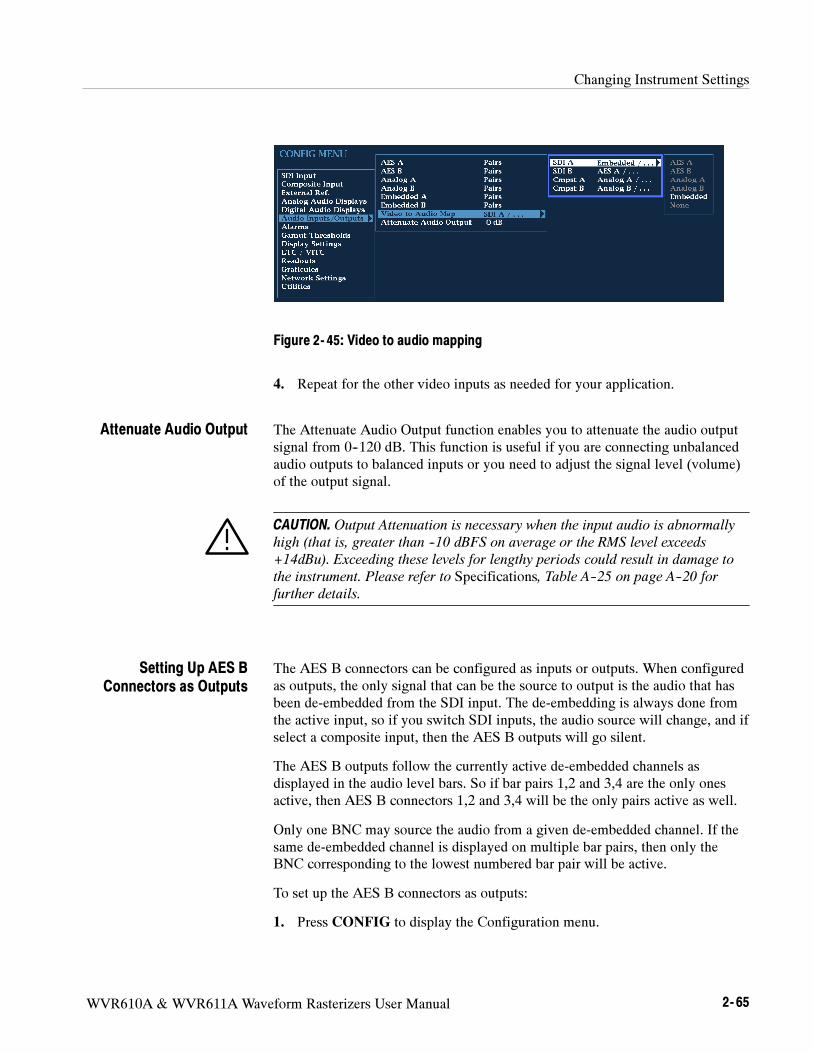
Changing Instrument Settings
WVR610A & WVR611A Waveform Rasterizers User Manual 2- 65
Figure 2- 45: Video to audio mapping
4. Repeat for the other video inputs as needed for your application.
The Attenuate Audio Output function enables you to attenuate the audio output
signal from 0--120 dB. This function is useful if you are connecting unbalanced
audio outputs to balanced inputs or you need to adjust the signal level (volume)
of the output signal.
CAUTION. Output Attenuation is necessary when the input audio is abnormally
high (that is, greater than --10 dBFS on average or the RMS level exceeds
+14dBu). Exceeding these levels for lengthy periods could result in damage to
the instrument. Please refer to Specifications, Table A--25 on page A--20 for
further details.
The AES B connectors can be configured as inputs or outputs. When configured
as outputs, the only signal that can be the source to output is the audio that has
been de-embedded from the SDI input. The de-embedding is always done from
the active input, so if you switch SDI inputs, the audio source will change, and if
select a composite input, then the AES B outputs will go silent.
The AES B outputs follow the currently active de-embedded channels as
displayed in the audio level bars. So if bar pairs 1,2 and 3,4 are the only ones
active, then AES B connectors 1,2 and 3,4 will be the only pairs active as well.
Only one BNC may source the audio from a given de-embedded channel. If the
same de-embedded channel is displayed on multiple bar pairs, then only the
BNC corresponding to the lowest numbered bar pair will be active.
To set up the AES B connectors as outputs:
1. Press CONFIG to display the Configuration menu.
Attenuate Audio Output
Setting Up AES B
Connectors as Outputs

Changing Instrument Settings
2- 66 WVR610A & WVR611A Waveform Rasterizers User Manual
2. Select Audio Inputs/Outputs.
3. Select AES B from the submenu.
4. Select Config Port As:.
5. Press SEL to select Output. See Figure 2--46.
Figure 2- 46: Configuring AES B as an output
6. Press CONFIG to remove the Configuration menu.
NOTE. If AES B will be used as an output, do not bother to set it up as an input
and do not select it in the Audio follows Video mode.
If AES B is used to output de-embedded audio, the first BNC will have the signal
displayed in the first pair of bars. The second BNC will have the signal
displayed in the second set of bars and so on. This mapping is not configurable.
Gamut Thresholds Menu
The Gamut Thresholds menu enables you to specify the signal levels at which
errors and alarms are triggered. See Table 2--23.
To change the Gamut Threshold settings:
1. Press CONFIG until the menu appears.
2. Use the GENERAL knob or the up/down arrow keys to select Gamut
Thresholds.
3. Use the navigation keys to change the menu focus to the Gamut Thresholds
submenu.
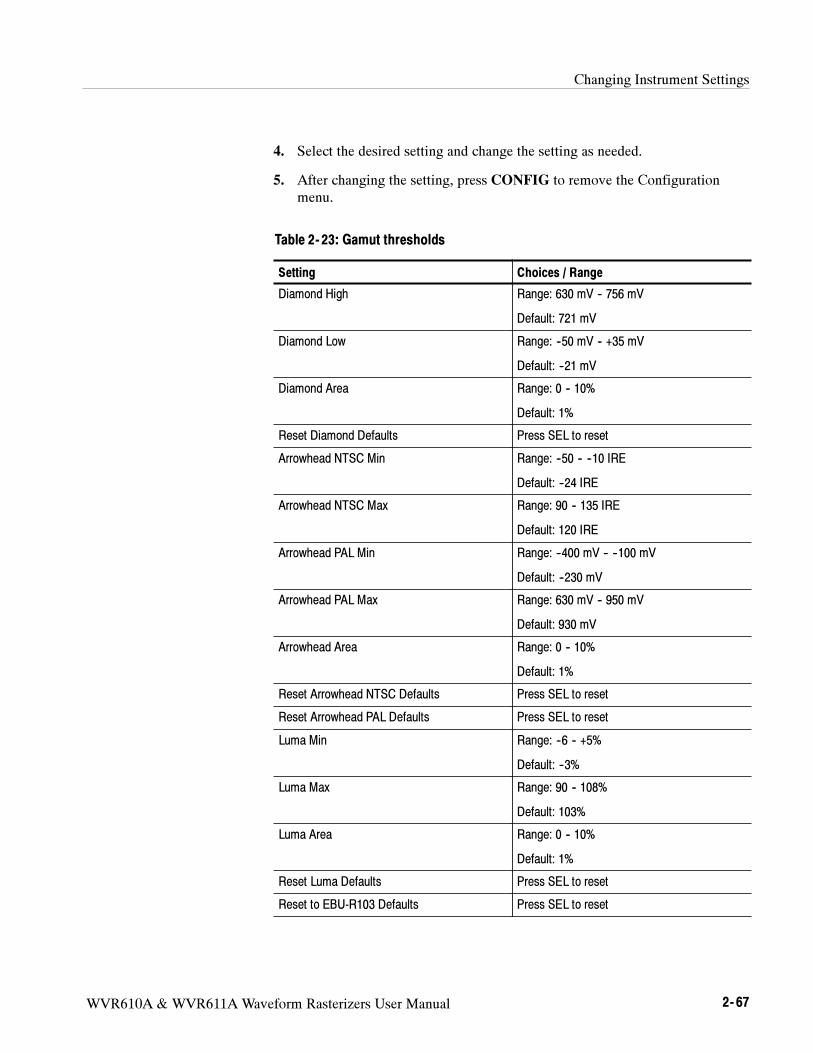
Changing Instrument Settings
WVR610A & WVR611A Waveform Rasterizers User Manual 2- 67
4. Select the desired setting and change the setting as needed.
5. After changing the setting, press CONFIG to remove the Configuration
menu.
Table 2- 23: Gamut thresholds
Setting Choices / Range
Diamond High Range: 630 mV -- 756 mV
Default: 721 mV
Diamond Low Range: --50 mV -- +35 mV
Default: --21 mV
Diamond Area Range: 0 -- 10%
Default: 1%
Reset Diamond Defaults Press SEL to reset
Arrowhead NTSC Min Range: --50 -- --10 IRE
Default: --24 IRE
Arrowhead NTSC Max Range: 90 -- 135 IRE
Default: 120 IRE
Arrowhead PAL Min Range: --400 mV -- --100 mV
Default: --230 mV
Arrowhead PAL Max Range: 630 mV -- 950 mV
Default: 930 mV
Arrowhead Area Range: 0 -- 10%
Default: 1%
Reset Arrowhead NTSC Defaults Press SEL to reset
Reset Arrowhead PAL Defaults Press SEL to reset
Luma Min Range: --6 -- +5%
Default: --3%
Luma Max Range: 90 -- 108%
Default: 103%
Luma Area Range: 0 -- 10%
Default: 1%
Reset Luma Defaults Press SEL to reset
Reset to EBU-R103 Defaults Press SEL to reset
Changing Instrument Settings
2- 68 WVR610A & WVR611A Waveform Rasterizers User Manual
Sets the level above which RGB components are considered too large and out of
gamut.
Specifies that signals below this level on a Diamond display will trigger an
error/alarm.
Specifies the percentage of the total image pixels (up to 10%) that can be outside
the current gamut limits, yet not be reported as a gamut error.
Resets the gamut thresholds for Diamond displays to the factory default.
Specifies that signals below this level on an Arrowhead NTSC display will
trigger an error or alarm.
Specifies that signals above this level on an Arrowhead NTSC display will
trigger an error or alarm.
Specifies that signals below this level on an Arrowhead PAL display will trigger
an error or alarm.
Specifies that signals above this level on an Arrowhead PAL display will trigger
an error or alarm.
Specifies the percentage of the total image pixels (up to 10%) that can be outside
the current gamut limits, yet not be reported as a gamut error.
Resets level to factory default for Arrowhead NTSC display.
Resets level to factory default for Arrowhead PAL display.
Specifies that signals below this level on an Arrowhead display will trigger an
error or alarm.
Specifies that signals above this level on an Arrowhead display will trigger an
error or alarm.
Specifies the percentage of the total image pixels (up to 10%) that can be outside
the current Luma limits, yet not be reported as a Luma error.
Diamond High
Diamond Low
Diamond Area
Reset Diamond Defaults
Arrowhead NTSC Min
Arrowhead NTSC Max
Arrowhead PAL Min
Arrowhead PAL Max
Arrowhead Area
Reset Arrowhead
NTSC Defaults
Reset Arrowhead
PAL Defaults
Luma Min
Luma Max
Luma Area
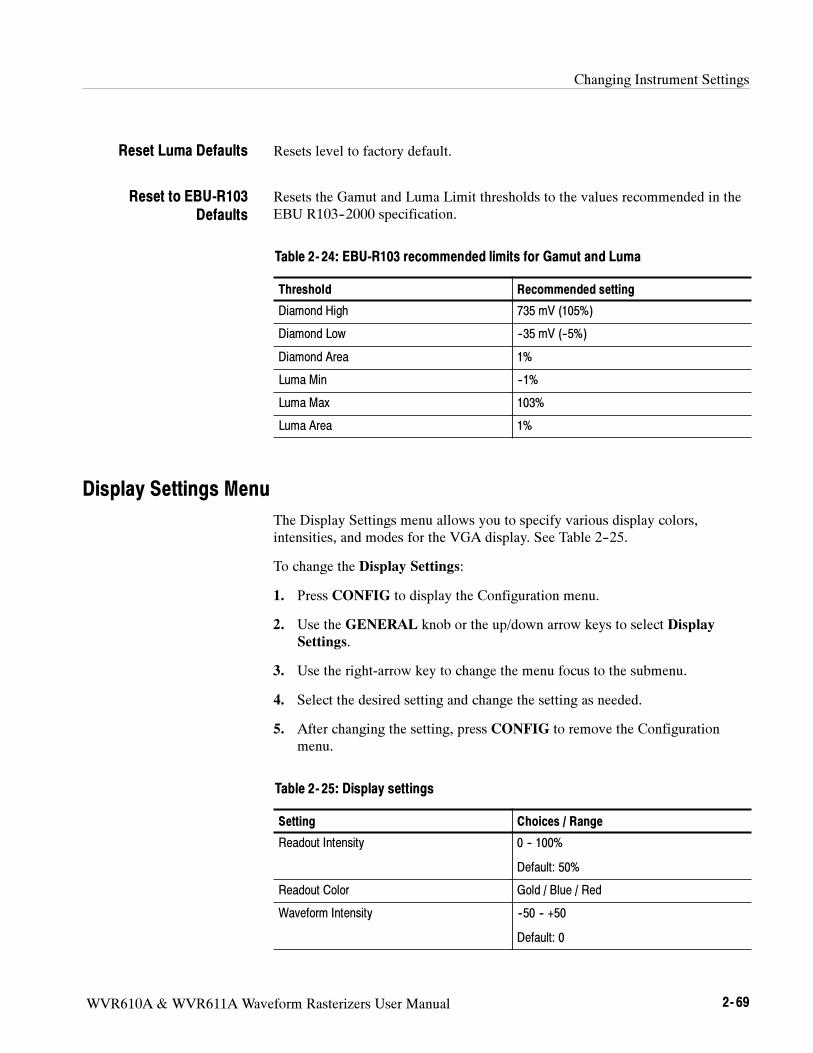
Changing Instrument Settings
WVR610A & WVR611A Waveform Rasterizers User Manual 2- 69
Resets level to factory default.
Resets the Gamut and Luma Limit thresholds to the values recommended in the
EBU R103--2000 specification.
Table 2- 24: EBU-R103 recommended limits for Gamut and Luma
Threshold Recommended setting
Diamond High 735 mV (105%)
Diamond Low --35 mV (--5%)
Diamond Area 1%
Luma Min --1%
Luma Max 103%
Luma Area 1%
Display Settings Menu
The Display Settings menu allows you to specify various display colors,
intensities, and modes for the VGA display. See Table 2--25.
To change the Display Settings:
1. Press CONFIG to display the Configuration menu.
2. Use the GENERAL knob or the up/down arrow keys to select Display
Settings.
3. Use the right-arrow key to change the menu focus to the submenu.
4. Select the desired setting and change the setting as needed.
5. After changing the setting, press CONFIG to remove the Configuration
menu.
Table 2- 25: Display settings
Setting Choices / Range
Readout Intensity 0 -- 100%
Default: 50%
Readout Color Gold / Blue / Red
Waveform Intensity --50 -- +50
Default: 0
Reset Luma Defaults
Reset to EBU-R103
Defaults
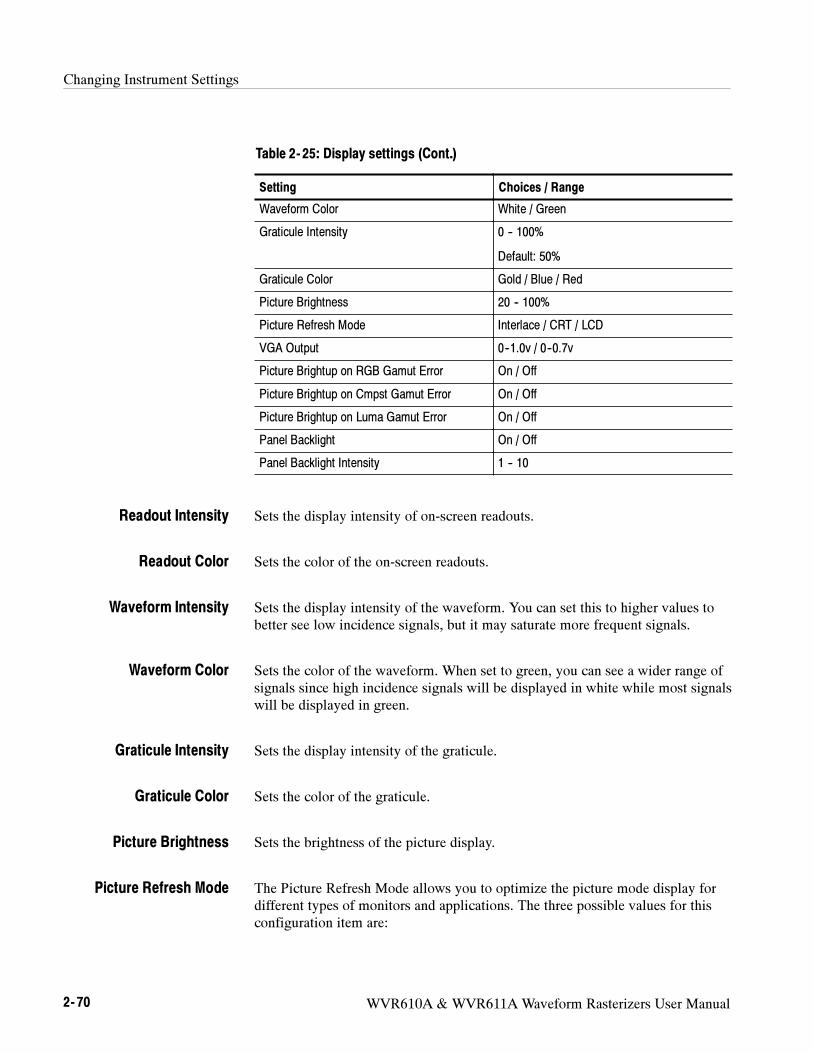
Changing Instrument Settings
2- 70 WVR610A & WVR611A Waveform Rasterizers User Manual
Table 2- 25: Display settings (Cont.)
Setting Choices / Range
Waveform Color White / Green
Graticule Intensity 0 -- 100%
Default: 50%
Graticule Color Gold / Blue / Red
Picture Brightness 20 -- 100%
Picture Refresh Mode Interlace / CRT / LCD
VGA Output 0--1.0v / 0--0.7v
Picture Brightup on RGB Gamut Error On / Off
Picture Brightup on Cmpst Gamut Error On / Off
Picture Brightup on Luma Gamut Error On / Off
Panel Backlight On / Off
Panel Backlight Intensity 1 -- 10
Sets the display intensity of on-screen readouts.
Sets the color of the on-screen readouts.
Sets the display intensity of the waveform. You can set this to higher values to
better see low incidence signals, but it may saturate more frequent signals.
Sets the color of the waveform. When set to green, you can see a wider range of
signals since high incidence signals will be displayed in white while most signals
will be displayed in green.
Sets the display intensity of the graticule.
Sets the color of the graticule.
Sets the brightness of the picture display.
The Picture Refresh Mode allows you to optimize the picture mode display for
different types of monitors and applications. The three possible values for this
configuration item are:
Readout Intensity
Readout Color
Waveform Intensity
Waveform Color
Graticule Intensity
Graticule Color
Picture Brightness
Picture Refresh Mode

Changing Instrument Settings
WVR610A & WVR611A Waveform Rasterizers User Manual 2- 71
Interlace. Interlace mode runs the picture very close to how it would run on a
standard video monitor. Each field is displayed for that field’s normal time. This
is useful if you want to see the picture with a minimum of processing.
CRT. CRT mode holds the previous field at reduced intensity to make the picture
be more uniform and brighter. While this introduces minor motion artifacts it
greatly reduces flicker.
LCD. LCD mode holds all of the previous field along with the current field. This
introduces some motion artifacts but is necessary to prevent problems on most
LCD monitors and projectors. This mode also increases the brightness signifi-
cantly.
The default mode is CRT. If you change to other modes, you may need to adjust
the Picture Brightness configuration parameter to optimize the image.
Sets the voltage output level for the VGA display.
Specifies whether or not the picture display shows a cross-hatch pattern on areas
of the picture where RGB gamut errors occur.
Specifies whether or not the picture display shows a cross-hatch pattern on areas
of the picture where composite gamut errors occur.
Specifies whether or not the picture display shows a cross-hatch pattern on areas
of the picture where luma gamut errors occur.
NOTE. The gamut bright--ups on the picture may be difficult to see on signals
with luminance in the mid range. An example of such a case is the cyan bar in a
75% color bar signal. This does not happen often at normal gamut threshold
values. The gamut errors reported on screen and in the log will not be affected
and will report errors in all signals accurately.
The Panel Backlight setting enables you to illuminate the front-panel buttons that
are not selected (the illumination setting for selected buttons cannot be changed).
There are two controls for the front-panel backlight. One control turns the
backlight on and off (Panel Backlight) and the other control sets the intensity or
brightness of the backlight (Panel Backlight Intensity).
VGA Output
Picture Brightup on RGB
Gamut Error
Picture Brightup on
Cmpst Gamut Error
Picture Brightup on
Luma Gamut Error
Panel Backlight
Changing Instrument Settings
2- 72 WVR610A & WVR611A Waveform Rasterizers User Manual
Sets the intensity of the front-panel button backlight. This feature is especially
useful in low-light situations so you can see buttons that are not selected.
Specifies the scope of the Freeze operation. If All Tiles is selected, pressing
FREEZE captures an image in all the tiles simultaneously. If Active Tile is
selected, pressing FREEZE captures an image only in the active tile.
LTC / VITC Menu
The LTC / VITC menu enables you to specify which time code is used for
logging and whether or not it is displayed in the Status Bar. See Table 2--26.
Table 2- 26: LTC / VITC settings
Setting Description Choices / Range
Display if Present Specifies which time code is
used for logging and displayed
in the Status bar readout
VITC / LTC / Off
Readouts Menu
The Readouts menu enables you to turn various display readouts on or off. See
Table 2--27.
To change the Readouts settings:
1. Press and hold the CONFIG button until the menu appears.
2. Use the GENERAL knob or the up/down arrow keys to select Readouts.
3. Use the navigation keys to change the menu focus to the Readouts submenu.
4. Select the desired setting and change the setting as needed.
5. After changing the setting, press CONFIG to remove the Configuration
menu.
Table 2- 27: Readouts settings
Setting Choices / Range
Waveform On / Off
Vector On / Off
Panel Backlight Intensity
Freeze Affects
Changing Instrument Settings
WVR610A & WVR611A Waveform Rasterizers User Manual 2- 73
Table 2- 27: Readouts settings (Cont.)
Setting Choices / Range
Picture On / Off
Gamut On / Off
Specifies whether or not the graticules and text are visible in the Waveform
display.
Specifies whether or not text readouts appear in the Vector display.
Specifies whether or not text readouts appear in the Picture display.
Specifies whether or not graticules and text readouts appear in the Gamut
display.
Graticules Menu
The Graticules submenu enables you to specify the graticule display style
associated with different displays based on the input signal. See Table 2--28.
Table 2- 28: Graticule settings
Setting Choices / Range
SDI Vector I/Q Axis On / Off
Cmpst Waveform Graticule Units Auto / mV
Picture Line Select Cursor On / Off
Field Sweep Line Select Cursor On / Off
Turns the display of the I/Q axis in the Vector display on or off for SDI input
signals.
Sets the Waveform display graticule units for Composite input signals.
Displays a cursor in the PICTURE display that tracks the selected line when any
tile has LINE SEL mode turned on. This feature enables you to see which line in
the picture is displayed in the tile in LINE SEL mode.
Waveform
Vector
Picture
Gamut
SDI Vector I/Q Axis
Cmpst Waveform
Graticule Units
Picture Line Select Cursor
Changing Instrument Settings
2- 74 WVR610A & WVR611A Waveform Rasterizers User Manual
Displays a cursor in a field or 2-field WFM display that tracks the selected line
in another display which has LINE SEL mode turned on. Thus enabling you to
see which line in the field is displayed in the tile in LINE SEL mode.
Network Settings Menu
This menu allows you to set IP addresses and change what methods of network
control are active.
Table 2- 29: Network settings
Setting Choices / Range
IP Config Mode Manual / DHCP
IP Address xxx.xxx.xxx.xxx
Subnet Mask xxx.xxx.xxx.xxx
Gateway Address xxx.xxx.xxx.xxx
View MAC Address xx:xx:xx:xx:xx:xx
Instrument Name 15-character alphanumeric string
SNMP Enable Off / On
SNMP Public Community 15-character alphanumeric string
SNMP Private Community 15-character alphanumeric string
SNMP Trap Enable Off / On
SNMP Trap Address 1 xxx.xxx.xxx.xxx
SNMP Trap Address 2 xxx.xxx.xxx.xxx
SNMP Trap Address 3 xxx.xxx.xxx.xxx
SNMP Trap Address 4 xxx.xxx.xxx.xxx
Web Enable Off / On
Web Password 15-character alphanumeric string
Specifies how the WVR610A & WVR611A network address is determined.
Network addresses can be assigned either automatically or manually. If your
network uses DHCP (Dynamic Host Configuration Protocol) to assign addresses,
then the address will be assigned dynamically to the WVR610A & WVR611A.
If your network does not use DHCP, you will have to manually enter the address
for the WVR610A & WVR611A. To get an address, talk to your LAN adminis-
trator.
To set the IP Config Mode:
1. Press CONFIG to display the Configuration menu.
Field Sweep Line Select
Cursor
IP Config Mode

Changing Instrument Settings
WVR610A & WVR611A Waveform Rasterizers User Manual 2- 75
2. Select Network Settings and press the right-arrow key to change the menu
focus to the submenu.
3. Select IP Config Mode.
4. Press SEL to set the mode toManual or DHCP as required.
5. If the IP Config Mode is set to Manual, set the IP Address.
6. Press CONFIG to remove the Configuration menu.
The IP (Internet Protocol) address is the network address of the WVR610A &
WVR611A. If you plan to use your WVR610A & WVR611A on a network (for
example, for using the web interface), you may need to set this address depend-
ing on how your network assigns addresses. If your network does not use
automatic address allocation (DHCP), you will need to set this address. To get an
address, talk to your LAN administrator.
To set the IP Address:
1. Press CONFIG to display the Configuration menu.
2. Select Network Settings and press the right-arrow key to change the menu
focus to the submenu.
3. Verify the IP Config Mode is set toManual.
4. Select IP Address and press the right-arrow key to change the menu focus to
the submenu. See Figure 2--47.
Figure 2- 47: Setting IP address
5. Use the left/right arrow keys to move the highlight to each box in the
address. Use the up/down arrow keys to change the number in each box as
required.
IP Address
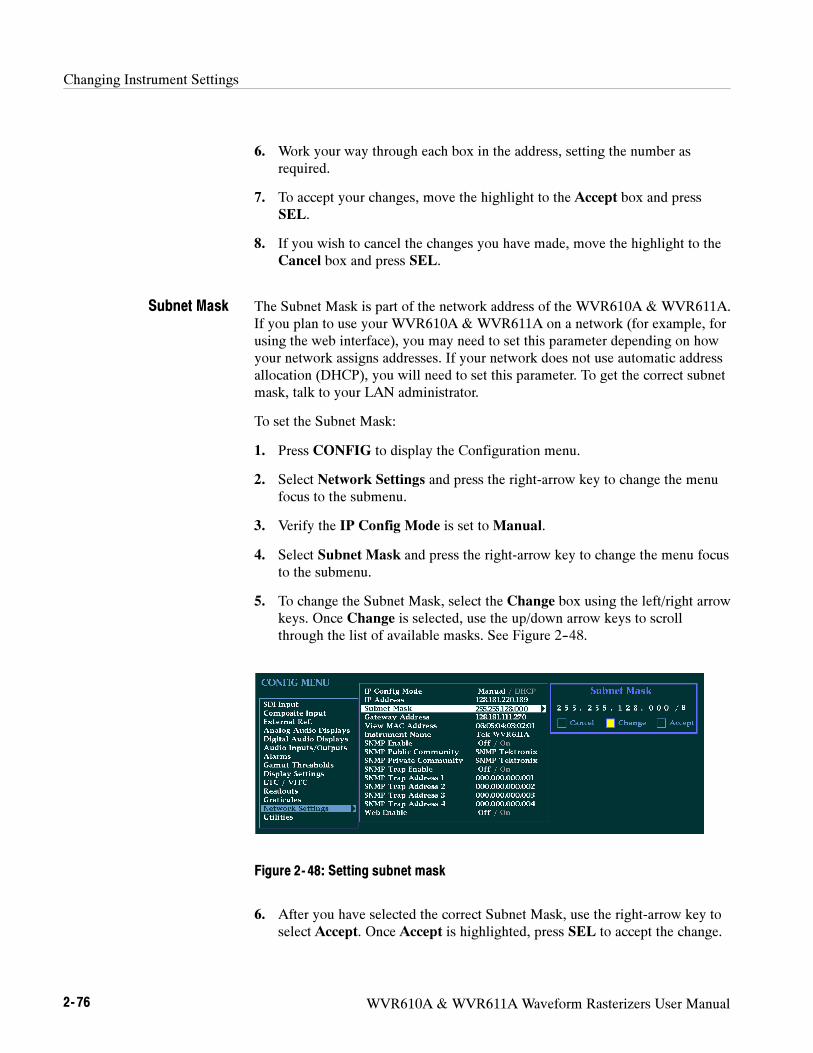
Changing Instrument Settings
2- 76 WVR610A & WVR611A Waveform Rasterizers User Manual
6. Work your way through each box in the address, setting the number as
required.
7. To accept your changes, move the highlight to the Accept box and press
SEL.
8. If you wish to cancel the changes you have made, move the highlight to the
Cancel box and press SEL.
The Subnet Mask is part of the network address of the WVR610A & WVR611A.
If you plan to use your WVR610A & WVR611A on a network (for example, for
using the web interface), you may need to set this parameter depending on how
your network assigns addresses. If your network does not use automatic address
allocation (DHCP), you will need to set this parameter. To get the correct subnet
mask, talk to your LAN administrator.
To set the Subnet Mask:
1. Press CONFIG to display the Configuration menu.
2. Select Network Settings and press the right-arrow key to change the menu
focus to the submenu.
3. Verify the IP Config Mode is set toManual.
4. Select Subnet Mask and press the right-arrow key to change the menu focus
to the submenu.
5. To change the Subnet Mask, select the Change box using the left/right arrow
keys. Once Change is selected, use the up/down arrow keys to scroll
through the list of available masks. See Figure 2--48.
Figure 2- 48: Setting subnet mask
6. After you have selected the correct Subnet Mask, use the right-arrow key to
select Accept. Once Accept is highlighted, press SEL to accept the change.
Subnet Mask
Changing Instrument Settings
WVR610A & WVR611A Waveform Rasterizers User Manual 2- 77
7. If you decide not the change the Subnet Mask, move the highlight to the
Cancel box and press SEL.
The Gateway Address is the network address of a node that serves as an entrance
to another network. To find out what the Gateway address is for your network,
talk to your LAN administrator.
To set the Gateway Address:
1. Press CONFIG to display the Configuration menu.
2. Select Network Settings and press the right-arrow key to change the menu
focus to the submenu.
3. Select Gateway Address and press the right-arrow key to change the menu
focus to the submenu.
4. Use the left/right arrow keys to move the highlight to each box in the
address. Use the up/down arrow keys to change the number in each box as
required.
5. Work your way through each box in the address, setting the number as
required.
6. To accept your changes, move the highlight to the Accept box and press
SEL.
7. If you wish to cancel the changes you have made, move the highlight to the
Cancel box and press SEL.
The View MAC Address parameter allows you to see the MAC (Media Access
Control) address assigned to the instrument. This is a unique address used to
identify the instrument.
To view the MAC address:
1. Press CONFIG to display the Configuration menu.
2. Select Network Settings and press the right-arrow to change the menu focus
to the submenu.
3. Read the MAC address at the right of View MAC Address.
The WVR610A & WVR611A allows you to name the instrument for identifica-
tion across a network. The instrument name is a 15-character string made up of
alphanumeric text. The available characters are 0--9, a--z, A--Z, -- , _ , and blank.
To change the instrument name:
Gateway Address
View MAC Address
Instrument Name
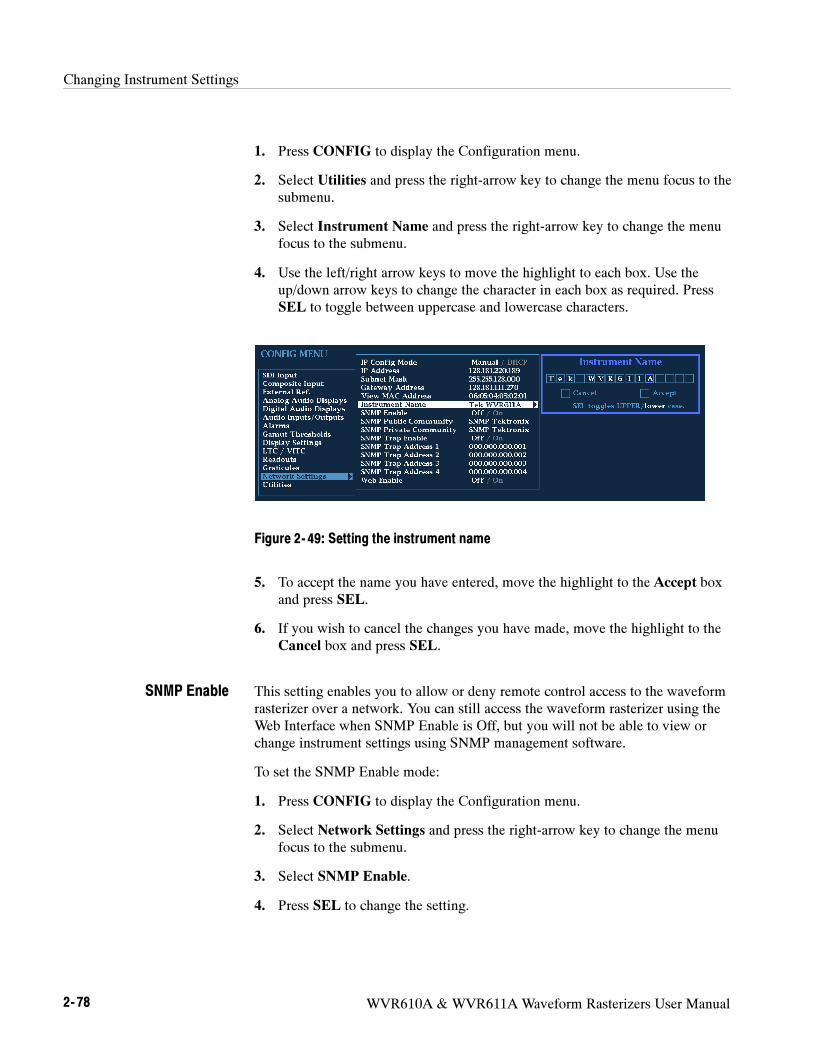
Changing Instrument Settings
2- 78 WVR610A & WVR611A Waveform Rasterizers User Manual
1. Press CONFIG to display the Configuration menu.
2. Select Utilities and press the right-arrow key to change the menu focus to the
submenu.
3. Select Instrument Name and press the right-arrow key to change the menu
focus to the submenu.
4. Use the left/right arrow keys to move the highlight to each box. Use the
up/down arrow keys to change the character in each box as required. Press
SEL to toggle between uppercase and lowercase characters.
Figure 2- 49: Setting the instrument name
5. To accept the name you have entered, move the highlight to the Accept box
and press SEL.
6. If you wish to cancel the changes you have made, move the highlight to the
Cancel box and press SEL.
This setting enables you to allow or deny remote control access to the waveform
rasterizer over a network. You can still access the waveform rasterizer using the
Web Interface when SNMP Enable is Off, but you will not be able to view or
change instrument settings using SNMP management software.
To set the SNMP Enable mode:
1. Press CONFIG to display the Configuration menu.
2. Select Network Settings and press the right-arrow key to change the menu
focus to the submenu.
3. Select SNMP Enable.
4. Press SEL to change the setting.
SNMP Enable
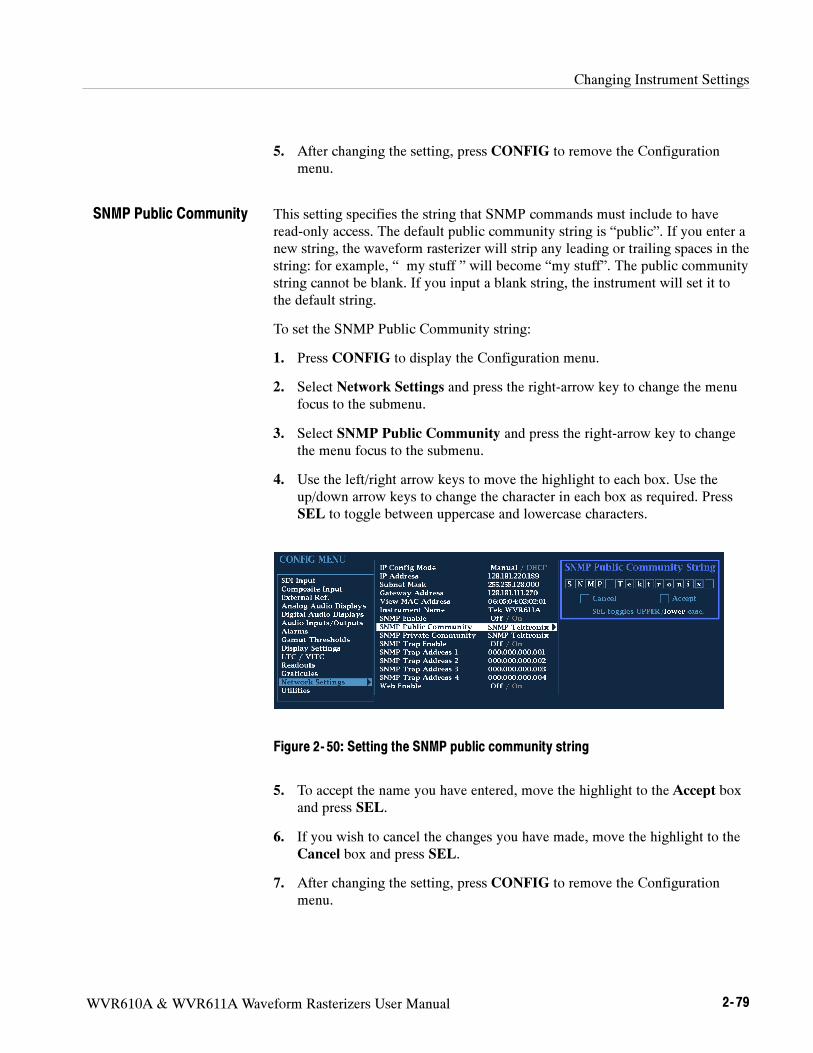
Changing Instrument Settings
WVR610A & WVR611A Waveform Rasterizers User Manual 2- 79
5. After changing the setting, press CONFIG to remove the Configuration
menu.
This setting specifies the string that SNMP commands must include to have
read-only access. The default public community string is “public”. If you enter a
new string, the waveform rasterizer will strip any leading or trailing spaces in the
string: for example, “ my stuff ” will become “my stuff”. The public community
string cannot be blank. If you input a blank string, the instrument will set it to
the default string.
To set the SNMP Public Community string:
1. Press CONFIG to display the Configuration menu.
2. Select Network Settings and press the right-arrow key to change the menu
focus to the submenu.
3. Select SNMP Public Community and press the right-arrow key to change
the menu focus to the submenu.
4. Use the left/right arrow keys to move the highlight to each box. Use the
up/down arrow keys to change the character in each box as required. Press
SEL to toggle between uppercase and lowercase characters.
Figure 2- 50: Setting the SNMP public community string
5. To accept the name you have entered, move the highlight to the Accept box
and press SEL.
6. If you wish to cancel the changes you have made, move the highlight to the
Cancel box and press SEL.
7. After changing the setting, press CONFIG to remove the Configuration
menu.
SNMP Public Community
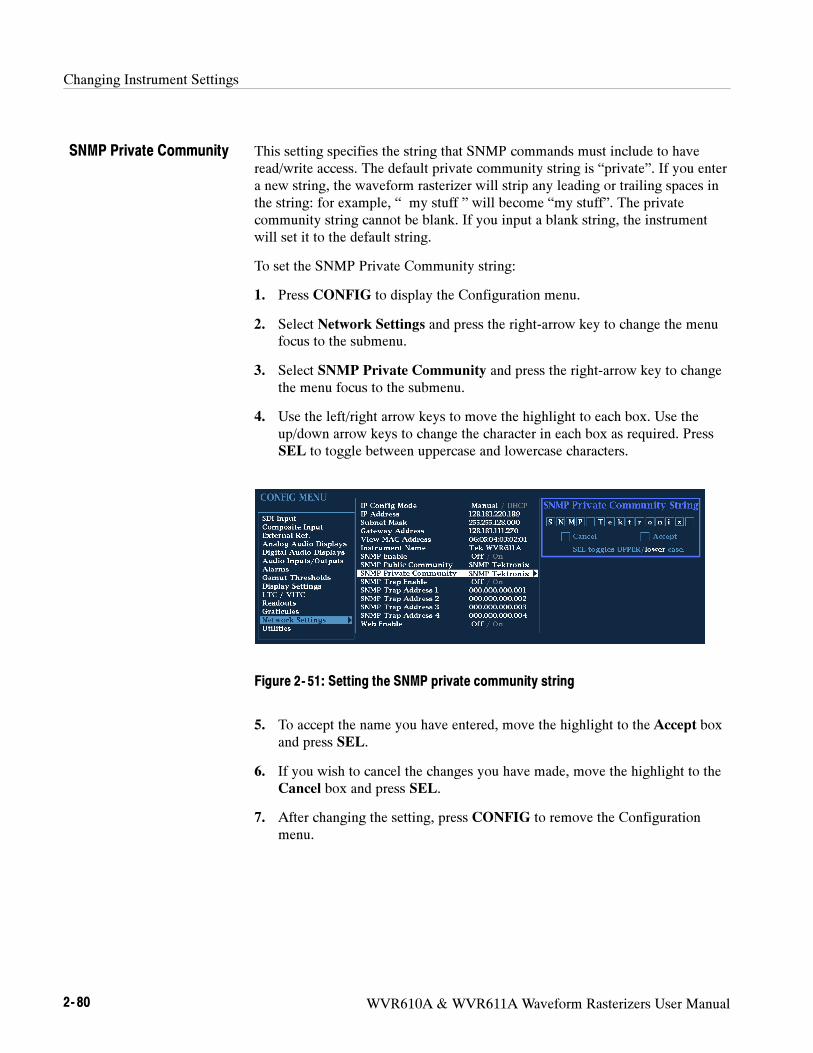
Changing Instrument Settings
2- 80 WVR610A & WVR611A Waveform Rasterizers User Manual
This setting specifies the string that SNMP commands must include to have
read/write access. The default private community string is “private”. If you enter
a new string, the waveform rasterizer will strip any leading or trailing spaces in
the string: for example, “ my stuff ” will become “my stuff”. The private
community string cannot be blank. If you input a blank string, the instrument
will set it to the default string.
To set the SNMP Private Community string:
1. Press CONFIG to display the Configuration menu.
2. Select Network Settings and press the right-arrow key to change the menu
focus to the submenu.
3. Select SNMP Private Community and press the right-arrow key to change
the menu focus to the submenu.
4. Use the left/right arrow keys to move the highlight to each box. Use the
up/down arrow keys to change the character in each box as required. Press
SEL to toggle between uppercase and lowercase characters.
Figure 2- 51: Setting the SNMP private community string
5. To accept the name you have entered, move the highlight to the Accept box
and press SEL.
6. If you wish to cancel the changes you have made, move the highlight to the
Cancel box and press SEL.
7. After changing the setting, press CONFIG to remove the Configuration
menu.
SNMP Private Community

Changing Instrument Settings
WVR610A & WVR611A Waveform Rasterizers User Manual 2- 81
This setting allows you to turn on or off the capability of the waveform rasterizer
to generate SNMP traps.
To set the SNMP Trap Enable mode:
1. Press CONFIG to display the Configuration menu.
2. Select Network Settings and press the right-arrow key to change the menu
focus to the submenu.
3. Select SNMP Trap Enable.
4. Press SEL to change the setting.
5. After changing the setting, press CONFIG to remove the Configuration
menu.
This setting allows you to set IP addresses to which SNMP traps are sent.
To set the SNMP Trap Addresses:
1. Press CONFIG to display the Configuration menu.
2. Select Network Settings and press the right-arrow key to change the menu
focus to the submenu.
3. Select the desired SNMP Trap Address (1 through 4) and press the
right-arrow key to change the menu focus to the submenu.
4. Use the left/right arrow keys to move the highlight to each box. Use the
up/down arrow keys to change the number in each box as required. See
Figure 2--52.
Figure 2- 52: Setting the SNMP trap address
5. To accept the address you have entered, move the highlight to the Accept
box and press SEL.
SNMP Trap Enable
SNMP Trap Address 1- 4
Changing Instrument Settings
2- 82 WVR610A & WVR611A Waveform Rasterizers User Manual
6. If you wish to cancel the changes you have made, move the highlight to the
Cancel box and press SEL.
7. After setting the address, press CONFIG to remove the Configuration menu.
NOTE. To disable a trap address, set the first three digits of the trap address to 0.
This setting allows you to allow or deny web browser access to the waveform
rasterizer.
To set the Web Enable setting:
1. Press CONFIG to display the Configuration menu.
2. Select Network Settings and press the right-arrow key to change the menu
focus to the submenu.
3. SelectWeb Enable.
4. Press SEL to change the setting.
5. After changing the setting, press CONFIG to remove the Configuration
menu.
Utilities Menu
The Utilities submenu provides settings for several non-measurement related
waveform rasterizer parameters. See Table 2--30.
To change the Utilities settings:
1. Press and hold the CONFIG button until the menu appears.
2. Use the GENERAL knob or the up/down arrow keys to select Utility.
3. Use the navigation keys to change the menu focus to the Utility submenu.
4. Select the desired setting and change the setting as needed.
5. After changing the setting, press CONFIG to remove the Configuration
menu.
Web Enable

Changing Instrument Settings
WVR610A & WVR611A Waveform Rasterizers User Manual 2- 83
Table 2- 30: Utilities settings
Setting Choices / Range
View HW / SW Version View Only
Set Clock Time : Date
CPU Color Palette View Only
System Upgrade Press SEL
Calibration Press SEL to Start
Run Power Up Diags Press SEL
Run Advanced Diags Press SEL
View Diagnostic Log Press SEL
Diag Log Mode Circular / Stop when full
This settings lists the version number for several hardware and software
subsystems.
To view the list of hardware and software versions:
1. Press CONFIG to display the Configuration menu.
2. Select Utilities and press the right-arrow to change the menu focus to the
submenu.
3. Select View HW/SW Version. The version numbers will appear in the
submenu listing to the right. See Figure 2--53.
Figure 2- 53: Viewing hw/sw version numbers
This setting allows you to set the real-time clock in the waveform rasterizer.
To set the clock:
1. Press CONFIG to display the Configuration menu.
View HW/SW Version
Set Clock
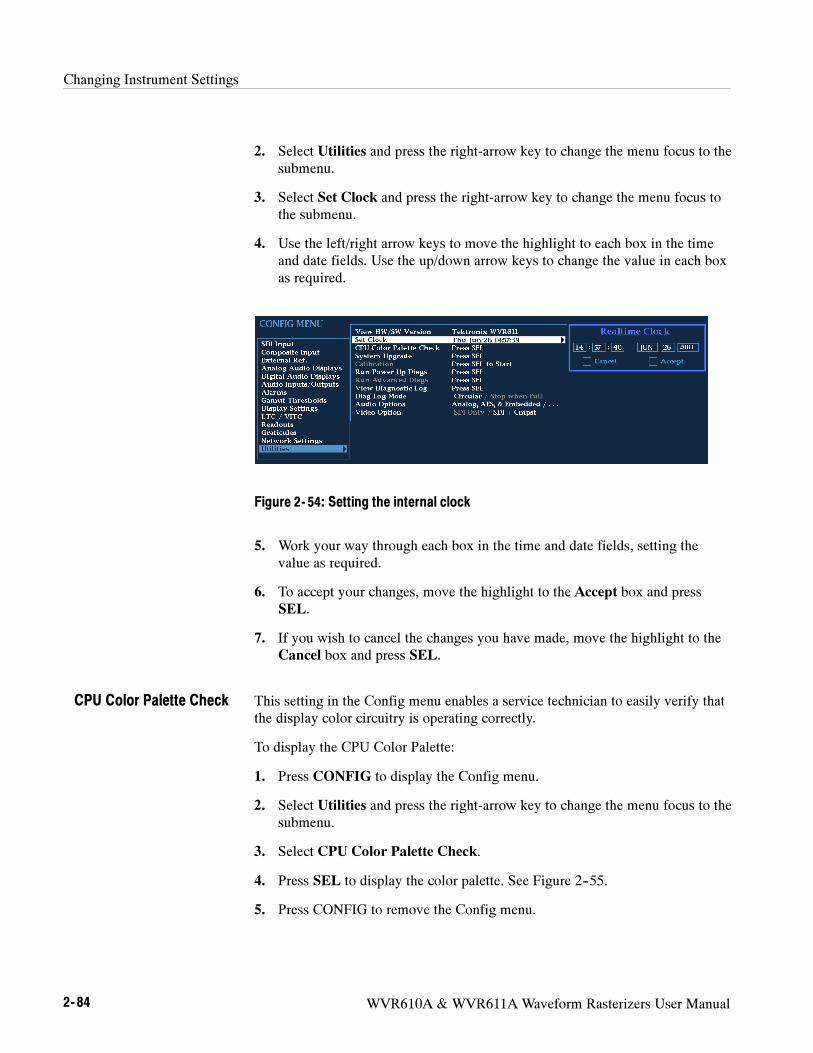
Changing Instrument Settings
2- 84 WVR610A & WVR611A Waveform Rasterizers User Manual
2. Select Utilities and press the right-arrow key to change the menu focus to the
submenu.
3. Select Set Clock and press the right-arrow key to change the menu focus to
the submenu.
4. Use the left/right arrow keys to move the highlight to each box in the time
and date fields. Use the up/down arrow keys to change the value in each box
as required.
Figure 2- 54: Setting the internal clock
5. Work your way through each box in the time and date fields, setting the
value as required.
6. To accept your changes, move the highlight to the Accept box and press
SEL.
7. If you wish to cancel the changes you have made, move the highlight to the
Cancel box and press SEL.
This setting in the Config menu enables a service technician to easily verify that
the display color circuitry is operating correctly.
To display the CPU Color Palette:
1. Press CONFIG to display the Config menu.
2. Select Utilities and press the right-arrow key to change the menu focus to the
submenu.
3. Select CPU Color Palette Check.
4. Press SEL to display the color palette. See Figure 2--55.
5. Press CONFIG to remove the Config menu.
CPU Color Palette Check

Changing Instrument Settings
WVR610A & WVR611A Waveform Rasterizers User Manual 2- 85
Figure 2- 55: CPU color palette
The System Upgrade selection is used to upgrade the system software of the
WVR610A & WVR611A. The upgrade is performed access an Ethernet network
using a PC to transfer the new software to the WVR610A & WVR611A. For the
procedure to upgrade the system firmware, refer to Upgrading the Waveform
Rasterizer Firmware on page D--1.
This menu selection is used during the Performance Verification and adjustment
process. You must use the correct, properly calibrated equipment to achieve
specified performance characteristics. Refer to the Composite Analog Vertical
Measurement Accuracy (WVR611A only), Composite Analog Frequency
Response (WVR611A only), Composite Analog Input DC Offset Restore Off
(WVR611A only), and Analog Audio Level Meter Accuracy Over Frequency
(Options AN and DA only) procedures in Performance Verification for the
adjustment procedures.
The waveform rasterizer provides diagnostic routines that you can run if you
believe your instrument is not behaving correctly. You can run two levels of
diagnostics. The Power Up Diags are the diagnostic routines that are run when
power is applied to the waveform rasterizer. The Advanced Diags is a more
thorough set of diagnostics that you can run if the waveform rasterizer passes the
Power Up Diags but you believe there is still a problem with the waveform
rasterizer.
To run the power-up diagnostics:
1. Press CONFIG to display the Configuration menu.
2. Select Utilities and press the right-arrow to change the menu focus to the
submenu.
3. Select Run Power Up Diags. Press SEL to display the Power-up Diagnos-
tics screen.
System Upgrade
Calibration
Run Power Up Diags
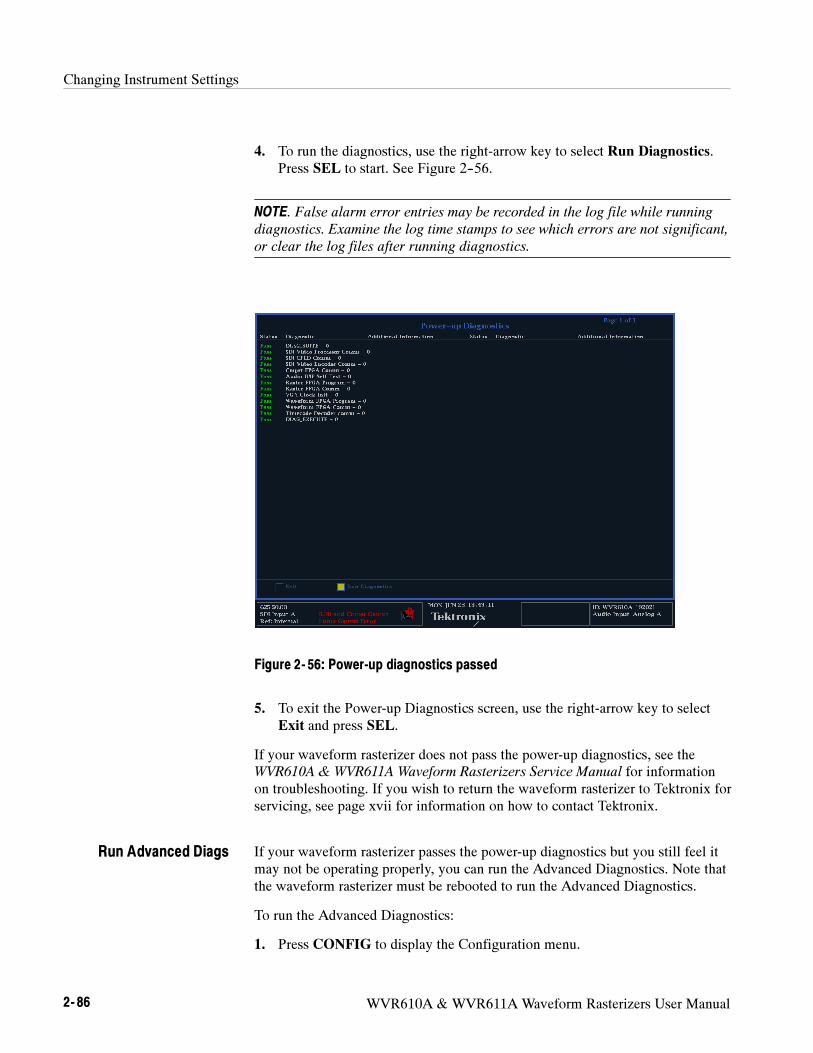
Changing Instrument Settings
2- 86 WVR610A & WVR611A Waveform Rasterizers User Manual
4. To run the diagnostics, use the right-arrow key to select Run Diagnostics.
Press SEL to start. See Figure 2--56.
NOTE. False alarm error entries may be recorded in the log file while running
diagnostics. Examine the log time stamps to see which errors are not significant,
or clear the log files after running diagnostics.
Figure 2- 56: Power-up diagnostics passed
5. To exit the Power-up Diagnostics screen, use the right-arrow key to select
Exit and press SEL.
If your waveform rasterizer does not pass the power-up diagnostics, see the
WVR610A & WVR611A Waveform Rasterizers Service Manual for information
on troubleshooting. If you wish to return the waveform rasterizer to Tektronix for
servicing, see page xvii for information on how to contact Tektronix.
If your waveform rasterizer passes the power-up diagnostics but you still feel it
may not be operating properly, you can run the Advanced Diagnostics. Note that
the waveform rasterizer must be rebooted to run the Advanced Diagnostics.
To run the Advanced Diagnostics:
1. Press CONFIG to display the Configuration menu.
Run Advanced Diags
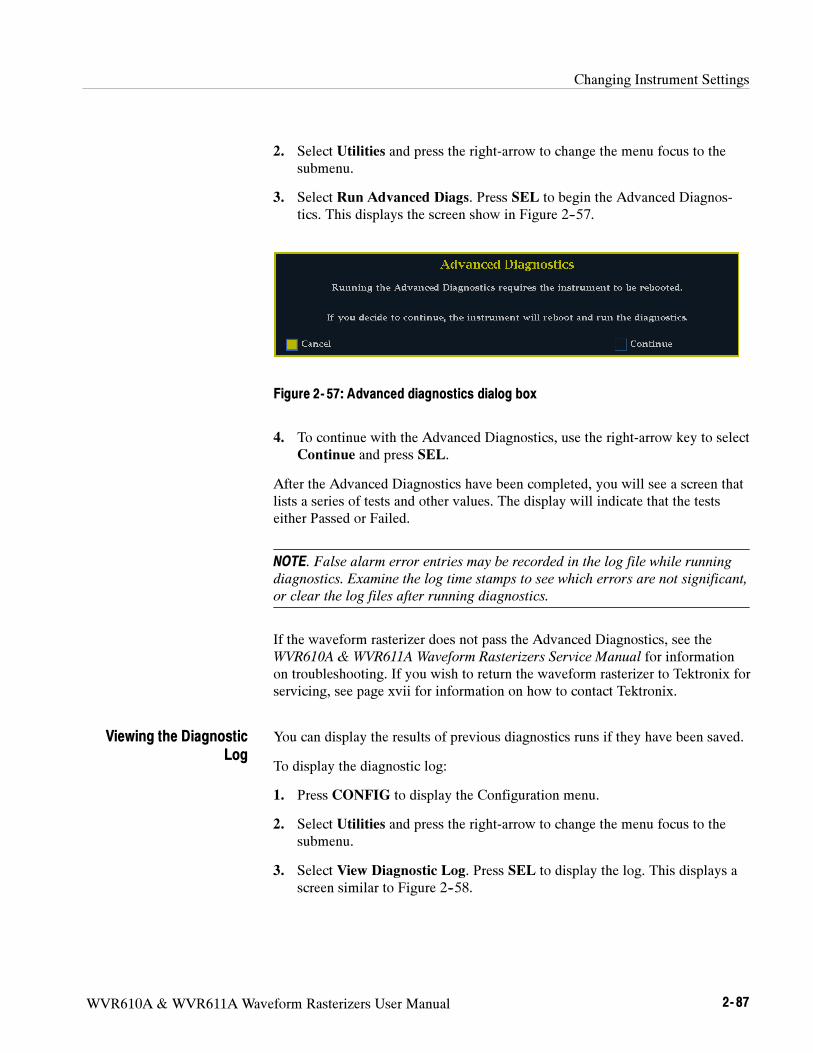
Changing Instrument Settings
WVR610A & WVR611A Waveform Rasterizers User Manual 2- 87
2. Select Utilities and press the right-arrow to change the menu focus to the
submenu.
3. Select Run Advanced Diags. Press SEL to begin the Advanced Diagnos-
tics. This displays the screen show in Figure 2--57.
Figure 2- 57: Advanced diagnostics dialog box
4. To continue with the Advanced Diagnostics, use the right-arrow key to select
Continue and press SEL.
After the Advanced Diagnostics have been completed, you will see a screen that
lists a series of tests and other values. The display will indicate that the tests
either Passed or Failed.
NOTE. False alarm error entries may be recorded in the log file while running
diagnostics. Examine the log time stamps to see which errors are not significant,
or clear the log files after running diagnostics.
If the waveform rasterizer does not pass the Advanced Diagnostics, see the
WVR610A & WVR611A Waveform Rasterizers Service Manual for information
on troubleshooting. If you wish to return the waveform rasterizer to Tektronix for
servicing, see page xvii for information on how to contact Tektronix.
You can display the results of previous diagnostics runs if they have been saved.
To display the diagnostic log:
1. Press CONFIG to display the Configuration menu.
2. Select Utilities and press the right-arrow to change the menu focus to the
submenu.
3. Select View Diagnostic Log. Press SEL to display the log. This displays a
screen similar to Figure 2--58.
Viewing the Diagnostic
Log

Changing Instrument Settings
2- 88 WVR610A & WVR611A Waveform Rasterizers User Manual
Figure 2- 58: Diagnostics log
The Diagnostic Log can contain many pages of information depending on how
long it has been since the log was erased and how many times diagnostics have
been run.
To view different pages in the Diagnostic Log:
Use the right-arrow key to select the page you wish to view. Press SEL to
view the selected page.
You can view the first page, last page, previous page or the next page. The
number of pages in the diagnostics log is shown at the top-right corner of the
diagnostics log screen.
Table 2--31 describes the contents of the columns that appear in the diagnostics
log.
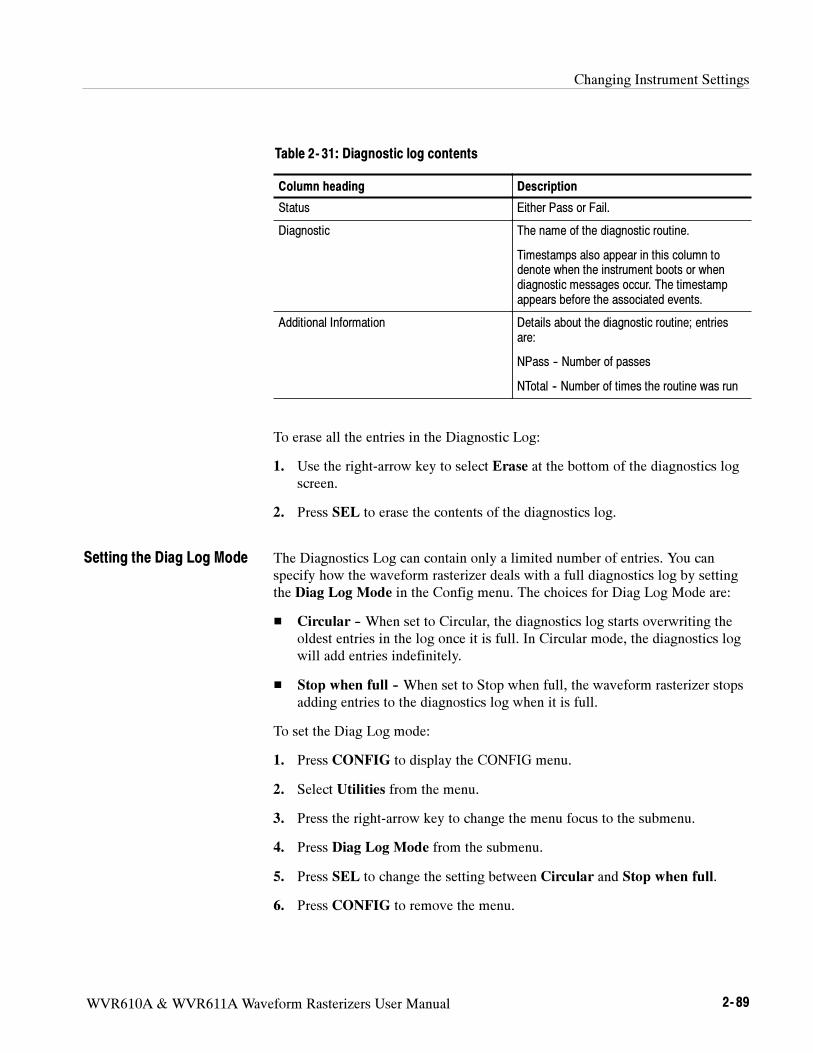
Changing Instrument Settings
WVR610A & WVR611A Waveform Rasterizers User Manual 2- 89
Table 2- 31: Diagnostic log contents
Column heading Description
Status Either Pass or Fail.
Diagnostic The name of the diagnostic routine.
Timestamps also appear in this column to
denote when the instrument boots or when
diagnostic messages occur. The timestamp
appears before the associated events.
Additional Information Details about the diagnostic routine; entries
are:
NPass -- Number of passes
NTotal -- Number of times the routine was run
To erase all the entries in the Diagnostic Log:
1. Use the right-arrow key to select Erase at the bottom of the diagnostics log
screen.
2. Press SEL to erase the contents of the diagnostics log.
The Diagnostics Log can contain only a limited number of entries. You can
specify how the waveform rasterizer deals with a full diagnostics log by setting
the Diag Log Mode in the Config menu. The choices for Diag Log Mode are:
Circular -- When set to Circular, the diagnostics log starts overwriting the
oldest entries in the log once it is full. In Circular mode, the diagnostics log
will add entries indefinitely.
Stop when full -- When set to Stop when full, the waveform rasterizer stops
adding entries to the diagnostics log when it is full.
To set the Diag Log mode:
1. Press CONFIG to display the CONFIG menu.
2. Select Utilities from the menu.
3. Press the right-arrow key to change the menu focus to the submenu.
4. Press Diag Log Mode from the submenu.
5. Press SEL to change the setting between Circular and Stop when full.
6. Press CONFIG to remove the menu.
Setting the Diag Log Mode

Changing Instrument Settings
2- 90 WVR610A & WVR611A Waveform Rasterizers User Manual

Reference

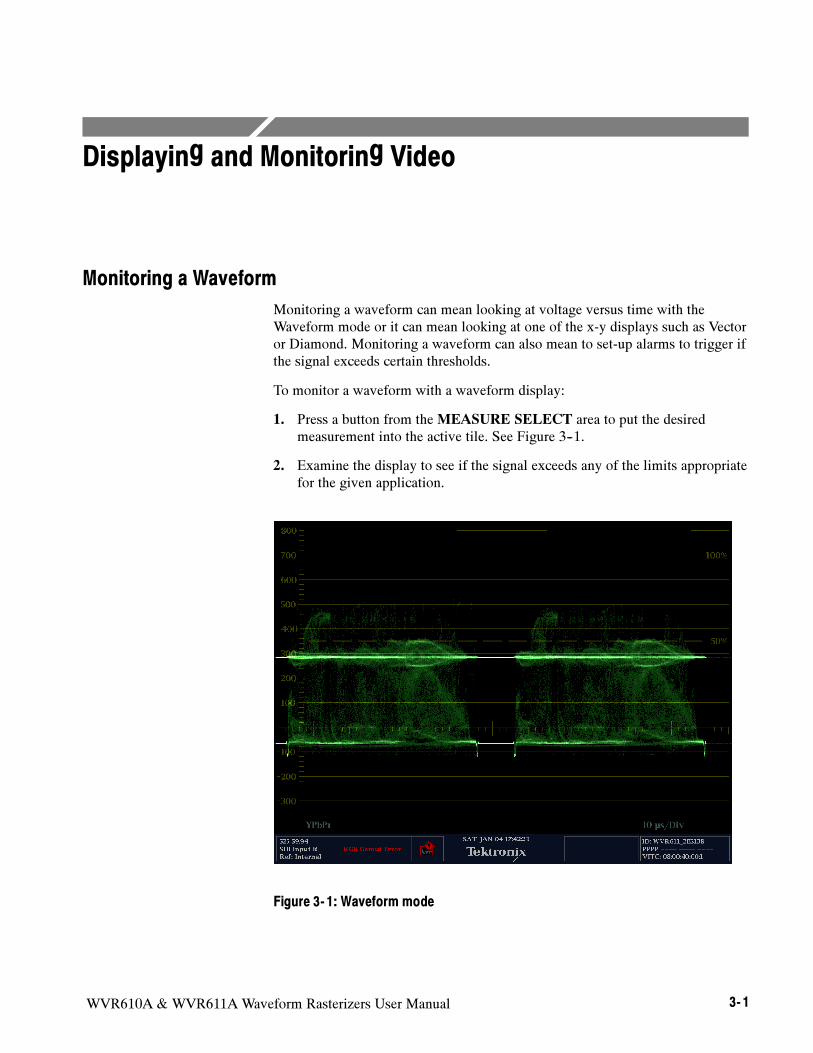
WVR610A & WVR611A Waveform Rasterizers User Manual 3- 1
Displaying and Monitoring Video
Monitoring a Waveform
Monitoring a waveform can mean looking at voltage versus time with the
Waveform mode or it can mean looking at one of the x-y displays such as Vector
or Diamond. Monitoring a waveform can also mean to set-up alarms to trigger if
the signal exceeds certain thresholds.
To monitor a waveform with a waveform display:
1. Press a button from theMEASURE SELECT area to put the desired
measurement into the active tile. See Figure 3--1.
2. Examine the display to see if the signal exceeds any of the limits appropriate
for the given application.
Figure 3- 1: Waveform mode
Displaying and Monitoring Video
3- 2 WVR610A & WVR611A Waveform Rasterizers User Manual
To monitor a waveform using alarms:
1. Configure the alarms to report if one of the available tests exceeds it limits.
(For details on configuring alarms, see Configuring Alarms and Viewing
Status on page 3--37.)
2. Configure the alarm threshold to the limits appropriate for the given
application.
Checking Black Level
Black level is the voltage at the low end of the active video range that corre-
sponds to “black” signals.
If the black level is set too high, then blacks will appear gray and washed out. If
the black level is set too low, then some low-luminance details of the image may
be lost or “crushed.” It is also important for all the components to match or the
black images will appear to have a false color. See Shading a Camera on
page 3--10.
For most video formats, the black level is at 0 volts. For NTSC, there is a
7.5 IRE setup that defines the black level. Note that for composite signals it is
acceptable for chroma components to go below black.
To check black level:
1. Put a waveform display in at least one tile.
2. If the input signal is a composite signal, then apply a luma filter (WFM >
Filter > Luma).
3. Press and holdWFM to bring up the pop-up menu, then select Center
WFM to place the signal with zero voltage on the center graticule.
4. Press the 5X gain button if the offset is small.
5. Check the display to see if black signals are at the correct level or use
CURSORS to measure any error.
NOTE. It is possible to monitor gain on live material, but it is better to use a
known signal such as a camera alignment chart or the color bars on a tape
leader to set the gain.
Displaying and Monitoring Video
WVR610A & WVR611A Waveform Rasterizers User Manual 3- 3
Checking Gain
The gain of a video channel sets the maximum signal voltage during active video
time. For the luminance component of the video, this is called the white level.
If the gain is set too high, then the signal might be clipped or over-drive the
subsequent stage. If the gain is set too low, then the image may appear dark and
dynamic range can be lost.
It is also important for all the components to match or the images will appear to
have a false color. See Shading a Camera on page 3--10.
To check gain:
1. Select waveform mode for the active tile.
2. If the signal is composite, then apply a luma filter (WFM > Filter > Luma).
3. Press and hold theWFM button to bring up the pop-up menu, then select
Center WFM to place the signal with zero voltage on the center graticule.
4. Compare the signal to the maximum allowed voltage. This is 700 mV for
most signals and 100 IRE for NTSC. You may want to use Cursors to
measure any error.
5. If the error is small, you may want to move the white level down to the zero
voltage graticule then press the 5x gain button to expand the signal.
NOTE. It is possible to monitor gain on live material, but it is better to use a
known signal such as a camera alignment chart or the color bars on a tape
leader to set the gain.
Selecting a Line for Viewing
In Line Select mode, you can select one line of the video signal to display and
measure. You can use Line Select to isolate the characteristics of one portion of
the image.
Line Select modifies many of the displays in the WVR610A & WVR611A. For
example, in the Waveform display, instead of seeing a waveform that is
representative of the entire video frame, the waveform displayed will be the
video signal of a single line. The same is true of the Vector, Lightning, and
Gamut displays. Line Select stays active as you change between measurement
modes. This enables you to select a line in Picture mode, and then go to
Waveform, Vector, Diamond, or other modes and view the same line.
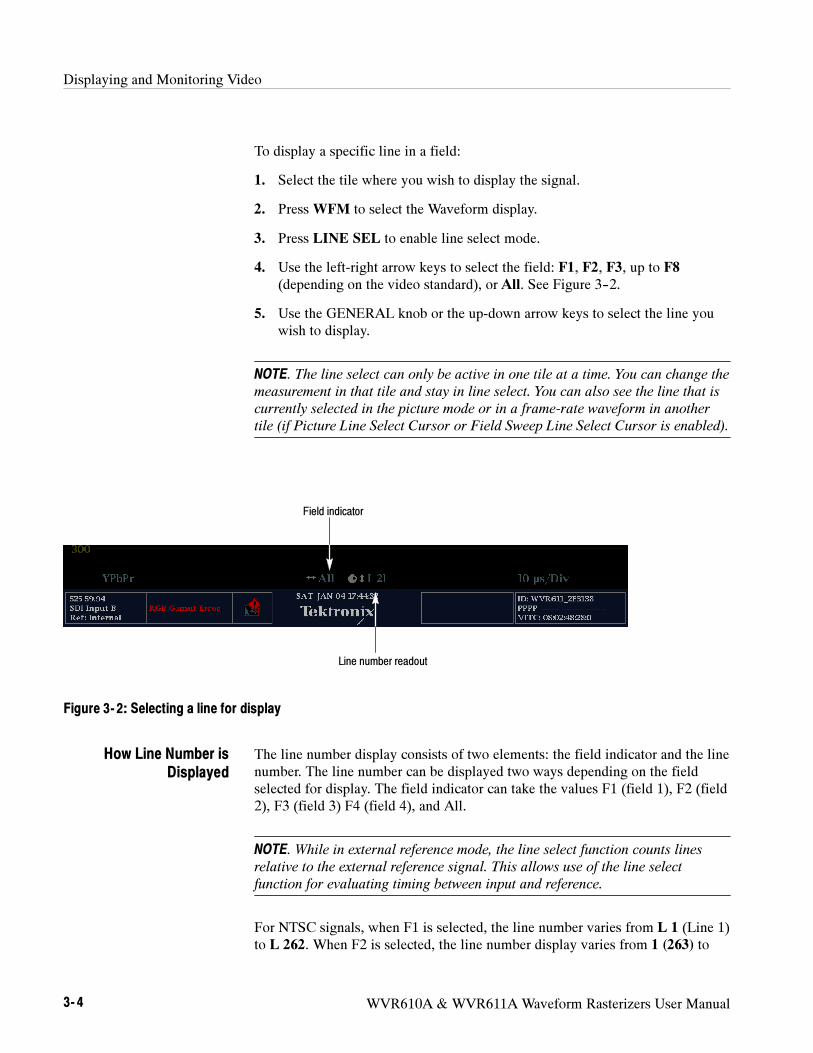
Displaying and Monitoring Video
3- 4 WVR610A & WVR611A Waveform Rasterizers User Manual
To display a specific line in a field:
1. Select the tile where you wish to display the signal.
2. PressWFM to select the Waveform display.
3. Press LINE SEL to enable line select mode.
4. Use the left-right arrow keys to select the field: F1, F2, F3, up to F8
(depending on the video standard), or All. See Figure 3--2.
5. Use the GENERAL knob or the up-down arrow keys to select the line you
wish to display.
NOTE. The line select can only be active in one tile at a time. You can change the
measurement in that tile and stay in line select. You can also see the line that is
currently selected in the picture mode or in a frame-rate waveform in another
tile (if Picture Line Select Cursor or Field Sweep Line Select Cursor is enabled).
Field indicator
Line number readout
Figure 3- 2: Selecting a line for display
The line number display consists of two elements: the field indicator and the line
number. The line number can be displayed two ways depending on the field
selected for display. The field indicator can take the values F1 (field 1), F2 (field
2), F3 (field 3) F4 (field 4), and All.
NOTE. While in external reference mode, the line select function counts lines
relative to the external reference signal. This allows use of the line select
function for evaluating timing between input and reference.
For NTSC signals, when F1 is selected, the line number varies from L 1 (Line 1)
to L 262. When F2 is selected, the line number display varies from 1 (263) to
How Line Number is
Displayed
Displaying and Monitoring Video
WVR610A & WVR611A Waveform Rasterizers User Manual 3- 5
263 (525). The number in parentheses following the line number is the line
number within the frame. Thus, 1 (263) indicates you have selected the first line
in field 2, which is the 263rd line in the frame. If F4 is selected, the line number
varies from 1 (787) to 263 (1050).
For PAL signals, when F1 is selected, the line number varies from L 1 (Line 1)
to L 313.5. When F2 is selected, the line number display varies from 313.5 to
625. The number in parentheses following the line number is the line number
within the frame. Thus, 1 (263) indicates you have selected the first line in field
2, which is the 263rd line in the frame. If F4 is selected, the line number varies
from 1 (788) to 263 (1200).
Measuring Rise Times
Rise time is usually measured from 10% to 90% amplitude of a positive going
transition. To measure rise time you need a test signal to have a known stimulus
to the system under test. The signal can be full field or inserted as a VITS.
Measuring rise time is an important way to check the performance of sources and
signal degradation by cabling. To measure rise times:
1. Select the active tile and set it to Waveform mode by pressingWFM. Press
LINE to set the display to a one line sweep.
2. Press VAR and then adjust Vertical Gain to set the rising edge to be
measured so it is ten divisions tall.
3. Use the horizontal position knob to place the rising edge in the center of the
screen.
4. PressMAG to expand the horizontal scale to 200 ns/div.
5. Use the VERTICAL knob to position the trace so the bottom of the
waveform is one major division below the reference line. (The 10% level of
the transition should be on the reference line.)
6. Use the HORIZONTAL knob to position the trace so that the rising edge of
the trace passes through a major division mark on the reference line.
7. Reposition the trace vertically so the top of the transition is one major
division above the reference line. (The 90% level of the transition is now on
the reference line.) Do not change the horizontal position.
8. Measure the rise time from the 10% starting point located in Step 5 to the
90% point where the rising edge now crosses the reference line.
If you set the trace to ten divisions tall, you can use Cursors to measure the time
between the 10% and 90% levels on the trace. See Figure 3--3.

Displaying and Monitoring Video
3- 6 WVR610A & WVR611A Waveform Rasterizers User Manual
Figure 3- 3: Measuring rise time with cursors
If it is not convenient to expand the transition vertically to ten major units, you
can make a good approximation of rise time by estimating the 10% and 90%
levels when positioning the top and bottom of the waveform near the reference
line. (With a 5-division transition, for example, position the waveform bottom at
one-half division below the reference line, which puts the 10% point on the
reference line; then position the waveform top at one-half division above the
reference line, which puts the 90% point on the reference line.)
Ensuring Regulatory Compliance
Each composite video standard has parameters which all broadcasts must meet.
To measure all of these parameters is a large job that may be more suited to an
automated measurement set such as a Tektronix VM700T, however a reasonable
subset can be checked with a waveform rasterizer.
For regulatory purposes, these values are measured on the output of a demodula-
tor that is driven from the off-air signal. These measurements can also be used
inside the facility to check internal signal fidelity. These measurements can be
performed on live signals, however they are easier to perform on a VITS, if one
is present.
Displaying and Monitoring Video
WVR610A & WVR611A Waveform Rasterizers User Manual 3- 7
The exact limits for each parameter is specified by the individual standard,
example values used here should not be mistaken as correct for all situations.
Parameters that are often checked for compliance:
Luma Amplitude
Peak Amplitude
Sync Amplitude
Burst Amplitude
Black Level / Setup
Proportion of sync to luma amplitude
Sync Width
Blanking Width
To check Luma Amplitude:
1. PressWFM to set the active tile to Waveform mode.
2. Choose a one or two line sweep.
3. Press and hold theWFM button to display the pop-up menu. Select
Filter > Luma to apply the Luma filter.
4. Compare the maximum level to the specification, that is 100 IRE for NTSC
and 700 mv for PAL.
To check Peak Amplitude:
1. PressWFM to set the active tile to Waveform mode.
2. Choose a one or two line sweep.
3. Press and hold theWFM button to display the pop-up menu. Select
Filter > Flat to apply the Flat filter.
4. Compare the maximum level to the specification, that is 120 IRE for NTSC
and 934 mv for PAL.
To check Sync Amplitude:
1. PressWFM to set the active tile to Waveform mode.
2. Choose a one or two line sweep.
3. Press and hold theWFM button to display the pop-up menu. Select
Filter > Flat to apply the Flat filter.
Displaying and Monitoring Video
3- 8 WVR610A & WVR611A Waveform Rasterizers User Manual
4. Compare the level to the specification, that is 40 IRE for NTSC and 300 mv
for PAL.
To check Burst Amplitude:
1. PressWFM to set the active tile to Waveform mode.
2. Choose a two line sweep.
3. Press and hold theWFM button to display the pop-up menu. Select
Filter > Flat to apply the Flat filter or Filter > Chroma to apply the
Chroma filter.
4. Compare the level to the specification, that is 40 IRE for NTSC and 300 mv
for PAL.
To check Black Level and Setup:
1. PressWFM to set the active tile to Waveform mode.
2. Choose a one or two line sweep.
3. Press and hold theWFM button to display the pop-up menu. Select
Filter > Luma to apply the Luma filter.
4. For PAL or NTSC without setup, verify that the minimum level during
active video is 0 V.
5. For NTSC with setup, verify the minimum level during active video is
7.5 IRE.
Check proportion of Sync to Luma Amplitude:
1. PressWFM to set the active tile to Waveform mode.
2. Choose a one or two line sweep.
3. Press and hold theWFM button to display the pop-up menu. Select
Filter > Flat to apply the Flat filter.
4. Use variable gain and vertical position and adjust the waveform to span from
the sync tip graticule line to the max luma graticule line.
5. If the blanking is not close to the zero or set-up graticule line, then the ratio
or proportion is incorrect.
To check Sync Width:
1. PressWFM to set the active tile to Waveform mode.
2. Choose a two line sweep.
Displaying and Monitoring Video
WVR610A & WVR611A Waveform Rasterizers User Manual 3- 9
3. Press and hold theWFM button to display the pop-up menu. Select
Filter > Flat to apply the Flat filter.
4. Use vertical position and adjust the waveform so the 50% point of sync is on
the center graticule.
5. Use the graticule to measure the sync width.
To check Blanking Width:
1. PressWFM to set the active tile to Waveform mode.
2. Choose a two line sweep.
3. Press and hold theWFM button to display the pop-up menu. Select
Filter > Flat to apply the Flat filter.
4. Use vertical position and adjust the waveform so the 50% point of the active
video transition is on the center graticule.
5. Use the graticule to measure the blanking width.
Matching Sources
To Match Sources means to adjust the components of the sources so that a
picture from each will look the same. For example, if you have two cameras
pointed at the same scene, then you probably want them to look the same as you
switch between them.
There are several waveform rasterizer display modes that can be used to match
sources:
Vector mode. This mode is good for matching hue and saturation but it does not
show luminance, so it is not a complete solution.
RGB waveform mode. This mode is easy to understand but not good for gamma
or if controls maintain constant luminance.
Composite waveform mode. This mode is good for looking at luminance and
saturation, but it does not show hue, so it is not a complete solution.
Diamond mode.A proprietary Tektronix display mode that shows luminance and
color information well. Diamond mode is especially good for gamma.
Picture mode. The ultimate authority as to what looks right, but hard to know
what you need to adjust to match the sources.
Displaying and Monitoring Video
3- 10 WVR610A & WVR611A Waveform Rasterizers User Manual
For all the modes, the procedure is about the same:
1. Display the first signal.
2. Note the location of the waveform features on the screen or use FREEZE to
capture a reference trace.
3. Switch to the second source.
4. Adjust the second source until it matches the first.
5. Switch back and forth between the two sources to verify they have the same
signal.
NOTE. You can use several of the suggested measurements in different tiles at the
same time. This will help you understand when one is more useful than the other.
For example, if vector and composite waveform are used at the same time, then
the complete luma and chroma space can be seen.
You can use the FREEZE function to assist comparing sources. Apply one input,
Press Freeze to capture an image, then apply the second source. Freeze Supports
several display modes that are useful for comparing sources.
You can use the CURSOR function to assist comparing sources. Turn on cursors
and use them as markers or to measure the differences.
Shading a Camera
Shading or balancing a camera means to adjust it to have equal red, green and
blue output in a given lighting situation.
The WVR610A & WVR611A support multiple ways of shading a camera. Three
of these methods are discussed below. For analog inputs, only one of these is
available. For all methods, a monochrome target such as a chip chart is assumed
to be in front of the camera.
Subcarrier nulling on a composite representation
Setting blanking and peak level on an RGB representation
Setting a straight line through the origin and peaks on the Diamond display
The Subcarrier Nulling method is the only one of these three methods that can
be used to balance a composite camera, although it can also be used for digital
component cameras by selecting a composite representation of the digital signal
in the Waveform pop-up menu.
Displaying and Monitoring Video
WVR610A & WVR611A Waveform Rasterizers User Manual 3- 11
Since the target is monochrome, there should be no subcarrier on the active part
of the waveform. So this method entails changing the camera controls to
eliminate any chroma.
The RGB method is very straight forward. Simply adjust the offset and gain for
each color so the video signal runs from 0 and 700 mV. The difficulty is getting
the gamma and knee points matched.
The third method uses the Tektronix proprietary Diamond display. This display
mode is available by selecting Gamut -- Gamut display type. In this display,
the chip chart should show as a vertical line through the origin and the top and
bottom of the diamond. If not, then change the gain and offset controls on the
individual colors to bring it in. If the line is not straight, then adjust the gamma
controls.
NOTE. Depending on how the camera head or color corrector controls work, one
or another of these methods may be much easier. For controls that maintain a
constant luminance, the diamond method is usually easiest.
You can use more than one method at a time, displaying each method in different
tiles. This will help you understand when one is more useful than the other.
Timing a Studio
Timing a studio involves adjusting the references going to different sources so
that their output feeds have the same timing when they arrive a common point,
such as a production switcher. For digital systems the timing typically only
needs to be close, because most switchers have some tolerance to timing errors.
For analog composite systems, the timing may need to be matched within a
small part of a subcarrier cycle to prevent hue shifts when switching between
sources.
The WVR610A & WVR611A support multiple methods and techniques of
timing a studio. All of these methods require an external reference to the
waveform rasterizers.
The methods and techniques are:
Comparing horizontal and vertical timing with Waveform Displays
Using Vector for fine timing on composite signals
Using SCH modes to check color framing
Using FREEZE to store a reference to assist the above methods
Using the new Tektronix Timing display
Displaying and Monitoring Video
3- 12 WVR610A & WVR611A Waveform Rasterizers User Manual
The traditional method of comparing horizontal and vertical timing is made
easier by the flexible tiles of the WVR610A & WVR611A.
The traditional method of comparing Horizontal and Vertical timing is made
easier by the flexible tiles and FREEZE function of the waveform rasterizer.
To time a studio using the traditional method:
1. Press EXT to select External Reference mode.
2. Apply the first input to the active channel of the waveform rasterizer.
3. Put one tile in line mode, choose an appropriate waveform mode.
4. Use the HORIZONTAL knob to center the sync edge or the SAV pulse.
5. PressMAG to increase the timing resolution.
6. Press FIELD to put a second tile in field mode, choose an appropriate
waveform mode.
7. Use the HORIZONTAL knob to center the vertical interval.
8. PressMAG to increase the timing resolution.
9. Press FREEZE save the waveform as a baseline.
10. Apply an input that needs to match timing with the first input.
11. Adjust the timing offset of the black generator to match the timing to the
saved baseline.
12. Repeat steps 10 and 11 for any other required signals.
NOTE. Use the Cursors as markers or to measure timing differences between
sources.
In this procedure, other tiles can be used to set fine timing and check color frame
alignment on composite signals. Alternatively, the other two tiles could be used
for line and field rate displays without mag active to show the location of
significantly mis-timed signals.
The WVR610A & WVR611A Timing display is significantly easier to use than
the traditional method. The Timing measurement draws a cross in the middle of
its display rectangle. The cross represents the timing of the reference signal. The
input signal is plotted as a circle. When the two signals occur at the same time,
the cross and the circle will be aligned. There are also numeric readouts of delay
Using the Traditional
Method
Using the Timing Display
Displaying and Monitoring Video
WVR610A & WVR611A Waveform Rasterizers User Manual 3- 13
in terms of lines of vertical delay and microseconds of horizontal delay. These
allow precise measurement of the timing offset between the two signals.
To use the Timing display to time a studio:
1. Press EXT to select External Reference mode.
2. Apply the first input to the active channel of the waveform rasterizer.
3. PressMEAS to select the Timing display.
4. Adjust the timing offset of the black generator to match the timing to the
external Reference.
Repeat step 4 for any other required signals.
NOTE. As you adjust timing, the circle representing the input timing may jump
occasionally. This because the color frame detection circuit can be temporarily
disrupted as the signal shifts. The jump is often a multiple of the field time. The
circle will settle back to the correct location in a second or so.
The rectangle in the Timing display represents one frame for SDI inputs or color
frame for composite inputs. The cross-hair in the center is zero offset, and the
circle represents the timing of the input signal. Lines of advance or delay are
shown as vertical displacement, while timing errors of less than a line are shown
as horizontal displacement. If the input is at the same time as the reference, then
the circle will be centered on the cross hair.
The timing offset is also shown numerically as lines and microseconds of
advance or delay in the Vertical Offset and Horizontal Offset boxes.
The Relative to: box indicates the chosen zero point for the timing display. The
default is Rear Panel. In this mode, the offset is zero when the input and
reference are at the same timing at the rear panel of the waveform rasterizer. The
other choice is Saved Offset. In this mode, you can save the timing from one
signal, and then display the timing relative to that saved offset.
Press and holdMEAS to bring up the timing pop-up menu and access the
Relative to: and Saved Offset functions.
To time down the inputs to a router:
1. Select one input as the master and route it and a reference to the waveform
rasterizer.
2. Save the timing offset for the master input (MEAS > Save Offset > Press
Select) and select Relative to: Saved Offset mode from the pop-up menu.
About the Timing Display
Displaying and Monitoring Video
3- 14 WVR610A & WVR611A Waveform Rasterizers User Manual
3. Now select other inputs to the router to be connected to the waveform
rasterizer. For each input the relative timing will be displayed.
4. Adjust the timing offset at the master sync source to time down the inputs to
the router to match the master.
NOTE. You cannot save the timing offset if either the input or reference is missing
or unlocked. You also cannot save a reference when in internal mode. Saving an
offset in these conditions would lead to misleading results so it is not allowed by
the instrument. A warning message will appear on the screen if you attempt to
save the offset when it is not allowed.
Background for the Timing Display. The resolution of the timing display is one
27 MHz clock cycle or 37 ns. To get the greater accuracy needed for a composite
signal, first use the timing display to get close, then use a vector display for the
final burst phase alignment. Since these two displays can be present simulta-
neously in separate tiles, this process can still be easy and quick.
For composite signals, the definition of “time aligned” is straight forward, but
for an SDI input relative to a composite reference the situation is more complex.
For the timing display the definition of “zero offset” on an SDI input assumes
the SDI signal will be converted to composite. The converted composite signal is
then compared to the composite reference. For the conversion, a half-band filter
with a 33 clock-cycle delay and an analog reconstruction filter are assumed. This
conversion introduces a delay of about 3 µs.
This timing relationship between input and reference is also compatible with
waveform mode. That is, if you have zero timing on the Timing display and
change from internal to external reference, the displayed waveform will not shift
position.
In the Relative to: Rear Panel mode, this 3 µs conversion delay is removed
from the measured offset before the display is generated. In the Relative to:
Saved Offset mode it has no effect.
Displaying and Monitoring Video
WVR610A & WVR611A Waveform Rasterizers User Manual 3- 15
Investigating a Flaw in a Picture
If you want to see the video signal that produces one portion of an image, then
use the line select function. Line select restricts the active tile so it displays only
one line of the video image. When you use line select, the selected line will also
be highlighted on the picture display. This makes it easy to zero in on any part of
the signal.
To use line select to investigate a portion of a picture:
1. Press PICT to select picture mode for one tile.
2. Select Waveform, Vector, or a Gamut display in a second tile.
3. Press LINE SEL.
The active tile set in step 2 will now be in line select mode.
4. Press CURSOR to display the Picture Cursor Line pop-up menu. Press SEL
to select On in the pop-up menu.
5. Use the GENERAL knob to put the highlight cursor on the area of interest
in the picture. See Figure 3--4.
6. Examine the tile, set up in step 2, to see the signal that creates the selected
line of the picture.
NOTE. Only one tile may be in line select at a time.

Displaying and Monitoring Video
3- 16 WVR610A & WVR611A Waveform Rasterizers User Manual
Picture line
cursor
Figure 3- 4: Investigating a line in a picture
Checking VITS
To display a VITS (Vertical Interval Test Signal), you need to know into which
field and line the signal was inserted. Once you know what line the signal was
inserted into, you can display the line using LINE SEL.
To display the VITS on a specific line:
1. Select the tile where you wish to display the signal.
2. PressWFM to select the Waveform display.
3. Press LINE (to the right of the INPUT buttons) to enable line select mode.
4. Use the left-right arrow keys to select the desired field. See Figure 3--2 on
page 3--4.
5. Use the GENERAL knob or the up-down arrow keys to select the line you
wish to display.
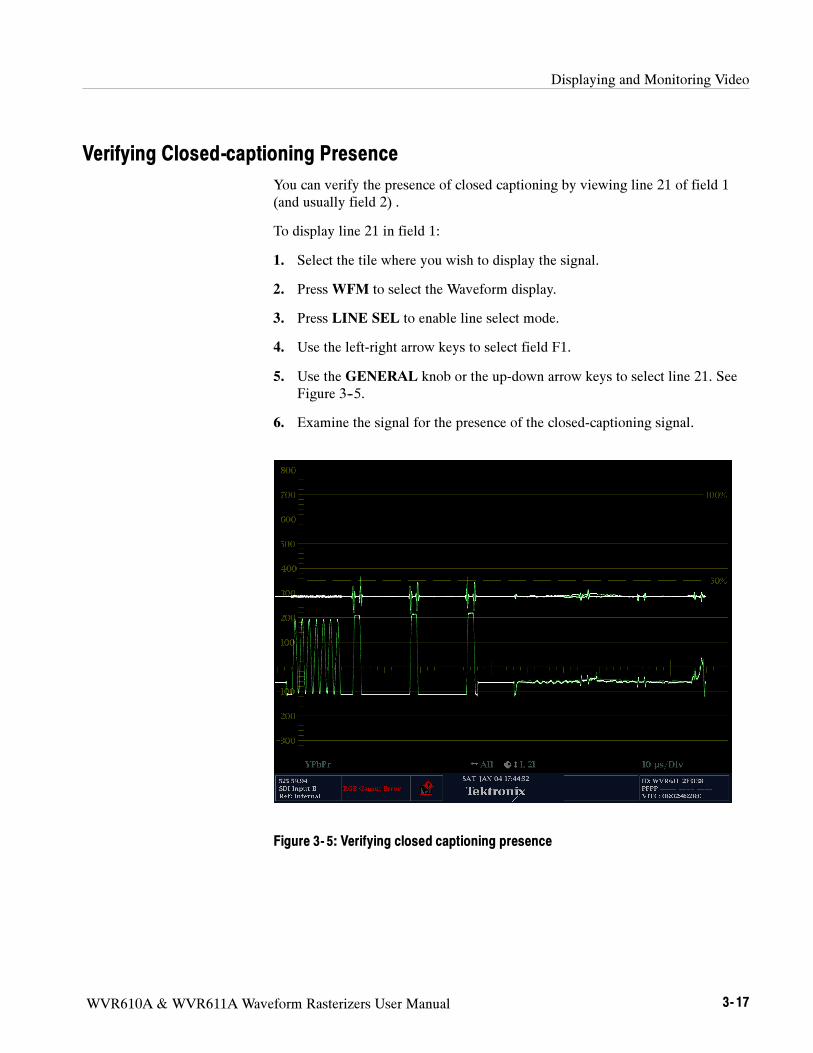
Displaying and Monitoring Video
WVR610A & WVR611A Waveform Rasterizers User Manual 3- 17
Verifying Closed-captioning Presence
You can verify the presence of closed captioning by viewing line 21 of field 1
(and usually field 2) .
To display line 21 in field 1:
1. Select the tile where you wish to display the signal.
2. PressWFM to select the Waveform display.
3. Press LINE SEL to enable line select mode.
4. Use the left-right arrow keys to select field F1.
5. Use the GENERAL knob or the up-down arrow keys to select line 21. See
Figure 3--5.
6. Examine the signal for the presence of the closed-captioning signal.
Figure 3- 5: Verifying closed captioning presence
Displaying and Monitoring Video
3- 18 WVR610A & WVR611A Waveform Rasterizers User Manual
Checking Gamut
Signals that are legal and valid in one signal representation may not be valid in
another representation. Specifically, signals which are legal in the Digital YCbCr
representation may not be legal if transcoded to RGB or encoded to NTSC /
PAL. Any signal that fails this test is considered out of gamut.
The WVR610A & WVR611A support multiple displays and alarms to allow
detecting out of gamut signals. The flexible tile display allows you to simulta-
neously view several of the gamut measurements to learn which is most
appropriate for a given application.
The displays are:
Diamond for checking that SDI signals conform to legal RGB gamut space
Split Diamond separates the upper and lower diamonds to show excursions
below black, otherwise it is identical to the Diamond display
Arrowhead for checking if an SDI signal is legal for composite color space
Composite Waveform modes for checking both SDI and composite signals
for legality in composite color space
Diamond, Split Diamond, and Arrowhead have adjustable thresholds. If the
signal goes outside the area defined by the thresholds, the signal is out of gamut.
If these limits are exceeded then the waveform rasterizer can generate alarms if
configured to do so.
For composite waveforms, the legal limit is simply the maximum level allowed
for the combination of luma and chroma. This limit depends on application. For
example, a recording on a tape may be able to handle a larger signal than if
driving into a transmitter.
The Diamond display is very effective at showing the relationship between the
R, G, and B signal video signals. The waveform monitor converts the Y, Pb,and
Prcomponents recovered from the serial signal to R, G, and B to form the
Diamond display. Figure 3--6 shows how the Diamond plot is developed.
Ultimately all color video signals are coded as RGB for display on a picture
monitor. To predictably display all three components, they must lie between peak
white, 700 mV, and black, 0 V. Picture monitors handle excursions outside the
standard range (gamut) in different ways.
Diamond Display
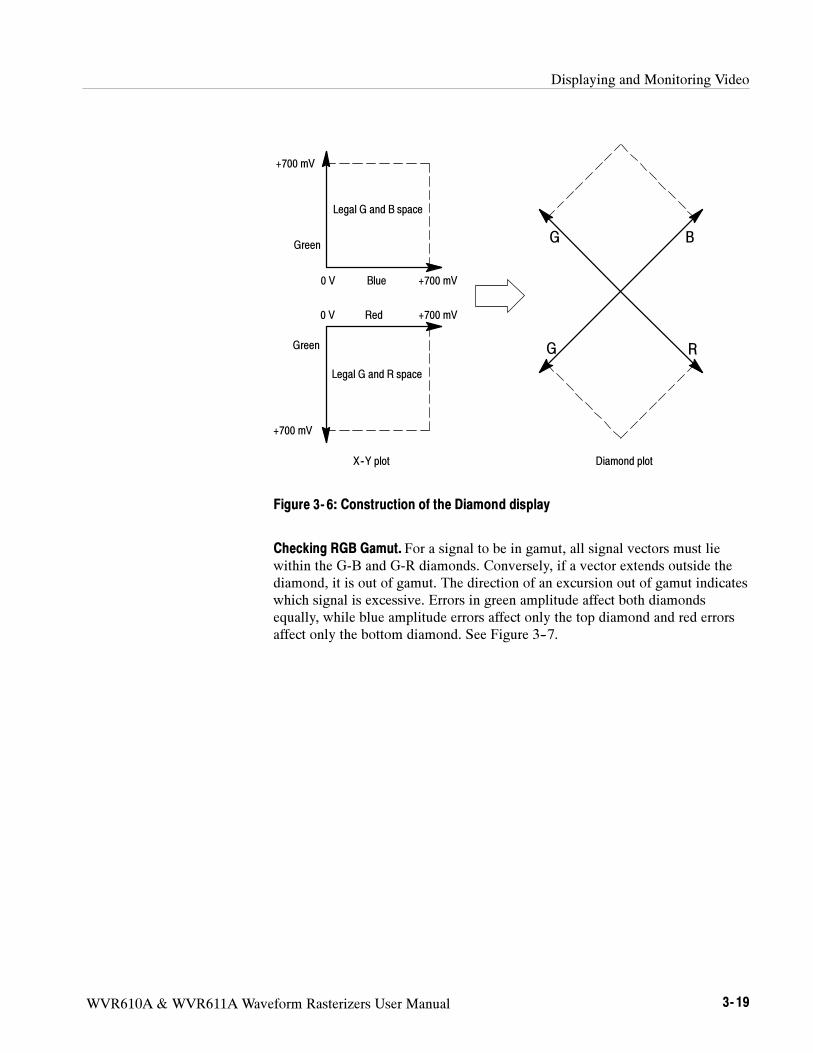
Displaying and Monitoring Video
WVR610A & WVR611A Waveform Rasterizers User Manual 3- 19
Red
Blue0 V +700 mV
+700 mV
+700 mV0 V
+700 mV
B
RG
G
X--Y plot Diamond plot
Green
Legal G and R space
Green
Legal G and B space
Figure 3- 6: Construction of the Diamond display
Checking RGB Gamut. For a signal to be in gamut, all signal vectors must lie
within the G-B and G-R diamonds. Conversely, if a vector extends outside the
diamond, it is out of gamut. The direction of an excursion out of gamut indicates
which signal is excessive. Errors in green amplitude affect both diamonds
equally, while blue amplitude errors affect only the top diamond and red errors
affect only the bottom diamond. See Figure 3--7.
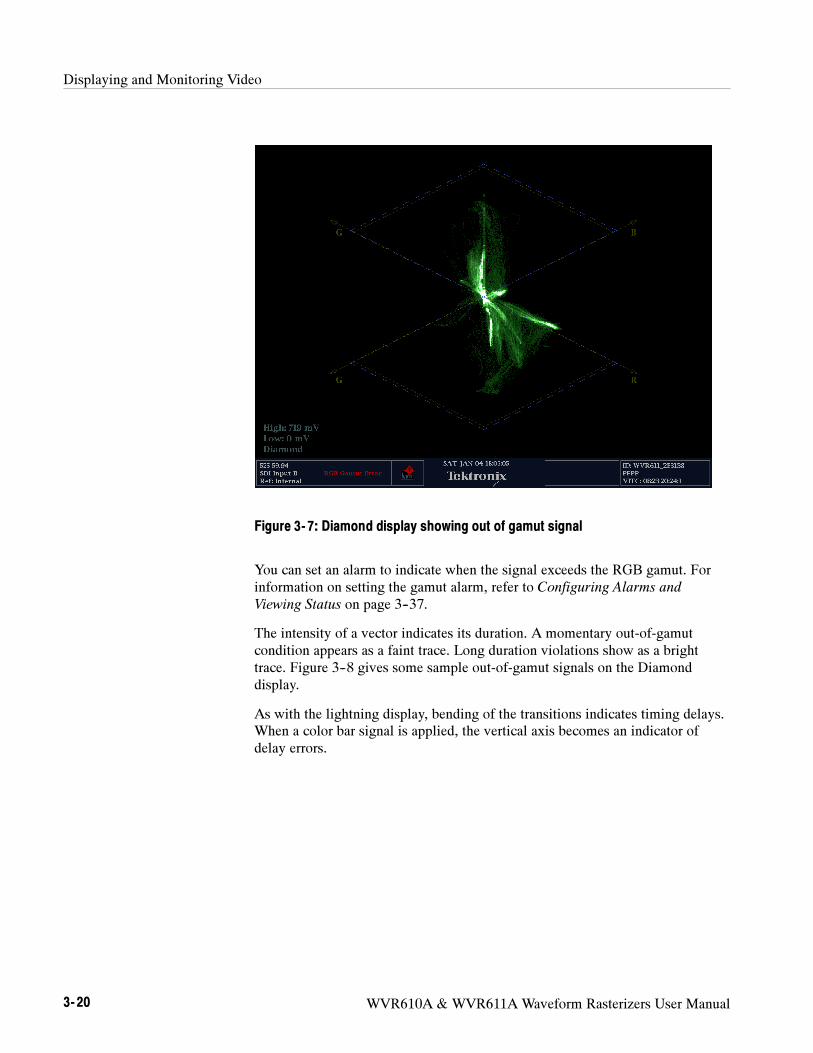
Displaying and Monitoring Video
3- 20 WVR610A & WVR611A Waveform Rasterizers User Manual
Figure 3- 7: Diamond display showing out of gamut signal
You can set an alarm to indicate when the signal exceeds the RGB gamut. For
information on setting the gamut alarm, refer to Configuring Alarms and
Viewing Status on page 3--37.
The intensity of a vector indicates its duration. A momentary out-of-gamut
condition appears as a faint trace. Long duration violations show as a bright
trace. Figure 3--8 gives some sample out-of-gamut signals on the Diamond
display.
As with the lightning display, bending of the transitions indicates timing delays.
When a color bar signal is applied, the vertical axis becomes an indicator of
delay errors.
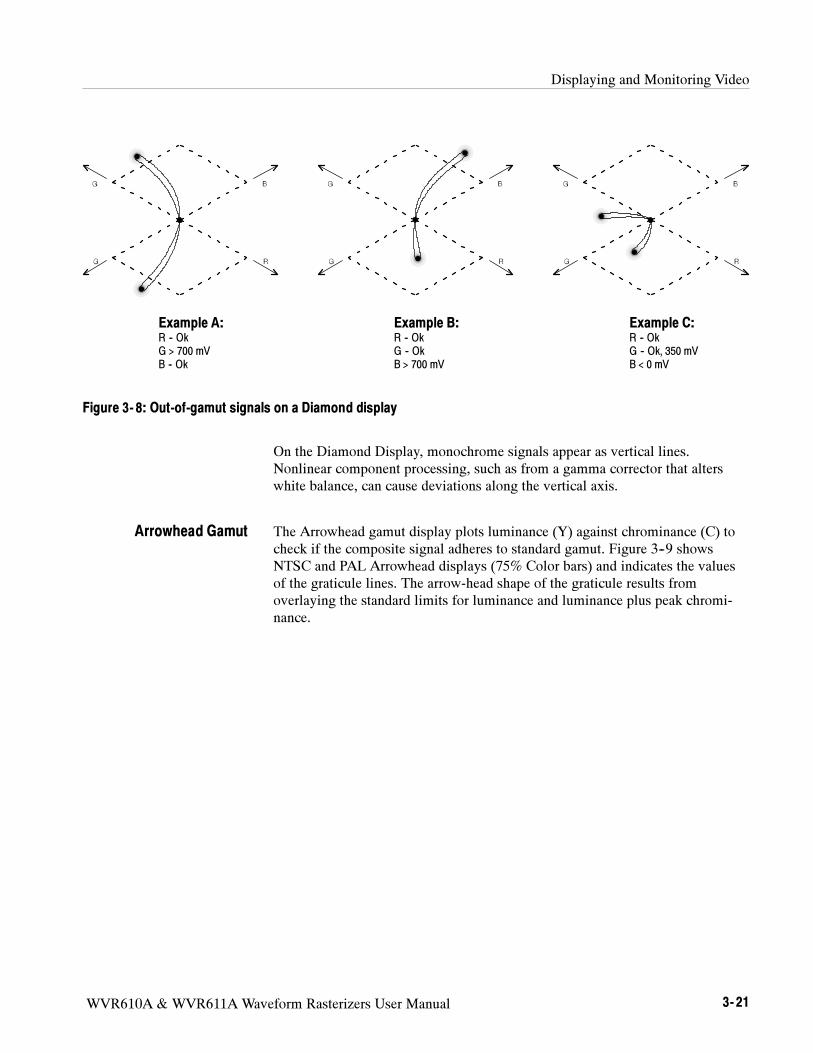
Displaying and Monitoring Video
WVR610A & WVR611A Waveform Rasterizers User Manual 3- 21
Example A:
R -- Ok
G > 700 mV
B -- Ok
Example B:
R -- Ok
G -- Ok
B > 700 mV
Example C:
R -- Ok
G -- Ok, 350 mV
B < 0 mV
Figure 3- 8: Out-of-gamut signals on a Diamond display
On the Diamond Display, monochrome signals appear as vertical lines.
Nonlinear component processing, such as from a gamma corrector that alters
white balance, can cause deviations along the vertical axis.
The Arrowhead gamut display plots luminance (Y) against chrominance (C) to
check if the composite signal adheres to standard gamut. Figure 3--9 shows
NTSC and PAL Arrowhead displays (75% Color bars) and indicates the values
of the graticule lines. The arrow-head shape of the graticule results from
overlaying the standard limits for luminance and luminance plus peak chromi-
nance.
Arrowhead Gamut
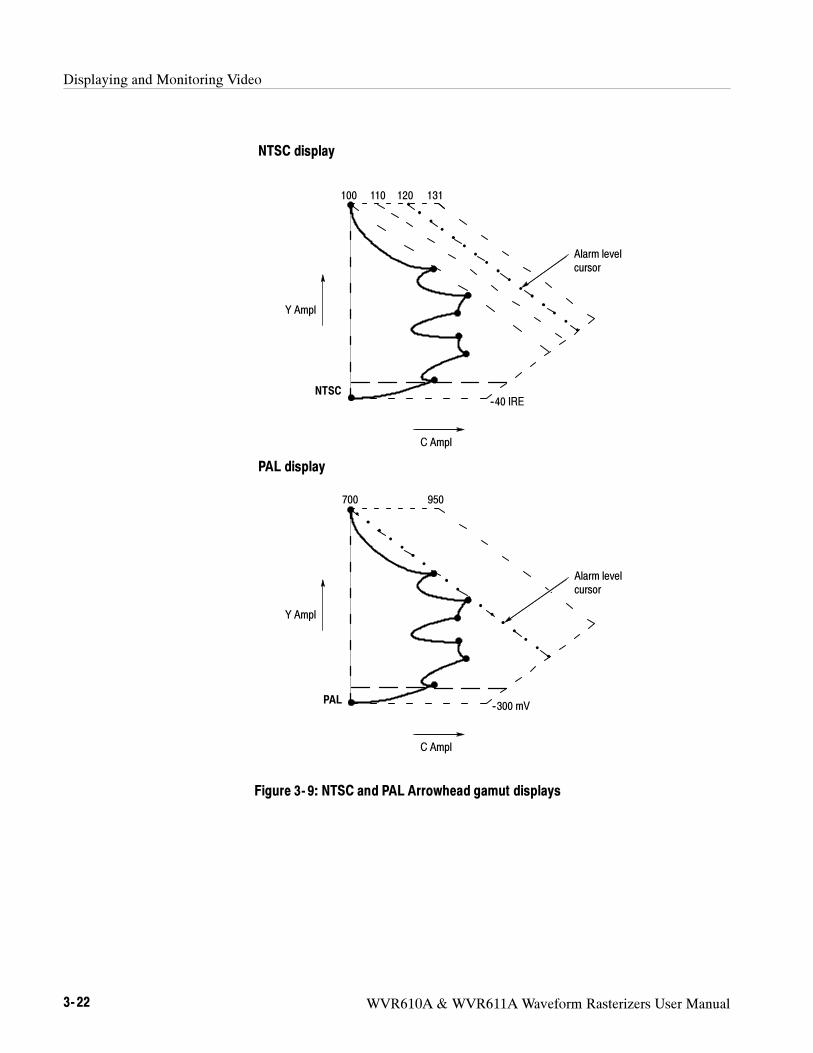
Displaying and Monitoring Video
3- 22 WVR610A & WVR611A Waveform Rasterizers User Manual
Alarm level
cursor
Y Ampl
C Ampl
--40 IRE
100 131
NTSC display
110
NTSC
Y Ampl
C Ampl
--300 mV
PAL display
700
Alarm level
cursor
950
PAL
120
Figure 3- 9: NTSC and PAL Arrowhead gamut displays
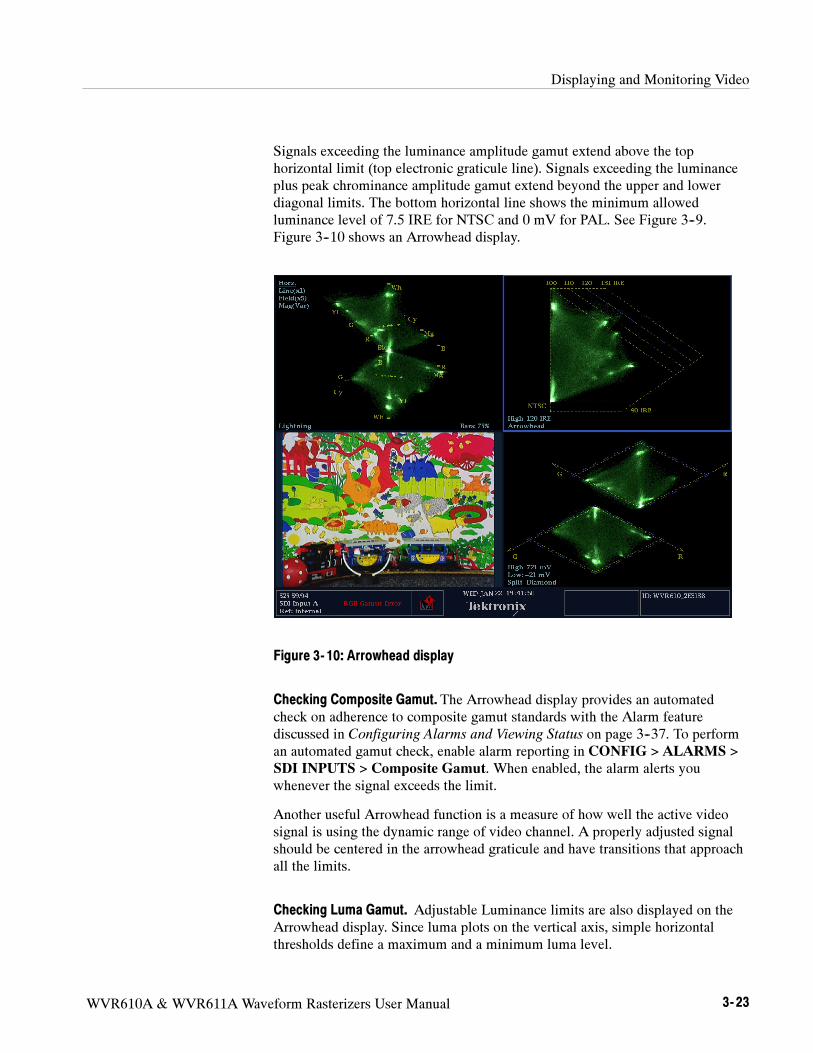
Displaying and Monitoring Video
WVR610A & WVR611A Waveform Rasterizers User Manual 3- 23
Signals exceeding the luminance amplitude gamut extend above the top
horizontal limit (top electronic graticule line). Signals exceeding the luminance
plus peak chrominance amplitude gamut extend beyond the upper and lower
diagonal limits. The bottom horizontal line shows the minimum allowed
luminance level of 7.5 IRE for NTSC and 0 mV for PAL. See Figure 3--9.
Figure 3--10 shows an Arrowhead display.
Figure 3- 10: Arrowhead display
Checking Composite Gamut. The Arrowhead display provides an automated
check on adherence to composite gamut standards with the Alarm feature
discussed in Configuring Alarms and Viewing Status on page 3--37. To perform
an automated gamut check, enable alarm reporting in CONFIG > ALARMS >
SDI INPUTS > Composite Gamut. When enabled, the alarm alerts you
whenever the signal exceeds the limit.
Another useful Arrowhead function is a measure of how well the active video
signal is using the dynamic range of video channel. A properly adjusted signal
should be centered in the arrowhead graticule and have transitions that approach
all the limits.
Checking Luma Gamut. Adjustable Luminance limits are also displayed on the
Arrowhead display. Since luma plots on the vertical axis, simple horizontal
thresholds define a maximum and a minimum luma level.
Displaying and Monitoring Video
3- 24 WVR610A & WVR611A Waveform Rasterizers User Manual
The thresholds are defined in terms of percent of full scale. Thus, they apply to
both the incoming SDI and the arrowhead representation of the SDI input as a
composite signal. By defining these levels in percent, they automatically account
for the presence or absence of setup.
The range for the Upper limit is 90% to 108%.
The range to the Lower Limit is --6% to +5%
The thresholds are affected by the user choice of set-up or no set-up for the
Arrowhead display.
Luma limit thresholds can be configured for identifying luma exceeding
threshold limits. The adjustable thresholds are indicated by the dark blue
horizontal graticule lines on the display.
Checking Frequency Response
Checking Frequency Response ensures that your video signal has the same gain
at all frequencies. To perform this test you need a signal with a known frequency
distribution, this typically means a test signal, either full field or set up as a
VITS.
There are four basic signals you can use to test frequency response:
Sweep
Multi-burst
Multi-pulse
Pulse and Bar
Sweep is a signal that starts at a low frequency and smoothly increases to a high
frequency. Apply the sweep signal to the system under test then use Waveform
mode to look at the envelope of the signal. It should be flat at the top and
bottom. If the envelope is smaller at some frequencies, then it indicates a roll-off
in frequency response. You may want to use Cursors to measure any response
error.
Multi-burst is similar to sweep except it has packets of discrete frequencies.
Typical signals can have packets of 0.5, 1, 2, 3, 4 and 5 MHz. Use the same
procedure as for sweep to evaluate the attenuation at each packet’s frequency.
Multi-Pulse is a series of pulses each filled with a burst. The frequency of the
burst increases across the line. If there is a roll-off in frequency response, the
bottom of the burst cycles will not get down to the baseline. Conversely, if there
is peaking, the burst cycles will extend past the baseline. Multi-pulse also
indicates the presence of group delay by an “S” shape in the bottom of the burst
cycles.
Displaying and Monitoring Video
WVR610A & WVR611A Waveform Rasterizers User Manual 3- 25
Pulse and Bar is one short pulse and one long bar on the same video line. Ideally,
the pulse and the bar should be the same amplitude. If they are not the same
amplitude, then it indicates a frequency response error since the pulse has higher
frequency components than the bar. The pulse can also indicate phase distortion
if it has excess ringing, or group delay errors if the ringing is asymmetric around
the pulse.

Displaying and Monitoring Video
3- 26 WVR610A & WVR611A Waveform Rasterizers User Manual
WVR610A & WVR611A Waveform Rasterizers User Manual 3- 27
Selecting and Monitoring Audio
The WVR610A & WVR611A provide several methods to monitor audio signals.
You can measure levels, monitor phase, and display phase correlation. You can
specify meter ballistics and scales, set the Test and Peak Program indicator
levels, and specify how phase is displayed.
NOTE. With audio option DA, the waveform rasterizer can monitor AES, analog
and Embedded audio. Option AN can only monitor analog audio and option DG
can only monitor AES and embedded audio.
Selecting the Audio Input
You select the audio input to be monitored from the front-panel AUDIO button
pop-up menu.
NOTE. The Audio display can appear in only one tile at a time.
To select the audio input monitor:
1. Press AUDIO to set the active tile to audio mode.
2. Press and hold the AUDIO button to display the pop-up menu. See
Figure 3--11.

Selecting and Monitoring Audio
3- 28 WVR610A & WVR611A Waveform Rasterizers User Manual
Figure 3- 11: Audio pop-up menu
3. Select Audio Input.
4. Select the following audio input options: Follows Video, AES A, AES B,
Analog A, Analog B, or Embedded (the available selections depend on the
installed audio option).
NOTE. Selection of Follows Video uses the audio to video mapping in the
Configuration menu.
5. To activate the input selected, press SEL.
Selecting and Monitoring Audio
WVR610A & WVR611A Waveform Rasterizers User Manual 3- 29
Checking Audio Level
The waveform rasterizer level meters are vertical bar graphs where the height of
the bar indicates the amplitude of the audio program in the corresponding input
channel. You can change the input and turn on and off the Phase display from the
audio pop-up menu. Other meter characteristics such as ballistics, scale units,
and program/test levels are configured through the Configuration menu.
To check audio level:
1. Press the AUDIO button to set the active tile to audio mode.
The level meter bars are displayed. These bars indicate the current audio
levels according to the selected meter ballistics. See Figure 3--12.
Figure 3- 12: Audio level meters
The graphical level meter displays three colors:
Green-- Indicates portions of the level meters below the test level.
Yellow-- Indicates portions of the level meters between the test and peak
program level.
Red-- Indicates portions of the level meters above the peak program level.
Selecting and Monitoring Audio
3- 30 WVR610A & WVR611A Waveform Rasterizers User Manual
Checking Audio Phase
The WVR610A & WVR611A, with optional audio, can display phase of one
input pair with a Lissajous pattern display, and it can display relative phase on all
four pairs of inputs with correlation meters.
To check audio phase:
1. Select the tile where you wish to display the audio phase.
2. Press the AUDIO button.
3. Press and hold the AUDIO button to display the pop-up menu.
4. Select Phase Display. Press SEL or the right-arrow key to turn the phase
display on.
5. Select the Phase Style and the Phase Pair from the pop-up menu. See
Figure 3--13.
Figure 3- 13: Audio phase display
The Lissajous or phase portion of the audio display is a plot of one channel
against another on an orthogonal pair of axes. You can set the instrument for
either soundstage or X--Y orientation of the Lissajous pattern. See Figure 3--14.
Lissajous Display
Selecting and Monitoring Audio
WVR610A & WVR611A Waveform Rasterizers User Manual 3- 31
Lissajous Sound Stage X-Y Orientation
Figure 3- 14: Audio phase displays
The Soundstage representation has the two channels plotted at 45 degree angles
with the mono combination appearing on the vertical axis. The soundstage
orientation is more like a left -- right image in a studio.
The X-Y orientation plots left channel data along the vertical axis and right
channel data on the horizontal axis, emulating the conventional X-Y display of
an oscilloscope.
The Correlation meters display the extent to which two channels move together.
This can be considered their mono compatibility. These meters are located under
the appropriate bars and one is duplicated under the phase display.
See Figure 3--15 on page 3--32.
When signals are correlated the diamond will be green, and it will move to
the right side.
If the signal is uncorrelated then the indicator will tend to stay in the middle.
Finally if the signals are anti-correlated -- that is one goes up when the other
goes down -- then the correlation meter indicator will be red and go to the
left end.
The more correlated or uncorrelated the signals are, the farther the indicator will
be from the center.
Correlation Meters
Selecting and Monitoring Audio
3- 32 WVR610A & WVR611A Waveform Rasterizers User Manual
Phase correlation meters
Green indicates
correlated signals
The further to the
right, the higher the
correlation
Yellow indicates uncorrelated
signals
Figure 3- 15: Audio phase display
The response time of the correlation meters can be set from the CONFIG menu.
The choices are shown in Table 3--1.
Table 3- 1: Correlation meter response times
Speed setting
Response aver-
aging time (s) Speed setting
Response aver-
aging time (s)
1 0.0167 11 3.0
2 0.0333 12 3.5
3 0.0667 13 4.0
4 0.1333 14 4.5
5 0.2667 15 5.0
6 0.5333 16 5.5
7 1.0 17 6.0
8 (default) 1.5 18 6.5
9 2.0 19 7.0
10 2.5 20 7.5
WVR610A & WVR611A Waveform Rasterizers User Manual 3- 33
Using Presets
A Preset is a saved instrument setting. Using presets saves you time because you
only need to press a single button to change a range of waveform rasterizer
settings to meet a specific measurement need. Presets are created and recalled
using the numbered buttons located under PRESETS on the front panel or using
the web interface.
There are a couple of advantages to saving presets on a PC using the web
interface. One is that the preset is a named file which can make it easier to recall
the purpose of the preset. A second advantage is that the number of presets that
can be saved on a PC is, for practical purposes, unlimited.
Creating Presets
You can create Presets either from the front panel of the WVR610A &
WVR611A or from the Remote Interface software.
To create a Preset on a WVR610A & WVR611A:
1. Set up the waveform rasterizer exactly as you wish to have it configured.
This includes setting the contents of each tile and the audio and video
settings.
2. After you have configured the waveform rasterizer, press and hold one of the
numbered buttons located under PRESETS for more than two seconds.
When settings have been assigned to a Preset button, a notification appears
informing you that Preset X has been saved.
The FACTORY Preset settings cannot be changed.
Using the Remote Interface software you can save the Presets on the WVR610A
& WVR611A.
To create a Preset using the Remote Interface software:
1. Set up the waveform rasterizer exactly as you wish to have it configured.
This includes setting the contents of each tile and the audio and video
settings.
2. In the Remote Interface Java applet, select File > Save as Preset. See
Figure 3--16.
From the Front Panel
From the Remote Interface
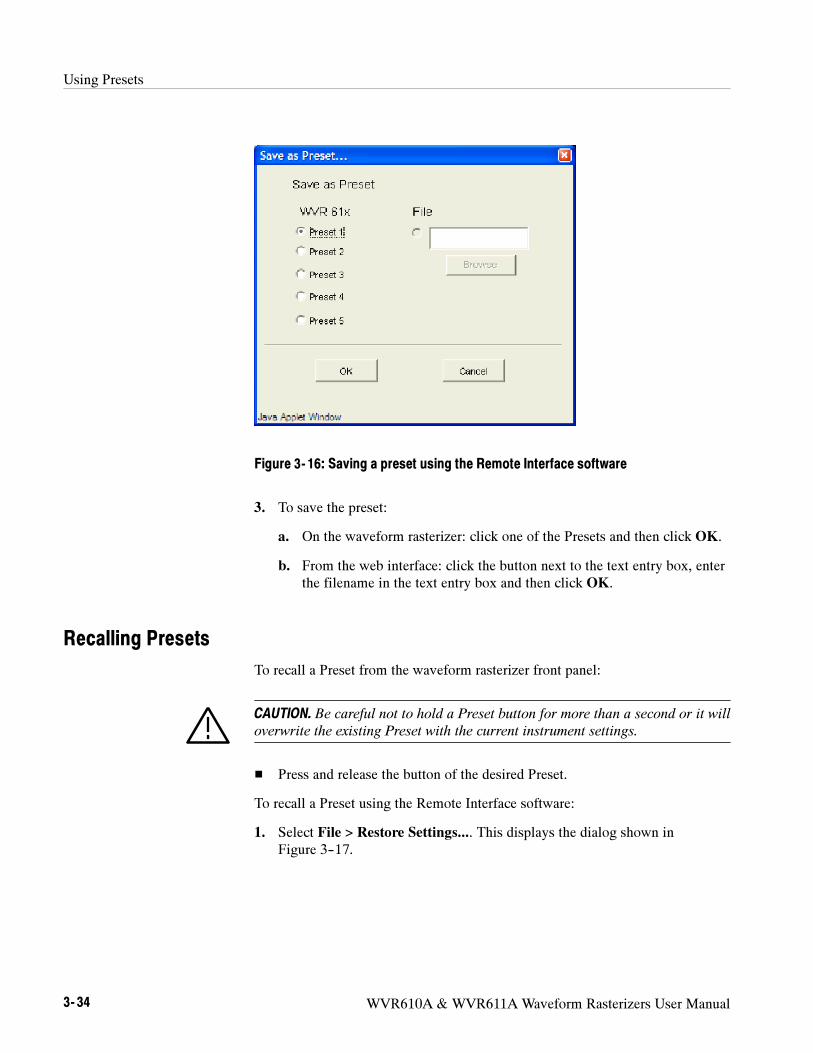
Using Presets
3- 34 WVR610A & WVR611A Waveform Rasterizers User Manual
Figure 3- 16: Saving a preset using the Remote Interface software
3. To save the preset:
a. On the waveform rasterizer: click one of the Presets and then click OK.
b. From the web interface: click the button next to the text entry box, enter
the filename in the text entry box and then click OK.
Recalling Presets
To recall a Preset from the waveform rasterizer front panel:
CAUTION. Be careful not to hold a Preset button for more than a second or it will
overwrite the existing Preset with the current instrument settings.
Press and release the button of the desired Preset.
To recall a Preset using the Remote Interface software:
1. Select File > Restore Settings.... This displays the dialog shown in
Figure 3--17.
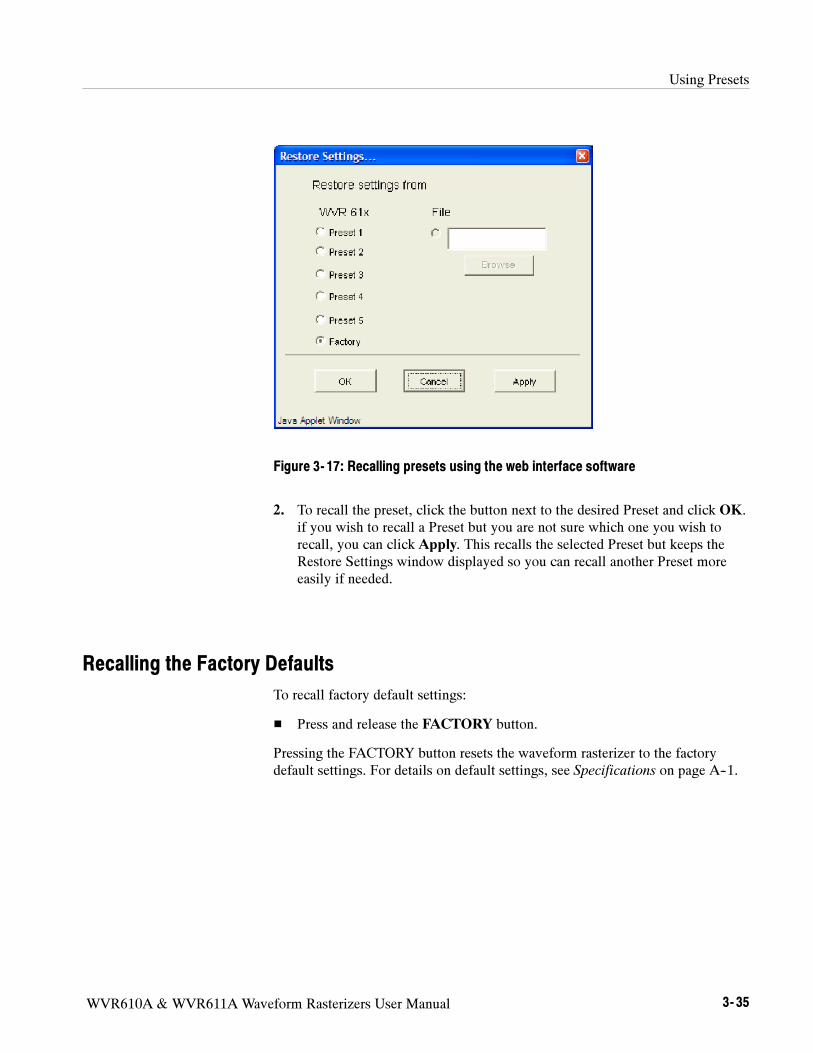
Using Presets
WVR610A & WVR611A Waveform Rasterizers User Manual 3- 35
Figure 3- 17: Recalling presets using the web interface software
2. To recall the preset, click the button next to the desired Preset and click OK.
if you wish to recall a Preset but you are not sure which one you wish to
recall, you can click Apply. This recalls the selected Preset but keeps the
Restore Settings window displayed so you can recall another Preset more
easily if needed.
Recalling the Factory Defaults
To recall factory default settings:
Press and release the FACTORY button.
Pressing the FACTORY button resets the waveform rasterizer to the factory
default settings. For details on default settings, see Specifications on page A--1.

Using Presets
3- 36 WVR610A & WVR611A Waveform Rasterizers User Manual
Contents of a Preset
All instrument settings except those set in the Utilities and Network Settings
submenus of the CONFIG menu are saved in a Preset. Settings that are not saved
are those such as the clock setting, IP configuration and network address.
The following is an overview of the settings saved in a Preset:
Measurement assigned to each tile
Tile specific settings
Input selection
SDI Input settings
Composite Input settings
Cursor settings
External Reference settings
Analog and Digital Audio Displays settings
Audio Inputs/Outputs settings
Alarm settings
Gamut Thresholds
Display Settings
Readout settings
Graticule settings
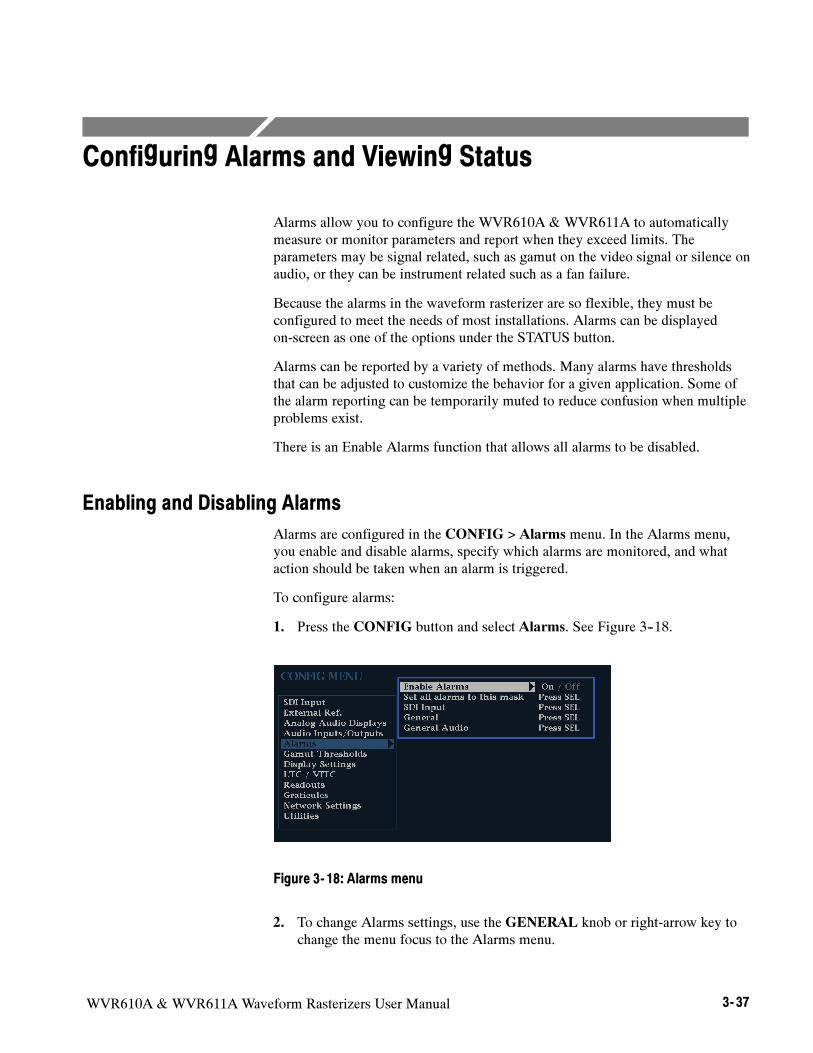
WVR610A & WVR611A Waveform Rasterizers User Manual 3- 37
Configuring Alarms and Viewing Status
Alarms allow you to configure the WVR610A & WVR611A to automatically
measure or monitor parameters and report when they exceed limits. The
parameters may be signal related, such as gamut on the video signal or silence on
audio, or they can be instrument related such as a fan failure.
Because the alarms in the waveform rasterizer are so flexible, they must be
configured to meet the needs of most installations. Alarms can be displayed
on-screen as one of the options under the STATUS button.
Alarms can be reported by a variety of methods. Many alarms have thresholds
that can be adjusted to customize the behavior for a given application. Some of
the alarm reporting can be temporarily muted to reduce confusion when multiple
problems exist.
There is an Enable Alarms function that allows all alarms to be disabled.
Enabling and Disabling Alarms
Alarms are configured in the CONFIG > Alarms menu. In the Alarms menu,
you enable and disable alarms, specify which alarms are monitored, and what
action should be taken when an alarm is triggered.
To configure alarms:
1. Press the CONFIG button and select Alarms. See Figure 3--18.
Figure 3- 18: Alarms menu
2. To change Alarms settings, use the GENERAL knob or right-arrow key to
change the menu focus to the Alarms menu.

Configuring Alarms and Viewing Status
3- 38 WVR610A & WVR611A Waveform Rasterizers User Manual
To enable or disable alarms:
1. From the CONFIG menu, select Alarms.
2. From the Alarms menu, select Enable Alarms.
3. Press SEL to select On to enable alarms or Off to disable alarms.
Note that when you disable alarms, Alarms Disabled appears in the Status
bar.
4. Press CONFIG to remove the CONFIG menu.
Alarm Conditions That Can Be Monitored
The waveform rasterizer can monitor up to 27 alarm conditions (depending on
the model and installed options), which are organized into several groups: SDI
Input, Composite Input, General, General Audio, AES and Embedded, and
Embedded Audio Specific. See Table 3--2.
Table 3- 2: Alarms
Alarm group Alarms
SDI Input SDI Input Missing
SDI Input Unlocked
EDH Alarm
RGB Gamut
Composite Gamut
Composite Input Input Missing
Input Unlocked
General External Reference Missing
External Reference Unlocked
LTC Invalid
LTC Missing
VITC Invalid
VITC Missing
Hardware Fault
General Audio Audio Clip
Audio Mute
Over Alarm
Silence
Enabling and Disabling
Alarms
Configuring Alarms and Viewing Status
WVR610A & WVR611A Waveform Rasterizers User Manual 3- 39
Table 3- 2: Alarms (Cont.)
Alarm group Alarms
AES and Embedded Signal Lock
Professional CRC
Validity Bit
Parity
Embedded Audio Specific Audio Stream Missing
Checksum
Buffer Full
Buffer Empty
Parity
SDI alarms indicate problems with SDI input signals. The SDI Input alarms that
can be monitored are:
SDI Input Missing. Indicates that an SDI input signal has not been detected at the
selected input.
SDI Input Unlocked. Indicates that the waveform rasterizer cannot lock to the
selected SDI input signal.
EDH Alarm. Indicates when the EDH has detected an error.
RGB Gamut. Indicates when the input signal contains colors that violate the
currently set limits for RGB gamut, which are specified by the Diamond
Thresholds.
Composite Gamut. Indicates an input signal containing colors that violate the
currently set limits for composite gamut, which are specified by the Arrowhead
Thresholds.
Luma Gamut. Indicates an input signal with Luminance values that exceed the
currently set limits for Luma, which are specified by the Luma Thresholds.
Composite input alarms indicate problems with composite input signals. The
alarms that can be monitored are:
Input Missing. Indicates a composite input signal has not been detected at the
selected input.
SDI Input
Composite Input
Configuring Alarms and Viewing Status
3- 40 WVR610A & WVR611A Waveform Rasterizers User Manual
Input Unlocked. Indicates that the waveform rasterizer cannot lock to the input
signal on the selected input.
General alarms indicate a signal is missing or there has been a hardware failure.
A hardware failure alarm indicates a potential instrument failure. The General
alarms that can be monitored are:
External Reference Missing. Indicates that no external reference signal is being
detected.
External Reference Unlocked. Indicates that the waveform rasterizer cannot lock
to the external reference signal. This is usually due to a wrong or unsupported
standard.
LTC Invalid. Indicates that the LTC was lost for one frame but has reappeared.
LTC Missing. Indicates that the LTC is not being detected.
VITC Invalid. Indicates that the VITC disappeared for one frame but has re-
appeared.
VITC Missing. Indicates that a break or discontinuity in the VITC has occurred.
Hardware Fault. Indicates that there has been a hardware failure. If this alarm
occurs, power down the instrument and contact your local Tektronix service
representative.
The General Audio alarms that can be monitored are:
Audio Clip. Indicates that an audio clip error has occurred. This occurs when the
audio signal consists of all “ones.”
Audio Mute. Indicates that an audio mute error has occurred. This occurs when
the audio signal consists of all “zeroes.”
Over Alarm. Indicates that the audio level has exceeded that level at which the
signal is considered “over” and the time it has been over has exceeded the
specified Duration for Over setting.
General
General Audio
Configuring Alarms and Viewing Status
WVR610A & WVR611A Waveform Rasterizers User Manual 3- 41
Silence Alarm. Indicates that the audio level has dropped below the level at which
the signal is considered “silent” and the time it has been silent has exceeded the
time specified by the Duration for Silence setting.
The AES and Embedded alarms that can be monitored are:
Signal Lock. Indicates that the waveform rasterizer is not locked to an incoming
signal on the indicated input channel. Data cannot be decoded; all data and all
other errors are ignored. This message appears when no input signal is present.
Professional CRC. If there is a Professional Channel Status CRC error, it will
appear in the Alarm Status Log.
Validity Bit. Indicates that the Validity bit is set high for one or more data
samples. In the AES/EBU standard, a set validity bit indicates that the sample is
not suitable for conversion to audio.
Parity. Indicates that the incoming subframe does not have even parity as
specified by the applicable digital audio standards. The data sample is unreliable
and is ignored.
The Embedded Audio Specific alarms that can be monitored are:
Audio Stream Missing. Indicates that there is no audio stream detected in the
selected input signal.
Checksum. Indicates that an error occurred in the data which resulted in an
invalid checksum.
Buffer Full. Indicates that the buffers in the de-embedder are full. When this
occurs, audio discontinuities result. This is usually caused by a serial source that
is outside the allowed time base range.
Buffer Empty. Indicates that the buffers in the de-embedder are empty. When this
occurs, audio discontinuities result. This is usually caused by a serial source that
is outside the allowed time base range.
Parity. Indicates that the incoming subframe does not have even parity as
specified by the applicable digital audio standards. The data sample is unreliable
and is ignored.
AES and Embedded
Embedded Audio Specific

Configuring Alarms and Viewing Status
3- 42 WVR610A & WVR611A Waveform Rasterizers User Manual
Setting Up Alarm Reporting Options
The WVR610A & WVR611A allow you to specify how alarm conditions are
reported. You can specify whether or not an alarm indicator is displayed
on-screen, if an alarm is logged, if an audible beep is sounded, if an SNMP trap
is sent out on the network, if a ground closure is triggered, and if a pop-up
notifier is displayed.
Alarms in each group can be set up using a mask or individually. The reporting
options are the same for all alarms. See Table 3--3 for a description of alarm
reporting options.
To change the alarm reporting options for each alarm group:
1. From the Alarms menu, select the desired alarm group.
2. Press SEL to display the alarm reporting options. See Figure 3--19.
Figure 3- 19: Setting alarm reporting options
3. Use the arrow keys to highlight the checkbox for the reporting option you
wish to change. Press the right or left-arrow key to move the highlight
horizontally. Press the up/down-arrow keys to move the highlight vertically.
4. After highlighting the checkbox for the reporting option you wish to change,
press SEL to change the setting. A setting is enabled when the box is filled
with an X.
5. When you have completed your changes, move the highlight to Select here
returns to the Config Menu. Press SEL to return to the Alarms menu.
6. After changing the setting, press CONFIG to remove the CONFIG menu.
You can set the alarm reporting options for all alarm groups to be the same by
using the Set all Alarms to this mask menu entry. This enables you to set the
alarm reporting options for all groups by setting the options in just one place.
Setting Alarms by Group
Setting Alarms by Mask
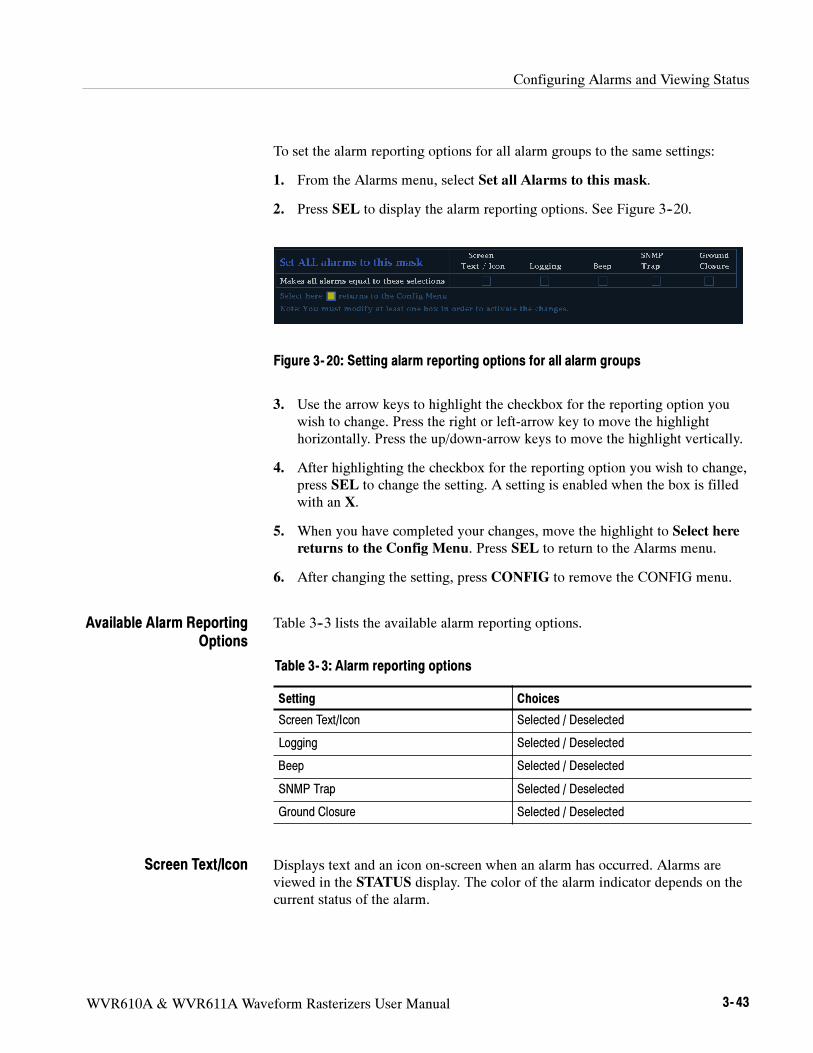
Configuring Alarms and Viewing Status
WVR610A & WVR611A Waveform Rasterizers User Manual 3- 43
To set the alarm reporting options for all alarm groups to the same settings:
1. From the Alarms menu, select Set all Alarms to this mask.
2. Press SEL to display the alarm reporting options. See Figure 3--20.
Figure 3- 20: Setting alarm reporting options for all alarm groups
3. Use the arrow keys to highlight the checkbox for the reporting option you
wish to change. Press the right or left-arrow key to move the highlight
horizontally. Press the up/down-arrow keys to move the highlight vertically.
4. After highlighting the checkbox for the reporting option you wish to change,
press SEL to change the setting. A setting is enabled when the box is filled
with an X.
5. When you have completed your changes, move the highlight to Select here
returns to the Config Menu. Press SEL to return to the Alarms menu.
6. After changing the setting, press CONFIG to remove the CONFIG menu.
Table 3--3 lists the available alarm reporting options.
Table 3- 3: Alarm reporting options
Setting Choices
Screen Text/Icon Selected / Deselected
Logging Selected / Deselected
Beep Selected / Deselected
SNMP Trap Selected / Deselected
Ground Closure Selected / Deselected
Displays text and an icon on-screen when an alarm has occurred. Alarms are
viewed in the STATUS display. The color of the alarm indicator depends on the
current status of the alarm.
Available Alarm Reporting
Options
Screen Text/Icon
Configuring Alarms and Viewing Status
3- 44 WVR610A & WVR611A Waveform Rasterizers User Manual
Logging stores errors in a file (Error/Alarm log) that includes time stamp, error
name, error signal source and additional info specific to the error. The log file is
not saved on power-down. An indicator is displayed on-screen when logging is
enabled.
Sounds an audio beep when an error/alarm has occurred. The audio beep can be
muted without being turned off, by using the Mute Alarms function in the
STATUS pop-up menu.
The instrument sends an SNMP trap to the SNMP Trap addresses specified in the
CONFIG > Network Settings submenu.
An output that can be used to drive a light or audible alarm. All alarms are
“OR’ed” together so that if any alarm is triggered, the output is driven to ground.
You can turn off several of the alarm reporting methods without disabling the
alarms by using Mute Alarms in the STATUS pop-up menu. When Mute Alarms
is On, the Beep, SNMP Trap, and Ground Closure options are switched off. This
enables you to continue to log errors and see visual alarm indicators without
audible alarms.
1. Select a tile in which to display the Status screen.
2. Press and hold the STATUS button to display the STATUS pop-up menu.
3. SelectMute Alarms from the pop-up menu.
4. Press SEL to select On.
5. Press STATUS again to remove the pop-up menu.
When Alarms are muted, the text “Alarms Muted” appears in the Status bar.
Viewing Alarm Status
To view Alarm Status:
1. Select the tile where you want the Alarm Status displayed.
2. Press the STATUS button. If the Alarm Status page is not displayed, press
and hold the STATUS button to display the STATUS menu. See
Figure 3--21.
3. Select Display Type from the menu.
Logging
Beep
SNMP Trap
Ground Closure
Muting Alarms
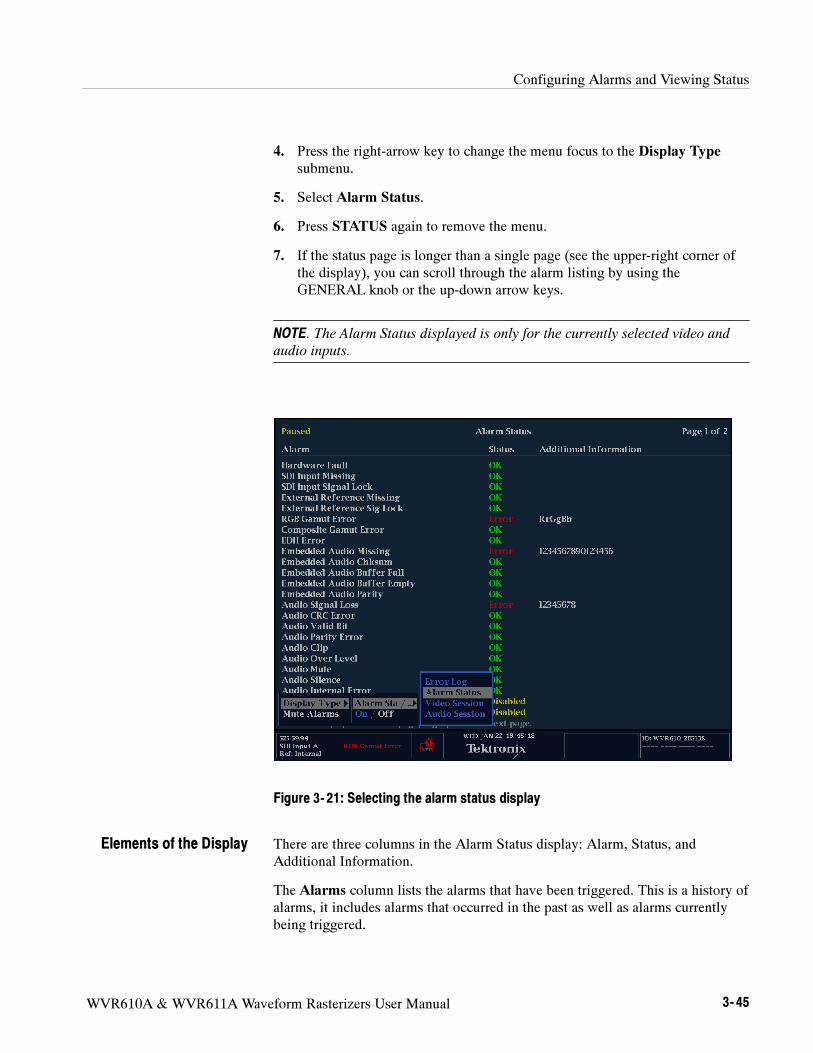
Configuring Alarms and Viewing Status
WVR610A & WVR611A Waveform Rasterizers User Manual 3- 45
4. Press the right-arrow key to change the menu focus to the Display Type
submenu.
5. Select Alarm Status.
6. Press STATUS again to remove the menu.
7. If the status page is longer than a single page (see the upper-right corner of
the display), you can scroll through the alarm listing by using the
GENERAL knob or the up-down arrow keys.
NOTE. The Alarm Status displayed is only for the currently selected video and
audio inputs.
Figure 3- 21: Selecting the alarm status display
There are three columns in the Alarm Status display: Alarm, Status, and
Additional Information.
The Alarms column lists the alarms that have been triggered. This is a history of
alarms, it includes alarms that occurred in the past as well as alarms currently
being triggered.
Elements of the Display
Configuring Alarms and Viewing Status
3- 46 WVR610A & WVR611A Waveform Rasterizers User Manual
The Status readouts use both text and color to indicate the current state of the
error. Text is used to indicate whether or not an error occurred. Color is used to
indicate the current status of an error.
The Status readout text is either OK or ERROR. If the text is OK, that means
that the alarm is not being triggered or has not occurred within the last five
seconds. ERROR means that an alarm is occurring or has occurred within the
last five seconds.
The meaning of the color for Status readouts is:
Yellow: Indicates that the alarm occurred within the last five seconds but has
cleared.
Red: Indicates an ongoing error.
The Additional Information column provides explanatory information. For
example, if an Audio Signal Loss alarm is triggered, the text 123----678 may
appear under Additional Information. These numbers indicate the audio channels
mapped to level meter bars 1, 2, 3, 6, 7, and 8 triggered the alarm.
NOTE. Different tiles can be set to display different screens under the Status
button. You can display up to four Status screens at the same time.
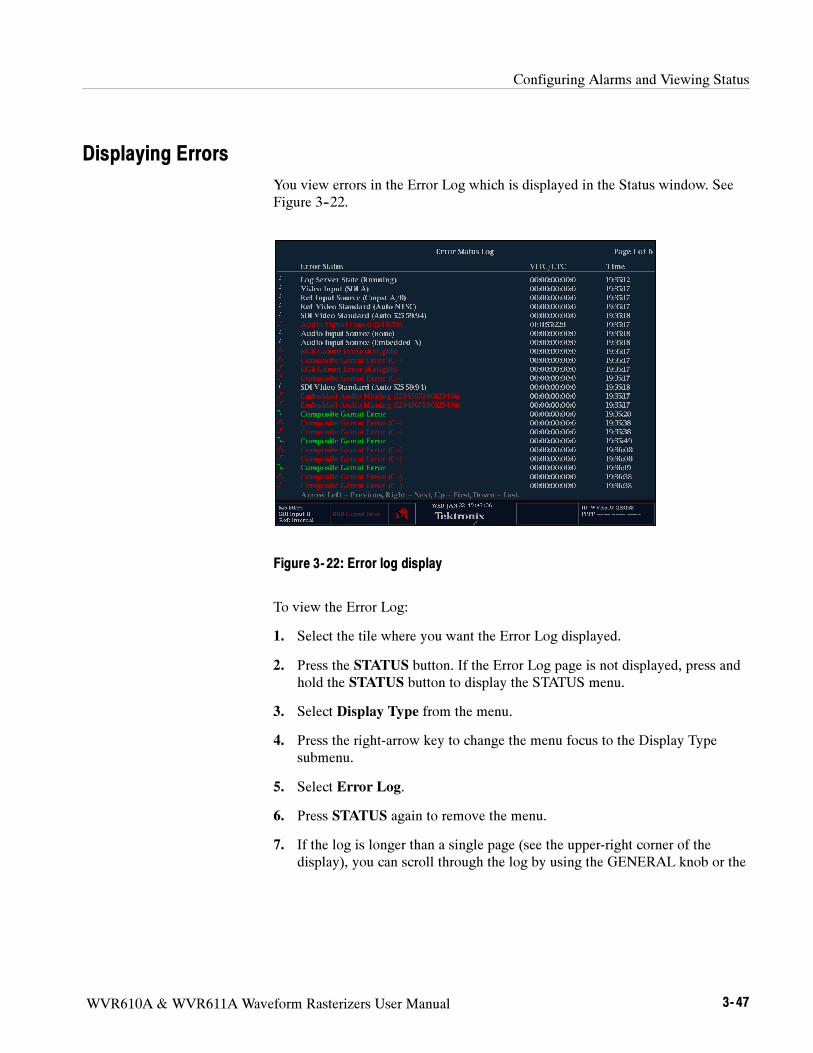
Configuring Alarms and Viewing Status
WVR610A & WVR611A Waveform Rasterizers User Manual 3- 47
Displaying Errors
You view errors in the Error Log which is displayed in the Status window. See
Figure 3--22.
Figure 3- 22: Error log display
To view the Error Log:
1. Select the tile where you want the Error Log displayed.
2. Press the STATUS button. If the Error Log page is not displayed, press and
hold the STATUS button to display the STATUS menu.
3. Select Display Type from the menu.
4. Press the right-arrow key to change the menu focus to the Display Type
submenu.
5. Select Error Log.
6. Press STATUS again to remove the menu.
7. If the log is longer than a single page (see the upper-right corner of the
display), you can scroll through the log by using the GENERAL knob or the
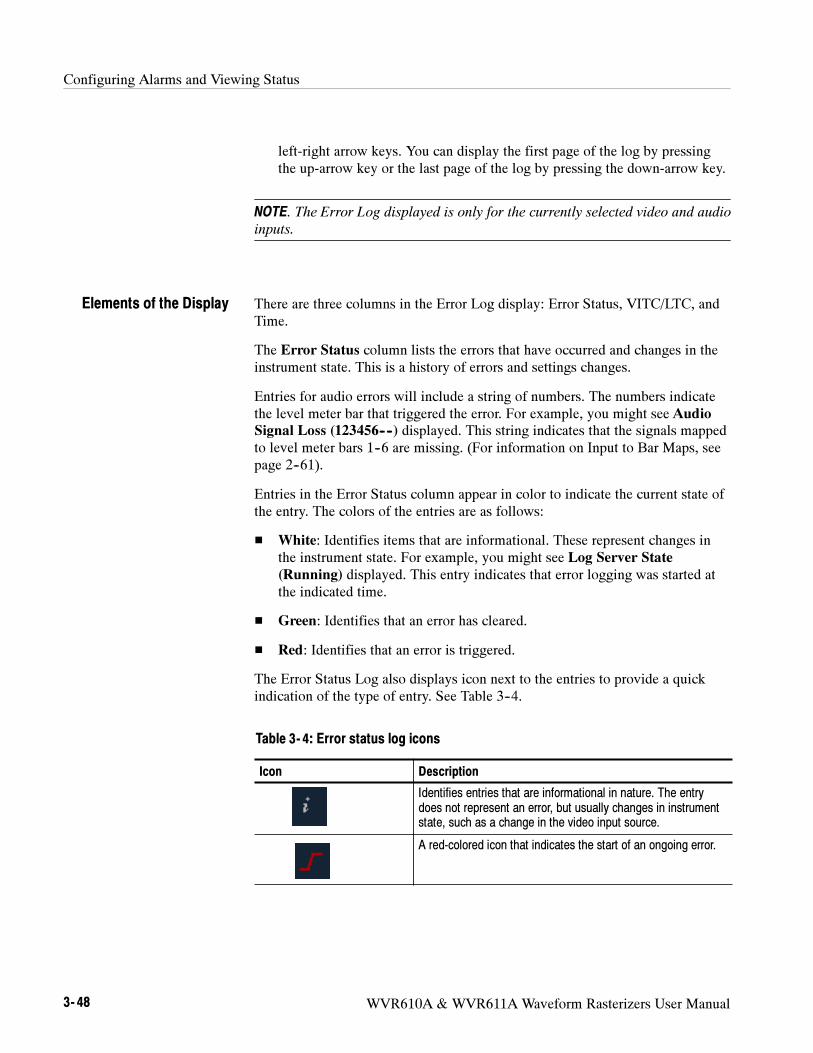
Configuring Alarms and Viewing Status
3- 48 WVR610A & WVR611A Waveform Rasterizers User Manual
left-right arrow keys. You can display the first page of the log by pressing
the up-arrow key or the last page of the log by pressing the down-arrow key.
NOTE. The Error Log displayed is only for the currently selected video and audio
inputs.
There are three columns in the Error Log display: Error Status, VITC/LTC, and
Time.
The Error Status column lists the errors that have occurred and changes in the
instrument state. This is a history of errors and settings changes.
Entries for audio errors will include a string of numbers. The numbers indicate
the level meter bar that triggered the error. For example, you might see Audio
Signal Loss (123456----) displayed. This string indicates that the signals mapped
to level meter bars 1--6 are missing. (For information on Input to Bar Maps, see
page 2--61).
Entries in the Error Status column appear in color to indicate the current state of
the entry. The colors of the entries are as follows:
White: Identifies items that are informational. These represent changes in
the instrument state. For example, you might see Log Server State
(Running) displayed. This entry indicates that error logging was started at
the indicated time.
Green: Identifies that an error has cleared.
Red: Identifies that an error is triggered.
The Error Status Log also displays icon next to the entries to provide a quick
indication of the type of entry. See Table 3--4.
Table 3- 4: Error status log icons
Icon Description
Identifies entries that are informational in nature. The entry
does not represent an error, but usually changes in instrument
state, such as a change in the video input source.
A red-colored icon that indicates the start of an ongoing error.
Elements of the Display
Configuring Alarms and Viewing Status
WVR610A & WVR611A Waveform Rasterizers User Manual 3- 49
Table 3- 4: Error status log icons (Cont.)
Icon Description
A red-colored icon that identifies a transient error.
A green-colored icon that indicates an when error has cleared.
The VITC/LTC column shows the time, according to the VITC or LTC in the
signal, that the error occurred, and in the case of ongoing errors, the VITC/LTC
at which the error first occurred.
The Time column shows the time, according to the internal clock, that the error
occurred.
In the Alarm Log, some events may appear out of sequence within the one
second resolution of the log. For example, when you change input the instrument
may register a few log entries from the previous input after the input change is
registered. Time stamping may also be out of sequence within a one second
interval. If you change from SDI with time code to Composite without a time
code, you may see a few entries with time stamp after the switch because
changes in the instrument state are logged immediately, while changes in the
alarms need time to filter through the detection circuits and code.
Displaying Video Session Status
The waveform rasterizer maintains a history, or log, of video alarms. The Video
Session display type in the STATUS menu shows this history. The Video Session
display contains a number of statistics that show the alarms that have been
triggered since the last time the logging was reset. See Figure 3--23.
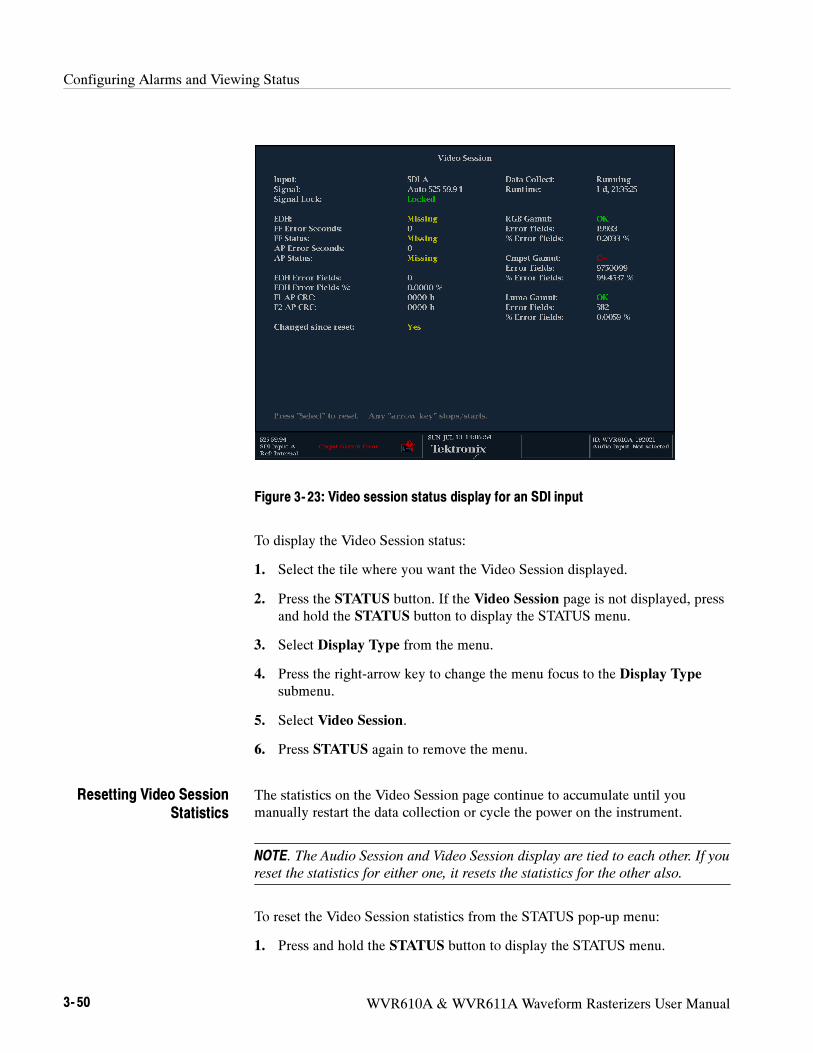
Configuring Alarms and Viewing Status
3- 50 WVR610A & WVR611A Waveform Rasterizers User Manual
Figure 3- 23: Video session status display for an SDI input
To display the Video Session status:
1. Select the tile where you want the Video Session displayed.
2. Press the STATUS button. If the Video Session page is not displayed, press
and hold the STATUS button to display the STATUS menu.
3. Select Display Type from the menu.
4. Press the right-arrow key to change the menu focus to the Display Type
submenu.
5. Select Video Session.
6. Press STATUS again to remove the menu.
The statistics on the Video Session page continue to accumulate until you
manually restart the data collection or cycle the power on the instrument.
NOTE. The Audio Session and Video Session display are tied to each other. If you
reset the statistics for either one, it resets the statistics for the other also.
To reset the Video Session statistics from the STATUS pop-up menu:
1. Press and hold the STATUS button to display the STATUS menu.
Resetting Video Session
Statistics
Configuring Alarms and Viewing Status
WVR610A & WVR611A Waveform Rasterizers User Manual 3- 51
While the STATUS pop-up menu is displayed, the word Paused appears in
the upper left-hand corner of the tile. While the pop-up menu is displayed,
the statistics in the tile are not updated. Even though the update of the
display is paused, internally the statistics continue to be updated. If you
remove the pop-up without making any change, the displayed statistics will
be updated immediately.
2. Select Sessions Reset.
3. Press SEL to reset the session statistics.
An alternate way to reset the Video Session statistics is to press SEL.
You can stop the update of the statistics display without clearing the accumulated
statistics.
There are two similar modes in the video session screen, Stopped and Frozen.
Stopped is controlled by pressing the front-panel arrow keys. When stopped, the
instrument stops accumulating data into the error statistics such as Runtime and
EDH error seconds. The real time portions of the display continue. Frozen is
controlled using the Freeze front-panel button. When frozen, all fields of the
display stop updating, but the statistics continue to accumulate in the instrument.
When the display is un-frozen, the statistic readouts will jump to the new value.
The stopped mode is useful to prevent logging errors that are anticipated, for
example, errors from switching inputs. The frozen mode is useful for capturing
an event like a state where multiple errors exist or a specific EDH checksum is
present.
To stop the update of Video Session statistics:
1. Press and hold the STATUS button to display the STATUS menu.
While the STATUS pop-up menu is displayed, the word Paused appears in
the upper left-hand corner of the tile. While the pop-up menu is displayed,
the statistics in the tile are not updated. Even though the update of the
display is paused, internally the statistics continue to be updated. If you
remove the pop-up without making any change, the displayed statistics will
be updated immediately.
2. Select Sessions Stop.
3. Press SEL to stop updating the sessions statistics.
To restart the update of Video Session statistics:
1. Press and hold the STATUS button to display the STATUS menu.
2. Select Sessions Start.
3. Press SEL to start updating the sessions statistics.
Stopping and Restarting
Video Session Updating
Configuring Alarms and Viewing Status
3- 52 WVR610A & WVR611A Waveform Rasterizers User Manual
An alternate way to stop and start the Video Session statistics is to press one of
the arrow keys.
Video Session Display for SDI Inputs
This section describes each of the elements of the Video Session display when
SDI A or B is the selected input.
There are three sections to the display: miscellaneous information, EDH status,
and Gamut status. The miscellaneous information section displays information
about the signal and the session. The EDH status (Error Detection and Handling)
section displays the EDH status, and the Gamut status section displays the gamut
status. See Figure 3--24.
Miscellaneous
information
Gamut status
EDH status
Figure 3- 24: Sections of video session display
The following information appears in the Miscellaneous section of the Video
Session display:
Input. Shows the selected input source: SDI A or SDI B.
Signal.Displays the format of the input signal in the following order: number of
lines, scan type and field rate.
Miscellaneous Section
Configuring Alarms and Viewing Status
WVR610A & WVR611A Waveform Rasterizers User Manual 3- 53
Signal Lock. Indicates whether or not the waveform rasterizer is locked to the
selected input.
Data Collect.Displays the state of error gathering. Possible states are:
Running -- Indicates errors are being gathered and displayed on the status
page.
Stopped -- Indicates errors are not being gathered. The status page is not
being updated.
Resetting -- Appears briefly after SEL has been pressed to reset the
statistics.
Runtime. Indicates the time since the last reset occurred. Time is displayed as
“DD, HH:MM:SS”, where DD is the number of days, HH is the number of
hours, MM is the number of minutes, and SS is the number of seconds.
The following information appears in the EDH section of the Video Session
display:
EDH.Displays the current condition of the EDH packet (for full details on EDH,
see SMPTE RP165). The possible values are:
Valid -- Indicates the EDH packet is present and that the embedded CRC
value matches the calculated CRC value.
Invalid -- Indicates the EDH packet is present but there is no CRC value
embedded or that it is corrupted.
Missing -- Indicates that the EDH packet is missing, which probably means
that the EDH packet was not inserted by the source.
Error -- Indicates that an EDH packet is present, but the embedded CRC
value does not match the calculated CRC value, and thus a transmission
error has occurred. The Error indicator is displayed for one second after an
error occurs.
FF Error Seconds.Displays the number of seconds containing at least one error
detected in either the active or blanking portion (Full Field) of the video signal.
FF Status.Displays the Full Field status of the video signal. Status can be:
Valid -- Indicates the embedded CRC value matches the calculated CRC
value.
EDH Section
Configuring Alarms and Viewing Status
3- 54 WVR610A & WVR611A Waveform Rasterizers User Manual
Invalid -- Indicates the no CRC value was embedded or that it is corrupted.
Missing -- Indicates that the EDH packet is missing, which probably means
that the EDH packet was not inserted by the source.
Error -- Indicates that the embedded CRC value does not match the
calculated CRC value, and thus a transmission error has occurred. The Error
indicator is displayed for one second after an error occurs.
AP Error Seconds.Displays the number of seconds containing at least one error
detected only in the active picture (AP) portion of the video signal.
AP Status.Displays the status of the Active Picture portion of the video signal.
Status can be:
Valid -- Indicates the embedded CRC value matches the calculated CRC
value.
Invalid -- Indicates the no CRC value was embedded or that it is corrupted.
Missing -- Indicates that the EDH packet is missing, which probably means
that the EDH packet was not inserted by the source.
Error -- Indicates that the embedded CRC value does not match the
calculated CRC value, and thus a transmission error has occurred. The Error
indicator is displayed for one second after an error occurs.
EDH Error Fields. The number of fields that contained an EDH error since the last
reset.
EDH Error Fields %.A calculated number listing the percentage of fields that
contained at least one EDH error since the last reset.
F1 AP CRC.A display of the active picture CRC value for field one. (This value
is sampled once a second.)
F2 AP CRC.A display of the active picture CRC value for field two. (This value
is sampled once a second.)
Changed since reset. Indicates if either the F1 or F2 AP CRC values have
changed since the last reset. This useful for detecting errors on static images that
do not have EDH.
Configuring Alarms and Viewing Status
WVR610A & WVR611A Waveform Rasterizers User Manual 3- 55
The following information appears in the RGB section of the Video Session
display:
RGB Gamut. The SDI input signal is evaluated against the thresholds set for the
Diamond display in the CONFIG > Gamut Thresholds submenu. RGB Gamut
displays OK if there are currently no gamut errors. If there is an error, a string of
letters or dashes is displayed to indicate which thresholds have been exceeded.
Each of the thresholds is identified by a letter in the string RrGgBb where an
uppercase letter corresponds to the maximum threshold and a lowercase letter
corresponds to the minimum threshold. A dash indicates that the signal is within
the corresponding threshold. Red indicates a current gamut error. Yellow
indicates a gamut error within the last 5 seconds.
Error Fields. The number of fields that contain at least one RGB error since the
last reset.
% Error Fields. The percentage of all fields that contained at least one RGB error
since the last reset. This is a calculated number.
The following information appears in the Cmpst section of the Video Session
display:
Cmpst Gamut. The SDI input signal is evaluated against the thresholds set for the
Arrowhead display in the CONFIG > Gamut Thresholds submenu. Cmpst Gamut
displays OK if there are currently no gamut errors. If there is an error, a string of
letters or dashes is displayed to indicate which thresholds have been exceeded.
Each of the thresholds is identified by a letter in the string Cc where the
uppercase letter corresponds to the maximum threshold and the lowercase letter
corresponds to the minimum threshold. A dash indicates that the signal is within
the corresponding threshold. Red indicates a current gamut error. Yellow
indicates a gamut error within the last 5 seconds.
Error Fields. The number of fields that contain at least one Cmpst error since the
last reset.
% Error Fields. The percentage of all fields that contained at least one Composite
error since the last reset. This is a calculated number.
RGB Section
CMPST Section
Configuring Alarms and Viewing Status
3- 56 WVR610A & WVR611A Waveform Rasterizers User Manual
The following information appears in the Luma section of the Video Session
display:
Luma Gamut. The SDI input signal is evaluated against the thresholds set for
Luma in the CONFIG > Gamut Thresholds submenu. Luma Gamut displays OK
if there are currently no gamut errors. If there is an error, a string of letters or
dashes is displayed to indicate which thresholds have been exceeded. Each of the
thresholds is identified by a letter in the string Ll where the uppercase letter
corresponds to the maximum threshold and the lowercase letter corresponds to
the minimum threshold. A dash indicates that the signal is within the corre-
sponding threshold. Red indicates a current gamut error. Yellow indicates a
gamut error within the last 5 seconds.
Error Fields. The number of fields that contain at least one Luma error since the
last reset.
% Error Fields. The percentage of all fields that contained at least one Luma error
since the last reset. This is calculated number.
There is one other readout that appears on the display, but it only appears when
you press FREEZE.
Frozen <date> <time>. When you press FREEZE, an image of the display is
captured and stored in memory. You can view the frozen image by pressing
FREEZE to display the pop-up menu and selecting Display Mode > Frozen
Only. This state is useful for looking at EDH (Error Detection and Handling)
CRC (Cyclic Redundancy Check) values on live video. Note that the frozen
image will remain in memory until you delete the image. You cannot freeze
another image if there is already a frozen image in memory.
Luma Section
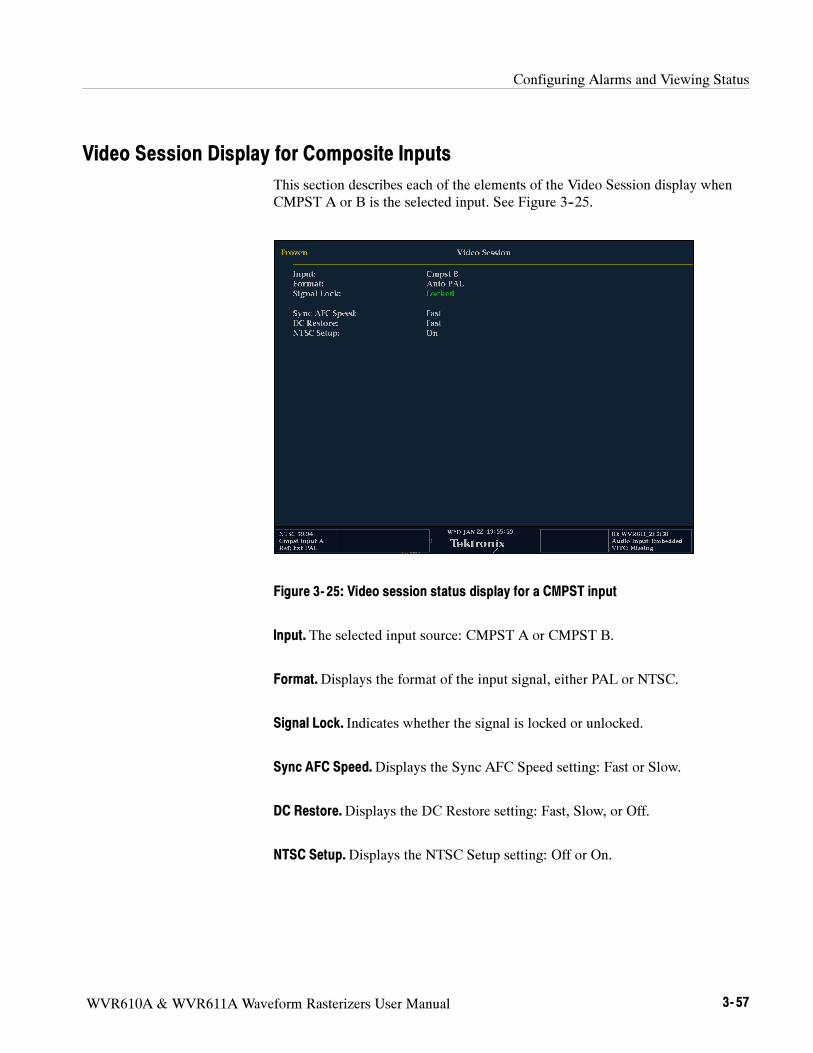
Configuring Alarms and Viewing Status
WVR610A & WVR611A Waveform Rasterizers User Manual 3- 57
Video Session Display for Composite Inputs
This section describes each of the elements of the Video Session display when
CMPST A or B is the selected input. See Figure 3--25.
Figure 3- 25: Video session status display for a CMPST input
Input. The selected input source: CMPST A or CMPST B.
Format.Displays the format of the input signal, either PAL or NTSC.
Signal Lock. Indicates whether the signal is locked or unlocked.
Sync AFC Speed.Displays the Sync AFC Speed setting: Fast or Slow.
DC Restore.Displays the DC Restore setting: Fast, Slow, or Off.
NTSC Setup.Displays the NTSC Setup setting: Off or On.
Configuring Alarms and Viewing Status
3- 58 WVR610A & WVR611A Waveform Rasterizers User Manual
Check Audio Status
You can check audio status in three ways, by looking at the Audio Session
display, the Alarm Status display or the Error Log. The three ways provide
different views of the audio status.
Audio Session. The Audio Session display shows which audio alarms that have
been triggered since the last reset of the error log with additional information
about the signal level. See Table 3--5. The Audio Session displays error
information by channel. It displays how many times errors have occurred but not
when they occurred.
Alarm Status. The Alarm Status display provides an instantaneous view of all
enabled alarms, not just audio alarms. The Alarm Status page indicates whether
or not an error or alarm is currently triggered. It does not indicate how many
times an error has occurred or when it occurred.
Error Log. The Error Log display provides a chronological list of all the errors
and alarms that have occurred since the error log was reset. While the error log
displays exactly when an event occurred (using VITC/LTC when present and
clock time) it does not provide a statistical view of the recorded errors or alarms
(that is, the number of times an error has been triggered).
The Audio Session display is a historical readout of the audio status. The period
covered by the Audio Session display is the time since the last reset.
To check the history of audio status:
1. Press the STATUS button to set the active tile to the status mode.
2. Press and hold the STATUS button to display the menu.
3. Set the Display Type to Audio Session. See Figure 3--26.
Audio Session Display
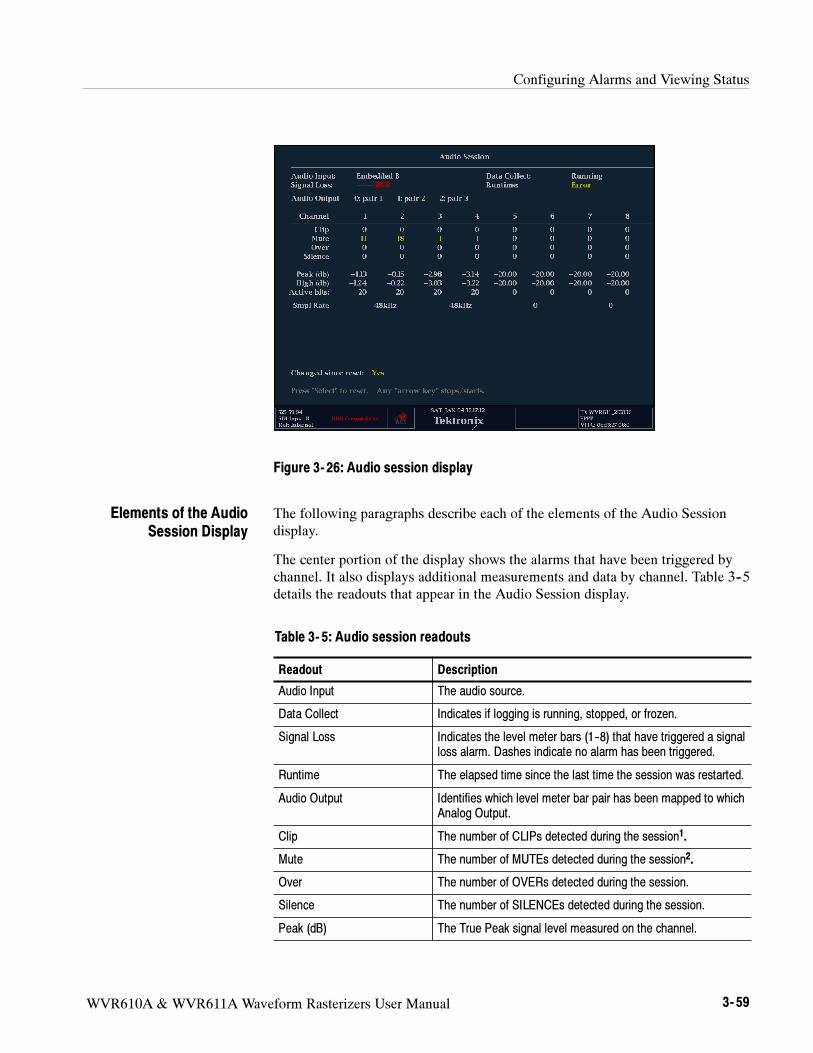
Configuring Alarms and Viewing Status
WVR610A & WVR611A Waveform Rasterizers User Manual 3- 59
Figure 3- 26: Audio session display
The following paragraphs describe each of the elements of the Audio Session
display.
The center portion of the display shows the alarms that have been triggered by
channel. It also displays additional measurements and data by channel. Table 3--5
details the readouts that appear in the Audio Session display.
Table 3- 5: Audio session readouts
Readout Description
Audio Input The audio source.
Data Collect Indicates if logging is running, stopped, or frozen.
Signal Loss Indicates the level meter bars (1--8) that have triggered a signal
loss alarm. Dashes indicate no alarm has been triggered.
Runtime The elapsed time since the last time the session was restarted.
Audio Output Identifies which level meter bar pair has been mapped to which
Analog Output.
Clip The number of CLIPs detected during the session1.
Mute The number of MUTEs detected during the session2.
Over The number of OVERs detected during the session.
Silence The number of SILENCEs detected during the session.
Peak (dB) The True Peak signal level measured on the channel.
Elements of the Audio
Session Display
Configuring Alarms and Viewing Status
3- 60 WVR610A & WVR611A Waveform Rasterizers User Manual
Table 3- 5: Audio session readouts (Cont.)
Readout Description
High (dB) The highest signal level measured by the signal level meter.
The level meter response is based on the Ballistics setting. If
ballistics is set to True Peak, this readout will be the same as
the Peak readout.
Active bits The number of active bits in the channel.
Smpl Rate The sample rate of the channel pair.
Changed since reset -- Either Yes or No. Indicates whether an error has occurred since
the last reset
1The number of Audio Clips reported is directly affected by the #Samples for Clip
setting in the CONFIG > Audio Displays submenu. See page 2- 52.
2The number of Audio Mutes reported is directly affected by the #Samples for Mute
setting in the CONFIG > Audio Displays submenu. See page 2- 52.
The values for the Clip and Mute readouts appear in color to indicate status. The
colors of the reported values are as follows:
Yellow: Indicates that the alarm occurred within the last five seconds but has
cleared.
Red: Indicates an ongoing error.
The Clip and Mute parameters are only displayed for digital audio feeds. Silence
and Over are available for both digital and analog feeds.
The statistics on the Audio Session page continue to accumulate until you
manually clear and restart the data collection or cycle the power on the instru-
ment.
NOTE. The Audio Session and Video Session display are tied to each other. If you
reset the statistics for either one, it resets the statistics for the other also.
To reset the Audio Session statistics:
1. Press and hold the STATUS button to display the STATUS menu.
2. Select Sessions Reset.
3. Press SEL to reset the sessions statistics.
An alternate way to reset the Audio Session statistics is to press SEL.
Resetting the Audio
Session Statistics
Configuring Alarms and Viewing Status
WVR610A & WVR611A Waveform Rasterizers User Manual 3- 61
You can stop the update of the statistics display without clearing the accumulated
statistics.
There are two similar modes in the audio session screen, Stopped and Frozen.
Stopped is controlled by pressing the front panel arrow keys. When stopped, the
instrument stops accumulating data into the error statistics such as runtimes. The
real-time portions of the display continue. Frozen is controlled using the Freeze
front-panel button. When frozen, all fields of the display stop updating, but the
statistics continue to accumulate in the instrument. When the display is
un-frozen, the statistic readouts will jump to the new value. The stopped mode is
useful to prevent logging errors that are anticipated, for example, errors from
switching inputs. The frozen mode is useful for capturing an event like a state
where multiple errors exist or a specific EDH checksum is present.
To stop the update of Audio Session statistics:
1. Press and hold the STATUS button to display the STATUS menu.
While the STATUS pop-up menu is displayed, the word Paused appears in
the upper left-hand corner of the tile. While the pop-up menu is displayed,
the statistics in the tile are not updated. Even though the update of the
display is paused, internally the statistics continue to be updated. If you
remove the pop-up without making any change, the displayed statistics will
be updated immediately.
2. Select Sessions Stop.
3. Press SEL to stop updating the sessions statistics.
To restart the update of Audio Session statistics:
1. Press and hold the STATUS button to display the STATUS menu.
2. Select Sessions Start.
3. Press SEL to start updating the sessions statistics.
An alternate way to stop and start the Audio Session statistics is to press one of
the arrow keys.
Embedded Audio Status. The WVR610A & WVR611A with audio option DG or
DA can monitor audio embedded in the serial digital video ancillary data
packets. For any 4-channel pairs, the WVR610A & WVR611A can display bars,
Phase (Lissajous), and check for alarms. On all 8 channel pairs, the WVR610A
& WVR611A can monitor for presence.
When the selected audio input is “Embedded”, a string of characters are
displayed in the right corner of the status bar. The 16-character string denotes the
status of each embedded audio channel. Each character shows the status of a
specific channel. The characters displayed are as shown in Figure 3--27.
Stopping and Restarting
Audio Session Updating
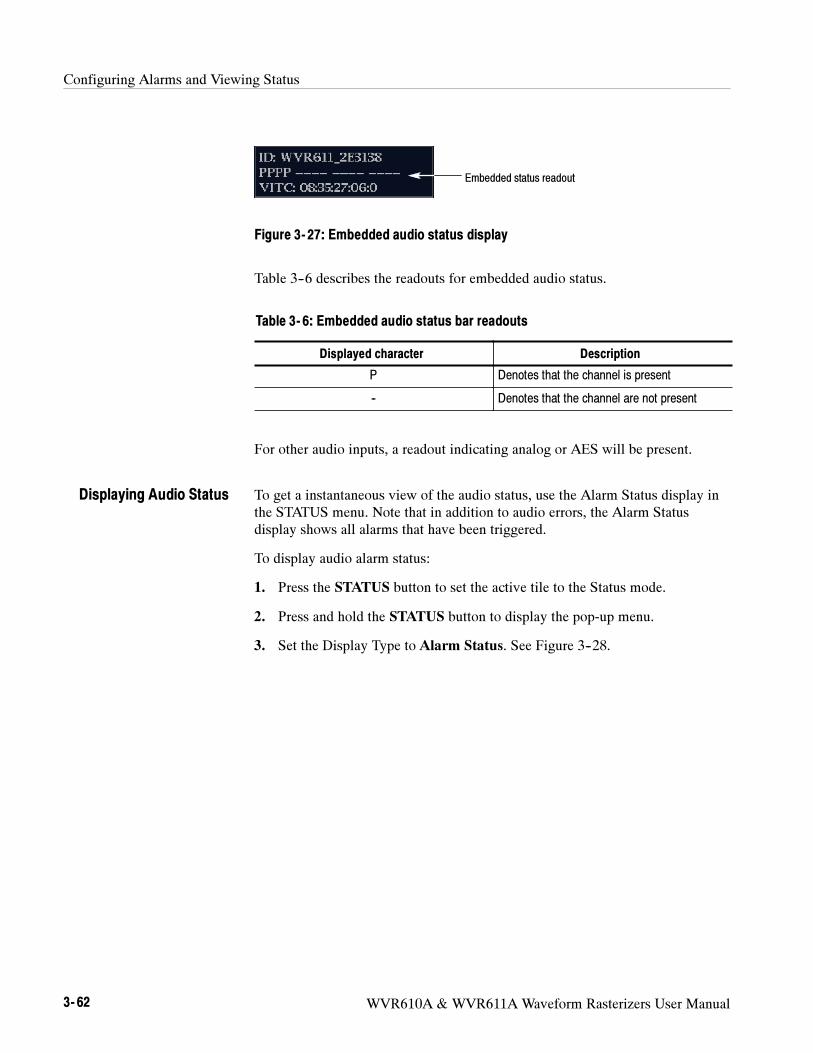
Configuring Alarms and Viewing Status
3- 62 WVR610A & WVR611A Waveform Rasterizers User Manual
Embedded status readout
Figure 3- 27: Embedded audio status display
Table 3--6 describes the readouts for embedded audio status.
Table 3- 6: Embedded audio status bar readouts
Displayed character Description
P Denotes that the channel is present
-- Denotes that the channel are not present
For other audio inputs, a readout indicating analog or AES will be present.
To get a instantaneous view of the audio status, use the Alarm Status display in
the STATUS menu. Note that in addition to audio errors, the Alarm Status
display shows all alarms that have been triggered.
To display audio alarm status:
1. Press the STATUS button to set the active tile to the Status mode.
2. Press and hold the STATUS button to display the pop-up menu.
3. Set the Display Type to Alarm Status. See Figure 3--28.
Displaying Audio Status
Configuring Alarms and Viewing Status
WVR610A & WVR611A Waveform Rasterizers User Manual 3- 63
Figure 3- 28: Alarm display showing audio errors
There are three columns in the Alarm Status display: Alarm, Status, and
Additional Information.
The Alarms column lists the all the types of alarms that can be detected. For
each alarm type, errors will be reported if any reporting method is enabled in
CONFIG > Alarms menu. If no reporting method is enabled, that alarm type will
show “Disabled” on the Alarm Status page.
The Status readout text is either OK or ERROR. If the text is OK, that means
that the alarm is not being triggered or has not been triggered within the last five
seconds. ERROR means that an alarm is occurring or has occurred within the
last five seconds.
The meaning of the color for Status readouts is:
Yellow: Indicates that the alarm occurred within the last five seconds but has
cleared.
Red: Indicates an ongoing error.
The Additional Information column provides explanatory information. For
example, if an Audio Signal Loss alarm is triggered, the text 123----678 may
Elements of the Display
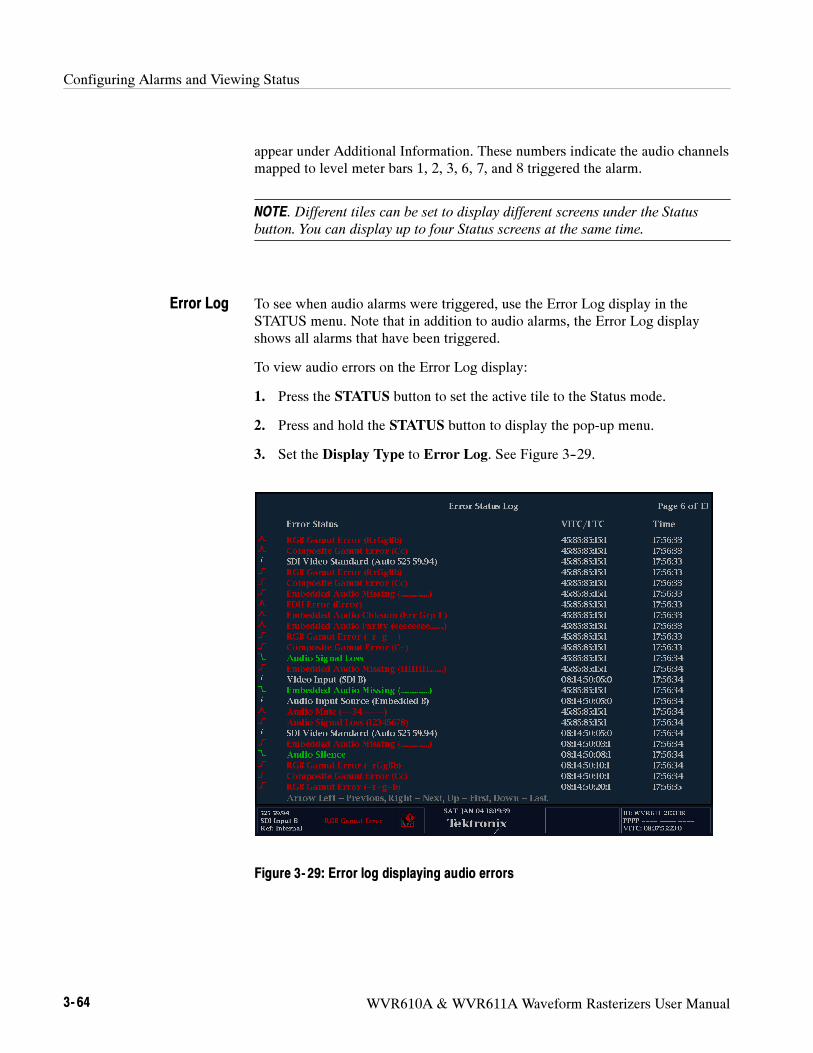
Configuring Alarms and Viewing Status
3- 64 WVR610A & WVR611A Waveform Rasterizers User Manual
appear under Additional Information. These numbers indicate the audio channels
mapped to level meter bars 1, 2, 3, 6, 7, and 8 triggered the alarm.
NOTE. Different tiles can be set to display different screens under the Status
button. You can display up to four Status screens at the same time.
To see when audio alarms were triggered, use the Error Log display in the
STATUS menu. Note that in addition to audio alarms, the Error Log display
shows all alarms that have been triggered.
To view audio errors on the Error Log display:
1. Press the STATUS button to set the active tile to the Status mode.
2. Press and hold the STATUS button to display the pop-up menu.
3. Set the Display Type to Error Log. See Figure 3--29.
Figure 3- 29: Error log displaying audio errors
Error Log
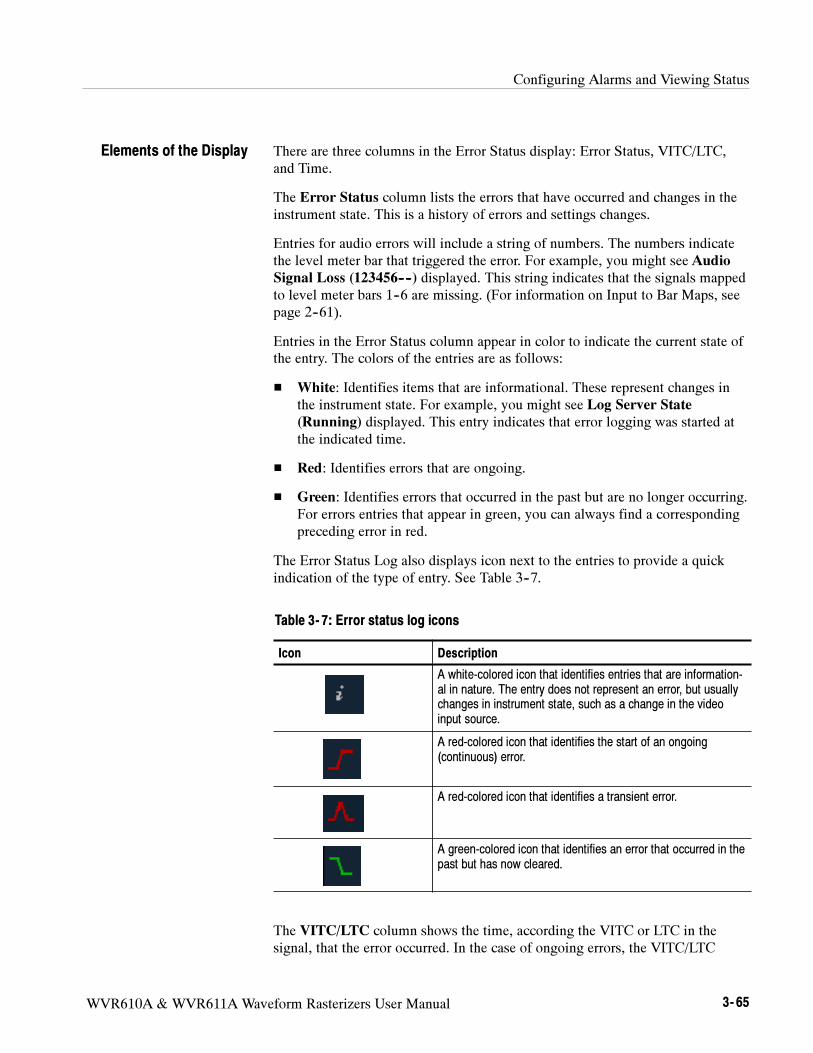
Configuring Alarms and Viewing Status
WVR610A & WVR611A Waveform Rasterizers User Manual 3- 65
There are three columns in the Error Status display: Error Status, VITC/LTC,
and Time.
The Error Status column lists the errors that have occurred and changes in the
instrument state. This is a history of errors and settings changes.
Entries for audio errors will include a string of numbers. The numbers indicate
the level meter bar that triggered the error. For example, you might see Audio
Signal Loss (123456----) displayed. This string indicates that the signals mapped
to level meter bars 1--6 are missing. (For information on Input to Bar Maps, see
page 2--61).
Entries in the Error Status column appear in color to indicate the current state of
the entry. The colors of the entries are as follows:
White: Identifies items that are informational. These represent changes in
the instrument state. For example, you might see Log Server State
(Running) displayed. This entry indicates that error logging was started at
the indicated time.
Red: Identifies errors that are ongoing.
Green: Identifies errors that occurred in the past but are no longer occurring.
For errors entries that appear in green, you can always find a corresponding
preceding error in red.
The Error Status Log also displays icon next to the entries to provide a quick
indication of the type of entry. See Table 3--7.
Table 3- 7: Error status log icons
Icon Description
A white-colored icon that identifies entries that are information-
al in nature. The entry does not represent an error, but usually
changes in instrument state, such as a change in the video
input source.
A red-colored icon that identifies the start of an ongoing
(continuous) error.
A red-colored icon that identifies a transient error.
A green-colored icon that identifies an error that occurred in the
past but has now cleared.
The VITC/LTC column shows the time, according the VITC or LTC in the
signal, that the error occurred. In the case of ongoing errors, the VITC/LTC
Elements of the Display
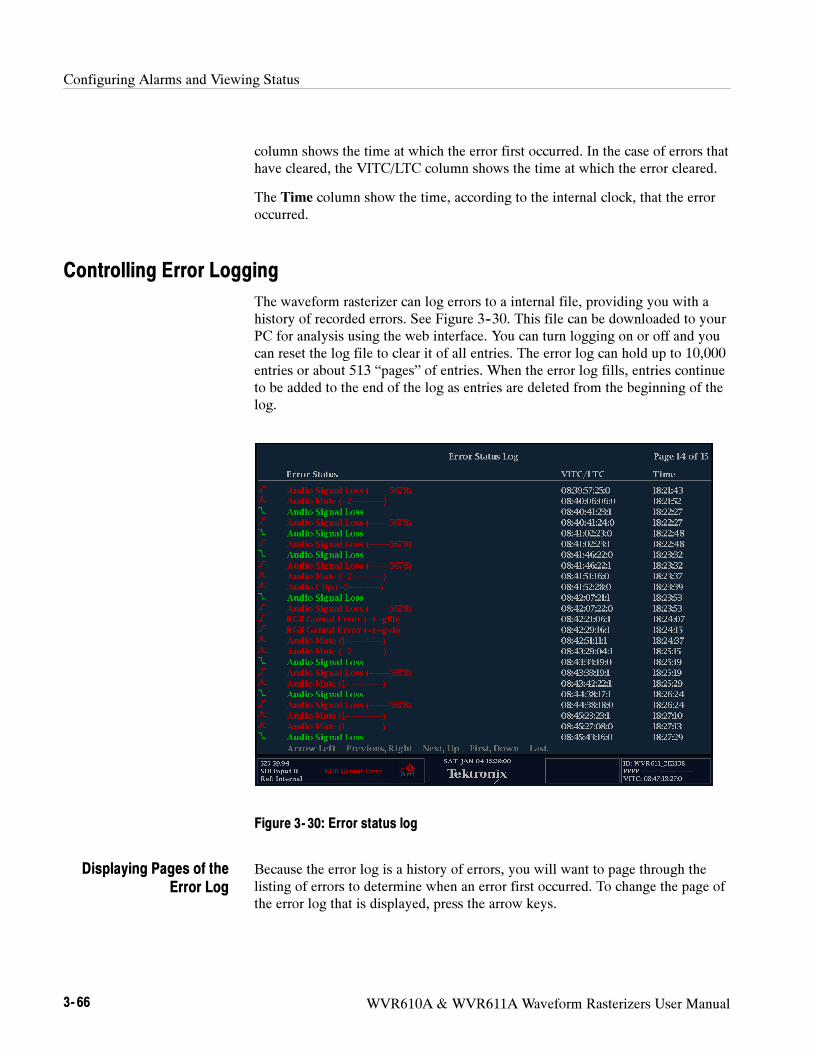
Configuring Alarms and Viewing Status
3- 66 WVR610A & WVR611A Waveform Rasterizers User Manual
column shows the time at which the error first occurred. In the case of errors that
have cleared, the VITC/LTC column shows the time at which the error cleared.
The Time column show the time, according to the internal clock, that the error
occurred.
Controlling Error Logging
The waveform rasterizer can log errors to a internal file, providing you with a
history of recorded errors. See Figure 3--30. This file can be downloaded to your
PC for analysis using the web interface. You can turn logging on or off and you
can reset the log file to clear it of all entries. The error log can hold up to 10,000
entries or about 513 “pages” of entries. When the error log fills, entries continue
to be added to the end of the log as entries are deleted from the beginning of the
log.
Figure 3- 30: Error status log
Because the error log is a history of errors, you will want to page through the
listing of errors to determine when an error first occurred. To change the page of
the error log that is displayed, press the arrow keys.
Displaying Pages of the
Error Log

Configuring Alarms and Viewing Status
WVR610A & WVR611A Waveform Rasterizers User Manual 3- 67
Press the left arrow to
display the previous page
Press the right arrow to
display the next page
Press the down arrow to
display the last page
Press the up arrow to
display the first page
Figure 3- 31: Use the arrow keys to navigate the error log
To activate logging:
1. Press and hold the STATUS button to display the STATUS menu.
2. Select Logging Active. See Figure 3--32.
3. Press SEL or the right-arrow key to select On.
4. Press STATUS again to remove the menu.
Figure 3- 32: Activating logging
To reset or clear the log of all entries:
1. Press and hold the STATUS button to display the STATUS menu.
2. Select Logging Reset. See Figure 3--32.
3. Press SEL to reset the log.
4. Press STATUS again to remove the menu.
NOTE. The error log is lost if power is removed from the waveform rasterizer.
Activating Logging
Resetting the Log File

Configuring Alarms and Viewing Status
3- 68 WVR610A & WVR611A Waveform Rasterizers User Manual

Appendices

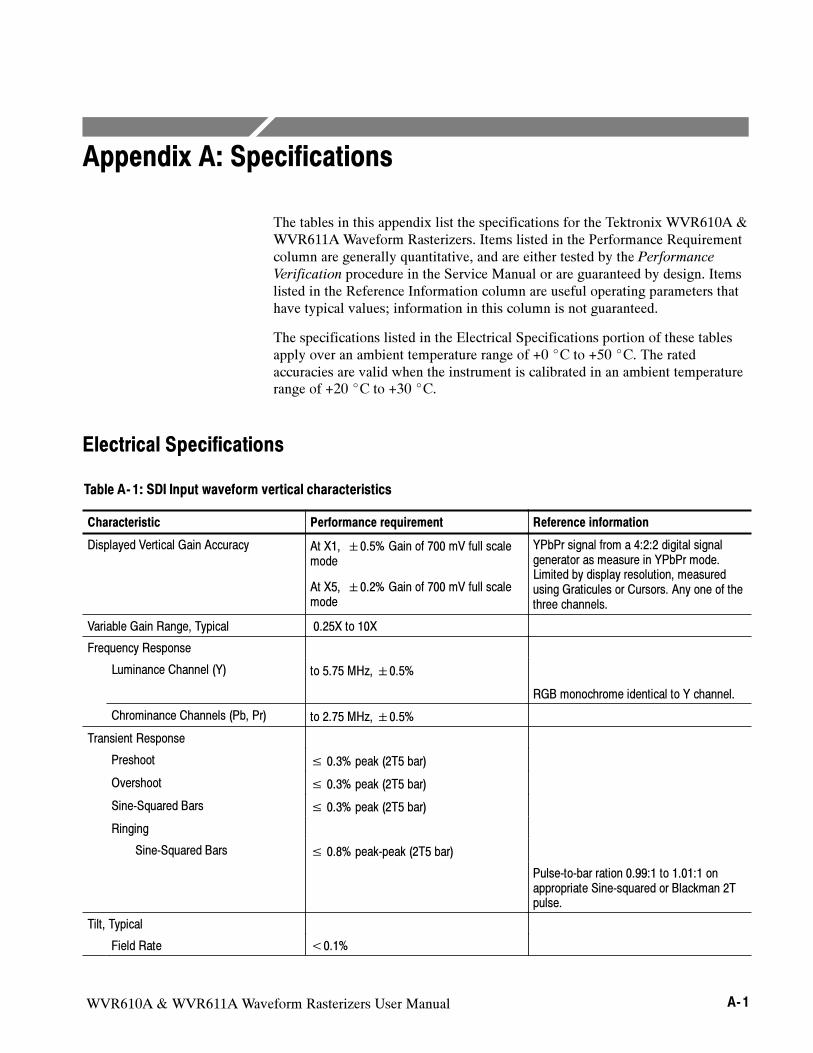
WVR610A & WVR611A Waveform Rasterizers User Manual A- 1
Appendix A: Specifications
The tables in this appendix list the specifications for the Tektronix WVR610A &
WVR611A Waveform Rasterizers. Items listed in the Performance Requirement
column are generally quantitative, and are either tested by the Performance
Verification procedure in the Service Manual or are guaranteed by design. Items
listed in the Reference Information column are useful operating parameters that
have typical values; information in this column is not guaranteed.
The specifications listed in the Electrical Specifications portion of these tables
apply over an ambient temperature range of +0 C to +50 C. The rated
accuracies are valid when the instrument is calibrated in an ambient temperature
range of +20 C to +30 C.
Electrical Specifications
Table A- 1: SDI Input waveform vertical characteristics
Characteristic Performance requirement Reference information
Displayed Vertical Gain Accuracy At X1, 0.5% Gain of 700 mV full scale
mode
At X5, 0.2% Gain of 700 mV full scale
mode
YPbPr signal from a 4:2:2 digital signal
generator as measure in YPbPr mode.
Limited by display resolution, measured
using Graticules or Cursors. Any one of the
three channels.
Variable Gain Range, Typical 0.25X to 10X
Frequency Response
Luminance Channel (Y) to 5.75 MHz, 0.5%
RGB monochrome identical to Y channel.
Chrominance Channels (Pb, Pr) to 2.75 MHz, 0.5%
Transient Response
Preshoot ≤ 0.3% peak (2T5 bar)
Overshoot ≤ 0.3% peak (2T5 bar)
Sine-Squared Bars ≤ 0.3% peak (2T5 bar)
Ringing
Sine-Squared Bars ≤ 0.8% peak-peak (2T5 bar)
Pulse-to-bar ration 0.99:1 to 1.01:1 on
appropriate Sine-squared or Blackman 2T
pulse.
Tilt, Typical
Field Rate <0.1%
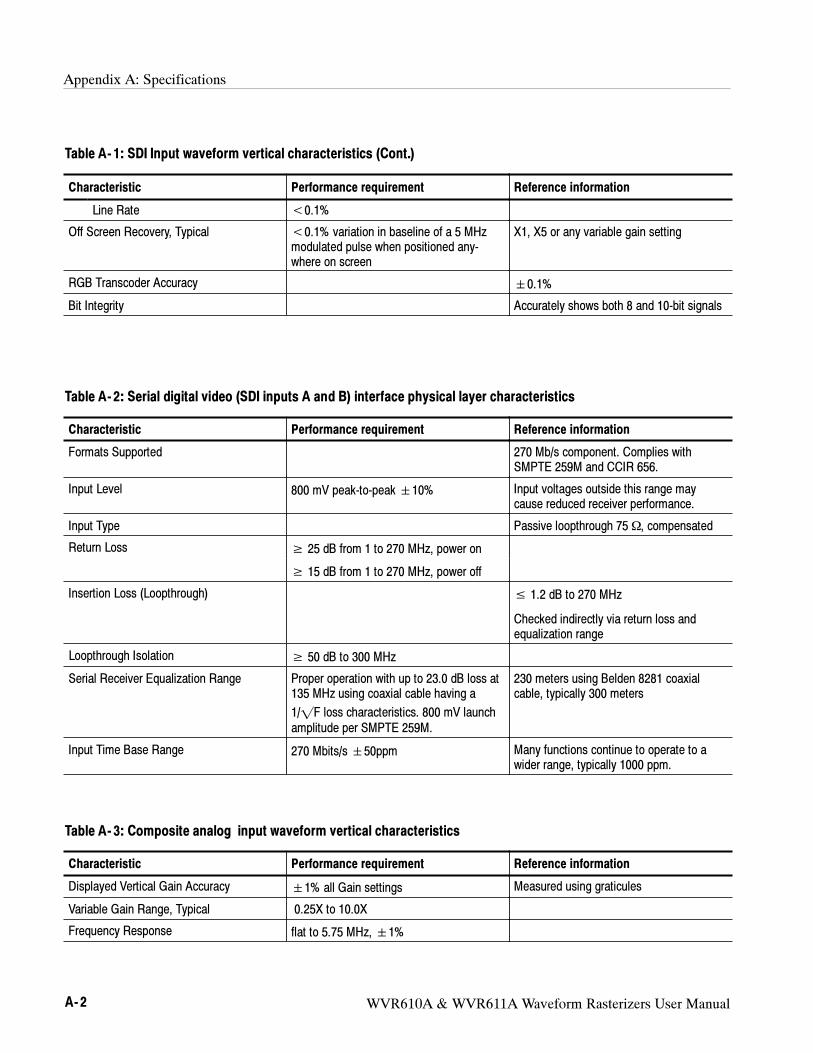
Appendix A: Specifications
A- 2 WVR610A & WVR611A Waveform Rasterizers User Manual
Table A- 1: SDI Input waveform vertical characteristics (Cont.)
Characteristic Reference informationPerformance requirement
Line Rate <0.1%
Off Screen Recovery, Typical <0.1% variation in baseline of a 5 MHz
modulated pulse when positioned any-
where on screen
X1, X5 or any variable gain setting
RGB Transcoder Accuracy 0.1%
Bit Integrity Accurately shows both 8 and 10-bit signals
Table A- 2: Serial digital video (SDI inputs A and B) interface physical layer characteristics
Characteristic Performance requirement Reference information
Formats Supported 270 Mb/s component. Complies with
SMPTE 259M and CCIR 656.
Input Level 800 mV peak-to-peak10% Input voltages outside this range may
cause reduced receiver performance.
Input Type Passive loopthrough 75Ω, compensated
Return Loss ≥ 25 dB from 1 to 270 MHz, power on
≥ 15 dB from 1 to 270 MHz, power off
Insertion Loss (Loopthrough) ≤ 1.2 dB to 270 MHz
Checked indirectly via return loss and
equalization range
Loopthrough Isolation ≥ 50 dB to 300 MHz
Serial Receiver Equalization Range Proper operation with up to 23.0 dB loss at
135 MHz using coaxial cable having a
1/F loss characteristics. 800 mV launch
amplitude per SMPTE 259M.
230 meters using Belden 8281 coaxial
cable, typically 300 meters
Input Time Base Range 270 Mbits/s50ppm Many functions continue to operate to a
wider range, typically 1000 ppm.
Table A- 3: Composite analog input waveform vertical characteristics
Characteristic Performance requirement Reference information
Displayed Vertical Gain Accuracy 1% all Gain settings Measured using graticules
Variable Gain Range, Typical 0.25X to 10.0X
Frequency Response flat to 5.75 MHz, 1%
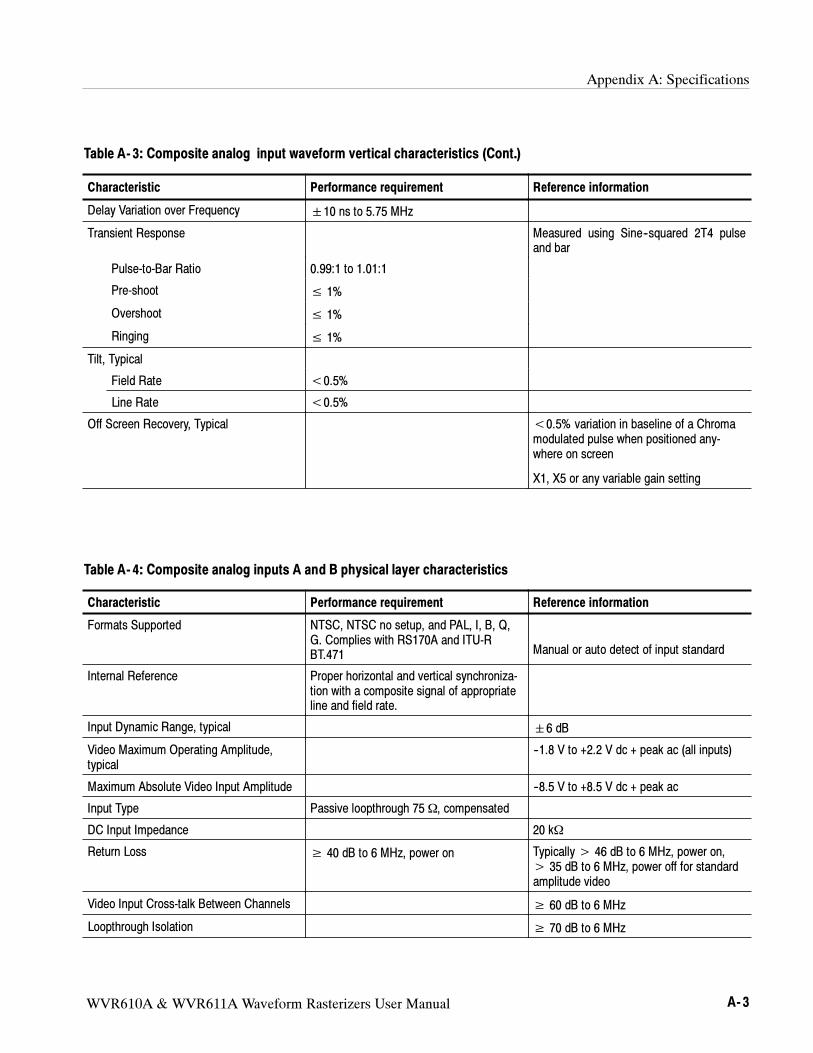
Appendix A: Specifications
WVR610A & WVR611A Waveform Rasterizers User Manual A- 3
Table A- 3: Composite analog input waveform vertical characteristics (Cont.)
Characteristic Reference informationPerformance requirement
Delay Variation over Frequency 10 ns to 5.75 MHz
Transient Response Measured using Sine--squared 2T4 pulse
and bar
Pulse-to-Bar Ratio 0.99:1 to 1.01:1
Pre-shoot ≤ 1%
Overshoot ≤ 1%
Ringing ≤ 1%
Tilt, Typical
Field Rate <0.5%
Line Rate <0.5%
Off Screen Recovery, Typical <0.5% variation in baseline of a Chroma
modulated pulse when positioned any-
where on screen
X1, X5 or any variable gain setting
Table A- 4: Composite analog inputs A and B physical layer characteristics
Characteristic Performance requirement Reference information
Formats Supported NTSC, NTSC no setup, and PAL, I, B, Q,
G. Complies with RS170A and ITU-R
BT.471Manual or auto detect of input standard
Internal Reference Proper horizontal and vertical synchroniza-
tion with a composite signal of appropriate
line and field rate.
Input Dynamic Range, typical 6 dB
Video Maximum Operating Amplitude,
typical
--1.8 V to +2.2 V dc + peak ac (all inputs)
Maximum Absolute Video Input Amplitude --8.5 V to +8.5 V dc + peak ac
Input Type Passive loopthrough 75Ω, compensated
DC Input Impedance 20 kΩ
Return Loss ≥ 40 dB to 6 MHz, power on Typically> 46 dB to 6 MHz, power on,
> 35 dB to 6 MHz, power off for standard
amplitude video
Video Input Cross-talk Between Channels ≥ 60 dB to 6 MHz
Loopthrough Isolation ≥ 70 dB to 6 MHz

Appendix A: Specifications
A- 4 WVR610A & WVR611A Waveform Rasterizers User Manual
Table A- 4: Composite analog inputs A and B physical layer characteristics (Cont.)
Characteristic Reference informationPerformance requirement
DC Offset with Restore Off ≤ 20 mV typical, Measured in full screen
mode at X5 vertical gain
DC Restore Modes Fast, Slow and Off modes Slow has a typical bandwidth of 10 Hz,
Fast has a typical bandwidth of 500 Hz.
DC Restore Offset Error ≤ 2 mV Registration between back porch and 0 V
graticule
DC Offset Between Inputs ≤ 7 mV
DC Restore 50 and 60 Hz Attenuation,
typical
Fast Mode>95% attenuation
Slow Mode<10% attenuation
Off Mode
Blanking Shift with 10 to 90% APL Change ≤ 1 IRE (7 mV PAL)
Blanking Shift with Presence and Absence
of Burst
≤ 1 IRE (7 mV PAL)
Typically 3 mV
Lock Range 50 ppm Remains locked
Lock in Presence of Hum 1 V peak-to-peak
On 0 dB signal, remains locked
Lock in Presence of White Noise Signal/Noise ratio of 32 dB
5 MHz bandwidth on black burst, remains
locked
Color Framing Correct color framing detected for signals
having<45° SCH Phase Error and burst
is present
Error Reporting Should report CPU-readable error condi-
tions, for example, no input present,
unlocked, etc.
Clamp Range Can correct signals with backporch within
1 V of ground.
Sync AFC Speed User selectable setting of Fast or Slow
response to line rate variations. Typical
bandwidth of 600 Hz (Fast) and 10 kHz
(Slow)
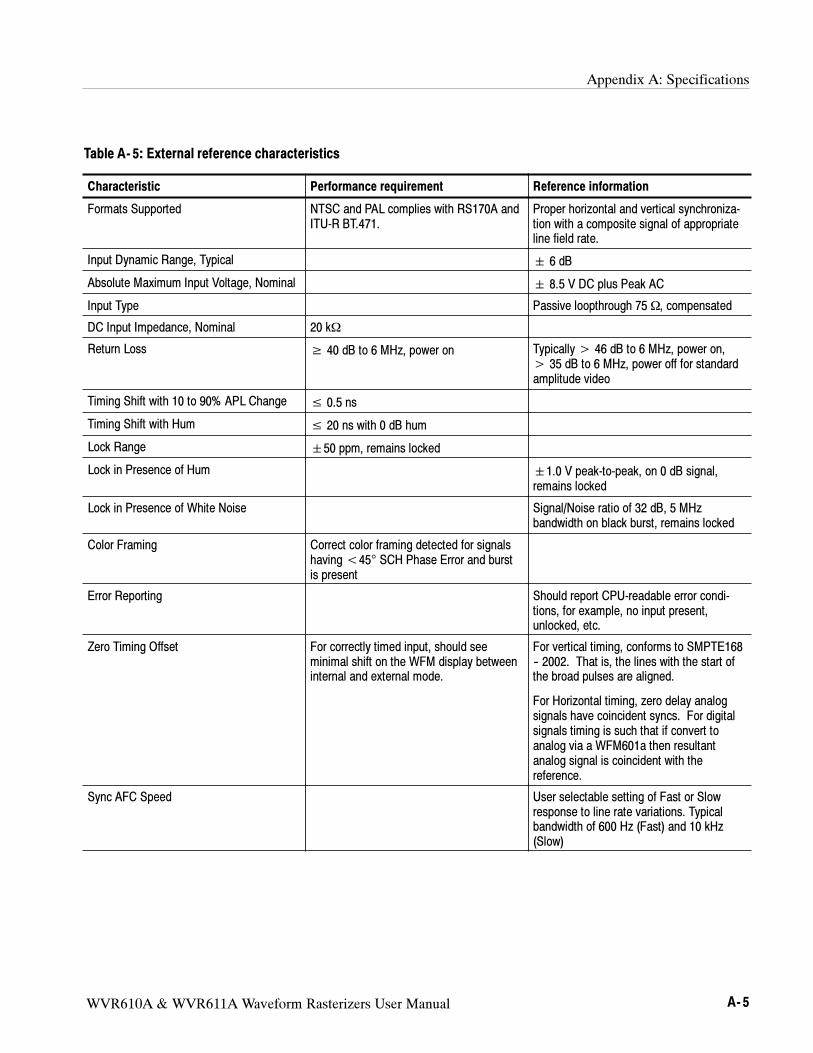
Appendix A: Specifications
WVR610A & WVR611A Waveform Rasterizers User Manual A- 5
Table A- 5: External reference characteristics
Characteristic Performance requirement Reference information
Formats Supported NTSC and PAL complies with RS170A and
ITU-R BT.471.
Proper horizontal and vertical synchroniza-
tion with a composite signal of appropriate
line field rate.
Input Dynamic Range, Typical 6 dB
Absolute Maximum Input Voltage, Nominal 8.5 V DC plus Peak AC
Input Type Passive loopthrough 75Ω, compensated
DC Input Impedance, Nominal 20 kΩ
Return Loss ≥ 40 dB to 6 MHz, power on Typically> 46 dB to 6 MHz, power on,
> 35 dB to 6 MHz, power off for standard
amplitude video
Timing Shift with 10 to 90% APL Change ≤ 0.5 ns
Timing Shift with Hum ≤ 20 ns with 0 dB hum
Lock Range 50 ppm, remains locked
Lock in Presence of Hum 1.0 V peak-to-peak, on 0 dB signal,
remains locked
Lock in Presence of White Noise Signal/Noise ratio of 32 dB, 5 MHz
bandwidth on black burst, remains locked
Color Framing Correct color framing detected for signals
having<45° SCH Phase Error and burst
is present
Error Reporting Should report CPU-readable error condi-
tions, for example, no input present,
unlocked, etc.
Zero Timing Offset For correctly timed input, should see
minimal shift on the WFM display between
internal and external mode.
For vertical timing, conforms to SMPTE168
-- 2002. That is, the lines with the start of
the broad pulses are aligned.
For Horizontal timing, zero delay analog
signals have coincident syncs. For digital
signals timing is such that if convert to
analog via a WFM601a then resultant
analog signal is coincident with the
reference.
Sync AFC Speed User selectable setting of Fast or Slow
response to line rate variations. Typical
bandwidth of 600 Hz (Fast) and 10 kHz
(Slow)
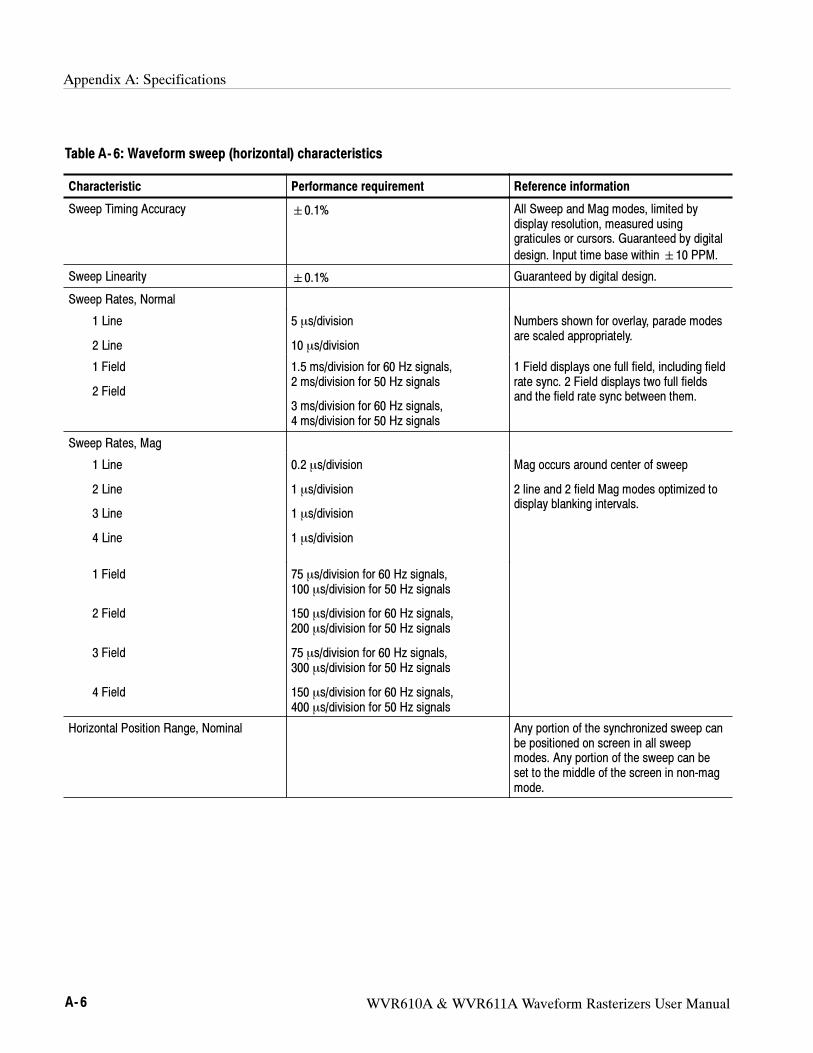
Appendix A: Specifications
A- 6 WVR610A & WVR611A Waveform Rasterizers User Manual
Table A- 6: Waveform sweep (horizontal) characteristics
Characteristic Performance requirement Reference information
Sweep Timing Accuracy 0.1% All Sweep and Mag modes, limited by
display resolution, measured using
graticules or cursors. Guaranteed by digital
design. Input time base within10 PPM.
Sweep Linearity 0.1% Guaranteed by digital design.
Sweep Rates, Normal
1 Line
2 Line
5 µs/division
10 µs/division
Numbers shown for overlay, parade modes
are scaled appropriately.
1 Field
2 Field
1.5 ms/division for 60 Hz signals,
2 ms/division for 50 Hz signals
3 ms/division for 60 Hz signals,
4 ms/division for 50 Hz signals
1 Field displays one full field, including field
rate sync. 2 Field displays two full fields
and the field rate sync between them.
Sweep Rates, Mag
1 Line
2 Line
3 Line
4 Line
0.2 µs/division
1 µs/division
1 µs/division
1 µs/division
Mag occurs around center of sweep
2 line and 2 field Mag modes optimized to
display blanking intervals.
1 Field
2 Field
3 Field
4 Field
75 µs/division for 60 Hz signals,
100 µs/division for 50 Hz signals
150 µs/division for 60 Hz signals,
200 µs/division for 50 Hz signals
75 µs/division for 60 Hz signals,
300 µs/division for 50 Hz signals
150 µs/division for 60 Hz signals,
400 µs/division for 50 Hz signals
Horizontal Position Range, Nominal Any portion of the synchronized sweep can
be positioned on screen in all sweep
modes. Any portion of the sweep can be
set to the middle of the screen in non-mag
mode.
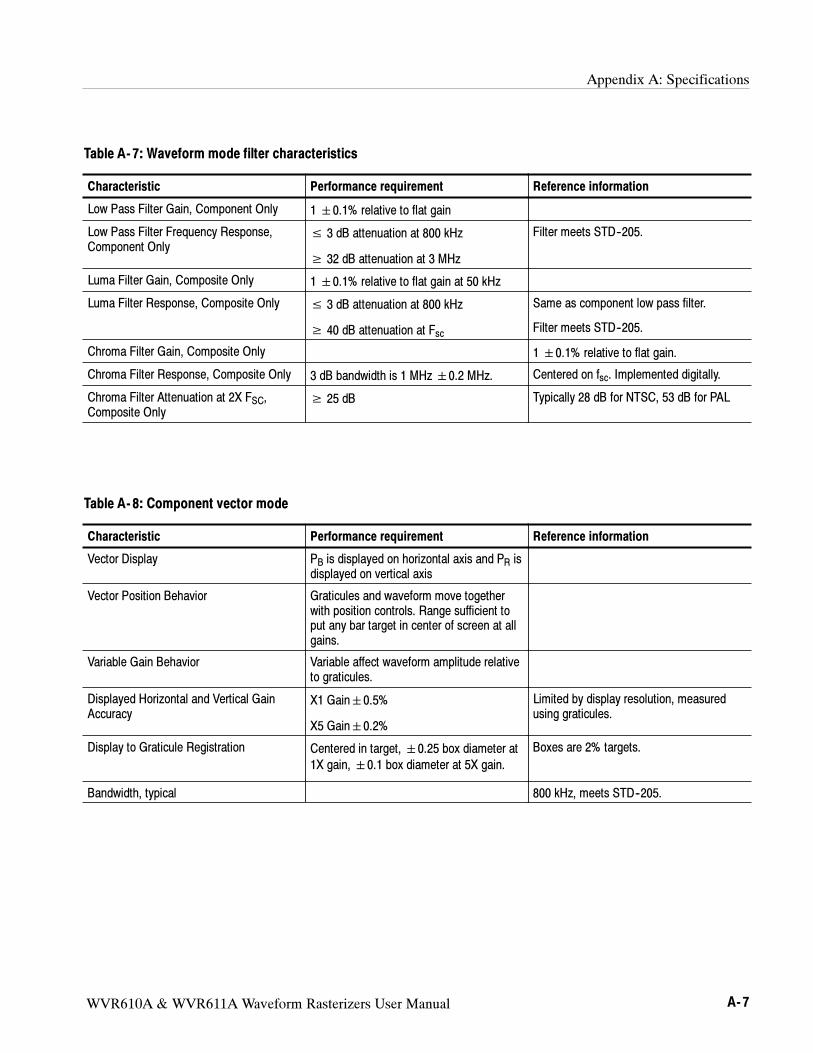
Appendix A: Specifications
WVR610A & WVR611A Waveform Rasterizers User Manual A- 7
Table A- 7: Waveform mode filter characteristics
Characteristic Performance requirement Reference information
Low Pass Filter Gain, Component Only 10.1% relative to flat gain
Low Pass Filter Frequency Response,
Component Only
≤ 3 dB attenuation at 800 kHz
≥ 32 dB attenuation at 3 MHz
Filter meets STD--205.
Luma Filter Gain, Composite Only 10.1% relative to flat gain at 50 kHz
Luma Filter Response, Composite Only ≤ 3 dB attenuation at 800 kHz
≥ 40 dB attenuation at Fsc
Same as component low pass filter.
Filter meets STD--205.
Chroma Filter Gain, Composite Only 10.1% relative to flat gain.
Chroma Filter Response, Composite Only 3 dB bandwidth is 1 MHz0.2 MHz. Centered on fsc. Implemented digitally.
Chroma Filter Attenuation at 2X FSC,
Composite Only
≥ 25 dB Typically 28 dB for NTSC, 53 dB for PAL
Table A- 8: Component vector mode
Characteristic Performance requirement Reference information
Vector Display PBis displayed on horizontal axis and P
Ris
displayed on vertical axis
Vector Position Behavior Graticules and waveform move together
with position controls. Range sufficient to
put any bar target in center of screen at all
gains.
Variable Gain Behavior Variable affect waveform amplitude relative
to graticules.
Displayed Horizontal and Vertical Gain
Accuracy
X1 Gain0.5%
X5 Gain0.2%
Limited by display resolution, measured
using graticules.
Display to Graticule Registration Centered in target, 0.25 box diameter at
1X gain, 0.1 box diameter at 5X gain.
Boxes are 2% targets.
Bandwidth, typical 800 kHz, meets STD--205.
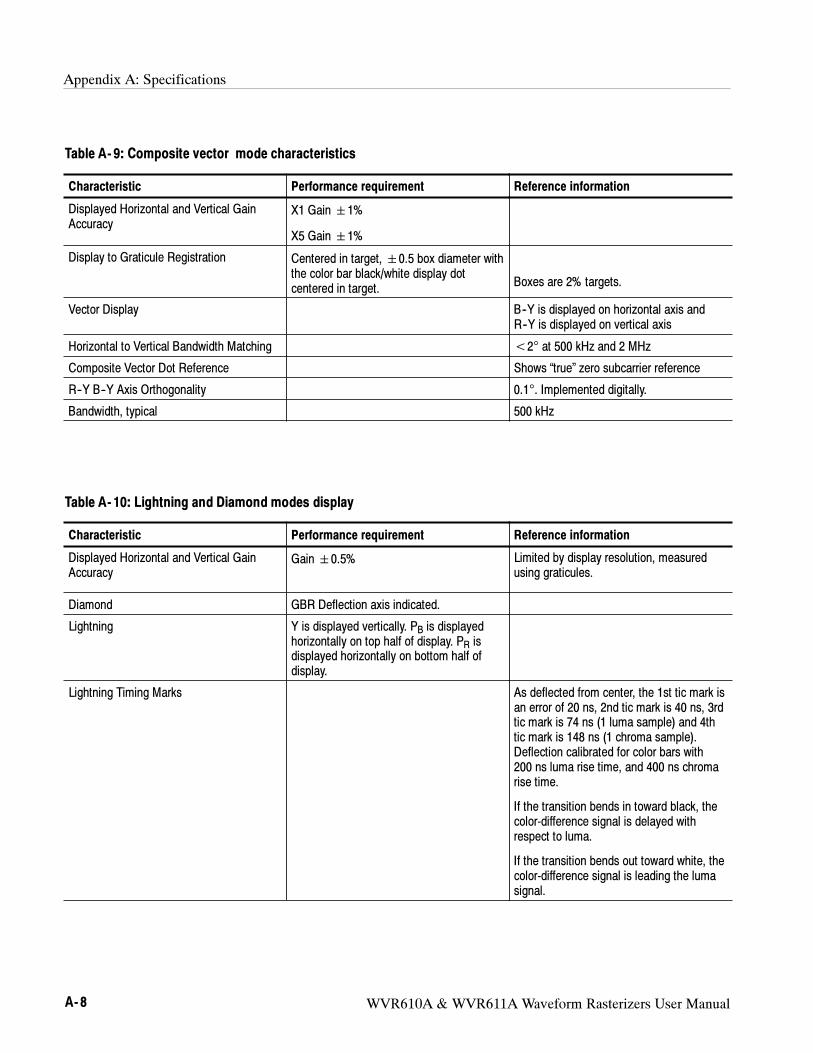
Appendix A: Specifications
A- 8 WVR610A & WVR611A Waveform Rasterizers User Manual
Table A- 9: Composite vector mode characteristics
Characteristic Performance requirement Reference information
Displayed Horizontal and Vertical Gain
Accuracy
X1 Gain1%
X5 Gain1%
Display to Graticule Registration Centered in target, 0.5 box diameter with
the color bar black/white display dot
centered in target.Boxes are 2% targets.
Vector Display B--Y is displayed on horizontal axis and
R--Y is displayed on vertical axis
Horizontal to Vertical Bandwidth Matching <2° at 500 kHz and 2 MHz
Composite Vector Dot Reference Shows “true” zero subcarrier reference
R--Y B--Y Axis Orthogonality 0.1°. Implemented digitally.
Bandwidth, typical 500 kHz
Table A- 10: Lightning and Diamond modes display
Characteristic Performance requirement Reference information
Displayed Horizontal and Vertical Gain
Accuracy
Gain0.5% Limited by display resolution, measured
using graticules.
Diamond GBR Deflection axis indicated.
Lightning Y is displayed vertically. PBis displayed
horizontally on top half of display. PRis
displayed horizontally on bottom half of
display.
Lightning Timing Marks As deflected from center, the 1st tic mark is
an error of 20 ns, 2nd tic mark is 40 ns, 3rd
tic mark is 74 ns (1 luma sample) and 4th
tic mark is 148 ns (1 chroma sample).
Deflection calibrated for color bars with
200 ns luma rise time, and 400 ns chroma
rise time.
If the transition bends in toward black, the
color-difference signal is delayed with
respect to luma.
If the transition bends out toward white, the
color-difference signal is leading the luma
signal.

Appendix A: Specifications
WVR610A & WVR611A Waveform Rasterizers User Manual A- 9
Table A- 11: RGB gamut error indication (Diamond displays)
Characteristic Performance requirement Reference information
Detection Level Adjustable thresholds:
Upper: 650 to 756 mV
Lower: --70 to +35 mV
Default is nominally 103% of legal RGB
Upper: 721 mV
Lower: --21 mV
Detection Level Accuracy 5 mV
Colorimetry According to CCIR601.
Table A- 12: Arrowhead mode (NTSC/PAL composite limit display of component input mode)
Characteristic Performance requirement Reference information
Signal to Graticule Accuracy
(PAL values in parenthesis)
1%, 100 IRE (700 mV) and
131 IRE (900 mV)
Composite Limit Cursor Accuracy
(PAL values in parenthesis)
2% at 100, 110, 120, and 131 IRE (700 and
900 mV)
2% at --24, --33, and --40 IRE (--230 and
--300 mV)
Detection Level Adjustable thresholds, 1% steps. Out of limit signals are displayed as Red on
the out-of-limit portion of the Arrowhead
display.
Composite Limit Detection Level Accuracy
(PAL values in parenthesis)
Detection level 7 mV, 90 to 135% in
1% steps
Upper Detection level can be set to 100,
110, 120, or 131 IRE (700 or 950 mV PAL)
Luma Limits High 90 to 108%
Low +5 to --6%
0.5% steps
Default is nominally 103% and --1%.
Luma Limit Detection Level Accuracy Detection level =7mV of cursor level
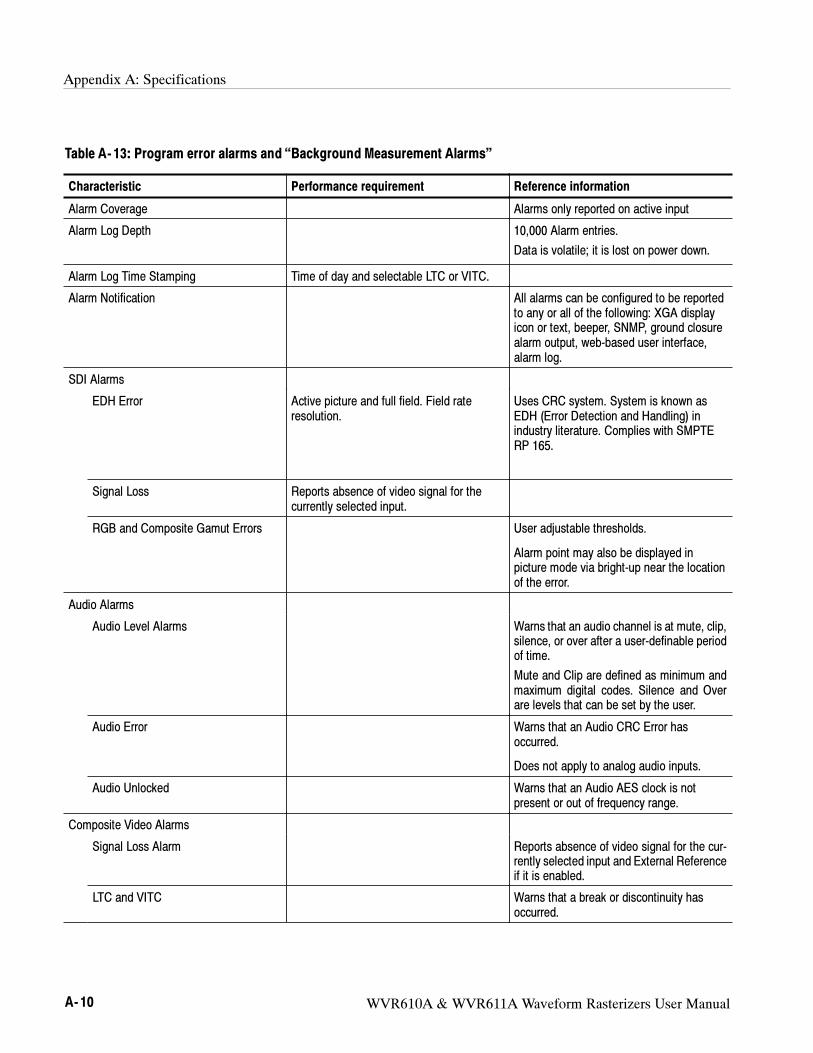
Appendix A: Specifications
A- 10 WVR610A & WVR611A Waveform Rasterizers User Manual
Table A- 13: Program error alarms and “Background Measurement Alarms”
Characteristic Performance requirement Reference information
Alarm Coverage Alarms only reported on active input
Alarm Log Depth 10,000 Alarm entries.
Data is volatile; it is lost on power down.
Alarm Log Time Stamping Time of day and selectable LTC or VITC.
Alarm Notification All alarms can be configured to be reported
to any or all of the following: XGA display
icon or text, beeper, SNMP, ground closure
alarm output, web-based user interface,
alarm log.
SDI Alarms
EDH Error Active picture and full field. Field rate
resolution.
Uses CRC system. System is known as
EDH (Error Detection and Handling) in
industry literature. Complies with SMPTE
RP 165.
Signal Loss Reports absence of video signal for the
currently selected input.
RGB and Composite Gamut Errors User adjustable thresholds.
Alarm point may also be displayed in
picture mode via bright-up near the location
of the error.
Audio Alarms
Audio Level Alarms Warns that an audio channel is at mute, clip,
silence, or over after a user-definable period
of time.
Mute and Clip are defined as minimum and
maximum digital codes. Silence and Over
are levels that can be set by the user.
Audio Error Warns that an Audio CRC Error has
occurred.
Does not apply to analog audio inputs.
Audio Unlocked Warns that an Audio AES clock is not
present or out of frequency range.
Composite Video Alarms
Signal Loss Alarm Reports absence of video signal for the cur-
rently selected input and External Reference
if it is enabled.
LTC and VITC Warns that a break or discontinuity has
occurred.
Appendix A: Specifications
WVR610A & WVR611A Waveform Rasterizers User Manual A- 11
Table A- 14: Miscellaneous measurements and displays
Characteristic Performance requirement Reference information
Embedded Audio Identifies the presence and activity of up to
16 channels of embedded digital audio.
Alarms are triggered for lack of presence,
checksum errors, buffer full/empty, or parity
errors on up to 8 channels.
EDH Error Statistics Displays asynchronous errored seconds.
Active picture and full field statistics are
separately compiled.
SDI Video Format Indicates whether the signal is 525 lines or
625 lines.
Composite Video Format Indicates whether the signal is NTSC or
PAL. “Forced Format” mode overrides.
VITC On screen readout of the VITC of the
selected video input. Also displayed in the
error logging information. Complies with
SMPTE 12M.
LTC On screen readout of the LTC on GC
Remote Connector. Also displayed in the
error logging information. Complies with
SMPTE 12M.
Table A- 15: Picture display mode
Characteristic Performance requirement Reference information
Modes Color Only, internally referenced with 60 Hz
refresh.
Full-screen Mode Under scan image with and without
blanking displayed
Close to 1 pixel per input sample but
interpolated as needed to get correct
aspect ratio. Composite picture with
blanking displayed does not show sync and
burst but does show vertical interval signals
such as VITS, teletext and closed caption.
Appendix A: Specifications
A- 12 WVR610A & WVR611A Waveform Rasterizers User Manual
Table A- 16: Measure display
Characteristic Performance requirement Reference information
Input Timing Relative to External Reference Display of Vertical and Horizontal timing
offset.
Timing Display Zero Definition
(When Relative to: is set to Rear Panel.)
For vertical timing conform to SMPTE168 --
2002.
For Horizontal timing, zero delay analog
signals have coincident syncs. For digital
signals, timing is such that if converted to
analog via a WFM601a then the resultant
analog signal is coincident with the
reference.
Timing zero is equivalent to nominal zero
delay on TG700. Also agrees with timing
that has minimal shift on the waveform
display when going from internal to
external.
Vertical timing as per SMPTE168 specifies
that the first lines that contain broad pulses
are aligned.
Table A- 17: Other display
Characteristic Performance requirement Reference information
LTC Waveform Displays voltage versus time waveform of
LTC input.
Timing derived from currently selected
video timing. Mutually exclusive to Stair
Step mode.
LTC Waveform Vertical Accuracy, Typical 5%
LTC Waveform DC Offset, Typical 100 mV
LTC Waveform Time Base, Typical 3 ms/division for NTSC, 4 ms/div for PAL
Runs in 2-field sweep mode only, triggered
by field one to allow verifying audio to video
synchronization.
Appendix A: Specifications
WVR610A & WVR611A Waveform Rasterizers User Manual A- 13
Table A- 18: Audio bar displays
Characteristic Performance requirement Reference information
Modes User can configure the response dynamics
(ballistics), reference levels, peak hold,
offset, and scale of the meters to suite the
monitoring needs of their installation or
situation. Each pair has a phase correlation
meter.
8 Channel Any four channel pairs with phase correla-
tion meters. Only six channels active with
analog audio input.
Surround Left, Right, Center, Lfe, Left surround,
Right surround meters, and an extra
channel pair. Phase correlation meters
between the two left--right pairs and the
extra pair.
Audio Sources Monitors the signal levels and stereo phase
of AES/EBU digital audio, digital audio
embedded in serial digital video and analog
audio inputs.
Level Meter Resolution 0.056 dB steps on 30 dB scale, from full
scale to --20 dB FS.
0.20 dB steps on 0 to--70 dB scale, for
signals above --240 dB FS, tiled display.
Correlation Meter Speed User selectable from 1 to 20. Factory
default set to 8.
Speed 1 averages over 0.0167 s.
Speed 2 averages over 0.0333 s.
Speed 3 averages over 0.0667 s.
Speed 4 averages over 0.133 s.
Speed 5 averages over 0.267 s.
Speed 6 averages over 0.533 s.
Speed 7 averages over 1.0 s.
Speed 8 averages over 1.5 s.
Speed 9 averages over 2.0 s.
Speed 10 averages over 2.5 s.
Speed 11 averages over 3.0 s.
Speed 12 averages over 3.5 s.
Speed 13 averages over 4.0 s.
Speed 14 averages over 4.5 s.
Speed 15 averages over 5.0 s.
Speed 16 averages over 5.5 s.
Speed 17 averages over 6.0 s.
Speed 18 averages over 6.5 s.
Speed 19 averages over 7.0 s.
Speed 20 averages over 7.5 s.
Metering Ballistics Selectable from True Peak, PPM Type 1,
PPM Type 2, and Extended VU.
Appendix A: Specifications
A- 14 WVR610A & WVR611A Waveform Rasterizers User Manual
Table A- 18: Audio bar displays (Cont.)
Characteristic Reference informationPerformance requirement
Peak Program Meter
PPM Type 1
PPM Type 2
Equivalent to IEC 60268--10 Type I,
DIN 45406, and Nordic N-9
Equivalent to IEEE Std. 152--1991 and IEC
60268--10 Type II
True Peak PPM decay characteristics, no attack delay.
Shows actual signal peaks regardless of
duration.
This is the factory default ballistic.
Extended VU A VU meter as defined in IEEE Std.
152--1991 but an extended dB-linear scale.
Peak Hold Hold adjustable from 1 to 10 seconds,
default is 2 seconds.
Indicated Peaks held for selected time.
Clip Indication Delay Count Consecutive FS samples for Clip indication,
user selectable Off or 1 to 100. Factory
default set to 1.
Mute Indication Delay Count Consecutive ”0” samples for Mute indica-
tion, user selectable Off or 1 to 100.
Factory default set to 10.
Clip/Mute Hold Time User selectable from 1 to 30 seconds.
Factory default set to 2.
Silence Indication Threshold Audio level below which the signal is
considered “silent”. Used to trigger
on-screen indication and alarms.
Silence Indication Delay Off or 1 to 60 seconds selectable. Indica-
tion and alarm will not be asserted until
threshold has been exceeded for the set
number of seconds. Factory default is set
to 10.
Over Indication Threshold Audio level above which the signal will be
considered “over”. Used to trigger on-
screen indication and alarms.
Over Indication Delay Off or 1 to 30 seconds selectable. Indica-
tion and alarm will not be asserted until
threshold has been exceeded for the set
number of seconds. Factory default is set
to 10.
Appendix A: Specifications
WVR610A & WVR611A Waveform Rasterizers User Manual A- 15
Table A- 18: Audio bar displays (Cont.)
Characteristic Reference informationPerformance requirement
Adjustable Peak Program Level (dBFS) Range: 0 to --30 dB.
Peak program level is the level (relative to
digital full scale) that you choose as the
maximum desired level for monitored
programs. The meter bars change to red
between the Peak program level.
Adjustable Test Level (dBFS) Range: 0 to --30 dB.
Test level is the level (relative to digital full
scale) that you choose as the test or “line
up” level for your system. The meter bars
change to yellow between the Test and
Peak program levels.
Set 0 dB Mark Selectable from Top of Scale, Peak
Program Level, or Test Level.
Use this item to number the meter scale
relative to top of scale or to one of the two
user--adjustable levels. When the zero
mark is et to either Peak program or Test
level, the scale units are dBr, relative to the
0 dB level; units above the selected 0 dB
mark are positive, while units below it are
negative.
Table A- 19: Audio bar and lissajous displays
Characteristic Performance requirement Reference information
Description In combination with Bar mode can have
Lissajous in one tile.
Automatic Gain Control Gain control can be on or off. AGC time constant: 0.5 sec to expand
display after a 0 to --40 level transition, 0.05
sec to reduce gain after a --40 to 0 dB level
transition.
Manual Scaling When AGC is off, level at perimeter of
display follows Program level on Bar
display.
Appendix A: Specifications
A- 16 WVR610A & WVR611A Waveform Rasterizers User Manual
Table A- 20: Audio text displays
Characteristic Performance requirement Reference information
Session Log (audio and video) List of Significant audio events with time
stamps. Depending on input may include
Clips, mutes, Silence, over.
Table A- 21: AES audio inputs
Characteristic Performance requirement Reference information
Inputs 2 sets with 8 channels each, 24-bit. Meets
requirements of AES 3--ID.
Input Connector BNC, terminated, unbalanced.
Input Impedance 75Ω
Return Loss > 25 dB relative to 75Ω, from 0.1 to
6 MHz, typically better than 25 dB to
12 MHz.
Input A has passive terms and so are the
same with power on or off. Input B has
active terms that go to a higher impedance
with the power off.
Input Amplitude Range 0.2 V to 2 V peak-to-peak
Input Sample Rate 32 kHz, 44.1 kHz, 48 kHz, and 96 kHz
Input Lock Range >5%. This means that exceeding 5%,
the instrument may search again for a new
lock point. Typically stays locked to 12.5%
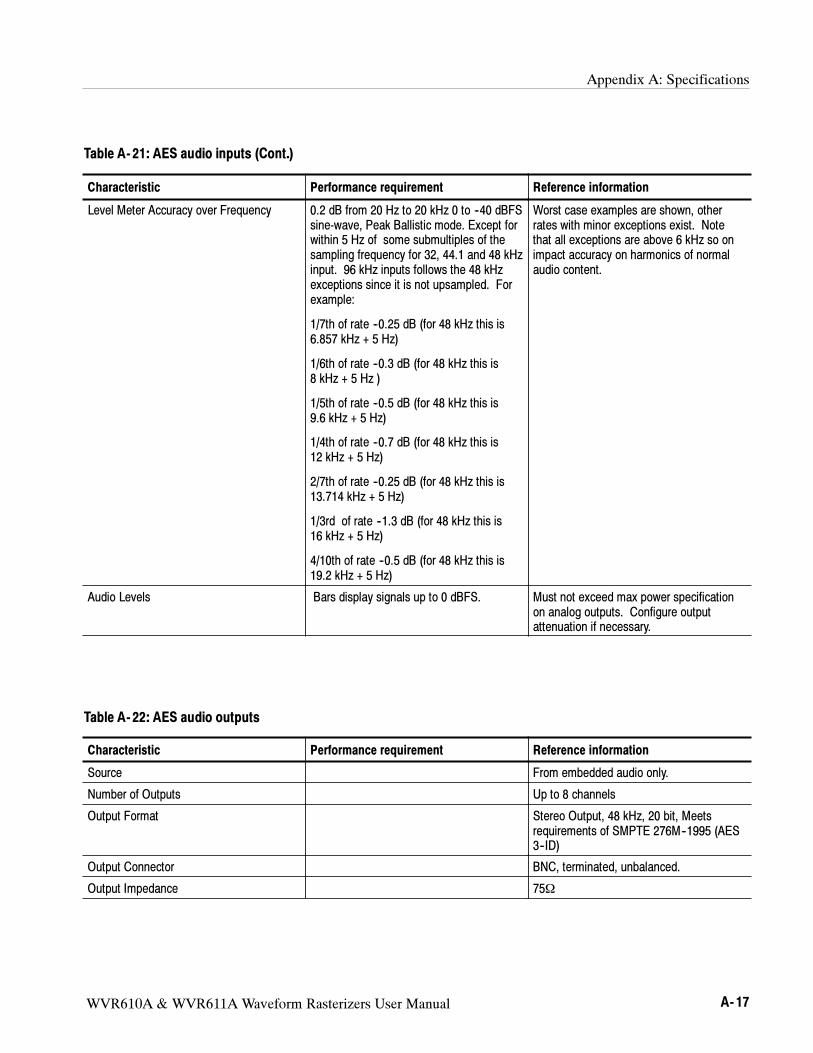
Appendix A: Specifications
WVR610A & WVR611A Waveform Rasterizers User Manual A- 17
Table A- 21: AES audio inputs (Cont.)
Characteristic Reference informationPerformance requirement
Level Meter Accuracy over Frequency 0.2 dB from 20 Hz to 20 kHz 0 to --40 dBFS
sine-wave, Peak Ballistic mode. Except for
within 5 Hz of some submultiples of the
sampling frequency for 32, 44.1 and 48 kHz
input. 96 kHz inputs follows the 48 kHz
exceptions since it is not upsampled. For
example:
1/7th of rate --0.25 dB (for 48 kHz this is
6.857 kHz + 5 Hz)
1/6th of rate --0.3 dB (for 48 kHz this is
8 kHz + 5 Hz )
1/5th of rate --0.5 dB (for 48 kHz this is
9.6 kHz + 5 Hz)
1/4th of rate --0.7 dB (for 48 kHz this is
12 kHz + 5 Hz)
2/7th of rate --0.25 dB (for 48 kHz this is
13.714 kHz + 5 Hz)
1/3rd of rate --1.3 dB (for 48 kHz this is
16 kHz + 5 Hz)
4/10th of rate --0.5 dB (for 48 kHz this is
19.2 kHz + 5 Hz)
Worst case examples are shown, other
rates with minor exceptions exist. Note
that all exceptions are above 6 kHz so on
impact accuracy on harmonics of normal
audio content.
Audio Levels Bars display signals up to 0 dBFS. Must not exceed max power specification
on analog outputs. Configure output
attenuation if necessary.
Table A- 22: AES audio outputs
Characteristic Performance requirement Reference information
Source From embedded audio only.
Number of Outputs Up to 8 channels
Output Format Stereo Output, 48 kHz, 20 bit, Meets
requirements of SMPTE 276M--1995 (AES
3--ID)
Output Connector BNC, terminated, unbalanced.
Output Impedance 75Ω
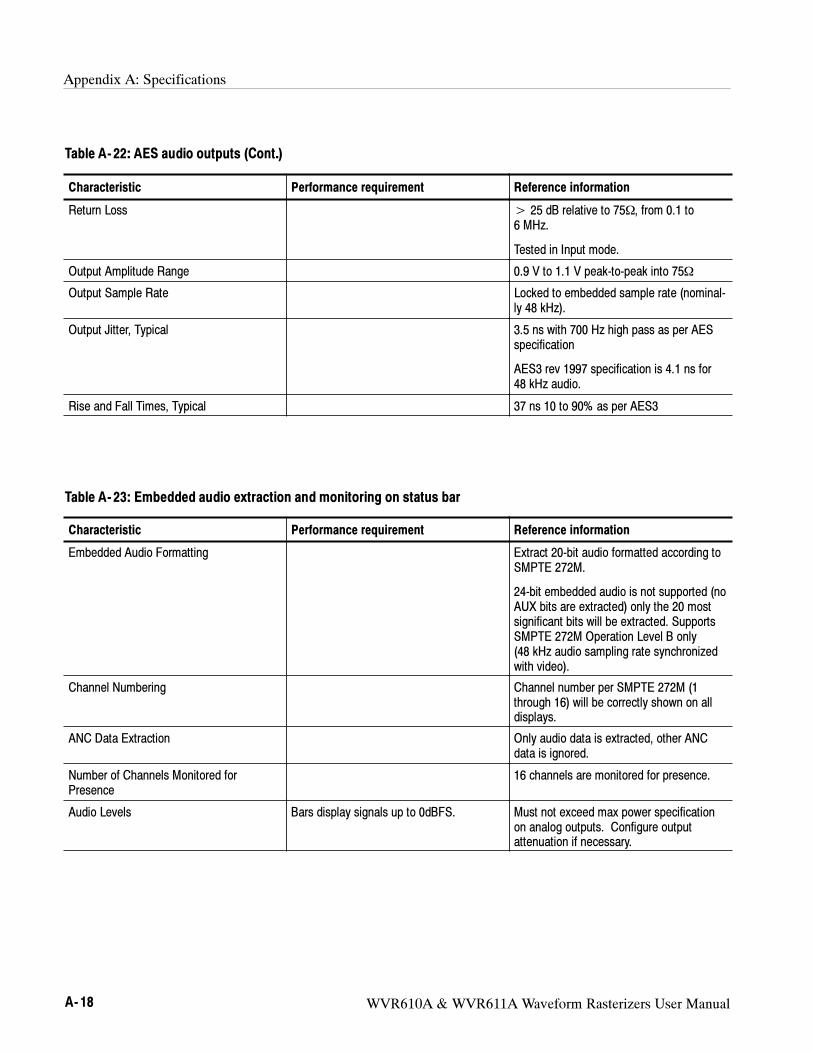
Appendix A: Specifications
A- 18 WVR610A & WVR611A Waveform Rasterizers User Manual
Table A- 22: AES audio outputs (Cont.)
Characteristic Reference informationPerformance requirement
Return Loss > 25 dB relative to 75Ω, from 0.1 to
6 MHz.
Tested in Input mode.
Output Amplitude Range 0.9 V to 1.1 V peak-to-peak into 75Ω
Output Sample Rate Locked to embedded sample rate (nominal-
ly 48 kHz).
Output Jitter, Typical 3.5 ns with 700 Hz high pass as per AES
specification
AES3 rev 1997 specification is 4.1 ns for
48 kHz audio.
Rise and Fall Times, Typical 37 ns 10 to 90% as per AES3
Table A- 23: Embedded audio extraction and monitoring on status bar
Characteristic Performance requirement Reference information
Embedded Audio Formatting Extract 20-bit audio formatted according to
SMPTE 272M.
24-bit embedded audio is not supported (no
AUX bits are extracted) only the 20 most
significant bits will be extracted. Supports
SMPTE 272M Operation Level B only
(48 kHz audio sampling rate synchronized
with video).
Channel Numbering Channel number per SMPTE 272M (1
through 16) will be correctly shown on all
displays.
ANC Data Extraction Only audio data is extracted, other ANC
data is ignored.
Number of Channels Monitored for
Presence
16 channels are monitored for presence.
Audio Levels Bars display signals up to 0dBFS. Must not exceed max power specification
on analog outputs. Configure output
attenuation if necessary.

Appendix A: Specifications
WVR610A & WVR611A Waveform Rasterizers User Manual A- 19
Table A- 24: Analog audio inputs
Characteristic Performance requirement Reference information
Number of Channels Provides up to two sets of six channels of
professional, balanced, differential inputs,
12 channels total.
Input Connector Balanced, unterminated connector on rear
panel.
Use 37 pin, 2 row, DSUB connector.
Level Meter Accuracy over Frequency 0.5 dB from 20 Hz to 20 kHz 0 to --40 dBFS
sine-wave, Peak Ballistic mode. Except for
within 5 Hz of some submultiples of the
sampling frequency for 32, 44.1 and 48 kHz
input. 96 kHz inputs follows the 48 kHz
exceptions since it is not upsampled. For
example:
1/7th of rate --0.75 dB (for 48 kHz this is
6.857 kHz + 5 Hz)
1/6th of rate --0.8 dB (for 48 kHz this is
8 kHz + 5 Hz )
1/5th of rate --1.0 dB (for 48 kHz this is
9.6 kHz + 5 Hz)
1/4th of rate --1.2 dB (for 48 kHz this is
12 kHz + 5 Hz)
2/7th of rate --0.75 dB (for 48 kHz this is
13.714 kHz + 5 Hz)
1/3rd of rate --1.8 dB (for 48 kHz this is
16 kHz + 5 Hz)
4/10th of rate --1.0 dB (for 48 kHz this is
19.2 kHz + 5 Hz)
Worst case examples are shown, other
rates with minor exceptions exist. Note
that all exceptions are above 6 kHz so on
impact accuracy on harmonics of normal
audio content.
Cross Talk ≤80 dB, typically≤100 dB from 20 Hz to
20 kHz.
Defined as the displayed bar level in any
channel that results from a Full scale signal
on a different input pair in that input.
Maximum Input Levels +24 dBu referenced to level Meter Accura-
cy over Frequency above.
Must not exceed max power specification
on analog outputs. Configure output
attenuation if necessary.
Resolution Sampling, Nominal 24 bits at 48 kHz
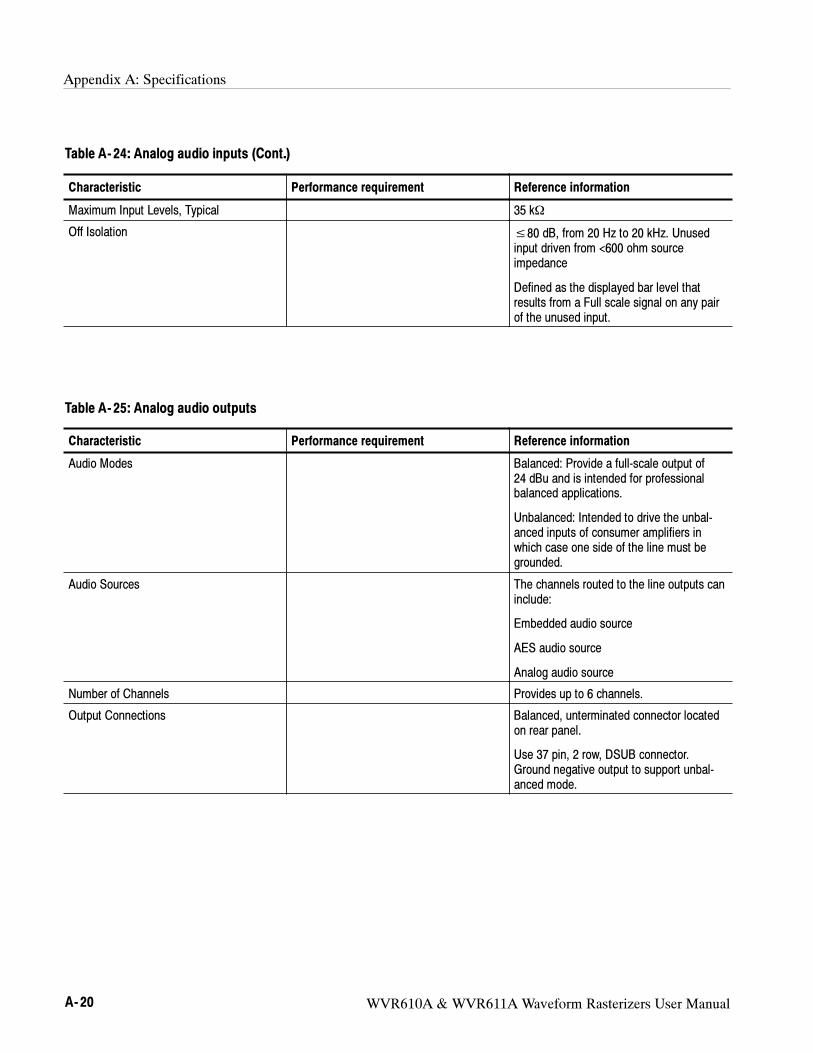
Appendix A: Specifications
A- 20 WVR610A & WVR611A Waveform Rasterizers User Manual
Table A- 24: Analog audio inputs (Cont.)
Characteristic Reference informationPerformance requirement
Maximum Input Levels, Typical 35 kΩ
Off Isolation ≤80 dB, from 20 Hz to 20 kHz. Unused
input driven from <600 ohm source
impedance
Defined as the displayed bar level that
results from a Full scale signal on any pair
of the unused input.
Table A- 25: Analog audio outputs
Characteristic Performance requirement Reference information
Audio Modes Balanced: Provide a full-scale output of
24 dBu and is intended for professional
balanced applications.
Unbalanced: Intended to drive the unbal-
anced inputs of consumer amplifiers in
which case one side of the line must be
grounded.
Audio Sources The channels routed to the line outputs can
include:
Embedded audio source
AES audio source
Analog audio source
Number of Channels Provides up to 6 channels.
Output Connections Balanced, unterminated connector located
on rear panel.
Use 37 pin, 2 row, DSUB connector.
Ground negative output to support unbal-
anced mode.
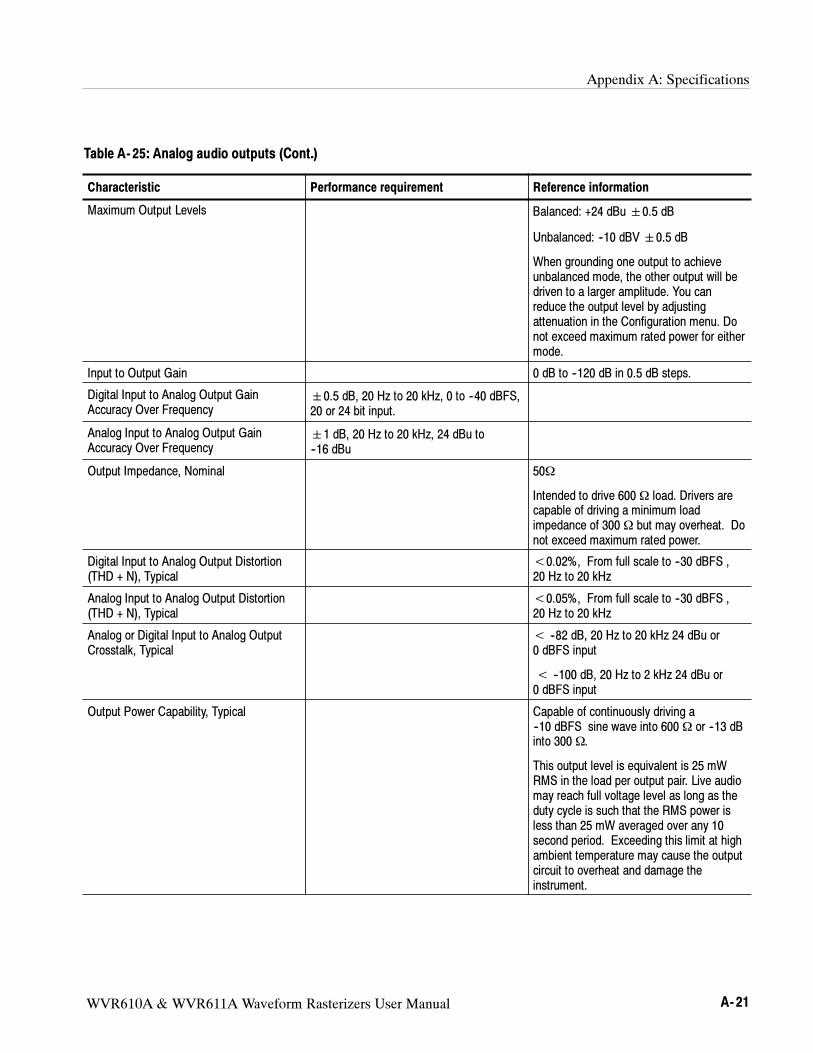
Appendix A: Specifications
WVR610A & WVR611A Waveform Rasterizers User Manual A- 21
Table A- 25: Analog audio outputs (Cont.)
Characteristic Reference informationPerformance requirement
Maximum Output Levels Balanced: +24 dBu0.5 dB
Unbalanced: --10 dBV0.5 dB
When grounding one output to achieve
unbalanced mode, the other output will be
driven to a larger amplitude. You can
reduce the output level by adjusting
attenuation in the Configuration menu. Do
not exceed maximum rated power for either
mode.
Input to Output Gain 0 dB to --120 dB in 0.5 dB steps.
Digital Input to Analog Output Gain
Accuracy Over Frequency
0.5 dB, 20 Hz to 20 kHz, 0 to --40 dBFS,
20 or 24 bit input.
Analog Input to Analog Output Gain
Accuracy Over Frequency
1 dB, 20 Hz to 20 kHz, 24 dBu to
--16 dBu
Output Impedance, Nominal 50Ω
Intended to drive 600Ω load. Drivers are
capable of driving a minimum load
impedance of 300Ω but may overheat. Do
not exceed maximum rated power.
Digital Input to Analog Output Distortion
(THD + N), Typical
<0.02%, From full scale to --30 dBFS ,
20 Hz to 20 kHz
Analog Input to Analog Output Distortion
(THD + N), Typical
<0.05%, From full scale to --30 dBFS ,
20 Hz to 20 kHz
Analog or Digital Input to Analog Output
Crosstalk, Typical
< --82 dB, 20 Hz to 20 kHz 24 dBu or
0 dBFS input
< --100 dB, 20 Hz to 2 kHz 24 dBu or
0 dBFS input
Output Power Capability, Typical Capable of continuously driving a
--10 dBFS sine wave into 600Ω or --13 dB
into 300 Ω.
This output level is equivalent is 25 mW
RMS in the load per output pair. Live audio
may reach full voltage level as long as the
duty cycle is such that the RMS power is
less than 25 mW averaged over any 10
second period. Exceeding this limit at high
ambient temperature may cause the output
circuit to overheat and damage the
instrument.
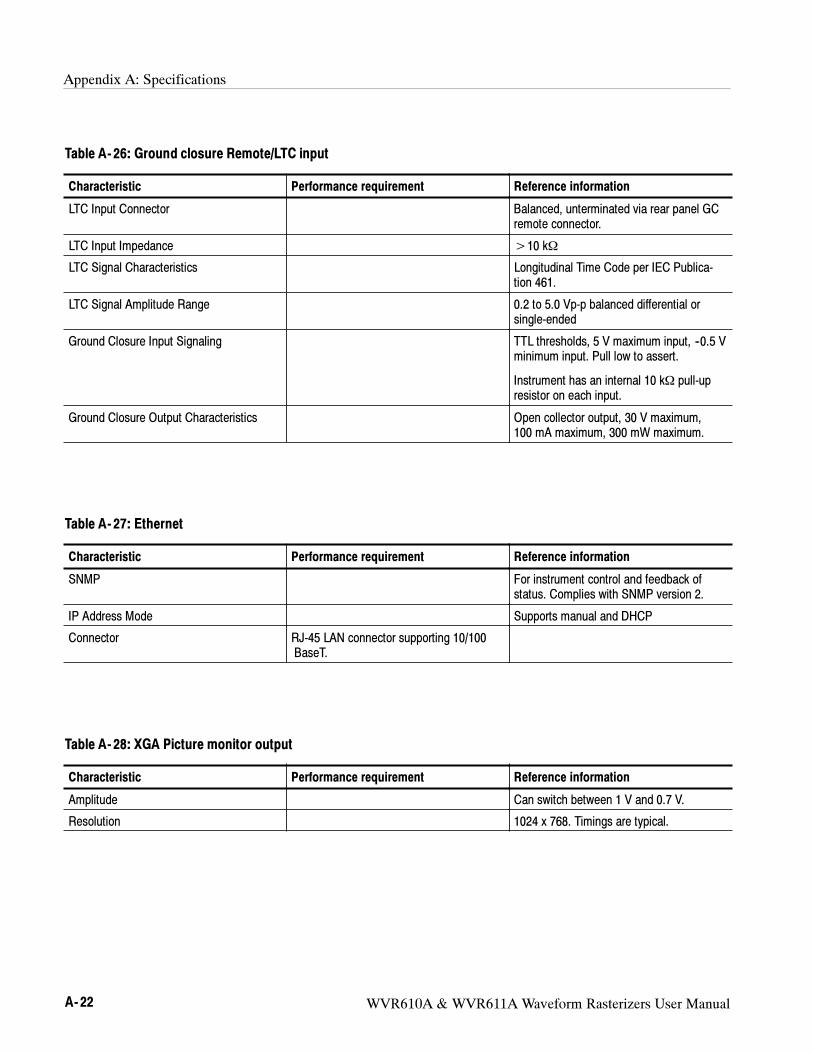
Appendix A: Specifications
A- 22 WVR610A & WVR611A Waveform Rasterizers User Manual
Table A- 26: Ground closure Remote/LTC input
Characteristic Performance requirement Reference information
LTC Input Connector Balanced, unterminated via rear panel GC
remote connector.
LTC Input Impedance >10 kΩ
LTC Signal Characteristics Longitudinal Time Code per IEC Publica-
tion 461.
LTC Signal Amplitude Range 0.2 to 5.0 Vp-p balanced differential or
single-ended
Ground Closure Input Signaling TTL thresholds, 5 V maximum input, --0.5 V
minimum input. Pull low to assert.
Instrument has an internal 10 kΩ pull-up
resistor on each input.
Ground Closure Output Characteristics Open collector output, 30 V maximum,
100 mA maximum, 300 mW maximum.
Table A- 27: Ethernet
Characteristic Performance requirement Reference information
SNMP For instrument control and feedback of
status. Complies with SNMP version 2.
IP Address Mode Supports manual and DHCP
Connector RJ-45 LAN connector supporting 10/100
BaseT.
Table A- 28: XGA Picture monitor output
Characteristic Performance requirement Reference information
Amplitude Can switch between 1 V and 0.7 V.
Resolution 1024 x 768. Timings are typical.
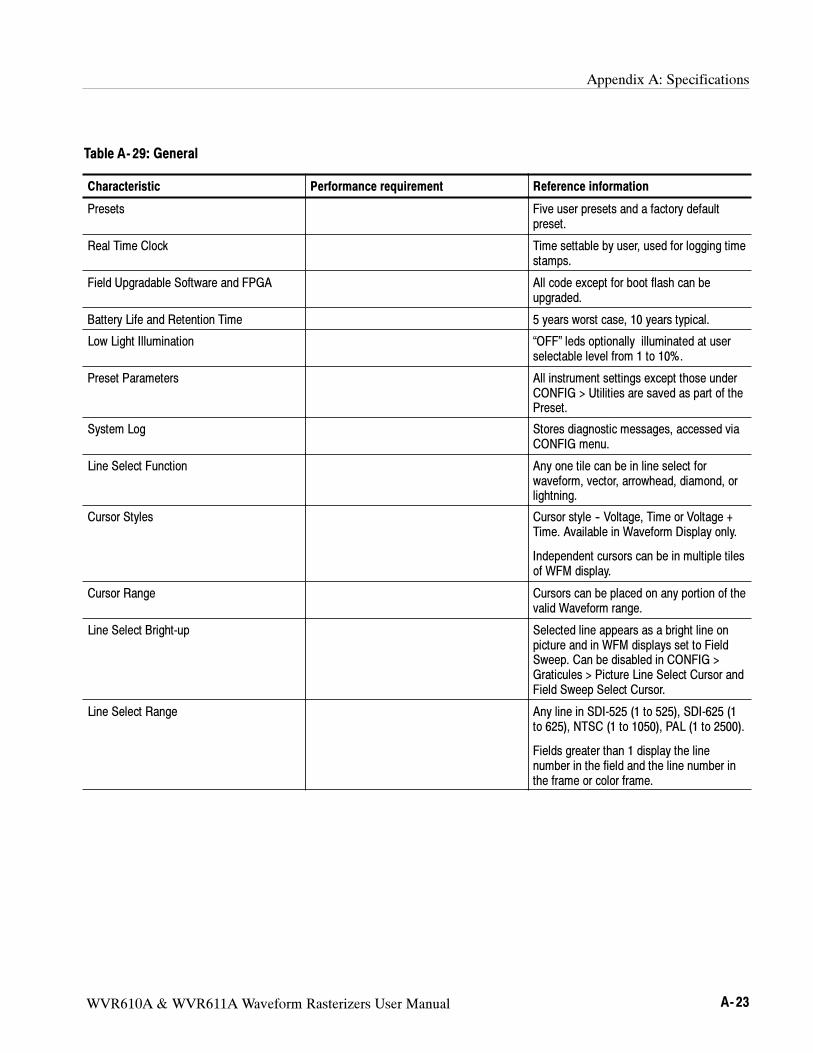
Appendix A: Specifications
WVR610A & WVR611A Waveform Rasterizers User Manual A- 23
Table A- 29: General
Characteristic Performance requirement Reference information
Presets Five user presets and a factory default
preset.
Real Time Clock Time settable by user, used for logging time
stamps.
Field Upgradable Software and FPGA All code except for boot flash can be
upgraded.
Battery Life and Retention Time 5 years worst case, 10 years typical.
Low Light Illumination “OFF” leds optionally illuminated at user
selectable level from 1 to 10%.
Preset Parameters All instrument settings except those under
CONFIG > Utilities are saved as part of the
Preset.
System Log Stores diagnostic messages, accessed via
CONFIG menu.
Line Select Function Any one tile can be in line select for
waveform, vector, arrowhead, diamond, or
lightning.
Cursor Styles Cursor style -- Voltage, Time or Voltage +
Time. Available in Waveform Display only.
Independent cursors can be in multiple tiles
of WFM display.
Cursor Range Cursors can be placed on any portion of the
valid Waveform range.
Line Select Bright-up Selected line appears as a bright line on
picture and in WFM displays set to Field
Sweep. Can be disabled in CONFIG >
Graticules > Picture Line Select Cursor and
Field Sweep Select Cursor.
Line Select Range Any line in SDI-525 (1 to 525), SDI-625 (1
to 625), NTSC (1 to 1050), PAL (1 to 2500).
Fields greater than 1 display the line
number in the field and the line number in
the frame or color frame.
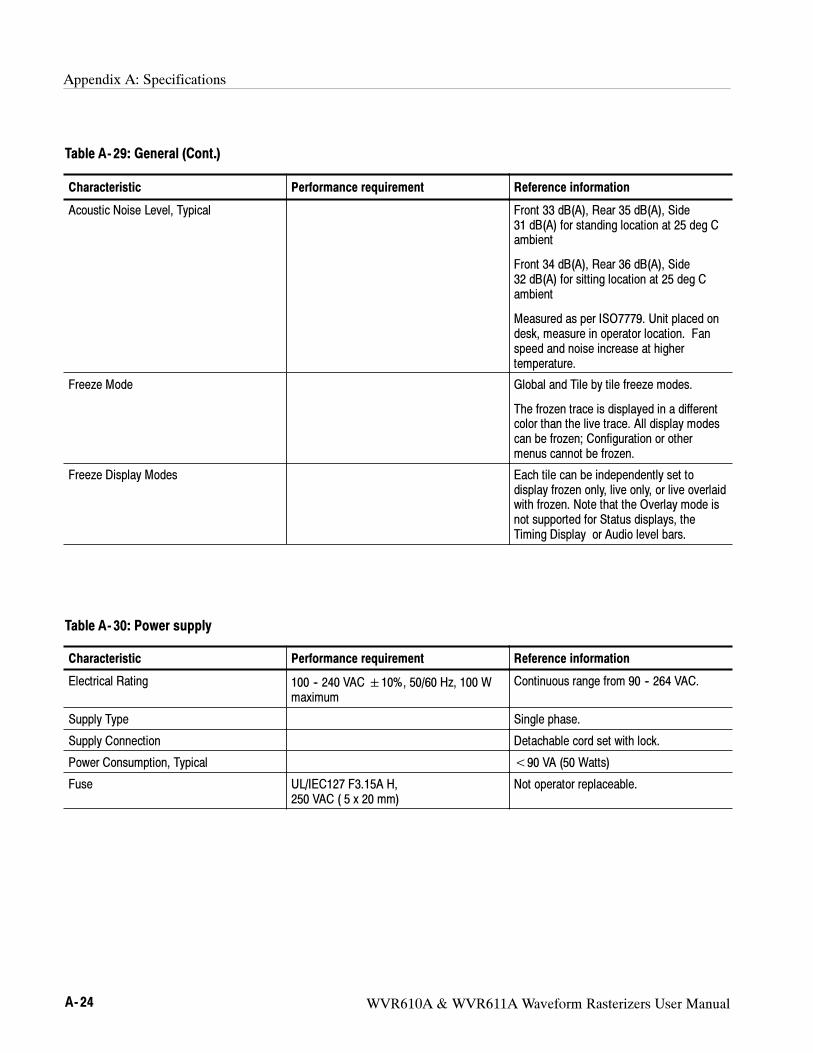
Appendix A: Specifications
A- 24 WVR610A & WVR611A Waveform Rasterizers User Manual
Table A- 29: General (Cont.)
Characteristic Reference informationPerformance requirement
Acoustic Noise Level, Typical Front 33 dB(A), Rear 35 dB(A), Side
31 dB(A) for standing location at 25 deg C
ambient
Front 34 dB(A), Rear 36 dB(A), Side
32 dB(A) for sitting location at 25 deg C
ambient
Measured as per ISO7779. Unit placed on
desk, measure in operator location. Fan
speed and noise increase at higher
temperature.
Freeze Mode Global and Tile by tile freeze modes.
The frozen trace is displayed in a different
color than the live trace. All display modes
can be frozen; Configuration or other
menus cannot be frozen.
Freeze Display Modes Each tile can be independently set to
display frozen only, live only, or live overlaid
with frozen. Note that the Overlay mode is
not supported for Status displays, the
Timing Display or Audio level bars.
Table A- 30: Power supply
Characteristic Performance requirement Reference information
Electrical Rating 100 -- 240 VAC10%, 50/60 Hz, 100 W
maximum
Continuous range from 90 -- 264 VAC.
Supply Type Single phase.
Supply Connection Detachable cord set with lock.
Power Consumption, Typical <90 VA (50 Watts)
Fuse UL/IEC127 F3.15A H,
250 VAC ( 5 x 20 mm)
Not operator replaceable.
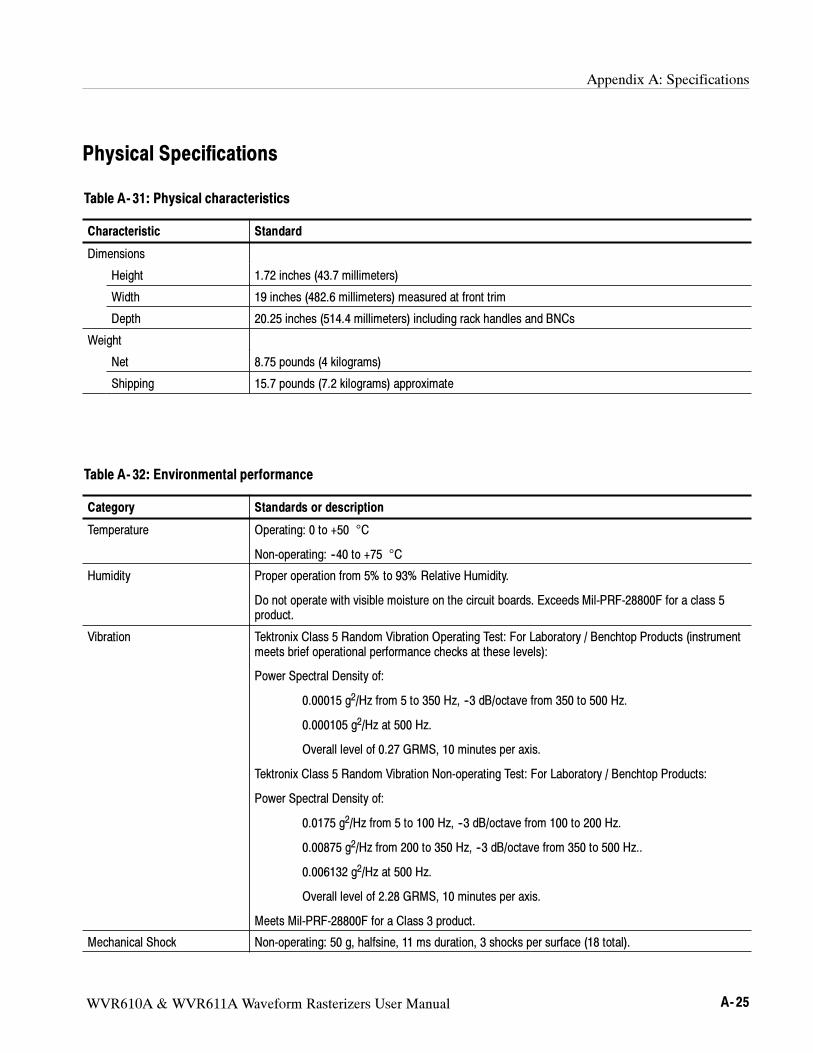
Appendix A: Specifications
WVR610A & WVR611A Waveform Rasterizers User Manual A- 25
Physical Specifications
Table A- 31: Physical characteristics
Characteristic Standard
Dimensions
Height 1.72 inches (43.7 millimeters)
Width 19 inches (482.6 millimeters) measured at front trim
Depth 20.25 inches (514.4 millimeters) including rack handles and BNCs
Weight
Net 8.75 pounds (4 kilograms)
Shipping 15.7 pounds (7.2 kilograms) approximate
Table A- 32: Environmental performance
Category Standards or description
Temperature Operating: 0 to +50 °C
Non-operating: --40 to +75 °C
Humidity Proper operation from 5% to 93% Relative Humidity.
Do not operate with visible moisture on the circuit boards. Exceeds Mil-PRF-28800F for a class 5
product.
Vibration Tektronix Class 5 Random Vibration Operating Test: For Laboratory / Benchtop Products (instrument
meets brief operational performance checks at these levels):
Power Spectral Density of:
0.00015 g2/Hz from 5 to 350 Hz, --3 dB/octave from 350 to 500 Hz.
0.000105 g2/Hz at 500 Hz.
Overall level of 0.27 GRMS, 10 minutes per axis.
Tektronix Class 5 Random Vibration Non-operating Test: For Laboratory / Benchtop Products:
Power Spectral Density of:
0.0175 g2/Hz from 5 to 100 Hz, --3 dB/octave from 100 to 200 Hz.
0.00875 g2/Hz from 200 to 350 Hz, --3 dB/octave from 350 to 500 Hz..
0.006132 g2/Hz at 500 Hz.
Overall level of 2.28 GRMS, 10 minutes per axis.
Meets Mil-PRF-28800F for a Class 3 product.
Mechanical Shock Non-operating: 50 g, halfsine, 11 ms duration, 3 shocks per surface (18 total).
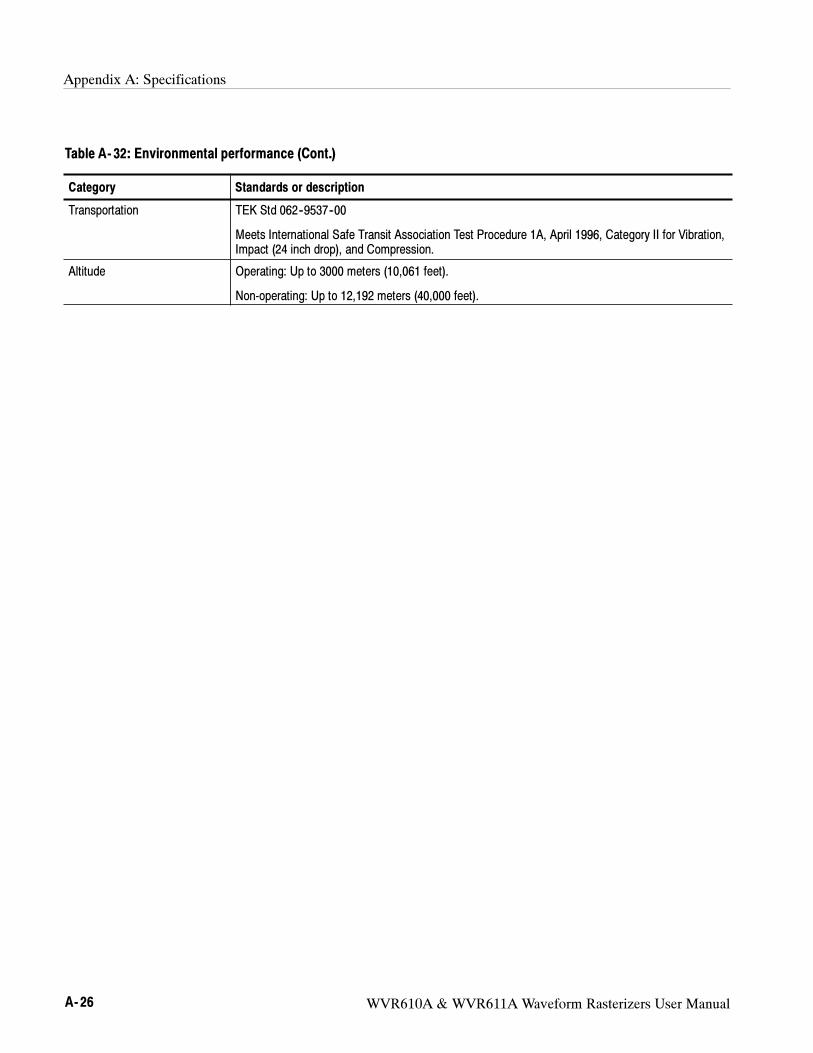
Appendix A: Specifications
A- 26 WVR610A & WVR611A Waveform Rasterizers User Manual
Table A- 32: Environmental performance (Cont.)
Category Standards or description
Transportation TEK Std 062--9537--00
Meets International Safe Transit Association Test Procedure 1A, April 1996, Category II for Vibration,
Impact (24 inch drop), and Compression.
Altitude Operating: Up to 3000 meters (10,061 feet).
Non-operating: Up to 12,192 meters (40,000 feet).
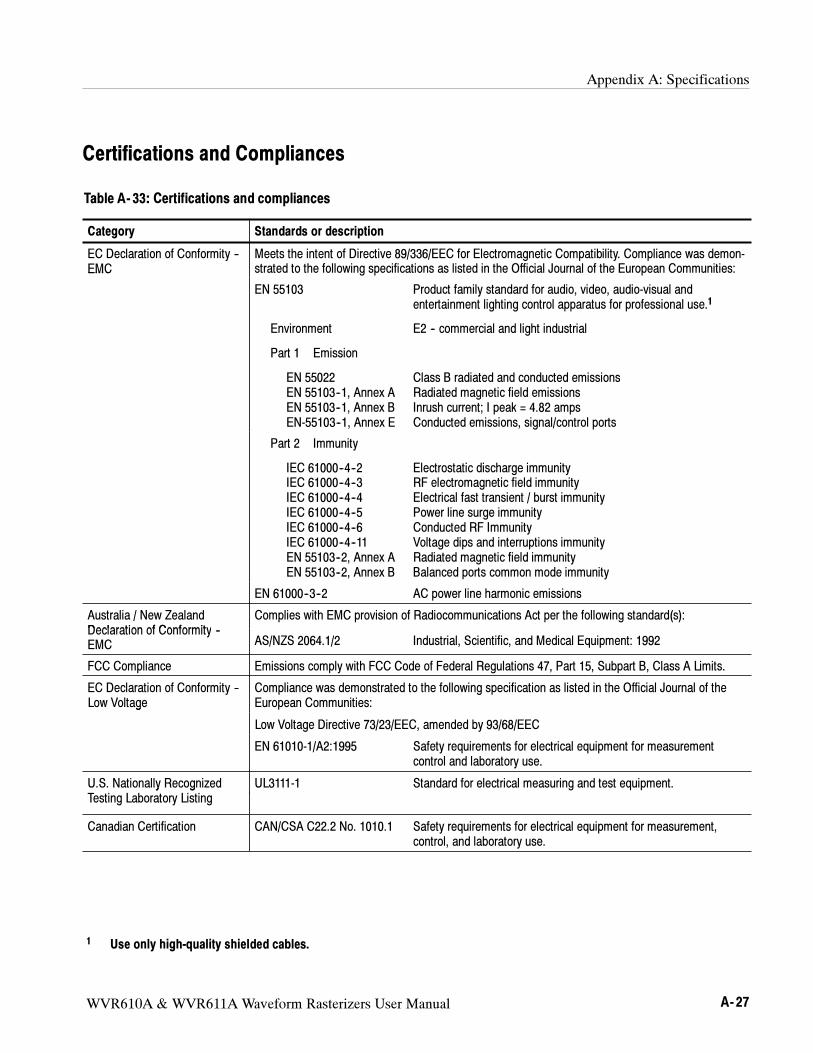
Appendix A: Specifications
WVR610A & WVR611A Waveform Rasterizers User Manual A- 27
Certifications and Compliances
Table A- 33: Certifications and compliances
Category Standards or description
EC Declaration of Conformity --
EMC
Meets the intent of Directive 89/336/EEC for Electromagnetic Compatibility. Compliance was demon-
strated to the following specifications as listed in the Official Journal of the European Communities:EMC
EN 55103 Product family standard for audio, video, audio-visual and
entertainment lighting control apparatus for professional use.1
Environment E2 -- commercial and light industrial
Part 1 Emission
EN 55022 Class B radiated and conducted emissions
EN 55103--1, Annex A Radiated magnetic field emissions
EN 55103--1, Annex B Inrush current; I peak = 4.82 amps
EN-55103--1, Annex E Conducted emissions, signal/control ports
Part 2 Immunity
IEC 61000--4--2 Electrostatic discharge immunity
IEC 61000--4--3 RF electromagnetic field immunity
IEC 61000--4--4 Electrical fast transient / burst immunity
IEC 61000--4--5 Power line surge immunity
IEC 61000--4--6 Conducted RF Immunity
IEC 61000--4--11 Voltage dips and interruptions immunity
EN 55103--2, Annex A Radiated magnetic field immunity
EN 55103--2, Annex B Balanced ports common mode immunity
EN 61000--3--2 AC power line harmonic emissions
Australia / New Zealand
Declaration of Conformity
Complies with EMC provision of Radiocommunications Act per the following standard(s):
Declaration of Conformity --
EMCAS/NZS 2064.1/2 Industrial, Scientific, and Medical Equipment: 1992
FCC Compliance Emissions comply with FCC Code of Federal Regulations 47, Part 15, Subpart B, Class A Limits.
EC Declaration of Conformity --
Low Voltage
Compliance was demonstrated to the following specification as listed in the Official Journal of the
European Communities:g
Low Voltage Directive 73/23/EEC, amended by 93/68/EEC
EN 61010-1/A2:1995 Safety requirements for electrical equipment for measurement
control and laboratory use.
U.S. Nationally Recognized UL3111-1 Standard for electrical measuring and test equipment.y g
Testing Laboratory Listing
Canadian Certification CAN/CSA C22.2 No. 1010.1 Safety requirements for electrical equipment for measurement,
control, and laboratory use.
1Use only high-quality shielded cables.
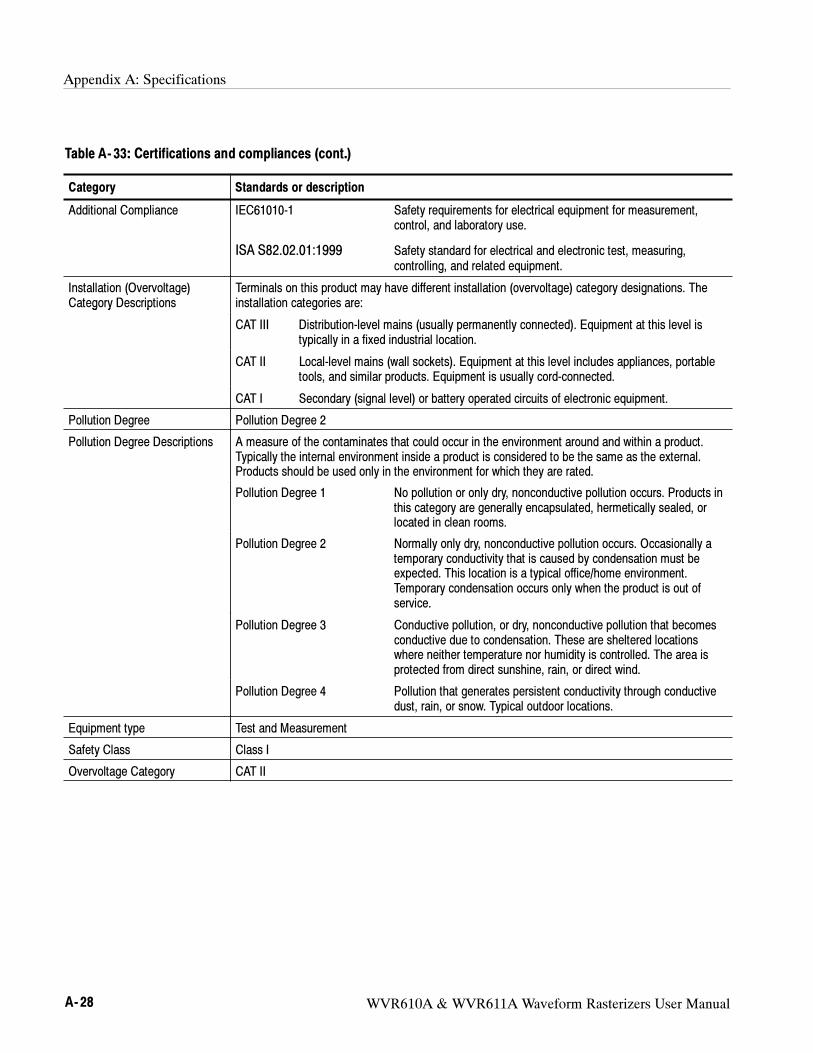
Appendix A: Specifications
A- 28 WVR610A & WVR611A Waveform Rasterizers User Manual
Table A- 33: Certifications and compliances (cont.)
Category Standards or description
Additional Compliance IEC61010-1 Safety requirements for electrical equipment for measurement,
control, and laboratory use.
ISA S82.02.01:1999 Safety standard for electrical and electronic test, measuring,
controlling, and related equipment.
Installation (Overvoltage)
Category Descriptions
Terminals on this product may have different installation (overvoltage) category designations. The
installation categories are:g y p
CAT III Distribution-level mains (usually permanently connected). Equipment at this level is
typically in a fixed industrial location.
CAT II Local-level mains (wall sockets). Equipment at this level includes appliances, portable
tools, and similar products. Equipment is usually cord-connected.
CAT I Secondary (signal level) or battery operated circuits of electronic equipment.
Pollution Degree Pollution Degree 2
Pollution Degree Descriptions A measure of the contaminates that could occur in the environment around and within a product.
Typically the internal environment inside a product is considered to be the same as the external.
Products should be used only in the environment for which they are rated.
Pollution Degree 1 No pollution or only dry, nonconductive pollution occurs. Products in
this category are generally encapsulated, hermetically sealed, or
located in clean rooms.
Pollution Degree 2 Normally only dry, nonconductive pollution occurs. Occasionally a
temporary conductivity that is caused by condensation must be
expected. This location is a typical office/home environment.
Temporary condensation occurs only when the product is out of
service.
Pollution Degree 3 Conductive pollution, or dry, nonconductive pollution that becomes
conductive due to condensation. These are sheltered locations
where neither temperature nor humidity is controlled. The area is
protected from direct sunshine, rain, or direct wind.
Pollution Degree 4 Pollution that generates persistent conductivity through conductive
dust, rain, or snow. Typical outdoor locations.
Equipment type Test and Measurement
Safety Class Class I
Overvoltage Category CAT II
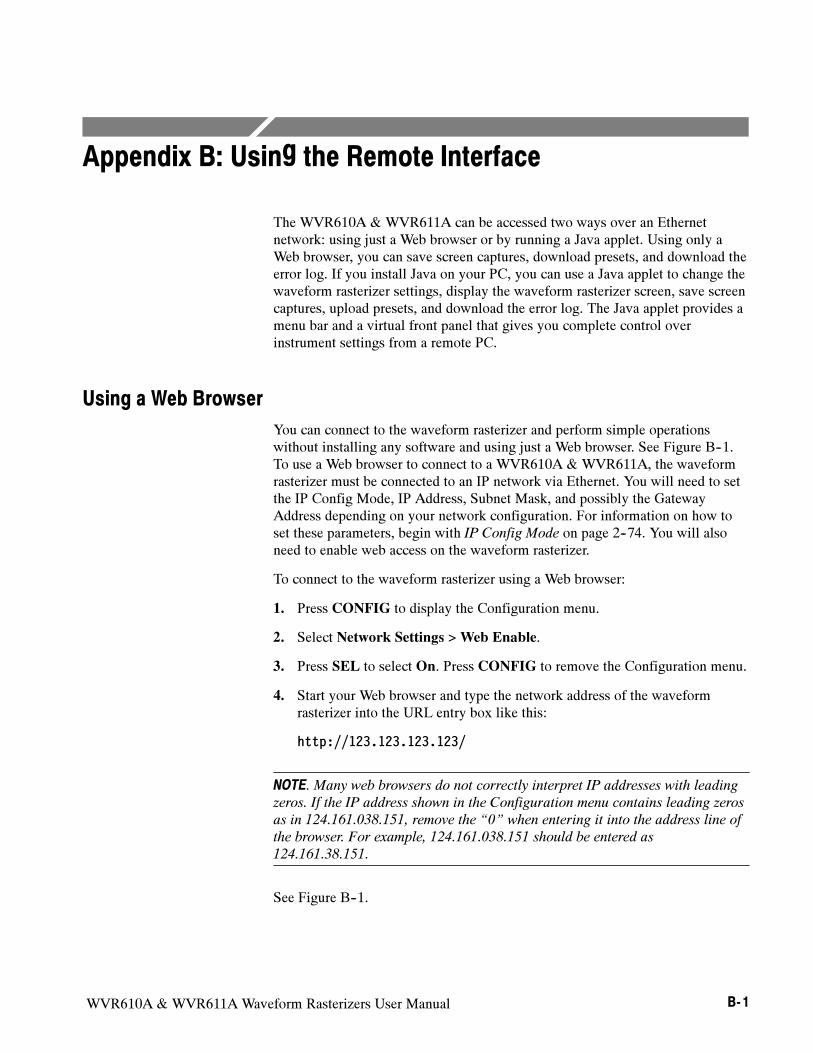
WVR610A & WVR611A Waveform Rasterizers User Manual B- 1
Appendix B: Using the Remote Interface
The WVR610A & WVR611A can be accessed two ways over an Ethernet
network: using just a Web browser or by running a Java applet. Using only a
Web browser, you can save screen captures, download presets, and download the
error log. If you install Java on your PC, you can use a Java applet to change the
waveform rasterizer settings, display the waveform rasterizer screen, save screen
captures, upload presets, and download the error log. The Java applet provides a
menu bar and a virtual front panel that gives you complete control over
instrument settings from a remote PC.
Using a Web Browser
You can connect to the waveform rasterizer and perform simple operations
without installing any software and using just a Web browser. See Figure B--1.
To use a Web browser to connect to a WVR610A & WVR611A, the waveform
rasterizer must be connected to an IP network via Ethernet. You will need to set
the IP Config Mode, IP Address, Subnet Mask, and possibly the Gateway
Address depending on your network configuration. For information on how to
set these parameters, begin with IP Config Mode on page 2--74. You will also
need to enable web access on the waveform rasterizer.
To connect to the waveform rasterizer using a Web browser:
1. Press CONFIG to display the Configuration menu.
2. Select Network Settings >Web Enable.
3. Press SEL to select On. Press CONFIG to remove the Configuration menu.
4. Start your Web browser and type the network address of the waveform
rasterizer into the URL entry box like this:
http://123.123.123.123/
NOTE. Many web browsers do not correctly interpret IP addresses with leading
zeros. If the IP address shown in the Configuration menu contains leading zeros
as in 124.161.038.151, remove the “0” when entering it into the address line of
the browser. For example, 124.161.038.151 should be entered as
124.161.38.151.
See Figure B--1.
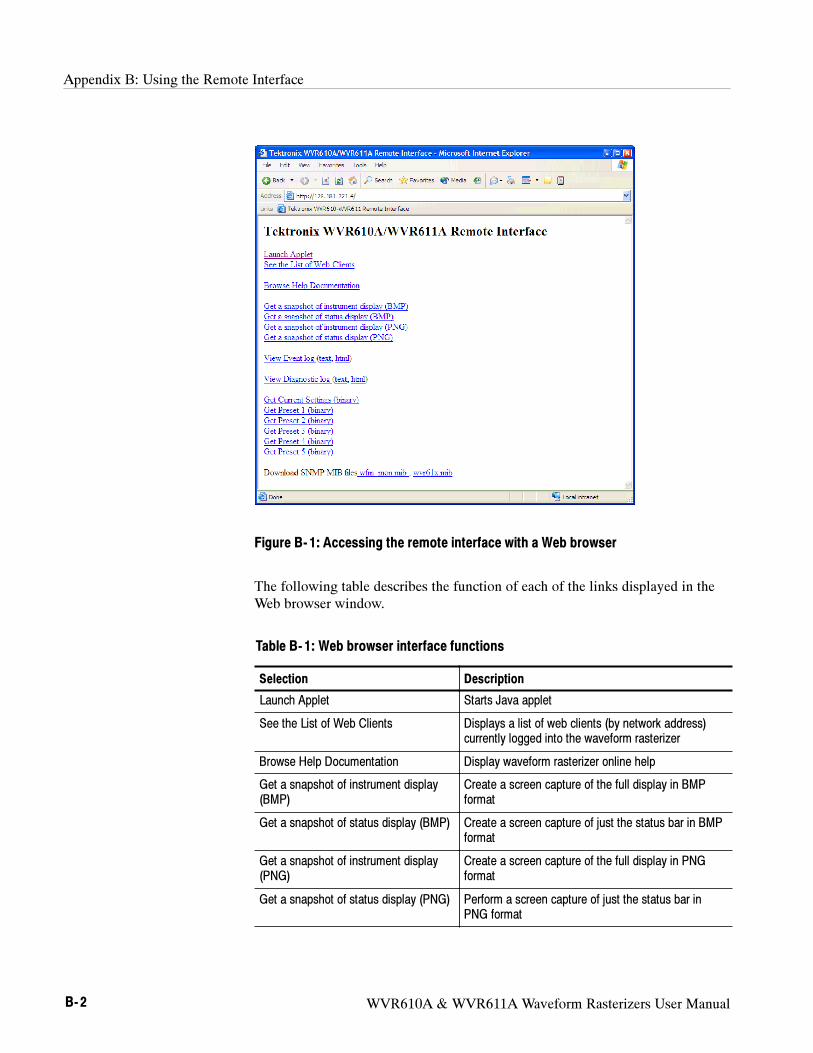
Appendix B: Using the Remote Interface
B- 2 WVR610A & WVR611A Waveform Rasterizers User Manual
Figure B- 1: Accessing the remote interface with a Web browser
The following table describes the function of each of the links displayed in the
Web browser window.
Table B- 1: Web browser interface functions
Selection Description
Launch Applet Starts Java applet
See the List of Web Clients Displays a list of web clients (by network address)
currently logged into the waveform rasterizer
Browse Help Documentation Display waveform rasterizer online help
Get a snapshot of instrument display
(BMP)
Create a screen capture of the full display in BMP
format
Get a snapshot of status display (BMP) Create a screen capture of just the status bar in BMP
format
Get a snapshot of instrument display
(PNG)
Create a screen capture of the full display in PNG
format
Get a snapshot of status display (PNG) Perform a screen capture of just the status bar in
PNG format
Appendix B: Using the Remote Interface
WVR610A & WVR611A Waveform Rasterizers User Manual B- 3
Table B- 1: Web browser interface functions (Cont.)
Selection Description
View Event Log Download and display the Error Log as tab-delimited
text or an HTML table.
View Diagnostic Log Download and display the Diagnostic Log as
tab-delimited text or an HTML table
Get Current Settings (binary) Download instrument settings to a file in binary format
Get Preset 1 (binary) Download Preset 1 to a file in binary format
Get Preset 2 (binary) Download Preset 2 to a file in binary format
Get Preset 3 (binary) Download Preset 3 to a file in binary format
Get Preset 4 (binary) Download Preset 4 to a file in binary format
Get Preset 5 (binary) Download Preset 5 to a file in binary format
Download SNMP MIB files
wfm_mon.mib, wvr61x.mib
Download the each of the MIB files in ASCII format.
Using the Java Applet
The Java applet version of the Remote Interface provides menus and a virtual
front panel for the WVR610A & WVR611A. Using the Java applet, you can
change any setting on the waveform rasterizer. You can download and upload
Presets. You can also view waveform rasterizer display and have it refreshed
automatically. Note that the Web interface operation is optimized for screen
resolutions of 1024 x 768 or higher. Operation on computers with lower
resolution has not been verified.
The Java applet is only supported for Microsoft Internet Explorer 5.0 or later
running on a Windows PC. The Java applet window does not resize correctly
when run in Netscape 6.0 (all platforms) or Safari 1.0 on Mac OS X. The web
applet is not supported in Netscape versions prior to version 6.0 and/or any
version of Internet Explorer on Mac OS X because they do not support Java
version 1.4.1.
Alternatively you can use the Java application which is a stand-alone application
that provides all of the features of the Java applet. It can be run on any platform
that supports Java version 1.4.1 or later, including Windows NT/2000/XP, Linux,
Unix, and Mac OS X. The Java application, unlike the Java applet, does not run
within a web browser and, thus, is not subject to the various browser limitations.
You can download the Java application package from the Tektronix web site.
Look forWVR600 Remote Software Package in the download section.
Browser Requirements
Appendix B: Using the Remote Interface
B- 4 WVR610A & WVR611A Waveform Rasterizers User Manual
To use the Remote Interface Java applet, you must install the Java Runtime
Environment.
To run the Remote Interface Java applet, you must have Version 1.41 (or later) of
the Java Run-Time Environment (JRE) from Sun Microsystems installed on your
PC. To download the JRE (Java Run-Time Environment) plug-in from Sun
Microsystems, go to the following URL and download the appropriate code:
http://java.sun.com/j2se/1.4/
Once you download the executable file, launch the installation software and
follow the instructions.
When you launch the Java applet, it is downloaded from the waveform rasterizer
and launched. There is no software installation required to use the applet (other
than the Java Run-Time Environment noted previously).
To launch the Java applet:
1. Launch your Web browser and type the network address of the waveform
rasterizer into the URL entry box like this:
http://123.123.123.123/
NOTE. Many web browsers do not correctly interpret IP addresses with leading
zeros. If the IP address shown in the Configuration menu contains leading zeros
as in 124.161.038.151, remove the “0” when entering it into the address line of
the browser. For example, 124.161.038.151 should be entered as
124.161.38.151.
Once you type the network address of the waveform rasterizer, press Return
to access the Remote Interface.
2. Once the Remote Interface appears, select Launch Applet.
The Java applet will be launched and the screen shown in Figure B--2 will
appear.
Installing Java
Launching the Applet
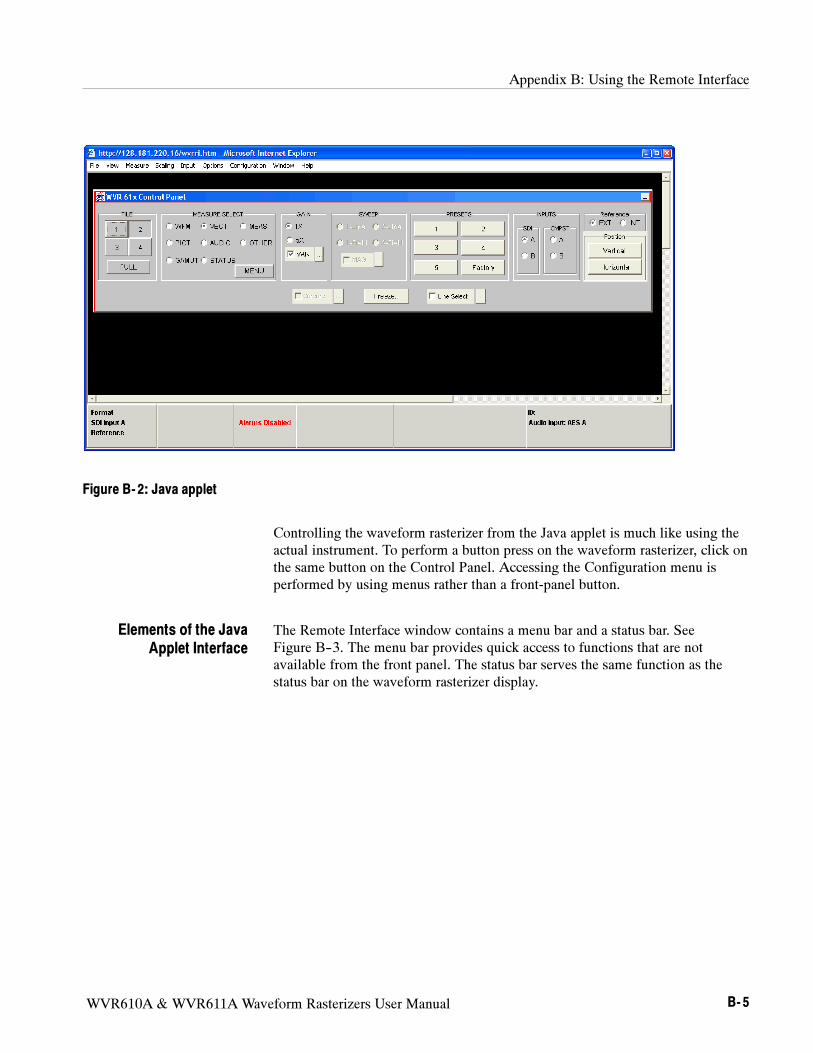
Appendix B: Using the Remote Interface
WVR610A & WVR611A Waveform Rasterizers User Manual B- 5
Figure B- 2: Java applet
Controlling the waveform rasterizer from the Java applet is much like using the
actual instrument. To perform a button press on the waveform rasterizer, click on
the same button on the Control Panel. Accessing the Configuration menu is
performed by using menus rather than a front-panel button.
The Remote Interface window contains a menu bar and a status bar. See
Figure B--3. The menu bar provides quick access to functions that are not
available from the front panel. The status bar serves the same function as the
status bar on the waveform rasterizer display.
Elements of the Java
Applet Interface
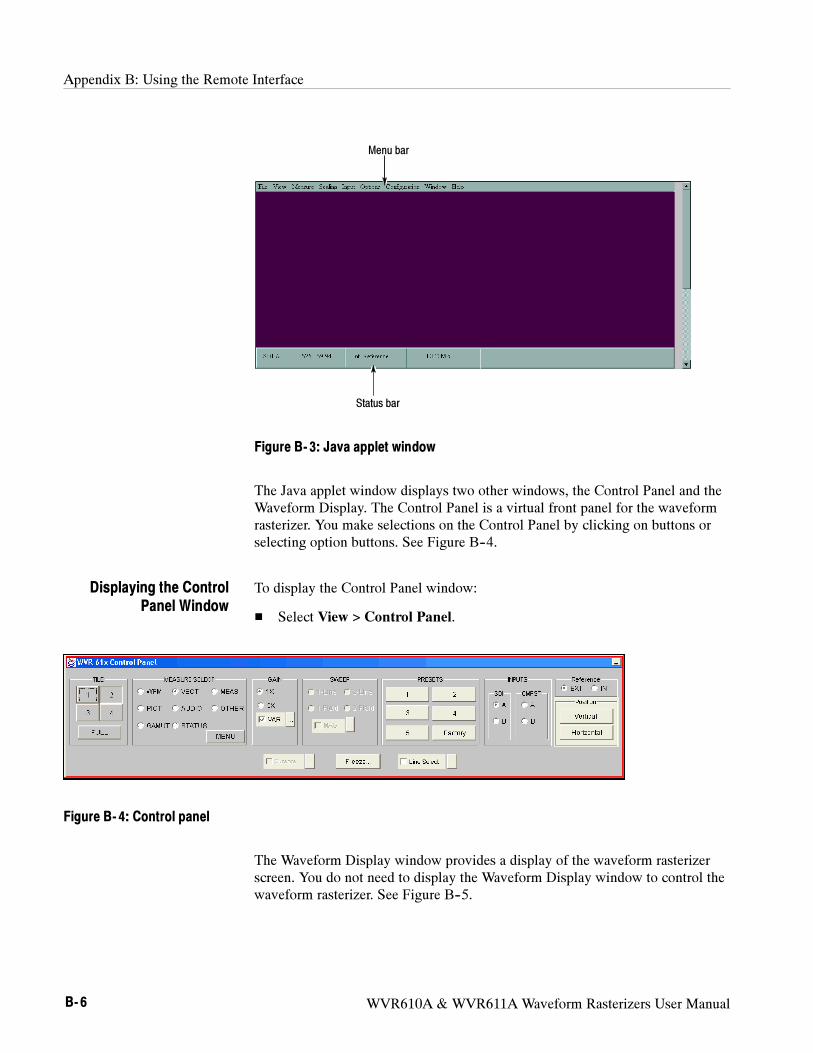
Appendix B: Using the Remote Interface
B- 6 WVR610A & WVR611A Waveform Rasterizers User Manual
Status bar
Menu bar
Figure B- 3: Java applet window
The Java applet window displays two other windows, the Control Panel and the
Waveform Display. The Control Panel is a virtual front panel for the waveform
rasterizer. You make selections on the Control Panel by clicking on buttons or
selecting option buttons. See Figure B--4.
To display the Control Panel window:
Select View > Control Panel.
Figure B- 4: Control panel
The Waveform Display window provides a display of the waveform rasterizer
screen. You do not need to display the Waveform Display window to control the
waveform rasterizer. See Figure B--5.
Displaying the Control
Panel Window
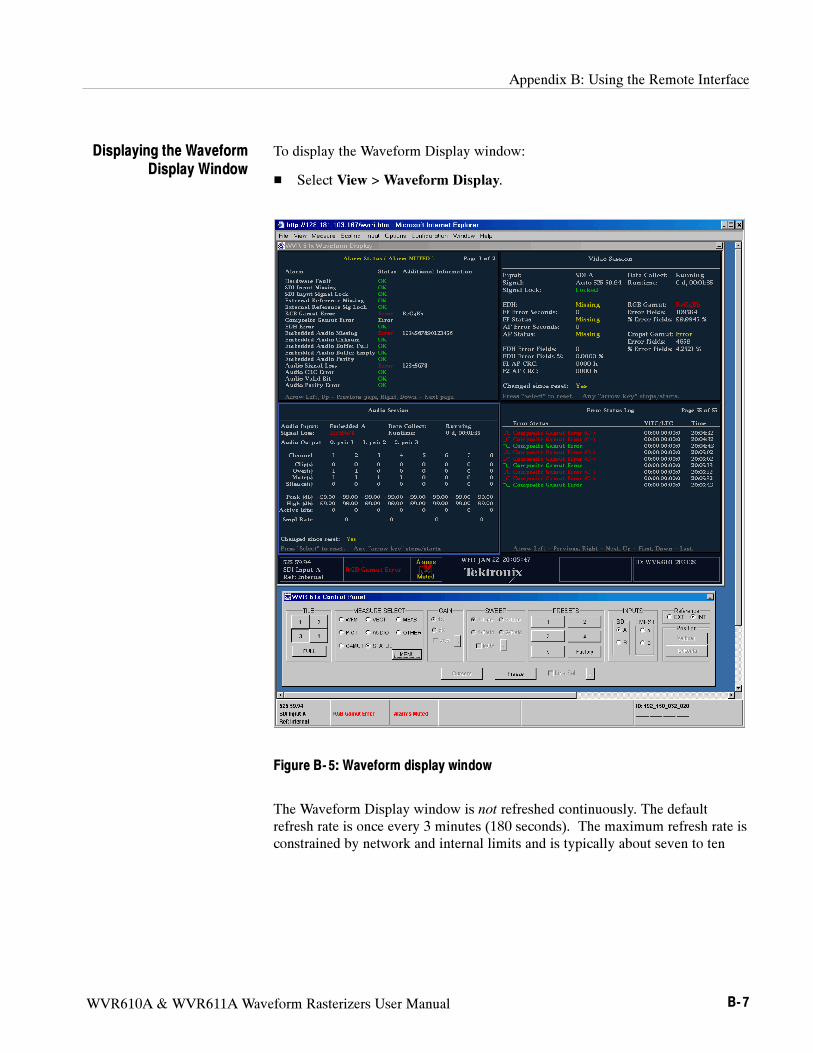
Appendix B: Using the Remote Interface
WVR610A & WVR611A Waveform Rasterizers User Manual B- 7
To display the Waveform Display window:
Select View >Waveform Display.
Figure B- 5: Waveform display window
The Waveform Display window is not refreshed continuously. The default
refresh rate is once every 3 minutes (180 seconds). The maximum refresh rate is
constrained by network and internal limits and is typically about seven to ten
Displaying the Waveform
Display Window
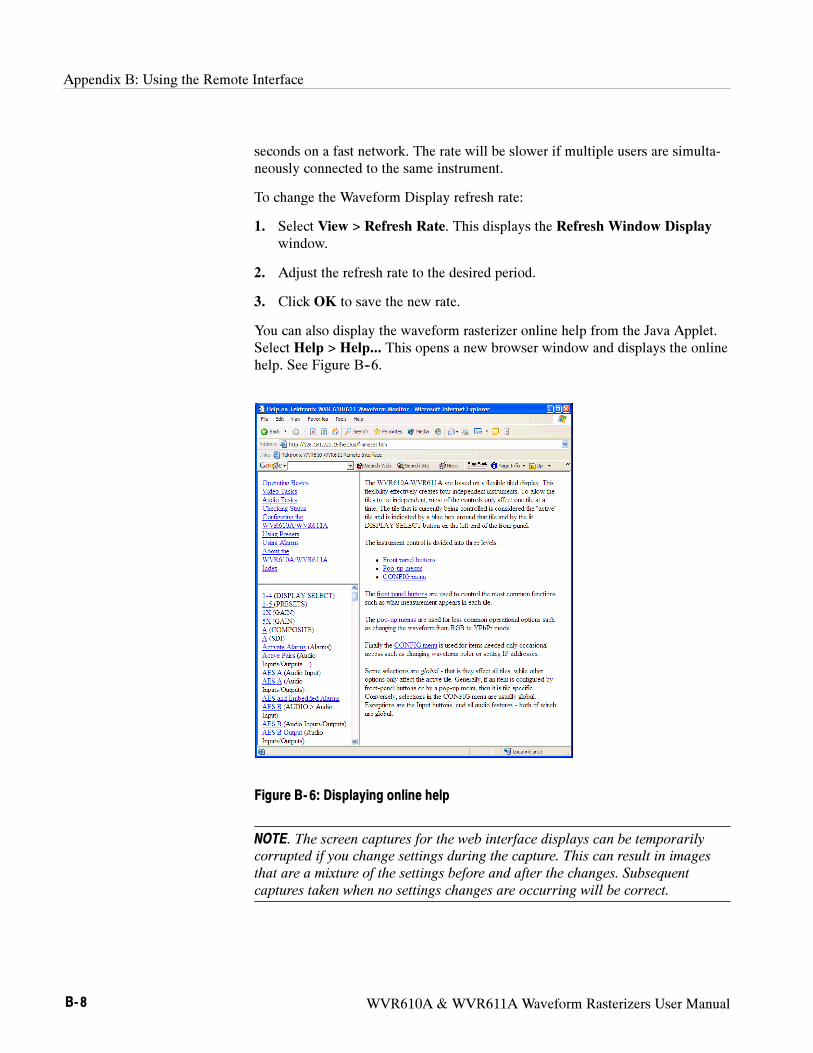
Appendix B: Using the Remote Interface
B- 8 WVR610A & WVR611A Waveform Rasterizers User Manual
seconds on a fast network. The rate will be slower if multiple users are simulta-
neously connected to the same instrument.
To change the Waveform Display refresh rate:
1. Select View > Refresh Rate. This displays the Refresh Window Display
window.
2. Adjust the refresh rate to the desired period.
3. Click OK to save the new rate.
You can also display the waveform rasterizer online help from the Java Applet.
Select Help > Help... This opens a new browser window and displays the online
help. See Figure B--6.
Figure B- 6: Displaying online help
NOTE. The screen captures for the web interface displays can be temporarily
corrupted if you change settings during the capture. This can result in images
that are a mixture of the settings before and after the changes. Subsequent
captures taken when no settings changes are occurring will be correct.
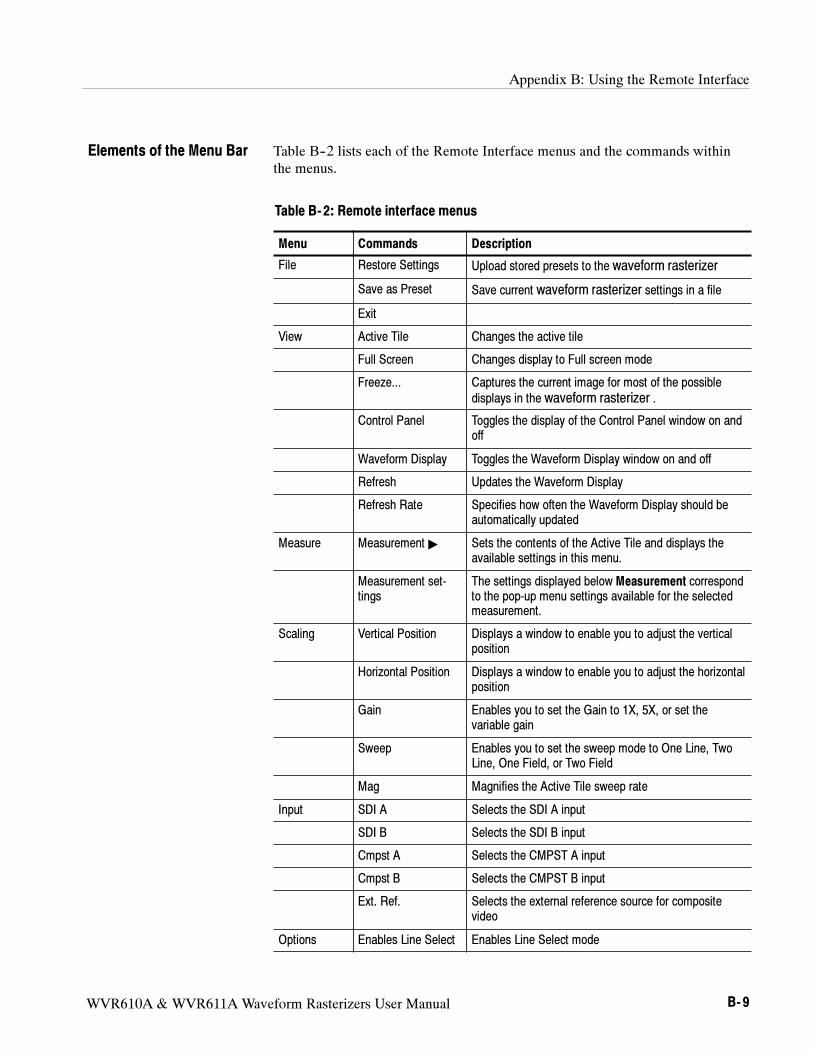
Appendix B: Using the Remote Interface
WVR610A & WVR611A Waveform Rasterizers User Manual B- 9
Table B--2 lists each of the Remote Interface menus and the commands within
the menus.
Table B- 2: Remote interface menus
Menu Commands Description
File Restore Settings Upload stored presets to the waveform rasterizer
Save as Preset Save current waveform rasterizer settings in a file
Exit
View Active Tile Changes the active tile
Full Screen Changes display to Full screen mode
Freeze... Captures the current image for most of the possible
displays in the waveform rasterizer .
Control Panel Toggles the display of the Control Panel window on and
off
Waveform Display Toggles the Waveform Display window on and off
Refresh Updates the Waveform Display
Refresh Rate Specifies how often the Waveform Display should be
automatically updated
Measure Measurement Sets the contents of the Active Tile and displays the
available settings in this menu.
Measurement set-
tings
The settings displayed below Measurement correspond
to the pop-up menu settings available for the selected
measurement.
Scaling Vertical Position Displays a window to enable you to adjust the vertical
position
Horizontal Position Displays a window to enable you to adjust the horizontal
position
Gain Enables you to set the Gain to 1X, 5X, or set the
variable gain
Sweep Enables you to set the sweep mode to One Line, Two
Line, One Field, or Two Field
Mag Magnifies the Active Tile sweep rate
Input SDI A Selects the SDI A input
SDI B Selects the SDI B input
Cmpst A Selects the CMPST A input
Cmpst B Selects the CMPST B input
Ext. Ref. Selects the external reference source for composite
video
Options Enables Line Select Enables Line Select mode
Elements of the Menu Bar
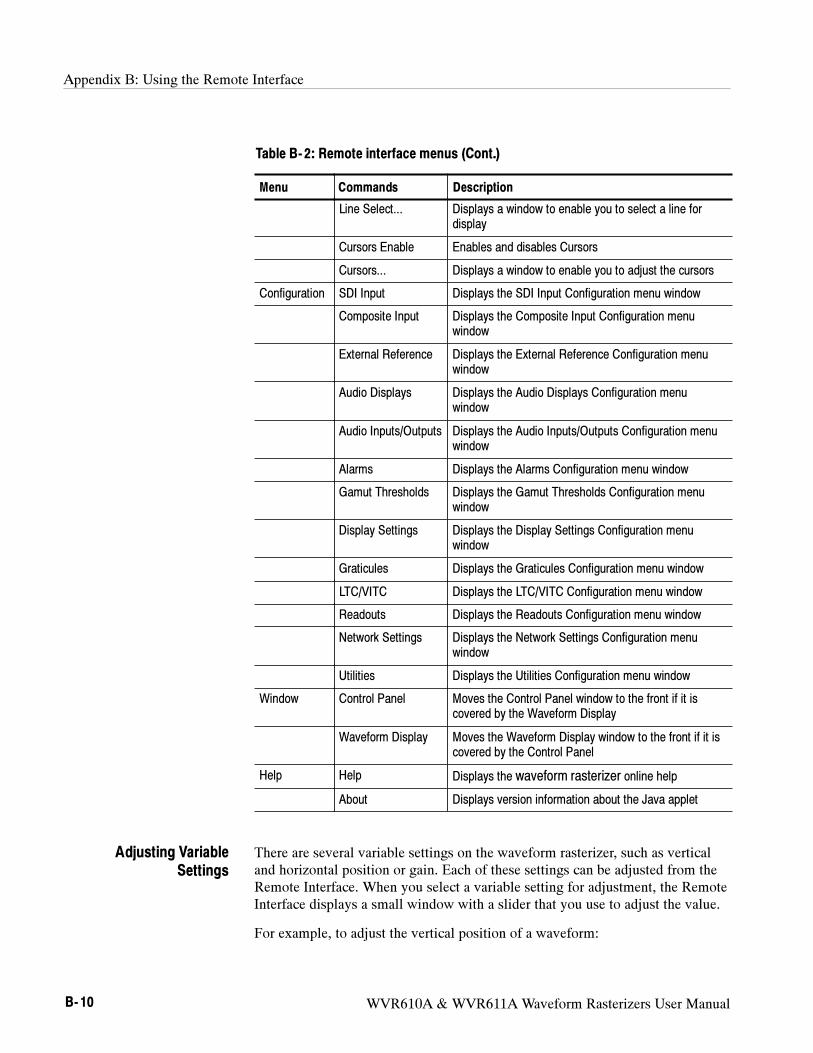
Appendix B: Using the Remote Interface
B- 10 WVR610A & WVR611A Waveform Rasterizers User Manual
Table B- 2: Remote interface menus (Cont.)
Menu DescriptionCommands
Line Select... Displays a window to enable you to select a line for
display
Cursors Enable Enables and disables Cursors
Cursors... Displays a window to enable you to adjust the cursors
Configuration SDI Input Displays the SDI Input Configuration menu window
Composite Input Displays the Composite Input Configuration menu
window
External Reference Displays the External Reference Configuration menu
window
Audio Displays Displays the Audio Displays Configuration menu
window
Audio Inputs/Outputs Displays the Audio Inputs/Outputs Configuration menu
window
Alarms Displays the Alarms Configuration menu window
Gamut Thresholds Displays the Gamut Thresholds Configuration menu
window
Display Settings Displays the Display Settings Configuration menu
window
Graticules Displays the Graticules Configuration menu window
LTC/VITC Displays the LTC/VITC Configuration menu window
Readouts Displays the Readouts Configuration menu window
Network Settings Displays the Network Settings Configuration menu
window
Utilities Displays the Utilities Configuration menu window
Window Control Panel Moves the Control Panel window to the front if it is
covered by the Waveform Display
Waveform Display Moves the Waveform Display window to the front if it is
covered by the Control Panel
Help Help Displays the waveform rasterizer online help
About Displays version information about the Java applet
There are several variable settings on the waveform rasterizer, such as vertical
and horizontal position or gain. Each of these settings can be adjusted from the
Remote Interface. When you select a variable setting for adjustment, the Remote
Interface displays a small window with a slider that you use to adjust the value.
For example, to adjust the vertical position of a waveform:
Adjusting Variable
Settings
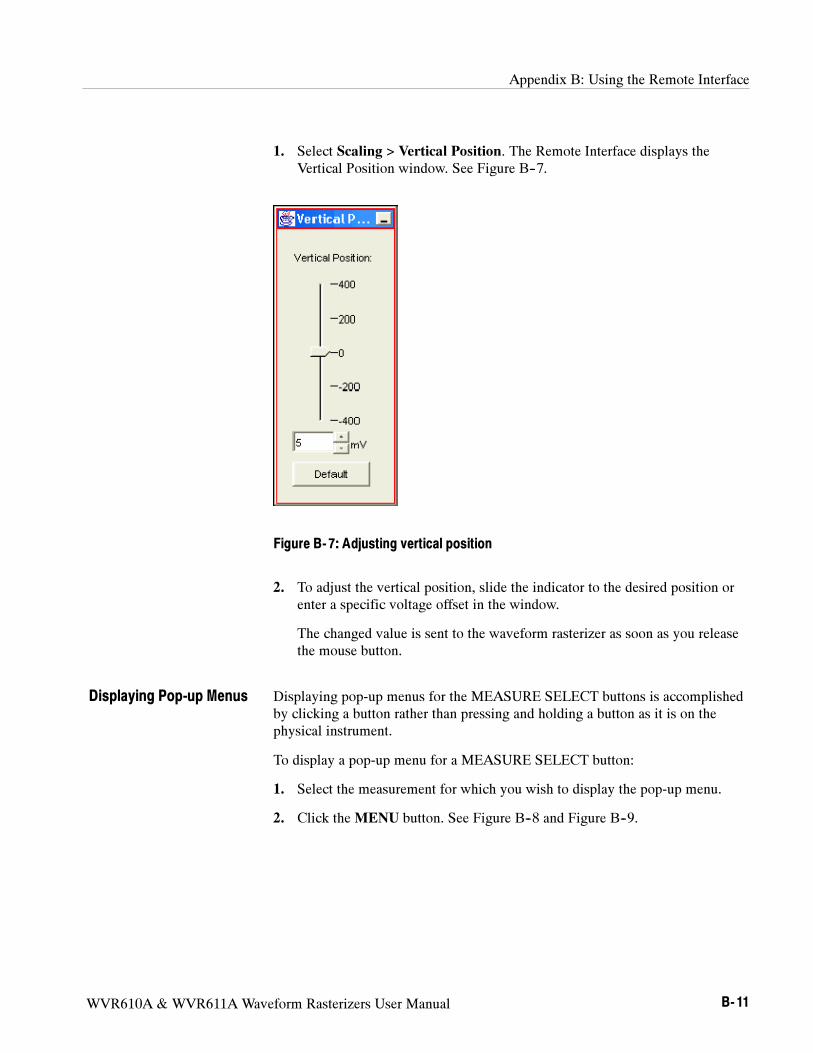
Appendix B: Using the Remote Interface
WVR610A & WVR611A Waveform Rasterizers User Manual B- 11
1. Select Scaling > Vertical Position. The Remote Interface displays the
Vertical Position window. See Figure B--7.
Figure B- 7: Adjusting vertical position
2. To adjust the vertical position, slide the indicator to the desired position or
enter a specific voltage offset in the window.
The changed value is sent to the waveform rasterizer as soon as you release
the mouse button.
Displaying pop-up menus for the MEASURE SELECT buttons is accomplished
by clicking a button rather than pressing and holding a button as it is on the
physical instrument.
To display a pop-up menu for a MEASURE SELECT button:
1. Select the measurement for which you wish to display the pop-up menu.
2. Click theMENU button. See Figure B--8 and Figure B--9.
Displaying Pop-up Menus
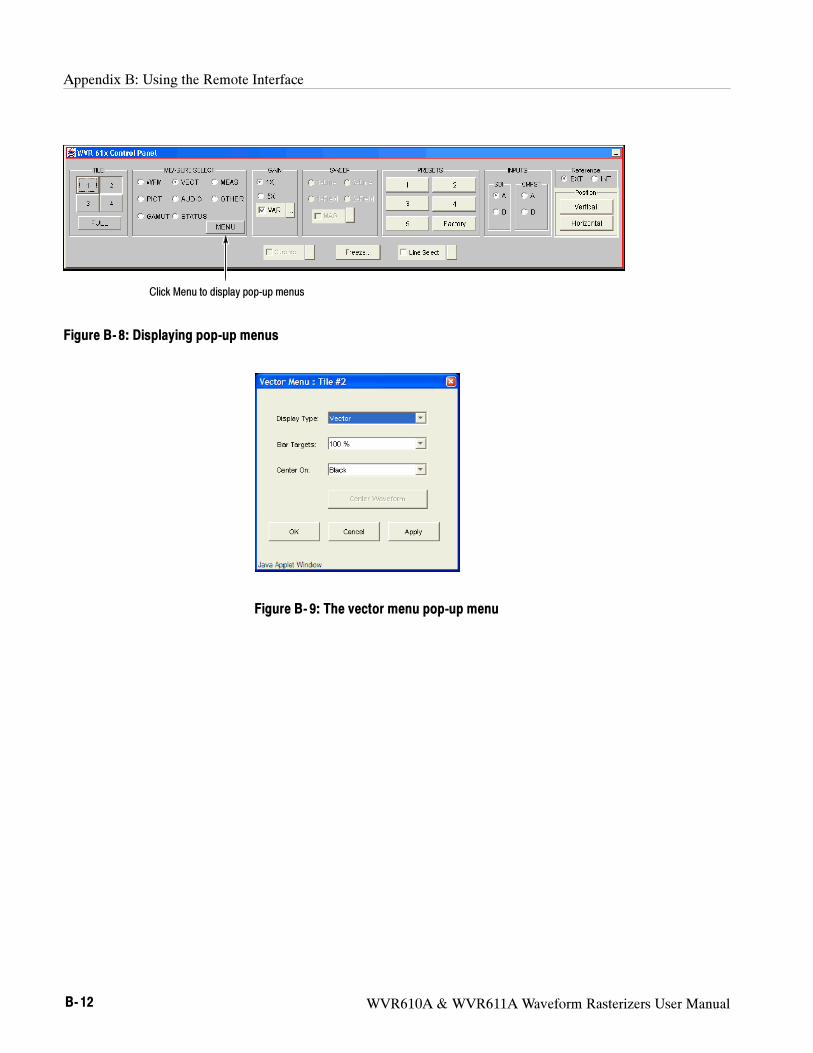
Appendix B: Using the Remote Interface
B- 12 WVR610A & WVR611A Waveform Rasterizers User Manual
Click Menu to display pop-up menus
Figure B- 8: Displaying pop-up menus
Figure B- 9: The vector menu pop-up menu
WVR610A & WVR611A Waveform Rasterizers User Manual C- 1
Appendix C: WVR610A & WVR611A Waveform Rasterizers
MIB
The WVR610A & WVR611A provide remote instrument control using SNMP
over a TCP/IP network. The WVR610A & WVR611A utilize two MIBs, one is
specific to the WVR610A & WVR611A and the second is a “general purpose”
MIB that is shared by several Tektronix video waveform monitors. Both MIBs
can be downloaded from the Tektronix web site: www.tektronix.com or from the
instrument using the Remote Interface (see Appendix B).
This chapter describes the elements of the two MIBs used by the WVR610A &
WVR611A. The two MIBs are:
wvr61x.mib is specific to the WVR610A & WVR611A
wfm_mon.mib is common to Tektronix video waveform monitors.
SNMP Command and Web Interface Interaction
The web interface might not always display the current state of the instrument
under certain conditions. If the web interface is connected to the instrument
through a slow network interface, the process of sending data to the web
waveform display can delay the reporting of instrument state in the web
interface. Turn off or decrease the frequency of the display refresh to improve
performance of the web interface control and reporting. Sustained high rates of
SNMP commands can also cause the web interface to delay reporting instrument
state. The web application will usually recover within a few seconds after a
pause in the SNMP command stream. In extreme circumstances of high-speed
SNMP command sequences, the web application can run out of memory and
lock up. In that event, stop and restart the web application to recover.
wvr61x MIB Definitions
The following imports are included:
Module-Identity, Object-Type, enterprises from SNMPv2-SMI
DisplayString from SNMPv2-TC
Module-Compliance, Object Groups from SNMPv2-Conf
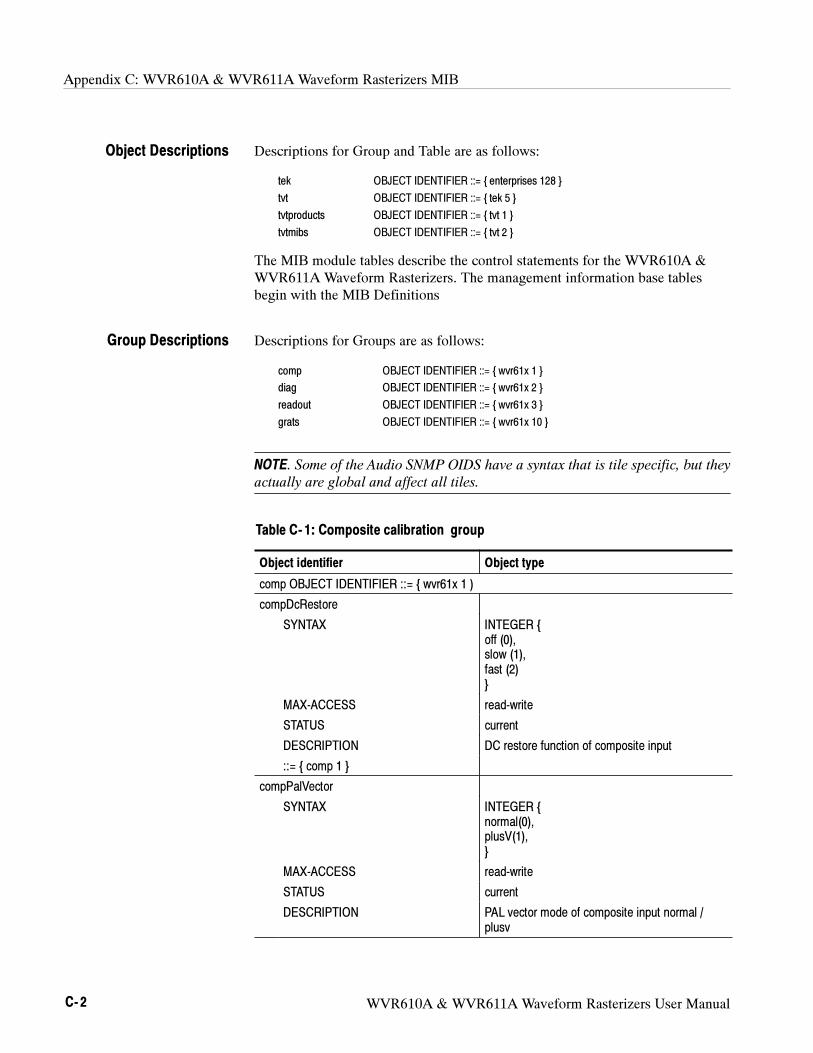
Appendix C: WVR610A & WVR611A Waveform Rasterizers MIB
C- 2 WVR610A & WVR611A Waveform Rasterizers User Manual
Descriptions for Group and Table are as follows:
tek OBJECT IDENTIFIER ::= enterprises 128
tvt OBJECT IDENTIFIER ::= tek 5
tvtproducts OBJECT IDENTIFIER ::= tvt 1
tvtmibs OBJECT IDENTIFIER ::= tvt 2
The MIB module tables describe the control statements for the WVR610A &
WVR611A Waveform Rasterizers. The management information base tables
begin with the MIB Definitions
Descriptions for Groups are as follows:
comp OBJECT IDENTIFIER ::= wvr61x 1
diag OBJECT IDENTIFIER ::= wvr61x 2
readout OBJECT IDENTIFIER ::= wvr61x 3
grats OBJECT IDENTIFIER ::= wvr61x 10
NOTE. Some of the Audio SNMP OIDS have a syntax that is tile specific, but they
actually are global and affect all tiles.
Table C- 1: Composite calibration group
Object identifier Object type
comp OBJECT IDENTIFIER ::= wvr61x 1 )
compDcRestore
SYNTAX INTEGER
off (0),
slow (1),
fast (2)
MAX-ACCESS read-write
STATUS current
DESCRIPTION DC restore function of composite input
::= comp 1
compPalVector
SYNTAX INTEGER
normal(0),
plusV(1),
MAX-ACCESS read-write
STATUS current
DESCRIPTION PAL vector mode of composite input normal /
plusv
Object Descriptions
Group Descriptions
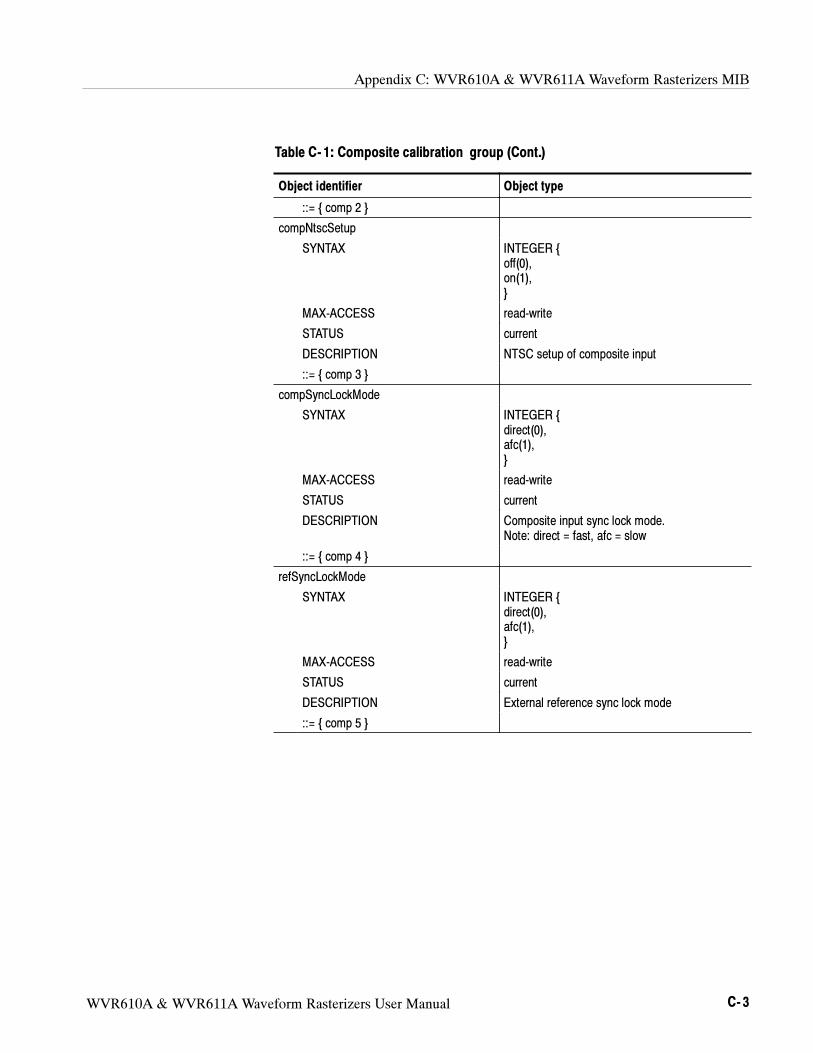
Appendix C: WVR610A & WVR611A Waveform Rasterizers MIB
WVR610A & WVR611A Waveform Rasterizers User Manual C- 3
Table C- 1: Composite calibration group (Cont.)
Object identifier Object type
::= comp 2
compNtscSetup
SYNTAX INTEGER
off(0),
on(1),
MAX-ACCESS read-write
STATUS current
DESCRIPTION NTSC setup of composite input
::= comp 3
compSyncLockMode
SYNTAX INTEGER
direct(0),
afc(1),
MAX-ACCESS read-write
STATUS current
DESCRIPTION Composite input sync lock mode.
Note: direct = fast, afc = slow
::= comp 4
refSyncLockMode
SYNTAX INTEGER
direct(0),
afc(1),
MAX-ACCESS read-write
STATUS current
DESCRIPTION External reference sync lock mode
::= comp 5
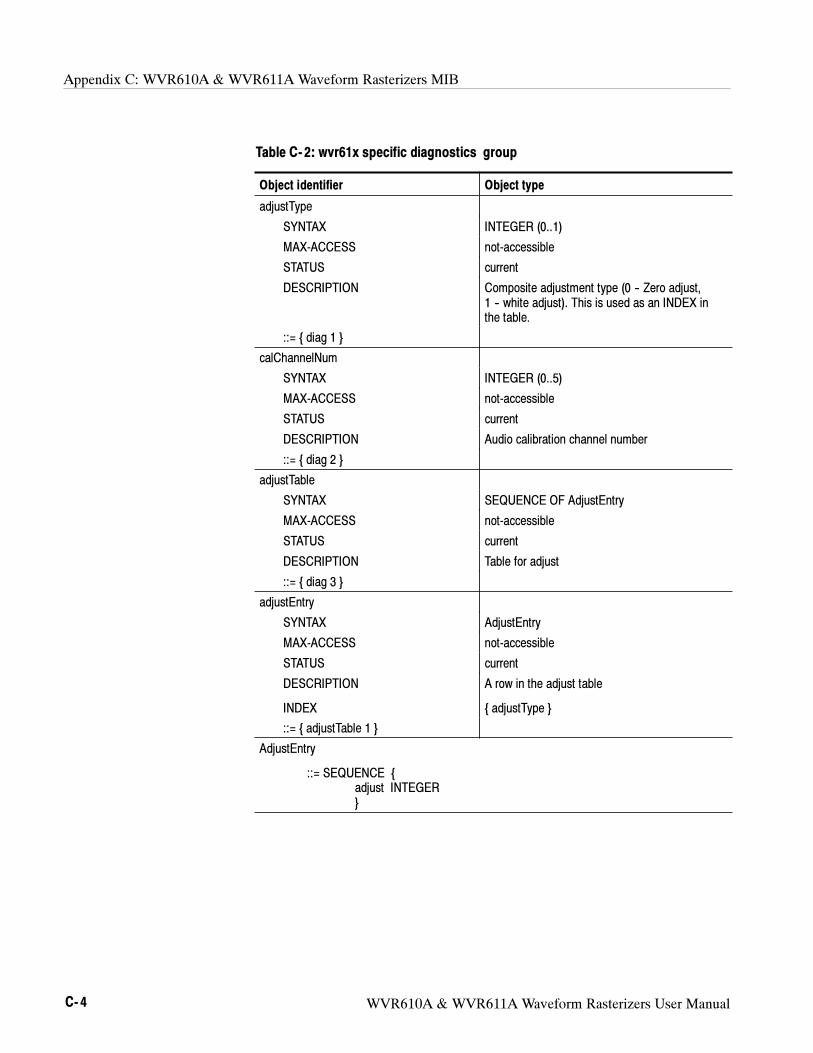
Appendix C: WVR610A & WVR611A Waveform Rasterizers MIB
C- 4 WVR610A & WVR611A Waveform Rasterizers User Manual
Table C- 2: wvr61x specific diagnostics group
Object identifier Object type
adjustType
SYNTAX INTEGER (0..1)
MAX-ACCESS not-accessible
STATUS current
DESCRIPTION Composite adjustment type (0 -- Zero adjust,
1 -- white adjust). This is used as an INDEX in
the table.
::= diag 1
calChannelNum
SYNTAX INTEGER (0..5)
MAX-ACCESS not-accessible
STATUS current
DESCRIPTION Audio calibration channel number
::= diag 2
adjustTable
SYNTAX SEQUENCE OF AdjustEntry
MAX-ACCESS not-accessible
STATUS current
DESCRIPTION Table for adjust
::= diag 3
adjustEntry
SYNTAX AdjustEntry
MAX-ACCESS not-accessible
STATUS current
DESCRIPTION
INDEX
A row in the adjust table
adjustType
::= adjustTable 1
AdjustEntry
::= SEQUENCE
adjust INTEGER
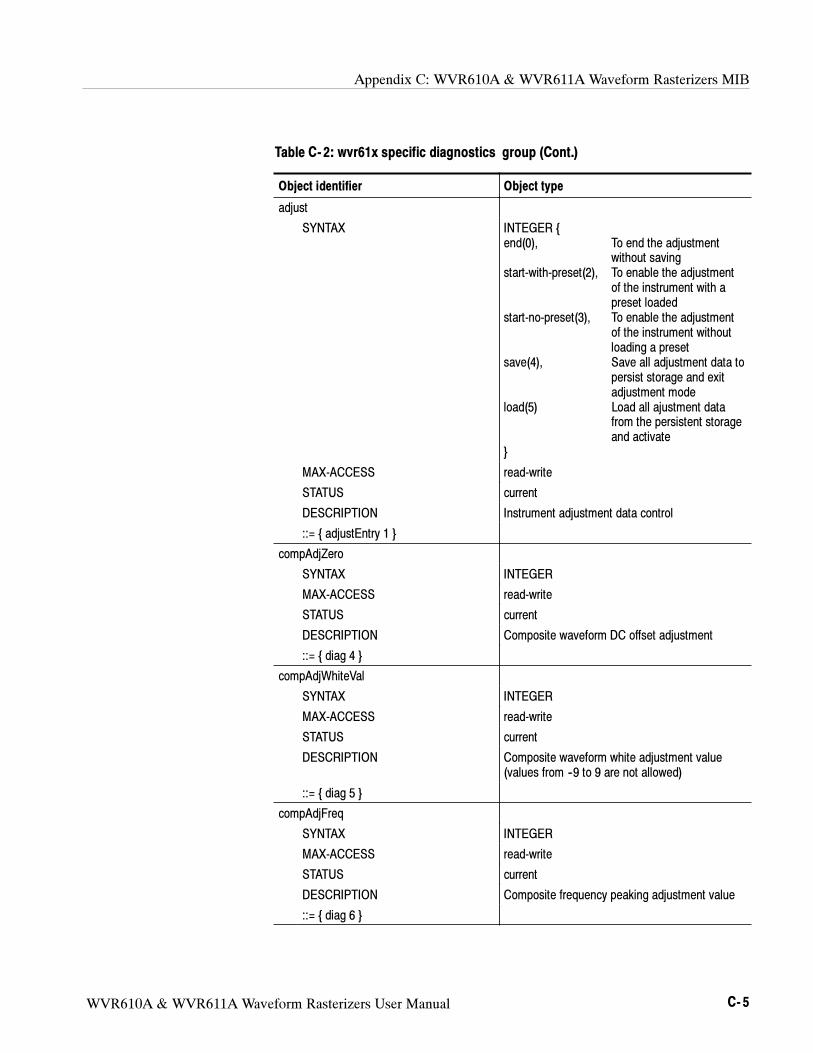
Appendix C: WVR610A & WVR611A Waveform Rasterizers MIB
WVR610A & WVR611A Waveform Rasterizers User Manual C- 5
Table C- 2: wvr61x specific diagnostics group (Cont.)
Object identifier Object type
adjust
SYNTAX INTEGER
end(0), To end the adjustment
without saving
start-with-preset(2), To enable the adjustment
of the instrument with a
preset loaded
start-no-preset(3), To enable the adjustment
of the instrument without
loading a preset
save(4), Save all adjustment data to
persist storage and exit
adjustment mode
load(5) Load all ajustment data
from the persistent storage
and activate
MAX-ACCESS read-write
STATUS current
DESCRIPTION Instrument adjustment data control
::= adjustEntry 1
compAdjZero
SYNTAX INTEGER
MAX-ACCESS read-write
STATUS current
DESCRIPTION Composite waveform DC offset adjustment
::= diag 4
compAdjWhiteVal
SYNTAX INTEGER
MAX-ACCESS read-write
STATUS current
DESCRIPTION Composite waveform white adjustment value
(values from --9 to 9 are not allowed)
::= diag 5
compAdjFreq
SYNTAX INTEGER
MAX-ACCESS read-write
STATUS current
DESCRIPTION Composite frequency peaking adjustment value
::= diag 6
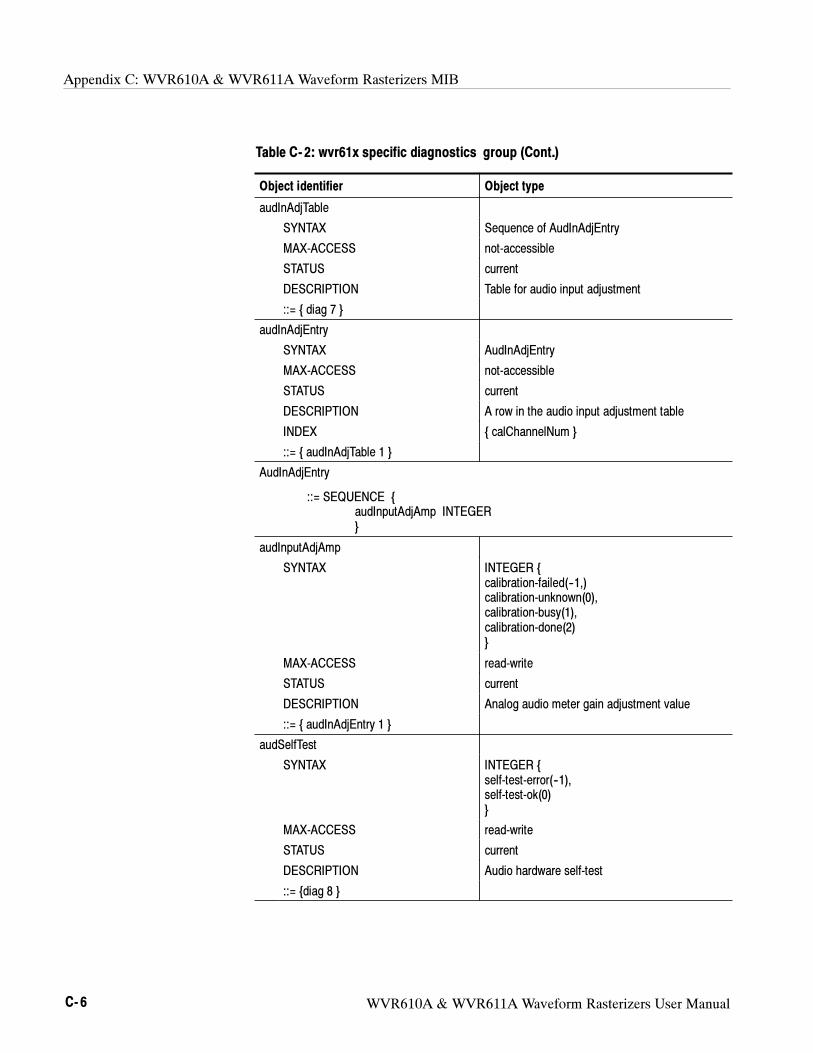
Appendix C: WVR610A & WVR611A Waveform Rasterizers MIB
C- 6 WVR610A & WVR611A Waveform Rasterizers User Manual
Table C- 2: wvr61x specific diagnostics group (Cont.)
Object identifier Object type
audInAdjTable
SYNTAX Sequence of AudInAdjEntry
MAX-ACCESS not-accessible
STATUS current
DESCRIPTION Table for audio input adjustment
::= diag 7
audInAdjEntry
SYNTAX AudInAdjEntry
MAX-ACCESS not-accessible
STATUS current
DESCRIPTION A row in the audio input adjustment table
INDEX calChannelNum
::= audInAdjTable 1
AudInAdjEntry
::= SEQUENCE
audInputAdjAmp INTEGER
audInputAdjAmp
SYNTAX INTEGER
calibration-failed(--1,)
calibration-unknown(0),
calibration-busy(1),
calibration-done(2)
MAX-ACCESS read-write
STATUS current
DESCRIPTION Analog audio meter gain adjustment value
::= audInAdjEntry 1
audSelfTest
SYNTAX INTEGER
self-test-error(--1),
self-test-ok(0)
MAX-ACCESS read-write
STATUS current
DESCRIPTION Audio hardware self-test
::= diag 8
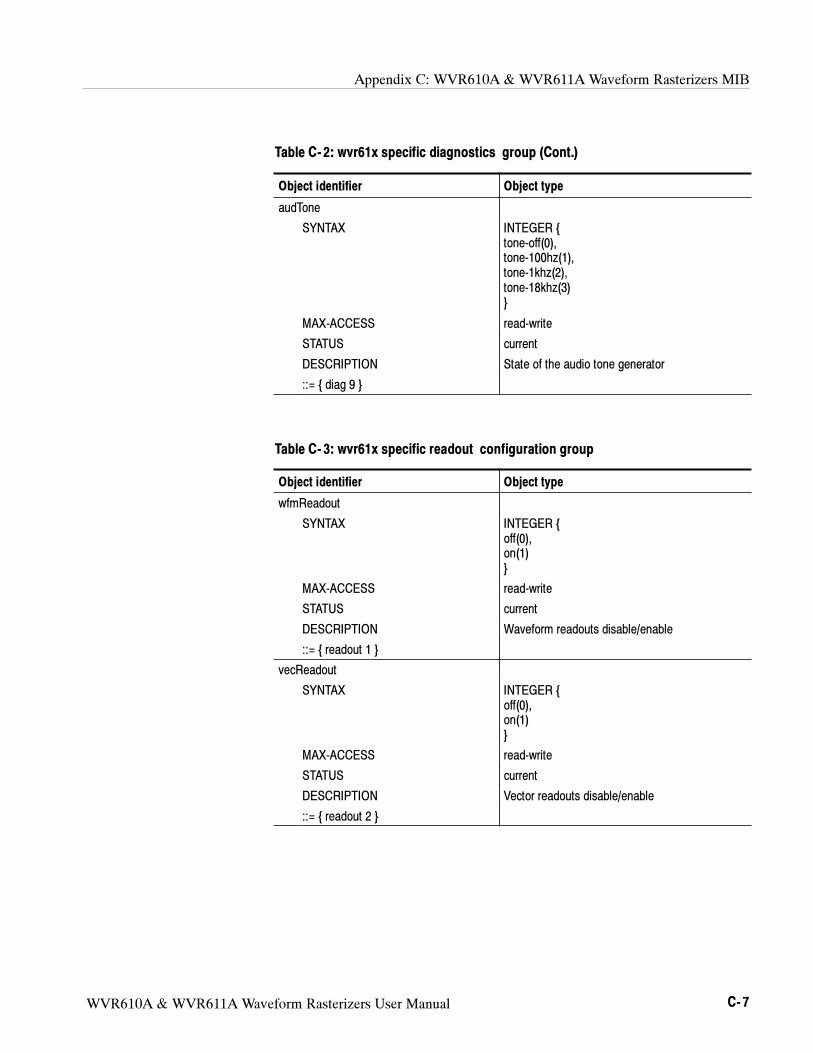
Appendix C: WVR610A & WVR611A Waveform Rasterizers MIB
WVR610A & WVR611A Waveform Rasterizers User Manual C- 7
Table C- 2: wvr61x specific diagnostics group (Cont.)
Object identifier Object type
audTone
SYNTAX INTEGER
tone-off(0),
tone-100hz(1),
tone-1khz(2),
tone-18khz(3)
MAX-ACCESS read-write
STATUS current
DESCRIPTION State of the audio tone generator
::= diag 9
Table C- 3: wvr61x specific readout configuration group
Object identifier Object type
wfmReadout
SYNTAX INTEGER
off(0),
on(1)
MAX-ACCESS read-write
STATUS current
DESCRIPTION Waveform readouts disable/enable
::= readout 1
vecReadout
SYNTAX INTEGER
off(0),
on(1)
MAX-ACCESS read-write
STATUS current
DESCRIPTION Vector readouts disable/enable
::= readout 2
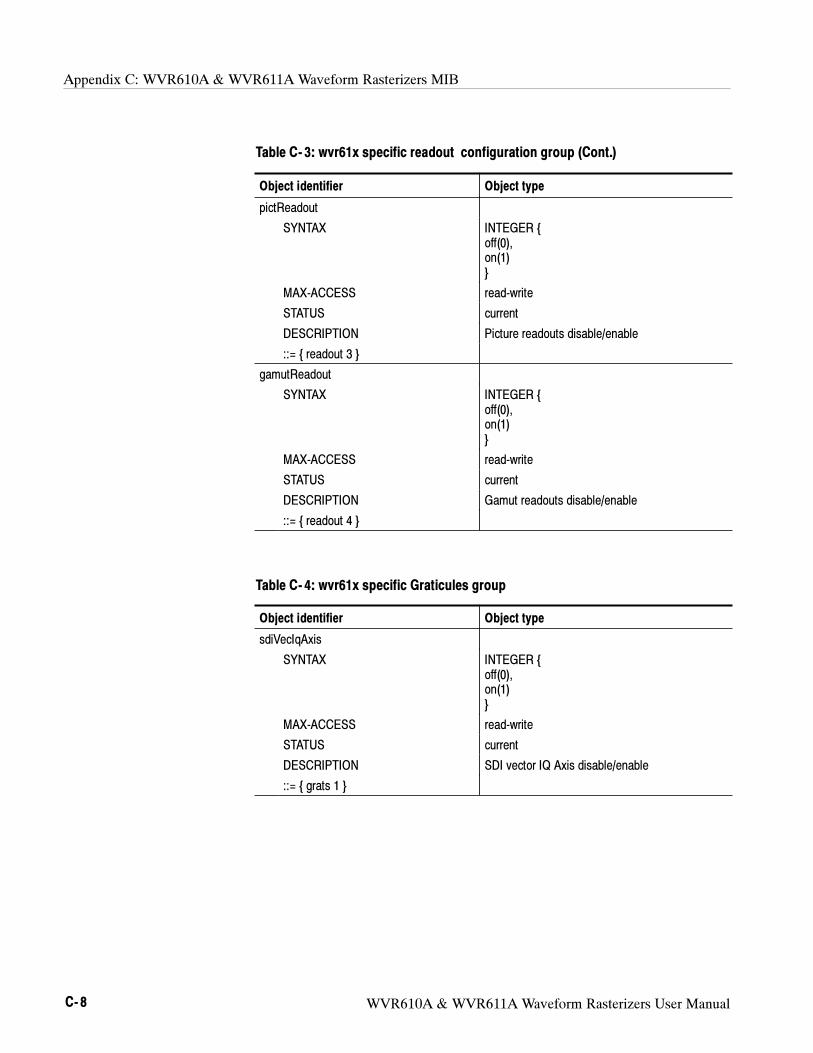
Appendix C: WVR610A & WVR611A Waveform Rasterizers MIB
C- 8 WVR610A & WVR611A Waveform Rasterizers User Manual
Table C- 3: wvr61x specific readout configuration group (Cont.)
Object identifier Object type
pictReadout
SYNTAX INTEGER
off(0),
on(1)
MAX-ACCESS read-write
STATUS current
DESCRIPTION Picture readouts disable/enable
::= readout 3
gamutReadout
SYNTAX INTEGER
off(0),
on(1)
MAX-ACCESS read-write
STATUS current
DESCRIPTION Gamut readouts disable/enable
::= readout 4
Table C- 4: wvr61x specific Graticules group
Object identifier Object type
sdiVecIqAxis
SYNTAX INTEGER
off(0),
on(1)
MAX-ACCESS read-write
STATUS current
DESCRIPTION SDI vector IQ Axis disable/enable
::= grats 1
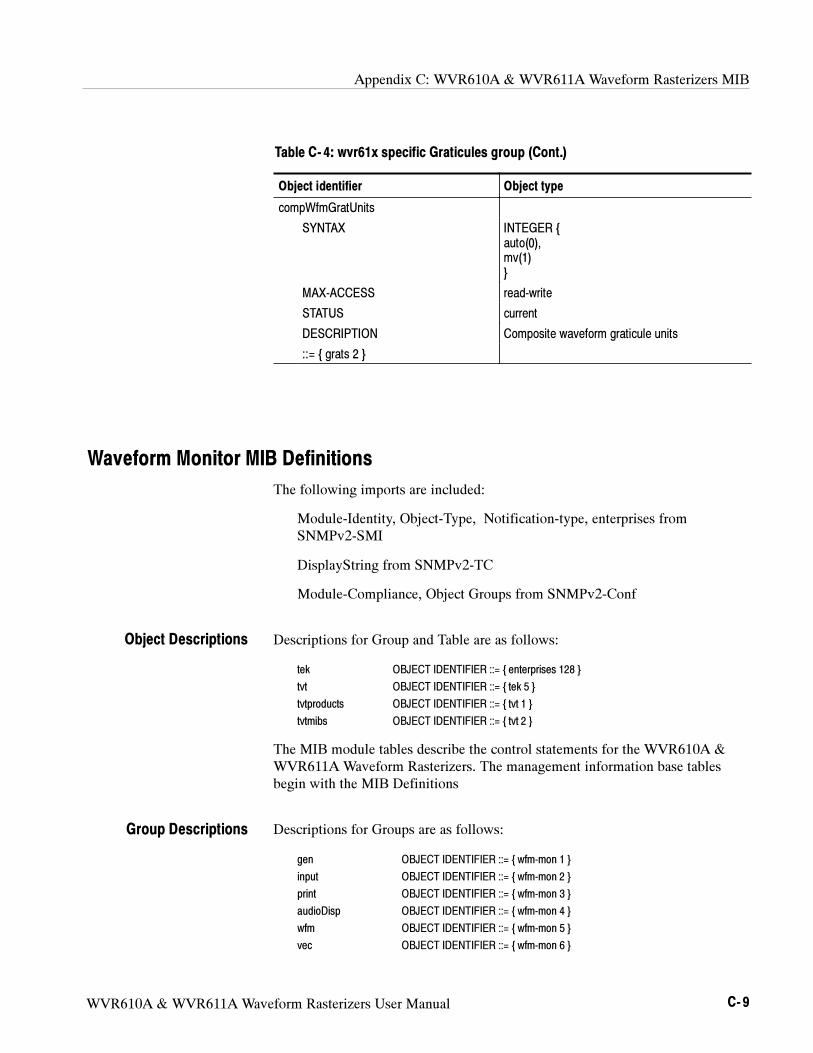
Appendix C: WVR610A & WVR611A Waveform Rasterizers MIB
WVR610A & WVR611A Waveform Rasterizers User Manual C- 9
Table C- 4: wvr61x specific Graticules group (Cont.)
Object identifier Object type
compWfmGratUnits
SYNTAX INTEGER
auto(0),
mv(1)
MAX-ACCESS read-write
STATUS current
DESCRIPTION Composite waveform graticule units
::= grats 2
Waveform Monitor MIB Definitions
The following imports are included:
Module-Identity, Object-Type, Notification-type, enterprises from
SNMPv2-SMI
DisplayString from SNMPv2-TC
Module-Compliance, Object Groups from SNMPv2-Conf
Descriptions for Group and Table are as follows:
tek OBJECT IDENTIFIER ::= enterprises 128
tvt OBJECT IDENTIFIER ::= tek 5
tvtproducts OBJECT IDENTIFIER ::= tvt 1
tvtmibs OBJECT IDENTIFIER ::= tvt 2
The MIB module tables describe the control statements for the WVR610A &
WVR611A Waveform Rasterizers. The management information base tables
begin with the MIB Definitions
Descriptions for Groups are as follows:
gen OBJECT IDENTIFIER ::= wfm-mon 1
input OBJECT IDENTIFIER ::= wfm-mon 2
print OBJECT IDENTIFIER ::= wfm-mon 3
audioDisp OBJECT IDENTIFIER ::= wfm-mon 4
wfm OBJECT IDENTIFIER ::= wfm-mon 5
vec OBJECT IDENTIFIER ::= wfm-mon 6
Object Descriptions
Group Descriptions
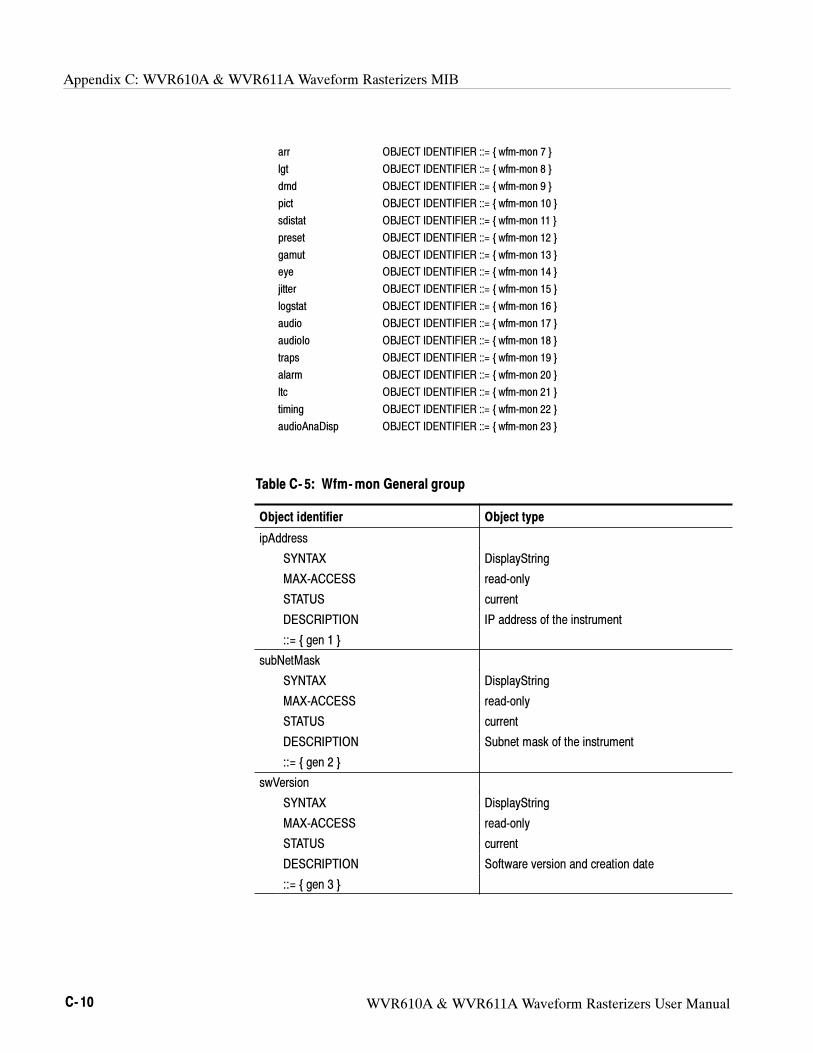
Appendix C: WVR610A & WVR611A Waveform Rasterizers MIB
C- 10 WVR610A & WVR611A Waveform Rasterizers User Manual
arr OBJECT IDENTIFIER ::= wfm-mon 7
lgt OBJECT IDENTIFIER ::= wfm-mon 8
dmd OBJECT IDENTIFIER ::= wfm-mon 9
pict OBJECT IDENTIFIER ::= wfm-mon 10
sdistat OBJECT IDENTIFIER ::= wfm-mon 11
preset OBJECT IDENTIFIER ::= wfm-mon 12
gamut OBJECT IDENTIFIER ::= wfm-mon 13
eye OBJECT IDENTIFIER ::= wfm-mon 14
jitter OBJECT IDENTIFIER ::= wfm-mon 15
logstat OBJECT IDENTIFIER ::= wfm-mon 16
audio OBJECT IDENTIFIER ::= wfm-mon 17
audioIo OBJECT IDENTIFIER ::= wfm-mon 18
traps OBJECT IDENTIFIER ::= wfm-mon 19
alarm OBJECT IDENTIFIER ::= wfm-mon 20
ltc OBJECT IDENTIFIER ::= wfm-mon 21
timing OBJECT IDENTIFIER ::= wfm-mon 22
audioAnaDisp OBJECT IDENTIFIER ::= wfm-mon 23
Table C- 5: Wfm-mon General group
Object identifier Object type
ipAddress
SYNTAX DisplayString
MAX-ACCESS read-only
STATUS current
DESCRIPTION IP address of the instrument
::= gen 1
subNetMask
SYNTAX DisplayString
MAX-ACCESS read-only
STATUS current
DESCRIPTION Subnet mask of the instrument
::= gen 2
swVersion
SYNTAX DisplayString
MAX-ACCESS read-only
STATUS current
DESCRIPTION Software version and creation date
::= gen 3
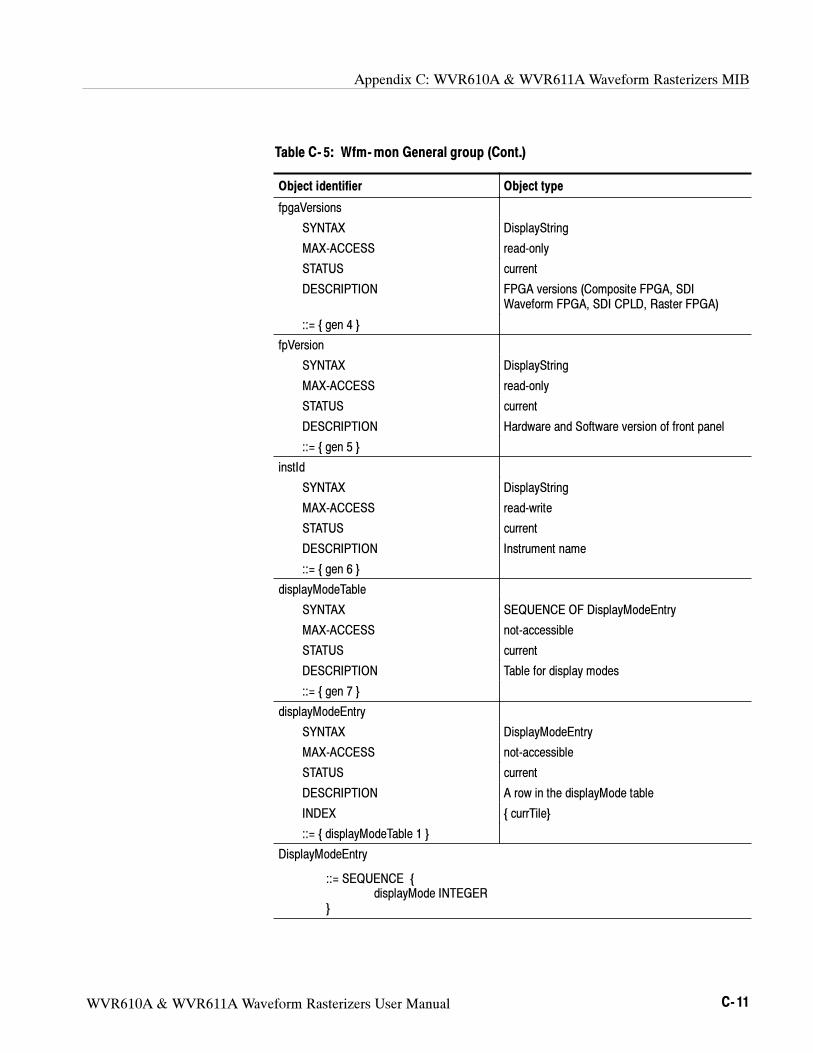
Appendix C: WVR610A & WVR611A Waveform Rasterizers MIB
WVR610A & WVR611A Waveform Rasterizers User Manual C- 11
Table C- 5: Wfm-mon General group (Cont.)
Object identifier Object type
fpgaVersions
SYNTAX DisplayString
MAX-ACCESS read-only
STATUS current
DESCRIPTION FPGA versions (Composite FPGA, SDI
Waveform FPGA, SDI CPLD, Raster FPGA)
::= gen 4
fpVersion
SYNTAX DisplayString
MAX-ACCESS read-only
STATUS current
DESCRIPTION Hardware and Software version of front panel
::= gen 5
instId
SYNTAX DisplayString
MAX-ACCESS read-write
STATUS current
DESCRIPTION Instrument name
::= gen 6
displayModeTable
SYNTAX SEQUENCE OF DisplayModeEntry
MAX-ACCESS not-accessible
STATUS current
DESCRIPTION Table for display modes
::= gen 7
displayModeEntry
SYNTAX DisplayModeEntry
MAX-ACCESS not-accessible
STATUS current
DESCRIPTION A row in the displayMode table
INDEX currTile
::= displayModeTable 1
DisplayModeEntry
::= SEQUENCE
displayMode INTEGER
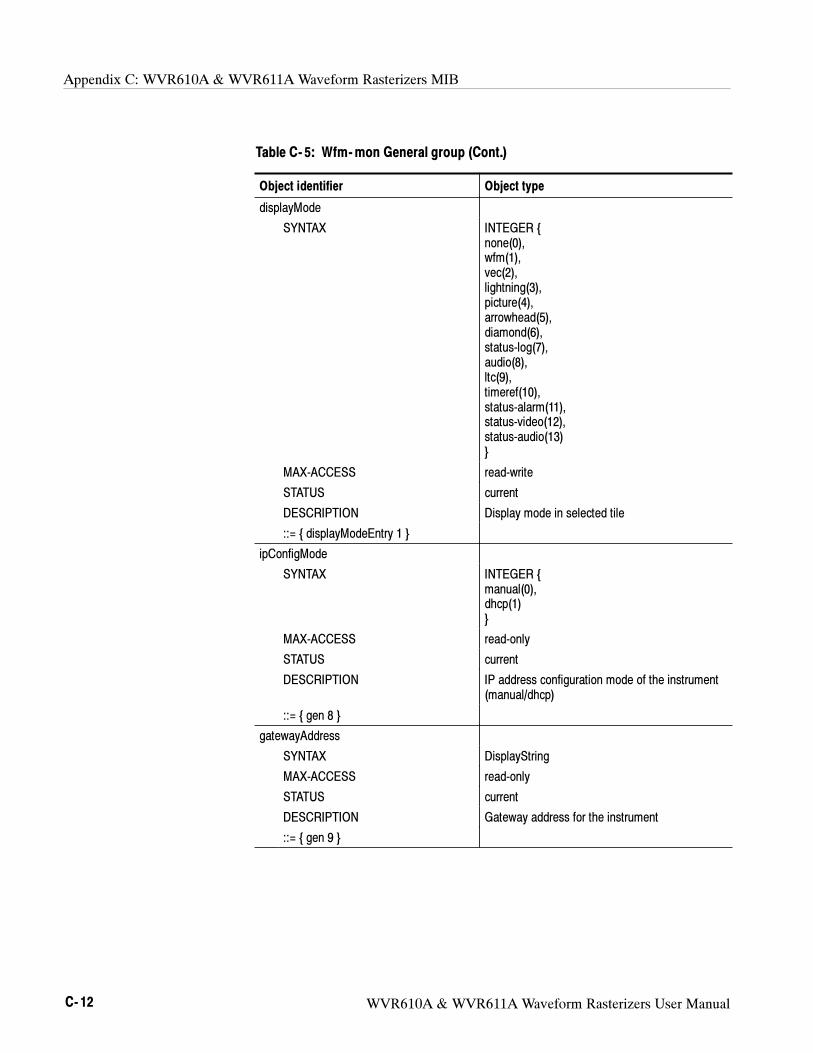
Appendix C: WVR610A & WVR611A Waveform Rasterizers MIB
C- 12 WVR610A & WVR611A Waveform Rasterizers User Manual
Table C- 5: Wfm-mon General group (Cont.)
Object identifier Object type
displayMode
SYNTAX INTEGER
none(0),
wfm(1),
vec(2),
lightning(3),
picture(4),
arrowhead(5),
diamond(6),
status-log(7),
audio(8),
ltc(9),
timeref(10),
status-alarm(11),
status-video(12),
status-audio(13)
MAX-ACCESS read-write
STATUS current
DESCRIPTION Display mode in selected tile
::= displayModeEntry 1
ipConfigMode
SYNTAX INTEGER
manual(0),
dhcp(1)
MAX-ACCESS read-only
STATUS current
DESCRIPTION IP address configuration mode of the instrument
(manual/dhcp)
::= gen 8
gatewayAddress
SYNTAX DisplayString
MAX-ACCESS read-only
STATUS current
DESCRIPTION Gateway address for the instrument
::= gen 9
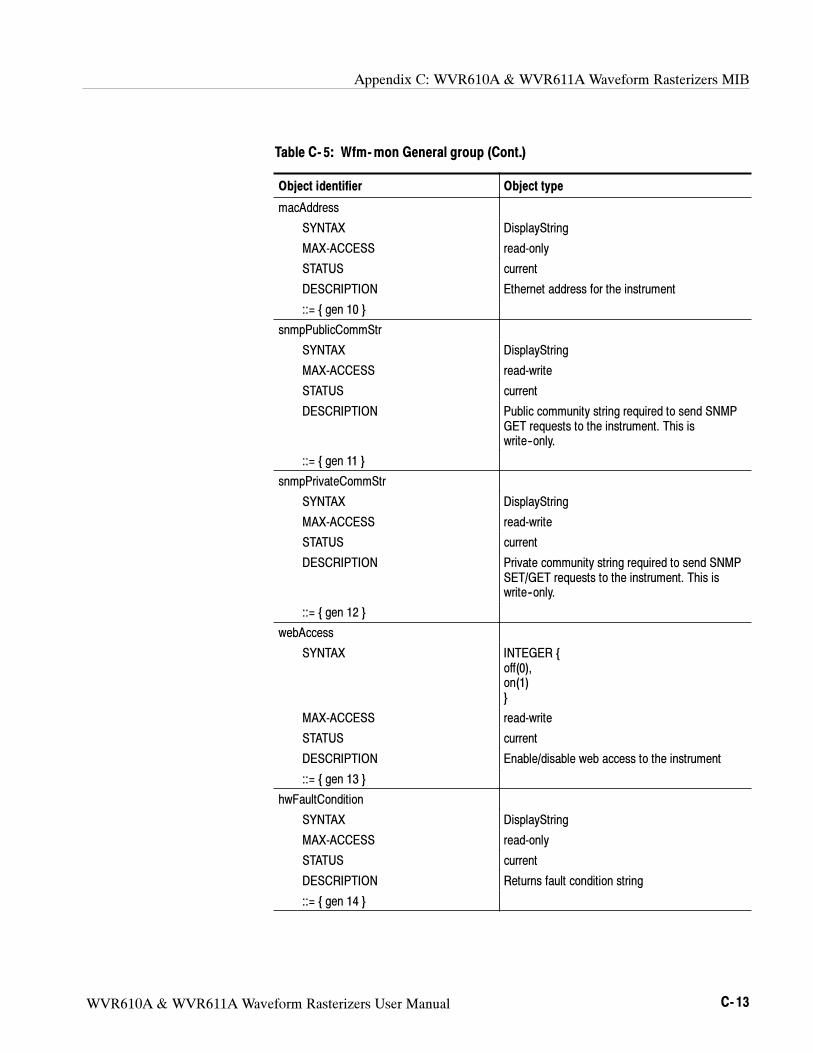
Appendix C: WVR610A & WVR611A Waveform Rasterizers MIB
WVR610A & WVR611A Waveform Rasterizers User Manual C- 13
Table C- 5: Wfm-mon General group (Cont.)
Object identifier Object type
macAddress
SYNTAX DisplayString
MAX-ACCESS read-only
STATUS current
DESCRIPTION Ethernet address for the instrument
::= gen 10
snmpPublicCommStr
SYNTAX DisplayString
MAX-ACCESS read-write
STATUS current
DESCRIPTION Public community string required to send SNMP
GET requests to the instrument. This is
write--only.
::= gen 11
snmpPrivateCommStr
SYNTAX DisplayString
MAX-ACCESS read-write
STATUS current
DESCRIPTION Private community string required to send SNMP
SET/GET requests to the instrument. This is
write--only.
::= gen 12
webAccess
SYNTAX INTEGER
off(0),
on(1)
MAX-ACCESS read-write
STATUS current
DESCRIPTION Enable/disable web access to the instrument
::= gen 13
hwFaultCondition
SYNTAX DisplayString
MAX-ACCESS read-only
STATUS current
DESCRIPTION Returns fault condition string
::= gen 14
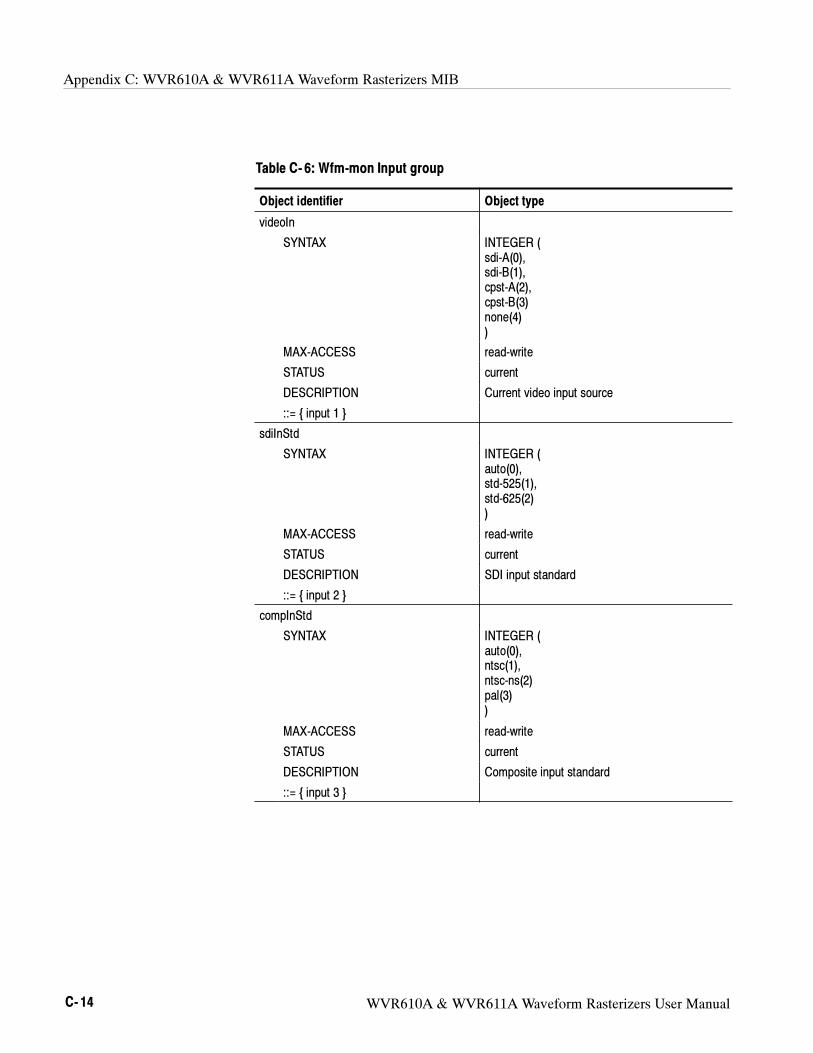
Appendix C: WVR610A & WVR611A Waveform Rasterizers MIB
C- 14 WVR610A & WVR611A Waveform Rasterizers User Manual
Table C- 6: Wfm-mon Input group
Object identifier Object type
videoIn
SYNTAX INTEGER (
sdi-A(0),
sdi-B(1),
cpst-A(2),
cpst-B(3)
none(4)
)
MAX-ACCESS read-write
STATUS current
DESCRIPTION Current video input source
::= input 1
sdiInStd
SYNTAX INTEGER (
auto(0),
std-525(1),
std-625(2)
)
MAX-ACCESS read-write
STATUS current
DESCRIPTION SDI input standard
::= input 2
compInStd
SYNTAX INTEGER (
auto(0),
ntsc(1),
ntsc-ns(2)
pal(3)
)
MAX-ACCESS read-write
STATUS current
DESCRIPTION Composite input standard
::= input 3
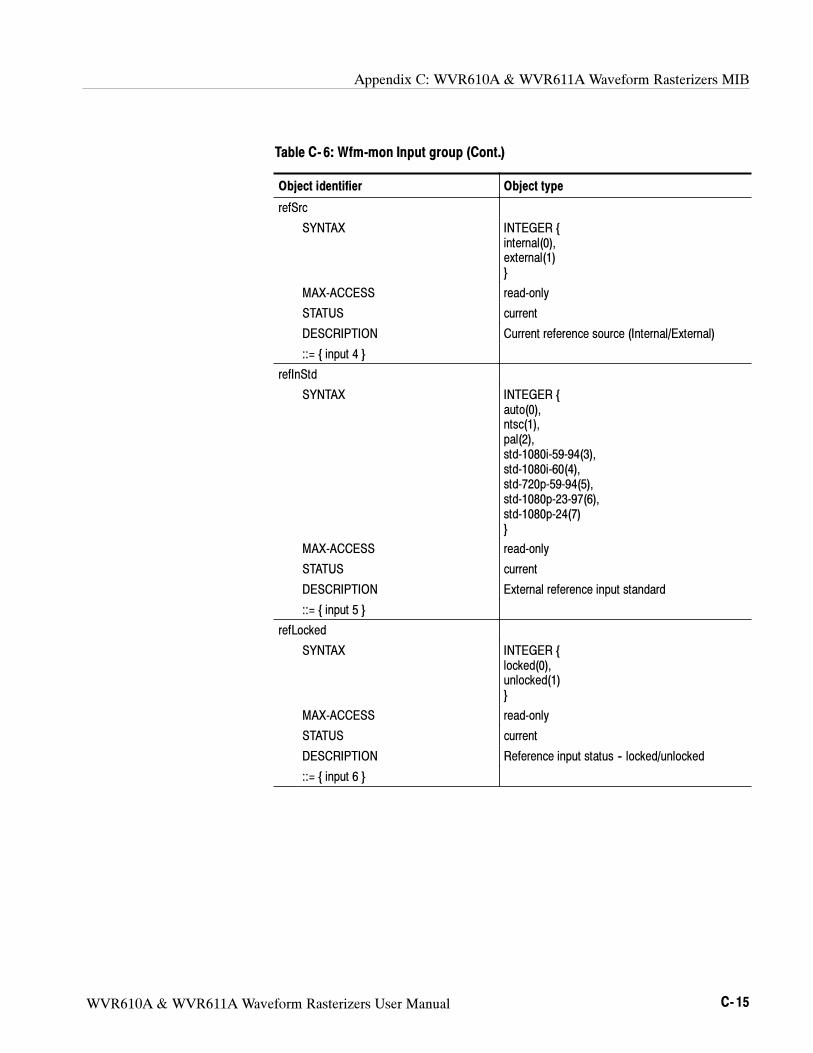
Appendix C: WVR610A & WVR611A Waveform Rasterizers MIB
WVR610A & WVR611A Waveform Rasterizers User Manual C- 15
Table C- 6: Wfm-mon Input group (Cont.)
Object identifier Object type
refSrc
SYNTAX INTEGER
internal(0),
external(1)
MAX-ACCESS read-only
STATUS current
DESCRIPTION Current reference source (Internal/External)
::= input 4
refInStd
SYNTAX INTEGER
auto(0),
ntsc(1),
pal(2),
std-1080i-59-94(3),
std-1080i-60(4),
std-720p-59-94(5),
std-1080p-23-97(6),
std-1080p-24(7)
MAX-ACCESS read-only
STATUS current
DESCRIPTION External reference input standard
::= input 5
refLocked
SYNTAX INTEGER
locked(0),
unlocked(1)
MAX-ACCESS read-only
STATUS current
DESCRIPTION Reference input status -- locked/unlocked
::= input 6
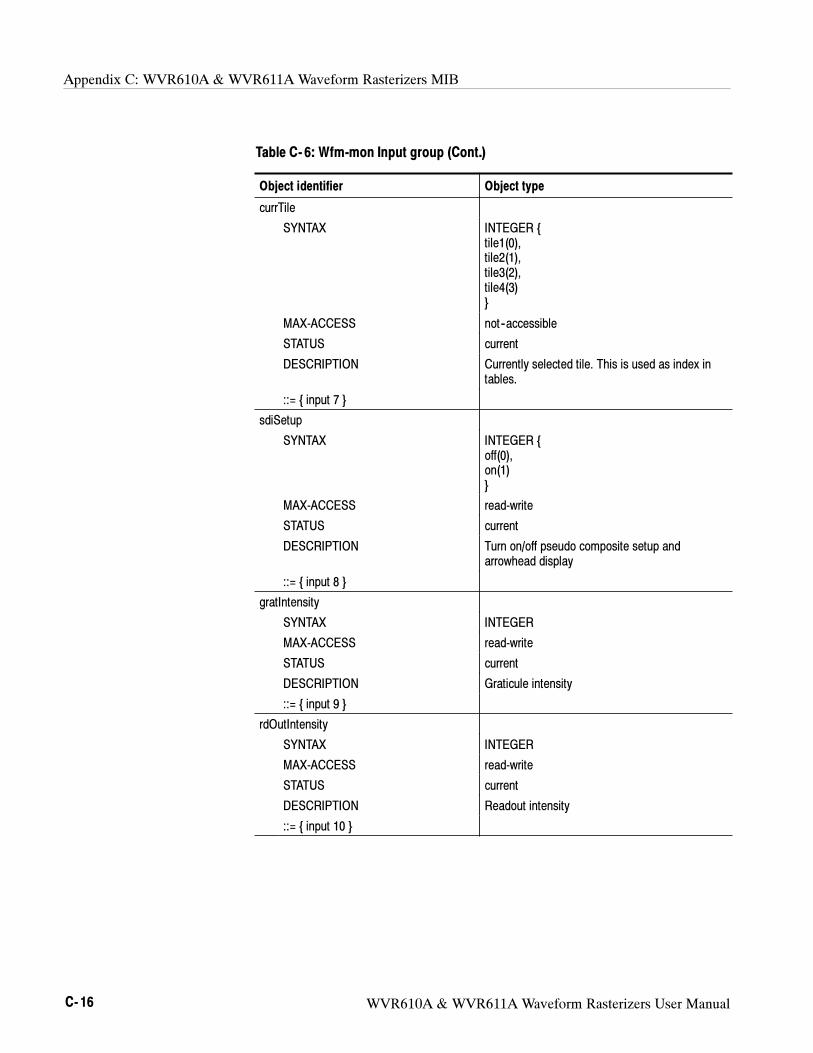
Appendix C: WVR610A & WVR611A Waveform Rasterizers MIB
C- 16 WVR610A & WVR611A Waveform Rasterizers User Manual
Table C- 6: Wfm-mon Input group (Cont.)
Object identifier Object type
currTile
SYNTAX INTEGER
tile1(0),
tile2(1),
tile3(2),
tile4(3)
MAX-ACCESS not--accessible
STATUS current
DESCRIPTION Currently selected tile. This is used as index in
tables.
::= input 7
sdiSetup
SYNTAX INTEGER
off(0),
on(1)
MAX-ACCESS read-write
STATUS current
DESCRIPTION Turn on/off pseudo composite setup and
arrowhead display
::= input 8
gratIntensity
SYNTAX INTEGER
MAX-ACCESS read-write
STATUS current
DESCRIPTION Graticule intensity
::= input 9
rdOutIntensity
SYNTAX INTEGER
MAX-ACCESS read-write
STATUS current
DESCRIPTION Readout intensity
::= input 10
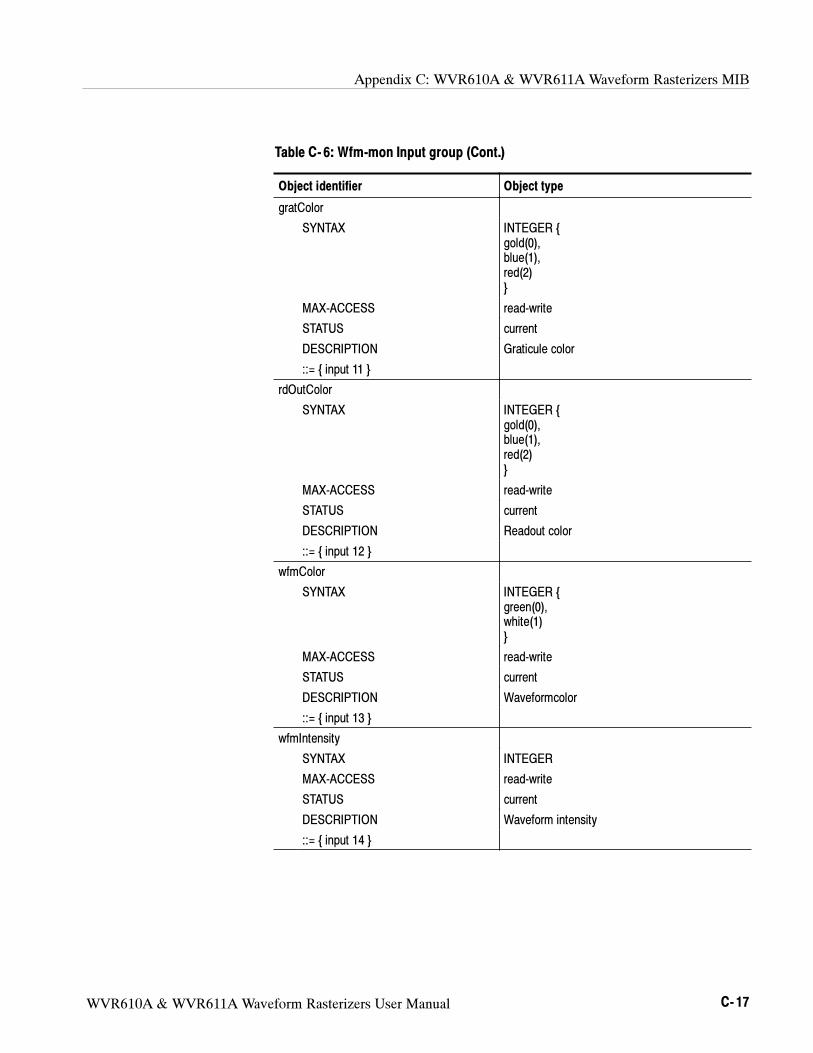
Appendix C: WVR610A & WVR611A Waveform Rasterizers MIB
WVR610A & WVR611A Waveform Rasterizers User Manual C- 17
Table C- 6: Wfm-mon Input group (Cont.)
Object identifier Object type
gratColor
SYNTAX INTEGER
gold(0),
blue(1),
red(2)
MAX-ACCESS read-write
STATUS current
DESCRIPTION Graticule color
::= input 11
rdOutColor
SYNTAX INTEGER
gold(0),
blue(1),
red(2)
MAX-ACCESS read-write
STATUS current
DESCRIPTION Readout color
::= input 12
wfmColor
SYNTAX INTEGER
green(0),
white(1)
MAX-ACCESS read-write
STATUS current
DESCRIPTION Waveformcolor
::= input 13
wfmIntensity
SYNTAX INTEGER
MAX-ACCESS read-write
STATUS current
DESCRIPTION Waveform intensity
::= input 14
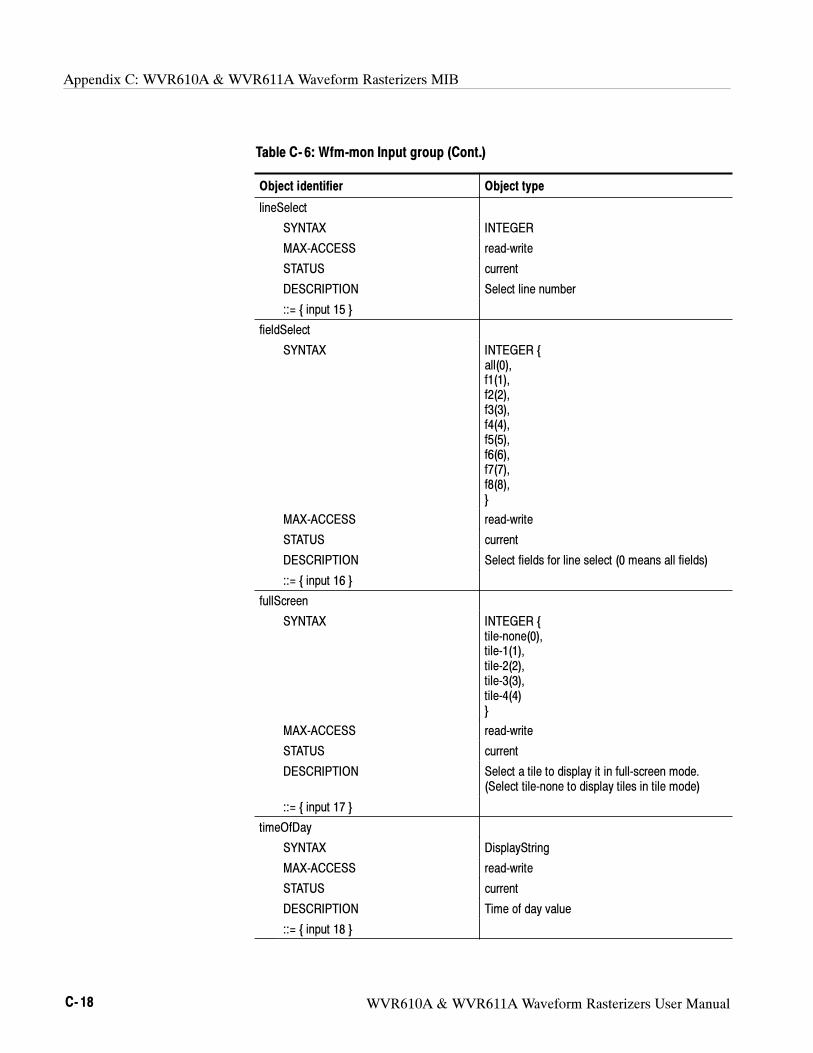
Appendix C: WVR610A & WVR611A Waveform Rasterizers MIB
C- 18 WVR610A & WVR611A Waveform Rasterizers User Manual
Table C- 6: Wfm-mon Input group (Cont.)
Object identifier Object type
lineSelect
SYNTAX INTEGER
MAX-ACCESS read-write
STATUS current
DESCRIPTION Select line number
::= input 15
fieldSelect
SYNTAX INTEGER
all(0),
f1(1),
f2(2),
f3(3),
f4(4),
f5(5),
f6(6),
f7(7),
f8(8),
MAX-ACCESS read-write
STATUS current
DESCRIPTION Select fields for line select (0 means all fields)
::= input 16
fullScreen
SYNTAX INTEGER
tile-none(0),
tile-1(1),
tile-2(2),
tile-3(3),
tile-4(4)
MAX-ACCESS read-write
STATUS current
DESCRIPTION Select a tile to display it in full-screen mode.
(Select tile-none to display tiles in tile mode)
::= input 17
timeOfDay
SYNTAX DisplayString
MAX-ACCESS read-write
STATUS current
DESCRIPTION Time of day value
::= input 18
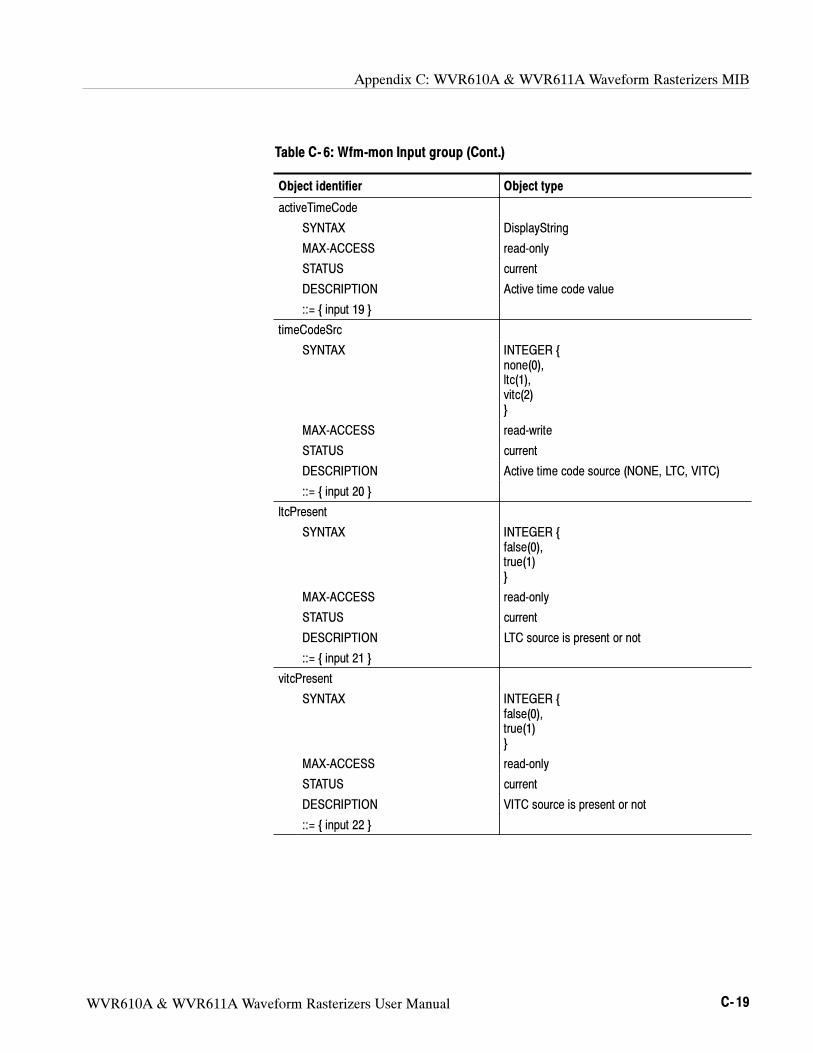
Appendix C: WVR610A & WVR611A Waveform Rasterizers MIB
WVR610A & WVR611A Waveform Rasterizers User Manual C- 19
Table C- 6: Wfm-mon Input group (Cont.)
Object identifier Object type
activeTimeCode
SYNTAX DisplayString
MAX-ACCESS read-only
STATUS current
DESCRIPTION Active time code value
::= input 19
timeCodeSrc
SYNTAX INTEGER
none(0),
ltc(1),
vitc(2)
MAX-ACCESS read-write
STATUS current
DESCRIPTION Active time code source (NONE, LTC, VITC)
::= input 20
ltcPresent
SYNTAX INTEGER
false(0),
true(1)
MAX-ACCESS read-only
STATUS current
DESCRIPTION LTC source is present or not
::= input 21
vitcPresent
SYNTAX INTEGER
false(0),
true(1)
MAX-ACCESS read-only
STATUS current
DESCRIPTION VITC source is present or not
::= input 22
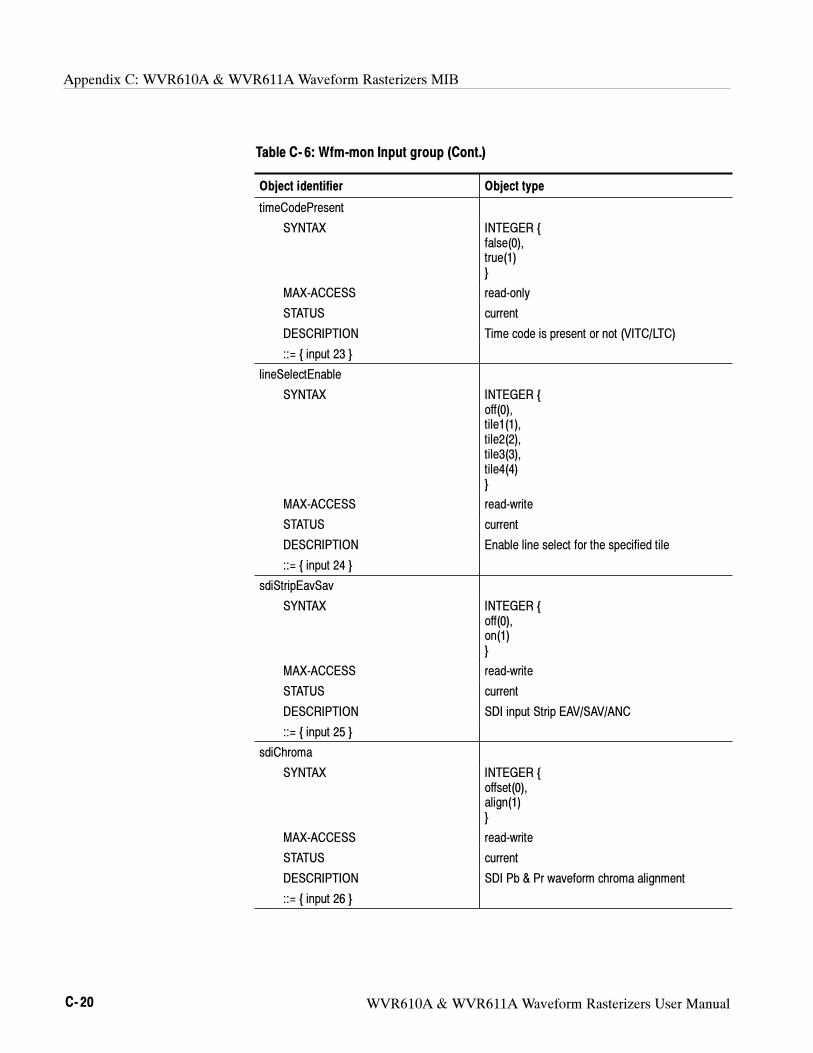
Appendix C: WVR610A & WVR611A Waveform Rasterizers MIB
C- 20 WVR610A & WVR611A Waveform Rasterizers User Manual
Table C- 6: Wfm-mon Input group (Cont.)
Object identifier Object type
timeCodePresent
SYNTAX INTEGER
false(0),
true(1)
MAX-ACCESS read-only
STATUS current
DESCRIPTION Time code is present or not (VITC/LTC)
::= input 23
lineSelectEnable
SYNTAX INTEGER
off(0),
tile1(1),
tile2(2),
tile3(3),
tile4(4)
MAX-ACCESS read-write
STATUS current
DESCRIPTION Enable line select for the specified tile
::= input 24
sdiStripEavSav
SYNTAX INTEGER
off(0),
on(1)
MAX-ACCESS read-write
STATUS current
DESCRIPTION SDI input Strip EAV/SAV/ANC
::= input 25
sdiChroma
SYNTAX INTEGER
offset(0),
align(1)
MAX-ACCESS read-write
STATUS current
DESCRIPTION SDI Pb & Pr waveform chroma alignment
::= input 26
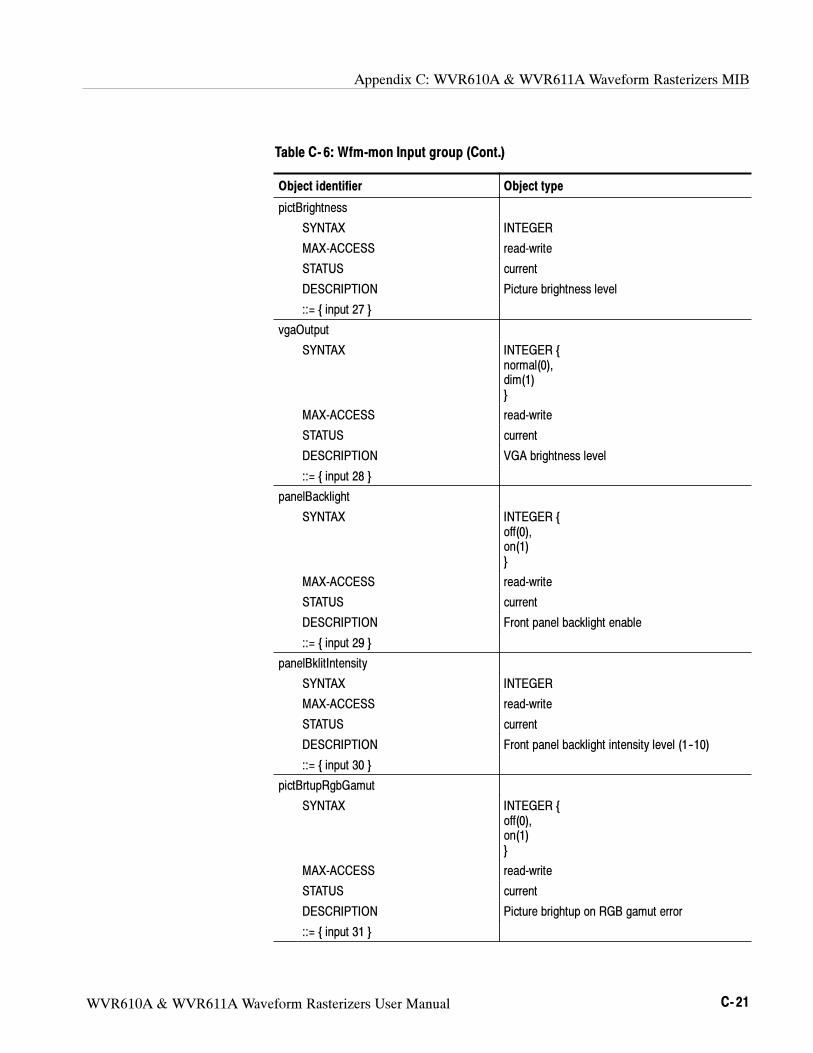
Appendix C: WVR610A & WVR611A Waveform Rasterizers MIB
WVR610A & WVR611A Waveform Rasterizers User Manual C- 21
Table C- 6: Wfm-mon Input group (Cont.)
Object identifier Object type
pictBrightness
SYNTAX INTEGER
MAX-ACCESS read-write
STATUS current
DESCRIPTION Picture brightness level
::= input 27
vgaOutput
SYNTAX INTEGER
normal(0),
dim(1)
MAX-ACCESS read-write
STATUS current
DESCRIPTION VGA brightness level
::= input 28
panelBacklight
SYNTAX INTEGER
off(0),
on(1)
MAX-ACCESS read-write
STATUS current
DESCRIPTION Front panel backlight enable
::= input 29
panelBklitIntensity
SYNTAX INTEGER
MAX-ACCESS read-write
STATUS current
DESCRIPTION Front panel backlight intensity level (1--10)
::= input 30
pictBrtupRgbGamut
SYNTAX INTEGER
off(0),
on(1)
MAX-ACCESS read-write
STATUS current
DESCRIPTION Picture brightup on RGB gamut error
::= input 31
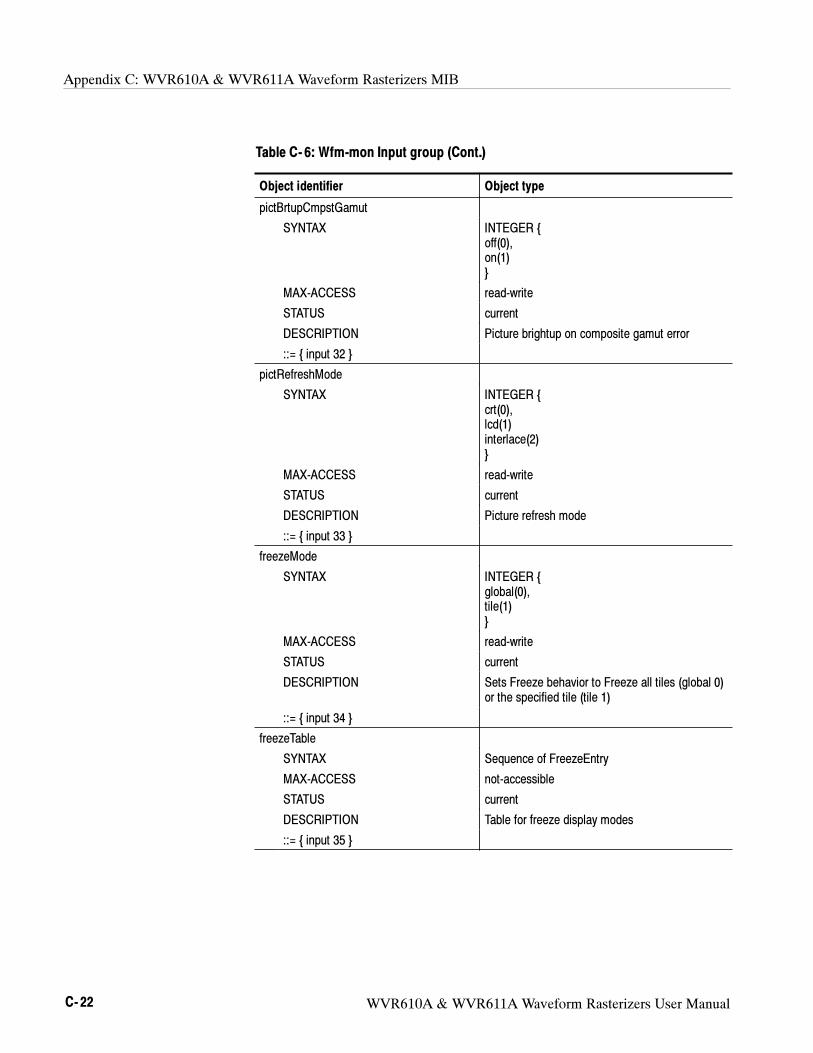
Appendix C: WVR610A & WVR611A Waveform Rasterizers MIB
C- 22 WVR610A & WVR611A Waveform Rasterizers User Manual
Table C- 6: Wfm-mon Input group (Cont.)
Object identifier Object type
pictBrtupCmpstGamut
SYNTAX INTEGER
off(0),
on(1)
MAX-ACCESS read-write
STATUS current
DESCRIPTION Picture brightup on composite gamut error
::= input 32
pictRefreshMode
SYNTAX INTEGER
crt(0),
lcd(1)
interlace(2)
MAX-ACCESS read-write
STATUS current
DESCRIPTION Picture refresh mode
::= input 33
freezeMode
SYNTAX INTEGER
global(0),
tile(1)
MAX-ACCESS read-write
STATUS current
DESCRIPTION Sets Freeze behavior to Freeze all tiles (global 0)
or the specified tile (tile 1)
::= input 34
freezeTable
SYNTAX Sequence of FreezeEntry
MAX-ACCESS not-accessible
STATUS current
DESCRIPTION Table for freeze display modes
::= input 35
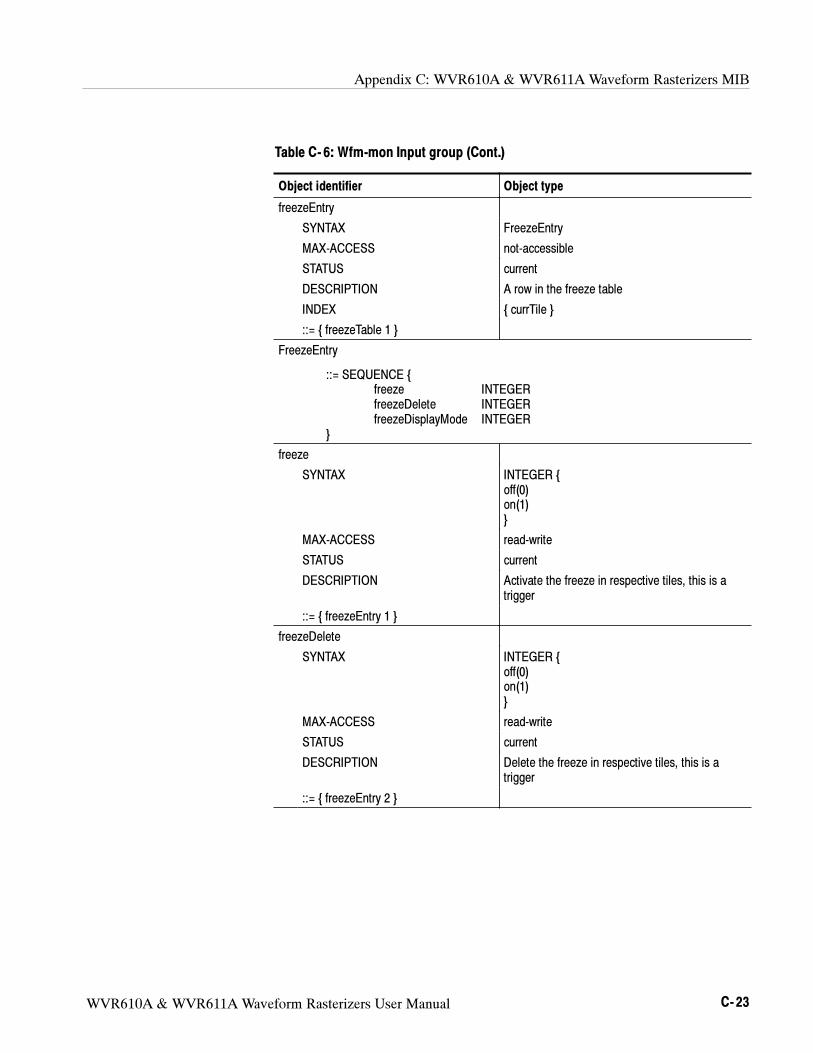
Appendix C: WVR610A & WVR611A Waveform Rasterizers MIB
WVR610A & WVR611A Waveform Rasterizers User Manual C- 23
Table C- 6: Wfm-mon Input group (Cont.)
Object identifier Object type
freezeEntry
SYNTAX FreezeEntry
MAX-ACCESS not-accessible
STATUS current
DESCRIPTION A row in the freeze table
INDEX currTile
::= freezeTable 1
FreezeEntry
::= SEQUENCE
freeze INTEGER
freezeDelete INTEGER
freezeDisplayMode INTEGER
freeze
SYNTAX INTEGER
off(0)
on(1)
MAX-ACCESS read-write
STATUS current
DESCRIPTION Activate the freeze in respective tiles, this is a
trigger
::= freezeEntry 1
freezeDelete
SYNTAX INTEGER
off(0)
on(1)
MAX-ACCESS read-write
STATUS current
DESCRIPTION Delete the freeze in respective tiles, this is a
trigger
::= freezeEntry 2
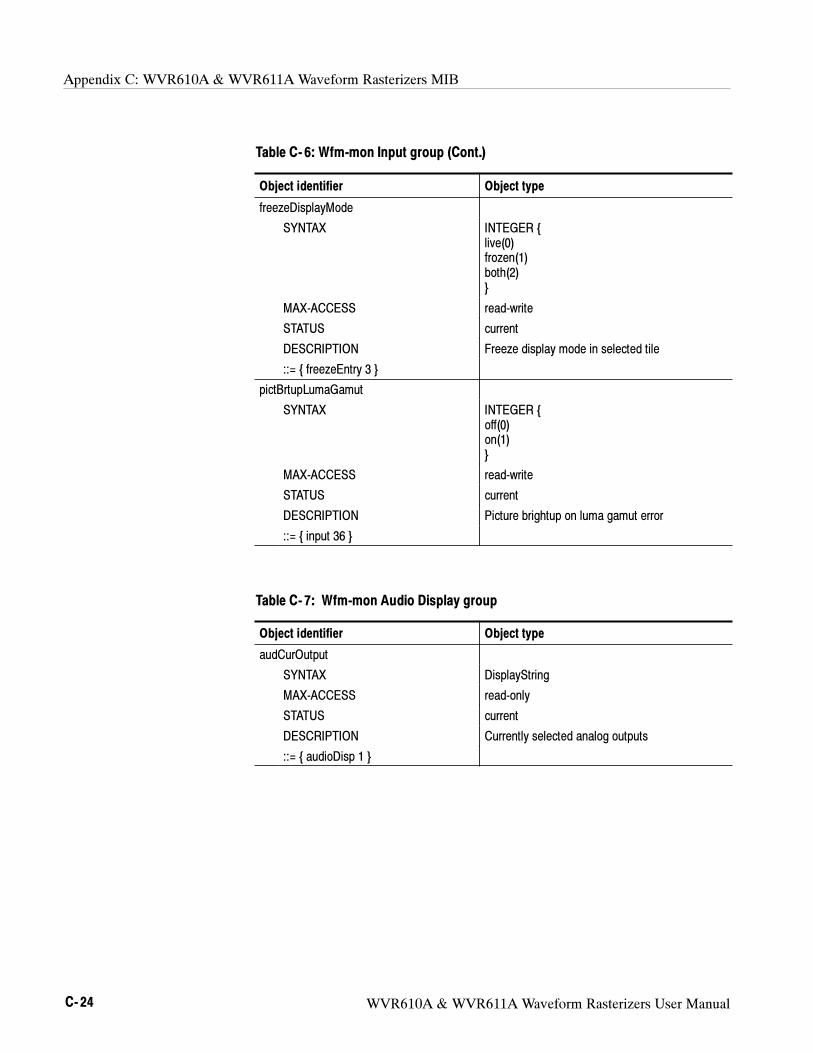
Appendix C: WVR610A & WVR611A Waveform Rasterizers MIB
C- 24 WVR610A & WVR611A Waveform Rasterizers User Manual
Table C- 6: Wfm-mon Input group (Cont.)
Object identifier Object type
freezeDisplayMode
SYNTAX INTEGER
live(0)
frozen(1)
both(2)
MAX-ACCESS read-write
STATUS current
DESCRIPTION Freeze display mode in selected tile
::= freezeEntry 3
pictBrtupLumaGamut
SYNTAX INTEGER
off(0)
on(1)
MAX-ACCESS read-write
STATUS current
DESCRIPTION Picture brightup on luma gamut error
::= input 36
Table C- 7: Wfm-mon Audio Display group
Object identifier Object type
audCurOutput
SYNTAX DisplayString
MAX-ACCESS read-only
STATUS current
DESCRIPTION Currently selected analog outputs
::= audioDisp 1

Appendix C: WVR610A & WVR611A Waveform Rasterizers MIB
WVR610A & WVR611A Waveform Rasterizers User Manual C- 25
Table C- 7: Wfm-mon Audio Display group (Cont.)
Object identifier Object type
audBallistic
SYNTAX INTEGER
truePeak(0),
ppm(1),
ppm(2)
vu(3)
MAX-ACCESS read-write
STATUS current
DESCRIPTION Meter ballistic selection for digital audio: True
Peak, PPM, or VU
::= audioDisp 2
audPkHold
SYNTAX INTEGER
MAX-ACCESS read-write
STATUS current
DESCRIPTION Hold time for digital audio peak level indicator (in
seconds)
::= audioDisp 3
audErrorHoldTm
SYNTAX INTEGER
MAX-ACCESS read-write
STATUS current
DESCRIPTION The length of time the Digital Audio in-bar error
messages, clip, and over indicators are displayed
or held after the error has been removed (in
seconds)
::= audioDisp 4
audClipTh
SYNTAX INTEGER
MAX-ACCESS read-write
STATUS current
DESCRIPTION Digital audio clip duration threshold (in samples)
::= audioDisp 5
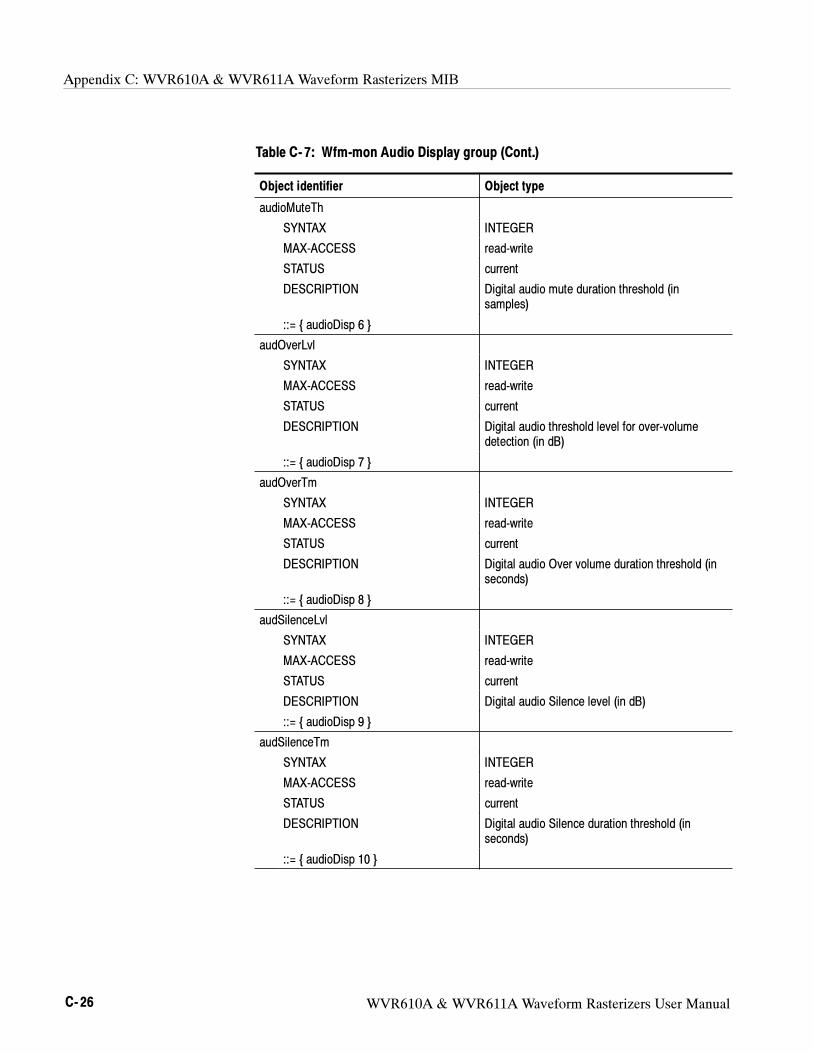
Appendix C: WVR610A & WVR611A Waveform Rasterizers MIB
C- 26 WVR610A & WVR611A Waveform Rasterizers User Manual
Table C- 7: Wfm-mon Audio Display group (Cont.)
Object identifier Object type
audioMuteTh
SYNTAX INTEGER
MAX-ACCESS read-write
STATUS current
DESCRIPTION Digital audio mute duration threshold (in
samples)
::= audioDisp 6
audOverLvl
SYNTAX INTEGER
MAX-ACCESS read-write
STATUS current
DESCRIPTION Digital audio threshold level for over-volume
detection (in dB)
::= audioDisp 7
audOverTm
SYNTAX INTEGER
MAX-ACCESS read-write
STATUS current
DESCRIPTION Digital audio Over volume duration threshold (in
seconds)
::= audioDisp 8
audSilenceLvl
SYNTAX INTEGER
MAX-ACCESS read-write
STATUS current
DESCRIPTION Digital audio Silence level (in dB)
::= audioDisp 9
audSilenceTm
SYNTAX INTEGER
MAX-ACCESS read-write
STATUS current
DESCRIPTION Digital audio Silence duration threshold (in
seconds)
::= audioDisp 10
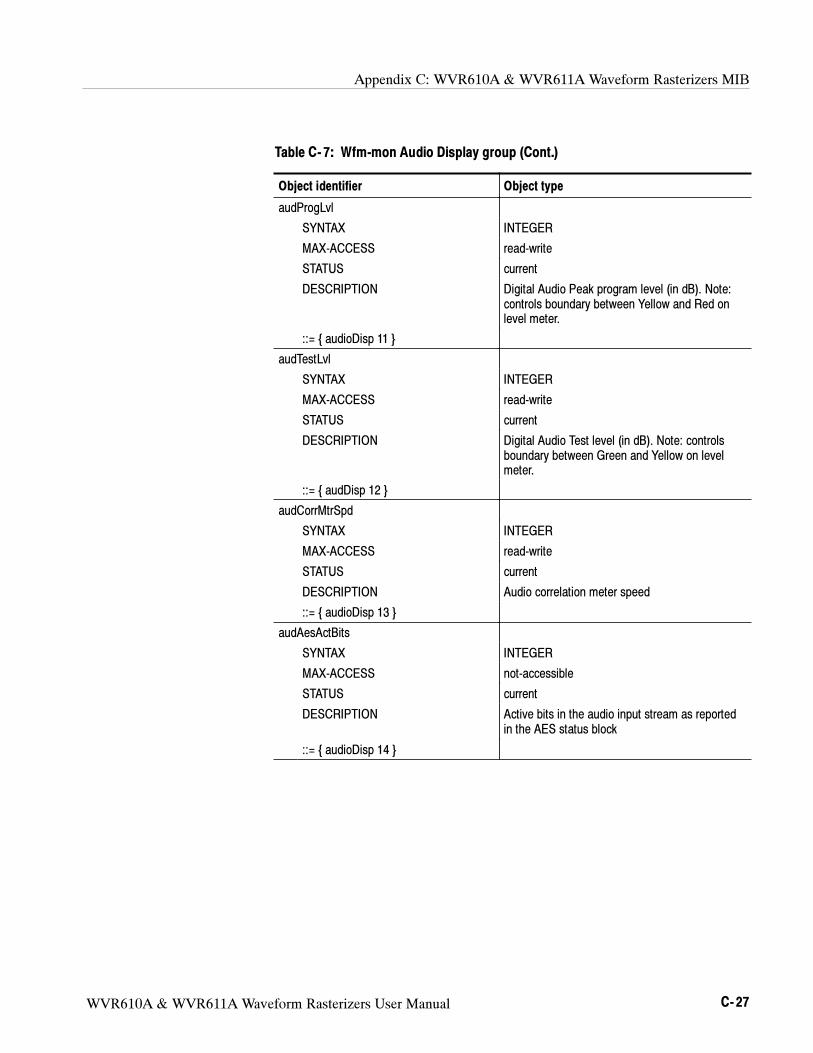
Appendix C: WVR610A & WVR611A Waveform Rasterizers MIB
WVR610A & WVR611A Waveform Rasterizers User Manual C- 27
Table C- 7: Wfm-mon Audio Display group (Cont.)
Object identifier Object type
audProgLvl
SYNTAX INTEGER
MAX-ACCESS read-write
STATUS current
DESCRIPTION Digital Audio Peak program level (in dB). Note:
controls boundary between Yellow and Red on
level meter.
::= audioDisp 11
audTestLvl
SYNTAX INTEGER
MAX-ACCESS read-write
STATUS current
DESCRIPTION Digital Audio Test level (in dB). Note: controls
boundary between Green and Yellow on level
meter.
::= audDisp 12
audCorrMtrSpd
SYNTAX INTEGER
MAX-ACCESS read-write
STATUS current
DESCRIPTION Audio correlation meter speed
::= audioDisp 13
audAesActBits
SYNTAX INTEGER
MAX-ACCESS not-accessible
STATUS current
DESCRIPTION Active bits in the audio input stream as reported
in the AES status block
::= audioDisp 14
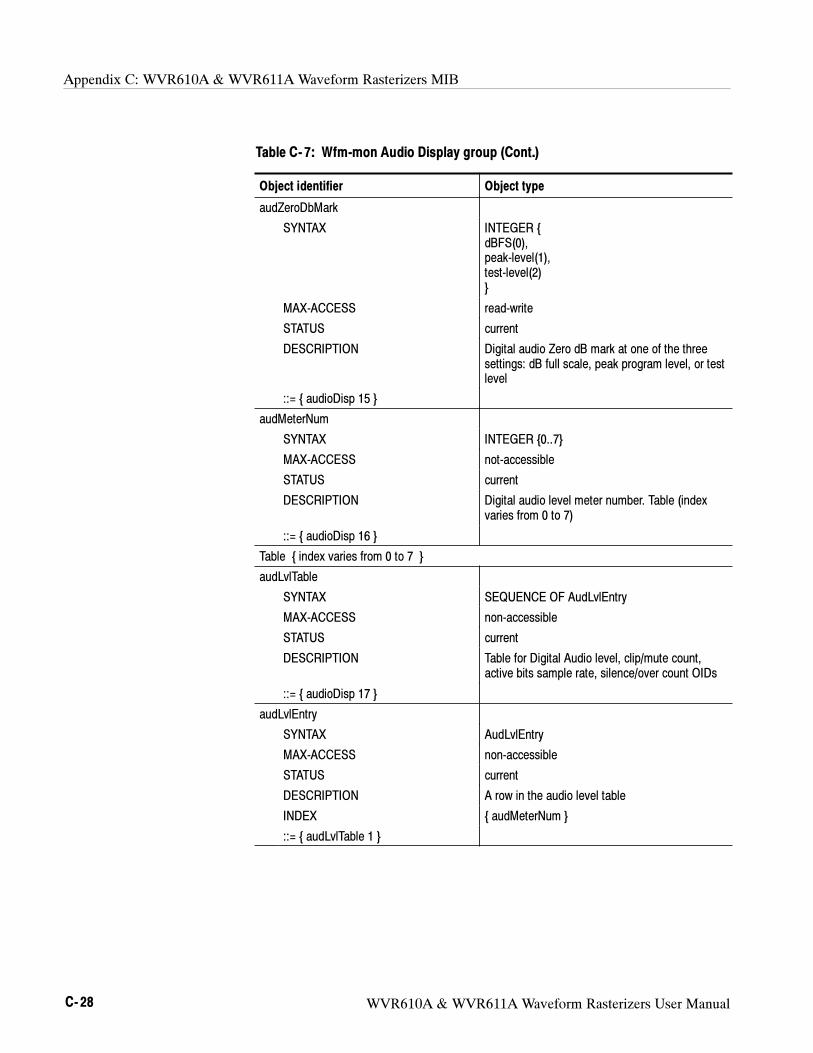
Appendix C: WVR610A & WVR611A Waveform Rasterizers MIB
C- 28 WVR610A & WVR611A Waveform Rasterizers User Manual
Table C- 7: Wfm-mon Audio Display group (Cont.)
Object identifier Object type
audZeroDbMark
SYNTAX INTEGER
dBFS(0),
peak-level(1),
test-level(2)
MAX-ACCESS read-write
STATUS current
DESCRIPTION Digital audio Zero dB mark at one of the three
settings: dB full scale, peak program level, or test
level
::= audioDisp 15
audMeterNum
SYNTAX INTEGER 0..7
MAX-ACCESS not-accessible
STATUS current
DESCRIPTION Digital audio level meter number. Table (index
varies from 0 to 7)
::= audioDisp 16
Table index varies from 0 to 7
audLvlTable
SYNTAX SEQUENCE OF AudLvlEntry
MAX-ACCESS non-accessible
STATUS current
DESCRIPTION Table for Digital Audio level, clip/mute count,
active bits sample rate, silence/over count OIDs
::= audioDisp 17
audLvlEntry
SYNTAX AudLvlEntry
MAX-ACCESS non-accessible
STATUS current
DESCRIPTION A row in the audio level table
INDEX audMeterNum
::= audLvlTable 1
Appendix C: WVR610A & WVR611A Waveform Rasterizers MIB
WVR610A & WVR611A Waveform Rasterizers User Manual C- 29
Table C- 7: Wfm-mon Audio Display group (Cont.)
Object identifier Object type
AudLvlEntry ::= SEQUENCE
audLevel INTEGER
audClipCount INTEGER
audMuteCount INTEGER
audActBits INTEGER
audSampleRt INTEGER
audSilenceCount INTEGER
audOverCount INTEGER
audLevel
SYNTAX INTEGER
MAX-ACCESS read-only
STATUS current
DESCRIPTION Returns the level of the Digital Audio in dBFS,
divide by 100 to get dBFS
::= audLvlEntry 1
audClipCount
SYNTAX INTEGER
MAX-ACCESS read-only
STATUS current
DESCRIPTION Returns the number of Digial Audio Clip
conditions detected in the current session
::= audLvlEntry 2
audMuteCount
SYNTAX INTEGER
MAX-ACCESS read-only
STATUS current
DESCRIPTION Returns the number of Digial Audio Mute
conditions detected in the current session
::= audLvlEntry 3
audActBits
SYNTAX INTEGER
MAX-ACCESS read-only
STATUS current
DESCRIPTION Active bits detected in digital audio input stream
::= audLvlEntry 4
Appendix C: WVR610A & WVR611A Waveform Rasterizers MIB
C- 30 WVR610A & WVR611A Waveform Rasterizers User Manual
Table C- 7: Wfm-mon Audio Display group (Cont.)
Object identifier Object type
audSampleRt
SYNTAX INTEGER
MAX-ACCESS read-only
STATUS current
DESCRIPTION Sample rate of the AES input stream
::= audLvlEntry 5
audSilenceCount
SYNTAX INTEGER
MAX-ACCESS read-only
STATUS current
DESCRIPTION Number of digital Silence conditions detected in
the current session
::= audLvlEntry 6
audOverCount
SYNTAX INTEGER
MAX-ACCESS read-only
STATUS current
DESCRIPTION Number of digital Over conditions detected in the
current session
::= audLvlEntry 7
audIgnoreValidBit
SYNTAX INTEGER
off(0),
on(1)
MAX-ACCESS read-write
STATUS current
DESCRIPTION Enable/disable detection of valid bit in AES
status block
::= audioDisp 18
Appendix C: WVR610A & WVR611A Waveform Rasterizers MIB
WVR610A & WVR611A Waveform Rasterizers User Manual C- 31
Table C- 7: Wfm-mon Audio Display group (Cont.)
Object identifier Object type
audPkHoldSeg
SYNTAX INTEGER
off(0),
on(1)
MAX-ACCESS read-write
STATUS current
DESCRIPTION Enable for the Peak Hold Segment on the Digital
Level Meters
::= audioDisp 19
audLvlMtrScale
SYNTAX INTEGER
normal(0),
custom(1)
MAX-ACCESS read-write
STATUS current
DESCRIPTION Digital audio meter scale display mode (in UI)
::= audioDisp 20
audLvlMtrHeight
SYNTAX INTEGER
MAX-ACCESS read-write
STATUS current
DESCRIPTION Digital audio meter scale top when it is in custom
mode (in UI)
::= audioDisp 21
audLvlMtrOffset
SYNTAX INTEGER
MAX-ACCESS read-write
STATUS current
DESCRIPTION Digital audio meter scale offset when it is in
custom mode (in UI)
::= audioDisp 22
Appendix C: WVR610A & WVR611A Waveform Rasterizers MIB
C- 32 WVR610A & WVR611A Waveform Rasterizers User Manual
Table C- 7: Wfm-mon Audio Display group (Cont.)
Object identifier Object type
audLissAGC
SYNTAX INTEGER
off(0),
on(1)
MAX-ACCESS read-write
STATUS current
DESCRIPTION Digital audio lissajous AGC enable
::= audioDisp 23
audSessionCtrl
SYNTAX INTEGER
reset(0),
stop(1)
run(2)
MAX-ACCESS read-write
STATUS current
DESCRIPTION Digital audio session control
::= audioDisp 24
audGratStepSize
SYNTAX INTEGER
MAX-ACCESS read-write
STATUS current
DESCRIPTION Digital audio meter scale graticule step size
::= audioDisp 25
Table C- 8: Wfm-mon waveform mode group
Object identifier Object type
wfmTable
SYNTAX SEQUENCE OF WfmEntry
MAX-ACCESS not-accessible
STATUS current
DESCRIPTION Table for waveform display mode
::= wfm 1
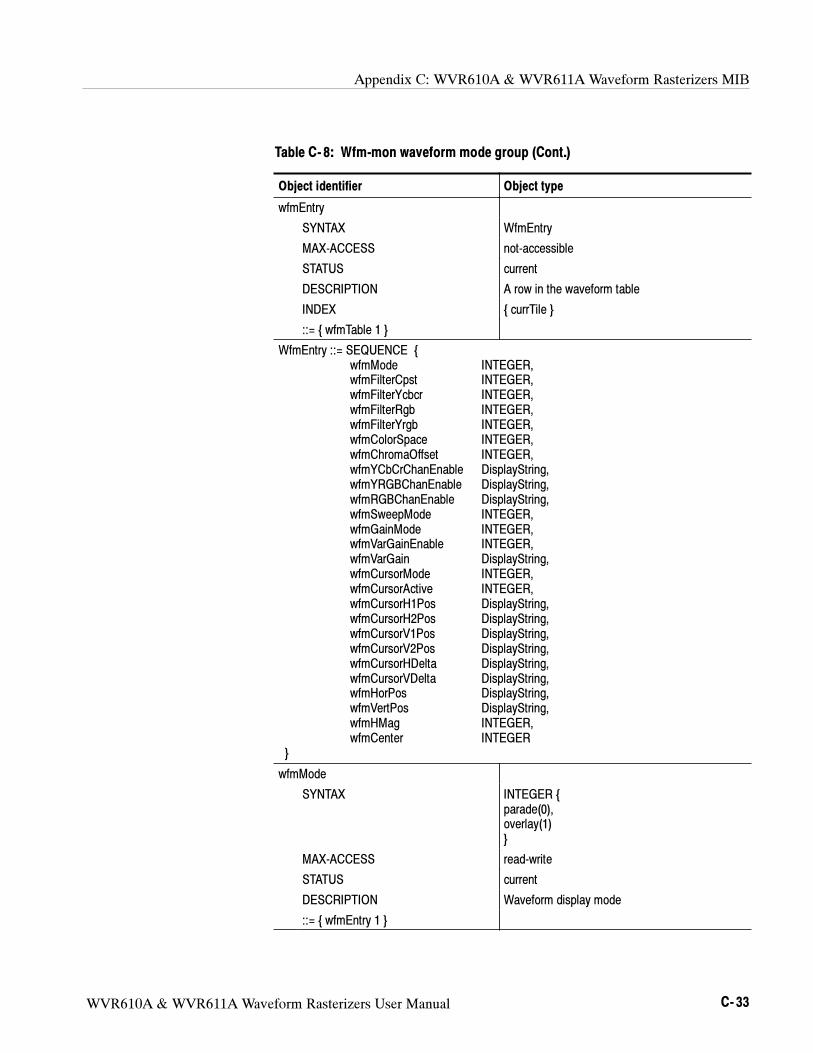
Appendix C: WVR610A & WVR611A Waveform Rasterizers MIB
WVR610A & WVR611A Waveform Rasterizers User Manual C- 33
Table C- 8: Wfm-mon waveform mode group (Cont.)
Object identifier Object type
wfmEntry
SYNTAX WfmEntry
MAX-ACCESS not-accessible
STATUS current
DESCRIPTION A row in the waveform table
INDEX currTile
::= wfmTable 1
WfmEntry ::= SEQUENCE
wfmMode INTEGER,
wfmFilterCpst INTEGER,
wfmFilterYcbcr INTEGER,
wfmFilterRgb INTEGER,
wfmFilterYrgb INTEGER,
wfmColorSpace INTEGER,
wfmChromaOffset INTEGER,
wfmYCbCrChanEnable DisplayString,
wfmYRGBChanEnable DisplayString,
wfmRGBChanEnable DisplayString,
wfmSweepMode INTEGER,
wfmGainMode INTEGER,
wfmVarGainEnable INTEGER,
wfmVarGain DisplayString,
wfmCursorMode INTEGER,
wfmCursorActive INTEGER,
wfmCursorH1Pos DisplayString,
wfmCursorH2Pos DisplayString,
wfmCursorV1Pos DisplayString,
wfmCursorV2Pos DisplayString,
wfmCursorHDelta DisplayString,
wfmCursorVDelta DisplayString,
wfmHorPos DisplayString,
wfmVertPos DisplayString,
wfmHMag INTEGER,
wfmCenter INTEGER
wfmMode
SYNTAX INTEGER
parade(0),
overlay(1)
MAX-ACCESS read-write
STATUS current
DESCRIPTION Waveform display mode
::= wfmEntry 1
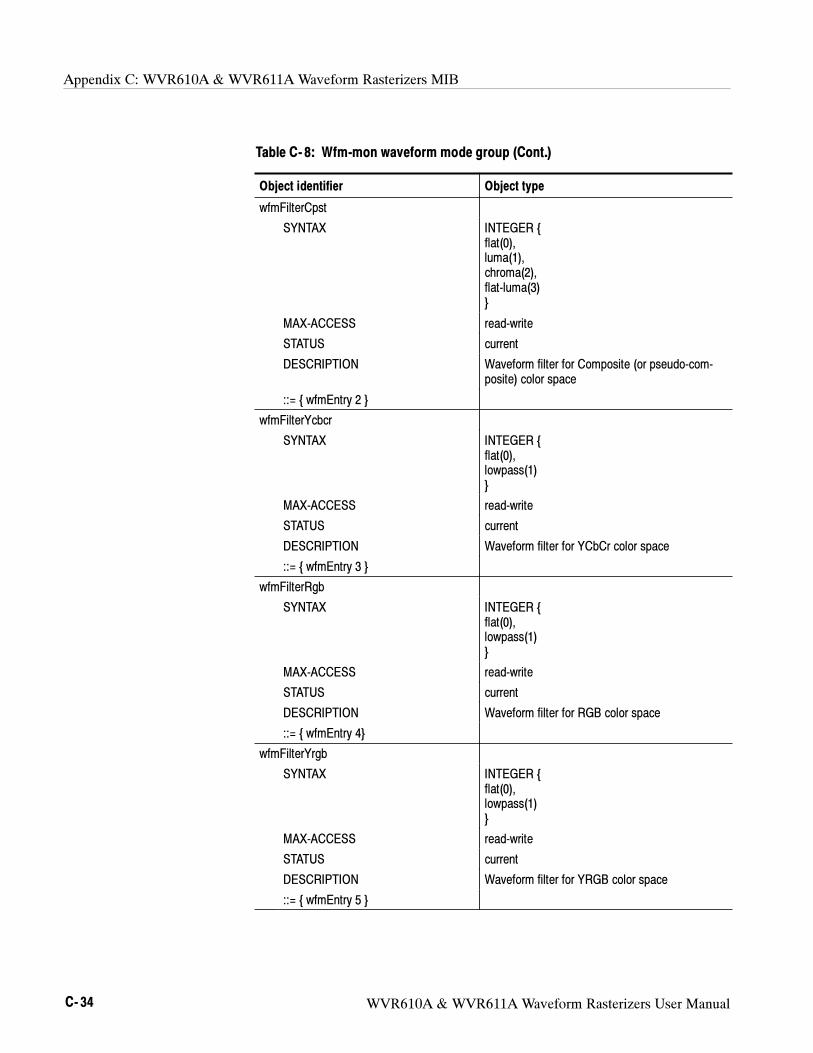
Appendix C: WVR610A & WVR611A Waveform Rasterizers MIB
C- 34 WVR610A & WVR611A Waveform Rasterizers User Manual
Table C- 8: Wfm-mon waveform mode group (Cont.)
Object identifier Object type
wfmFilterCpst
SYNTAX INTEGER
flat(0),
luma(1),
chroma(2),
flat-luma(3)
MAX-ACCESS read-write
STATUS current
DESCRIPTION Waveform filter for Composite (or pseudo-com-
posite) color space
::= wfmEntry 2
wfmFilterYcbcr
SYNTAX INTEGER
flat(0),
lowpass(1)
MAX-ACCESS read-write
STATUS current
DESCRIPTION Waveform filter for YCbCr color space
::= wfmEntry 3
wfmFilterRgb
SYNTAX INTEGER
flat(0),
lowpass(1)
MAX-ACCESS read-write
STATUS current
DESCRIPTION Waveform filter for RGB color space
::= wfmEntry 4
wfmFilterYrgb
SYNTAX INTEGER
flat(0),
lowpass(1)
MAX-ACCESS read-write
STATUS current
DESCRIPTION Waveform filter for YRGB color space
::= wfmEntry 5
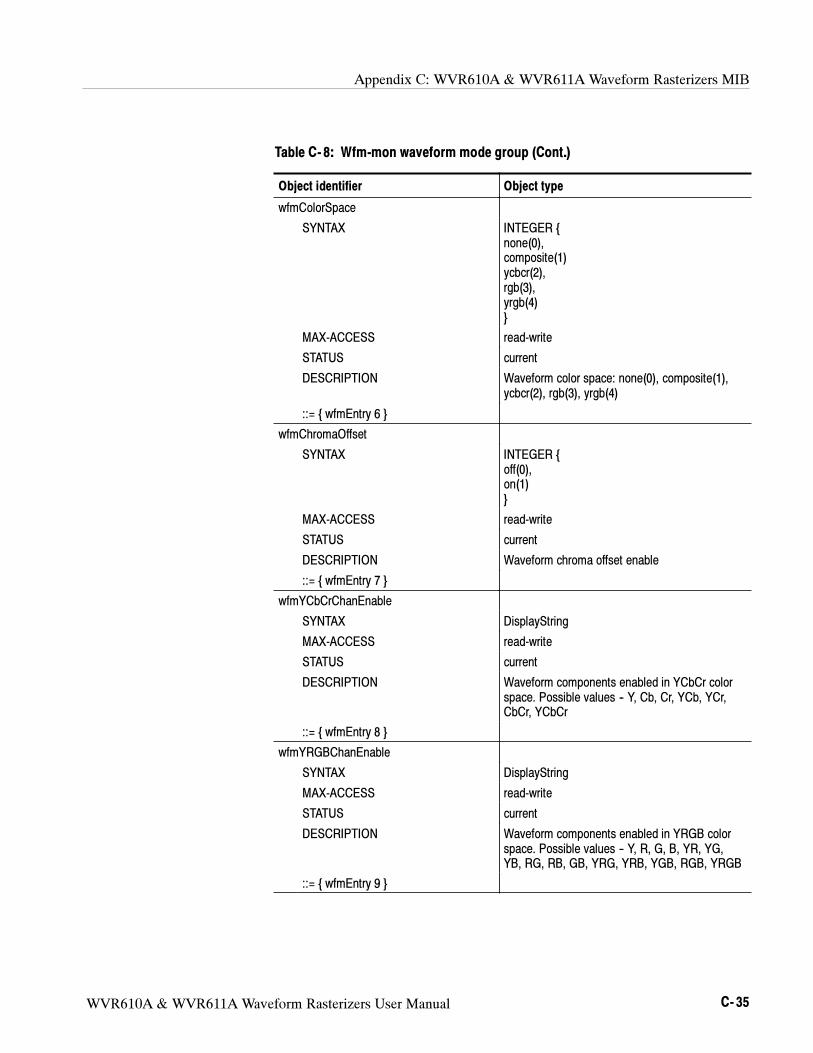
Appendix C: WVR610A & WVR611A Waveform Rasterizers MIB
WVR610A & WVR611A Waveform Rasterizers User Manual C- 35
Table C- 8: Wfm-mon waveform mode group (Cont.)
Object identifier Object type
wfmColorSpace
SYNTAX INTEGER
none(0),
composite(1)
ycbcr(2),
rgb(3),
yrgb(4)
MAX-ACCESS read-write
STATUS current
DESCRIPTION Waveform color space: none(0), composite(1),
ycbcr(2), rgb(3), yrgb(4)
::= wfmEntry 6
wfmChromaOffset
SYNTAX INTEGER
off(0),
on(1)
MAX-ACCESS read-write
STATUS current
DESCRIPTION Waveform chroma offset enable
::= wfmEntry 7
wfmYCbCrChanEnable
SYNTAX DisplayString
MAX-ACCESS read-write
STATUS current
DESCRIPTION Waveform components enabled in YCbCr color
space. Possible values -- Y, Cb, Cr, YCb, YCr,
CbCr, YCbCr
::= wfmEntry 8
wfmYRGBChanEnable
SYNTAX DisplayString
MAX-ACCESS read-write
STATUS current
DESCRIPTION Waveform components enabled in YRGB color
space. Possible values -- Y, R, G, B, YR, YG,
YB, RG, RB, GB, YRG, YRB, YGB, RGB, YRGB
::= wfmEntry 9

Appendix C: WVR610A & WVR611A Waveform Rasterizers MIB
C- 36 WVR610A & WVR611A Waveform Rasterizers User Manual
Table C- 8: Wfm-mon waveform mode group (Cont.)
Object identifier Object type
wfmRGBChanEnable
SYNTAX DisplayString
MAX-ACCESS read-write
STATUS current
DESCRIPTION Waveform components enabled in RGB color
space. Possible values -- R, G, B, RG, GB, RB,
RGB
::= wfmEntry 10
wfmSweepMode
SYNTAX INTEGER
h1(1),
h2(2),
f1(3),
f2(4)
MAX-ACCESS read-write
STATUS current
DESCRIPTION Waveform sweep mode
::= wfmEntry 11
wfmGainMode
SYNTAX INTEGER
gain--x1(0),
gain--x5(1)
MAX-ACCESS read-write
STATUS current
DESCRIPTION Waveform fixed gain value
::= wfmEntry 12
wfmVarGainEnable
SYNTAX INTEGER
off(0),
on(1)
MAX-ACCESS read-write
STATUS current
DESCRIPTION Enable/disable waveform variable gain
::= wfmEntry 13
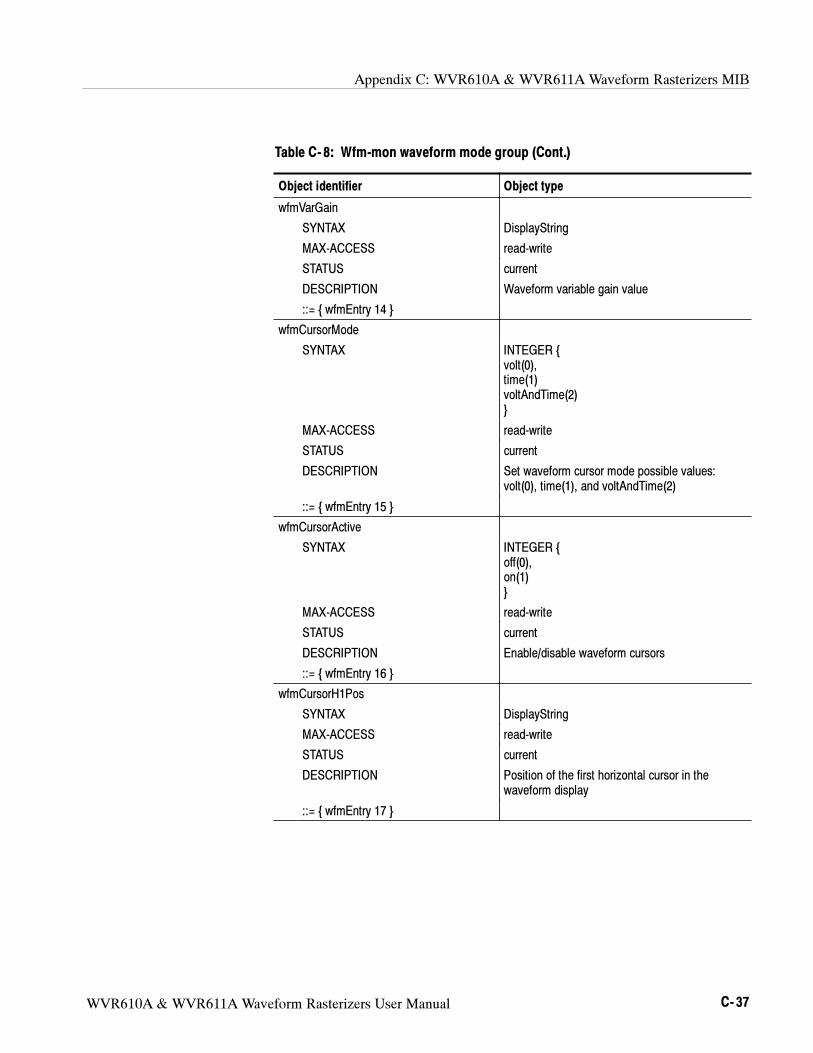
Appendix C: WVR610A & WVR611A Waveform Rasterizers MIB
WVR610A & WVR611A Waveform Rasterizers User Manual C- 37
Table C- 8: Wfm-mon waveform mode group (Cont.)
Object identifier Object type
wfmVarGain
SYNTAX DisplayString
MAX-ACCESS read-write
STATUS current
DESCRIPTION Waveform variable gain value
::= wfmEntry 14
wfmCursorMode
SYNTAX INTEGER
volt(0),
time(1)
voltAndTime(2)
MAX-ACCESS read-write
STATUS current
DESCRIPTION Set waveform cursor mode possible values:
volt(0), time(1), and voltAndTime(2)
::= wfmEntry 15
wfmCursorActive
SYNTAX INTEGER
off(0),
on(1)
MAX-ACCESS read-write
STATUS current
DESCRIPTION Enable/disable waveform cursors
::= wfmEntry 16
wfmCursorH1Pos
SYNTAX DisplayString
MAX-ACCESS read-write
STATUS current
DESCRIPTION Position of the first horizontal cursor in the
waveform display
::= wfmEntry 17
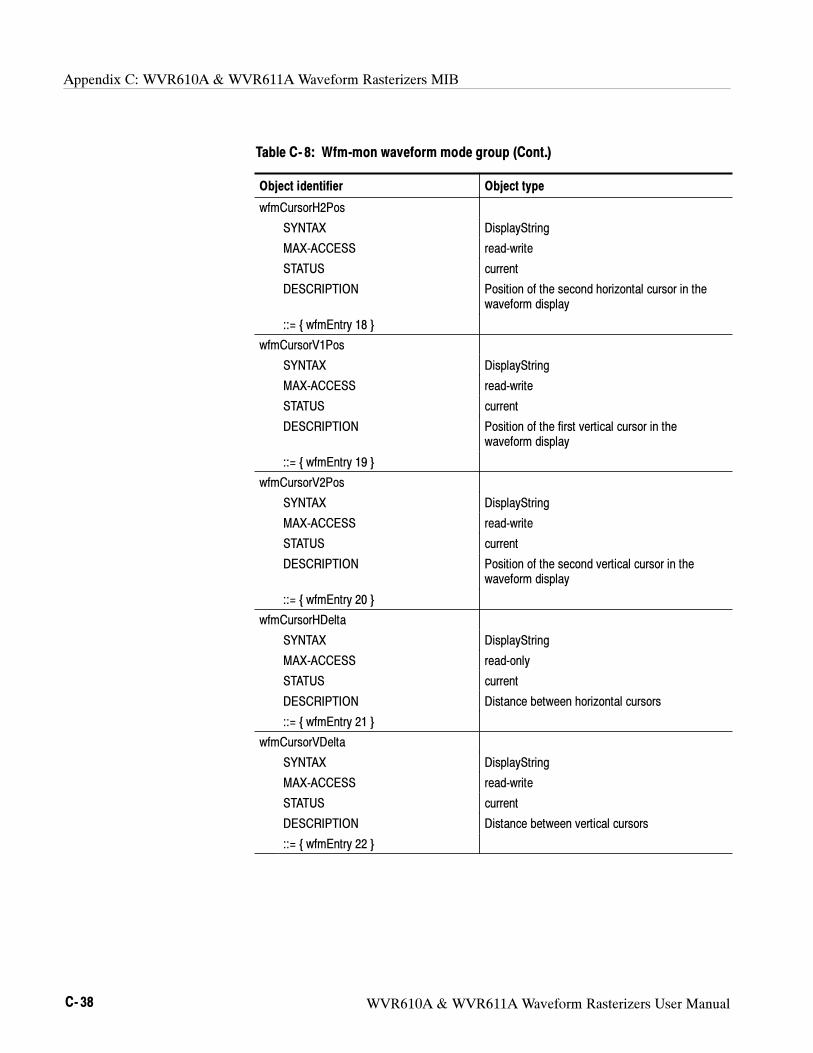
Appendix C: WVR610A & WVR611A Waveform Rasterizers MIB
C- 38 WVR610A & WVR611A Waveform Rasterizers User Manual
Table C- 8: Wfm-mon waveform mode group (Cont.)
Object identifier Object type
wfmCursorH2Pos
SYNTAX DisplayString
MAX-ACCESS read-write
STATUS current
DESCRIPTION Position of the second horizontal cursor in the
waveform display
::= wfmEntry 18
wfmCursorV1Pos
SYNTAX DisplayString
MAX-ACCESS read-write
STATUS current
DESCRIPTION Position of the first vertical cursor in the
waveform display
::= wfmEntry 19
wfmCursorV2Pos
SYNTAX DisplayString
MAX-ACCESS read-write
STATUS current
DESCRIPTION Position of the second vertical cursor in the
waveform display
::= wfmEntry 20
wfmCursorHDelta
SYNTAX DisplayString
MAX-ACCESS read-only
STATUS current
DESCRIPTION Distance between horizontal cursors
::= wfmEntry 21
wfmCursorVDelta
SYNTAX DisplayString
MAX-ACCESS read-write
STATUS current
DESCRIPTION Distance between vertical cursors
::= wfmEntry 22
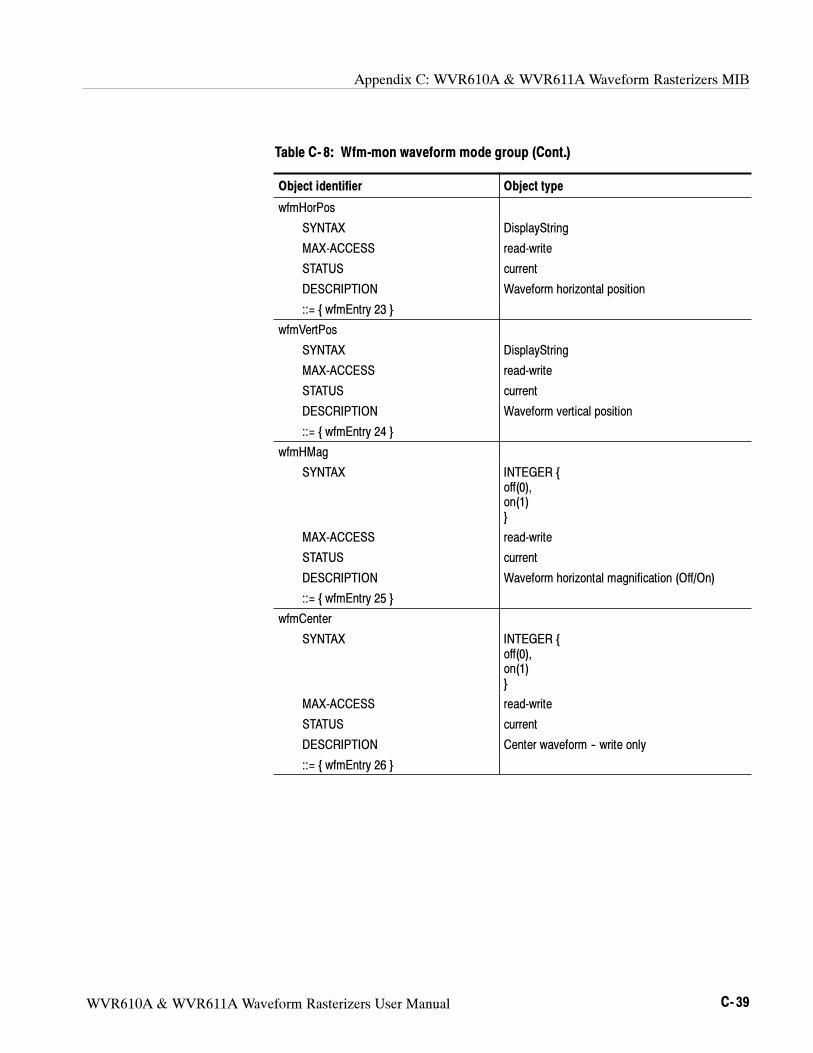
Appendix C: WVR610A & WVR611A Waveform Rasterizers MIB
WVR610A & WVR611A Waveform Rasterizers User Manual C- 39
Table C- 8: Wfm-mon waveform mode group (Cont.)
Object identifier Object type
wfmHorPos
SYNTAX DisplayString
MAX-ACCESS read-write
STATUS current
DESCRIPTION Waveform horizontal position
::= wfmEntry 23
wfmVertPos
SYNTAX DisplayString
MAX-ACCESS read-write
STATUS current
DESCRIPTION Waveform vertical position
::= wfmEntry 24
wfmHMag
SYNTAX INTEGER
off(0),
on(1)
MAX-ACCESS read-write
STATUS current
DESCRIPTION Waveform horizontal magnification (Off/On)
::= wfmEntry 25
wfmCenter
SYNTAX INTEGER
off(0),
on(1)
MAX-ACCESS read-write
STATUS current
DESCRIPTION Center waveform -- write only
::= wfmEntry 26
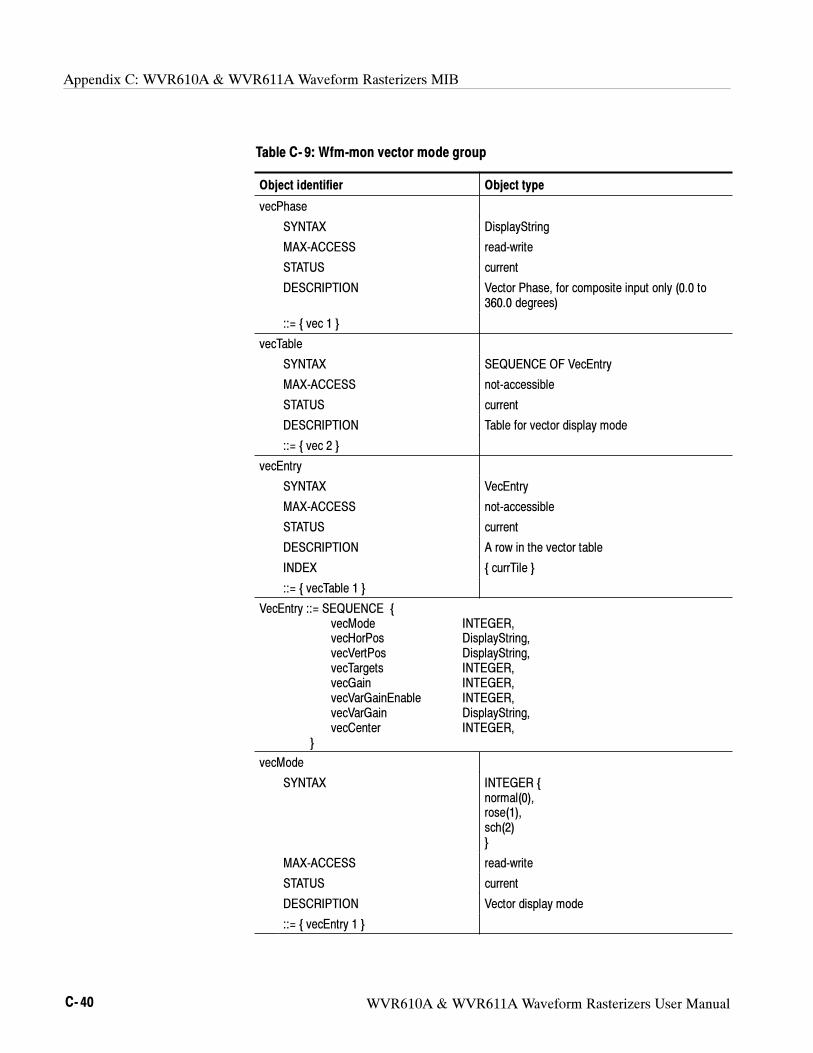
Appendix C: WVR610A & WVR611A Waveform Rasterizers MIB
C- 40 WVR610A & WVR611A Waveform Rasterizers User Manual
Table C- 9: Wfm-mon vector mode group
Object identifier Object type
vecPhase
SYNTAX DisplayString
MAX-ACCESS read-write
STATUS current
DESCRIPTION Vector Phase, for composite input only (0.0 to
360.0 degrees)
::= vec 1
vecTable
SYNTAX SEQUENCE OF VecEntry
MAX-ACCESS not-accessible
STATUS current
DESCRIPTION Table for vector display mode
::= vec 2
vecEntry
SYNTAX VecEntry
MAX-ACCESS not-accessible
STATUS current
DESCRIPTION A row in the vector table
INDEX currTile
::= vecTable 1
VecEntry ::= SEQUENCE
vecMode INTEGER,
vecHorPos DisplayString,
vecVertPos DisplayString,
vecTargets INTEGER,
vecGain INTEGER,
vecVarGainEnable INTEGER,
vecVarGain DisplayString,
vecCenter INTEGER,
vecMode
SYNTAX INTEGER
normal(0),
rose(1),
sch(2)
MAX-ACCESS read-write
STATUS current
DESCRIPTION Vector display mode
::= vecEntry 1
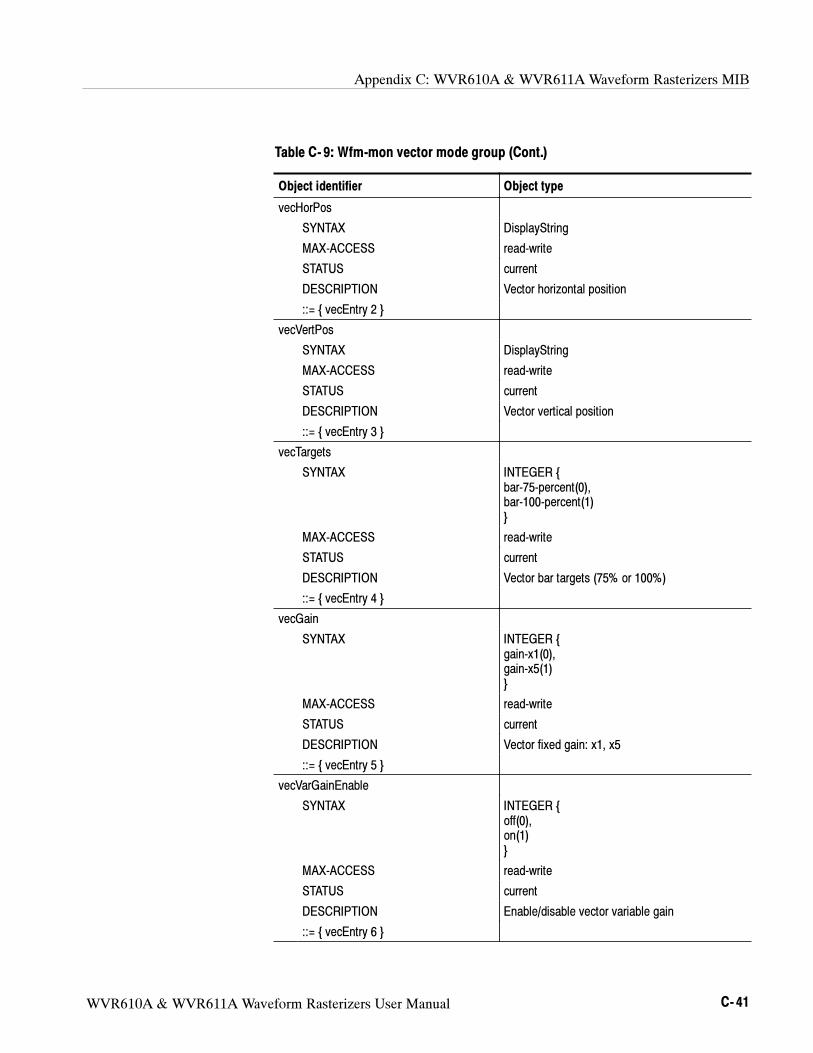
Appendix C: WVR610A & WVR611A Waveform Rasterizers MIB
WVR610A & WVR611A Waveform Rasterizers User Manual C- 41
Table C- 9: Wfm-mon vector mode group (Cont.)
Object identifier Object type
vecHorPos
SYNTAX DisplayString
MAX-ACCESS read-write
STATUS current
DESCRIPTION Vector horizontal position
::= vecEntry 2
vecVertPos
SYNTAX DisplayString
MAX-ACCESS read-write
STATUS current
DESCRIPTION Vector vertical position
::= vecEntry 3
vecTargets
SYNTAX INTEGER
bar-75-percent(0),
bar-100-percent(1)
MAX-ACCESS read-write
STATUS current
DESCRIPTION Vector bar targets (75% or 100%)
::= vecEntry 4
vecGain
SYNTAX INTEGER
gain-x1(0),
gain-x5(1)
MAX-ACCESS read-write
STATUS current
DESCRIPTION Vector fixed gain: x1, x5
::= vecEntry 5
vecVarGainEnable
SYNTAX INTEGER
off(0),
on(1)
MAX-ACCESS read-write
STATUS current
DESCRIPTION Enable/disable vector variable gain
::= vecEntry 6
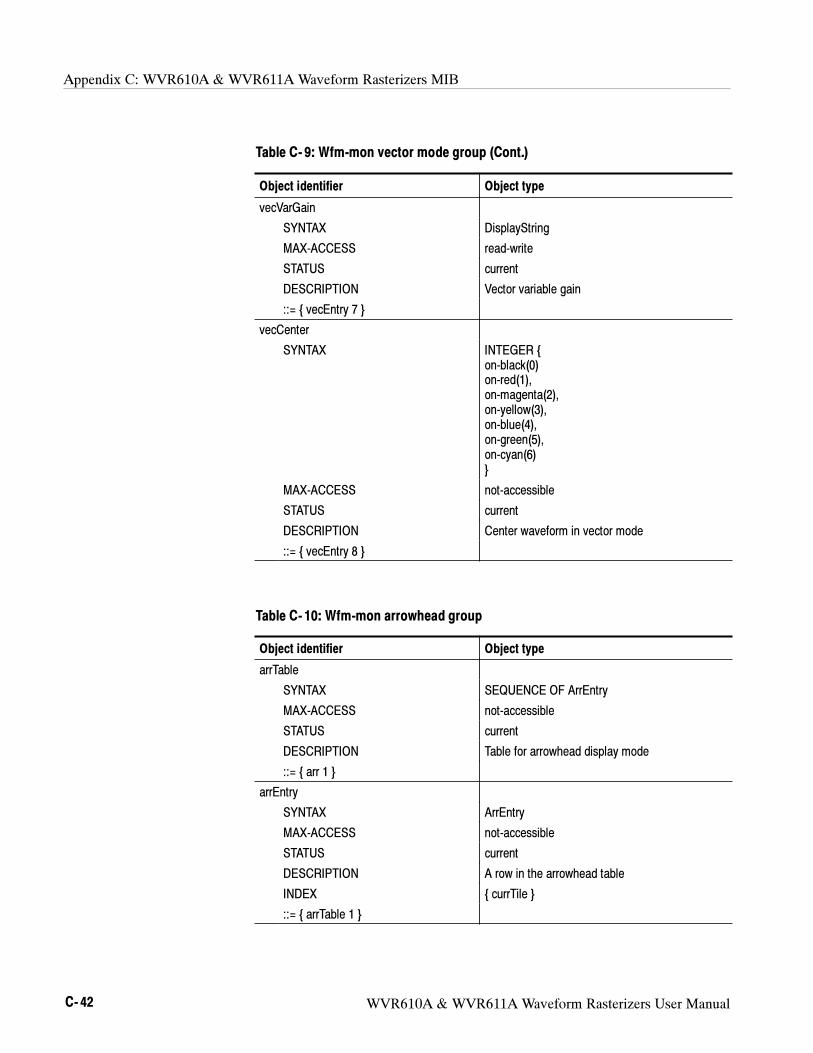
Appendix C: WVR610A & WVR611A Waveform Rasterizers MIB
C- 42 WVR610A & WVR611A Waveform Rasterizers User Manual
Table C- 9: Wfm-mon vector mode group (Cont.)
Object identifier Object type
vecVarGain
SYNTAX DisplayString
MAX-ACCESS read-write
STATUS current
DESCRIPTION Vector variable gain
::= vecEntry 7
vecCenter
SYNTAX INTEGER
on-black(0)
on-red(1),
on-magenta(2),
on-yellow(3),
on-blue(4),
on-green(5),
on-cyan(6)
MAX-ACCESS not-accessible
STATUS current
DESCRIPTION Center waveform in vector mode
::= vecEntry 8
Table C- 10: Wfm-mon arrowhead group
Object identifier Object type
arrTable
SYNTAX SEQUENCE OF ArrEntry
MAX-ACCESS not-accessible
STATUS current
DESCRIPTION Table for arrowhead display mode
::= arr 1
arrEntry
SYNTAX ArrEntry
MAX-ACCESS not-accessible
STATUS current
DESCRIPTION A row in the arrowhead table
INDEX currTile
::= arrTable 1

Appendix C: WVR610A & WVR611A Waveform Rasterizers MIB
WVR610A & WVR611A Waveform Rasterizers User Manual C- 43
Table C- 10: Wfm-mon arrowhead group (Cont.)
Object identifier Object type
ArrEntry ::= SEQUENCE
arrMode INTEGER
arrMode
SYNTAX INTEGER
normal(0),
setup(1)
MAX-ACCESS read-write
STATUS current
DESCRIPTION Arrowhead display mode: normal/setup
::= arrEntry 1
Table C- 11: Wfm-mon lightning group
Object identifier Object type
lgtTable
SYNTAX SEQUENCE OF LgtEntry
MAX-ACCESS not-accessible
STATUS current
DESCRIPTION Table for lightning display mode
::= lgt 1
lgtEntry
SYNTAX LgtEntry
MAX-ACCESS not-accessible
STATUS current
DESCRIPTION A row in the lightning table
INDEX currTile
::= lgtTable 1
LgtEntry ::= SEQUENCE
lgtHorPos DisplayString,
lgtVertPos DisplayString,
lgtHorGain INTEGER,
lgtVertGain INTEGER,
lgtVarHGainEnable INTEGER,
lgtVarHorGain DisplayString,
lgtVarVGainEnable INTEGER,
lgtVarVertGain DisplayString
lgtCenter INTEGER
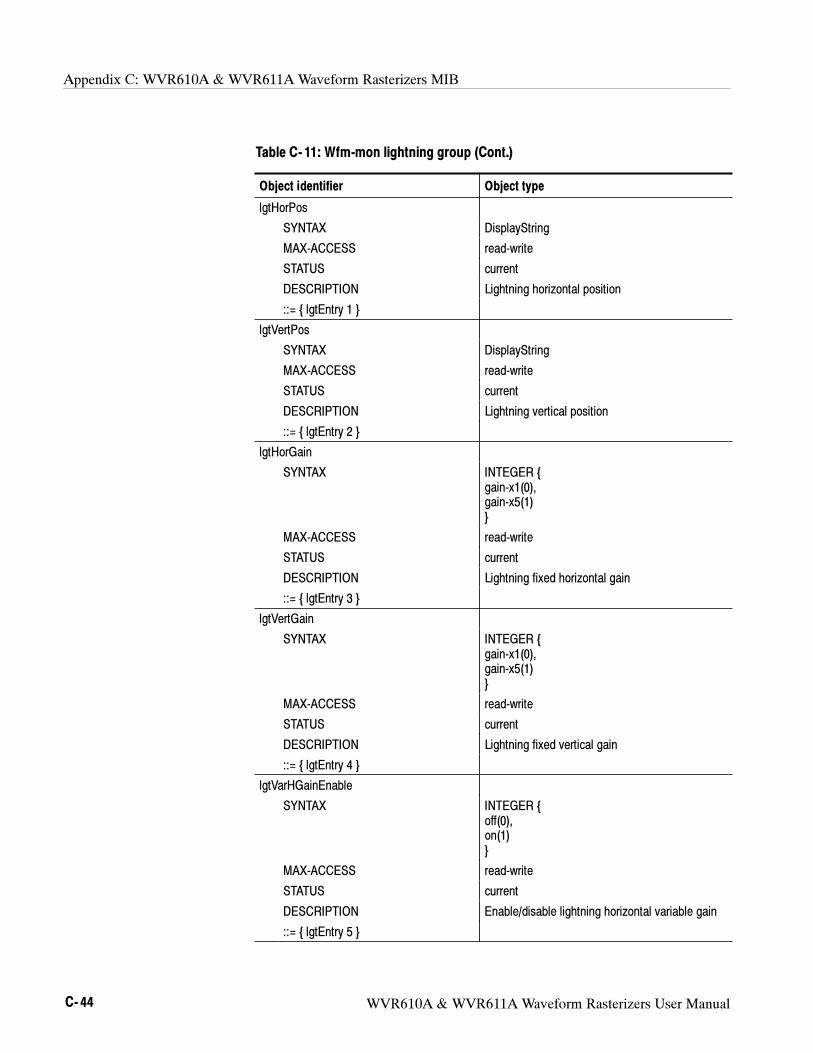
Appendix C: WVR610A & WVR611A Waveform Rasterizers MIB
C- 44 WVR610A & WVR611A Waveform Rasterizers User Manual
Table C- 11: Wfm-mon lightning group (Cont.)
Object identifier Object type
lgtHorPos
SYNTAX DisplayString
MAX-ACCESS read-write
STATUS current
DESCRIPTION Lightning horizontal position
::= lgtEntry 1
lgtVertPos
SYNTAX DisplayString
MAX-ACCESS read-write
STATUS current
DESCRIPTION Lightning vertical position
::= lgtEntry 2
lgtHorGain
SYNTAX INTEGER
gain-x1(0),
gain-x5(1)
MAX-ACCESS read-write
STATUS current
DESCRIPTION Lightning fixed horizontal gain
::= lgtEntry 3
lgtVertGain
SYNTAX INTEGER
gain-x1(0),
gain-x5(1)
MAX-ACCESS read-write
STATUS current
DESCRIPTION Lightning fixed vertical gain
::= lgtEntry 4
lgtVarHGainEnable
SYNTAX INTEGER
off(0),
on(1)
MAX-ACCESS read-write
STATUS current
DESCRIPTION Enable/disable lightning horizontal variable gain
::= lgtEntry 5

Appendix C: WVR610A & WVR611A Waveform Rasterizers MIB
WVR610A & WVR611A Waveform Rasterizers User Manual C- 45
Table C- 11: Wfm-mon lightning group (Cont.)
Object identifier Object type
lgtVarHorGain
SYNTAX DisplayString
MAX-ACCESS read-write
STATUS current
DESCRIPTION Lightning variable horizontal (chroma) gain
::= lgtEntry 6
lgtVarVGainEnable
SYNTAX INTEGER
off(0),
on(1)
MAX-ACCESS read-write
STATUS current
DESCRIPTION Enable/disable lightning vertical variable gain
::= lgtEntry 7
lgtVarVertGain
SYNTAX DisplayString
MAX-ACCESS read-write
STATUS current
DESCRIPTION Lightning variable vertical (luma) gain
::= lgtEntry 8
lgtCenter
SYNTAX INTEGER
MAX-ACCESS not-accessible
STATUS current
DESCRIPTION Center waveform in lightning mode
::= lgtEntry 9
Table C- 12: Wfm-mon diamond group
Object identifier Object type
dmdThrHigh
SYNTAX INTEGER
MAX-ACCESS read-write
STATUS current
DESCRIPTION Upper threshold (mV)
::= dmd 1
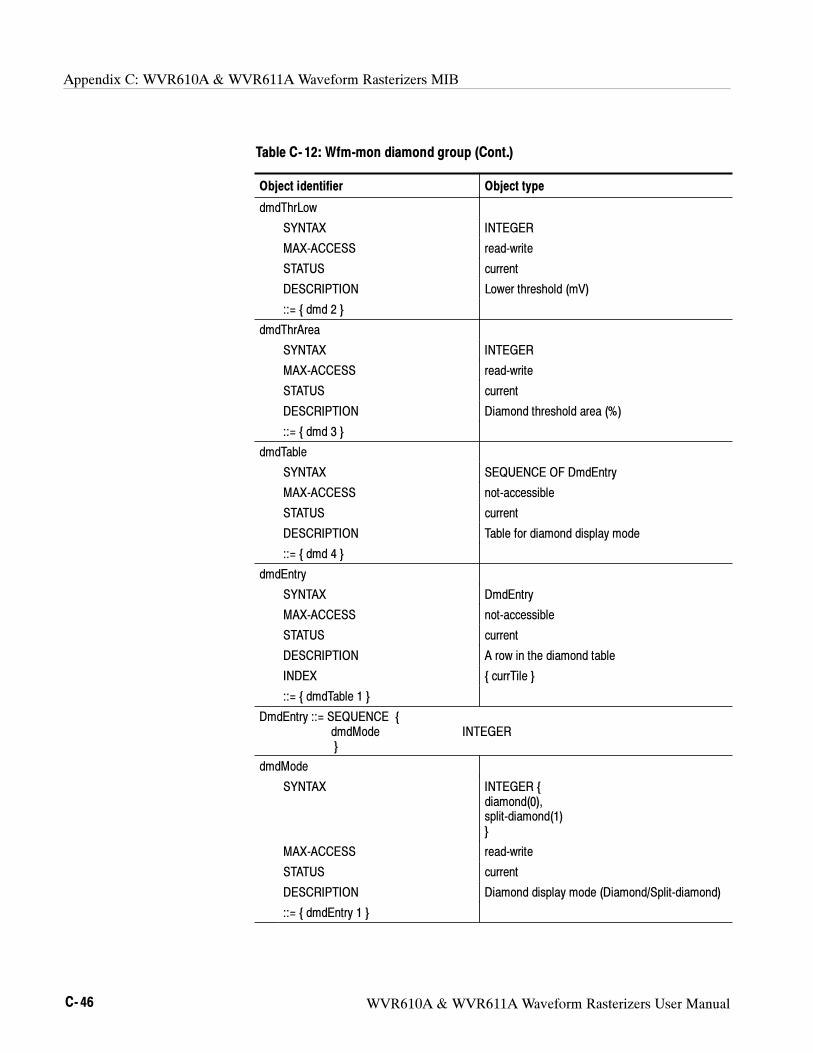
Appendix C: WVR610A & WVR611A Waveform Rasterizers MIB
C- 46 WVR610A & WVR611A Waveform Rasterizers User Manual
Table C- 12: Wfm-mon diamond group (Cont.)
Object identifier Object type
dmdThrLow
SYNTAX INTEGER
MAX-ACCESS read-write
STATUS current
DESCRIPTION Lower threshold (mV)
::= dmd 2
dmdThrArea
SYNTAX INTEGER
MAX-ACCESS read-write
STATUS current
DESCRIPTION Diamond threshold area (%)
::= dmd 3
dmdTable
SYNTAX SEQUENCE OF DmdEntry
MAX-ACCESS not-accessible
STATUS current
DESCRIPTION Table for diamond display mode
::= dmd 4
dmdEntry
SYNTAX DmdEntry
MAX-ACCESS not-accessible
STATUS current
DESCRIPTION A row in the diamond table
INDEX currTile
::= dmdTable 1
DmdEntry ::= SEQUENCE
dmdMode INTEGER
dmdMode
SYNTAX INTEGER
diamond(0),
split-diamond(1)
MAX-ACCESS read-write
STATUS current
DESCRIPTION Diamond display mode (Diamond/Split-diamond)
::= dmdEntry 1
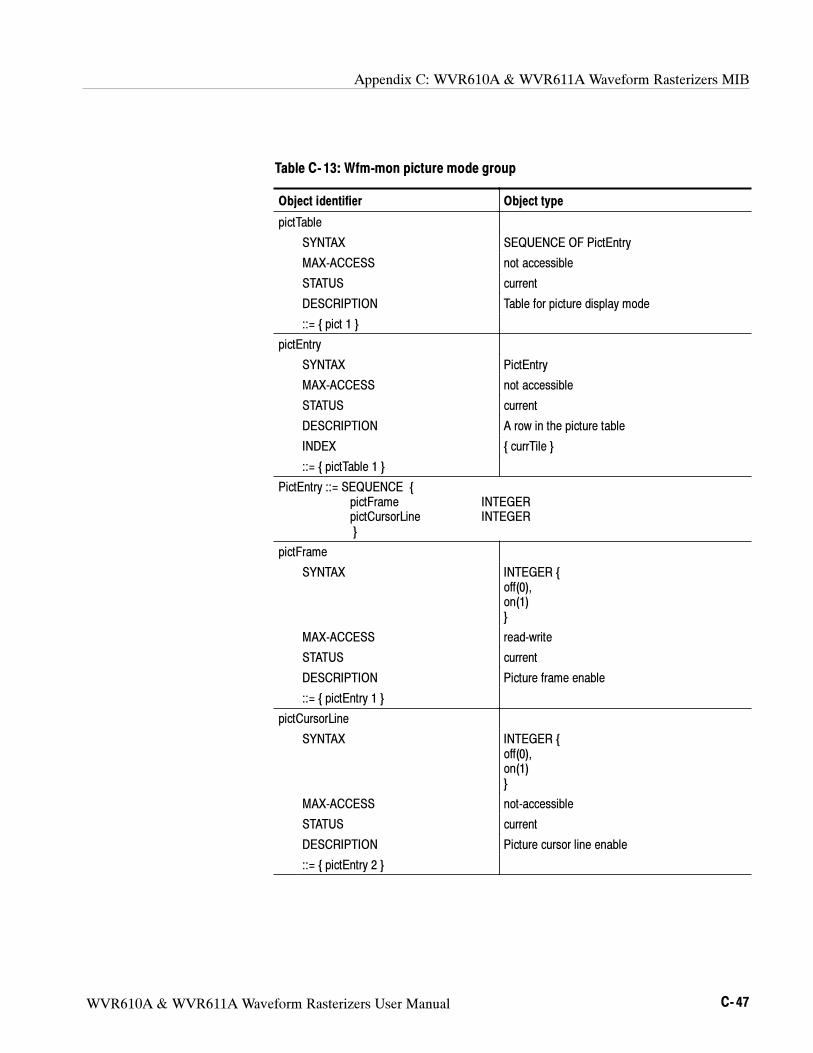
Appendix C: WVR610A & WVR611A Waveform Rasterizers MIB
WVR610A & WVR611A Waveform Rasterizers User Manual C- 47
Table C- 13: Wfm-mon picture mode group
Object identifier Object type
pictTable
SYNTAX SEQUENCE OF PictEntry
MAX-ACCESS not accessible
STATUS current
DESCRIPTION Table for picture display mode
::= pict 1
pictEntry
SYNTAX PictEntry
MAX-ACCESS not accessible
STATUS current
DESCRIPTION A row in the picture table
INDEX currTile
::= pictTable 1
PictEntry ::= SEQUENCE
pictFrame INTEGER
pictCursorLine INTEGER
pictFrame
SYNTAX INTEGER
off(0),
on(1)
MAX-ACCESS read-write
STATUS current
DESCRIPTION Picture frame enable
::= pictEntry 1
pictCursorLine
SYNTAX INTEGER
off(0),
on(1)
MAX-ACCESS not-accessible
STATUS current
DESCRIPTION Picture cursor line enable
::= pictEntry 2
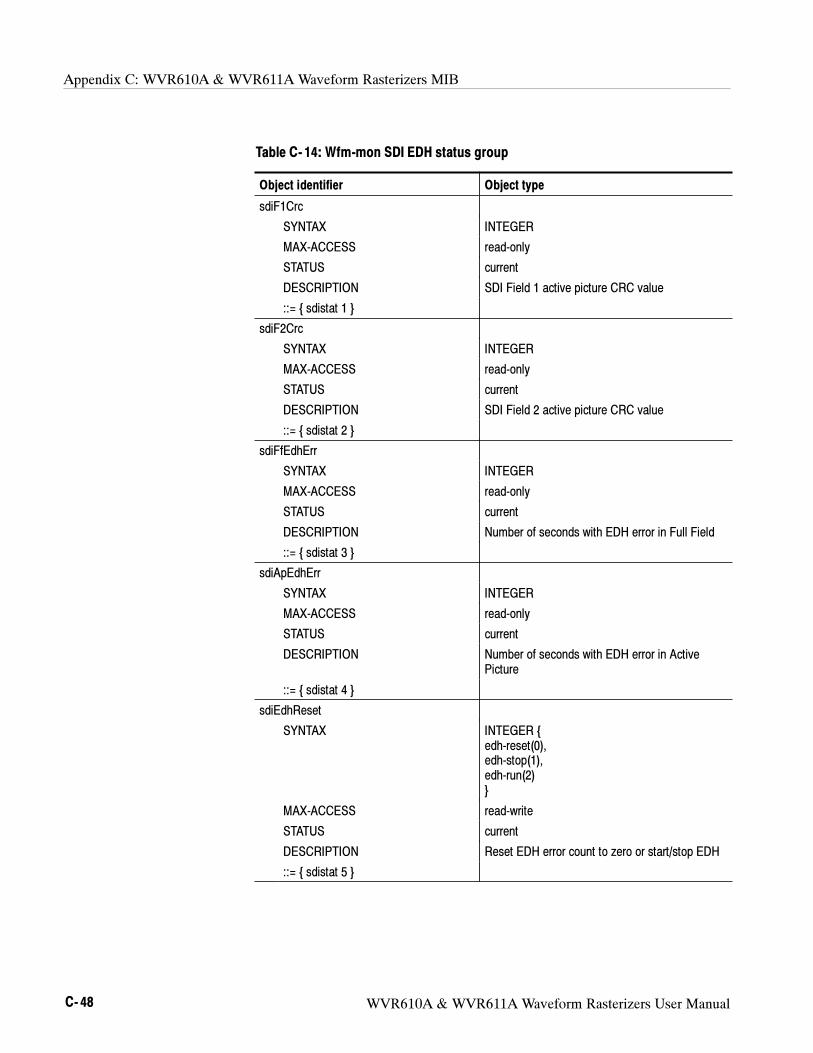
Appendix C: WVR610A & WVR611A Waveform Rasterizers MIB
C- 48 WVR610A & WVR611A Waveform Rasterizers User Manual
Table C- 14: Wfm-mon SDI EDH status group
Object identifier Object type
sdiF1Crc
SYNTAX INTEGER
MAX-ACCESS read-only
STATUS current
DESCRIPTION SDI Field 1 active picture CRC value
::= sdistat 1
sdiF2Crc
SYNTAX INTEGER
MAX-ACCESS read-only
STATUS current
DESCRIPTION SDI Field 2 active picture CRC value
::= sdistat 2
sdiFfEdhErr
SYNTAX INTEGER
MAX-ACCESS read-only
STATUS current
DESCRIPTION Number of seconds with EDH error in Full Field
::= sdistat 3
sdiApEdhErr
SYNTAX INTEGER
MAX-ACCESS read-only
STATUS current
DESCRIPTION Number of seconds with EDH error in Active
Picture
::= sdistat 4
sdiEdhReset
SYNTAX INTEGER
edh-reset(0),
edh-stop(1),
edh-run(2)
MAX-ACCESS read-write
STATUS current
DESCRIPTION Reset EDH error count to zero or start/stop EDH
::= sdistat 5
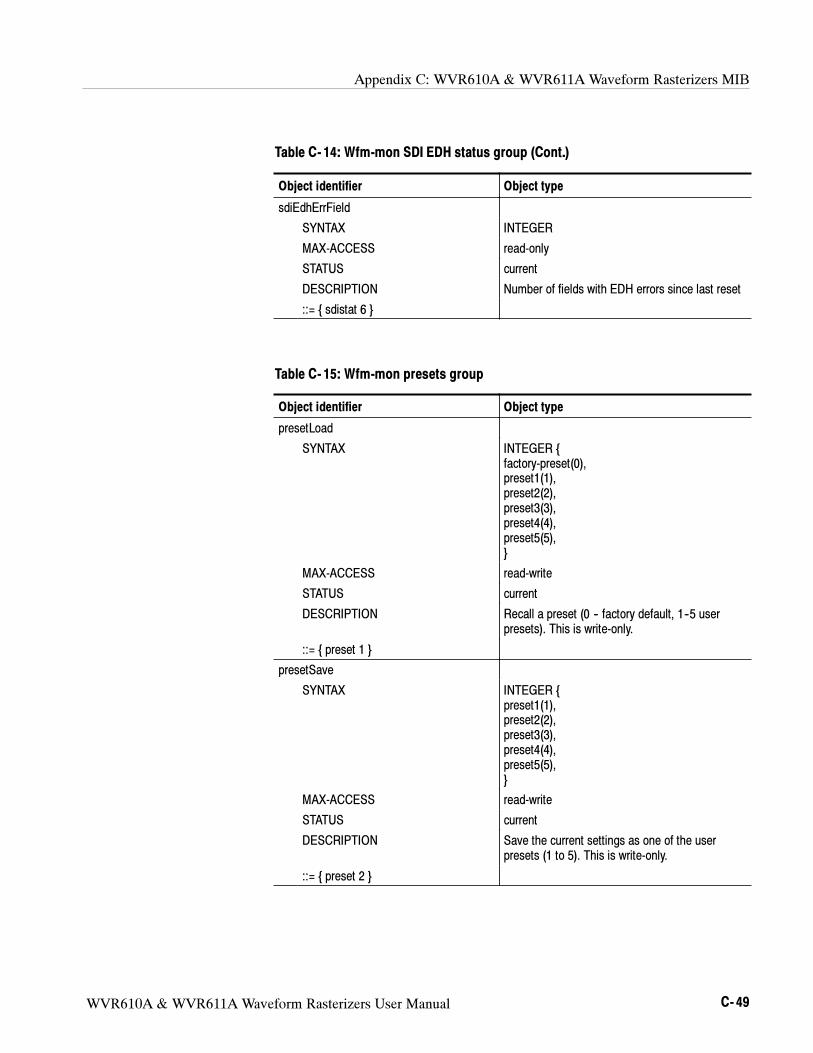
Appendix C: WVR610A & WVR611A Waveform Rasterizers MIB
WVR610A & WVR611A Waveform Rasterizers User Manual C- 49
Table C- 14: Wfm-mon SDI EDH status group (Cont.)
Object identifier Object type
sdiEdhErrField
SYNTAX INTEGER
MAX-ACCESS read-only
STATUS current
DESCRIPTION Number of fields with EDH errors since last reset
::= sdistat 6
Table C- 15: Wfm-mon presets group
Object identifier Object type
presetLoad
SYNTAX INTEGER
factory-preset(0),
preset1(1),
preset2(2),
preset3(3),
preset4(4),
preset5(5),
MAX-ACCESS read-write
STATUS current
DESCRIPTION Recall a preset (0 -- factory default, 1--5 user
presets). This is write-only.
::= preset 1
presetSave
SYNTAX INTEGER
preset1(1),
preset2(2),
preset3(3),
preset4(4),
preset5(5),
MAX-ACCESS read-write
STATUS current
DESCRIPTION Save the current settings as one of the user
presets (1 to 5). This is write-only.
::= preset 2
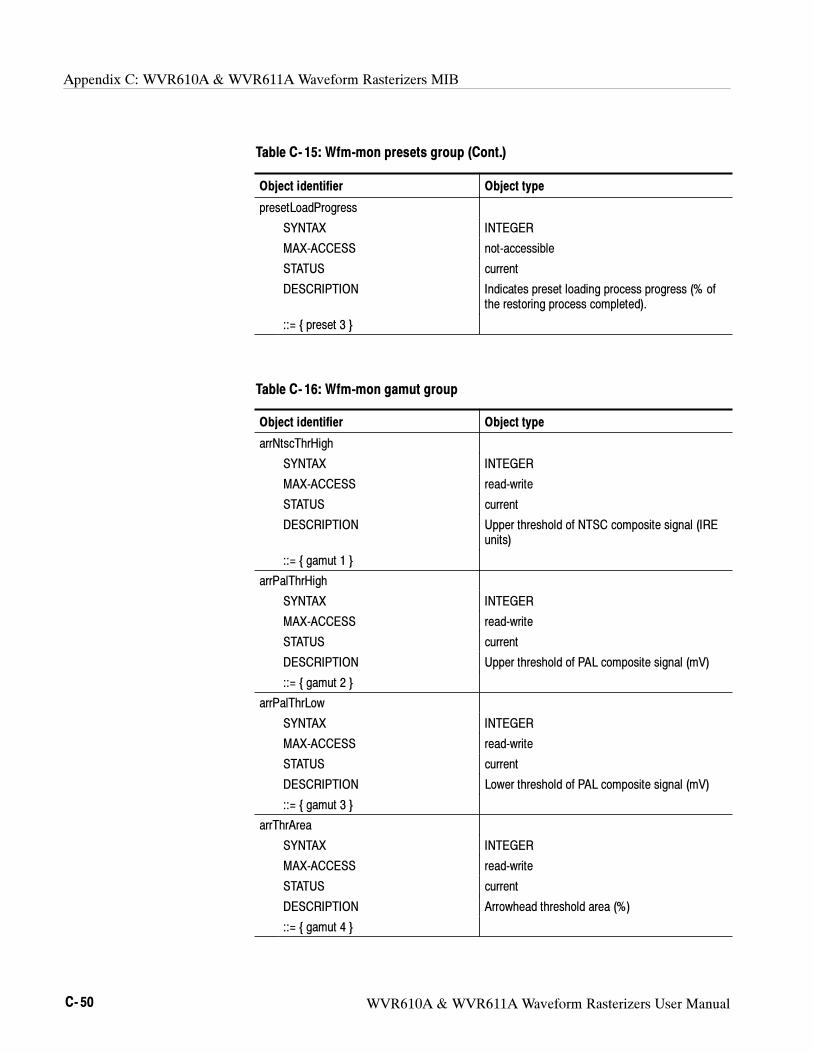
Appendix C: WVR610A & WVR611A Waveform Rasterizers MIB
C- 50 WVR610A & WVR611A Waveform Rasterizers User Manual
Table C- 15: Wfm-mon presets group (Cont.)
Object identifier Object type
presetLoadProgress
SYNTAX INTEGER
MAX-ACCESS not-accessible
STATUS current
DESCRIPTION Indicates preset loading process progress (% of
the restoring process completed).
::= preset 3
Table C- 16: Wfm-mon gamut group
Object identifier Object type
arrNtscThrHigh
SYNTAX INTEGER
MAX-ACCESS read-write
STATUS current
DESCRIPTION Upper threshold of NTSC composite signal (IRE
units)
::= gamut 1
arrPalThrHigh
SYNTAX INTEGER
MAX-ACCESS read-write
STATUS current
DESCRIPTION Upper threshold of PAL composite signal (mV)
::= gamut 2
arrPalThrLow
SYNTAX INTEGER
MAX-ACCESS read-write
STATUS current
DESCRIPTION Lower threshold of PAL composite signal (mV)
::= gamut 3
arrThrArea
SYNTAX INTEGER
MAX-ACCESS read-write
STATUS current
DESCRIPTION Arrowhead threshold area (%)
::= gamut 4
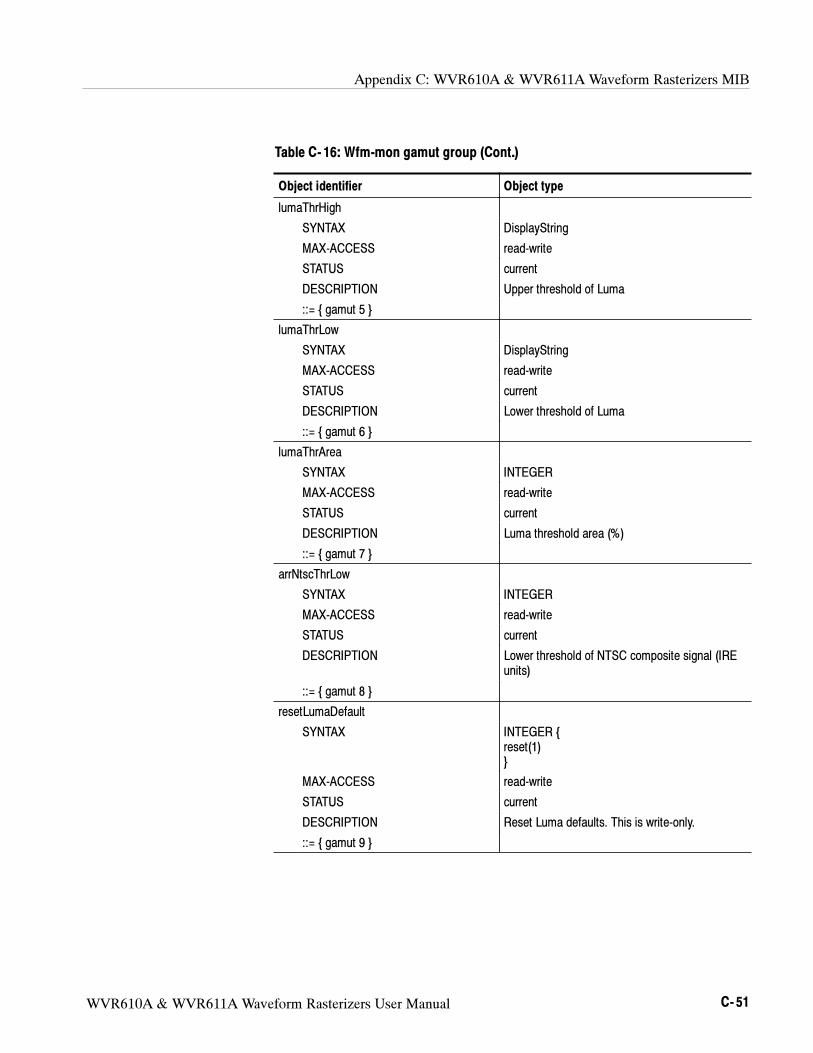
Appendix C: WVR610A & WVR611A Waveform Rasterizers MIB
WVR610A & WVR611A Waveform Rasterizers User Manual C- 51
Table C- 16: Wfm-mon gamut group (Cont.)
Object identifier Object type
lumaThrHigh
SYNTAX DisplayString
MAX-ACCESS read-write
STATUS current
DESCRIPTION Upper threshold of Luma
::= gamut 5
lumaThrLow
SYNTAX DisplayString
MAX-ACCESS read-write
STATUS current
DESCRIPTION Lower threshold of Luma
::= gamut 6
lumaThrArea
SYNTAX INTEGER
MAX-ACCESS read-write
STATUS current
DESCRIPTION Luma threshold area (%)
::= gamut 7
arrNtscThrLow
SYNTAX INTEGER
MAX-ACCESS read-write
STATUS current
DESCRIPTION Lower threshold of NTSC composite signal (IRE
units)
::= gamut 8
resetLumaDefault
SYNTAX INTEGER
reset(1)
MAX-ACCESS read-write
STATUS current
DESCRIPTION Reset Luma defaults. This is write-only.
::= gamut 9
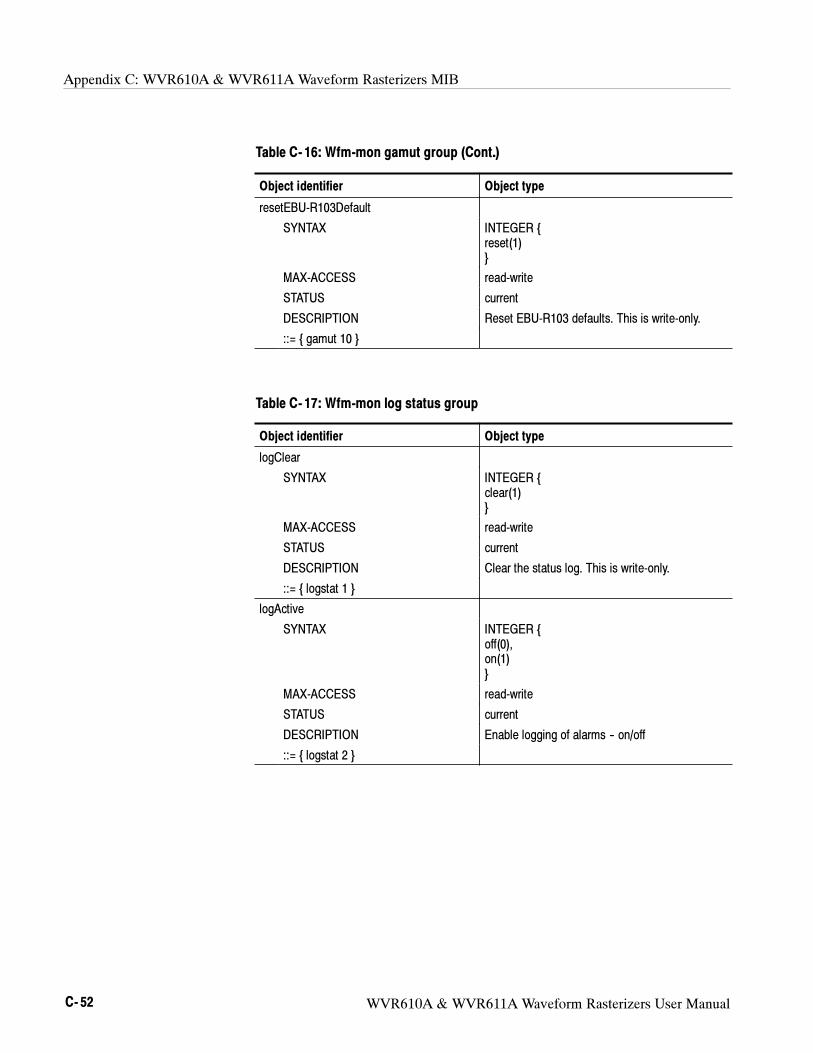
Appendix C: WVR610A & WVR611A Waveform Rasterizers MIB
C- 52 WVR610A & WVR611A Waveform Rasterizers User Manual
Table C- 16: Wfm-mon gamut group (Cont.)
Object identifier Object type
resetEBU-R103Default
SYNTAX INTEGER
reset(1)
MAX-ACCESS read-write
STATUS current
DESCRIPTION Reset EBU-R103 defaults. This is write-only.
::= gamut 10
Table C- 17: Wfm-mon log status group
Object identifier Object type
logClear
SYNTAX INTEGER
clear(1)
MAX-ACCESS read-write
STATUS current
DESCRIPTION Clear the status log. This is write-only.
::= logstat 1
logActive
SYNTAX INTEGER
off(0),
on(1)
MAX-ACCESS read-write
STATUS current
DESCRIPTION Enable logging of alarms -- on/off
::= logstat 2

Appendix C: WVR610A & WVR611A Waveform Rasterizers MIB
WVR610A & WVR611A Waveform Rasterizers User Manual C- 53
Table C- 17: Wfm-mon log status group (Cont.)
Object identifier Object type
logPage
SYNTAX INTEGER
first(1),
last(2),
prev(3),
next(4)
MAX-ACCESS read-write
STATUS current
DESCRIPTION Go to the specified page of the log. This is
write-only.
::= logstat 3
Table C- 18: Wfm-mon audio group
Object identifier Object type
audTable
SYNTAX SEQUENCE OF AudEntry
MAX-ACCESS not accessible
STATUS current
DESCRIPTION Table for audio mode
::= audio 1
audEntry
SYNTAX AudEntry
MAX-ACCESS not accessible
STATUS current
DESCRIPTION A row in the audio table
INDEX currTile
::= audTable 1
AudEntry ::= SEQUENCE
audPhaseDisplay INTEGER
audPhaseStyle INTEGER
audPhasePair INTEGER
audInput INTEGER
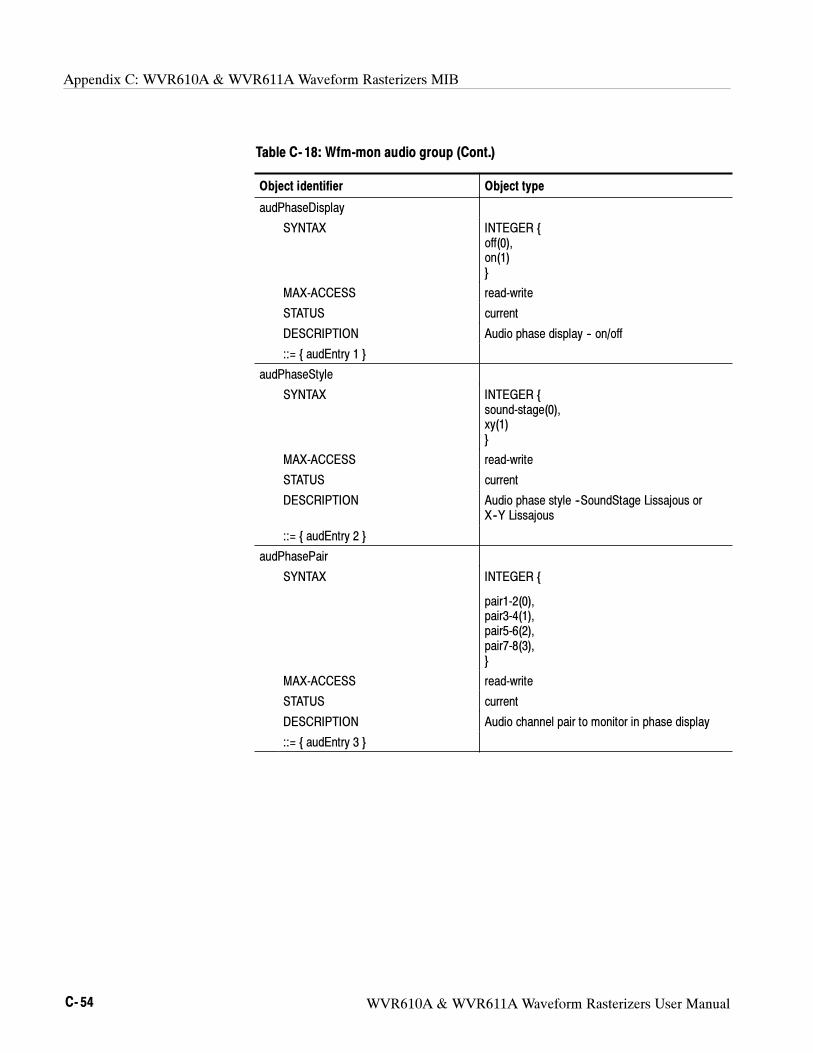
Appendix C: WVR610A & WVR611A Waveform Rasterizers MIB
C- 54 WVR610A & WVR611A Waveform Rasterizers User Manual
Table C- 18: Wfm-mon audio group (Cont.)
Object identifier Object type
audPhaseDisplay
SYNTAX INTEGER
off(0),
on(1)
MAX-ACCESS read-write
STATUS current
DESCRIPTION Audio phase display -- on/off
::= audEntry 1
audPhaseStyle
SYNTAX INTEGER
sound-stage(0),
xy(1)
MAX-ACCESS read-write
STATUS current
DESCRIPTION Audio phase style --SoundStage Lissajous or
X--Y Lissajous
::= audEntry 2
audPhasePair
SYNTAX INTEGER
pair1-2(0),
pair3-4(1),
pair5-6(2),
pair7-8(3),
MAX-ACCESS read-write
STATUS current
DESCRIPTION Audio channel pair to monitor in phase display
::= audEntry 3
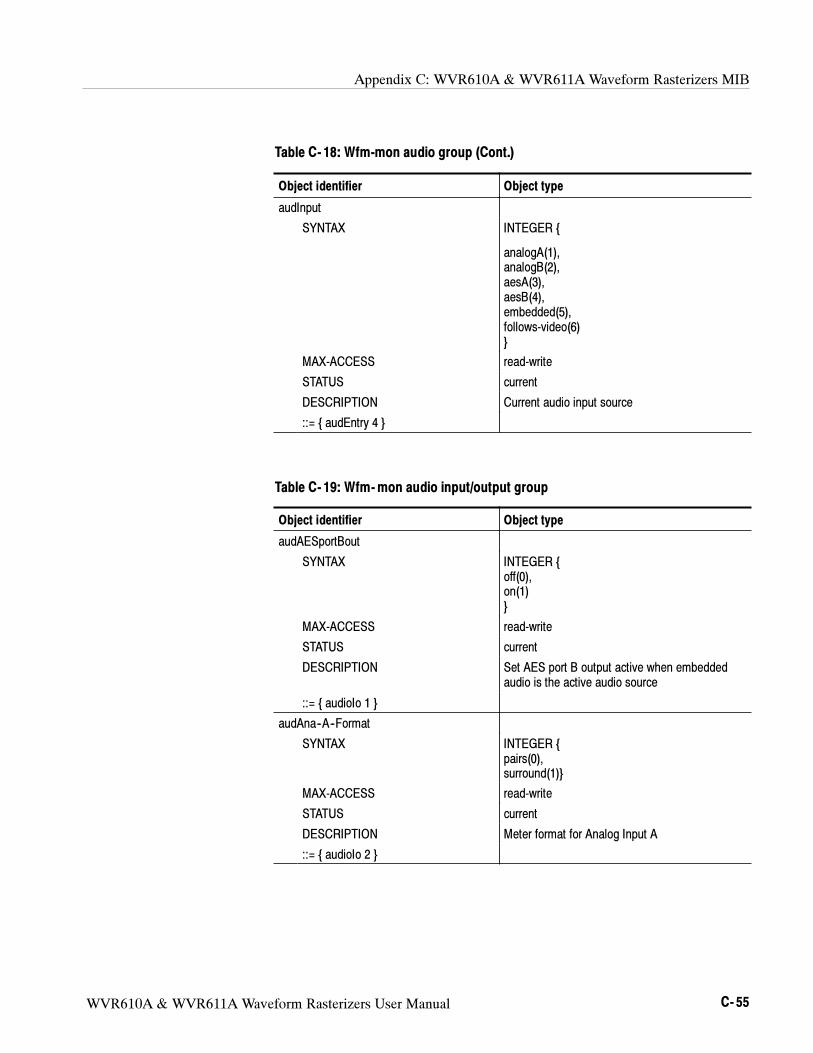
Appendix C: WVR610A & WVR611A Waveform Rasterizers MIB
WVR610A & WVR611A Waveform Rasterizers User Manual C- 55
Table C- 18: Wfm-mon audio group (Cont.)
Object identifier Object type
audInput
SYNTAX INTEGER
analogA(1),
analogB(2),
aesA(3),
aesB(4),
embedded(5),
follows-video(6)
MAX-ACCESS read-write
STATUS current
DESCRIPTION Current audio input source
::= audEntry 4
Table C- 19: Wfm-mon audio input/output group
Object identifier Object type
audAESportBout
SYNTAX INTEGER
off(0),
on(1)
MAX-ACCESS read-write
STATUS current
DESCRIPTION Set AES port B output active when embedded
audio is the active audio source
::= audioIo 1
audAna--A--Format
SYNTAX INTEGER
pairs(0),
surround(1)
MAX-ACCESS read-write
STATUS current
DESCRIPTION Meter format for Analog Input A
::= audioIo 2
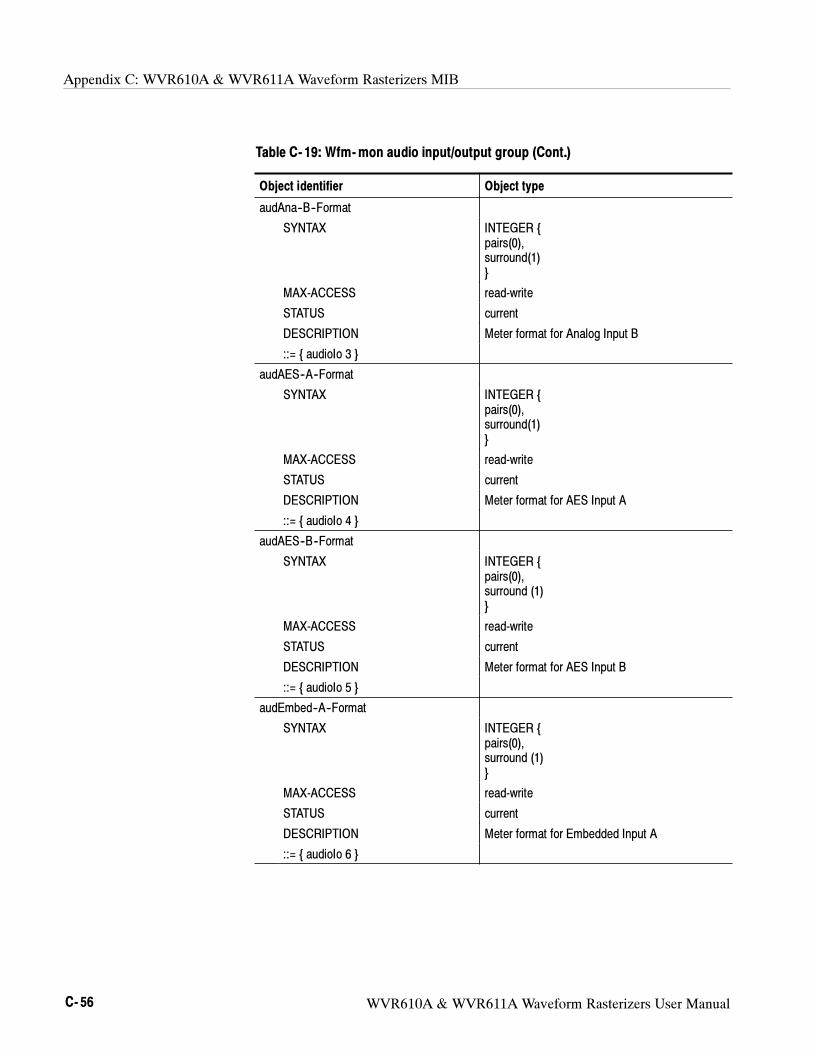
Appendix C: WVR610A & WVR611A Waveform Rasterizers MIB
C- 56 WVR610A & WVR611A Waveform Rasterizers User Manual
Table C- 19: Wfm-mon audio input/output group (Cont.)
Object identifier Object type
audAna--B--Format
SYNTAX INTEGER
pairs(0),
surround(1)
MAX-ACCESS read-write
STATUS current
DESCRIPTION Meter format for Analog Input B
::= audioIo 3
audAES--A--Format
SYNTAX INTEGER
pairs(0),
surround(1)
MAX-ACCESS read-write
STATUS current
DESCRIPTION Meter format for AES Input A
::= audioIo 4
audAES--B--Format
SYNTAX INTEGER
pairs(0),
surround (1)
MAX-ACCESS read-write
STATUS current
DESCRIPTION Meter format for AES Input B
::= audioIo 5
audEmbed--A--Format
SYNTAX INTEGER
pairs(0),
surround (1)
MAX-ACCESS read-write
STATUS current
DESCRIPTION Meter format for Embedded Input A
::= audioIo 6

Appendix C: WVR610A & WVR611A Waveform Rasterizers MIB
WVR610A & WVR611A Waveform Rasterizers User Manual C- 57
Table C- 19: Wfm-mon audio input/output group (Cont.)
Object identifier Object type
audEmbed--B--Format
SYNTAX INTEGER
pairs (0),
surround (1)
MAX-ACCESS read-write
STATUS current
DESCRIPTION Meter format for Embedded Input B
::= audioIo 7
levelMeters
SYNTAX INTEGER
barPair1(0),
barPair2(1),
barPair3(2),
barPair4(3)
MAX-ACCESS not--accessible
STATUS current
DESCRIPTION Level meter pair number. This is used as index in
table.
::= audioIo 8
audBarInTable
SYNTAX SEQUENCE OF AudBarInEntry
MAX-ACCESS not--accessible
STATUS current
DESCRIPTION Table for Bar to Audio source input map
::= audioIo 9
audBarInEntry
SYNTAX AudBarInEntry
MAX-ACCESS not--accessible
STATUS current
DESCRIPTION A row in the audBarInTable
INDEX levelMeters
::= audBarInTable 1
AudBarInEntry ::= SEQUENCE
audAES--A--BarInput INTEGER,
audAES--B--BarInput INTEGER,
audEmbed--A--BarInput INTEGER,
audEmbed--B--BarInput INTEGER
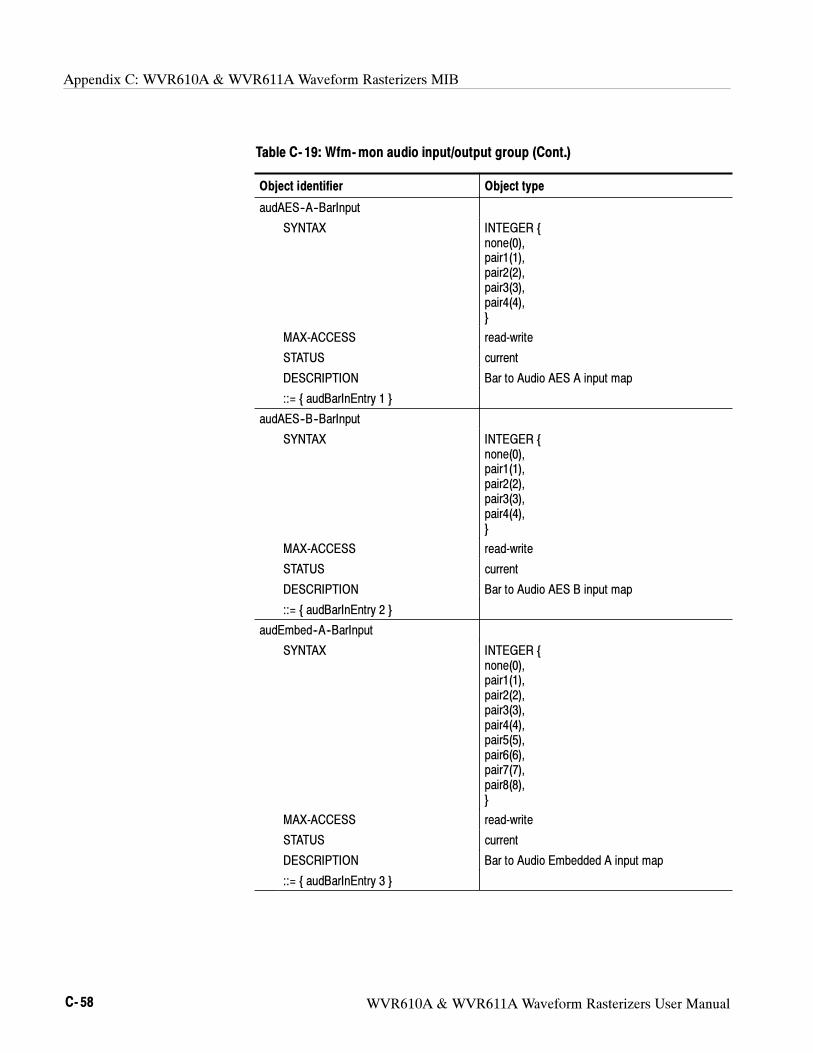
Appendix C: WVR610A & WVR611A Waveform Rasterizers MIB
C- 58 WVR610A & WVR611A Waveform Rasterizers User Manual
Table C- 19: Wfm-mon audio input/output group (Cont.)
Object identifier Object type
audAES--A--BarInput
SYNTAX INTEGER
none(0),
pair1(1),
pair2(2),
pair3(3),
pair4(4),
MAX-ACCESS read-write
STATUS current
DESCRIPTION Bar to Audio AES A input map
::= audBarInEntry 1
audAES--B--BarInput
SYNTAX INTEGER
none(0),
pair1(1),
pair2(2),
pair3(3),
pair4(4),
MAX-ACCESS read-write
STATUS current
DESCRIPTION Bar to Audio AES B input map
::= audBarInEntry 2
audEmbed--A--BarInput
SYNTAX INTEGER
none(0),
pair1(1),
pair2(2),
pair3(3),
pair4(4),
pair5(5),
pair6(6),
pair7(7),
pair8(8),
MAX-ACCESS read-write
STATUS current
DESCRIPTION Bar to Audio Embedded A input map
::= audBarInEntry 3
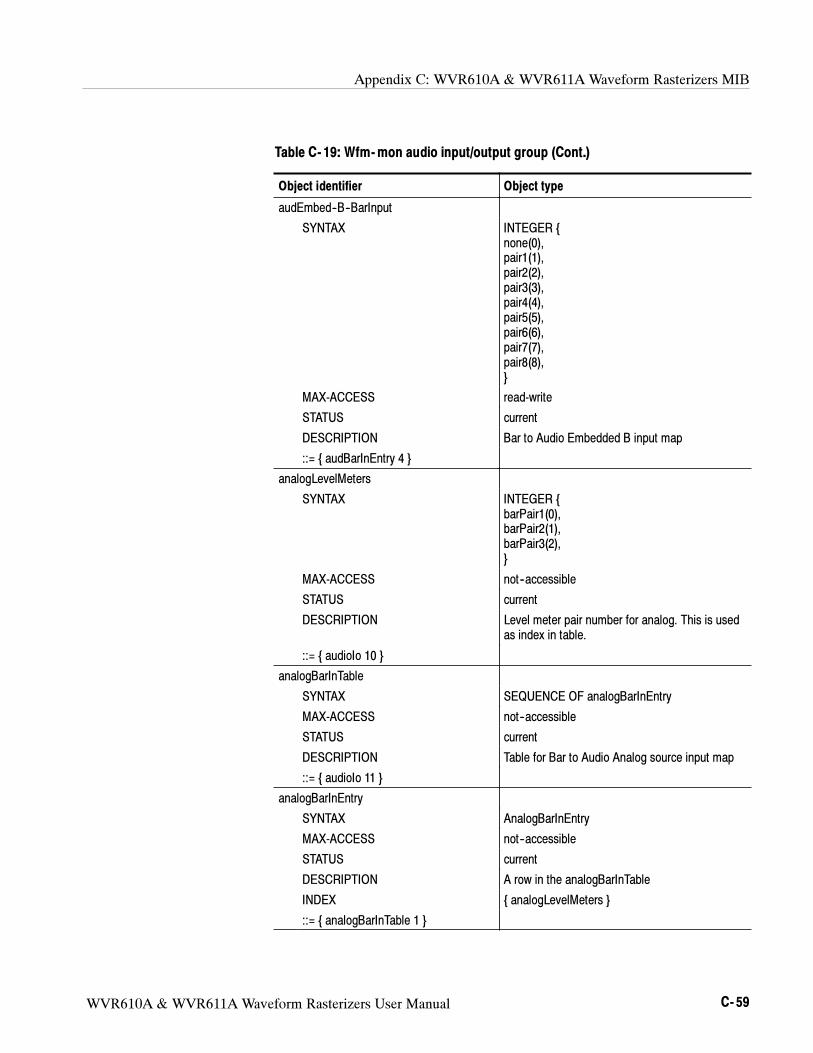
Appendix C: WVR610A & WVR611A Waveform Rasterizers MIB
WVR610A & WVR611A Waveform Rasterizers User Manual C- 59
Table C- 19: Wfm-mon audio input/output group (Cont.)
Object identifier Object type
audEmbed--B--BarInput
SYNTAX INTEGER
none(0),
pair1(1),
pair2(2),
pair3(3),
pair4(4),
pair5(5),
pair6(6),
pair7(7),
pair8(8),
MAX-ACCESS read-write
STATUS current
DESCRIPTION Bar to Audio Embedded B input map
::= audBarInEntry 4
analogLevelMeters
SYNTAX INTEGER
barPair1(0),
barPair2(1),
barPair3(2),
MAX-ACCESS not--accessible
STATUS current
DESCRIPTION Level meter pair number for analog. This is used
as index in table.
::= audioIo 10
analogBarInTable
SYNTAX SEQUENCE OF analogBarInEntry
MAX-ACCESS not--accessible
STATUS current
DESCRIPTION Table for Bar to Audio Analog source input map
::= audioIo 11
analogBarInEntry
SYNTAX AnalogBarInEntry
MAX-ACCESS not--accessible
STATUS current
DESCRIPTION A row in the analogBarInTable
INDEX analogLevelMeters
::= analogBarInTable 1
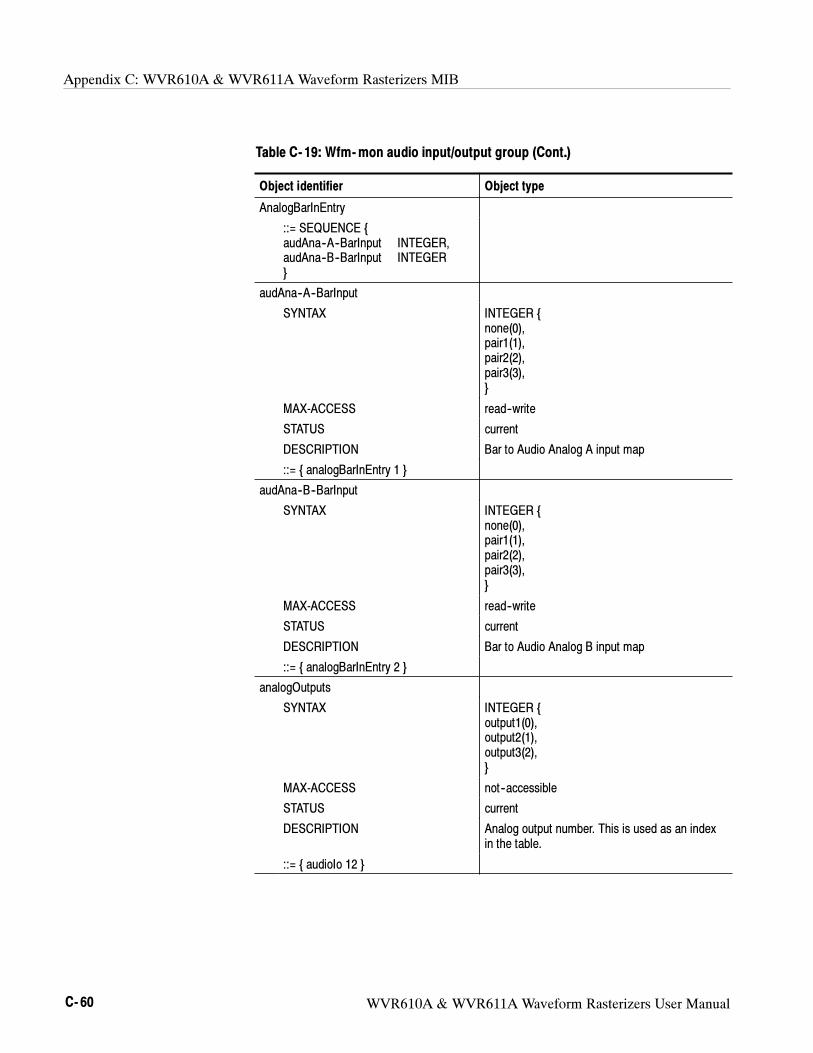
Appendix C: WVR610A & WVR611A Waveform Rasterizers MIB
C- 60 WVR610A & WVR611A Waveform Rasterizers User Manual
Table C- 19: Wfm-mon audio input/output group (Cont.)
Object identifier Object type
AnalogBarInEntry
::= SEQUENCE
audAna--A--BarInput INTEGER,
audAna--B--BarInput INTEGER
audAna--A--BarInput
SYNTAX INTEGER
none(0),
pair1(1),
pair2(2),
pair3(3),
MAX-ACCESS read--write
STATUS current
DESCRIPTION Bar to Audio Analog A input map
::= analogBarInEntry 1
audAna--B--BarInput
SYNTAX INTEGER
none(0),
pair1(1),
pair2(2),
pair3(3),
MAX-ACCESS read--write
STATUS current
DESCRIPTION Bar to Audio Analog B input map
::= analogBarInEntry 2
analogOutputs
SYNTAX INTEGER
output1(0),
output2(1),
output3(2),
MAX-ACCESS not--accessible
STATUS current
DESCRIPTION Analog output number. This is used as an index
in the table.
::= audioIo 12
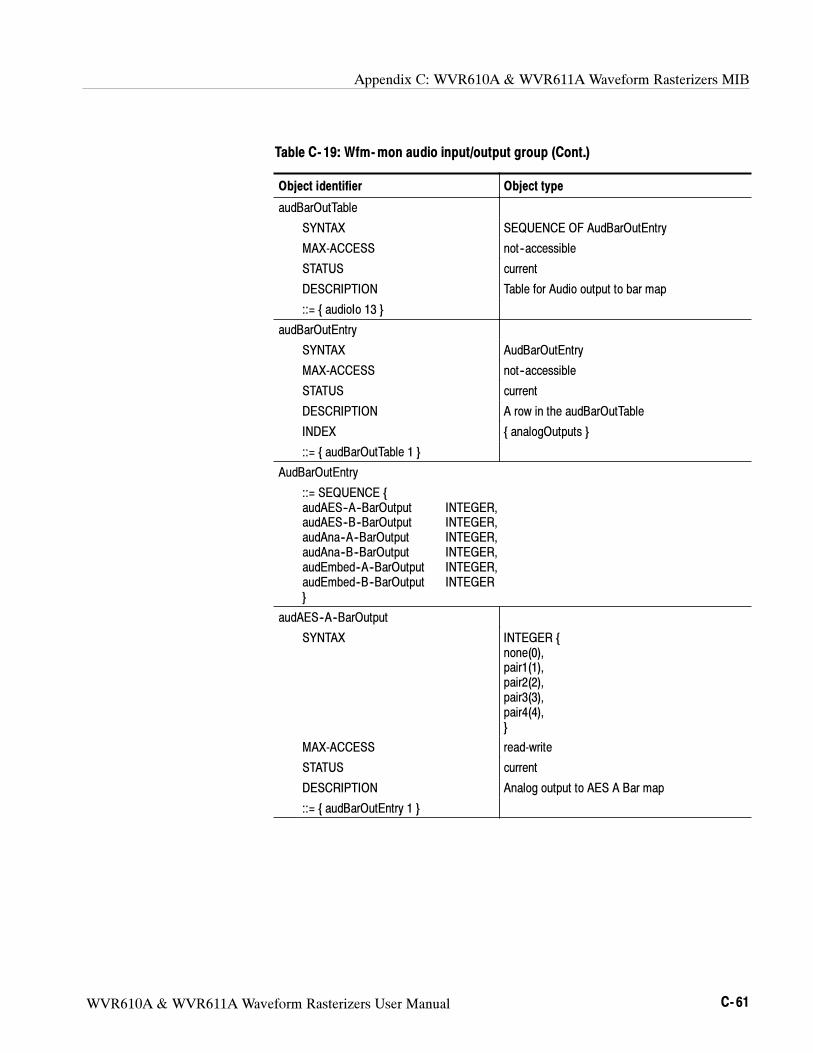
Appendix C: WVR610A & WVR611A Waveform Rasterizers MIB
WVR610A & WVR611A Waveform Rasterizers User Manual C- 61
Table C- 19: Wfm-mon audio input/output group (Cont.)
Object identifier Object type
audBarOutTable
SYNTAX SEQUENCE OF AudBarOutEntry
MAX-ACCESS not--accessible
STATUS current
DESCRIPTION Table for Audio output to bar map
::= audioIo 13
audBarOutEntry
SYNTAX AudBarOutEntry
MAX-ACCESS not--accessible
STATUS current
DESCRIPTION A row in the audBarOutTable
INDEX analogOutputs
::= audBarOutTable 1
AudBarOutEntry
::= SEQUENCE
audAES--A--BarOutput INTEGER,
audAES--B--BarOutput INTEGER,
audAna--A--BarOutput INTEGER,
audAna--B--BarOutput INTEGER,
audEmbed--A--BarOutput INTEGER,
audEmbed--B--BarOutput INTEGER
audAES--A--BarOutput
SYNTAX INTEGER
none(0),
pair1(1),
pair2(2),
pair3(3),
pair4(4),
MAX-ACCESS read-write
STATUS current
DESCRIPTION Analog output to AES A Bar map
::= audBarOutEntry 1
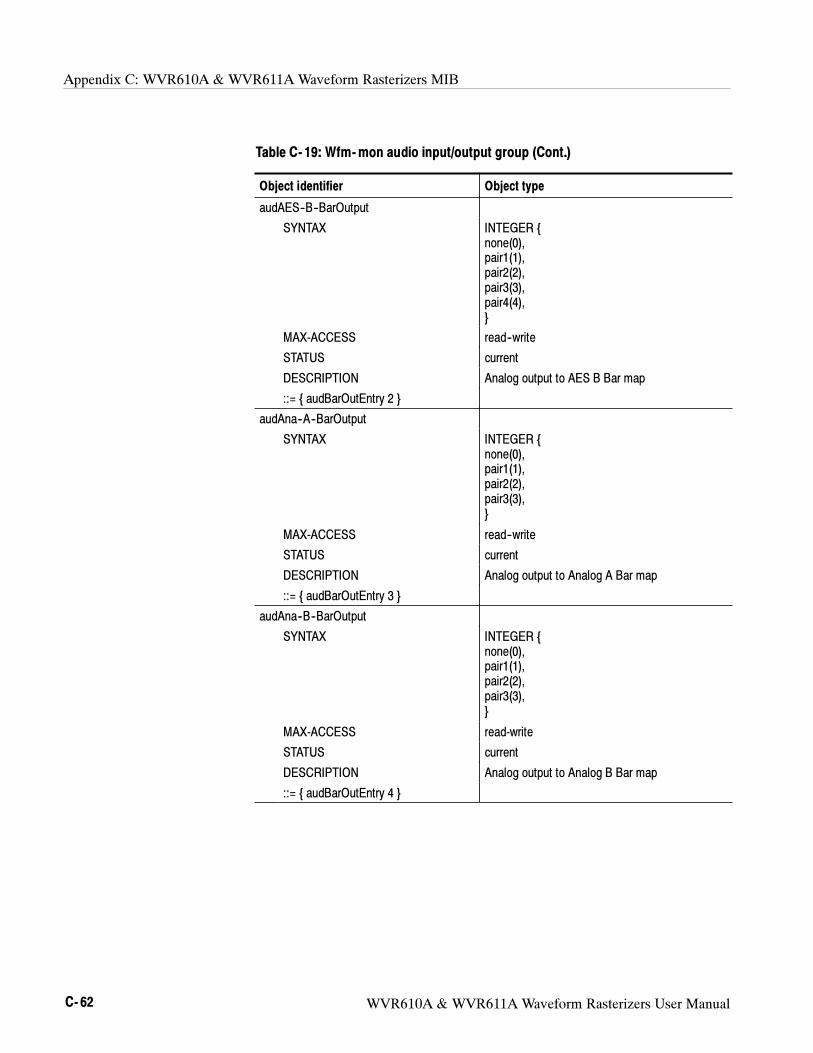
Appendix C: WVR610A & WVR611A Waveform Rasterizers MIB
C- 62 WVR610A & WVR611A Waveform Rasterizers User Manual
Table C- 19: Wfm-mon audio input/output group (Cont.)
Object identifier Object type
audAES--B--BarOutput
SYNTAX INTEGER
none(0),
pair1(1),
pair2(2),
pair3(3),
pair4(4),
MAX-ACCESS read--write
STATUS current
DESCRIPTION Analog output to AES B Bar map
::= audBarOutEntry 2
audAna--A--BarOutput
SYNTAX INTEGER
none(0),
pair1(1),
pair2(2),
pair3(3),
MAX-ACCESS read--write
STATUS current
DESCRIPTION Analog output to Analog A Bar map
::= audBarOutEntry 3
audAna--B--BarOutput
SYNTAX INTEGER
none(0),
pair1(1),
pair2(2),
pair3(3),
MAX-ACCESS read-write
STATUS current
DESCRIPTION Analog output to Analog B Bar map
::= audBarOutEntry 4
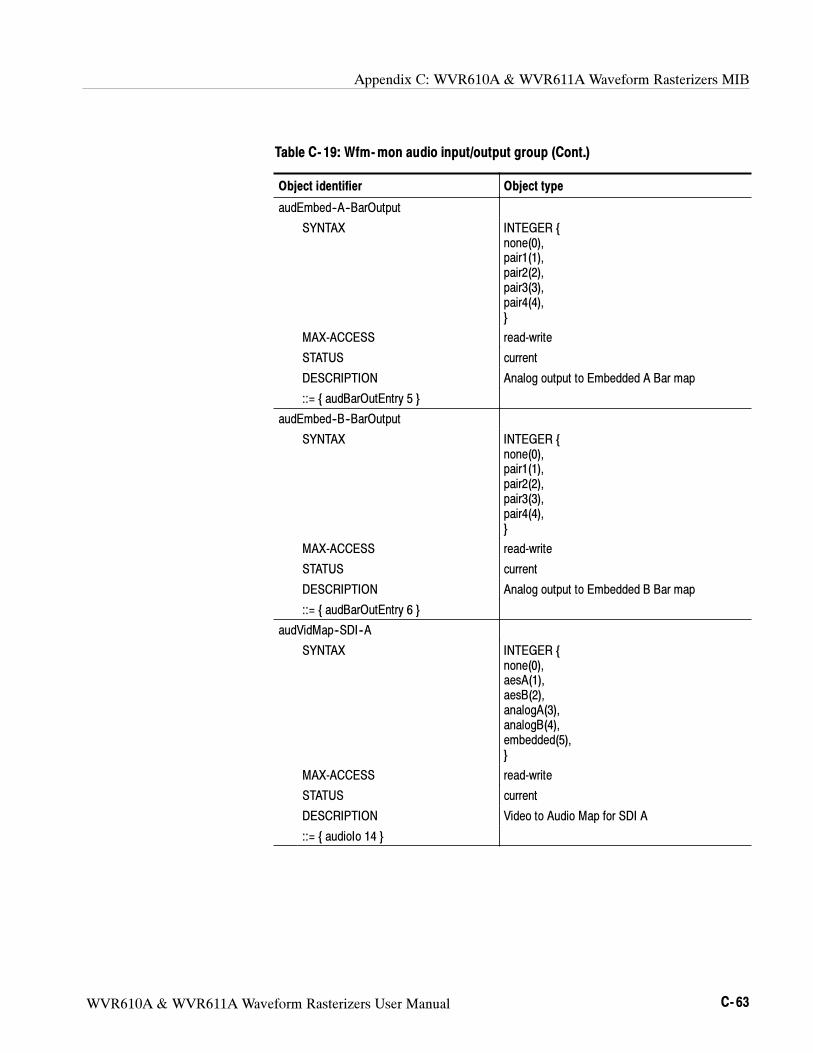
Appendix C: WVR610A & WVR611A Waveform Rasterizers MIB
WVR610A & WVR611A Waveform Rasterizers User Manual C- 63
Table C- 19: Wfm-mon audio input/output group (Cont.)
Object identifier Object type
audEmbed--A--BarOutput
SYNTAX INTEGER
none(0),
pair1(1),
pair2(2),
pair3(3),
pair4(4),
MAX-ACCESS read-write
STATUS current
DESCRIPTION Analog output to Embedded A Bar map
::= audBarOutEntry 5
audEmbed--B--BarOutput
SYNTAX INTEGER
none(0),
pair1(1),
pair2(2),
pair3(3),
pair4(4),
MAX-ACCESS read-write
STATUS current
DESCRIPTION Analog output to Embedded B Bar map
::= audBarOutEntry 6
audVidMap--SDI--A
SYNTAX INTEGER
none(0),
aesA(1),
aesB(2),
analogA(3),
analogB(4),
embedded(5),
MAX-ACCESS read-write
STATUS current
DESCRIPTION Video to Audio Map for SDI A
::= audioIo 14
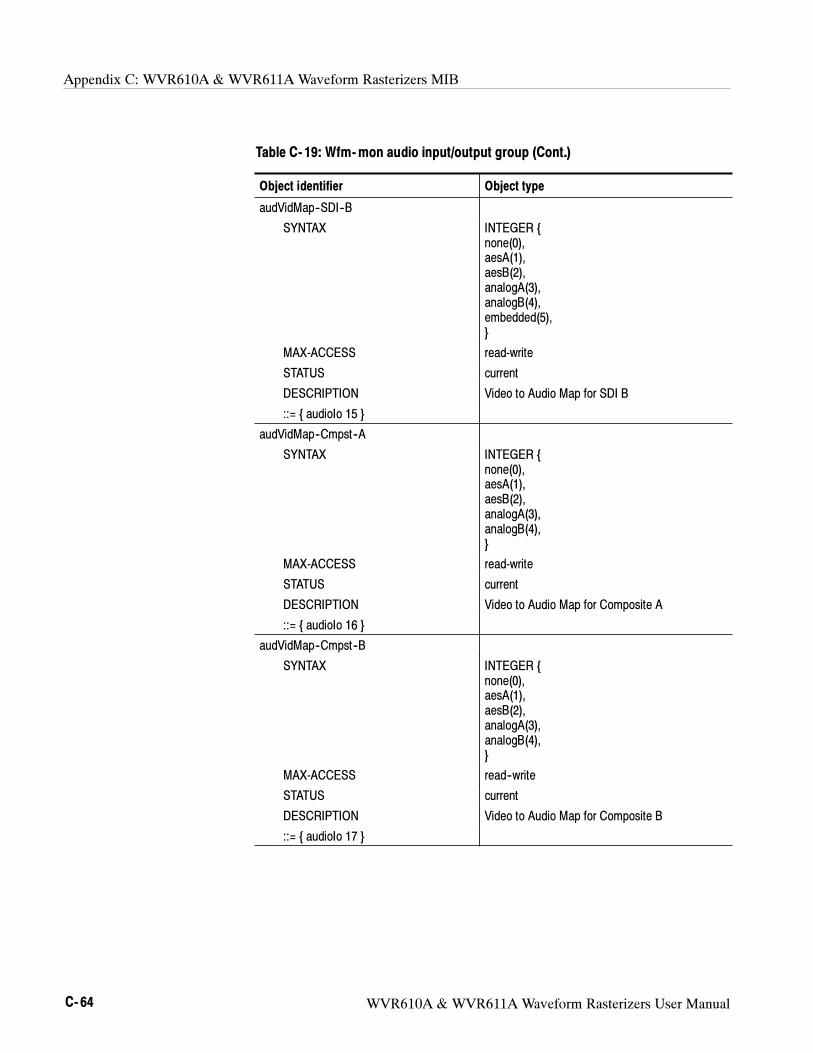
Appendix C: WVR610A & WVR611A Waveform Rasterizers MIB
C- 64 WVR610A & WVR611A Waveform Rasterizers User Manual
Table C- 19: Wfm-mon audio input/output group (Cont.)
Object identifier Object type
audVidMap--SDI--B
SYNTAX INTEGER
none(0),
aesA(1),
aesB(2),
analogA(3),
analogB(4),
embedded(5),
MAX-ACCESS read-write
STATUS current
DESCRIPTION Video to Audio Map for SDI B
::= audioIo 15
audVidMap--Cmpst--A
SYNTAX INTEGER
none(0),
aesA(1),
aesB(2),
analogA(3),
analogB(4),
MAX-ACCESS read-write
STATUS current
DESCRIPTION Video to Audio Map for Composite A
::= audioIo 16
audVidMap--Cmpst--B
SYNTAX INTEGER
none(0),
aesA(1),
aesB(2),
analogA(3),
analogB(4),
MAX-ACCESS read--write
STATUS current
DESCRIPTION Video to Audio Map for Composite B
::= audioIo 17
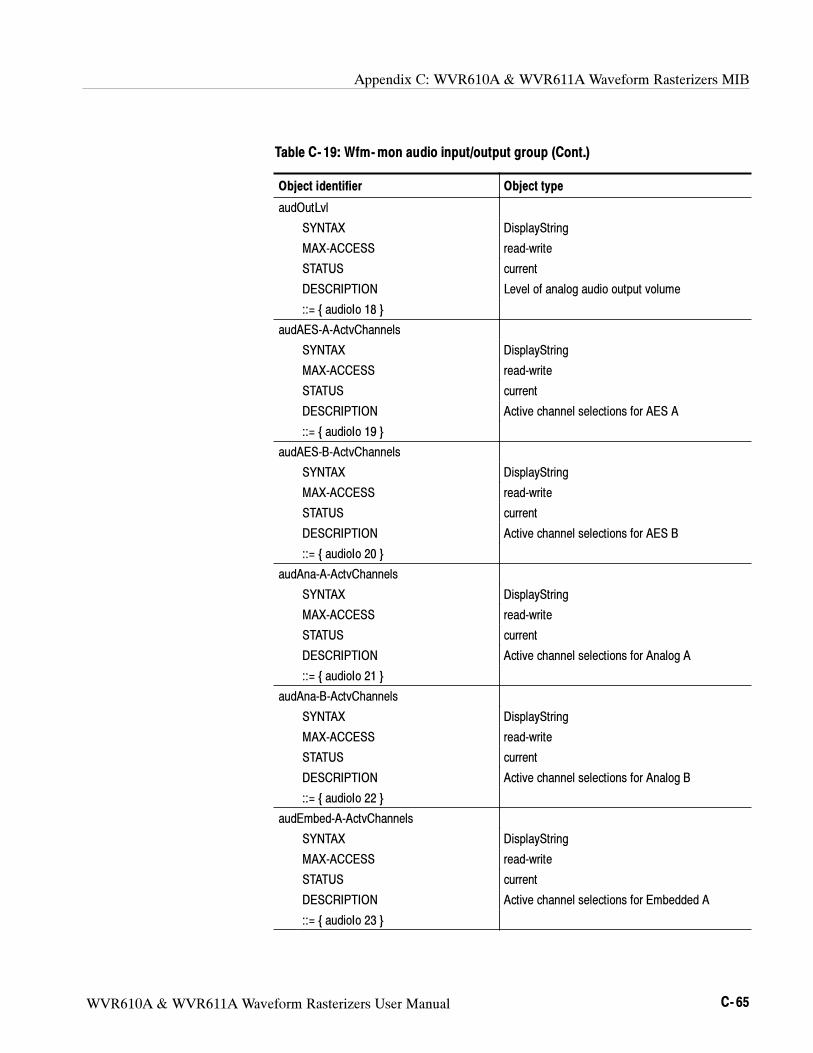
Appendix C: WVR610A & WVR611A Waveform Rasterizers MIB
WVR610A & WVR611A Waveform Rasterizers User Manual C- 65
Table C- 19: Wfm-mon audio input/output group (Cont.)
Object identifier Object type
audOutLvl
SYNTAX DisplayString
MAX-ACCESS read-write
STATUS current
DESCRIPTION Level of analog audio output volume
::= audioIo 18
audAES-A-ActvChannels
SYNTAX DisplayString
MAX-ACCESS read-write
STATUS current
DESCRIPTION Active channel selections for AES A
::= audioIo 19
audAES-B-ActvChannels
SYNTAX DisplayString
MAX-ACCESS read-write
STATUS current
DESCRIPTION Active channel selections for AES B
::= audioIo 20
audAna-A-ActvChannels
SYNTAX DisplayString
MAX-ACCESS read-write
STATUS current
DESCRIPTION Active channel selections for Analog A
::= audioIo 21
audAna-B-ActvChannels
SYNTAX DisplayString
MAX-ACCESS read-write
STATUS current
DESCRIPTION Active channel selections for Analog B
::= audioIo 22
audEmbed-A-ActvChannels
SYNTAX DisplayString
MAX-ACCESS read-write
STATUS current
DESCRIPTION Active channel selections for Embedded A
::= audioIo 23
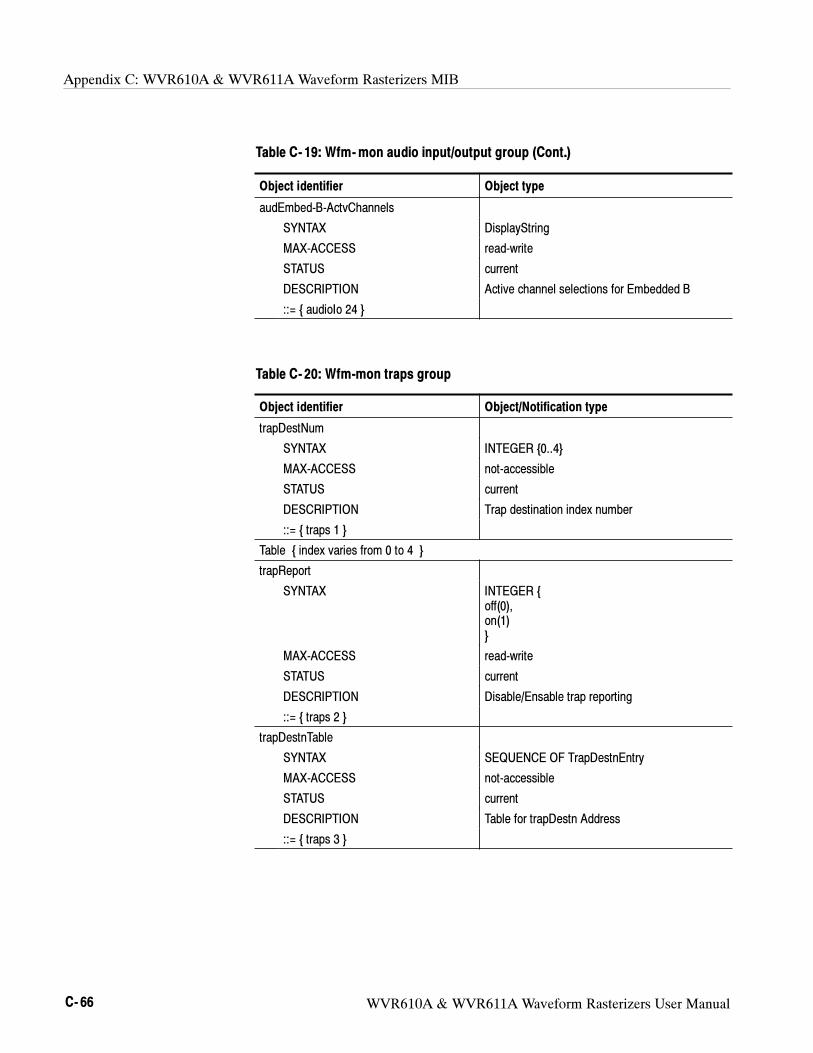
Appendix C: WVR610A & WVR611A Waveform Rasterizers MIB
C- 66 WVR610A & WVR611A Waveform Rasterizers User Manual
Table C- 19: Wfm-mon audio input/output group (Cont.)
Object identifier Object type
audEmbed-B-ActvChannels
SYNTAX DisplayString
MAX-ACCESS read-write
STATUS current
DESCRIPTION Active channel selections for Embedded B
::= audioIo 24
Table C- 20: Wfm-mon traps group
Object identifier Object/Notification type
trapDestNum
SYNTAX INTEGER 0..4
MAX-ACCESS not-accessible
STATUS current
DESCRIPTION Trap destination index number
::= traps 1
Table index varies from 0 to 4
trapReport
SYNTAX INTEGER
off(0),
on(1)
MAX-ACCESS read-write
STATUS current
DESCRIPTION Disable/Ensable trap reporting
::= traps 2
trapDestnTable
SYNTAX SEQUENCE OF TrapDestnEntry
MAX-ACCESS not-accessible
STATUS current
DESCRIPTION Table for trapDestn Address
::= traps 3
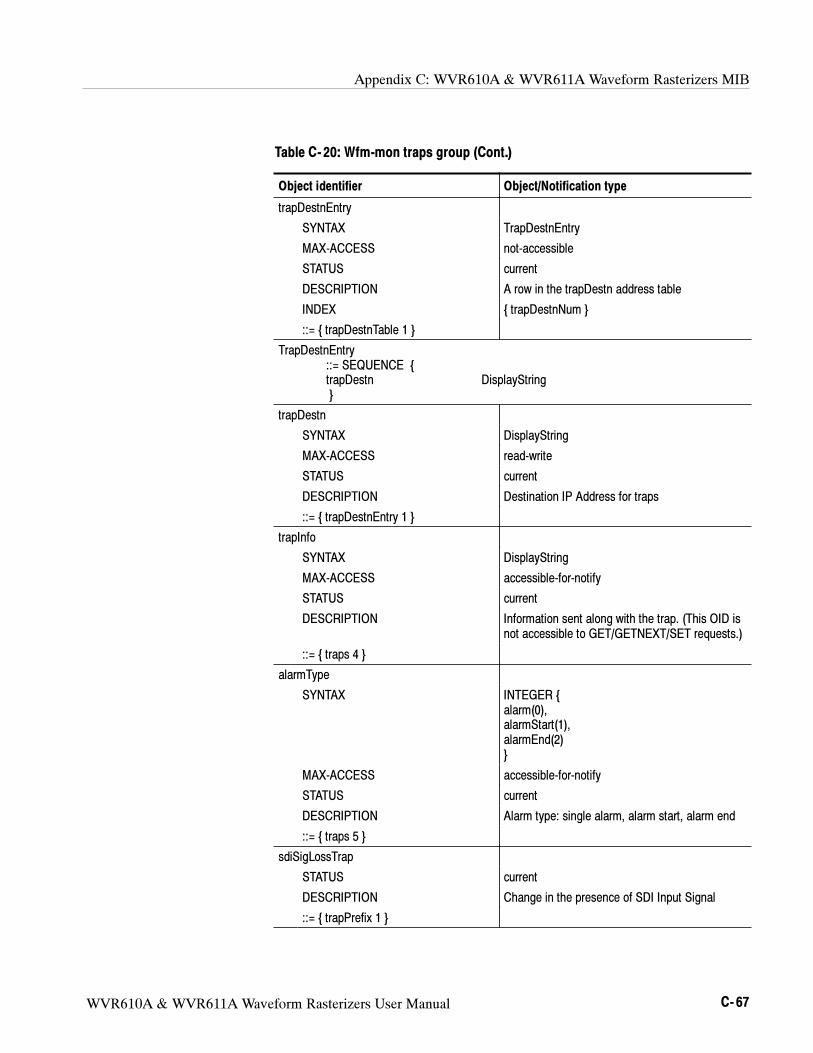
Appendix C: WVR610A & WVR611A Waveform Rasterizers MIB
WVR610A & WVR611A Waveform Rasterizers User Manual C- 67
Table C- 20: Wfm-mon traps group (Cont.)
Object identifier Object/Notification type
trapDestnEntry
SYNTAX TrapDestnEntry
MAX-ACCESS not-accessible
STATUS current
DESCRIPTION A row in the trapDestn address table
INDEX trapDestnNum
::= trapDestnTable 1
TrapDestnEntry
::= SEQUENCE
trapDestn DisplayString
trapDestn
SYNTAX DisplayString
MAX-ACCESS read-write
STATUS current
DESCRIPTION Destination IP Address for traps
::= trapDestnEntry 1
trapInfo
SYNTAX DisplayString
MAX-ACCESS accessible-for-notify
STATUS current
DESCRIPTION Information sent along with the trap. (This OID is
not accessible to GET/GETNEXT/SET requests.)
::= traps 4
alarmType
SYNTAX INTEGER
alarm(0),
alarmStart(1),
alarmEnd(2)
MAX-ACCESS accessible-for-notify
STATUS current
DESCRIPTION Alarm type: single alarm, alarm start, alarm end
::= traps 5
sdiSigLossTrap
STATUS current
DESCRIPTION Change in the presence of SDI Input Signal
::= trapPrefix 1
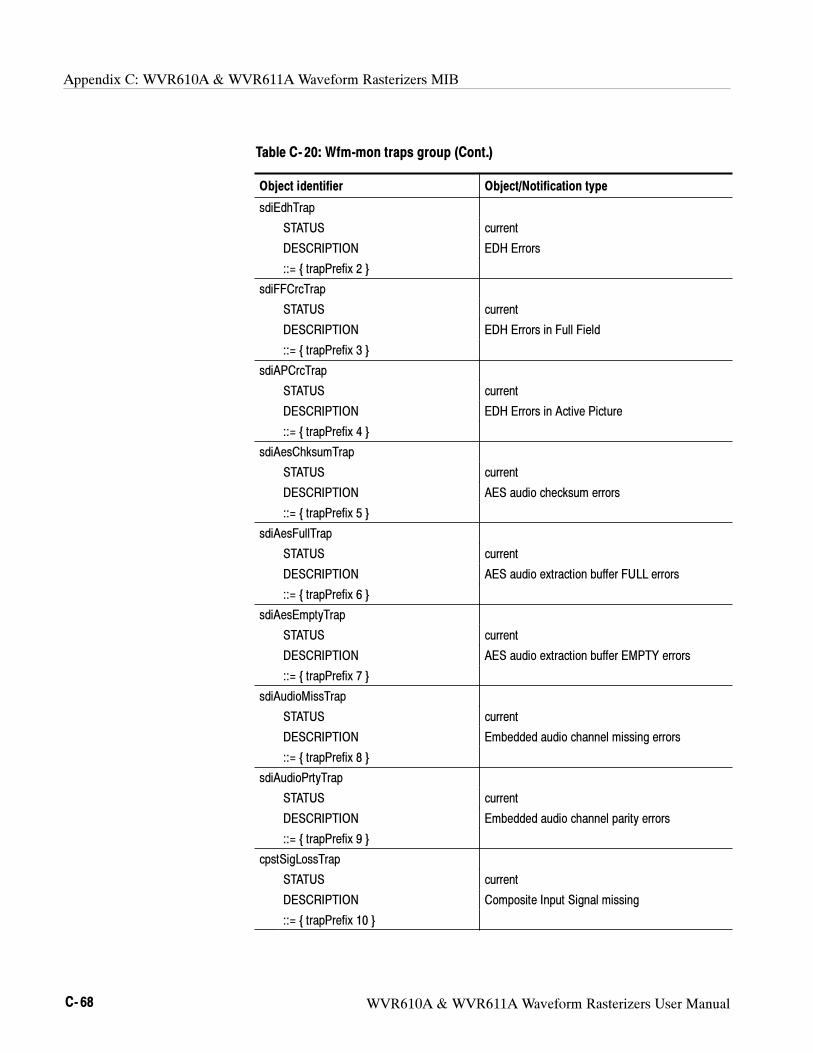
Appendix C: WVR610A & WVR611A Waveform Rasterizers MIB
C- 68 WVR610A & WVR611A Waveform Rasterizers User Manual
Table C- 20: Wfm-mon traps group (Cont.)
Object identifier Object/Notification type
sdiEdhTrap
STATUS current
DESCRIPTION EDH Errors
::= trapPrefix 2
sdiFFCrcTrap
STATUS current
DESCRIPTION EDH Errors in Full Field
::= trapPrefix 3
sdiAPCrcTrap
STATUS current
DESCRIPTION EDH Errors in Active Picture
::= trapPrefix 4
sdiAesChksumTrap
STATUS current
DESCRIPTION AES audio checksum errors
::= trapPrefix 5
sdiAesFullTrap
STATUS current
DESCRIPTION AES audio extraction buffer FULL errors
::= trapPrefix 6
sdiAesEmptyTrap
STATUS current
DESCRIPTION AES audio extraction buffer EMPTY errors
::= trapPrefix 7
sdiAudioMissTrap
STATUS current
DESCRIPTION Embedded audio channel missing errors
::= trapPrefix 8
sdiAudioPrtyTrap
STATUS current
DESCRIPTION Embedded audio channel parity errors
::= trapPrefix 9
cpstSigLossTrap
STATUS current
DESCRIPTION Composite Input Signal missing
::= trapPrefix 10
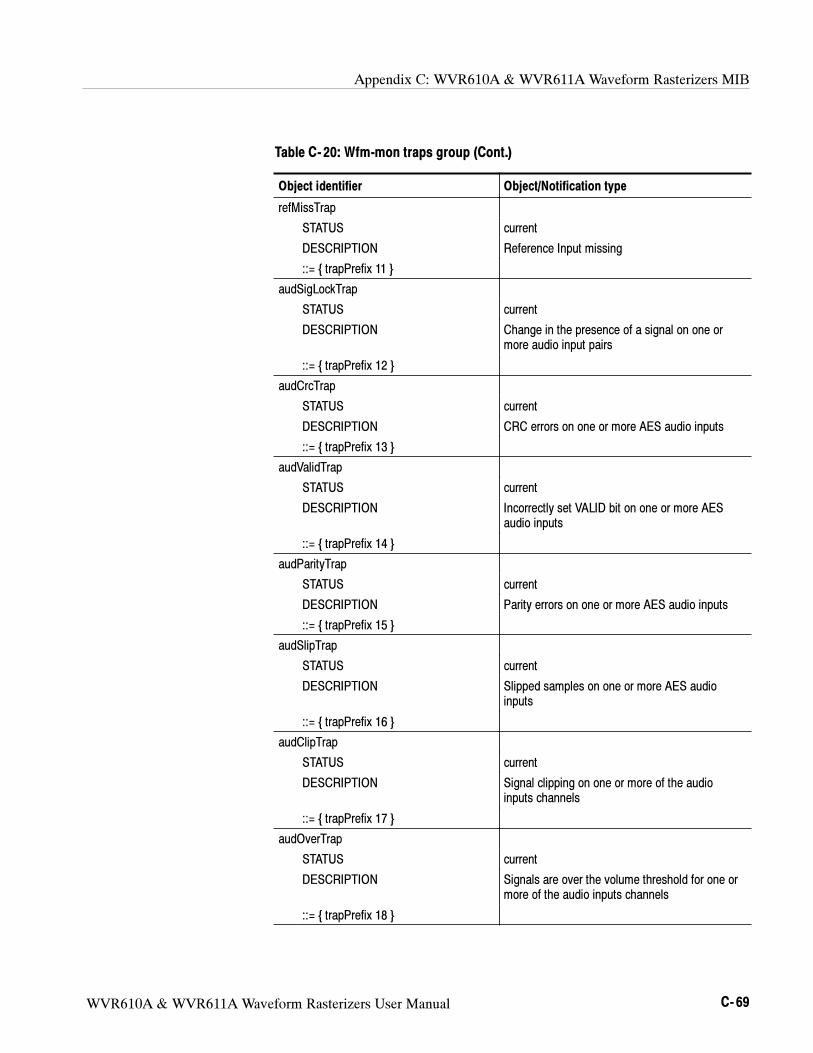
Appendix C: WVR610A & WVR611A Waveform Rasterizers MIB
WVR610A & WVR611A Waveform Rasterizers User Manual C- 69
Table C- 20: Wfm-mon traps group (Cont.)
Object identifier Object/Notification type
refMissTrap
STATUS current
DESCRIPTION Reference Input missing
::= trapPrefix 11
audSigLockTrap
STATUS current
DESCRIPTION Change in the presence of a signal on one or
more audio input pairs
::= trapPrefix 12
audCrcTrap
STATUS current
DESCRIPTION CRC errors on one or more AES audio inputs
::= trapPrefix 13
audValidTrap
STATUS current
DESCRIPTION Incorrectly set VALID bit on one or more AES
audio inputs
::= trapPrefix 14
audParityTrap
STATUS current
DESCRIPTION Parity errors on one or more AES audio inputs
::= trapPrefix 15
audSlipTrap
STATUS current
DESCRIPTION Slipped samples on one or more AES audio
inputs
::= trapPrefix 16
audClipTrap
STATUS current
DESCRIPTION Signal clipping on one or more of the audio
inputs channels
::= trapPrefix 17
audOverTrap
STATUS current
DESCRIPTION Signals are over the volume threshold for one or
more of the audio inputs channels
::= trapPrefix 18
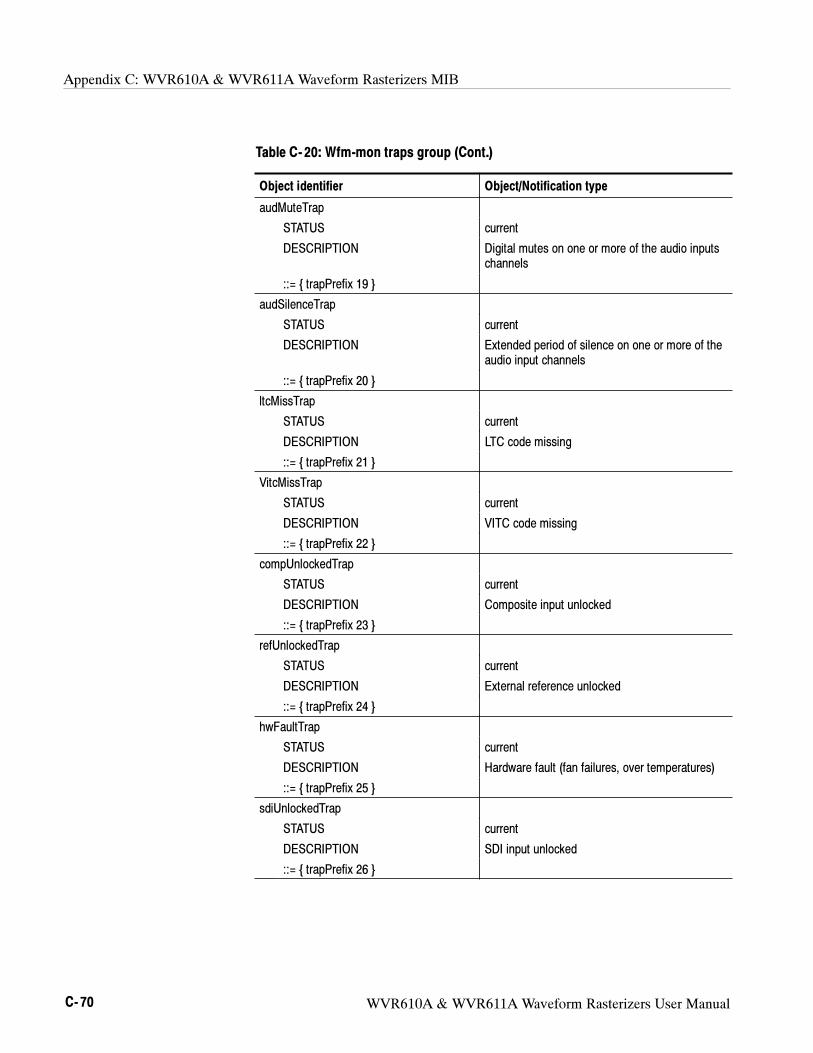
Appendix C: WVR610A & WVR611A Waveform Rasterizers MIB
C- 70 WVR610A & WVR611A Waveform Rasterizers User Manual
Table C- 20: Wfm-mon traps group (Cont.)
Object identifier Object/Notification type
audMuteTrap
STATUS current
DESCRIPTION Digital mutes on one or more of the audio inputs
channels
::= trapPrefix 19
audSilenceTrap
STATUS current
DESCRIPTION Extended period of silence on one or more of the
audio input channels
::= trapPrefix 20
ltcMissTrap
STATUS current
DESCRIPTION LTC code missing
::= trapPrefix 21
VitcMissTrap
STATUS current
DESCRIPTION VITC code missing
::= trapPrefix 22
compUnlockedTrap
STATUS current
DESCRIPTION Composite input unlocked
::= trapPrefix 23
refUnlockedTrap
STATUS current
DESCRIPTION External reference unlocked
::= trapPrefix 24
hwFaultTrap
STATUS current
DESCRIPTION Hardware fault (fan failures, over temperatures)
::= trapPrefix 25
sdiUnlockedTrap
STATUS current
DESCRIPTION SDI input unlocked
::= trapPrefix 26
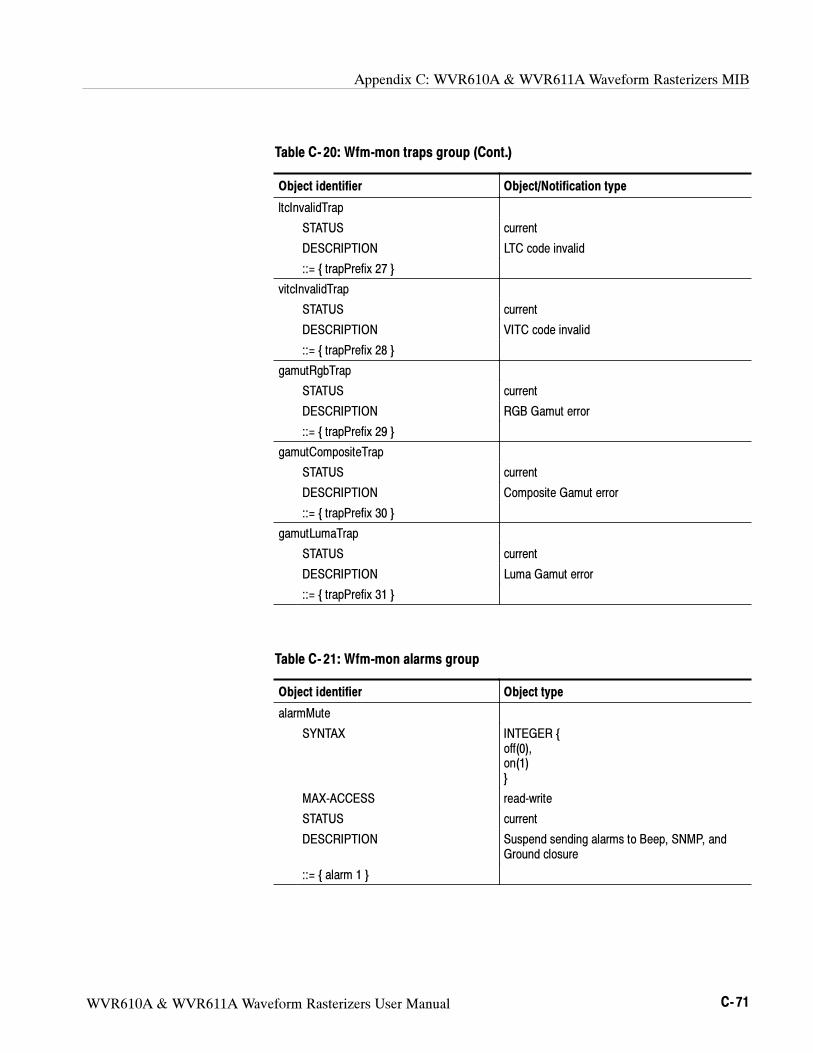
Appendix C: WVR610A & WVR611A Waveform Rasterizers MIB
WVR610A & WVR611A Waveform Rasterizers User Manual C- 71
Table C- 20: Wfm-mon traps group (Cont.)
Object identifier Object/Notification type
ltcInvalidTrap
STATUS current
DESCRIPTION LTC code invalid
::= trapPrefix 27
vitcInvalidTrap
STATUS current
DESCRIPTION VITC code invalid
::= trapPrefix 28
gamutRgbTrap
STATUS current
DESCRIPTION RGB Gamut error
::= trapPrefix 29
gamutCompositeTrap
STATUS current
DESCRIPTION Composite Gamut error
::= trapPrefix 30
gamutLumaTrap
STATUS current
DESCRIPTION Luma Gamut error
::= trapPrefix 31
Table C- 21: Wfm-mon alarms group
Object identifier Object type
alarmMute
SYNTAX INTEGER
off(0),
on(1)
MAX-ACCESS read-write
STATUS current
DESCRIPTION Suspend sending alarms to Beep, SNMP, and
Ground closure
::= alarm 1
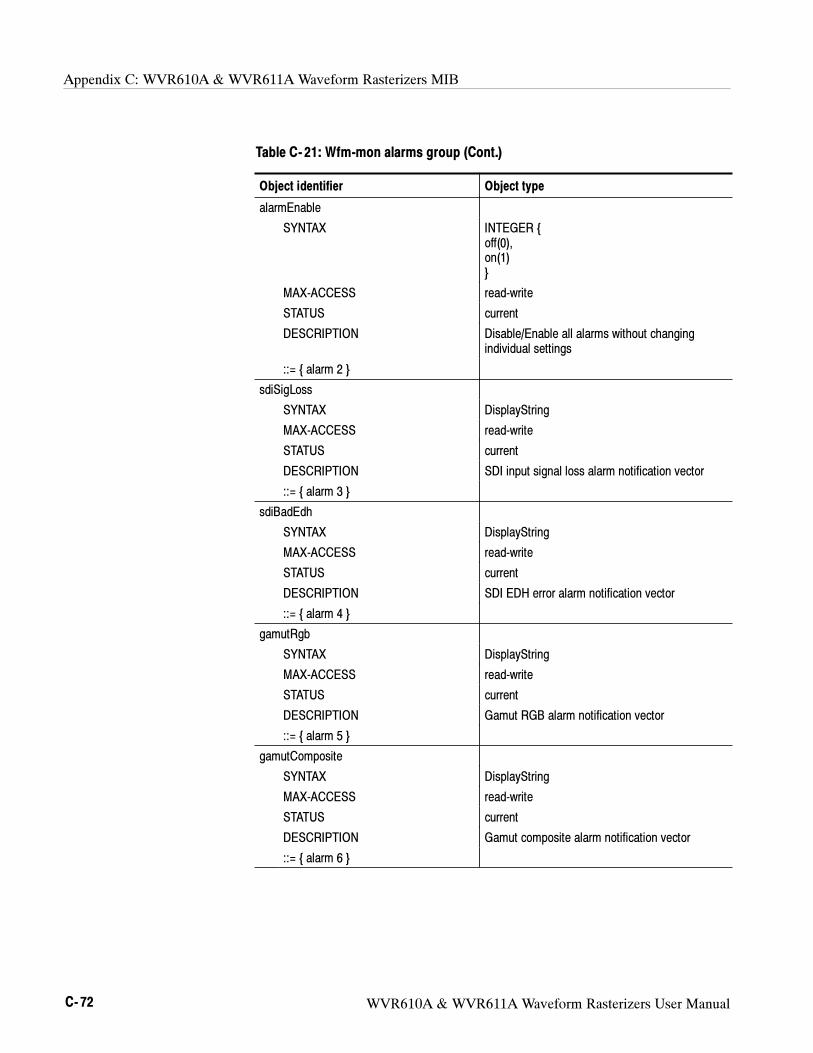
Appendix C: WVR610A & WVR611A Waveform Rasterizers MIB
C- 72 WVR610A & WVR611A Waveform Rasterizers User Manual
Table C- 21: Wfm-mon alarms group (Cont.)
Object identifier Object type
alarmEnable
SYNTAX INTEGER
off(0),
on(1)
MAX-ACCESS read-write
STATUS current
DESCRIPTION Disable/Enable all alarms without changing
individual settings
::= alarm 2
sdiSigLoss
SYNTAX DisplayString
MAX-ACCESS read-write
STATUS current
DESCRIPTION SDI input signal loss alarm notification vector
::= alarm 3
sdiBadEdh
SYNTAX DisplayString
MAX-ACCESS read-write
STATUS current
DESCRIPTION SDI EDH error alarm notification vector
::= alarm 4
gamutRgb
SYNTAX DisplayString
MAX-ACCESS read-write
STATUS current
DESCRIPTION Gamut RGB alarm notification vector
::= alarm 5
gamutComposite
SYNTAX DisplayString
MAX-ACCESS read-write
STATUS current
DESCRIPTION Gamut composite alarm notification vector
::= alarm 6
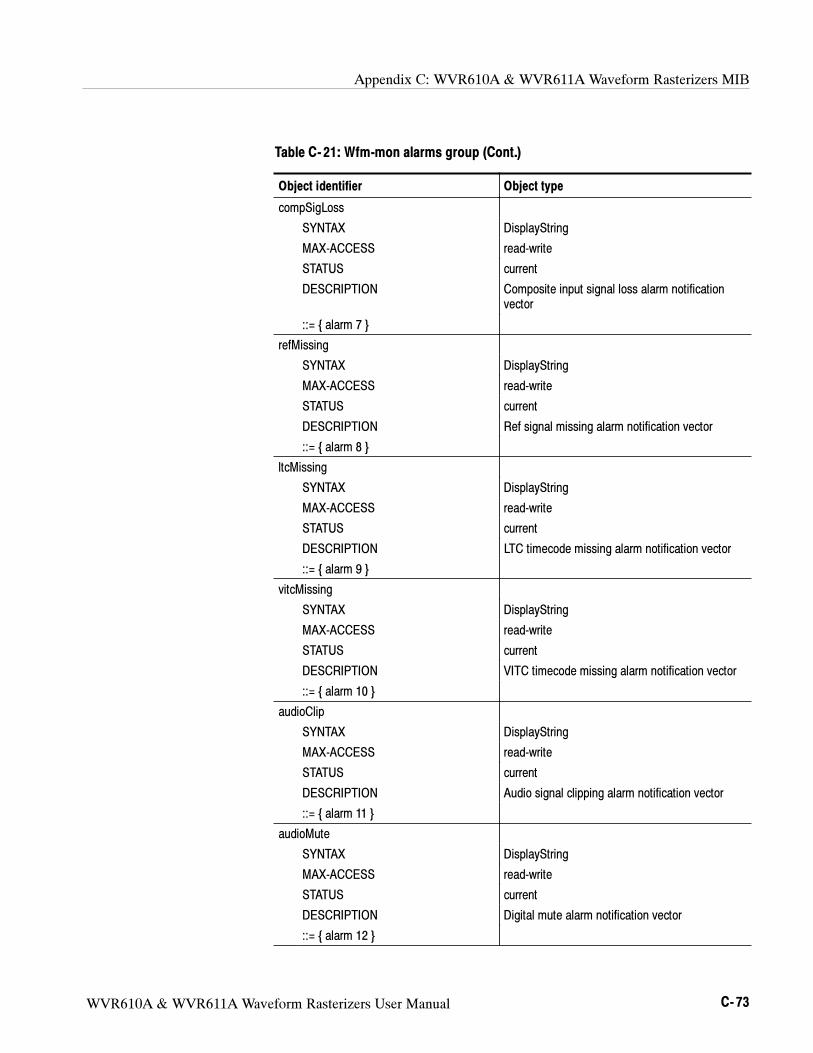
Appendix C: WVR610A & WVR611A Waveform Rasterizers MIB
WVR610A & WVR611A Waveform Rasterizers User Manual C- 73
Table C- 21: Wfm-mon alarms group (Cont.)
Object identifier Object type
compSigLoss
SYNTAX DisplayString
MAX-ACCESS read-write
STATUS current
DESCRIPTION Composite input signal loss alarm notification
vector
::= alarm 7
refMissing
SYNTAX DisplayString
MAX-ACCESS read-write
STATUS current
DESCRIPTION Ref signal missing alarm notification vector
::= alarm 8
ltcMissing
SYNTAX DisplayString
MAX-ACCESS read-write
STATUS current
DESCRIPTION LTC timecode missing alarm notification vector
::= alarm 9
vitcMissing
SYNTAX DisplayString
MAX-ACCESS read-write
STATUS current
DESCRIPTION VITC timecode missing alarm notification vector
::= alarm 10
audioClip
SYNTAX DisplayString
MAX-ACCESS read-write
STATUS current
DESCRIPTION Audio signal clipping alarm notification vector
::= alarm 11
audioMute
SYNTAX DisplayString
MAX-ACCESS read-write
STATUS current
DESCRIPTION Digital mute alarm notification vector
::= alarm 12
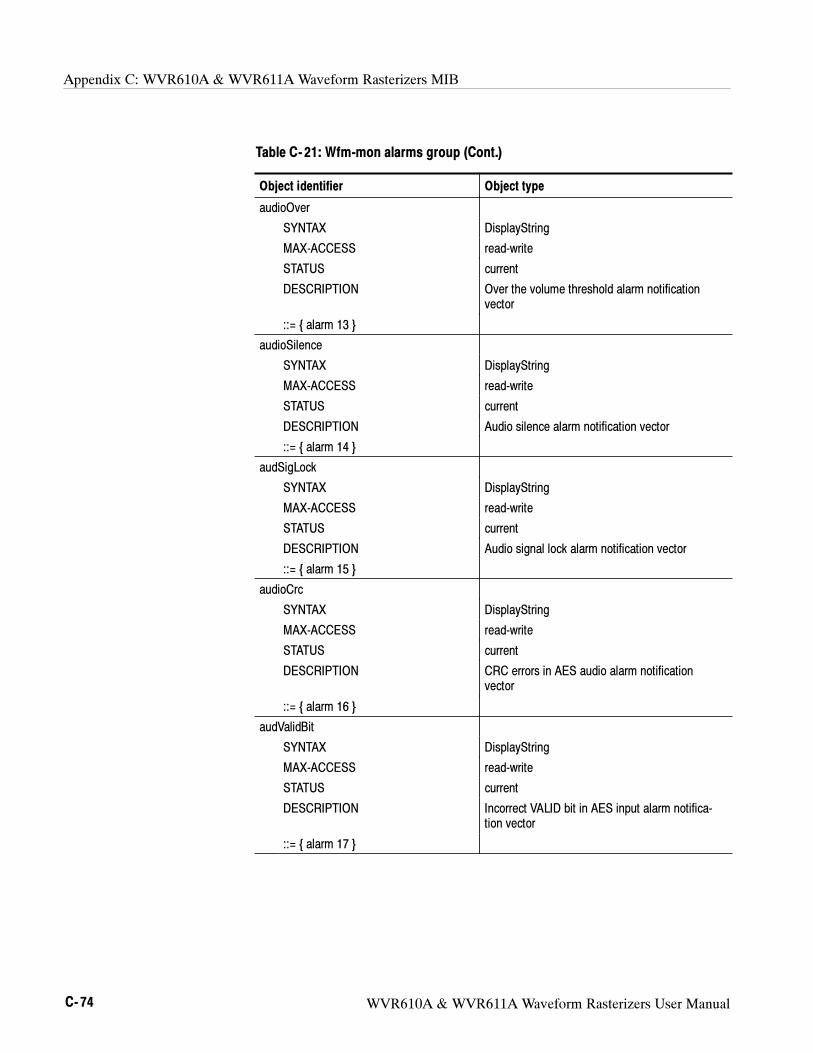
Appendix C: WVR610A & WVR611A Waveform Rasterizers MIB
C- 74 WVR610A & WVR611A Waveform Rasterizers User Manual
Table C- 21: Wfm-mon alarms group (Cont.)
Object identifier Object type
audioOver
SYNTAX DisplayString
MAX-ACCESS read-write
STATUS current
DESCRIPTION Over the volume threshold alarm notification
vector
::= alarm 13
audioSilence
SYNTAX DisplayString
MAX-ACCESS read-write
STATUS current
DESCRIPTION Audio silence alarm notification vector
::= alarm 14
audSigLock
SYNTAX DisplayString
MAX-ACCESS read-write
STATUS current
DESCRIPTION Audio signal lock alarm notification vector
::= alarm 15
audioCrc
SYNTAX DisplayString
MAX-ACCESS read-write
STATUS current
DESCRIPTION CRC errors in AES audio alarm notification
vector
::= alarm 16
audValidBit
SYNTAX DisplayString
MAX-ACCESS read-write
STATUS current
DESCRIPTION Incorrect VALID bit in AES input alarm notifica-
tion vector
::= alarm 17
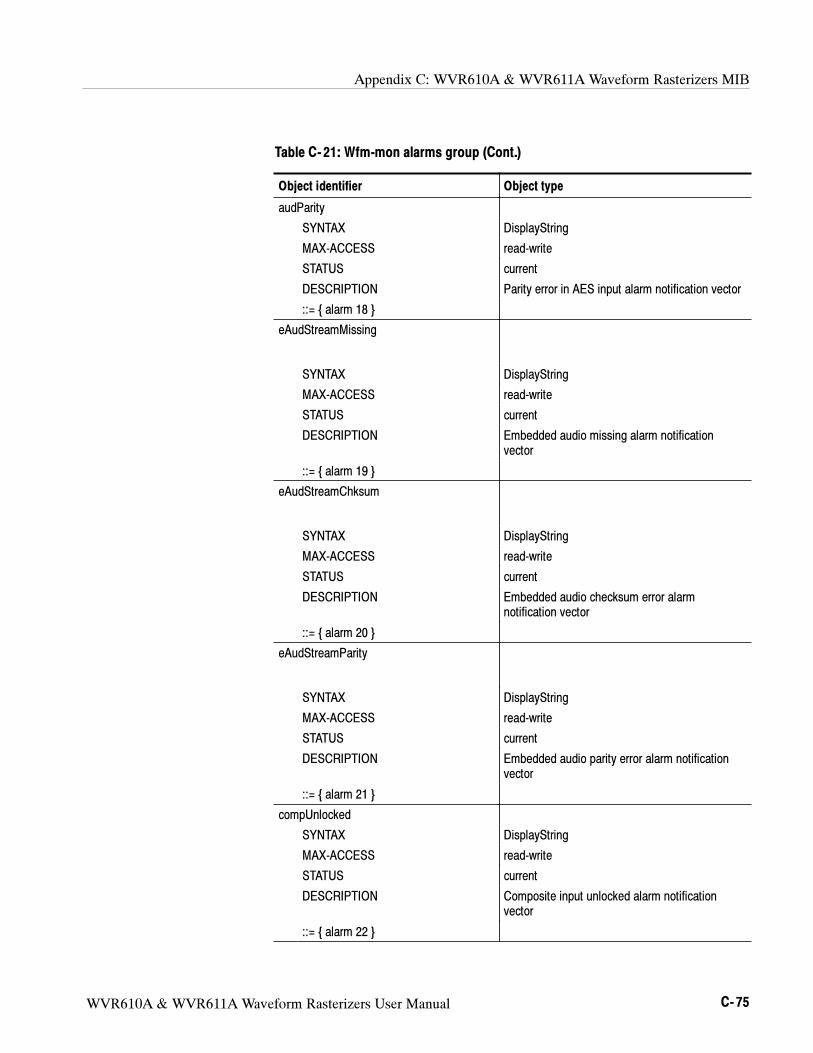
Appendix C: WVR610A & WVR611A Waveform Rasterizers MIB
WVR610A & WVR611A Waveform Rasterizers User Manual C- 75
Table C- 21: Wfm-mon alarms group (Cont.)
Object identifier Object type
audParity
SYNTAX DisplayString
MAX-ACCESS read-write
STATUS current
DESCRIPTION Parity error in AES input alarm notification vector
::= alarm 18
eAudStreamMissing
SYNTAX DisplayString
MAX-ACCESS read-write
STATUS current
DESCRIPTION Embedded audio missing alarm notification
vector
::= alarm 19
eAudStreamChksum
SYNTAX DisplayString
MAX-ACCESS read-write
STATUS current
DESCRIPTION Embedded audio checksum error alarm
notification vector
::= alarm 20
eAudStreamParity
SYNTAX DisplayString
MAX-ACCESS read-write
STATUS current
DESCRIPTION Embedded audio parity error alarm notification
vector
::= alarm 21
compUnlocked
SYNTAX DisplayString
MAX-ACCESS read-write
STATUS current
DESCRIPTION Composite input unlocked alarm notification
vector
::= alarm 22
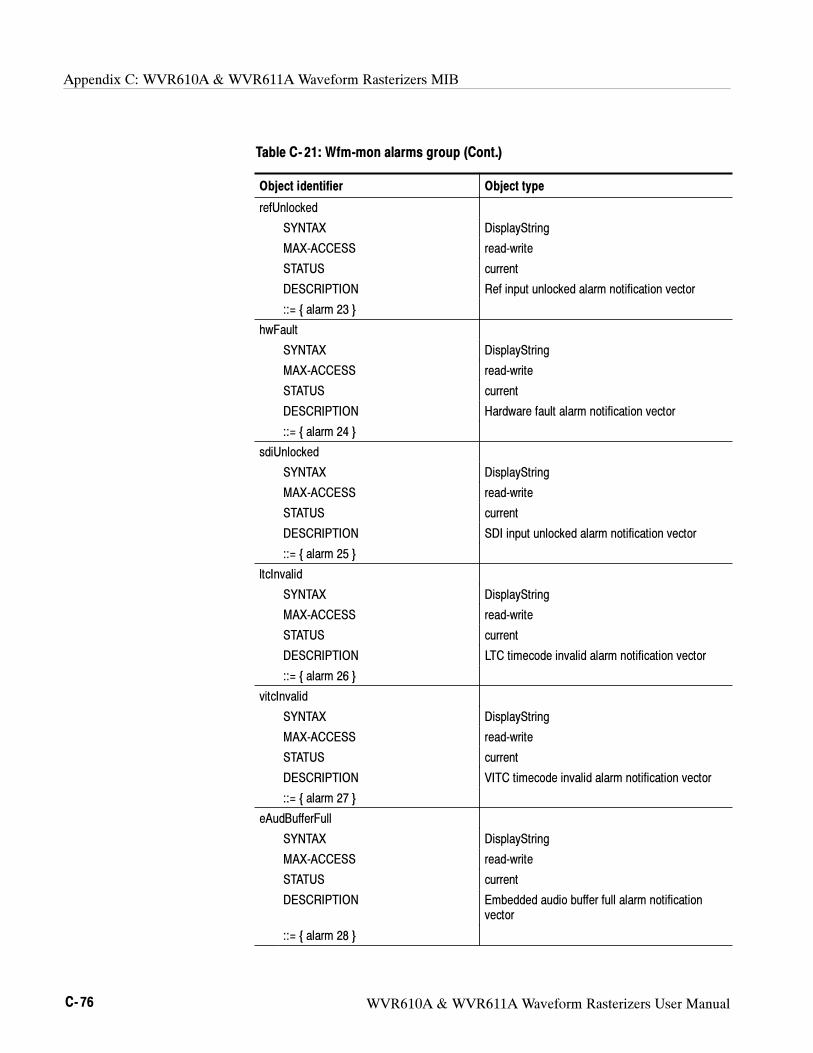
Appendix C: WVR610A & WVR611A Waveform Rasterizers MIB
C- 76 WVR610A & WVR611A Waveform Rasterizers User Manual
Table C- 21: Wfm-mon alarms group (Cont.)
Object identifier Object type
refUnlocked
SYNTAX DisplayString
MAX-ACCESS read-write
STATUS current
DESCRIPTION Ref input unlocked alarm notification vector
::= alarm 23
hwFault
SYNTAX DisplayString
MAX-ACCESS read-write
STATUS current
DESCRIPTION Hardware fault alarm notification vector
::= alarm 24
sdiUnlocked
SYNTAX DisplayString
MAX-ACCESS read-write
STATUS current
DESCRIPTION SDI input unlocked alarm notification vector
::= alarm 25
ltcInvalid
SYNTAX DisplayString
MAX-ACCESS read-write
STATUS current
DESCRIPTION LTC timecode invalid alarm notification vector
::= alarm 26
vitcInvalid
SYNTAX DisplayString
MAX-ACCESS read-write
STATUS current
DESCRIPTION VITC timecode invalid alarm notification vector
::= alarm 27
eAudBufferFull
SYNTAX DisplayString
MAX-ACCESS read-write
STATUS current
DESCRIPTION Embedded audio buffer full alarm notification
vector
::= alarm 28
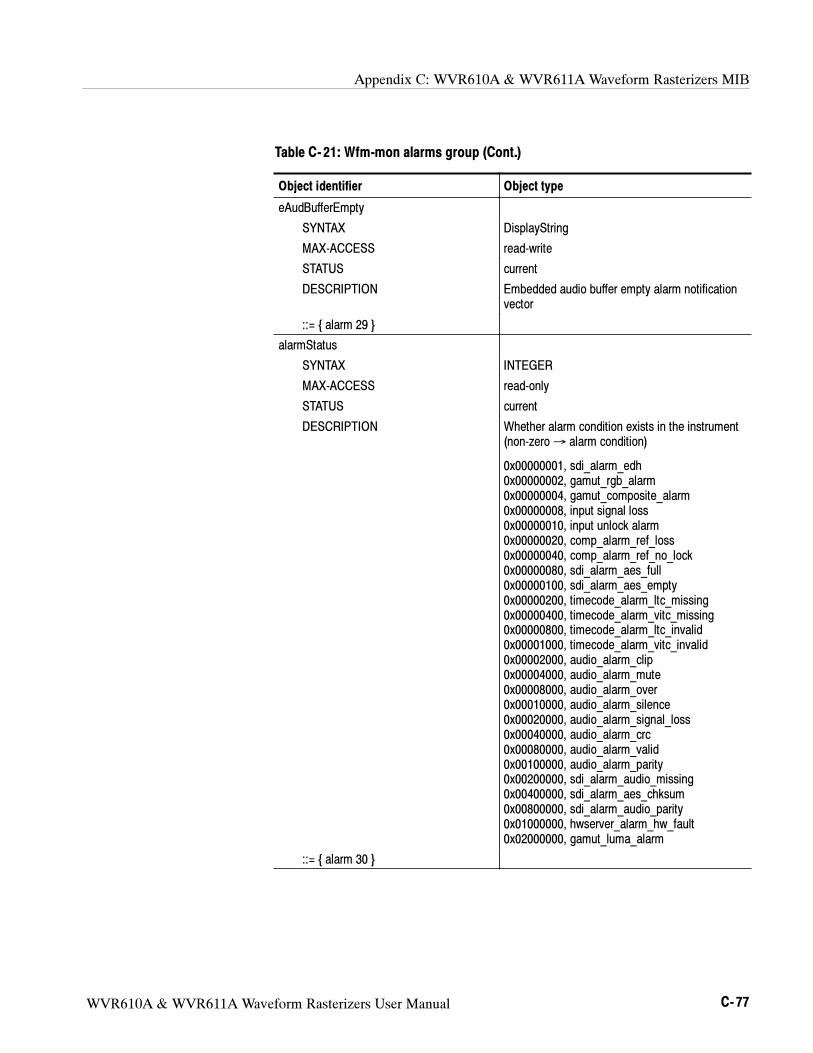
Appendix C: WVR610A & WVR611A Waveform Rasterizers MIB
WVR610A & WVR611A Waveform Rasterizers User Manual C- 77
Table C- 21: Wfm-mon alarms group (Cont.)
Object identifier Object type
eAudBufferEmpty
SYNTAX DisplayString
MAX-ACCESS read-write
STATUS current
DESCRIPTION Embedded audio buffer empty alarm notification
vector
::= alarm 29
alarmStatus
SYNTAX INTEGER
MAX-ACCESS read-only
STATUS current
DESCRIPTION Whether alarm condition exists in the instrument
(non-zero→ alarm condition)
0x00000001, sdi_alarm_edh
0x00000002, gamut_rgb_alarm
0x00000004, gamut_composite_alarm
0x00000008, input signal loss
0x00000010, input unlock alarm
0x00000020, comp_alarm_ref_loss
0x00000040, comp_alarm_ref_no_lock
0x00000080, sdi_alarm_aes_full
0x00000100, sdi_alarm_aes_empty
0x00000200, timecode_alarm_ltc_missing
0x00000400, timecode_alarm_vitc_missing
0x00000800, timecode_alarm_ltc_invalid
0x00001000, timecode_alarm_vitc_invalid
0x00002000, audio_alarm_clip
0x00004000, audio_alarm_mute
0x00008000, audio_alarm_over
0x00010000, audio_alarm_silence
0x00020000, audio_alarm_signal_loss
0x00040000, audio_alarm_crc
0x00080000, audio_alarm_valid
0x00100000, audio_alarm_parity
0x00200000, sdi_alarm_audio_missing
0x00400000, sdi_alarm_aes_chksum
0x00800000, sdi_alarm_audio_parity
0x01000000, hwserver_alarm_hw_fault
0x02000000, gamut_luma_alarm
::= alarm 30

Appendix C: WVR610A & WVR611A Waveform Rasterizers MIB
C- 78 WVR610A & WVR611A Waveform Rasterizers User Manual
Table C- 21: Wfm-mon alarms group (Cont.)
Object identifier Object type
gamutLuma
SYNTAX DisplayString
MAX-ACCESS read-write
STATUS current
DESCRIPTION Luma gamut alarm notification vector
::= alarm 31
Table C- 22: Wfm-mon LTC Mode group
Object identifier Object type
ltcHorPos
SYNTAX DisplayString
MAX-ACCESS not-accessible
STATUS current
DESCRIPTION LTC waveform horizontal position
::= ltc 1
ltcVertPos
SYNTAX DisplayString
MAX-ACCESS not-accessible
STATUS current
DESCRIPTION LTC waveform vertical position
::= ltc 2
ltcGain
SYNTAX INTEGER
gain-x1(0),
gain-x5(1)
MAX-ACCESS read-write
STATUS current
DESCRIPTION LTC waveform fixed gain (1X or 5X)
::= ltc 3
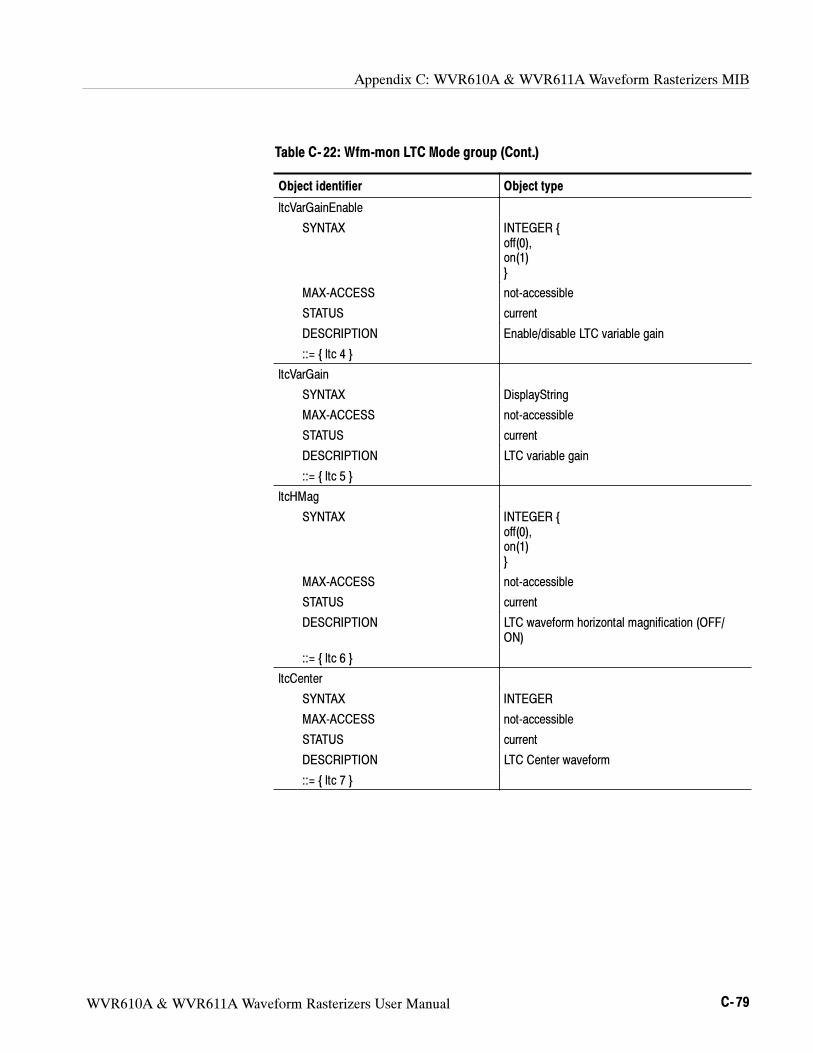
Appendix C: WVR610A & WVR611A Waveform Rasterizers MIB
WVR610A & WVR611A Waveform Rasterizers User Manual C- 79
Table C- 22: Wfm-mon LTC Mode group (Cont.)
Object identifier Object type
ltcVarGainEnable
SYNTAX INTEGER
off(0),
on(1)
MAX-ACCESS not-accessible
STATUS current
DESCRIPTION Enable/disable LTC variable gain
::= ltc 4
ltcVarGain
SYNTAX DisplayString
MAX-ACCESS not-accessible
STATUS current
DESCRIPTION LTC variable gain
::= ltc 5
ltcHMag
SYNTAX INTEGER
off(0),
on(1)
MAX-ACCESS not-accessible
STATUS current
DESCRIPTION LTC waveform horizontal magnification (OFF/
ON)
::= ltc 6
ltcCenter
SYNTAX INTEGER
MAX-ACCESS not-accessible
STATUS current
DESCRIPTION LTC Center waveform
::= ltc 7
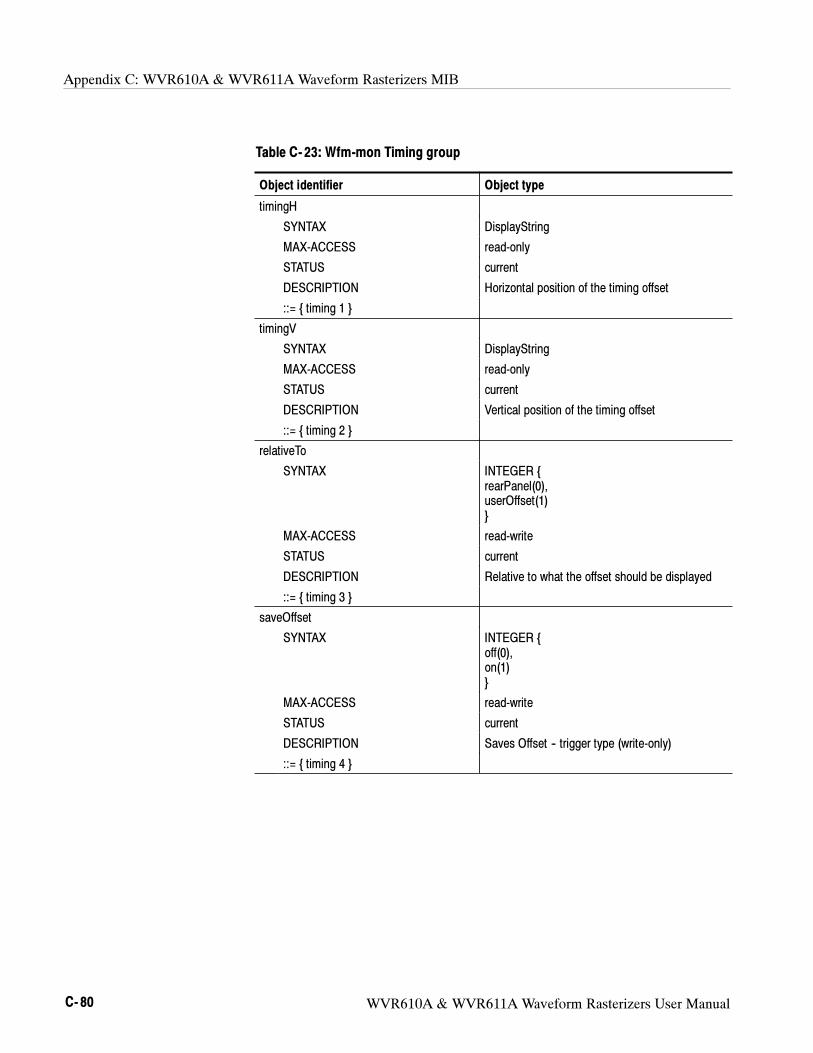
Appendix C: WVR610A & WVR611A Waveform Rasterizers MIB
C- 80 WVR610A & WVR611A Waveform Rasterizers User Manual
Table C- 23: Wfm-mon Timing group
Object identifier Object type
timingH
SYNTAX DisplayString
MAX-ACCESS read-only
STATUS current
DESCRIPTION Horizontal position of the timing offset
::= timing 1
timingV
SYNTAX DisplayString
MAX-ACCESS read-only
STATUS current
DESCRIPTION Vertical position of the timing offset
::= timing 2
relativeTo
SYNTAX INTEGER
rearPanel(0),
userOffset(1)
MAX-ACCESS read-write
STATUS current
DESCRIPTION Relative to what the offset should be displayed
::= timing 3
saveOffset
SYNTAX INTEGER
off(0),
on(1)
MAX-ACCESS read-write
STATUS current
DESCRIPTION Saves Offset -- trigger type (write-only)
::= timing 4
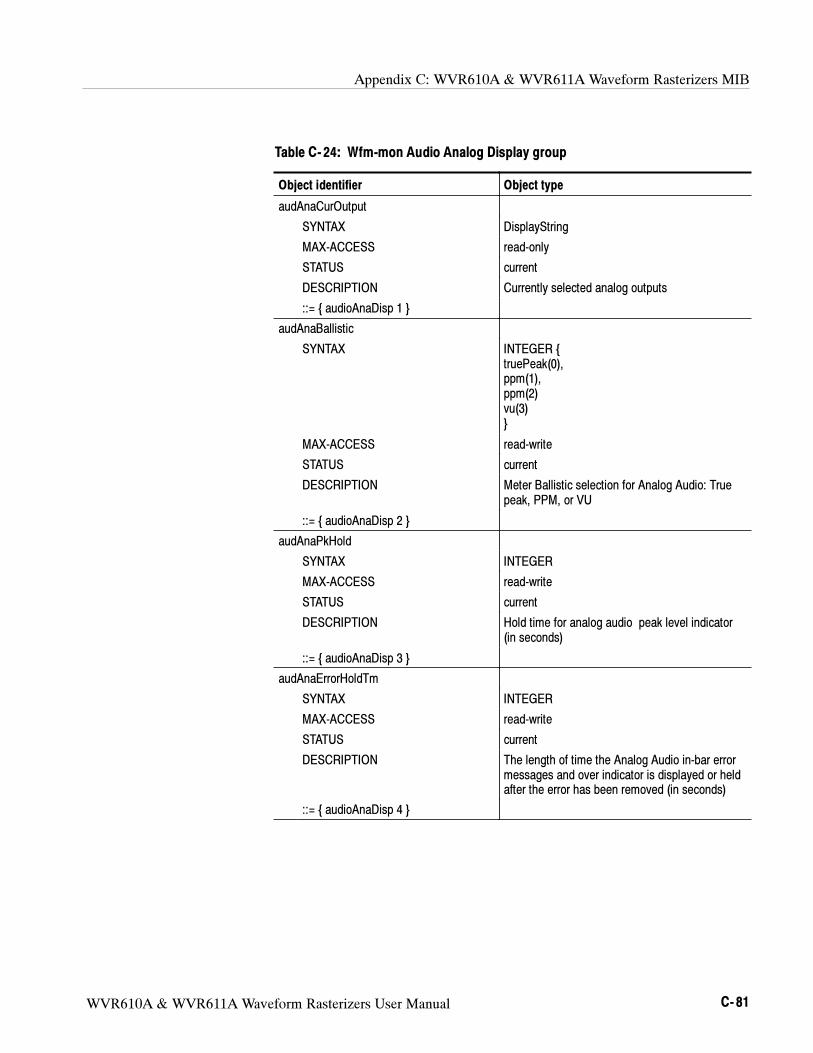
Appendix C: WVR610A & WVR611A Waveform Rasterizers MIB
WVR610A & WVR611A Waveform Rasterizers User Manual C- 81
Table C- 24: Wfm-mon Audio Analog Display group
Object identifier Object type
audAnaCurOutput
SYNTAX DisplayString
MAX-ACCESS read-only
STATUS current
DESCRIPTION Currently selected analog outputs
::= audioAnaDisp 1
audAnaBallistic
SYNTAX INTEGER
truePeak(0),
ppm(1),
ppm(2)
vu(3)
MAX-ACCESS read-write
STATUS current
DESCRIPTION Meter Ballistic selection for Analog Audio: True
peak, PPM, or VU
::= audioAnaDisp 2
audAnaPkHold
SYNTAX INTEGER
MAX-ACCESS read-write
STATUS current
DESCRIPTION Hold time for analog audio peak level indicator
(in seconds)
::= audioAnaDisp 3
audAnaErrorHoldTm
SYNTAX INTEGER
MAX-ACCESS read-write
STATUS current
DESCRIPTION The length of time the Analog Audio in-bar error
messages and over indicator is displayed or held
after the error has been removed (in seconds)
::= audioAnaDisp 4
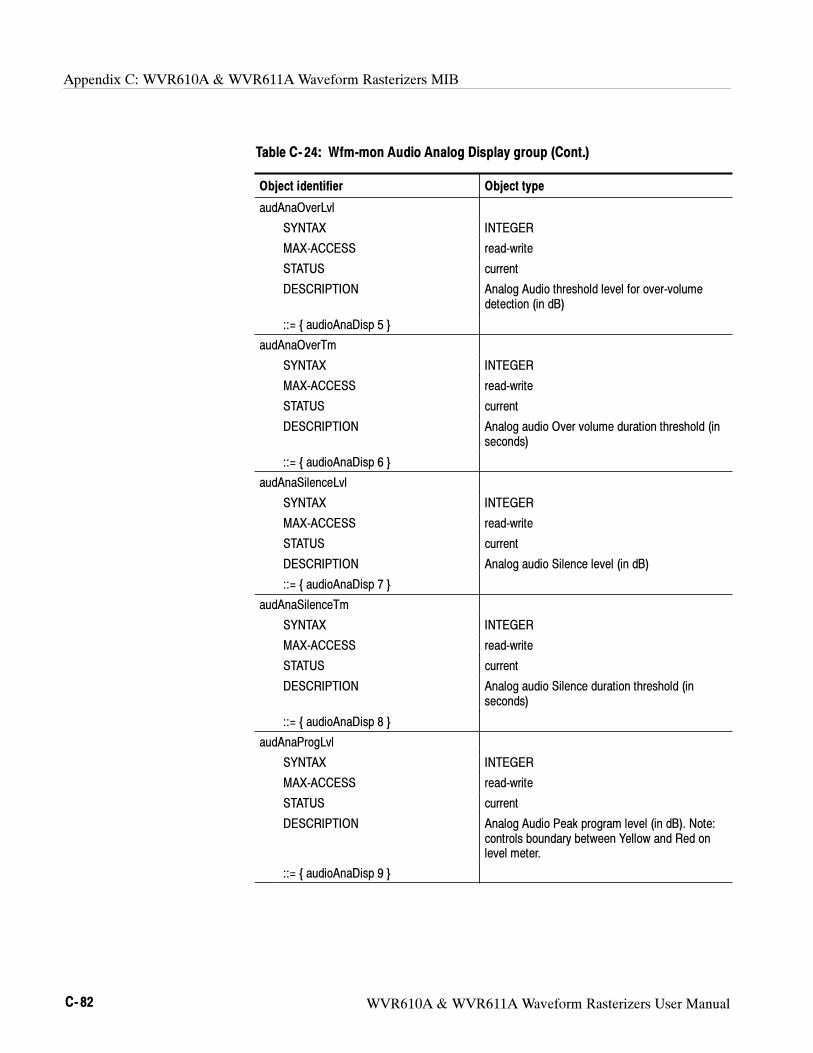
Appendix C: WVR610A & WVR611A Waveform Rasterizers MIB
C- 82 WVR610A & WVR611A Waveform Rasterizers User Manual
Table C- 24: Wfm-mon Audio Analog Display group (Cont.)
Object identifier Object type
audAnaOverLvl
SYNTAX INTEGER
MAX-ACCESS read-write
STATUS current
DESCRIPTION Analog Audio threshold level for over-volume
detection (in dB)
::= audioAnaDisp 5
audAnaOverTm
SYNTAX INTEGER
MAX-ACCESS read-write
STATUS current
DESCRIPTION Analog audio Over volume duration threshold (in
seconds)
::= audioAnaDisp 6
audAnaSilenceLvl
SYNTAX INTEGER
MAX-ACCESS read-write
STATUS current
DESCRIPTION Analog audio Silence level (in dB)
::= audioAnaDisp 7
audAnaSilenceTm
SYNTAX INTEGER
MAX-ACCESS read-write
STATUS current
DESCRIPTION Analog audio Silence duration threshold (in
seconds)
::= audioAnaDisp 8
audAnaProgLvl
SYNTAX INTEGER
MAX-ACCESS read-write
STATUS current
DESCRIPTION Analog Audio Peak program level (in dB). Note:
controls boundary between Yellow and Red on
level meter.
::= audioAnaDisp 9
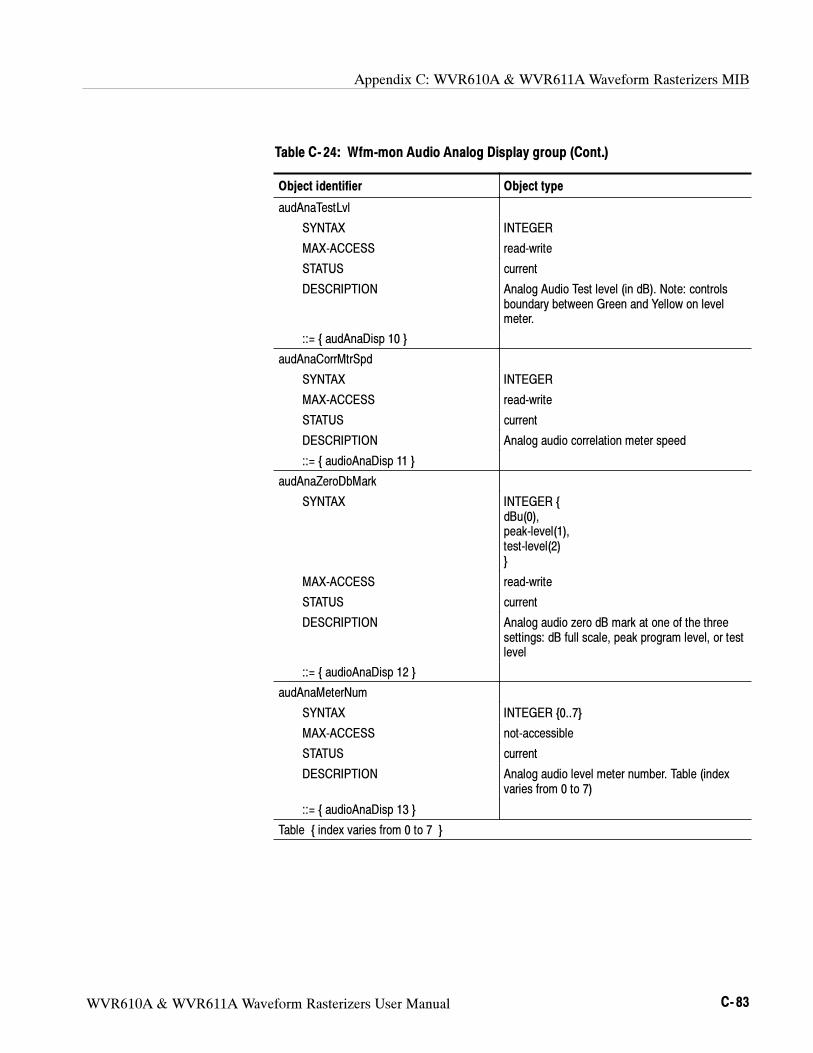
Appendix C: WVR610A & WVR611A Waveform Rasterizers MIB
WVR610A & WVR611A Waveform Rasterizers User Manual C- 83
Table C- 24: Wfm-mon Audio Analog Display group (Cont.)
Object identifier Object type
audAnaTestLvl
SYNTAX INTEGER
MAX-ACCESS read-write
STATUS current
DESCRIPTION Analog Audio Test level (in dB). Note: controls
boundary between Green and Yellow on level
meter.
::= audAnaDisp 10
audAnaCorrMtrSpd
SYNTAX INTEGER
MAX-ACCESS read-write
STATUS current
DESCRIPTION Analog audio correlation meter speed
::= audioAnaDisp 11
audAnaZeroDbMark
SYNTAX INTEGER
dBu(0),
peak-level(1),
test-level(2)
MAX-ACCESS read-write
STATUS current
DESCRIPTION Analog audio zero dB mark at one of the three
settings: dB full scale, peak program level, or test
level
::= audioAnaDisp 12
audAnaMeterNum
SYNTAX INTEGER 0..7
MAX-ACCESS not-accessible
STATUS current
DESCRIPTION Analog audio level meter number. Table (index
varies from 0 to 7)
::= audioAnaDisp 13
Table index varies from 0 to 7
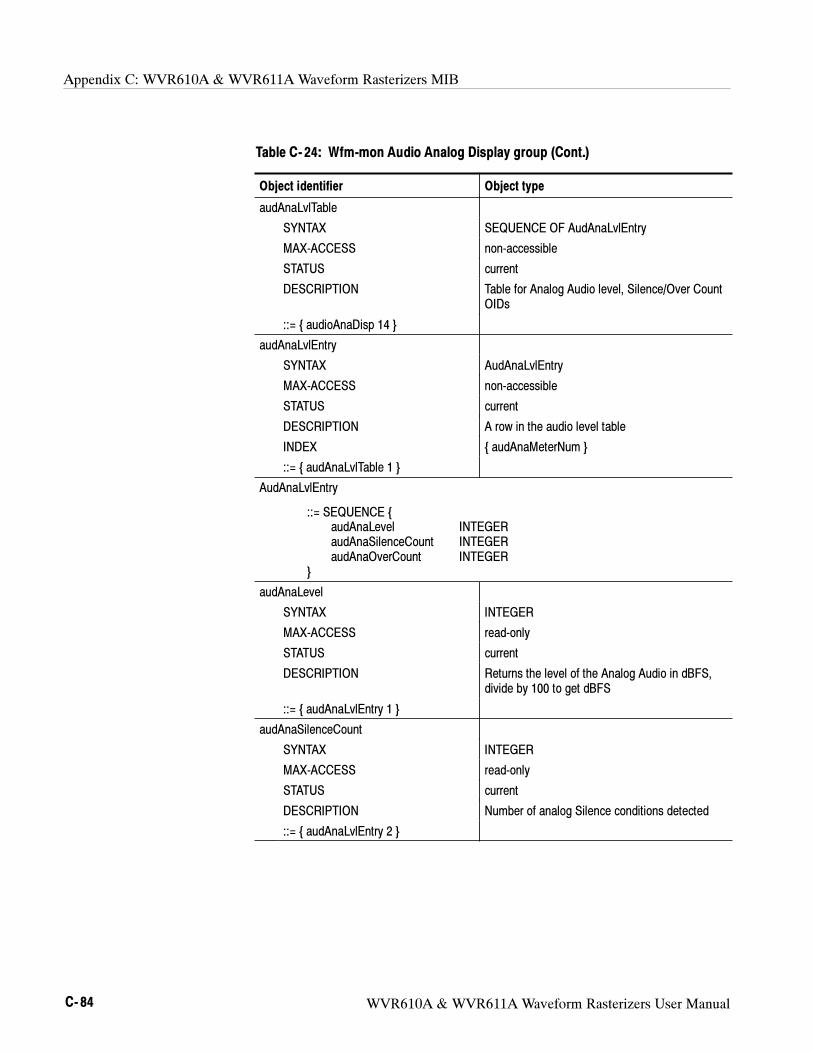
Appendix C: WVR610A & WVR611A Waveform Rasterizers MIB
C- 84 WVR610A & WVR611A Waveform Rasterizers User Manual
Table C- 24: Wfm-mon Audio Analog Display group (Cont.)
Object identifier Object type
audAnaLvlTable
SYNTAX SEQUENCE OF AudAnaLvlEntry
MAX-ACCESS non-accessible
STATUS current
DESCRIPTION Table for Analog Audio level, Silence/Over Count
OIDs
::= audioAnaDisp 14
audAnaLvlEntry
SYNTAX AudAnaLvlEntry
MAX-ACCESS non-accessible
STATUS current
DESCRIPTION A row in the audio level table
INDEX audAnaMeterNum
::= audAnaLvlTable 1
AudAnaLvlEntry
::= SEQUENCE
audAnaLevel INTEGER
audAnaSilenceCount INTEGER
audAnaOverCount INTEGER
audAnaLevel
SYNTAX INTEGER
MAX-ACCESS read-only
STATUS current
DESCRIPTION Returns the level of the Analog Audio in dBFS,
divide by 100 to get dBFS
::= audAnaLvlEntry 1
audAnaSilenceCount
SYNTAX INTEGER
MAX-ACCESS read-only
STATUS current
DESCRIPTION Number of analog Silence conditions detected
::= audAnaLvlEntry 2
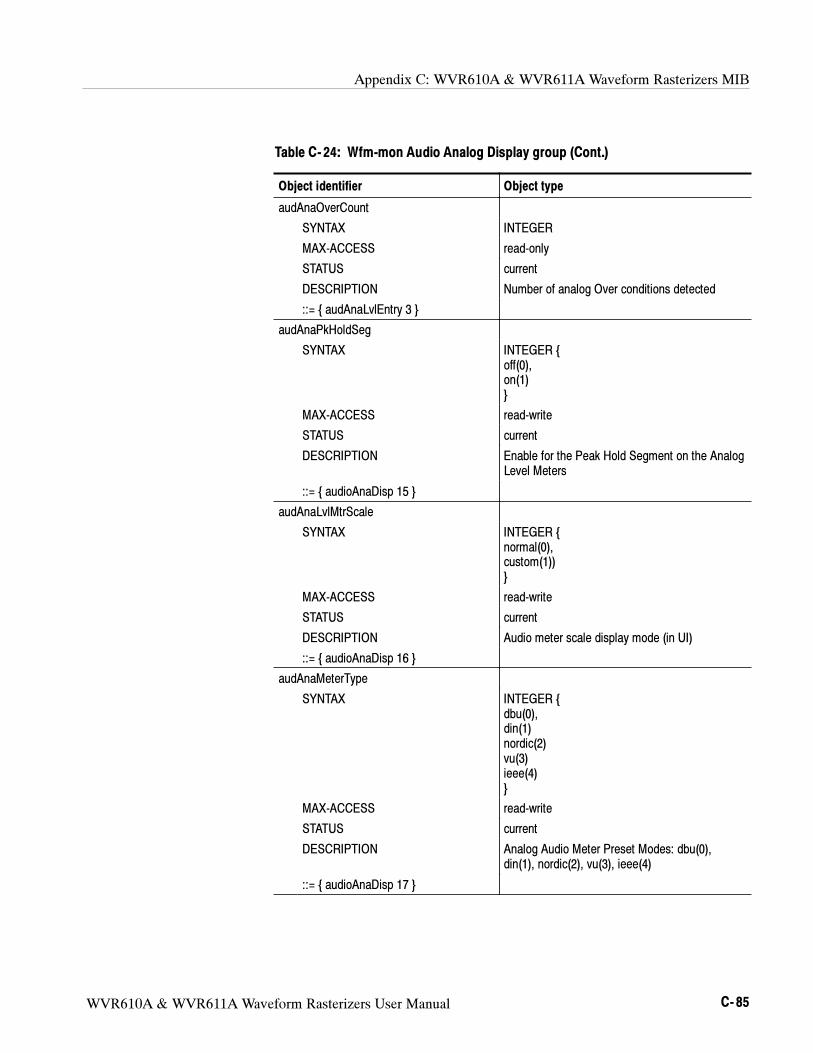
Appendix C: WVR610A & WVR611A Waveform Rasterizers MIB
WVR610A & WVR611A Waveform Rasterizers User Manual C- 85
Table C- 24: Wfm-mon Audio Analog Display group (Cont.)
Object identifier Object type
audAnaOverCount
SYNTAX INTEGER
MAX-ACCESS read-only
STATUS current
DESCRIPTION Number of analog Over conditions detected
::= audAnaLvlEntry 3
audAnaPkHoldSeg
SYNTAX INTEGER
off(0),
on(1)
MAX-ACCESS read-write
STATUS current
DESCRIPTION Enable for the Peak Hold Segment on the Analog
Level Meters
::= audioAnaDisp 15
audAnaLvlMtrScale
SYNTAX INTEGER
normal(0),
custom(1))
MAX-ACCESS read-write
STATUS current
DESCRIPTION Audio meter scale display mode (in UI)
::= audioAnaDisp 16
audAnaMeterType
SYNTAX INTEGER
dbu(0),
din(1)
nordic(2)
vu(3)
ieee(4)
MAX-ACCESS read-write
STATUS current
DESCRIPTION Analog Audio Meter Preset Modes: dbu(0),
din(1), nordic(2), vu(3), ieee(4)
::= audioAnaDisp 17
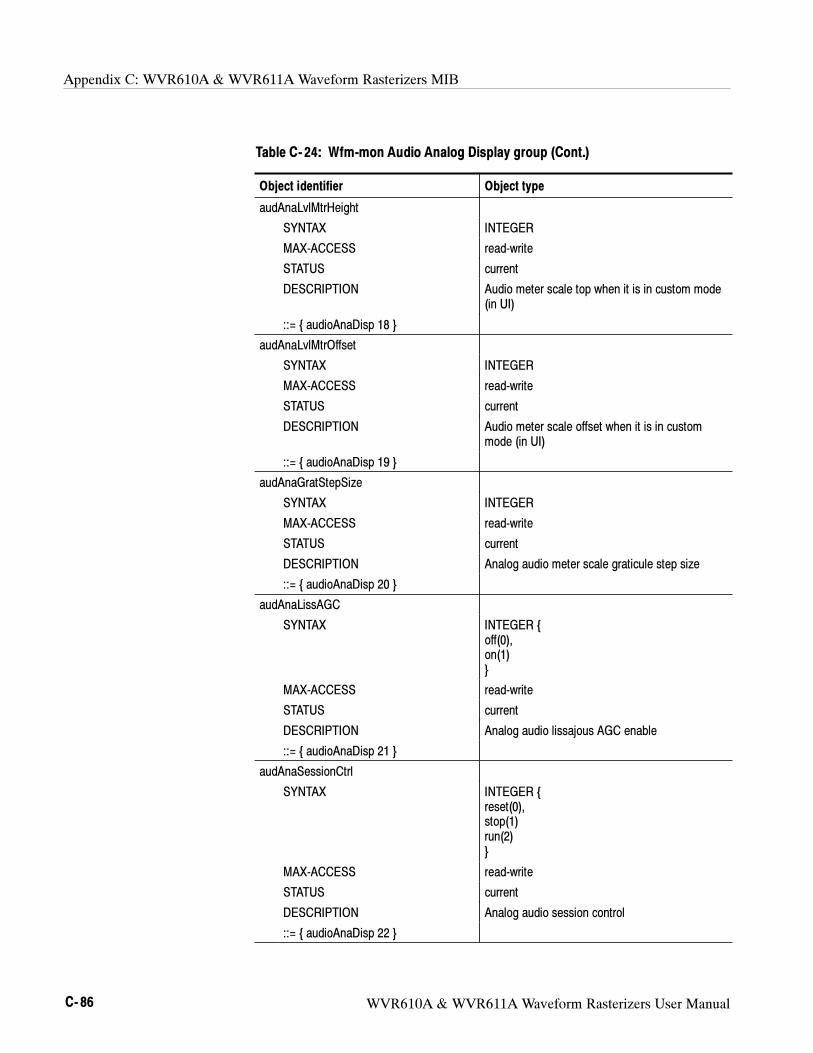
Appendix C: WVR610A & WVR611A Waveform Rasterizers MIB
C- 86 WVR610A & WVR611A Waveform Rasterizers User Manual
Table C- 24: Wfm-mon Audio Analog Display group (Cont.)
Object identifier Object type
audAnaLvlMtrHeight
SYNTAX INTEGER
MAX-ACCESS read-write
STATUS current
DESCRIPTION Audio meter scale top when it is in custom mode
(in UI)
::= audioAnaDisp 18
audAnaLvlMtrOffset
SYNTAX INTEGER
MAX-ACCESS read-write
STATUS current
DESCRIPTION Audio meter scale offset when it is in custom
mode (in UI)
::= audioAnaDisp 19
audAnaGratStepSize
SYNTAX INTEGER
MAX-ACCESS read-write
STATUS current
DESCRIPTION Analog audio meter scale graticule step size
::= audioAnaDisp 20
audAnaLissAGC
SYNTAX INTEGER
off(0),
on(1)
MAX-ACCESS read-write
STATUS current
DESCRIPTION Analog audio lissajous AGC enable
::= audioAnaDisp 21
audAnaSessionCtrl
SYNTAX INTEGER
reset(0),
stop(1)
run(2)
MAX-ACCESS read-write
STATUS current
DESCRIPTION Analog audio session control
::= audioAnaDisp 22
WVR610A & WVR611A Waveform Rasterizers User Manual D- 1
Appendix D: Upgrading the Waveform Rasterizer Firmware
System Upgrade (CONFIG> Utilities > System Upgrade) is used to upgrade the
system software of the WVR610A & WVR611A. The upgrade is performed
across an Ethernet network using a PC to transfer the new software to the
WVR610A & WVR611A.
The firmware upgrade process involves the following steps:
Downloading the firmware package ZIP-file from the Tektronix website.
Initiating the update mode on the waveform rasterizer.
Unzipping the firmware package and using the enclosed data-transfer utility
to send the new firmware data to the instrument you are upgrading.
Verifying the operation of the instrument after the firmware upgrade.
PC System Requirements
Before you download the WVR610A & WVR611A firmware-upgrade package,
verify that your PC meets these requirements.
The data-transfer utility for upgrading the WVR610A & WVR611A runs on the
following PC systems:
Windows 98
Windows NT 4.0
Windows 2000
Windows ME systems
Windows XP
Additionally, your PC requires the following minimum system-requirements to
load and operate the data-transfer utility used to upgrade the waveform rasterizer:
Winsock 2.0
Ethernet interface
10 MB of free disk space
Appendix D: Upgrading the Waveform Rasterizer Firmware
D- 2 WVR610A & WVR611A Waveform Rasterizers User Manual
Firmware Package Download
You can download the latest version of the WVR610A & WVR611A firmware
from the Tektronix website at the following URL:
http://www.tek.com/Measurement/video_audio
From there, follow the links to Software & Drivers, and then to Video Test to
locate the waveform rasterizer firmware-upgrade package.
When you download the upgrade package, you will receive a self-extracting ZIP
file containing the following files:
transfer.exe (data-transfer utility program)
firmware.pkg (waveform rasterizer firmware-upgrade data file)
readme.txt (release notes)
Preparing for the System Upgrade
Once you have downloaded a system upgrade package, unzip the file. Next,
write down the network address of the waveform rasterizer you plan to upgrade.
NOTE. When using DHCP, there is a small possibility that the waveform
rasterizer will be assigned a different address when the software update mode is
activated. If the unit is not off or disconnected from the network long enough,
then typically the waveform rasterizer will get the same address as it had
previously. This means that you can go to the Config menu and get the current IP
address and use that in the update process. If this does not work the first time
you may need to try again or use the manual IP address mode.
During firmware upgrade mode, the boot monitor might turn on the instrument
FAULT light on the front panel if it detects an error. The boot monitor may
signal a FAULT after an unsuccessful firmware update operation or from an error
in the DHCP software. This FAULT will not be logged into the diagnostic log
since the boot monitor is running, not the main instrument software.
The boot monitor will assert a FAULT after an unsuccessful firmware update
operation. The failure of the firmware update can be caused by a network
communication error, timeout or a corrupt firmware package. When it detects a
firmware update error, the instrument will return to the ready state (tile buttons
flashing). You can then try to resend the firmware data to the instrument. In the
case of repeated failures, check to make sure that you have the correct firmware
release for the instrument.
Appendix D: Upgrading the Waveform Rasterizer Firmware
WVR610A & WVR611A Waveform Rasterizers User Manual D- 3
In bootrom version 1.5 and later, the boot monitor might also detect errors in the
DHCP software which can result from repeatedly switching between factory and
DHCP network settings. If the FAULT light remains lit and the instrument fails
to obtain an address from a DHCP server, reboot the instrument by pressing one
of the MEASURE SELECT buttons or by removing power from the instrument.
When the instrument reboots, hold down the FULL button to return the
instrument to the firmware update mode.
CAUTION. Once the instrument has started to erase internal flash (VECT button
lit), DO NOT remove power from the instrument. If you remove power while the
instrument is reprogramming flash, the flash image will be corrupted and the
instrument will only boot in the firmware update mode until new firmware has
been loaded into the instrument flash. Use the MEASURE select buttons to abort
a firmware update. Remove power from the instrument only as a last resort.
NOTE. If you have an instrument with a bootrom version prior to 1.5, set the IP
configuration mode to Manual or DHCP before performing a firmware update.
Older bootrom versions have a bug that prevents them from switching back to
DHCP mode after switching to the factory default network configuration while
in the SW update mode.
In bootrom version 1.5 and later, the instrument will automatically switch to
factory default if DHCP discovery fails. Press the SEL button to restart DHCP
discovery.
Table D--1 describes the appearance of the front-panel buttons as the firmware
upgrade process progresses.
Table D- 1: Button animation sequences
Button indication State Description
Flashing DISPLAY SE-
LECT buttons
Ready Instrument is ready to receive
firmware data and is waiting for a
connection from the PC host
Flashing arrow buttons DHCP discovery Instrument is negotiating for an IP
address from a DHCP server
SEL button lit Factory IP configuration Instrument is configured with factory
default IP address of 192.168.1.1
Arrow and SEL not lit Manual IP configuration Instrument is configured with manual
IP configuration
Arrow buttons lit, SEL not
lit
DHCP configuration Instrument has received an IP
address from a DHCP server

Appendix D: Upgrading the Waveform Rasterizer Firmware
D- 4 WVR610A & WVR611A Waveform Rasterizers User Manual
Table D- 1: Button animation sequences (Cont.)
Button indication DescriptionState
WFM button lit Receiving firmware Instrument is receiving firmware data
VECT button lit Erasing flash memory Instrument is erasing internal flash
memory
MEAS button lit Programming flash
memory
Instrument is programming internal
flash memory
1X button lit Verifying flash memory Instrument is verifying programming
of internal flash memory
Installing the Firmware
To install new firmware in a waveform rasterizer:
1. On the waveform rasterizer, press CONFIG to display the Config menu.
2. Select Utilities and press the right-arrow key to change the menu focus to the
submenu.
3. Select System Upgrade and press SEL. This displays the System Software
Upgrade window. See Figure D--1.
Figure D- 1: Select continue to begin the firmware upgrade process
4. To continue with the upgrade, press the right-arrow key to select Continue
and press SEL.
NOTE. You can also place the waveform rasterizer into the upgrade mode by
pressing the FULL button while applying power to the instrument.

Appendix D: Upgrading the Waveform Rasterizer Firmware
WVR610A & WVR611A Waveform Rasterizers User Manual D- 5
This places the waveform rasterizer into the upgrade mode. The monitor
display will go to black and the DISPLAY SELECT keys will flash in
sequence. If the instrument is in DHCP mode, the arrow keys will also flash.
NOTE. If the waveform rasterizer is in DHCP mode, wait until the arrow keys
stop flashing before proceeding.
If you don’t recall the IP address of the waveform rasterizer, there are two
ways to proceed. One, you can temporarily set the IP address to the default
value (192.168.1.1) once it is in upgrade mode by pressing SEL. After the
upgrade is completed, the original IP address will be restored. Two, you can
cycle the power and the instrument will exit upgrade mode and return to
normal operation. Then you can check the IP address in the Config >
Network Settings submenu.
5. On the PC, double-click the transfer.exe file to launch the transfer program.
This displays the window shown in Figure D--2.
Figure D- 2: Transfer utility window
6. Type the network address (for example: 198.181.221.123) or DNS name of
the waveform rasterizer you wish to update, and then press Enter. This starts
the firmware upgrade process.
To stop the firmware update, you can press any MEASURE button on the
front-panel of the waveform rasterizer before the transfer utility begins
erasing the flash ROM. Once the words Erasing Flash... appear in the
transfer utility window, you cannot stop the update.
As the firmware upgrade begins, the buttons on the waveform rasterizer will
stop flashing. Next, buttons on the waveform rasterizer will illuminate to
indicate the progress of the software upgrade.
As each stage completes, the following buttons illuminate in sequence
WFM, VECT, MEAS, and 1X.
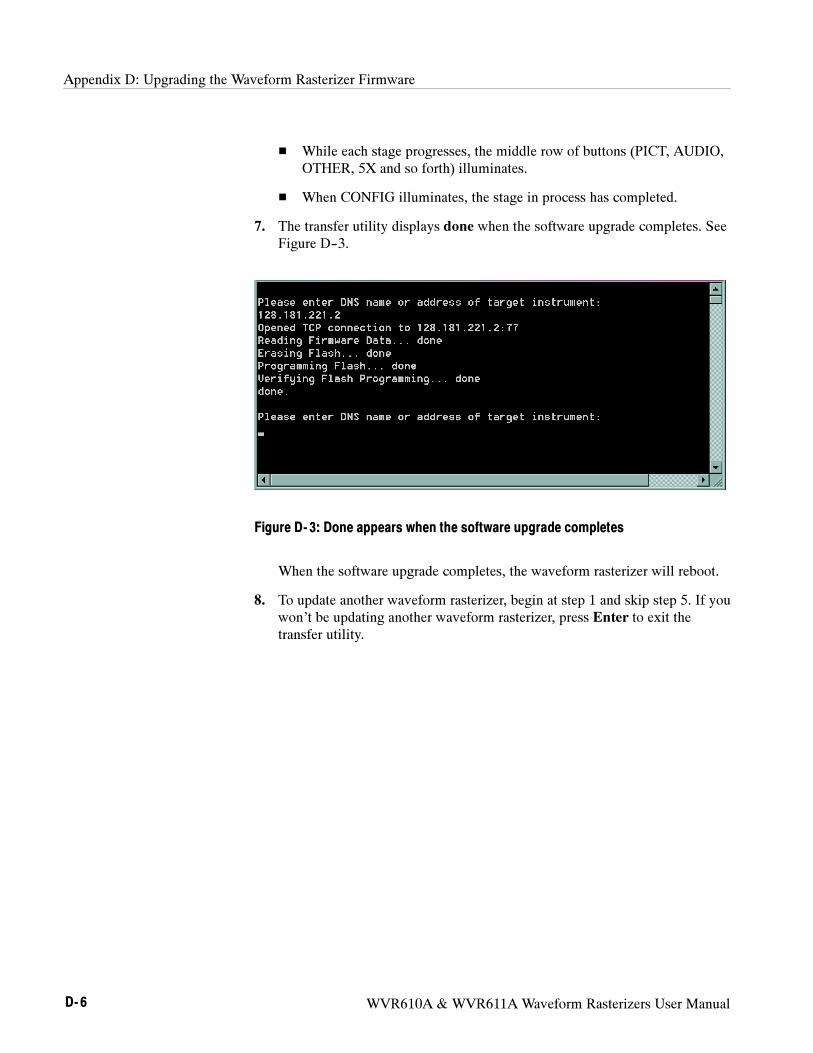
Appendix D: Upgrading the Waveform Rasterizer Firmware
D- 6 WVR610A & WVR611A Waveform Rasterizers User Manual
While each stage progresses, the middle row of buttons (PICT, AUDIO,
OTHER, 5X and so forth) illuminates.
When CONFIG illuminates, the stage in process has completed.
7. The transfer utility displays done when the software upgrade completes. See
Figure D--3.
Figure D- 3: Done appears when the software upgrade completes
When the software upgrade completes, the waveform rasterizer will reboot.
8. To update another waveform rasterizer, begin at step 1 and skip step 5. If you
won’t be updating another waveform rasterizer, press Enter to exit the
transfer utility.
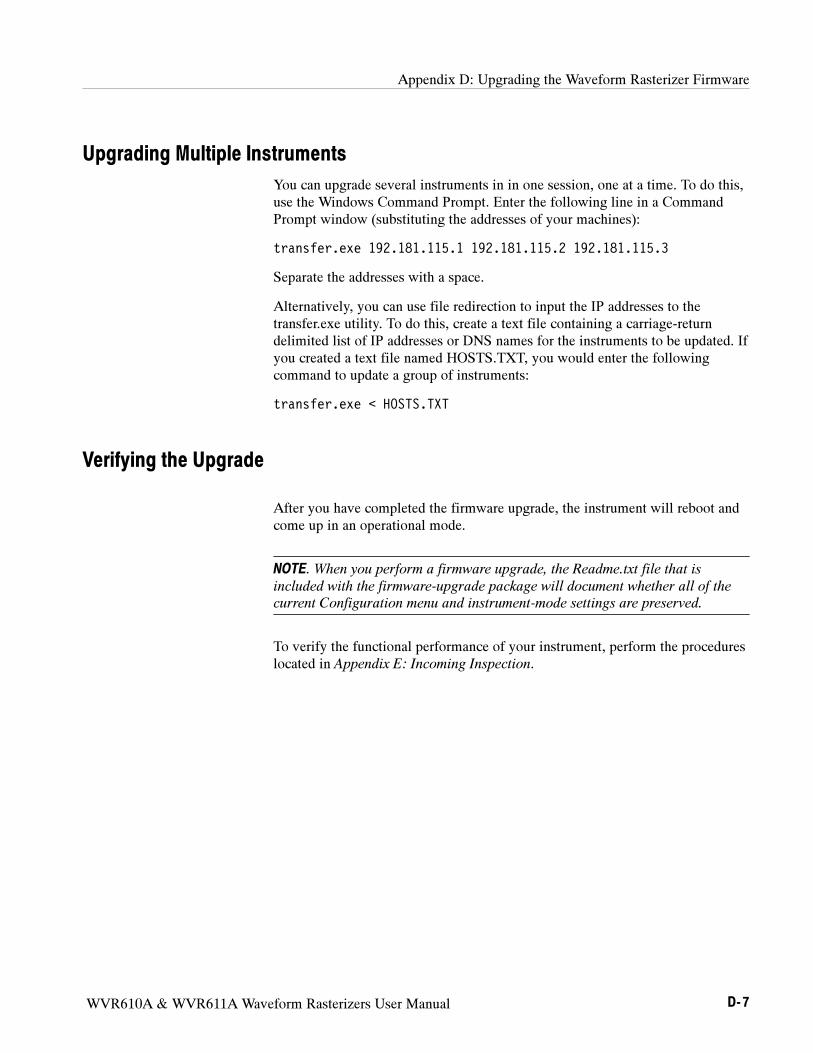
Appendix D: Upgrading the Waveform Rasterizer Firmware
WVR610A & WVR611A Waveform Rasterizers User Manual D- 7
Upgrading Multiple Instruments
You can upgrade several instruments in in one session, one at a time. To do this,
use the Windows Command Prompt. Enter the following line in a Command
Prompt window (substituting the addresses of your machines):
transfer.exe 192.181.115.1 192.181.115.2 192.181.115.3
Separate the addresses with a space.
Alternatively, you can use file redirection to input the IP addresses to the
transfer.exe utility. To do this, create a text file containing a carriage-return
delimited list of IP addresses or DNS names for the instruments to be updated. If
you created a text file named HOSTS.TXT, you would enter the following
command to update a group of instruments:
transfer.exe < HOSTS.TXT
Verifying the Upgrade
After you have completed the firmware upgrade, the instrument will reboot and
come up in an operational mode.
NOTE. When you perform a firmware upgrade, the Readme.txt file that is
included with the firmware-upgrade package will document whether all of the
current Configuration menu and instrument-mode settings are preserved.
To verify the functional performance of your instrument, perform the procedures
located in Appendix E: Incoming Inspection.

Appendix D: Upgrading the Waveform Rasterizer Firmware
D- 8 WVR610A & WVR611A Waveform Rasterizers User Manual
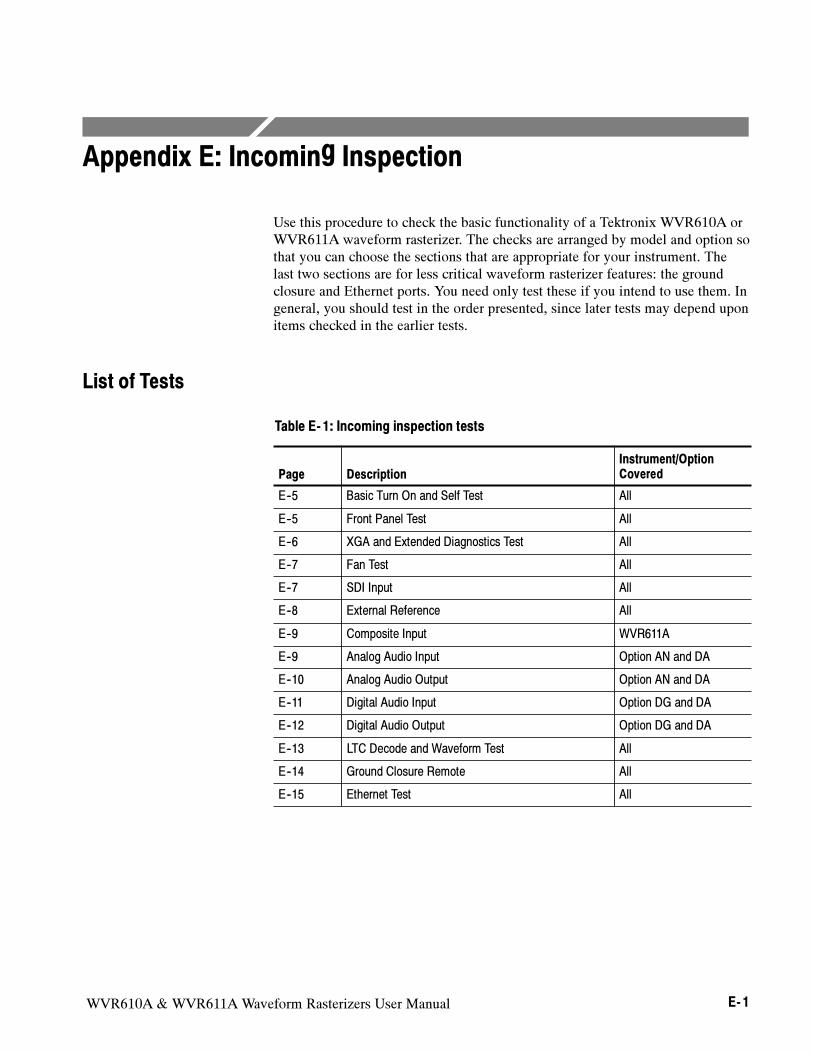
WVR610A & WVR611A Waveform Rasterizers User Manual E- 1
Appendix E: Incoming Inspection
Use this procedure to check the basic functionality of a Tektronix WVR610A or
WVR611A waveform rasterizer. The checks are arranged by model and option so
that you can choose the sections that are appropriate for your instrument. The
last two sections are for less critical waveform rasterizer features: the ground
closure and Ethernet ports. You need only test these if you intend to use them. In
general, you should test in the order presented, since later tests may depend upon
items checked in the earlier tests.
List of Tests
Table E- 1: Incoming inspection tests
Page Description
Instrument/Option
Covered
E--5 Basic Turn On and Self Test All
E--5 Front Panel Test All
E--6 XGA and Extended Diagnostics Test All
E--7 Fan Test All
E--7 SDI Input All
E--8 External Reference All
E--9 Composite Input WVR611A
E--9 Analog Audio Input Option AN and DA
E--10 Analog Audio Output Option AN and DA
E--11 Digital Audio Input Option DG and DA
E--12 Digital Audio Output Option DG and DA
E--13 LTC Decode and Waveform Test All
E--14 Ground Closure Remote All
E--15 Ethernet Test All
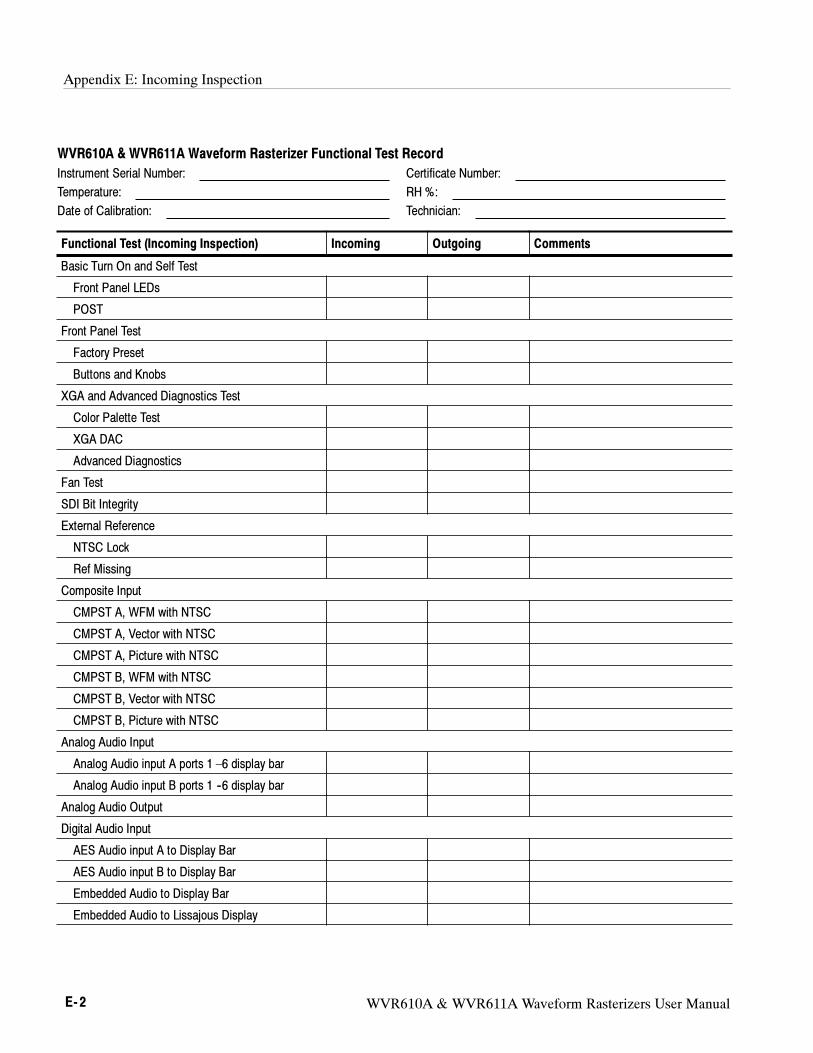
Appendix E: Incoming Inspection
E- 2 WVR610A & WVR611A Waveform Rasterizers User Manual
WVR610A & WVR611A Waveform Rasterizer Functional Test Record
Instrument Serial Number: Certificate Number:
Temperature: RH %:
Date of Calibration: Technician:
Functional Test (Incoming Inspection) Incoming Outgoing Comments
Basic Turn On and Self Test
Front Panel LEDs
POST
Front Panel Test
Factory Preset
Buttons and Knobs
XGA and Advanced Diagnostics Test
Color Palette Test
XGA DAC
Advanced Diagnostics
Fan Test
SDI Bit Integrity
External Reference
NTSC Lock
Ref Missing
Composite Input
CMPST A, WFM with NTSC
CMPST A, Vector with NTSC
CMPST A, Picture with NTSC
CMPST B, WFM with NTSC
CMPST B, Vector with NTSC
CMPST B, Picture with NTSC
Analog Audio Input
Analog Audio input A ports 1 –6 display bar
Analog Audio input B ports 1 --6 display bar
Analog Audio Output
Digital Audio Input
AES Audio input A to Display Bar
AES Audio input B to Display Bar
Embedded Audio to Display Bar
Embedded Audio to Lissajous Display
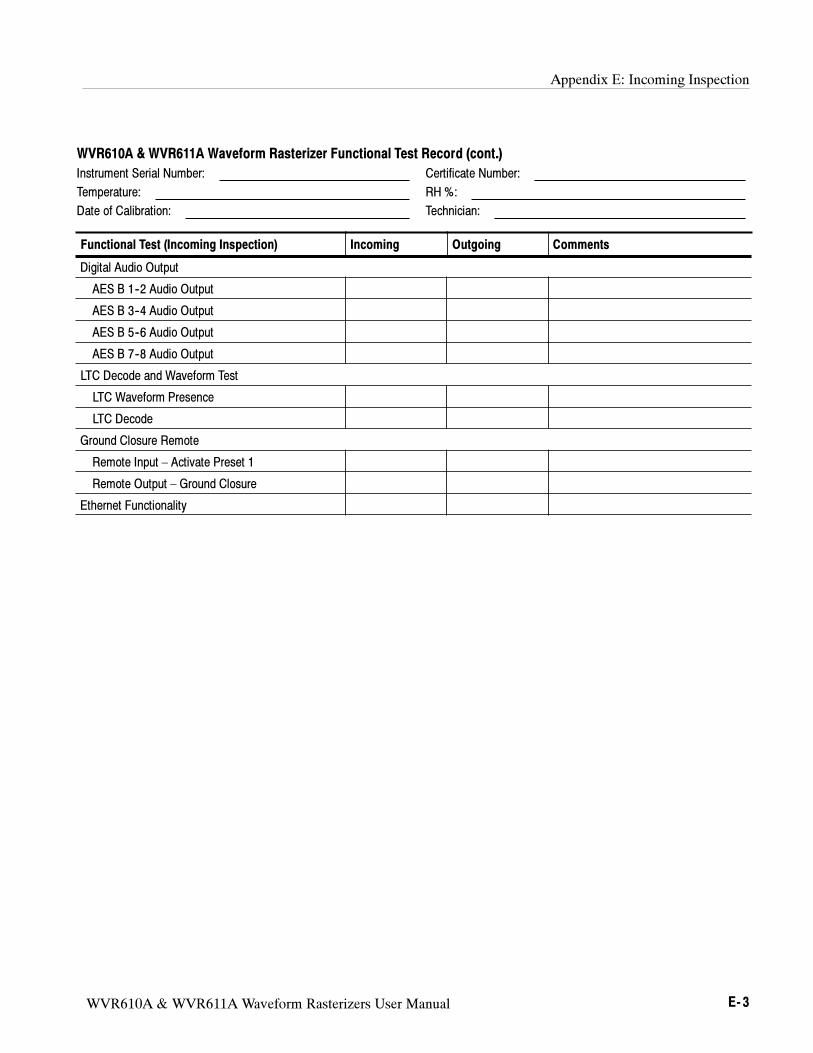
Appendix E: Incoming Inspection
WVR610A & WVR611A Waveform Rasterizers User Manual E- 3
WVR610A & WVR611A Waveform Rasterizer Functional Test Record (cont.)
Instrument Serial Number: Certificate Number:
Temperature: RH %:
Date of Calibration: Technician:
Functional Test (Incoming Inspection) CommentsOutgoingIncoming
Digital Audio Output
AES B 1--2 Audio Output
AES B 3--4 Audio Output
AES B 5--6 Audio Output
AES B 7--8 Audio Output
LTC Decode and Waveform Test
LTC Waveform Presence
LTC Decode
Ground Closure Remote
Remote Input – Activate Preset 1
Remote Output – Ground Closure
Ethernet Functionality
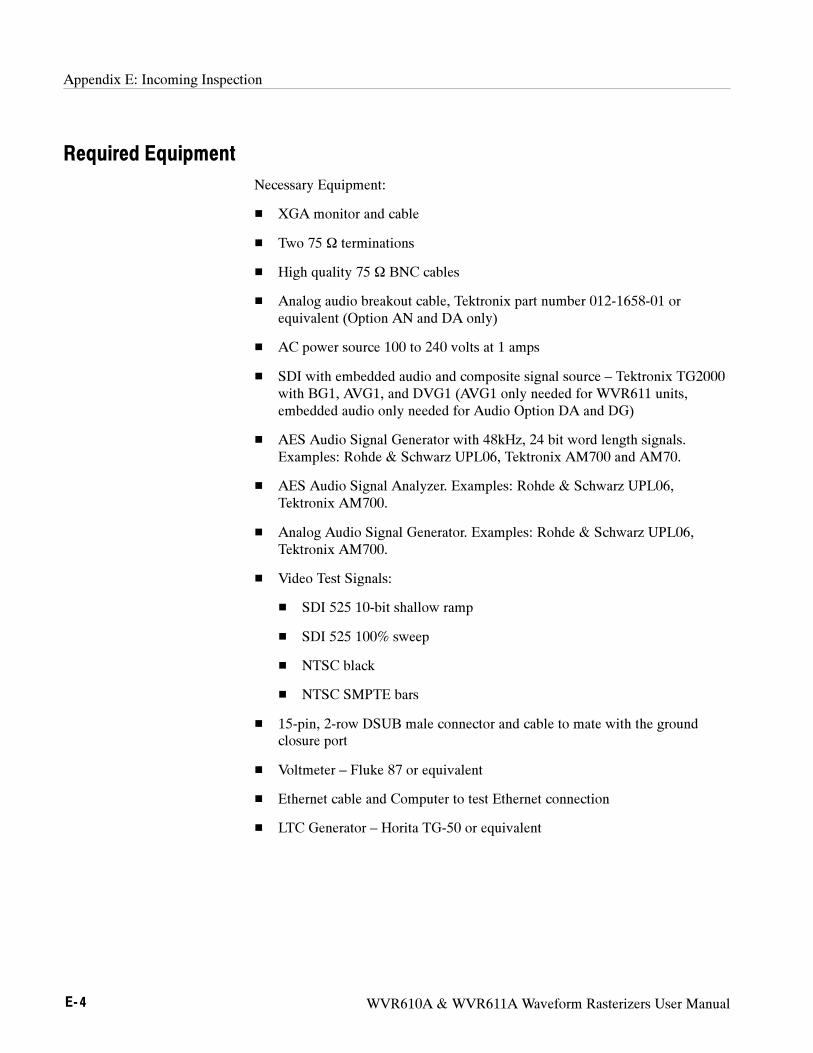
Appendix E: Incoming Inspection
E- 4 WVR610A & WVR611A Waveform Rasterizers User Manual
Required Equipment
Necessary Equipment:
XGA monitor and cable
Two 75 Ω terminations
High quality 75 Ω BNC cables
Analog audio breakout cable, Tektronix part number 012-1658-01 or
equivalent (Option AN and DA only)
AC power source 100 to 240 volts at 1 amps
SDI with embedded audio and composite signal source – Tektronix TG2000
with BG1, AVG1, and DVG1 (AVG1 only needed for WVR611 units,
embedded audio only needed for Audio Option DA and DG)
AES Audio Signal Generator with 48kHz, 24 bit word length signals.
Examples: Rohde & Schwarz UPL06, Tektronix AM700 and AM70.
AES Audio Signal Analyzer. Examples: Rohde & Schwarz UPL06,
Tektronix AM700.
Analog Audio Signal Generator. Examples: Rohde & Schwarz UPL06,
Tektronix AM700.
Video Test Signals:
SDI 525 10-bit shallow ramp
SDI 525 100% sweep
NTSC black
NTSC SMPTE bars
15-pin, 2-row DSUB male connector and cable to mate with the ground
closure port
Voltmeter – Fluke 87 or equivalent
Ethernet cable and Computer to test Ethernet connection
LTC Generator – Horita TG-50 or equivalent
Appendix E: Incoming Inspection
WVR610A & WVR611A Waveform Rasterizers User Manual E- 5
Basic Turn On and Self Test
1. Connect a XGA monitor to the connector on the rear of the waveform
rasterizer.
2. Connect the AC line cord to the rear of the instrument and to a 100 to
240 VAC source. There is no power switch on the waveform rasterizer, so
the instrument will turn on as soon as you apply power.
3. Look at the front panel immediately after you apply power. All the buttons
should be lit, the text over the three knobs should also be lit, and the Fault
indicator should light up.
4. After a couple of seconds, the lights in the buttons and text will turn off.
5. After about 15 seconds the fault light should turn off.
6. Also after about 15 seconds, the Power on diagnostic page should appear on
the XGA monitor.
7. Verify that all self tests pass. Any failures will be shown in Red. The results
of the Power on diagnostics are erased from the screen, but you can view
them the results by selecting CONFIG > Utilities > View Diagnostics Log.
8. After the diagnostics are finished, the instrument state will be restored.
When the progress indicator in the lower-right part of the screen is finished,
the instrument has finished initializing.
9. Record Pass or Fail for the POST in the test record.
Front Panel Test
1. Press FACTORY to restore the factory preset. Wait for the process to
complete as indicated by the progress indicator.
2. Connect the DVG1 output to the SDI A input. Terminate the SDI loop-
through.
3. Press FULL to make the active tile be full screen.
4. Press HELP to display the help screens.
5. Press all the other buttons.
Each one should flash as you press it. Most buttons should bring up help text
for that button in the right pane of the help screen. Some buttons, such as the
presets, all bring up the same information so you may need to alternate
between preset buttons and another button to see the text change. The HELP
and navigation keys (the four arrow keys and the SEL key) do not bring up
help text since they are used to traverse the help panes and content.
Appendix E: Incoming Inspection
E- 6 WVR610A & WVR611A Waveform Rasterizers User Manual
6. Press the right arrow key until the Help Contents pane in the upper-left
corner is highlighted.
7. Turn the GENERAL knob and verify the selector box moves up and down
the list.
8. Press HELP to exit help.
9. Turn the HORIZONTAL and VERTICAL knobs and verify the waveform
moves appropriately.
10. Record Pass or Fail for Buttons and Knobs in the test record.
XGA and Extended Diagnostics Test
1. Press CONFIG to display the CONFIG menu.
2. Select Utilities and then press SEL.
3. Select CPU Color Palette Test then press SEL.
4. Verify that 16 distinct colors are displayed. This tests the XGA data path
from the CPU.
5. Press the left arrow key to change the menu focus back to the Utilities
submenu.
6. Select Run Advanced Diags and then press SEL.
7. Use the right-arrow key to highlight the Continue box and then press SEL
to run the test.
8. Verify the XGA DAC is working by looking at the White and Red steps at
the top of the screen, and at the Green and Blue ramps at the bottom of the
screen. They should not have steps but should instead have a smooth
transition from dark to light.
9. Record Pass or Fail for XGA DAC in the test record.
10. Verify the following frequencies are within 10 kHz of the nominal value
listed below:
a. SDI Clock = 27.000 MHz
b. VGA clock = 64.000 MHz
c. Audio PLL = 12.288 MHz
d. Analog Pix = 27.000 MHz (WVR611A only)
Appendix E: Incoming Inspection
WVR610A & WVR611A Waveform Rasterizers User Manual E- 7
e. Hsync rate : Width = 19 : 3 µs
f. Vsync rate : Width = 16737 : 64 µs
g. Lissajous Frequencies – Liss[0,1] = 19.8 MHz--20.1 MHz (only if audio
option installed)
11. Verify that all the tests in the middle section of the screen have a green Pass
status.
12. Verify that the bus bit activity tests (SDI PIX and VGA PIX) at the bottom
of the screen show both a red and a green bar in each bit location. The VGA
PIX line (XGA bus) should show 8 bits from the CPU, a space, then Hsync,
a space, Vsync, a space and then the blank line. It is normal for the V sync
bit to blink occasionally.
13. Press SEL or cycle the power to re-boot the unit in normal operation.
14. Record Pass or Fail for Advanced Diagnostics in the test record.
Fan Test
If the fault light in the lower left corner of the front panel is not on (Red), then
the fans are running. You should also be able to hear them and feel air coming
out the back of the instrument. At low temperatures the fans will turn slowly and
be very quiet. Record Pass or Fail for Fan Test in the test record.
SDI Input – Check Bit Integrity
1. Apply a 10-bit 525 shallow ramp to the SDI A port. Install a termination on
the other side of the loop through.
2. Press FACTORY to restore the factory preset.
3. Press and holdWFM to bring up the WFM pop-up menu.
4. Use the arrow keys to select the Pr and Pb waveforms and turn them off.
5. Press the 5X gain button.
6. Press the VAR gain button and then use the GENERAL knob to increase the
gain to 10X.
7. Press FULL to expand the tile to full screen.
8. Count the steps in the waveform. There should be 11 to 13 even vertical
steps in each major division (10 mV). The steps should always step upward
in a monotonic ramp.
Appendix E: Incoming Inspection
E- 8 WVR610A & WVR611A Waveform Rasterizers User Manual
9. Press VAR to switch variable gain off and press 1X to get back to normal
gain.
10. Change the input signal to a 100% sweep.
11. Verify the sine waves are uniform and do not have steps. Also verify the
amplitude is 700 mV.
12. If desired, move the input and termination to input B, select input B from the
front panel and repeat steps 5 through 11.
13. Record Pass or Fail for SDI Bit Integrity in the test record.
External Reference
1. Press FACTORY to restore the factory preset.
2. Apply a 525 SDI signal to SDI A from the TG2000 DVG1 module. Install a
termination on the loopthrough.
3. Apply an NTSC signal to the External Reference Port from the TG2000 BG1
module. Install a termination on the loopthrough.
4. Select EXT REF on the waveform rasterizer front panel.
5. The status bar in the lower left-hand corner of the display should display
Ref: Ext NTSC.
6. Press the display select 4 button, thenWFM, then FIELD.
7. Verify that both WFM tiles are stable.
8. Record Pass or Fail for NTSC Lock in the test record.
9. Remove the NTSC signal from the reference input.
10. Both WFM tiles should “unlock” and scroll.
11. The status bar in the lower left-hand corner of the display should display
Ref: Ext. Missing.
12. Record Pass or Fail for Ref Missing in the test record.
Appendix E: Incoming Inspection
WVR610A & WVR611A Waveform Rasterizers User Manual E- 9
Composite Input
1. Press FACTORY to restore the factory preset.
2. Apply an NTSC SMPTE bar signal from the TG2000 AVG1 module to the
Composite A port. Install a termination on the loop through.
3. Select the CMPST A input from the front panel.
4. Observe the WFM in tile 1, the signal should be aligned with the zero
graticule.
5. Record Pass or Fail in the test record.
6. Observe the Vector in tile 2, the burst should be aligned with the burst
marker that extends to the left of the vector center.
7. Record Pass or Fail in the test record.
8. Observe the picture in tile 3. It should be stable and show the color bar
signal.
9. Record Pass or Fail in the test record.
10. If desired, move the input and termination to input B and repeat steps 3 – 8.
Analog Audio Input
1. Press FACTORY to restore the factory preset.
2. Set the analog audio generator to output a 1 kHz, 18dBu sine wave.
3. Press and hold the display select button 4 to display the AUDIO pop-up
menu.
4. In the Audio Input submenu, select Analog A.
5. Using the audio breakout cable or equivalent, connect the first Line A input
pair to the analog audio generator and verify that the output level of the
generator is indicated on the audio bars with a –6 dBFS signal.
6. Repeat step 5 for the second and third line A input pair.
7. Record Pass or Fail in the test record.
8. Bring up the AUDIO pop-up menu again and select Analog B in the Audio
Input submenu.
9. Repeat step 5 for all three Line B input pairs.
10. Record Pass or Fail in the test record.
Appendix E: Incoming Inspection
E- 10 WVR610A & WVR611A Waveform Rasterizers User Manual
Analog Audio Output
1. Press FACTORY to restore the factory preset.
2. Press and hold the display select button 4 to display the AUDIO pop-up
menu.
3. In the Audio Input submenu, select Analog A.
4. Using the audio breakout cable or equivalent, connect the first Line A input
pair to the analog audio generator and verify that the output level of the
generator is indicated on the audio bars with a –6 dBFS signal.
5. Press CONFIG to display the CONFIG menu.
6. In the Audio Inputs/Outputs submenu, set Attenuate Audio Output to
0 dB (press SEL and use the GENERAL knob to adjust the value, then press
SEL again when you have set the value).
7. While in the Audio Inputs/Outputs submenu, select Analog A and from
the submenu select Analog Out Map. Press SEL to display the Analog
Output to Analog “A” Bar Map.
8. Put an X in the first bar pair position for Analog Output 0, Analog Output 1,
and Analog Output 2.
9. Press CONFIG to exit the CONFIG menu.
10. Connect the first analog output pair on the breakout cable to the second line
A input pair.
11. Verify on the level meter bars that the second set of bars is within 1 dB of
the first set of bars.
12. Connect the second analog output pair on the breakout cable to the second
line A input pair.
13. Verify on the level meter bars, that the second set of bars is within 1 dB of
the first set of bars.
14. Connect the third analog output pair on the breakout cable to the second line
A input pair.
15. Verify on the level meter bars, that the second set of bars is within 1 dB of
the first set of bars.
16. Record Pass or Fail in the test record.
Appendix E: Incoming Inspection
WVR610A & WVR611A Waveform Rasterizers User Manual E- 11
Digital Audio Input
1. Press FACTORY to restore the factory preset.
2. Set the digital audio generator to output a 1 kHz, --6dBFS sine wave.
3. Press and hold the display select button 4 to display the AUDIO pop-up
menu.
4. In the Audio Input submenu, select AES A.
5. Connect the output of the digital audio generator to the AES A 1-2 input.
6. Verify that the first set of level meter bars indicates –6 dBFS.
7. Repeat steps 5 and 6 for AES A 3-4, AES A 5-6, and AES A 7-8.
8. Record Pass or Fail for AES A in the test record.
9. Press and hold the display select button 4 to display the AUDIO pop-up
menu.
10. In the Audio Input submenu, select AES B (make sure it is configured as an
input in the CONFIG menu).
11. Connect the output of the digital audio generator to the AES B 1-2 input.
12. Verify that the first set of level meter bars indicates –6 dBFS.
13. Record Pass or Fail for AES B in the test record.
14. Repeat steps 11 and 12 for AES B 3-4, AES B 5-6, and AES B 7-8.
15. Set the SD signal generator for the following signal output:
a. 525 format color bars
b. Embedded audio: 2 groups starting with group 1
c. Set the audio channels as follows:
i. Channel 1: 50 Hz, --35 dB
ii. Channel 2: 100 Hz, --30 dB
iii. Channel 3: 150 Hz, --25 dB
iv. Channel 4: 200 Hz, --20 dB
v. Channel 5: 250 Hz, --15 dB
vi. Channel 6: 300 Hz, --10 dB
vii. Channel 7: 400 Hz, --5 dB
Appendix E: Incoming Inspection
E- 12 WVR610A & WVR611A Waveform Rasterizers User Manual
viii. Channel 8: 500 Hz, 0 dB
16. Connect the output of the SD signal generator with embedded audio to the
port A SDI input.
17. Press and hold the display select button 4 to display the AUDIO pop-up
menu.
18. In the Audio Input submenu, select Embedded.
19. Verify that the level meter bars have a stair step pattern from –35 dB on
channel 1 to 0 dB on channel 8.
20. Record Pass or Fail for Embedded Display in the test record.
21. Bring up the audio tile pop-up and set the phase pair to 1 & 2.
22. Go through the other phase pairs (3 & 4, 5 & 6, 7 & 8) and verify that the
phase display changes in each one.
23. Record Pass or Fail for Embedded to Lissajous in the test record.
Digital Audio Output
1. Press FACTORY to restore the factory preset.
2. If you have just finished testing the Digital Audio Inputs, proceed to step 3,
otherwise do steps 15-19 of the Digital Audio Input test.
3. Press CONFIG to display the CONFIG menu.
4. Select Audio Inputs/Outputs.
5. Under the AES B submenu, configure the port as an Output.
6. Press CONFIG to close the menu.
7. Connect the AES B 1-2 output to the Audio Signal Analyzer input.
8. Verify on the analyzer that the signal levels are at –35 dB for the left channel
and –30 dB for the right.
9. Connect the AES B 3-4 output to the Audio Signal Analyzer input.
10. Verify on the analyzer that the signal levels are at –25 dB for the left channel
and –20 dB for the right.
11. Connect the AES B 5-6 output to the Audio Signal Analyzer input.
12. Verify on the analyzer that the signal levels are at –15 dB for the left channel
and –10 dB for the right.
Appendix E: Incoming Inspection
WVR610A & WVR611A Waveform Rasterizers User Manual E- 13
13. Connect the AES B 7-8 output to the Audio Signal Analyzer input.
14. Verify on the analyzer that the signal levels are at –5 dB for the left channel
and 0 dB for the right.
15. Record Pass or Fail for each output in the test record.
LTC Decode and Waveform Test
1. Press FACTORY to restore the factory preset.
2. Connect the LTC generator to pins 7 and 8 of the remote connector. This will
require making a custom cable assembly.
3. Connect the TG2000 DVG1 SDI output to the SDI A input. Terminate the
loopthrough.
4. Connect the TG2000 composite output to the video input of the Timecode
generator.
5. Select any NTSC signal for the AVG1.
6. Select any 525 signal for the DVG1.
7. Press CONFIG and select LTC/VITC.
8. Use the navigation keys to set the timecode source to be LTC.
9. Press Other to display the LTC waveform.
10. The LTC waveform should be displayed in the active tile. The amplitude will
depend on the source. The sync packet should remain at a constant horizontal
location on the sweep.
11. Record Pass or Fail for the LTC waveform in the test record.
12. In the lower-right corner of the screen, the time from the LTC input should
be shown.
13. Record Pass or Fail for LTC Decode in the test record.
Appendix E: Incoming Inspection
E- 14 WVR610A & WVR611A Waveform Rasterizers User Manual
Ground Closure Remote
1. Connect an SDI signal to SDI input A and terminate the loopthrough.
2. Press FACTORY to restore the factory preset.
3. Press PICT to display a picture in tile 1.
4. Press and hold the PRESET 1 button until the message Preset #1 was saved
is displayed in the active tile. You will need to hold the button for 1 to 2
seconds.
5. Press FACTORY again.
6. On a 15-pin DSUB connector, solder wires or strip back insulation to gain
access to pins 2, 5, and 9.
7. Connect the DSUB connector to the ground closure remote connector on the
waveform rasterizer.
8. Short pins 2 and 5 together on the remote cable.
9. Preset 1 should be restored so that a picture is displayed in tile1.
10. Record Pass or Fail for Activate Preset in the test record.
11. Connect the voltmeter to pins 2 and 9 of the DSUB connector.
12. Verify the voltage is about 4.7 V. This indicates the output is not asserted.
13. Press CONFIG to display the CONFIG menu. Select Alarms and then
select SDI Input.
14. Use the arrow keys to get to the top right corner of the SDI Input error check
box, and press SEL to put an “X” in the box for the Ground Closure
column and the SDI Input Missing row. This instructs the waveform
rasterizer to assert the ground closure if the SDI input is not present.
15. The voltmeter should still read about 4.7 V on pin 9.
16. Remove the input signal from SDI A connector on the rear panel.
17. The voltmeter should now read a low voltage, below 0.5 V.
18. Record Pass or Fail for Ground Closure in the test record.
Appendix E: Incoming Inspection
WVR610A & WVR611A Waveform Rasterizers User Manual E- 15
Ethernet Test
1. Connect an Ethernet cable from the rear of the unit to a computer with a Web
browser.
2. Press FACTORY to restore the factory preset.
3. Press CONFIG to display the Configuration menu.
4. Select Network Settings and press the right-arrow key to change the menu
focus to the submenu.
5. Verify the IP Config Mode is set toManual.
6. Select IP Address and press the right-arrow key to change the menu focus to
the submenu.
7. Use the left/right arrow keys to move the highlight to each box in the
address. Use the up/down arrow keys to change the number in each box as
required. Configure the IP Config Mode and IP Address to be compatible
with the computer.
8. To accept your changes, move the highlight to the Accept box and press
SEL.
9. From the computer, enter the IP address of the waveform rasterizer into the
Web browser address line (for example, http://192.182.256.23).
You should see a Web page that lists several options for accessing the
waveform rasterizer from the PC. If this happens, then the Ethernet function
is working.
10. Record Pass or Fail for Ethernet in the test record.

Appendix E: Incoming Inspection
E- 16 WVR610A & WVR611A Waveform Rasterizers User Manual
WVR610A & WVR611A Waveform Rasterizers User Manual F- 1
Appendix F: User Maintenance
This appendix contains procedures for cleaning the instrument and performing
preventive maintenance on the waveform rasterizer.
Cleaning
Protect the instrument from adverse weather conditions. The instrument is not
waterproof.
CAUTION. To avoid damage to the instrument, do not expose it to sprays, liquids,
or solvents.
Do not use chemical cleaning agents; they may damage the instrument. Avoid
chemicals that contain acetone, benzene, toluene, xylene, or similar solvents,
because they may damage the plastic.
WARNING. To avoid personal injury, remove the power cord before cleaning the
instrument.
Remove the power cord before cleaning the instrument. Clean the exterior
surfaces of the instrument with a dry, lint-free cloth or a soft-bristle brush. If dirt
remains, use a cloth or swab dampened with a 75% isopropyl alcohol solution. A
swab is useful for cleaning in narrow spaces around the controls and connectors.
Do not use abrasive compounds on any part of the instrument.
CAUTION. Do not allow moisture inside the instrument. During exterior cleaning,
use only enough solution to dampen the cloth or swab.
Preventive Maintenance
Preventive maintenance mainly consists of periodic cleaning. Periodic cleaning
reduces instrument breakdown and increases reliability. Clean the instrument as
needed, based on the operating environment. Dirty conditions may require more
frequent cleaning than computer-room conditions.
General Care
Cleaning the Exterior

Appendix F: User Maintenance
F- 2 WVR610A & WVR611A Waveform Rasterizers User Manual

Glossary

WVR610A & WVR611A Waveform Rasterizers User Manual Glossary- 1
Glossary
Accuracy
The closeness of the indicated value to the true value.
Ancillary Data
Data supporting the video signal or program. Time multiplexed into the
video signal during the horizontal and/or vertical blanking intervals.
Ancillary data may be sent between the EAV and SAV packets in horizontal
blanking and in larger blocks during vertical blanking. Ancillary data may
include checksums, multi-channel digital audio, and other data.
Ballistics
The response characteristics of a meter. In other words, how quickly does a
meter respond to a change in signal level. In the waveform rasterizer you can
set the audio display ballistics to True Peak, PPM, and VU.
Bandwidth
The range of frequencies over which signal amplitude remains constant
(within some limit) as it is passed through a system.
Baseband
Refers to a signal that is not yet modulated on a carrier.
Brightup
A change in the display that occurs on specified conditions. For example,
you can set the picture display to “brightup” on an RGB gamut error. Areas
that are outside the acceptable gamut are displayed as a crosshatch pattern.
Color Difference Signals
Signals used by color television systems to convey color information in such
a way that the signals go to zero when there is no color in the picture. R--Y,
B--Y, I, and Q are all color difference signals for the NTSC system; U and V
are color difference signals for the PAL system. The component system color
difference signal are Y, PB, P
Ras specified by SMPTE and CCIR standards.
Color Gamut
The area between minimum and maximum reproducible limits for elements
of the color difference or RGB signals.
Component Video
Video which exists in the form of three separate signals, all of which are
required in order to completely specify the color picture. For example, R, G,
and B; or Y, R--Y, and B--Y.
Composite Video
A single video signal containing all of the necessary information to
reproduce a color picture. Composite video is created by adding quadrature
Glossary
Glossary- 2 WVR610A & WVR611A Waveform Rasterizers User Manual
amplitude modulated R--Y and B--Y to the luminance signal for NTSC
systems or U and V to the luminance signal for PAL systems.
DC Restorer
A circuit that automatically adjusts the level of the video signal to keep a
selected point on the signal at a fixed DC level.
CRC
Cyclic Redundancy Check. A CRC calculation is performed on a data set
and the result is compared to a checksum. If there is a difference, then an
error occurred.
dB (Decibel)
A logarithmic unit used to describe signal ratios. For voltages, dB = 20
Log10
(V1/V
2).
dBFS
A signal ratio referenced to Full Scale. Full scale refers to the maximum
level possible without clipping.
DHCP
Acronym for Dynamic Host Configuration Protocol. A network management
protocol for dynamically assigning Internet Protocol (IP) network addresses
to a machine from a central server. DHCP is based on the less advanced
Bootstrap protocol.
Diamond Display
An X-Y display for RGB signals that defines the valid gamut limits in the
form of two diamonds.
Distortion
See harmonic distortion.
EAV
Acronym for End of Active Video in component digital systems. One of two
(EAV and SAV) timing reference packets.
EDH
Error detection and handling. Supports the standard SMPTE RP-165, which
defines a technique for recognizing inaccuracies in the serial digital signal.
Frame
Contains all the information required for a complete picture. For interlaced
scan systems, there are two fields in a frame.
Glossary
WVR610A & WVR611A Waveform Rasterizers User Manual Glossary- 3
Gamma
A measure that compares the contrast in the original and reproduced
television picture. Since CRT picture monitors have a nonlinear relationship
between the input voltage and brightness, the signal must be correspondingly
enhanced to nullify the nonlinear distortion. Gamma correction is always
done at the source (camera) in television systems: the R, G, and B signals are
converted to R1/V, G
1/V, and B
1/V. Values of about 2.2 are typically used for
gamma.
Gamut
See Color Gamut.
GBR
See RGB.
Graticule
The scale used to quantify the displayed signal on a waveform monitor or
vectorscope.
Harmonic Distortion
Signal distortion caused by non-linearities in a system. System non-lineari-
ties produce multiples of a single frequency signal applied to the the system.
Harmonic distortion is evident when a pure sine wave applied to a system
produces harmonic content at multiples of the sine wave frequency at the
output.
Hue
The property of color that allows us to distinguish between colors such as
red, yellow, purple, etc.
Lightning Display
A display, for use with SMPTE specified color difference signals (Y, PB,
PR), that plots the two color difference signals against luminance to create a
display similar in appearance to a lightning bolt.
Linear Distortion
Refers to distortions that are independent of signal amplitude.
Lissajous figure
An X–Y plot in which the signals applied to both axes are sinusoidal
functions. For a stable display the signals must be harmonics. Lissajous
figures are useful for determining phase and harmonic relationships.
LSB
Least Significant Bit. The lowest weighted bit or signal line.
LTC
Acronym for Longitudinal Time Code. A time code recorded on a videotape
in the form of an audio signal. See also VITC.
Glossary
Glossary- 4 WVR610A & WVR611A Waveform Rasterizers User Manual
Luminance
The signal (Y) which represents brightness or the amount of light in the
picture. Luminance is the only signal required for black and white pictures.
For color systems, it is obtained as a weighted sum of the R, G, and B
signals.
MIB
Acronym for Management Information Base. A database used by an SNMP
agent.
MSB
Most Significant Bit. The highest weighted bit or signal line.
Nonlinear Distortion
Refers to distortions that are amplitude-dependent.
NTSC
National Television System Committee. The organization that developed the
television standard currently in use in the United States, Canada, and Japan.
Now generally used to refer to that standard.
NTSC Setup
In NTSC systems, video black is typically 7.5 IRE above the blanking level.
This is 7.5 IRE level is referred to as the black setup level or simply setup or
NTSC setup.
PAL
Phase Alternate Line. Refers to one of the television systems used in Europe
and many other parts of the world. The phase of one of the color difference
signals alternates from line to line to help cancel out phase errors.
Pb
A color difference signal used in component video systems. It is derived by
subtracting the B (blue) signal from Y.
Pr
A color difference signal used in component video systems. It is derived by
subtracting the R (red) signal from Y.
PPM
PPM is an acronym for Peak Program Meter.
Receiver Equalization
Refers to recovering the data signal after cable loss. The signal is boosted to
its original standard amplitude. Gain at high frequencies is boosted to regain
a flat response.
Glossary
WVR610A & WVR611A Waveform Rasterizers User Manual Glossary- 5
RF
Radio Frequency. In television applications, RF generally refers to the
television signal after the picture carrier modulation process.
RGB
Red, Green, and Blue. Also referred to as GBR in SMPTE specifications.
The three primary colors used in color television’s additive color reproduc-
tion system. These are the three color signals generated by the camera and
used by the picture monitor to produce a picture.
R--Y
One of the color difference signals obtained by subtracting luminance (Y)
from the red camera signal.
Saturation
The property of color which relates to the amount of white light in the color.
Highly saturated colors are vivid, while less saturated colors have more
white mixed in and, therefore, appear pastel. For example, red is highly
saturated, while pink is the same hue, but less saturated.
In signal terms, saturation is determined by the ratio between luminance
level and chrominance amplitude. A vectorscope does not display saturation;
the length of the vectors represents chrominance amplitude. In order to verify
that the saturation of the colors in a color bar signal is correct, you must
check luminance amplitudes with a waveform monitor in addition to
observing the vectors.
SAV
Acronym for Start of Active Video in component digital systems. One of two
(EAV and SAV) timing reference packets.
SCH
SCH (SubCarrier to Horizontal) Phase refers to the timing relationship
between the 50% point of the leading edge of sync and the zero crossings of
the reference subcarrier. Errors are expressed in degrees.
SNMP
Acronym for Simple Network Management Protocol. A network manage-
ment system that is used for remote instrument control.
Termination
In order to accurately send a signal through a transmission line, there must
be an impedance at the end which matches the impedance of the source and
of the line itself. Without termination, amplitude errors and reflections will
result. Video is a 75 Ω system, so a 75 Ω termination must be put at the end
of the signal path.
True Peak
Audio display ballistic.
Glossary
Glossary- 6 WVR610A & WVR611A Waveform Rasterizers User Manual
U
The B--Y signal after a weighting factor of 0.493 has been applied. The
weighting is necessary to reduce peak modulation in the composite signal.
V
The R--Y signal after a weighting factor of 0.877 has been applied. The
weighting is necessary to reduce peak modulation in the composite signal.
VITC
Acronym for Vertical Interval Time Code. A method of recording a time
code on a video tape. See also LTC.
VU
Acronym for Volume Unit.
Vectorscope
A specialized oscilloscope which demodulates the video signal and presents
a display of R--Y versus B--Y in NTSC systems (or V versus U in PAL
systems). The angle and magnitude of the displayed vectors are respectively
related to hue and saturation.
Vertical Interval
The synchronizing information that appears between fields and signals the
picture monitor to return to the top of the screen to begin another vertical
scan.
Y
See Luminance.

Index


WVR610A & WVR611A Waveform Rasterizers User Manual Index- 1
Index
Numbers
1X button, 2--5
5X button, 2--5
A
A button, 2--7
Accessories, standard, 1--3
Accuracy, Glossary--1
Active Bits, Audio Session display, 3--60
active tile, 2--1, 2--32
selecting, 2--33
Address, Tektronix, xvii
AES A/B, Audio Inputs/Outputs, 2--61
AES and Embedded Alarms
Parity, 3--41
Professional CRC, 3--41
Signal Lock, 3--41
Validity Bit, 3--41
AES connectors, 2--42
alarm reporting options, 3--42
Alarm Status, Status pop--up menu, 2--30
Alarm Status, 3--44
check audio status, 3--58
display, 3--62
Alarms menu, 3--37
Analog A/B, Audio Inputs/Outputs, 2--61
analog audio, connecting, 2--44
Analog Audio Displays, Configuration menu, 2--52
Analog I/O connector, 2--42
Analog Out Map, Audio Inputs/Outputs, 2--63
AP EDH Status, Video Session Status, 3--54
AP Error Seconds, Video Session display, 3--54
arrow keys, 2--7
Arrowhead, Gamut pop--up menu, 2--28
Arrowhead Area, Gamut Thresholds, 2--68
Arrowhead Display, NTSC and PAL graticules, 3--22
Arrowhead display, 3--18
composite gamut, 3--21
Arrowhead NTSC Max, Gamut Thresholds, 2--68
Arrowhead NTSC Min, Gamut Thresholds, 2--68
Arrowhead PAL Max, Gamut Thresholds, 2--68
Arrowhead PAL Min, Gamut Thresholds, 2--68
Attenuate Audio Output, 2--65
AUDIO button, 2--5
audio display, elements of, 2--21
Audio Input
Audio pop--up menu, 2--24
Audio Session display, 3--59
audio input, selecting, 3--27
Audio Inputs/Outputs, Configuration menu, 2--60
audio level, checking, 3--29
Audio Clip alarm, 3--40
Audio Mute alarm, 3--40
audio options, 1--2
Audio Output, Audio Session display, 3--59
audio phase, checking, 3--30
Audio pop--up menu, 2--24
Audio Session
check audio status, 3--58
Status pop--up menu, 2--30
Audio Session display, 3--58
Active Bits, 3--60
Audio Input, 3--59
Data Collect, 3--59
Audio Output, 3--59
Changed since reset, 3--60
Clip, 3--59
elements of the display, 3--59
High (dB), 3--60
Mute, 3--59
Over, 3--59
Peak (dB), 3--59
reset statistics, 3--60
Runtime, 3--59
Signal Loss, 3--59
Silence, 3--59
Smpl Rate, 3--60
stopping and starting updates, 3--61
audio status, checking, 3--58
Audio Stream Missing, 3--41
B
B button, 2--7
balancing a camera, 3--10
Ballistics
Analog Audio Displays, 2--53, 2--54
Digital Audio Displays, 2--57, 2--58
Bar Format, Audio Inputs/Outputs, 2--62
Input to Bar Map, Audio Inputs/Outputs, 2--62
Bar Targets, Vector pop--up menu, 2--17
Beep, alarm reporting options, 3--44
Index
Index- 2 WVR610A & WVR611A Waveform Rasterizers User Manual
black level, checking, 3--2, 3--8
blanking width, checking, 3--9
Buffer Empty, 3--41
Buffer Full, 3--41
burst amplitude, checking, 3--8
buttons, 1--5, 3--33, 3--34
C
Calibration, Utilities, 2--83, 2--85
Center Waveform
Other pop--up menu, 2--26
Vector pop--up menu, 2--17
Waveform pop--up menu, 2--15
Certifications and compliances, A--27
Changed since reset, Audio Session display, 3--60
Checksum, 3--41
Chroma
SDI Input, 2--50
Waveform pop--up menu, 2--15
Cleaning, F--1
Clip, Audio Session display, 3--59
closed captioning, checking, 3--17
Cmpst Gamut, Video Session display, 3--55
Cmpst Input
DC Restore, 2--51
Input Format, 2--50
NTSC Setup, 2--51
PAL Vector, 2--51
Sync AFC Speed, 2--51
Cmpst Waveform Graticule Units, Graticules, 2--73
Component video, Glossary--1
Composite gamut
checking, 3--23
Diamond display, 3--21
Composite Gamut alarm, 3--39
Composite Input Alarms
Input Missing, 3--39
Input Unlocked, 3--40
composite input connectors, 2--41
Composite video, Glossary--1
CONFIG button, 2--7
Configuration menu, 2--10
connecting a display, 1--10
Connector, compatibility, 1--13
Contacting Tektronix, xvii
Correlation Meter Speed
Analog Audio Displays, 2--54, 2--56
Digital Audio Displays, 2--58, 2--60
correlation meters, 3--31
CPU Color Palette, Utilities, 2--84
CPU Color Palette Check, Utilities, 2--83
CURSOR button, 2--7
CURSOR pop--up menu, 2--40
cursors
active, 2--39
displaying, 2--38
inactive, 2--39
removing, 2--38
D
Data Collect, Audio Session display, 3--59
DC Restore
Cmpst Input, 2--51
Video Session display, 3--57
Delete Frozen Image, FREEZE pop--up menu, 2--35
Diag Log Mode, 2--89
Utilities, 2--83
Diamond, Gamut pop--up menu, 2--28
Diamond Area, Gamut Thresholds, 2--68
Diamond Display, construction of the diamond
graticule, 3--19
Diamond display, 3--18
checking RGB Gamut, 3--19
RGB gamut, 3--18
shading a camera, 3--11
Diamond High, Gamut Thresholds, 2--67
Diamond Low, Gamut Thresholds, 2--68
Digital Audio Displays, Configuration menu, 2--56
Digital Silence Level, Audio Displays, 2--57
disabling alarms, 3--38
display connector. See XGA output connector
DISPLAY SELECT buttons, 2--1
Display Settings, Configuration menu, 2--69
Duration for Over
Analog Audio Displays, 2--53, 2--56
Digital Audio Displays, 2--57, 2--59
Duration for Silence
Analog Audio Displays, 2--53, 2--55
Digital Audio Displays, 2--57, 2--59
E
EDH, Video Session display, 3--53
EDH Alarm, 3--39
EDH Error Fields, Video Session display, 3--54
EDH Error Fields %, Video Session display, 3--54
Electrical specifications, A--1
Embedded A/B, Audio Inputs/Outputs, 2--61
Embedded Audio Specific Alarms
Audio Stream Missing, 3--41
Buffer Empty, 3--41
Index
WVR610A & WVR611A Waveform Rasterizers User Manual Index- 3
Buffer Full, 3--41
Checksum, 3--41
Parity, 3--41
embedded audio status, 3--61
Enable Alarms, 3--38
Environmental performance, Specifications, A--25
Erase, Diagnostics Log screen, 2--89
ERROR, Alarm Status display, 3--46, 3--63
Error Fields, Video Session display, 3--55, 3--56
% Error Fields, Video Session display, 3--55, 3--56
Error Hold Time
Analog Audio Displays, 2--53, 2--56
Digital Audio Displays, 2--57, 2--59
Error Log
check audio status, 3--58, 3--64
elements of, 3--65
icons, 3--65
Status pop--up menu, 2--30
error log
activating, 3--66
size, 3--66
Error Log display, 3--47
icons, 3--48
Ethernet connector, 2--47
EXT button, 2--7
External Ref, Sync AFC Speed, 2--52
External Ref., Lock to Standard, 2--52
External Reference Missing alarm, 3--40
External Reference Unlocked alarm, 3--40
F
F1 AP CRC, Video Session display, 3--54
F2 AP CRC, Video Session display, 3--54
FACTORY button, 2--6, 3--35
factory defaults, recalling, 3--35
FF EDH Status, Video Session display, 3--53
FF Error Seconds, Video Session display, 3--53
FIELD button, 2--6
field number, 3--4
Field Sweep Line Select Cursor, Graticules, 2--73
Filter, Waveform pop--up menu, 2--14
Flat, Waveform pop--up menu, 2--15
Flat + Luma, Waveform pop--up menu, 2--15
Follows video, Audio pop--up menu, 2--24
Format, Video Session display, 3--57
Freeze, Video Session display, 3--56
Freeze Affects, Display Settings, 2--72
FREEZE button, 2--7, 2--35
Freeze pop--up menu, 2--35
frequency response, checking, 3--24
front--panel controls, 2--4
Frozen Only, Freeze pop--up menu, 2--36
full--screen mode, 2--33
G
gain, frequency response, 3--24
Gain Setting, 2--13
Gamut, Readouts, 2--73
gamut
Arrowhead display, 3--21
checking, 3--18
Diamond display, 3--18
GAMUT button, 2--5
Gamut display
checking RGB gamut, 3--19
composite Arrowhead display, 3--21
Gamut pop--up menu, 2--28
Gamut Thresholds, Configuration menu, 2--66
Gateway Address
Network Settings, 2--77
Utilities, 2--74
General alarms
External Reference Missing, 3--40
External Reference Unlocked, 3--40
Hardware Fault, 3--40
LTC Invalid, 3--40
LTC Missing, 3--40
VITC Invalid, 3--40
VITC Missing, 3--40
General Audio alarms
Audio Clip, 3--40
Audio Mute, 3--40
Over Alarm, 3--40
Silence Alarm, 3--41
GENERAL knob, 2--8
Graticule, Arrowhead NTSC and PAL, 3--22
Graticule Color, Display Settings, 2--70
Graticule Intensity, Display Settings, 2--70
Graticules, Configuration menu, 2--73
Ground Closure, alarm reporting options, 3--44
ground closure connector, 2--46
H
Hardware Fault alarm, 3--40
Hardware installation, 1--5–1--9
Harmonic distortion, Glossary--3
HELP button, 2--7
High (dB), Audio Session display, 3--60
HORIZONTAL knob, 2--8
Horizontal Offset, Timing display, 2--18
Index
Index- 4 WVR610A & WVR611A Waveform Rasterizers User Manual
I
icons
Error Log, 3--65
Error Log display, 3--48
status bar, 2--12
Ignore Validity Bit, Digital Audio Displays, 2--60
Input, Video Session display, 3--57
Input Format
Cmpst Input, 2--50
SDI Input, 2--49
Input Missing alarm, 3--39
Input Unlocked alarm, 3--40
Installation, 1--5
BNC connector compatibility, 1--13
connecting power, 1--10
hardware, 1--5
in a serial video system, 1--11
line termination, 1--12
rackmount, 1--5
Instrument dimensions, A--25
Instrument Name, Utilities, 2--74, 2--77
Instrument options, 1--2
Instrument weight, A--25
IP Address
Network Settings, 2--75
Utilities, 2--74
IP Config Mode
Network Settings, 2--74
Utilities, 2--74
J
Java applet, accessing remote interface, B--3
K
knobs, 2--8
L
level meter colors, 3--29
Lightning, Vector pop--up menu, 2--15
Lightning Display, Glossary--3
limits, gamut, 3--18
limits, ensuring, 3--6
LINE button, 2--6
line number, 3--4
LINE SEL, 3--15
LINE SEL button, 2--7
Line Select mode, 3--3
line up level, 2--55, 2--59
Lissajous AGC
Analog Audio Displays, 2--54, 2--56
Digital Audio Displays, 2--58, 2--60
Lissajous display, 3--30
Lissajous Snd Stage, Audio pop--up menu, 2--25
Lissajous Sound Stage, Phase Style, 3--31
Live + Frozen Only, Freeze pop--up menu, 2--36
Live Only, Freeze pop--up menu, 2--36
Lock to Standard, External Ref., 2--52
Logging, alarm reporting options, 3--44
Logging Active, 3--67
Logging Reset, 3--67
LTC / VITC, Configuration menu, 2--72
LTC Invalid alarm, 3--40
LTC Missing alarm, 3--40
Luma, Waveform pop--up menu, 2--15
luma amplitude, checking, 3--7
Luma Area, Gamut Thresholds, 2--68
Luma Gamut, Video Session display, 3--56
Luma Gamut alarm, 3--39
Luma Max, Gamut Thresholds, 2--68
Luma Min, Gamut Thresholds, 2--68
Luminance, Glossary--4
M
MAG button, 2--6
Maintenance, F--1
matching sources, 3--9
MEAS button, 2--5, 2--18
Measure pop--up menu, 2--18
Relative to:, 2--19
Save Offset, 2--19
Mechanical installation, 1--5
Meter Scaling
Analog Audio Displays, 2--53, 2--55
Digital Audio Displays, 2--57, 2--59
MIB table, C--1
MIB Tables, SNMP, C--2, C--9
monitoring a waveform, 3--1
Mute, Audio Session display, 3--59
Mute Alarms, STATUS pop--up menu, 3--44
N
NTSC, Arrowhead Gamut graticule, 3--22
Index
WVR610A & WVR611A Waveform Rasterizers User Manual Index- 5
NTSC Setup
SDI Input, 2--50
Video Session display, 3--57
O
OK, Alarm Status display, 3--46, 3--63
online help, 2--37
displaying, 2--38
navigating, 2--38
Options
audio, 1--2
Option AN, 1--2
Option DA, 1--2
Option DG, 1--2
power cords, 1--3
warranty, 1--2
options, service, 1--2
OTHER button, 2--5
Other pop--up menu, 2--26
Over, Audio Session display, 3--59
Over Alarm, 3--40
Over Level
Analog Audio Displays, 2--53, 2--56
Digital Audio Displays, 2--57, 2--59
Overlay, Waveform pop--up menu, 2--14
P
Pairs, Audio Inputs/Outputs, 2--62
PAL, Arrowhead Gamut graticule, 3--22
PAL Vector, Cmpst Input, 2--51
Panel Backlight, Display Settings, 2--70, 2--71
Panel Backlight Intensity, Display Settings, 2--70, 2--72
Parade, Waveform pop--up menu, 2--14
Parity, 3--41
Part numbers
Service Manual, 1--4
User Manual, 1--3
Paused, Audio Session, 3--51, 3--61
Peak (dB), Audio Session display, 3--59
peak amplitude, checking, 3--7
Peak Hold Segment
Analog Audio Displays, 2--53, 2--54
Digital Audio Displays, 2--57, 2--58
Peak Hold Time
Analog Audio Displays, 2--53, 2--54
Digital Audio Displays, 2--57, 2--58
Peak Program Level
Analog Audio Displays, 2--53, 2--55
Digital Audio Displays, 2--57, 2--59
Phase Display, Audio pop--up menu, 2--24
Phase Pair, Audio pop--up menu, 2--25
Phase Style, Audio pop--up menu, 2--25
Phone number, Tektronix, xvii
Physical specifications, A--25
PICT button, 2--5
Picture, Readouts, 2--73
Picture Brightness, Display Settings, 2--70
Picture Brightup on Cmpst Gamut Error, Display
Settings, 2--70, 2--71
Picture Brightup on Luma Error, Display Settings, 2--70
Picture Brightup on Luma Gamut Error, Display
Settings, 2--71
Picture Brightup on RGB Gamut Error, Display
Settings, 2--70, 2--71
Picture Frame, 2--20
Picture pop--up menu, 2--20
Picture Line Select Cursor, Graticules, 2--73
Picture pop--up menu, 2--20
Picture Refresh Mode, Display Settings, 2--70
pop--up menus, 2--8
Audio, 2--24
Cursors, 2--40
Freeze, 2--35
Gamut, 2--28
MEAS, 2--18
Other, 2--26
Picture, 2--20
Status, 2--29
Vector, 2--16
Waveform, 2--13
Power, AC requirements, 1--10
power connector, 2--41
Power cord options, 1--3
Power, connecting, 1--10
PPM Type 1, Ballistics, 2--54, 2--58
PPM Type 2, Ballistics, 2--54, 2--58
Presets
contents, 3--36
creating, 3--33
recalling, 3--34
presets, creating, 3--33
PRESETS buttons, 2--6
Preventive maintenance, F--1
Product description, 1--1
product description, 1--1
Product support, contact information, xvii
Professional CRC, 3--41
R
Rackmount installation, 1--5
Readout Color, Display Settings, 2--69, 2--70
Index
Index- 6 WVR610A & WVR611A Waveform Rasterizers User Manual
Readout Intensity, Display Settings, 2--69, 2--70
Readouts, Configuration menu, 2--72
Rear Panel, Measure pop--up menu, 2--19
recalling
factory defaults, 3--35
Presets, 3--34
green text, Error Log display, 3--48
red text
Alarm Status display, 3--46, 3--63
Error Log display, 3--48
Audio Session display, 3--60
white text, Error Log display, 3--48
regulatory compliance, ensuring, 3--6
Relative to:, Measure pop--up menu, 2--19
REMOTE connector, 2--46
Remote Interface, B--1
Reset Arrowhead NTSC Defaults, Gamut Thesholds,
2--68
Reset Arrowhead PAL Defaults, Gamut Thresholds,
2--68
Reset Diamond Defaults, Gamut Thresholds, 2--68
Reset Luma Defaults, Gamut Thesholds, 2--68
reset statistics
Audio Session display, 3--60
Video Session display, 3--50
Reset to EBU--R103 Defaults, Gamut Thesholds, 2--69
RGB, Waveform pop--up menu, 2--14
RGB Gamut, Video Session display, 3--55
RGB gamut, Diamond display, 3--18
RGB Gamut alarm, 3--39
rise time, measuring, 3--5
Run Advanced Diags, Utilities, 2--83, 2--86
Run Power Up Diags, Utilities, 2--83, 2--85
Runtime
Audio Session display, 3--59
Video Session display, 3--53
S
#Samples for Clip, Digital Audio Displays, 2--57, 2--59
#Samples for Mute, Digital Audio Displays, 2--57, 2--59
Save Offset, Measure pop--up menu, 2--19
Screen Text/Icon, alarm reporting options, 3--43
SDI --> Composite, Waveform pop--up menu, 2--14
SDI Iinput Missing alarm, 3--39
SDI Input
Chroma, 2--50
Input Format, 2--49
NTSC Setup, 2--50
Strip EAV/SAV/ANC, 2--49
SDI Input Alarms
Composite Gamut, 3--39
Luma Gamut, 3--39
SDI Input alarms
EDH Alarm, 3--39
RGB Gamut, 3--39
SDI Iinput Missing, 3--39
SDI Input Unlocked, 3--39
SDI input connectors, 2--41
SDI Input Unlocked alarm, 3--39
SDI Vector I/Q Axis, Graticules, 2--73
SEL button, 2--7
select a line, 3--3
selecting a measurement, 2--34
selecting audio input, 3--27
Service support, contact information, xvii
Sessions Reset, Audio Session, 3--51, 3--60
Sessions Start, Audio Session, 3--51, 3--61
Sessions Stop, Audio Sessions, 3--51, 3--61
Set 0dB Mark To:
Analog Audio Displays, 2--53, 2--54
Digital Audio Displays, 2--57, 2--58
Set all alarms to this mask, 3--42
Set Clock, Utilities, 2--83
Set Meter Type to:, Analog Audio Displays, 2--53, 2--55
shading a camera, 3--10
Signal Lock, 3--41
Video Session display, 3--57
Signal Loss, Audio Session display, 3--59
Silence, Audio Session display, 3--59
Silence Alarm, 3--41
Silence Level
Analog Audio Displays, 2--53, 2--55
Digital Audio Displays, 2--59
Smpl Rate, Audio Session display, 3--60
SNMP, C--1
SNMP Enable, Network Settings, 2--78
SNMP Private Community, Network Settings, 2--80
SNMP Public Community, Network Settings, 2--79
SNMP Trap, alarm reporting options, 3--44
SNMP Trap Address, Network Settings, 2--81
SNMP Trap Enable, Network Settings, 2--81
sources, matching, 3--9
Specifications
electrical , A--1
physical, A--25
Split Diamond, Gamut pop--up menu, 2--28
Split Diamond display, 3--18
Standard (NTSC/PAL), Glossary--4
Standard accessories, 1--3
Index
WVR610A & WVR611A Waveform Rasterizers User Manual Index- 7
start error logging, 3--67
starting and stopping updates, Audio Session display,
3--61
status bar
elements of, 2--10
icons, 2--12
STATUS button, 2--5
Status pop--up menu, 2--29
stopping and starting, Video Session display, 3--51
Strip EAV/SAV/ANC, SDI Input, 2--49
Subnet Mask
Network Settings, 2--76
Utilities, 2--74
Surround, Audio Inputs/Outputs, 2--62
Sync AFC Speed
Cmpst Input, 2--51
External Ref, 2--52
Video Session display, 3--57
sync amplitude, checking, 3--7
sync to luma amplitude ratio, checking, 3--8
sync width, checking, 3--8
System Upgrade, Utilities, 2--83, 2--85, D--1
T
Technical support, contact information, xvii
Tektronix, contacting, xvii
Termination, line discussion, 1--12
Test Level
Analog Audio Displays, 2--53, 2--55
Digital Audio Displays, 2--57, 2--59
Time, Cursor pop--up menu, 2--40
timing a studio, 3--11
Timing display, 2--18, 3--12
True Peak, Ballistics, 2--54, 2--58
U
URL, Tektronix, xvii
User service, F--1
Utilities, Configuration menu, 2--82
V
Validity Bit, 3--41
VAR button, 2--5
VECT button, 2--5
Vector
Readouts, 2--72, 2--73
Vector pop--up menu, 2--15
Vector pop--up menu, 2--16
Bar Targets, 2--17
Center Waveform, 2--17
VERTICAL knob, 2--8
Vertical Offset, Timing display, 2--18
VGA Output, Display Settings, 2--70, 2--71
video input connectors, 2--41
Video Session, Status pop--up menu, 2--30
Video Session display, 3--49
reset statistics, 3--50
stopping and starting, 3--51
SDI Inputs, 3--52
Video to Audio Mapping, 2--64
Audio Inputs/Outputs, 2--61, 2--63
View Diagnostic Log, Utilities, 2--83
View HW/SW Version, Utilities, 2--83
View MAC Address
Network Settings, 2--77
Utilities, 2--74
View the Diagnostic Log, Utilities, 2--87
VITC Invalid alarm, 3--40
VITC Missing alarm, 3--40
VITS, checking, 3--16
Voltage, Cursor pop--up menu, 2--40
Voltage + Time, Cursor pop--up menu, 2--40
VU, Ballistics, 2--54, 2--58
W
Warranty options, 1--2
Waveform, Readouts, 2--72, 2--73
Waveform Color, Display Settings, 2--69, 2--70
Waveform Intensity, Display Settings, 2--69, 2--70
Waveform pop--up menu, 2--13
Center Waveform, 2--15
Filter, 2--14
Chroma, 2--15
Flat, 2--15
Flat + Luma, 2--15
Low Pass, 2--15
Luma, 2--15
Overlay, 2--14
Parade, 2--14
RGB, 2--14
SDI --> Composite, 2--14
YPbPr, 2--14
YRGB, 2--14
web browser, accessing remote interface, B--1
Web Enable, Network Settings, 2--82
Web site address, Tektronix, xvii
WFM button, 2--5
Index
Index- 8 WVR610A & WVR611A Waveform Rasterizers User Manual
X
X--Y
Audio pop--up menu, 2--25
Phase Style, 3--31
XGA output connector, 2--45
Y
yellow text
Alarm Status display, 3--46, 3--63
Audio Session display, 3--60
YPbPr, Waveform pop--up menu, 2--14
YRGB, Waveform pop--up menu, 2--14