wine coolers - user manual - temptech
TRANSCRIPT
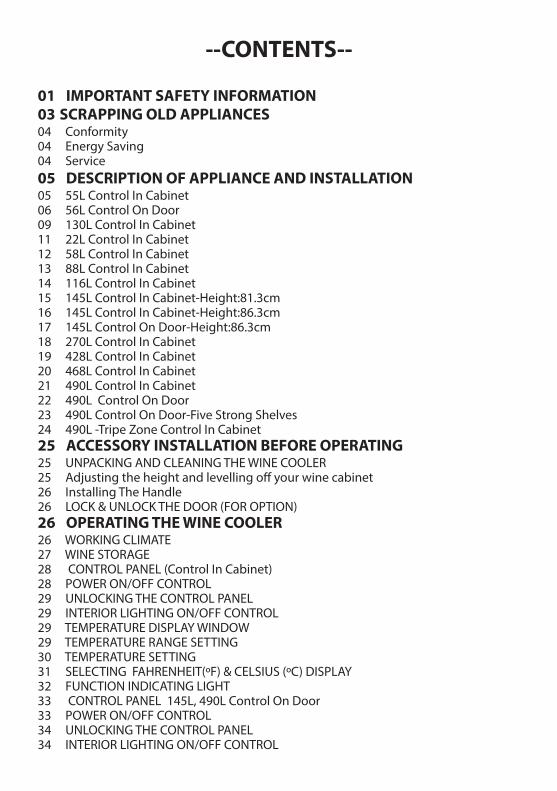
This manual contains impor tant information including safety and installation instructions of the appliances. Please read it carefully before use and follow all safety information & instructions. It is recommended to keep this manual for easy reference so that you can be familiar with the operation of the appliance.
V2/2017
55L 56L 130L22L 58L 88L 116L 145L
270L 428L 468L 490L
USER MANUALWine Coolers
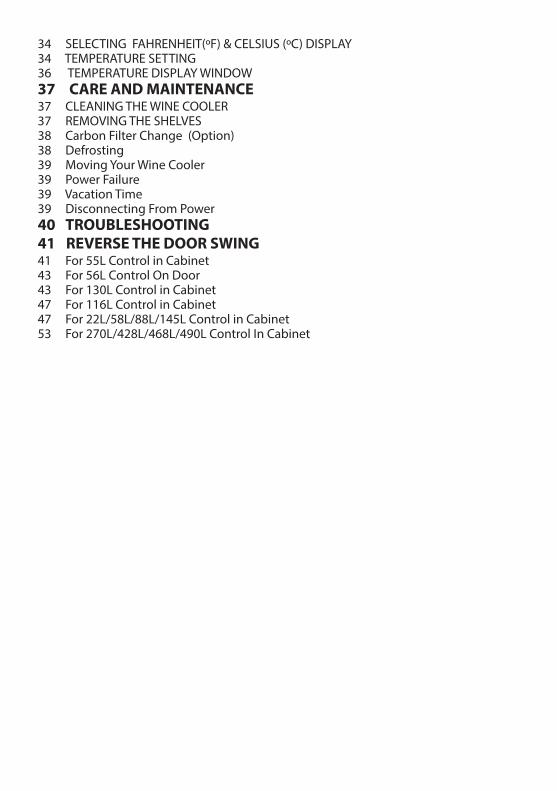
--CONTENTS--
01 IMPORTANT SAFETY INFORMATION 03 SCRAPPING OLD APPLIANCES04 Conformity04 Energy Saving04 Service05 DESCRIPTION OF APPLIANCE AND INSTALLATION 05 55L Control In Cabinet06 56L Control On Door09 130L Control In Cabinet11 22L Control In Cabinet12 58L Control In Cabinet13 88L Control In Cabinet14 116L Control In Cabinet15 145L Control In Cabinet-Height:81.3cm16 145L Control In Cabinet-Height:86.3cm17 145L Control On Door-Height:86.3cm18 270L Control In Cabinet19 428L Control In Cabinet 20 468L Control In Cabinet 21 490L Control In Cabinet 22 490L Control On Door23 490L Control On Door-Five Strong Shelves24 490L -Tripe Zone Control In Cabinet25 ACCESSORY INSTALLATION BEFORE OPERATING 25 UNPACKING AND CLEANING THE WINE COOLER25 Adjusting the height and levelling off your wine cabinet26 Installing The Handle26 LOCK & UNLOCK THE DOOR (FOR OPTION)26 OPERATING THE WINE COOLER 26 WORKING CLIMATE27 WINE STORAGE28 CONTROL PANEL (Control In Cabinet) 28 POWER ON/OFF CONTROL29 UNLOCKING THE CONTROL PANEL29 INTERIOR LIGHTING ON/OFF CONTROL29 TEMPERATURE DISPLAY WINDOW29 TEMPERATURE RANGE SETTING30 TEMPERATURE SETTING31 SELECTING FAHRENHEIT(ºF) & CELSIUS (ºC) DISPLAY32 FUNCTION INDICATING LIGHT33 CONTROL PANEL 145L, 490L Control On Door33 POWER ON/OFF CONTROL34 UNLOCKING THE CONTROL PANEL34 INTERIOR LIGHTING ON/OFF CONTROL
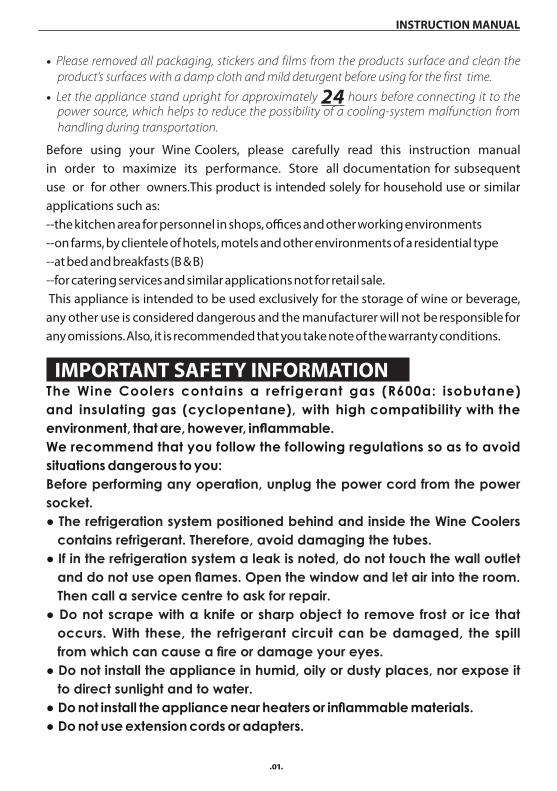
34 SELECTING FAHRENHEIT(ºF) & CELSIUS (ºC) DISPLAY34 TEMPERATURE SETTING36 TEMPERATURE DISPLAY WINDOW37 CARE AND MAINTENANCE 37 CLEANING THE WINE COOLER37 REMOVING THE SHELVES38 Carbon Filter Change (Option)38 Defrosting 39 Moving Your Wine Cooler39 Power Failure39 Vacation Time39 Disconnecting From Power40 TROUBLESHOOTING 41 REVERSE THE DOOR SWING 41 For 55L Control in Cabinet43 For 56L Control On Door43 For 130L Control in Cabinet47 For 116L Control in Cabinet47 For 22L/58L/88L/145L Control in Cabinet53 For 270L/428L/468L/490L Control In Cabinet
.01.
INSTRUCTION MANUAL
• Please removed all packaging, stickers and films from the products surface and clean the product’s surfaces with a damp cloth and mild deturgent before using for the first time.
• Let the appliance stand upright for approximately 24 hours before connecting it to the power source, which helps to reduce the possibility of a cooling-system malfunction from handling during transportation.
Before using your Wine Coolers, please carefully read this instruction manual in order to maximize its performance. Store all documentation for subsequent use or for other owners.This product is intended solely for household use or similar applications such as:--the kitchen area for personnel in shops, offices and other working environments--on farms, by clientele of hotels, motels and other environments of a residential type--at bed and breakfasts (B & B)--for catering services and similar applications not for retail sale. This appliance is intended to be used exclusively for the storage of wine or beverage, any other use is considered dangerous and the manufacturer will not be responsible for any omissions. Also, it is recommended that you take note of the warranty conditions.
IMPORTANT SAFETY INFORMATION The Wine Coolers contains a refrigerant gas (R600a: isobutane) and insulating gas (cyclopentane), with high compatibility with the environment, that are, however, inflammable.We recommend that you follow the following regulations so as to avoid situations dangerous to you:Before performing any operation, unplug the power cord from the power socket.● The refrigeration system positioned behind and inside the Wine Coolers
contains refrigerant. Therefore, avoid damaging the tubes.● If in the refrigeration system a leak is noted, do not touch the wall outlet
and do not use open flames. Open the window and let air into the room. Then call a service centre to ask for repair.
● Do not scrape with a knife or sharp object to remove frost or ice that occurs. With these, the refrigerant circuit can be damaged, the spill from which can cause a fire or damage your eyes.
● Do not install the appliance in humid, oily or dusty places, nor expose it to direct sunlight and to water.
● Do not install the appliance near heaters or inflammable materials.● Do not use extension cords or adapters.
.02.
INSTRUCTION MANUAL
● Do not excessively pull or fold the power cord or touch the plug with wet hands.
● Do not damage the plug and/or the power cord; this could cause electrical shocks or fires.
● It is recommended to keep the plug clean, any excessive dust residues on the plug can be the cause fire.
● Do not use mechanical devices or other equipment to hasten the defrosting process.
● Absolutely avoid the use of open flame or electrical equipment, such as heaters, steam cleaners, candles, oil lamps and the like in order to speed up the defrosting phase.
● Do not use or store inflammable sprays, such as spray paint, near the Wine Coolers. It could cause an explosion or fi re.
● Do not use electrical appliances inside the food storage compartments, unless they are of the type recommended by the manufacturer.
● Do not place or store inflammable and highly volatile materials such as ether, petrol, LPG, propane gas, aerosol spray cans, adhesives, pure alcohol, etc. These materials may cause an explosion.
● Do not store medicine or research materials in the Wine Coolers. When the material that requires a strict control of storage temperatures is to be stored, it is possible that it will deteriorate or an uncontrolled reaction may occur that can cause risks.
● Maintain the ventilation openings in the appliance enclosure or in the built-in structure, free of obstruction.
● Do not place objects and/or containers filled with water on the top of the appliance.
● Do not perform repairs on this Wine Coolers. All interventions must be performed solely by qualified personnel.
● This appliance can be used by children aged from 8 years and above and by persons with reduced physical, sensory or mental capabilities or with a lack of experience and knowledge; provided that they have been given adequate supervision or instruction concerning how to use the appliance in a safe way and understand the hazards involved.
● Children should not play with the appliance. Cleaning and user maintenance should not be made by children without supervision
● This appliance is not intended for use by persons (including children) with reduced physical, sensory or mental capabilities, or lack of experience and knowledge, unless they have been given supervision or instruction concerning use of the appliance by a person responsible for their safety.
.03.
INSTRUCTION MANUAL
Children should be supervised to ensure that they do not play with the appliance.
● The appliance must be positioned so that the plug is accessible● If the supply cord is damaged, it must be replaced by the manufacturer,
its service agent or similarly qualified persons in order to avoid a hazard.● The appliance shall not be installed in the laundry● GWP for R600a: 3● Do not store explosive substances such as aerosol cans with a flammable
propellant in this appliance.– WARNING: Keep ventilation openings, in the appliance enclosure or in
the built-in structure, clear of obstruction.– WARNING: Do not use mechanical devices or other means to accelerate
the defrosting process, other than those recommended by the manufacturer.
– WARNING: Do not damage the refrigerant circuit.– WARNING: Do not use electrical appliances inside the food storage
compartments of the appl iance, unless they are of the type recommended by the manufacturer
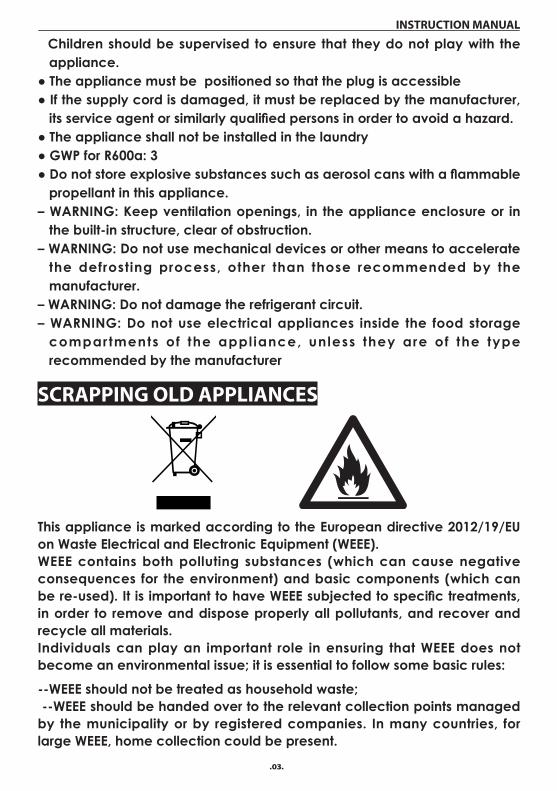
SCRAPPING OLD APPLIANCES
This appliance is marked according to the European directive 2012/19/EU on Waste Electrical and Electronic Equipment (WEEE).WEEE contains both polluting substances (which can cause negative consequences for the environment) and basic components (which can be re-used). It is important to have WEEE subjected to specific treatments, in order to remove and dispose properly all pollutants, and recover and recycle all materials.Individuals can play an important role in ensuring that WEEE does not become an environmental issue; it is essential to follow some basic rules:
--WEEE should not be treated as household waste; --WEEE should be handed over to the relevant collection points managed by the municipality or by registered companies. In many countries, for large WEEE, home collection could be present.
.04.
INSTRUCTION MANUAL
In many countries, when you buy a new appliance, the old one may be returned to the retailer who has to collect it free of charge on a one-to-one basis, as long as the equipment is of equivalent type and has the same functions as the supplied equipment.
� Conformity
By placing the marking on this product, we declare, on our own responsibility, compliance to all of European safety ,health and environmental requirements stated in the legislation for this product.
� Energy Saving--Always ensure good ventilation. Do not cover ventilation opening or grille.--Always keep fan louvers clear.--Do not place appliance in areas of direct sunlight or close to a stove,
heather or similar object.--Open or keep the doors open as little as possible--Remove dust present on the rear of the appliance
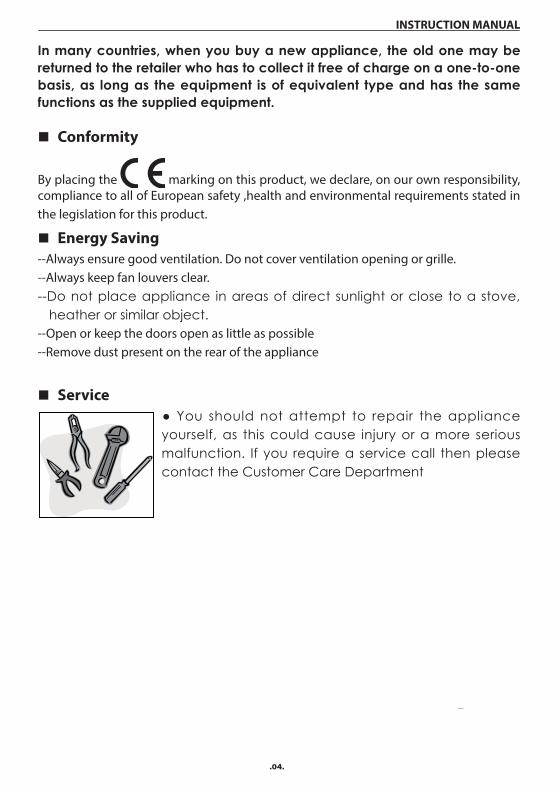
� Service● You should not attempt to repair the appliance yourself, as this could cause injury or a more serious malfunction. If you require a service call then please contact the Customer Care Department
.05.
INSTRUCTION MANUAL
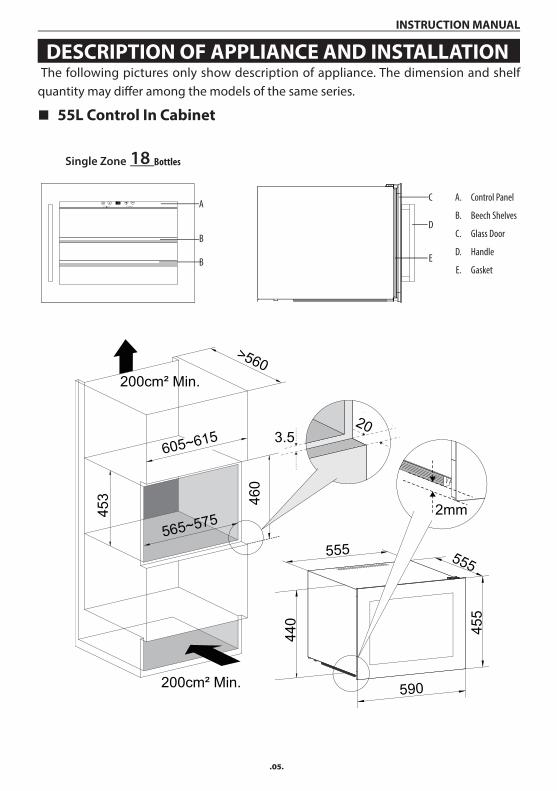
DESCRIPTION OF APPLIANCE AND INSTALLATION The following pictures only show description of appliance. The dimension and shelf quantity may diff er among the models of the same series.
� 55L Control In Cabinet
A.
C.
B.
D.
E.
Control Panel
Glass Door
Beech Shelves
Handle
Gasket
A
DB
C
B E
Single Zone 18 Bottles
565~575
605~615
>560
200cm² Min.
200cm² Min.
453 46
0
555 555
590
455
440
2mm
3.520
.06.
INSTRUCTION MANUAL
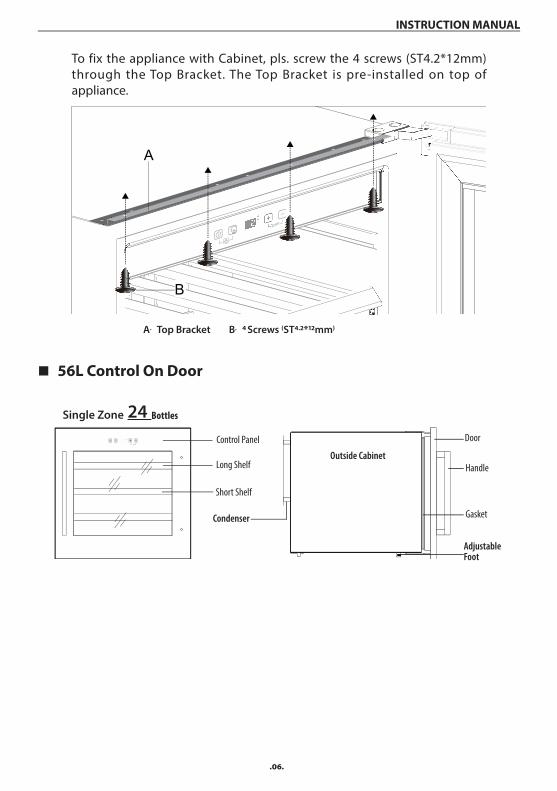
To fix the appliance with Cabinet, pls. screw the 4 screws (ST4.2*12mm) through the Top Bracket. The Top Bracket is pre-installed on top of appliance.
A. Top Bracket B. 4�Screws (ST4.2*12mm)
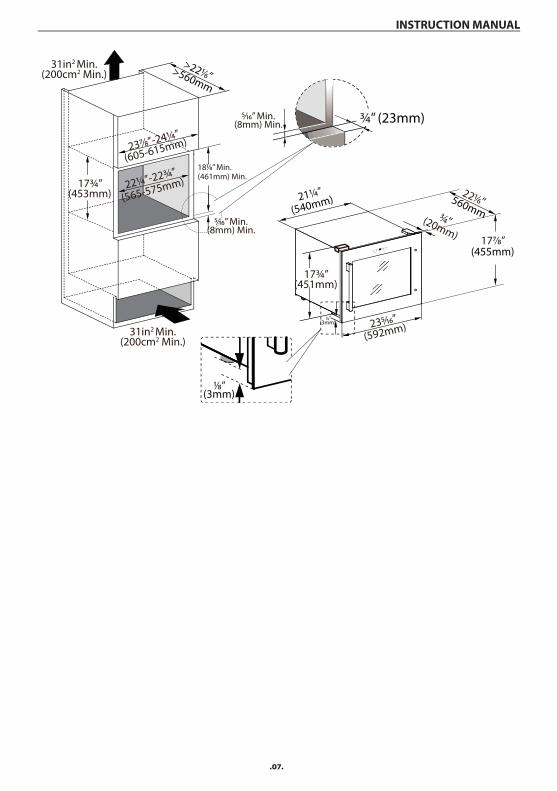
� 56L Control On Door
Control Panel
HandleLong Shelf
Door
Short Shelf
Gasket
Outside Cabinet
Condenser
AdjustableFoot
Single Zone 24 Bottles
.07.
INSTRUCTION MANUAL
>221⁄6”>560mm
221⁄6”560mm
1⁄8” (3mm)
1⁄8” (3mm)
21¼”
(540mm)¾”(20mm) 177⁄8”
(455mm)
235⁄16”
(592mm)
17¾”(451mm)
31in2 Min.(200cm2 Min.)
31in2 Min.(200cm2 Min.)
17¾”(453mm)
237⁄8”-24¼”
(605-615mm)
22¼”-22¾”
(565-575mm)
5⁄16” Min.(8mm) Min.
181⁄8” Min.(461mm) Min.
¾” (23mm) 5⁄16” Min.(8mm) Min.
.08.
INSTRUCTION MANUAL
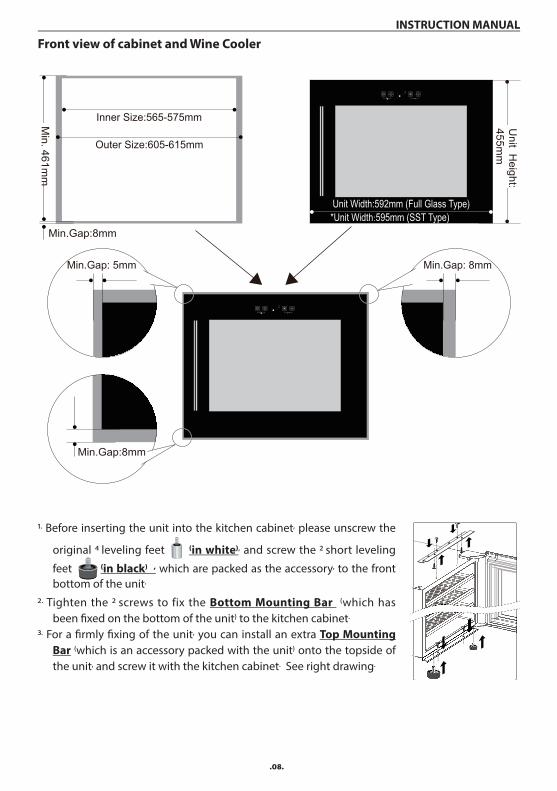
Front view of cabinet and Wine Cooler
1. Before inserting the unit into the kitchen cabinet, please unscrew the
original 4� leveling feet (in white), and screw the 2�short leveling
feet (in black) , which are packed as the accessory, to the front bottom of the unit.
2. Tighten the 2� screws to fix the Bottom Mounting Bar (which has been fi xed on the bottom of the unit) to the kitchen cabinet.
3. For a fi rmly fi xing of the unit, you can install an extra Top Mounting Bar (which is an accessory packed with the unit) onto the topside of the unit, and screw it with the kitchen cabinet. See right drawing.
.09.
INSTRUCTION MANUAL
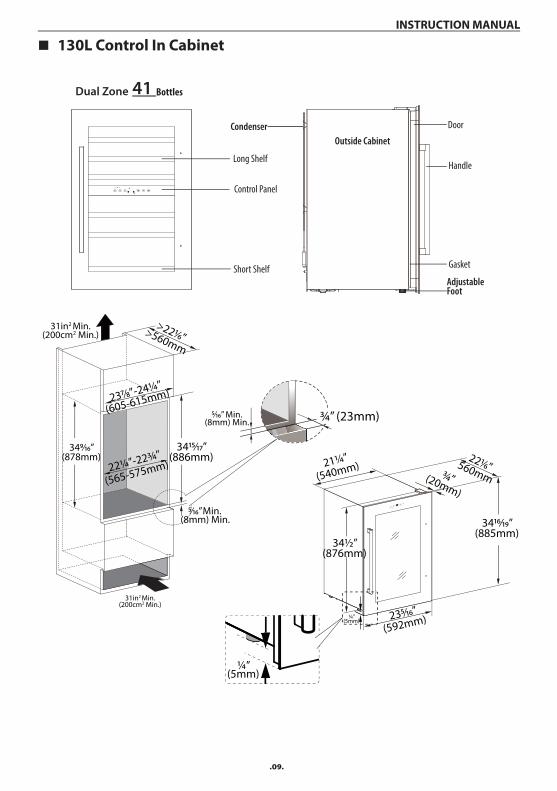
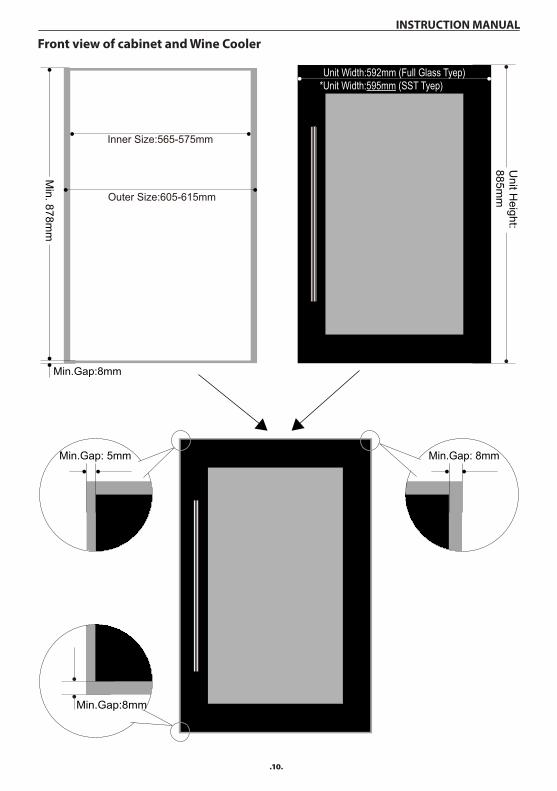
� 130L Control In Cabinet
Dual Zone 41 Bottles
Control Panel
HandleLong Shelf
Door
Short Shelf Gasket
Outside CabinetCondenser
AdjustableFoot
>22>560mm
¼” (5mm)
¼” (5mm)
21¼”
(540mm)¾”(20mm)
23(592mm)
23 -24¼”
(605-615mm)
22¼”-22¾”
(565-575mm)
Min.(8mm) Min.
34(878mm)
34½”(876mm)
34(885mm)
34(886mm) 22560mm
¾” (23mm) 5⁄16” Min.(8mm) Min.
31in2 Min.(200cm2 Min.)
31in2 Min.(200cm2 Min.)
.10.
INSTRUCTION MANUAL
Front view of cabinet and Wine Cooler

.11.
INSTRUCTION MANUAL
1. Before inserting the unit into the kitchen cabinet, please unscrew the
original 4� leveling feet (in white), and screw the 2�short leveling
feet (in black) , which are packed as the accessory, to the front bottom of the unit.
2. Tighten the 2� screws to fix the Bottom Mounting Bar (which has been fi xed on the bottom of the unit) to the kitchen cabinet.
3. For a fi rmly fi xing of the unit, you can install an extra Top Mounting Bar (which is an accessory packed with the unit) onto the topside of the unit, and screw it with the kitchen cabinet. See right drawing.
� 22L Control In Cabinet
Control Panel
Chrome Shelf
Front LouverAdjustable Foot
Outside Canbinet
Handle
Door
Gasket
Single Zone 7 Bottles
33½”(850mm)
34¼”(870mm)
>205⁄8”(525mm)
>34¼”(870mm)
57⁄8”(150mm)
61⁄8”(155mm)
205⁄8”(525mm)18¾”(475mm)
•Height Adjustable: 863-883mm
.12.
INSTRUCTION MANUAL
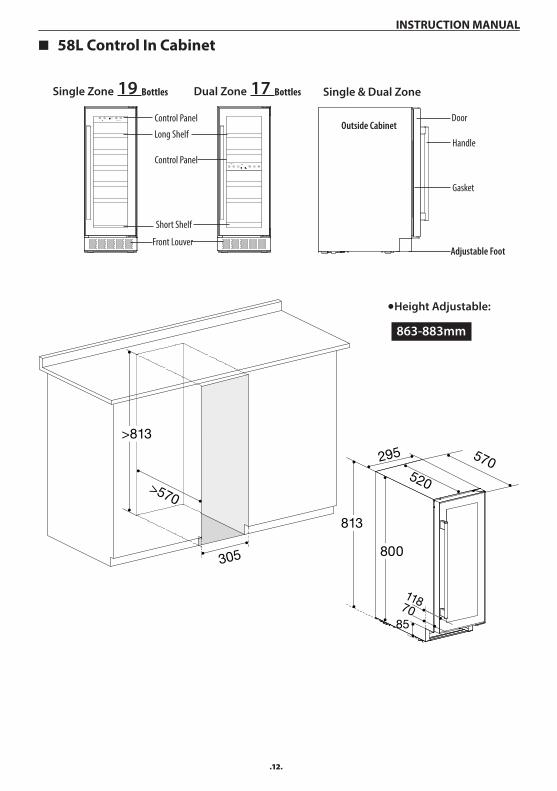
� 58L Control In Cabinet
Control Panel
Control Panel
Long Shelf
Short Shelf
Front LouverAdjustable Foot
Outside Cabinet
Handle
Door
Gasket
Single & Dual ZoneSingle Zone 19 Bottles 17 BottlesDual Zone
•Height Adjustable:
863-883mm
.13.
INSTRUCTION MANUAL
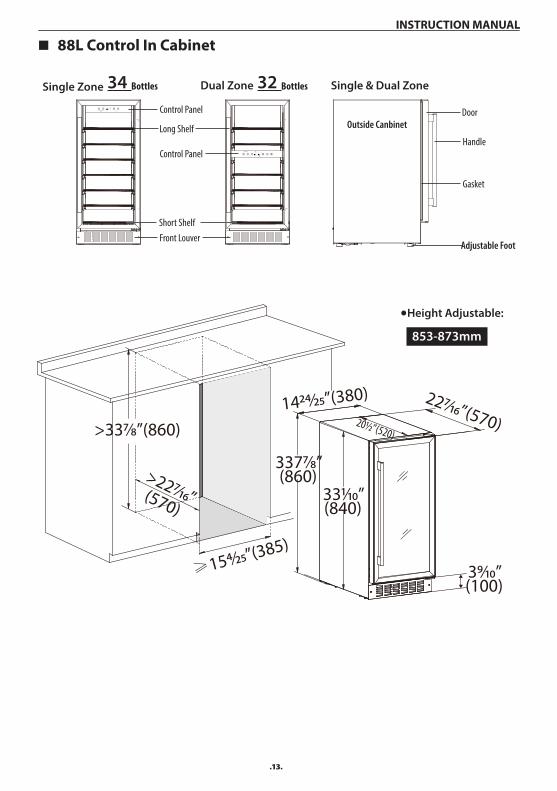
� 88L Control In Cabinet
Control Panel
Single Zone Dual Zone 34 Bottles 32 Bottles Single & Dual Zone
Long Shelf
Short ShelfFront Louver
Outside Canbinet
Handle
Door
Gasket
Control Panel
Adjustable Foot
>227⁄16”(570)
≥154⁄25”(385)
>337⁄8”(860)
3377⁄8”(860)
331⁄10”(840)
39⁄10”(100)
1424⁄25”(380)
•Height Adjustable:
853-873mm
.14.
INSTRUCTION MANUAL
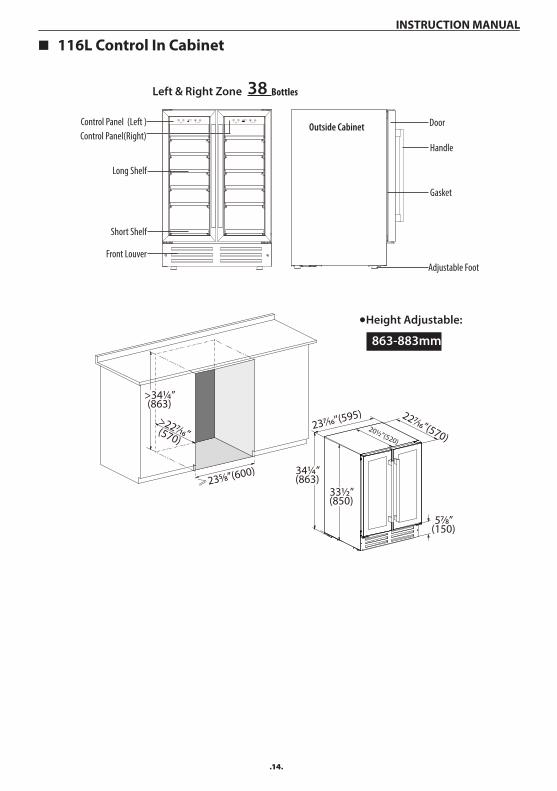
� 116L Control In Cabinet
38 BottlesLeft & Right Zone
Control Panel (Left )Control Panel(Right)
Long Shelf
Front Louver
Short Shelf
Adjustable Foot
Outside Cabinet
Handle
Door
Gasket
>22(570)
≥23 (600)
23 (595)
>34¼”(863)
34¼”(863)
33½”(850)
5(150)
•Height Adjustable:
863-883mm
.15.
INSTRUCTION MANUAL
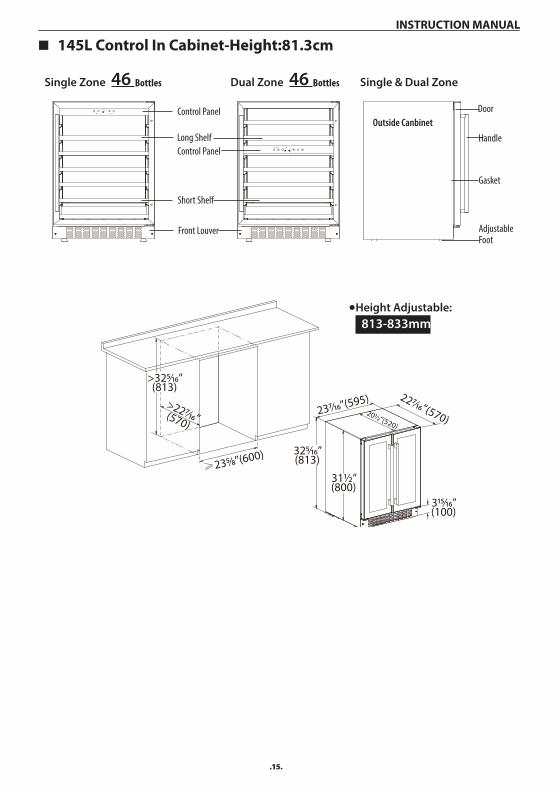
� 145L Control In Cabinet-Height:81.3cm
Control Panel
Single Zone Dual Zone 46 Bottles 46 Bottles Single & Dual Zone
Long Shelf
Short Shelf
Front Louver
Outside Canbinet
Handle
Door
Gasket
Control Panel
FootAdjustable
>227⁄16”(570)
≥235⁄8”(600)
>325⁄16”(813)
325⁄16”(813)
31½”(800)
237⁄16”(595)
•Height Adjustable: 813-833mm
.16.
INSTRUCTION MANUAL
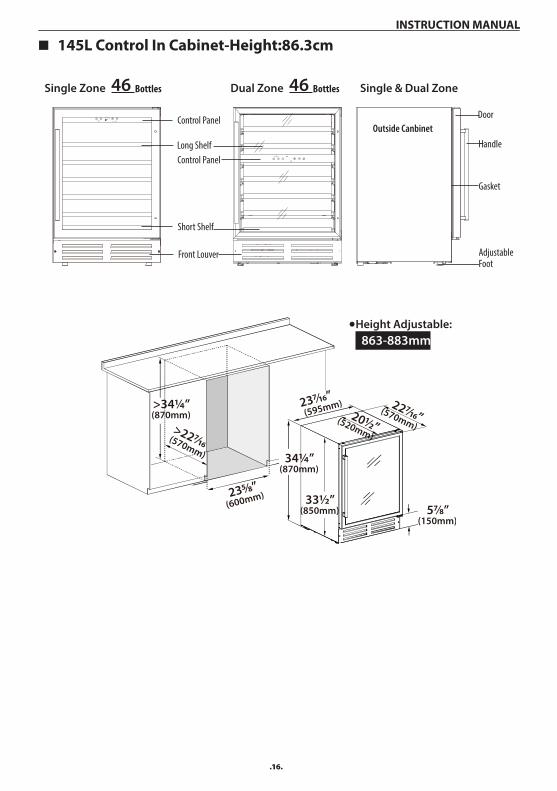
� 145L Control In Cabinet-Height:86.3cm
Control Panel
Single Zone Dual Zone 46 Bottles 46 Bottles Single & Dual Zone
Long Shelf
Short Shelf
Front Louver
Outside Canbinet
Handle
Door
Gasket
Control Panel
FootAdjustable
•Height Adjustable: 863-883mm
.17.
INSTRUCTION MANUAL
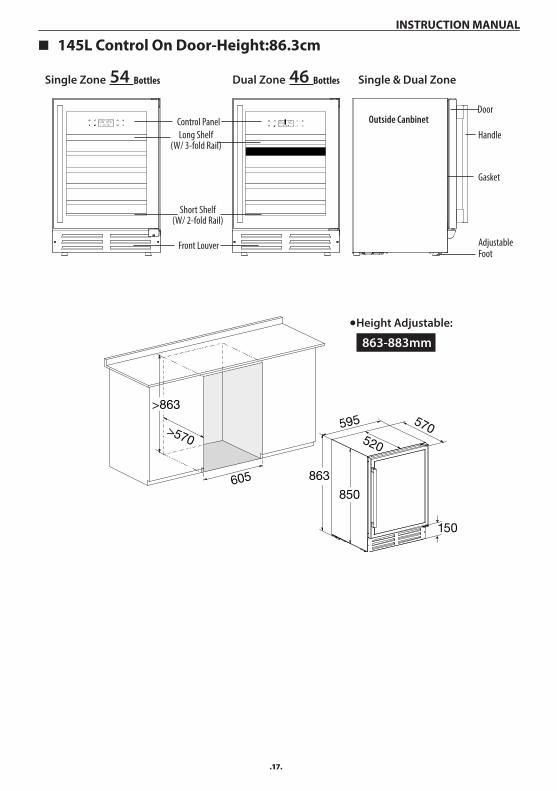
� 145L Control On Door-Height:86.3cm
Control Panel
Single Zone Dual Zone 54 Bottles 46 Bottles Single & Dual Zone
Long Shelf(W/ 3-fold Rail)
Short Shelf(W/ 2-fold Rail)
Front Louver
Outside Canbinet
Handle
Door
Gasket
FootAdjustable
•Height Adjustable:
863-883mm
.18.
INSTRUCTION MANUAL
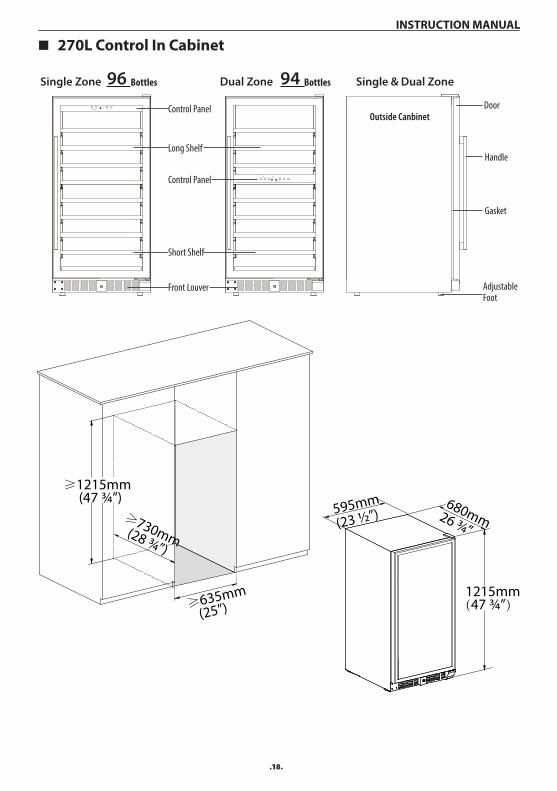
� 270L Control In Cabinet
Control Panel
Single Zone Dual Zone 96 Bottles 94 Bottles Single & Dual Zone
Long Shelf
Short Shelf
Front Louver
Outside Canbinet
Handle
Door
Gasket
Control Panel
FootAdjustable
≥1215mm (47 ¾”)
≥635mm
(25”)1215mm(47 ¾”)
595mm
(23 ½”)≥730mm (28 ¾”)
680mm26 ¾”
.19.
INSTRUCTION MANUAL
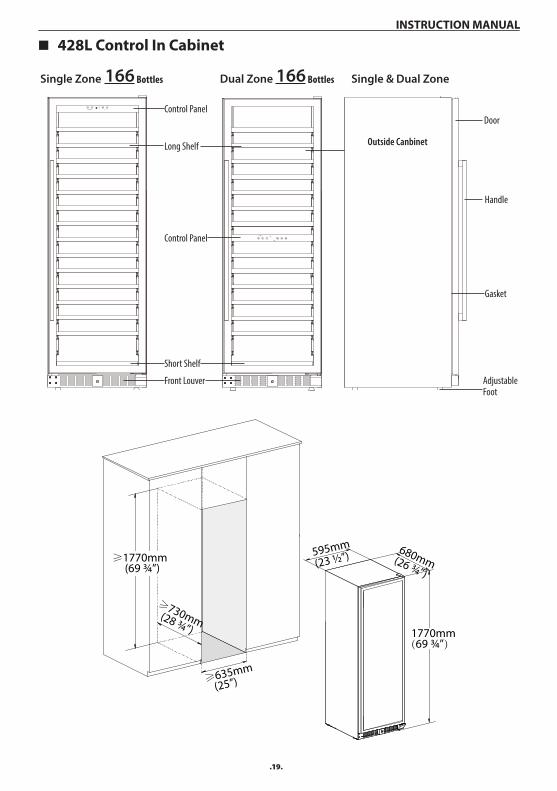
� 428L Control In Cabinet
Control Panel
Single Zone Dual Zone 166 Bottles 166 Bottles Single & Dual Zone
Long Shelf
Short Shelf
Front Louver
Outside Canbinet
Handle
Door
Gasket
Control Panel
FootAdjustable
≥1770mm (69 ¾”)
≥635mm
(25”)
1770mm(69 ¾”)
595mm
(23 ½”)
≥730mm (28 ¾”)
680mm(26 ¾”)
.20.
INSTRUCTION MANUAL
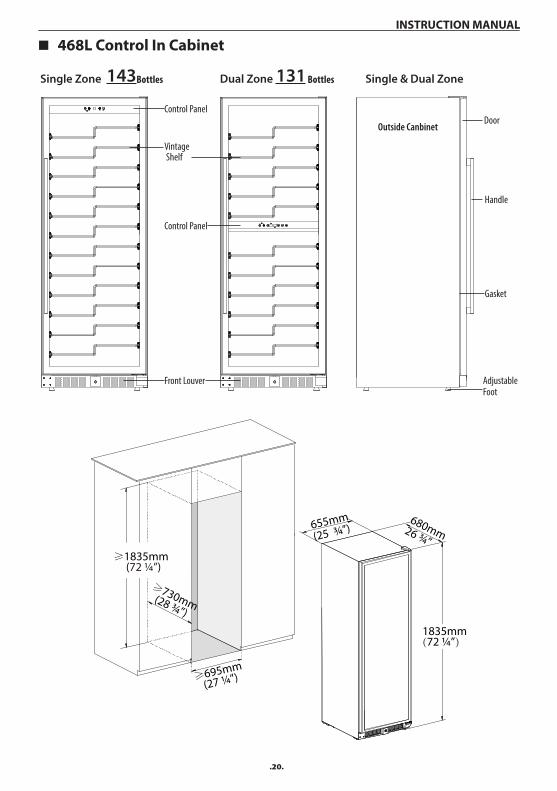
� 468L Control In Cabinet
Single Zone Dual Zone 143Bottles 131 Bottles Single & Dual Zone
癋癈
癈癋
Control Panel
Vintage Shelf
Front Louver
Handle
Door
Gasket
Control Panel
FootAdjustable
Outside Canbinet
≥1835mm (72 ¼”)
≥695mm
(27 ¼”)
1835mm(72 ¼”)
655mm
(25 ¾”)
≥730mm (28 ¾”)
680mm26 ¾”
.21.
INSTRUCTION MANUAL
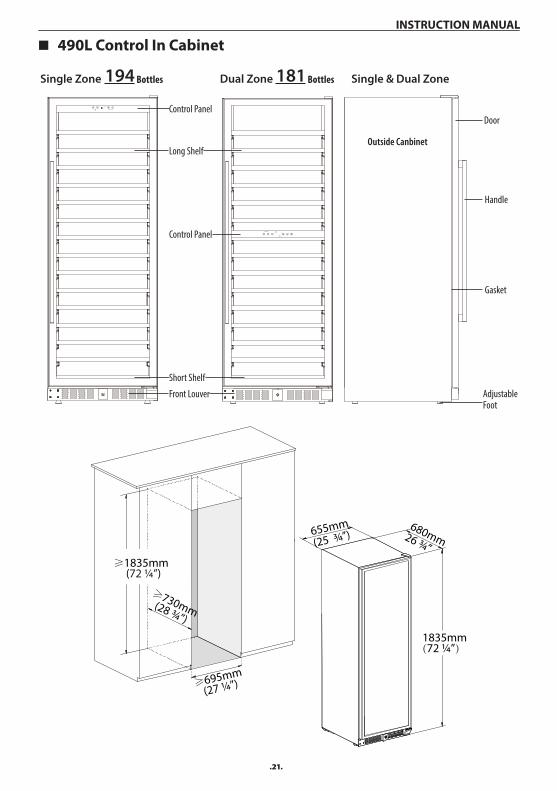
� 490L Control In Cabinet
Control Panel
Single Zone Dual Zone 194 Bottles 181 Bottles Single & Dual Zone
Long Shelf
Short Shelf
Front Louver
Outside Canbinet
Handle
Door
Gasket
Control Panel
FootAdjustable
≥1835mm (72 ¼”)
≥695mm
(27 ¼”)
1835mm(72 ¼”)
655mm
(25 ¾”)
≥730mm (28 ¾”)
680mm26 ¾”
.22.
INSTRUCTION MANUAL
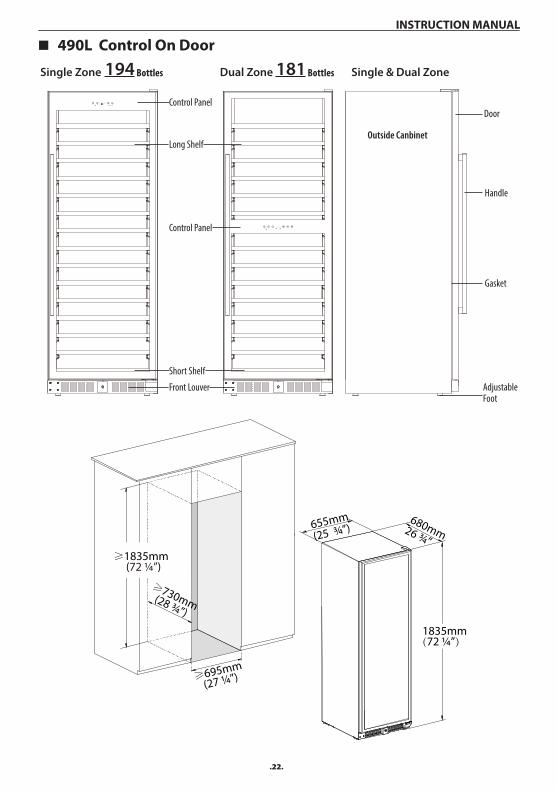
� 490L Control On Door
Control Panel
Single Zone Dual Zone 194 Bottles 181 Bottles Single & Dual Zone
Long Shelf
Short Shelf
Front Louver
Outside Canbinet
Handle
Door
Gasket
Control Panel
FootAdjustable
≥1835mm (72 ¼”)
≥695mm
(27 ¼”)
1835mm(72 ¼”)
655mm
(25 ¾”)
≥730mm (28 ¾”)
680mm26 ¾”
.23.
INSTRUCTION MANUAL
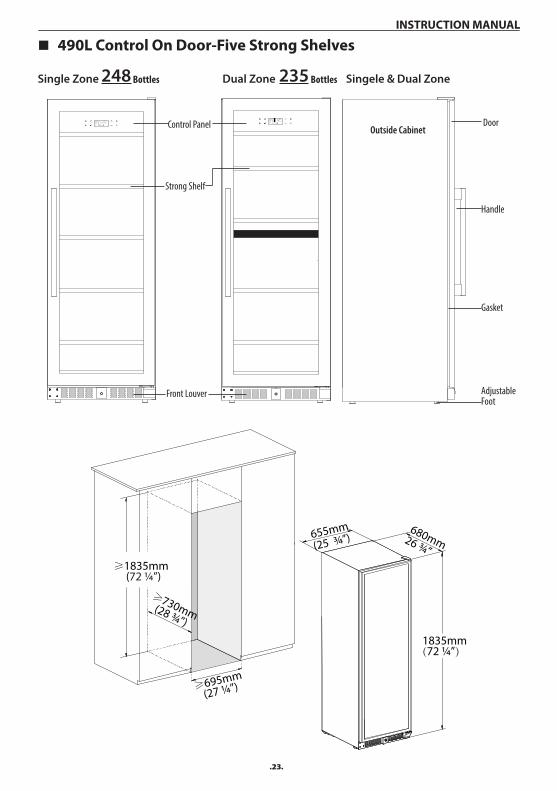
� 490L Control On Door-Five Strong Shelves
Strong Shelf
Front Louver
Outside Cabinet
Handle
Door
Gasket
FootAdjustable
Control Panel
Single Zone Dual Zone 248 Bottles 235 Bottles Singele & Dual Zone
≥1835mm (72 ¼”)
≥695mm
(27 ¼”)
1835mm(72 ¼”)
655mm
(25 ¾”)
≥730mm (28 ¾”)
680mm26 ¾”
.24.
INSTRUCTION MANUAL
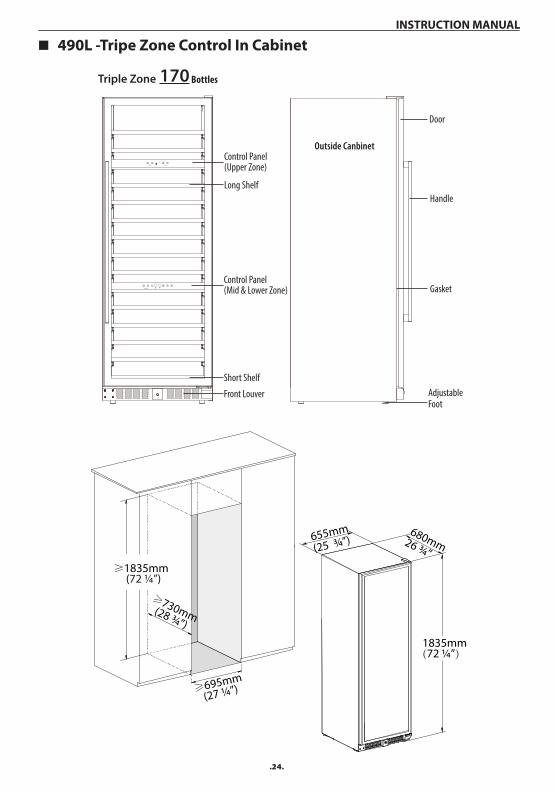
� 490L -Tripe Zone Control In Cabinet
Control Panel(Upper Zone)
Triple Zone 170 Bottles
Long Shelf
Short Shelf
Front Louver
Outside Canbinet
Handle
Door
GasketControl Panel(Mid & Lower Zone)
FootAdjustable
≥1835mm (72 ¼”)
≥695mm
(27 ¼”)
1835mm(72 ¼”)
655mm
(25 ¾”)
≥730mm (28 ¾”)
680mm26 ¾”
.25.
INSTRUCTION MANUAL
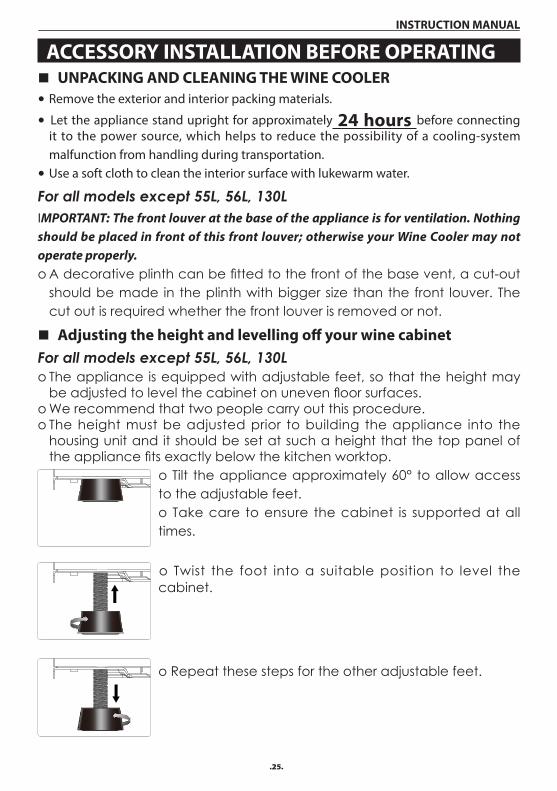
ACCESSORY INSTALLATION BEFORE OPERATING � UNPACKING AND CLEANING THE WINE COOLER
• Remove the exterior and interior packing materials.
• Let the appliance stand upright for approximately 24 hours before connecting it to the power source, which helps to reduce the possibility of a cooling-system malfunction from handling during transportation.
• Use a soft cloth to clean the interior surface with lukewarm water.
For all models except 55L, 56L, 130LIMPORTANT: The front louver at the base of the appliance is for ventilation. Nothing should be placed in front of this front louver; otherwise your Wine Cooler may not operate properly.o A decorative plinth can be fitted to the front of the base vent, a cut-out
should be made in the plinth with bigger size than the front louver. The cut out is required whether the front louver is removed or not.
� Adjusting the height and levelling off your wine cabinetFor all models except 55L, 56L, 130Lo The appliance is equipped with adjustable feet, so that the height may
be adjusted to level the cabinet on uneven floor surfaces.o We recommend that two people carry out this procedure.o The height must be adjusted prior to building the appliance into the
housing unit and it should be set at such a height that the top panel of the appliance fits exactly below the kitchen worktop.
o Tilt the appliance approximately 60° to allow access to the adjustable feet.o Take care to ensure the cabinet is supported at all times.
o Twist the foot into a suitable position to level the cabinet.
o Repeat these steps for the other adjustable feet.
.26.
INSTRUCTION MANUAL
IMPORTANT: If the appliance is not level, then the door and door seal may be aff ected.IMPORTANT: Do not move the appliance when the feet are adjusted high.
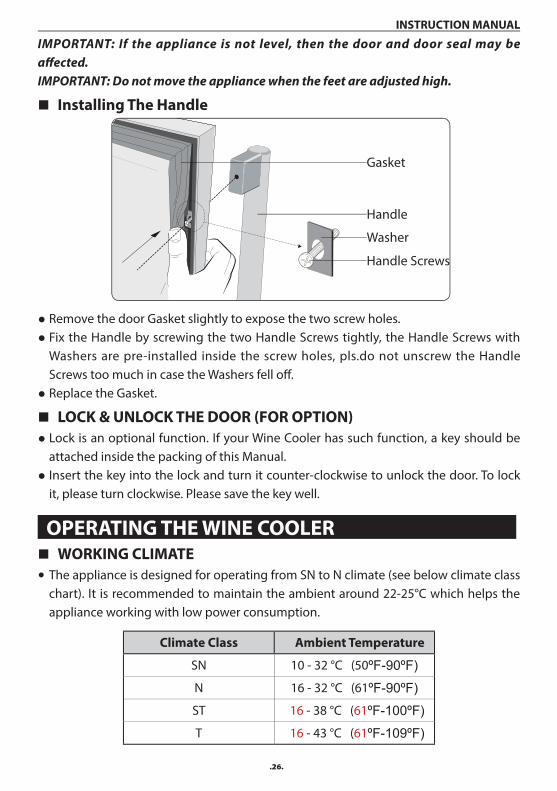
� Installing The Handle
Gasket
Washer
Handle Screws
Handle
● Remove the door Gasket slightly to expose the two screw holes. ● Fix the Handle by screwing the two Handle Screws tightly, the Handle Screws with Washers are pre-installed inside the screw holes, pls.do not unscrew the Handle Screws too much in case the Washers fell off .
● Replace the Gasket.
� LOCK & UNLOCK THE DOOR (FOR OPTION) ● Lock is an optional function. If your Wine Cooler has such function, a key should be attached inside the packing of this Manual.
● Insert the key into the lock and turn it counter-clockwise to unlock the door. To lock it, please turn clockwise. Please save the key well.
OPERATING THE WINE COOLER � WORKING CLIMATE
• The appliance is designed for operating from SN to N climate (see below climate class chart). It is recommended to maintain the ambient around 22-25°C which helps the appliance working with low power consumption.
Climate Class Ambient Temperature
SN 10 - 32 °C (50ºF-90ºF)
N 16 - 32 °C (61ºF-90ºF)
ST 16 - 38 °C (61ºF-100ºF)
T 16 - 43 °C (61ºF-109ºF)
.27.
INSTRUCTION MANUAL
• If the ambient temperature is above or below the designed climate range, the performance of the unit may be affected. For example, the appliance operating in extreme cold or hot conditions may cause interior temperatures to fluctuate, and the temperature set 5-22°C may not be reached sometimes.
� WINE STORAGE• The standard shelves are designed perfectly for Bordeaux bottle storage. The
maximum loaded bottles may vary subject to the different size or dimension wine bottles you store.
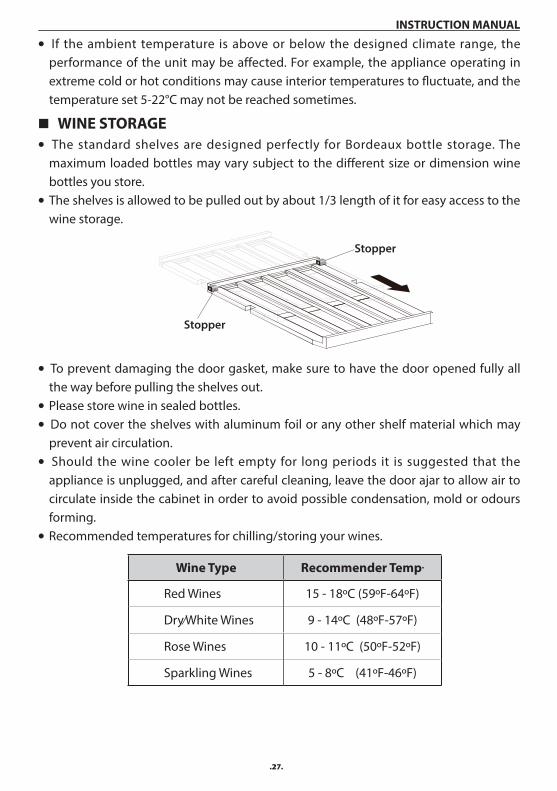
• The shelves is allowed to be pulled out by about 1/3 length of it for easy access to the wine storage.
Stopper
Stopper
• To prevent damaging the door gasket, make sure to have the door opened fully all
the way before pulling the shelves out.
• Please store wine in sealed bottles.
• Do not cover the shelves with aluminum foil or any other shelf material which may prevent air circulation.
• Should the wine cooler be left empty for long periods it is suggested that the appliance is unplugged, and after careful cleaning, leave the door ajar to allow air to circulate inside the cabinet in order to avoid possible condensation, mold or odours forming.
• Recommended temperatures for chilling/storing your wines.
Wine Type Recommender Temp.
Red Wines 15 - 18ºC (59ºF-64ºF)
Dry/White Wines 9 - 14ºC (48ºF-57ºF)
Rose Wines 10 - 11ºC (50ºF-52ºF)
Sparkling Wines 5 - 8ºC (41ºF-46ºF)
.28.
INSTRUCTION MANUAL
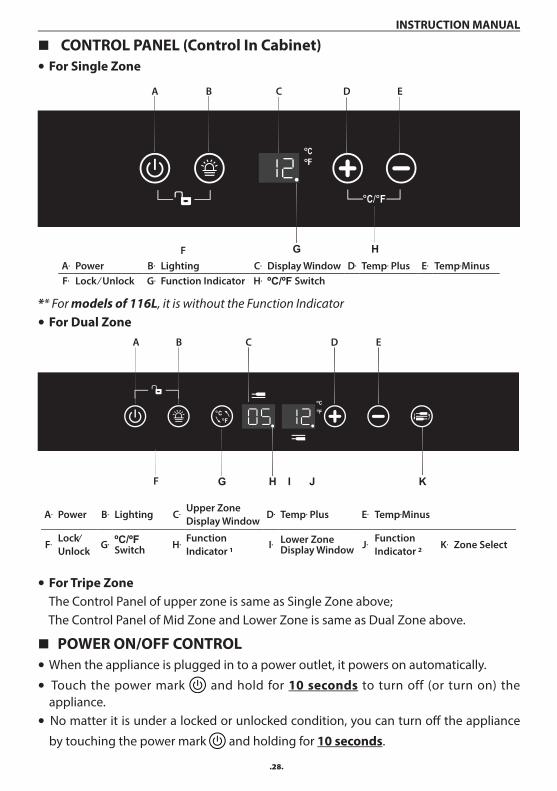
� CONTROL PANEL (Control In Cabinet) • For Single Zone
A. Power B. Lighting C. Display Window D. Temp. Plus E. Temp.MinusF. Lock / Unlock G. Function Indicator H. ºC/ºF Switch
A B DC E
F G H
** For models of 116L, it is without the Function Indicator
• For Dual Zone
A. Power B. Lighting C.Upper ZoneDisplay Window
D. Temp. Plus E. Temp.Minus
F.Lock/Unlock
G. ºC/ºFSwitch H.
FunctionIndicator 1
I. Lower ZoneDisplay Window J.
FunctionIndicator 2
K. Zone Select
A B DC E
F G H I J K
• For Tripe Zone
The Control Panel of upper zone is same as Single Zone above; The Control Panel of Mid Zone and Lower Zone is same as Dual Zone above.
� POWER ON/OFF CONTROL• When the appliance is plugged in to a power outlet, it powers on automatically.
• Touch the power mark and hold for 10 seconds to turn off (or turn on) the appliance.
• No matter it is under a locked or unlocked condition, you can turn off the appliance
by touching the power mark and holding for 10 seconds.
.29.
INSTRUCTION MANUAL
Warning: To avoid damaging the compressor, please do not turn on the appliance again within 5 minutes after you turn it off.
� UNLOCKING THE CONTROL PANEL
• To unlock the control panel, touch the power mark and lighting mark with 2 fingers at the same time and hold for 3 seconds . When unlocked a buzz sound will be heard.
• The control panel will be automatically locked with a buzz sound heard after 10 seconds without being touched.
• Under the locked condition, the control panel will not react to any touching order for Lighting On/Off and Temperature Setting.
� INTERIOR LIGHTING ON/OFF CONTROL• Under the unlocked condition, touch the lighting mark to turn on (or turn off) the
interior cool LED lighting.
• The lighting will stay on unstil it is manually turned off.
� TEMPERATURE DISPLAY WINDOW• The temperature is displayed in digital which is the best way to be read out. The
digital is shown as the set temperature when you are setting the temperature, and it will change to be the real temperature of the inside cabinet after 10 seconds without being touched.
• When the temperature probe is out of order, the display window will show with “HH” or “LL” instead of a digital figure while continuous buzz sound will be heard. In case of this happens, this appliance is considerately designed to keep periodical running of compressor and fans which helps to keep the coldness of the inside cabinet to protect your stored wines.
Warning: To avoid destroying your stored wines, it is strongly recommended to have the appliance repaired immediately, as the spare periodical running can not ensure the appliance to achieve the temperature you have set.
� TEMPERATURE RANGE SETTINGFor Single Zone
• The default temperature setting range is E: 5-22 ºC (41-72 ºF).
• To set a temperature range as desired, pls.make sure the control panel is under locked condition.
• Press the mark for 3 seconds, the display window will flash "E"--"F"--"H"--"L" in loop with a sound of beep by every pressing.
• Leave the window flashing for 3 seconds with a sound of beep to confirm the setting.
.30.
INSTRUCTION MANUAL
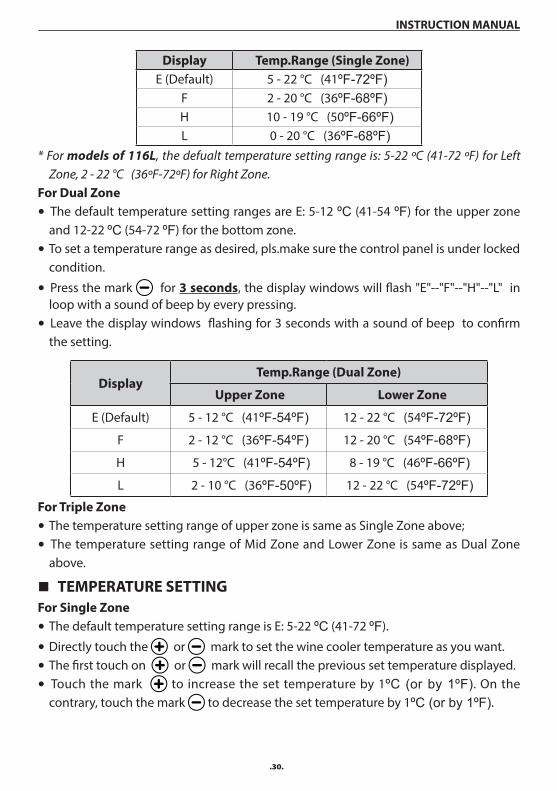
Display Temp.Range (Single Zone)E (Default) 5 - 22 °C (41ºF-72ºF)
F 2 - 20 °C (36ºF-68ºF)H 10 - 19 °C (50ºF-66ºF)L 0 - 20 °C (36ºF-68ºF)
* For models of 116L, the defualt temperature setting range is: 5-22 ºC (41-72 ºF) for Left Zone, 2 - 22 °C (36ºF-72ºF) for Right Zone.
For Dual Zone
• The default temperature setting ranges are E: 5-12 ºC (41-54 ºF) for the upper zone and 12-22 ºC (54-72 ºF) for the bottom zone.
• To set a temperature range as desired, pls.make sure the control panel is under locked condition.
• Press the mark for 3 seconds, the display windows will flash "E"--"F"--"H"--"L" in loop with a sound of beep by every pressing.
• Leave the display windows flashing for 3 seconds with a sound of beep to confirm the setting.
DisplayTemp.Range (Dual Zone)
Upper Zone Lower Zone
E (Default) 5 - 12 °C (41ºF-54ºF) 12 - 22 °C (54ºF-72ºF)
F 2 - 12 °C (36ºF-54ºF) 12 - 20 °C (54ºF-68ºF)
H 5 - 12°C (41ºF-54ºF) 8 - 19 °C (46ºF-66ºF)
L 2 - 10 °C (36ºF-50ºF) 12 - 22 °C (54ºF-72ºF)For Triple Zone
• The temperature setting range of upper zone is same as Single Zone above;
• The temperature setting range of Mid Zone and Lower Zone is same as Dual Zone above.
� TEMPERATURE SETTINGFor Single Zone
• The default temperature setting range is E: 5-22 ºC (41-72 ºF).
• Directly touch the or mark to set the wine cooler temperature as you want.
• The first touch on or mark will recall the previous set temperature displayed.
• Touch the mark to increase the set temperature by 1ºC (or by 1ºF). On the contrary, touch the mark to decrease the set temperature by 1ºC (or by 1ºF).
.31.
INSTRUCTION MANUAL
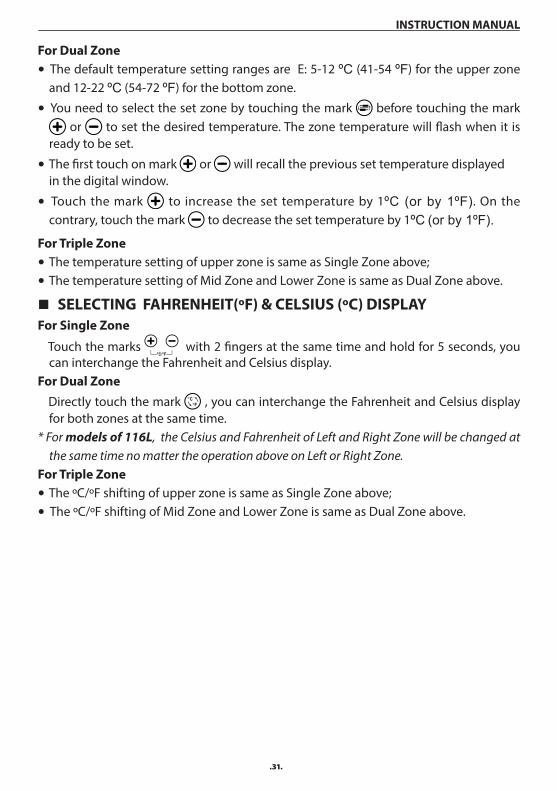
For Dual Zone
• The default temperature setting ranges are E: 5-12 ºC (41-54 ºF) for the upper zone and 12-22 ºC (54-72 ºF) for the bottom zone.
• You need to select the set zone by touching the mark before touching the mark or to set the desired temperature. The zone temperature will flash when it is
ready to be set.
• The first touch on mark or will recall the previous set temperature displayed in the digital window.
• Touch the mark to increase the set temperature by 1ºC (or by 1ºF). On the contrary, touch the mark to decrease the set temperature by 1ºC (or by 1ºF).
For Triple Zone
• The temperature setting of upper zone is same as Single Zone above;
• The temperature setting of Mid Zone and Lower Zone is same as Dual Zone above.
� SELECTING FAHRENHEIT(ºF) & CELSIUS (ºC) DISPLAYFor Single Zone
Touch the marks with 2 fingers at the same time and hold for 5 seconds, you can interchange the Fahrenheit and Celsius display.
For Dual Zone Directly touch the mark , you can interchange the Fahrenheit and Celsius display
for both zones at the same time. * For models of 116L, the Celsius and Fahrenheit of Left and Right Zone will be changed at
the same time no matter the operation above on Left or Right Zone.For Triple Zone
• The ºC/ºF shifting of upper zone is same as Single Zone above;
• The ºC/ºF shifting of Mid Zone and Lower Zone is same as Dual Zone above.
.32.
INSTRUCTION MANUAL
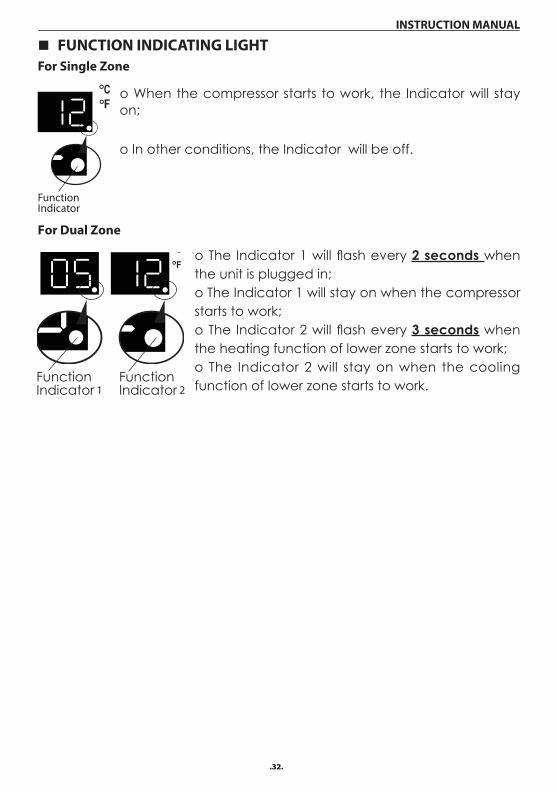
� FUNCTION INDICATING LIGHTFor Single Zone
FunctionIndicator
o When the compressor starts to work, the Indicator will stayon;
o In other conditions, the Indicator will be off.
For Dual Zone
Function Indicator 2
Function Indicator 1
o The Indicator 1 will flash every 2 seconds whenthe unit is plugged in;o The Indicator 1 will stay on when the compressorstarts to work;o The Indicator 2 will flash every 3 seconds whenthe heating function of lower zone starts to work;o The Indicator 2 will stay on when the coolingfunction of lower zone starts to work.
.33.
INSTRUCTION MANUAL
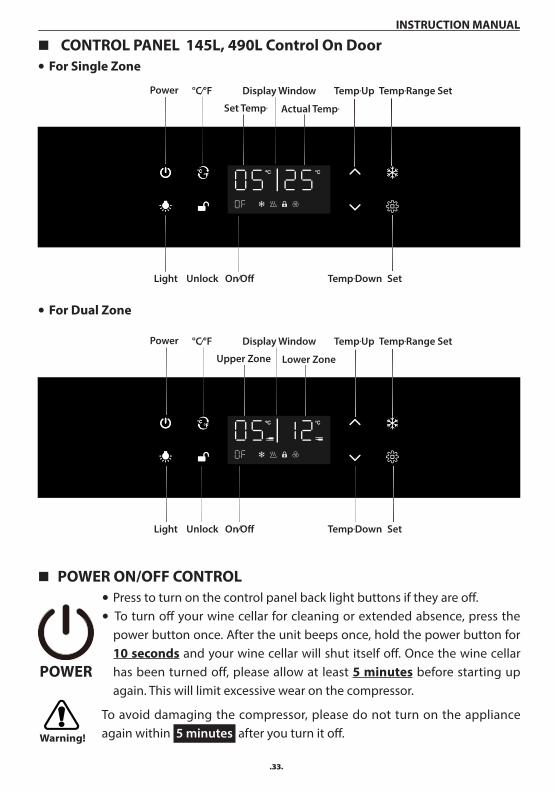
� CONTROL PANEL 145L, 490L Control On Door• For Single Zone
Power °C/°F
Set Temp. Actual Temp.
Temp.Up Temp.Range SetDisplay Window
Temp.DownLight Unlock On/Off Set
• For Dual Zone
Power °C/°F
Upper Zone Lower Zone
Temp.Up Temp.Range SetDisplay Window
Temp.DownLight Unlock On/Off Set
� POWER ON/OFF CONTROL
POWER
• Press to turn on the control panel back light buttons if they are off.
• To turn off your wine cellar for cleaning or extended absence, press the power button once. After the unit beeps once, hold the power button for 10 seconds and your wine cellar will shut itself off. Once the wine cellar has been turned off, please allow at least 5 minutes before starting up again. This will limit excessive wear on the compressor.
Warning!
To avoid damaging the compressor, please do not turn on the appliance again within 5 minutes after you turn it off.
.34.
INSTRUCTION MANUAL
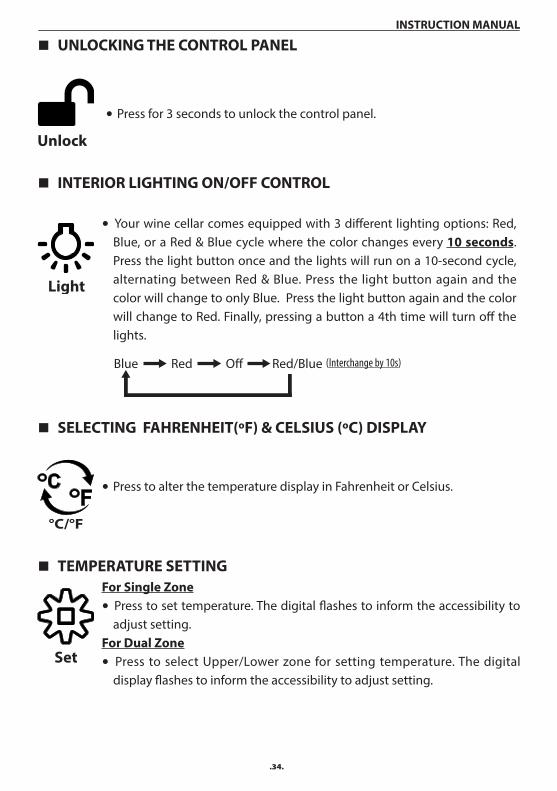
� UNLOCKING THE CONTROL PANEL
Unlock
• Press for 3 seconds to unlock the control panel.
� INTERIOR LIGHTING ON/OFF CONTROL
Light
• Your wine cellar comes equipped with 3 different lighting options: Red, Blue, or a Red & Blue cycle where the color changes every 10 seconds. Press the light button once and the lights will run on a 10-second cycle, alternating between Red & Blue. Press the light button again and the color will change to only Blue. Press the light button again and the color will change to Red. Finally, pressing a button a 4th time will turn off the lights.
Blue Red Off Red/Blue (Interchange by 10s)
� SELECTING FAHRENHEIT(ºF) & CELSIUS (ºC) DISPLAY
°C/°F
• Press to alter the temperature display in Fahrenheit or Celsius.
� TEMPERATURE SETTING
Set
For Single Zone
• Press to set temperature. The digital flashes to inform the accessibility to adjust setting.
For Dual Zone
• Press to select Upper/Lower zone for setting temperature. The digital display flashes to inform the accessibility to adjust setting.
.35.
INSTRUCTION MANUAL
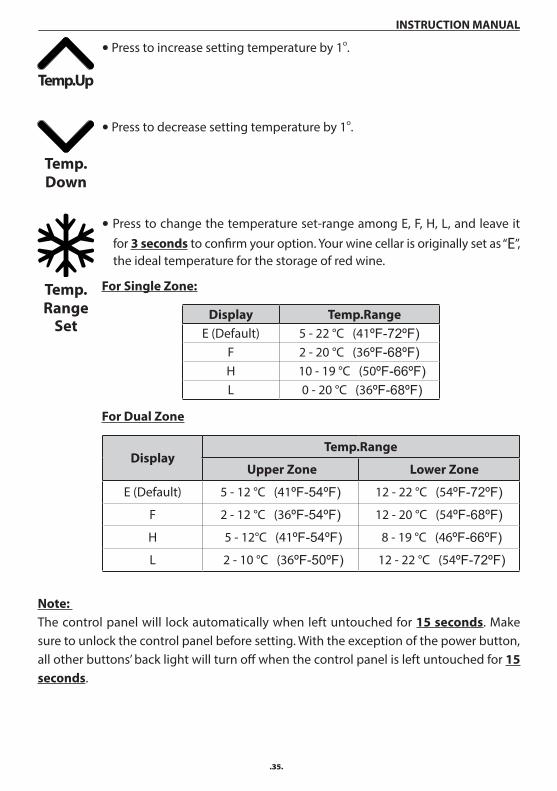
Temp.Up
• Press to increase setting temperature by 1o.
Temp.Down
• Press to decrease setting temperature by 1o.
Temp.Range
Set
• Press to change the temperature set-range among E, F, H, L, and leave it for 3 seconds to confirm your option. Your wine cellar is originally set as “E”, the ideal temperature for the storage of red wine.
For Single Zone:
Display Temp.RangeE (Default) 5 - 22 °C (41ºF-72ºF)
F 2 - 20 °C (36ºF-68ºF)H 10 - 19 °C (50ºF-66ºF)L 0 - 20 °C (36ºF-68ºF)
For Dual Zone
DisplayTemp.Range
Upper Zone Lower Zone
E (Default) 5 - 12 °C (41ºF-54ºF) 12 - 22 °C (54ºF-72ºF)
F 2 - 12 °C (36ºF-54ºF) 12 - 20 °C (54ºF-68ºF)
H 5 - 12°C (41ºF-54ºF) 8 - 19 °C (46ºF-66ºF)
L 2 - 10 °C (36ºF-50ºF) 12 - 22 °C (54ºF-72ºF)
Note: The control panel will lock automatically when left untouched for 15 seconds. Make sure to unlock the control panel before setting. With the exception of the power button, all other buttons’ back light will turn off when the control panel is left untouched for 15 seconds.
.36.
INSTRUCTION MANUAL
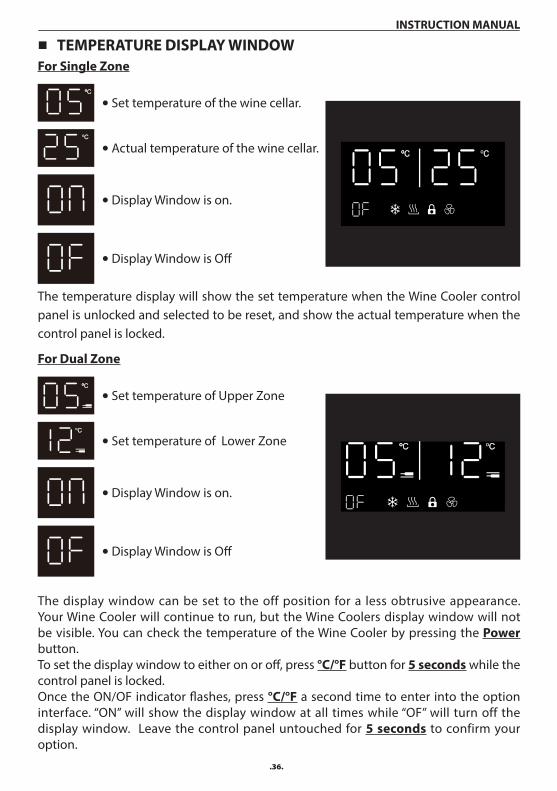
� TEMPERATURE DISPLAY WINDOWFor Single Zone
• Display Window is on.
• Display Window is Off
• Actual temperature of the wine cellar.
• Set temperature of the wine cellar.
The temperature display will show the set temperature when the Wine Cooler control panel is unlocked and selected to be reset, and show the actual temperature when the control panel is locked.
For Dual Zone
• Display Window is on.
• Display Window is Off
• Set temperature of Lower Zone
• Set temperature of Upper Zone
The display window can be set to the off position for a less obtrusive appearance. Your Wine Cooler will continue to run, but the Wine Coolers display window will not be visible. You can check the temperature of the Wine Cooler by pressing the Power button.To set the display window to either on or off, press °C/°F button for 5 seconds while the control panel is locked. Once the ON/OF indicator flashes, press °C/°F a second time to enter into the option interface. “ON” will show the display window at all times while “OF” will turn off the display window. Leave the control panel untouched for 5 seconds to confirm your option.
.37.
INSTRUCTION MANUAL
Note: Temperatures may fluctuate depending on whether the interior light is ON or OFF and depending on the position of the bottles.
CARE AND MAINTENANCE � CLEANING THE WINE COOLER
• Turn off the power, unplug the appliance, and remove all items including shelves.• Wipe the inside surfaces with a sponge and baking soda solution. The solution should
be about 2 tablespoons of baking soda to 1 quart (approx. 1 litre) of warm water.• Wash the shelves with a mild detergent solution. Allow wooden shelves to dry before
placing back into the wine cooler.• Wring excess water out of the sponge or cloth when cleaning area of the controls, or
any electrical parts.• Wipe the outside cabinet with warm water and mild liquid detergent. Wipe dry with
a clean soft cloth.• Do not use steel wool or steel brush on the stainless steel. These will scratch the
stainless steel with steel particles and rusting may occur.
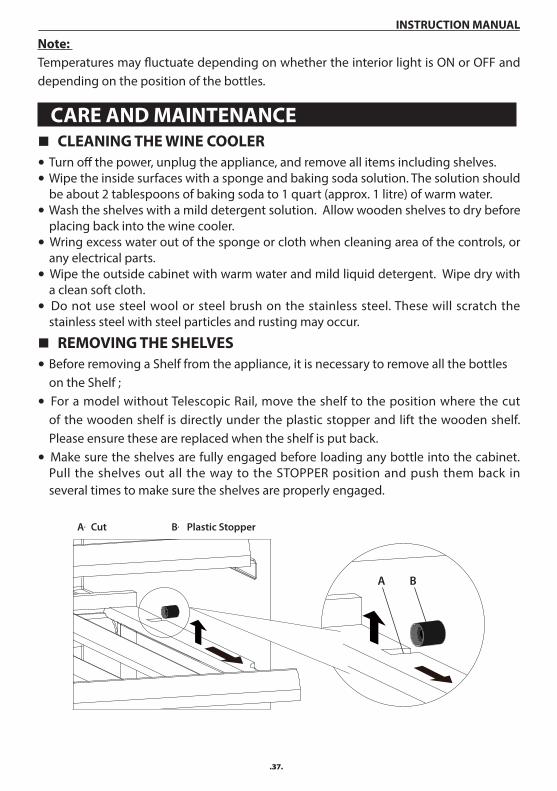
� REMOVING THE SHELVES• Before removing a Shelf from the appliance, it is necessary to remove all the bottles on the Shelf ;
• For a model without Telescopic Rail, move the shelf to the position where the cut of the wooden shelf is directly under the plastic stopper and lift the wooden shelf. Please ensure these are replaced when the shelf is put back.
• Make sure the shelves are fully engaged before loading any bottle into the cabinet. Pull the shelves out all the way to the STOPPER position and push them back in several times to make sure the shelves are properly engaged.
BA
A. Cut B. Plastic Stopper
.38.
INSTRUCTION MANUAL
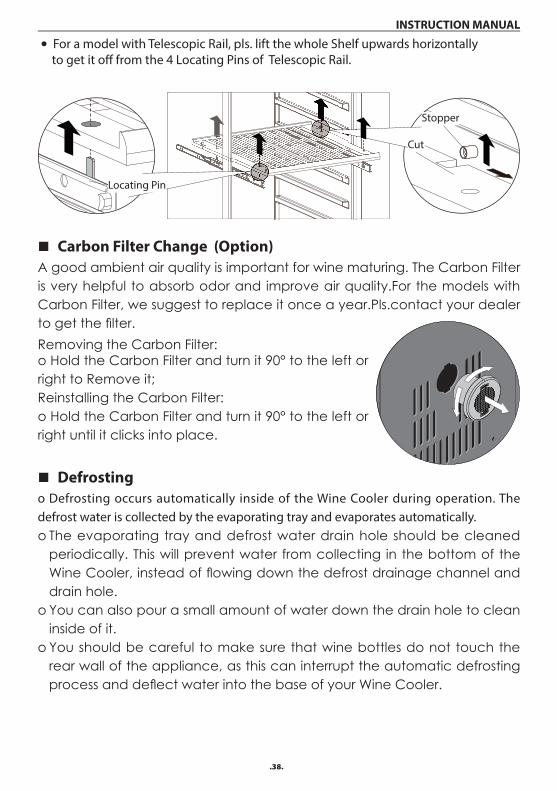
• For a model with Telescopic Rail, pls. lift the whole Shelf upwards horizontally to get it off from the 4 Locating Pins of Telescopic Rail.
Stopper
Locating Pin
Cut
� Carbon Filter Change (Option)A good ambient air quality is important for wine maturing. The Carbon Filter is very helpful to absorb odor and improve air quality.For the models with Carbon Filter, we suggest to replace it once a year.Pls.contact your dealer to get the fi lter.Removing the Carbon Filter: o Hold the Carbon Filter and turn it 90° to the left or right to Remove it;Reinstalling the Carbon Filter:o Hold the Carbon Filter and turn it 90° to the left or right until it clicks into place.
� Defrosting o Defrosting occurs automatically inside of the Wine Cooler during operation. The defrost water is collected by the evaporating tray and evaporates automatically.o The evaporating tray and defrost water drain hole should be cleaned
periodically. This will prevent water from collecting in the bottom of the Wine Cooler, instead of fl owing down the defrost drainage channel and drain hole.
o You can also pour a small amount of water down the drain hole to clean inside of it.
o You should be careful to make sure that wine bottles do not touch the rear wall of the appliance, as this can interrupt the automatic defrosting process and defl ect water into the base of your Wine Cooler.
.39.
INSTRUCTION MANUAL
� Moving Your Wine CoolerIf you need to move your Wine Cooler to another location you should
follow the steps outlined below. o Remove all items from the Wine Cooler. o Securely tape down all loose items such as the shelves inside of the
appliance.o Turn the adjustable foot up to the base to avoid damage. o Tape the door closed. o Ensure the appliance stays secure in the upright position during
transportation. Also protect the outside of the appliance with a blanket or similar item.
� Power Failureo If power is cut to the appliance, for a few hours it will be able to maintain
the temperature inside the cabinet. Providing that the number of times that the door is opened is kept to a minimum.
o If the power cut is for longer than a few hours, then you will need to store the contents in an alternate location to prevent them being affected by temperature rise.
IMPORTANT: If the appliance is unplugged, the power is lost or turned off you must wait 5 minutes before restarting the Wine Cooler. If you attempt to restart before this time delay, the compressor could be damaged.
� Vacation TimeShort vacations: Leave the Wine Cooler in operation for holidays of less than 3 weeks.Long vacations: o If your appliance is not going to be in use for a period of time, you should
remove the bottles of wine and switch off the applianceo The interior should be cleaned with a solution of bicarbonate of soda
and lukewarm water.o The interior should then be thoroughly dried.o To prevent mould growth, the door should be left slightly ajar.
� Disconnecting From Powero If the unit is unplugged, or there is a power cut, you must wait for 5
minutes before restarting. Attempting to restart the Wine Cooler before 5 minutes has elapsed, may cause it not to function.
.40.
INSTRUCTION MANUAL
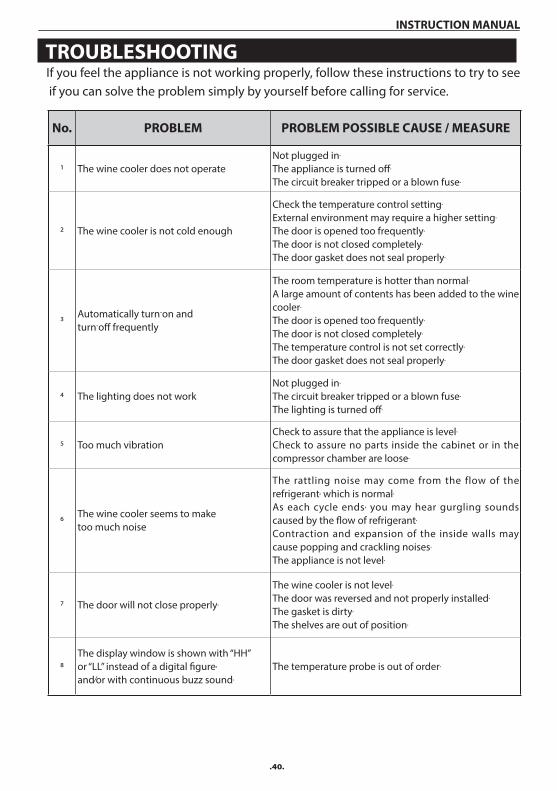
TROUBLESHOOTING If you feel the appliance is not working properly, follow these instructions to try to see
if you can solve the problem simply by yourself before calling for service.
No. PROBLEM PROBLEM POSSIBLE CAUSE / MEASURE
1 The wine cooler does not operateNot plugged in.The appliance is turned off.The circuit breaker tripped or a blown fuse.
2 The wine cooler is not cold enough
Check the temperature control setting.External environment may require a higher setting.The door is opened too frequently.The door is not closed completely.The door gasket does not seal properly.
3Automatically turn-on and turn-off frequently
The room temperature is hotter than normal.A large amount of contents has been added to the wine cooler.The door is opened too frequently.The door is not closed completely.The temperature control is not set correctly.The door gasket does not seal properly.
4 The lighting does not workNot plugged in.The circuit breaker tripped or a blown fuse.The lighting is turned off.
5 Too much vibrationCheck to assure that the appliance is level.Check to assure no parts inside the cabinet or in the compressor chamber are loose.
6The wine cooler seems to make too much noise
The rattling noise may come from the flow of the refrigerant, which is normal.As each cycle ends, you may hear gurgling sounds caused by the flow of refrigerant.Contraction and expansion of the inside walls may cause popping and crackling noises.The appliance is not level.
7 The door will not close properly.
The wine cooler is not level.The door was reversed and not properly installed.The gasket is dirty.The shelves are out of position.
8The display window is shown with “HH” or “LL” instead of a digital figure, and/or with continuous buzz sound.
The temperature probe is out of order.
.41.
INSTRUCTION MANUAL
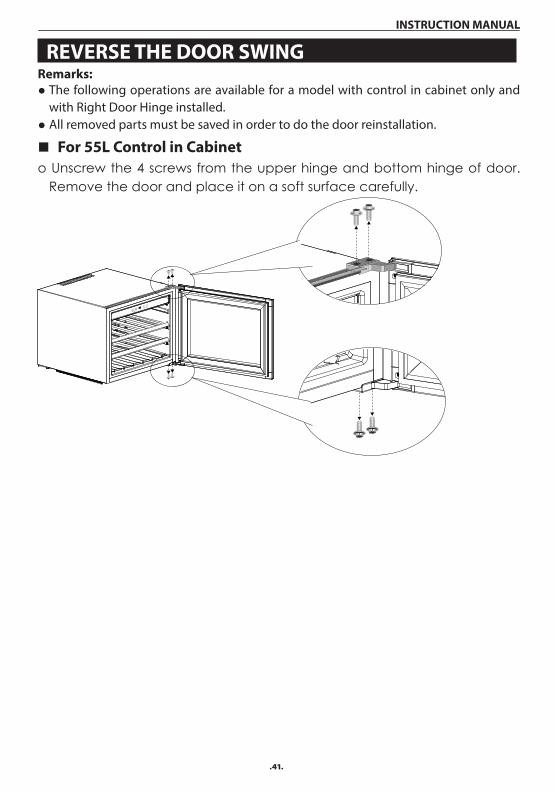
REVERSE THE DOOR SWING Remarks:
● The following operations are available for a model with control in cabinet only and with Right Door Hinge installed.
● All removed parts must be saved in order to do the door reinstallation.
� For 55L Control in Cabineto Unscrew the 4 screws from the upper hinge and bottom hinge of door.
Remove the door and place it on a soft surface carefully.
.42.
INSTRUCTION MANUAL
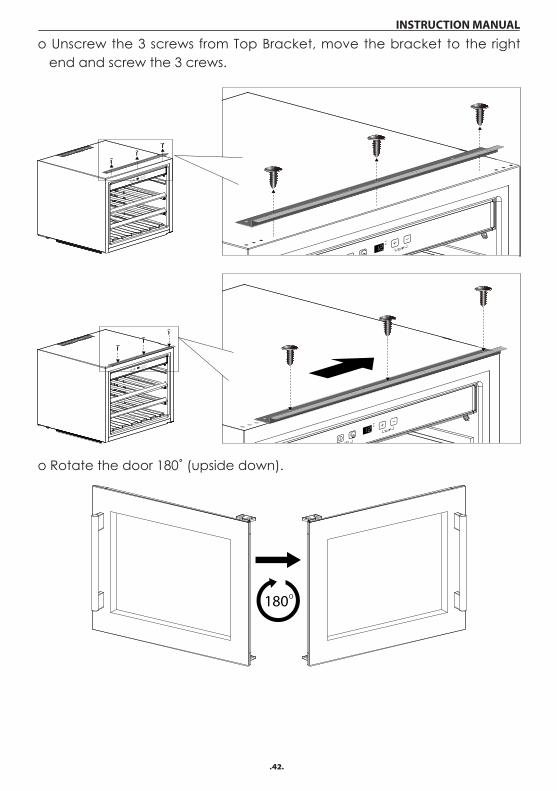
o Unscrew the 3 screws from Top Bracket, move the bracket to the right end and screw the 3 crews.
o Rotate the door 180˚ (upside down).

.43.
INSTRUCTION MANUAL
o Screw the 4 screws of the upper hinge and bottom hinge tightly to fi x the door in place.
� For 56L Control On Door ● To reverse the door, a professional instruction is needed, pls.contact with your local dealer for help.
� For 130L Control in Cabinet
1. Unscrew the 8 screws from Upper Hinge and Bottom Hinge one by one.
Upper Hinge
Screws (4pcs)
Screws (4pcs)
Bottom Hinge
.44.
INSTRUCTION MANUAL
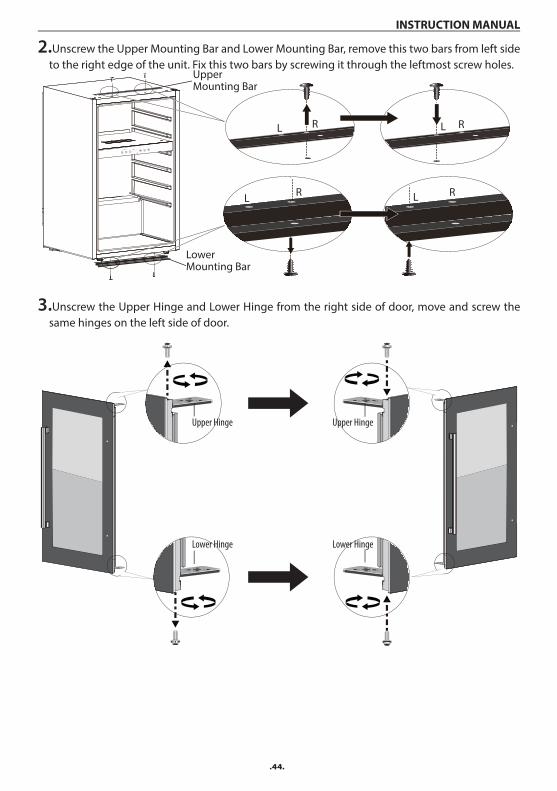
2.Unscrew the Upper Mounting Bar and Lower Mounting Bar, remove this two bars from left side to the right edge of the unit. Fix this two bars by screwing it through the leftmost screw holes.
Upper Mounting Bar
Lower Mounting Bar
RL
L R
L R
L R
3.Unscrew the Upper Hinge and Lower Hinge from the right side of door, move and screw the same hinges on the left side of door.
Upper Hinge Upper Hinge
Lower Hinge Lower Hinge

.45.
INSTRUCTION MANUAL
4.Remove the Handle Hole Cap (2pcs) on the right side of Door by prying it out gently with small flat screwdriver.
Handle Hole Cap
5.Gently pull the door gasket to one side to reveal the Handle Screws (2pcs) on the left side of the Door.Unscrew it with a cross screwdriver and Remove the Handle (Leave the Washers as where it is).
Handle ScrewWasher
Handle
.46.
INSTRUCTION MANUAL
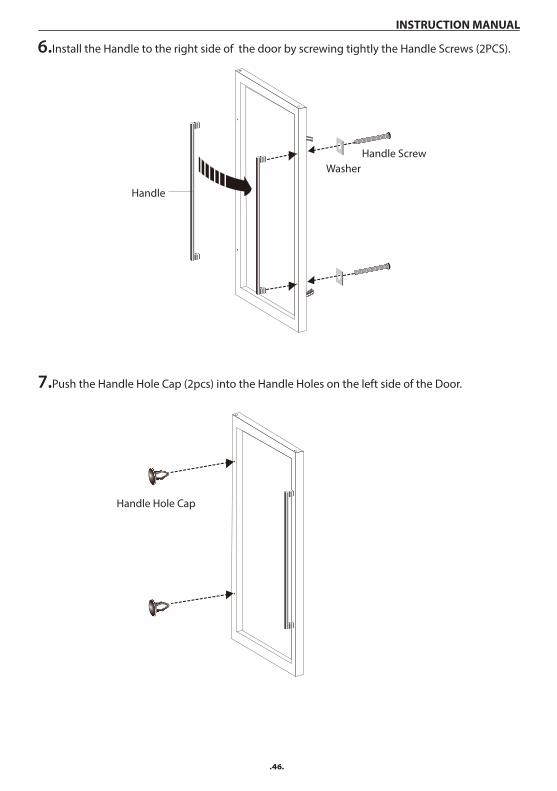
6.Install the Handle to the right side of the door by screwing tightly the Handle Screws (2PCS).
Handle
WasherHandle Screw
7.Push the Handle Hole Cap (2pcs) into the Handle Holes on the left side of the Door.
Handle Hole Cap
.47.
INSTRUCTION MANUAL
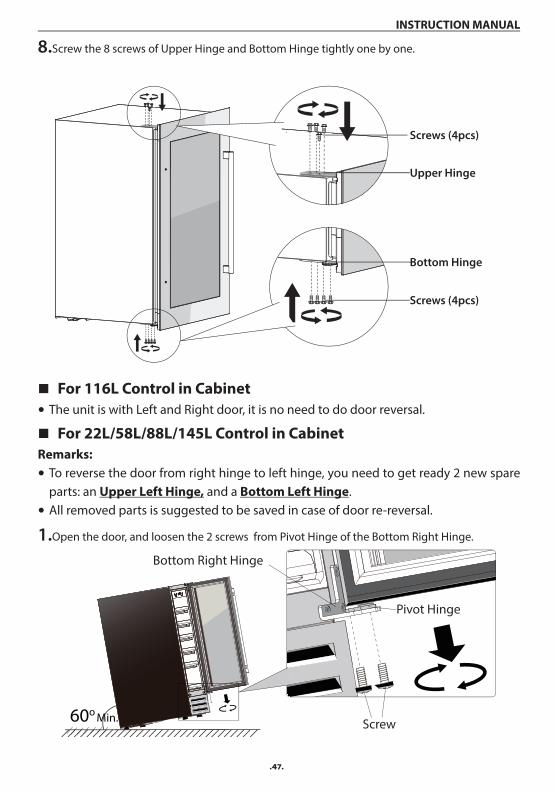
8.Screw the 8 screws of Upper Hinge and Bottom Hinge tightly one by one.
Upper Hinge
Screws (4pcs)
Screws (4pcs)
Bottom Hinge
� For 116L Control in Cabinet• The unit is with Left and Right door, it is no need to do door reversal.
� For 22L/58L/88L/145L Control in CabinetRemarks:
• To reverse the door from right hinge to left hinge, you need to get ready 2 new spare parts: an Upper Left Hinge, and a Bottom Left Hinge.
• All removed parts is suggested to be saved in case of door re-reversal.
1.Open the door, and loosen the 2 screws from Pivot Hinge of the Bottom Right Hinge.
60o Min.
Bottom Right Hinge
Screw
Pivot Hinge

.48.
INSTRUCTION MANUAL
2.Carefully remove the door from the Upper Right Hinge and prevent it from scratching. Take out
the Pivot Hinge from the door hinge hole.
60o Min. Pivot HingeBottom Right Hinge
Door
Upper Right Hinge
3.Unscrew the Upper Right Hinge and Bottom Right Hinge from the cabinet. Keep them well for
door re-installation.Upper Right Hinge
Bottom Right Hinge
4.Pull out the 6 Plastic Caps at the front left corner of the cabinet. And move them all to the right side.
Plastic Caps (6pcs)
.49.
INSTRUCTION MANUAL
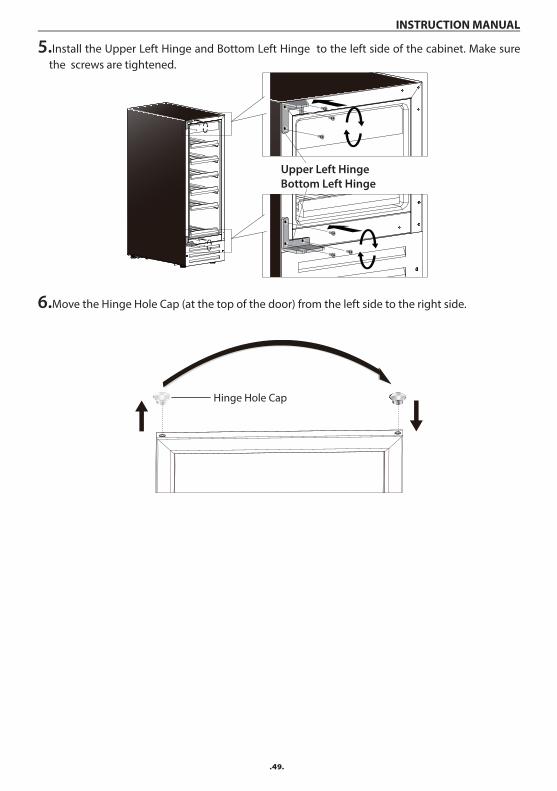
5.Install the Upper Left Hinge and Bottom Left Hinge to the left side of the cabinet. Make sure the screws are tightened.
Upper Left HingeBottom Left Hinge
6.Move the Hinge Hole Cap (at the top of the door) from the left side to the right side.
Hinge Hole Cap
.50.
INSTRUCTION MANUAL
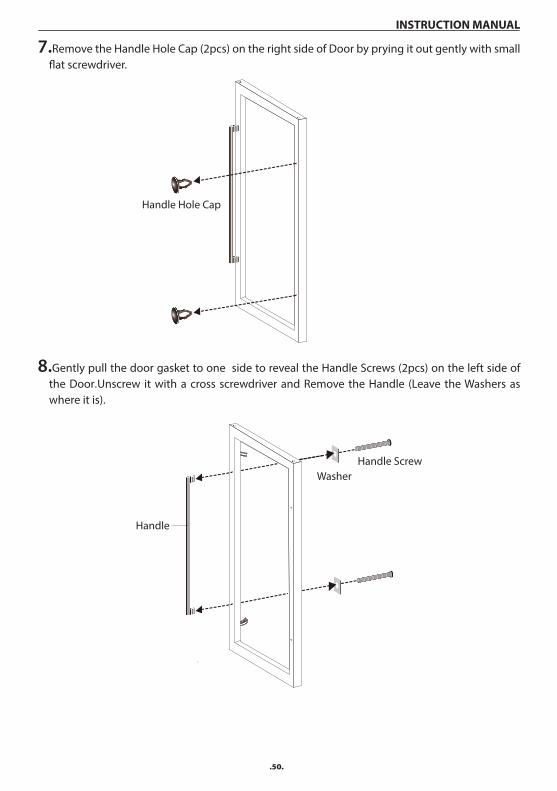
7.Remove the Handle Hole Cap (2pcs) on the right side of Door by prying it out gently with small flat screwdriver.
Handle Hole Cap
8.Gently pull the door gasket to one side to reveal the Handle Screws (2pcs) on the left side of the Door.Unscrew it with a cross screwdriver and Remove the Handle (Leave the Washers as where it is).
Handle ScrewWasher
Handle
.51.
INSTRUCTION MANUAL
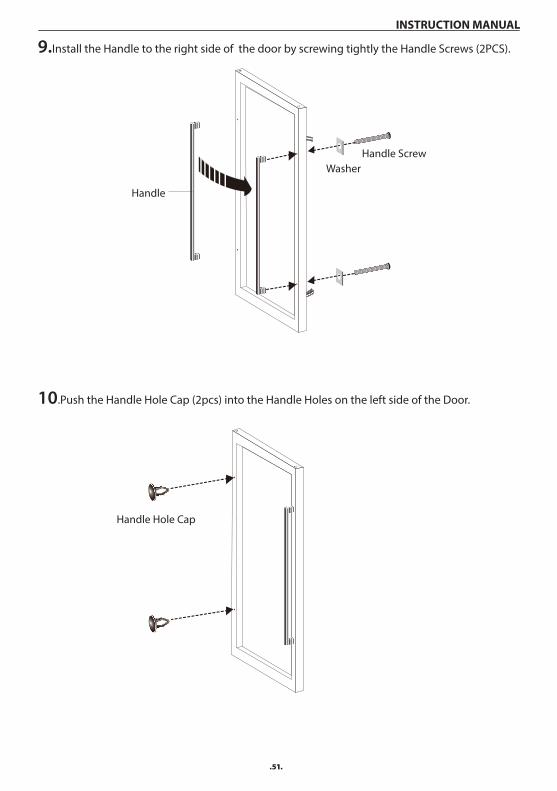
9.Install the Handle to the right side of the door by screwing tightly the Handle Screws (2PCS).
Handle
WasherHandle Screw
10.Push the Handle Hole Cap (2pcs) into the Handle Holes on the left side of the Door.
Handle Hole Cap
.52.
INSTRUCTION MANUAL
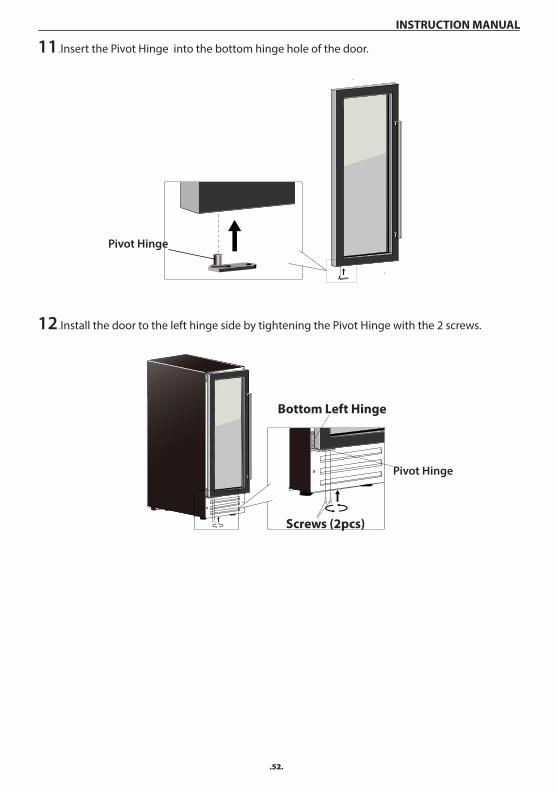
11.Insert the Pivot Hinge into the bottom hinge hole of the door.
Pivot Hinge
12.Install the door to the left hinge side by tightening the Pivot Hinge with the 2 screws.
Pivot Hinge
Screws (2pcs)
Bottom Left Hinge
.53.
INSTRUCTION MANUAL
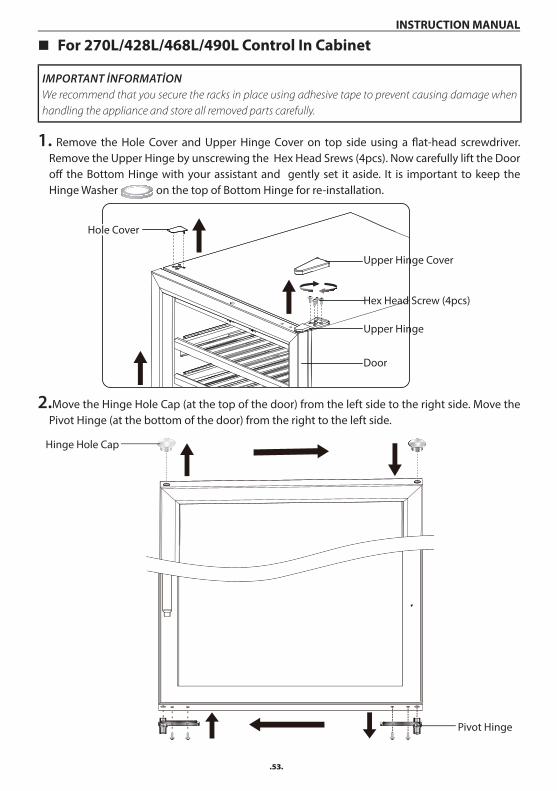
� For 270L/428L/468L/490L Control In Cabinet
IMPORTANT İNFORMATİONWe recommend that you secure the racks in place using adhesive tape to prevent causing damage when handling the appliance and store all removed parts carefully.
1. Remove the Hole Cover and Upper Hinge Cover on top side using a flat-head screwdriver. Remove the Upper Hinge by unscrewing the Hex Head Srews (4pcs). Now carefully lift the Door off the Bottom Hinge with your assistant and gently set it aside. It is important to keep the Hinge Washer on the top of Bottom Hinge for re-installation.
Hole Cover
Upper Hinge Cover
Hex Head Screw (4pcs)
Upper Hinge
Door
2.Move the Hinge Hole Cap (at the top of the door) from the left side to the right side. Move the Pivot Hinge (at the bottom of the door) from the right to the left side.
Pivot Hinge
Hinge Hole Cap
.54.
INSTRUCTION MANUAL
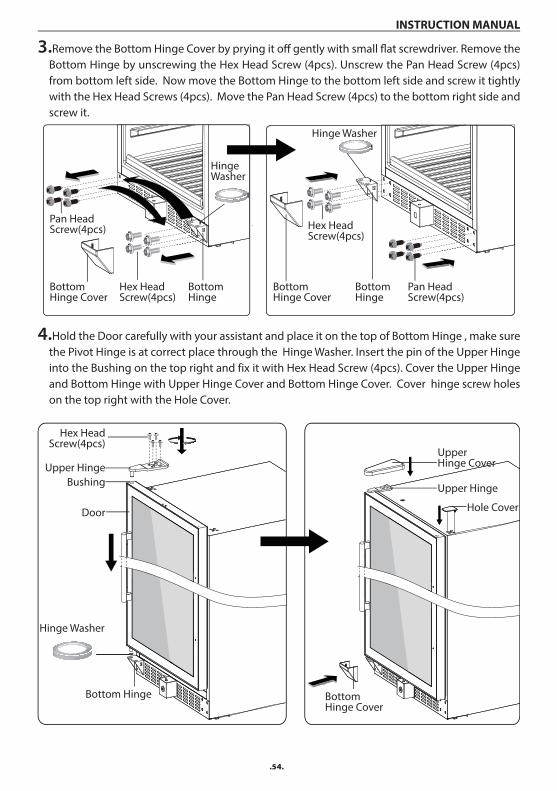
3.Remove the Bottom Hinge Cover by prying it off gently with small flat screwdriver. Remove the Bottom Hinge by unscrewing the Hex Head Screw (4pcs). Unscrew the Pan Head Screw (4pcs) from bottom left side. Now move the Bottom Hinge to the bottom left side and screw it tightly with the Hex Head Screws (4pcs). Move the Pan Head Screw (4pcs) to the bottom right side and screw it.
Bottom Hinge Cover
Bottom Hinge Cover
Hex Head Screw(4pcs)
Hex HeadScrew(4pcs)
Pan Head Screw(4pcs)
BottomHinge
HingeWasher
Hinge Washer
BottomHinge
Pan Head Screw(4pcs)
4.Hold the Door carefully with your assistant and place it on the top of Bottom Hinge , make sure the Pivot Hinge is at correct place through the Hinge Washer. Insert the pin of the Upper Hinge into the Bushing on the top right and fix it with Hex Head Screw (4pcs). Cover the Upper Hinge and Bottom Hinge with Upper Hinge Cover and Bottom Hinge Cover. Cover hinge screw holes on the top right with the Hole Cover.
Hex HeadScrew(4pcs)
Upper HingeBushing
Door
Hinge Washer
Bottom Hinge
Upper Hinge Cover
Upper Hinge
Hole Cover
Bottom Hinge Cover

.55.
INSTRUCTION MANUAL
5.Remove the Handle Hole Cap (2pcs) on the right side of Door by prying it out gently with small flat screwdriver.
Handle Hole Cap
6.Gently pull the door gasket to one side to reveal the Handle Screws (2pcs) on the left side of the Door.Unscrew it with a cross screwdriver and Remove the Handle (Leave the Washers as where it is).
Handle ScrewWasher
Handle
.56.
INSTRUCTION MANUAL
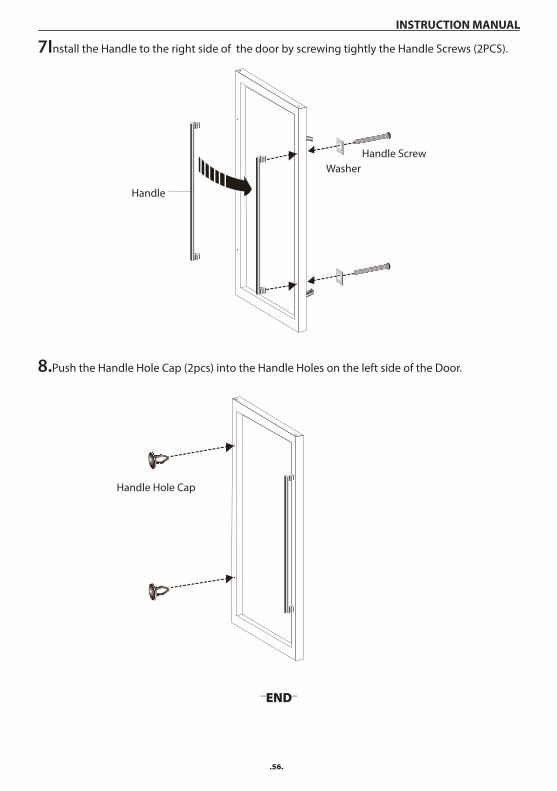
7Install the Handle to the right side of the door by screwing tightly the Handle Screws (2PCS).
Handle
WasherHandle Screw
8.Push the Handle Hole Cap (2pcs) into the Handle Holes on the left side of the Door.
Handle Hole Cap
--END--