veritas netbackup™ installation guide: unix ... - veritas sort
TRANSCRIPT
Veritas NetBackup™Installation Guide
UNIX and Windows
Release 9.1
21317387
Veritas NetBackup™ Installation GuideLast updated: 2021-06-07
Legal NoticeCopyright © 2021 Veritas Technologies LLC. All rights reserved.
Veritas, the Veritas Logo, and NetBackup are trademarks or registered trademarks of VeritasTechnologies LLC or its affiliates in the U.S. and other countries. Other names may betrademarks of their respective owners.
This product may contain third-party software for which Veritas is required to provide attributionto the third party (“Third-party Programs”). Some of the Third-party Programs are availableunder open source or free software licenses. The License Agreement accompanying theSoftware does not alter any rights or obligations you may have under those open source orfree software licenses. Refer to the Third-party Legal Notices document accompanying thisVeritas product or available at:
https://www.veritas.com/about/legal/license-agreements
The product described in this document is distributed under licenses restricting its use, copying,distribution, and decompilation/reverse engineering. No part of this document may bereproduced in any form by any means without prior written authorization of Veritas TechnologiesLLC and its licensors, if any.
THE DOCUMENTATION IS PROVIDED "AS IS" AND ALL EXPRESS OR IMPLIEDCONDITIONS, REPRESENTATIONS AND WARRANTIES, INCLUDING ANY IMPLIEDWARRANTY OF MERCHANTABILITY, FITNESS FOR A PARTICULAR PURPOSE ORNON-INFRINGEMENT, ARE DISCLAIMED, EXCEPT TO THE EXTENT THAT SUCHDISCLAIMERS ARE HELD TO BE LEGALLY INVALID. Veritas Technologies LLC SHALLNOT BE LIABLE FOR INCIDENTAL OR CONSEQUENTIAL DAMAGES IN CONNECTIONWITH THE FURNISHING, PERFORMANCE, OR USE OF THIS DOCUMENTATION. THEINFORMATION CONTAINED IN THIS DOCUMENTATION IS SUBJECT TO CHANGEWITHOUT NOTICE.
The Licensed Software and Documentation are deemed to be commercial computer softwareas defined in FAR 12.212 and subject to restricted rights as defined in FAR Section 52.227-19"Commercial Computer Software - Restricted Rights" and DFARS 227.7202, et seq."Commercial Computer Software and Commercial Computer Software Documentation," asapplicable, and any successor regulations, whether delivered by Veritas as on premises orhosted services. Any use, modification, reproduction release, performance, display or disclosureof the Licensed Software and Documentation by the U.S. Government shall be solely inaccordance with the terms of this Agreement.
Veritas Technologies LLC2625 Augustine DriveSanta Clara, CA 95054
http://www.veritas.com
Technical SupportTechnical Support maintains support centers globally. All support services will be deliveredin accordance with your support agreement and the then-current enterprise technical supportpolicies. For information about our support offerings and how to contact Technical Support,visit our website:
https://www.veritas.com/support
You can manage your Veritas account information at the following URL:
https://my.veritas.com
If you have questions regarding an existing support agreement, please email the supportagreement administration team for your region as follows:
[email protected] (except Japan)
DocumentationMake sure that you have the current version of the documentation. Each document displaysthe date of the last update on page 2. The latest documentation is available on the Veritaswebsite:
https://sort.veritas.com/documents
Documentation feedbackYour feedback is important to us. Suggest improvements or report errors or omissions to thedocumentation. Include the document title, document version, chapter title, and section titleof the text on which you are reporting. Send feedback to:
You can also see documentation information or ask a question on the Veritas community site:
http://www.veritas.com/community/
Veritas Services and Operations Readiness Tools (SORT)Veritas Services and Operations Readiness Tools (SORT) is a website that provides informationand tools to automate and simplify certain time-consuming administrative tasks. Dependingon the product, SORT helps you prepare for installations and upgrades, identify risks in yourdatacenters, and improve operational efficiency. To see what services and tools SORT providesfor your product, see the data sheet:
https://sort.veritas.com/data/support/SORT_Data_Sheet.pdf
Chapter 1 Preparing for installation ................................................... 8
General installation information ......................................................... 8Available NetBackup installation methods ..................................... 8About compatibility between NetBackup versions .......................... 10About NetBackup software availability ........................................ 10How to install NetBackup ......................................................... 11Creating the user account to support the NetBackup web server
..................................................................................... 13About storage device configuration ............................................ 14About security certificates for NetBackup hosts ............................. 16Environment variable for certificate key size ................................. 16Restrictions on the NetBackup installation directory ....................... 17NetBackup database is not supported on the btrfs file system
..................................................................................... 17Installation operational notes and limitations ...................................... 17
Windows compiler and security requirements for NetBackup 9.1and later installation and upgrade ........................................ 18
Java GUI and JRE installation optional for some computers ............ 19Enable 8dot3 name file setting for NetBackup master servers that
support NAT .................................................................... 19NetBackup servers must use a host name that is compliant with
RFC 1123 and RFC 952 .................................................... 19Host ID-based certificate is not deployed during installation on 8.1
media server or client host with dual stack configuration ........... 19NetBackup 8.2 and later RHEL 8 installation issue ........................ 20NetBackup 8.2 and later SUSE 15 installation issue ...................... 20External certificate authority certificates supported in NetBackup
8.2 and later .................................................................... 21SCCM and Chef deployment tools and documentation now
available ......................................................................... 21Known SUSE Linux master server install issue ............................. 21
SORT information ......................................................................... 22About Veritas Services and Operations Readiness Tools ................ 22Recommended SORT procedures for new installations .................. 23Recommended SORT procedures for upgrades ............................ 26
Veritas NetInsights Console information ............................................ 28
Contents
About Veritas Usage Insights .................................................... 28Best practices for Veritas Usage Insights ..................................... 29
Chapter 2 NetBackup licenses .......................................................... 30
About NetBackup license requirements ............................................. 30About license key entry .................................................................. 31Frequently asked questions about license keys .................................. 32
Chapter 3 Installing server software on UNIX systems .............. 35
Installation requirements for UNIX and Linux ...................................... 35Do not mix non-English versions of Windows and UNIX platforms
unless master and media servers are NetBackup appliances..................................................................................... 39
NetBackup installations on environments that run different versionsof UNIX-based operating systems ........................................ 39
Special installation guidelines for Solaris systems ......................... 39Special installation guidelines for UNIX clustered environments
..................................................................................... 40How the installation script works ...................................................... 40Installing NetBackup master server software on UNIX .......................... 41
Continuing with NetBackup software installation ........................... 48Installing NetBackup media server software on UNIX ........................... 48
Silently installing NetBackup media server software on UNIX andLinux ............................................................................. 58
About pushing client software from a master server to clients ................ 63Installing client type software on a master server .......................... 63
Chapter 4 Installing server software on Windows systems........................................................................................... 65
Installation and upgrade requirements for Windows and Windowsclusters ................................................................................ 65
Requirements for Windows cluster installations and upgrades ............... 72Performing local, remote, or clustered server installation on Windows
systems ................................................................................ 73Post-installation tasks for NetBackup cluster environments ................... 90Verifying Windows cluster installations or upgrades ............................. 91Installing NetBackup servers silently on Windows systems .................... 92
5Contents
Chapter 5 About the administrative interfaces .............................. 96
About the NetBackup web user interface ........................................... 96About the NetBackup Administration Console ..................................... 97Installing the NetBackup Administration Console ................................. 97Installing multiple versions of the NetBackup Administration Console
on Windows .......................................................................... 98Removing earlier versions of the NetBackup Administration Console
on Windows .......................................................................... 99About the NetBackup Remote Administration Console ......................... 99Installing the NetBackup Remote Administration Console .................... 100
Chapter 6 Installing NetBackup client software .......................... 101
About NetBackup client installation ................................................. 101About NetBackup client installation on Windows ................................ 102
About Windows client installation methods and requirements.................................................................................... 103
Installing NetBackup Windows clients locally or remotely .............. 105Installing NetBackup Windows clients silently ............................. 114How to configure NetBackup clients .......................................... 115
About NetBackup client installation on UNIX and Linux ....................... 116About UNIX and Linux client installation methods ........................ 117Installing UNIX clients locally ................................................... 118Install of the UNIX and Linux client binaries with native installers
.................................................................................... 124About remote installation methods for UNIX/Linux clients .............. 136Adding a UNIX/Linux client after initial server installation ............... 139
Chapter 7 Configuring NetBackup .................................................. 141
About NetBackup startup and shutdown scripts ................................. 141About NetBackup server configuration ............................................ 143
Starting the NetBackup Administration Console .......................... 145About the Device Configuration Wizard ..................................... 146About the Volume Configuration Wizard .................................... 148About the Catalog Backup Wizard ............................................ 149About the Backup Policy Configuration Wizard ............................ 150
Chapter 8 Upgrading NetBackup software ................................... 152
About upgrading NetBackup ......................................................... 152About the NetBackup 9.x Upgrade Portal ......................................... 152
6Contents
Chapter 9 Removing NetBackup server and client software.......................................................................................... 154
About NetBackup server software removal on UNIX systems ............... 154About NetBackup client software removal on UNIX and Linux systems
.......................................................................................... 155Removing NetBackup from UNIX and Linux servers and clients ........... 156About NetBackup server software removal on Windows systems .......... 167Removing NetBackup server and client software from Windows servers,
clusters, and clients ............................................................... 167About removal of the Java Console state data from Windows servers
and Windows clients .............................................................. 171Removing a clustered media server by migrating all data to a new
media server ........................................................................ 171
Chapter 10 Reference .......................................................................... 172
Generate a certificate on the inactive nodes of a clustered masterserver ................................................................................. 172
About the NetBackup answer file ................................................... 173Persistent Java Virtual Machine options .......................................... 192About RBAC bootstrapping ........................................................... 193NetBackup master server web server user and group creation ............. 195About the NetBackup Java Runtime Environment .............................. 197Add or Remove Java GUI and JRE after install ................................. 199Using NetApp disk arrays with Replication Director ............................ 200Security updates to the NetBackup database .................................... 204Size guidance for the NetBackup master server and domain ................ 204
Index .................................................................................................................. 207
7Contents
Preparing for installationThis chapter includes the following topics:
■ General installation information
■ Installation operational notes and limitations
■ SORT information
■ Veritas NetInsights Console information
General installation informationReview this section for the general installation information that is related toNetBackup.
Available NetBackup installation methodsThe table that is shown details the various ways you can install NetBackup.
1Chapter
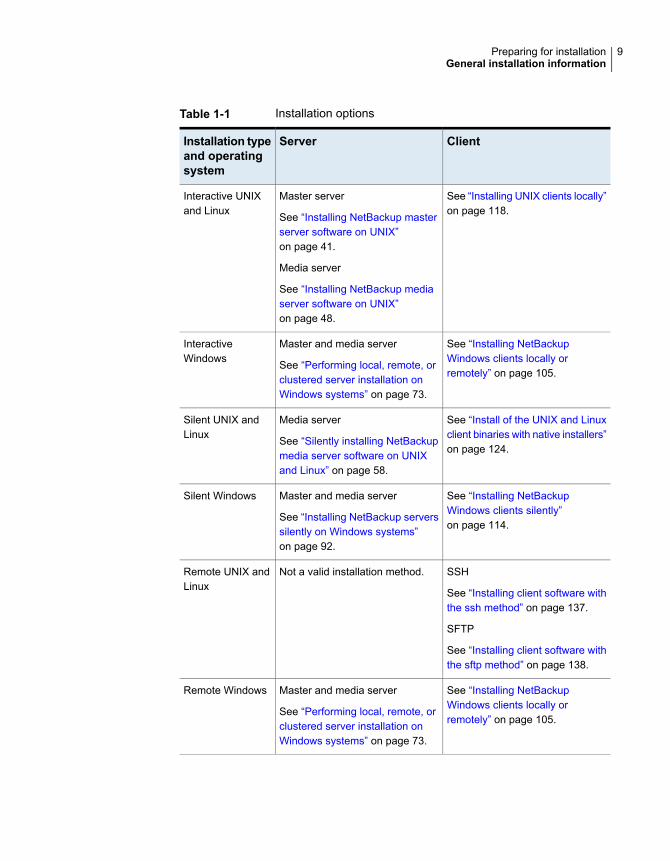
Table 1-1 Installation options
ClientServerInstallation typeand operatingsystem
See “Installing UNIX clients locally”on page 118.
Master server
See “Installing NetBackup masterserver software on UNIX”on page 41.
Media server
See “Installing NetBackup mediaserver software on UNIX”on page 48.
Interactive UNIXand Linux
See “Installing NetBackupWindows clients locally orremotely” on page 105.
Master and media server
See “Performing local, remote, orclustered server installation onWindows systems” on page 73.
InteractiveWindows
See “Install of the UNIX and Linuxclient binaries with native installers”on page 124.
Media server
See “Silently installing NetBackupmedia server software on UNIXand Linux” on page 58.
Silent UNIX andLinux
See “Installing NetBackupWindows clients silently”on page 114.
Master and media server
See “Installing NetBackup serverssilently on Windows systems”on page 92.
Silent Windows
SSH
See “Installing client software withthe ssh method” on page 137.
SFTP
See “Installing client software withthe sftp method” on page 138.
Not a valid installation method.Remote UNIX andLinux
See “Installing NetBackupWindows clients locally orremotely” on page 105.
Master and media server
See “Performing local, remote, orclustered server installation onWindows systems” on page 73.
Remote Windows
9Preparing for installationGeneral installation information
About compatibility between NetBackup versionsYou can run mixed versions of NetBackup between master servers, media servers,and clients. This back-level support lets you upgrade NetBackup one server at atime, which minimizes the effect on overall system performance.
Veritas supports only certain combinations of servers and clients. In mixed versionenvironments, certain computers must be the highest version. Specifically, theversion order is: OpsCenter server, master server, media server, and then clients.For example, the scenario that is shown is supported: 9.0 OpsCenter server >8.3.0.1 master server > 8.3 media server > 8.0 client.
All NetBackup versions are four digits long. The NetBackup 9.0 release is the 9.0.0.0release. Likewise, the NetBackup 8.3 release is the NetBackup 8.3.0.0 release.For the purposes of supportability, the fourth digit is ignored. An 8.3 master serversupports an 8.3.0.1 media server. Likewise, an 8.3.0.1 master supports an 8.3OpsCenter server. An example of what is not supported is an 8.3 OpsCenter serverwith a 9.0 master server.
The NetBackup catalog resides on the master server. Therefore, the master serveris considered to be the client for a catalog backup. If your NetBackup configurationincludes a media server, it must use the same NetBackup version as the masterserver to perform a catalog backup.
At NetBackup 8.1, it is critical to follow the longstanding requirement that the masterserver is upgraded first. Then upgrade all media servers that are required to supportany 8.1 clients. Veritas recommends that you upgrade all your media servers beforeupgrading any clients. After all master and all media servers are at NetBackup 8.1,begin to upgrade your clients to 8.1. Pre-8.1 media servers are not able to backupor restore NetBackup 8.1 clients.
For complete information about compatibility between NetBackup versions, referto the Veritas SORT website.
https://sort.veritas.com/
Veritas recommends that you review the End of Support Life information availableonline.
https://sort.veritas.com/eosl
About NetBackup software availabilityNetBackup 9.1 is available as ESD images for download from the MyVeritaswebpage. The images adhere to a 1.8G size limitation.
To ensure the accuracy of the ESD download, some of the product images havebeen split into smaller, more manageable files. Before you uncompress any file,
10Preparing for installationGeneral installation information
you must first join the split image files that you can identify as 1 of 2 and 2 of 2.A Download Readme.txt file on MyVeritas describes how to join the files together.
How to install NetBackupFor new NetBackup installations, install the software in the following order:
Install master server software.Step 1
Install media server software (NetBackup Enterprise only).Step 2
Install the NetBackup Remote Administration Console (optional).Step 3
Install client software.Step 4
Install any NetBackup add-on products (such as language packages).Step 5
Before you proceed with any installation procedure, be sure to review the installationrequirements.
See “Installation requirements for UNIX and Linux” on page 35.
See “Installation and upgrade requirements for Windows and Windows clusters”on page 65.
About the NetBackup preinstall checkerThe server installer for both the UNIX/Linux and the Windows platforms includes apreinstall checker. This feature helps to determine if your server is ready for asuccessful installation or upgrade.
The check runs automatically when you start an installation on a master or a mediaserver. The results of the check are shown at the following point:
■ UNIX/Linux upgrade scriptAfter you answer the question “Is this host the master server”.
■ Windows installation wizardOn theReady to Install the Program screen, where the Installation Summaryappears.
NetBackup uses a preinstallation program that does a check at the beginning ofinstallations or upgrades. The check looks for any known problems that you caneliminate so the operation can succeed. The checks that are performed aredeveloped from customer input on the previous problems that were encounteredduring installations and upgrades. Veritas can update the checker whenever newcustomer feedback is received. Refreshes are not dependent on a NetBackuprelease. If your server can connect to telemetry.veritas.com, NetBackup automatically
11Preparing for installationGeneral installation information
updates the checker with the latest version when the installation or the upgradestarts.
One of the tests that is performed is a comparison of the locally installed EmergencyEngineering Binary (EEB) updates with the fixes included with the version ofNetBackup being installed. If any of the preinstall tests fail, a message appears toindicate what type of action is required.
One of the tests that is performed is a comparison of the installed EmergencyEngineering Binaries (EEBs) with the fixes in the NetBackup version being installed.If any of the preinstall tests fail, a message appears to indicate what type of actionis required.
Some test failures are considered minor and let you continue with the installationor the upgrade. Critical test failures prevent the installation or the upgrade fromhappening. The output informs you that other action must be taken before you canproceed safely with the installation or the upgrade.
The preinstall check results are stored in the following locations:
■ UNIXIn the installation trace file in the following path:/usr/openv/tmp
■ WindowsIn the following directory:%ALLUSERSPROFILE%\Veritas\NetBackup\InstallSummary\
See “About Veritas Services and Operations Readiness Tools” on page 22.
About the NetBackup Product Improvement ProgramThe NetBackup Product Improvement Program captures installation deploymentand product usage information.
During the NetBackup installation, you are enrolled in the NetBackup ProductImprovement Program and send this information automatically and securely toVeritas. The information that Veritas receives becomes part of a continuous qualityimprovement program that helps understand how customers configure, deploy, anduse the NetBackup product. This information is then used to help Veritas identifyimprovements in product features, testing, technical support, and futurerequirements.
To learn more about the NetBackup Product Improvement Program, refer to theNetBackup license agreement section 17.18 Data Collection; Data ProtectionRegulations. The following describes where to find the license agreement:
■ UNIXIn the downloaded media images from MyVeritas, see the file LICENSE.
12Preparing for installationGeneral installation information
■ WindowsFrom the downloaded media images fromMyVeritas, start the installation wizard(Browser.exe). On theHome page, click Installation. On the Installation page,select either Server Software Installation or Client Software Installation. Onthe Welcome page, click Next to advance to the License Agreement page.
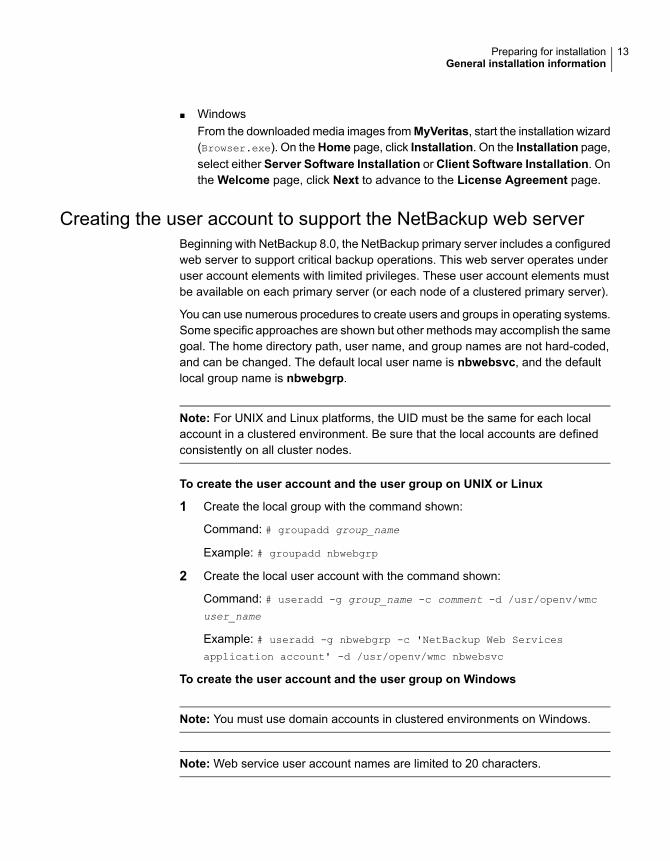
Creating the user account to support the NetBackup web serverBeginning with NetBackup 8.0, the NetBackup primary server includes a configuredweb server to support critical backup operations. This web server operates underuser account elements with limited privileges. These user account elements mustbe available on each primary server (or each node of a clustered primary server).
You can use numerous procedures to create users and groups in operating systems.Some specific approaches are shown but other methods may accomplish the samegoal. The home directory path, user name, and group names are not hard-coded,and can be changed. The default local user name is nbwebsvc, and the defaultlocal group name is nbwebgrp.
Note: For UNIX and Linux platforms, the UID must be the same for each localaccount in a clustered environment. Be sure that the local accounts are definedconsistently on all cluster nodes.
To create the user account and the user group on UNIX or Linux
1 Create the local group with the command shown:
Command: # groupadd group_name
Example: # groupadd nbwebgrp
2 Create the local user account with the command shown:
Command: # useradd -g group_name -c comment -d /usr/openv/wmc
user_name
Example: # useradd -g nbwebgrp -c 'NetBackup Web Services
application account' -d /usr/openv/wmc nbwebsvc
To create the user account and the user group on Windows
Note: You must use domain accounts in clustered environments on Windows.
Note: Web service user account names are limited to 20 characters.
13Preparing for installationGeneral installation information
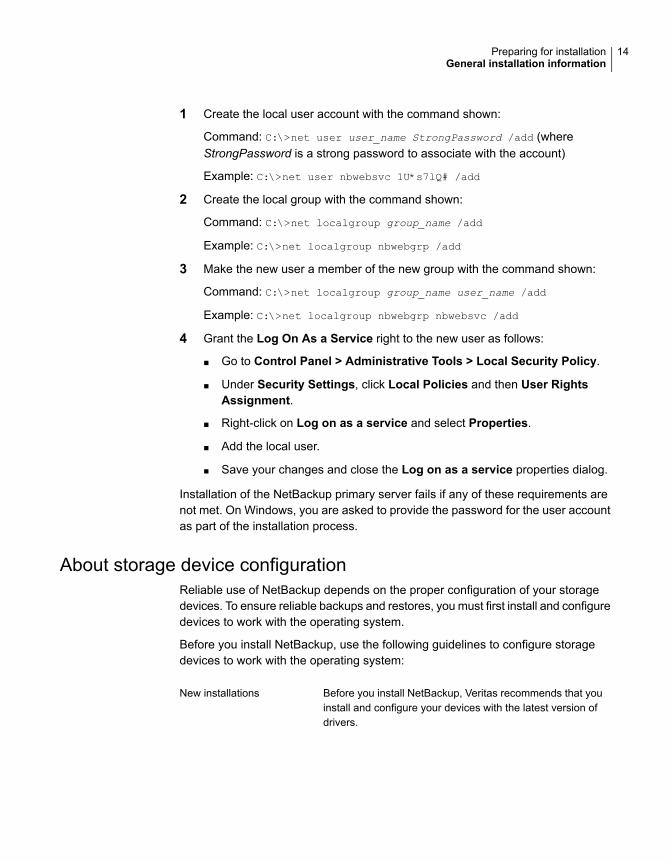
1 Create the local user account with the command shown:
Command: C:\>net user user_name StrongPassword /add (whereStrongPassword is a strong password to associate with the account)
Example: C:\>net user nbwebsvc 1U*s7lQ# /add
2 Create the local group with the command shown:
Command: C:\>net localgroup group_name /add
Example: C:\>net localgroup nbwebgrp /add
3 Make the new user a member of the new group with the command shown:
Command: C:\>net localgroup group_name user_name /add
Example: C:\>net localgroup nbwebgrp nbwebsvc /add
4 Grant the Log On As a Service right to the new user as follows:
■ Go to Control Panel > Administrative Tools > Local Security Policy.
■ Under Security Settings, click Local Policies and then User RightsAssignment.
■ Right-click on Log on as a service and select Properties.
■ Add the local user.
■ Save your changes and close the Log on as a service properties dialog.
Installation of the NetBackup primary server fails if any of these requirements arenot met. On Windows, you are asked to provide the password for the user accountas part of the installation process.
About storage device configurationReliable use of NetBackup depends on the proper configuration of your storagedevices. To ensure reliable backups and restores, you must first install and configuredevices to work with the operating system.
Before you install NetBackup, use the following guidelines to configure storagedevices to work with the operating system:
Before you install NetBackup, Veritas recommends that youinstall and configure your devices with the latest version ofdrivers.
New installations
14Preparing for installationGeneral installation information
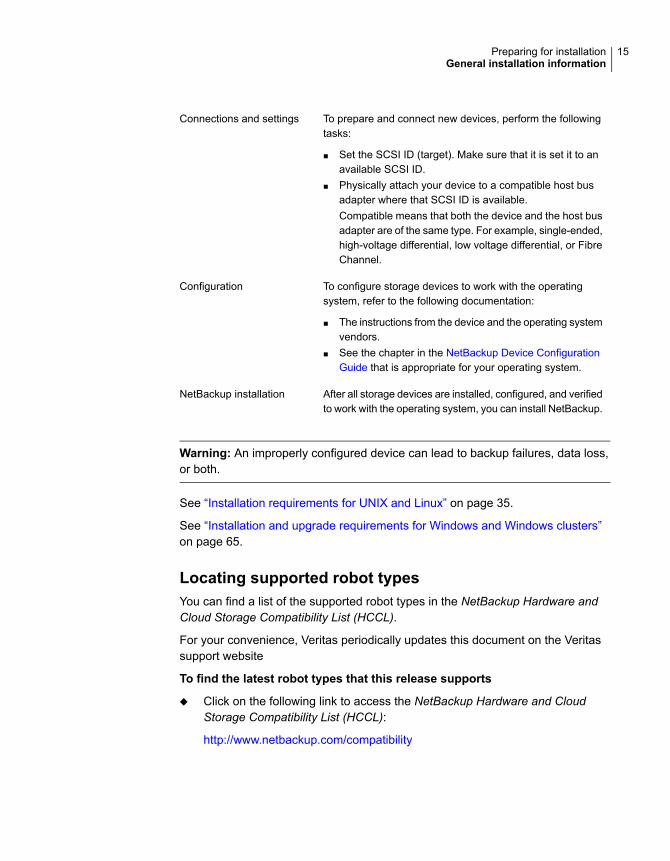
To prepare and connect new devices, perform the followingtasks:
■ Set the SCSI ID (target). Make sure that it is set it to anavailable SCSI ID.
■ Physically attach your device to a compatible host busadapter where that SCSI ID is available.Compatible means that both the device and the host busadapter are of the same type. For example, single-ended,high-voltage differential, low voltage differential, or FibreChannel.
Connections and settings
To configure storage devices to work with the operatingsystem, refer to the following documentation:
■ The instructions from the device and the operating systemvendors.
■ See the chapter in the NetBackup Device ConfigurationGuide that is appropriate for your operating system.
Configuration
After all storage devices are installed, configured, and verifiedto work with the operating system, you can install NetBackup.
NetBackup installation
Warning: An improperly configured device can lead to backup failures, data loss,or both.
See “Installation requirements for UNIX and Linux” on page 35.
See “Installation and upgrade requirements for Windows and Windows clusters”on page 65.
Locating supported robot typesYou can find a list of the supported robot types in the NetBackup Hardware andCloud Storage Compatibility List (HCCL).
For your convenience, Veritas periodically updates this document on the Veritassupport website
To find the latest robot types that this release supports
◆ Click on the following link to access the NetBackup Hardware and CloudStorage Compatibility List (HCCL):
http://www.netbackup.com/compatibility
15Preparing for installationGeneral installation information
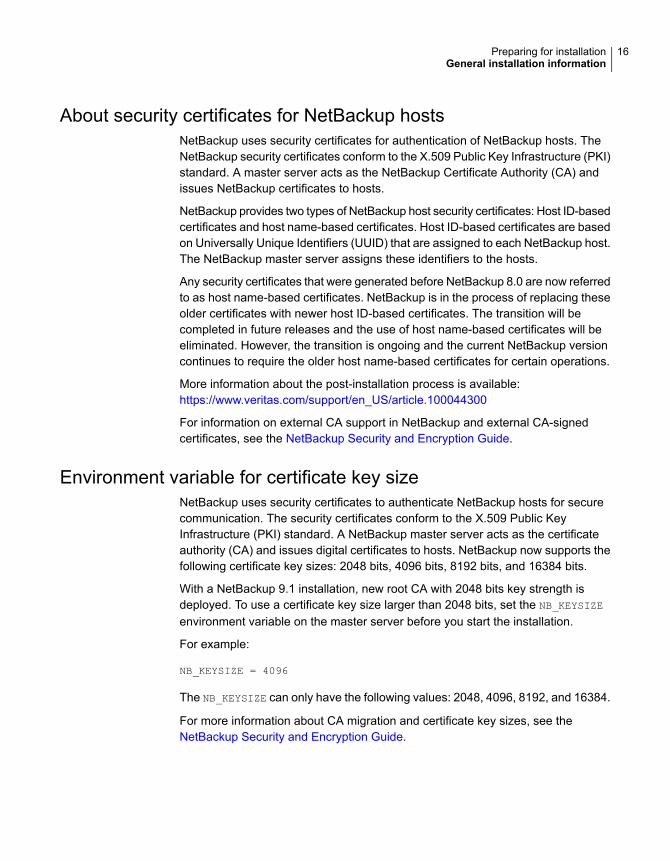
About security certificates for NetBackup hostsNetBackup uses security certificates for authentication of NetBackup hosts. TheNetBackup security certificates conform to the X.509 Public Key Infrastructure (PKI)standard. A master server acts as the NetBackup Certificate Authority (CA) andissues NetBackup certificates to hosts.
NetBackup provides two types of NetBackup host security certificates: Host ID-basedcertificates and host name-based certificates. Host ID-based certificates are basedon Universally Unique Identifiers (UUID) that are assigned to each NetBackup host.The NetBackup master server assigns these identifiers to the hosts.
Any security certificates that were generated before NetBackup 8.0 are now referredto as host name-based certificates. NetBackup is in the process of replacing theseolder certificates with newer host ID-based certificates. The transition will becompleted in future releases and the use of host name-based certificates will beeliminated. However, the transition is ongoing and the current NetBackup versioncontinues to require the older host name-based certificates for certain operations.
More information about the post-installation process is available:https://www.veritas.com/support/en_US/article.100044300
For information on external CA support in NetBackup and external CA-signedcertificates, see the NetBackup Security and Encryption Guide.
Environment variable for certificate key sizeNetBackup uses security certificates to authenticate NetBackup hosts for securecommunication. The security certificates conform to the X.509 Public KeyInfrastructure (PKI) standard. A NetBackup master server acts as the certificateauthority (CA) and issues digital certificates to hosts. NetBackup now supports thefollowing certificate key sizes: 2048 bits, 4096 bits, 8192 bits, and 16384 bits.
With a NetBackup 9.1 installation, new root CA with 2048 bits key strength isdeployed. To use a certificate key size larger than 2048 bits, set the NB_KEYSIZE
environment variable on the master server before you start the installation.
For example:
NB_KEYSIZE = 4096
The NB_KEYSIZE can only have the following values: 2048, 4096, 8192, and 16384.
For more information about CA migration and certificate key sizes, see theNetBackup Security and Encryption Guide.
16Preparing for installationGeneral installation information
Restrictions on the NetBackup installation directoryEach NetBackup supported file system defines restrictions on file and folder namesfor the installation folder. Consult the file system vendor provided documentationfor more details on the file and the folder name restrictions.
Additionally, NetBackup supports only certain characters for the installation foldername. Use of non-supported characters can produce unexpected results andpossibly result in lost data. The NetBackup supported characters for the installationfolder are:
■ UNIX and LinuxThe POSIX fully portable file name characters (A–Z a–z 0–9 . _ -)
■ WindowsThe printable characters within the ASCII 7-bit range
Note: On Traditional Chinese and Korean versions of Windows, if the NetBackupclient is installed to a path that contains a space, restore operations may fail. Pathssuch as C:\Program Files contain a space. Make sure to install the NetBackupclient software to a path that does not contain a space on these versions of Windows.
Be aware that for Windows master servers, if you install NetBackup into a directoryname with two periods, some restore operations fail. Directory names such as..foldername or folder..name are examples of directories where a restore canfail.
NetBackup database is not supported on the btrfs file systemVeritas does not support the installation of the NetBackup database on a btrfs filesystem. Do not attempt to install the NetBackup database onto a btrfs file system.The database files reside on the master server in the directories under/usr/openv/db. Before you attempt a NetBackup upgrade, move the database toa supported file system (such as ext4 or xfs) before you start the upgrade. Moreinformation about moving the database before an upgrade is available in theNetBackup Upgrade Guide.
Installation operational notes and limitationsReview this section for the details that are related to operational notes, limitations,and requirements.
17Preparing for installationInstallation operational notes and limitations
Windows compiler and security requirements for NetBackup 9.1 andlater installation and upgrade
NetBackup 9.1 and later for Windows uses the Visual Studio 2019 compiler andthe Windows 10 Software Development Kit (SDK). The installation and the upgradeprocess use Microsoft redistributable utilities to install Visual Studio 2019 C++run-time libraries on Windows hosts where they are not already installed. Theseutilities can fail or behave unexpectedly on hosts without all the security updatesin place. Windows hosts must have all security updates in place before you installor upgrade to NetBackup 9.1 or later.
More information on the Microsoft redistributable utilities is available:https://visualstudio.microsoft.com/downloads/
Failures and unexpected behaviors include:
■ NetBackup's installation process fail shortly after start with a message aboutinability to deploy Visual Studio 2019 C++ run-time libraries.
■ The nbcertcmdtool application failing unexpectedly when executed by theNetBackup installation process. This failure is difficult to distinguish fromnbcertcmdtool failures that result from invalid or insufficient securityconfiguration.
■ MSDP applications fail unexpectedly near the conclusion of the NetBackupinstallation process.
To prevent this problem, apply all Windows security updates before any install orany upgrade attempts.
For Windows Server 2012 R2 and Windows 8.1, the list of required security updatesincludes KB 2919355(https://support.microsoft.com/en-us/topic/windows-rt-8-1-windows-8-1-and-windows-server-2012-r2-update-april-2014-3c9d820b-7079-359d-8660-21de648fa31d).
For Windows Server 2012 R2, 2008 Service Pack 2, Windows 8.1, and all otherearlier supported versions, you must install the Universal C run-time in Windowsupdate. This update lets NetBackup run correctly. Microsoft KB 3118401 is theminimum patch level to ensure the appropriate C++ run-time binaries are present.Other later patches should contain this fix.
More information about this requirement is available:https://support.microsoft.com/en-us/topic/update-for-universal-c-runtime-in-windows-322bf30f-4735-bb94-3949-49f5c49f4732
18Preparing for installationInstallation operational notes and limitations
Java GUI and JRE installation optional for some computersStarting with NetBackup 8.3, the Java GUI and the JRE packages are optional forUNIX, Linux, and Windows media servers and UNIX and Linux clients.
As with previous releases, the Java GUI and JRE packages are installedautomatically on all master servers because they are required. The Java GUI andthe JRE are not part of the default installation on Windows clients. Install the JavaRemote Administration Console if you require this functionality on your Windowsclients.
The various NetBackup installation methods allow the user the choice to install ornot install the Java GUI and JRE packages. More information about installing theJava GUI and the JRE after install or upgrade is available.
See “Add or Remove Java GUI and JRE after install” on page 199.
Enable 8dot3 name file setting for NetBackup master servers thatsupport NAT
For master servers only: To use the NetBackup Messaging Broker service for NATyou must enable the 8dot3 name file setting for the volume where NetBackup isinstalled. Use the Microsoft fsutil command to modify or confirm this setting.
NetBackup servers must use a host name that is compliant with RFC1123 and RFC 952
All NetBackup server names must use a host name that is complaint with RFC 1123("Requirements for Internet Hosts - Application and Support") and RFC 952 ("DODInternet Host Table Specification") standards. These standards include the supportedand unsupported characters that can be used in a host name. For example, theunderscore character ( _ ) is not a supported character for host names.
More information is available about these standards and about this issue:
RFC 1123: http://www.ietf.org/rfc/rfc1123.txt
RFC 952: http://www.ietf.org/rfc/rfc952.txt
NetBackup Status Code 130 System Error Occurred:http://www.veritas.com/docs/000125019
Host ID-based certificate is not deployed during installation on 8.1media server or client host with dual stack configuration
In the environment shown, the host ID-based certificate is not deployed:
19Preparing for installationInstallation operational notes and limitations
■ The NetBackup master server is 8.1 or later with IPv6-only configuration.
■ NetBackup 8.1 software is installed on a media server or a client host with dualstack configuration.
The host ID-based certificate is not deployed because the web service connectionbetween the host and the master server was not established.
Workaround: Manually deploy the host ID-based certificate to the 8.1 host after theinstallation. Refer to the article shown:
https://www.veritas.com/support/en_US/article.000127129
NetBackup 8.2 and later RHEL 8 installation issueAfter you provide the NetBackup license key during the NetBackup 8.2 and laterinstallation on RHEL 8, you receive the error shown:
/usr/openv/netbackup/bin/admincmd/bpminlicense: error while loading
shared libraries: libnsl.so.1: cannot open shared object file: No
such file or directory (127)
This issue results from the upgrade of the libnsl.so.1 library by Red Hat. Toresolve this installation issue, do one of the following:
1 Before you start the NetBackup installation, log into the RHEL 8 server withroot credentials and install the libnsl library.
2 Log into the RHEL 8 server with root credentials and install the libnsl library.Then reinstall NetBackup.
NetBackup 8.2 and later SUSE 15 installation issueAfter you install NetBackup 8.2 and later on a SUSE 15 server, the NetBackupservices do not start. This issue is the result of changes to the SUSE packages.
To resolve this installation issue, do one of the following:
1 Before NetBackup installation, install the insserv-compat package from theSuSE15 ISO.
2 If NetBackup is already installed:
■ Install the insserv-compat package from SuSE15 ISO.
■ Run the insserv netbackup command.
■ Run the chkconfig netbackup command. The output should be netbackup
on.
20Preparing for installationInstallation operational notes and limitations
External certificate authority certificates supported in NetBackup 8.2and later
NetBackup introduced support for external certificate authority certificates inNetBackup 8.2. This change provides an alternative to the NetBackup CertificateAuthority for providing host verification and security. It supports certificates in PEM,DER, and P7B formats.
For information on external CA support in NetBackup and external CA-signdcertificates, see the NetBackup Security and Encryption Guide.
External certificate authority limitations in NetBackup 8.2■ External certificate authority specifications containing UNC paths or
mapped network drives fail forWindows hosts that use a remote installationmethodYou cannot use UNC paths and mapped network drives for external CA certificatespecifications on Windows hosts performing remote installations. Remoteinstallation methods include VxUpdate and the setup wizard push installationoption. If you attempt to use a UNC path or mapped network drive, the precheckand the installation operations fail due to inaccessible paths.
SCCM and Chef deployment tools and documentation now availableWith the NetBackup 8.1 release, Veritas now supports the use of System CenterConfiguration Manager (SCCM) and Chef for NetBackup deployment. Veritas hastested and validated several different deployment paths. Documentation andtemplates for both SCCM and Chef are available. See SORT for additional detailsaround the support and use of SCCM and Chef.
Known SUSE Linux master server install issueIn some rare cases, the preinstall checker for SUSE Linux master servers reportsthat the webservice user or webservice group does not exist.
Please validate that the user and group exist as expected and rerun the installation.
If the problem persists, set an environment variable to override the preinstall checkerfailure and rerun the operation.
NBPREINSTALL_CRITICAL_OVERRIDE=YES
21Preparing for installationInstallation operational notes and limitations
SORT informationReview this section for the details that are related to Services and OperationsReadiness Tools (SORT).
About Veritas Services and Operations Readiness ToolsVeritas Services and Operations Readiness Tools (SORT) is a robust set ofstandalone and web-based tools that support Veritas enterprise products. ForNetBackup, SORT provides the ability to collect, analyze, and report on hostconfigurations across UNIX/Linux or Windows environments. This data is invaluablewhen you want to assess if your systems are ready for an initial NetBackupinstallation or for an upgrade.
Access SORT from the following webpage:
https://sort.veritas.com/netbackup
Once you get to the SORT page, more information is available as follows:
■ Installation and Upgrade ChecklistUse this tool to create a checklist to see if your system is ready for a NetBackupinstallation or an upgrade. This report contains all the software and the hardwarecompatibility information specific to the information provided. The report alsoincludes product installation or upgrade instructions, as well as links to otherreferences.
■ Hot fix and EEB Release AuditorUse this tool to find out whether a release that you plan to install contains thehot fixes that you need.
■ Custom ReportsUse this tool to get recommendations for your system and Veritas enterpriseproducts.
■ NetBackup Future Platform and Feature PlansUse this tool to get information about what items Veritas intends to replace withnewer and improved functionality. The tool also provides insight about whatitems Veritas intends to discontinue without replacement. Some of these itemsinclude certain NetBackup features, functionality, 3rd-party product integration,Veritas product integration, applications, databases, and the OS platforms.
Help for the SORT tools is available. Click Help in the upper right corner of theSORT home page. You have the option to:
■ Page through the contents of the help similar to a book
■ Look for topics in the index
22Preparing for installationSORT information
■ Search the help with the search option
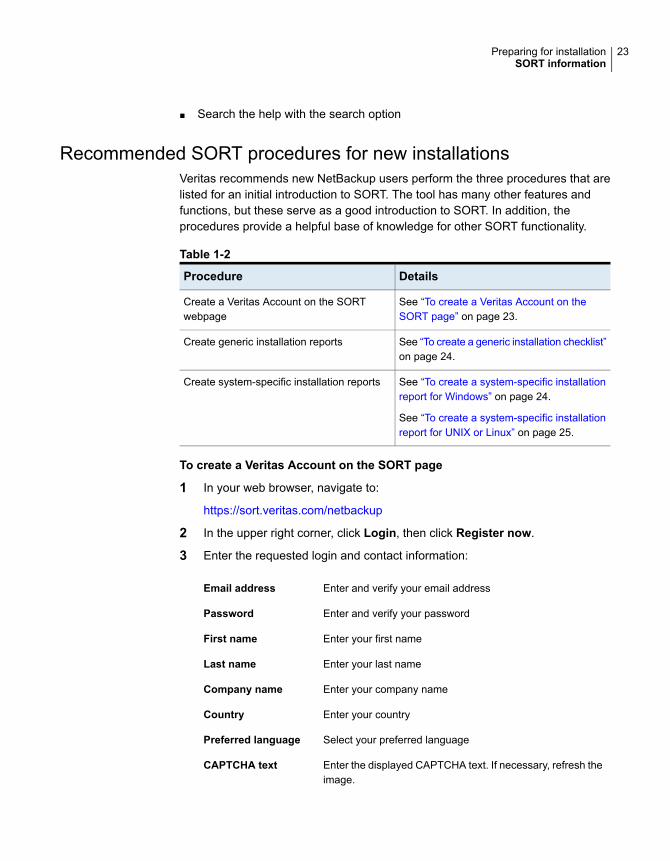
Recommended SORT procedures for new installationsVeritas recommends new NetBackup users perform the three procedures that arelisted for an initial introduction to SORT. The tool has many other features andfunctions, but these serve as a good introduction to SORT. In addition, theprocedures provide a helpful base of knowledge for other SORT functionality.
Table 1-2
DetailsProcedure
See “To create a Veritas Account on theSORT page” on page 23.
Create a Veritas Account on the SORTwebpage
See “To create a generic installation checklist”on page 24.
Create generic installation reports
See “To create a system-specific installationreport for Windows” on page 24.
See “To create a system-specific installationreport for UNIX or Linux” on page 25.
Create system-specific installation reports
To create a Veritas Account on the SORT page
1 In your web browser, navigate to:
https://sort.veritas.com/netbackup
2 In the upper right corner, click Login, then click Register now.
3 Enter the requested login and contact information:
Enter and verify your email addressEmail address
Enter and verify your passwordPassword
Enter your first nameFirst name
Enter your last nameLast name
Enter your company nameCompany name
Enter your countryCountry
Select your preferred languagePreferred language
Enter the displayed CAPTCHA text. If necessary, refresh theimage.
CAPTCHA text
23Preparing for installationSORT information

4 Click Submit.
5 When you receive your login information, you can log into SORT and beginuploading your customized information.
To create a generic installation checklist
1 In your web browser, navigate to:
https://sort.veritas.com/netbackup
2 Find and select the Installation and Upgrade Checklist widget.
3 Specify the requested information
Select the appropriate product from the drop-down menu.For NetBackup select NetBackup Enterprise Server orNetBackup Server.
Product
Select the correct version of NetBackup. The most currentversion is always shown at the top of the list.
Product version youare installing orupgraded to
Select the operating system that corresponds to the checklistyou want generated.
Platform
Select the correct processor type for your checklist.Processor
For new installations, do not make any selections. Forupgrades, you can select the currently installed version ofNetBackup.
Product version youare upgrading from(optional)
4 Click Generate Checklist.
5 A checklist corresponding to your choices is created. You can modify yourselections from this screen, and click Generate Checklist to create a newchecklist.
You can save the resulting information as a PDF. Numerous options areavailable for NetBackup and many of them are covered in the generatedchecklist. Please spend time reviewing each section to determine if it appliesto your environment.
To create a system-specific installation report for Windows
1 Go to the SORT website:
https://sort.veritas.com/netbackup
2 In the Installation and Upgrade section, select Installation and Upgradecustom reports by SORT data collectors.
24Preparing for installationSORT information
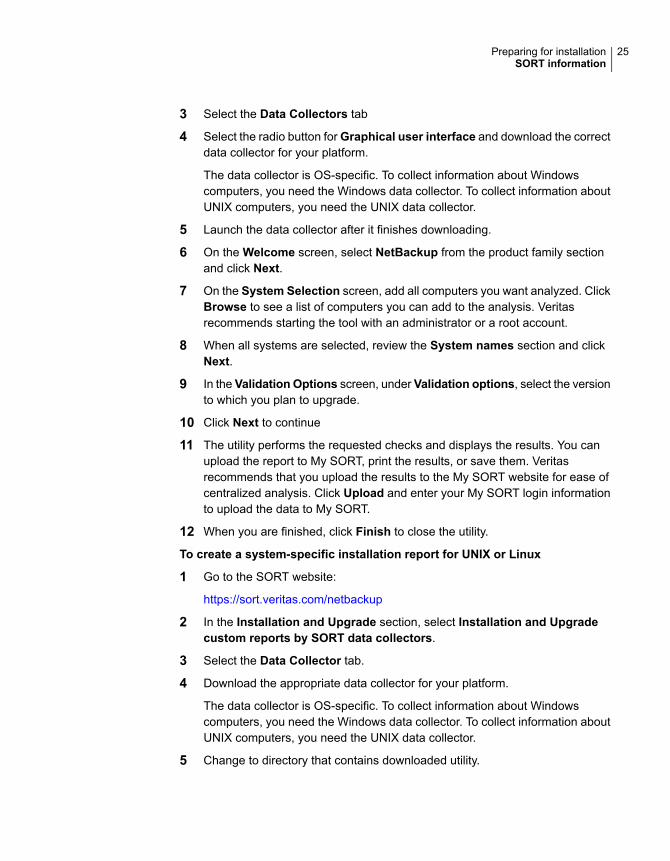
3 Select the Data Collectors tab
4 Select the radio button for Graphical user interface and download the correctdata collector for your platform.
The data collector is OS-specific. To collect information about Windowscomputers, you need the Windows data collector. To collect information aboutUNIX computers, you need the UNIX data collector.
5 Launch the data collector after it finishes downloading.
6 On the Welcome screen, select NetBackup from the product family sectionand click Next.
7 On the System Selection screen, add all computers you want analyzed. ClickBrowse to see a list of computers you can add to the analysis. Veritasrecommends starting the tool with an administrator or a root account.
8 When all systems are selected, review the System names section and clickNext.
9 In the Validation Options screen, under Validation options, select the versionto which you plan to upgrade.
10 Click Next to continue
11 The utility performs the requested checks and displays the results. You canupload the report to My SORT, print the results, or save them. Veritasrecommends that you upload the results to the My SORT website for ease ofcentralized analysis. Click Upload and enter your My SORT login informationto upload the data to My SORT.
12 When you are finished, click Finish to close the utility.
To create a system-specific installation report for UNIX or Linux
1 Go to the SORT website:
https://sort.veritas.com/netbackup
2 In the Installation and Upgrade section, select Installation and Upgradecustom reports by SORT data collectors.
3 Select the Data Collector tab.
4 Download the appropriate data collector for your platform.
The data collector is OS-specific. To collect information about Windowscomputers, you need the Windows data collector. To collect information aboutUNIX computers, you need the UNIX data collector.
5 Change to directory that contains downloaded utility.
25Preparing for installationSORT information
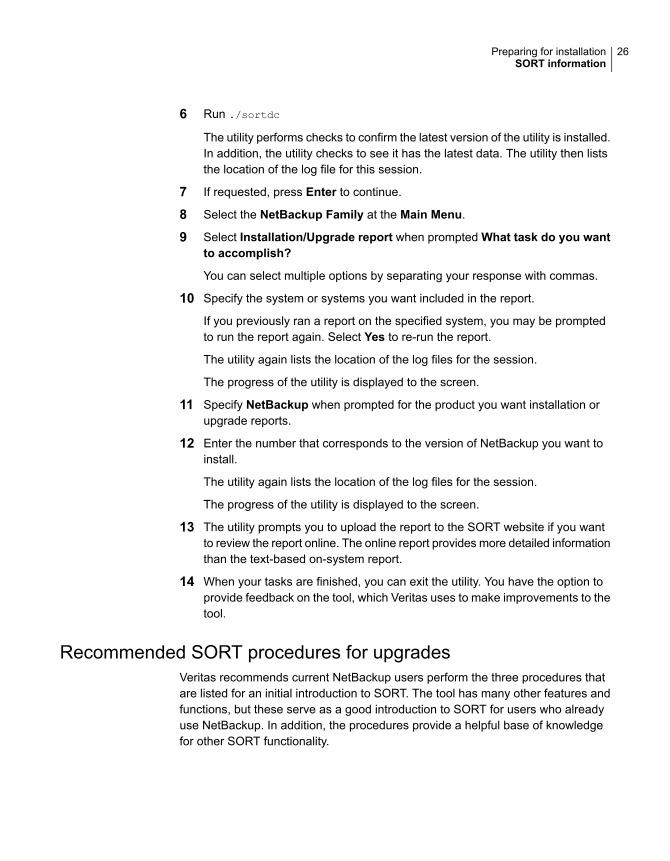
6 Run ./sortdc
The utility performs checks to confirm the latest version of the utility is installed.In addition, the utility checks to see it has the latest data. The utility then liststhe location of the log file for this session.
7 If requested, press Enter to continue.
8 Select the NetBackup Family at the Main Menu.
9 Select Installation/Upgrade report when prompted What task do you wantto accomplish?
You can select multiple options by separating your response with commas.
10 Specify the system or systems you want included in the report.
If you previously ran a report on the specified system, you may be promptedto run the report again. Select Yes to re-run the report.
The utility again lists the location of the log files for the session.
The progress of the utility is displayed to the screen.
11 Specify NetBackup when prompted for the product you want installation orupgrade reports.
12 Enter the number that corresponds to the version of NetBackup you want toinstall.
The utility again lists the location of the log files for the session.
The progress of the utility is displayed to the screen.
13 The utility prompts you to upload the report to the SORT website if you wantto review the report online. The online report provides more detailed informationthan the text-based on-system report.
14 When your tasks are finished, you can exit the utility. You have the option toprovide feedback on the tool, which Veritas uses to make improvements to thetool.
Recommended SORT procedures for upgradesVeritas recommends current NetBackup users perform the three procedures thatare listed for an initial introduction to SORT. The tool has many other features andfunctions, but these serve as a good introduction to SORT for users who alreadyuse NetBackup. In addition, the procedures provide a helpful base of knowledgefor other SORT functionality.
26Preparing for installationSORT information
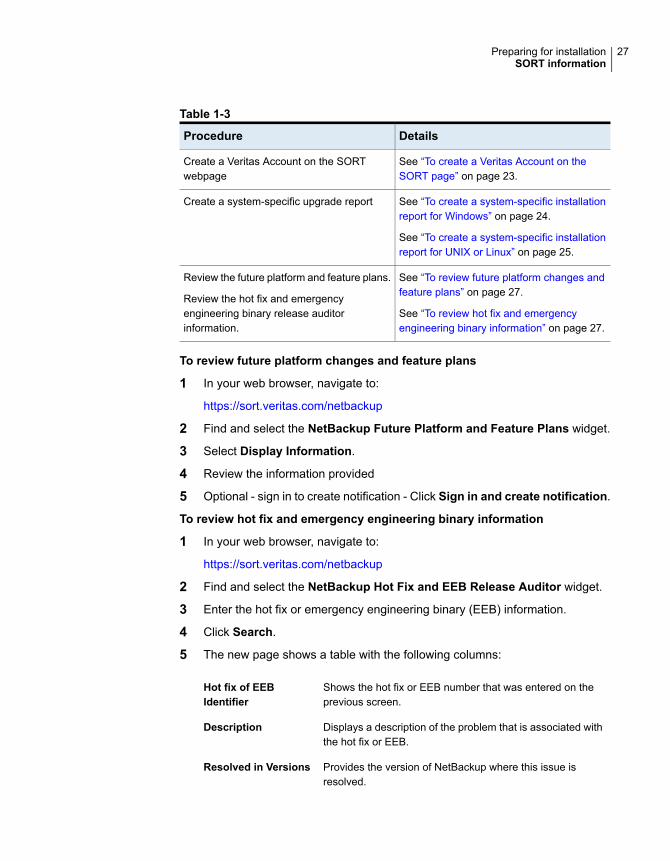
Table 1-3
DetailsProcedure
See “To create a Veritas Account on theSORT page” on page 23.
Create a Veritas Account on the SORTwebpage
See “To create a system-specific installationreport for Windows” on page 24.
See “To create a system-specific installationreport for UNIX or Linux” on page 25.
Create a system-specific upgrade report
See “To review future platform changes andfeature plans” on page 27.
See “To review hot fix and emergencyengineering binary information” on page 27.
Review the future platform and feature plans.
Review the hot fix and emergencyengineering binary release auditorinformation.
To review future platform changes and feature plans
1 In your web browser, navigate to:
https://sort.veritas.com/netbackup
2 Find and select the NetBackup Future Platform and Feature Plans widget.
3 Select Display Information.
4 Review the information provided
5 Optional - sign in to create notification - Click Sign in and create notification.
To review hot fix and emergency engineering binary information
1 In your web browser, navigate to:
https://sort.veritas.com/netbackup
2 Find and select the NetBackup Hot Fix and EEB Release Auditor widget.
3 Enter the hot fix or emergency engineering binary (EEB) information.
4 Click Search.
5 The new page shows a table with the following columns:
Shows the hot fix or EEB number that was entered on theprevious screen.
Hot fix of EEBIdentifier
Displays a description of the problem that is associated withthe hot fix or EEB.
Description
Provides the version of NetBackup where this issue isresolved.
Resolved in Versions
27Preparing for installationSORT information
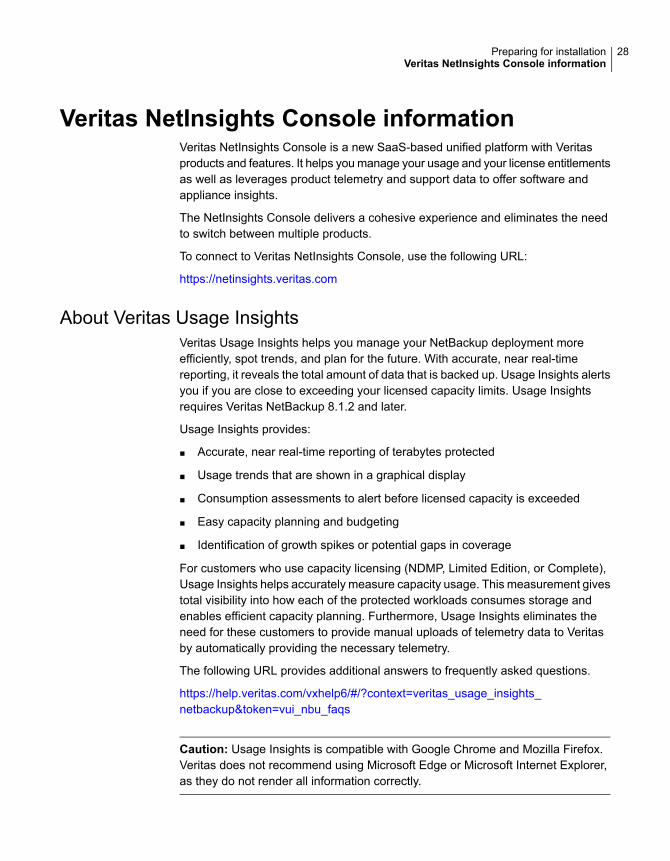
Veritas NetInsights Console informationVeritas NetInsights Console is a new SaaS-based unified platform with Veritasproducts and features. It helps you manage your usage and your license entitlementsas well as leverages product telemetry and support data to offer software andappliance insights.
The NetInsights Console delivers a cohesive experience and eliminates the needto switch between multiple products.
To connect to Veritas NetInsights Console, use the following URL:
https://netinsights.veritas.com
About Veritas Usage InsightsVeritas Usage Insights helps you manage your NetBackup deployment moreefficiently, spot trends, and plan for the future. With accurate, near real-timereporting, it reveals the total amount of data that is backed up. Usage Insights alertsyou if you are close to exceeding your licensed capacity limits. Usage Insightsrequires Veritas NetBackup 8.1.2 and later.
Usage Insights provides:
■ Accurate, near real-time reporting of terabytes protected
■ Usage trends that are shown in a graphical display
■ Consumption assessments to alert before licensed capacity is exceeded
■ Easy capacity planning and budgeting
■ Identification of growth spikes or potential gaps in coverage
For customers who use capacity licensing (NDMP, Limited Edition, or Complete),Usage Insights helps accurately measure capacity usage. This measurement givestotal visibility into how each of the protected workloads consumes storage andenables efficient capacity planning. Furthermore, Usage Insights eliminates theneed for these customers to provide manual uploads of telemetry data to Veritasby automatically providing the necessary telemetry.
The following URL provides additional answers to frequently asked questions.
https://help.veritas.com/vxhelp6/#/?context=veritas_usage_insights_netbackup&token=vui_nbu_faqs
Caution: Usage Insights is compatible with Google Chrome and Mozilla Firefox.Veritas does not recommend using Microsoft Edge or Microsoft Internet Explorer,as they do not render all information correctly.
28Preparing for installationVeritas NetInsights Console information
See “Best practices for Veritas Usage Insights” on page 29.
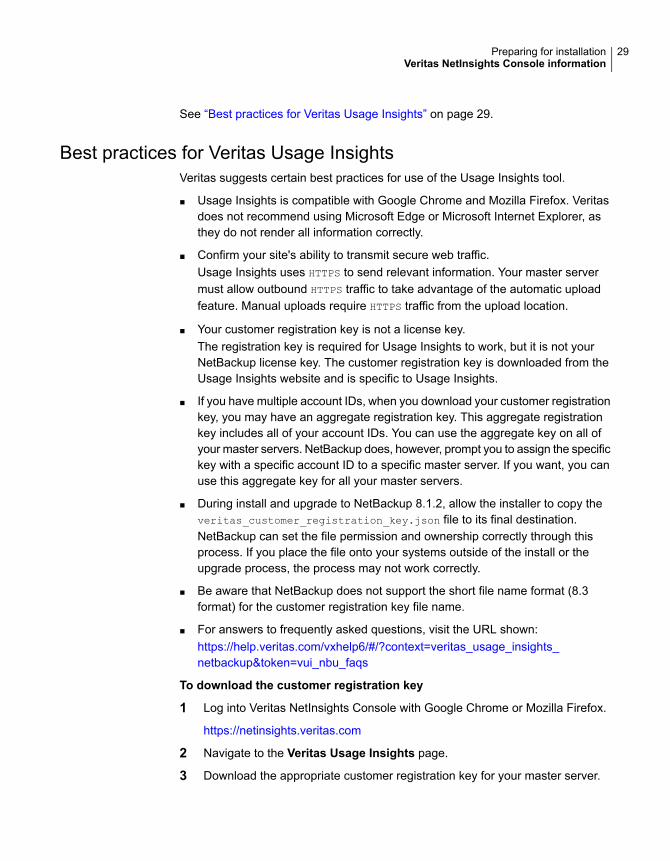
Best practices for Veritas Usage InsightsVeritas suggests certain best practices for use of the Usage Insights tool.
■ Usage Insights is compatible with Google Chrome and Mozilla Firefox. Veritasdoes not recommend using Microsoft Edge or Microsoft Internet Explorer, asthey do not render all information correctly.
■ Confirm your site's ability to transmit secure web traffic.Usage Insights uses HTTPS to send relevant information. Your master servermust allow outbound HTTPS traffic to take advantage of the automatic uploadfeature. Manual uploads require HTTPS traffic from the upload location.
■ Your customer registration key is not a license key.The registration key is required for Usage Insights to work, but it is not yourNetBackup license key. The customer registration key is downloaded from theUsage Insights website and is specific to Usage Insights.
■ If you have multiple account IDs, when you download your customer registrationkey, you may have an aggregate registration key. This aggregate registrationkey includes all of your account IDs. You can use the aggregate key on all ofyour master servers. NetBackup does, however, prompt you to assign the specifickey with a specific account ID to a specific master server. If you want, you canuse this aggregate key for all your master servers.
■ During install and upgrade to NetBackup 8.1.2, allow the installer to copy theveritas_customer_registration_key.json file to its final destination.NetBackup can set the file permission and ownership correctly through thisprocess. If you place the file onto your systems outside of the install or theupgrade process, the process may not work correctly.
■ Be aware that NetBackup does not support the short file name format (8.3format) for the customer registration key file name.
■ For answers to frequently asked questions, visit the URL shown:https://help.veritas.com/vxhelp6/#/?context=veritas_usage_insights_netbackup&token=vui_nbu_faqs
To download the customer registration key
1 Log into Veritas NetInsights Console with Google Chrome or Mozilla Firefox.
https://netinsights.veritas.com
2 Navigate to the Veritas Usage Insights page.
3 Download the appropriate customer registration key for your master server.
29Preparing for installationVeritas NetInsights Console information
NetBackup licensesThis chapter includes the following topics:
■ About NetBackup license requirements
■ About license key entry
■ Frequently asked questions about license keys
About NetBackup license requirementsTo install NetBackup master server or media server software, you must enter aNetBackup product license.
To obtain licenses, you must order a license SKU when you order your NetBackupproducts.
After you place your order, Veritas sends you an email with a license certificate thatincludes the following information:
This list includes all of the licenses for the products that youordered.
Keep this list in a secure location. You may be asked for aproduct license if you ever need to contact technical supportfor assistance.
List of NetBackup licensespurchased
Go to the following website and enter this serial number todownload the ESD images to your system:
http://my.veritas.com
Serial number for access todownload NetBackupproducts
When you install NetBackup, Veritas recommends that you enter all other productlicenses on the master server when you are prompted. Although you can add theselicenses later, it is easier to enter them when you install the master server software.
2Chapter
For detailed information on how to administer NetBackup licenses, refer to theNetBackup Administrator’s Guide, Volume I.
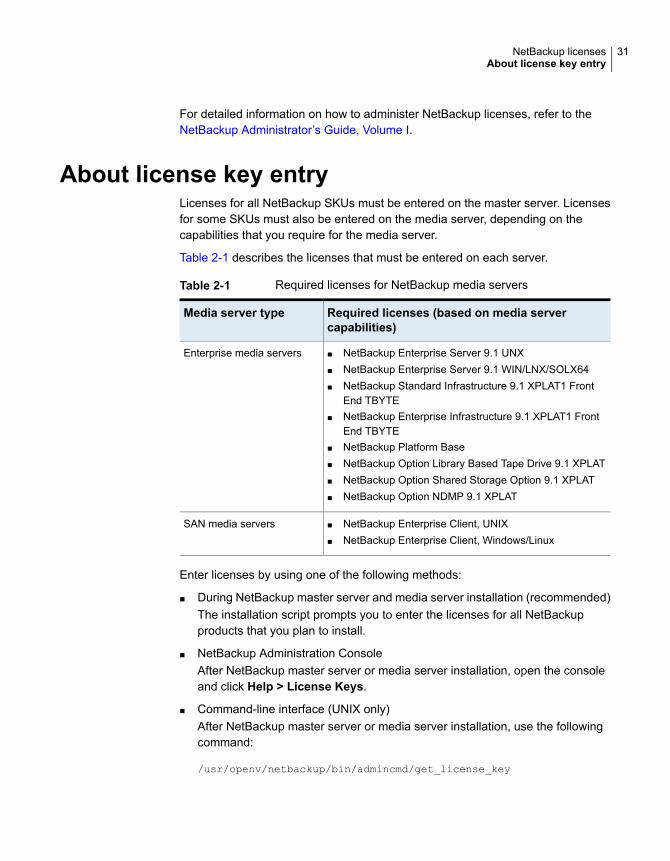
About license key entryLicenses for all NetBackup SKUs must be entered on the master server. Licensesfor some SKUs must also be entered on the media server, depending on thecapabilities that you require for the media server.
Table 2-1 describes the licenses that must be entered on each server.
Table 2-1 Required licenses for NetBackup media servers
Required licenses (based on media servercapabilities)
Media server type
■ NetBackup Enterprise Server 9.1 UNX■ NetBackup Enterprise Server 9.1 WIN/LNX/SOLX64■ NetBackup Standard Infrastructure 9.1 XPLAT1 Front
End TBYTE■ NetBackup Enterprise Infrastructure 9.1 XPLAT1 Front
End TBYTE■ NetBackup Platform Base■ NetBackup Option Library Based Tape Drive 9.1 XPLAT■ NetBackup Option Shared Storage Option 9.1 XPLAT■ NetBackup Option NDMP 9.1 XPLAT
Enterprise media servers
■ NetBackup Enterprise Client, UNIX■ NetBackup Enterprise Client, Windows/Linux
SAN media servers
Enter licenses by using one of the following methods:
■ During NetBackup master server and media server installation (recommended)The installation script prompts you to enter the licenses for all NetBackupproducts that you plan to install.
■ NetBackup Administration ConsoleAfter NetBackup master server or media server installation, open the consoleand click Help > License Keys.
■ Command-line interface (UNIX only)After NetBackup master server or media server installation, use the followingcommand:
/usr/openv/netbackup/bin/admincmd/get_license_key
31NetBackup licensesAbout license key entry
Note: You can log on to a NetBackup server from almost any server in a systemto view, enter, and administer licenses. When you administer licenses remotely,make sure that you view the licenses of the system you intend to change. You donot want to add or change a license on the wrong server.
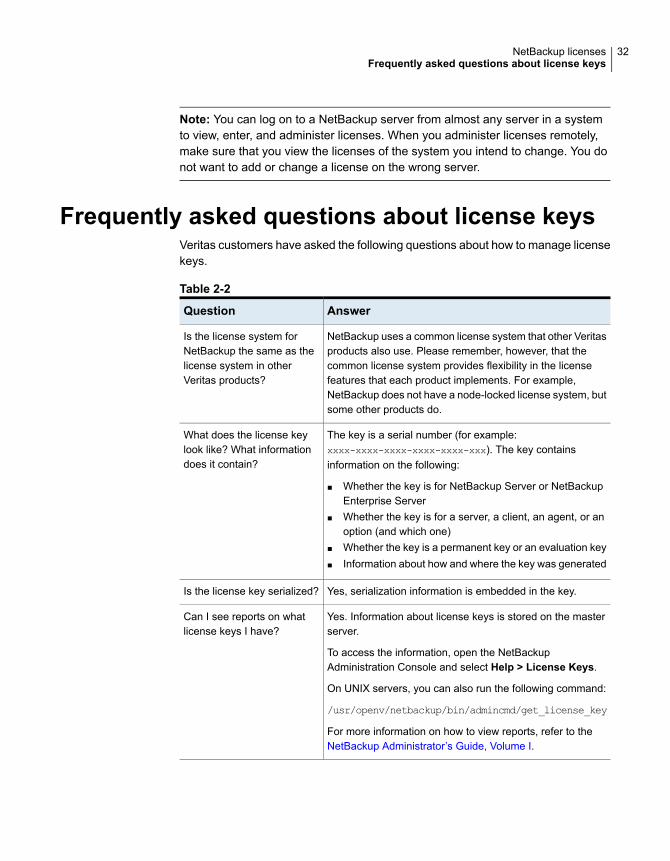
Frequently asked questions about license keysVeritas customers have asked the following questions about how to manage licensekeys.
Table 2-2
AnswerQuestion
NetBackup uses a common license system that other Veritasproducts also use. Please remember, however, that thecommon license system provides flexibility in the licensefeatures that each product implements. For example,NetBackup does not have a node-locked license system, butsome other products do.
Is the license system forNetBackup the same as thelicense system in otherVeritas products?
The key is a serial number (for example:xxxx-xxxx-xxxx-xxxx-xxxx-xxx). The key containsinformation on the following:
■ Whether the key is for NetBackup Server or NetBackupEnterprise Server
■ Whether the key is for a server, a client, an agent, or anoption (and which one)
■ Whether the key is a permanent key or an evaluation key■ Information about how and where the key was generated
What does the license keylook like? What informationdoes it contain?
Yes, serialization information is embedded in the key.Is the license key serialized?
Yes. Information about license keys is stored on the masterserver.
To access the information, open the NetBackupAdministration Console and select Help > License Keys.
On UNIX servers, you can also run the following command:
/usr/openv/netbackup/bin/admincmd/get_license_key
For more information on how to view reports, refer to theNetBackup Administrator’s Guide, Volume I.
Can I see reports on whatlicense keys I have?
32NetBackup licensesFrequently asked questions about license keys
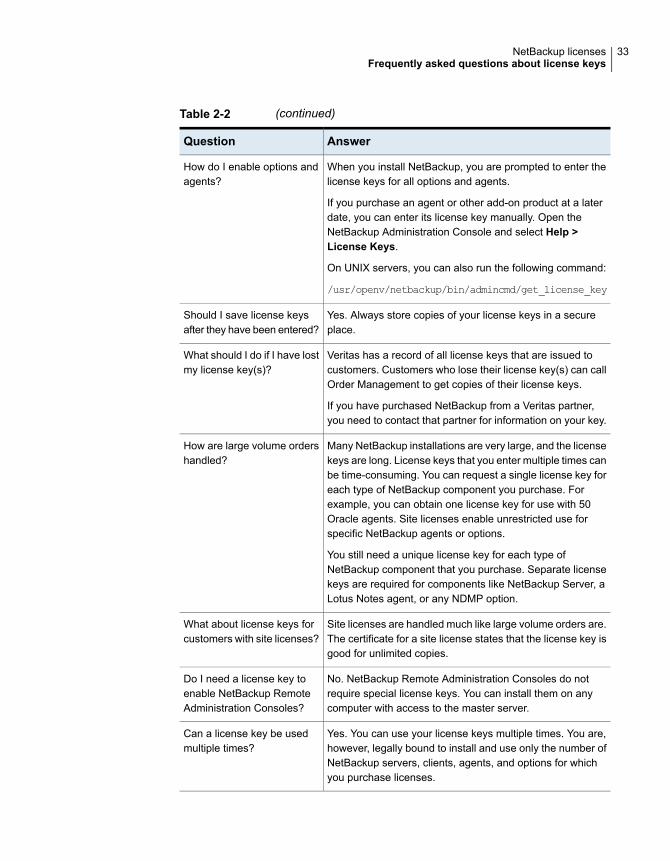
Table 2-2 (continued)
AnswerQuestion
When you install NetBackup, you are prompted to enter thelicense keys for all options and agents.
If you purchase an agent or other add-on product at a laterdate, you can enter its license key manually. Open theNetBackup Administration Console and select Help >License Keys.
On UNIX servers, you can also run the following command:
/usr/openv/netbackup/bin/admincmd/get_license_key
How do I enable options andagents?
Yes. Always store copies of your license keys in a secureplace.
Should I save license keysafter they have been entered?
Veritas has a record of all license keys that are issued tocustomers. Customers who lose their license key(s) can callOrder Management to get copies of their license keys.
If you have purchased NetBackup from a Veritas partner,you need to contact that partner for information on your key.
What should I do if I have lostmy license key(s)?
Many NetBackup installations are very large, and the licensekeys are long. License keys that you enter multiple times canbe time-consuming. You can request a single license key foreach type of NetBackup component you purchase. Forexample, you can obtain one license key for use with 50Oracle agents. Site licenses enable unrestricted use forspecific NetBackup agents or options.
You still need a unique license key for each type ofNetBackup component that you purchase. Separate licensekeys are required for components like NetBackup Server, aLotus Notes agent, or any NDMP option.
How are large volume ordershandled?
Site licenses are handled much like large volume orders are.The certificate for a site license states that the license key isgood for unlimited copies.
What about license keys forcustomers with site licenses?
No. NetBackup Remote Administration Consoles do notrequire special license keys. You can install them on anycomputer with access to the master server.
Do I need a license key toenable NetBackup RemoteAdministration Consoles?
Yes. You can use your license keys multiple times. You are,however, legally bound to install and use only the number ofNetBackup servers, clients, agents, and options for whichyou purchase licenses.
Can a license key be usedmultiple times?
33NetBackup licensesFrequently asked questions about license keys
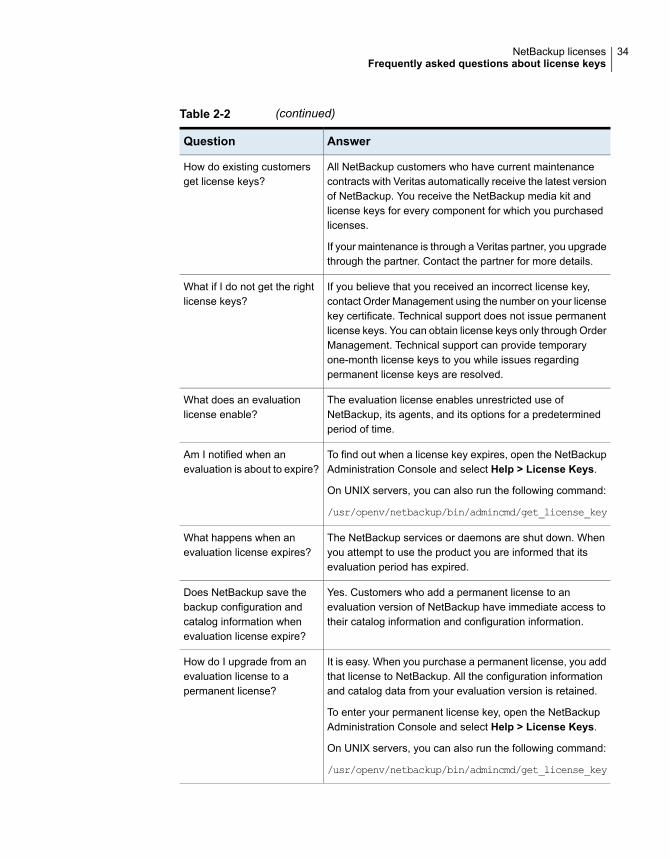
Table 2-2 (continued)
AnswerQuestion
All NetBackup customers who have current maintenancecontracts with Veritas automatically receive the latest versionof NetBackup. You receive the NetBackup media kit andlicense keys for every component for which you purchasedlicenses.
If your maintenance is through a Veritas partner, you upgradethrough the partner. Contact the partner for more details.
How do existing customersget license keys?
If you believe that you received an incorrect license key,contact Order Management using the number on your licensekey certificate. Technical support does not issue permanentlicense keys. You can obtain license keys only through OrderManagement. Technical support can provide temporaryone-month license keys to you while issues regardingpermanent license keys are resolved.
What if I do not get the rightlicense keys?
The evaluation license enables unrestricted use ofNetBackup, its agents, and its options for a predeterminedperiod of time.
What does an evaluationlicense enable?
To find out when a license key expires, open the NetBackupAdministration Console and select Help > License Keys.
On UNIX servers, you can also run the following command:
/usr/openv/netbackup/bin/admincmd/get_license_key
Am I notified when anevaluation is about to expire?
The NetBackup services or daemons are shut down. Whenyou attempt to use the product you are informed that itsevaluation period has expired.
What happens when anevaluation license expires?
Yes. Customers who add a permanent license to anevaluation version of NetBackup have immediate access totheir catalog information and configuration information.
Does NetBackup save thebackup configuration andcatalog information whenevaluation license expire?
It is easy. When you purchase a permanent license, you addthat license to NetBackup. All the configuration informationand catalog data from your evaluation version is retained.
To enter your permanent license key, open the NetBackupAdministration Console and select Help > License Keys.
On UNIX servers, you can also run the following command:
/usr/openv/netbackup/bin/admincmd/get_license_key
How do I upgrade from anevaluation license to apermanent license?
34NetBackup licensesFrequently asked questions about license keys
Installing server softwareon UNIX systems
This chapter includes the following topics:
■ Installation requirements for UNIX and Linux
■ How the installation script works
■ Installing NetBackup master server software on UNIX
■ Installing NetBackup media server software on UNIX
■ About pushing client software from a master server to clients
Installation requirements for UNIX and LinuxTable 3-1 describes the requirements to prepare your UNIX and Linux systems forNetBackup installation. Use this table as a checklist to address each item.
For the most up-to-date information about installation requirements, Veritasrecommends use of the SORT website. More information about SORT is available.
See “About Veritas Services and Operations Readiness Tools” on page 22.
Table 3-1 NetBackup requirements for UNIX and Linux
DetailsRequirementCheck
■ For a complete list of compatible UNIX and Linux operating systems, refer to theSoftware Compatibility List (SCL) at the following website:http://www.netbackup.com/compatibilityhttps://sort.veritas.com/netbackup
OperatingSystem
3Chapter

Table 3-1 NetBackup requirements for UNIX and Linux (continued)
DetailsRequirementCheck
■ Master servers in a production environment with several database agents enabledshould have a minimum of 16 GB of memory and four cores each.NetBackup does not enforce minimum memory requirements. Veritas does, however,recommend using at least the minimum recommended memory. Failure to use theminimum recommended memory amounts can result in unacceptable performance.
■ Media servers in a production environment with several database agents enabledshould have a minimum of 4 GB of memory each.
Memory
■ The exact amount of space that is required depends on the hardware platform. Moreinformation about this topic is available.NetBackup Release Notes for 9.1
■ NetBackup catalogs contain information about your backups that become larger asyou use the product. The disk space that the catalogs require depends primarily onthe following aspects of your backup configuration:■ The number of files that are backed up.■ The frequency of your backups.■ The amount of time that you set to retain your backup data.
If space is an issue, you can install NetBackup on an alternate file system. The installationlets you select an alternate install location, and creates the appropriate link from/usr/openv.
Note: The value for disk space is for initial installation only. The NetBackup catalogrequires considerably more space once the master server is placed in a productionenvironment.
Disk space
■ Ensure that the gzip and the gunzip commands are installed on the local system.The directories where these commands are installed must be part of the root user’spath environment variable setting.
■ All NetBackup installation ESD images, appropriate licenses, and the root passwordfor all servers.
■ A server of a supported hardware type that runs a supported version of its operatingsystem (with applicable patches), adequate disk space, and supported peripherals.For details on these requirements, refer to the NetBackup Release Notes for 9.1.
■ All NetBackup servers must recognize and be recognizable by their client systems.In some environments, this means that each must be defined in the other’s/etc/hosts file. Other environments may use the Network Information Service (NIS)or Domain Name Service (DNS).
■ The minimum screen resolution configuration is 1024x768, 256 colors.
Generalrequirements
36Installing server software on UNIX systemsInstallation requirements for UNIX and Linux
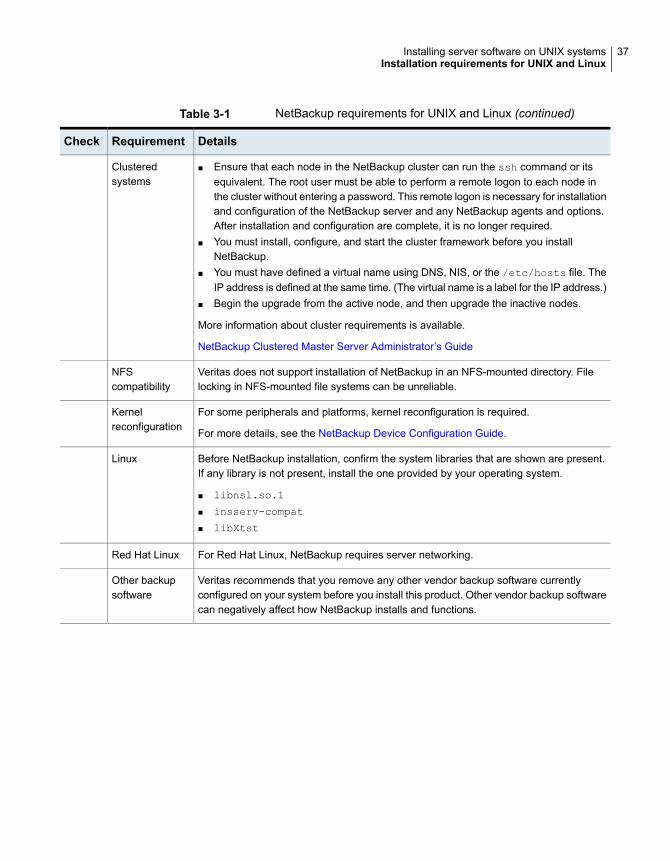
Table 3-1 NetBackup requirements for UNIX and Linux (continued)
DetailsRequirementCheck
■ Ensure that each node in the NetBackup cluster can run the ssh command or itsequivalent. The root user must be able to perform a remote logon to each node inthe cluster without entering a password. This remote logon is necessary for installationand configuration of the NetBackup server and any NetBackup agents and options.After installation and configuration are complete, it is no longer required.
■ You must install, configure, and start the cluster framework before you installNetBackup.
■ You must have defined a virtual name using DNS, NIS, or the /etc/hosts file. TheIP address is defined at the same time. (The virtual name is a label for the IP address.)
■ Begin the upgrade from the active node, and then upgrade the inactive nodes.
More information about cluster requirements is available.
NetBackup Clustered Master Server Administrator’s Guide
Clusteredsystems
Veritas does not support installation of NetBackup in an NFS-mounted directory. Filelocking in NFS-mounted file systems can be unreliable.
NFScompatibility
For some peripherals and platforms, kernel reconfiguration is required.
For more details, see the NetBackup Device Configuration Guide.
Kernelreconfiguration
Before NetBackup installation, confirm the system libraries that are shown are present.If any library is not present, install the one provided by your operating system.
■ libnsl.so.1
■ insserv-compat
■ libXtst
Linux
For Red Hat Linux, NetBackup requires server networking.Red Hat Linux
Veritas recommends that you remove any other vendor backup software currentlyconfigured on your system before you install this product. Other vendor backup softwarecan negatively affect how NetBackup installs and functions.
Other backupsoftware
37Installing server software on UNIX systemsInstallation requirements for UNIX and Linux
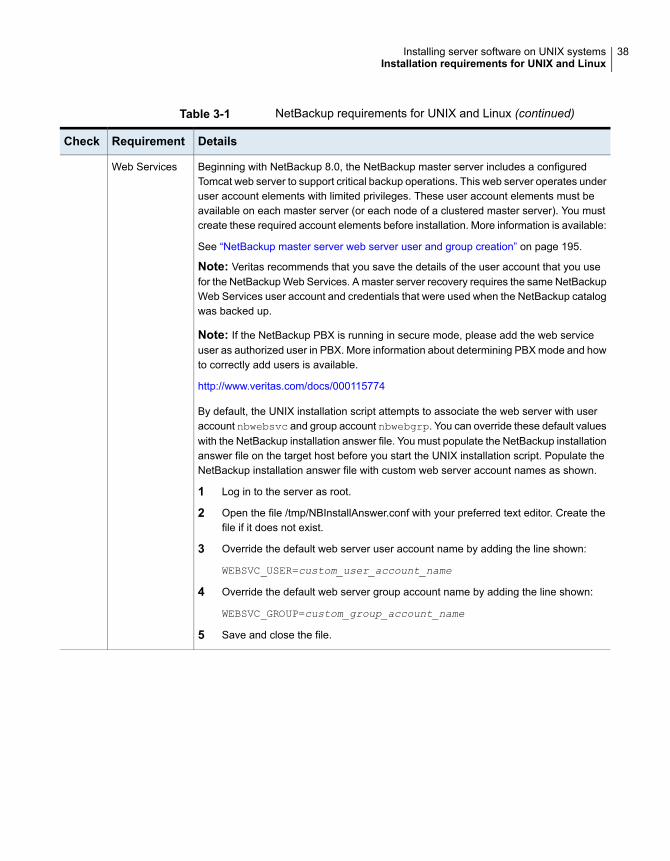
Table 3-1 NetBackup requirements for UNIX and Linux (continued)
DetailsRequirementCheck
Beginning with NetBackup 8.0, the NetBackup master server includes a configuredTomcat web server to support critical backup operations. This web server operates underuser account elements with limited privileges. These user account elements must beavailable on each master server (or each node of a clustered master server). You mustcreate these required account elements before installation. More information is available:
See “NetBackup master server web server user and group creation” on page 195.
Note: Veritas recommends that you save the details of the user account that you usefor the NetBackup Web Services. A master server recovery requires the same NetBackupWeb Services user account and credentials that were used when the NetBackup catalogwas backed up.
Note: If the NetBackup PBX is running in secure mode, please add the web serviceuser as authorized user in PBX. More information about determining PBX mode and howto correctly add users is available.
http://www.veritas.com/docs/000115774
By default, the UNIX installation script attempts to associate the web server with useraccount nbwebsvc and group account nbwebgrp. You can override these default valueswith the NetBackup installation answer file. You must populate the NetBackup installationanswer file on the target host before you start the UNIX installation script. Populate theNetBackup installation answer file with custom web server account names as shown.
1 Log in to the server as root.
2 Open the file /tmp/NBInstallAnswer.conf with your preferred text editor. Create thefile if it does not exist.
3 Override the default web server user account name by adding the line shown:
WEBSVC_USER=custom_user_account_name
4 Override the default web server group account name by adding the line shown:
WEBSVC_GROUP=custom_group_account_name
5 Save and close the file.
Web Services
38Installing server software on UNIX systemsInstallation requirements for UNIX and Linux
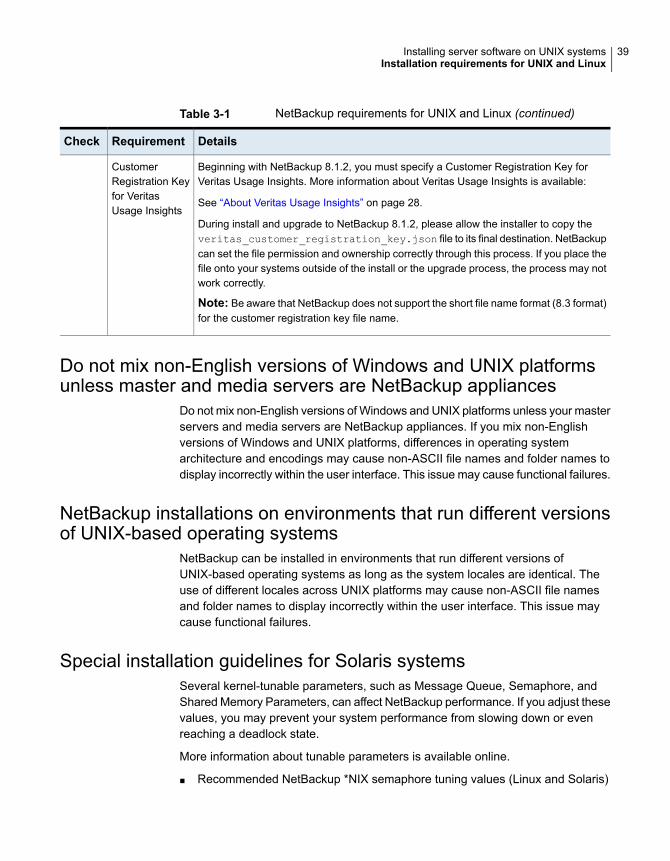
Table 3-1 NetBackup requirements for UNIX and Linux (continued)
DetailsRequirementCheck
Beginning with NetBackup 8.1.2, you must specify a Customer Registration Key forVeritas Usage Insights. More information about Veritas Usage Insights is available:
See “About Veritas Usage Insights” on page 28.
During install and upgrade to NetBackup 8.1.2, please allow the installer to copy theveritas_customer_registration_key.json file to its final destination. NetBackupcan set the file permission and ownership correctly through this process. If you place thefile onto your systems outside of the install or the upgrade process, the process may notwork correctly.
Note: Be aware that NetBackup does not support the short file name format (8.3 format)for the customer registration key file name.
CustomerRegistration Keyfor VeritasUsage Insights
Do not mix non-English versions of Windows and UNIX platformsunless master and media servers are NetBackup appliances
Do not mix non-English versions of Windows and UNIX platforms unless your masterservers and media servers are NetBackup appliances. If you mix non-Englishversions of Windows and UNIX platforms, differences in operating systemarchitecture and encodings may cause non-ASCII file names and folder names todisplay incorrectly within the user interface. This issue may cause functional failures.
NetBackup installations on environments that run different versionsof UNIX-based operating systems
NetBackup can be installed in environments that run different versions ofUNIX-based operating systems as long as the system locales are identical. Theuse of different locales across UNIX platforms may cause non-ASCII file namesand folder names to display incorrectly within the user interface. This issue maycause functional failures.
Special installation guidelines for Solaris systemsSeveral kernel-tunable parameters, such as Message Queue, Semaphore, andShared Memory Parameters, can affect NetBackup performance. If you adjust thesevalues, you may prevent your system performance from slowing down or evenreaching a deadlock state.
More information about tunable parameters is available online.
■ Recommended NetBackup *NIX semaphore tuning values (Linux and Solaris)
39Installing server software on UNIX systemsInstallation requirements for UNIX and Linux
http://www.veritas.com/docs/000081309
■ Tuning Solaris 10 for NetBackuphttp://www.veritas.com/docs/000035120
■ Tuning Solaris 10 shared memory for NetBackup Media Server processes (bptm/ bpdm)http://www.veritas.com/docs/000034846While this link refers to NetBackup 6.x, the information remains valid forNetBackup 7.x and NetBackup 8.x.
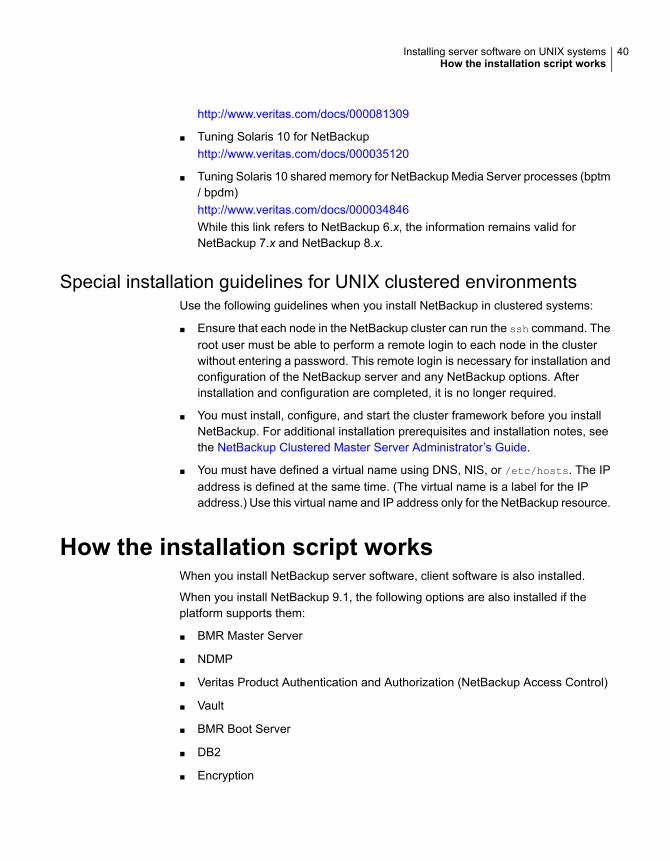
Special installation guidelines for UNIX clustered environmentsUse the following guidelines when you install NetBackup in clustered systems:
■ Ensure that each node in the NetBackup cluster can run the ssh command. Theroot user must be able to perform a remote login to each node in the clusterwithout entering a password. This remote login is necessary for installation andconfiguration of the NetBackup server and any NetBackup options. Afterinstallation and configuration are completed, it is no longer required.
■ You must install, configure, and start the cluster framework before you installNetBackup. For additional installation prerequisites and installation notes, seethe NetBackup Clustered Master Server Administrator’s Guide.
■ You must have defined a virtual name using DNS, NIS, or /etc/hosts. The IPaddress is defined at the same time. (The virtual name is a label for the IPaddress.) Use this virtual name and IP address only for the NetBackup resource.
How the installation script worksWhen you install NetBackup server software, client software is also installed.
When you install NetBackup 9.1, the following options are also installed if theplatform supports them:
■ BMR Master Server
■ NDMP
■ Veritas Product Authentication and Authorization (NetBackup Access Control)
■ Vault
■ BMR Boot Server
■ DB2
■ Encryption
40Installing server software on UNIX systemsHow the installation script works
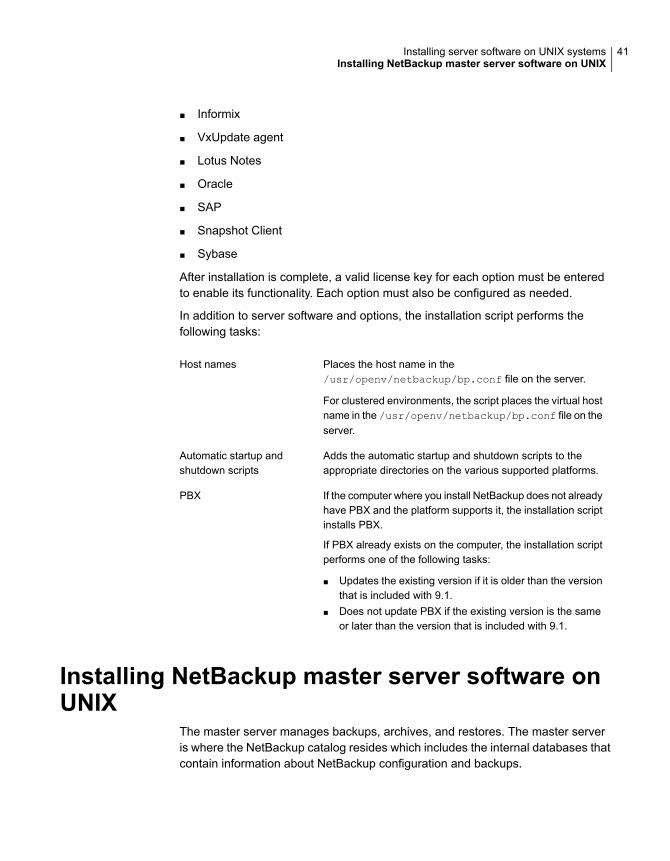
■ Informix
■ VxUpdate agent
■ Lotus Notes
■ Oracle
■ SAP
■ Snapshot Client
■ Sybase
After installation is complete, a valid license key for each option must be enteredto enable its functionality. Each option must also be configured as needed.
In addition to server software and options, the installation script performs thefollowing tasks:
Places the host name in the/usr/openv/netbackup/bp.conf file on the server.
For clustered environments, the script places the virtual hostname in the /usr/openv/netbackup/bp.conf file on theserver.
Host names
Adds the automatic startup and shutdown scripts to theappropriate directories on the various supported platforms.
Automatic startup andshutdown scripts
If the computer where you install NetBackup does not alreadyhave PBX and the platform supports it, the installation scriptinstalls PBX.
If PBX already exists on the computer, the installation scriptperforms one of the following tasks:
■ Updates the existing version if it is older than the versionthat is included with 9.1.
■ Does not update PBX if the existing version is the sameor later than the version that is included with 9.1.
PBX
Installing NetBackup master server software onUNIX
The master server manages backups, archives, and restores. The master serveris where the NetBackup catalog resides which includes the internal databases thatcontain information about NetBackup configuration and backups.
41Installing server software on UNIX systemsInstalling NetBackup master server software on UNIX
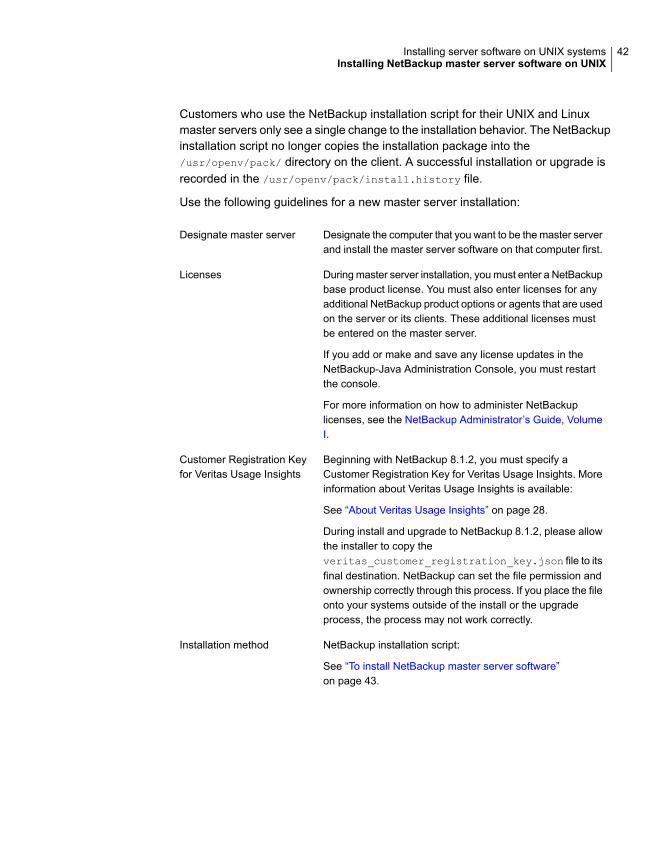
Customers who use the NetBackup installation script for their UNIX and Linuxmaster servers only see a single change to the installation behavior. The NetBackupinstallation script no longer copies the installation package into the/usr/openv/pack/ directory on the client. A successful installation or upgrade isrecorded in the /usr/openv/pack/install.history file.
Use the following guidelines for a new master server installation:
Designate the computer that you want to be the master serverand install the master server software on that computer first.
Designate master server
During master server installation, you must enter a NetBackupbase product license. You must also enter licenses for anyadditional NetBackup product options or agents that are usedon the server or its clients. These additional licenses mustbe entered on the master server.
If you add or make and save any license updates in theNetBackup-Java Administration Console, you must restartthe console.
For more information on how to administer NetBackuplicenses, see the NetBackup Administrator’s Guide, VolumeI.
Licenses
Beginning with NetBackup 8.1.2, you must specify aCustomer Registration Key for Veritas Usage Insights. Moreinformation about Veritas Usage Insights is available:
See “About Veritas Usage Insights” on page 28.
During install and upgrade to NetBackup 8.1.2, please allowthe installer to copy theveritas_customer_registration_key.json file to itsfinal destination. NetBackup can set the file permission andownership correctly through this process. If you place the fileonto your systems outside of the install or the upgradeprocess, the process may not work correctly.
Customer Registration Keyfor Veritas Usage Insights
NetBackup installation script:
See “To install NetBackup master server software”on page 43.
Installation method
42Installing server software on UNIX systemsInstalling NetBackup master server software on UNIX
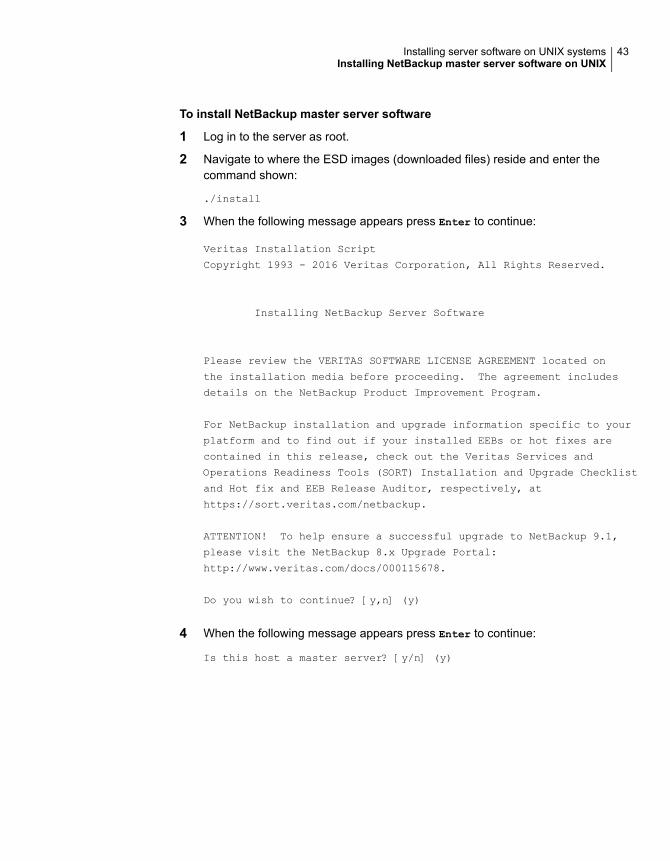
To install NetBackup master server software
1 Log in to the server as root.
2 Navigate to where the ESD images (downloaded files) reside and enter thecommand shown:
./install
3 When the following message appears press Enter to continue:
Veritas Installation Script
Copyright 1993 - 2016 Veritas Corporation, All Rights Reserved.
Installing NetBackup Server Software
Please review the VERITAS SOFTWARE LICENSE AGREEMENT located on
the installation media before proceeding. The agreement includes
details on the NetBackup Product Improvement Program.
For NetBackup installation and upgrade information specific to your
platform and to find out if your installed EEBs or hot fixes are
contained in this release, check out the Veritas Services and
Operations Readiness Tools (SORT) Installation and Upgrade Checklist
and Hot fix and EEB Release Auditor, respectively, at
https://sort.veritas.com/netbackup.
ATTENTION! To help ensure a successful upgrade to NetBackup 9.1,
please visit the NetBackup 8.x Upgrade Portal:
http://www.veritas.com/docs/000115678.
Do you wish to continue? [y,n] (y)
4 When the following message appears press Enter to continue:
Is this host a master server? [y/n] (y)
43Installing server software on UNIX systemsInstalling NetBackup master server software on UNIX
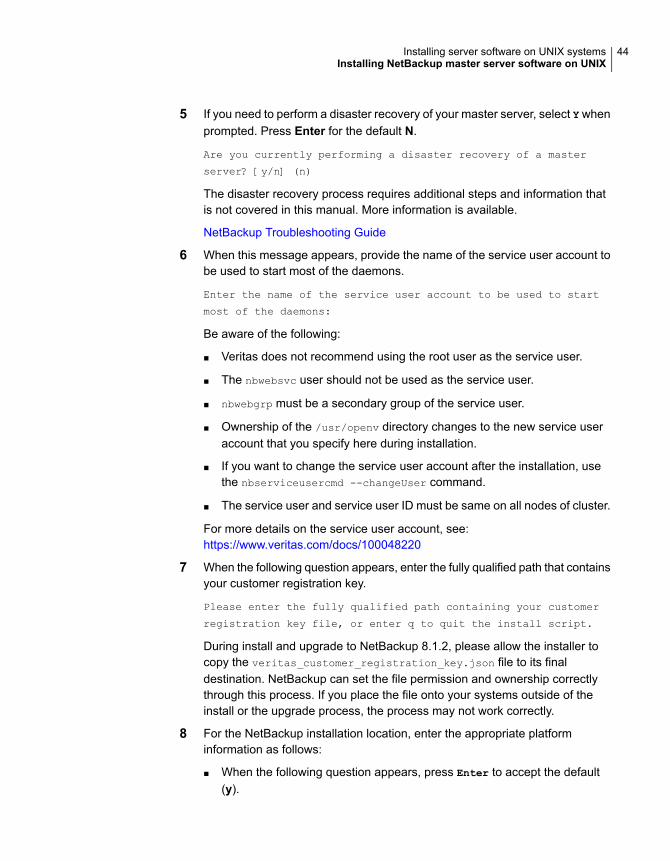
5 If you need to perform a disaster recovery of your master server, select Y whenprompted. Press Enter for the default N.
Are you currently performing a disaster recovery of a master
server? [y/n] (n)
The disaster recovery process requires additional steps and information thatis not covered in this manual. More information is available.
NetBackup Troubleshooting Guide
6 When this message appears, provide the name of the service user account tobe used to start most of the daemons.
Enter the name of the service user account to be used to start
most of the daemons:
Be aware of the following:
■ Veritas does not recommend using the root user as the service user.
■ The nbwebsvc user should not be used as the service user.
■ nbwebgrp must be a secondary group of the service user.
■ Ownership of the /usr/openv directory changes to the new service useraccount that you specify here during installation.
■ If you want to change the service user account after the installation, usethe nbserviceusercmd --changeUser command.
■ The service user and service user ID must be same on all nodes of cluster.
For more details on the service user account, see:https://www.veritas.com/docs/100048220
7 When the following question appears, enter the fully qualified path that containsyour customer registration key.
Please enter the fully qualified path containing your customer
registration key file, or enter q to quit the install script.
During install and upgrade to NetBackup 8.1.2, please allow the installer tocopy the veritas_customer_registration_key.json file to its finaldestination. NetBackup can set the file permission and ownership correctlythrough this process. If you place the file onto your systems outside of theinstall or the upgrade process, the process may not work correctly.
8 For the NetBackup installation location, enter the appropriate platforminformation as follows:
■ When the following question appears, press Enter to accept the default(y).
44Installing server software on UNIX systemsInstalling NetBackup master server software on UNIX
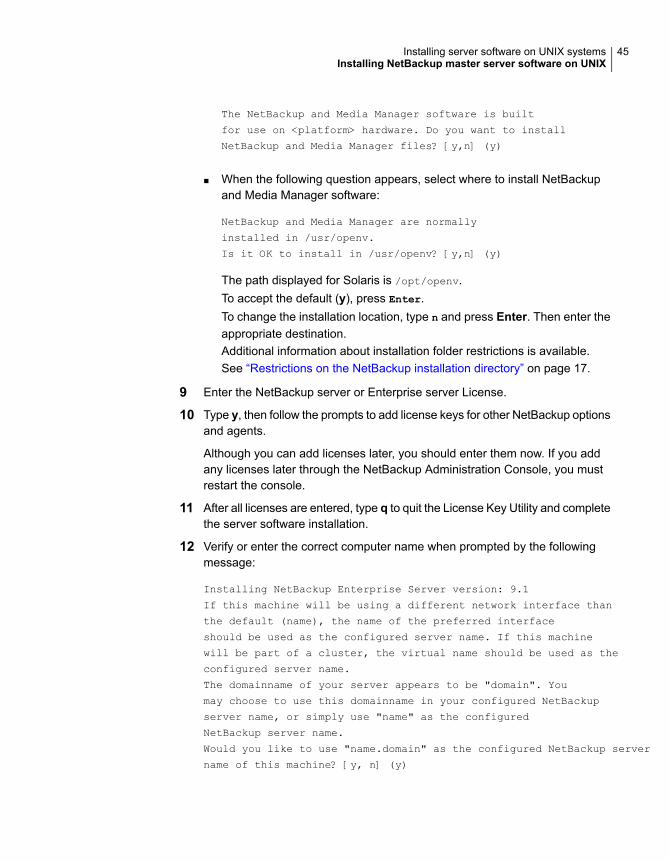
The NetBackup and Media Manager software is built
for use on <platform> hardware. Do you want to install
NetBackup and Media Manager files? [y,n] (y)
■ When the following question appears, select where to install NetBackupand Media Manager software:
NetBackup and Media Manager are normally
installed in /usr/openv.
Is it OK to install in /usr/openv? [y,n] (y)
The path displayed for Solaris is /opt/openv.To accept the default (y), press Enter.To change the installation location, type n and press Enter. Then enter theappropriate destination.Additional information about installation folder restrictions is available.See “Restrictions on the NetBackup installation directory” on page 17.
9 Enter the NetBackup server or Enterprise server License.
10 Type y, then follow the prompts to add license keys for other NetBackup optionsand agents.
Although you can add licenses later, you should enter them now. If you addany licenses later through the NetBackup Administration Console, you mustrestart the console.
11 After all licenses are entered, type q to quit the License Key Utility and completethe server software installation.
12 Verify or enter the correct computer name when prompted by the followingmessage:
Installing NetBackup Enterprise Server version: 9.1
If this machine will be using a different network interface than
the default (name), the name of the preferred interface
should be used as the configured server name. If this machine
will be part of a cluster, the virtual name should be used as the
configured server name.
The domainname of your server appears to be "domain". You
may choose to use this domainname in your configured NetBackup
server name, or simply use "name" as the configured
NetBackup server name.
Would you like to use "name.domain" as the configured NetBackup server
name of this machine? [y, n] (y)
45Installing server software on UNIX systemsInstalling NetBackup master server software on UNIX
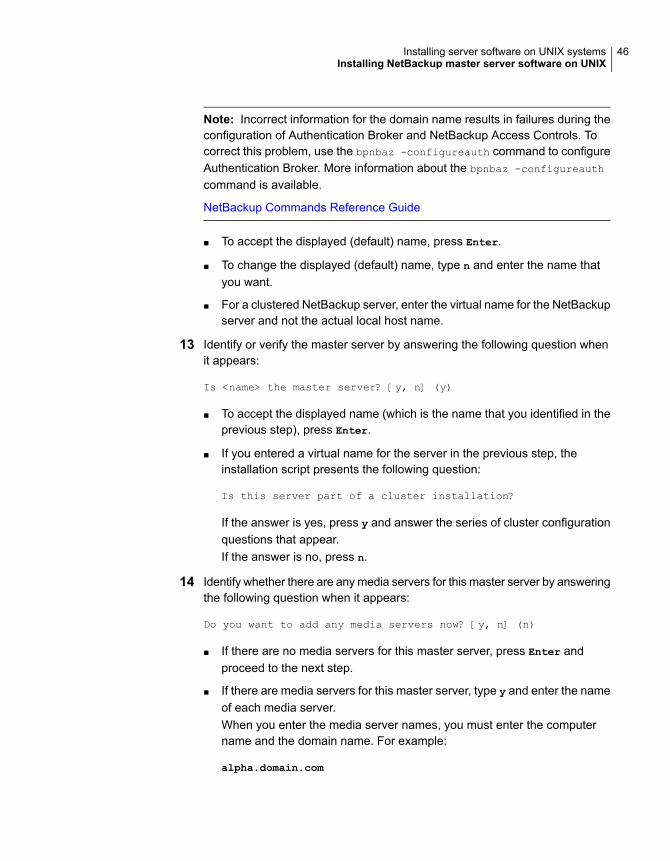
Note: Incorrect information for the domain name results in failures during theconfiguration of Authentication Broker and NetBackup Access Controls. Tocorrect this problem, use the bpnbaz -configureauth command to configureAuthentication Broker. More information about the bpnbaz -configureauth
command is available.
NetBackup Commands Reference Guide
■ To accept the displayed (default) name, press Enter.
■ To change the displayed (default) name, type n and enter the name thatyou want.
■ For a clustered NetBackup server, enter the virtual name for the NetBackupserver and not the actual local host name.
13 Identify or verify the master server by answering the following question whenit appears:
Is <name> the master server? [y, n] (y)
■ To accept the displayed name (which is the name that you identified in theprevious step), press Enter.
■ If you entered a virtual name for the server in the previous step, theinstallation script presents the following question:
Is this server part of a cluster installation?
If the answer is yes, press y and answer the series of cluster configurationquestions that appear.If the answer is no, press n.
14 Identify whether there are any media servers for this master server by answeringthe following question when it appears:
Do you want to add any media servers now? [y, n] (n)
■ If there are no media servers for this master server, press Enter andproceed to the next step.
■ If there are media servers for this master server, type y and enter the nameof each media server.When you enter the media server names, you must enter the computername and the domain name. For example:
alpha.domain.com
46Installing server software on UNIX systemsInstalling NetBackup master server software on UNIX
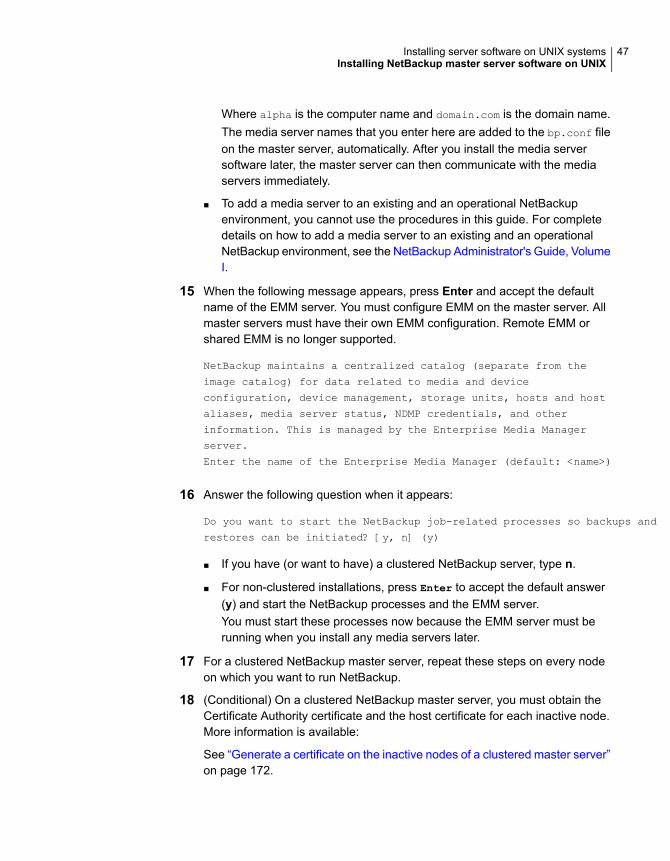
Where alpha is the computer name and domain.com is the domain name.The media server names that you enter here are added to the bp.conf fileon the master server, automatically. After you install the media serversoftware later, the master server can then communicate with the mediaservers immediately.
■ To add a media server to an existing and an operational NetBackupenvironment, you cannot use the procedures in this guide. For completedetails on how to add a media server to an existing and an operationalNetBackup environment, see the NetBackup Administrator's Guide, VolumeI.
15 When the following message appears, press Enter and accept the defaultname of the EMM server. You must configure EMM on the master server. Allmaster servers must have their own EMM configuration. Remote EMM orshared EMM is no longer supported.
NetBackup maintains a centralized catalog (separate from the
image catalog) for data related to media and device
configuration, device management, storage units, hosts and host
aliases, media server status, NDMP credentials, and other
information. This is managed by the Enterprise Media Manager
server.
Enter the name of the Enterprise Media Manager (default: <name>)
16 Answer the following question when it appears:
Do you want to start the NetBackup job-related processes so backups and
restores can be initiated? [y, n] (y)
■ If you have (or want to have) a clustered NetBackup server, type n.
■ For non-clustered installations, press Enter to accept the default answer(y) and start the NetBackup processes and the EMM server.You must start these processes now because the EMM server must berunning when you install any media servers later.
17 For a clustered NetBackup master server, repeat these steps on every nodeon which you want to run NetBackup.
18 (Conditional) On a clustered NetBackup master server, you must obtain theCertificate Authority certificate and the host certificate for each inactive node.More information is available:
See “Generate a certificate on the inactive nodes of a clustered master server”on page 172.
47Installing server software on UNIX systemsInstalling NetBackup master server software on UNIX
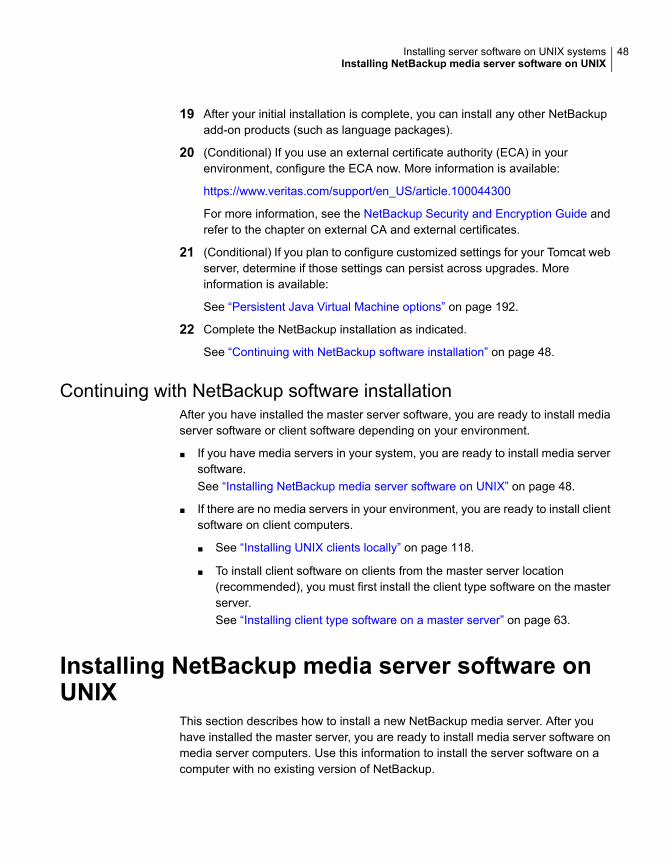
19 After your initial installation is complete, you can install any other NetBackupadd-on products (such as language packages).
20 (Conditional) If you use an external certificate authority (ECA) in yourenvironment, configure the ECA now. More information is available:
https://www.veritas.com/support/en_US/article.100044300
For more information, see the NetBackup Security and Encryption Guide andrefer to the chapter on external CA and external certificates.
21 (Conditional) If you plan to configure customized settings for your Tomcat webserver, determine if those settings can persist across upgrades. Moreinformation is available:
See “Persistent Java Virtual Machine options” on page 192.
22 Complete the NetBackup installation as indicated.
See “Continuing with NetBackup software installation” on page 48.
Continuing with NetBackup software installationAfter you have installed the master server software, you are ready to install mediaserver software or client software depending on your environment.
■ If you have media servers in your system, you are ready to install media serversoftware.See “Installing NetBackup media server software on UNIX” on page 48.
■ If there are no media servers in your environment, you are ready to install clientsoftware on client computers.
■ See “Installing UNIX clients locally” on page 118.
■ To install client software on clients from the master server location(recommended), you must first install the client type software on the masterserver.See “Installing client type software on a master server” on page 63.
Installing NetBackup media server software onUNIX
This section describes how to install a new NetBackup media server. After youhave installed the master server, you are ready to install media server software onmedia server computers. Use this information to install the server software on acomputer with no existing version of NetBackup.
48Installing server software on UNIX systemsInstalling NetBackup media server software on UNIX
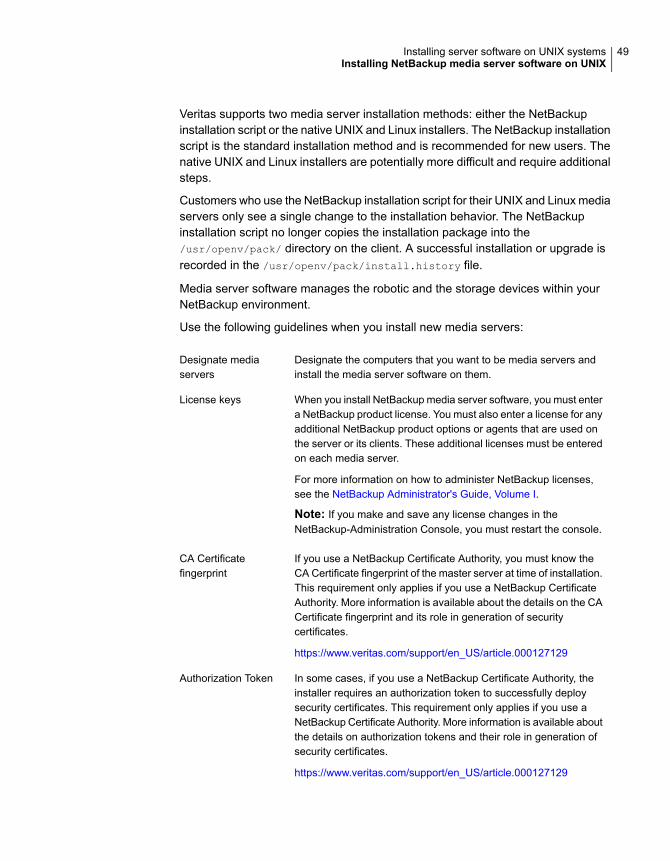
Veritas supports two media server installation methods: either the NetBackupinstallation script or the native UNIX and Linux installers. The NetBackup installationscript is the standard installation method and is recommended for new users. Thenative UNIX and Linux installers are potentially more difficult and require additionalsteps.
Customers who use the NetBackup installation script for their UNIX and Linux mediaservers only see a single change to the installation behavior. The NetBackupinstallation script no longer copies the installation package into the/usr/openv/pack/ directory on the client. A successful installation or upgrade isrecorded in the /usr/openv/pack/install.history file.
Media server software manages the robotic and the storage devices within yourNetBackup environment.
Use the following guidelines when you install new media servers:
Designate the computers that you want to be media servers andinstall the media server software on them.
Designate mediaservers
When you install NetBackup media server software, you must entera NetBackup product license. You must also enter a license for anyadditional NetBackup product options or agents that are used onthe server or its clients. These additional licenses must be enteredon each media server.
For more information on how to administer NetBackup licenses,see the NetBackup Administrator's Guide, Volume I.
Note: If you make and save any license changes in theNetBackup-Administration Console, you must restart the console.
License keys
If you use a NetBackup Certificate Authority, you must know theCA Certificate fingerprint of the master server at time of installation.This requirement only applies if you use a NetBackup CertificateAuthority. More information is available about the details on the CACertificate fingerprint and its role in generation of securitycertificates.
https://www.veritas.com/support/en_US/article.000127129
CA Certificatefingerprint
In some cases, if you use a NetBackup Certificate Authority, theinstaller requires an authorization token to successfully deploysecurity certificates. This requirement only applies if you use aNetBackup Certificate Authority. More information is available aboutthe details on authorization tokens and their role in generation ofsecurity certificates.
https://www.veritas.com/support/en_US/article.000127129
Authorization Token
49Installing server software on UNIX systemsInstalling NetBackup media server software on UNIX
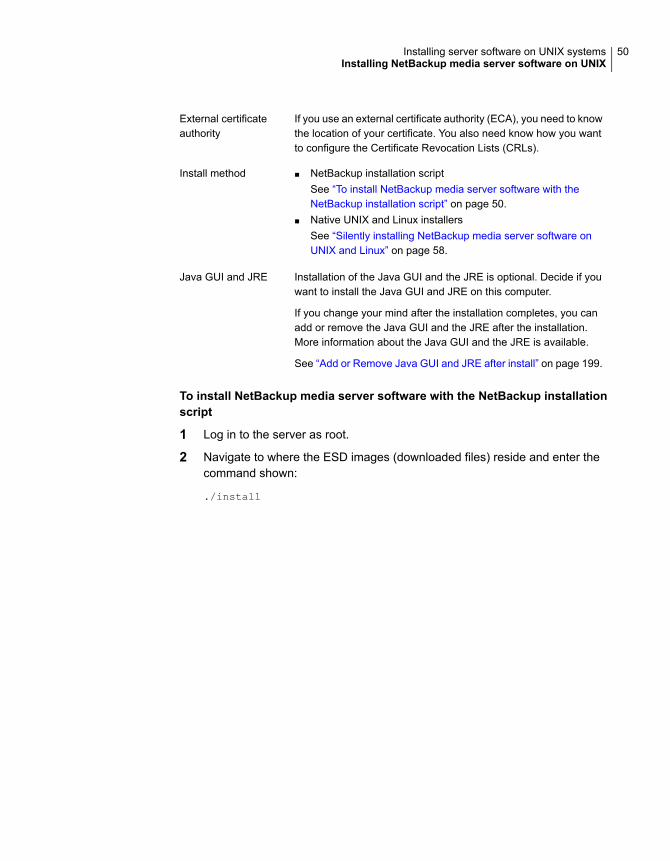
If you use an external certificate authority (ECA), you need to knowthe location of your certificate. You also need know how you wantto configure the Certificate Revocation Lists (CRLs).
External certificateauthority
■ NetBackup installation scriptSee “To install NetBackup media server software with theNetBackup installation script” on page 50.
■ Native UNIX and Linux installersSee “Silently installing NetBackup media server software onUNIX and Linux” on page 58.
Install method
Installation of the Java GUI and the JRE is optional. Decide if youwant to install the Java GUI and JRE on this computer.
If you change your mind after the installation completes, you canadd or remove the Java GUI and the JRE after the installation.More information about the Java GUI and the JRE is available.
See “Add or Remove Java GUI and JRE after install” on page 199.
Java GUI and JRE
To install NetBackup media server software with the NetBackup installationscript
1 Log in to the server as root.
2 Navigate to where the ESD images (downloaded files) reside and enter thecommand shown:
./install
50Installing server software on UNIX systemsInstalling NetBackup media server software on UNIX
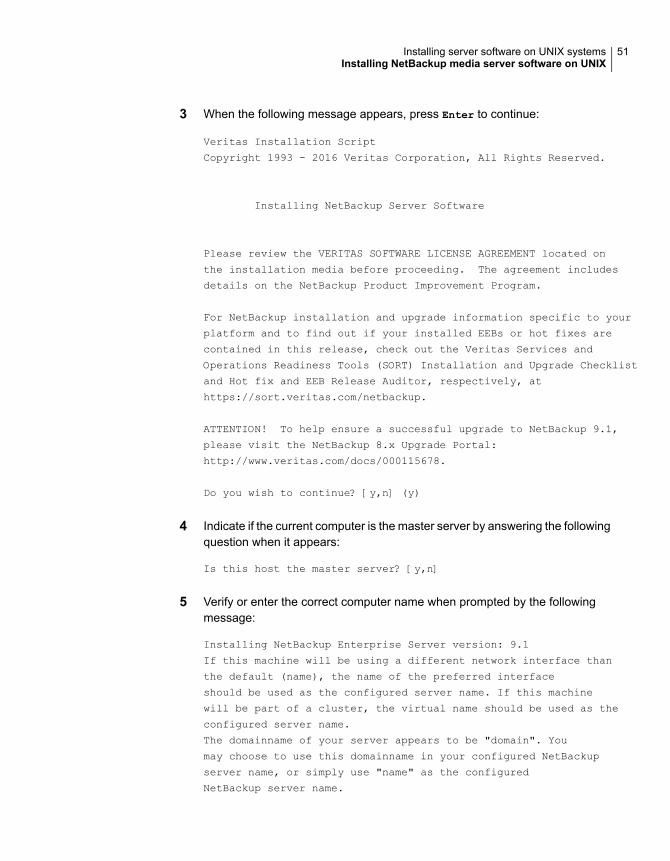
3 When the following message appears, press Enter to continue:
Veritas Installation Script
Copyright 1993 - 2016 Veritas Corporation, All Rights Reserved.
Installing NetBackup Server Software
Please review the VERITAS SOFTWARE LICENSE AGREEMENT located on
the installation media before proceeding. The agreement includes
details on the NetBackup Product Improvement Program.
For NetBackup installation and upgrade information specific to your
platform and to find out if your installed EEBs or hot fixes are
contained in this release, check out the Veritas Services and
Operations Readiness Tools (SORT) Installation and Upgrade Checklist
and Hot fix and EEB Release Auditor, respectively, at
https://sort.veritas.com/netbackup.
ATTENTION! To help ensure a successful upgrade to NetBackup 9.1,
please visit the NetBackup 8.x Upgrade Portal:
http://www.veritas.com/docs/000115678.
Do you wish to continue? [y,n] (y)
4 Indicate if the current computer is the master server by answering the followingquestion when it appears:
Is this host the master server? [y,n]
5 Verify or enter the correct computer name when prompted by the followingmessage:
Installing NetBackup Enterprise Server version: 9.1
If this machine will be using a different network interface than
the default (name), the name of the preferred interface
should be used as the configured server name. If this machine
will be part of a cluster, the virtual name should be used as the
configured server name.
The domainname of your server appears to be "domain". You
may choose to use this domainname in your configured NetBackup
server name, or simply use "name" as the configured
NetBackup server name.
51Installing server software on UNIX systemsInstalling NetBackup media server software on UNIX
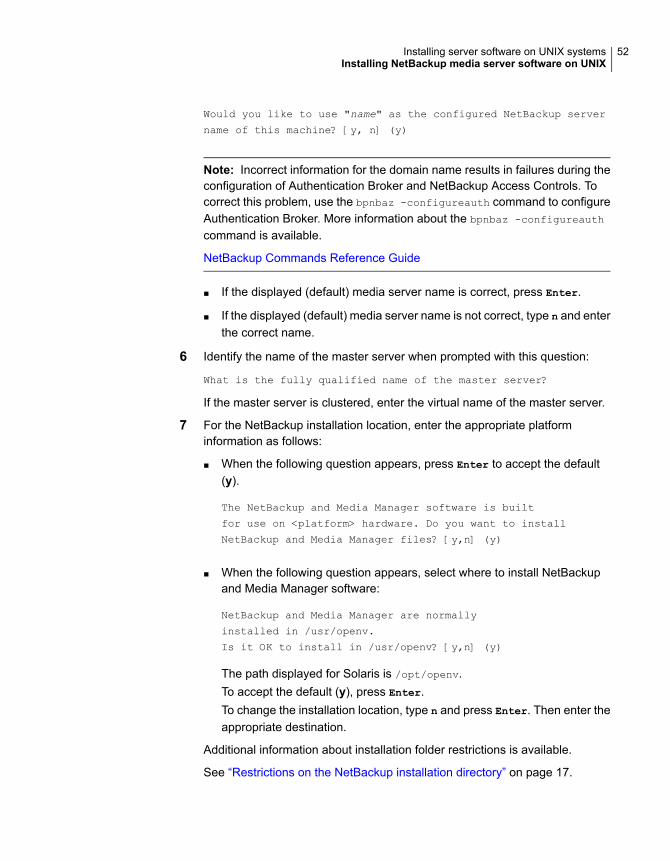
Would you like to use "name" as the configured NetBackup server
name of this machine? [y, n] (y)
Note: Incorrect information for the domain name results in failures during theconfiguration of Authentication Broker and NetBackup Access Controls. Tocorrect this problem, use the bpnbaz -configureauth command to configureAuthentication Broker. More information about the bpnbaz -configureauth
command is available.
NetBackup Commands Reference Guide
■ If the displayed (default) media server name is correct, press Enter.
■ If the displayed (default) media server name is not correct, type n and enterthe correct name.
6 Identify the name of the master server when prompted with this question:
What is the fully qualified name of the master server?
If the master server is clustered, enter the virtual name of the master server.
7 For the NetBackup installation location, enter the appropriate platforminformation as follows:
■ When the following question appears, press Enter to accept the default(y).
The NetBackup and Media Manager software is built
for use on <platform> hardware. Do you want to install
NetBackup and Media Manager files? [y,n] (y)
■ When the following question appears, select where to install NetBackupand Media Manager software:
NetBackup and Media Manager are normally
installed in /usr/openv.
Is it OK to install in /usr/openv? [y,n] (y)
The path displayed for Solaris is /opt/openv.To accept the default (y), press Enter.To change the installation location, type n and press Enter. Then enter theappropriate destination.
Additional information about installation folder restrictions is available.
See “Restrictions on the NetBackup installation directory” on page 17.
52Installing server software on UNIX systemsInstalling NetBackup media server software on UNIX
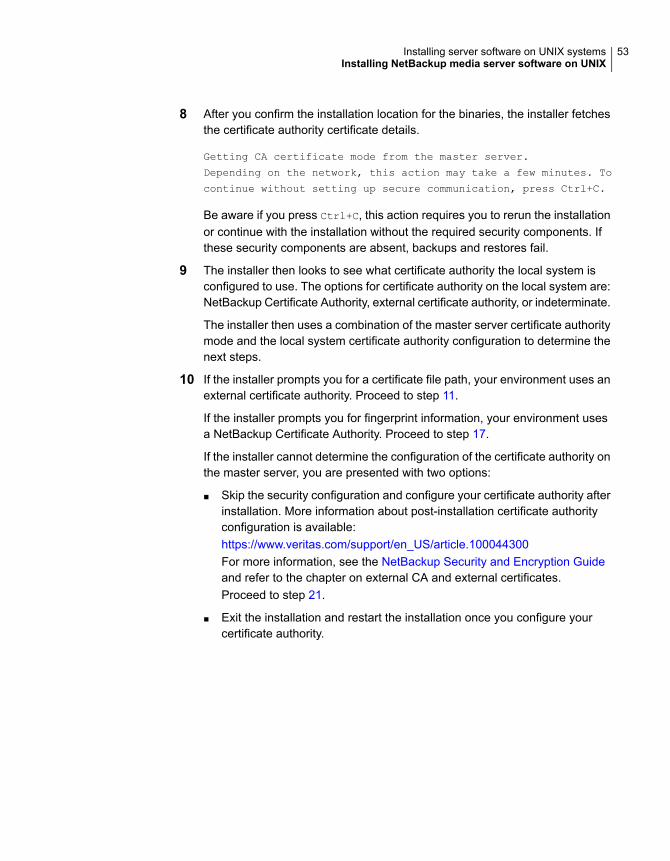
8 After you confirm the installation location for the binaries, the installer fetchesthe certificate authority certificate details.
Getting CA certificate mode from the master server.
Depending on the network, this action may take a few minutes. To
continue without setting up secure communication, press Ctrl+C.
Be aware if you press Ctrl+C, this action requires you to rerun the installationor continue with the installation without the required security components. Ifthese security components are absent, backups and restores fail.
9 The installer then looks to see what certificate authority the local system isconfigured to use. The options for certificate authority on the local system are:NetBackup Certificate Authority, external certificate authority, or indeterminate.
The installer then uses a combination of the master server certificate authoritymode and the local system certificate authority configuration to determine thenext steps.
10 If the installer prompts you for a certificate file path, your environment uses anexternal certificate authority. Proceed to step 11.
If the installer prompts you for fingerprint information, your environment usesa NetBackup Certificate Authority. Proceed to step 17.
If the installer cannot determine the configuration of the certificate authority onthe master server, you are presented with two options:
■ Skip the security configuration and configure your certificate authority afterinstallation. More information about post-installation certificate authorityconfiguration is available:https://www.veritas.com/support/en_US/article.100044300For more information, see the NetBackup Security and Encryption Guideand refer to the chapter on external CA and external certificates.Proceed to step 21.
■ Exit the installation and restart the installation once you configure yourcertificate authority.
53Installing server software on UNIX systemsInstalling NetBackup media server software on UNIX
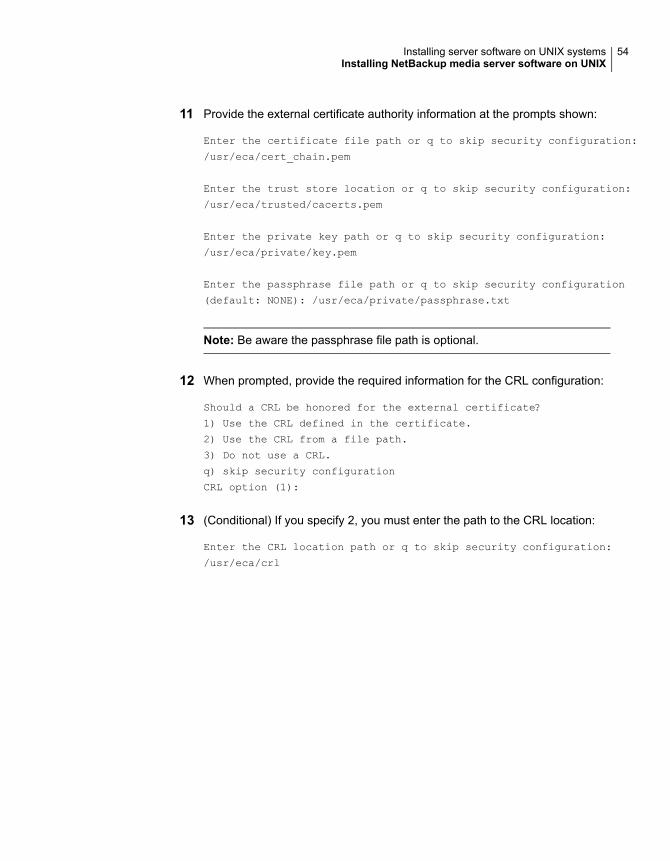
11 Provide the external certificate authority information at the prompts shown:
Enter the certificate file path or q to skip security configuration:
/usr/eca/cert_chain.pem
Enter the trust store location or q to skip security configuration:
/usr/eca/trusted/cacerts.pem
Enter the private key path or q to skip security configuration:
/usr/eca/private/key.pem
Enter the passphrase file path or q to skip security configuration
(default: NONE): /usr/eca/private/passphrase.txt
Note: Be aware the passphrase file path is optional.
12 When prompted, provide the required information for the CRL configuration:
Should a CRL be honored for the external certificate?
1) Use the CRL defined in the certificate.
2) Use the CRL from a file path.
3) Do not use a CRL.
q) skip security configuration
CRL option (1):
13 (Conditional) If you specify 2, you must enter the path to the CRL location:
Enter the CRL location path or q to skip security configuration:
/usr/eca/crl
54Installing server software on UNIX systemsInstalling NetBackup media server software on UNIX

14 The installer echoes the configuration information you entered and attemptsto retrieve details for the external certificate:
External CA values entered:
Certificate file path: /usr/eca/cert_chain.pem
Trust store file path: /usr/eca/trusted/cacerts.pem
Private key file path: /usr/eca/private/key.pem
Passphrase file path: /usr/eca/private/passphrase.txt
CRL check level: Use the CRL from a file path.
CRL location path: /usr/eca/crl
Getting external CA certificate details
Issued By : CN=IITFRMNUSINT,O=Veritas,OU=iitf
Subject Name : CN=cuomovm04,O=Veritas,OU=iitf
Expiry Date : Oct 31 17:25:59 2019 GMT
SHA1 Fingerprint : 62:B2:C3:31:D5:95:15:85:9D:C9:AE:C6:EA:C2:DF:DF:
6D:4B:92:5B
Serial Number : 0x6c7fa2743072ec3eaae4fd60085d468464319a
Certificate Path : /usr/eca/cert_chain.pem
Validating host ECA certificate.
NOTE: Depending on the network, this action may take a few minutes.
To continue without setting up secure communication, press Ctrl+C.
15 (Conditional) If the external certificate enrollment pre-check finishessuccessfully, select 1 and press Enter to continue.
The external certificate enrollment pre-check is successful.
The external certificate is valid for use with master server name
How do you want to proceed?
1) Continue the installation using this certificate.
2) Update external certificate values.
3) Abort the installation.
Default option (1):
Proceed to step 21.
55Installing server software on UNIX systemsInstalling NetBackup media server software on UNIX
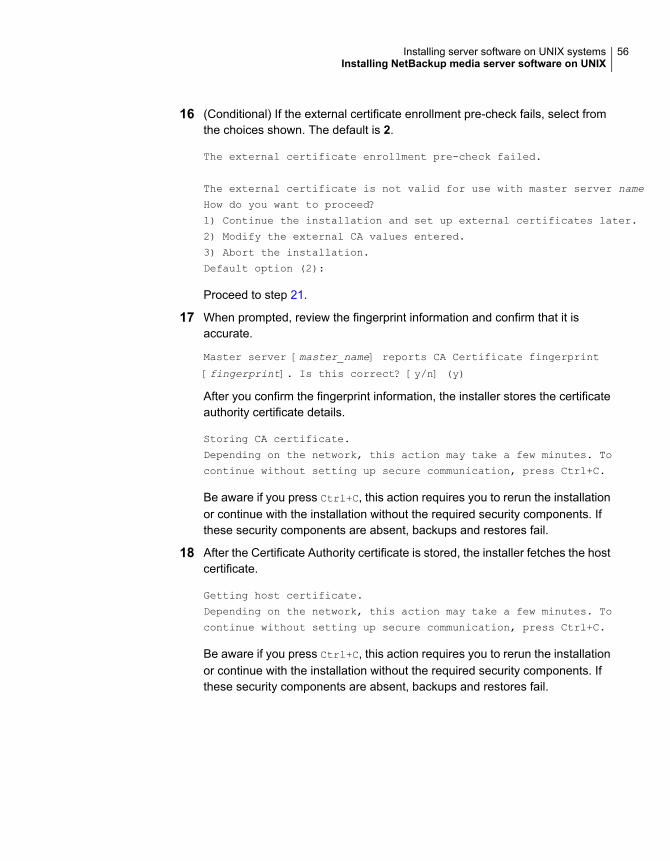
16 (Conditional) If the external certificate enrollment pre-check fails, select fromthe choices shown. The default is 2.
The external certificate enrollment pre-check failed.
The external certificate is not valid for use with master server name
How do you want to proceed?
1) Continue the installation and set up external certificates later.
2) Modify the external CA values entered.
3) Abort the installation.
Default option (2):
Proceed to step 21.
17 When prompted, review the fingerprint information and confirm that it isaccurate.
Master server [master_name] reports CA Certificate fingerprint
[fingerprint]. Is this correct? [y/n] (y)
After you confirm the fingerprint information, the installer stores the certificateauthority certificate details.
Storing CA certificate.
Depending on the network, this action may take a few minutes. To
continue without setting up secure communication, press Ctrl+C.
Be aware if you press Ctrl+C, this action requires you to rerun the installationor continue with the installation without the required security components. Ifthese security components are absent, backups and restores fail.
18 After the Certificate Authority certificate is stored, the installer fetches the hostcertificate.
Getting host certificate.
Depending on the network, this action may take a few minutes. To
continue without setting up secure communication, press Ctrl+C.
Be aware if you press Ctrl+C, this action requires you to rerun the installationor continue with the installation without the required security components. Ifthese security components are absent, backups and restores fail.
56Installing server software on UNIX systemsInstalling NetBackup media server software on UNIX
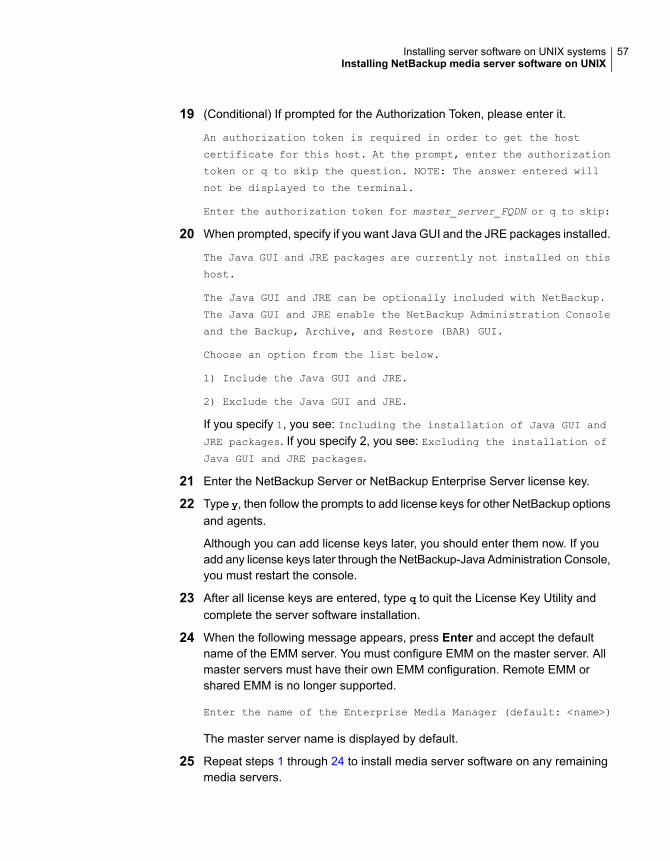
19 (Conditional) If prompted for the Authorization Token, please enter it.
An authorization token is required in order to get the host
certificate for this host. At the prompt, enter the authorization
token or q to skip the question. NOTE: The answer entered will
not be displayed to the terminal.
Enter the authorization token for master_server_FQDN or q to skip:
20 When prompted, specify if you want Java GUI and the JRE packages installed.
The Java GUI and JRE packages are currently not installed on this
host.
The Java GUI and JRE can be optionally included with NetBackup.
The Java GUI and JRE enable the NetBackup Administration Console
and the Backup, Archive, and Restore (BAR) GUI.
Choose an option from the list below.
1) Include the Java GUI and JRE.
2) Exclude the Java GUI and JRE.
If you specify 1, you see: Including the installation of Java GUI and
JRE packages. If you specify 2, you see: Excluding the installation of
Java GUI and JRE packages.
21 Enter the NetBackup Server or NetBackup Enterprise Server license key.
22 Type y, then follow the prompts to add license keys for other NetBackup optionsand agents.
Although you can add license keys later, you should enter them now. If youadd any license keys later through the NetBackup-Java Administration Console,you must restart the console.
23 After all license keys are entered, type q to quit the License Key Utility andcomplete the server software installation.
24 When the following message appears, press Enter and accept the defaultname of the EMM server. You must configure EMM on the master server. Allmaster servers must have their own EMM configuration. Remote EMM orshared EMM is no longer supported.
Enter the name of the Enterprise Media Manager (default: <name>)
The master server name is displayed by default.
25 Repeat steps 1 through 24 to install media server software on any remainingmedia servers.
57Installing server software on UNIX systemsInstalling NetBackup media server software on UNIX
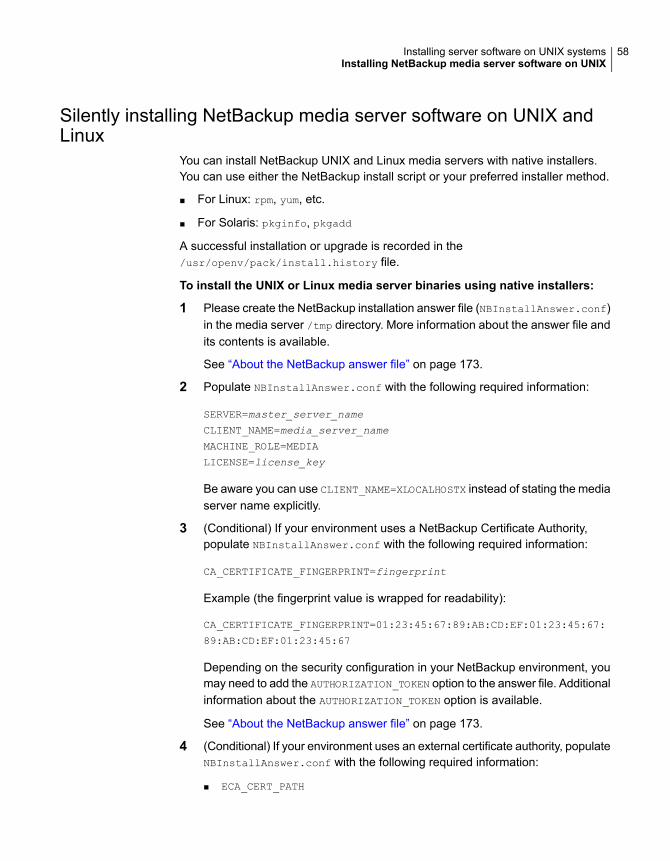
Silently installing NetBackup media server software on UNIX andLinux
You can install NetBackup UNIX and Linux media servers with native installers.You can use either the NetBackup install script or your preferred installer method.
■ For Linux: rpm, yum, etc.
■ For Solaris: pkginfo, pkgadd
A successful installation or upgrade is recorded in the/usr/openv/pack/install.history file.
To install the UNIX or Linux media server binaries using native installers:
1 Please create the NetBackup installation answer file (NBInstallAnswer.conf)in the media server /tmp directory. More information about the answer file andits contents is available.
See “About the NetBackup answer file” on page 173.
2 Populate NBInstallAnswer.conf with the following required information:
SERVER=master_server_name
CLIENT_NAME=media_server_name
MACHINE_ROLE=MEDIA
LICENSE=license_key
Be aware you can use CLIENT_NAME=XLOCALHOSTX instead of stating the mediaserver name explicitly.
3 (Conditional) If your environment uses a NetBackup Certificate Authority,populate NBInstallAnswer.conf with the following required information:
CA_CERTIFICATE_FINGERPRINT=fingerprint
Example (the fingerprint value is wrapped for readability):
CA_CERTIFICATE_FINGERPRINT=01:23:45:67:89:AB:CD:EF:01:23:45:67:
89:AB:CD:EF:01:23:45:67
Depending on the security configuration in your NetBackup environment, youmay need to add the AUTHORIZATION_TOKEN option to the answer file. Additionalinformation about the AUTHORIZATION_TOKEN option is available.
See “About the NetBackup answer file” on page 173.
4 (Conditional) If your environment uses an external certificate authority, populateNBInstallAnswer.conf with the following required information:
■ ECA_CERT_PATH
58Installing server software on UNIX systemsInstalling NetBackup media server software on UNIX
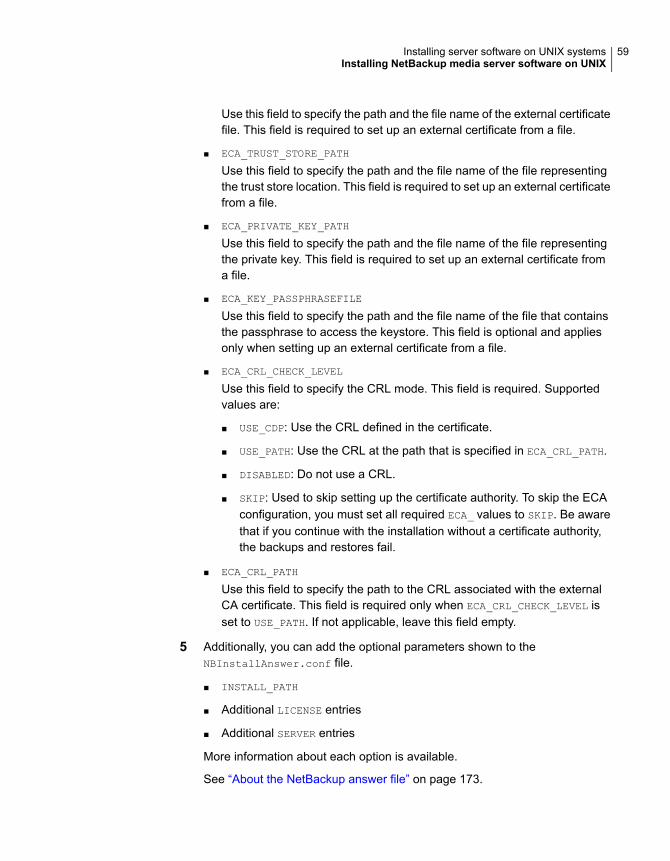
Use this field to specify the path and the file name of the external certificatefile. This field is required to set up an external certificate from a file.
■ ECA_TRUST_STORE_PATH
Use this field to specify the path and the file name of the file representingthe trust store location. This field is required to set up an external certificatefrom a file.
■ ECA_PRIVATE_KEY_PATH
Use this field to specify the path and the file name of the file representingthe private key. This field is required to set up an external certificate froma file.
■ ECA_KEY_PASSPHRASEFILE
Use this field to specify the path and the file name of the file that containsthe passphrase to access the keystore. This field is optional and appliesonly when setting up an external certificate from a file.
■ ECA_CRL_CHECK_LEVEL
Use this field to specify the CRL mode. This field is required. Supportedvalues are:
■ USE_CDP: Use the CRL defined in the certificate.
■ USE_PATH: Use the CRL at the path that is specified in ECA_CRL_PATH.
■ DISABLED: Do not use a CRL.
■ SKIP: Used to skip setting up the certificate authority. To skip the ECAconfiguration, you must set all required ECA_ values to SKIP. Be awarethat if you continue with the installation without a certificate authority,the backups and restores fail.
■ ECA_CRL_PATH
Use this field to specify the path to the CRL associated with the externalCA certificate. This field is required only when ECA_CRL_CHECK_LEVEL isset to USE_PATH. If not applicable, leave this field empty.
5 Additionally, you can add the optional parameters shown to theNBInstallAnswer.conf file.
■ INSTALL_PATH
■ Additional LICENSE entries
■ Additional SERVER entries
More information about each option is available.
See “About the NetBackup answer file” on page 173.
59Installing server software on UNIX systemsInstalling NetBackup media server software on UNIX
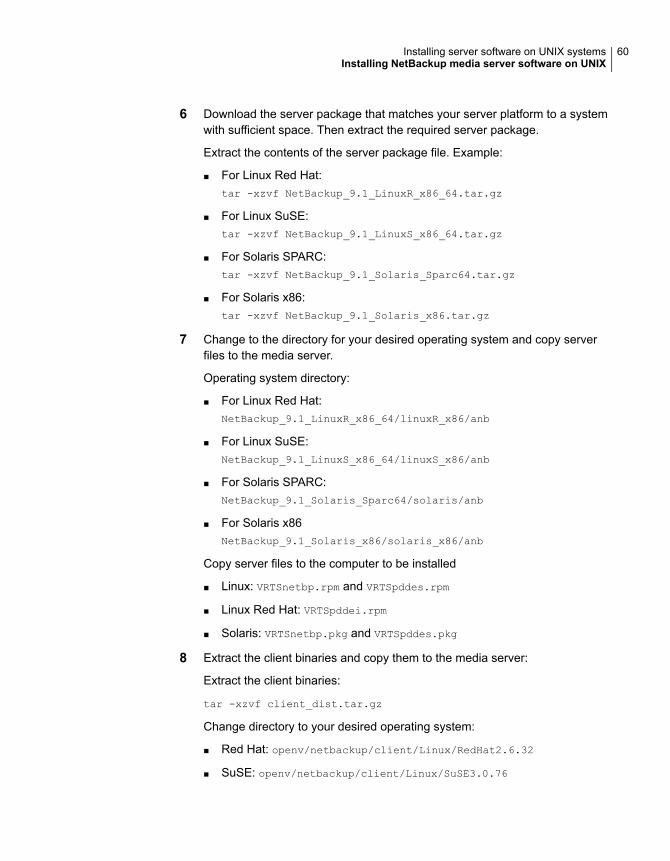
6 Download the server package that matches your server platform to a systemwith sufficient space. Then extract the required server package.
Extract the contents of the server package file. Example:
■ For Linux Red Hat:tar -xzvf NetBackup_9.1_LinuxR_x86_64.tar.gz
■ For Linux SuSE:tar -xzvf NetBackup_9.1_LinuxS_x86_64.tar.gz
■ For Solaris SPARC:tar -xzvf NetBackup_9.1_Solaris_Sparc64.tar.gz
■ For Solaris x86:tar -xzvf NetBackup_9.1_Solaris_x86.tar.gz
7 Change to the directory for your desired operating system and copy serverfiles to the media server.
Operating system directory:
■ For Linux Red Hat:NetBackup_9.1_LinuxR_x86_64/linuxR_x86/anb
■ For Linux SuSE:NetBackup_9.1_LinuxS_x86_64/linuxS_x86/anb
■ For Solaris SPARC:NetBackup_9.1_Solaris_Sparc64/solaris/anb
■ For Solaris x86NetBackup_9.1_Solaris_x86/solaris_x86/anb
Copy server files to the computer to be installed
■ Linux: VRTSnetbp.rpm and VRTSpddes.rpm
■ Linux Red Hat: VRTSpddei.rpm
■ Solaris: VRTSnetbp.pkg and VRTSpddes.pkg
8 Extract the client binaries and copy them to the media server:
Extract the client binaries:
tar -xzvf client_dist.tar.gz
Change directory to your desired operating system:
■ Red Hat: openv/netbackup/client/Linux/RedHat2.6.32
■ SuSE: openv/netbackup/client/Linux/SuSE3.0.76
60Installing server software on UNIX systemsInstalling NetBackup media server software on UNIX
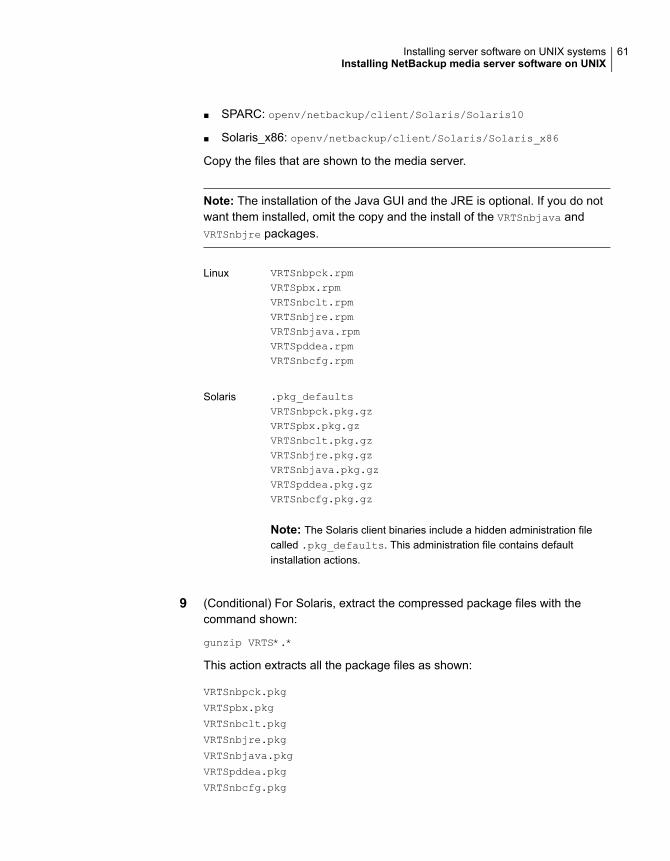
■ SPARC: openv/netbackup/client/Solaris/Solaris10
■ Solaris_x86: openv/netbackup/client/Solaris/Solaris_x86
Copy the files that are shown to the media server.
Note: The installation of the Java GUI and the JRE is optional. If you do notwant them installed, omit the copy and the install of the VRTSnbjava andVRTSnbjre packages.
VRTSnbpck.rpmVRTSpbx.rpmVRTSnbclt.rpmVRTSnbjre.rpmVRTSnbjava.rpmVRTSpddea.rpmVRTSnbcfg.rpm
Linux
.pkg_defaultsVRTSnbpck.pkg.gzVRTSpbx.pkg.gzVRTSnbclt.pkg.gzVRTSnbjre.pkg.gzVRTSnbjava.pkg.gzVRTSpddea.pkg.gzVRTSnbcfg.pkg.gz
Note: The Solaris client binaries include a hidden administration filecalled .pkg_defaults. This administration file contains defaultinstallation actions.
Solaris
9 (Conditional) For Solaris, extract the compressed package files with thecommand shown:
gunzip VRTS*.*
This action extracts all the package files as shown:
VRTSnbpck.pkg
VRTSpbx.pkg
VRTSnbclt.pkg
VRTSnbjre.pkg
VRTSnbjava.pkg
VRTSpddea.pkg
VRTSnbcfg.pkg
61Installing server software on UNIX systemsInstalling NetBackup media server software on UNIX
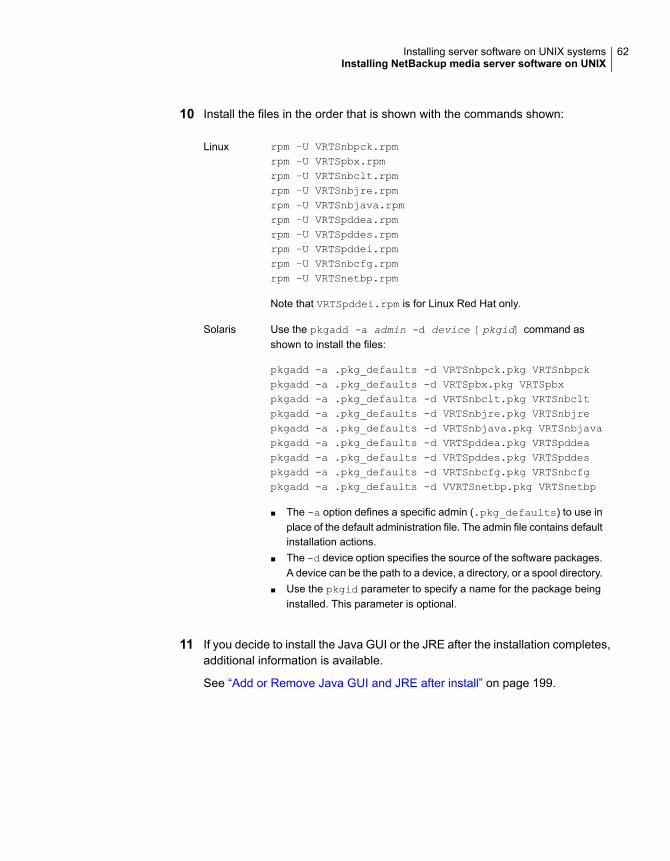
10 Install the files in the order that is shown with the commands shown:
rpm –U VRTSnbpck.rpmrpm –U VRTSpbx.rpmrpm –U VRTSnbclt.rpmrpm –U VRTSnbjre.rpmrpm –U VRTSnbjava.rpmrpm –U VRTSpddea.rpmrpm –U VRTSpddes.rpmrpm –U VRTSpddei.rpmrpm –U VRTSnbcfg.rpmrpm –U VRTSnetbp.rpm
Note that VRTSpddei.rpm is for Linux Red Hat only.
Linux
Use the pkgadd -a admin -d device [pkgid] command asshown to install the files:
pkgadd -a .pkg_defaults -d VRTSnbpck.pkg VRTSnbpckpkgadd -a .pkg_defaults -d VRTSpbx.pkg VRTSpbxpkgadd -a .pkg_defaults -d VRTSnbclt.pkg VRTSnbcltpkgadd -a .pkg_defaults -d VRTSnbjre.pkg VRTSnbjrepkgadd -a .pkg_defaults -d VRTSnbjava.pkg VRTSnbjavapkgadd -a .pkg_defaults -d VRTSpddea.pkg VRTSpddeapkgadd -a .pkg_defaults -d VRTSpddes.pkg VRTSpddespkgadd -a .pkg_defaults -d VRTSnbcfg.pkg VRTSnbcfgpkgadd -a .pkg_defaults -d VVRTSnetbp.pkg VRTSnetbp
■ The -a option defines a specific admin (.pkg_defaults) to use inplace of the default administration file. The admin file contains defaultinstallation actions.
■ The -d device option specifies the source of the software packages.A device can be the path to a device, a directory, or a spool directory.
■ Use the pkgid parameter to specify a name for the package beinginstalled. This parameter is optional.
Solaris
11 If you decide to install the Java GUI or the JRE after the installation completes,additional information is available.
See “Add or Remove Java GUI and JRE after install” on page 199.
62Installing server software on UNIX systemsInstalling NetBackup media server software on UNIX
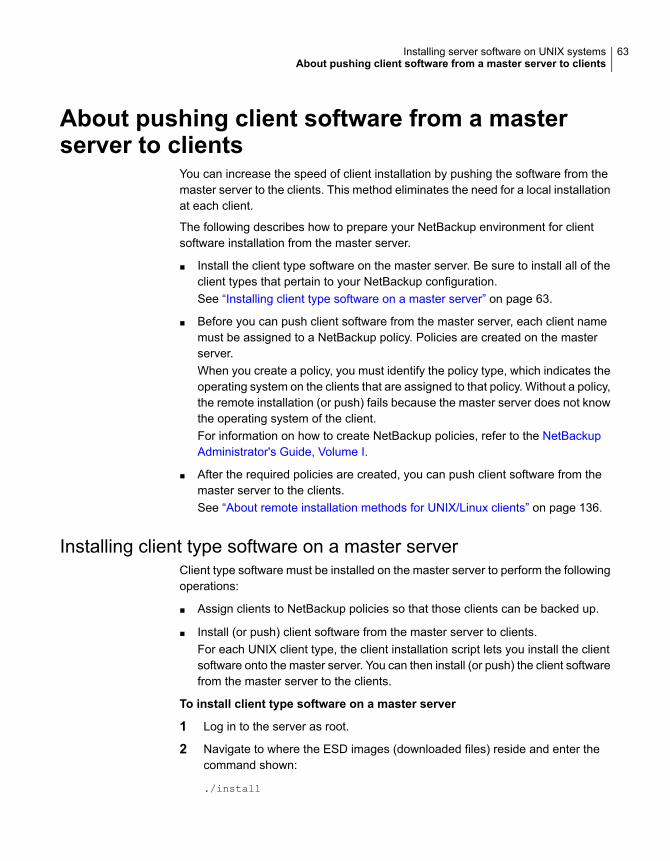
About pushing client software from a masterserver to clients
You can increase the speed of client installation by pushing the software from themaster server to the clients. This method eliminates the need for a local installationat each client.
The following describes how to prepare your NetBackup environment for clientsoftware installation from the master server.
■ Install the client type software on the master server. Be sure to install all of theclient types that pertain to your NetBackup configuration.See “Installing client type software on a master server” on page 63.
■ Before you can push client software from the master server, each client namemust be assigned to a NetBackup policy. Policies are created on the masterserver.When you create a policy, you must identify the policy type, which indicates theoperating system on the clients that are assigned to that policy. Without a policy,the remote installation (or push) fails because the master server does not knowthe operating system of the client.For information on how to create NetBackup policies, refer to the NetBackupAdministrator's Guide, Volume I.
■ After the required policies are created, you can push client software from themaster server to the clients.See “About remote installation methods for UNIX/Linux clients” on page 136.
Installing client type software on a master serverClient type software must be installed on the master server to perform the followingoperations:
■ Assign clients to NetBackup policies so that those clients can be backed up.
■ Install (or push) client software from the master server to clients.For each UNIX client type, the client installation script lets you install the clientsoftware onto the master server. You can then install (or push) the client softwarefrom the master server to the clients.
To install client type software on a master server
1 Log in to the server as root.
2 Navigate to where the ESD images (downloaded files) reside and enter thecommand shown:
./install
63Installing server software on UNIX systemsAbout pushing client software from a master server to clients

3 When the following message appears, press Enter to continue:
Veritas Installation Script
Copyright 1993 - 2016 Veritas Corporation, All Rights Reserved.
Installing NetBackup Client Software
Please review the VERITAS SOFTWARE LICENSE AGREEMENT located on
the installation media before proceeding. The agreement includes
details on the NetBackup Product Improvement Program.
For NetBackup installation and upgrade information specific to your
platform and to find out if your installed EEBs or hot fixes are
contained in this release, check out the Veritas Services and
Operations Readiness Tools (SORT) Installation and Upgrade Checklist
and Hot fix and EEB Release Auditor, respectively, at
https://sort.veritas.com/netbackup.
Do you wish to continue? [y,n] (y)
4 Select all of the client types that you want to install and follow the installationprompts.
64Installing server software on UNIX systemsAbout pushing client software from a master server to clients
Installing server softwareon Windows systems
This chapter includes the following topics:
■ Installation and upgrade requirements for Windows and Windows clusters
■ Requirements for Windows cluster installations and upgrades
■ Performing local, remote, or clustered server installation on Windows systems
■ Post-installation tasks for NetBackup cluster environments
■ Verifying Windows cluster installations or upgrades
■ Installing NetBackup servers silently on Windows systems
Installation and upgrade requirements forWindows and Windows clusters
Table 4-1 describes the requirements to prepare your Windows systems forNetBackup installation. Use this table as a checklist to address each item.
For the most up-to-date information about installation requirements, Veritasrecommends use of the SORT website. More information about SORT is available.
See “About Veritas Services and Operations Readiness Tools” on page 22.
4Chapter
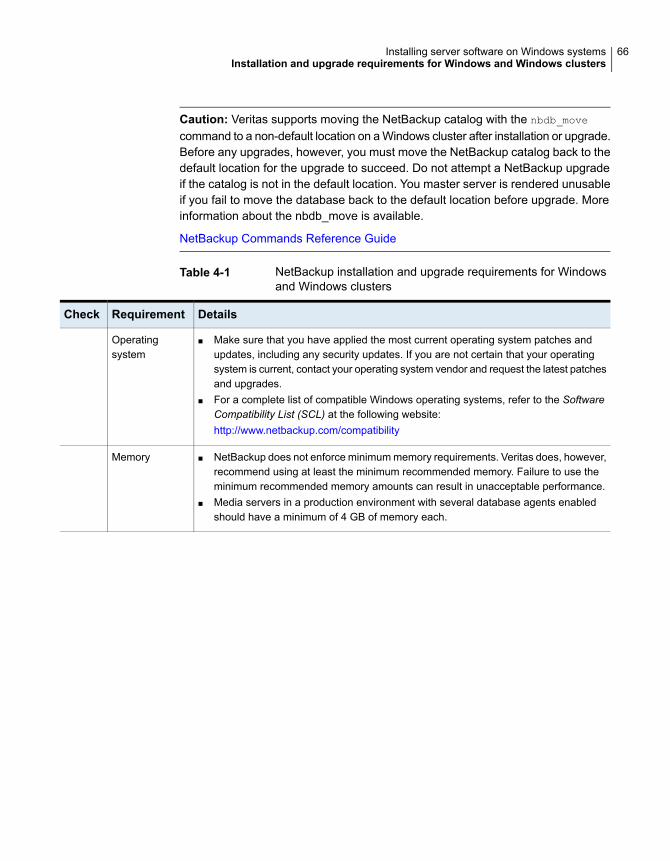
Caution: Veritas supports moving the NetBackup catalog with the nbdb_move
command to a non-default location on a Windows cluster after installation or upgrade.Before any upgrades, however, you must move the NetBackup catalog back to thedefault location for the upgrade to succeed. Do not attempt a NetBackup upgradeif the catalog is not in the default location. You master server is rendered unusableif you fail to move the database back to the default location before upgrade. Moreinformation about the nbdb_move is available.
NetBackup Commands Reference Guide
Table 4-1 NetBackup installation and upgrade requirements for Windowsand Windows clusters
DetailsRequirementCheck
■ Make sure that you have applied the most current operating system patches andupdates, including any security updates. If you are not certain that your operatingsystem is current, contact your operating system vendor and request the latest patchesand upgrades.
■ For a complete list of compatible Windows operating systems, refer to the SoftwareCompatibility List (SCL) at the following website:http://www.netbackup.com/compatibility
Operatingsystem
■ NetBackup does not enforce minimum memory requirements. Veritas does, however,recommend using at least the minimum recommended memory. Failure to use theminimum recommended memory amounts can result in unacceptable performance.
■ Media servers in a production environment with several database agents enabledshould have a minimum of 4 GB of memory each.
Memory
66Installing server software on Windows systemsInstallation and upgrade requirements for Windows and Windows clusters
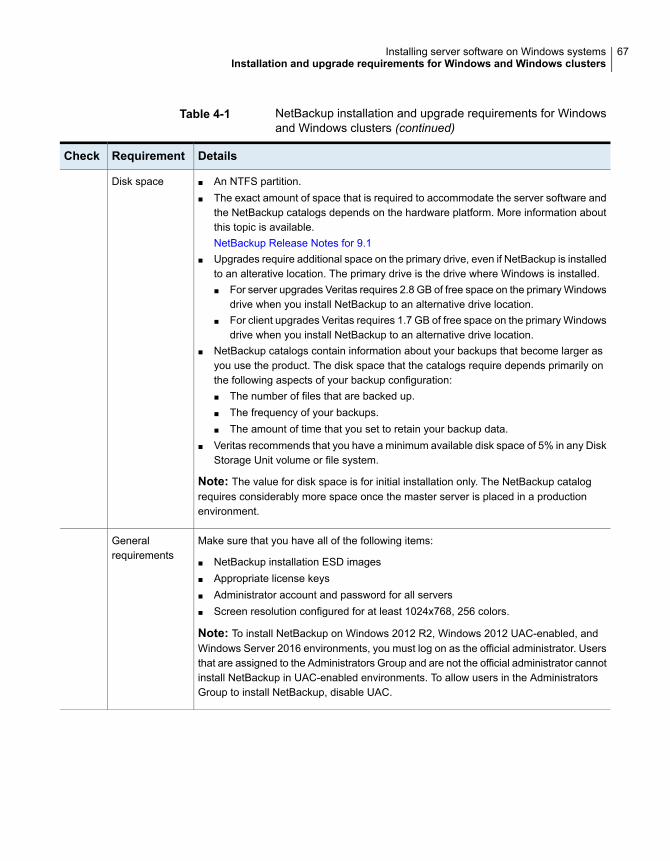
Table 4-1 NetBackup installation and upgrade requirements for Windowsand Windows clusters (continued)
DetailsRequirementCheck
■ An NTFS partition.■ The exact amount of space that is required to accommodate the server software and
the NetBackup catalogs depends on the hardware platform. More information aboutthis topic is available.NetBackup Release Notes for 9.1
■ Upgrades require additional space on the primary drive, even if NetBackup is installedto an alterative location. The primary drive is the drive where Windows is installed.■ For server upgrades Veritas requires 2.8 GB of free space on the primary Windows
drive when you install NetBackup to an alternative drive location.■ For client upgrades Veritas requires 1.7 GB of free space on the primary Windows
drive when you install NetBackup to an alternative drive location.■ NetBackup catalogs contain information about your backups that become larger as
you use the product. The disk space that the catalogs require depends primarily onthe following aspects of your backup configuration:■ The number of files that are backed up.■ The frequency of your backups.■ The amount of time that you set to retain your backup data.
■ Veritas recommends that you have a minimum available disk space of 5% in any DiskStorage Unit volume or file system.
Note: The value for disk space is for initial installation only. The NetBackup catalogrequires considerably more space once the master server is placed in a productionenvironment.
Disk space
Make sure that you have all of the following items:
■ NetBackup installation ESD images■ Appropriate license keys■ Administrator account and password for all servers■ Screen resolution configured for at least 1024x768, 256 colors.
Note: To install NetBackup on Windows 2012 R2, Windows 2012 UAC-enabled, andWindows Server 2016 environments, you must log on as the official administrator. Usersthat are assigned to the Administrators Group and are not the official administrator cannotinstall NetBackup in UAC-enabled environments. To allow users in the AdministratorsGroup to install NetBackup, disable UAC.
Generalrequirements
67Installing server software on Windows systemsInstallation and upgrade requirements for Windows and Windows clusters
Table 4-1 NetBackup installation and upgrade requirements for Windowsand Windows clusters (continued)
DetailsRequirementCheck
Remote andclusterinstallations
68Installing server software on Windows systemsInstallation and upgrade requirements for Windows and Windows clusters

Table 4-1 NetBackup installation and upgrade requirements for Windowsand Windows clusters (continued)
DetailsRequirementCheck
In addition to all previously stated installation requirements, the following guidelines applyto remote installations and cluster installations:
■ All nodes in the cluster must run the same operating system version, service packlevel, and NetBackup version. You cannot mix versions of server operating systems.
■ The installation account must have administrator privileges on all remote systems oron all nodes in the cluster.
■ The source system (or primary node) must run Windows 2012/2012 R2/Windows2016.
■ The destination PC (or clustered nodes) must have Windows 2012/2012 R2/Windows2016.
■ The Remote Registry service must be started on the remote system.The NetBackup installer can enable and start the Remote Registry service on theremote system. If the Remote Registry service is not started, the installation receivesthe following error message:Attempting to connect to server server_name failed with thefollowing error: Unable to connect to the remote system. Onepossible cause for this is the absence of the Remote Registryservice. Please ensure this service is started on the remotehost and try again.
■ NetBackup virtual name and IP addressHave the virtual name and IP address for NetBackup available. You must providethis information during installation.
■ Cluster support changes for media serversYou cannot perform a new installation of a clustered media server.
■ Windows Server Failover Clusters (WSFC)■ The shared disk that the NetBackup Group uses must already be configured in
the cluster and online on the active node.■ Install NetBackup from the node with the shared disk (that is, the active node).■ Computer or host names cannot be longer than 15 characters.
■ Cluster server (VCS) clusters:All NetBackup disk resources must be configured in Veritas Enterprise Administrator(VEA) before you install NetBackup.
■ Cluster node device configuration and upgradesWhen you upgrade clusters, the ltid and the robotic daemons retrieve the deviceconfiguration for a particular cluster node from the EMM database. The cluster nodename (provided by gethostname) stores or retrieves the device configuration in theEMM database. The cluster node name is used when any updates are made to thedevice configuration, including when ltid updates the drive status. The cluster nodename is only used to indicate where a device is connected. The NetBackup virtual
69Installing server software on Windows systemsInstallation and upgrade requirements for Windows and Windows clusters
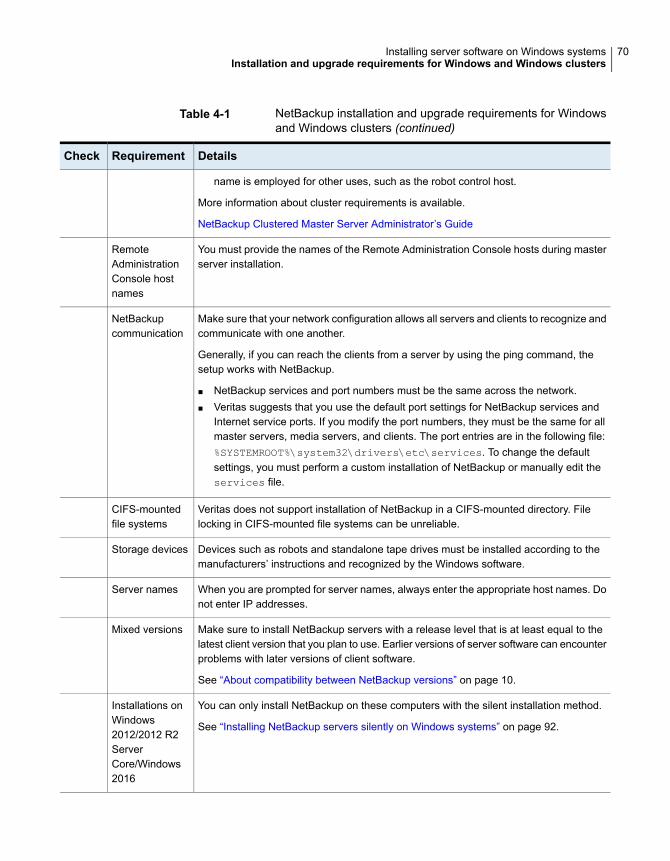
Table 4-1 NetBackup installation and upgrade requirements for Windowsand Windows clusters (continued)
DetailsRequirementCheck
name is employed for other uses, such as the robot control host.
More information about cluster requirements is available.
NetBackup Clustered Master Server Administrator’s Guide
You must provide the names of the Remote Administration Console hosts during masterserver installation.
RemoteAdministrationConsole hostnames
Make sure that your network configuration allows all servers and clients to recognize andcommunicate with one another.
Generally, if you can reach the clients from a server by using the ping command, thesetup works with NetBackup.
■ NetBackup services and port numbers must be the same across the network.■ Veritas suggests that you use the default port settings for NetBackup services and
Internet service ports. If you modify the port numbers, they must be the same for allmaster servers, media servers, and clients. The port entries are in the following file:%SYSTEMROOT%\system32\drivers\etc\services. To change the defaultsettings, you must perform a custom installation of NetBackup or manually edit theservices file.
NetBackupcommunication
Veritas does not support installation of NetBackup in a CIFS-mounted directory. Filelocking in CIFS-mounted file systems can be unreliable.
CIFS-mountedfile systems
Devices such as robots and standalone tape drives must be installed according to themanufacturers’ instructions and recognized by the Windows software.
Storage devices
When you are prompted for server names, always enter the appropriate host names. Donot enter IP addresses.
Server names
Make sure to install NetBackup servers with a release level that is at least equal to thelatest client version that you plan to use. Earlier versions of server software can encounterproblems with later versions of client software.
See “About compatibility between NetBackup versions” on page 10.
Mixed versions
You can only install NetBackup on these computers with the silent installation method.
See “Installing NetBackup servers silently on Windows systems” on page 92.
Installations onWindows2012/2012 R2ServerCore/Windows2016
70Installing server software on Windows systemsInstallation and upgrade requirements for Windows and Windows clusters
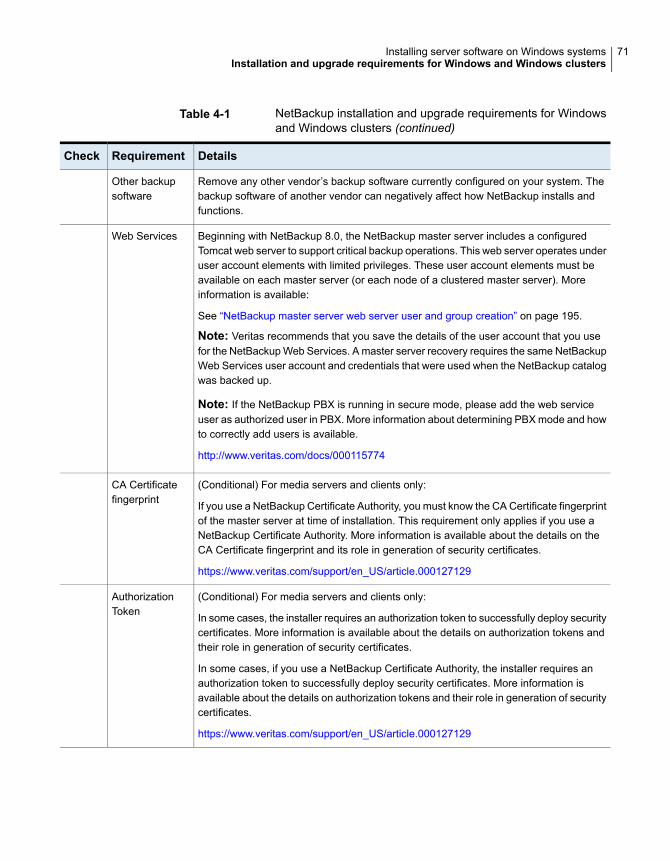
Table 4-1 NetBackup installation and upgrade requirements for Windowsand Windows clusters (continued)
DetailsRequirementCheck
Remove any other vendor’s backup software currently configured on your system. Thebackup software of another vendor can negatively affect how NetBackup installs andfunctions.
Other backupsoftware
Beginning with NetBackup 8.0, the NetBackup master server includes a configuredTomcat web server to support critical backup operations. This web server operates underuser account elements with limited privileges. These user account elements must beavailable on each master server (or each node of a clustered master server). Moreinformation is available:
See “NetBackup master server web server user and group creation” on page 195.
Note: Veritas recommends that you save the details of the user account that you usefor the NetBackup Web Services. A master server recovery requires the same NetBackupWeb Services user account and credentials that were used when the NetBackup catalogwas backed up.
Note: If the NetBackup PBX is running in secure mode, please add the web serviceuser as authorized user in PBX. More information about determining PBX mode and howto correctly add users is available.
http://www.veritas.com/docs/000115774
Web Services
(Conditional) For media servers and clients only:
If you use a NetBackup Certificate Authority, you must know the CA Certificate fingerprintof the master server at time of installation. This requirement only applies if you use aNetBackup Certificate Authority. More information is available about the details on theCA Certificate fingerprint and its role in generation of security certificates.
https://www.veritas.com/support/en_US/article.000127129
CA Certificatefingerprint
(Conditional) For media servers and clients only:
In some cases, the installer requires an authorization token to successfully deploy securitycertificates. More information is available about the details on authorization tokens andtheir role in generation of security certificates.
In some cases, if you use a NetBackup Certificate Authority, the installer requires anauthorization token to successfully deploy security certificates. More information isavailable about the details on authorization tokens and their role in generation of securitycertificates.
https://www.veritas.com/support/en_US/article.000127129
AuthorizationToken
71Installing server software on Windows systemsInstallation and upgrade requirements for Windows and Windows clusters
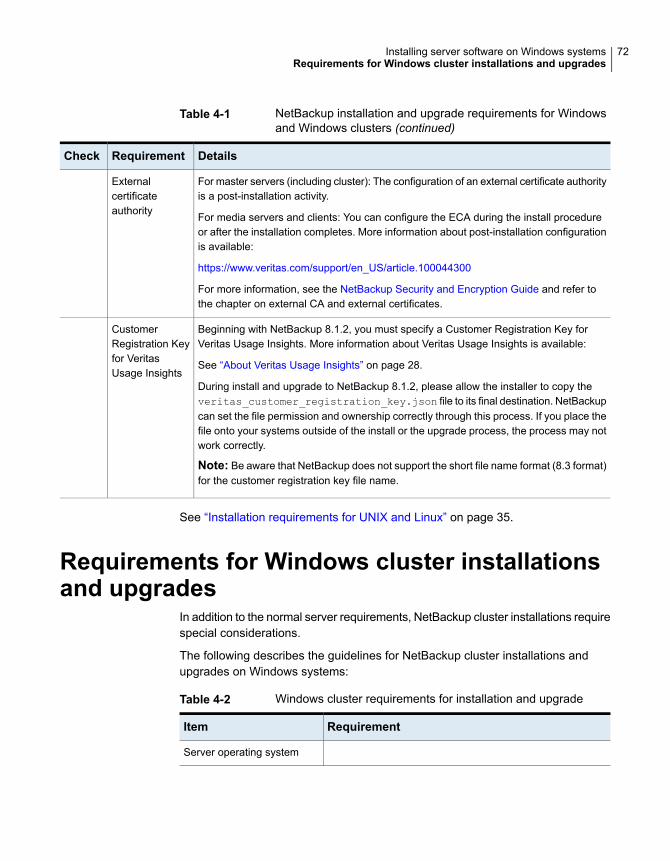
Table 4-1 NetBackup installation and upgrade requirements for Windowsand Windows clusters (continued)
DetailsRequirementCheck
For master servers (including cluster): The configuration of an external certificate authorityis a post-installation activity.
For media servers and clients: You can configure the ECA during the install procedureor after the installation completes. More information about post-installation configurationis available:
https://www.veritas.com/support/en_US/article.100044300
For more information, see the NetBackup Security and Encryption Guide and refer tothe chapter on external CA and external certificates.
Externalcertificateauthority
Beginning with NetBackup 8.1.2, you must specify a Customer Registration Key forVeritas Usage Insights. More information about Veritas Usage Insights is available:
See “About Veritas Usage Insights” on page 28.
During install and upgrade to NetBackup 8.1.2, please allow the installer to copy theveritas_customer_registration_key.json file to its final destination. NetBackupcan set the file permission and ownership correctly through this process. If you place thefile onto your systems outside of the install or the upgrade process, the process may notwork correctly.
Note: Be aware that NetBackup does not support the short file name format (8.3 format)for the customer registration key file name.
CustomerRegistration Keyfor VeritasUsage Insights
See “Installation requirements for UNIX and Linux” on page 35.
Requirements for Windows cluster installationsand upgrades
In addition to the normal server requirements, NetBackup cluster installations requirespecial considerations.
The following describes the guidelines for NetBackup cluster installations andupgrades on Windows systems:
Table 4-2 Windows cluster requirements for installation and upgrade
RequirementItem
Server operating system
72Installing server software on Windows systemsRequirements for Windows cluster installations and upgrades
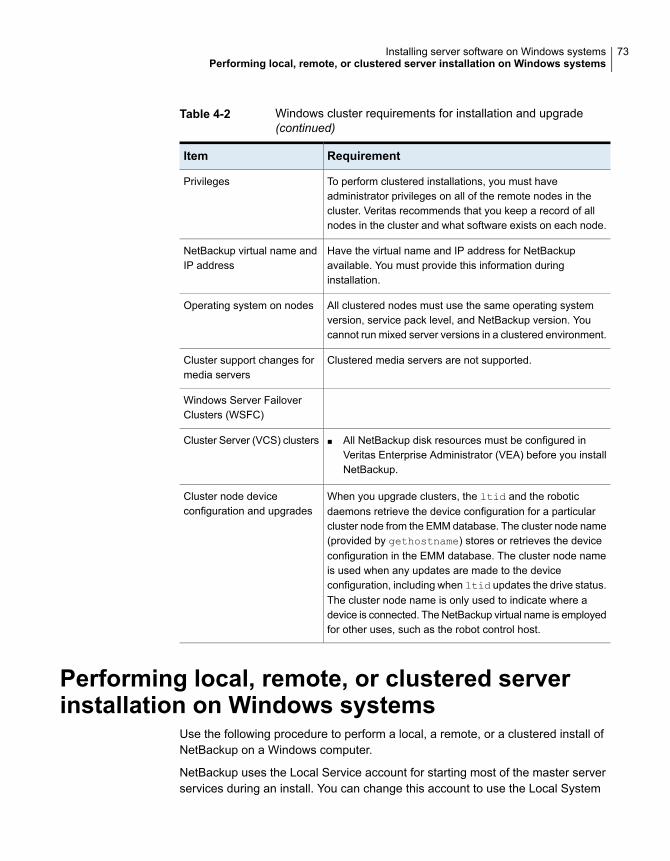
Table 4-2 Windows cluster requirements for installation and upgrade(continued)
RequirementItem
To perform clustered installations, you must haveadministrator privileges on all of the remote nodes in thecluster. Veritas recommends that you keep a record of allnodes in the cluster and what software exists on each node.
Privileges
Have the virtual name and IP address for NetBackupavailable. You must provide this information duringinstallation.
NetBackup virtual name andIP address
All clustered nodes must use the same operating systemversion, service pack level, and NetBackup version. Youcannot run mixed server versions in a clustered environment.
Operating system on nodes
Clustered media servers are not supported.Cluster support changes formedia servers
Windows Server FailoverClusters (WSFC)
■ All NetBackup disk resources must be configured inVeritas Enterprise Administrator (VEA) before you installNetBackup.
Cluster Server (VCS) clusters
When you upgrade clusters, the ltid and the roboticdaemons retrieve the device configuration for a particularcluster node from the EMM database. The cluster node name(provided by gethostname) stores or retrieves the deviceconfiguration in the EMM database. The cluster node nameis used when any updates are made to the deviceconfiguration, including when ltid updates the drive status.The cluster node name is only used to indicate where adevice is connected. The NetBackup virtual name is employedfor other uses, such as the robot control host.
Cluster node deviceconfiguration and upgrades
Performing local, remote, or clustered serverinstallation on Windows systems
Use the following procedure to perform a local, a remote, or a clustered install ofNetBackup on a Windows computer.
NetBackup uses the Local Service account for starting most of the master serverservices during an install. You can change this account to use the Local System
73Installing server software on Windows systemsPerforming local, remote, or clustered server installation on Windows systems
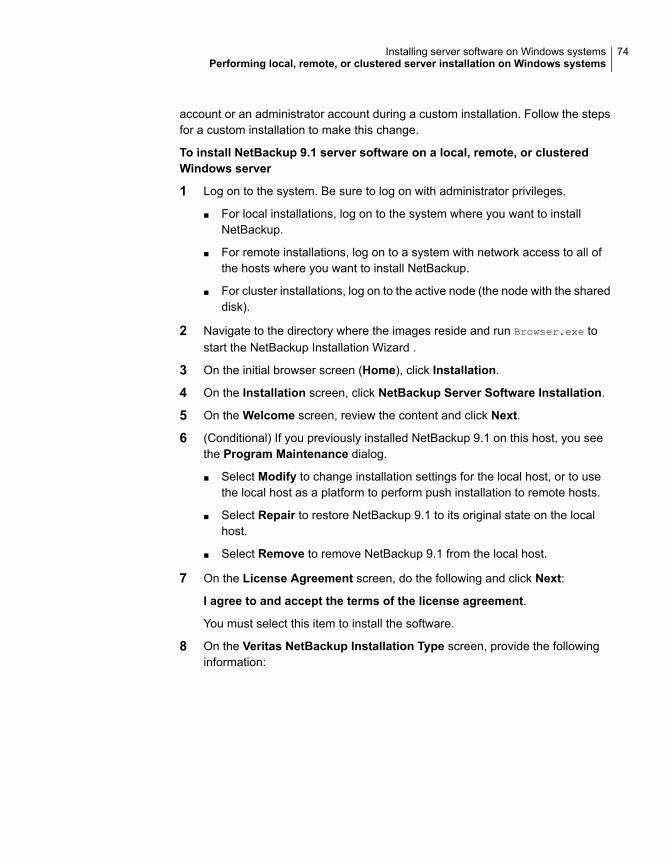
account or an administrator account during a custom installation. Follow the stepsfor a custom installation to make this change.
To install NetBackup 9.1 server software on a local, remote, or clusteredWindows server
1 Log on to the system. Be sure to log on with administrator privileges.
■ For local installations, log on to the system where you want to installNetBackup.
■ For remote installations, log on to a system with network access to all ofthe hosts where you want to install NetBackup.
■ For cluster installations, log on to the active node (the node with the shareddisk).
2 Navigate to the directory where the images reside and run Browser.exe tostart the NetBackup Installation Wizard .
3 On the initial browser screen (Home), click Installation.
4 On the Installation screen, click NetBackup Server Software Installation.
5 On the Welcome screen, review the content and click Next.
6 (Conditional) If you previously installed NetBackup 9.1 on this host, you seethe Program Maintenance dialog.
■ Select Modify to change installation settings for the local host, or to usethe local host as a platform to perform push installation to remote hosts.
■ Select Repair to restore NetBackup 9.1 to its original state on the localhost.
■ Select Remove to remove NetBackup 9.1 from the local host.
7 On the License Agreement screen, do the following and click Next:
I agree to and accept the terms of the license agreement.
You must select this item to install the software.
8 On the Veritas NetBackup Installation Type screen, provide the followinginformation:
74Installing server software on Windows systemsPerforming local, remote, or clustered server installation on Windows systems
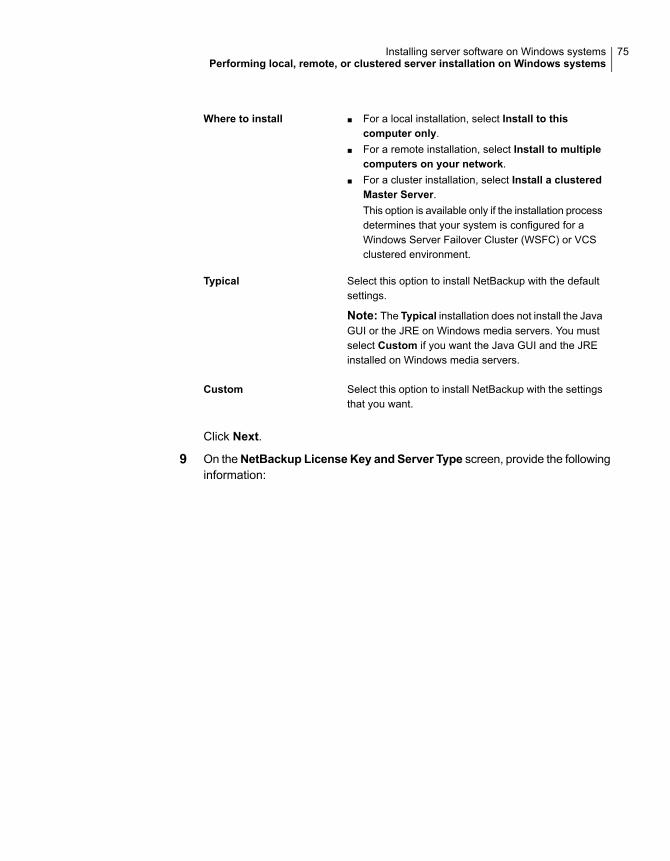
■ For a local installation, select Install to thiscomputer only.
■ For a remote installation, select Install to multiplecomputers on your network.
■ For a cluster installation, select Install a clusteredMaster Server.This option is available only if the installation processdetermines that your system is configured for aWindows Server Failover Cluster (WSFC) or VCSclustered environment.
Where to install
Select this option to install NetBackup with the defaultsettings.
Note: The Typical installation does not install the JavaGUI or the JRE on Windows media servers. You mustselect Custom if you want the Java GUI and the JREinstalled on Windows media servers.
Typical
Select this option to install NetBackup with the settingsthat you want.
Custom
Click Next.
9 On theNetBackup LicenseKey and Server Type screen, provide the followinginformation:
75Installing server software on Windows systemsPerforming local, remote, or clustered server installation on Windows systems
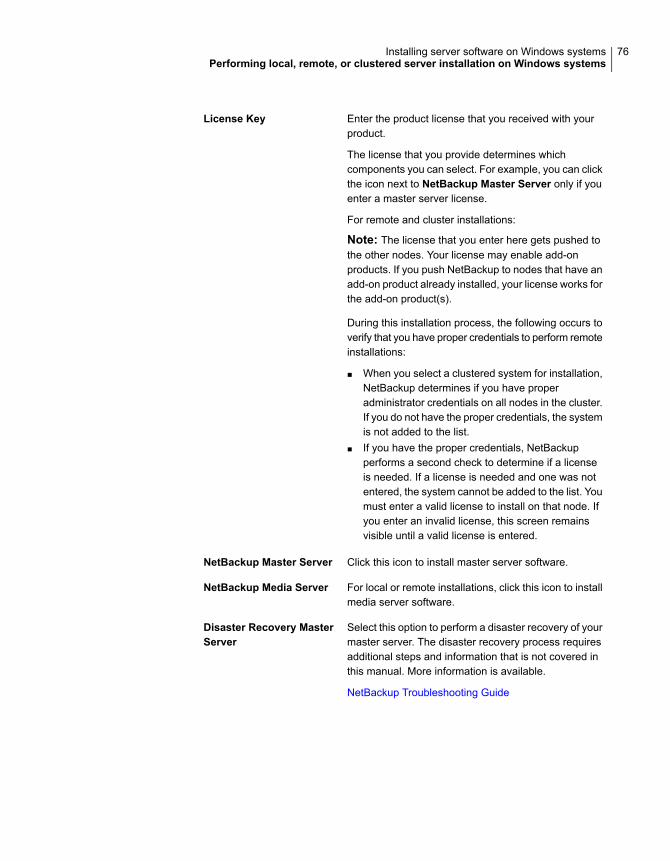
Enter the product license that you received with yourproduct.
The license that you provide determines whichcomponents you can select. For example, you can clickthe icon next to NetBackup Master Server only if youenter a master server license.
For remote and cluster installations:
Note: The license that you enter here gets pushed tothe other nodes. Your license may enable add-onproducts. If you push NetBackup to nodes that have anadd-on product already installed, your license works forthe add-on product(s).
During this installation process, the following occurs toverify that you have proper credentials to perform remoteinstallations:
■ When you select a clustered system for installation,NetBackup determines if you have properadministrator credentials on all nodes in the cluster.If you do not have the proper credentials, the systemis not added to the list.
■ If you have the proper credentials, NetBackupperforms a second check to determine if a licenseis needed. If a license is needed and one was notentered, the system cannot be added to the list. Youmust enter a valid license to install on that node. Ifyou enter an invalid license, this screen remainsvisible until a valid license is entered.
License Key
Click this icon to install master server software.NetBackup Master Server
For local or remote installations, click this icon to installmedia server software.
NetBackup Media Server
Select this option to perform a disaster recovery of yourmaster server. The disaster recovery process requiresadditional steps and information that is not covered inthis manual. More information is available.
NetBackup Troubleshooting Guide
Disaster Recovery MasterServer
76Installing server software on Windows systemsPerforming local, remote, or clustered server installation on Windows systems
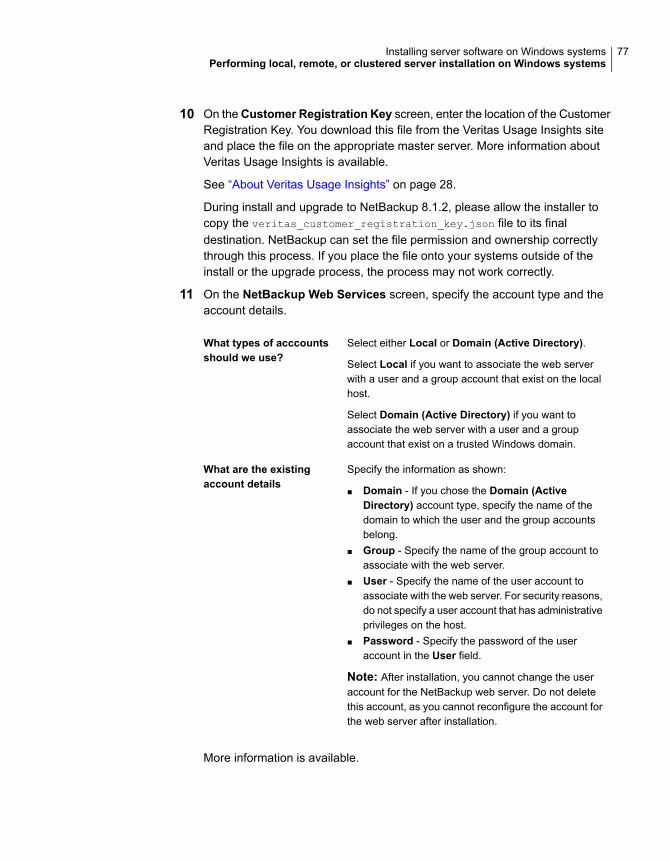
10 On theCustomer Registration Key screen, enter the location of the CustomerRegistration Key. You download this file from the Veritas Usage Insights siteand place the file on the appropriate master server. More information aboutVeritas Usage Insights is available.
See “About Veritas Usage Insights” on page 28.
During install and upgrade to NetBackup 8.1.2, please allow the installer tocopy the veritas_customer_registration_key.json file to its finaldestination. NetBackup can set the file permission and ownership correctlythrough this process. If you place the file onto your systems outside of theinstall or the upgrade process, the process may not work correctly.
11 On the NetBackup Web Services screen, specify the account type and theaccount details.
Select either Local or Domain (Active Directory).
Select Local if you want to associate the web serverwith a user and a group account that exist on the localhost.
Select Domain (Active Directory) if you want toassociate the web server with a user and a groupaccount that exist on a trusted Windows domain.
What types of acccountsshould we use?
Specify the information as shown:
■ Domain - If you chose the Domain (ActiveDirectory) account type, specify the name of thedomain to which the user and the group accountsbelong.
■ Group - Specify the name of the group account toassociate with the web server.
■ User - Specify the name of the user account toassociate with the web server. For security reasons,do not specify a user account that has administrativeprivileges on the host.
■ Password - Specify the password of the useraccount in the User field.
Note: After installation, you cannot change the useraccount for the NetBackup web server. Do not deletethis account, as you cannot reconfigure the account forthe web server after installation.
What are the existingaccount details
More information is available.
77Installing server software on Windows systemsPerforming local, remote, or clustered server installation on Windows systems
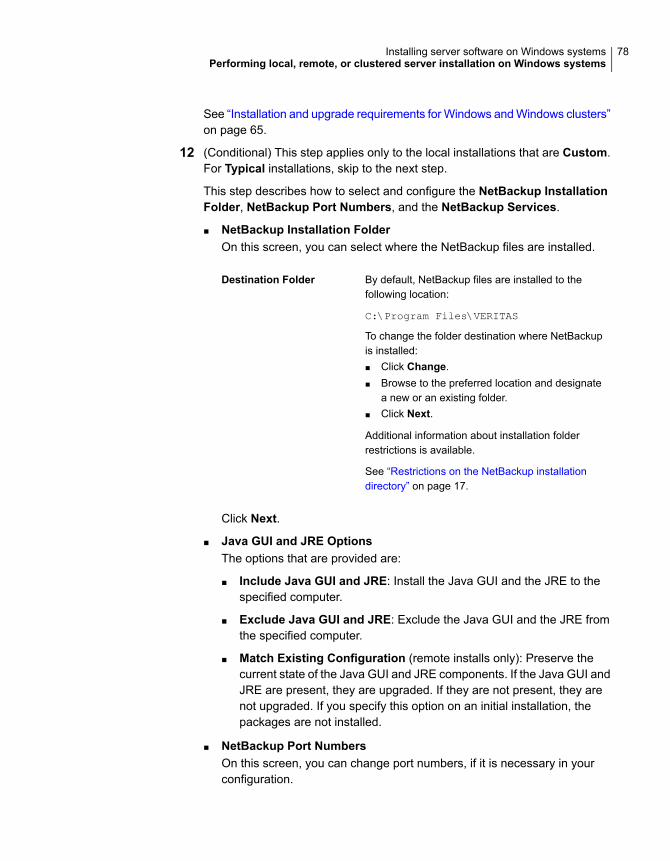
See “Installation and upgrade requirements for Windows and Windows clusters”on page 65.
12 (Conditional) This step applies only to the local installations that are Custom.For Typical installations, skip to the next step.
This step describes how to select and configure the NetBackup InstallationFolder, NetBackup Port Numbers, and the NetBackup Services.
■ NetBackup Installation FolderOn this screen, you can select where the NetBackup files are installed.
By default, NetBackup files are installed to thefollowing location:
C:\Program Files\VERITAS
To change the folder destination where NetBackupis installed:■ Click Change.■ Browse to the preferred location and designate
a new or an existing folder.■ Click Next.
Additional information about installation folderrestrictions is available.
See “Restrictions on the NetBackup installationdirectory” on page 17.
Destination Folder
Click Next.
■ Java GUI and JRE OptionsThe options that are provided are:
■ Include Java GUI and JRE: Install the Java GUI and the JRE to thespecified computer.
■ Exclude Java GUI and JRE: Exclude the Java GUI and the JRE fromthe specified computer.
■ Match Existing Configuration (remote installs only): Preserve thecurrent state of the Java GUI and JRE components. If the Java GUI andJRE are present, they are upgraded. If they are not present, they arenot upgraded. If you specify this option on an initial installation, thepackages are not installed.
■ NetBackup Port NumbersOn this screen, you can change port numbers, if it is necessary in yourconfiguration.
78Installing server software on Windows systemsPerforming local, remote, or clustered server installation on Windows systems
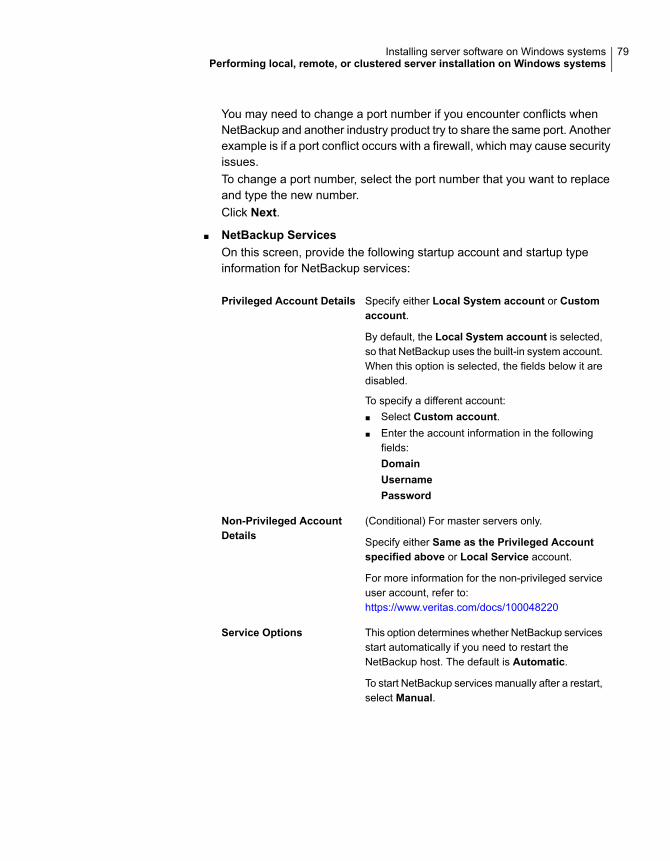
You may need to change a port number if you encounter conflicts whenNetBackup and another industry product try to share the same port. Anotherexample is if a port conflict occurs with a firewall, which may cause securityissues.To change a port number, select the port number that you want to replaceand type the new number.Click Next.
■ NetBackup ServicesOn this screen, provide the following startup account and startup typeinformation for NetBackup services:
Specify either Local System account or Customaccount.
By default, the Local System account is selected,so that NetBackup uses the built-in system account.When this option is selected, the fields below it aredisabled.
To specify a different account:■ Select Custom account.■ Enter the account information in the following
fields:DomainUsernamePassword
Privileged Account Details
(Conditional) For master servers only.
Specify either Same as the Privileged Accountspecified above or Local Service account.
For more information for the non-privileged serviceuser account, refer to:https://www.veritas.com/docs/100048220
Non-Privileged AccountDetails
This option determines whether NetBackup servicesstart automatically if you need to restart theNetBackup host. The default is Automatic.
To start NetBackup services manually after a restart,select Manual.
Service Options
79Installing server software on Windows systemsPerforming local, remote, or clustered server installation on Windows systems
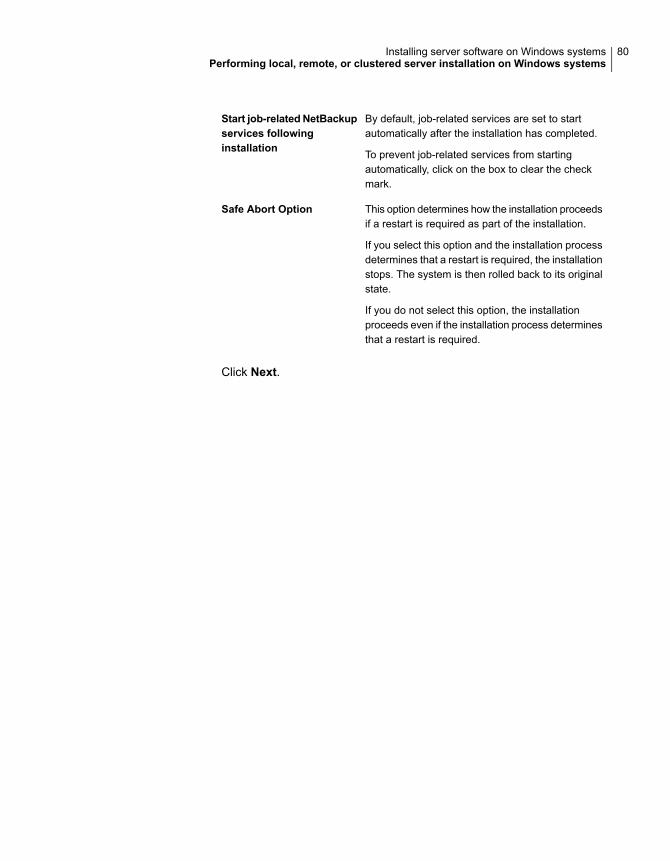
By default, job-related services are set to startautomatically after the installation has completed.
To prevent job-related services from startingautomatically, click on the box to clear the checkmark.
Start job-related NetBackupservices followinginstallation
This option determines how the installation proceedsif a restart is required as part of the installation.
If you select this option and the installation processdetermines that a restart is required, the installationstops. The system is then rolled back to its originalstate.
If you do not select this option, the installationproceeds even if the installation process determinesthat a restart is required.
Safe Abort Option
Click Next.
80Installing server software on Windows systemsPerforming local, remote, or clustered server installation on Windows systems
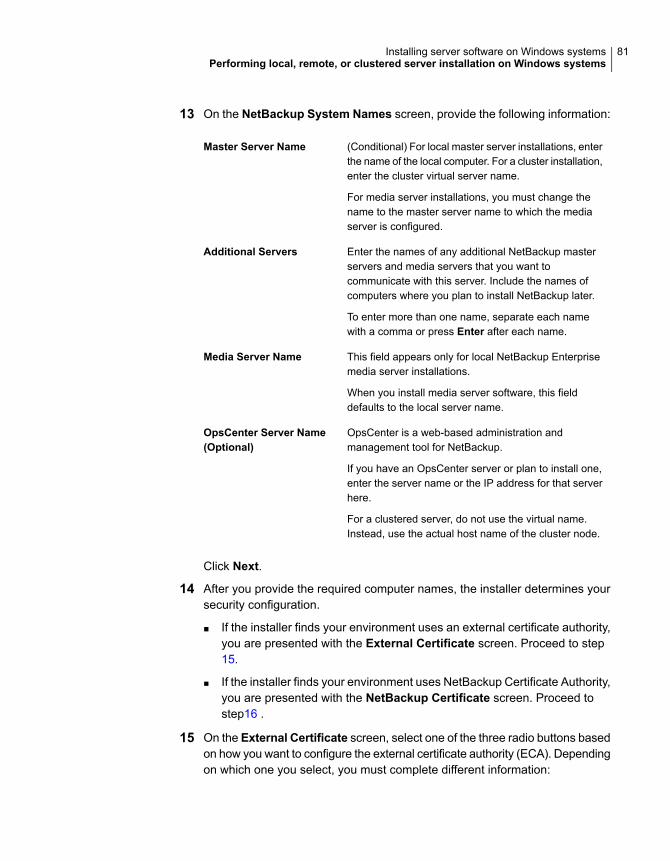
13 On the NetBackup System Names screen, provide the following information:
(Conditional) For local master server installations, enterthe name of the local computer. For a cluster installation,enter the cluster virtual server name.
For media server installations, you must change thename to the master server name to which the mediaserver is configured.
Master Server Name
Enter the names of any additional NetBackup masterservers and media servers that you want tocommunicate with this server. Include the names ofcomputers where you plan to install NetBackup later.
To enter more than one name, separate each namewith a comma or press Enter after each name.
Additional Servers
This field appears only for local NetBackup Enterprisemedia server installations.
When you install media server software, this fielddefaults to the local server name.
Media Server Name
OpsCenter is a web-based administration andmanagement tool for NetBackup.
If you have an OpsCenter server or plan to install one,enter the server name or the IP address for that serverhere.
For a clustered server, do not use the virtual name.Instead, use the actual host name of the cluster node.
OpsCenter Server Name(Optional)
Click Next.
14 After you provide the required computer names, the installer determines yoursecurity configuration.
■ If the installer finds your environment uses an external certificate authority,you are presented with the External Certificate screen. Proceed to step15.
■ If the installer finds your environment uses NetBackup Certificate Authority,you are presented with the NetBackup Certificate screen. Proceed tostep16 .
15 On the External Certificate screen, select one of the three radio buttons basedon how you want to configure the external certificate authority (ECA). Dependingon which one you select, you must complete different information:
81Installing server software on Windows systemsPerforming local, remote, or clustered server installation on Windows systems
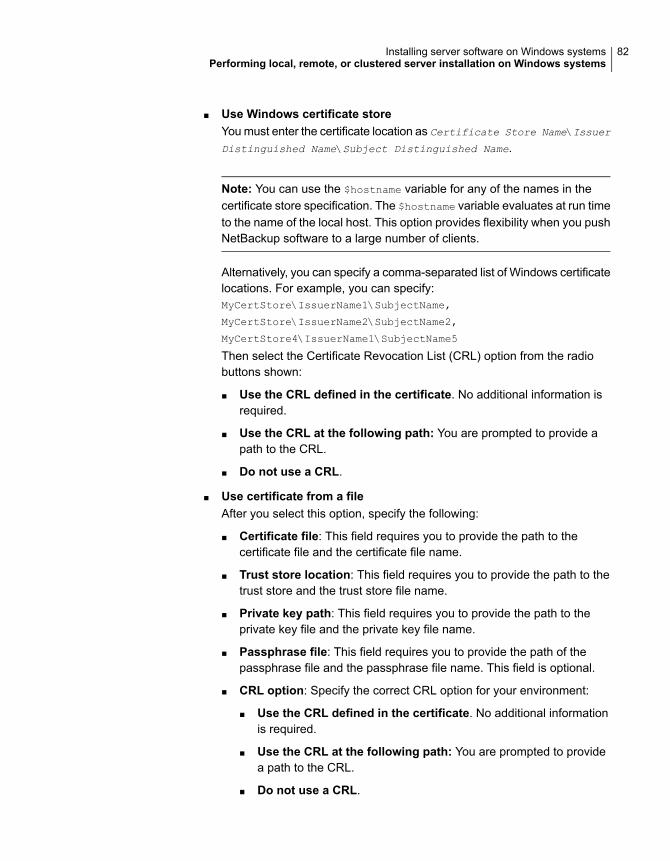
■ Use Windows certificate storeYou must enter the certificate location as Certificate Store Name\Issuer
Distinguished Name\Subject Distinguished Name.
Note: You can use the $hostname variable for any of the names in thecertificate store specification. The $hostname variable evaluates at run timeto the name of the local host. This option provides flexibility when you pushNetBackup software to a large number of clients.
Alternatively, you can specify a comma-separated list of Windows certificatelocations. For example, you can specify:MyCertStore\IssuerName1\SubjectName,
MyCertStore\IssuerName2\SubjectName2,
MyCertStore4\IssuerName1\SubjectName5
Then select the Certificate Revocation List (CRL) option from the radiobuttons shown:
■ Use the CRL defined in the certificate. No additional information isrequired.
■ Use the CRL at the following path: You are prompted to provide apath to the CRL.
■ Do not use a CRL.
■ Use certificate from a fileAfter you select this option, specify the following:
■ Certificate file: This field requires you to provide the path to thecertificate file and the certificate file name.
■ Trust store location: This field requires you to provide the path to thetrust store and the trust store file name.
■ Private key path: This field requires you to provide the path to theprivate key file and the private key file name.
■ Passphrase file: This field requires you to provide the path of thepassphrase file and the passphrase file name. This field is optional.
■ CRL option: Specify the correct CRL option for your environment:
■ Use the CRL defined in the certificate. No additional informationis required.
■ Use the CRL at the following path: You are prompted to providea path to the CRL.
■ Do not use a CRL.
82Installing server software on Windows systemsPerforming local, remote, or clustered server installation on Windows systems
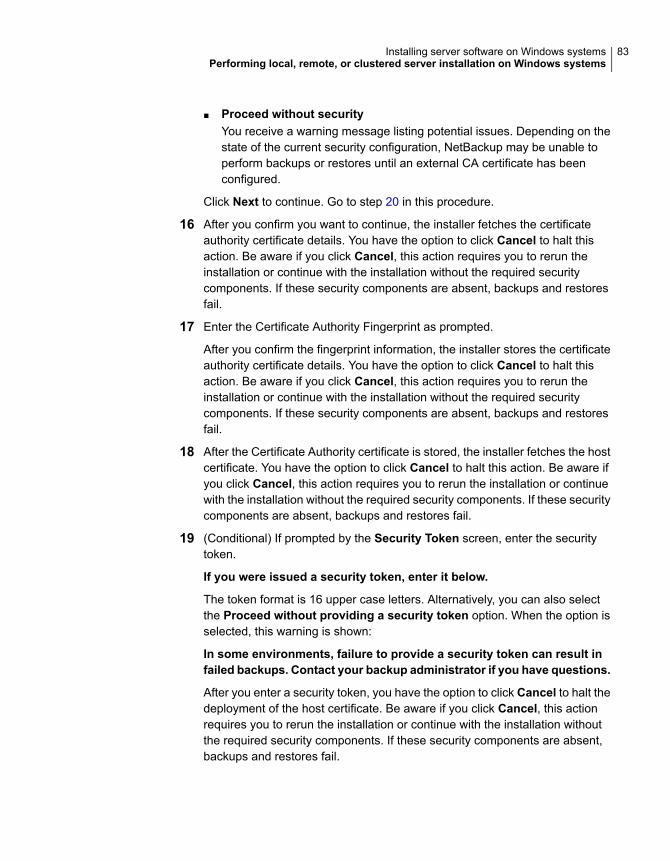
■ Proceed without securityYou receive a warning message listing potential issues. Depending on thestate of the current security configuration, NetBackup may be unable toperform backups or restores until an external CA certificate has beenconfigured.
Click Next to continue. Go to step 20 in this procedure.
16 After you confirm you want to continue, the installer fetches the certificateauthority certificate details. You have the option to click Cancel to halt thisaction. Be aware if you click Cancel, this action requires you to rerun theinstallation or continue with the installation without the required securitycomponents. If these security components are absent, backups and restoresfail.
17 Enter the Certificate Authority Fingerprint as prompted.
After you confirm the fingerprint information, the installer stores the certificateauthority certificate details. You have the option to click Cancel to halt thisaction. Be aware if you click Cancel, this action requires you to rerun theinstallation or continue with the installation without the required securitycomponents. If these security components are absent, backups and restoresfail.
18 After the Certificate Authority certificate is stored, the installer fetches the hostcertificate. You have the option to click Cancel to halt this action. Be aware ifyou click Cancel, this action requires you to rerun the installation or continuewith the installation without the required security components. If these securitycomponents are absent, backups and restores fail.
19 (Conditional) If prompted by the Security Token screen, enter the securitytoken.
If you were issued a security token, enter it below.
The token format is 16 upper case letters. Alternatively, you can also selectthe Proceed without providing a security token option. When the option isselected, this warning is shown:
In some environments, failure to provide a security token can result infailed backups. Contact your backup administrator if you have questions.
After you enter a security token, you have the option to click Cancel to halt thedeployment of the host certificate. Be aware if you click Cancel, this actionrequires you to rerun the installation or continue with the installation withoutthe required security components. If these security components are absent,backups and restores fail.
83Installing server software on Windows systemsPerforming local, remote, or clustered server installation on Windows systems
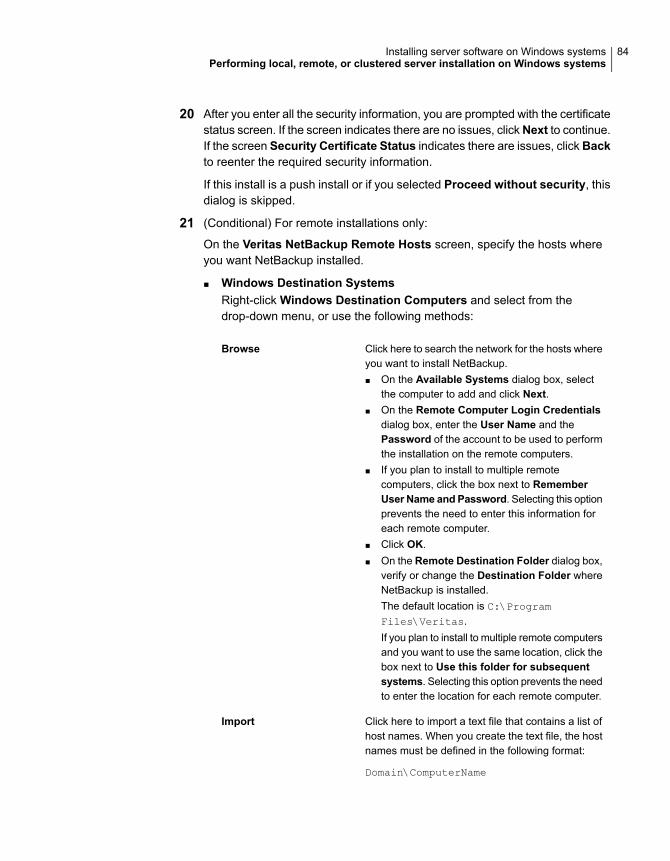
20 After you enter all the security information, you are prompted with the certificatestatus screen. If the screen indicates there are no issues, clickNext to continue.If the screen Security Certificate Status indicates there are issues, click Backto reenter the required security information.
If this install is a push install or if you selected Proceed without security, thisdialog is skipped.
21 (Conditional) For remote installations only:
On the Veritas NetBackup Remote Hosts screen, specify the hosts whereyou want NetBackup installed.
■ Windows Destination SystemsRight-click Windows Destination Computers and select from thedrop-down menu, or use the following methods:
Click here to search the network for the hosts whereyou want to install NetBackup.■ On the Available Systems dialog box, select
the computer to add and click Next.■ On the Remote Computer Login Credentials
dialog box, enter the User Name and thePassword of the account to be used to performthe installation on the remote computers.
■ If you plan to install to multiple remotecomputers, click the box next to RememberUser Name andPassword. Selecting this optionprevents the need to enter this information foreach remote computer.
■ Click OK.■ On the Remote Destination Folder dialog box,
verify or change the Destination Folder whereNetBackup is installed.The default location is C:\ProgramFiles\Veritas.If you plan to install to multiple remote computersand you want to use the same location, click thebox next to Use this folder for subsequentsystems. Selecting this option prevents the needto enter the location for each remote computer.
Browse
Click here to import a text file that contains a list ofhost names. When you create the text file, the hostnames must be defined in the following format:
Domain\ComputerName
Import
84Installing server software on Windows systemsPerforming local, remote, or clustered server installation on Windows systems
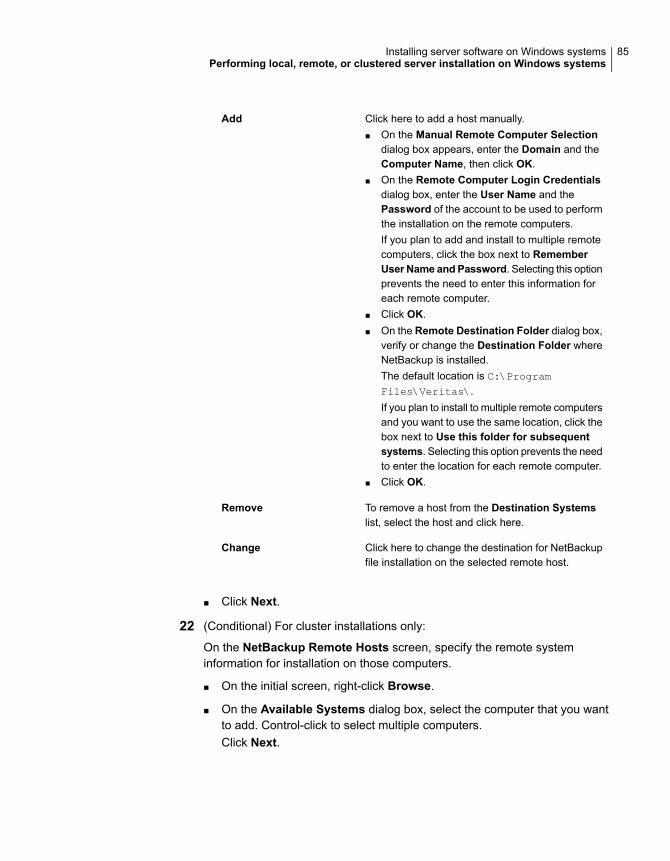
Click here to add a host manually.■ On the Manual Remote Computer Selection
dialog box appears, enter the Domain and theComputer Name, then click OK.
■ On the Remote Computer Login Credentialsdialog box, enter the User Name and thePassword of the account to be used to performthe installation on the remote computers.If you plan to add and install to multiple remotecomputers, click the box next to RememberUser Name andPassword. Selecting this optionprevents the need to enter this information foreach remote computer.
■ Click OK.■ On the Remote Destination Folder dialog box,
verify or change the Destination Folder whereNetBackup is installed.The default location is C:\ProgramFiles\Veritas\.If you plan to install to multiple remote computersand you want to use the same location, click thebox next to Use this folder for subsequentsystems. Selecting this option prevents the needto enter the location for each remote computer.
■ Click OK.
Add
To remove a host from the Destination Systemslist, select the host and click here.
Remove
Click here to change the destination for NetBackupfile installation on the selected remote host.
Change
■ Click Next.
22 (Conditional) For cluster installations only:
On the NetBackup Remote Hosts screen, specify the remote systeminformation for installation on those computers.
■ On the initial screen, right-click Browse.
■ On the Available Systems dialog box, select the computer that you wantto add. Control-click to select multiple computers.Click Next.
85Installing server software on Windows systemsPerforming local, remote, or clustered server installation on Windows systems
■ On the Remote Computer Login Credentials dialog box, enter the username, password, and domain that NetBackup is to use on the remotesystem(s).If you intend to add more remote computers, click the check box next toRemember user name and password.When you provide credentials, you select cluster nodes and add them tothe Windows Destination Systems list. These are the nodes on whichyou remotely install NetBackup. Make sure that you select your local hostwhen you select systems to install.Each time you choose a system, NetBackup performs system and licensechecks. For example, it verifies the system for a server installation thatmatches the type that you selected, as follows:
Considers the remote to be verified.■ NetBackup notinstalled
Compares the installation type on that system to theinstallation type that you request.
■ NetBackup alreadyinstalled
Notifies you of the problem and disallows the choice.One example of an invalid combination is to try to installa Remote Administration Console on a remote systemthat is already a master server.
■ Invalid combination
Notifies you of the problem and disallows the choice.■ Remote system not asupported platform orlevel
The installation procedure also verifies that you have proper administratorcredentials on the remote system. If you do not have administratorcredentials, the Enter Network Password screen appears, and promptsyou to enter the administrator’s user name and password.Click OK and continue selecting destination systems.
This process repeats for each node that you select. You can elect to retain theuser name and password. In that case, you are prompted only when the username or password is not valid.
Note the following about the push-install process in a clustered environment:
■ You can install NetBackup on any number of nodes. However, the clusteringservice sets the limit for the number of nodes in a cluster, not NetBackup.
■ Language packages and other NetBackup add-on products cannot beinstalled with the push method. Add-on products must be installed on eachindividual node in the cluster group. For instructions on how to install theseproducts, refer to the NetBackup documentation that supports each product.
86Installing server software on Windows systemsPerforming local, remote, or clustered server installation on Windows systems
■ NetBackup pushes to the other nodes only the license keys you enter atthe beginning of the installation. Your license keys may enable add-onproducts. If you push NetBackup to nodes that have an add-on productalready installed, your key works for that product.
Click Next.
23 (Conditional) For cluster installations only:
On the Cluster Settings screen, you provide the virtual and the physicalnetwork information.
Note: You can add only one virtual IP address during installation. If your virtualname can resolve into more than one IP address, you can add multiple IPaddresses after the installation using the bpclusterutil -addIP option. Moreinformation about the bpclusterutil command is available.
NetBackup Commands Reference Guide
For new installations, the following configuration settings that you enter applyto all nodes:
For new cluster installations, select this option.Create a new ClusterGroup
The default cluster setting is IPv4.
Enter the following addresses:
■ Virtual IPv4 AddressThe IP address to which the virtual server name shouldresolve.For new cluster installations, you must enter the addressmanually.
■ IPv4 Subnet MaskIdentifies a subnetwork so that IP addresses can beshared on a local area network. This number correlatesdirectly to the virtual IP address of the cluster.
IPv4 Clusters
To enable IPv6 clusters, select this option.
Enter the following IP address:
■ Virtual IPv6 AddressThe IPv6 address must be entered in CIDR format.
IPv6 Clusters
The name that is used to identify a NetBackup service groupor resource group. The resources in any resource group arerelated and interdependent.
NBClusterGroupName
87Installing server software on Windows systemsPerforming local, remote, or clustered server installation on Windows systems
The name by which NetBackup is known in the cluster.
When you install the client software, this host name mustbe added to theAdditional Servers field on theNetBackupSystem Names screen.
The server uses this name when it communicates with theclient nodes.
Virtual Host Name
A directory on one of the shared disks in the cluster whereNetBackup stores configuration information. If the letter forthe disk (or drive) does not appear in the pull-down list, enteronly the letter.
Path to Shared Data
For NetBackup clustered environments, select a publicnetwork that is assigned to the node of the cluster.
Warning: You must not select a private network that isassigned to this cluster.
Public Network
After you set all of the parameters, click this icon to configurethe cluster for use with NetBackup. The Next icon is notavailable until after successful cluster configuration.
The text box provides the following information about theconfiguration:
■ Identifies any existing clusters or NetBackup clustergroups.
■ Indicates a successful configuration.■ Identifies any problems or errors that occurred during
the configuration (configuration failure).
Note: If you click Cancel after a successful clusterconfiguration for new installations, a pop-up messageappears. The message asks if you are sure that you wantto proceed with the cancelation. To cancel the installationand remove the new cluster group, click Yes. To continuewith the installation and retain the new cluster group, clickNo and then click Next.
If the cluster configuration fails, see the NetBackup ClusteredMaster Server Administrator's Guide for information abouthow to resolve the problem.
Cluster Configuration
When the successful cluster configuration message appears, click Next.
24 On theReady to Install the Program screen, review the Installation Summarythat shows your selections from the previous steps.
88Installing server software on Windows systemsPerforming local, remote, or clustered server installation on Windows systems
Note:Veritas recommends that you review the summary screen for any warningmessages. You can prevent installation and upgrade issues if you resolve anyproblems before you continue the installation.
Then select one of the following options:
■ Click Install to start the installation.
■ ClickBack to view the previous screens and make any changes, then returnto this screen and click Install.
■ Click Cancel to cancel the installation.
After you click Install, the installation process begins and a screen appearsthat shows you the installation progress. This process may take several minutes.
For remote and cluster installations, up to five installations occur simultaneously.When an installation is completed, another one begins so that a maximum offive installations are in progress.
25 On the Installation Complete screen, select from the following options:
The installation log file provides detailed installationinformation and shows whether any errors occurred.This log includes information about the optionalinstallation of the Java GUI and the JRE.
Examine the installation log at the following location:
%ALLUSERSPROFILE%\Veritas\NetBackup\InstallLogs\
Note: When you perform a remote or a clusterinstallation to multiple computers, this option only letsyou view the log for the local computer. Each computerthat you selected for installation contains its owninstallation log file. To view the log file of a remotecomputer, open a Windows Explorer window and enter\\<COMPUTERNAME>.
Search the installation log for the following errorindications:
■ Strings that include Return Value 3.■ Important log messages that are color coded as
follows:Yellow = warning.Red = error.
View installation log file
89Installing server software on Windows systemsPerforming local, remote, or clustered server installation on Windows systems
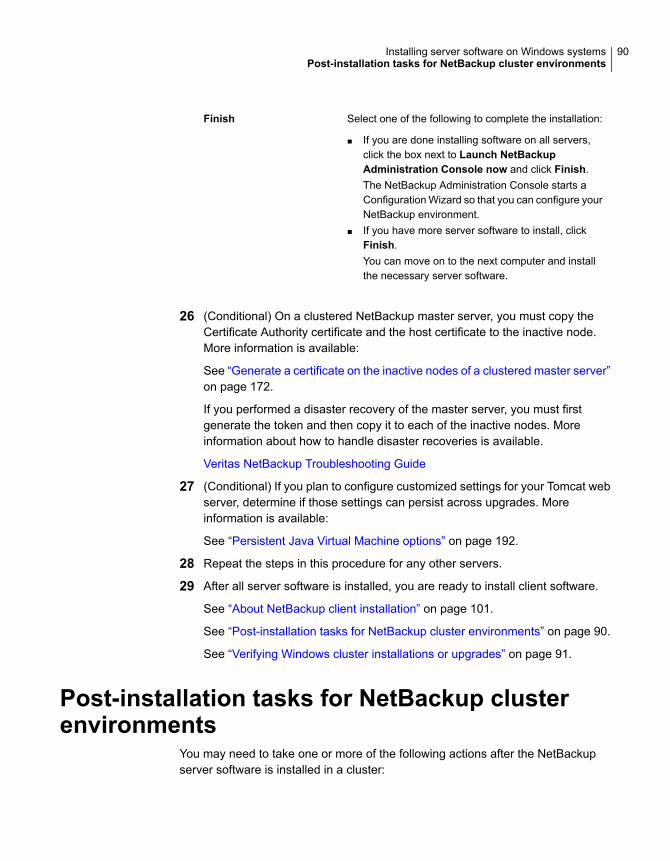
Select one of the following to complete the installation:
■ If you are done installing software on all servers,click the box next to Launch NetBackupAdministration Console now and click Finish.The NetBackup Administration Console starts aConfiguration Wizard so that you can configure yourNetBackup environment.
■ If you have more server software to install, clickFinish.You can move on to the next computer and installthe necessary server software.
Finish
26 (Conditional) On a clustered NetBackup master server, you must copy theCertificate Authority certificate and the host certificate to the inactive node.More information is available:
See “Generate a certificate on the inactive nodes of a clustered master server”on page 172.
If you performed a disaster recovery of the master server, you must firstgenerate the token and then copy it to each of the inactive nodes. Moreinformation about how to handle disaster recoveries is available.
Veritas NetBackup Troubleshooting Guide
27 (Conditional) If you plan to configure customized settings for your Tomcat webserver, determine if those settings can persist across upgrades. Moreinformation is available:
See “Persistent Java Virtual Machine options” on page 192.
28 Repeat the steps in this procedure for any other servers.
29 After all server software is installed, you are ready to install client software.
See “About NetBackup client installation” on page 101.
See “Post-installation tasks for NetBackup cluster environments” on page 90.
See “Verifying Windows cluster installations or upgrades” on page 91.
Post-installation tasks for NetBackup clusterenvironments
You may need to take one or more of the following actions after the NetBackupserver software is installed in a cluster:
90Installing server software on Windows systemsPost-installation tasks for NetBackup cluster environments

You must obtain the Certificate Authority certificate and thehost certificate for each inactive node. More information isavailable:
See “Generate a certificate on the inactive nodes of aclustered master server” on page 172.
Obtain certificates
Configure your external certificate authority. If you opted toskip the security configuration or if you have a master server,you may need to configure an ECA. More information aboutconfiguring ECAs is available:
https://www.veritas.com/support/en_US/article.100044300
For more information, see the NetBackup Security andEncryption Guide and refer to the chapter on external CAand external certificates.
External certificate authority
You may need to restart each of the cluster nodes after theinstallation is complete.
Restart
Under normal circumstances, cluster configuration is one ofthe final steps when you install NetBackup in a cluster. If thisstep is not done or does not complete successfully, you canuse the bpclusterutil command from the active node toperform this step.
For information on how to run bpclusterutil, see theNetBackup Commands Reference Guide.
WSFC and VCS clusters
Any NetBackup resources that you took offline come backonline automatically.
WSFC clusters
See “Verifying Windows cluster installations or upgrades” on page 91.
Verifying Windows cluster installations orupgrades
The Cluster Administration console lets you verify the installation or upgrade andview your current system structure.
To verify a successful WSFC cluster installation or upgrade through theCluster Administration console
1 During a cluster installation, you can open the Cluster Administration consoleto see your current structure.
2 After you have completed the installation and the configuration process, theconsole shows the new cluster group configuration.
91Installing server software on Windows systemsVerifying Windows cluster installations or upgrades
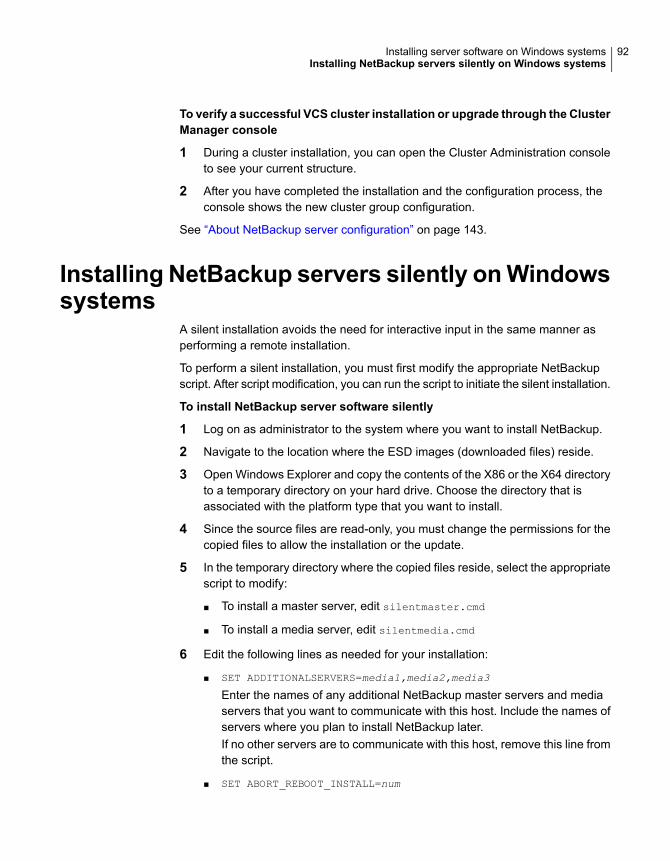
To verify a successful VCS cluster installation or upgrade through the ClusterManager console
1 During a cluster installation, you can open the Cluster Administration consoleto see your current structure.
2 After you have completed the installation and the configuration process, theconsole shows the new cluster group configuration.
See “About NetBackup server configuration” on page 143.
Installing NetBackup servers silently onWindowssystems
A silent installation avoids the need for interactive input in the same manner asperforming a remote installation.
To perform a silent installation, you must first modify the appropriate NetBackupscript. After script modification, you can run the script to initiate the silent installation.
To install NetBackup server software silently
1 Log on as administrator to the system where you want to install NetBackup.
2 Navigate to the location where the ESD images (downloaded files) reside.
3 Open Windows Explorer and copy the contents of the X86 or the X64 directoryto a temporary directory on your hard drive. Choose the directory that isassociated with the platform type that you want to install.
4 Since the source files are read-only, you must change the permissions for thecopied files to allow the installation or the update.
5 In the temporary directory where the copied files reside, select the appropriatescript to modify:
■ To install a master server, edit silentmaster.cmd
■ To install a media server, edit silentmedia.cmd
6 Edit the following lines as needed for your installation:
■ SET ADDITIONALSERVERS=media1,media2,media3
Enter the names of any additional NetBackup master servers and mediaservers that you want to communicate with this host. Include the names ofservers where you plan to install NetBackup later.If no other servers are to communicate with this host, remove this line fromthe script.
■ SET ABORT_REBOOT_INSTALL=num
92Installing server software on Windows systemsInstalling NetBackup servers silently on Windows systems
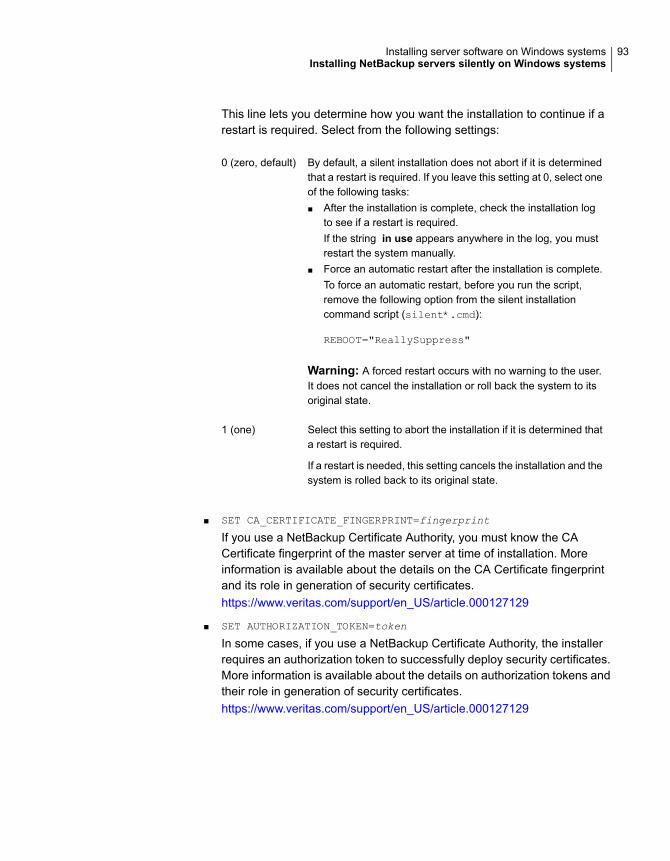
This line lets you determine how you want the installation to continue if arestart is required. Select from the following settings:
By default, a silent installation does not abort if it is determinedthat a restart is required. If you leave this setting at 0, select oneof the following tasks:■ After the installation is complete, check the installation log
to see if a restart is required.If the string in use appears anywhere in the log, you mustrestart the system manually.
■ Force an automatic restart after the installation is complete.To force an automatic restart, before you run the script,remove the following option from the silent installationcommand script (silent*.cmd):
REBOOT="ReallySuppress"
Warning: A forced restart occurs with no warning to the user.It does not cancel the installation or roll back the system to itsoriginal state.
0 (zero, default)
Select this setting to abort the installation if it is determined thata restart is required.
If a restart is needed, this setting cancels the installation and thesystem is rolled back to its original state.
1 (one)
■ SET CA_CERTIFICATE_FINGERPRINT=fingerprint
If you use a NetBackup Certificate Authority, you must know the CACertificate fingerprint of the master server at time of installation. Moreinformation is available about the details on the CA Certificate fingerprintand its role in generation of security certificates.https://www.veritas.com/support/en_US/article.000127129
■ SET AUTHORIZATION_TOKEN=token
In some cases, if you use a NetBackup Certificate Authority, the installerrequires an authorization token to successfully deploy security certificates.More information is available about the details on authorization tokens andtheir role in generation of security certificates.https://www.veritas.com/support/en_US/article.000127129
93Installing server software on Windows systemsInstalling NetBackup servers silently on Windows systems
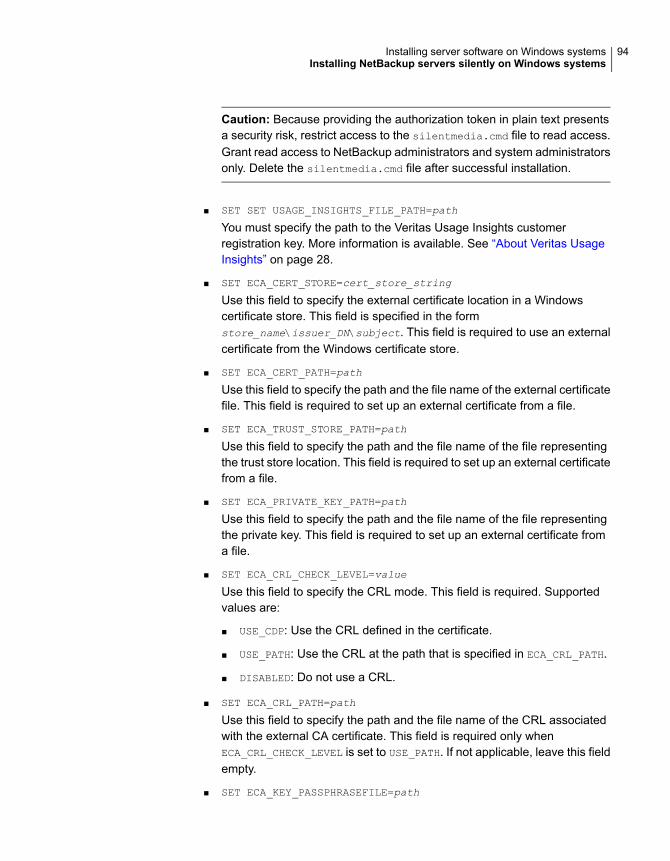
Caution: Because providing the authorization token in plain text presentsa security risk, restrict access to the silentmedia.cmd file to read access.Grant read access to NetBackup administrators and system administratorsonly. Delete the silentmedia.cmd file after successful installation.
■ SET SET USAGE_INSIGHTS_FILE_PATH=path
You must specify the path to the Veritas Usage Insights customerregistration key. More information is available. See “About Veritas UsageInsights” on page 28.
■ SET ECA_CERT_STORE=cert_store_string
Use this field to specify the external certificate location in a Windowscertificate store. This field is specified in the formstore_name\issuer_DN\subject. This field is required to use an externalcertificate from the Windows certificate store.
■ SET ECA_CERT_PATH=path
Use this field to specify the path and the file name of the external certificatefile. This field is required to set up an external certificate from a file.
■ SET ECA_TRUST_STORE_PATH=path
Use this field to specify the path and the file name of the file representingthe trust store location. This field is required to set up an external certificatefrom a file.
■ SET ECA_PRIVATE_KEY_PATH=path
Use this field to specify the path and the file name of the file representingthe private key. This field is required to set up an external certificate froma file.
■ SET ECA_CRL_CHECK_LEVEL=value
Use this field to specify the CRL mode. This field is required. Supportedvalues are:
■ USE_CDP: Use the CRL defined in the certificate.
■ USE_PATH: Use the CRL at the path that is specified in ECA_CRL_PATH.
■ DISABLED: Do not use a CRL.
■ SET ECA_CRL_PATH=path
Use this field to specify the path and the file name of the CRL associatedwith the external CA certificate. This field is required only whenECA_CRL_CHECK_LEVEL is set to USE_PATH. If not applicable, leave this fieldempty.
■ SET ECA_KEY_PASSPHRASEFILE=path
94Installing server software on Windows systemsInstalling NetBackup servers silently on Windows systems
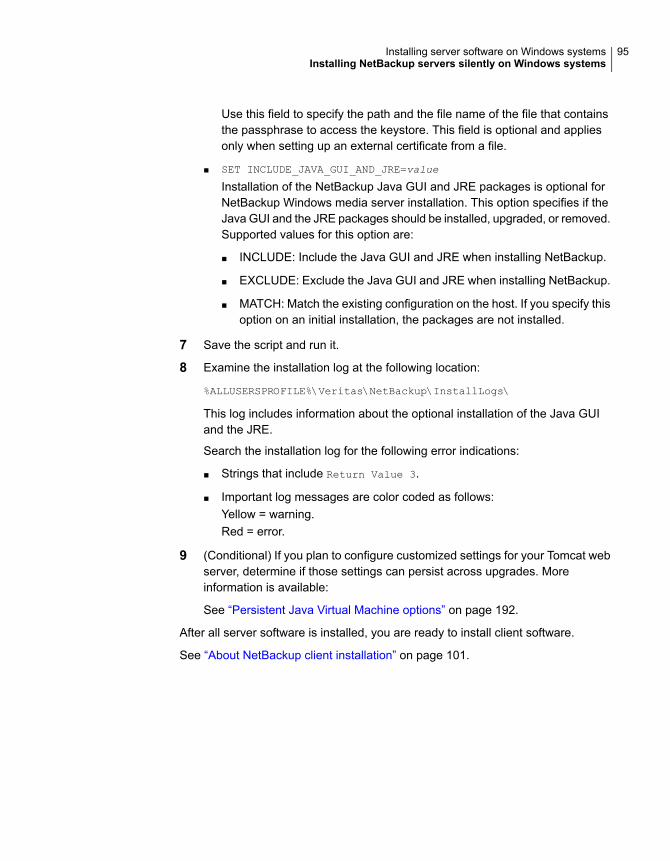
Use this field to specify the path and the file name of the file that containsthe passphrase to access the keystore. This field is optional and appliesonly when setting up an external certificate from a file.
■ SET INCLUDE_JAVA_GUI_AND_JRE=value
Installation of the NetBackup Java GUI and JRE packages is optional forNetBackup Windows media server installation. This option specifies if theJava GUI and the JRE packages should be installed, upgraded, or removed.Supported values for this option are:
■ INCLUDE: Include the Java GUI and JRE when installing NetBackup.
■ EXCLUDE: Exclude the Java GUI and JRE when installing NetBackup.
■ MATCH: Match the existing configuration on the host. If you specify thisoption on an initial installation, the packages are not installed.
7 Save the script and run it.
8 Examine the installation log at the following location:
%ALLUSERSPROFILE%\Veritas\NetBackup\InstallLogs\
This log includes information about the optional installation of the Java GUIand the JRE.
Search the installation log for the following error indications:
■ Strings that include Return Value 3.
■ Important log messages are color coded as follows:Yellow = warning.Red = error.
9 (Conditional) If you plan to configure customized settings for your Tomcat webserver, determine if those settings can persist across upgrades. Moreinformation is available:
See “Persistent Java Virtual Machine options” on page 192.
After all server software is installed, you are ready to install client software.
See “About NetBackup client installation” on page 101.
95Installing server software on Windows systemsInstalling NetBackup servers silently on Windows systems
About the administrativeinterfaces
This chapter includes the following topics:
■ About the NetBackup web user interface
■ About the NetBackup Administration Console
■ Installing the NetBackup Administration Console
■ Installing multiple versions of the NetBackup Administration Console on Windows
■ Removing earlier versions of the NetBackup Administration Console on Windows
■ About the NetBackup Remote Administration Console
■ Installing the NetBackup Remote Administration Console
About the NetBackup web user interfaceIn version 8.1.2, Veritas introduces a new web user interface for use with NetBackup.The new interface is designed to improve the ease of use and functionality. At thistime, not all functionality of the NetBackup Administration Console is present in thenew interface.
NetBackup uses the Transport Layer Security (TLS) protocol to encrypt thecommunication for the new interface. You need a TLS certificate that identifies theNetBackup host to enable TLS on the NetBackup web server. NetBackup usesself-signed certificates for client and host validation. A self-signed certificate isautomatically generated during install for enabling TLS communications betweenthe web browser and the NetBackup web server. You can create and implementthird-party certificates to use in place of the self-signed certificates to support theNetBackup Web Service. The certificates are used for TLS encryption and
5Chapter
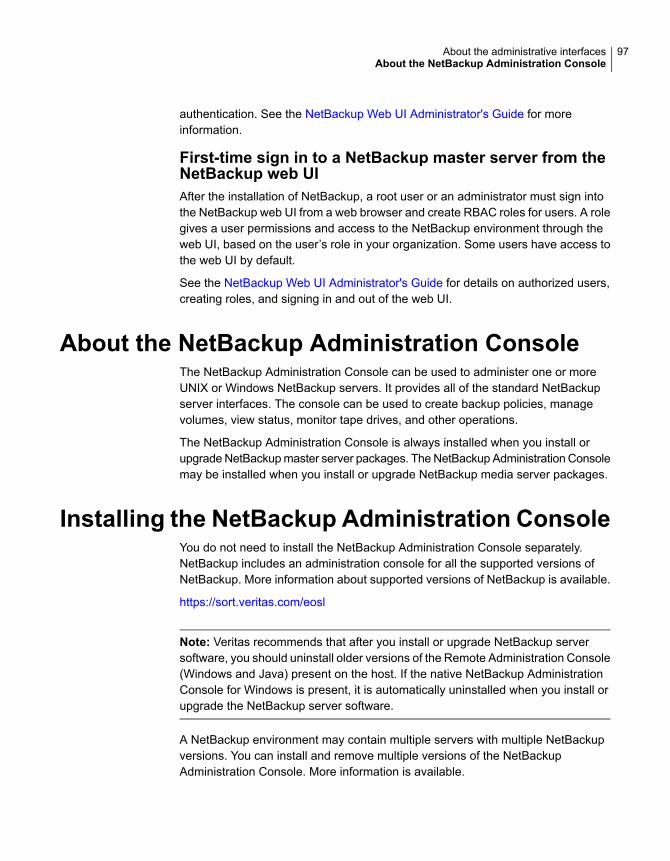
authentication. See the NetBackup Web UI Administrator's Guide for moreinformation.
First-time sign in to a NetBackup master server from theNetBackup web UIAfter the installation of NetBackup, a root user or an administrator must sign intothe NetBackup web UI from a web browser and create RBAC roles for users. A rolegives a user permissions and access to the NetBackup environment through theweb UI, based on the user’s role in your organization. Some users have access tothe web UI by default.
See the NetBackup Web UI Administrator's Guide for details on authorized users,creating roles, and signing in and out of the web UI.
About the NetBackup Administration ConsoleThe NetBackup Administration Console can be used to administer one or moreUNIX or Windows NetBackup servers. It provides all of the standard NetBackupserver interfaces. The console can be used to create backup policies, managevolumes, view status, monitor tape drives, and other operations.
The NetBackup Administration Console is always installed when you install orupgrade NetBackup master server packages. The NetBackup Administration Consolemay be installed when you install or upgrade NetBackup media server packages.
Installing the NetBackup Administration ConsoleYou do not need to install the NetBackup Administration Console separately.NetBackup includes an administration console for all the supported versions ofNetBackup. More information about supported versions of NetBackup is available.
https://sort.veritas.com/eosl
Note: Veritas recommends that after you install or upgrade NetBackup serversoftware, you should uninstall older versions of the Remote Administration Console(Windows and Java) present on the host. If the native NetBackup AdministrationConsole for Windows is present, it is automatically uninstalled when you install orupgrade the NetBackup server software.
A NetBackup environment may contain multiple servers with multiple NetBackupversions. You can install and remove multiple versions of the NetBackupAdministration Console. More information is available.
97About the administrative interfacesAbout the NetBackup Administration Console
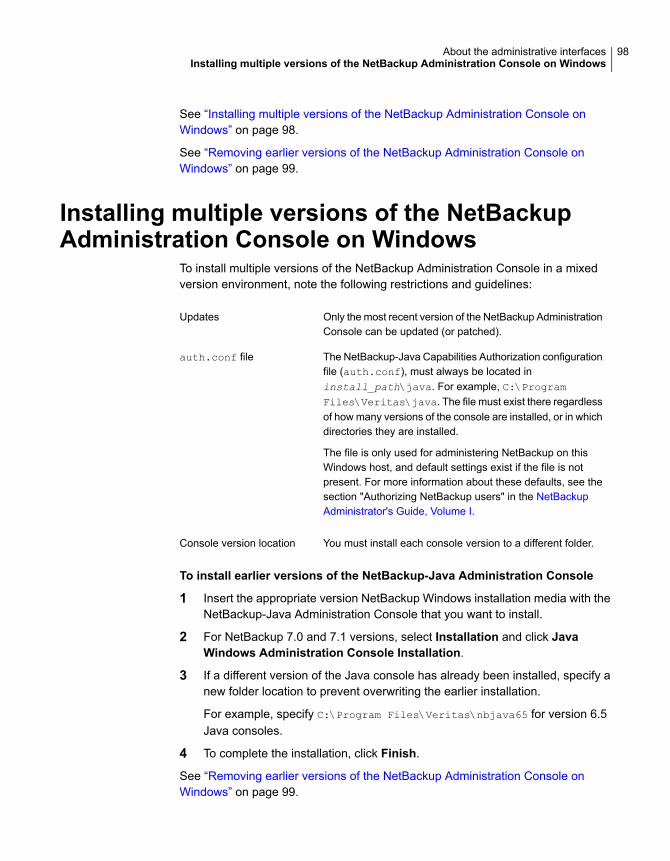
See “Installing multiple versions of the NetBackup Administration Console onWindows” on page 98.
See “Removing earlier versions of the NetBackup Administration Console onWindows” on page 99.
Installing multiple versions of the NetBackupAdministration Console on Windows
To install multiple versions of the NetBackup Administration Console in a mixedversion environment, note the following restrictions and guidelines:
Only the most recent version of the NetBackup AdministrationConsole can be updated (or patched).
Updates
The NetBackup-Java Capabilities Authorization configurationfile (auth.conf), must always be located ininstall_path\java. For example, C:\ProgramFiles\Veritas\java. The file must exist there regardlessof how many versions of the console are installed, or in whichdirectories they are installed.
The file is only used for administering NetBackup on thisWindows host, and default settings exist if the file is notpresent. For more information about these defaults, see thesection "Authorizing NetBackup users" in the NetBackupAdministrator's Guide, Volume I.
auth.conf file
You must install each console version to a different folder.Console version location
To install earlier versions of the NetBackup-Java Administration Console
1 Insert the appropriate version NetBackup Windows installation media with theNetBackup-Java Administration Console that you want to install.
2 For NetBackup 7.0 and 7.1 versions, select Installation and click JavaWindows Administration Console Installation.
3 If a different version of the Java console has already been installed, specify anew folder location to prevent overwriting the earlier installation.
For example, specify C:\Program Files\Veritas\nbjava65 for version 6.5Java consoles.
4 To complete the installation, click Finish.
See “Removing earlier versions of the NetBackup Administration Console onWindows” on page 99.
98About the administrative interfacesInstalling multiple versions of the NetBackup Administration Console on Windows
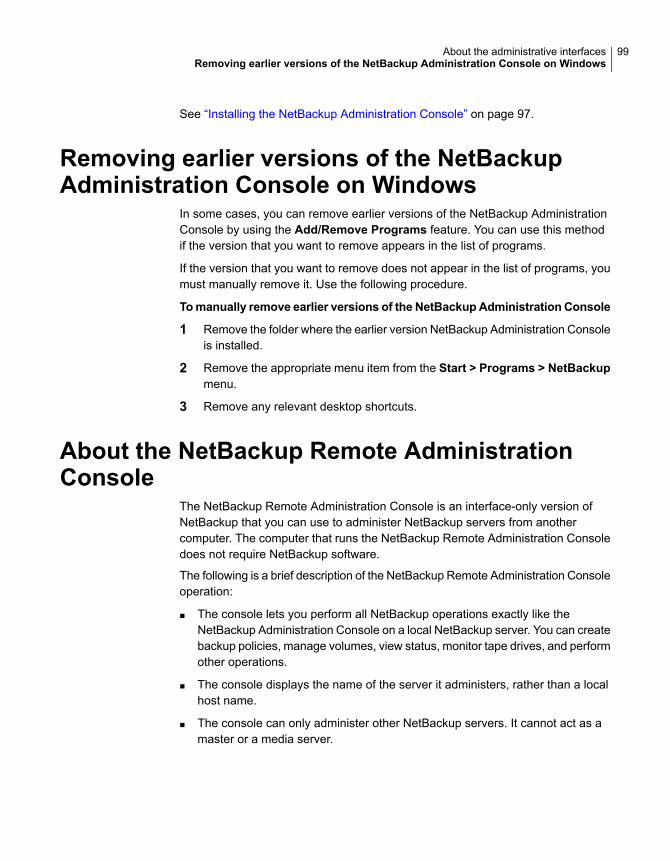
See “Installing the NetBackup Administration Console” on page 97.
Removing earlier versions of the NetBackupAdministration Console on Windows
In some cases, you can remove earlier versions of the NetBackup AdministrationConsole by using the Add/Remove Programs feature. You can use this methodif the version that you want to remove appears in the list of programs.
If the version that you want to remove does not appear in the list of programs, youmust manually remove it. Use the following procedure.
Tomanually remove earlier versions of the NetBackupAdministrationConsole
1 Remove the folder where the earlier version NetBackup Administration Consoleis installed.
2 Remove the appropriate menu item from the Start > Programs > NetBackupmenu.
3 Remove any relevant desktop shortcuts.
About the NetBackup Remote AdministrationConsole
The NetBackup Remote Administration Console is an interface-only version ofNetBackup that you can use to administer NetBackup servers from anothercomputer. The computer that runs the NetBackup Remote Administration Consoledoes not require NetBackup software.
The following is a brief description of the NetBackup Remote Administration Consoleoperation:
■ The console lets you perform all NetBackup operations exactly like theNetBackup Administration Console on a local NetBackup server. You can createbackup policies, manage volumes, view status, monitor tape drives, and performother operations.
■ The console displays the name of the server it administers, rather than a localhost name.
■ The console can only administer other NetBackup servers. It cannot act as amaster or a media server.
99About the administrative interfacesRemoving earlier versions of the NetBackup Administration Console on Windows

Installing the NetBackup Remote AdministrationConsole
The procedure shown details how to install the NetBackup Remote AdministrationConsole on a non-NetBackup computer.
To install the NetBackup Remote Administration Console
1 Navigate to the location where the downloaded files reside and runBrowser.exe.
Note: You cannot install NetBackup Remote Administration Console on acomputer where NetBackup server software is already installed.
2 On the initial screen, select Installation.
3 On the Installation screen, click NetBackup Java Remote AdministrationConsole Installation.
4 On the Welcome screen, review the content and click Next.
5 On the License Agreement screen, accept the agreement and click Next.
6 On the NetBackup Installation Type screen, select Install to this computeronly and Typical Installation and then click Next.
If an earlier version of the console already exists, you have the following options:
■ Cancel the installation and remove the earlier version of the console. Thenrun the new console installation again.
■ Specify an alternate installation location for the new version of the console.
7 On theReady to Install the Program screen, review the Installation Summaryand click Install.
8 On the Installation Complete screen, click Finish.
9 To open the console, click Start > Programs > Veritas NetBackup >NetBackup Version Administration Console.
Note: NetBackup includes an administration console for all the supported versionsof NetBackup. More information about supported versions of NetBackup is available.
https://sort.veritas.com/eosl
See “About the NetBackup Remote Administration Console” on page 99.
100About the administrative interfacesInstalling the NetBackup Remote Administration Console
Installing NetBackup clientsoftware
This chapter includes the following topics:
■ About NetBackup client installation
■ About NetBackup client installation on Windows
■ About NetBackup client installation on UNIX and Linux
About NetBackup client installationBy definition, NetBackup servers are also clients. When you install NetBackupserver software, client software is also installed.
When you install client software, you perform a true client installation since no serversoftware is installed.
Client software can be installed locally at each individual computer or remotely.The operating system determines which clients can be installed remotely.
A Windows host can only push client software to Windowsclients.
NetBackup does not need to be installed on the host that isused to perform the remote client installation.
Windows
A NetBackup UNIX or Linux server can only push clientsoftware to UNIX or Linux clients.
NetBackup software and client type software must be installedon the server that is used to perform the remote clientinstallation.
UNIX or Linux
6Chapter

Note: Additional steps are required to deploy clients in a secure environment wherethe clients do not have direct connectivity to the master server. More informationon this topic is available. See the topic on deploying certificates on clients withoutconnectivity to the master server in the NetBackup Security and Encryption Guide.
Note: All scripts must be stored and run locally. One recommendation is that scriptsshould not be world-writable. Scripts are not allowed to be run from network orremote locations. Any script that is created and saved in the NetBackup db_ext
(UNIX) or dbext (Windows) location needs to be protected during a NetBackupuninstall.
For more information about registering authorized locations and scripts, review theknowledge base article:
http://www.veritas.com/docs/000126002
For more information about your specific database agent, review the documentationfor that agent:
http://www.veritas.com/docs/DOC5332
About NetBackup client installation on WindowsThe NetBackup client installation wizard for Microsoft Windows lets you select theappropriate setup and installation options from a series of wizard screens. Afteryou select options, a window appears that lets you verify your selections before theinstallation begins.
While the installation is in progress, a dialog box provides details of the installationand the setup progress. When the installation is completed, a final window showsthe results.
Note the following when you install NetBackup client software on Windows systems:
You cannot install NetBackup client software on thecomputers that currently have NetBackup server software.In these cases, you must first remove the NetBackup serversoftware.
See “Removing NetBackup server and client software fromWindows servers, clusters, and clients” on page 167.
Client installation restrictions
102Installing NetBackup client softwareAbout NetBackup client installation on Windows
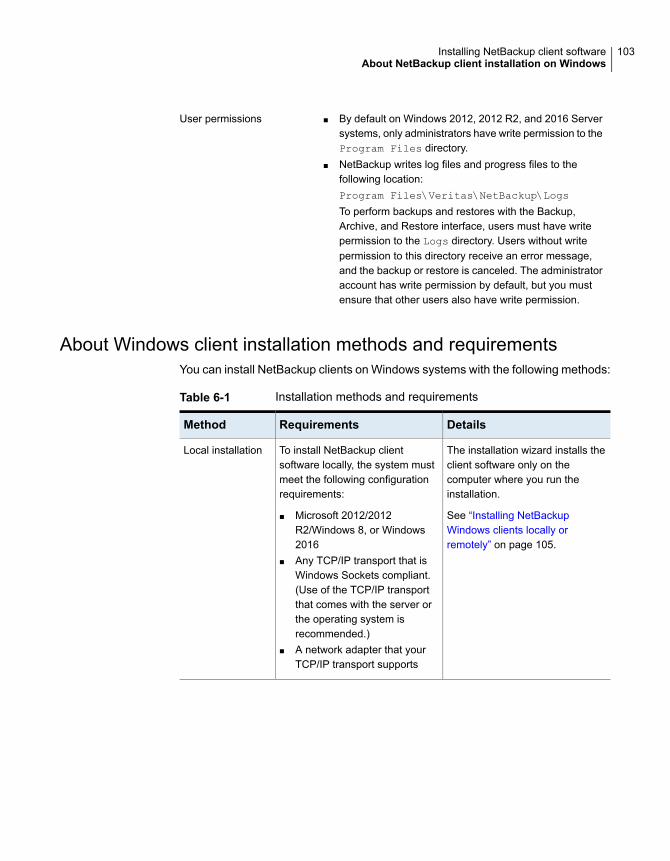
■ By default on Windows 2012, 2012 R2, and 2016 Serversystems, only administrators have write permission to theProgram Files directory.
■ NetBackup writes log files and progress files to thefollowing location:Program Files\Veritas\NetBackup\Logs
To perform backups and restores with the Backup,Archive, and Restore interface, users must have writepermission to the Logs directory. Users without writepermission to this directory receive an error message,and the backup or restore is canceled. The administratoraccount has write permission by default, but you mustensure that other users also have write permission.
User permissions
About Windows client installation methods and requirementsYou can install NetBackup clients on Windows systems with the following methods:
Table 6-1 Installation methods and requirements
DetailsRequirementsMethod
The installation wizard installs theclient software only on thecomputer where you run theinstallation.
See “Installing NetBackupWindows clients locally orremotely” on page 105.
To install NetBackup clientsoftware locally, the system mustmeet the following configurationrequirements:
■ Microsoft 2012/2012R2/Windows 8, or Windows2016
■ Any TCP/IP transport that isWindows Sockets compliant.(Use of the TCP/IP transportthat comes with the server orthe operating system isrecommended.)
■ A network adapter that yourTCP/IP transport supports
Local installation
103Installing NetBackup client softwareAbout NetBackup client installation on Windows
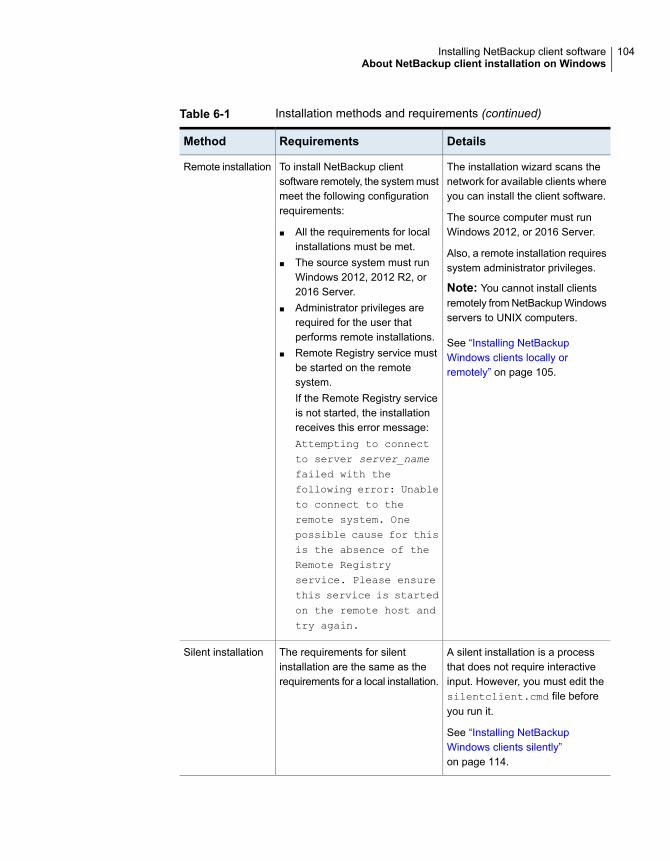
Table 6-1 Installation methods and requirements (continued)
DetailsRequirementsMethod
The installation wizard scans thenetwork for available clients whereyou can install the client software.
The source computer must runWindows 2012, or 2016 Server.
Also, a remote installation requiressystem administrator privileges.
Note: You cannot install clientsremotely from NetBackup Windowsservers to UNIX computers.
See “Installing NetBackupWindows clients locally orremotely” on page 105.
To install NetBackup clientsoftware remotely, the system mustmeet the following configurationrequirements:
■ All the requirements for localinstallations must be met.
■ The source system must runWindows 2012, 2012 R2, or2016 Server.
■ Administrator privileges arerequired for the user thatperforms remote installations.
■ Remote Registry service mustbe started on the remotesystem.If the Remote Registry serviceis not started, the installationreceives this error message:Attempting to connectto server server_namefailed with thefollowing error: Unableto connect to theremote system. Onepossible cause for thisis the absence of theRemote Registryservice. Please ensurethis service is startedon the remote host andtry again.
Remote installation
A silent installation is a processthat does not require interactiveinput. However, you must edit thesilentclient.cmd file beforeyou run it.
See “Installing NetBackupWindows clients silently”on page 114.
The requirements for silentinstallation are the same as therequirements for a local installation.
Silent installation
104Installing NetBackup client softwareAbout NetBackup client installation on Windows
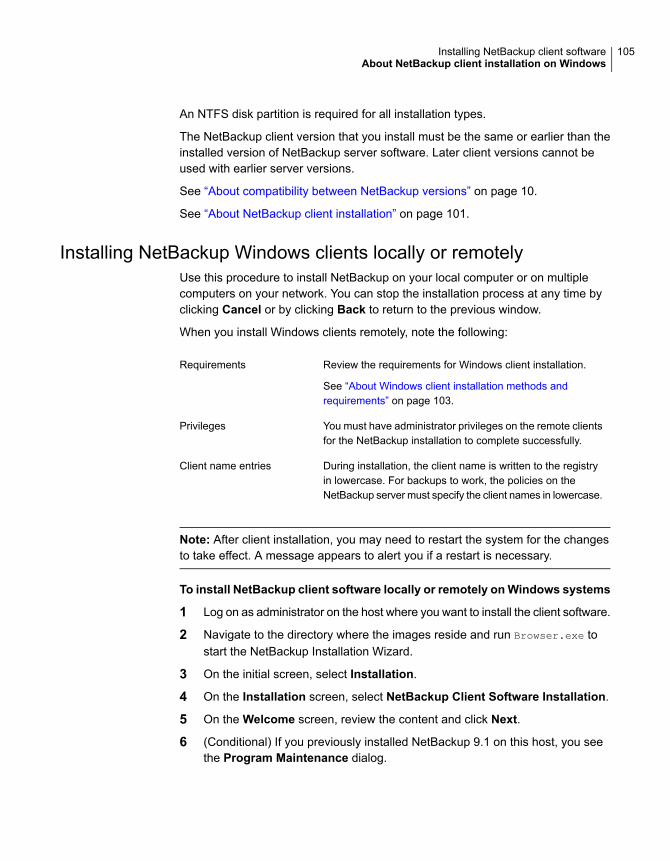
An NTFS disk partition is required for all installation types.
The NetBackup client version that you install must be the same or earlier than theinstalled version of NetBackup server software. Later client versions cannot beused with earlier server versions.
See “About compatibility between NetBackup versions” on page 10.
See “About NetBackup client installation” on page 101.
Installing NetBackup Windows clients locally or remotelyUse this procedure to install NetBackup on your local computer or on multiplecomputers on your network. You can stop the installation process at any time byclicking Cancel or by clicking Back to return to the previous window.
When you install Windows clients remotely, note the following:
Review the requirements for Windows client installation.
See “About Windows client installation methods andrequirements” on page 103.
Requirements
You must have administrator privileges on the remote clientsfor the NetBackup installation to complete successfully.
Privileges
During installation, the client name is written to the registryin lowercase. For backups to work, the policies on theNetBackup server must specify the client names in lowercase.
Client name entries
Note: After client installation, you may need to restart the system for the changesto take effect. A message appears to alert you if a restart is necessary.
To install NetBackup client software locally or remotely onWindows systems
1 Log on as administrator on the host where you want to install the client software.
2 Navigate to the directory where the images reside and run Browser.exe tostart the NetBackup Installation Wizard.
3 On the initial screen, select Installation.
4 On the Installation screen, select NetBackup Client Software Installation.
5 On the Welcome screen, review the content and click Next.
6 (Conditional) If you previously installed NetBackup 9.1 on this host, you seethe Program Maintenance dialog.
105Installing NetBackup client softwareAbout NetBackup client installation on Windows
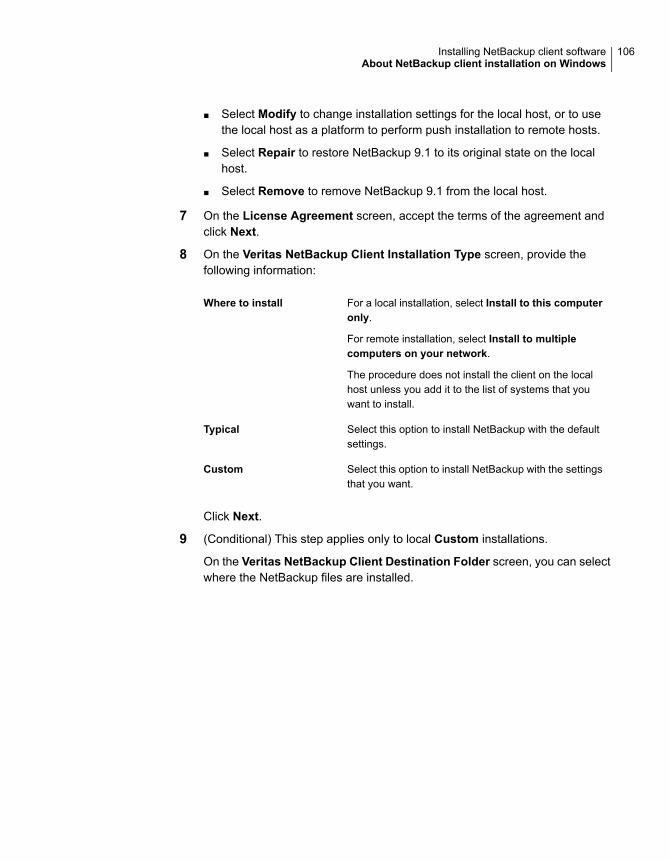
■ Select Modify to change installation settings for the local host, or to usethe local host as a platform to perform push installation to remote hosts.
■ Select Repair to restore NetBackup 9.1 to its original state on the localhost.
■ Select Remove to remove NetBackup 9.1 from the local host.
7 On the License Agreement screen, accept the terms of the agreement andclick Next.
8 On the Veritas NetBackup Client Installation Type screen, provide thefollowing information:
For a local installation, select Install to this computeronly.
For remote installation, select Install to multiplecomputers on your network.
The procedure does not install the client on the localhost unless you add it to the list of systems that youwant to install.
Where to install
Select this option to install NetBackup with the defaultsettings.
Typical
Select this option to install NetBackup with the settingsthat you want.
Custom
Click Next.
9 (Conditional) This step applies only to local Custom installations.
On the Veritas NetBackup Client Destination Folder screen, you can selectwhere the NetBackup files are installed.
106Installing NetBackup client softwareAbout NetBackup client installation on Windows
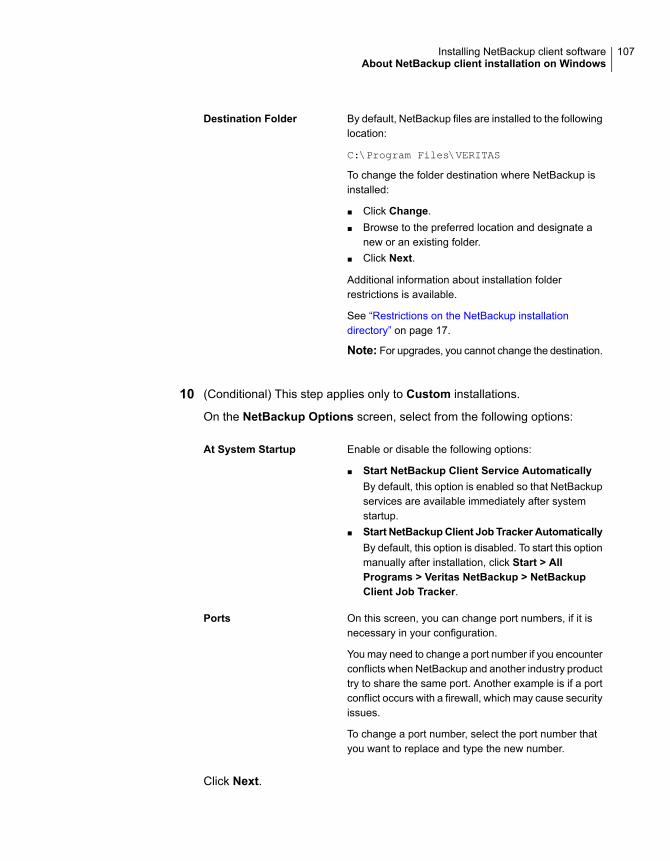
By default, NetBackup files are installed to the followinglocation:
C:\Program Files\VERITAS
To change the folder destination where NetBackup isinstalled:
■ Click Change.■ Browse to the preferred location and designate a
new or an existing folder.■ Click Next.
Additional information about installation folderrestrictions is available.
See “Restrictions on the NetBackup installationdirectory” on page 17.
Note: For upgrades, you cannot change the destination.
Destination Folder
10 (Conditional) This step applies only to Custom installations.
On the NetBackup Options screen, select from the following options:
Enable or disable the following options:
■ Start NetBackup Client Service AutomaticallyBy default, this option is enabled so that NetBackupservices are available immediately after systemstartup.
■ Start NetBackupClient Job Tracker AutomaticallyBy default, this option is disabled. To start this optionmanually after installation, click Start > AllPrograms > Veritas NetBackup > NetBackupClient Job Tracker.
At System Startup
On this screen, you can change port numbers, if it isnecessary in your configuration.
You may need to change a port number if you encounterconflicts when NetBackup and another industry producttry to share the same port. Another example is if a portconflict occurs with a firewall, which may cause securityissues.
To change a port number, select the port number thatyou want to replace and type the new number.
Ports
Click Next.
107Installing NetBackup client softwareAbout NetBackup client installation on Windows
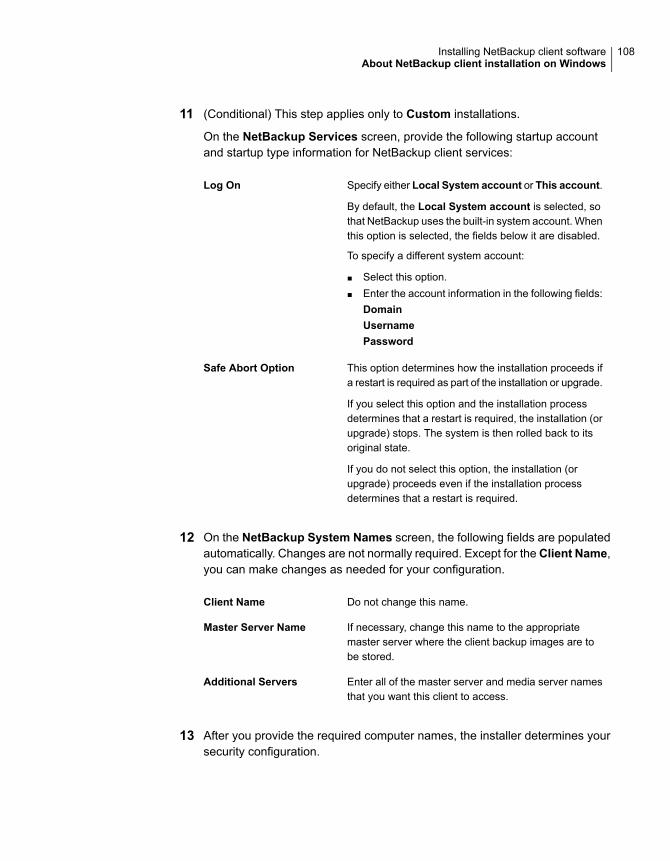
11 (Conditional) This step applies only to Custom installations.
On the NetBackup Services screen, provide the following startup accountand startup type information for NetBackup client services:
Specify either Local System account or This account.
By default, the Local System account is selected, sothat NetBackup uses the built-in system account. Whenthis option is selected, the fields below it are disabled.
To specify a different system account:
■ Select this option.■ Enter the account information in the following fields:
DomainUsernamePassword
Log On
This option determines how the installation proceeds ifa restart is required as part of the installation or upgrade.
If you select this option and the installation processdetermines that a restart is required, the installation (orupgrade) stops. The system is then rolled back to itsoriginal state.
If you do not select this option, the installation (orupgrade) proceeds even if the installation processdetermines that a restart is required.
Safe Abort Option
12 On the NetBackup System Names screen, the following fields are populatedautomatically. Changes are not normally required. Except for the Client Name,you can make changes as needed for your configuration.
Do not change this name.Client Name
If necessary, change this name to the appropriatemaster server where the client backup images are tobe stored.
Master Server Name
Enter all of the master server and media server namesthat you want this client to access.
Additional Servers
13 After you provide the required computer names, the installer determines yoursecurity configuration.
108Installing NetBackup client softwareAbout NetBackup client installation on Windows
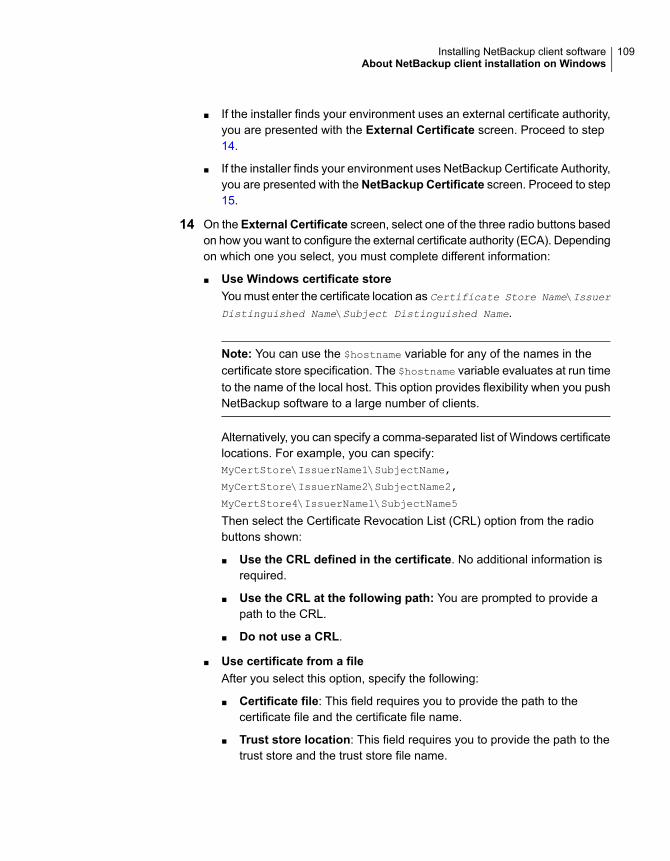
■ If the installer finds your environment uses an external certificate authority,you are presented with the External Certificate screen. Proceed to step14.
■ If the installer finds your environment uses NetBackup Certificate Authority,you are presented with the NetBackup Certificate screen. Proceed to step15.
14 On the External Certificate screen, select one of the three radio buttons basedon how you want to configure the external certificate authority (ECA). Dependingon which one you select, you must complete different information:
■ Use Windows certificate storeYou must enter the certificate location as Certificate Store Name\Issuer
Distinguished Name\Subject Distinguished Name.
Note: You can use the $hostname variable for any of the names in thecertificate store specification. The $hostname variable evaluates at run timeto the name of the local host. This option provides flexibility when you pushNetBackup software to a large number of clients.
Alternatively, you can specify a comma-separated list of Windows certificatelocations. For example, you can specify:MyCertStore\IssuerName1\SubjectName,
MyCertStore\IssuerName2\SubjectName2,
MyCertStore4\IssuerName1\SubjectName5
Then select the Certificate Revocation List (CRL) option from the radiobuttons shown:
■ Use the CRL defined in the certificate. No additional information isrequired.
■ Use the CRL at the following path: You are prompted to provide apath to the CRL.
■ Do not use a CRL.
■ Use certificate from a fileAfter you select this option, specify the following:
■ Certificate file: This field requires you to provide the path to thecertificate file and the certificate file name.
■ Trust store location: This field requires you to provide the path to thetrust store and the trust store file name.
109Installing NetBackup client softwareAbout NetBackup client installation on Windows

■ Private key path: This field requires you to provide the path to theprivate key file and the private key file name.
■ Passphrase file: This field requires you to provide the path of thepassphrase file and the passphrase file name. This field is optional.
■ CRL option: Specify the correct CRL option for your environment:
■ Use the CRL defined in the certificate. No additional informationis required.
■ Use the CRL at the following path: You are prompted to providea path to the CRL.
■ Do not use a CRL.
■ Proceed without securityYou receive a warning message listing potential issues. Depending on thestate of the current security configuration, NetBackup may be unable toperform backups or restores until an external CA certificate has beenconfigured.
Click Next to continue. Go to step 19 in this procedure.
15 After you confirm you want to continue, the installer fetches the certificateauthority certificate details. You have the option to click Cancel to halt thisaction. Be aware if you click Cancel, this action requires you to rerun theinstallation or continue with the installation without the required securitycomponents. If these security components are absent, backups and restoresfail.
16 On the Confirm the CA fingerprint screen, select I recognize the fingerprintfor this host. Proceed with the certificate deployment. if the fingerprintdisplayed is one you recognize and trust. Click Next to continue.
If you do not recognize or trust the displayed fingerprint, select Proceedwithoutthe certificate deployment.
After you confirm the fingerprint information, the installer stores the certificateauthority certificate details. You have the option to click Cancel to halt thisaction. Be aware if you click Cancel, this action requires you to rerun theinstallation or continue with the installation without the required securitycomponents. If these security components are absent, backups and restoresfail.
17 After the Certificate Authority certificate is stored, the installer deploys the hostcertificate. You have the option to click Cancel to halt this action. Be aware ifyou click Cancel, this action requires you to rerun the installation or continuewith the installation without the required security components. If these securitycomponents are absent, backups and restores fail.
110Installing NetBackup client softwareAbout NetBackup client installation on Windows
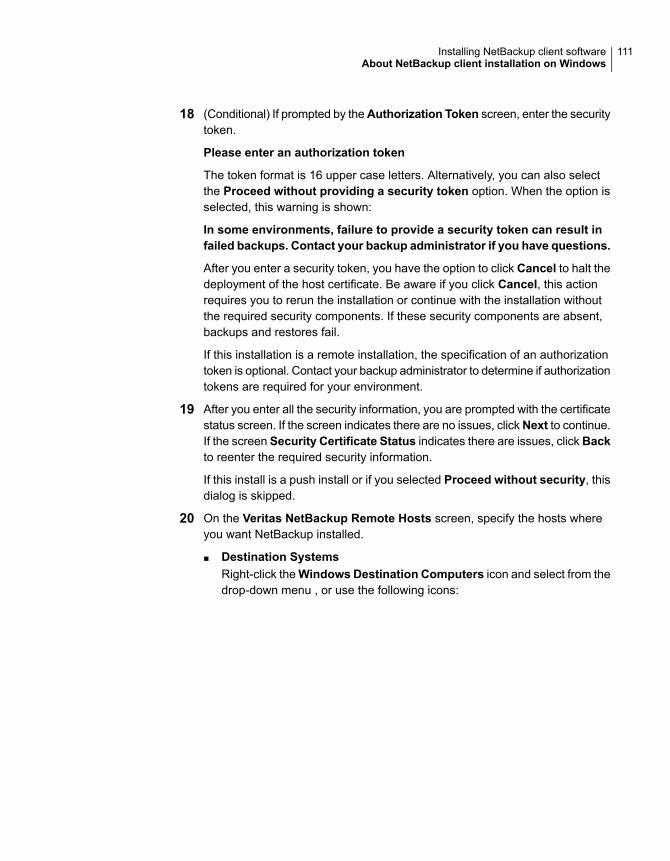
18 (Conditional) If prompted by theAuthorization Token screen, enter the securitytoken.
Please enter an authorization token
The token format is 16 upper case letters. Alternatively, you can also selectthe Proceed without providing a security token option. When the option isselected, this warning is shown:
In some environments, failure to provide a security token can result infailed backups. Contact your backup administrator if you have questions.
After you enter a security token, you have the option to click Cancel to halt thedeployment of the host certificate. Be aware if you click Cancel, this actionrequires you to rerun the installation or continue with the installation withoutthe required security components. If these security components are absent,backups and restores fail.
If this installation is a remote installation, the specification of an authorizationtoken is optional. Contact your backup administrator to determine if authorizationtokens are required for your environment.
19 After you enter all the security information, you are prompted with the certificatestatus screen. If the screen indicates there are no issues, clickNext to continue.If the screen Security Certificate Status indicates there are issues, click Backto reenter the required security information.
If this install is a push install or if you selected Proceed without security, thisdialog is skipped.
20 On the Veritas NetBackup Remote Hosts screen, specify the hosts whereyou want NetBackup installed.
■ Destination SystemsRight-click theWindows Destination Computers icon and select from thedrop-down menu , or use the following icons:
111Installing NetBackup client softwareAbout NetBackup client installation on Windows
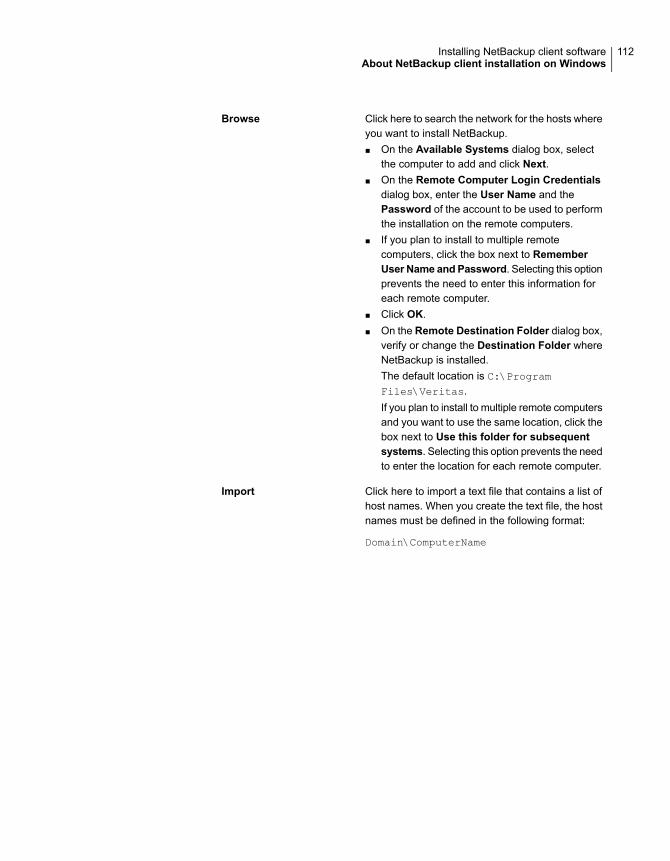
Click here to search the network for the hosts whereyou want to install NetBackup.■ On the Available Systems dialog box, select
the computer to add and click Next.■ On the Remote Computer Login Credentials
dialog box, enter the User Name and thePassword of the account to be used to performthe installation on the remote computers.
■ If you plan to install to multiple remotecomputers, click the box next to RememberUser Name andPassword. Selecting this optionprevents the need to enter this information foreach remote computer.
■ Click OK.■ On the Remote Destination Folder dialog box,
verify or change the Destination Folder whereNetBackup is installed.The default location is C:\ProgramFiles\Veritas.If you plan to install to multiple remote computersand you want to use the same location, click thebox next to Use this folder for subsequentsystems. Selecting this option prevents the needto enter the location for each remote computer.
Browse
Click here to import a text file that contains a list ofhost names. When you create the text file, the hostnames must be defined in the following format:
Domain\ComputerName
Import
112Installing NetBackup client softwareAbout NetBackup client installation on Windows
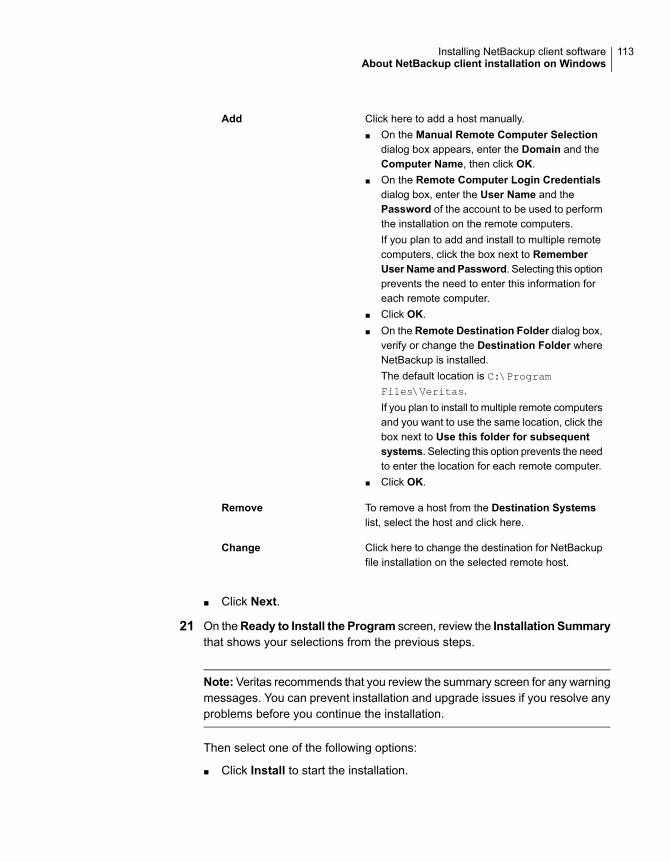
Click here to add a host manually.■ On the Manual Remote Computer Selection
dialog box appears, enter the Domain and theComputer Name, then click OK.
■ On the Remote Computer Login Credentialsdialog box, enter the User Name and thePassword of the account to be used to performthe installation on the remote computers.If you plan to add and install to multiple remotecomputers, click the box next to RememberUser Name andPassword. Selecting this optionprevents the need to enter this information foreach remote computer.
■ Click OK.■ On the Remote Destination Folder dialog box,
verify or change the Destination Folder whereNetBackup is installed.The default location is C:\ProgramFiles\Veritas.If you plan to install to multiple remote computersand you want to use the same location, click thebox next to Use this folder for subsequentsystems. Selecting this option prevents the needto enter the location for each remote computer.
■ Click OK.
Add
To remove a host from the Destination Systemslist, select the host and click here.
Remove
Click here to change the destination for NetBackupfile installation on the selected remote host.
Change
■ Click Next.
21 On theReady to Install the Program screen, review the Installation Summarythat shows your selections from the previous steps.
Note:Veritas recommends that you review the summary screen for any warningmessages. You can prevent installation and upgrade issues if you resolve anyproblems before you continue the installation.
Then select one of the following options:
■ Click Install to start the installation.
113Installing NetBackup client softwareAbout NetBackup client installation on Windows
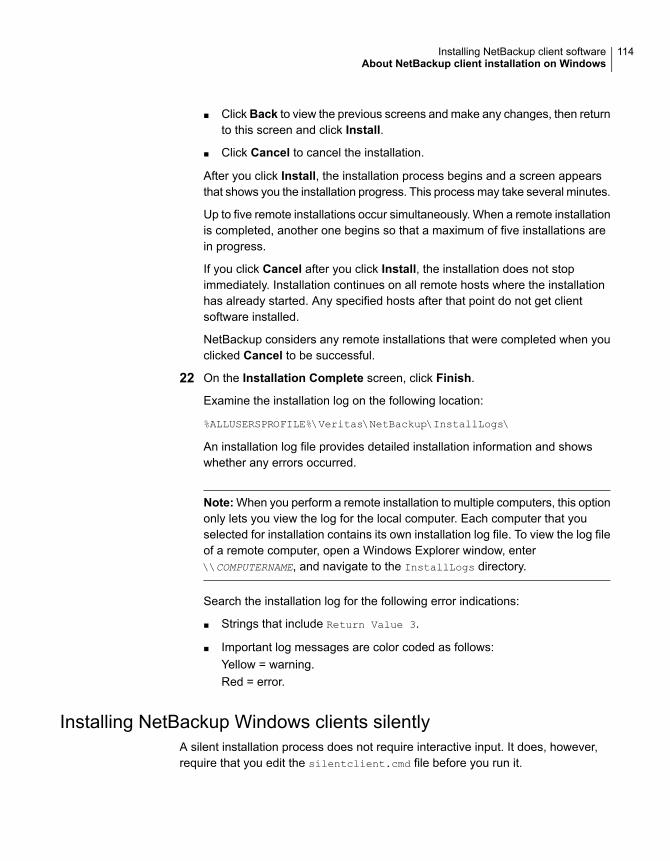
■ ClickBack to view the previous screens and make any changes, then returnto this screen and click Install.
■ Click Cancel to cancel the installation.
After you click Install, the installation process begins and a screen appearsthat shows you the installation progress. This process may take several minutes.
Up to five remote installations occur simultaneously. When a remote installationis completed, another one begins so that a maximum of five installations arein progress.
If you click Cancel after you click Install, the installation does not stopimmediately. Installation continues on all remote hosts where the installationhas already started. Any specified hosts after that point do not get clientsoftware installed.
NetBackup considers any remote installations that were completed when youclicked Cancel to be successful.
22 On the Installation Complete screen, click Finish.
Examine the installation log on the following location:
%ALLUSERSPROFILE%\Veritas\NetBackup\InstallLogs\
An installation log file provides detailed installation information and showswhether any errors occurred.
Note:When you perform a remote installation to multiple computers, this optiononly lets you view the log for the local computer. Each computer that youselected for installation contains its own installation log file. To view the log fileof a remote computer, open a Windows Explorer window, enter\\COMPUTERNAME, and navigate to the InstallLogs directory.
Search the installation log for the following error indications:
■ Strings that include Return Value 3.
■ Important log messages are color coded as follows:Yellow = warning.Red = error.
Installing NetBackup Windows clients silentlyA silent installation process does not require interactive input. It does, however,require that you edit the silentclient.cmd file before you run it.
114Installing NetBackup client softwareAbout NetBackup client installation on Windows
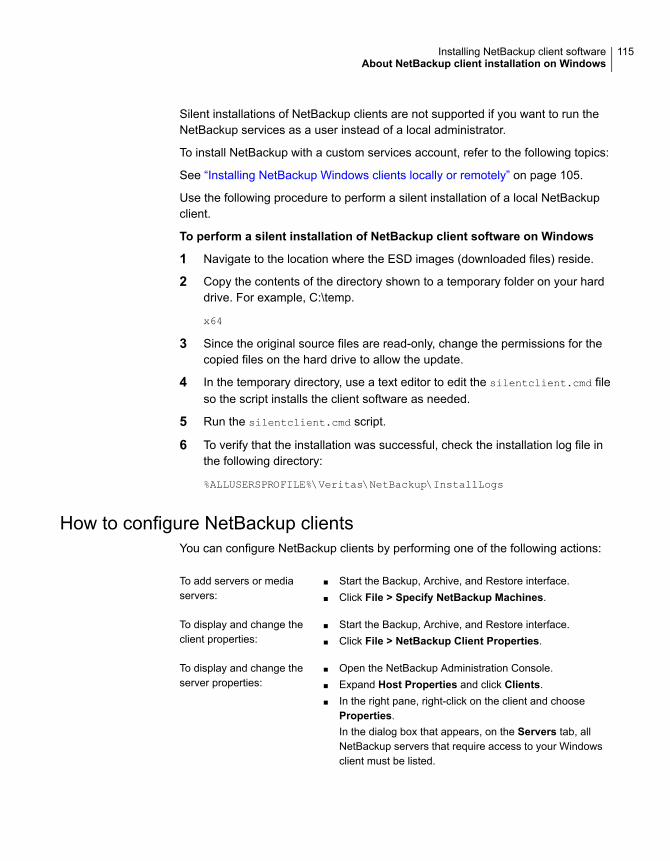
Silent installations of NetBackup clients are not supported if you want to run theNetBackup services as a user instead of a local administrator.
To install NetBackup with a custom services account, refer to the following topics:
See “Installing NetBackup Windows clients locally or remotely” on page 105.
Use the following procedure to perform a silent installation of a local NetBackupclient.
To perform a silent installation of NetBackup client software on Windows
1 Navigate to the location where the ESD images (downloaded files) reside.
2 Copy the contents of the directory shown to a temporary folder on your harddrive. For example, C:\temp.
x64
3 Since the original source files are read-only, change the permissions for thecopied files on the hard drive to allow the update.
4 In the temporary directory, use a text editor to edit the silentclient.cmd fileso the script installs the client software as needed.
5 Run the silentclient.cmd script.
6 To verify that the installation was successful, check the installation log file inthe following directory:
%ALLUSERSPROFILE%\Veritas\NetBackup\InstallLogs
How to configure NetBackup clientsYou can configure NetBackup clients by performing one of the following actions:
■ Start the Backup, Archive, and Restore interface.■ Click File > Specify NetBackup Machines.
To add servers or mediaservers:
■ Start the Backup, Archive, and Restore interface.■ Click File > NetBackup Client Properties.
To display and change theclient properties:
■ Open the NetBackup Administration Console.■ Expand Host Properties and click Clients.■ In the right pane, right-click on the client and choose
Properties.In the dialog box that appears, on the Servers tab, allNetBackup servers that require access to your Windowsclient must be listed.
To display and change theserver properties:
115Installing NetBackup client softwareAbout NetBackup client installation on Windows
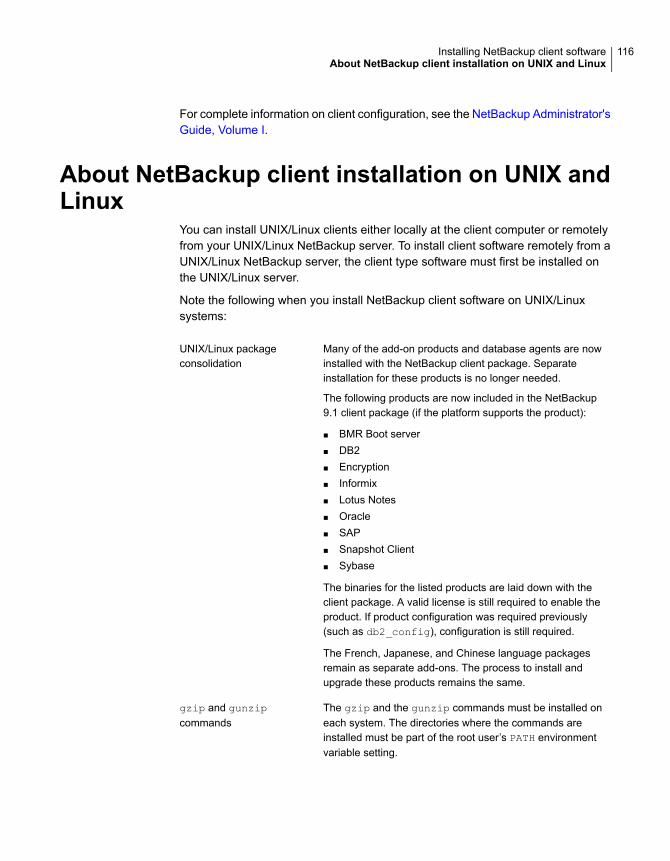
For complete information on client configuration, see the NetBackup Administrator'sGuide, Volume I.
About NetBackup client installation on UNIX andLinux
You can install UNIX/Linux clients either locally at the client computer or remotelyfrom your UNIX/Linux NetBackup server. To install client software remotely from aUNIX/Linux NetBackup server, the client type software must first be installed onthe UNIX/Linux server.
Note the following when you install NetBackup client software on UNIX/Linuxsystems:
Many of the add-on products and database agents are nowinstalled with the NetBackup client package. Separateinstallation for these products is no longer needed.
The following products are now included in the NetBackup9.1 client package (if the platform supports the product):
■ BMR Boot server■ DB2■ Encryption■ Informix■ Lotus Notes■ Oracle■ SAP■ Snapshot Client■ Sybase
The binaries for the listed products are laid down with theclient package. A valid license is still required to enable theproduct. If product configuration was required previously(such as db2_config), configuration is still required.
The French, Japanese, and Chinese language packagesremain as separate add-ons. The process to install andupgrade these products remains the same.
UNIX/Linux packageconsolidation
The gzip and the gunzip commands must be installed oneach system. The directories where the commands areinstalled must be part of the root user’s PATH environmentvariable setting.
gzip and gunzipcommands
116Installing NetBackup client softwareAbout NetBackup client installation on UNIX and Linux
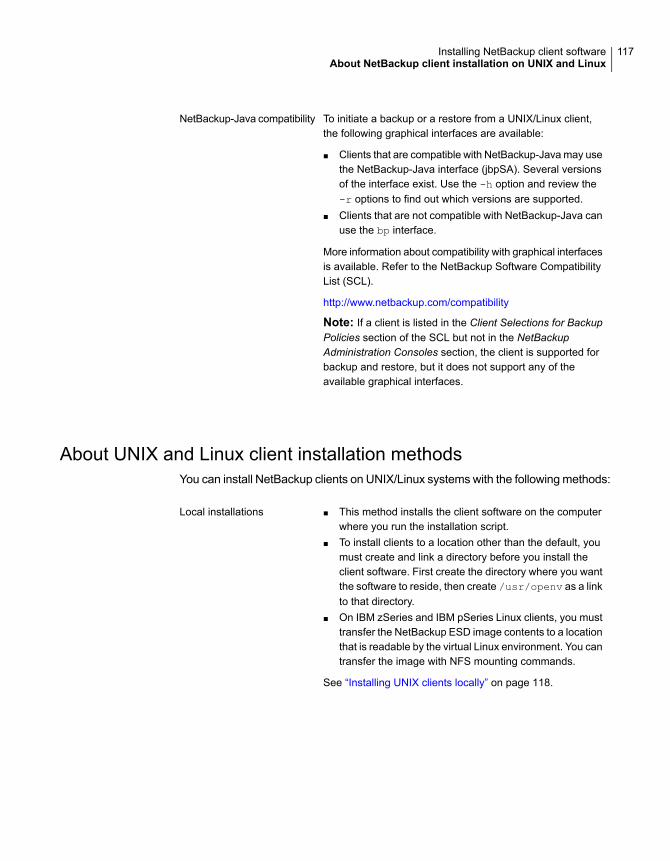
To initiate a backup or a restore from a UNIX/Linux client,the following graphical interfaces are available:
■ Clients that are compatible with NetBackup-Java may usethe NetBackup-Java interface (jbpSA). Several versionsof the interface exist. Use the -h option and review the-r options to find out which versions are supported.
■ Clients that are not compatible with NetBackup-Java canuse the bp interface.
More information about compatibility with graphical interfacesis available. Refer to the NetBackup Software CompatibilityList (SCL).
http://www.netbackup.com/compatibility
Note: If a client is listed in the Client Selections for BackupPolicies section of the SCL but not in the NetBackupAdministration Consoles section, the client is supported forbackup and restore, but it does not support any of theavailable graphical interfaces.
NetBackup-Java compatibility
About UNIX and Linux client installation methodsYou can install NetBackup clients on UNIX/Linux systems with the following methods:
■ This method installs the client software on the computerwhere you run the installation script.
■ To install clients to a location other than the default, youmust create and link a directory before you install theclient software. First create the directory where you wantthe software to reside, then create /usr/openv as a linkto that directory.
■ On IBM zSeries and IBM pSeries Linux clients, you musttransfer the NetBackup ESD image contents to a locationthat is readable by the virtual Linux environment. You cantransfer the image with NFS mounting commands.
See “Installing UNIX clients locally” on page 118.
Local installations
117Installing NetBackup client softwareAbout NetBackup client installation on UNIX and Linux
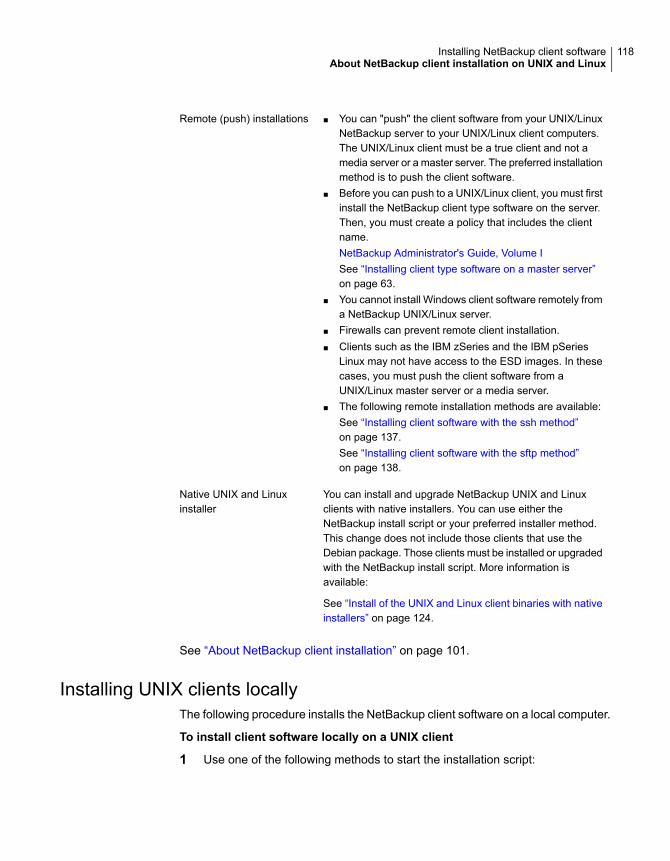
■ You can "push" the client software from your UNIX/LinuxNetBackup server to your UNIX/Linux client computers.The UNIX/Linux client must be a true client and not amedia server or a master server. The preferred installationmethod is to push the client software.
■ Before you can push to a UNIX/Linux client, you must firstinstall the NetBackup client type software on the server.Then, you must create a policy that includes the clientname.NetBackup Administrator's Guide, Volume ISee “Installing client type software on a master server”on page 63.
■ You cannot install Windows client software remotely froma NetBackup UNIX/Linux server.
■ Firewalls can prevent remote client installation.■ Clients such as the IBM zSeries and the IBM pSeries
Linux may not have access to the ESD images. In thesecases, you must push the client software from aUNIX/Linux master server or a media server.
■ The following remote installation methods are available:See “Installing client software with the ssh method”on page 137.See “Installing client software with the sftp method”on page 138.
Remote (push) installations
You can install and upgrade NetBackup UNIX and Linuxclients with native installers. You can use either theNetBackup install script or your preferred installer method.This change does not include those clients that use theDebian package. Those clients must be installed or upgradedwith the NetBackup install script. More information isavailable:
See “Install of the UNIX and Linux client binaries with nativeinstallers” on page 124.
Native UNIX and Linuxinstaller
See “About NetBackup client installation” on page 101.
Installing UNIX clients locallyThe following procedure installs the NetBackup client software on a local computer.
To install client software locally on a UNIX client
1 Use one of the following methods to start the installation script:
118Installing NetBackup client softwareAbout NetBackup client installation on UNIX and Linux
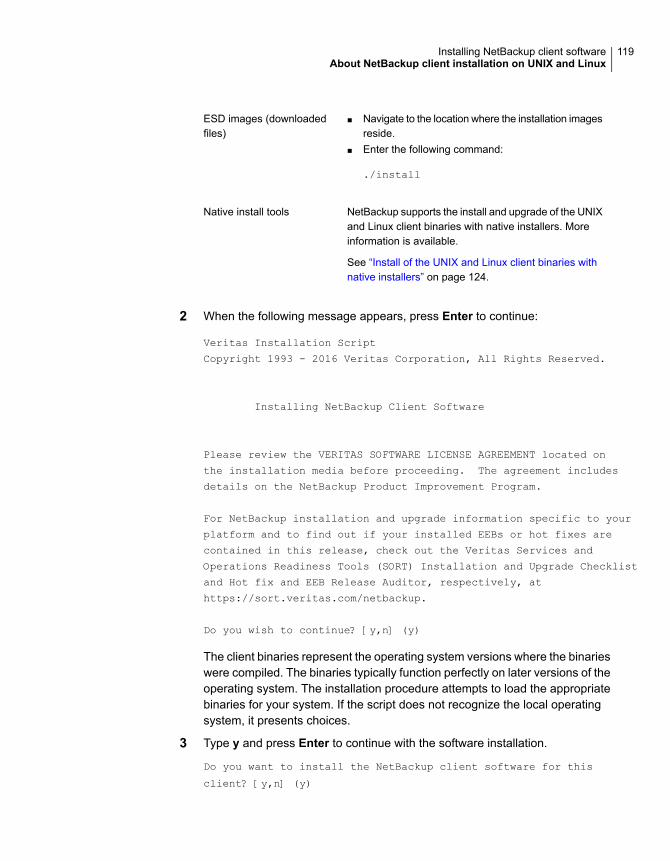
■ Navigate to the location where the installation imagesreside.
■ Enter the following command:
./install
ESD images (downloadedfiles)
NetBackup supports the install and upgrade of the UNIXand Linux client binaries with native installers. Moreinformation is available.
See “Install of the UNIX and Linux client binaries withnative installers” on page 124.
Native install tools
2 When the following message appears, press Enter to continue:
Veritas Installation Script
Copyright 1993 - 2016 Veritas Corporation, All Rights Reserved.
Installing NetBackup Client Software
Please review the VERITAS SOFTWARE LICENSE AGREEMENT located on
the installation media before proceeding. The agreement includes
details on the NetBackup Product Improvement Program.
For NetBackup installation and upgrade information specific to your
platform and to find out if your installed EEBs or hot fixes are
contained in this release, check out the Veritas Services and
Operations Readiness Tools (SORT) Installation and Upgrade Checklist
and Hot fix and EEB Release Auditor, respectively, at
https://sort.veritas.com/netbackup.
Do you wish to continue? [y,n] (y)
The client binaries represent the operating system versions where the binarieswere compiled. The binaries typically function perfectly on later versions of theoperating system. The installation procedure attempts to load the appropriatebinaries for your system. If the script does not recognize the local operatingsystem, it presents choices.
3 Type y and press Enter to continue with the software installation.
Do you want to install the NetBackup client software for this
client? [y,n] (y)
119Installing NetBackup client softwareAbout NetBackup client installation on UNIX and Linux
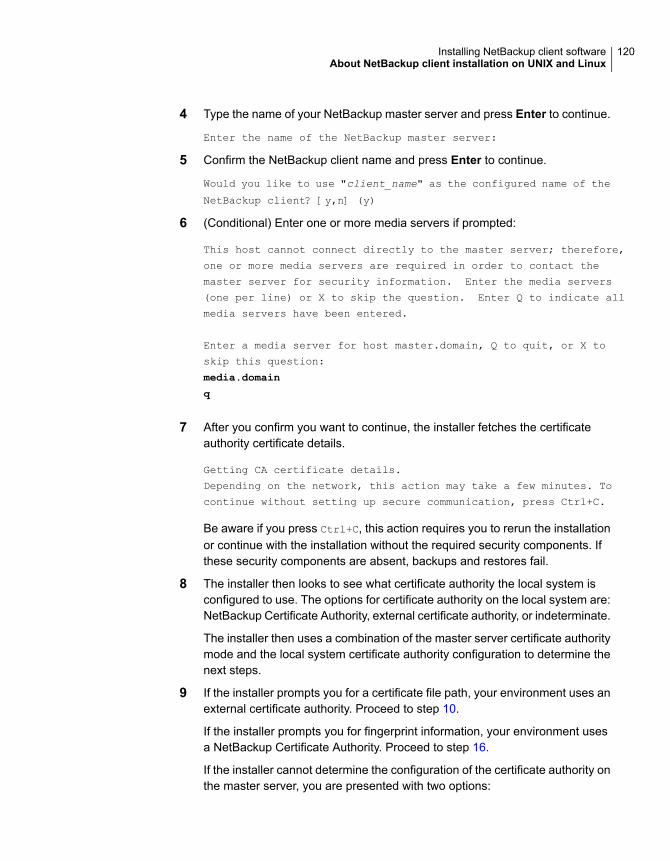
4 Type the name of your NetBackup master server and press Enter to continue.
Enter the name of the NetBackup master server:
5 Confirm the NetBackup client name and press Enter to continue.
Would you like to use "client_name" as the configured name of the
NetBackup client? [y,n] (y)
6 (Conditional) Enter one or more media servers if prompted:
This host cannot connect directly to the master server; therefore,
one or more media servers are required in order to contact the
master server for security information. Enter the media servers
(one per line) or X to skip the question. Enter Q to indicate all
media servers have been entered.
Enter a media server for host master.domain, Q to quit, or X to
skip this question:
media.domain
q
7 After you confirm you want to continue, the installer fetches the certificateauthority certificate details.
Getting CA certificate details.
Depending on the network, this action may take a few minutes. To
continue without setting up secure communication, press Ctrl+C.
Be aware if you press Ctrl+C, this action requires you to rerun the installationor continue with the installation without the required security components. Ifthese security components are absent, backups and restores fail.
8 The installer then looks to see what certificate authority the local system isconfigured to use. The options for certificate authority on the local system are:NetBackup Certificate Authority, external certificate authority, or indeterminate.
The installer then uses a combination of the master server certificate authoritymode and the local system certificate authority configuration to determine thenext steps.
9 If the installer prompts you for a certificate file path, your environment uses anexternal certificate authority. Proceed to step 10.
If the installer prompts you for fingerprint information, your environment usesa NetBackup Certificate Authority. Proceed to step 16.
If the installer cannot determine the configuration of the certificate authority onthe master server, you are presented with two options:
120Installing NetBackup client softwareAbout NetBackup client installation on UNIX and Linux
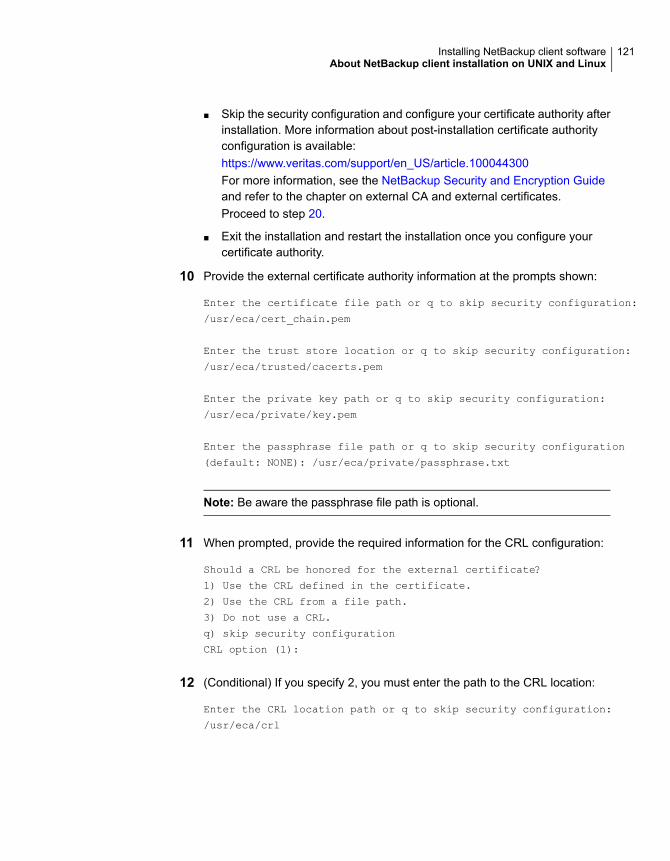
■ Skip the security configuration and configure your certificate authority afterinstallation. More information about post-installation certificate authorityconfiguration is available:https://www.veritas.com/support/en_US/article.100044300For more information, see the NetBackup Security and Encryption Guideand refer to the chapter on external CA and external certificates.Proceed to step 20.
■ Exit the installation and restart the installation once you configure yourcertificate authority.
10 Provide the external certificate authority information at the prompts shown:
Enter the certificate file path or q to skip security configuration:
/usr/eca/cert_chain.pem
Enter the trust store location or q to skip security configuration:
/usr/eca/trusted/cacerts.pem
Enter the private key path or q to skip security configuration:
/usr/eca/private/key.pem
Enter the passphrase file path or q to skip security configuration
(default: NONE): /usr/eca/private/passphrase.txt
Note: Be aware the passphrase file path is optional.
11 When prompted, provide the required information for the CRL configuration:
Should a CRL be honored for the external certificate?
1) Use the CRL defined in the certificate.
2) Use the CRL from a file path.
3) Do not use a CRL.
q) skip security configuration
CRL option (1):
12 (Conditional) If you specify 2, you must enter the path to the CRL location:
Enter the CRL location path or q to skip security configuration:
/usr/eca/crl
121Installing NetBackup client softwareAbout NetBackup client installation on UNIX and Linux

13 The installer echoes the configuration information you entered and attemptsto retrieve details for the external certificate:
External CA values entered:
Certificate file path: /usr/eca/cert_chain.pem
Trust store file path: /usr/eca/trusted/cacerts.pem
Private key file path: /usr/eca/private/key.pem
Passphrase file path: /usr/eca/private/passphrase.txt
CRL check level: Use the CRL from a file path.
CRL location path: /usr/eca/crl
Getting external CA certificate details
Issued By : CN=IITFRMNUSINT,O=Veritas,OU=iitf
Subject Name : CN=cuomovm04,O=Veritas,OU=iitf
Expiry Date : Oct 31 17:25:59 2019 GMT
SHA1 Fingerprint : 62:B2:C3:31:D5:95:15:85:9D:C9:AE:C6:EA:C2:DF:
DF:6D:4B:92:5B
Serial Number : 0x6c7fa2743072ec3eaae4fd60085d468464319a
Certificate Path : /usr/eca/cert_chain.pem
Validating host ECA certificate.
NOTE: Depending on the network, this action may take a few
minutes. To continue without setting up secure
communication, press Ctrl+C.
14 (Conditional) If the external certificate enrollment pre-check finishessuccessfully, select 1 and press Enter to continue.
The external certificate enrollment pre-check is successful.
The external certificate is valid for use with master server name
How do you want to proceed?
1) Continue the installation using this certificate.
2) Update external certificate values.
3) Abort the installation.
Default option (1):
Proceed to step 20.
122Installing NetBackup client softwareAbout NetBackup client installation on UNIX and Linux
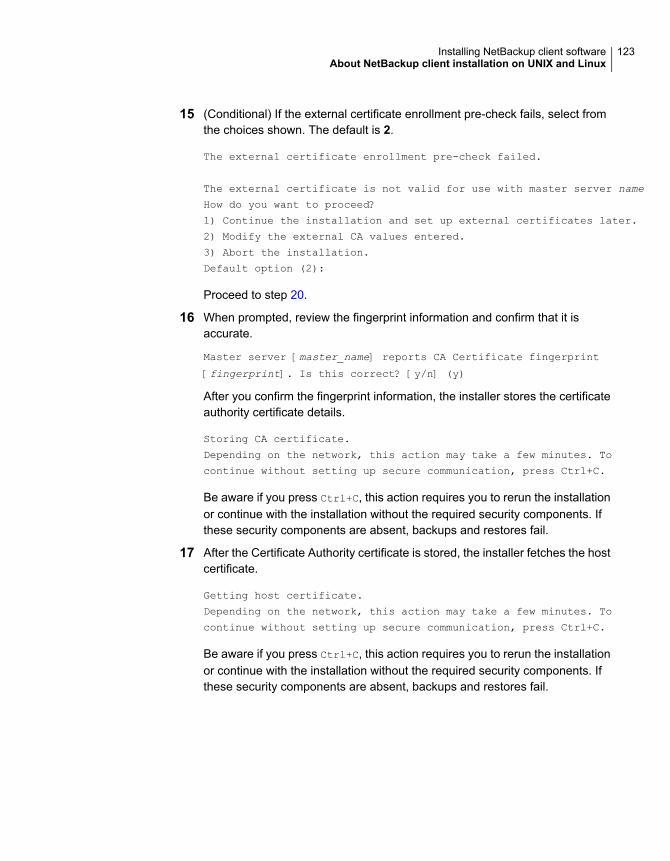
15 (Conditional) If the external certificate enrollment pre-check fails, select fromthe choices shown. The default is 2.
The external certificate enrollment pre-check failed.
The external certificate is not valid for use with master server name
How do you want to proceed?
1) Continue the installation and set up external certificates later.
2) Modify the external CA values entered.
3) Abort the installation.
Default option (2):
Proceed to step 20.
16 When prompted, review the fingerprint information and confirm that it isaccurate.
Master server [master_name] reports CA Certificate fingerprint
[fingerprint]. Is this correct? [y/n] (y)
After you confirm the fingerprint information, the installer stores the certificateauthority certificate details.
Storing CA certificate.
Depending on the network, this action may take a few minutes. To
continue without setting up secure communication, press Ctrl+C.
Be aware if you press Ctrl+C, this action requires you to rerun the installationor continue with the installation without the required security components. Ifthese security components are absent, backups and restores fail.
17 After the Certificate Authority certificate is stored, the installer fetches the hostcertificate.
Getting host certificate.
Depending on the network, this action may take a few minutes. To
continue without setting up secure communication, press Ctrl+C.
Be aware if you press Ctrl+C, this action requires you to rerun the installationor continue with the installation without the required security components. Ifthese security components are absent, backups and restores fail.
123Installing NetBackup client softwareAbout NetBackup client installation on UNIX and Linux

18 (Conditional) If prompted for the Authorization Token, please enter it.
An authorization token is required in order to get the host
certificate for this host. At the prompt, enter the authorization
token or q to skip the question. NOTE: The answer entered will
not be displayed to the terminal.
Enter the authorization token for master_server_FQDN or q to skip:
The token format is 16 upper case letters. Be aware if you press Ctrl+C, thisaction requires you to rerun the installation or continue with the installationwithout the required security components. If these security components areabsent, backups and restores fail.
19 When prompted, specify if you want Java and the JRE packages installed.
The Java GUI and JRE packages are currently not installed on this
host.
The Java GUI and JRE can be optionally included with NetBackup.
The Java GUI and JRE enable the Backup, Archive, and Restore (BAR)
GUI.
Choose an option from the list below.
1) Include the Java GUI and JRE.
2) Exclude the Java GUI and JRE.
If you specify 1, you see: Including the installation of Java GUI and
JRE packages. If you specify 2, you see: Excluding the installation of
Java GUI and JRE packages.
20 Follow the prompts to complete the installation.
Additional information about installation folder restrictions is available.
See “Restrictions on the NetBackup installation directory” on page 17.
21 After the installation is complete, select Exit from this Script.
Install of the UNIX and Linux client binaries with native installersYou can install NetBackup UNIX and Linux clients with native installers. You canuse either the NetBackup install script or your preferred installer method. Thischange does not include those clients that use the Debian package. Those clientsmust be installed with the NetBackup install script.
■ For AIX: lslpp, installp
■ For HP-UX: swlist, swinstall
124Installing NetBackup client softwareAbout NetBackup client installation on UNIX and Linux
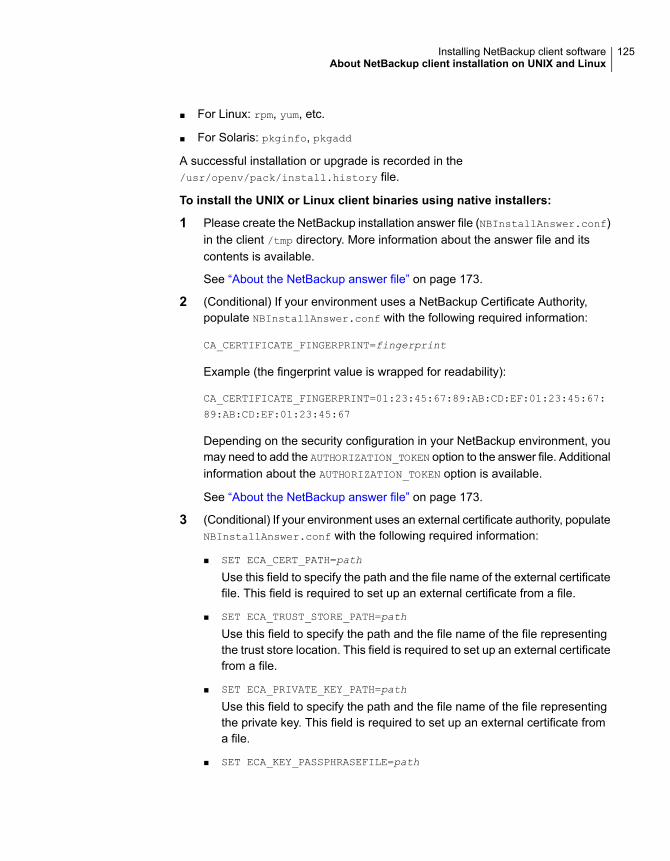
■ For Linux: rpm, yum, etc.
■ For Solaris: pkginfo, pkgadd
A successful installation or upgrade is recorded in the/usr/openv/pack/install.history file.
To install the UNIX or Linux client binaries using native installers:
1 Please create the NetBackup installation answer file (NBInstallAnswer.conf)in the client /tmp directory. More information about the answer file and itscontents is available.
See “About the NetBackup answer file” on page 173.
2 (Conditional) If your environment uses a NetBackup Certificate Authority,populate NBInstallAnswer.conf with the following required information:
CA_CERTIFICATE_FINGERPRINT=fingerprint
Example (the fingerprint value is wrapped for readability):
CA_CERTIFICATE_FINGERPRINT=01:23:45:67:89:AB:CD:EF:01:23:45:67:
89:AB:CD:EF:01:23:45:67
Depending on the security configuration in your NetBackup environment, youmay need to add the AUTHORIZATION_TOKEN option to the answer file. Additionalinformation about the AUTHORIZATION_TOKEN option is available.
See “About the NetBackup answer file” on page 173.
3 (Conditional) If your environment uses an external certificate authority, populateNBInstallAnswer.conf with the following required information:
■ SET ECA_CERT_PATH=path
Use this field to specify the path and the file name of the external certificatefile. This field is required to set up an external certificate from a file.
■ SET ECA_TRUST_STORE_PATH=path
Use this field to specify the path and the file name of the file representingthe trust store location. This field is required to set up an external certificatefrom a file.
■ SET ECA_PRIVATE_KEY_PATH=path
Use this field to specify the path and the file name of the file representingthe private key. This field is required to set up an external certificate froma file.
■ SET ECA_KEY_PASSPHRASEFILE=path
125Installing NetBackup client softwareAbout NetBackup client installation on UNIX and Linux
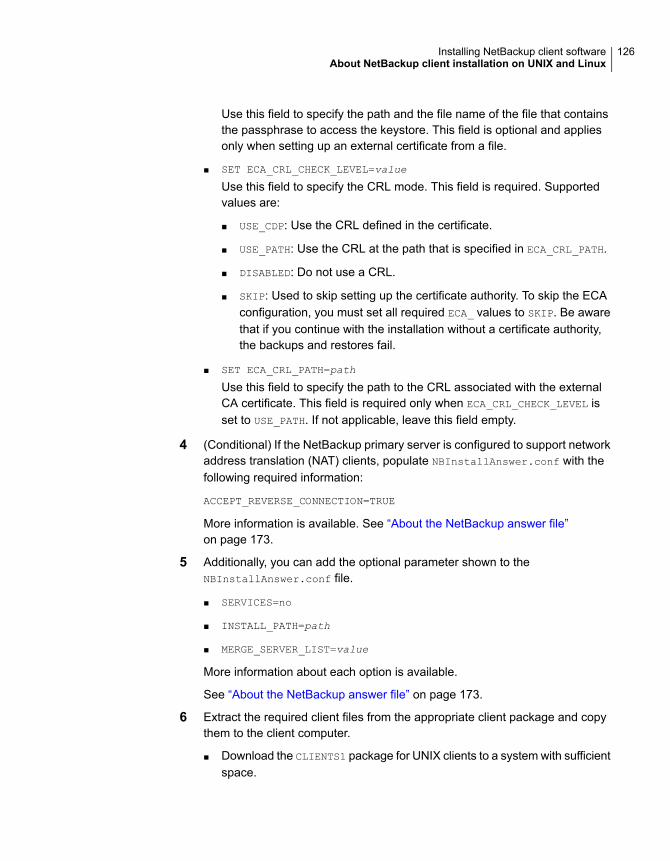
Use this field to specify the path and the file name of the file that containsthe passphrase to access the keystore. This field is optional and appliesonly when setting up an external certificate from a file.
■ SET ECA_CRL_CHECK_LEVEL=value
Use this field to specify the CRL mode. This field is required. Supportedvalues are:
■ USE_CDP: Use the CRL defined in the certificate.
■ USE_PATH: Use the CRL at the path that is specified in ECA_CRL_PATH.
■ DISABLED: Do not use a CRL.
■ SKIP: Used to skip setting up the certificate authority. To skip the ECAconfiguration, you must set all required ECA_ values to SKIP. Be awarethat if you continue with the installation without a certificate authority,the backups and restores fail.
■ SET ECA_CRL_PATH=path
Use this field to specify the path to the CRL associated with the externalCA certificate. This field is required only when ECA_CRL_CHECK_LEVEL isset to USE_PATH. If not applicable, leave this field empty.
4 (Conditional) If the NetBackup primary server is configured to support networkaddress translation (NAT) clients, populate NBInstallAnswer.conf with thefollowing required information:
ACCEPT_REVERSE_CONNECTION=TRUE
More information is available. See “About the NetBackup answer file”on page 173.
5 Additionally, you can add the optional parameter shown to theNBInstallAnswer.conf file.
■ SERVICES=no
■ INSTALL_PATH=path
■ MERGE_SERVER_LIST=value
More information about each option is available.
See “About the NetBackup answer file” on page 173.
6 Extract the required client files from the appropriate client package and copythem to the client computer.
■ Download the CLIENTS1 package for UNIX clients to a system with sufficientspace.
126Installing NetBackup client softwareAbout NetBackup client installation on UNIX and Linux
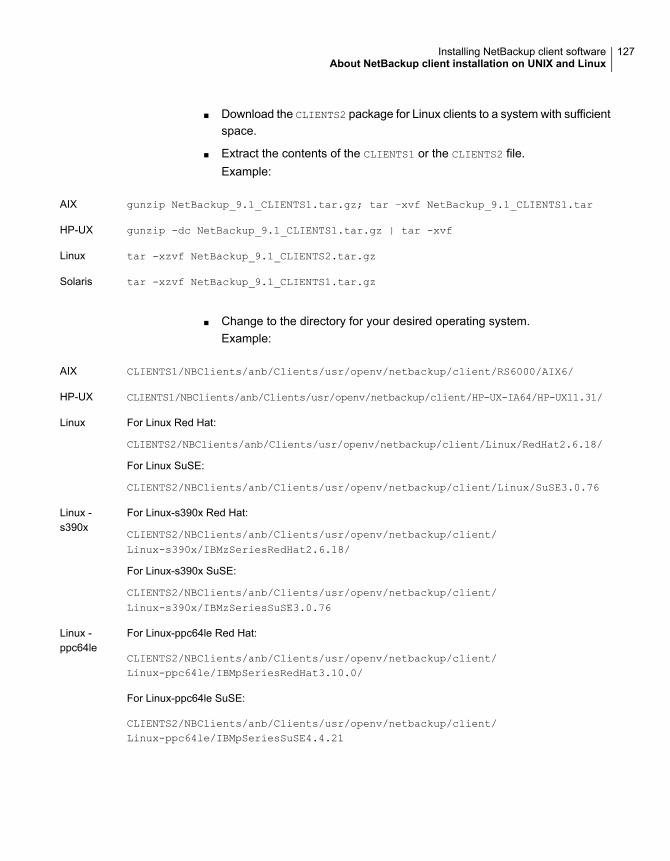
■ Download the CLIENTS2 package for Linux clients to a system with sufficientspace.
■ Extract the contents of the CLIENTS1 or the CLIENTS2 file.Example:
gunzip NetBackup_9.1_CLIENTS1.tar.gz; tar –xvf NetBackup_9.1_CLIENTS1.tarAIX
gunzip -dc NetBackup_9.1_CLIENTS1.tar.gz | tar -xvfHP-UX
tar -xzvf NetBackup_9.1_CLIENTS2.tar.gzLinux
tar -xzvf NetBackup_9.1_CLIENTS1.tar.gzSolaris
■ Change to the directory for your desired operating system.Example:
CLIENTS1/NBClients/anb/Clients/usr/openv/netbackup/client/RS6000/AIX6/AIX
CLIENTS1/NBClients/anb/Clients/usr/openv/netbackup/client/HP-UX-IA64/HP-UX11.31/HP-UX
For Linux Red Hat:
CLIENTS2/NBClients/anb/Clients/usr/openv/netbackup/client/Linux/RedHat2.6.18/
For Linux SuSE:
CLIENTS2/NBClients/anb/Clients/usr/openv/netbackup/client/Linux/SuSE3.0.76
Linux
For Linux-s390x Red Hat:
CLIENTS2/NBClients/anb/Clients/usr/openv/netbackup/client/Linux-s390x/IBMzSeriesRedHat2.6.18/
For Linux-s390x SuSE:
CLIENTS2/NBClients/anb/Clients/usr/openv/netbackup/client/Linux-s390x/IBMzSeriesSuSE3.0.76
Linux -s390x
For Linux-ppc64le Red Hat:
CLIENTS2/NBClients/anb/Clients/usr/openv/netbackup/client/Linux-ppc64le/IBMpSeriesRedHat3.10.0/
For Linux-ppc64le SuSE:
CLIENTS2/NBClients/anb/Clients/usr/openv/netbackup/client/Linux-ppc64le/IBMpSeriesSuSE4.4.21
Linux -ppc64le
127Installing NetBackup client softwareAbout NetBackup client installation on UNIX and Linux
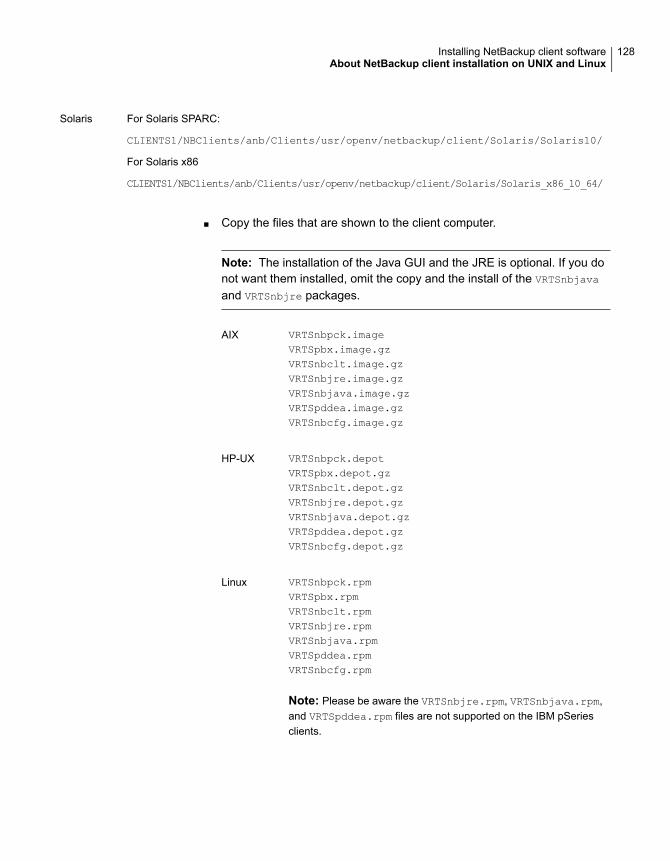
For Solaris SPARC:
CLIENTS1/NBClients/anb/Clients/usr/openv/netbackup/client/Solaris/Solaris10/
For Solaris x86
CLIENTS1/NBClients/anb/Clients/usr/openv/netbackup/client/Solaris/Solaris_x86_10_64/
Solaris
■ Copy the files that are shown to the client computer.
Note: The installation of the Java GUI and the JRE is optional. If you donot want them installed, omit the copy and the install of the VRTSnbjava
and VRTSnbjre packages.
VRTSnbpck.imageVRTSpbx.image.gzVRTSnbclt.image.gzVRTSnbjre.image.gzVRTSnbjava.image.gzVRTSpddea.image.gzVRTSnbcfg.image.gz
AIX
VRTSnbpck.depotVRTSpbx.depot.gzVRTSnbclt.depot.gzVRTSnbjre.depot.gzVRTSnbjava.depot.gzVRTSpddea.depot.gzVRTSnbcfg.depot.gz
HP-UX
VRTSnbpck.rpmVRTSpbx.rpmVRTSnbclt.rpmVRTSnbjre.rpmVRTSnbjava.rpmVRTSpddea.rpmVRTSnbcfg.rpm
Note: Please be aware the VRTSnbjre.rpm, VRTSnbjava.rpm,and VRTSpddea.rpm files are not supported on the IBM pSeriesclients.
Linux
128Installing NetBackup client softwareAbout NetBackup client installation on UNIX and Linux
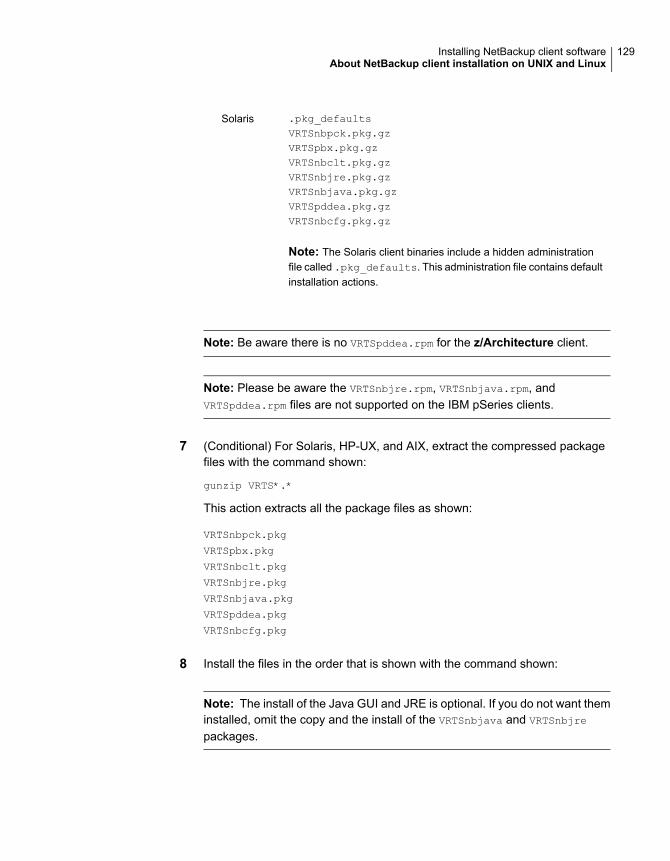
.pkg_defaultsVRTSnbpck.pkg.gzVRTSpbx.pkg.gzVRTSnbclt.pkg.gzVRTSnbjre.pkg.gzVRTSnbjava.pkg.gzVRTSpddea.pkg.gzVRTSnbcfg.pkg.gz
Note: The Solaris client binaries include a hidden administrationfile called .pkg_defaults. This administration file contains defaultinstallation actions.
Solaris
Note: Be aware there is no VRTSpddea.rpm for the z/Architecture client.
Note: Please be aware the VRTSnbjre.rpm, VRTSnbjava.rpm, andVRTSpddea.rpm files are not supported on the IBM pSeries clients.
7 (Conditional) For Solaris, HP-UX, and AIX, extract the compressed packagefiles with the command shown:
gunzip VRTS*.*
This action extracts all the package files as shown:
VRTSnbpck.pkg
VRTSpbx.pkg
VRTSnbclt.pkg
VRTSnbjre.pkg
VRTSnbjava.pkg
VRTSpddea.pkg
VRTSnbcfg.pkg
8 Install the files in the order that is shown with the command shown:
Note: The install of the Java GUI and JRE is optional. If you do not want theminstalled, omit the copy and the install of the VRTSnbjava and VRTSnbjre
packages.
129Installing NetBackup client softwareAbout NetBackup client installation on UNIX and Linux

installp –ad VRTSnbpck.image allinstallp –ad VRTSpbx.image allinstallp –ad VRTSnbclt.image allinstallp –ad VRTSnbjre.image allinstallp –ad VRTSnbjava.image allinstallp –ad VRTSpddea.image allinstallp –ad VRTSnbcfg.image all
Alternatively use a single command to install all packages:
installp –ad folder_name all
AIX
swinstall –s VRTSnbpck.depot \*swinstall –s VRTSpbx.depot \*swinstall –s VRTSnbclt.depot \*swinstall –s VRTSnbjre.depot \*swinstall –s VRTSnbjava.depot \*swinstall –s VRTSpddea.depot \*swinstall –s VRTSnbcfg.depot \*
Alternatively use a single command to install all packages:
swinstall -s ./VRTSnbpck.depot \*;swinstall -s./VRTSpbx.depot \*;swinstall -s ./VRTSnbclt.depot\*;swinstall -s ./VRTSnbjre.depot \*;swinstall -s./VRTSnbjava.depot \*;swinstall -s ./VRTSpddea.depot\*;swinstall -s ./VRTSnbcfg.depot \*
HP-UX
rpm –U VRTSnbpck.rpmrpm –U VRTSpbx.rpmrpm –U VRTSnbclt.rpmrpm –U VRTSnbjre.rpmrpm –U VRTSnbjava.rpmrpm –U VRTSpddea.rpmrpm –U VRTSnbcfg.rpm
Note: Please be aware the VRTSnbjre.rpm, VRTSnbjava.rpm, andVRTSpddea.rpm files are not supported on the IBM pSeries clients.
Linux
130Installing NetBackup client softwareAbout NetBackup client installation on UNIX and Linux
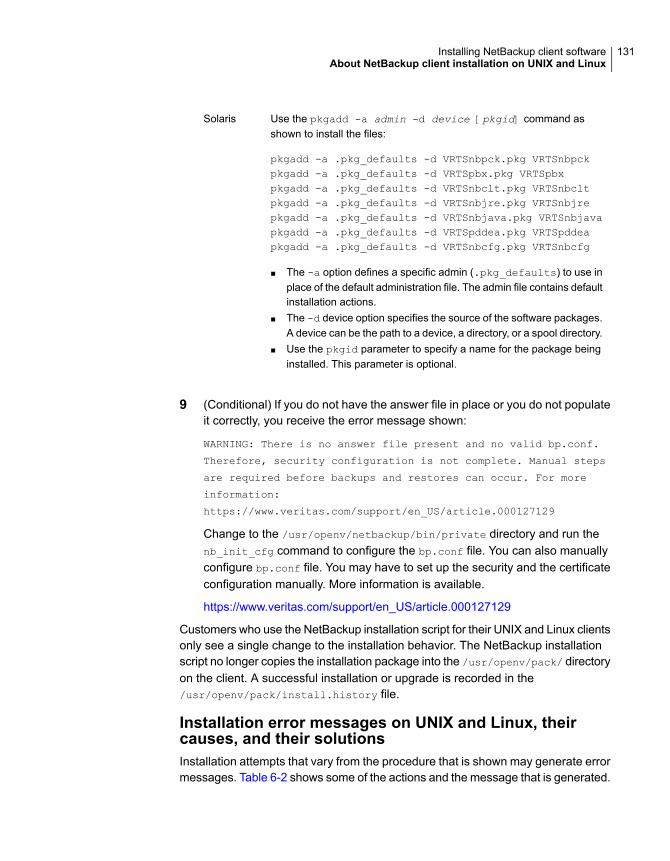
Use the pkgadd -a admin -d device [pkgid] command asshown to install the files:
pkgadd -a .pkg_defaults -d VRTSnbpck.pkg VRTSnbpckpkgadd -a .pkg_defaults -d VRTSpbx.pkg VRTSpbxpkgadd -a .pkg_defaults -d VRTSnbclt.pkg VRTSnbcltpkgadd -a .pkg_defaults -d VRTSnbjre.pkg VRTSnbjrepkgadd -a .pkg_defaults -d VRTSnbjava.pkg VRTSnbjavapkgadd -a .pkg_defaults -d VRTSpddea.pkg VRTSpddeapkgadd -a .pkg_defaults -d VRTSnbcfg.pkg VRTSnbcfg
■ The -a option defines a specific admin (.pkg_defaults) to use inplace of the default administration file. The admin file contains defaultinstallation actions.
■ The -d device option specifies the source of the software packages.A device can be the path to a device, a directory, or a spool directory.
■ Use the pkgid parameter to specify a name for the package beinginstalled. This parameter is optional.
Solaris
9 (Conditional) If you do not have the answer file in place or you do not populateit correctly, you receive the error message shown:
WARNING: There is no answer file present and no valid bp.conf.
Therefore, security configuration is not complete. Manual steps
are required before backups and restores can occur. For more
information:
https://www.veritas.com/support/en_US/article.000127129
Change to the /usr/openv/netbackup/bin/private directory and run thenb_init_cfg command to configure the bp.conf file. You can also manuallyconfigure bp.conf file. You may have to set up the security and the certificateconfiguration manually. More information is available.
https://www.veritas.com/support/en_US/article.000127129
Customers who use the NetBackup installation script for their UNIX and Linux clientsonly see a single change to the installation behavior. The NetBackup installationscript no longer copies the installation package into the /usr/openv/pack/ directoryon the client. A successful installation or upgrade is recorded in the/usr/openv/pack/install.history file.
Installation error messages on UNIX and Linux, theircauses, and their solutionsInstallation attempts that vary from the procedure that is shown may generate errormessages. Table 6-2 shows some of the actions and the message that is generated.
131Installing NetBackup client softwareAbout NetBackup client installation on UNIX and Linux
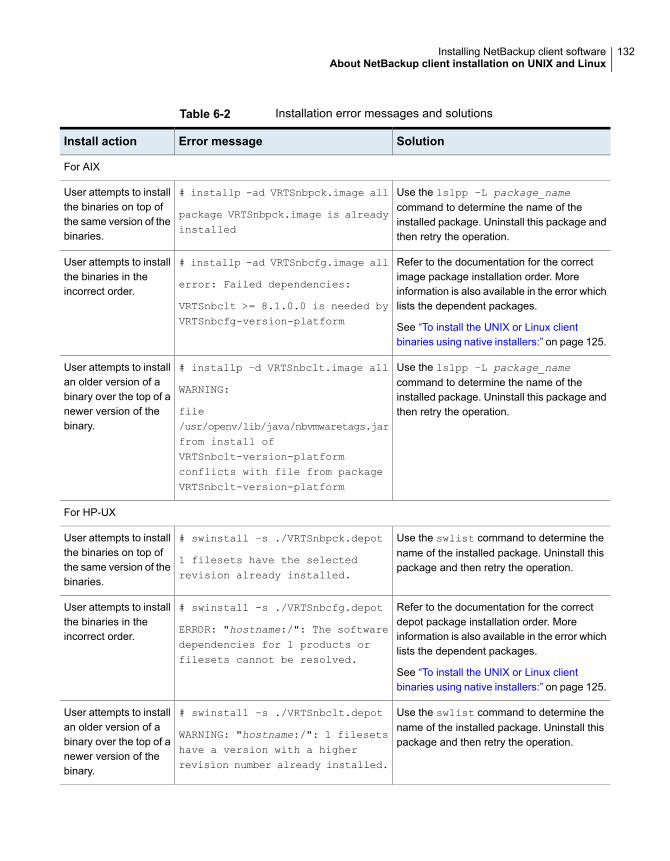
Table 6-2 Installation error messages and solutions
SolutionError messageInstall action
For AIX
Use the lslpp –L package_namecommand to determine the name of theinstalled package. Uninstall this package andthen retry the operation.
# installp -ad VRTSnbpck.image all
package VRTSnbpck.image is alreadyinstalled
User attempts to installthe binaries on top ofthe same version of thebinaries.
Refer to the documentation for the correctimage package installation order. Moreinformation is also available in the error whichlists the dependent packages.
See “To install the UNIX or Linux clientbinaries using native installers:” on page 125.
# installp -ad VRTSnbcfg.image all
error: Failed dependencies:
VRTSnbclt >= 8.1.0.0 is needed byVRTSnbcfg-version-platform
User attempts to installthe binaries in theincorrect order.
Use the lslpp –L package_namecommand to determine the name of theinstalled package. Uninstall this package andthen retry the operation.
# installp –d VRTSnbclt.image all
WARNING:
file/usr/openv/lib/java/nbvmwaretags.jarfrom install ofVRTSnbclt-version-platformconflicts with file from packageVRTSnbclt-version-platform
User attempts to installan older version of abinary over the top of anewer version of thebinary.
For HP-UX
Use the swlist command to determine thename of the installed package. Uninstall thispackage and then retry the operation.
# swinstall –s ./VRTSnbpck.depot
1 filesets have the selectedrevision already installed.
User attempts to installthe binaries on top ofthe same version of thebinaries.
Refer to the documentation for the correctdepot package installation order. Moreinformation is also available in the error whichlists the dependent packages.
See “To install the UNIX or Linux clientbinaries using native installers:” on page 125.
# swinstall -s ./VRTSnbcfg.depot
ERROR: "hostname:/": The softwaredependencies for 1 products orfilesets cannot be resolved.
User attempts to installthe binaries in theincorrect order.
Use the swlist command to determine thename of the installed package. Uninstall thispackage and then retry the operation.
# swinstall –s ./VRTSnbclt.depot
WARNING: "hostname:/": 1 filesetshave a version with a higherrevision number already installed.
User attempts to installan older version of abinary over the top of anewer version of thebinary.
132Installing NetBackup client softwareAbout NetBackup client installation on UNIX and Linux
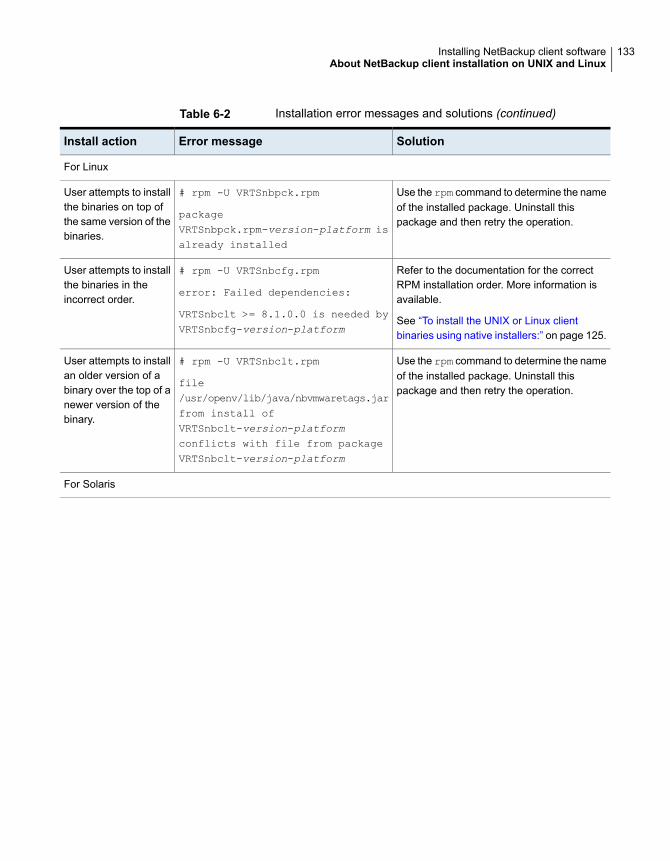
Table 6-2 Installation error messages and solutions (continued)
SolutionError messageInstall action
For Linux
Use the rpm command to determine the nameof the installed package. Uninstall thispackage and then retry the operation.
# rpm -U VRTSnbpck.rpm
packageVRTSnbpck.rpm-version-platform isalready installed
User attempts to installthe binaries on top ofthe same version of thebinaries.
Refer to the documentation for the correctRPM installation order. More information isavailable.
See “To install the UNIX or Linux clientbinaries using native installers:” on page 125.
# rpm -U VRTSnbcfg.rpm
error: Failed dependencies:
VRTSnbclt >= 8.1.0.0 is needed byVRTSnbcfg-version-platform
User attempts to installthe binaries in theincorrect order.
Use the rpm command to determine the nameof the installed package. Uninstall thispackage and then retry the operation.
# rpm -U VRTSnbclt.rpm
file/usr/openv/lib/java/nbvmwaretags.jarfrom install ofVRTSnbclt-version-platformconflicts with file from packageVRTSnbclt-version-platform
User attempts to installan older version of abinary over the top of anewer version of thebinary.
For Solaris
133Installing NetBackup client softwareAbout NetBackup client installation on UNIX and Linux
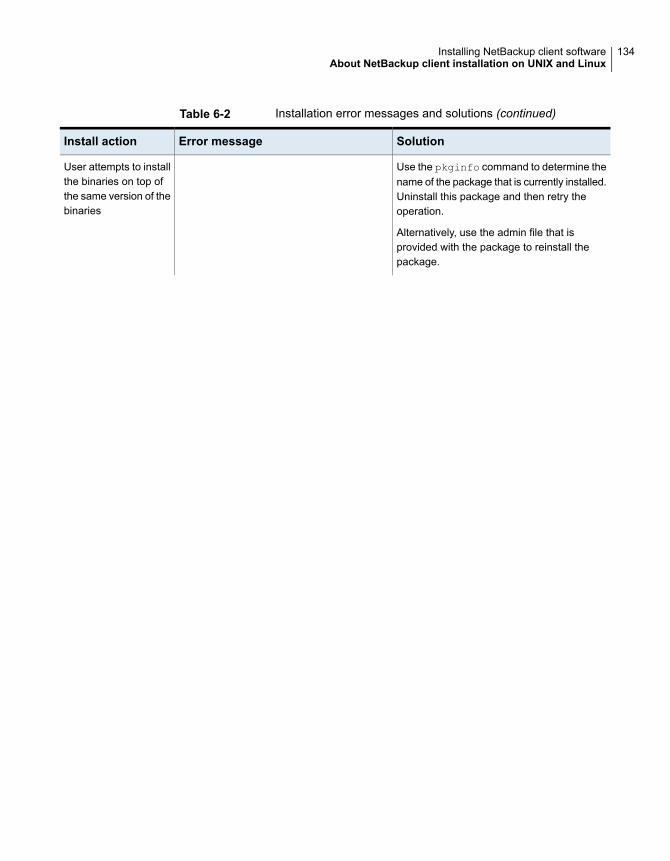
Table 6-2 Installation error messages and solutions (continued)
SolutionError messageInstall action
Use the pkginfo command to determine thename of the package that is currently installed.Uninstall this package and then retry theoperation.
Alternatively, use the admin file that isprovided with the package to reinstall thepackage.
User attempts to installthe binaries on top ofthe same version of thebinaries
134Installing NetBackup client softwareAbout NetBackup client installation on UNIX and Linux
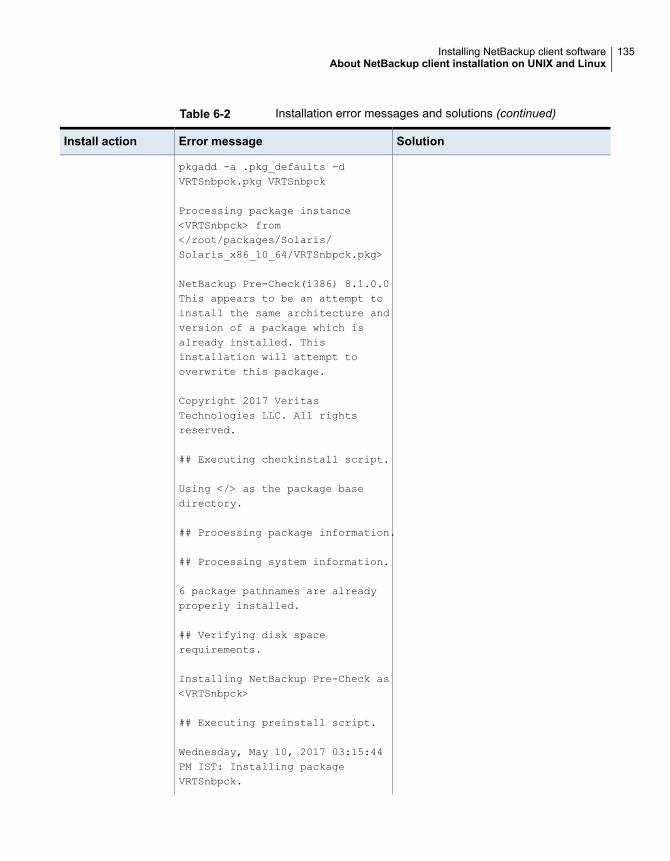
Table 6-2 Installation error messages and solutions (continued)
SolutionError messageInstall action
pkgadd -a .pkg_defaults -dVRTSnbpck.pkg VRTSnbpck
Processing package instance<VRTSnbpck> from</root/packages/Solaris/Solaris_x86_10_64/VRTSnbpck.pkg>
NetBackup Pre-Check(i386) 8.1.0.0This appears to be an attempt toinstall the same architecture andversion of a package which isalready installed. Thisinstallation will attempt tooverwrite this package.
Copyright 2017 VeritasTechnologies LLC. All rightsreserved.
## Executing checkinstall script.
Using </> as the package basedirectory.
## Processing package information.
## Processing system information.
6 package pathnames are alreadyproperly installed.
## Verifying disk spacerequirements.
Installing NetBackup Pre-Check as<VRTSnbpck>
## Executing preinstall script.
Wednesday, May 10, 2017 03:15:44PM IST: Installing packageVRTSnbpck.
135Installing NetBackup client softwareAbout NetBackup client installation on UNIX and Linux
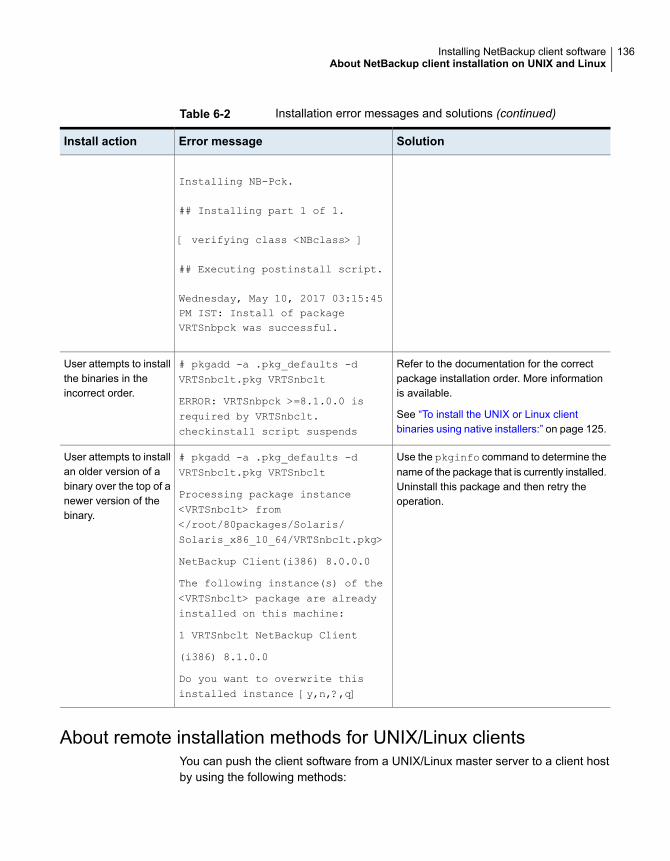
Table 6-2 Installation error messages and solutions (continued)
SolutionError messageInstall action
Installing NB-Pck.
## Installing part 1 of 1.
[ verifying class <NBclass> ]
## Executing postinstall script.
Wednesday, May 10, 2017 03:15:45PM IST: Install of packageVRTSnbpck was successful.
Refer to the documentation for the correctpackage installation order. More informationis available.
See “To install the UNIX or Linux clientbinaries using native installers:” on page 125.
# pkgadd -a .pkg_defaults -dVRTSnbclt.pkg VRTSnbclt
ERROR: VRTSnbpck >=8.1.0.0 isrequired by VRTSnbclt.checkinstall script suspends
User attempts to installthe binaries in theincorrect order.
Use the pkginfo command to determine thename of the package that is currently installed.Uninstall this package and then retry theoperation.
# pkgadd -a .pkg_defaults -dVRTSnbclt.pkg VRTSnbclt
Processing package instance<VRTSnbclt> from</root/80packages/Solaris/Solaris_x86_10_64/VRTSnbclt.pkg>
NetBackup Client(i386) 8.0.0.0
The following instance(s) of the<VRTSnbclt> package are alreadyinstalled on this machine:
1 VRTSnbclt NetBackup Client
(i386) 8.1.0.0
Do you want to overwrite thisinstalled instance [y,n,?,q]
User attempts to installan older version of abinary over the top of anewer version of thebinary.
About remote installation methods for UNIX/Linux clientsYou can push the client software from a UNIX/Linux master server to a client hostby using the following methods:
136Installing NetBackup client softwareAbout NetBackup client installation on UNIX and Linux

■ ssh
See “Installing client software with the ssh method” on page 137.
■ sftp
See “Installing client software with the sftp method” on page 138.
Note: For installation in clustered environments, enter the virtual name for theNetBackup server and not the actual local host name. You can only push clientsoftware from the active node.
Installing client software with the ssh methodThis client installation method is based on the usage of the SunSSH and theOpenSSH products, which must be at specific version and patch levels. For moreinformation about these patches, please refer to the NetBackup 9.1 Release Notes.
Before you perform this procedure, read the following guidelines:
To use the ssh method, the UNIX client must have sshdenabled and configured to allow root user logins.
SSH daemon (sshd)
If you want to install client software to a location other thanthe default, you must first create and link the desired directory.Create the directory where you want the client software toreside, and then create /usr/openv as a link to thatdirectory.
Additional information about installation folder restrictions isavailable.
See “Restrictions on the NetBackup installation directory”on page 17.
Client software location
Make sure that the clients are assigned to a backup policy.Backup policies
The install_client_files scripts may prompt you forsecurity information based on your environment. Theinformation that is required is based on the master serversecurity mode and the target host security configuration. Fordetails on how to respond to these prompts, refer to theNetBackup Security and Encryption Guide.
Security configuration
To install client software from a UNIX master server to UNIX clients with thessh method
◆ On the NetBackup server, run the install_client_files script.
Use one of the following commands:
137Installing NetBackup client softwareAbout NetBackup client installation on UNIX and Linux
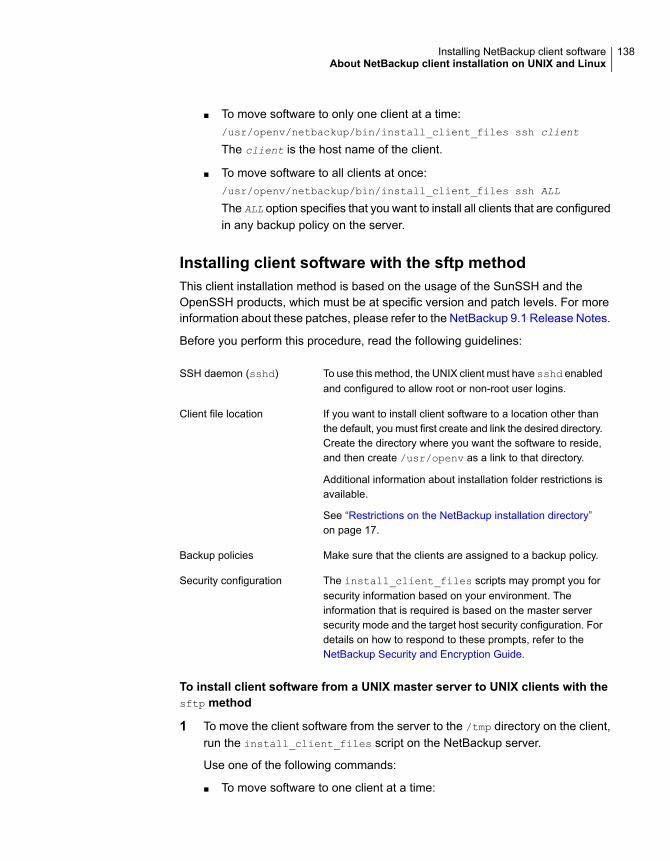
■ To move software to only one client at a time:/usr/openv/netbackup/bin/install_client_files ssh client
The client is the host name of the client.
■ To move software to all clients at once:/usr/openv/netbackup/bin/install_client_files ssh ALL
The ALL option specifies that you want to install all clients that are configuredin any backup policy on the server.
Installing client software with the sftp methodThis client installation method is based on the usage of the SunSSH and theOpenSSH products, which must be at specific version and patch levels. For moreinformation about these patches, please refer to the NetBackup 9.1 Release Notes.
Before you perform this procedure, read the following guidelines:
To use this method, the UNIX client must have sshd enabledand configured to allow root or non-root user logins.
SSH daemon (sshd)
If you want to install client software to a location other thanthe default, you must first create and link the desired directory.Create the directory where you want the software to reside,and then create /usr/openv as a link to that directory.
Additional information about installation folder restrictions isavailable.
See “Restrictions on the NetBackup installation directory”on page 17.
Client file location
Make sure that the clients are assigned to a backup policy.Backup policies
The install_client_files scripts may prompt you forsecurity information based on your environment. Theinformation that is required is based on the master serversecurity mode and the target host security configuration. Fordetails on how to respond to these prompts, refer to theNetBackup Security and Encryption Guide.
Security configuration
To install client software from a UNIX master server to UNIX clients with thesftp method
1 To move the client software from the server to the /tmp directory on the client,run the install_client_files script on the NetBackup server.
Use one of the following commands:
■ To move software to one client at a time:
138Installing NetBackup client softwareAbout NetBackup client installation on UNIX and Linux
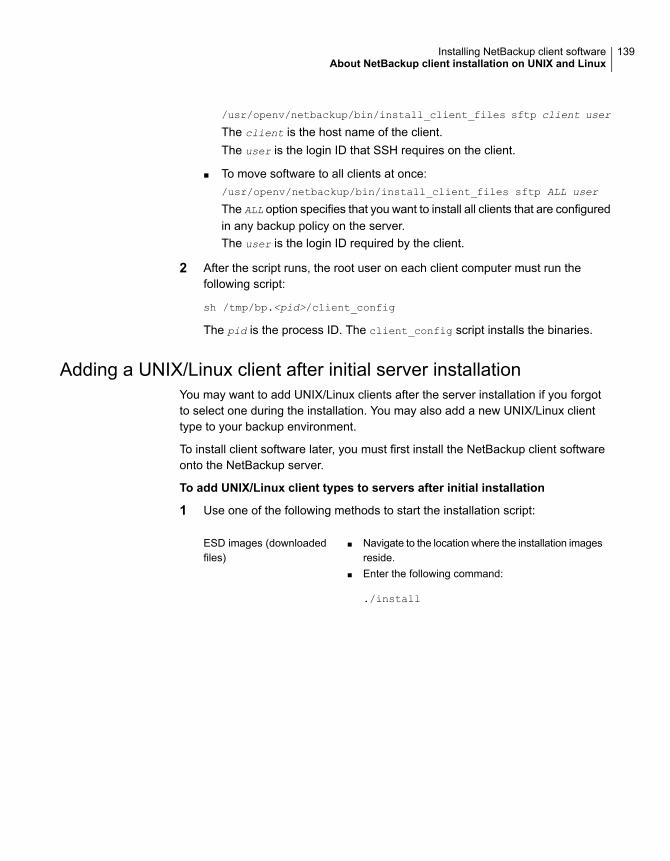
/usr/openv/netbackup/bin/install_client_files sftp client user
The client is the host name of the client.The user is the login ID that SSH requires on the client.
■ To move software to all clients at once:/usr/openv/netbackup/bin/install_client_files sftp ALL user
The ALL option specifies that you want to install all clients that are configuredin any backup policy on the server.The user is the login ID required by the client.
2 After the script runs, the root user on each client computer must run thefollowing script:
sh /tmp/bp.<pid>/client_config
The pid is the process ID. The client_config script installs the binaries.
Adding a UNIX/Linux client after initial server installationYou may want to add UNIX/Linux clients after the server installation if you forgotto select one during the installation. You may also add a new UNIX/Linux clienttype to your backup environment.
To install client software later, you must first install the NetBackup client softwareonto the NetBackup server.
To add UNIX/Linux client types to servers after initial installation
1 Use one of the following methods to start the installation script:
■ Navigate to the location where the installation imagesreside.
■ Enter the following command:
./install
ESD images (downloadedfiles)
139Installing NetBackup client softwareAbout NetBackup client installation on UNIX and Linux
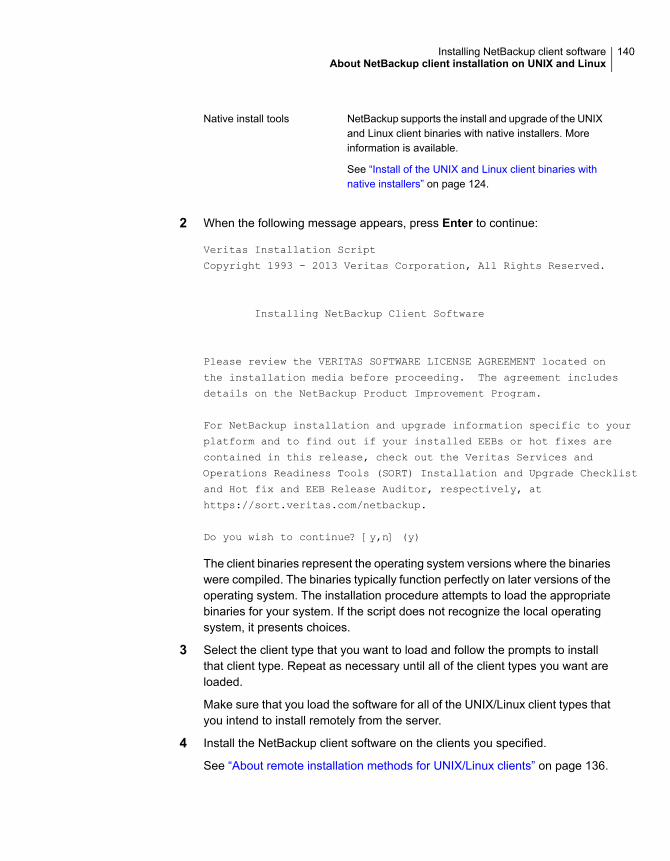
NetBackup supports the install and upgrade of the UNIXand Linux client binaries with native installers. Moreinformation is available.
See “Install of the UNIX and Linux client binaries withnative installers” on page 124.
Native install tools
2 When the following message appears, press Enter to continue:
Veritas Installation Script
Copyright 1993 - 2013 Veritas Corporation, All Rights Reserved.
Installing NetBackup Client Software
Please review the VERITAS SOFTWARE LICENSE AGREEMENT located on
the installation media before proceeding. The agreement includes
details on the NetBackup Product Improvement Program.
For NetBackup installation and upgrade information specific to your
platform and to find out if your installed EEBs or hot fixes are
contained in this release, check out the Veritas Services and
Operations Readiness Tools (SORT) Installation and Upgrade Checklist
and Hot fix and EEB Release Auditor, respectively, at
https://sort.veritas.com/netbackup.
Do you wish to continue? [y,n] (y)
The client binaries represent the operating system versions where the binarieswere compiled. The binaries typically function perfectly on later versions of theoperating system. The installation procedure attempts to load the appropriatebinaries for your system. If the script does not recognize the local operatingsystem, it presents choices.
3 Select the client type that you want to load and follow the prompts to installthat client type. Repeat as necessary until all of the client types you want areloaded.
Make sure that you load the software for all of the UNIX/Linux client types thatyou intend to install remotely from the server.
4 Install the NetBackup client software on the clients you specified.
See “About remote installation methods for UNIX/Linux clients” on page 136.
140Installing NetBackup client softwareAbout NetBackup client installation on UNIX and Linux
Configuring NetBackupThis chapter includes the following topics:
■ About NetBackup startup and shutdown scripts
■ About NetBackup server configuration
About NetBackup startup and shutdown scriptsWhen you install NetBackup, the installation script also performs configuration ofstartup and shutdown scripts. Startup scripts allow the NetBackup daemons to startautomatically when the system boots. Shutdown scripts automatically terminatethe startup scripts at system shutdown.
The installation process copies the NetBackup startup and shutdown scripts to theappropriate operating system location.
For non-cluster upgrades, any existing NetBackup related startup and shutdownscripts are saved, and the newly released versions of those scripts are installed.
Table 7-1 lists the links for the startup and the shutdown scripts for the variousplatforms that are installed during NetBackup installation.
7Chapter
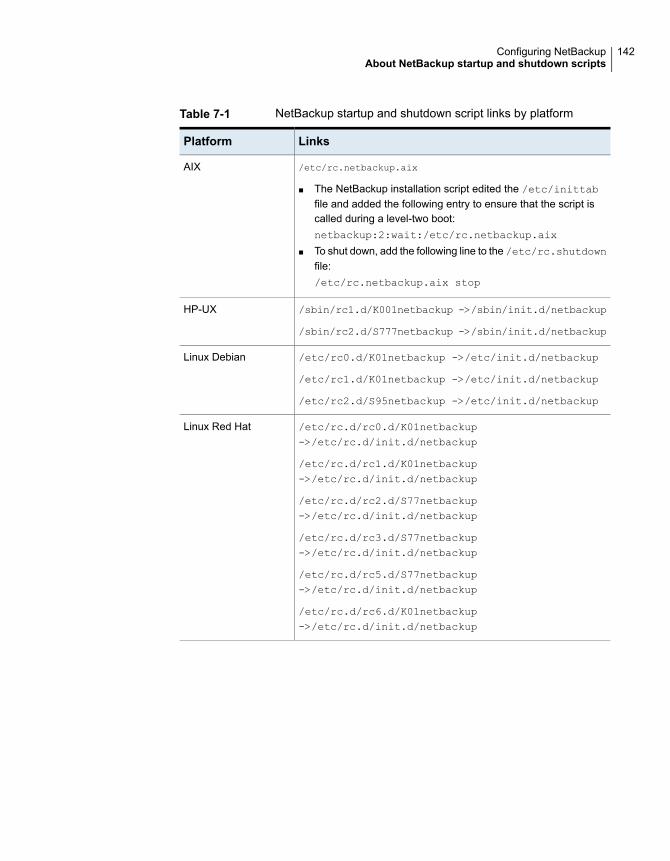
Table 7-1 NetBackup startup and shutdown script links by platform
LinksPlatform
/etc/rc.netbackup.aix
■ The NetBackup installation script edited the /etc/inittabfile and added the following entry to ensure that the script iscalled during a level-two boot:netbackup:2:wait:/etc/rc.netbackup.aix
■ To shut down, add the following line to the /etc/rc.shutdownfile:/etc/rc.netbackup.aix stop
AIX
/sbin/rc1.d/K001netbackup ->/sbin/init.d/netbackup
/sbin/rc2.d/S777netbackup ->/sbin/init.d/netbackup
HP-UX
/etc/rc0.d/K01netbackup ->/etc/init.d/netbackup
/etc/rc1.d/K01netbackup ->/etc/init.d/netbackup
/etc/rc2.d/S95netbackup ->/etc/init.d/netbackup
Linux Debian
/etc/rc.d/rc0.d/K01netbackup->/etc/rc.d/init.d/netbackup
/etc/rc.d/rc1.d/K01netbackup->/etc/rc.d/init.d/netbackup
/etc/rc.d/rc2.d/S77netbackup->/etc/rc.d/init.d/netbackup
/etc/rc.d/rc3.d/S77netbackup->/etc/rc.d/init.d/netbackup
/etc/rc.d/rc5.d/S77netbackup->/etc/rc.d/init.d/netbackup
/etc/rc.d/rc6.d/K01netbackup->/etc/rc.d/init.d/netbackup
Linux Red Hat
142Configuring NetBackupAbout NetBackup startup and shutdown scripts
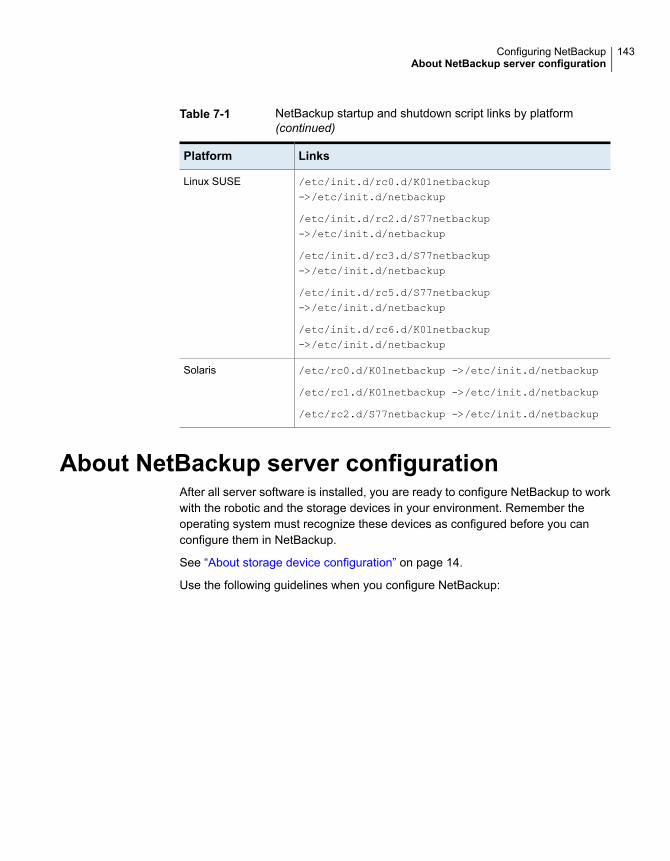
Table 7-1 NetBackup startup and shutdown script links by platform(continued)
LinksPlatform
/etc/init.d/rc0.d/K01netbackup->/etc/init.d/netbackup
/etc/init.d/rc2.d/S77netbackup->/etc/init.d/netbackup
/etc/init.d/rc3.d/S77netbackup->/etc/init.d/netbackup
/etc/init.d/rc5.d/S77netbackup->/etc/init.d/netbackup
/etc/init.d/rc6.d/K01netbackup->/etc/init.d/netbackup
Linux SUSE
/etc/rc0.d/K01netbackup ->/etc/init.d/netbackup
/etc/rc1.d/K01netbackup ->/etc/init.d/netbackup
/etc/rc2.d/S77netbackup ->/etc/init.d/netbackup
Solaris
About NetBackup server configurationAfter all server software is installed, you are ready to configure NetBackup to workwith the robotic and the storage devices in your environment. Remember theoperating system must recognize these devices as configured before you canconfigure them in NetBackup.
See “About storage device configuration” on page 14.
Use the following guidelines when you configure NetBackup:
143Configuring NetBackupAbout NetBackup server configuration
The procedures for configuring master and media serversare very similar. Veritas recommends, however, that youconfigure all server information such as storage devices andvolumes from the master server. Following this order helpsensure that the master servers properly administer the mediaservers.
Warning: Communication problems between the masterserver and the media server do not prevent you from runningthe configuration wizards. Therefore, do not run the wizardson the media server until the problems are corrected. If yourun any of the wizards when a communication problem exists,the master server cannot recognize the information that youenter. You must first correct the problem. After you correctthe problem, run the configuration wizards from the masterserver.
NetBackup Enterprise servers
■ Configure devices on every node in the cluster.■ Start by configuring all storage devices from the active
node so that they work with NetBackup.■ For a NetBackup failover server, attach all of the devices
to each node in the cluster on which NetBackup isinstalled. Refer to the clustering vendor’s documentationfor information on how to migrate to another node.
■ Unless otherwise noted, configure NetBackup to use thevirtual host names of master servers and media serversin the cluster.For complete information on to how to configure an add-onproduct to fail over, see the NetBackup Clustered MasterServer Administrator's Guide.
Clustered environments
For initial NetBackup server configuration, Veritas recommends that you launchthe NetBackup Administration Console and click theGetting Started icon. A seriesof wizards guide you through the following configuration procedures:
■ Configure Storage DevicesSee “About the Device Configuration Wizard” on page 146.
■ Configure VolumesSee “About the Volume Configuration Wizard” on page 148.
■ Configure the Catalog BackupSee “About the Catalog Backup Wizard” on page 149.
■ Create a Backup PolicySee “About the Backup Policy Configuration Wizard” on page 150.
144Configuring NetBackupAbout NetBackup server configuration
If NetBackup is already configured and you want to change a specific area, clickthe appropriate wizard on the NetBackup Administration Console.
For complete information on all of the NetBackup wizards and how to configureNetBackup, see the NetBackup Administrator's Guide, Volume I.
See “About storage device configuration” on page 14.
Starting the NetBackup Administration ConsoleUse the following procedures to open the NetBackup Administration Console toconfigure NetBackup. The Getting Started wizard guides you through the primaryconfiguration steps to make NetBackup function.
Note:Other wizards are available from the initial NetBackup Administration Consolewindow that are not part of the Getting Started wizard. For example, you canconfigure disk pools or create a snapshot backup policy. See the NetBackupAdministrator’s Guide, Volume I for complete information about all NetBackupwizards.
On Windows systems, if you clicked the check box LaunchAdministrationConsolethat appears at the end of NetBackup installation, you can skip this procedure.
To start the NetBackup Administration Console on Windows
1 Log on to the NetBackup server as the Administrator.
2 Click Start > Programs > Veritas NetBackup > NetBackup AdministrationConsole.
3 To begin configuration, on the Administration Console, click Getting Started.
The Getting Started screen appears and prompts you to begin deviceconfiguration.
Note: If you still need to configure devices to work with the operating system,close the wizard. You must first configure those devices as specified by thedevice and the operating system vendors.
145Configuring NetBackupAbout NetBackup server configuration
To start the NetBackup Administration Console on UNIX
1 Log in to the NetBackup server as root.
For clustered environments, log in to the active node as root.
If you need to run the user interface on a computer other than the NetBackupserver, log on to that computer. For UNIX systems, log in as root.
2 Enter the following command:
/usr/openv/netbackup/bin/jnbSA &
3 Enter the password for root.
For clustered environments, when you log in to the NetBackup AdministrationConsole, specify the virtual host name in the Host field.
4 Click Login.
5 To begin configuration, on the Administration Console, click Getting Started.
6 On the initial Getting Started screen, review the content and click Next.
The following screen prompts you to Configure Storage Devices.
Note: If you still need to configure devices to work with the operating system,close the wizard. You must first configure those devices as specified by thedevice and the operating system vendors.
About the Device Configuration WizardBefore you can run backups, you must define your storage devices for NetBackup.This wizard guides you through this process. You must, however, be certain thatyou have configured your storage devices correctly for your operating system.NetBackup cannot function reliably unless devices are installed and configuredcorrectly.
See “About storage device configuration” on page 14.
For clustered environments, begin configuring all storage devices from the activenode. For a NetBackup failover server, Veritas recommends that you attach all ofthe devices to every node on which NetBackup is installed.
For complete instructions, refer to the NetBackup Clustered Master ServerAdministrator's Guide.
This wizard takes you through the following processes:
■ Scans the hosts for backup devices
146Configuring NetBackupAbout NetBackup server configuration
■ Verifies the devices that were automatically detected
■ Verifies and corrects the drive configuration
■ Updates the device configuration
The wizard presents the following information when you configure devices:
■ When the wizard displays the Device Hosts screen, youmust specify the hosts on which to auto-discover andconfigure devices (NetBackup Enterprise servers only).
■ When the wizard displays the Backup Devices screen,confirm that the list of devices is complete and accurate.If a known backup device does not appear in this list, takethe following action:■ Verify that the backup device is physically attached to
the host.■ Verify that all that specified device and operating
system vendor installation procedures are performedsuccessfully.
■ Verify that all drives correspond to the proper device.If you need to move a drive, select the drive and dragit to the correct location.
■ For clusters, ensure that you perform storage deviceconfiguration on each node. Begin on the active node,then move the NetBackup active node to another nodeand perform the storage device configuration on that node.Repeat for each node of the cluster on which NetBackupruns.
Note: By default, robotic daemons and NetBackupadd-on products do not cause NetBackup to failover ifthey fail. You can configure robotic devices andNetBackup add-on products to fail over NetBackup if therobot or the add-on product fails. The operating systemmust recognize the robots as configured before you canconfigure NetBackup to failover. For complete detailsabout fail over configuration, refer to the NetBackupClustered Master Server Administrator’s Guide.
Device configuration
147Configuring NetBackupAbout NetBackup server configuration
■ You define storage units from the Configure StorageUnits screen. If your system does not have a tape device,you can store data on a disk by defining disk storage units.
■ When you enter a path for a storage unit, the followingrules apply:■ Use the correct path separators (forward slash (/) for
UNIX and backward slash (\) for Windows).■ Use a colon (:) to specify a drive separation on
Windows platforms.■ Use the following characters only:
Alphabetic characters (ASCII A-Z, a-z)Numeric characters (0-9)Miscellaneous characters: plus (+), minus (-),underscore (_), or period (.)
Defining storage units
See “About the Volume Configuration Wizard” on page 148.
About the Volume Configuration WizardAfter you have configured your storage devices, the Getting Started Wizard startsthe Volume Configuration Wizard. However, if you only have disk storage capability,NetBackup skips this wizard.
This wizard lets you initiate an inventory of each configured robot. NetBackupautomatically updates the volume database if it finds new robotic media during theinventory. In addition, you can define new volumes for use in standalone drives.
For complete information about volumes or volume configuration for standalonedrives, refer to the NetBackup Administrator's Guide, Volume I.
Note: For clustered environments, configure volumes from the active node.
This wizard lets you do the following tasks:
■ Select a device for volume configuration
■ Perform an inventory of the robot
■ Create new volumes
■ Create new volume groups
The wizard presents the following information when you configure volumes andperform inventory:
148Configuring NetBackupAbout NetBackup server configuration
■ NetBackup conducts an inventory of the robot or thedevice that you selected. To view the results after theinventory has completed, see the Results: field.
■ After the device inventory has completed, the wizardprompts you to identify which device slots contain cleaningmedia.If you upgraded NetBackup and have pre-existing barcoderules, the barcode reader automatically detects thedesignated slots for the cleaning media. If you do notdesignate cleaning slots, NetBackup considers all media(including cleaning media) as typical media and tries tooverwrite it.
■ After the inventory has completed, you are prompted toidentify which device slots contain cleaning media.If you identify one or more slots as cleaning media in theIdentify Cleaning Media screen, you see the RobotInventory (CleaningMedia) screen. This screen displaysthe results after the software updates the EMM database.If you do not designate cleaning media, NetBackupconsiders all media to be typical media (including cleaningmedia) and tries to overwrite it.
Robot or device inventory
■ Specify the number of volumes for the device.■ The wizard does not let you configure cleaning tapes for
standalone drives.
Standalone drives
When you specify multiple drive types, the following are true:
■ Media that is written by one robot drive may not work inany other drive. If this situation occurs, NetBackupconsiders the robot to have more than one type of drive.
■ If the robot has more than one type of drive, the wizardcannot inventory the robot.
Multiple drive types
See “About the Catalog Backup Wizard” on page 149.
About the Catalog Backup WizardThe NetBackup catalog contains information about your configuration and thelocations of backed up files and directories. If a disk fails and your catalog is lost,a catalog backup makes it easy to restore your data and resume your backupschedule.
Therefore, you must configure a catalog backup policy before any data gets backedup.
149Configuring NetBackupAbout NetBackup server configuration
This wizard lets you create a policy for an online, hot catalog backup. Online, hotcatalog backups can back up the catalog while normal client backups are in progress.
A catalog backup policy lets you specify the following information:
■ The destinations for the catalog backupA backup destination can be any configured storage device. For additionaldisaster recovery protection, you can specify a second location for your catalogbackup.
Note:Although NetBackup supports catalog backup to disk, Veritas recommendsthat you back up the catalog to a removable media that gets stored off-site.
■ The disaster recovery passphrase. More information about the passphrase isavailable. See the NetBackup Troubleshooting Guide.
■ When the catalog backup occurs
■ The location of the disaster recovery file that is needed to recover from thecatalog backup
Use the following guidelines to configure a catalog backup:
■ Configure a catalog backup policy before any other files or data are backed up.
■ For clustered systems, configure the catalog backup policy from the active node.
For complete details about catalog backups, see the chapter “Protecting theNetBackup catalog” in the NetBackup Administrator's Guide, Volume I.
For instructions on how to configure a catalog backup in clustered environments,see the NetBackup Clustered Master Server Administrator's Guide.
About the Backup Policy Configuration WizardThis wizard lets you define a backup policy for a group of one or more clients. Forclustered environments, configure the policy from the active node.
The wizard lets you specify the following:
■ Policy names and types
■ Clients
■ Files and directories to back up
■ Backup types
■ Backup rotations
■ Starting times of backups
150Configuring NetBackupAbout NetBackup server configuration
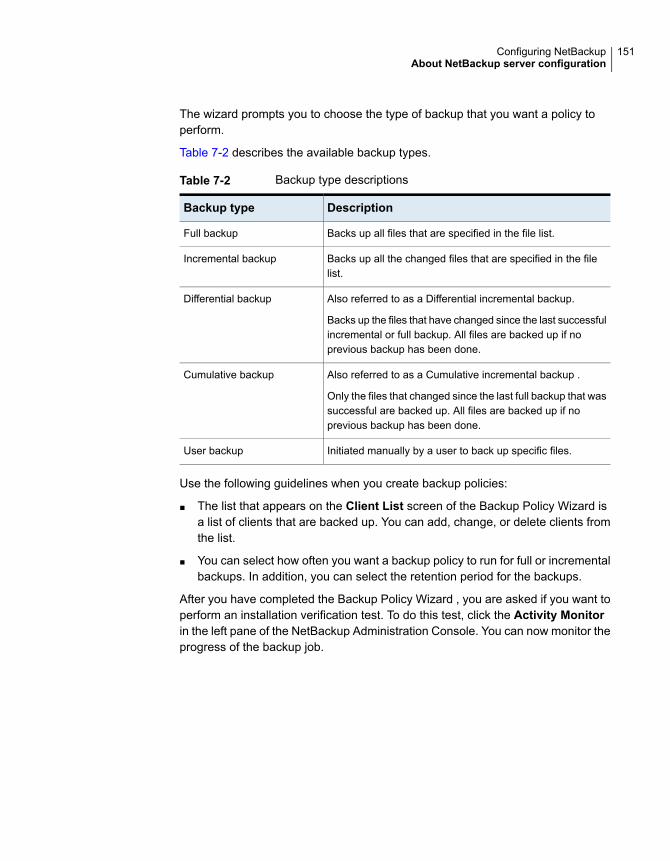
The wizard prompts you to choose the type of backup that you want a policy toperform.
Table 7-2 describes the available backup types.
Table 7-2 Backup type descriptions
DescriptionBackup type
Backs up all files that are specified in the file list.Full backup
Backs up all the changed files that are specified in the filelist.
Incremental backup
Also referred to as a Differential incremental backup.
Backs up the files that have changed since the last successfulincremental or full backup. All files are backed up if noprevious backup has been done.
Differential backup
Also referred to as a Cumulative incremental backup .
Only the files that changed since the last full backup that wassuccessful are backed up. All files are backed up if noprevious backup has been done.
Cumulative backup
Initiated manually by a user to back up specific files.User backup
Use the following guidelines when you create backup policies:
■ The list that appears on the Client List screen of the Backup Policy Wizard isa list of clients that are backed up. You can add, change, or delete clients fromthe list.
■ You can select how often you want a backup policy to run for full or incrementalbackups. In addition, you can select the retention period for the backups.
After you have completed the Backup Policy Wizard , you are asked if you want toperform an installation verification test. To do this test, click the Activity Monitorin the left pane of the NetBackup Administration Console. You can now monitor theprogress of the backup job.
151Configuring NetBackupAbout NetBackup server configuration
Upgrading NetBackupsoftware
This chapter includes the following topics:
■ About upgrading NetBackup
■ About the NetBackup 9.x Upgrade Portal
About upgrading NetBackupComplete upgrade information can be found in the Veritas NetBackup UpgradeGuide on the NetBackup Upgrade Portal. The portal can be accessed by clickingon the following link:
http://www.veritas.com/docs/000115678
See “About Veritas Services and Operations Readiness Tools” on page 22.
See “About the NetBackup 9.x Upgrade Portal” on page 152.
About the NetBackup 9.x Upgrade PortalThe NetBackup 9.x Upgrade Portal contains the necessary information andinstructions for upgrades to version 9.1. The following is a link to the portal:
http://www.veritas.com/docs/000115678
You must perform an upgrade to NetBackup 9.1 as described in the portaldocumentation.
To help you plan and prepare for an upgrade to NetBackup 9.1, the followingdescribes the important information that can be found on the portal:
■ Catalog backup
8Chapter
Before the upgrade, a catalog backup should be created to provide a backupof the catalog in case of a failed upgrade.
■ NetBackup Catalog Check (NBCC) utility for NetBackup 9.1.Before the upgrade, the catalog should be checked to make sure that it is freeof any inconsistencies that may cause the upgrade to fail. If the NBCC resultsshow any catalog inconsistencies, you must seek assistance from VeritasEnterprise Support for additional guidance.
■ Upgrade to NetBackup OpsCenter 9.1The NetBackup OpsCenter Administrator's Guide provides important notes forupgrading to NetBackup OpsCenter 9.1. This upgrade must be done before youupgrade to NetBackup 9.1.
■ Catalog cleanup.Your current NetBackup catalog must be free of any inconsistencies that mayprevent a successful upgrade.
■ Upgrade to NetBackup 9.1After the catalog cleanup and the NBCC results are declared as acceptable andyou have upgraded to NetBackup OpsCenter 9.1, begin the NetBackup 9.1upgrade.
If you have any questions or concerns about the upgrade process for NetBackup9.1, please contact Veritas Enterprise Support.
See “About Veritas Services and Operations Readiness Tools” on page 22.
153Upgrading NetBackup softwareAbout the NetBackup 9.x Upgrade Portal
Removing NetBackupserver and client software
This chapter includes the following topics:
■ About NetBackup server software removal on UNIX systems
■ About NetBackup client software removal on UNIX and Linux systems
■ Removing NetBackup from UNIX and Linux servers and clients
■ About NetBackup server software removal on Windows systems
■ Removing NetBackup server and client software from Windows servers, clusters,and clients
■ About removal of the Java Console state data from Windows servers andWindows clients
■ Removing a clustered media server by migrating all data to a new media server
About NetBackup server software removal onUNIX systems
NetBackup removal procedures remove NetBackup completely, along with anyinstalled add-on products. Each procedure gives you the opportunity to save anydata that you want and to remove add-on products before you remove NetBackup.
Veritas recommends that you use the following order when you remove NetBackupserver software:
■ Save any data that you require.This task is very important if you plan to reinstall NetBackup at a later date.
9Chapter
■ Remove any add-on products before you remove NetBackup server software.
■ Remove the NetBackup server software.
Note: As part of the removal of the NetBackup server software, the securitycertificates are automatically deleted. If you want to retain the certificates, pleasesave them before removing NetBackup.
More information about this topic is available. Please refer to the information onretaining host ID-based certificates when reinstalling NetBackup in theNetBackupSecurity and Encryption Guide.
See “Removing NetBackup from UNIX and Linux servers and clients” on page 156.
See “About NetBackup client software removal on UNIX and Linux systems”on page 155.
About NetBackup client software removal onUNIXand Linux systems
Use the following guidelines when you remove NetBackup from UNIX/Linux clients:
When you remove NetBackup client software, PBX is not removed. You mustremove PBX manually. The client software removal procedure in this documentincludes a step that describes how to perform this task.
As part of the removal of the NetBackup client software, the security certificatesare automatically deleted. If you want to retain the certificates, please save thembefore removing NetBackup.
More information about this topic is available. Please refer to the information onretaining host ID-based certificates when reinstalling NetBackup in theNetBackupSecurity and Encryption Guide.
Warning: Do not remove PBX if your client uses other Veritas software productsthat require PBX to run.
155Removing NetBackup server and client softwareAbout NetBackup client software removal on UNIX and Linux systems
Removing NetBackup from UNIX and Linuxservers and clients
Use this procedure to remove NetBackup from UNIX and Linux servers and clients.You may also need to reference other documents for procedures of specific tasksto remove NetBackup successfully.
Use the following guidelines when you remove NetBackup from UNIX and Linuxservers and clients:
If you moved the NBDB files in /usr/openv/db/data fromtheir default installation location, this procedure includes astep that describes how to remove these files.
NetBackup relationaldatabase (NBDB) location
Before you begin to remove NetBackup, you must removeNetBackup from the cluster application. Follow the instructionsin your cluster documentation on how to remove a group,then you can remove NetBackup.
The virtual host name security certificates are automaticallyremoved from the shared drive of the cluster as a part ofNetBackup server software removal.
You must remove NetBackup from each node in the cluster.
Clustered environments
When you remove NetBackup, PBX is not removed. Youmust remove PBX manually. This procedure includes a stepthat describes how to perform this task.
Warning: Do not remove PBX if your server uses otherVeritas software products that require PBX to run.
PBX
The NetBackup Administration Console must be closed whenyou remove NetBackup. Otherwise, NetBackup may causea failure that forces you to restart the procedure.
NetBackup AdministrationConsole
To remove NetBackup from UNIX servers
1 Log on as the root user on the server or the client.
2 (Conditional: servers only) Perform a catalog backup.
3 If the NetBackup Administration Console is open, you must close it now.
4 (Conditional: servers only) Save all important data from any add-on productsthat you have installed.
5 Stop the NetBackup/Media Manager daemons with the following command:
/usr/openv/netbackup/bin/bp.kill_all
156Removing NetBackup server and client softwareRemoving NetBackup from UNIX and Linux servers and clients
6 Identify any installed add-on products by using the following command:
lslpp -LAIX
swlistHP-UX
rpm -qaLinux
pkginfoSolaris
Look for any of the seven add-on products listed:
VRTSfrnb (Applies only to servers)
VRTSfrnbclt
VRTSjanb (Applies only to servers)
VRTSjanbclt
VRTSzhnb (Applies only to servers)
VRTSzhnbclt
VRTSnbsds (Applies only to servers)
Remove any add-on products found.
7 (Conditional: servers only) For Solaris systems only, run the following command:
/usr/openv/volmgr/bin/driver/sg.install -deinstall
8 To unregister NetBackup from the VxUL master configuration that is stored inthe /etc/vx/vrtslog.conf file, run the following command:
/usr/openv/netbackup/bin/vxlogcfg -r -p 51216
The -p option specifies the product ID, which is 51216 for NetBackup.
9 (Conditional: servers only) If BMR is supported and enabled on the server,remove the associated files with the following command:
/usr/openv/netbackup/bin/bmrsetupmaster -undo -f
10 (Conditional: servers only) If you moved the NBDB files from their defaultinstallation location, you must delete these files manually as follows:
■ Navigate to the following directory where the NBDB files reside:/usr/openv/db/data
■ Open the vxdbms.conf file.This file contains a list of the database-related files and the path for eachfile.
■ Delete each of the database-related files.
157Removing NetBackup server and client softwareRemoving NetBackup from UNIX and Linux servers and clients
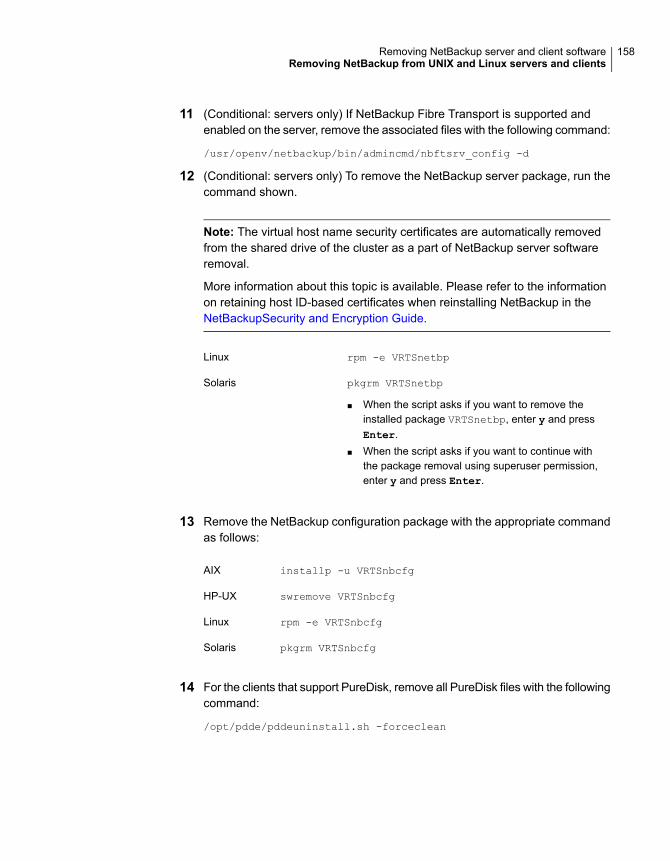
11 (Conditional: servers only) If NetBackup Fibre Transport is supported andenabled on the server, remove the associated files with the following command:
/usr/openv/netbackup/bin/admincmd/nbftsrv_config -d
12 (Conditional: servers only) To remove the NetBackup server package, run thecommand shown.
Note: The virtual host name security certificates are automatically removedfrom the shared drive of the cluster as a part of NetBackup server softwareremoval.
More information about this topic is available. Please refer to the informationon retaining host ID-based certificates when reinstalling NetBackup in theNetBackupSecurity and Encryption Guide.
rpm -e VRTSnetbpLinux
pkgrm VRTSnetbp
■ When the script asks if you want to remove theinstalled package VRTSnetbp, enter y and pressEnter.
■ When the script asks if you want to continue withthe package removal using superuser permission,enter y and press Enter.
Solaris
13 Remove the NetBackup configuration package with the appropriate commandas follows:
installp -u VRTSnbcfgAIX
swremove VRTSnbcfgHP-UX
rpm -e VRTSnbcfgLinux
pkgrm VRTSnbcfgSolaris
14 For the clients that support PureDisk, remove all PureDisk files with the followingcommand:
/opt/pdde/pddeuninstall.sh -forceclean
158Removing NetBackup server and client softwareRemoving NetBackup from UNIX and Linux servers and clients
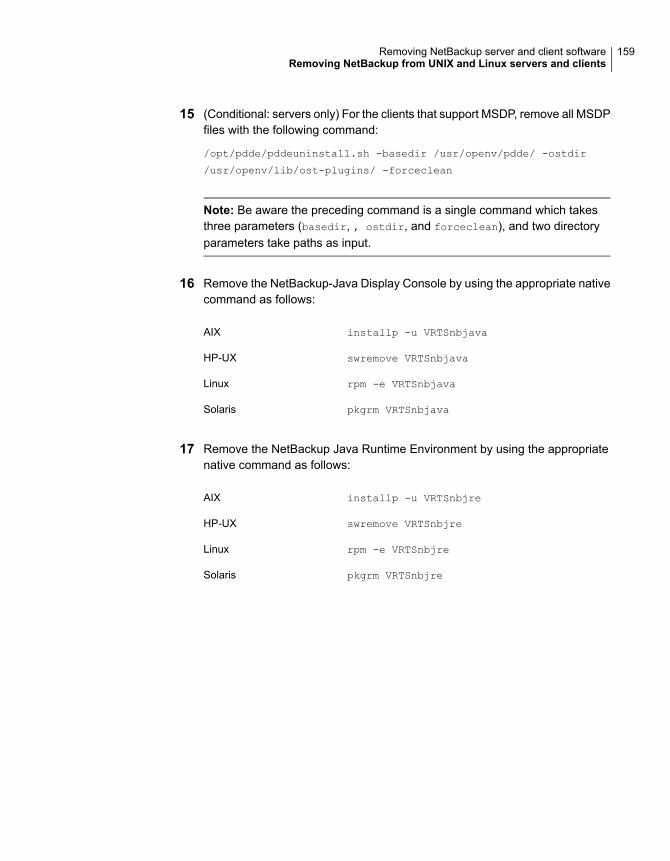
15 (Conditional: servers only) For the clients that support MSDP, remove all MSDPfiles with the following command:
/opt/pdde/pddeuninstall.sh -basedir /usr/openv/pdde/ -ostdir
/usr/openv/lib/ost-plugins/ -forceclean
Note: Be aware the preceding command is a single command which takesthree parameters (basedir, , ostdir, and forceclean), and two directoryparameters take paths as input.
16 Remove the NetBackup-Java Display Console by using the appropriate nativecommand as follows:
installp -u VRTSnbjavaAIX
swremove VRTSnbjavaHP-UX
rpm -e VRTSnbjavaLinux
pkgrm VRTSnbjavaSolaris
17 Remove the NetBackup Java Runtime Environment by using the appropriatenative command as follows:
installp -u VRTSnbjreAIX
swremove VRTSnbjreHP-UX
rpm -e VRTSnbjreLinux
pkgrm VRTSnbjreSolaris
159Removing NetBackup server and client softwareRemoving NetBackup from UNIX and Linux servers and clients
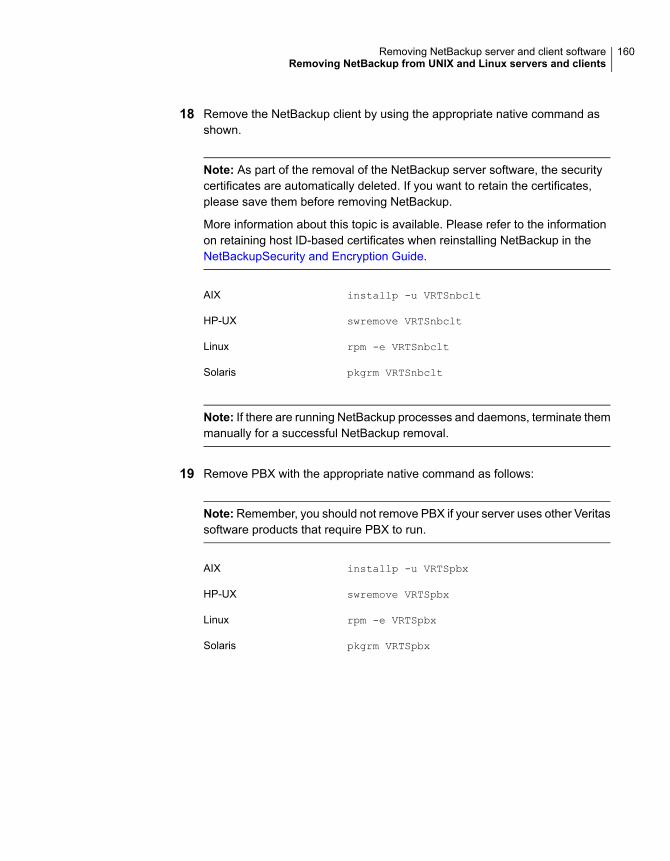
18 Remove the NetBackup client by using the appropriate native command asshown.
Note: As part of the removal of the NetBackup server software, the securitycertificates are automatically deleted. If you want to retain the certificates,please save them before removing NetBackup.
More information about this topic is available. Please refer to the informationon retaining host ID-based certificates when reinstalling NetBackup in theNetBackupSecurity and Encryption Guide.
installp -u VRTSnbcltAIX
swremove VRTSnbcltHP-UX
rpm -e VRTSnbcltLinux
pkgrm VRTSnbcltSolaris
Note: If there are running NetBackup processes and daemons, terminate themmanually for a successful NetBackup removal.
19 Remove PBX with the appropriate native command as follows:
Note:Remember, you should not remove PBX if your server uses other Veritassoftware products that require PBX to run.
installp -u VRTSpbxAIX
swremove VRTSpbxHP-UX
rpm -e VRTSpbxLinux
pkgrm VRTSpbxSolaris
160Removing NetBackup server and client softwareRemoving NetBackup from UNIX and Linux servers and clients
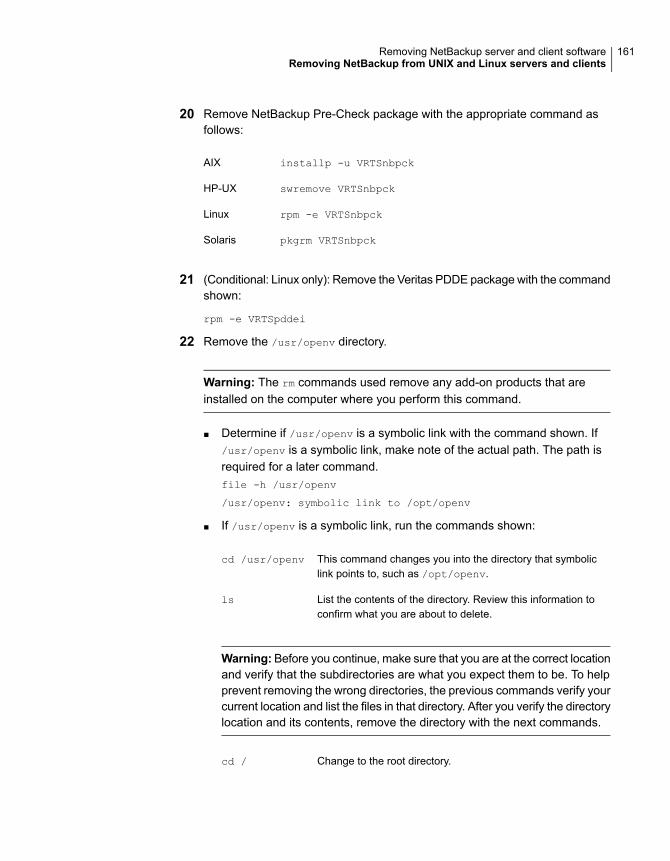
20 Remove NetBackup Pre-Check package with the appropriate command asfollows:
installp -u VRTSnbpckAIX
swremove VRTSnbpckHP-UX
rpm -e VRTSnbpckLinux
pkgrm VRTSnbpckSolaris
21 (Conditional: Linux only): Remove the Veritas PDDE package with the commandshown:
rpm -e VRTSpddei
22 Remove the /usr/openv directory.
Warning: The rm commands used remove any add-on products that areinstalled on the computer where you perform this command.
■ Determine if /usr/openv is a symbolic link with the command shown. If/usr/openv is a symbolic link, make note of the actual path. The path isrequired for a later command.file -h /usr/openv
/usr/openv: symbolic link to /opt/openv
■ If /usr/openv is a symbolic link, run the commands shown:
This command changes you into the directory that symboliclink points to, such as /opt/openv.
cd /usr/openv
List the contents of the directory. Review this information toconfirm what you are about to delete.
ls
Warning:Before you continue, make sure that you are at the correct locationand verify that the subdirectories are what you expect them to be. To helpprevent removing the wrong directories, the previous commands verify yourcurrent location and list the files in that directory. After you verify the directorylocation and its contents, remove the directory with the next commands.
Change to the root directory.cd /
161Removing NetBackup server and client softwareRemoving NetBackup from UNIX and Linux servers and clients
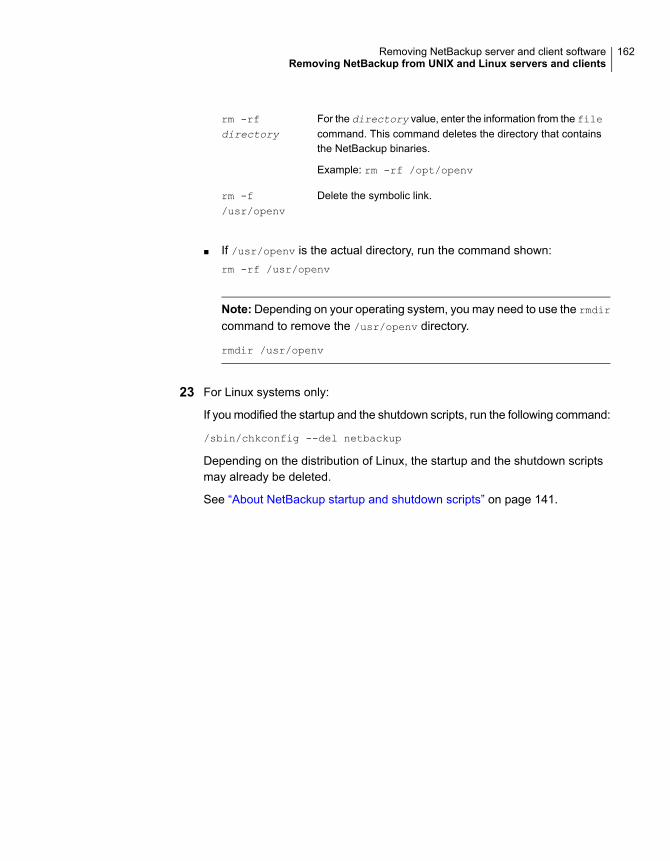
For the directory value, enter the information from the filecommand. This command deletes the directory that containsthe NetBackup binaries.
Example: rm -rf /opt/openv
rm -rfdirectory
Delete the symbolic link.rm -f/usr/openv
■ If /usr/openv is the actual directory, run the command shown:rm -rf /usr/openv
Note:Depending on your operating system, you may need to use the rmdir
command to remove the /usr/openv directory.
rmdir /usr/openv
23 For Linux systems only:
If you modified the startup and the shutdown scripts, run the following command:
/sbin/chkconfig --del netbackup
Depending on the distribution of Linux, the startup and the shutdown scriptsmay already be deleted.
See “About NetBackup startup and shutdown scripts” on page 141.
162Removing NetBackup server and client softwareRemoving NetBackup from UNIX and Linux servers and clients
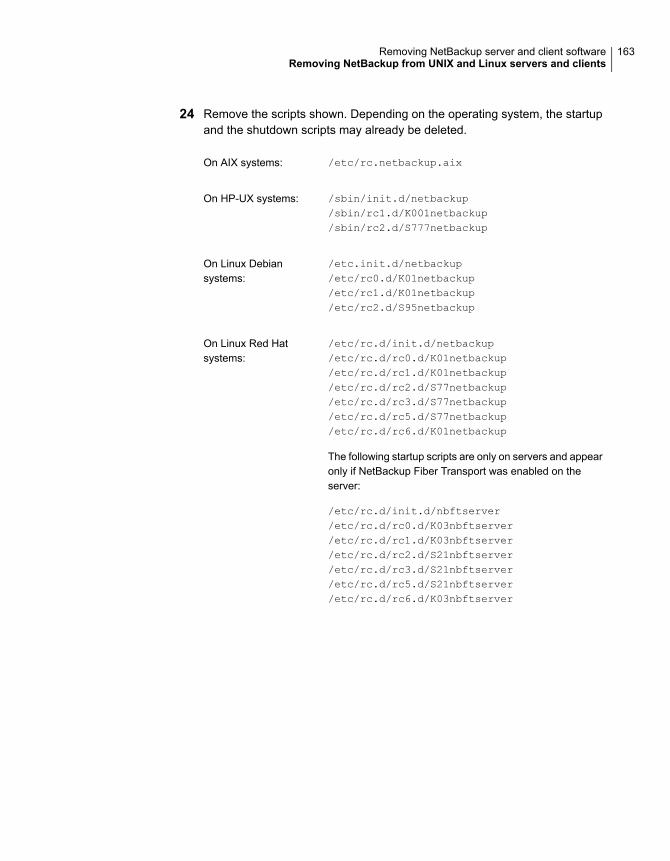
24 Remove the scripts shown. Depending on the operating system, the startupand the shutdown scripts may already be deleted.
/etc/rc.netbackup.aixOn AIX systems:
/sbin/init.d/netbackup/sbin/rc1.d/K001netbackup/sbin/rc2.d/S777netbackup
On HP-UX systems:
/etc.init.d/netbackup/etc/rc0.d/K01netbackup
On Linux Debiansystems:
/etc/rc1.d/K01netbackup/etc/rc2.d/S95netbackup
/etc/rc.d/init.d/netbackup/etc/rc.d/rc0.d/K01netbackup
On Linux Red Hatsystems:
/etc/rc.d/rc1.d/K01netbackup/etc/rc.d/rc2.d/S77netbackup/etc/rc.d/rc3.d/S77netbackup/etc/rc.d/rc5.d/S77netbackup/etc/rc.d/rc6.d/K01netbackup
The following startup scripts are only on servers and appearonly if NetBackup Fiber Transport was enabled on theserver:
/etc/rc.d/init.d/nbftserver/etc/rc.d/rc0.d/K03nbftserver/etc/rc.d/rc1.d/K03nbftserver/etc/rc.d/rc2.d/S21nbftserver/etc/rc.d/rc3.d/S21nbftserver/etc/rc.d/rc5.d/S21nbftserver/etc/rc.d/rc6.d/K03nbftserver
163Removing NetBackup server and client softwareRemoving NetBackup from UNIX and Linux servers and clients
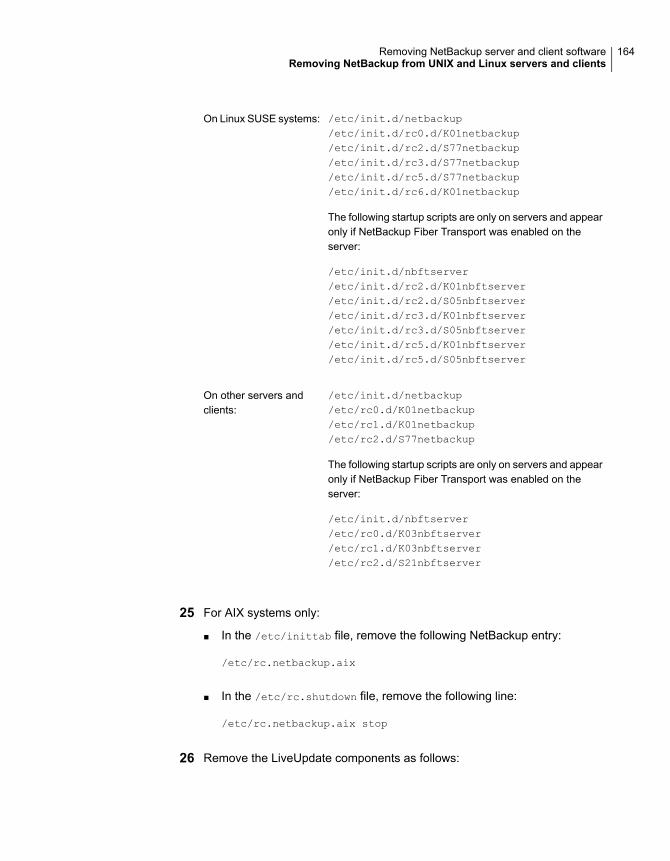
/etc/init.d/netbackup/etc/init.d/rc0.d/K01netbackup/etc/init.d/rc2.d/S77netbackup/etc/init.d/rc3.d/S77netbackup/etc/init.d/rc5.d/S77netbackup/etc/init.d/rc6.d/K01netbackup
The following startup scripts are only on servers and appearonly if NetBackup Fiber Transport was enabled on theserver:
/etc/init.d/nbftserver/etc/init.d/rc2.d/K01nbftserver/etc/init.d/rc2.d/S05nbftserver/etc/init.d/rc3.d/K01nbftserver/etc/init.d/rc3.d/S05nbftserver/etc/init.d/rc5.d/K01nbftserver/etc/init.d/rc5.d/S05nbftserver
On Linux SUSE systems:
/etc/init.d/netbackup/etc/rc0.d/K01netbackup/etc/rc1.d/K01netbackup/etc/rc2.d/S77netbackup
The following startup scripts are only on servers and appearonly if NetBackup Fiber Transport was enabled on theserver:
/etc/init.d/nbftserver/etc/rc0.d/K03nbftserver/etc/rc1.d/K03nbftserver/etc/rc2.d/S21nbftserver
On other servers andclients:
25 For AIX systems only:
■ In the /etc/inittab file, remove the following NetBackup entry:
/etc/rc.netbackup.aix
■ In the /etc/rc.shutdown file, remove the following line:
/etc/rc.netbackup.aix stop
26 Remove the LiveUpdate components as follows:
164Removing NetBackup server and client softwareRemoving NetBackup from UNIX and Linux servers and clients
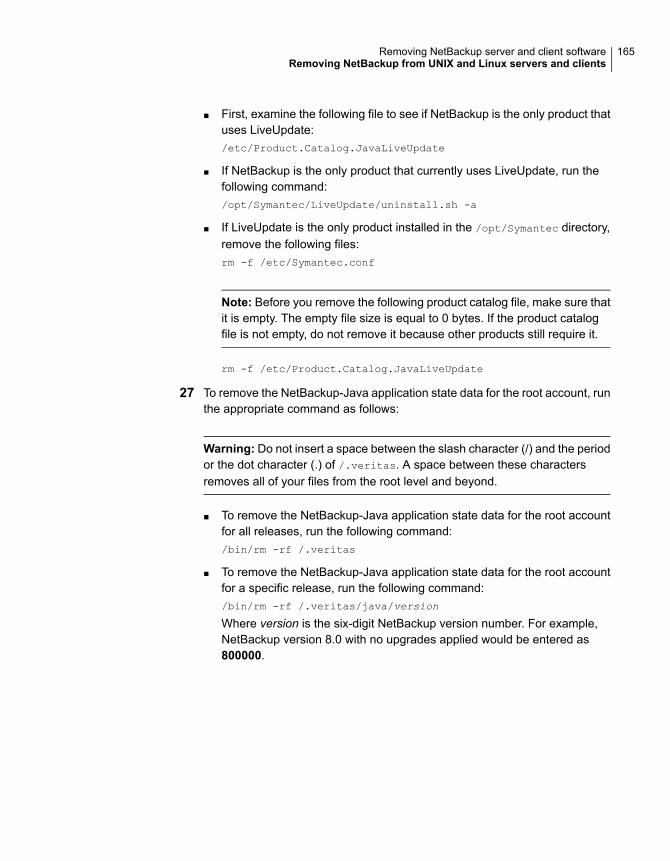
■ First, examine the following file to see if NetBackup is the only product thatuses LiveUpdate:/etc/Product.Catalog.JavaLiveUpdate
■ If NetBackup is the only product that currently uses LiveUpdate, run thefollowing command:/opt/Symantec/LiveUpdate/uninstall.sh -a
■ If LiveUpdate is the only product installed in the /opt/Symantec directory,remove the following files:rm -f /etc/Symantec.conf
Note: Before you remove the following product catalog file, make sure thatit is empty. The empty file size is equal to 0 bytes. If the product catalogfile is not empty, do not remove it because other products still require it.
rm -f /etc/Product.Catalog.JavaLiveUpdate
27 To remove the NetBackup-Java application state data for the root account, runthe appropriate command as follows:
Warning: Do not insert a space between the slash character (/) and the periodor the dot character (.) of /.veritas. A space between these charactersremoves all of your files from the root level and beyond.
■ To remove the NetBackup-Java application state data for the root accountfor all releases, run the following command:/bin/rm -rf /.veritas
■ To remove the NetBackup-Java application state data for the root accountfor a specific release, run the following command:/bin/rm -rf /.veritas/java/version
Where version is the six-digit NetBackup version number. For example,NetBackup version 8.0 with no upgrades applied would be entered as800000.
165Removing NetBackup server and client softwareRemoving NetBackup from UNIX and Linux servers and clients

28 Inform NetBackup-Java users that they can remove their $HOME/.veritasdirectory.
The $HOME/.veritas and the $HOME/.veritas/java directories containapplication state information, that is saved when the user exits NetBackup-Javaapplications. The saved information includes table column order and size. Theprocess removes this directory for the root user only.
The common subdirectory in $HOME/.veritas/java/.userPrefs/vrts can beremoved.
29 If you enabled NetBackup Access Control, NetBackup placed several files onclients and servers. These files can be divided into the following categories:
■ NetBackup application temporary filesThese files are removed with NetBackup.
■ Individual user (cache) filesThese cache files reside in the $HOME/.vxss directory. Inform all users thatthey can remove this directory.Files are generated in the /.vxss directory by a Single Sign-On operationof the NetBackup Administration Console on the host where the consoleruns. The NetBackup Administration Console cleans these files when anexit function is performed, so the directory does not always containtemporary files. However, if a system crash were to occur, any files in thedirectory may be left behind. With the console shutdown , you can deletethese files safely with no data loss.NetBackup also creates cached certificates for client and server NetBackupapplications. These files reside within the /.vxss directory. These filestypically have a name that is consistent with a DNS entry for a networkinterface, as in machine.company.com. Example directory entries are asfollows:/usr/openv/var/vxss/credentials/machine.company.com
/usr/openv/var/vxss/credentials/dhcp
These files are created with the command bpnbat -LoginMachine. If youplan to reinstall NetBackup on the same computer at a later date, do oneof the following:
■ Preserve the certificates in the vxss/credentials directory.
■ If you do not preserve the certificates, you must provide the computeridentity password as originally set on the Root+AB broker. As analternative, you can reset the password on the Root+AB broker whenyou reinstall.
For more information on Root+AB brokers, see the .NetBackup Securityand Encryption Guide
166Removing NetBackup server and client softwareRemoving NetBackup from UNIX and Linux servers and clients
For more information on NetBackup Access Control and how to remove it,see the NetBackup Security and Encryption Guide.
About NetBackup server software removal onWindows systems
When you remove NetBackup server software, the process deletes theVERITAS/NetBackup directories from the server.
You can remove NetBackup server software in the following ways:
■ Remove server software, configuration, and catalog information.
■ Remove server software and save NetBackup configuration and cataloginformation.If you intend to reinstall NetBackup, use this procedure to save the configuration,catalog, and log file information before you remove NetBackup.
Note: As part of the removal of the NetBackup server software, the securitycertificates are automatically deleted. If you want to retain the certificates, pleasesave them before removing NetBackup.
More information about this topic is available. Please refer to the information onretaining host ID-based certificates when reinstalling NetBackup in theNetBackupSecurity and Encryption Guide.
Note: After an uninstall, some registry and some directory information remainon a Windows computer. This behavior is by design, as these files may be inuse by either the NetBackup Authentication Service or the NetBackupAuthorization Service.
See “Removing NetBackup server and client software from Windows servers,clusters, and clients” on page 167.
Removing NetBackup server and client softwarefrom Windows servers, clusters, and clients
Use the following procedures to remove NetBackup software and NetBackupconfiguration and catalog information.
167Removing NetBackup server and client softwareAbout NetBackup server software removal on Windows systems
To remove NetBackup server and client software
1 (Conditional: cluster only) Follow the instructions in your cluster documentationfor removing a group.
No method exists to remove NetBackup from multiple nodes at the same time.
2 (Conditional: server and cluster only) If the NetBackup Administration Consoleis open, close it.
(Conditional: client only) If the NetBackup Backup, Archive, and Restoreinterface is open, close it.
If either of these interfaces is open when you try to remove NetBackup, a failuremay occur that forces you to restart this procedure.
3 Select Start > Settings > Control Panel.
4 On the Control Panel window, select the appropriate utility for installedprograms and applications.
5 On theCurrently Installed Programs list, click Veritas NetBackup for serversand clusters. Select Veritas NetBackup Client for clients.
Note: Be aware that the removal of the Veritas NetBackup item for serversand clusters removes the Veritas NetBackup Java GUI and the VeritasNetBackup JRE packages.
6 Click Remove.
For Windows, after you click Yes to continue, another dialog box appears toinform you that PBX is still running.
Veritas recommends that you click Do not close applications. (A reboot willbe required.) to continue with NetBackup removal. PBX is stopped andrestarted automatically as needed for removal.
7 (Conditional: server and cluster only) Remove the NetBackup deduplicationuser directory as follows:
In the Documents and Settings directory, delete the purediskdbuserdirectory.
The virtual host name security certificates are automatically removed from theshared drive of the cluster as a part of NetBackup server software removal.
Use the following procedure to remove NetBackup server software and saveNetBackup configuration and catalog information.
168Removing NetBackup server and client softwareRemoving NetBackup server and client software from Windows servers, clusters, and clients
To remove and save NetBackup configuration and catalog information
1 If the NetBackup Administration Console is open, close it.
If a console session is open when you try to remove NetBackup, a failure mayoccur that forces you to restart this procedure.
2 Select Start > Settings > Control Panel.
3 On the Control Panel window, select the appropriate utility for installedprograms and applications. .
4 In the Currently Installed Programs list, click Veritas NetBackup .
5 Click Change. This action lets you modify, repair, or remove NetBackup.
6 On the Program Maintenance dialog box, select Remove.
7 Clear the check mark next toRemove all NetBackup Configuration, Catalog,and Log files to disable this function. (The box is checked by default.)
8 Click Next.
9 If you enabled NetBackup Access Control, NetBackup placed several files onclients and servers. These files can be divided into the following categories:
These files are removed with NetBackup.NetBackup applicationtemporary files
169Removing NetBackup server and client softwareRemoving NetBackup server and client software from Windows servers, clusters, and clients
User cache files exist in their home directories, asfollows:
user\Local Settings\ApplicationData\VERITAS\NetBackup
Files are generated in the \NetBackup directory by aSingle Sign-On operation of the NetBackupAdministration Console on the host where the consoleruns. The NetBackup Administration Console cleansthese files when an exit function is performed, so thedirectory does not always contain temporary files. If asystem crash were to occur, however, any files in thedirectory may be left behind. With the console shutdown,you can delete these files safely with no data loss.
NetBackup also creates cached certificates for clientand server NetBackup applications. These files residewithin the \NetBackup directory. These files typicallyhave a name that is consistent with a DNS entry for anetwork interface, such as machine.company.com.Example directory entries are as follows:
user\Local Settings\ApplicationData\VERITAS\NetBackup\pc.comp.com
user\Local Settings\ApplicationData\VERITAS\NetBackup\dhcp
These files are created with the command bpnbat
-LoginMachine. If you plan to reinstall NetBackup onthe same computer at a later date, do one of thefollowing:
■ Preserve the certificates in the \NetBackupdirectory.
■ If you do not preserve the certificates, you mustprovide the computer identity password as originallyset on the Root+AB broker. As an alternative, youcan reset the password on the Root+AB broker whenyou reinstall. See the NetBackup Security andEncryption Guide.
Individual user (cache) files
170Removing NetBackup server and client softwareRemoving NetBackup server and client software from Windows servers, clusters, and clients
10 Remove the NetBackup deduplication user directory as follows:
Note: This step is necessary only if you upgraded to version 9.1 from a previousor earlier version of NetBackup.
In theDocuments and Settings directory, delete the purediskdbuser directory.
About removal of the Java Console state datafrom Windows servers and Windows clients
The NetBackup Java Console stores state data on a per-user basis. This informationincludes user preferences, toolbar locations, and related settings. After you uninstallthe NetBackup Java Console, remove the state data by deleting the following folder:
USERPROFILE_DIR\Veritas\Java\JAVA_VERSION
■ For roaming user profiles, USERPROFILE_DIR is %APPDATA%.
■ For local user profiles on Windows, USERPROFILE_DIR is %LOCALAPPDATA%.
■ JAVA_VERSION is a six-digit NetBackup version number. For example, NetBackupversion 8.0 with no upgrades applied would be 800000.
Removing a clustered media server by migratingall data to a new media server
You can remove clustered media servers from the NetBackup environment. Youmust migrate all data from the cluster to a new standalone server, and thendecommission the old clustered server.
The steps required to migrate all NetBackup resources and decommission a mediaserver is covered in depth in the NetBackup Administrator's Guide, Volume I. Pleasesee the About decommissioning a media server topic in the NetBackupAdministrator's Guide, Volume I.
171Removing NetBackup server and client softwareAbout removal of the Java Console state data from Windows servers and Windows clients
ReferenceThis chapter includes the following topics:
■ Generate a certificate on the inactive nodes of a clustered master server
■ About the NetBackup answer file
■ Persistent Java Virtual Machine options
■ About RBAC bootstrapping
■ NetBackup master server web server user and group creation
■ About the NetBackup Java Runtime Environment
■ Add or Remove Java GUI and JRE after install
■ Using NetApp disk arrays with Replication Director
■ Security updates to the NetBackup database
■ Size guidance for the NetBackup master server and domain
Generate a certificate on the inactive nodes of aclustered master server
After finishing a clustered master server installation or upgrade, you must generatea certificate on all inactive nodes. This procedure is required for backups andrestores of the inactive node of the cluster to succeed.
Generating the certificate on the inactive nodes in a clustered master server
Note: Unless otherwise indicated, all commands are issued from the inactive node
10Chapter
1 (Conditional) Add all inactive nodes to the cluster.
If all the nodes of the cluster are not currently part of the cluster, start by addingthem to the cluster. Please consult with your operating system clusterinstructions for assistance with this process.
2 Run the nbcertcmd command to store the Certificate Authority certificate onthe inactive node.
UNIX: /usr/openv/netbackup/bin/nbcertcmd -getCACertificate
Windows: install_path\NetBackup\bin\nbcertcmd -getCACertificate
3 Run the nbcertcmd command to generate the host certificate on the inactivenode.
nbcertcmd -getCertificate
4 (Conditional) If the nbcertcmd -getCertificate command fails with an errormessage indicating that a token is needed, you need a token from the CertificateAuthority. Use the steps that are shown to get and correctly use the token.
■ On the active node, use the bpnbat command as shown to authorize thenecessary changes. When you are prompted for the authentication broker,enter the virtual server name, not the local node name.bpnbat -login -loginType WEB
■ On the active node, use the nbcertcmd command to create a token.nbcertcmd -createToken -name token_name
The token name is not important to this procedure. When the commandruns, it displays the token string value. Note this value as it is necessaryfor the next command.
■ On the inactive node, use the authorization token with the nbcertcmd
command to store the host certificate.nbcertcmd -getCertificate -token
This command prompts you for the token string value. Enter the token stringfrom the nbcertcmd -createToken command.
Additional information about certificates is available. Please see the section ondeploying certificates on master server nodes in the Veritas NetBackup Securityand Encryption Guide.
About the NetBackup answer fileNetBackup provides a way to perform unattended, silent installation, and upgradeswith a predefined set of configuration options. These options allow the user to:
173ReferenceAbout the NetBackup answer file
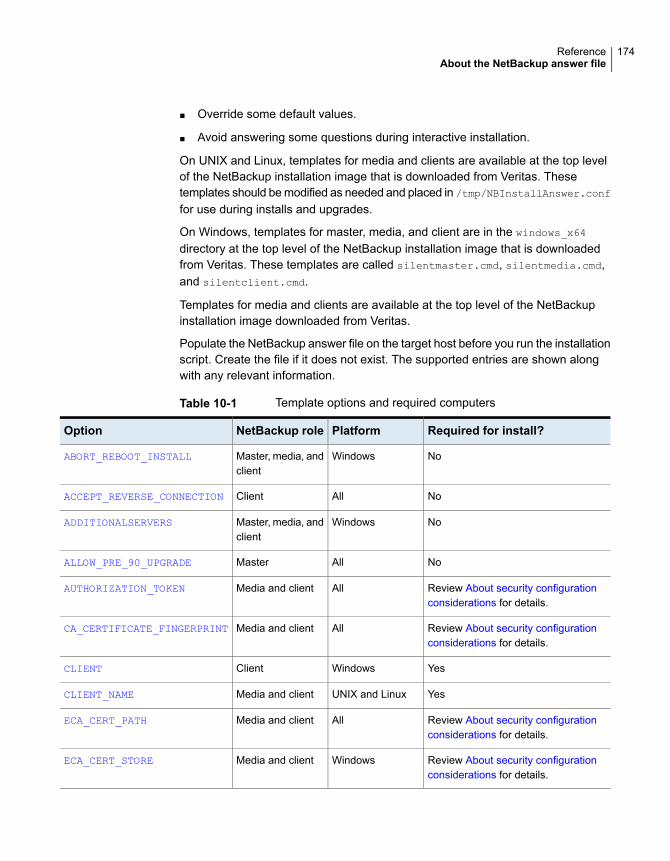
■ Override some default values.
■ Avoid answering some questions during interactive installation.
On UNIX and Linux, templates for media and clients are available at the top levelof the NetBackup installation image that is downloaded from Veritas. Thesetemplates should be modified as needed and placed in /tmp/NBInstallAnswer.conf
for use during installs and upgrades.
On Windows, templates for master, media, and client are in the windows_x64
directory at the top level of the NetBackup installation image that is downloadedfrom Veritas. These templates are called silentmaster.cmd, silentmedia.cmd,and silentclient.cmd.
Templates for media and clients are available at the top level of the NetBackupinstallation image downloaded from Veritas.
Populate the NetBackup answer file on the target host before you run the installationscript. Create the file if it does not exist. The supported entries are shown alongwith any relevant information.
Table 10-1 Template options and required computers
Required for install?PlatformNetBackup roleOption
NoWindowsMaster, media, andclient
ABORT_REBOOT_INSTALL
NoAllClientACCEPT_REVERSE_CONNECTION
NoWindowsMaster, media, andclient
ADDITIONALSERVERS
NoAllMasterALLOW_PRE_90_UPGRADE
Review About security configurationconsiderations for details.
AllMedia and clientAUTHORIZATION_TOKEN
Review About security configurationconsiderations for details.
AllMedia and clientCA_CERTIFICATE_FINGERPRINT
YesWindowsClientCLIENT
YesUNIX and LinuxMedia and clientCLIENT_NAME
Review About security configurationconsiderations for details.
AllMedia and clientECA_CERT_PATH
Review About security configurationconsiderations for details.
WindowsMedia and clientECA_CERT_STORE
174ReferenceAbout the NetBackup answer file
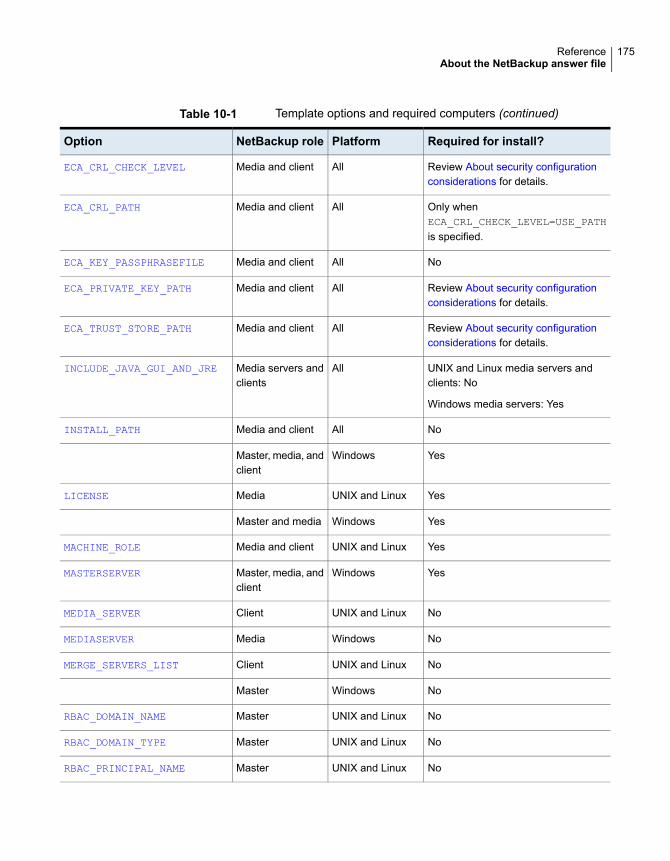
Table 10-1 Template options and required computers (continued)
Required for install?PlatformNetBackup roleOption
Review About security configurationconsiderations for details.
AllMedia and clientECA_CRL_CHECK_LEVEL
Only whenECA_CRL_CHECK_LEVEL=USE_PATHis specified.
AllMedia and clientECA_CRL_PATH
NoAllMedia and clientECA_KEY_PASSPHRASEFILE
Review About security configurationconsiderations for details.
AllMedia and clientECA_PRIVATE_KEY_PATH
Review About security configurationconsiderations for details.
AllMedia and clientECA_TRUST_STORE_PATH
UNIX and Linux media servers andclients: No
Windows media servers: Yes
AllMedia servers andclients
INCLUDE_JAVA_GUI_AND_JRE
NoAllMedia and clientINSTALL_PATH
YesWindowsMaster, media, andclient
YesUNIX and LinuxMediaLICENSE
YesWindowsMaster and media
YesUNIX and LinuxMedia and clientMACHINE_ROLE
YesWindowsMaster, media, andclient
MASTERSERVER
NoUNIX and LinuxClientMEDIA_SERVER
NoWindowsMediaMEDIASERVER
NoUNIX and LinuxClientMERGE_SERVERS_LIST
NoWindowsMaster
NoUNIX and LinuxMasterRBAC_DOMAIN_NAME
NoUNIX and LinuxMasterRBAC_DOMAIN_TYPE
NoUNIX and LinuxMasterRBAC_PRINCIPAL_NAME
175ReferenceAbout the NetBackup answer file
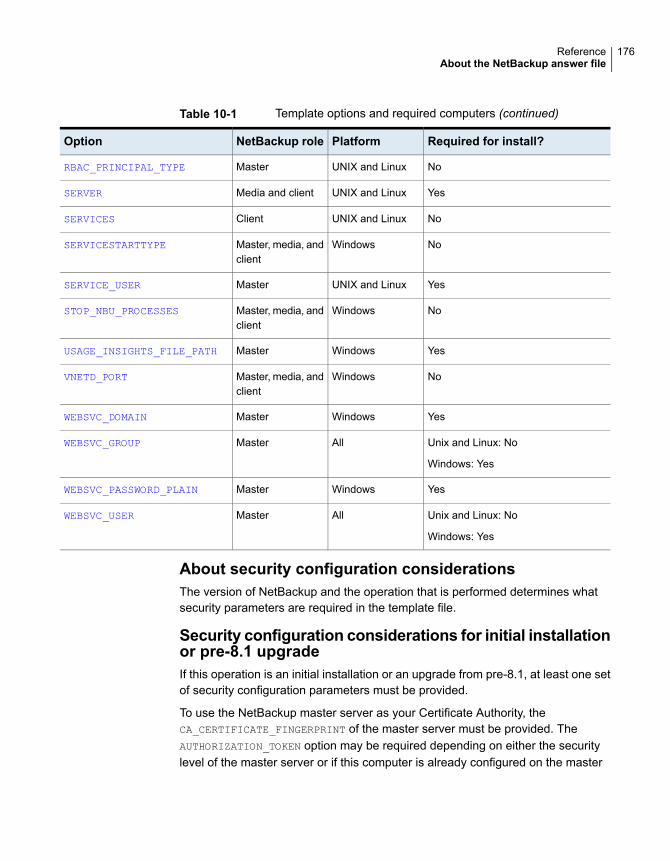
Table 10-1 Template options and required computers (continued)
Required for install?PlatformNetBackup roleOption
NoUNIX and LinuxMasterRBAC_PRINCIPAL_TYPE
YesUNIX and LinuxMedia and clientSERVER
NoUNIX and LinuxClientSERVICES
NoWindowsMaster, media, andclient
SERVICESTARTTYPE
YesUNIX and LinuxMasterSERVICE_USER
NoWindowsMaster, media, andclient
STOP_NBU_PROCESSES
YesWindowsMasterUSAGE_INSIGHTS_FILE_PATH
NoWindowsMaster, media, andclient
VNETD_PORT
YesWindowsMasterWEBSVC_DOMAIN
Unix and Linux: No
Windows: Yes
AllMasterWEBSVC_GROUP
YesWindowsMasterWEBSVC_PASSWORD_PLAIN
Unix and Linux: No
Windows: Yes
AllMasterWEBSVC_USER
About security configuration considerationsThe version of NetBackup and the operation that is performed determines whatsecurity parameters are required in the template file.
Security configuration considerations for initial installationor pre-8.1 upgradeIf this operation is an initial installation or an upgrade from pre-8.1, at least one setof security configuration parameters must be provided.
To use the NetBackup master server as your Certificate Authority, theCA_CERTIFICATE_FINGERPRINT of the master server must be provided. TheAUTHORIZATION_TOKEN option may be required depending on either the securitylevel of the master server or if this computer is already configured on the master
176ReferenceAbout the NetBackup answer file
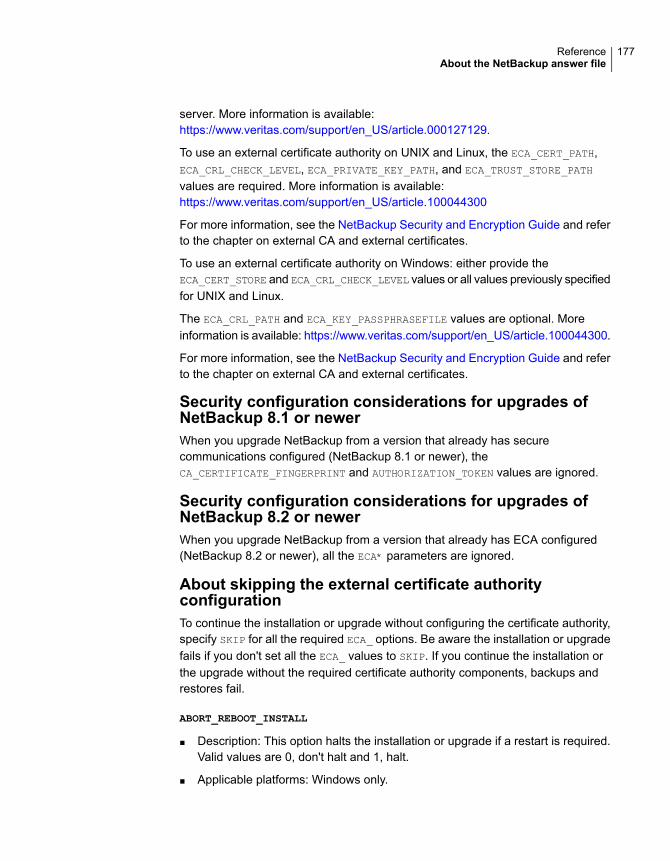
server. More information is available:https://www.veritas.com/support/en_US/article.000127129.
To use an external certificate authority on UNIX and Linux, the ECA_CERT_PATH,ECA_CRL_CHECK_LEVEL, ECA_PRIVATE_KEY_PATH, and ECA_TRUST_STORE_PATH
values are required. More information is available:https://www.veritas.com/support/en_US/article.100044300
For more information, see the NetBackup Security and Encryption Guide and referto the chapter on external CA and external certificates.
To use an external certificate authority on Windows: either provide theECA_CERT_STORE and ECA_CRL_CHECK_LEVEL values or all values previously specifiedfor UNIX and Linux.
The ECA_CRL_PATH and ECA_KEY_PASSPHRASEFILE values are optional. Moreinformation is available: https://www.veritas.com/support/en_US/article.100044300.
For more information, see the NetBackup Security and Encryption Guide and referto the chapter on external CA and external certificates.
Security configuration considerations for upgrades ofNetBackup 8.1 or newerWhen you upgrade NetBackup from a version that already has securecommunications configured (NetBackup 8.1 or newer), theCA_CERTIFICATE_FINGERPRINT and AUTHORIZATION_TOKEN values are ignored.
Security configuration considerations for upgrades ofNetBackup 8.2 or newerWhen you upgrade NetBackup from a version that already has ECA configured(NetBackup 8.2 or newer), all the ECA* parameters are ignored.
About skipping the external certificate authorityconfigurationTo continue the installation or upgrade without configuring the certificate authority,specify SKIP for all the required ECA_ options. Be aware the installation or upgradefails if you don't set all the ECA_ values to SKIP. If you continue the installation orthe upgrade without the required certificate authority components, backups andrestores fail.
ABORT_REBOOT_INSTALL
■ Description: This option halts the installation or upgrade if a restart is required.Valid values are 0, don't halt and 1, halt.
■ Applicable platforms: Windows only.
177ReferenceAbout the NetBackup answer file
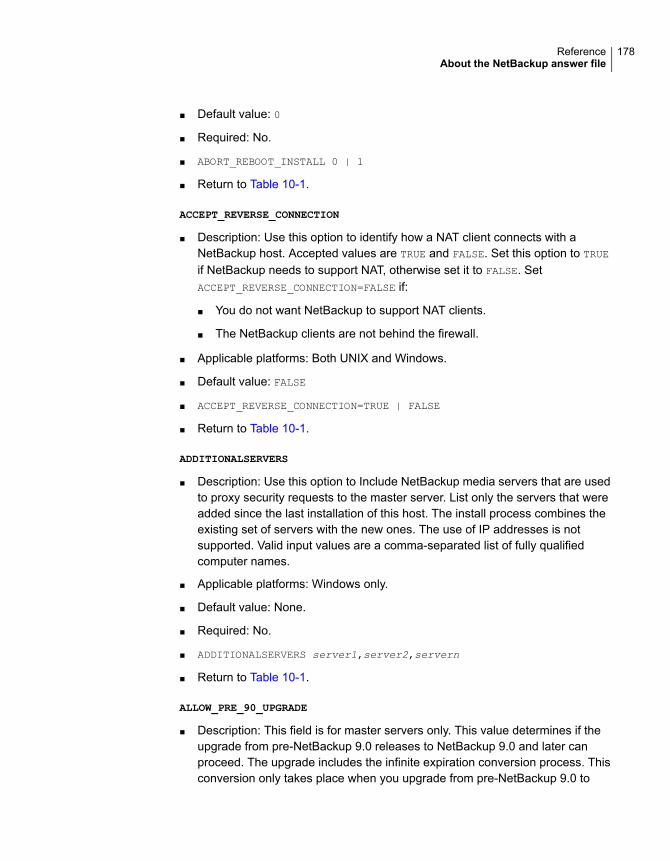
■ Default value: 0
■ Required: No.
■ ABORT_REBOOT_INSTALL 0 | 1
■ Return to Table 10-1.
ACCEPT_REVERSE_CONNECTION
■ Description: Use this option to identify how a NAT client connects with aNetBackup host. Accepted values are TRUE and FALSE. Set this option to TRUE
if NetBackup needs to support NAT, otherwise set it to FALSE. SetACCEPT_REVERSE_CONNECTION=FALSE if:
■ You do not want NetBackup to support NAT clients.
■ The NetBackup clients are not behind the firewall.
■ Applicable platforms: Both UNIX and Windows.
■ Default value: FALSE
■ ACCEPT_REVERSE_CONNECTION=TRUE | FALSE
■ Return to Table 10-1.
ADDITIONALSERVERS
■ Description: Use this option to Include NetBackup media servers that are usedto proxy security requests to the master server. List only the servers that wereadded since the last installation of this host. The install process combines theexisting set of servers with the new ones. The use of IP addresses is notsupported. Valid input values are a comma-separated list of fully qualifiedcomputer names.
■ Applicable platforms: Windows only.
■ Default value: None.
■ Required: No.
■ ADDITIONALSERVERS server1,server2,servern
■ Return to Table 10-1.
ALLOW_PRE_90_UPGRADE
■ Description: This field is for master servers only. This value determines if theupgrade from pre-NetBackup 9.0 releases to NetBackup 9.0 and later canproceed. The upgrade includes the infinite expiration conversion process. Thisconversion only takes place when you upgrade from pre-NetBackup 9.0 to
178ReferenceAbout the NetBackup answer file

NetBackup 9.0 or later. The upgrade behavior and need for this option dependon your master server platform.
■ WindowsThis value is required for silent upgrades of Windows master servers. Specify1 to allow the upgrade to continue, specify 0 to prevent the upgrade. Thisvalue is ignored during an interactive Windows master server upgrade.Depending on the size of the NetBackup catalog and the required conversiontime, you may be asked if you want to continue the upgrade.
■ UNIXFor UNIX and Linux master servers, specify yes or no to eliminate userprompts. If the infinite expiration conversion is expected to add length to theupgrade process, a value of yes means the upgrade proceeds. A value ofnomeans the upgrade stops. If this value is not specified, NetBackup promptsyou if you want to continue with the upgrade.
NetBackup 9.0 and later versions support the expiration dates that extend beyondthe year 2038. To ensure compatibility with previous NetBackup versions, allitems with an infinite expiration date are updated to reflect the new infiniteexpiration date value. This conversion may extend the time that is required tocomplete the upgrade. Review the article that is shown for more information:https://www.veritas.com/content/support/en_US/article.100048600
■ Applicable platforms: Both UNIX and Windows.
■ Default value: None
■ Required: Platform and upgrade method dependent.
■ ALLOW_PRE_90_UPGRADE=yes|no (UNIX)ALLOW_PRE_90_UPGRADE=1|0 (Windows)
■ Return to Table 10-1.
AUTHORIZATION_TOKEN
■ Description: This option specifies that NetBackup should automatically use anauthorization or a reissue token when it retrieves the host certificate. TheAUTHORIZATION_TOKEN is 16 upper case letters. Some environments require anauthorization token for backups and restores to work correctly. If this informationis required and is not provided in the answer file, the installation fails. If SKIP isspecified, the installer attempts to retrieve a host certificate without including atoken. In some environments this choice may result in additional manual stepsfollowing the installation.Be aware that AUTHORIZATION_TOKEN is ignored under either of these conditions:
■ ECA is in use on the master server.
179ReferenceAbout the NetBackup answer file
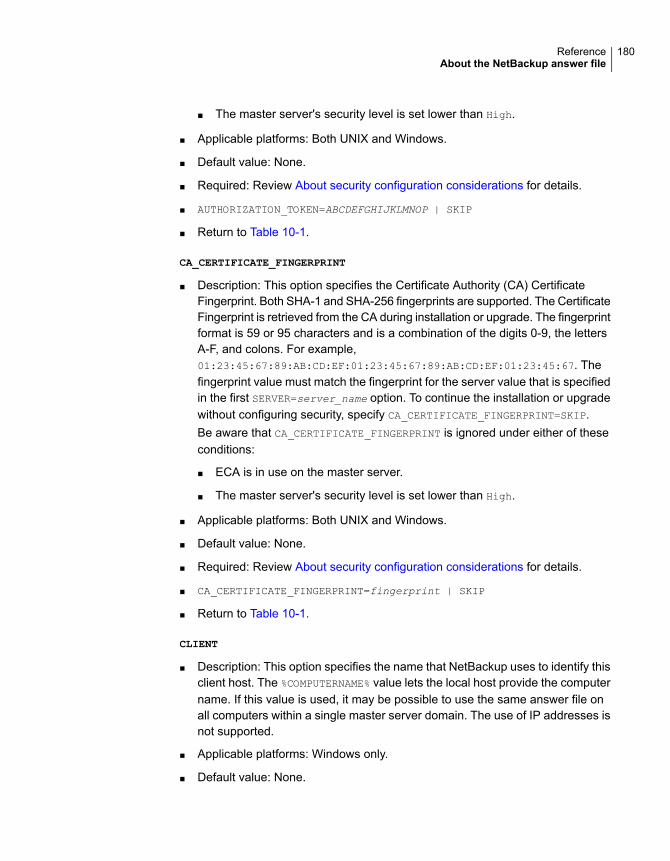
■ The master server's security level is set lower than High.
■ Applicable platforms: Both UNIX and Windows.
■ Default value: None.
■ Required: Review About security configuration considerations for details.
■ AUTHORIZATION_TOKEN=ABCDEFGHIJKLMNOP | SKIP
■ Return to Table 10-1.
CA_CERTIFICATE_FINGERPRINT
■ Description: This option specifies the Certificate Authority (CA) CertificateFingerprint. Both SHA-1 and SHA-256 fingerprints are supported. The CertificateFingerprint is retrieved from the CA during installation or upgrade. The fingerprintformat is 59 or 95 characters and is a combination of the digits 0-9, the lettersA-F, and colons. For example,01:23:45:67:89:AB:CD:EF:01:23:45:67:89:AB:CD:EF:01:23:45:67. Thefingerprint value must match the fingerprint for the server value that is specifiedin the first SERVER=server_name option. To continue the installation or upgradewithout configuring security, specify CA_CERTIFICATE_FINGERPRINT=SKIP.Be aware that CA_CERTIFICATE_FINGERPRINT is ignored under either of theseconditions:
■ ECA is in use on the master server.
■ The master server's security level is set lower than High.
■ Applicable platforms: Both UNIX and Windows.
■ Default value: None.
■ Required: Review About security configuration considerations for details.
■ CA_CERTIFICATE_FINGERPRINT=fingerprint | SKIP
■ Return to Table 10-1.
CLIENT
■ Description: This option specifies the name that NetBackup uses to identify thisclient host. The %COMPUTERNAME% value lets the local host provide the computername. If this value is used, it may be possible to use the same answer file onall computers within a single master server domain. The use of IP addresses isnot supported.
■ Applicable platforms: Windows only.
■ Default value: None.
180ReferenceAbout the NetBackup answer file
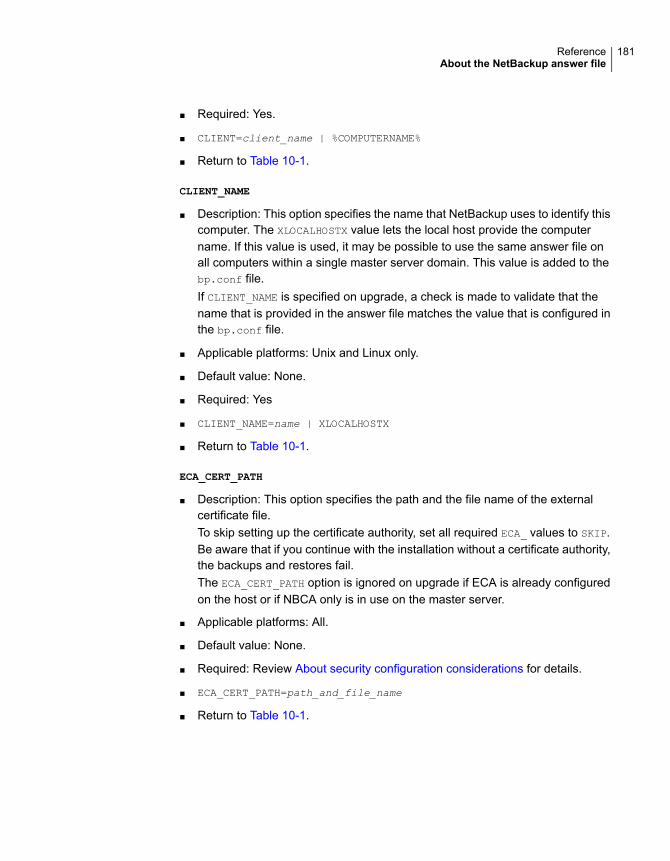
■ Required: Yes.
■ CLIENT=client_name | %COMPUTERNAME%
■ Return to Table 10-1.
CLIENT_NAME
■ Description: This option specifies the name that NetBackup uses to identify thiscomputer. The XLOCALHOSTX value lets the local host provide the computername. If this value is used, it may be possible to use the same answer file onall computers within a single master server domain. This value is added to thebp.conf file.If CLIENT_NAME is specified on upgrade, a check is made to validate that thename that is provided in the answer file matches the value that is configured inthe bp.conf file.
■ Applicable platforms: Unix and Linux only.
■ Default value: None.
■ Required: Yes
■ CLIENT_NAME=name | XLOCALHOSTX
■ Return to Table 10-1.
ECA_CERT_PATH
■ Description: This option specifies the path and the file name of the externalcertificate file.To skip setting up the certificate authority, set all required ECA_ values to SKIP.Be aware that if you continue with the installation without a certificate authority,the backups and restores fail.The ECA_CERT_PATH option is ignored on upgrade if ECA is already configuredon the host or if NBCA only is in use on the master server.
■ Applicable platforms: All.
■ Default value: None.
■ Required: Review About security configuration considerations for details.
■ ECA_CERT_PATH=path_and_file_name
■ Return to Table 10-1.
181ReferenceAbout the NetBackup answer file
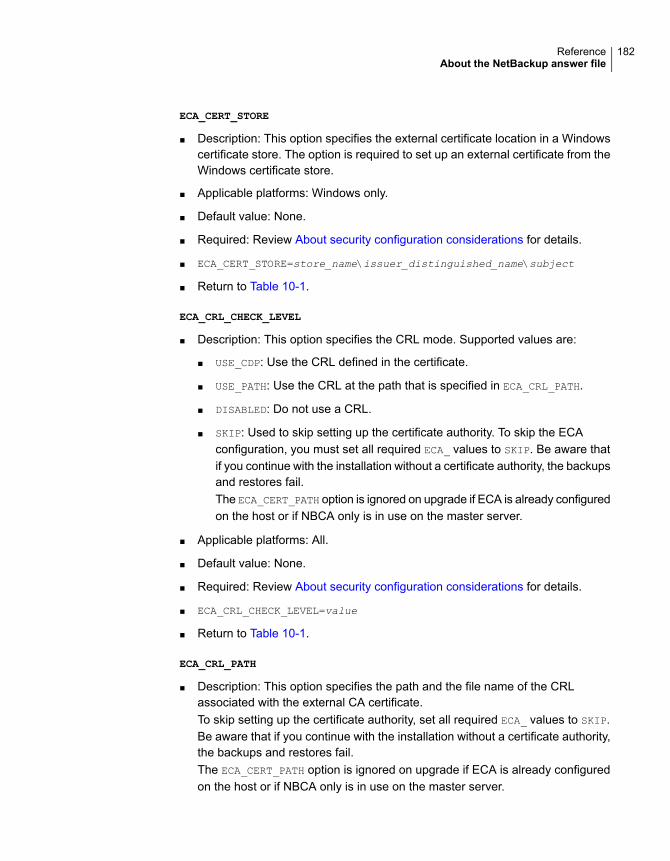
ECA_CERT_STORE
■ Description: This option specifies the external certificate location in a Windowscertificate store. The option is required to set up an external certificate from theWindows certificate store.
■ Applicable platforms: Windows only.
■ Default value: None.
■ Required: Review About security configuration considerations for details.
■ ECA_CERT_STORE=store_name\issuer_distinguished_name\subject
■ Return to Table 10-1.
ECA_CRL_CHECK_LEVEL
■ Description: This option specifies the CRL mode. Supported values are:
■ USE_CDP: Use the CRL defined in the certificate.
■ USE_PATH: Use the CRL at the path that is specified in ECA_CRL_PATH.
■ DISABLED: Do not use a CRL.
■ SKIP: Used to skip setting up the certificate authority. To skip the ECAconfiguration, you must set all required ECA_ values to SKIP. Be aware thatif you continue with the installation without a certificate authority, the backupsand restores fail.The ECA_CERT_PATH option is ignored on upgrade if ECA is already configuredon the host or if NBCA only is in use on the master server.
■ Applicable platforms: All.
■ Default value: None.
■ Required: Review About security configuration considerations for details.
■ ECA_CRL_CHECK_LEVEL=value
■ Return to Table 10-1.
ECA_CRL_PATH
■ Description: This option specifies the path and the file name of the CRLassociated with the external CA certificate.To skip setting up the certificate authority, set all required ECA_ values to SKIP.Be aware that if you continue with the installation without a certificate authority,the backups and restores fail.The ECA_CERT_PATH option is ignored on upgrade if ECA is already configuredon the host or if NBCA only is in use on the master server.
182ReferenceAbout the NetBackup answer file
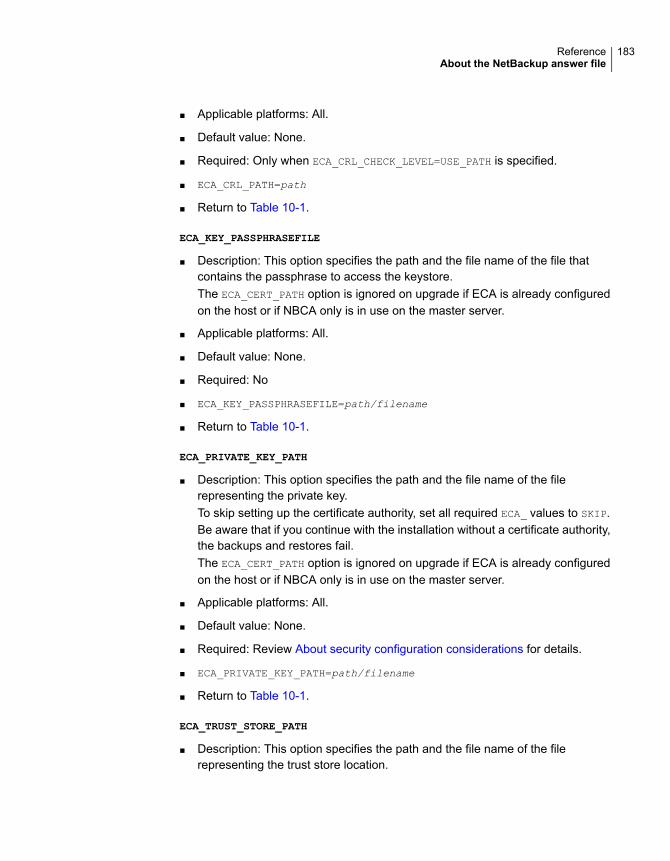
■ Applicable platforms: All.
■ Default value: None.
■ Required: Only when ECA_CRL_CHECK_LEVEL=USE_PATH is specified.
■ ECA_CRL_PATH=path
■ Return to Table 10-1.
ECA_KEY_PASSPHRASEFILE
■ Description: This option specifies the path and the file name of the file thatcontains the passphrase to access the keystore.The ECA_CERT_PATH option is ignored on upgrade if ECA is already configuredon the host or if NBCA only is in use on the master server.
■ Applicable platforms: All.
■ Default value: None.
■ Required: No
■ ECA_KEY_PASSPHRASEFILE=path/filename
■ Return to Table 10-1.
ECA_PRIVATE_KEY_PATH
■ Description: This option specifies the path and the file name of the filerepresenting the private key.To skip setting up the certificate authority, set all required ECA_ values to SKIP.Be aware that if you continue with the installation without a certificate authority,the backups and restores fail.The ECA_CERT_PATH option is ignored on upgrade if ECA is already configuredon the host or if NBCA only is in use on the master server.
■ Applicable platforms: All.
■ Default value: None.
■ Required: Review About security configuration considerations for details.
■ ECA_PRIVATE_KEY_PATH=path/filename
■ Return to Table 10-1.
ECA_TRUST_STORE_PATH
■ Description: This option specifies the path and the file name of the filerepresenting the trust store location.
183ReferenceAbout the NetBackup answer file
To skip setting up the certificate authority, set all required ECA_ values to SKIP.Be aware that if you continue with the installation without a certificate authority,the backups and restores fail.The ECA_CERT_PATH option is ignored on upgrade if ECA is already configuredon the host or if NBCA only is in use on the master server.
■ Applicable platforms: All.
■ Default value: None.
■ Required: Review About security configuration considerations for details.
■ ECA_TRUST_STORE_PATH=path/filename
■ Return to Table 10-1.
INCLUDE_JAVA_GUI_AND_JRE
■ Description: Used to determine how to handle the optional Java and JREcomponents during install or upgrade. Supported values are:
■ INCLUDE: Include the Java GUI and JRE as part of the installation or upgrade.
■ EXCLUDE: Exclude the Java GUI and JRE.
■ MATCH: Match the existing configuration on the host. If you specify this optionon an initial installation, the components are not installed.
■ Applicable platforms: All.
■ Default value: None
■ Required: UNIX and Linux, no. Windows media servers, yes.
■ Return to Table 10-1.
INSTALL_PATH
■ Description: This option specifies the location to install the NetBackup binaries.Only the absolute path to a base directory is required for this option. The installerautomatically appends /openv. This option cannot be used to change the locationof NetBackup during an upgrade.Be aware that the INSTALL_PATH option is ignored on upgrade.
■ Applicable platforms: Unix and Linux only.
■ Default value: /usr
■ Required: No
■ INSTALL_PATH = path
■ Return to Table 10-1.
184ReferenceAbout the NetBackup answer file
INSTALLDIR
■ Description: This option specifies the location to install NetBackup. The fullyqualified path to the base directory is required.
■ Applicable platforms: Windows only.
■ Default value: None.
■ Required: Yes
■ INSTALLDIR=C:\Program Files\Veritas
■ Return to Table 10-1.
LICENSE
■ Description: This option specifies the license key string to apply to the server.Additional LICENSE = key_string lines may be added if more licenses are tobe applied. This option only adds additional keys - no existing keys are removed.
■ Applicable platforms: Unix and Linux only.
■ Default value: None.
■ Required: Yes, for media servers. Not required for clients.
■ LICENSE = key_string
■ Return to Table 10-1.
LICENSEKEY
■ Description: This option specifies the NetBackup license key for the installation.
■ Applicable platforms: Windows only.
■ Default value: None.
■ Required: Yes for master and media servers. Not required for clients.
■ LICENSEKEY=NetBackup_license_key
■ Return to Table 10-1.
MACHINE_ROLE
■ Description: This option specifies the NetBackup role to install and configure onthis computer. For upgrades, this value must match the configured role on thecomputer.
■ Default value: None. Supported values are MASTER, MEDIA, and CLIENT.
■ Applicable platforms: Unix and Linux only.
185ReferenceAbout the NetBackup answer file
■ Required: Yes.
■ MACHINE_ROLE = MASTER | MEDIA | CLIENT
■ Return to Table 10-1.
MASTERSERVER
■ Description: This option specifies the server name this computer recognizes asthe current NetBackup master server. If this host is the master server,%COMPUTERNAME% can be used for the value. The use of IP addresses is notsupported. Additional master servers can be specified with theADDITIONALSERVERS option.
■ Applicable platforms: Windows only.
■ Default value: None.
■ Required: Yes.
■ MASTERSERVER=master_server_name
■ Return to Table 10-1.
MEDIA_SERVER
■ Description: This option specifies that NetBackup may use the named host totunnel secure web requests for this client. A tunnel is required whencommunication between the client and the NetBackup Web Service on themaster server is blocked. This communication is required to obtain a hostcertificate during the NetBackup installation or upgrade. Multiple MEDIA_SERVER
entries may exist in the answer file. Each one is used as a candidate to tunnelhttps requests. These entries are added to the bp.conf file.
■ Applicable platforms: Unix and Linux only.
■ Default value: None.
■ Required: No.
■ MEDIA_SERVER=media_server_name
■ Return to Table 10-1.
MEDIASERVER
■ Description: This option specifies the name of the host this computer recognizesas its media server. The use of IP addresses is not supported.
■ Applicable platforms: Windows only.
■ Default value: None.
186ReferenceAbout the NetBackup answer file

■ Required: No.
■ MEDIASERVER=media_server_name
■ Return to Table 10-1.
MERGE_SERVERS_LIST
■ Description: Merge the servers present in bp.conf on the master with the serverlist contained in this client's bp.conf.
■ Applicable platforms: Unix and Linux only.
■ Default value: NO
■ Required: No.
■ MERGE_SERVERS_LIST = yes | no
■ Return to Table 10-1.
OPSCENTER_SERVER_NAME
■ Description: This option specifies the name of the server that runs the OpsCenter.Leave this option empty if you don't use OpsCenter. You can also configureOpsCenter after install.
■ Applicable platforms: Windows only.
■ Default value: None.
■ Required: No.
■ OPSCENTER_SERVER_NAME=OpsCenter_server_name
■ Return to Table 10-1.
RBAC_DOMAIN_NAME
■ Description: This option specifies the domain name of the principal that isconfigured to have the role-based access control (RBAC) permissions for theAdministrator role.
■ Default value: None.
■ Applicable platforms: Unix and Linux only.
■ Required: No
■ RBAC_DOMAIN_NAME = domain_name
■ Return to Table 10-1.
187ReferenceAbout the NetBackup answer file
RBAC_DOMAIN_TYPE
■ Description: This option specifies the domain type of the principal that isconfigured to have the role-based access control (RBAC) permissions for theAdministrator role.
■ Applicable platforms: Unix and Linux only.
■ Default value: None.
■ Required: No
■ RBAC_DOMAIN_TYPE = domain_type
■ Return to Table 10-1.
RBAC_PRINCIPAL_NAME
■ Description: This option specifies the name of the principal that is configured tohave the role-based access control (RBAC) permissions for the Administratorrole. This user or the user group must already exist on the system.
■ Applicable platforms: Unix and Linux only.
■ Default value: None.
■ Required: No
■ RBAC_PRINCIPAL_NAME = principal_name
■ Return to Table 10-1.
RBAC_PRINCIPAL_TYPE
■ Description: This option specifies the type of the principal that is configured tohave the role-based access control (RBAC) permissions for the Administratorrole.
■ Applicable platforms: Unix and Linux only.
■ Default value: None.
■ Required: No
■ RBAC_PRINCIPAL_TYPE = USER | USERGROUP
■ Return to Table 10-1.
SERVER
■ Description: This option specifies the server name this computer recognizes asthe current NetBackup master server. Additional SERVER= lines may be addedif there are other servers that should be recognized. In the case where multiple
188ReferenceAbout the NetBackup answer file
SERVER= lines are present, the first occurrence is the master server. Theseentries are added to the bp.conf file.
■ Applicable platforms: Unix and Linux only.
■ Default value: None.
■ Required: Yes.
■ SERVER=master_server_name
■ Return to Table 10-1.
SERVICES
■ Description: This option specifies whether NetBackup services should be startedupon completion of the client installation or upgrade. If no is specified, theNetBackup services are not started. Additional manual configuration steps maybe performed after the install or upgrade but before the NetBackup services arestarted.
■ Applicable platforms: Unix and Linux only.
■ Default value: YES
■ Required: No.
■ SERVICES=no
■ Return to Table 10-1.
SERVICESTARTTYPE
■ Description: This option specifies if the NetBackup services are restarted afterthe host server reboots.
■ Applicable platforms: Windows only.
■ Default value: Automatic
■ Required: No.
■ SERVICESTARTTYPE=Automatic | Manual
■ Return to Table 10-1.
SERVICE_USER
■ Description: This option specifies the service user account is used to start mostof the NetBackup services or daemons on the master server. Be aware of theitems shown:
■ Veritas recommends you do not use the root user as the service user.
189ReferenceAbout the NetBackup answer file
■ Veritas recommends you do not use the nbwebsvc user as the service user.
■ The nbwebgrp group must be a secondary group of the service user.
■ Ownership of the /usr/openv directory changes to the new service useraccount that you specify with this option.
■ Use the nbserviceusercmd --changeUser command to change this userafter installation.
■ For cluster servers, the service user and the service user ID must be sameon all cluster nodes.
■ More information about the service user account is available:https://www.veritas.com/docs/100048220
■ Applicable platforms: UNIX and Linux only.
■ Default value: None.
■ Required: Yes.
■ SERVICE_USER=name
■ Return to Table 10-1.
STOP_NBU_PROCESSES
■ Description: This option specifies if the install process should stop any activeNetBackup processes automatically if detected. Be sure to confirm there are noactive NetBackup jobs and that all NetBackup databases are shut down beforeinstallation or upgrade. Valid input values are 0 for don't stop, and 1 for stop.
■ Applicable platforms: Windows only.
■ Default value: 0
■ Required: No.
■ STOP_NBU_PROCESSES = 0 | 1
■ Return to Table 10-1.
USAGE_INSIGHTS_FILE_PATH
■ Description: This option specifies the path and the file name of the Usage Insightscustomer registration key file.
■ Applicable platforms: Windows only.
■ Default value: None.
■ Required: For master servers, yes
■ USAGE_INSIGHTS_FILE_PATH = path_and_file_name
190ReferenceAbout the NetBackup answer file
■ Return to Table 10-1.
VNETD_PORT
■ Description: This option specifies the port NetBackup's vnetd process uses.
■ Applicable platforms: Windows only.
■ Default value: 13724
■ Required: No.
■ VNETD_PORT=port_number
■ Return to Table 10-1.
WEBSVC_DOMAIN
■ Description: Use this option to associate the web server with Domain (ActiveDirectory) accounts. Provide the domain name in this field. If you plan toassociate the web server with local accounts, leave this field blank.
■ Applicable platforms: Windows only.
■ Default value: None.
■ Required: No.
■ WEBSVC_DOMAIN=domain_name
■ Return to Table 10-1.
WEBSVC_GROUP
■ Description: This option specifies the group name of the account that theNetBackup web server uses. This group must already exist on the system.
■ Applicable platforms: All.
■ Default value: nbwebgrp
■ Required: UNIX and Linux master servers, no. Windows master servers, yes.
■ WEBSVC_GROUP=custom_group_account_name
■ Return to Table 10-1.
WEBSVC_PASSWORD_PLAIN
■ Description: This option specifies the password for the Windows WEBSVC_USER
account. If your websvc password contains any special characters (% ^ & < >
| ' ` , ; = ( ) ! " \ [ ] . * ?), add the appropriate escape charactersto the password. For example if the websvc password is abc% you must enterabc%%.
191ReferenceAbout the NetBackup answer file
Caution: This option places the password for this account in clear text and canpotentially be a security concern.
■ Applicable platforms: Windows only.
■ Default value: None.
■ WEBSVC_PASSWORD_PLAIN=password
■ Return to Table 10-1.
WEBSVC_USER
■ Description: This option specifies the user name of the account that theNetBackup web server uses. This user must already exist on the system.
■ Applicable platforms: All.
■ Default value: nbwebsvc
■ Required: UNIX and Linux master servers, no. Windows master servers, yes.
■ WEBSVC_USER=custom_user_account_name
■ Return to Table 10-1.
Persistent Java Virtual Machine optionsBefore NetBackup 9.0, any web service Java Virtual Machine (JVM) tuning values(such as memory allocation) are overwritten during NetBackup upgrades. InNetBackup 9.0, Veritas has defined a set of web server JVM tuning options thatpersist across upgrades. These options are defined as environment variables in anexecutable shell script that is stored on the local host. The script's contents overridethe out of the box JVM tuning options. The script only runs when the NetBackup9.0 or later web service starts. You can configure the options for which you wantto override the default values. You can define this script at any time. Once thevalues are defined, you do not need to redefine them in any future upgrades.
192ReferencePersistent Java Virtual Machine options
To define the persistent JVM tuning options:
1 Create the wmcConfig script in the appropriate NetBackup configurationdirectory:
Windows:install_path\Veritas\NetBackup\var\global\wsl\config\wmcConfig.bat
UNIX and Linux: /usr/openv/var/global/wsl/config/wmcConfig.sh
2 Edit the script to include the desired variables from the supported variableslist. Each value must be on its own line. Supported variables are:
WMC_HEAP
WMC_METASPACE
WMC_NEW_RATIO
WMC_SURVIVOR_RATIO
WMC_GC_CONFIG
WMC_HEAP_DUMP_CONFIG
Refer to the JVM documentation from Oracle for more information on thevariables and their appropriate ranges.
3 Restart the web service to apply the configuration changes.
About RBAC bootstrappingRBAC Bootstrapping lets you assign role-based access control (RBAC) permissionsto a user or a user group during NetBackup installation or upgrade on UNIXplatforms. The UNIX installer uses the bpnbaz -AddRBACPrincipal command togrant the Administrator role permissions to the user or the user group that youspecify in the /tmp/NBInstallAnswer.conf file.
Note: RBAC bootstrapping provides access to all objects for the specified user oruser group, even if previously the user or the user group had restricted access tocertain objects. For example, the existing user Tester1 was assigned the DefaultVMware Administrator role. If Tester 1 is specified for RBAC bootstrapping, Tester1is assigned the Administrator role.
After installation or upgrade, you can run the bpnbaz -AddRBACPrincipal commandstandalone on both Windows and UNIX platforms to assign RBAC permissions.The command is available only on the master server. For more information aboutthis command, see the NetBackup Command Reference Guide.
193ReferenceAbout RBAC bootstrapping

RBAC Bootstrapping during installation and upgrades onUNIX platforms:Use the answer file template NBInstallAnswer-master.template available in theinstall package to create the /tmp/NBInstallAnswer.conf file. In that file, add thefollowing entries before you run the installation or upgrade:
RBAC_DOMAIN_TYPE = domain_type
RBAC_DOMAIN_NAME = domain_name
RBAC_PRINCIPAL_TYPE = USER | USERGROUP
RBAC_PRINCIPAL_NAME = principal_name
Be aware that RBAC_DOMAIN_TYPE supports the values shown: NT, VX, UNIXPWD,
LDAP.
Note: Additional information about the RBAC_* options is available.
See “About the NetBackup answer file” on page 173.
RBAC bootstrapping is not performed if all the entries are empty or missing. In thiscase, the message Answer file did not contain any RBAC entries is postedin the install trace file. The install process always continues whether the RBACbootstrapping is successful or not. The audit records are created under theSEC_CONFIG category.
If RBAC bootstrapping is successful, the installer displays the following message:
Successfully configured the RBAC permissions for principal_name.
The installer also displays this message if the user or the user group already existswith the Administrator RBAC role.
If one or more RBAC entries exist in the answer file, but a required answer file entryis missing, the installer displays the following message:
Warning: Unable to configure the RBAC permissions. One or more
required fields are missing in /tmp/NBInstallAnswer.conf.
If there are other issues with the RBAC Bootstrapping, the installer displays thefollowing message:
Warning: Failed to configure the RBAC permissions for principal_name.
Refer to logs in /usr/openv/netbackup/logs/admin for more information.
If RBAC bootstrapping is successful but auditing fails, the install displays thefollowing message:
194ReferenceAbout RBAC bootstrapping

Successfully configured the RBAC permissions for
user_or_usergroup_name.
WARNING: Auditing of this operation failed.
Refer to logs in /usr/openv/netbackup/logs/admin for more information.
After the installation or upgrade completes, the specified user or user group isassigned the Administrator role with its corresponding RBAC access permissions.The user can then access APIs and the Web UI.
NetBackup master server web server user andgroup creation
Beginning with NetBackup 8.0, the NetBackup master server includes a configuredweb server to support critical backup operations. This web server operates underuser account elements with limited privileges. These user account elements mustbe available on each master server (or each node of a clustered master server).
Note: For security purposes, do not create web server users or groups withadministrator or superuser privileges.
You can use numerous procedures to create users and groups in operating systems.Some specific approaches are shown, but other methods may accomplish the samegoal. The home directory path, user name, and group names are not hard-coded,and can be changed. The default local user name is nbwebsvc, and the default localgroup name is nbwebgrp. The user and group must have sufficient permissions torun daemons.
More information about this topic is available.
See “Installation requirements for UNIX and Linux” on page 35.
Please be aware of the operating system-specific account and group requirements:
■ In UNIX and Linux clustered environments, make sure that the local accountsare defined consistently on all cluster nodes. The UID must be the same foreach local account. You can use LDAP accounts on UNIX.
■ For Windows clustered master servers, you must use a domain account. Youcan use a domain account for non-clustered environments, but it is not required.
■ For Windows clustered master servers, you must use a domain group.
The NetBackup Master Server installation fails if any of these requirements are notmet. On Windows, you are asked to provide the password for the user account aspart of the installation process.
195ReferenceNetBackup master server web server user and group creation
Note: If the password associated with the web server account expires after initialconfiguration, NetBackup provides no notification the password has expired. Thisbehavior is normal and expected, as the operating system manages the accountand the password.
As long as the web server remains active, the account and the web server continueto operate normally.
When the web server is restarted, or if you attempt to restart the nbwmc service, theservice fails to start, due to the expired password. Navigate to the appropriate areain the operating system, supply the correct password, and restart the service.
More information about the web services account and group is available. See theVeritas NetBackup Security and Encryption Guide and the section on the webservices account.
To create the local user account and the local group:
1 Create a local group.
■ Linux and UNIX: # groupadd nbwebgrp
■ Windows: C:\>net localgroup nbwebgrp /add
2 Create a local user.
■ Linux and UNIX:# useradd -g nbwebgrp -c 'NetBackup Web Services
account' -d /usr/openv/wmc nbwebsvc
■ Windows: C:\>net user nbwebsvc strong_password /add
3 (Conditional) For Windows only, make the user a member of the group:
C:\>net localgroup nbwebgrp nbwebsvc /add
4 (Conditional) For Windows only, grant the Log on as a service right to theuser:
■ Go to Control Panel > Administrative Tools > Local Security Policy.
■ Under Security Settings, click Local Policies > User Rights Assignment.
■ Right-click on Log on as a service and select Properties
■ Add the local user. The default local user name is nbwebsvc.
■ Save your changes and close the Properties dialog for Log on as aservice.
196ReferenceNetBackup master server web server user and group creation
About the NetBackup Java Runtime EnvironmentVeritas installs a customized version of the Java Runtime Environment (JRE) whenyou install any of the products shown. The customized version of JRE does notinclude all the directories that a standard JRE installation includes, such as man
and plugin.
Products that install the JRE:
■ NetBackup master server, media server, or UNIX and Linux client software
■ NetBackup Java Remote Administration Console
■ OpsCenter Server or View Builder
Starting with NetBackup 8.3, the Java GUI and the JRE packages are optional forUNIX, Linux, and Windows media servers and UNIX and Linux clients.
As with previous releases, the Java GUI and JRE packages are installedautomatically on all master servers because they are required. The Java GUI andthe JRE are not part of the default installation on Windows clients. Install the JavaRemote Administration Console if you require this functionality on your Windowsclients.
The various NetBackup installation methods allow the user the choice to install ornot install the Java GUI and JRE packages. More information about installing orremoving the Java GUI and the JRE after install or upgrade is available.
See “Add or Remove Java GUI and JRE after install” on page 199.
Previously, the JRE package that is installed with NetBackup or OpsCenter wasonly updated when you upgraded to a later release of either software. You can usethe nbcomponentupdate utility to update the JRE to a supported version for theproducts shown:
■ NetBackup master server, media server, or UNIX and Linux client software
■ NetBackup Java Remote Administration Console
■ OpsCenter Server or View Builder
Note: You cannot use this utility to update the JRE for the NetBackup Plug-in forVMware vCenter.
If your system is running NetBackup 8.0 or later, use Table 10-2 to determine thelocation of the nbcomponentupdate utility.
197ReferenceAbout the NetBackup Java Runtime Environment
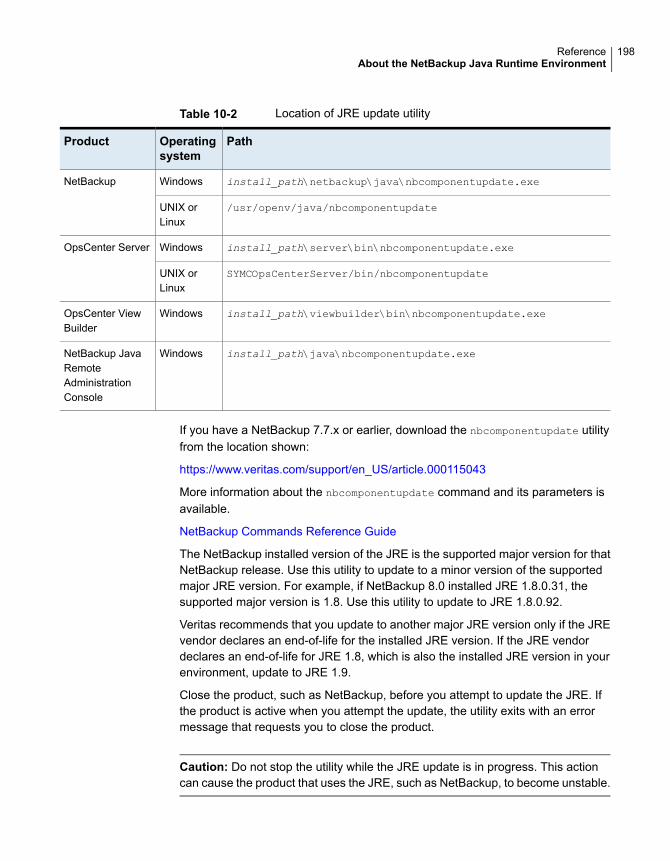
Table 10-2 Location of JRE update utility
PathOperatingsystem
Product
install_path\netbackup\java\nbcomponentupdate.exeWindowsNetBackup
/usr/openv/java/nbcomponentupdateUNIX orLinux
install_path\server\bin\nbcomponentupdate.exeWindowsOpsCenter Server
SYMCOpsCenterServer/bin/nbcomponentupdateUNIX orLinux
install_path\viewbuilder\bin\nbcomponentupdate.exeWindowsOpsCenter ViewBuilder
install_path\java\nbcomponentupdate.exeWindowsNetBackup JavaRemoteAdministrationConsole
If you have a NetBackup 7.7.x or earlier, download the nbcomponentupdate utilityfrom the location shown:
https://www.veritas.com/support/en_US/article.000115043
More information about the nbcomponentupdate command and its parameters isavailable.
NetBackup Commands Reference Guide
The NetBackup installed version of the JRE is the supported major version for thatNetBackup release. Use this utility to update to a minor version of the supportedmajor JRE version. For example, if NetBackup 8.0 installed JRE 1.8.0.31, thesupported major version is 1.8. Use this utility to update to JRE 1.8.0.92.
Veritas recommends that you update to another major JRE version only if the JREvendor declares an end-of-life for the installed JRE version. If the JRE vendordeclares an end-of-life for JRE 1.8, which is also the installed JRE version in yourenvironment, update to JRE 1.9.
Close the product, such as NetBackup, before you attempt to update the JRE. Ifthe product is active when you attempt the update, the utility exits with an errormessage that requests you to close the product.
Caution: Do not stop the utility while the JRE update is in progress. This actioncan cause the product that uses the JRE, such as NetBackup, to become unstable.
198ReferenceAbout the NetBackup Java Runtime Environment
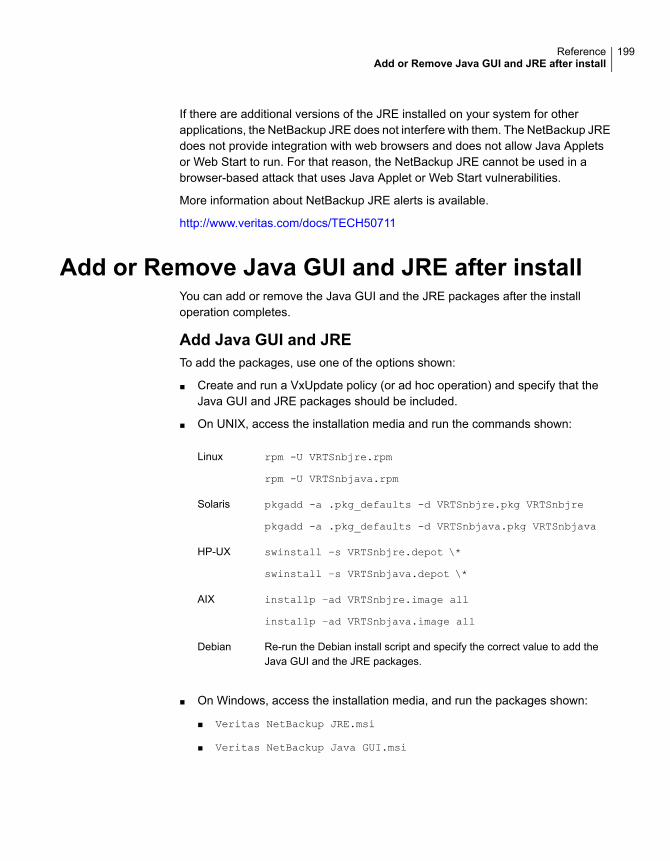
If there are additional versions of the JRE installed on your system for otherapplications, the NetBackup JRE does not interfere with them. The NetBackup JREdoes not provide integration with web browsers and does not allow Java Appletsor Web Start to run. For that reason, the NetBackup JRE cannot be used in abrowser-based attack that uses Java Applet or Web Start vulnerabilities.
More information about NetBackup JRE alerts is available.
http://www.veritas.com/docs/TECH50711
Add or Remove Java GUI and JRE after installYou can add or remove the Java GUI and the JRE packages after the installoperation completes.
Add Java GUI and JRETo add the packages, use one of the options shown:
■ Create and run a VxUpdate policy (or ad hoc operation) and specify that theJava GUI and JRE packages should be included.
■ On UNIX, access the installation media and run the commands shown:
rpm -U VRTSnbjre.rpm
rpm -U VRTSnbjava.rpm
Linux
pkgadd -a .pkg_defaults -d VRTSnbjre.pkg VRTSnbjre
pkgadd -a .pkg_defaults -d VRTSnbjava.pkg VRTSnbjava
Solaris
swinstall –s VRTSnbjre.depot \*
swinstall –s VRTSnbjava.depot \*
HP-UX
installp –ad VRTSnbjre.image all
installp –ad VRTSnbjava.image all
AIX
Re-run the Debian install script and specify the correct value to add theJava GUI and the JRE packages.
Debian
■ On Windows, access the installation media, and run the packages shown:
■ Veritas NetBackup JRE.msi
■ Veritas NetBackup Java GUI.msi
199ReferenceAdd or Remove Java GUI and JRE after install
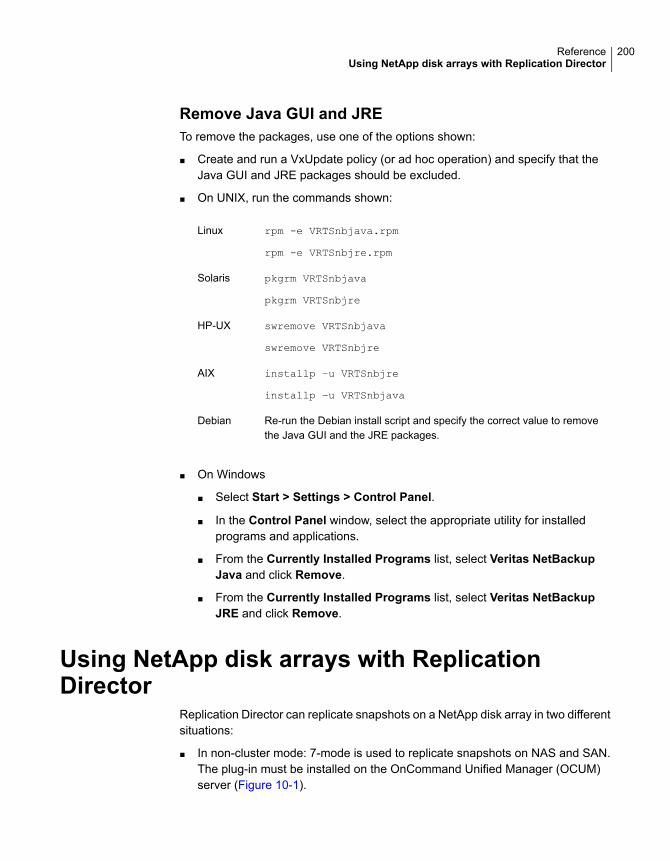
Remove Java GUI and JRETo remove the packages, use one of the options shown:
■ Create and run a VxUpdate policy (or ad hoc operation) and specify that theJava GUI and JRE packages should be excluded.
■ On UNIX, run the commands shown:
rpm -e VRTSnbjava.rpm
rpm -e VRTSnbjre.rpm
Linux
pkgrm VRTSnbjava
pkgrm VRTSnbjre
Solaris
swremove VRTSnbjava
swremove VRTSnbjre
HP-UX
installp –u VRTSnbjre
installp –u VRTSnbjava
AIX
Re-run the Debian install script and specify the correct value to removethe Java GUI and the JRE packages.
Debian
■ On Windows
■ Select Start > Settings > Control Panel.
■ In the Control Panel window, select the appropriate utility for installedprograms and applications.
■ From the Currently Installed Programs list, select Veritas NetBackupJava and click Remove.
■ From the Currently Installed Programs list, select Veritas NetBackupJRE and click Remove.
Using NetApp disk arrays with ReplicationDirector
Replication Director can replicate snapshots on a NetApp disk array in two differentsituations:
■ In non-cluster mode: 7-mode is used to replicate snapshots on NAS and SAN.The plug-in must be installed on the OnCommand Unified Manager (OCUM)server (Figure 10-1).
200ReferenceUsing NetApp disk arrays with Replication Director
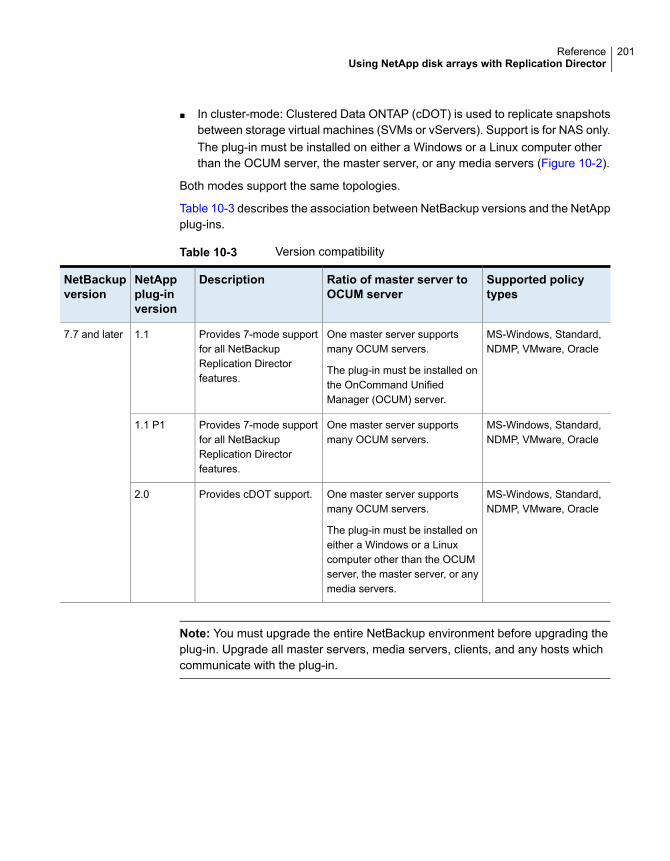
■ In cluster-mode: Clustered Data ONTAP (cDOT) is used to replicate snapshotsbetween storage virtual machines (SVMs or vServers). Support is for NAS only.The plug-in must be installed on either a Windows or a Linux computer otherthan the OCUM server, the master server, or any media servers (Figure 10-2).
Both modes support the same topologies.
Table 10-3 describes the association between NetBackup versions and the NetAppplug-ins.
Table 10-3 Version compatibility
Supported policytypes
Ratio of master server toOCUM server
DescriptionNetAppplug-inversion
NetBackupversion
MS-Windows, Standard,NDMP, VMware, Oracle
One master server supportsmany OCUM servers.
The plug-in must be installed onthe OnCommand UnifiedManager (OCUM) server.
Provides 7-mode supportfor all NetBackupReplication Directorfeatures.
1.17.7 and later
MS-Windows, Standard,NDMP, VMware, Oracle
One master server supportsmany OCUM servers.
Provides 7-mode supportfor all NetBackupReplication Directorfeatures.
1.1 P1
MS-Windows, Standard,NDMP, VMware, Oracle
One master server supportsmany OCUM servers.
The plug-in must be installed oneither a Windows or a Linuxcomputer other than the OCUMserver, the master server, or anymedia servers.
Provides cDOT support.2.0
Note: You must upgrade the entire NetBackup environment before upgrading theplug-in. Upgrade all master servers, media servers, clients, and any hosts whichcommunicate with the plug-in.
201ReferenceUsing NetApp disk arrays with Replication Director

Figure 10-1 Communication between NetBackup and the NBUPlugin for7-mode
NetApp OnCommand Unified ManagerNBUPlugin for 7-modeN
FS/C
IFS
NetBackupclient 2
NetBackupclient 1 NetBackup media server
NetBackup master server
SnapMirrorSnapVault
Communicate via OpenStorage Technology plug-in
iSC
SI/F
C
NFS
/CIF
S
iSC
SI/F
C
7-mode Primary 7-mode Secondary
202ReferenceUsing NetApp disk arrays with Replication Director
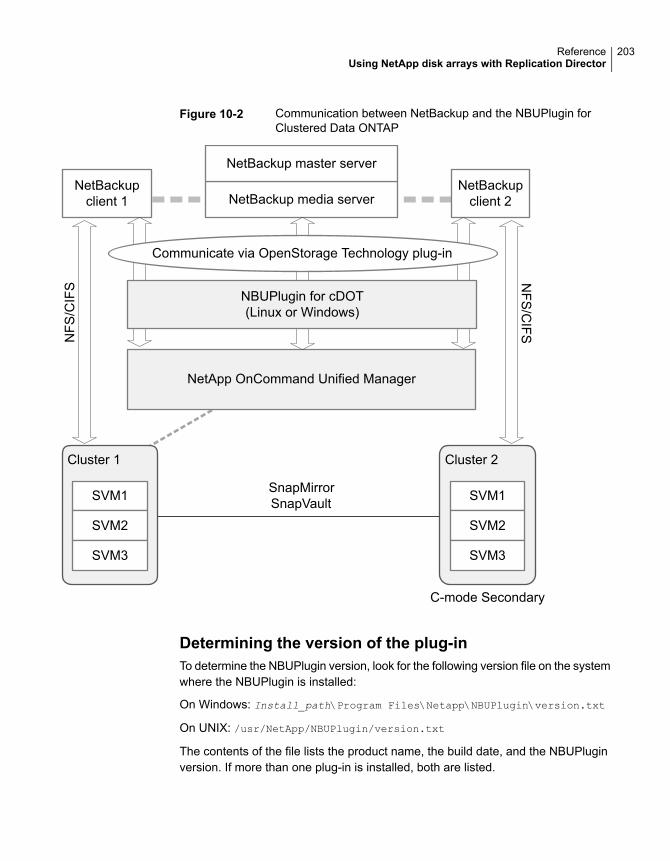
Figure 10-2 Communication between NetBackup and the NBUPlugin forClustered Data ONTAP
NetApp OnCommand Unified Manager
NFS
/CIF
S
NetBackupclient 2
NetBackupclient 1 NetBackup media server
NetBackup master server
NBUPlugin for cDOT(Linux or Windows)
Cluster 1
SVM1
SVM2
SVM3
Cluster 2
C-mode Secondary
SVM1
SVM2
SVM3
SnapMirrorSnapVault
NFS
/CIFS
Communicate via OpenStorage Technology plug-in
Determining the version of the plug-inTo determine the NBUPlugin version, look for the following version file on the systemwhere the NBUPlugin is installed:
On Windows: Install_path\Program Files\Netapp\NBUPlugin\version.txt
On UNIX: /usr/NetApp/NBUPlugin/version.txt
The contents of the file lists the product name, the build date, and the NBUPluginversion. If more than one plug-in is installed, both are listed.
203ReferenceUsing NetApp disk arrays with Replication Director
Upgrading the plug-inIf upgrading the NetApp Plug-in for Veritas NetBackup, make sure that all storagelifecycle policy jobs that use the old plug-in are complete before upgrading.
To determine whether all of the jobs that are associated with a storage lifecyclepolicy are complete, in process, or not started, use the following command:
On Windows: install_path\NetBackup\bin\admincmd>nbstlutil.exe stlilist
-U
On UNIX: /usr/openv/netbackup/bin/admincmd/nbstlutil stlilist -U
Security updates to the NetBackup databaseAs a part of security changes in NetBackup, Veritas may make changes to yourNetBackup (NBDB) database password. If you changed the password on theNetBackup database from the default value, no changes to the password are made.Any existing NetBackup databases which still have the default password are updatedwith a new, randomly generated password. All new installations of NetBackup havea randomly generated password assigned to the NetBackup database for improvedsecurity. This password is not provided to the user during installation or upgrade.You can use the nbdb_admin command to change this randomly generatedpassword. See the NetBackup Commands Reference Guide for more informationabout the nbdb_admin command.
Size guidance for the NetBackup master serverand domain
NetBackup master server sizing is an important activity as part of an overallNetBackup solution design. The following information provides best practices andsizing recommendations to assist in that endeavor.
Veritas always recommends a comprehensive data protection assessment todetermine the optimal configuration for a NetBackup master and NetBackup domain.The following information is meant as guidelines.
■ Catalog size should not exceed 4 TB.The size of the NetBackup catalog and the performance that is related to readingdata from the NetBackup catalog is driven by the I/O performance and morespecifically the disk speed. Veritas recommends the use of solid-state drives(SSDs) where possible for the catalog. The disks require good read and writeperformance, which is even more critical in large environments.
204ReferenceSecurity updates to the NetBackup database
Managing the size of the catalog through compression and catalog archiving isrecommended for images with a long-term retention (LTR).
■ The number of devices in the EMM database should not exceed 1500.Examples of devices are a tape drive, a tape library, a disk pool, and so on.
■ The number of media servers should not exceed 50.It is important to maintain a manageable number of media servers and storagetargets within each NetBackup domain. Every media server and storage targetthat is deployed must be managed, maintained, and eventually patched andupgraded. Each of those media servers has a configuration that has to also bemaintained. Therefore, it is important to consider the manageability, usability,and the administrative implications. Veritas recommends deploying media serversand storage targets that are properly sized with the necessary CPU, memory,network bandwidth, and disk I/O to support the backup workloads. It is alsoimportant to consider whether the same workloads require duplication orreplication to a DR location. Sizing the media servers and storage targets toaccommodate those secondary options is crucial. In summary, Veritasrecommends that you deploy properly sized media servers and storage targets,while keeping the number less than 50 per domain.
■ The number of jobs must not exceed one job per second per client, but it ispossible to submit multiple jobs per second, each sent from a different client.Each backup client has the "one job per second per client" limit, so multipleclients may execute in parallel.
■ Computing resources such as CPU and memory affect how well the masterserver scales.
To accommodate the processing of the metadata streams from media servers, itis critical that the master server has the requisite amount of system resources. Amedia server sends metadata about the files it has backed up to the master server.This metadata is batched and sent periodically. The batch size, determined by thetuning parameter MAX_ENTRIES_PER_ADD, has significant effect on master serverperformance, especially for backup images that contain many small files.
For additional information about batch size for sending metadata to the NetBackupcatalog, see the NetBackup Backup Planning and Performance Tuning Guide
The master server must then process each of these metadata message payloads.Each payload requires an operating system process, each of which consumessystem resources. The consumed system resources are disk capacity, CPU cycles,memory capacity, network bandwidth, and disk I/O.
Table 10-4 provides additional information.
205ReferenceSize guidance for the NetBackup master server and domain
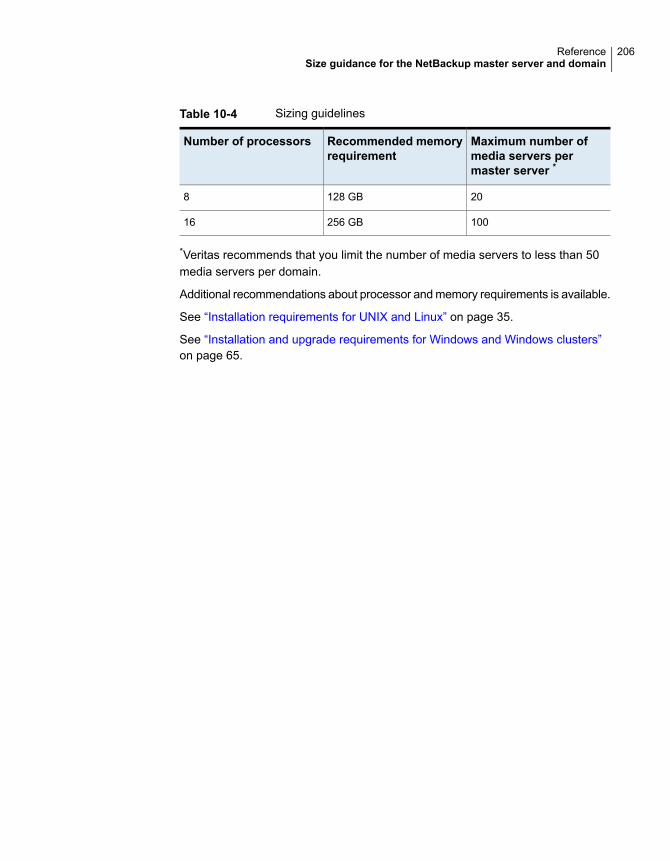
Table 10-4 Sizing guidelines
Maximum number ofmedia servers permaster server *
Recommended memoryrequirement
Number of processors
20128 GB8
100256 GB16
*Veritas recommends that you limit the number of media servers to less than 50media servers per domain.
Additional recommendations about processor and memory requirements is available.
See “Installation requirements for UNIX and Linux” on page 35.
See “Installation and upgrade requirements for Windows and Windows clusters”on page 65.
206ReferenceSize guidance for the NetBackup master server and domain
Aabout
Backup Policy Wizard 150client installation 101client installation on Linux 116client installation on UNIX 116client installation on Windows 102license key entry 31Linux client installation methods 117NetBackup 9.x Upgrade Portal 152NetBackup catalog backup configuration 149NetBackup Linux client removal 155NetBackup Remote Administration Console for
Windows 99NetBackup server configuration 143NetBackup UNIX client removal 155preinstall checker 11push client software 63remote installation methods for Linux clients 136remote installation methods for UNIX clients 136startup and shutdown scripts 141storage device configuration 14UNIX and Linux installation requirements 35UNIX client installation methods 117Veritas Services and Operations Readiness
Tools 22Windows client installation methods 103Windows client system requirements 103
about NetBackup removalon UNIX systems 154
access controlremove files 170
adding Linux clients 139adding UNIX clients 139authentication certificates. See security certificates
Bbackup
online, hot catalog 149backup policies
guidelines for creating 150
backup policybackup types 150create 150
Backup Policy Wizardabout 150
backup typesbackup policy 150
barcode rulescleaning media 149
bp.conf fileinstallation script 40
Ccatalog backup configuration
NetBackup wizards 149certificates. See security certificatescleaning media
barcode rules 149client installation
about 101methods for Linux 117methods for UNIX 117methods for Windows 103
client installation methodsfor remote Linux clients 136for remote UNIX clients 136
client installation on Linuxabout 116
client installation on UNIXabout 116
client installation on Windowsabout 102
client softwareinstall locally on Windows 105
client type softwareinstall on master server 63
client_config script 138clients
about remote installation methods for Linuxclients 136
Index
clients (continued)about remote installation methods for UNIX
clients 136adding after initial install 139loading onto server 139pushing software to 139
clusterprivate network 88
Cluster Administrator consoleverify Windows cluster installation or upgrade 91
cluster groupconfiguration 88install new 87
cluster group name 87cluster installation and upgrade
requirements 72cluster installations
post-installation tasks 90cluster installations or upgrades
verify Windows 91compatibility
NetBackup-Java 117configuration
master and media servers 143NetBackup servers 143
configuration guidelinesNetBackup Enterprise servers 143
configurecluster group 88NetBackup catalog backup 149NetBackup storage devices 146NetBackup volumes 148Windows client 115
configure catalog backupguidelines 149
configure storage devicesfor the operating system 14
continue installationafter master server installation 48
createbackup policy 150
Ddefine
storage units 148device configuration
guidelines 147NetBackup wizards 146
Domain Name Service (DNS) 36
Ffrequently asked questions
license keys 32
GGetting Started
NetBackup wizards 143guidelines
configure catalog backup 149device configuration 147for creating backup policies 150robot inventory 149standalone drive inventory 149
gunzip commandUNIX client installation 116
gzip commandUNIX client installation 116
Hhosts file 36how to install
sequence for new installations 11how to start
NetBackup Administration Console 145
Iinstall
multiple versions of NetBackup AdministrationConsole, on Windows 98
multiple versions of NetBackup AdministrationConsole, restrictions and guidelines 98
NetBackup Administration Console 97NetBackup Remote Administration Console 100new cluster group 87
install locallyclient software on Windows 105
install locally on Windowsserver software 73
install NetBackup clientslocally 118
install on clustered Windows environmentsserver software 73
install on master serverclient type software 63
install remotelyWindows client software 105
install remotely on Windowsserver software 73
208Index
install silentlyWindows client 114
install UNIX clientsftp method 138ssh method 137
install_client_files script 137–138installation
methods for Linux clients 117methods for UNIX clients 117methods for Windows clients 103UNIX clients locally 118
installation guidelinesSolaris systems 39UNIX clusters 40
installation requirementsUNIX and Linux systems 35Windows systems 65
installation restrictionsWindows client 102
installation scriptbp.conf file 40server installation 40services file 40
inventoryrobot 149standalone drive 149
IPv4 clusters 87IPv6 clusters 87
Llicense key entry
about 31license keys
frequently asked questions 32licenses
requirements 30Linux client
about removing PBX 155Linux client installation methods
about 117Linux clients
installation methods 117remove NetBackup from 156
Linux serversremove NetBackup from 156
loading client types onto server 139local installation
UNIX client 117Windows client 103
Mmaster and media servers
configuration 143master server
continue installation after 48install client type software 63software installation 41
media serversoftware installation 48
methodsfor Linux client installation 117for UNIX client installation 117for Winodws client installation 103
mixed version support 10
NNBUPlugin
determining the version 203upgrading 204
NetBackuphow to install 11
NetBackup Access Controlremove files 166
NetBackup Administration Consoleabout 97how to start 145install 97install multiple versions on Windows 98remove multiple versions on Windows 99
NetBackup catalog backup configurationabout 149
NetBackup client softwareadd a UNIX client type 139install locally 118
NetBackup Electronic Software Distribution (ESD)images 10
NetBackup Enterprise serversconfiguration guidelines 143
NetBackup Product Improvement Program 12NetBackup Remote Administration Console
installation 100NetBackup Remote Administration Console for
Windowsabout 99
NetBackup scriptsstartup and shutdown 141UNIX 141
NetBackup server configurationabout 143
209Index
NetBackup server softwareabout removal on UNIX 154
NetBackup serversconfiguration 143remove software 167
NetBackup storage devicesconfigure 146
NetBackup upgrades 152NetBackup volumes
configure 148NetBackup wizards
backup policy configuration 150catalog backup configuration 149device configuration 146Getting Started 143volume configuration 148
NetBackup-Javacompatibility 117
Network Information Service (NIS) 36new installations
sequence 11NTFS partition 105
Oonline, hot catalog
backup 149operating system
configure storage devices for 14
PPBX
about removal from Linux clients 155about removal from UNIX clients 155remove 156remove from non-Solaris 156
plug-insNetApp 201upgrading from NetApp 204
post-installation taskscluster installations 90
preinstall checkerabout 11
private networkcluster 88
public network 88push client software
about 63
push installationUNIX client 118
pushing client software 139
Rrecommended installation procedures
Veritas Operations Readiness Tools 23recommended upgrade procedures
Veritas Operations Readiness Tools 26remote
about installation methods for Linux clients 136about installation methods for UNIX clients 136
remote installationabout methods for Linux clients 136about methods for UNIX clients 136UNIX client 118Windows client 104
remote UNIX client installationsftp method 138ssh method 137
removeserver software in clusters 167Windows Java Console 171Windows server software 167
remove filesaccess control 170
remove multiple versions on WindowsNetBackup Administration Console 99
remove NetBackupfrom Linux clients 156from Linux servers 156from UNIX clients 156from UNIX servers 156
remove NetBackup softwareabout Linux clients 155about UNIX clients 155Windows client 167
remove softwareNetBackup servers 167
requirementscluster installation and upgrade 72licenses 30
requirements for server installationLinux 37Red Hat Linux 37
restrictions and guidelinesinstall multiple versions of NetBackup
Administration Console 98
210Index
robotinventory 149
robot inventoryguidelines 149
robot typeslocate supported 15
Sscripts
client_config 138install_client_files 137install_client_files using sftp 138install_client_files using ssh 137
security certificatesfor NetBackup hosts 16
sequencefor installations 11
server installationinstallation script 40requirements for Linux 37requirements for Red Hat Linux 37
server softwareinstall in clustered Windows environments 73install locally on Windows 73install remotely on Windows 73remove in clusters 167
server software removalon UNIX systems 154
serverssilent installation on Windows 92
services fileinstallation script 40
sftp methodinstall UNIX client 138remote UNIX client installation 138
silent installation on Windowsservers 92
silent InstallationsWindows client 104
software installationmaster server 41media server 48
SORTVeritas Operations Readiness Tools 23, 26Veritas Services and Operations Readiness
Tools 22ssh method
install UNIX client 137remote UNIX client installation 137
standalone driveinventory 149
standalone drive inventoryguidelines 149
startup and shutdownNetBackup scripts 141
startup and shutdown scriptsabout 141
storage device configurationabout 14
storage unitsdefine 148
subnet mask 87supported robot types
locate for this release 15system requirements
Windows clients 103
Uuninstall
Windows Java Console 171Windows server software 167
UNIXNetBackup scripts 141
UNIX and Linux installation requirementsabout 35
UNIX and Linux systemsinstallation requirements 35
UNIX clientabout removing PBX 155local installation 117push installation 118remote installation 118
UNIX client installation methodsabout 117
UNIX clientsinstallation methods 117installing locally 118, 139remove NetBackup from 156
UNIX serversremove NetBackup from 156
upgrade portalabout NetBackup 9.x 152
upgrade to NetBackup 9.xabout the upgrade portal 152
user accountweb server 13
user permissionsuser-directed operations 103
211Index
user permissions (continued)Windows client 103
user-directed operationsuser permissions 103
Vverify
Windows cluster installations or upgrades 91verify Windows cluster installation or upgrade
Cluster Administrator console 91Veritas Operations Readiness Tools (SORT)
recommended installation procedures 23recommended upgrade procedures 26
Veritas Services and Operations Readiness Tools(SORT)
about 22versions, determining NetApp NBUPlugin 201virtual host name 88virtual IP address 87volume configuration
NetBackup wizards 148
Wweb server
user account 13Windows
clustered install 73local install 73remote install 73remove or uninstall Java Console 171remove or uninstall server software 167remove or uninstall software 167silent install 92verify cluster installation 91
Windows clientconfigure 115install silently 114installation restrictions 102local installation 103remote installation 104remove NetBackup software 167silent installation 104user permissions 103
Windows client installation methodsabout 103
Windows client softwareinstall remotely 105
Windows client system requirementsabout 103
Windows clientsinstallation methods 103system requirements 103
Windows systemscluster installation and upgrade requirements 72installation requirements 65
212Index